Normal view

Cyber and Physical Risks Targeting the 2026 Winter Olympics

Blogs

Blog

Cyber and Physical Risks Targeting the 2026 Winter Olympics

In this post we analyze the multi-vector threat landscape of the 2026 Winter Olympics, examining how the Games’ dispersed geographic footprint and high digital complexity create unique potential for cyber sabotage and physical disruptions.

SHARE THIS:
Default Author Image
February 5, 2026

The Milano-Cortina 2026 Winter Olympics represent a historic milestone as the first Games co-hosted by two major cities. However, the event’s expansive geographic footprint—covering 22,000 square kilometers across northern Italy—presents a complex security environment. From the metropolitan centers of Milan to the alpine peaks of Cortina d’Ampezzo, security forces are contending with a multi-vector threat landscape.

Kinetic and Physical Security Challenges

The geographically dispersed nature of the Milano-Cortina 2026 Winter Games also creates unique physical security challenges. Because venues are spread across thousands of square kilometers of the Alps, securing transit corridors and ensuring rapid emergency response across different Italian regions—including Lombardy, Veneto, and Trentino—is an incredible logistical hurdle. New tunnels, increased train services, and extended bus routes have been welcomed but create new potential targets for physical disruption by threat actors or protestors.

Terrorist and Extremist Threats

Flashpoint has not identified any terrorist or extremist threats to the Winter Olympic Games. However, lone threat actors in support of international terrorist organizations or domestic violence extremists remain a persistent threat due to the large number of attendees expected and the media attention that this event will attract.

Authorities in northern Italy are investigating a series of sabotage attacks on the national railway network that coincided with the opening of the 2026 Winter Olympic Games. The coordinated incidents—which included arson at a track switch, severed electrical cables, and the discovery of a rudimentary explosive device—caused delays of over two hours and temporarily disabled the vital transport hub of Bologna.

Protests

Flashpoint analysts identified several protests targeting the 2026 Winter Olympics:

  • US Presence and ICE Backlash: Hundreds of demonstrators have participated in protests in central Milan to demand that US ICE agents withdraw from security roles at the upcoming Winter Olympics.
  • Anti-Olympic and Environmental Activism: The most organized opposition comes from the Unsustainable Olympics Committee. They have already staged marches in Milan and Cortina, with more planned for February.
  • Pro-Palestinian Groups: Organizations such as BDS Italia are actively campaigning to boycott the games, demanding that Israel not be permitted to participate. Other pro-Palestinian groups have attempted to disrupt the Torch Relay in several cities and are expected to hold flash mob-style demonstrations in Milan’s Piazza del Duomo during the Opening Ceremony.
  • Labor Strikes: Italy frequently experiences transport strikes, which often fall on Fridays. Because the Opening Ceremony is on Friday, February 6, unions are leveraging this for maximum impact. An International Day of Protest has been coordinated by port and dock workers across the Mediterranean for February 6.

On February 7, a massive protest of approximately 10,000 people near the Olympic Village in Milan descended into violence as a peaceful march against the Winter Games ended in clashes with Italian police. While the majority of demonstrators initially focused on the environmental destruction caused by Olympic infrastructure, a smaller group of masked protestors engaged security forces with flares, stones, and firecrackers.

Cyber Threats Facing the 2026 Winter Olympics

The Milano-Cortina 2026 Winter Olympics will be among the most digitally complex global events, making it a prime target for cyberattacks. The greatest risks stem from familiar tactics such as phishing, spoofed websites, and business email compromise, which exploit human trust rather than technical flaws. With billions of viewers and a vast network of cloud services, vendors, and connected systems, the games create an expansive attack surface under intense operational pressure.

Italy blocked a series of cyberattacks targeting its foreign ministry offices, including one in Washington, as well as Winter Olympics websites and hotels in Cortina d’Ampezzo, with officials attributing the attempts to Russian sources. Foreign Minister Antonio Tajani confirmed the attacks were prevented just days before the Games’ official opening, which began with curling matches on February 4. 

Past Olympic Games show a clear pattern of heightened cyber activity, including phishing campaigns, distributed denial-of-service (DDoS) attacks, ransomware, and online scams targeting both organizers and the public. A mix of cybercriminals, advanced persistent threats, and hacktivists is expected to exploit the event for financial gain, espionage, or publicity. Experts emphasize that improving security awareness, verifying digital interactions, and strengthening supply chain defenses are critical, as the most damaging incidents often arise from ordinary threats amplified by scale and urgency.

Staying Safe at the 2026 Winter Games

The security success of Milano-Cortina 2026 relies on the integration of real-time intelligence, advanced technological safeguards, and public vigilance. As the Games proceed, the intersection of cyber-sabotage and physical protest remains the most likely source of operational disruption.

To stay safe at this year’s Games, participants should:

  1. Download Official Apps: Install the Milano Cortina 2026 Ground Transportation App and the Atm Milano app for real-time updates on transit, road closures, and “guaranteed” travel windows during strikes.
  2. Plan Around Friday Strikes: Be aware that transport strikes (Feb 6, 13, and 20) typically guarantee services only between 6:00 AM – 9:00 AM and 6:00 PM – 9:00 PM. Plan your venue transfers accordingly.
  3. Secure Your Digital Footprint: Avoid public Wi-Fi at major venues. Use a VPN and ensure Multi-Factor Authentication (MFA) is active on all your ticketing and banking accounts.
  4. Stay Clear of Protests: While most demonstrations are expected to be peaceful, they can cause sudden police cordons and transit delays.
  5. Respect the Drone Ban: Unauthorized drones are strictly prohibited over Milan and venue clusters. Leave yours at home to avoid heavy fines or interception by security units.

Stay Safe Using Flashpoint

While there are no current indications of imminent threats of extreme violence targeting the Milano-Cortina 2026 Winter Olympics, the event’s vast geographic footprint and digital complexity demand constant vigilance. Securing an event that spans 22,000 square kilometers requires more than just a physical presence; it necessitates a multi-faceted approach that bridges the gap between digital and kinetic risks.

To effectively navigate the intersection of cyber-sabotage, civil unrest, and logistical challenges, organizations and attendees must adopt a comprehensive strategy that integrates real-time intelligence with proactive security measures. Download Flashpoint’s Physical Safety Event Checklist to learn more.

Request a demo today.

The post Cyber and Physical Risks Targeting the 2026 Winter Olympics appeared first on Flashpoint.

SaaS Abuse at Scale: Phone-Based Scam Campaign Leveraging Trusted Platforms

5 February 2026 at 13:00

Overview This report documents a large-scale phishing campaign in which attackers abused legitimate software-as-a-service (SaaS) platforms to deliver phone-based scam lures that appeared authentic and trustworthy. Rather than spoofing domains or compromising services, the attackers deliberately misused native platform functionality to generate and distribute emails that closely resembled routine service notifications, inheriting the trust, reputation, and authentication posture of well-known SaaS providers. The campaign generated approximately 133,260 phishing emails, impacting 20,049 organizations. It is part of a broader and rapidly escalating trend in which attackers weaponize trusted brands and native cloud workflows to maximize delivery, credibility, and reach. Observed brands […]

The post SaaS Abuse at Scale: Phone-Based Scam Campaign Leveraging Trusted Platforms appeared first on Check Point Blog.

Protecting the Big Game: A Threat Assessment for Super Bowl LX

Blogs

Blog

Protecting the Big Game: A Threat Assessment for Super Bowl LX

This threat assessment analyzes potential physical and cyber threats to Super Bowl LX.

SHARE THIS:
Default Author Image
February 4, 2026
Superbowl LIX Threat Assessment | Flashpoint Blog
Table Of Contents

Each year, the Super Bowl draws one of the largest live audiences of any global sporting event, with tens of thousands of spectators attending in person and more than 100 million viewers expected to watch worldwide. Super Bowl LX, taking place on February 8, 2026 at Levi’s Stadium, will feature the Seattle Seahawks and the New England Patriots, with Bad Bunny headlining the halftime show and Green Day performing during the opening ceremony.

Beyond the game itself, the Super Bowl represents one of the most influential commercial and media stages in the world, with major brands investing in some of the most expensive advertising time of the year. The scale, visibility, and economic significance of the event make it an attractive target for threat actors seeking attention, disruption, or financial gain, underscoring the need for heightened security awareness.

Cybersecurity Considerations

At this time, Flashpoint has not observed any specific cyber threats targeting Super Bowl LX. Despite the absence of overt threats, it remains possible that threat actors may attempt to obtain personal information—including financial and credit card details—through scams, malware, phishing campaigns, or other opportunistic cyber activity.

High-profile events such as the Super Bowl have historically been leveraged as bait for cyber campaigns targeting fans and attendees rather than league infrastructure. In October 2024, the online store of the Green Bay Packers was hacked, exposing customers’ financial details. Previous incidents also include the February 2022 “BlackByte” ransomware attack that targeted the San Francisco 49ers in the lead-up to Super Bowl LVI.

Although Flashpoint has not identified any credible calls for large-scale cyber campaigns against Super Bowl LX at this time, analysts assess that cyber activity—if it occurs—is more likely to focus on fraud, impersonation, and social engineering directed at ticket holders, travelers, and high-profile attendees.

Online Sentiment

Flashpoint is currently monitoring online sentiment ahead of Super Bowl LX. At the time of publishing, analysts have identified pockets of increasingly negative online chatter related primarily to allegations of federal immigration enforcement activity in and around the event, as well as broader political and social tensions surrounding the Super Bowl.

Online discussions include calls for protests and boycotts tied to perceived Immigration and Customs Enforcement (ICE) involvement, as well as controversy surrounding halftime and opening ceremony performers. While sentiment toward the game itself and associated events remains largely positive, Flashpoint continues to monitor for escalation in rhetoric that could translate into real-world activity.

Potential Physical Threats

Protests and Boycotts

Flashpoint analysts have identified online chatter promoting protests in the Bay Area in response to allegations that Immigration and Customs Enforcement (ICE) agents will conduct enforcement operations in and around Super Bowl LX. A planned protest is scheduled to take place near Levi’s Stadium on February 8, 2026, during game-day hours.

At this time, Flashpoint has not identified any calls for violence or physical confrontation associated with these actions. However, analysts cannot rule out the possibility that demonstrations could expand or relocate, potentially causing localized disruptions near the venue or surrounding infrastructure if protesters gain access to restricted areas.

In addition, Flashpoint has identified online calls to boycott the Super Bowl tied to both the alleged ICE presence and controversy surrounding the event’s halftime and opening ceremony performers. Flashpoint has not identified any chatter indicating that players, NFL personnel, or affiliated organizations plan to boycott or disrupt the game or related events.

Terrorist and Extremist Threats

Flashpoint has not identified any direct or credible threats to Super Bowl LX or its attendees from violent extremists or terrorist groups at this time. However, as with any high-profile sporting event, lone actors inspired by international terrorist organizations or domestic violent extremist ideologies remain a persistent risk due to the scale of attendance and global media attention.

Super Bowl LX is designated as a SEAR-1 event, necessitating extensive interagency coordination and heightened security measures. Law enforcement presence is expected to be significant, with layered security protocols, strict access control points, and comprehensive screening procedures in place throughout Levi’s Stadium and surrounding areas. Contingency planning for crowd management, emergency response, and evacuation scenarios is ongoing.

Mitigation Strategies and Executive Protection

Given the absence of specific, identified threats, mitigation strategies for key personnel attending Super Bowl LX focus on general best practices. Security teams tasked with executive protection should remove sensitive personal information from online sources, monitor open-source and social media channels, and establish targeted alerts for potential threats or emerging protest activity.

Physical security teams and protected individuals should also familiarize themselves with venue layouts, emergency exits, nearby medical facilities, and law enforcement presence, and remain alert to changes in crowd dynamics or protest activity in the vicinity of the event.

The nearest medical facilities are:

  • O’Connor Hospital (Santa Clara Valley Healthcare)
  • Kaiser Permanente Santa Clara Medical Center
  • Santa Clara Valley Medical Center
  • Valley Health Center Sunnyvale

Several of these facilities offer 24/7 emergency services and are located within a short driving distance of the stadium.

The primary law enforcement facility near the venue is:

  • Santa Clara Police Department

As a SEAR-1 event, extensive coordination is expected among local, state, and federal law enforcement agencies throughout the Bay Area.

    Stay Safe Using Flashpoint

    Although there are no indications of any credible, immediate threats to Super Bowl LX or attendees at this time, it is imperative to be vigilant and prepared. Protecting key personnel in today’s threat environment requires a multi-faceted approach. To effectively bridge the gap between online and offline threats, organizations must adopt a comprehensive strategy that incorporates open source intelligence (OSINT) and physical security measures. Download Flashpoint’s Physical Safety Event Checklist to learn more.

    Request a demo today.

    Empowering the RAF Association with Next-Generation Cyber Resilience

    3 February 2026 at 19:00

    Palo Alto Networks is proud to enter a strategic partnership with the RAF Association.

    For over 90 years, the Royal Air Forces Association (RAFA) has championed a simple yet profound belief: No member of the RAF community should ever be left without the help they need. Serving personnel, veterans and their families, the RAF Association provides crucial welfare support, responding to increasingly complex needs in an era of operational changes and challenges, including persistent global deployment.

    Delivering on their mission today requires not only compassion and expertise but also resilient digital foundations. To strengthen and future-proof its operations, RAFA has entered into a strategic partnership with Palo Alto Networks. Together, we are modernising the Association's cyber security posture through a secure-by-design, zero trust architecture to enhance organisational resilience, secure sensitive beneficiary data, and improve operational agility. This helps ensure they can focus on their mission of support, not security management.

    As Nick Bunting OBE, Secretary General at the RAF Association, puts it:

    Cybersecurity is essential to safeguarding the trust people place in our organisation. This transformation will give us greater protection for our data and systems, ensuring that our services remain dependable and that our organisation is secure, resilient and ready for the future. Strong digital security is not just a technical requirement, it is a fundamental part of how we uphold our duty of care to every individual who relies on us.

    RAFA and Palo Alto Networks team.
    RAF Association & Palo Alto Networks Team (left to right): Gareth Turner, Tom Brookes, Nick Bunting OBE, Phil Sherwin, Ali Redfern, Darren Bisbey, Alistair Wildman

    Securing the Mission

    The RAF Association operates in a distributed environment comprising headquarters’ functions, remote caseworkers, and more than 20 RAFAKidz nursery sites, supported by a growing portfolio of cloud-based services. In this context, cybersecurity is not simply an IT concern. It is a safeguarding imperative.

    Disruption to systems or a compromise of sensitive beneficiary data could directly impact RAFA’s ability to deliver services and maintain the trust of the communities it supports. By consolidating fragmented legacy tools into a unified platform, this partnership ensures the Association’s digital evolution aligns security controls with GDPR obligations and safeguarding requirements.

    Digital Resilience with a Unified Platform for Visibility and Control

    To support RAFA's lean IT operational model, this transformation will move them away from fragmented legacy tools toward a unified platform approach. The deployment of Prisma® SASE (secure access service edge) and Cortex XDR® will provide RAFA with consistent visibility and control across users, devices, applications and data, regardless of location. This consolidation replaces complexity with clarity, allowing the organisation to inspect traffic for threats in real-time. Security policies are now enforced continuously, threats are detected and contained faster, and access to critical systems is governed by zero trust principles without compromising the user experience.

    As Phil Sherwin, Chief Information Officer, at the RAF Association states:

    Our data is one of our most valuable assets and the protection of that data, as we continue to provide life-changing support to members of the RAF community, is our most important priority. This partnership will move us into the next generation of security tools that adopt zero trust principles and is a crucial step on our journey to providing a layered approach to data protection.

    One of the most critical aspects of this modernisation is supporting RAFA’s diverse workforce, particularly within the RAFAKidz nursery sites. These environments rely on nondesk-based staff using iPads and mobile devices to get their critical work done.

    Using zero touch provisioning and the Prisma Browser™, we are enabling secure, seamless connectivity for unmanaged devices. This ensures that nursery staff can access necessary SaaS applications safely without complex login hurdles or manual configuration, improving their agility and allowing them to focus on caring for children rather than troubleshooting technology.

    Creating Operational Advantage by Scaling Operations with AI and Automation

    As a charity, RAFA has a responsibility to ensure resources are used efficiently. A critical goal of this partnership is to improve productivity and allow the organisation to scale its services without increasing the IT burden.

    By adopting Strata™ Cloud Manager with AIOps (artificial intelligence for IT operations), RAFA is shifting from reactive security operations to proactive, automated management. Machine learning helps identify configuration risks and performance issues before they affect users, while standardized policies enable the secure, consistent onboarding of new sites. This shift is projected to significantly reduce operational overhead, enabling RAFA to scale its support network cost-effectively. This shift is projected to reduce operational overhead by 40–50%.

    A Resilient Future

    This partnership is about more than deploying technology. It is about ensuring RAFA remains resilient, trusted and capable of supporting the RAF community for decades to come.

    As Darren Bisbey, Head of Group Information Security for the RAF Association, puts it:

    We live in an era where digital threats are accelerating in both scale and sophistication, creating unprecedented challenges for organisations. Our partnership with Palo Alto is a statement of intent, reflecting our unwavering commitment to building the most secure environments possible for our data.

    At Palo Alto Networks, we are honored to support RAFA in this journey, providing the digital armour and operational advantage necessary to protect those who serve and have served.

    As Alistair Wildman, Palo Alto Networks CEO for Northern Europe states:

    For over 90 years, RAFA has been a lifeline for the RAF community; it is our privilege to ensure that legacy endures in a digital-first world. By embracing a unified, AI-driven platform, RAFA is moving beyond complex, fragmented security to a posture that is Secure by Design. This partnership allows them to navigate today’s threat landscape with confidence, ensuring their resources remain focused where they belong: on the families who need them.


    Key Takeaways

    1. Digital Resilience – Strategic Shift to Zero Trust Architecture: RAFA is modernizing its cybersecurity posture by implementing a comprehensive zero trust architecture. This transition involves moving from fragmented legacy tools to a unified platform approach, deploying Prisma® SASE and Cortex XDR for 360-degree visibility and complete control over access and traffic.
    2. Interoperability – Secure, Seamless Access for Diverse Workforce: The partnership ensures operational agility by simplifying security for nondesk-based staff, particularly at the RAFAKidz nursery sites. Solutions like Zero-Touch Provisioning and the Prisma Access Browser enable secure, seamless connectivity for unmanaged devices, allowing nursery staff to focus on their critical work without complex login or configuration issues.
    3. Creating Operational Advantage – Efficiency and Scalability through AI and Automation: RAFA is leveraging technology to scale services efficiently and reduce operational overhead. By using Strata Cloud Manager with AIOps (Artificial Intelligence for IT Operations), the organization can shift to proactive management and automating remediation, which is projected to reduce operational overhead by 40–50%.

    The post Empowering the RAF Association with Next-Generation Cyber Resilience appeared first on Palo Alto Networks Blog.

    How to get started with security response automation on AWS

    29 January 2026 at 20:44

    December 2, 2019: Original publication date of this post.


    At AWS, we encourage you to use automation. Not just to deploy your workloads and configure services, but to also help you quickly detect and respond to security events within your AWS environments. In addition to increasing the speed of detection and response, automation also helps you scale your security operations as your workloads in AWS increase and scale as well. For these reasons, security automation is a key principle outlined in the Well-Architected Framework, the AWS Cloud Adoption Framework, and the AWS Security Incident Response Guide.

    Security response automation is a broad topic that spans many areas. The goal of this blog post is to introduce you to core concepts and help you get started. You will learn how to implement automated security response mechanisms within your AWS environments. This post will include common patterns that customers often use, implementation considerations, and an example solution. Additionally, we will share resources AWS has produced in the form of the Automated Security Response GitHub repo. The GitHub repo includes scripts that are ready-to-deploy for common scenarios.

    What is security response automation?

    Security response automation is a planned and programmed action taken to achieve a desired state for an application or resource based on a condition or event. When you implement security response automation, you should adopt an approach that draws from existing security frameworks. Frameworks are published materials which consist of standards, guidelines, and best practices in order help organizations manage cybersecurity-related risk. Using frameworks helps you achieve consistency and scalability and enables you to focus more on the strategic aspects of your security program. You should work with compliance professionals within your organization to understand any specific compliance or security frameworks that are also relevant for your AWS environment.

    Our example solution is based on the NIST Cybersecurity Framework (CSF), which is designed to help organizations assess and improve their ability to help prevent, detect, and respond to security events. According to the CSF, “cybersecurity incident response” supports your ability to contain the impact of potential cybersecurity events.

    Although automation is not a CSF requirement, automating responses to events enables you to create repeatable, predictable approaches to monitoring and responding to threats. When we build automation around events that we know should not occur, it gives us an advantage over a malicious actor because the automation is able to respond within minutes or even seconds compared to an on-call support engineer.

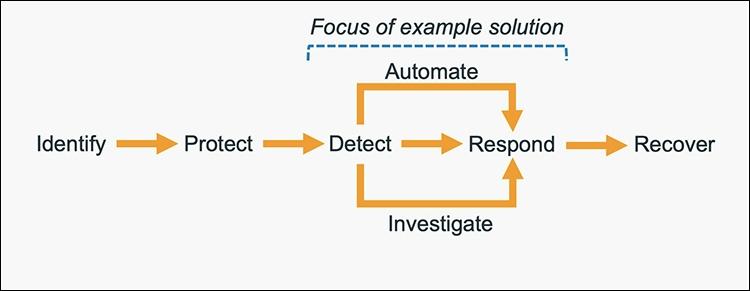
    The five main steps in the CSF are identify, protect, detect, respond and recover. We’ve expanded the detect and respond steps to include automation and investigation activities.

    Figure 1: The five steps in the CSF

    Figure 1: The five steps in the CSF

    The following definitions for each step in the diagram above are based on the CSF but have been adapted for our example in this blog post. Although we will focus on the detect, automate and respond steps, it’s important to understand the entire process flow.

    • Identify: Identify and understand the resources, applications, and data within your AWS environment.
    • Protect: Develop and implement appropriate controls and safeguards to facilitate the delivery of services.
    • Detect: Develop and implement appropriate activities to identify the occurrence of a cybersecurity event. This step includes the implementation of monitoring capabilities which will be discussed further in the next section.
    • Automate: Develop and implement planned, programmed actions that will achieve a desired state for an application or resource based on a condition or event.
    • Investigate: Perform a systematic examination of the security event to establish the root cause.
    • Respond: Develop and implement appropriate activities to take automated or manual actions regarding a detected security event.
    • Recover: Develop and implement appropriate activities to maintain plans for resilience and to restore capabilities or services that were impaired due to a security event

    Security response automation on AWS

    AWS CloudTrail and AWS Config continuously log details regarding users and other identity principals, the resources they interacted with, and configuration changes they might have made in your AWS account. We are able to combine these logs with Amazon EventBridge, which gives us a single service to trigger automations based on events. You can use this information to automatically detect resource changes and to react to deviations from your desired state.

    Figure 2: Automated remediation flow

    Figure 2: Automated remediation flow

    As shown in the diagram above, an automated remediation flow on AWS has three stages:

    1. Monitor: Your automated monitoring tools collect information about resources and applications running in your AWS environment. For example, they might collect AWS CloudTrail information about activities performed in your AWS account, usage metrics from your Amazon EC2 instances, or flow log information about the traffic going to and from network interfaces in your Amazon Virtual Private Cloud (VPC).
    2. Detect: When a monitoring tool detects a predefined condition—such as a breached threshold, anomalous activity, or configuration deviation—it raises a flag within the system. A triggering condition might be an anomalous activity detected by Amazon GuardDuty, a resource out of compliance with an AWS Config rule, or a high rate of blocked requests on an Amazon VPC security group or AWS Web Application Firewall (AWS WAF) web access control list (web-acl).
    3. Respond: When a condition is flagged, an automated response is triggered that performs an action you’ve predefined—something intended to remediate or mitigate the flagged condition.

    Examples of automated response actions may include modifying a VPC security group, patching an Amazon EC2 instance, rotating various different types of credentials, or adding an additional entry into an IP set in AWS WAF that is part of a web-acl rule to block suspicious clients who triggered a threshold from a monitoring metric.

    You can use the event-driven flow described above to achieve a variety of automated response patterns with varying degrees of complexity. Your response pattern could be as simple as invoking a single AWS Lambda function, or it could be a complex series of AWS Step Function tasks with advanced logic. In this blog post, we’ll use two simple Lambda functions in our example solution.

    How to define your response automation

    Now that we’ve introduced the concept of security response automation, start thinking about security requirements within your environment that you’d like to enforce through automation. These design requirements might come from general best practices you’d like to follow, or they might be specific controls from compliance frameworks relevant for your business.

    Customers start with the run-books they already use as part of their Incident Response Lifecycle. Simple run-books, like responding to an exfiltrated credential, can be quickly mapped to automation especially if your run book calls for the disabling of the credential and the notification of on-call personnel. But it can be resource driven as well. Events such as a new AWS VPC being created might trigger your automation to immediately deploy your company’s standard configuration for VPC flowlog collection.

    Your objectives should be quantitative, not qualitative. Here are some examples of quantitative objectives:

    • Remote administrative network access to servers should be limited.
    • Server storage volumes should be encrypted.
    • AWS console logins should be protected by multi-factor authentication.

    As an optional step, you can expand these objectives into user stories that define the conditions and remediation actions when there is an event. User stories are informal descriptions that briefly document a feature within a software system. User stories may be global and span across multiple applications or they may be specific to a single application.

    For example:

    “Remote administrative network access to servers should have limited access from internal trusted networks only. Remote access ports include SSH TCP port 22 and RDP TCP port 3389. If remote access ports are detected within the environment and they are accessible to outside resources, they should be automatically closed and the owner will be notified.”

    Once you’ve completed your user story, you can determine how to use automated remediation to help achieve these objectives in your AWS environment. User stories should be stored in a location that provides versioning support and can reference the associated automation code.

    You should carefully consider the effect of your remediation mechanisms in order to help prevent unintended impact on your resources and applications. Remediation actions such as instance termination, credential revocation, and security group modification can adversely affect application availability. Depending on the level of risk that’s acceptable to your organization, your automated mechanism can only provide a notification which would then be manually investigated prior to remediation. Once you’ve identified an automated remediation mechanism, you can build out the required components and test them in a non-production environment.

    Sample response automation walkthrough

    In the following section, we’ll walk you through an automated remediation for a simulated event that indicates potential unauthorized activity—the unintended disabling of CloudTrail logging. Outside parties might want to disable logging to avoid detection and the recording of their unauthorized activity. Our response is to re-enable the CloudTrail logging and immediately notify the security contact. Here’s the user story for this scenario:

    “CloudTrail logging should be enabled for all AWS accounts and regions. If CloudTrail logging is disabled, it will automatically be enabled and the security operations team will be notified.”

    A note about the sample response automation below as it references Amazon EventBridge: EventBridge was formerly referred to as Amazon CloudWatch Events. If you see other documentation referring to Amazon CloudWatch, you can find that configuration now via the Amazon EventBridge console page.

    Additionally, we will be looking at this scenario through the lens of an account that has a stand-alone CloudTrail configuration. While this is an acceptable configuration, AWS recommends using AWS Organizations, which allows you to configure an organizational CloudTrail. These organizational trails are immutable to the child accounts so that logging data cannot be removed or tampered with.

    In order to use our sample remediation, you will need to enable Amazon GuardDuty and AWS Security Hub in the AWS Region you have selected. Both of these services include a 30-day trial at no additional cost. See the AWS Security Hub pricing page and the Amazon GuardDuty pricing page for additional details.

    Important: You’ll use AWS CloudTrail to test the sample remediation. Running more than one CloudTrail trail in your AWS account will result in charges based on the number of events processed while the trail is running. Charges for additional copies of management events recorded in a Region are applied based on the published pricing plan. To minimize the charges, follow the clean-up steps that we provide later in this post to remove the sample automation and delete the trail.

    Deploy the sample response automation

    In this section, we’ll show you how to deploy and test the CloudTrail logging remediation sample. Amazon GuardDuty generates the finding

    Stealth:IAMUser/CloudTrailLoggingDisabled when CloudTrail logging is disabled, and AWS Security Hub collects findings from GuardDuty using the standardized finding format mentioned earlier. We recommend that you deploy this sample into a non- production AWS account.

    Select the Launch Stack button below to deploy a CloudFormation template with an automation sample in the us-east-1 Region. You can also download the template and implement it in another Region. The template consists of an Amazon EventBridge rule, an AWS Lambda function, and the IAM permissions necessary for both components to execute. It takes several minutes for the CloudFormation stack build to complete.

    Select the Launch Stack button to launch the template

    1. In the CloudFormation console, choose the Select Template form, and then select Next.
    2. On the Specify Details page, provide the email address for a security contact. For the purpose of this walkthrough, it should be an email address that you have access to. Then select Next.
    3. On the Options page, accept the defaults, then select Next.
    4. On the Review page, confirm the details, then select Create.
    5. While the stack is being created, check the inbox of the email address that you provided in step 2. Look for an email message with the subject AWS Notification – Subscription Confirmation. Select the link in the body of the email to confirm your subscription to the Amazon Simple Notification Service (Amazon SNS) topic. You should see a success message like the one shown in Figure 3:

      Figure 3: SNS subscription confirmation

      Figure 3: SNS subscription confirmation

    6. Return to the CloudFormation console. After the Status field for the CloudFormation stack changes to CREATE COMPLETE (as shown in Figure 4), the solution is implemented and is ready for testing.

      Figure 4: CREATE_COMPLETE status

      Figure 4: CREATE_COMPLETE status

    Test the sample automation

    You’re now ready to test the automated response by creating a test trail in CloudTrail, then trying to stop it.

    1. From the AWS Management Console, choose Services > CloudTrail.
    2. Select Trails, then select Create Trail.
    3. On the Create Trail form:
      1. Enter a value for Trail name and for AWS KMS alias, as shown in Figure 5.
      2. For Storage location, create a new S3 bucket or choose an existing one. For our testing, we create a new S3 bucket.

        Figure 5: Create a CloudTrail trail

        Figure 5: Create a CloudTrail trail

      3. On the next page, under Management events, select Write-only (to minimize event volume).

        Figure 6: Create a CloudTrail trail

        Figure 6: Create a CloudTrail trail

    4. On the Trails page of the CloudTrail console, verify that the new trail has started. You should see the status as logging, as shown in Figure 7.

      Figure 7: Verify new trail has started

      Figure 7: Verify new trail has started

    5. You’re now ready to act like an unauthorized user trying to cover their tracks. Stop the logging for the trail that you just created:
      1. Select the new trail name to display its configuration page.
      2. In the top-right corner, choose the Stop logging button.
      3. When prompted with a warning dialog box, select Stop logging.
      4. Verify that the logging has stopped by confirming that the Start logging button now appears in the top right, as shown in Figure 8.

        Figure 8: Verify logging switch is off

        Figure 8: Verify logging switch is off

      You have now simulated a security event by disabling logging for one of the trails in the CloudTrail service. Within the next few seconds, the near real-time automated response will detect the stopped trail, restart it, and send an email notification. You can refresh the Trails page of the CloudTrail console to verify through the Stop logging button at the top right corner.

      Within the next several minutes, the investigatory automated response will also begin. GuardDuty will detect the action that stopped the trail and enrich the data about the source of unexpected behavior. Security Hub will then ingest that information and optionally correlate with other security events.

      Following the steps below, you can monitor findings within Security Hub for the finding type TTPs/Defense Evasion/Stealth:IAMUser-CloudTrailLoggingDisabled to be generated:

    6. In the AWS Management Console, choose Services > Security Hub.
      1. In the left pane, select Findings.
      2. Select the Add filters field, then select Type.
      3. Select EQUALS, paste TTPs/Defense Evasion/Stealth:IAMUser-CloudTrailLoggingDisabled into the field, then select Apply.
      4. Refresh your browser periodically until the finding is generated.

      Figure 9: Monitor Security Hub for your finding

      Figure 9: Monitor Security Hub for your finding

    7. Select the title of the finding to review details. When you’re ready, you can choose to archive the finding by selecting the Archive link. Alternately, you can select a custom action to continue with the response. Custom actions are one of the ways that you can integrate Security Hub with custom partner solutions.

    Now that you’ve completed your review of the finding, let’s dig into the components of automation.

    How the sample automation works

    This example incorporates two automated responses: a near real-time workflow and an investigatory workflow. The near real-time workflow provides a rapid response to an individual event, in this case the stopping of a trail. The goal is to restore the trail to a functioning state and alert security responders as quickly as possible. The investigatory workflow still includes a response to provide defense in depth and uses services that support a more in-depth investigation of the incident.

    Figure 10: Sample automation workflow

    Figure 10: Sample automation workflow

    In the near real-time workflow, Amazon EventBridge monitors for the undesired activity.

    When a trail is stopped, AWS CloudTrail publishes an event on the EventBridge bus. An EventBridge rule detects the trail-stopping event and invokes a Lambda function to respond to the event by restarting the trail and notifying the security contact via an Amazon Simple Notification Service (SNS) topic.

    In the investigative workflow, CloudTrail logs are monitored for undesired activities. For example, if a trail is stopped, there will be a corresponding log record. GuardDuty detects this activity and retrieves additional data points regarding the source IP that executed the API call. Two common examples of those additional data points in GuardDuty findings include whether the API call came from an IP address on a threat list, or whether it came from a network not commonly used in your AWS account. An AWS Lambda function responds by restarting the trail and notifying the security contact. The finding is imported into AWS Security Hub, where it’s aggregated with other findings for analyst viewing. Using EventBridge, you can configure Security Hub to export the finding to partner security orchestration tools, SIEM (security information and event management) systems, and ticketing systems for investigation.

    AWS Security Hub imports findings from AWS security services such as GuardDuty, Amazon Macie and Amazon Inspector, plus from third-party product integrations you’ve enabled. Findings are provided to Security Hub in AWS Security Finding Format (ASFF), which minimizes the need for data conversion. Security Hub correlates these findings to help you identify related security events and determine a root cause. Security Hub also publishes its findings to Amazon EventBridge to enable further processing by other AWS services such as AWS Lambda. You can also create custom actions using Security Hub. Custom actions are useful for security analysts working with the Security Hub console who want to send a specific finding, or a small set of findings, to a response or a remediation workflow.

    Deeper look into how the “Respond” phase works

    Amazon EventBridge and AWS Lambda work together to respond to a security finding.

    Amazon EventBridge is a service that provides real-time access to changes in data in AWS services, your own applications, and Software-as-a-Service (SaaS) applications without writing code. In this example, EventBridge identifies a Security Hub finding that requires action and invokes a Lambda function that performs remediation. As shown in Figure 11, the Lambda function both notifies the security operator via SNS and restarts the stopped CloudTrail.

    Figure 11: Sample “respond” workflow

    Figure 11: Sample “respond” workflow

    To set this response up, we looked for an event to indicate that a trail had stopped or was disabled. We knew that the GuardDuty finding Stealth:IAMUser/CloudTrailLoggingDisabled is raised when CloudTrail logging is disabled. Therefore, we configured the default event bus to look for this event.

    You can learn more regarding the available GuardDuty findings in the user guide.

    How the code works

    When Security Hub publishes a finding to EventBridge, it includes full details of the finding as discovered by GuardDuty. The finding is published in JSON format. If you review the details of the sample finding, note that it has several fields helping you identify the specific events that you’re looking for. Here are some of the relevant details:

    {
       …
       "source":"aws.securityhub",
       …
       "detail":{
          "findings": [{
    		…
        	“Types”: [
    			"TTPs/Defense Evasion/Stealth:IAMUser-CloudTrailLoggingDisabled"
    			],
    		…
          }]
    }
    

    You can build an event pattern using these fields, which an EventBridge filtering rule can then use to identify events and to invoke the remediation Lambda function. Below is a snippet from the CloudFormation template we provided earlier that defines that event pattern for the EventBridge filtering rule:

    # pattern matches the nested JSON format of a specific Security Hub finding
          EventPattern:
            source:
            - aws.securityhub
            detail-type:
              - "Security Hub Findings - Imported"
            detail:
              findings:
                Types:
                  - "TTPs/Defense Evasion/Stealth:IAMUser-CloudTrailLoggingDisabled"
    

    Once the rule is in place, EventBridge continuously monitors the event bus for events with this pattern.

    When EventBridge finds a match, it invokes the remediating Lambda function and passes the full details of the event to the function. The Lambda function then parses the JSON fields in the event so that it can act as shown in this Python code snippet:

    # extract trail ARN by parsing the incoming Security Hub finding (in JSON format)
    trailARN = event['detail']['findings'][0]['ProductFields']['action/awsApiCallAction/affectedResources/AWS::CloudTrail::Trail']   
    
    # description contains useful details to be sent to security operations
    description = event['detail']['findings'][0]['Description']
    

    The code also issues a notification to security operators so they can review the findings and insights in Security Hub and other services to better understand the incident and to decide whether further manual actions are warranted. Here’s the code snippet that uses SNS to send out a note to security operators:

    #Sending the notification that the AWS CloudTrail has been disabled.
    snspublish = snsclient.publish(
    	TargetArn = snsARN,
    	Message="Automatically restarting CloudTrail logging.  Event description: \"%s\" " %description
    	)
    

    While notifications to human operators are important, the Lambda function will not wait to take action. It immediately remediates the condition by restarting the stopped trail in CloudTrail. Here’s a code snippet that restarts the trail to reenable logging:

    try:
    	client = boto3.client('cloudtrail')
    	enablelogging = client.start_logging(Name=trailARN)
    	logger.debug("Response on enable CloudTrail logging- %s" %enablelogging)
    except ClientError as e:
    	logger.error("An error occured: %s" %e)
    

    After the trail has been restarted, API activity is once again logged and can be audited.

    This can help provide relevant data for the remaining steps in the incident response process. The data is especially important for the post-incident phase, when your team analyzes lessons learned to help prevent future incidents. You can also use this phase to identify additional steps to automate in your incident response.

    How to Enable Custom Action and build your own Automated Response

    Unlike how you set up the notification earlier, you may not want fully automate responses to findings. To set up automation that you can manually trigger it for specific findings, you can use custom actions. A custom action is a Security Hub mechanism for sending selected findings to EventBridge that can be matched by an EventBridge rule. The rule defines a specific action to take when a finding is received that is associated with the custom action ID. Custom actions can be used, for example, to send a specific finding, or a small set of findings, to a response or remediation workflow. You can create up to 50 custom actions.

    In this section, we will walk you through how to create a custom action in Security Hub which will trigger an EventBridge rule to execute a Lambda function for the same security finding related to CloudTrail Disabled.

    Create a Custom Action in Security Hub

    1. Open Security Hub. In the left navigation pane, under Management, open the Custom actions page.
    2. Choose Create custom action.
    3. Enter an Action Name, Action Description, and Action ID that are representative of an action that you are implementing—for example Enable CloudTrail Logging.
    4. Choose Create custom action.
    5. Copy the custom action ARN that was generated. You will need it in the next steps.

    Create Amazon EventBridge Rule to capture the Custom Action

    In this section, you will define an EventBridge rule that will match events (findings) coming from Security Hub which were forwarded by the custom action you defined above.

    1. Navigate to the Amazon EventBridge console.
    2. On the right side, choose Create rule.
    3. On the Define rule detail page, give your rule a name and description that represents the rule’s purpose (for example, the same name and description that you used for the custom action). Then choose Next.
    4. Security Hub findings are sent as events to the AWS default event bus. In the Define pattern section, you can identify filters to take a specific action when matched events appear. For the Build event pattern step, leave the Event source set to AWS events or EventBridge partner events.
    5. Scroll down to Event pattern. Under Event source, leave it set to AWS Services, and under AWS Service, select Security Hub.
    6. For the Event Type, choose Security Hub Findings – Custom Action.
    7. Then select Specific custom action ARN(s) and enter the ARN for the custom action that you created earlier.
    8. Notice that as you selected these options, the event pattern on the right was updating. Choose Next.
    9. On the Select target(s) step, from the Select a target dropdown, select Lambda function. Then, from the Function dropdown, select SecurityAutoremediation-CloudTrailStartLoggingLamb-xxxx. This lambda function was created as part of the Cloudformation template.
    10. Choose Next.
    11. For the Configure tags step, choose Next.
    12. For the Review and create step, choose Create rule.

    Trigger the automation

    As GuardDuty and Security Hub have been enabled, after AWS Cloudtrail logging is enabled, you should see a security finding generated by Amazon GuardDuty and collected in AWS Security Hub.

    1. Navigate to the Security Hub Findings page.
    2. In the top corner, from the Actions dropdown menu, select the Enable CloudTrail Logging custom action.
    3. Verify the CloudTrail configuration by accessing the AWS CloudTrail dashboard.
    4. Confirm that the trail status displays as Logging, which indicates the successful execution of the remediation Lambda function triggered by the EventBridge rule through the custom action.

    How AWS helps customers get started

    Many customers look at the task of building automation remediation as daunting. Many operations teams might not have the skills or human scale to take on developing automation scripts. Because many Incident Response scenarios can be mapped to findings in AWS security services, we can begin building tools that respond and are quickly adaptable to your environment.

    Automated Security Response (ASR) on AWS is a solution that enables AWS Security Hub customers to remediate findings with a single click using sets of predefined response and remediation actions called Playbooks. The remediations are implemented as AWS Systems Manager automation documents. The solution includes remediations for issues such as unused access keys, open security groups, weak account password policies, VPC flow logging configurations, and public S3 buckets. Remediations can also be configured to trigger automatically when findings appear in AWS Security Hub.

    The solution includes the playbook remediations for some of the security controls defined as part of the following standards:

    • AWS Foundational Security Best Practices (FSBP) v1.0.0
    • Center for Internet Security (CIS) AWS Foundations Benchmark v1.2.0
    • Center for Internet Security (CIS) AWS Foundations Benchmark v1.4.0
    • Center for Internet Security (CIS) AWS Foundations Benchmark v3.0.0
    • Payment Card Industry (PCI) Data Security Standard (DSS) v3.2.1
    • National Institute of Standards and Technology (NIST) Special Publication 800-53 Revision 5

    A Playbook called Security Control is included that allows operation with AWS Security Hub’s Consolidated Control Findings feature.

    Figure 12: Architecture of the Automated Security Solution

    Figure 12: Architecture of the Automated Security Solution

    Additionally, the library includes instructions in the Implementation Guide on how to create new automations in an existing Playbook.

    You can use and deploy this library into your accounts at no additional cost, however there are costs associated with the services that it consumes.

    Clean up

    After you’ve completed the sample security response automation, we recommend that you remove the resources created in this walkthrough example from your account in order to minimize the charges associated with the trail in CloudTrail and data stored in S3.

    Important: Deleting resources in your account can negatively impact the applications running in your AWS account. Verify that applications and AWS account security do not depend on the resources you’re about to delete.

    Here are the clean-up steps:

    Summary

    You’ve learned the basic concepts and considerations behind security response automation on AWS and how to use Amazon EventBridge, Amazon GuardDuty and AWS Security Hub to automatically re-enable AWS CloudTrail when it becomes disabled unexpectedly. Additionally you got a chance to learn about the AWS Automated Security Response library and how it can help you rapidly get started with automations through Security Hub. As a next step, you may want to start building your own custom response automations and dive deeper into the AWS Security Incident Response Guide, NIST Cybersecurity Framework (CSF) or the AWS Cloud Adoption Framework (CAF) Security Perspective. You can explore additional automatic remediation solutions on the AWS Solution Library. You can find the code used in this example on GitHub.

    If you have feedback about this blog post, submit them in the Comments section below. If you have questions about using this solution, start a thread in the
    EventBridge, GuardDuty or Security Hub forums, or contact AWS Support.

    Introducing Palo Alto Networks Quantum-Safe Security

    Accelerating the Migration to the Post-Quantum Era

    The promise of quantum computing brings an unprecedented paradox. While it will unlock revolutionary breakthroughs in science, materials discovery and medicine, it simultaneously poses an existential threat to the mathematical foundations of modern cybersecurity.

    For decades, the global economy has relied on public key cryptography to safeguard everything from personal privacy to national security. This cryptography is built on mathematical problems that are computationally infeasible for classical computers to solve but that quantum computers can solve efficiently, rendering today’s cryptographic protocols obsolete.

    Using Shor’s algorithm, a sufficiently powerful quantum computer could factor the large prime numbers that underpin public key cryptography, in minutes. These are tasks that would take today’s most advanced supercomputers a millennium to crack. This capability would effectively turn our strongest digital defenses into open doors, creating a period of vulnerability leading up to Q-Day – the day today’s encryption is broken.

    The Migration Crisis: Why Traditional Strategies Fail

    For CISOs and technical leaders, the transition to post-quantum cryptography (PQC) is not a simple patch-and-deploy exercise. It is a multiyear transformation that requires updating cryptography across every device, application, certificate and infrastructure component in the enterprise.

    Most enterprises today are constrained by cryptographic debt – years of accumulated, undocumented and deprecated encryption protocols buried deep within legacy applications, third-party software libraries and unmanaged IoT devices. This creates a vast and largely invisible attack surface that traditional vulnerability scanners were never designed to detect.

    The challenge is compounded by the absence of a unified source of truth. Existing tools offer a fragmented "outside-in" view of the environment. They may identify devices on the network, but they lack visibility into cryptographic libraries embedded within live traffic. Without a real-time Cryptographic Bill of Materials (CBOM), security teams are forced to rely on manual, point-in-time audits that become outdated almost immediately. Spreadsheets cannot scale to this problem.

    This visibility gap makes it impossible to prioritize remediation, leaving sensitive data exposed to harvest now, decrypt later (HNDL) attacks. In these attacks, adversaries intercept and store encrypted data today with the intent of unlocking it once quantum computing capabilities mature.

    Operationally, traditional migration approaches are equally unworthy. Manually updating cryptography across thousands of global endpoints and branch offices often requires disruptive rip and replace strategies that threaten uptime and demand specialized expertise that is in extremely short supply. Organizations need a way to bridge today’s classical infrastructure with a quantum-resilient future without disrupting business operations or exhausting IT resources.

    At Palo Alto Networks, we believe global enterprises cannot afford to wait. Our new Quantum-Safe Security solution is designed to remove these operational roadblocks by making cryptographic discovery, risk assessment and transition both continuous and actionable. We empower enterprises to gain real-time visibility into cryptographic risk and begin building agentic resilience at enterprise scale by integrating with existing security and infrastructure systems, including security information and event management (SIEM), load balancers, endpoint detection and response (EDR), as well as Application Vulnerability Management (AVM) tools.

    The Four Stages of Cryptographic Inventory & Remediation

    Palo Alto Networks Quantum-Safe Security is built around four foundational stages.

    1. Continuous Discovery through Ecosystem Ingestion

    Visibility is the first line of defense, but in a complex enterprise, true visibility requires more than a periodic scan. It requires continuous, high-fidelity ingestion of cryptographic intelligence across the environment.

    Our solution acts as a central nervous system for your cryptographic posture, ingesting telemetry and logs directly from PAN-OS NGFW and Prisma® Access, enriched with data from a broad ecosystem of third-party security solutions, simplifying Day 0 onboarding. By leveraging your existing network infrastructure as sensors, we provide a comprehensive view of the cryptographic behavior of all assets without the operational friction of deploying new software.

    To eliminate blind spots, we go beyond our own telemetry to ingest critical information from your existing systems you rely on. This includes syncing with configuration management database (CMDB) and asset management platforms to align cryptographic data with business inventories, integrating with EDR and access control solutions to monitor endpoint behavior, and aggregating data from network clouds and log platforms. The result is a unified intelligence layer that reflects how cryptography is actually used across the enterprise.

    By synthesizing these data streams, we deliver a multidimensional view of cryptographic exposure:

    • Discovery – Identification of every application, user device, infrastructure component and IoT device.
    • Behavior – Analysis of traffic metadata, including protocols, key exchange mechanisms, encryption algorithms, hashes, certificates and tunnels.
    • Context – Precise attribution of hardware models, cryptographic libraries (such as deprecated OpenSSL versions), and browser versions in use.

    Quantum-safe Security dashboard screenshot.

    2. Risk Assessment & Prioritization

    Not all data is created equal, and a successful migration requires a surgical focus on where the exposure is most acute. Our Quantum Safe Security solution quantifies risk by correlating cryptographic strength with business criticality, providing a clear, prioritized view of current risk and where remediation matters most.

    Assets are categorized into strategic zones, starting with immediate exposure risks caused by deprecated protocols that are vulnerable to classical exploitation today. From there, the solution addresses long-term harvest now, decrypt later threats. As threat models evolve, the risk engine is designed to expand to emerging vectors like identity and authentication integrity, anticipating risks such as “Trust Now, Forge Later" attacks that could undermine digital trust at scale.

    At the same time, the solution validates and tracks quantum-secure assets that have successfully transitioned to post-quantum or hybrid-PQC algorithms. By correlating this intelligence with business criticality and data shelf-life, security leaders can make informed decisions. For example, a crown jewel asset containing data that must remain confidential for a decade or more, is flagged as a high HNDL risk today and elevated to the top of the migration queue.

    Quantum-safe security dashboard overview.

    3. Comprehensive Remediation

    Moving from a vulnerable state to quantum resilience is a structured journey. Our comprehensive remediation framework guides organizations through three critical stages, supported by automated workflows and prioritized recommendations at every step.

    • Current State to Quantum Ready: The first stage focuses on infrastructure modernization. Using continuous discovery insights, the solution provides hardware and software recommendations required to support next-generation cryptographic protocols. An asset reaches a Quantum Ready state once it has the underlying hardware and OS capabilities to support post-quantum algorithms, even if those protocols are not yet activated.
    • Quantum Ready to Quantum-Safe: Transitioning to a Quantum-safe state requires activation and configuration of post-quantum defenses. Our solution provides data configuration and certificate compliance guidance to enable PQC/Hybrid-PQC algorithms to be correctly implemented across the estate.
    • Virtual Patching via Cipher Translation: For all current and especially legacy systems or IoT devices that cannot be upgraded, we provide an accelerated path to quantum-safety. Through Cipher Translation, the infrastructure acts as a proxy, providing agentic remediation that reencrypts vulnerable traffic into quantum-safe standards (such as ML-KEM) in real-time at the network edge. This approach instantly moves legacy assets from a high-risk current state to a Quantum-safe posture without a single line of code change. Chain of hardware recommendations, software recommendations, data configuration, certificate compliance, cipher translation.

    4. Governance: Continuous Crypto-Hygiene & Global Compliance

    Quantum readiness is not a one-time event; it is a strategic enterprise transformation that requires continuous oversight to prevent the re-emergence of vulnerabilities. Our governance framework provides the guardrails for your migration through two critical layers of management:

    Continuous Crypto-Hygiene & Ongoing Management: Maintaining high-fidelity visibility is essential to preventing the accumulation of "crypto-debt." Our solution automates real-time mapping of all cryptographic dependencies, ensuring your CBOM remains dynamic and accurate as your environment evolves. Furthermore, we introduce Active Drift Detection, which automatically detects and can even block the use of weak or noncompliant ciphers in real-time, preventing developers or third-party services from accidentally introducing insecure protocols.

    Global Crypto-Compliance Enforcement & Reporting: As regulatory pressure from governments (like the US Commercial National Security Algorithm Suite 2.0) mounts, organizations must demonstrate measurable progress. Our solution will provide Automated Framework Auditing, offering continuous, native mapping of your environment against global standards, including NIST, FIPS 140-3, and DORA.

    Architecting a Quantum-Resilient Enterprise

    The transition to quantum-safe security is far more than a technical upgrade. It represents a fundamental shift in how organizations protect the longevity and integrity of their digital assets. Achieving quantum resilience is a multiyear effort that requires both advanced technology and strategic partnership.

    That's why Palo Alto Networks has established Integrated Quantum Practices, bringing together technology, partners and professional services to help organizations navigate the complexity of this transition with confidence. By combining deep cryptographic visibility with intelligent, agentic remediation, organizations can systematically retire their cryptographic debt and build resilience into their security architecture over time.

    This proactive approach does more than mitigate emerging risk. It establishes a foundation of digital trust that is resilient against the threats of tomorrow, enabling your most sensitive intellectual property to remain secure for its entire shelf life, even as cryptographic standards evolve.

    Secure Your First-Mover Advantage: The Quantum Readiness Assessment

    Don’t let the complexity of the quantum transition stall your organization’s progress. Begin your path to resilience with a Quantum Readiness Assessment, a focused engagement to clarify current exposure and identify the most critical areas for action. To go deeper, watch the Quantum-Safe Summit on demand for expert perspectives on cryptographic risk and quantum readiness.

    The Palo Alto Networks Quantum-Safe Security solution is expected to be generally available to customers on January 30, 2026, with additional integration enhancements planned for April 2026.

    Forward-Looking Statements

    This blog contains forward-looking statements that involve risks, uncertainties and assumptions, including, without limitation, statements regarding the benefits, impact or performance or potential benefits, impact or performance of our products and technologies or future products and technologies. These forward-looking statements are not guarantees of future performance, and there are a significant number of factors that could cause actual results to differ materially from statements made in this [blog. We identify certain important risks and uncertainties that could affect our results and performance in our most recent Annual Report on Form 10-K, our most recent Quarterly Report on Form 10-Q, and our other filings with the U.S. Securities and Exchange Commission from time-to-time, each of which are available on our website at investors.paloaltonetworks.com and on the SEC's website at www.sec.gov. All forward-looking statements in this blog are based on information available to us as of the date hereof, and we do not assume any obligation to update the forward-looking statements provided to reflect events that occur or circumstances that exist after the date on which they were made.

    The post Introducing Palo Alto Networks Quantum-Safe Security appeared first on Palo Alto Networks Blog.

    File integrity monitoring with AWS Systems Manager and Amazon Security Lake 

    27 January 2026 at 19:21

    Customers need solutions to track inventory data such as files and software across Amazon Elastic Compute Cloud (Amazon EC2) instances, detect unauthorized changes, and integrate alerts into their existing security workflows.

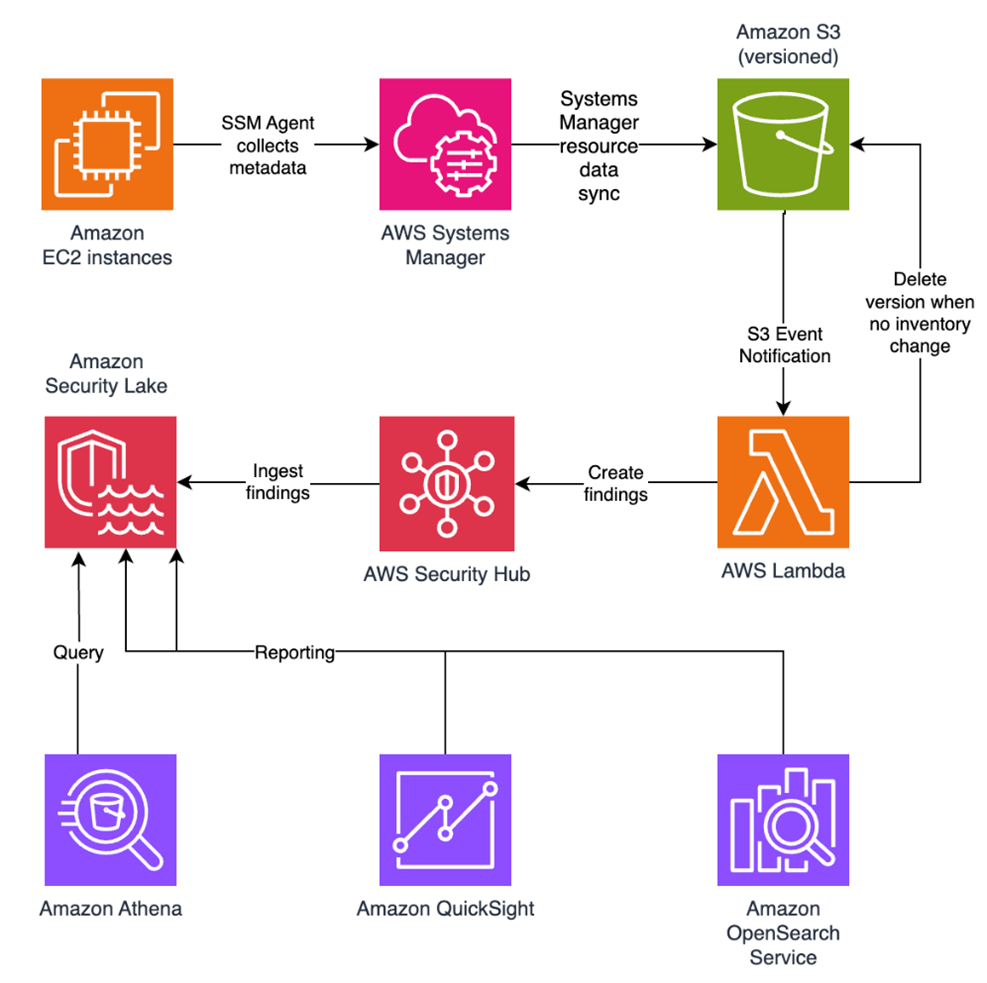
    In this blog post, I walk you through a highly scalable serverless file integrity monitoring solution. It uses AWS Systems Manager Inventory to collect file metadata from Amazon EC2 instances. The metadata is sent through the Systems Manager Resource Data Sync feature to a versioned Amazon Simple Storage Service (Amazon S3) bucket, storing one inventory object for each EC2 instance. Each time a new object is created in Amazon S3, an Amazon S3 Event Notification triggers a custom AWS Lambda function. This Lambda function compares the latest inventory version with the previous one to detect file changes. If a file that isn’t expected to change has been created, modified, or deleted, the function creates an actionable finding in AWS Security Hub. Findings are then ingested by Amazon Security Lake in a standard OCSF format, which centralizes and normalizes the data. Finally, the data can be analyzed using Amazon Athena for one-time queries, or by building visual dashboards with Amazon QuickSight and Amazon OpenSearch Service. Figure 1 summarizes this flow:

    Figure 1: File integrity monitoring workflow

    Figure 1: File integrity monitoring workflow

    This integration offers an alternative to the default AWS Config and Security Hub integration, which relies on limited data (for example, no file modification timestamps). The solution presented in this post provides control and flexibility to implement custom logic tailored to your operational needs and support security-related efforts.

    This flexible solution can also be used with other Systems Manager Inventory metadata, such as installed applications, network configurations, or Windows registry entries, enabling custom detection logic across a wide range of operational and security use cases.

    Now let’s build the file integrity monitoring solution.

    Prerequisites

    Before you get started, you need an AWS account with permissions to create and manage AWS resources such as Amazon EC2, AWS Systems Manager, Amazon S3, and Lambda.

    Step 1: Start an EC2 instance

    Start by launching an EC2 instance and creating a file that you will later modify to simulate an unauthorized change.

    Create an AWS Identity and Access Management (IAM) role to allow the EC2 instance to communicate with Systems Manager:

    1. Open the AWS Management Console and go to IAM, choose Roles from the navigation pane, and then choose Create role.
    2. Under Trusted entity type, select AWS service, select EC2 as the use case, and choose Next.
    3. On the Add permissions page, search for and select the AmazonSSMManagedInstanceCore IAM policy, then choose Next.
    4. Enter SSMAccessRole as the role name and choose Create role.
    5. The new SSMAccessRole should now appear in your list of IAM roles:
    Figure 2: Create an IAM role for communication with Systems Manager

    Figure 2: Create an IAM role for communication with Systems Manager

    Start an EC2 instance:

    1. Open the Amazon EC2 console and choose Launch Instance.
    2. Enter a Name, keep the default Linux Amazon Machine Image (AMI), and select an Instance type (for example, t3.micro).
    3. Under Advanced details:
      1. IAM instance profile, select the previously created SSMAccessRole
      2. Create a fictitious payment application configuration file in the /etc/paymentapp/ folder on the EC2 instance. Later, you will modify it to demonstrate a file-change event for integrity monitoring. To create this file during EC2 startup, copy and paste the following script into User data.
    #!/bin/bash
    mkdir -p /etc/paymentapp
    echo "db_password=initial123" > /etc/paymentapp/config.yaml
    Figure 3: Adding the application configuration file

    Figure 3: Adding the application configuration file

    1. Leave the remaining settings as default, choose Proceed without key pair, and then select Launch Instance. A key pair isn’t required for this demo because you use Session Manager for access.

    Step 2: Enable Security Hub and Security Lake

    If Security Hub and Security Lake are already enabled, you can skip to Step 3.
    To start, enable Security Hub, which collects and aggregates security findings. AWS Security Hub CSPM adds continuous monitoring and automated checks against best practices.

    1. Open the Security Hub console.
    2. Choose Security Hub CSPM from the navigation pane and then select Enable AWS Security Hub CSPM and choose Enable Security Hub CSPM at the bottom of the page.

    Note: For this demo, you don’t need the Security standards options and can clear them.

    Figure 4: Enable Security Hub CSP

    Figure 4: Enable Security Hub CSP

    Next, activate Security Lake to start collecting actionable findings from Security Hub:

    1. Open the Amazon Security Lake console and choose Get Started.
    2. Under Data sources, select Ingest specific AWS sources.
    3. Under Log and event sources, select Security Hub (you will use this only for this demo):
    Figure 5: Select log and event sources

    Figure 5: Select log and event sources

    1. Under Select Regions, choose Specific Regions and make sure you select the AWS Region that you’re using.
    2. Use the default option to Create and use a new service role.
    3. Choose Next and Next again, then choose Create.

    Step 3: Configure Systems Manager Inventory and sync to Amazon S3

    With Security Hub and Security Lake enabled, the next step is to enable Systems Manager Inventory to collect file metadata and configure a Resource Data Sync to export this data to S3 for analysis.

    1. Create an S3 bucket by carefully following the instructions in the section To create and configure an Amazon S3 bucket for resource data sync.
    2. After you created the bucket, enable versioning in the Amazon S3 console by opening the bucket’s Properties tab, choosing Edit under Bucket Versioning, selecting Enable, and saving your changes. Versioning causes each new inventory snapshot to be saved as a separate version, so that you can track file changes over time.

    Note: In production, enable S3 server access logging on the inventory bucket to keep an audit trail of access requests, enforce HTTPS-only access, and enable CloudTrail data events for S3 to record who accessed or modified inventory files.

    The next step is to enable Systems Manager Inventory and set up the resource data sync:

    1. In the Systems Manager console, go to Fleet Manager, choose Account management, and select Set up inventory.
    2. Keep the default values but deselect every inventory type except File. Set a Path to limit collection to the files relevant for this demo and your security requirements. Under File, set the Path to: /etc/paymentapp/.
    Figure 6: Set the parameters and path

    Figure 6: Set the parameters and path

    1. Choose Setup Inventory.
    2. In Fleet Manager, choose Account management and select Resource Data Syncs.
    3. Choose Create resource data sync, enter a Sync name, and enter the name of the versioned S3 bucket you created earlier.
    4. Select This Region and then choose Create.

    Step 4: Implement the Lambda function

    Next, complete the setup to detect changes and create findings. Each time Systems Manager Inventory writes a new object to Amazon S3, an S3 Event Notification triggers a Lambda function that compares the latest and previous object versions. If it finds created, modified, or deleted files, it creates a security finding. To accomplish this, you will create the Lambda function, set its environment variables, add the helper layer, and attach the required permissions.

    The following is an example finding generated in AWS Security Finding Format (ASFF) and sent to Security Hub. In this example, you see a notification about a file change on the EC2 instance listed under the Resources section.

    {
    	...
    "Id": "fim-i-0b8f40f4de065deba-2025-07-12T13:48:31.741Z",
    	"AwsAccountId": "XXXXXXXXXXXX",
    	"Types": [
    		"Software and Configuration Checks/File Integrity Monitoring"
    	],
    	"Severity": {
    		"Label": "MEDIUM"
    	},
    	"Title": "File changes detected via SSM Inventory",
    	"Description": "0 created, 1 modified, 0 deleted file(s) on instance i-0b8f40f4de065deba",
    	"Resources": [
    		{
    			"Type": "AwsEc2Instance",
    			"Id": "i-0b8f40f4de065deba"
    		}
    	],
    	...
    }

    Create the Lambda function

    This function detects file changes, reports findings, and removes unused Amazon S3 object versions to reduce costs.

    1. Open the Lambda console and choose Create function in the navigation pane.
    2. For Function Name enter fim-change-detector.
    3. Select Author from scratch, enter a function name, select the latest Python runtime, and choose Create function.
    4. On the Code tab, paste the following main function and choose Deploy.
    import boto3, os, json, re
    from datetime import datetime, UTC
    from urllib.parse import unquote_plus
    from helpers import is_critical, load_file_metadata, is_modified, extract_instance_id
    
    s3 = boto3.client('s3')
    securityhub = boto3.client('securityhub')
    
    CRITICAL_FILE_PATTERNS = os.environ["CRITICAL_FILE_PATTERNS"].split(",")
    SEVERITY_LABEL = os.environ["SEVERITY_LABEL"]
    	
    def lambda_handler(event, context):
    	# Safe event handling
    	if "Records" not in event or not event["Records"]:
    		return
    
    	# Extract S3 event
    	record = event['Records'][0]
    	bucket = record['s3']['bucket']['name']
    	key = unquote_plus(record['s3']['object']['key'])
    	current_version = record['s3']['object'].get('versionId')
    	if not current_version:
    		return
    
    	# Fetching the region name
    	account_id = context.invoked_function_arn.split(":")[4]
    	region = boto3.session.Session().region_name
    
    	# Get object versions (latest first)
    	versions = s3.list_object_versions(Bucket=bucket, Prefix=key).get('Versions', [])
    	versions = sorted(versions, key=lambda v: v['LastModified'], reverse=True)
    
    	# Find previous version
    	idx = next((i for i,v in enumerate(versions) if v["VersionId"] == current_version), None)
    	if idx is None or idx + 1 >= len(versions):
    		return
    	prev_version = versions[idx+1]["VersionId"]
    
    	# Load both versions
    	current = load_file_metadata(bucket, key, current_version)
    	previous = load_file_metadata(bucket, key, prev_version)
    
    	# Compare
    	created = {p for p in set(current) - set(previous) if is_critical(p)}
    	deleted = {p for p in set(previous) - set(current) if is_critical(p)}
    	modified = {p for p in set(current) & set(previous) if is_critical(p) and is_modified(p, current, previous)}
    
    	# Report if changes were found
    	if created or deleted or modified:
    		instance_id = extract_instance_id(bucket, key, current_version)
    		now = datetime.now(UTC).isoformat(timespec='milliseconds').replace('+00:00', 'Z')
    		finding = {
    			"SchemaVersion": "2018-10-08",
    			"Id": f"fim-{instance_id}-{now}",
    			"ProductArn": f"arn:aws:securityhub:{region}:{account_id}:product/{account_id}/default",
    			"AwsAccountId": account_id,
    			"GeneratorId": "ssm-inventory-fim",
    			"CreatedAt": now,
    			"UpdatedAt": now,
    			"Types": ["Software and Configuration Checks/File Integrity Monitoring"],
    			"Severity": {"Label": SEVERITY_LABEL},
    			"Title": "File changes detected via SSM Inventory",
    			"Description": (
    				f"{len(created)} created, {len(modified)} modified, "
    				f"{len(deleted)} deleted file(s) on instance {instance_id}"
    			),
    			"Resources": [{"Type": "AwsEc2Instance", "Id": instance_id}]
    		}
    		securityhub.batch_import_findings(Findings=[finding])
    
    	# No change – delete older S3 version
    	else:
    		if prev_version != current_version:
    			try:
    				s3.delete_object(Bucket=bucket, Key=key, VersionId=prev_version)
    			except Exception as e:
    				print(f"Delete previous S3 object version failed: {e}")

    Note: In production, set Lambda reserved concurrency to prevent unbounded scaling, configure a dead letter queue (DLQ) to capture failed invocations, and optionally attach the function to an Amazon VPC for network isolation.

    Configure environment variables

    Configure the two required environment variables in the Lambda console. These two variables (one for critical paths to monitor and one for security finding severity) must be set or the function will fail.

    1. Open the Lambda console and choose Configuration and then select Environment variables.
    2. Choose Edit and then choose Add environment variable.
    3. Under Key, choose CRITICAL_FILE_PATTERNS
      1. Enter ^/etc/paymentapp/config.*$ as the value.
      2. Set the SEVERITY_LABEL to MEDIUM.
    Figure 7: CRITICAL_FILE_PATTERNS and SEVERITY_LABEL configuration

    Figure 7: CRITICAL_FILE_PATTERNS and SEVERITY_LABEL configuration

    Set up permissions

    The next step is to attach permissions to the Lambda function

    1. In your Lambda function, choose Configuration and then select Permissions.
    2. Under Execution role, select the role name that will lead to the role in IAM.
    3. Choose Add permissions and select Create inline policy. Select JSON view.
    4. Paste the following policy, and make sure to replace <bucket-name> with the name of your S3 bucket, and you also update <region> and <account-id> with your AWS Region and Account ID:
    {
    "Version": "2012-10-17",
    "Statement": [
    	{
    		"Effect": "Allow",
    		"Action": "securityhub:BatchImportFindings",
    		"Resource": "arn:aws:securityhub:<region>:<account-id>:product/<account-id>/default"
    	},
    	{
    		"Effect": "Allow",
    		"Action": [
    			"s3:GetObject",
    			"s3:GetObjectVersion",
    			"s3:ListBucketVersions",
    			"s3:DeleteObjectVersion"
    		],
    		"Resource": [
    			"arn:aws:s3:::<bucket-name>",
    			"arn:aws:s3:::<bucket-name>/*"
    			]
    		}
    	]
    }
    1. To finalize, enter a Policy name and choose Create policy.

    Add functions to the Lambda layer

    For better modularity, add some helper functions to a Lambda layer. These functions are already referenced in the import section of the preceding Lambda function’s Python code. The helper functions check critical paths, load file metadata, compare modification times, and extract the EC2 instance ID.

    Open AWS CloudShell from the top-right corner of the AWS console header, then copy and paste the following script and press Enter. It creates the helper layer and attaches it to your Lambda function.

    #!/bin/bash
    set -e
    FUNCTION_NAME="fim-change-detector"
    LAYER_NAME="fim-change-detector-layer"
    
    mkdir -p python
    cat > python/helpers.py << 'EOF'
    import json, re, os
    from dateutil.parser import parse as parse_dt
    import boto3
    s3 = boto3.client('s3')
    CRITICAL_FILE_PATTERNS = os.environ.get("CRITICAL_FILE_PATTERNS", "").split(",")
    
    def is_critical(path):
    	return any(re.match(p.strip(), path) for p in CRITICAL_FILE_PATTERNS if p.strip())
    
    def load_file_metadata(bucket, key, version_id):
    	obj = s3.get_object(Bucket=bucket, Key=key, VersionId=version_id)
    	data = {}
    	for line in obj['Body'].read().decode().splitlines():
    		if line.strip():
    			i = json.loads(line)
    			n, d, m = i.get("Name","").strip(), i.get("InstalledDir","").strip(), i.get("ModificationTime","").strip()
    			if n and d and m: data[f"{d.rstrip('/')}/{n}"] = m
    	return data
    
    def is_modified(path, current, previous):
    	try: return parse_dt(current[path]) != parse_dt(previous[path])
    	except: return current[path] != previous[path]
    
    def extract_instance_id(bucket, key, version_id):
    	obj = s3.get_object(Bucket=bucket, Key=key, VersionId=version_id)
    	for line in obj['Body'].read().decode().splitlines():
    		if line.strip():
    			r = json.loads(line)
    			if "resourceId" in r: return r["resourceId"]
    	return None
    EOF
    
    zip -r helpers_layer.zip python >/dev/null
    LAYER_VERSION_ARN=$(aws lambda publish-layer-version \
    	--layer-name "$LAYER_NAME" \
    	--description "Helper functions for File Integrity Monitoring" \
    	--zip-file fileb://helpers_layer.zip \
    	--compatible-runtimes python3.13 \
    	--query 'LayerVersionArn' \
    	--output text)
    
    aws lambda update-function-configuration \
    	--function-name "$FUNCTION_NAME" \
    	--layers "$LAYER_VERSION_ARN" >/dev/null
    echo "Layer created and attached to the Lambda function."

    Step 5: Set up S3 Event Notifications

    Finally, set up S3 Event Notifications to trigger the Lambda function when new inventory data arrives.

    1. Open the S3 console and select the Systems Manager Inventory bucket that you created.
    2. Choose Properties and select Event notifications.
    3. Choose Create event notification.
      1. Enter an Event name.
      2. In the Prefix field, enter AWS%3AFile/ to limit Lambda triggers to file inventory objects only.
        Note: The prefix contains a : character, which must be URL-encoded as %3A.
      3. Under Event types, select Put.
      4. At the bottom, select your newly created Lambda function, and choose Save changes.

    In this example, inventory collection runs every 30 minutes (48 times each day) but can be adjusted based on security requirements to optimize costs. The Lambda function is triggered once for each instance whenever a new inventory object is created. You can further reduce event volume by filtering EC2 instances through S3 Event Notification prefixes, enabling focused monitoring of high-value instances.

    Step 6: Test the file change detection flow

    Now that the EC2 instance is running and the sample configuration file /etc/paymentapp/config.yaml has been initialized, you’re ready to simulate an unauthorized change to test the file integrity monitoring setup.

    1. Open the Systems Manager console.
    2. Go to Session Manager and choose Start session.
    3. Select your EC2 instance and choose Start Session.
    4. Run the following command to modify the file:

    echo “db_password=hacked456" | sudo tee /etc/paymentapp/config.yaml

    This simulates a configuration tampering event. During the next Systems Manager Inventory run, the updated metadata will be saved to Amazon S3.

    To manually trigger this:

    1. Open the Systems Manager console and choose State Manager.
    2. Select your association and choose Apply association now to start the inventory update.
    3. After the association status changes to Success, check your SSM Inventory S3 bucket in the AWS:File folder and review the inventory object and its versions.
    4. Open the Security Hub console and choose Findings. After a short delay, you should see a new finding like the one shown in Figure 8:
    Figure 8: View file change findings

    Figure 8: View file change findings

    Step 7: Query and visualize findings

    While Security Hub provides a centralized view of findings, you can deepen your analysis using Amazon Athena to run SQL queries directly on the normalized Security Lake data in Amazon S3. This data follows the Open Cybersecurity Schema Framework (OCSF), which is a vendor-neutral standard that simplifies integration and analysis of security data across different tools and services.

    The following is an example Athena query:

    SELECT
    	finding_info.desc AS description,
    	class_uid AS class_id,
    	severity AS severity_label,
    	type_name AS finding_type,
    	time_dt AS event_time,
    	region,
    	accountid
    FROM amazon_security_lake_table_us_east_1_sh_findings_2_0

    Note: Be sure to adjust the FROM clause for other Regions. Security Lake processes findings before they appear in Athena, so expect a short delay between ingestion and data availability.
    You will see a similar result for the preceding query, shown in Figure 9:

    Figure 9: Athena query result in the Amazon Athena query editor

    Figure 9: Athena query result in the Amazon Athena query editor

    Security Lake classifies this finding as an OCSF 2004 Class, Detection Finding. You can explore the full schema definitions at OCSF Categories. For more query examples, see the Security Lake query examples.
    For visual exploration and real-time insights, you can integrate Security Lake with OpenSearch Service and QuickSight, both of which now offer extensive generative AI support. For a guided walkthrough using QuickSight, see How to visualize Amazon Security Lake findings with Amazon QuickSight.

    Clean up

    After testing the step-by-step guide, make sure to clean up the resources you created for this post to avoid ongoing costs.

    1. Terminate the EC2 instance
    2. Delete the Resource Data Sync and Inventory Association
    3. Remove the Lambda function.
    4. Disable Security Lake and Security Hub CSPM
    5. Delete IAM roles created for this post
    6. Delete the associated SSM Resource Data Sync and Security Lake S3 buckets.

    Conclusion

    In this post, you learned how to use Systems Manager Inventory to track file integrity, report findings to Security Hub, and analyze them using Security Lake.
    You can access the full sample code to set up this solution in the AWS Samples repository.
    While this post uses a single-account, single-Region setup for simplicity, Security Lake supports collecting data across multiple accounts and Regions using AWS Organizations. You can also use a Systems Manager resource data sync to send inventory data to a central S3 bucket.

    Getting Started with Amazon Security Lake and Systems Manager Inventory provides guidance for enabling scalable, cloud-centric monitoring with full operational context.

    Adam Nemeth Adam Nemeth
    Adam is a Senior Solutions Architect and generative AI enthusiast at AWS, helping financial services customers by embracing the Day 1 culture and customer obsession of Amazon. With over 24 years of IT experience, Adam previously worked at UBS as an architect and has also served as a delivery lead, consultant, and entrepreneur. He lives in Switzerland with his wife and their three children.

    New Android Theft Protection Feature Updates: Smarter, Stronger

    27 January 2026 at 17:59
    Posted by Nataliya Stanetsky, Fabricio Ferracioli, Elliot Sisteron, Irene Ang of the Android Security Team

    Phone theft is more than just losing a device; it's a form of financial fraud that can leave you suddenly vulnerable to personal data and financial theft. That’s why we're committed to providing multi-layered defenses that help protect you before, during, and after a theft attempt.

    Today, we're announcing a powerful set of theft protection feature updates that build on our existing protections, designed to give you greater peace of mind by making your device a much harder target for criminals.

    Stronger Authentication Safeguards

    We've expanded our security to protect you against an even wider range of threats. These updates are now available for Android devices running Android 16+.

    More User Control for Failed Authentications: In Android 15, we launched Failed Authentication Lock, a feature that automatically locks the device's screen after excessive failed authentication attempts. This feature is now getting a new dedicated enable/disable toggle in settings, giving you more granular control over your device's security.

    Expanding Identity Check to cover more: Early in 2025, we enabled Identity Check for Android 15+, which requires the user to utilize biometrics when performing certain actions outside of trusted places. Later in the year, we extended this safeguard to cover all features and apps that use the Android Biometric Prompt. This means that critical tools that utilize Biometric Prompt, like third-party banking apps and Google Password Manager, now automatically benefit from the additional security of Identity Check.

    Stronger Protection Against Screen Lock Guessing: We’re making it much harder for a thief to guess your PIN, pattern, or password by increasing the lockout time after failed attempts. To ensure you aren’t locked out by mistake (by a curious child, for instance), identical incorrect guesses no longer count toward your retry limit.

    Fake apps, NFC skimming attacks, and other Android issues in 2026 | Kaspersky official blog

    27 January 2026 at 17:36

    The year 2025 saw a record-breaking number of attacks on Android devices. Scammers are currently riding a few major waves: the hype surrounding AI apps, the urge to bypass site blocks or age checks, the hunt for a bargain on a new smartphone, the ubiquity of mobile banking, and, of course, the popularity of NFC. Let’s break down the primary threats of 2025–2026, and figure out how to keep your Android device safe in this new landscape.

    Sideloading

    Malicious installation packages (APK files) have always been the Final Boss among Android threats, despite Google’s multi-year efforts to fortify the OS. By using sideloading — installing an app via an APK file instead of grabbing it from the official store — users can install pretty much anything, including straight-up malware. And neither the rollout of Google Play Protect, nor the various permission restrictions for shady apps have managed to put a dent in the scale of the problem.

    According to preliminary data from Kaspersky for 2025, the number of detected Android threats grew almost by half. In the third quarter alone, detections jumped by 38% compared to the second. In certain niches, like Trojan bankers, the growth was even more aggressive. In Russia alone, the notorious Mamont banker attacked 36 times more users than it did the previous year, while globally this entire category saw a nearly fourfold increase.

    Today, bad actors primarily distribute malware via messaging apps by sliding malicious files into DMs and group chats. The installation file usually sports an enticing name (think “party_pics.jpg.apk” or “clearance_sale_catalog.apk”), accompanied by a message “helpfully” explaining how to install the package while bypassing the OS restrictions and security warnings.

    Once a new device is infected, the malware often spams itself to everyone in the victim’s contact list.

    Search engine spam and email campaigns are also trending, luring users to sites that look exactly like an official app store. There, they’re prompted to download the “latest helpful app”, such as an AI assistant. In reality, instead of an installation from an official app store, the user ends up downloading an APK package. A prime example of these tactics is the ClayRat Android Trojan, which uses a mix of all these techniques to target Russian users. It spreads through groups and fake websites, blasts itself to the victim’s contacts via SMS, and then proceeds to steal the victim’s chat logs and call history; it even goes as far as snapping photos of the owner using the front-facing camera. In just three months, over 600 distinct ClayRat builds have surfaced.

    The scale of the disaster is so massive that Google even announced an upcoming ban on distributing apps from unknown developers starting in 2026. However, after a couple of months of pushback from the dev community, the company pivoted to a softer approach: unsigned apps will likely only be installable via some kind of superuser mode. As a result, we can expect scammers to simply update their how-to guides with instructions on how to toggle that mode on.

    Kaspersky for Android will help you protect yourself from counterfeit and trojanized APK files. Unfortunately, due to Google’s decision, our Android security apps are currently unavailable on Google Play. We’ve previously provided detailed information on how to install our Android apps with a 100% guarantee of authenticity.

    NFC relay attacks

    Once an Android device is compromised, hackers can skip the middleman to steal the victim’s money directly thanks to the massive popularity of mobile payments. In the third quarter of 2025 alone, over 44 000 of these attacks were detected in Russia alone — a 50% jump from the previous quarter.

    There are two main scams currently in play: direct and reverse NFC exploits.

    Direct NFC relay is when a scammer contacts the victim via a messaging app and convinces them to download an app — supposedly to “verify their identity” with their bank. If the victim bites and installs it, they’re asked to tap their physical bank card against the back of their phone and enter their PIN. And just like that the card data is handed over to the criminals, who can then drain the account or go on a shopping spree.

    Reverse NFC relay is a more elaborate scheme. The scammer sends a malicious APK and convinces the victim to set this new app as their primary contactless payment method. The app generates an NFC signal that ATMs recognize as the scammer’s card. The victim is then talked into going to an ATM with their infected phone to deposit cash into a “secure account”. In reality, those funds go straight into the scammer’s pocket.

    We break both of these methods down in detail in our post, NFC skimming attacks.

    NFC is also being leveraged to cash out cards after their details have been siphoned off through phishing websites. In this scenario, attackers attempt to link the stolen card to a mobile wallet on their own smartphone — a scheme we covered extensively in NFC carders hide behind Apple Pay and Google Wallet.

    The stir over VPNs

    In many parts of the world, getting onto certain websites isn’t as simple as it used to be. Some sites are blocked by local internet regulators or ISPs via court orders; others require users to pass an age verification check by showing ID and personal info. In some cases, sites block users from specific countries entirely just to avoid the headache of complying with local laws. Users are constantly trying to bypass these restrictions —and they often end up paying for it with their data or cash.

    Many popular tools for bypassing blocks — especially free ones — effectively spy on their users. A recent audit revealed that over 20 popular services with a combined total of more than 700 million downloads actively track user location. They also tend to use sketchy encryption at best, which essentially leaves all user data out in the open for third parties to intercept.

    Moreover, according to Google data from November 2025, there was a sharp spike in cases where malicious apps are being disguised as legitimate VPN services to trick unsuspecting users.

    The permissions that this category of apps actually requires are a perfect match for intercepting data and manipulating website traffic. It’s also much easier for scammers to convince a victim to grant administrative privileges to an app responsible for internet access than it is for, say, a game or a music player. We should expect this scheme to only grow in popularity.

    Trojan in a box

    Even cautious users can fall victim to an infection if they succumb to the urge to save some cash. Throughout 2025, cases were reported worldwide where devices were already carrying a Trojan the moment they were unboxed. Typically, these were either smartphones from obscure manufacturers or knock-offs of famous brands purchased on online marketplaces. But the threat wasn’t limited to just phones; TV boxes, tablets, smart TVs, and even digital photo frames were all found to be at risk.

    It’s still not entirely clear whether the infection happens right on the factory floor or somewhere along the supply chain between the factory and the buyer’s doorstep, but the device is already infected before the first time it’s turned on. Usually, it’s a sophisticated piece of malware called Triada, first identified by Kaspersky analysts back in 2016. It’s capable of injecting itself into every running app to intercept information: stealing access tokens and passwords for popular messaging apps and social media, hijacking SMS messages (confirmation codes: ouch!), redirecting users to ad-heavy sites, and even running a proxy directly on the phone so attackers can browse the web using the victim’s identity.

    Technically, the Trojan is embedded right into the smartphone’s firmware, and the only way to kill it is to reflash the device with a clean OS. Usually, once you dig into the system, you’ll find that the device has far less RAM or storage than advertised — meaning the firmware is literally lying to the owner to sell a cheap hardware config as something more premium.

    Another common pre-installed menace is the BADBOX 2.0 botnet, which also pulls double duty as a proxy and an ad-fraud engine. This one specializes in TV boxes and similar hardware.

    How to go on using Android without losing your mind

    Despite the growing list of threats, you can still use your Android smartphone safely! You just have to stick to some strict mobile hygiene rules.

    • Install a comprehensive security solution on all your smartphones. We recommend Kaspersky for Android to protect against malware and phishing.
    • Avoid sideloading apps via APKs whenever you can use an app store instead. A known app store — even a smaller one — is always a better bet than a random APK from some random website. If you have no other choice, download APK files only from official company websites, and double-check the URL of the page you’re on. If you aren’t 100% sure what the official site is, don’t just rely on a search engine; check official business directories or at least Wikipedia to verify the correct address.
    • Read OS warnings carefully during installation. Don’t grant permissions if the requested rights or actions seem illogical or excessive for the app you’re installing.
    • Under no circumstances should you install apps from links or attachments in chats, emails, or similar communication channels.
    • Never tap your physical bank card against your phone. There is absolutely no legitimate scenario where doing this would be for your own benefit.
    • Do not enter your card’s PIN into any app on your phone. A PIN should only ever be requested by an ATM or a physical payment terminal.
    • When choosing a VPN, stick to paid ones from reputable companies.
    • Buy smartphones and other electronics from official retailers, and steer clear of brands you’ve never heard of. Remember: if a deal seems too good to be true, it almost certainly is.

    Other major Android threats from 2025:

    IAM Identity Center now supports IPv6

    26 January 2026 at 21:17

    Amazon Web Services (AWS) recommends using AWS IAM Identity Center to provide your workforce access to AWS managed applications—such as Amazon Q Developer—and AWS accounts. Today, we announced IAM Identity Center support for IPv6. To learn more about the advantages of IPv6, visit the IPv6 product page.

    When you enable IAM Identity center, it provides an access portal for workforce users to access their AWS applications and accounts either by signing in to the access portal using a URL or by using a bookmark for the application URL. In either case, the access portal handles user authentication before granting access to applications and accounts. Supporting both IPv4 and IPv6 connectivity to the access portal helps facilitate seamless access for clients, such as browsers and applications, regardless of their network configuration.

    The launch of IPv6 support in IAM Identity Center introduces new dual-stack endpoints that support both IPv4 and IPv6, so that users can connect using IPv4, IPv6, or dual-stack clients. Current IPv4 endpoints continue to function with no action required. The dual stack capability offered by Identity Center extends to managed applications. When users access the application dual-stack endpoint, the application automatically routes to the Identity Center dual-stack endpoint for authentication. To use Identity Center from IPv6 clients, you must direct your workforce to use the new dual-stack endpoints, and update configurations on your external identity provider (IdP), if you use one.

    In this post, we show you how to update your configuration to allow IPv6 clients to connect directly to IAM Identity Center endpoints without requiring network address translation services. We also show you how to monitor which endpoint users are connecting to. Before diving into the implementation details, let’s review the key phases of the transition process.

    Transition overview

    To use IAM Identity Center from an IPv6 network and client, you need to use the new dual-stack endpoints. Figure 1 shows what the transition from IPv4 to IPv6 over dual-stack endpoints looks like when using Identity Center. The figure shows:

    • A before state where clients use the IPv4 endpoints.
    • The transition phase, when your clients use a combination of IPv4 and dual-stack endpoints.
    • After the transition is complete, your clients will connect to dual-stack endpoints using their IPv4 or IPv6, depending on their preferences.

    Figure 1: Transition from IPv4-only to dual-stack endpoints

    Figure 1: Transition from IPv4-only to dual-stack endpoints

    Prerequisites

    You must have the following prerequisites in place to enable IPv6 access for your workforce users and administrators:

    • An existing IAM Identity Center instance
    • Updated firewalls or gateways to include the new dual-stack endpoints
    • IPv6 capable clients and networks

    Work with your network administrators to update the configuration of your firewalls and gateways and to verify that your clients, such as laptops or desktops, are ready to accept IPv6 connectivity. If you have already enabled IPv6 connectivity for other AWS services, you might be familiar with these changes. Next, implement the two steps that follow.

    Step 1: Update your IdP configuration

    You can skip this step If you don’t use an external IdP as your identity source.

    In this step, you update the Assertion Consumer Service (ACS) URL from your IAM Identity Center instance into your IdP’s configuration for single sign-on and the SCIM configuration for user provisioning. Your IdP’s capability determines how you update the ACS URLs. If your IdP supports multiple ACS URLs, configure both IPv4 and dual-stack URLs to enable a flexible transition. With that configuration, some users can continue using IPv4-only endpoints while others use dual-stack endpoints for IPv6. If your IdP supports only one ACS URL, to use IPv6 you must update the new dual-stack ACS URL in your IdP and transition all users to using dual-stack endpoints. If you don’t use an external IdP, you can skip this step and go to the next step.

    Update both the SAML single sign-on and the SCIM provisioning configurations:

    1. Update the single sign-on settings in your IdP to use the new dual-stack URLs. First, locate the URLs in the AWS Management Console for IAM Identity Center.
      1. Choose Settings in the navigation pane and then select Identity source.
      2. Choose Actions and select Manage authentication.
      3. in Under Manage SAML 2.0 authentication, you will find the following URLs under Service provider metadata:
        • AWS access portal sign-in URL
        • IAM Identity Center Assertion Consumer Service (ACS) URL
        • IAM Identity Center issuer URL
    2. If your IdP supports multiple ACS URLs, then add the dual-stack URL to your IdP configuration alongside existing IPv4 one. With this setting, you and your users can decide when to start using the dual-stack endpoints, without all users in your organization having to switch together.

      Figure 2: Dual-stack single sign-on URLs

      Figure 2: Dual-stack single sign-on URLs

    3. If your IdP does not support multiple ACS URLs, replace the existing IPv4 URL with the new dual-stack URL, and switch your workforce to use only the dual-stack endpoints.
    4. Update the provisioning endpoint in your IdP. Choose Settings in the navigation pane and under Identity source, choose Actions and select Manage provisioning. Under Automatic provisioning, copy the new SCIM endpoint that ends in api.aws. Update this new URL in your external IdP.

      Figure 3: Dual-stack SCIM endpoint URL

      Figure 3: Dual-stack SCIM endpoint URL

    Step 2: Locate and share the new dual-stack endpoints

    Your organization needs two kinds of URLs for IPv6 connectivity. The first is the new dual-stack access portal URL that your workforce users use to access their assigned AWS applications and accounts. The dual-stack access portal URL is available in the IAM Identity Center console, listed as the Dual-stack in the Settings summary (you might need to expand the Access portal URLs section, shown in Figure 4).

    Figure 4: Locate dual-stack access portal endpoints

    Figure 4: Locate dual-stack access portal endpoints

    This dual-stack URL ends with app.aws as its top-level domain (TLD). Share this URL with your workforce and ask them to use this dual-stack URL to connect over IPv6. As an example, if your workforce uses the access portal to access AWS accounts, they will need to sign in through the new dual-stack access portal URL when using IPv6 connectivity. Alternately, if your workforce accesses the application URL, you need to enable the dual-stack application URL following application-specific instructions. For more information, see AWS services that support IPv6.

    The URLs that administrators use to manage IAM Identity Center are the second kind of URL your organization needs. The new dual-stack service endpoints end in api.aws as their TLD and are listed in the Identity Center service endpoints. Administrators can use these service endpoints to manage users and groups in Identity Center, update their access to applications and resources, and perform other management operations. As an example, if your administrator uses identitystore.{region}.amazonaws.com to manage users and groups in Identity Center, they should now use the dual-stack version of the same service endpoint which is identitystore.{region}.api.aws, so they can connect to service endpoints using IPv6 clients and networks.

    If your users or administrators use an AWS SDK to access AWS applications and accounts or manage services, follow Dual-stack and FIPS endpoints to enable connectivity to the dual-stack endpoints.

    After completing these two steps, your workforce and administrators can connect to IAM Identity Center using IPv6. Remember, these endpoints also support IPv4, so clients not yet IPv6-capable can continue to connect using IPv4.

    Monitoring dual-stack endpoint usage

    You can optionally monitor AWS CloudTrail logs to track usage of dual-stack endpoints. The key difference between IPv4-only and dual-stack endpoint usage is the TLD and appears in the clientProvidedHostHeader field. The following example shows the difference between these CloudTrail events for the CreateTokenWithIAM API call.

    IPv4-only endpoints Dual-stack endpoints
    "CloudTrailEvent": {
      "eventName": "CreateToken",
      "tlsDetails": {
         "tlsVersion": "TLSv1.3",
         "cipherSuite": "TLS_AES_128_GCM_SHA256",
         "clientProvidedHostHeader": "oidc.us-east-1.amazonaws.com"
      }
    }
    "CloudTrailEvent": {
      "eventName": "CreateToken",
      "tlsDetails": {
         "tlsVersion": "TLSv1.3",
         "cipherSuite": "TLS_AES_128_GCM_SHA256",
         "clientProvidedHostHeader": "oidc.us-east-1.api.aws"
      }
    }

    Conclusion

    IAM Identity Center now allows clients to connect over IPv6 natively with no network address translation infrastructure. This post showed you how to transition your organization to use IPv6 with Identity Center and its integrated applications. Remember that existing IPv4 endpoints will continue to function, so you can transition at your own pace. Also, no immediate action is required by you. However, we recommend planning your transition to take advantage of IPv6 benefits and meet compliance requirements. If you have questions, comments, or concerns, contact AWS Support, or start a new thread in the IAM Identity Center re:Post channel.

     
    If you have feedback about this post, submit comments in the Comments section below. If you have questions about this post, contact AWS Support.
     

    Suchintya Dandapat Suchintya Dandapat
    Suchintya Dandapat is a Principal Product Manager for AWS where he partners with enterprise customers to solve their toughest identity challenges, enabling secure operations at global scale.
    ❌