A breakup is a major upheaval — the kind that turns life upside down. The familiar order of things, where two people shared the same interests, moments, and often even the same physical space, collapses in an instant, leaving each of you in a world of your own.
Besides that, couples are connected not just in real life, but digitally too. Shared subscriptions, saved addresses and passwords, access to joint cloud storage — all of that used to be woven into your day-to-day life. Moving on emotionally can take a long time, sure, but there are steps you can take right now that will tighten up your security — even if they won’t help you get over your ex.
Here’s what you need to check after a breakup, which services to disconnect, and why you should do it even if the split was amicable.
Digital hygiene: your insurance policy
Cutting off your ex’s access to your online accounts isn’t paranoia — it’s looking out for your own security. A breakup doesn’t automatically sever your digital ties: any access you granted each other during the relationship stays active until someone manually shuts it down. Most of the time, nobody’s plotting to actually exploit it, yet it can still lead to anything from awkward moments to a genuine risk of being tracked.
Take Aleta Dignard-Fung, of Las Vegas, who told NPR that after breaking up with her boyfriend, it didn’t immediately occur to her that he still knew her Spotify password. One day, in the shower with music playing, she noticed her playlist suddenly switch. Her ex had logged in from another device and started playing his own chosen tracks. “It was just kind of like the Spotify wars, and we’d just spend like 10 minutes trying to override each other’s songs,” she admitted. But the fallout isn’t always this lighthearted.
Relationship coach Susan Winter shared a case from her own practice in that same interview. One of her clients simply couldn’t let go of his ex-girlfriend after their breakup. The two had shared an OpenTable account — the restaurant reservation service — and she’d never revoked his access. He started tracking her bookings: where she was going, what time, how many people. That’s how he kept tabs on whether someone new had entered her life.
These two stories, while showing very different behavior from the exes involved, both trace back to the same root cause: accounts that were never properly locked down. In the former case, it led to an awkward moment. In the latter, it led to anxiety and a real sense of being watched. To make sure neither scenario happens to you, it’s worth running through a quick checklist.
Terminate your partner’s sessions
In the settings for your social media, messaging apps, email, and other key services, pull up the list of active sessions and log out everything except your current devices.
Change your passwords
Update the passwords to any key accounts your partner might have known — say, if you used a meaningful date as your password. If you reused the same password across multiple services, change it everywhere. While you’re at it, review your security questions and your backup email or phone number for account recovery — neither should still be tied to your ex. To skip the hassle of memorizing new credentials while still leveling up your security, we recommend using a password manager — it’ll generate a unique, strong password for every account, and save and sync it across all your devices; the only thing you need to remember is a single main password.
Check two-factor authentication and trusted devices
Make sure verification codes only go to your own device. Remove your partner’s devices from your trusted list — you can do this in your Apple and Google account settings.
Split up your shared Apple/Google accounts
If you shared an Apple or Google account, sign out of that. Turn off Family Sharing, iCloud, and backups. Check your shared photo albums too — anything that lands there automatically is visible to your ex as well.
Review your subscriptions
If you shared subscriptions — streaming services, family plans, that kind of thing — cancel them or set up new ones and link your own card.
Check your bank cards
If your ex’s card is linked to a marketplace, delivery app, or rideshare service account you own, remove it from your saved payment methods. If your card is linked to their account and you no longer have access to it, the safest move is to just get your card reissued.
Revoke smart home access
Cut off your ex’s access to cameras, video doorbells, GPS trackers, and smart speakers. If the devices were on a shared account, change the password or move them over to your own personal account.
Review your privacy settings
Check the privacy settings across your accounts on various services and social media using our free online tool, Privacy Checker. It walks you through a privacy configuration tailored to your operating system, platform, and even your browser.
If you notice signs of stalking
Reach out to advocacy or legal aid organizations — they can help you map out the best course of action. It’s also worth leaning on family and close friends who can support you through a tough situation. On Android devices, you can use our security suite with the Who’s Spying on Me feature. It’s designed to help you detect tracking and stalking so you can take the right steps to protect yourself. The feature includes:
Stalkerware Detection. Flags apps designed to secretly monitor your life and collect data you’d never want shared with anyone else.
Device Scanner. Finds planted trackers that let someone follow your movements and always know where you are.
Permissions Control. Shows which apps have access to permissions that could make it easier for someone to spy on you or compromise your privacy.
What can actually help — and what might make things worse — during this difficult time? Check out our other posts:
When targeting an organization to steal information, maintaining a low profile is critical for attackers. They typically aim for long-term persistence, which requires avoiding security alerts while preserving access in case they’re detected and the organization initiates incident response or routine password resets. Malware such as infostealers or ostensibly legitimate remote monitoring and management (RMM) tools fail the first requirement: their use triggers EDR and generates suspicious events in SIEM consoles. Relying on stolen credentials conflicts with the second requirement: the moment the security team suspects a compromise, passwords can be changed immediately — terminating access. If attackers attempt to steal browser cookies instead of passwords, they face a different challenge: many online services now correlate device characteristics with the expected session cookie and block access if the cookie is used on an unrecognized device. Furthermore, cookie theft protection mechanisms implemented in Chromium-based browsers (such as Chrome, Edge, and Opera) this year have made this approach significantly more difficult.
To address this persistence challenge, the ToddyCat APT — whose main game is spying — developed a novel technique. Kaspersky experts discovered this method during an incident investigation and named it Shadow Token via Remote Debug (STRD). This technique allows the attackers to establish reliable, persistent access to a victim’s mailbox and other resources in Google Workspace. With minor adjustments, the same approach could potentially be adapted to target other services that grant third-party application access via OAuth 2.0 authentication.
How an STRD attack works
First, the attackers must compromise the victim’s system with malware. In past campaigns, ToddyCat gained initial access to organizations by exploiting known vulnerabilities in server software and distributing malicious loaders via messaging apps. The specific employee targeted by the attackers might not notice the intrusion at all. This can occur, for example, if the adversary first obtains privileged administrative credentials and uses them to deploy the malware onto targeted machines remotely. Crucially, the deployment and execution of this malware mustn’t trigger immediate security alerts.
Once active, the malware executes an STRD attack, connecting the attackers’ remote service to the victim’s mailbox using the OAuth 2.0 protocol. This process requires no user interaction and shows no visible activity on the screen. To the cloud environment (Google Workspace, in the case at hand), the activity appears as if the user has legitimately authorized a third-party app for email access or data backup.
After that, the malware can terminate its operations and even delete itself from the system. The adversary retains direct access to the mailbox using the acquired OAuth token — and they need no connection to the victim’s endpoint or to the corporate network for that. Depending on the organization’s Google Workspace configuration, this access can persist for an extended period and survive subsequent password resets.
The core concept of Shadow Token via Remote Debug
At the heart of this attack is a connection to Google Workspace services via OAuth 2.0. This is a legitimate workflow used whenever a third-party application requests access to calendar data, emails, or Google Drive files. For example, to display calendar meetings in Zoom and automatically generate conference links, a user must authorize Zoom to access Google services. Similarly, configuring a third-party email client or calendar app requires granting permission. During this authorization process, the service requesting access opens a new browser window. In this window, Google Workspace first prompts the user to select the appropriate account. Once the account is chosen, the subsequent screen displays the specific permissions requested by the third-party app, allowing the user to either approve or deny access. For this scenario to proceed seamlessly, the user must already be authenticated to Google services in their browser — which is typically the case in organizations using Google Workspace. If the user isn’t authenticated, additional steps for entering credentials and completing multi-factor authentication are introduced into the sequence.
The ToddyCat hackers developed a malicious tool called Umbrij to facilitate a two-step covert authorization process when the user is already authenticated in Google. First, the malware identifies the browsers installed on the system, and locates the specific folder storing the user’s active profile for each. The attackers target Chrome and Edge, as these are the browsers most likely serving as the primary ones within the organization.
Next, Umbrij copies the entire user profile folder to a different directory on the machine. It then launches an instance of the browser, specifying the path to the duplicated profile via the command line. Because this duplicate profile contains the user’s session cookies, websites with saved credentials won’t prompt for re-authentication. Furthermore, since this occurs on the exact same computer where the primary browser is running, online services detect no anomalies. The browsing history for this newly launched instance is isolated within the new folder, keeping it hidden from the user’s main account activity.
Crucially, the browser is launched in a dedicated debugging mode typically reserved for web development. The browser window and user interface don’t appear on the screen at all (headless mode). Instead, the browser can be controlled through a debugging port using the DevTools protocol, allowing the malware to issue commands and read the state of the screen. To orchestrate these actions, Umbrij leverages Puppeteer, a legitimate automation library.
After verifying that the debugging browser instance has launched successfully, Umbrij opens a legitimate Google Workspace OAuth screen within it. The request sent to Google is engineered to bypass additional security checks while requesting maximum access privileges. For the application ID — the identity supposedly requesting these extensive permissions — the malware impersonates one of two legitimate tools: Google Workspace Migration for Microsoft Outlook (GWMMO), or Google Workspace Sync for Microsoft Outlook (GWSMO).
When Google opens the window within the headless browser, Umbrij uses debugging tools to programmatically click on the corporate account name and the confirmation buttons. As a result, Google generates an authorization code for the app. Umbrij extracts and saves this code, subsequently forwarding it to the attackers’ command-and-control server. Finally, operating entirely within their own infrastructure rather than on the victim’s computer, the attackers exchange this authorization code for an OAuth access token. This single token is all they need to maintain long-term unrestricted access to the mailbox.
How to protect against OAuth token theft
If a Google Workspace account is compromised, incident response measures must include the following steps after collecting the necessary logs and other forensic data for investigation:
Resetting the affected user’s password
Terminating all active web sessions for the user
Revoking OAuth tokens and third-party app permissions
Reviewing and removing access granted through legacy App Passwords
In addition, security and IT teams must systematically audit issued OAuth permissions, revoke unjustifiable access rights, and restrict capabilities that allow excessive or unauthorized permission grants. We covered this topic in detail in our article on blocking unwanted AI assistants.
How to prevent exploitation of Shadow Token via Remote Debug
While Kaspersky users are protected against the Umbrij tool, security teams should proactively implement policies that prevent standard users from launching browsers in debugging mode. This functionality is intended exclusively for website and web app developers. This restriction can be enforced through the DeveloperToolsAvailability group policy (available for both Chrome and Edge).
Additionally, configure monitoring within your SIEM/XDR to track the launch of browser instances with an active debugging port. This event serves as a strong indicator of this specific attack technique.
In addition, AWS is introducing several new security and governance tools, including: new global condition keys for OAuth, token introspection and revocation, dynamic client registration, new AWS CloudTrail elements, and a new API for headless OAuth connectivity. All of this is compatible with your existing IAM configuration including permissions, roles, and federated access.
In this post, you’ll learn how to connect your agents to the AWS MCP Server, understand how AWS Sign-In authorizes agent access, and manage access using new security and governance capabilities.
How to connect an agent to the AWS MCP Server
This walkthrough uses Claude Code, but the same steps apply to any agent that supports Model Context Protocol (MCP) such as Kiro, Codex, and Gemini. See Setting up the AWS MCP Server for how to connect the AWS MCP Server to an agent.
Prerequisite permissions
To connect an agent to the AWS MCP Server, you’ll need the IAM permissions required for OAuth-based sign-in. The following AWS CLI command adds a managed policy with required permissions to your IAM role (remember to replace <MyRole> with your IAM role):
aws iam attach-role-policy \
  --role-name <MyRole> \
  --policy-arn arn:aws:iam::aws:policy/AWSMCPSignInOAuthAccessPolicy
Step 1: Configure the AWS MCP Server on your agent
Run the following command to add the AWS MCP Server endpoint to your agent’s configuration as shown in Figure 1:
claude mcp add --transport http aws-mcp https://aws-mcp.us-east-1.api.aws/mcp
Figure 1: Adding the AWS MCP Server endpoint to Claude Code
Step 2: Review the authorization request
The first time your agent needs to access the AWS MCP Server, it opens a browser and redirects you to an AWS Sign-In page, shown in Figure 2. Authenticate as you would on AWS console or AWS CLI, review the authorization request, and approve access. You should receive an Authorization successful message.
Figure 2: Review authorization request
Note that if you already have an active AWS Sign-In session (e.g., because you previously signed in to the console earlier in the day), you can reuse that session without needing to sign in again.
Step 3: Start using AWS tools
After connecting your agent to the AWS MCP Server, you can begin invoking tools provided by the server. To verify that Claude Code is connected to the AWS MCP Server, start Claude Code and run the following command:
/mcp
The command displays the configured MCP servers and confirms that the AWS MCP Server is connected and ready to use with your AWS credentials.
Figure 3 shows an example of a successful connection to the AWS MCP Server.
Figure 3: Verifying the AWS MCP Server connection in Claude Code
After the connection is established, you can ask Claude Code to invoke tools provided by the AWS MCP Server. For example, enter the following prompt:
Deploy a sample serverless web application into my development AWS account
Claude Code uses the AWS MCP Server to identify the active AWS account, confirm the target account, and describe the deployment it plans to perform before invoking AWS services on your behalf.
Figure 4 shows Claude Code confirming the active AWS account and outlining the resources that will be deployed.
Figure 4: Using Claude Code to deploy a sample serverless application through the AWS MCP Server
Authorization models and how they work
AWS Sign-In supports two authorization models for connecting agents to the AWS MCP Server:
Interactive authorization for developers’ AI agents using browser based authentication
Non-interactive (headless) authorization for applications and AI agents that already have AWS credentials and don’t have access to a browser
Note that authorizing an agent allows it to access the AWS MCP Server on your behalf. It doesn’t grant the agent additional AWS permissions. Every request is still evaluated using your existing IAM policies, SCPs, RCPs, permission boundaries, and other organizational controls.
Interactive access
In the interactive case, the agent first discovers the AWS Sign-In OAuth server and then registers itself as an OAuth client using Dynamic Client Registration (DCR). It then redirects you to an AWS Sign-In page where you authenticate and authorize access (step 2 in the preceding section). After successful authorization, AWS Sign-In then issues short-lived access tokens and refresh tokens that authorize the agent to access the AWS MCP Server on your behalf. AWS Sign-In automatically manages token issuance and token refresh, enabling authorized agents to continue accessing the AWS MCP Server without requiring you to repeatedly sign in.
The interactive authorization model supports three distinct sign-in methods: native AWS IAM credentials for individual developers, managed access through AWS IAM Identity Center for enterprises, and seamless federated access via third-party providers like Okta and Ping Identity for larger organizations.
OAuth server metadata and DCR
Before an agent can request authorization, it must discover the AWS Sign-In OAuth endpoints and register itself as an OAuth client. AWS Sign-In supports OAuth metadata discovery and DCR, allowing supported agents to configure themselves automatically without requiring developers to manually provision OAuth client IDs and client secrets. When an agent connects to the AWS MCP Server for the first time, it retrieves the AWS MCP Server’s protected resource metadata (RFC 9728) and the AWS Sign-In OAuth metadata (RFC 8414). The agent then uses (RFC 7591) to register with AWS Sign-In, obtain a client ID, and initiate the standard OAuth authorization code flow.
AWS Sign-In supports OAuth discovery and DCR for agents running on local workstations and supported hosted environments. For the current list of supported agents and environments, see Supported redirect URIs for the AWS MCP Server.
Non-interactive access to the AWS MCP Server
Non-interactive (headless) authorization is for agents and applications that run without a browser or human in the loop, and thus don’t require interactive sign-in. This allows agents that already have AWS credentials to obtain OAuth access tokens and connect to the AWS MCP Server. The following is an example of how to obtain an access token.
In the non-interactive case, AWS Sign-In implements the OAuth client credentials grant using AWS security credentials instead of a static client secret. Applications authenticate to the AWS Sign-In token endpoint using SigV4 creds, and AWS Sign-In returns a short-lived OAuth access token that can be used to access the AWS MCP Server.
Please note you may have to update the SDK and AWS CLI, please refer to CLI guide.
Managing OAuth access
AWS Sign-In extends the existing IAM authorization model with capabilities for governing OAuth access to the AWS MCP Server. Administrators can use familiar IAM policies together with new OAuth-specific controls.
Granting OAuth permissions
OAuth access is governed using IAM policies and requires the following IAM actions:
signin:AuthorizeOAuth2Access – Allows users to sign in interactively using the OAuth authorization code flow
signin:CreateOAuth2Token – Allows applications to obtain OAuth access tokens by exchanging authorization codes, refresh tokens, or using client credentials
When an application requests access, AWS Sign-In creates an OAuth authorization grant between the agent and the AWS MCP Server. This grant is represented as an IAM resource, which the preceding AWS Sign-In actions are authorized against.
OAuth authorization grants are represented as an IAM resource enabling administrators to use standard IAM policy constructs, including global condition keys, together with OAuth-specific condition keys to control how authorization grants are created and used.
Governing OAuth access
AWS Sign-In introduces OAuth-specific condition keys that allow administrators to govern how agents obtain OAuth authorization. The following examples demonstrate common governance patterns.
To restrict OAuth authorization to localhost:
In addition to accessing the AWS MCP Server with agents on your local workstation, AWS supports signing into the AWS MCP Server on select hosted providers through dynamic client registration. Click here to view the list of supported remote providers. Many organizations want to allow developers to authorize agents running on their local workstations while preventing OAuth tokens from being delivered to untrusted redirect URIs or using unsupported authorization flows. The following policy allows only the OAuth authorization code and refresh token flows for the AWS MCP server and restricts token delivery tolocalhost.
Use the aws:SignInSessionArn global condition key to deny authorization associated with a specific sign-in session. This allows administrators to contain a suspicious or compromised authorization session without affecting other active sessions.
These examples demonstrate common governance patterns. Additional IAM and SCP examples are available in the AWS Sign-In condition keys reference.
Revoking OAuth tokens
AWS Sign-In provides OAuth token introspection and token revocation APIs that allow administrators to build custom tools for token validation and revocation. Access to these APIs is controlled through the signin:IntrospectOAuth2Token and signin:RevokeOAuth2Token permissions. IAM principals with permissions are allowed to introspect and revoke tokens for the same account.
The introspection API can be used to determine whether a token is active and obtain information about the associated authorization. The revocation API allows administrators and security tools to revoke individual refresh tokens without affecting other active sessions. For example, if an organization needs to invalidate access for a specific OAuth authorization, account admins can revoke the associated refresh token without affecting other active sessions.
Monitoring OAuth activity
OAuth-related activities are recorded in AWS CloudTrail, including authorization requests, token issuance, token revocation, and token introspection events. CloudTrail logs also capture details such as the OAuth client, target the AWS MCP Server, redirect URI, authorization flow, and associated sign-in session. In addition, AWS API calls made using OAuth access tokens include the associated aws:SignInSessionArn context, allowing organizations to correlate API activity with the originating OAuth sign-in session.
This allows security teams to monitor OAuth usage, investigate authorization activity, detect anomalous behavior, and integrate OAuth events into existing auditing, compliance, and incident response workflows alongside other AWS activity.
Here’s a CloudTrail sample for an AuthorizeOAuth2Access event:
AWS Sign-In support for OAuth enables you to securely connect to the AWS MCP Server using industry-standard authorization. This release simplifies application and agent integration with AWS while supporting your existing IAM setup, governance, and auditing capabilities.
Modern web applications require robust security controls to protect user data and application resources. Authentication and authorization are two fundamental pillars of application security that answer critical questions: Who are you? and What are you allowed to do? Implementing these controls correctly can be challenging for developers, especially when building data-intensive applications with frameworks like Streamlit (an open-source Python framework for building interactive web applications) or when requiring fine-grained access control. Key challenges include protecting access to application resources, implementing application identity with multi-factor authentication (MFA), and implementing usage-based controls.
In this post, you will learn how to build fine-grained access controls for a sample Streamlit application using Amazon Cognito for authentication and Amazon Verified Permissions with Cedar policies for authorization. This architecture provides enterprise-grade security with minimal development effort, so you can focus on your application’s core functionality. You will learn how to reduce development time for secure applications, implement enterprise-grade authentication, through proper access management, and scale security with growing user bases.
Security architecture overview
The reference architecture follows a layered security design with four key components; separating identity verification, authorization evaluation, application logic, and enforcement boundaries. By assigning clear responsibilities to each layer, the architecture limits blast radius and ensures that a failure in any single control does not compromise the overall system.
Authentication layer: Amazon Cognito handles user authentication with secure credential validation and JSON web tokens (JWTs). It provides built-in password policies, account lockout protection, and session management.
Authorization layer: Verified Permissions uses the Cedar policy engine to evaluate fine-grained access requests based on centrally stored policies.
Application layer: The Streamlit frontend integrates with both services, managing user sessions and enforcing access controls in the user interface.
Security boundaries: Multiple layers of security controls protect against unauthorized access, privilege escalation, authentication verification, authorization checks, and input validation.
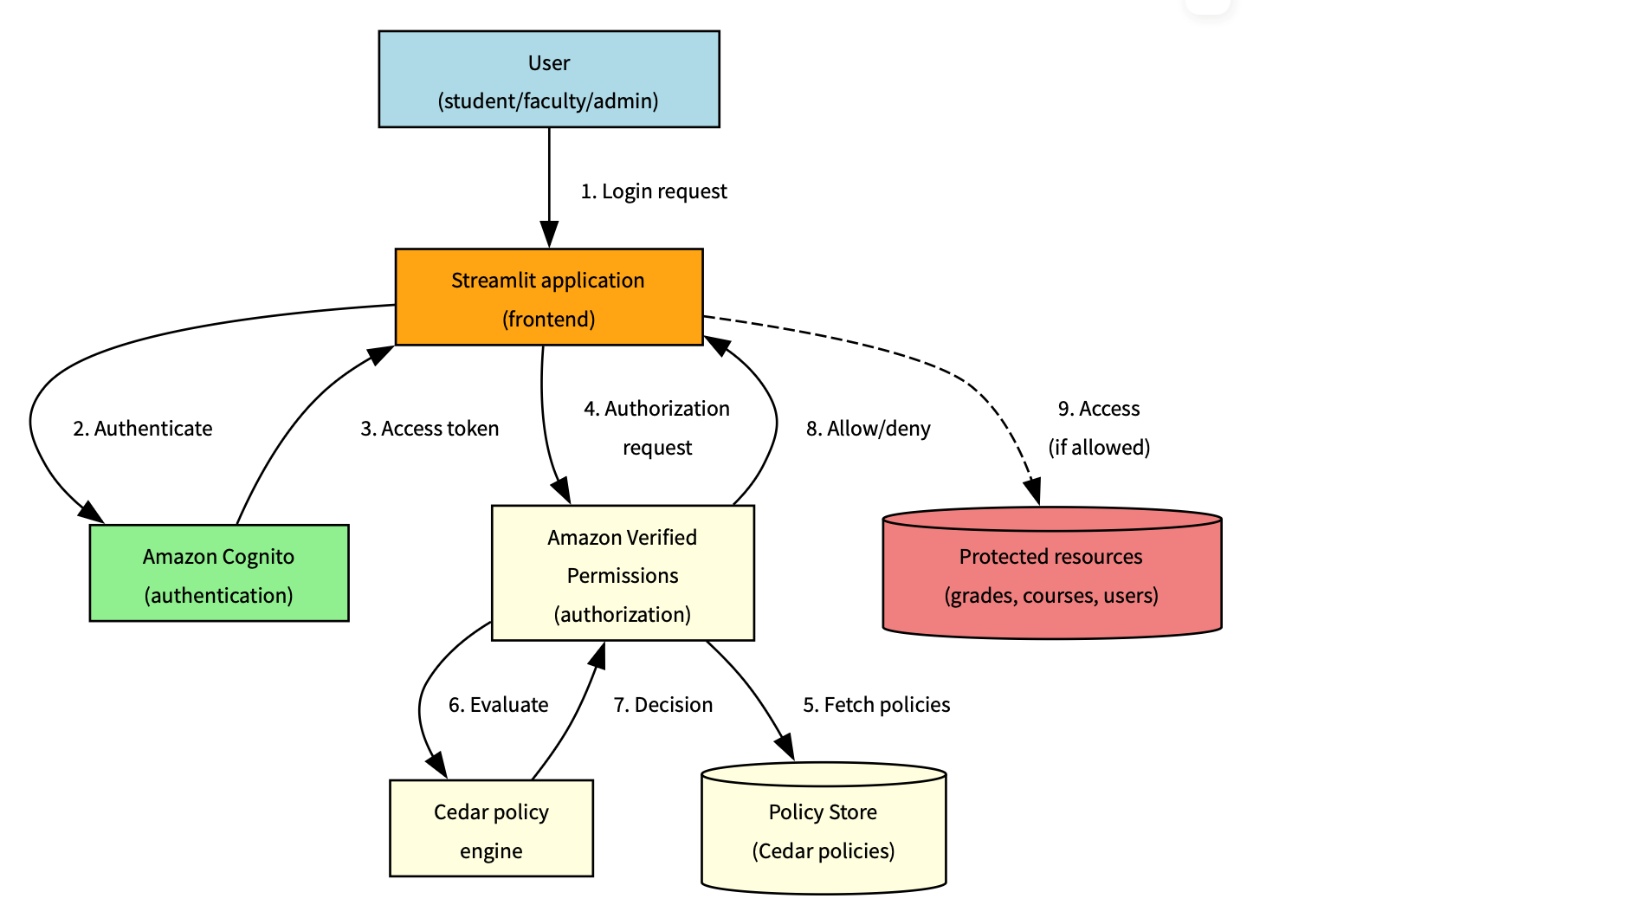
This separation of concerns enables authentication and authorization to function as complementary security controls, following defense-in-depth principles. Figure 1 illustrates the end-to-end authentication and authorization workflow, showing how a user’s sign-in request flows through Amazon Cognito for identity verification, then through Verified Permissions for Cedar policy-based access decisions, before the application enforces the result.
Figure 1: Solution architecture and workflow
The following workflow demonstrates how the three architecture layers work together: the authentication layer (steps 1–3) handles identity verification using Amazon Cognito, the authorization layer (steps 4–6) evaluates Cedar policies using Verified Permissions, and the application layer (steps 7–8) enforces the decision in Streamlit.
The user sends a sign-in request, which is submitted through Streamlit
The request is authenticated by Amazon Cognito
An access token is sent back to Streamlit
An authorization request is sent to Verified Permissions
The Cedar policy engine evaluates the request
A decision is sent back by the policy engine
The instruction to allow or deny is sent back to Streamlit
If the instruction is to allow, access is provided
Understanding authorization with Cedar
While authentication establishes user identity, authorization determines what actions users can perform. Verified Permissions provides a scalable authorization service based on Cedar, a policy language specifically designed for fine-grained access control.
Cedar policies follow a structured format that defines who can perform which actions on what resources. Let’s examine the anatomy of a Cedar policy:
permit(
    principal == ?principal,
    action == application::Action::"ViewGrade",
    resource == ?resource
) when {
    principal has role == "Student" &&
    resource.student == principal.entityId
};
Policy components
Effect: permitor forbid determines whether the policy allows or denies access
Principal: The entity (user) making the request, represented by ?principal as a variable
Action: The operation being performed, scoped to your application namespace
Resource: The target of the action, also represented as a variable
Conditions: The when clause contains logical expressions that must evaluate to true
Advanced Cedar policy patterns
This section describes commonly used Cedar policy patterns for implementing fine-grained authorization with Amazon Verified Permissions. The examples illustrate how to model ownership, role-based access, hierarchical permissions, and administrative controls in real-world applications
Resource ownership control
This pattern helps ensure that users can only access resources they own:
permit(
    principal == ?principal,
    action == application::Action::"ViewGrade",
    resource == ?resource
) when {
    principal has role == "Student" &&
    resource.student == principal.entityId
};
What it does – This policy allows students to view only their own grades by:
Checking that the user has the Student role
Verifying that the grade resource’s student attribute matches the student’s entityId
Preventing students from accessing other students’ grades while allowing access to their own academic performance
Role-based access with resource type
This pattern grants access based on role and resource type:
permit(
    principal == ?principal,
    action == application::Action::"EditCourse",
    resource == ?resource
) when {
    principal has role == "Faculty" &&
    resource has resourceType == "Course" &&
    resource.instructor == principal.entityId
};
What it does – This policy allows faculty members to edit courses they teach by:
Verifying the user has the Faculty role
Confirming the resource is of type Course
Verifying that the course’s instructor attribute matches the faculty member’s entityId
Restricting faculty to modify only their own courses, not courses taught by other instructors
Hierarchical authorization
This pattern allows department heads to manage faculty in their department:
permit(
    principal == ?principal,
    action == application::Action::"ManageFaculty",
    resource == ?resource
) when {
    principal has role == "DepartmentHead" &&
    resource has role == "Faculty" &&
    resource.department == principal.department
};
What it does – This policy implements departmental hierarchy controls by:
Requiring the user to be a DepartmentHead
Verifying the resource is a faculty member
Matching the faculty member’s department with the department head’s department
Preventing department heads from managing faculty in other departments
Administrative override
This pattern provides emergency access with proper justification:
permit(
    principal == ?principal,
    action == ?action,
    resource == ?resource
) when {
    principal has role == "Administrator" &&
    context has emergencyAccess == true &&
    context has justification
};
What it does – This policy provides emergency access capabilities by:
Allowing administrators to perform any action on any resource
Requiring an emergency access flag to be set to true
Requiring a justification for emergency access
Supporting accountability through required documentation while enabling emergency operations
Cedar policy evaluation flow
Understanding how policies are evaluated helps design effective authorization systems. Figure 2 shows a common evaluation pattern for an academic scenario
Note: A policy match evaluates to the policy’s effect (permit or forbid). Forbid policies take precedence: if any forbid policy matches, access is denied regardless of permit policies.
Figure 2: Policy evaluation process
The policy evaluation process follows these steps:
User attempts to access a protected resource
Application sends an authorization request to Verified Permissions
Verified Permissions retrieves applicable Cedar policies from the policy store
The Cedar policy engine evaluates each policy against the request
If any forbid policy matches, access is denied immediately
If any permit policy matches and no forbid policies match, access is allowed
If no policies match, access is denied by default
The evaluation result (ALLOW or DENY) is returned to the application
Application enforces the authorization decision
Cedar policy language
Cedar is an Amazon open source policy language designed for fine-grained authorization. Every policy defines who (principal) can perform what action on which resource under what conditions, as shown in Figure 3.
Figure 3: Cedar policy definitions
Policy interaction
The following table shows how different policies interact in complex scenarios where multiple policies could apply:
Scenario
Student policy
Faculty policy
Department head policy
Admin policy
Student accessing own grade
Permit
N/A
N/A
Override
Faculty editing course
N/A
Permit
N/A
Override
Department head managing faculty
N/A
N/A
Permit
Override
Emergency admin access
N/A
N/A
N/A
Permit
Legend:
Permit – Policy allows access
N/A – Policy doesn’t apply
Override – Emergency admin access
The preceding table shows how each role’s policy applies to different scenarios, with admin access having override capabilities across most situations except for emergency admin access where it’s the primary permit authority. The Override column specifically indicates that the administrator’s emergency access policy can supersede other role-specific policies, but only when the emergencyAccess context flag is explicitly set and a justification is provided. This is not an automatic override.
Policy optimization tips:
Order conditions by likelihood of success – Place the most frequently true conditions first in your when clause to enable short-circuit evaluation. For example, check role before resource ownership, because role mismatches are caught earlier. See Cedar best practices.
Use indexed attributes for faster lookups – Use entity attributes that Verified Permissions indexes natively (entityId, role, resource type) as primary conditions. Best practices for designing an authorization model
Cache policy evaluations when appropriate
Monitor evaluation metrics and performance
Real-world application: Academic system
Consider an academic system with different user roles and their corresponding permissions:
Student: View own grades
Policy helps ensure students can only access grade resources where they are listed as the student
The policy verifies the student’s role and matches the resource owner to the principal’s entity ID
Faculty: Edit course content, manage grades
Policy allows faculty to edit courses they teach
Faculty can view and modify grades for students in their courses
Teaching assistant (TA): Grade management and course support
Policy permits TAs to manage grades for courses they assist with
Access is limited to specific courses assigned to the TA
Department head: Manage faculty assignments
Policy allows department heads to manage faculty in their department
Access is scoped to the department hierarchy
Administrator: System-wide access
Policy provides emergency access with proper justification
Administrative actions are logged and audited
Prerequisites
To implement the preceding Academic system application, you need an active AWS account, Python 3.8 or later, basic Streamlit knowledge, and AWS Identity and Access Management (IAM) permissions for Amazon Cognito and Verified Permissions.
./deploy-demo-environment.sh
Do you want to start the demo now? (Y/N): Y
This provisions an Amazon Cognito user pool, a Verified Permissions policy store, and any sample resources needed for the demo.
Verify the login screen:
Figure 4: Verify login credentials
Demo walkthrough and shut down: Interact with the demo and test the policies and features. When you’re ready to exit, press Ctrl+C to shut down and stop.
Define your Cedar policies: Start with basic policies and gradually add complexity as you understand the evaluation model.
Implement authentication: Integrate Amazon Cognito authentication into your application with proper error handling.
Add authorization checks: Implement authorization checks at critical access points in your application. For authentication, implement proper error handling for expired tokens, failed MFA challenges, and account lockouts. Use the Amazon Cognito built-in token refresh flow. For authorization, place Verified Permissions checks at every API endpoint and UI component that accesses protected resources.
Test thoroughly: Create test scenarios for each user role and permission combination.
When implementing this architecture, follow these best practices to support security:
Layer your security controls: Use both authentication and authorization as complementary controls rather than relying on a single mechanism.
Follow least privilege principles: Grant only the permissions needed for specific user roles. Start with minimal permissions and add more as needed.
Implement proper session management: Set appropriate token expiration and refresh policies. Amazon Cognito handles much of this automatically, but you should configure timeouts based on your security requirements.
Validate all inputs: Sanitize user inputs to prevent injection attacks. Don’t rely on client-side validation alone.
Monitor authentication events: Set up logging and alerts for suspicious activities such as repeated failed login attempts or unusual access patterns.
Conduct regular security reviews: Periodically audit your policies and security configurations to verify they still meet your requirements and follow current best practices.
Implement secure error handling: Avoid information disclosure through error messages. Provide helpful feedback to users without revealing system details that could aid attackers.
Conclusion
Implementing proper authentication and authorization is critical for application security. By using Amazon Cognito and Amazon Verified Permissions, you can build robust security controls without complex custom code. Through this approach, you can implement enterprise-grade authentication with minimal effort, define and enforce fine-grained authorization policies, scale your security controls as your application grows, and centrally manage and audit security policies.
To get started with your implementation, create your AWS resources including an Amazon Cognito user pool and Verified Permissions policy store. Define your Cedar policies based on your application’s access requirements. Integrate authentication and authorization checks into your application flow. Test thoroughly with different user roles and access scenarios. Finally, monitor and refine your security controls based on usage patterns.
Have you ever tried to tally up how much you spend on subscriptions each month? Music, movies, gaming, language courses, delivery services, heated seats, and even the ability to chat with the Grok bot directly from your car — there’s a subscription for just about everything now. There’s even a subscription service specifically designed to… track your other subscriptions.
The number of subscriptions varies significantly depending on where you live, but statistically, 78% of adults worldwide have at least one paid subscription, with the average user juggling 5.6 active services. Furthermore, a large portion of these are family plans used by groups of close relatives… and sometimes other people: 37% of users share their subscriptions outside their immediate family.
Because subscription accounts, especially family plans, often contain sensitive personal data, they’ve become a prime target for cybercriminals. Today we look at how to manage your subscriptions securely, avoid having your accounts compromised, and keep from falling for scammers’ latest tricks.
Security of shared accounts and subscriptions
Why would anyone want to hack your subscription? Even if the service only offers entertainment, your account almost certainly contains sensitive information: your name, address, email, phone number, the names of other members, and other personally identifiable information. This data is then sold on the dark web and used for further attacks.
Attackers compromise subscription accounts either through social engineering and phishing, or by taking advantage of many users’ reliance on weak or leaked passwords. As we recently highlighted in our research, nearly half of all passwords worldwide can be cracked in less than a minute. Scammers then either resell existing subscriptions or slots in a family group at a discount, or they sign the victim up for new services, hoping the extra charges go unnoticed.
Finally, some middlemen don’t bother with hacking at all; they simply buy bulk subscriptions for a large number of devices, where the per-unit cost is typically much lower. They then resell individual slots in these plans on online marketplaces. As a result, a single “family” account can end up filled with people who are complete strangers to one another.
Sharing subscriptions with family and others
Many subscription owners think nothing of sharing access with family and friends. What could possibly go wrong?
The worst-case scenario from a security standpoint is when a single account is purchased and the owner shares the login and password with other users. This usually happens when people try to save money on a family plan by buying an individual subscription and sharing it. Some services even allow for different profiles, but they are all tied to a single account, meaning the credentials are shared. This is how streaming platforms like Hulu and Disney+ operate.
Sharing one account among multiple people significantly increases the risk of your credentials falling into the wrong hands. There’s no way to guarantee that everyone else is storing those details securely or that their devices aren’t infected with malware. Even without malware, it’s incredibly easy to accidentally hand over a password to attackers simply by signing in to the subscription service over unprotected public Wi-Fi.
It’s entirely possible that the password you kindly shared with some friends has already surfaced in some corner of the dark web, and you may soon lose access to your account. Furthermore, if you reuse the same password across different sites and apps, your other accounts are now in the crosshairs as well.
The second scenario is when each group member has an individual account. Many services now allow you to add extra users to a subscription at no additional cost, and most owners are happy to give away these free slots. Even then, you shouldn’t let your guard down: a breach of just one of these accounts can still leak sensitive information, such as family members’ names, addresses, billing info, and other subscription-related data.
How to protect your subscriptions (and your wallet)
To keep your and your loved ones’ personal data private and your accounts under your control, follow these simple rules.
Use strong account security
To do this, learn — and teach your friends and family — how to use password managers, two-factor authentication, or passkeys.
If you and your loved ones rely on memory to store passwords, there’s a high probability that you’re reusing the same one across multiple services. This is a major blunder: data breaches happen all the time, and a single compromised password gives attackers access to your other accounts.
The simplest solution is to use a password manager that generates and remembers complex, unique passwords for every site and service on your behalf. All you have to do is remember the single main password for its encrypted vault. Additionally, Kaspersky Password Manager doesn’t just store and create passwords; it can also check if they’ve appeared in leaked databases, and sync your credentials across all your devices.
Additionally, a password manager provides a robust defense against phishing: unlike a human, who can easily be misled by a sign-in form that looks almost identical to the real thing and is hosted on a look-alike domain, a password manager won’t fall for the trick. It’ll only offer to autofill your saved login and password on the specific site or service for which they were originally stored.
Two-factor authentication (2FA) is an extra layer of verification the system requests after you enter your password — such as an SMS code or a one-time code from an authenticator app. Whenever technically possible, be sure to enable 2FA on every account linked to a subscription. This applies to the subscription services themselves, as well as any third-party accounts you use to sign in, such as Google, Apple, or Facebook.
We recommend storing your two-factor authentication tokens and generating the one-time codes — which refresh every 30 seconds — inside Kaspersky Password Manager. This significantly lowers the chances of someone hijacking your account. Even if an attacker somehow discovers or guesses your password, they won’t be able to get the code without physical access to your device.
Finally, you can ditch passwords (almost) entirely by switching to passkeys. We’ve previously covered what this password alternative looks like and the specifics of using it. Currently, this is the most breach-resistant authentication system out there. Its main drawback has been the difficulty of syncing passkeys across different ecosystems, like Windows and iOS, but the updated version of Kaspersky Password Manager can now save and sync passkeys across Windows, macOS, iOS, and Android devices, making that issue a thing of the past.
Don’t overlook device security
Even a complex password and 2FA aren’t reasons to let your guard down. An attacker can infect your device with an infostealer: malware designed to swipe things like session cookies from your browser, app configuration files, and other sensitive data. Session cookies allow you to stay signed in without re-entering your credentials every time; however, if scammers get their hands on them, they can sign in to the service as you — even without knowing your username or password. This makes a proactive approach essential, especially if you use Chrome, Edge, Opera, or other Chromium-based browsers on Windows. We recommend installing Kaspersky Premium on all your devices; it includes Kaspersky Password Manager in addition to comprehensive protection against cyberthreats.
Only share subscriptions with people you trust
Otherwise, you might be asking for trouble. For example, if you share a Steam subscription with a friend who cheats, both of your accounts could end up banned. Furthermore, never try to let someone else into your personal account or individual subscription. Sharing your password with others is usually a violation of the terms of service, and can result in your account being blocked.
Make sure there are no strangers in your family group
To do this, periodically check active devices and sessions in your subscription settings. If you see an unrecognized device in the authorized list, terminate that session — or all of them — and change your account password immediately. Signing back in on a few devices is much easier than trying to recover a hijacked account.
And remember: don’t let your own habits compromise your security. If you’re visiting friends, on vacation, or on a business trip and use a local computer or smart TV — or if you sign in to your account from a public computer — don’t forget to sign out when you’re done. Otherwise, the next person to use that device might find themselves with free subscriptions or, even worse, access to your email or cloud photo stream.
Don’t take the bait
Watch out for phishing emails and messages spoofing legitimate services. If you receive a notification about a “need to update your billing details”, or a claim that a “new user has been added” to your family plan, don’t rush to click any links or open attachments. Links can lead to a phishing page, and attachments may hide malware. Scammers often use email addresses and domains that look nearly identical to the real ones — for instance, by swapping l (lowercase L) for I (uppercase i), or using a familiar name in a different domain zone.
Unfortunately, phishing pages are often indistinguishable from the originals now that AI is being used for high-quality design and layout. Since spotting every red flag yourself is increasingly difficult, it’s best to delegate anti-phishing protection to Kaspersky Premium. It will alert you to suspicious sites, saving your money and keeping your peace of mind.
Lastly, some scammers lure users in with freebies like fake gift subscriptions for Telegram Premium. The victim is asked to visit a phishing page mimicking the Telegram login screen and sign in to their account to claim the gift. The result isn’t hard to guess: instead of a premium subscription — a hijacked account. Recently, scammers have even learned to use mini-apps to steal credentials directly inside Telegram under various pretexts — ranging from gift giveaways to claims that you must move to a new chat because the old one was blocked.
Avoid buying subscriptions from third-party sellers
You can often find subscription offers on marketplaces and retail platforms at prices significantly lower than what the official provider charges. More likely than not, that tempting price hides a hacked account or a family group that you could be kicked out of at any moment, because the family admin is either the seller or a random user. Furthermore, sharing a family plan with strangers from around the world is a violation of terms for many services.
How to get rid of unwanted subscriptions
Now that we’ve covered subscription security, what about those extra subscriptions that quietly eat away at your balance every month? Research shows that users typically underestimate how many active subscriptions they have and how much they spend on them; they also frequently forget to cancel auto-renewals for subscriptions they no longer use, or auto-charges after the trial period ends.
If you suspect you’re in that boat, start your investigation with your own bank statements. Recurring charges for the same amount can be a subscription you’ve forgotten about. Check who received the payment; if the name doesn’t ring a bell, do an online search on the company. It’s also worth searching your email box for the merchant name or the payment amount; this can help you track down subscription notifications and figure out what exactly you’re paying for. And don’t forget to check your spam folder, as that’s where subscription alerts often end up.
Now, let’s look at how to check and cancel active subscriptions purchased through the App Store and Google Play.
For Android users
Open Settings on your device.
Tap Google, then tap your profile picture, and go to Google Account.
Go to Wallet & subscriptions.
If you’re the family group manager, you’ll be able to see the purchase history for other family members.
For iOS users
Open Settings on your device.
Tap your profile picture at the top of the menu.
Go to Subscriptions.
Note: to manage your iCloud subscription, you’ll need to go to the specific iCloud section located just below Subscriptions. In the Family Sharing section, if you’re the one who set it up, you can view the subscription and purchase history for all family members.
Every year, hundreds of millions of real user passwords leak onto the dark web. We analyzed 231 million unique passwords from dark-web leaks between 2023 and 2026, and the conclusions are bleak: the vast majority are extremely weak. To crack 60% of these passwords, a hacker needs only an hour and a few dollars in their pocket. Furthermore, password cracking is accelerating by the year; in our similar 2024 study, the percentage of vulnerable passwords was lower.
Today we’re looking at just how reliable the average password is (spoiler: not really), and how you can secure your data and accounts using more robust methods. At the same time, we’ll highlight the patterns most commonly found in actual user passwords.
These days, passwords are almost never stored in plain text. For instance, if you create an account with the password “Password123!”, the server won’t store it as-is. Instead, the password is hashed using specific algorithms, turning it into a fixed-length string of letters and numbers (a hash) which is what actually stays on the server. For example, here’s what the MD5 hash for “Password123!” looks like:
2c103f2c4ed1e59c0b4e2e01821770fa.
Every time the user enters their password, it’s converted into a hash and compared against the one stored on the server; if the hashes match, the password is correct. If an attacker gets their hands on this hash, they have to decrypt it to recover the original password — this is what’s known as “password cracking”. This is typically done using owned or rented GPUs, and several methods can be employed for the crack:
Exhaustive enumeration (brute force). The computer tries every possible combination of characters, calculating the hash for each one. This method is the easiest way to crack short passwords, or those consisting of a single character set (such as digits only).
Rainbow tables. A total nightmare for anyone with a simple password, this is essentially a “phone book” for passwords whose hashes have already been cracked via brute force or smart algorithms. All an attacker has to do is find a matching hash and see which password corresponds to it.
Smart cracking. These algorithms are trained on databases of leaked passwords. They understand the frequency of different character combinations, and run their checks from the most likely to the least popular sequences. They account for dictionary words, character substitutions (a → @ or s → $), and consider common password structures like “dictionary word + number + special character”, while checking hashes against rainbow tables. Combining these methods significantly accelerates the cracking process.
Beyond that, attackers can also intercept passwords in plain text. There are numerous ways to do this, ranging from phishing (where a victim is lured to a fake web page and enters their password voluntarily) and keyloggers that capture keystrokes, to stealers or Trojans that swipe documents, cookies, clipboard data, and more. Unfortunately, many users keep their passwords as plain text in notes, messaging apps, and documents, or save them in browsers where attackers can extract them in seconds.
Every year, we track around a hundred million plain-text password leaks. We use these databases to warn Kaspersky Password Manager users if their data has been compromised. To address the most frequent question we get on this: no, we don’t know our users’ passwords. We’ve explained in non-techie language exactly how we compare your passwords to leaked ones without actually knowing them — and why neither your passwords stored in Kaspersky Password Managernor even their hashes ever leave your device — in our overviews of our leak analysis technology and our password manager’s internal architecture. Give them a read; you’ll be surprised by just how elegant the design is.
60% of passwords are cracked in under an hour
We expanded the database from our previous study by an additional 38 million real passwords posted by attackers on dark-web forums and compared the results. Testing was conducted using a single RTX 5090 GPU for passwords hashed with the MD5 algorithm. The data for the analysis was obtained from our Digital Footprint Intelligence service. You can review the algorithm we used to assess password strength in our article on Securelist.
Unfortunately, passwords remain as weak as ever, while cracking them becomes faster and easier with every year. Today, 60% of passwords can be cracked in less than an hour; two years ago, that figure was 59%. But the truly frightening part is something else: nearly half of all passwords (48%) are cracked in less than a minute!
Cracking time
Percentage of passwords crackable within this time in 2024
Percentage of passwords crackable within this time today
Less than a minute
45%
48%
Less than an hour
59% (+14%)
60% (+12%)
Less than 24 hours
67% (+8%)
68% (+8%)
Less than a month
73% (+6%)
74% (+6%)
Less than a year
77% (+4%)
77% (+3%)
More than a year
23%
23%
Password cracking time: two years ago and today
Attackers owe this boost in speed to graphics processors, which grow more powerful every year. While an RTX 4090 in 2024 could brute-force MD5 hashes at a rate of 164 gigahashes (billion hashes) per second, the new RTX 5090 has increased that speed by 34% — reaching 220 gigahashes per second.
And although a high-end video card like that currently retails for several thousand dollars, the price tag isn’t much of a barrier: there are plenty of cheap cloud services available for renting GPU computing power. Depending on the configuration and the model, rental costs range from a few cents to a few dollars per hour. As we’ve seen, one hour is all an attacker needs to crack three out of every five passwords they’ve found in a leak. Plus, depending on the scale of the task, they can always rent ten or even a hundred GPUs instead of just one…
It’s worth noting that cracking every password in a dataset doesn’t take much longer than cracking a single one. During each iteration, once the attacker calculates a hash for a specific character combination, they check if that same hash exists anywhere in the dataset — and the larger the dataset, the easier it is to find a match. If a match is found, the corresponding password is flagged as “cracked”, and the algorithm moves along to the next one.
Which passwords are vulnerable?
The strength of any password depends on its length, content variety, and the randomness of that content. Passwords created by humans turn out to be the least resilient — unfortunately, humans are quite predictable. We use dictionary words and character combinations that smart algorithms have long since mastered, we avoid long random strings, and patterns can be found even in keystrokes we believe are random. Interestingly enough, passwords generated by AI still carry the fingerprints of a human approach; we covered this in a separate post on how to create a strong yet memorable password.
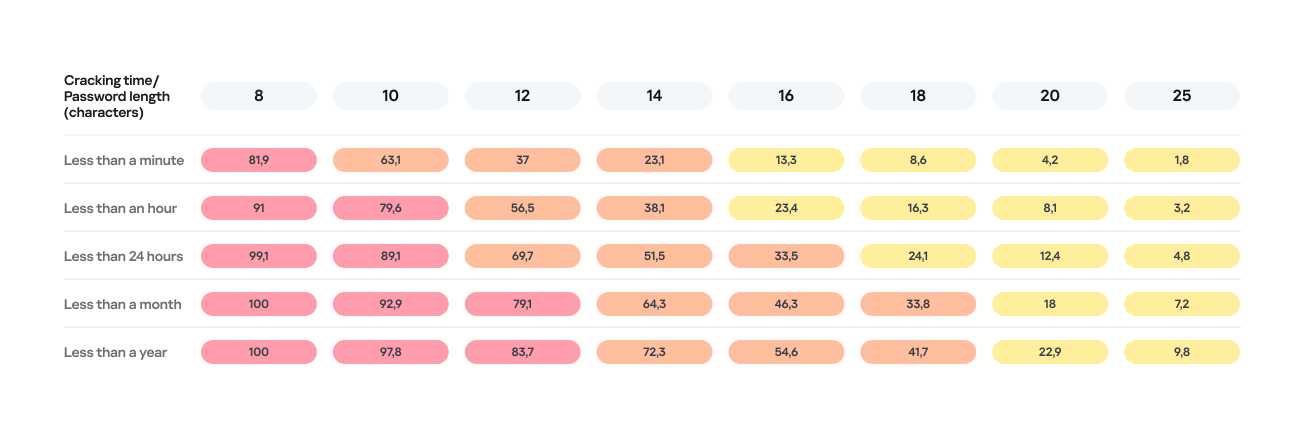
Password length is the primary factor affecting cracking time. As you can see from the table below, it takes less than 24 hours to crack almost any eight-character password.
Percentage of varying password lengths crackable within a given timeframe
But the predictability of your password is just as important. Think you’re boosting security by adding a number or a special character to a memorable word? You are, but only slightly. The patterns people use to create passwords are easily predictable and, at times, pretty amusing — though this is no laughing matter.
What we learned about password patterns
Analysis of over 200 million passwords revealed characteristic patterns that allow smart algorithms to crack user passwords with ease.
Pick a number
More than half of all passwords (53%) end with one or more digits, while nearly one in six (17%) starts with a number. Every eighth password (12%) contains sequences that look a lot like years — ranging from 1950 to 2030 — and one in ten (10%) specifically falls between 1990 and 2026. This most likely happens because folks add their birth year (or that of someone close), some other significant year, or the year they created the password or account. Fun fact: based on the distribution of these dates, it suggests that the most active internet users were born between 2000 and 2012.
However, among all numeric combinations, the most popular turned out to be… you guessed it: “1234”. Overall, patterns involving sequential keyboard presses (“qwerty, ,”ytrewq”, and the like) appear in 3% of passwords.
Special characters aren’t a silver bullet
Most password policies in recent years require at least one special character. The absolute winner in this category is the @ symbol: it appears in one out of every 10 passwords. The period (.) comes in second, followed by the exclamation point (!) in third.
Love rules the world… and Skibidi Toilet does too
Emotionally charged words often form the foundation of a password, and despite everything, positive words are more common. Frequently occurring examples include “love”, “angel”, “team”, “mate”, “life”, and “star”. That said, negativity pops up too — mostly in the form of common English swear words.
Interestingly, viral memes are reflected in passwords as well. Between 2023 and 2026, the use of the word Skibidi in passwords skyrocketed 36-fold! Naturally (see the link if it doesn’t seem natural), “toilet” saw a boost too, though to a lesser extent.
Users tend to keep their passwords unchanged for years
More than half of the passwords (54%) we identified in recent leaks have surfaced before. Part of this can be explained by the same data migrating from one dataset to another. However, there’s a much more troubling reason too: many users simply haven’t changed their passwords in years.
Analyzing the dates found within passwords shows that combinations containing the years from 2020 through 2024 remain popular. It seems people add the current year to their password when they create it — and then forget about it for several years. This actually allows us to calculate the average lifespan of a password: about three to five years.
This is a dangerous trend. For one, smart algorithms can crack much more complex passwords over that kind of timeframe. Secondly, the longer your password remains unchanged, the higher the probability it will leak — whether through a breach, malware infection, or a phishing attack.
The situation gets even worse when the same password is used across multiple accounts. In this case, attackers don’t even need to crack anything; they just need to find your password in a single leak and plug it into other sites.
How to protect your passwords and accounts
If you’ve realized while reading this post that your own passwords are among those easily crackable — don’t panic. We’ve put together a list of simple but essential tips for you.
Use a password manager
The weakest passwords are the ones people come up with themselves. Creating and memorizing hundreds of sequences of 16–20 random characters (since every site requires a unique, long password) is a daunting, unrealistic task.
That’s why you should delegate password generation and storage to our password manager. It doesn’t just create and store complex, randomized passwords in an encrypted format; it also syncs them across all your devices. To decrypt your vault, you only need to remember one main password that no one knows but you — our guide on mnemonic passwords can help you with that.
Don’t store passwords as plain text
Whatever you do, never write down passwords in files, messages, or documents. They lack the robust encryption provided by a password manager. Furthermore, these kinds of notes fall into the hands of attackers instantly if you happen to pick up a Trojan or an infostealer.
Don’t store passwords in your browser
Many users save their passwords in their browsers — especially since they conveniently offer to do it automatically. Unfortunately, research shows that malware has evolved to extract these passwords from all popular browsers almost instantly. Kaspersky Password Manager can help you import saved passwords from your favorite browser — just follow our simple, three-step guide. Most importantly, don’t forget to clear the browser’s password storage once the import is complete.
Switch to passkeys
Wherever possible, use passkeys — a cryptographic replacement for passwords. In this setup, the service stores a public key, while the private key remains on your device and is never transmitted. During login, the device simply signs a one-time request. Additionally, passkeys are tied to a specific domain, meaning phishing attacks using spoofed addresses won’t work. Kaspersky Password Manager allows you to store both passwords and passkeys, solving the problem of syncing them across different ecosystems, including Windows, Android, macOS, and iOS.
Set up two-factor authentication
Enable two-factor authentication wherever possible. Even if your password is compromised, a properly configured 2FA setup makes it extremely difficult for the attacker to access your account. For maximum security, skip the one-time codes sent via SMS and use authenticator apps instead — and yes, Kaspersky Password Manager comes in handy here, too.
Practice good digital hygiene
Remember, storing your passwords correctly is only half the battle. It’s crucial to follow the rules of digital hygiene: avoid downloading unverified files, pirated software, cheats, or cracks, and don’t click on random links. The number of infostealer attacks has been steadily rising in recent years, which means you need a robust security solution for full protection. We recommend Kaspersky Premium — it protects all your devices from Trojans, phishing, and other threats. Besides, the subscription includes our password manager.
For those serious about account security, check out our collection of posts on passwords, passkeys, and two-factor authentication:
The smart-home craze has connected everything — from your lightbulbs to your tea kettle — to the internet, and the adult industry isn’t sitting this one out: manufacturers are releasing more smart models than ever. While syncing a sex toy to your smartphone unlocks some cool extra features, it also opens the door to potential security and privacy headaches. The good news? You can significantly lower most of these risks just by tweaking your settings and adjusting your usage habits.
How sex-toy apps actually work
To be clear upfront, while researchers have successfully hijacked sex toys in controlled experiments, the odds of a hacker remotely taking over your vibrator in the real world are pretty slim. In this post, we focus on the more realistic risks: your privacy and the safety of your data.
Most modern adult toys link up with the manufacturer’s app. These apps offer a range of usage options: you can control the device yourself, or hand over the remote to a partner — anywhere in the world via the internet.
Beyond just basic controls, many of these apps have social features: private messaging, group chats, calls, and even video sessions. In fact, you don’t even need a physical device to use some of them; you just create an account. Because of this, some of these services have essentially evolved into niche dating platforms.
The toy and your phone talk to each other via Bluetooth — with minimal risks. To handle social features or remote control, the app connects to a cloud server. This creates a constant stream of data moving back and forth: everything from commands to private messages.
Here’s the catch: even if you only use the app to control your toy locally via Bluetooth, you still get connected to that cloud server. That means you’re inheriting all the security and privacy risks.
The main risks of using sex-toy apps
Sex-toy apps are typically free. In practice, this means the primary way these services make money is by collecting data — which is often excessive. It’s not hard to find buyers of this information; it could be ad services, data brokers, or other companies interested in building detailed user profiles.
Developers of intimate apps suffer from frequent data breaches, and in this sense they’re no different from many other online services that spring a leak regularly. However, unlike a breach at an online pet food store, a data leak from a sex toy app can have much more serious consequences for the user. For sex industry workers, such as those who use webcams, these data breaches pose a direct threat to their physical safety.
Vulnerabilities within the service’s infrastructure warrant special attention. These types of bugs can be exploited by hackers to gain unauthorized access to other people’s accounts.
The inclusion of broad social features essentially turns sex-toy apps into just another messaging platform. However, while we usually know if mainstream messengers use end-to-end encryption, or what vulnerabilities they face, every sex-toy app has to be evaluated individually.
Without end-to-end encryption, user chats may be accessible on the server side. This means that if the service is compromised, the contents of those messages could end up in the hands of hackers. Furthermore, the sex toy manufacturer itself, or its individual employees, could have access to your chats.
Finally, the user’s account and everything in it can be hijacked by bad actors if it isn’t protected by a strong password and, ideally, two-factor authentication.
How to lower the risks when using sex-toy apps
Now that we’ve covered the threats, let’s talk about how to defend yourself. The most obvious choice is to skip installing the app altogether. Thankfully, most sex toys still come with physical buttons — unlike, say, smart mattresses, which often require an app just to function. For those who want the extra features, here are some practical tips for setting up and using these services.
Create an account with a dedicated email address
Set up a separate email address just for registering your account in the intimate app. This should be a “clean” email with no links to any other online services you use. Naturally, the username for this email account shouldn’t include your real name or any other easily identifiable info.
Using an anonymous email protects your reputation if the app suffers a data breach. The risk of this happening is far from theoretical. For instance, back in 2015, a hacking group named The Impact Team leaked the user database of Ashley Madison, a dating site for people seeking extramarital affairs.
To create an anonymous email, pick a service that doesn’t require a phone number at all, or lets you skip that step. Besides your real name, we also recommend leaving out your birth date, your usual social media handles, and any other details that could lead back to you.
Don’t sign up via Google, Apple, social media, or your phone number
The reasoning here is basically the same as the previous point. However, it’s worth highlighting that signing up through Google, Apple, social media, or your phone number is actually just about the worst way to go.
Using Google or social media accounts gives the app permission to, among other things, access certain data from those profiles. In the context of intimate apps, this is especially risky because it creates a direct link between highly sensitive data and your real-world identity.
Keep your real info out of your profile
Once you’re in the app, don’t use any information that could be traced back to you. Come up with an anonymous handle (if you’re feeling uninspired, use a random nickname generator), pick a fake birthday, and choose a random location.
Using fictional info means you don’t have to sweat being outed if the service ever leaks your data. You’re also protecting yourself from stalking, blackmail, and other threats that come with someone being able to pin your real identity to your account.
Hide your face and distinguishing marks when sharing private media
As we’ve mentioned throughout this post, these apps often include social features used for swapping intimate photos and videos. Even if you trust the person you’re chatting with, those files can be saved, forwarded, or used without your consent. When combined with other account info, they can make it easy to figure out who you are.
We recommend never sending intimate media that shows your face or anything else that identifies you — think recognizable home decor, personal items, documents, unique clothing, tattoos, or jewelry.
Set a strong password and enable two-factor authentication, if available
If a hacker breaks into your sex toy account, they’re getting access to your most private data. Because of that, your account needs a rock-solid password. Just to be clear, here’s what we mean by a strong password:
It’s at least 16 characters long.
It uses a mix of uppercase and lowercase letters, numbers, and special characters (like $ or @).
It’s not a real word or a well-known phrase.
It’s unique and not reused for any of your other accounts.
It doesn’t include personal info that’s easy for an outsider to find.
We also recommend turning on two-factor authentication (2FA) if the service offers it. Your best bet is to use 2FA one-time codes from an authenticator app, as it’s the most secure and completely anonymous option. You can dive deeper into creating and storing secure passwords, as well as different 2FA methods, in our dedicated blogposts.
Grant only the necessary app permissions
Every mobile app asks for permission to access certain features of your phone like Bluetooth, location, your camera, or your storage. Every extra “yes” you give expands the amount of data the app can scoop up.
We suggest being extra cautious about what you let these services see, especially when it comes to sex-toy apps. By tightening these permissions, you cut down on the amount of info that can be collected or shared without your say-so.
Take a second to think about the absolute bare minimum you’re willing to allow a sex-toy app to access. For example, there’s usually no reason for it to track your location or access your camera and mic. If you do want to upload photos, it’s better to grant access only to specific files rather than giving the app the keys to your entire photo library.
Stop apps from tracking your activity
In your iOS settings, you can block apps from collecting data about what you do and linking it to a single advertising ID. This practice, known as tracking, allows companies to stitch together data from different apps, websites, and services to build a comprehensive profile of you for targeted ads or behavioral analysis.
We strongly recommend disabling tracking for all sex-toy apps so that sensitive details about your private life don’t end up as part of your advertising profile.
Unfortunately, Android doesn’t have an exact equivalent for this setting. To minimize data collection on those devices, you’ll need to turn off ad personalization, and manually delete or reset your advertising ID every now and then. You can find more tips on dodging ad tracking in our dedicated guide.
Keep your apps and operating system up to date
Updates aren’t just about shiny new features; they also fix security bugs. Outdated versions of apps and operating systems often have vulnerabilities that hackers are just waiting to exploit.
Staying on top of your updates helps close these gaps, and lowers the risk of data breaches or unauthorized access. To make sure you don’t miss any critical fixes, it’s best to turn on automatic updates whenever possible.
Security is in your hands
Smart sex-toys and their companion apps naturally handle sensitive data, which means they require extra care when it comes to setup and daily use. That said, you can eliminate — or at least significantly reduce — most risks by following basic security rules. Essentially, it comes down to sharing as little personal info as possible with the app and, of course, using a rock-solid password.
Want more tips on keeping your intimate life private in the digital age? Check out these posts:
At the NDSS Symposium 2026 in San Diego in February, a group of respected researchers presented a study unveiling the AirSnitch attack, which bypasses the Wi-Fi client isolation feature — also commonly known as guest network or device isolation. This attack allows connecting to a single wireless network via an access point, and then gaining access to other connected devices, including those using entirely different service set identifiers (SSIDs) on that same hardware. Targeted devices could easily be running on wireless subnets protected by WPA2 or WPA3 protocols. The attack doesn’t actually break encryption; instead, it exploits the way access points handle group keys and packet routing.
In practical terms, this means that a guest network provides very little in the way of real security. If your guest and employee networks are running on the same physical device, AirSnitch allows a connected attacker to inject malicious traffic into neighboring SSIDs. In some cases, they can even pull off a full-blown man-in-the-middle (MitM) attack.
Wi-Fi security and the role of isolation
Wi-Fi security is constantly evolving; every time a practical attack is made against the latest generation of protection, the industry shifts toward more complex algorithms and procedures. This cycle started with the FMS attacks used to crack WEP encryption keys, and continues to this day: recent examples include the KRACK attacks on WPA2, and the FragAttacks, which impacted every security protocol version from WEP all the way through WPA3.
Attacking modern Wi-Fi networks effectively (and quietly) is no small feat. Most professionals agree that using WPA2/WPA3 with complex keys and separating networks based on their purpose is usually enough for protection. However, only specialists really know that client isolation was never actually standardized within the IEEE 802.11 protocols. Different manufacturers implement isolation in completely different ways — using Layer 2 or Layer 3 of network architecture; in other words, handling it at either the router or the Wi-Fi controller level — meaning the behavior of isolated subnets varies wildly depending on your specific access point or router model.
While marketing claims that client isolation is perfect for keeping restaurant or hotel guests from attacking one another — or ensuring corporate visitors can’t access anything but the internet — in reality, isolation often relies on people not trying to hack it. This is exactly what the AirSnitch research highlights.
Types of AirSnitch attacks
The name AirSnitch doesn’t just refer to a single vulnerability, but a whole family of architectural flaws found in Wi-Fi access points. It’s also the name of an open-source tool used to test routers for these specific weaknesses. However, security professionals need to keep in mind that there’s only a very thin line between testing and attacking.
The model for all these attacks is the same: a malicious client is connected to an access point (AP) where isolation is active. Other users — the targets — are connected to the same SSID or even different SSIDs on that same AP. This is a very realistic scenario; for example, a guest network might be open and unencrypted, or an attacker could simply get the guest Wi-Fi password by posing as a legitimate visitor.
For certain AirSnitch attacks, the attacker needs to know the victim’s MAC or IP address beforehand. Ultimately, how effective each attack is depends on the specific hardware manufacturer (more on that below).
GTK attack
After the WPA2/WPA3 handshake, the access point and the clients agree on a Group Transient Key (GTK) to handle broadcast traffic. In this scenario, the attacker wraps packets destined for a specific victim inside a broadcast traffic envelope. They then send these directly to the victim while spoofing the access point’s MAC address. This attack only allows for traffic injection, meaning the attacker won’t receive a response. However, even that is enough to deliver malicious ICMPv6 routing advertisements, or DNS and ARP messages to the client — effectively bypassing isolation. This is the most universal version of the attack working on any WPA2/WPA3 network that uses a shared GTK. That said, some enterprise-grade access points support GTK randomization for each individual client, which renders this specific method ineffective.
Broadcast packet redirection
This version of the attack doesn’t even require the attacker to authenticate at the access point first. The attacker sends packets to the AP with a broadcast destination address (FF:FF:FF:FF:FF:FF) and the ToDS flag set to 1. As a result, many access points treat this packet as legitimate broadcast traffic; they encrypt it using the GTK, and blast it out to every client on the subnet, including the victim. Just like in the previous method, traffic specifically meant for a single victim can be pre-packaged inside.
Router redirection
This attack exploits an architectural gap between Layer 2 and Layer 3 security found in some manufacturers’ hardware. The attacker sends a packet to the access point, setting the victim’s IP address as the destination at the network layer (L3). However, at the wireless layer (L2), the destination is set to the access point’s own MAC address, so the isolation filter doesn’t trip. The routing subsystem (L3) then dutifully routes the packet back out to the victim, bypassing the L2 isolation entirely. Like the previous methods, this is another transmit-only attack where the attacker can’t see the reply.
Port stealing to intercept packets
The attacker connects to the network using a spoofed version of the victim’s MAC address, and floods the network with ARP responses claiming, “this MAC address is on my port and SSID”. The target network’s router updates its MAC tables, and starts sending the victim’s traffic to this new port instead. Consequently, traffic intended for the victim ends up with the attacker — even if the victim is connected to a completely different SSID.
In a scenario where the attacker connects via an open, unencrypted network, this means traffic meant for a client on a WPA2/WPA3-secured network is actually broadcast over the open air, where not only the attacker but anyone nearby can sniff it.
Port stealing to send packets
In this version, the attacker connects directly to the victim’s Wi-Fi adapter, and bombards it with ARP requests spoofing the access point’s MAC address. As a result, the victim’s computer starts sending its outgoing traffic to the attacker instead of the network. By running both stealing attacks simultaneously, an attacker can, in several scenarios, execute a full MitM attack.
Practical consequences of AirSnitch attacks
By combining several of the techniques described above, a hacker can pull off some pretty serious moves:
Complete bidirectional traffic interception for a MitM attack. This means they can snatch and modify data moving between the victim and the access point without the victim ever knowing.
Hopping between SSIDs. An attacker sitting on a guest network can reach hosts on a locked-down corporate network if both are running off the same physical access point.
Attacks on RADIUS. Since many companies use RADIUS authentication for their corporate Wi-Fi, an attacker can spoof the access point’s MAC address to intercept initial RADIUS authentication packets. From there, they can brute-force the shared secret. Once they have that, they can spin up a rogue RADIUS server and access point to hijack data from any device that connects to it.
Exposing unencrypted data from “secure” subnets: Traffic that’s supposed to be sent to a client under the protection of WPA2/WPA3 can be retransmitted onto an open guest network, where it’s essentially broadcast for anyone to hear.
To pull off these attacks effectively, a hacker needs a device capable of simultaneous data transmission and reception with both the victim’s adapter and the access point. In a real-world scenario, this usually means a laptop with two Wi-Fi adapters running specifically configured Linux drivers. It’s worth noting that the attack isn’t exactly silent: it requires a flood of ARP packets, it can cause brief Wi-Fi glitches when it starts, and network speeds might tank to around 10Mbps. Despite these red flags, it’s still very much a practical threat in many environments.
Vulnerable devices
As part of the study, several enterprise and home access points and routers were put to the test. The list included products from Cisco, Netgear, Ubiquiti, Tenda, D-Link, TP-Link, LANCOM, and ASUS, as well as routers running popular community firmware like DD-WRT and OpenWrt. Every single device tested was vulnerable to at least some of the attacks described here. Even more concerning, the D-Link DIR-3040 and LANCOM LX-6500 were susceptible to every single variation of AirSnitch.
Interestingly, some routers were equipped with protective mechanisms that blocked the attacks, even though the underlying architectural flaws were still present. For example, the Tenda RX2 Pro automatically disconnects any client whose MAC address appears on two BSSIDs simultaneously, which effectively shuts down port stealing.
The researchers emphasize that any network administrator or IT security team serious about defense should test their own specific configurations. That’s the only way to pinpoint exactly which threats are relevant to your organization’s setup.
How to protect your corporate network from AirSnitch
The threat is most immediate for organizations running guest and corporate Wi-Fi networks on the same access points without additional VLAN segmentation. There are also significant risks for companies using RADIUS with outdated settings or weak shared secrets for wireless authentication.
The bottom line is that we need to stop viewing client isolation on an access point as a real security measure, and start seeing it as just a convenience feature. Real security needs to be handled differently:
Segment the network using VLANs. Each SSID should have its own VLAN, with strict 802.1Q packet tagging maintained all the way from the access point to the firewall or router.
Implement stricter packet inspection at the routing level — depending on the hardware capabilities. Features like Dynamic ARP Inspection, DHCP snooping, and limiting the number of MAC addresses per port help defend against IP/MAC spoofing.
Enable individual GTK keys for each client, if your equipment supports it.
Use more resilient RADIUS and 802.1X settings, including modern cipher suites and robust shared secrets.
Log and analyze EAP/RADIUS authentication anomalies in your SIEM. This helps track many attack attempts beyond just AirSnitch. Other red flag events to watch for include the same MAC address appearing on different SSIDs, spikes in ARP requests, or clients rapidly jumping between BSSIDs or VLANs.
Apply security at higher levels of the network topology. Many of these attacks lose their punch if the organization has universally implemented TLS and HSTS for all business application traffic, requires an active VPN for all Wi-Fi connections, or has fully embraced a Zero Trust architecture.
In 2022, we dived deep into an attack method called browser-in-the-browser — originally developed by the cybersecurity researcher known as mr.d0x. Back then, no actual examples existed of this model being used in the wild. Fast-forward four years, and browser-in-the-browser attacks have graduated from the theoretical to the real: attackers are now using them in the field. In this post, we revisit what exactly a browser-in-the-browser attack is, show how hackers are deploying it, and, most importantly, explain how to keep yourself from becoming its next victim.
What is a browser-in-the-browser (BitB) attack?
For starters, let’s refresh our memories on what mr.d0x actually cooked up. The core of the attack stems from his observation of just how advanced modern web development tools — HTML, CSS, JavaScript, and the like — have become. It’s this realization that inspired the researcher to come up with a particularly elaborate phishing model.
A browser-in-the-browser attack is a sophisticated form of phishing that uses web design to craft fraudulent websites imitating login windows for well-known services like Microsoft, Google, Facebook, or Apple that look just like the real thing. The researcher’s concept involves an attacker building a legitimate-looking site to lure in victims. Once there, users can’t leave comments or make purchases unless they “sign in” first.
Signing in seems easy enough: just click the Sign in with {popular service name} button. And this is where things get interesting: instead of a genuine authentication page provided by the legitimate service, the user gets a fake form rendered inside the malicious site, looking exactly like… a browser pop-up. Furthermore, the address bar in the pop-up, also rendered by the attackers, displays a perfectly legitimate URL. Even a close inspection won’t reveal the trick.
From there, the unsuspecting user enters their credentials for Microsoft, Google, Facebook, or Apple into this rendered window, and those details go straight to the cybercriminals. For a while this scheme remained a theoretical experiment by the security researcher. Now — real-world attackers have added it to their arsenals.
Facebook credential theft
Attackers have put their own spin on mr.d0x’s original concept: recent browser-in-the-browser hits have been kicking off with emails designed to alarm recipients. For instance, one phishing campaign posed as a law firm informing the user they’d committed a copyright violation by posting something on Facebook. The message included a credible-looking link allegedly to the offending post.
Attackers sent messages on behalf of a fake law firm alleging copyright infringement — complete with a link supposedly to the problematic Facebook post. Source
Interestingly, to lower the victim’s guard, clicking the link didn’t immediately open a fake Facebook login page. Instead, they were first greeted by a bogus Meta CAPTCHA. Only after passing it was the victim presented with the fake authentication pop-up.
This isn’t a real browser pop-up; it’s a website element mimicking a Facebook login page — a ruse that allows attackers to display a perfectly convincing address. Source
Naturally, the fake Facebook login page followed mr.d0x’s blueprint: it was built entirely with web design tools to harvest the victim’s credentials. Meanwhile, the URL displayed in the forged address bar pointed to the real Facebook site — www.facebook.com.
How to avoid becoming a victim
The fact that scammers are now deploying browser-in-the-browser attacks just goes to show that their bag of tricks is constantly evolving. But don’t despair — there’s a way to tell if a login window is legit. A password manager is your friend here, which, among other things, acts as a reliable security litmus test for any website.
That’s because when it comes to auto-filling credentials, a password manager looks at the actual URL, not what the address bar appears to show, or what the page itself looks like. Unlike a human user, a password manager can’t be fooled with browser-in-the-browser tactics, or any other tricks, like domains having a slightly different address (typosquatting) or phishing forms buried in ads and pop-ups. There’s a simple rule: if your password manager offers to auto-fill your login and password, you’re on a website you’ve previously saved credentials for. If it stays silent, something’s fishy.
Beyond that, following our time-tested advice will help you defend against various phishing methods, or at least minimize the fallout if an attack succeeds:
Enable two-factor authentication (2FA) for every account that supports it. Ideally, use one-time codes generated by a dedicated authenticator app as your second factor. This helps you dodge phishing schemes designed to intercept confirmation codes sent via SMS, messaging apps, or email. You can read more about one-time-code 2FA in our dedicated post.
Use passkeys. The option to sign in with this method can also serve as a signal that you’re on a legitimate site. You can learn all about what passkeys are and how to start using them in our deep dive into the technology.
Set unique, complex passwords for all your accounts. Whatever you do, never reuse the same password across different accounts. We recently covered what makes a password truly strong on our blog. To generate unique combinations — without needing to remember them — Kaspersky Password Manager is your best bet. As an added bonus, it can also generate one-time codes for two-factor authentication, store your passkeys, and synchronize your passwords and files across your various devices.
Finally, this post serves as yet another reminder that theoretical attacks described by cybersecurity researchers often find their way out into the wild. So, keep an eye on our blog, and subscribe to our Telegram channel to stay up to speed on the latest threats to your digital security and how to shut them down.
Read about other inventive phishing techniques scammers are using day in day out:
Outbound Email Security Matters for Deliverability and Routing. Especially for organizations that need to deliver a large set of emails, and frequently (Transactional Emails) regarding, for instance, transaction receipts and payment notifications.
ARC isan email authentication system that preserves trust and integrity across intermediaries, ensuring legitimate emails are recognized even after multiple hops. It is an important setup for your email ecosystem!
One tool that I can't live without when performing a penetration test in an Active Directory environment is called NetExec. Being able to efficiently authenticate against multiple systems in the network is crucial, and NetExec is an incredibly powerful tool that helps automate a lot of this activity.
In this video, Michael Allen discusses how to test Adversary-in-the-Middle attacks without using hacking tools. He delves into the intricacies of credential harvesting, the evolution of multi-factor authentication (MFA), and how attackers adapt their strategies to bypass security measures.
BB King//* The state of Ohio recently validated a webapp pentest finding that sometimes goes overlooked. It relates to the details of administrative functions, how they can be abused, and […]
Carrie Roberts // Answer: Enough to make it worth it! Penetration testers love to perform password spraying attacks against publicly available email portals as described here in this great post by Beau Bullock. […]
Logan Lembke // Kerberos authentication can be daunting but is an important protocol to understand for any IT professional, and especially important in the field of information security. While you […]

 Login
Login