❌

Normal view

Secure AI agent access patterns to AWS resources using Model Context Protocol

15 April 2026 at 00:52

AI agents and coding assistants interact with AWS resources through the Model Context Protocol (MCP). Unlike traditional applications with deterministic code paths, agents reason dynamically, choosing different tools or accessing different data depending on context. You must assume an agent can do anything within its granted entitlements, whether OAuth scopes, API keys, or AWS Identity and Access Management (IAM) permissions, and design your controls accordingly. Agents operate at machine speed, so the impact of misconfigured permissions scales quickly.

This blog post focuses on IAM as the authorization layer for AWS resource access and presents three security principles for building deterministic IAM controls for these non-deterministic AI systems. The principles apply whether you’re using AI coding assistants like Kiro and Claude Code, or deploying agents on hosting environments like Amazon Bedrock AgentCore. We cover deployment patterns, then explore each principle with concrete IAM policy examples and implementation guidance.

This post specifically addresses securing the MCP access path, where agents interact with AWS resources through MCP servers. AI coding assistants and agents can also access AWS service APIs directly through general-purpose tools like bash or shell execution, bypassing MCP servers entirely. For this reason, we recommend architecting agents to use MCP servers rather than direct service access where possible. MCP servers provide a layer of abstraction that enables the differentiation controls in principle 3 and creates additional monitoring capabilities through AWS CloudTrail. When agents bypass MCP, the differentiation mechanisms in principle 3 don’t apply, and principles 1 and 2 become your primary controls. We discuss this scope boundary in principle 3.

MCP deployment patterns

Your deployment pattern determines which security principles and implementation approaches apply. Three dimensions define this pattern, including where the agent runs, what type of MCP server offers the tools, and your level of control over the agent code. No matter how you connect to it, the MCP server needs AWS credentials to interact with AWS resources.

Where agents run

Agents access AWS resources from three locations: developer machines (where you control the infrastructure), hosting environments (where you control the infrastructure or significant aspects of it), and third-party agent platforms (where you do not control the infrastructure). This post focuses on the first two patterns. Each has a different credential model and different organizational control options.

AI coding assistants and local agents

AI coding assistants (Kiro, Claude Code) or local agent applications represent the first deployment pattern. These assistants run locally on developer machines and connect to MCP servers or use AWS Command Line Interface (AWS CLI) commands to access AWS resources. In this pattern, credentials come from the developer’s local environment. When a developer configures an MCP server in their mcp.json file, they specify which AWS credentials to use. Options include a named profile, which can use credential helpers and the credential provider chain for short-lived credentials, environment variables, or explicit credential configuration. This means the developer controls which IAM principal the agent uses to access AWS. This creates a governance challenge. Without additional controls, developers often use their developer admin credentials, shared development roles, or even production roles for agent access. Developer credentials often carry broad permissions designed for interactive use, where human judgment serves as a safeguard. When an agent inherits these permissions, it operates without that judgment at machine speed. Principle 1 explores this risk in detail.

Agents on hosting environments

Agents deployed on hosting environments represent the second deployment pattern. These agents run on infrastructure you manage, not on developer machines. This changes the credential management model. Using Amazon Bedrock AgentCore as an example, when an agent runs on AgentCore Runtime, it uses an execution IAM role that you configure when creating the runtime. The execution role’s permissions apply to all operations the agent performs and cannot be scoped down per-invocation at the runtime configuration level. For more granular control, agents can call AWS Security Token Service (AWS STS) AssumeRole or AssumeRoleWithWebIdentity (collectively referred to as AssumeRole in this post). This obtains temporary credentials with session policies that further restrict permissions beyond the role’s base permissions. Agents built with frameworks like Strands can also initialize individual MCP clients with different credential sets by calling AssumeRole and passing the resulting credentials to each client connection. This enables per-tool credential isolation within a single agent process. The same pattern applies to agents deployed on Amazon Elastic Compute Cloud (Amazon EC2) or Amazon Elastic Kubernetes Service (Amazon EKS).

With this centralized execution model, you can implement organizational controls. You define the available IAM roles through infrastructure configuration instead of relying on developer choice. However, you must design these roles carefully to prevent overly permissive access and implement session policies for tool-specific restrictions.

What type of MCP server

MCP servers come in two types, provider-managed and self-managed. AWS-managed servers are operated by AWS on your behalf. Self-managed servers are servers that you install and run yourself. The server type affects your operational overhead, available features, and how you implement security controls.

AWS offers fully managed MCP servers, including the AWS MCP Server, Amazon EKS MCP Server, and Amazon ECS MCP Server. These AWS-managed servers run on AWS infrastructure and require no installation or maintenance on your part. AWS-managed MCP servers automatically add IAM context keys (aws:ViaAWSMCPService and aws:CalledViaAWSMCP) to every downstream AWS service call. You can write IAM policies that check these keys to distinguish between AI-driven actions and human-initiated actions without any additional configuration.

Self-managed MCP servers include AWS-provided servers from the AWS MCP GitHub repository that you install and run yourself. They also include custom MCP servers that you build from scratch. With self-managed servers, you control the deployment location (local machine, Amazon EC2, Amazon EKS), the configuration, and the maintenance. These servers can be used with either AI coding assistants running locally or agents deployed on hosting environments. The key difference for security controls is that self-managed servers don’t automatically add IAM context keys for differentiation. You must configure the MCP server to add session tags when assuming IAM roles if you require differentiation between AI-driven and human-initiated actions. This requires modifying your MCP server code to call AWS STS AssumeRole with tags attached. You then write IAM policies that check for these tags using the aws:PrincipalTag condition key. Self-managed servers can also be extended to implement dynamic authorization flows, such as mapping inbound OAuth tokens to outbound IAM role assumptions, giving you control over the full authorization chain. Additionally, with AWS-managed MCP servers, AWS injects context keys at the service layer, so callers cannot spoof them. With self-managed servers, the entity calling AssumeRole sets the session tags, so you must trust that your MCP server code hasn’t been modified.

The responsibility model differs between server types. With AWS-managed MCP servers, AWS is responsible for server infrastructure, patching, and context key injection. You’re responsible for IAM policy design and credential configuration. With self-managed MCP servers, you’re additionally responsible for server patching, dependency and library supply chain security, session tag implementation, and verifying server integrity. This connects to the supply chain risk described in principle 1. While self-managed servers require more operational overhead to implement and maintain, they give you flexibility and control.

Level of client control

A third dimension shapes your security implementation, whether you control the agent and MCP client code (code-controlled) or are limited to configuring pre-built tools without modifying their runtime behavior (configuration-bound). This determines which security mechanisms are available to you at runtime.

In configuration-bound scenarios, you use an AI coding assistant such as Kiro or Claude Code and configure credentials in your mcp.json file. You select which IAM role or profile the agent uses, but you cannot modify the agent’s runtime behavior. The agent calls AWS APIs using whatever credentials you configured ahead of time, and you cannot inject session policies or tags into those calls programmatically. Your security controls must be in place before the agent runs. You select narrowly scoped roles at configuration time, and your organization enforces guardrails through permission boundaries and service control policies (SCPs). These mechanisms restrict what the agent can do regardless of which role the developer selects.

In code-controlled scenarios, you build or deploy a custom agent on Amazon Bedrock AgentCore, Amazon EC2, Amazon EKS, or your local machine, or you build and run a custom MCP server. Because you control the runtime code, you can implement credential management programmatically. For custom agents, this means calling AssumeRole with session policies scoped to each tool invocation, attaching session tags for differentiation, and obtaining temporary credentials with the minimum permissions each operation requires. For custom MCP servers, you can inject session policies into every AWS API call the server makes, applying a consistent set of restrictions across all operations. Both approaches give you runtime IAM controls that are not available in config-bound scenarios.

Deployment pattern summary

The following table summarizes how these dimensions combine.

Source type MCP server type Client control Credential source Differentiation mechanism Example use case
AI coding assistant AWS-managed MCP Config-bound Local (AWS CLI, env vars, ) Automatic context keys Kiro calling AWS-managed MCP server
AI coding assistant Self-managed MCP (local or remote) Config-bound Local (AWS CLI, env vars, ) Manual session tags or session policies Kiro calling local AWS MCP server
Agent on hosting environment AWS-managed MCP Code-controlled Execution role or AssumeRole Automatic context keys Amazon Bedrock AgentCore agent calling AWS-managed MCP server
Agent on hosting environment Self-managed MCP (remote) Code-controlled Execution role or AssumeRole Manual session tags or session policies Agent calling AWS MCP server deployed on Amazon Bedrock AgentCore

Your deployment pattern and level of client control determine which of the following security principles apply and how you implement them.

Three security principles for agent access

With this understanding of deployment patterns, let’s explore the three security principles that apply across all patterns.

  • Principle 1 – Assume all granted permissions could be used: Design permissions based on the acceptable scope of impact, not intended functionality alone.
  • Principle 2 – Provide organizational guidance on role usage: Enforce permission design through role governance, session policies, permission boundaries, and organizational policies.
  • Principle 3 – Differentiate AI-driven from human-initiated actions: Apply different IAM rules based on whether the action comes from an agent or a human.

Security principle 1: Assume all granted permissions could be used

The first security principle is fundamental. Any permission you grant to an agent can be exercised, regardless of your intended use case. If you give an agent s3:DeleteObject permission with a tool that can call the API, you must assume it can delete any Amazon Simple Storage Service (Amazon S3) object it has access to. This can happen in ways you cannot predict or fully prevent through code review alone. This non-deterministic behavior requires a shift in your approach to IAM permissions.

Traditional applications follow deterministic code paths. You can review the source code, identify every API call, and grant the permissions needed. AI agents operate differently. They make decisions at runtime based on reasoning, context, and learned patterns. You cannot predict which AWS APIs or tools an agent will call or which resources it will access. Static analysis of agent code tells you what tools are available, but not which tools will be invoked or how they’ll be used.

This creates a challenge when developers configure agents to use AWS credentials. Developers commonly use existing IAM roles, such as the role their traditional application uses or their local admin role for the AWS CLI. These roles were designed assuming predictable behavior and human judgment. Your local admin role has s3:* permissions because you exercise judgment on what to delete and when. You understand the context, recognize production resources, and can assess the impact of your actions.

An agent with that same role operates at machine speed without human judgment. It can delete production data through hallucination or be directed through prompt injection to perform unintended actions. It can also make a logical error in its reasoning that leads to unintended operations. The speed and scale at which agents operate increases the potential scope of these issues. An agent can make thousands of API calls in seconds, so the impact of misconfigured permissions scales quickly.

Consider the following scenarios with overly permissive access.

  • Hallucination: The agent misinterprets a user request and performs the wrong action. An agent designed to clean up temporary files might hallucinate that production data is temporary and delete it.
  • Prompt injection: An outside party crafts unexpected input that influences the agent’s reasoning. An agent designed to query Amazon DynamoDB tables could be directed to call dynamodb:PutItem or dynamodb:DeleteItem on resources outside its intended scope.
  • Logic errors: The agent’s reasoning leads to an incorrect conclusion. An agent analyzing S3 storage costs might conclude that frequently accessed production data is unused and delete it to save costs.
  • Tool poisoning: A compromised MCP server or dependency performs unintended operations using the agent’s credentials. An agent with broad S3 and DynamoDB permissions connects to an MCP server whose dependency has been modified to exfiltrate data. The compromised tool reads sensitive objects and writes them to an attacker-controlled location, all within the agent’s granted permissions.

This security principle reframes how you approach IAM permissions for agents. Instead of asking what does the agent need to do?, ask what is the scope of impact if the agent acts outside its intended use case? Design permissions based on the acceptable scope of access, not only on intended functionality. If an agent needs to read S3 objects, grant s3:GetObject, not s3:*. If it needs to write to specific paths, use resource-level conditions to restrict access to those paths. Consider what tools the agent has access to and what API calls those tools can make. Design permissions that limit what the agent is allowed to perform based on organizational policy. This doesn’t mean agents can’t have write or delete permissions. It means you and your organization must consider what resources those permissions apply to and what safeguards are in place.

Beyond IAM policies, consider implementing data perimeters as an additional layer of defense. Data perimeters use VPC endpoint policies, resource control policies (RCPs), resource policies, and service control policies (SCPs) to restrict access based on identity, resource, and network boundaries. For agents, data perimeters help verify that even if IAM permissions are broader than intended, access is limited to trusted resources from expected networks. For more information, see Building a data perimeter on AWS.

Practical implementation guidance:

  • Apply least privilege rigorously: If an agent needs read access, grant read permissions. If it needs write access, grant write to specific resources, not all resources of that type.
  • Use resource-level restrictions: Employ IAM policy conditions to limit permissions to specific buckets, paths, tables, or other resources. Don’t grant blanket permissions across all resources.
  • Consider read-only alternatives: Evaluate whether the agent’s task can be accomplished with read-only access. Many analysis and reporting tasks don’t require write or delete permissions.
  • Implement comprehensive monitoring: Set up Amazon CloudWatch alarms for unexpected agent actions, unusual access patterns, or operations on sensitive resources. Monitor for sensitive operations like deletions or modifications to production resources.
  • Conduct regular permission audits: As agents gain new tools and capabilities, developers often add permissions incrementally without removing unused ones. An agent that started with read-only access can gradually accumulate write and delete permissions across multiple services. Review agent IAM roles and policies regularly to identify and remove permissions that are no longer needed.
  • Verify MCP server integrity: Verify the provenance and integrity of MCP servers before granting them access to AWS credentials. Maintain an organizational registry of approved MCP servers and their expected behavior, and monitor for unauthorized server deployments that might have assumed execution roles. For more on agentic application risks, see the OWASP Top 10 for Agentic Applications.

Security principle 1 establishes the foundation. Understand the scope of every permission you grant. The next two security principles build on this foundation.

Security principle 2: Provide organizational guidance on role usage

The second security principle addresses organizational governance. Principle 1 requires that you design permissions based on acceptable scope of impact. Principle 2 addresses how your organization enforces that design through role governance, session policies, permission boundaries, and organizational policies.

When developers adopt AI coding assistants and configure MCP servers, they choose which credentials to use. Without organizational controls, developers often use existing roles (such as personal admin roles, shared development roles, or production roles) that were designed for human use with far more permissions than agents need. For agents deployed on hosting environments, you configure execution roles, but the same question applies. What permissions should those roles have, and how do you enforce consistency across deployments? The answer depends on your level of client control.

When you control the agent code

When you build or deploy custom agents on Amazon Bedrock AgentCore, Amazon EC2, Amazon EKS, or locally, you control the runtime code and can implement dynamic credential management. This is the strongest enforcement model because you can scope permissions per tool invocation at runtime. The same applies if you build or modify a custom MCP server. Because you control the server code, you can inject session policies into every AWS API call the server makes.

The IAM role defines the permission ceiling for the agent across all its tools. Instead of creating a separate role for every tool or MCP server, you use session policies to scope down the role’s permissions per operation. When the agent invokes a specific tool, it calls AssumeRole with a session policy that restricts permissions to just what that tool requires. The effective permissions are the intersection of the role’s policies and the session policy. Session policies restrict permissions but never expand them. If a role grants broad permissions but you attach the ReadOnlyAccess managed policy as a session policy, the agent can only perform read operations. You can also use inline session policies for resource-specific restrictions, such as limiting access to specific S3 buckets or DynamoDB tables.

The following example shows how to implement session policies in agent code.

import boto3

# Uses the execution IAM role as part of AgentCore Runtime
sts = boto3.client('sts')

# Assume role with ReadOnlyAccess managed policy as session policy
response = sts.assume_role(
    RoleArn='arn:aws:iam::111122223333:role/AgentDataRole',
    RoleSessionName='agent-data-reader',
    PolicyArns=[
        {'arn': 'arn:aws:iam::aws:policy/ReadOnlyAccess'}
    ],
    DurationSeconds=3600
)

# Use the temporary credentials
credentials = response['Credentials']
s3 = boto3.client(
    's3',
    aws_access_key_id=credentials['AccessKeyId'],
    aws_secret_access_key=credentials['SecretAccessKey'],
    aws_session_token=credentials['SessionToken']
)

For agents on hosting environments like Amazon Bedrock AgentCore, the execution role serves two purposes. It’s the trust anchor that lets the agent call AssumeRole for tool-specific credentials, and it can supply baseline permissions that all operations need, such as writing logs to CloudWatch. For tool-specific operations that access customer resources, use AssumeRole with session policies to obtain scoped temporary credentials rather than using the execution role’s permissions directly. This centralized execution model simplifies enforcing consistent session policies across all agent deployments. Agents can also attach tags when assuming roles for differentiation purposes (covered in Security principle 3).

When you’re configuration bound

When you use an AI coding assistant like Kiro or Claude Code with off-the-shelf MCP servers, you configure credentials in your mcp.json file but cannot modify the agent’s runtime behavior. Your security controls must be established before the agent runs.

Your first control is role selection. As described in the preceding deployment patterns section, AI coding assistants use credentials from the developer’s local environment. Create agent-specific IAM roles with narrower permissions than equivalent human roles, and direct developers to use them. For self-managed MCP servers running locally, the developer specifies the role through environment variables in the mcp.json configuration.

{
  "mcpServers": {
    "awslabs.aws-pricing-mcp-server": {
      "command": "uvx",
      "args": ["awslabs.aws-pricing-mcp-server@latest"],
      "env": {
        "AWS_PROFILE": "agent-dev-role",
        "AWS_REGION": "us-east-1"
      }
    }
  }
}

For AWS-managed MCP servers, the developer connects through the mcp-proxy-for-aws proxy and specifies the role through the profile parameter.

{
  "mcpServers": {
    "aws-mcp": {
      "command": "uvx",
      "args": [
        "mcp-proxy-for-aws@latest",
        "https://aws-mcp.us-east-1.api.aws/mcp",
        "--profile", "agent-dev-role",
        "--metadata", "AWS_REGION=us-east-1"
      ]
    }
  }
}

Only role selection depends on developer compliance. IAM permission boundaries provide organizational enforcement without requiring code changes or developer cooperation. A permission boundary is a managed policy that your security team attaches to an IAM role to set the maximum permissions that role can grant. The effective permissions are the intersection of the role’s identity-based policies and the permission boundary. Permission boundaries are most effective on agent-specific roles that your organization creates for agent use. They ensure those roles cannot exceed their intended permissions even if misconfigured. If a developer configures their existing role in mcp.json instead, a permission boundary on that role restricts all use of the role, not just agent use. For AWS-managed MCP servers, principle 3’s context keys address this gap. They let you write IAM policies that restrict actions only when they come through an MCP server, leaving the developer’s direct use of the same role unaffected. For self-managed MCP servers, modifying the server code to AssumeRole into an organization-defined role provides a similar override, and session tags can be attached during that AssumeRole for differentiation (see principle 3). For multi-account environments, SCPs in AWS Organizations provide guardrails at the account or organizational unit level. SCPs set the maximum permissions for all principals in an account, giving your central governance team control over agent permissions across your organization.

Organizational governance at scale

Whether your agents are config-bound or code-controlled, you need organizational mechanisms to enforce consistent governance across teams and accounts.

Tag IAM roles intended for agent use with a consistent identifier, such as a tag key of Usage with a value of Agent. This lets your governance team inventory all agent roles across accounts, identify roles that don’t have permission boundaries, and distinguish agent roles from human roles in audit reports. You can also use tag-based conditions in SCPs to enforce that only properly tagged roles are used for agent operations. For AWS-managed MCP servers, the automatic context keys (principle 3) provide this identification without requiring role tags, but tagging remains useful for role inventory and audit purposes.

Use CloudTrail to monitor all API calls made by agent sessions and set up CloudWatch alarms for sensitive operations like resource deletion or permission changes. Principle 3 covers how to filter and analyze agent activity using context keys (AWS-managed MCP) and session tags (self-managed MCP).

For multi-account environments, combine SCPs with permission boundaries and resource control policies (RCPs) for layered enforcement. SCPs set the maximum permissions for principals within your organization at the account or organizational unit level, while permission boundaries constrain individual roles. RCPs enforce controls at the resource level regardless of the caller’s organizational membership, protecting resources even from cross-account access. Verify that the AWS services you use support MCP context keys in RCP evaluation. This layered approach gives your central governance team control over agent permissions across your organization, even when individual teams manage their own accounts and roles. Conduct quarterly reviews of agent roles and session policies to identify permissions that are no longer needed as agent capabilities evolve.

Practical implementation guidance:

  • For code controlled agents: Implement session policies for every tool invocation. Use AssumeRole with the minimum permissions each operation requires rather than relying on the execution role’s base permissions.
  • For config-bound agents: Create agent-specific IAM roles with narrower permissions than human roles or configure self-managed MCP servers to AssumeRole into an organization-defined role. Have your security team attach permission boundaries to agent-specific roles to enforce maximum permissions regardless of developer role selection.
  • At the organization level: Tag agent roles consistently, enforce guardrails through SCPs, and monitor agent activity through CloudTrail. Conduct quarterly reviews to remove unused permissions.

Security principle 2 gives you organizational control over agent permissions through mechanisms matched to your level of client control. Session policies and dynamic credential scoping enforce permissions at runtime for code-controlled agents. Permission boundaries and SCPs enforce permissions at the organizational level for config-bound agents. The next principle adds a complementary layer of governance at the resource level based on whether a human or agent is performing the action.

Security principle 3: Differentiate AI-driven from human-initiated actions

The third security principle adds an additional level of control on top of principle 2. Where principle 2 governs what permissions an agent has, this principle governs what the agent can do with those permissions based on whether the action is AI-driven or human-initiated.

This principle is essential for two reasons. For AWS-managed MCP servers, you cannot modify the server code to inject session policies or call AssumeRole with scoped credentials. The developer’s credentials flow through as-is. Context keys are your primary mechanism to restrict agent actions differently from human-initiated actions on the same role. For self-managed MCP servers where principle 2’s session policies are already in place, differentiation adds a second layer of defense at the resource level. Even if the session policy is broader than intended, differentiation policies can deny specific dangerous operations when performed through an agent.

For example, you can allow both humans and agents to read Amazon S3 objects, but deny delete operations when accessed through agents. Without a differentiation mechanism, IAM policies can’t distinguish between AI-driven actions and human-initiated actions. If a developer has s3:DeleteObject permission and uses an agent with their credentials, the agent also has s3:DeleteObject permission with no way to restrict it.

Differentiation gives you granular governance. Allow human-initiated actions with broad permissions while restricting agent actions to narrower permissions. Apply different rules based on context and implement progressive restrictions. Allow read operations for everyone, require approval for AI-driven write operations, and deny delete operations for agent actions entirely. Maintain audit trails showing which actions were AI-driven versus human-initiated, essential for compliance and security investigations.

When agents bypass MCP servers

Differentiation through condition keys and session tags applies when the agent accesses AWS through an MCP server. AI coding assistants like Kiro and Claude Code have access to general-purpose tools, including bash, shell, and code execution. When an agent uses a bash tool to run an AWS CLI command like aws s3 rm s3://my-bucket/my-object or executes a Python script that calls boto3 directly, the request goes straight to AWS using the developer’s existing credentials. The request bypasses MCP servers entirely. The aws:ViaAWSMCPService condition key isn’t set, session tags from MCP server AssumeRole calls aren’t applied, and IAM policies conditioned on these values don’t evaluate.

This means a deny policy like β€œCondition": {"Bool": {"aws:ViaAWSMCPService": β€œtrue"}} blocks the agent when it calls Amazon S3 through a managed MCP server, but doesn’t block the same agent when it runs the equivalent AWS CLI command through a bash tool. The agent has two paths to the same AWS API, and differentiation controls govern one path.

The condition keys work as designed, differentiating MCP-mediated access from direct access. This is a scope boundary. Differentiation controls secure the MCP access path. For the direct access path, principles 1 and 2 are your controls. Least privilege on the underlying IAM role (principle 1) and organizational guardrails like permission boundaries and SCPs (principle 2) apply regardless of how the agent reaches AWS. If the role doesn’t have s3:DeleteObject permission, the agent can’t delete objects through a bash tool or through an MCP server.

Restricting which tools an agent can access is a complementary control outside the scope of IAM. You can use agent frameworks and hosting environments such as Amazon Bedrock AgentCore to limit the set of available tools, removing general-purpose execution capabilities for agents that interact with AWS exclusively through MCP servers. When you combine tool restriction with the IAM controls in this post, you close the gap between the MCP access path and the direct access path.

AWS-managed MCP servers: Automatic context keys

AWS-managed MCP servers, including the AWS MCP Server, Amazon EKS MCP Server, and Amazon ECS MCP Server, offer differentiation by default. They automatically add IAM context keys to every downstream AWS service call. These context keys are aws:ViaAWSMCPService, a boolean set to true when the request comes through any AWS-managed MCP server. The second key is aws:CalledViaAWSMCP, a string containing the MCP server name like aws-mcp.amazonaws.com, eks-mcp.amazonaws.com, or ecs-mcp.amazonaws.com. No configuration is required on your part. You only need to write IAM policies that check for these keys to apply different rules for agent actions.

The following IAM policy denies delete operations when accessed through any AWS-managed MCP server.

{
  "Version": "2012-10-17",
  "Statement": [{
    "Sid": "AllowS3ReadOperations",
    "Effect": "Allow",
    "Action": [
      "s3:GetObject",
      "s3:ListBucket"
    ],
    "Resource": "*"
  }, {
    "Sid": "DenyDeleteWhenAccessedViaMCP",
    "Effect": "Deny",
    "Action": [
      "s3:DeleteObject",
      "s3:DeleteBucket"
    ],
    "Resource": "*",
    "Condition": {
      "Bool": {
        "aws:ViaAWSMCPService": "true"
      }
    }
  }]
}

When a request doesn’t come through an AWS-managed MCP server, the aws:ViaAWSMCPService condition key isn’t present in the request context. The Deny statement only applies when the key is explicitly set to true, so human-initiated actions are unaffected by this policy.

You can also restrict operations to specific MCP servers. With this policy, you can run EKS operations only when accessed through the EKS MCP server, not through the AWS API MCP server.

{
  "Version": "2012-10-17",
  "Statement": [{
    "Sid": "AllowEKSOperationsViaEKSMCP",
    "Effect": "Allow",
    "Action": "eks:*",
    "Resource": "*",
    "Condition": {
      "StringEquals": {
        "aws:CalledViaAWSMCP": "eks-mcp.amazonaws.com"
      }
    }
  }, {
    "Sid": "DenyEKSOperationsViaOtherMCP",
    "Effect": "Deny",
    "Action": "eks:*",
    "Resource": "*",
    "Condition": {
      "Bool": {
        "aws:ViaAWSMCPService": "true"
      },
      "StringNotEquals": {
        "aws:CalledViaAWSMCP": "eks-mcp.amazonaws.com"
      }
    }
  }]
}

Self-managed MCP servers: Manual session tags

Self-managed MCP servers, whether AWS-provided servers from the AWS MCP GitHub repository or custom servers you build yourself, don’t automatically add IAM context keys. To implement differentiation with self-managed servers, you must configure the MCP server to add session tags when assuming IAM roles. This requires modifying your MCP server to call AWS STS AssumeRole with tags attached. The tags remain active for the duration of the assumed role session and can be referenced in IAM policies using the aws:PrincipalTag condition key. This approach gives you flexibility and control over the session tag configuration. To maintain consistency, verify that all MCP server instances add the appropriate tags.

The following example shows how to configure your MCP server to add session tags.

import boto3

sts = boto3.client('sts')

response = sts.assume_role(
    RoleArn='arn:aws:iam::111122223333:role/MCPServerRole',
    RoleSessionName='mcp-server-session',
    Tags=[
        {'Key': 'AccessType', 'Value': 'AI'},
        {'Key': 'Source', 'Value': 'AgentRuntime'},
        {'Key': 'MCPServer', 'Value': 'org-data-server'}
    ]
)

# Use the temporary credentials from response['Credentials']
credentials = response['Credentials']

After your MCP server has added session tags, you can write IAM policies that check for these tags to differentiate agent actions.

{
  "Version": "2012-10-17",
  "Statement": [{
    "Sid": "AllowS3ReadOperations",
    "Effect": "Allow",
    "Action": [
      "s3:GetObject",
      "s3:ListBucket"
    ],
    "Resource": "*"
  }, {
    "Sid": "DenyDeleteWhenAccessedViaAI",
    "Effect": "Deny",
    "Action": [
      "s3:DeleteObject",
      "s3:DeleteBucket"
    ],
    "Resource": "*",
    "Condition": {
      "StringEquals": {
        "aws:PrincipalTag/AccessType": "AI"
      }
    }
  }]
}

Session tags and session policies are both passed to AssumeRole, but serve different purposes. Session policies (covered in security principle 2) constrain what permissions the agent has. Session tags (covered here in security principle 3) mark the session as AI-driven, enabling IAM policies to differentiate between agent and human actions. You can use both in the same AssumeRole call for defense-in-depth. The session policy constrains what the agent can do. The session tags let IAM policies apply different rules based on the actor type.

The following example uses both session policies and session tags together.

import boto3

sts = boto3.client('sts')

# Assume role with both managed session policy and tags
response = sts.assume_role(
    RoleArn='arn:aws:iam::111122223333:role/AgentDataRole',
    RoleSessionName='agent-data-reader',
    PolicyArns=[                              # Principle 2: Constrains permissions
        {'arn': 'arn:aws:iam::aws:policy/ReadOnlyAccess'}
    ],
    Tags=[                                    # Principle 3: Enables differentiation
        {'Key': 'AccessType', 'Value': 'AI'},
        {'Key': 'Source', 'Value': 'AgentRuntime'},
        {'Key': 'MCPServer', 'Value': 'org-data-server'}
    ],
    DurationSeconds=3600
)

CloudTrail logging and audit trails

Both differentiation mechanisms generate CloudTrail logs for audit trails. For AWS-managed MCP servers, downstream AWS API calls include the MCP service identifier in the invokedBy, sourceIPAddress, and userAgent fields. You can filter on these fields to isolate agent activity. MCP-originated downstream calls are classified as data events, so you must enable data event logging on your CloudTrail trail to capture them.

{
  "eventVersion": "1.11",
  "userIdentity": {
    "type": "AssumedRole",
    "principalId": "AROAEXAMPLE:developer-session",
    "arn": "arn:aws:sts::111122223333:assumed-role/DeveloperRole/developer-session",
    "accountId": "111122223333",
    "sessionContext": {
      "sessionIssuer": {
        "type": "Role",
        "principalId": "AROAEXAMPLE",
        "arn": "arn:aws:iam::111122223333:role/DeveloperRole",
        "accountId": "111122223333",
        "userName": "DeveloperRole"
      }
    },
    "invokedBy": "aws-mcp.amazonaws.com"
  },
  "eventSource": "s3.amazonaws.com",
  "eventName": "GetObject",
  "sourceIPAddress": "aws-mcp.amazonaws.com",
  "userAgent": "aws-mcp.amazonaws.com",
  "eventType": "AwsApiCall",
  "managementEvent": false,
  "eventCategory": "Data"
}

For self-managed MCP servers with session tags, the tags appear in the requestParameters.principalTags field of the AssumeRole CloudTrail event. You can correlate the session name from the AssumeRole event to downstream API calls to trace agent activity.

{
  "eventSource": "sts.amazonaws.com",
  "eventName": "AssumeRole",
  "requestParameters": {
    "roleArn": "arn:aws:iam::111122223333:role/MCPServerRole",
    "roleSessionName": "mcp-server-session",
    "principalTags": {
      "AccessType": "AI",
      "Source": "AgentRuntime",
      "MCPServer": "org-data-server"
    }
  }
}

With these logs, you can query CloudTrail to find all AI-driven actions and analyze patterns of agent behavior. You can also identify unexpected or unauthorized operations and maintain compliance audit trails. Set up CloudWatch alarms to detect agent actions on sensitive resources or unusual patterns that indicate unintended access or misconfiguration.

Things to consider

When deciding between AWS-managed and self-managed MCP servers, consider the trade-offs. AWS-managed MCP servers offer the most straightforward path. Context keys are added automatically with no configuration on your part. Self-managed MCP servers require modifying code to add session tags. However, they give you complete control over the tags and let you implement custom functionality not available in AWS-managed servers. Organizations can use both approaches, AWS-managed servers for standard AWS operations and self-managed servers for specialized use cases.

Practical implementation guidance:

  • Assess direct access paths: Evaluate whether your agents have access to general-purpose tools (bash, shell, code execution) that can bypass MCP servers. If they do, rely on principles 1 and 2 for those paths and consider restricting tool availability where possible.
  • Choose a differentiation mechanism: Select based on your MCP server type (for managed, use context keys, for self-managed, use session tags).
  • For AWS-managed MCP: Write IAM policies that check aws:ViaAWSMCPService and aws:CalledViaAWSMCP condition keys. No MCP server configuration needed.
  • For self managed MCP: Modify MCP server code to add session tags when assuming roles. Verify consistent tag application across all instances.
  • Update IAM policies: Add differentiation conditions to existing policies. Test in non-production first to verify behavior.
  • Monitor CloudTrail logs: Verify differentiation is working by checking for context keys or session tags in CloudTrail events.
  • Set up alerts: Configure CloudWatch alarms for AI-driven sensitive operations or policy violations.
  • Perform regular audits: Review IAM policies quarterly to verify differentiation conditions remain correct as agent capabilities evolve.

Conclusion

Securing AI agent access to AWS resources requires building deterministic IAM controls for non-deterministic AI systems. The three security principles give you a defense-in-depth framework that adapts to your deployment pattern and level of client control.

Your implementation path depends on your situation. Start with principle 1. Audit current agent permissions and default to read-only access where possible. Next, implement principle 2. For config-bound scenarios, establish permission boundaries and select agent-specific roles. For code-controlled scenarios, implement dynamic session policies scoped to each tool invocation. Finally, add principle 3 differentiation based on your MCP server type. Use automatic context keys with AWS-managed MCP servers, or configure session tags with self-managed servers.

By applying these three security principles, you can use AI agents while maintaining the governance and compliance controls your organization requires.

Riggs Goodman III

Riggs Goodman III

Riggs is a Principal Solution Architect at AWS. His current focus is on AI security, providing technical guidance, architecture patterns, and leadership for customers and partners to build AI workloads on AWS. Internally, Riggs focuses on driving overall technical strategy and innovation across AWS service teams to address customer and partner challenges.

Why 2FA SMS is a Bad Idea in 2026

By: Sucuri
9 April 2026 at 21:00
Why 2FA SMS is a Bad Idea in 2026

What is 2FA?

Two-factor authentication (2FA) offers a second layer of security to help protect an account from brute force, phishing, and social engineering attacks.

2FA requires an extra step for a user to prove their identity, which reduces the chance of a bad actor gaining access to their account or data. And since notifications are sent to verify the initial authentication via username and passwords, it also gives users and business the ability to monitor for potential indicators of a compromise.

Continue reading Why 2FA SMS is a Bad Idea in 2026 at Sucuri Blog.

How to Fix β€œNot Secure” Warnings and SSL Issues in WordPress (8 Steps)

31 March 2026 at 18:13
How to Fix β€œNot Secure” Warnings and SSL Issues in WordPress (8 Steps)

If you own a WordPress website and ever encountered the β€œNot Secure” warning, you might have worried that visitors would perceive your site as spam or fraudulent. Not only does this warning impact user trust, but it can also create technical search issues when both HTTP and HTTPS versions of your pages remain accessible or when redirects, canonicals, and sitemaps point to different URL versions. Browsers show the visible security warning, while search engines rely on permanent redirects, canonical URLs, and updated sitemaps to understand your preferred HTTPS pages.

Continue reading How to Fix β€œNot Secure” Warnings and SSL Issues in WordPress (8 Steps) at Sucuri Blog.

The Security Risks of Using Nulled WordPress Plugins

By: Sucuri
30 March 2026 at 23:10
The Security Risks of Using Nulled WordPress Plugins

Every year, thousands of WordPress sites get compromised, and a surprising number of those infections trace back to a single decision: installing a nulled plugin.

Nulled plugins promise premium features for little or no money. The problem is that the β€œsavings” often come attached to malware, broken update paths, SEO damage, and legal headaches that cost far more than a legitimate license ever would. It might seem like a harmless shortcut, but it’s one that can unravel everything you’ve built online.

Continue reading The Security Risks of Using Nulled WordPress Plugins at Sucuri Blog.

Web Shells: Types, Mitigation & Removal

26 March 2026 at 20:00
Web Shells: Types, Mitigation & Removal

Web shells are malicious scripts that give attackers persistent access to compromised web servers, enabling them to execute commands and control the server remotely. These scripts exploit vulnerabilities like SQL injection, remote file inclusion (RFI), and cross-site scripting (XSS) to gain entry.

Once deployed, web shells allow attackers to manipulate the server, leading to data theft, website defacement, or serving as a launchpad for further attacks. They are especially dangerous because they are also a post-compromise access mechanism (backdoor) rather than a standalone infection.

Continue reading Web Shells: Types, Mitigation & Removal at Sucuri Blog.

Deploy AWS applications and access AWS accounts across multiple Regions with IAM Identity Center

14 March 2026 at 22:21

If your organization relies on AWS IAM Identity Center for workforce access, you can now extend that access across multiple AWS Regions with multi-Region replication. Previously, AWS access portal was only available in one Region, when you add an additional Region, users get an active access portal endpoint there. If the primary Region experiences a disruption, they can continue working through the additional Region. This enhancement also enables you to deploy AWS managed applications in additional Regions closer to your users, which reduces latency and helps meet regional compliance requirements. Meanwhile, you maintain centralized control by managing Identity Center configurations from the primary Region.

In this post, you’ll learn how to configure multi-Regions support, including multi-Region replication, encryption setup, adding Regions, updating your identity provider (IdP), and testing the setup end to end.

Prerequisites and considerations

Before enabling multi-Region support, confirm your environment meets these requirements and understand how this change will affect your existing setup.

Considerations

Keep the following limitations in mind before you begin:

  • IAM Identity Center account instances don’t support multiRegion replication.
  • Microsoft Active Directory and IAM Identity Center directory as identity source aren’t supported for multi-Region replication.
  • AWS opt-in Regions aren’t supported.
  • The AWS access portal in additional Regions doesn’t support the custom alias (in other words, customer-chosen subdomains).
  • AWS account access through additional Region relies on already provisioned permissions; new permission set assignments and group memberships can be managed only in the primary Region and are then automatically replicated to additional Regions.

Walkthrough

To set up multi-Region support, you’ll follow three steps: creating and configuring a customer-managed KMS key with Identity Center, enabling the additional Region in the Identity Center console, and updating your identity provider with the new regional URLs and bookmark applications.

Important: Your Identity Center instance operates on a primary-replica model where instance-level configuration changes must be made in the primary Region, while additional Regions receive read-only replications of your settings and provide Region-local access for your workforce. In this example, you will use Okta as your external IdP, with N. Virginia (us-east-1) as the primary Region and Frankfurt (eu-central-1) as the additional Region.

Before you start, ensure that you’re signed in to the console as an administrator in the same account and Region where your Identity Center instance resides.

Create and configure multi-Region customer-managed KMS keys with Identity Center

First, you must set up a multi-Region customer-managed KMS key with Identity Center in your primary Region and replicate it to additional Regions where you plan to replicate Identity Center. Identity Center uses customer-managed KMS keys for encryption of your identity data such as user attributes. Because the same key material must be available in each Region, you’ll create a multi-Region key β€” complete this step in the AWS Organizations management account. Before proceeding, confirm that your currently deployed AWS managed applications support customer-managed KMS keys with Identity Center. Each AWS KMS key has usage and storage cost, see AWS KMS pricing page for details.

1. Create the multi-Region customer-managed KMS keys in your primary Region and add it to your Identity Center instance
Follow the blog AWS IAM Identity Center now supports customer-managed KMS keys for encryption at rest, ensuring that you choose Multi-Region Key in Part 1: Create the key and define permissions.

For guidance on configuring your key policy, see the KMS key policy examples for common use cases in the Identity Center User Guide, which provides example policies you can adapt for your specific requirements.

2. Create replica keys in additional Regions
After completing the primary Region setup, create new replica keys in each AWS Region where you plan to replicate Identity Center. To complete this step, follow the documentation in Create multi-Region replica keys.

Note: The replica key automatically inherits the same key policy as the primary customer-managed KMS key. However, future modifications to the key policy must be manually applied to the replica key in each Region. AWS KMS replica keys are independent resources; policy changes on the primary key do not propagate automatically.

Add an additional Region to Identity Center

Now that key replication is complete, you can add an additional Region to your Identity Center instance. For this post, use Frankfurt (eu-central-1). If you have a delegated admin account configured, we recommend completing remaining configurations in that account. We will perform this configuration using the console, but you can also use the IAM Identity Center API. For detailed instructions, see Add the Region in IAM Identity Center.

  1. Open the AWS Management Console.
  2. In the search bar, enter IAM Identity Center and choose the service.
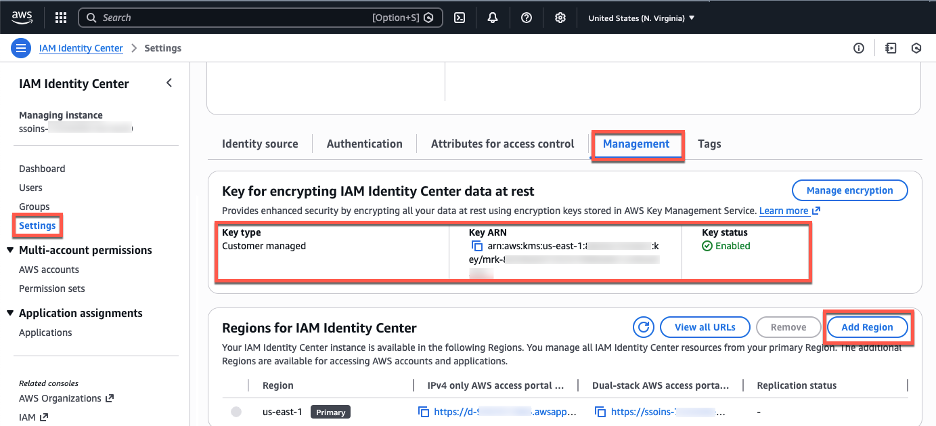
  3. In the navigation pane, choose Settings.
  4. Choose Add Region.
  5. Figure 1: Management tab with encryption and Region information

    Figure 1: Management tab with encryption and Region information

  6. From the Region list on the following page, select Frankfurt (eu-central-1). Then, choose Add Region.
  7. The Region list shows Regions enabled by default where the customer-managed KMS key was replicated, making them available for you to choose.

    Figure 2: Choose an AWS Region to add

    Figure 2: Choose an AWS Region to add

  8. You’ll return to the Settings for Identity Center page, where you’ll see the new Region with a Replicating status. A blue banner indicates that Identity Center is replicating your workforce identities, configuration, and metadata to the new Region. After the initial setup (15–30 minutes, depending on the size of your Identity Center instance), future changes replicate within seconds.
  9. Figure 3: Initial replication to the newly added Region in progress

    Figure 3: Initial replication to the newly added Region in progress

  10. After replication completes, the Replication Status column changes to Replicated. Your Identity Center endpoints in the additional Region are now active.
  11. Figure 4: A console view after the initial replication is done

    Figure 4: A console view after the initial replication is done

  12. Users can now access AWS accounts through both AWS access portal URLs. You can view and copy the enabled portal URLs either from the Region list or by choosing View AWS access portal URLs.

You can view Security Assertions Markup Language (SAML) information, such as ACS URLs, about the primary and additional Regions by choosing View ACS URLs. In the next section you will use both, your AWS access portal URLs and ACS URLs to update your external IdP configuration.

Update your IdP configuration for the additional Region

You’ve successfully replicated your Identity Center instance to the Frankfurt (eu-central-1) Region. This means your workforce identities are now available in that additional Region and can use the new AWS access portal endpoint. Identity Center supports two authentication flows: one where users start from the AWS access portal or AWS managed application (service provider-initiated), and one where users start from their IdP portal (IdP-initiated). With service provider-initiated authentication, when users attempt to authenticate, Identity Center redirects them to your IdP authentication page, and after successful authentication, their authentication response is sent to the Regional SAML assertion consumer service (ACS) endpoint in Identity Center. The ACS endpoint in the additional Region uses a different URL than the primary Region, as shown in the following image.

Figure 5: Identity Center URLs

Figure 5: Identity Center URLs

Currently, your IdP only has information about your Identity Center in the primary Region. To successfully redirect users’ authentication responses to the additional Region, you must add the new Regional endpoint to the IdP configuration.

Update the Identity Center application in your IdP:

This update enables service provider-initiated authentication to succeed. In the Identity Center app within your external IdP, add the ACS URL for the additional Region so that the app contains both Regional ACS URLs. Keep the existing URL as the first one in the list, the IdP uses the first URL as the default redirect target for IdP-initated authentication. The additional ACS URL will be used by the IdP to send the authentication response when users sign in using service provider-initiated authentication flows.

As an example, follow the instructions to configure your Identity Center application in Okta:

  1. Log in to the Okta portal as an Admin.
  2. Expand the Applications drop-down in the left pane, then choose Applications
  3. Choose your Identity Center Application
  4. Select the Sign-on tab and choose Edit in the Settings windows.
  5. In the AWS SSO ACS URL1 box add the additional ACS URL
Figure 6 – Identity Center enterprise application configuration in Okta

Figure 6: Identity Center enterprise application configuration in Okta

Users can now access accounts starting from the Region-specific AWS access portal, in this case they need to remember two Region specific URLs, one for Frankfurt (eu-central-1) and one for N. Virginia (us-east-1). To accommodate these Region-specific portal URLs, we recommend creating a bookmark application in your IdP. While users can also bookmark the URLs directly in their browsers, providing a bookmark app makes the additional Region discoverable in the IdP portal without requiring each user to manually save a URL.

This bookmark app functions like a browser bookmark and contains only the URL to the AWS access portal in the additional Region. Users can access this bookmark app from their IdP portal to reach the Region-specific AWS access portal. You also must grant your users access to the bookmark app in the external IdP. In Okta, follow the instructions below:

  1. Log in to the Okta portal as an Admin.
  2. Expand the Applications drop-down in the left pane, then choose Applications.
  3. Choose Browse App Catalog
  4. Search for β€œBookmark App”, select it from the list of results, and choose Add in the left pane.
  5. Choose an app name. For this blog post, the name can be β€œIdentity Center – Frankfurt (eu-central-1)”
  6. In the URL box, paste the Frankfurt (eu-central-1) specific URL
  7. Choose Done. You will be redirected to the Bookmark application in the Assignments tab.
  8. Choose Assign and select the Groups/People that will have access to this application.

After completing this configuration, users will see two Identity Center applications in their IdP portalβ€”one for the primary Region and another for the additional Region.
Figure 7 shows how this configuration appears in the Okta end user dashboard.

Figure 7: Okta end-user portal with two Region-specific tiles for Identity Center

Figure 7: Okta end-user portal with two Region-specific tiles for Identity Center

If you choose the newly created bookmark app, it will direct you to the AWS access portal in the additional Region.

Note: Identity Center supports IPv4-only endpoints, and dual-stack endpoints that support both IPv6 and IPv4. Depending on where your organization is in the process of IPv6 adoption, you will need to configure corresponding Assertion Consumer Service (ACS) URLs in your external IdP and used the corresponding AWS access portal URLs in your IdP bookmark application. For more information, see IPv6 support in Identity Center blog.

Test your multi-Region configuration

In the previous sections, you finished configuring the requirements for Identity Center multi-Region replication between the primary N. Virginia (us-east-1) and additional Frankfurt (eu-central-1) Regions. With this configuration complete, users with sufficient permissions can now enable supported AWS managed applications in either Region. Additionally, users can access their AWS accounts through the AWS access portal from either Region. To validate both capabilities, you will first test AWS account access from the additional Region and then configure a supported AWS managed application in that Region.

Accessing AWS accounts from the additional Region

Permission set assignment that exists in the primary Region of your Identity Center instance will be replicated to your additional Region. This means that, if there is a service disruption in Identity Center in the primary Region, you can switch to the additional Region to access your AWS accounts through the access portal or AWS CLI. To complete this section, your user in Identity Center needs existing access to an AWS account with permission sets. For more information see Manage AWS accounts with permission sets.

Access AWS accounts from the additional Region using the AWS access portal

  1. Open the IAM Identity Center console.
  2. In the navigation pane, choose Settings.
  3. Choose the Management tab.
  4. Choose View AWS access portal URLs.
  5. Choose additional Region URL, a new browser tab will open with the AWS access portal in Frankfurt (eu-central-1).
  6. Confirm you can see permission sets assigned to you.
  7. Choose a permission set, confirm that you can access your AWS account.

Access AWS accounts from the additional Region using the AWS CLI

AWS Command Line Interface (AWS CLI) connects to a specific Identity Center Region to authenticate users and obtain credentials. For customers using multi-Region replication, we recommend creating multiple Regional CLI profilesβ€”one for your primary Region and another for each additional Region. Separate profiles allow you to quickly switch between Regions during a disruption without reconfiguring your CLI. Before completing this section, confirm that AWS CLI version 2.x or later is installed and that you have an existing AWS CLI configuration file.
To facilitate Region-specific access through the AWS CLI, create two CLI profiles using the following configuration:

  1. Open your AWS CLI configuration file at ~/.aws/config.
  2. Add the following two profiles configurations, one per additional Region. The example below shows a user in Virginia using N. Virginia (us-east-1) as their primary Identity Center Region with Frankfurt (eu-central-1) as a backup. Replace with your actual Identity Center instance ID and with your account number. To find your Identity Center instance ID, navigate to IAM Identity Center console, Settings, Instance ARN (the instance ID is the value that starts with β€˜ssoins-β€˜)
  3. Save the file.
    [profile ReadOnly]
    sso_role_name=ReadOnly
    sso_account=<account-Id>
    sso_session=us-east-1
    
    [sso-session us-east-1]
    sso_region=us-east-1
    sso_start_url=https://identitycenter.amazonaws.com/ssoins-<instance-Id>
    
    [profile ReadOnly-additional]
    sso_role_name=ReadOnly
    sso_account=<account-Id>
    sso_session=eu-central-1
    
    [sso-session eu-central-1]
    sso_region=eu-central-1
    sso_start_url=https://identitycenter.amazonaws.com/ssoins-<instance-Id>
    

Once the profiles have been configured, you can authenticate to each regional Identity Center endpoint independently using the following commands.
1. Run aws sso login –profile ReadOnly to log in through your primary Region N. Virginia (us-east-1),
2. Run aws sso login –profile ReadOnly-additional to log in through your additional Region Frankfurt (eu-central-1)

Each command opens a browser window to the corresponding regional AWS access portal, where you complete the authentication flow. After a successful login, the AWS CLI uses the credentials obtained from that Region for subsequent API calls made with that profile.

Deploy AWS managed applications in the additional Region

To test application deployment in the additional Region, for this blog post you will configure AWS Deadline Cloud, a managed service for rendering and visual effects workloads. You can choose other AWS managed applications that support deployment in additional Identity Center Regions β€” see the AWS managed applications that you can use with IAM Identity Center table in the documentation. This table is regularly updated as additional applications become available.
To configure AWS Deadline Cloud, follow the steps:

  1. Navigate to the AWS Deadline Cloud console and switch to your additional Regionβ€”for this example, Frankfurt (eu-central-1).
  2. Choose Set up Deadline Cloud on the Get Started section and follow the configuration wizard until Step 2: Set up monitor.
  3. In the Set up monitor screen, enter a name (for example, Frankfurtmonitorapp), then expand the Additional monitor settings menu. Notice how the Identity Center instance in Frankfurt (eu-central-1) is automatically selected by the AWS DeadLine Cloud wizard. Choose Next.
  4. On Define farm details, under Groups and users, select the group that will have access to the application, verify you are a member of that group. Notice how you can automatically choose groups that were synced from your IdP into your Identity Center instance.
  5. For this demonstration, leave remaining configurations with their default values and complete the application setup by following the wizard. After the application deployment is complete, choose Go to dashboard.

The application is now configured to use Region-local Identity Center service APIs for user sign-in and access to workforce identities. The dashboard displays the option to manage users, and user assignment management for this application is performed through the Frankfurt (eu-central-1) Region.

Testing user access to your AWS managed application

You can test user access to AWS Deadline Cloud by choosing Monitor in the upper right-hand corner of the dashboard. This initiates the service provider authentication workflow, which redirects you to your IdP for authentication. Because your IdP now recognizes the Frankfurt (eu-central-1) ACS URL, it knows where to send the successful authentication response, and you are authorized to access the newly created application.

You can also access the application using the application provided endpoint or through your AWS access portal. The AWS access portal in each Region displays the applications assigned to the user independent of the Region they are configured.

What happens when you try to enable your application in a Region where Identity Center isn’t configured?

If Frankfurt (eu-central-1) hasn’t been added to your Identity Center instance, the application console will detect your organization instance in N. Virginia (us-east-1), and prompt you to enable Frankfurt (eu-central-1) first.

Figure 8: AWS Deadline cloud console wizard when Identity Center isn’t configured in the current Region

Figure 8: AWS Deadline cloud console wizard when Identity Center isn’t configured in the current Region

Note: Existing deployments of AWS managed applications that use cross-Region calls with Identity Center (for example, Amazon Q Business) continue to function normally. When deploying an AWS managed application that supports cross-Region calls, we recommend configuring it to use Identity Center in the same Region, provided the prerequisites are met. Otherwise, you can configure the application to use Identity Center from one of its enabled Regions. See the respective AWS application’s User Guide to learn if it supports cross-Region calls to Identity Center.

Optional: Automatic failover of domains for AWS access portal

Identity Center provides Regional endpoints for the AWS access portal when you enable multi-Region replication. You can access these Regional instances directly, or you can build a redirection system that intelligently routes users to the nearest available AWS access portal endpoint with failover capabilities.

For a serverless implementation of automatic failover, you can combine several AWS services:

  • Amazon Route 53: Manages DNS routing with health checks and geoproximity-based routing policies to redirect users to their nearest Regional endpoint.
  • Amazon Application Recovery Controller (ARC): Orchestrates failover logic and provides readiness checks to ensure smooth transitions between Regions during service disruptions.
  • Application Load Balancer (ALB): Performs simple HTTP redirects to the appropriate Regional AWS access portal endpoints based on routing decisions.

This setup redirects users to a healthy endpoint in another Region if the primary Region goes down. Geoproximity routing sends users to their nearest endpoint under normal conditions.

Administration and auditing tasks by Region

The primary Region is the central management hub for instance-level configurations, while additional Regions provide Region-local application management and access capabilities. Application management is always performed in the Region where the application was configured.

This table shows the availability of use cases between Regions. The primary Region maintains centralized control over identity and access management, while additional Regions focus onRegion-specific application management and providing resilient access to AWS accounts.

Task category

Primary Region

Additional Region

Workforce identity management

Full management of workforce identities and user provisioning

Read-only

User session revocation

Revoke user sessions

Revoke user sessions

Instance-level configuration

Configuration changes and settings

Read-only

User assignments to applications (Region-specific)

For applications in the primary Region

For applications in an additional Region

Trusted identity propagation (TIP)

Use TIP with applications in the same Region

Use TIP with applications in the same Region

Enable/disable application access

For applications in the primary Region

For applications in an additional Region

External IdP configuration

Manage connection and configuration with external IdPs

Read-only

Customer-managed applications

Deploy and configure SAML and OAuth2 applications

Deploy and configure SAML and OAuth2 applications

AWS account access

Access AWS accounts through a Region-specific AWS access portal

Access AWS accounts through Region-specific AWS access portal

Application management (Region-specific)

Manage applications configured in the primary Region

Manage applications configured in additional Regions

Account access permissions

Configure and manage permission sets and account assignments

Not available

Conclusion

In this post, you learned how to extend your access to AWS through IAM Identity Center across multiple AWS Regions using multi-Region replication. To replicate your Identity Center instance to additional Regions, you need a multi-Region KMS key, updated IdP configuration, and network access to the new regional endpoints.

With multi-Region replication in place, your users gain resilient, low-latency access to AWS accounts and AWS managed applications through Region-specific AWS access portals. If a disruption occurs in the primary Region, users can continue working using already provisioned permissions through any additional Region. For organizations looking to deploy AWS managed applications beyond Deadline Cloud in additional Regions, consult the AWS managed applications that integrate with IAM Identity Center table in the Identity Center User Guide to verify that the application supports both customer-managed KMS keys and deployment in additional Regions before proceeding.

To explore the full range of IAM Identity Center multi-Region capabilities, including quota management, visit the Using IAM Identity Center across multiple AWS Regions user guide.


If you have feedback about this post, submit comments in the Comments section below. If you have questions about this post, contact AWS Support.

Alex Milanovic

Alex Milanovic

Alex is a Senior Product Manager at AWS Identity, with over a decade of expertise in identity and access management and more than 25 years in the tech sector. His work centers on empowering organizations of all sizes, from large enterprises to small and medium-sized businesses, to effectively adopt and implement identity and access management cloud services.

Laura Reith

Laura Reith

Laura is an Identity Solutions Architect at AWS, where she thrives on helping customers overcome security and identity challenges. In her free time, she enjoys wreck diving and traveling around the world.

Understanding IAM for Managed AWS MCP Servers

2 March 2026 at 17:12

As AI agents become part of your development workflows on Amazon Web Services (AWS), you want them to work with your existing AWS Identity and Access Management (IAM) permissions, not force you to build a separate permissions model. At the same time, you need the flexibility to apply different governance controls when an AI agent makes an API call compared to when a developer does it directly. In this post, we show you how to use new standardized IAM context keys for AWS-managed remote Model Context Protocol (MCP) servers, a simplified authorization model that works like the AWS CLI and SDKs you already use, and upcoming VPC endpoint support for network perimeter controls.

Overview

At re:Invent 2025, we launched four AWS-managed remote MCP servers (AWS, EKS, ECS, and SageMaker) in preview. AWS hosts and manages remote MCP servers, removing the need for local installation and maintenance while providing automatic updates, resiliency, scalability, and complete audit logging through AWS CloudTrail. For example, with the AWS MCP Server you can access AWS documentation and execute calls to over 15,000 AWS APIs, helping AI agents perform multi-step tasks like setting up VPCs or configuring Amazon CloudWatch alarms.

We heard from customers that, as AI agents become more integrated into dev workflows, you want these workflows to work with existing AWS permissions without having to reconfigure IAM policies or create separate permissions models for AI. At the same time, you want the flexibility to apply different governance controls for AI actions compared to direct human actions. We recently introduced two standardized IAM context keys (aws:ViaAWSMCPService and aws:CalledViaAWSMCP) that give you this control. These context keys work consistently across all AWS-managed remote MCP servers, so you can implement defense-in-depth security, maintain detailed audit trails, and meet compliance requirements by differentiating between calls using AI solutions and human-initiated actions. In addition, we heard from customers the need to simplify the authorization model. Starting soon, you will no longer need to separate MCP-specific IAM actions (such asaws-mcp:InvokeMCP) to interact with AWS-managed MCP servers. This aligns with how AWS Command Line Interface (AWS CLI) and AWS SDKs work today, reducing configuration overhead, while your existing IAM policies continue to control what actions can be performed. Looking ahead, we’re adding VPC endpoint support for AWS-managed MCP servers so you can connect directly from your VPC, providing enhanced security through two-stage authorization and network perimeter controls for customers who need to enforce identity and network perimeters.

Using IAM to differentiate between human-driven and AI-driven actions

To give you fine-grained control over AI solutions using MCP servers, we’ve introduced two standardized IAM context keys. These keys work consistently across all AWS-managed MCP servers:

  • aws:ViaAWSMCPService (boolean): Set to true when the request comes through an AWS-managed MCP server. Use this to allow or deny all MCP-initiated actions.
  • aws:CalledViaAWSMCP (string, single valued): Contains the service principal name of the MCP server (for example, aws-mcp.amazonaws.com, eks-mcp.amazonaws.com, and ecs-mcp.amazonaws.com). Use this to allow or deny actions from specific MCP servers. This context key value will include more MCP servers when new MCP servers are available, allowing you to configure fined grained access to your AWS resources through IAM and SCP policies.

For organizations that want to completely disable MCP server access across their organization or specific organizational units, you can use a service control policy (SCP) to deny all or some actions when accessed through MCP servers:

{
  "Version": "2012-10-17",
  "Statement": [
    {
      "Sid": "DenyAllActionsViaMCP",
      "Effect": "Deny",
      "Action": "*",
      "Resource": "*",
      "Condition": {
        "Bool": {
          "aws:ViaAWSMCPService": "true"
        }
      }
    }
  ]
}

In another example, you can allow AI agents using AWS MCP Server to read Amazon Simple Storage Service (Amazon S3) buckets but deny delete operations. The AWS MCP Server provides the aws___call_aws tool, which can execute any AWS API operation, including Amazon S3 operations:

{
  "Version": "2012-10-17",
  "Statement": [
    {
      "Sid": "AllowS3ReadOperations",
      "Effect": "Allow",
      "Action": [
        "s3:GetObject",
        "s3:ListBucket"
      ],
      "Resource": "*"
    },
    {
      "Sid": "DenyDeleteWhenAccessedViaMCP",
      "Effect": "Deny",
      "Action": [
        "s3:DeleteObject",
        "s3:DeleteBucket"
      ],
      "Resource": "*",
      "Condition": {
        "Bool": {
          "aws:ViaAWSMCPService": "true"
        }
      }
    }
  ]
}

You can also restrict access to specific AWS-managed MCP servers. For example, allow EKS operations only when called through the EKS MCP server, not through the AWS MCP server:

{
  "Version": "2012-10-17",
  "Statement": [
    {
      "Sid": "AllowEKSOperationsViaEKSMCP",
      "Effect": "Allow",
      "Action": "eks:*",
      "Resource": "*",
      "Condition": {
        "StringEquals": {
          "aws:CalledViaAWSMCP": "eks-mcp.amazonaws.com"
        }
      }
    },
    {
      "Sid": "DenyEKSOperationsViaOtherMCP",
      "Effect": "Deny",
      "Action": "eks:*",
      "Resource": "*",
      "Condition": {
        "StringNotEquals": {
          "aws:CalledViaAWSMCP": "eks-mcp.amazonaws.com"
        }
      }
    }
  ]
}

Understanding the changes for public endpoint authorization

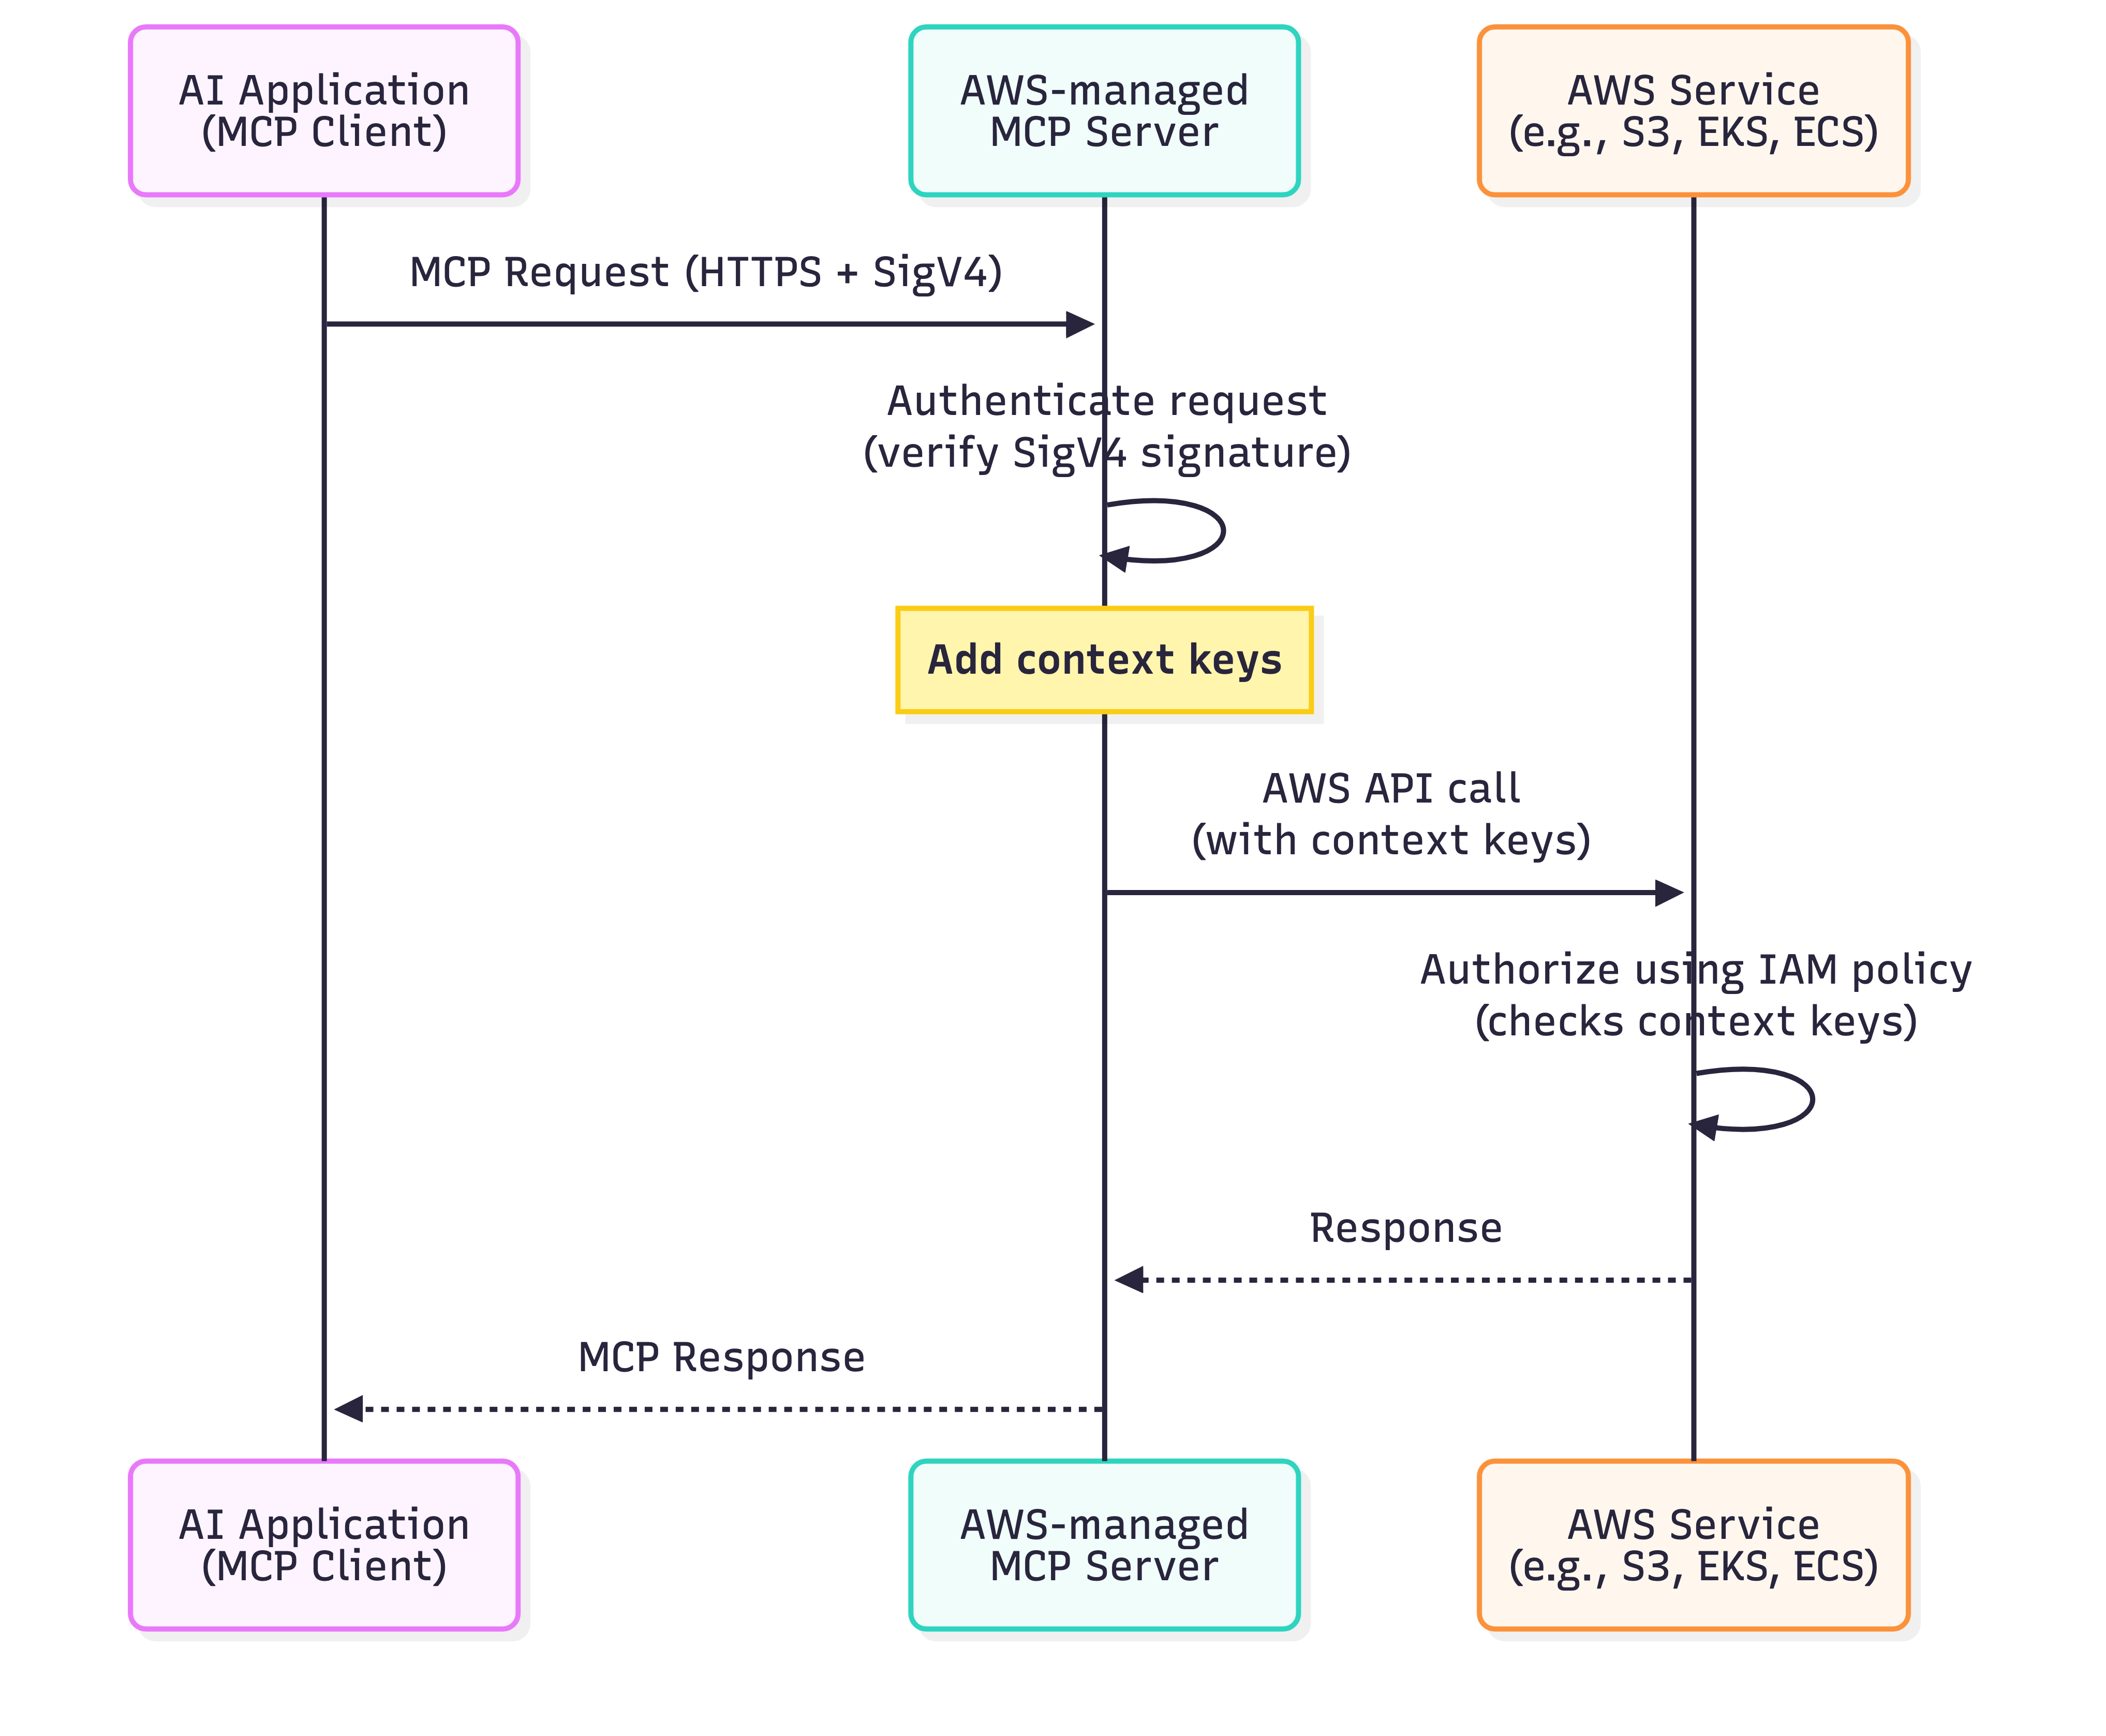
Based on feedback, we’re simplifying the authorization model to work like the AWS CLI and SDKs you already use. Moving forward, the MCP server adds the standardized IAM context keys (aws:ViaAWSMCPService and aws:CalledViaAWSMCP) to your request and forwards it to the downstream AWS service. The MCP server will still authenticate your request using SigV4 as before. Now, the downstream service performs the authorization check using your existing IAM policies, which can reference these context keys for fine-grained control. This means your AI agents work with your existing AWS credentials and service-level permissions, eliminating the need for separate MCP-specific IAM actions and reducing configuration overhead. The following diagram illustrates how this simplified authorization flow works:

Figure 1: Authorization flow for managed MCP servers.

Figure 1: Authorization flow for managed MCP servers.

Using IAM with MCP servers and VPC endpoints

We also heard from customers in regulated industries who need additional network-level controls for AI agent access. Customers in industries like financial services and healthcare require private network communication to meet compliance mandates. To meet these requirements, AWS will also add VPC endpoint support for AWS-managed MCP servers in the future. You can use VPC endpoints to keep all AI agent traffic within your private network, eliminating exposure through the public internet. When you configure a VPC endpoint, the MCP server performs an authorization check at the VPC endpoint level before forwarding requests to downstream AWS services. This creates a defense-in-depth approach where you control access at both the network perimeter (VPC endpoint) and the service level (IAM policies). You can combine VPC endpoints with the aws:ViaAWSMCPService and aws:CalledViaAWSMCP context keys to implement layered security controls that meet your organization’s specific governance and compliance requirements. Additional details on context keys and example patterns will be available when support for VPC endpoints is launched.

Things to consider

When implementing IAM authorization for MCP servers, you need to make decisions about deployment patterns, policy design, and operational practices. Here are key considerations to help you choose the right approach for your organization.

  • Designing IAM policies: Only give access that is needed, and refine policies and remove unused access over time. Use context keys to differentiate calls using AI solutions from direct developer actions.
  • Security and compliance: VPC endpoints help meet requirements for private network communication in regulated industries.
  • Getting started: Start with the deployment pattern that matches your current needs. Begin with restrictive IAM policies and relax them as you understand your AI agents’ requirements. Monitor CloudTrail logs to see what actions your AI agents perform and use the data to refine your policies over time.

Conclusion

You now have the control to govern AI agent access to your AWS resources through AWS-managed MCP Server using the same IAM policies and tools you already trust. The standardized IAM context keys (aws:ViaAWSMCPService and aws:CalledViaAWSMCP) are available across all AWS-managed MCP servers, giving you fine-grained control to differentiate calls using AI solutions from direct developer actions at the service level. In upcoming releases, AWS managed MCP servers will work without separate IAM actions over public endpoints and simplify your IAM policy management. We will also provide support for VPC endpoints with enhanced security through two-stage authorization and network perimeter controls for customers who need additional access restrictions. See the documentation for your specific AWS-managed MCP server to confirm whether it supports the new public endpoint authorization model and VPC endpoints. Whether you’re building AI coding assistants or agentic applications, start implementing these controls today to secure your AI workflows while maintaining the flexibility to define access rules that match your organization’s security posture.

Riggs Goodman III Riggs Goodman III
Riggs is a Principal Partner Solution Architect at AWS. His current focus is on AI security and networking, providing technical guidance, architecture patterns, and leadership for customers and partners to build AI workloads on AWS. Internally, Riggs focuses on driving overall technical strategy and innovation across AWS service teams to address customer and partner challenges.
Shreya Jain

Shreya Jain

Shreya is a Senior Technical Product Manager in AWS Identity. She is energized by bringing clarity and simplicity to complex ideas. When she’s not applying her creative energy at work, you’ll find her at Pilates, dancing, or discovering her next favorite coffee shop.

Praneeta Prakash Praneeta Prakash
Praneeta is a Senior Product Manager at AWS Developer Tools, where she drives innovation at the intersection of cloud infrastructure and developer experience. She works on strategic initiatives that shape how developers interact with cloud infrastructure, particularly in the evolving landscape of AI-native development. Her work centers on making AWS more accessible and intuitive for developers of all skill levels, from frontend engineers building their first cloud application to experienced teams scaling production systems.
Brian Ruf Khaled Sinno
Khaled is a Principal Engineer at Amazon Web Services. His current focus is on Identity and Access Management in AWS and more generally on providing identity and security controls for customers in the cloud. In the past, he has worked on availability and security within AWS RDS (i.e. databases) while also contributing more broadly to the security space of database and search services. Prior to AWS, Khaled led large engineering teams in the FinTech industry, working on distributed systems in finance and trading platforms.

Beyond Login Screens: Why Access Control Matters

By: Sucuri
7 February 2026 at 04:01
Beyond Login Screens: Why Access Control Matters

As breach costs go up and attackers focus on common web features like dashboards, admin panels, customer portals, and APIs, weak access control quickly leads to lost data, broken trust, and costly incidents. The worst part is that many failures are not rare technical flaws but simple mistakes, such as missing permission checks, roles with too much power, or predictable IDs in URLs.

This post aims to help you control who can access different parts of your website and explain why it matters.Β 

Continue reading Beyond Login Screens: Why Access Control Matters at Sucuri Blog.

How to get started with security response automation on AWS

29 January 2026 at 20:44

December 2, 2019: Original publication date of this post.


At AWS, we encourage you to use automation. Not just to deploy your workloads and configure services, but to also help you quickly detect and respond to security events within your AWS environments. In addition to increasing the speed of detection and response, automation also helps you scale your security operations as your workloads in AWS increase and scale as well. For these reasons, security automation is a key principle outlined in the Well-Architected Framework, the AWS Cloud Adoption Framework, and the AWS Security Incident Response Guide.

Security response automation is a broad topic that spans many areas. The goal of this blog post is to introduce you to core concepts and help you get started. You will learn how to implement automated security response mechanisms within your AWS environments. This post will include common patterns that customers often use, implementation considerations, and an example solution. Additionally, we will share resources AWS has produced in the form of the Automated Security Response GitHub repo. The GitHub repo includes scripts that are ready-to-deploy for common scenarios.

What is security response automation?

Security response automation is a planned and programmed action taken to achieve a desired state for an application or resource based on a condition or event. When you implement security response automation, you should adopt an approach that draws from existing security frameworks. Frameworks are published materials which consist of standards, guidelines, and best practices in order help organizations manage cybersecurity-related risk. Using frameworks helps you achieve consistency and scalability and enables you to focus more on the strategic aspects of your security program. You should work with compliance professionals within your organization to understand any specific compliance or security frameworks that are also relevant for your AWS environment.

Our example solution is based on the NIST Cybersecurity Framework (CSF), which is designed to help organizations assess and improve their ability to help prevent, detect, and respond to security events. According to the CSF, β€œcybersecurity incident response” supports your ability to contain the impact of potential cybersecurity events.

Although automation is not a CSF requirement, automating responses to events enables you to create repeatable, predictable approaches to monitoring and responding to threats. When we build automation around events that we know should not occur, it gives us an advantage over a malicious actor because the automation is able to respond within minutes or even seconds compared to an on-call support engineer.

The five main steps in the CSF are identify, protect, detect, respond and recover. We’ve expanded the detect and respond steps to include automation and investigation activities.

Figure 1: The five steps in the CSF

Figure 1: The five steps in the CSF

The following definitions for each step in the diagram above are based on the CSF but have been adapted for our example in this blog post. Although we will focus on the detect, automate and respond steps, it’s important to understand the entire process flow.

  • Identify: Identify and understand the resources, applications, and data within your AWS environment.
  • Protect: Develop and implement appropriate controls and safeguards to facilitate the delivery of services.
  • Detect: Develop and implement appropriate activities to identify the occurrence of a cybersecurity event. This step includes the implementation of monitoring capabilities which will be discussed further in the next section.
  • Automate: Develop and implement planned, programmed actions that will achieve a desired state for an application or resource based on a condition or event.
  • Investigate: Perform a systematic examination of the security event to establish the root cause.
  • Respond: Develop and implement appropriate activities to take automated or manual actions regarding a detected security event.
  • Recover: Develop and implement appropriate activities to maintain plans for resilience and to restore capabilities or services that were impaired due to a security event

Security response automation on AWS

AWS CloudTrail and AWS Config continuously log details regarding users and other identity principals, the resources they interacted with, and configuration changes they might have made in your AWS account. We are able to combine these logs with Amazon EventBridge, which gives us a single service to trigger automations based on events. You can use this information to automatically detect resource changes and to react to deviations from your desired state.

Figure 2: Automated remediation flow

Figure 2: Automated remediation flow

As shown in the diagram above, an automated remediation flow on AWS has three stages:

  1. Monitor: Your automated monitoring tools collect information about resources and applications running in your AWS environment. For example, they might collect AWS CloudTrail information about activities performed in your AWS account, usage metrics from your Amazon EC2 instances, or flow log information about the traffic going to and from network interfaces in your Amazon Virtual Private Cloud (VPC).
  2. Detect: When a monitoring tool detects a predefined conditionβ€”such as a breached threshold, anomalous activity, or configuration deviationβ€”it raises a flag within the system. A triggering condition might be an anomalous activity detected by Amazon GuardDuty, a resource out of compliance with an AWS Config rule, or a high rate of blocked requests on an Amazon VPC security group or AWS Web Application Firewall (AWS WAF) web access control list (web-acl).
  3. Respond: When a condition is flagged, an automated response is triggered that performs an action you’ve predefinedβ€”something intended to remediate or mitigate the flagged condition.

Examples of automated response actions may include modifying a VPC security group, patching an Amazon EC2 instance, rotating various different types of credentials, or adding an additional entry into an IP set in AWS WAF that is part of a web-acl rule to block suspicious clients who triggered a threshold from a monitoring metric.

You can use the event-driven flow described above to achieve a variety of automated response patterns with varying degrees of complexity. Your response pattern could be as simple as invoking a single AWS Lambda function, or it could be a complex series of AWS Step Function tasks with advanced logic. In this blog post, we’ll use two simple Lambda functions in our example solution.

How to define your response automation

Now that we’ve introduced the concept of security response automation, start thinking about security requirements within your environment that you’d like to enforce through automation. These design requirements might come from general best practices you’d like to follow, or they might be specific controls from compliance frameworks relevant for your business.

Customers start with the run-books they already use as part of their Incident Response Lifecycle. Simple run-books, like responding to an exfiltrated credential, can be quickly mapped to automation especially if your run book calls for the disabling of the credential and the notification of on-call personnel. But it can be resource driven as well. Events such as a new AWS VPC being created might trigger your automation to immediately deploy your company’s standard configuration for VPC flowlog collection.

Your objectives should be quantitative, not qualitative. Here are some examples of quantitative objectives:

  • Remote administrative network access to servers should be limited.
  • Server storage volumes should be encrypted.
  • AWS console logins should be protected by multi-factor authentication.

As an optional step, you can expand these objectives into user stories that define the conditions and remediation actions when there is an event. User stories are informal descriptions that briefly document a feature within a software system. User stories may be global and span across multiple applications or they may be specific to a single application.

For example:

β€œRemote administrative network access to servers should have limited access from internal trusted networks only. Remote access ports include SSH TCP port 22 and RDP TCP port 3389. If remote access ports are detected within the environment and they are accessible to outside resources, they should be automatically closed and the owner will be notified.”

Once you’ve completed your user story, you can determine how to use automated remediation to help achieve these objectives in your AWS environment. User stories should be stored in a location that provides versioning support and can reference the associated automation code.

You should carefully consider the effect of your remediation mechanisms in order to help prevent unintended impact on your resources and applications. Remediation actions such as instance termination, credential revocation, and security group modification can adversely affect application availability. Depending on the level of risk that’s acceptable to your organization, your automated mechanism can only provide a notification which would then be manually investigated prior to remediation. Once you’ve identified an automated remediation mechanism, you can build out the required components and test them in a non-production environment.

Sample response automation walkthrough

In the following section, we’ll walk you through an automated remediation for a simulated event that indicates potential unauthorized activityβ€”the unintended disabling of CloudTrail logging. Outside parties might want to disable logging to avoid detection and the recording of their unauthorized activity. Our response is to re-enable the CloudTrail logging and immediately notify the security contact. Here’s the user story for this scenario:

β€œCloudTrail logging should be enabled for all AWS accounts and regions. If CloudTrail logging is disabled, it will automatically be enabled and the security operations team will be notified.”

A note about the sample response automation below as it references Amazon EventBridge: EventBridge was formerly referred to as Amazon CloudWatch Events. If you see other documentation referring to Amazon CloudWatch, you can find that configuration now via the Amazon EventBridge console page.

Additionally, we will be looking at this scenario through the lens of an account that has a stand-alone CloudTrail configuration. While this is an acceptable configuration, AWS recommends using AWS Organizations, which allows you to configure an organizational CloudTrail. These organizational trails are immutable to the child accounts so that logging data cannot be removed or tampered with.

In order to use our sample remediation, you will need to enable Amazon GuardDuty and AWS Security Hub in the AWS Region you have selected. Both of these services include a 30-day trial at no additional cost. See the AWS Security Hub pricing page and the Amazon GuardDuty pricing page for additional details.

Important: You’ll use AWS CloudTrail to test the sample remediation. Running more than one CloudTrail trail in your AWS account will result in charges based on the number of events processed while the trail is running. Charges for additional copies of management events recorded in a Region are applied based on the published pricing plan. To minimize the charges, follow the clean-up steps that we provide later in this post to remove the sample automation and delete the trail.

Deploy the sample response automation

In this section, we’ll show you how to deploy and test the CloudTrail logging remediation sample. Amazon GuardDuty generates the finding

Stealth:IAMUser/CloudTrailLoggingDisabled when CloudTrail logging is disabled, and AWS Security Hub collects findings from GuardDuty using the standardized finding format mentioned earlier. We recommend that you deploy this sample into a non- production AWS account.

Select the Launch Stack button below to deploy a CloudFormation template with an automation sample in the us-east-1 Region. You can also download the template and implement it in another Region. The template consists of an Amazon EventBridge rule, an AWS Lambda function, and the IAM permissions necessary for both components to execute. It takes several minutes for the CloudFormation stack build to complete.

Select the Launch Stack button to launch the template

  1. In the CloudFormation console, choose the Select Template form, and then select Next.
  2. On the Specify Details page, provide the email address for a security contact. For the purpose of this walkthrough, it should be an email address that you have access to. Then select Next.
  3. On the Options page, accept the defaults, then select Next.
  4. On the Review page, confirm the details, then select Create.
  5. While the stack is being created, check the inbox of the email address that you provided in step 2. Look for an email message with the subject AWS Notification – Subscription Confirmation. Select the link in the body of the email to confirm your subscription to the Amazon Simple Notification Service (Amazon SNS) topic. You should see a success message like the one shown in Figure 3:

    Figure 3: SNS subscription confirmation

    Figure 3: SNS subscription confirmation

  6. Return to the CloudFormation console. After the Status field for the CloudFormation stack changes to CREATE COMPLETE (as shown in Figure 4), the solution is implemented and is ready for testing.

    Figure 4: CREATE_COMPLETE status

    Figure 4: CREATE_COMPLETE status

Test the sample automation

You’re now ready to test the automated response by creating a test trail in CloudTrail, then trying to stop it.

  1. From the AWS Management Console, choose Services > CloudTrail.
  2. Select Trails, then select Create Trail.
  3. On the Create Trail form:
    1. Enter a value for Trail name and for AWS KMS alias, as shown in Figure 5.
    2. For Storage location, create a new S3 bucket or choose an existing one. For our testing, we create a new S3 bucket.

      Figure 5: Create a CloudTrail trail

      Figure 5: Create a CloudTrail trail

    3. On the next page, under Management events, select Write-only (to minimize event volume).

      Figure 6: Create a CloudTrail trail

      Figure 6: Create a CloudTrail trail

  4. On the Trails page of the CloudTrail console, verify that the new trail has started. You should see the status as logging, as shown in Figure 7.

    Figure 7: Verify new trail has started

    Figure 7: Verify new trail has started

  5. You’re now ready to act like an unauthorized user trying to cover their tracks. Stop the logging for the trail that you just created:
    1. Select the new trail name to display its configuration page.
    2. In the top-right corner, choose the Stop logging button.
    3. When prompted with a warning dialog box, select Stop logging.
    4. Verify that the logging has stopped by confirming that the Start logging button now appears in the top right, as shown in Figure 8.

      Figure 8: Verify logging switch is off

      Figure 8: Verify logging switch is off

    You have now simulated a security event by disabling logging for one of the trails in the CloudTrail service. Within the next few seconds, the near real-time automated response will detect the stopped trail, restart it, and send an email notification. You can refresh the Trails page of the CloudTrail console to verify through the Stop logging button at the top right corner.

    Within the next several minutes, the investigatory automated response will also begin. GuardDuty will detect the action that stopped the trail and enrich the data about the source of unexpected behavior. Security Hub will then ingest that information and optionally correlate with other security events.

    Following the steps below, you can monitor findings within Security Hub for the finding type TTPs/Defense Evasion/Stealth:IAMUser-CloudTrailLoggingDisabled to be generated:

  6. In the AWS Management Console, choose Services > Security Hub.
    1. In the left pane, select Findings.
    2. Select the Add filters field, then select Type.
    3. Select EQUALS, paste TTPs/Defense Evasion/Stealth:IAMUser-CloudTrailLoggingDisabled into the field, then select Apply.
    4. Refresh your browser periodically until the finding is generated.

    Figure 9: Monitor Security Hub for your finding

    Figure 9: Monitor Security Hub for your finding

  7. Select the title of the finding to review details. When you’re ready, you can choose to archive the finding by selecting the Archive link. Alternately, you can select a custom action to continue with the response. Custom actions are one of the ways that you can integrate Security Hub with custom partner solutions.

Now that you’ve completed your review of the finding, let’s dig into the components of automation.

How the sample automation works

This example incorporates two automated responses: a near real-time workflow and an investigatory workflow. The near real-time workflow provides a rapid response to an individual event, in this case the stopping of a trail. The goal is to restore the trail to a functioning state and alert security responders as quickly as possible. The investigatory workflow still includes a response to provide defense in depth and uses services that support a more in-depth investigation of the incident.

Figure 10: Sample automation workflow

Figure 10: Sample automation workflow

In the near real-time workflow, Amazon EventBridge monitors for the undesired activity.

When a trail is stopped, AWS CloudTrail publishes an event on the EventBridge bus. An EventBridge rule detects the trail-stopping event and invokes a Lambda function to respond to the event by restarting the trail and notifying the security contact via an Amazon Simple Notification Service (SNS) topic.

In the investigative workflow, CloudTrail logs are monitored for undesired activities. For example, if a trail is stopped, there will be a corresponding log record. GuardDuty detects this activity and retrieves additional data points regarding the source IP that executed the API call. Two common examples of those additional data points in GuardDuty findings include whether the API call came from an IP address on a threat list, or whether it came from a network not commonly used in your AWS account. An AWS Lambda function responds by restarting the trail and notifying the security contact. The finding is imported into AWS Security Hub, where it’s aggregated with other findings for analyst viewing. Using EventBridge, you can configure Security Hub to export the finding to partner security orchestration tools, SIEM (security information and event management) systems, and ticketing systems for investigation.

AWS Security Hub imports findings from AWS security services such as GuardDuty, Amazon Macie and Amazon Inspector, plus from third-party product integrations you’ve enabled. Findings are provided to Security Hub in AWS Security Finding Format (ASFF), which minimizes the need for data conversion. Security Hub correlates these findings to help you identify related security events and determine a root cause. Security Hub also publishes its findings to Amazon EventBridge to enable further processing by other AWS services such as AWS Lambda. You can also create custom actions using Security Hub. Custom actions are useful for security analysts working with the Security Hub console who want to send a specific finding, or a small set of findings, to a response or a remediation workflow.

Deeper look into how the β€œRespond” phase works

Amazon EventBridge and AWS Lambda work together to respond to a security finding.

Amazon EventBridge is a service that provides real-time access to changes in data in AWS services, your own applications, and Software-as-a-Service (SaaS) applications without writing code. In this example, EventBridge identifies a Security Hub finding that requires action and invokes a Lambda function that performs remediation. As shown in Figure 11, the Lambda function both notifies the security operator via SNS and restarts the stopped CloudTrail.

Figure 11: Sample β€œrespond” workflow

Figure 11: Sample β€œrespond” workflow

To set this response up, we looked for an event to indicate that a trail had stopped or was disabled. We knew that the GuardDuty finding Stealth:IAMUser/CloudTrailLoggingDisabled is raised when CloudTrail logging is disabled. Therefore, we configured the default event bus to look for this event.

You can learn more regarding the available GuardDuty findings in the user guide.

How the code works

When Security Hub publishes a finding to EventBridge, it includes full details of the finding as discovered by GuardDuty. The finding is published in JSON format. If you review the details of the sample finding, note that it has several fields helping you identify the specific events that you’re looking for. Here are some of the relevant details:

{
   …
   "source":"aws.securityhub",
   …
   "detail":{
      "findings": [{
		…
    	β€œTypes”: [
			"TTPs/Defense Evasion/Stealth:IAMUser-CloudTrailLoggingDisabled"
			],
		…
      }]
}

You can build an event pattern using these fields, which an EventBridge filtering rule can then use to identify events and to invoke the remediation Lambda function. Below is a snippet from the CloudFormation template we provided earlier that defines that event pattern for the EventBridge filtering rule:

# pattern matches the nested JSON format of a specific Security Hub finding
      EventPattern:
        source:
        - aws.securityhub
        detail-type:
          - "Security Hub Findings - Imported"
        detail:
          findings:
            Types:
              - "TTPs/Defense Evasion/Stealth:IAMUser-CloudTrailLoggingDisabled"

Once the rule is in place, EventBridge continuously monitors the event bus for events with this pattern.

When EventBridge finds a match, it invokes the remediating Lambda function and passes the full details of the event to the function. The Lambda function then parses the JSON fields in the event so that it can act as shown in this Python code snippet:

# extract trail ARN by parsing the incoming Security Hub finding (in JSON format)
trailARN = event['detail']['findings'][0]['ProductFields']['action/awsApiCallAction/affectedResources/AWS::CloudTrail::Trail']   

# description contains useful details to be sent to security operations
description = event['detail']['findings'][0]['Description']

The code also issues a notification to security operators so they can review the findings and insights in Security Hub and other services to better understand the incident and to decide whether further manual actions are warranted. Here’s the code snippet that uses SNS to send out a note to security operators:

#Sending the notification that the AWS CloudTrail has been disabled.
snspublish = snsclient.publish(
	TargetArn = snsARN,
	Message="Automatically restarting CloudTrail logging.  Event description: \"%s\" " %description
	)

While notifications to human operators are important, the Lambda function will not wait to take action. It immediately remediates the condition by restarting the stopped trail in CloudTrail. Here’s a code snippet that restarts the trail to reenable logging:

try:
	client = boto3.client('cloudtrail')
	enablelogging = client.start_logging(Name=trailARN)
	logger.debug("Response on enable CloudTrail logging- %s" %enablelogging)
except ClientError as e:
	logger.error("An error occured: %s" %e)

After the trail has been restarted, API activity is once again logged and can be audited.

This can help provide relevant data for the remaining steps in the incident response process. The data is especially important for the post-incident phase, when your team analyzes lessons learned to help prevent future incidents. You can also use this phase to identify additional steps to automate in your incident response.

How to Enable Custom Action and build your own Automated Response

Unlike how you set up the notification earlier, you may not want fully automate responses to findings. To set up automation that you can manually trigger it for specific findings, you can use custom actions. A custom action is a Security Hub mechanism for sending selected findings to EventBridge that can be matched by an EventBridge rule. The rule defines a specific action to take when a finding is received that is associated with the custom action ID. Custom actions can be used, for example, to send a specific finding, or a small set of findings, to a response or remediation workflow. You can create up to 50 custom actions.

In this section, we will walk you through how to create a custom action in Security Hub which will trigger an EventBridge rule to execute a Lambda function for the same security finding related to CloudTrail Disabled.

Create a Custom Action in Security Hub

  1. Open Security Hub. In the left navigation pane, under Management, open the Custom actions page.
  2. Choose Create custom action.
  3. Enter an Action Name, Action Description, and Action ID that are representative of an action that you are implementingβ€”for example Enable CloudTrail Logging.
  4. Choose Create custom action.
  5. Copy the custom action ARN that was generated. You will need it in the next steps.

Create Amazon EventBridge Rule to capture the Custom Action

In this section, you will define an EventBridge rule that will match events (findings) coming from Security Hub which were forwarded by the custom action you defined above.

  1. Navigate to the Amazon EventBridge console.
  2. On the right side, choose Create rule.
  3. On the Define rule detail page, give your rule a name and description that represents the rule’s purpose (for example, the same name and description that you used for the custom action). Then choose Next.
  4. Security Hub findings are sent as events to the AWS default event bus. In the Define pattern section, you can identify filters to take a specific action when matched events appear. For the Build event pattern step, leave the Event source set to AWS events or EventBridge partner events.
  5. Scroll down to Event pattern. Under Event source, leave it set to AWS Services, and under AWS Service, select Security Hub.
  6. For the Event Type, choose Security Hub Findings – Custom Action.
  7. Then select Specific custom action ARN(s) and enter the ARN for the custom action that you created earlier.
  8. Notice that as you selected these options, the event pattern on the right was updating. Choose Next.
  9. On the Select target(s) step, from the Select a target dropdown, select Lambda function. Then, from the Function dropdown, select SecurityAutoremediation-CloudTrailStartLoggingLamb-xxxx. This lambda function was created as part of the Cloudformation template.
  10. Choose Next.
  11. For the Configure tags step, choose Next.
  12. For the Review and create step, choose Create rule.

Trigger the automation

As GuardDuty and Security Hub have been enabled, after AWS Cloudtrail logging is enabled, you should see a security finding generated by Amazon GuardDuty and collected in AWS Security Hub.

  1. Navigate to the Security Hub Findings page.
  2. In the top corner, from the Actions dropdown menu, select the Enable CloudTrail Logging custom action.
  3. Verify the CloudTrail configuration by accessing the AWS CloudTrail dashboard.
  4. Confirm that the trail status displays as Logging, which indicates the successful execution of the remediation Lambda function triggered by the EventBridge rule through the custom action.

How AWS helps customers get started

Many customers look at the task of building automation remediation as daunting. Many operations teams might not have the skills or human scale to take on developing automation scripts. Because many Incident Response scenarios can be mapped to findings in AWS security services, we can begin building tools that respond and are quickly adaptable to your environment.

Automated Security Response (ASR) on AWS is a solution that enables AWS Security Hub customers to remediate findings with a single click using sets of predefined response and remediation actions called Playbooks. The remediations are implemented as AWS Systems Manager automation documents. The solution includes remediations for issues such as unused access keys, open security groups, weak account password policies, VPC flow logging configurations, and public S3 buckets. Remediations can also be configured to trigger automatically when findings appear in AWS Security Hub.

The solution includes the playbook remediations for some of the security controls defined as part of the following standards:

  • AWS Foundational Security Best Practices (FSBP) v1.0.0
  • Center for Internet Security (CIS) AWS Foundations Benchmark v1.2.0
  • Center for Internet Security (CIS) AWS Foundations Benchmark v1.4.0
  • Center for Internet Security (CIS) AWS Foundations Benchmark v3.0.0
  • Payment Card Industry (PCI) Data Security Standard (DSS) v3.2.1
  • National Institute of Standards and Technology (NIST) Special Publication 800-53 Revision 5

A Playbook called Security Control is included that allows operation with AWS Security Hub’s Consolidated Control Findings feature.

Figure 12: Architecture of the Automated Security Solution

Figure 12: Architecture of the Automated Security Solution

Additionally, the library includes instructions in the Implementation Guide on how to create new automations in an existing Playbook.

You can use and deploy this library into your accounts at no additional cost, however there are costs associated with the services that it consumes.

Clean up

After you’ve completed the sample security response automation, we recommend that you remove the resources created in this walkthrough example from your account in order to minimize the charges associated with the trail in CloudTrail and data stored in S3.

Important: Deleting resources in your account can negatively impact the applications running in your AWS account. Verify that applications and AWS account security do not depend on the resources you’re about to delete.

Here are the clean-up steps:

Summary

You’ve learned the basic concepts and considerations behind security response automation on AWS and how to use Amazon EventBridge, Amazon GuardDuty and AWS Security Hub to automatically re-enable AWS CloudTrail when it becomes disabled unexpectedly. Additionally you got a chance to learn about the AWS Automated Security Response library and how it can help you rapidly get started with automations through Security Hub. As a next step, you may want to start building your own custom response automations and dive deeper into the AWS Security Incident Response Guide, NIST Cybersecurity Framework (CSF) or the AWS Cloud Adoption Framework (CAF) Security Perspective. You can explore additional automatic remediation solutions on the AWS Solution Library. You can find the code used in this example on GitHub.

If you have feedback about this blog post, submit them in the Comments section below. If you have questions about using this solution, start a thread in the
EventBridge, GuardDuty or Security Hub forums, or contact AWS Support.

How to Protect Your Site From Content Sniffing with HTTP Security Headers

19 December 2025 at 00:58
How to Protect Your Site From Content Sniffing with HTTP Security Headers

Ever had a perfectly β€œsafe” page or file turn into an attack vector out of nowhere? That can happen when browsers start guessing what your content is instead of listening to your server. Browsers sometimes try to figure out what kind of file they’re dealing with if the server doesn’t provide the Content-Type header or provides the wrong one, a process known as β€œcontent sniffing.” While this can be helpful, content sniffing is a security risk if an attacker can mess with the content.

Continue reading How to Protect Your Site From Content Sniffing with HTTP Security Headers at Sucuri Blog.

How to Protect Your WordPress Site From a Phishing Attack

13 December 2025 at 08:36
How to Protect Your WordPress Site From a Phishing Attack

If you run a website, manage a business inbox, or even just use online banking, you’ve already lived in the phishing era for a long time. The only thing that’s changed is the polish.

Phishing scams have moved past those obviously fake β€œplease verify” requests to include convincing login pages, realistic invoices, and even bogus delivery updates. Some are mass-sent and easy to spot, others are customized precisely for the person they’re targeting, their job, company, tech, and everyday apps.

Continue reading How to Protect Your WordPress Site From a Phishing Attack at Sucuri Blog.

A Beginner’s Guide to the CVE Database

20 November 2025 at 02:47
A Beginner’s Guide to the CVE Database

Keeping websites and applications secure starts with knowing which vulnerabilities exist, how severe they are, and whether they affect your stack. That’s exactly where the CVE program shines. Below, we’ll cover some CVE fundamentals, including what they are, how to search and understand the data, and how to translate this information into actionable steps.

Introduction to the CVE database
So, what is CVE?

CVE stands for Common Vulnerabilities and Exposures, a community-driven program that assigns unique identifiers to publicly known vulnerabilities.

Continue reading A Beginner’s Guide to the CVE Database at Sucuri Blog.

How to Fix the ERR_TOO_MANY_REDIRECTS Error

13 November 2025 at 22:10
How to Fix the ERR_TOO_MANY_REDIRECTS Error

Encountering the ERR_TOO_MANY_REDIRECTS error (also called a redirect loop error) can be frustrating, especially when your website was working fine just moments ago. This issue is common across browsers such as Chrome, Firefox, and Edge and it typically means your site has entered a redirection loop.

In this post, you’ll learn what the error means, why it occurs, ways to identify where the redirect is coming from, and how to fix it effectively – including an important section on redirect types, which often play a direct role in causing this issue.

Continue reading How to Fix the ERR_TOO_MANY_REDIRECTS Error at Sucuri Blog.

How to Choose WordPress Caching Options

12 November 2025 at 03:27
How to Choose WordPress Caching Options

If you want a faster WordPress site, caching belongs at the center of your performance plan. It reduces the work your server has to do and turns slow, dynamic page builds into quick, static responses. On many unoptimized sites, that shift alone can reduce several seconds off page loads when paired with other best practices. The trick isn’t whether to cache but how to pick the right caching approach for your site’s content, traffic, and infrastructure.

Continue reading How to Choose WordPress Caching Options at Sucuri Blog.

Scout2 Usage: AWS Infrastructure Security Best Practices

Jordan Drysdale// Full disclosure and tl;dr: The NCC Group has developed an amazing toolkit for analyzing your AWS infrastructure against Amazon’s best practices guidelines. Start here: https://github.com/nccgroup/Scout2 Then, access your […]

The post Scout2 Usage: AWS Infrastructure Security Best Practices appeared first on Black Hills Information Security, Inc..

❌