
Normal view

Threat tactic spotlight: Subdomain takeover

16 June 2026 at 19:53

In this blog post you’ll learn how to detect and prevent subdomain takeover – a tactic where threat actors exploit dangling DNS records to redirect traffic to attacker-controlled resources. We’ll explain the issue, how the situation arises, and how you can use various AWS features and services to help mitigate the impact of this tactic.

Under the shared responsibility model, securing configurations in the cloud is your responsibility. AWS supports you through strong defaults, guidance in the Security Pillar of the Well-Architected Framework, and security services to help you meet that responsibility. The AWS Customer Incident Response Team (AWS CIRT) also monitors for new and trending tactics that threat actors use to exploit specific customer configurations, so that you can make informed design decisions and improve your response plans.

AWS CIRT has observed threat actors actively scanning for public DNS CNAME records that point to resources that no longer exist, looking for subdomain takeover opportunities.

Note: The subdomain takeover tactic does not leverage vulnerabilities of AWS services. It exploits a dangling DNS record to redirect traffic to an attacker-controlled resource.

Quick DNS Primer

CNAME Records: A CNAME (Canonical Name) record is a DNS entry that points one domain name to another. For example, api.example.com can be configured to point to api.example.s3-website-us-east-1.amazonaws.com. This feature of DNS enables users to configure a memorable, human-friendly domain name while the actual resource lives at a longer, machine-generated AWS hostname. A security issue emerges when the target resource is deleted but the CNAME record pointing to it remains – creating a “dangling” record.

Dangling Records: When a resource (like an S3 bucket) is deleted but the DNS record pointing to it is left behind, that DNS record becomes “dangling”, pointing to a resource that no longer exists. For resources in globally shared namespaces, threat actors can potentially reclaim the name of your deleted resource and serve malicious content through your DNS record.

What is subdomain takeover?

A subdomain is a prefix added to a domain that allows you to organize access to your resources. A subdomain takeover occurs when you delete the underlying resource and a threat actor creates a new resource with the same name to take advantage of the DNS records still pointing to it.

A subdomain takeover is possible when a CNAME record points to an AWS resource that uses a globally shared DNS namespace where the resource name can be chosen by any AWS customer. The following AWS resources meet these criteria:

Amazon S3 (global namespace): Bucket names like mybucket.s3.amazonaws.com are globally unique and can be claimed by any account if the bucket is deleted. Note: S3 buckets created with account regional namespaces (launched March 2026) are scoped to your account and are not subject to this issue.

Amazon CloudFront: Distribution domain names like d111111abcdef8.cloudfront.net are assigned by AWS and cannot be chosen by an attacker. However, if you delete a distribution and another customer creates one that happens to receive the same domain name, a dangling CNAME could resolve to their content.

AWS Elastic Beanstalk: Environment names like myapp.elasticbeanstalk.com are globally unique and can be claimed by any account if the environment is terminated.

Resources like Amazon VPC, Amazon EC2 instances, or private hosted zones are not subject to this tactic because they do not expose globally claimable DNS namespaces.

MITRE ATT&CK classifies this technique under T1584.001: Compromise Infrastructure – Domains.

Analyzing an example scenario

Consider the following scenario:

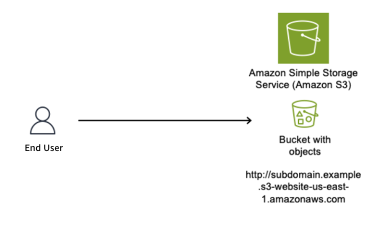
You create a DNS CNAME record pointing to your S3 website endpoint. The subdomain subdomain.example.com now resolves to subdomain.example.s3-website-us-east-1.amazonaws.com, which serves content from the S3 bucket named subdomain.example. If your team deletes the bucket and forgets to delete the DNS record, users that navigate to the site will see an error stating that the bucket doesn’t exist. However, at this point, if a threat actor sees this error and moves in to claim the bucket name, they will be able to set up their own site that users will see when they navigate to the subdomain.example.com site.

Figure 1 shows an S3 bucket named subdomain.example (a globally unique bucket name) configured to host a static website, with the S3 website endpoint subdomain.example.s3-website-us-east-1.amazonaws.com.

Figure 1: S3 bucket configured as a static website

Figure 1: S3 bucket configured as a static website

As shown in Figure 2, we use Amazon Route 53 to create a CNAME record to resolve to our Amazon domain name; to give users a friendly name and so they do not have to remember the long S3 website name in URLs.

Figure 2: DNS Resolver configured with CNAME record pointing to origin bucket

Figure 2: DNS Resolver configured with CNAME record pointing to origin bucket

The customer’s AWS administrator decides to stop serving content from the S3 bucket and deletes it, as shown in Figure 3.

Figure 3: Resource deleted without removing the CNAME record

Figure 3: Resource deleted without removing the CNAME record

With the S3 bucket deleted and the CNAME record still in place, the DNS record is now dangling. A threat actor identifies this situation and creates a new S3 bucket with the same global name subdomain.example in an AWS account that the threat actor controls, as shown in Figure 4. The threat actor can now serve content from this new bucket, including potentially malicious content. End users remain unaware of this switch and continue to access subdomain.example.com, trusting the content because it appears to originate from a URL they recognize.

Figure 4: Subdomain takeover happens

Figure 4: Subdomain takeover happens

Potential impacts of a sub-domain takeover

Consider these potential impacts:

Reputation risk: There is a potential risk to your organization’s reputation, because you don’t control the content being served from the threat actor’s site that your DNS record points to.

Potential exposure to phishing campaigns: Users within your organization might have the subdomain bookmarked in their browser, not knowing the resource is no longer available, then unsuspectingly navigate to the site that now hosts malware or is used to phish user credentials.

Blocking: If the subdomain is flagged by security vendors for malicious activity, it could impact your business operations.

Financial loss: Subdomain takeover incidents can result in a financial impact due to the potential disruption to service delivery as you deal with the event.

Proactive detection

AWS Config for proactive detection

For proactive detection, you can use AWS Config to continuously monitor your Route 53 CNAME records and verify that the target resources exist in your account.

Prerequisite: This approach requires AWS Config recorder to be enabled for the resource types you want to monitor (S3 buckets, CloudFront distributions, Elastic Beanstalk environments). If Config isn’t recording a resource type, it won’t appear in the inventory check. For more information, see Setting up AWS Config with the console.

Why use AWS Config inventory instead of DNS resolution checks?

A common approach is to check whether a CNAME resolves to a valid endpoint. However, this method has a critical flaw: if an attacker has already claimed the resource, DNS resolution will succeed – to their resource, not yours. You would have no indication that you don’t own what’s responding.

By querying AWS Config’s recorded configuration items, you’re checking whether the resource exists in your account inventory, not just whether something responds at that DNS name. This approach correctly identifies dangling CNAMEs even after a takeover has occurred.

Implementation approach:

Account-level vs. organization-level scope

The reference implementation queries AWS Config inventory within a single account. This means that if a CNAME record in Account A points to a resource that legitimately exists in Account B within the same AWS organization, the rule will flag it as NON_COMPLIANT.

For organizations that share resources across accounts, you can modify the solution to use an AWS Config Aggregator, which queries resource inventory across all accounts in your organization. This is similar to how IAM Access Analyzer supports both account-level and organization-level scopes. To use this approach, you need an organization-level Config Aggregator already configured, and the Lambda function’s IAM role needs the config:SelectAggregateResourceConfig permission.

We recommend starting with account-level scope for simplicity, then expanding to organization-level if your environment includes cross-account resource sharing.

The main idea is to create a custom AWS Config rule that queries your Route 53 hosted zones for CNAME records, then parses each CNAME target to determine whether it points to a known AWS resource pattern such as S3, CloudFront, or Elastic Beanstalk. For each match, the rule cross-references the target against your AWS Config inventory to verify that the resource actually exists in your account. If the resource isn’t found, the rule marks the CNAME record as NON_COMPLIANT, surfacing it for review.

The Config rule should focus on known AWS resource patterns:

  • S3: *.s3.amazonaws.com, *.s3-website-<region>.amazonaws.com
  • CloudFront: *.cloudfront.net
  • Elastic Beanstalk: *.elasticbeanstalk.com

Note: CNAME records pointing to external third-party services are outside the scope of this detection mechanism, as those resources won’t appear in your AWS Config inventory.

NON_COMPLIANT findings from your Config rule can be routed to AWS Security Hub for centralized visibility, or trigger SNS notifications to alert your security team.

Figure 5: Dangling DNS Detection Solution

Figure 5: Dangling DNS Detection Solution

Reference implementation:

We’ve published a complete implementation of this detection approach as an open-source solution. The solution deploys a Lambda function that discovers CNAME records across all your Route 53 hosted zones and uses pattern matching to identify targets pointing to S3, CloudFront, and Elastic Beanstalk. It then queries your AWS Config inventory to verify whether each target resource still exists in your account. When a dangling record is detected, the solution generates a HIGH severity finding in Security Hub and can optionally send SNS notifications to alert your security team. A CloudWatch metrics dashboard is also included for ongoing compliance tracking.

Deployment:

# Clone the repository
git clone https://github.com/aws-samples/sample-dangling-dns-detection
cd sample-dangling-dns-detection

# Build the Lambda deployment package
./scripts/package.sh

# Upload to S3
aws s3 cp dist/dangling-dns-detection.zip s3://YOUR_BUCKET/

# Deploy the CloudFormation stack
aws cloudformation deploy \
  --template-file infrastructure/template.yaml \
  --stack-name dangling-dns-detection \
  --parameter-overrides \
      LambdaCodeS3Bucket=YOUR_BUCKET \
      EvaluationFrequency=TwentyFour_Hours \
  --capabilities CAPABILITY_NAMED_IAM

The stack creates an AWS Config custom rule that runs on your specified schedule (default: every 24 hours), evaluating all CNAME records and reporting compliance status.

Mitigating the effects

Mitigating subdomain takeover requires both preventive procedures and responsive capabilities.

Prevention: Standard operating procedure

The most effective mitigation is a standard operating procedure for resource deprovisioning that ensures DNS records are removed before the underlying resource:

  1. Within your DNS zone, delete the CNAME record that points to the fully qualified domain name (FQDN) of the resource that you plan to deprovision.
  2. Wait for the DNS TTL to expire before deleting the resource. DNS resolvers cache records for the duration of the TTL (for example, a TTL of 3600 means resolvers may serve the old record for up to one hour). If you delete the resource before the TTL expires, a threat actor could claim the resource name while cached CNAME entries are still directing traffic to it.
  3. Deprovision the resource that you no longer want to use.
  4. Run a DNS check of the CNAME record that you removed to verify that the resource is no longer resolving.

Key principle: Always delete DNS first, wait for the TTL to expire, then delete the resource. This order eliminates the window where a dangling record could be exploited.

Prevention: S3 account regional namespaces

As mentioned earlier, AWS introduced account regional namespaces for Amazon S3 general purpose buckets in March 2026. While this is a meaningful step toward mitigating the S3-specific takeover vector, there are important operational limitations to be aware of:

Existing buckets are unaffected. Buckets already created in the global namespace cannot be migrated to an account regional namespace. The bucket names remain globally unique and claimable by anyone if the bucket is deleted.

Global namespace is still the default. When creating a new bucket through the console, CLI, or SDK, the global namespace remains the default selection. Users who aren’t aware of the new option will continue creating globally-scoped buckets.

Existing IaC templates require updates. Existing infrastructure-as-code templates (CloudFormation, CDK, Terraform) that don’t explicitly opt in to the account regional namespace will continue provisioning buckets in the global namespace. For CloudFormation, this means setting the BucketNamespace property to account-regional. For other IaC tools, consult their documentation for the equivalent configuration. Organizations need to audit and update their templates to opt in.

For these reasons, the dangling DNS detection approach described in this post remains critical – particularly for organizations with existing S3 infrastructure, and for CloudFront, and Elastic Beanstalk resources where no equivalent namespace scoping exists.

Response: Notification and remediation

When a dangling DNS record is detected, the reference solution described in the Detection section automatically creates a HIGH severity finding in AWS Security Hub and reports the CNAME record as NON_COMPLIANT in AWS Config. If you provide an SNS topic ARN during deployment, the solution also sends notifications to alert your security or operations team via email, Slack, or other channels. For production environments, consider a human-in-the-loop workflow where these notifications are reviewed by a team member who approves the DNS record deletion before it’s executed. This prevents accidental deletion of legitimate records during transient issues.

The reference solution also includes a CloudWatch dashboard for tracking compliance status and evaluation metrics over time, giving your team ongoing visibility into DNS health across your hosted zones.

Note: Fully automated remediation (auto-deleting DNS records) carries risk – a false positive could disrupt legitimate services. We recommend starting with detection and notification, then evaluating automation based on your detection accuracy and operational maturity.

Conclusion

Subdomain takeover is a preventable misconfiguration that can have significant impact on your organization. A layered defense approach provides the best protection:

Prevention: Implement a standard operating procedure that deletes DNS records before deprovisioning the underlying resource.

Detection: Use AWS Config custom rules to proactively identify CNAME records pointing to resources that no longer exist in your account.

Response: Configure notifications through SNS or Security Hub so your team can respond quickly when dangling records are detected.

Monitoring: Maintain ongoing visibility through CloudWatch dashboards to track DNS health and compliance status.

The key insight is that good DNS hygiene – knowing when your CNAME records point to a nonexistent resource – is your first line of defense. Automated detection through AWS Config provides a safety net when operational procedures fail. And if you detect an issue, having a playbook ready to enact your response can lower the impact and your mean time to recovery.

If you have feedback about this post, submit comments in the Comments section below.

Matt Gurr

Matthew Gurr

Matthew is the Senior Incident Response lead in the Asia-Pacific region for the AWS Customer Incident Response Team (AWS CIRT). He has a passion for helping customers proactively prepare for a security event. In his spare time, he enjoys cycling, music, and reading.

Luis Pastor

Luis Pastor

Luis is a Senior Security Solutions Architect at AWS leading the Infrastructure Security and Compliance Technical Field Communities. He drives security architecture for enterprise customers across financial services, healthcare, and retail, specializing in cloud security transformation and regulatory compliance frameworks. Before AWS, Luis architected security solutions in hybrid cloud environments.

Geoff Sweet

Geoff Sweet

Geoff has been in industry since the late 1990s. He began his career in electrical engineering. Starting in IT during the dot-com boom, he has held a variety of diverse roles, such as systems architect, network architect, and, for the past several years, security architect. Geoff specializes in infrastructure security.

Ariam Michael

Ariam Michael

Ariam is a Solutions Architect at AWS. She has supported various customers in the Worldwide Public Sector, specifically SLG and Federal Civilian customers. She is passionate about security, specifically Data Protection helping customers implement encryption and best practices.

Automating post-quantum cryptography readiness using AWS Config

14 May 2026 at 18:18

Migrating your TLS endpoints to Post-quantum cryptography (PQC) starts with understanding your current TLS endpoint inventory and posture. This post introduces the PQC Readiness Scanner — an automated tool that inventories your Application Load Balancer (ALB), Network Load Balancer (NLB), and Amazon API Gateway endpoints and continuously monitors their TLS configurations for PQC readiness. The scanner classifies each endpoint into a three-tier framework that helps prioritize and plan PQC migration.

As quantum computing advances, you need to migrate to quantum-resistant cryptography to protect your data long-term. The PQC Readiness Scanner helps you identify which endpoints to migrate first and tracks your progress across accounts. For web traffic, PQC key exchange algorithms are negotiated only within TLS 1.3. This means quantum-resistant connections require endpoints that support TLS 1.3 and PQC key exchange.

Under the AWS Shared Responsibility Model, AWS secures the infrastructure and enables PQC support across its services. Customers are responsible for configuring their resources to use PQC-capable TLS policies. For AWS-terminated TLS connections—such as those on Application Load Balancer (ALB), Network Load Balancer (NLB), Amazon API Gateway, and Amazon CloudFront—customers choose the security policy (an AWS-managed configuration defining supported TLS protocol versions and cipher suites for a listener) that determines TLS version and cipher suite, key exchange, and authentication algorithm support.

The automated PQC Readiness Scanner for AWS-terminated TLS endpoints is built using AWS Config conformance packs. A conformance pack is a collection of AWS Config rules and remediation actions that can be deployed as a single entity in an account and a Region or across an organization in AWS Organizations.

Solution overview

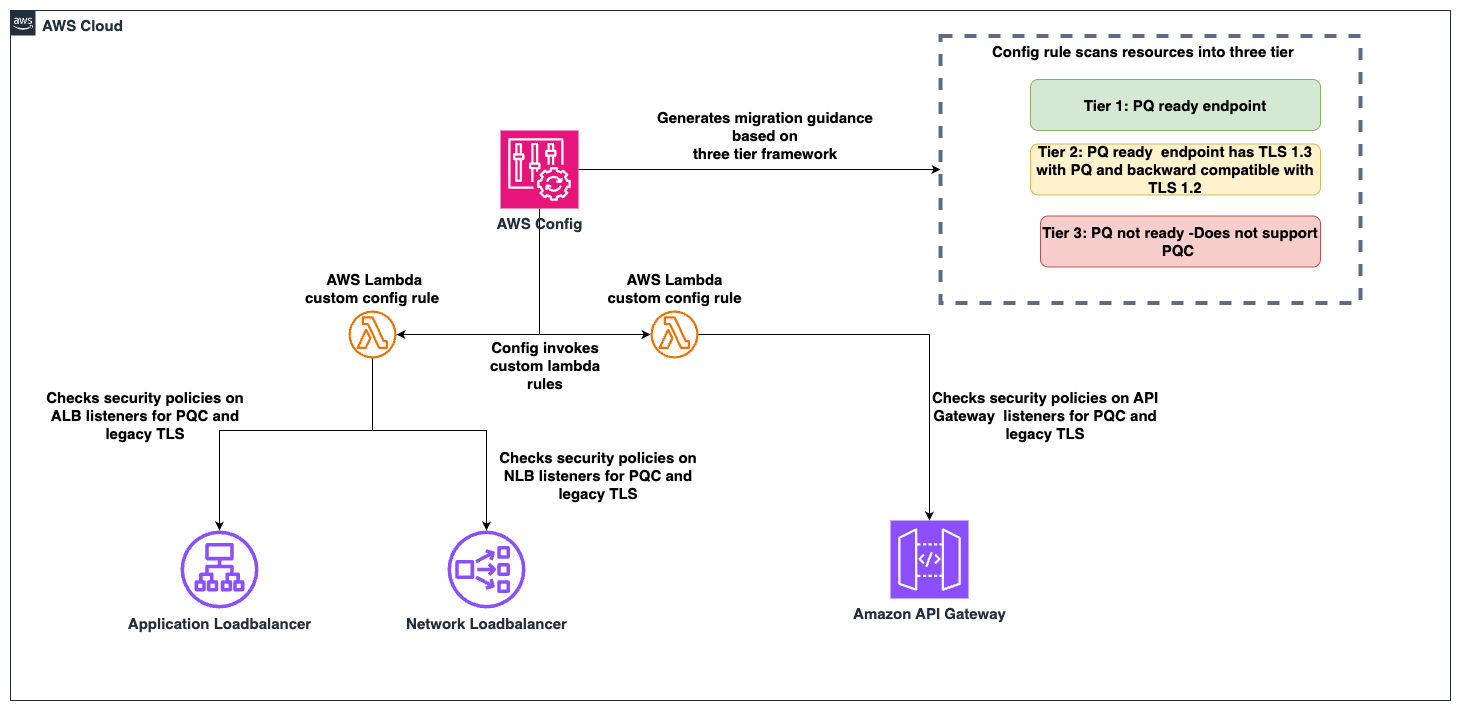
The PQC Readiness Scanner deploys AWS Config rules using a conformance pack to evaluate the security policy on each endpoint. Based on the evaluation, each resource is classified into a three-tier readiness framework that prioritizes migration actions needed to achieve PQ-ready TLS.

The PQC Readiness Scanner performs two checks per resource:

  1. Does the endpoint use a PQ-ready security policy?
  2. Does the endpoint support legacy TLS 1.0 or 1.1?

Each check returns COMPLIANT or NON_COMPLIANT status with specific policy recommendations.

PQC requires endpoints to support TLS 1.3 and use PQC key exchange algorithms. The three-tier framework helps you interpret findings and prioritize fixes. The goal is to have TLS 1.3 with PQC key exchange enabled on the endpoints. However, achieving this requires maintaining backward compatibility with clients.

Tier

Readiness level

TLS protocols

PQC status

Migration priority

Tier 1

PQ-ready (strongest posture)

TLS 1.3 only with PQC key exchange

PQ-ready

None

Tier 2

PQ-ready (backward compatible)

TLS 1.2 and 1.3 with PQC key exchange

PQ-ready

Low

Tier 3

Not PQ-ready

No PQC key exchange

Not PQ-ready

High

How to prioritize your migrations

  • Tier 1 represents the strongest security using only TLS 1.3 with PQC key exchange. These resources already meet the target state.
  • Tier 2 represents a backward-compatible PQ-ready configuration. Endpoints support both TLS 1.2 and TLS 1.3, with PQC key exchange negotiated on TLS 1.3 connections. Migration priority is low because these resources already provide quantum-resistant protection for clients that support TLS 1.3, while maintaining TLS 1.2 compatibility for legacy clients. Migrate to Tier 1 when client-side analysis confirms that the connecting clients support TLS 1.3 with PQC key exchange.
  • Tier 3 covers resources that aren’t PQ-ready. This includes endpoints without TLS 1.3 support, endpoints with TLS 1.3 but without PQC key exchange policies. These resources require immediate attention.

Assessment scope

The scanner evaluates the following AWS edge services that terminate TLS connections on behalf of your applications.

  • Edge services:
    • Application Load Balancer (ALB), Network Load Balancer (NLB) listeners with HTTPS, TLS, and TCP SSL protocols are evaluated.
    • API Gateway REST APIs are evaluated for AWS Regional and private endpoints along with API Gateway HTTP APIs (v2) and WebSocket APIs (v2).
  • Excluded edge services:
    • CloudFront distributions are excluded from the PQC readiness scope because TLS 1.3 with hybrid post-quantum key exchange is automatically enabled across existing CloudFront TLS security policies for viewer-to-edge connections. No customer action is required for inbound (viewer-facing) PQC on CloudFront.
  • Recommended approach for Classic load balancer:
    • For Classic Load Balancers, AWS recommends migrating to ALB or NLB. Classic Load Balancers don’t support TLS 1.3 or PQC key exchange and can’t be made PQ-ready.

How the solution works

AWS Config enables continuous monitoring and evaluation. Conformance packs enable organization-wide deployment. AWS Lambda is a serverless compute service that runs code to perform security policy evaluation based on the AWS Config rules. AWS Serverless Application Model (AWS SAM) is an open source framework used for deploying the AWS Lambda functions.

Figure 1: PQC readiness solution architecture

Figure 1: PQC readiness solution architecture

The PQC Readiness Scanner conformance pack implements four custom AWS Config rules powered by two Lambda functions:

Rule

What it checks

Non-compliant result

ELB PQ-ready

Load balancer listeners use security policies that support TLS 1.3 with PQC key exchange algorithms

Policy doesn’t include PQC support, the resource is marked with a recommended upgrade policy

ELB legacy TLS

Load balancer listeners allow TLS 1.0 or 1.1 connections

Legacy protocols are configured, the resource is flagged.

API Gateway PQ-ready

API Gateway endpoints use security policies that support TLS 1.3 with PQC key exchange algorithms

Policy doesn’t include PQC support, the resource is marked with a recommended upgrade policy

API Gateway legacy TLS

API Gateway endpoints allow TLS 1.0 or 1.1

Legacy protocols are configured, the resource is flagged.

Prerequisites

Before deploying the solution, you need:

  • AWS Command Line Interface (AWS CLI) configured with appropriate permissions
    aws configure
    aws sts get-caller-identity  # Verify

  • Python 3.12 installed. The Lambda runtime requires this version.
    python3 --version  # Should show 3.12.x

  • AWS SAM CLI installed (Installation Guide)
    pip install aws-sam-cli
    
    # Verify
    sam --version

  • AWS Config enabled in your target AWS Region.
    • Configure it to record (This step is not needed if your accounts are recording all resources by default)
      • AWS::ElasticLoadBalancingV2::LoadBalancer
      • AWS::ApiGateway::RestApi
      • AWS::ApiGatewayV2::Api resource types.
    • Enable via AWS Config Console → Recorder → Recording Strategy → Select specific resource types (Follow the steps in manual setup for AWS Config recording strategy for specific resource types)

Steps to deploy the PQC Readiness Scanner

Deploy the PQC Readiness Config Scanner in three phases. Complete deployment commands and configuration details are available in the GitHub repository. The Lambda functions must be deployed first because the conformance pack references their ARNs as parameters. See the GitHub repository for details.

Deploy to single account:

  1. Clone and Build:
    git clone https://github.com/aws-samples/sample-PQC-Readiness-using-AWS-Config.git
    
    cd sample-PQC-Readiness-using-AWS-Config/installation
    
    sam build

  2. Deploy to One or More Regions:
    # Make script executable (first time only)
    chmod +x deploy-per-regions.sh
    
    # Deploy to a single region
    ./deploy-per-regions.sh us-east-1
    
    # Deploy to multiple regions
    ./deploy-per-regions.sh us-east-1 us-west-2 eu-west-1

    Type y and continue if you have enabled AWS Config recording for these resources or its by default recording all resources.

    Figure 2: Type y and continue if you have enabled AWS Config recording for these resources or its by default recording all resources.

  3. The script automatically:
    • Deploys Lambda functions via SAM
    • Deploys conformance pack (creates Config rules)
    • Verifies deployment success
    • Provides clear status messages

The deployment creates two Lambda functions that perform PQ-ready and legacy TLS checks. It provisions IAM roles with least-privilege permissions for ELB, ALB, NLB, and API Gateway describe operations. Lambda permissions allow AWS Config to invoke the functions.

Example screen-print of how a successful deployment looks like.

Figure 3: Example screen-print of what a successful deployment looks like.

Multi-account deployment (Organizations):

For organization-wide deployment across multiple AWS accounts, use CloudFormation StackSets to deploy Lambda functions to each account.

Important Constraint: AWS Config CUSTOM_LAMBDA rules require the Lambda function to exist in the same account as the Config rule. You cannot use a centralized Lambda in one account to evaluate resources in other accounts.

Prerequisite: Shared S3 Bucket

Before packaging, create an S3 bucket accessible by each target account in your organization. This bucket will host the Lambda deployment artifacts that CloudFormation StackSets pulls into each member account.

# Create the shared S3 bucket (run from management/central account)
aws s3 mb s3://<your-org-shared-bucket> --region us-east-1

Grant read access to the target accounts using one of the following options:

aws s3api put-bucket-policy \
  --bucket <your-org-shared-bucket> \
  --policy '{
    "Statement": [
      {
        "Sid": "BucketOwnerFullAccess",
        "Effect": "Allow",
        "Principal": {
          "AWS": "arn:aws:iam::<bucket-owner-account-id>:root"
        },
        "Action": "s3:*",
        "Resource": [
          "arn:aws:s3:::<your-org-shared-bucket>",
          "arn:aws:s3:::<your-org-shared-bucket>/*"
        ]
      },
      {
        "Sid": "CrossAccountReadAccess",
        "Effect": "Allow",
        "Principal": {
          "AWS": [
            "arn:aws:iam::<account-id-1>:root",
            "arn:aws:iam::<account-id-2>:root"
          ]
        },
        "Action": ["s3:GetObject", "s3:ListBucket"],
        "Resource": [
          "arn:aws:s3:::<your-org-shared-bucket>",
          "arn:aws:s3:::<your-org-shared-bucket>/*"
        ]
      }
    ]
  }'

Replace <account IDs> with the AWS account IDs where StackSets will deploy the Lambda functions.

Note: The bucket must be in the same region as the StackSet deployment regions. For multi-region deployments, create one bucket per region and run sam package separately for each.

Step 1: Build and Upload Lambda Packages to S3

Run the packaging script from the installation/ directory:

cd installation

# Make script executable (first time only)
chmod +x deploy-stacksets.sh

# Build, package, upload to S3, and generate resolved template
./deploy-stacksets.sh <your-org-shared-bucket>

This script automatically:

  • Builds Lambda functions using SAM
  • Creates ZIP packages
  • Uploads ZIPs to the shared S3 bucket
  • Generates packaged-template.yaml with S3 values baked in (no parameters needed at deploy time)
Sample script output of successful upload of the lambda packages to S3 bucket

Figure 4: Sample script output of successful upload of the lambda packages to S3 bucket

Step 2: Deploy Lambda Functions via StackSets

Run the following from the management account (or delegated admin account):

# Create StackSet (--region sets the StackSet "home region" where it is managed)
aws cloudformation create-stack-set \
  --stack-set-name pqc-readiness-lambda-functions \
  --template-body file://packaged-template.yaml \
  --capabilities CAPABILITY_IAM \
  --permission-model SERVICE_MANAGED \
  --auto-deployment Enabled=true,RetainStacksOnAccountRemoval=false \
  --region us-east-1

# Deploy stack instances to member accounts
# --regions = target regions where Lambda functions are deployed in member accounts
# --region  = must match the StackSet home region above
aws cloudformation create-stack-instances \
  --stack-set-name pqc-readiness-lambda-functions \
  --deployment-targets OrganizationalUnitIds=ou-xxxx-xxxxxxxx \
  --regions us-east-1 \
  --region us-east-1

Important — StackSet home region vs deployment regions:

  • --region (on each CLI command) = the StackSet home region where the StackSet resource lives. Subsequent operations (describe, update, delete) must specify this same region.
  • --regions (on create-stack-instances) = the deployment target region(s) where stack instances are created in member accounts.
  • These are independent values. Specify --region explicitly to avoid accidental deployment to your CLI’s default region.

Note: SERVICE_MANAGED StackSets must be created from the management or delegated admin account. The management account itself is excluded from stack instance deployments — use deploy-per-regions.sh separately if you need the scanner in the management account.

Step 3: Deploy Organization Conformance Pack

aws configservice put-organization-conformance-pack \
  --organization-conformance-pack-name pqc-legacy-tls-compliance \
  --template-body file://conformance-packs/pqc-legacy-tls-conformance-pack.yaml

This creates Config rules in each member account that reference their local Lambda functions.

    Migration guidance and prioritization

    The three-tier system provides PQC migration priorities:

    High priority – Tier 3 (not PQ-ready):

    • Target: Resources without PQC support. This includes endpoints not using PQ-ready security policies, endpoints that still allow TLS 1.0 or 1.1.
    • Action: Upgrade to a PQ-ready policy containing PQ in its name, such as those ending with -PQ-2025-09 (see Elastic Load Balancing security policies documentation for the full list).
    • Important: Before upgrading to a PQ-ready policy, audit your client TLS versions. PQ-ready policies require TLS 1.3 support; legacy clients that only support TLS 1.2 or earlier will fail to negotiate a connection. Start with a Tier 2 backward-compatible policy (which supports both TLS 1.2 and 1.3 with PQC), monitor connection logs for TLS negotiation failures, and only move to a Tier 1 TLS 1.3-only policy after confirming that your clients support TLS 1.3 with PQC key exchange.
    • Risk: Endpoints don’t support post-quantum cryptography for data in transit. Legacy TLS protocols are vulnerable to current cryptographic attacks.

    Low priority – Tier 2 (PQ-ready, backward compatible):

    • Target: Resources using TLS 1.3 + PQ-ready policies that also support TLS 1.2 for backward compatibility.
    • Action: Consider TLS 1.3-only policies when client compatibility analysis confirms connecting clients support TLS 1.3.
    • Risk: Minimal. These resources already support PQ-TLS with TLS 1.3 connections. TLS 1.2 and earlier fallback maintains backward compatibility, which might indicate some clients aren’t negotiating in PQ-TLS. Remediation is to monitor logs, identify the volume of these connections and clients and plan migration for these clients to use TLS 1.3 with PQ-TLS.

    No action – Tier 1 (PQ-ready, optimal):

    • Target: Resources using TLS 1.3 only with PQC key exchange: These resources meet the target state. No migration needed.

    Viewing the results

    In each member account, navigate to AWS Config Console in the deployed region.

    Conformance Pack View

    Go to AWS Config → Conformance packs and look for:

    OrgConformsPack-pqc-legacy-tls-compliance-

    Note: Organization conformance packs are prefixed with OrgConformsPack- and have a random suffix appended (e.g., OrgConformsPack-pqc-legacy-tls-compliance-gyv22je0).

    PQC Conformance Pack Compliance Score is the percentage of the number of compliant rule-resource

    Figure 5: PQC Conformance Pack Compliance Score is the percentage of the number of compliant rule-resource

    Click the conformance pack to see an overall compliance summary across all 4 rules.

    Individual Rules View

    Go to AWS Config → Rules and find 4 rules with prefix pqc-:

    • pqc-elb-pqc-compliance-conformance-pack-
    • pqc-elb-legacy-tls-conformance-pack-
    • pqc-apigateway-pqc-compliance-conformance-pack-
    • pqc-apigateway-legacy-tls-conformance-pack-

    Click any rule to view:

    • Compliant vs non-compliant resource counts
    • Detailed annotations for each resource
    • Resource ARNs and current security policy configurations
    Visibility into Config rules status inside the conformance pack

    Figure 6: Visibility into Config rules status inside the conformance pack

    Sample image of the config rule findings and annotation describing the migeration guidance based on 3-tier classification.

    Figure 7: Sample image of the config rule findings and annotation describing the migration guidance based on 3-tier classification.

    Conclusion

    After deploying the PQC Readiness Scanner, you gain visibility into TLS posture across AWS edge services, which reduces manual configuration reviews. The tier system provides specific upgrade recommendations so teams can understand next steps without cryptographic expertise. The scanner automatically detects configuration changes to help new deployments maintain readiness standards. Built-in AWS Config reporting supports audit requirements and demonstrates measurable progress toward PQC readiness.

    Deploy the PQC Readiness Scanner and review your results with PQC Readiness Scanner. Start migration with high priority Tier 3 resources and monitor progress across your accounts using AWS Config aggregators.

    Additional resources

    If you have feedback about this post, submit comments in the Comments section below. If you have questions about this post, start a new thread on AWS Config re:Post or contact AWS Support.

    Pravin Nair

    Pravin Nair

    Pravin is a Senior Security Solutions Architect specializing in data protection and privacy at AWS. He partners with customers to architect secure, scalable cloud solutions that address complex security challenges across encryption, infrastructure protection, and privacy engineering. His expertise spans encryption at rest and in transit, infrastructure security, privacy-based architectures, and emerging security domains including generative AI security and post-quantum cryptography.

    Security posture improvement in the AI era

    1 May 2026 at 22:58

    It’s only been a few weeks since Anthropic announced the Claude Mythos Preview model and launched Project Glasswing with AWS and other leading organizations. This has generated a lot of discussion about the future of cybersecurity and what the ever-increasing capabilities of foundation models mean to organizations.

    As AWS CISO Amy Herzog pointed out in the Project Glasswing announcement, “At AWS, we build defenses before threats emerge, from our custom silicon up through the technology stack. Security isn’t a phase for us; it’s continuous and embedded in everything we do.”

    Read more from Amy about this in Building AI defenses at scale: Before the threats emerge.

    While the discussion around the future of cybersecurity is important, the only thing we know for certain is that organizations need to be able to react quickly to the rapid changes AI is bringing to technology and business in general. And you can’t react quickly if your security fundamentals aren’t dialed in.

    The security hygiene gap

    It’s easy to assume you have the foundational security elements covered, or to overlook some completely. Basic security use cases like identity management, threat detection, vulnerability management, data protection, and network security can be inconsistently implemented across cloud environments. While AI is reshaping the security landscape, strong security fundamentals continue to be essential for every organization, regardless of size or industry.

    These are the security basics that matter whether or not you’re adopting AI: patching consistently, enforcing least-privilege access, enabling logging and monitoring, encrypting data at rest and in transit, and reviewing security configurations regularly. When these fundamentals are in place, you’re better positioned to take advantage of AI-driven tools and respond to newly discovered vulnerabilities, wherever they come from.

    While the concepts that drive security fundamentals are universal, implementing them in your environment is best done with an understanding of the context unique to your organization. That’s why we have a multitude of freely available materials—like the AWS Well-Architected Framework—that you can use to help ask the right questions and implement changes in your environment. We also offer programs like the Security Health Improvement Program (SHIP) to help you improve your security posture through prescriptive guidance and continuous improvement.

    What is the Security Health Improvement Program (SHIP)?

    SHIP is a no-cost program available to every AWS customer, regardless of support tier. SHIP provides a proven, data-driven methodology to:

    • Assess your current security posture using data from your AWS environment
    • Identify specific opportunities to improve across 10 core security use cases
    • Build a prioritized action plan tailored to your environment
    • Establish a mechanism for continuous security improvement

    The program is led by AWS Solutions Architects and Technical Account Managers who take you through a personalized report, contextualize findings for your environment, and help you build a prioritized action plan.

    Why SHIP matters in the AI era

    Project Glasswing highlights an important shift: AI-powered tools are accelerating the pace of vulnerability discovery, which means organizations need to be prepared to assess and respond to findings and changing situations faster than before. In addition to external factors, as organizations adopt AI—whether deploying foundation models, building agentic workflows, or using AI-powered services—how they implement their security controls must change as well. A strong security foundation is what makes confident AI adoption possible.

    Here’s how SHIP helps:

    Address foundational security gaps proactively

    SHIP uses a data-driven methodology to identify opportunities to improve and optimize across 10 core security use cases: threat detection, cloud security posture management, application security testing, configuration management, access governance, vulnerability management, application protection, network security, encryption, and secrets management. The program includes a SHIP assessment to identify critical security findings related to your current security posture, so your team can build a prioritized roadmap for improvement tailored to your environment.

    Establish the security baseline AI workloads require

    Before you deploy your first model on Amazon Bedrock or build agentic workflows with Amazon Bedrock AgentCore, you need confidence that your underlying infrastructure follows security best practices. SHIP uses actual data from your environment to provide prescriptive, specific guidance rather than generic security recommendations. This is especially relevant as AI-driven vulnerability discovery tools become more widely available: organizations with strong baselines will be able to act on new findings quickly and effectively.

    Build a mechanism for continuous security improvement

    As AI capabilities evolve, organizations benefit from having a repeatable process to assess and strengthen their security posture over time. SHIP establishes the methodology and mechanisms for your team to continuously assess, prioritize, and improve. By building this operational capability, you’re strengthening your organization’s ability to adapt and contributing to broader industry resilience. As the cybersecurity community integrates AI into defense strategies, SHIP helps you maintain foundational best practices so you can adopt these innovations effectively and with confidence.

    Getting started is straightforward

    SHIP is available today, at no cost, to every AWS customer. Here’s how to get started:

    1. Talk to your AWS account team. Ask about scheduling a SHIP engagement, or request one directly on the SHIP page.
    2. Attend a SHIP Activation Day. AWS regularly hosts hands-on workshops where you can run the SHIP assessment with AWS Solutions Architects and start building your improvement plan.
    3. Explore the prescriptive guidance. Consult the AWS Well-Architected Framework – Security Lens for documentation, reference architectures, and implementation guides you can start using today.

    Take the next step together

    AWS is committed to being the most secure cloud, from our participation in Project Glasswing to the security embedded in every layer of our infrastructure. Security is a shared responsibility, and programs like SHIP give customers the tools, guidance, and support to strengthen their security foundations so they can build confidently, no matter what comes next.

    Ready to improve your security posture? Contact your AWS account team to schedule a SHIP engagement, or visit the SHIP resources page to learn more.

    Celeste Bishop

    Celeste Bishop

    Celeste is a Senior Security Specialist at AWS, based in Austin, Texas. Over the past five years, she has held a range of security-focused roles spanning field and product marketing, developer relations, and executive engagement. She partners closely with customers, security leaders, and field teams to help organizations operate securely in the cloud. Celeste holds a Bachelor’s in Economics from the University of Texas at Austin.

    ❌