Building an AI-powered defense-in-depth security architecture for serverless microservices
Enterprise customers face an unprecedented security landscape where sophisticated cyber threats use artificial intelligence to identify vulnerabilities, automate attacks, and evade detection at machine speed. Traditional perimeter-based security models are insufficient when adversaries can analyze millions of attack vectors in seconds and exploit zero-day vulnerabilities before patches are available.
The distributed nature of serverless architectures compounds this challenge—while microservices offer agility and scalability, they significantly expand the attack surface where each API endpoint, function invocation, and data store becomes a potential entry point, and a single misconfigured component can provide attackers the foothold needed for lateral movement. Organizations must simultaneously navigate complex regulatory environments where compliance frameworks like GDPR, HIPAA, PCI-DSS, and SOC 2 demand robust security controls and comprehensive audit trails, while the velocity of software development creates tension between security and innovation, requiring architectures that are both comprehensive and automated to enable secure deployment without sacrificing speed.
The challenge is multifaceted:
- Expanded attack surface: Multiple entry points across distributed services requiring protection against distributed denial of service (DDoS) attacks, injection vulnerabilities, and unauthorized access
- Identity and access complexity: Managing authentication and authorization across numerous microservices and service-to-service communications
- Data protection requirements: Encrypting sensitive data in transit and at rest while securely storing and rotating credentials without compromising performance
- Compliance and data protection: Meeting regulatory requirements through comprehensive audit trails and continuous monitoring in distributed environments
- Network isolation challenges: Implementing controlled communication paths without exposing resources to the public internet
- AI-powered threats: Defending against attackers who use AI to automate reconnaissance, adapt attacks in real-time, and identify vulnerabilities at machine speed
The solution lies in defense-in-depth—a layered security approach where multiple independent controls work together to protect your application.
This article demonstrates how to implement a comprehensive AI-powered defense-in-depth security architecture for serverless microservices on Amazon Web Services (AWS). By layering security controls at each tier of your application, this architecture creates a resilient system where no single point of failure compromises your entire infrastructure, designed so that if one layer is compromised, additional controls help limit the impact and contain the incident while incorporating AI and machine learning services throughout to help organizations address and respond to AI-powered threats with AI-powered defenses.
Architecture overview: A journey through security layers
Let’s trace a user request from the public internet through our secured serverless architecture, examining each security layer and the AWS services that protect it. This implementation deploys security controls at seven distinct layers with continuous monitoring and AI-powered threat detection throughout, where each layer provides specific capabilities that work together to create a comprehensive defense-in-depth strategy:
- Layer 1 blocks malicious traffic before it reaches your application
- Layer 2 verifies user identity and enforces access policies
- Layer 3 encrypts communications and manages API access
- Layer 4 isolates resources in private networks
- Layer 5 secures compute execution environments
- Layer 6 protects credentials and sensitive configuration
- Layer 7 encrypts data at rest and controls data access
- Continuous monitoring detects threats across layers using AI-powered analysis
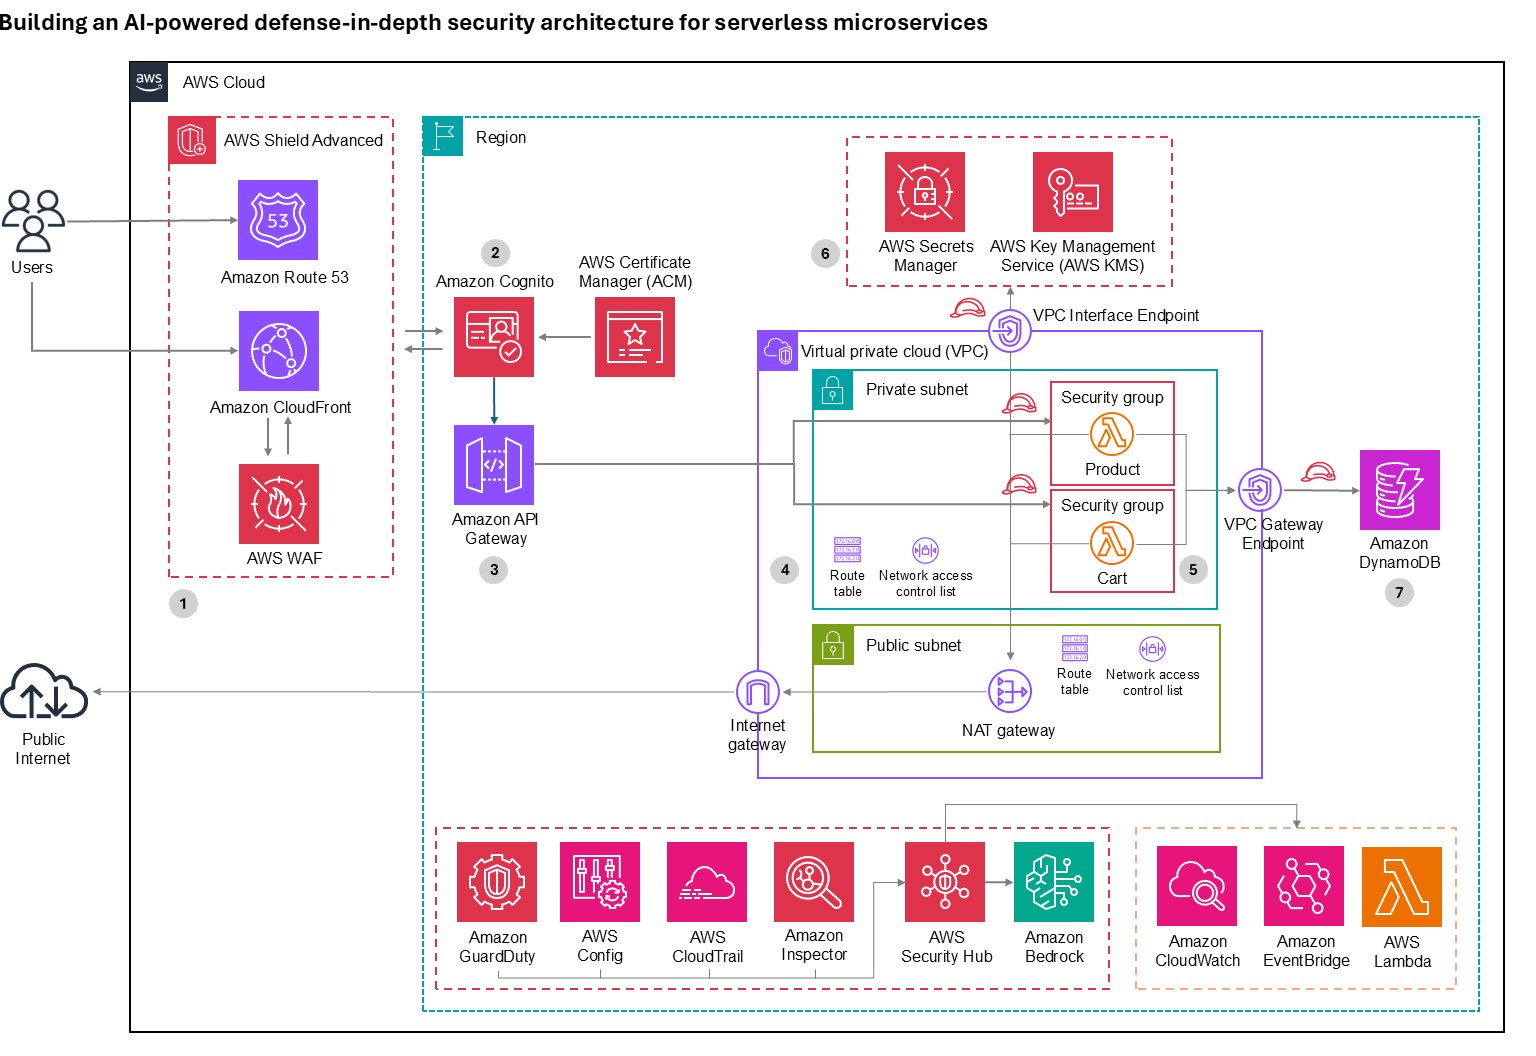
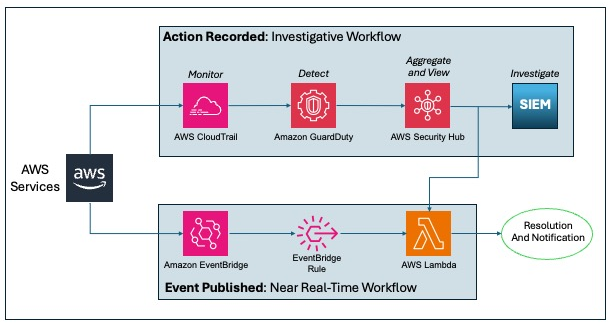
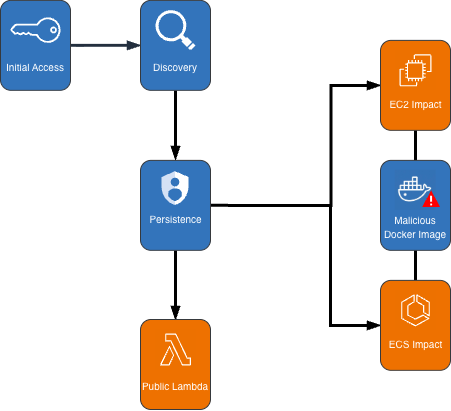
Figure 1: Architecture diagram
Layer 1: Edge protection
Before requests reach your application, they traverse the public internet where attackers launch volumetric DDoS attacks, SQL injection, cross-site scripting (XSS), and other web exploits. AWS observed and mitigated thousands of distributed denial of service (DDoS) attacks in 2024, with one exceeding 2.3 terabits per second.
- DDos protection: AWS Shield provides managed DDoS protection for applications running on AWS and is enabled for customers at no cost. AWS Shield Advanced offers enhanced detection, continuous access to the AWS DDoS Response Team (DRT), cost protection during attacks, and advanced diagnostics for enterprise applications.
- Layer 7 protection: AWS WAF protects against Layer 7 attacks through managed rule groups from AWS and AWS Marketplace sellers that cover OWASP Top 10 vulnerabilities including SQL injection, XSS, and remote file inclusion. Rate-based rules automatically block IPs that exceed request thresholds, protecting against application-layer DDoS and brute force attacks. Geo-blocking capabilities restrict access based on geographic location, while Bot Control uses machine learning to identify and block malicious bots while allowing legitimate traffic.
- AI for security: Amazon GuardDuty uses generative AI to enhance native security services, implementing AI capabilities to improve threat detection, investigation, and response through automated analysis.
- AI-powered enhancement: Organizations can build autonomous AI security agents using Amazon Bedrock to analyze AWS WAF logs, reason through attack data, and automate incident response. These agents detect novel attack patterns that signature-based systems miss, generate natural language summaries of security incidents, automatically recommend AWS WAF rule updates based on emerging threats, correlate attack indicators across distributed services to identify coordinated campaigns, and trigger appropriate remediation actions based on threat context. This helps enable more proactive threat detection and response capabilities, reducing mean time to detection and response.
Layer 2: Verifying identity
After requests pass edge protection, you must verify user identity and determine resource access. Traditional username/password authentication is vulnerable to credential stuffing, phishing, and brute force attacks, requiring robust identity management that supports multiple authentication methods and adaptive security responding to risk signals in real time.
Amazon Cognito provides comprehensive identity and access management for web and mobile applications through two components:
- User pools offer a fully managed user directory handling registration, sign-in, multi-factor authentication (MFA), password policies, social identity provider integration, SAML and OpenID Connect federation for enterprise identity providers, and advanced security features including adaptive authentication and compromised credential detection.
- Identity pools grant temporary, limited-privilege AWS credentials to users for secure direct access to AWS services without exposing long-term credentials.
Amazon Cognito adaptive authentication uses machine learning to detect suspicious sign-in attempts by analyzing device fingerprinting, IP address reputation, geographic location anomalies, and sign-in velocity patterns, then allows sign-in, requires additional MFA verification, or blocks attempts based on risk assessment. Compromised credential detection automatically checks credentials against databases of compromised passwords and blocks sign-ins using known compromised credentials. MFA supports both SMS-based and time-based one-time password (TOTP) methods, significantly reducing account takeover risk.
For advanced behavioral analysis, organizations can use Amazon Bedrock to analyze patterns across extended timeframes, detecting account takeover attempts through geographic anomalies, device fingerprint changes, access pattern deviations, and time-of-day anomalies.
Layer 3: The application front door
An API gateway serves as your application’s entry point. It must handle request routing, throttling, API key management, encryption and it needs to integrate seamlessly with your authentication layer and provide detailed logging for security auditing while maintaining high performance and low latency.
- Amazon API Gateway is a fully managed service for creating, publishing, and securing APIs at scale, providing critical security capabilities including SSL/TLS encryption with AWS Certificate Manager (ACM) to automatically handle certificate provisioning, renewal, and deployment. Request throttling and quota management protects backend services through configurable burst and rate limits with usage quotas per API key or client to prevent abuse, while API key management controls access from partner systems and third-party integrations. Request/response validation uses JSON Schema to validate data before reaching AWS Lambda functions, preventing malformed requests from consuming compute resources while seamless integration with Amazon Cognito validates JSON Web Tokens (JWTs) and enforces authentication requirements before requests reach application logic.
- GuardDuty provides AI-powered intelligent threat detection by analyzing API invocation patterns and identifying suspicious activity including credential exfiltration using machine learning. For advanced analysis, Amazon Bedrock analyzes API Gateway metrics and Amazon CloudWatch logs to identify unusual HTTP 4XX error spikes (for example, 403 Forbidden) that might indicate scanning or probing attempts, geographic distribution anomalies, endpoint access pattern deviations, time-series anomalies in request volume, or suspicious user agent patterns.
Layer 4: Network isolation
Application logic and data must be isolated from direct internet access. Network segmentation is designed to limit lateral movement if a security incident occurs, helping to prevent compromised components from easily accessing sensitive resources.
- Amazon Virtual Private Cloud (Amazon VPC) provides isolated network environments implementing a multi-tier architecture with public subnets for NAT gateways and application load balancers with internet gateway routes, private subnets for Lambda functions and application components accessing the internet through NAT Gateways for outbound connections, and data subnets with the most restrictive access controls. Lambda functions run in private subnets to prevent direct internet access, VPC flow logs capture network traffic for security analysis, security groups provide stateful firewalls following least privilege principles, Network ACLs add stateless subnet-level firewalls with explicit deny rules, and VPC endpoints enable private connectivity to Amazon DynamoDB, AWS Secrets Manager, and Amazon S3 without traffic leaving the AWS network.
- GuardDuty provides AI-powered network threat detection by continuously monitoring VPC Flow Logs, CloudTrail logs, and DNS logs using machine learning to identify unusual network patterns, unauthorized access attempts, compromised instances, and reconnaissance activity, now including generative AI capabilities for automated analysis and natural language security queries.
Layer 5: Compute security
Lambda functions executing your application code and often requiring access to sensitive resources and credentials must be protected against code injection, unauthorized invocations, and privilege escalation. Additionally, functions must be monitored for unusual behavior that might indicate compromise.
Lambda provides built-in security features including:
- AWS Identity and Access Management (IAM) execution roles that define precise resource and action access following least privilege principles
- Resource-based policies that control which services and accounts can invoke functions to prevent unauthorized invocations
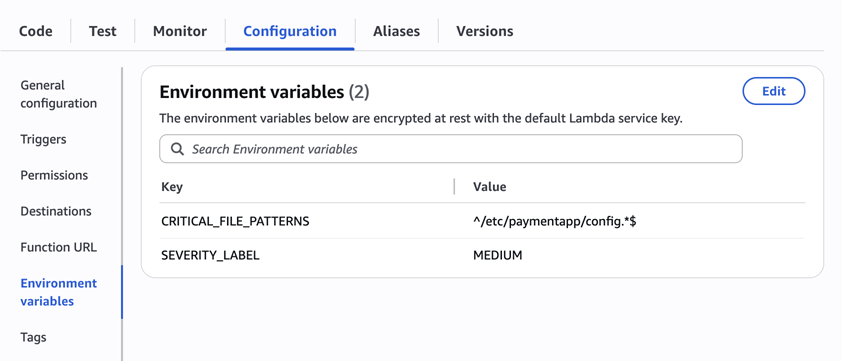
- Environment variable encryption using AWS Key Management Services (AWS KMS) for variables at rest while sensitive data should use Secrets Manager function isolation designed so that each execution runs in isolated environments preventing cross-invocation data access
- VPC integration enabling functions to benefit from network isolation and security group controls
- Runtime security with automatically patched and updated managed runtimes
- Code signing with AWS Signer digitally signing deployment packages for code integrity and cryptographic verification against unauthorized modifications
AI-powered code security: Amazon CodeGuru Security combines machine learning and automated reasoning to identify vulnerabilities including OWASP Top 10 and CWE Top 25 issues, log injection, secrets, and insecure AWS API usage. Using deep semantic analysis trained on millions of lines of Amazon code, it employs rule mining and supervised ML models combining logistic regression and neural networks for high true-positive rates.
Vulnerability management: Amazon Inspector provides automated vulnerability management, continuously scanning Lambda functions for software vulnerabilities and network exposure, using machine learning to prioritize findings and provide detailed remediation guidance.
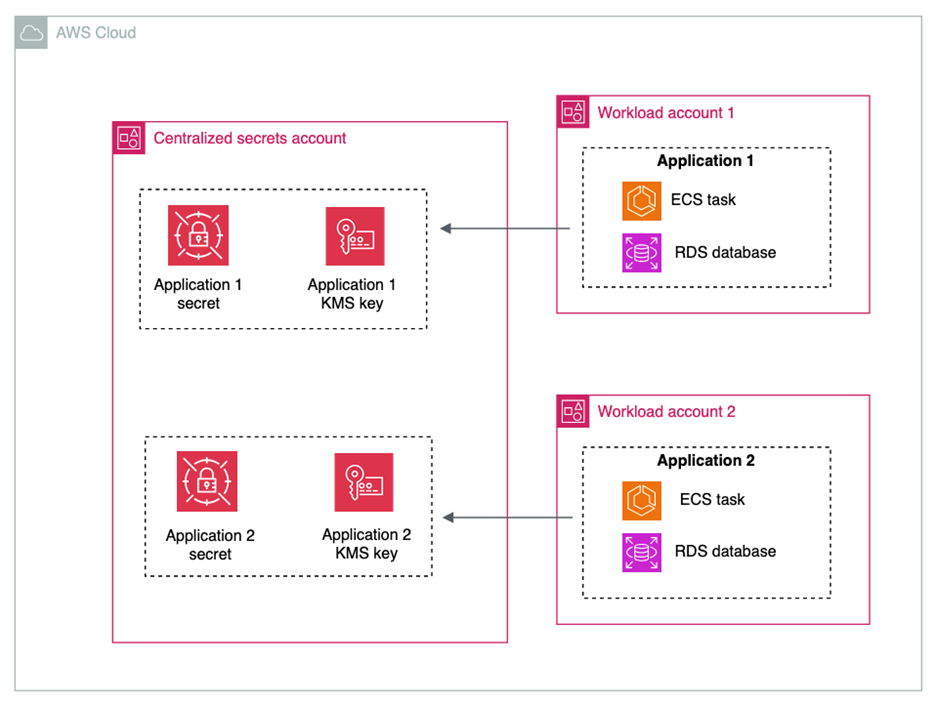
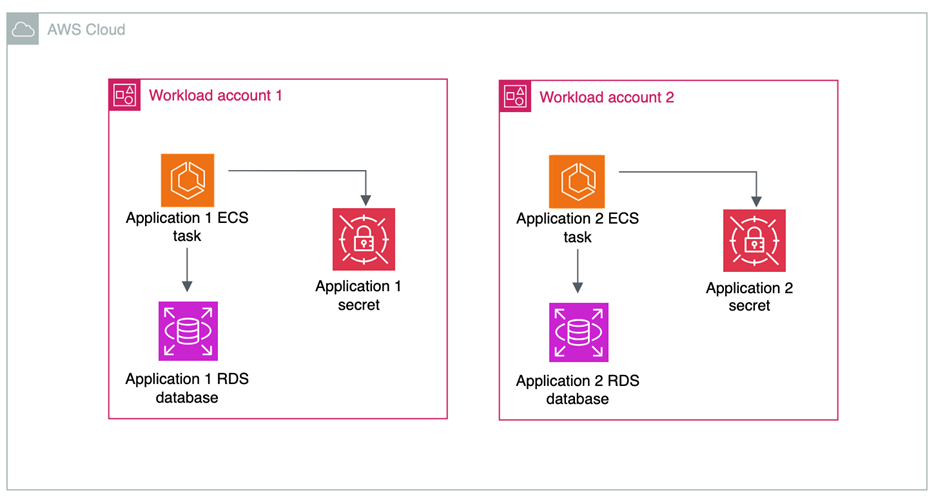
Layer 6: Protecting credentials
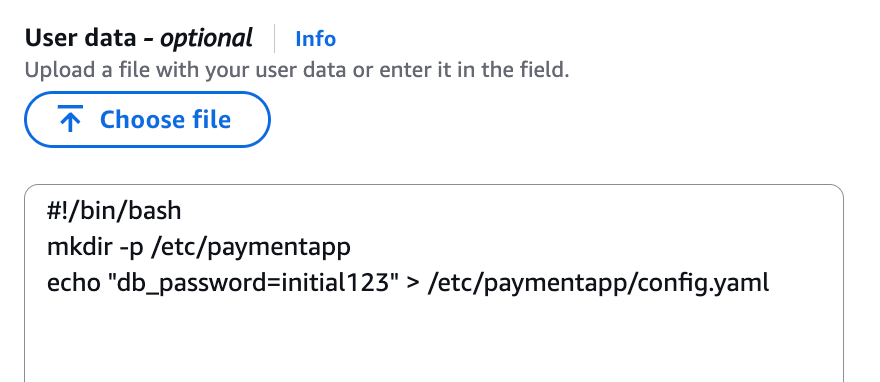
Applications require access to sensitive credentials including database passwords, API keys, and encryption keys. Hardcoding secrets in code or storing them in environment variables creates security vulnerabilities, requiring secure storage, regular rotation, authorized-only access, and comprehensive auditing for compliance.
- Secrets Manager protects access to applications, services, and IT resources without managing hardware security modules (HSMs). It provides centralized secret storage for database credentials, API keys, and OAuth tokens in an encrypted repository using AWS KMS encryption at rest.
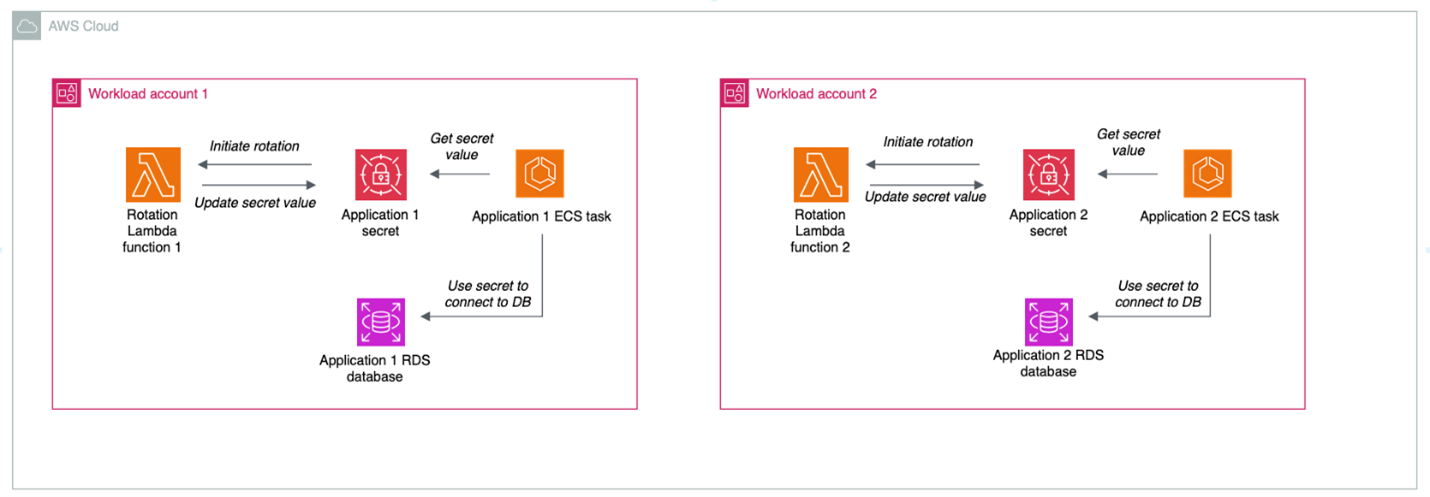
- Automatic secret rotation configures rotation for database credentials, automatically updating both the secret store and target database without application downtime.
- Fine-grained access control uses IAM policies to control which users and services access specific secrets, implementing least-privilege access.
- Audit trails log secret access in AWS CloudTrail for compliance and security investigations. VPC endpoint support is designed so that secret retrieval traffic doesn’t leave the AWS network.
- Lambda integration enables functions to retrieve secrets programmatically at runtime, designed so that secrets aren’t stored in code or configuration files and can be rotated without redeployment.
- GuardDuty provides AI-powered monitoring, detecting anomalous behavior patterns that could indicate credential compromise or unauthorized access.
Layer 7: Data protection
The data layer stores sensitive business information and customer data requiring protection both at rest and in transit. Data must be encrypted, access tightly controlled, and operations audited, while maintaining resilience against availability attacks and high performance.
Amazon DynamoDB is a fully managed NoSQL database providing built-in security features including:
- Encryption at rest (using AWS-owned, AWS managed, or customer managed KMS keys)
- Encryption in transit (TLS 1.2 or higher)
- Fine-grained access control through IAM policies with item-level and attribute-level permissions
- VPC endpoints for private connectivity
- Point-in-Time Recovery for continuous backups
- Streams for audit trails
- Backup and disaster recovery capabilities
- Global Tables for multi-AWS Region, multi-active replication designed to provide high availability and low-latency global access
GuarDuty and Amazon Bedrock provide AI-powered data protection:
- GuardDuty monitors DynamoDB API activity through CloudTrail logs using machine learning to detect anomalous data access patterns including unusual query volumes, access from unexpected geographic locations, and data exfiltration attempts.
- Amazon Bedrock analyzes DynamoDB Streams and CloudTrail logs to identify suspicious access patterns, correlate anomalies across multiple tables and time periods, generate natural language summaries of data access incidents for security teams, and recommend access control policy adjustments based on actual usage patterns versus configured permissions. This helps transform data protection from reactive monitoring to proactive threat hunting that can detect compromised credentials and insider threats.
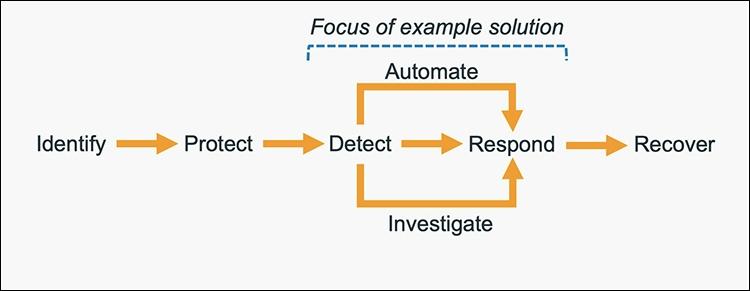
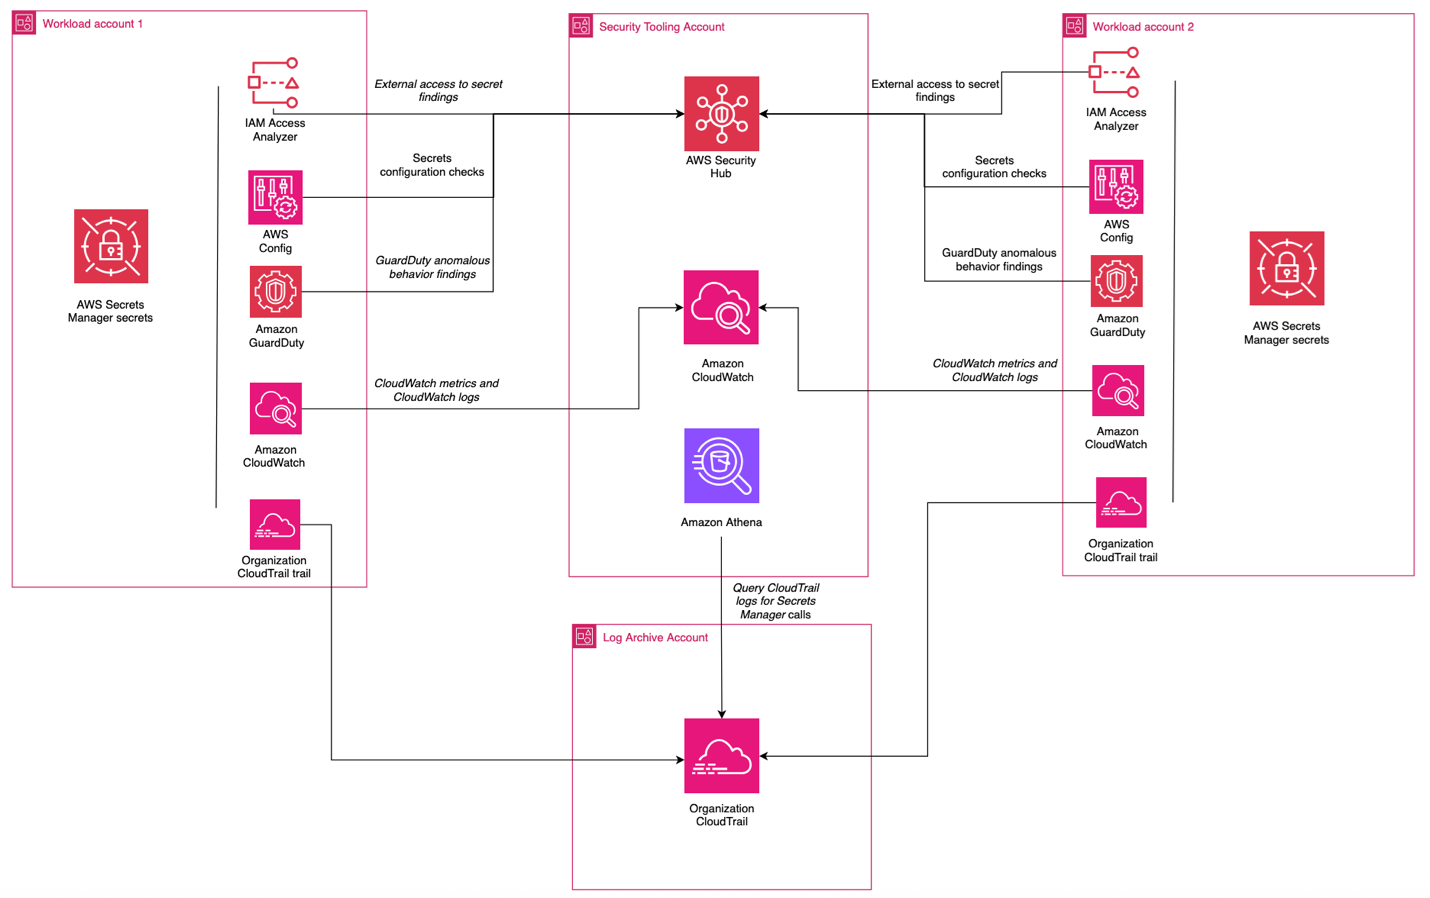
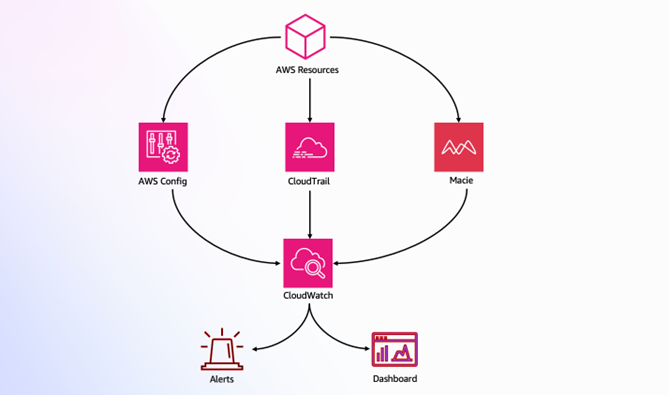
Continuous monitoring
Even with comprehensive security controls at every layer, continuous monitoring is essential to detect threats that bypass defenses. Security requires ongoing real-time visibility, intelligent threat detection, and rapid response capabilities rather than one-time implementation.
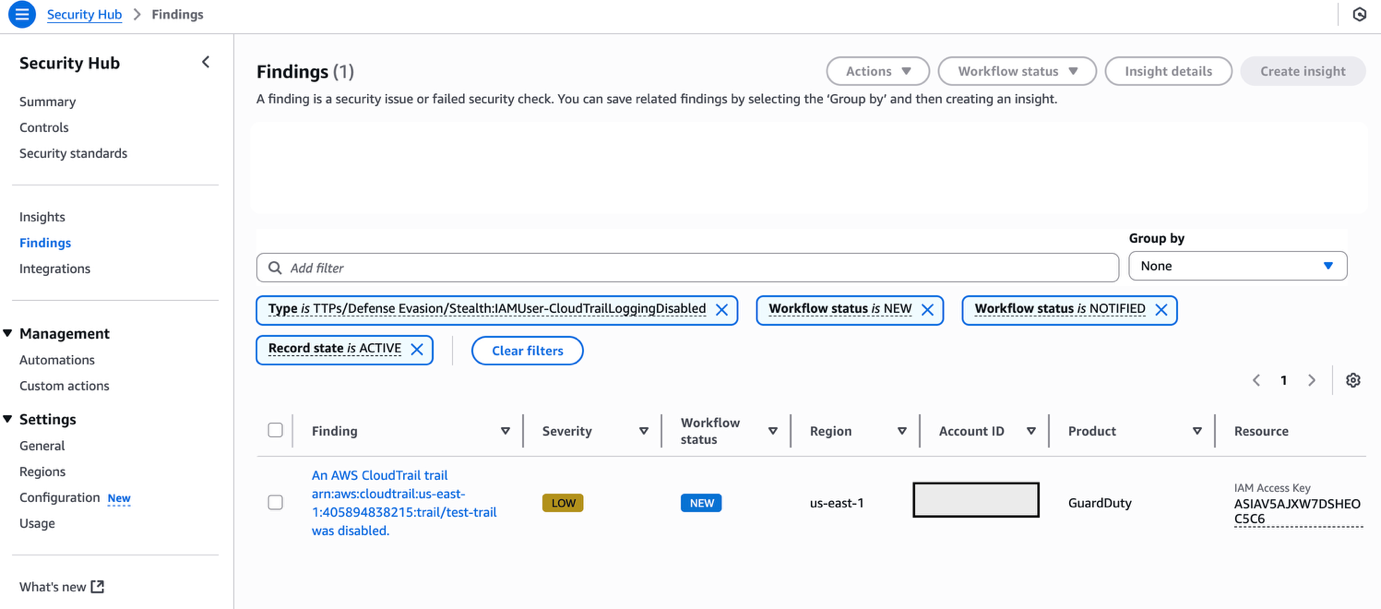
- GuardDuty protects your AWS accounts, workloads, and data with intelligent threat detection.
- CloudWatch provides comprehensive monitoring and observability, collecting metrics, monitoring log files, setting alarms, and automatically reacting to AWS resource changes.
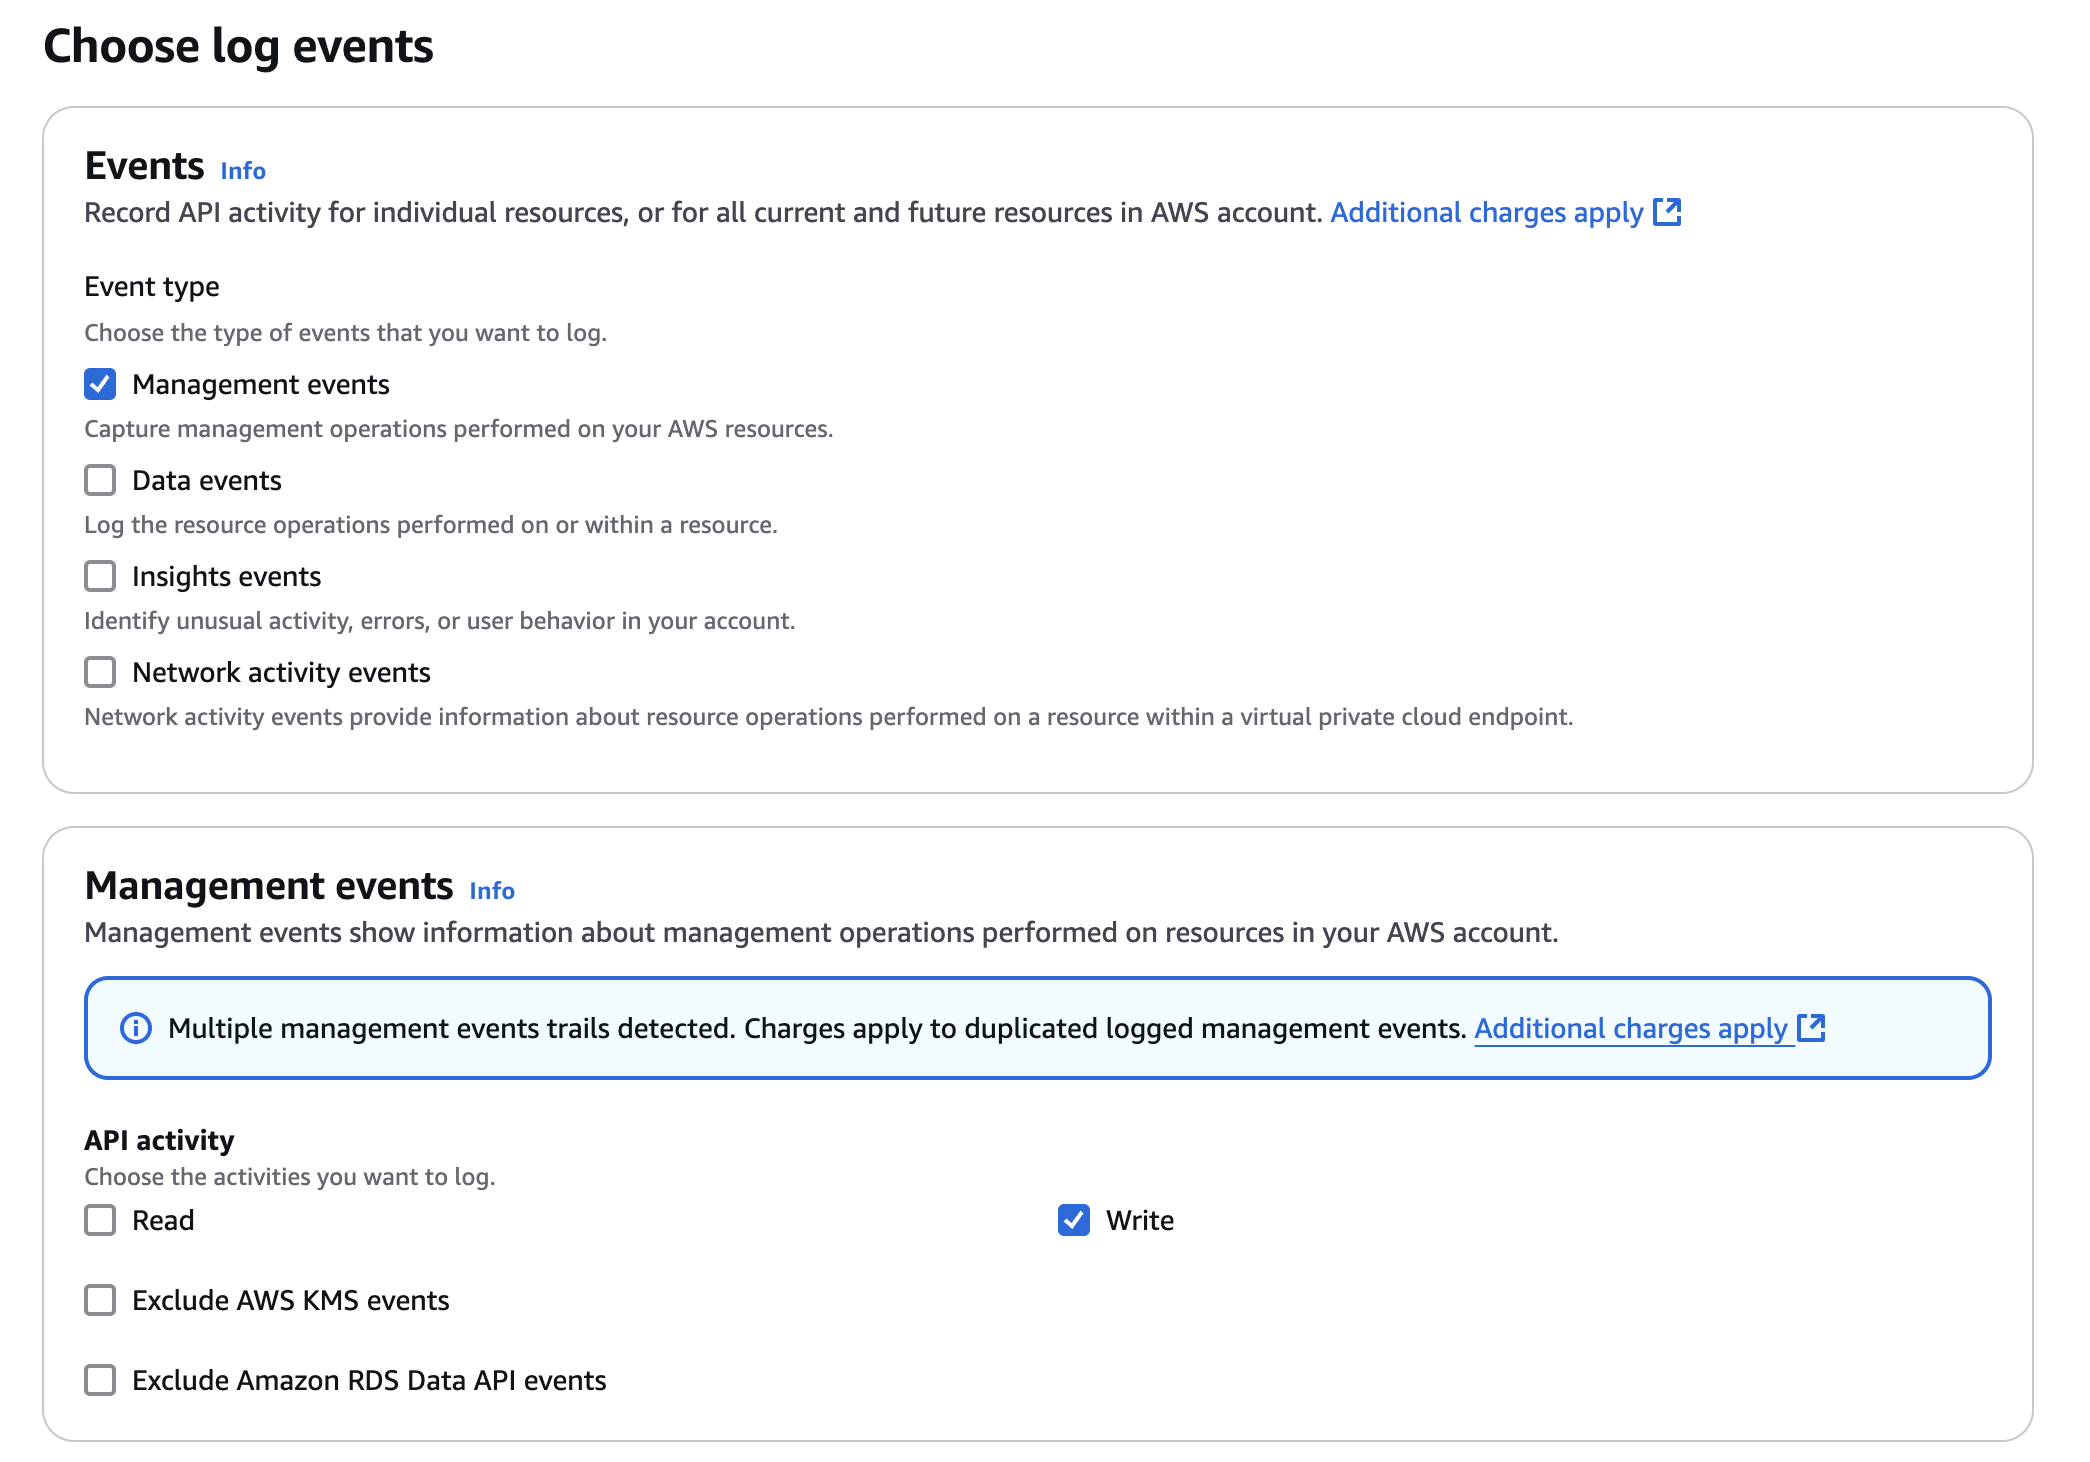
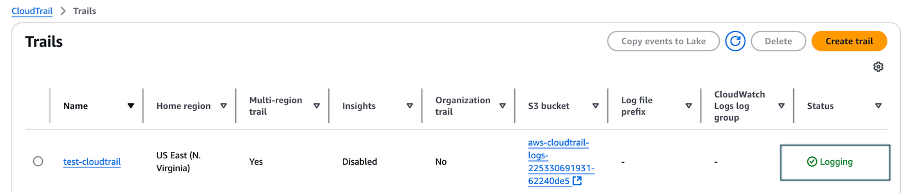
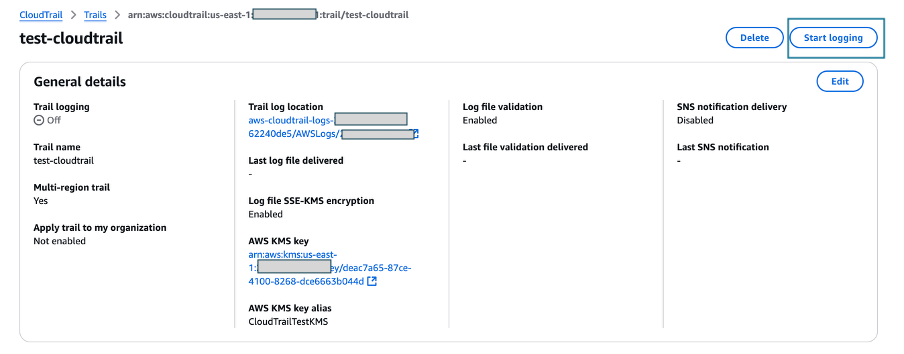
- CloudTrail provides governance, compliance, and operational auditing by logging all API calls in your AWS account, creating comprehensive audit trails for security analysis and compliance reporting.
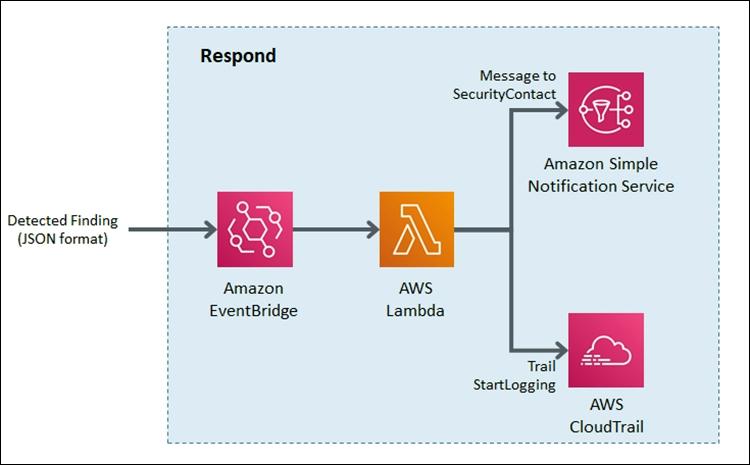
- AI-powered enhancement with Amazon Bedrock provides automated threat analysis; generating natural language summaries of GuardDuty findings and CloudWatch logs, pattern recognition identifying coordinated attacks across multiple security signals, incident response recommendations based on your architecture and compliance requirements, security posture assessment with improvement recommendations, and automated response through Lambda and Amazon EventBridge that isolates compromised resources, revokes suspicious credentials, or notifies security teams through Amazon SNS when threats are detected.
Conclusion
Securing serverless microservices presents significant challenges, but as demonstrated, using AWS services alongside AI-powered capabilities creates a resilient defense-in-depth architecture that protects against current and emerging threats while proving that security and agility are not mutually exclusive.
Security is an ongoing process—continuously monitor your environment, regularly review security controls, stay informed about emerging threats and best practices, and treat security as a fundamental architectural principle rather than an afterthought.
Further reading
- Best practices for achieving success with Zero Trust
- AI/ML for security – AWS Prescriptive Guidance
- Automate cloud security vulnerability assessment and alerting using Amazon Bedrock
- Infrastructure protection – Serverless Applications Lens
If you have feedback about this blog post, submit them in the Comments section below. If you have questions about using this solution, start a thread in the EventBridge, GuardDuty, or Security Hub forums, or contact AWS Support.