Reading view

Travel scams are everywhere. Here’s how to avoid them

Planning a holiday should be exciting, fun, and not a cybersecurity risk. But booking flights, hotels, and rental properties often means sharing sensitive personal and financial information across multiple platforms. Combined with frequent travel scams and recurring data breaches in the travel and hospitality sector, it creates plenty of opportunities for criminals.

This guide covers the most common risks when making travel reservations and explains how to avoid them. Save the adventure for your destination.

Travel bookings combine high-value payments with urgency and emotional decision-making. Attackers love that for several reasons:

  • Large upfront payments make scams profitable.
  • Booking confirmations often contain valuable personal data, such as names, travel dates, contact details, and sometimes passport information.
  • Travelers are more likely to act quickly and overlook red flags.
  • Travel and hospitality companies are frequent breach targets due to complex IT environments and third-party integrations.

Recent years have seen repeated breaches involving hotel chains, booking platforms, cruise operators, and airlines, exposing everything from email addresses to passport numbers.

Common travel-related scams

Fake booking websites

Attackers create convincing clones of airline, hotel, and travel booking websites, often promoted through online ads or SEO poisoning (manipulating search engine results). Victims enter payment details, receive fake confirmations, and only discover the fraud later.

Last year we uncovered a campaign using fake Booking.com websites that tricked visitors into infecting their own devices with a Remote Access Trojan (RAT).

Phishing messages about reservation problems

Emails, texts, or messaging app notifications may claim there’s a problem with your booking and urge you to click a link, open an attachment, or call a number. The scammers often impersonate legitimate travel brands and may include real stolen data from previous breaches.

Earlier this year, we wrote about a Booking.com breach that provided scammers with a lot of useful information that could make their messages appear more convincing.

Vacation rental fraud

Scammers post fake listings or hijack legitimate ones on rental platforms. They typically encourage off-platform communication or payments to avoid built-in protections.

In 2024, one of our researchers encountered exactly this type of scam. A supposedly legitimate Airbnb listing in Amsterdam turned out to be fake, and the scammer sent an email claiming to be from TripAdvisor in an attempt to collect payment details.

“Too good to be true” deals

Deep discounts on flights or accommodation are used to lure victims into paying for offers that don’t exist.

If a deal seems unusually generous, look for the catch. Be especially cautious when advertisers claim the offer will end very soon. Creating urgency is one of the oldest tricks in the scammer playbook.


Scam or legit? Scam Guard knows.


Booking.com impersonation scams

Booking.com has become an increasingly popular brand for scammers to impersonate. According to our—anonymized—Scam Guard data, we’ve recently seen:

  • Fake cashback emails promising a €435 refund that lead to phishing websites
  • In-app messages requesting an additional reservation fee
  • Emails containing PDF attachments that require a “secure viewer,” which turns out to be malware
  • WhatsApp messages claiming credit card details are missing and directing users to phishing sites
  • Text messages linking to fake Booking.com pages and demanding card verification before a deadline

The number of scams impersonating Booking.com has been growing. Since the breach disclosed in April, Scam Guard data shows a 56% increase in Booking.com-related scams compared to the previous period, with weekly volume up consistently across five straight weeks.

How to book travel safely

There are a few simple things that can dramatically reduce your risk:

  • Use secure payment methods. Credit cards offer better fraud protection than debit cards or bank transfers. Never pay anyone asking for payment in cryptocurrencies or gift cards.
  • Stick to trusted platforms. Even though these are not guaranteed to be safe, using them is better than gambling on an unknown platform.
  • Don’t click on sponsored search results. I cannot say this often enough.
  • Verify the existence of the booked accommodation through other channels.
  • Treat requests to move communication or payment to another platform as suspicious.
  • Consider urgent language, unexpected attachments, and mismatched sender domains as red flags.
  • Downloads needed to open an attachment are not to be trusted. These downloads often turn out to be malware. To block and remove malware, use an up-to-date, real-time anti-malware solution.

Pro tip: Malwarebytes Browser Guard will block known phishing websites and can even recognize suspicious websites that are not in our database yet.


We don’t just report on threats—we remove them

Cybersecurity risks should never spread beyond a headline. Keep threats off your devices by downloading Malwarebytes today.
  •  

Your Windows PC has a security deadline in June 2026

A Secure Boot certificate refresh is rolling out across supported Windows devices through Windows Update. In June 2026, the Secure Boot certificates that have shipped inside Windows since 2011 begin to expire, and Microsoft is replacing them with new 2023-dated certificates.

The good news: If you keep your PC updated, you probably won’t need to do anything. The bad news: Some older devices may not transition cleanly. Your PC won’t suddenly stop working, but over time it could miss important boot-level security protections without you realizing it.

Here’s what’s going on, why it matters, and how to check that your machine is on the right side of the deadline.

What is Secure Boot, and what’s expiring?

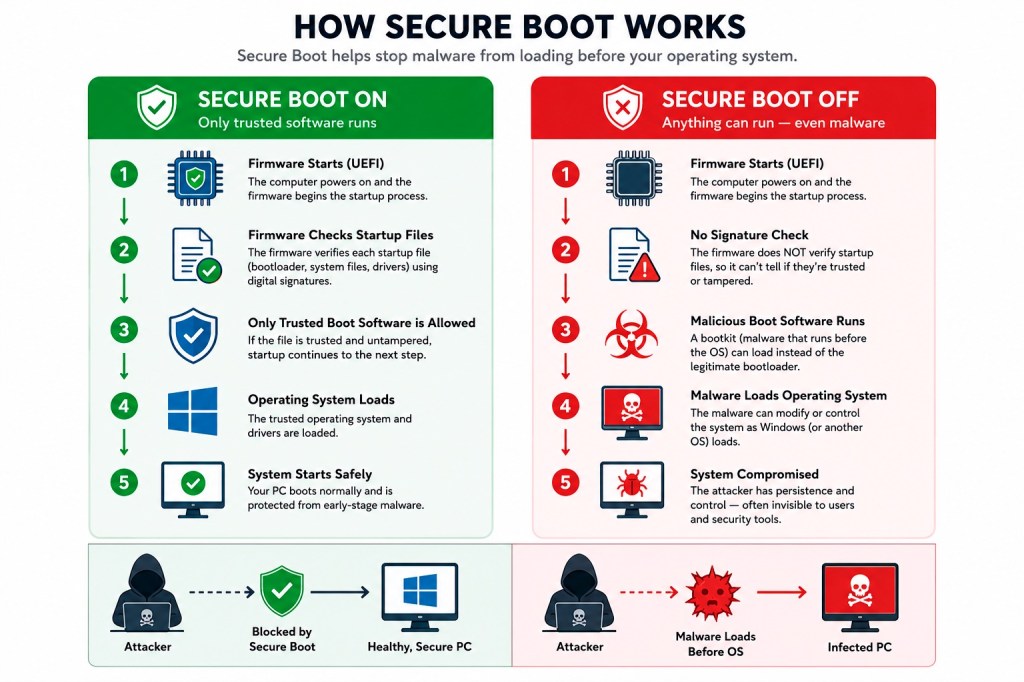
Secure Boot is a UEFI firmware feature built into virtually every PC sold since around 2012. It runs before Windows even starts loading, and its job is to verify that the boot loader and early boot components have been signed by a trusted party. If something tries to insert itself into the boot chain that isn’t on the trust list—a bootkit, for example—Secure Boot refuses to let it run.

How Secure Boot works

The “trusted party” part is the crucial bit. Trust is established through cryptographic certificates baked into your motherboard firmware. The current certificates were issued in 2011 and are now reaching expiration. Three specific certificates are involved:

  • Microsoft Corporation KEK CA 2011: expires June 24, 2026
  • Microsoft UEFI CA 2011: expires June 27, 2026
  • Microsoft Windows Production PCA 2011: expires October 19, 2026

Microsoft is replacing them with a 2023-dated set, including Windows UEFI CA 2023 and Microsoft Corporation KEK 2K CA 2023. According to Microsoft engineers speaking during a March 2026 AMA session, the new certificates are valid until 2038, and a separate post-quantum cryptography transition is planned for around 2030 for future hardware.

“Will my computer stop working?”

No. This is the single most important thing to understand, because the rumor mill has been louder than the facts.

If the deadline arrives and your PC is still running on the 2011 certificates, Windows will still boot, Windows Update will still work, and your PC will continue functioning normally.

What changes is that, in Microsoft’s own words, the device “will no longer be able to receive new security protections” for the early boot process, including updates to Windows Boot Manager, Secure Boot databases, revocation lists, and mitigations for newly discovered boot-level vulnerabilities.

In plain English: Your PC becomes harder to protect over time. It’s protected against today’s known boot threats, but not necessarily against the ones that will be discovered next month or next year.

That’s a problem because bootkits operate underneath Windows and antivirus software. They run before anything else and can disable the security tools that would normally catch them.

The BlackLotus problem

If you want a concrete example of why boot-level security matters, look at BlackLotus.

BlackLotus is a UEFI bootkit that emerged on hacking forums in 2022 and was confirmed in the wild by researchers in early 2023. It exploited CVE-2022-21894, nicknamed “Baton Drop,” to bypass Secure Boot on fully patched Windows systems. Once installed, it could disable BitLocker, Hypervisor-Protected Code Integrity (HVCI), and Microsoft Defender before Windows fully loaded.

Microsoft addressed the underlying flaw in CVE-2023-24932, but fixing vulnerable boot managers safely is complicated. Revoking the wrong boot components can leave systems unbootable, which is why Microsoft has rolled out protections gradually over several years.

The 2026 certificate rollover is a planned lifecycle event (the 2011 certificates were always going to expire), but it also enables the broader Secure Boot hardening Microsoft has been doing in response to vulnerable boot managers and attacks such as BlackLotus.

With the new trust anchors in place, Microsoft can continue rolling out newer 2023-signed boot components and safely revoke vulnerable ones as new threats emerge. Devices that don’t make the transition may eventually miss those future protections.

How the rollout works

Microsoft is using a staged rollout designed to avoid breaking systems.

A scheduled Windows task runs roughly every 12 hours and applies the update in stages:

  1. Add the new Windows UEFI CA 2023 to the firmware’s signature database.
  2. If the old 2011 third-party certificate is still present, add the Microsoft UEFI CA 2023 and Microsoft Option ROM UEFI CA 2023 alongside it.
  3. Add the new Microsoft Corporation KEK 2K CA 2023 key.
  4. Update the Windows Boot Manager to one signed by the new certificate. This step is deferred until the next natural reboot.

Microsoft’s IT pro guidance estimates the full process takes roughly 48 hours and one or more restarts to complete. Each step must succeed before the next one runs, so a device can sit partway through the sequence for a while if (for example) it’s waiting on a firmware update or a scheduled reboot.

For most home users, this happens silently in the background through normal cumulative updates.

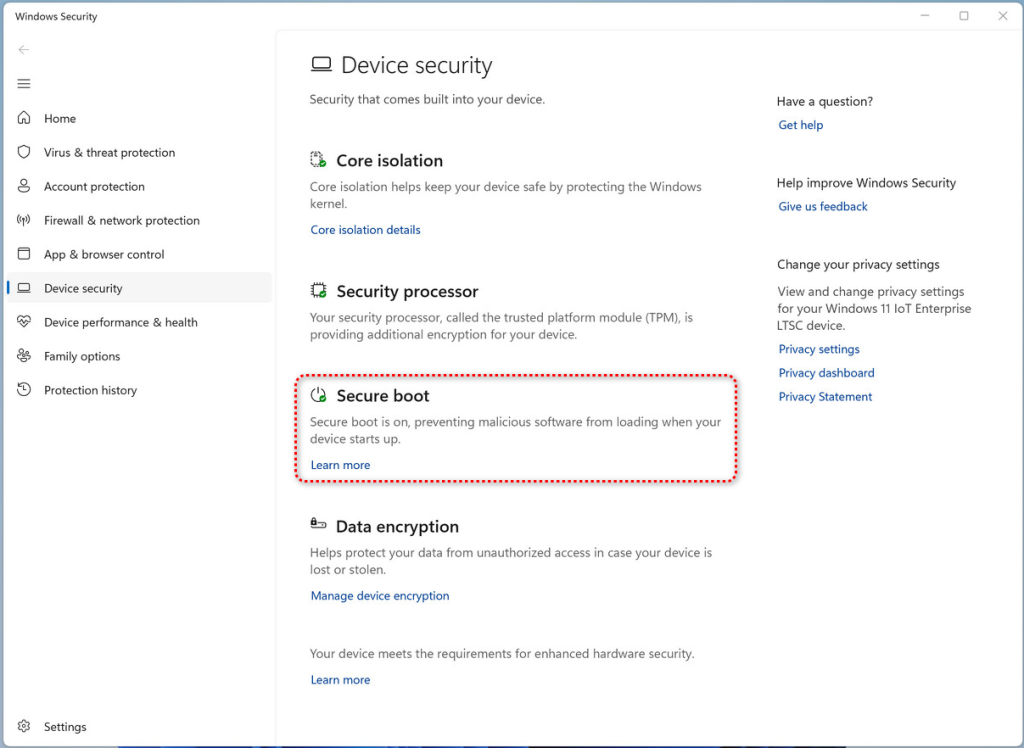
Starting with the April 2026 Windows update, the Windows Security app includes updated Secure Boot status information under Device security that shows whether the new certificates have been applied successfully.

Secure Boot settings

What could go wrong

Most systems will transition without problems, but there are some known trouble spots:

  • Older PCs with outdated firmware. Some older UEFI firmware implementations don’t properly support the new certificates. These systems may require a BIOS or firmware update from the manufacturer before the transition can complete.
  • PCs that bypassed Windows 11 requirements. If Secure Boot was disabled to install Windows 11 using unofficial workarounds, the new certificates cannot be applied correctly.
  • Legacy BIOS / CSM systems. Devices running Legacy BIOS (or UEFI with Compatibility Support Module enabled) aren’t using Secure Boot at all, so they’re outside the scope of this update entirely.
  • Custom firmware and weird configurations. Some custom or unusual firmware configurations may trigger a BitLocker recovery prompt after the Secure Boot variables change. Microsoft has been careful to note that BitLocker itself is not being disabled, but users should have their recovery keys handy just in case.

Windows Latest reported seeing update failures on thousands of PCs with outdated firmware during testing. Microsoft’s own guidance more broadly warns that firmware, platform, and OEM limitations can block the transition. In many cases, Windows Security will flag affected systems with yellow or red status warnings.

What home users should do

For most people, the advice is straightforward:

  • Keep Windows fully up to date. Microsoft is rolling the new certificates out through normal Windows updates, and most home users won’t need to do anything beyond installing monthly updates.
  • Check your Secure Boot status (the text, not just the color). Open Windows Security > Device security > Secure Boot. A green badge with the text “Secure Boot is on, preventing malicious software from loading when your device starts up.” is the all-clear. Microsoft warns that a green checkmark alone doesn’t confirm the new certificates have been applied.
  • If your device is older, check for a BIOS/firmware update from your manufacturer. Some systems need them before the Secure Boot update can complete properly. This is especially important for PCs built before 2024.
  • Don’t disable Secure Boot to “fix” something. Disabling Secure Boot is exactly the wrong response—it removes the protection entirely rather than updating it. Some game anti-cheat systems and older apps ask users to do this.
  • Don’t panic about the new SecureBoot folder. Windows 11’s May 2026 cumulative update (KB5089549) creates a folder at C:\Windows\SecureBoot containing example PowerShell scripts intended for IT administrators. It’s not malware, it’s expected, and you don’t need to delete it.
  • Use up-to-date, real-time anti-malware protection that can detect threats at the OS level even if something does slip past Secure Boot.

What IT teams should do

If you manage a fleet, Microsoft has published extensive guidance and the work is more involved. The short version:

  • Inventory your devices now. Pull the manufacturer, model, BIOS version and date, baseboard product, and Secure Boot status across the fleet. Microsoft provides a PowerShell sample script at aka.ms/GetSecureBoot that surfaces the relevant registry keys and event IDs.
  • Watch Event IDs 1801 and 1808. Event ID 1808 confirms the new certificates are in place. Event ID 1801 means the device has not completed the update.
  • Test before broad rollout. Microsoft recommends testing at least four devices per unique manufacturer/model/firmware combination. Some systems may need an OEM firmware update before they can accept the new certificates.
  • Choose one deployment method per device. Use registry keys, Group Policy, WinCS command-line tools, or Intune/ConfigMgr scripts, but don’t mix methods on the same machine.
  • Pay attention to PXE imaging and Hyper-V. SCCM/MECM PXE servers may need a re-signed boot.wim, and Hyper-V hosts may need updating before new VMs are created with the 2023 KEK in the firmware template.
  • Document devices that can’t be updated. Older hardware without OEM firmware support may need to be replaced before the deadline or formally accepted as an exception with compensating controls. These devices will keep working, but they may miss future boot-level protections.

The bottom line

This is one of those security events that won’t generate a dramatic incident on June 24, 2026. Nothing visible will break that day.

The risk is what happens in the months and years after. Devices that fail to transition to the new trust chain may slowly fall behind on future boot-level protections as Microsoft continues responding to threats like BlackLotus and other bootkits.

For most home users, Windows Update will handle the transition automatically. Your main job is to keep your system updated and verify Secure Boot status before the deadlines arrive.

If your hardware is older, now is a good time to check whether your manufacturer still provides firmware updates—and whether your PC is ready for the next decade of Secure Boot protections.


CNET Editors' Choice Award 2026

“One of the best cybersecurity suites on the planet.” 

According to CNET. Read their review


  •  

3 easy-to-miss cybersecurity risks for small businesses

There’s a lot to security that isn’t necessarily “cyber.” It’s not all hackers or complex network attacks.

Alongside traditional cyberattacks that deploy malware or exploit known software vulnerabilities, there are also less technical—yet equally devastating—forms of theft.

This doesn’t mean that well-known cybersecurity best practices don’t apply. Every small business owner should still use unique passwords for every account, turn on multi-factor authentication, keep their software and operating systems updated, and run always-on cybersecurity software.

But for the everyday small business owner juggling dozens of accounts, networks, devices, and the reams of data being created, stored, and shared across text messages, emails, and online portals, this advice is for you.

For National Small Business Week in the US, here are three ways to protect your business that require little technical prowess.

Don’t use your Social Security Number as your tax ID

In the US, the Internal Revenue Service (IRS) allows small business owners to use their personal Social Security Number (SSN) as the Federal Tax ID. It’s a small grace meant to simplify annual record-keeping for sole proprietors and owner-employees, but for cybercriminals, it’s a basic oversight they’d like every small business to make.

Using your Social Security Number as your Federal Tax ID means putting your Social Security Number in an ever-increasing number of hands. That’s because small business taxes are different from taxes for everyday salaried employees.

Whenever a small business takes on a new client or a contractor who pays for services costing at least $600, that small business has to share and receive what is called a W-9 form. This exact form isn’t filed with the IRS, but it is used to track payments for later filings.

What’s more important, though, is that this form asks for an owner’s name, address, and tax ID number.

This means that as a small business grows, its vulnerability to identity theft increases in tandem. Every W-9 filed that uses an owner’s SSN as their tax ID number is another opportunity for that SSN to be stolen. After just one year of operation, a small business owner’s SSN could end up in the inboxes, filing cabinets, and cloud drives of a dozen different people and companies.

This is exactly what cybercriminals want.

Equipped with a W-9 form about your business, a cybercriminal could impersonate you or your business. They could open a business credit line, file fraudulent returns that claim your small business income, or scam your clients.

How to stay safe:

Apply for a free Employer Identification Number (EIN) at IRS.gov. It’s quick to do and it separates your business tax identity from your personal tax identity. After that, put the EIN on W-9s, 1099s, and all other business paperwork instead of your SSN.

Keep your personal cloud storage personal

The most popular cloud storage for most small business owners is the cloud storage they already have—their personal Google Drive or iCloud.

Built to make memory archival as easy as possible, these tools can automatically back up and secure nearly every single moment that happens through your device, from the vacation photos you snapped last summer, to your kid’s first steps recorded on video, to the texts you sent, the notes you made, and the calendar appointments you managed.

But this type of automatic archival poses a threat to any non-personal information that you view, send, markup, or sign when using your personal smartphone. Suddenly, and often without thinking about it, your cloud storage has backups of signed contracts, tax returns, client intake forms, invoices, business financial statements, and photos of physical paperwork.

Above, we warned about using your SSN as your tax ID because it creates a risk if anyone in your business network is breached. But storing client information in your personal cloud storage creates a different problem: it puts that risk directly on you.

Compounding the threat here is the fact that many personal cloud storage accounts are shared with family members. More people accessing the same account means more exposure and more chances for mistakes, even if everyone has good intentions.

How to stay safe:

Go through the cloud backup settings on both your phone and your computer and manage what data is being synced. Move sensitive business files to a dedicated business storage account with proper access controls, sharing permissions, and audit logs—something that can tell you who opened a file and when.

If anything business-related has to live in a personal cloud account, give that account a strong, unique password, turn on multi-factor authentication, and don’t share access with anyone who isn’t you.

Protect device and account access in the home

Devices have a funny way of moving around. Your smartphone goes into your spouse’s hands as they override your music choices in the car. Your tablet ends most nights in your kid’s bedroom as they watch TV. And your laptop gets tugged around from couch to counter to kitchen table—each time fully opened and logged in, a portal to the web.

You trust everyone in your home to act safely online, but the path to online safety is full of mistakes.

A single errant click on a fake ad, a malicious search result, or a disguised download is all it takes to compromise your device today, along with all your small business records.

Aside from the threat of malware, someone using your device could make purchases, accidentally delete files, and overwrite important documents.

Remember, an “insider threat” doesn’t need to be malicious to cause damage—they just need to be inside your network (which in this, is your home).

How to stay safe:

Treat your devices that you use for work as work devices. That means requiring a passcode or password for device entry, along with multi-factor authentication for important business accounts.

Also, to ensure that any wrong click doesn’t lead to a malicious PDF download or a wayward malware installation, use always-on antimalware protection software, like Malwarebytes for Teams.

Secure your success

It’s easy to get overwhelmed with modern cybersecurity advice. Every week there are new vulnerabilities to patch, emerging scams to avoid, and novel viruses and pieces of malware that can seemingly take over your device, your data, and your business.

Thankfully, there are important steps you can take today that don’t require you to fiddle with internal settings or take a class on network engineering. Some of the most effective protections are simple: Limit how widely you share sensitive information, keep business and personal data separate, and control who can access your devices.

For everything else, try Malwarebytes for Teams to receive 24/7, always-on antimalware protection to shut out viruses, block malware attacks, and keep hackers out of your business.

  •  

Hackers stole hundreds of thousands of Roblox accounts: Here’s what to do

More than 610,000 Roblox accounts were reportedly stolen. Was yours or your child’s among them?

Ukrainian police arrested three individuals in Lviv who allegedly orchestrated one of the largest Roblox account theft operations to date. Between October 2025 and January 2026, the hacking group is said to have compromised over 610,000 Roblox accounts, including at least 357 high-value “elite” accounts, making around $225,000 from selling access to them.

The hackers distributed infostealing malware disguised as game-enhancement tools, harvested login credentials from infected devices, and sold accounts through a Russian website and closed online communities based on their value.

This operation targeted Roblox accounts because they hold significant monetary value for many users. Accounts can contain high Robux balances, limited-edition items that can no longer be obtained, years of gaming progress with achievements and unlocks, and paid access to premium content. 

Roblox account recovery

If you recently downloaded any suspicious game enhancements or other Roblox-related software, your first priority is to run a full system anti-malware scan.

Then check for unknown or untrusted browser extensions. Keep only those that came from verified, trusted sources.

If the scans led to any removals, clear your browser history and cookies completely. Note that this will log you out of most websites.

If you still have access to your Roblox account, change your password and turn on two-step verification if you haven’t already.

If the hackers changed your password and you’re unable to log in, use the password recovery option on the Roblox login page by clicking “Forgot Password or Username?”. Enter the email address associated with your account and check your inbox (including spam folders) for the reset link.

After recovering access, immediately terminate all active sessions to prevent hackers from maintaining access through stolen cookies. Go to Settings > Security and click Log out of all other sessions at the bottom of the page. This ensures that anyone who had unauthorized access can no longer use your account.

If you’ve been completely locked out—because hackers have changed both your password and recovery details—contact Roblox Support immediately. Visit the Roblox support page and provide as much detail as possible. They may ask for:

  • Your account username (this is crucial for identification).
  • The original email address used to create the account.
  • Payment information or purchase receipts showing Robux transactions.
  • The approximate date and time of the compromise.
  • Screenshots showing account details before the compromise, including creation date.
  • Your previous account settings or any other details that prove ownership.

Roblox explicitly states that, unless required by law, it is under no obligation to restore compromised accounts. It does not guarantee that accounts will be returned to their previous state or that lost virtual items and currency can be recovered. Only in very limited circumstances may Roblox offer the ability to recover lost inventory or its approximate value. It’s important to note that you must contact Roblox within 30 days of the compromise if you want assistance recovering lost items or currency. The support process typically takes 2–5 days.


Picked up something you shouldn’t have?


How to protect your Roblox account

There are a few steps that make it harder for someone to steal your Roblox account:

  • Verified email address. Ensure your account has a verified email address that you actively monitor. This helps you spot unauthorized password or email changes quickly.
  • Use unique passwords. Never reuse passwords across different accounts. If one is exposed elsewhere, attackers will try it on other platforms, including Roblox. Your Roblox password should be completely unique and stored securely. A password manager can help you with both.
  • Don’t share access. Never share your password with anyone, even with people claiming to be friends. Your account credentials should belong only to you (and your parents if you’re a minor). Roblox staff will never ask for your password.
  • Be wary of game enhancements, hacks, cracks and keys. The hackers in this case specifically distributed malware disguised as game-enhancement tools. Be extremely cautious about downloading any third-party programs, cheats, exploits, or tools that claim to improve your Roblox experience. These are often vehicles for credential theft and account compromise.
  • Keep software updated. Keep all the software on your device up-to-date, so you’re protected against the latest known exploits.
  • Use anti-malware. Run up-to-date, real-time anti-malware software to protect your device against information stealers and other malware.

Let’s face it, an incognito window can only do so much. 
 
Breaches, dark web trading, credit fraud. Malwarebytes Identity Theft Protection monitors for all of it, alerts you fast, and comes with identity theft insurance. 

  •  

Apple patches WebKit bug that could let sites access your data

Apple has released a Background Security Improvement to patch a flaw that could allow malicious websites to bypass browser protections and access data from other sites.

What is it?

The patched WebKit vulnerability is described as:

“A cross-origin issue in the Navigation API was addressed with improved input validation.”

WebKit vulnerabilities refer to security flaws in Apple’s web rendering engine, which powers Safari, Mail, and the App Store on iOS and macOS.

What this means is that the CVE-2026-20643 vulnerability makes it possible for a malicious website to pretend to be another site, maybe one you trust, and then read or steal information that should be kept separate. Normally, browsers enforce a rule called the “same‑origin policy,” which is like a strict fence that stops one site from peeking into another site’s data. This bug could help cybercriminals cut through that fence.

In practical terms, an attacker would first have to lure you to a specially crafted web page. If you visited it, that page could try to bypass the normal isolation between sites and access things it should not see, such as data from another tab or embedded content from a different service.

Attackers do not currently appear to exploit this flaw in the wild, but they like to chain issues like this with other bugs to steal accounts or sensitive data, which likely prompted Apple to ship it as a Background Security Improvement. Apple’s fix tightens how WebKit checks and handles cross‑site navigation.

What to do

This patch for a WebKit vulnerability, tracked as CVE-2026-20643, installs on top of versions 26.3.1/26.3.2 and not as a separate full OS version. Background Security Improvements are only available on the latest OS branch (26.x) and apply silently in the background if you’re on the latest version.

For iOS and iPadOS users, you can check if you’re using the latest software version by  going to Settings > General > Software Update. It’s also worth turning on Automatic Updates if you haven’t already. You can do that on the same screen.

For macOS Tahoe users, you can find out if you’re on the latest 26.3 version from the Apple menu. In the upper-left corner of your screen, choose About This Mac. The information shown there includes the macOS name and version number. If you need to know the build number as well, click the version number to see it.

This Background Security Improvement is only available for Mac users running Tahoe 26.3.1 and MacBook Neo users running 26.3.2.

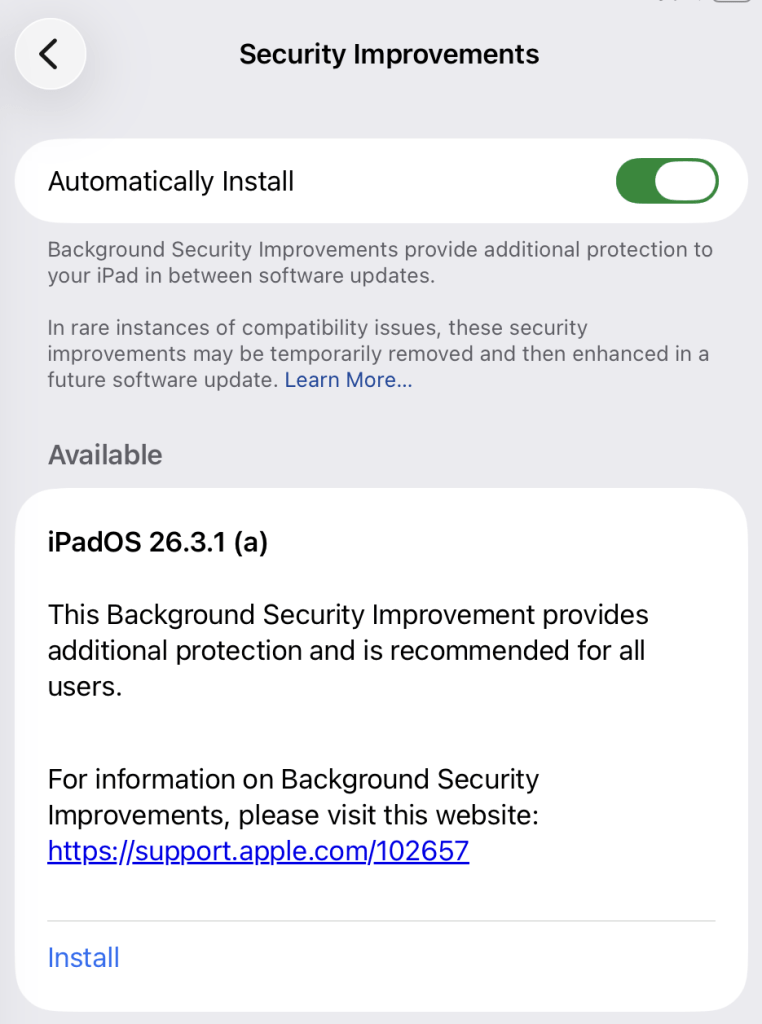
All users have to do is to check if they have the Background Security Improvements option set to enabled.

For iPhone and iPad users, this setting can be found under Privacy & Security, where you can scroll down and look for the Background Security Improvements toggle.

Automatically install security improvements

On a Mac (macOS Tahoe 26.3.+ only), you can check by following these instructions:

  1. Click the Apple menu > System Settings.
  2. In the sidebar, click Privacy & Security.
  3. Scroll down on the right and click Background Security Improvements.
  4. Make sure Automatically Install is turned on. If it’s off, the Mac won’t get Background Security Improvements until the fixes are rolled into a later full update.

The Install option in my screenshot means that you can speed up the process by clicking it. But it’s fine to wait until it happens automatically.

After the update, your OS version should show 26.3.1 (a), except for MacBook Neos which should be at 26.3.2 (a).


We don’t just report on phone security—we provide it

Cybersecurity risks should never spread beyond a headline. Keep threats off your mobile devices by downloading Malwarebytes for iOS, and Malwarebytes for Android today.

  •  

How to see your Google Search history (and delete it)

Your Google Search history provides one of the most detailed windows into your private life, and I know this because when I looked at my own search history last year, I was overwhelmed by the information buried within.

Across just 18 months, Google tracked the 8,079 searches I made and the 3,050 websites I visited because of those searches. That included my late-night perusal of WebMD because of medical symptoms I’d looked up just seconds before, my tour of Goodwill donation sites as I searched for where to drop off clothes ahead of an upcoming move, and my ironically tracked visit to a Reddit thread titled “How do I delete most, if not all, of my info off of the Internet?” (One answer I learned: Don’t use Google Search.)

Google tracked my every question, concern, and flight of fancy—almost literally. On just one day in August 2025, Google recorded the seven flight searches I made on Google Flights and the six hotel searches I made on Google Travel.

Google also recorded the many questions and requests I made when researching topics for the Lock and Code podcast, which I host. And while all of that Google data made for an interesting investigation into what Google knows about me (which you can listen to below), it also made it clear that more people should know how to access this same information.

For most Google users, if Web & App Activity is turned on, Google is saving what they look up, what time they looked it up, and what websites they clicked on as a result. There are ways to turn that data tracking off, but the first step is to know where to look.

Here’s how to do that.

How to find your Google Search history

You can start by opening your web browser and signing into Google’s centralized hub for your data online at myactivity.google.com.

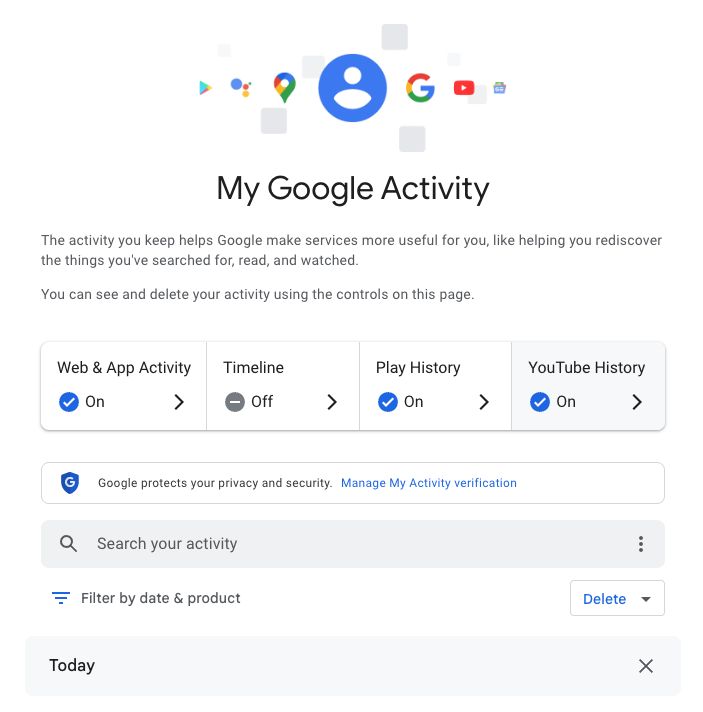
My Google Activity
The My Google Activity home page

Once logged in, you’ll see the above welcome screen with quick settings that you can change, if you want to. Those settings are different for some users, but may include:

  • Web & App Activity
  • Timeline
  • Play History
  • YouTube History

Further down on the page, you can browse through your Google Search history. (Our screenshot gallery below can help walk you through the steps.)

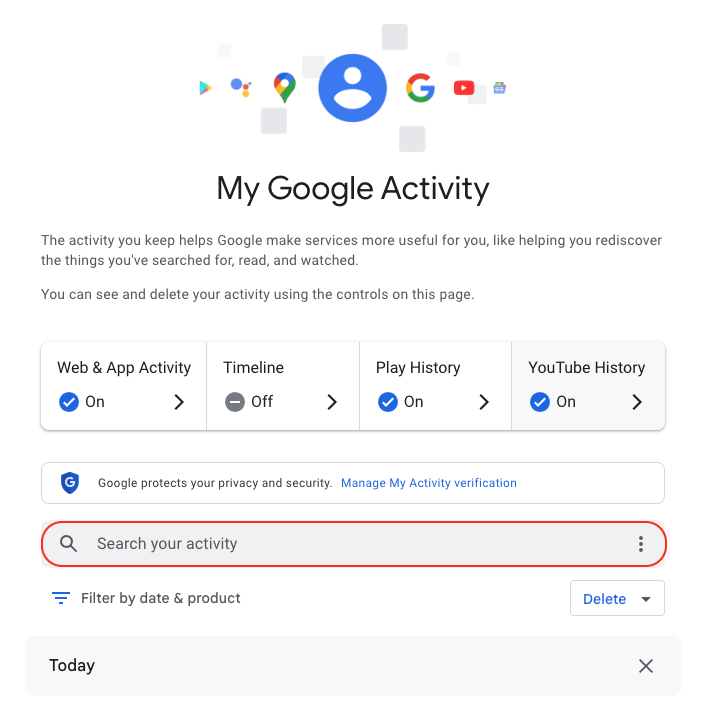
  • First, look for the search bar in the welcome screen that says Search your activity.
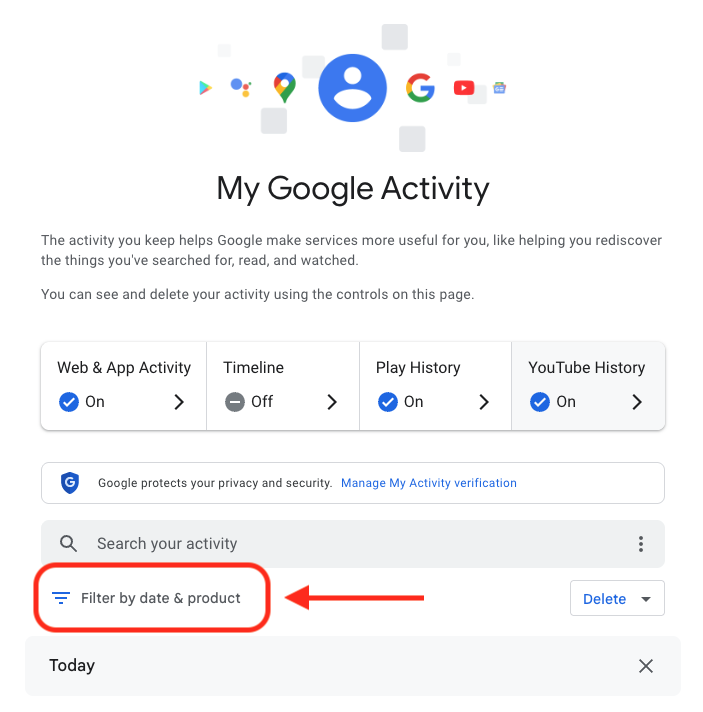
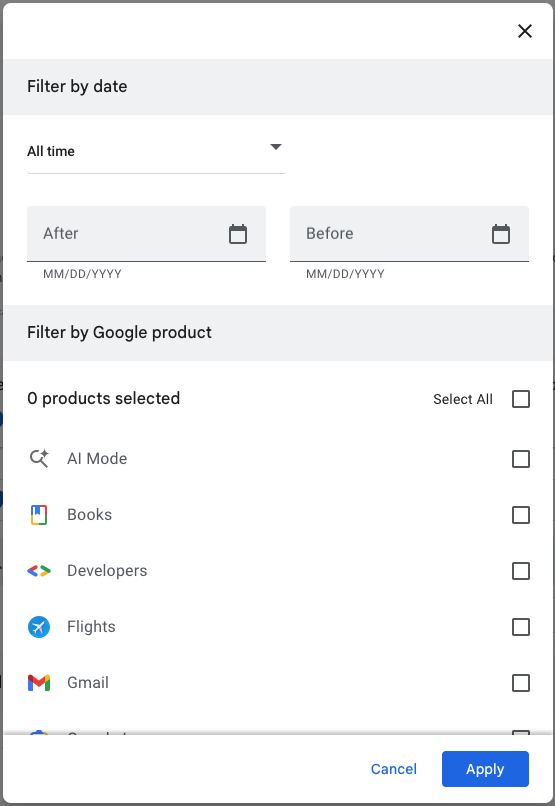
  • Right below, you will find the words Filter by date & product. These words are clickable. Click them.
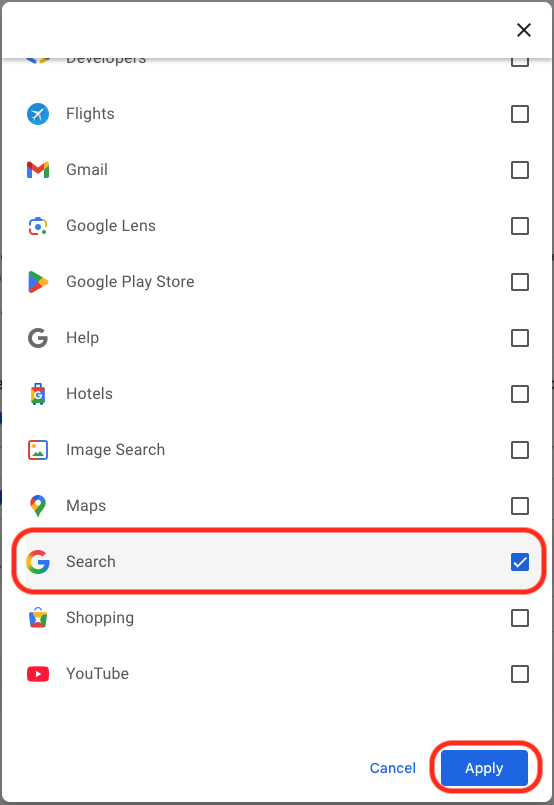
  • Once you’ve clicked Filter by date & product, you’ll see a pop-up menu where you can look through your Google activity by date or product. Instead of focusing on the date, scroll down through the list of Google products and check the box for Google Search.
  • Press Apply.
  • Find the search bar in the My Google Activity homepage
  • Click on the words “Filter by date & product”
  • Scroll down through the list of items until you find Google Search
  • Click on the Google Search checkbox and click “Apply”

After you press Apply, you’ll be taken to a webpage that lists your Google Search history in reverse chronological order, showing you your most recent activity first. As you scroll down, you can find older activity. You can also use the search bar at the top of the page to look for individual pieces of activity, like a search or series of searches that you previously made.

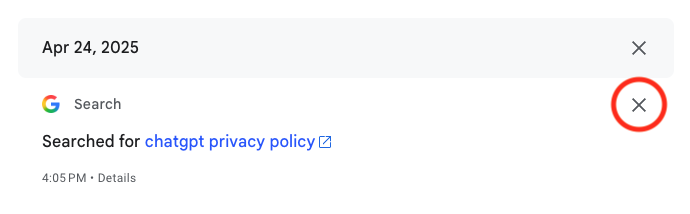
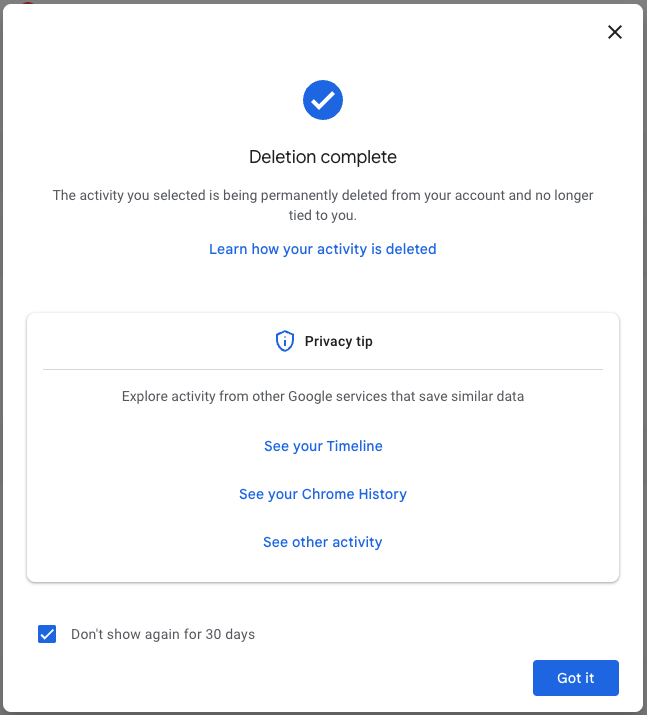
From here, you can also delete individual Google Search entries so that Google no longer stores that data. This will only apply to the individual search you made.

  • You can delete individual searches by clicking the “X” button in the top right corner of each search record
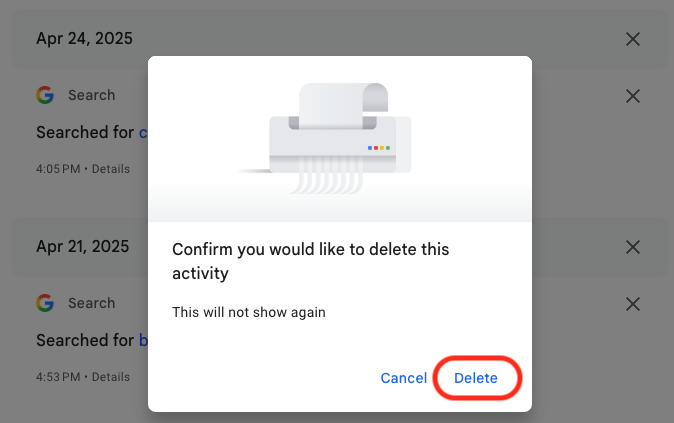
  • Confirm your deletion by pressing “Delete”
  • Your search is now no longer tied to your overall Google activity

If you want to better protect your privacy, making targeted deletions from your Google Search history is a difficult, lengthy, and imperfect method. Instead, you can simply tell Google to stop recording any of your searches from now on.

How to turn off Google Search history

There’s a simple way to instruct Google to stop saving your online searches to your Google Account, and it takes just a few clicks. Follow the instructions below, along with the image gallery, for guidance.

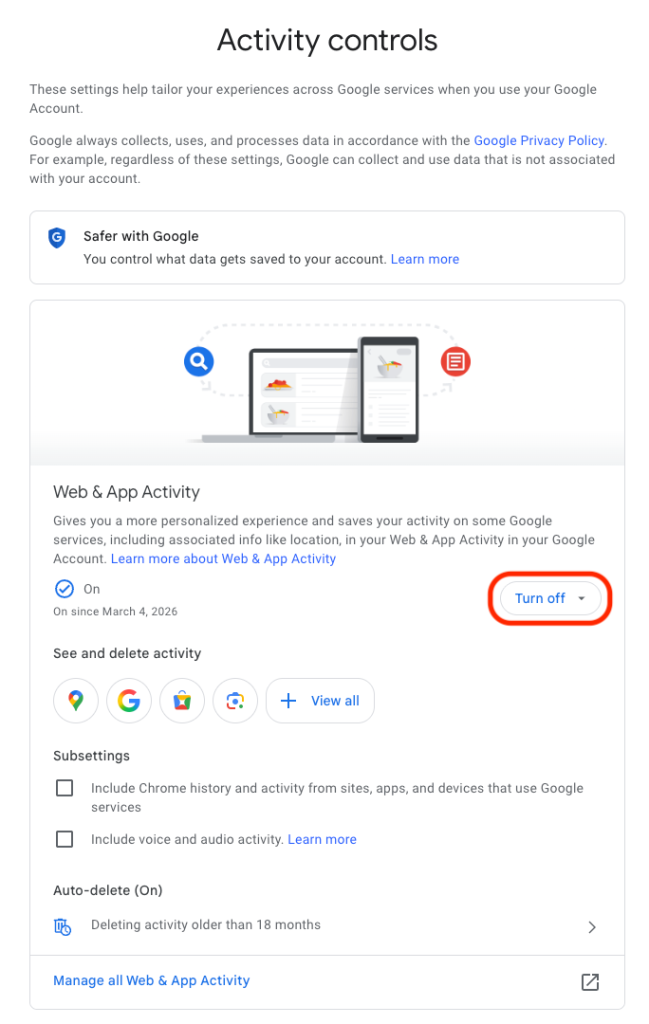
  • Go to your My Google Activity homepage (this is the same page you saw when first signing into myactivity.google.com)
  • Click on that quick control button we saw earlier: Web & App Activity
  • From here, you will see a new screen with the title Activity Controls
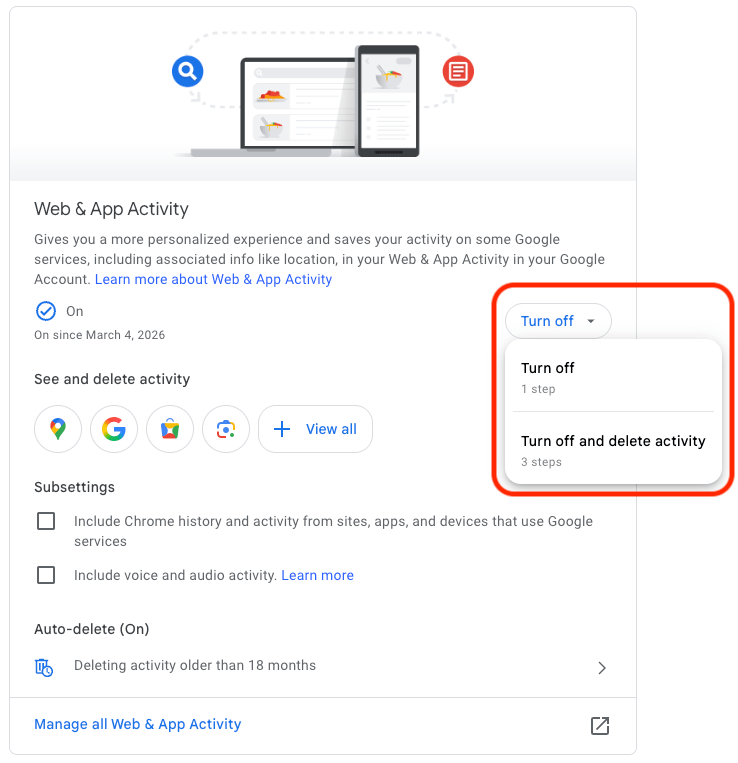
  • Find the button that says Turn off and click it
  • Choose between Turn off and Turn off and delete activity
  • Find the “Turn off” button from the Activity Controls webpage
  • You can choose one of two options for turning off your data
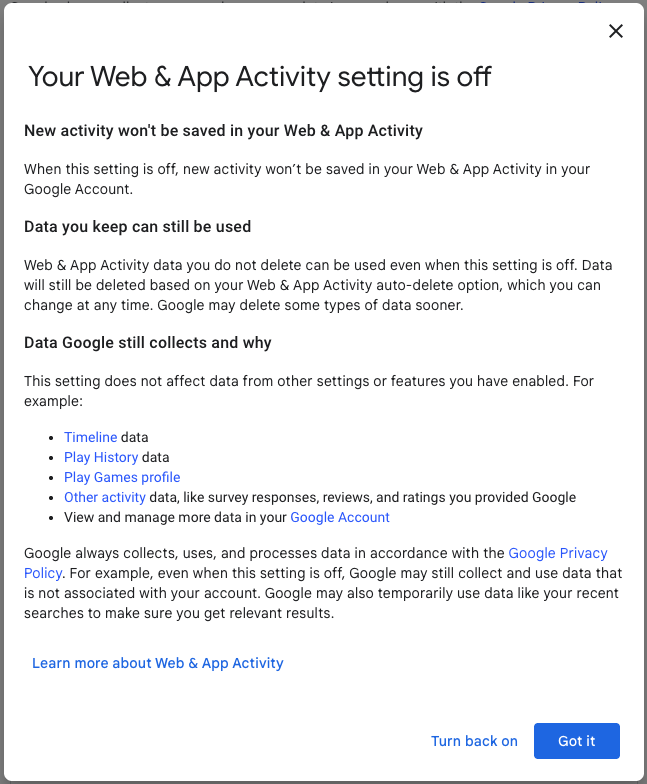
  • With one click, you can stop Google from recording your activity

If you selected Turn off, you’re done. Google will no longer save your Google Searches as part of your overall Google profile activity. This option means that Google still has your prior searches recorded, though. So, if you want, you can choose the second option, Turn off and delete activity.

When you select that option, Google will walk you through additional steps to choose what types of data you want erased, such as past activity tied to Google Search, Maps, Ads, Image Search, Google Play Store, Help and other services. All of these options reveal just how many products and pipelines Google has built to vacuum up your data.

Don’t be overwhelmed, though. Go through the list at your own pace and start making decisions about your data that are right for you.


We don’t just report on data privacy—we help you remove your personal information

Cybersecurity risks should never spread beyond a headline. With Malwarebytes Personal Data Remover, you can scan to find out which sites are exposing your personal information, and then delete that sensitive data from the internet.

  •  

Signal and WhatsApp accounts targeted in phishing campaign

Dutch intelligence services AIVD and MIVD warn that Russian state‑backed hackers are running a large‑scale campaign to break into Signal and WhatsApp accounts of high‑value targets.

The targets are said to be senior officials, military personnel, civil servants, and journalists. The attackers are not breaking end‑to‑end encryption or exploiting a vulnerability in the apps themselves. Instead, they rely on proven phishing and social engineering methods to trick users into handing over verification codes and PINs, or to add a malicious “linked device” to their account.

Last year we reported on GhostPairing, a method that tricks the target into completing WhatsApp’s own device-pairing flow, silently adding the attacker’s browser as an invisible linked device to the account.

In the cases reported by the Dutch intelligence services, the attackers contacted victims on Signal or WhatsApp while posing as “Signal Security Support Chatbot”, “Signal Support” or a similar official‑sounding account.

The message typically warns about suspicious activity or a possible detected data leak and instructs the user to complete a verification step to avoid losing data or having their account blocked.

Victims are then asked to send back the SMS verification code they just received and/or their Signal PIN.

If the victim complies, the attacker can register the account on a device they control and effectively take it over, receiving new messages and sending messages as the victim.

In a second variant, attackers abuse the “linked devices” feature (Signal’s and WhatsApp’s desktop or other secondary device function). Targets are pushed to click a link or scan a QR code that silently links the attacker’s device to the victim’s account. The victim keeps access as normal, but the attacker can now read along in real time without obvious signs of compromise.

These attacks are not new, but deserve a renewed warning because they rely entirely on human behavior, and understanding how they work makes them easier to stop. The methods used are not technically sophisticated and they can easily be copied by non‑state actors or ordinary cybercriminals.

Because of the current Russian campaigns, AIVD and MIVD say that chat apps such as Signal and WhatsApp are unsuitable for sharing classified, confidential, or otherwise sensitive government information, even though they technically support end‑to‑end encryption.

How to keep your conversations confidential

One specific warning for the targeted users is to use designated apps for sensitive information. Despite dedicated secure systems being available to many of them, some resorted to apps they already knew—Signal and WhatsApp. And to be fair, these apps are safe if you follow a few basic rules:

How to prevent and detect compromised accounts

  • Never share verification codes or PIN numbers. Your SMS verification code and PIN are only needed when you install or re‑register the app on a device. They are never legitimately requested in a chat. Any in‑app message, direct message (DM), email, or SMS asking you to send these codes back is a phishing attempt.
  • Do not trust “support” accounts in chat. Signal explicitly states that Support will never contact you via in‑app messages, SMS, or social media to ask for your verification code or PIN. Treat any “Signal Support Bot”, “Security Chatbot” or similar as malicious, block and report it and then delete the conversation.
  • Be cautious with links and QR codes in chat. Only scan QR codes or click device‑linking links when you yourself are in the app’s device‑linking menu and you initiated the process. If a message pushes you to “verify your device” or “secure your data” via a link or QR, assume it is part of this campaign.
  • Regularly review linked devices and group memberships. In Signal and WhatsApp, check the list of linked devices and remove anything you do not recognize. Also keep an eye out for strange group participants or duplicate contacts (for example “deleted account” or a contact that appears twice), which Dutch intelligence services mention as possible signs of account compromise.
  • Use built‑in hardening features. Enable options like registration lock, registration PIN and device‑change alerts so that your account cannot be silently re‑registered without an extra secret. Store your PIN in a password manager instead of choosing something easy to guess or reusing a common code, to reduce the chance of social engineering or shoulder‑surfing.

Use disappearing messages

Both Signal and WhatsApp support disappearing messages, and using them can meaningfully limit the impact of account compromise or device access (though they don’t prevent it completely).

Short‑timer and disappearing messages reduce how much content is available if an attacker gets into a chat later, or if someone obtains long‑term access to a device or backup. They are not a complete solution, but they can limit the damage.

Signal lets you set a per‑chat timer so that all new messages in that conversation auto‑delete from all devices after the chosen period.​ You can enable it for 1:1 or group chats and choose from various durations (seconds to weeks), and either party can see it is enabled and change the timer.​

WhatsApp also supports disappearing messages with timers per chat (and a default option for new chats). Messages can auto-delete after periods such as 24 hours, 7 days, or 90 days, and newer builds include shorter options like 1 or 12 hours.

You turn it on in the chat info under “Disappearing messages,” then pick the desired timer; only messages sent after enabling it are affected.

For particularly sensitive media or voice messages, WhatsApp also offers “view once”  photos, voice messages, and videos that can only be opened a single time before disappearing from the chat.

Enable multi-factor authentication

We’ve written a complete guide on setting up two-step verification on WhatsApp.

To set up two-factor authentication (2FA) on Signal, enable the Registration Lock feature, which requires your set PIN to log in on a new device. Open Signal, go to Settings > Privacy > Registration Lock and turn it on. This ensures that even if someone steals your SIM, they cannot access your account without your personal PIN.


We don’t just report on privacy—we offer you the option to use it.

Privacy risks should never spread beyond a headline. Keep your online privacy yours by using Malwarebytes Privacy VPN.

  •  

Quiz sites trick users into enabling unwanted browser notifications

Our support team flagged a number of customers who suspected their device might be infected with malware, but Malwarebytes scans came up empty.

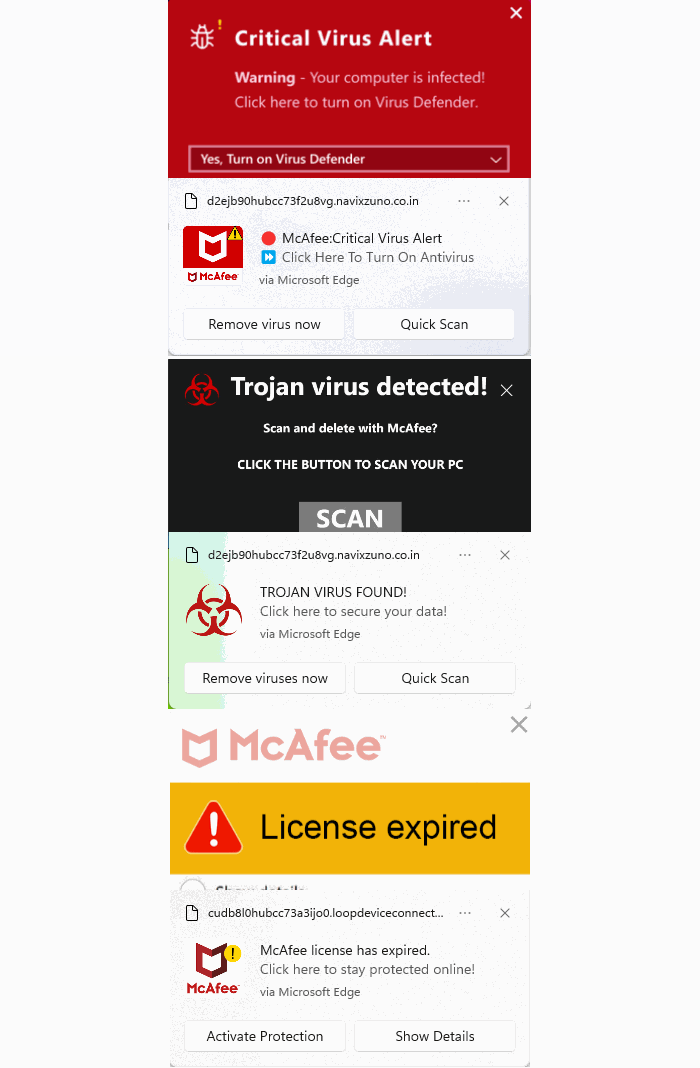
When the customers provided screenshots, our Malware Removal Support team quickly recognized the format as web push notifications.

The reason the scans came up clean is that these notifications aren’t malware on the device. They’re browser notifications from websites that trick users into clicking “Allow.”

We helped the customers disable the push notifications (see below for instructions). But since most of them didn’t know how they got them in the first place, we went down the rabbit hole to find out where they were coming from.

Examples of web push notifications

We started with one of the most prevalent domains called unsphiperidion[.]co.in, but all we found was a misleading advertisement that promised the Adguard browser extension and instead led to Poperblocker.

Screenshot showing fake "update the Adguard browser extension" prompt
Fake Adguard browser extension update prompt

But another clue, also mentioned by the Malware Removal Support team—a domain called triviabox[.]co[.]in—practically brought us straight to the source.

We found a site that challenged our intelligence by prompting us to take a quiz.

Screenshot showing "Only people who lived through the 80s can score 15/20 on this quiz"
Quiz website example

Later we found these quizzes come in different flavors. Some about geography, vocabulary, and history, while others are specifically targeted at Canada, Germany, France, Japan, and the US.

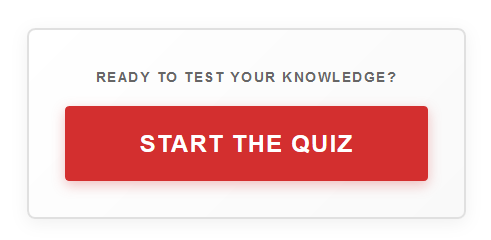
But the main goal of these sites is to get you to click the “Start the quiz” button, so the site can send notifications later and make money from ads, affiliate schemes, scams, or unwanted downloads.

Screenshot showing "Ready to test your knowledge? Start the quiz"
Ready to test your knowledge? Start the quiz

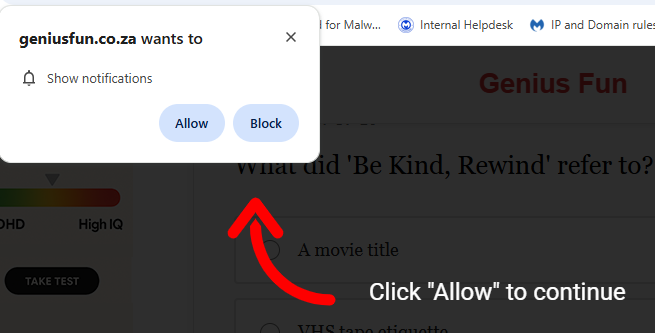
What that button does before it starts the quiz is show the visitor a prompt with a misleading background.

Screenshot showing "Click Allow to continue" and a show notifications prompt.
Click Allow to continue triggers the browser’s “show notifications” prompt

The show notifications text in the actual prompt tells the real story. You’ll be giving the website permission to show you notifications even when you’re not on the website, which makes it hard for users to determine the origin.

The Click “Allow” to continue text with the red arrow on the website itself is nothing more than a well-placed lure to get you to click that Allow button and open the flood gates. To avoid raising suspicion, the visitor is then presented with the quiz, so later on they will have no reason to suspect what started the ordeal.

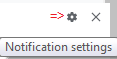
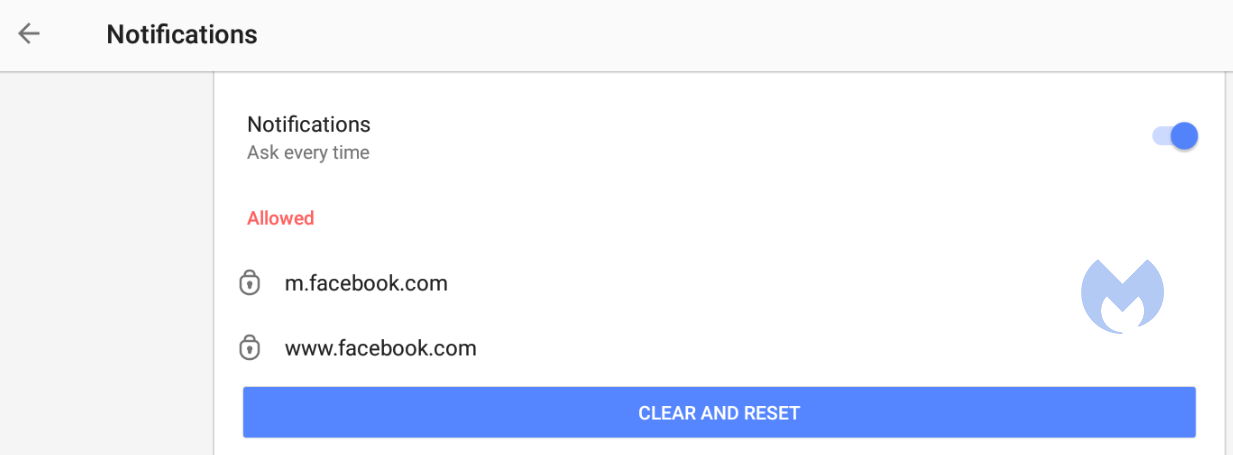
Web push notifications (also called browser push notifications) are not always simple advertisements. Some can be misleading messages about the safety of your computer. The gear icon in the notifications themselves can be very helpful. On Chromium-based browsers, clicking it will lead you to the Notifications settings menu where you can block them.

Unfortunately, we often find them used by “affiliates” to promote security software. If you’re looking for an anti-malware solution that doesn’t make use of such affiliates, you know where to find us.

How to remove and block web push notifications

For every browser, the notifications look slightly different and the methods to disable them are slightly different as well. To make them easier to find, I have split them up by browser.

Chrome

To completely turn off notifications, even from an extension:

  • Click the three dots button in the upper right-hand corner of the Chrome menu to enter the Settings menu.
  • In the Settings menu and click on Privacy and Security.
  • Click on Site settings.
  • In that menu, select Notifications.
  • By default, the slider is set to Sites can ask to send notifications, but feel free to move it to Don’t allow sites to send notifications if you wish to block notifications completely.

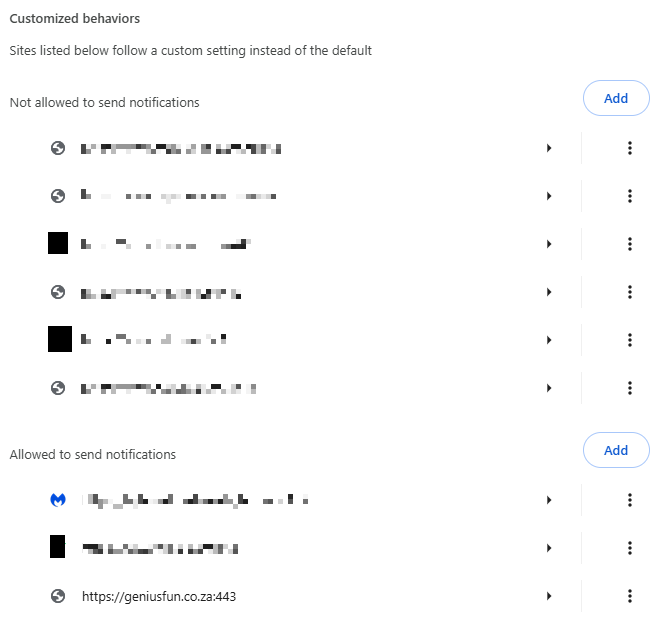
For more granular control, you can use the Customized behaviors menu to manipulate the individual items.

Customized behaviors section of the Chromium notifications menu

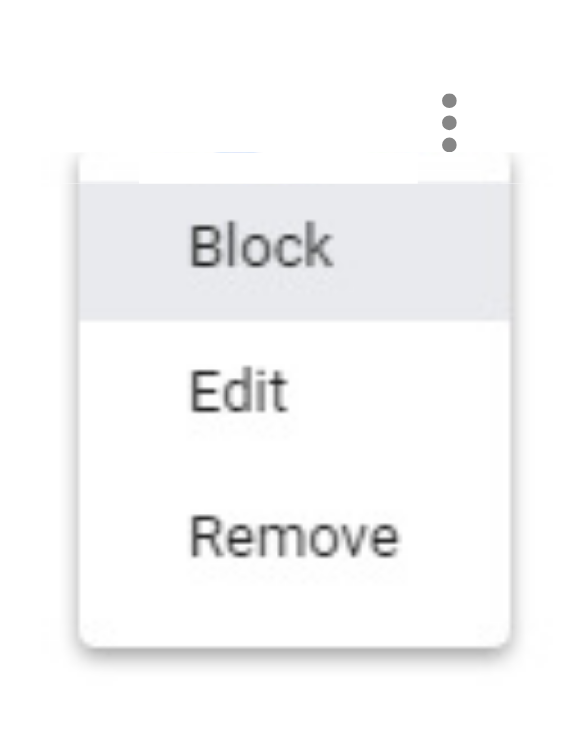
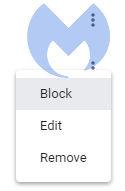
Note that sometimes you may see items with a jigsaw puzzle piece icon in the place of the three stacked dots. These are enforced by an extension, so you would have to figure out which extension is responsible first and then remove it. But for the ones with the three dots behind them, you can click on the dots to open this context menu:

Selecting Block will move the item to the block list. Selecting Remove will delete the item from the list. It will ask permission to show notifications again if you visit their site (unless you have set the slider to Block).

Shortcut: another way to get into the Notifications menu shown earlier is to click on the gear icon in the notifications themselves. This will take you directly to the itemized list.

Firefox

To completely turn off notifications in Firefox:

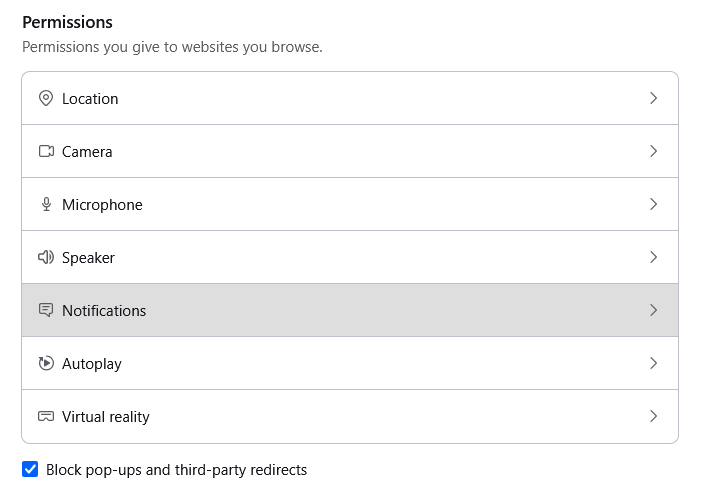
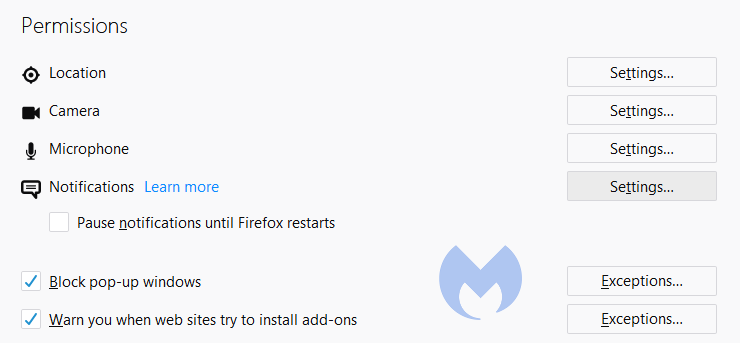
  • Click the three horizontal bars in the upper right-hand corner of the menu bar and select Options in the settings menu.
  • On the left-hand side, select Privacy & Security.
  • Scroll down to the Permissions section and click on Notifications.

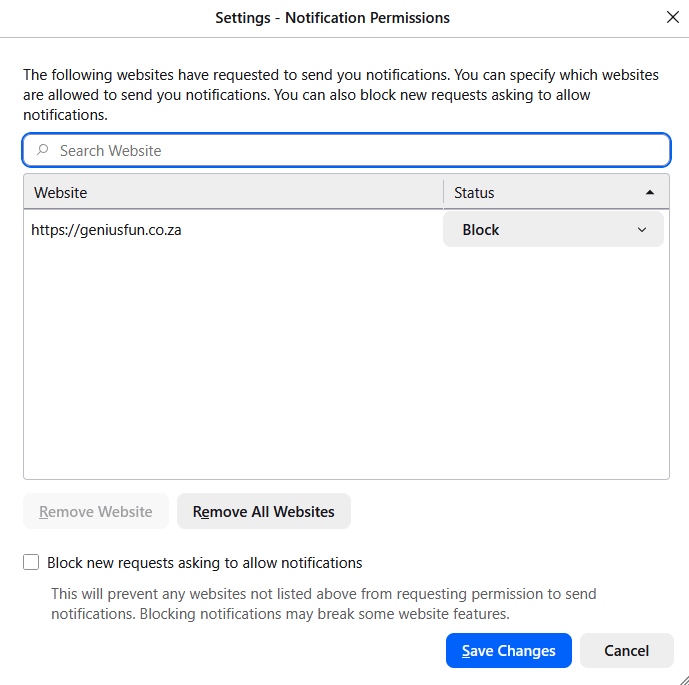
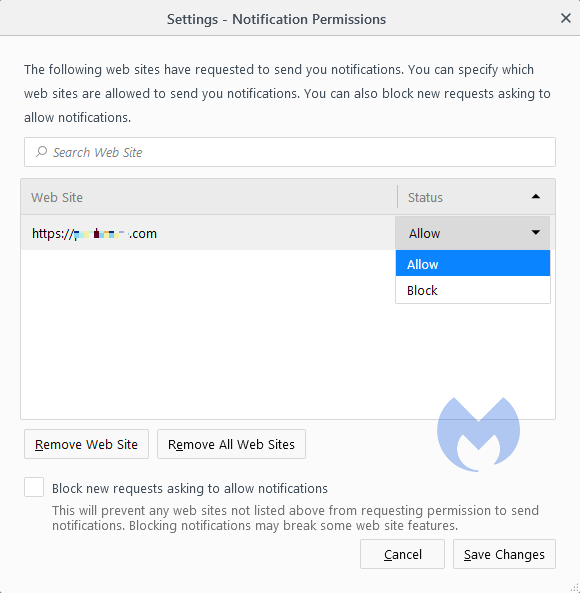
  • In the resulting menu, put a checkmark in the Block new requests asking to allow notifications box at the bottom.

In the same menu, you can apply a more granular control by setting listed items to Block or Allow by using the drop-down menu behind each item.

Click on Save Changes when you’re done.

Opera

Where push notifications are concerned, you can see how closely related Opera and Chrome are.

  • Open the menu by clicking the O in the upper left-hand corner.
  • Click on Settings (on Windows)/Preferences (on Mac).
  • Click on Advanced and select Privacy & security.
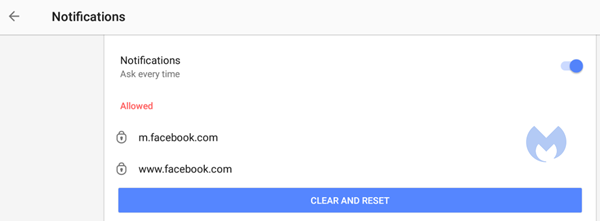
  • Under Content settings (desktop)/Site settings (Android,) select Notifications.
Opera notifications menu

On Android, you can remove all the items at once or one by one. On desktops, it works exactly the same as it does in Chrome. The same is true for accessing the menu from the notifications themselves. Click the gear icon in the notification, and you will be taken to the Notifications menu.

Edge

In Edge, go to Settings and more in the upper right corner of your browser window, then

  • Select Settings  > Privacy, search, and services > Site permissions > All sites.
  • Select the website for which you want to block notifications, find the Notifications setting, and choose Block from the dropdown menu.​​​​​​​

To manage notifications from your browser address bar: 

To check or manage notifications while visiting a website you’ve already subscribed to, follow the steps below:   

  • Select View site information to the left of your address bar.
  • Under Permissions for this site Notifications, choose Block from the drop-down menu.

Safari on Mac

On your Mac, open the Apple menu, then

  • Choose System Settings, then click Notifications in the sidebar. (You may need to scroll down.)
  • Go to Application Notifications, click the website, then turn off Allow Notifications.

The website remains in the list in Notifications settings. To remove it from the list, deny the website permission to send notifications in Safari settings. See Change websites settings.

To stop seeing requests for permission to send you notifications in Safari:

  • Go to the Safari app on your Mac.
  • Choose Safari > Settings.
  • Click Websites, then click Notifications.
  • Deselect Allow websites to ask for permission to send notifications.

From now on, when you visit a website that wants to send you notifications, you aren’t asked.

Are these notifications useful at all?

While we could conceive of some cases where push notifications might be found useful, we would certainly not hold it against you if you decided to disable them altogether.

Web push notifications are not just there to disturb Windows users. Android, Chromebook, MacOS, even Linux users may see them if they use one of the participating browsers: Chrome, Firefox, Opera, Edge, and Safari. In some cases, the browser does not even have to be opened, and it can still display push notifications.

Be careful out there and think twice before you click “Allow.”

Indicators of Compromise (IOCs)

During the course of the investigation we found—and blocked—these domains related to the campaign:

  1. dailyrumour[.]co.nz
  2. edifaqe[.]org
  3. geniusfun[.]co.in
  4. geniusfun[.]co.za
  5. genisfun[.]co.nz 
  6. holicithed[.]com
  7. ivenih[.]org
  8. loopdeviceconnection[.]co.in
  9. mindorbittest[.]com
  10. navixzuno[.]co.in
  11. quizcentral[.]co.in
  12. quizcentral[.]co.za
  13. rixifabed[.]org
  14. triviabox[.]co.in
  15. uhuhedeb[.]org
  16. unsphiperidion[.]co.in
  17. yeqeso[.]org
  18. ylloer[.]org

We don’t just report on threats—we remove them

Cybersecurity risks should never spread beyond a headline. Keep threats off your devices by downloading Malwarebytes today.
  •  

How to find and remove credential-stealing Chrome extensions

Researchers have found yet another family of malicious extensions in the Chrome Web Store. This time, 30 different Chrome extensions were found stealing credentials from more than 260,000 users.

The extensions rendered a full-screen iframe pointing to a remote domain. This iframe overlaid the current webpage and visually appeared as the extension’s interface. Because this functionality was hosted remotely, it was not included in the review that allowed the extensions into the Web Store.

In other recent findings, we reported about extensions spying on ChatGPT chats, sleeper extensions that monitored browser activity, and a fake extension that deliberately caused a browser crash.

To spread the risk of detections and take-downs, the attackers used a technique known as “extension spraying.” This means they used different names and unique identifiers for basically the same extension.

What often happens is that researchers provide a list of extension names and IDs, and it’s up to users to figure out whether they have one of these extensions installed.

Searching by name is easy when you open your “Manage extensions” tab, but unfortunately extension names are not unique. You could, for example, have the legitimate extension installed that a criminal tried to impersonate.

Searching by unique identifier

For Chrome and Edge, a browser extension ID is a unique 32‑character string of lowercase letters that stays the same even if the extension is renamed or reshipped.

When we’re looking at the extensions from a removal angle, there are two kinds: those installed by the user, and those force‑installed by other means (network admin, malware, Group Policy Object (GPO), etc.).

We will only look at the first type in this guide—the ones users installed themselves from the Web Store. The guide below is aimed at Chrome, but it’s almost the same for Edge.

How to find installed extensions

You can review the installed Chrome extensions like this:

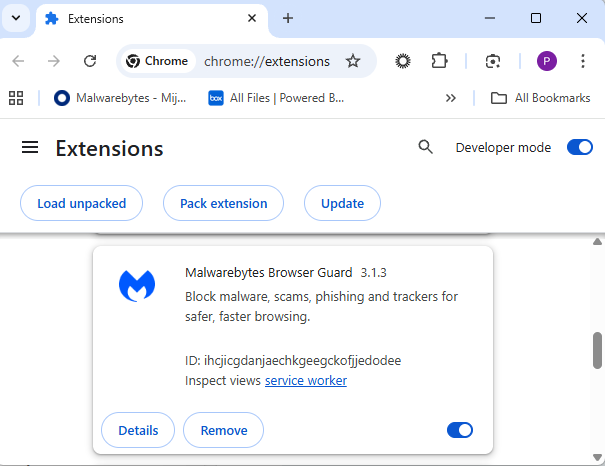
  • In the address bar type chrome://extensions/.
  • This will open the Extensions tab and show you the installed extensions by name.
  • Now toggle Developer mode to on and you will also see their unique ID.
Extensions tab showing Malwarebytes Browser Guard
Don’t remove this one. It’s one of the good ones.

Removal method in the browser

Use the Remove button to get rid of any unwanted entries.

If it disappears and stays gone after restart, you’re done. If there is no Remove button or Chrome says it’s “Installed by your administrator,” or the extension reappears after a restart, there’s a policy, registry entry, or malware forcing it.

Alternative

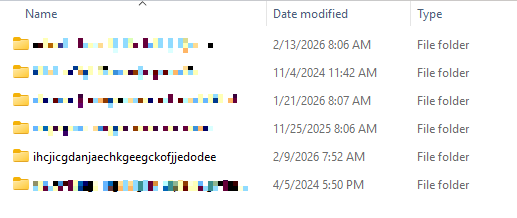
Alternatively, you can also search the Extensions folder. On Windows systems this folder lives here: C:\Users\<your‑username>\AppData\Local\Google\Chrome\User Data\Default\Extensions.

Please note that the AppData folder is hidden by default. To unhide files and folders in Windows, open Explorer, click the View tab (or menu), and check the Hidden items box. For more advanced options, choose Options > Change folder and search options > View tab, then select Show hidden files, folders, and drives.

Chrome extensions folder

You can organize the list alphabetically by clicking on the Name column header once or twice. This makes it easier to find extensions if you have a lot of them installed.

Deleting the extension folder here has one downside. It leaves an orphaned entry in your browser. When you start Chrome again after doing this, the extension will no longer load because its files are gone. But it will still show up in the Extensions tab, only without the appropriate icon.

So, our advice is to remove extensions in the browser when possible.

Malicious extensions

Below is the list of credential-stealing extensions using the iframe method, as provided by the researchers.

Extension IDExtension name
acaeafediijmccnjlokgcdiojiljfpbeChatGPT Translate
baonbjckakcpgliaafcodddkoednpjgfXAI
bilfflcophfehljhpnklmcelkoiffapbAI For Translation
cicjlpmjmimeoempffghfglndokjihhnAI Cover Letter Generator
ckicoadchmmndbakbokhapncehanaeniAI Email Writer
ckneindgfbjnbbiggcmnjeofelhflhajAI Image Generator Chat GPT
cmpmhhjahlioglkleiofbjodhhiejheiAI Translator
dbclhjpifdfkofnmjfpheiondafpkoedAi Wallpaper Generator
djhjckkfgancelbmgcamjimgphaphjdlAI Sidebar
ebmmjmakencgmgoijdfnbailknaaiffhChat With Gemini
ecikmpoikkcelnakpgaeplcjoickgacjAi Picture Generator
fdlagfnfaheppaigholhoojabfaapnhbGoogle Gemini
flnecpdpbhdblkpnegekobahlijbmfokChatGPT Picture Generator
fnjinbdmidgjkpmlihcginjipjaoapolEmail Generator AI
fpmkabpaklbhbhegegapfkenkmpipickChat GPT for Gmail
fppbiomdkfbhgjjdmojlogeceejinadgGemini AI Sidebar
gcfianbpjcfkafpiadmheejkokcmdkjlLlama
gcdfailafdfjbailcdcbjmeginhncjkbGrok Chatbot
gghdfkafnhfpaooiolhncejnlgglhkheAI Sidebar
gnaekhndaddbimfllbgmecjijbbfpabcAsk Gemini
gohgeedemmaohocbaccllpkabadoogplDeepSeek Chat
hgnjolbjpjmhepcbjgeeallnamkjnfgiAI Letter Generator
idhknpoceajhnjokpnbicildeoligdghChatGPT Translation
kblengdlefjpjkekanpoidgoghdngdglAI GPT
kepibgehhljlecgaeihhnmibnmikbngaDeepSeek Download
lodlcpnbppgipaimgbjgniokjcnpiiadAI Message Generator
llojfncgbabajmdglnkbhmiebiinohekChatGPT Sidebar
nkgbfengofophpmonladgaldioelckbeChat Bot GPT
nlhpidbjmmffhoogcennoiopekbiglbpAI Assistant
phiphcloddhmndjbdedgfbglhpkjcffhAsking Chat Gpt
pgfibniplgcnccdnkhblpmmlfodijppgChatGBT
cgmmcoandmabammnhfnjcakdeejbfimnGrok

We don’t just report on threats—we remove them

Cybersecurity risks should never spread beyond a headline. Keep threats off your devices by downloading Malwarebytes today.

  •  

How to Install and Perform Wi-Fi Attacks with Wifiphisher 

tl;dr: Install Wifiphisher on Kali and run a basic attack.  This crappy little copy/paste-able operation resulted in a functional Wifiphisher virtual environment on Kali (as of January 22, 2024).   Two […]
The post How to Install and Perform Wi-Fi Attacks with Wifiphisher  appeared first on Black Hills Information Security, Inc..

  •  

How to Weaponize the Yubikey

Michael Allen // A couple of years ago, I had a YubiKey that was affected by a security vulnerability, and to fix the issue, Yubico sent me a brand new […]

The post How to Weaponize the Yubikey appeared first on Black Hills Information Security, Inc..

  •  

An SMB Relay Race – How To Exploit LLMNR and SMB Message Signing for Fun and Profit

Jordan Drysdale// This is basically a slight update and rip off of Marcello’s work out here: https://byt3bl33d3r.github.io/practical-guide-to-ntlm-relaying-in-2017-aka-getting-a-foothold-in-under-5-minutes.html /tl;dr – Zero to DA on an environment through an exposed Outlook Web […]

The post An SMB Relay Race – How To Exploit LLMNR and SMB Message Signing for Fun and Profit appeared first on Black Hills Information Security, Inc..

  •  

Let’s Go Hunting! How to Hunt Command & Control Channels Using Bro IDS and RITA

Logan Lembke// Here at BHIS, we ♥ Bro IDS. Imagine… Bro IDS Everywhere! If you haven’t encountered Bro IDS before, checkout this webcast on John’s Youtube channel discussing the need for Bro […]

The post Let’s Go Hunting! How to Hunt Command & Control Channels Using Bro IDS and RITA appeared first on Black Hills Information Security, Inc..

  •  
❌