Normal view

Operationalizing AWS security: A maturity roadmap

8 June 2026 at 18:18

Enabling security tooling is the starting point. Making it operational—where findings drive decisions, response times are measurable, and your security posture improves week over week—is where most organizations struggle.

This blog post provides a phased maturity roadmap for organizations that have already enabled AWS Security Hub and Amazon GuardDuty. These two services form the foundation of a cloud-centered security operations capability on AWS. Security Hub provides centralized security posture management and aggregates findings from multiple AWS security services, while GuardDuty provides intelligent threat detection by continuously monitoring for malicious activity and unauthorized behavior. For any production or enterprise AWS environment, having both services enabled across all accounts and AWS Regions is a baseline expectation; not because they’re optional add-ons, but because effective security operations require both the ability to detect threats and the ability to understand your overall security posture. If you haven’t yet enabled them, the Security Hub documentation and GuardDuty documentation provide setup guidance, including multi-account deployment with AWS Organizations.

Customers consistently tell us that while individual AWS security service documentation is thorough, what’s missing is a consolidated operational playbook—one resource that ties the services together into a working security operations practice with clear phases, progression criteria, and an operational cadence. That’s the gap this post fills. Rather than covering how each feature works (the documentation does that well), this post focuses on when and why to use each capability, and how to build the organizational habits that make them effective.

What follows is a six-phase roadmap for moving from these services are active to these services are driving our security operations. Each phase builds on the previous one, and each is designed to deliver tangible, measurable improvement.

Phase 0: Assess your current state

Goal: Understand what’s working before changing anything.

Estimated timeline: 1–2 weeks

Move to Phase 1 when: You have a documented current-state assessment covering all the following items.

Before introducing new processes or automation, establish a clear picture of the current environment. This assessment informs every decision that follows.

Actions:

  • Findings inventory: Review existing active GuardDuty findings to determine how many there are, the severity distribution, and how old the oldest findings are. A large backlog of untouched HIGH or CRITICAL findings that have been sitting for weeks is a strong signal about where to focus first.
  • Security Hub score baseline: Determine your current compliance score against AWS Foundational Security Best Practices (FSBP) and The CIS AWS Foundations Benchmark. Check to see which standards are enabled; if multiple standards are enabled, review for overlapping standards (creating noise) or unused standards.
  • Multi-account and multi-Region check: Look to see if GuardDuty is enabled in every account and every Region, or only in Regions with active workloads. Threat actors frequently operate in Regions that organizations don’t actively monitor. Also check to see if Security Hub aggregation is configured with a delegated administrator account or if each account is being managed independently.
  • Integration check: Determine if GuardDuty findings are flowing into Security Hub and if Amazon Inspector and Amazon Macie are enabled and feeding findings in. Without integration, Security Hub might be only surfacing its own compliance checks.
  • Notification check: See if there’s an Amazon EventBridge rule configured for notifications and if so, how findings are being routed and to whom. Know if notifications are being sent using an Amazon Simple Notification Service (Amazon SNS) topic or a chat channel integration. Without a clear notification and response workflow, findings can accumulate silently in the console with no one looking at them.

Deliverable: A one-page current state assessment that identifies what’s enabled, what’s flowing where, who’s looking at it, and what’s in the existing backlog.

Phase 1: Reduce the noise

Goal: Make the signal meaningful before asking anyone to act on it.

Estimated timeline: 2–3 weeks

Move to Phase 2 when: Remaining findings represent items requiring real decisions, compliance scores reflect actual posture, and you can articulate why every suppression rule and disabled control exists.

This is the single most important phase. If this step is skipped in favor of jumping straight to automation, the result is automated chaos. Alert fatigue is the primary reason security tooling is ignored, and addressing it first is what makes everything that follows sustainable.

GuardDuty tuning:

  • Create suppression rules for known-benign findings. The goal is to suppress activity you’ve already evaluated and accepted—such as expected traffic from corporate egress IPs (based on trusted IP lists), internal tools that trigger DNS-based findings, or internet-facing resources that naturally receive port scanning. The principle: if you’ve investigated a finding and it’s expected, suppress it so your team can focus on what matters.
  • Triage every active HIGH and CRITICAL finding into three categories: needs immediate investigation (real threat, not yet reviewed), true positive, already addressed (archive using workflow status), or false positive or expected behavior (create a suppression rule). Every finding must be categorized into one of these three states.
  • Review GuardDuty protection plans and enable any that are relevant but not yet active. Organizations that enabled GuardDuty years ago might not have activated protection plans released since then (such as Runtime Monitoring, Malware Protection, RDS Protection, and Lambda Protection). Evaluate each against your workload profile and enable what applies.

Security Hub tuning:

  • Disable controls that aren’t relevant to the environment. This is the highest-value quick win. If a service isn’t in use, disable its controls. If a control is addressed by an alternative solution, disable it. A 47% compliance score where half the failures are irrelevant trains teams to ignore the dashboard entirely. See the Security Hub controls reference for the full list.
  • Choose a primary standard. AWS Foundational Security Best Practices is a strong default. The CIS AWS Foundations Benchmark adds value when there’s a specific compliance mandate. Avoid enabling PCI DSS or NIST 800-53 standards unless there’s a reporting requirement—they add significant volume without proportional signal for most organizations.
  • Configure cross-Region aggregation to the delegated administrator account if not already in place. A single aggregated view eliminates the need to check findings across multiple Regional consoles.
  • Use the workflow status field operationally. Findings should progress from NEW to NOTIFIED to RESOLVED or SUPPRESSED. If everything remains in NEW indefinitely, the system carries no operational meaning.

Deliverable: A tuned environment where remaining findings represent items that require real decisions. Compliance scores should now reflect your organization’s actual security posture rather than noise.

Phase 2: Build the notification and routing layer

Goal: Get the right findings to the right people at the right time.

Estimated timeline: 2–3 weeks

Move to Phase 3 when: CRITICAL and HIGH findings reach the security team within minutes, MEDIUM findings create tracked tickets, and notifications include enriched context. No action is taken until a person or an automation is informed that something needs attention.

Architecture: Security Hub to EventBridge rule to routing logic to destination

Tiered notification strategy:

CRITICAL Page on-call immediately PagerDuty or Opsgenie 15 minutes
HIGH Alert security team channel Slack or Teams channel and ticket creation 4 hours
MEDIUM Create ticket for review Jira or ServiceNow 48 hours
LOW or INFORMATIONAL Batch digest Weekly email summary or dashboard review Next review cycle

Key design decisions:

  • Route from Security Hub, not individual services. Because findings from GuardDuty, Inspector, Macie, and Security Hub compliance checks all aggregate in Security Hub, build your EventBridge rules there for centralized management.
  • Create a fast path for the most dangerous finding types. Certain GuardDuty findings, particularly those involving credential exfiltration, cryptocurrency activity, trojans, and active compromises, warrant a separate, faster routing path that bypasses normal triage. Identify these based on your threat model and the GuardDuty finding types reference.
  • Enrich notifications before delivery. A raw JSON finding in a chat channel provides little actionable context. Use an AWS Lambda function to format notifications with the information responders need: account alias, Region, Amazon Resource Name (ARN), finding type, severity, a console deep link, and a plain-language description. The Security Hub CloudWatch Events integration guide describes the event format.

Deliverable: A working notification pipeline where CRITICAL and HIGH findings reach the security team within minutes, MEDIUM findings create tracked work items, and LOW and INFORMATIONAL findings are batched for periodic review.

Phase 3: Build automated remediation for high-confidence findings

Goal: For findings where the correct response is deterministic, remove the human from the loop.

Estimated timeline: 3–4 weeks

Move to Phase 4 when: At least 3–5 high-confidence finding types have automated responses deployed with audit trails, and the team has established a process for evaluating new auto-remediation candidates.

The guiding principle: Only auto-remediate when all three conditions are met: the finding is high-confidence, the response is deterministic, and the blast radius of the automated action is limited. Automated remediation must not create the risk of a production outage.

Decision framework:

Confidence level High – no false positive risk Medium – context-dependent Low – requires investigation
Response complexity Single, well-defined action Multiple steps or judgment calls Requires forensic analysis
Blast radius Limited to one resource Could affect dependent services Production-wide impact
Rollback difficulty Straightforward to reverse Moderate effort to reverse Difficult or impossible to reverse

Common auto-remediation categories:

  • Instance isolation for confirmed compromise findings (cryptocurrency mining, malware, and trojans): Replace the security group, snapshot volumes for forensics, and notify.
  • Credential revocation for confirmed credential compromise: Attach deny-all policies, revoke sessions, and deactivate access keys as appropriate to the credential type.
  • Compliance drift correction for deterministic misconfigurations: Re-enable Amazon Simple Storage Service (Amazon S3) Block Public Access, revoke overly permissive security group rules, and re-enable AWS CloudTrail logging.
  • Notification-only escalation for findings that require human judgment before action: Amazon Elastic Block Store (Amazon EBS) encryption gaps (require migration) and access key rotation (requires coordination with the key owner).

For implementation, AWS provides Security Hub Automated Response and Remediation (SHARR), a solution that includes pre-built remediation playbooks deployed as AWS Step Functions workflows triggered by EventBridge. This is a strong starting point—evaluate the provided playbooks, enable the ones that fit, and extend with custom remediations as needed.

Note: For findings that recur because the environment lacks preventive guardrails, the best long-term response is often a service control policy (SCP) that prevents the misconfiguration from occurring in the first place. Phase 5 covers this preventive controls layer.

Deliverable: A library of automated and semi-automated remediation runbooks with full audit trails, and a documented decision framework the team uses to evaluate new auto-remediation candidates.

Phase 4: Build the operational rhythm

Goal: Turn security findings management into a sustained organizational practice, not a one-time cleanup.

Estimated timeline: 4–6 weeks to establish, then ongoing

Move to Phase 5 when: The weekly cadence has been running consistently for at least 8 weeks, monthly metrics show positive trends, and the first quarterly review has been completed.

This is where many organizations stall, and it’s the most important phase in the entire roadmap. The technology is working, the notifications are flowing, automated remediations are firing, but there’s no organizational habit built around it. Without this phase, everything you’ve built in Phases 0–3 will gradually decay. Suppression rules will go stale, new team members won’t know the system exists, and findings will start accumulating again. The operational rhythm is what converts a security tooling deployment into a security operations practice.

Weekly security review (30 minutes)

Attendees: Security team lead, cloud platform team representative, rotating engineering lead from an application team

Why the rotating engineering lead matters: Security findings don’t exist in a vacuum; they’re generated by workloads that engineering teams own. Rotating an engineering representative through this meeting accomplishes three things: it builds security awareness across the organization, ensures findings are routed to people with the context to resolve them, and creates organizational accountability beyond the security team.

Agenda template:

5 minutes Compliance score trend – Review Security Hub scores by account and standard. Is the trend improving, declining, or flat? If declining, why? Security lead Identified regression areas
5 minutes Critical and high findings review – Walk through new HIGH and CRITICAL GuardDuty findings from the past week. Are there any that need immediate escalation? Security lead Escalation actions assigned
10 minutes Top five failing controls – Identify the five Security Hub controls with the most failures. Assign an owner and a target date for each. Platform lead Owners and dates documented
5 minutes Automation review – Did any auto-remediations fire this week? Did they work correctly? Were there any false triggers? Security lead Automation adjustments queued
5 minutes Tuning decisions – Are new suppression rules needed based on this week’s findings? Are any new finding types candidates for auto-remediation? All Tuning backlog updated

Running the meeting effectively:

  • Keep a running document (such as a wiki page or shared document) that captures decisions and action items week over week. This becomes your institutional memory.
  • If the compliance score hasn’t moved in over 3 weeks, that’s a signal. Either the assigned work isn’t happening, or the remaining findings are genuinely difficult to address. Both need to be discussed.
  • Track action items from previous weeks. A review that generates action items but never follows up on them will lose credibility and attendance quickly.

Escalation procedures

Define clear escalation paths before they’re needed:

CRITICAL finding not acknowledged within the SLA Auto-escalate to security team manager 15 minutes after SLA breach
HIGH finding not resolved within the SLA Escalate to finding owner’s manager 4 hours after SLA breach
Compliance score drops more than 5 points in a week Escalate to cloud platform team lead for investigation Next business day
Auto-remediation failure Page security on-call Immediate
New finding type not covered by existing runbooks Add to weekly review agenda for triage and runbook development Next weekly review

Monthly metrics report

Compile these metrics monthly and review them with security and engineering leadership. The goal is to tell a story about whether the organization’s security posture is improving, stable, or degrading, and why.

Mean time to acknowledge (MTTA) for CRITICAL findings Are findings being seen promptly? Decreasing month over month
Mean time to resolve (MTTR) for CRITICAL and HIGH findings Are findings being acted on? Decreasing month over month
Security Hub compliance score by standard, by account What is the posture trend over time? Increasing month over month
Number of active GuardDuty findings by severity Is the backlog growing or shrinking? Decreasing for HIGH and CRITICAL
Findings auto-remediated compared to manually resolved Is automation delivering value? Auto-remediation ratio increasing
Number of suppressed findings (with quarterly justification review) Is noise being managed, or are problems being hidden? Stable or decreasing
New findings introduced compared to resolved this month Is the organization getting ahead or falling behind? More finding resolved than introduced
SLA adherence rate by severity Are response commitments being met? More than 95% for CRITICAL, and more than 90% for HIGH

Building the dashboard: Use Amazon CloudWatch dashboards for real-time operational visibility or Amazon QuickSight connected to Security Hub findings through Amazon Security Lake for historical trend analysis and executive reporting. The dashboard should be visible to—and regularly viewed by—everyone in the weekly review, not locked in a security team tool.

Quarterly reviews

The quarterly review is a deeper inspection of the system itself; not just the findings, but the machinery processing them.

Quarterly review checklist:

  • Suppression rules audit: Review every active suppression rule to determine if the underlying condition is still present and the suppression is still justified. Document the review outcome for each rule.
  • Disabled controls audit: Review every disabled Security Hub control. Check that the justification is still valid and if the environment changed (for example, a service that wasn’t in use is now in use).
  • Automation audit: Review AWS Identity and Access Management (IAM) roles used by remediation functions and verify least privilege. Review execution logs for any anomalies or failures that weren’t caught.
  • New capabilities review: Evaluate newly released GuardDuty protection plans and Security Hub controls from that quarter. AWS releases new detection and compliance capabilities regularly. If you’re not reviewing them quarterly, you’re accumulating blind spots.
  • Process effectiveness review: Determine if the weekly meeting is well-attended and if action items are being completed. Make sure SLAs are being met. If attendance, action item completion, and SLA compliance aren’t where they should be, explore structural changes to address the gaps.

Operational maturity scoring

Use this rubric to assess the maturity of your operational rhythm itself. Score each dimension 1–3 and use the total to track progress over time.

Review cadence One time reviews when someone remembers Weekly review happens, but attendance is inconsistent Weekly review is consistently attended with documented outcomes
Metrics tracking No metrics captured Metrics are collected monthly but not acted on Metrics drive decisions and declining trends trigger specific actions
Finding ownership Findings sit in queue with no owner Findings are assigned to teams but SLAs aren’t tracked Every finding has an owner, SLAs are tracked, and breaches are escalated
Automation management Set-and-forget automations Automation logs are reviewed periodically Automation is reviewed weekly, and new candidates are evaluated continuously
Tuning lifecycle Suppression rules created but never reviewed Annual review of suppressions and disabled controls Quarterly reviews with documented justification for every rule
Cross-team engagement Security team works in isolation Platform team participates Engineering teams actively participate and own remediation

Scoring (revisit quarterly):

  • Beginning: 6–9
  • Established: 10–14
  • Optimized: 15–18

Deliverable: A documented operational cadence with clear ownership (consider a RACI matrix), metrics dashboards, escalation procedures, and a continuous improvement loop. The cadence should survive team member turnover—if it depends on one person remembering to run it, it’s not yet operational.

Phase 5: Mature the architecture

Goal: Fill remaining gaps and build toward a comprehensive security operations capability. Estimated timeline: Ongoing. Prioritize based on organizational risk profile and compliance requirements.

  • Amazon Inspector integration: Enable Amazon Inspector for Amazon Elastic Compute Cloud (Amazon EC2) instances, Lambda functions, and Amazon Elastic Container Registry (Amazon ECR) container images. Findings flow into Security Hub automatically, adding vulnerability management alongside threat detection and posture management. Prioritize this if you have Amazon EC2 or container workloads without an existing vulnerability scanning solution.
  • Amazon Macie: Enable Amazon Macie for S3 buckets containing potentially sensitive data. Particularly important for organizations with compliance requirements around personally identifiable information (PII), protected health information (PHI), or Payment Card Industry (PCI) data. Configure automated sensitive data discovery and route findings to Security Hub.
  • Amazon Security Lake: Amazon Security Lake centralizes security-relevant logs in OCSF format for long-term retention, forensic investigation, and threat hunting. This is valuable when you need historical analysis beyond the Security Hub retention window, or when feeding a third-party Security Information and Event Management (SIEM) tool.
  • Preventive controls layer: Convert recurring detective findings into preventive policies. Use SCPs to prevent disabling GuardDuty, Security Hub, and CloudTrail, IAM permission boundaries on developer roles, AWS WAF on public endpoints, and AWS Network Firewall for VPC traffic inspection. The pattern is to make recurring misconfigurations impossible to introduce.
  • Detective controls expansion: Use AWS IAM Access Analyzer for external access and unused access findings, AWS CloudTrail Lake for long-term queryable audit logs, and AWS Config custom rules for organization-specific compliance checks.
  • Incident response readiness: Have incident response playbooks referencing specific GuardDuty finding types, pre-built forensics infrastructure (isolated VPC, forensic AMIs, and pre-configured IAM roles), regular tabletop exercises, and AWS CloudFormation templates to deploy isolation infrastructure on demand. See the AWS Security Incident Response Guide for a comprehensive framework.

Conclusion

In this post, I provided a six-phase roadmap for operationalizing Security Hub and GuardDuty and showed that it isn’t a single project, but a progression. Phase 0 and Phase 1 can typically be completed in 3–5 weeks and deliver immediate clarity. Phases 2 and 3 build the response infrastructure that turns findings into action over the following 5–7 weeks. Phase 4 is what makes everything sustainable and is where you should invest the most attention. And Phase 5 expands the aperture from Security Hub and GuardDuty into a comprehensive security operations capability.

If you walked away from this post and did one thing, run the Phase 0 assessment this week. That single deliverable tells you exactly where to focus next. Use the following self-assessment checklist to identify your current phase, then focus on the next one. A tuned environment with working notifications and a weekly review cadence is dramatically more effective than a fully featured but neglected deployment. Start where you are, reduce the noise, build the habits, and iterate. To learn more, explore the AWS Security Hub User Guide, the Amazon GuardDuty User Guide, and the AWS Security Incident Response Guide. If you’ve implemented a similar operational cadence, or have questions about any phase, share your experience in the comments.

Self-assessment checklist

Phase 0 We know how many active GuardDuty findings exist across all accounts
We know our current Security Hub compliance score
We know whether GuardDuty is enabled in every account and region
We know who (if anyone) is reviewing findings today
Phase 1 GuardDuty suppression rules exist for known-benign activity
Irrelevant Security Hub controls have been disabled with documented justification
All active HIGH and CRITICAL findings have been triaged
Security Hub compliance scores reflect actual posture, not noise
Phase 2 HIGH and CRITICAL findings generate real-time notifications to the security team
MEDIUM findings automatically create tracked work items
Notifications include enriched context (account alias, resource ARN, and console link)
Phase 3 At least three high-confidence finding types trigger automated remediation
Auto-remediation actions have full audit trails
Remediation runbooks are documented and version-controlled
Phase 4 A weekly security review meeting occurs with defined attendees and agenda
MTTA and MTTR are tracked monthly for CRITICAL and HIGH findings
Suppression rules and disabled controls are reviewed quarterly
Security metrics trend positively over the past 3 months
Phase 5 Amazon Inspector, Macie, or Security Lake are integrated
Preventive controls (SCPs, permission boundaries) address recurring findings
Incident response playbooks exist and are tested through tabletop exercises

If you have feedback about this post, submit comments in the Comments section below.

Joseph Sadler

Joseph Sadler

Joseph is a Senior Solutions Architect on the Worldwide Public Sector team at AWS, specializing in cybersecurity and machine learning. With public and private sector experience, he has expertise in cloud security, artificial intelligence, threat detection, and incident response. His diverse background helps him architect robust, secure solutions that use cutting-edge technologies to safeguard mission-critical systems

Identify unused AWS KMS keys and prevent accidental key deletions

2 June 2026 at 21:01

As you scale your use of Amazon Web Services (AWS), managing KMS keys becomes increasingly important. Whether you manage a handful of keys or thousands across multiple AWS accounts and AWS Regions, there’s often a need to audit key usage to help you meet compliance requirements, evaluate your risk posture, and optimize key management costs. However, determining which keys are actively in use and which have been sitting idle can be a time consuming and complex task.

To help with this, AWS Key Management Service (AWS KMS) has launched the GetKeyLastUsage API, a new feature that you can use to quickly determine when each key was last used for a cryptographic operation, significantly enhancing your audit capabilities and key lifecycle management. For more information, see Determine past usage of a KMS key.

Before this launch, the primary way to audit key usage was through AWS CloudTrail logs. CloudTrail captures every cryptographic operation by default, so the data is available. The difficulty is turning that data into actionable insight. You need to identify which keys to examine, query the right logs, and repeat that process frequently enough to maintain an accurate view. For the most recent 90 days, CloudTrail event history makes this manageable. Beyond that, you need to create a dedicated trail to deliver logs to Amazon Simple Storage Service (Amazon S3) for long-term retention, then query those logs using tools such as Amazon Athena to determine when a key was last used.

Determine when a key was last used

AWS KMS now provides a direct way to see when a key was last used for cryptographic operations. You can also see this information using the AWS Management Console for AWS KMS and the AWS Command Line Interface (AWS CLI).

The GetKeyLastUsage API returns the date and time of the most recent cryptographic operation performed with a KMS key, without requiring you to search through CloudTrail logs. The API returns the date and time of the last key operation, the type of operation performed, CloudTrail event ID, and KMS request ID. You can access this information for all customer-managed keys and AWS managed keys irrespective of key spec, key origin, key store, or key usage type.

In addition, you can restrict a key from being disabled or scheduled for deletion if it was recently used, by incorporating this usage information as a condition within the KMS key policy. See the Preventing accidental key deletion with policy controls section for implementation details.

About the tracking period

One of the important concepts you must understand before relying on the last usage information reported on a KMS key is the tracking period. The tracking period is the date from which AWS KMS began tracking cryptographic activity for the key. Tracking began on April 23, 2026, for most AWS Regions. Understanding the tracking period is critical because it determines whether the absence of usage information means a key has never been used or only hasn’t been used since tracking started.

For example, if you have a key created on January 1, 2026, and you check its usage, any cryptographic operations that occurred between January 1 and April 22 wouldn’t be captured in the usage information. Thus, you can’t conclude that it’s never been used, because it might have been used in the months before tracking began.

Getting started

There’s nothing to enable or additional configuration required to view usage information on last cryptographic operation performed on your KMS keys.

To view KMS key usage:

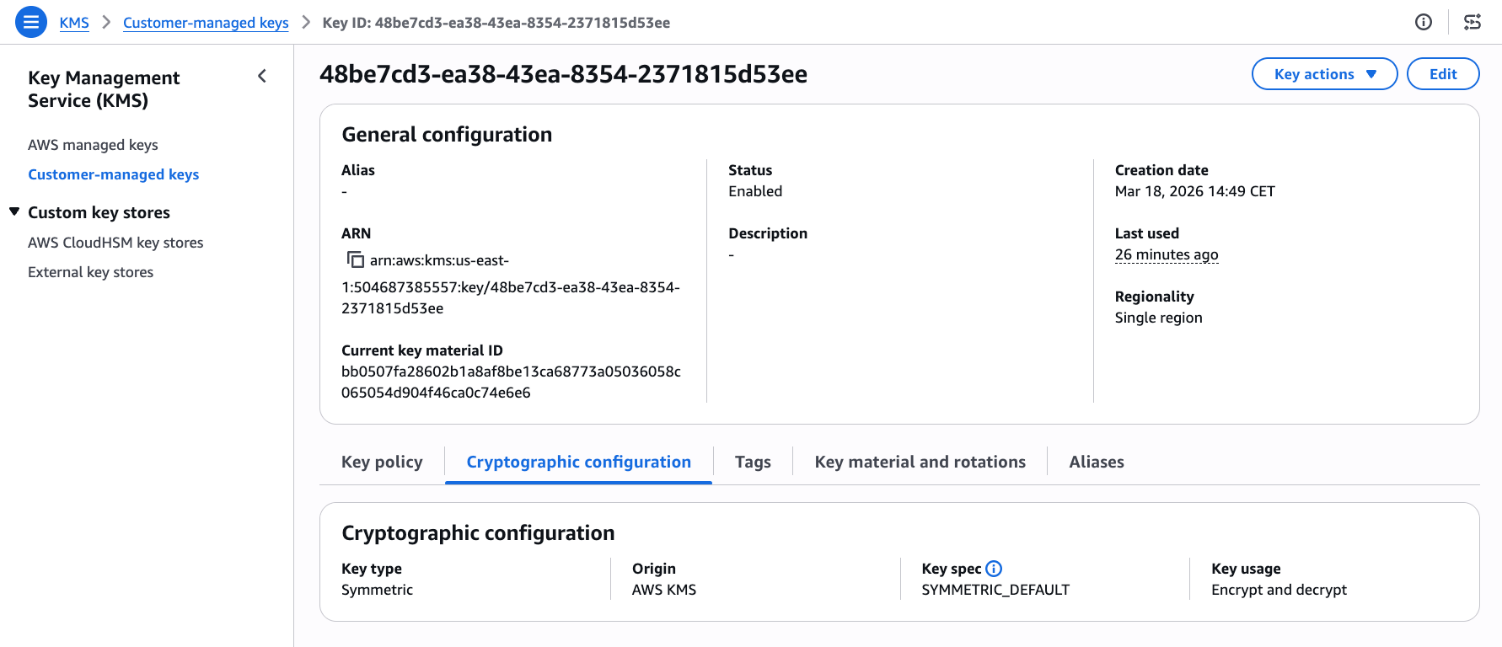
  1. Go to the AWS KMS console and choose Customer-managed keys in the navigation pane and select a key. Look for Last used on the general configuration.
    Figure 1: KMS key general configuration page

    Figure 1: KMS key general configuration page

  2. Choose the link under Last used to see additional details such as Timestamp, Operation, and the CloudTrail event ID.
    Figure 2: View last used details including timestamp, operation, and event ID

    Figure 2: View last used details including timestamp, operation, and event ID

  3. The Last used column is also shown when you attempt to schedule key deletion, so that you can make informed decisions.
    Figure 3: Scheduled key deletion warning

    Figure 3: Scheduled key deletion warning

API reference

See the following examples for ideas on how to use the GetKeyLastUsage API to better understand KMS key usage.

Use case 1: Cost optimization through unused key cleanup

If you manage thousands of AWS KMS keys distributed across multiple AWS accounts, you might have keys that have remained unused since creation or keys that are no longer needed. By cleaning up these keys, you can reduce operational costs and minimize your security footprint. However, without visibility into which keys are actively performing cryptographic operations, it can be difficult to distinguish between keys protecting critical workloads and those that can be safely decommissioned.

Note that there are some precautions that you should take before scheduling key deletion. While the last usage information can help identify unused keys, it shouldn’t be the only factor in deciding whether to delete or disable a key. The last usage information tells you when a key was last used, not whether it will be needed in the future. A key might be unused for months but still required to decrypt files, for compliance scenarios or disaster recovery as shown in figure 4.

When you identify a potentially unused key, first disable it using DisableKey and monitor your applications and services for any encryption or decryption failures.

Figure 4: A use case where GetKeyLastUsage doesn’t accurately reflect whether a KMS key is still required

Figure 4: A use case where GetKeyLastUsage doesn’t accurately reflect whether a KMS key is still required

As an example, Amazon EBS volumes only interact with KMS keys during specific lifecycle events like volume creation, attachment, and detachment. After a volume is attached to an Amazon Elastic Compute Cloud (Amazon EC2) instance, the plaintext data encryption key is cached in the Nitro Card hardware, and all subsequent read/write operations use this cached key without any further AWS KMS API calls. This means a production volume running continuously for months or years will show no KMS activity during that entire period. However, the volume remains completely dependent on that KMS key for any future operations like instance restarts, volume reattachments, or disaster recovery scenarios. If someone deletes the KMS key, the encrypted data key stored with the volume can never be decrypted again, making the volume’s data permanently and irreversibly inaccessible. Before deleting any KMS key, you must verify it has no associated EBS volumes or snapshots, regardless of how long ago the last KMS API call occurred.

AWS provides a mechanism where you can create a CloudWatch alarm that notifies you if a key pending deletion is being accessed, giving you an opportunity to cancel the deletion before data becomes inaccessible.

Solution with GetKeyLastUsage API

Here’s a sample script that scans all customer-managed keys in an account and retrieves each key’s last usage date through the GetKeyLastUsage API. It accepts two optional inputs: a threshold in days and an AWS Region. The script filters and displays only keys that haven’t been used within the specified period, presenting results in a table with the key name, AWS account ID, AWS Region, and last usage date. This can help you identify unused encryption keys.

The following is an example to scan all keys that haven’t been used in the last 180 days in the us-east-1 Region:

./script.sh 180 us-east-1
#!/bin/bash
DAYS=${1:-90}
REGION=${2:-$(aws configure get region)}
CUTOFF=$(date -v-${DAYS}d +%s 2>/dev/null || date -d "-${DAYS} days" +%s)
ACCOUNT_ID=$(aws sts get-caller-identity --query Account --output text)
printf "Showing keys not used in the last %s days (Region: %s)\n\n" "$DAYS" "$REGION"
printf "%-50s %-15s %-20s %-15s\n" "Key Name" "Account ID" "Region" "Last Usage Date"
printf "%.0s-" {1..100}
printf "\n"
for key_id in $(aws kms list-keys --region $REGION --query 'Keys[*].KeyId' --output text); do
key_manager=$(aws kms describe-key --region $REGION --key-id $key_id --query 'KeyMetadata.KeyManager' --output text)
if [ "$key_manager" = "CUSTOMER" ]; then
last_usage=$(aws kms get-key-last-usage --region $REGION --key-id $key_id)
timestamp=$(echo $last_usage | jq -r '.KeyLastUsage.TimeStamp // empty')
if [ -z "$timestamp" ]; then
last_epoch=0
else
last_epoch=$(date -jf "%Y-%m-%dT%H:%M:%S" "$(echo $timestamp | cut -d. -f1)" +%s 2>/dev/null || date -d "$timestamp" +%s)
fi
if [ "$last_epoch" -lt "$CUTOFF" ]; then
key_alias=$(aws kms list-aliases --region $REGION --key-id $key_id --query 'Aliases[0].AliasName' --output text)
key_name=${key_alias:-$key_id}
[ "$key_name" = "None" ] && key_name=$key_id
if [ -z "$timestamp" ]; then
tracking_date=$(echo $last_usage | jq -r '.TrackingStartDate' | cut -d'T' -f1)
last_used="${tracking_date}*"
else
last_used=$(echo $timestamp | cut -d'T' -f1)
fi
printf "%-50s %-15s %-20s %-15s\n" "$key_name" "$ACCOUNT_ID" "$REGION" "$last_used"
fi
fi
done
printf "\n* = No operations performed since tracking started\n"

Use case 2: Preventing accidental key deletion with policy controls

Organizations frequently face the risk of accidental key deletions, which can have severe operational consequences. Despite precautions and safety measures, accidents can happen. A key might be deleted because someone believes it’s no longer in use, only to discover that critical applications or workloads depend on it. This results in data access failures, application downtime, and emergency recovery procedures. Without visibility into recent key usage, teams lack the information needed to make safe disable decisions or implement effective safeguards.

Solution with policy based controls

To prevent KMS keys from being accidentally Disabled or Deleted use the kms:TrailingDaysWithoutKeyUsage condition key in key policies to automatically block deletion or disabling of recently used keys:

  1. Open the AWS KMS console and choose Customer managed keys in the navigation pane.
  2. Select the key you want to protect.
  3. In the Key policy tab, choose Edit.
  4. In the policy editor, add the following statement:
{
  "Sid": "PreventDeletionOfRecentlyUsedKeys",
  "Effect": "Deny",
  "Principal": "*",
  "Action": [
    "kms:ScheduleKeyDeletion",
    "kms:DisableKey"
  ],
  "Resource": "*",
  "Condition": {
    "NumericLessThanEquals": {
      "kms:TrailingDaysWithoutKeyUsage": "365"
    }
  }
}
  1. Choose Save changes.

The policy prevents deletion or disabling a key if it was used within the past 365 days. You can adjust the threshold to match your organization’s requirements. For more information about the condition key, see kms:TrailingDaysWithoutKeyUsage.

Important considerations

When reviewing key usage for possible deletion, consider the following:

  • Key deletion is irreversible and makes encrypted data unrecoverable. AWS enforces a 7–30 day waiting period. During this time, monitor usage attempts and cancel the deletion if necessary. Delete a key only if you’re certain that no data has been encrypted or will be encrypted with it. Consider disabling the key first to test the impact of unavailable keys.
  • CloudTrail remains authoritative because it provides the full audit trail. GetKeyLastUsage quickly tells you when and what operations occurred, but CloudTrail shows you who made the request and with what parameters. Learn more about logging KMS API calls with CloudTrail.

Conclusion

The GetKeyLastUsage API enhances your KMS key management capabilities by providing immediate access to usage data that was previously only present in CloudTrail logs. Start by opening the AWS KMS console and checking the Last used field for any customer-managed keys and AWS managed keys to see this information in action. For broader key auditing, integrate the API into your existing automation scripts using the AWS CLI examples provided.

If you have feedback about this post, submit comments in the Comments section below.


Andrea Rossi

Andrea Rossi

Andrea is the Solutions Architect who always asks “but is it secure?” one more time. Based in Milan, Italy, he works with customers to architect cloud solutions where security is foundational, not an afterthought, from network-level hardening to integrating Generative AI workloads into compliant environments.

Poojil Tripathi

Poojil Tripathi

Poojil is a Solutions Architect based in Austin, TX, who would like to remind you that you should never click on links. He works with customers to design secure-by-design cloud solutions on AWS, specializing in encryption and healthy paranoia.

Well-architected best practices for software supply chain security

26 May 2026 at 19:03

There have been multiple notable supply chain attacks using the npm Registry since September: Shai-Hulud, Chalk/Debug, one abusing tea.xyz tokens, and recently axios. Thanks to community efforts involving the Amazon Inspector team, the Open Source Security Foundation, and others, the affected packages were quickly flagged, which reduced the impact of these incidents.

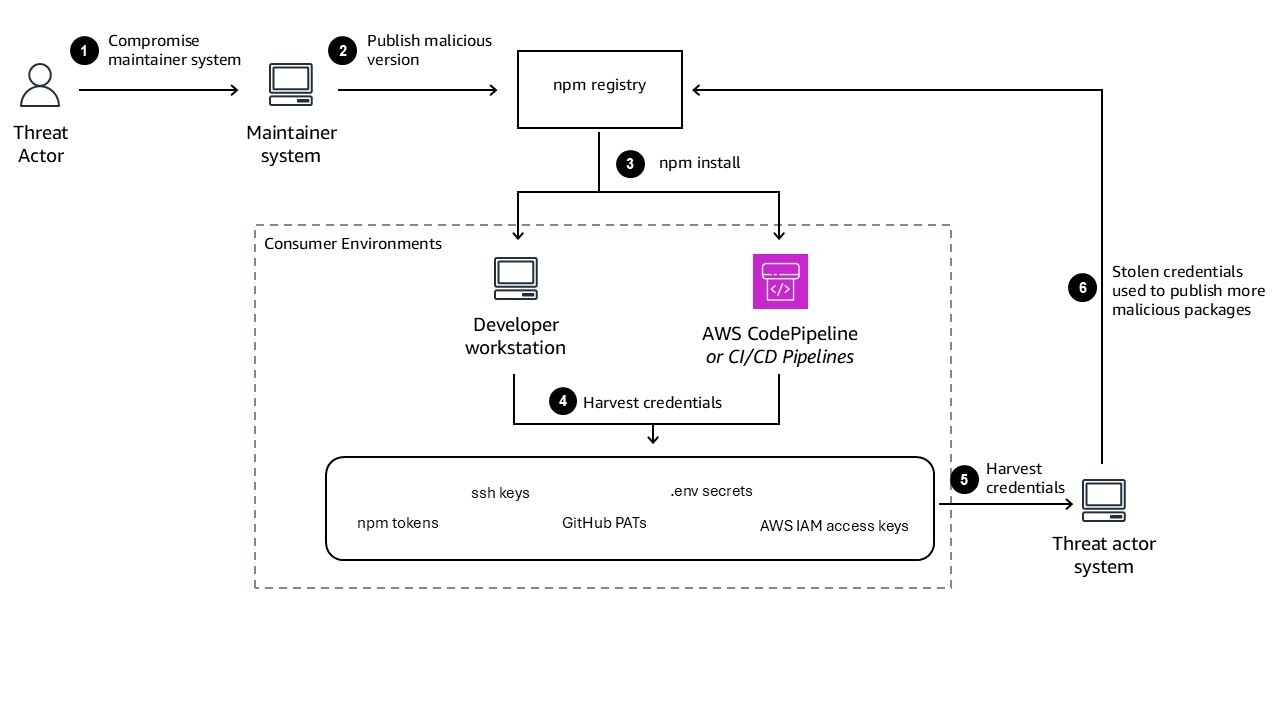
Supply chain attacks like Shai-Hulud exploit vulnerabilities on two fronts: compromised maintainer accounts that publish malicious packages, and consumer environments that download and execute those packages. The Shai-Hulud attack, shown in Figure 1, succeeded because maintainer credentials were compromised through phishing, enabling threat actors to publish malicious versions of popular packages. Incidents like these highlight the need for strong security practices within the software supply chain, and effective defense requires addressing both sides. Package maintainers need protections that prevent account compromise and limit sprawl when credentials are stolen. Package consumers need layered defenses that detect malicious packages, prevent their deployment, and limit damage when compromise occurs.

In this post, we explore best practices for package consumers. These practices are aligned with the AWS Well-Architected Framework – Security Pillar and you can use them to reduce exposure to similar threats and limit their impact if they occur.

Figure 1: Architecture diagram showing Shai-Hulud attack flow

Figure 1: Architecture diagram showing Shai-Hulud attack flow

Use temporary credentials and grant least privilege

When Shai-Hulud executed in developer environments and continuous integration and delivery (CI/CD) pipelines, it scanned for secrets such as npm tokens, GitHub tokens, and AWS Identity and Access Management (IAM) access keys. Long-term credentials exposed in this way enabled threat actors to propagate the malware further and access cloud resources. Recent incidents have shown organizations discovering multiple leaked IAM credential pairs, with concerns about additional exposed credentials and potential compromise of CI/CD pipelines.

Removing long-lived credentials from your developer environments and CI/CD pipelines reduces the scope of exposure in the event a system is compromised. For developers working locally, the new AWS CLI login command (aws login) simplifies the process of acquiring short-lived CLI credentials and removes the need to store long-lived credentials in configuration files. AWS IAM Identity Center also provides a straightforward way to acquire temporary credentials that expire automatically. For CI/CD pipelines, OpenID Connect (OIDC) federation with GitHub Actions, GitLab CI, or other platforms provide temporary credentials for each job without storing long-lived tokens. IAM can also federate AWS Identities to external services, allowing your AWS workloads to securely access external services without using long-term credentials. Temporary credentials expire automatically, limiting the window of exposure if a pipeline is compromised.

If you’re interacting with a third-party service that doesn’t support temporary credentials, consider storing the credentials to centralized storage using AWS Secrets Manager. Limit access to these secrets, require the use of temporary credentials, and apply automatic rotation and audit logging to reduce the risk of exposure of these credentials.

To reduce risk from credential exposure:

In the event of a security incident where credentials might be exposed, immediately rotate all long-term credentials to limit the scope of impact. Use Amazon GuardDuty and AWS CloudTrail to detect abnormal IAM activity and identify which credentials might have been compromised.

Implement defense in depth

Even with temporary credentials and least privilege, a single compromised account can enable threat actors to publish malicious packages or access sensitive resources. Defense in depth creates multiple layers of protection that work together to prevent sprawl after initial compromise. While adding approval workflows to every operation would dramatically decrease deployment speed, implementing them strategically for sensitive workloads provides balanced security.

The key principle is to ensure that if one credential or account is compromised, additional controls prevent that compromise from spreading across your organization. This includes multi-factor authentication (MFA) for access combined with different IAM roles for sensitive workloads. For single-developer open source projects, MFA becomes even more critical because there’s no separation of duties through multiple maintainers.

For package maintainers working in team environments, requiring multiple approvers to release packages to production creates separation of duties. However, developers can still trigger merge requests that initiate deployment pipelines, so multi-party approval should be implemented within the pipeline itself for sensitive deployments. This ensures that even if a developer’s credentials are compromised and they trigger a deployment, the pipeline requires additional approval before releasing to production.

For package consumers, multi-approval workflows in deployment pipelines help ensure that if a malicious package passes initial scanning, human review can catch suspicious changes before production deployment. Artifact signing provides a complementary cryptographic layer that works alongside these process controls.

The Shai-Hulud attack succeeded because compromised maintainer credentials allowed threat actors to publish malicious packages directly to the public npm registry. For package consumers, the defense is ensuring that packages pulled from public registries cannot reach production without verification. Artifact signing is one concrete implementation of this layered approach. By cryptographically binding a package or container image to the identity that produced it, signing creates a verification layer that is independent of the credential used to trigger the build—meaning a compromised developer credential alone isn’t sufficient to introduce an unverified artifact into your deployment pipeline.

Artifact signing as part of defense in depth

AWS Signer provides cryptographic signing for packages, creating an additional verification layer within your defense in depth strategy. The signing authorization model separates concerns: developer credentials shouldn’t have signing permissions. Only CI/CD pipeline roles should have signing permissions through the signer:StartSigningJob API. Signer uses FIPS 140-3 Level 3 validated hardware security modules (HSMs) to store signing keys, providing strong cryptographic protection.

The container image signing workflow, shown in Figure 2, demonstrates how signing integrates seamlessly into existing processes:

Figure 2: Diagram showing Signer signing workflow

Figure 2: Diagram showing Signer signing workflow

The benefits of Signer compared to building custom signing infrastructure include:

  • Fully managed: No need to build custom signing infrastructure or manage certificate lifecycle
  • Automated: Amazon ECR managed signing happens automatically on image push without manual steps
  • Centralized governance: Single signing profile can be used across multiple accounts and pipelines
  • Native integration: Built-in integration with Notation and Kyverno for signature verification in Amazon EKS
  • FIPS 140-3 Level 3 compliance: Meets stringent regulatory requirements for cryptographic operations

Audit logging for all signing operations enables detection of unusual patterns such as signing from new IP addresses, unusual times, or rapid succession of signing jobs. For every credential in your system, consider who can access what, how they prove their identity, and what second layer prevents sprawl if that credential is compromised. Artifact signing, combined with centralized storage and Software Bills of Materials (SBOMs), provides layered protection against tampering and malicious packages.

Centralize dependency management

By centralizing package and dependency management, you can validate and approve dependencies before they’re used in applications and quickly audit dependencies in the event of a supply chain security incident. Recent incidents have shown organizations discovering compromised npm packages in their internal artifact repositories, requiring rapid assessment of which applications might be affected.

On AWS, you can use AWS CodeArtifact to host and manage your organization’s software packages. You can use the package group configuration to define an approved list of upstream sources and block access to all others—a direct control against typosquatting attacks, where malicious packages are published under names that closely resemble legitimate ones. Rather than relying on developers to identify suspicious package names at install time, package group configuration enforces the boundary at the repository level. Centralization also helps you pin versions of dependencies to prevent automatic updates from pulling in malicious versions and quickly remove compromised dependencies across your software portfolio when an incident occurs.

For container images, Amazon ECR provides centralized image storage with AWS Key Management Service (AWS KMS) encryption and lifecycle policies. Combine Amazon ECR with Amazon Inspector scanning to continuously validate image integrity.

For additional guidance see SEC11-BP05: Centralize services for packages and dependencies.

npm provenance attestation

For npm packages specifically, provenance attestations provide a complementary control on the consumer side. Available since npm 9.5, npm provenance links a published package to the specific source repository and CI/CD workflow that produced it, using Sigstore as the underlying signing infrastructure. When a package is installed, the npm CLI can verify that the published artifact matches the attested build provenance—providing confidence that the package wasn’t tampered with between build and publication. For organizations consuming open source npm packages, checking for provenance attestations before adding a new dependency is a low-friction signal of supply chain integrity. Package maintainers publishing to npm can enable provenance by running npm publish with the –provenance flag from a supported CI/CD environment such as GitHub Actions.

For additional guidance see SEC11-BP06: Deploy software programatically and, from the DevOps Lens of the AWS Well-Architected Framework, DL.CS.2: Sign code artifacts after each build

Scan dependencies throughout the software development lifecycle

AWS provides services to help you scan dependencies continuously, from development through deployment:

  • In development: Kiro can perform software composition analysis during code reviews to identify vulnerable third-party code.
  • In code repositories and pipelines: Amazon Inspector scans first-party code, third-party dependencies, and Infrastructure as Code for vulnerabilities.
  • For container images: Amazon Inspector provides continuous vulnerability scanning of Amazon ECR images. Amazon Inspector can also be integrated directly into CI/CD pipelines to scan images before they are pushed to Amazon ECR or deployed, helping you block compromised dependencies earlier in the release cycle.

Traditional vulnerability scanners focus on known CVEs—publicly disclosed vulnerabilities with assigned identifiers. Supply chain attacks like Shai-Hulud involve malicious packages that function as zero-days: they’re intentionally crafted by threat actors and actively exploited before a CVE is assigned. Traditional vulnerability scanners that rely on CVE databases won’t detect these packages until they’ve been formally identified and catalogued, which can take days or weeks.

Detecting these requires behavioral analysis at scale and community collaboration, not just static signature matching. The operational scale of AWS—with threat intelligence from sources like MadPot and incident response data across millions of customers—enables detection of suspicious package behavior across multiple environments simultaneously. When a newly published package exhibits credential-harvesting behavior in multiple customer accounts within hours of publication, that cross-account signal enables rapid identification. These findings are contributed to community-maintained databases like the OpenSSF Malicious Packages Repository (github.com/ossf/malicious-packages), which assigns a formal identifier (MAL-ID) and shares it across the security community. For the tea.xyz token farming campaign, the average time from submission to formal identification was approximately 30 minutes. AWS services like Amazon Inspector participate in this community loop, contributing findings and ingesting newly assigned MAL-IDs to surface threats in your environment.

A related threat model worth understanding is the sleeper package: a package that appears benign at publication and activates malicious behavior only after a delay or trigger condition. Static analysis alone is insufficient to catch these packages because the malicious payload isn’t present or active at install time. Amazon Inspector behavioral analysis is specifically designed to detect this class of threat, complementing static vulnerability scanning.

Software Bills of Materials (SBOMs) in SPDX or CycloneDX format enable you to quickly assess exposure during incidents. When responding to supply chain incidents, use SBOMs to identify which applications contain compromised packages, prioritize remediation, and assess blast radius. In the Shai-Hulud incident, the compromised packages (MAL-2025-46974 and CVE-2025-59144) were identified early, providing actionable findings that customers could remediate quickly. Organizations that had scanning enabled but experienced alert fatigue may have missed critical alerts, highlighting the importance of proper alert routing and prioritization.

Figure 3: Screenshot of Amazon Inspector console showing malicious package findings

Figure 3: Screenshot of Amazon Inspector console showing malicious package findings

For additional guidance see SEC11-BP02: Automate testing throughout the development and release lifecycle.

Configure logging and monitoring

Visibility into activity is essential to detect anomalous behavior early. Configure logging and centralize those logs for analysis:

  • Enable application and service logging
  • Centralize and monitor logs across accounts
  • Use GuardDuty to continuously monitor for malicious activity and anomalous API calls
  • Aggregate findings with AWS Security Hub and enforce configuration best practices with AWS Config

CloudTrail logging provides audit trails for credential access and API activity. When responding to supply chain incidents, review CloudTrail logs for specific events that indicate credential compromise or malicious activity: sts:AssumeRole calls from unexpected IP addresses or regions, secretsmanager:GetSecretValue or ssm:GetParameter calls from unfamiliar sources, ecr:PutImage from developer workstations bypassing CI/CD pipelines, lambda:UpdateFunctionCode outside normal deployment windows, iam:CreateAccessKey followed by immediate API activity, and codecommit:GitPush or codebuild:StartBuild from unusual IP addresses. When combined with Amazon EventBridge rules, you can trigger automated responses when Amazon Inspector detects malicious packages or when these unusual credential access patterns occur.

Organizations affected by recent supply chain attacks have used CloudTrail analysis to determine the scope of credential exposure and identify which resources might have been accessed by compromised credentials. This forensic capability is essential for understanding blast radius and ensuring complete remediation.

For additional guidance see the best practices in SEC04: Detection.

These components of a defense in depth strategy work together to prevent sprawl after initial compromise and help you to detect and respond to the event. Figure 4. shows how these fit together.

Figure 4: Architecture diagram showing defense architecture

Figure 4: Architecture diagram showing defense architecture

Additional best practices

The Security pillar of the Well-Architected Framework also provides organizational best practices that are applicable to improving security processes across all dimensions of your organization. Relevant best practices include SEC11-BP01: Train for application security; SEC11-BP08: Build a program that embeds security ownership in workload teams; and SEC10: Incident Response.

Conclusion

Recent incidents including Shai-Hulud, Chalk/Debug, and tea.xyz reflect ongoing efforts by threat actors to target the the package registries, CI/CD pipelines, and developer credentials for increased attack surface and propagation. A single compromised maintainer account or malicious package can propagate across thousands of consumer environments simultaneously. The controls described in this post are designed with that threat model in mind. Temporary credentials limit the value of stolen tokens, centralized dependency management and upstream blocking reduce the attack surface at the registry level, artifact signing ensures that even if a build pipeline is compromised, unsigned artifacts cannot reach production, and dependency scanning throughout your software lifecycle helps you identify compromised packages early, before they can impact you. Each layer narrows the window of opportunity for a threat actor.

Learn more

See the following blogs and workshops to dive deeper on this topic:

If you have feedback about this post, submit comments in the Comments section below.
Trevor Schiavone

Trevor Schiavone

Trevor is a Senior Solutions Architect with a background in application development and architecture. He brings a builder’s perspective to helping customers design secure, scalable, and innovative solutions on AWS. He is also an active part of the AWS security community with a focus on application security and identity.

Desiree Brunner

Desiree Brunner

Desiree is a Security Specialist Solutions Architect working with regulated customers as part of the AWS EMEA Security & Compliance team. She builds on her background in DevOps and platform engineering to support her customers in designing secure, compliant cloud environments. Passionate about mental health and knowledge sharing, she regularly speaks at AWS events and supports teams on their cloud security journey.

WordPress Site Down? Here’s How to Get Back Online

22 May 2026 at 02:05
WordPress Site Down? Here’s How to Get Back Online

If your WordPress site goes offline, every minute costs you lost sales, missed leads, and a dent in visitor trust. Search engines may start flagging errors, and customers see a blank page instead of your business. In that moment, the pressure is real:

What broke, and how do you get back online before the damage adds up?

The good news is that most WordPress outages are fixable. In most cases, your site isn’t lost, it’s blocked by something like a plugin conflict, server hiccup, database error, expired domain, SSL problem, sudden traffic spike, or malware infection.

Continue reading WordPress Site Down? Here’s How to Get Back Online at Sucuri Blog.

❌