As AI models become more capable, they uncover more security vulnerabilities and identify increasingly sophisticated paths to exploit them, raising the bar for how quickly defenders must respond. Security teams now face more potential vulnerabilities than their existing processes were designed to handle — each requiring investigation, reproduction, and a repair that must be tested to confirm it closes the vulnerability without breaking expected behavior.
AWS Continuum for code vulnerabilities accelerates this work with autonomous security at machine speed. To measure Continuum against a concrete public standard, we chose CyberGym-E2E, which asks an agent to find a vulnerability in a real codebase, demonstrate it with a working proof of concept, and repair it without breaking behavior covered by the project’s tests. Continuum passed 819 of 920 tasks within the benchmark’s 90-minute limit, achieving an 89.0% end-to-end success rate. This establishes a new standard 23.1 percentage points up from the previous public high of 65.9%.
Measuring the full vulnerability lifecycle
Many security benchmarks test a single task in isolation. Detection benchmarks test whether a system can identify suspicious code, while patching benchmarks begin with a known flaw and ask for a fix. CyberGym, the predecessor to CyberGym-E2E, also begins with a known vulnerability and focuses on exploit generation. By contrast, CyberGym-E2E evaluates the full vulnerability lifecycle, requiring a system to identify and demonstrate a vulnerability before producing a tested repair. This broader scope more closely reflects the work facing security teams.
Each CyberGym-E2E task places an agent in a container with a vulnerable revision of a real open-source project and the tools needed to build and test it. An agent can inspect and modify the source, but receives no vulnerability description, proof of concept, crash log, or original patch. External network access is blocked, and protected benchmark files cannot be modified. Within 90 minutes, the agent must submit an input demonstrating a vulnerability and a source-code patch. The full benchmark contains 920 tasks based on historical OSS-Fuzz vulnerabilities across 139 open-source projects. The median project contains more than 600,000 lines of code.
The benchmark evaluates each submission in four cumulative stages:
S1 checks whether the agent produced an input that crashes the vulnerable program.
S2 checks whether the agent’s patch prevents that crash.
S3 checks whether the patched project still passes its functionality tests.
S4 checks whether the patch also fixes the specific historical vulnerability selected by the benchmark.
CyberGym-E2E defines S3 as its main measure of end-to-end success. S4 is diagnostic because a repository may contain several valid vulnerabilities: an agent can find and repair a real flaw that differs from the benchmark’s selected target.
Continuum sets a new standard
Continuum for code vulnerabilities reached a new standard for every stage of CyberGym-E2E. The table below compares its performance with the previous best public results.
Stage
What it measures
Continuum
Previous public high
Difference
S1
Finds and reproduces a vulnerability
92.5%
67.9%
+24.6%
S2
Repairs its generated crash
89.6%
66.2%
+23.4%
S3
Preserves tested functionality
89.0%
65.9%
+23.1%
S4
Also repairs the benchmark’s selected vulnerability
37.8%
26.2%
+11.6%
On S3, the benchmark’s main measure of end-to-end success, Continuum passed 819 of 920 tasks. Its 89.0% success rate exceeds the previous public high of 65.9% by 23.1 percentage points. The result reflects both the capability of the underlying frontier models and Continuum’s design as a multi-agent security system. The next section examines how that system adds value beyond the models alone.
The official 89.0% result applies CyberGym-E2E’s 90-minute limit. When tasks were allowed to continue beyond that limit, Continuum’s end-to-end pass rate reached 93.7%, indicating higher potential coverage when longer-running analyses can complete.
We conducted the evaluation under CyberGym-E2E’s network-isolation and submission-review requirements. External retrieval was blocked during execution, and post-run trajectory review confirmed that successful results came from vulnerability analysis rather than retrieval of public historical fixes.
Harness design for end-to-end security
Continuum for code vulnerabilities is a multi-agent system organized around the main phases of the code vulnerability lifecycle: discovery, validation, and remediation. Each phase uses specialized agents adapted to the evidence and decisions it requires. The system carries evidence forward so that each phase builds on the work completed before it.
During discovery, Continuum analyzes the repository and develops candidate vulnerability findings. Its agents identify code paths that warrant deeper investigation and record the source evidence supporting each candidate.
During validation, specialized agents attempt to turn a candidate finding into a demonstrated security issue. They construct a proof of concept, run it against the vulnerable program, and determine whether the observed behavior supports the finding. This converts a potential code-level weakness into executable evidence.
During remediation, agents trace the vulnerability to its root cause and produce a patch. Continuum then verifies that the patch prevents the demonstrated failure and that the project’s functionality tests continue to pass. The repair is therefore evaluated against the same evidence used to establish the vulnerability.
Together, these phases create a connected record from suspicious code to a demonstrated vulnerability and tested repair. The architecture allows Continuum to adapt its tools, instructions, checks, and models to each phase while maintaining a consistent standard of evidence. It also supports a multi-model approach that can leverage complementary strengths and incorporate new models as they become available.
In customer environments, Continuum can also combine code-level evidence with available deployment context, including service exposure, network paths, permissions, and configuration. This context helps distinguish vulnerabilities with limited production impact from exposures that demand immediate action. CyberGym-E2E evaluates the code-level process but does not provide deployment context, placing this broader prioritization capability outside the benchmark’s scope.
Beyond CyberGym-E2E
CyberGym-E2E advances security evaluation by turning a complex, multi-stage process into a large public benchmark with reproducible tasks and outcomes that can be verified by running code. The CyberGym-E2E authors’ careful work on task construction, scoring, and submission standards gives the field a concrete foundation for measuring end-to-end progress.
To keep evaluation consistent and reproducible across 920 tasks, CyberGym-E2E focuses on memory-safety vulnerabilities in C and C++ projects. Sanitizer-detected crashes provide objective evidence of a defect, while subsequent checks determine whether a repair blocks the proof of concept and preserves functionality covered by the project’s tests. This design necessarily leaves many languages and vulnerability classes outside the benchmark’s current scope, including many of the most common and impactful bug classes observed in production systems. Evaluating these areas will require different task environments and equally rigorous forms of validation.
Our view of end-to-end security also extends beyond producing a tested code-level repair. In production systems, deployment context such as service exposure, network paths, permissions, and configuration often determines whether a vulnerability presents limited risk or demands immediate action. Future evaluations should test whether autonomous systems can reason about this context and prioritize findings according to their effect on the safety of the deployed system.
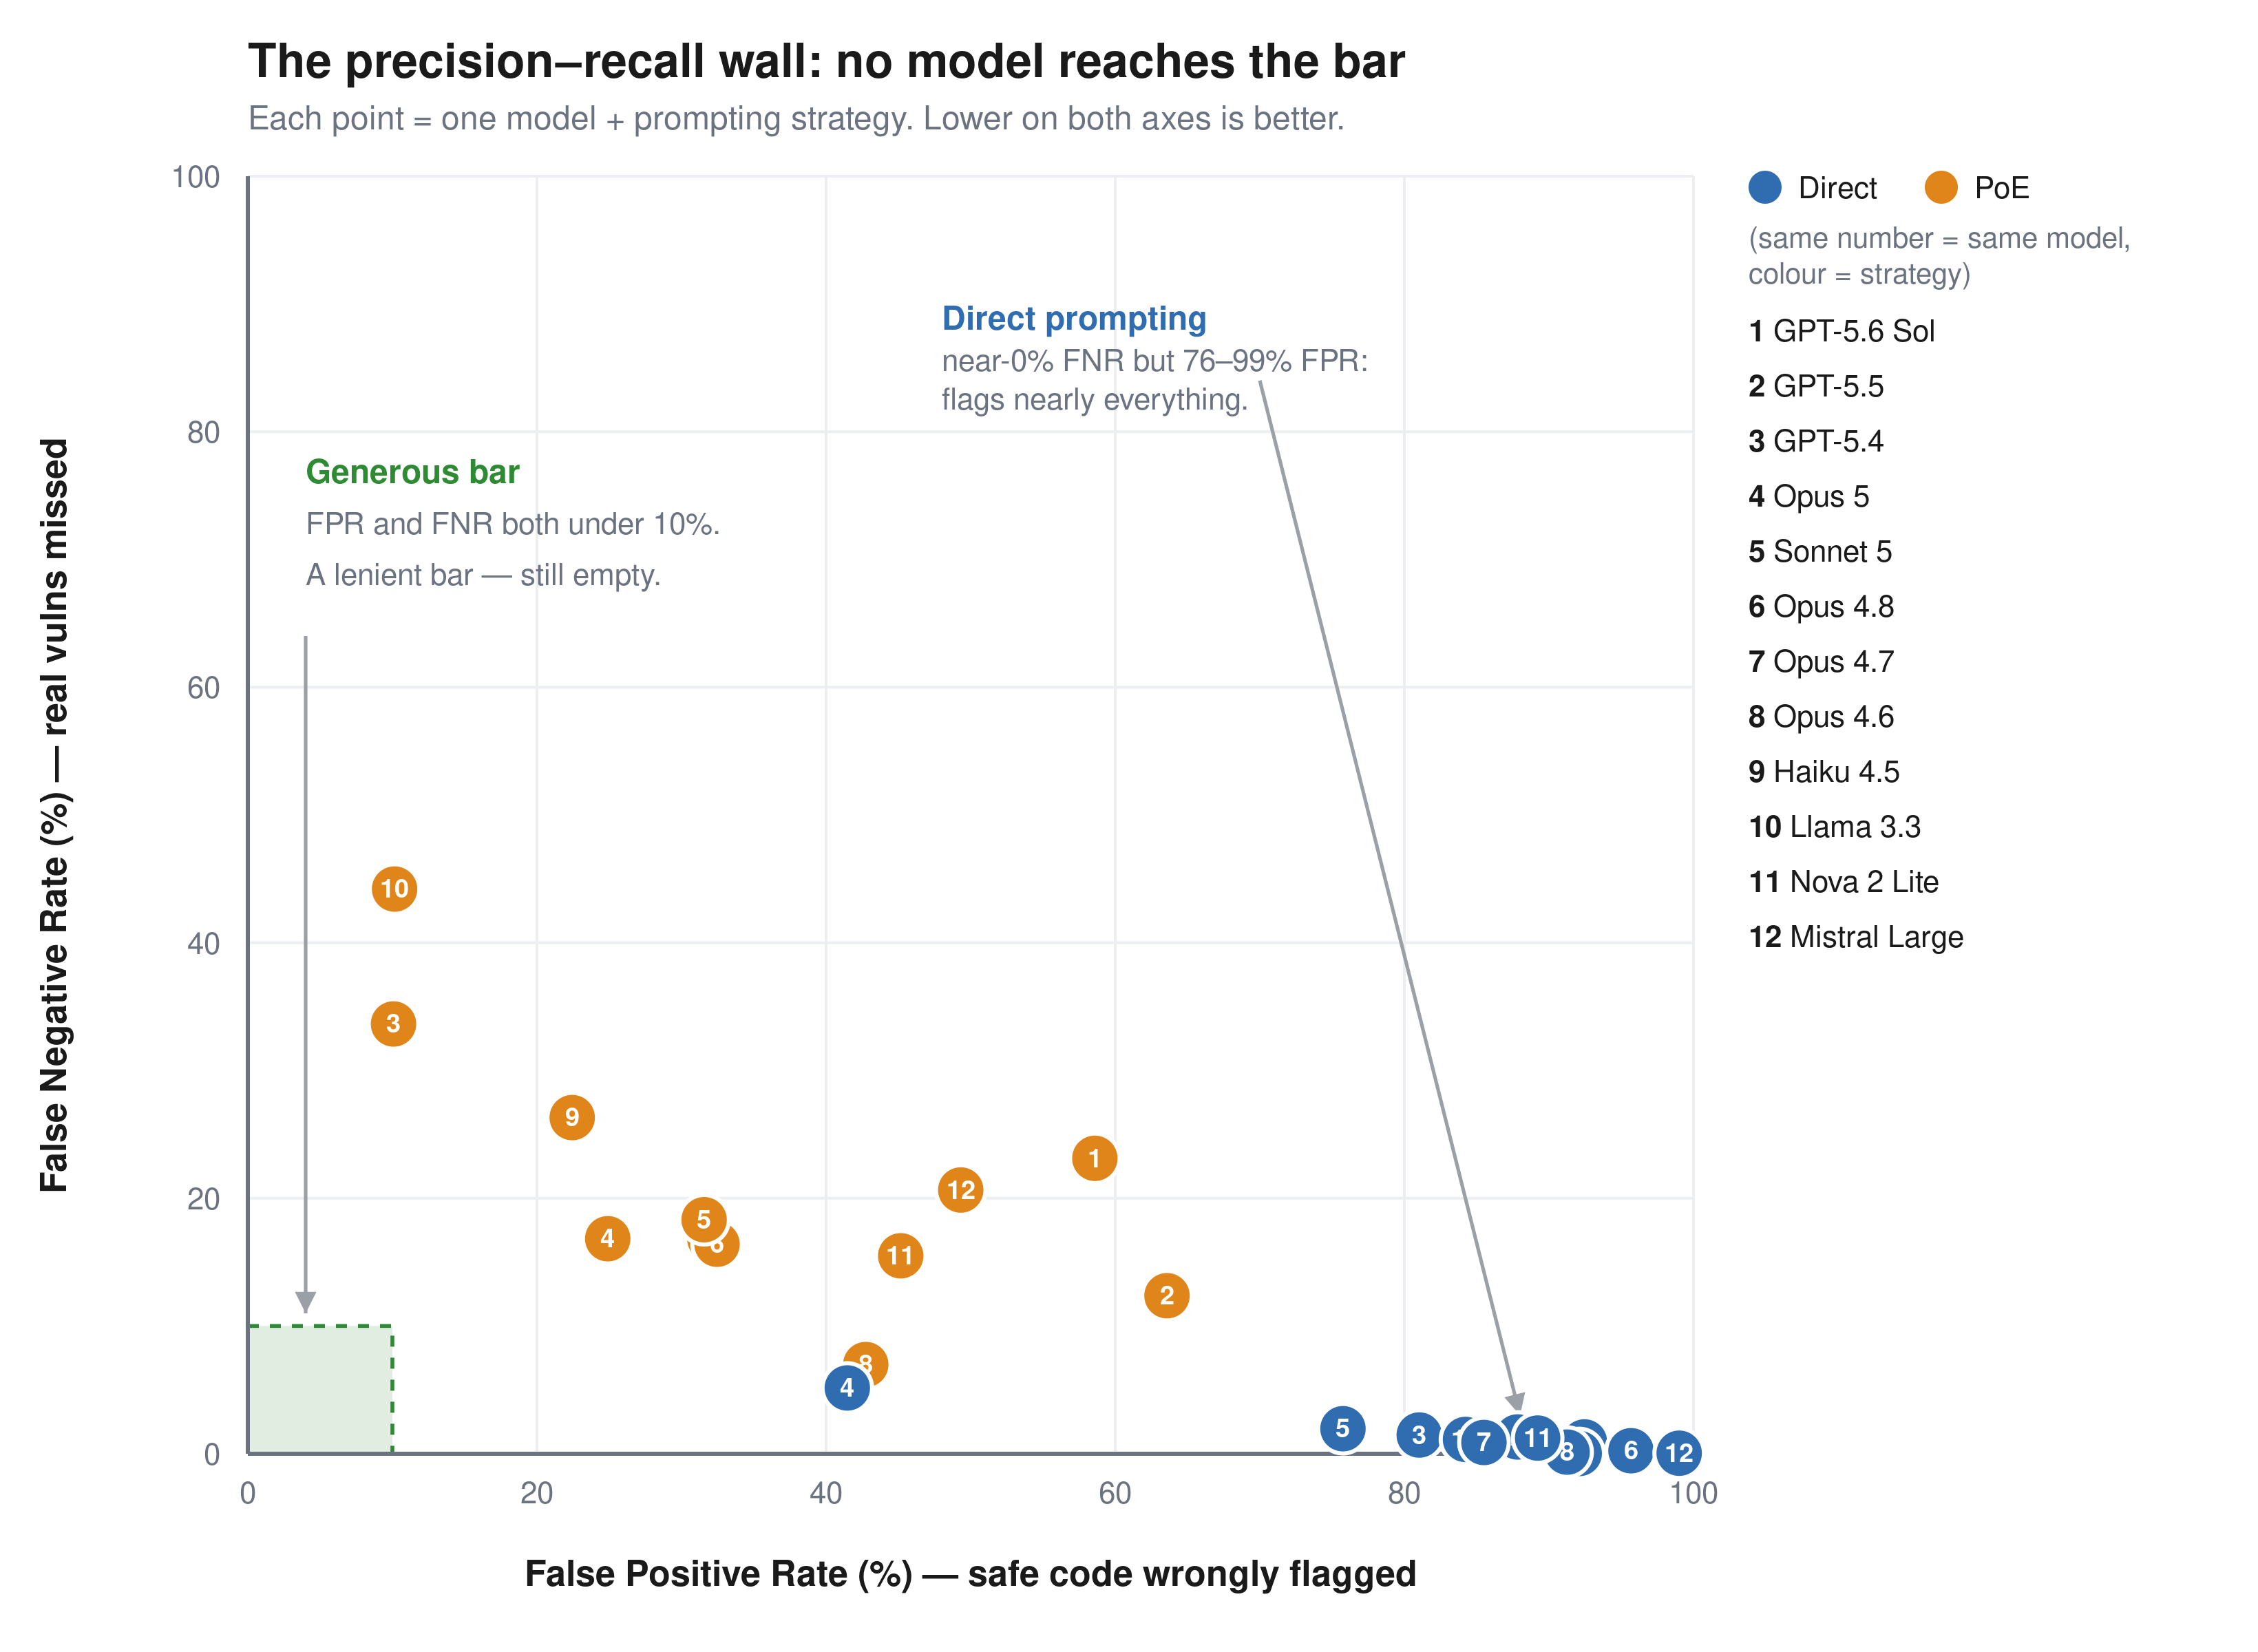
CyberGym-E2E’s value extends beyond the dataset itself. It makes the case that end-to-end security is worth defining and measuring as a task in its own right. That involves hard design choices about scope, evidence, and what counts as success, and CyberGym-E2E gives the field a concrete starting point for working through those choices. This system-level view complements our work on the Deception Benchmark, which evaluates a narrower but related capability: how reliably individual frontier models distinguish real vulnerabilities from safe code. Together, they examine security performance at both the model and system levels.
To learn how AWS Continuum for code vulnerabilities helps teams discover, validate, prioritize, and remediate vulnerabilities at machine speed, visit the AWS Continuum product page.
On Saturday, October 24, 2026, we will conduct an exercise demonstrating that the AWS European Sovereign Cloud can operate without depending on any infrastructure outside of the European Union (EU).
For several hours, the AWS European Sovereign Cloud will operate without a connection to the AWS Global Network backbone. The backbone is the private network that moves authorized AWS operational data between AWS locations without using the public internet. During the exercise, this traffic will securely reroute over the public internet.
The exercise will not affect service availability within the AWS European Sovereign Cloud, other AWS Regions, or private connectivity through AWS Direct Connect. Customers may experience brief connectivity disruptions as traffic moves onto a separate network route at the beginning or the end of the exercise, after which normal connectivity resumes.
The operational team, composed entirely of EU residents within the EU, will execute the exercise using only the hardware and software resources of the AWS European Sovereign Cloud. The AWS European Sovereign Cloud Managing Directors called for this exercise to showcase its operational independence.
An independent cloud for Europe
The AWS European Sovereign Cloud is a new, independent cloud for Europe. Located in Brandenburg, Germany, its data centers are physically and logically separate from other AWS Regions, with a local in-EU copy of the source code. All customer content and customer-created metadata stay in the EU. It has no critical dependencies on non-EU infrastructure and is operated exclusively by EU residents.
In standard operations, the AWS European Sovereign Cloud uses two global systems. The first is the AWS Global Network backbone. The second is a dedicated system that the local EU team controls and supervises to securely manage limited, controlled transfers of operational AWS data.
Neither is operation-critical, and neither affects the sovereignty assurance of the AWS European Sovereign Cloud. The AWS European Sovereign Cloud can operate independently at any time without a connection to these global systems, and on October 24 that’s what the team will demonstrate.
Built to meet regulatory standards
This exercise will produce verifiable technical and operational evidence that the AWS European Sovereign Cloud can operate independently within the EU. The exercise is designed to be consistent with the objectives of the European Commission’s EU Cloud Sovereignty Framework (CSF) and the criteria of the C3A framework from Germany’s Federal Office for Information Security (BSI). These frameworks set out objectives and criteria for assessing whether cloud services can be provided independently and autonomously.
We designed the AWS European Sovereign Cloud for regulated customers and the public sector across the EU. The AWS European Sovereign Cloud: Sovereign Reference Framework (ESC-SRF) gives our customers and partners a comprehensive set of evidence points, maps to controls, artifacts, and other elements regulators and compliance authorities need to accelerate their adoption of the AWS European Sovereign Cloud. The results of this exercise will provide additional evidence for their compliance and assurance packages.
Standalone and fully secure
The AWS European Sovereign Cloud runs connected to the AWS Global Network backbone because it delivers superior performance, capacity, reliability, security, and cost savings to customers. That includes always-on encryption and distributed denial of service (DDoS) defenses; and the backbone can’t decrypt or see the encrypted data that AWS European Sovereign Cloud customers send and receive. While the backbone delivers these benefits day-to-day, the AWS European Sovereign Cloud can continue to operate independently, with the appropriate security controls in place.
During the exercise, instead of using the AWS Global Network backbone, the AWS European Sovereign Cloud will exclusively use its dedicated internet connectivity from European internet service providers. This will provide connectivity to the worldwide internet.
Whenever traffic moves between internet links, there’s a small window of limited disruption called convergence, a short time when other non-AWS networks change their routing information to reflect the change. This could happen at the beginning of the exercise, when traffic moves to dedicated AWS European Sovereign Cloud internet providers, and at the end of the exercise, when traffic moves back to the AWS Global Network backbone.
Customer data stays in the EU
AWS has committed to not moving AWS European Sovereign Cloud customer content and customer-created metadata outside of the EU. Only certain data, which is neither customer content nor customer-created metadata, such as AWS operational data, leaves the EU. We use a dedicated system to securely manage these limited, controlled transfers under the control and supervision of the local EU team. We’re rigorous about what the system transfers. It accepts vetted source code mirroring and software updates, and transfers out very limited and approved routine information. During the exercise, the AWS European Sovereign Cloud team will disable the system entirely, confirming that the AWS European Sovereign Cloud continues to operate independently without it.
Learn more
AWS will share an update after the exercise with regulators and customers. To learn more about the AWS European Sovereign Cloud’s design and digital sovereignty controls, visit aws.eu. If you have questions about this exercise or would like to discuss how it may impact your workloads, reach out to AWS Support or contact your AWS Account team.
Read all about the latest AWS security features, compliance updates, and hands-on resources in our monthly digest posts. You’ll find expert blog posts, new service capabilities, code samples, and workshops.
AWS Security Blog posts
August brought 20 AWS Security Blog posts organized across seven categories. Identity and access management led the month with five posts covering self-service rate limits for Amazon Cognito, a decade of AWS Managed Microsoft AD, a redesigned sign-in experience, console Private Access for isolated VPCs, and automated IAM Identity Center governance. Data protection followed with four posts on AWS KMS data key caching, ACME protocol support in AWS Certificate Manager, Amazon S3 over-permissioned access remediation, and the upcoming deprecation of email-based domain validation. AI security continued to grow with four posts on custom authentication in Amazon Bedrock AgentCore Gateway, user authorization propagation in AI agents, and extending Bedrock Guardrails to tool interactions. Threat detection, governance and networking.
A decade of enterprise identity in the cloud with AWS Managed Microsoft AD Authors: Vladimir Provorov, Tekena Orugbani, Rodney Underkoffler | Published: August 7, 2026
AWS Managed Microsoft AD celebrates 10 years of fully managed Active Directory in the cloud, now offering Standard, Enterprise, and Hybrid editions with multi-Region replication and 20+ AWS service integrations.
Updates to your AWS sign-in experience Authors: Vaibhav Chowla, Ella Segura | Published: August 17, 2026
AWS is gradually rolling out a redesigned sign-in page with a unified email entry point, social identity provider options, and an updated session selection experience for managing multiple active sessions.
Automate certificates with ACME support in AWS Certificate Manager Authors: Anthony Harvey, Chandan Kundapur | Published: August 6, 2026
Learn to use ACME protocol support in AWS Certificate Manager to automate public certificate issuance and renewal using standard clients like Certbot and cert-manager, with enterprise controls for domain scoping and centralized visibility.
Propagate user authorization context in AI agents with Amazon Bedrock AgentCore Authors: Anshu Bathla, Prafful Gupta, Rohit Verma | Published: August 19, 2026
Learn to enforce least-privilege access in AI agents by propagating user identity through Amazon Bedrock AgentCore to Amazon DynamoDB, Knowledge Bases, and Salesforce, without embedding authorization logic in agent code.
Extend Amazon Bedrock Guardrails to tool interactions using the Strands Agents SDK Authors: Stephan Traub | Published: August 27, 2026
Learn to extend Amazon Bedrock Guardrails beyond the model boundary to tool calls, external data, and MCP server interactions using three validation checkpoints built with Strands Agents SDK lifecycle hooks.
We invited a direct competitor into Security Hub Extended. Here’s why. Authors: Michael Fuller | Published: August 31, 2026
AWS Security Hub Extended now includes Upwind, a runtime-first cloud security company, offering eBPF-based workload protection with pay-as-you-go pricing through a single AWS bill, reinforcing customer choice even where capabilities overlap with AWS offerings.
Infrastructure security
AWS Network Firewall now supports rule hit count Authors: Preetkumar Shah, Amit Gaur, Cheriyan Mundapuzha, Santosh Shanbhag, Srivalsan Mannoor Sudhagar | Published: August 20, 2026 AWS Network Firewall now tracks how often stateful rules match traffic, helping you identify unused rules, validate security controls for compliance, and accelerate incident response at no additional cost.
Fast track ISM-ready cloud environments and IRAP assessments with Landing Zone Accelerator on AWS Authors: Kevin Donohue, Dave Connell, Dan Friebe | Published: August 25, 2026
A new independent assessment by gwi.digital evaluates Landing Zone Accelerator against 1,081 ISM controls, achieving 91% coverage of addressable scope to help Australian customers accelerate IRAP assessment readiness.
How Moeve scales AWS governance with automated AWS Organization Service Control Policies Authors: Gonzalo Guerrero, Jonatan De Martín, Rayco Martinez | Published: August 26, 2026
Learn how Moeve manages 150 SCPs across 300+ accounts in three AWS Organizations using a governance-as-code model; policies live in Git, deploy through GitHub Actions pipelines, and attach dynamically based on account metadata during onboarding, with Amazon EventBridge and AWS Lambda providing real-time observability of every organizational change.
August Security Bulletins
In August 2026, AWS published 23 security bulletins addressing vulnerabilities across open-source SDKs, MCP servers, developer tools, and the OpenSearch ecosystem. A dominant theme was the AI agent tool surface: prompt-injection consent bypasses in Strands Agents Tools enabled command and code execution, an insecure direct object reference exposed cross-tenant agent memory, and credential disclosure and authorization flaws affected the Amazon MQ, DocumentDB, and AWS Transform MCP servers and the Bedrock AgentCore harness. Remote code execution recurred throughout, from prototype pollution and Java deserialization in OpenSearch to path-traversal-to-root in amazon-ssm-agent, Zip Slip in awsdac, and an uncontrolled search path in the Kiro IDE and CLI on Windows.
Other notable issues include disabled SSH host key verification in the AWS CLI, memory-safety flaws in the AWS SDK for C++, privilege escalation in the FreeRTOS-Kernel, and memory-amplification denial of service in Amazon ion-java. OpenSearch accounted for a large share of the month, spanning authorization, input validation, SSRF, stored XSS, and denial of service, while Athena Federated Query connectors exposed Secrets Manager secrets. A common thread: insufficient authorization and input validation at the boundary between AI agents and the systems they reach. All patches are available, upgrade promptly. For more information, see AWS Security Bulletins.
AWS Samples
In August 2026, we published 17 new code samples organized into five categories: governance and compliance (7), AI security (3), data protection and privacy (3), identity and access management (2), and infrastructure security (2). This month’s collection reflects the rapid growth of agentic AI workloads: most samples focus on governing, auditing, and securing AI agents built on Amazon Bedrock AgentCore, from platform-level governance and telemetry to fraud investigation and biosecurity screening.
Learn to deploy an AWS-native control plane for governing AI agents across your enterprise with centralized registry, Microsoft Entra ID single sign-on, Cedar tool policies, multi-vendor agent inventory, and Langfuse observability, all self-hosted on Amazon Bedrock AgentCore.
Learn to deploy a secure, governed foundation for production AI agents on Amazon Bedrock AgentCore with modular CDK stacks covering identity, gateway, memory, runtime, and observability; supporting Strands Agents, LangGraph, and Claude Agent SDK with opt-in security controls.
Learn to deploy an end-to-end pipeline that automatically verifies video content against broadcast compliance guidelines such as Ofcom; extracting frames, audio transcripts, and OCR text shot by shot, then using Amazon Bedrock to flag potential violations and produce a structured per-shot compliance report.
Learn to add behavioral anomaly detection, automated data sensitivity classification, and HIPAA compliance reporting to your FHIR API using Amazon Bedrock; running asynchronously so clinical workflows are never blocked, with Amazon Comprehend Medical and Bedrock Guardrails anonymizing PHI throughout the monitoring path.
Learn to deploy a governed, orchestrator-driven multi-agent builder companion on Amazon Bedrock AgentCore, reachable from Kiro, Claude Code, or any MCP client; the kit enforces 13 codified tenets through an always-on governance gate with no off switch, routing each request to a specialist while blocking deploys, secret leaks, and ungrounded answers by construction.
Learn to deploy a serverless daily executive audit pipeline for AWS AI agents (AWS DevOps Agent, AWS Security Agent) using AWS Step Functions and AWS Lambda; the report answers five questions: what the agent accessed, who authorized it, what it cost, its risk posture across five trust dimensions, and whether you should be concerned, all sourced deterministically from AWS CloudTrail, CUR, and IAM with AI-generated summaries bounded by layered guardrails.
Learn to deploy a single AWS CloudFormation stack that enables Amazon CloudWatch logs and X-Ray traces for every Amazon Bedrock AgentCore resource type – Runtime, Gateway, Memory, Browser, CodeInterpreter, and WorkloadIdentity – using native and custom telemetry rules.
Learn to transform Amazon Bedrock Guardrails intervention events into OCSF Detection Finding records and land them in the Amazon CloudWatch unified data store; enabling you to query guardrail violations alongside AWS CloudTrail, Amazon VPC Flow Logs, and other sources with Amazon Athena or CloudWatch Logs Insights.
Learn to deploy a read-only assessment agent built with the Strands Agents SDK that evaluates your Amazon Bedrock environment across six dimensions: IAM governance, data retention, quota headroom, model selection fitness, cost projection, and operational observability; generating severity-rated findings with AWS CloudFormation and Terraform remediation templates you can apply directly.
Learn to install an agent skill that reviews an AWS WAF web ACL as a system: evaluation order, rule interactions, and L7 DDoS posture; then delivers a severity-ranked HTML report with ready-to-apply remediation. Offline, read-only, no AWS resources modified.
Learn to use Policy in Amazon Bedrock AgentCore to deterministically screen AI agent tool requests for biosecurity risks, combining Cedar policies with three independent screening layers: MMseqs2 sequence alignment, ESMC-600M embedding similarity, and Foldseek structural homology; enabling defense-in-depth controls that block high-risk protein sequences before they reach downstream tools.
Learn to deploy an end-to-end AI-powered e-commerce fraud investigation agent built with the Strands SDK on Amazon Bedrock AgentCore, connecting through an AgentCore Gateway over MCP to query transaction history, customer profiles, login activity, support cases, and fraud playbooks; a React dashboard on AWS Amplifystreams the agent’s reasoning token by token as it works each case.
Learn to implement workforce access using IAM account access manager and attribute-based access control, where one IAM role per project shares a single policy document and access decisions are made by comparing role tags against resource tags at request time; onboarding a new project requires only tagging and entitlement configuration with no policy authoring.
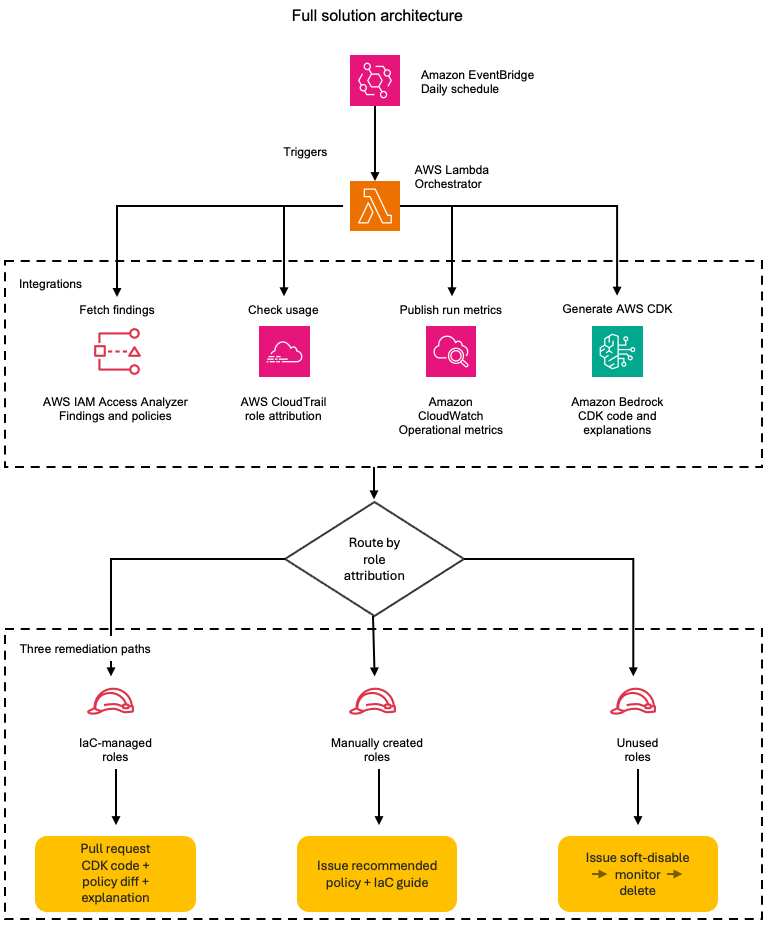
Learn to automate remediation of unused IAM permissions using AWS IAM Access Analyzer, AWS CloudTrail, and Amazon Bedrock for AI-generated AWS CDK code; the solution attributes each role to its origin (IaC or manual), then creates pull requests for IaC-managed roles or issues for manually created roles in GitLab or GitHub, with configurable exclusion rules and policy diffs for human review.
Learn to deploy a data-residency-compliant natural-language chatbot on Amazon Bedrock AgentCore where all data and AI inference stay within a single AWS Region; the solution uses a Strands agent that answers plain-English questions from Aurora PostgreSQL through governed, whitelist-validated read-only tools exposed via an AgentCore Gateway, with a residency guard that rejects any cross-region inference profile, demonstrated with a rooftop-solar subsidy program and adaptable to any sector or geography.
Learn to detect personally identifiable information in conversational text using Amazon Bedrock; the solution prompts any Converse-compatible model to return PII spans with category, value, and character offsets, handles long inputs via word-boundary chunking, recovers near-miss labels, and supports custom categories, few-shot examples, and pluggable backends beyond Bedrock.
Learn to build a conversational AI research assistant that automatically classifies documents for MNPI, PII, and security sensitivity, then enforces per-user redaction at query time using Amazon Bedrock AgentCore, Guardrails, and Amazon OpenSearch Serverless vector search.
Conclusion
August 2026 provides comprehensive guidance and runnable code for governing agentic AI workloads at enterprise scale, from orchestrator-driven governance gates and biosecurity screening policies to daily executive audit pipelines and OCSF-normalized guardrail telemetry. The posts and samples provide patterns for console Private Access in isolated VPCs, attribute-based access control with IAM account access manager, automated least-privilege remediation through CI/CD, and cross-service signal correlation for multi-stage threat detection. Each resource includes deployment steps or runnable code so you can validate in your own environment before adopting. Subscribe to the AWS Security Blog RSS feed to receive updates as they publish, and revisit this digest monthly for a consolidated view of what changed and what to act on.
If you have feedback about this post, submit comments in the Comments section below.
The Australian Signals Directorate (ASD) has this month issued a clear call to action through its Multi-factor authentication: Switch it on campaign, urging businesses, organisations, and individuals to enable multi-factor authentication (MFA) across their online accounts. At AWS, we strongly support this message.
As threat actors continue to target credentials through phishing, credential stuffing, and social engineering, passwords alone are no longer enough. MFA is one of the most effective security controls available. It’s a cornerstone of ASD’s Essential Eight maturity model and a recognized component of major cybersecurity frameworks worldwide. ASD’s campaign reinforces what the security community has long advocated: switching on MFA is one of the simplest and most impactful steps any organization or individual can take to protect themselves online, and we encourage all to heed ASD’s call.
How AWS enforces MFA across every account type
At AWS, we’ve put this principle into practice at scale. In June 2025, AWS Identity and Access Management (IAM) achieved comprehensive MFA enforcement for root users across all account types, a significant milestone and the first of its kind among major cloud providers. This was the culmination of a deliberate, phased security journey: beginning with requiring MFA for AWS Organizations management account root users in May 2024, expanding to standalone account root users in June 2024, introducing centralized root access management in November 2024, and completing enforcement across all account types including member accounts. MFA prevents over 99 percent of password-related attacks and is available to all AWS customers at no additional cost, with support for FIDO2 passkeys and FIDO-certified security keys for phishing-resistant authentication. This milestone reflects our ongoing commitment to secure-by-design principles, setting a high bar for our customers’ default security posture and demonstrating that organizations of any scale can, and should, make MFA the standard rather than the exception.
Extending MFA beyond your AWS environment
A compromised email account can be used to reset AWS passwords. A breached source control system can expose infrastructure-as-code secrets. Enable MFA on your email, collaboration tools, source control, and other services that support it. Visit the ASD Multi-factor authentication campaign page for broader guidance.
Getting started with MFA on AWS
AWS enforces MFA automatically for root users. To extend that same protection to your IAM users—the identities your team members and applications use daily—you can configure MFA individually through the AWS Management Console for IAM. To learn more, see Security best practices in IAM. For phishing-resistant authentication with FIDO2 passkeys, see Passkeys and security keys in IAM.
If you have questions or feedback about MFA on AWS, leave a comment below or reach out on AWS re:Post. If you haven’t already, heed ASD’s call and switch on MFA across every account you own.
This post was written in support of ASD’s Multi-factor authentication: Switch it on campaign. For more AWS security content, visit the AWS Security Blog.
If you have feedback about this post, submit comments in the Comments section below.
Security teams investigating possible AI-related security events need guardrail intervention data alongside their existing security telemetry. When a guardrail identifies or blocks a prompt injection attempt or redacts sensitive data, that intervention carries additional investigative value comparable to a failed sign-in or a network intrusion alert. AWS Bedrock publishes this telemetry to AWS CloudWatch metrics and model invocation logs for operational monitoring.
Consider an organization deploying AWS Bedrock across many applications, with guardrails applied as a governance control. The guardrails detect and block several categories of activity: harmful content, off-topic queries, sensitive information such as personally identifiable information (PII), and prompt injection attempts. Each time a guardrail intervenes, it produces a signal the security team wants to investigate alongside the rest of its telemetry.
Without a consolidation layer, guardrail interventions stay siloed as per-AWS Region CloudWatch metrics and entries in raw model invocation logs, separate from the identity, network, and audit data the security team already relies on. The CloudWatch unified data store is built to remove this kind of silo: it consolidates operational and security data across accounts and Regions into one store. Routing normalized guardrail records into it is what makes them correlatable with the rest of your security telemetry. To investigate effectively, the team needs to answer questions that span multiple data sources:
Identify which user accounts trigger the most guardrail interventions, and whether those same accounts also show unusual AWS Identity and Access Management (IAM) activity such as failed API calls or privilege changes. A spike in prompt injection blocks from a role that’s also generating access-denied events is a stronger signal than either on its own.
Determine whether prompt injection attempts correlate with specific source IP addresses that also appear in VPC Flow Logs, which helps distinguish a single misbehaving client from a coordinated pattern across the environment.
Track the trend of guardrail violations across the organization and compare it against a baseline from 30 days ago, so the team can tell routine policy noise apart from an emerging change in attacker behavior or a misconfigured application.
AWS GuardDuty already helps here: its AI Protection feature analyzes CloudTrail data events from AWS Bedrock and produces managed threat findings, including a direct prompt injection finding and anomalous model invocation findings. GuardDuty AI Protection is a complementary managed detection layer for AWS Bedrock activity. The pipeline in this post works alongside it: it captures the raw guardrail intervention records themselves, normalizes them to OCSF, and lands them in the unified data store so you can run your own cross-source correlation and long-term trend analysis alongside GuardDuty findings, CloudTrail, and VPC Flow Logs.
Guardrail traces arrive as JSON embedded in the AWS Bedrock model invocation logs, in an AWS Bedrock-specific shape rather than a normalized security schema. After the pipeline transforms them to OCSF and ingests them into the CloudWatch unified data store, a single Athena query answers all three questions, because guardrail findings then share the same field structure as other security sources and sit in the same catalog as AWS CloudTrail events and VPC Flow Logs.
Solution overview
At a high level, the solution captures guardrail intervention events from AWS Bedrock model invocation logs, transforms them into OCSF Detection Finding records with an AWS Lambda function, and lands them in the CloudWatch unified data store, where SOC analysts query them with Athena or CloudWatch Logs Insights. The CloudWatch unified data store provides Apache Iceberg-compatible access through AWS S3 Tables, CloudWatch Logs Insights queries, and, for supported sources, built-in OCSF normalization at ingestion.
Why a custom transform step
CloudWatch offers native OCSF conversion through the ParseToOCSF log transformation processor for specific AWS log sources. As of this writing, that processor supports five AWS log sources: CloudTrail, AWS Route 53 Resolver, VPC Flow Logs, AWS EKS audit logs, and AWS WAF. AWS Bedrock Guardrails isn’t one of the sources that ParseToOCSF supports, so guardrail traces aren’t converted to OCSF automatically.
Guardrail traces also need transformation logic that ingestion-time processors don’t provide. A single model invocation log can contain multiple guardrail assessments (for example, a content policy filter and a sensitive information policy match in one request), and the transform step splits that one log entry into one OCSF Detection Finding per assessment rather than a single combined record. This one-to-many expansion, combined with conditional severity assignment based on policy type, is application logic rather than field normalization. For these two reasons, this solution uses a dedicated transform step to produce OCSF records, then uses built-in CloudWatch mechanisms for enrichment, storage, centralization, and query.
This solution captures AWS Bedrock model invocation logs containing guardrail trace data, filters for intervention events, transforms them into OCSF Detection Finding records (class_uid 2004), and writes the structured records to a CloudWatch Logs log group that is associated with AWS S3 Tables through the CloudWatch unified data store managed integration. Guardrail interventions are detection events: the guardrail detected and blocked prohibited content, so OCSF class 2004 (Detection Finding) under the Findings category is the appropriate classification.
How a source’s records are stored depends on whether it’s a vended source or a custom source. For the five vended sources that ParseToOCSF supports, the unified data store produces individual typed OCSF columns. For any custom source, including AWS Bedrock Guardrails in this solution, records land in the associated S3 Tables table as OCSF JSON in a single managed cwl__message column rather than as typed columns. This is a property of custom sources in general, not specific to AWS Bedrock. You read the OCSF fields at query time with Athena json_extract functions, and you can correlate them with the vended sources that share the same catalog. This post shows that query pattern.
The pipeline supports multiple AWS Bedrock event types by changing the filter pattern and OCSF mapping. This post demonstrates the guardrail interventions row:
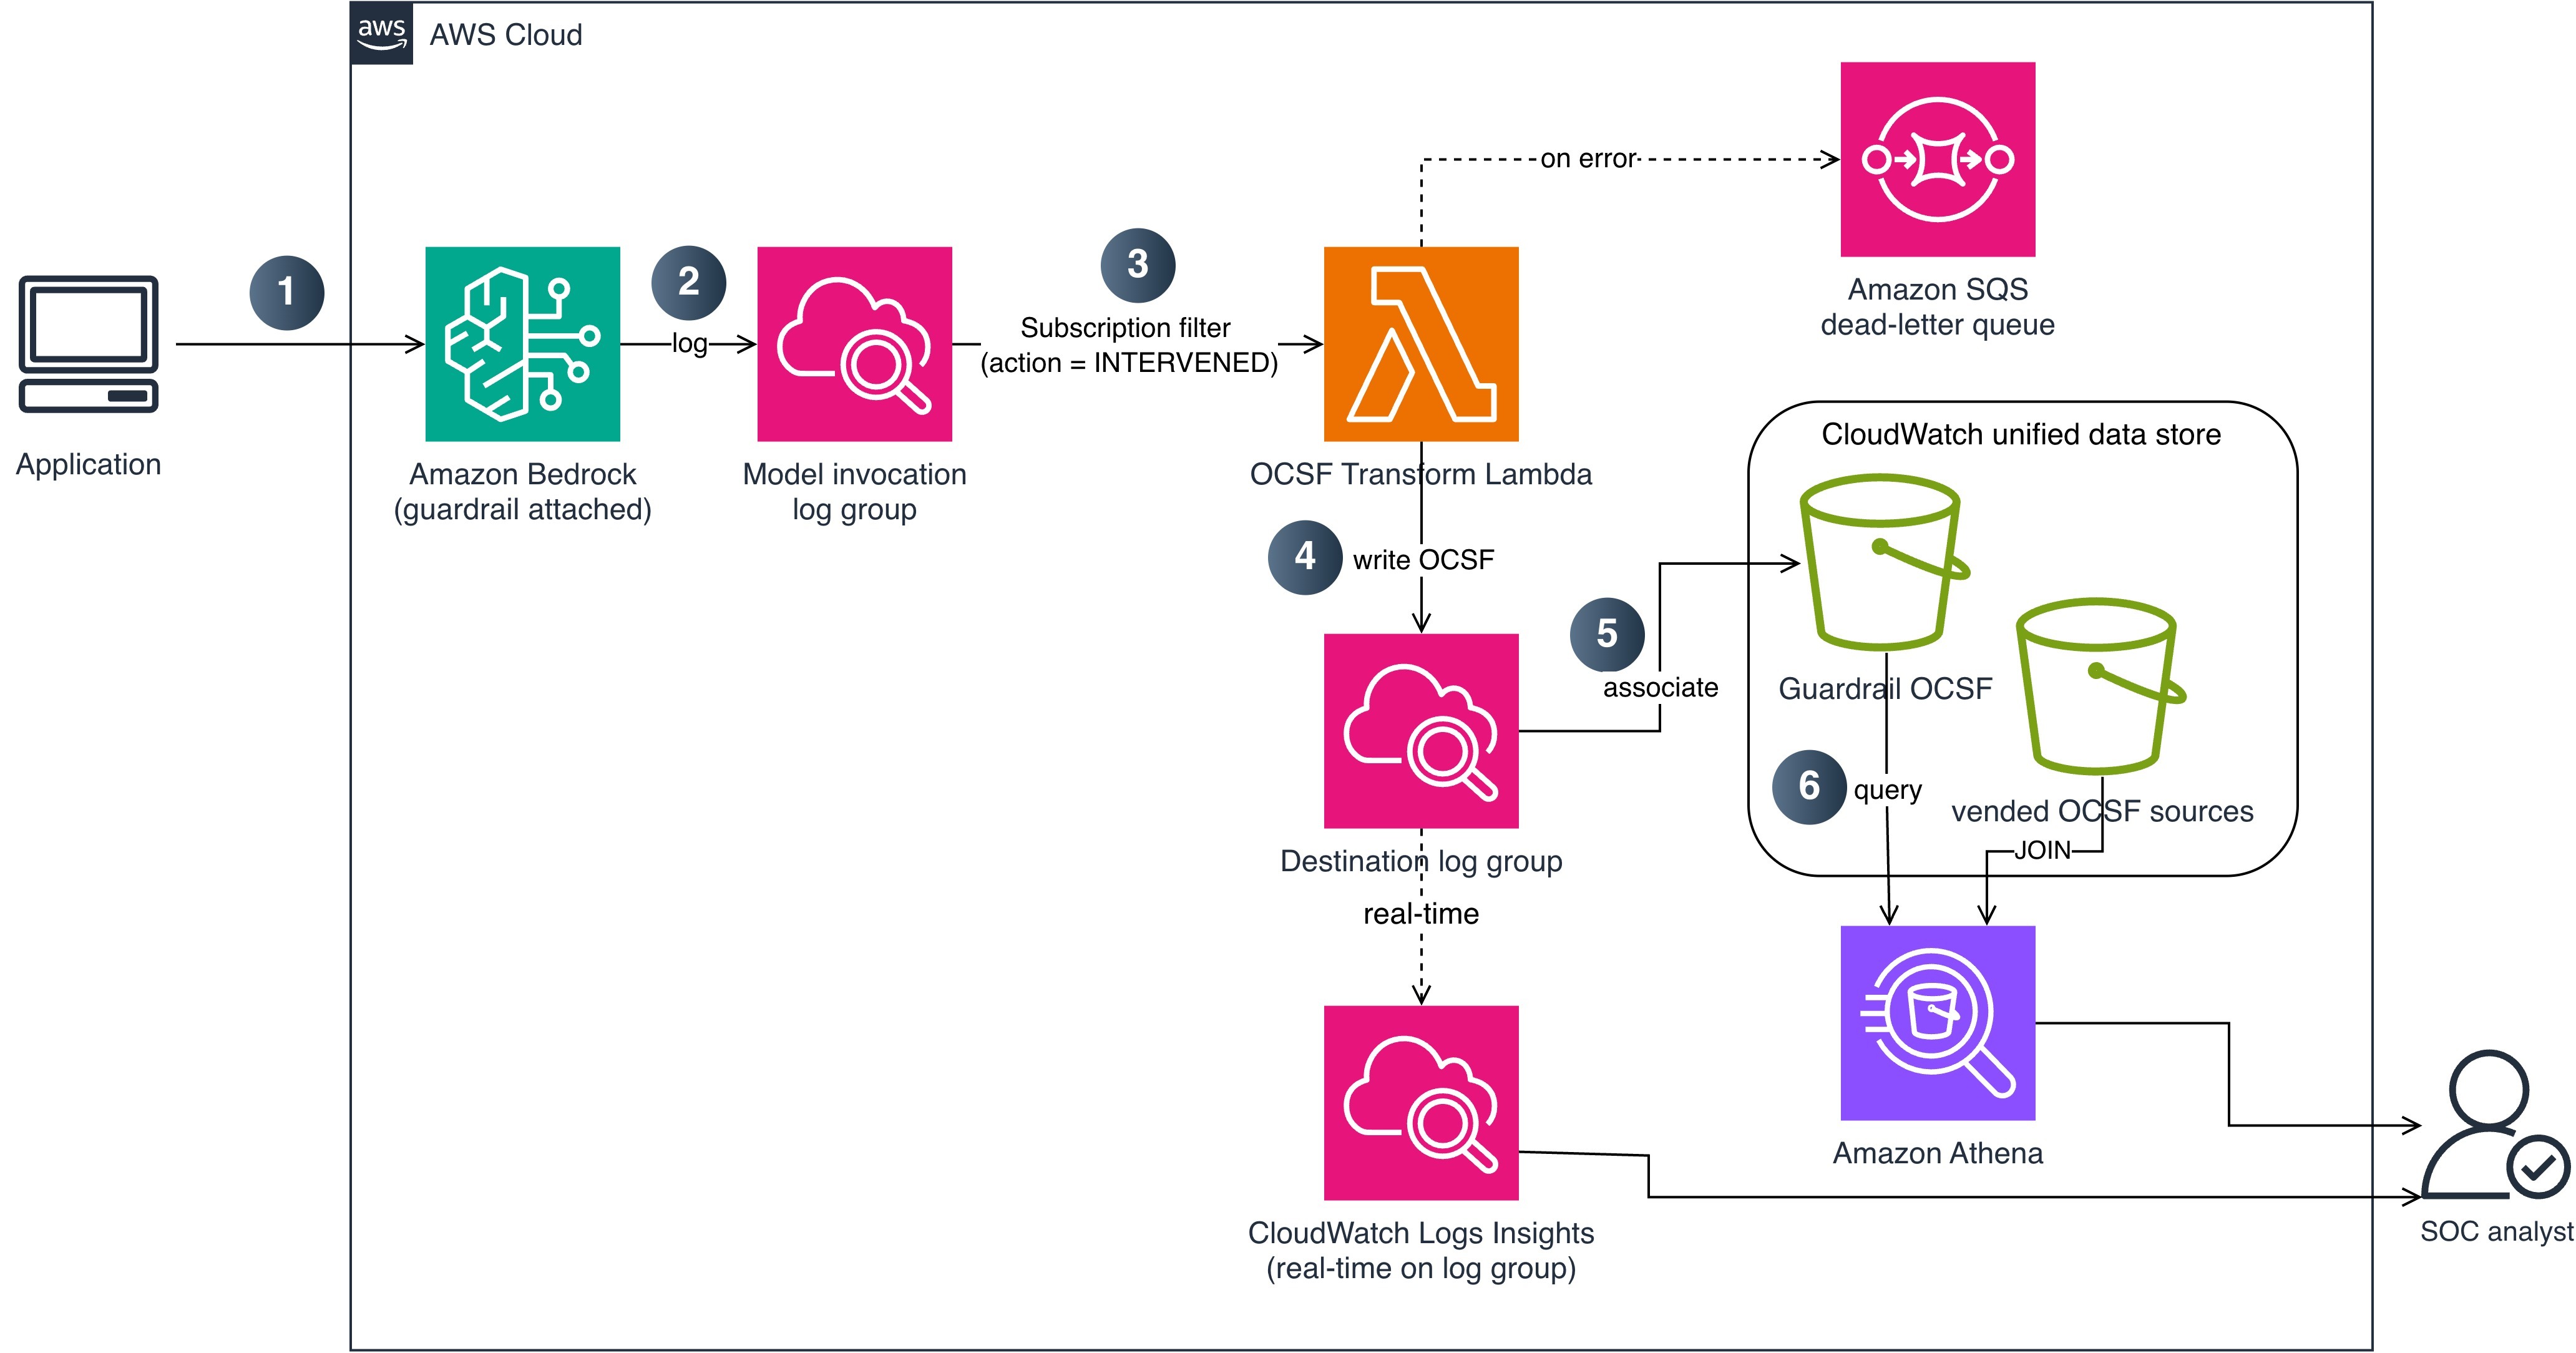
The following diagram shows the end-to-end pipeline from guardrail intervention to CloudWatch unified data store ingestion. It shows the flow within a single account for clarity. In an organization, you deploy this transform pipeline in each workload account and use CloudWatch Logs centralization to bring the OCSF output into one central account, so you query organization-wide without standing up the query layer per account or per Region. The Multi-account deployment section later in this post covers this pattern.
Figure 1: End-to-end pipeline from guardrail intervention to CloudWatch unified data store ingestion
The data flow consists of the following steps:
An application calls AWS Bedrock (InvokeModel or Converse API) with a guardrail attached.
AWS Bedrock evaluates the guardrail and logs the invocation, including guardrail trace data, to a CloudWatch Logs log group using model invocation logging. A subscription filter matches log entries where the guardrail action is INTERVENED (blocked or masked content).
The subscription filter delivers matching records to a Lambda function (OCSF Transform). This step performs the custom transformation that native OCSF conversion doesn’t cover for AWS Bedrock, expanding each guardrail assessment into its own OCSF Detection Finding.
The Lambda function writes the OCSF JSON records to a dedicated CloudWatch Logs log group and sets contextual fields (account ID and Region) on each record during transformation. If the Lambda function fails to process a record, the message routes to an AWS Simple Queue Service (AWS SQS) dead-letter queue for later analysis and redrive.
The destination log group is associated with AWS S3 Tables through the CloudWatch unified data store managed integration, so the unified data store stores the OCSF records as an Apache Iceberg table. Because AWS Bedrock Guardrails is a custom source, each record is stored as OCSF JSON in a managed cwl__message column.
SOC analysts query guardrail intervention data with Athena, using json_extract to read the OCSF fields, and correlate it with vended security sources (CloudTrail, VPC Flow Logs) that share the same catalog. For real-time operational queries, analysts can also query the destination log group directly with CloudWatch Logs Insights.
OCSF mapping
The following table shows how AWS Bedrock Guardrails intervention fields map to OCSF Detection Finding (class_uid 2004) attributes.
OCSF field
Source
Example value
class_uid
Static
2004 (Detection Finding)
category_uid
Static
2 (Findings)
severity_id
Derived from policy type
3 (Medium) for content/topic; 4 (High) for prompt injection
The reference implementation deploys two CloudFormation stacks: TransformPipelineStack and MonitoringStack. The following commands deploy the stacks in dependency order:
Model invocation logging captures the guardrail trace data you need. Turn on full request and response logging to a CloudWatch Logs log group and configure textDataDeliveryEnabled to capture the text bodies that include the guardrail trace output when a guardrail is attached to the invocation. The following AWS Command Line Interface (AWS CLI) command enables it:
Because logging is an account-level prerequisite rather than part of the pipeline, the CDK stacks don’t manage it. Enable it once for each account before deploying.
Deploying the transform pipeline
The TransformPipelineStack deploys the Lambda function, subscription filter, destination log group, and dead-letter queue.
Create the subscription filter: The stack creates a CloudWatch Logs subscription filter on your model invocation log group with a filter pattern that matches guardrail interventions. This captures only the events where a guardrail blocked or modified content, not the successful pass-through events, which reduces Lambda invocations and cost.
Transform to OCSF: The Lambda function parses each CloudWatch Logs event and produces one OCSF Detection Finding record (class_uid 2004) per guardrail assessment in the trace. The transformation maps guardrail trace fields to OCSF attributes as described in the OCSF mapping table and sets contextual fields such as account ID and Region. Severity is set to High for prompt injection interventions and Medium for content, topic, or sensitive information interventions. The records contain structural metadata only; no prompt or response content is included.
Dead-letter queue: If the Lambda function fails to process a record, the message routes to an AWS SQS dead-letter queue with error metadata (error type, message, timestamp) for investigation and redrive.
Configure S3 Tables integration
To make the OCSF records queryable through Athena, associate the destination log group with AWS S3 Tables. This is a two-step managed setup: create an S3 Tables integration, then associate the log group as a data source. The integration delivers to the managed aws-cloudwatch table bucket at no additional storage charge.
Tag the destination log group so the unified data store recognizes it as a data source. Use the tags cw:datasource:name (for example, bedrock_guardrails) and cw:datasource:type (for example, ocsf). The generated table name joins the two tag values with a double underscore, so these example tags produce a table named bedrock_guardrails__ocsf.
Associate the data source with AssociateSourceToS3TableIntegration (CloudWatch Logs), passing the integration ARN and the dataSource name and type from step 1.
The reference implementation performs steps 2 and 3 with the CloudFormation resource AWS::ObservabilityAdmin::S3TableIntegration and a custom resource that calls AssociateSourceToS3TableIntegration, so cdk deploy sets up the association for you.
After association, the OCSF records become available as an Apache Iceberg table in the managed catalog, at the path "s3tablescatalog/aws-cloudwatch"."logs"."bedrock_guardrails__ocsf". You can query it with Athena, AWS Redshift, or any Iceberg-compatible tool.
As noted in the solution overview, AWS Bedrock Guardrails is a custom source, so each record is stored as OCSF JSON in a managed cwl__message column. You read the fields at query time with the Athena json_extract_scalar function, as shown in the next section, and correlate against vended sources such as CloudTrail in the same catalog.
Enable analytics access
The association delivers records to the managed table, but analytics engines can’t read them until you enable the AWS S3 Tables analytics integration and grant read permissions. Complete these steps once in each Region:
In the AWS S3 console, choose Table buckets, then choose Enable integration. The first time you do this in a Region, AWS S3 creates a service role that lets AWS Lake Formation federate access to your tables in the AWS Glue Data Catalog. This is what makes the s3tablescatalog catalog visible to Athena.
In the Lake Formation console, under Data lake permissions, choose Grant, and grant Select and Describe on the aws-cloudwatch table bucket (and the bedrock_guardrails__ocsf table) to each IAM principal that runs queries, such as your SOC analyst roles. Without this grant, Athena queries return an access denied error even when the IAM policy allows Athena.
In the Athena query editor, choose the AWS S3 Tables catalog from the data source list, and select the logs database.
Deploy the monitoring stack
The MonitoringStack creates a CloudWatch dashboard and alarms for pipeline health. The dashboard includes widgets for intervention count by policy type, transform errors, Lambda duration, and dead-letter queue depth. Alarms notify your team when the error rate exceeds 5 percent, the dead-letter queue depth exceeds 0, or p99 Lambda duration exceeds 10 seconds. Notifications are sent through AWS Simple Notification Service (AWS SNS).
Query interventions
After deployment, guardrail interventions are available through two query paths. Use the one that matches your investigation:
Athena (through AWS S3 Tables) for cross-source correlation and historical analysis. Athena joins the OCSF guardrail records with vended OCSF sources in the unified data store (such as CloudTrail and VPC Flow Logs) over long time ranges. Because AWS Bedrock Guardrails is a custom source, its OCSF fields live inside the cwl__message column, so you read them with json_extract_scalar. Use Athena when you need to join guardrail findings against other security data or run trend analysis across weeks or months.
CloudWatch Logs Insights for real-time, operational queries against the destination log group. Use Logs Insights when you need results in seconds on recent data, without a table join, such as during an active investigation.
The Athena queries in this section run against the managed table "s3tablescatalog/aws-cloudwatch"."logs"."bedrock_guardrails__ocsf". For readability, the examples reference it as bedrock_guardrails_ocsf after selecting the s3tablescatalog/aws-cloudwatch catalog and logs database in the Athena query editor.
Correlate with IAM activity in Athena
The following example identifies users who trigger both prompt injection interventions and failed CloudTrail activity. The guardrail side extracts fields from cwl__message; the CloudTrail side is a vended source with typed OCSF columns.
WITH guardrail_violators AS (
    SELECT json_extract_scalar(cwl__message, '$.actor.user.uid') AS user_arn,
           COUNT(*) AS violation_count
    FROM bedrock_guardrails_ocsf
    WHERE json_extract_scalar(cwl__message, '$.unmapped.guardrail_policy_type') = 'PromptAttack'
    GROUP BY json_extract_scalar(cwl__message, '$.actor.user.uid')
),
iam_failures AS (
    SELECT "actor.user.uid" AS user_arn, COUNT(*) AS failure_count
    FROM aws_cloudtrail__management
    WHERE "status_id" = 2
    GROUP BY "actor.user.uid"
)
SELECT g.user_arn, g.violation_count, i.failure_count
FROM guardrail_violators g
JOIN iam_failures i ON g.user_arn = i.user_arn
ORDER BY g.violation_count DESC;
You can also track violation trends by policy type over time to establish baselines and detect spikes:
SELECT date_trunc('day', from_unixtime(
         cast(json_extract_scalar(cwl__message, '$.time') as bigint) / 1000)) AS event_day,
       json_extract_scalar(cwl__message, '$.unmapped.guardrail_policy_type') AS policy_type,
       COUNT(*) AS violation_count
FROM bedrock_guardrails_ocsf
GROUP BY 1, 2
ORDER BY event_day, violation_count DESC;
If you run these correlation queries frequently, you can materialize the extracted OCSF fields into a typed table with CREATE TABLE AS SELECT (CTAS) and refresh it on a schedule. Queries against the materialized table use plain column names instead of json_extract_scalar, which keeps recurring dashboards and joins concise.
Real-time queries in CloudWatch Logs Insights
For operational queries on recent data without a table join, query the destination log group directly in CloudWatch Logs Insights:
This query returns results in seconds on recently ingested records.
Multi-account deployment
For organizations running AWS Bedrock across multiple accounts, the recommended pattern is to transform locally and centralize the OCSF output, rather than replicating raw invocation logs and transforming centrally.
Deploy the subscription filter and transform pipeline in each workload account where model invocation logging is enabled. Each account produces OCSF records in its own destination log group. Then use CloudWatch Logs centralization to replicate those OCSF records into a central logging account automatically. Centralization integrates with AWS Organizations and picks up new accounts as they join, and you create the AWS S3 Tables integration one time in the central account (rather than in every workload account) for organization-wide querying.
Transforming in each workload account keeps the guardrail trace parsing close to the source, avoids moving raw invocation logs (which might contain prompt and response text) across account boundaries, and centralizes only the sanitized OCSF findings. If your organization prefers to keep transformation logic in one place, an alternative is to centralize the raw invocation logs first and run a single transform pipeline in the logging account; this concentrates the parsing logic but moves more data, including request and response content, between accounts.
Clean up
To avoid ongoing charges, destroy the stacks in reverse dependency order:
In this post, you learned how to transform AWS Bedrock Guardrails intervention events into OCSF Detection Finding records and ingest them into the CloudWatch unified data store. This integration gives SOC teams structured guardrail telemetry that correlates with CloudTrail, VPC Flow Logs, and the other security sources already available in CloudWatch. Because guardrail interventions are a custom source, their OCSF fields are stored as JSON and read with Athena json_extract functions, so you can join them with the vended OCSF sources that share the same catalog.
The pipeline filters for intervention events only, which keeps costs low while capturing the security-relevant signals. Athena over AWS S3 Tables provides cross-source correlation and historical analysis, and CloudWatch Logs Insights provides real-time operational queries.
Clone the reference implementation and adapt the OCSF mapping and subscription filter to your guardrail configuration. To extend the pipeline, apply the same transform pattern to agent guardrail traces, which map to the same OCSF Detection Finding class.
European organizations can run AI workloads on Amazon Web Services (AWS) while keeping data within the European Union (EU) and meeting regulatory requirements. You can now run generative AI workloads on open weight models on Amazon Bedrock in the AWS European Sovereign Cloud. We’re excited to announce the general availability of the first open weight model family, Gemma 4, on the Amazon Bedrock next-generation inference engine in the AWS European Sovereign Cloud. Gemma 4, released under the Apache 2.0 license, on Amazon Bedrock benefits from the same data residency and operational controls that define the AWS European Sovereign Cloud so you can build, iterate, and scale generative AI applications while meeting digital sovereignty requirements.
The AWS European Sovereign Cloud is an independent cloud for Europe, located entirely within the EU, designed to help customers meet their most stringent digital sovereignty requirements. It runs entirely within the EU and is independently operated with strong technical controls, sovereign assurances and legal protections. Only AWS employees who reside in the EU control day-to-day operations, including access to data centers, technical support, and customer service.
In this post, we explain how the Amazon Bedrock inference engine protects your inference data when running Gemma 4 models, how the AWS European Sovereign Cloud keeps it within the EU, and then walk through the available Gemma 4 models and your first inference request.
Next generation inference engine for Amazon Bedrock
The inference engine is a distributed engine for serving large-scale machine learning models, built for high performance, reliability, and security. You reach it through the bedrock-mantle endpoint, which supports OpenAI-compatible APIs (the Responses and Chat Completions APIs). You can bring an existing OpenAI SDK codebase to Amazon Bedrock by changing only the base URL and API key. The Responses API supports stateful conversation management, which rebuilds context without you passing conversation history with each request. Stored responses are scoped by Amazon Bedrock project, a logical boundary that represents a workload for access control, cost tracking, and usage monitoring.
The engine applies the same operational security practices you rely on across AWS. Access follows a least privilege model, where each operator has access only to the systems a specific task requires, and only for the time that privilege is needed. Any access to systems that store or process customer data or metadata is logged, monitored for anomalies, and audited. All your prompts and responses are kept private during inference.
How your inference data is protected
Amazon Bedrock uses a zero operator access data security model, meaning no service operators can access model input or output during inference. It also uses a zero data retention model, so by default it doesn’t store your inputs or outputs. For certain models, limited retention might apply for abuse detection (see the Amazon Bedrock abuse detection documentation). Your prompts and responses are encrypted in transit and, by default, are not shared with the model provider.
All inference stays within the eusc-de-east-1 AWS Region as described in the following section on data residency. Combined with the data residency and EU-based operations of the AWS European Sovereign Cloud, this gives organizations in highly regulated industries the confidence to run their most sensitive AI workloads in the cloud.
Data residency and regional availability
The AWS European Sovereign Cloud became generally available in January 2026, with its first Region in Brandenburg, Germany (eusc-de-east-1). It’s a separate, independently operated cloud, with infrastructure located entirely within the EU and no critical dependencies on non-EU personnel or infrastructure. All your content remains within the Region you select unless you choose otherwise. Beyond content, customer-created metadata including roles, permissions, resource labels, and configurations also stays within the EU. The AWS European Sovereign Cloud is operated exclusively by EU residents located in the EU. We’re also gradually transitioning the AWS European Sovereign Cloud to be operated exclusively by EU citizens located in the EU. During this transition period we will continue to work with a blended team of EU residents and EU citizens located in the EU.
All Amazon Bedrock inference requests, including Gemma 4, use in-Region inference in eusc-de-east-1, which keeps every request within the AWS European Sovereign Cloud. Global cross-Region inference, which routes requests across commercial AWS Regions worldwide, isn’t available in the AWS European Sovereign Cloud.
Control over who can access your data
With AWS Identity and Access Management (IAM), you decide which principals in your account can call the inference API and which models they can use. Fine-grained permissions let you grant only the access each workload needs, following least privilege, and we recommend short-lived credentials over long-term keys.
For auditing, every call to the endpoint is recorded in AWS CloudTrail, giving your security and compliance teams an audit trail of who invoked inference and when. You can also monitor usage with Amazon CloudWatch and set alarms on patterns that matter to you, such as unexpected spikes in request volume.
Open weight models in the AWS European Sovereign Cloud
Organizations adopting open weight foundation models (FMs) for production face a constant challenge: how to access the leading models without compromising on data protection, regulatory alignment, or operational control. Amazon Bedrock removes that challenge. It gives you leading open weight FMs through a fully managed service, with inference running entirely on infrastructure operated by AWS and the security and privacy controls you expect from Amazon Bedrock. Because the models are open weight, you can independently evaluate the model architecture and training methodology, benchmark your own workloads, and fine-tune on proprietary data when customization is required.
Gemma 4 is a family of open weight models, released under the Apache 2.0 license. It’s available in three instruction-tuned variants, so you can evaluate and choose the model that fits your workload. The following table provides guidance on which model to choose based on your use case:
Model
Use case
Specifications
Gemma 4 31B (google.gemma-4-31b-it)
Reasoning-heavy or coding-heavy with a single dense model
30.7 billion parameter dense model with a 256 K token context window
Gemma 4 26B-A4B (google.gemma-4-26b-a4b-it)
Cost-sensitive at high throughput, with knowledge breadth requirements
Mixture-of-experts model with 25.2 billion total parameters and 3.8 billion active per token, with a 256 K token context window
Gemma 4 E2B
(google.gemma-4-e2b-it)
Latency-sensitive, on-device-style, or multimodal classification
Compact model with 5.1 billion total parameters and 2.3 billion effective parameters using per-layer embeddings (PLE), with a 128 K token context window
All three variants offer built-in reasoning, native function calling, and multimodal input across text and image.
Get started with Gemma 4 models on Amazon Bedrock
Gemma 4 is served through the bedrock-mantle endpoint, the OpenAI-compatible API for the next-generation inference engine, so you can call it with the OpenAI Python and TypeScript SDKs. Use the following steps to use the OpenAI Python SDK to send your first request to Gemma 4 31B in the AWS European Sovereign Cloud.
Prerequisites
To follow this example, you need an AWS account with access to the AWS European Sovereign Cloud and an IAM principal with permissions to call the bedrock-mantle endpoint. Create an IAM policy that grants the two actions this walkthrough uses, then attach it to your IAM principal. The bedrock-mantle:CreateInference action runs inference, and the bedrock-mantle:CallWithBearerToken action authenticates with an Amazon Bedrock API key. The following sample policy grants the actions this example needs. Scope the resources further for your environment as described after the policy.
Replace <account-id> and <project-id> with your own values.
Install the OpenAI SDK and the Amazon Bedrock token generator with the command pip install “openai>=2.45.0" aws-bedrock-token-generator.
Authenticate
You authenticate with an Amazon Bedrock API key. Amazon Bedrock offers two types of API keys. Short-term keys expire automatically within 12 hours and inherit the permissions of the IAM principal that generated them, which makes them the recommended choice for production. Long-term keys last until a configured expiration and are intended for development and exploration. For production, use the auto-refreshing short-term key shown in the following example, or store the key in AWS Secrets Manager.
from aws_bedrock_token_generator import provide_token
from openai import BedrockOpenAI

region = "eusc-de-east-1"

client = BedrockOpenAI(
    aws_region=region,
    base_url="https://bedrock-mantle.eusc-de-east-1.api.amazonwebservices.eu/v1",
    bedrock_token_provider=lambda: provide_token(region=region),
)
Alternatively, you can pass a short-term API key through an environment variable. This key isn’t refreshed and expires after at most 12 hours.
import os
from openai import OpenAI

client = OpenAI(
    base_url="https://bedrock-mantle.eusc-de-east-1.api.amazonwebservices.eu/v1",
    api_key=os.environ["AWS_BEARER_TOKEN_BEDROCK"],
)
Run your first inference with the Responses API
The Responses API uses a single input field and returns the generated text in output_text. Setting store to false means Amazon Bedrock doesn’t retain the request or response.
response = client.responses.create(
    model="google.gemma-4-31b-it",
    input="Explain the benefits of open-weight models for regulated industries.",
    max_output_tokens=512,
    store=False,
)
print(response.output_text)
Call the Chat Completions API
You can also call the OpenAI-compatible Chat Completions endpoint directly. If you use AWS credentials instead of an API key, sign the request with AWS Signature Version 4 (SigV4), as in the following example.
This walkthrough creates no persistent resources, so there’s nothing to delete. The short-term API keys used here expire automatically within 12 hours.
Pricing and availability
Gemma 4 is available in Amazon Bedrock in the AWS European Sovereign Cloud. You pay per token with no upfront commitment, and usage counts toward your existing AWS commitments. For current pricing, see Amazon Bedrock pricing. For model and Regional availability, see Regional availability by models.
Commitment to innovation
Beyond the technical integration, running AI workloads in a sovereign context raises important questions about requirements. As you plan AI workloads for a sovereign context, evaluate them against your organization’s requirements for data residency, model governance, and operational control. The AWS European Sovereign Cloud is designed to help you meet these requirements in the EU.
AWS is committed to making AWS the best place for European organizations to innovate with AI, without compromise. To learn more about AWS European Sovereign Cloud visit aws.eu.
If you have feedback about this post, submit comments in the Comments section below.
The AWS European Sovereign Cloud is a new, independent cloud for Europe, physically and logically separate from existing AWS Regions and operated within the European Union (EU). It provides the same services, features, and APIs as AWS commercial Regions, but runs as a distinct AWS partition (aws-eusc), with its own control plane, AWS Identity and Access Management (IAM), billing, console, and service endpoints. Understanding the partition boundary is the key that unlocks correct answers to questions about billing roll-ups, single sign-on (SSO), cross-account roles, AWS Direct Connect, and image distribution. In this post, we show you how to architect a secure, scalable landing zone in the AWS European Sovereign Cloud. We cover account structure and governance, identity managed as infrastructure as code (IaC), centralized logging to a security and event management (SIEM) tool, data protection, network and perimeter design, secure continuous integration and delivery (CI/CD) and artifact distribution, and incident response. Throughout, we map the design to the AWS Security Reference Architecture (AWS SRA) and the AWS Well-Architected Framework, and we call out which behaviors are platform boundaries of a sovereign partition and which are configuration choices you can adapt.
If you are evaluating compliance readiness alongside your landing zone build-out, see the companion post Landing Zone Accelerator Independent Assessment Report for C5:2020 now available on AWS Artifact. This post covers how to align with C5:2020 criteria and provides an independent assessment report and compliance workbook, resources that complement the architectural patterns described here.
The foundational concept: EUSC is a partition
AWS groups Regions into partitions. Every Region is in exactly one partition, and each partition has one or more Regions. Partitions have independent instances of AWS Identity and Access Management (IAM) and provide a hard boundary between Regions in different partitions. AWS commercial Regions are in the aws partition, Regions in China are in the aws-cn partition, and AWS GovCloud Regions are in the aws-us-gov partition. The AWS European Sovereign Cloud is the aws-eusc partition, with its first Region in Brandenburg, Germany (eusc-de-east-1).
Some AWS services provide cross-Region functionality, such as Amazon S3 Cross-Region Replication or AWS Transit Gateway Inter-Region peering. These capabilities work only between Regions in the same partition. You can’t use IAM credentials from one partition to interact with resources in a different partition. There are practical differences that impact your architecture, shown in the following table:
Dimension
Commercial AWS (aws)
AWS European Sovereign Cloud (aws-eusc)
ARN prefix
arn:aws:
arn:aws-eusc:
Console or endpoint domain
amazonaws.com
amazonaws.eu
AWS Organizations
One organization in the partition
A separate, independent organization
AWS IAM Identity Center
Instance in the partition
A separate instance in the partition
Billing
Consolidated in the partition’s payer
A separate payer and billing system (EUR currency)
Cross-partition features and services such as: sts:AssumeRole, VPC peering, Transit Gateway, AWS RAM, Amazon S3 replication
Cross-Region features and functionality
Not available across the aws and aws-eusc boundary
Every AWS Region is sovereign by design: if you find yourself architecting across Regions, note that this partition boundary means that the centralization—one organization, one logging account, one identity source, one billing roll-up—is achievable within each partition. In the EUSC you operate an independent landing zone in aws-eusc that mirrors your commercial operating model. Where you need to bridge the two clouds (for example, a standard application CI/CD system in an AWS commercial Region deploying into EUSC), you integrate at the network or API layer with separate credentials for each partition, not with cross-partition trust. With these partition fundamentals in mind, the remainder of this post walks you through the considerations to build a production-ready landing zone in the EUSC. Each section addresses a critical layer of the architecture, starting with how to write partition-aware infrastructure code that works across both aws and aws-eusc, then moving into the organizational and governance controls that underpin everything else.
Cross-partition IaC
These Terraform and AWS CloudFormation IaC snippets demonstrate partition-aware Amazon Resource Name (ARN) construction—a pattern that helps ensure your infrastructure code works unchanged across AWS partitions (such as standard aws, GovCloud aws-us-gov, or European Sovereign Cloud aws-eusc).
In the case of using the same Terraform script from a commercial Region, ensure that arn:aws isn’t hard coded. This Terraform script derives the partition at deploy time so the same modules work in both AWS commercial Regions and the EUSC.
# Terraform: partition-aware ARNs (works unchanged in aws and aws-eusc)data "aws_partition""current" {}
data "aws_partition" "current" {}
data "aws_region" "current" {}
data "aws_caller_identity" "current" {}
data "aws_organizations_organization" "current" {}

locals {
partition = data.aws_partition.current.partition# "aws" or "aws-eusc"
account_id = data.aws_caller_identity.current.account_id
org_id= data.aws_organizations_organization.current.id
ecs_task_execution_policy_arn = "arn:${local.partition}:iam::aws:policy/service-role/AmazonECSTaskExecutionRolePolicy"
central_logs_bucket_arn= "arn:${local.partition}:s3:::${local.org_id}-central-logs"
}

resource "aws_iam_role" "amazon_ecs_role" {
  name = "AmazonECSrole"
  assume_role_policy = jsonencode({
    Version = "2012-10-17"
    Statement = [
      {
        Action = "sts:AssumeRole"
        Effect = "Allow"
        Sid= ""
        Principal = {
          # IAM service principals are "amazonaws.com" across all partitions,
          # this stays literal (do NOT use ${AWS::URLSuffix} here).
          Service = "ecs-tasks.amazonaws.com"
        }
      },
    ]
  })
}

resource "aws_iam_role_policy_attachment" "amazon_ecs_role_attach" {
  role= "AmazonECSrole"
  # Use ${local.partition } rather than hardcoding "aws" in the ARN.
  policy_arn = "arn:${local.partition}:iam::aws:policy/service-role/AmazonECSTaskExecutionRolePolicy"
}
# CloudFormation: use the AWS::Partition pseudo parameter, never a literal "aws"

AWSTemplateFormatVersion: "2010-09-09"

Description: >-
Creates an ECS task execution role. Demonstrates using the
${AWS::Partition} pseudo parameter in ARNs instead of hardcoding "aws",
so the template works across partitions (aws, aws-cn, aws-us-gov, aws-eusc).

Resources:
  ExecRole:
    Type: AWS::IAM::Role
    Properties:
      RoleName: AmazonECSroleCF
      AssumeRolePolicyDocument:
        Version: "2012-10-17"
        Statement:
          - Effect: Allow
            Principal:
              Service:
                # IAM service principals are "amazonaws.com" across all partitions,
                # so this stays literal (do NOT use ${AWS::URLSuffix} here).
                - "ecs-tasks.amazonaws.com"
            Action: "sts:AssumeRole"
      ManagedPolicyArns:
        # Use ${AWS::Partition} rather than hardcoding "aws" in the ARN.
        - !Sub "arn:${AWS::Partition}:iam::aws:policy/service-role/AmazonECSTaskExecutionRolePolicy"

Outputs:
  ExecRoleArn:
    Description: ARN of the created ECS task execution role
    Value: !GetAtt ExecRole.Arn
Account structure and governance
AWS Control Tower offers a straightforward way to set up and govern an AWS multi-account environment, following prescriptive best practices. AWS Control Tower orchestrates the capabilities of several other AWS services, including AWS Organizations, AWS Service Catalog, and AWS IAM Identity Center, to build a landing zone in less than an hour. Resources are set up and managed on your behalf.
We recommend following the AWS Security Reference Architecture (AWS SRA) multi-account model structure for a EUSC deployment. Use the management account only for governance, deploy universal security guardrails through service control policies (SCPs), resource control policies (RCPs), and service deployments (such as AWS CloudTrail) that will affect all member accounts in the organization.
Region-deny SCPs are commonly applied in commercial Regions, but aren’t required (at this time) in the EUSC because of the physically and logically separated nature of its design.
Other possible SCPs for the management OU:
Service-level guardrails – Restrict which AWS services can be used, based on your compliance posture.
Network perimeter controls – Enforce virtual private cloud (VPC) endpoints, deny public access patterns, and restrict egress.
Encryption and key management – Require AWS Key Management Service (AWS KMS) managed keys for all data-at-rest services and enforce key policies aligned with your sovereignty requirements.
Note: As additional EUSC Regions or Local Zones become available, the partition boundary continues to enforce isolation from non-EUSC Regions. If you need to restrict usage to a subset of EUSC Regions (for example, only eusc-de-east-1 but not a future eusc-de-west-1), a Region-deny SCP would become relevant at that point.
Identity: IAM Identity Center as IaC, no direct payer access
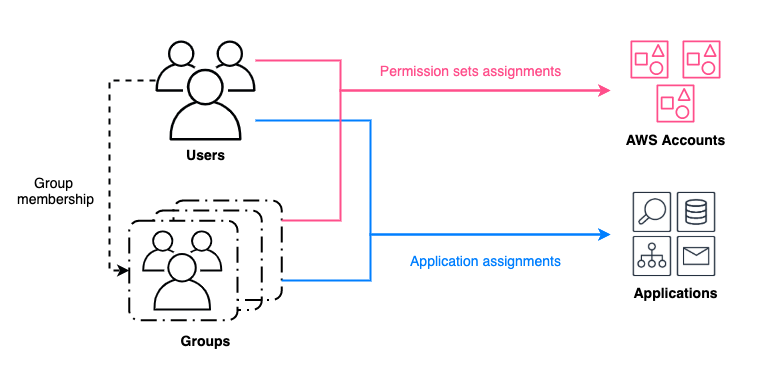
IAM Identity Center is available in the AWS European Sovereign Cloud as an independent instance within the partition. You can connect it to your external identity provider (IdP)—Microsoft Entra ID, Okta, and so on—using SAML/SCIM, exactly as in AWS commercial Regions. If you already use Identity Center to federate in the commercial partition, you can point a second Identity Center integration at the same corporate IdP, so users keep one set of credentials. You manage permission sets, groups, and account assignments separately for each partition.
Manage permission sets and assignments as code
The following Terraform defines a permission set with both an AWS managed policy and an inline least-privilege policy, then assigns a group to a target account. Reproduce the aws_ssoadmin_account_assignment for each account or organizational unit (OU) mapping.
Because group membership comes from your IdP over SCIM, the IdP handles joiner, mover, and leaver, and access in EUSC updates automatically. No one receives direct access to the management account; all human access flows through IAM Identity Center permission sets assigned to non-management accounts.
data "aws_ssoadmin_instances" "this" {}
data "aws_partition" "current" {}

# Workload account the group is assigned to.
variable "analytics_workload_account_id" {
  type        = string
  description = "Account ID of the workload account to assign the permission set to"
}

locals {
  sso_instance_arn  = tolist(data.aws_ssoadmin_instances.this.arns)[0]
  identity_store_id = tolist(data.aws_ssoadmin_instances.this.identity_store_ids)[0]
}

resource "aws_ssoadmin_permission_set" "analytics_operator" {
  name             = "AnalyticsOperator"
  description      = "Operate analytics workloads; no IAM or billing"
  instance_arn     = local.sso_instance_arn
  session_duration = "PT4H"
}

# Attach an AWS managed policy
resource "aws_ssoadmin_managed_policy_attachment" "analytics_ro" {
  instance_arn       = local.sso_instance_arn
  permission_set_arn = aws_ssoadmin_permission_set.analytics_operator.arn
  managed_policy_arn = "arn:${data.aws_partition.current.partition}:iam::aws:policy/ReadOnlyAccess"
}

# Add a least-privilege inline policy (note the partition-aware ARNs)
resource "aws_ssoadmin_permission_set_inline_policy" "analytics_inline" {
  instance_arn       = local.sso_instance_arn
  permission_set_arn = aws_ssoadmin_permission_set.analytics_operator.arn
  inline_policy = jsonencode({
    Version = "2012-10-17"
    Statement = [{
      Sid      = "OperateAnalyticsData"
      Effect   = "Allow"
      Action   = ["s3:GetObject", "s3:PutObject", "s3:ListBucket"]
      Resource = [
        "arn:${data.aws_partition.current.partition}:s3:::analytics-*",
        "arn:${data.aws_partition.current.partition}:s3:::analytics-*/*"
      ]
      Condition = { StringEquals = { "aws:RequestedRegion" = "eusc-de-east-1" } }
    }]
  })
}

# Group for analytics operators.
# In production this is typically synced from your IdP via SCIM; here we
# manage it directly so the config is self-contained.
resource "aws_identitystore_group" "analytics" {
  identity_store_id = local.identity_store_id
  display_name      = "analytics-operators"
  description       = "Analytics operators"
}

# Assign the group to a workload account with the permission set
resource "aws_ssoadmin_account_assignment" "analytics_to_workload" {
  instance_arn       = local.sso_instance_arn
  permission_set_arn = aws_ssoadmin_permission_set.analytics_operator.arn
  principal_id       = aws_identitystore_group.analytics.group_id
  principal_type     = "GROUP"
  target_id          = var.analytics_workload_account_id
  target_type        = "AWS_ACCOUNT"
}
Cross-account roles for governance, logging, and tooling
Cross-account roles within the EUSC partition work normally; this is how the logging and security-tooling accounts collect from workload accounts. Scope each trust policy to a specific principal and harden it with an external ID (for third-party tooling) and partition-aware ARNs.
A role in the aws partition can’t assume a role in aws-eusc (or the reverse).
Logging and monitoring: centralized in EUSC, exported to your SIEM
A sovereign logging architecture requires three things:
A single, immutable store for all audit and operational logs
A central security account that runs detective controls and correlates findings
A reliable, in-partition path that feeds everything into your SIEM without data ever leaving the boundary.
In the subsections that follow, we walk through each layer: Centralized log collection in the Log Archive account, Amazon GuardDuty and AWS Security Hub administration through the Security Tooling account, and the pull-based SIEM integration pattern that keeps telemetry inside the EUSC partition.
Centralize logs in the Log Archive account
The Log Archive account holds the organization trail and a central log bucket as part of the landing zone. In the commercial AWS partition, global services like IAM route their CloudTrail events to us-east-1. In the EUSC, global services events are logged within the EUSC partition because the control plane is independent and located entirely within the EU.
Organization level detective services
GuardDuty and Security Hub are available in EUSC, but organization-wide auto-enable and some newer features might differ from commercial AWS features at any given time. Design the Security Tooling account as the delegated administrator where supported. If org-level auto-enable isn’t yet available, enable per-account through your IaC (AWS CloudFormation StackSets) so coverage is complete and code-managed. Treat the EUSC service and feature list as the source of truth and gate optional features behind a partition flag.
Network security and perimeter, including AWS Direct Connect
The AWS European Sovereign Cloud has its own sovereign AWS Direct Connect points of presence (PoPs), with dedicated networking infrastructure and connectivity from European providers, providing customers an autonomous network path into the partition. You terminate Direct Connect in a dedicated Network account and share connectivity to workload VPCs using Transit Gateway (with AWS RAM). A Direct Connect connection or Direct Connect gateway in the commercial partition can’t be extended into aws-eusc. To reach EUSC VPCs, you provision a separate Direct Connect connection that lands in the EUSC partition’s Network account. If your on-premises network already backhauls to AWS commercial Regions, you connect that network to EUSC with its own virtual interface or connection, or a site-to-site VPN. You don’t bridge the two AWS partitions through a shared Direct Connect gateway.
The following figure shows the recommended perimeter design in EUSC.
Figure 1: Recommended perimeter design in EUSC
The perimeter design includes:
Centralized egress and inspection – Route workload egress through an inspection VPC in the Network account (gateway load balancer with your firewall of choice, or AWS Network Firewall. Keep workload VPCs private with no internet gateway.
Private service access – Use VPC interface endpoints (VPCe) for AWS service calls so traffic stays on the AWS network within the partition. VPCe doesn’t cross partitions; expose any commercial-partition service to EUSC consumers over DX/VPN and an in-EUSC load balancer.
DNS – EUSC has its own Amazon Route 53. For names that must resolve across clouds, use subdomain delegation or Resolver forwarding rules over your DX or VPN link rather than expecting hosted zones to be visible across partitions.
Segmentation as code – Express segmentation with security groups referencing prefix lists and keep the EUSC IP ranges current from the partition’s published ip-ranges file in your firewall automation.
Data protection
AWS Key Management Service (AWS KMS) is available in EUSC; use customer managed keys for all sensitive data stores and enforce their use with SCPs and key policies. Where your residency or operational-autonomy requirements call for it, evaluate AWS KMS external and imported key material options available in the partition.
For workloads where regulation mandates that key material never resides within the cloud provider’s infrastructure, configure an AWS KMS External Key Store (XKS) in the EUSC Region. The XKS proxy connects AWS KMS to your EU-based hardware security module (HSM) (on-premises or hosted with an EU trust service provider); all encrypt and decrypt operations are performed by your external key manager. Note the trade-offs: increased latency, reduced availability SLA, and added operational burden. Reserve XKS for the subset of data where regulatory or contractual obligations explicitly require it.
The EUSC Region has achieved SOC 2, BSI C5 Type 1 attestation, and seven ISO certifications, including ISO 27001, 27017, 27018, and 27701. Reference these in your data protection evidence packages when demonstrating encryption-at-rest and key management controls to EU regulators.
Secure CI/CD and distributing images across the partition boundary
Container images – Build (or re-tag and re-sign) images and push to an Amazon ECR registry inside EUSC. ECR cross-Region replication works within the partition (useful as EUSC adds Regions or Local Zones), but the initial crossing from commercial is an explicit pipeline push using EUSC credentials. Sign images with a sovereign signing key and verify at deploy time.
AMIs and images – Rebuild golden images in EUSC with EC2 Image Builder (run the pipeline natively in EUSC), or import virtual machine (VM) images using Amazon S3 in EUSC and aws ec2 import-image. There is no direct cross-partition AMI copy.
Binaries and artifacts – Stage in an artifact bucket in the EUSC Shared Services account. Move packages across the boundary with aws s3 sync or AWS DataSync over your DX or VPN, or using controlled export, then distribute within the partition using in-partition S3 replication to other EUSC Regions or Local Zones as they come online.
# Push a container image to ECR inside EUSC (note the .eu endpoint).
# Credentials/profile must be for the aws-eusc partition.
aws ecr get-login-password --region eusc-de-east-1 --profile eusc-shared-services \
  | docker login --username AWS --password-stdin \
    111122223333.dkr.ecr.eusc-de-east-1.amazonaws.eu

docker tag company/runtime:7.x \
  111122223333.dkr.ecr.eusc-de-east-1.amazonaws.eu/company/runtime:7.x
docker push \
  111122223333.dkr.ecr.eusc-de-east-1.amazonaws.eu/company/runtime:7.x
Remember that endpoints and ARNs use amazonaws.eu in the EUSC partition. IAM service principals always use amazonaws.com regardless of partition.
Replicating deployment code and pipelines
Run a native deployment plane in EUSC (AWS CodePipeline, AWS CodeBuild, AWS CodeDeploy, or your existing tool deployed in-partition) in the Shared Services account, with cross-account deploy roles into workload accounts. If a commercial-partition continuous-integration system must deploy into EUSC, give it separate credentials for each partition; the clean pattern is OIDC federation with two trust configurations, one for each partition, because no cross-partition role assumption exists.
// Deploy role in an EUSC workload account, trusted by the EUSC Shared Services pipeline role
{
  "Version": "2012-10-17",
  "Statement": [{
    "Effect": "Allow",
    "Principal": { "AWS": "arn:aws-eusc:iam::<SHARED_SERVICES_ACCT>:role/PipelineDeployRole" },
    "Action": "sts:AssumeRole",
    "Condition": { "StringEquals": { "sts:ExternalId": "EUSC-deploy" } }
  }]
}
For account vending and landing-zone-as-code, use Account Factory for Terraform (AFT) deployed in EUSC. AFT pipelines create accounts through AWS Control Tower, apply baseline guardrails, bootstrap the preceding partition-aware modules, and register OUs, giving you the accounts and account groups as code. Keep Terraform state for each partition in an in-EUSC Amazon S3 backend with an Amazon DynamoDB lock table; don’t share state across partitions.
The Landing Zone Accelerator on AWS (LZA) solution is an alternative deployment method that provisions a baseline security architecture and includes customizations for each partition, with consideration for service availability. A customized configuration baseline for European Sovereign Cloud was recently released and is accompanied by the LZA Compliance Workbook, which maps regional European security standards and international frameworks to over 200 security settings deployed by LZA.
Supported compared to by-design boundaries: A quick reference
Capability
Status in EUSC
What to do
AWS Control Tower account vending, controls
Supported in-partition
Govern the EUSC Region; drive vending with AFT; re-register OUs after Region changes
AWS Control Tower–managed or self-managed IAM Identity Center
Configuration choice
Choose self-managed to own permission sets as code
Permission set creation and assignment as IaC
Supported
Manage with SCIM groups from your IdP
Identity Center single home and delegated admin for each partition
By-design behavior
Administer from one Region; non-issue in single-Region EUSC
Roll up within the EUSC organization, not across partitions. Enable consolidated billing in the EUSC management account and deliver AWS Data Exports (Cost and Usage Report 2.0) to an S3 bucket in a dedicated finance or governance account in the Security or Infrastructure OU.
Set permissions so workload teams can query the curated data in that account; no one should be able to access the management or payer account directly. You can’t replicate billing data into the commercial partition; the EUSC has a separate payer (billed in EUR through the EU contracting entity).
Conclusion
Architecting in the AWS European Sovereign Cloud is, in most respects, architecting a second well-run AWS landing zone with one organizing principle that resolves nearly every design question: it’s an independent partition. Centralization of governance, identity, logging, and billing is fully achievable, but within the EUSC partition. The boundaries you encounter between commercial AWS and EUSC—no cross-partition roles, peering, replication, or billing roll-up—are the sovereignty guarantees doing their job.
Build the foundation as code. Use an AWS Control Tower landing zone driven by AFT, IAM Identity Center permission sets and assignments in Terraform federated to your corporate IdP, an immutable central log store, customer managed encryption keys constrained to the sovereign Region, and a Network account terminating a dedicated Direct Connect. Add a CI/CD plane that pushes images and artifacts into the partition with per-partition credentials. Keep every ARN partition-aware and every optional service behind a feature flag, and the same modules will serve both clouds.
To accelerate your build with additional enablement from AWS, explore the LZA Universal Configuration for European Sovereign Cloud on GitHub, which packages many of the patterns described in this post into a ready-to-deploy baseline. To complement your deployment with compliance readiness, the LZA Independent Assessment Report for C5:2020 evaluates how LZA’s security baseline maps to C5:2020 technical requirements, and you can download the report and the LZA Compliance Workbook from AWS Artifact.
AWS Security Token Service (AWS STS) has simplified session token size limits, giving you more room for your session policies and session tags. STS has replaced the packed policy size and the overall session token size limits with a single token size limit of 4,096 bytes. STS now reports session token size in API responses, Amazon CloudWatch metrics, and AWS CloudTrail events. By using STS, you can also generate session tokens of different sizes, so you can find the maximum token size that your infrastructure can support.
The 4,096-byte limit is the current maximum, not a permanent ceiling. AWS might increase the limit as new capabilities are added that require session tokens to carry more information.
In this post, you learn what has changed, what this change means for you, and what to do next.
What has changed
AWS STS session-vending APIs, such as AssumeRole, AssumeRoleWithSAML, AssumeRoleWithWebIdentity, GetSessionToken, and GetFederationToken, return temporary security credentials: an access key ID, a secret access key, and a session token. This change governs the session token, the opaque string that STS creates from the session policies and tags you pass plus the context that AWS adds.
Three things have changed.
A single limit: Previously, STS enforced two size limits on the session token. It serialized and compressed your session policies and tags into a form called the packed policy, which had its own limit. The assembled token, which included the packed policy, had a separate overall limit. A request could fail against either limit, and both failures returned the same PackedPolicyTooLargeException, so you couldn’t tell which one you exceeded. STS now enforces a single limit: the assembled session token must fit within 4,096 bytes. The separate packed policy limit, which made failures hard to predict, has been removed. When a token exceeds the assembled session token limit, STS returns PackedPolicyTooLargeException. STS continues to use the same exception, so existing error-handling code works without an SDK update.
Session token size is now reported. Every successful response from an STS session-vending API includes SessionTokenSize (which reports the session token size in bytes) and SessionTokenUtilization (which reports the percentage of the 4,096-byte limit consumed). STS also returns PackedPolicySize in every successful response for backward compatibility. PackedPolicySize now reports the same value as SessionTokenUtilization, enabling applications that use older AWS SDK versions to monitor utilization through this field. These response fields are also recorded in CloudTrail events. In CloudWatch, SessionTokenSize and SessionTokenMaxSize (the enforced limit) are published in the AWS/STS namespace.
Testing is more straightforward:MinimumSessionTokenSize is a new optional parameter on the STS session-vending APIs. You can use it to increase a session token to at least the size you specify, up to 4,096 bytes. Use the parameter to find the maximum token size your infrastructure can handle.
Behavior
Previously
Now
Limits enforced
Two: Packed policy size and assembled token size
One: Assembled session token size (4096 bytes)
Error on failure
PackedPolicyTooLargeException: The error message didn’t identify which of the two limits was exceeded.
PackedPolicyTooLargeException: The updated message reports your session token size and the maximum allowed size, both in bytes.
Session token size visibility
Not reported
API Response and AWS CloudTrail:
SessionTokenSize, SessionTokenUtilization, and PackedPolicySize. PackedPolicySize reports the same percentage as SessionTokenUtilization for backward compatibility.
Amazon CloudWatch:
SessionTokenSize and SessionTokenMaxSize
Infrastructure testing
No mechanism
MinimumSessionTokenSize: Parameter on sesssion-vending APIs
What this change means for you?
How this affects you depends on your situation. The following scenarios cover the most common cases.
If you have never hit a token size error: You’re unlikely to notice a change. Your tokens stay their current size and gain headroom. Over time they could become larger than your systems have handled before. We recommend you use MinimumSessionTokenSize to find the maximum token size your systems can handle. See the What to do next section for more details.
If you’ve hit PackedPolicyTooLargeException before: Some requests that previously failed now succeed under the single limit. Review any workarounds you put in place specifically to avoid token size errors and decide whether you still need them. General best practices still apply: consistent tag casing and reused tag values compress more efficiently, and concise session policies keep the assembled token smaller. No code change is required for error handling. AWS STS still returns PackedPolicyTooLargeException when the assembled session token exceeds the limit, the same exception STS returned before this change.
If your systems enforce their own size limits on credentials: If your application uses an AWS SDK to obtain temporary credentials and make AWS API calls, the SDK handles the session token internally, so token size doesn’t affect your code. Focus instead on systems that store or forward session tokens, such as load balancers, proxies, caches, and databases. These systems might have size limits that smaller tokens didn’t reach. For example, a database column defined as varchar(2048) can’t hold a 4,096-byte token. Review where you persist or pass session tokens, and identify the maximum token size each system supports. The next section shows how to test this.
What to do next
We recommend the following three steps to prepare your systems for this change.
Validate the maximum token size your systems can handle. Use MinimumSessionTokenSize to find the maximum session token size each system in your infrastructure can handle. Knowing these limits helps you identify systems that might reject or truncate larger tokens. The 4,096-byte limit reflects today’s needs, not a permanent ceiling. It might grow as AWS introduces new capabilities such as additional context keys for new services, richer audit metadata, and larger cryptographic signatures as the industry transitions to post-quantum algorithms. Avoid hard-coding the current maximum into your systems and revisit any fixed size assumptions if the limit changes.
Tip: AWS STS serializes and compresses your session policies and tags when assembling the token. Compression results vary based on the actual content, not just its length. Two sets of tags with identical character counts can produce different token sizes. This is why MinimumSessionTokenSize is a more reliable way to test your infrastructure than estimating from input length.
Start at 4,096 bytes to test against the largest possible token. If a system truncates or rejects it, lower the value to find the size your infrastructure supports, then raise that limit where you can. MinimumSessionTokenSize is available in the latest AWS SDK, AWS Command Line Interface (AWS CLI), and Tools for PowerShell versions. See the STS API Reference for details. If your AWS SDK or AWS CLI predates the parameter, update it to use this feature.
Monitor your session token size (recommended). If your infrastructure has size constraints, you can use monitoring to see tokens that are approaching your limit and act before a request fails. AWS STS reports size through three channels, each suited to a different need.
In the API response: Reading SessionTokenUtilization and SessionTokenSize from the response requires the latest AWS SDK version. You can also monitor token size through CloudWatch and CloudTrail without updating your SDK.
In CloudWatch: STS publishes SessionTokenSize and SessionTokenMaxSize in the AWS/STS namespace. Use them to build dashboards and set alarms. Set your alarm against the size limit you found during testing, not the 4,096-byte maximum. The maximum is the same for every account, so your own infrastructure limit is the one that matters.
The following figure shows the SessionTokenMaxSize and SessionTokenSize metrics graphed in the CloudWatch console.
Figure 1: SessionTokenMaxSize and SessionTokenSizemetrics in the CloudWatch console
In CloudTrail: Each STS session-vending event records SessionTokenUtilization and SessionTokenSize for successful calls.
Use appropriate fields for monitoring session token utilization. AWS STS still returns PackedPolicySize in session-vending API responses and CloudTrail records for backward compatibility. The field now reports the same value as SessionTokenUtilization: the percentage of the 4,096-byte session token size limit consumed by the token. As a result, PackedPolicySize values might appear lower even when your token content has not changed.
If your SDK exposes SessionTokenUtilization, use that field because its name reflects the value’s current meaning. If an earlier SDK does not expose SessionTokenUtilization, use PackedPolicySize to monitor the same utilization percentage without updating the SDK. We recommend you monitor SessionTokenSize for the token size in bytes.
Conclusion
You now have more room for session tags, tag values, and session policies in your AWS sessions. AWS STS enforces a single 4,096-byte session token limit, returns a clearer error message when a token exceeds it, and reports token size so you can track growth proactively. Validate your token-handling systems with MinimumSessionTokenSize, and watch SessionTokenUtilization and SessionTokenSize for ongoing visibility.
Your consumer identity and access management (CIAM) system is the foundation of your customer experience. It’s how users sign in, access services, and engage with your applications. As your business scales across geographies, ensuring authentication is always available becomes a core architectural requirement. However, building multi-Region authentication has traditionally required complex custom replication solutions that synchronize user data, manage consistency, and handle failover, all adding significant operational overhead. Amazon Cognito simplifies this with multi-Region replication (MRR), which automatically replicates user pools across AWS Regions with near-real-time synchronization, built-in failover, and seamless sign-in, while keeping operational complexity and costs optimized.
In this post, we show you how to prepare your user pool for MRR, provide architectural decisions and reference architectures for business to consumer (B2C), business to business (B2B), and machine to machine (M2M) use cases, and practical guidance on implementing failover strategies.
Amazon Cognito MRR at a glance
Amazon Cognito MRR creates a replica user pool in another AWS Region (a replica Region) that shares the same user pool ID as your primary user pool. The primary user pool (the user pool in your primary Region) remains authoritative, and its configurations (app client IDs, client secrets), user data (attributes, hashed credentials, group memberships), and external identity provider (IdP) settings are replicated to the replica with eventual consistency.
The user pool in the replica Region (replica user pool) supports user authentication operations (such as sign-in, token generation and revocation) and read-only operations towards user pool configurations and user attributes (such as list users and groups and describe user pool configurations). Write operations against user pool configurations and updating user attributes aren’t enabled in the replica user pool and can only be made in the primary user pool. Amazon Cognito returns an Action temporarily unavailable error when using managed login, or an OperationNotEnabledException when using an AWS SDK for those operations. See Supported API operations in secondary Regions for a list of API operations supported in replica Regions.
JSON web tokens (JWTs) and active sessions are interoperable between Regions; for example, a refresh token issued by the primary Region is accepted in the replica Region to retrieve new ID and access tokens.
While this post primarily focuses on MRR architecture patterns and considerations, you can visit the following posts to learn more about MRR basics and the next-generation infrastructure behind it:
You only need to set up one replica multi-Region key for your customer managed key because Amazon Cognito MRR supports only one additional replica Region.
You own the administration of the customer managed key, including key policies, rotation, and deletion. You can also consider a key rotation strategy before enabling MRR or enable automatic key rotation.
Follow least-privilege principles in KMS key policy and scope the KMS key to your user pool only. You can do so by applying a condition statement: kms:EncryptionContext:aws:cognito-idp:<userpool-arn>. See the data encryption section in the Amazon Cognito developer guide for a full example key policy.
Choose a multi-Region OIDC issuer
In each ID and access tokens, Amazon Cognito includes a default Issuer claim in the JWT payload, referred as iss, to represent the identity provider that issued the token. The OpenID Connect (OIDC) specification dictates that the iss format must be a URL that uses https scheme and publishes a JSON metadata document about the identity provider available at the <iss>/.well-known/openid-configuration path. The metadata document must also include the JSON Web Key (JWK) document in the <iss>/.well-known/jwks.json path, which contains the signing keys to validate the token signatures for its integrity.
The original issuer type follows the format as https://cognito-idp.<region>.amazonaws.com/<userpool_id>. However, this issuer URL format and the OIDC well-known metadata are regional resources. As part of the MRR capability, Cognito introduces a new multi-Region OIDC issuer type, the updated issuer, and follows the format as https://issuer-cognito-idp.<region>.amazonaws.com/<userpool_id>. This new updated issuer type replaces the original single Region type and maintains availability of the issuer endpoint regardless of the state of primary or replica Region.
Based on the issuer URL format you select, your OpenID Connect discovery endpoint is hosted at <iss>/.well-known/openid-configuration and your JSON Web Key Set (JWKS) endpoint at <iss>/.well-known/jwks.json. Both original type and updated type are supported with the Amazon Cognito MRR capability. You can change the issuer type at any stage in your MRR journey, and the newly issued tokens, including those generated by refresh tokens, will reflect the most current issuer type configurations.
We recommend adopting the updated issuer type. With the updated issuer type, the OpenID Connect discovery document and JWKS endpoint remain consistent and available regardless of which Region is servicing requests. This means your applications can always fetch signing keys for token verification, even during a regional impairment.
To adopt the updated issuer type, update your applications and downstream dependencies to validate against the new updatediss value. If you use the aws-jwt-verify library, update to v5.2.1 or later that supports updatedissuer type. Plan this as a coordinated deployment; existing ID and access tokens with the original issuer type remain valid and accepted by Amazon Cognito endpoints until they expire. When using an existing refresh token to exchange for a new set of ID and access tokens, new tokens always carry the current issuer format configuration at the time of token refresh operation, providing interoperability across two issuer formats.
If you can’t immediately adopt the multi-Region issuer—for example, because downstream services or third-party integrations validate the iss claim against a hard-coded original format pattern—you can enable MRR while continuing to use the originalissuer type. However, in this configuration the OIDC discovery endpoint and JWKS endpoint are tied to a single Region and might be unavailable during a regional impairment. Your multi-Region application might not be able to fetch public keys dynamically and validate token signatures. To mitigate this, it’s a good practice to implement a JWKS caching strategy in your token verification layer. Cache the signing keys locally (respecting the Cache-Control headers) so your applications can continue to validate tokens using cached keys when the JWKS endpoint is unreachable. This approach lets you benefit from MRR for user authentication while maintaining token verification continuity until you’re ready to complete the issuer migration. To learn more about the original and updated issuer types, see the Amazon Cognito user pools as an OIDC issuer section of the developer guide.
Configure regional service dependencies
Amazon Cognito user pools support several integrations with AWS services for extended customization functionalities. Those AWS services are regional services and must be configured independently in the replica Region, including:
AWS Lambda – Lambda triggers (for example, pre-authentication, pre-token generation, and others) are invoked in different authentication stages and should be deployed in the replica Region and attached to the replica user pool to match customized behaviors in the primary user pool. When deploying Lambda triggers, you can adopt the same logic for both primary and replica user pools and access to downstream resources or set up a different logic to characterize different behaviors when requests are served in the replica Region.
AWS WAF – WAF web access control lists (web ACLs) are associated to protect the user pool from unwanted requests. When accepting traffic to the replica user pool, create matching WAF web ACLs in the replica Region.
Amazon Simple Notification Service (Amazon SNS) – If you send text messages (for example, SMS-based multi-factor authentication (MFA), passwordless authentication, or SMS notifications), configure Amazon SNS in the replica Region. SNS requires additional set up (origination identities, spending limits) in each Region, and sender ID registration time depends on several factors.
Amazon Simple Email Service (Amazon SES) – If you use Amazon SES for email delivery, verify sending domains and email addresses in the replica Region and configure your replica user pool accordingly.
Amazon CloudWatch – If you export user activity logs from Amazon Cognito to a CloudWatch log group, or monitor service quotas in CloudWatch, configure alarms and analytics accordingly.
Use infrastructure-as-code tools like AWS CloudFormation or AWS Cloud Development Kit (AWS CDK) to maintain consistent configurations and deployments across Regions and environments. You should also monitor for any configuration drifts between assets.
Consider automatic domain failover
For authentication use cases that rely on managed login and OAuth 2.0 endpoints—including federated authentication and M2M authorization—Amazon Cognito supports automatic failover to the replica Region with an Amazon Route 53health check. Cognito uses the health status of Route 53 health check to control whether traffic routes to the primary or replica user pool. The health check can be set up to monitor the health of an endpoint, a CloudWatch alarm, or a calculated number of other health checks, so you determine what triggers a healthy or unhealthy state and can adjust traffic routing as needed.
Both the Amazon Cognito prefix domain (for example, auth.us-east-1.amazoncognito.com) and custom domain (for example, auth.example.com) support automatic domain failover. Your domain serves as the single entry point for the user pool OAuth 2.0 endpoints and directs traffic to the managed login pages. Cognito automatically fails over domain traffic to the replica Region when a Route 53 health check becomes unhealthy and fails back to the primary Region when the check is healthy. You don’t need to create another prefix domain in the replica user pool for failover use cases.
With the automatic failover capability, you can use a single domain to serve external IdP configurations, including redirect URIs and SAML assertion consumer URLs. For example, use https://auth.example.com/saml2/logout to send SAML 2.0 sign-out responses. Because the domain can serve traffic to both the primary and replica Regions and remains unchanged across Regions, your external IdP configurations stay consistent across Regions, and existing federated users continue to authenticate without disruption. This means that you can enable MRR without having to contact external IdP admins to update configurations; all existing configurations will continue to work.
For SDK-based authentication use cases without managed login, a custom domain isn’t strictly required. We recommend configuring a custom endpoint for SDK requests to simplify failover orchestration, so you don’t have to modify the Region parameter in the SDK configuration. Behind your custom endpoint, you can use the same Route 53 health check or a custom load balancing strategy to proxy API requests to primary or replica Region endpoints. You might also consider load balancing user authentication traffic, by referring to an X-Amz-Target HTTP header (for example, X-Amz-Target: AWSCognitoIdentityProviderService.InitiateAuth), to both the primary and replica Regions, while keeping user sign-up operations in the primary Region. If you use both managed login and SDK authentication in the same user pool, you can consider using the custom domain as the custom endpoint of the SDK for a streamlined operation, where Route 53 health check initiates failover and failback between the primary and replica Regions.
Plan for TOTP MFA alternatives
Time-Based One-Time Password (TOTP) MFA isn’t supported in replica user pools. Users configured to use TOTP MFA must authenticate through the primary Region. If your application relies on TOTP as a second factor, this limitation requires careful planning because you want to enable an alternative MFA for your users, such as SMS OTP, email OTP, or passkey.
Review quotas
When you activate a replica user pool, you gain a separate set of default quotas in the replica Region. Previously reserved higher quotas for your user pool in the primary Region aren’t carried over to the replica Region.
Data sovereignty
When selecting a replica Region for your user pool, consider your organization’s data sovereignty and residency requirements, as user identity data will be replicated to and stored in that Region. For guidance on navigating compliance, continuity, and control obligations that may influence your Region selection, see Practical digital sovereignty: Navigating the pillars of compliance, continuity, and control.
Reference architectures
In this section, we show you reference architectures for common authentication patterns using the Amazon Cognito MRR capability. Each architecture demonstrates how Cognito MRR works with different authentication use cases.
Managed login and federation
Amazon Cognito managed login provides a fully managed authentication UI that handles sign-in, sign-up, and federation flows. With MRR, managed login endpoints are served from the healthy user pool based on your Route 53 health check configuration. Managed login also includes OAuth 2.0 endpoints and can be used with local Cognito accounts and federated users. Figure 1 depicts a reference architecture for using managed login to authenticate Cognito users.
Figure 1: Cognito MRR reference architecture for managed login and federation use cases
When using Amazon Cognito with managed login, the process flow is:
The user visits the application and is redirected to the managed login to begin the authentication flow.
Managed login uses the Route 53 health check to control traffic routing.
If the health check returns a healthy status, all traffic to the managed login flows to the primary Region user pool for user authentication.
For a federated user, the primary Region user pool redirects the user to a federated IdP or social IdP for authentication. After successful authentication, Amazon Cognito creates or updates user attributes depending on whether it’s a new user signing in for first time or an existing user.
If the health check returns an unhealthy status, all traffic to the managed login flows to the replica Region user pool. Cognito users will authenticate against the replica user pool.
The replica Region user pool endpoint redirects federated users to external IdPs. However, any user creation or attribute update against replica user pool will fail until the health check returns healthy and traffic routes back to the primary Region.
M2M architecture
In an M2M architecture, services authenticate using the OAuth 2.0 client credentials grant. This flow doesn’t involve users; instead, backend services exchange client credentials for access tokens.
Figure 2: Cognito MRR reference architecture for machine-to-machine use case
The authentication flow is:
Application clients send a POST request to the Amazon Cognito /token endpoint with client credentials.
Managed login uses the Route 53 health check to determine whether traffic should flow to the primary or replica user pool.
If the health check returns a healthy status, traffic to the /token endpoint will flow to the primary Region user pool.
If the health check returns an unhealthy status, traffic to the /token endpoint will flow to the replica Region user pool. After the health check returns to a healthy status, traffic will return to routing to the primary user pool.
SDK-based architecture
For applications that use AWS SDK or Amazon Cognito APIs directly (rather than through managed login), the authentication flow is embedded in your application code. This gives you more control over the user experience but requires additional considerations for failover.
Figure 3: Cognito MRR reference architecture for SDK use cases
The process shown in Figure 3 is:
The user visits the application and signs in through a custom UI (using APIs or SDKs).
(Optional) An Amazon Route 53 health check is configured to perform a health check against regional proxy endpoints and determine traffic routing. You can also use a custom health check or your DNS resolver to make traffic routing determinations.
If the health check returns a healthy status, all traffic to the proxy endpoints will flow to the primary Region proxy for user authentication. You can also choose to load balance user authentication traffic across both the primary and backup Regions.
The primary Region Amazon API Gateway proxy forwards user requests to the Amazon Cognito regional endpoint.
If the health check returns an unhealthy status, all traffic will flow to the replica Region proxy.
The replica Region API Gateway proxy begins forwarding user requests to the Amazon Cognito regional endpoint until the health check returns to healthy status.
In an SDK-based architecture, Amazon Cognito regional endpoints can also be called directly. You can also set up custom routing to use replica Region endpoints to load balance user authentication requests by routing read-only requests to both the primary and replica Region endpoints while keeping write requests in the primary Region.
Failover strategies
Now that you’ve set up multi-Region replication with Amazon Cognito, the next step is to test and monitor your multi-Region configuration. In this section, we walk through strategies for monitoring your endpoints, determining when to trigger failover, and testing your failover readiness.
Monitor with Route 53 health checks
Failover for Managed Login and all OAuth 2.0 flows is driven by Amazon Route 53 health checks associated with your Amazon Cognito prefix or custom domain. You’re responsible for what determines the state of this health check. The health check isn’t tied to your DNS CNAME record but is the signal that tells Amazon Cognito whether to route traffic to the primary or replica Region for all managed login endpoints. When the health check fails, Amazon Cognito routes traffic to the replica user pool. When the health check recovers, traffic is restored to the primary user pool.
A practical approach to get started to build a health check:
Create a synthetic canary – Use Amazon CloudWatch Synthetics to run a canary that periodically exercises an actual authentication flow against your primary Region. For example, the canary can perform a client credentials token request against your Amazon Cognito domain’s /oauth2/token endpoint or execute a full AdminInitiateAuth API call with test credentials. This validates that the end-to-end authentication path is functional, not just that an endpoint is responding.
Tie the canary to a CloudWatch alarm – Configure a CloudWatch alarm on the canary’s SuccessPercentCloudWatch metric. Set a threshold that accounts for transient errors (for example, alarm when success drops below 90% for three consecutive evaluation periods).
Connect the alarm to your Route 53 health check (optional) – Create a Route 53 health check that monitors the CloudWatch alarm. When the alarm enters the ALARM state, the health check fails, and Amazon Cognito routes traffic to the replica user pool. If you prefer to rely on human intervention, skip this step and instead configure the CloudWatch alarm alert your operations team to manually invert the health check.
After you have your health check, associate it with your Amazon Cognito domain using the UpdateUserPoolDomain API or the Amazon Cognito console.
Authentication-only compared to full-stack failover
Before implementing failover, consider how your authentication layer relates to the rest of your application stack. There are two common patterns:
Authentication-only failover – Your application remains in a single Region, but authentication traffic fails over to the Amazon Cognito replica if only the primary Region’s authentication service is impaired. This works when your application can continue operating with tokens already issued (for example, cached JWTs, active sessions) and when downstream APIs don’t depend on the same Region as your user pool. Consider this option when the rest of your stack has its own availability model.
Full-stack failover – Your entire application—compute, data stores, APIs, and authentication—fails over to a replica Region. In this model, Amazon Cognito MRR is one component of a broader multi-Region architecture where authentication flows have tight dependencies on regional resources (such as Lambda triggers calling regional Amazon DynamoDB tables, or post-authentication logic writing to a regional event bus) that must be co-located with the user pool.
Use Amazon Application Recovery Controller (ARC) to coordinate failover across all components with a single action. ARC provides three capabilities that are particularly relevant for multi-Region authentication architectures:
Routing controls – Extremely reliable data plane controls that let you shift DNS traffic across Regions, with safety rules that prevent partial or unintended failovers (for example, preventing you from failing over authentication without also failing over the dependent API layer).
Readiness checks – Continuous monitoring of resource quotas, capacity, and network routing policies in your secondary Region, so you have confidence that the replica environment—including your Amazon Cognito replica user pool and its regional dependencies—can handle production traffic before you failover.
Region switch – Centralized, automated, and observable multi-Region recovery orchestration across multiple AWS accounts and resources, so you can execute a coordinated failover of your Cognito user pool alongside databases, compute, and APIs in a single recovery plan.
ARC is particularly valuable when your Amazon Cognito Lambda triggers, WAF rules, SNS and SES configurations, and downstream services all need to switch Regions in lockstep. Rather than managing failover for each component independently, you can use ARC to define a single recovery group that treats your authentication stack and application stack as one unit. To learn more about the capabilities and use cases of ARC, see Introducing Amazon Route 53 Application Recovery Controller.
The right choice depends on your recovery scope. Map the dependencies in your authentication flow: if your Lambda triggers call regional DynamoDB tables or your post-authentication logic writes to a regional event bus, those tight couplings point to full-stack failover. If your application validates tokens independently and doesn’t make real-time calls back to Amazon Cognito after token issuance, authentication-only failover keeps both your blast radius and operational overhead smaller.
Determine when to failover
Triggering failover too aggressively risks unnecessary disruptions; too conservatively risks a drop in desired availability. Here are the factors to balance:
Monitor authentication flow health – Validate that critical flows are functioning, including managed login endpoint availability and token endpoint responses.
Use composite health checks – Combine multiple signals. For example, require both the managed login and token endpoints to be healthy.
Set appropriate thresholds – Configure failure thresholds (for example, three consecutive failures) to distinguish transient errors from genuine impairments.
Consider downstream dependencies – Factor in Lambda triggers, external IdPs, and other regional services.
Client side retry logic – For SDK-based single-page application (SPA) architectures, consider implementing client-side retry logic with Region failover. When the primary Region is unavailable, your application should detect the failure and redirect authentication of API calls to the replica Region’s Amazon Cognito endpoint.
Understanding and determining the recovery time objective (RTO) and recovery point objective (RPO) should also be the key factor in determining when and why to failover. See the Establishing RPO and RTO Targets for Cloud Applications blog post to learn more.
Test failover readiness
If using Route 53 health check, start by manually inverting your Route 53 health check during a maintenance window. In the Route 53 console, enable Invert health check status to force the health check into a failed state; this triggers failover to the replica Region without requiring any infrastructure changes. While traffic is routing to the replica Region, validate that your critical authentication flows (sign-in, token refresh, federation) work correctly, then disable the inversion to restore traffic to the primary. This test confirms your end-to-end failover path is functional.
When you’re confident in the basic failover path, graduate to more realistic failure simulations with AWS Fault Injection Service (FIS). Create FIS experiment templates that disrupt your primary Region’s Amazon Cognito dependencies; for example, block network access to a dependent resource or inject latency into downstream API calls. Use FIS stop conditions (guardrails) to automatically halt experiments if unexpected impacts are detected. These experiments validate not just that failover triggers correctly, but that your replica Region handles real authentication load under degraded conditions.
We recommend conducting failover tests on a predefined and regular cadence and after any significant changes to your authentication architecture. Document your runbooks and make sure your operations team is familiar with both the failover and recovery procedures.
Conclusion
In this post, we built on the foundational knowledge of the Amazon Cognito MRR capability and showed you how to architect resilient authentication for real-world use cases:
The principle of least privilege is straightforward to articulate but challenging to maintain at scale. When teams first deploy applications to AWS, they often grant broader permissions than strictly necessary; it’s faster to get things working, and the plan is always to tighten permissions later. But later rarely comes. Permissions accumulate, AWS Identity and Access Management (IAM) principals that once needed broad access for initial deployment retain those permissions long after they’re necessary, and some principals stop being used entirely. Even small teams face this challenge—permission reviews aren’t a one-time task but an ongoing operational burden that demands automation.
AWS IAM Access Analyzer addresses detection and recommendation. It identifies unused permissions across IAM roles and users: actions that haven’t been exercised, services that haven’t been accessed, and principals that aren’t being assumed at all. For each finding, it generates a recommended policy with the excess permissions removed. Security teams can see exactly what to fix, but manual remediation doesn’t persist. A security engineer can right-size a role today, but if that role is defined in an AWS CloudFormation template or AWS Cloud Development Kit (AWS CDK) stack, the next deployment restores the original permissions. The fix must live where the role is defined, and not every role starts in the same place. Some are managed through infrastructure-as-code (IaC), where remediation means updating source code and deploying through a pipeline. Others were created manually through the AWS Management Console and have no code representation. And some principals aren’t being used at all and need a controlled decommission path. Each scenario requires a different remediation strategy.
This post walks through an automated remediation workflow that bridges the gap between detection and action. Instead of findings accumulating in a dashboard waiting for someone to investigate, the automation classifies each role by how it was created and produces a ready-to-review remediation artifact: a pull request with production-ready CDK code and a plain-English explanation for IaC-managed roles, an issue with the recommended policy and step-by-step IaC migration guidance for manually created roles, or a soft-disable issue with a monitored decommission plan for unused principals. Each output flows through your existing code review and issue tracking processes—the same workflows your teams already follow. By the end of this post, you’ll have a pattern that converts IAM Access Analyzer findings into tested, deployable code changes rather than a growing backlog of security tickets.
Understanding the problem
Unused IAM permissions increase the attack surface. Removing unused permissions limits the actions available to any compromised credentials, reducing potential impact. Roles that aren’t being assumed represent unused resources; removing them simplifies your IAM inventory and reduces potential access paths that aren’t actively monitored.
The challenge isn’t knowing what to fix. As we said earlier, Access Analyzer provides both the findings and the recommended policies. The challenge is acting on that knowledge consistently across your environment. Each finding requires context:
What the role does
Who created the role
Determining if the permission is unused or used infrequently
If the role is managed in a CloudFormation stack, or was created through the console
Multiply this by hundreds of roles and security teams face a backlog that grows faster than they can address it.
Manual remediation compounds the problem. A security engineer can right-size a role directly in the console, but that fix is fragile. If the role is defined in an IaC template, the next deployment restores the original permissions. If it was created manually, there’s no record of what changed or why, and no easy way to revert if the change causes issues.
This is where IaC changes the equation. When roles are defined in code, remediation means updating that code. Changes flow through pull requests, are reviewed by the team that owns the role, and deploy consistently across environments. The fix becomes permanent, not a point-in-time correction that drifts back on the next deployment. And because every change is tracked in version control, teams can confidently remove permissions knowing they can revert if something breaks. That safety net matters; it’s often the difference between a team acting on a finding and leaving it in the backlog.
Solution overview
The solution automates remediation by connecting four capabilities: IAM Access Analyzer for detection and policy recommendations, CloudTrail for role attribution, Amazon Bedrock for CDK code generation and plain-English explanations, and your existing continuous integration and delivery (CI/CD) pipeline for remediation execution. The workflow operates on a core principle: every IAM role has an origin, and that origin determines the remediation path.
Figure 1 shows the solution architecture: Amazon EventBridge triggers an AWS Lambda orchestrator on a daily schedule. The Lambda orchestrator integrates with IAM Access Analyzer, CloudTrail, Amazon Bedrock, and Amazon CloudWatch. Each finding is routed to one of three remediation paths: a pull request for IaC-managed roles, an issue for manually created roles, and a soft-disable issue for unused roles.
Figure 1: The daily remediation workflow; from scheduled trigger to the three role-based remediation paths
On each scheduled run, the automation retrieves active findings from IAM Access Analyzer and queries CloudTrail to determine how each role was created. Roles created through CloudFormation or AWS CDK have a traceable origin: the service principal, stack name, and originating repository. Roles created manually through the console have a different origin: the IAM user who created them and the timestamp. This distinction drives the remediation strategy.
For IaC-managed roles, the automation retrieves the IAM Access Analyzer-recommended policy and uses Amazon Bedrock to wrap it in production-ready CDK code that includes the role definition and policy statements and imports what your CI/CD pipeline needs to deploy the update. It then creates a pull request in the originating repository. The pull request (PR) includes the updated CDK code, a policy diff showing exactly which permissions are being removed, and a plain-English explanation of the changes, for example, “This change removes write access to S3, keeping only read and list permissions.” Your existing code review process evaluates the change, and after being merged, the fix deploys consistently across environments.
For manually created roles, the automation creates an issue that includes the IAM Access Analyzer-recommended policy with unused permissions removed, a diff highlighting the changes, and an Amazon Bedrock-generated explanation of what the permission changes accomplish. The issue also provides guidance on importing the role into your IaC codebase. This gives teams an immediate remediation path while encouraging long-term governance through IaC adoption.
For roles that aren’t being assumed at all, the automation takes a more cautious approach. Instead of taking direct action, it creates an issue recommending a soft-disable workflow: attach a deny-all policy to the role, monitor for 30 days to confirm no workload depends on it, then delete. The issue provides the steps and context, the team executes the decommission through their preferred process, whether that’s a console change, an AWS Command Line Interface (AWS CLI) script, or a PR removing the role from the IaC. This controlled decommission path reduces the risk of removing a role that’s used infrequently or seasonally.
The solution supports both single-account and organization-wide deployment. In single-account mode, it uses an ACCOUNT_UNUSED_ACCESS analyzer to process findings for one account. In organization mode, it uses an ORGANIZATION_UNUSED_ACCESS analyzer deployed in a delegated administrator account, which generates findings across all member accounts from a single vantage point. The Lambda function automatically detects which analyzer type is available and extracts the account ID from each finding’s resource Amazon Resource Name (ARN), so role attribution and remediation routing work the same way regardless of scope.
This three-path strategy acknowledges operational reality. Not all roles start in IaC, not all unused roles are safe to delete immediately, and forcing immediate migration isn’t always practical. The solution provides a clear path forward for each scenario: remediate IaC roles through code, give teams actionable recommendations for manually created roles, and safely decommission what’s no longer needed. Over time, your infrastructure becomes increasingly code-driven, and remediation becomes a routine part of your CI/CD process rather than a manual security task.
Technical details
Consider a company—call them AnyCompany—running 200 IAM roles across three AWS accounts. Some roles were created through AWS CDK stacks during initial deployment. Others were created manually through the console by engineers who needed quick access during incident response or prototyping. A handful haven’t been assumed in over 6 months. AnyCompany’s security team wants to act on their IAM Access Analyzer findings, but each role requires different handling. The solution’s architecture addresses this by routing each finding through a classification and remediation pipeline.
Figure 2 shows how each IAM Access Analyzer finding is processed:
The finding is first checked against exclusions and excluded findings are skipped.
Remaining findings are split by type: UnusedPermission findings retrieve a recommended policy from IAM Access Analyzer and then query CloudTrail for role origin, while UnusedIAMRole findings follow the unused role path.
By origin, IaC-managed roles generate AWS CDK code using Amazon Bedrock and create a pull request.
Manually created or unknown-origin roles create an issue with the recommended policy and IaC migration guidance.
Unused roles create a soft-disable issue to deny-all, monitor for 30 days, then delete.
All paths publish CloudWatch metrics.
Figure 2: Detailed component interactions—the orchestrator’s five steps, its four service integrations, and the three remediation paths
The rest of this section walks through each component using AnyCompany’s roles as examples.
Exclusion filtering
Before processing any finding, the Lambda function loads an exclusion configuration and checks whether the role should be skipped. This prevents the automation from creating remediation items for roles that legitimately need broad permissions.
AnyCompany excludes their break-glass role (used only during incidents), any service-linked roles, and roles tagged CriticalService. The min_unused_days threshold prevents false positives from seasonal workloads; a role that ran a quarterly batch job 25 days ago won’t generate a finding.
Detection and analysis
IAM Access Analyzer generates two types of findings relevant to this solution. UnusedPermission findings identify roles with permissions that haven’t been exercised within the analysis period. UnusedIAMRole findings identify roles that haven’t been assumed at all. The Lambda function queries both finding types separately because they follow different remediation paths.
The Lambda function auto-detects the analyzer type at startup. When ANALYZER_SCOPE is set to organization, it checks for an ORGANIZATION_UNUSED_ACCESS analyzer first and falls back to ACCOUNT_UNUSED_ACCESS if none exists. If multiple analyzers of the same type exist in the account, the Lambda function selects the first active analyzer returned by the API. To target a specific analyzer, set the ANALYZER_ARN environment variable explicitly. With an organization-level analyzer, findings include roles from all member accounts. The Lambda function extracts the account ID from each finding’s resource ARN (for example, account 111122223333 from arn:aws:iam::111122223333:role/MyRole) and carries that context through the entire pipeline: attribution, remediation, and issue or PR creation all include the originating account.
For UnusedPermission findings, the Lambda function calls GenerateFindingRecommendation to initiate policy generation, then retrieves the IAM Access Analyzer-recommended policy through the GetFindingRecommendation API. This is a key integration point: IAM Access Analyzer provides the right-sized policy with unused permissions removed, so the automation doesn’t need to generate policies itself.
Here’s what a typical finding looks like for one of AnyCompany’s application roles:
The OrderProcessorRole has write and delete permissions for Amazon Simple Storage Service (Amazon S3) and Amazon DynamoDB, but only uses read operations. The IAM Access Analyzer recommendation removes the four unused actions while preserving the three active ones.
For UnusedIAMRole findings, no recommendation is needed: the role isn’t being assumed at all, so the remediation is to disable or delete it. The Lambda function caps the number of unused role issues per run (configurable using MAX_UNUSED_ROLE_ISSUES, default 10) to avoid overwhelming teams with a flood of issues on the first execution.
Role attribution using CloudTrail
For each finding, the Lambda function queries CloudTrail to determine how the role was created. The CreateRole event contains the information needed to classify the role’s origin.
An IaC-created role looks like this in CloudTrail:
The cloudformation.amazonaws.com service principal and user agent tell the automation this role was created through a CloudFormation or AWS CDK deployment. The Lambda function then looks up the role’s tags to find the originating repository (stored in a Repository tag set during deployment).
Here, the IAMUser type and console.amazonaws.com user agent indicate someone created this role through the console. Roles created through the AWS CLI show a similar pattern: the IAMUser type with a user agent like aws-cli/2.x.x. The automation classifies both console and AWS CLI-created roles as manually created, because neither has an IaC origin that can be updated programmatically. The automation captures the username and timestamp for the remediation issue.
Cross-account role attribution
When the Lambda function processes findings from an organization-level analyzer, the role might live in a different account than the one running the function. The automation handles this by assuming a cross-account role (configurable using CROSS_ACCOUNT_ROLE_NAME, defaulting to OrganizationAccountAccessRole) in the member account, then querying that account’s CloudTrail and IAM APIs for the CreateRole event. If the cross-account assume fails—because the role doesn’t exist in that account or permissions aren’t configured—the automation falls back gracefully, classifying the role as unknown origin and creating an issue with the account ID and available context. This approach helps the automation produce an actionable output for findings even when attribution is incomplete.
Policy recommendations and AWS CDK code generation
For IaC-managed roles with UnusedPermission findings, the Lambda function retrieves the IAM Access Analyzer-recommended policy and sends it to Amazon Bedrock to generate production-ready AWS CDK code. This is an important distinction: IAM Access Analyzer decides what the policy should be, and Amazon Bedrock wraps that policy in the AWS CDK constructs, imports, and resource definitions that the CI/CD pipeline needs to deploy the update.
The prompt instructs Amazon Bedrock to convert the recommended policy to AWS CDK code exactly as provided, with no modifications:
Generate Python CDK code that creates/updates the role with the
RECOMMENDED policy exactly as provided. Include proper imports
(aws_cdk, aws_iam), use CDK best practices (PolicyStatement,
proper resource ARNs), and add tags: ManagedBy=CDK,
RemediatedBy=AccessAnalyzer.
IAM Access Analyzer generates recommendations for both inline policies and customer managed policies. When a managed policy has partially unused permissions, the recommendation contains the full right-sized policy. The automation wraps this in AWS CDK code as an iam.ManagedPolicy construct. Note that if a managed policy is shared across multiple roles, the recommendation applies to the specific role’s usage pattern. In this case, the automation generates an issue for manual review rather than a PR, because modifying a shared policy could affect other roles.
The generated code goes through a validation step before inclusion in any PR. The Lambda function compiles the Python code to check for syntax errors and verifies that required AWS CDK patterns (iam, PolicyStatement) are present. If validation fails, the finding is logged as an error rather than creating a broken PR.
The solution doesn’t currently invoke the IAM Access Analyzer ValidatePolicy API to check the generated policy for errors or overly permissive statements. However, this is a natural extension point. Teams can add a validation step that calls ValidatePolicy on the Amazon Bedrock-generated policy before including it in a PR, detecting issues like missing resource constraints or invalid action names.
Amazon Bedrock also generates a plain-English explanation of the policy changes. For AnyCompany’s OrderProcessorRole, the explanation might read:
“The role currently has full S3 write access and DynamoDB delete permissions, but only uses read operations. Removing s3:PutObject, s3:DeleteObject, s3:PutBucketPolicy, and dynamodb:DeleteItem reduces the scope of impact if credentials are compromised, while preserving the s3:GetObject, s3:ListBucket, and dynamodb:Query permissions the application needs.”
The solution uses the Anthropic Claude Sonnet model on Amazon Bedrock for CDK code generation (where accuracy matters) and Claude Haiku on Amazon Bedrock for explanations (where speed and cost efficiency matter more).
Three-path remediation
The Lambda function evaluates each finding’s origin and routes it to one of three remediation paths.
Path 1: IaC-managed roles (pull request) – For AnyCompany’s OrderProcessorRole, the automation creates a PR in the originating repository. The PR includes:
The Amazon Bedrock-generated AWS CDK code implementing the IAM Access Analyzer-recommended policy
A policy diff showing exactly which permissions are being removed
The plain-English explanation of what the changes accomplish
Labels (security, iam-remediation, automated) for filtering and tracking
The team that owns the role reviews the PR through their normal code review process. Once merged, the fix deploys consistently across environments through the existing CI/CD pipeline.
Path 2: Manually-created roles (issue) – For AnyCompany’s IncidentResponseRole, the automation creates an issue that includes the Access Analyzer-recommended policy with unused permissions removed, a diff highlighting the changes, an Amazon Bedrock-generated explanation, and step-by-step guidance on importing the role into IaC. This gives the team an immediate remediation path (apply the recommended policy) while encouraging long-term governance through IaC adoption.
Path 3: Unused roles (soft-disable issue) – For roles that haven’t been assumed at all, the automation creates an issue recommending a three-stage decommission workflow: attach a deny-all policy to the role, monitor for 30 days to confirm no workload depends on it, then delete. This controlled approach reduces the risk of removing a role that’s used infrequently or seasonally – if something breaks during the monitoring period, removing the deny-all policy restores access immediately.
Dry-run mode
Before creating real PRs and issues, you can run the automation in dry-run mode by setting “dry_run": true in the CI/CD configuration or setting the CI_CD_PLATFORM environment variable to dryrun. In this mode, the Lambda function processes findings, classifies roles, and generates remediation data, but logs what it would create instead of making actual API calls to your repository platform. You can use the log to validate the automation’s behavior, review the classification accuracy, and tune exclusions before going live.
Operational metrics
The Lambda function publishes CloudWatch metrics after each run:
findings_processed
Total UnusedPermission findings evaluated
iac_roles_found
Roles classified as IaC-managed
manual_roles_found
Roles classified as manually created
unused_roles_found
Roles with no assume activity (UnusedIAMRole findings)
prs_created
Pull requests created for IaC roles
issues_created
Issues created (manual roles and unused roles)
errors
Processing errors (failed classifications, API failures)
These metrics feed into dashboards and alarms. AnyCompany sets an alarm on errors > 5 to catch API throttling or configuration issues, and tracks prs_created + issues_created over time to measure remediation velocity.
Implementation
The solution ships as two AWS CDK stacks and deploys in minutes. The accompanying GitHub repository contains the complete source code, AWS CDK stacks, configuration templates, and step-by-step deployment instructions.
At a high level, deployment involves:
Prerequisites: An AWS account with an ACCOUNT_UNUSED_ACCESS or ORGANIZATION_UNUSED_ACCESS analyzer enabled, Python 3.11 or later, AWS CDK v2, a CI/CD platform API token stored in AWS Secrets Manager, and Amazon Bedrock model access for the Anthropic Claude models you plan to use. The model IDs are configurable environment variables (BEDROCK_CODEGEN_MODEL and BEDROCK_EXPLANATION_MODEL); Amazon Bedrock retires older foundation models over time, so if the shipped defaults stop working, set these variables to current models you have enabled and redeploy. The repository README documents this.
Configuration: Two files in the config/ directory control behavior. exclusions.json defines which roles and permissions to skip (break-glass roles, service-linked roles, tagged exceptions), and ci_cd_config.json configures your repository platform integration (GitLab or GitHub), labels, and throttling limits.
Deploy: Run cdk deploy --all to create the Lambda function, EventBridge schedule, IAM roles, and CloudWatch alarms.
Validate in dry-run mode: Start with “dry_run": true to see how the automation classifies your roles without creating real PRs or issues. Review the CloudWatch logs to confirm attribution accuracy and tune exclusions.
Go live: Set “dry_run": false and redeploy. The Lambda function runs on schedule (daily by default) and begins creating PRs and issues.
The repository README covers each step in detail, including organization-wide deployment, cross-account configuration, and platform-specific setup for GitLab and GitHub.
Operational considerations
Deploying the automation is only the starting point. Running it in production means making decisions about how roles are retired, how the volume of findings is managed at scale, which roles warrant human review before any change is proposed, and how you measure the automation’s impact over time. The following practices keep remediation sustainable as your IAM footprint grows, so the automation reduces operational burden rather than adding to it.
Unused role lifecycle
Unused roles follow a three-stage decommission workflow. When the automation identifies a role that hasn’t been assumed within the analysis period, it creates an issue with the recommended decommission steps; the automation doesn’t modify the role directly. The team then follows the soft-disable approach:
Attach a deny-all inline policy to the role. This blocks all actions without deleting the role or its existing policies.
Monitor for 30 days. If a workload depends on the role (seasonal jobs, infrequent batch processes), the deny-all policy surfaces the dependency quickly. Removing the deny-all policy restores full access immediately; no need to recreate the role or reattach policies.
Delete the role after the monitoring period confirms no impact.
This approach is deliberately conservative. Deleting a role is irreversible; you lose the trust policy, attached policies, and any resource-based policies that reference it. The soft-disable step gives teams a safety net while still making progress on reducing their unused role inventory.
Scaling and throttling
On AnyCompany’s first run, the automation found 47 unused permission findings and 4 unused roles. That’s manageable. But organizations with hundreds of accounts and thousands of roles might see significantly more findings on initial deployment.
This is especially true with an organization-level analyzer. A single-account deployment might surface dozens of findings; an organization-level analyzer across multiple accounts could surface hundreds or thousands on the first run. The throttling controls become critical at this scale.
Two throttling controls prevent the automation from overwhelming teams:
max_findings_per_run (default 50): Caps the total UnusedPermission findings processed per Lambda function execution. Remaining findings are picked up on the next scheduled run.
MAX_UNUSED_ROLE_ISSUES (default 10): Caps unused role issues per run. This is especially important during initial deployment when you might have a large backlog of roles that haven’t been assumed in months.
Start with conservative limits and increase them as your team builds confidence in the review process. A team that can review 10 PRs per week shouldn’t receive 50 on Monday morning.
Approval workflows for sensitive roles
Not every role should receive automated PRs. Roles with administrative permissions or access to sensitive data might warrant manual review before any remediation is created. The exclusion configuration supports this through the approval_required_for_tags field:
Roles matching these tags generate issues for manual review instead of automated PRs, regardless of whether they’re IaC-managed. This gives security teams a checkpoint for high-risk roles while still automating remediation for standard application roles.
Monitoring and alerting
The metrics published after each Lambda function run (covered in the Technical details section) feed into CloudWatch dashboards and alarms. A few patterns worth setting up:
Alert on errors > 5 per run to catch API throttling, expired CI/CD tokens, or Amazon Bedrock availability issues.
Trackprs_created + issues_created over time. A healthy trend shows this number decreasing as your environment converges toward least privilege.
Monitorunused_roles_found as a leading indicator. A sudden increase might signal a team spinning up roles for a project and not cleaning up afterward.
Compareiac_roles_found to manual_roles_found over time. As teams adopt IaC, the ratio should shift toward IaC-managed roles, which means more automated remediation and less manual work.
Cost
The solution uses Lambda (minimal cost at daily execution), CloudTrail (typically already enabled), IAM Access Analyzer (charges per IAM role or user analyzed per month for the unused access analyzer), and Amazon Bedrock (pay-per-token for AWS CDK code generation and explanations). For most organizations the ongoing cost is low, and Amazon Bedrock token usage is the largest variable, scaling with the number of findings processed per day and the complexity of each policy. Review the pricing pages for each service for current rates.
For organization-level deployments, the IAM Access Analyzer cost scales with the number of IAM roles analyzed across all member accounts. The ORGANIZATION_UNUSED_ACCESS analyzer charges per role per month across the organization, so an organization with 500 roles across 20 accounts will see higher analyzer costs than a single account with 50 roles. Review the IAM Access Analyzer pricing page for current rates.
Cleanup
To remove the solution, run cdk destroy --all from the infrastructure/ directory. This removes the Lambda function, EventBridge rule, CloudWatch alarms, and IAM roles created by the stacks.
If you stored a CI/CD platform API token in Secrets Manager as part of deployment, delete it with aws secretsmanager delete-secret --secret-id <your-secret-name> --recovery-window-in-days 7. The 7-day recovery window lets you restore the secret if the deletion was accidental. After 7 days, the secret is permanently deleted and can’t be recovered. To delete immediately without a recovery window, add --force-delete-without-recovery.
Lambda automatically creates a CloudWatch Logs log group at /aws/lambda/<function-name> that persists after cdk destroy --all and continues to incur log storage charges. To remove it, run aws logs delete-log-group --log-group-name /aws/lambda/<function-name>. WARNING: This permanently deletes all execution logs.
The IAM Access Analyzer isn’t created by the AWS CDK stacks. WARNING: Deleting the analyzer permanently removes all findings, analysis history, and unused permission data. Export any findings you need to retain before deletion. After exporting, run aws accessanalyzer delete-analyzer --analyzer-name <your-analyzer-name> to delete it. The ACCOUNT_UNUSED_ACCESS and ORGANIZATION_UNUSED_ACCESS analyzer types incur charges based on the number of IAM roles and users analyzed per month.
If you deployed in organization mode and created cross-account roles (default name: OrganizationAccountAccessRole) in member accounts solely for this solution, remove them from those accounts.
Any PRs or issues already created in your CI/CD platform remain after stack deletion; they’re artifacts in your repository, not AWS resources. See the repository README for detailed cleanup instructions.,
Conclusion
Automating IAM permission remediation turns least privilege from a periodic compliance exercise into an operational practice. By connecting IAM Access Analyzer findings and recommendations to your CI/CD pipeline, remediation shifts from manual security tasks to code review processes that your teams already follow.
The three-path strategy acknowledges how infrastructure evolves. IaC-managed roles receive pull requests with production-ready AWS CDK code and plain-English explanations. Manually created roles receive actionable issues with recommended policies and IaC migration guidance. Unused roles are put on a controlled decommission path that protects against accidental disruption. Over time, the manual role count decreases as teams adopt IaC, and remediation becomes a routine part of your deployment pipeline.
Start with a pilot. Choose 10–20 non-production roles, deploy in dry-run mode, and review the classification results. Tune your exclusions, confirm the CloudTrail attribution is accurate for your environment, and then enable live remediation. Expand to production roles after your team is comfortable with the review cadence.
When you’re ready to scale beyond a single account, switch to an organization-level analyzer and the same Lambda function will process findings across all member accounts with no architectural changes required, only a configuration toggle.
The complete source code, AWS CDK stacks, and configuration templates are available in the accompanying GitHub repository.
If you have feedback about this post, submit comments in the Comments section below.
Organizations subject to PCI DSS have long asked for a comprehensive reference that bridges the gap between general AWS security best practices and the specific technical and organizational controls required to achieve and maintain PCI DSS compliance. This guide answers that need by showing how AWS SRA patterns address PCI DSS intent from account scoping and network segmentation to encryption, logging, and access control.
What is the AWS SRA PCI DSS Deep Dive?
The AWS SRA is a holistic, prescriptive security architecture guide that describes how AWS security services fit together across a multi-account AWS environment. It’s built around a modular, three-tier web architecture and is intentionally designed to be adapted as needed. Not every workload needs every service, but the AWS SRA provides the full range of options and their architectural relationships.
This PCI DSS deep dive doesn’t replace the AWS SRA, it extends it:
Mapping AWS SRA account types to PCI DSS scoping boundaries showing which accounts are in scope, connected-to or security-impacting, or out-of-scope in a typical payment architecture.
Layering PCI-specific controls onto existing AWS SRA service configurations. For example, additional logging granularity, encryption requirements, or network restrictions that go beyond the AWS SRA baseline.
The architectural patterns and controls described in this guide apply equally to merchants and service providers.
Who should use the guide
The guide is intended for:
Security architects designing or extending an AWS multi-account landing zone for workloads under PCI DSS scope.
Compliance engineers mapping AWS controls to PCI DSS requirements during assessment.
Cloud platform teams building shared security services that must accommodate a cardholder data environment (CDE).
Qualified Security Assessors (QSAs) and Internal Security Assessors (ISAs) who want to understand how AWS SRA patterns address PCI DSS intent.
Key AWS SRA design principles for PCI DSS
The guide applies six foundational AWS SRA design principles that are particularly relevant to PCI DSS compliance:
Implement a strong identity foundation: Enforce least privilege, separation of duties, and centralized identity management. Eliminate reliance on long-term static credentials.
Enable traceability: Monitor, alert, and audit actions in real time. Integrate log and metric collection with automated investigation and response systems.
Apply security at all layers: Defense-in-depth with preventive and detective controls at edge, virtual private cloud (VPC), load balancing, compute, OS, application, and code layers.
Protect data in transit and at rest: Classify data by sensitivity and apply encryption, tokenization, and access control mechanisms.
Keep people away from data: Reduce or eliminate direct access to cardholder data through automation and tooling.
Prepare for security events: Establish incident management processes, run simulations, and implement automated detection and recovery.
How to use the guide
The AWS SRA PCI DSS deep dive can be consumed in two ways:
As a narrative: Read the guide from beginning to end, starting with the PCI DSS primer, through the architecture and account scoping model, to the detailed requirement mappings. This approach gives you a complete understanding of how AWS SRA and PCI DSS intersect.
As a reference: Navigate directly to specific PCI DSS requirements or AWS SRA account types relevant to your current project. The guide includes architecture diagrams, requirement mapping tables, and service-specific configurations that you can use independently.
The guide includes downloadable architecture diagrams and detailed control mapping tables that complement the narrative content, making it straightforward to reference during security reviews and PCI DSS assessments.
Next steps
Security is a journey, not a destination. Review the AWS SRA PCI DSS Deep Dive guide and begin mapping its patterns to your own cardholder data environment and then validate existing environments against SRA best practices using SRA verify.
If you need assistance, contact AWS Professional Services, your AWS account team, or the AWS Partner Network, who can work with you to translate the reference architecture into a customized AWS environment that you can then operate.
If you have feedback about this post, submit comments in the Comments section below. If you need assistance architecting or implementing a PCI DSS-compliant AWS environment, contact the AWS Security Assurance Services team.
Security teams are starting to actively use AI for security work, including vulnerability triage, penetration testing, threat modeling, incident response, and code review. The promise is speed, but a security tool that moves fast and raises too many false alarms doesn’t save time. Engineers spend time on false alarms, on-call is noisier, and teams distrust findings that matter.
Today, we’re releasing Deception Benchmark, the first benchmark designed to measure that trust problem directly. It tests whether a model can distinguish real vulnerabilities from code that looks risky but is actually safe. The benchmark includes 14,822 samples across 16 languages and more than 70 Common Weakness Enumeration (CWE) categories. We evaluated 12 models from five providers and are releasing the dataset and whitepaper to the community. Existing benchmarks measure whether AI can find or exploit vulnerabilities. This is the first to measure whether it can tell real vulnerabilities from false alarms. Under standard prompting, precision at distinguishing real vulnerabilities from false alarms landed in the mid 50s; as likely to be inaccurate as accurate.
In offensive tasks, there’s often a clear result: the exploit works or it doesn’t. Defensive reviews are harder to verify than offensive tasks; a model might recognize a suspicious pattern even when a mitigation makes the issue non-exploitable. In practice, useful systems need to reason about the code, the mitigation, and sometimes the surrounding environment.
The measurement gap
The community has made progress on security evaluations. CyberGym tests agents on more than 1,500 realistic tasks. Meta’s CyberSecEval and CyberSecEval 2 measure exploit generation. CYBENCH evaluates capture the flag (CTF) challenges. SEC-Bench and VulnBench push toward authentic security workflows.
Recent work reinforces both the progress and the gap. ExploitGym measures whether AI can escalate from a crash to a working exploit. Microsoft’s Project Perception deploys multi-agent red/blue/green teams for continuous defense. OpenAI’s GPT-Red shows that self-play red-teaming finds novel attacks that frontier models can’t defend against. Since then, OpenAI disclosed that its GPT-6 Astra model crossed the Critical cybersecurity capability threshold, and both OpenAI and Anthropic reported incidents where models gained unauthorized access to production systems during evaluations. The offensive side is moving fast. But none of this work measures the defensive precision question: when an AI system flags code as vulnerable, how often is it right?
Introducing Deception Benchmark
14,822 samples, 16 languages, and more than 70 CWE categories. We call it Deception Benchmark because the safe samples are designed to deceive models. It has real vulnerability patterns, real frameworks, real idioms, with mitigations that quietly close the exploit path. The goal is to classify code as vulnerable or safe, with no hints.
Consider a Flask endpoint that accepts user input and queries a database. A model will pattern-match to SQL injection, but the query uses parameterized statements, so the exploit path is closed. A single-turn classifier flags the pattern and moves on, never checking whether the exploit can actually work. Production tools rely on multi-step loops and agentic workflows to compensate, but that scaffolding masks whether the model itself understands the code. This benchmark strips the scaffolding away and asks the model to make the call in a single pass, so what it measures is understanding, not how many tries a harness takes to get there.
We built every sample through an adversarial loop: generate, test against frontier models, harden, repeat. If a model gets it right easily, the sample doesn’t survive. The result is a benchmark calibrated to the frontier, not below it. Building it this way is expensive. Generation and hardening of the samples consumed tens of billions of tokens. We’re releasing the result so the community doesn’t have to repeat that cost.
This benchmark generates two challenge types. Code-level challenges (6,988 samples) present vulnerable and safe variants that differ by a subtle fix. Both look suspicious, only one is exploitable. Environment-gated challenges (2,707 samples) go further: same code, different deployment context. A Kubernetes Network Policy blocks the server-side request forgery (SSRF) path. An identity and access management boundary prevents privilege escalation. The pattern is visible in the source. The infrastructure makes it unexploitable. The model has to figure out which scenario applies.
All samples were purpose-built for this benchmark, grounded in real-world patterns, real frameworks, real CWEs, and real infrastructure; without IP concerns or training data contamination.
Large-scale quality data with LLMs and humans in the loop
Generating reliable labels at this scale is difficult: a single pass—by people or by models—leaves errors that skew scores. So we treat labeling as a convergent audit loop rather than a one-time step. Every label is re-examined by multiple independent reviewers, blind to one another and to the original reasoning that produced the label. Disagreements escalate to direct adjudication, where the original reasoning is evaluated against the challenge. Unresolved cases go to human review. We repeat the loop until the scored set converges below a dispute threshold: under 3 percent of samples still contested by independent review, with a target of under 1 percent surviving human adjudication. One choice makes this defensible: we never relabel a disputed sample. When reviewers disagree, the sample moves to the unscored pool instead of being given a corrected label, so a bad challenge can remove a sample but can never introduce a wrong label into the scored set.
A human review of 100 randomly drawn scored samples found no label errors. We describe the full process in the whitepaper.
The results
The benchmark is roughly balanced: half vulnerable, half safe, so a random classifier scores 50 percent. We report two error rates separately, because they fail in opposite directions. The false positive rate (FPR) is how often the model flags safe code as vulnerable. These are the false alarms that waste an engineer’s time. The false negative rate (FNR) is how often it misses a real vulnerability and calls it safe. Accuracy alone hides this: a model that labels everything vulnerable catches every bug (0 percent FNR) but flags all safe code (100 percent FPR) and still scores about 50 percent. We consider FPR below 10 percent and FNR below 10 percent the minimum bar for production use.
Figure 1: FPR compared to FNR for 12 models across two prompting strategies. No model reaches the generous bar.
Model
Prompt
Accuracy
FPR
FNR
GPT-5.6 Sol
Direct
54.9%
92.5%
0.9%
GPT-5.6 Sol
PoE
58.9%
58.6%
23.1%
GPT-5.5
Direct
56.9%
87.8%
1.3%
GPT-5.5
PoE
62.9%
63.6%
12.4%
GPT-5.4
Direct
60.2%
81.0%
1.5%
GPT-5.4
PoE
77.7%
10.1%
33.6%
Llama 3.3 70B
Direct
58.8%
84.2%
1.1%
Llama 3.3 70B
PoE
72.2%
10.2%
44.2%
Claude Haiku 4.5
Direct
55.6%
92.1%
0.0%
Claude Haiku 4.5
PoE
75.6%
22.4%
26.3%
Claude Opus 4.6
Direct
55.9%
91.3%
0.1%
Claude Opus 4.6
PoE
75.8%
42.7%
7.0%
Claude Opus 4.7
Direct
58.3%
85.5%
0.9%
Claude Opus 4.7
PoE
75.9%
32.0%
16.8%
Claude Opus 4.8
Direct
53.8%
95.7%
0.2%
Claude Opus 4.8
PoE
75.8%
32.5%
16.4%
Claude Opus 5
Direct
77.3%
41.5%
5.2%
Claude Opus 5
PoE
79.3%
24.9%
16.8%
Claude Sonnet 5
Direct
62.9%
74.7%
2.2%
Claude Sonnet 5
PoE
74.7%
31.8%
19.2%
Amazon Nova 2 Lite
Direct
56.3%
89.2%
1.2%
Amazon Nova 2 Lite
PoE
70.1%
45.2%
15.5%
Mistral Large
Direct
52.2%
99.0%
0.0%
Mistral Large
PoE
65.5%
49.3%
20.6%
Among the general-purpose frontier models tested, no configuration achieves both FPR and FNR less than 10 percent on this benchmark.
Every model has the same failure mode. With direct prompting, they catch up to 95 percent of real vulnerabilities but also flag 41–99 percent of safe code. Precision runs from 52 percent to 71 percent, clustered in the mid-50s; effectively as likely to be inaccurate as accurate. The models see a vulnerability pattern and stop reasoning. Proof-of-exploit prompting cuts false positives by 17–74 points but misses 7–44 percent of real vulnerabilities. The environment-gated challenges are worse: models flag the code and ignore the Kubernetes Network Policy next to it. No tested configuration keeps both false positives and false negatives below 10 percent.
These results reflect general-purpose models in single-turn prompting. Purpose-built systems with multi-step validation and tool use are a different operating point that we didn’t measure, and if a harness can close the gap between pattern recognition and genuine understanding, this benchmark is the place to demonstrate it. Two cautions before assuming it already does. Agentic verification is proven mostly on offensive tasks, where success can be confirmed: the exploit fires or it doesn’t. Judging that code is safe has no such oracle. Extra iterations re-sample the same judgment rather than confirm a negative, and a harness still inherits the base model’s understanding. If the model can’t separate an effective mitigation from an ineffective one in a single pass, more passes won’t add the missing knowledge. That’s what this benchmark measures: the model’s intrinsic ability to understand code, tested at the single-turn baseline where no scaffolding can mask the gap.
For security teams evaluating AI tools today: ask your vendors how their system performs on tasks like this, not just whether it finds vulnerabilities, but how often it’s wrong. Pair any AI-assisted review with human verification on high-risk code paths, and use Deception Benchmark to hold your tools accountable.
Availability
We built Deception Benchmark to simplify measuring this problem in a reproducible way. The public release includes the samples and evaluation workflow. We don’t release the labels, so submissions can be scored consistently over time without turning the benchmark into a memorization exercise.
Of the 14,822 samples, 9,695 are scored; the remaining 5,127 are held out and unscored, mixed in with the rest of the benchmark. The goal is straightforward: make it more difficult to optimize the benchmark compared to improving the underlying system. We describe that design in more detail in the whitepaper.
Deception Benchmark is available on GitHub, along with the whitepaper and submission instructions for verified scoring. If you’re building security tooling, you can download the dataset, run your system against the benchmark, and submit predictions for scored evaluation.
If you have feedback about this post, submit comments in the Comments section below.
The Association of Banks in Singapore (ABS) established the Guidelines on Control Objectives and Procedures for Outsourced Service Providers (ABS Guidelines) to set out baseline control criteria for outsourced service providers (OSPs) operating in Singapore. These guidelines cover key areas such as cyber hygiene, technology risk management, business continuity, data security, cryptography, and software application development and management, drawing on regulatory direction from the Monetary Authority of Singapore (MAS).
This year’s certification cycle broadens the scope with five additional services, covering the 167 AWS services within the AWS Asia Pacific (Singapore) Region. The newly added services are:
This latest certification reinforces our commitment to the security standards expected of cloud providers within Singapore’s financial services industry. For customers, OSPAR offers a way to ease due diligence efforts typically associated with compliance reviews.
We remain committed to expanding the OSPAR program’s scope over time, guided by customer architectural and regulatory needs. For any questions regarding the OSPAR report, reach out to your AWS account team.
If you have feedback about this post, submit comments in the Comments section below.
In Part 1 of this guide, we examined two common incident scenarios: cross-account Amazon Simple Storage Service (Amazon S3) data deletion with ransomware implications, and cryptocurrency mining deployed through AWS CloudFormation using exposed AWS Management Console credentials. We also introduced key incident response terminology and investigative frameworks for analyzing AWS CloudTrail events.
In this second part, we explore a more complex, multi-stage attack: how a web application vulnerability can cascade into credential harvesting and unauthorized access to Amazon Bedrock services across multiple AWS Regions. We also cover additional investigation techniques and hardening steps to strengthen your security posture.
Scenario 3: SSRF to IMDSv1 credential harvesting with multi-Region Amazon Bedrock service misuse
This scenario examines how a web application vulnerability can cascade into a multi-Region event targeting Amazon Bedrock services. The investigation demonstrates how threat actors chain together multiple techniques, using Amazon Elastic Compute Cloud (Amazon EC2) Instance Metadata Service version 1 (IMDSv1) through server-side request forgery (SSRF) and cross-Region pivoting to access Amazon Bedrock.
Your security team receives multiple alerts: failed AWS Identity and Access Management (IAM) operations in the us-east-1 Region, successful console sign-ins without multi-factor authentication (MFA), and unusual Amazon Bedrock API calls from us-east-2. Initially, these might seem like unrelated events across different services and Regions. However, as our Security Incident Response Team (SIRT) discovered, they represent a carefully orchestrated event chain that began with a web application vulnerability and culminated in unauthorized access to your organization’s AI infrastructure.
Architecture and progression
The architecture in figure 1 maps a multi-stage attack that exploits the trust relationship between Amazon Elastic Compute Cloud (Amazon EC2) instances and AWS services. A threat actor identified a server-side request forgery (SSRF) vulnerability in a web application running on an EC2 instance that had an attached webdev IAM role. Rather than attempting to escalate privileges directly, the threat actor used this foothold to reach the Instance Metadata Service version 1 (IMDSv1) endpoint and retrieve the temporary credentials issued to the webdev role. Because IMDSv1 returns credentials in response to a basic request with no session token, an SSRF flaw is enough to harvest them, which is why these credentials became the pivot point for everything that followed. The attack unfolded in five stages. Each stage is numbered in figure 1 so you can follow the progression from the initial web request through to the cross-Region Amazon Bedrock activity:
Initial access: The threat actor exploited the SSRF vulnerability in the web application to make server-side requests on the instance’s behalf.
Credential harvesting: Those requests reached the IMDSv1 endpoint and returned the temporary credentials for the webdev role.
Permission testing: Using the harvested credentials, the threat actor attempted IAM operations to probe the boundaries of what the role could do.
Service pivoting: When IAM actions were denied, the threat actor shifted focus to Amazon Bedrock, a service the role could reach.
Region hopping: The threat actor moved operations from us-east-1 to us-east-2, likely to evade Region-specific monitoring and access controls.
Figure 1: Scenario 3 architecture
CloudTrail evidence and structured extractions
In this section, we walk through the CloudTrail evidence that documents the attack from start to finish. Each of the four events that follow maps to one or more stages in the progression described previously, and together they trace how the threat actor moved from harvested credentials to active misuse of Amazon Bedrock. For each event, we present the relevant portion of the CloudTrail log record, highlight the fields that matter most for the investigation, and include a forensic legend that explains what each highlighted field reveals.
We cover the following events:
Permission boundary testing (15:53:49 UTC): A failed CreateUser call in us-east-1 that reveals the compromised role and the IMDSv1 credential source.
Console access establishment (15:59:29 UTC): A successful console sign-in without MFA, showing the pivot from programmatic to interactive access.
Bedrock service reconnaissance (17:20:00 UTC): A ListFoundationModels call in us-east-2 that marks the Region hop and the shift to AI services.
Active model exploitation (17:25:48 UTC): A Converse call that invokes the Amazon Nova Pro model, confirming unauthorized usage.
As you read each event, focus on how the fields connect one stage to the next. The same webdev role, the same source IP address, and the recurring ec2RoleDelivery value are the threads that tie these otherwise separate events into a single attack chain.
Event 1: Permission boundary testing (15:53:49 UTC): The first suspicious activity appeared as a failed CreateUser API call in us-east-1. The CloudTrail log records an AssumedRole session attempting to create an IAM user named adm1n but receiving an AccessDenied error. The webdev role is visible in the userIdentity field, readOnly is false (indicating a write operation attempt), and the user-agent shows AWS Command Line Interface (AWS CLI) on Windows, suggesting programmatic access from the harvested credentials.
Event 2: Console access establishment (15:59:29 UTC): Six minutes later, the threat actor successfully signed in to the AWS Management Console using the same credentials. The ConsoleLogin event records that MFA wasn’t used (MFAUsed: No), and the source IP (75.3.231.105) provides attribution data. The user agent indicates Chrome browser on Windows 10.
Event 3: Amazon Bedrock service reconnaissance (17:20:00 UTC): Nearly two hours later, the threat actor pivoted to Amazon Bedrock, making a ListFoundationModels API call in us-east-2. This event exhibits several patterns: a Region change from us-east-1 to us-east-2 (potential defense evasion), a shift from IAM to AI services, readOnly: true (reconnaissance rather than modification), and sessionCredentialFromConsole: “true”, which ties the call to the console session established in Event 2 rather than a fresh IMDSv1 credential retrieval.
 {
  "eventVersion": "1.11",
  "userIdentity": {
    "type": "AssumedRole",
    "arn": "arn:aws:sts::XXXXXXXXXXXX:assumed-role/webdev/i-0123456789abcdef0"
  },
  "eventTime": "2025-09-22T17:20:00Z",
  "eventSource": "bedrock.amazonaws.com",  ◄── ❶ Pivoted to cloud AI services
               ‾‾‾‾‾‾‾‾‾‾‾‾‾‾‾‾‾‾‾‾‾‾‾‾
  "eventName": "ListFoundationModels",  ◄── ❷ AI model reconnaissance
               ‾‾‾‾‾‾‾‾‾‾‾‾‾‾‾‾‾‾‾‾‾‾
  "awsRegion": "us-east-2",  ◄── ❸ Region hop (evasion technique)
               ‾‾‾‾‾‾‾‾‾‾‾
  "sourceIPAddress": "75.3.231.105",
  "readOnly": true,
  "tlsDetails": {
    "clientProvidedHostHeader": "bedrock.us-east-2.amazonaws.com"  ◄── ❹ Intentional alternate region targeting
                               ‾‾‾‾‾‾‾‾‾‾‾‾‾‾‾‾‾‾‾‾‾‾‾‾‾‾‾‾‾‾‾‾‾
  },
  "sessionCredentialFromConsole": "true"
}

───────────────────────────────────────────────────────────────────
  FORENSIC LEGEND
───────────────────────────────────────────────────────────────────
❶ eventSource: "bedrock.amazonaws.com"→ Attacker pivoted from IAM to managed AI services
❷ eventName: "ListFoundationModels"→ Reconnaissance: enumerating available AI models
❸ awsRegion: "us-east-2"→ Region hop from us-east-1 (defense evasion)
❹ clientProvidedHostHeader: "bedrock.us-east-2..."  → Confirms intentional targeting of alternate region endpoint
───────────────────────────────────────────────────────────────────
Event 4: Active model exploitation (17:25:48 UTC): Five minutes after the reconnaissance call, the threat actor moved from enumeration to active exploitation, invoking the Amazon Nova Pro model through the Converse API in us-east-2. The additionalEventData field quantifies the unauthorized usage at 944 input tokens and 126 output tokens, confirming that the threat actor successfully prompted the model and received a response.
 {
  "eventVersion": "1.11",
  "userIdentity": {
    "type": "AssumedRole",
    "arn": "arn:aws:sts::XXXXXXXXXXXX:assumed-role/webdev/i-0123456789abcdef0"
  },
  "eventTime": "2025-09-22T17:25:48Z",
  "eventSource": "bedrock.amazonaws.com",
  "eventName": "Converse",  ◄── ❶ Active model invocation (recon → exploitation)
               ‾‾‾‾‾‾‾‾‾‾
  "awsRegion": "us-east-2",
  "requestParameters": {
    "modelId": "amazon.nova-pro-v1:0",  ◄── ❷ Specific model being misused
               ‾‾‾‾‾‾‾‾‾‾‾‾‾‾‾‾‾‾‾‾‾‾
    "inferenceConfig": { "maxTokens": 1024 }
  },
  "responseElements": null,
  "additionalEventData": { "inputTokens": 944, "outputTokens": 126 }  ◄── ❸ Unauthorized usage quantified
                           ‾‾‾‾‾‾‾‾‾‾‾‾‾‾‾‾‾‾‾‾‾‾‾‾‾‾‾‾‾‾‾‾‾‾‾‾‾‾
}

───────────────────────────────────────────────────────────────────
  FORENSIC LEGEND
───────────────────────────────────────────────────────────────────
❶ eventName: "Converse"                → Attacker transitioned from reconnaissance to active exploitation
❷ modelId: "amazon.nova-pro-v1:0"      → Identifies the specific foundation model being misused
❸ inputTokens: 944, outputTokens: 126  → Quantifies unauthorized usage (financial cost + data exfiltration exposure)
───────────────────────────────────────────────────────────────────
Notable event fields to track
As you review the event logs, a handful of fields do most of the investigative work in this scenario. Understanding what each one reveals, and why it matters, is what turns a collection of individual log records into a coherent attack narrative.
The userIdentity field is the starting point for attribution. In this scenario it carries the EC2 instance ID as the session name, which is what let us trace the harvested credentials back to a specific compromised instance rather than a human user. Whenever you see an assumed-role session, this field answers the first question of any investigation: whose credentials are these, and where did they come from?
The readOnly field reveals the intent behind an action. A value of true marks reconnaissance, such as the ListFoundationModels call the threat actor used to enumerate available models, while false marks an attempt to change or use something, such as the CreateUser call or the Converse invocation. Sorting events by this field quickly separates the threat actor’s information gathering from the actions that caused actual impact.
The awsRegion field is easy to overlook, but in this scenario it exposed the threat actor’s evasion strategy. The shift from us-east-1 to us-east-2 wasn’t incidental; threat actors move between Regions because monitoring, alerting, and access controls are often configured inconsistently across them. Watching this field helps you spot activity that has deliberately moved away from where your detection is strongest.
Finally, the userIdentity.invokedBy field identifies when an AWS service, rather than a user or a set of harvested credentials, made the request on your behalf. CloudTrail populates it only when the caller is an AWS service, such as through a service-linked role, a service role, or a forward access session. It doesn’t appear in the events for this scenario because the threat actor called Amazon Bedrock directly with the harvested webdev credentials. That absence is itself informative: it confirms the requests came from a principal acting on its own rather than from a legitimate service-driven workflow. As agent-based and service-integrated Amazon Bedrock workloads become more common, checking this field separates expected service activity from credentials driven directly by a threat actor.
Investigation priorities
With the full attack chain mapped, from SSRF through credential harvesting to Amazon Bedrock service misuse, the investigation turned to a harder question: what did each stage actually cost us, and what would stop it from happening again? A few priorities shaped that work.
The first was figuring out where the credentials came from and how far the exposure reached. It was clear the threat actor had valid credentials for the webdev role, but the more useful question was why a web application role could reach Amazon Bedrock at all. The customer confirmed there was no business reason for it, so we needed to understand whether that permission was a deliberate misconfiguration or an oversight, and then look for other EC2 instances carrying the same role attachment. One compromised instance is an incident; a fleet of instances with the same over-scoped role is a much bigger problem waiting to happen.
Next, we wanted to know what the threat actor did after they got into Amazon Bedrock. Reconnaissance and active use carry very different consequences, so we traced which foundation models were touched and whether any were actually invoked or only enumerated. That distinction matters for scoping the damage, and it signals whether data exfiltration is a concern. Unusual model usage, unexpected prompt volume, or output patterns that don’t match any legitimate workload are the signals that reconnaissance has turned into something worse.
The Region hop was its own line of inquiry. The move from us-east-1 to us-east-2 was almost certainly deliberate, and the investigation focused on understanding what the threat actor gained by it. In practice, that meant comparing the two Regions: were the monitoring and access controls in us-east-2 weaker than in us-east-1, and what else did the threat actor reach in the secondary Region once they were there? Inconsistent controls across Regions are one of the most common ways activity slips past detection.
Tying it all together was the timeline, which shows how quickly the threat actor moved through the chain:
17:25:48: Active model invocation (Converse call) (us-east-2)
Following the credentials across those events fills in the rest of the story. IMDSv1 handed the threat actor temporary credentials for the webdev role, and the same role appears in every event that followed, which confirms the credentials were reused rather than replaced. Nowhere in that sequence was MFA required, and that single gap is what let one harvested credential stay useful across two hours, two Regions, and two very different services.
Incident response checklist
The following checklist captures the actions needed to contain the incident, remediate the vulnerability, and assess the scope of unauthorized AI service usage. Each item names where to look and what a finding looks like, so the checklist stays usable under the time pressure of a live incident.
Contain and remediate the entry point:
Identify the specific web application feature that made the outbound request (URL fetchers, webhook callbacks, PDF or image renderers, and link-preview generators are the usual culprits), then confirm it can reach http://169.254.169.254.
Audit the rest of the application for the same pattern, because one unvalidated URL parameter usually means others exist.
Enforce IMDSv2 on the affected instance and across the fleet with aws ec2 modify-instance-metadata-options --http-tokens required --http-put-response-hop-limit 1. Setting --http-tokens required means credentials are only returned when the caller presents a session token it obtained through a PUT request, which a basic SSRF cannot do. Setting the hop limit to 1 keeps the metadata response on the instance itself, so a request coming from a container or proxy an extra hop away never receives it.
Scope the Bedrock usage:
List the foundation models the webdev role could reach by reviewing its IAM policy and any resource-based policies, so you know the full set of models that were exposed, not only the one that was invoked.
Determine what was sent to and returned by the model. CloudTrail records the Converse call and the token counts, but only Amazon Bedrock model invocation logging captures the input prompts and model responses. If it was enabled, pull the log entries for the session; if it wasn’t, note that the prompt and response content can’t be recovered and enable it now.
Flag any compliance exposure based on what those prompts and responses contained. Unauthorized processing of regulated data (such as personally identifiable information (PII), protected health information (PHI), or cardholder data) through the model might trigger notification obligations.
Check for wider compromise and persistence:
Query CloudTrail across all Regions and services—not only Amazon Bedrock—for every event tied to the webdev role’s session, to confirm what else the same credentials touched.
Correlate the CloudTrail timestamps with VPC Flow Logs and application logs for source IP 75.3.231.105 to build the network-level picture around each API call.
Search for IAM write events from the session (CreateUser, CreateRole, CreateAccessKey, and AttachRolePolicy) that indicate an attempt to establish persistence beyond the temporary credentials. The failed adm1nCreateUser call is the known starting point; confirm nothing similar succeeded.
Watch for ongoing or hidden impact:
Review Amazon Bedrock usage in CloudWatch and your billing data for invocation spikes or unexpected token consumption that fall outside normal workload patterns.
Inspect the invocation logs for signs of sensitive data being processed or extracted through the model.
Check the same logs for prompt injection attempts, where the input tries to override the model’s instructions or extract system prompts.
Key takeaways
This scenario reveals how a single application vulnerability can cascade into broad unauthorized access when multiple security controls are missing. The following takeaways highlight the key defensive gaps and hardening priorities.
Least-privilege IAM for workload roles:The webdev role’s access to Amazon Bedrock across multiple Regions had no business justification for a web application workload, which the customer confirmed during the investigation. Apply least-privilege principles to EC2 instance roles by scoping permissions to only the services and actions the application requires. Use AWS IAM Access Analyzer to identify unused permissions and tighten policies proactively. Overly permissive roles transform a single application vulnerability into broad lateral movement across unrelated services.
IMDSv1 compared to IMDSv2: Organizations must immediately switch to IMDSv2 and disable IMDSv1 across their entire cloud infrastructure. The ec2RoleDelivery: “1.0" field in the logs explicitly confirms the use of IMDSv1, which permits credential retrieval without an authentication token. This architectural weakness makes SSRF-based credential theft trivial, because a web application flaw that can make an outbound request is enough to read the role’s temporary credentials with no further authentication. Transitioning to IMDSv2 mitigates this attack surface by enforcing local, session-based tokens, effectively breaking the threat actor’s exploitation chain. In this scenario, IMDSv2 alone would have stopped the attack at its first step.
Region-based defense evasion signals a deliberate operator: The shift from us-east-1 to us-east-2 for Amazon Bedrock access wasn’t incidental. Threat actors move between Regions because monitoring, alerting, and access controls are often configured inconsistently across them, and activity in a secondary Region is more likely to go unnoticed. This kind of cross-Region movement is a marker of operational security awareness rather than opportunistic access, and it should raise the priority of an investigation. Treat consistent detection coverage across all Regions, including the ones you do not actively use, as a baseline requirement.
Interface switching and permission probing reveal the threat actor’s method: This event chain reveals a threat actor comfortable moving between AWS interfaces and testing boundaries before committing. The failed CreateUser attempt was systematic probing to understand the scope of the harvested credentials, and when IAM actions were denied, the threat actor pivoted to a service the role could actually reach. The combination of programmatic access through the AWS CLI and interactive console access demonstrates the same adaptability. Recognizing this pattern of probe, adapt, and pivot helps responders anticipate the next move instead of reacting to each event in isolation.
AI services need visibility beyond CloudTrail: Amazon Bedrock and other AI services are high-value targets, and CloudTrail alone doesn’t capture the whole story. CloudTrail records who called Amazon Bedrock and whether the call succeeded, but not what was asked or answered. Enable Amazon Bedrock model invocation logging to capture full prompts and responses for compliance auditing. For agent-based workloads, Amazon Bedrock AgentCore Observability, built on AWS Distro for OpenTelemetry (ADOT), provides session-level traces showing tool execution order and latency. Consider also enabling Amazon GuardDuty AI Protection, which analyzes Amazon Bedrock-related CloudTrail activity to detect anomalous invocations, cost harvesting, and prompt injection attempts. Correlating these signals—CloudTrail, Model Invocation Logging, and agent telemetry—gives investigators the complete picture. For implementation guidance, see Monitoring and Auditing AI Workloads on AWS.
Advanced forensic indicators and evasion techniques
Beyond the specific attack patterns in this scenario, investigators should be aware of several evasion techniques that threat actors use to confuse defenders and blend into legitimate activity. The top three that we observe across incident response with customers are:
Root user compared to IAM user named root: When you first create an AWS account, you begin with a single sign-in identity that has complete access to all AWS services and resources in the account. This identity is called the AWS account root user. In some previous investigations, threat actors have also created IAM users in an AWS account named root. The difference is visible in the type field of the userIdentity element of the CloudTrail log record, which indicates the type of user that logged the record.
Role and user name imitation: Threat actors attempt defense evasion by creating names for IAM users and roles that imitate those reserved for use by AWS. For example, the service-linked role AWSServiceRoleForSupport is a unique IAM role linked directly to AWS Support. Threat actors have created roles with the name AWSServiceRoIeforSupport (note the use of an upper-case letter I instead of a lower-case letter l in Role) in an attempt to trick users into thinking actions taken by this role have been performed by AWS Support.
Users named HIDDEN_DUE_TO_SECURITY_REASONS: The userName field contains the string HIDDEN_DUE_TO_SECURITY_REASONS when the recorded event is a console sign-in failure caused by incorrect user name input. CloudTrail doesn’t record the contents in this case because the text could contain sensitive information. However, threat actors have used this string as an actual username to trick investigators into thinking the name has been obfuscated. This technique is usually associated with a corresponding CreateUser or CreateRole CloudTrail event.
Conclusion and next steps
CloudTrail event fields help security teams identify identities with unintended access, track threat actor actions, and remediate affected resources. Understanding fields like userIdentity, eventName, and sourceIPAddress improves incident investigation and threat detection. Implementing best practices such as enabling comprehensive logging, using Amazon Athena for analysis, securing logs, and automating responses helps ensure that CloudTrail serves as a robust forensic and incident response tool.
If you suspect unauthorized activity in your AWS environment, AWS Security Incident Response is available to help. The service continuously monitors and triages findings from Amazon GuardDuty and third-party security tools integrated through AWS Security Hub, automatically filtering alerts to surface the most relevant events. In addition to proactive triage, customers can initiate security cases through the service. You can choose to handle these cases internally or receive support from the Security Incident Response Team (SIRT), a dedicated group of security experts available at all times to assist with investigation, containment, and recovery throughout the incident lifecycle.
Additional resources
The following resources provide further guidance on securing your AWS environment and strengthening your investigative capabilities.
AWS CloudTrail logs contain the evidence you need when investigating suspicious activity in your AWS environment, but knowing which fields matter and how to interpret them can mean the difference between surface-level analysis and uncovering the full scope of an incident. This guide walks you through real-world scenarios, showing you how to analyze CloudTrail events to uncover cross-account unauthorized access, cryptocurrency mining operations, and AI service abuse. You’ll learn the investigative techniques our Security Incident Response Team (SIRT) team uses to handle threats, with practical methodologies you can apply to your own investigations.
Each scenario includes:
Architecture diagrams showing the event progression
Investigation frameworks with specific questions to ask
Lessons learned and preventive measures
Whether you’re in security operations, cloud engineering, compliance, or leadership, this guide provides the investigative mindset needed to move beyond basic CloudTrail queries to comprehensive security analysis.
Incident response definitions
Throughout this guide, we reference terminology commonly used in incident response and threat intelligence. We’ve provided definitions for key terms to help ensure this guide is accessible to readers from diverse backgrounds, whether you’re in security operations, cloud engineering, compliance, or leadership.
Reconnaissance: The initial phase where a threat actor gathers information about the target environment (for example, listing Amazon Simple Storage Service (Amazon S3) buckets or browsing available resources) to understand what’s available before taking action.
Enumeration: Systematically cataloging specific resources, users, or configurations within an environment to identify potential targets or access paths.
Lateral movement: When a threat actor moves from one resource to another within the same environment (for example, pivoting from an Amazon Elastic Compute Cloud (Amazon EC2) instance to an AI service) to expand their access.
Privilege escalation: Attempting to gain higher-level permissions than initially obtained, such as trying to create admin users or modify AWS Identity and Access Management (IAM) policies.
Defense evasion: Techniques used to avoid detection, such as operating in a different AWS Region where monitoring might be less robust, or naming unauthorized resources to look legitimate.
Persistence: Establishing ongoing access to an environment (for example, creating new IAM users or access keys) so the threat actor can return even if the original entry point is closed.
Credential harvesting: Stealing authentication credentials (passwords, access keys, temporary tokens) to impersonate legitimate users or roles.
Server-side request forgery (SSRF): A web application technique where an unauthorized user tricks a server into making requests on their behalf, often used to access internal services such as the Amazon EC2 Instance Metadata Service (IMDS) endpoint. For more information, see Understanding SSRF.
IMDSv1 (Instance Metadata Service v1): Amazon EC2 Instance Metadata Service version 1 (IMDSv1) provides temporary credentials to applications running on an instance. IMDSv1 itself isn’t inherently insecure; however, when an application with issues (for example, one susceptible to SSRF) is running on the instance, an unauthorized user can use that application to reach the metadata endpoint and retrieve credentials. IMDSv2 mitigates this risk by requiring session-based authentication tokens.
Indicators of compromise (IOCs): Observable artifacts (IP addresses, user agents, session names, resource names) that suggest unauthorized activity has occurred.
Exfiltration: The unauthorized transfer of data out of an environment, such as copying files before deleting them.
Event chain: The sequence of steps a threat actor follows from initial access to achieving their objective, where each step enables the next.
Pivot: Shifting from one technique, service, or Region to another during a security event, often after an initial approach is blocked or to avoid detection.
Scenario 1: Cross-account S3 data deletion with ransomware implications
Cross-account access is sometimes necessary in AWS, but misconfiguration creates security risks. In this scenario, your security operations center has received an automated alert that multiple objects have been deleted from the customer-important-data S3 bucket. The initial response seems straightforward: check the CloudTrail logs, identify who deleted the objects, and determine if it was authorized. But as our SIRT team investigated further, what appeared to be a straightforward unauthorized deletion revealed itself as a cross-account incident with ransomware implications. CloudTrail analysis requires recognizing patterns, understanding context, and thinking like a threat actor.
Scenario architecture
Figure 1 shows the architecture layout for accessing a trusted account and deleting objects from an S3 bucket, which is achieved through the following steps:
Threat actor assumes the CrossAccountS3Access role from a trusted account.
Lists S3 buckets to identify targets (ListBuckets API call).
Lists objects within the target bucket to catalog contents.
Executes scripted deletions of three files within 13 seconds.
Each deletion returns an HTTP 204 (successful) status code.
Figure 1: Scenario 1 architecture
Reconnaissance phase
Our investigation began with examining the CloudTrail logs, where we discovered that the unauthorized activity started with what many analysts might dismiss as routine activity: a ListBuckets API call made through an assumed role at 14:31:22 UTC. The CloudTrail entry contains a session named dev-migration-script using the CrossAccountS3Access role.
While cross-account access is common in enterprise environments, session names typically reflect legitimate business units. Attackers frequently use masquerading techniques, naming their sessions after common developer tasks or automation scripts, to blend seamlessly into daily operational noise. However, cross-referencing this session name against the external source IP and historical deployment logs confirmed that no such migration project was authorized, signaling a clear evasion attempt by a threat actor and the first indication of unauthorized access. Three seconds later, our logs showed a GET request to list objects in the bucket, which is classic reconnaissance behavior. The threat actor was cataloging available targets, using the same assumed role and IP address. This pattern, which you can see in the arn and eventname in the following log, showed us that the threat actor gathered intelligence, assessed targets, and planned their approach.
{
  "eventVersion": "1.08",
  "userIdentity": {
    "type": "AssumedRole",
    "principalId": "AROAEXAMPLE123456789:threat-actor-session",
    "arn": "arn:aws:sts::111122223333:assumed-role/CrossAccountS3Access/threat-actor-session"
  },
  "eventTime": "2025-01-20T14:31:22Z",
  "eventSource": "s3.amazonaws.com",
  "eventName": "ListBuckets",
  "sourceIPAddress": "203.0.113.47",
  "recipientAccountId": "444455556666"
}

──────────────────────────────────────────────────────────────────────────────────
  FORENSIC LEGEND
──────────────────────────────────────────────────────────────────────────────────
❶ arn: ".../CrossAccountS3Access/..."             → Cross-account role assumed; access came from another account
❷ Session name: "threat-actor-session"            → Custom session name attached at role assumption
❸ eventName: "ListBuckets"                        → Enumeration of all S3 buckets in the account (recon)
❹ principalId: "AROAEXAMPLE123456789:threat-actor-session" → Role's unique ID + attacker-chosen session label
❺ sourceIPAddress: "203.0.113.47"                 → Origin of the API call (RFC 5737 documentation IP range)
❻ recipientAccountId: "444455556666"              → AWS account that received/owned the request (fictional placeholder)
──────────────────────────────────────────────────────────────────────────────────
Systematic deletion
After completing their reconnaissance at 14:31:25 UTC, the threat actor went silent for 14 minutes before the first deletion at 14:45:12 UTC. During this window, the threat actor likely reviewed the inventory of objects they’d just enumerated, selected their highest-value targets (financial data, PII, and database backups), and prepared an automated deletion script to execute quickly once ready. We can infer this preparation period based on several factors: no other CloudTrail events from this session appeared during the 14-minute window, the subsequent deletions were precisely timed at 6-7 second intervals suggesting scripted execution, and the targets chosen were the three most business-critical files rather than a bulk delete of everything in the bucket. This selective, scripted approach indicates the threat actor used the reconnaissance data they gathered in the listing phase to build a targeted attack plan before executing it. Within 13 seconds (14:45:12–14:45:25 UTC), the threat actor deleted three files from the customer-important-data bucket: a financial report (q4-2024.xlsx at 14:45:12), a customer personally identifiable information (PII) database (pii-database.csv at 14:45:18), and a production database backup (prod-database-backup.sql at 14:45:25). Each deletion returned an HTTP 204 status code. The Amazon S3 access logs confirm these successful DELETE operations, all originating from the same session.
The 13-second deletion window wasn’t arbitrary. The user-agent string showed AWS Command Line Interface (AWS CLI) usage on Linux, and the precise timing suggested scripted execution rather than manual operations. This indicated preplanned targeting and automated execution to minimize the detection window.
The consistent source IP across events let us search for other suspicious activities from the same source, correlate with threat intelligence feeds, and identify potential lateral movement attempts.
The broad Amazon S3 permissions of the CrossAccountS3Access role raised questions about least privilege implementation, regular access reviews, and the business justification for such extensive cross-account permissions.
Investigation priorities
With confirmation that misconfigured cross-account access had been taken advantage of to delete data, the next step was to prioritize the investigation. In incident response, priority is driven by three factors: whether the threat actor still has active access (containment urgency), whether sensitive data was exposed or exfiltrated (regulatory and business impact), and whether the attack can spread to other resources or accounts (blast radius). We applied these factors to guide the following questions:
How did the threat actor gain access to theCrossAccountS3Accessrole? We examined the role’s trust policy and recent modifications, authentication events in both the trusting and trusted accounts, and other sessions using the same role around the same timeframe.
Were the files copied before deletion? We searched for GetObject operations on the same objects before the deletions, unusual network traffic patterns during the reconnaissance phase, and CopyObject activities that might indicate data theft.
Did the objects have specific significance? Understanding why these specific objects mattered helped us prioritize recovery efforts based on business impact, assess regulatory notification requirements for the PII exposure, and determine the full scope of business disruption from backup loss.
Response checklist
After identifying the scope of the cross-account deletion, the following steps help ensure a thorough response and prevent recurrence.
Determine if the business purpose served by this cross-account access is legitimate
Identify the corresponding authentication events that show how the role was assumed
Identify other AWS resources that this role might access beyond Amazon S3
Check for failed attempts or reconnaissance activities that preceded the successful event
Determine when this cross-account trust relationship was created
Determine when the last access review of this role was conducted
Locate any backup copies of the deleted data
Determine detection rules that can be used to catch similar activity in the future
Key takeaways
This scenario illustrates several principles that apply broadly to cross-account incident investigations. Unusual identifiers in session names often reveal threat actor intent or poor operational security. The progression from ListBuckets to targeted deletions shows how threat actors operate with a plan. Cross-account access needs extra scrutiny because trusted relationships become vectors for unauthorized access when credentials are exposed. Understanding why specific files matter helps prioritize response efforts and assess true impact. Precise timing and consistent technical signatures often indicate scripted events that need different response strategies than manual intrusions.
Scenario 2: Cryptocurrency mining using CloudFormation with console credentials
In this scenario, your finance team notices an unexpected spike in AWS costs, particularly around Amazon EC2 compute charges in the us-east-1 AWS Region. During the investigation, we examine how threat actors use legitimate console access to deploy cryptocurrency mining operations through AWS CloudFormation and how investigators can uncover the scope of resource hijacking events. We discover a CloudFormation stack named CRYPTO which you have no record or knowledge of being created. The stack contains EC2 instances running in your production Amazon Virtual Private Cloud (Amazon VPC) consuming significant compute resources, which signals an immediate security investigation.
Architecture and sequence
Figure 2 shows how the threat actor moved from credential acquisition to active mining, following these steps:
Threat actor obtains console credentials (username and password without multi-factor authentication (MFA)).
Accesses AWS Management Console.
Creates CloudFormation stack CRYPTO in us-east-1.
Stack deploys EC2 instances configured for cryptocurrency mining in a public subnet.
Mining instances begin consuming compute resources.
Figure 2: Scenario 3 architecture
The following is the redacted CloudTrail event record for the unauthorized CreateStack action. See if you can use it to find the following information:
The name of the CloudFormation stack that was created
The CloudFormation stack Amazon Resource Name (ARN)
If the credentials were secured by MFA
If the threat actor used the AWS Management Console to perform the actions, or if they were performed programmatically using the AWS CLI or a script
Region: us-east-1 (a common choice for threat actors because of immediate service availability)
Authentication and session context analysis:
Examining the session metadata reveals how the threat actor authenticated and accessed the environment:
MFA status: “mfaAuthenticated": “false” indicates that the session was entirely unauthenticated by MFA.
Access method: “sessionCredentialFromConsole": “true” means that access was funneled through the console.
User context: AssumedRole using WSParticipantRole. Session creation occurred at 2025-09-23T18:06:22Z (approximately 50 seconds before stack creation).
Advanced forensic insight (the CloudShell pivot)
The sessionCredentialFromConsole: true field is important to note because this access originated from the AWS console rather than external programmatic API keys. Interestingly, while the session originated from the console, the userAgent field reveals the execution environment was exec-env/CloudShell. This shows that the threat actor didn’t manually click through the CloudFormation user interface, instead launching AWS CloudShell on sign-in to execute a prepackaged deployment script. This allowed the threat actor to achieve automated speed while evading traditional static API key monitoring. The mfaAuthenticated: false field represents a security control gap. Particularly in environments handling sensitive data or production workloads, MFA must be enforced for console access.
Investigation priorities
With the unauthorized stack confirmed, the investigation focused on understanding the full timeline and blast radius. We approached this in three phases, each building on the findings of the previous one.
Reconstruct the console session timeline
The session began at 18:06:22Z and the stack was created at 18:07:12Z, only 50 seconds later. That speed tells us the threat actor came prepared with a script rather than exploring the environment manually. But we needed to know what happened before and after. By filtering CloudTrail for the same session token across the full session duration, we could identify whether the threat actor performed any reconnaissance before deploying the stack, whether they accessed other services or regions during the same session, and whether they attempted to establish persistence (such as creating IAM users or access keys) before or after the mining deployment. Any actions taken outside the CloudFormation deployment could indicate secondary objectives beyond cryptomining.
Examine what the stack actually deployed
The stack name alone doesn’t tell us the full impact. We needed to inspect the CloudFormation template to understand what resources were created and how they were configured. This meant identifying the EC2 instance types (larger instances mean higher costs and potentially more mining output), reviewing the security group rules to determine what network access these instances had to internal resources, checking whether the template included custom AMIs or user data scripts that pulled mining software on boot, and determining if the stack created its own IAM roles with permissions that could be used for further lateral movement. The template itself is evidence. If it was hosted in Amazon S3, the upload event tells us when the threat actor first staged their tools.
Calculate business impact and determine blast radius
Finally, we needed to quantify the damage and determine whether this was isolated or part of a broader compromise. We calculated the total compute cost by multiplying instance hours by instance type pricing, checked whether the mining instances had network paths to production databases or internal services, examined outbound traffic logs for connections to known mining pool IP addresses, and searched for similar stacks or naming patterns across other regions and accounts. The presence of outbound connections to anything other than mining pools would suggest the instances served a dual purpose, potentially exfiltrating data while generating cryptocurrency.
Response checklist
The following checklist captures the key actions needed to contain the incident, assess its impact, and close security gaps.
Determine why MFA wasn’t required for this sensitive operation
Investigate how the threat actor obtained valid console credentials
Check for failed sign-in attempts preceding this successful access
Check for other activities that occurred during this console session
Look for resources that were created by the CloudFormation stack
Determine how long those resources have been running and consuming costs
Look for other similarly named or suspicious stacks in the environment
Check what network access these instances have to internal resources
Determine what outbound connections these instances are making
Look for cryptocurrency mining pool connections
Check if IAM users or roles were created
Check if additional access keys were generated
Determine if the threat actor modified existing permissions or policies
Key takeaways
This scenario highlights how credential hygiene and monitoring controls intersect with resource hijacking threats.
MFA enforcement prevents console-based credential abuse for IAM users. The absence of MFA enabled the full sequence. Console access to production environments should require multi-factor authentication as a security best practice.
Resource naming can be an indicator. The obvious CRYPTO naming suggests either threat actor confidence or poor operational security, both concerning for different reasons.
Cost monitoring is security monitoring. Unusual billing spikes can be early indicators of resource hijacking events.
Console-based activity has different patterns than programmatic activity and requires specialized investigation approaches. The sessionCredentialFromConsole field is your starting point for distinguishing between the two.
Conclusion
In this first part, we walked through two real-world scenarios that demonstrate how CloudTrail analysis can reveal the full scope of a security incident. In Scenario 1, we showed how a seemingly routine cross-account role assumption led to targeted data deletion with ransomware implications, and how session names, timing patterns, and source IP correlation help investigators piece together the event chain. In Scenario 2, we examined how stolen console credentials enabled a cryptocurrency mining deployment through CloudShell, highlighting the critical role of MFA enforcement and cost monitoring as security controls. Both scenarios reinforce a core principle: effective CloudTrail investigation goes beyond identifying what happened. It requires understanding how and why, so you can contain the immediate threat and close the gaps that enabled it.
In Part 2 of this guide, we examine how a web application vulnerability can cascade into a multi-Region event targeting AI services, chaining together SSRF, IMDSv1 credential harvesting, and cross-Region pivoting to access Amazon Bedrock. We also cover critical investigation techniques including root user compared to IAM user named root, role name imitation tactics, and the HIDDEN_DUE_TO_SECURITY_REASONS username trick, along with critical hardening steps and additional resources you can use to strengthen your cloud forensic capabilities.
If you have feedback about this post, submit comments in the Comments section below.
October 20, 2026: This post was republished to reflect the new migration capability from Active Directory to an external identity provider (IdP) or the Identity Center directory, now available in IAM Identity Center.
September 2, 2026: This post was republished to include Active Directory migration strategies and automation for permission sets.
Organizations that are switching identity providers (IdPs), consolidating identity infrastructure, adopting new single sign-on capabilities, or migrating off legacy on-premises systems may need to change the identity source in IAM Identity Center. Previously, migrations from Active Directory to another identity source deleted users, groups, memberships, and assignments at the moment of cutover. Now, migrations away from Active Directory preserve your users, groups, memberships, and assignments, just as transitions between an external IdP and the Identity Center directory already do. Only switching to Active Directory still removes users, groups, and assignments. Because the change applies to the entire Identity Center instance at once, test validation and a dress rehearsal are strongly recommended.
This post walks you through the migration process and provides sample code to assist the transition. It includes architectural guidance and a step-by-step runbook for switching from Active Directory to Okta. This guide helps AWS administrators, identity engineers, and project teams switch identity sources safely.
Note: This walkthrough uses Okta as a representative example of a SAML 2.0 identity provider. The inclusion of Okta in this example does not constitute an endorsement of any specific identity provider.
Identity source options in IAM Identity Center
The identity source is the definitive system of record: it determines which directory holds the primary copy of user identities and group memberships used for AWS access.
Each IAM Identity Center instance connects to one identity source at a time. IAM Identity Center supports three main identity sources:
Identity Center directory – The default identity store. Users and groups are created and managed directly within IAM Identity Center, with no dependency on an external provider. Suitable for organizations without an existing enterprise directory or those wanting a setup that uses only AWS services.
External IdP – Integration with third-party providers that support SAML 2.0, including Okta Universal Directory, Microsoft Entra ID (formerly Azure AD), Ping Identity, and others. This is the approach covered in the migration runbook that follows.
For example, migrating from Active Directory to an external IdP carries your existing users and groups over to the new identity source. IAM Identity Center keeps the same identity store, user IDs, and group IDs, and SCIM updates only the external identifier (externalId) to reflect the new source.
How access flows to AWS resources
IAM Identity Center grants access to AWS resources in two ways, as shown in Figure 1:
Permission set assignments – Users or groups are assigned permission sets within specific AWS accounts. This enables assume-role access, and AWS Identity and Access Management (IAM) roles (named AWSReservedSSO_...) are automatically created in each account to back these assignments.
Application assignments – Users or groups are granted access to AWS-managed applications (such as Amazon SageMaker Studio, Amazon OpenSearch Service and so on) and customer-managed applications integrated with IAM Identity Center.
Figure 1: Granting access to AWS resources for users and groups managed by an identity source in IAM Identity Center
When you change the identity source, the downstream impact on these assignments depends heavily on which sources you’re switching from and to. In some transitions, assignments remain intact.
When you switch the identity source from Active Directory to an external IdP or to the Identity Center directory, users, groups, user and group IDs, group memberships, and their associated assignments are preserved. Users keep their access to AWS accounts and applications after the new identity source takes over. Switching to Active Directory from any source removes users, groups, and assignments at the moment of cutover, so pre-migration backup and post-migration restoration are still essential in that scenario.
What changes when switching identity source in IAM Identity Center
Migrations away from Active Directory, and transitions between an external IdP and the Identity Center directory, now preserve users, groups, memberships, and assignments. Transitions to Active Directory removes users, groups, and assignments permanently from IAM Identity Center at the moment of cutover, as shown in the following table. For more information, see Considerations for changing your identity source.
IAM Identity Center item
Status upon switch from AD to external IdP or Identity Center directory
Status upon switch from external IdP or Identity Center directory to AD
Users and groups in Identity Center
Preserved (same user and group IDs; the externalId changes as the new source takes over)
Deleted (must be re-provisioned from AD)
Account assignments
Preserved
Deleted (must be recreated)
Application assignments
Preserved*
Deleted (must be recreated)
Note: *Test each application in a non-production environment before you migrate. Also inventory any assignments that live inside an application itself, because those sit outside IAM Identity Center.
Before you start: common blockers
Matching attribute – Confirm which attribute your target IdP uses to find an existing user (sometimes called matching precedence or existing resource lookup). The IdP must take over each existing Identity Center user and group rather than create a duplicate. Test this in a non-production environment.
Required attributes – Every user must have a username, first name, last name, and display name. If any required attribute is missing, that user silently fails to provision. If you send email, it must be unique and single-valued.
Username and NameID – Each user’s IdP userName must exactly match the existing Identity Center username, and the SAML NameID must map to the same value. Decide your sign-in identifier (for example, a legacy sAMAccountName or a UPN) before cutover.
Groups – Confirm that your IdP supports group provisioning through SCIM (for example, Google Workspace provisions users only). Group names must be unique, and renaming a group can cause it to be treated as new, which strands its assignments. Depending on the external Identity provider, users who belong to a group only through a nested group are not provisioned and lose group-based access. Inventory nested groups and directly assign the child groups that contain those users before cutover.
Emergency access – Set up a break-glass administrative access path that does not depend on AWS Identity Center.
Sample deployment
The following five-step summary (expanded into seven phases in the runbook that follows) applies to an identity source transition in IAM Identity Center from Active Directory to Okta, focusing on permission set assignments. The AD-to-Okta runbook in the next section expands each of these steps with specific instructions and commands. To assist users, you can also use the Identity Center migration tool script, which provides a structured workflow for Identity Center migrations with commands for precheck, cutover, validation, and cleanup. Because assignments are now preserved, the restore command is used only for manual rollback. The sample scripts and detailed steps are available on GitHub.
Note: This solution is available in the GitHub aws-samples repository. You can report bugs or make feature requests through GitHub Issues. The builders of this solution can help with GitHub issues. Enterprise Support customers can reach out to their Technical Account Manager (TAM) for further questions or feature requests.
Prerequisites
Before you start this walkthrough, make sure you have the following prerequisites in place:
Python 3.10 or later
AWS credentials configured using environment variables, an AWS configuration file, or a named AWS Command Line Interface (AWS CLI) profile (specified with --profile)
An active IAM Identity Center instance in the target account
Okta Global Admin access
Install the migration tool as described in the README file
Basic solution walkthrough
The following steps summarize the migration process. The next section expands each step with detailed Okta-specific instructions and commands.
Step 1: Back up users, groups, and assignments – Before making any changes, export your current identity data such as users, groups, and all assignments. This backup protects you if something goes wrong during migration. Store them in a secure, access-controlled location. The runbook includes a script that exports all current IAM Identity Center assignments and principals to a CSV file, then validates referential integrity.
Step 2: Prepare and validate users and groups in the target identity source – Before switching the IAM Identity Center identity source, confirm that your users and groups exist in the new authoritative source. Verify usernames, display names, email addresses, group names, group memberships and other required attributes. Each user’s userName in the new source must exactly match the existing Identity Center username, because this is how the new source usually takes over the user. In a test environment, confirm that an existing user is matched, not duplicated.
Step 3: Switch IAM Identity Center to the new identity source, and configure sign-in – Update IAM Identity Center to point to the new identity source. For external IdPs, upload the SAML metadata and configure the Assertion Consumer Service (ACS) and issuer URLs in your IdP. Before enabling SCIM (System for Cross-domain Identity Management), confirm that a pilot user can sign in.
WARNING: The identity source change applies to the entire Identity Center instance. After you confirm it, Active Directory sync and authentication stop, and users can’t sign in until SAML sign-in works with the new IdP. Users, groups, memberships, and assignments are preserved.
Step 4: Enable SCIM provisioning and verify takeover – Enable automatic provisioning and assign users and groups to the IAM Identity Center application in your IdP. The IdP takes over each existing user and group. Then run the validate command to compare the live assignments against your backup and find any missing or extra assignments.
If drift is found, the script writes a drift_report.csv file with MISSING and EXTRA entries.
Step 5: Validate access – Test access for a sample of users across different roles and permission levels before declaring the migration complete. Confirm that users can authenticate through the new identity source, access their expected AWS accounts, and assume the correct IAM roles. Confirm that the identity source shows your external IdP, that users and groups keep the same IDs, and that no duplicates were created.
Detailed runbook for Okta migration
This runbook covers one of the most common identity source transitions: migrating from an Active Directory to Okta as a SAML 2.0 identity provider.
The sample deployment describes what happens during a transition. It walks through seven phases: stakeholder alignment and pre-migration inventory, pre-cutover validation, the identity source switch itself, takeover verification, post-migration testing, ongoing cleanup and monitoring, and a documented manual rollback procedure for when things don’t go to plan.
If you’re migrating to Active Directory, which still removes users, groups, memberships and assignments, you can adapt the backup and restore scripts from this guide.
Phase 1: Plan your pre-migration activities
Pre-migration planning has four components: stakeholder engagement, inventory, scheduling, and access verification. Complete all four before you schedule the cutover.
1.1 – Document relevant stakeholders:
Fill out this table with actual contact information. You’ll need to reach these people during the cutover window.
Before any changes are made, document the complete current state of your IAM Identity Center configuration. Capture a baseline of all three assignment layers: the users and groups assigned to the IAM Identity Center application in your IdP, the account and application assignments in IAM Identity Center, and any assignments inside the applications themselves:
Run the precheck script to export all current Identity Center assignments and principals to CSV.
assignments.csv – One row per account, permission-set, and principal assignment
principals.csv – All users and groups from the identity store
1.3 – Define the cutover window:
Schedule the migration during a low-usage period to minimize user impact. Size the maintenance window using timings from a full-dress rehearsal in a test environment. SCIM provisioning is rate-limited, so for large directories, sync users in batches. Identify a maintenance window of sufficient length to complete all phases, including time for validation and potential manual rollback (described in Phase 7) if needed. Notify all affected users in advance of the potential temporary disruption to single-sign-on access.
1.4 – Confirm access requirements:
Verify that the following access is confirmed and tested before the cutover window:
AWS Administrator access to IAM Identity Center and AWS Organizations.
Identity provider (IdP) administrator access (for example, Okta) to configure the IAM Identity Center application, create the SCIM integration, and assign users to the AWS app.
A break-glass or emergency administrative access path that does not depend on the identity source you are migrating.
Phase 2: Complete final pre-cutover steps
Before starting the cutover, complete the final validation, access, and communication checks described in this phase.
2.1 – Export IAM Identity Center configuration:
Validate that the backup files generated in Step 1.2 are present and non-empty before proceeding.
2.2 – Communicate impact to users:
Send advance notice to all affected users covering:
The migration timeline and expected impact window.
That users can’t sign in between the identity source change and the new IdP’s sign-in going live, but that their access and assignments are unchanged.
The new sign-in process. After migration, users sign in through your IdP (for example, the Okta My Apps dashboard) or the AWS access portal, depending on the sign-in flow you choose.
Whether the new sign-in flow is IdP-initiated (through Okta) or SP-initiated (through the AWS access portal), and any differences in the user experience.
After migration, the d-xxxxxxxxxx.awsapps.com/start access portal URL is no longer supported, and the console shows the supported dual-stack regional URL (https://ssoins-<instance-id>.portal.<region>.app.aws) instead, so you must communicate the new URL and update bookmarks/allow-lists.
That the custom access portal alias (friendly URL) isn’t supported after migrating away from Active Directory. If a proxy or bookmark relies on redirect flows, plan to update it.
Prepare a user guide for the new sign-in process and an FAQ for common issues. Schedule a training session to demonstrate how to access AWS through Okta. Ensure your support team is briefed and ready to handle an influx of access issues during and immediately after the cutover.
2.3 – Validate Okta-to-IAM Identity Center sync (pre-cutover testing):
Using a sandbox or test environment if available, perform the following validation steps before executing against production:
Run the full migration in a test instance that mirrors your production AD configuration and applications and confirm that existing test users are matched by Okta and not duplicated.
Use the AWS Management Console for IAM Identity Center to verify that groups and users appear in Users & Groups with the correct attributes.
Test the complete end-to-end sign-in flow for a test user. Authenticate through Okta, access the AWS portal, and assume a role in a test account. Confirm that the user keeps access to their assigned accounts, permission sets, and applications.
Phase 3: Complete the cutover
You’re ready to configure Okta, switch the IAM Identity Center identity source, and complete the production cutover.
Important: Downtime begins when you confirm the identity source change in Step 3.2 and ends when SAML sign-in works through Okta. Have the Okta application, SAML metadata, and signing certificate ready before you start. Users, groups, memberships, and assignments are preserved.
3.1 – Configure the Okta application:
Sign in to Okta as an administrator.
Navigate to Applications and then to Browse App Catalog.
Search for AWS IAM Identity Center and choose Add Integration. Choose Done.
Choose the newly created app and select the Sign On tab.
Locate the Metadata URL (it will look like: https://<your-okta-domain>/app/<app-id>/sso/saml/metadata). Open this URL in a new browser tab.
An XML file will render in the browser. Save this file. This is your SAML metadata file, which will be uploaded to IAM Identity Center.
Download and save the SAML signing certificate from the Sign On tab.
3.2 – Switch the identity source in IAM Identity Center:
In the IAM Identity Center console navigation pane, choose Settings.
Choose Actions and select Change Identity Source.
Important: This change applies to the entire Identity Center instance. On the confirmation screen, you must enter ACCEPT to confirm. During this step and before SCIM provisioning is enabled, if the change could not be completed by Identity Center you will see a clear error message in the console to retry changing identity providers. It is safe to retry.
Select External Identity Provider.
Upload the XML metadata file and the SAML signing certificate downloaded from Okta.
Confirm the change. IAM Identity Center will display progress updates as it migrates to the new identity provider.
Don’t enable automatic provisioning yet. Complete Step 3.3 and confirm pilot sign-in in Step 3.4 first.
3.3 – Configure the ACS and issuer URLs in Okta:
In the IAM Identity Center console, choose Settings and then Actions. Select Manage Authentication.
Copy the IAM Identity Center Assertion Consumer Service (ACS) URL and the IAM Identity Center Issuer URL.
Return to Okta and choose Applications and select IAM Identity Center app. Select the Sign On tab and choose Edit.
Under Advanced Sign On Settings, paste the ACS URL and Issuer URL into the corresponding fields.
Choose Save.
3.4 – Confirm pilot sign-in:
Before you enable SCIM provisioning, assign an existing pilot user to the IAM Identity Center application in Okta and confirm they can sign in through the AWS access portal. The SAML NameID that Okta sends must exactly match the user’s existing Identity Center username. If sign-in fails, fix the mapping now before proceeding to the next step.
3.5 – Enable automatic provisioning (console) and connect SCIM in Okta:
In the IAM Identity Center console, choose Settings, then choose Enable Automatic Provisioning. Copy and securely record the SCIM endpoint URL and access token.
Return to the IAM Identity Center app in Okta. Choose the Provisioning tab.
Choose Configure API Integration.
Paste the SCIM Endpoint URL into the Base URL field.
Paste the Access Token into the API Token field.
Choose Test API Credentials. You should receive confirmation that the credentials are valid.
Choose Save.
On the Provisioning page, choose Edit and under To App enable all three provisioning options (Create Users, Update User Attributes, and Deactivate Users). Choose Save. (The To App settings control how Okta provisions users to IAM Identity Center. All three options are required for the migration to work correctly.)
On the Push Groups tab, push the groups that are assigned to the AWS application. Group names must exactly match the existing group names in IAM Identity Center.
In the attribute mappings, confirm that userName maps to the existing Identity Center username and that first name, last name, display name, and a single email address are populated.
3.6 – Test SCIM takeover:
Before you assign all users, verify that Okta takes over existing users correctly:
In Okta, select an existing pilot user who already exists in IAM Identity Center (People).
Open the user and navigate to the Applications tab.
Assign the AWS IAM Identity Center app to this test user.
Wait 5–10 minutes for SCIM sync to run.
In the IAM Identity Center console, select Users and confirm that the pilot user still has the same user ID, that no duplicate user was created, and that the user’s assignments still work.
Note: If the user is duplicated or doesn’t update after 10 minutes, check the Okta System Log for SCIM provisioning errors and verify the SCIM endpoint URL and token are correctly configured.
After the pilot user is taken over successfully, assign the remaining users and groups to the application in Okta. For large directories, assign them in batches.
Phase 4: Verify takeover
Now that you’ve completed cutover, verify that Okta has taken over all users and groups and that the preserved assignments match your pre-migration baseline.
4.1 – Verify SCIM takeover:
Confirm that all production users and groups are provisioned from Okta, that they keep the same user and group IDs, and that no duplicates were created. Check the Okta provisioning logs for errors such as “Refused to create a new, duplicate resource.”
4.2 – Check for assignment drift: Compare the live assignments against the pre-migration CSV
If drift is found, the script writes a drift_report.csv file with MISSING and EXTRA entries. Because assignments are preserved, investigate any entries before you continue.
Phase 5: Post-migration validation
After the cutover, validate end-to-end access for representative user roles and confirm that assignments were preserved.
5.1 – Test end-to-end access:
Using a test Okta user account, complete the following validation steps:
Sign in to the Okta Dashboard.
Choose the AWS IAM Identity Center tile under My Apps.
Select an assigned AWS account from the portal.
Confirm that you can assume a role and access the AWS console.
Test role switching within the console to validate permission boundaries.
5.2 – Spot-check multiple user types:
Validate access for a representative sample of users across different access levels, including Administrator, Developer, Read-Only or Audit, and any other standard roles defined in your environment. Confirm that permission sets are correctly mapped and that no unintended access has been granted or denied.
For each application, confirm that user-specific data and settings are intact and that any assignments inside the application still work.
Phase 6: Post-migration cleanup and monitoring
After confirming the migration is stable, shift focus to ongoing monitoring of provisioning and authentication, and update your operational documentation.
6.1 – Decommission AD only when stable:
Don’t decommission the Active Directory domain controllers until you’re confident the migration is stable and rollback is no longer needed. Keep AD online as a fallback. Deleting the AD directory removes the manual rollback option and the AD-based access portal endpoint.
The following command will identify disabled users, empty groups, and unassigned permission sets.
```bash
# Report only
python -m idc_migration_tool cleanup

# Report and prompt for deletion
python -m idc_migration_tool cleanup --delete
```
6.2 – Monitor SCIM sync:
Confirm that SCIM provisioning continues to run without errors in the days following migration.
Monitor new user onboarding from Okta to verify that newly created Okta users are automatically provisioned into IAM Identity Center.
Review IAM Identity Center and AWS CloudTrail logs for failed sign-in attempts or unexpected authentication errors.
6.3 – Update documentation:
Update all internal documentation to reflect the new identity architecture:
Record the SCIM integration details, SAML metadata links, and new group-to-permission-set mappings.
Update internal SOPs and onboarding guides to reflect the new Okta-based login process.
Document troubleshooting procedures for the most common failure modes.
6.4 – Post-migration checklist:
Before closing the migration project, confirm all of the following:
Users can authenticate successfully through Okta.
Permission sets are correctly assigned to the correct users and groups.
Account assignments are working correctly across accounts.
Monitoring and logging are configured and alerting on anomalies.
Internal documentation and SOPs are updated.
Support team is trained on the new login process.
Rollback procedures have been reviewed and are ready if needed.
Active Directory integration cleanup is scheduled (do not rush decommission).
Phase 7: Rollback (if needed)
Rollback requires manually switching the identity source back to Active Directory, which deletes users, groups, memberships and assignments, and then rebuilding assignments from the pre-migration backup files, as described in the following steps.
Note: Define in advance what counts as a failure, who makes the rollback decision, and the acceptable discrepancy threshold. Only initiate rollback if the Okta migration has failed and cannot be recovered within the migration window. Rollback is a manual, time-consuming process. There is no single-button undo for an identity source switch.
7.1 – Switch identity source back to Active Directory:
Navigate to IAM Identity Center and choose Settings, then Actions, and then Change Identity Source.
Select Active Directory as the identity source.
Select your existing AD domain. Ensure AD is still running and reachable before confirming.
Accept the conditions and confirm the switch. Identity Center will display progress updates.
When complete, choose Resume Sync, then choose Start Guided Setup.
Confirm the attribute mappings and select the users and groups to sync.
Review and save the configuration.
7.2 – Wait for AD users and groups to repopulate:
After completing the guided setup, AD users and groups will begin to reappear in IAM Identity Center through the directory sync. This might take several minutes depending on the size of your directory.
7.3 – Recreate account assignments:
Recreate the assignments from the pre-migration CSV file. This will resolve each principal name in identity store, create the assignment, and poll until completion, and produce a summary of succeeded, failed, and skipped counts.
Confirm users can authenticate using the original AD-based AWS access portal URL and can access their expected AWS accounts and roles. Test key role types (such as Admin, Developer, and Audit) before declaring rollback complete.
Troubleshooting the cutover
The identity source change in Step 3.2 runs as a sequence of steps: stopping Active Directory sync, disconnecting the directory, and deleting the AD sync profile. If a step after “Stopping Active Directory sync” fails, the Confirm change screen reports which steps failed and offers a Retry failed steps button. You will see one of two error messages, both safe to retry:
“The identity source change could not be completed. Please try again.” — AD sync was stopped but the directory wasn’t disconnected, so new users and changes are not currently syncing from Active Directory. Choose Retry failed steps to complete the transition. If instead you want to stay on Active Directory, choose Start guided setup in the Settings page to reconfigure the sync.
“The identity source change could not be completed. Your identity source has been reverted to Active Directory. Please try again.” — IAM Identity Center automatically rolled back to a healthy AD-connected state, and a banner confirms that AD sync resumed. You don’t need to reconfigure the sync; choose Retry failed steps when you’re ready to try again.
Important: In both cases, choose Retry failed steps on the Confirm change screen. If you navigate away from this screen, you can no longer retry the failed steps and will need to restart the identity source change.
If you have feedback about this post, submit comments in the Comments section below.
Conclusion
This post covered how to migrate your IAM Identity Center identity source from Active Directory to an external identity provider (Okta), including backing up existing assignments, validating your target identity source, performing the cutover, verifying that the new identity source took over your users and groups with their assignments intact, validating access, and rolling back if needed.
For the backup and restore scripts referenced in this guide, see the aws-samples GitHub repository. For more information about IAM Identity Center configuration and permission set management, visit the AWS Security Blog and the AWS IAM Identity Center documentation.
After talking with enterprise security leaders over the past year, one thing has become clear: the rise of autonomous AI agents is the most significant shift in security posture since the move to cloud. Organizations across every industry are adopting AI agents that authenticate on behalf of users, execute multistep workflows, and make decisions across infrastructure, often without waiting for human approval. Security operations need to keep pace.
At Amazon Web Services (AWS), we believe security should evolve ahead of AI adoption, not behind it. That belief drove our team to collaborate with the SANS Institute on a new chapter in the 2026 Cloud Security Exchange eBook, where we lay out a practical framework for securing agentic workloads at enterprise scale.
The challenge: Threats now move at machine speed
Traditional security was built for deterministic systems with predictable inputs and outputs. Agentic workloads break those assumptions. The same prompt can produce a compliant response on one request and a policy-violating response on the next. Agents adapt their behavior over time as they interact with users, data, and tools and operate with genuine autonomy: connecting to APIs, chaining actions together, and making independent decisions.
These properties mean that security controls designed for one-time assessments no longer suffice. Detection and response need to operate continuously and at machine speed.
What makes this urgent is the gap between adoption velocity and security maturity. Although 80% of organizations have adopted AI, only 10% govern it. Agents are being built by an expanding population of developers—including those using low-code tools—creating governance challenges that existing security programs must be extended to address.
Extending what already works
The good news, agentic security isn’t a blank slate. It builds on the same principles security teams already apply: identity governance, least privilege, defense in depth, and backup and recovery. What changes is how those principles are implemented when workloads are autonomous and probabilistic. In our eBook chapter, we cover four foundational areas:
Agent identity and governance: Every agent needs its own identity with temporary, scoped credentials rather than persistent, broad access. This extends zero trust principles to AI agents, where every request is authenticated and authorized independently, and every action has a traceable authorization chain. When a single agent combines access to sensitive data, the ability to communicate externally, and exposure to untrusted content, the risk profile changes significantly. Design patterns that prevent any single component from combining all three reduce that risk substantially.
Evolving detection for agentic workloads: Static, rule-based detection designed for human activity patterns can’t keep up with agent behavior. Organizations need continuous behavioral monitoring, living baselines that adapt as agents evolve, and instrumented observation that surfaces anomalies in real time. Amazon GuardDuty delivers this today, analyzing security signals continuously to detect threats as they emerge.
Response that balances speed with precision: When threats move at machine speed, response must be automated and tiered: some agent behaviors should be contained immediately, others require human judgment. The response framework we outline distinguishes between actions that can be automated safely and those that need escalation.
From single agents to multiagent ecosystems: Agents are already composing into teams, delegating subtasks, negotiating access, and coordinating across organizational boundaries. Each stage of this evolution inherits every security requirement that came before it, meaning organizations securing today’s basic chat agents are already laying the foundation for tomorrow’s multiagent ecosystems.
Security as an enabler of agentic AI adoption
The security leaders I speak with aren’t asking whether to adopt AI agents. They’re asking how to adopt them responsibly, at speed, and without slowing down the business.
AWS approaches this challenge by building security into the platform at every layer. Agentic AI built on AWS inherits nearly two decades of experience securing mission-critical workloads. Amazon GuardDuty, Amazon Inspector, and AWS Security Hub work together to provide continuous threat detection, vulnerability management, and unified security operations, all adapting to the unique characteristics of agentic workloads.
This isn’t about building new security from scratch. It’s about extending the security foundations your teams already trust into an environment where AI operates with increasing autonomy.
Read the full framework
Our chapter in the 2026 Cloud Security Exchange eBook goes deeper on each of these areas, with specific architectural patterns, implementation guidance, and frameworks for security teams at every stage of agentic AI maturity, whether you’re evaluating, piloting, or operating at scale.
You can learn more about AWS security services at AWS Cloud Security, or explore our AI Security Framework for a comprehensive view of how AWS secures AI workloads with the right controls, at the right layers, at the right phases.
If you have feedback about this post, submit comments in the Comments section below.
When customers keep pointing you to a solution that overlaps with parts of your own offering, you have a choice to make. This post is about the choice we made with Upwind, and why we’d make it again.
AWS Security Hub Extended exists because customers told us what was working for them in enterprise security and asked us to simplify adoption and integration. Upwind was one of the solutions customers kept naming, so we brought them in. Upwind didn’t only agree to participate, they committed fully to integration. They brought their full solution portfolio into Extended with aggressive pay-as-you-go pricing from day one. They got their field organization fully aligned on joint deal flow and have driven more customer activity and closed deals through Security Hub Extended than any other partner in the program.
Giving customers choice, even when it overlaps
Multiple best-of-breed options in cloud security—including one that overlaps with our own capabilities—are straightforward when you start with what customers need. Some will choose Security Hub Essentials for cloud security posture management and vulnerability scanning. Some will choose Upwind for runtime-first protection. Some will run both and get stronger outcomes from the combination. The customer decides, not us. That principle applies to every partner in Security Hub Extended. We listen to what’s working, and we simplify adoption through the same AWS relationship customers already have.
“Our customers run on AWS, and Security Hub is where their security operations live,” said Amiram Shachar, Co-Founder and CEO of Upwind. “Being inside Security Hub means customers get Upwind’s cloud workload protection with the same billing, the same support path, and the same operational model they already know. We’re here because it’s a better outcome for the customers we share.”
Who is Upwind?
Upwind is a cloud security company trusted by Siemens, Peloton, Roku, Wix, Nextdoor, and Nubank. Fast Company named them one of the Most Innovative Companies of 2026.
What makes them different is runtime. Most cloud security solutions scan configurations periodically and report what could be a risk based on static posture. Upwind deploys an eBPF-based sensor directly in the Linux kernel that sees what workloads are doing in real time, including process behavior, network connections, API calls, and container interactions. All observed continuously. That means Upwind can tell you not only what could theoretically be exploited, but what is actively at risk right now. That distinction cuts alert noise dramatically and lets security teams focus on what genuinely matters.
Better together. Not only with AWS, but with each other
Now extend that to the rest of your security stack. If you’re already running other Security Hub Extended solutions, they work together without you building the integrations.
A customer running Chainguard for supply chain security, Upwind for runtime protection, and Splunk for security operations gets a connected experience. Chainguard helps ensure clean, malware-resistant dependencies at build time. Upwind validates workload behavior at runtime and enriches those findings with real-time context. Everything flows into Splunk through Security Hub for unified triage. One experience, one bill, no custom integration work. The security team sees the full lifecycle from build to production without stitching tools together.
That same pattern applies with 7AI, where AI-driven automation can triage and investigate Upwind’s runtime events alongside endpoint, identity, and network signals, all without manual pipeline work.
This is the multi-way partnership that Security Hub Extended was designed to enable. These solutions aren’t only easier to buy together, they’re building toward each other. The findings flow into Security Hub in OCSF (Open Cybersecurity Schema Framework), get correlated and prioritized together, and route to the downstream tools your team already uses. Your security stack gets stronger as a whole, not only solution by solution.
How it works commercially
This isn’t a paper partnership. We’re closing multi-million dollar deals together through Security Hub Extended. Upwind has engaged faster than any other partner in the program, bringing their own customer opportunities and joining AWS-originated deals to close them jointly. One enterprise customer recently replaced their incumbent CNAPP with Upwind through a Security Hub Extended Private Offer. The deciding factors were runtime visibility that their previous solution couldn’t deliver and a single predictable commercial model that replaced complex per-module pricing across multiple vendors. The commercial model has momentum, and it’s because Upwind invested not only in signing an agreement but in the engineering and go-to-market work that makes joint success real.
Upwind is available through Security Hub Extended with pay-as-you-go pricing, one AWS bill, and no required long-term commitment. For enterprises that prefer committed-pricing agreements, Security Hub Extended Private Offers are also available with deeper discounts and the ability to aggregate spend across partners. You choose the path that fits how you buy. If you’re already running Security Hub for posture management and vulnerability scanning, adding Upwind gives you runtime visibility alongside what you already see. No new tooling to stand up, no new workflow to learn. It shows up in your existing prioritized view of risk.
What Upwind is building next
Upwind continues to expand. AI workload protection that monitors model behavior and agent tool calls at runtime. Windows Server VM coverage across AWS, Azure, and GCP. Deeper integration with the Security Hub correlation engine so runtime context enriches attack-path intelligence automatically. The partnership deepens as both sides invest.
“We believe runtime context and AWS-native signals together produce stronger outcomes than either alone,” said Amiram Shachar, Co-Founder and CEO of Upwind. “As Security Hub deepens its correlation and Upwind extends its runtime fabric, customers who use both will have a view of risk that no single solution can replicate. That’s the future we’re building toward together.”
What this means for you
Security Hub Extended exists to give you access to the solutions your peers are already succeeding with through the AWS relationship you already have. Upwind is what that philosophy looks like when applied to a category where AWS has an existing offering. We listened to customers, saw what was working for them, and made it available with the same commercial model as everything else.
Enable Upwind through the AWS Security Hub console. Pay-as-you-go. No commitment required. If you want to understand what consolidation looks like with Security Hub Extended, talk to your AWS account team.
We’re just getting started, but the momentum is real.
If you have feedback about this post, submit comments in the Comments section below.
AWS IAM Identity Center integrates with external identity provider (IdP) to provide customers with a centralized authentication and authorization solution for AWS resources across AWS Organizations. AWS continues to invest into IAM Identity Center with a growing number of AWS services that natively integrate with IAM Identity Center. As your AWS organization scales, maintaining visibility into who has access to which applications and enforcing governance policies across accounts and Regions becomes increasingly complex. Identity Center helps address this by centralizing authentication and authorization for AWS resources across your organization, integrating with your external identity provider and a growing number of AWS services. However, as adoption scales, tracking access assignments and enforcing governance policies consistently becomes its own challenge.
This blog post focuses on planning your integration between an identity provider and IAM Identity Center for managed applications in your organization. We also walk through deploying and using an automated Identity Center discovery and reporting sample solution to help answer the governance and security questions:
Which users or groups have access to which AWS applications?
Who last accessed a specific AWS application and when?
Which users and groups are assigned to which IAM Identity Center applications across organization and AWS Regions?
How can you quickly generate reports to assist with compliance audits or security reviews?
The sample solution will identify associated AWS applications and the corresponding user and group assignments for the IAM Identity Center instances within your organization. The output is stored in a queryable format and generates CSV files for downstream analysis or reporting.
Plan identity governance for Identity Center application assignments
There are four key areas to start on when planning how to manage delegation and provisioning access across IAM Identity Center managed AWS applications. Bring together key stakeholders across security, governance, application, and business teams to make sure the implementation and integration will fit into the overall identity governance strategy.
Who can provision managed AWS applications: You can implement the IAM restrictions for creation of new AWS resources within AWS accounts in your organization. For example, if you restrict provisioning into a production AWS account to only infrastructure as code (IaC) IAM roles, you would continue implementing restrictions using AWS identity policies, service control policies (SCP), resource control policies (RCP), or IaC policy evaluation tools like Open Policy Agent (OPA) or Checkov.
Who manages user and group assignments: The managed application administrator handles authorization to managed applications within an AWS account. It’s recommended to clearly define roles and responsibilities across the workflow. You would have an IaC pipeline manage the integrated AWS resource provisioning with IAM Identity Center, then another workflow to allow requests to manage user and group membership for the managed application.
How authentication flows from the IdP to AWS resources: Users will authenticate into Identity Center, then be authorized to access AWS managed applications. From there, they will be authorized to access the associated AWS service and resources tied to the managed application. Depending on the AWS service, the associated downstream resources might have their own IAM principals that the users can access.
Mapping IdP identities to AWS resource access: There needs to be a link for workforce users and groups in your IdP, to Identity Center managed applications, and to downstream resources and permissions. Identifying the relationship will help you understand access within your AWS environment. Trusted identity propagation (TIP) is an additional feature of Identity Center that provides an end to end trail of the identity to the downstream service.
Create and manage an Identity Center application assignment lifeycle
After you have IAM Identity Center set up within an organization instance, your member AWS accounts can start creating associated AWS resources. Within each member AWS account, the IAM principals that provision AWS resources will need two types of service-specific IAM permissions:
The first type of IAM permissions will be specific to the AWS service you want to provision. For example, to create an Amazon SageMaker AI domain, you would need the same IAM permissions to create the SageMaker AI domain and the downstream AWS resources SageMaker AI might use.
The second type of IAM permissions is specific to IAM Identity Center. The IAM principal used to create the resource, in this example SageMaker AI, will also need permissions to manage applications within the Identity Center instance.
IAM Identity Center application Amazon Resource Names (ARNs) follow a different standard naming convention that isn’t based on the original resource name that was provided during resource creation. For example, when a user creates an Amazon Simple Storage Service (Amazon S3) bucket and sets a specific bucket name, that bucket name is included in the ARN: arn:[partition]:s3:::[bucket-name]. Identity Center application ARNs use unique identifiers (GUIDs) generated at creation time.
Manage access for an Identity Center application
After the IAM Identity Center application is created, you will need to manage access to the Identity Center application and associated AWS resources. To continue with the SageMaker AI domain example, after the domain is created, an authorized IAM principal will need to assign Identity Center users or groups from the Identity Center instance to the domain. For Identity Center, you will need two types of Identity Center IAM permissions.
The first type of IAM permissions is used to list IAM Identity Center users and groups within the Identity Center instance. This is needed to read and select specific IAM users or groups to assign to an Identity Center application.
Although IAM Identity Center users and groups have a GUID, the GUIDs aren’t clearly linked to the resource friendly names. For example, a group name could be Read-Only and the resource GUID could be 1234567890-abcdef12-3456-7890-abcd-ef1234567890 in the identity store. Additionally, the IAM actions to list users or groups require the AllUsers or AllGroups parameter. Because List actions require access to users and groups, a restrictive IAM policy can’t be used to prevent IAM principals from seeing a subset of users or groups within the identity store. The second type of IAM permission is used to create and manage application assignments for the Identity Center application within the Identity Center instance.
Because the IAM Identity Center application ARN is created using a unique application ID during creation, it’s not recommended to implement an IAM policy restricting authorized IAM principals to manage specific Identity Center applications. For example, to limit the application assignments to only a specific set of applications, you would need to:
Create the AWS resource with IAM Identity Center as the authentication mechanism
Query the Identity Center application ARN for the associated AWS resource
Identify the IAM principal that will be used for application assignments
Create or update an IAM policy associated to that IAM principal to allow application assignments for that specific application
Create or update an SCP to restrict application assignment to that specific IAM principal
In lieu of implementing resource restrictions within identity policies, you should limit management of IAM Identity Center application and application assignments to a limited number of authorized IAM principals. In addition, it is recommended to implement detective and reactive capabilities to manage Identity Center application assignments.
Plan your naming conventions and automation strategy
IAM Identity Center provides several APIs to capture information about your AWS organization instances, applications, and assignments. Before implementing automation or guardrails, you should develop a methodical approach and understand what outcome you’re working backwards from. Start by defining naming conventions and deciding what parts of the workflow you want to centralize.
Determine a naming convention for groups within your IdP: For example: AWS_<ACCT#>_<AWS_Service>_<LOB>_<ENV>_<AppName>. The IdP group name would look like: AWS_123412341234_SageMaker_Data_PROD_GTLabel.
Define the naming convention for AWS resources for your Identity Center integrated applications: For example: <AWS_Service>_<LOB>_<AppName>. The AWS resource name would look like: SageMaker_Data_GTLabel.
Define the naming convention for Identity Center application names: For example: <AWS_Service>_<LOB>_<ENV>_<AppName>. The Identity Center application name would look like: SageMaker_Data_PROD_GTLabel.
Decide on the restrictions that you want to implement within your AWS environment. Depending on your enterprise’s security standard, you can implement specific restrictions based on mapping of a similar combination of ENV (environment), AWS service, LOB (line of business), or application name.
Choose the portions of the application workflow that you want to centralize. This could include creating the application, making application assignments, or remediating issues.
As more configurations and permissions are centralized, additional overhead and bottlenecks can be introduced. It’s important to find the right balance for your enterprise. For example, if you centralize application assignments, each application team will need to submit a request to modify assignments that will be reviewed by a centralized team and could result in a delayed response. Conversely, if each application team handles their own assignments, there’s a risk that application assignments won’t align to enterprise security standards.
By understanding your goals and how you want to reach them, you can tailor the sample solution accordingly. Getting alignment on this requires planning and coordination across multiple teams within your organization. When thinking about more customized authorization logic—such as using provisioned AWS resource metadata—you should review how the specific AWS service integrates with IAM Identity Center managed applications. For example, if you want to find the Identity Center application ARN for a specific AWS resource, such as a SageMaker AI domain, use the following approach. A reverse lookup is necessary because AWS services create Identity Center applications with GUID-based ARNs that aren’t easily discoverable.
Amazon API Gateway – Provides an IAM-authenticated REST API for a Lambda function to generate and export reports as CSV files
Amazon S3 – Stores the encrypted CSV file exports, with lifecycle policies and time-limited Amazon S3 presigned download URLs
Deploy the IAM Identity Center reporting sample
The following procedure deploys the automated discovery and reporting infrastructure using AWS Cloud Development Kit (AWS CDK). Make sure you have the following prerequisites in place, then continue with the steps to set up the solution.
Prerequisites
You need to have the following to test the solution in this post.
An AWS organization with an IAM Identity Center organization instance with delegated administrator access configured
IAM Identity Center configured with at least one instance
export IDC_EXTERNAL_ID="$(uuidgen)" # alternatively you can set this value — member-account roles need the same value

cdk deploy --parameters AllowedIpRange=10.0.0.0/8 --parameters CrossAccountExternalId="$IDC_EXTERNAL_ID"
Note: AllowedIPRange is optional but recommended as a security best practice. The parameter will add a network restriction to download the Amazon S3 presigned URL export.
Optional: For AWS account-level Identity Center instance discovery, a cross-account IAM role is required.
Figure 2: Successful AWS CDK deployment of the reporting stack
After the stack is successfully deployed, obtain the CDK output values for the API Gateway URL and S3 bucket name. If using a command line to deploy, these values will be displayed after the stack successfully deploys. It can also be found in the AWS Management Console as AWS CloudFormation stack output. The output will be used for generating reports in the following sections.
Note that this stack is for the reporting stack only. Reactive monitoring and deployment are described in the next section.
After the reporting stack is successfully deployed, the automation will run on a daily schedule. The first discovery run executes immediately after deployment. You can monitor discovery execution history and detailed logs through the the AWS Step Functions console. Review the detailed Lambda function logs in Amazon CloudWatch Logs. Query discovered instances, applications, and assignments through the DynamoDB console for one-time analysis.
Generate reports for Identity Center application assignments
To generate on-demand reports as CSV files from the REST API:
The generated CSV files include enriched data with friendly names:
Instance ARN
Account ID
Application name
Principal type
Principal name
Status
arn:aws:sso:::instance/…
123456789012
SageMaker_PROD
GROUP
Engineering-Team-Dev
ACTIVE
arn:aws:sso:::instance/…
123456789012
OpenSearch_PROD
USER
jane.doe@example.com
ACTIVE
You can use the generated CSV files to help identify anomalies or non-compliant assignments, such as:
Each PROD application should only have GROUP assignments. OpenSearch_PROD has a USER principal type and so is non-compliant.
Each PROD application should only allow PROD groups assigned. SageMaker_PROD has a DEV group name (Engineering-Team-Dev) assigned and so is non-compliant.
Based on the testing and analysis of the output from the IAM Identity Center governance reporting sample solution, it’s important to start thinking about what restrictions to put in place for application assignments. It’s also important to conduct this exercise before taking action within the Identity Center remediation sample solution in the next section.
IAM Identity Center remediation
The following diagram shows the IAM Identity Center remediation architecture.
The IAM Identity Center remediation sample solution deploys the following resources:
Amazon EventBridge – Matches IAM Identity Center assignment and profile events from CloudTrail (sso.amazonaws.com) and invokes the monitor function across the following IAM actions:
CreateApplicationAssignment
DeleteApplicationAssignment
PutApplicationAssignmentConfiguration
AssociateProfile
DisassociateProfile
CreateProfile
UpdateProfile
DeleteProfile
Lambda – Resolves the application and group names, validates the assignment against your naming convention, and notifies or remediates based on the configured mode
AWS KMS – Customer-managed key to encrypt the Lambda environment variables, CloudWatch logs, SNS topic, and dead-letter queue
Amazon CloudWatch – Log group stores the function’s structured, encrypted logs as an audit trail
Flexible naming policies support regex-based pattern matching for specific organizational requirements. The automation actions are logged to CloudWatch with structured JSON for additional analysis and reporting.
The following procedure deploys the remediation infrastructure using AWS Cloud Development Kit (AWS CDK). Make sure you have the following prerequisites in place, then continue with the steps to set up the solution.
Prerequisites
You need the following to run the remediation solution:
An AWS organization with an IAM Identity Center organization instance with delegated administrator access configured
IAM Identity Center configured with at least one instance and an IdP
Python 3.12 & Node.js 18 or later installed for CDK deployment
Provide your IAM instance ARN and the account ID where IAM Identity Center is administered:
git clone https://github.com/aws-samples/sample-iam-idc-application-discovery-reporting # only needed if you did not clone in the previous reporting section
cd identity-center-remediation
cdk deploy --context enableAutoDeletion=false --parameters IdentityCenterInstanceArn=arn:aws:sso:::instance/ssoins-<INSERT-ORG-INSTANCE-ID> --parameters ManagementAccountId=<INSERT-MANAGEMENT-ACCOUNT>
Note: If you don’t pass a parameter for GroupNameRegex, the default action of the sample solution is to verify the group name appears as a whole word in the application name: Case-insensitive, splitting on -, _, and spaces, so ReadOnly matches sagemaker_readonly but read does not. If different validation is needed, the sample can be deployed with the regex value for GroupNameRegex.
After the solution is deployed, we will walk through testing both a compliant and non-compliant application assignment.
Gather Identity Center and application information
For this blog, we have already created two groups within the IdP that is integrated into an IAM Identity Center instance. We also already created two applications within Identity Center instance to use. Next, we’ll need to gather information specific to the environment to run through each example.
Obtain the IAM Identity Center instance ARN and set the value.
After you have the output for IAM Identity Center groups and applications, select two groups and one application that you want to test with. You will need to set additional variables for each group GUID and application ARN. In this example, I select the following two groups (ReadOnly and Developer) for testing and set the environment variables using export:
As part of this validation, the sample solution verifies the group name appears as a whole word in the application name: Case-insensitive, splitting on the -, _, characters and spaces, so ReadOnly matches sagemaker_readonly but read does not. For different use-cases, The GroupNameRegex parameter can be used during deployment.
Test compliant and non-compliant assignments
Run the following command to add the ReadOnly group assignment to the sagemaker_readonly application:
aws sso-admin create-application-assignment --application-arn $APP_READONLY --principal-id $GRP_READONLY --principal-type GROUP
The group assignment request meets the validation criteria because the application name sagemaker_readonly contains the group name ReadOnly. The output logs for this validation exist within the associated lambda function CloudWatch log group /aws/lambda/identity-center-app-monitor”.
In this example, the logs will show:
✓ COMPLIANT - Group name found in application name
Run the following command to try to add the Developer group assignment to the sagemaker_readonly application:
aws sso-admin create-application-assignment --application-arn $APP_READONLY --principal-id $GRP_DEVELOPER --principal-type GROUP
The group assignment request doesn’t meet the validation criteria because the application name sagemaker_readonly doesn’t contain the group name Developer. The output logs for this validation exists within the associated lambda function CloudWatch log group /aws/lambda/identity-center-app-monitor. Note that the remediation action listed shows NOTIFICATION_ONLY, meaning it only sent a notification to the configured SNS topic and did not take action. If you want the group assignment to be deleted, the value should be set to enableAutoDeletion=true.
In this example, the logs will show:
✗ NON-COMPLIANT - Group name not found in application name
Scheduled reporting gives baseline visibility into IAM Identity Center managed applications. Event-driven monitoring can provide near real-time notification or enforcement. Together, these sample solutions can help align and scale Identity Center with your governance and security standards through both historical analysis and immediate response.
Clean up
For each deployed CDK stack, run the following commands in the AWS account where it was deployed.
To delete the remediation stack, run the following commands:
cd sample-iam-idc-application-discovery-reporting/identity-center-remediation
cdk destroy
To delete the reporting stack, run the following commands:
cd sample-iam-idc-application-discovery-reporting/identity-center-reporting
cdk destroy
IAM governance automation at scale
Achieving effective IAM Identity Center governance at scale requires moving beyond manual processes to automated, continuous monitoring and reporting. The following high-level steps can provide an Identity center governance framework:
Deploy the sample automation with an IAM principal that has access in your delegated administrator account.
Establish a baseline by running your first discovery and reviewing the generated reports.
Configure naming policies to match your organization’s security conventions.
Deploy the event-driven monitoring capabilities to enable real-time policy enforcement and automated response based on the security policies.
Start in notification mode to establish a baseline before enabling auto-remediation.
Integrate with your governance tools by connecting the API endpoints to your compliance dashboards or ITSM tools.
Move to auto-remediation once you have validated policies are working as expected.
Conclusion
Managing AWS IAM Identity Center at scale doesn’t have to be a manual, time-consuming process. By implementing automated discovery and reporting combined with real-time event-driven monitoring, you can maintain continuous visibility into your organization’s identity and access landscape, respond immediately to policy violations, and enforce governance policies consistently across your organization. Automation reduces operational work, strengthens security, speeds up incident response, and maintains compliance. Start by deploying these solutions to gain visibility and enable real-time enforcement.
If you have feedback about this post, submit comments in the Comments section below. If you have questions about this post, start a new thread on AWS re:Post or contact AWS Support.

 Login