Anthropic has just announced a new Claude Marketplace, and it brings all AI-related tools into one place, including plugins, connectors, agents, and more. [...]
For more than two decades now, setting up a home router has meant going through the same old routine: pick a Wi-Fi band, name your network, choose a security type, and set a password. After you type in your network name, you often see an option next to it to hide the network name — sometimes labeled hide SSID, or simply hidden or closed network. If you choose this option, the network you create won’t show up automatically in the list of available Wi-Fi networks on any smartphone, computer, or smart-home device — you need to type in the correct network name by hand. Only then will the device be able to find that network and connect to it. At first glance, hiding your wireless network’s name might seem like a smart precaution: keeping neighbors or passersby from hacking into your Wi-Fi since they simply can’t see it. But in fact things work differently: all your devices will give away the hidden network — and not just at home either.
How devices connect to Wi-Fi
Every Wi-Fi access point broadcasts a short data packet roughly 10 times a second so your smartphone or computer can show you a list of nearby networks’ names, like JohnWiFi, TommyNet, CafeDeArts_Guest, or other, creative variants. This packet contains (i) the network’s name (Service Set Identifier, or SSID), (ii) a unique identifier for the access point (Basic Service Set Identifier, or BSSID), and (iii) details about the radio channel the network uses. This info helps devices (i) pick the best network to connect to, and (ii) automatically join networks they already know; accordingly, none of the data in that packet is encrypted. Hidden networks also broadcast these advertising packets; they just leave the SSID field blank. This method of finding networks is called passive because a Wi-Fi client, like, say, your smartphone, just needs to listen to the airwaves to spot nearby access points.
On top of that, the client can scan for Wi-Fi networks on its own, which is known as active discovery. Your smartphone or computer is constantly broadcasting the names of Wi-Fi networks it knows and would like to connect to. If one of those networks happens to be nearby, the access point answers back, and the connection is made.
Active discovery can sometimes help save your smartphone’s battery, and it’s indispensable when you’re working with hidden networks. Discovering a hidden network and connecting to it becomes a two-step process. First, the smartphone “hears” that there’s a Wi-Fi access point nearby with a hidden network name. It then tries to reach that network by broadcasting the names (SSIDs) it already knows — either hidden networks it’s connected to before, or the name the user typed in when first connecting to a hidden network. If the name matches, the router responds, and the connection goes through.
A hidden network name (SSID) doesn’t actually hide your Wi-Fi network
The regular list of available Wi-Fi networks on your smartphone or computer won’t show networks that don’t broadcast a public SSID. But any specialized Wi-Fi scanning software can spot them easily — it just won’t show their names. And hidden networks are still easy to identify and tell apart thanks to each router’s unique BSSID.
So hiding a Wi-Fi network’s name doesn’t make it truly invisible, and it won’t protect you from cybercriminals. It’s worth noting that any large-scale analysis, such as mapping the geographic locations of Wi-Fi networks, relies on BSSIDs, not SSIDs. Besides the huge databases kept by Apple and Google, there are public access-point-mapping projects too, like WiGLE.
If someone wants to break into a network at a specific location, specialized software lets them find out its SSID just by waiting for one of the legitimate clients to connect and listening in on the active discovery session. From there, they can connect to that Wi-Fi network — provided it uses a weak enough security protocol.
Your devices leak hidden Wi-Fi network names and personal data
The main drawback of a hidden SSID is that smartphones and computers have to broadcast it before they can connect to the wireless network. And they do this everywhere — not just near the specific access point in question. As soon as any network with a hidden name shows up within signal range, the client attempts to connect, and during that attempt it broadcasts the names of every hidden network it knows. And this broadcast isn’t encrypted, which means anyone nearby can pick up the data being transmitted.
In 2021, researchers at the University of Hamburg ran an experiment collecting radio signal data on a busy street. In just three one-hour listening sessions, they gathered 252 000 Wi-Fi connection requests from passersby’s smartphones. Of those, 23% contained the SSID of a network the smartphone would have preferred to connect to.
And that’s where a factor few people think about comes into play: the network’s name itself. Twelve percent of the SSIDs found were long numeric strings that looked a lot like passwords. So, once someone knows the SSID and BSSID, they can look up the BSSID in a service like WiGLE and find the access point’s real-world address. Once there, an attacker can try to use such a string as both the SSID and the password to connect — with a good chance of success. The researchers’ sample also included 106 SSIDs containing a first and/or last name, 92 SSIDs that pointed to a home address, and three that revealed an email address.
Given all this, it’s no surprise that Apple and Asus recommend against using the hidden SSID feature.
Other drawbacks of hiding your Wi-Fi network
Beyond the data leak issues, hidden SSID technology — a holdover from early Wi-Fi versions — also hurts the performance of modern versions of the radio protocol. In the 6GHz band, searching for a hidden Wi-Fi network across 59 possible channels becomes noisy and power-hungry: the client has to run through every option and send a lot of requests. As a result, performance drops for all nearby Wi-Fi networks in the 6GHz band, and the client itself burns through battery power sending out all those requests.
Asus also points out that Windows devices may tend to connect to visible networks first — even if a network with a hidden SSID is available and marked as preferred.
When a hidden SSID actually makes sense
There aren’t many scenarios where hiding your network name is genuinely useful. For example, if a router is meant for a small group of people but is installed in a very crowded location, a hidden SSID can cut down on the number of connection attempts and ease the load on the router. But keep in mind that this boosts performance, not security — and only slightly at that.
Another similar case is a technical Wi-Fi network for a limited number of fixed devices — like a network of security cameras or smart home gadgets. These devices always stay in the same place, so whenever they try to connect to their assigned Wi-Fi, they find it right away, and no data leaks out — unless an attacker is actually listening in on the radio signal near the router. At the same time, outsiders are less likely to try connecting to such a network.
How to make your Wi-Fi more secure
To protect your Wi-Fi network from wireless hackers, don’t hide the SSID: instead, use the modern WPA3 security protocol along with a long password. Attackers can intercept data over the air and then try to crack the password with brute force, so a strong Wi-Fi password should be at least 20 characters long. The easiest way to generate and store such long, hard-to-crack passwords is with a password manager that syncs across your devices; that way they’re always at hand — no matter which gadget you’re using.
If some of your older devices don’t support WPA3, it’s fine to use WPA2 with protected management frames (PMF) turned on, which guard against many types of attacks on Wi-Fi networks.
You should also make sure Wi-Fi Protected Setup (WPS) is turned off, since it essentially replaces your password with an easy-to-guess PIN code.
As for the network name, instead of hiding it, pick one that doesn’t reveal your name, address, or any other personal details. It’s also worth avoiding default network names like ISPName-XXXX or dlink, but for a different reason: generic names like these can confuse you and your guests alike. If you don’t want your access point to show up on Wi-Fi geolocation maps from Apple, Google, and other providers, you can add the suffix _nomap to the end of your network name, but there’s no guarantee it will actually work.
Apart from protecting your Wi-Fi, make sure your router is configured securely overall. First and foremost, that means giving it a long, unique admin password, and keeping it updated with the manufacturer’s latest firmware. And if you have a bit more time, you could even boost your Wi-Fi performance.
How Wi-Fi networks get hacked, and how to protect them:
In 2026, the owner of an ordinary home router, smart TV, or TV box is a prime target for cybercriminals. These devices are readily recruited into botnets and residential proxy networks, which we’ve covered before.
Criminals “sublease” the infected device by letting outsiders pay to visit any website from the victim’s IP address, so it looks like the device’s owner is doing it. The service is in demand across all kinds of shady schemes: from ad fraud and spam campaigns to password bruteforcing and account hacking. In our previous post, we described how home routers get recruited into these proxy networks; today we take a look at an even more vulnerable, and equally ubiquitous category of devices: smart TVs and TV boxes.
These appeal to criminals for two reasons. First, unlike computers and smartphones, TVs are almost always plugged into the power and have a fast internet connection. A dark screen doesn’t mean the device is switched off. On top of that, the limited user interface and monitoring tools mean suspicious background processes can easily slip unnoticed past users.
The threat is evolving and growing more aggressive. A recent study found that once proxyware turns up on a set-top box, the risks to its owner go well beyond having their traffic siphoned off.
SuperBox’s marketing leans heavily on the promise of providing thousands of TV channels, with no subscription or monthly fees. But out of the box, the device can’t actually do anything of the sort. To get access to pirated content, you need to install the brand’s proprietary app store.
When you launch it and install additional apps, the thousands of TV channels do appear. Meanwhile behind the scenes, with no warnings or permission prompts, the device floods external sites with unauthorized requests, and network traffic spikes sharply.
The researchers uncovered several alarming facts. First, the victim gets enrolled into as many as five botnets at once. The SuperBox runs clients for several proxyware networks simultaneously, which even try to compete with one another by blocking rival software from being installed.
But the real shock was the attacks on the internal network. The TV box’s proxyware places no limits on what its paying clients can actually do on the network. They can reach not only external sites but also devices inside your home network.
Normally, your home router and ISP settings protect you from outside attacks. But proxyware bypasses these barriers because it operates from inside the network. During an experiment, the researchers confirmed that an attacker on the internet can easily leverage the infected set-top box to open the admin panel of a home router, such as a Linksys, which is supposed to be accessible only to its owner when connected to the home Wi-Fi network. This means hackers can try to steal data from other devices in the same household, or even encrypt home network storage (NAS).
At the same time, flaws in SuperBox’s factory firmware let hackers remotely install and run any application with superuser privileges, and the threat is anything but hypothetical. Over three weeks of monitoring, the test set-top box was hit by more than 1300 attacks through the home proxy network. Attackers installed three different types of malware, including a module for launching DDoS attacks.
The malware uses several methods to gain a foothold in the system, and it survives reboots and power failures alike.
How to tell if your set-top box is working for hackers
If you have a cheap TV set-top box or Android TV from a little-known brand, it’s worth checking it for anomalies.
The most reliable method is to review the network traffic. Use the statistics in your router’s control panel, but note that some budget models may lack this feature. This feature is called Traffic Analyzer on Asus routers, Traffic Usage on TP-Link, and Traffic Monitor on Keenetic. Find your TV or set-top box in the device list and check the ratio of downloaded to uploaded data. They should consume a lot of traffic to download video while sending very little. If your box is quietly pushing gigabytes of data out or staying chatty on the network even while idle, that’s a telltale sign it’s infected.
If traffic statistics aren’t available, look for indirect signs:
The network and memory activity LEDs won’t stop blinking even though no one’s using the device.
The set-top box’s casing is constantly warm or hot.
The interface lags behind the remote, and the box freezes at random moments that have nothing to do with heavy video playback.
Your other devices (computers or phones) are seeing a real drop in internet speed.
When trying to visit familiar sites over your home Wi-Fi, you’re constantly hit with a CAPTCHA — a sign your network may be compromised and flagged as a spam source.
Your ISP’s tech support calls you asking about suspicious network loads.
What to do with an infected device
The best solution is to disconnect the device from the internet and dispose of it. If you have to keep using it, follow these steps to minimize the risks:
Do a factory (hard) reset. Restore the set-top box to its original state.
Take it offline before setting up again. The first time you turn it on after a reset, skip the Wi-Fi setup step and don’t plug in the Ethernet cable.
Block app installation. Go to Android settings and disable installation of apps from unknown sources. Be sure to turn off any debugging features if enabled: USB debugging, Wireless debugging, and ADB. Menu item names may differ depending on your Android version and device manufacturer.
Isolate it on the network. Set up a guest Wi-Fi network on your router and connect the TV box to it. Enable Client Isolation in your router’s settings, if it has it. This will stop the box from seeing other devices on your home network, which protects your computers and network storage.
Check for updates. Once the box is connected to the guest network, check for official firmware updates: manufacturers sometimes patch known vulnerabilities, though with lesser-known brands, you shouldn’t count on it.
Your most reliable safeguards
Buying cheap devices with pirate streaming features and installing software from shady sources is a surefire way to compromise your home network. Your IP address will become a source of malicious activity, which at best gets you blocked by your ISP and at worst puts you on law enforcement’s radar. What’s more, hackers can use the box as a launchpad to attack your home computers and NAS, which can lead to personal data theft or a ransomware attack.
The best protection is to buy devices from trusted brands and pay for legal content. And to rule out someone hijacking control of your network, make sure your router’s admin panel and other home devices are protected with unique, strong passwords. To avoid having to remember them all, use a reliable password manager such as Kaspersky Password Manager. Additionally, the Smart Home Monitor feature included in Kaspersky Premium lets you keep all your devices fully under control.
There may be more things you don’t know about your smart home devices:
Picture your computer keeping a diary — the kind kids used to keep logging their daily activities, or the kind travelers, merchants, and nobles kept centuries before that. Here’s what it might look like.
Thursday, September 10.
8:00 AM. User read the news on cnn.com and bbc.co.uk (Safari).
8:10 AM. User replied to John Kaufman’s email about delivery dates, then sent the same question to the logistics team (Gmail).
8:20 AM. User checked his to-do list, reviewed recent updates, and planned out the day’s priorities (Todo).
We’re not exaggerating. This is exactly what your Mac’s new diary looks like. It’s a set of text files that any app on your computer can read — as can anyone sitting at the keyboard. The feature responsible is called Computer History, and it was released by OpenAI in mid-August. At the moment, it only works in the ChatGPT app for Mac, requires a Pro subscription or higher, and is disabled by default. According to its developers, the idea behind History is to let the AI assistant quickly get up to speed on your work context, so it can answer even vague requests, like “send a reminder to whoever I was emailing about last week’s deliveries”. Of course, that convenience comes at a price, ranging from your data being processed on OpenAI’s servers, to the risk of it leaking off your Mac — whether to a nosy family member or straight into the hands of cybercriminals.
How ChatGPT Computer History works
If this sounds a lot like Microsoft’s similar Recall feature, or Chronicle, which OpenAI itself announced earlier, that’s no coincidence. Both were built with the same goal in mind, just using different methods. Having watched Recall turn into the PR disaster it was, the team behind Computer History decided against constantly taking and analyzing screenshots. Instead, ChatGPT relies on macOS’s Accessibility features to read the text on your screen and track your actions: mouse clicks, text typed into fields, switching between apps, and the like. All of this gets stored as a stream of raw activity data inside the ChatGPT container (app group), which only the ChatGPT app itself, or other apps you’ve specifically given permission, can access. In tests run by digital forensics researchers, just two hours of normal computer use generated around 3500 of these logged events.
That raw data remains on your computer for up to 48 hours. During this time, the ChatGPT app periodically runs hidden chat sessions behind the scenes, where it asks the AI to summarize related events into a single recap. Essentially diary entries, these summaries get saved as plain text files in a folder that any app on your Mac can open: ~/.codex/memories/extensions/skysight/.
When you chat with the assistant, or when certain automated features kick in, these notes can be pulled into the conversation for more context-aware responses. OpenAI is especially keen on pointing out that the assistant can spot patterns in your workflows and offer to automate them, creating what it calls “skills” that replicate your actions for you.
Once a summary is ready, the raw activity data behind it is deleted. OpenAI says it won’t keep those hidden background chats or use them to train its AI, except where required by law. The diary-style summaries that get pulled into your conversations, though, are stored on OpenAI’s servers under the exact same rules as your regular chats and the assistant’s memory, so your preexisting privacy settings will apply to them too.
What Computer History can see, and what you can turn off
Since the whole feature runs on accessibility tools, ChatGPT only picks up what your operating system is already willing to share with those tools. That includes window titles, blocks of text, image captions in your browser, text you’re typing into a field as you type it, and the names of interface elements you click on. Watching a video? The AI can’t see the video itself, but it can read the window title, the site name, and the video description. Browsing photos? It sees file and folder names, not the actual images. Audio is never recorded or saved in any situation. All that gets logged from a video call is the meeting window title, unless the call itself has live captions turned on. Password fields that are masked (shown as dots) aren’t read at all and, according to OpenAI, private browsing windows are never scanned.
One thing that sets this apart from Microsoft Recall is the clearly spelled out step-by-step procedure the user needs to go through to turn it on. Computer History never activates itself. You have to navigate to the settings menu, then Integrations → Computer History and turn it on manually after reading through the warnings and explanations. You’ll also need access to the agent’s memory enabled for the feature to work. From there, you choose which apps and websites you want it to track, and confirm a series of macOS permission prompts.
For companies using a business subscription, this requires approval at two levels: an administrator first has to enable Computer History for the whole organization, and then each employee has to turn it on individually.
At any point, you can go to Computer History → Permissions and either list specific apps and sites to exclude from tracking, or, conversely, set ChatGPT to only watch a limited list you choose (Include only these apps, Include only these websites).
To see what your own computer’s diary looks like, check Computer History → History. From there, you can delete individual entries or disable the tracking of specific apps directly from the list.
The risks of using ChatGPT Computer History
We covered the risks of centralized storage of someone’s entire activity in our earlier piece on Microsoft Recall, and most of what we said there applies to ChatGPT Computer History.
You might assume your chats and emails are private, protected by passwords and encryption. But a copy of the most important parts of those conversations is sitting in plain text files that anyone with access to your computer, and plenty of other apps, can open.
The people you’re messaging have no idea this extra copy exists. If they’ve turned on, say, a self-destructing chat feature, but the messaging app’s window itself isn’t marked as private, that precaution does nothing to protect them.
Even if you trust OpenAI completely and take its privacy promises at face value, your data can still be stolen directly off your computer by an infostealer. Mac-targeting infostealers have exploded over the past two years, so this isn’t a hypothetical risk. And the people who write this type of malware move fast, quickly updating it to grab whatever new type of data looks promising. OpenAI’s files are a boon for them: everything you’ve done, already summarized by AI into something easy to read. While there are no passwords or credit card numbers in there, the available details are likely enough to craft a convincing targeted urgent email from the boss.
And if a nosy coworker or family member gets their hands on your computer, reading through the diary of your work and life would take them all of five minutes.
Computer History: turn it off, or just configure it?
We’d recommend limiting or fully disabling Computer History if your work involves sensitive information. This especially applies to doctors, lawyers, and anyone else bound by professional confidentiality, or handling personal or medical data. The same goes for anyone living with an overly controlling family member, or working in an office with nosy coworkers.
If none of that applies to you and you’d like to try out how useful the AI’s search and auto-generated skills actually are, here’s how to set things up safely.
Lock down your Mac’s login. Turn off auto-login, and set your Mac to require a password immediately after the screensaver kicks in or it wakes from sleep. Use a strong password along with Touch ID, and make sure FileVault disk encryption is turned on.
Set up your exclusions. Manually add every messaging app you use for private conversations, along with any finance apps or sites, and anywhere else you keep sensitive information, to Computer History’s exclusion list.
Check in regularly. At least a couple of times a week, visit Computer History settings to see which apps and sites it’s been tracking. This helps you catch and remove any sources of private information you forgot to exclude earlier.
No matter how you configure Computer History, the two most common ways your data could end up in the wrong hands — on any Mac — are a macOS infostealer snatching it directly from your computer, and typing your information into a fake website. To guard against both, make sure you’re running full-featured security software on your Mac, such as Kaspersky Premium for macOS.
AI can create privacy risks you might never think to look for. You can read about more of them in our other posts:
Threat actors are constantly developing new attack schemes — from OAuth token theft to attacks on AI agents — but the classics never quite leave their playbook. On any given day, an employee may receive malware attached directly to an email, or lying in wait behind a link embedded in an email. Making these attacks succeed still requires a degree of creativity, and in recent years attackers have increasingly adopted exotic file formats. Users don’t perceive these formats as dangerous; more importantly, many EDR and email security solutions skip scanning them entirely. Yet they’ve proven highly effective for deploying malware or harvesting credentials.
Below are the file types that may be blind spots in your organization’s detection strategy — despite being observed as used in real-world attacks.
Disk images
This is the broadest and most dangerous attachment category. A disk image can contain a fully prepared, correctly structured set of files tailored to a wide range of attack scenarios. It mounts as a separate volume (standalone virtual disk), and when doing so often uses tools built into the operating system. The victim doesn’t need to extract anything or create suspicious folders on disk.
The most versatile format is ISO, which dates back to the heyday of multimedia CDs. ISO images mount natively on every major OS without additional utilities, whether through simple tools like File Explorer or via the command line interface. This is precisely why threat actors have no hesitation in sending ISO files as email attachments.
Somewhat less common are IMG containers, which also mount without additional tooling on macOS or Linux, but require installing a small, free utility such as OSFMount on Windows, or using WSL2 (Windows Subsystem for Linux), which is built into recent Windows versions. A file with identical content may also carry a DD extension.
Threat actors also make use of VHD, a virtual disk format native to Windows, which generally works on Linux machines as well (via qemu-nbd or guestmount). On macOS, an additional utility — again, qemu-nbd is a common choice — is required to mount it. Note that on unpatched Windows systems, the victim doesn’t need to take any further action after the disk mounts: CVE-2025-24993 — a vulnerability actively exploited in real-world attacks — triggers attacker code execution immediately upon mounting the image.
For completeness’ sake, VMDK, the disk image format used by VMware, is also worth detecting, though it’s largely ineffective in attacks on regular users since every popular OS requires additional software to mount it.
All of these image formats can be viewed and unpacked not only with specialized tools, but with standard archive utilities like 7-Zip or RAR. As a result, the odds that the user will fall for the bait are higher than one might hope.
In addition to not being a well-known potentially dangerous format, image files give attackers one further advantage: files extracted from disk images on Windows frequently lack the Mark of the Web flag, and therefore can be launched without triggering additional system warnings.
There’s one more reason why EPP/EDR solutions must scan virtual machines and disk images: these formats are also used during later stages of an attack. To mask active file-system activity from monitoring tools, ransomware gangs sometimes run the entire encryption process inside a virtual machine deployed on the victim’s computer. The RagnarLocker ransomware strain has used VirtualBox for this purpose, while the CRON#TRAP campaign relied on a QEMU environment.
MS Office files
No, this isn’t about macro-laced DOC files. Microsoft has grown weary enough of this classic attack vector that macros in downloaded documents are now blocked outright, and enabling them requires considerable effort from the user. But Office relies on dozens of file formats, and some of the less common ones still occasionally give attackers an edge.
Less familiar to both users and security solutions are OneNote files (.one). These are essentially simple notes, but they can carry embedded attachments, including not just images and links, but VBS/WSF/BAT scripts as well. Within the note, an attachment normally displays as an icon, but attackers overlay it with a picture showing a message with a “View” button.
Another Office format popular with attackers is the Excel add-in. These files use the .xll extension but are, in effect, full-fledged Windows dynamic-link libraries (DLLs), and therefore may have extensive functionality. Victims receive a malicious email with what looks like an invoice; the icon suggests that the file will open in Excel. Ignoring the security warning may result in an infostealer infection.
SVG “graphics”
The description of the SVG (Scalable Vector Graphics) format sounds entirely innocuous. Indeed, 99% of SVG files are logos and interface icons. But unlike PNG or JPG, SVG files are fundamentally XML documents, and beyond points, lines and fills they can contain JavaScript. In terms of malicious potential, SVG is not far behind a full web page. In real-world attacks, SVG files can redirect a user to a phishing page immediately upon opening, or render the phishing page directly by unpacking a Base64-encoded block into full HTML.
SVG files pose a distinct risk to corporate portals that accept user file uploads. If a portal’s Content Security Policy (CSP) isn’t sufficiently restrictive, and lets someone upload a malicious SVG file, the embedded JavaScript can steal cookies from the page, inject unauthorized content, and carry out similar attacks.
Polyglot files
Polyglot file formats are less exotic in and of themselves, but the files carry more than meets the eye. They’re called polyglots because attackers construct a file that can be validly interpreted in multiple ways: for example, it can be a valid ZIP archive and a valid executable at the same time. The purpose is purely to evade detection by security solutions and deceive the user. We’ve covered polyglots in detail in a separate blog post.
The clear standout in our roundup is a malicious campaign distributing the IcedID infostealer. Victims receive emails with a ZIP attachment, which unpacks into an ISO disk image. That further unpacks into a CHM file (the Windows Help format) that’s also correctly processed as an mshta (Microsoft HTML Application host) application, which then downloads the primary malware payload.
Defending against exotic files
These attacks rely on the assumption that security solutions either don’t scan unusual file formats, or scan them only superficially. Preventing the threat starts with not operating on that assumption with regard to your own infrastructure:
Configure EDR, web, and email filters to scan all of the file formats described above.
Process archives and disk images with the same rigor as you would apply to executables.
Detonate potentially dangerous file types in a sandbox, and configure recursive unpacking of nested formats through to the end of the chain: ZIP → ISO → CHM.
Where feasible, quarantine all file formats anomalous for email — disk images in particular.
Build detection rules for anomalous usage patterns that involve exotic files. For example, unusually small disk images are rare and are therefore worth investigating.
Review the technical documentation of your security solutions to confirm that complex formats are detected through deep structural parsing rather than magic-byte checks alone.
Deploy behavioral detection capable of flagging anomalous execution patterns and legitimate utilities launched from unexpected contexts. The usual suspects here include mshta, git, wscript, hh, and rundll32.
SVG files warrant a dedicated policy. Treat SVGs as active content at the email and web perimeter. On corporate portals, enforce a strict CSP, and serve user-uploaded files from a separate subdomain so that a malicious script embedded in an SVG can’t access the session on the main portal.
OpenAI has revealed Astra, an unreleased model designed to tackle complex, long-running tasks, after an internal version produced ten significant advances in mathematics and theoretical computer science. [...]
Security lapse leaves sensitive information and contact details of 51 government officials exposed for 40 hours
The public body in charge of the UK’s state investments has been pushed to improve its internal security after a data breach left “high-level management information” publicly accessible for nearly two days.
UK Government Investments (UKGI), the agency that manages the taxpayers’ interest in a swathe of companies including Channel 4 and the Post Office, said the security failure also left more than 50 government officials’ personal details exposed for nearly 40 hours.
OpenAI says it has reduced the price of two GPT-5.6 models, cutting Luna's API price by 80% and Terra's by 20% as it works to make its models more efficient. [...]
Once the attacker has breached the corporate network, subsequent stages of the attack often involve leveraging standard domain infrastructure protocols: using Kerberos, running DNS queries, accessing internal services, opening network shares, and other common networking actions. Because this activity is virtually indistinguishable from legitimate network traffic, it is extremely difficult to detect it with traditional network attack detection tools.
Kerberoasting and DNS tunneling have long ceased to be exotic techniques. They are becoming standard methods in modern attacks because they allow attackers to execute critical compromise stages while remaining undetected by traditional security tools. A clear example of this trend is seen in latest campaigns, employing both Kerberoasting and DNS tunneling.
Traditional network security tools perform well when the attack features a distinct and identifiable indicator: a characteristic query string, a known malicious traffic pattern, or the source code of an already discovered exploit. While this approach to threat detection remains effective, it cannot always be applied to discovering network attacks that blend seamlessly with legitimate traffic inside a corporate network.
Instead of searching for explicit indicators of attack, Network Anomaly Detection (NAD) analyzes all traffic for suspicious artifacts that deviate from the host’s typical network activity. Within Kaspersky’s solution portfolio, this technology is implemented specifically in the Kaspersky Anti Targeted Attack (KATA) platform.
The system analyzes network traffic data (DNS, DCE/RPC, Kerberos and other packets) and extracts key parameters used to identify anomalous behavior. This approach enables searching for attacks on domain controllers, signs of traffic tunneling and exfiltration, C2 communications, and other scenarios that may point to compromise of network infrastructure.
However, Network Anomaly Detection is not built on a single, universal set of indicators. Each attack scenario employs tailored detection models that account for the specifics of the corresponding network protocol, typical host behavior, and characteristic deviations from that baseline. This article examines two practical examples – detecting Kerberoasting and DNS tunneling – to demonstrate how these principles are implemented in KATA’s NAD rules and why this approach proves more effective than traditional signature-based analysis.
Kerberoasting attack detection by KATA
Why standard tools have a hard time detecting Kerberoasting
The Kerberoasting attack leverages the standard operational logic of the Kerberos protocol. The attacker identifies service accounts configured with a Service Principal Name (SPN), requests a Ticket-Granting Service (TGS) ticket for them, and attempts to crack the password offline using a dictionary attack against the retrieved ticket. If the password is weak or hasn’t been changed in a long time, the adversary can bruteforce it to get it in cleartext. Subsequently, these compromised credentials can be leveraged for both vertical and horizontal movement across the network.
The essence of a Kerberoasting attack is that an adversary possessing a compromised low-privileged account and a valid Ticket-Granting Ticket (TGT) for that account can request TGS tickets with weakened encryption for service accounts with SPNs. Crucially, it doesn’t matter whether the compromised account actually holds access permissions for those services. Having obtained these tickets, the attacker can then take them offline and bruteforce the service account’s password by trying to decrypt the corresponding ticket locally, without generating any network activity. As the encryption key is based on the password hash, the adversary can guess the password upon finding the correct key.
The attacker’s objective is to find a service account that has a simple password. Most likely, this will be an account created manually by the administrators of the infrastructure or a service. This is precisely why attackers are not interested in system service accounts with SPNs (such as CIFS/fileserver.company.local); these are generated automatically and feature highly complex passwords that are impossible to bruteforce.
We should note that the TGS ticket requests made by attackers are identical to standard, legitimate requests. Every domain naturally exhibits a high volume of Kerberos traffic. Therein lies the primary challenge of detecting Kerberoasting: legitimate service ticket requests (TGS-REQ) are indistinguishable from those issued by attackers. Consequently, the primary detection method relies on correlating indirect indicators rather than signature matching. Key indicators include an anomalous request source (atypical host or user account), a surge in requested SPNs within a short time window, attempts to obtain service tickets for sensitive or privileged service accounts, and off-hour timing or unusual request volume when benchmarked against the historical profile of both the user and the host.
Most of these indicators can be detected using NAD technology, which helps analysts cut through high volumes of Kerberos traffic to establish a concrete hypothesis: who initiated the Kerberoasting attack, which service accounts are at risk, and why this activity deviates from the baseline.
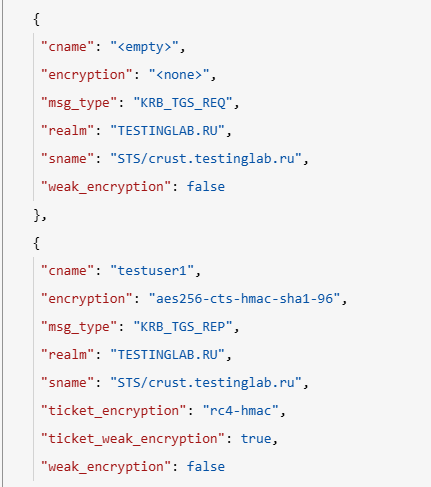
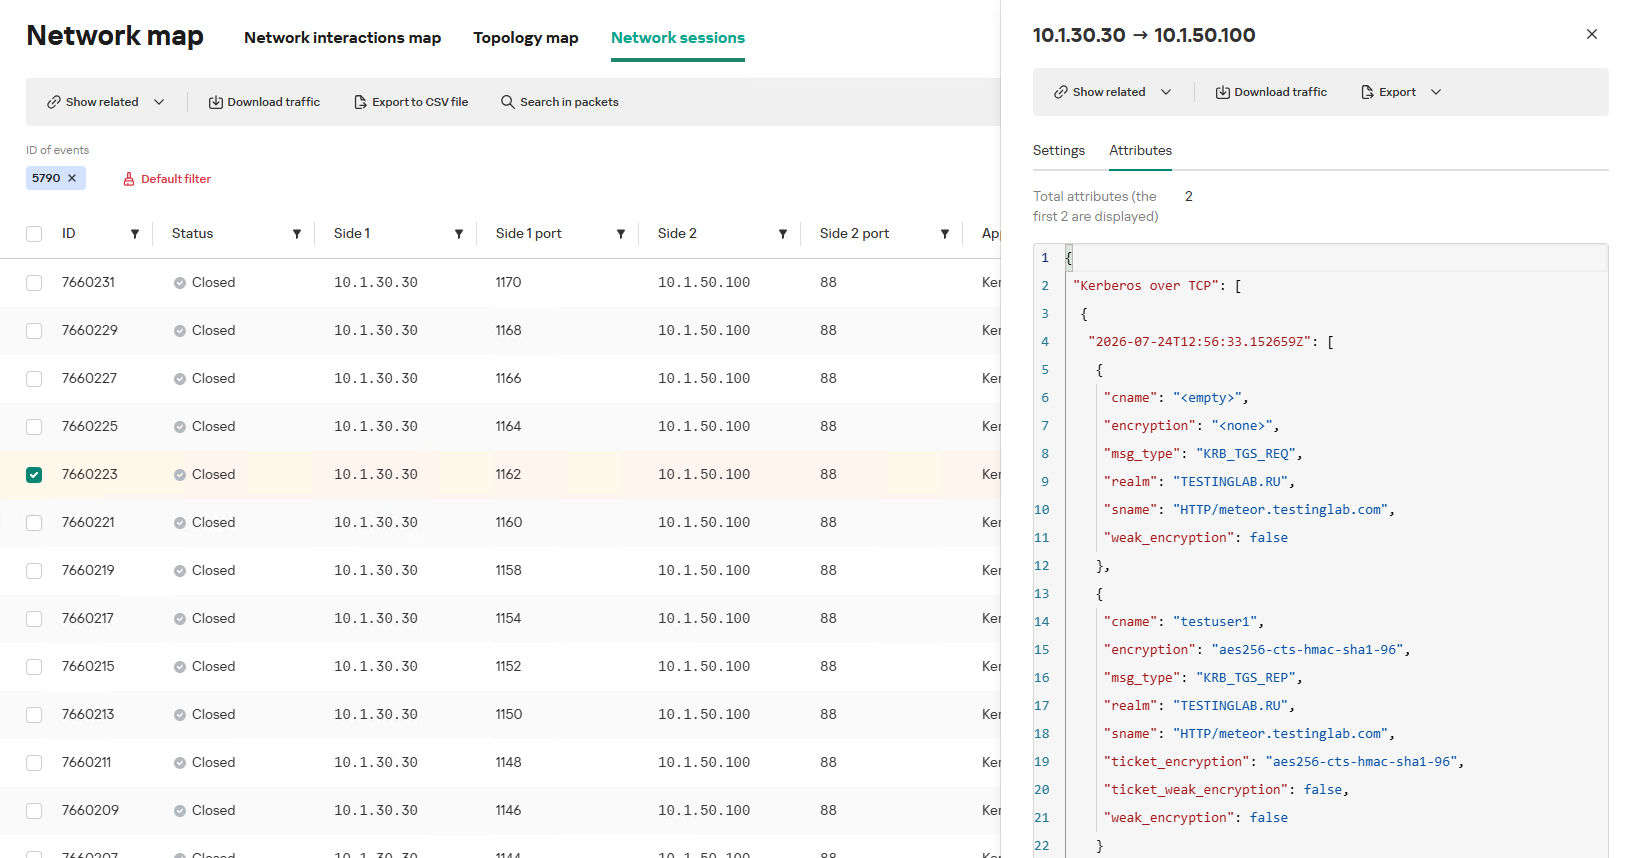
In the context of this attack, the network anomaly stems from a single host – likely using a single user account (cname) – receiving TGS tickets ("msg_type": "KRB_TGS_REP") for numerous unique services with SPNs (sname) within a short timeframe. These service accounts are non-system accounts.
Example of a TGS-REQ – TGS-REP event pair from network session attributes
To detect this anomaly, the NAD rule titled “Signs of a Kerberoasting attack” implements the following logic:
From Kerberos network sessions during the search depth period, select only those with a successful Kerberos TGS-REP response, subject to the following conditions:
The IP address that initiated the session must not be excluded in the excl_sip variable.
The requesting client name (cname) must not be included in the excluded users list (excl_users variable).
The SPN (sname) must not be excluded within the rule. System SPNs are omitted from detection logic because they exist across most corporate environments and hold no interest for adversaries in this attack vector; including them in the total count of unique SPNs could lead to predefined threshold being exceeded, triggering false positives.
Extract the cname (the name of the client requesting the TGS-REQ) and sname (SPN itself) from these qualifying sessions.
Group the sessions by the source IP address and client account name (cname), while aggregating sessions with unique SPNs.
Generate an alert if a single IP address using a single client account receives TGS-REP responses for N unique SPN names within the specified search depth window, where N equals or exceeds the threshold variable count_spns.
Within the event regeneration window, group under the initial alert all subsequent alerts associated with the same client IP address. This avoids creating duplicate event records by incrementing the aggregation counter (Total appearances).
We should note that this type of logic cannot be implemented using IDS signatures. Consider creating a Suricata rule designed to detect Kerberos TGS-REP packets. To minimize false positives, we’ll exclude system SPNs (which carry highly complex passwords) and apply a threshold for the number of responses a single client can receive. However, such a rule cannot evaluate the uniqueness of the requested SPNs; it can only track packet counts. As a result, this signature would produce a high volume of false positives because any domain naturally generates large amounts of identical legitimate TGS-REP messages.
Furthermore, adding exclusions and tuning thresholds to fit your specific infrastructure environments is significantly more practical when managed through user variables in the interface rather than directly modifying the underlying structure of the IDS rule itself.
Creating a Network Anomaly Detection rule
Network Anomaly Detection (NAD) rules are written as SQL queries executed against KATA’s ClickHouse database. Below, we demonstrate how to add and deploy a rule.
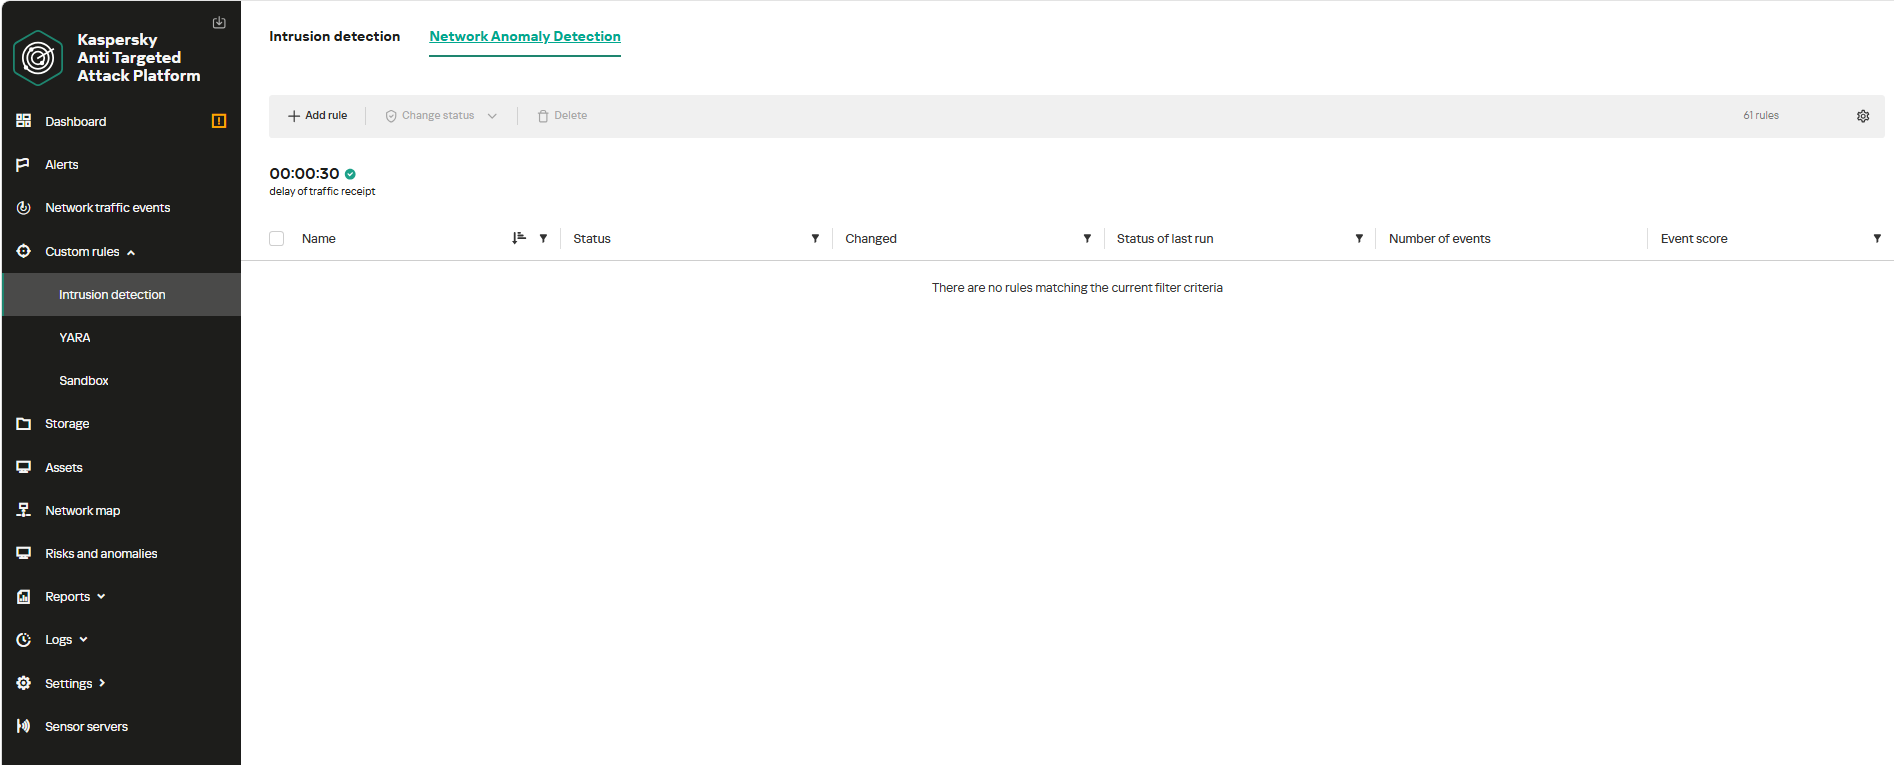
To begin working with NAD rules, navigate to the “Custom rules” section of the interface and select “Intrusion detection”. Under the “Network Anomaly Detection” tab, you can create a new rule.
The Network Anomaly Detection page UI
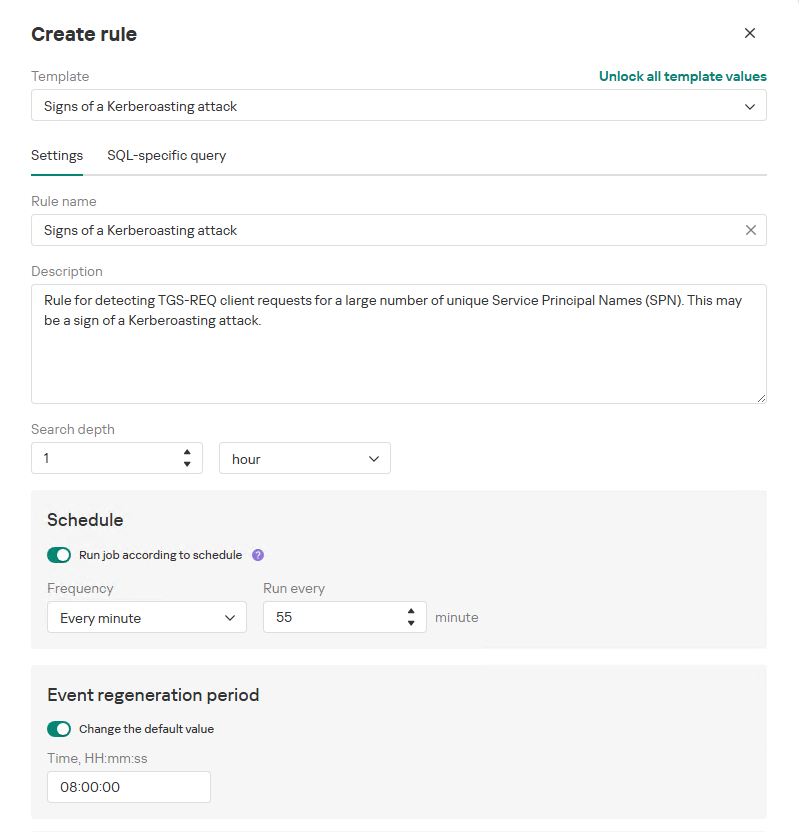
When adding a new rule, an analyst can select an appropriate rule template from the prebuilt set supplied with product updates. They can also manually modify the rule added from the template (converting it to a custom rule while keeping the original template intact) or author a rule from scratch using the provided guide.
Upon selecting a template, the analyst can review the rule description and either adjust or leave the default values for the following settings:
Search depth (the lookback window over which the SQL query will run)
Schedule (the execution frequency for running the query against the specified search depth)
Event regeneration period (the timeframe during which identical alerts will be aggregated into a single record rather than displayed as distinct events)
UI for creating a new NAD rule
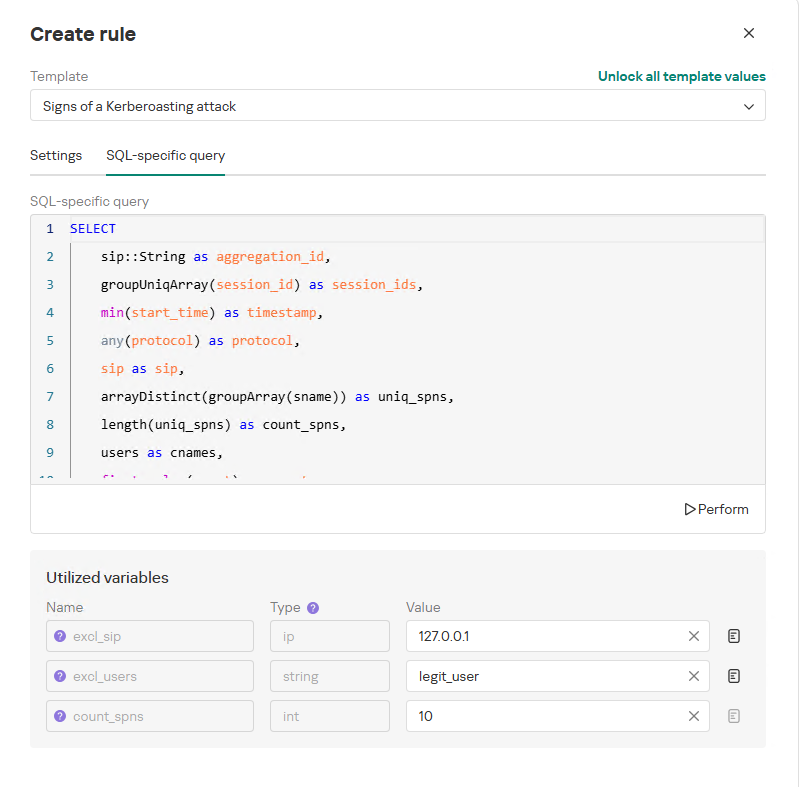
To ensure the rule functions correctly, we recommend navigating to the “SQL-specific query” tab before deployment to review the variables used within the rule – a description for each variable is available by hovering over the question mark icon.
The variables are lists of IP addresses, dates, strings or numeric values that define the network infrastructure – such as domain controllers, DNS servers, time ranges, critical segments, and other entities. This allows you to tailor each rule to different network environments and incorporate specific infrastructure characteristics without modifying the underlying logic.
In our example, using variables allows you to adjust the “Signs of a Kerberoasting attack” rule as follows without altering the underlying SQL query:
Exclude the source IP address of the TGS-REQ requests from the scope of detection logic (you can specify a single address, a subnet mask, or a dictionary containing addresses and subnets) as well as the requesting client account (accepts a single value or a dictionary with multiple values).
Adjust the threshold value required to trigger an alert based on the number of unique SPNs in the TGS-REQ messages.
Query contents and variables used in the new rule
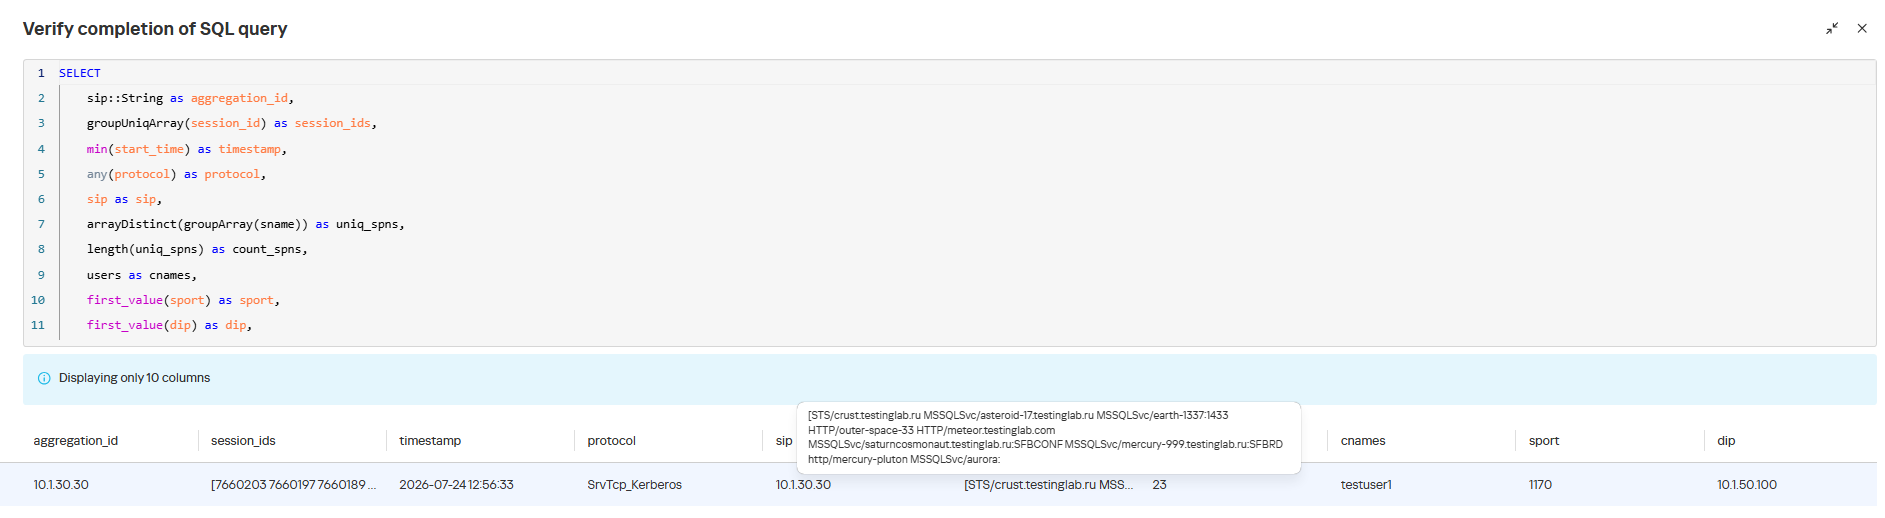
On this same page, you can test if the rule is functional prior to saving it.
Rule execution test results
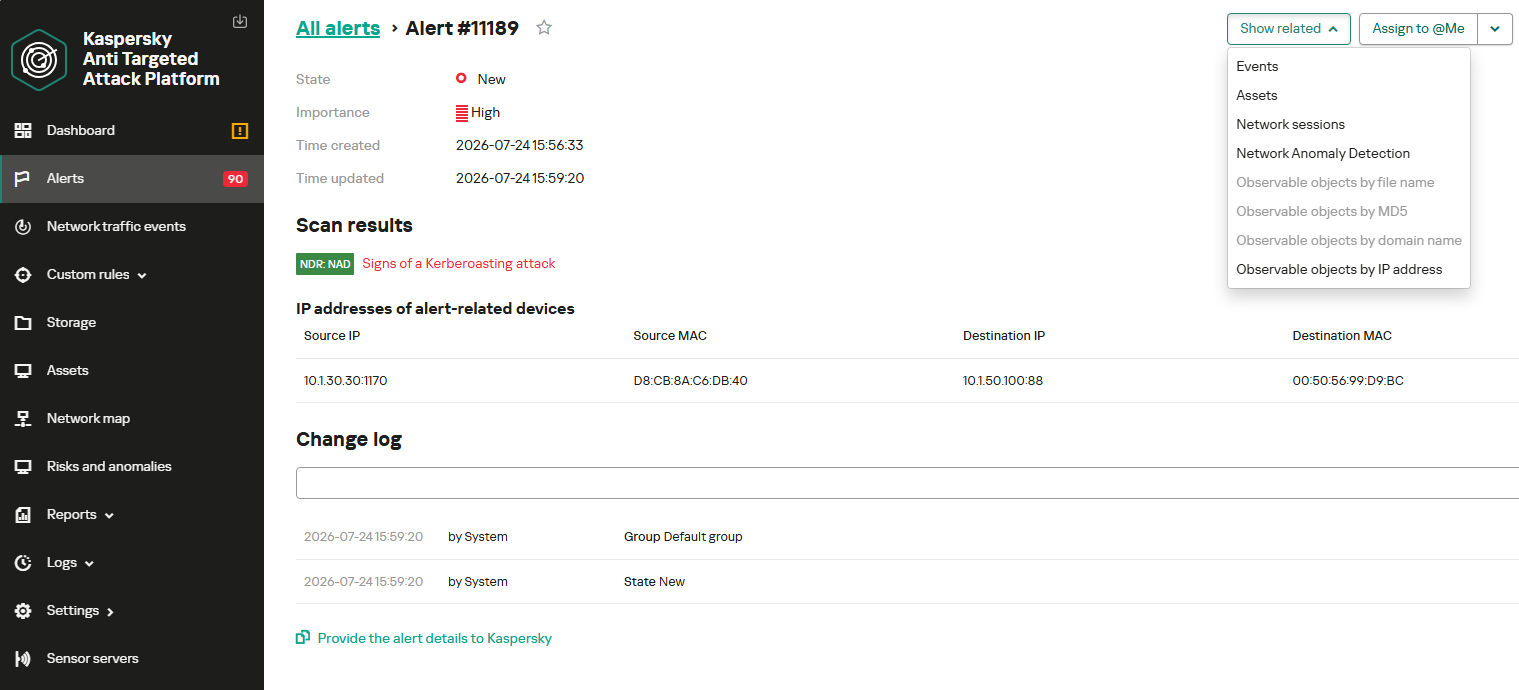
When this rule triggers, an NDR:NAD alert is generated. In the alert card, the analyst can review basic information: IP addresses, ports, and participating network endpoints.
Alert card for the NAD rule
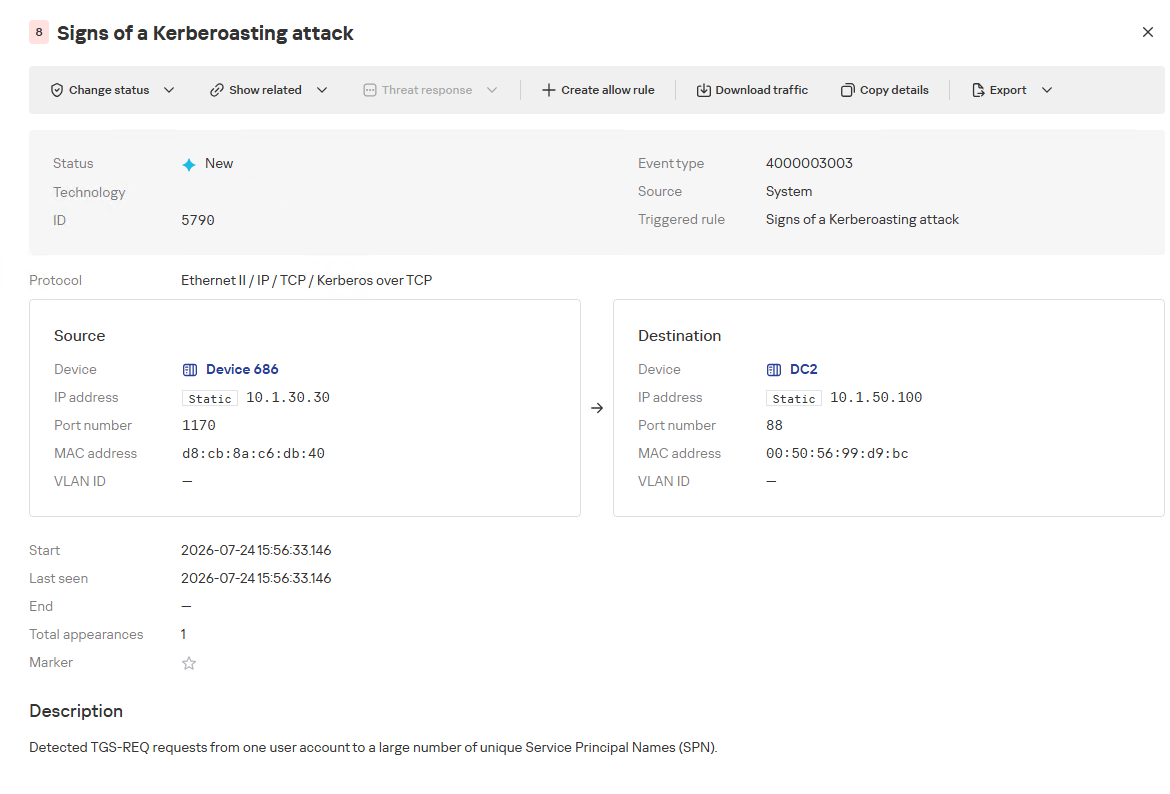
From there, the analyst can navigate to the associated event, which provides a detailed breakdown of the anomaly alongside links to the affected hosts.
NAD rule triggering event
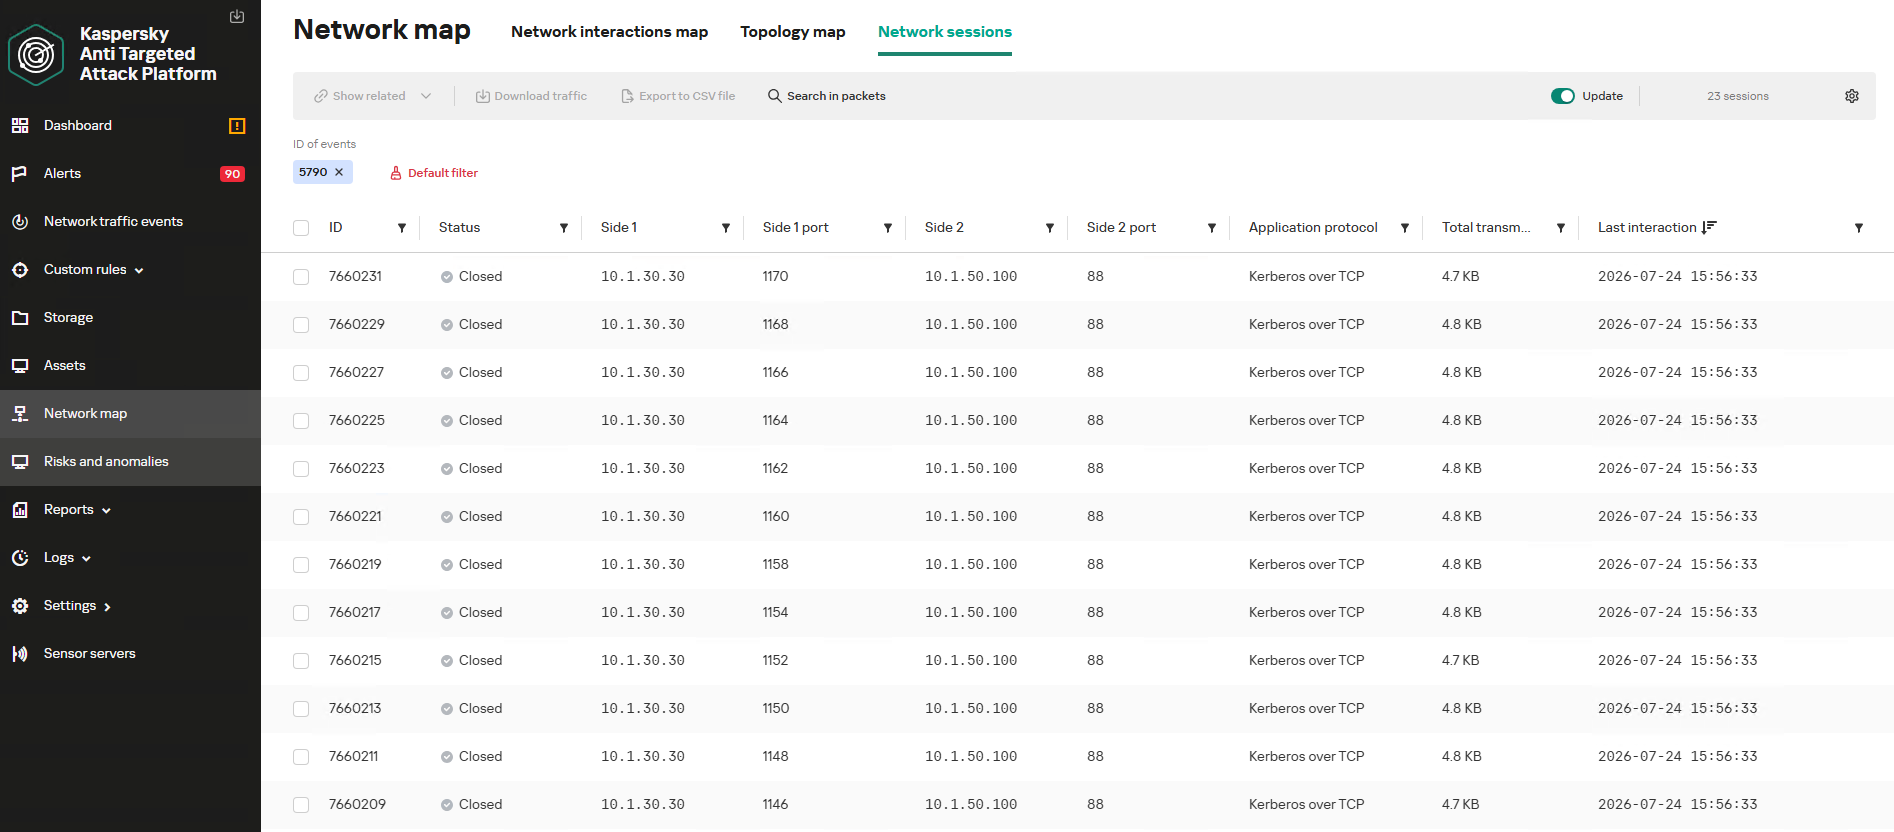
If needed, the analyst can view and export the network sessions associated with the alert. These sessions can be accessed directly from the alert or within the event card via the “Show related” drop-down list.
Network sessions that triggered the rule
Within an individual session, the analyst can inspect standard details including interacting parties, data volume sent and received, and other fields and metrics. On the “Attributes” tab, the analyst can review the specific events recorded within that session.
Network session attributes
Detecting DNS tunneling in KATA
How DNS tunnels work
DNS tunneling is a technique used to transmit data or control malware through firewalls by encoding information within DNS protocol requests and responses. Instead of performing standard name resolution, an infected host transmits data encoded within subdomain strings and receives response data via DNS records. This covert channel can be leveraged for C2 communication, bypassing network restrictions, or data exfiltration.
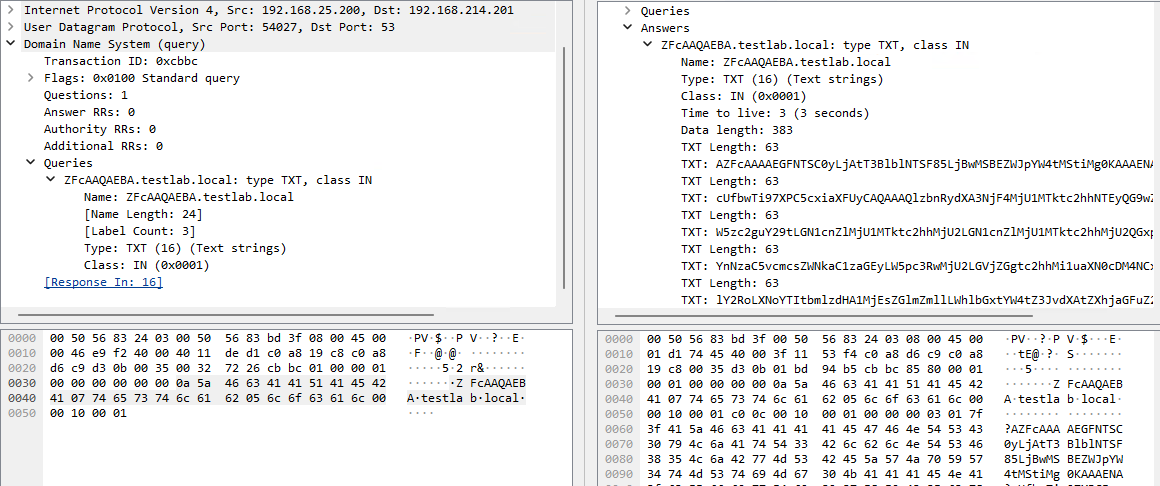
One method of implementing DNS tunneling involves utilizing TXT records. In this scenario, the client issues DNS TXT record queries for domain names where the right-hand portion of the domain name (the higher-level domains) remains static, while the left-hand portion (the lowest-level subdomain) carries encoded or encrypted data sent from the client to the server. Under this structure, a sample domain name might look like ZFcABQAIBA[.]testlab[.]local, where testlab[.]local serves as the static right-hand portion and ZFcABQAIBA represents the variable left-hand string containing the data transmitted by the client.
In response to these queries, the server delivers commands or messages inside the data field of the TXT response. Because the right-hand portion of the domain name remains static, all client queries are consistently routed to the same C2 server, even if the intermediate DNS resolvers targeted by the client change.
DNS query (left) and corresponding response (right) during DNS tunneling via TXT records
It is rather challenging to identify this malicious activity within DNS traffic without generating false positives. DNS traffic is permitted across almost all corporate networks, long domain names occur routinely in both internal and external environments, and TXT records are frequently leveraged for legitimate operational purposes.
Suspicion is established through a combination of indicators: a high volume of long, seemingly random subdomains associated with a single top-level domain, high request frequency, an unusually large number of unique names, non-standard record types, and significant data transfer volumes within a single DNS session.
By analyzing DNS traffic for threat detection, we identified three primary fields of interest:
Requested DNS name
DNS record type
TXT data field within the response
As shown in the image above, all of these fields are present in the DNS response. In a real-world scenario, a tunnel of this nature will transmit a volume of data that is abnormally large compared to standard DNS traffic.
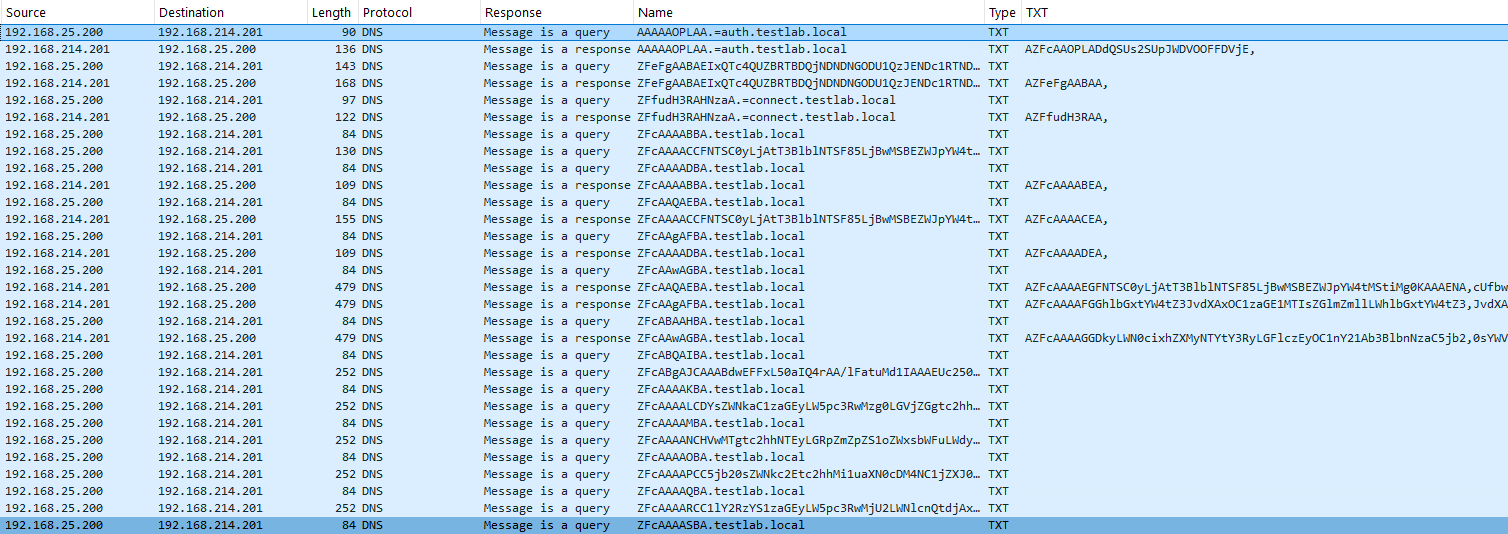
Data exchange within a DNS tunnel
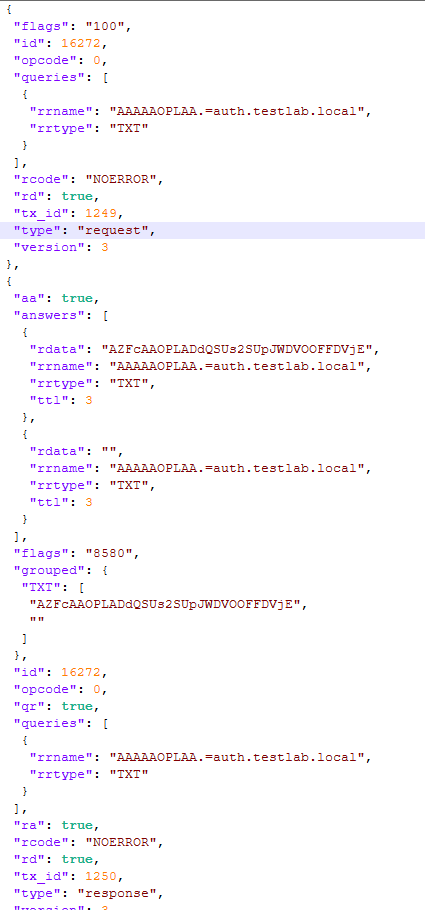
Thus, in the context of DNS tunneling, a network anomaly occurs when 1) a single query source host sends data embedded in the variable left-hand portion of domain names (rrname) while 2) maintaining a static right-hand portion (rrname) and 3) receives DNS server responses containing TXT records (rtype) with varying data (rdata), while 4) the total volume of data transmitted in the left-hand portion of the requested domain name together with the TXT data response (rdata + rrname) exceeds a predefined threshold.
Request and response events from DNS session attributes
When detecting DNS tunneling, the following nuances must be considered:
A single tunnel will not be constrained to a single DNS session; data may be transmitted across multiple sessions with the DNS server, or each individual request may occur within a separate session.
A client DNS query can contain more than one requested domain name.
A DNS response can contain multiple TXT records, as well as a large volume of various non-TXT record types.
Traffic between DNS servers must be excluded, as it duplicates client requests and can trigger false positives.
Although the factors outlined above (an abnormally large or frequently changing left-hand subdomain alongside a static right-hand domain, or an unusually long string in a TXT record) serve as key indicators of DNS tunneling, they can also occur within legitimate network traffic.
These challenges create a high likelihood of false positives when detecting DNS tunneling, particularly when using IDS-based tools. Writing an accurate IDS rule for this type of activity is practically impossible. With rare exceptions, DNS tunneling tools possess static markers that can be leveraged for signature-based detection. However, in the absence of such markers, signature methods fail to deliver high detection accuracy without generating an overwhelming number of false positives. In these cases, a comprehensive approach combining multiple correlated indicators is essential to improve overall detection quality.
DNS tunneling detection logic
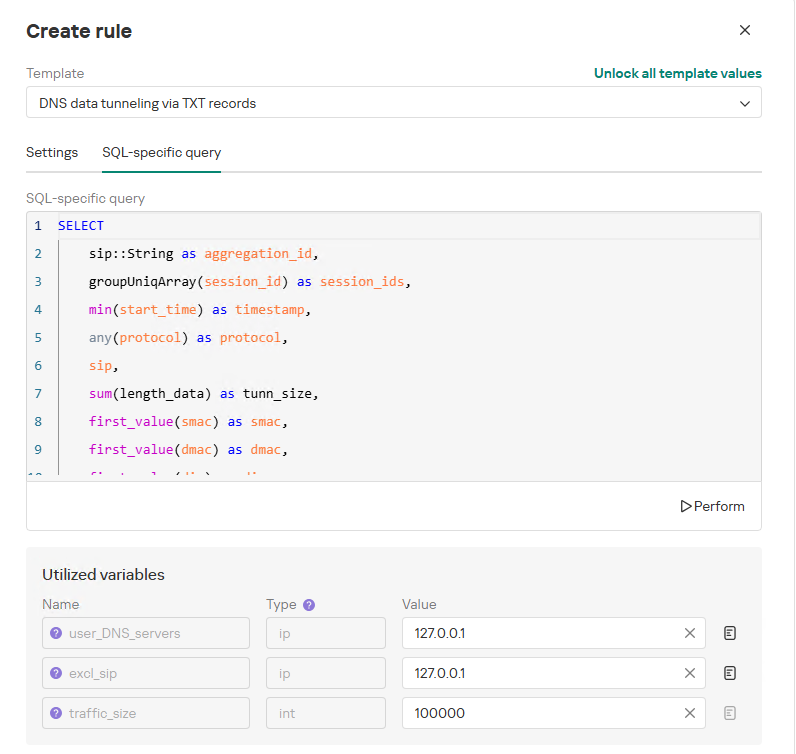
To add a rule for detecting this anomaly, you can use the prebuilt “DNS data tunneling via TXT records” template in the new rule creation interface. The “SQL-specific query” tab will display the list of variables used:
user_DNS_servers: a list of internal DNS server addresses within the infrastructure, required for the rule to function correctly and minimize potential false positives
excl_sip: IP addresses to be excluded from the scope of the rule (you can specify a single address, a subnet mask, or a list containing both addresses and subnets)
traffic_size: the threshold value for the total volume of data (in bytes) transmitted through the tunnel
Variables used in the “DNS data tunneling via TXT records” rule
The detection logic for this network anomaly is structured as follows:
From network sessions using the DNS protocol within the timeframe defined by the rule’s search depth, select only those sessions containing at least one TXT response.
Additionally:
The IP address that initiated the session must not be excluded in the excl_sip variable.
The source IP address that initiated the session must not belong to the internal DNS servers listed in the user_DNS_servers variable.
The DNS names requested by the client must not be excluded within the rule.
Split qualifying DNS sessions into individual log lines, each corresponding to an individual request or response. Retain only DNS responses containing TXT data.
Extract DNS names and their associated TXT data from these DNS responses. Retain only unique values.
Group all resulting records by the session’s source IP address, aggregating all unique DNS names and TXT data blocks.
Generate an alert if the combined size (in bytes) of the unique DNS names and TXT response data for a single IP address within the search depth window exceeds the specified threshold (the traffic_size parameter).
Within the event regeneration window, group under the initial alert all subsequent alerts associated with the same client IP address. This avoids creating duplicate event records by incrementing the aggregation counter (Total appearances).
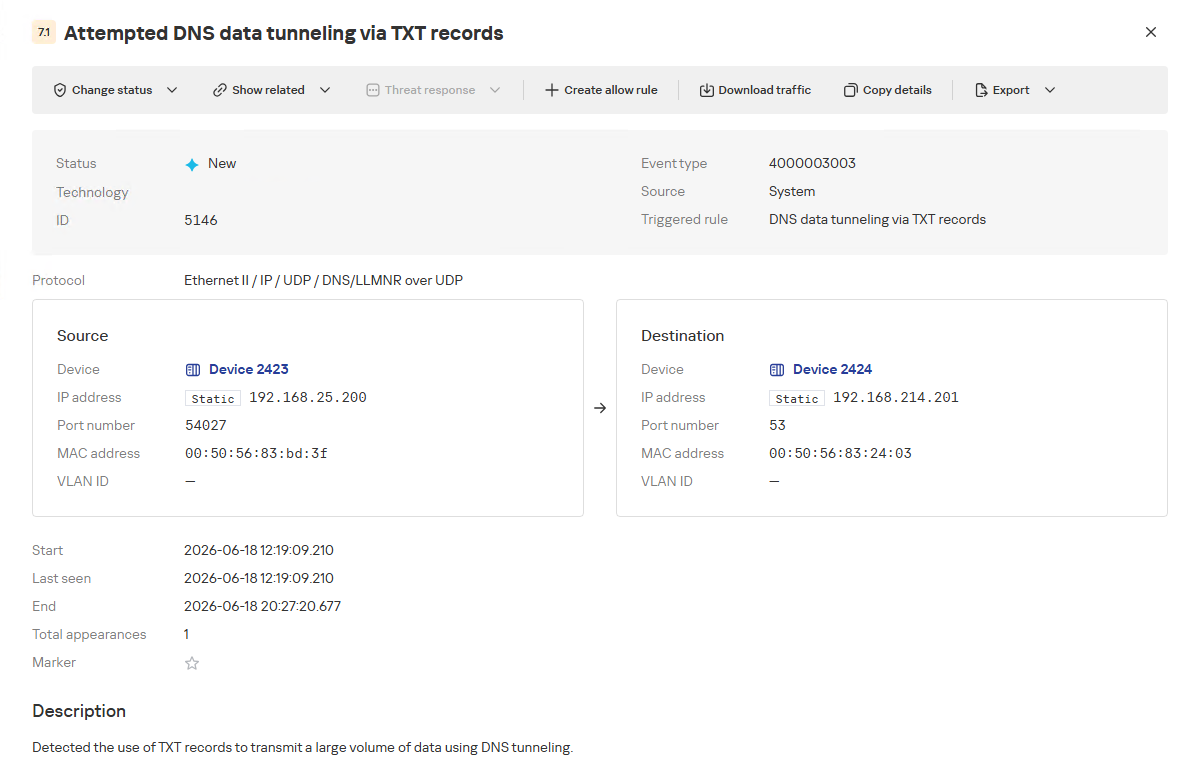
“DNS data tunneling via TXT records” rule triggering event
The primary value of NAD technology in this scenario lies in noise reduction – by minimizing false positives – and faster investigation times. A DNS tunnel rarely presents itself as a single, blatantly malicious request. Instead, it leaves behind a behavioral footprint: repetition, length, domain structure, unusual record types, numerous subdomains branching off an unchanging root domain, and anomalous host behavior. KATA consolidates these indicators into a single alert, presenting the analyst with an actionable attack hypothesis rather than a set of fragmented DNS events.
Prebuilt rules for detecting network anomalies in KATA
KATA users should note that Network Anomaly Detection (NAD) rules are not enabled by default. Rules must be added manually using the procedure described in the preceding sections. This design ensures that analysts can fine-tune rules to fit specific network infrastructures using variables.
Analysts have three ways of creating new rules:
Adding a rule from a prebuilt template and adjusting custom variables. In this case, the rule is classified as a system rule.
Adding a rule from a prebuilt template and modifying its underlying SQL query (which requires enabling the “Unlock all template values” option) to create a custom rule based on the template. When modified this way, the rule transitions from a system rule to a custom rule.
Authoring a custom rule from scratch, which requires a basic understanding of ClickHouse SQL queries and familiarity with the product documentation.
As of this publication, the product ships with 59 prebuilt NAD rule templates (with additional templates delivered via product updates). KATA supports running up to 200 active rules simultaneously.
Prebuilt rules are divided into six categories:
Large Data Transfers: tracking abnormally large network sessions across various protocols during regular hours, at night, or over weekends.
Suspicious Connections: detecting suspicious connections that may indicate hazardous activity, shadow IT, evasion of attack detection mechanisms, and other threats.
Connections to Suspicious Resources: detects actions that violate security policies, potential data exfiltration beyond the perimeter, and unauthorized internet access originating from secured network segments.
C2 Communication: identifies network sessions characteristic of a potential C2 communication channel or tunnel.
The table below lists the rule templates for detecting network anomalies in KATA:
Rule category
Rule name
Protocols used
Large Data Transfers
Data tunneling in DNS traffic
DNS
ICMP, TCP, UDP, RDP, SSH or LDAP sessions with a large volume of traffic (6 rules)
ICMP, TCP, UDP, RDP, SSH, or LDAP (depends on selected rule)
ICMP, TCP, UDP, RDP, SSH or LDAP sessions with a large volume of traffic at nighttime (6 rules)
ICMP, TCP, UDP, RDP, SSH, or LDAP (depends on selected rule)
ICMP, TCP, UDP, RDP, SSH or LDAP sessions with a large volume of traffic on non-working days (6 rules)
ICMP, TCP, UDP, RDP, SSH, or LDAP (depends on selected rule)
Suspicious Connections
Queries to unknown DNS servers
DNS
Use of unauthorized routes
TCP, UDP
Use of suspicious ports for connections to external addresses
TCP, UDP
Use of non-typical protocols for connections
TCP, UDP, HTTP, HTTPS, DNS, SMTP
Inconsistencies with firewall configuration
TCP, UDP
Use of unauthorized ports for RDP or SSH sessions (2 rules)
RDP or SSH (depends on selected rule)
Interactions with external IP addresses over the RDP or SSH protocol (2 rules)
RDP or SSH (depends on selected rule)
Suspicious RDP sessions with domain controllers
RDP
Connection to an unknown server via Kaspersky Security Center ports
TCP, UDP
Domain Attacks
Signs of a DCSync attack
DCE/RPC
Signs of a DCShadow attack
DCE/RPC
Signs of DHCP spoofing
DHCP
DNS queries to Canarytoken domains
DNS
Signs of a Kerberoasting attack
Kerberos
Signs of an AS-REP Roasting attack
Kerberos
Signs of a brute-force password attack on SSH
SSH
Signs of SOAPHound usage
LDAP
Large-volume Active Directory object data collection via LDAP queries
LDAP
Reconnaissance Activity
Getting information about a task in the Task Scheduler
DCE/RPC
Getting a list of Kerberos users
Kerberos
LDAP queries to rights delegation attribute
LDAP
LDAP queries to attribute for getting administrator passwords
LDAP
Signs of an internal horizontal port scan
TCP, UDP
Signs of an internal vertical port scan
TCP, UDP
DNS zone data replication requests sent from sources other than DNS servers
DNS
Successfully completed requests for DNS zone data replication sent from sources other than DNS servers
DNS
LDAP query targeting a critical attribute of insecure credentials
LDAP
Enumeration of domain accounts via LDAP queries
LDAP
Exceeding the threshold for requested critical attributes in LDAP queries
LDAP
LDAP search queries containing a high number of critical attributes
LDAP
Connections to Suspicious Resources
Queries to unauthorized domain names
DNS
Transmission of large data volumes to cloud storages
TCP, UDP, DNS
Connections to cloud storages or file transfer services
TCP, DNS
Connections to public repositories
TCP, DNS
Connections to resources of programs for traffic tunneling
TCP, DNS
С2 Communication
Possible queries to DGA domains
DNS
DNS data tunneling via TXT records
DNS
Numerous blocked connections to external addresses
TCP, UDP
Conclusion
The examples of Kerberoasting and DNS tunneling clearly demonstrate why modern security defenses cannot rely solely on looking for known signatures and indicators of compromise. Both attack techniques abuse protocols that operate inside corporate networks every day. At the individual event level, they may look like legitimate activity, yet in behavioral context, they stand out as clear indicators of compromise.
NAD directly addresses this gap. Instead of relying purely on signature matches across Kerberos or DNS traffic, it highlights deviations from established baselines: who initiated the activity, how frequently it recurred, which services or domains were targeted, and why that matters for a specific infrastructure.
As a result, analysts gain a clear, actionable starting point for investigation. This capability is especially valuable for spotting the signs of APT group activity, which runs stealthily and is designed to blend in with legitimate operations. The importance of this capability will only grow: as attack techniques evolve, detecting suspicious activity at its earliest stages – before it escalates into critical service compromise or a data breach – becomes increasingly vital.
Once the attacker has breached the corporate network, subsequent stages of the attack often involve leveraging standard domain infrastructure protocols: using Kerberos, running DNS queries, accessing internal services, opening network shares, and other common networking actions. Because this activity is virtually indistinguishable from legitimate network traffic, it is extremely difficult to detect it with traditional network attack detection tools.
Kerberoasting and DNS tunneling have long ceased to be exotic techniques. They are becoming standard methods in modern attacks because they allow attackers to execute critical compromise stages while remaining undetected by traditional security tools. A clear example of this trend is seen in latest campaigns, employing both Kerberoasting and DNS tunneling.
Traditional network security tools perform well when the attack features a distinct and identifiable indicator: a characteristic query string, a known malicious traffic pattern, or the source code of an already discovered exploit. While this approach to threat detection remains effective, it cannot always be applied to discovering network attacks that blend seamlessly with legitimate traffic inside a corporate network.
Instead of searching for explicit indicators of attack, Network Anomaly Detection (NAD) analyzes all traffic for suspicious artifacts that deviate from the host’s typical network activity. Within Kaspersky’s solution portfolio, this technology is implemented specifically in the Kaspersky Anti Targeted Attack (KATA) platform.
The system analyzes network traffic data (DNS, DCE/RPC, Kerberos and other packets) and extracts key parameters used to identify anomalous behavior. This approach enables searching for attacks on domain controllers, signs of traffic tunneling and exfiltration, C2 communications, and other scenarios that may point to compromise of network infrastructure.
However, Network Anomaly Detection is not built on a single, universal set of indicators. Each attack scenario employs tailored detection models that account for the specifics of the corresponding network protocol, typical host behavior, and characteristic deviations from that baseline. This article examines two practical examples – detecting Kerberoasting and DNS tunneling – to demonstrate how these principles are implemented in KATA’s NAD rules and why this approach proves more effective than traditional signature-based analysis.
Kerberoasting attack detection by KATA
Why standard tools have a hard time detecting Kerberoasting
The Kerberoasting attack leverages the standard operational logic of the Kerberos protocol. The attacker identifies service accounts configured with a Service Principal Name (SPN), requests a Ticket-Granting Service (TGS) ticket for them, and attempts to crack the password offline using a dictionary attack against the retrieved ticket. If the password is weak or hasn’t been changed in a long time, the adversary can bruteforce it to get it in cleartext. Subsequently, these compromised credentials can be leveraged for both vertical and horizontal movement across the network.
The essence of a Kerberoasting attack is that an adversary possessing a compromised low-privileged account and a valid Ticket-Granting Ticket (TGT) for that account can request TGS tickets with weakened encryption for service accounts with SPNs. Crucially, it doesn’t matter whether the compromised account actually holds access permissions for those services. Having obtained these tickets, the attacker can then take them offline and bruteforce the service account’s password by trying to decrypt the corresponding ticket locally, without generating any network activity. As the encryption key is based on the password hash, the adversary can guess the password upon finding the correct key.
The attacker’s objective is to find a service account that has a simple password. Most likely, this will be an account created manually by the administrators of the infrastructure or a service. This is precisely why attackers are not interested in system service accounts with SPNs (such as CIFS/fileserver.company.local); these are generated automatically and feature highly complex passwords that are impossible to bruteforce.
We should note that the TGS ticket requests made by attackers are identical to standard, legitimate requests. Every domain naturally exhibits a high volume of Kerberos traffic. Therein lies the primary challenge of detecting Kerberoasting: legitimate service ticket requests (TGS-REQ) are indistinguishable from those issued by attackers. Consequently, the primary detection method relies on correlating indirect indicators rather than signature matching. Key indicators include an anomalous request source (atypical host or user account), a surge in requested SPNs within a short time window, attempts to obtain service tickets for sensitive or privileged service accounts, and off-hour timing or unusual request volume when benchmarked against the historical profile of both the user and the host.
Most of these indicators can be detected using NAD technology, which helps analysts cut through high volumes of Kerberos traffic to establish a concrete hypothesis: who initiated the Kerberoasting attack, which service accounts are at risk, and why this activity deviates from the baseline.
In the context of this attack, the network anomaly stems from a single host – likely using a single user account (cname) – receiving TGS tickets ("msg_type": "KRB_TGS_REP") for numerous unique services with SPNs (sname) within a short timeframe. These service accounts are non-system accounts.
Example of a TGS-REQ – TGS-REP event pair from network session attributes
To detect this anomaly, the NAD rule titled “Signs of a Kerberoasting attack” implements the following logic:
From Kerberos network sessions during the search depth period, select only those with a successful Kerberos TGS-REP response, subject to the following conditions:
The IP address that initiated the session must not be excluded in the excl_sip variable.
The requesting client name (cname) must not be included in the excluded users list (excl_users variable).
The SPN (sname) must not be excluded within the rule. System SPNs are omitted from detection logic because they exist across most corporate environments and hold no interest for adversaries in this attack vector; including them in the total count of unique SPNs could lead to predefined threshold being exceeded, triggering false positives.
Extract the cname (the name of the client requesting the TGS-REQ) and sname (SPN itself) from these qualifying sessions.
Group the sessions by the source IP address and client account name (cname), while aggregating sessions with unique SPNs.
Generate an alert if a single IP address using a single client account receives TGS-REP responses for N unique SPN names within the specified search depth window, where N equals or exceeds the threshold variable count_spns.
Within the event regeneration window, group under the initial alert all subsequent alerts associated with the same client IP address. This avoids creating duplicate event records by incrementing the aggregation counter (Total appearances).
We should note that this type of logic cannot be implemented using IDS signatures. Consider creating a Suricata rule designed to detect Kerberos TGS-REP packets. To minimize false positives, we’ll exclude system SPNs (which carry highly complex passwords) and apply a threshold for the number of responses a single client can receive. However, such a rule cannot evaluate the uniqueness of the requested SPNs; it can only track packet counts. As a result, this signature would produce a high volume of false positives because any domain naturally generates large amounts of identical legitimate TGS-REP messages.
Furthermore, adding exclusions and tuning thresholds to fit your specific infrastructure environments is significantly more practical when managed through user variables in the interface rather than directly modifying the underlying structure of the IDS rule itself.
Creating a Network Anomaly Detection rule
Network Anomaly Detection (NAD) rules are written as SQL queries executed against KATA’s ClickHouse database. Below, we demonstrate how to add and deploy a rule.
To begin working with NAD rules, navigate to the “Custom rules” section of the interface and select “Intrusion detection”. Under the “Network Anomaly Detection” tab, you can create a new rule.
The Network Anomaly Detection page UI
When adding a new rule, an analyst can select an appropriate rule template from the prebuilt set supplied with product updates. They can also manually modify the rule added from the template (converting it to a custom rule while keeping the original template intact) or author a rule from scratch using the provided guide.
Upon selecting a template, the analyst can review the rule description and either adjust or leave the default values for the following settings:
Search depth (the lookback window over which the SQL query will run)
Schedule (the execution frequency for running the query against the specified search depth)
Event regeneration period (the timeframe during which identical alerts will be aggregated into a single record rather than displayed as distinct events)
UI for creating a new NAD rule
To ensure the rule functions correctly, we recommend navigating to the “SQL-specific query” tab before deployment to review the variables used within the rule – a description for each variable is available by hovering over the question mark icon.
The variables are lists of IP addresses, dates, strings or numeric values that define the network infrastructure – such as domain controllers, DNS servers, time ranges, critical segments, and other entities. This allows you to tailor each rule to different network environments and incorporate specific infrastructure characteristics without modifying the underlying logic.
In our example, using variables allows you to adjust the “Signs of a Kerberoasting attack” rule as follows without altering the underlying SQL query:
Exclude the source IP address of the TGS-REQ requests from the scope of detection logic (you can specify a single address, a subnet mask, or a dictionary containing addresses and subnets) as well as the requesting client account (accepts a single value or a dictionary with multiple values).
Adjust the threshold value required to trigger an alert based on the number of unique SPNs in the TGS-REQ messages.
Query contents and variables used in the new rule
On this same page, you can test if the rule is functional prior to saving it.
Rule execution test results
When this rule triggers, an NDR:NAD alert is generated. In the alert card, the analyst can review basic information: IP addresses, ports, and participating network endpoints.
Alert card for the NAD rule
From there, the analyst can navigate to the associated event, which provides a detailed breakdown of the anomaly alongside links to the affected hosts.
NAD rule triggering event
If needed, the analyst can view and export the network sessions associated with the alert. These sessions can be accessed directly from the alert or within the event card via the “Show related” drop-down list.
Network sessions that triggered the rule
Within an individual session, the analyst can inspect standard details including interacting parties, data volume sent and received, and other fields and metrics. On the “Attributes” tab, the analyst can review the specific events recorded within that session.
Network session attributes
Detecting DNS tunneling in KATA
How DNS tunnels work
DNS tunneling is a technique used to transmit data or control malware through firewalls by encoding information within DNS protocol requests and responses. Instead of performing standard name resolution, an infected host transmits data encoded within subdomain strings and receives response data via DNS records. This covert channel can be leveraged for C2 communication, bypassing network restrictions, or data exfiltration.
One method of implementing DNS tunneling involves utilizing TXT records. In this scenario, the client issues DNS TXT record queries for domain names where the right-hand portion of the domain name (the higher-level domains) remains static, while the left-hand portion (the lowest-level subdomain) carries encoded or encrypted data sent from the client to the server. Under this structure, a sample domain name might look like ZFcABQAIBA[.]testlab[.]local, where testlab[.]local serves as the static right-hand portion and ZFcABQAIBA represents the variable left-hand string containing the data transmitted by the client.
In response to these queries, the server delivers commands or messages inside the data field of the TXT response. Because the right-hand portion of the domain name remains static, all client queries are consistently routed to the same C2 server, even if the intermediate DNS resolvers targeted by the client change.
DNS query (left) and corresponding response (right) during DNS tunneling via TXT records
It is rather challenging to identify this malicious activity within DNS traffic without generating false positives. DNS traffic is permitted across almost all corporate networks, long domain names occur routinely in both internal and external environments, and TXT records are frequently leveraged for legitimate operational purposes.
Suspicion is established through a combination of indicators: a high volume of long, seemingly random subdomains associated with a single top-level domain, high request frequency, an unusually large number of unique names, non-standard record types, and significant data transfer volumes within a single DNS session.
By analyzing DNS traffic for threat detection, we identified three primary fields of interest:
Requested DNS name
DNS record type
TXT data field within the response
As shown in the image above, all of these fields are present in the DNS response. In a real-world scenario, a tunnel of this nature will transmit a volume of data that is abnormally large compared to standard DNS traffic.
Data exchange within a DNS tunnel
Thus, in the context of DNS tunneling, a network anomaly occurs when 1) a single query source host sends data embedded in the variable left-hand portion of domain names (rrname) while 2) maintaining a static right-hand portion (rrname) and 3) receives DNS server responses containing TXT records (rtype) with varying data (rdata), while 4) the total volume of data transmitted in the left-hand portion of the requested domain name together with the TXT data response (rdata + rrname) exceeds a predefined threshold.
Request and response events from DNS session attributes
When detecting DNS tunneling, the following nuances must be considered:
A single tunnel will not be constrained to a single DNS session; data may be transmitted across multiple sessions with the DNS server, or each individual request may occur within a separate session.
A client DNS query can contain more than one requested domain name.
A DNS response can contain multiple TXT records, as well as a large volume of various non-TXT record types.
Traffic between DNS servers must be excluded, as it duplicates client requests and can trigger false positives.
Although the factors outlined above (an abnormally large or frequently changing left-hand subdomain alongside a static right-hand domain, or an unusually long string in a TXT record) serve as key indicators of DNS tunneling, they can also occur within legitimate network traffic.
These challenges create a high likelihood of false positives when detecting DNS tunneling, particularly when using IDS-based tools. Writing an accurate IDS rule for this type of activity is practically impossible. With rare exceptions, DNS tunneling tools possess static markers that can be leveraged for signature-based detection. However, in the absence of such markers, signature methods fail to deliver high detection accuracy without generating an overwhelming number of false positives. In these cases, a comprehensive approach combining multiple correlated indicators is essential to improve overall detection quality.
DNS tunneling detection logic
To add a rule for detecting this anomaly, you can use the prebuilt “DNS data tunneling via TXT records” template in the new rule creation interface. The “SQL-specific query” tab will display the list of variables used:
user_DNS_servers: a list of internal DNS server addresses within the infrastructure, required for the rule to function correctly and minimize potential false positives
excl_sip: IP addresses to be excluded from the scope of the rule (you can specify a single address, a subnet mask, or a list containing both addresses and subnets)
traffic_size: the threshold value for the total volume of data (in bytes) transmitted through the tunnel
Variables used in the “DNS data tunneling via TXT records” rule
The detection logic for this network anomaly is structured as follows:
From network sessions using the DNS protocol within the timeframe defined by the rule’s search depth, select only those sessions containing at least one TXT response.
Additionally:
The IP address that initiated the session must not be excluded in the excl_sip variable.
The source IP address that initiated the session must not belong to the internal DNS servers listed in the user_DNS_servers variable.
The DNS names requested by the client must not be excluded within the rule.
Split qualifying DNS sessions into individual log lines, each corresponding to an individual request or response. Retain only DNS responses containing TXT data.
Extract DNS names and their associated TXT data from these DNS responses. Retain only unique values.
Group all resulting records by the session’s source IP address, aggregating all unique DNS names and TXT data blocks.
Generate an alert if the combined size (in bytes) of the unique DNS names and TXT response data for a single IP address within the search depth window exceeds the specified threshold (the traffic_size parameter).
Within the event regeneration window, group under the initial alert all subsequent alerts associated with the same client IP address. This avoids creating duplicate event records by incrementing the aggregation counter (Total appearances).
“DNS data tunneling via TXT records” rule triggering event
The primary value of NAD technology in this scenario lies in noise reduction – by minimizing false positives – and faster investigation times. A DNS tunnel rarely presents itself as a single, blatantly malicious request. Instead, it leaves behind a behavioral footprint: repetition, length, domain structure, unusual record types, numerous subdomains branching off an unchanging root domain, and anomalous host behavior. KATA consolidates these indicators into a single alert, presenting the analyst with an actionable attack hypothesis rather than a set of fragmented DNS events.
Prebuilt rules for detecting network anomalies in KATA
KATA users should note that Network Anomaly Detection (NAD) rules are not enabled by default. Rules must be added manually using the procedure described in the preceding sections. This design ensures that analysts can fine-tune rules to fit specific network infrastructures using variables.
Analysts have three ways of creating new rules:
Adding a rule from a prebuilt template and adjusting custom variables. In this case, the rule is classified as a system rule.
Adding a rule from a prebuilt template and modifying its underlying SQL query (which requires enabling the “Unlock all template values” option) to create a custom rule based on the template. When modified this way, the rule transitions from a system rule to a custom rule.
Authoring a custom rule from scratch, which requires a basic understanding of ClickHouse SQL queries and familiarity with the product documentation.
As of this publication, the product ships with 59 prebuilt NAD rule templates (with additional templates delivered via product updates). KATA supports running up to 200 active rules simultaneously.
Prebuilt rules are divided into six categories:
Large Data Transfers: tracking abnormally large network sessions across various protocols during regular hours, at night, or over weekends.
Suspicious Connections: detecting suspicious connections that may indicate hazardous activity, shadow IT, evasion of attack detection mechanisms, and other threats.
Connections to Suspicious Resources: detects actions that violate security policies, potential data exfiltration beyond the perimeter, and unauthorized internet access originating from secured network segments.
C2 Communication: identifies network sessions characteristic of a potential C2 communication channel or tunnel.
The table below lists the rule templates for detecting network anomalies in KATA:
Rule category
Rule name
Protocols used
Large Data Transfers
Data tunneling in DNS traffic
DNS
ICMP, TCP, UDP, RDP, SSH or LDAP sessions with a large volume of traffic (6 rules)
ICMP, TCP, UDP, RDP, SSH, or LDAP (depends on selected rule)
ICMP, TCP, UDP, RDP, SSH or LDAP sessions with a large volume of traffic at nighttime (6 rules)
ICMP, TCP, UDP, RDP, SSH, or LDAP (depends on selected rule)
ICMP, TCP, UDP, RDP, SSH or LDAP sessions with a large volume of traffic on non-working days (6 rules)
ICMP, TCP, UDP, RDP, SSH, or LDAP (depends on selected rule)
Suspicious Connections
Queries to unknown DNS servers
DNS
Use of unauthorized routes
TCP, UDP
Use of suspicious ports for connections to external addresses
TCP, UDP
Use of non-typical protocols for connections
TCP, UDP, HTTP, HTTPS, DNS, SMTP
Inconsistencies with firewall configuration
TCP, UDP
Use of unauthorized ports for RDP or SSH sessions (2 rules)
RDP or SSH (depends on selected rule)
Interactions with external IP addresses over the RDP or SSH protocol (2 rules)
RDP or SSH (depends on selected rule)
Suspicious RDP sessions with domain controllers
RDP
Connection to an unknown server via Kaspersky Security Center ports
TCP, UDP
Domain Attacks
Signs of a DCSync attack
DCE/RPC
Signs of a DCShadow attack
DCE/RPC
Signs of DHCP spoofing
DHCP
DNS queries to Canarytoken domains
DNS
Signs of a Kerberoasting attack
Kerberos
Signs of an AS-REP Roasting attack
Kerberos
Signs of a brute-force password attack on SSH
SSH
Signs of SOAPHound usage
LDAP
Large-volume Active Directory object data collection via LDAP queries
LDAP
Reconnaissance Activity
Getting information about a task in the Task Scheduler
DCE/RPC
Getting a list of Kerberos users
Kerberos
LDAP queries to rights delegation attribute
LDAP
LDAP queries to attribute for getting administrator passwords
LDAP
Signs of an internal horizontal port scan
TCP, UDP
Signs of an internal vertical port scan
TCP, UDP
DNS zone data replication requests sent from sources other than DNS servers
DNS
Successfully completed requests for DNS zone data replication sent from sources other than DNS servers
DNS
LDAP query targeting a critical attribute of insecure credentials
LDAP
Enumeration of domain accounts via LDAP queries
LDAP
Exceeding the threshold for requested critical attributes in LDAP queries
LDAP
LDAP search queries containing a high number of critical attributes
LDAP
Connections to Suspicious Resources
Queries to unauthorized domain names
DNS
Transmission of large data volumes to cloud storages
TCP, UDP, DNS
Connections to cloud storages or file transfer services
TCP, DNS
Connections to public repositories
TCP, DNS
Connections to resources of programs for traffic tunneling
TCP, DNS
С2 Communication
Possible queries to DGA domains
DNS
DNS data tunneling via TXT records
DNS
Numerous blocked connections to external addresses
TCP, UDP
Conclusion
The examples of Kerberoasting and DNS tunneling clearly demonstrate why modern security defenses cannot rely solely on looking for known signatures and indicators of compromise. Both attack techniques abuse protocols that operate inside corporate networks every day. At the individual event level, they may look like legitimate activity, yet in behavioral context, they stand out as clear indicators of compromise.
NAD directly addresses this gap. Instead of relying purely on signature matches across Kerberos or DNS traffic, it highlights deviations from established baselines: who initiated the activity, how frequently it recurred, which services or domains were targeted, and why that matters for a specific infrastructure.
As a result, analysts gain a clear, actionable starting point for investigation. This capability is especially valuable for spotting the signs of APT group activity, which runs stealthily and is designed to blend in with legitimate operations. The importance of this capability will only grow: as attack techniques evolve, detecting suspicious activity at its earliest stages – before it escalates into critical service compromise or a data breach – becomes increasingly vital.
Virtually every website selling products or services features a live chat widget. It usually appears as a small window in the corner of your screen, complete with an agent’s name and picture.
Sometimes these chats simply collect tickets for tech support or sales to process. But often there’s a real person on the other end of the screen. And here’s where many users get an unwelcome surprise: agents can see absolutely everything you type into the chat box, even if you have no intention of sending it. In this article, we break down why this happens and what you can do about it.
All in the name of customer experience
It’s all thanks to a feature known as live typing preview, or real-time typing view, which exists under one name or another in almost every popular customer chat platform. Here’s how the developer of LiveAgent, a customer support system used by more than 40 000 companies, describes it in its blog: “This live chat typing preview allows agents to anticipate questions and deliver faster responses. Additionally, real-time chat monitoring enables supervisors to oversee chat interactions, ensuring quality and timeliness.”
While that might sound helpful and harmless to some, having their unsent messages watched without their permission can trigger outright panic for others. To make matters worse, it’s almost impossible to tell whether the website uses the feature. That is, unless the chat agent admits it to you directly… or replies to a message you decided not to send.
As an alternative, you can run a quick test: type out a message in the chat box, wait 15 seconds, and see if the agent starts typing a response. If they do, you’re almost certainly dealing with real-time typing view. Whether to continue that conversation is up to you. Most importantly, never type personal information into a chat box — even if you are doing so from a Kaspersky Premium device.
Real-time typing view is just the tip of the iceberg. In reality, websites collect far more information than you might think. You’re likely already familiar with cookies, and have probably asked yourself at least once, “Should I accept these or not?” We answer that and other questions in our post Taking the biscuit: why hackers like cookies so much.
Tracking techniques that use web beacons and tracking pixels are not as widely known. To learn why they’re a concern and how to turn them off, check out our post Who is tracking you on the web and how.
Another technology that remains largely unknown to the general public is session replay scripts. These tools allow website owners to watch a recording of your visit: how fast you moved your cursor, where you clicked, which pages you browsed, and what you added to your shopping cart.
Of course, the primary goal of session replay is the same as real-time typing view: improving customer and user experience. It helps companies analyze your behavior, identify friction points, and make improvements. If a customer fails to complete a checkout or encounters a technical issue, developers can review the recording of their session to pinpoint what went wrong.
In theory, it sounds helpful enough: “We will collect a small amount of data about you to make the site better for you.” In practice, however, this approach comes with significant risks for users.
What’s the catch?
The primary risk here lies in whether websites collect this data legally, how they store it, and whether they share it with anyone. While you can usually gauge legality by reading their privacy policy, the terms of data storage and sharing are often described vaguely.
On top of that, users rarely realize an agent can read their message before it’s actually sent. If you change your mind about asking a question, edit a sentence, or delete your text entirely, that doesn’t mean no one saw the draft. Unlike cookies, opting out of this technology is practically impossible. Most chat widgets simply don’t offer a setting to disable typing previews.
As for tracking pixels, web beacons, and session replays, they’re essentially a form of digital surveillance. Beyond collecting vast amounts of data, they can also slow down your device’s performance. Even worse, if attackers compromise a website’s analytics system, they can gain access to this data, reconstruct your path through the site, and uncover details that can be leveraged in future attacks. To learn more about how scammers pull off these tricks and how social engineering works, check out our post They’re reading you like a book: scammers’ favorite tricks.
While you can’t prevent a potential breach on a third-party website, you can — and should — take steps to secure your own browsing session.
What you can do about it
First and foremost, pay close attention to what you type in a chat box. It’s critical never to share personal data, credit card numbers, logins, passwords, or any other sensitive information with live chat agents.
Beyond that, there’s always a risk of landing on a phishing site and entering your account credentials there. To prevent this, we recommend using our security solutions, which block visits to malicious and suspicious websites. We also suggest storing your credentials in Kaspersky Password Manager — our password manager won’t let you auto-fill saved logins and passwords on a fake site.
Users of Kaspersky Standard, Kaspersky Plus, and Kaspersky Premium have access to our Private Browsing feature (on Windows and macOS). It prevents third-party services from tracking your online activity and collecting real-time information about what you do on websites.
To minimize the risk of data leaks, keep these tips in mind:
Never type anything into a chat box that you aren’t prepared to send. On almost every website, the agent can see your text while you type, so deleting a message is no guarantee it stays private.
Keep in mind that your activity on a website may be recorded. These recordings can capture your clicks, page navigation, and form inputs. Treat every website as if your actions are being watched.
Pay attention to privacy policies. Reputable companies typically state whether they use analytics tools, session recording, or third-party support services.
Approach chat interactions with caution. Real-life rules apply here as well: never share verification codes, passwords, phone numbers, or other sensitive details in a chat.
Be smart about accepting cookies. Taking a moment to check what information a website collects is well worth the effort — it helps you make an informed choice about whether you’re comfortable sharing that data.
Tired of endless digital tracking? Here’s how you can protect yourself and your data:
A new report from the Government Accounting Office reveals that the Department of Homeland Security (DHS) plans to nearly triple the number of surveillance towers along U.S. borders, from the current 830 to 2,300 by 2034.
DHS expects to expend $1 billion in taxpayer dollars for this dangerous expansion of a surveillance network indiscriminately trained on towns, school playgrounds, backyards, and vehicles—threatening the privacy and civil liberties of everyone in the border regions.
The towers are planned as part of DHS component Customs and Border Protection’s (CBP) Integrated Surveillance Tower (IST) program, which captures images of people and vehicles. The IST program operates autonomous surveillance towers, consisting of autonomous surveillance towers, consisting of AI-based systems using radar, thermal infrared and optical systems to track targets over long distances; integrated fixed towers, optimized for surveilling foot traffic and vehicles; and remote video surveillance systems, which can often be found very close to the border fence in Arizona, including residential neighborhoods where cameras are capable of spying on homes on both sides of the border. (For a description and photos of these technologies, see EFF’s updated guide to surveillance at the U.S.-Mexico Border.)
DHS expects to purchase more long-range autonomous towers and to upgrade existing towers with autonomous capabilities. The $1 billion comes from the so-called One Big Beautiful Act—a massive tax and spending law that President Trump signed in 2025, the report says.
The explosive expansion of border surveillance is a digital dumpster fire for human rights and civil liberties. It’s not just surveillance towers; drones, aerostats, surveillance vehicles, ground sensors, game cameras, and license plate readers are also part of the vast taxpayer-funded infrastructure that threatens all those who live, work, or seek refuge in the borderlands. This technology isn’t exclusive to U.S. federal agencies: it’s also deployed by state and local law enforcement, and even by governments on the Mexican side.
Since 2022, EFF has studied and mapped surveillance technology along the U.S.-Mexico border using public records research, open-source intelligence, and fact-finding trips, and created a handy interactive map to provide researchers and journalists with the tools they need to analyze the impact of U.S. border security policy. We have also documented the different types of surveillance technology in a zine, "Surveillance Technology at the U.S.-Mexico Border." We updated the publication earlier this year to help people identify the machinery of homeland security by adding more models of surveillance towers, newly deployed military tech, and a gallery of disguised trail cams and automated license plate readers.
EFF’s work includes defending the rights of individuals whose devices have been searched or seized upon entering the country; pushing back on the collection of biometric and social media identifiers; and developing digital security guidance for people crossing borders.
With the web of surveillance tech at the borders about to explode, EFF will continue to investigate and expose it and find ways to fight back with the communities that live in the shadow of this technological threat to human rights.
When targeting an organization to steal information, maintaining a low profile is critical for attackers. They typically aim for long-term persistence, which requires avoiding security alerts while preserving access in case they’re detected and the organization initiates incident response or routine password resets. Malware such as infostealers or ostensibly legitimate remote monitoring and management (RMM) tools fail the first requirement: their use triggers EDR and generates suspicious events in SIEM consoles. Relying on stolen credentials conflicts with the second requirement: the moment the security team suspects a compromise, passwords can be changed immediately — terminating access. If attackers attempt to steal browser cookies instead of passwords, they face a different challenge: many online services now correlate device characteristics with the expected session cookie and block access if the cookie is used on an unrecognized device. Furthermore, cookie theft protection mechanisms implemented in Chromium-based browsers (such as Chrome, Edge, and Opera) this year have made this approach significantly more difficult.
To address this persistence challenge, the ToddyCat APT — whose main game is spying — developed a novel technique. Kaspersky experts discovered this method during an incident investigation and named it Shadow Token via Remote Debug (STRD). This technique allows the attackers to establish reliable, persistent access to a victim’s mailbox and other resources in Google Workspace. With minor adjustments, the same approach could potentially be adapted to target other services that grant third-party application access via OAuth 2.0 authentication.
How an STRD attack works
First, the attackers must compromise the victim’s system with malware. In past campaigns, ToddyCat gained initial access to organizations by exploiting known vulnerabilities in server software and distributing malicious loaders via messaging apps. The specific employee targeted by the attackers might not notice the intrusion at all. This can occur, for example, if the adversary first obtains privileged administrative credentials and uses them to deploy the malware onto targeted machines remotely. Crucially, the deployment and execution of this malware mustn’t trigger immediate security alerts.
Once active, the malware executes an STRD attack, connecting the attackers’ remote service to the victim’s mailbox using the OAuth 2.0 protocol. This process requires no user interaction and shows no visible activity on the screen. To the cloud environment (Google Workspace, in the case at hand), the activity appears as if the user has legitimately authorized a third-party app for email access or data backup.
After that, the malware can terminate its operations and even delete itself from the system. The adversary retains direct access to the mailbox using the acquired OAuth token — and they need no connection to the victim’s endpoint or to the corporate network for that. Depending on the organization’s Google Workspace configuration, this access can persist for an extended period and survive subsequent password resets.
The core concept of Shadow Token via Remote Debug
At the heart of this attack is a connection to Google Workspace services via OAuth 2.0. This is a legitimate workflow used whenever a third-party application requests access to calendar data, emails, or Google Drive files. For example, to display calendar meetings in Zoom and automatically generate conference links, a user must authorize Zoom to access Google services. Similarly, configuring a third-party email client or calendar app requires granting permission. During this authorization process, the service requesting access opens a new browser window. In this window, Google Workspace first prompts the user to select the appropriate account. Once the account is chosen, the subsequent screen displays the specific permissions requested by the third-party app, allowing the user to either approve or deny access. For this scenario to proceed seamlessly, the user must already be authenticated to Google services in their browser — which is typically the case in organizations using Google Workspace. If the user isn’t authenticated, additional steps for entering credentials and completing multi-factor authentication are introduced into the sequence.
The ToddyCat hackers developed a malicious tool called Umbrij to facilitate a two-step covert authorization process when the user is already authenticated in Google. First, the malware identifies the browsers installed on the system, and locates the specific folder storing the user’s active profile for each. The attackers target Chrome and Edge, as these are the browsers most likely serving as the primary ones within the organization.
Next, Umbrij copies the entire user profile folder to a different directory on the machine. It then launches an instance of the browser, specifying the path to the duplicated profile via the command line. Because this duplicate profile contains the user’s session cookies, websites with saved credentials won’t prompt for re-authentication. Furthermore, since this occurs on the exact same computer where the primary browser is running, online services detect no anomalies. The browsing history for this newly launched instance is isolated within the new folder, keeping it hidden from the user’s main account activity.
Crucially, the browser is launched in a dedicated debugging mode typically reserved for web development. The browser window and user interface don’t appear on the screen at all (headless mode). Instead, the browser can be controlled through a debugging port using the DevTools protocol, allowing the malware to issue commands and read the state of the screen. To orchestrate these actions, Umbrij leverages Puppeteer, a legitimate automation library.
After verifying that the debugging browser instance has launched successfully, Umbrij opens a legitimate Google Workspace OAuth screen within it. The request sent to Google is engineered to bypass additional security checks while requesting maximum access privileges. For the application ID — the identity supposedly requesting these extensive permissions — the malware impersonates one of two legitimate tools: Google Workspace Migration for Microsoft Outlook (GWMMO), or Google Workspace Sync for Microsoft Outlook (GWSMO).
When Google opens the window within the headless browser, Umbrij uses debugging tools to programmatically click on the corporate account name and the confirmation buttons. As a result, Google generates an authorization code for the app. Umbrij extracts and saves this code, subsequently forwarding it to the attackers’ command-and-control server. Finally, operating entirely within their own infrastructure rather than on the victim’s computer, the attackers exchange this authorization code for an OAuth access token. This single token is all they need to maintain long-term unrestricted access to the mailbox.
How to protect against OAuth token theft
If a Google Workspace account is compromised, incident response measures must include the following steps after collecting the necessary logs and other forensic data for investigation:
Resetting the affected user’s password
Terminating all active web sessions for the user
Revoking OAuth tokens and third-party app permissions
Reviewing and removing access granted through legacy App Passwords
In addition, security and IT teams must systematically audit issued OAuth permissions, revoke unjustifiable access rights, and restrict capabilities that allow excessive or unauthorized permission grants. We covered this topic in detail in our article on blocking unwanted AI assistants.
How to prevent exploitation of Shadow Token via Remote Debug
While Kaspersky users are protected against the Umbrij tool, security teams should proactively implement policies that prevent standard users from launching browsers in debugging mode. This functionality is intended exclusively for website and web app developers. This restriction can be enforced through the DeveloperToolsAvailability group policy (available for both Chrome and Edge).
Additionally, configure monitoring within your SIEM/XDR to track the launch of browser instances with an active debugging port. This event serves as a strong indicator of this specific attack technique.
Thalha Jubair, 20, and Owen Flowers, 19, sentenced to five and a half years each for cyber-attack that cost Transport for London £39m
The data of millions of commuters was stolen, Londoners were left out of pocket and 27,000 Transport for London staff were forced to reset their passwords.
Over four days in 2024 a pair of teenage hackers had London’s transport network at their mercy. Thalha Jubair and Owen Flowers had burrowed into the heart of Transport for London’s IT systems and held the “keys to the kingdom”.
Signal agencies in Australia, the US, the UK, New Zealand and Canada sound alarm after Trump blocks foreign nationals from Anthropic’s Fable AI model
Powerful AI models capable of devastating new cyber attacks on governments and businesses are mere months away, intelligence agencies for the Five Eyes have warned in a rare joint statement, urging leaders to “act now”.
OpenAI appears to be testing a new subscription and experience for science use cases, but it's unclear if it'll be available to everyone regardless of their background. [...]
The long-running series in which readers answer other readers’ questions on subjects ranging from trivial flights of fancy to profound scientific and philosophical concepts
I’ve been struggling to get my head around the idea that a passkey, which can be a pin on your phone, or facial recognition, can be safer than using a complicated password and two-factor authentication.
I get that having something unique to your device, not stored on a company’s server, is unphishable and less hackable by cybercrims, but what if your phone is nicked and someone guesses the password? And what if you lose your phone?
Tech company says it ‘caught and disrupted’ NSO Group’s attempts to access accounts in Jordan and Lebanon
A spyware firm has been targeting WhatsApp users with malicious links in contravention of a US court order forbidding it from doing so, Meta has said.
In a post, Meta said WhatsApp had “caught and disrupted spear phishing attempts” by NSO Group, which a spokesperson said targeted a handful of users in Jordan and Lebanon. It had also caught the group creating “test accounts and groups” on WhatsApp.

 Login