❌

Normal view

How to protect your data after a breakup | Kaspersky official blog

20 July 2026 at 14:45

A breakup is a major upheaval β€” the kind that turns life upside down. The familiar order of things, where two people shared the same interests, moments, and often even the same physical space, collapses in an instant, leaving each of you in a world of your own.

Besides that, couples are connected not just in real life, but digitally too. Shared subscriptions, saved addresses and passwords, access to joint cloud storageΒ β€” all of that used to be woven into your day-to-day life. Moving on emotionally can take a long time, sure, but there are steps you can take right now that will tighten up your security β€” even if they won’t help you get over your ex.

Here’s what you need to check after a breakup, which services to disconnect, and why you should do it even if the split was amicable.

Digital hygiene: your insurance policy

Cutting off your ex’s access to your online accounts isn’t paranoiaΒ β€” it’s looking out for your own security. A breakup doesn’t automatically sever your digital ties: any access you granted each other during the relationship stays active until someone manually shuts it down. Most of the time, nobody’s plotting to actually exploit it, yet it can still lead to anything from awkward moments to a genuine risk of being tracked.

Take Aleta Dignard-Fung, of Las Vegas, who told NPR that after breaking up with her boyfriend, it didn’t immediately occur to her that he still knew her Spotify password. One day, in the shower with music playing, she noticed her playlist suddenly switch. Her ex had logged in from another device and started playing his own chosen tracks. β€œIt was just kind of like the Spotify wars, and we’d just spend like 10 minutes trying to override each other’s songs,” she admitted. But the fallout isn’t always this lighthearted.

Relationship coach Susan Winter shared a case from her own practice in that same interview. One of her clients simply couldn’t let go of his ex-girlfriend after their breakup. The two had shared an OpenTable accountΒ β€” the restaurant reservation serviceΒ β€” and she’d never revoked his access. He started tracking her bookings: where she was going, what time, how many people. That’s how he kept tabs on whether someone new had entered her life.

These two stories, while showing very different behavior from the exes involved, both trace back to the same root cause: accounts that were never properly locked down. In the former case, it led to an awkward moment. In the latter, it led to anxiety and a real sense of being watched. To make sure neither scenario happens to you, it’s worth running through a quick checklist.

Terminate your partner’s sessions

In the settings for your social media, messaging apps, email, and other key services, pull up the list of active sessions and log out everything except your current devices.

Change your passwords

Update the passwords to any key accounts your partner might have known β€” say, if you used a meaningful date as your password. If you reused the same password across multiple services, change it everywhere. While you’re at it, review your security questions and your backup email or phone number for account recovery β€” neither should still be tied to your ex. To skip the hassle of memorizing new credentials while still leveling up your security, we recommend using a password managerΒ β€” it’ll generate a unique, strong password for every account, and save and sync it across all your devices; the only thing you need to remember is a single main password.

Check two-factor authentication and trusted devices

Make sure verification codes only go to your own device. Remove your partner’s devices from your trusted listΒ β€” you can do this in your Apple and Google account settings.

Split up your shared Apple/Google accounts

If you shared an Apple or Google account, sign out of that. Turn off Family Sharing, iCloud, and backups. Check your shared photo albums tooΒ β€” anything that lands there automatically is visible to your ex as well.

Review your subscriptions

If you shared subscriptionsΒ β€” streaming services, family plans, that kind of thingΒ β€” cancel them or set up new ones and link your own card.

Check your bank cards

If your ex’s card is linked to a marketplace, delivery app, or rideshare service account you own, remove it from your saved payment methods. If your card is linked to their account and you no longer have access to it, the safest move is to just get your card reissued.

Revoke smart home access

Cut off your ex’s access to cameras, video doorbells, GPS trackers, and smart speakers. If the devices were on a shared account, change the password or move them over to your own personal account.

Review your privacy settings

Check the privacy settings across your accounts on various services and social media using our free online tool, Privacy Checker. It walks you through a privacy configuration tailored to your operating system, platform, and even your browser.

If you notice signs of stalking

Reach out to advocacy or legal aid organizations β€” they can help you map out the best course of action. It’s also worth leaning on family and close friends who can support you through a tough situation. On Android devices, you can use our security suiteΒ with the Who’s Spying on Me feature. It’s designed to help you detect tracking and stalking so you can take the right steps to protect yourself. The feature includes:

  • Stalkerware Detection. Flags apps designed to secretly monitor your life and collect data you’d never want shared with anyone else.
  • Device Scanner. Finds planted trackers that let someone follow your movements and always know where you are.
  • Permissions Control. Shows which apps have access to permissions that could make it easier for someone to spy on you or compromise your privacy.

What can actually helpΒ β€” and what might make things worseΒ β€” during this difficult time? Check out our other posts:

Email hijacking via OAuth | Kaspersky official blog

17 July 2026 at 18:18

When targeting an organization to steal information, maintaining a low profile is critical for attackers. They typically aim for long-term persistence, which requires avoiding security alerts while preserving access in case they’re detected and the organization initiates incident response or routine password resets. Malware such as infostealers or ostensibly legitimate remote monitoring and management (RMM) tools fail the first requirement: their use triggers EDR and generates suspicious events in SIEM consoles. Relying on stolen credentials conflicts with the second requirement: the moment the security team suspects a compromise, passwords can be changed immediately β€” terminating access. If attackers attempt to steal browser cookies instead of passwords, they face a different challenge: many online services now correlate device characteristics with the expected session cookie and block access if the cookie is used on an unrecognized device. Furthermore, cookie theft protection mechanisms implemented in Chromium-based browsers (such as Chrome, Edge, and Opera) this year have made this approach significantly more difficult.

To address this persistence challenge, the ToddyCat APTΒ β€” whose main game is spyingΒ β€” developed a novel technique. Kaspersky experts discovered this method during an incident investigation and named it Shadow Token via Remote Debug (STRD). This technique allows the attackers to establish reliable, persistent access to a victim’s mailbox and other resources in Google Workspace. With minor adjustments, the same approach could potentially be adapted to target other services that grant third-party application access via OAuth 2.0 authentication.

How an STRD attack works

First, the attackers must compromise the victim’s system with malware. In past campaigns, ToddyCat gained initial access to organizations by exploiting known vulnerabilities in server software and distributing malicious loaders via messaging apps. The specific employee targeted by the attackers might not notice the intrusion at all. This can occur, for example, if the adversary first obtains privileged administrative credentials and uses them to deploy the malware onto targeted machines remotely. Crucially, the deployment and execution of this malware mustn’t trigger immediate security alerts.

Once active, the malware executes an STRD attack, connecting the attackers’ remote service to the victim’s mailbox using the OAuth 2.0 protocol. This process requires no user interaction and shows no visible activity on the screen. To the cloud environment (Google Workspace, in the case at hand), the activity appears as if the user has legitimately authorized a third-party app for email access or data backup.

After that, the malware can terminate its operations and even delete itself from the system. The adversary retains direct access to the mailbox using the acquired OAuth tokenΒ β€” and they need no connection to the victim’s endpoint or to the corporate network for that. Depending on the organization’s Google Workspace configuration, this access can persist for an extended period and survive subsequent password resets.

The core concept of Shadow Token via Remote Debug

At the heart of this attack is a connection to Google Workspace services via OAuth 2.0. This is a legitimate workflow used whenever a third-party application requests access to calendar data, emails, or Google Drive files. For example, to display calendar meetings in Zoom and automatically generate conference links, a user must authorize Zoom to access Google services. Similarly, configuring a third-party email client or calendar app requires granting permission. During this authorization process, the service requesting access opens a new browser window. In this window, Google Workspace first prompts the user to select the appropriate account. Once the account is chosen, the subsequent screen displays the specific permissions requested by the third-party app, allowing the user to either approve or deny access. For this scenario to proceed seamlessly, the user must already be authenticated to Google services in their browserΒ β€” which is typically the case in organizations using Google Workspace. If the user isn’t authenticated, additional steps for entering credentials and completing multi-factor authentication are introduced into the sequence.

The ToddyCat hackers developed a malicious tool called Umbrij to facilitate a two-step covert authorization process when the user is already authenticated in Google. First, the malware identifies the browsers installed on the system, and locates the specific folder storing the user’s active profile for each. The attackers target Chrome and Edge, as these are the browsers most likely serving as the primary ones within the organization.

Next, Umbrij copies the entire user profile folder to a different directory on the machine. It then launches an instance of the browser, specifying the path to the duplicated profile via the command line. Because this duplicate profile contains the user’s session cookies, websites with saved credentials won’t prompt for re-authentication. Furthermore, since this occurs on the exact same computer where the primary browser is running, online services detect no anomalies. The browsing history for this newly launched instance is isolated within the new folder, keeping it hidden from the user’s main account activity.

Crucially, the browser is launched in a dedicated debugging mode typically reserved for web development. The browser window and user interface don’t appear on the screen at all (headless mode). Instead, the browser can be controlled through a debugging port using the DevTools protocol, allowing the malware to issue commands and read the state of the screen. To orchestrate these actions, Umbrij leverages Puppeteer, a legitimate automation library.

After verifying that the debugging browser instance has launched successfully, Umbrij opens a legitimate Google Workspace OAuth screen within it. The request sent to Google is engineered to bypass additional security checks while requesting maximum access privileges. For the application IDΒ β€” the identity supposedly requesting these extensive permissionsΒ β€” the malware impersonates one of two legitimate tools: Google Workspace Migration for Microsoft Outlook (GWMMO), or Google Workspace Sync for Microsoft Outlook (GWSMO).

When Google opens the window within the headless browser, Umbrij uses debugging tools to programmatically click on the corporate account name and the confirmation buttons. As a result, Google generates an authorization code for the app. Umbrij extracts and saves this code, subsequently forwarding it to the attackers’ command-and-control server. Finally, operating entirely within their own infrastructure rather than on the victim’s computer, the attackers exchange this authorization code for an OAuth access token. This single token is all they need to maintain long-term unrestricted access to the mailbox.

How to protect against OAuth token theft

If a Google Workspace account is compromised, incident response measures must include the following steps after collecting the necessary logs and other forensic data for investigation:

  • Resetting the affected user’s password
  • Terminating all active web sessions for the user
  • Revoking OAuth tokens and third-party app permissions
  • Reviewing and removing access granted through legacy App Passwords

In addition, security and IT teams must systematically audit issued OAuth permissions, revoke unjustifiable access rights, and restrict capabilities that allow excessive or unauthorized permission grants. We covered this topic in detail in our article on blocking unwanted AI assistants.

How to prevent exploitation of Shadow Token via Remote Debug

While Kaspersky users are protected against the Umbrij tool, security teams should proactively implement policies that prevent standard users from launching browsers in debugging mode. This functionality is intended exclusively for website and web app developers. This restriction can be enforced through the DeveloperToolsAvailability group policy (available for both Chrome and Edge).

Additionally, configure monitoring within your SIEM/XDR to track the launch of browser instances with an active debugging port. This event serves as a strong indicator of this specific attack technique.

Introducing OAuth Support for AWS MCP Server

10 July 2026 at 01:43

You can now connect your agents to the AWS MCP Server using the same credentials and sign-in methods that you already use for connecting to the AWS Management Console or AWS Command Line Interface (AWS CLI) through a familiar browser-based experience powered by industry-standard OAuth. This new sign-in path supports AWS Identity and Access Management (IAM) federation, AWS IAM Identity Center, and root or IAM users.

In addition, AWS is introducing several new security and governance tools, including: new global condition keys for OAuth, token introspection and revocation, dynamic client registration, new AWS CloudTrail elements, and a new API for headless OAuth connectivity. All of this is compatible with your existing IAM configuration including permissions, roles, and federated access.

In this post, you’ll learn how to connect your agents to the AWS MCP Server, understand how AWS Sign-In authorizes agent access, and manage access using new security and governance capabilities.

How to connect an agent to the AWS MCP Server

This walkthrough uses Claude Code, but the same steps apply to any agent that supports Model Context Protocol (MCP) such as Kiro, Codex, and Gemini. See Setting up the AWS MCP Server for how to connect the AWS MCP Server to an agent.

Prerequisite permissions

To connect an agent to the AWS MCP Server, you’ll need the IAM permissions required for OAuth-based sign-in. The following AWS CLI command adds a managed policy with required permissions to your IAM role (remember to replace <MyRole> with your IAM role):

aws iam attach-role-policy \
  --role-name <MyRole> \
  --policy-arn arn:aws:iam::aws:policy/AWSMCPSignInOAuthAccessPolicy

Step 1: Configure the AWS MCP Server on your agent

Run the following command to add the AWS MCP Server endpoint to your agent’s configuration as shown in Figure 1:

claude mcp add --transport http aws-mcp https://aws-mcp.us-east-1.api.aws/mcp

Figure 1: Adding the AWS MCP Server endpoint to Claude Code

Figure 1: Adding the AWS MCP Server endpoint to Claude Code

Step 2: Review the authorization request

The first time your agent needs to access the AWS MCP Server, it opens a browser and redirects you to an AWS Sign-In page, shown in Figure 2. Authenticate as you would on AWS console or AWS CLI, review the authorization request, and approve access. You should receive an Authorization successful message.

Figure 2: Review authorization request

Figure 2: Review authorization request

Note that if you already have an active AWS Sign-In session (e.g., because you previously signed in to the console earlier in the day), you can reuse that session without needing to sign in again.

Step 3: Start using AWS tools

After connecting your agent to the AWS MCP Server, you can begin invoking tools provided by the server. To verify that Claude Code is connected to the AWS MCP Server, start Claude Code and run the following command:

/mcp

The command displays the configured MCP servers and confirms that the AWS MCP Server is connected and ready to use with your AWS credentials.

Figure 3 shows an example of a successful connection to the AWS MCP Server.

Figure 3: Verifying the AWS MCP Server connection in Claude Code

Figure 3: Verifying the AWS MCP Server connection in Claude Code

After the connection is established, you can ask Claude Code to invoke tools provided by the AWS MCP Server. For example, enter the following prompt:

Deploy a sample serverless web application into my development AWS account

Claude Code uses the AWS MCP Server to identify the active AWS account, confirm the target account, and describe the deployment it plans to perform before invoking AWS services on your behalf.

Figure 4 shows Claude Code confirming the active AWS account and outlining the resources that will be deployed.

Figure 4: Using Claude Code to deploy a sample serverless application through the AWS MCP Server

Figure 4: Using Claude Code to deploy a sample serverless application through the AWS MCP Server

Authorization models and how they work

AWS Sign-In supports two authorization models for connecting agents to the AWS MCP Server:

  • Interactive authorization for developers’ AI agents using browser based authentication
  • Non-interactive (headless) authorization for applications and AI agents that already have AWS credentials and don’t have access to a browser

Note that authorizing an agent allows it to access the AWS MCP Server on your behalf. It doesn’t grant the agent additional AWS permissions. Every request is still evaluated using your existing IAM policies, SCPs, RCPs, permission boundaries, and other organizational controls.

Interactive access

In the interactive case, the agent first discovers the AWS Sign-In OAuth server and then registers itself as an OAuth client using Dynamic Client Registration (DCR). It then redirects you to an AWS Sign-In page where you authenticate and authorize access (step 2 in the preceding section). After successful authorization, AWS Sign-In then issues short-lived access tokens and refresh tokens that authorize the agent to access the AWS MCP Server on your behalf. AWS Sign-In automatically manages token issuance and token refresh, enabling authorized agents to continue accessing the AWS MCP Server without requiring you to repeatedly sign in.

The interactive authorization model supports three distinct sign-in methods: native AWS IAM credentials for individual developers, managed access through AWS IAM Identity Center for enterprises, and seamless federated access via third-party providers like Okta and Ping Identity for larger organizations.

OAuth server metadata and DCR

Before an agent can request authorization, it must discover the AWS Sign-In OAuth endpoints and register itself as an OAuth client. AWS Sign-In supports OAuth metadata discovery and DCR, allowing supported agents to configure themselves automatically without requiring developers to manually provision OAuth client IDs and client secrets. When an agent connects to the AWS MCP Server for the first time, it retrieves the AWS MCP Server’s protected resource metadata (RFC 9728) and the AWS Sign-In OAuth metadata (RFC 8414). The agent then uses (RFC 7591) to register with AWS Sign-In, obtain a client ID, and initiate the standard OAuth authorization code flow.

AWS Sign-In supports OAuth discovery and DCR for agents running on local workstations and supported hosted environments. For the current list of supported agents and environments, see Supported redirect URIs for the AWS MCP Server.

Non-interactive access to the AWS MCP Server

Non-interactive (headless) authorization is for agents and applications that run without a browser or human in the loop, and thus don’t require interactive sign-in. This allows agents that already have AWS credentials to obtain OAuth access tokens and connect to the AWS MCP Server. The following is an example of how to obtain an access token.

aws signin create-oauth2-token-with-iam \ 
--grant-type client_credentials \ 
--resource aws-mcp.amazonaws.com \  
--region us-east-1 
{ 
"accessToken": "ASOA****************************************...", 
"tokenType": "Bearer", 
"expiresIn": 3600 
}

In the non-interactive case, AWS Sign-In implements the OAuth client credentials grant using AWS security credentials instead of a static client secret. Applications authenticate to the AWS Sign-In token endpoint using SigV4 creds, and AWS Sign-In returns a short-lived OAuth access token that can be used to access the AWS MCP Server.

Please note you may have to update the SDK and AWS CLI, please refer to CLI guide.

Managing OAuth access

AWS Sign-In extends the existing IAM authorization model with capabilities for governing OAuth access to the AWS MCP Server. Administrators can use familiar IAM policies together with new OAuth-specific controls.

Granting OAuth permissions

OAuth access is governed using IAM policies and requires the following IAM actions:

  • signin:AuthorizeOAuth2Access – Allows users to sign in interactively using the OAuth authorization code flow
  • signin:CreateOAuth2Token – Allows applications to obtain OAuth access tokens by exchanging authorization codes, refresh tokens, or using client credentials

When an application requests access, AWS Sign-In creates an OAuth authorization grant between the agent and the AWS MCP Server. This grant is represented as an IAM resource, which the preceding AWS Sign-In actions are authorized against.

arn:aws:signin:us-east-1:012345678910:service-principal/aws-mcp.amazonaws.com

OAuth authorization grants are represented as an IAM resource enabling administrators to use standard IAM policy constructs, including global condition keys, together with OAuth-specific condition keys to control how authorization grants are created and used.

Governing OAuth access

AWS Sign-In introduces OAuth-specific condition keys that allow administrators to govern how agents obtain OAuth authorization. The following examples demonstrate common governance patterns.

To restrict OAuth authorization to localhost:

In addition to accessing the AWS MCP Server with agents on your local workstation, AWS supports signing into the AWS MCP Server on select hosted providers through dynamic client registration. Click here to view the list of supported remote providers. Many organizations want to allow developers to authorize agents running on their local workstations while preventing OAuth tokens from being delivered to untrusted redirect URIs or using unsupported authorization flows. The following policy allows only the OAuth authorization code and refresh token flows for the AWS MCP server and restricts token delivery tolocalhost.

{
  "Version": "2012-10-17",
  "Statement": [
    {
      "Effect": "Allow",
      "Action": [
        "signin:AuthorizeOAuth2Access",
        "signin:CreateOAuth2Token"
      ],
      "Resource": "arn:aws:signin:*:*:service-principal/aws-mcp.amazonaws.com",
      "Condition": {
        "StringLike": {
          "signin:OAuthRedirectUri": "http://localhost:*"
        },
        "StringEquals": {
          "signin:OAuthGrantType": [
            "authorization_code",
            "refresh_token"
          ]
        }
      }
    }
  ]
}

To deny access for a specific OAuth session

Use the aws:SignInSessionArn global condition key to deny authorization associated with a specific sign-in session. This allows administrators to contain a suspicious or compromised authorization session without affecting other active sessions.

{
  "Version": "2012-10-17",
  "Statement": [
    {
      "Effect": "Deny",
      "Action": [
        "*"
      ],
      "Resource": "*",
      "Condition": {
        "ArnEquals": {
          "aws:SignInSessionArn": "arn:aws:signin:us-east-1:111122223333:session/abc123-example-session-id"
        }
      }
    }
  ]
}

These examples demonstrate common governance patterns. Additional IAM and SCP examples are available in the AWS Sign-In condition keys reference.

Revoking OAuth tokens

AWS Sign-In provides OAuth token introspection and token revocation APIs that allow administrators to build custom tools for token validation and revocation. Access to these APIs is controlled through the signin:IntrospectOAuth2Token and signin:RevokeOAuth2Token permissions. IAM principals with permissions are allowed to introspect and revoke tokens for the same account.

The introspection API can be used to determine whether a token is active and obtain information about the associated authorization. The revocation API allows administrators and security tools to revoke individual refresh tokens without affecting other active sessions. For example, if an organization needs to invalidate access for a specific OAuth authorization, account admins can revoke the associated refresh token without affecting other active sessions.

Monitoring OAuth activity

OAuth-related activities are recorded in AWS CloudTrail, including authorization requests, token issuance, token revocation, and token introspection events. CloudTrail logs also capture details such as the OAuth client, target the AWS MCP Server, redirect URI, authorization flow, and associated sign-in session. In addition, AWS API calls made using OAuth access tokens include the associated aws:SignInSessionArn context, allowing organizations to correlate API activity with the originating OAuth sign-in session.

This allows security teams to monitor OAuth usage, investigate authorization activity, detect anomalous behavior, and integrate OAuth events into existing auditing, compliance, and incident response workflows alongside other AWS activity.

Here’s a CloudTrail sample for an AuthorizeOAuth2Access event:

{
    "eventVersion": "1.11",
    "userIdentity": {
        "type": "AssumedRole",
        "principalId": "AROATJHQDX737YZP****:testuser",
        "arn": "arn:aws:sts::111111111111:assumed-role/Admin/testuser",
        "accountId": "111111111111",
        "sessionContext": {
            "sessionIssuer": {
                "type": "Role",
                "principalId": "AROA2IRT4N5U4RDHM2LG4",
                "arn": "arn:aws:iam::111111111111:role/Admin",
                "accountId": "111111111111",
                "userName": "Admin"
            },
            "attributes": {
                "creationDate": "2026-06-09T05:06:39Z",
                "mfaAuthenticated": "false"
            }
        }
    },
    "eventTime": "2026-06-09T05:09:00Z",
    "eventSource": "signin.amazonaws.com",
    "eventName": "AuthorizeOAuth2Access",
    "awsRegion": "us-west-2",
    "sourceIPAddress": "192.0.0.2",
    "userAgent": "Mozilla/5.0 (Macintosh; Intel Mac OS X 10_15_7) AppleWebKit/537.36 (KHTML, like Gecko) Chrome/149.0.0.0 Safari/537.36",
    "requestParameters": {
        "resource": "https://aws-mcp.us-west-2.api.aws/mcp",
        "redirect_uri": "http://127.0.0.1:60432/oauth/callback",
        "code_challenge_method": "S256",
        "client_id": "arn:aws:signin:us-west-2::external-client/dcr/609544da-aasa-49a4-ab11-c2r457fa999"
    },
    "responseElements": null,
    "additionalEventData": {
        "success": "true"
    },
    "requestID": "4fb4ff7b-6yu7-9090-78i9-9c0088a65134",
    "eventID": "bb05b222-31ec-4237-b8e7-8eb26d4fd48b",
    "readOnly": true,
    "eventType": "AwsApiCall",
    "managementEvent": true,
    "recipientAccountId": "111111111111",
    "eventCategory": "Management",
    "tlsDetails": {
        "tlsVersion": "TLSv1.3",
        "cipherSuite": "TLS_AES_128_GCM_SHA256",
        "clientProvidedHostHeader": "us-west-2.oauth.signin.aws"
    }
}

Here’s a CloudTrail sample for a CreateOAuth2Token event:

{
    "eventVersion": "1.11",
    "userIdentity": {
        "type": "AssumedRole",
        "principalId": "AROATJHQDX737YZP7****:testuser",
        "arn": "arn:aws:sts::111111111111:assumed-role/Admin/testuser",
        "accountId": "111111111111",
        "sessionContext": {
            "sessionIssuer": {
                "type": "Role",
                "principalId": "AROA2IRT4N5U4RDHM****",
                "arn": "arn:aws:iam::111111111111:role/Admin",
                "accountId": "111111111111",
                "userName": "Admin"
            },
            "attributes": {
                "creationDate": "2026-06-09T05:06:39Z",
                "mfaAuthenticated": "false"
            },
            "signInSessionArn":"arn:aws:signin:us-west-2:111111111111:session/daff060f-7871-5tg6-67yu-a07bbdabe61a"
            
        }
    },
    "eventTime": "2026-06-09T05:10:04Z",
    "eventSource": "signin.amazonaws.com",
    "eventName": "CreateOAuth2Token",
    "awsRegion": "us-west-2",
    "sourceIPAddress": "192.0.0.2",
    "userAgent": "curl/8.7.1",
    "requestParameters": {
        "resource": "https://aws-mcp.us-west-2.api.aws/mcp",
        "client_id": "arn:aws:signin:us-west-2::external-client/dcr/609544da-b3dd-49a4-ab11-c2e98d7fa999"
    },
    "responseElements": null,
    "additionalEventData": {
        "signInSessionArn": "arn:aws:signin:us-west-2:111111111111:session/daff060f-7871-5tg6-67yu-a07bbdabe61a",
        "grant_type": "refresh_token",
        "success": "true"
    },
    "requestID": "44d6d7ce-e4r5-4cbf-0909-bfb8a8295a76",
    "eventID": "f79cc63f-b383-4e3c-a1e5-97c7db1ab833",
    "readOnly": true,
    "eventType": "AwsApiCall",
    "managementEvent": true,
    "recipientAccountId": "111111111111",
    "eventCategory": "Management",
    "tlsDetails": {
        "tlsVersion": "TLSv1.3",
        "cipherSuite": "TLS_AES_128_GCM_SHA256",
        "clientProvidedHostHeader": "us-west-2.oauth.signin.aws"
    }
}

Additional audit events and logging details for calls made using OAuth access tokens to the AWS MCP Server can be found in Logging AWS MCP Server API calls using AWS CloudTrail.

Conclusion

AWS Sign-In support for OAuth enables you to securely connect to the AWS MCP Server using industry-standard authorization. This release simplifies application and agent integration with AWS while supporting your existing IAM setup, governance, and auditing capabilities.

To learn more, see Sign-In with OAuth 2.0 in the AWS Sign-In User Guide and Setting up the AWS MCP Server in the Agent Toolkit for AWS User Guide.

If you have feedback about this post, submit comments in the Comments section below.


Vaibhav Chowla

Vaibhav Chowla

Vaibhav is a Senior Technical Product Manager at AWS, specializing in AWS Identity products. He focuses on enhancing user authentication and security, helping customers of all sizes solve complex identity and access management (IAM) challenges. Outside of technology, Vaibhav enjoys traveling and exploring new cultures and cuisines.

Jaimin Bhatt

Jaimin Bhatt

Jaimin is a Principal Software Engineer at AWS. He works on AWS Identity and Access Management (IAM) across sign-in, threat detection, and the authentication and authorization that secures access to AWS. Jaimin is an active participant in multiple industry standards bodies. Previously, he led work on data perimeter controls for AWS Management Console sign-in, multi-session support for the console, a simplified AWS CLI sign-in experience, and the internal Amazon identity provider.

Ankur Joshi

Ankur Joshi

Ankur is a Software Development Manager on the AWS Identity Sign-In team. His team focuses on delivering secure and resilient authentication mechanisms and access controls for AWS customers.

Building secure B2C applications with fine-grained access control using Amazon Cognito and Amazon Verified Permissions

5 June 2026 at 19:07

Modern web applications require robust security controls to protect user data and application resources. Authentication and authorization are two fundamental pillars of application security that answer critical questions: Who are you? and What are you allowed to do? Implementing these controls correctly can be challenging for developers, especially when building data-intensive applications with frameworks like Streamlit (an open-source Python framework for building interactive web applications) or when requiring fine-grained access control. Key challenges include protecting access to application resources, implementing application identity with multi-factor authentication (MFA), and implementing usage-based controls.

In this post, you will learn how to build fine-grained access controls for a sample Streamlit application using Amazon Cognito for authentication and Amazon Verified Permissions with Cedar policies for authorization. This architecture provides enterprise-grade security with minimal development effort, so you can focus on your application’s core functionality. You will learn how to reduce development time for secure applications, implement enterprise-grade authentication, through proper access management, and scale security with growing user bases.

Security architecture overview

The reference architecture follows aΒ layered security design with four key components; separating identity verification, authorization evaluation, application logic, and enforcement boundaries. By assigning clear responsibilities to each layer, the architecture limits blast radius and ensures that a failure in any single control does not compromise the overall system.

  • Authentication layer: Amazon Cognito handles user authentication with secure credential validation and JSON web tokens (JWTs). It provides built-in password policies, account lockout protection, and session management.
  • Authorization layer: Verified Permissions uses the Cedar policy engine to evaluate fine-grained access requests based on centrally stored policies.
  • Application layer: The Streamlit frontend integrates with both services, managing user sessions and enforcing access controls in the user interface.
  • Security boundaries: Multiple layers of security controls protect against unauthorized access, privilege escalation, authentication verification, authorization checks, and input validation.

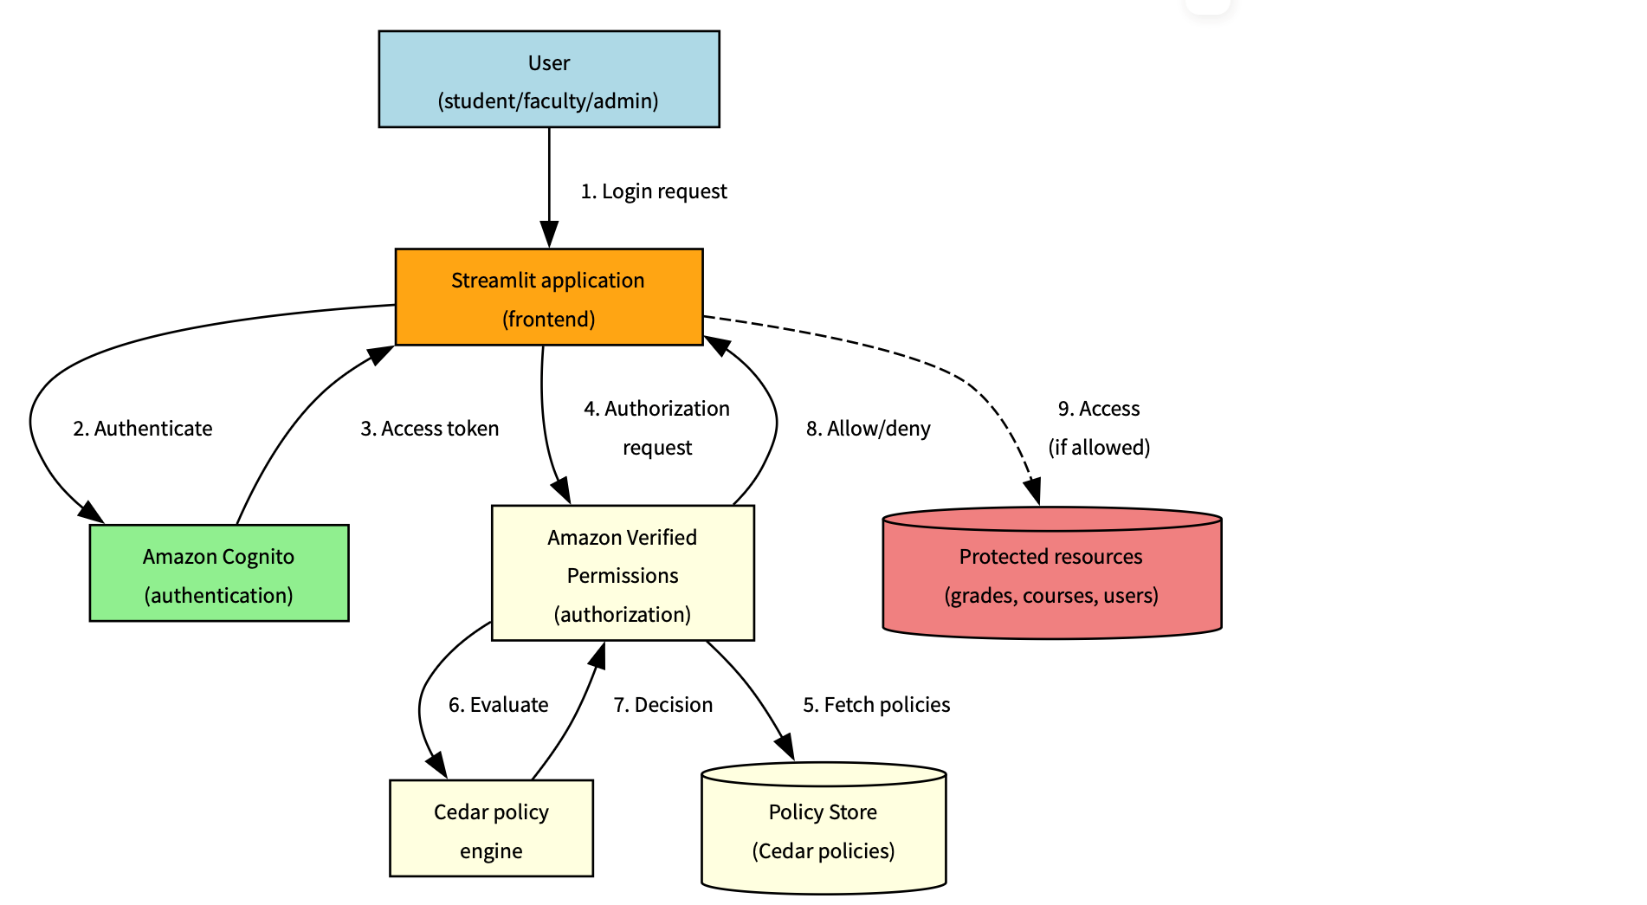
This separation of concerns enables authentication and authorization to function as complementary security controls, following defense-in-depth principles. Figure 1 illustrates the end-to-end authentication and authorization workflow, showing how a user’s sign-in request flows through Amazon Cognito for identity verification, then through Verified Permissions for Cedar policy-based access decisions, before the application enforces the result.

Figure 1: Solution architecture and workflow

Figure 1: Solution architecture and workflow

The following workflow demonstrates how the three architecture layers work together: the authentication layer (steps 1–3) handles identity verification using Amazon Cognito, the authorization layer (steps 4–6) evaluates Cedar policies using Verified Permissions, and the application layer (steps 7–8) enforces the decision in Streamlit.

  1. The user sends a sign-in request, which is submitted through Streamlit
  2. The request is authenticated by Amazon Cognito
  3. An access token is sent back to Streamlit
  4. An authorization request is sent to Verified Permissions
  5. The Cedar policy engine evaluates the request
  6. A decision is sent back by the policy engine
  7. The instruction to allow or deny is sent back to Streamlit
  8. If the instruction is to allow, access is provided

Understanding authorization with Cedar

While authentication establishes user identity, authorization determines what actions users can perform. Verified Permissions provides a scalable authorization service based on Cedar, a policy language specifically designed for fine-grained access control.

Cedar policies follow a structured format that defines who can perform which actions on what resources. Let’s examine the anatomy of a Cedar policy:

permit(
    principal == ?principal,
    action == application::Action::"ViewGrade",
    resource == ?resource
) when {
    principal has role == "Student" &&
    resource.student == principal.entityId
};

Policy components

  • Effect:Β permitorΒ forbid determines whether the policy allows or denies access
  • Principal: The entity (user) making the request, represented byΒ ?principalΒ as a variable
  • Action: The operation being performed, scoped to your application namespace
  • Resource: The target of the action, also represented as a variable
  • Conditions: TheΒ whenΒ clause contains logical expressions that must evaluate to true

Advanced Cedar policy patterns

This section describes commonly used Cedar policy patterns for implementing fine-grained authorization with Amazon Verified Permissions. The examples illustrate how to model ownership, role-based access, hierarchical permissions, and administrative controls in real-world applications

Resource ownership control

This pattern helps ensure that users can only access resources they own:

permit(
    principal == ?principal,
    action == application::Action::"ViewGrade",
    resource == ?resource
) when {
    principal has role == "Student" &&
    resource.student == principal.entityId
};

What it does – This policy allows students to view only their own grades by:

  • Checking that the user has the Student role
  • Verifying that the grade resource’sΒ studentΒ attribute matches the student’sΒ entityId
  • Preventing students from accessing other students’ grades while allowing access to their own academic performance

Role-based access with resource type

This pattern grants access based on role and resource type:

permit(
    principal == ?principal,
    action == application::Action::"EditCourse",
    resource == ?resource
) when {
    principal has role == "Faculty" &&
    resource has resourceType == "Course" &&
    resource.instructor == principal.entityId
};

What it does – This policy allows faculty members to edit courses they teach by:

  • Verifying the user has the Faculty role
  • Confirming the resource is of type Course
  • Verifying that the course’sΒ instructorΒ attribute matches the faculty member’sΒ entityId
  • Restricting faculty to modify only their own courses, not courses taught by other instructors

Hierarchical authorization

This pattern allows department heads to manage faculty in their department:

permit(
    principal == ?principal,
    action == application::Action::"ManageFaculty",
    resource == ?resource
) when {
    principal has role == "DepartmentHead" &&
    resource has role == "Faculty" &&
    resource.department == principal.department
};

What it does – This policy implements departmental hierarchy controls by:

  • Requiring the user to be a DepartmentHead
  • Verifying the resource is a faculty member
  • Matching the faculty member’s department with the department head’s department
  • Preventing department heads from managing faculty in other departments

Administrative override

This pattern provides emergency access with proper justification:

permit(
    principal == ?principal,
    action == ?action,
    resource == ?resource
) when {
    principal has role == "Administrator" &&
    context has emergencyAccess == true &&
    context has justification
};

What it does – This policy provides emergency access capabilities by:

  • Allowing administrators to perform any action on any resource
  • Requiring an emergency access flag to be set to true
  • Requiring a justification for emergency access
  • Supporting accountability through required documentation while enabling emergency operations

Cedar policy evaluation flow

Understanding how policies are evaluated helps design effective authorization systems. Figure 2 shows a common evaluation pattern for an academic scenario

Note: A policy match evaluates to the policy’s effect (permit or forbid). Forbid policies take precedence: if any forbid policy matches, access is denied regardless of permit policies.

Figure 2: Policy evaluation process

Figure 2: Policy evaluation process

The policy evaluation process follows these steps:

  1. User attempts to access a protected resource
  2. Application sends an authorization request to Verified Permissions
  3. Verified Permissions retrieves applicable Cedar policies from the policy store
  4. The Cedar policy engine evaluates each policy against the request
  5. If anyΒ forbidΒ policy matches, access is denied immediately
  6. If anyΒ permitΒ policy matches and noΒ forbidΒ policies match, access is allowed
  7. If no policies match, access is denied by default
  8. The evaluation result (ALLOW or DENY) is returned to the application
  9. Application enforces the authorization decision

Cedar policy language

Cedar is an Amazon open source policy language designed for fine-grained authorization. Every policy defines who (principal) can perform what action on which resource under what conditions, as shown in Figure 3.

Figure 3: Cedar policy definitions

Figure 3: Cedar policy definitions

Policy interaction

The following table shows how different policies interact in complex scenarios where multiple policies could apply:

Scenario Student policy Faculty policy Department head policy Admin policy
Student accessing own grade Permit N/A N/A Override
Faculty editing course N/A Permit N/A Override
Department head managing faculty N/A N/A Permit Override
Emergency admin access N/A N/A N/A Permit

Legend:

  • Permit – Policy allows access
  • N/A – Policy doesn’t apply
  • Override – Emergency admin access

The preceding table shows how each role’s policy applies to different scenarios, with admin access having override capabilities across most situations except for emergency admin access where it’s the primary permit authority. The Override column specifically indicates that the administrator’s emergency access policy can supersede other role-specific policies, but only when the emergencyAccess context flag is explicitly set and a justification is provided. This is not an automatic override.

Policy optimization tips:

  • Order conditions by likelihood of success – Place the most frequently true conditions first in your when clause to enable short-circuit evaluation. For example, check role before resource ownership, because role mismatches are caught earlier. See Cedar best practices.
  • Use indexed attributes for faster lookups – Use entity attributes that Verified Permissions indexes natively (entityId, role, resource type) as primary conditions. Best practices for designing an authorization model
  • Cache policy evaluations when appropriate
  • Monitor evaluation metrics and performance

Real-world application: Academic system

Consider an academic system with different user roles and their corresponding permissions:

Student: View own grades

  • Policy helps ensure students can only access grade resources where they are listed as the student
  • The policy verifies the student’s role and matches the resource owner to the principal’s entity ID

Faculty: Edit course content, manage grades

  • Policy allows faculty to edit courses they teach
  • Faculty can view and modify grades for students in their courses

Teaching assistant (TA): Grade management and course support

  • Policy permits TAs to manage grades for courses they assist with
  • Access is limited to specific courses assigned to the TA

Department head: Manage faculty assignments

  • Policy allows department heads to manage faculty in their department
  • Access is scoped to the department hierarchy

Administrator: System-wide access

  • Policy provides emergency access with proper justification
  • Administrative actions are logged and audited

Prerequisites

To implement the preceding Academic system application, you need an active AWS account, Python 3.8 or later, basic Streamlit knowledge, and AWS Identity and Access Management (IAM) permissions for Amazon Cognito and Verified Permissions.

Run the sample and extend the solution

  1. Download the code base: Start by downloading the code base from the avp streamlit samples repository
  2. Set up your development environment: Install the AWS SDK for Python (boto3) and configure your AWS credentials.
    • Install the AWS SDK for Python:
      pip install boto3
      
    • Log in to your AWS account:
      aws login --region $REGION
    • Verify that your AWS Command Line Interface (AWS CLI), Python, and dependencies are correctly configured.
      ./verify-setup.sh
  3. Create your AWS resources: Use the AWS Management Console or infrastructure as code (IaC) tools to provision your Amazon Cognito user pool and Verified Permissions policy store.
    ./deploy-demo-environment.sh
    Do you want to start the demo now? (Y/N): Y

    This provisions an Amazon Cognito user pool, a Verified Permissions policy store, and any sample resources needed for the demo.

  4. Verify the login screen:
    Figure 4: Verify login credentials

    Figure 4: Verify login credentials

  5. Demo walkthrough and shut down: Interact with the demo and test the policies and features. When you’re ready to exit, press Ctrl+C to shut down and stop.
  6. Define your Cedar policies: Start with basic policies and gradually add complexity as you understand the evaluation model.
  7. Implement authentication: Integrate Amazon Cognito authentication into your application with proper error handling.
  8. Add authorization checks: Implement authorization checks at critical access points in your application. For authentication, implement proper error handling for expired tokens, failed MFA challenges, and account lockouts. Use the Amazon Cognito built-in token refresh flow. For authorization, place Verified Permissions checks at every API endpoint and UI component that accesses protected resources.
  9. Test thoroughly: Create test scenarios for each user role and permission combination.
  10. Monitor and iterate: Set up AWS CloudTrail logging and Amazon CloudWatch alarms to monitor your security controls and refine them based on real-world usage.

Security best practices

When implementing this architecture, follow these best practices to support security:

  • Layer your security controls: Use both authentication and authorization as complementary controls rather than relying on a single mechanism.
  • Follow least privilege principles: Grant only the permissions needed for specific user roles. Start with minimal permissions and add more as needed.
  • Implement proper session management: Set appropriate token expiration and refresh policies. Amazon Cognito handles much of this automatically, but you should configure timeouts based on your security requirements.
  • Validate all inputs: Sanitize user inputs to prevent injection attacks. Don’t rely on client-side validation alone.
  • Monitor authentication events: Set up logging and alerts for suspicious activities such as repeated failed login attempts or unusual access patterns.
  • Conduct regular security reviews: Periodically audit your policies and security configurations to verify they still meet your requirements and follow current best practices.
  • Implement secure error handling: Avoid information disclosure through error messages. Provide helpful feedback to users without revealing system details that could aid attackers.

Conclusion

Implementing proper authentication and authorization is critical for application security. By using Amazon Cognito and Amazon Verified Permissions, you can build robust security controls without complex custom code. Through this approach, you can implement enterprise-grade authentication with minimal effort, define and enforce fine-grained authorization policies, scale your security controls as your application grows, and centrally manage and audit security policies.

To get started with your implementation, create your AWS resources including an Amazon Cognito user pool and Verified Permissions policy store. Define your Cedar policies based on your application’s access requirements. Integrate authentication and authorization checks into your application flow. Test thoroughly with different user roles and access scenarios. Finally, monitor and refine your security controls based on usage patterns.

For additional resources, check out theΒ Amazon Cognito documentationΒ andΒ Amazon Verified Permissions documentation.

If you have feedback about this post, submit comments in the Comments section below.


Sowmya Vemuri

Sowmya Vemuri

Sowmya is a Senior Technical Customer Solutions Manager at AWS, where she partners with AWS’s largest customers to drive agentic AI transformation, cloud security strategy, and compute modernization at scale. She has 14+ years of engineering, product, and technical leadership experience building and scaling distributed systems across the stack: bare-metal servers, data platforms, enterprise and consumer applications, and autonomous cloud architectures with zero human operator access.

Why Outbound email control is critical

Outbound Email Security Matters for Deliverability and Routing. Especially for organizations that need to deliver a large set of emails, and frequently (Transactional Emails) regarding, for instance, transaction receipts and payment notifications.

How to Test Adversary-in-the-Middle Without Hacking Tools

By: BHIS
24 March 2025 at 16:00

In this video, Michael Allen discusses how to test Adversary-in-the-Middle attacks without using hacking tools. He delves into the intricacies of credential harvesting, the evolution of multi-factor authentication (MFA), and how attackers adapt their strategies to bypass security measures.

The post How to Test Adversary-in-the-Middle Without Hacking Tools appeared first on Black Hills Information Security, Inc..

❌