Fortinet has confirmed a new, actively exploited critical FortiCloud single sign-on (SSO) authentication bypass vulnerability, tracked as CVE-2026-24858, and says it has mitigated the zero-day attacks by blocking FortiCloud SSO connections from devices running vulnerable firmware versions. [...]
The Chinese espionage threat group Mustang Panda has updated its CoolClient backdoor to a new variant that can steal login data from browsers and monitor the clipboard. [...]
Accelerating the Migration to the Post-Quantum Era
The promise of quantum computing brings an unprecedented paradox. While it will unlock revolutionary breakthroughs in science, materials discovery and medicine, it simultaneously poses an existential threat to the mathematical foundations of modern cybersecurity.
For decades, the global economy has relied on public key cryptography to safeguard everything from personal privacy to national security. This cryptography is built on mathematical problems that are computationally infeasible for classical computers to solve but that quantum computers can solve efficiently, rendering today’s cryptographic protocols obsolete.
Using Shor’s algorithm, a sufficiently powerful quantum computer could factor the large prime numbers that underpin public key cryptography, in minutes. These are tasks that would take today’s most advanced supercomputers a millennium to crack. This capability would effectively turn our strongest digital defenses into open doors, creating a period of vulnerability leading up to Q-Day – the day today’s encryption is broken.
The Migration Crisis: Why Traditional Strategies Fail
For CISOs and technical leaders, the transition to post-quantum cryptography (PQC) is not a simple patch-and-deploy exercise. It is a multiyear transformation that requires updating cryptography across every device, application, certificate and infrastructure component in the enterprise.
Most enterprises today are constrained by cryptographic debt – years of accumulated, undocumented and deprecated encryption protocols buried deep within legacy applications, third-party software libraries and unmanaged IoT devices. This creates a vast and largely invisible attack surface that traditional vulnerability scanners were never designed to detect.
The challenge is compounded by the absence of a unified source of truth. Existing tools offer a fragmented "outside-in" view of the environment. They may identify devices on the network, but they lack visibility into cryptographic libraries embedded within live traffic. Without a real-time Cryptographic Bill of Materials (CBOM), security teams are forced to rely on manual, point-in-time audits that become outdated almost immediately. Spreadsheets cannot scale to this problem.
This visibility gap makes it impossible to prioritize remediation, leaving sensitive data exposed to harvest now, decrypt later (HNDL) attacks. In these attacks, adversaries intercept and store encrypted data today with the intent of unlocking it once quantum computing capabilities mature.
Operationally, traditional migration approaches are equally unworthy. Manually updating cryptography across thousands of global endpoints and branch offices often requires disruptive rip and replace strategies that threaten uptime and demand specialized expertise that is in extremely short supply. Organizations need a way to bridge today’s classical infrastructure with a quantum-resilient future without disrupting business operations or exhausting IT resources.
At Palo Alto Networks, we believe global enterprises cannot afford to wait. Our new Quantum-Safe Security solution is designed to remove these operational roadblocks by making cryptographic discovery, risk assessment and transition both continuous and actionable. We empower enterprises to gain real-time visibility into cryptographic risk and begin building agentic resilience at enterprise scale by integrating with existing security and infrastructure systems, including security information and event management (SIEM), load balancers, endpoint detection and response (EDR), as well as Application Vulnerability Management (AVM) tools.
The Four Stages of Cryptographic Inventory & Remediation
Palo Alto Networks Quantum-Safe Security is built around four foundational stages.
1. Continuous Discovery through Ecosystem Ingestion
Visibility is the first line of defense, but in a complex enterprise, true visibility requires more than a periodic scan. It requires continuous, high-fidelity ingestion of cryptographic intelligence across the environment.
Our solution acts as a central nervous system for your cryptographic posture, ingesting telemetry and logs directly from PAN-OS NGFW and Prisma® Access, enriched with data from a broad ecosystem of third-party security solutions, simplifying Day 0 onboarding. By leveraging your existing network infrastructure as sensors, we provide a comprehensive view of the cryptographic behavior of all assets without the operational friction of deploying new software.
To eliminate blind spots, we go beyond our own telemetry to ingest critical information from your existing systems you rely on. This includes syncing with configuration management database (CMDB) and asset management platforms to align cryptographic data with business inventories, integrating with EDR and access control solutions to monitor endpoint behavior, and aggregating data from network clouds and log platforms. The result is a unified intelligence layer that reflects how cryptography is actually used across the enterprise.
By synthesizing these data streams, we deliver a multidimensional view of cryptographic exposure:
Discovery – Identification of every application, user device, infrastructure component and IoT device.
Behavior – Analysis of traffic metadata, including protocols, key exchangemechanisms, encryption algorithms, hashes, certificates and tunnels.
Context – Precise attribution of hardware models, cryptographic libraries (such as deprecated OpenSSL versions), and browser versions in use.
2. Risk Assessment & Prioritization
Not all data is created equal, and a successful migration requires a surgical focus on where the exposure is most acute. Our Quantum Safe Security solution quantifies risk by correlating cryptographic strength with business criticality, providing a clear, prioritized view of current risk and where remediation matters most.
Assets are categorized into strategic zones, starting with immediate exposure risks caused by deprecated protocols that are vulnerable to classical exploitation today. From there, the solution addresses long-term harvest now, decrypt later threats. As threat models evolve, the risk engine is designed to expand to emerging vectors like identity and authentication integrity, anticipating risks such as “Trust Now, Forge Later" attacks that could undermine digital trust at scale.
At the same time, the solution validates and tracks quantum-secure assets that have successfully transitioned to post-quantum or hybrid-PQC algorithms. By correlating this intelligence with business criticality and data shelf-life, security leaders can make informed decisions. For example, a crown jewel asset containing data that must remain confidential for a decade or more, is flagged as a high HNDL risk today and elevated to the top of the migration queue.
3. Comprehensive Remediation
Moving from a vulnerable state to quantum resilience is a structured journey. Our comprehensive remediation framework guides organizations through three critical stages, supported by automated workflows and prioritized recommendations at every step.
Current State to Quantum Ready: The first stage focuses on infrastructure modernization. Usingcontinuous discovery insights, the solution provides hardware and software recommendations required to support next-generation cryptographic protocols. An asset reaches a Quantum Ready state once it has the underlying hardware and OS capabilities to support post-quantum algorithms, even if those protocols are not yet activated.
Quantum Ready to Quantum-Safe: Transitioning to a Quantum-safe state requires activation and configuration of post-quantum defenses. Our solution provides data configuration and certificate compliance guidance to enable PQC/Hybrid-PQC algorithms to be correctly implemented across the estate.
Virtual Patching via Cipher Translation: For all current and especially legacy systems or IoT devices that cannot be upgraded, we provide an accelerated path to quantum-safety. Through Cipher Translation, the infrastructure acts as a proxy, providing agentic remediation that reencrypts vulnerable traffic into quantum-safe standards (such as ML-KEM) in real-time at the network edge. This approach instantly moves legacy assets from a high-risk current state to a Quantum-safe posture without a single line of code change.
4. Governance: Continuous Crypto-Hygiene & Global Compliance
Quantum readiness is not a one-time event; it is a strategic enterprise transformation that requires continuous oversight to prevent the re-emergence of vulnerabilities. Our governance framework provides the guardrails for your migration through two critical layers of management:
Continuous Crypto-Hygiene & Ongoing Management: Maintaining high-fidelity visibility is essential to preventing the accumulation of "crypto-debt." Our solution automates real-time mapping of all cryptographic dependencies, ensuring your CBOM remains dynamic and accurate as your environment evolves. Furthermore, we introduce Active Drift Detection, which automatically detects and can even block the use of weak or noncompliant ciphers in real-time, preventing developers or third-party services from accidentally introducing insecure protocols.
Global Crypto-Compliance Enforcement & Reporting: As regulatory pressure from governments (like the US Commercial National Security Algorithm Suite 2.0) mounts, organizations must demonstrate measurable progress. Our solution will provide Automated Framework Auditing, offering continuous, native mapping of your environment against global standards, including NIST, FIPS 140-3, and DORA.
Architecting a Quantum-Resilient Enterprise
The transition to quantum-safe security is far more than a technical upgrade. It represents a fundamental shift in how organizations protect the longevity and integrity of their digital assets. Achieving quantum resilience is a multiyear effort that requires both advanced technology and strategic partnership.
That's why Palo Alto Networks has established Integrated Quantum Practices, bringing together technology, partners and professional services to help organizations navigate the complexity of this transition with confidence. By combining deep cryptographic visibility with intelligent, agentic remediation, organizations can systematically retire their cryptographic debt and build resilience into their security architecture over time.
This proactive approach does more than mitigate emerging risk. It establishes a foundation of digital trust that is resilient against the threats of tomorrow, enabling your most sensitive intellectual property to remain secure for its entire shelf life, even as cryptographic standards evolve.
Secure Your First-Mover Advantage: The Quantum Readiness Assessment
Don’t let the complexity of the quantum transition stall your organization’s progress. Begin your path to resilience with a Quantum Readiness Assessment, a focused engagement to clarify current exposure and identify the most critical areas for action. To go deeper, watch the Quantum-Safe Summit on demand for expert perspectives on cryptographic risk and quantum readiness.
The Palo Alto Networks Quantum-Safe Security solution is expected to be generally available to customers on January 30, 2026, with additional integration enhancements planned for April 2026.
Forward-Looking Statements
This blog contains forward-looking statements that involve risks, uncertainties and assumptions, including, without limitation, statements regarding the benefits, impact or performance or potential benefits, impact or performance of our products and technologies or future products and technologies. These forward-looking statements are not guarantees of future performance, and there are a significant number of factors that could cause actual results to differ materially from statements made in this [blog. We identify certain important risks and uncertainties that could affect our results and performance in our most recent Annual Report on Form 10-K, our most recent Quarterly Report on Form 10-Q, and our other filings with the U.S. Securities and Exchange Commission from time-to-time, each of which are available on our website at investors.paloaltonetworks.com and on the SEC's website at www.sec.gov. All forward-looking statements in this blog are based on information available to us as of the date hereof, and we do not assume any obligation to update the forward-looking statements provided to reflect events that occur or circumstances that exist after the date on which they were made.
Multiple threat actors, both state-sponsored and financially motivated, are exploiting the CVE-2025-8088 high-severity vulnerability in WinRAR for initial access and to deliver various malicious payloads. [...]
Customers need solutions to track inventory data such as files and software across Amazon Elastic Compute Cloud (Amazon EC2) instances, detect unauthorized changes, and integrate alerts into their existing security workflows.
In this blog post, I walk you through a highly scalable serverless file integrity monitoring solution. It uses AWS Systems Manager Inventory to collect file metadata from Amazon EC2 instances. The metadata is sent through the Systems Manager Resource Data Sync feature to a versioned Amazon Simple Storage Service (Amazon S3) bucket, storing one inventory object for each EC2 instance. Each time a new object is created in Amazon S3, an Amazon S3 Event Notification triggers a custom AWS Lambda function. This Lambda function compares the latest inventory version with the previous one to detect file changes. If a file that isn’t expected to change has been created, modified, or deleted, the function creates an actionable finding in AWS Security Hub. Findings are then ingested by Amazon Security Lake in a standard OCSF format, which centralizes and normalizes the data. Finally, the data can be analyzed using Amazon Athena for one-time queries, or by building visual dashboards with Amazon QuickSight and Amazon OpenSearch Service. Figure 1 summarizes this flow:
Figure 1: File integrity monitoring workflow
This integration offers an alternative to the default AWS Config and Security Hub integration, which relies on limited data (for example, no file modification timestamps). The solution presented in this post provides control and flexibility to implement custom logic tailored to your operational needs and support security-related efforts.
This flexible solution can also be used with other Systems Manager Inventory metadata, such as installed applications, network configurations, or Windows registry entries, enabling custom detection logic across a wide range of operational and security use cases.
Now let’s build the file integrity monitoring solution.
Prerequisites
Before you get started, you need an AWS account with permissions to create and manage AWS resources such as Amazon EC2, AWS Systems Manager, Amazon S3, and Lambda.
Step 1: Start an EC2 instance
Start by launching an EC2 instance and creating a file that you will later modify to simulate an unauthorized change.
Open the AWS Management Console and go to IAM, choose Roles from the navigation pane, and then choose Create role.
Under Trusted entity type, select AWS service, select EC2 as the use case, and choose Next.
On the Add permissions page, search for and select the AmazonSSMManagedInstanceCore IAM policy, then choose Next.
Enter SSMAccessRole as the role name and choose Create role.
The new SSMAccessRole should now appear in your list of IAM roles:
Figure 2: Create an IAM role for communication with Systems Manager
Start an EC2 instance:
Open the Amazon EC2 console and choose Launch Instance.
Enter a Name, keep the default Linux Amazon Machine Image (AMI), and select an Instance type (for example, t3.micro).
Under Advanced details:
IAM instance profile, select the previously created SSMAccessRole
Create a fictitious payment application configuration file in the /etc/paymentapp/ folder on the EC2 instance. Later, you will modify it to demonstrate a file-change event for integrity monitoring. To create this file during EC2 startup, copy and paste the following script into User data.
Figure 3: Adding the application configuration file
Leave the remaining settings as default, choose Proceed without key pair, and then select Launch Instance. A key pair isn’t required for this demo because you use Session Manager for access.
Step 2: Enable Security Hub and Security Lake
If Security Hub and Security Lake are already enabled, you can skip to Step 3. To start, enable Security Hub, which collects and aggregates security findings. AWS Security Hub CSPM adds continuous monitoring and automated checks against best practices.
Open the Security Hub console.
Choose Security Hub CSPM from the navigation pane and then select Enable AWS Security Hub CSPM and choose Enable Security Hub CSPM at the bottom of the page.
Note: For this demo, you don’t need the Security standards options and can clear them.
Figure 4: Enable Security Hub CSP
Next, activate Security Lake to start collecting actionable findings from Security Hub:
Open the Amazon Security Lake console and choose Get Started.
Under Data sources, select Ingest specific AWS sources.
Under Log and event sources, select Security Hub (you will use this only for this demo):
Figure 5: Select log and event sources
Under Select Regions, choose Specific Regions and make sure you select the AWS Region that you’re using.
Use the default option to Create and use a new service role.
Choose Next and Next again, then choose Create.
Step 3: Configure Systems Manager Inventory and sync to Amazon S3
With Security Hub and Security Lake enabled, the next step is to enable Systems Manager Inventory to collect file metadata and configure a Resource Data Sync to export this data to S3 for analysis.
After you created the bucket, enable versioning in the Amazon S3 console by opening the bucket’s Properties tab, choosing Edit under Bucket Versioning, selecting Enable, and saving your changes. Versioning causes each new inventory snapshot to be saved as a separate version, so that you can track file changes over time.
The next step is to enable Systems Manager Inventory and set up the resource data sync:
In the Systems Manager console, go to Fleet Manager, choose Account management, and select Set up inventory.
Keep the default values but deselect every inventory type except File. Set a Path to limit collection to the files relevant for this demo and your security requirements. Under File, set the Path to: /etc/paymentapp/.
Figure 6: Set the parameters and path
Choose Setup Inventory.
In Fleet Manager, choose Account management and select Resource Data Syncs.
Choose Create resource data sync, enter a Sync name, and enter the name of the versioned S3 bucket you created earlier.
Select This Region and then choose Create.
Step 4: Implement the Lambda function
Next, complete the setup to detect changes and create findings. Each time Systems Manager Inventory writes a new object to Amazon S3, an S3 Event Notification triggers a Lambda function that compares the latest and previous object versions. If it finds created, modified, or deleted files, it creates a security finding. To accomplish this, you will create the Lambda function, set its environment variables, add the helper layer, and attach the required permissions.
The following is an example finding generated in AWS Security Finding Format (ASFF) and sent to Security Hub. In this example, you see a notification about a file change on the EC2 instance listed under the Resources section.
This function detects file changes, reports findings, and removes unused Amazon S3 object versions to reduce costs.
Open the Lambda console and choose Create function in the navigation pane.
For Function Name enter fim-change-detector.
Select Author from scratch, enter a function name, select the latest Python runtime, and choose Create function.
On the Code tab, paste the following main function and choose Deploy.
import boto3, os, json, re
from datetime import datetime, UTC
from urllib.parse import unquote_plus
from helpers import is_critical, load_file_metadata, is_modified, extract_instance_id

s3 = boto3.client('s3')
securityhub = boto3.client('securityhub')

CRITICAL_FILE_PATTERNS = os.environ["CRITICAL_FILE_PATTERNS"].split(",")
SEVERITY_LABEL = os.environ["SEVERITY_LABEL"]

def lambda_handler(event, context):
	# Safe event handling
	if "Records" not in event or not event["Records"]:
		return

	# Extract S3 event
	record = event['Records'][0]
	bucket = record['s3']['bucket']['name']
	key = unquote_plus(record['s3']['object']['key'])
	current_version = record['s3']['object'].get('versionId')
	if not current_version:
		return

	# Fetching the region name
	account_id = context.invoked_function_arn.split(":")[4]
	region = boto3.session.Session().region_name

	# Get object versions (latest first)
	versions = s3.list_object_versions(Bucket=bucket, Prefix=key).get('Versions', [])
	versions = sorted(versions, key=lambda v: v['LastModified'], reverse=True)

	# Find previous version
	idx = next((i for i,v in enumerate(versions) if v["VersionId"] == current_version), None)
	if idx is None or idx + 1 >= len(versions):
		return
	prev_version = versions[idx+1]["VersionId"]

	# Load both versions
	current = load_file_metadata(bucket, key, current_version)
	previous = load_file_metadata(bucket, key, prev_version)

	# Compare
	created = {p for p in set(current) - set(previous) if is_critical(p)}
	deleted = {p for p in set(previous) - set(current) if is_critical(p)}
	modified = {p for p in set(current) & set(previous) if is_critical(p) and is_modified(p, current, previous)}

	# Report if changes were found
	if created or deleted or modified:
		instance_id = extract_instance_id(bucket, key, current_version)
		now = datetime.now(UTC).isoformat(timespec='milliseconds').replace('+00:00', 'Z')
		finding = {
			"SchemaVersion": "2018-10-08",
			"Id": f"fim-{instance_id}-{now}",
			"ProductArn": f"arn:aws:securityhub:{region}:{account_id}:product/{account_id}/default",
			"AwsAccountId": account_id,
			"GeneratorId": "ssm-inventory-fim",
			"CreatedAt": now,
			"UpdatedAt": now,
			"Types": ["Software and Configuration Checks/File Integrity Monitoring"],
			"Severity": {"Label": SEVERITY_LABEL},
			"Title": "File changes detected via SSM Inventory",
			"Description": (
				f"{len(created)} created, {len(modified)} modified, "
				f"{len(deleted)} deleted file(s) on instance {instance_id}"
			),
			"Resources": [{"Type": "AwsEc2Instance", "Id": instance_id}]
		}
		securityhub.batch_import_findings(Findings=[finding])

	# No change – delete older S3 version
	else:
		if prev_version != current_version:
			try:
				s3.delete_object(Bucket=bucket, Key=key, VersionId=prev_version)
			except Exception as e:
				print(f"Delete previous S3 object version failed: {e}")
Configure the two required environment variables in the Lambda console. These two variables (one for critical paths to monitor and one for security finding severity) must be set or the function will fail.
Open the Lambda console and choose Configuration and then select Environment variables.
Choose Edit and then choose Add environment variable.
Under Key, choose CRITICAL_FILE_PATTERNS
Enter ^/etc/paymentapp/config.*$ as the value.
Set the SEVERITY_LABEL to MEDIUM.
Figure 7: CRITICAL_FILE_PATTERNS and SEVERITY_LABEL configuration
Set up permissions
The next step is to attach permissions to the Lambda function
In your Lambda function, choose Configuration and then select Permissions.
Under Execution role, select the role name that will lead to the role in IAM.
Paste the following policy, and make sure to replace <bucket-name> with the name of your S3 bucket, and you also update <region> and <account-id> with your AWS Region and Account ID:
To finalize, enter a Policy name and choose Create policy.
Add functions to the Lambda layer
For better modularity, add some helper functions to a Lambda layer. These functions are already referenced in the import section of the preceding Lambda function’s Python code. The helper functions check critical paths, load file metadata, compare modification times, and extract the EC2 instance ID.
Open AWS CloudShell from the top-right corner of the AWS console header, then copy and paste the following script and press Enter. It creates the helper layer and attaches it to your Lambda function.
#!/bin/bash
set -e
FUNCTION_NAME="fim-change-detector"
LAYER_NAME="fim-change-detector-layer"

mkdir -p python
cat > python/helpers.py << 'EOF'
import json, re, os
from dateutil.parser import parse as parse_dt
import boto3
s3 = boto3.client('s3')
CRITICAL_FILE_PATTERNS = os.environ.get("CRITICAL_FILE_PATTERNS", "").split(",")

def is_critical(path):
	return any(re.match(p.strip(), path) for p in CRITICAL_FILE_PATTERNS if p.strip())

def load_file_metadata(bucket, key, version_id):
	obj = s3.get_object(Bucket=bucket, Key=key, VersionId=version_id)
	data = {}
	for line in obj['Body'].read().decode().splitlines():
		if line.strip():
			i = json.loads(line)
			n, d, m = i.get("Name","").strip(), i.get("InstalledDir","").strip(), i.get("ModificationTime","").strip()
			if n and d and m: data[f"{d.rstrip('/')}/{n}"] = m
	return data

def is_modified(path, current, previous):
	try: return parse_dt(current[path]) != parse_dt(previous[path])
	except: return current[path] != previous[path]

def extract_instance_id(bucket, key, version_id):
	obj = s3.get_object(Bucket=bucket, Key=key, VersionId=version_id)
	for line in obj['Body'].read().decode().splitlines():
		if line.strip():
			r = json.loads(line)
			if "resourceId" in r: return r["resourceId"]
	return None
EOF

zip -r helpers_layer.zip python >/dev/null
LAYER_VERSION_ARN=$(aws lambda publish-layer-version \
	--layer-name "$LAYER_NAME" \
	--description "Helper functions for File Integrity Monitoring" \
	--zip-file fileb://helpers_layer.zip \
	--compatible-runtimes python3.13 \
	--query 'LayerVersionArn' \
	--output text)

aws lambda update-function-configuration \
	--function-name "$FUNCTION_NAME" \
	--layers "$LAYER_VERSION_ARN" >/dev/null
echo "Layer created and attached to the Lambda function."
Step 5: Set up S3 Event Notifications
Finally, set up S3 Event Notifications to trigger the Lambda function when new inventory data arrives.
Open the S3 console and select the Systems Manager Inventory bucket that you created.
Choose Properties and select Event notifications.
Choose Create event notification.
Enter an Event name.
In the Prefix field, enter AWS%3AFile/ to limit Lambda triggers to file inventory objects only. Note: The prefix contains a : character, which must be URL-encoded as %3A.
Under Event types, select Put.
At the bottom, select your newly created Lambda function, and choose Save changes.
In this example, inventory collection runs every 30 minutes (48 times each day) but can be adjusted based on security requirements to optimize costs. The Lambda function is triggered once for each instance whenever a new inventory object is created. You can further reduce event volume by filtering EC2 instances through S3 Event Notification prefixes, enabling focused monitoring of high-value instances.
Step 6: Test the file change detection flow
Now that the EC2 instance is running and the sample configuration file /etc/paymentapp/config.yaml has been initialized, you’re ready to simulate an unauthorized change to test the file integrity monitoring setup.
Open the Systems Manager console.
Go to Session Manager and choose Start session.
Select your EC2 instance and choose Start Session.
Run the following command to modify the file:
echo “db_password=hacked456" | sudo tee /etc/paymentapp/config.yaml
This simulates a configuration tampering event. During the next Systems Manager Inventory run, the updated metadata will be saved to Amazon S3.
To manually trigger this:
Open the Systems Manager consoleand choose State Manager.
Select your association and choose Apply association now to start the inventory update.
After the association status changes to Success, check your SSM Inventory S3 bucket in the AWS:File folder and review the inventory object and its versions.
Open the Security Hub console and choose Findings. After a short delay, you should see a new finding like the one shown in Figure 8:
Figure 8: View file change findings
Step 7: Query and visualize findings
While Security Hub provides a centralized view of findings, you can deepen your analysis using Amazon Athena to run SQL queries directly on the normalized Security Lake data in Amazon S3. This data follows the Open Cybersecurity Schema Framework (OCSF), which is a vendor-neutral standard that simplifies integration and analysis of security data across different tools and services.
The following is an example Athena query:
SELECT
	finding_info.desc AS description,
	class_uid AS class_id,
	severity AS severity_label,
	type_name AS finding_type,
	time_dt AS event_time,
	region,
	accountid
FROM amazon_security_lake_table_us_east_1_sh_findings_2_0
Note: Be sure to adjust the FROM clause for other Regions. Security Lake processes findings before they appear in Athena, so expect a short delay between ingestion and data availability. You will see a similar result for the preceding query, shown in Figure 9:
Figure 9: Athena query result in the Amazon Athena query editor
Posted by Nataliya Stanetsky, Fabricio Ferracioli, Elliot Sisteron, Irene Ang of the Android Security Team
Phone theft is more than just losing a device; it's a form of financial fraud that can leave you suddenly vulnerable to personal data and financial theft. That’s why we're committed to providing multi-layered defenses that help protect you before, during, and after a theft attempt.
Today, we're announcing a powerful set of theft protection feature updates that build on our existing protections, designed to give you greater peace of mind by making your device a much harder target for criminals.
Stronger Authentication Safeguards
We've expanded our security to protect you against an even wider range of threats. These updates are now available for Android devices running Android 16+.
More User Control for Failed Authentications: In Android 15, we launched Failed Authentication Lock, a feature that automatically locks the device's screen after excessive failed authentication attempts. This feature is now getting a new dedicated enable/disable toggle in settings, giving you more granular control over your device's security.
Expanding Identity Check to cover more: Early in 2025, we enabled Identity Check for Android 15+, which requires the user to utilize biometrics when performing certain actions outside of trusted places. Later in the year, we extended this safeguard to cover all features and apps that use the Android Biometric Prompt. This means that critical tools that utilize Biometric Prompt, like third-party banking apps and Google Password Manager, now automatically benefit from the additional security of Identity Check.
Stronger Protection Against Screen Lock Guessing: We’re making it much harder for a thief to guess your PIN, pattern, or password by increasing the lockout time after failed attempts. To ensure you aren’t locked out by mistake (by a curious child, for instance), identical incorrect guesses no longer count toward your retry limit.
Nike is investigating what it described as a "potential cyber security incident" after the World Leaks ransomware gang leaked 1.4 TB of files allegedly stolen from the sportswear giant. [...]
A critical-severity vulnerability in the vm2 Node.js sandbox library, tracked as CVE-2026-22709, allows escaping the sandbox and executing arbitrary code on the underlying host system. [...]
A Nebraska federal grand jury charged 31 additional defendants for their involvement in an ATM jackpotting operation allegedly orchestrated by members of the Venezuelan gang Tren de Aragua. [...]
Modern ransomware has shifted from encryption to psychological extortion that exploits fear, liability, and exposure. Flare shows how today's ransomware groups weaponize stolen data and pressure tactics to force payment. [...]
Nonprofit security organization Shadowserver has found over 6,000 SmarterMail servers exposed online and likely vulnerable to attacks exploiting a critical authentication bypass vulnerability. [...]
The year 2025 saw a record-breaking number of attacks on Android devices. Scammers are currently riding a few major waves: the hype surrounding AI apps, the urge to bypass site blocks or age checks, the hunt for a bargain on a new smartphone, the ubiquity of mobile banking, and, of course, the popularity of NFC. Let’s break down the primary threats of 2025–2026, and figure out how to keep your Android device safe in this new landscape.
Sideloading
Malicious installation packages (APK files) have always been the Final Boss among Android threats, despite Google’s multi-year efforts to fortify the OS. By using sideloading — installing an app via an APK file instead of grabbing it from the official store — users can install pretty much anything, including straight-up malware. And neither the rollout of Google Play Protect, nor the various permission restrictions for shady apps have managed to put a dent in the scale of the problem.
According to preliminary data from Kaspersky for 2025, the number of detected Android threats grew almost by half. In the third quarter alone, detections jumped by 38% compared to the second. In certain niches, like Trojan bankers, the growth was even more aggressive. In Russia alone, the notorious Mamont banker attacked 36 times more users than it did the previous year, while globally this entire category saw a nearly fourfold increase.
Today, bad actors primarily distribute malware via messaging apps by sliding malicious files into DMs and group chats. The installation file usually sports an enticing name (think “party_pics.jpg.apk” or “clearance_sale_catalog.apk”), accompanied by a message “helpfully” explaining how to install the package while bypassing the OS restrictions and security warnings.
Once a new device is infected, the malware often spams itself to everyone in the victim’s contact list.
Search engine spam and email campaigns are also trending, luring users to sites that look exactly like an official app store. There, they’re prompted to download the “latest helpful app”, such as an AI assistant. In reality, instead of an installation from an official app store, the user ends up downloading an APK package. A prime example of these tactics is the ClayRat Android Trojan, which uses a mix of all these techniques to target Russian users. It spreads through groups and fake websites, blasts itself to the victim’s contacts via SMS, and then proceeds to steal the victim’s chat logs and call history; it even goes as far as snapping photos of the owner using the front-facing camera. In just three months, over 600 distinct ClayRat builds have surfaced.
The scale of the disaster is so massive that Google even announced an upcoming ban on distributing apps from unknown developers starting in 2026. However, after a couple of months of pushback from the dev community, the company pivoted to a softer approach: unsigned apps will likely only be installable via some kind of superuser mode. As a result, we can expect scammers to simply update their how-to guides with instructions on how to toggle that mode on.
Once an Android device is compromised, hackers can skip the middleman to steal the victim’s money directly thanks to the massive popularity of mobile payments. In the third quarter of 2025 alone, over 44 000 of these attacks were detected in Russia alone — a 50% jump from the previous quarter.
There are two main scams currently in play: direct and reverse NFC exploits.
Direct NFC relay is when a scammer contacts the victim via a messaging app and convinces them to download an app — supposedly to “verify their identity” with their bank. If the victim bites and installs it, they’re asked to tap their physical bank card against the back of their phone and enter their PIN. And just like that the card data is handed over to the criminals, who can then drain the account or go on a shopping spree.
Reverse NFC relay is a more elaborate scheme. The scammer sends a malicious APK and convinces the victim to set this new app as their primary contactless payment method. The app generates an NFC signal that ATMs recognize as the scammer’s card. The victim is then talked into going to an ATM with their infected phone to deposit cash into a “secure account”. In reality, those funds go straight into the scammer’s pocket.
We break both of these methods down in detail in our post, NFC skimming attacks.
NFC is also being leveraged to cash out cards after their details have been siphoned off through phishing websites. In this scenario, attackers attempt to link the stolen card to a mobile wallet on their own smartphone — a scheme we covered extensively in NFC carders hide behind Apple Pay and Google Wallet.
The stir over VPNs
In many parts of the world, getting onto certain websites isn’t as simple as it used to be. Some sites are blocked by local internet regulators or ISPs via court orders; others require users to pass an age verification check by showing ID and personal info. In some cases, sites block users from specific countries entirely just to avoid the headache of complying with local laws. Users are constantly trying to bypass these restrictions —and they often end up paying for it with their data or cash.
Many popular tools for bypassing blocks — especially free ones — effectively spy on their users. A recent audit revealed that over 20 popular services with a combined total of more than 700 million downloads actively track user location. They also tend to use sketchy encryption at best, which essentially leaves all user data out in the open for third parties to intercept.
The permissions that this category of apps actually requires are a perfect match for intercepting data and manipulating website traffic. It’s also much easier for scammers to convince a victim to grant administrative privileges to an app responsible for internet access than it is for, say, a game or a music player. We should expect this scheme to only grow in popularity.
Trojan in a box
Even cautious users can fall victim to an infection if they succumb to the urge to save some cash. Throughout 2025, cases were reported worldwide where devices were already carrying a Trojan the moment they were unboxed. Typically, these were either smartphones from obscure manufacturers or knock-offs of famous brands purchased on online marketplaces. But the threat wasn’t limited to just phones; TV boxes, tablets, smart TVs, and even digital photo frames were all found to be at risk.
It’s still not entirely clear whether the infection happens right on the factory floor or somewhere along the supply chain between the factory and the buyer’s doorstep, but the device is already infected before the first time it’s turned on. Usually, it’s a sophisticated piece of malware called Triada, first identified by Kaspersky analysts back in 2016. It’s capable of injecting itself into every running app to intercept information: stealing access tokens and passwords for popular messaging apps and social media, hijacking SMS messages (confirmation codes: ouch!), redirecting users to ad-heavy sites, and even running a proxy directly on the phone so attackers can browse the web using the victim’s identity.
Technically, the Trojan is embedded right into the smartphone’s firmware, and the only way to kill it is to reflash the device with a clean OS. Usually, once you dig into the system, you’ll find that the device has far less RAM or storage than advertised — meaning the firmware is literally lying to the owner to sell a cheap hardware config as something more premium.
Another common pre-installed menace is the BADBOX 2.0 botnet, which also pulls double duty as a proxy and an ad-fraud engine. This one specializes in TV boxes and similar hardware.
How to go on using Android without losing your mind
Despite the growing list of threats, you can still use your Android smartphone safely! You just have to stick to some strict mobile hygiene rules.
Install a comprehensive security solution on all your smartphones. We recommend Kaspersky for Android to protect against malware and phishing.
Avoid sideloading apps via APKs whenever you can use an app store instead. A known app store — even a smaller one — is always a better bet than a random APK from some random website. If you have no other choice, download APK files only from official company websites, and double-check the URL of the page you’re on. If you aren’t 100% sure what the official site is, don’t just rely on a search engine; check official business directories or at least Wikipedia to verify the correct address.
Read OS warnings carefully during installation. Don’t grant permissions if the requested rights or actions seem illogical or excessive for the app you’re installing.
Under no circumstances should you install apps from links or attachments in chats, emails, or similar communication channels.
Buy smartphones and other electronics from official retailers, and steer clear of brands you’ve never heard of. Remember: if a deal seems too good to be true, it almost certainly is.
Hackers have stolen the personal and contact information belonging to over 29.8 million SoundCloud user accounts after breaching the audio streaming platform's systems. [...]
A new malware-as-a-service (MaaS) called 'Stanley' promises malicious Chrome extensions that can clear Google's review process and publish them to the Chrome Web Store. [...]
A new malicious campaign mixes the ClickFix method with fake CAPTCHA and a signed Microsoft Application Virtualization (App-V) script to ultimately deliver the Amatera infostealing malware. [...]
When you enable IAM Identity center, it provides an access portal for workforce users to access their AWS applications and accounts either by signing in to the access portal using a URL or by using a bookmark for the application URL. In either case, the access portal handles user authentication before granting access to applications and accounts. Supporting both IPv4 and IPv6 connectivity to the access portal helps facilitate seamless access for clients, such as browsers and applications, regardless of their network configuration.
The launch of IPv6 support in IAM Identity Center introduces new dual-stack endpoints that support both IPv4 and IPv6, so that users can connect using IPv4, IPv6, or dual-stack clients. Current IPv4 endpoints continue to function with no action required. The dual stack capability offered by Identity Center extends to managed applications. When users access the application dual-stack endpoint, the application automatically routes to the Identity Center dual-stack endpoint for authentication. To use Identity Center from IPv6 clients, you must direct your workforce to use the new dual-stack endpoints, and update configurations on your external identity provider (IdP), if you use one.
In this post, we show you how to update your configuration to allow IPv6 clients to connect directly to IAM Identity Center endpoints without requiring network address translation services. We also show you how to monitor which endpoint users are connecting to. Before diving into the implementation details, let’s review the key phases of the transition process.
Transition overview
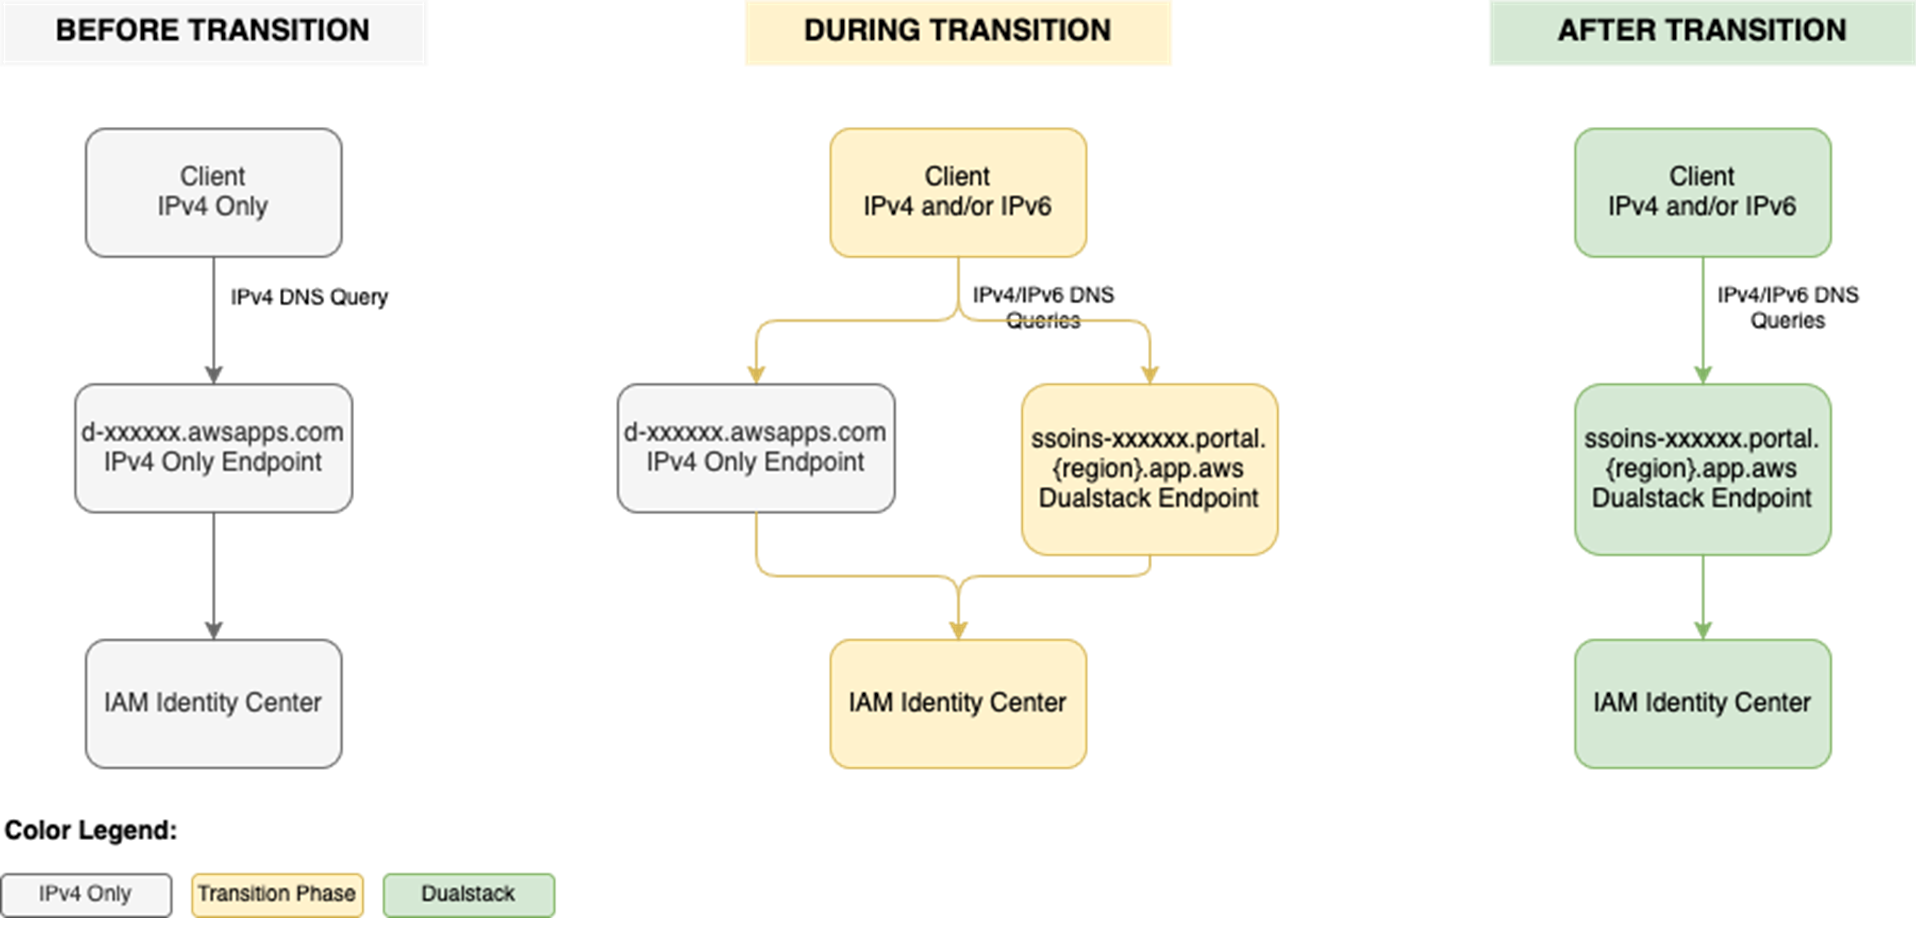
To use IAM Identity Center from an IPv6 network and client, you need to use the new dual-stack endpoints. Figure 1 shows what the transition from IPv4 to IPv6 over dual-stack endpoints looks like when using Identity Center. The figure shows:
A before state where clients use the IPv4 endpoints.
The transition phase, when your clients use a combination of IPv4 and dual-stack endpoints.
After the transition is complete, your clients will connect to dual-stack endpoints using their IPv4 or IPv6, depending on their preferences.
Figure 1: Transition from IPv4-only to dual-stack endpoints
Prerequisites
You must have the following prerequisites in place to enable IPv6 access for your workforce users and administrators:
Work with your network administrators to update the configuration of your firewalls and gateways and to verify that your clients, such as laptops or desktops, are ready to accept IPv6 connectivity. If you have already enabled IPv6 connectivity for other AWS services, you might be familiar with these changes. Next, implement the two steps that follow.
Step 1: Update your IdP configuration
You can skip this step If you don’t use an external IdP as your identity source.
In this step, you update the Assertion Consumer Service (ACS) URL from your IAM Identity Center instance into your IdP’s configuration for single sign-on and the SCIM configuration for user provisioning. Your IdP’s capability determines how you update the ACS URLs. If your IdP supports multiple ACS URLs, configure both IPv4 and dual-stack URLs to enable a flexible transition. With that configuration, some users can continue using IPv4-only endpoints while others use dual-stack endpoints for IPv6. If your IdP supports only one ACS URL, to use IPv6 you must update the new dual-stack ACS URL in your IdP and transition all users to using dual-stack endpoints. If you don’t use an external IdP, you can skip this step and go to the next step.
Update both the SAML single sign-on and the SCIM provisioning configurations:
Update the single sign-on settings in your IdP to use the new dual-stack URLs. First, locate the URLs in the AWS Management Console for IAM Identity Center.
Choose Settings in the navigation pane and then select Identity source.
Choose Actions and select Manage authentication.
in Under Manage SAML 2.0 authentication, you will find the following URLs under Service provider metadata:
AWS access portal sign-in URL
IAM Identity Center Assertion Consumer Service (ACS) URL
IAM Identity Center issuer URL
If your IdP supports multiple ACS URLs, then add the dual-stack URL to your IdP configuration alongside existing IPv4 one. With this setting, you and your users can decide when to start using the dual-stack endpoints, without all users in your organization having to switch together.
Figure 2: Dual-stack single sign-on URLs
If your IdP does not support multiple ACS URLs, replace the existing IPv4 URL with the new dual-stack URL, and switch your workforce to use only the dual-stack endpoints.
Update the provisioning endpoint in your IdP. Choose Settings in the navigation pane and under Identity source, choose Actions and select Manage provisioning. Under Automatic provisioning, copy the new SCIM endpoint that ends in api.aws. Update this new URL in your external IdP.
Figure 3: Dual-stack SCIM endpoint URL
Step 2: Locate and share the new dual-stack endpoints
Your organization needs two kinds of URLs for IPv6 connectivity. The first is the new dual-stack access portal URL that your workforce users use to access their assigned AWS applications and accounts. The dual-stack access portal URL is available in the IAM Identity Center console, listed as the Dual-stack in the Settings summary (you might need to expand the Access portal URLs section, shown in Figure 4).
This dual-stack URL ends with app.aws as its top-level domain (TLD). Share this URL with your workforce and ask them to use this dual-stack URL to connect over IPv6. As an example, if your workforce uses the access portal to access AWS accounts, they will need to sign in through the new dual-stack access portal URL when using IPv6 connectivity. Alternately, if your workforce accesses the application URL, you need to enable the dual-stack application URL following application-specific instructions. For more information, see AWS services that support IPv6.
The URLs that administrators use to manage IAM Identity Center are the second kind of URL your organization needs. The new dual-stack service endpoints end in api.aws as their TLD and are listed in the Identity Center service endpoints. Administrators can use these service endpoints to manage users and groups in Identity Center, update their access to applications and resources, and perform other management operations. As an example, if your administrator uses identitystore.{region}.amazonaws.com to manage users and groups in Identity Center, they should now use the dual-stack version of the same service endpoint which is identitystore.{region}.api.aws, so they can connect to service endpoints using IPv6 clients and networks.
If your users or administrators use an AWS SDK to access AWS applications and accounts or manage services, follow Dual-stack and FIPS endpoints to enable connectivity to the dual-stack endpoints.
After completing these two steps, your workforce and administrators can connect to IAM Identity Center using IPv6. Remember, these endpoints also support IPv4, so clients not yet IPv6-capable can continue to connect using IPv4.
Monitoring dual-stack endpoint usage
You can optionally monitor AWS CloudTrail logs to track usage of dual-stack endpoints. The key difference between IPv4-only and dual-stack endpoint usage is the TLD and appears in the clientProvidedHostHeader field. The following example shows the difference between these CloudTrail events for the CreateTokenWithIAM API call.
IAM Identity Center now allows clients to connect over IPv6 natively with no network address translation infrastructure. This post showed you how to transition your organization to use IPv6 with Identity Center and its integrated applications. Remember that existing IPv4 endpoints will continue to function, so you can transition at your own pace. Also, no immediate action is required by you. However, we recommend planning your transition to take advantage of IPv6 benefits and meet compliance requirements. If you have questions, comments, or concerns, contact AWS Support, or start a new thread in the IAM Identity Center re:Post channel.
If you have feedback about this post, submit comments in the Comments section below. If you have questions about this post, contact AWS Support.
With CloudHSM, you can manage and access your keys on FIPS 140-3 Level 3 validated hardware, protected with customer-owned, single-tenant hardware security module (HSM) instances that run in your own virtual private cloud (VPC). This PCI PIN attestation gives you the flexibility to deploy your regulated workloads with reduced compliance overhead. CloudHSM might be suitable when operations supported by the service are integrated into a broader solution that requires PCI-PIN compliance. For payment operations, such as PIN translation, we encourage you to consider AWS Payment Cryptography as a fully managed alternative for PCI-PIN compliance.
The PCI PIN compliance report package for AWS CloudHSM includes two key components:
PCI PIN Attestation of Compliance (AOC) – demonstrating that AWS CloudHSM was successfully validated against the PCI PIN standard with zero findings
PCI PIN Responsibility Summary – provides guidance to help AWS customers understand their responsibilities in developing and operating a highly secure environment for handling PIN-based transactions
AWS was evaluated by Coalfire, a third-party Qualified Security Assessor (QSA). Customers can access the PCI PIN Attestation of Compliance (AOC) and PCI PIN Responsibility Summary reports through AWS Artifact.
To learn more about our PCI program and other compliance and security programs, see the AWS Compliance Programs page. As always, we value your feedback and questions; reach out to the AWS Compliance team through the Contact Us page.
If you have feedback about this post, submit comments in the Comments section below. If you have questions about this post, contact AWS Support.