Normal view

BeatBanker and BTMOB trojans: infection techniques and how to stay safe | Kaspersky official blog

By: GReAT
11 March 2026 at 12:24

To achieve their malign aims, Android malware developers have to address several challenges in a row: trick users to get inside their smartphones, dodge security software, talk victims into granting various system permissions, keep away from built-in battery optimizers that kill resource hogs, and, after all that, make sure their malware actually turns a profit. The creators of the BeatBanker — an Android‑based malware campaign recently discovered by our experts — have come up with something new for each one of these steps. The attack is (for now) aimed at Brazilian users, but the developers’ ambitions will almost certainly push them toward international expansion, so it’s worth staying on guard and studying the threat actor’s tricks. You can find a full technical analysis of the malware on Securelist.

How BeatBanker infiltrates a smartphone

The malware is distributed through specially crafted phishing pages that mimic the Google Play Store. A page that’s easily mistaken for the official app marketplace invites users to download a seemingly useful app. In one campaign, the trojan disguised itself as the Brazilian government services app, INSS Reembolso; in another, it posed as the Starlink app.

The malicious site cupomgratisfood{.}shop does an excellent job imitating an app store. It's just unclear why the fake INSS Reembolso appears all of three times. To be extra sure, perhaps?!

The malicious site cupomgratisfood{.}shop does an excellent job imitating an app store. It’s just unclear why the fake INSS Reembolso appears all of three times. To be extra sure, perhaps?!

The installation takes place in several stages to avoid requesting too many permissions at once and to further lull the victim’s vigilance. After the first app is downloaded and launched, it displays an interface that also resembles Google Play and simulates an update for the decoy app — requesting the user’s permission to install apps, which doesn’t look out-of-the-ordinary in context. If you grant this permission, the malware downloads additional malicious modules to your smartphone.
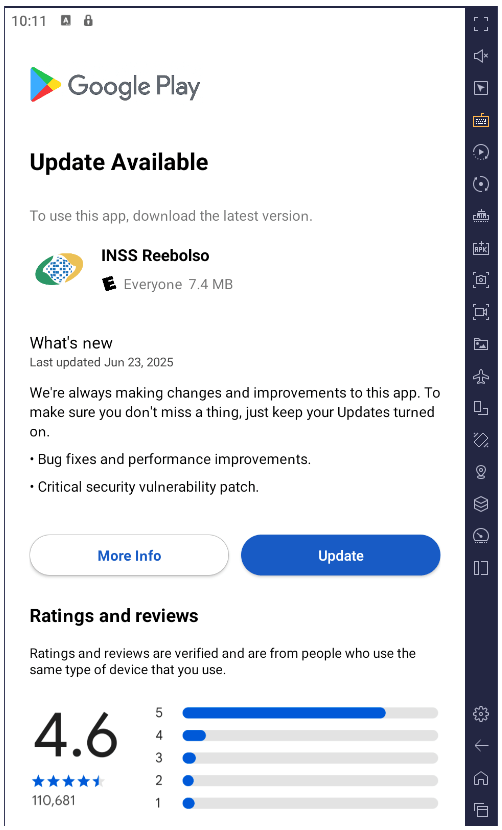
After installation, the trojan simulates a decoy app update via Google Play by requesting permission to install applications while downloading additional malicious modules in the process

After installation, the trojan simulates a decoy app update via Google Play by requesting permission to install applications while downloading additional malicious modules in the process

All components of the trojan are encrypted. Before decrypting and proceeding to the next stages of infection, it checks to ensure it’s on a real smartphone and in the target country. BeatBanker immediately terminates its own process if it finds any discrepancies or detects that it’s running in emulated or analysis environments. This complicates dynamic analysis of the malware. Incidentally, the fake update downloader injects modules directly into RAM to avoid creating files on the smartphone that would be visible to security software.

All these tricks are nothing new and frequently used in complex malware for desktop computers. However, for smartphones, such sophistication is still a rarity, and not every security tool will spot it. Users of Kaspersky products are protected from this threat.

Playing audio as a shield

Once established on the smartphone, BeatBanker downloads a module for mining Monero cryptocurrency. The authors were very concerned that the smartphone’s aggressive battery optimization systems might shut down the miner, so they came up with a trick: playing an all-but-inaudible sound at all times. Power consumption control systems typically spare apps that are playing audio or video to avoid cutting off background music or podcast players. In this way, the malware can run continuously. Additionally, it displays a persistent notification in the status bar, asking the user to keep the phone on for a system update.
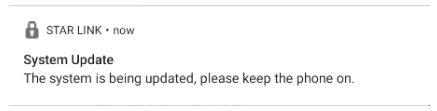
Example of a persistent system update notification from another malicious app masquerading as the Starlink app

Example of a persistent system update notification from another malicious app masquerading as the Starlink app

Control via Google

To manage the trojan, the authors leverage Google’s legitimate Firebase Cloud Messaging (FCM) — a system for receiving notifications and sending data from a smartphone. This feature is available to all apps and it’s the most popular method for sending and receiving data. Thanks to FCM, attackers can monitor the device’s status and change its settings as needed.

Nothing bad happens for a while after the malware is installed: the attackers wait it out. Then they trigger the miner, but they’re careful to throttle it back if the phone overheats, the battery starts dipping, or the owner happens to be using the device. All of this is handled via FCM.

Theft and espionage

In addition to the crypto miner, BeatBanker installs extra modules to spy on the user and rob them at the right moment. The spyware module requests Accessibility Services permission, and if this is granted, begins monitoring everything that’s happening on the smartphone.

If the owner opens the Binance or Trust Wallet app to send USDT, the malware overlays a fake screen on top of the wallet interface, effectively swapping the recipient’s address for its own. All transfers go to the attackers.

The trojan features an advanced remote control system and is capable of executing many other commands:

  • Intercepting one-time codes from Google Authenticator
  • Recording audio from the microphone
  • Streaming the screen in real-time
  • Monitoring the clipboard and intercept keystrokes
  • Sending SMS messages
  • Simulating taps on specific areas of the screen and text input according to a script sent by the attacker, and much more

All of this makes it possible to rob the victim when they use any other banking or payment services — not just crypto payments.

Sometimes victims are infected with a different module for espionage and remote smartphone control — the BTMOB remote access trojan. Its malicious capabilities are even broader, including:

  • Automatic acquisition of certain permissions on Android 13–15
  • Continuous geolocation tracking
  • Access to the front and rear cameras
  • Obtaining PIN codes and passwords for screen unlocking
  • Capturing keyboard input

How to protect yourself from BeatBanker

Cybercriminals are constantly refining their attacks and coming up with new ways to profit from their victims. Despite this, you can protect yourself by following a few simple precautions:

  • Download apps from official sources only, such as Google Play or the app store preinstalled by the vendor. If you find an app while searching the internet, don’t open it via a link from your browser; instead, head to the Google Play app or another branded store on your smartphone to search for it there. While you’re at it, check the number of downloads, the app’s age, and look at the ratings and reviews. Avoid new apps, apps with low ratings, and those with a small number of downloads.
  • Check any permissions you grant. Don’t grant permissions if you’re not sure what they do or why that specific app requires them. Be extra careful with permissions like Install unknown apps, Accessibility, Superuser, and Display over other apps. We’ve written about these in detail in a separate article.
  • Equip your device with a comprehensive anti-malware solution. We, naturally, recommend Kaspersky for Android. Users of Kaspersky products are protected from BeatBanker — detected with the verdicts HEUR:Trojan-Dropper.AndroidOS.BeatBanker and HEUR:Trojan-Dropper.AndroidOS.Banker.*.
  • Regularly update both your operating system and security software. For Kaspersky for Android, which is currently unavailable on Google Play, please review our detailed instructions on installing and updating the app.

Threats to Android users have been going through the roof lately. Check out our other posts on the most relevant and widespread Android attacks and tips for keeping you and your loved ones safe:


How to disable unwanted AI assistants and features on your PC and smartphone | Kaspersky official blog

5 March 2026 at 13:25

If you don’t go searching for AI services, they’ll find you all the same. Every major tech company feels a moral obligation not just to develop an AI assistant, integrated chatbot, or autonomous agent, but to bake it into their existing mainstream products and forcibly activate it for tens of millions of users. Here are just a few examples from the last six months:

On the flip side, geeks have rushed to build their own “personal Jarvises” by renting VPS instances or hoarding Mac minis to run the OpenClaw AI agent. Unfortunately, OpenClaw’s security issues with default settings turned out to be so massive that it’s already been dubbed the biggest cybersecurity threat of 2026.

Beyond the sheer annoyance of having something shoved down your throat, this AI epidemic brings some very real practical risks and headaches. AI assistants hoover up every bit of data they can get their hands on, parsing the context of the websites you visit, analyzing your saved documents, reading through your chats, and so on. This gives AI companies an unprecedentedly intimate look into every user’s life.

A leak of this data during a cyberattack — whether from the AI provider’s servers or from the cache on your own machine — could be catastrophic. These assistants can see and cache everything you can, including data usually tucked behind multiple layers of security: banking info, medical diagnoses, private messages, and other sensitive intel. We took a deep dive into how this plays out when we broke down the issues with the AI-powered Copilot+ Recall system, which Microsoft also planned to force-feed to everyone. On top of that, AI can be a total resource hog, eating up RAM, GPU cycles, and storage, which often leads to a noticeable hit to system performance.

For those who want to sit out the AI storm and avoid these half-baked, rushed-to-market neural network assistants, we’ve put together a quick guide on how to kill the AI in popular apps and services.

How to disable AI in Google Docs, Gmail, and Google Workspace

Google’s AI assistant features in Mail and Docs are lumped together under the umbrella of “smart features”. In addition to the large language model, this includes various minor conveniences, like automatically adding meetings to your calendar when you receive an invite in Gmail. Unfortunately, it’s an all-or-nothing deal: you have to disable all of the “smart features” to get rid of the AI.

To do this, open Gmail, click the Settings (gear) icon, and then select See all settings. On the General tab, scroll down to Google Workspace smart features. Click Manage Workspace smart feature settings and toggle off two options: Smart features in Google Workspace and Smart features in other Google products. We also recommend unchecking the box next to Turn on smart features in Gmail, Chat, and Meet on the same general settings tab. You’ll need to restart your Google apps afterward (which usually happens automatically).

How to disable AI Overviews in Google Search

You can kill off AI Overviews in search results on both desktops and smartphones (including iPhones), and the fix is the same across the board. The simplest way to bypass the AI overview on a case-by-case basis is to append -ai to your search query — for example, how to make pizza -ai. Unfortunately, this method occasionally glitches, causing Google to abruptly claim it found absolutely nothing for your request.

If that happens, you can achieve the same result by switching the search results page to Web mode. To do this, select the Web filter immediately below the search bar — you’ll often find it tucked away under the More button.

A more radical solution is to jump ship to a different search engine entirely. For instance, DuckDuckGo not only tracks users less and shows little ads, but it also offers a dedicated AI-free search — just bookmark the search page at noai.duckduckgo.com.

How to disable AI features in Chrome

Chrome currently has two types of AI features baked in. The first communicates with Google’s servers and handles things like the smart assistant, an autonomous browsing AI agent, and smart search. The second handles locally more utility-based tasks, such as identifying phishing pages or grouping browser tabs. The first group of settings is labeled AI mode, while the second contains the term Gemini Nano.

To disable them, type chrome://flags into the address bar and hit Enter. You’ll see a list of system flags and a search bar; type “AI” into that search bar. This will filter the massive list down to about a dozen AI features (and a few other settings where those letters just happen to appear in a longer word). The second search term you’ll need in this window is “Gemini“.

After reviewing the options, you can disable the unwanted AI features — or just turn them all off — but the bare minimum should include:

  • AI Mode Omnibox entrypoint
  • AI Entrypoint Disabled on User Input
  • Omnibox Allow AI Mode Matches
  • Prompt API for Gemini Nano
  • Prompt API for Gemini Nano with Multimodal Input

Set all of these to Disabled.

How to disable AI features in Firefox

While Firefox doesn’t have its own built-in chatbots and hasn’t (yet) tried to force upon users agent-based features, the browser does come equipped with smart-tab grouping, a sidebar for chatbots, and a few other perks. Generally, AI in Firefox is much less “in your face” than in Chrome or Edge. But if you still want to pull the plug, you’ve two ways to do it.

The first method is available in recent Firefox releases — starting with version 148, a dedicated AI Controls section appeared in the browser settings, though the controls are currently a bit sparse. You can use a single toggle to completely Block AI enhancements, shutting down AI features entirely. You can also specify whether you want to use On-device AI by downloading small local models (currently just for translations) and configure AI chatbot providers in sidebar, choosing between Anthropic Claude, ChatGPT, Copilot, Google Gemini, and Le Chat Mistral.

The second path — for older versions of Firefox — requires a trip into the hidden system settings. Type about:config into the address bar, hit Enter, and click the button to confirm that you accept the risk of poking around under the hood.

A massive list of settings will appear along with a search bar. Type “ML” to filter for settings related to machine learning.

To disable AI in Firefox, toggle the browser.ml.enabled setting to false. This should disable all AI features across the board, but community forums suggest this isn’t always enough to do the trick. For a scorched-earth approach, set the following parameters to false (or selectively keep only what you need):

  • ml.chat.enabled
  • ml.linkPreview.enabled
  • ml.pageAssist.enabled
  • ml.smartAssist.enabled
  • ml.enabled
  • ai.control.translations
  • tabs.groups.smart.enabled
  • urlbar.quicksuggest.mlEnabled

This will kill off chatbot integrations, AI-generated link descriptions, assistants and extensions, local translation of websites, tab grouping, and other AI-driven features.

How to disable AI features in Microsoft apps

Microsoft has managed to bake AI into almost every single one of its products, and turning it off is often no easy task — especially since the AI sometimes has a habit of resurrecting itself without your involvement.

How to disable AI features in Edge

Microsoft’s browser is packed with AI features, ranging from Copilot to automated search. To shut them down, follow the same logic as with Chrome: type edge://flags into the Edge address bar, hit Enter, then type “AI” or “Copilot” into the search box. From there, you can toggle off the unwanted AI features, such as:

  • Enable Compose (AI-writing) on the web
  • Edge Copilot Mode
  • Edge History AI

Another way to ditch Copilot is to enter edge://settings/appearance/copilotAndSidebar into the address bar. Here, you can customize the look of the Copilot sidebar and tweak personalization options for results and notifications. Don’t forget to peek into the Copilot section under App-specific settings — you’ll find some additional controls tucked away there.

How to disable Microsoft Copilot

Microsoft Copilot comes in two flavors: as a component of Windows (Microsoft Copilot), and as part of the Office suite (Microsoft 365 Copilot). Their functions are similar, but you’ll have to disable one or both depending on exactly what the Redmond engineers decided to shove onto your machine.

The simplest thing you can do is just uninstall the app entirely. Right-click the Copilot entry in the Start menu and select Uninstall. If that option isn’t there, head over to your installed apps list (Start → Settings → Apps) and uninstall Copilot from there.

In certain builds of Windows 11, Copilot is baked directly into the OS, so a simple uninstall might not work. In that case, you can toggle it off via the settings: Start → Settings → Personalization → Taskbar → turn off Copilot.

If you ever have a change of heart, you can always reinstall Copilot from the Microsoft Store.

It’s worth noting that many users have complained about Copilot automatically reinstalling itself, so you might want to do a weekly check for a couple of months to make sure it hasn’t staged a comeback. For those who are comfortable tinkering with the System Registry (and understand the consequences), you can follow this detailed guide to prevent Copilot’s silent resurrection by disabling the SilentInstalledAppsEnabled flag and adding/enabling the TurnOffWindowsCopilot parameter.

How to disable Microsoft Recall

The Microsoft Recall feature, first introduced in 2024, works by constantly taking screenshots of your computer screen and having a neural network analyze them. All that extracted information is dumped into a database, which you can then search using an AI assistant. We’ve previously written in detail about the massive security risks Microsoft Recall poses.

Under pressure from cybersecurity experts, Microsoft was forced to push the launch of this feature from 2024 to 2025, significantly beefing up the protection of the stored data. However, the core of Recall remains the same: your computer still remembers your every move by constantly snapping screenshots and OCR-ing the content. And while the feature is no longer enabled by default, it’s absolutely worth checking to make sure it hasn’t been activated on your machine.

To check, head to the settings: Start → Settings → Privacy & Security → Recall & snapshots. Ensure the Save snapshots toggle is turned off, and click Delete snapshots to wipe any previously collected data, just in case.

You can also check out our detailed guide on how to disable and completely remove Microsoft Recall.

How to disable AI in Notepad and Windows context actions

AI has seeped into every corner of Windows, even into File Explorer and Notepad. You might even trigger AI features just by accidentally highlighting text in an app — a feature Microsoft calls “AI Actions”. To shut this down, head to Start → Settings → Privacy & Security → Click to Do.

Notepad has received its own special Copilot treatment, so you’ll need to disable AI there separately. Open the Notepad settings, find the AI features section, and toggle Copilot off.

Finally, Microsoft has even managed to bake Copilot into Paint. Unfortunately, as of right now, there is no official way to disable the AI features within the Paint app itself.

How to disable AI in WhatsApp

In several regions, WhatsApp users have started seeing typical AI additions like suggested replies, AI message summaries, and a brand-new Chat with Meta AI button. While Meta claims the first two features process data locally on your device and don’t ship your chats off to their servers, verifying that is no small feat. Luckily, turning them off is straightforward.

To disable Suggested Replies, go to Settings → Chats → Suggestions & smart replies and toggle off Suggested replies. You can also kill off AI Sticker suggestions in that same menu. As for the AI message summaries, those are managed in a different location: Settings → Notifications → AI message summaries.

How to disable AI on Android

Given the sheer variety of manufacturers and Android flavors, there’s no one-size-fits-all instruction manual for every single phone. Today, we’ll focus on killing off Google’s AI services — but if you’re using a device from Samsung, Xiaomi, or others, don’t forget to check your specific manufacturer’s AI settings. Just a heads-up: fully scrubbing every trace of AI might be a tall order — if it’s even possible at all.

In Google Messages, the AI features are tucked away in the settings: tap your account picture, select Messages settings, then Gemini in Messages, and toggle the assistant off.

Broadly speaking, the Gemini chatbot is a standalone app that you can uninstall by heading to your phone’s settings and selecting Apps. However, given Google’s master plan to replace the long-standing Google Assistant with Gemini, uninstalling it might become difficult — or even impossible — down the road.

If you can’t completely uninstall Gemini, head into the app to kill its features manually. Tap your profile icon, select Gemini Apps activity, and then choose Turn off or Turn off and delete activity. Next, tap the profile icon again and go to the Connected Apps setting (it may be hiding under the Personal Intelligence setting). From here, you should disable all the apps where you don’t want Gemini poking its nose in.

How to disable AI in macOS and iOS

Apple’s platform-level AI features, collectively known as Apple Intelligence, are refreshingly straightforward to disable. In your settings — on desktops, smartphones, and tablets alike — simply look for the section labeled Apple Intelligence & Siri. By the way, depending on your region and the language you’ve selected for your OS and Siri, Apple Intelligence might not even be available to you yet.

Other posts to help you tune the AI tools on your devices:

What a browser-in-the-browser attack is, and how to spot a fake login window | Kaspersky official blog

In 2022, we dived deep into an attack method called browser-in-the-browser — originally developed by the cybersecurity researcher known as mr.d0x. Back then, no actual examples existed of this model being used in the wild. Fast-forward four years, and browser-in-the-browser attacks have graduated from the theoretical to the real: attackers are now using them in the field. In this post, we revisit what exactly a browser-in-the-browser attack is, show how hackers are deploying it, and, most importantly, explain how to keep yourself from becoming its next victim.

What is a browser-in-the-browser (BitB) attack?

For starters, let’s refresh our memories on what mr.d0x actually cooked up. The core of the attack stems from his observation of just how advanced modern web development tools — HTML, CSS, JavaScript, and the like — have become. It’s this realization that inspired the researcher to come up with a particularly elaborate phishing model.

A browser-in-the-browser attack is a sophisticated form of phishing that uses web design to craft fraudulent websites imitating login windows for well-known services like Microsoft, Google, Facebook, or Apple that look just like the real thing. The researcher’s concept involves an attacker building a legitimate-looking site to lure in victims. Once there, users can’t leave comments or make purchases unless they “sign in” first.

Signing in seems easy enough: just click the Sign in with {popular service name} button. And this is where things get interesting: instead of a genuine authentication page provided by the legitimate service, the user gets a fake form rendered inside the malicious site, looking exactly like… a browser pop-up. Furthermore, the address bar in the pop-up, also rendered by the attackers, displays a perfectly legitimate URL. Even a close inspection won’t reveal the trick.

From there, the unsuspecting user enters their credentials for Microsoft, Google, Facebook, or Apple into this rendered window, and those details go straight to the cybercriminals. For a while this scheme remained a theoretical experiment by the security researcher. Now — real-world attackers have added it to their arsenals.

Facebook credential theft

Attackers have put their own spin on mr.d0x’s original concept: recent browser-in-the-browser hits have been kicking off with emails designed to alarm recipients. For instance, one phishing campaign posed as a law firm informing the user they’d committed a copyright violation by posting something on Facebook. The message included a credible-looking link allegedly to the offending post.

Phishing email masquerading as a legal notice

Attackers sent messages on behalf of a fake law firm alleging copyright infringement — complete with a link supposedly to the problematic Facebook post. Source

Interestingly, to lower the victim’s guard, clicking the link didn’t immediately open a fake Facebook login page. Instead, they were first greeted by a bogus Meta CAPTCHA. Only after passing it was the victim presented with the fake authentication pop-up.

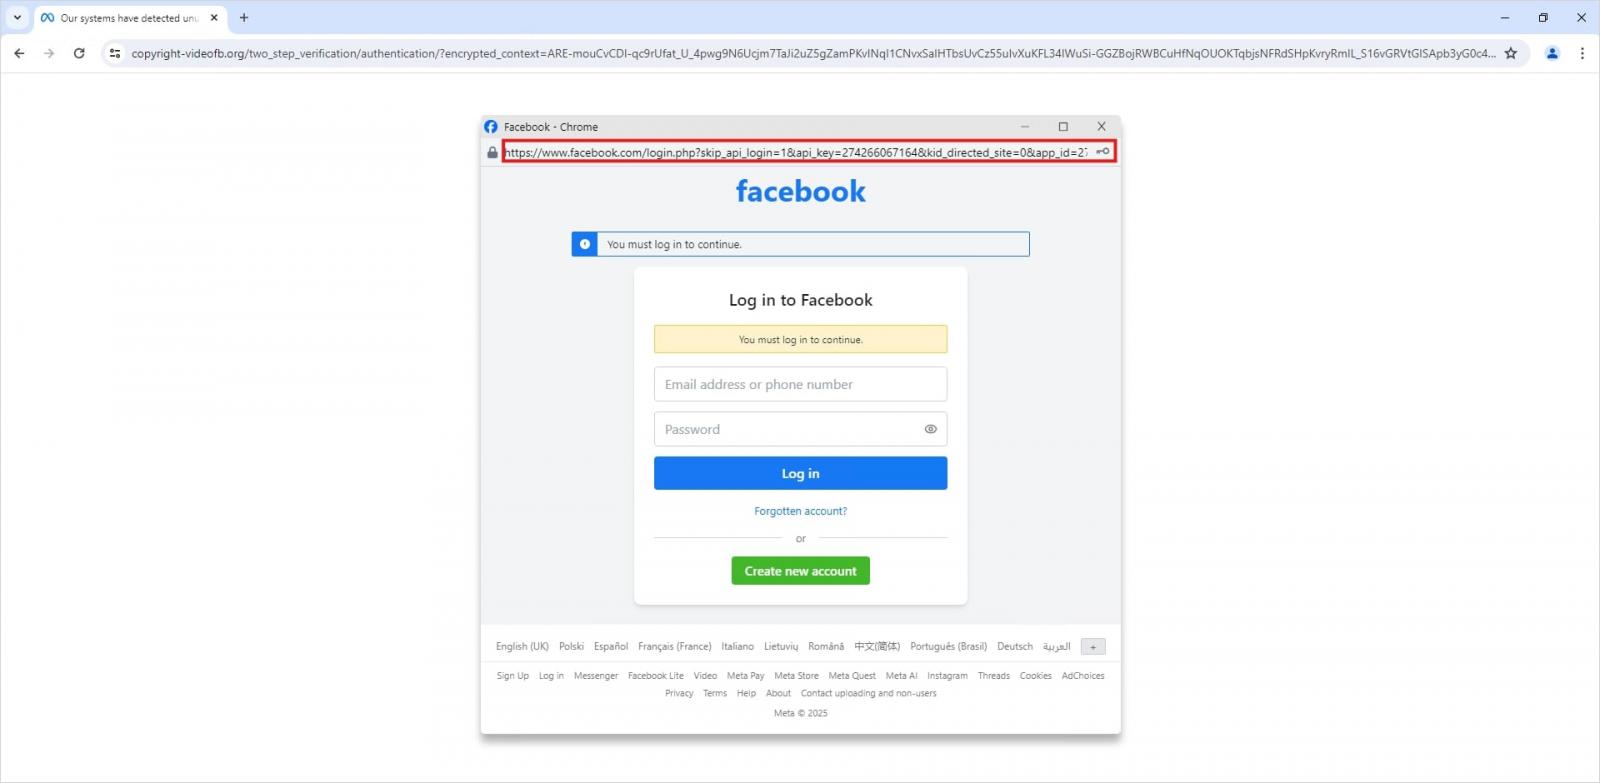
Fake login window rendered directly inside the webpage

This isn’t a real browser pop-up; it’s a website element mimicking a Facebook login page — a ruse that allows attackers to display a perfectly convincing address. Source

Naturally, the fake Facebook login page followed mr.d0x’s blueprint: it was built entirely with web design tools to harvest the victim’s credentials. Meanwhile, the URL displayed in the forged address bar pointed to the real Facebook site — www.facebook.com.

How to avoid becoming a victim

The fact that scammers are now deploying browser-in-the-browser attacks just goes to show that their bag of tricks is constantly evolving. But don’t despair — there’s a way to tell if a login window is legit. A password manager is your friend here, which, among other things, acts as a reliable security litmus test for any website.

That’s because when it comes to auto-filling credentials, a password manager looks at the actual URL, not what the address bar appears to show, or what the page itself looks like. Unlike a human user, a password manager can’t be fooled with browser-in-the-browser tactics, or any other tricks, like domains having a slightly different address (typosquatting) or phishing forms buried in ads and pop-ups. There’s a simple rule: if your password manager offers to auto-fill your login and password, you’re on a website you’ve previously saved credentials for. If it stays silent, something’s fishy.

Beyond that, following our time-tested advice will help you defend against various phishing methods, or at least minimize the fallout if an attack succeeds:

  • Enable two-factor authentication (2FA) for every account that supports it. Ideally, use one-time codes generated by a dedicated authenticator app as your second factor. This helps you dodge phishing schemes designed to intercept confirmation codes sent via SMS, messaging apps, or email. You can read more about one-time-code 2FA in our dedicated post.
  • Use passkeys. The option to sign in with this method can also serve as a signal that you’re on a legitimate site. You can learn all about what passkeys are and how to start using them in our deep dive into the technology.
  • Set unique, complex passwords for all your accounts. Whatever you do, never reuse the same password across different accounts. We recently covered what makes a password truly strong on our blog. To generate unique combinations — without needing to remember them — Kaspersky Password Manager is your best bet. As an added bonus, it can also generate one-time codes for two-factor authentication, store your passkeys, and synchronize your passwords and files across your various devices.

Finally, this post serves as yet another reminder that theoretical attacks described by cybersecurity researchers often find their way out into the wild. So, keep an eye on our blog, and subscribe to our Telegram channel to stay up to speed on the latest threats to your digital security and how to shut them down.

Read about other inventive phishing techniques scammers are using day in day out:

CVE-2026-3102: macOS ExifTool image-processing vulnerability | Kaspersky official blog

By: GReAT
2 March 2026 at 16:17

Can a computer be infected with malware simply by processing a photo — particularly if that computer is a Mac, which many still believe (wrongly) to be inherently resistant to malware? As it turns out, the answer is yes — if you’re using a vulnerable version of ExifTool or one of the many apps built based on it. ExifTool is a ubiquitous open-source solution for reading, writing, and editing image metadata. It’s the go-to tool for photographers and digital archivists, and is widely used in data analytics, digital forensics, and investigative journalism.

Our GReAT experts discovered a critical vulnerability — tracked as CVE-2026-3102 — which is triggered during the processing of malicious image files containing embedded shell commands within their metadata. When a vulnerable version of ExifTool on macOS processes such a file, the command is executed. This allows a threat actor to perform unauthorized actions in the system, such as downloading and executing a payload from a remote server. In this post, we break down how this exploit works, provide actionable defense recommendations, and explain how to verify if your system is vulnerable.

What is ExifTool?

ExifTool is a free, open-source application addressing a niche but critical requirement: it extracts metadata from files, and enables the processing of both that data and the files themselves. Metadata is the information embedded within most modern file formats that describes or supplements the main content of a file. For instance, in a music track, metadata includes the artist’s name, song title, genre, release year, album cover art, and so on. For photographs, metadata typically consists of the date and time of a shot, GPS coordinates, ISO and shutter speed settings, and the camera make and model. Even office documents store metadata, such as the author’s name, total editing time, and the original creation date.

ExifTool is the industry leader in terms of the sheer volume of supported file formats, as well as the depth, accuracy, and versatility of its processing capabilities. Common use cases include:

  • Adjusting dates if they’re incorrectly recorded in the source files
  • Moving metadata between different file formats (from JPG to PNG and so on)
  • Pulling preview thumbnails from professional RAW formats (such as 3FR, ARW, or CR3)
  • Retrieving data from niche formats, including FLIR thermal imagery, LYTRO light-field photos, and DICOM medical imaging
  • Renaming photo/video (etc.) files based on the time of actual shooting, and synchronizing the file creation time and date accordingly
  • Embedding GPS coordinates into a file by syncing it with a separately stored GPS track log, or adding the name of the nearest populated area

The list goes on and on. ExifTool is available both as a standalone command-line application and an open-source library, meaning its code often runs under the hood of powerful, multi-purpose tools; examples include photo organization systems like Exif Photoworker and MetaScope, or image processing automation tools like ImageIngester. In large digital libraries, publishing houses, and image analytics firms, ExifTool is frequently used in automated mode, triggered by internal enterprise applications and custom scripts.

How CVE-2026-3102 works

To exploit this vulnerability, an attacker must craft an image file in a certain way. While the image itself can be anything, the exploit lies in the metadata — specifically the DateTimeOriginal field (date and time of creation), which must be recorded in an invalid format. In addition to the date and time, this field must contain malicious shell commands. Due to the specific way ExifTool handles data on macOS, these commands will execute only if two conditions are met:

  • The application or library is running on macOS
  • The -n (or –printConv) flag is enabled. This mode outputs machine-readable data without additional processing, as is. For example, in -n mode, camera orientation data is output simply, inexplicably, as “six”, whereas with additional processing, it becomes the more human-readable “Rotated 90 CW”. This “human-readability” prevents the vulnerability from being exploited

A rare but by no means fantastical scenario for a targeted attack would look like this: a forensics laboratory, a media editorial office, or a large organization that processes legal or medical documentation receives a digital document of interest. This can be a sensational photo or a legal claim — the bait depends on the victim’s line of work. All files entering the company undergo sorting and cataloging via a digital asset management (DAM) system. In large companies, this may be automated; individuals and small firms run the required software manually. In either case, the ExifTool library must be used under the hood of this software. When processing the date of the malicious photo, the computer where the processing occurs is infected with a Trojan or an infostealer, which is subsequently capable of stealing all valuable data stored on the attacked device. Meanwhile, the victim could easily notice nothing at all, as the attack leverages the image metadata while the picture itself may be harmless, entirely appropriate, and useful.

How to protect against the ExifTool vulnerability

GReAT researchers reported the vulnerability to the author of ExifTool, who promptly released version 13.50, which is not susceptible to CVE-2026-3102. Versions 13.49 and earlier must be updated to remediate the flaw.

It’s critical to ensure that all photo processing workflows are using the updated version. You should verify that all asset management platforms, photo organization apps, and any bulk image processing scripts running on Macs are calling ExifTool version 13.50 or later, and don’t contain an embedded older copy of the ExifTool library.

Naturally, ExifTool — like any software — may contain additional vulnerabilities of this class. To harden your defenses, we also recommend the following:

  • Isolate the processing of untrusted files. Process images from questionable sources on a dedicated machine or within a virtual environment, strictly limiting its access to other computers, data storage, and network resources.
  • Continuously track vulnerabilities along the software supply chain. Organizations that rely on open-source components in their workflows can use Open Source Software Threats Data Feed for tracking.

Finally, if you work with freelancers or self-employed contractors (or simply allow BYOD), only allow them to access your network if they have a comprehensive macOS security solution installed.

Still think macOS is safe? Then read about these Mac threats:

❌