Ransomware kept its grip on organizations through the second quarter of 2026, and the headline number barely moved. What changed underneath that number is more interesting: new research gave us a rare look inside a top tier operation as it was being built, and it revealed just how little it now takes for a small and skilled group to reach the top of the field. Here’s what the quarter actually showed, and what it means for how you defend against it. Key takeaways Data leak sites recorded 2,139 ransomware victims in Q2 2026, essentially flat versus Q1 and up 33% […]
For the past year, the ransomware conversation has centered on concentration: a handful of dominant RaaS operations controlling most of the damage, and a shrinking pool of active groups fighting over the same territory. The State of Ransomware Q2 2026 report from Check Point Research shows that picture starting to shift. The leaders are still winning, but the road to joining them has gotten a great deal shorter.
Key observed findings
The ecosystem stayed concentrated even as its tail widened considerably. The top 10 groups accounted for 57.6% of all victims, down from 71% in Q1, while the number of active groups climbed from 71 to 93, a new high for the period tracked in this report.
Victim volume held at an elevated baseline and did not meaningfully change QoQ. Data leak sites recorded 2,139 victims in Q2, essentially flat versus Q1 (up 0.8%) and up 33% year over year, keeping pace with the highs set through 2025.
Qilin and The Gentlemen fought a close race for the top spot all quarter. Qilin remained the most prolific operator for a fourth straight quarter with 279 victims, though its count fell 17%, while The Gentlemen surged 62% to 269 victims and actually outpaced Qilin during the month of June.
An internal leak gave an unprecedented look inside The Gentlemen’s operation. Chat logs and platform data exposed a core team of roughly nine operators supported by a broader affiliate base, along with confirmation that the group used AI coding assistants to build its ransomware management panel in about three days, genuine first party evidence of AI accelerating malicious tooling development.
Ransom payment rates fell to a multi year low near 23%, continuing a six year decline from 85% in 2019. Even so, on chain ransomware payments still exceeded $820 million in 2025, and the payer market itself is splitting: average payments are rising even as the median falls, a sign that large enterprises keep paying heavily while the mid market increasingly holds firm or settles small.
Law enforcement concentrated its Q2 efforts on shared infrastructure rather than individual groups. Actions took down a cryptocurrency laundering platform used by multiple ransomware actors, prompted sanctions against major Iranian digital asset exchanges, dismantled a malware signing service abused by several RaaS operations, and disrupted large infostealer and VPN anonymization networks that many groups depend on at once.
The geographic picture shifted meaningfully. The US share of victims fell from 50% to 42% quarter over quarter, largely because the quarter’s fastest growing groups, including The Gentlemen and the newly active Krybit, target the US far less often than the ecosystem average.
The exploitation window kept narrowing, with AI increasingly cited as the accelerant. Vulnerabilities are now being weaponized within hours to days of disclosure, lowering the cost of exploit development and giving ransomware operators one more edge in the race to reach victims first.
To read the full findings, access the State of Ransomware Q2 2026 report from Check Point Research here.
When you build a new application or capability on Amazon Web Services (AWS), you want to focus on what you’re building. Getting a service running almost always begins with AWS Identity and Access Management (IAM). Many AWS services that act on your behalf need an IAM role, an identity the service assumes to access your resources with a defined set of permissions. You then author a trust policy so the service can assume the role, choose the permissions the workload needs, and attach it. Configuring roles and policies for common patterns is repeatable work that doesn’t need to be manual.
IAM role manager does that work for you. When role manager is enabled, AWS creates and configures the IAM roles as you build in supported service consoles, so you can start using a service and let AWS handle the role behind it. You create the resource you want, and role manager provisions and attaches the role you need as part of the same flow, so you can build now and refine permissions as your workload matures.
With that step automated, getting started takes minutes. You can create an AWS Lambda function and start running your code, with its execution role already created and attached, without switching context to set one up. Role creation becomes an automated part of building your application rather than a separate step.
Role manager is especially useful when you’re getting started: the moments when you want to stand up a service or get a proof of concept running and want to defer role configuration until later in your development process. You don’t need prior IAM experience to get started. You keep full control of what it creates, because the roles are ordinary IAM roles that you can view, edit, or delete like any role you author yourself. When you want to tighten a role, AWS IAM Access Analyzer reviews how it has been used and recommends a policy scoped to only the permissions it needs.
How to enable role manager
Role manager has two states, enabled and disabled. Enabling it for an account authorizes AWS to create roles in that account. In an organization, administrators can use a service control policy (SCP) to control whether member accounts can enable or use role manager. To enable it:
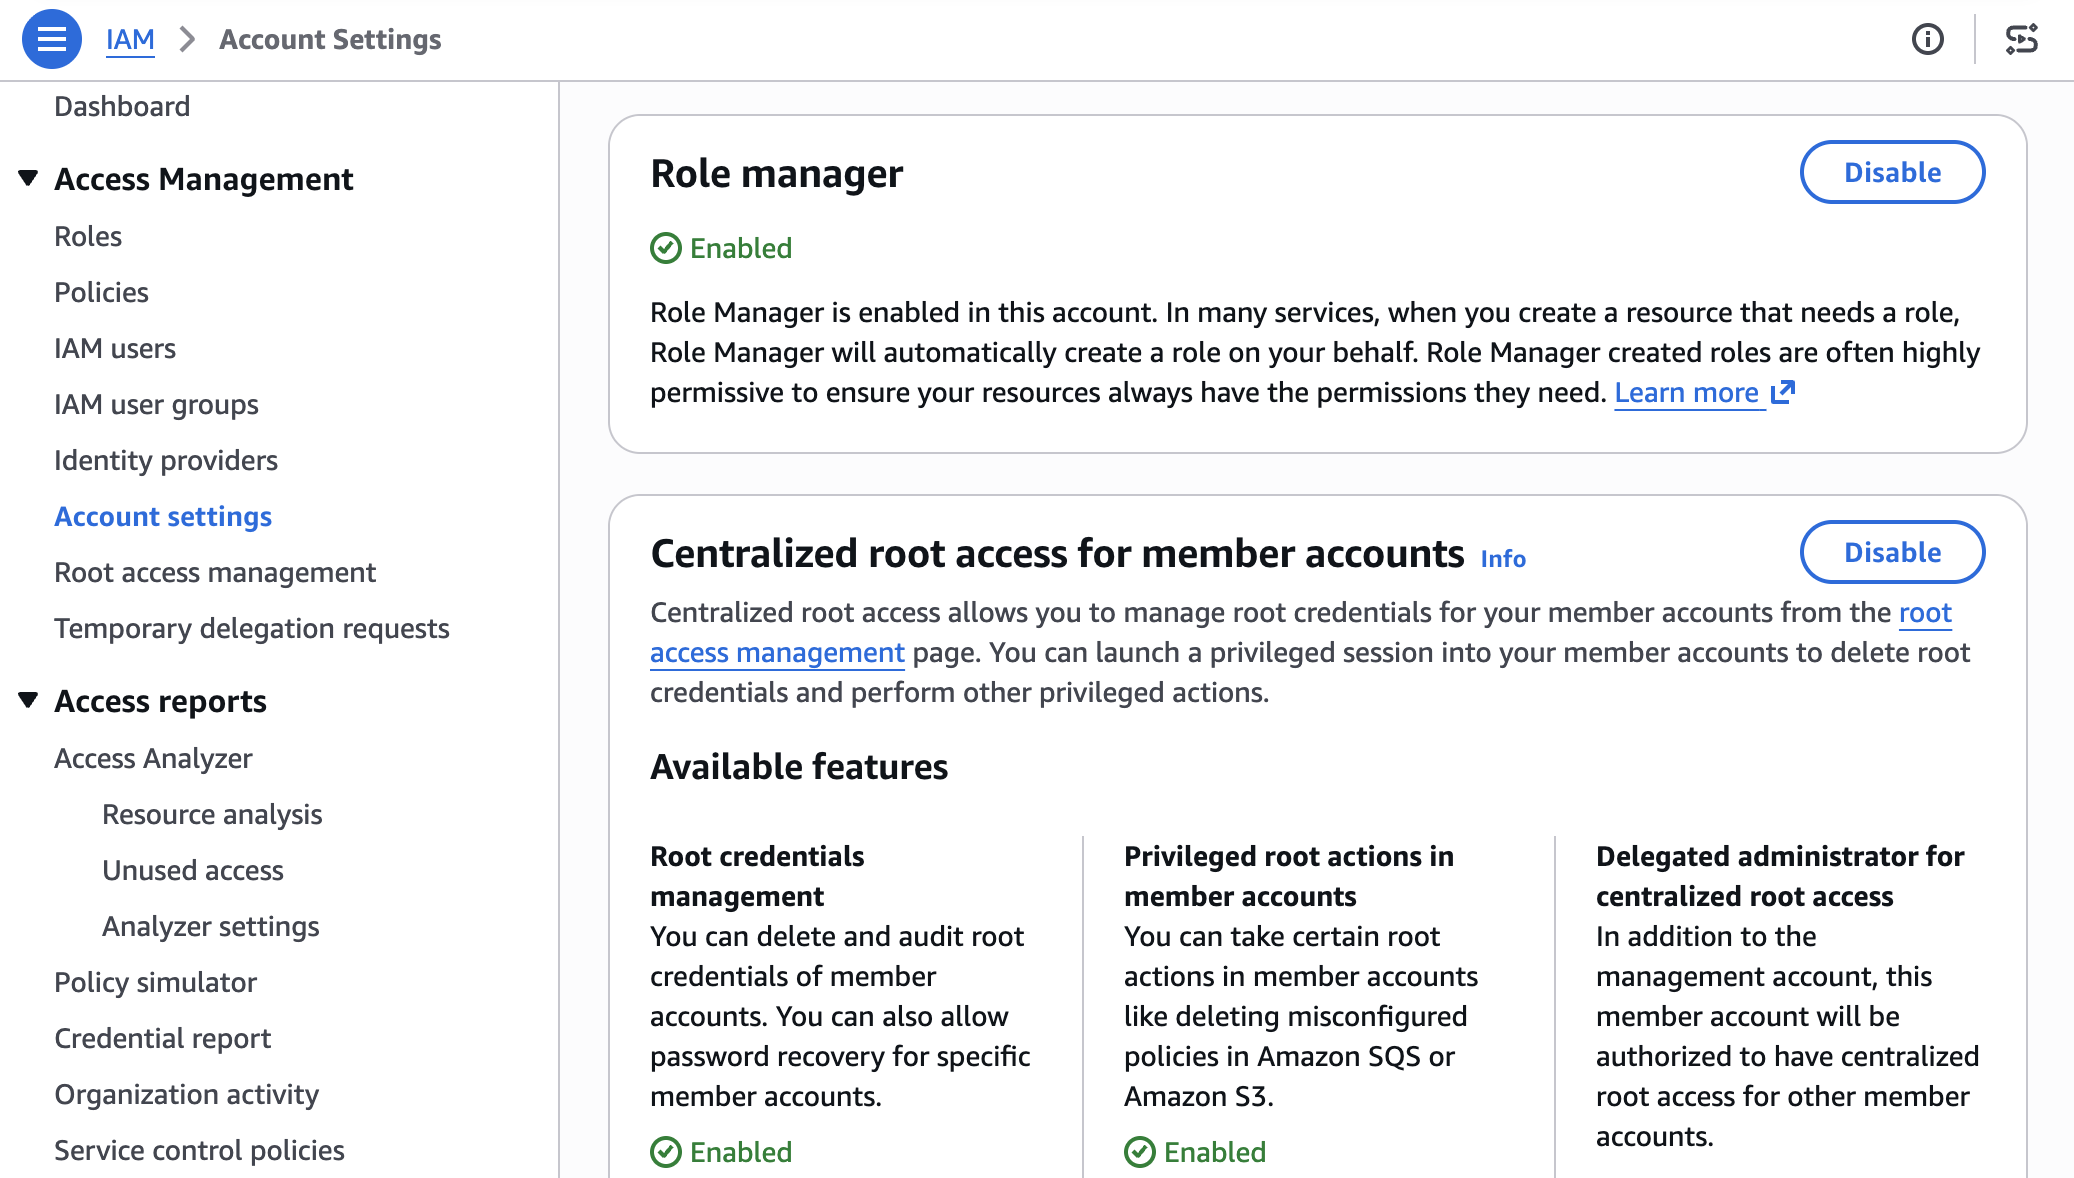
Open the IAM console and choose Account settings.
In the role manager section, choose Enable.
Figure 1: Enable Role Manager
Some AWS services already create a role for you when you create a resource that needs one. Role manager doesn’t change that: those services keep creating roles automatically, and roles you already created keep working. What role manager adds is a single account-level control, and coverage for a case that built-in flows can’t handle: tasks whose permissions AWS can’t determine in advance, such as running your own code. For those tasks, role manager provisions a role that you can narrow later.
Example: Create an Amazon EventBridge rule
Start with a common task: an Amazon EventBridge rule that invokes a target, such as an Amazon Simple Queue Service (Amazon SQS) queue or an Amazon Simple Notification Service (Amazon SNS) topic. Without role manager, you would pause here to create a role that lets EventBridge invoke the target, write the role’s trust policy, attach the required permissions, and then return to finish the rule. With role manager enabled, you define the rule and its target, choose Create, and role manager provisions the role and attaches it for you. The EventBridge console shows the rule created and ready, and you never open the role-creation flow.
Figure 2: Creating an EventBridge rule with no manual role setup
The role comes from an AWS managed role template: a definition AWS builds and maintains for a specific task, with the trust policy and permissions already worked out. The console calls a new IAM API, AcquireRole, which finds the matching template, provisions the role from it, and returns it to EventBridge. Depending on the service, AcquireRole either creates a new role or reuses one that already fits, so an account does not fill up with duplicate roles for the same task.
Role manager creates the role using your own IAM permissions, not a separate role-manager permission. To provision a new role, you need permission for the actions the template performs: at minimum, you need permissions to create and attach roles. When AcquireRole reuses an existing role instead of creating one, it needs only iam:GetRole and iam:GetRoleTemplateVersion. If you’re missing either of these permissions, the console tells you which one is needed rather than creating the role.
Run code that calls other AWS services
Not every task has a set of permissions AWS can define in advance. When a role runs your own code, such as a Lambda function, AWS has no way of knowing which services that code will call. Role manager covers this case too: create a Lambda function with role manager enabled, and it attaches an execution role that your code can use right away and that you can narrow once you know what the function calls.
Because the permissions your code needs aren’t known up front, role manager attaches the AWS managed policy PowerUserAccess to the role. PowerUserAccess grants access to AWS services so your function can call what it needs. By design, it doesn’t grant permission to manage IAM, AWS Organizations, or account settings. The template also configures the role to trust only the Lambda service.
Figure 3: Create an AWS Lambda function with no manual role setup
Role manager attaches an execution role, and your function is ready to run. Figure 4 shows the Execution role panel on the function’s Configuration tab, with the role that role manager attached.
Figure 4: Role manager provides a role automatically to an AWS Lambda function
You can open the role in the IAM console to review its permissions. Figure 5 shows the role’s Permissions tab with the PowerUserAccess policy attached.
Figure 5: Permissions of the role provided by role manager for an AWS Lambda function
You keep full visibility into what role manager creates. Every role it creates records the role template it came from, and both GetRole and ListRoles return that template reference. You can inspect any role in your account and tell which were created by role manager. You read a role’s trust policy and permissions the same way you would for a role you authored, and AWS CloudTrail records each role’s creation.
Refining roles as workloads mature
As your workloads mature, refine the roles that role manager created to follow least privilege. When you’re ready, you can disable role manager and get IAM Access Analyzer unused access analysis at no additional cost for 90 days. Access Analyzer looks at how each role has been used and recommends a policy you can apply that keeps only the permissions the role needs. Start with the roles attached to your most critical workloads and work outward.
Disabling role manager doesn’t disrupt anything already running: your resources keep the roles they have, those roles stay in your account until you change them, and from that point you author new roles yourself, the same as before. If you would rather narrow a single role than the whole account, editing that role removes it from role manager’s control and it becomes a standard customer-managed role, with your changes preserved. In sandbox or development accounts, keeping role manager enabled saves time. For production workloads, disable role manager and refine the roles it created to least privilege before going live.
Conclusion
Role manager automates IAM role setup so you can focus on building from the start. When you enable it, AWS creates and attaches the IAM roles your resources need as you build, so you can start in minutes without prior IAM experience. Because these are IAM roles that you fully control, you keep the same visibility and the same tools you already use. Keep role manager enabled while you build, and refine the roles it created as your workloads mature.
To get started, enable role manager in the IAM console and create a resource in a supported service. To learn more, see IAM role creation and the list of supported services in the IAM User Guide.
If you have feedback about this post, submit comments in the Comments section below.
Key takeaways Weekly cyber attacks reached 2,336 per organization in July 2026, up 3% from June and 16% year over year Education remained the most attacked industry, averaging 4,848 weekly attacks per organization Latin America recorded the highest regional attack volume, while Europe saw one of the sharpest increases at 18% year over year GenAI adoption continued to expand, with organizations using an average of 8 tools and 1 in 36 prompts carrying a high risk of sensitive data exposure Email remained a key entry point, with 1 in every 128 emails classified as phishing and another 20% falling into […]
Organizations operating in Germany and across Europe increasingly need to demonstrate cloud security compliance under the Cloud Computing Compliance Criteria Catalogue (C5:2020), published by Germany’s Federal Office for Information Security (BSI). Last year, we introduced Landing Zone Accelerator on AWS support for digital sovereignty and today we’re announcing the availability of a new independent assessment report available on AWS Artifact which evaluates how the Landing Zone Accelerator (LZA) on AWS solution provides enhanced coverage for C5:2020 requirements by implementing nearly 200 native security controls. LZA is available using a standard multi-account configuration or as a container-based deployment option in the AWS European Sovereign Cloud, enabling customers with data residency requirements to use the same security configuration baseline.
How this accelerates your compliance journey
Security and compliance are a shared responsibility. LZA takes on part of this responsibility by defining a security architecture baseline and automatically provisioning your AWS environment that scales as your organization grows. Where AWS already provides C5 Type 2 attestation reports for “security of the cloud”, the LZA assessment report offers an independent opinion of how the security baseline LZA provisions aligns with C5:2020 criteria for “security in the cloud”. Instead of starting from scratch, you can deploy with LZA, evaluate the scope of coverage from the report, and use the LZA Compliance Workbook to build on and customize for your organization’s unique use case. These resources can help you reduce time in architecture design, evidence collection, and preparation for C5:2020 assessments. The free LZA Compliance Workbook available on AWS Artifact and open source Universal Configuration GitHub repository are also excellent sources to add to a knowledge base, enabling you to create a security compliance chat agent with Bedrock to assist your governance or assurance teams.
What’s in the report
AWS Partner Schellman, an independent third-party assessor, evaluated the LZA Universal Configuration architecture and security control baseline, which maps to C5:2020 controls in the LZA Compliance Workbook, to determine how the LZA infrastructure aligns to C5:2020 technical requirements. The report concluded that LZA can help implement 325 security controls in aggregate, aligning to technical requirements from eight C5:2020 control areas. It also describes the LZA architecture design, security best practices, and scoping considerations for C5:2020 assessments. This is the first installation of the independent C5 report for LZA, which will be updated in 2027 to evaluate coverage for the pending C5:2026 revision.
In addition to the LZA C5:2020 report, you can also find the LZA Compliance Workbook available on AWS Artifact. It maps C5:2020 requirement identifiers to security implementation statements, giving you a starting point from which you can customize and enhance your compliance documentation for your unique workloads or operational practices after deploying LZA.
Amazon Web Services (AWS) is pleased to announce that the Summer 2026 System and Organization Controls (SOC) 1 report is now available. The reports cover 185 services over the 12-month period from July 1, 2025–June 30, 2026, giving customers a full year of assurance. These reports demonstrate our continuous commitment to adhering to the heightened expectations of cloud service providers.
AWS strives to continuously bring services into the scope of its compliance programs to help customers meet their architectural and regulatory needs. You can view the current list of services in scope on our Services in Scope page. As an AWS customer, you can reach out to your AWS account team if you have any questions or feedback about SOC compliance.
Check Point Research is tracking a long‑running campaign called Operation Dream Job, targeting organizations worldwide, with a particular focus on the defense sector. The campaign is affiliated to DPRK-linked Lazarus group and its latest wave focuses on the defense sector in Europe and India.
In the latest variant of the Operation Dream Job campaign, the threat actor distributed SecurityPDF, a modified PDF viewer designed to open attacker-crafted PDF documents and execute a new backdoor which we named Troy.
During the intrusion, the threat actor exploited CVE-2026-68820, a zero-day vulnerability in the Microsoft AFD.sys driver, to deploy a new version of FudModule, Lazarus’ kernel-mode rootkit. Following Check Point Research responsible disclosure, Microsoft released a patch as part of their August Patch Tuesday updates.
Lazarus also used CVE-2025-49113 to exploit vulnerable Roundcube webmail servers. The compromised servers were infected with RelayShell, a PHP webshell that repurposes compromised web servers as relay nodes within the attacker’s command-and-control infrastructure.
At least in one case, a compromised organization in Western Europe was leveraged to conduct a spear-phishing campaign, allowing the attackers to abuse the organization’s reputation and trust to target additional victims.
Introduction
Since early 2026, Check Point Research has tracked a wave of the Operation Dream Job campaign. This wave primarily targeted the defense sector worldwide, with a particular emphasis on companies operating in the aerospace and aviation industries.
We observed the threat actor distributing modified PDF viewers designed to execute malicious payloads embedded within specially crafted PDF files, opened by the user. In this campaign, the threat actor expanded its delivery method by leveraging impersonation websites and search engine optimization (SEO) techniques to distribute the trojanized applications, increasing its credibility and helping it evade some phishing-based detections.
During the operation, the threat actor deployed a new version of the FudModule rootkit, exploiting a zero-day local privilege escalation (LPE) vulnerability in the Windows AFD.sys driver, to obtain SYSTEM privileges and disable EDR visibility. Following responsible disclosure, Microsoft assigned the vulnerability CVE-2026-68820 and released a patch on August 11, 2026, as part of their August Patch Tuesday updates.
The attackers’ command-and-control infrastructure consists of compromised Roundcube and WordPress servers hosting RelayShell, a new PHP webshell that repurposes compromised web servers as relay nodes.
In this blog, we analyze the latest Operation Dream Job campaign, walking through the complete attack chain and providing a technical analysis of the malware and the novel techniques employed throughout the operation, offering new insights into the group’s evolving modus operandi.
Infection Chain
The Operation Dream Job campaign begins with targeted spear-phishing lures centered on attractive job opportunities at well-known companies in the defense, aerospace, and aviation industries.
The exact method used to approach victims in the current campaign remains unclear. However, based on previously documented Dream Job campaigns, we assess that the threat actor likely approached targets through professional networking platforms such as LinkedIn, or directly through messaging applications. Posing as recruiters, the attackers present enticing job opportunities and ultimately direct victims to download malicious files.
During our analysis, we identified two distinct infection chains used to compromise targets. While the second chain appears to represent a more recent evolution of the campaign, both infection methods remain active in parallel.
Infection Chain 1: DLL Sideloading chain
In this infection chain, the victim is convinced to download an encrypted zip archive containing three files:
A legitimate, digitally signed PDF viewer executable.
A malicious DLL that is loaded through DLL sideloading.
An encrypted payload with a PDF extension.
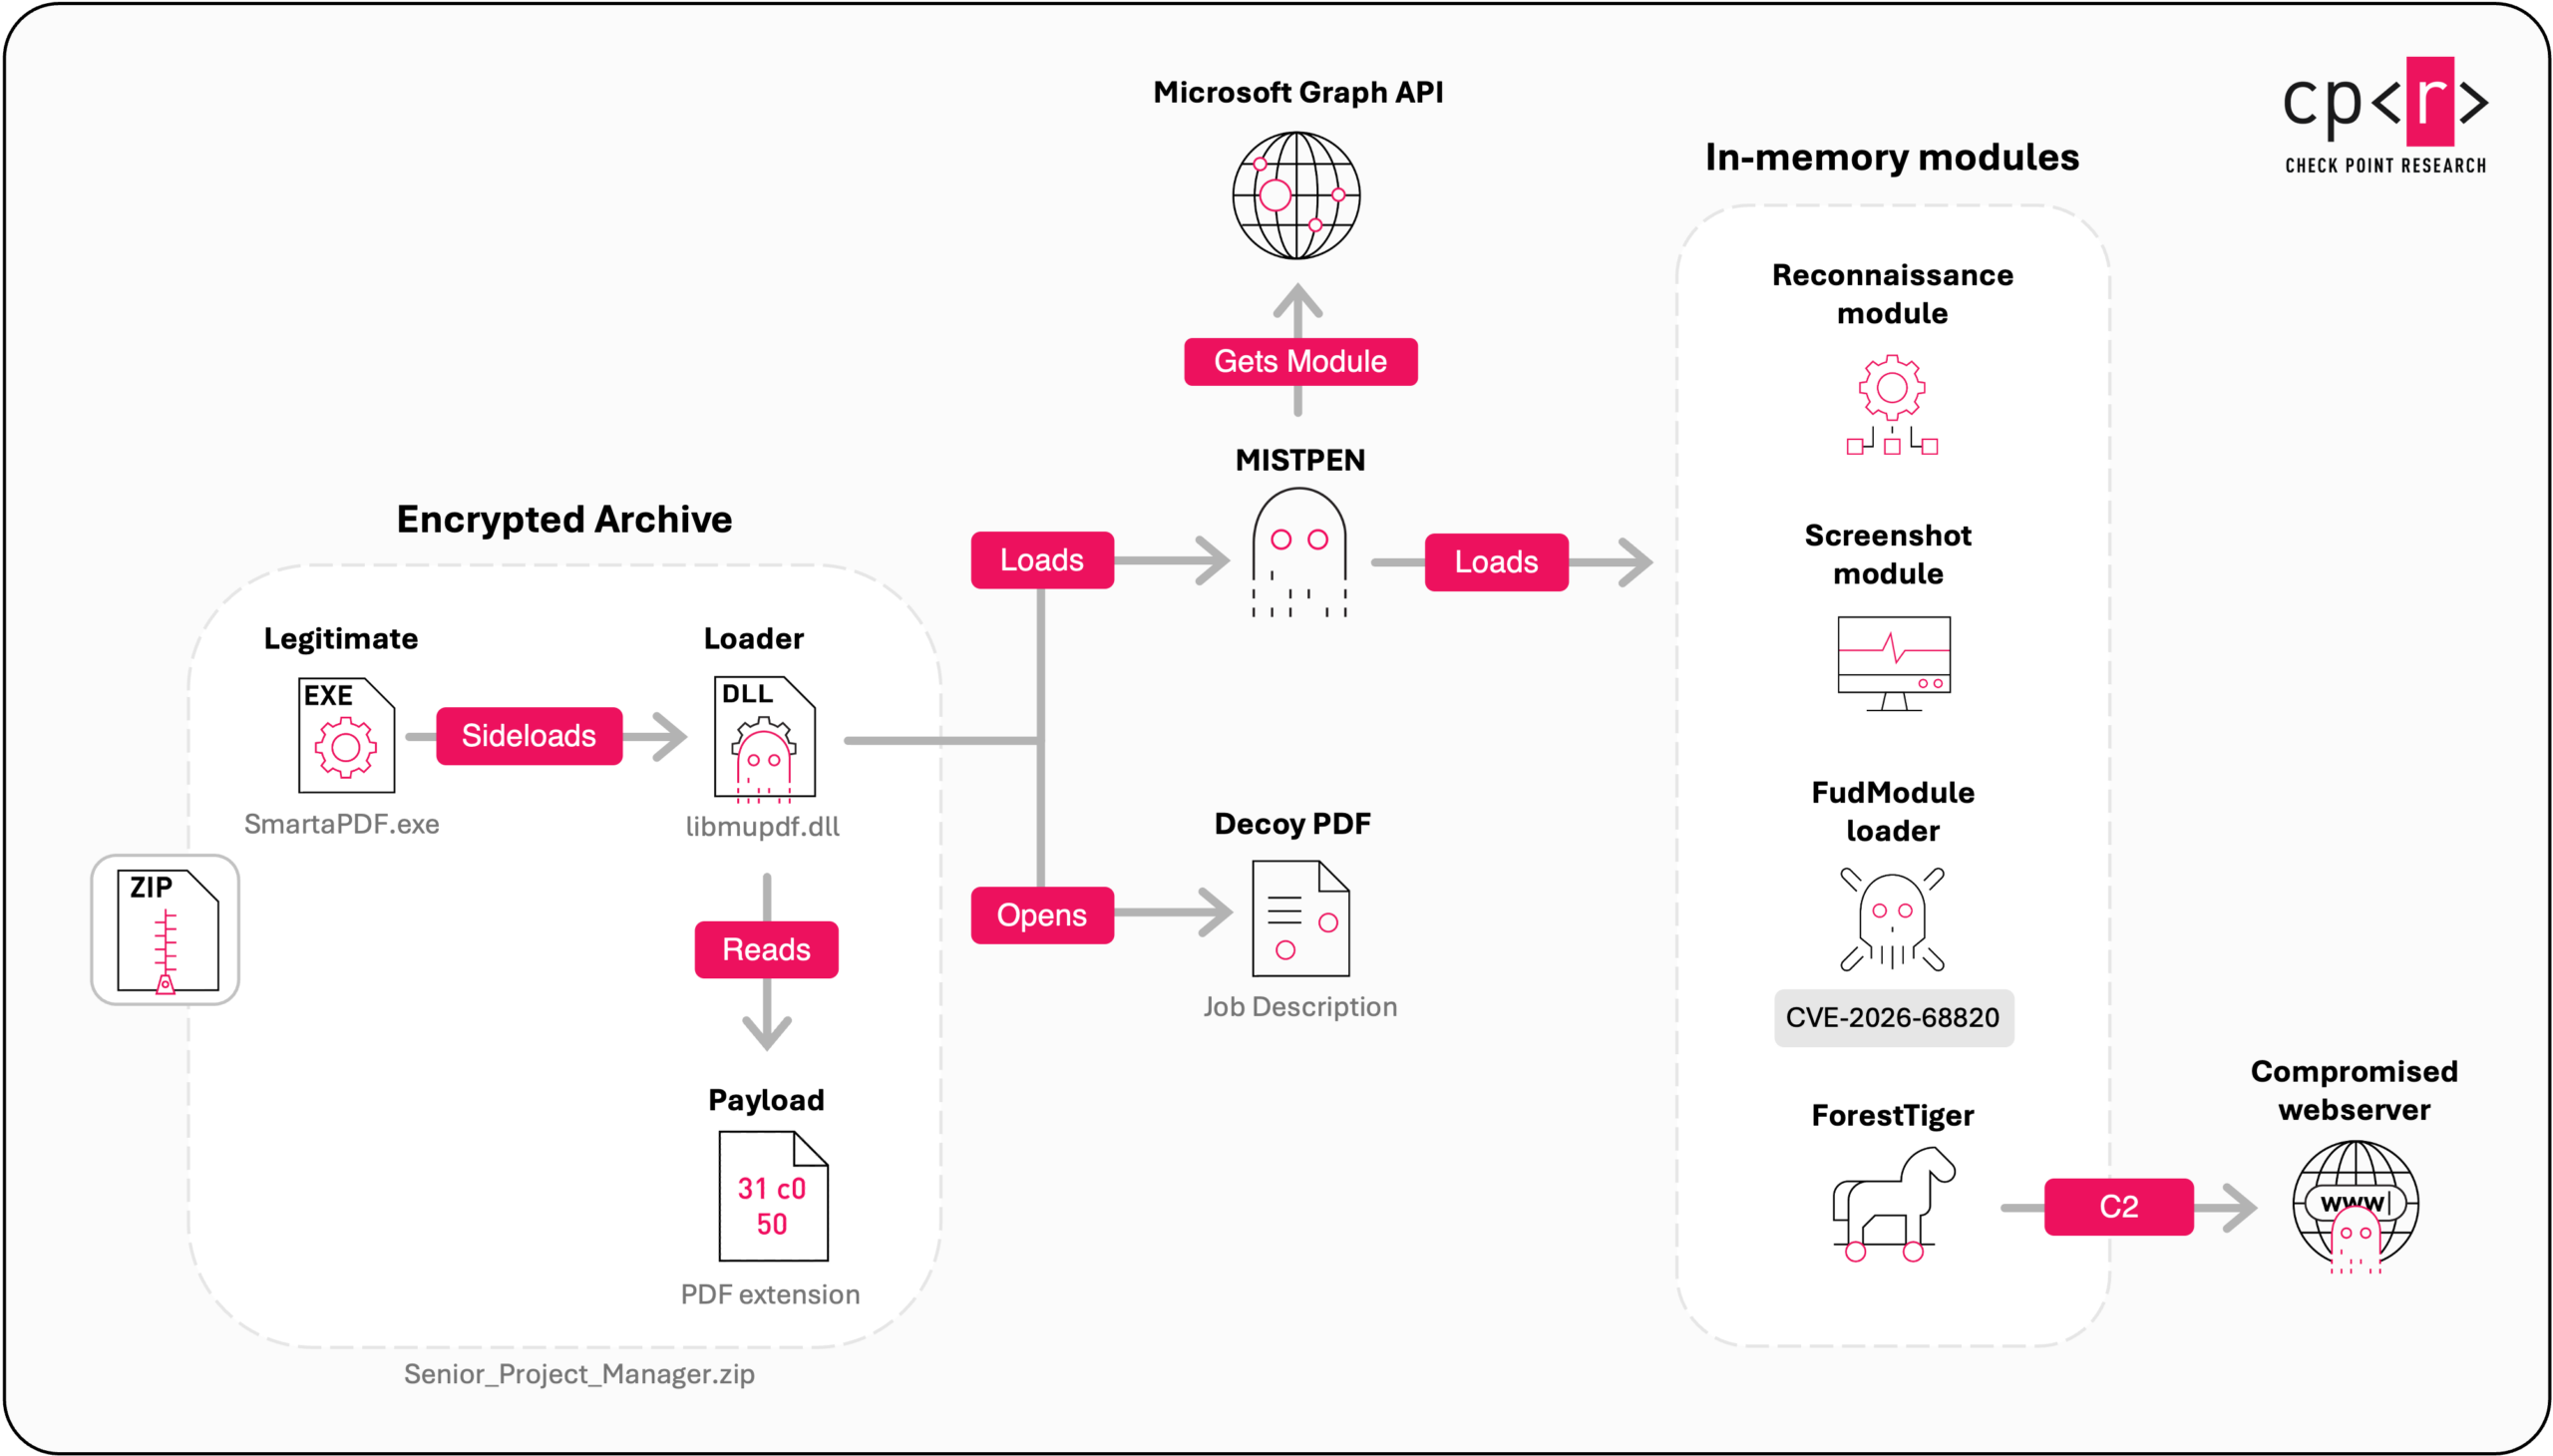
Figure 1 – High-level overview of the DLL sideloading infection chain.
When the victim launches the executable, the malicious DLL libmupdf.dll is loaded via DLL sideloading. The DLL extracts a decoy PDF document from the encrypted payload and displays it to the user, while simultaneously extracting, decrypting, and executing an embedded payload directly in memory.
Figure 2 – PDF decoy impersonating Lockheed Martin job description.
The executed payload is MISTPEN, a lightweight in-memory downloader that uses Microsoft Graph API to access OneDrive in order to retrieve additional modules and run them in memory.
Reconnaissance: During the initial stages of the infection, the threat actor deploys several reconnaissance modules that collect system and process information, allowing the attacker to verify that the system is a suitable target before proceeding with the next stage of the attack.
Persistence: Once the target has been validated, MISTPEN receives an additional persistence module that installs the malware on disk and ensures that MISTPEN is automatically executed after system reboot.
Privilege Escalation: After persistence is established, MISTPEN loads an in-memory local privilege escalation (LPE) module designed to exploit the zero day vulnerability CVE-2026-68820 in the Microsoft AFD.sys driver. Successful exploitation allows the malware to execute FudModule, Lazarus’ kernel-mode rootkit, with SYSTEM privileges.
Backdoor Deployment: The final backdoor delivered by MISTPEN is the ForestTiger backdoor, a well-documented malware family widely attributed to the Lazarus threat group. Once deployed, it provides the attackers with long-term remote access to the compromised host.
Infection Chain 2: Trojanized PDF viewer
In July 2026, we observed a new campaign sharing many characteristics with previously documented Operation Dream Job, particularly the campaign described by ESET in 2025.
In this infection chain, victims receive fraudulent job offers impersonating Enveil, a Privacy Enhancing Technology company, and are instructed to download an encrypted ZIP archive containing two files:
SecurityPDF – a trojanized PDF viewer that has been modified to extract and execute an encrypted payload from specially crafted PDF documents.
A malicious PDF file – an encrypted payload disguised as a PDF document that is decrypted and executed when opened with the modified viewer.
Figure 3 – Crafted PDF opened by SecurityPDF.
SecurityPDF is a trojanized version of a legitimate open-source PDF viewer built on the MuPDF framework. The threat actor modified two code paths responsible for opening PDF documents: the File → Open dialog and the drag-and-drop file handling routine.
As a result, whenever a user opens a PDF document, the application checks whether the file contains the following marker This document is encrypted with sumatrapdf reader!!!!!!!!!!!!. If the marker is present, the application extracts the embedded payload, decrypts it using a single-byte XOR key (0x39), writes the resulting executable to %TEMP%\new.exe, and launches it as a child process.
The new.exe file is a small executable responsible for reflectively loading an embedded DLL containing the Troy backdoor, a previously undocumented backdoor first observed in this campaign.
In addition, we identified at least three websites impersonating Enveil that distribute the trojanized PDF viewer. Some of these websites rank highly in search engine results, with some even appearing as the top result for relevant search queries. It is important to note that the attacker only impersonates Enveil, and there are no indications that the company was targeted or compromised.
Figure 4 – Website appearing as the top search result for “Enveil SecurityPDF”.
Although we did not directly observe how the threat actor incorporated these websites into the phishing campaign, we assess that they were likely used to separate the delivery of the trojanized PDF viewer from the delivery of the crafted PDF document. In this scenario, victims would first receive the malicious PDF file through a phishing message and later be instructed to download the PDF viewer from what appears to be the vendor’s legitimate website. Separating these infection chain stages reduces the likelihood of detection.
MISTPEN
MISTPEN is the first in-memory module executed during the attack chain. First documented by Mandiant in 2024, it functions as a lightweight downloader that uses the Microsoft Graph API to communicate through attacker-controlled files hosted on OneDrive and retrieve additional payloads
All files exchanged through OneDrive are encrypted with AES, using separate keys for uploads and downloads. MISTPEN’s primary capability is the reflective loading of PE DLL files directly into memory, enabling the deployment of additional payloads without touching disk.
Before delivering the final backdoor, MISTPEN often deploys several in-memory modules designed to perform specific tasks. These modules do not implement their own network communication mechanisms; instead, they execute their designated tasks and return the resulting data to MISTPEN, which uploads it to the C2.
Below is a description of the modules we observed being loaded by MISTPEN during our analysis.
GetInfoPlugin – Host Reconnaissance Module
This module is a 64-bit Windows DLL internally named Release_GetInfoPlugin_x64.dll. Its primary purpose is to profile the compromised host and return the collected information as a single wide-character string.
The module collects basic system information, including the machine’s domain or workgroup membership (via NetGetJoinInformation), the computer name, the current user name, and the operating system version and build number. The collected data is formatted in the following template and returned to MISTPEN:
This module is a 64-bit Windows DLL internally named Release_PvPlugin_x64.dll. It serves as an extended version of the GetInfoPlugin module, collecting the same host reconnaissance data while adding detailed information about running processes.
For each running process, the module collects the Process PID, PPID, creation timestamp, associated domain and user, and process name. The collected information is formatted into a tabular process list and returned to MISTPEN.
OneScreenCapture – Screenshot Module
This module is a 64-bit Windows DLL internally named OneScreenCapture64.dll, it is responsible for capturing the current desktop (including all monitors) and returns the screenshot to its caller.
The module uses standard Windows USER32 and GDI APIs to capture the virtual desktop into a bitmap. The bitmap is then converted to a JPEG image and Base64-encoded into a single wide-character string before being returned to MISTPEN for exfiltration.
LPE loader
This module is a 64-bit Windows DLL that acts as a loader for a local privilege escalation (LPE) exploit module. It is loaded by an extended version of MISTPEN that provides it with an RPC buffer used for communication between the two components. Messages written to this buffer are forwarded by MISTPEN to the attacker through its existing Microsoft Graph API communication channel, while responses received from the C2 are relayed back to the module through the same interface.
Figure 5 – Writing and reading data through the shared RPC buffer.
In addition to MISTPEN’s AES-based transport encryption, the module encrypts all exchanged data using GOST-CBC with a randomly generated 16-byte session key. The encrypted data is then Base64-encoded, with the session key prepended to each packet.
The module operates in four stages:
Host Fingerprinting – The module gathers detailed information about the compromised host, including the operating system version, build number, installed security products, and other system characteristics.
Key Exchange – The module requests a set of four public keys from the C2 server.
Session Key Generation – Using the received public keys, the module generates new key material using the Kyber/ML-KEM algorithm and transmits the resulting encapsulated key material back to the C2.
LPE Deployment – Finally, the module requests the encrypted LPE payload, decrypts it using the negotiated key, and executes it directly in memory with export DestroyEnv. Throughout the process, status messages are sent back to the C2 to indicate whether each stage of the exploitation succeeded.
Figure 6 – Execution of LPE module with export DestroyEnv.
The downloaded LPE payload is FudModule, Lazarus’ kernel-mode exploit module. It exploits a local privilege escalation vulnerability to obtain SYSTEM privileges and injects a payload into a SYSTEM process. In the observed attack, the injected payload was another instance of MISTPEN, allowing the malware to continue operating with elevated privileges and without EDR visibility.
CVE-2026-68820: Yet another Zero-Day discovered by Lazarus
The file we investigated, Afd4Eop12_x64.dll, has a compiler timestamp of July 7, 2026, 22:07:44 UTC. Its strings immediately suggest a variant of FudModule, including references such as “enable_god_mode passed.” and a main function similar to previous Fud Modules. FudModule is a Lazarus privilege escalation tool, reported and being used since around 2021.
Figure 7 – Exploitation and post-exploitation function calls of FudModule, similar to the 2024 variant.
The module targets afd.sys, the Windows Ancillary Function Driver, a part of the Windows kernel that is in charge of managing and handling sockets in Windows. In 2024, FudModule was reported to use another zero-day, CVE-2024-38193, a use-after-free vulnerability in the same afd.sys driver.
At first sight, the vulnerability looked similar to CVE-2025-60719, which is also a use-after-free vulnerability in the AFD.sys driver fixed in November 2025 and not linked to any particular threat actor. In the sample itself, we observed an explicit minimum-version check for Windows 11build 26100 (24H2), with explicit support also for build 26200 (25H2). However, testing on the latest fully patched Windows 11 system confirmed that the exploit targets a distinct, previously undocumented vulnerability, actively being used in the wild as a part of Operation ‘Dream Job’ since at least early July 2026.
We will not be disclosing full technical details of the vulnerability in this article, as it was patched on the August 11 Patch Tuesday fix. At a high level, the exploit takes advantage of how afd.sys handles a socket is created when it is accessed concurrently by several threads at once.
The driver maintains a small piece of information about the state associated with each socket. Under specific concurrent conditions, two of its own code paths can operate on this state at the same simultaneously, without synchronization, creating a race condition If triggered at the right moment, one code path can access memory after it has already been released by another, resulting in a use-after-free vulnerability.
From there, the module does what these modules do – it leverages this memory corruption to obtain a kernel read/write primitive, which is subsequently used to achieve local privilege escalation to SYSTEM.
We disclosed the issue to Microsoft, and Microsoft issued a fix quickly.
Disclosure timeline
Jul 28, 2026: Issue reported to the Microsoft Security Response Center (MSRC).
Jul 31, 2026: Microsoft confirmed the bug
Aug 5, 2026: Microsoft assigned CVE-2026-68820 to the issue.
Aug 11, 2026: Fixed on Patch Tuesday.
FudModule v3.1
Except for a novel, completely different exploit chain, this FudModule’s post-exploitation behavior is quite similar to FudModule v3, reported by Gen Digital back in 2024.
Shared with v3
The entire telemetry teardown suite: process, thread, and image notify callbacks; object and registry callbacks; minifilter removal by altitude band; and the termination of the NT Kernel Logger.
Crash-dump suppression, executed before everything else.
The WFP stage, which is activated when Kaspersky is present and Symantec is absent.
The hardcoded ETW provider kill-list: its 94 GUIDs match the first 94 entries of Gen’s published 95-GUID list, in identical order.
The driver selection engine, with the same universal preserve list and per-class keep and kill rules.
Privileged-handle forgery and the same two-hop spawn through services.exe into a SYSTEM msiexec.exe process.
Logging vocabulary, surviving essentially string-for-string, including: GetGodMode failed, GetSystemHandle passed., CreateRemoteProcess passed., RemoteDllExecute passed., and the ClearVaccine* family.
Functionality removed from v3
The dedicated Microsoft Defender stage used to disable monitoring of MsMpEng.exe. Only the orphaned string SuspendDefender passed. remains, and is no longer referenced by executable code, while Gen’s FudModule v3 YARA rule contains the active-stage variant SuspendDefender skipped.
The PPL stripping functionality targeting AhnLab’s asdsvc.exe.
Microsoft Defender is still blinded here, but only through the generic security-product suppression engine, like any other vendor, rather than through a dedicated Defender-specific stage.
New functionality since v3
A Smart App Control tampering functionality not documented in publicly analyzed FudModule versions through v3. Within the SYSTEM-level msiexec.exe child process, its remote stub sets VerifiedAndReputablePolicyState to zero and invokes NtSetSystemInformation class 0xA4 with option 0x10000000, triggering an in-place reload of the code integrity policy.
Targeting
As mentioned before, this version only targets newer Windows builds 26100/26200, unlike the previous version that also targeted older ones.
Troy Backdoor
The Troy backdoor is a newly identified modular remote access trojan in Lazarus’ arsenal. Delivered as a 64-bit DLL, it supports 17 operator commands, providing a broad range of remote access and post-exploitation capabilities.
The name Troy is derived from a PDB path embedded in the sample: E:\HK\Tool_Module\Troy_Handle\1Troy_Create_Dll_Tool\x64\Release\Test_Dll.pdb. Notably, the term Troy has also appeared in PDB paths associated with previously documented Lazarus samples. For example, an ESET report published last year documented a sample containing a PDB path E:\Work\Troy\안정화\...
The Troy backdoor supports three Command and Control (C2) servers, each configured with a URL and port. At startup, the implant iterates through the configured servers in order, parsing each URL into its host and path components, establishing an HTTP connection, and issuing a connection request. It validates the response against the string CONNECTED and uses the first server that responds successfully.
The initial connection is followed by a challenge-response handshake used to authorize the implant against the server. Once authenticated, Troy collects host information and registers the victim by sending a client identifier and a system profile containing the user profile directory, account name, Windows version, local IPv4 address, and current working directory.
Following registration, Troy enters its command-processing loop. Tasks received from the C2 server are Base64-encoded; the implant decodes them and identifies commands using plaintext prefix matching. Command results are returned through the send channel in a compact JSON envelope: { "to":"<channel>", "msg":"<base64>" }. Responses that exceed the maximum message size are divided into numbered chunks and reassembled on the C2 side.
The Troy backdoor provides a notably broad feature set for a single-DLL implant, and a cohesive design. Its seventeen supported commands span the capabilities required for each stage of post-compromise operations, from initial reconnaissance and file operations, to command execution and in-memory code delivery, while following a consistent tasking and result-framing model throughout.
Figure 8 – Troy’s reflective DLL injection flow, showing remote RWX allocation, loader and payload writes, and execution through RtlCreateUserThread.
Troy Backdoor Supported C2 Commands
Command
Capability
What it does
WAIT
Keepalive
Server-side no-op that keeps the session alive and feeds the idle back-off counter.
DRIVES
Drive enumeration
Reports every mounted volume letter present on the host.
LIST|<path>
Directory listing
Enumerates a directory with names, sizes and timestamps, sending the listing length first and the listing itself second.
OPEN|<exe> [args]
Process creation
Launches an executable with arguments in a hidden window with no console.
DELETE|<path>
File and folder deletion
Removes a single file, or an entire directory tree through a silent shell file operation.
ZIPDOWNLOAD|<src>|<dst>
Archive and exfiltrate
Compresses a path with PowerShell Compress-Archive into a temporary archive, uploads it, then removes the archive.
DOWNLOAD|<victim-source>|<client-destination>
File exfiltration
Streams a file from the victim to the operator in chunks.
UPLOAD|<client-source>|<victim-destination>
File drop
Writes an operator-supplied file to disk, appending the filename when the destination is a directory.
CMD|<commandline>
Interactive shell
Runs a command and captures its output, tracking cd /d so the working directory persists between commands, with a 10 second execution watchdog.
mem <dllpath> <pid>
In-memory DLL injection
Maps a DLL into a remote process using an embedded reflective loader, matching architecture before injecting.
pk <pid>
Process termination
Terminates a process by identifier and reports the outcome.
sleep <N>
One-shot delay
Pauses the implant for N minutes without changing the stored interval.
DEFAULTSLEEP
Configured delay
Acknowledges, then pauses for the currently configured beacon interval.
GET_CONFIG
Configuration read
Returns the stored configuration as eight fields covering the client ID, the sleep interval, and the three server and port pairs. The stored values may differ from the connection actually in use.
SET_CONFIG|
Configuration update
Writes eight replacement fields into stored configuration state. Only the idle interval takes effect at runtime, because the connection loop does not read the stored servers and the port remains hardcoded to 80.
pvd
Process listing with command lines
Enumerates processes with session, owner and start time, enriched with full command lines retrieved over WMI.
pv
Process listing
The same enumeration without the command line column.
Compromised Infrastructure Used as ForestTiger C2
As previously reported, ForestTiger’s C2 infrastructure has historically relied primarily on compromised servers mainly running WordPress and SharePoint. In more recent campaigns, the threat actor appears to have shifted toward using compromised Roundcube webmail servers as C2 infrastructure.
The majority of the Roundcube servers we analyzed were running versions vulnerable to CVE-2025-49113, a critical PHP Object Deserialization vulnerability that can lead to remote code execution (RCE). Exploitation of this vulnerability requires authentication with valid Roundcube credentials. During our investigation, we identified several credential leaks that are available in the Darkweb, and contain usernames and passwords associated with accounts on the compromised webmail servers. We assess that the threat actor likely leveraged these credentials to authenticate to the affected Roundcube instances before exploiting CVE-2025-49113 to deploy RelayShell web shells, which subsequently serve as a C2 relay mechanism.
In addition, we observed the threat actor compromise PrestaShop websites and deploy the same RelayShell web shell.
RelayShell
Following the post-exploitation of a web server, the threat actor deployed a previously undocumented PHP web shell that we named RelayShell. Unlike a traditional web shell that provides direct command execution, RelayShell primarily acts as a communication relay between the threat actor and an infected endpoint.
RelayShell operates in two distinct modes, selected by the password supplied in the HTTP POST request. For clarity, we refer to these as Victim mode and Operator mode.
Victim Mode
When accessed using the victim password, RelayShell creates a new PHP session that is subsequently used for communication with the infected endpoint.
The webshell then decrypts a hidden configuration stored in an external file using a custom substitution cipher. The configuration contains two values:
A backbone URL
A unique identifier (PID) assigned to the compromised server
RelayShell then immediately sends an HTTP POST request to the configured backbone URL using the unique identifier and authentication password.
Figure 9 – WebShell contacting the backbone compromised server on new session creation.
Based on our analysis, the backbone URL appears to point to another RelayShell instance acting as an upstream relay or notification server. This request signals that a new victim session has been established, allowing the operator to subsequently connect using the second password.
Operator Mode
When accessed using the operator password, RelayShell enters operator mode, providing a set of commands for interacting with the compromised server. These commands support session management, connectivity checks, file upload and deletion, and retrieval of activity logs.
Command Type
Description
Session auth / selection
Scans existing .ses files, picks the latest session, and returns its data.
Check & cleanup
Updates configuration, deletes old session/log/temp files, and checks connectivity to the backbone URL.
Download log
Sends back the encoded log file containing activity records.
File upload
Writes an arbitrary file to disk, using Base64‑encoded filename and content.
Self‑delete / file removal
Self-delete Deletes a specified file (provided as Base64‑encoded path).
File-Based Communication Channel
After both the victim and operator sessions are established, RelayShell provides two commands, send and receive, which implement a lightweight file-based communication channel using temporary files stored on the compromised server.
Messages are exchanged through files following the naming convention <session_id><object>.log where object identifies the side of the communication channel: 1 for the victim and 2 for the operator.
When sending data, RelayShell writes the supplied content to the session file corresponding to the sender. When receiving data, RelayShell reads and returns the contents of the file corresponding to the opposite side, creating a bidirectional communication between the victim and the operator.
Figure 10 – Obfuscated command switch for requesting and sending data.
This mechanism effectively turns the compromised web server into a relay node. The victim-side implant establishes the session and notifies the backbone server that is monitored by the threat actor , after which the actor connects to the RelayShell instance and exchanges commands and responses through the file-based messaging channel.
During our investigation, we observed the threat actor accessing RelayShell through shared VPN services, including ExpressVPN, further obscuring the origin of their infrastructure.
We also identified 17 unique identifiers, suggesting that at least 17 compromised servers were likely used as relay nodes during the campaign. However, we were unable to identify all of the affected servers.
Victimology
This new Operation Dream Job campaign focused heavily on the defense sector, particularly organizations involved in military technologies such as surveillance sensors, drones, and robotics. The campaign had a global reach, with activity extending into South America, including Brazil, and successful targeting observed in Western Europe, including France and Germany.
During the campaign, a compromised organization headquartered in France was later leveraged by the threat actor to conduct spear-phishing attacks against targets worldwide, likely to increase the perceived campaign’s authenticity and credibility.
Another notable target was India, which has a substantial and rapidly growing defense and aerospace industry, with expanding domestic production and technology exports.
The latest Operation Dream Job campaign demonstrates that Lazarus continues to evolve both its malware capabilities and operational tradecraft. Beyond deploying a new version of FudModule that exploits the CVE-2026-68820 zero-day vulnerability, the threat actor also refined its initial access techniques by combining targeted spear-phishing with impersonation websites and search engine optimization (SEO) to distribute trojanized software.
The threat actor’s decision to rely on compromised Roundcube instances and content management system (CMS) servers for C2 reflects an operational approach well suited to highly monitored defense-sector environments, where network activity may be closely inspected by organizational security teams as well as government and national cybersecurity authorities. By abusing legitimate web infrastructure, the threat actor can better blend malicious communications within normal network traffic.
Our findings highlight Lazarus’s continued evolution toward stealthier and more resilient operations, combining new delivery techniques, modular malware, zero-day exploitation, and compromised web infrastructure. We believe the technical details presented in this research will help defenders identify, detect, and disrupt future Operation Dream Job campaigns.
It typically begins the same way it has for years, with an approach from a recruiter offering a role at a company the target would recognize, accompanied by a PDF describing the position in convincing detail. That approach remains one of the most effective entry points used by state sponsored threat actors today, and Check Point Research has spent recent months tracking a new wave of it. Operation Dream Job, the long running campaign attributed to the North Korea affiliated Lazarus group, has resurfaced with a previously undisclosed Windows vulnerability (CVE-2026-68820), a newly identified backdoor, and a command and control […]
The NHS DSPT is an assessment that allows organizations to measure their performance against the National Data Guardian’s 10 data security standards. All organizations that access NHS patient data and systems are expected to use the toolkit to demonstrate their compliance with safe data security standards. NHS DSPT covers standards regarding Personal Confidential Data, Continuity Planning, IT Protection, and more. AWS undergoes the assessment to provide customers with assurance that we are practicing good data security.
Security and compliance is a shared responsibility between AWS and the customer. When customers move their computer systems and data to the cloud, security responsibilities are shared between the customer and the cloud service provider. For more information, see the AWS Shared Security Responsibility Model.
In today's fast-moving cybersecurity landscape, threat analysts must move beyond basic, binary reputation scores to successfully defend against modern, highly adaptive web threats. Traditional URL analysis has been redefined by the launch of URL Scanning 2.0, an update that significantly expands VirusTotal's URL analysis capabilities by introducing automated visits with a full browser instance and deeper historical visibility.
Instead of relying on static reputation scores alone, URL Scanning 2.0 enriches reports with "under-the-hood" headless browser telemetry, including the DOM, full-page screenshots, web technologies, and network request logs. Crucially, it introduces historical analysis pivoting, giving analysts the ability to track how a page has changed over time.
URL Scanning 2.0
To successfully defend against modern, highly adaptive web threats, threat analysts must move beyond basic, binary reputation scores. With the debut of URL Scanning 2.0, VirusTotal introduces robust headless browser integration that captures how a page behaves dynamically in a clean sandbox environment.
Every scan now generates rich, granular telemetry that provides a blueprint of the target page's execution:
- Headless Browser Data: Full-page visual screenshots, full DOM (Document Object Model) trees, and web technologies (e.g., Cloudflare, PHP, HTTP/3).
- Page and Network Statistics: Highly detailed counters of individual network requests, encrypted HTTPS transactions, unique contacted domains/subdomains, and serving IP address mappings with geographic tracking.
- Anti-Phishing Fingerprints: Automatic identification of brands, cloned-website tags, password input fields, tracker IDs, and favicon dhashes.
- Historical Pivoting: A timeline containing historical analyses of a URL with its corresponding risk score, allowing analysts to track exactly how its metadata and content have shifted over time.
Access Levels in VirusTotal
Public Access (Free for VirusTotal Users) The core enhancements of the URL Scanning 2.0 engine are available to everyone. For the latest scan, analysts can access rich telemetry generated by headless browser execution, including visual screenshots, extracted JavaScript globals, console messages, and a list of all loaded network resources.
VirusTotal Premium Customers For paid VirusTotal customers, the platform unlocks deeper retrospective capabilities and exclusive data fields. Analysts have the ability to pivot to and review the full historical analyses of a URL as it was observed at specific points in time, and access advanced telemetry like the full DOM captures of the execution. Furthermore, premium access unlocks advanced infrastructure relationships, allowing users to pivot on contacted domains, IPs, and downloaded files.
Note: The aforementioned Google Threat Intelligence and Automatic Brand Identification features are exclusively available to Google Threat Intelligence customers.
Investigating a Phishing Case
Initially, when an analyst navigates to the mentioned URL to view the report generated by VirusTotal, they would see something similar to the following with the new URL Scanning features:
At the top of the interface, we can see that the URL has been scanned three times. This means there are three distinct reports for the same URL, each potentially containing different information that could be highly useful for an analyst. In the top right corner, we can view these past analyses by clicking on "History".
This is where the new historical analysis pivoting comes into play: it allows analysts to travel back through a URL's timeline with point-in-time snapshots.
By clicking on "History", we can view all the historical analyses for that URL, including response codes, detections, screenshots, and other metadata. You can also apply filters to narrow down the timeline and view only the historical records you are interested in, based on specific response codes, URL actions, and other criteria.
In this case, if we click on the initial historical analysis performed on July 6, 2026 (as shown in the screenshot above), we can examine its specific information across the "Summary", "Details", and "Detection" tabs. A key feature of URL Scanning 2.0 is that the information within these report tabs will dynamically re-render to match the exact historical state of the snapshot you select.
As observed in the history timeline, after clicking on this specific analysis included a live screenshot and other relevant metadata, indicating the scan occurred while the website was fully operational and actively distributed. The previous screenshot gives us a clear view of how the phishing page was visually structured.
Furthermore, diving into the "Details" tab reveals other interesting technical artifacts from the campaign. These details are incredibly useful for pivoting and identifying new malicious URLs that share similar characteristics.
Among the wealth of information generated by URL Scanning 2.0, analysts will find HTTP transactions, detected JavaScript variables, console messages, external outbound links, and other critical metadata. These key technical markers serve as pivotable and searchable attributes, allowing teams to conduct advanced footprint hunting and instantly find other malicious URLs exhibiting the exact same technical fingerprint.
Furthermore, every snapshot taken during each analysis provides the complete Document Object Model (DOM) tree captured by the full browser instances. It allows you to inspect the exact structure of the page as it was dynamically rendered to the victim, exposing elements that static scans might miss. As can be seen in the following image, having direct access to this point-in-time DOM data empowers analysts to dig deep into the page's architecture.
Advanced Threat Hunting: Scaling the Investigation
Let's scale our investigation using VirusTotal Intelligence queries based on the artifacts discovered via URL Scanning 2.0.
During the analysis of the financial phishing site, we discovered that the page relied on static assets hosted on a third-party domain: jiaoyisuo.thai2570[.]com. We can pivot on this finding using an advanced query:
VT Query
entity:url (outgoing_link:jiaoyisuo.thai2570.com OR content:jiaoyisuo.thai2570.com)
The results demonstrate a multi-brand operation, including fake cryptocurrency exchange portals and typosquatting domains for other financial services. By further pivoting on the hosting domain with entity:domain "thai2570.com", analysts can map out a highly segmented subdomain tree used for hosting assets, capturing payments, and backend control panels.
Conclusion
URL Scanning 2.0 represents a paradigm shift in how security analysts investigate web-based threats. Investigations are no longer limited to static verdicts. By surfacing powerful metadata directly inside the workflow—such as historical DOM captures, live screenshots, and pivotable technical identifiers—analysts can now turn a single indicator into a comprehensive infrastructure map.
Log in to VirusTotal to explore the new URL Scanning 2.0 features today, and consider upgrading to VirusTotal Premium to unlock the full power of historical pivoting and advanced threat hunting.
We’re excited to announce that our Europe (London) AWS Region has renewed its accreditation for United Kingdom (UK) Police-Assured Secure Facilities (PASF) for Official-Sensitive data. Since 2017, the Amazon Web Services (AWS) Europe (London) Region has been accredited under the PASF program. This demonstrates our continuous commitment to adhere to the heightened expectations of customers with UK law enforcement workloads. Our UK law enforcement customers who require PASF can continue to run their applications in the PASF-accredited Europe (London) Region in confidence.
The PASF is a long-established assurance process, used by UK law enforcement, as a method for assuring the security of facilities such as data centers or other locations that house critical business applications that process or hold police data. PASF consists of a control set of security requirements, an on-site inspection, and an audit interview with representatives of the facility.
The Police Digital Service (PDS) confirmed the accreditation renewal for AWS on May 28, 2026. A confirmation letter can be found on AWS Artifact. The UK police force and law enforcement organizations can also obtain confirmation of the compliance status of AWS through the Police Digital Service.
We’re excited to announce that Amazon Web Services (AWS) has completed theCyberVadis assessment of its security posture with the highest score (Mature) in all assessed areas. This demonstrates our continued commitment to meet the heightened expectations for cloud service providers. Customers can now use the 2026 AWS CyberVadis report and scorecard to reduce their supplier due-diligence burden.
With the increasing adoption of cloud products and services across multiple sectors and industries, AWS is a critical component of customers’ third-party environments. Regulated customers, such as those in the financial services sector, are held to high standards by regulators and auditors when it comes to exercising effective due diligence on third parties.
Many customers use third-party risk management services such as CyberVadis to better manage risks from their evolving third-party environments and drive operational efficiencies. In support of these efforts, AWS has completed its annual CyberVadis security posture assessment, conducted by CyberVadis security analysts.
CyberVadis is a comprehensive third-party risk assessment process that combines the speed and scalability of automation with the certainty of analyst validation. CyberVadis assessments employ a dynamic and comprehensive approach to third-party risk assessment, replacing outdated static spreadsheets and the need for annual AWS assessment access requests. This cloud-based solution provides advanced capabilities by integrating AWS responses with analytics and sophisticated risk models to deliver an in-depth view of the security posture of AWS.
CyberVadis’s risk assessment methodology evaluates 20 topics covering the entire cybersecurity life cycle across four phases: Identify, Protect, Detect, and React. These topics include Data Privacy, Access Management, and Infrastructure Security. The assessment criteria are based on international information security standards, including ISO 2700x, NIST Cybersecurity Framework, Cybersecurity for ICS, PCI DSS, NIS2 and GDPR.
Customers can use CyberVadis results to map the assessment of AWS to commonly used industry frameworks and standards to instantly gain visibility into controls coverage.
AWS customers can download the complete 2026 AWS Assessment Report directly through CyberVadis’s portal using their own account, or through AWS Artifact.
To learn more about our other compliance and security programs, see AWS Compliance Programs.
As an AWS customer, you can reach out to your AWS account team if you have any questions or feedback.
If you have feedback about this post, submit comments in the Comments section below.
For the latest discoveries in cyber research for the week of 10th August, please download our Threat Intelligence Bulletin.
TOP ATTACKS AND BREACHES
North Carolina Ports, the US authority operating the ports of Wilmington, Morehead City and others, has suffered a cyberattack that forced some operations onto manual processes. The authority claims it has contained the intrusion, but degraded systems caused delays while affected services were restored.
Ryde, an electric scooter operator in Scandinavian countries, has disclosed a data breach affecting all 4.5 million customer accounts across Norway, Sweden, Finland, and Germany. Attackers copied phone numbers, email addresses, birth dates, partial payment card numbers, and payment histories. Full card numbers and ride histories were unaffected.
Canadian hardware wallet maker Coinkite has disclosed a theft campaign exploiting a Coldcard firmware vulnerability, with at least 1,367 bitcoin worth about $88.6 million stolen from thousands of addresses. The company halted affected shipments, destroyed vulnerable inventory, and released patched firmware after confirming exploitation against customer wallets.
Beacon, a UK provider of customer relationship management software for charities, has disclosed a data breach after attackers compromised an access key. The company notified around 1,500 nonprofit customers that database information, donation records, and stored attachments may have been downloaded. Payment and bank details were not affected.
AI THREATS
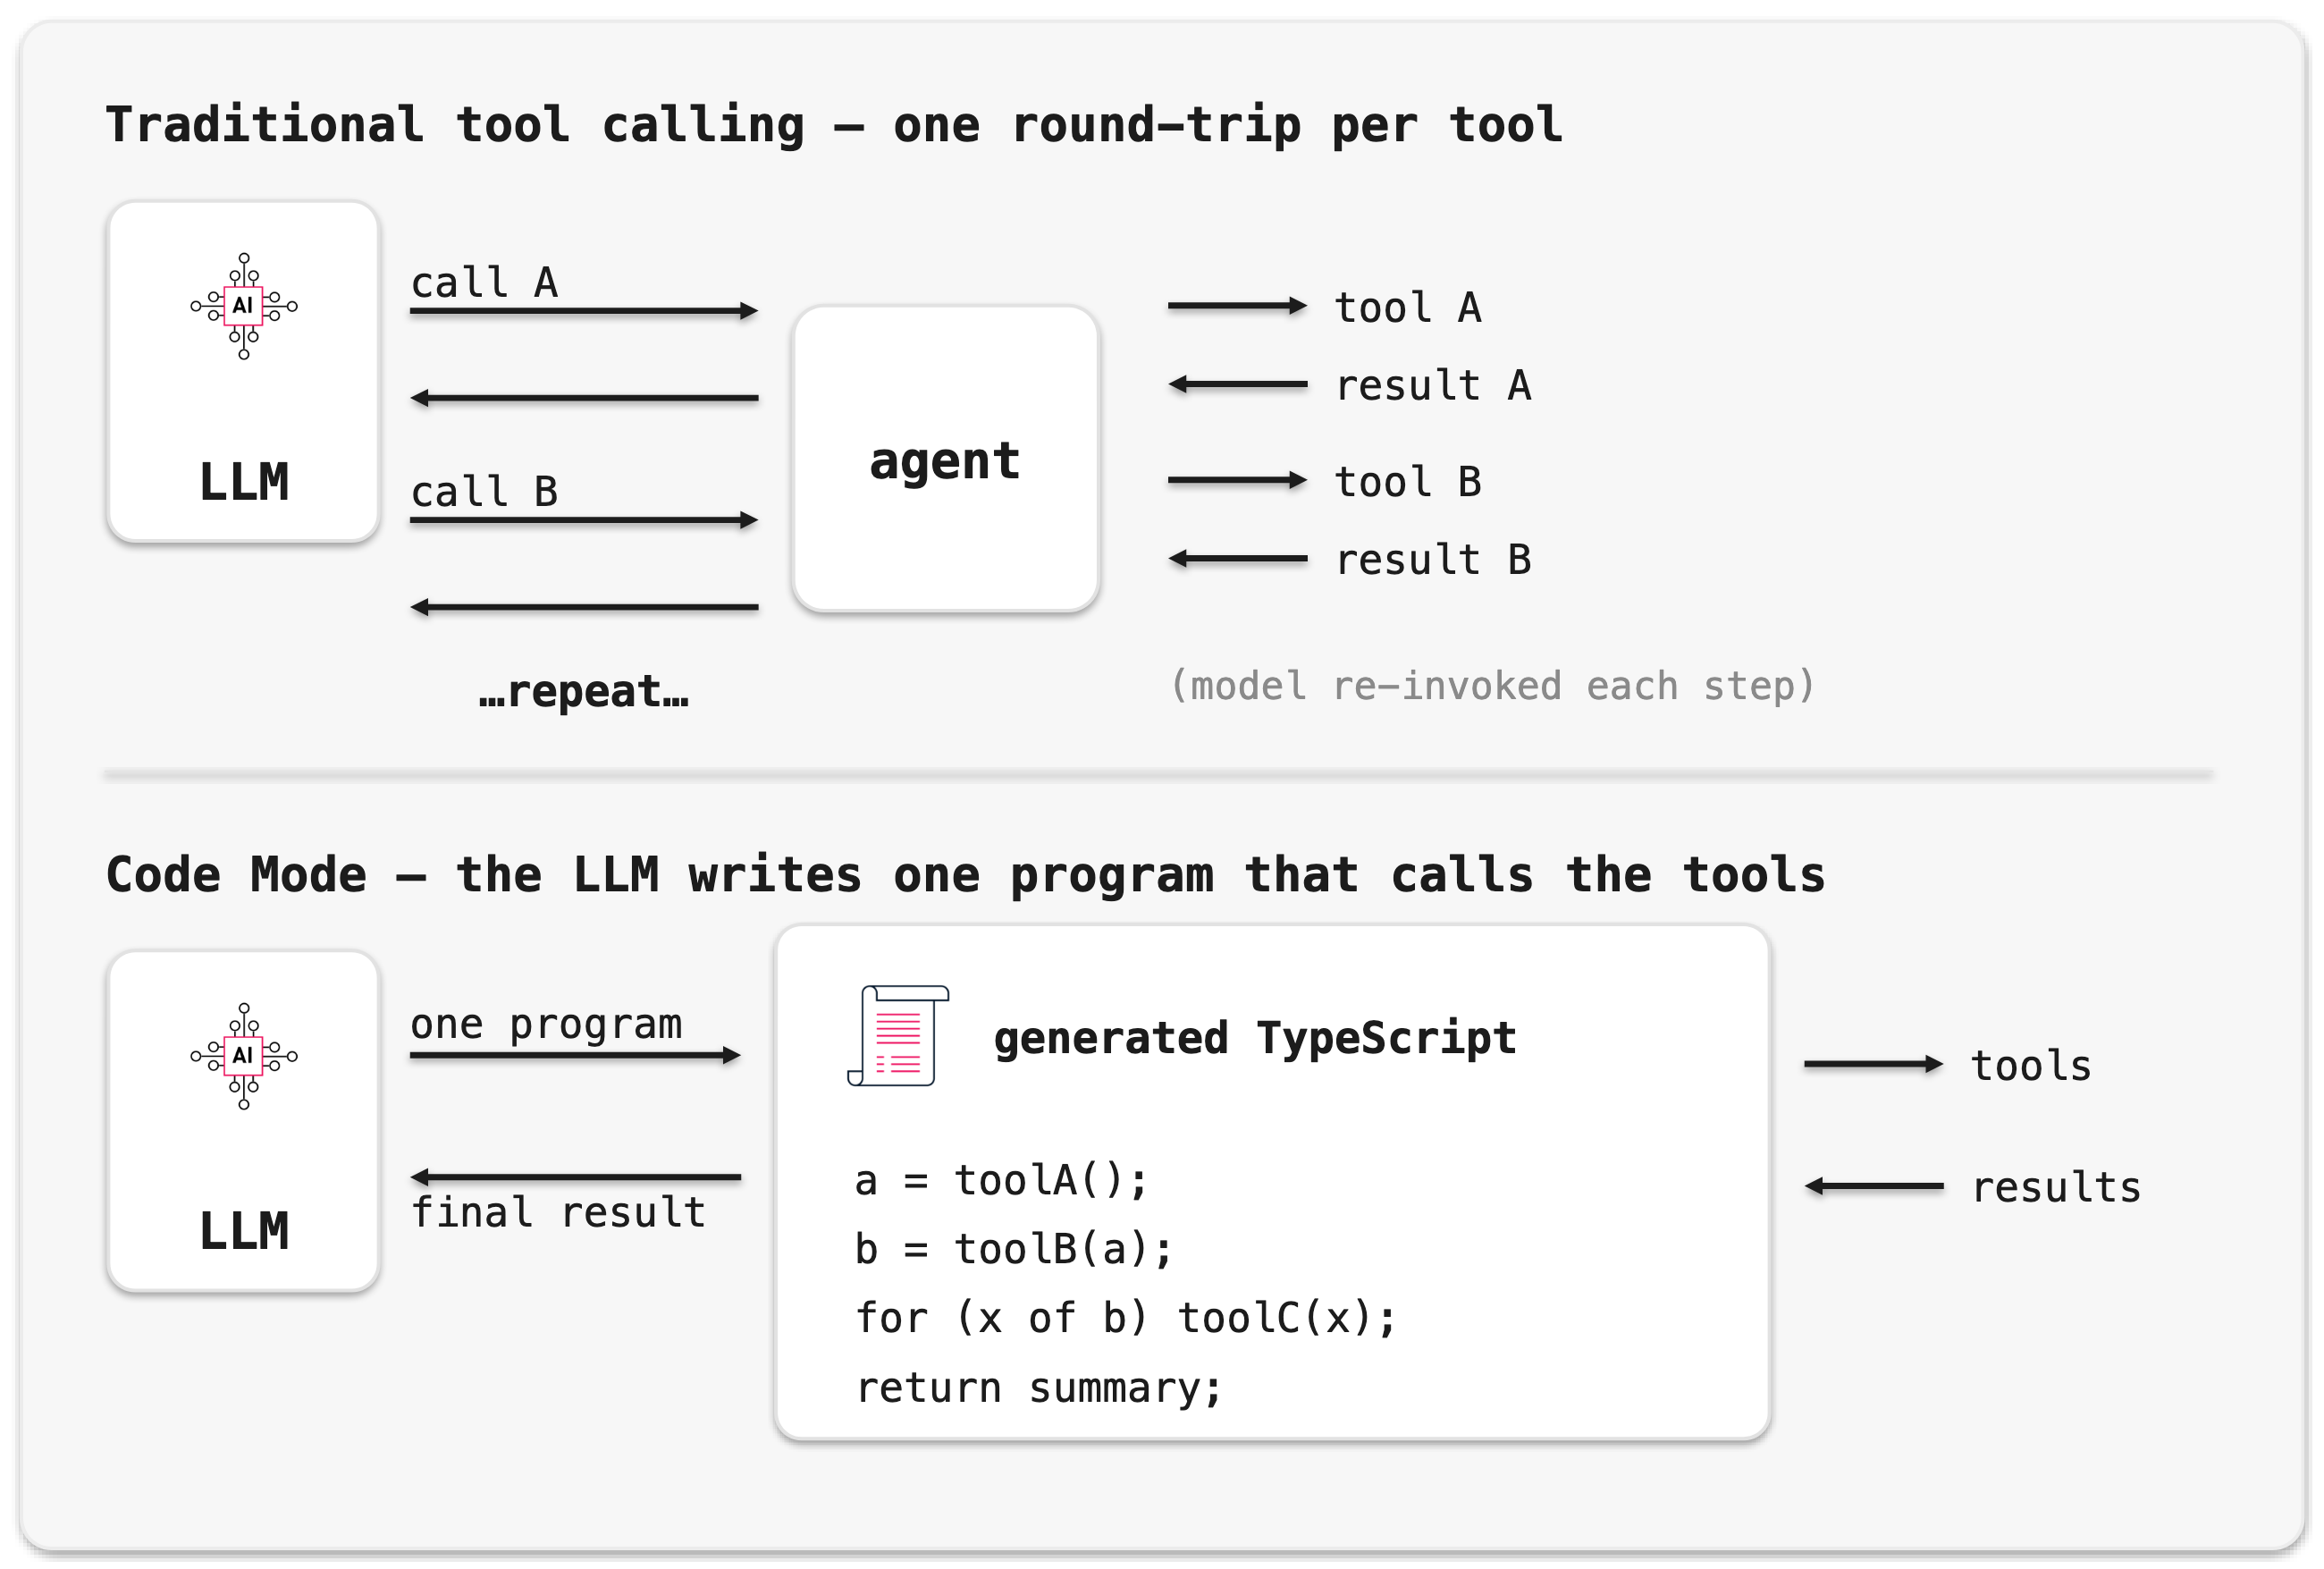
Check Point Research has demonstrated that Cloudflare Code Mode, which allows AI agents to write TypeScript against tools, inherited five vulnerabilities from the workerd runtime. The flaws could enable sandbox escape and cross-tenant data exposure. Cloudflare rated two issues Critical and fixed its managed Workers environment.
Researchers have disclosed vulnerabilities in Google Gemini CLI and Anthropic Claude Code that could expose automation environments to code execution and API key theft. CVE-2026-12537, rated CVSS 10.0, affected Gemini CLI workflows, while CVE-2026-54316 affected Claude Code. Both vendors released patched versions.
Researchers have detailed AI-enabled identity fraud kits that automate know-your-customer bypasses across banks, fintech companies, and cryptocurrency exchanges. Tools such as ProKYC can generate identity documents, selfie-with-ID images, spoofed location data, and synthetic video used against document, selfie, and liveness checks during remote onboarding.
VULNERABILITIES AND PATCHES
Cisco has released fixes for multiple critical vulnerabilities in Catalyst SD-WAN and IOS XE software disclosed on August 5. The highest-severity issues carry CVSS scores up to 9.9 and can enable privilege escalation, code execution, or system compromise. Cisco also addressed additional high and medium-severity flaws across network management products.
WordPress has released version 7.0.3 to address CVE-2026-64638, a high-severity Core vulnerability known as XSS2Shell. The flaw can turn a failed login into pre-authentication cross-site scripting and, under specific conditions, remote code execution. Fixes were also backported for supported WordPress branches dating to version 4.7.
TP-Link has addressed 15 vulnerabilities in its Omada provisioning ecosystem affecting controllers, network devices, mobile applications, and VIGI cameras. The flaws include device impersonation, credential exposure, and remote code execution risks during provisioning. 11 flaws received CVE identifiers, and patched firmware has been released for affected products.
A vendor-installed backdoor has been identified across at least 20 Zbtlink router models sold under brands including Wiflyer and ZBT. The remote-management component contacts hardcoded servers and can accept unauthenticated commands with root privileges. Researchers reproduced the behavior by impersonating the vendor server and obtaining a root shell.
THREAT INTELLIGENCE REPORTS
Researchers have identified the Shai-Hulud CHAINDROP supply-chain campaign, which backdoored more than 400 npm packages after attackers compromised the maintainer of the widely used keyv library. The malware executes through a preinstall hook, steals developer tokens, and republishes modified packages, affecting an ecosystem with roughly 1.3 billion monthly downloads.
Researchers have uncovered a campaign targeting large US financial firms in which callers impersonate coworkers or IT staff to capture passwords and multi-factor authentication codes through spoofed websites. The actors, tracked as UNC6671, then threaten victims with data leaks and have issued ransom demands ranging from $750,000 to $3 million.
Researchers have revealed a macOS ClickFix campaign using more than 250 look-alike domains to distribute MacSync and Atomic Stealer malware. The operation evolved to fingerprint visitors before displaying malicious instructions, allowing attackers to target genuine macOS users while concealing the campaign from automated security scanners and analysis systems.
Researchers have documented a campaign that uploaded nearly 800 malicious npm packages delivering cross-platform RAT and infostealer malware. The packages instructed developers to import them, activating the WEL1DROPPER downloader. It retrieved payloads through Cloudflare Workers or DNS TXT records, established persistence, and deployed additional malicious tools.
Anthropic’s new inference hooks give enterprises a native enforcement point before prompts ever reach the model. Combined with Check Point Workforce AI Security, organizations get a real-time allow-or-deny decision on every prompt, with no proxy in the path. Why This Matters Enterprise AI adoption has moved well past experimentation. Employees draft documents, write code, summarize meetings, and query enterprise knowledge through large language models every day. The challenge was never understanding that AI introduces risk. It was finding a practical enforcement point. Web gateways and Data Loss Prevention (DLP) tools were designed for websites and SaaS applications, not conversations with […]
Ten years ago, we launched AWS Directory Service for Microsoft Active Directory, a fully managed Microsoft Active Directory in the AWS Cloud. In that original announcement, Jeff Barr described a straightforward promise: “You will spend less time administering and more time working on your applications and your business.”
A decade later, AWS Managed Microsoft AD has become the identity backbone for thousands of enterprises worldwide. What started as a way to run directory-aware workloads in the cloud now powers SQL Server authentication, Amazon WorkSpaces virtual desktops, and Amazon FSx for Windows File Server for thousands of enterprises worldwide.
The beginning: Solving a real customer problem
In 2015, customers migrating Windows workloads to Amazon Web Services (AWS) faced a familiar challenge. Microsoft Active Directory (AD) had become the dominant standard for enterprise identity, by some estimates commanding 90% market share for directory services in the Fortune 1000. Running SharePoint, SQL Server, .NET applications, or virtually any Windows workload meant running AD.
However, running AD well comes with significant operational overhead. It requires careful capacity planning, high availability design across multiple sites, ongoing patching and maintenance, backup and disaster recovery procedures, and deep expertise that’s increasingly difficult to find and retain. Customers told us they wanted to focus on their applications, not on managing domain controllers.
So we built AWS Managed Microsoft AD. Powered by actual Windows Server, it delivered real Microsoft AD (not a compatible alternative, but the genuine article) as a fully managed service. We handled the domain controller deployment, the multi-AZ high availability, the automated backups, the patching, the monitoring, and many more features including scalability and multi-Region replication. Customers got a directory they could provision in 25–30 minutes and start using immediately.
“AWS Directory Service now lets you run a Microsoft Active Directory (AD) as a managed service… Host monitoring and recovery, data replication, snapshots, and software updates are automatically configured and managed for you.”
The first decade of innovation
Looking back at the past 10 years, we’re struck by how much AWS Managed Microsoft AD has evolved in response to customer feedback. Here are some of the highlights:
2015: Launch of AWS Managed Microsoft AD (Enterprise Edition) in five AWS Regions, powered by Windows Server 2012 R2. Support for trust relationships with on-premises AD, seamless domain join for Amazon Elastic Compute Cloud (Amazon EC2) instances, and integration with Amazon WorkSpaces.
2017: Introduction of Standard Edition, optimized for small and midsize businesses. This gave customers a cost-effective option for resource forest deployments and smaller workloads.
2018: Added support for schema extensions, enabling customers to extend their directory schema for applications that require custom attributes. Support for Group Managed Service Accounts (gMSA) with Windows containers and other services.
2019: Launched multi-Region replication for Enterprise Edition, allowing customers to automatically replicate their directory across AWS Regions for improved performance and disaster recovery. Added directory sharing across AWS accounts and integration with AWS Organizations.
2020: Introduced fine-grained directory settings for security and compliance, enabling customers to configure secure channel settings for protocols and ciphers. Enhanced compliance support—with the service now HIPAA eligible—included as an in-scope service under PCI DSS, and achieving FedRAMP authorization.
2021: Added CloudWatch metrics for domain controllers, helping customers optimize scaling decisions based on CPU, memory, disk, and AD-specific metrics like DNS and directory read/write operations. Launched integration with AWS Transfer Family for SFTP/FTPS/FTP authentication.
2022: Windows Server 2019 upgrade became available, with customer-initiated updates and automatic migration for all directories beginning in 2023.
2023: AWS Private CA Connector for Active Directory launched, allowing customers to replace self-managed enterprise certificate authorities with AWS Private CA for automatic certificate enrollment to domain-joined objects, with no local agents or proxy servers required.
2025: General availability of AWS Managed Microsoft AD (Hybrid Edition), allowing customers to extend their existing AD domain to AWS while retaining administrative control. Introduced self-service edition upgrades through the UpdateDirectorySetup API, eliminating the need for support tickets when scaling from Standard to Enterprise Edition.
2026 and beyond: As we enter our second decade, our roadmap continues to be shaped by the customers who depend on AWS Managed Microsoft AD every day. We’re working on new capabilities driven directly by your feedback, and we look forward to sharing more soon.
Powering identity across AWS
Over the past decade, more than 20 AWS services have added native integration with AWS Managed Microsoft AD. What started with WorkSpaces and EC2 domain join has expanded to more than 20 AWS services, making AWS Managed Microsoft AD foundational for many enterprise customers’ workloads on AWS.
Database services
For many customers, database authentication is a primary driver for adopting AWS Managed Microsoft AD. By pairing Amazon Relational Database Service (Amazon RDS) for SQL Server with AWS Managed Microsoft AD, they gain the benefits of fully managed services while achieving straightforward integration and reduced management overhead. This combination lets developers and DBAs use their existing AD credentials to access SQL Server databases, so they don’t need to manage separate database accounts.
Beyond SQL Server, AWS Managed Microsoft AD enables Windows authentication across the Amazon RDS family:
Amazon RDS for Oracle
Amazon RDS for PostgreSQL
Amazon RDS for MySQL
Amazon RDS for DB2
Amazon Aurora MySQL
Amazon Aurora PostgreSQL
File storage services
Amazon FSx for Windows File Server provides fully managed Windows file shares that integrate natively with AWS Managed Microsoft AD. Customers use AD users and groups to control access to file shares, apply Windows ACLs, and use features like DFS namespaces, all with the same management experience they use on premises.
AWS Storage Gateway supports AD authentication for SMB file shares, enabling hybrid storage architectures where on-premises applications access cloud storage using familiar AD credentials.
AWS Transfer Family added AD integration in 2021, allowing customers to authenticate SFTP, FTPS, and FTP users against their AWS Managed Microsoft AD. This allows customers to migrate file transfer workflows without changing end-user credentials.
End user computing
Amazon end-user computing services were among the first to integrate with AWS Managed Microsoft AD:
Amazon WorkSpaces: Virtual desktops provisioned and authenticated through AD
AWS IAM Identity Center (formerly AWS Single Sign-On) uses AWS Managed Microsoft AD as an identity source, synchronizing users and groups to provide single sign-on access across AWS accounts and applications. This provides centralized identity management while using your existing AD infrastructure.
AWS Client VPN authenticates users against AWS Managed Microsoft AD, providing secure remote access using corporate credentials.
Amazon EC2 instances (both Windows and Linux) support seamless domain join at launch. Windows instances can be managed using Group Policy, and Linux instances can authenticate users through SSSD or Realm integration.
Amazon Elastic Container Service (Amazon ECS) supports AD authentication for Windows containers through Group Managed Service Accounts (gMSA), enabling containerized applications to authenticate to AD-integrated resources.
Business applications
Amazon QuickSight provides business intelligence with AD-based user provisioning.
Amazon Connect provides contact center agent authentication
This breadth of integration means customers can standardize on a single directory for their entire AWS environment, from databases to desktops to file servers to analytics.
Choosing the right edition
Over the years, we’ve learned that customers have different needs when it comes to managed AD. Today, AWS Managed Microsoft AD is available in three editions, each designed for specific use cases.
Standard Edition: Basic, cost-effective identity
Standard Edition is optimized for small and midsize businesses, or for enterprises deploying a resource forest model in a single AWS Region. With 1 GB of directory object storage supporting up to 30,000 objects (approximately 5,000 users), Standard Edition provides everything needed to run directory-aware workloads without the overhead of managing domain controllers.
Common use cases:
Resource forest deployments – Many customers use Standard Edition as a resource forest, establishing a trust relationship with their on-premises AD. User identities remain in the customer’s existing domain, while the resource forest manages AWS resources like Amazon RDS for SQL Server and FSx for Windows File Server.
Development and test environments – Cost-effective option for non-production workloads
Single-Region applications – Workloads that don’t require global presence
Standard Edition is a great starting point, and customers aren’t locked in. With our new self-service upgrade capability (launched October 2025), you can upgrade to Enterprise Edition programmatically through the UpdateDirectorySetup API, no support tickets or maintenance window coordination required.
Enterprise Edition: Built for global scale
Enterprise Edition is designed for organizations with larger user populations, complex deployments, or global footprints. With 17 GB of storage supporting up to 500,000 directory objects, Enterprise Edition provides the capacity and capabilities that large enterprises require.
Key capabilities:
Multi-Region replication – Automatically replicate your directory across AWS Regions. Users and applications connect to local domain controllers, reducing latency and providing disaster recovery capabilities.
Extended directory sharing – Share your directory with up to 500 AWS accounts, enabling centralized identity across large organizations using AWS Organizations.
Higher compute capacity – Larger domain controller instances with more CPU and memory for demanding workloads
If you have users and applications in multiple geographic regions, or anticipate significant growth in directory objects, Enterprise Edition is the right choice.
Hybrid Edition: Extend your existing domain
Launched earlier this year, Hybrid Edition takes a fundamentally different approach. Instead of creating a new AD domain in AWS, Hybrid Edition extends your existing AD domain into the cloud.
What makes Hybrid Edition unique:
Same domain – AWS Managed Microsoft AD domain controllers join your existing AD. No new domain name, no trust relationships to configure.
Retain administrative control – Unlike Standard and Enterprise where you receive delegated OU permissions, Hybrid Edition preserves your existing administrative rights. Your AD administrators continue using familiar tools while changes replicate to AWS in real time.
Preserve existing investments – Security principals, group policies, and permissions transfer seamlessly. No migration of identities required.
Hybrid Edition is ideal for customers who want the operational benefits of AWS-managed domain controller infrastructure without changing their AD architecture or giving up administrative control.
Which edition should you choose?
Use the following table to determine which edition best fits your use case.
Use case
Edition
A new AD domain for AWS workloads in a single Region
Standard Edition
A resource forest with trust to on-premises AD
Standard Edition
Multi-Region replication for global deployments
Enterprise Edition
Support for more than 30,000 directory objects
Enterprise Edition
To extend your existing AD domain to AWS
Hybrid Edition
To retain full administrative control over your AD
Hybrid Edition
What we’ve learned: Design decisions that stood the test of time
Looking back at the decisions we made in 2015, several have proven foundational to the service’s success:
High availability by default – Every AWS Managed Microsoft AD directory deploys with a minimum of two domain controllers across separate Availability Zones. Customers don’t need to design high availability (HA) architecture, it’s built in.
Real Microsoft AD – We chose to run actual Windows Server AD, not a compatible alternative. This means standard AD administration tools work, existing scripts and automation work, and applications that depend on specific AD behaviors typically work without modification.
Seamless integration with AWS services – By building native integrations between AWS Managed Microsoft AD and other AWS services, we’ve made it possible for customers to use a single directory across their entire AWS environment.
Customer retains control – While AWS manages the infrastructure, customers manage their directory content. You control your users, groups, OUs, and policies using familiar tools.
Room to grow – The edition model (and now self-service upgrades) means customers can start with what they need today and scale as requirements evolve.
Looking ahead: The next chapter
As we celebrate 10 years of AWS Managed Microsoft AD, we’re excited about what’s ahead. The launch of Hybrid Edition earlier this year represents a significant expansion of what’s possible, giving customers new flexibility in how they architect their identity infrastructure for hybrid and multi-cloud environments.
We continue to listen to customer feedback and invest in capabilities that reduce operational burden while expanding what you can build. Whether you’re running your first SQL Server database in the cloud, deploying virtual desktops to a global workforce, or modernizing legacy applications that depend on AD, AWS Managed Microsoft AD is here to help.
Thank you to all the customers who have trusted us with their identity infrastructure over the past decade. Your feedback has shaped this service, and we’re committed to continuing to earn that trust for the next 10 years and beyond.
Resources
Ready to get started or learn more? Here are some resources:
Misconfigured Amazon Simple Storage Service (Amazon S3) buckets can expose your data to unauthorized access. Without proactive review, S3 bucket policies or Access Control Lists (ACLs) configured with broad access may go unnoticed in your environment. In this post, you learn how to identify and fix over-permissioned S3 buckets across your AWS environment, along with best practice recommendations and automation opportunities to help you prevent security gaps. This post provides a workflow framework and methodology recommendations for your security team to adapt. The focus of this post is on the what and why rather than a prescriptive implementation. You will need to customize the approach based on your organization’s requirements and existing security tooling.
This solution is intended for security engineers, cloud architects, and DevOps teams managing single- or multiple-account AWS environments with Amazon S3 workloads that require access management.
Prerequisites
Before you begin, make sure you have the following in place:
For multi-account environments, AWS Organizations should already be configured.
Basic familiarity with IAM policies and Python will help you customize the solution to your needs.
Solution overview
This solution uses a five-phase workflow diagram to detect, remediate, and continuously monitor over-permissioned S3 buckets across your AWS accounts. The following workflow diagram illustrates the high-level end-to-end process for identifying and remediating over-permissioned S3 buckets across your Amazon Web Services (AWS) environment.
Setup and prerequisites – Configure AWS Organizations or multi-account access, designate a central security account, deploy AWS Config across all accounts, and enable AWS Security Hub with a central administrator.
Detection and identification – Deploy AWS Config rules (such as s3-bucket-public-read-prohibited and s3-bucket-public-write-prohibited) and run an audit Lambda function that scans each S3 bucket. The function checks three areas: Public Access Block configuration, bucket policy status, and bucket ACL grants. Buckets with issues are added to a risky buckets list. The function then generates a report in CSV and JSON format, uploads it to an output S3 bucket, and sends an SNS alert.
Remediation – Address findings using one or more approaches – Apply restrictive bucket policies to deny public read/write access and restrict access to specific IAM principals; deploy a remediation Lambda function to automatically update bucket policies and disable public access settings; or use CloudFormation StackSets to deploy standardized policies across multiple accounts.
Continuous monitoring – Schedule the audit Lambda function for recurring scans (daily or weekly) using Amazon EventBridge. Use EventBridge to detect policy changes, configure automated notifications for new violations, enable IAM Access Analyzer for S3 to identify external access, and run regular compliance scans.
Resource cleanup – Review and delete resources created during the audit that are no longer needed, including Lambda functions and IAM roles, EventBridge rules, SNS topics and subscriptions, audit output S3 buckets, AWS Config rules, and Security Hub (if enabled only for this audit).
Cost considerations
This section covers the AWS services used in this solution and their associated costs so you can estimate spend before deployment. The primary cost drivers are AWS Config and Security Hub, which scale with the number of accounts and resources you monitor. Lambda, Amazon EventBridge, Amazon SNS, and Amazon S3 typically add minimal costs for most environments. Start with a pilot in one or two accounts to validate costs before scaling.
AWS Config – Charges per configuration item recorded and per rule evaluation. Costs scale with the number of accounts and resources tracked.
Security Hub – Charges per account per AWS Region for security checks and finding ingestion.
Lambda – Charges per request and per GB-second of compute time.
EventBridge – Scheduled rules are free. Custom event bus usage might incur charges.
Amazon SNS – Charges per notification delivered.
Amazon S3 – Storage costs for audit report output files. Minimal for most environments.
Check the service pricing pages for current rates. Use the AWS Pricing Calculator to estimate costs for your specific environment before enabling services across all accounts. Consider starting with a pilot in one or two accounts to validate costs before scaling.
Detect and report over-permissioned buckets
This section walks you through setting up the audit environment, deploying the Lambda-based scanner, and generating reports of over-permissioned S3 buckets across your accounts. Follow these steps to identify over-permissioned S3 buckets in your multi-account environment, starting with preparing your environment for an Amazon S3 audit.
To set up the multi-account audit environment:
Set up AWS Organizations or multi-account access. Set up centralized management of your AWS accounts using AWS Organizations or configure cross-account IAM roles.
Choose a central security account. Choose one account as your security/audit account. This account will run the audit Lambda function and collect results from member accounts.
Create an Amazon SNS topic for alerts. Subscribe your security team to receive notifications when over-permissioned buckets are detected. Note the topic Amazon Resource Name (ARN) from the output—you will need it when creating the Lambda execution role (step 6) and the Lambda function (step 9). Confirm the email subscription before testing; Amazon SNS doesn’t deliver alerts until the subscription is confirmed. Learn more in the Amazon SNS Developer Guide.
(Optional): Create an S3 bucket for audit reports. If you plan to use Script v2 for historical reporting and trend analysis, create a dedicated bucket now. Skip this step if you only need real-time alerts using Script v1.
Plan cross-account IAM roles. The central security account needs permission to scan member accounts. Design cross-account roles that:
Grant minimum Amazon S3 read permissions (list buckets, read policies, ACLs, public access configurations).
Include an external ID condition to mitigate the confused deputy problem.
Note: The specific trust policy and permissions policy for your cross-account roles will depend on organizational requirements. Work with your IAM administrators to grant minimum necessary access for the audit function.
Create the Lambda execution role. Create an IAM role for your Lambda function with the permissions it needs to scan buckets, publish alerts, and write logs. Apply the principle of least privilege—grant only the minimum Amazon S3 read permissions required for the audit (such as, listing buckets, reading bucket policies, ACLs, and public access block configurations), Amazon SNS publish permission for the alert topic created in step 3, Amazon S3 write permission for the output bucket created in step 4 (Script v2), and Amazon CloudWatch Logs permissions. For multi-account scanning, also include sts:AssumeRolepermission for the cross-account role ARNs created in step 5. The AWS Lambda execution role documentation has instructions on creating and configuring execution roles.
To deploy the S3 audit solution Deploy the audit components
Enable AWS Config in member accounts. AWS Config provides compliance monitoring and can detect when S3 buckets are created or modified with public access settings. This will enable the Lambda-based audit to receive real-time detection between scheduled scans. The AWS Config Developer Guide has setup instructions. Deploy pre-defined AWS Config rules to identify overly permissive settings. These managed rules provide automated compliance checking. When AWS Config detects violations, it sends findings to Security Hub (configured in step 8) for centralized visibility alongside the Lambda audit results.
s3-bucket-public-read-prohibited
s3-bucket-public-write-prohibited
Create AWS Config rules for specific permission patterns. For the full list of available rules, see the AWS Config managed rules reference
Enable Security Hub for centralized visibility. Enable AWS Security Hub in member accounts and configure the central security account as the administrator. Security Hub aggregates findings from AWS Config rules (step 7), IAM Access Analyzer (enabled later), and can receive custom findings from your Lambda audit function, providing a single dashboard for Amazon S3 security issues across your organization. See the Security Hub User Guide for setup details.
Deploy the audit Lambda function. Deploy a Python Lambda function using the Boto3 library to list S3 buckets, check their policies, ACLs, and IAM permissions, and identify over-permissioned buckets. See the example scripts that follow.
Important: These code examples aren’t production ready. Adapt them to meet your organization’s requirements and test them in a non-production environment before deployment.
Choose your approach:
Script v1 – Best for immediate SNS alerts when issues are detected.
Script v2 – Best for historical reports, trend analysis using BI tools.
Both scripts – Best for different schedules and ongoing needs.
Audit Lambda function – Example script v1 (Scan and alert)
The following is an example of a Lambda function script for reference purposes. Review, adapt, and test before use in your environment, it scans all S3 buckets in the current account and checks for:
Public Access block configuration gaps
Bucket policies that allow public access
ACL grants to AllUsers
Note: Replace placeholder values with actual values before deployment:
<REGION>– Your AWS Region (for example, us-east-1)
<ACCOUNT_ID>– Your 12-digit AWS account ID
<TOPIC_NAME>– The name of your SNS topic created in step 3
import boto3
import json

def lambda_handler(event, context):
    s3 = boto3.client('s3')
    sns = boto3.client('sns')
    risky_buckets = []
    errors = []

    try:
        buckets = s3.list_buckets()['Buckets']
    except Exception as e:
        return {'statusCode': 500, 'body': f'Failed to list buckets: {str(e)}'}

    for bucket in buckets:
        bucket_name = bucket['Name']
        issues = []

        try:
            # Check Public Access Block — all four settings should be enabled
            try:
                pab = s3.get_public_access_block(Bucket=bucket_name)
                config = pab['PublicAccessBlockConfiguration']
                if not all([
                    config.get('BlockPublicAcls'),      # Block new public ACLs
                    config.get('BlockPublicPolicy'),     # Block new public bucket policies
                    config.get('IgnorePublicAcls'),      # Ignore existing public ACLs
                    config.get('RestrictPublicBuckets')   # Restrict access to public buckets
                ]):
                    issues.append('Public Access Block not fully enabled')
            except s3.exceptions.NoSuchPublicAccessBlockConfiguration:
                issues.append('No Public Access Block configured')

            # Check bucket policy — flag if policy status is public
            try:
                policy_status = s3.get_bucket_policy_status(Bucket=bucket_name)
                if policy_status['PolicyStatus']['IsPublic']:
                    issues.append('Bucket policy allows public access')
            except s3.exceptions.NoSuchBucketPolicy:
                pass  # No bucket policy is acceptable

            # Check bucket ACL
            acl = s3.get_bucket_acl(Bucket=bucket_name)
            for grant in acl.get('Grants', []):
                grantee = grant.get('Grantee', {})
                uri = grantee.get('URI', '')
                # 'AllUsers' = anonymous public access
                # 'AuthenticatedUsers' = any AWS account (still overly permissive)
                if grantee.get('Type') == 'Group' and ('AllUsers' in uri or 'AuthenticatedUsers' in uri):
                    issues.append('Bucket ACL grants public access')
                    break

            if issues:
                risky_buckets.append({'bucket': bucket_name, 'issues': issues})

        except Exception as e:
            errors.append(f'{bucket_name}: {str(e)}')

    # Send alert if risky buckets found
    if risky_buckets:
        message = f'Found {len(risky_buckets)} buckets with public access:\n\n'
        for item in risky_buckets:
            message += f"  {item['bucket']}: {', '.join(item['issues'])}\n"

        sns.publish(
            TopicArn='arn:aws:sns:<REGION>:<ACCOUNT_ID>:<TOPIC_NAME>',
            Subject='S3 Public Access Alert',
            Message=message
        )

    return {
        'statusCode': 200,
        'body': json.dumps({
            'risky_buckets': risky_buckets,
            'errors': errors,
            'total_checked': len(buckets)
        })
    }
Multi-account scanning: This script scans the current account only. To scan across member accounts, see the Multi-account extension section later in this post.
Audit Lambda function – Example script v2 (CSV and JSON report)
The following is an example Lambda function script for reference purposes. Before deploying any script, review error handling, logging, output structure, and permissions. This script generates CSV and JSON output files and uploads them to an S3 bucket for reporting and business intelligence (BI) dashboard integration.
You can deploy both functions with different EventBridge schedules, for example, Script v1 daily for alerts and Script v2 weekly for reports.
Note: Before you deploy this script, replace <OUTPUT_BUCKET_NAME> with the S3 bucket you created for audit reports in step 4.
import boto3
import csv
import json
import os

def lambda_handler(event, context):
    s3 = boto3.client('s3')
    buckets = s3.list_buckets()['Buckets']

    full_access_buckets = []
    for bucket in buckets:
        bucket_name = bucket['Name']
        try:
            bucket_policy = s3.get_bucket_policy(Bucket=bucket_name)['Policy']
            policy = json.loads(bucket_policy)
            for statement in policy['Statement']:
                if (statement['Effect'] == 'Allow'
                    and statement['Principal'] == '*'
                    and 'Action' in statement
                    and 's3:*' in statement['Action']):
                    full_access_buckets.append({'BucketName': bucket_name})
                    break
        except s3.exceptions.ClientError as e:
            if e.response['Error']['Code'] != 'NoSuchBucketPolicy':
                print(f'Error checking bucket policy for {bucket_name}: {e}')

    # Output CSV
    csv_output = os.path.join('/tmp', 'full_access_buckets.csv')
    with open(csv_output, 'w', newline='') as csvfile:
        writer = csv.DictWriter(csvfile, fieldnames=['BucketName'])
        writer.writeheader()
        writer.writerows(full_access_buckets)

    # Output JSON
    json_output = os.path.join('/tmp', 'full_access_buckets.json')
    with open(json_output, 'w') as jsonfile:
        json.dump(full_access_buckets, jsonfile, indent=2)

    # Upload to Amazon S3
    output_bucket = '<OUTPUT_BUCKET_NAME>'
    s3.upload_file(csv_output, output_bucket, 'full_access_buckets.csv')
    s3.upload_file(json_output, output_bucket, 'full_access_buckets.json')

    return {
        'statusCode': 200,
        'body': json.dumps(f'CSV and JSON files uploaded to {output_bucket}')
    }
Important: If this function runs on a schedule, consider implementing a file naming strategy with timestamps to prevent overwriting previous reports or establish a lifecycle policy to manage retention. Include the output bucket in your cleanup procedures when the auditing process is no longer needed.
What if no over-permissioned buckets are found?
If the audit scan returns zero risky buckets, document the clean baseline for future comparison and move to the verification and monitoring phase to so new buckets or policy changes don’t introduce risk over time.
Multi-account extension
The preceding example scripts scan buckets in the current account only. To scan across member accounts in your organization, add the following AssumeRole logic. This function assumes the cross-account IAM role you created during setup, then returns an Amazon S3 client with temporary credentials for each member account.
Note: Before you deploy, configure the following Lambda environment variables:
<MEMBER_ACCOUNTS> – Comma-separated list of 12-digit account IDs to scan (for example, 111111111111,222222222222)
<CROSS_ACCOUNT_ROLE_NAME> – The IAM role name created in each member account (for example, S3AuditRole)
<EXTERNAL_ID> – The external ID configured in the trust policy (for example, s3-audit-external-id)
import boto3
import os

def get_member_s3_clients():
    """
    Assumes the cross-account audit role in each member account
    and returns a list of (account_id, s3_client) tuples.
    """
    sts = boto3.client('sts')
    member_accounts = os.environ.get('<MEMBER_ACCOUNTS>', '').split(',')
    cross_account_role_name = os.environ.get('<CROSS_ACCOUNT_ROLE_NAME>')
    external_id = os.environ.get('<EXTERNAL_ID>')

    clients = []
    for account_id in member_accounts:
        account_id = account_id.strip()
        if not account_id:
            continue

        try:
            assumed_role = sts.assume_role(
                RoleArn=f'arn:aws:iam::{account_id}:role/{cross_account_role_name}',
                RoleSessionName='S3AuditSession',
                ExternalId=external_id
            )

            # Create S3 client with assumed credentials
            s3_client = boto3.client(
                's3',
                aws_access_key_id=assumed_role['Credentials']['AccessKeyId'],
                aws_secret_access_key=assumed_role['Credentials']['SecretAccessKey'],
                aws_session_token=assumed_role['Credentials']['SessionToken']
            )
            clients.append((account_id, s3_client))

        except Exception as e:
            print(f'Failed to assume role in account {account_id}: {e}')

    return clients
To scan each member account, replace the single-account s3.list_buckets() call with a loop over member accounts:
def lambda_handler(event, context):
    all_risky_buckets = []
    all_errors = []

    # Scan each member account
    for account_id, s3_client in get_member_s3_clients():
        try:
            buckets = s3_client.list_buckets()['Buckets']
            for bucket in buckets:
                # ... same scanning logic as the single-account scripts ...
                # Use s3_client instead of s3 for each API call
                pass
        except Exception as e:
            all_errors.append(f'Account {account_id}: {e}')

    # ... same alerting/reporting logic ...
The Lambda execution role in the central security account needs sts:AssumeRole permission for the cross-account role ARNs. Add this to the execution role policy you created in step 5.
Remediate elevated access
This section describes how to fix over-permissioned buckets using account-level controls, bucket policies, and optional automation. Any elevated access that you find needs to be remediated.
Enable Amazon S3 Block Public Access (account level)
Before applying individual bucket policies, enable Amazon S3 Block Public Access at the account level. This prevents buckets in the account from being made public, regardless of individual bucket policies or ACLs. See theS3 Block Public Access documentation for configuration details. See the following example AWS CLI command; replace <ACCOUNT_ID> with the ID of the account you’re using to manage resource access:
For multi-account environments, deploy this setting across member accounts using AWS CloudFormation StackSets or AWS Organizations service control policies (SCPs).
Important: Before enabling account-level S3 Block Public Access, check whether any workloads need public bucket access (for example, static website hosting, public dataset sharing). Coordinate with your application teams to identify any exceptions.
Remediate using bucket policies
Implement bucket policies that restrict access to specific IAM users, roles, or accounts. When crafting policies, apply the principle of least privilege and include only the actions and principals required for your use case.
Example S3 bucket policy: deny public read/write access. Modify the resource ARN, actions, and conditions to match your requirements:
Automate remediation with Lambda or CloudFormation StackSets (optional):
You can also remediate using Lambda or CloudFormation Stacksets:
Create Lambda functions to automatically update bucket policies or disable public access settings for flagged buckets
Use CloudFormation StackSets to deploy standardized bucket policies and S3 Block Public Access settings across multiple accounts
Verify your remediation
This section explains how to confirm that your fixes are effective before moving to ongoing monitoring. After applying remediation, verify the fix is effective before setting up ongoing monitoring:
Re-run the audit Lambda function – Confirm the previously flagged buckets no longer appear in the risky buckets list.
Check Security Hub compliance – Verify the compliance status has changed from FAILED to PASSED for Amazon S3-related controls.
Validate with IAM Access Analyzer – Review findings for the remediated S3 buckets. Active findings should resolve automatically after public access is removed.
Test application functionality – Confirm that legitimate workloads continue to function correctly.
Document the verification results for your auditing needs. If any S3 buckets still show issues, investigate whether the policy was applied correctly or if there are conflicting permissions.
Automation opportunities
This section covers optional strategies to automate ongoing detection and maintain your security posture without manual intervention.
(Optional) Schedule recurring scans with Amazon EventBridge
Regular security scans help identify new issues arising from configuration changes or newly created S3 buckets. When new security risks are detected, Amazon SNS sends an alert and automatically initiates the remediation phase (Workflow 2 in Figure 1). To avoid repeated alerts, you can configure the audit Lambda function to run on a schedule and compare current results with the previous baseline to generate notifications when new findings are discovered.
For ongoing monitoring, you can schedule the audit Lambda function to run on a recurring basis using EventBridge. Create a scheduled rule with a cron expression (for example, daily at 6:00 AM UTC or weekly on Mondays), add the Lambda function as the target, and grant EventBridge permission to invoke it. See Amazon EventBridge scheduling documentation for instructions on creating scheduled rules and configuring targets.
Enable IAM Access Analyzer for Amazon S3
IAM Access Analyzer monitors bucket policies, ACLs, and access points to identify buckets accessible from outside your account or organization. Create an analyzer scoped to your organization or individual account, then review findings to identify unintended external access. Findings automatically flow into Security Hub when both services are enabled, giving you a dashboard view for Amazon S3 security findings. See the IAM Access Analyzer documentation for setup and usage instructions.
Automate notifications for policy drift
Recurring scans might surface new findings from policy drift or newly created buckets. When new risks are detected, Amazon SNS alert triggers and the remediation cycle repeat (as shown in Workflow 2 in Figure 1) sends email notifications. Configure the audit Lambda function to compare current scan results against the previous baseline and alert on new findings for ongoing reviews.
Clean up
This section lists the resources created during this walkthrough that you should review and remove when they are no longer needed. If the following services were not previously active in your account, leaving them enabled might result in additional ongoing charges. See the Cost considerations section for details. Review and remove unused resources to optimize costs.
Delete or disable the following script-generated resources if they’re not required after outputs are generated. Focus first on Lambda functions and EventBridge rules if you’re not running recurring scans. If you enabled AWS Config or Security Hub specifically for this audit, evaluate whether you need them for other compliance requirements before disabling.
Lambda – Functions, IAM roles, and policies created for auditing
Amazon EventBridge – Scheduled rules created for recurring audit triggers
Amazon SNS – Topics and subscriptions created for notifications
AWS Config – Rules and recorders if no longer needed for compliance
Security Hub – Disable if enabled solely for this audit
IAM Access Analyzer – Delete the analyzer if no longer needed for ongoing monitoring
Note: Be careful when deleting data and consider temporarily disabling services first to check for dependencies. Only delete resources generated as part of your audit outputs. Verify you have retained any necessary results before proceeding. Verify resources are not used by other workloads before deletion.
Best practices
This section provides recommendations to maintain secure Amazon S3 configurations long-term. To learn more about maintaining secure Amazon S3 configurations, review the AWS documentation links provided in the conclusion. The following recommendations aren’t exhaustive. Adapt and extend them based on your organization’s evolving security requirements and AWS best practices guidance. After you’ve fixed existing issues, these practices help you maintain secure Amazon S3 configurations.
Start with account-level controls – Enable S3 Block Public Access at the account level. This prevents buckets from becoming public even if someone misconfigures an individual bucket policy. For multi-account environments, enforce this through AWS Organizations SCPs.
Automate detection – Use IAM Access Analyzer to detect external access. Schedule your audit Lambda function with EventBridge to catch new issues weekly or daily, depending on your change frequency. Compare scan results against previous baselines to identify drift.
Standardize across accounts – Use CloudFormation StackSets to deploy the same secure configuration to all accounts in your organization, reducing the chance of configuration drift. Use StackSets for IAM roles, AWS Config rules, and S3 Block Public Access settings.
Additional security measures
Regularly review and rotate cross-account IAM role credentials and external IDs
Implement Amazon S3 server-side encryption (SSE-S3 or SSE-KMS) for data at rest
Enable S3 access logging and AWS CloudTrail data events for audit trails
Conclusion
This section summarizes what you accomplished and suggests next steps to maintain your S3 security posture. By implementing the detection, remediation, and monitoring workflow outlined in this post, you can proactively identify and secure over-permissioned S3 buckets across your AWS environment. To maintain your ongoing security posture, enable IAM Access Analyzer for continuous monitoring and schedule recurring audits with EventBridge. To learn more about Amazon S3 security best practices, see Security best practices for Amazon S3
Security leaders evaluating Check Point Exposure Management tend to ask the same questions: how the solution discovers assets, what intelligence it provides, and how well it fits their existing tools and workflows. Below, we answer the questions that come up most often in product evaluations, offering a practical look at how organizations discover, understand, and reduce cyber risk. 1. How does the platform discover my assets? Every exposure management program starts with knowing what you own. Security teams cannot assess, prioritize, or remediate exposures tied to systems they do not know exist. Check Point Exposure Management begins by continuously discovering […]
Black Hat USA 2026 gave Check Point Research four chances to show the room something it hadn’t seen before. Across two days, our researchers pulled apart a decade-old Windows driver, a malware format most tools can’t touch, the plumbing underneath today’s AI agent frameworks, and the sandbox meant to contain them, and found the same pattern waiting in each: attackers moving into the layers we trust by default. Here’s a look at what they presented. BTR Reforged: The Driver Nobody Had Looked At Jiří Vinopal opened the day with a talk that started from an uncomfortable premise. Somewhere inside Windows […]
Check Point Research analyzed Cloudflare Code Mode, a technique that changes how AI agents use MCP by turning tools into a TypeScript API the model can write code against.
The research uncovered five vulnerabilities in workerd, the open-source runtime behind Code Mode and Cloudflare Workers. Two were rated Critical by Cloudflare.
The blast radius is broad: by Cloudflare’s own numbers, Workers is built by millions of developers,[1] serves millions of requests per second,[2] and carries more than 10% of all traffic on Cloudflare’s network.[3]
Because workerd underpins both Code Mode sandboxes and Workers tenant isolation, the findings create sandbox-escape and cross-tenant exposure risk.
Cloudflare’s managed Workers environment has been fixed in production. Self-hosted workerd / Code Mode deployments should update to v1.20260619.1.
Check Point Research released proof-of-concept code as part of its Black Hat USA 2026 presentation.
The short version
We set out to break Cloudflare Code Mode, and ended up breaking Cloudflare Workers too. We did both by targeting workerd, the runtime beneath both: an in-process sandbox that relies entirely on V8 to isolate untrusted code.
We found five memory-corruption bugs in workerd’s native C++ (the “glue” between JavaScript and the runtime), and turned them into two end-to-end attacks:
Cross-tenant heap swipe. An out-of-bounds read in URLPattern lets one Worker reach across the shared process heap and swipe another tenant’s secrets.
Code Mode sandbox escape. Starting from a prompt injection, a use-after-free in node:zlib breaks out of the sandbox and runs native code on the host.
Part I – Understanding the target
1. Where this started: Code Mode
Code Mode is Cloudflare’s take on LLM tool use. Instead of a model emitting structured tool calls one at a time, Code Mode exposes the available tools as a typed TypeScript API and lets the model write code that calls them: loops, conditionals, data shuffling and all.
In the traditional MCP / tool-calling loop, the model emits one {tool, args} call, the agent runs it, feeds the result back. The model then emits the next call. Every step is a fresh model invocation, and usually a network round-trip. Code Mode collapses that: the model writes one program that orchestrates many tool calls itself (looping, branching, and combining intermediate results locally) and only the final output returns to the model.
Cloudflare’s argument is that LLMs, trained on enormous amounts of real-world code, are simply better at writing a program against a typed API than at emitting long chains of synthetic tool calls. [4]
Figure 1 – Tool calling vs. Code Mode
That code has to run somewhere, and that “somewhere” is workerd, the runtime behind Cloudflare Workers.
2. The workerd origin story
To understand workerd, start with the product it was built for: Cloudflare Workers. Workers is Cloudflare’s serverless platform: you upload a piece of code and Cloudflare runs it at the edge, in data centers close to the user, on demand for every request. There’s no server to manage and, ideally, no cold machine to wait for.
That model creates a hard isolation problem. Cloudflare runs code from a huge number of different customers, and to keep latency and cost down it packs many of them onto the same machines, and, as we’ll see, into the same process. The classic answer (a container or VM per tenant) is far too heavy for this: each one adds tens to hundreds of milliseconds of cold start and a real memory footprint, which is exactly what an edge platform serving oceans of short requests cannot afford.
Cloudflare’s answer is to isolate at the language-runtime level rather than the OS level, using V8 isolates, the same primitive Chrome uses to separate browser tabs. An isolate is a lightweight, independent JavaScript context. Many can live inside a single process, each starts in single-digit milliseconds, and the isolate is the security boundary between tenants.
The trade-off is that this boundary is a software boundary inside one shared address space, not a hardware or kernel one. Untrusted code runs in-process, and the whole model rests on the isolate holding.
Figure 2 – Many tenants, one process
workerd is the runtime that implements all of this. It was closed-source for years: Workers launched in 2017, but Cloudflare only released workerd as open source in September 2022.[5] It’s exactly what Code Mode runs the model’s generated code on.
3. Why workerd was the obvious sandbox for Code Mode
Code Mode has to run untrusted, model-written code, and it needs that code to reach the declared MCP tools and nothing else. workerd answers both at once.
Running untrusted tenant code in-process is its day job, and it lets Code Mode lock the rest down: no filesystem, no arbitrary network (fetch() and connect() simply throw) with the tools exposed only through bindings.[6] Cloudflare didn’t build a new sandbox for Code Mode. It reused the one it already trusts to isolate millions of Workers.
4. Why we targeted workerd
When you set out to break Code Mode, the obvious place to look is the seam between Code Mode and workerd. This is the integration layer: how tools become bindings, how the configuration is wired, how the two interact. Going after the runtime itself is the unusual move. It’s a bit like setting out to break an AI coding assistant and then going to audit Docker’s own source code, the container runtime itself, not the agent on top of it.
Five reasons made us decide to do it anyway:
An in-process sandbox is a bold, inherently risky bet. Isolating untrusted code without an OS-level boundary means no VM, no container, just a V8 isolate inside a shared process. That puts the entire security model on a single software boundary. That kind of ambitious bet is exactly what’s worth stress-testing.
workerd had almost no public scrutiny.[7] Despite sitting directly on that boundary, there was barely any prior public vulnerability research on workerd, in stark contrast to V8, which is picked apart continuously.
The attack surface is huge. And it’s not just V8. workerd has its own implementation that exposes many Web/Node APIs, each written in C++ and reachable from untrusted JavaScript.
The blast radius reaches Cloudflare Workers. workerd isn’t only Code Mode’s runtime. It’s the engine behind Cloudflare Workers, one of the most widely deployed serverless platforms on the internet. A bug here would never have stayed contained to an experimental agent feature.
AI security has a low-level side too. Beyond the high-level frameworks, the internal, low-level layers that agents rely on to interact with the world deserve research as well.
5. The cage, memory protection keys, and Node
V8 is one of the most heavily attacked pieces of software around, with a long history of memory bugs, so Cloudflare assumes it can break and layers defenses so a compromise of one isolate doesn’t reach the host or other tenants.
Defenses
1. The V8 sandbox (“the cage”). The cage confines JS-reachable objects so a corrupted one can’t forge pointers outside it. Assume arbitrary read/write inside the cage, and stop it reaching memory outside.
2. Memory protection keys. As a further layer against V8 vulnerabilities, production also tags isolate-group memory with hardware memory protection keys (MPK / pkeys), so even with arbitrary read/write inside one isolate’s V8, an attacker still can’t read another tenant’s pages.
3. The L2 process sandbox. Underneath both sits a second-layer (“L2”) process sandbox, so even native code execution inside the process is meant to be contained. Per Cloudflare, the V8 Workers run in a strict layer-2 sandbox (Linux namespaces plus seccomp) that blocks all filesystem and direct network access,[8] limiting what a compromised process can reach on the host.
Attack Surface
Node. Real-world JavaScript assumes Node.js exists, and code constantly reaches for node:* modules, so workerd reimplements a large slice of the Node API in C++. This is exposed to JS through JSG, its “JavaScript Glue” layer. Node was never designed for a threat model where the attacker writes the JavaScript, so this drops a great deal of extra native code onto the boundary, much of it workerd’s own, and enabled by default (a Worker can just require('node:crypto')).
It also means more native objects allocated on the tcmallocheap, which is secured by neither the cage nor the memory protection keys.
6. Bottom Line
Putting all of the above together, we did exactly that. We targeted workerd’s JSG code, the “JavaScript Glue” that hands native C++ to untrusted JavaScript, whether it is a Node reimplementation or one of workerd’s own API implementations. It is the code that had a fraction of V8’s scrutiny (§4), and the native objects it allocates sit on the tcmalloc heap, memory that lives outside both the cage and the memory-protection keys (§5). So a bug there is not boxed in the way a V8 bug is. It is exactly the surface those mitigations do not cover.
By going after that code we found five vulnerabilities, all of them in workerd’s own native code, each covered in the Vulnerabilities section (Part II).
Building on those bugs, we developed two end-to-end exploits, covered in the Exploits section (Part III).
Code Mode sandbox escape. Starting from a single prompt injection, the model is steered into writing attacker-controlled TypeScript. That TypeScript contains a memory-corruption which leads to native code execution, breaking out of Code Mode and running on the host, fully outside the V8 isolate.
Cross-tenant secret leak. Starting from a malicious Worker you deploy into Cloudflare’s shared pool, we show that one tenant can read another tenant’s memory and leak its secrets straight out of the shared process. This is the production scenario, and it holds up there because the whole exploit runs from the tcmalloc heap, the memory the cage and MPK do not cover.
But to be explicit, we did not run the exploit on Cloudflare production ourselves. Both exploits were verified on the self-hosted version of workerd. The cross-tenant idea should work the same way on production, since it runs entirely from the tcmalloc heap that the mitigations do not cover, but we did not test it there. On a shared host, a memory-corruption exploit that crashes the process could take other tenants down with it, and we were not willing to risk that.
Part II – The vulnerabilities
7. URLPattern out-of-bounds read
URLPattern is a Web API for matching a URL against a pattern, essentially what a router does. You build a pattern such as new URLPattern({ pathname: "/users/:id" }), call .exec() on a URL, and read back the named capture groups ({ id: "…" }). workerd exposes it to Workers, and in our setting the pattern itself is attacker-controlled.
workerd actually ships two URLPattern implementations. The first is the original, workerd-native one (the urlpattern_original compatibility flag). The second is the newer standard one backed by the AdaURL-parser library. We found the same out-of-bounds read in both implementations, and it gives the same primitive.
7.1 Root cause
Under the hood, URLPattern turns your pattern into a regular expression. Matching a URL then produces two parallel lists: the matched values (one per capture group in the regex) and the group names.
A quick example of the benign case:
Figure 3 – URLPattern: pattern → result
URLPattern also lets you drop raw regex straight into a pattern, with named or unnamed groups. For example, /(\d+)/(?<slug>[a-z]+) has one unnamed group and one named group:
Figure 4 – URLPattern with named group
Here is the implementation. When you call .exec(), workerd runs the compiled regex against the URL and builds the groups object from the result. The original, workerd-native version does it like this:
// urlpattern.c++: building the groups object from a regex match
KJ_IF_SOME(array, regex.getHandle(js)(js, input)) {  // run regex vs URL
  uint32_t index = 1;                                // [0] is full match, skip
  uint32_t length = array.size();                    // 1 + capture count values
  kj::Vector<Groups::Field> fields(length - 1);

  while (index < length) {                           // each capture value
    auto value = array.get(js, index);
    fields.add(Groups::Field{
      .name = kj::str(nameList[index - 1]),           // name by position
      .value = value.isUndefined() ? kj::String() : kj::str(value),
    });
    index++;
  }
  // ...
}
For each capture group, the loop builds one { name, value } field. The value is what the regex matched in the URL. The name is the group’s name (like id from earlier), taken from the nameList vector.
The two sides of that pairing come from completely different places, and that is the part to hold onto:
length comes from V8. It’s the size of the match array V8 returns after running the compiled regex, i.e. how many capture groups the regex actually produced.
nameList comes from URLPattern’s own implementation. It’s the list of names workerd assembled while parsing the pattern, before the regex ever ran.
Figure 5 – The group-count mismatch
The loop lines them up position by position, on the assumption that the two counts agree.
So the whole thing rests on those two counts staying equal, and they don’t always. When URLPattern parses the pattern to build nameList, its own group counting misses a group nested inside another group. V8, compiling the real regex, counts every group, nested ones included. So a pattern with one group nested inside another, like (ab(cde)), gives V8 two capture groups where URLPattern counted only one, and length ends up larger than nameList:
Now the loop runs one step too far. For that extra value, index - 1 points past the end of nameList, and kj::str(nameList[index - 1]) reads from beyond the vector, an out-of-bounds read. That is the bug.
7.2 Why an OOB read is an arbitrary read
nameList is a kj::Vector<kj::String>. A kj::String is 24 bytes:
Figure 6 – kj::String memory layout
The OOB index makes kj::str() read 24 bytes of whatever follows the vector and treat it as a kj::String, then dereferenceptr to copy out the “string.” So if we control the memory after nameList, we control ptr, and the returned JS string is the bytes at an address of our choosing. OOB read → arbitrary read.
7.3 Two notes
The same bug is in both implementations, and the Ada one reaches production. The standard, Ada-backed URLPattern makes the identical counting mistake, with the same out-of-bounds read. We confirmed the Ada version triggers on Cloudflare production, and reported it to the Ada maintainers in parallel.
Our full end-to-end exploit was on the original implementation, self-hosted. Turning the read into a working cross-tenant secret leak was demonstrated against urlpattern_original on self-hosted workerd. That exact path did not reproduce on production, because production has a check the open-source build lacked.
8. zlib deflateParams() UAF
zlib is the most common compression library around. Node.js ships it as the built-in node:zlib module, and to stay Node-compatible workerd reimplemented it in C++. It exposes a handful of APIs. The basic ones compress and decompress via Gzip, Deflate/Inflate, and Brotli. In workerd it comes with the nodejs_compat flag (compatibility date 2024-09-23 or later).
8.1 Dangling buffers
Let’s look at a basic use of zlib. You call write() with an input buffer and an output buffer, and zlib compresses the input into the output.
Those three lines already span three distinct layers:
JavaScript (V8): creates the input and output buffers.
workerd’s glue code: the translation layer between JavaScript and native C++, turning those buffers into the raw pointers and lengths the C library expects.
zlib: the C compression library that does the actual work.
The buffer to watch is output. As it moves, its pointer is passed between all three layers, handled differently in each. So let’s take it one layer at a time, starting on the JavaScript side.
On the JavaScript side, output is reference-counted: it stays alive as long as at least one reference points at it. Follow that count through a single write():
handle.write(input, output, …). As the buffer crosses into native code, workerd takes a reference of its own for the duration of the call: refcount 2. That extra reference is what guarantees the buffer can’t be freed while zlib is mid-compression.
write() returns, and workerd drops its reference again: back to refcount 1, held by the JS variable.
nothing holdsoutput anymore (it goes out of scope, or is reassigned), so the last reference is gone: refcount 0.
Figure 7 – output refcount lifecycle
Now follow the same buffer into the native side. To hand output to zlib, workerd fills in a z_stream(zlib’s state struct), copying the buffer’s raw address into its next_out field, the pointer zlib writes its compressed output through. That copy happens in setBuffers, on every write():
// zlib-util.c++
void ZlibContext::setBuffers(kj::ArrayPtr<kj::byte> input, kj::ArrayPtr<kj::byte> output) {
  stream.avail_in  = input.size();
  stream.next_in   = input.begin();    // raw pointer into the JS input buffer
  stream.avail_out = output.size();
  stream.next_out  = output.begin();   // raw pointer into the JS output buffer
}
And write() forgets to clear them. When it returns, it resets nothing in the z_stream. next_out still holds the raw address of output. Clearing it is workerd’s job, and the write path simply doesn’t.
The same sequence, now with stream.next_out shown alongside:
Figure 8 – next_out left dangling
Nothing ever clears next_out after setBuffers sets it. So once output’s refcount reaches 0, the buffer becomes garbage, and the next garbage-collection event reclaims its memory, leaving next_out pointing into freed memory.
8.2 The Use in Use-After-Free
We now have a dangling next_out, and the next step is to find who writes through it.
We started in workerd’s own code, but next_out is zlib’s field, and it is zlib, not workerd, that writes output through it. So the real question is where, inside the zlib library, next_out gets written.
The obvious place is an ordinary compression step: deflate() (and inflate()), the functions that push output through next_out. But in workerd that path is only ever reached through write(), and write() runs setBuffers first, resetting next_out to a fresh buffer before deflate() runs. The stale pointer is overwritten before it is ever used. No good.
What we found instead is deflateParams, reached from handle.params(), the call that adjusts the compression parameters, like the level (how hard zlib compresses). It touches the same z_stream and, crucially, does not resetnext_out first:
That hands zlib the same z_stream, still carrying the stale next_out from the last write(). And rather than clearing next_in/next_out, deflateParams flushes whatever output zlib still has buffered before it applies the new settings:
// zlib - deflate.c, deflateParams() (trimmed)
func = configuration_table[s->level].func;
if ((strategy != s->strategy || func != configuration_table[level].func)
        && /* there is data still pending */) {
    /* flush the last buffer */
    deflate(strm, Z_BLOCK);   // flush pending output through strm->next_out
}
s->level    = level;          // new config applied only after the flush
s->strategy = strategy;
If the level or strategy changes and data is still pending, zlib calls deflate() to flush it before updating the config, and that deflate() writes through strm->next_out, the dangling pointer.
But there is still a problem. When we called write(), zlib already compressed the data we handed it, so how are we supposed to have any bytes still pending for deflateParams to flush?
8.3 Z_NO_FLUSH
Each zlib write takes a flush mode controlling how eagerly output is emitted. Passing Z_NO_FLUSH tells zlib to hold compressed output in its internal buffer rather than push it all out through next_out, so the write() returns with data still pending. That pending data is exactly what deflateParams flushes.
8.4 Putting everything together
The whole use-after-free is a handful of JavaScript calls. Tracking outBuf’s refcount and next_out across the full cycle, the same way we did on the JavaScript side:
Figure 9 – The zlib use-after-free
9. HTMLRewriter AttributesIterator UAF
HTMLRewriter is a Workers API for transforming HTML as it streams through. A Worker can rewrite tags, attributes, and text on the fly without buffering the whole document. workerd exposes it on top of lol-html, Cloudflare’s Rust streaming HTML rewriter, through a layer of C++ bindings.
The bug is in those bindings, not in lol-html. When you ask an element for an attributes iterator, the C++ binding grabs a raw pointer into the element’s internal attribute array and reads through it on each next(). Adding attributes with setAttribute grows that array, and once it outgrows its capacity the array reallocates to a new location and the old one is freed, but the iterator is still pointing at the old, now-freed array. The next next() reads from that freed memory:
new HTMLRewriter().on('div', {
  element(el) {
    const iter = el.attributes[Symbol.iterator](); // pointer into backing array
    iter.next();                                   // reads backing array
    for (let i = 0; i < 10000; i++)                // grow attributes...
      el.setAttribute(`x${i}`, 'A'.repeat(100));   // ...until it reallocates

    const leaked = iter.next().value;              // iter → freed array: UAF
  }
});
10. KV SQL bypass → arbitrary deserialization
The other four bugs are memory-corruption. This one is a classic that leads to arbitrary deserialization.
10.1 Durable Objects
Workers are stateless. Each request runs in a fresh, short-lived context, and nothing held in memory survives to the next one. Durable Objects are Cloudflare’s answer to that: a Durable Object is a single, uniquely-addressable instance that stays alive and keeps its state across requests, both in memory and in private, strongly-consistent storage. It’s how you hold persistent, coordinated state on the edge: a chat room, a live document, a counter.
That storage has a newer SQLite backend, and a Worker can reach the same database in two ways:
the key/value API (storage.get / put), which stores each value serialized with the structured-clone algorithm, and
the SQL API (storage.sql.exec), which runs raw SQL against the same database.
The key/value data lives in a reserved SQLite table, _cf_KV, and reading a value back deserializes its bytes with V8’s structured-clone deserializer, including workerd’s handlers for internal types.
10.2 The authorizer bypass
A SQL authorizer guards those internal tables. It rejects any query that touches a _cf_-prefixed table: CREATE, SELECT, INSERT, UPDATE, DROP, all of it. But we found one operation it forgot to check.
The authorizer validates the tables a query references, but not the destination name of a rename. So while every direct query against _cf_KV is rejected, nothing stops you from creating an ordinary table under an allowed name and then renaming it with ALTER TABLE … RENAME TO _cf_KV. You build the table under a name the authorizer permits, fill it with crafted bytes, and rename it into place:
CREATE TABLE kv_tmp (key TEXT, value BLOB);          -- allowed
INSERT INTO kv_tmp VALUES ('k', <attacker bytes>);   -- crafted payload
ALTER TABLE kv_tmp RENAME TO _cf_KV;                 -- not checked → now KV
A later key/value read (storage.get('k')) then feeds those attacker-controlled bytes straight into workerd’s internal deserializers, exactly the untrusted input they were never meant to handle.
We didn’t continue from here. The point is the attack surface. A malicious Worker can control the bytes fed to V8’s deserializer, which will deserialize any object it supports, including workerd’s own internal types. And while we stopped there, the surface is worth stressing: that deserializer was built for trusted, in-process data, and unlike V8’s parser and JIT, it isn’t fuzzed for hostile input. That makes it a very strong attack surface, and a well-worn path to type confusion and memory corruption.
Part III – The full chain and its impact
11. Cross-tenant secret theft (Workers)
Cloudflare Workers run the same workerd and the same many-tenants-one-process model from §2. Different customers’ Workers run as separate V8 isolates inside one OS process, sharing one address space and one native (tcmalloc) heap. The isolate is the only wall between them, and that wall is in V8, not on the native heap.
Figure 10 – Cross-tenant OOB read
So the URLPattern read from §7 isn’t just a crash, it’s a way for a Worker you deploy to read another tenant’s memory out of that shared heap. Here is how that out-of-bounds read becomes a private key read from a different Worker. Everything below operates on the tcmalloc heap, outside the cage and the memory-protection keys (§5).
11.1 The strategy
Recall the primitive from §7. The read goes one entry past the end of nameList, treats those 24 bytes as a kj::String { ptr, size, disposer }, and returns the bytes at ptr. So if we control whatever sits right after nameList, we control that fake kj::String, and reading one attacker-chosen kj::String is reading any address we point it at:
Figure 11 – Fake kj::String read primitive
That is the basic primitive. What we actually want is to sweep another tenant’s memory for secrets, to read anywhere in the process, and to do it with as little heap spraying as possible. To get there we need three things:
Break ASLR. Leak a real heap address, so we know where to read.
Control theptr of the fake kj::String. So we can read the bytes at any address we choose.
Make it repeatable. Read one address after another without re-shaping the heap each time.
11.2 Sizing nameList
One lever first, because it makes the rest easier. nameList’s size is ours to choose. Its length is just the number of capture groups the pattern declares, so padding the pattern with extra groups grows the kj::Vector<kj::String> to whatever size we want. tcmalloc places allocations by size class, so choosing nameList’s size chooses the neighborhood it lands in, and picking the size class is what makes landing our own allocations right next to it reliable.
11.3 Defeating ASLR
A read is only useful once we know where to aim it, and ASLR hides that. To beat it we just need to leak any one real heap address. The out-of-bounds read already returns whatever the fake kj::String’s ptr points at, so if we arrange for ptr to point at a location that itself holds a heap pointer, the read hands that pointer’s bytes back to us as a string:
Figure 12 – Leaking a heap pointer
So we need an object right after nameList with two things:
ptr(first 8 bytes), points at a heap pointer, so dereferencing it leaks a heap address.
size(next 8 bytes), a small, valid length: not zero, not a pointer, just short enough that the read returns a sane string.
We didn’t find a real object whose layout already satisfies both, so as a last resort we turned to the tcmalloc free list, and it has two properties that fit perfectly:
The first 8 bytes of a freed chunk are the next pointer (to the next free chunk), which is requirement #1.
The rest of the chunk, including bytes 8–15, is left untouched by the free, so a size we wrote there earlier stays put. That is requirement #2.
So what we can do is allocate a chunk right after nameList, write size = 8 into its bytes 8–15, and free it. The free turns its first 8 bytes into a next pointer to the next free chunk, while our size = 8 survives:
Figure 13 – Freelist next-pointer overwrite
The read hands back that heap pointer as bytes. Since tcmalloc aligns its heap to a 1 GB boundary, one leaked pointer gives us the heap base.
11.4 A repeatable read with VFS files
ASLR gives us an address. Now we want to read many, to sweep the heap. The problem is doing that without re-shaping every time. If reading a new address meant a fresh allocation, we’d have to land it next to nameList again on each read. What we need instead is an allocation we can keep in place and change in-place, so we just rewrite the target pointer and read again.
The best fit we found is a workerd API called VFS, a virtual (memory-only) filesystem. A VFS file’s contents are a native kj::heapArray on the tcmalloc heap, and crucially we can overwrite those contents at will without reallocating. It also lets us pick the file’s size, so we match nameList’s size class and a sprayed file lands right after it.
The idea is to shape the heap once so a VFS file lands right after nameList, then read any address by rewriting that file’s bytes in place and calling exec() again, with no re-shaping per read:
Figure 14 – Repeatable read via VFS
(This works because nameList is allocated when the URLPattern is constructed, but the out-of-bounds read only fires later on exec(), so the shaped layout persists across reads.)
11.5 Reading another Worker’s secret
From here it’s just a sweep. We walk the heap with the repeatable read and look for bytes that look like a secret, in the PoC, Bearer sk…-style API tokens, until we find one belonging to a co-located Worker.
12. Sandbox escape: from the zlib UAF to host RCE
The second demo stays inside Code Mode and goes all the way to native code on the host, starting from the zlib use-after-free of §8.
12.1 Improving the primitive
Recall what §8 gives us, broken into the pieces we’ll build on:
A use-after-free write. When params() flushes, zlib writes through the stale next_out into the output buffer, after that buffer has been freed and its slot can be reused.
A controllable allocation size. We choose the size of the output buffer, which decides which freed slot the write targets and what we can spray into it.
Our primitive, then:
Figure 15 – Reusing the freed buffer
And the write isn’t clean. The first 5 bytes of every flush are compression metadata.
Two improvements make it precise:
1. The offset of the write. workerd’s write() lets us choose where in the output buffer zlib starts writing. Alongside the buffer it takes an output offset, and zlib sets next_out = buffer + offset, so the write lands at freed + offset, a precise spot inside the reused object instead of always at its start.
2. The size of the write. We also keep the flush small, down to a single 8-byte field, so the write overwrites exactly the field we’re aiming at, rather than splattering the whole object around it.
Together that turns a blunt write at the top of the buffer into a small write landing exactly on a field we pick:
Figure 16 – Flush at chosen offset
12.2 From use-after-free to repeatable read/write
You might still be wondering how an imprecise write is exploitable at all. We control where it lands, but not the bytes. The trick with this kind of primitive is to stop caring about the bytes. Instead of writing a value, you find a “strong” object and overwrite its size / length field. You don’t need the exact bytes, you just need to make that length bigger. A bloated length turns the object’s own bounded read/write into an out-of-bounds read/write, and that you can build on.
The strong object we use is, again, a VFS file, but this time we corrupt the file’s metadata (the FileImpl object that tracks where the file’s data lives and how long it is), not the file’s contents:
Figure 17 – FileImpl metadata layout
With a FileImpl in the freed slot, we aim the UAF write at offset 0x20 so it lands on data.size and inflates the length.
Why does a bigger data.size matter? The file’s data lives at data.ptr, and data.size is the length workerd treats as its bounds, any read or write through the file API is allowed as long as it stays within [0, data.size) of data.ptr. Normally data.size matches the real buffer, so the file stays in bounds. After we inflate it, that bound now covers the real buffer and whatever heap follows it, so a file read or write past the real buffer still passes workerd’s bounds check and is carried out normally, even though it now reaches into adjacent memory:
Figure 18 – Inflating data.size out-of-bounds
And the file API makes that precise. Node’s fs read/write take a position argument (the file offset to read or write at, passed straight to the call, no separate seek), plus a length, so we can land exactly on any spot at data.ptr + position. To read 8 bytes from an out-of-bounds offset:
Figure 19 – OOB read via readSync
And to write 8 bytes at an out-of-bounds offset. Here the bytes are ours, it’s an ordinary file write:
Figure 20 – OOB write via writeSync
So one inflated length turns the VFS file into an out-of-bounds read and write at any offset across the heap.
12.3 Arbitrary read/write
OOB across adjacent heap is strong, but it only reaches forward from one buffer and the exact distances depend on the layout. We upgrade it to a clean, anywhere-in-the-process read/write with a second FileImpl.
The idea is to use the OOB write from the inflated file to reach a secondFileImpl sitting further along the heap, and overwrite itsdata.ptr with any address we want. That second file’s metadata now says “your contents live at <address>”, so an ordinary read or write of the second file reads or writes that address:
Figure 21 – Arbitrary read/write primitive
And it’s repeatable. To hit a new address we just rewrite the second file’s data.ptr through the first file again and read/write once more, with no re-triggering the bug. That gives us a stable arbitrary 64-bit read and write across the whole process, the same shape of primitive we built for the cross-tenant read in §11.
12.4 To native code
On the self-hosted build the V8 sandbox is off, which makes the finish almost trivial. Normally turning a memory read/write into code execution means defeating W^X with a ROP chain and chasing per-version gadget offsets. Here we don’t have to. With the sandbox off, workerd reserves V8’s code region as a 256 MB read-write-execute (RWX) mapping at a fixed address,0xaaaaf0000000, present from process startup, no leak required. So we skip ROP entirely.
The finish is simple. Use the arbitrary write to drop ARM64 shellcode (a reverse shell) into that RWX region, then redirect a function pointer to it. The pointer we hijack belongs to the zlib stream itself, the native write callback that handle.write() invokes (reached through the z_stream, which we locate via its avail_in field). We overwrite that callback’s target with our shellcode address and then call handle.write() once more. Instead of running zlib’s write path, control jumps to the shellcode, native code in the host process, out of the V8 isolate entirely.
Cage-off caveat. This chain was built against a self-hostedworkerdcompiled with the V8 sandbox off, which lets ArrayBuffer backing stores and native C++ objects share one heap, exactly what the FileImpl overlap relies on (and how Code Mode runs, §5). The underlying UAF is independent of the cage, but with the cage on this specific FileImpl technique would not work as-is. Reaching RCE there would need a different post-UAF path.
Part IV – Takeaways and disclosure
13. Defensive takeaways
The engine is not the whole boundary. Hardening V8 and shipping the cage is necessary, not sufficient. Every native API reachable from untrusted JS is part of the boundary.
Glue layers deserve first-class security review. JSG marshals lifetimes and pointers across the JS/native seam. That’s exactly where UAFs and missing bounds checks live. It had a fraction of V8’s scrutiny.
Native allocations need their own threat model. tcmalloc free-list behavior, VFS buffers, and kj containers live outside the cage. If the cage is your isolation story, the things it doesn’t cover are your attack surface.
Agent-generated code is normal code. In Code Mode the model writing exploit-shaped TypeScript isn’t an exceptional event, it’s the intended mode of operation. Prompt injection is a code-execution entry point, and should be modeled as one.
Disclosure timeline
All five vulnerabilities were reported to Cloudflare through HackerOne under coordinated disclosure.
Date
Event
February 1, 2026
4 of the 5 vulnerabilities reported via HackerOne (zlib UAF, HTMLRewriter UAF, both URLPattern OOB reads)
March 11, 2026
Cloudflare rated two of them Critical (zlib UAF, HTMLRewriter UAF)
March 12, 2026
The 5th, the KV SQL-bypass → deserialization, reported
Aug 5–6, 2026
Public reveal at Black Hat USA 2026 (Mandalay Bay)
Cloudflare’s responses and confirmations:
Two rated Critical. Cloudflare rated the zlib use-after-free and the HTMLRewriter use-after-free as Critical.
Production reach. Cloudflare confirmed that the bugs reproduce on Cloudflare production, with one exception. The original URLPattern out-of-bounds read (urlpattern_original) does not trigger there (the Ada-backed standard URLPattern does).
The cage doesn’t cover the heap we used. Cloudflare confirmed our central claim, that the tcmalloc native heap is outside both the V8 sandbox (cage) and the memory-protection keys. Exactly the memory every primitive in this post operates on.
Fix. Cloudflare’s managed Workers were fixed in production, and workerd v1.20260619.1 closes all of these bugs for self-hosted deployments. As of now, Cloudflare has not assigned CVEs.
“we prohibit the sandboxed worker from talking to the Internet. The global fetch() and connect() functions throw errors” : https://blog.cloudflare.com/code-mode/

 Login
Login