Reading view

Five ways to use Kiro and Amazon Q to strengthen your security posture

A Monday morning security alert flags unauthorized access attempts, security group misconfigurations, and AWS Identity and Access Management (IAM) policy violations. Your team needs answers fast.

Security teams are using Kiro and Amazon Q Developer to handle repetitive tasks—scanning resources, drafting policies, and researching Common Vulnerabilities and Exposures (CVEs)—so engineers can focus on risk decisions and complex scenarios that require human judgment, resulting in faster threat response and more consistent security coverage.

This post shows you five ways to use Kiro and Amazon Q Developer to strengthen your AWS security posture based on the AWS Well-Architected Framework Security Pillar. Each technique builds on a common foundation described after the tool overview below.

About these tools

Amazon Web Services (AWS) gives customers choices when it comes to AI-assisted development and security automation. Whether you prefer Kiro’s agentic integrated development environment (IDE) experience or the deep integration of Amazon Q Developer into your existing AWS environment, both tools can help you implement the security practices described in this post. The right choice depends on your team’s workflow, and in many cases both tools are complementary and can be used together.

Kiro is an AI-powered, agentic, IDE designed by AWS for specification-driven development, combining natural language prompting with structured, intentional coding to generate, test, and deploy applications.

Amazon Q Developer is the generative AI assistant integrated into AWS development and cloud environments, designed to answer questions, generate code, troubleshoot issues, and automate operational tasks across AWS services.

For setup instructions and to learn more, see the Kiro documentation and Amazon Q Developer documentation.

1. Embed security best practices with persistent context

Providing AI assistants with the right context helps them produce more consistent and relevant results. Each of the five techniques in this post becomes significantly more powerful when your AI assistant already understands your organization’s security standards. Setting up persistent context first means every subsequent interaction builds on that foundation, and the results you get from triage, remediation, reviews, and policy development will better reflect your specific environment rather than generic best practices.

Without persistent context, you need to repeat the same security requirements in every prompt such as "enable encryption, use least privilege IAM settings, and enable logging," which leads to inconsistent results and missed controls. Amazon Q Developer IDE Plugin rules and Kiro steering files (CLI and IDE) solve exactly this problem: you can use them to codify your organization’s security standards so AI automatically builds secure infrastructure consistently, without requiring you to repeat requirements in every prompt. Both tools support this capability independently, so you can configure whichever fits your workflow, or use both together for coverage across your full development environment. The following steps show you how to get started with each.

For Amazon Q Developer:

  1. Create directory: .amazonq/rules/ in your project root.
  2. Create file: .amazonq/rules/security-standards.md.
  3. Paste your organization’s security standards in natural language (see “Example security standards context file” below).

For Kiro (steering files):

In Kiro, persistent context documents are called steering files. They give the agent ongoing awareness of your architecture decisions, coding standards, and security requirements across every interaction and every session.

  1. Create file: security-standards.md in your project root.
  2. Reference it in prompts: Using security-standards.md as context, create....

Pro tip: You can use Kiro itself to help you create steering files. Describe your security requirements in natural language and ask Kiro to generate a structured steering file for your review before saving and activating it. This means your AI assistant can help you build the very context it will later use, making the setup process faster and more thorough.

Example security standards context file:

# AWS Security Standards

## Identity and Access Management
- All IAM roles must use least privilege principles
- Require MFA for console access
- Enable IAM Access Analyzer for all accounts
- Rotate access keys every 90 days
- Use IAM roles for EC2 instances, never embed access keys

## Data Protection
- Enable encryption at rest for all storage services (S3, EBS, RDS)
- Use AWS KMS customer-managed keys for sensitive data
- Enable encryption in transit with TLS 1.2 minimum
- Implement S3 bucket policies denying unencrypted uploads
- Enable versioning and MFA delete for critical S3 buckets

## Infrastructure Protection
- Security groups must follow least privilege (no 0.0.0.0/0 on sensitive ports)
- Deploy resources in private subnets when possible
- Enable VPC Flow Logs for network monitoring
- Use AWS WAF for public-facing applications
- Implement Network ACLs as additional defense layer

## Detective Controls
- Enable CloudTrail in all regions with log file validation
- Configure CloudWatch alarms for security events
- Enable GuardDuty for threat detection
- Set up AWS Config rules for compliance monitoring
- Implement centralized logging with retention policies

## Incident Response
- Create SNS topics for security alerts
- Configure automated responses with AWS Lambda
- Maintain runbooks for common security incidents
- Enable AWS Systems Manager for secure instance access
- Implement automated backup and recovery procedure

What this unlocks:

Without persistent context, a prompt like Create a Lambda function to process customer data could produce a basic function with no encryption, logging, or IAM configuration. AI output is non-deterministic, meaning that without guidance it might or might not include those controls. Steering files and rules documents minimize those variables by providing stronger guidance as part of every prompt and inference input.

With your security standards embedded as in the example above, however, the same prompt generates a function with KMS-encrypted environment variables, a CloudWatch log group with 90-day retention, least-privilege IAM, VPC placement in private subnets, a dead-letter queue, and AWS X-Ray tracing—all automatically.

Where it works:

This persistent context approach applies across both tools and all infrastructure generation workflows:

  • Amazon Q Developer IDE Plugin: Rules in .amazonq/rules/ apply automatically to every code generation and review interaction.
  • Kiro: Steering files provide the agent with continuous architectural and security awareness across sessions and projects.

The shift-left impact:

This approach isn’t a replacement for your existing continuous integration and delivery (CI/CD) security automation. It’s a powerful complement to it, and that distinction matters. By embedding security standards directly into the development workflow, you shift security validation further left than pipeline checks can reach. Developers across your organization, not just security specialists, can generate infrastructure that meets your security standards from the first line of code. This scales security expertise into non-security roles, empowers development teams to self-serve on compliance requirements, and reduces the volume of findings that ever reach your automated pipeline checks.

The result is security functioning as an enabler of faster development rather than a gate that slows it down, and security engineers spending their time on policy design and complex risk decisions rather than remediating avoidable misconfigurations.

Measurable impact:

Track these metrics to quantify the value of persistent context:

  • Security findings during code review: Establish a 30–60 day baseline before enabling context files, then compare
  • Time from development to deployment: Track average cycle time before and after
  • Remediation cost: Research consistently shows defects fixed in development cost significantly less than those fixed in production. Track your own ratio for 60 days
  • Standards consistency: Audit a random sample of infrastructure pull requests for compliance with your top 10 policies

Implementation recommendation: Start by codifying your top 10 most frequently violated security policies as context. Measure the reduction in these specific findings over 30–60 days to quantify the impact on your team.

2. Accelerate security finding triage and investigation

AWS Security Hub consolidates findings from services such as Amazon GuardDuty, AWS Config, Amazon Inspector, and third-party security tools into a single dashboard, providing centralized security finding visibility and built-in triage capabilities across your AWS environment. AWS Security Hub Extended will bring even more capabilities into this mix, giving customers expanded control and additional opportunities to leverage the AI-assisted workflows described in this post at greater scale and with deeper integration across your security toolchain.

Kiro can complement Security Hub by helping you correlate findings across accounts, understand CVE context, and develop remediation approaches, including:

  • Query findings using natural language across multiple AWS accounts and AWS Regions
  • Understand specific CVEs and their potential impact on your infrastructure
  • Generate investigation queries for AWS CloudTrail and Amazon Virtual Private Cloud (Amazon VPC) Flow Logs
  • Correlate security events across different time periods and services
  • Access the latest AWS security documentation and best practices

How it works – Model Context Protocols:

To enable these capabilities, Kiro uses Model Context Protocols (MCPs)—a standardized way for AI assistants to securely connect with external tools, services, and data sources, enabling them to take actions, retrieve real-time information, and interact with APIs beyond their built-in capabilities.

Open source MCP servers for AWS are a suite of specialized MCP servers that enable Kiro to interact with AWS security services, providing real-time visibility into your security posture. To get started, configure security-focused MCP servers in your Kiro settings file (as shown in the following example). For full instructions on configuring MCP servers in Kiro, see the Kiro MCP documentation.

Note on authentication: Before querying Security Hub, verify you have configured valid AWS credentials for the target account. Set the AWS_PROFILE value to a named profile in your ~/.aws/credentials file that has the appropriate permissions, or configure credentials using the AWS Command Line Interface (AWS CLI) (aws configure). Without valid credentials for the target account, Kiro will not be able to retrieve findings.

{
    "mcpServers": {
        "awslabs.aws-api-mcp-server": {
            "command": "uvx",
            "args": ["awslabs.aws-api-mcp-server@latest"],
            "env": {
                "FASTMCP_LOG_LEVEL": "ERROR",
                "AWS_PROFILE": "<PROFILE>",
                "AWS_REGION": "us-east-1"
            },
            "timeout": 120000,
            "disabled": false
        },
        "awslabs.cloudtrail-mcp-server": {
            "command": "uvx",
            "args": ["awslabs.cloudtrail-mcp-server@latest"],
            "env": {
                "FASTMCP_LOG_LEVEL": "ERROR",
                "AWS_PROFILE": "<PROFILE>"
            },
            "disabled": false
        },
        "awslabs.iam-mcp-server": {
            "command": "uvx",
            "args": ["awslabs.iam-mcp-server@latest"],
            "env": {
                "FASTMCP_LOG_LEVEL": "ERROR",
                "AWS_PROFILE": "<PROFILE>"
            },
            "disabled": false
        }
    }
}

Configure the following security-focused MCP servers to get started:

  • AWS API MCP Server: Interact with Security Hub, GuardDuty, IAM Access Analyzer, and AWS Config through AWS CLI commands
  • CloudTrail MCP Server: Audit trail analysis and compliance monitoring
  • AWS IAM MCP Server: Manage IAM users, roles, policies, and permissions
  • AWS Knowledge MCP Server: Access up-to-date AWS security documentation and best practices

For a full list of available MCP servers, see the awslabs/mcp GitHub repository.

Example: querying Security Hub with Kiro:

  1. Open your terminal or Kiro IDE.
  2. Enter the following command:
"Show me all critical security findings from Security Hub in my production account ID <ACCOUNT ID>"

Example output:

> Found 4 critical security findings in account 123456789012:

## Configuration Issues (2)

1. SSM.7 - SSM documents block public sharing disabled
- Status: FAILED (since July 17, 2025)
- Impact: Systems Manager documents can be publicly shared
- Remediation: Enable block public sharing setting for SSM documents
- [Documentation](https://docs.aws.amazon.com/console/securityhub/SSM.7/remediation)

2. Config.1 - AWS Config not properly configured
- Status: FAILED (since March 4, 2025)
- Issue: Config isn't recording required IAM resource types (User, Role, Group, Policy)
- Standards affected: CIS, NIST 800-53, PCI DSS, AWS Foundational Security
- Remediation: Enable recording for IAM resources in AWS Config
- [Documentation](https://docs.aws.amazon.com/console/securityhub/Config.1/remediation)

## Vulnerabilities (2)

3. CVE-2020-36242 in Lambda function: MyLambdaOne
- Package: cryptography version 3.2.1
- CVSS Score: 9.1 (Critical)
- Issue: Integer/buffer overflow in Fernet encryption class
- Fix: Upgrade to cryptography 3.3.2
- Function: SPC-1233HH5R-MyLambdaOne-lUh3ESH0MdXF

4. CVE-2020-36242 in Lambda function: AutoUpdateMyLambdaOne
- Package: cryptography version 3.2.1
- CVSS Score: 9.1 (Critical)
- Same vulnerability as above
- Function: SPC-1233HH5R-AutoUpdateMyLambdaOne-d9HIBfxThbFW

Real-world impact:
Security finding triage that previously required navigating multiple consoles, correlating logs manually, and researching CVE databases can be accelerated significantly. Teams that have integrated AI-assisted triage into their Security Hub workflows report reducing mean time to triage for critical findings from hours to minutes, enabling faster containment and more consistent coverage across accounts.

3. Accelerate remediation of security findings in your infrastructure as code

AI assistants can scan your infrastructure code and flag security issues with specific fix recommendations. However, implementing these changes requires careful review, testing, and validation before any changes reach production.

Important: AI-generated remediation suggestions must be reviewed by a qualified security engineer before implementation. Automated application of AI-generated changes without human validation can introduce unintended misconfigurations or service disruptions. Treat AI output as a starting point, not a finished product.

The workflow:
You can execute this workflow in either Kiro or Amazon Q Developer, depending on which tool fits your existing development environment:

  1. Ask Kiro or Amazon Q Developer to scan your infrastructure files and identify security gaps.
  2. Review AI-generated remediation suggestions with your security team.
  3. Test changes in non-production environments.
  4. Validate using AWS security services such as IAM Access Analyzer, AWS Config, and Security Hub.
  5. Deploy to production with monitoring and rollback procedures in place.

Example prompt:

"Scan my infrastructure at /path/to/templates, identify all S3 buckets without encryption, enable AES-256 encryption, add bucket policies to deny unencrypted uploads, and provide the deployment command"

What happens:

The AI assistant analyzes your infrastructure files, whether written in AWS CloudFormation, Terraform , or AWS Cloud Development Kit (AWS CDK), and identifies resources that violate security best practices. It then implements controls such as encryption at rest using AWS Key Management Service (AWS KMS) or Amazon Simple Storage Service (Amazon S3)-managed keys, adds bucket policies enforcing encryption in transit, configures public access blocks, and generates the exact deployment command with a change preview so you can review what will be modified before anything is applied.

Based on the example security standards context file above, the following controls would be applied across all generated infrastructure: encryption at rest and in transit, least-privilege IAM policies, security group optimizations, VPC configurations, logging enablement, and backup and recovery settings.

Validation required:
AI-generated configurations deserve the same thoughtful review as other infrastructure code. Even a policy that looks correct on the surface might need tuning to match your organization’s least-privilege standards, or encryption settings might need adjusting to satisfy specific compliance requirements. Running those changes through a non-production environment and having a human confirm the results before anything reaches production are part of good infrastructure practices, whether the code was written by a person or generated by AI.

Real-world impact:

Identifying non-compliant resources across multiple accounts manually can take many hours and generating remediation templates for each resource can add significant time. Security teams that have adopted AI-assisted infrastructure scanning report spending less time on manual identification and template generation, and with AI assistance the same identification and drafting work can be completed in much less time. Customers report that a full remediation cycle that previously occupied their team for the better part of a day can be completed in under an hour when AI handles the scanning and template generation. It is worth noting that manual remediation time grows considerably at scale, as remediating dozens of non-compliant resources is not a linear exercise. Validation time in non-production environments remains essential regardless of how the remediation was generated, and should always be factored into your planning.

4. Perform in-depth security reviews

Amazon Q Developer and Kiro can analyze your infrastructure code and identify potential security issues across multiple categories aligned with the AWS Well-Architected Framework Security Pillar.

Using Amazon Q Developer:

  1. Open your infrastructure file in your IDE.
  2. Select the code you want to review.
  3. Open the context menu and choose Send to Amazon Q, then choose Optimize.
  4. Select Focus on security best practices.

Using Kiro:

  1. Open your infrastructure file in Kiro.
  2. Enter a natural language prompt such as: Perform a comprehensive security review of this CloudFormation template and identify all deviations from our standards.
  3. Kiro will automatically apply your steering files as additional context when generating its response.
  4. Review the findings and iterate with follow-up prompts.

Security categories evaluated: For the complete, up-to-date list of security categories and controls, see the AWS Well-Architected Framework Security Pillar documentation. Current categories include but are not limited to:

  • Identity and access management: Overly permissive IAM policies, missing multi-factor authentication (MFA) requirements, unused credentials and access keys, cross-account access risks
  • Detective controls: CloudTrail logging configuration, Amazon CloudWatch alarm coverage, GuardDuty enablement status, and AWS Config rule implementation
  • Infrastructure protection: Security group misconfigurations, public subnet exposure, missing AWS WAF rules, unencrypted network traffic
  • Data protection: Storage encryption status, KMS key rotation policies, backup configurations, S3 bucket access controls
  • Incident response: Amazon Simple Notification Service (Amazon SNS) alerting setup, log retention policies, automated response mechanisms

Example output:

Security Recommendations:
- Enable S3 bucket encryption with KMS: Critical
- Implement least privilege IAM policies: High
- Enable GuardDuty threat detection: High
- Configure VPC Flow Logs: Medium
- Add WAF rules for API Gateway: Medium
- Enable CloudTrail in all regions: Critical
- Implement automated backup policies: High

Total security improvements: 23 findings across 5 Well-Architected pillars

Keeping your configuration files current:

A security architect review remains valuable for keeping your steering files and rules documents complete and current. The goal is an AI assistant that already understands your environment, not one that needs correcting after every interaction. Treat your configuration files as living documents and update them when your security standards evolve, when new services are adopted, or when post-incident reviews reveal gaps. As this post notes, project rules reduce architectural drift and help maintain consistency as AI agents operate more autonomously.

Real-world impact:

Security reviews that previously required a security engineer to manually inspect infrastructure templates line by line can be completed in significantly less time with AI assistance. Teams using AI-assisted security reviews as a pre-commit gate—before code reaches CI/CD pipeline checks—report catching a meaningful portion of security findings earlier in the development cycle where they are faster and less costly to address. Integrating this review step into pull request workflows means security validation happens continuously rather than only at deployment gates.

5. Assist with service control policy development

You can use AWS Organizations Service Control Policies (SCPs) to apply preventive controls consistently across every account in your organization, enforcing security baselines without relying on individual account administrators. Kiro can generate initial SCP drafts from natural language security requirements, speeding up the drafting and iteration process considerably. Because SCPs are preventive controls that can’t be bypassed by administrators, misconfigurations can cause organization-wide service disruptions, making expert validation and staged testing essential before any SCP reaches production.

Step 1: Generate an SCP draft:

Describe your security requirements in natural language:

"Create an SCP with these security controls:
- Deny creation of S3 buckets without encryption
- Require MFA for IAM user console access
- Prevent public RDS snapshots
- Deny security group rules allowing 0.0.0.0/0 on sensitive ports
- Enforce encryption for all EBS volumes
- Require VPC Flow Logs on all VPCs
- Deny IAM policy creation without approval tags
- Restrict resource creation to approved regions only"

Kiro generates a complete SCP policy JSON with proper deny statements, condition keys for MFA and encryption enforcement, resource-level restrictions, and regional compliance requirements.

Step 2: Validate and lint the SCP:

Use Kiro or Amazon Q Developer to assist with policy linting and initial testing as a first layer of validation. IAM Policy Autopilot, available as a Kiro Power with one-click installation directly from the Kiro IDE, can analyze your application’s usage and generate necessary permissions based on the SDK calls it discovers. IAM Policy Autopilot also integrates as an MCP server with Kiro, Amazon Q Developer, and other MCP-compatible coding assistants, making it a natural part of your existing workflow rather than a separate tool.

"Review this SCP JSON for syntax errors, overly broad deny statements, and missing condition keys. Flag any statements that could unintentionally block legitimate operations."

The IAM Policy Simulator then adds another layer of validation on top of the AI-assisted linting, so you can test policy behavior, verify condition keys are correctly applied, and confirm that no legitimate operations are unintentionally blocked. IAM Policy Autopilot complements existing IAM tools such as IAM Access Analyzer by providing functional policies as a starting point, which you can then validate using IAM Access Analyzer policy validation or refine over time with unused access analysis. Together, these tools form a layered validation approach where each one strengthens the output of the previous step.

Step 3: Test in a sandbox environment:

Create a test organizational unit (OU) with non-production accounts and apply the SCP to the test OU. Attempt operations that should be blocked and confirm that no legitimate operations are unintentionally blocked. Use Kiro to pre-validate your infrastructure code against the proposed SCP before sandbox testing:

"Analyze my current infrastructure against this proposed SCP and identify resources that would be non-compliant"

This scan covers your infrastructure code files. For live account scanning across your organization, use the following AWS services:

  • AWS Config with the Config Aggregator and Conformance Packs for continuous compliance monitoring across your organization.
  • IAM Access Analyzer for automated reasoning-based analysis of external access, internal access, and unused permissions.
  • Account Assessment for AWS Organizations for bulk scanning of identity-based, resource-based, and service control policies across all accounts.
  • Security Hub for centralized aggregation of compliance findings and security scores across your entire organization.

Step 4: Security architect review:

Engage your security architects to identify potential risks and verify the policy aligns with your security framework. Check for conflicts with existing SCPs by reviewing all SCPs attached to parent OUs and the root in the AWS Organizations console. Use the IAM Policy Simulator to test interactions between policies and verify that emergency access procedures ( SEC03-BP03 Establish emergency access process – Security Pillar and SEC10-BP05 Pre-provision access – Security Pillar) remain functional before any production rollout.

Step 5: Staged rollout:

Deploy to development accounts first and monitor for policy violations and operational issues. Gradually expand to additional environments and maintain documented rollback procedures throughout the process.

Important: It’s strongly recommended not to deploy AI-generated SCPs directly to production without thorough expert review and staged testing. A misconfigured SCP can cause organization-wide service disruptions affecting every account in your organization.

Real-world impact:

SCP drafting that previously required security architects to write and iterate on complex JSON policy documents manually, often spanning multiple review cycles over several days, can be condensed when AI handles the initial drafting and linting. Your architects can then focus their time on policy design, edge case analysis, and organizational impact assessment rather than JSON syntax and structure.

Responsible implementation framework

Adopting AI-assisted security workflows is most effective when introduced gradually, with clear validation gates at each stage. The following two-phase approach gives your team time to build confidence, measure results, and establish the internal practices needed before expanding to production environments.

  • Phase 1: Development and testing (weeks 1–4): Start by testing AI-generated security controls in isolated development accounts. Validate functionality, identify edge cases, and deploy to a dedicated testing environment with thorough security validation. Use IAM Access Analyzer, AWS Config, and Security Hub to verify that generated controls behave as expected. This phase is also the right time to build internal expertise across both your security team and your development teams, so that knowledge of what works and what requires human review is shared broadly from the start.
  • Phase 2: Staging and production (week 5 and later): Apply the validated controls to a staging environment that mirrors production. Conduct penetration testing where appropriate and validate that monitoring and alerting function correctly before expanding further. Gradually roll out to production accounts with continuous monitoring in place. Maintain rollback procedures throughout and establish feedback loops so that lessons learned in production flow back into your steering files, rules documents, and validation processes over time.

Key takeaways

What distinguishes the approach in this post from general guidance on AI coding assistants is the specificity of the security integration. There’s no shortage of content about how AI assistants accelerate development. What this post focuses on is how to configure both Kiro and Amazon Q Developer to perform security-specific tasks: triaging findings from Security Hub, remediating infrastructure code vulnerabilities against your organization’s defined standards, conducting Well-Architected security reviews, drafting and validating SCPs, and generating secure-by-default infrastructure through persistent context that reflects your environment rather than generic defaults.

Kiro is an agentic IDE that helps you go from prototype to production with spec-driven development, and its steering files give the agent persistent awareness of your security standards across every session. Amazon Q Developer complements this by providing deep integration into your existing AWS environment and IDE workflows. Together, these tools extend your security team’s reach into every stage of the development lifecycle, scale security expertise into development teams, and reduce the gap between when vulnerabilities are introduced and when they are caught. As the AWS Well-Architected Framework Security Pillar establishes, embedding security early and consistently across the development process is foundational to a strong security posture.

These five techniques aren’t about replacing your security controls. They’re about making security a natural part of how your teams build on AWS, regardless of whether they’re security specialists or application developers. In addition to the five techniques covered in this post, the following AWS capabilities complement this approach and are worth exploring for a more complete picture:

  • Amazon Inspector is a vulnerability management service that continually scans AWS workloads for software vulnerabilities, code vulnerabilities, and unintended network exposure. It automatically discovers and scans Amazon EC2 instances, container images in Amazon ECR, AWS Lambda functions, and first-party code repositories. Amazon Inspector integrates directly into CI/CD pipelines through plugins for Jenkins, TeamCity, GitHub Actions, and Amazon CodeCatalyst, which teams can use to catch vulnerabilities before deployment. Its code security capabilities include Static Application Security Testing (SAST), Software Composition Analysis (SCA), and infrastructure as code (IaC) scanning, with native integration to GitHub and GitLab. All findings are surfaced directly in Security Hub for centralized visibility and response across your organization.
  • Amazon Q Developer security scanning provides real-time security issue detection in the IDE, including SAST scanning for security vulnerabilities, secrets detection, IaC security evaluation, and software composition analysis for third-party dependencies. These capabilities are available across JetBrains, Visual Studio Code, and Visual Studio.
  • Kiro Powers are curated and pre-packaged MCP servers, steering files, and hooks validated by Kiro partners to accelerate specialized development and deployment use cases. Security-relevant Kiro Powers include the IAM Policy Autopilot Kiro Power for baseline IAM policy generation and the real-time coding security validation MCP server pattern for Kiro.
  • AWS Security Agent is a frontier AI agent that proactively secures your applications throughout the development lifecycle. Security teams define organizational security requirements once in the AWS Security Agent console, such as approved encryption libraries, authentication frameworks, and logging standards, and AWS Security Agent then automatically validates these requirements throughout development by evaluating architectural documents and code against your defined standards. It provides three core capabilities: design security review for architecture documents, code security review that automatically analyzes pull requests against your defined standards across connected repositories, and on-demand penetration testing that discovers, validates, and reports vulnerabilities through sophisticated multi-step attack scenarios customized for each application. When vulnerabilities are found, AWS Security Agent creates pull requests with ready-to-implement fixes directly in your code repository. Customers report that AWS Security Agent compresses penetration testing timelines from weeks to hours, transforming penetration testing from a periodic bottleneck into an on-demand capability that reduces risk exposure and scales security reviews to match development velocity.
  • AWS Security Hub automated response and remediation provides pre-built playbooks for common findings using AWS Systems Manager Automation, enabling your team to act on findings faster and more consistently.

Getting started

If you’re new to AI-assisted security workflows, the following week-by-week approach gives your team a practical path forward without overextending before the foundation is in place.

  • Weeks 1 and 2: Set up your persistent context files with your top 10 security policies as described in the foundational setup section above. Configure MCP servers in Kiro for Security Hub and CloudTrail access and verify that credentials are correctly configured for your target accounts.
  • Weeks 3 and 4: Run your first AI-assisted security review on a non-production infrastructure template. Compare the findings against your last manual review to establish a baseline for measuring impact over time.
  • Weeks 5 and 6: pilot AI-assisted SCP drafting for one new preventive control. Run the full validation workflow including AI-assisted linting, IAM Policy Autopilot, and the IAM Policy Simulator before any production application.
  • From that point forward: Measure the metrics outlined in the foundational setup section, update your steering files and rules documents as your standards evolve, and share findings across your security team, development teams, and platform engineering teams. The knowledge of what works and what requires human judgment is valuable to everyone who touches infrastructure in your organization.

Conclusion

Kiro and Amazon Q Developer give security teams practical tools to accelerate threat response and maintain consistent security coverage by handling the tasks that consume the most time with the least strategic value: scanning for known misconfigurations, drafting policy JSON, researching CVEs, and generating secure infrastructure. These AI assistants are most effective when paired with security engineers, as they accelerate assessments and code generation while human review, policy design, and risk judgment remain essential throughout.

By implementing the five techniques outlined in this post, starting with embedding security best practices through persistent context and then applying that foundation to Security Hub finding triage, infrastructure code remediation, in-depth Well-Architected security reviews, and SCP development, your team can strengthen your AWS security posture while maintaining the standards your organization requires.

AWS services such as Security Hub, IAM Access Analyzer, AWS Config, and CloudTrail provide the foundation for these AI-assisted workflows, enabling centralized visibility and automated validation of security controls across your environment. Emergency access procedures should be established and validated before deploying any preventive controls such as SCPs, following the break-glass guidance in the AWS Well-Architected Security Pillar and the AWS Prescriptive Guidance for break-glass access.

Start small with non-production environments, establish clear validation processes, measure results, and gradually expand your use of AI assistants as your team builds expertise and confidence. The result is faster threat response, more consistent security coverage, and security engineers focused on complex decisions rather than repetitive tasks.

Additional resources

If you have feedback about this post, submit comments in the Comments section below

Roger Nem

Roger Nem

Roger is an Enterprise Technical Account Manager (TAM) supporting Healthcare & Life Science customers at Amazon Web Services (AWS). As a Security Technical Field community specialist, he helps enterprise customers design secure cloud architectures aligned with industry best practices. Beyond his professional pursuits, Roger finds joy in quality time with family and friends, nurturing his passion for music, and exploring new destinations through travel.

  •  

Access control with IAM Identity Center session tags

As organizations expand their Amazon Web Services (AWS) footprint, managing secure, scalable, and cost-efficient access across multiple accounts becomes increasingly important. AWS IAM Identity Center offers a centralized, unified solution for managing workforce access to AWS accounts. It simplifies authentication, enhances security, and provides a seamless user sign-in experience to AWS services across diverse environments.

By combining IAM Identity Center permission sets with session tags, organizations can unlock powerful capabilities for fine-grained access control and resource optimization. You can use session tags to pass dynamic attributes from your external identity provider into AWS, enabling more context-aware permissions and better cost visibility. This integration makes it possible to use advanced AWS features such as AWS Glue usage profiles and AWS Systems Manager Session Manager run as to enforce fine-grained access control, so that administrators can dynamically map permissions and runtime configurations based on user attributes passed during federated access.

In this post, I demonstrate how session tags derived from directory group attributes in Microsoft Entra ID can deliver functionality equivalent to AWS Identity and Access Management (IAM) role tags. Using role tags, you can implement attribute-based access control (ABAC) using IAM Identity Center, while maintaining centralized and efficient access management. To demonstrate this, you can configure an AWS Glue usage profile, as described in Introducing AWS Glue usage profiles for flexible cost control, where session tags can be passed through Identity Center and an external identity provider like Microsoft Entra ID. This approach is extensible to other AWS services such as AWS Systems Manager Session Manager (run as) and can also be used with other identity providers.

User authentication and IAM Identity Center Federation flow

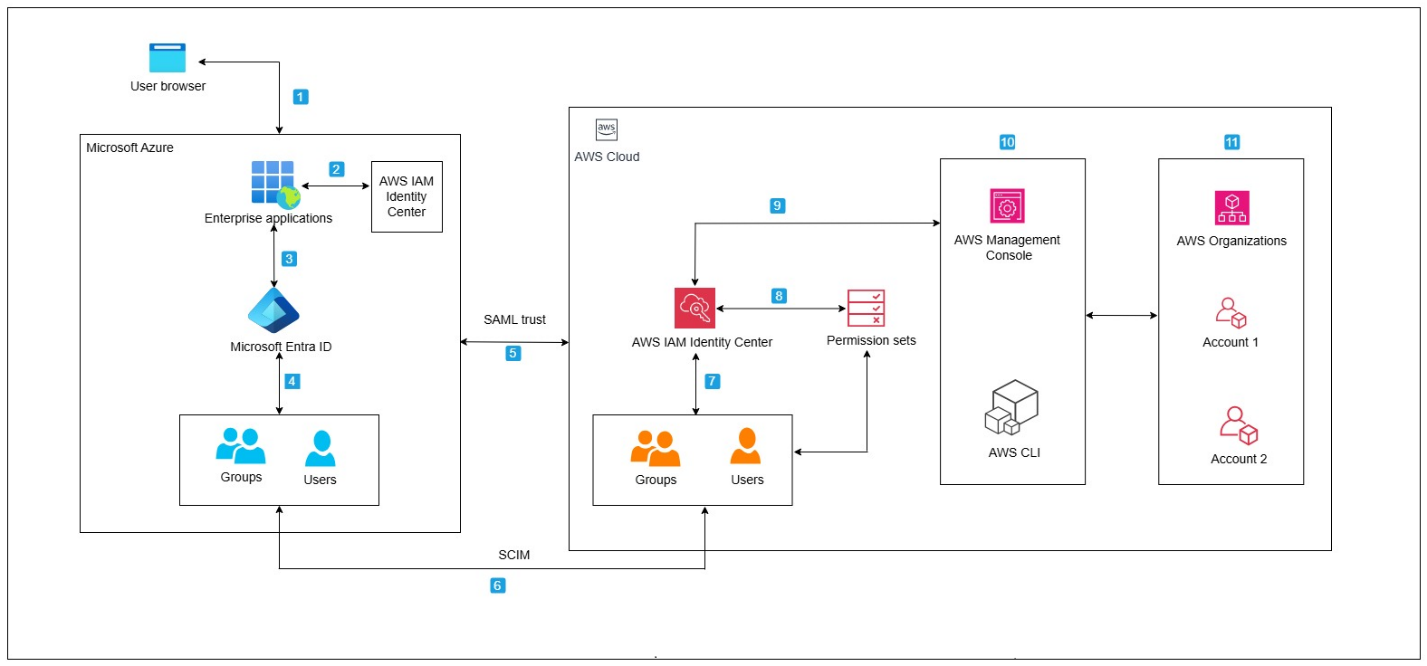
The following figure shows the architecture and workflow of the solution.

Figure 1 – User authentication and federation flow between Microsoft Entra and AWS

Figure 1 – User authentication and federation flow between Microsoft Entra and AWS

The user authentication and federation flow includes the following steps:

  1. User accesses application using a browser.
  2. The enterprise application (configured in Azure) initiates authentication.
  3. Microsoft Entra ID handles sign-in.
  4. Users and groups are managed in Entra ID.
  5. A SAML trust is established between Entra ID and IAM Identity Center.
  6. SCIM provisioning syncs users and groups from Entra ID to AWS.
  7. Synced users and groups appear in Identity Center.
  8. Session tags are passed during SAML authentication.
    • Entra ID can send user attributes (department, role, cost center, project ID, and so on) as SAML attributes.
    • Identity Center consumes these as session tags, which are used for fine-grained access control and attribute-based access control inside AWS.
  9. Admins define permission sets for users and groups in Identity Center.
  10. Users get federated access to AWS using their Entra ID credentials.
  11. Users sign in through AWS Management Console or AWS Command Line Interface (AWS CLI) using those permissions.
  12. Access is granted to specific AWS accounts under AWS Organizations.

Prerequisites

To follow the steps in this post, you need the following prerequisites:

  1. An organization instance of IAM Identity Center enabled.
  2. A Microsoft Entra ID tenant. For more information, see Quickstart: Create a new tenant in Microsoft Entra ID.
  3. Access to an external identity provider such as Microsoft Entra ID to federate users into AWS. You can enable federated access between Microsoft Entra ID and IAM Identity Center by completing the steps in Configure SAML and SCIM with Microsoft Entra ID and IAM Identity Center. They include configuring SAML and SCIM integration between the two systems, testing the SAML connection to help ensure authentication is functioning correctly, and enabling SCIM synchronization to automate user and group provisioning.

Solution implementation

With the prerequisites in place, you’re ready to configure access control through IAM Identity center tags by using the following steps.

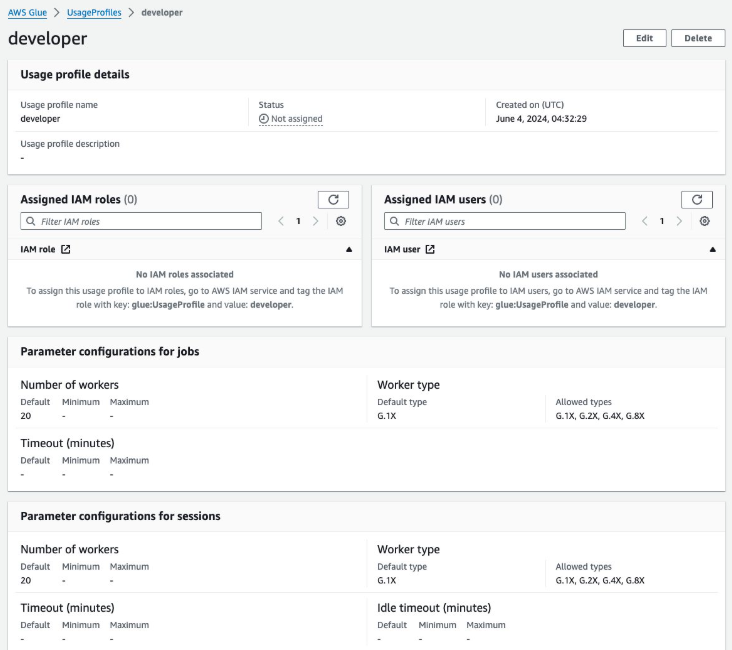
  1. Create an AWS Glue usage profile as described in Introducing AWS Glue usage profiles for flexible cost control in Create an AWS Glue usage profile. For the purposes of this post, create a profile named developer.
    1. On the AWS Management Console for AWS Glue, choose Cost management in the navigation pane.
    2. Choose Create usage profile.
    3. For Usage profile name, enter developer.
    4. Under Customize configurations for jobs, for Number of workers, for Default, enter 20.
    5. For Default worker type, select G.1X.
    6. For Allowed worker types, select G.1XG.2XG.4X, and G.8X.
    7. For Customize configurations for sessions, configure the same values.
    8. Choose Create usage profile.

    Figure 2 – Glue usage profile creation on the console

    Figure 2 – Glue usage profile creation on the console

  2. Create a custom permission set instead of using predefined ones. Attach the following AWS Managed Policies to the custom permission set:
    • AWSGlueConsoleFullAccess
    • IAMReadOnlyAccess

    Note: For fine-grained access control, you can create custom permission sets by combining AWS managed, customer managed, and inline policies in IAM. In this post, you use AWS managed policies with intentionally broad permissions for simplicity. In production, always follow the principles of least privilege and scope permissions appropriately.

    By default, when you create a permission set, the permission set isn’t provisioned (used in any AWS accounts). To provision a permission set in an AWS account, you must assign IAM Identity Center access to users or groups in the account and then apply the permission set to those users and groups. For more information, see Assign user or group access to AWS accounts.

  3. Configure user attributes in Microsoft Entra ID for access control in IAM Identity Center as described in Step 5 of Configure SAML and SCIM with Microsoft Entra ID and IAM Identity Center to set up ABAC. Add claim conditions for attribute mapping based on Entra ID group membership. Assign the developer value for users in a corresponding group. This enables logic such as Users in this group receive this profile or All users receive this profile. When using an AWS Glue profile and when making API calls to create AWS Glue resources, admins need to tag the user or role with glue:UsageProfile as the key and the profile name as the value.
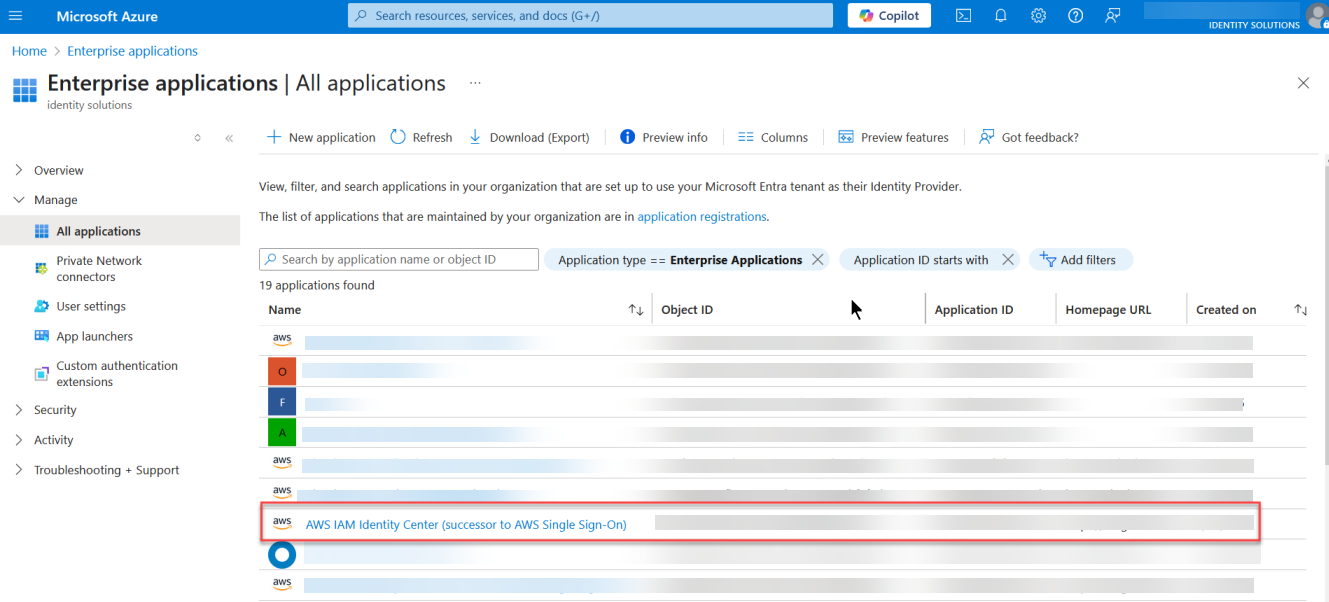
  4. Next, sign in to the enterprise application that you created in the previous step, which has SCIM and SAML connections set up to IAM Identity Center:
    1. Sign in to Azure.
    2. Choose Enterprise applications.
    3. Select the application that you created
      Figure 3 – An enterprise application created in Microsoft Entra ID

      Figure 3 – An enterprise application created in Microsoft Entra ID

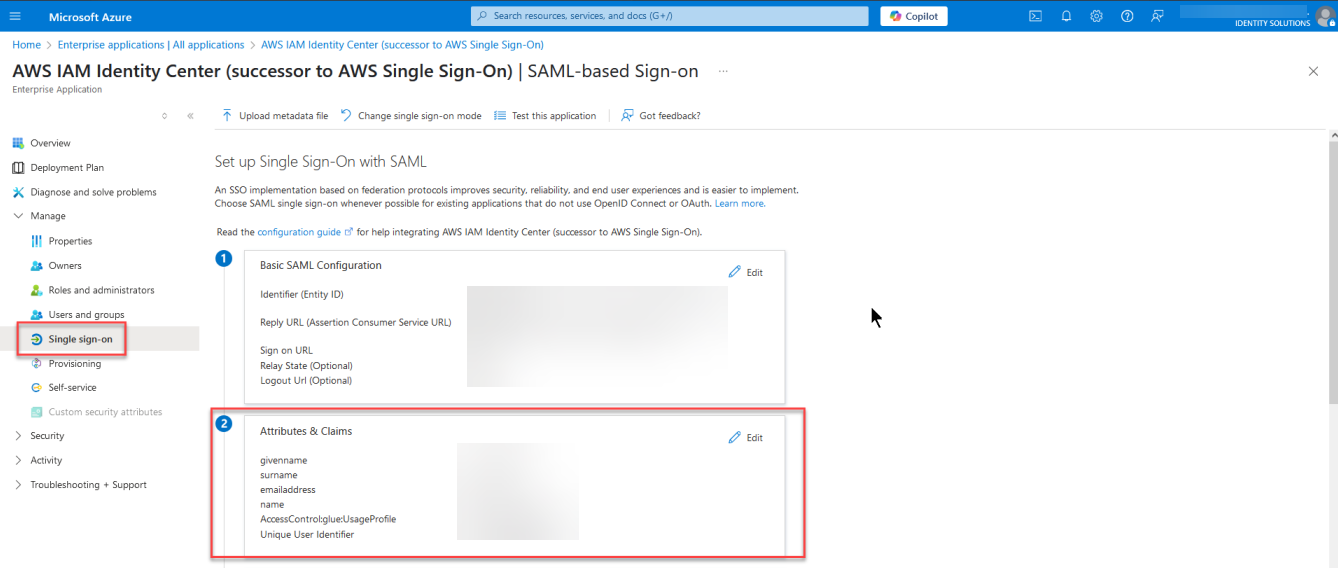
  5. When you’re signed in to your application, select Manage and then Single sign-on in the navigation pane, then select Attributes & Claims.
    Figure 4 – Attributes & Claims section in Microsoft Entra ID

    Figure 4 – Attributes & Claims section in Microsoft Entra ID

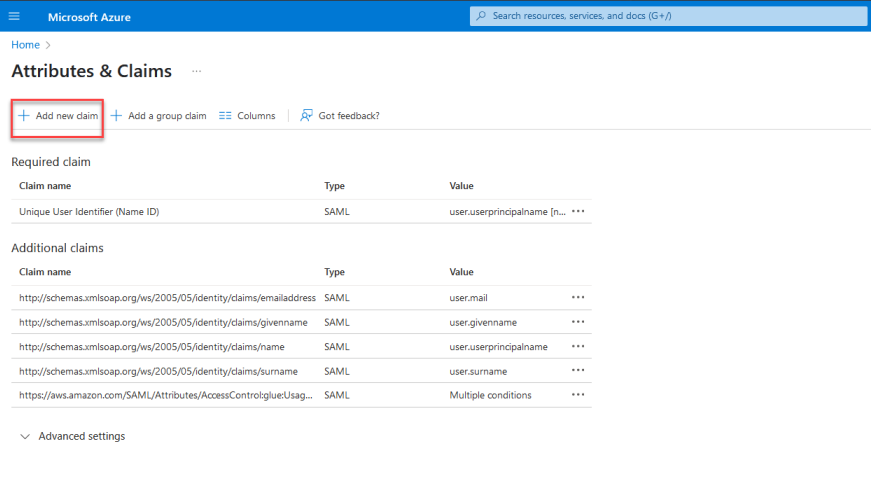
  6. Configure the key value pair that will used as session tags by selecting Add new claim.
    Figure 5 – Configuring attributes by adding a new claim

    Figure 5 – Configuring attributes by adding a new claim

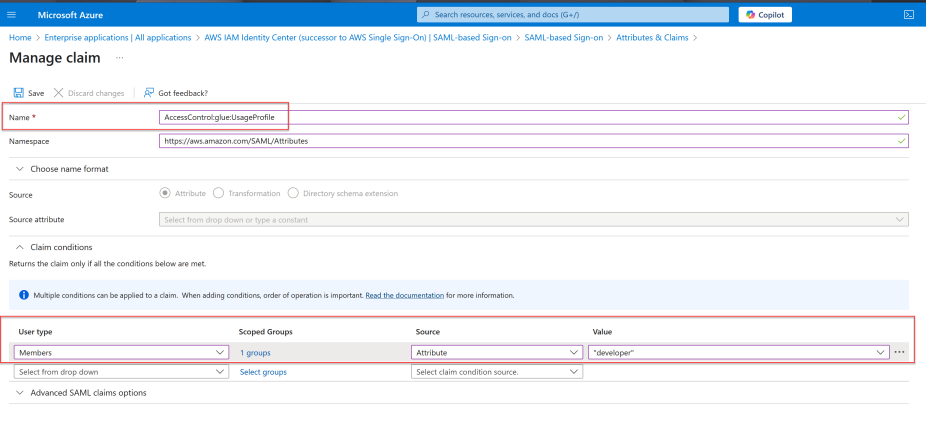
  7. For Name, enter AccessControl:<AttributeName>. Replace <AttributeName> with the name of the attribute you are expecting in IAM Identity Center. For this example, use AccessControl:glue:UsageProfile.
  8. In Claim conditions set the following:
    • User type, select Members
    • Source, select Attribute.
    • Value, enter developer (without quotation marks).

    Figure 6 – Attribute claim addition in Microsoft Entra using group membership

    Figure 6 – Attribute claim addition in Microsoft Entra using group membership

It’s important to note that the tags are being assigned based on group membership in Microsoft Entra ID. This approach lets you manage access and configuration dynamically without needing to set tags individually for each user. By assigning the tag to a Microsoft Entra ID group, anyone signing in to IAM Identity Center and who is in that group will automatically have the tag value applied to their session.

Test the solution

Now that the required configuration is complete, test the setup using the developer usage profile created as part of the Solution implementation section. Sign in as your user through Microsoft Entra ID using https://myapps.microsoft.com/ and verify the job creation using the following steps mentioned.

To verify successful job creation:

  1. Open the AWS Glue console using the developer usage profile.
  2. In the navigation pane, choose ETL jobs.
  3. Select Script editor, then choose Create script.
  4. Create a new job using the values you want to validate.

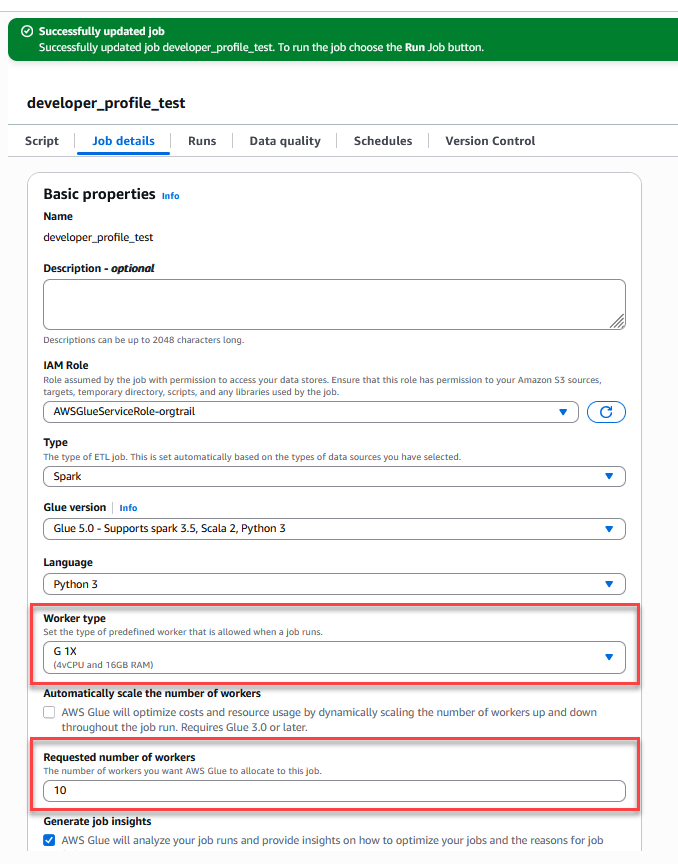
The green banner at the top of the screen should say Successfully updated job.

Figure 7 – Successful AWS Glue job creation with configured parameters for the <em>developer</em> usage profile

Figure 7 – Successful AWS Glue job creation with configured parameters for the developer usage profile

Validation using AWS CloudTrail

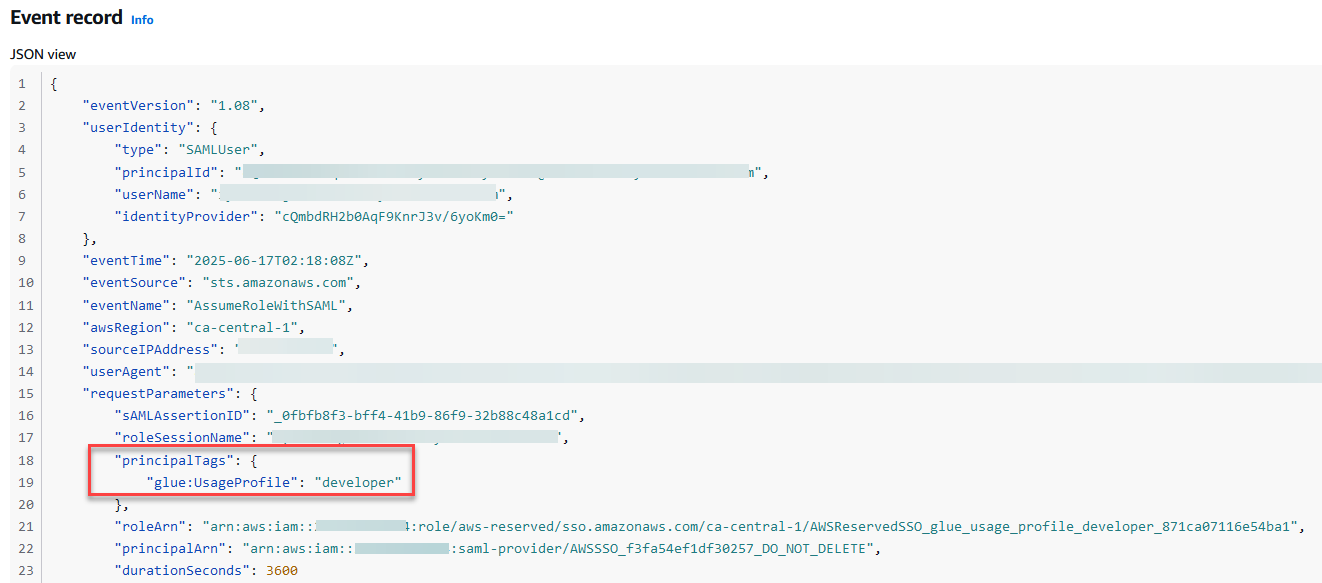
Examine the AssumeRoleWithSAML event using AWS Cloudtrail. Use the following steps to verify the sequence of events.

  1. Navigate to the CloudTrail console.
  2. Select Event history.
  3. In the Lookup attributes dropdown, select Event name.
  4. Set the event name to AssumeRoleWithSAML.
  5. Open a relevant event and inspect the requestParameters section.
  6. Confirm that the expected session tags appear under PrincipalTags.
Figure 8 – ABAC tags passed during the role assumption

Figure 8 – ABAC tags passed during the role assumption

Using session tags for other use cases

The concepts discussed in this post can be extended to configure AWS Systems Manager Session Manager Run As support for federated users using session tags. By default, Session Manager launches sessions using a system-generated ssm-user account. For Linux instances, you can optionally configure sessions to run as a specific OS-level user through Session Manager preferences. You can configure your identity provider to pass the user attribute (AccessControl: SSMSessionRunAs and name of an OS user account for the key value during federation and the session will be tagged using the attribute value.

Clean up

To avoid incurring future charges, delete any resources created during this walkthrough if they’re no longer needed:

  1. Remove the IAM Identity Center instance and clean up the associated enterprise application in Microsoft Entra.
  2. Delete the AWS Glue usage profile.
  3. Remove any other AWS resources you provisioned for testing the solution.

Conclusion

In this post, you learned how to federate access to AWS using AWS IAM Identity Center and SAML 2.0 identity providers like Microsoft Entra ID, enabling a secure, scalable, and centralized approach to managing user access across multiple AWS accounts. By using permission sets, reserved IAM roles, and session tags, organizations can implement fine-grained ABAC without the complexity of managing individual IAM users or static roles.

As cloud environments become more complex, adopting modern identity federation and ABAC through IAM Identity Center helps security teams maintain control while providing users with seamless, context-aware access to the resources they need.

Resources

If you have feedback about this post, submit comments in the Comments section below.

Rashmi Iyer

Rashmi Iyer

Rashmi is a Senior Solutions Architect at AWS, supporting financial services enterprises in building secure, resilient, and scalable cloud architectures while ensuring compliance with industry best practices. With over 15 years of experience in the private telco cloud, she has designed and architected complex telecom solutions, specializing in the packet core domain, the backbone of mobile data networks.

  •  

Optimize security operations through an AWS Security Hub POC

April 27, 2026: This post was first published in September 2025 when the enhanced AWS Security Hub was in public preview. It has since been updated to reflect the general availability of Security Hub. This revision also provides a more detailed, step-by-step framework for planning your POC.


AWS Security Hub prioritizes your critical security issues and helps you respond at scale to protect your environment. The service sharpens findings through aggregation, correlation, and enrichment of AWS native security signals into actionable insights, enabling faster and more efficient response times. You can use these capabilities to gain visibility across your cloud environment through centralized management in a unified cloud security solution. Security Hub creates a cloud-native application protection platform (CNAPP) and through the AWS free trial, you can create a comprehensive proof of concept (POC) evaluation without significant upfront investment in time or resources.

In this blog post, we guide you through planning and implementation POC for Security Hub to assess the implementation, functionality, cost estimate, and value of Security Hub in your environment. We walk you through the following steps:

  1. Understand the value of Security Hub
  2. Determine success criteria for the POC
  3. Define Security Hub configuration
  4. Prepare for deployment
  5. Enable Security Hub
  6. Validate deployment

Understand the value of Security Hub

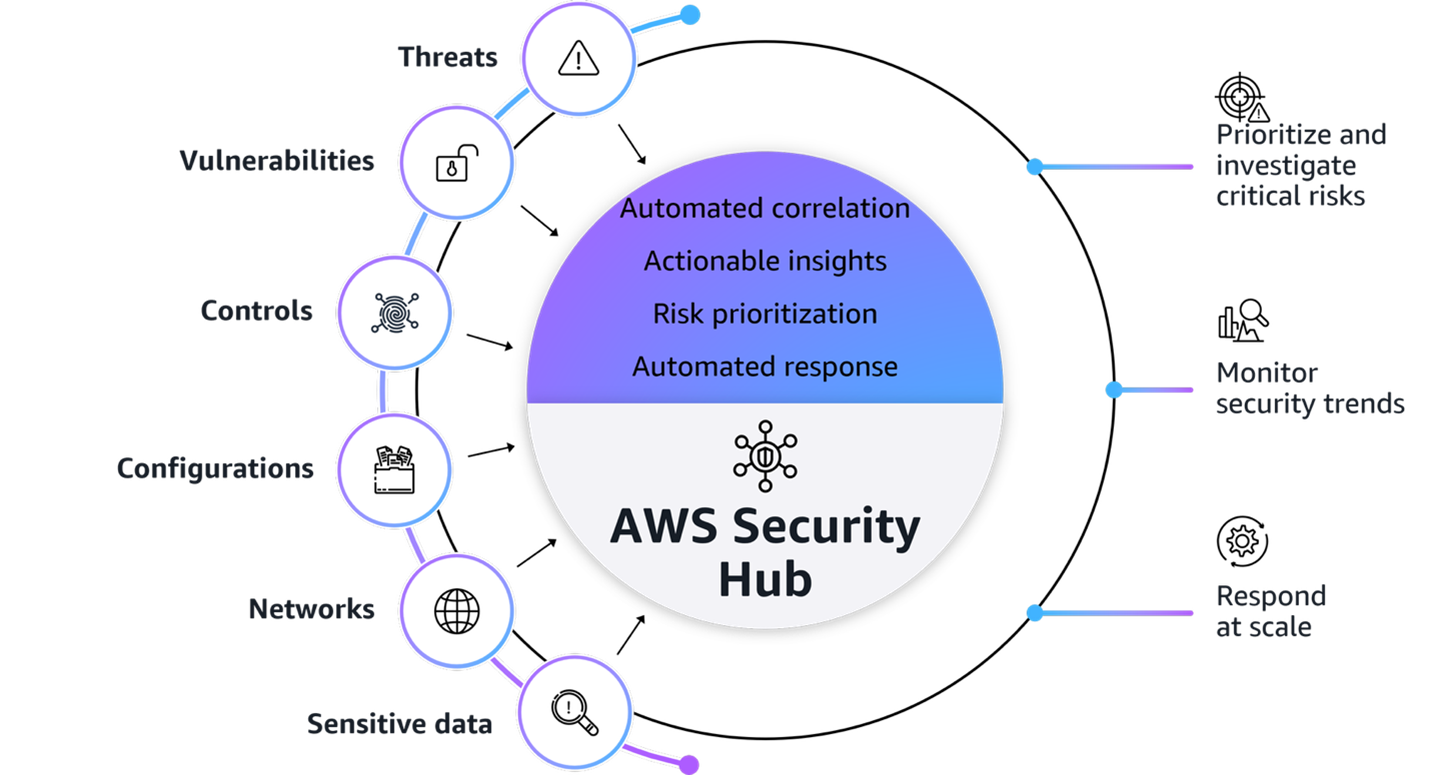
Figure1: AWS Security Hub overview

Figure 1: AWS Security Hub overview

Figure 1 provides a visualization of how Security Hub unifies signals from multiple AWS security services, partner solutions capabilities. The signals, which are ingested by Security Hub from multiple AWS security services and curated partner solutions include:

At its core, Security Hub provides four key capabilities in one unified solution:

  1. Unified security operations: Security Hub delivers a unified security operations experience, bringing your security signals into a single consolidated view and avoiding the need to switch between multiple security tools. This provides comprehensive visibility across your entire estate, including AWS, multi-cloud, and on-premises, so your security teams can efficiently detect, prioritize, and respond to potential security risks.
  2. Intelligent prioritization helps focus on what matters most: Security Hub helps you identify and prioritize critical security risks that might be missed when viewing findings in isolation. Security findings are correlated by analyzing resource relationships and signals from AWS security services and capabilities.
  3. Actionable insights guide security teams on next steps: Gain actionable insights through advanced analytics to transform correlated findings into clear, prioritized insights that highlight the most critical security risks in your environment. You can quickly understand potential impacts, visualize relationships, and identify which security issues pose the greatest risk to critical resources.
  4. Streamlined security response and automation capabilities: Security Hub enhances your security operations by enabling streamlined response capabilities. It seamlessly integrates with your existing ticketing systems to help facilitate efficient incident management.

With this integrated approach your security team can:

  • Investigate critical risks that need immediate attention from a single pane of glass
  • Monitor security trends and attack surface across your environments
  • Fix what really matters across the entire attack chain and path
  • Automate responses to streamline remediation

Understand the Open Cybersecurity Schema Framework

Security Hub uses the Open Cybersecurity Schema Framework (OCSF) to help standardize security data and analysis and enable better integration between security tools. This standardization helps simplify how security findings are structured and analyzed across your environment. This standardized data model enables seamless integration and data exchange across your security tooling, providing normalized and consistent data formats. When implementing your Security Hub POC, make sure that you’re familiar with the OCSF specifications Security Hub uses.

Additionally, confirm that any analytics or security information and event management (SIEM) tools you plan to integrate with support the OCSF data format to maximize the value of the consolidated security insights provided by Security Hub.

Determine success criteria

Establishing success criteria helps benchmark the outcomes of the POC with the goals of the business. Some example criteria and key performance indicators (KPI) include:

  • Alert consolidation metrics: Determine what resources you’re currently using to correlate security events and signals to understand their relationship. Review the process and note if it’s completed outside of AWS or through a SIEM. By setting a benchmark to reduce correlation overhead you can significantly improve efficiency and accelerate security investigations and posture improvement.
  • Response time improvements: Reducing your time to detect, investigate, and resolve security events and improve security posture is essential to streamlined security operations. Security Hub provides visualizations for potential attack paths that adversaries could use to exploit resources and helps assess the potential blast radius.
    • Reduced mean time to detect (MTTD) security incidents.
    • Reduced mean time to response (MTTR) for critical findings.
    • Reduced time to identify potentially affected resources in blast radius.
    • Increased accuracy of attack path analysis.
    • Number of controls implemented based on attack path insights (post investigation).
  • Automation capabilities: Having response playbooks as part of your incident management and response plan helps ensure comprehensive investigations lead to improved security posture. Review your automation capabilities to see if portions of or entire playbooks can be automated.
    • Potentially increased percentage of security findings automatically routed to the correct teams by using Jira Cloud, ServiceNow, or a third-party tool.
    • Reduced average time from detection to ticket creation.
  • Severity and risk classification: Review your organization’s inventory of assets to determine if it’s complete and if you can use telemetry to determine the severity level and associated risks.
    • Reduced time to identify critical resources and service coverage gaps affected by new vulnerabilities, threats, and misconfigurations.
    • Faster and more accurate severity label and risk calculation of findings.
    • Reduced time to identify service gap coverage.

After establishing your success criteria, it’s essential to evaluate organizational readiness and potential constraints that might impact your POC implementation. Begin by conducting a comprehensive assessment of your current environment: Determine if the foundational security services (GuardDuty, Amazon Inspector, Security Hub CSPM, and Macie) are enabled across your accounts, and identify your critical workloads and if there are any excessive attack surfaces.

Review your success criteria to make sure that your goals are realistic given your timeframe and potential constraints that are specific to your organization. For example:

  • Do you have full control over the configuration of AWS services that are deployed in an organization?
  • Do you have resources that can dedicate time to implement and test?
  • Is this time convenient for relevant stakeholders to evaluate the service?

Maximize your POC value through service activation

To get the most comprehensive evaluation of the capabilities of Security Hub, coordinate the activation of underlying security services to optimize the overlapping trial periods available at no additional cost. The following is a list of the underlying security services, and their free trial length:

  • Security Hub: 30-day trial (essential plan capabilities)
  • GuardDuty: 30-day trial (covers most protection plans except GuardDuty Malware Protection)
  • Security Hub CSPM: 30-day trial
  • Macie: 30-day trial
  • Amazon Inspector: 15-day trial

Consider enabling these services simultaneously so that you have at least two weeks of overlapping coverage to evaluate the full correlation and risk prioritization capabilities of Security Hub across each service. Optionally, if you want to conduct a POC with minimal configuration because of limitations, you can enable only Security Hub CSPM and Amazon Inspector during the initial POC phase to properly assess the results and data.

Note: Document your activation dates and trial expiration dates carefully. Create calendar reminders for trial end dates and schedule your key POC evaluation milestones to occur while services are active. This will help make sure that you can thoroughly assess the unified security operations capabilities of Security Hub when services are running at full capacity.

If you already have one or more of these underlying services enabled, you can proceed to enable the new Security Hub. To fully use the new Security Hub capabilities, particularly the exposure findings feature, specific service dependencies must be met, both Security Hub CSPM and Amazon Inspector are essential because they provide the telemetry needed for the Security Hub correlation engine and exposure findings. The combination enables Security Hub to deliver comprehensive risk analysis and prioritization by correlating configuration risks with runtime vulnerabilities. If you have other security services already enabled (such as GuardDuty or Macie), you can maintain these existing services while enabling Security Hub, and it will automatically begin incorporating their findings into its consolidated view, enhancing your overall security posture visualization.

Define your Security Hub configuration

After your success criteria have been established, you’re ready to plan your configuration. Some important decisions include:

  • Select a delegated administrator: From the AWS Organizations management account, you can set a delegated administrator for your organization. As a best practice, we recommend using the same delegated administrator across security services for consistent governance and according to our AWS Security Reference Architecture (AWS SRA).
  • Select accounts in scope: Define accounts you want to have Security Hub enabled for.
  • Define AWS Regions: Determine Regional restrictions or considerations.
  • Determine AWS service integrations: In addition to the core security capabilities of posture management and vulnerability management, Security Hub integrates signals from other AWS security services such as GuardDuty and Macie.
  • Define third-party integrations:
    • For ticketing, Security Hub integrates with popular service management systems such as Atlassian’s Jira Service Management Cloud and ServiceNow.
    • Partners who already support or intend to support the OCSF schema to receive findings from Security Hub include companies such as Arctic Wolf, CrowdStrike, DataBee, Datadog, DTEX Systems, Dynatrace, Fortinet, IBM, Netskope, Orca Security, Palo Alto Neworks, Rapid7, Securonix, SentinelOne, Sophos, Splunk, Sumo Logic, Tines, Trellix, Wiz, and Zscaler.
    • Service partners such as Accenture, Caylent, Deloitte, IBM, and Optiv can help you adopt Security Hub and the OCSF schema.
  • Use the Security Hub cost estimator: Use the Security Hub Cost Estimation Tool for a pre-enablement cost estimate based on your current spend on Amazon Inspector, Security Hub CSPM, and GuardDuty.

Prepare for deployment

After determining your success criteria and Security Hub configuration, identify stakeholders, desired state, and timeframe. Prepare for deployment by completing:

  • Project plan and timeline: Develop a project plan with defined success criteria, scope boundaries, key milestones, and realistic implementation timelines. Suggested timeline of events:
    • Before enablement:
      • Validate core security service configuration for GuardDuty, Amazon Inspector, Security Hub CSPM, and Macie
      • Request approvals for free trial from appropriate stakeholders
    • Day 0 – Enable the service, become comfortable with the Security Hub layout and begin training security personnel
    • Week 1 – Validate desired coverage of threat detection, vulnerability management, and posture management across accounts and Regions
    • Week 2 – Connect to IT service management (ITSM) tools and begin creating automations for critical workloads and resources
    • Week 3 – Execute a tabletop exercise in response to a selected exposure finding
    • Week 4 – Analyze trends of threats and exposures from day 1 through week 4
  • Identify stakeholders: Identify CISO, information security teams, SOC personnel, incident response teams, security engineers, finance, legal, compliance, external MSSPs, and business unit representatives.
  • Develop a RACI matric: Create a detailed RACI chart defining roles and responsibilities across the incident response lifecycle, facilitating accountability and proper communication channels.
  • Configure management account access: Secure authorization to delegate administrative access. For more information, see Permissions required to designate a delegated Security Hub administrator account.
  • Set up IAM roles and permissions: Use AWS Identity and Access Management (IAM) roles to implement role-based access controls aligned with the RACI chart, including case management, escalation, and read-only roles using AWS managed policies. For more information, see AWS Managed Policies

Enable Security Hub

AWS security services integrate with AWS Organizations to help you centrally manage Security Hub.

  1. If you haven’t already done so, enable Security Hub CSPM and Amazon Inspector at a minimum. Also enable any other AWS security services that you want to integrate with Security Hub.
  2. Enable Security Hub for your organization from the organization management account.
  3. If setting a delegated administrator for Security Hub, see Setting a delegated administrator account in Security Hub from the management account.

    Note: As a best practice, we recommend using the same delegated administrator across security services for consistent governance.

  4. Sign in to the delegated administrator with an IAM policy that gives you permission to enable and disable member accounts. With this policy, you will have granular control to decide what Regions you want enabled.
  5. Configure Security Hub plans for deployment. Security Hub comes with the Essentials, Threat Analytics, and Extended plans.
  6. Configure third-party integrations to create incidents or issues for Security Hub findings.

Note: After you enable Security Hub, exposure findings in your environment are created and analyzed immediately. However, it can take up to 6 hours to receive an exposure finding for a resource.

Validate deployment

The final step is to confirm that Security Hub is configured correctly and to evaluate the solution against your success criteria.

  • Validate policy: Verify that you have the correct permissions to manage member accounts and Regional restrictions are configured correctly.
  • Validate integrations: Verify that tickets with ServiceNow or Jira Cloud are working correctly by signing in to the AWS Management Console for Security hub and choosing Inventory in the navigation pane. Select Findings and verify there is a ticket ID in your finding.
  • Assess success criteria: Determine if you achieved the success criteria that you defined at the beginning of the project.

Conclusion

In this post, we showed you how to plan and implement an effective Security Hub POC. You learned how to do so through phases, including defining success criteria, configuring Security Hub, and validating that Security Hub meets your business needs. Take advantage of the trial periods to maximize your testing window without incurring significant costs. Throughout the POC, maintain focus on your predefined success criteria while remaining open to unexpected benefits or challenges that might arise. Maintain open communication with your AWS account team to address any questions or concerns to help you get the most out of your Security Hub POC experience.

Additional resources

If you have feedback about this post, submit comments in the Comments section below. If you have questions about this post, contact AWS Support.

Kyle Shields

Kyle Shields

Kyle is a Security Specialist Solutions Architect focused on threat detection and incident response at AWS. Today, he’s focused on helping enterprise AWS customers adopt and operationalize AWS Security Incident Response and improve their security posture.

Ahmed Adekunle

Ahmed is a Security Specialist Solutions Architect focused on detection and response services at AWS. Before AWS, his background was in business process management and AWS technology consulting, helping customers use cloud technology to transform their business. Outside of work, Ahmed enjoys playing soccer, supporting less privileged activities, traveling, and eating spicy food, specifically African cuisine.

Author

Marshall Jones

Marshall is a Worldwide Security Specialist Solutions Architect at AWS. His background is in AWS consulting and security architecture and focused on a variety of security domains including edge, threat detection, and compliance. Today, he’s focused on helping enterprise AWS customers adopt and operationalize AWS security services to increase security effectiveness and reduce risk.

  •  

Can I do that with policy? Understanding the AWS Service Authorization Reference

Understanding what AWS Identity and Access Management (IAM) policies can control helps you build better security controls and avoid spending time on approaches that won’t work. You’ve likely encountered questions like:

  • Can I use AWS Organizations service control policies (SCPs) to prevent the creation of security groups that allow traffic from 0.0.0.0/0?
  • Can I block uploads unless objects are encrypted?
  • Can I prevent functions with more than 512 MB of memory allocated?

Some of these are possible with IAM policies. Others are not. The difference is determined by a fundamental principle of AWS authorization: Policies make decisions based on information available in the authorization context at the time of the API call.

In this blog post, you learn how to use the AWS Service Authorization Reference to determine what’s achievable with IAM policies, recognize scenarios that need alternative solutions, and build more effective security controls in your AWS environment.

Understanding AWS authorization context

When you make an AWS API request through the AWS Management Console, AWS Command Line Interface (AWS CLI), or AWS SDK, the specific AWS service (such as Amazon S3 or Amazon EC2) receiving the request assembles a request context containing information about that request. This context is used for policy evaluation decisions. Request context is structured using the Principal, Action, Resource, Condition (PARC) model, which has four key components.

  • Principal: Identifies the requester and their attributes (tags, session context)
  • Action: Specifies the AWS API operation being requested (for example, s3:PutObject, ec2:RunInstances)
  • Resource: Defines the target AWS resource using Amazon Resource Names (ARNs)
  • Condition: Provides additional context available at request time, such as IP address, time, encryption parameters, MFA status, and service-specific attributes

The following example shows the typical request context for an Amazon S3 object upload:

  • Principal: AIDA123456789EXAMPLE
  • Action: s3:PutObject
  • Resource: arn:aws:s3:::my-bucket/documents/samplereport.pdf
  • Condition:
    • aws:PrincipalTag/Department=Finance
    • aws:RequestedRegion=us-east-1
    • aws:SourceIp=x.x.x.x
    • aws:MultiFactorAuthPresent=true
    • s3:x-amz-server-side-encryption=AES256
    • s3:x-amz-storage-class=STANDARD_IA

IAM policies can evaluate request metadata like encryption method and storage class being specified. However, it cannot evaluate the actual file contents, object size, or specific data patterns. Policy evaluation occurs at the time of the request, using the information present in the authorization context.

An essential resource: The Service Authorization Reference

The Service Authorization Reference is the authoritative documentation for understanding what policies can control. For every AWS service, it documents:

  • Actions: Every controllable operation
  • Resources: Resource types that can be targeted
  • Condition keys: The exact context information available for policy decisions

Condition keys are broadly divided into two categories. Global condition keys, which can be used across AWS services, and service-specific condition keys, which are defined for use with an individual AWS service. Use the Service Authorization Reference to find the global-condition keys or service-specific condition keys for each AWS service.

How to use the Service Authorization Reference

Follow these steps to determine if your requirement can be controlled with IAM policies:

  1. Navigate to your service: Go to the page for the specific AWS service you’re working with, such as Actions, resources, and condition keys for Amazon S3.
  2. Find the action you want: Find the API operation you want to control. Be precise, different actions have different available condition keys.
  3. Examine available condition keys: The Condition keys column shows what context information AWS makes available for that action.
  4. Make your feasibility determination: If the information you need isn’t listed as a condition key, you will not be able to control it with IAM policies alone.

Let’s take an example from the Amazon Elastic Compute Cloud (Amazon EC2) ec2:RunInstances action to see what you can and can’t control. In the Service Authorization Reference under the Amazon EC2 section, examine the RunInstances action and check the Resource types column. The RunInstances action affects multiple resource types, each with its own set of condition keys.

For the instance* resource type:

  • ec2:InstanceType: Can restrict instance types
  • ec2:EbsOptimized: Can require EBS optimization
  • aws:RequestTag/: Can enforce tagging requirements

For the network-interface* resource type:

  • ec2:Subnet: Can control subnet placement
  • ec2:Vpc: Can limit to specific virtual private clouds (VPCs)
  • ec2:AssociatePublicIpAddress: Can control public IP assignment

Note: These are a few examples from the many condition keys available for each resource type under the RunInstances action. The Service Authorization Reference lists dozens of condition keys across resource types (instance, network interface, security group, subnet, volume, and so on) that RunInstances affects. Consult the complete reference to see the available options for your specific use case.

Access the Service Authorization Reference programmatically

Beyond the human-readable documentation, AWS provides the Service Authorization Reference in machine-readable JSON format to streamline automation of policy management workflows. Use this programmatic access to incorporate authorization metadata into your development and security workflows.
For detailed information about the JSON structure and field definitions, see the Simplified AWS service information for programmatic access.
Developers can use tools like the IAM MCP Server for AWS IAM operations. This server provides AI assistants with the ability to manage IAM users, roles, policies, and permissions while following security best practices.

Using IAM policies to control specific scenarios

The following examples show how you can use IAM policies to control specific scenarios.

Example 1: Enforce AES256 server-side encryption on S3 objects

In the Amazon S3 Service Authorization Reference, under s3:PutObject action, the s3:x-amz-server-side-encryption condition key is available in the authorization context, which can be used to control the server-side encryption of S3 objects with AES-256. Here is the required policy.

Policy 1: Deny Amazon S3 object upload if the encryption doesn’t use AES-256

{
	"Version": "2012-10-17",
	"Statement": [
		{
			"Sid": "DenyUnencryptedObjectUploads",
			"Effect": "Deny",
			"Action": "s3:PutObject",
			"Resource": "arn:aws:s3:::my-bucket/*",
			"Condition": {
				"StringNotEquals": {
					"s3:x-amz-server-side-encryption": "AES256"
				}
			}
		}
	]
}

Policy 1 is a resource-based policy that can be applied on an S3 bucket to restrict object uploads. It denies a PutObject request when the server-side encryption isn’t using the AES-256 encryption algorithm.

Example 2: Allow different instance types based on the user’s cost center tag.

When checking the Amazon EC2 Service Authorization Reference for ec2:RunInstances, the ec2:InstanceType condition key, which is resource specific, is available. To restrict instance types based on who is launching them (rather than just what is being launched), you can either combine this with a global condition key or attach different policies to different principals. By using aws:PrincipalTag/tag-key alongside ec2:InstanceType, you can identify the user’s cost center from their IAM identity tags and then apply different instance type restrictions accordingly. This allows a single policy to dynamically enforce different permissions based on the requester’s identity.

Policy 2: Restricting EC2 instance types by cost center

{
	"Version": "2012-10-17",
	"Statement": [
		{
			"Sid": "AllowDevInstanceTypes",
			"Effect": "Allow",
			"Action": "ec2:RunInstances",
			"Resource": "arn:aws:ec2:*:*:instance/*",
			"Condition": {
				"StringEquals": {
					"aws:PrincipalTag/CostCenter": "Development"
				},
				"StringLike": {
					"ec2:InstanceType": "t3.*"
				}
			}
		},
		{
			"Sid": "AllowProdInstanceTypes",
			"Effect": "Allow",
			"Action": "ec2:RunInstances",
			"Resource": "arn:aws:ec2:*:*:instance/*",
			"Condition": {
				"StringEquals": {
					"aws:PrincipalTag/CostCenter": "Production"
				},
				"StringLike": {
					"ec2:InstanceType": [
						"m5.*",
						"c5.*",
						"r5.*"
					]
				}
			}
		}
	]
}

This is an identity-based policy that you can attach to IAM users, groups, or roles to control EC2 instance launches based on cost allocation. In the first statement, aws:PrincipalTag, which is a global condition key (tags attached to the IAM user or role), is used to determine which instance types are allowed. Users tagged with CostCenter=Development can only launch cost-effective T3 instance types (t3.micro, t3.small, t3.medium, and so on)with the service specific key ec2:InstanceType.

In the second statement, users tagged with CostCenter=Production can launch more powerful instance types from the M5 (general purpose), C5 (compute optimized), and R5 (memory optimized) families. This approach lets organizations enforce cost controls and allocate resources based on workload requirements. Each cost center maintains flexibility for its specific needs.

Note: Additional resources are required in the IAM policy to successfully launch EC2 instances. For the complete list, see Launch Instances.

Example 3: Users can only access and update DynamoDB items where the partition key matches their username.

You have identified that GetItem, PutItem,and UpdateItem actions are required. Corresponding to these actions, you can use the condition key to expose partition key values in the authorization context as described in the Amazon DynamoDB Service Authorization Reference

Policy 3: DynamoDB fine-grained access control

{
	"Version": "2012-10-17",
	"Statement": [
		{
			"Effect": "Allow",
			"Action": [
				"dynamodb:GetItem",
				"dynamodb:PutItem",
				"dynamodb:UpdateItem"
			],
			"Resource": "arn:aws:dynamodb:us-east-1:111122223333:table/UserProfiles",
			"Condition": {
				"ForAllValues:StringEquals": {
					"dynamodb:LeadingKeys": ["${aws:username}"]
				}
			}
		}
	]
}

The policy allows users to perform read and write actions (GetItem, PutItem, and UpdateItem) on the UserProfiles table, but only for items where the partition key value equals their own username (using the ${aws:username} policy variable). For example, if user alice attempts to access an item with partition key bob, the request will be denied.

Scenarios that need more than policies alone

Some requirements can’t be met using IAM policies. Here are three common scenarios that aren’t achievable with IAM policies alone.

Scenario 1: Block users from creating security group rules that allow traffic from 0.0.0.0/0 on TCP port 22

Upon checking the Amazon EC2 Service Authorization Reference, you will find that the ec2:AuthorizeSecurityGroupIngress action is required in an IAM policy to add an inbound access rules to a security group.

To verify this in the Service Authorization Reference, navigate to the Amazon EC2 Service Authorization Reference and search for the AuthorizeSecurityGroupIngress action, which is the action that creates security group rules. After you locate this action, review the Condition keys column and look for condition keys related to CIDR blocks, IP ranges, ports, or protocols. Available condition keys for ec2:AuthorizeSecurityGroupIngress include:

Notice there are no condition keys for CIDR blocks (such as 0.0.0.0/0), port numbers (such as 22), or protocols (such as TCP). The authorization context doesn’t include information about the specific CIDR blocks, ports, or protocols being added to the security group rule, so IAM policies can’t control these attributes.

Solution
Take a reactive approach using the AWS Config managed rule INCOMING_SSH_DISABLED to detect overly permissive rules. You can also use a combination of Amazon EventBridge and Lambda to either send a notification to your security team for the non-compliant configuration or to restrict the security group through an automation. For more information, see How to Automatically Revert and Receive Notifications About Changes to Your Amazon VPC Security Groups.

Scenario 2: Prevent creation of Lambda functions with more than 512 MB of memory allocated

Following the same verification methodology described in Scenario 1, navigate to the AWS Lambda Service Authorization Reference and examine the CreateFunction action’s condition keys for the function* resource type.

Available condition keys for lambda:CreateFunction with the function* resource type include:

  • lambda:CodeSigningConfigArn: Filters access by the ARN of the code signing
  • configuration-lambda:Layer: Filters access by the ARN of a version of an AWS Lambda layer
  • lambda:VpcIds: Filters access by the ID of the VPC configured for the Lambda function

There is no condition key for memory allocation (MemorySize parameter), timeout settings, storage configuration (EphemeralStorage), or runtime selection. Because memory allocation isn’t exposed in the authorization context, IAM policies can’t restrict this parameter.

Solution

Key takeaways

Keep these principles in mind when working with IAM policies:

  • Policies control what’s in the authorization context, not all elements you see in API documentation
  • The Service Authorization Reference is authoritative; if something isn’t listed as a condition key, you can’t control it with policies
  • Different actions have different available contexts even within the same service
  • Alternative approaches exist. AWS Config, EventBridge, and service-specific controls can be used to achieve your goals when policies alone can’t
  • Layered security is essential; combine preventive, detective, and responsive controls to help ensure that your data is secure

Conclusion

In this post, you learned how to use the AWS Service Authorization Reference to determine what’s achievable with IAM policies and recognize scenarios that require alternative solutions. By understanding that policies can only make decisions based on information available in the authorization context, you can build more effective security controls and avoid spending time on approaches that won’t work.

The Service Authorization Reference is your authoritative source for understanding policy capabilities. When you need to implement a control, start there to see if the required condition keys exist. If they don’t, you will need to layer in detective or responsive controls using services like AWS Config, Amazon EventBridge, or AWS Lambda.

Remember that effective AWS security isn’t about finding one perfect control, it’s about combining preventive, detective, and responsive measures to create defense in depth. IAM policies are powerful tools for prevention and work as part of a comprehensive security strategy.

Next steps:

If you have feedback about this post, submit comments in the Comments section below.


Author

Anshu Bathla

Anshu is a Senior Lead Consultant – SRC at AWS, based in Gurugram, India. He works with customers across diverse verticals to help strengthen their security infrastructure and achieve their security goals. Outside of work, Anshu enjoys reading books and gardening at his home garden.

Author

Prafful Gupta

Prafful is an Associate Delivery Consultant at AWS, based in Gurugram, India. Having started his professional journey with Amazon, he specializes in DevOps and Generative AI solutions, helping customers navigate their cloud transformation journeys. Beyond work, he enjoys networking with fellow professionals and spending quality time with family.

  •  
❌