❌

Reading view

Virtualization security: attack layers and misconfiguration impact

Introduction

Incidents in virtual environments can begin with a software vulnerability, human error, a configuration weakness, or several of these factors at once. The investigation is rarely limited to the workload. Hypervisors, container runtimes, management consoles, monitoring platforms, identity systems, virtual networks, datastores, backups, and automation accounts all influence what an attacker can reach.

Kaspersky GERT recently investigated two more ransomware cases on ESXi and Proxmox environments in which weak access controls, insufficient network separation, exposed administrative services, and poor management of privileged credentials contributed to the impact. A monitoring system that could reach the virtualization layer also exposed a reusable root credential. Once the attacker controlled that route, ordinary administrative access was enough to affect several hosts. No VM escape was required.

The incidents show why patching and secure configuration must be managed together. A fully patched hypervisor can still be compromised through a shared password, an overprivileged monitoring account, an open SSH path, or an administrator interface reachable from a general server network. NIST guidance places secure configuration baselines, restricted administrative access, current patches, and monitoring across all layers within the same set of sound security practices.

In this article, we’re going to describe both incidents with additional focus on common unsafe practices that were exploited, leading to compromise, as well as remediation tactics. We’ll also discuss the broader scope of threats targeting virtual environments for a better understanding of possible protection strategies.

The connected system defenders must protect

A business virtual environment is not just Hyper-V, VMware, or Docker but rather a connected stack. Management consoles, orchestration tools, monitoring platforms, and automation accounts sit above hypervisors and container engines. Registries, image stores, virtual switches, datastores, and backup systems connect the layers. Applications and business services run at the bottom, while much of the administrative power sits near the top.

The important boundaries extend beyond guest to host. They include workload to management plane, monitoring system to hypervisor, registry to deployment, administrator workstation to console, management plane to storage, and one virtual network segment to another. An attacker only needs one usable route. The possibility of compromise may lie in one stolen or insecurely placed administrator credential rather than in a complex escape exploit. In the GERT case, the compromise route passed through the monitoring platform and included a valid virtualization platform credential.

Case #1: From network monitoring to ESXi encryption

The investigation began with evidence of BlackNevas ransomware activity on a Windows system in a virtualized domain controller segment. UserAssist artifacts recorded execution of the AnyDesk RMM tool and GMER binaries. The environment also used PRTG Network Monitor to monitor its virtual infrastructure.
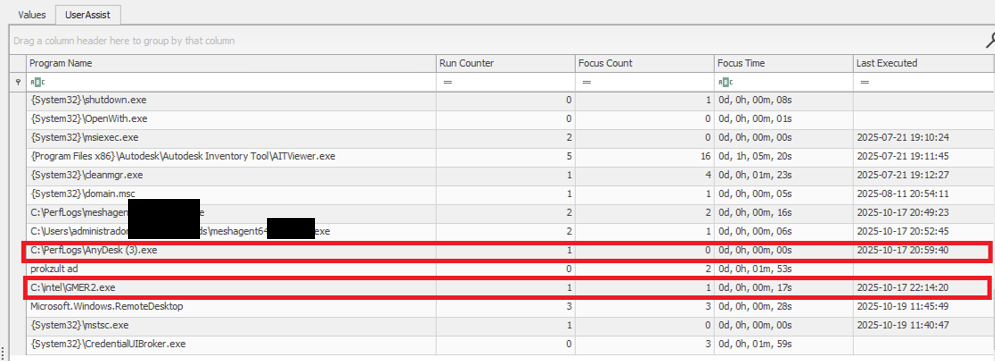
UserAssist artifacts

UserAssist artifacts

The available evidence showed that the PRTG deployment had broad access to the ESXi hosts and that the same root password was reused across several nodes. After obtaining access to the monitoring environment, the attacker used the ESXi credential to connect over SSH to the hosts that shared the same password. This design joined monitoring, credential storage, and direct administration into one attack path.

PRTG supports storing VMware credentials at the device or inherited group level. That feature is operationally useful, but a monitoring server becomes privileged infrastructure when it holds credentials that can administer the systems it observes. The security question is therefore not whether monitoring needs access, but whether the identity, privileges, storage method, and permitted network path are limited to the monitoring task.

The threat actor gained root access to the ESXi environment and used the esxcli command to bypass the system restriction by disabling the execInstalledOnly policy to execute the encryption binary and also perform anti-forensic log deletion. Let’s look closely at the timeline of the initial host compromise.

ESXi (192.168.*.*) timeline

2025-10-18 Connection attempts from IP address 192.168.*.*.
2025-10-19 During an SSH session by root from IP 192.168.*.*, the file esx is uploaded to the system.
2025-10-19 User "root" attempts to execute the binary esx with the error "Execution of non-installed file prevented".
	chmod 777 esx
	./esx /log
2025-10-19 User "root" deactivates the execInstalledOnly option.
	esxcli system settings advanced set -o 
	/User/execInstalledOnly -i 0
2025-10-19 User "root" executes the malware esx.
2025-10-19 New connection attempts from IP 192.168.*.*.

Now, at the same time, the following activities ensued on a different host with the same password for the root user:

ESXi (172.16.*.*) timeline

2025-10-19 SSH connection by user "root" from IP 172.16.*.*.
2025-10-19 User "root" executes the malware esx and clears the logs.
	chmod a+x esx && chmod 777 esx
	./esx /selftest
	nohup ./esx /p /vmfs/ /depth 5 /log /wipe
	./esx /depth 5 /log /wipe

Case #2: Credential notes impacting the whole Proxmox environment

GERT responded to a ransomware incident by The Gentlemen group, in which the threat actor gained access to Proxmox using information collected during the dwell time between initial access and visible impact. On a compromised system administrator workstation, the actor discovered administrative credentials and access details stored in notes in plain text. These records provided the information needed to log in to Proxmox using the root account.

The actor then activated the VNC web socket through the compromised root account, gaining extensive control over the Proxmox environment. This access was subsequently used to download and execute ransomware within the cluster, which resulted in the encryption of the entire virtual environment. Below are the log records showing the root account being used to access other hosts via a VNC web socket.

root@pam [01/08/2026:00:28:36 -0400] "GET /api2/json/nodes/******/vncwebsocket?port=5900&vncticket=****
root@pam [01/08/2026:00:30:17 -0400] "GET /api2/json/nodes/******/vncwebsocket?port=5900&vncticket=****
root@pam [01/08/2026:00:31:19 -0400] "GET /api2/json/nodes/******/vncwebsocket?port=5900&vncticket=****
root@pam [01/08/2026:00:43:38 -0400] "GET /api2/json/nodes/******/vncwebsocket?port=5900&vncticket=****
root@pam [01/08/2026:00:44:49 -0400] "GET /api2/json/nodes/******/vncwebsocket?port=5900&vncticket=****

This incident is a clear example of the risks of storing privileged credentials in unsecured notes or other easily accessible files. Once the administrator workstation was compromised, the saved credentials allowed the actor to move from a single endpoint into the virtualization management layer. Because the credentials belonged to a highly privileged root account, one poor credential handling practice significantly increased the scope and impact of the attack. Privileged credentials should instead be stored in an approved password manager or privileged access management system, protected with multifactor authentication and rotated immediately if an administrator workstation is suspected of being compromised.

Why the misconfiguration caused broad impact

Both cases exhibited unsafe misconfiguration practices whose exploitation led to a bigger impact on the host system. Next, we will break down each misconfiguration to see how it enabled further compromise and what should be done to avoid it.

Monitoring inherited excessive privilege

In Case 1, the monitoring platform could do more than collect health and performance data. It held or could use credentials with enough privilege to reach ESXi directly. A compromise of the monitoring system therefore became a compromise of the management plane. Monitoring identities should be dedicated to the task and given only the permissions required by the deployed sensors.

Credential reuse

Password reuse converted one recovered secret into farm-wide access. System administration should use named identities through the central management plane. Each host should have unique credentials and proper password storage hygiene. Password strength alone does not limit the impact of theft, but where the credential can be used and where it is stored do.

Direct root access bypassed central control

Direct SSH access allowed the actor to authenticate as root, upload a binary, and change a security setting without first passing through vCenter role controls. Broadcom, the parent company of VMware, recommends managing vSphere through vCenter, disabling SSH during normal operation, and using Lockdown Mode where suitable. Required service accounts should be explicit exceptions rather than members of a broad administrator group.

Lack of enhanced security settings

The initial execution attempt was blocked by execInstalledOnly, but the attacker had enough privilege to disable this policy. Broadcom documents enforcement options that combine execInstalledOnly with UEFI Secure Boot and TPM-backed configuration protection. These controls must be enabled, tested, and monitored for change. A setting that can be silently disabled by the same credential used for daily administration provides limited resistance after account compromise.

Unsafe credential storage

Case 2 demonstrated the possibility of compromise lying in privileged credential exposure. The mitigation strategy involves not only securing the administrative credential storage but also general hardening practices of secret handling, such as privilege management and regular access audits.

How to close this attack path

In this section, we share remediation advice on how to mitigate such attacks, and detect and prevent them from going further. We recommend the following actions:

  • Separate monitoring from administration. Create a dedicated monitoring identity for each platform and restrict it to the smallest set of objects and actions that the monitoring sensors require. Do not use ESXi root or another emergency account for routine polling. Prevent monitoring servers from starting interactive administrator sessions unless a separately approved support workflow requires it. The same principle applies beyond VMware.
  • Replace stored root passwords. Locate every copy of hypervisor, management, storage, and backup credentials in monitoring tools, scripts, scheduled tasks, connection managers, and service configurations. Replace static passwords with vault retrieval, brokered identities, or limited API tokens where the platform supports them. Record every retrieval and rotate the secret after emergency use or compromise.
  • Restrict direct host access. Route normal ESXi administration through vCenter and enable an appropriate Lockdown Mode after testing monitoring, backup, and recovery dependencies. Keep ESXi Shell and SSH stopped by default. When support work requires SSH, enable it for a defined period, restrict the source, and alert on service activation, root login, and changes to the exception list of users who are allowed to connect via SSH.
  • Use a specialized security solution. In our portfolio, Kaspersky Cloud Workload Security (KCWS) is perfectly suited to address virtual environment risks, offering a powerful combination of two products: Kaspersky Hybrid Cloud Security (KHCS) and Kaspersky Container Security (KCS). Kaspersky Hybrid Cloud Security is specifically built to secure virtualized infrastructures, private data centers, and hybrid clouds. A patented Light Agent architecture minimizes resource impact without compromising performance, while comprehensive infrastructure visualization through a unified console gives administrators complete visibility and control over the entire hybrid network. Kaspersky Container Security covers every stage of a containerized app’s lifecycle, from development to operation. Among other capabilities, the solution allows for detecting misconfigurations using a dedicated scanner for images, file systems, and repositories that contain IaC files (such as Terraform, CloudFormation, Azure ARM templates, Helm charts, and Dockerfiles).
  • Treat configuration changes as security events. Alert when execInstalledOnly, Secure Boot enforcement, Lockdown Mode, SSH, local accounts, exception users, firewall rules, or remote logging settings change. Baseline the expected state and test whether the security team can detect an unauthorized change. A secure configuration set once does not mean that the control remains active on the host.
  • Isolate the management network. Place hypervisor, monitoring, backup, storage, and cluster administration on restricted management networks. Permit only the exact source and destination services required. Administrative workstations should enter through hardened jump hosts with named identities and multifactor authentication.
  • Protect logs, backups, and recovery. Forward ESXi, vCenter, Proxmox monitoring, identity, and network logs to protected storage that a compromised administrator cannot erase. Backup platforms should use separate identities, restricted management paths, and recovery copies outside ordinary administrative reach.

Configuration checks for monitored virtualization

Below are recommended checks to run when enabling virtualization monitoring. The safest state depends on the platform and monitoring method, but each control should be tested.

Control area Safer state Verification
Monitoring identity Dedicated service account or token with only required read and polling rights Review assigned roles and test every sensor without root or global administrator access
Credential storage No recoverable host root password on a monitoring or general-purpose server Review tool configurations, scripts, scheduled tasks, and connection stores for embedded credentials, access tokens, or other secrets
Network path Monitoring reaches only required polling services while administration uses a jump host Test management ports from monitoring server, user segments and untrusted network segments
Direct host access Lockdown Mode where suitable with SSH and ESXi Shell stopped by default Attempt direct client API and SSH access to host using a routine account
Configuration integrity Secure Boot and execInstalledOnly enforcement enabled where supported and tested Change a test setting through the approved process and confirm an alert is generated
Evidence Host, management, identity, monitoring, firewall, and PAM logs stored remotely Generate successful and failed logins and verify source, account, host, time, and action

The wider attack surface

Closing the monitoring and credential routes does not secure the environment by itself. Virtualization also relies on isolation boundaries, trusted images, management APIs, virtual networks, storage, and backups. Each layer requires a different control and leaves evidence in a different place.

VM and container escapes

In a VM escape, code inside a guest reaches past the VM boundary and affects the host or another guest. The weakness may be in a virtual device, an integration feature, a hypercall interface, or another component that translates guest requests for the host. If the escape works, control of one VM may lead to control of the physical server and every workload on it. VMware CVE-2025-22224 showed this risk: an attacker with administrator rights inside a VM could execute code as the VMX process on the host, and Broadcom reported exploitation in the wild.

A container escape can reach a similar result, but the starting point is different. Linux containers share the host kernel, so their isolation model differs from that of a VM. Namespaces limit what processes can see, cgroups control resource use, and capabilities split root privileges into smaller parts. A kernel or runtime bug can break this isolation. Copy Fail (CVE-2026-31431) is a good example of a kernel flaw. Code already running in a container could use a Linux AF_ALG crypto socket to change pages in the shared Linux kernel page cache. Because the host and other containers may read the same cached pages, the effect did not have to stay inside one container. The fix is a kernel update; Docker Engine 29.4.3 also tightened its default security profiles to reduce exposure on hosts that had not yet been patched.

Unsafe settings can also break the boundary. Privileged mode, excessive capabilities, writable host mounts, or access to the Docker socket may remove isolation without any software exploit. For instance, runc CVE-2024-21626 involved leaked file descriptors that could expose the host filesystem to a malicious image or container process.

This difference changes the investigation. A VM can often be treated like a separate computer with its own kernel, memory, and disk. A container is a group of host processes placed inside namespaces. If investigators collect only the container filesystem, they may leave the most useful process, socket, and control-plane evidence on the host.

Images and templates

A compromised golden VM image or container base image can spread through normal automation. Common weaknesses include unofficial public images, mutable tags, overprivileged build tokens, recoverable secrets in older layers, and stale templates that restore vulnerable software or forgotten accounts. Scanning might help, but it does not establish who built the artifact or whether the exact image tested and approved was the one ultimately deployed to production. Use controlled builders, provenance records, signature checks, and planned rebuilds from trusted sources.

Management tools and APIs

A stolen vCenter identity, exposed Docker API, overpowered Portainer role, or compromised backup console may give an attacker an easier route than an escape exploit. Portainer advisory GHSA-7fw3-x4r2-g7wc showed how a proxy validated one bind-mount representation but missed an equivalent API form, allowing an authenticated non-administrator with container creation privileges to reach host paths. The runtime performed a valid request after authorization had already failed in the management layer.

Administrative file-copy operations also deserve attention. Docker fixed archive and mount-handling flaws in CVE-2026-41567, CVE-2026-41568, and CVE-2026-42306. These cases required particular conditions and operator or API activity. They are a reminder to patch the daemon and record who initiated copy operations, which container was involved, the source and destination paths, and the result.

Virtual networks, storage, and backups

East-west traffic between virtual workloads may stay inside one host and bypass a physical sensor. Management, migration, storage, and workload traffic should use separate zones with filtering between them. Snapshot and memory files may contain credentials, while weak datastore permissions can expose whole virtual disks. Backup systems need broad access to recover services, which also makes them valuable to an attacker who wants to delete recovery points or reach several hosts.

Attack surface examples by layer

To sum up, the described attack vectors might be mitigated as follows:

Attack surface Initial access Possible impact Primary control
Credentials and configuration Password recovered from monitoring or an overprivileged account Direct control of several hypervisor nodes Unique vaulted credentials, segmented access, and configuration monitoring
VM escape Administrative access or code execution privileges inside a guest plus a hypervisor flaw Host process or neighboring workload compromise Patch the hypervisor and reduce risky virtual devices and guest privilege
Malicious container affecting kernel or runtime Code in a container or a malicious image Host filesystem, kernel, or shared cache impact Patch kernel and runtime, and remove privileged settings
Images and templates Compromised build input registry or golden image Repeated deployment of the compromise Immutable digests, controlled builds, provenance, and verification
Management API Stolen identity exposing endpoint or authorization gap Fleet-wide administrative actions MFA, least privilege, network restrictions, and complete API validation
Networks, storage, and backups Flat network or broad datastore and access through backups Lateral movement, data theft, encryption, and recovery loss Segmentation, least privilege, protected backups, and traffic monitoring

Conclusion

GERT cases that we presented in this article did not require an attacker to break the VM boundary. The attack path was created by an overprivileged monitoring relationship, an insecure password storage approach, a recoverable and reused root credential, broad management-network reachability, and direct SSH administration. Each element was legitimate on its own, but together they allowed one compromise to reach virtualization hosts and their workloads.

Misconfiguration should therefore receive the same operational attention as vulnerability management. Teams need to know where privileged credentials exist, which systems can use them, which network paths make them effective, and which logs will show their use. Escape flaws, unsafe images, API weaknesses, virtual network exposure, and attacks on storage or backups remain serious, but closing the known administrative route should come first.


  •  

How a hidden Wi-Fi network name can give away your data to strangers | Kaspersky official blog

For more than two decades now, setting up a home router has meant going through the same old routine: pick a Wi-Fi band, name your network, choose a security type, and set a password. After you type in your network name, you often see an option next to it to hide the network name — sometimes labeled hide SSID, or simply hidden or closed network. If you choose this option, the network you create won’t show up automatically in the list of available Wi-Fi networks on any smartphone, computer, or smart-home device — you need to type in the correct network name by hand. Only then will the device be able to find that network and connect to it. At first glance, hiding your wireless network’s name might seem like a smart precaution: keeping neighbors or passersby from hacking into your Wi-Fi since they simply can’t see it. But in fact things work differently: all your devices will give away the hidden network — and not just at home either.

How devices connect to Wi-Fi

Every Wi-Fi access point broadcasts a short data packet roughly 10 times a second so your smartphone or computer can show you a list of nearby networks’ names, like JohnWiFi, TommyNet, CafeDeArts_Guest, or other, creative variants. This packet contains (i) the network’s name (Service Set Identifier, or SSID), (ii) a unique identifier for the access point (Basic Service Set Identifier, or BSSID), and (iii) details about the radio channel the network uses. This info helps devices (i) pick the best network to connect to, and (ii) automatically join networks they already know; accordingly, none of the data in that packet is encrypted. Hidden networks also broadcast these advertising packets; they just leave the SSID field blank. This method of finding networks is called passive because a Wi-Fi client, like, say, your smartphone, just needs to listen to the airwaves to spot nearby access points.

On top of that, the client can scan for Wi-Fi networks on its own, which is known as active discovery. Your smartphone or computer is constantly broadcasting the names of Wi-Fi networks it knows and would like to connect to. If one of those networks happens to be nearby, the access point answers back, and the connection is made.

Active discovery can sometimes help save your smartphone’s battery, and it’s indispensable when you’re working with hidden networks. Discovering a hidden network and connecting to it becomes a two-step process. First, the smartphone “hears” that there’s a Wi-Fi access point nearby with a hidden network name. It then tries to reach that network by broadcasting the names (SSIDs) it already knows — either hidden networks it’s connected to before, or the name the user typed in when first connecting to a hidden network. If the name matches, the router responds, and the connection goes through.

A hidden network name (SSID) doesn’t actually hide your Wi-Fi network

The regular list of available Wi-Fi networks on your smartphone or computer won’t show networks that don’t broadcast a public SSID. But any specialized Wi-Fi scanning software can spot them easily — it just won’t show their names. And hidden networks are still easy to identify and tell apart thanks to each router’s unique BSSID.

So hiding a Wi-Fi network’s name doesn’t make it truly invisible, and it won’t protect you from cybercriminals. It’s worth noting that any large-scale analysis, such as mapping the geographic locations of Wi-Fi networks, relies on BSSIDs, not SSIDs. Besides the huge databases kept by Apple and Google, there are public access-point-mapping projects too, like WiGLE.

If someone wants to break into a network at a specific location, specialized software lets them find out its SSID just by waiting for one of the legitimate clients to connect and listening in on the active discovery session. From there, they can connect to that Wi-Fi network — provided it uses a weak enough security protocol.

Your devices leak hidden Wi-Fi network names and personal data

The main drawback of a hidden SSID is that smartphones and computers have to broadcast it before they can connect to the wireless network. And they do this everywhere — not just near the specific access point in question. As soon as any network with a hidden name shows up within signal range, the client attempts to connect, and during that attempt it broadcasts the names of every hidden network it knows. And this broadcast isn’t encrypted, which means anyone nearby can pick up the data being transmitted.

In 2021, researchers at the University of Hamburg ran an experiment collecting radio signal data on a busy street. In just three one-hour listening sessions, they gathered 252 000 Wi-Fi connection requests from passersby’s smartphones. Of those, 23% contained the SSID of a network the smartphone would have preferred to connect to.

And that’s where a factor few people think about comes into play: the network’s name itself. Twelve percent of the SSIDs found were long numeric strings that looked a lot like passwords. So, once someone knows the SSID and BSSID, they can look up the BSSID in a service like WiGLE and find the access point’s real-world address. Once there, an attacker can try to use such a string as both the SSID and the password to connect — with a good chance of success. The researchers’ sample also included 106 SSIDs containing a first and/or last name, 92 SSIDs that pointed to a home address, and three that revealed an email address.

Given all this, it’s no surprise that Apple and Asus recommend against using the hidden SSID feature.

Other drawbacks of hiding your Wi-Fi network

Beyond the data leak issues, hidden SSID technology — a holdover from early Wi-Fi versions — also hurts the performance of modern versions of the radio protocol. In the 6GHz band, searching for a hidden Wi-Fi network across 59 possible channels becomes noisy and power-hungry: the client has to run through every option and send a lot of requests. As a result, performance drops for all nearby Wi-Fi networks in the 6GHz band, and the client itself burns through battery power sending out all those requests.

Asus also points out that Windows devices may tend to connect to visible networks first — even if a network with a hidden SSID is available and marked as preferred.

When a hidden SSID actually makes sense

There aren’t many scenarios where hiding your network name is genuinely useful. For example, if a router is meant for a small group of people but is installed in a very crowded location, a hidden SSID can cut down on the number of connection attempts and ease the load on the router. But keep in mind that this boosts performance, not security — and only slightly at that.

Another similar case is a technical Wi-Fi network for a limited number of fixed devices — like a network of security cameras or smart home gadgets. These devices always stay in the same place, so whenever they try to connect to their assigned Wi-Fi, they find it right away, and no data leaks out — unless an attacker is actually listening in on the radio signal near the router. At the same time, outsiders are less likely to try connecting to such a network.

How to make your Wi-Fi more secure

To protect your Wi-Fi network from wireless hackers, don’t hide the SSID: instead, use the modern WPA3 security protocol along with a long password. Attackers can intercept data over the air and then try to crack the password with brute force, so a strong Wi-Fi password should be at least 20 characters long. The easiest way to generate and store such long, hard-to-crack passwords is with a password manager that syncs across your devices; that way they’re always at hand — no matter which gadget you’re using.

If some of your older devices don’t support WPA3, it’s fine to use WPA2 with protected management frames (PMF) turned on, which guard against many types of attacks on Wi-Fi networks.

You should also make sure Wi-Fi Protected Setup (WPS) is turned off, since it essentially replaces your password with an easy-to-guess PIN code.

To quickly spot unknown devices connected to your Wi-Fi network, use Smart Home Monitor in Kaspersky Premium.

As for the network name, instead of hiding it, pick one that doesn’t reveal your name, address, or any other personal details. It’s also worth avoiding default network names like ISPName-XXXX or dlink, but for a different reason: generic names like these can confuse you and your guests alike. If you don’t want your access point to show up on Wi-Fi geolocation maps from Apple, Google, and other providers, you can add the suffix _nomap to the end of your network name, but there’s no guarantee it will actually work.

Apart from protecting your Wi-Fi, make sure your router is configured securely overall. First and foremost, that means giving it a long, unique admin password, and keeping it updated with the manufacturer’s latest firmware. And if you have a bit more time, you could even boost your Wi-Fi performance.

How Wi-Fi networks get hacked, and how to protect them:

  •  

Protecting your smart TV and set-top box from being hacked | Kaspersky official blog

In 2026, the owner of an ordinary home router, smart TV, or TV box is a prime target for cybercriminals. These devices are readily recruited into botnets and residential proxy networks, which we’ve covered before.

Criminals “sublease” the infected device by letting outsiders pay to visit any website from the victim’s IP address, so it looks like the device’s owner is doing it. The service is in demand across all kinds of shady schemes: from ad fraud and spam campaigns to password bruteforcing and account hacking. In our previous post, we described how home routers get recruited into these proxy networks; today we take a look at an even more vulnerable, and equally ubiquitous category of devices: smart TVs and TV boxes.

These appeal to criminals for two reasons. First, unlike computers and smartphones, TVs are almost always plugged into the power and have a fast internet connection. A dark screen doesn’t mean the device is switched off. On top of that, the limited user interface and monitoring tools mean suspicious background processes can easily slip unnoticed past users.

The threat is evolving and growing more aggressive. A recent study found that once proxyware turns up on a set-top box, the risks to its owner go well beyond having their traffic siphoned off.

Anatomy of the infection

The researchers focused on a popular TV box by SuperBox, which we already covered earlier in the post Is your TV box renting out your network?

SuperBox’s marketing leans heavily on the promise of providing thousands of TV channels, with no subscription or monthly fees. But out of the box, the device can’t actually do anything of the sort. To get access to pirated content, you need to install the brand’s proprietary app store.

When you launch it and install additional apps, the thousands of TV channels do appear. Meanwhile behind the scenes, with no warnings or permission prompts, the device floods external sites with unauthorized requests, and network traffic spikes sharply.

The researchers uncovered several alarming facts. First, the victim gets enrolled into as many as five botnets at once. The SuperBox runs clients for several proxyware networks simultaneously, which even try to compete with one another by blocking rival software from being installed.

But the real shock was the attacks on the internal network. The TV box’s proxyware places no limits on what its paying clients can actually do on the network. They can reach not only external sites but also devices inside your home network.

Normally, your home router and ISP settings protect you from outside attacks. But proxyware bypasses these barriers because it operates from inside the network. During an experiment, the researchers confirmed that an attacker on the internet can easily leverage the infected set-top box to open the admin panel of a home router, such as a Linksys, which is supposed to be accessible only to its owner when connected to the home Wi-Fi network. This means hackers can try to steal data from other devices in the same household, or even encrypt home network storage (NAS).

At the same time, flaws in SuperBox’s factory firmware let hackers remotely install and run any application with superuser privileges, and the threat is anything but hypothetical. Over three weeks of monitoring, the test set-top box was hit by more than 1300 attacks through the home proxy network. Attackers installed three different types of malware, including a module for launching DDoS attacks.

The malware uses several methods to gain a foothold in the system, and it survives reboots and power failures alike.

How to tell if your set-top box is working for hackers

If you have a cheap TV set-top box or Android TV from a little-known brand, it’s worth checking it for anomalies.

The most reliable method is to review the network traffic. Use the statistics in your router’s control panel, but note that some budget models may lack this feature. This feature is called Traffic Analyzer on Asus routers, Traffic Usage on TP-Link, and Traffic Monitor on Keenetic. Find your TV or set-top box in the device list and check the ratio of downloaded to uploaded data. They should consume a lot of traffic to download video while sending very little. If your box is quietly pushing gigabytes of data out or staying chatty on the network even while idle, that’s a telltale sign it’s infected.

If traffic statistics aren’t available, look for indirect signs:

  • The network and memory activity LEDs won’t stop blinking even though no one’s using the device.
  • The set-top box’s casing is constantly warm or hot.
  • The interface lags behind the remote, and the box freezes at random moments that have nothing to do with heavy video playback.
  • Your other devices (computers or phones) are seeing a real drop in internet speed.
  • When trying to visit familiar sites over your home Wi-Fi, you’re constantly hit with a CAPTCHA — a sign your network may be compromised and flagged as a spam source.
  • Your ISP’s tech support calls you asking about suspicious network loads.

What to do with an infected device

The best solution is to disconnect the device from the internet and dispose of it. If you have to keep using it, follow these steps to minimize the risks:

  1. Do a factory (hard) reset. Restore the set-top box to its original state.
  2. Take it offline before setting up again. The first time you turn it on after a reset, skip the Wi-Fi setup step and don’t plug in the Ethernet cable.
  3. Block app installation. Go to Android settings and disable installation of apps from unknown sources. Be sure to turn off any debugging features if enabled: USB debugging, Wireless debugging, and ADB. Menu item names may differ depending on your Android version and device manufacturer.
  4. Isolate it on the network. Set up a guest Wi-Fi network on your router and connect the TV box to it. Enable Client Isolation in your router’s settings, if it has it. This will stop the box from seeing other devices on your home network, which protects your computers and network storage.
  5. Check for updates. Once the box is connected to the guest network, check for official firmware updates: manufacturers sometimes patch known vulnerabilities, though with lesser-known brands, you shouldn’t count on it.

Your most reliable safeguards

Buying cheap devices with pirate streaming features and installing software from shady sources is a surefire way to compromise your home network. Your IP address will become a source of malicious activity, which at best gets you blocked by your ISP and at worst puts you on law enforcement’s radar. What’s more, hackers can use the box as a launchpad to attack your home computers and NAS, which can lead to personal data theft or a ransomware attack.

The best protection is to buy devices from trusted brands and pay for legal content. And to rule out someone hijacking control of your network, make sure your router’s admin panel and other home devices are protected with unique, strong passwords. To avoid having to remember them all, use a reliable password manager such as Kaspersky Password Manager. Additionally, the Smart Home Monitor feature included in Kaspersky Premium lets you keep all your devices fully under control.

There may be more things you don’t know about your smart home devices:

  •  

CrashStealer, a new infostealer for macOS: how it works and how to stay safe | Kaspersky official blog

Mac users have historically trusted their operating system to keep them safe. That peace of mind mostly comes from Apple’s strict control over its ecosystem, and the fact that macOS has historically faced fewer mass attacks than Windows. However, that doesn’t mean Macs are invulnerable: threats do exist, and new ones emerge all the time. Over just the past few weeks, security researchers have published reports on at least two new campaigns that target Apple devices.

The malware used in one of the campaigns has been dubbed CrashStealer, while the other is known as ClickLock. Both rely on different tricks to force users into entering their Mac password, which attackers then use to steal account credentials, crypto assets, documents, and much more. In today’s post, we take a close look at how CrashStealer operates — and how to avoid falling victim to it.

A videoconferencing app with CrashStealer inside

It was back in May 2026 that researchers spotted the first signs this malware was being developed, and by early July, they caught it operating in the wild. The malware earned its name because of its core mechanism: it disguises itself as the macOS built-in crash reporting tool (CrashReporter) while functioning as an infostealer designed to hijack sensitive data.

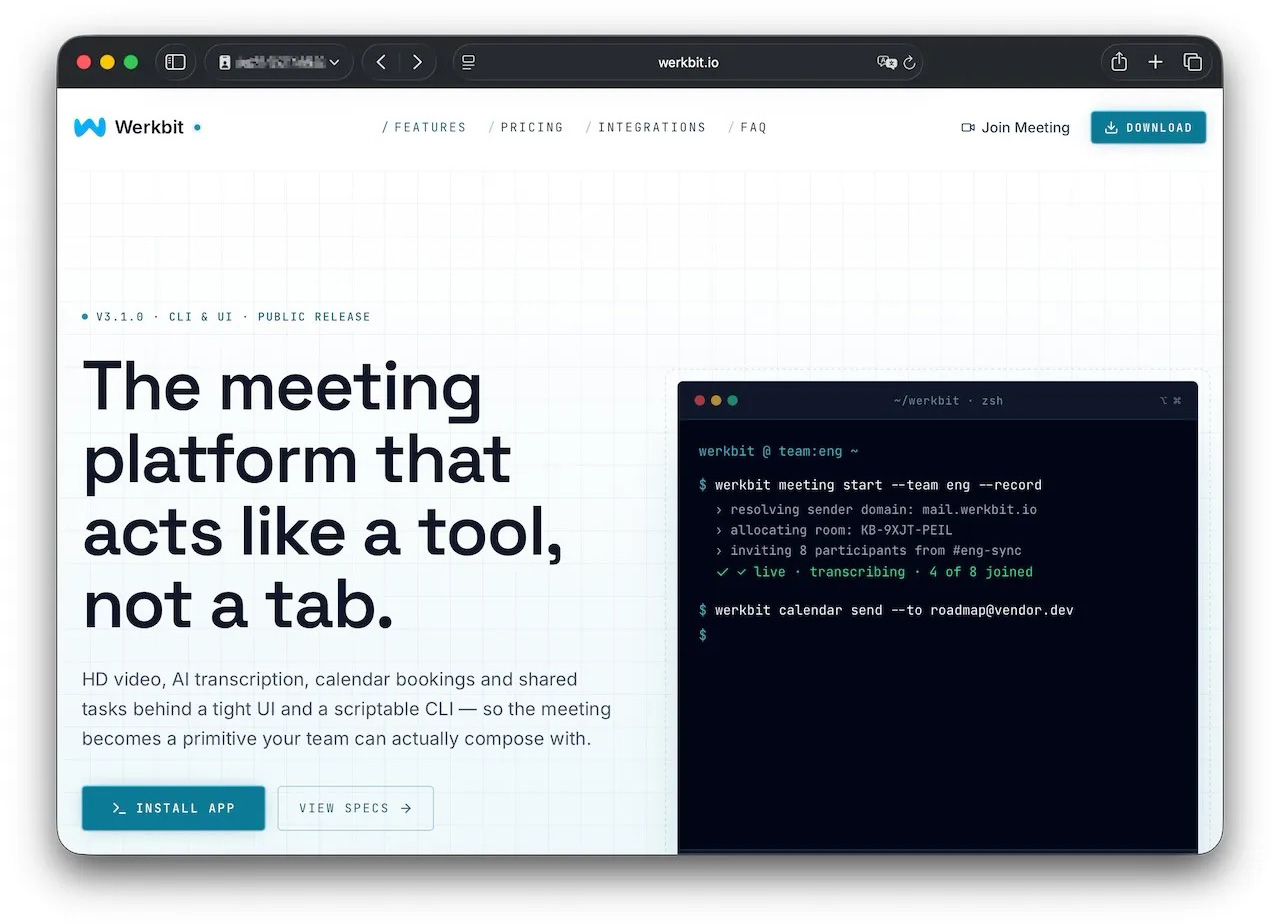
Researchers managed to trace one of the websites users visited to download the malware. The site poses as a legitimate platform for distributing the video conferencing tool Werkbit.

A website that distributes CrashStealer under the guise of the Werkbit app

According to researchers, this is the site victims used to download Werkbit, which secretly contained the CrashStealer malware loader. Source

However, you can’t just visit the site and download the software. Before downloading, visitors are asked to enter a special meeting PIN. This setup likely allows the attackers to limit the distribution scope by targeting only specific, pre-selected victims. Exactly how the cybercriminals choose their targets and deliver the PIN remains unknown.

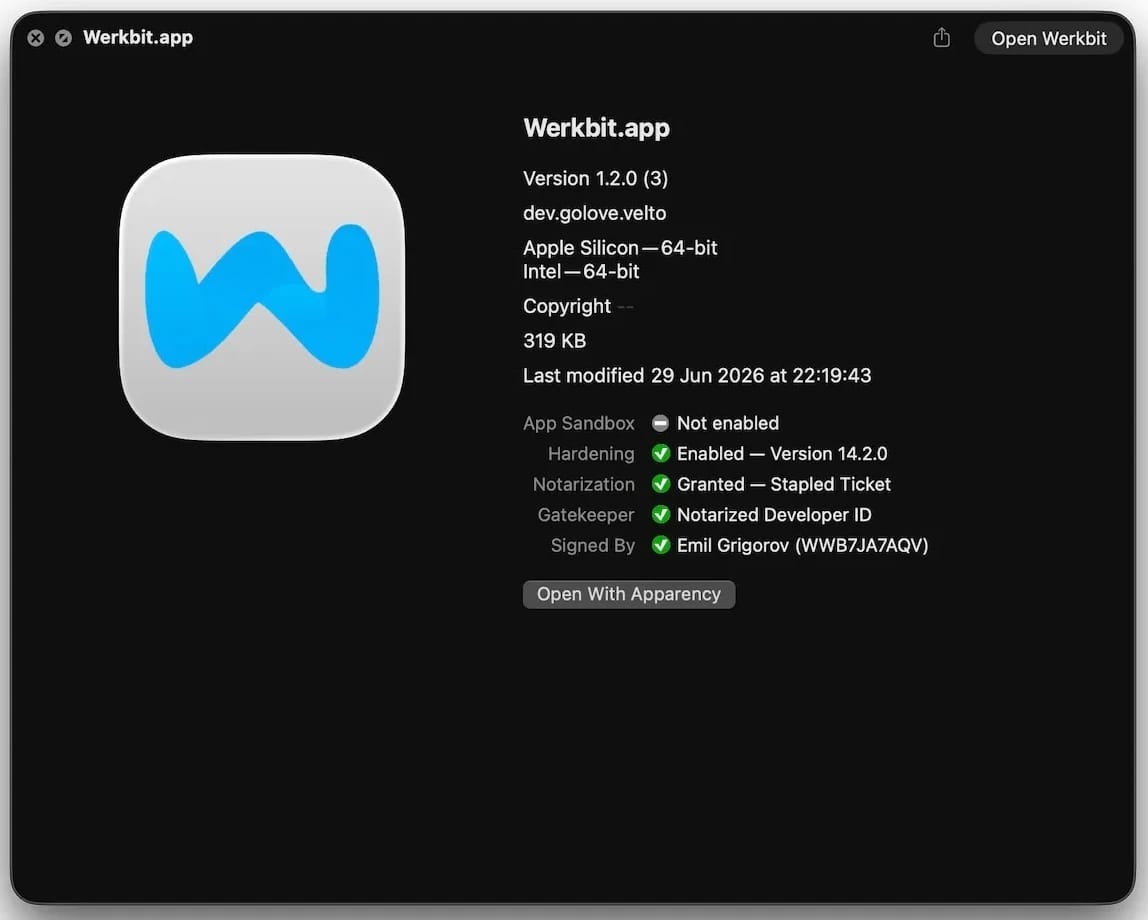
The “lucky” users with a code end up installing the initial malicious payload — named Werkbit Setup. Interestingly, it carries a valid Apple developer certificate and has successfully passed Apple’s notarization process — meaning it cleared the automated prescan for malicious code. As a result, the attackers manage to bypass the operating system’s built-in Gatekeeper defense. This allows the payload to launch without triggering the usual untrusted software warnings.

Signed and notarized Werkbit Setup installer

The Werkbit Setup installer is signed with a valid Apple developer certificate and has passed notarization. Source

Once launched, Werkbit Setup first reaches out to GitHub. Researchers believe using this popular platform helps attackers blend in by making these initial network requests look far less suspicious to security tools. After retrieving instructions from a GitHub repository, the program connects directly to the attackers’ server to fetch CrashStealer itself.

The loader then saves the malware to a temporary macOS folder, launches it, and wipes most of the intermediate setup files. As a result, a fully functional infostealer is up and running within seconds of Werkbit Setup starting. By the way, the user never gets any videoconferencing app.

How CrashStealer works

Unlike the Werkbit Setup loader, the CrashStealer malware itself isn’t signed with an Apple developer certificate. To keep users from suspecting anything, the malware disguises itself as the built-in macOS crash reporting tool, CrashReporter, by using the exact same name, app identifier, and a similar icon.

Once launched, CrashStealer completes a sequence of steps to gain access to sensitive data, establish persistence in the system, and cover its tracks:

  1. Remove metadata — including the attribute that flags the app as an internet download.
  2. Display a fake system prompt asking for the user’s macOS password.
  3. Use the previously captured credentials to gain access to Keychain, the built-in macOS password manager.
  4. Check the computer for installed security tools and malware analysis software.
  5. Collect saved browser passwords, cookies, Keychain contents, and data from other password managers and crypto wallets.
  6. Encrypt the data it stole and prepare it for forwarding to the attackers’ server.
  7. Create a copy of itself and establish persistence to launch automatically every time macOS boots.
  8. Delete temporary files and other installation traces to make detection much harder.

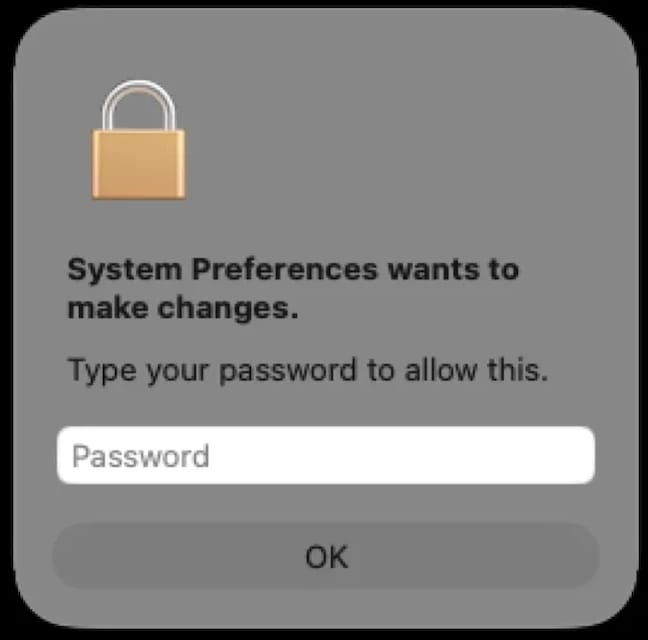
Step two deserves a closer look. The password prompt that the user sees looks extremely convincing. What’s more, the malware immediately verifies whether the credentials are correct: if you make a typo and enter an invalid password, CrashStealer will pop the window right back up to ask you again.

Fake macOS password prompt

Once launched, CrashStealer displays a pop-up that mimics the standard macOS password request. Source

What data is CrashStealer after?

CrashStealer’s hit list is massive. First and foremost, its operators target Keychain: the built-in macOS password manager where the system stores account credentials, cryptographic keys, certificates, tokens, and more.

Users of third-party password managers aren’t safe either: the malware steals data from 14 of these services, including 1Password, Bitwarden, LastPass, Dashlane, Keeper, KeePassXC, NordPass, Enpass, and RoboForm.

In addition, the malware collects all credentials and cookies stored in Chromium-based browsers — Chrome, Brave, Edge, Opera, Opera GX, Vivaldi, Chromium, and NAVER Whale — as well as Firefox. The attackers clearly have a strong interest in crypto assets: CrashStealer specifically targets data from 80 different crypto wallet extensions, including MetaMask, Phantom, Coinbase Wallet, Trust Wallet, Rabby, Exodus, Keplr, and Solflare.

Finally, the malware scans the Documents and Downloads folders to pick files that might be of interest to the cybercriminals. CrashStealer encrypts all the stolen data with the AES-256-GCM algorithm, ZIP’s it up, and sends it to the attackers’ server.

How to protect your device

The spike in attacks on macOS is a clear wake-up call: Apple users need to get proactive about their security. We recommend:

  • Researching apps online before installing them
  • Sticking to utilities from official app stores whenever possible
  • Using a reliable security solution that blocks malicious websites and stops malware activity on your device
  • Keeping all your credentials and banking details in a secure password manager. One option is Kaspersky Password Manager— which, notably, wasn’t listed among the apps targeted by CrashStealer

Kaspersky security solutions detect the malware described in this post and assigns to it the verdicts HEUR:Trojan-Downloader.OSX.Agent.gen and HEUR:Trojan-PSW.OSX.Agent.gen.

  •  

How to protect your data after a breakup | Kaspersky official blog

A breakup is a major upheaval — the kind that turns life upside down. The familiar order of things, where two people shared the same interests, moments, and often even the same physical space, collapses in an instant, leaving each of you in a world of your own.

Besides that, couples are connected not just in real life, but digitally too. Shared subscriptions, saved addresses and passwords, access to joint cloud storage — all of that used to be woven into your day-to-day life. Moving on emotionally can take a long time, sure, but there are steps you can take right now that will tighten up your security — even if they won’t help you get over your ex.

Here’s what you need to check after a breakup, which services to disconnect, and why you should do it even if the split was amicable.

Digital hygiene: your insurance policy

Cutting off your ex’s access to your online accounts isn’t paranoia — it’s looking out for your own security. A breakup doesn’t automatically sever your digital ties: any access you granted each other during the relationship stays active until someone manually shuts it down. Most of the time, nobody’s plotting to actually exploit it, yet it can still lead to anything from awkward moments to a genuine risk of being tracked.

Take Aleta Dignard-Fung, of Las Vegas, who told NPR that after breaking up with her boyfriend, it didn’t immediately occur to her that he still knew her Spotify password. One day, in the shower with music playing, she noticed her playlist suddenly switch. Her ex had logged in from another device and started playing his own chosen tracks. “It was just kind of like the Spotify wars, and we’d just spend like 10 minutes trying to override each other’s songs,” she admitted. But the fallout isn’t always this lighthearted.

Relationship coach Susan Winter shared a case from her own practice in that same interview. One of her clients simply couldn’t let go of his ex-girlfriend after their breakup. The two had shared an OpenTable account — the restaurant reservation service — and she’d never revoked his access. He started tracking her bookings: where she was going, what time, how many people. That’s how he kept tabs on whether someone new had entered her life.

These two stories, while showing very different behavior from the exes involved, both trace back to the same root cause: accounts that were never properly locked down. In the former case, it led to an awkward moment. In the latter, it led to anxiety and a real sense of being watched. To make sure neither scenario happens to you, it’s worth running through a quick checklist.

Terminate your partner’s sessions

In the settings for your social media, messaging apps, email, and other key services, pull up the list of active sessions and log out everything except your current devices.

Change your passwords

Update the passwords to any key accounts your partner might have known — say, if you used a meaningful date as your password. If you reused the same password across multiple services, change it everywhere. While you’re at it, review your security questions and your backup email or phone number for account recovery — neither should still be tied to your ex. To skip the hassle of memorizing new credentials while still leveling up your security, we recommend using a password manager — it’ll generate a unique, strong password for every account, and save and sync it across all your devices; the only thing you need to remember is a single main password.

Check two-factor authentication and trusted devices

Make sure verification codes only go to your own device. Remove your partner’s devices from your trusted list — you can do this in your Apple and Google account settings.

Split up your shared Apple/Google accounts

If you shared an Apple or Google account, sign out of that. Turn off Family Sharing, iCloud, and backups. Check your shared photo albums too — anything that lands there automatically is visible to your ex as well.

Review your subscriptions

If you shared subscriptions — streaming services, family plans, that kind of thing — cancel them or set up new ones and link your own card.

Check your bank cards

If your ex’s card is linked to a marketplace, delivery app, or rideshare service account you own, remove it from your saved payment methods. If your card is linked to their account and you no longer have access to it, the safest move is to just get your card reissued.

Revoke smart home access

Cut off your ex’s access to cameras, video doorbells, GPS trackers, and smart speakers. If the devices were on a shared account, change the password or move them over to your own personal account.

Review your privacy settings

Check the privacy settings across your accounts on various services and social media using our free online tool, Privacy Checker. It walks you through a privacy configuration tailored to your operating system, platform, and even your browser.

If you notice signs of stalking

Reach out to advocacy or legal aid organizations — they can help you map out the best course of action. It’s also worth leaning on family and close friends who can support you through a tough situation. On Android devices, you can use our security suite with the Who’s Spying on Me feature. It’s designed to help you detect tracking and stalking so you can take the right steps to protect yourself. The feature includes:

  • Stalkerware Detection. Flags apps designed to secretly monitor your life and collect data you’d never want shared with anyone else.
  • Device Scanner. Finds planted trackers that let someone follow your movements and always know where you are.
  • Permissions Control. Shows which apps have access to permissions that could make it easier for someone to spy on you or compromise your privacy.

What can actually help — and what might make things worse — during this difficult time? Check out our other posts:

  •  

Email hijacking via OAuth | Kaspersky official blog

When targeting an organization to steal information, maintaining a low profile is critical for attackers. They typically aim for long-term persistence, which requires avoiding security alerts while preserving access in case they’re detected and the organization initiates incident response or routine password resets. Malware such as infostealers or ostensibly legitimate remote monitoring and management (RMM) tools fail the first requirement: their use triggers EDR and generates suspicious events in SIEM consoles. Relying on stolen credentials conflicts with the second requirement: the moment the security team suspects a compromise, passwords can be changed immediately — terminating access. If attackers attempt to steal browser cookies instead of passwords, they face a different challenge: many online services now correlate device characteristics with the expected session cookie and block access if the cookie is used on an unrecognized device. Furthermore, cookie theft protection mechanisms implemented in Chromium-based browsers (such as Chrome, Edge, and Opera) this year have made this approach significantly more difficult.

To address this persistence challenge, the ToddyCat APT — whose main game is spying — developed a novel technique. Kaspersky experts discovered this method during an incident investigation and named it Shadow Token via Remote Debug (STRD). This technique allows the attackers to establish reliable, persistent access to a victim’s mailbox and other resources in Google Workspace. With minor adjustments, the same approach could potentially be adapted to target other services that grant third-party application access via OAuth 2.0 authentication.

How an STRD attack works

First, the attackers must compromise the victim’s system with malware. In past campaigns, ToddyCat gained initial access to organizations by exploiting known vulnerabilities in server software and distributing malicious loaders via messaging apps. The specific employee targeted by the attackers might not notice the intrusion at all. This can occur, for example, if the adversary first obtains privileged administrative credentials and uses them to deploy the malware onto targeted machines remotely. Crucially, the deployment and execution of this malware mustn’t trigger immediate security alerts.

Once active, the malware executes an STRD attack, connecting the attackers’ remote service to the victim’s mailbox using the OAuth 2.0 protocol. This process requires no user interaction and shows no visible activity on the screen. To the cloud environment (Google Workspace, in the case at hand), the activity appears as if the user has legitimately authorized a third-party app for email access or data backup.

After that, the malware can terminate its operations and even delete itself from the system. The adversary retains direct access to the mailbox using the acquired OAuth token — and they need no connection to the victim’s endpoint or to the corporate network for that. Depending on the organization’s Google Workspace configuration, this access can persist for an extended period and survive subsequent password resets.

The core concept of Shadow Token via Remote Debug

At the heart of this attack is a connection to Google Workspace services via OAuth 2.0. This is a legitimate workflow used whenever a third-party application requests access to calendar data, emails, or Google Drive files. For example, to display calendar meetings in Zoom and automatically generate conference links, a user must authorize Zoom to access Google services. Similarly, configuring a third-party email client or calendar app requires granting permission. During this authorization process, the service requesting access opens a new browser window. In this window, Google Workspace first prompts the user to select the appropriate account. Once the account is chosen, the subsequent screen displays the specific permissions requested by the third-party app, allowing the user to either approve or deny access. For this scenario to proceed seamlessly, the user must already be authenticated to Google services in their browser — which is typically the case in organizations using Google Workspace. If the user isn’t authenticated, additional steps for entering credentials and completing multi-factor authentication are introduced into the sequence.

The ToddyCat hackers developed a malicious tool called Umbrij to facilitate a two-step covert authorization process when the user is already authenticated in Google. First, the malware identifies the browsers installed on the system, and locates the specific folder storing the user’s active profile for each. The attackers target Chrome and Edge, as these are the browsers most likely serving as the primary ones within the organization.

Next, Umbrij copies the entire user profile folder to a different directory on the machine. It then launches an instance of the browser, specifying the path to the duplicated profile via the command line. Because this duplicate profile contains the user’s session cookies, websites with saved credentials won’t prompt for re-authentication. Furthermore, since this occurs on the exact same computer where the primary browser is running, online services detect no anomalies. The browsing history for this newly launched instance is isolated within the new folder, keeping it hidden from the user’s main account activity.

Crucially, the browser is launched in a dedicated debugging mode typically reserved for web development. The browser window and user interface don’t appear on the screen at all (headless mode). Instead, the browser can be controlled through a debugging port using the DevTools protocol, allowing the malware to issue commands and read the state of the screen. To orchestrate these actions, Umbrij leverages Puppeteer, a legitimate automation library.

After verifying that the debugging browser instance has launched successfully, Umbrij opens a legitimate Google Workspace OAuth screen within it. The request sent to Google is engineered to bypass additional security checks while requesting maximum access privileges. For the application ID — the identity supposedly requesting these extensive permissions — the malware impersonates one of two legitimate tools: Google Workspace Migration for Microsoft Outlook (GWMMO), or Google Workspace Sync for Microsoft Outlook (GWSMO).

When Google opens the window within the headless browser, Umbrij uses debugging tools to programmatically click on the corporate account name and the confirmation buttons. As a result, Google generates an authorization code for the app. Umbrij extracts and saves this code, subsequently forwarding it to the attackers’ command-and-control server. Finally, operating entirely within their own infrastructure rather than on the victim’s computer, the attackers exchange this authorization code for an OAuth access token. This single token is all they need to maintain long-term unrestricted access to the mailbox.

How to protect against OAuth token theft

If a Google Workspace account is compromised, incident response measures must include the following steps after collecting the necessary logs and other forensic data for investigation:

  • Resetting the affected user’s password
  • Terminating all active web sessions for the user
  • Revoking OAuth tokens and third-party app permissions
  • Reviewing and removing access granted through legacy App Passwords

In addition, security and IT teams must systematically audit issued OAuth permissions, revoke unjustifiable access rights, and restrict capabilities that allow excessive or unauthorized permission grants. We covered this topic in detail in our article on blocking unwanted AI assistants.

How to prevent exploitation of Shadow Token via Remote Debug

While Kaspersky users are protected against the Umbrij tool, security teams should proactively implement policies that prevent standard users from launching browsers in debugging mode. This functionality is intended exclusively for website and web app developers. This restriction can be enforced through the DeveloperToolsAvailability group policy (available for both Chrome and Edge).

Additionally, configure monitoring within your SIEM/XDR to track the launch of browser instances with an active debugging port. This event serves as a strong indicator of this specific attack technique.

  •  

Microsoft is changing Edge’s plaintext password behavior

Microsoft said it will change Edge’s password handling as a “defense‑in‑depth” measure.

Originally, Edge decrypted the entire saved‑password store on startup and kept all credentials resident in process memory in clear text for the whole browser session, regardless of whether a given credential was ever used or not.

A short while ago, Microsoft said this plaintext password behavior was by design. Now, Microsoft has changed course, and the new password-handling behavior is already present in Canary (the experimental preview version of Microsoft Edge), with rollout prioritized across all channels.

The researcher who originally flagged the issue said:

“Edge is the only Chromium‑based browser I’ve tested that behaves this way. By contrast, Chrome uses a design that makes it far harder for attackers to extract saved passwords by simply reading process memory.”

Microsoft Edge Security Lead Gareth Evans said Microsoft is now taking a broader view and has committed to changing Edge so that saved passwords are no longer loaded into memory on startup as clear text. As a result, exposure will be reduced as a defense‑in‑depth improvement. That means even if an attacker has administrative control of a device, it becomes harder to harvest all the passwords.

According to Microsoft:

“Going forward, Microsoft Edge will no longer load all saved passwords into memory at browser startup. Instead, passwords will be decrypted only when needed for autofill or password management operations.”

The change is already live in the Edge Canary channel and will be included in the next update for all supported Edge releases (build 148 and newer across Stable, Beta, Dev, Canary, and Extended Stable).

The reason for this change is probably more reputational and strategic rather than an acknowledgment of an exploitable vulnerability. Microsoft seems to want to align reality with its “secure by design” messaging and reduce a very visible, easy‑to‑demo weakness, even if it still doesn’t treat it as a classic memory‑disclosure bug.

Passwords in your browser

Please note that this change just means Edge will become roughly as secure an option to store passwords as every other Chromium-based browser.

Your browser password manager gives you ease of use, but that comes with some security tradeoffs. Of course, password managers aren’t foolproof either, so it’s important to decide for yourself where you store your passwords.

If you’re confident a website is safe, and anyone who can access it under your account wouldn’t learn anything sensitive, feel free to store the password in your browser, but disable autofill so you stay in control.

Use MFA where possible. It enormously reduces the risk if someone gets hold of your password. And avoid using the browser password manager to store your credit card details or other sensitive personally identifiable information, such as medical information.


Let’s face it, an incognito window can only do so much. 
 
Breaches, dark web trading, credit fraud. Malwarebytes Identity Theft Protection monitors for all of it, alerts you fast, and comes with identity theft insurance. 

  •  

Microsoft says Edge’s plaintext password behavior is “by design”

Some time ago, we discussed whether you should allow your browser to remember your passwords.

In that article we mentioned the importance of encryption.

“With a browser password manager, someone with access to your browser could see your passwords in clear text, although Windows can be set to ask for authentication (the same you use at startup of your device).”

The typical behavior of browser password managers is to store passwords encrypted on disk, tied to your user account, and protected by the operating system.

But recently, a security researcher systematically tested every major Chromium-based browser for how they handle credentials in memory. The researcher found that Edge was the only one loading the entire password vault into plaintext process memory at startup, where it remains for the duration of the session.  

Chrome and other Chromium browsers were observed to only decrypt a password when needed (autofill or “show password”), not the whole vault, and to use mechanisms like app‑bound encryption for keys. Edge does not use those protections in this context.

So, the researcher decided to write a proof-of-concept (PoC) demonstrating that accessing that vault doesn’t rely on zero-days or complex exploitation. It relies on the relatively simple ability to read process memory, which does require elevated privileges.

But when the researcher reported the issue to Microsoft, the response was underwhelming. The company’s official response was that the behavior is “by design.” The reasoning most likely is that this behavior speeds up sign‑in and autofill, and attackers would already need a compromised machine or elevated access to read RAM, which Microsoft treats as out of scope for this design decision.

Which is basically true. An attacker already needs significant foothold: for example, code execution on the box and the ability to read Edge’s process memory, often requiring elevated privileges. This is not a remote, unauthenticated bug in the browser, but the design makes post‑compromise credential harvesting easier. And it’s a capability many infostealers already have.

It’s just another thing an attacker can do once they’ve compromised your machine. Combined with this academic study from 2024, which found many password managers leak plaintext passwords into memory under some conditions, it leads us to repeat our advice.

Should you allow your browser to remember your passwords?

Your browser password manager gives you ease of use, but that costs you some security. Of course, password managers aren’t foolproof either, so it’s important to decide for yourself where you store your passwords.

If you’re confident the website is safe, and anyone that can access it under your account won’t learn anything new, feel free to store the password in your browser, but disable autofill so you stay in control.

Use MFA where possible. It enormously reduces the risk should someone get hold of your password. And refrain from using the browser password manager to store your credit card details or other sensitive personally identifiable information, such as medical information.

But we’d add that, among the major browsers, Edge appears to be the weakest option if you still choose to use a built‑in password manager.


Stop threats before they can do any harm.

Malwarebytes Browser Guard blocks phishing pages and malicious sites automatically. Free, one click to install. Add it to your browser →

  •  

Podcast: Passwords: You Are the Weakest Link

Why are companies still recommending an 8-character password minimum?  Passwords are some of the easiest targets for attackers, yet companies still allow weak passwords in their environment. Multiple service providers recommend […]

The post Podcast: Passwords: You Are the Weakest Link appeared first on Black Hills Information Security, Inc..

💾

  •  

The Paper Password Manager

Michael Allen // Every year around the holidays I end up having a conversation with at least one friend or family member about the importance of choosing unique passwords for […]

The post The Paper Password Manager appeared first on Black Hills Information Security, Inc..

  •  

Webcast: Passwords: You Are the Weakest Link

Why are companies still recommending an 8-character password minimum?  Passwords are some of the easiest targets for attackers, yet companies still allow weak passwords in their environment. Multiple service providers recommend […]

The post Webcast: Passwords: You Are the Weakest Link appeared first on Black Hills Information Security, Inc..

💾

  •  

Passwords: Our First Line of Defense

Darin Roberts // “Why do you recommend a 15-character password policy when (name your favorite policy here) recommends only 8-character minimum passwords?” I have had this question posed to me […]

The post Passwords: Our First Line of Defense appeared first on Black Hills Information Security, Inc..

  •  

Finding: Weak Password Policy

David Fletcher// The weak password policy finding is typically an indicator of one of two conditions during a test: A password could be easily guessed using standard authentication mechanisms. A […]

The post Finding: Weak Password Policy appeared first on Black Hills Information Security, Inc..

  •  

An Open Letter about Big All-Powerful Company’s Password Policy

Kelsey Bellew // Dear Big All-Powerful Company, Your idea of a ‘strong password’ is flawed. When I first saw the following message, I laughed. I said out loud, “No, you […]

The post An Open Letter about Big All-Powerful Company’s Password Policy appeared first on Black Hills Information Security, Inc..

  •  
  •  

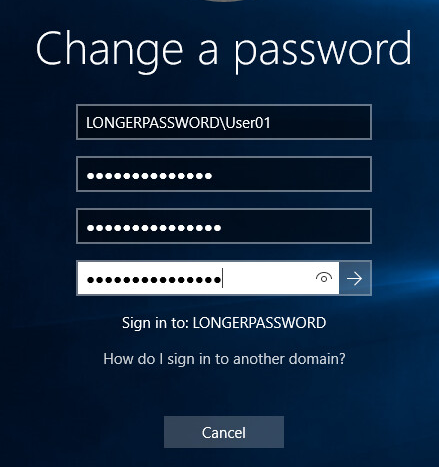
How to Increase the Minimum Character Password Length (15+) Policies in Active Directory

Kent Ickler // As a start to a series on Windows Administration in the eyes of a security-conscious “Windows Guy” I invite you on configuring AD DS PSOs (Password Security […]

The post How to Increase the Minimum Character Password Length (15+) Policies in Active Directory appeared first on Black Hills Information Security, Inc..

  •  

Question:  What Can I Learn from Password Spraying a 2FA Microsoft Web App Portal?

Carrie Roberts // Answer: Enough to make it worth it! Penetration testers love to perform password spraying attacks against publicly available email portals as described here in this great post by Beau Bullock. […]

The post Question:  What Can I Learn from Password Spraying a 2FA Microsoft Web App Portal? appeared first on Black Hills Information Security, Inc..

  •  

Lawrence’s List 061016

Lawrence Hoffman // It’s been one of those crazy busy weeks. I always feel like I didn’t get enough time to read articles, surf Reddit, and attempt to keep up […]

The post Lawrence’s List 061016 appeared first on Black Hills Information Security, Inc..

  •  
❌