When you build a new application or capability on Amazon Web Services (AWS), you want to focus on what you’re building. Getting a service running almost always begins with AWS Identity and Access Management (IAM). Many AWS services that act on your behalf need an IAM role, an identity the service assumes to access your resources with a defined set of permissions. You then author a trust policy so the service can assume the role, choose the permissions the workload needs, and attach it. Configuring roles and policies for common patterns is repeatable work that doesn’t need to be manual.
IAM role manager does that work for you. When role manager is enabled, AWS creates and configures the IAM roles as you build in supported service consoles, so you can start using a service and let AWS handle the role behind it. You create the resource you want, and role manager provisions and attaches the role you need as part of the same flow, so you can build now and refine permissions as your workload matures.
With that step automated, getting started takes minutes. You can create an AWS Lambda function and start running your code, with its execution role already created and attached, without switching context to set one up. Role creation becomes an automated part of building your application rather than a separate step.
Role manager is especially useful when you’re getting started: the moments when you want to stand up a service or get a proof of concept running and want to defer role configuration until later in your development process. You don’t need prior IAM experience to get started. You keep full control of what it creates, because the roles are ordinary IAM roles that you can view, edit, or delete like any role you author yourself. When you want to tighten a role, AWS IAM Access Analyzer reviews how it has been used and recommends a policy scoped to only the permissions it needs.
How to enable role manager
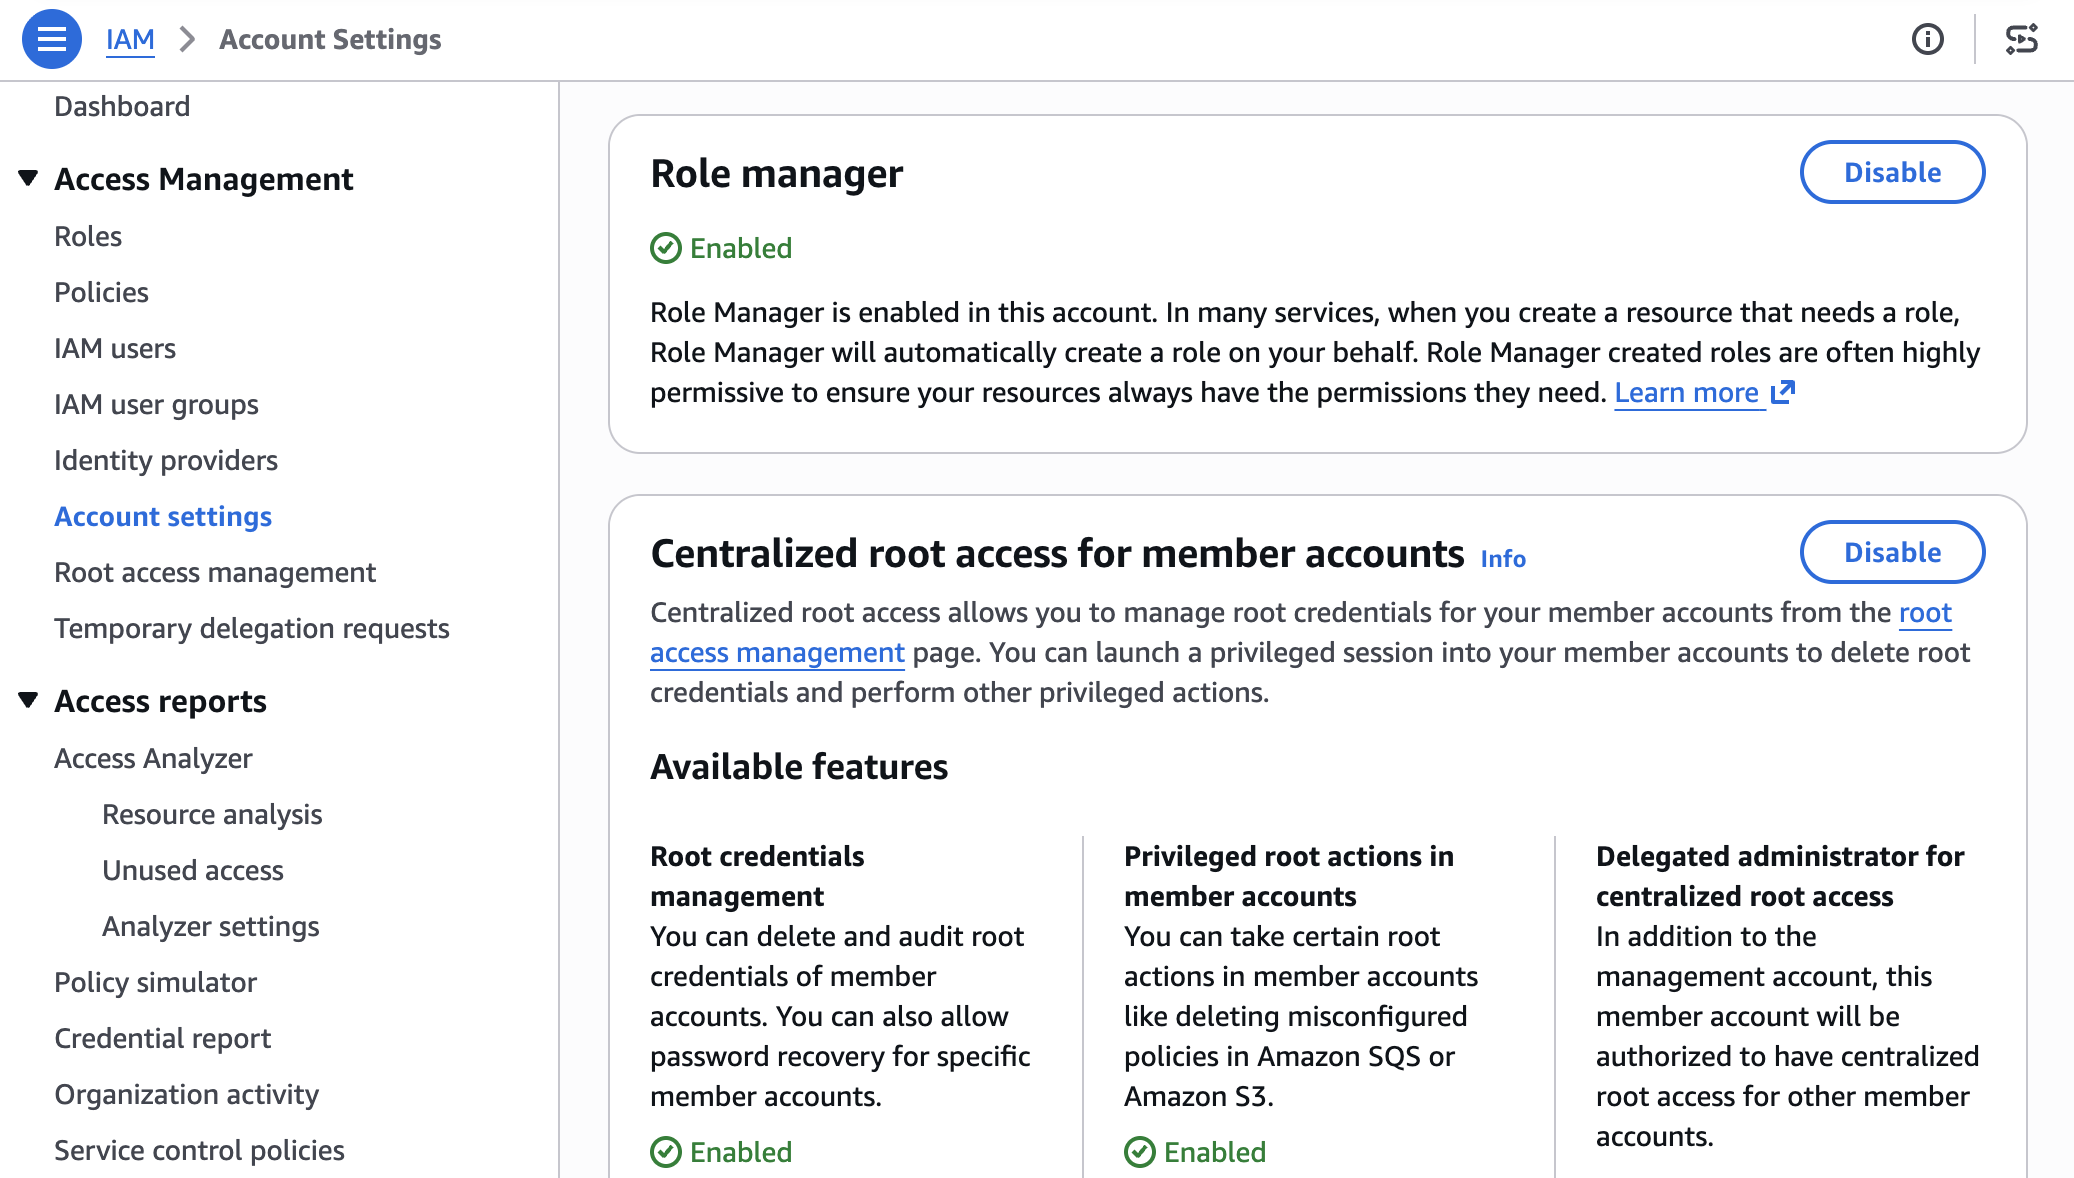
Role manager has two states, enabled and disabled. Enabling it for an account authorizes AWS to create roles in that account. In an organization, administrators can use a service control policy (SCP) to control whether member accounts can enable or use role manager. To enable it:
Open the IAM console and choose Account settings.
In the role manager section, choose Enable.
Figure 1: Enable Role Manager
Some AWS services already create a role for you when you create a resource that needs one. Role manager doesn’t change that: those services keep creating roles automatically, and roles you already created keep working. What role manager adds is a single account-level control, and coverage for a case that built-in flows can’t handle: tasks whose permissions AWS can’t determine in advance, such as running your own code. For those tasks, role manager provisions a role that you can narrow later.
Example: Create an Amazon EventBridge rule
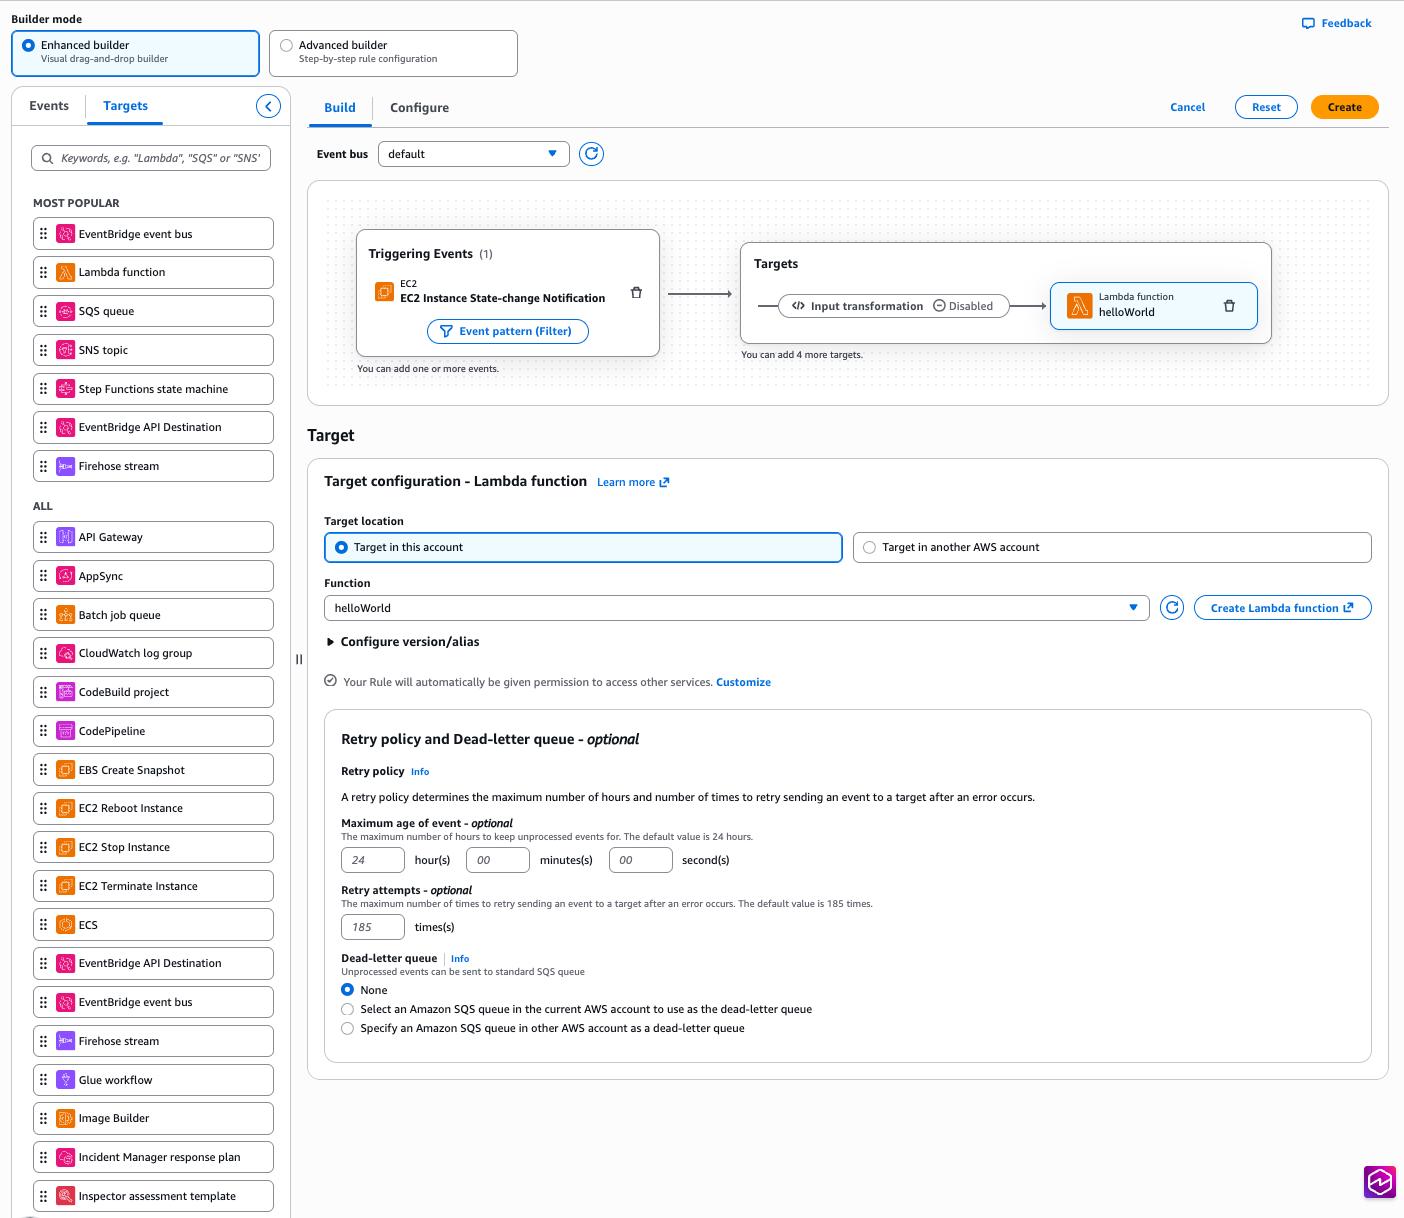
Start with a common task: an Amazon EventBridge rule that invokes a target, such as an Amazon Simple Queue Service (Amazon SQS) queue or an Amazon Simple Notification Service (Amazon SNS) topic. Without role manager, you would pause here to create a role that lets EventBridge invoke the target, write the role’s trust policy, attach the required permissions, and then return to finish the rule. With role manager enabled, you define the rule and its target, choose Create, and role manager provisions the role and attaches it for you. The EventBridge console shows the rule created and ready, and you never open the role-creation flow.
Figure 2: Creating an EventBridge rule with no manual role setup
The role comes from an AWS managed role template: a definition AWS builds and maintains for a specific task, with the trust policy and permissions already worked out. The console calls a new IAM API, AcquireRole, which finds the matching template, provisions the role from it, and returns it to EventBridge. Depending on the service, AcquireRole either creates a new role or reuses one that already fits, so an account does not fill up with duplicate roles for the same task.
Role manager creates the role using your own IAM permissions, not a separate role-manager permission. To provision a new role, you need permission for the actions the template performs: at minimum, you need permissions to create and attach roles. When AcquireRole reuses an existing role instead of creating one, it needs only iam:GetRole and iam:GetRoleTemplateVersion. If you’re missing either of these permissions, the console tells you which one is needed rather than creating the role.
Run code that calls other AWS services
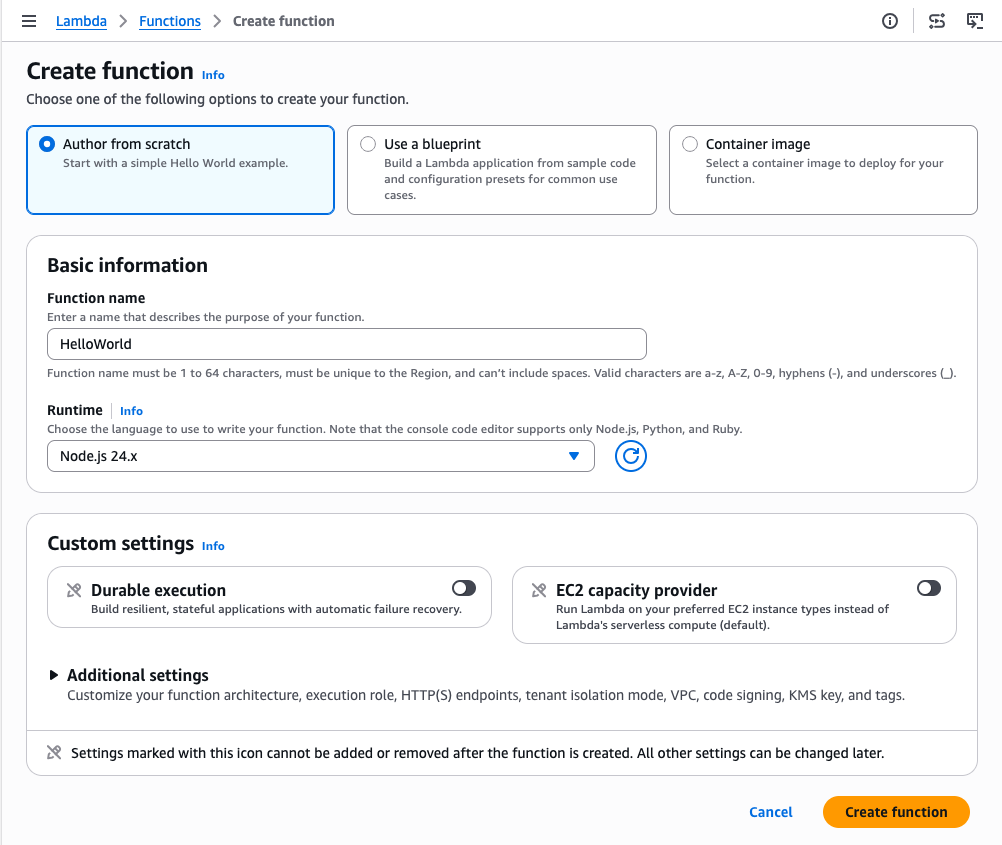
Not every task has a set of permissions AWS can define in advance. When a role runs your own code, such as a Lambda function, AWS has no way of knowing which services that code will call. Role manager covers this case too: create a Lambda function with role manager enabled, and it attaches an execution role that your code can use right away and that you can narrow once you know what the function calls.
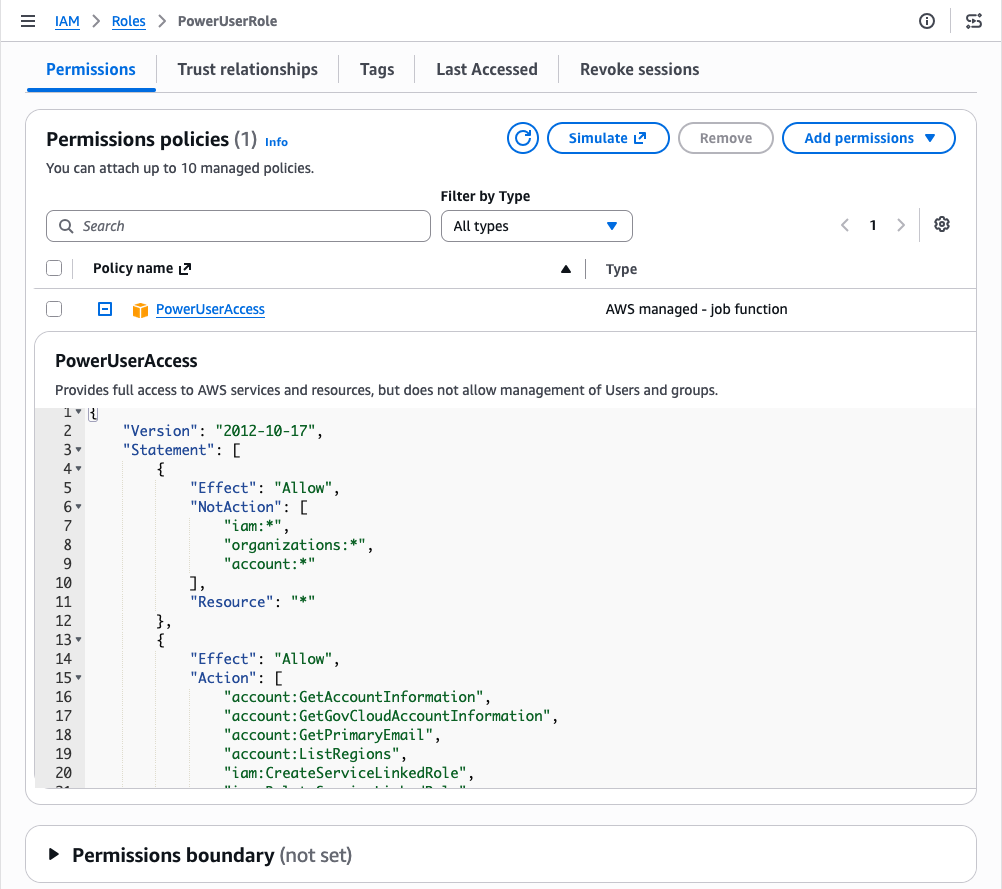
Because the permissions your code needs aren’t known up front, role manager attaches the AWS managed policy PowerUserAccess to the role. PowerUserAccess grants access to AWS services so your function can call what it needs. By design, it doesn’t grant permission to manage IAM, AWS Organizations, or account settings. The template also configures the role to trust only the Lambda service.
Figure 3: Create an AWS Lambda function with no manual role setup
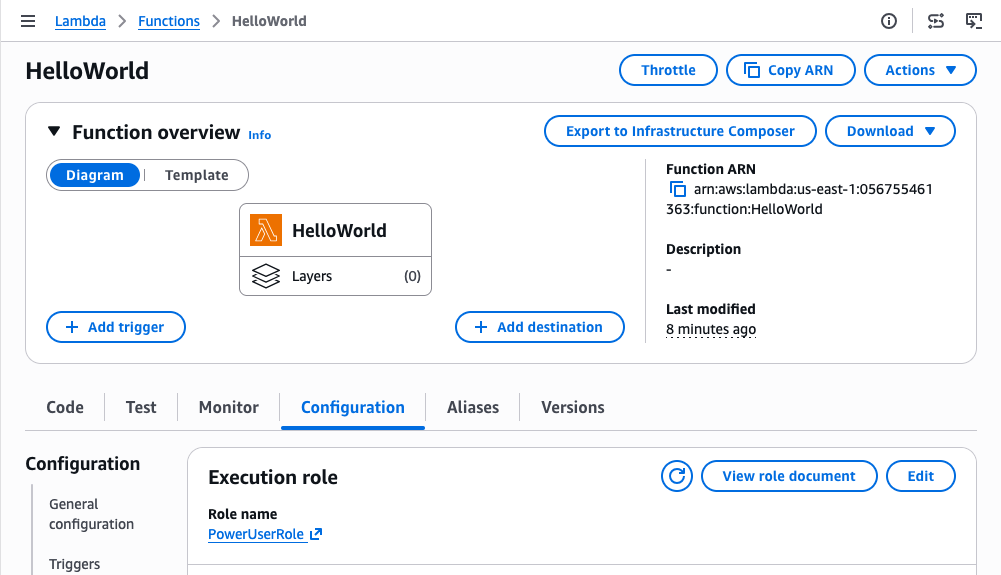
Role manager attaches an execution role, and your function is ready to run. Figure 4 shows the Execution role panel on the function’s Configuration tab, with the role that role manager attached.
Figure 4: Role manager provides a role automatically to an AWS Lambda function
You can open the role in the IAM console to review its permissions. Figure 5 shows the role’s Permissions tab with the PowerUserAccess policy attached.
Figure 5: Permissions of the role provided by role manager for an AWS Lambda function
You keep full visibility into what role manager creates. Every role it creates records the role template it came from, and both GetRole and ListRoles return that template reference. You can inspect any role in your account and tell which were created by role manager. You read a role’s trust policy and permissions the same way you would for a role you authored, and AWS CloudTrail records each role’s creation.
Refining roles as workloads mature
As your workloads mature, refine the roles that role manager created to follow least privilege. When you’re ready, you can disable role manager and get IAM Access Analyzer unused access analysis at no additional cost for 90 days. Access Analyzer looks at how each role has been used and recommends a policy you can apply that keeps only the permissions the role needs. Start with the roles attached to your most critical workloads and work outward.
Disabling role manager doesn’t disrupt anything already running: your resources keep the roles they have, those roles stay in your account until you change them, and from that point you author new roles yourself, the same as before. If you would rather narrow a single role than the whole account, editing that role removes it from role manager’s control and it becomes a standard customer-managed role, with your changes preserved. In sandbox or development accounts, keeping role manager enabled saves time. For production workloads, disable role manager and refine the roles it created to least privilege before going live.
Conclusion
Role manager automates IAM role setup so you can focus on building from the start. When you enable it, AWS creates and attaches the IAM roles your resources need as you build, so you can start in minutes without prior IAM experience. Because these are IAM roles that you fully control, you keep the same visibility and the same tools you already use. Keep role manager enabled while you build, and refine the roles it created as your workloads mature.
To get started, enable role manager in the IAM console and create a resource in a supported service. To learn more, see IAM role creation and the list of supported services in the IAM User Guide.
If you have feedback about this post, submit comments in the Comments section below.
Organizations operating in Germany and across Europe increasingly need to demonstrate cloud security compliance under the Cloud Computing Compliance Criteria Catalogue (C5:2020), published by Germany’s Federal Office for Information Security (BSI). Last year, we introduced Landing Zone Accelerator on AWS support for digital sovereignty and today we’re announcing the availability of a new independent assessment report available on AWS Artifact which evaluates how the Landing Zone Accelerator (LZA) on AWS solution provides enhanced coverage for C5:2020 requirements by implementing nearly 200 native security controls. LZA is available using a standard multi-account configuration or as a container-based deployment option in the AWS European Sovereign Cloud, enabling customers with data residency requirements to use the same security configuration baseline.
How this accelerates your compliance journey
Security and compliance are a shared responsibility. LZA takes on part of this responsibility by defining a security architecture baseline and automatically provisioning your AWS environment that scales as your organization grows. Where AWS already provides C5 Type 2 attestation reports for “security of the cloud”, the LZA assessment report offers an independent opinion of how the security baseline LZA provisions aligns with C5:2020 criteria for “security in the cloud”. Instead of starting from scratch, you can deploy with LZA, evaluate the scope of coverage from the report, and use the LZA Compliance Workbook to build on and customize for your organization’s unique use case. These resources can help you reduce time in architecture design, evidence collection, and preparation for C5:2020 assessments. The free LZA Compliance Workbook available on AWS Artifact and open source Universal Configuration GitHub repository are also excellent sources to add to a knowledge base, enabling you to create a security compliance chat agent with Bedrock to assist your governance or assurance teams.
What’s in the report
AWS Partner Schellman, an independent third-party assessor, evaluated the LZA Universal Configuration architecture and security control baseline, which maps to C5:2020 controls in the LZA Compliance Workbook, to determine how the LZA infrastructure aligns to C5:2020 technical requirements. The report concluded that LZA can help implement 325 security controls in aggregate, aligning to technical requirements from eight C5:2020 control areas. It also describes the LZA architecture design, security best practices, and scoping considerations for C5:2020 assessments. This is the first installation of the independent C5 report for LZA, which will be updated in 2027 to evaluate coverage for the pending C5:2026 revision.
In addition to the LZA C5:2020 report, you can also find the LZA Compliance Workbook available on AWS Artifact. It maps C5:2020 requirement identifiers to security implementation statements, giving you a starting point from which you can customize and enhance your compliance documentation for your unique workloads or operational practices after deploying LZA.
Amazon Web Services (AWS) is pleased to announce that the Summer 2026 System and Organization Controls (SOC) 1 report is now available. The reports cover 185 services over the 12-month period from July 1, 2025–June 30, 2026, giving customers a full year of assurance. These reports demonstrate our continuous commitment to adhering to the heightened expectations of cloud service providers.
AWS strives to continuously bring services into the scope of its compliance programs to help customers meet their architectural and regulatory needs. You can view the current list of services in scope on our Services in Scope page. As an AWS customer, you can reach out to your AWS account team if you have any questions or feedback about SOC compliance.
The NHS DSPT is an assessment that allows organizations to measure their performance against the National Data Guardian’s 10 data security standards. All organizations that access NHS patient data and systems are expected to use the toolkit to demonstrate their compliance with safe data security standards. NHS DSPT covers standards regarding Personal Confidential Data, Continuity Planning, IT Protection, and more. AWS undergoes the assessment to provide customers with assurance that we are practicing good data security.
Security and compliance is a shared responsibility between AWS and the customer. When customers move their computer systems and data to the cloud, security responsibilities are shared between the customer and the cloud service provider. For more information, see the AWS Shared Security Responsibility Model.
We’re excited to announce that our Europe (London) AWS Region has renewed its accreditation for United Kingdom (UK) Police-Assured Secure Facilities (PASF) for Official-Sensitive data. Since 2017, the Amazon Web Services (AWS) Europe (London) Region has been accredited under the PASF program. This demonstrates our continuous commitment to adhere to the heightened expectations of customers with UK law enforcement workloads. Our UK law enforcement customers who require PASF can continue to run their applications in the PASF-accredited Europe (London) Region in confidence.
The PASF is a long-established assurance process, used by UK law enforcement, as a method for assuring the security of facilities such as data centers or other locations that house critical business applications that process or hold police data. PASF consists of a control set of security requirements, an on-site inspection, and an audit interview with representatives of the facility.
The Police Digital Service (PDS) confirmed the accreditation renewal for AWS on May 28, 2026. A confirmation letter can be found on AWS Artifact. The UK police force and law enforcement organizations can also obtain confirmation of the compliance status of AWS through the Police Digital Service.
We’re excited to announce that Amazon Web Services (AWS) has completed theCyberVadis assessment of its security posture with the highest score (Mature) in all assessed areas. This demonstrates our continued commitment to meet the heightened expectations for cloud service providers. Customers can now use the 2026 AWS CyberVadis report and scorecard to reduce their supplier due-diligence burden.
With the increasing adoption of cloud products and services across multiple sectors and industries, AWS is a critical component of customers’ third-party environments. Regulated customers, such as those in the financial services sector, are held to high standards by regulators and auditors when it comes to exercising effective due diligence on third parties.
Many customers use third-party risk management services such as CyberVadis to better manage risks from their evolving third-party environments and drive operational efficiencies. In support of these efforts, AWS has completed its annual CyberVadis security posture assessment, conducted by CyberVadis security analysts.
CyberVadis is a comprehensive third-party risk assessment process that combines the speed and scalability of automation with the certainty of analyst validation. CyberVadis assessments employ a dynamic and comprehensive approach to third-party risk assessment, replacing outdated static spreadsheets and the need for annual AWS assessment access requests. This cloud-based solution provides advanced capabilities by integrating AWS responses with analytics and sophisticated risk models to deliver an in-depth view of the security posture of AWS.
CyberVadis’s risk assessment methodology evaluates 20 topics covering the entire cybersecurity life cycle across four phases: Identify, Protect, Detect, and React. These topics include Data Privacy, Access Management, and Infrastructure Security. The assessment criteria are based on international information security standards, including ISO 2700x, NIST Cybersecurity Framework, Cybersecurity for ICS, PCI DSS, NIS2 and GDPR.
Customers can use CyberVadis results to map the assessment of AWS to commonly used industry frameworks and standards to instantly gain visibility into controls coverage.
AWS customers can download the complete 2026 AWS Assessment Report directly through CyberVadis’s portal using their own account, or through AWS Artifact.
To learn more about our other compliance and security programs, see AWS Compliance Programs.
As an AWS customer, you can reach out to your AWS account team if you have any questions or feedback.
If you have feedback about this post, submit comments in the Comments section below.
Ten years ago, we launched AWS Directory Service for Microsoft Active Directory, a fully managed Microsoft Active Directory in the AWS Cloud. In that original announcement, Jeff Barr described a straightforward promise: “You will spend less time administering and more time working on your applications and your business.”
A decade later, AWS Managed Microsoft AD has become the identity backbone for thousands of enterprises worldwide. What started as a way to run directory-aware workloads in the cloud now powers SQL Server authentication, Amazon WorkSpaces virtual desktops, and Amazon FSx for Windows File Server for thousands of enterprises worldwide.
The beginning: Solving a real customer problem
In 2015, customers migrating Windows workloads to Amazon Web Services (AWS) faced a familiar challenge. Microsoft Active Directory (AD) had become the dominant standard for enterprise identity, by some estimates commanding 90% market share for directory services in the Fortune 1000. Running SharePoint, SQL Server, .NET applications, or virtually any Windows workload meant running AD.
However, running AD well comes with significant operational overhead. It requires careful capacity planning, high availability design across multiple sites, ongoing patching and maintenance, backup and disaster recovery procedures, and deep expertise that’s increasingly difficult to find and retain. Customers told us they wanted to focus on their applications, not on managing domain controllers.
So we built AWS Managed Microsoft AD. Powered by actual Windows Server, it delivered real Microsoft AD (not a compatible alternative, but the genuine article) as a fully managed service. We handled the domain controller deployment, the multi-AZ high availability, the automated backups, the patching, the monitoring, and many more features including scalability and multi-Region replication. Customers got a directory they could provision in 25–30 minutes and start using immediately.
“AWS Directory Service now lets you run a Microsoft Active Directory (AD) as a managed service… Host monitoring and recovery, data replication, snapshots, and software updates are automatically configured and managed for you.”
The first decade of innovation
Looking back at the past 10 years, we’re struck by how much AWS Managed Microsoft AD has evolved in response to customer feedback. Here are some of the highlights:
2015: Launch of AWS Managed Microsoft AD (Enterprise Edition) in five AWS Regions, powered by Windows Server 2012 R2. Support for trust relationships with on-premises AD, seamless domain join for Amazon Elastic Compute Cloud (Amazon EC2) instances, and integration with Amazon WorkSpaces.
2017: Introduction of Standard Edition, optimized for small and midsize businesses. This gave customers a cost-effective option for resource forest deployments and smaller workloads.
2018: Added support for schema extensions, enabling customers to extend their directory schema for applications that require custom attributes. Support for Group Managed Service Accounts (gMSA) with Windows containers and other services.
2019: Launched multi-Region replication for Enterprise Edition, allowing customers to automatically replicate their directory across AWS Regions for improved performance and disaster recovery. Added directory sharing across AWS accounts and integration with AWS Organizations.
2020: Introduced fine-grained directory settings for security and compliance, enabling customers to configure secure channel settings for protocols and ciphers. Enhanced compliance support—with the service now HIPAA eligible—included as an in-scope service under PCI DSS, and achieving FedRAMP authorization.
2021: Added CloudWatch metrics for domain controllers, helping customers optimize scaling decisions based on CPU, memory, disk, and AD-specific metrics like DNS and directory read/write operations. Launched integration with AWS Transfer Family for SFTP/FTPS/FTP authentication.
2022: Windows Server 2019 upgrade became available, with customer-initiated updates and automatic migration for all directories beginning in 2023.
2023: AWS Private CA Connector for Active Directory launched, allowing customers to replace self-managed enterprise certificate authorities with AWS Private CA for automatic certificate enrollment to domain-joined objects, with no local agents or proxy servers required.
2025: General availability of AWS Managed Microsoft AD (Hybrid Edition), allowing customers to extend their existing AD domain to AWS while retaining administrative control. Introduced self-service edition upgrades through the UpdateDirectorySetup API, eliminating the need for support tickets when scaling from Standard to Enterprise Edition.
2026 and beyond: As we enter our second decade, our roadmap continues to be shaped by the customers who depend on AWS Managed Microsoft AD every day. We’re working on new capabilities driven directly by your feedback, and we look forward to sharing more soon.
Powering identity across AWS
Over the past decade, more than 20 AWS services have added native integration with AWS Managed Microsoft AD. What started with WorkSpaces and EC2 domain join has expanded to more than 20 AWS services, making AWS Managed Microsoft AD foundational for many enterprise customers’ workloads on AWS.
Database services
For many customers, database authentication is a primary driver for adopting AWS Managed Microsoft AD. By pairing Amazon Relational Database Service (Amazon RDS) for SQL Server with AWS Managed Microsoft AD, they gain the benefits of fully managed services while achieving straightforward integration and reduced management overhead. This combination lets developers and DBAs use their existing AD credentials to access SQL Server databases, so they don’t need to manage separate database accounts.
Beyond SQL Server, AWS Managed Microsoft AD enables Windows authentication across the Amazon RDS family:
Amazon RDS for Oracle
Amazon RDS for PostgreSQL
Amazon RDS for MySQL
Amazon RDS for DB2
Amazon Aurora MySQL
Amazon Aurora PostgreSQL
File storage services
Amazon FSx for Windows File Server provides fully managed Windows file shares that integrate natively with AWS Managed Microsoft AD. Customers use AD users and groups to control access to file shares, apply Windows ACLs, and use features like DFS namespaces, all with the same management experience they use on premises.
AWS Storage Gateway supports AD authentication for SMB file shares, enabling hybrid storage architectures where on-premises applications access cloud storage using familiar AD credentials.
AWS Transfer Family added AD integration in 2021, allowing customers to authenticate SFTP, FTPS, and FTP users against their AWS Managed Microsoft AD. This allows customers to migrate file transfer workflows without changing end-user credentials.
End user computing
Amazon end-user computing services were among the first to integrate with AWS Managed Microsoft AD:
Amazon WorkSpaces: Virtual desktops provisioned and authenticated through AD
AWS IAM Identity Center (formerly AWS Single Sign-On) uses AWS Managed Microsoft AD as an identity source, synchronizing users and groups to provide single sign-on access across AWS accounts and applications. This provides centralized identity management while using your existing AD infrastructure.
AWS Client VPN authenticates users against AWS Managed Microsoft AD, providing secure remote access using corporate credentials.
Amazon EC2 instances (both Windows and Linux) support seamless domain join at launch. Windows instances can be managed using Group Policy, and Linux instances can authenticate users through SSSD or Realm integration.
Amazon Elastic Container Service (Amazon ECS) supports AD authentication for Windows containers through Group Managed Service Accounts (gMSA), enabling containerized applications to authenticate to AD-integrated resources.
Business applications
Amazon QuickSight provides business intelligence with AD-based user provisioning.
Amazon Connect provides contact center agent authentication
This breadth of integration means customers can standardize on a single directory for their entire AWS environment, from databases to desktops to file servers to analytics.
Choosing the right edition
Over the years, we’ve learned that customers have different needs when it comes to managed AD. Today, AWS Managed Microsoft AD is available in three editions, each designed for specific use cases.
Standard Edition: Basic, cost-effective identity
Standard Edition is optimized for small and midsize businesses, or for enterprises deploying a resource forest model in a single AWS Region. With 1 GB of directory object storage supporting up to 30,000 objects (approximately 5,000 users), Standard Edition provides everything needed to run directory-aware workloads without the overhead of managing domain controllers.
Common use cases:
Resource forest deployments – Many customers use Standard Edition as a resource forest, establishing a trust relationship with their on-premises AD. User identities remain in the customer’s existing domain, while the resource forest manages AWS resources like Amazon RDS for SQL Server and FSx for Windows File Server.
Development and test environments – Cost-effective option for non-production workloads
Single-Region applications – Workloads that don’t require global presence
Standard Edition is a great starting point, and customers aren’t locked in. With our new self-service upgrade capability (launched October 2025), you can upgrade to Enterprise Edition programmatically through the UpdateDirectorySetup API, no support tickets or maintenance window coordination required.
Enterprise Edition: Built for global scale
Enterprise Edition is designed for organizations with larger user populations, complex deployments, or global footprints. With 17 GB of storage supporting up to 500,000 directory objects, Enterprise Edition provides the capacity and capabilities that large enterprises require.
Key capabilities:
Multi-Region replication – Automatically replicate your directory across AWS Regions. Users and applications connect to local domain controllers, reducing latency and providing disaster recovery capabilities.
Extended directory sharing – Share your directory with up to 500 AWS accounts, enabling centralized identity across large organizations using AWS Organizations.
Higher compute capacity – Larger domain controller instances with more CPU and memory for demanding workloads
If you have users and applications in multiple geographic regions, or anticipate significant growth in directory objects, Enterprise Edition is the right choice.
Hybrid Edition: Extend your existing domain
Launched earlier this year, Hybrid Edition takes a fundamentally different approach. Instead of creating a new AD domain in AWS, Hybrid Edition extends your existing AD domain into the cloud.
What makes Hybrid Edition unique:
Same domain – AWS Managed Microsoft AD domain controllers join your existing AD. No new domain name, no trust relationships to configure.
Retain administrative control – Unlike Standard and Enterprise where you receive delegated OU permissions, Hybrid Edition preserves your existing administrative rights. Your AD administrators continue using familiar tools while changes replicate to AWS in real time.
Preserve existing investments – Security principals, group policies, and permissions transfer seamlessly. No migration of identities required.
Hybrid Edition is ideal for customers who want the operational benefits of AWS-managed domain controller infrastructure without changing their AD architecture or giving up administrative control.
Which edition should you choose?
Use the following table to determine which edition best fits your use case.
Use case
Edition
A new AD domain for AWS workloads in a single Region
Standard Edition
A resource forest with trust to on-premises AD
Standard Edition
Multi-Region replication for global deployments
Enterprise Edition
Support for more than 30,000 directory objects
Enterprise Edition
To extend your existing AD domain to AWS
Hybrid Edition
To retain full administrative control over your AD
Hybrid Edition
What we’ve learned: Design decisions that stood the test of time
Looking back at the decisions we made in 2015, several have proven foundational to the service’s success:
High availability by default – Every AWS Managed Microsoft AD directory deploys with a minimum of two domain controllers across separate Availability Zones. Customers don’t need to design high availability (HA) architecture, it’s built in.
Real Microsoft AD – We chose to run actual Windows Server AD, not a compatible alternative. This means standard AD administration tools work, existing scripts and automation work, and applications that depend on specific AD behaviors typically work without modification.
Seamless integration with AWS services – By building native integrations between AWS Managed Microsoft AD and other AWS services, we’ve made it possible for customers to use a single directory across their entire AWS environment.
Customer retains control – While AWS manages the infrastructure, customers manage their directory content. You control your users, groups, OUs, and policies using familiar tools.
Room to grow – The edition model (and now self-service upgrades) means customers can start with what they need today and scale as requirements evolve.
Looking ahead: The next chapter
As we celebrate 10 years of AWS Managed Microsoft AD, we’re excited about what’s ahead. The launch of Hybrid Edition earlier this year represents a significant expansion of what’s possible, giving customers new flexibility in how they architect their identity infrastructure for hybrid and multi-cloud environments.
We continue to listen to customer feedback and invest in capabilities that reduce operational burden while expanding what you can build. Whether you’re running your first SQL Server database in the cloud, deploying virtual desktops to a global workforce, or modernizing legacy applications that depend on AD, AWS Managed Microsoft AD is here to help.
Thank you to all the customers who have trusted us with their identity infrastructure over the past decade. Your feedback has shaped this service, and we’re committed to continuing to earn that trust for the next 10 years and beyond.
Resources
Ready to get started or learn more? Here are some resources:
Misconfigured Amazon Simple Storage Service (Amazon S3) buckets can expose your data to unauthorized access. Without proactive review, S3 bucket policies or Access Control Lists (ACLs) configured with broad access may go unnoticed in your environment. In this post, you learn how to identify and fix over-permissioned S3 buckets across your AWS environment, along with best practice recommendations and automation opportunities to help you prevent security gaps. This post provides a workflow framework and methodology recommendations for your security team to adapt. The focus of this post is on the what and why rather than a prescriptive implementation. You will need to customize the approach based on your organization’s requirements and existing security tooling.
This solution is intended for security engineers, cloud architects, and DevOps teams managing single- or multiple-account AWS environments with Amazon S3 workloads that require access management.
Prerequisites
Before you begin, make sure you have the following in place:
For multi-account environments, AWS Organizations should already be configured.
Basic familiarity with IAM policies and Python will help you customize the solution to your needs.
Solution overview
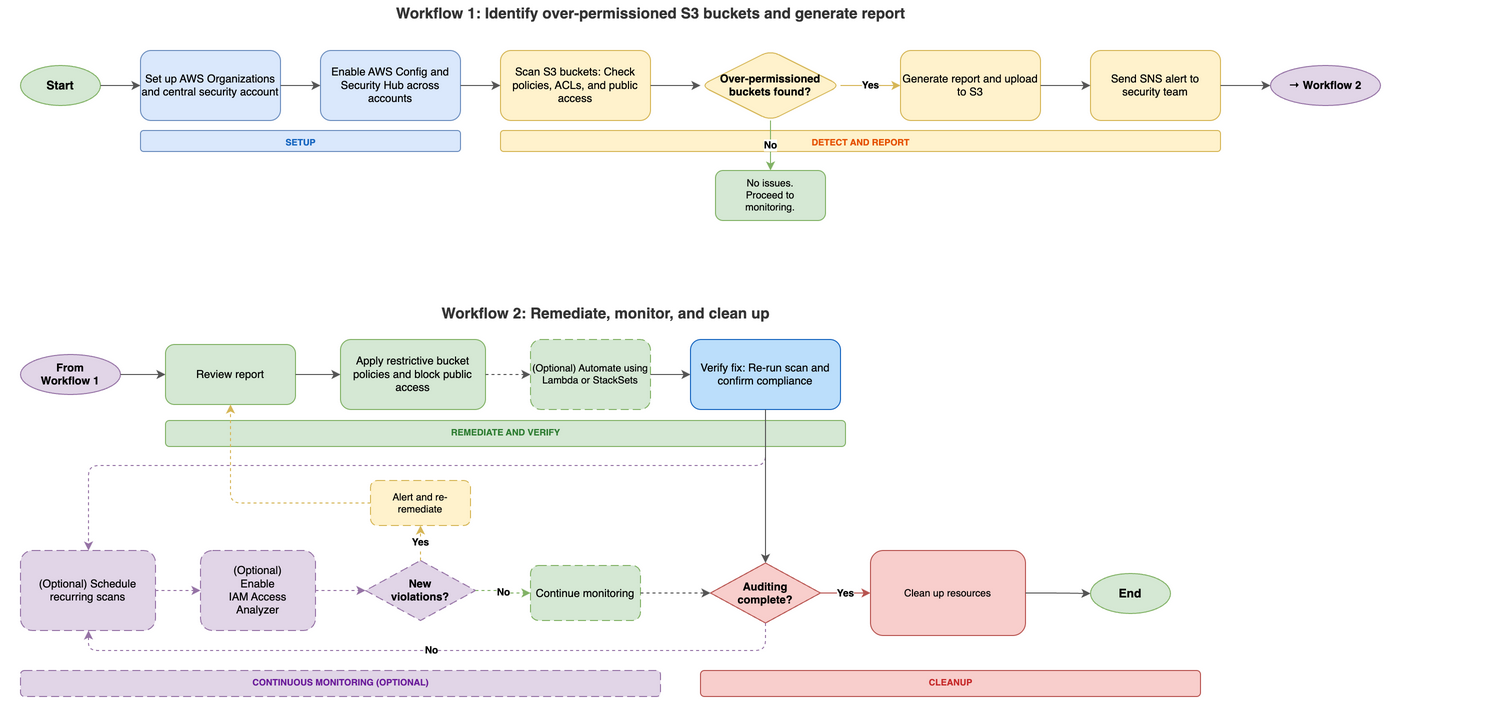
This solution uses a five-phase workflow diagram to detect, remediate, and continuously monitor over-permissioned S3 buckets across your AWS accounts. The following workflow diagram illustrates the high-level end-to-end process for identifying and remediating over-permissioned S3 buckets across your Amazon Web Services (AWS) environment.
Setup and prerequisites – Configure AWS Organizations or multi-account access, designate a central security account, deploy AWS Config across all accounts, and enable AWS Security Hub with a central administrator.
Detection and identification – Deploy AWS Config rules (such as s3-bucket-public-read-prohibited and s3-bucket-public-write-prohibited) and run an audit Lambda function that scans each S3 bucket. The function checks three areas: Public Access Block configuration, bucket policy status, and bucket ACL grants. Buckets with issues are added to a risky buckets list. The function then generates a report in CSV and JSON format, uploads it to an output S3 bucket, and sends an SNS alert.
Remediation – Address findings using one or more approaches – Apply restrictive bucket policies to deny public read/write access and restrict access to specific IAM principals; deploy a remediation Lambda function to automatically update bucket policies and disable public access settings; or use CloudFormation StackSets to deploy standardized policies across multiple accounts.
Continuous monitoring – Schedule the audit Lambda function for recurring scans (daily or weekly) using Amazon EventBridge. Use EventBridge to detect policy changes, configure automated notifications for new violations, enable IAM Access Analyzer for S3 to identify external access, and run regular compliance scans.
Resource cleanup – Review and delete resources created during the audit that are no longer needed, including Lambda functions and IAM roles, EventBridge rules, SNS topics and subscriptions, audit output S3 buckets, AWS Config rules, and Security Hub (if enabled only for this audit).
Cost considerations
This section covers the AWS services used in this solution and their associated costs so you can estimate spend before deployment. The primary cost drivers are AWS Config and Security Hub, which scale with the number of accounts and resources you monitor. Lambda, Amazon EventBridge, Amazon SNS, and Amazon S3 typically add minimal costs for most environments. Start with a pilot in one or two accounts to validate costs before scaling.
AWS Config – Charges per configuration item recorded and per rule evaluation. Costs scale with the number of accounts and resources tracked.
Security Hub – Charges per account per AWS Region for security checks and finding ingestion.
Lambda – Charges per request and per GB-second of compute time.
EventBridge – Scheduled rules are free. Custom event bus usage might incur charges.
Amazon SNS – Charges per notification delivered.
Amazon S3 – Storage costs for audit report output files. Minimal for most environments.
Check the service pricing pages for current rates. Use the AWS Pricing Calculator to estimate costs for your specific environment before enabling services across all accounts. Consider starting with a pilot in one or two accounts to validate costs before scaling.
Detect and report over-permissioned buckets
This section walks you through setting up the audit environment, deploying the Lambda-based scanner, and generating reports of over-permissioned S3 buckets across your accounts. Follow these steps to identify over-permissioned S3 buckets in your multi-account environment, starting with preparing your environment for an Amazon S3 audit.
To set up the multi-account audit environment:
Set up AWS Organizations or multi-account access. Set up centralized management of your AWS accounts using AWS Organizations or configure cross-account IAM roles.
Choose a central security account. Choose one account as your security/audit account. This account will run the audit Lambda function and collect results from member accounts.
Create an Amazon SNS topic for alerts. Subscribe your security team to receive notifications when over-permissioned buckets are detected. Note the topic Amazon Resource Name (ARN) from the output—you will need it when creating the Lambda execution role (step 6) and the Lambda function (step 9). Confirm the email subscription before testing; Amazon SNS doesn’t deliver alerts until the subscription is confirmed. Learn more in the Amazon SNS Developer Guide.
(Optional): Create an S3 bucket for audit reports. If you plan to use Script v2 for historical reporting and trend analysis, create a dedicated bucket now. Skip this step if you only need real-time alerts using Script v1.
Plan cross-account IAM roles. The central security account needs permission to scan member accounts. Design cross-account roles that:
Grant minimum Amazon S3 read permissions (list buckets, read policies, ACLs, public access configurations).
Include an external ID condition to mitigate the confused deputy problem.
Note: The specific trust policy and permissions policy for your cross-account roles will depend on organizational requirements. Work with your IAM administrators to grant minimum necessary access for the audit function.
Create the Lambda execution role. Create an IAM role for your Lambda function with the permissions it needs to scan buckets, publish alerts, and write logs. Apply the principle of least privilege—grant only the minimum Amazon S3 read permissions required for the audit (such as, listing buckets, reading bucket policies, ACLs, and public access block configurations), Amazon SNS publish permission for the alert topic created in step 3, Amazon S3 write permission for the output bucket created in step 4 (Script v2), and Amazon CloudWatch Logs permissions. For multi-account scanning, also include sts:AssumeRolepermission for the cross-account role ARNs created in step 5. The AWS Lambda execution role documentation has instructions on creating and configuring execution roles.
To deploy the S3 audit solution Deploy the audit components
Enable AWS Config in member accounts. AWS Config provides compliance monitoring and can detect when S3 buckets are created or modified with public access settings. This will enable the Lambda-based audit to receive real-time detection between scheduled scans. The AWS Config Developer Guide has setup instructions. Deploy pre-defined AWS Config rules to identify overly permissive settings. These managed rules provide automated compliance checking. When AWS Config detects violations, it sends findings to Security Hub (configured in step 8) for centralized visibility alongside the Lambda audit results.
s3-bucket-public-read-prohibited
s3-bucket-public-write-prohibited
Create AWS Config rules for specific permission patterns. For the full list of available rules, see the AWS Config managed rules reference
Enable Security Hub for centralized visibility. Enable AWS Security Hub in member accounts and configure the central security account as the administrator. Security Hub aggregates findings from AWS Config rules (step 7), IAM Access Analyzer (enabled later), and can receive custom findings from your Lambda audit function, providing a single dashboard for Amazon S3 security issues across your organization. See the Security Hub User Guide for setup details.
Deploy the audit Lambda function. Deploy a Python Lambda function using the Boto3 library to list S3 buckets, check their policies, ACLs, and IAM permissions, and identify over-permissioned buckets. See the example scripts that follow.
Important: These code examples aren’t production ready. Adapt them to meet your organization’s requirements and test them in a non-production environment before deployment.
Choose your approach:
Script v1 – Best for immediate SNS alerts when issues are detected.
Script v2 – Best for historical reports, trend analysis using BI tools.
Both scripts – Best for different schedules and ongoing needs.
Audit Lambda function – Example script v1 (Scan and alert)
The following is an example of a Lambda function script for reference purposes. Review, adapt, and test before use in your environment, it scans all S3 buckets in the current account and checks for:
Public Access block configuration gaps
Bucket policies that allow public access
ACL grants to AllUsers
Note: Replace placeholder values with actual values before deployment:
<REGION>– Your AWS Region (for example, us-east-1)
<ACCOUNT_ID>– Your 12-digit AWS account ID
<TOPIC_NAME>– The name of your SNS topic created in step 3
import boto3
import json

def lambda_handler(event, context):
    s3 = boto3.client('s3')
    sns = boto3.client('sns')
    risky_buckets = []
    errors = []

    try:
        buckets = s3.list_buckets()['Buckets']
    except Exception as e:
        return {'statusCode': 500, 'body': f'Failed to list buckets: {str(e)}'}

    for bucket in buckets:
        bucket_name = bucket['Name']
        issues = []

        try:
            # Check Public Access Block — all four settings should be enabled
            try:
                pab = s3.get_public_access_block(Bucket=bucket_name)
                config = pab['PublicAccessBlockConfiguration']
                if not all([
                    config.get('BlockPublicAcls'),      # Block new public ACLs
                    config.get('BlockPublicPolicy'),     # Block new public bucket policies
                    config.get('IgnorePublicAcls'),      # Ignore existing public ACLs
                    config.get('RestrictPublicBuckets')   # Restrict access to public buckets
                ]):
                    issues.append('Public Access Block not fully enabled')
            except s3.exceptions.NoSuchPublicAccessBlockConfiguration:
                issues.append('No Public Access Block configured')

            # Check bucket policy — flag if policy status is public
            try:
                policy_status = s3.get_bucket_policy_status(Bucket=bucket_name)
                if policy_status['PolicyStatus']['IsPublic']:
                    issues.append('Bucket policy allows public access')
            except s3.exceptions.NoSuchBucketPolicy:
                pass  # No bucket policy is acceptable

            # Check bucket ACL
            acl = s3.get_bucket_acl(Bucket=bucket_name)
            for grant in acl.get('Grants', []):
                grantee = grant.get('Grantee', {})
                uri = grantee.get('URI', '')
                # 'AllUsers' = anonymous public access
                # 'AuthenticatedUsers' = any AWS account (still overly permissive)
                if grantee.get('Type') == 'Group' and ('AllUsers' in uri or 'AuthenticatedUsers' in uri):
                    issues.append('Bucket ACL grants public access')
                    break

            if issues:
                risky_buckets.append({'bucket': bucket_name, 'issues': issues})

        except Exception as e:
            errors.append(f'{bucket_name}: {str(e)}')

    # Send alert if risky buckets found
    if risky_buckets:
        message = f'Found {len(risky_buckets)} buckets with public access:\n\n'
        for item in risky_buckets:
            message += f"  {item['bucket']}: {', '.join(item['issues'])}\n"

        sns.publish(
            TopicArn='arn:aws:sns:<REGION>:<ACCOUNT_ID>:<TOPIC_NAME>',
            Subject='S3 Public Access Alert',
            Message=message
        )

    return {
        'statusCode': 200,
        'body': json.dumps({
            'risky_buckets': risky_buckets,
            'errors': errors,
            'total_checked': len(buckets)
        })
    }
Multi-account scanning: This script scans the current account only. To scan across member accounts, see the Multi-account extension section later in this post.
Audit Lambda function – Example script v2 (CSV and JSON report)
The following is an example Lambda function script for reference purposes. Before deploying any script, review error handling, logging, output structure, and permissions. This script generates CSV and JSON output files and uploads them to an S3 bucket for reporting and business intelligence (BI) dashboard integration.
You can deploy both functions with different EventBridge schedules, for example, Script v1 daily for alerts and Script v2 weekly for reports.
Note: Before you deploy this script, replace <OUTPUT_BUCKET_NAME> with the S3 bucket you created for audit reports in step 4.
import boto3
import csv
import json
import os

def lambda_handler(event, context):
    s3 = boto3.client('s3')
    buckets = s3.list_buckets()['Buckets']

    full_access_buckets = []
    for bucket in buckets:
        bucket_name = bucket['Name']
        try:
            bucket_policy = s3.get_bucket_policy(Bucket=bucket_name)['Policy']
            policy = json.loads(bucket_policy)
            for statement in policy['Statement']:
                if (statement['Effect'] == 'Allow'
                    and statement['Principal'] == '*'
                    and 'Action' in statement
                    and 's3:*' in statement['Action']):
                    full_access_buckets.append({'BucketName': bucket_name})
                    break
        except s3.exceptions.ClientError as e:
            if e.response['Error']['Code'] != 'NoSuchBucketPolicy':
                print(f'Error checking bucket policy for {bucket_name}: {e}')

    # Output CSV
    csv_output = os.path.join('/tmp', 'full_access_buckets.csv')
    with open(csv_output, 'w', newline='') as csvfile:
        writer = csv.DictWriter(csvfile, fieldnames=['BucketName'])
        writer.writeheader()
        writer.writerows(full_access_buckets)

    # Output JSON
    json_output = os.path.join('/tmp', 'full_access_buckets.json')
    with open(json_output, 'w') as jsonfile:
        json.dump(full_access_buckets, jsonfile, indent=2)

    # Upload to Amazon S3
    output_bucket = '<OUTPUT_BUCKET_NAME>'
    s3.upload_file(csv_output, output_bucket, 'full_access_buckets.csv')
    s3.upload_file(json_output, output_bucket, 'full_access_buckets.json')

    return {
        'statusCode': 200,
        'body': json.dumps(f'CSV and JSON files uploaded to {output_bucket}')
    }
Important: If this function runs on a schedule, consider implementing a file naming strategy with timestamps to prevent overwriting previous reports or establish a lifecycle policy to manage retention. Include the output bucket in your cleanup procedures when the auditing process is no longer needed.
What if no over-permissioned buckets are found?
If the audit scan returns zero risky buckets, document the clean baseline for future comparison and move to the verification and monitoring phase to so new buckets or policy changes don’t introduce risk over time.
Multi-account extension
The preceding example scripts scan buckets in the current account only. To scan across member accounts in your organization, add the following AssumeRole logic. This function assumes the cross-account IAM role you created during setup, then returns an Amazon S3 client with temporary credentials for each member account.
Note: Before you deploy, configure the following Lambda environment variables:
<MEMBER_ACCOUNTS> – Comma-separated list of 12-digit account IDs to scan (for example, 111111111111,222222222222)
<CROSS_ACCOUNT_ROLE_NAME> – The IAM role name created in each member account (for example, S3AuditRole)
<EXTERNAL_ID> – The external ID configured in the trust policy (for example, s3-audit-external-id)
import boto3
import os

def get_member_s3_clients():
    """
    Assumes the cross-account audit role in each member account
    and returns a list of (account_id, s3_client) tuples.
    """
    sts = boto3.client('sts')
    member_accounts = os.environ.get('<MEMBER_ACCOUNTS>', '').split(',')
    cross_account_role_name = os.environ.get('<CROSS_ACCOUNT_ROLE_NAME>')
    external_id = os.environ.get('<EXTERNAL_ID>')

    clients = []
    for account_id in member_accounts:
        account_id = account_id.strip()
        if not account_id:
            continue

        try:
            assumed_role = sts.assume_role(
                RoleArn=f'arn:aws:iam::{account_id}:role/{cross_account_role_name}',
                RoleSessionName='S3AuditSession',
                ExternalId=external_id
            )

            # Create S3 client with assumed credentials
            s3_client = boto3.client(
                's3',
                aws_access_key_id=assumed_role['Credentials']['AccessKeyId'],
                aws_secret_access_key=assumed_role['Credentials']['SecretAccessKey'],
                aws_session_token=assumed_role['Credentials']['SessionToken']
            )
            clients.append((account_id, s3_client))

        except Exception as e:
            print(f'Failed to assume role in account {account_id}: {e}')

    return clients
To scan each member account, replace the single-account s3.list_buckets() call with a loop over member accounts:
def lambda_handler(event, context):
    all_risky_buckets = []
    all_errors = []

    # Scan each member account
    for account_id, s3_client in get_member_s3_clients():
        try:
            buckets = s3_client.list_buckets()['Buckets']
            for bucket in buckets:
                # ... same scanning logic as the single-account scripts ...
                # Use s3_client instead of s3 for each API call
                pass
        except Exception as e:
            all_errors.append(f'Account {account_id}: {e}')

    # ... same alerting/reporting logic ...
The Lambda execution role in the central security account needs sts:AssumeRole permission for the cross-account role ARNs. Add this to the execution role policy you created in step 5.
Remediate elevated access
This section describes how to fix over-permissioned buckets using account-level controls, bucket policies, and optional automation. Any elevated access that you find needs to be remediated.
Enable Amazon S3 Block Public Access (account level)
Before applying individual bucket policies, enable Amazon S3 Block Public Access at the account level. This prevents buckets in the account from being made public, regardless of individual bucket policies or ACLs. See theS3 Block Public Access documentation for configuration details. See the following example AWS CLI command; replace <ACCOUNT_ID> with the ID of the account you’re using to manage resource access:
For multi-account environments, deploy this setting across member accounts using AWS CloudFormation StackSets or AWS Organizations service control policies (SCPs).
Important: Before enabling account-level S3 Block Public Access, check whether any workloads need public bucket access (for example, static website hosting, public dataset sharing). Coordinate with your application teams to identify any exceptions.
Remediate using bucket policies
Implement bucket policies that restrict access to specific IAM users, roles, or accounts. When crafting policies, apply the principle of least privilege and include only the actions and principals required for your use case.
Example S3 bucket policy: deny public read/write access. Modify the resource ARN, actions, and conditions to match your requirements:
Automate remediation with Lambda or CloudFormation StackSets (optional):
You can also remediate using Lambda or CloudFormation Stacksets:
Create Lambda functions to automatically update bucket policies or disable public access settings for flagged buckets
Use CloudFormation StackSets to deploy standardized bucket policies and S3 Block Public Access settings across multiple accounts
Verify your remediation
This section explains how to confirm that your fixes are effective before moving to ongoing monitoring. After applying remediation, verify the fix is effective before setting up ongoing monitoring:
Re-run the audit Lambda function – Confirm the previously flagged buckets no longer appear in the risky buckets list.
Check Security Hub compliance – Verify the compliance status has changed from FAILED to PASSED for Amazon S3-related controls.
Validate with IAM Access Analyzer – Review findings for the remediated S3 buckets. Active findings should resolve automatically after public access is removed.
Test application functionality – Confirm that legitimate workloads continue to function correctly.
Document the verification results for your auditing needs. If any S3 buckets still show issues, investigate whether the policy was applied correctly or if there are conflicting permissions.
Automation opportunities
This section covers optional strategies to automate ongoing detection and maintain your security posture without manual intervention.
(Optional) Schedule recurring scans with Amazon EventBridge
Regular security scans help identify new issues arising from configuration changes or newly created S3 buckets. When new security risks are detected, Amazon SNS sends an alert and automatically initiates the remediation phase (Workflow 2 in Figure 1). To avoid repeated alerts, you can configure the audit Lambda function to run on a schedule and compare current results with the previous baseline to generate notifications when new findings are discovered.
For ongoing monitoring, you can schedule the audit Lambda function to run on a recurring basis using EventBridge. Create a scheduled rule with a cron expression (for example, daily at 6:00 AM UTC or weekly on Mondays), add the Lambda function as the target, and grant EventBridge permission to invoke it. See Amazon EventBridge scheduling documentation for instructions on creating scheduled rules and configuring targets.
Enable IAM Access Analyzer for Amazon S3
IAM Access Analyzer monitors bucket policies, ACLs, and access points to identify buckets accessible from outside your account or organization. Create an analyzer scoped to your organization or individual account, then review findings to identify unintended external access. Findings automatically flow into Security Hub when both services are enabled, giving you a dashboard view for Amazon S3 security findings. See the IAM Access Analyzer documentation for setup and usage instructions.
Automate notifications for policy drift
Recurring scans might surface new findings from policy drift or newly created buckets. When new risks are detected, Amazon SNS alert triggers and the remediation cycle repeat (as shown in Workflow 2 in Figure 1) sends email notifications. Configure the audit Lambda function to compare current scan results against the previous baseline and alert on new findings for ongoing reviews.
Clean up
This section lists the resources created during this walkthrough that you should review and remove when they are no longer needed. If the following services were not previously active in your account, leaving them enabled might result in additional ongoing charges. See the Cost considerations section for details. Review and remove unused resources to optimize costs.
Delete or disable the following script-generated resources if they’re not required after outputs are generated. Focus first on Lambda functions and EventBridge rules if you’re not running recurring scans. If you enabled AWS Config or Security Hub specifically for this audit, evaluate whether you need them for other compliance requirements before disabling.
Lambda – Functions, IAM roles, and policies created for auditing
Amazon EventBridge – Scheduled rules created for recurring audit triggers
Amazon SNS – Topics and subscriptions created for notifications
AWS Config – Rules and recorders if no longer needed for compliance
Security Hub – Disable if enabled solely for this audit
IAM Access Analyzer – Delete the analyzer if no longer needed for ongoing monitoring
Note: Be careful when deleting data and consider temporarily disabling services first to check for dependencies. Only delete resources generated as part of your audit outputs. Verify you have retained any necessary results before proceeding. Verify resources are not used by other workloads before deletion.
Best practices
This section provides recommendations to maintain secure Amazon S3 configurations long-term. To learn more about maintaining secure Amazon S3 configurations, review the AWS documentation links provided in the conclusion. The following recommendations aren’t exhaustive. Adapt and extend them based on your organization’s evolving security requirements and AWS best practices guidance. After you’ve fixed existing issues, these practices help you maintain secure Amazon S3 configurations.
Start with account-level controls – Enable S3 Block Public Access at the account level. This prevents buckets from becoming public even if someone misconfigures an individual bucket policy. For multi-account environments, enforce this through AWS Organizations SCPs.
Automate detection – Use IAM Access Analyzer to detect external access. Schedule your audit Lambda function with EventBridge to catch new issues weekly or daily, depending on your change frequency. Compare scan results against previous baselines to identify drift.
Standardize across accounts – Use CloudFormation StackSets to deploy the same secure configuration to all accounts in your organization, reducing the chance of configuration drift. Use StackSets for IAM roles, AWS Config rules, and S3 Block Public Access settings.
Additional security measures
Regularly review and rotate cross-account IAM role credentials and external IDs
Implement Amazon S3 server-side encryption (SSE-S3 or SSE-KMS) for data at rest
Enable S3 access logging and AWS CloudTrail data events for audit trails
Conclusion
This section summarizes what you accomplished and suggests next steps to maintain your S3 security posture. By implementing the detection, remediation, and monitoring workflow outlined in this post, you can proactively identify and secure over-permissioned S3 buckets across your AWS environment. To maintain your ongoing security posture, enable IAM Access Analyzer for continuous monitoring and schedule recurring audits with EventBridge. To learn more about Amazon S3 security best practices, see Security best practices for Amazon S3
Customers tell us that managing TLS certificates at scale is one of their biggest operational concerns. The Certification Authority Browser Forum (CA/Browser Forum) has mandated a phased reduction in maximum certificate validity for public certificates. By March 2027, the maximum validity drops to 100 days. By March 2029, it lasts for 47 days. For an organization managing 1,000 certificates, the final transition means roughly 30 renewal events every day. Renewal and rotations of renewed certificates at that cadence isn’t something manual processes or ticket-driven workflows can sustain at scale.
We recently announced Automated Certificate Management Environment (ACME) protocol support in AWS Certificate Manager (ACM). With this launch, you can use the ACME clients your teams already know, including popular open source tools like certbot, cert-manager, acme.sh, and win-acme, to automate public certificate issuance and renewal for your infrastructure. Customers that are using third-party certificate authorities (CAs) can point their existing ACME-compatible clients at ACM instead of their current CA, with minimal reconfiguration. This applies whether it’s running on Amazon Web Services (AWS), on premises, or in a hybrid environment. Certificates created through ACME are registered in ACM, giving you a unified view of your entire certificate inventory.
This post covers how the feature works, how to get started, and the controls and best practices to help you manage certificate issuance at scale.
Background
ACME is an open source protocol that automates the process of verifying domain ownership and issuing certificates and has become a standard mechanism for certificate automation. While ACM has long provided managed certificate issuance and renewal for AWS-integrated services such as Elastic Load Balancing (ELB), Amazon CloudFront, and Amazon API Gateway, many customers also need to automate certificates for their own infrastructure, including servers they manage in their data centers, Kubernetes clusters, Internet of Things (IoT) fleets, and hybrid environments. Until now, those customers had to turn to external providers. This launch brings the ACM automation model to that same infrastructure, using the standard ACME protocol with AWS managed certificate endpoints.
How it works
The feature introduces a new centrally provisioned and managed resource type: the ACME endpoint. Each endpoint is an AWS resource with a unique ACME directory URL and AWS Identity and Access Management (IAM)-based access controls. You create and manage endpoints through the ACM API or AWS Management Console, and point your existing ACME clients at the endpoint URL. Certificates issued through your endpoint are automatically registered with ACM, appearing in your certificate inventory alongside certificates created by the RequestCertificate and ImportCertificate API calls.
The architecture separates into two planes. In the control plane, PKI administrators use ACM APIs to create ACME endpoints, pre-approve the domains an endpoint is allowed to issue for, and generate external account binding (EAB) credentials. In the data plane, ACME clients register with an endpoint using EAB credentials and request certificates for domains the administrator has already validated. This architecture is how we provide customers the ability to scale. Instead of each client proving domain ownership on every request, a principal with appropriate ACM permissions (typically your PKI administrator) validates domains once at the endpoint level, and then application owners don’t need DNS credentials to get a certificate.
Adding to the data plane, EABs control client access to the endpoints. Each EAB is bound to an IAM role that controls what certificate operations the ACME client can perform, and credentials you generate in ACM are distributed to authorized ACME clients. An ACME client authorized for one endpoint can’t use a different endpoint. This creates security boundaries between environments. For example, a client authorized for your development endpoint can’t obtain certificates from your production endpoint.
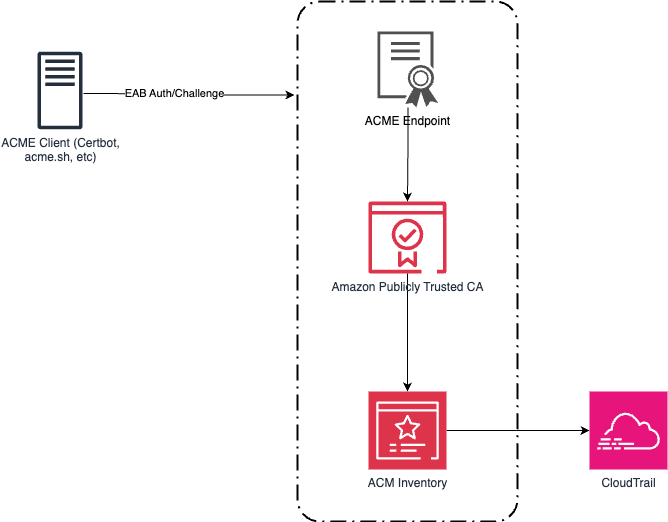
Figure 1 shows the ACME request flow through ACM. An ACME client authenticates to an ACME endpoint using EAB credentials. The endpoint routes certificate orders to Amazon Trust Services for issuance. Issued certificates are registered in ACM inventory, where Amazon EventBridge and AWS CloudTrail provide expiration alerting and audit logging.
Figure 1: An ACME architecture and workflow
Getting started
Getting started with the new ACME feature in ACM is straightforward. Use the following steps to create your first ACME-generated certificate.
Prerequisites
An AWS account with permissions to create and manage ACM resources
An ACME client installed on your infrastructure (for example, Certbot, cert-manager, acme.sh, or others)
Amazon Route 53 hosted zone for your domain, or the ability to create a CNAME record with your DNS provider
Step 1: Create an ACME endpoint
Before you can use ACME clients with ACM, you need to create an ACME endpoint. This endpoint provides the URL that your ACME clients will use to request certificates.
Run the following command from the AWS CLI to create an ACME endpoint:
Before ACME clients can request a certificate, the administrator validates the domain using DNS once at the endpoint level. Use DomainScope to control exactly which certificate patterns are allowed:
Enabling only ExactDomain restricts clients to that specific name,
Subdomains enabled allows names like api.example.com,
Wildcards enabled allows *.example.com.
Leave a scope disabled to block that pattern outright, even if an otherwise-valid ACME request asks for it. For a production endpoint, consider enabling only ExactDomain and Subdomains and leaving Wildcards disabled for a stricter posture.
If your domain is hosted in Route 53, specifying HostedZoneId lets ACM create the required CNAME record automatically. If your domain is hosted elsewhere, omit it and create the provided CNAME record manually with your DNS provider. Validation typically completes within a few seconds after the record is in place.
EAB credentials authenticate your ACME clients to your endpoint. Generate a unique set of credentials for each client or environment to maintain security boundaries.
Run the following command to generate your EAB credentials, adjusting your expiration to fit your organization’s risk profile:
With your endpoint URL and EAB credentials ready, you can now configure your preferred ACME client. The following examples show configuration for two popular clients. As a reminder, the server information was retrieved in step 1, part 4 as the EndpointUrl.
After the initial registration, your ACME client handles renewals.
Enterprise controls
Other ACME alternatives can provide certificates but don’t give the same amount of control and governance for customers that need to scale their certificate environment. The following controls are available to help reduce risk across your organization.
Domain validation
Customers managing large numbers of domains told us they need a way to prevent unauthorized certificate issuance across their domain space. Domain validation gives you this control. For each domain you validate, you enable the certificate patterns it should be allowed to issue, whether it’s ExactDomain, Subdomains, or Wildcards. For example, if you validate internal.example.com and enable only Wildcards, an ACME client can request *.internal.example.com but a request for internal.example.com itself or api.internal.example.com is rejected. This enforcement happens at the endpoint level, before requests reach the ACM certificate authority, and you can validate multiple domains under a single endpoint, each with its own scope.
Centralized certificate visibility
Certificates issued through your ACME endpoints are registered with ACM. You can use the aws acm list-certificates command to see all your issued certificates.
IAM authorization, CloudTrail audit logging and observability
Endpoint management operations are authorized through IAM and logged to CloudTrail. You can use IAM policies to control which principals can create endpoints, generate EAB credentials, and manage domain constraints.
Best practices
For customers implementing ACME certificates for the first time, consider the following best practices for your organizations.
Segment endpoints along organizational or environment boundaries
The endpoint serves as a useful method of isolation for larger organizations. A large enterprise can create one endpoint per organizational boundary (business unit, subsidiary, or environment) instead of a single shared endpoint company-wide. Each endpoint has its own pre-approved domains and its own set of EABs, so a compromised credential in one business unit has no path to certificates in another.
However, weigh this against your operational overhead as well. A reasonable starting point is one endpoint per environment (dev, staging, andprod) within a business unit, expanding to per-business-unit endpoints only where compliance or organizational requirements call for it.
Manage EAB credentials securely
Anyone holding a validKeyIdandMacKeyfor an endpoint can obtain certificates for any domain pre-approved on that endpoint, so these credentials deserve the same handling you’d give an access key.
Avoid hard coding theMacKeywhere possible by using a secret store such as AWS Secrets Manager. Distribute it only to the ACME clients that you authorize to use the endpoint.
Set the expiration of the EAB to an acceptable level. While EAB supports long-lived credentials, not all scenarios require an indefinitely long EAB.
When creating the role for each EAB, adhere to concept of least privilege. Creating a role per EAB, rather than sharing a role across all bindings, can help reduce risk in your AWS environment.
Audit CreateAcmeExternalAccountBinding and GetAcmeExternalAccountBindingCredentials calls in CloudTrail separately. Because retrieving the actual key material is a distinct API call from creating the binding, alerting on retrieval events is a stronger signal of real credential distribution than binding creation alone.
Automate how EABs are associated with clients at runtime
Generate a unique set of EAB credentials for each client or environment rather than sharing one binding across multiple ACME clients. As you begin to scale with multiple endpoints, usesome of the following patterns to reduce operational toil.
Name each EAB and its bound IAM role after the client it belongs to (team, application, environment), so the binding’s purpose is obvious from DescribeAcmeExternalAccountBinding output alone, without cross-referencing a spreadsheet.
Store each client’s KeyId and MacKey under a secrets path scoped to that client (for example, a Secrets Manager path per team and environment), and let the client’s provisioning pipeline retrieve its own credentials.
In Kubernetes, use one ClusterIssuer or namespace-scoped Issuer per EAB rather than one shared issuer across teams. This keeps the client-to-EAB association explicit in cluster config, and lets you revoke one team’s access without touching anyone else’s.
For ephemeral infrastructure (build agents, autoscaled fleets), provision EAB credentials as part of your infrastructure-as-code or continuous integration and deployment (CI/CD) pipeline instead of a one-time manual handoff, so credential lifecycle tracks infrastructure lifecycle.
Monitor your deployment of ACME
ACME’s power is through automation, and organizations should monitor their ACME usage for anomalies.
Alarm on issuance failures, not just successes. At 45-day certificate validity, a silent renewal failure gives you far less runway to react than the months of time you might be used to with longer-lived certificates.
Test renewal automation before you depend on it. Force a manual renewal against a non-production endpoint and confirm your client, monitoring, and on-call runbooks behave as expected, before the CA/Browser Forum’s shortened validity windows turn a failed renewal into a disruptive event for your organization.
Availability and pricing
ACME support in AWS Certificate Manager is available today in all commercial AWS Regions and will be available in AWS GovCloud (US), the China Regions, and the AWS European Sovereign Cloudpartitions at a later date. See the ACM pricing page for more information on ACME pricing.
Conclusion
The phased reduction in certificate validity can’t easily be solved without automation. ACME support in ACM gives you that automation through a standard protocol and standard tooling, while keeping the visibility and governance controls your security teams rely on from ACM.
When your encryption system generates millions of duplicate API calls per hour, costs spiral and performance degrades. That’s exactly the challenge NICE Actimize faced while operating their global-scale, event-driven financial crime detection platform on Amazon Web Services (AWS).
NICE Actimize, a leading provider of financial crime, risk, and compliance solutions, processes millions of encrypted messages daily across hundreds of tenants. By rethinking how they cache encryption keys, they reduced their AWS Key Management Service (AWS KMS) costs by 77% while maintaining strict security guarantees and per-tenant encryption isolation.
In this post, we explore the cache stampede problem that emerges when envelope encryption meets high-concurrency, multi-tenant architectures. We walk through two solutions: the AWS-recommended hierarchical keyring pattern and a custom caching approach that NICE Actimize built for their regulated environment. These patterns apply to multi-tenant software as a service (SaaS) environments and high-throughput systems where per-tenant encryption generates significant KMS API volume.
Why per-tenant encryption matters
Financial services systems operate under strict regulatory requirements. You must encrypt data at rest and in transit. For multi-tenant SaaS providers, this requirement might go further: each tenant’s data must be encrypted with separate keys to provide complete cryptographic isolation. If one tenant’s key is compromised, no other tenant’s data is at risk.
Consider an enterprise SaaS environment built on an event-driven architecture using Amazon Managed Streaming for Apache Kafka (Amazon MSK), with many different databases for storing data and Amazon Simple Queue Service (Amazon SQS) for messaging. Messages flow continuously between producers and consumers, and each message must be encrypted with the correct tenant-specific key. At scale with millions of messages daily across hundreds of tenants, this creates a massive volume of encryption and decryption operations.
To handle this volume efficiently, the standard approach is envelope encryption: a two-tier model where an AWS KMS key encrypts short-lived data keys, and those data keys encrypt the actual data. Your application can encrypt large volumes of data locally without calling AWS KMS for every operation, reducing latency and costs.
The cache stampede problem
Envelope encryption reduces AWS KMS calls, but it doesn’t eliminate them. Each encrypt operation still requires a data key, either generated fresh using GenerateDataKey or retrieved from a cache, and each decrypt operation must unwrap an encrypted data key (EDK) by calling Decrypt. In high-throughput systems processing millions of messages, these calls add up quickly.
The AWS Encryption SDK provides a built-in solution for this: the CachingCryptoMaterialsManager. This component caches data encryption materials (data keys) locally, so your application can reuse them across multiple operations without calling AWS KMS each time. You configure a time-to-live (TTL), a maximum message-use limit, and a local cache, and the SDK handles the rest.
This approach works well under moderate load when you partition the cache by tenant AWS KMS key Amazon Resource Name (ARN) so that each tenant’s encryption materials remain cryptographically isolated. However, a critical problem emerges as concurrency scales to hundreds of threads processing millions of encrypted messages in parallel: the cache stampede, also known as the thundering herd problem.
How the stampede occurs
The CachingCryptoMaterialsManager caches the result of the SDK’s internal getMaterialsForEncrypt and decryptMaterials calls at the materials level. The cache stampede, however, happens at the KMS API call level. When a cached data key expires or a new, previously-unseen EDK arrives, the following sequence unfolds:
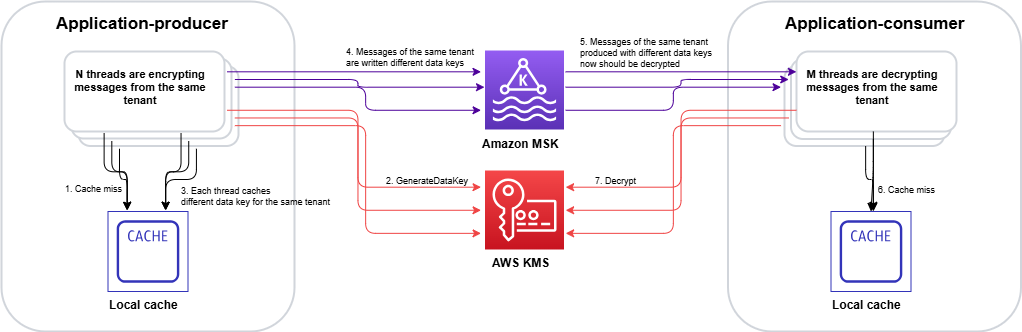
On encrypt – data key explosion: Multiple threads simultaneously call encrypt() for the same tenant. Each thread finds the cache entry expired and independently calls GenerateDataKey against AWS KMS. Instead of one thread generating a data key while others wait, N threads create N distinct data keys. Each new data key produces a unique EDK, which inflates the EDK cardinality across the system.
On decrypt – redundant unwrap calls: Those extra unique EDKs propagate downstream. When consumers later read encrypted records, each distinct EDK is a separate cache key. Multiple threads encountering the same EDK simultaneously each trigger an independent Decrypt call to AWS KMS because the cache has no coordination mechanism to make competing threads wait for a single in-flight request.
Compounding effect: The encrypt-side stampede creates excess EDK cardinality, which degrades the decrypt-side cache hit ratio, which triggers more KMS calls, which drives up costs further. In the NICE Actimize case, this produced a ratio of 30% unique data keys to data records in DynamoDB tables, meaning nearly one in three records was encrypted with a different data key.
At enterprise SaaS scale, this compounding effect can generate millions of redundant AWS KMS GenerateDataKey and Decrypt calls per hour, even with the SDK’s built-in caching enabled. The following figure shows the pattern leading to a stampede.
Figure 1: Cache stampede – multiple threads independently calling AWS KMS for the same encrypted data key, creating duplicate requests
The stampede follows this sequence on the encrypt side:
Multiple threads call encrypt() for the same tenant concurrently.
Each thread checks the CachingCryptoMaterialsManager and finds the cache entry expired.
With no coordination mechanism, each thread independently calls GenerateDataKey.
AWS KMS returns N distinct data keys (one per thread).
Each data key produces a unique EDK, inflating cardinality across the system.
On the decrypt side, the inflated EDK cardinality compounds the problem:
Consumer threads encounter unique EDKs that were never cached.
Multiple threads hitting the same EDK simultaneously each trigger a separate Decrypt call. AWS KMS returns the same plaintext data key N times, doing redundant work.
Two paths forward
We evaluated two approaches to solve the cache stampede problem. Each fits different architectural requirements and regulatory constraints.
Option A: Hierarchical keyring with DynamoDB (AWS-recommended)
AWS addresses the cache stampede challenge through the hierarchical keyring pattern, which introduces an additional level of key hierarchy that significantly reduces how often cache stampedes occur.
In this architecture, branch keys serve as intermediate wrapping keys stored in a DynamoDB table. This DynamoDB table acts as a shared cache layer that coordinates across all instances in your distributed fleet.
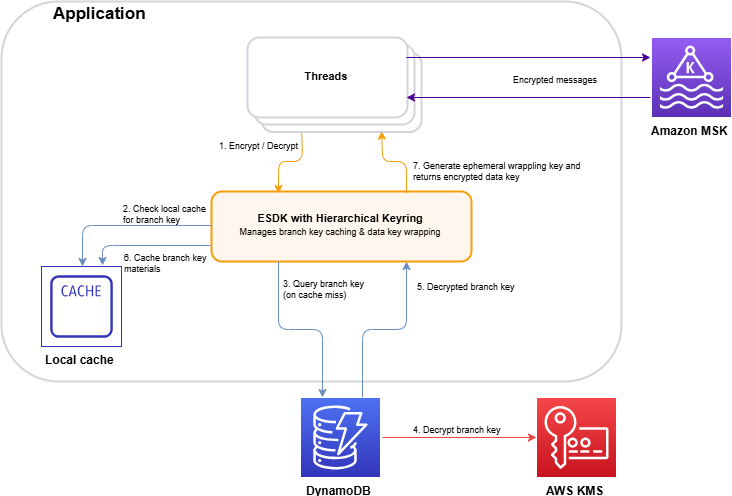
Figure 2: Hierarchical keyring architecture – branch keys in DynamoDB coordinating across distributed instances
The architecture (shown in Figure 2) works as follows:
The application requests encryption through the hierarchical keyring.
The keyring checks the local cache for the tenant’s branch key.
On a cache miss, it queries the DynamoDB Key Store table for the active branch key.
AWS KMS decrypts the branch key (this is the only KMS call in the flow).
The decrypted branch key is returned to the keyring.
The keyring stores the branch key in the local cache for subsequent requests.
The keyring derives a unique wrapping key from the branch key and generates the data key locally.
The key insight is that the cache is thread-aware. When the cache expires, threads coordinate to make a single request to refresh the cache. Only a single thread is used to make a call to the branch key, rather than all the threads acting independently. Additionally, by adding an additional key into the key hierarchy, branch keys don’t live within AWS KMS. This means cache misses and the stampedes they trigger interact with the branch key, and don’t make as many calls to the AWS KMS service at the top of the hierarchy:
Without hierarchical keyrings: Your local cache needs to store all the data encryption keys, and has constant misses as new, unique data keys arrive with each encrypted message. A miss can trigger a stampede.
With hierarchical keyrings: The same branch key wraps thousands or millions of data keys. A cache miss only occurs when a branch key expires or is first requested, which happens orders of magnitude less frequently than without hierarchical keyrings.
The DynamoDB table acts as a coordination point. The first thread to request a missing branch key retrieves it from AWS KMS and stores it in DynamoDB (the Key Store table). Subsequent requests from instances in the fleet retrieve the cached branch key from DynamoDB instead of making duplicate AWS KMS calls.
Beyond reducing cache miss frequency, the hierarchical keyring provides built-in stampede protection within its local cache implementation. The SDK offers multiple cache types, and the Default cache, designed for heavily multi-threaded environments, prevents multiple threads from calling AWS KMS on cache expiry by notifying a single thread that the branch key materials entry is about to expire 10 seconds in advance. That one thread refreshes the cache while all other threads continue serving requests using the still-valid entry.
This solution integrates with the AWS Encryption SDK and requires minimal code changes to existing applications. For event-driven architectures processing encrypted Kafka streams, this approach reduces KMS call volume by orders of magnitude while preserving per-tenant cryptographic isolation.
Option B: Custom KMS client caching – Solving the stampede at the API layer
While the hierarchical keyring (Option A) addresses the stampede by reducing how often cache misses occur, there’s a complementary approach: eliminating the stampede at its source by caching KMS API responses directly, using atomic, single-flight cache loading that prevents concurrent threads from issuing duplicate calls. This is the path NICE Actimize took.
The IClientSupplier extension point in AWS Encryption SDK v3
In the AWS Encryption SDK v2, decorating the AWS KMS client on a per-request basis was possible through the RegionalClientSupplier interface, but it was an advanced and undocumented use case. Without explicit guidance or a supported pattern, caching strategies typically operated above the SDK layer, making it difficult to prevent duplicate KMS calls at their source. The AWS Encryption SDK v3 introduced the IClientSupplier interface, which the AwsKmsMrkMultiKeyring accepts at construction time. This interface is called by the SDK whenever it needs a KMS client for a given AWS Region, and you control what it returns, making it possible to insert a caching layer between the SDK and AWS KMS.
Architecture: A decorated KMS client with two Caffeine caches The solution is a CachedKmsClient—a decorator that wraps the standard AWS SDK KmsClient and interposes two Caffeine LoadingCache instances between the application and AWS KMS:
Cache
Key
Value
Purpose
GenerateDataKey cache
GenerateDataKeyRequest (tenant KMS key ARN and key spec)
GenerateDataKeyResponse (EDK and plaintext data key)
Ensures encrypt operations on the same node reuse the same data key for a given tenant KMS key during the cache window
Decrypt cache
DecryptRequest (EDK and key ARN)
DecryptResponse (plaintext data key)
Ensures decrypt operations for the same EDK share a single KMS call result
Both caches are configured with refreshAfterWrite (default: 1 hour, configurable), which means:
During the refresh window, concurrent threads receive the cached response instantly resulting in zero KMS calls.
When a cache entry expires, Caffeine’s LoadingCache.get() guarantees that exactly one thread executes the loader function (the actual KMS API call), while all other concurrent threads block and wait for that single result. This is the atomic, single-flight property that eliminates the stampede.
Security consideration: Caching plaintext data keys in memory means the keys exist in process memory for the duration of the cache TTL. The TTL acts as a security control: shorter TTLs reduce the window of exposure in the event of a memory dump, while longer TTLs reduce KMS call volume. Choose a TTL that balances your security requirements with your cost and performance goals. Key rotation at the KMS key level remains unaffected by the cache, because rotated keys produce new data keys on the next cache refresh.
Integration with the AWS Encryption SDK v3
The integration is minimal. The IClientSupplierAWS Lambda function returns a CachedKmsClient singleton for each AWS Region, this singleton is passed into the AwsKmsMrkMultiKeyring at keyring construction time. From that point forward, each GenerateDataKey and Decrypt call the SDK makes flows through the caching decorator transparently, with no changes to the encrypt or decrypt call sites.
The CachedKmsClient is a singleton per Region (managed using a ConcurrentHashMap), so all tenants on the same node share the same caching layer but their data keys remain fully isolated because the cache keys include the tenant-specific AWS KMS key ARN.
Why Caffeine?
Caffeine is a high-performance, near-optimal Java caching library well-suited for this pattern for several reasons:
Atomic loading: LoadingCache.get() guarantees that on a cache miss, only one thread executes the loader while others wait. This is the core property that eliminates the stampede.
refreshAfterWrite semantics: Unlike expireAfterWrite (which blocks all threads during refresh), refreshAfterWrite allows one thread to asynchronously reload the entry while other threads continue to serve the stale-but-valid cached value. This eliminates latency spikes during key rotation.
Observability: Cache eviction listeners and Micrometer metric counters can be wired in to track actual KMS call volume per tenant KMS key, enabling real-time cost monitoring.
Choosing between the two options
The hierarchical keyring with DynamoDB (Option A) is a production-ready, AWS-recommended solution that reduces stampede frequency by introducing longer-lived branch keys. It’s the best choice for most organizations. Particularly when starting fresh or when the operational overhead of an additional data store is acceptable.
NICE Actimize chose the custom caching approach (Option B) for a pragmatic reason: it avoided introducing a new infrastructure dependency into the encryption critical path. Their platform already operated at scale across hundreds of tenants, and adding a DynamoDB table as a key coordination layer would have meant taking on additional operational responsibility: provisioning, monitoring, backup, access control, and ensuring high availability for a component that sits directly in the encrypt/decrypt hot path. In a regulated financial services environment, each new stateful component in the security chain requires its own resilience planning, failure-mode analysis, and compliance review. The Caffeine cache used in Option B, by contrast, is an in-process library (a JAR on the classpath). It is stateless, requires no network calls, no provisioning and no operational overhead. It makes a lighter dependency than a managed cloud resource in the critical path. There is no shared state to lose, no additional infrastructure to protect, and no new failure mode beyond what already exists with AWS KMS itself. If a node restarts, the cache rebuilds on the next KMS call.
Results
By implementing a rotation policy with the optimized caching approach, NICE Actimize achieved the following results:
77% reduction in AWS KMS costs – Eliminating millions of redundant API calls translated directly into significant cost savings.
Maintained strict per-tenant isolation – Per-tenant encryption isolation remained fully intact, with no compromise to their security posture.
Improved system performance – Removing the stampede of duplicate AWS KMS calls reduced latency and freed up system resources for core processing.
The cache stampede problem compounds in multi-tenant encryption systems: excess data key generation on the encrypt side degrades cache hit ratios on the decrypt side, creating a feedback loop of redundant KMS calls. The AWS-recommended hierarchical keyring pattern with DynamoDB provides a production-ready solution that integrates with the AWS Encryption SDK with minimal code changes. For regulated environments requiring additional control, a custom caching approach can deliver similar results.
If you operate a multi-tenant SaaS platform or a high-throughput system with per-tenant encryption requirements, consider these patterns to optimize your encryption costs and performance.
Customers have access to models that are continuously getting better with each new generation bringing larger context windows, stronger reasoning, and lower token costs. Getting the strongest AI-powered security will come from tools that combine the most relevant models with deep knowledge of a customer’s specific environment.
AWS Continuum for code vulnerabilities (Preview) is built to be that tool to help secure your code at machine speed. Today, we’re announcing our work with Anthropic and OpenAI that extends AWS Continuum directly into the developer workflows where code is being written: Anthropic Claude Code, OpenAI Codex, and Kiro. Developers can use these integrations to discover vulnerabilities, contextually prioritize, validate, and remediate, within their existing workflows.
Models are getting smarter
AI models are advancing rapidly. Each generation brings new capabilities, and different models excel at different tasks. The latest frontier models can now identify vulnerabilities and reason through multi-step attack paths that would take a human security team weeks to trace manually.
This is a genuine breakthrough in detection, but it creates a new challenge for your security teams: more findings, more complexity, and the need to determine which ones matter most in your environment and how to address them. The next challenge customers face is building the correct harness and orchestration to turn these models into a single interface that goes from detection through remediation. This is what we set out to do when creating Continuum, which brings together many different models and uses the model that’s most effective for each part of the process.
We also partner with the Frontier Model Forum, an industry consortium developing shared safety standards, evaluation methods, and benchmarking to ensure we can evaluate these models effectively together. We’re also working with model providers on shared security performance benchmarking to make sure we’re using the best model for each task within Continuum and our other AWS security products.
The harness
An AI harness is the orchestration layer that wraps around a model to connect it to tools, guardrails, memory, and workflows, so it delivers outcomes. Think of the model as the engine and the harness as everything around it. You need both to have a high-performance car.
Harnesses are becoming increasingly complex. Teams are stitching together multiple models, agents that call agents, and dynamic workflows, and are dealing with constant change driven by innovations in models, agent frameworks, and tool integrations.
As a result of that complexity, customers are implementing shadow infrastructure to manage integration layers across models and tools. Every time the landscape shifts, security and governance controls potentially break, forcing teams to go back to revisit them and make updates.
These challenges extend beyond the model. They arise in the orchestration required to connect different models and developer environments with tools, context, controls, and workflows across a customer’s environment. At AWS, we see managing that complexity as heavy lifting that AWS should solve. We treat the harness as infrastructure and with the same rigor we apply to identity, discovery, policy enforcement, observability, and compliance of the core infrastructure at AWS.
Enter Continuum
AWS Continuum for code vulnerabilities discovers vulnerabilities, prioritizes them within the context of a customer’s business, validates them in a sandbox, and provides remediation at machine speed. Under the hood, Continuum is an agent-team loop architecture. A sophisticated harness that orchestrates all of it: selecting the right model, connecting to a customer environment, and delivering secure code that’s been validated in context. You never need to think about how the orchestration works, or what changed in the latest release.
Anthropic and OpenAI collaborations
We are working with Anthropic and OpenAI to bring Continuum into the developer workflows where code is being written.
How it will work:
Within Claude Code, Codex, and Kiro coding environments, on-demand vulnerability scans identify potential issues and send findings to Continuum. Continuum prioritizes them within the context of the customer’s AWS environment (configurations, AWS Identity and Access Management (IAM) policies, network topology, and exposure surfaces) and validates them in a sandbox. It then returns prioritized, contextual intelligence back to the coding assistant, which adjusts its recommendations accordingly.
This collapses what was traditionally a multi-step, multi-team process (write, scan, triage, prioritize, fix, rescan) into a single outcome: the code suggestion itself. Two modes, one outcome:
For existing code: Use Continuum for code vulnerabilities from AWS to discover, prioritize, validate, and remediate across your environment.
For greenfield code: Use the Continuum plugin within Codex, Claude Code, or Kiro to get security-validated suggestions in your development environment.
Early design partners are already seeing results.
“AWS Continuum connects source code with enterprise knowledge, allowing teams to accurately pinpoint security vulnerabilities and verify that flagged issues are truly meaningful. This shortens what really matters: timeline to fix serious vulnerabilities.” – Mike Johnson, CISO, Rivian
Next
AWS Continuum for code vulnerabilities is available in preview through AWS. Sign up to request access at AWS Continuum.
Continuum integrated into Claude Code, Codex, and Kiro workflows are coming soon.
If you have feedback about this post, submit comments in the Comments section below.
Imagine preparing for your biggest sales event of the year, and you want to ensure your customer identity management service can handle the elevated traffic for carrying out application activities. For security teams, business leaders, and technologists managing identity infrastructure at scale, this scenario has been all too familiar. Whether you’re a CISO evaluating security controls, a CFO managing cloud costs, traditional support ticket processes for adjusting Amazon Cognito rate limits meant waiting 10–14 days for capacity increases, requiring teams to plan weeks in advance or rush to escalate.
Today, we’re announcing provisioned limits for Amazon Cognito, a capability that transforms how you manage authentication rate limits. This introduces a feature in the AWS Management Console for Amazon Cognito for on-demand capacity adjustments, working alongside the existing account-level maximum limits in AWS Service Quotas. Together, they give you self-service control over your authentication infrastructure so you can scale up for Black Friday (or similar sales events), scale down after tax season, and optimize costs with unprecedented precision. What once took up to 2 weeks now happens in minutes.
In this post, you’ll learn how provisioned limits work, the relationship between account-level maximums and provisioned capacity, the cost implications and optimization strategies, and step-by-step implementation guidance. This capability fundamentally changes how you approach authentication capacity planning.
Manual processes that can’t keep pace
Identity management services open the front door to your application. When users can’t sign in, everything else stops. Amazon Cognito offers extremely flexible limit management: customers can request adjustments as granular as 1 request per second (RPS) for as short as 1 day. As customer demand for faster, self-service adjustments grew, we identified opportunities to address the following challenges:
Support tickets required for each rate limit change
10–14 day approval timelines for standard review and processing
Advance planning needed weeks ahead of anticipated traffic spikes
For businesses with seasonal traffic, like tax preparation services that see 90% of annual authentication volume in March and April, or ecommerce platforms preparing for Black Friday, these factors meant teams had to plan capacity decisions well in advance with limited ability to adjust in the moment.
Provisioned limits and account-level max limits
Starting July 6, 2026, Amazon Cognito introduced provisioned limits in the Amazon Cognito console. At the account level (per AWS Region, per account), you’ll find a Provisioned limits tab next to the User Pools tab. This gives you direct control over your authentication rate limits through two complementary mechanisms:
Provisioned limits (Amazon Cognito console) – Adjust your provisioned capacity up or down on-demand. Changes take effect immediately. You’re billed for the capacity you provision above the default limit, regardless of how much you use.
Account-level max limit (Service Quotas console) – Set your account’s ceiling, the maximum RPS your account is allowed to provision. Raising this ceiling doesn’t incur additional charges. Approximately 90% of requests are automatically approved within minutes. For larger limit increases (depending on the API category and Region), manual approval through AWS Support might still be required.
The following experience shows the end-to-end workflow of adjusting your provisioned limits and requesting a higher account-level max.
Figure 1: Provisioned limit experience workflow
How they work together
Let’s use the UserCreation API as an example. The default limit is 50 RPS, and initially the provisioned limit is also 50 RPS—meaning billed capacity is 0 (no additional charge). The applied account-level max limit is also 50 RPS. So you have three values: default (50), provisioned limit (50), and account-level max (50).
Start by going to the Amazon Cognito console and choosing User pools from the navigation pane.
Figure 2: UserCreation with default values
Choose Edit provisioned limit, to go to the Edit provisioned limit page with an input field for New provisioned limit. However, because the account-level max limit is 50 RPS, you can’t set the provisioned limit above 50. For example, if you want to provision 55 RPS, the console won’t allow it because 55 exceeds the current account max of 50.
Figure 3: Editing the provisioned limit constraint constraint to more than the account-level max
To set a higher limit, choose Request an increase. This takes you to the Service Quotas console, where you can choose Request increase at account level to request a higher account-level max, for example, 55 RPS. Most requests are automatically approved within minutes. At any time, you can check the status of the request using the Request history tab.
Figure 4: Service Quotas page where the account-level max increase is requested and auto-approved
After receiving approval, return to the Amazon Cognito console to edit your provisioned limit up to 55 RPS. Your billed capacity becomes 5 RPS (55 minus the 50 default).
Figure 5: Provisioned after increasing the provisioned limit to 55 RPS, with billed capacity of 5 RPS.
This two-part model gives you precise control over both cost and capacity. Raising the account-level max in Service Quotas doesn’t incur additional charges—it only sets your ceiling. You are billed for what you provision in the Amazon Cognito console above the default, so you benefit from right-sizing your provisioned capacity to match expected demand. Raise your account max ahead of time to prepare for future scaling needs without incurring any cost. When the time comes, increase your provisioned limit to what you need, and scale back down after the event. You stop being charged for the extra capacity as soon as you reduce the provisioned limit. This applies equally to seasonal spikes, planned load tests, or unexpected viral growth—all self-service, all within minutes.
How the provisioned limits experience works
The provisioned limits experience introduces three key concepts that work together:
Default limit – The baseline rate included at no additional cost (for example, 50 RPS for UserCreation).
Provisioned limit – The capacity you actively request and reserve in the Amazon Cognito console. Because this capacity is reserved specifically for your account, it’s the chargeable dimension. You’re billed for any provisioned capacity above the default, regardless of how much you consume. For example, if the default is 50 RPS and you provision 80 RPS, you’re billed for 30 RPS even if your actual usage is only 60 RPS. If your provisioned capacity is 50 RPS (the default), your billed capacity is 0.
Applied account-level max limit – The ceiling managed through Service Quotas. This determines how high you can set your provisioned limit. Raising this ceiling doesn’t incur charges, it only unlocks the ability to provision higher capacity. Importantly, the Provisioned limits page displays each API category with its adjustability status. For example, UserCreation is marked Adjustable (shown earlier in Figure 5) and can be modified. However, UserList is marked Not adjustable, meaning the account-level max limit can’t be adjusted for that category. You can still see its default and provisioned limit on the page, but you can’t modify them. For adjustable categories, you will see the default limit, current provisioned limit, and billed capacity at a glance.
Figure 6: Provisioned limits overview with non-adjustable API categories.
Multi-tenant SaaS considerations
For software as a service (SaaS) providers managing multiple tenants with varying throughput requirements, the UpdateProvisionedLimit API enables programmatic management of provisioned capacity. Teams using dedicated user pools per tenant, for example, can integrate this into their infrastructure-as-code pipelines to adjust provisioned limits per tenant tier. With provisioned limits, SaaS vendors can tier their capacity management per tenant, for example, provisioning higher capacity for enterprise-tier tenants and lower capacity for free-tier tenants, and adjust each tenant’s provisioned capacity independently through the API based on their service tier and demand patterns.
Conclusion
With provisioned limits, whether you’re preparing for peak shopping season, tax filing deadlines, or any other scaling event, you can now adjust provisioned limits to respond to your organization’s needs on demand. The separation between the account-level max (in Service Quotas) and the provisioned limit (in the Amazon Cognito console) gives you full control to plan ahead, respond to demand changes in minutes, and optimize costs on your own terms.
Get started
The provisioned limits experience for Amazon Cognito user pools launched on July 6, 2026, and is available across all AWS Regions where Amazon Cognito is supported. To get started:
Review your current authentication traffic patterns using Amazon CloudWatch metrics to understand your baseline
Set up CloudWatch alarms at 70% and 85% of your current rate limits
Ensure your team has appropriate AWS Identity and Access Management ( IAM) permissions for both Service Quotas and the Provisioned limits tab in the Amazon Cognito console
Raise your account-level max in Service Quotas based on your demand expectations
Use the Amazon Cognito console Provisioned limits tab to adjust capacity up or down as needed
Amazon Web Services (AWS) is pleased to announce the successful completion of our Payment Card Industry (PCI) Data Security Standard (DSS) and Three Domain Secure (3DS) certifications. As part of this renewal, we have expanded the scope to include three additional AWS services and one additional AWS Region:
This certification means that customers can use these services while maintaining PCI DSS and PCI 3DS compliance, enabling innovation without compromising security. The full list of services can be found on the AWS Services in Scope by Compliance Program page.
The PCI DSS and PCI 3DS compliance packages include two key components for each certification:
Attestation of Compliance (AOC) – demonstrates that AWS was successfully validated against the PCI DSS and PCI 3DS standards.
AWS Responsibility Summary – provides guidance to help AWS customers understand their responsibility in developing and operating a highly secure environment on AWS for handling payment card data.
AWS was evaluated by Coalfire, a third-party Qualified Security Assessor (QSA).
This refreshed certification offers customers greater flexibility in deploying regulated workloads while reducing compliance overhead. Customers can access the PCI DSS and PCI 3DS report packages through AWS Artifact. This self-service portal provides on-demand access to AWS compliance reports, streamlining audit processes.
To learn more about our PCI programs and other compliance and security programs, see the AWS Compliance Programs page.
As always, we value your feedback and questions; reach out to the AWS Compliance team through the Compliance Support page.
If you have feedback about this post, submit comments in the Comments section below. If you have questions about this post, contact AWS Support.
The HIPAA Security Rule’s Technical Safeguards (§164.312) define five standards and nine implementation specifications covering access control, audit controls, integrity, authentication, and transmission security.
The guidance also covers the 2025 NPRM proposed changes,including encryption at rest and in transit becoming required, multi-factor authentication (MFA) becoming mandatory for all electronic Personal Health Information (ePHI) access, and new specifications for network segmentation, configuration management, anti-malware protection, patch management, software removal, incident response and breach notification.
Key topics included
Shared responsibility for HIPAA on AWS – A responsibility matrix mapping each §164.312 specification to what AWS manages nd what the customer must configure and operate.
ePHI boundary architecture – Guidance on establishing a defined ePHI boundary
ePHI data flow and encryption – A reference architecture tracing ePHI with the applicable §164.312 specification
Foundation checklist – Prerequisite recommendation before configuring individual Technical Safeguard controls.
This guidance is written for cloud architects, security engineers, CISOs, and compliance teams at covered entities and business associates building or operating AWS healthcare workloads. It assumes familiarity with AWS services and is intended as a practical implementation reference, not a legal or regulatory interpretation. This guidance focuses exclusively on Technical Safeguards.
HHS published a Notice of Proposed Rulemakingin January 2025, proposing significant updates to the HIPAA Security Rule—including eliminating the Addressable designation, making encryption, MFA, and asset inventory mandatory, and introducing new technical requirements not present in the current rule. As of June 2026, the final rule has not been published. This guidance covers both the current rule and the proposed changes and recommends treating all specifications as Required for new workloads.
For questions about HIPAA readiness on AWS, including Administrative Safeguards, Physical Safeguards, risk analysis, and assessment preparation, contact the AWS Security Assurance Services teamor your AWS account representative.
This guidance is provided by AWS Security Assurance Services, LLC, a HITRUST External Assessor Firm and PCI-QSAC along with contribution from AWS HCLS, AWS Compliance teams. It is for informational and guidance purposes only and does not constitute legal, regulatory, or compliance advice. Recipients are solely responsible for determining applicability to their specific environments and legal obligations.
If you have feedback about this post, submit comments in the Comments section below.
AI coding agents are part of the developer toolchain. Tools like Kiro and Claude Code generate features, tests, and code refactors from natural-language prompts. A single agent can open dozens of pull requests (PRs) across your repositories in an afternoon. That productivity comes with a trade-off: agents optimize for task completion at machine speed with no understanding of your organization’s risk.
Through protocols like the Model Context Protocol (MCP), agents also reach beyond the integrated development environment (IDE) to call APIs, query databases, and modify infrastructure and even entire environments, expanding the scope of resources your application security team defends.
This post lays out an application security (AppSec) control framework for AI coding agents. Two pillars organize the framework: author-time controls shape what the agent produces in the IDE; build-time controls verify and gate what reaches production. Your existing secure software development lifecycle (SDLC) controls still apply and are critical to a defense-in-depth security strategy. The framework shows where to layer additional guardrails so AppSec scales with agent-driven development. The framework is tool-agnostic and cloud-agnostic. Throughout, we use AWS services—Kiro in the IDE and AWS CodePipeline in the build—as a running example that you can adapt to your own toolchain.
Risks
Each of the following risks includes a treatment summary. The control framework section later in this post provides implementation details. The risks are ordered by severity with the highest impact risks first.
R001. Prompt and context injection
Agents read untrusted content, such as issue descriptions, web pages, MCP responses, and README files in third-party packages. Text from outside parties can redirect the agent to disclose secrets, open unauthorized PRs, or invoke tools without user consent. This risk, known as prompt injection, is the top risk in the OWASP Top 10 for LLM Applications. Any agent that reads content from outside parties is exposed, with or without MCP, so connecting tools widens the scope of impact.
Treatment: Treat non-developer input as untrusted. A large language model (LLM) can’t reliably separate instructions from data in a single context window, so architect for it: keep the agent that orchestrates trusted actions separate from the one exposed to untrusted content and grant the exposed agent only read-only, least-privilege access. Require human approval for irreversible actions. Use version-control steering files to prevent silent tampering.
R002. Inadvertent data disclosure and overly permissive configurations
Agents optimize for getting work done. Left unchecked, the code they generate can default to wildcard identity and access management policies, open security groups, and unencrypted storage, or embed sensitive values in code rather than referencing a secrets manager. Most coding agents now include safety mechanisms that make these outcomes less likely, but they remain imperfect, so you still need controls to account for the possibility.
Treatment: Security requirements in a steering document, plus policy-as-code scanning (Checkov, cfn-nag) in the IDE and pipeline. See Context as a security control.
R003. Uncontrolled changes reaching production
Ungated code reaching production isn’t new, but AI agents amplify it. Machine-speed generation can propagate a flawed pattern across repositories before it’s identified.
Treatment: Branch protection rules requiring PR approval (a human-in-the-loop checkpoint), pre-commit hooks for security checks, and sandboxed agent runs that prevent direct pushes to protected branches. The right balance between human review and automated speed depends on the risk profile of the change. For many low-risk paths, automated checks alone might suffice, while higher-risk changes warrant a human checkpoint.
R004. Supply chain risks
Agents don’t always distinguish current best practices from outdated patterns. They might recommend deprecated packages, reference library versions with new Common Vulnerabilities and Exposures (CVEs), and hallucinate package names that don’t exist, which can introduce risks of dependency confusion issues.
Treatment: Software Composition Analysis (SCA) in the pipeline (for example, Amazon Inspector code scanning or Dependabot) to flag vulnerable or unexpected dependencies. For additional control, resolve against a scoped registry like AWS CodeArtifact. Even without a fully curated registry, lockfile validation and allow-listing critical packages reduce exposure.
R005. Uncontrolled external access
Through MCP and tool integrations, agents query databases, call APIs, and modify infrastructure. Without constraints on which tools and data an agent can reach, a single misconfigured integration provides unintended access to sensitive resources.
Treatment: Scope MCP servers to least-privilege tools and resources, enforce authn or authz on external connections, and audit tool invocations. The control point is the configuration file. Review it the same way you review AWS Identity and Access Management (IAM) policies.
R006. Hallucinations and incorrect code
Agents produce plausible-looking output. Code that compiles, passes linting, and looks reasonable can still be functionally wrong: misusing APIs, introducing subtle logic errors, or implementing security-sensitive operations incorrectly. Code that passes continuous integration (CI) but is wrong slips through review; code that fails to build is caught immediately.
Treatment: Layer deterministic verification (static application security testing (SAST), unit tests) with non-deterministic review (LLM-assisted screening against the specification). Neither catches everything alone.
R007. Scope creep
Given a bug-fix prompt, an agent might also refactor surrounding code, disable an unreliable test, or reorganize imports. Unrequested changes introduce regressions and complicate review.
Treatment: A reviewed specification document that defines what must change and what must not, paired with a targeted review of the proposed changes. See Specifications as scope boundaries.
The preceding risks share a common thread: agents produce output faster than humans can review it, and they lack context to self-correct.
The following framework addresses this gap. It organizes controls into two pillars: author-time (pre-generation and post-generation of code) and build-time (in the pipeline, before code reaches production). Author-time controls shape what the agent produces. Build-time controls verify it. Neither is sufficient alone; together they reduce the volume and severity of issues that reach human reviewers.
Deterministic compared to non-deterministic mitigations
Deterministic mitigations[D] produce the same result every time. Linters, SAST scanners, secrets detection, and policy-as-code match patterns against rules and define security invariants: no critical findings, no hardcoded secrets, and no wildcard IAM policies. Use them when the condition can be expressed as a rule. Organizations already have these and must continue enforcing them.
Non-deterministic mitigations [ND] use model judgment. They include steering documents, LLM-as-judge review, specification compliance checks, and scope-creep detection, and they evaluate intent rather than patterns. They catch novel issues that rules miss, but are probabilistic. Use them when evaluation requires context or reasoning across files. This is the new layer that AI-generated code demands, because agents produce code that can pass every deterministic check yet remain functionally wrong.
Human review[H] provides the final layer for the risk-based decisions neither tool type can make. Apply it where judgment is needed, not everywhere: routing every change to a person invites consent fatigue, where reviewers approve by reflex and the control loses its value. The default reflex is to route everything back to a human, but that isn’t always the right response—reserve human judgment for the decisions that genuinely need it.
The control framework
The framework organizes controls into two pillars. Author-time controls (Pillar 1) shape what the agent produces in the IDE, before code is generated and just after. Build-time controls (Pillar 2) verify and gate that output in the pipeline, before it reaches production. The controls within each pillar are tagged deterministic [D], non-deterministic [ND], or human [H].
Pillar 1: Author-time controls (pre- and post-generation of code)
Author-time controls work inside the IDE, where the developer and agent still hold full context. They shape the prompt and the generated output before it ever reaches a pull request. The following controls apply at this stage.
Context as a security control [ND]
Control statement: Encode security invariants as natural-language constraints in a steering document that every developer environment consumes at session start. Addresses R002. Many AI coding agent risks share one root cause: the agent lacks the security context an experienced developer carries implicitly. Your security team sets the policies, such as Amazon Simple Storage Service (Amazon S3) buckets require encryption, API gateways require mutual TLS, and credentials must come from AWS Secrets Manager. Developers don’t always have these requirements available when they’re building. They build what works, not what’s compliant. An AI agent amplifies this gap because it defaults to whatever pattern dominated its training data, with no awareness of your organization’s security posture.
A key mitigation is steering. Security teams write these invariants once as natural-language guidance in a steering document, then distribute them as shareable resources that developers consume in their IDE. The agent loads the file at session start and treats the contents as standing requirements:
IAM policies must follow least-privilege principles; no wildcard Amazon Resource Names (ARNs).
No hardcoded credentials in source code; use a secrets manager.
Security groups must not allow unrestricted inbound access.
This shifts security left, before code generation begins. Steering biases generation toward secure defaults; it doesn’t guarantee them. Treat it as a strong default, paired with the following deterministic gates that block non-compliant code from merging. Security teams define the rules once and every developer environment inherits them automatically. Steering reduces the volume of issues that reach the pipeline, though it doesn’t replace downstream scanning.
How to write effective steering rules: Keep each rule specific and testable, scope it to a concrete risk class, keep the rule set concise so the agent can hold it in context, and iterate from the issues your scanners and reviewers surface.
Specifications as scope boundaries [ND]
Control statement: Require a reviewed specification before code generation begins. Define what must change and what must not. Addresses R007.
Spec-driven workflows turn vague prompts into reviewable specifications before code is generated. This creates a human checkpoint at the design phase, where security decisions are made:
Requirements use testable notation that’s auditable before the agent writes a line of code. For example, the Easy Approach to Requirements Syntax (EARS): WHEN [condition] THE SYSTEM SHALL [behavior].
Tasks are ordered in implementation steps, each mapped back to a requirement.
For bug fixes, specifications add a critical element: unchanged behavior documentation. This is an explicit list of behaviors that must continue working, giving the agent a written boundary against scope creep.
In this model, the specification becomes the primary artifact, code is a derivative of it. Human review effort concentrates on whether the specification solves the right problem with the right constraints, not on reading implementation diffs line by line.
Controlled tool access using MCP [D + ND]
Control statement: Scope each MCP server to the minimum set of tools the agent needs, and give it a dedicated, scoped-down credential rather than the developer’s own. Maintain an allowlist of reviewed MCP servers. Addresses R005.
MCP servers act as controlled gateways between the agent, the external tools, and data:
Dependency management – An MCP server fronting your private package registry resolves dependencies against curated packages, not the public internet. This is a deterministic constraint on supply chain risk.
Infrastructure tooling – Visibility into current resource configurations prevents templates that conflict with existing infrastructure.
Scoped permissions – Each MCP server exposes a defined set of tools and resources. You choose exactly what the agent can access, supporting least-privilege at the integration layer. You supply that credential through the agent’s configuration (in Kiro, the env block of .kiro/settings/mcp.json). Avoid autoApprove: ["*"], which removes the human approval prompt on every tool call.
IDE code scanning [D]
Control statement: Run real-time static analysis in the IDE so security issues surface while the developer (and agent) still have full context. Addresses R002, R006.
Real-time diagnostics catch syntax errors, type mismatches, and configuration issues as the developer types. A malformed IAM policy is flagged before the agent builds further on it. Security-focused extensions (ESLint security plugins, Checkov, SAST) layer on top for immediate feedback while code is fresh in context.
Hooks: Automated guardrails at the point of action [D + ND]
Control statement: Attach deterministic checks to file-save events and non-deterministic verification to task-completion events. Addresses R002, R007.
Shell command hooks [D] – Triggered on file save, these run a linter, formatter, or security scanner and produce the same result every time. They enforce hard rules.
AI-powered hooks [ND] – Triggered on task completion. These prompt the agent to verify that the implementation matches the specification and check for any untested edge cases or files that were modified outside the task’s scope.
Pillar 2: Build-time controls (in the pipeline)
Build-time controls run in the pipeline after code is committed and before it reaches production. They verify and gate what the agent produced, catching what author-time controls did not. The following controls apply at this stage.
Layered security scanning [D]
Control statement: Run secrets detection, static analysis, dependency scanning, and infrastructure-as-code scanning in sequence. Fail the build on any critical finding. Addresses R002, R003, R004.
Secrets detection runs first because it’s cheapest and addresses a high-severity class of issue. It scans for hardcoded API keys, database connection strings, and credentials that AI agents might inadvertently include.
SAST scans source code for injection issues, insecure deserialization, and resource leaks. Custom rules can target AI-specific anti-patterns including overly broad exception handling, deprecated APIs, placeholder credentials, dynamic code execution through eval().
Software Composition Analysis (SCA) identifies known CVEs in dependencies. This is critical for AI-generated code, which might reference deprecated packages or hallucinate package names that open you to dependency confusion issues.
Infrastructure as code (IaC) scanning validates AWS CloudFormation, Terraform, and AWS Cloud Development Kit (AWS CDK) templates against security policies before deployment. Catches overly permissive IAM roles, unencrypted storage, and public-facing resources the agent created.
Each stage halts the pipeline on failure. Results export to a standard format (Static Analysis Results Interchange Format (SARIF)) for compliance auditing and flow downstream to human reviewers. The open source Automated Security Helper (ASH) bundles secrets, SAST, SCA, and IaC scanners behind one command that you can run locally and in AWS CodeBuild, emitting SARIF for the gates that follow.
Quality gates [D]
Control statement: Define pass/fail thresholds for each scan type. Block deployment on any critical or high-severity finding. Addresses R003.
Quality gates convert scan results into go/no-go decisions. Define thresholds for each severity: block on critical findings, require justification for highs, and track mediums. The gate is deterministic: if a threshold is breached, the pipeline stops. Exceptions require documented approval.
Differentiate blocking compared to advisory modes: hard failures on main, advisory on feature branches. Avoid gates becoming a friction that teams route around.
AI-assisted review [ND]
Control statement: Use an LLM reviewer to pre-screen every pull request for specification compliance, scope creep, and security anti-patterns before human review. Addresses R001, R006, R007.
Specification compliance – Does the implementation match the requirements document?
Scope verification – Were files modified outside the task’s stated scope?
Security pattern review – Are there logic errors, misused APIs, or insecure patterns that pass SAST but violate intent?
This pre-screening focuses human reviewer attention on genuine risks rather than formatting or obvious issues. On AWS, AWS Security Agent (code review in preview at publication) checks pull requests against AWS-managed and custom security requirements. The reviewer screens and surfaces findings; the merge decision stays with a human.
A critical principle: the agent that wrote the code should not be the agent that reviews it. A separate session helps avoid self-confirmation bias, but a separate session alone doesn’t always avoid the generator’s blind spots, because two sessions of the same model can share them. Where practical, use a different model for review so the reviewer is less likely to inherit the same systematic weaknesses.
Human-in-the-loop review [ND + H]
Control statement: Require human approval on most pull requests, especially those touching security-sensitive or high-blast-radius code. Lower-risk changes might be eligible for agent-assisted or fully automated approval as tooling matures. Provide reviewers with scan results, LLM pre-screening output, and specification context to enable fast, informed decisions. Addresses R003.
Scale review depth to the risk of the change. Low-risk or boilerplate changes can take a lighter-touch review, while security-sensitive or novel-logic changes warrant mandatory deep review and a second reviewer.
Scanners catch known patterns but can’t judge whether code implements the intended business logic. Human review also serves to calibrate trust: teams build intuition about where agents excel (boilerplate, test writing) and where they’ve tended to struggle (novel business logic, security-sensitive operations), recognizing that this frontier shifts as models improve.
Place two approval gates: after security scans (reviewer focuses on correctness and business logic, with scan results as context) and before production deployment (final sign-off after integration testing). Treat human review as a secondary control, not a guarantee: reviewers are themselves non-deterministic and can miss issues, so human review layers on top of the deterministic gates rather than replacing them.
Putting the framework into practice on AWS
The framework is tool-agnostic, but AWS gives you building blocks for each pillar. The following services map directly to the controls described previously: Kiro for author-time guardrails, and CodeBuild and CodePipeline for build-time gates.
Kiro: Structured AI development
Kiro maps to Pillar 1: It puts the author-time controls in the IDE, where the developer and agent still share full context. Each feature in the following list implements one of those controls, configured in-repo under .kiro/ so the guardrails are version-controlled and shared across the team rather than set per developer.
Steering documents – Markdown files in .kiro/steering/ load into the agent’s context at session start. Conditional inclusion using fileMatch (for example, ["**/*.tf"]) loads IaC-specific rules only when relevant.
Specification-driven workflows – Three-phase specifications (requirements in EARS, design, and tasks) with review checkpoints. Bug-fix specifications capture unchanged behavior explicitly.
Agent hooks – Triggered on file save, tool invocation, or task completion. Shell hooks run deterministic checks (linters, tests); Ask Kiro hooks run AI prompts for non-deterministic review. For example, a security pre-commit scanner hook can flag hardcoded credentials when the agent finishes a task.
Property-based testing – Guided by a specification or hook, Kiro can generate property-based tests (for example, using the hypothesis library) that exercise hundreds of randomized inputs, probing edge cases a hand-written test suite would miss.
MCP integrations – Connect Kiro to private package registries, internal docs, issue trackers, and infrastructure tooling, creating the controlled tool access pattern.
AWS CodeBuild and AWS CodePipeline: Pipeline controls
CodeBuild runs each scanning tool (checking for secrets, SAST, SCA, and IaC) as a build action. A non-zero exit code fails the action, and the stage halts or rolls back according to its OnFailure setting. Findings export as SARIF to Amazon S3 for compliance, and CodePipeline action variables pass results to downstream approval actions.
CodeBuild exit codes halt the pipeline on scan failures
AWS Lambda invoke actions evaluate scan results against configurable thresholds and return pass/fail decisions
Manual approval actions halt the pipeline, send Amazon Simple Notification Service (Amazon SNS) notifications, and link to review artifacts; decisions and reviewer identity are logged for audit
The following table consolidates the framework into a single view that includes each stage of the SDLC and the deterministic [D] and non-deterministic [ND] controls that apply there. Every stage carries both, a reminder that neither control type is sufficient on its own.
Full security scan suite, integration tests, and policy-as-code
AI-assisted review for human approvers
Post-deploy
Runtime monitoring and anomaly detection
AI-powered incident triage
Conclusion
This post laid out a framework for adopting AI coding agents at machine speed without letting unreviewed risk reach production. It layers guardrails at two points:
Author-time controls – Steering, specs, and scoped tools shape what the agent generates in the IDE.
Build-time controls – Scanning, quality gates, and layered review verify it before it reaches production.
No single layer is enough: deterministic gates enforce hard rules, non-deterministic review catches what they miss, and human judgment is reserved for the decisions that need it. Together, they let AppSec scale with agent-driven development.
Where to start this week:
Start with steering and specs – Encode security requirements as steering and use specifications for new features. Highest impact, lowest effort. For a ready-made starting set, the open source Project CodeGuard (a Coalition for Secure AI project under OASIS Open, of which Amazon is a contributing member) publishes reusable steering rules for common risk classes—hardcoded credentials, IaC misconfiguration, supply chain, and MCP security—that you can adapt to your AWS environment.
Add deterministic pipeline gates – Integrate SAST, SCA, and secrets detection. Table-stakes regardless of AI usage.
Calibrate and iterate – Review what controls catch, adjust steering for recurring issues, and expand agent autonomy as trust builds.
Accountability – Developers remain accountable for the security of what they ship. AI agents accelerate development; they don’t transfer ownership.
Amazon Inspector is an automated vulnerability management service that continually scans Amazon Web Services (AWS) workloads for software vulnerabilities. The vulnerability management capabilities of Amazon Inspector are powered by an asset inventory engine known as the Amazon Inspector SBOM Generator (inspector-sbomgen), a standalone command-line tool that produces a software bill of materials (SBOM) from container images, directories, archives, local systems, compiled binaries, and more. Over the past two years, we’ve expanded inspector-sbomgen’s coverage across dozens of programming language ecosystems, operating systems, and widely deployed applications.
We’re pleased to announce a new capability for builders using inspector-sbomgen: a plugin system for writing your own custom package collectors that you can use right away, without requiring source code compilation nor waiting for an official release.
In this post, we walk you through what the inspector-sbomgen plugin system does, why we built it, and how you can write your first plugin in a few minutes. Along the way, we also cover how plugin-generated package components integrate with Amazon Inspector for vulnerability scanning, and we explore the plugin safety model, which helps ensure security-hardened and predictable plugin behavior.
Why we built a plugin system
Software ecosystems are dynamic. New language package managers, lockfile formats, and end user applications ship constantly, and many are adopted quickly, in some cases with little security scrutiny. That leaves security teams with a visibility gap: production workloads running software that their SBOM tooling doesn’t yet recognize. Customers have asked us to inventory many of these ecosystems directly, and until recently, the only path to support was to open a feature request and wait for the inspector-sbomgen team to onboard the ecosystem and deploy a new release.
The inspector-sbomgen plugin system changes that. With plugins, you can:
Onboard ecosystems that inspector-sbomgen doesn’t support out of the box. New open source ecosystems, niche or fast-moving package formats, and internal or proprietary tooling can all be inventoried without modifying inspector-sbomgen.
Prototype detection for an ecosystem quickly. We designed a plugin system that is friendly to developers and AI coding assistants alike. Plugins are written in Lua, loaded at runtime, and require no Go toolchain nor compilation. You can use the built in test harness to iterate on a plugin and see results immediately.
Build on a stable foundation. The plugin API abstracts away artifact-type differences, so you write your detection logic once and it works seamlessly across container images, archives, local systems, and more. And because plugins stay decoupled from the internals of sbomgen, the core tool’s regression surface stays small.
Internally, we’ve used the plugin system to ship new ecosystem coverage faster than before. In our 1.13 release, more than 20 ecosystems that were previously implemented in Go, including Apache Tomcat, NGINX, MySQL, Redis, WordPress, and the OpenSSH toolchain, are now embedded as plugins inside the sbomgen binary. The same release also added more than ten brand-new ecosystems as plugins, including Apache Cassandra, Apache Struts, Conda, Swift packages, and AI-agent collectors (Amazon Q Developer, Kiro CLI, Claude Code, GitHub Copilot, and Ollama).
How inspector-sbomgen plugins work
Sbomgen plugins follow a two-step pipeline:
Discovery – Scan the artifact’s file system to identify files that contain installed package metadata.
Collection –Open each discovered file, parse file contents, and publish findings into the SBOM.
Under the hood, an event bus connects discovery and collection plugins. Discovery plugins publish events listing discovered files, and one or more collection plugins subscribe to these events, triggering package collection. Developers might recognize this behavior as the observer pattern.
This decoupling lets a single discovery plugin feed multiple collectors, for example, one extracting package metadata, another scanning for secrets, and another checking policy. Each collection plugin works from the same file list without re-walking the artifact filesystem, a computationally expensive operation.
Write your first plugin in 5 minutes
Inspector-sbomgen makes it straightforward to bootstrap a plugin environment. The plugin new command tells sbomgen to create a new plugin workspace, and the —-with-example flag populates the workspace with a discovery-collection plugin pair, that you can run immediately.
inspector-sbomgen plugin new --with-example
After invoking the preceding command, you will be prompted to provide a plugin name and a directory that will contain your plugin workspace. You can provide custom values or use the default values:
Plugin name (identifies the software ecosystem your plugin will inventory, e.g. debian-dpkg, rhel-rpm, python-pip, cmake) [my-custom-ecosystem]: <enter>
Project directory [my-sbomgen-plugins]: <enter>

Created plugin "my-custom-ecosystem" in my-sbomgen-plugins/
Note that you can skip interactive prompts by specifying the plugin name and directory using the corresponding command line interface (CLI) arguments:
After creating your plugin workspace, inspector-sbomgen will display a next steps screen, which guides developers and AI code assistants to the source files they need to change and to supporting documentation:
Next steps:

  Get started:
    1. Open plugin folder in a code editor (VS Code recommended)
    2. Add test files that your plugin will discover and parse
       (e.g., config files, lockfiles, binaries, etc.):
       my-sbomgen-plugins/discovery/cross-platform/extra-ecosystems/my-custom-ecosystem/_testdata/

  Develop:
    3. Edit discovery:    my-sbomgen-plugins/discovery/cross-platform/extra-ecosystems/my-custom-ecosystem/init.lua
    4. Edit collection:   my-sbomgen-plugins/collection/cross-platform/extra-ecosystems/my-custom-ecosystem/init.lua

  Test:
    5. Write unit tests:  my-sbomgen-plugins/discovery/cross-platform/extra-ecosystems/my-custom-ecosystem/init_test.lua
    6. Run unit tests:    inspector-sbomgen plugin test --path my-sbomgen-plugins

  Deploy:
    7. Distribute your plugin directory wherever you run inspector-sbomgen:
       inspector-sbomgen <arguments> --plugin-dir /path/to/my-sbomgen-plugins

       Example:
       inspector-sbomgen container --image alpine:latest -o /tmp/sbom.json --plugin-dir /path/to/my-sbomgen-plugins

For code completion, install the VS Code Lua language server extension:
  https://luals.github.io/#vscode-install

For more information:
  - Plugin guide:    my-sbomgen-plugins/docs/sbomgen-plugin-developer-guide.md
  - Testing guide:   my-sbomgen-plugins/docs/sbomgen-plugin-testing-guide.md
  - API reference:   my-sbomgen-plugins/docs/sbomgen-plugin-api-reference.md
  - Documentation:   https://docs.aws.amazon.com/inspector/latest/user/sbom-generator.html
Now that you have a plugin workspace, let’s explore its contents in greater detail:
The scaffolded project includes a working discovery and collection plugin pair, passing unit tests with test fixtures under _testdata/, a .vscode/settings.json for integrated development environment (IDE) integration, and a local copy of the developer documentation.
The scaffolding is deliberately succinct and complete, so it reads well for both humans and AI coding assistants. Every file has clear comments that explain what each function does and what the plugin author needs to fill in.
To test a plugin, you first need something to scan, such as a package lock file or a compiled binary. The example plugin inventories a fictional example.lock with the following contents:
The provided discovery plugin knows how to look for instances of example.lock within the artifact file system:
-- my-custom-ecosystem discovery plugin
-- Discovers example.lock files in the artifact file list.

function discover()
    return sbomgen.find_files_by_name({"example.lock"})
end
And the provided collection plugin knows how to parse the contents of example.lock and publish package findings to the output SBOM.
-- my-custom-ecosystem collection plugin
-- Parses example.lock files and extracts package name and version.

function collect(file_path)
    local content = sbomgen.read_file(file_path)
    if content == nil then
        return
    end

    for line in content:gmatch("[^\n]+") do
        local name, ver = line:match("^(.+)==(.+)$")
        if name and ver then
            sbomgen.push_package({
                name = name,
                version = ver,
                purl_type = "generic",
                namespace = "my-custom-ecosystem",
                component_type = sbomgen.component_types.APPLICATION,
            })
        end
    end
end
Run the tests
Plugins ship with a built-in test framework so you can validate your logic before scanning a real artifact. Tests are written in Lua, live next to the plugin in init_test.lua, and reference fixture data in _testdata/:
function test_discovers_packages()
    local result = testing.scan_directory("_testdata")
    testing.assert_equals(3, #result.findings)
    testing.assert_equals("my-package-alpha", result.findings[1].name)
    testing.assert_equals("1.0.0", result.findings[1].version)
end

function test_no_findings_for_empty_directory()
    local result = testing.scan_directory("_testdata/empty")
    testing.assert_equals(0, #result.findings)
end
Run the tests with the following command:
inspector-sbomgen plugin test --path my-sbomgen-plugins -v

=== RUN   my-custom-ecosystem/discovery/init_test/test_discovers_packages
--- PASS: my-custom-ecosystem/discovery/init_test/test_discovers_packages (0.04s)
=== RUN   my-custom-ecosystem/discovery/init_test/test_no_findings_for_empty_directory
--- PASS: my-custom-ecosystem/discovery/init_test/test_no_findings_for_empty_directory (0.04s)
ok    2 tests passed
This is the tightest development loop we could design: no Go toolchain, no rebuild, no container spin-up. Write a test, run it, iterate.
Scan a real artifact
For plugins to produce findings, inspector-sbomgen needs an artifact that contains the files your plugin looks for. For the example plugin, any directory with an example.lock file works. The fixture we generated earlier is a good stand-in:
The --plugin-dir flag tells inspector-sbomgen where to load your Lua plugins from. The resulting SBOM contains a CycloneDX component for each of the three packages in example.lock, for example:
Every plugin-generated component carries an amazon:inspector:sbom_generator:source_path property that records the file the component was collected from, so you can always trace a component back to the artifact that produced it.
Vulnerability scanning with Amazon Inspector
Plugin-generated findings are first-class SBOM components. They work with every downstream consumer that reads CycloneDX SBOMs, including Amazon Inspector. To send an SBOM to Amazon Inspector for vulnerability analysis, add the --scan-sbom flag (this requires an active AWS account):
An important caveat when you onboard a brand-new ecosystem: Plugin authors can inventory arbitrary ecosystems, but Amazon Inspector can only report vulnerabilities for components it has advisories for. When you point Amazon Inspector at a component whose ecosystem isn’t in its advisory feeds yet, Inspector will return the component with a property, Component skipped: no supported rules found. For example:
This is expected behavior, not an error. The SBOM is still generated correctly, the component is still tracked, and the source_path tells you exactly which file produced it. If and when Amazon Inspector adds advisory coverage for the ecosystem, the same SBOM will start producing vulnerability findings without any change to your plugin. For ecosystems Inspector already supports, plugin-generated components are indistinguishable from components produced by built-in scanners.
First class IDE support
We care about productivity and efficiency when writing plugins. Writing Lua without modern conveniences such as autocomplete isn’t fun, so every plugin project scaffolded with the plugin new command ships with a library/sbomgen.lua definition file and a .vscode/settings.json that automatically wires it up to the Lua Language Server extension for VS Code.
For code completion and IDE support, first install the sumneko.lua extension, open your plugin project in VS Code, and every sbomgen.* function will get:
Parameter hints with types.
Hover documentation.
Autocomplete for constants (sbomgen.component_types.*, sbomgen.groups.*, sbomgen.platform.*).
Type checking on function calls.
Inline warnings when required fields are missing from push_package().
The same definition file makes plugin development work well with AI coding assistants. The types and documentation are embedded in a form that tools can read, so assistants can generate correct plugin code with far less monitoring than writing against a raw language would require.
A safe foundation
Plugins run real code inside the same process as inspector-sbomgen, so we designed the execution environment to keep that code stable and security-hardened. Every Lua plugin runs in an isolated sandbox. Every Lua virtual machine (VM) has access to a restricted subset of the Lua standard library to ensure only safe operations are permitted:
No direct filesystem access. The Lua io library isn’t loaded. All file operations go through sbomgen.* functions, which route through sbomgen’s internals so your plugin behaves identically whether it’s scanning a directory on disk, a container image, a compressed archive, or a mounted volume.
No subprocess execution or environment mutation. The Lua os library is blocked, so plugins can’t spawn processes, modify environment variables, or touch files outside the artifact.
No VM introspection. The Lua debug library is blocked.
No unbounded code loading.dofile, loadfile, and loadstring are removed. require() is available but restricted to the plugin’s own directory tree, so plugins can share helper modules with themselves but cannot load code from other plugins or system paths.
If a plugin raises an unhandled Lua error, inspector-sbomgen logs a warning and continues with the next file or plugin; one faulty plugin does not prevent other plugins from running. Plugins never override inspector-sbomgen’s built-in package collectors. Every plugin must declare a unique name. If a custom plugin uses a name that’s already claimed by an official built-in plugin, the custom plugin is skipped with a warning. Built-in plugins always take precedence, so a custom plugin can never silently replace or shadow the tool’s own detection behavior.
Whether you’re adding support for an internal lockfile format, prototyping detection for a new open source ecosystem, or replacing a home-grown scanner with something your whole organization can run at scale, the plugin system is designed to make the path from idea to working SBOM as short as possible. We can’t wait to see what you build with it. If you have feedback about this post, submit comments in the Comments section below. If you have questions about this post, contact AWS Support.
Amazon is sharing new findings about how a threat actor linked to the Democratic People’s Republic of Korea (DPRK) is targeting open source software libraries, the shared building blocks that companies around the world use to develop applications. Amazon Threat Intelligence has linked several recent compromises of popular Node Package Manager (NPM) libraries to the same DPRK-linked threat actor, a connection that hasn’t been publicly reported until now. The analysis also describes how generative AI is already changing what malicious software packages look like and how threat actors are beginning to probe AI-based code systems. We’re sharing this research to help the open source community and security teams better identify and address these types of events.
These developments come 2 years after the XZ Utils backdoor, which demonstrated how a patient attacker can compromise critical open source software by exploiting the trust and limited time of volunteer maintainers. Open source software underpins much of the internet’s infrastructure: operating systems, web servers, encryption libraries, and the application frameworks that businesses rely on daily. When an attacker compromises a widely used open source package, every organization that depends on that package is potentially affected. Since then, Amazon Threat Intelligence has observed the volume and sophistication of software supply chain attacks increase, driven in large part by DPRK‑linked threat actors and cybercriminal groups.
In this post, Amazon Threat Intelligence and the Amazon Inspector team share new details about recent campaigns against popular NPM packages, including evidence that the compromises of the axios, debug, chalk, and typo-crypto libraries were carried out by the same DPRK-linked threat actor tracked by the security community as SAPPHIRE SLEET, STARDUST CHOLLIMA, BlueNoroff, CageyChameleon, and Alluring Pisces. We also outline how the techniques used to compromise open source repositories are evolving, why these changes matter for organizations that depend on open source software, and what Amazon Web Services (AWS) is doing to help customers detect and respond to these threats.
One DPRK–linked group behind multiple NPM compromises
In March 2025, the DPRK-linked threat actor compromised the typo-crypto package. In September 2025, the same threat actor compromised the debug and chalk NPM packages. In March 2026, the same operational playbook appeared in a compromise of the axios package, one of the most widely used JavaScript libraries with more than 100 million weekly downloads. In each case with debug, chalk, and axios, the threat actor gained access by socially engineering a trusted maintainer of the package, then published a software update containing malicious code. Any organization that automatically pulled the latest version of these packages received the compromised update.
While the axios compromise has been publicly attributed to this DPRK-linked threat actor, the typo-crypto, debug, and chalk incidents haven’t previously been connected to it. Amazon Threat Intelligence identified shared tactics, techniques, and procedures (TTPs) across these supply-chain campaigns, including trojanized NPM packages, use of post-install hooks (scripts that run automatically when a package is installed), and code reuse. Based on analysis of command-and-control (C2) indicators and TTPs, Amazon Threat Intelligence assesses with medium confidence that these campaigns are attributable to the DPRK-linked threat actor tracked as SAPPHIRE SLEET, STARDUST CHOLLIMA, BlueNoroff, CageyChameleon, and Alluring Pisces. This is the first time these compromises have been publicly tied to this DPRK-linked threat actor.
Amazon Threat Intelligence assesses this as part of a financially motivated pattern: by compromising a small number of highly popular packages, the group gains potential access to thousands of downstream environments simultaneously. For a financially motivated threat actor, this approach is far more efficient than targeting organizations one at a time.
The aggregate impact of these incidents underscores the efficiency of targeting share dependencies. As reported by Wiz Research, roughly 1 in 10 cloud environments were affected by the debug and chalk supply chain event within a two‑hour window.
A smaller campaign that foreshadowed later activity
During routine analysis of indicators and TTPs related to the axios threat actor, Amazon Threat Intelligence identified a connection to a domain registered in 2025, prompting a full investigation into its historical activity. That investigation uncovered that the same DPRK-linked threat actor had committed a trojanized file to the typo-crypto NPM package in March 2025. The malicious file, core.js, masquerades as the legitimate core-js NPM package within the typo-crypto repository.
Based on the limited number of observed downloads, Amazon Threat Intelligence assesses that this campaign was small scale and likely served as a testing ground for the more visible supply chain operations that followed in late 2025 and 2026. The group appears to have been refining supply chain techniques more than a year before the larger campaigns that drew public attention. Amazon Inspector reported this malware to the Open Source Vulnerabilities (OSV) database, where it’s now tracked as MAL‑2026‑3400, so that the broader security community can benefit from these findings.
The trojanized file executes when it receives a hash input beginning with the value 0098273. When triggered, it downloads a second-stage payload from a hardcoded C2 server, then executes the payload based on the victim’s operating system, with behavior tailored for Windows, macOS, or Linux. The malware implements file-based persistence with payload rotation and uses multi-layer obfuscation, combining base64‑encoded text with an XOR cipher keyed to 01042025.
Amazon Threat Intelligence assesses that the group was experimenting with techniques that later appeared in the higher-impact campaigns against axios, debug, and chalk. Although the observed download volume was low, the tradecraft aligns with what we later observed in attacks on more popular packages.
How attacker tradecraft is shifting
Over the past year, Amazon Threat Intelligence and Amazon Inspector have observed threat actors changing the techniques they use to target open source libraries. These changes matter because open source packages remain attractive targets: they’re widely trusted, automatically updated in many environments, and maintained by communities that welcome new contributors. The following patterns describe how attackers are adapting their methods to evade modern defenses. Each is designed to exploit the gap between the moment a dependency is inspected and the moment it actually executes. A year ago, we looked for malicious packages. Today, we look for malicious behaviors split across packages that appear harmless on their own.
From package‑level attacks to fragment‑level attacks
Amazon Inspector has observed attackers increasingly splitting a single malicious workflow across several ordinary-looking packages. One package stores an encrypted blob disguised as configuration. A second ships the decryption logic. A third, often published later, fetches and executes the payload.
Viewed on its own, each package looks benign. There are no install hooks that stand out, no obvious evaluation of untrusted input, no network calls that look suspicious. The malicious behavior only appears when the components are used together in the intended sequence. This approach is designed to defeat scanners that evaluate packages one by one instead of reasoning about how they interact in a real dependency graph.
Long-horizon campaigns that invest in trust
We’re also observing threat actors taking a long view of trust accumulation. Instead of publishing obvious malware and waiting for downloads, they publish something genuinely useful and maintain it. They behave like real maintainers for weeks or months, shipping features, fixing bugs, and gaining dependents.
The same patience shows up on the human side. In some cases, the goal isn’t to launch a new package at all, but to become a contributor to an existing project. That’s the through line from XZ Utils backdoor to the debug, chalk, and axios maintainer compromises. In each case, the adversary treated legitimacy as an asset to be spent once, at the moment of maximum access.
Decoupling the package from its behavior
In many recent cases, a library is clean on the public registry yet still dangerous, because its real behavior depends on resources the attacker controls elsewhere. These can include guard or license scripts fetched from an external repository at runtime, configuration files that gate certain behaviors, or remote endpoints consulted at startup.
As long as those external resources remain benign, code reviews pass and automated scans return clean results. When an attacker flips the content or arms an endpoint that previously returned a placeholder, every installed copy can become malicious at once, without any new package release. A package that shows no malicious behavior today isn’t the same as a package that’s is safe by design.
From basic obfuscation to real cryptography
Where attackers used to rely on simple obfuscation such as minification or single-layer base64 encoding, we now observe multi-stage payloads that use stronger cryptographic techniques. Examples include AES‑GCM encrypted blobs gated by passphrases, RC4-style string arrays with per-call keys, layered XOR over base64, and native loaders that hold the next stage as an encrypted field decrypted only in memory.
The common design choice is that the decryption key is never stored in the package itself. It’s derived from runtime context, fetched from a server at execution time, or supplied as a license key. That means even an analyst with full source access can’t reliably decrypt the payload statically. Stage one looks like a simple decryptor; the malicious content remains ciphertext until it runs on a real target with the real key.
Payloads that avoid detonating in sandboxes
As defenders have scaled automated analysis in cloud sandboxes, attackers have made their code more environment aware. The payload decides whether it’s being analyzed before it acts. We see execution gated behind real package install lifecycles, single-use environment variables, and checks for signals of a genuine developer or build environment. These include interactive terminals, realistic usernames and hostnames, domain membership, plausible uptime, local file history, specific operating systems, and cloud metadata that helps distinguish analysis infrastructure from normal workloads.
Some delivery servers also tailor what they serve based on the client. A benign decoy goes to generic browser-like requests, while the live payload only appears for the exact user agent used by the malware. The result is that a clean verdict from a cloud sandbox often tells you more about how convincing your environment looks than how safe the package is.
How generative AI is reshaping both attacks and defenses
Generative AI is changing what attackers can produce and what defenders can rely on. Adversaries can generate novel code and content at scale. Historically, many malicious packages were caught because they looked wrong, with broken language, thin documentation, obvious copy-paste, or a telltale function reused across samples. Generative AI erases many of those signals.
Attackers can now produce thousands of lines of coherent, idiomatic, well-commented code, complete with convincing documentation, plausible commit histories, and synthetic maintainer identities, wrapped around a backdoor. Because each variant can be mutated, renamed, restructured, and re-encrypted, there is no single stable signature to match. Pattern-based detection loses ground against malware that looks one of a kind in every deployment.
AI is also creating new initial access vectors. One emerging technique is slopsquatting, where attackers register package names that exist only because an AI coding assistant hallucinated them. When a developer or an autonomous coding agent asks for help and the model confidently recommends a nonexistent package, an attacker can pre-register that name and wait. The next person who follows the recommendation might receive malware, despite not mistyping anything or visiting a malicious site, because the AI effectively delivered the bad dependency for them. As organizations move toward agents that install dependencies with limited human review, this path looks less like a curiosity and more like a scalable delivery channel.
Most significantly, AI changes the calculus for defensive automation. Attackers are no longer just writing malware for humans to miss. They’re writing malware for AI reviewers to approve. As organizations rely on AI systems to review code and triage packages, those AI systems themselves become part of the attack surface. We expect that indirect prompt injection, a technique where hidden instructions manipulate an AI system into taking unintended actions, will increasingly be embedded in malicious packages to fool AI-based code scanners. These instructions can be hidden in source comments, README files, docstrings, or test fixtures, and crafted to convince an automated system to mark malicious code as safe, skip a specific file, or perform an unintended action during analysis. The same content the malware needs to function can carry a second, separate message aimed at the machine that inspects it.
How AWS is responding
We’re investing across Amazon Threat Intelligence and Amazon Inspector to help customers adapt to this shifting landscape of software supply chain risk. Amazon remains committed to helping protect the security of our customers and the internet by actively hunting for and mitigating threats from sophisticated threat actors. We will continue working with Amazon teams, industry partners, and the security community to share intelligence and mitigate threats. Upon discovering this campaign, Amazon Threat Intelligence worked with Amazon Inspector so the malicious package was tracked, mitigated, and shared with the community through the OSV database. Additionally, the observed indicators were shared with Amazon GuardDuty to alert our customers of this activity.
Amazon Inspector uses these insights to refine our detection logic, broaden coverage across registries, and prioritize signals that reflect the tradecraft shifts described in this post, and is collaborating with industry partners such as package registries and Open Source Security Foundation (OpenSSF) to share findings.
We’re also investing in helping open source maintainers better secure their projects. In 2026, AWS joined the Linux Foundation and other industry leaders to launch Akrites, a collaborative initiative to defend critical open source software against AI-enabled cyber threats. AWS has also jointly invested $12.5 million alongside other organizations to defend the open source ecosystem from AI-driven attacks. These efforts reflect a broader commitment: the security of open source software is a shared responsibility, and defending it requires sustained investment from the organizations that depend on it.
Our goal is to help customers understand where their environments rely on open source components, identify suspicious behavior early, and respond quickly when the software supply chain is used as an entry point.
August 11, 20206: This post was updated to clarify that the social engineering of a trusted maintainer applied to the debug, chalk, and axios compromises specifically. The underlying attribution and findings remain unchanged.
If you use and install packages from npm or PyPI, the first hours after a package is published are the riskiest because scanners can’t analyze packages before publication. Recent supply chain events affecting NodeJS and Python packages have been detected and removed within hours. However, while those packages were available to the general public, it’s possible that they were installed by users, creating the potential for a security incident. As you will see from the data that follows, if users had waited 1 day before accessing those packages, none of the recent supply chain security events would have had an impact.
In this post, I show you a one-line configuration that you can use to eliminate this exposure in your environment: a dependency cooldown for npm and pip. This change tells your package manager to skip versions published in the last 24 hours, giving the security community time to detect and remove unexpected packages before they reach your systems. These settings secure the default setup. There’s another use case of package updates: receiving security fixes to address security risks. This process involves updating packages to a more recent version. I also show you how to override the cooldown configuration so you can install the latest security patches while newly installed package updates are delayed. We recommend that you assess the severity of code defects and apply security fixes if there’s known risk. Handling security fixes based on their severity—and how to specify SLAs for these fixes based on severity—is beyond the scope of this blog post.
Background: Two risks pull in opposite directions
Software delivered by Amazon Linux packages go through review by Amazon package maintainers and pass guardrails before release. Open source software is developed and maintained with similar processes and guardrails. The npm and PyPI registries have open publishing access and don’t enforce reviews. Unexpected packages are potentially added to the registries because of risks like impersonation or stolen credentials. You’re caught between two risks: older software accumulates unpatched vulnerabilities, while new packages potentially contain unexpected vulnerabilities that haven’t been detected yet. The best approach is to stay current without adopting the newest releases immediately, while applying recommended security fixes. The following diagram illustrates the relation between the two types of risks in an abstract way, where the supply chain risk is highest immediately after a package is published, because unexpected updates can potentially bypass guardrails. After a package is published, auditing can review it and identify potential defects over time. If no security fixes are applied, the risk of all the code defects adds up.
Figure 1: Software risk over lifetime. Unpatched vulnerabilities risk increases over time. Very recent software also carries more supply chain risk.
The problem: The first day presents the highest risk
Supply chain events follow a consistent pattern. An unexpected author publishes an unexpected package or package version and waits for automated systems and users to pull it in. Security researchers and automated scanners typically detect and remove these packages within hours, but by then, systems have been exposed to the risk.
Datadog’s 2026 State of DevSecOps report found that 54% of JavaScript applications install at least one dependency within a day of its release. That’s the time window that presents the highest supply chain risk. Recent events show how fast detection happens:
Event
Exposure window
Nx s1ngularity (Aug 2025)
4–5 hours
axios (Mar 2026)
2–3 hours
Bitwarden CLI (Apr 2026)
93 minutes
TanStack (May 2026)
30 minutes
node-ipc (May 2026)
less than 24 hours
The solution: Skip packages published today
A dependency cooldown tells your package manager to skip recently published versions. If a version hasn’t existed on the registry for the configured timespan, for example, 1 day, it won’t be installed, giving the security community time to detect and remove unexpected versions.
A 1-day cooldown blocks each event listed in the preceding table. Notably, several of these events produced valid provenance attestations and passed build verification. These provenance checks alone didn’t stop them. A cooldown works independently of authorization mechanisms, because it blocks by age rather than by trust.
Both npm (v11.10.0+) and pip (v26.1+) support cooldowns . Amazon Linux 2023 ships these packages in NodeJS 24 and Python 3.14 since release 2023.11.20260608.
If you use lockfile-based installations through npm ci or pip install -r requirements.txt with pinned versions, you won’t pull latest package updates. The cooldown doesn’t apply to those installations. The cooldown only affects resolution of new or updated packages. See the Lockfile-based installs and the cooldown section for details.
Prerequisites
To implement the following solution, you first need to have the following prerequisites in place:
Node.js 24 with npm 11.10.0 or later (in nodejs24-24.14.1-1.amzn2023.0.1 or later).
Python 3.14 with pip 26.1 (in python3.14-pip-26.1.1-1.amzn2023.0.1 or later)
pip-audit (tool to scan python packages required for defect-based override scripts). Use python3.14 -m pip install pip-audit to install.
Future versions of Node.js and Python will bring new commands. The following tool commands work for Amazon Linux 2023 with Node.js 24 and Python 3.14. The provided commands target specific package versions. Adjust the commands if you use later releases.
To set up the npm cooldown
Create the global configuration directory, depending on your NodeJS version. sudo mkdir -p /usr/lib/nodejs24/etc
Add the npm configuration file with the cooldown setting. sudo npm-24 config set min-release-age 1 --location=global
Check that the cooldown is active by running the next command. npm-24 config list
You will see before = "<timestamp from 24 hours ago>" in the output, confirming npm converted the 1-day cooldown into a date filter. For more information, see the npm min-release-age documentation.
To set up the pip cooldown
Create the system-wide pip configuration file with the cooldown setting. sudo python3.14 -m pip config set --global global.uploaded-prior-to P1D
Verify the configuration (for Python 3.14 and pip 26.1+). python3.14 -m pip config list
You will see global.uploaded-prior-to='P1D' in the output.
This configuration is safe to deploy immediately, because older pip versions (25.x) silently ignore the setting.
To install a package’s latest version without cooldown
What if you want to install the latest version of a package, for example to receive security fixes? The following sections describe how to override the flag using the tool command line. To identify which packages need urgent updates, run the appropriate audit command for your package manager.
npm auditor python3.14 -m pip_audit
For npm packages
Install the package with the cooldown override. npm-24 install <package-name> --min-release-age=0
For pip packages
Install the package with the cooldown override. python3.14 -m pip install <package-name> --uploaded-prior-to="P0D"
Update packages that need urgent updates
We recommend that you apply security fixes for packages that have known security risks. You don’t need to turn off the cooldown entirely to apply security fixes. Use the audit tools to identify packages with known issues, then override the cooldown for only these packages.
Prerequisites: Ensure you have Python 3 and pip-audit installed (python3.14 -m pip install pip-audit).
Important: These scripts demonstrate the concept. For production use, add error handling, logging, and testing. Review packages before updating them in automated pipelines.
For npm packages
The following script demonstrates the required steps to identify npm packages with a known security fix. The npm audit command prints these packages as JSON. Next, packages in this list are updated with an npm install command, where their cooldown is overridden so that the latest version is picked up.
npm audit --json | python3 -c "
import json, sys, subprocess
data = json.load(sys.stdin)
for pkg in data.get('vulnerabilities', {}):
    subprocess.run(['npm-24', 'install', f'{pkg}@latest', '--min-release-age=0'])
"
For pip packages
The following script demonstrates the required steps to identify pip packages with a known security fix. The pip_audit command prints these packages as JSON. Next, all packages in this list are updated with an pip install command that overrides the cooldown so that the latest version can be picked up.
python3.14 -m pip_audit --format=json | python3.14 -c "
import json, sys, subprocess
from packaging.version import Version
data = json.load(sys.stdin)
for dep in data.get('dependencies', []):
    pkg = dep['name']
    vulns = dep.get('vulns', [])
    if not vulns:
        continue
    fix_versions = [v for vuln in vulns for v in vuln.get('fix_versions', [])]
    if not fix_versions:
        print(f'{pkg}: vulnerable but no fix published, skipping')
        continue
    fix = max(fix_versions, key=Version)
    print(f'Updating {pkg} -> {fix}')
    subprocess.run(['python3.14', '-m', 'pip', 'install', f'{pkg}=={fix}', '--uploaded-prior-to=P0D'])
"
Lockfile-based installs and the cooldown
If you use npm ci or pip install -r requirements.txt with pinned versions, the cooldown doesn’t apply. These commands install what the lockfile specifies, regardless of package age. The cooldown only affects resolution of new or updated packages.
Industry adoption: Cooldowns are now used across PyPI and NodeJS
Major package managers and enterprises have started to adopt dependency cooldowns. As of May 2026, several popular package management tools now include cooldown features: pnpm (a fast Node.js package manager), Renovate (an automated dependency update tool), and StepSecurity (a supply chain security platform).
pnpm 11 ships with minimumReleaseAge enabled by default. It’s one of the first major package manager to make cooldowns opt-out rather than opt-in.
Renovate’sconfig best-practices preset has included a 3-day npm cooldown since 2025 and is widely adopted across enterprises.
StepSecurity Secure Registry uses a configurable cooldown period for enterprise customers. StepSecurity recommends a 10 day delay as default.
How AWS is helping protect the open source supply chain
AWS scans upstream package registries to catch unexpected packages before they reach customers.
Amazon Inspector, a security management service that continuously scans workloads for software vulnerabilities and network exposure, uses AI-assisted detection rules to scan upstream package registries. In 2025, Amazon Inspector researchers identified over 150,000 unexpected npm packages linked to a token farming campaign.
Unexpected packages are typically caught within hours of publication. A 1-day cooldown ensures you don’t install them during that detection window.
Recommendations
To secure your Amazon Linux 2023 configuration:
Set a 1-day cooldown for npm and pip as shown in the preceding sections. External registries don’t have human review, so give the defenders time to catch problems.
Override when needed for urgent security patches using the per-command flags.
Run npm audit or pip_audit regularly to identify packages that need immediate attention.
Set up the cooldown with one line of configuration, and the protection is immediate.
Conclusion
By implementing the solutions presented in the post, you secure your npm and PyPI environment from most instances of unexpected code. The update delay of 1 day protects your environment, while still allowing to apply the latest security fixes. To learn about how to protect your environment further, see the following resources:
Choosing the right cryptographic key management service on Amazon Web Services (AWS) starts with understanding the difference between AWS Key Management Service (AWS KMS) and AWS CloudHSM. Both provide key storage backed by a hardware security module (HSM) but serve very different needs. AWS KMS is a fully managed service that integrates with all AWS services and all AWS Regions, making it the right choice for most key management workloads. AWS CloudHSM is a specialized option for use cases where you have strict requirements for dedicated HSM instances or must support legacy applications built around traditional HSM interfaces.
Quick comparison
The following table shows the pricing, AWS Region availability, algorithms, and AWS service integrations as of July 2026.
Criteria
AWS KMS
AWS CloudHSM
Best for
Most cloud-based key management needs
Lift-and-shift from on-premises applications and use of legacy algorithms
Deployment
AWS managed HSMs, accessed through API endpoints
Customer managed HSMs, accessed through an Elastic Network Interface (ENI) in your virtual private cloud (VPC)
Cost
Pay per use (symmetric and RSA 2048 operations): $1 per key plus $0.03 per 10,000 requests per month
Pay by the hour (us-east-1): $1.60 per HSM instance per hour
AWS integration
All AWS services
Custom integration with AWS services
Region coverage
All AWS Regions
32 Regions
Quick decision guide
Choose AWS KMS for most use cases. Choose AWS CloudHSM only if you require:
Direct integration with third-party tools such as Microsoft SignTool, Nginx, and HAProxy that rely on traditional HSM interfaces, including: PKCS#11, Java Cryptographic Extension (JCE), OpenSSL Provider, and Key Storage Provider (KSP). These interfaces are required when your application is built to communicate with an HSM directly rather than through a cloud API.
Deprecated algorithms such as 3DES and PKCS#1 v1.5 with RSA. If you need to run less commonly used operations not supported by AWS KMS such as AES key wrapping and AES with CTR or CBC modes.
Shared benefits
AWS KMS and AWS CloudHSM both provide robust encryption key management capabilities that help organizations meet their security and compliance requirements. While each service offers distinct features tailored to different use cases, they share several core benefits that make them valuable tools for protecting sensitive data in the cloud.
Security
AWS KMS and AWS CloudHSM both provide tamper-resistant, HSM-based key management with physical data center controls. They secure administration and workloads with Transport Layer Security (TLS). Neither service allows AWS employees to access your key material. Both services deliver equivalent security through Federal Information Processing Standard (FIPS) 140-3 Level 3 validated hardware and enforce strict cryptographic isolation of customer keys. Compliance frameworks such as the ones listed below validate security based on cryptographic boundaries rather than hardware or partition dedication. The multi-tenant architecture of AWS KMS provides the same security guarantees as the single-tenant model used by AWS CloudHSM while reducing operational complexity and cost. Customer security teams consistently approve AWS KMS adoption after confirming that cryptographic isolation meets their single-tenant security and compliance requirements.
Regulatory compliance
AWS KMS and AWS CloudHSM meet major compliance certifications, including:
Federal Information Processing Standard (FIPS) 140-3 Level 3
Payment Card Industry Data Security Standard (PCI-DSS)
Health Insurance Portability and Accountability Act (HIPAA)
Federal Risk and Authorization Management Program (FedRAMP)
Both services protect data including personally identifiable information (PII) and Protected Health Information (PHI).
Standard algorithms
AWS KMS and AWS CloudHSM support standard cryptographic operations including AES-256, RSA, ECDSA, Ed25519, ECDH, ML-DSA, SHA-2, and HMAC. Both services are actively investing in post-quantum cryptography (PQC) to help customers prepare for future quantum computing threats and are committed to expanding PQC algorithm support as National Institute of Standards and Technology (NIST) standards are finalized.
Performance
AWS KMS supports a default request rate for cryptographic operations ranging from 10,000 transactions per second (TPS) to 100,000 TPS per account based on Region. You can request quota increases beyond the default limits. AWS CloudHSM requires explicit provisioning of additional instances for higher throughput. Customers typically provision at least one additional HSM instance to handle peak activity, which can be difficult to predict due to lack of utilization metrics.
Operational support
AWS KMS and AWS CloudHSM both support high availability, durability, automatic backup, and software patching. AWS KMS is a Regional service with high availability and durability provided without any customer management required. AWS CloudHSM is a zonal service with customers required to manage high availability and durability.
Given these shared capabilities, the choice of which service to use depends on your specific requirements. The following sections outline decision points to help you choose.
When to choose AWS KMS
AWS KMS offers a fully managed service that simplifies key management operations and reduces operational overhead compared to AWS CloudHSM. Organizations choose AWS KMS when they need seamless integration with AWS services, automatic key rotation, and a cost-effective solution that doesn’t require dedicated HSM management.
AWS integration
AWS KMS integrates with all AWS services across all major categories. These include AI platforms, storage, databases, and compute services. Most of these services support AWS KMS customer managed keys, giving you full control over the key using policies and access controls. For customers that value convenience over control, AWS services provide transparent encryption using AWS owned keys, eliminating the cost and lifecycle management overhead of customer-owned keys. Both customer managed and AWS owned keys are AWS KMS keys. AWS Identity and Access Management (IAM) enables least-privilege access controls, key policies to control access, and auditing all key usage through AWS CloudTrail.
Operational simplicity
AWS KMS handles all operational tasks including HSM instance provisioning and maintenance, automatic key rotation, auto-scaling, disaster recovery, and comprehensive audit logging. This eliminates the operational overhead required to maintain a solution based on AWS CloudHSM.
Cost considerations
AWS KMS costs $1 per month per key plus $0.03 per 10,000 requests (symmetric and RSA 2048 operations). AWS CloudHSM costs approximately $1.60 per hour per HSM (approximately $1,152 per month), excluding the operational overhead for staff to manage the cluster—which further favors AWS KMS for most workloads.
Break-even analysis:
Less than 500 million operations per month: AWS KMS typically costs 35–99% less
500 million–1 billion operations per month: Costs are comparable
More than 1 billion operations per month: AWS CloudHSM might be more cost-effective.
Note: Many AWS services cache Data Encryption Keys (DEKs) locally, significantly reducing the number of AWS KMS API calls. Actual AWS KMS costs at scale are often much lower than raw operation counts suggest. For example: A workload with 100 keys and 100 million monthly operations using two HSMs for high availability:
AWS CloudHSM: Approximately $2,304 per month for two HSMs plus operational costs
AWS KMS: $100 per month (keys) plus $300 per month in operational costs for a total of $400 per month
Savings using AWS KMS: $1904 per month (83% reduction)
Region coverage
AWS KMS operates in every AWS Region, including all commercial Regions, GovCloud, China Regions, and the European Sovereign Cloud Region. AWS CloudHSM operates in 34 Regions, and AWS evaluates each new Region individually for AWS CloudHSM support.
When to choose AWS CloudHSM
AWS CloudHSM provides HSM-specific interfaces and support for legacy cryptographic algorithms that aren’t available from AWS KMS.
Lift-and-shift on-premises workloads
AWS CloudHSM supports traditional HSM interfaces such as PKCS#11, JCE, OpenSSL, and KSP, simplifying migration to AWS with minimal application changes. AWS is actively expanding AWS KMS integration options for these workloads. Contact AWS Support to discuss current alternatives.
Legacy cryptographic algorithms
AWS CloudHSM supports deprecated algorithms such as 3DES and PKCS#1 v1.5 padding with RSA. It also supports less commonly used operations such as AES key wrapping and AES with CTR or CBC modes.
Conclusion
For most organizations, AWS KMS delivers enterprise-grade security with lower costs and zero operational overhead. Choose AWS CloudHSM only if you have specific requirements for traditional HSM interfaces or less commonly used algorithms and can justify the additional cost and operational complexity.
Ready to get started? Use these guides to implement your chosen solution:
The new IRAP report includes four additional AWS services that are now assessed at the PROTECTED level under IRAP. This brings the total number of services assessed at the PROTECTED level to 167.
We have developed an IRAP documentation pack to help our Australian customers and their partners plan, architect, and assess risk for their workloads when they use AWS cloud services.
The IRAP pack on AWS Artifact also includes newly updated versions of the AWS Consumer Guide and the whitepaper Reference Architectures for ISM PROTECTED Workloads in the AWS Cloud.
Reach out to your AWS representatives to let us know which additional services you want to see in scope for upcoming IRAP assessments. We strive to bring more services into scope at the PROTECTED level under IRAP to support your requirements.

 Login
Login