Reading view

Threat tactic spotlight: Subdomain takeover

In this blog post you’ll learn how to detect and prevent subdomain takeover – a tactic where threat actors exploit dangling DNS records to redirect traffic to attacker-controlled resources. We’ll explain the issue, how the situation arises, and how you can use various AWS features and services to help mitigate the impact of this tactic.

Under the shared responsibility model, securing configurations in the cloud is your responsibility. AWS supports you through strong defaults, guidance in the Security Pillar of the Well-Architected Framework, and security services to help you meet that responsibility. The AWS Customer Incident Response Team (AWS CIRT) also monitors for new and trending tactics that threat actors use to exploit specific customer configurations, so that you can make informed design decisions and improve your response plans.

AWS CIRT has observed threat actors actively scanning for public DNS CNAME records that point to resources that no longer exist, looking for subdomain takeover opportunities.

Note: The subdomain takeover tactic does not leverage vulnerabilities of AWS services. It exploits a dangling DNS record to redirect traffic to an attacker-controlled resource.

Quick DNS Primer

CNAME Records: A CNAME (Canonical Name) record is a DNS entry that points one domain name to another. For example, api.example.com can be configured to point to api.example.s3-website-us-east-1.amazonaws.com. This feature of DNS enables users to configure a memorable, human-friendly domain name while the actual resource lives at a longer, machine-generated AWS hostname. A security issue emerges when the target resource is deleted but the CNAME record pointing to it remains – creating a “dangling” record.

Dangling Records: When a resource (like an S3 bucket) is deleted but the DNS record pointing to it is left behind, that DNS record becomes “dangling”, pointing to a resource that no longer exists. For resources in globally shared namespaces, threat actors can potentially reclaim the name of your deleted resource and serve malicious content through your DNS record.

What is subdomain takeover?

A subdomain is a prefix added to a domain that allows you to organize access to your resources. A subdomain takeover occurs when you delete the underlying resource and a threat actor creates a new resource with the same name to take advantage of the DNS records still pointing to it.

A subdomain takeover is possible when a CNAME record points to an AWS resource that uses a globally shared DNS namespace where the resource name can be chosen by any AWS customer. The following AWS resources meet these criteria:

Amazon S3 (global namespace): Bucket names like mybucket.s3.amazonaws.com are globally unique and can be claimed by any account if the bucket is deleted. Note: S3 buckets created with account regional namespaces (launched March 2026) are scoped to your account and are not subject to this issue.

Amazon CloudFront: Distribution domain names like d111111abcdef8.cloudfront.net are assigned by AWS and cannot be chosen by an attacker. However, if you delete a distribution and another customer creates one that happens to receive the same domain name, a dangling CNAME could resolve to their content.

AWS Elastic Beanstalk: Environment names like myapp.elasticbeanstalk.com are globally unique and can be claimed by any account if the environment is terminated.

Resources like Amazon VPC, Amazon EC2 instances, or private hosted zones are not subject to this tactic because they do not expose globally claimable DNS namespaces.

MITRE ATT&CK classifies this technique under T1584.001: Compromise Infrastructure – Domains.

Analyzing an example scenario

Consider the following scenario:

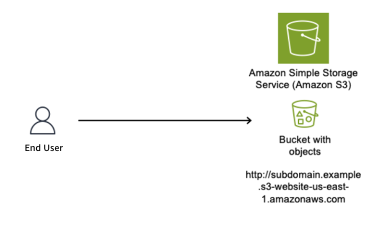
You create a DNS CNAME record pointing to your S3 website endpoint. The subdomain subdomain.example.com now resolves to subdomain.example.s3-website-us-east-1.amazonaws.com, which serves content from the S3 bucket named subdomain.example. If your team deletes the bucket and forgets to delete the DNS record, users that navigate to the site will see an error stating that the bucket doesn’t exist. However, at this point, if a threat actor sees this error and moves in to claim the bucket name, they will be able to set up their own site that users will see when they navigate to the subdomain.example.com site.

Figure 1 shows an S3 bucket named subdomain.example (a globally unique bucket name) configured to host a static website, with the S3 website endpoint subdomain.example.s3-website-us-east-1.amazonaws.com.

Figure 1: S3 bucket configured as a static website

Figure 1: S3 bucket configured as a static website

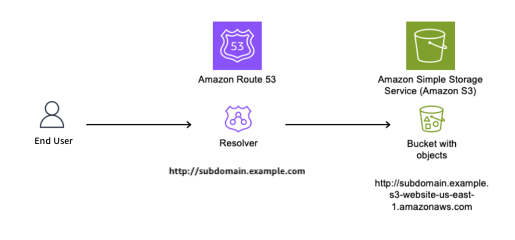
As shown in Figure 2, we use Amazon Route 53 to create a CNAME record to resolve to our Amazon domain name; to give users a friendly name and so they do not have to remember the long S3 website name in URLs.

Figure 2: DNS Resolver configured with CNAME record pointing to origin bucket

Figure 2: DNS Resolver configured with CNAME record pointing to origin bucket

The customer’s AWS administrator decides to stop serving content from the S3 bucket and deletes it, as shown in Figure 3.

Figure 3: Resource deleted without removing the CNAME record

Figure 3: Resource deleted without removing the CNAME record

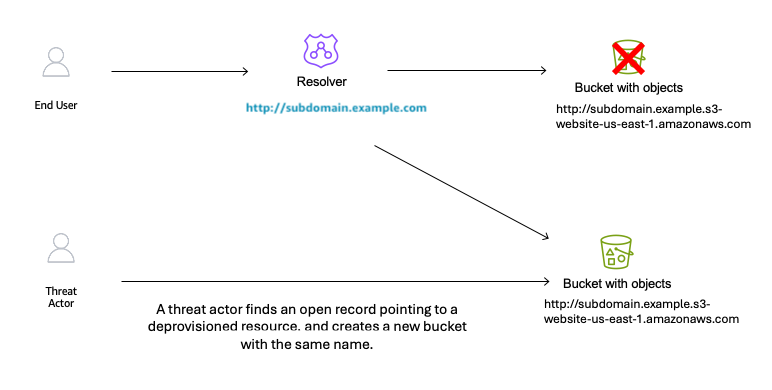
With the S3 bucket deleted and the CNAME record still in place, the DNS record is now dangling. A threat actor identifies this situation and creates a new S3 bucket with the same global name subdomain.example in an AWS account that the threat actor controls, as shown in Figure 4. The threat actor can now serve content from this new bucket, including potentially malicious content. End users remain unaware of this switch and continue to access subdomain.example.com, trusting the content because it appears to originate from a URL they recognize.

Figure 4: Subdomain takeover happens

Figure 4: Subdomain takeover happens

Potential impacts of a sub-domain takeover

Consider these potential impacts:

Reputation risk: There is a potential risk to your organization’s reputation, because you don’t control the content being served from the threat actor’s site that your DNS record points to.

Potential exposure to phishing campaigns: Users within your organization might have the subdomain bookmarked in their browser, not knowing the resource is no longer available, then unsuspectingly navigate to the site that now hosts malware or is used to phish user credentials.

Blocking: If the subdomain is flagged by security vendors for malicious activity, it could impact your business operations.

Financial loss: Subdomain takeover incidents can result in a financial impact due to the potential disruption to service delivery as you deal with the event.

Proactive detection

AWS Config for proactive detection

For proactive detection, you can use AWS Config to continuously monitor your Route 53 CNAME records and verify that the target resources exist in your account.

Prerequisite: This approach requires AWS Config recorder to be enabled for the resource types you want to monitor (S3 buckets, CloudFront distributions, Elastic Beanstalk environments). If Config isn’t recording a resource type, it won’t appear in the inventory check. For more information, see Setting up AWS Config with the console.

Why use AWS Config inventory instead of DNS resolution checks?

A common approach is to check whether a CNAME resolves to a valid endpoint. However, this method has a critical flaw: if an attacker has already claimed the resource, DNS resolution will succeed – to their resource, not yours. You would have no indication that you don’t own what’s responding.

By querying AWS Config’s recorded configuration items, you’re checking whether the resource exists in your account inventory, not just whether something responds at that DNS name. This approach correctly identifies dangling CNAMEs even after a takeover has occurred.

Implementation approach:

Account-level vs. organization-level scope

The reference implementation queries AWS Config inventory within a single account. This means that if a CNAME record in Account A points to a resource that legitimately exists in Account B within the same AWS organization, the rule will flag it as NON_COMPLIANT.

For organizations that share resources across accounts, you can modify the solution to use an AWS Config Aggregator, which queries resource inventory across all accounts in your organization. This is similar to how IAM Access Analyzer supports both account-level and organization-level scopes. To use this approach, you need an organization-level Config Aggregator already configured, and the Lambda function’s IAM role needs the config:SelectAggregateResourceConfig permission.

We recommend starting with account-level scope for simplicity, then expanding to organization-level if your environment includes cross-account resource sharing.

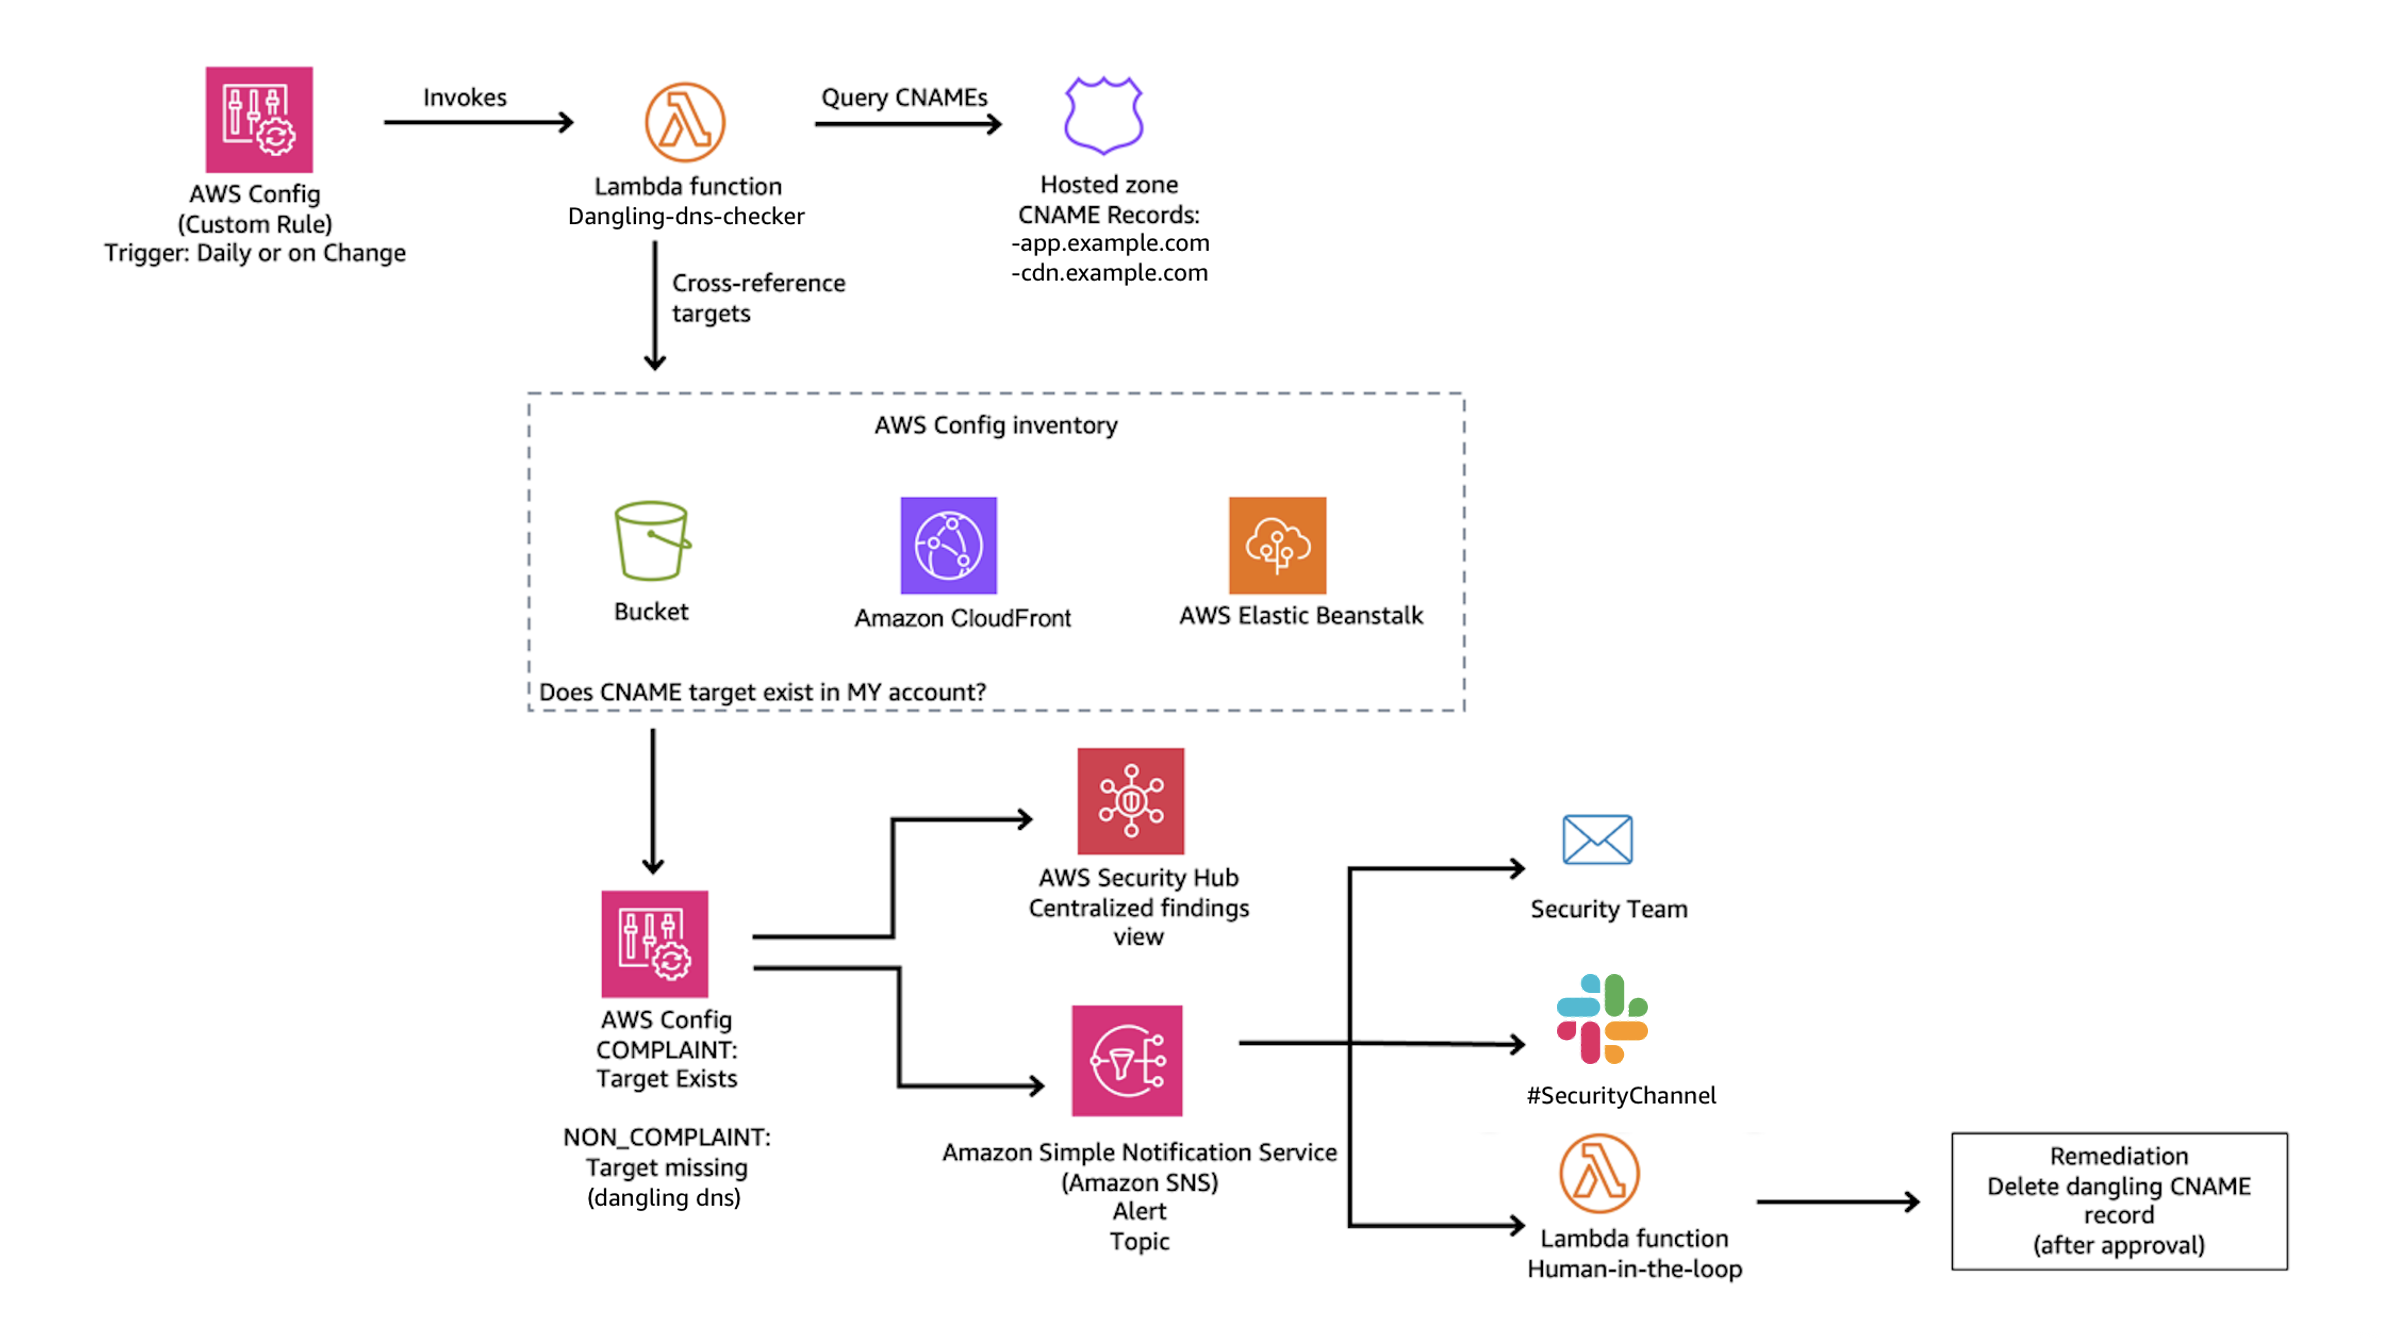
The main idea is to create a custom AWS Config rule that queries your Route 53 hosted zones for CNAME records, then parses each CNAME target to determine whether it points to a known AWS resource pattern such as S3, CloudFront, or Elastic Beanstalk. For each match, the rule cross-references the target against your AWS Config inventory to verify that the resource actually exists in your account. If the resource isn’t found, the rule marks the CNAME record as NON_COMPLIANT, surfacing it for review.

The Config rule should focus on known AWS resource patterns:

  • S3: *.s3.amazonaws.com, *.s3-website-<region>.amazonaws.com
  • CloudFront: *.cloudfront.net
  • Elastic Beanstalk: *.elasticbeanstalk.com

Note: CNAME records pointing to external third-party services are outside the scope of this detection mechanism, as those resources won’t appear in your AWS Config inventory.

NON_COMPLIANT findings from your Config rule can be routed to AWS Security Hub for centralized visibility, or trigger SNS notifications to alert your security team.

Figure 5: Dangling DNS Detection Solution

Figure 5: Dangling DNS Detection Solution

Reference implementation:

We’ve published a complete implementation of this detection approach as an open-source solution. The solution deploys a Lambda function that discovers CNAME records across all your Route 53 hosted zones and uses pattern matching to identify targets pointing to S3, CloudFront, and Elastic Beanstalk. It then queries your AWS Config inventory to verify whether each target resource still exists in your account. When a dangling record is detected, the solution generates a HIGH severity finding in Security Hub and can optionally send SNS notifications to alert your security team. A CloudWatch metrics dashboard is also included for ongoing compliance tracking.

Deployment:

# Clone the repository
git clone https://github.com/aws-samples/sample-dangling-dns-detection
cd sample-dangling-dns-detection

# Build the Lambda deployment package
./scripts/package.sh

# Upload to S3
aws s3 cp dist/dangling-dns-detection.zip s3://YOUR_BUCKET/

# Deploy the CloudFormation stack
aws cloudformation deploy \
  --template-file infrastructure/template.yaml \
  --stack-name dangling-dns-detection \
  --parameter-overrides \
      LambdaCodeS3Bucket=YOUR_BUCKET \
      EvaluationFrequency=TwentyFour_Hours \
  --capabilities CAPABILITY_NAMED_IAM

The stack creates an AWS Config custom rule that runs on your specified schedule (default: every 24 hours), evaluating all CNAME records and reporting compliance status.

Mitigating the effects

Mitigating subdomain takeover requires both preventive procedures and responsive capabilities.

Prevention: Standard operating procedure

The most effective mitigation is a standard operating procedure for resource deprovisioning that ensures DNS records are removed before the underlying resource:

  1. Within your DNS zone, delete the CNAME record that points to the fully qualified domain name (FQDN) of the resource that you plan to deprovision.
  2. Wait for the DNS TTL to expire before deleting the resource. DNS resolvers cache records for the duration of the TTL (for example, a TTL of 3600 means resolvers may serve the old record for up to one hour). If you delete the resource before the TTL expires, a threat actor could claim the resource name while cached CNAME entries are still directing traffic to it.
  3. Deprovision the resource that you no longer want to use.
  4. Run a DNS check of the CNAME record that you removed to verify that the resource is no longer resolving.

Key principle: Always delete DNS first, wait for the TTL to expire, then delete the resource. This order eliminates the window where a dangling record could be exploited.

Prevention: S3 account regional namespaces

As mentioned earlier, AWS introduced account regional namespaces for Amazon S3 general purpose buckets in March 2026. While this is a meaningful step toward mitigating the S3-specific takeover vector, there are important operational limitations to be aware of:

Existing buckets are unaffected. Buckets already created in the global namespace cannot be migrated to an account regional namespace. The bucket names remain globally unique and claimable by anyone if the bucket is deleted.

Global namespace is still the default. When creating a new bucket through the console, CLI, or SDK, the global namespace remains the default selection. Users who aren’t aware of the new option will continue creating globally-scoped buckets.

Existing IaC templates require updates. Existing infrastructure-as-code templates (CloudFormation, CDK, Terraform) that don’t explicitly opt in to the account regional namespace will continue provisioning buckets in the global namespace. For CloudFormation, this means setting the BucketNamespace property to account-regional. For other IaC tools, consult their documentation for the equivalent configuration. Organizations need to audit and update their templates to opt in.

For these reasons, the dangling DNS detection approach described in this post remains critical – particularly for organizations with existing S3 infrastructure, and for CloudFront, and Elastic Beanstalk resources where no equivalent namespace scoping exists.

Response: Notification and remediation

When a dangling DNS record is detected, the reference solution described in the Detection section automatically creates a HIGH severity finding in AWS Security Hub and reports the CNAME record as NON_COMPLIANT in AWS Config. If you provide an SNS topic ARN during deployment, the solution also sends notifications to alert your security or operations team via email, Slack, or other channels. For production environments, consider a human-in-the-loop workflow where these notifications are reviewed by a team member who approves the DNS record deletion before it’s executed. This prevents accidental deletion of legitimate records during transient issues.

The reference solution also includes a CloudWatch dashboard for tracking compliance status and evaluation metrics over time, giving your team ongoing visibility into DNS health across your hosted zones.

Note: Fully automated remediation (auto-deleting DNS records) carries risk – a false positive could disrupt legitimate services. We recommend starting with detection and notification, then evaluating automation based on your detection accuracy and operational maturity.

Conclusion

Subdomain takeover is a preventable misconfiguration that can have significant impact on your organization. A layered defense approach provides the best protection:

Prevention: Implement a standard operating procedure that deletes DNS records before deprovisioning the underlying resource.

Detection: Use AWS Config custom rules to proactively identify CNAME records pointing to resources that no longer exist in your account.

Response: Configure notifications through SNS or Security Hub so your team can respond quickly when dangling records are detected.

Monitoring: Maintain ongoing visibility through CloudWatch dashboards to track DNS health and compliance status.

The key insight is that good DNS hygiene – knowing when your CNAME records point to a nonexistent resource – is your first line of defense. Automated detection through AWS Config provides a safety net when operational procedures fail. And if you detect an issue, having a playbook ready to enact your response can lower the impact and your mean time to recovery.

If you have feedback about this post, submit comments in the Comments section below.

Matt Gurr

Matthew Gurr

Matthew is the Senior Incident Response lead in the Asia-Pacific region for the AWS Customer Incident Response Team (AWS CIRT). He has a passion for helping customers proactively prepare for a security event. In his spare time, he enjoys cycling, music, and reading.

Luis Pastor

Luis Pastor

Luis is a Senior Security Solutions Architect at AWS leading the Infrastructure Security and Compliance Technical Field Communities. He drives security architecture for enterprise customers across financial services, healthcare, and retail, specializing in cloud security transformation and regulatory compliance frameworks. Before AWS, Luis architected security solutions in hybrid cloud environments.

Geoff Sweet

Geoff Sweet

Geoff has been in industry since the late 1990s. He began his career in electrical engineering. Starting in IT during the dot-com boom, he has held a variety of diverse roles, such as systems architect, network architect, and, for the past several years, security architect. Geoff specializes in infrastructure security.

Ariam Michael

Ariam Michael

Ariam is a Solutions Architect at AWS. She has supported various customers in the Worldwide Public Sector, specifically SLG and Federal Civilian customers. She is passionate about security, specifically Data Protection helping customers implement encryption and best practices.

  •  

Operationalizing AWS security: A maturity roadmap

Enabling security tooling is the starting point. Making it operational—where findings drive decisions, response times are measurable, and your security posture improves week over week—is where most organizations struggle.

This blog post provides a phased maturity roadmap for organizations that have already enabled AWS Security Hub and Amazon GuardDuty. These two services form the foundation of a cloud-centered security operations capability on AWS. Security Hub provides centralized security posture management and aggregates findings from multiple AWS security services, while GuardDuty provides intelligent threat detection by continuously monitoring for malicious activity and unauthorized behavior. For any production or enterprise AWS environment, having both services enabled across all accounts and AWS Regions is a baseline expectation; not because they’re optional add-ons, but because effective security operations require both the ability to detect threats and the ability to understand your overall security posture. If you haven’t yet enabled them, the Security Hub documentation and GuardDuty documentation provide setup guidance, including multi-account deployment with AWS Organizations.

Customers consistently tell us that while individual AWS security service documentation is thorough, what’s missing is a consolidated operational playbook—one resource that ties the services together into a working security operations practice with clear phases, progression criteria, and an operational cadence. That’s the gap this post fills. Rather than covering how each feature works (the documentation does that well), this post focuses on when and why to use each capability, and how to build the organizational habits that make them effective.

What follows is a six-phase roadmap for moving from these services are active to these services are driving our security operations. Each phase builds on the previous one, and each is designed to deliver tangible, measurable improvement.

Phase 0: Assess your current state

Goal: Understand what’s working before changing anything.

Estimated timeline: 1–2 weeks

Move to Phase 1 when: You have a documented current-state assessment covering all the following items.

Before introducing new processes or automation, establish a clear picture of the current environment. This assessment informs every decision that follows.

Actions:

  • Findings inventory: Review existing active GuardDuty findings to determine how many there are, the severity distribution, and how old the oldest findings are. A large backlog of untouched HIGH or CRITICAL findings that have been sitting for weeks is a strong signal about where to focus first.
  • Security Hub score baseline: Determine your current compliance score against AWS Foundational Security Best Practices (FSBP) and The CIS AWS Foundations Benchmark. Check to see which standards are enabled; if multiple standards are enabled, review for overlapping standards (creating noise) or unused standards.
  • Multi-account and multi-Region check: Look to see if GuardDuty is enabled in every account and every Region, or only in Regions with active workloads. Threat actors frequently operate in Regions that organizations don’t actively monitor. Also check to see if Security Hub aggregation is configured with a delegated administrator account or if each account is being managed independently.
  • Integration check: Determine if GuardDuty findings are flowing into Security Hub and if Amazon Inspector and Amazon Macie are enabled and feeding findings in. Without integration, Security Hub might be only surfacing its own compliance checks.
  • Notification check: See if there’s an Amazon EventBridge rule configured for notifications and if so, how findings are being routed and to whom. Know if notifications are being sent using an Amazon Simple Notification Service (Amazon SNS) topic or a chat channel integration. Without a clear notification and response workflow, findings can accumulate silently in the console with no one looking at them.

Deliverable: A one-page current state assessment that identifies what’s enabled, what’s flowing where, who’s looking at it, and what’s in the existing backlog.

Phase 1: Reduce the noise

Goal: Make the signal meaningful before asking anyone to act on it.

Estimated timeline: 2–3 weeks

Move to Phase 2 when: Remaining findings represent items requiring real decisions, compliance scores reflect actual posture, and you can articulate why every suppression rule and disabled control exists.

This is the single most important phase. If this step is skipped in favor of jumping straight to automation, the result is automated chaos. Alert fatigue is the primary reason security tooling is ignored, and addressing it first is what makes everything that follows sustainable.

GuardDuty tuning:

  • Create suppression rules for known-benign findings. The goal is to suppress activity you’ve already evaluated and accepted—such as expected traffic from corporate egress IPs (based on trusted IP lists), internal tools that trigger DNS-based findings, or internet-facing resources that naturally receive port scanning. The principle: if you’ve investigated a finding and it’s expected, suppress it so your team can focus on what matters.
  • Triage every active HIGH and CRITICAL finding into three categories: needs immediate investigation (real threat, not yet reviewed), true positive, already addressed (archive using workflow status), or false positive or expected behavior (create a suppression rule). Every finding must be categorized into one of these three states.
  • Review GuardDuty protection plans and enable any that are relevant but not yet active. Organizations that enabled GuardDuty years ago might not have activated protection plans released since then (such as Runtime Monitoring, Malware Protection, RDS Protection, and Lambda Protection). Evaluate each against your workload profile and enable what applies.

Security Hub tuning:

  • Disable controls that aren’t relevant to the environment. This is the highest-value quick win. If a service isn’t in use, disable its controls. If a control is addressed by an alternative solution, disable it. A 47% compliance score where half the failures are irrelevant trains teams to ignore the dashboard entirely. See the Security Hub controls reference for the full list.
  • Choose a primary standard. AWS Foundational Security Best Practices is a strong default. The CIS AWS Foundations Benchmark adds value when there’s a specific compliance mandate. Avoid enabling PCI DSS or NIST 800-53 standards unless there’s a reporting requirement—they add significant volume without proportional signal for most organizations.
  • Configure cross-Region aggregation to the delegated administrator account if not already in place. A single aggregated view eliminates the need to check findings across multiple Regional consoles.
  • Use the workflow status field operationally. Findings should progress from NEW to NOTIFIED to RESOLVED or SUPPRESSED. If everything remains in NEW indefinitely, the system carries no operational meaning.

Deliverable: A tuned environment where remaining findings represent items that require real decisions. Compliance scores should now reflect your organization’s actual security posture rather than noise.

Phase 2: Build the notification and routing layer

Goal: Get the right findings to the right people at the right time.

Estimated timeline: 2–3 weeks

Move to Phase 3 when: CRITICAL and HIGH findings reach the security team within minutes, MEDIUM findings create tracked tickets, and notifications include enriched context. No action is taken until a person or an automation is informed that something needs attention.

Architecture: Security Hub to EventBridge rule to routing logic to destination

Tiered notification strategy:

CRITICAL Page on-call immediately PagerDuty or Opsgenie 15 minutes
HIGH Alert security team channel Slack or Teams channel and ticket creation 4 hours
MEDIUM Create ticket for review Jira or ServiceNow 48 hours
LOW or INFORMATIONAL Batch digest Weekly email summary or dashboard review Next review cycle

Key design decisions:

  • Route from Security Hub, not individual services. Because findings from GuardDuty, Inspector, Macie, and Security Hub compliance checks all aggregate in Security Hub, build your EventBridge rules there for centralized management.
  • Create a fast path for the most dangerous finding types. Certain GuardDuty findings, particularly those involving credential exfiltration, cryptocurrency activity, trojans, and active compromises, warrant a separate, faster routing path that bypasses normal triage. Identify these based on your threat model and the GuardDuty finding types reference.
  • Enrich notifications before delivery. A raw JSON finding in a chat channel provides little actionable context. Use an AWS Lambda function to format notifications with the information responders need: account alias, Region, Amazon Resource Name (ARN), finding type, severity, a console deep link, and a plain-language description. The Security Hub CloudWatch Events integration guide describes the event format.

Deliverable: A working notification pipeline where CRITICAL and HIGH findings reach the security team within minutes, MEDIUM findings create tracked work items, and LOW and INFORMATIONAL findings are batched for periodic review.

Phase 3: Build automated remediation for high-confidence findings

Goal: For findings where the correct response is deterministic, remove the human from the loop.

Estimated timeline: 3–4 weeks

Move to Phase 4 when: At least 3–5 high-confidence finding types have automated responses deployed with audit trails, and the team has established a process for evaluating new auto-remediation candidates.

The guiding principle: Only auto-remediate when all three conditions are met: the finding is high-confidence, the response is deterministic, and the blast radius of the automated action is limited. Automated remediation must not create the risk of a production outage.

Decision framework:

Confidence level High – no false positive risk Medium – context-dependent Low – requires investigation
Response complexity Single, well-defined action Multiple steps or judgment calls Requires forensic analysis
Blast radius Limited to one resource Could affect dependent services Production-wide impact
Rollback difficulty Straightforward to reverse Moderate effort to reverse Difficult or impossible to reverse

Common auto-remediation categories:

  • Instance isolation for confirmed compromise findings (cryptocurrency mining, malware, and trojans): Replace the security group, snapshot volumes for forensics, and notify.
  • Credential revocation for confirmed credential compromise: Attach deny-all policies, revoke sessions, and deactivate access keys as appropriate to the credential type.
  • Compliance drift correction for deterministic misconfigurations: Re-enable Amazon Simple Storage Service (Amazon S3) Block Public Access, revoke overly permissive security group rules, and re-enable AWS CloudTrail logging.
  • Notification-only escalation for findings that require human judgment before action: Amazon Elastic Block Store (Amazon EBS) encryption gaps (require migration) and access key rotation (requires coordination with the key owner).

For implementation, AWS provides Security Hub Automated Response and Remediation (SHARR), a solution that includes pre-built remediation playbooks deployed as AWS Step Functions workflows triggered by EventBridge. This is a strong starting point—evaluate the provided playbooks, enable the ones that fit, and extend with custom remediations as needed.

Note: For findings that recur because the environment lacks preventive guardrails, the best long-term response is often a service control policy (SCP) that prevents the misconfiguration from occurring in the first place. Phase 5 covers this preventive controls layer.

Deliverable: A library of automated and semi-automated remediation runbooks with full audit trails, and a documented decision framework the team uses to evaluate new auto-remediation candidates.

Phase 4: Build the operational rhythm

Goal: Turn security findings management into a sustained organizational practice, not a one-time cleanup.

Estimated timeline: 4–6 weeks to establish, then ongoing

Move to Phase 5 when: The weekly cadence has been running consistently for at least 8 weeks, monthly metrics show positive trends, and the first quarterly review has been completed.

This is where many organizations stall, and it’s the most important phase in the entire roadmap. The technology is working, the notifications are flowing, automated remediations are firing, but there’s no organizational habit built around it. Without this phase, everything you’ve built in Phases 0–3 will gradually decay. Suppression rules will go stale, new team members won’t know the system exists, and findings will start accumulating again. The operational rhythm is what converts a security tooling deployment into a security operations practice.

Weekly security review (30 minutes)

Attendees: Security team lead, cloud platform team representative, rotating engineering lead from an application team

Why the rotating engineering lead matters: Security findings don’t exist in a vacuum; they’re generated by workloads that engineering teams own. Rotating an engineering representative through this meeting accomplishes three things: it builds security awareness across the organization, ensures findings are routed to people with the context to resolve them, and creates organizational accountability beyond the security team.

Agenda template:

5 minutes Compliance score trend – Review Security Hub scores by account and standard. Is the trend improving, declining, or flat? If declining, why? Security lead Identified regression areas
5 minutes Critical and high findings review – Walk through new HIGH and CRITICAL GuardDuty findings from the past week. Are there any that need immediate escalation? Security lead Escalation actions assigned
10 minutes Top five failing controls – Identify the five Security Hub controls with the most failures. Assign an owner and a target date for each. Platform lead Owners and dates documented
5 minutes Automation review – Did any auto-remediations fire this week? Did they work correctly? Were there any false triggers? Security lead Automation adjustments queued
5 minutes Tuning decisions – Are new suppression rules needed based on this week’s findings? Are any new finding types candidates for auto-remediation? All Tuning backlog updated

Running the meeting effectively:

  • Keep a running document (such as a wiki page or shared document) that captures decisions and action items week over week. This becomes your institutional memory.
  • If the compliance score hasn’t moved in over 3 weeks, that’s a signal. Either the assigned work isn’t happening, or the remaining findings are genuinely difficult to address. Both need to be discussed.
  • Track action items from previous weeks. A review that generates action items but never follows up on them will lose credibility and attendance quickly.

Escalation procedures

Define clear escalation paths before they’re needed:

CRITICAL finding not acknowledged within the SLA Auto-escalate to security team manager 15 minutes after SLA breach
HIGH finding not resolved within the SLA Escalate to finding owner’s manager 4 hours after SLA breach
Compliance score drops more than 5 points in a week Escalate to cloud platform team lead for investigation Next business day
Auto-remediation failure Page security on-call Immediate
New finding type not covered by existing runbooks Add to weekly review agenda for triage and runbook development Next weekly review

Monthly metrics report

Compile these metrics monthly and review them with security and engineering leadership. The goal is to tell a story about whether the organization’s security posture is improving, stable, or degrading, and why.

Mean time to acknowledge (MTTA) for CRITICAL findings Are findings being seen promptly? Decreasing month over month
Mean time to resolve (MTTR) for CRITICAL and HIGH findings Are findings being acted on? Decreasing month over month
Security Hub compliance score by standard, by account What is the posture trend over time? Increasing month over month
Number of active GuardDuty findings by severity Is the backlog growing or shrinking? Decreasing for HIGH and CRITICAL
Findings auto-remediated compared to manually resolved Is automation delivering value? Auto-remediation ratio increasing
Number of suppressed findings (with quarterly justification review) Is noise being managed, or are problems being hidden? Stable or decreasing
New findings introduced compared to resolved this month Is the organization getting ahead or falling behind? More finding resolved than introduced
SLA adherence rate by severity Are response commitments being met? More than 95% for CRITICAL, and more than 90% for HIGH

Building the dashboard: Use Amazon CloudWatch dashboards for real-time operational visibility or Amazon QuickSight connected to Security Hub findings through Amazon Security Lake for historical trend analysis and executive reporting. The dashboard should be visible to—and regularly viewed by—everyone in the weekly review, not locked in a security team tool.

Quarterly reviews

The quarterly review is a deeper inspection of the system itself; not just the findings, but the machinery processing them.

Quarterly review checklist:

  • Suppression rules audit: Review every active suppression rule to determine if the underlying condition is still present and the suppression is still justified. Document the review outcome for each rule.
  • Disabled controls audit: Review every disabled Security Hub control. Check that the justification is still valid and if the environment changed (for example, a service that wasn’t in use is now in use).
  • Automation audit: Review AWS Identity and Access Management (IAM) roles used by remediation functions and verify least privilege. Review execution logs for any anomalies or failures that weren’t caught.
  • New capabilities review: Evaluate newly released GuardDuty protection plans and Security Hub controls from that quarter. AWS releases new detection and compliance capabilities regularly. If you’re not reviewing them quarterly, you’re accumulating blind spots.
  • Process effectiveness review: Determine if the weekly meeting is well-attended and if action items are being completed. Make sure SLAs are being met. If attendance, action item completion, and SLA compliance aren’t where they should be, explore structural changes to address the gaps.

Operational maturity scoring

Use this rubric to assess the maturity of your operational rhythm itself. Score each dimension 1–3 and use the total to track progress over time.

Review cadence One time reviews when someone remembers Weekly review happens, but attendance is inconsistent Weekly review is consistently attended with documented outcomes
Metrics tracking No metrics captured Metrics are collected monthly but not acted on Metrics drive decisions and declining trends trigger specific actions
Finding ownership Findings sit in queue with no owner Findings are assigned to teams but SLAs aren’t tracked Every finding has an owner, SLAs are tracked, and breaches are escalated
Automation management Set-and-forget automations Automation logs are reviewed periodically Automation is reviewed weekly, and new candidates are evaluated continuously
Tuning lifecycle Suppression rules created but never reviewed Annual review of suppressions and disabled controls Quarterly reviews with documented justification for every rule
Cross-team engagement Security team works in isolation Platform team participates Engineering teams actively participate and own remediation

Scoring (revisit quarterly):

  • Beginning: 6–9
  • Established: 10–14
  • Optimized: 15–18

Deliverable: A documented operational cadence with clear ownership (consider a RACI matrix), metrics dashboards, escalation procedures, and a continuous improvement loop. The cadence should survive team member turnover—if it depends on one person remembering to run it, it’s not yet operational.

Phase 5: Mature the architecture

Goal: Fill remaining gaps and build toward a comprehensive security operations capability. Estimated timeline: Ongoing. Prioritize based on organizational risk profile and compliance requirements.

  • Amazon Inspector integration: Enable Amazon Inspector for Amazon Elastic Compute Cloud (Amazon EC2) instances, Lambda functions, and Amazon Elastic Container Registry (Amazon ECR) container images. Findings flow into Security Hub automatically, adding vulnerability management alongside threat detection and posture management. Prioritize this if you have Amazon EC2 or container workloads without an existing vulnerability scanning solution.
  • Amazon Macie: Enable Amazon Macie for S3 buckets containing potentially sensitive data. Particularly important for organizations with compliance requirements around personally identifiable information (PII), protected health information (PHI), or Payment Card Industry (PCI) data. Configure automated sensitive data discovery and route findings to Security Hub.
  • Amazon Security Lake: Amazon Security Lake centralizes security-relevant logs in OCSF format for long-term retention, forensic investigation, and threat hunting. This is valuable when you need historical analysis beyond the Security Hub retention window, or when feeding a third-party Security Information and Event Management (SIEM) tool.
  • Preventive controls layer: Convert recurring detective findings into preventive policies. Use SCPs to prevent disabling GuardDuty, Security Hub, and CloudTrail, IAM permission boundaries on developer roles, AWS WAF on public endpoints, and AWS Network Firewall for VPC traffic inspection. The pattern is to make recurring misconfigurations impossible to introduce.
  • Detective controls expansion: Use AWS IAM Access Analyzer for external access and unused access findings, AWS CloudTrail Lake for long-term queryable audit logs, and AWS Config custom rules for organization-specific compliance checks.
  • Incident response readiness: Have incident response playbooks referencing specific GuardDuty finding types, pre-built forensics infrastructure (isolated VPC, forensic AMIs, and pre-configured IAM roles), regular tabletop exercises, and AWS CloudFormation templates to deploy isolation infrastructure on demand. See the AWS Security Incident Response Guide for a comprehensive framework.

Conclusion

In this post, I provided a six-phase roadmap for operationalizing Security Hub and GuardDuty and showed that it isn’t a single project, but a progression. Phase 0 and Phase 1 can typically be completed in 3–5 weeks and deliver immediate clarity. Phases 2 and 3 build the response infrastructure that turns findings into action over the following 5–7 weeks. Phase 4 is what makes everything sustainable and is where you should invest the most attention. And Phase 5 expands the aperture from Security Hub and GuardDuty into a comprehensive security operations capability.

If you walked away from this post and did one thing, run the Phase 0 assessment this week. That single deliverable tells you exactly where to focus next. Use the following self-assessment checklist to identify your current phase, then focus on the next one. A tuned environment with working notifications and a weekly review cadence is dramatically more effective than a fully featured but neglected deployment. Start where you are, reduce the noise, build the habits, and iterate. To learn more, explore the AWS Security Hub User Guide, the Amazon GuardDuty User Guide, and the AWS Security Incident Response Guide. If you’ve implemented a similar operational cadence, or have questions about any phase, share your experience in the comments.

Self-assessment checklist

Phase 0 We know how many active GuardDuty findings exist across all accounts
We know our current Security Hub compliance score
We know whether GuardDuty is enabled in every account and region
We know who (if anyone) is reviewing findings today
Phase 1 GuardDuty suppression rules exist for known-benign activity
Irrelevant Security Hub controls have been disabled with documented justification
All active HIGH and CRITICAL findings have been triaged
Security Hub compliance scores reflect actual posture, not noise
Phase 2 HIGH and CRITICAL findings generate real-time notifications to the security team
MEDIUM findings automatically create tracked work items
Notifications include enriched context (account alias, resource ARN, and console link)
Phase 3 At least three high-confidence finding types trigger automated remediation
Auto-remediation actions have full audit trails
Remediation runbooks are documented and version-controlled
Phase 4 A weekly security review meeting occurs with defined attendees and agenda
MTTA and MTTR are tracked monthly for CRITICAL and HIGH findings
Suppression rules and disabled controls are reviewed quarterly
Security metrics trend positively over the past 3 months
Phase 5 Amazon Inspector, Macie, or Security Lake are integrated
Preventive controls (SCPs, permission boundaries) address recurring findings
Incident response playbooks exist and are tested through tabletop exercises

If you have feedback about this post, submit comments in the Comments section below.

Joseph Sadler

Joseph Sadler

Joseph is a Senior Solutions Architect on the Worldwide Public Sector team at AWS, specializing in cybersecurity and machine learning. With public and private sector experience, he has expertise in cloud security, artificial intelligence, threat detection, and incident response. His diverse background helps him architect robust, secure solutions that use cutting-edge technologies to safeguard mission-critical systems

  •  

AWS Security Hub Extended: Why enterprise security products should sell themselves

Our largest security services customers started the same way every customer does – with a click. They enabled Amazon GuardDuty, Amazon Inspector, AWS WAF, and AWS Security Hub, experienced the benefits in real time, and evaluated with transparent pay-as-you-go pricing. No RFP. No six-month evaluation. No multi-year commitment up front. Our field teams played a critical role in that growth, not by selling the first click, but by building the trusted relationships that turned early adoption into deep, long-term commitment. We believe customers should have this same frictionless adoption experience and flexibility for all best-in-class security products and that’s why we developed Security Hub Extended.

In our first post, we introduced Security Hub Extended, a significant expansion of Security Hub that brings together curated partner solutions in a single, unified experience. In our second post, we walked through how it works technically, including the onboarding flow, the pricing model, the unified operations layer built on the Open Cybersecurity Schema Framework (OCSF). In this post, I want to step back and talk about why we built it the way we did and why I believe the way enterprises discover, evaluate, and adopt security solutions is ready for a fundamental shift.

The shift

If you’ve ever tried to evaluate a new enterprise security product, you know the drill. Request a demo. Wait. Take the demo. Request a PoC. Wait for professional services (or your team to stop building) to set it up. Negotiate pricing, which isn’t published, so you’re starting blind. Loop in procurement. Sign a multi-year commitment. Then, months later, find out whether the product actually solves your problem in your unique environment.

Meanwhile, an ambitious security engineer on your team has already spun up an open-source tool, connected real data, and knows in two hours whether it’s going to work for your use cases. They didn’t need a slide deck. They needed a solution they could put their hands on.

A Fortune 500 CISO recently told me: “I spent 9 months procuring a security solution and it still doesn’t work the way the demo showed.” That frustration isn’t unique. It’s the norm.

This isn’t a criticism of the sales motion. Sales-led has evolved for good reason. Enterprise procurement is complex, products need customization, customers need support. I respect the craft and have poured a significant portion of my career into trying to perfect it. Even the most product-driven companies still need great sales, marketing, field enablement, and support.

It doesn’t change the fact that threats are evolving constantly, and defenders need the flexibility to discover and deploy new solutions as fast as the landscape shifts. Having the best solutions discoverable and deployable in that moment of need isn’t just a convenience, it’s a competitive advantage that customers are demanding. A new threat emerges, security teams have access to industry-leading solutions, and in a few clicks they’ve found their answer and are already seeing value. That’s the model every security company should be building toward.

What we’ve learned at AWS

At AWS, we’ve spent two decades learning what it takes to let customers adopt complex enterprise technology on their own terms, at massive scale. We haven’t always gotten it right, but we learn fast and adjust. The result is one of the largest cloud businesses in the world. I bring up that scale for one reason. It’s proof that complex, enterprise-grade technology can be adopted without requiring a traditional procurement gauntlet. Compute, storage, databases, AI/ML, networking, and yes, security — adopted all through a console, on each customer’s own timeline, and scaled when they were ready.

The proof is in the adoption

Amazon GuardDuty, Amazon Inspector, AWS Shield, AWS Security Hub are all available through the AWS Management Console. All pay-as-you-go. All activated with a click. Tens of thousands of customers rely on these security services today. When you make it easy to get started and deliver outcomes that earn confidence, expansion follows naturally.

These are sophisticated, enterprise-grade security solutions. And customers, from two-person startups to the world’s largest financial institutions, adopt them the same way. They try it, see the value, expand, and lean on the AWS team to go deeper.

We didn’t get here by accident, and we definitely didn’t get here without making mistakes. Building products that can be adopted and scaled on their own, without a sales engineer explaining away UX problems, without a solutions architect doing the first deployment, requires a different kind of product mindset. Time-to-value becomes your most important metric. Onboarding friction becomes your biggest enemy. Transparent pricing becomes non-negotiable. It’s hard. We’ve gotten a lot wrong along the way. And we’re still iterating.

But the results are clear. When customers adopt based on experience rather than commitment, they don’t just stay, they expand. They bring their teams. They become advocates. I’ve spent 15 years at AWS, the last 10 building security services like GuardDuty and Security Hub. When we launch a new security service or major feature, we consistently see rapid organic adoption at a pace that would be impossible through traditional sales cycles alone. These products are built to deliver value the moment customers turn them on and we make that as easy as we possibly can. That’s the scale a product-led motion unlocks.

Security Hub Extended

So, we asked ourselves: why can’t we build a similar approach that can expand to include industry leading partner solutions? Why can’t the CrowdStrikes, the Splunks, the Zscalers, and the fast-growing innovators solving tomorrow’s problems like Cyera, Noma, and 7AI also reach customers with the same frictionless motion that AWS services enjoy? Why can’t a security team that discovers a new threat on Monday have a proven solution deployed and delivering value by Tuesday? Our partners have built incredible products. What they haven’t always had is an avenue to put those products directly in the hands of the customers who need them most, at the moment they need them, at scale, in a way that feels as natural as turning on an AWS service. Not by replacing how our partners build or sell, but by giving them infrastructure that lets their products speak for themselves.

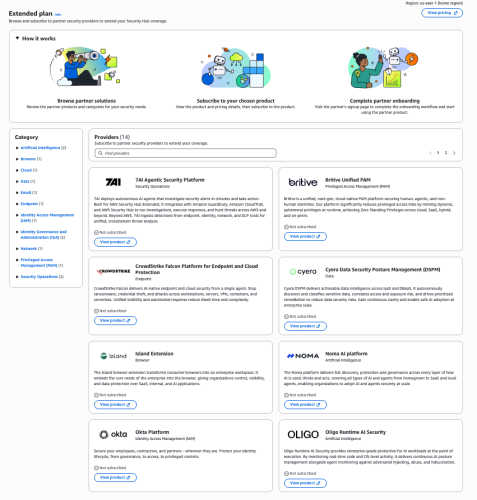
That’s what Security Hub Extended is. Security teams already using Security Hub can discover curated partner solutions right alongside their AWS security services. One click to evaluate, one click to deploy, pay-as-you-go pricing on your existing AWS bill with Enterprise Discount Program (EDP) discounts automatically applied. No separate procurement cycle. No long-term commitments required. Start fast, validate at scale, and commit for deeper discounts when you’re ready, versus making a three-year bet based on a few months of testing.

For customers, industry-leading enterprise security solutions become as easy to adopt as GuardDuty or WAF. For our partners, Security Hub Extended is a growth channel where the product leads and the customer experience mirrors what we’ve spent 20 years building at AWS. For the industry, it’s an invitation to reimagine what the relationship between a security product and a security practitioner can look like when you remove the friction standing between them.

But Security Hub Extended isn’t just a simpler way to buy security products. It’s a unified solution. When a customer enables a solution through Extended, we’re working toward an experience where AWS handles the rest. Sensors that deploy automatically across Amazon EC2, Amazon EKS, and AWS Fargate workloads using the same mechanism that powers GuardDuty Runtime Monitoring. IAM roles that provision across a customer’s Organization in one click. Resource inventory is automated from day one – S3 buckets, databases, AI workloads – without manual work.

Once enabled, solutions in Security Hub Extended emit findings in OCSF, automatically aggregated in Security Hub alongside findings from GuardDuty, Amazon Inspector, and every other AWS security service. Security Hub applies risk scoring and correlated risk analytics across all of them. AWS-native and third-party findings together, weighted and prioritized as a single view of your security posture. For example, an endpoint detection from CrowdStrike, correlated with a credential theft in GuardDuty, and a data access event from Cyera, produces an attack path that none of those solutions can produce alone. The correlation uses AWS context (IAM topology, VPC exposure, resource criticality) to improve the context of each attack path for security analysts. Deploying a solution through Security Hub Extended doesn’t add another pane of glass. It deepens the intelligence of the one you already have.

We’re also building toward automated response. Customers will be able to opt in to pre-built playbooks that take action through AWS-native services when a threat is detected, such as isolating compromised resources, revoking credentials, or containing active threats. The goal is detect-to-respond in seconds, not the hours it takes to context-switch across five consoles and two ticketing systems.

Where we are and where we’re headed

We’re still in the first inning — or Day 1, as we like to say at Amazon. We launched in February 2026 with 14 partners, now 21, spanning endpoint, identity, email, network, data, browser, cloud, AI, and security operations, and we’re continuously working backwards from customers as we operationalize for scale. We are building this because our customers asked for it. We’re learning alongside our partners and customers every week, identifying what works, what needs improvement, where the friction still lives, and iterating quickly.

We’re building and delivering at the speed of our customers. That means shipping fast, iterating faster, and not waiting for perfection. We’re not where we want to be just yet, and we need your feedback to get us there. What’s encouraging is that our partners aren’t waiting to be asked. They’re investing in this alongside us. Not because we’re demanding it, but because they see the same thing we do, that companies that make it effortless for customers to get started are the ones that will win at scale.

The early signals are encouraging. Customer response has exceeded our expectations, and the feedback we hear most often is that the procurement simplification and flexibility of pay-as-you-go with public pricing alone, even before the unified operations and data normalization benefits, is a meaningful differentiator.

If you’re a security leader: Security Hub Extended is live now. Log into Security Hub, look for the Security Hub Extended Plan (or visit the Security Hub Extended Pricing Page), and explore what’s available for your use cases. Start with what solves your most urgent problem. Pay-as-you-go, no commitment. Your team will tell you if it’s working in days, not months.

The vision is bigger than what’s live today, and we’re iterating fast. Share your feedback on AWS re:Post for Security Hub, reach out through contact AWS Support, or connect with me directly.


Michael Fuller

Michael Fuller

Michael has been with AWS for 16 years and led product for AWS Security Services for 11 years. Michael has 29 years in the industry and held several roles in product management, business development, and software development for IBM, Cisco, and Amazon. Michael has a Bachelor’s of Science in Computer Engineering from the University of Arizona and an MBA from the University of Washington.


  •  

Complimentary virtual training: Get hands-on with AWS Security Services

If you’re looking to strengthen your organization’s security posture on Amazon Web Services (AWS) but aren’t sure where to start, then we’re here to help. Security Activation Days are complimentary, virtual, hands-on workshops designed to help you get practical experience with AWS security services in a single session.

What to expect

Each Security Activation Day is a 3–6 hour virtual workshop where you work directly with AWS security services in real-world scenarios. Through a combination of presentations, demos, and workshops, you will get hands-on practice guided by AWS security specialists either in your own environment or in an AWS-provided sandbox.

Topics rotate across the full spectrum of AWS security, identity, and governance services, including threat detection and response, identity and access management, network and application protection, data protection, and governance and compliance. You will leave with actionable knowledge you can apply to your workloads immediately—not a to-do list of things to research later.

Who should attend

Security Activation Days are made for builders—security engineers, cloud architects, and DevOps teams who want to go deeper on specific AWS security capabilities. Whether you’re evaluating a service for the first time or looking to operationalize something you’ve already deployed, these sessions meet you where you are.

What attendees are saying

With over 6,400 attendees across 90 events so far in 2026, Security Activation Days consistently earn a 4.8 out of 5 satisfaction rating. Participants tell us the hands-on format is what makes the difference: there’s no substitute for actually configuring a service and seeing the results in real time.

How to register

We run Security Activation Days year-round across all time zones, with new sessions added regularly. Find a session, show up ready to learn, and start building today.

If you have feedback about this post, submit comments in the Comments section below.
Ashley Nelson

Ashley Nelson

Ashley is a Sr. WW Security Specialist at AWS, where she leads worldwide customer enablement programs for Security, Identity, and Governance services.

  •  

Security posture improvement in the AI era

It’s only been a few weeks since Anthropic announced the Claude Mythos Preview model and launched Project Glasswing with AWS and other leading organizations. This has generated a lot of discussion about the future of cybersecurity and what the ever-increasing capabilities of foundation models mean to organizations.

As AWS CISO Amy Herzog pointed out in the Project Glasswing announcement, “At AWS, we build defenses before threats emerge, from our custom silicon up through the technology stack. Security isn’t a phase for us; it’s continuous and embedded in everything we do.”

Read more from Amy about this in Building AI defenses at scale: Before the threats emerge.

While the discussion around the future of cybersecurity is important, the only thing we know for certain is that organizations need to be able to react quickly to the rapid changes AI is bringing to technology and business in general. And you can’t react quickly if your security fundamentals aren’t dialed in.

The security hygiene gap

It’s easy to assume you have the foundational security elements covered, or to overlook some completely. Basic security use cases like identity management, threat detection, vulnerability management, data protection, and network security can be inconsistently implemented across cloud environments. While AI is reshaping the security landscape, strong security fundamentals continue to be essential for every organization, regardless of size or industry.

These are the security basics that matter whether or not you’re adopting AI: patching consistently, enforcing least-privilege access, enabling logging and monitoring, encrypting data at rest and in transit, and reviewing security configurations regularly. When these fundamentals are in place, you’re better positioned to take advantage of AI-driven tools and respond to newly discovered vulnerabilities, wherever they come from.

While the concepts that drive security fundamentals are universal, implementing them in your environment is best done with an understanding of the context unique to your organization. That’s why we have a multitude of freely available materials—like the AWS Well-Architected Framework—that you can use to help ask the right questions and implement changes in your environment. We also offer programs like the Security Health Improvement Program (SHIP) to help you improve your security posture through prescriptive guidance and continuous improvement.

What is the Security Health Improvement Program (SHIP)?

SHIP is a no-cost program available to every AWS customer, regardless of support tier. SHIP provides a proven, data-driven methodology to:

  • Assess your current security posture using data from your AWS environment
  • Identify specific opportunities to improve across 10 core security use cases
  • Build a prioritized action plan tailored to your environment
  • Establish a mechanism for continuous security improvement

The program is led by AWS Solutions Architects and Technical Account Managers who take you through a personalized report, contextualize findings for your environment, and help you build a prioritized action plan.

Why SHIP matters in the AI era

Project Glasswing highlights an important shift: AI-powered tools are accelerating the pace of vulnerability discovery, which means organizations need to be prepared to assess and respond to findings and changing situations faster than before. In addition to external factors, as organizations adopt AI—whether deploying foundation models, building agentic workflows, or using AI-powered services—how they implement their security controls must change as well. A strong security foundation is what makes confident AI adoption possible.

Here’s how SHIP helps:

Address foundational security gaps proactively

SHIP uses a data-driven methodology to identify opportunities to improve and optimize across 10 core security use cases: threat detection, cloud security posture management, application security testing, configuration management, access governance, vulnerability management, application protection, network security, encryption, and secrets management. The program includes a SHIP assessment to identify critical security findings related to your current security posture, so your team can build a prioritized roadmap for improvement tailored to your environment.

Establish the security baseline AI workloads require

Before you deploy your first model on Amazon Bedrock or build agentic workflows with Amazon Bedrock AgentCore, you need confidence that your underlying infrastructure follows security best practices. SHIP uses actual data from your environment to provide prescriptive, specific guidance rather than generic security recommendations. This is especially relevant as AI-driven vulnerability discovery tools become more widely available: organizations with strong baselines will be able to act on new findings quickly and effectively.

Build a mechanism for continuous security improvement

As AI capabilities evolve, organizations benefit from having a repeatable process to assess and strengthen their security posture over time. SHIP establishes the methodology and mechanisms for your team to continuously assess, prioritize, and improve. By building this operational capability, you’re strengthening your organization’s ability to adapt and contributing to broader industry resilience. As the cybersecurity community integrates AI into defense strategies, SHIP helps you maintain foundational best practices so you can adopt these innovations effectively and with confidence.

Getting started is straightforward

SHIP is available today, at no cost, to every AWS customer. Here’s how to get started:

  1. Talk to your AWS account team. Ask about scheduling a SHIP engagement, or request one directly on the SHIP page.
  2. Attend a SHIP Activation Day. AWS regularly hosts hands-on workshops where you can run the SHIP assessment with AWS Solutions Architects and start building your improvement plan.
  3. Explore the prescriptive guidance. Consult the AWS Well-Architected Framework – Security Lens for documentation, reference architectures, and implementation guides you can start using today.

Take the next step together

AWS is committed to being the most secure cloud, from our participation in Project Glasswing to the security embedded in every layer of our infrastructure. Security is a shared responsibility, and programs like SHIP give customers the tools, guidance, and support to strengthen their security foundations so they can build confidently, no matter what comes next.

Ready to improve your security posture? Contact your AWS account team to schedule a SHIP engagement, or visit the SHIP resources page to learn more.

Celeste Bishop

Celeste Bishop

Celeste is a Senior Security Specialist at AWS, based in Austin, Texas. Over the past five years, she has held a range of security-focused roles spanning field and product marketing, developer relations, and executive engagement. She partners closely with customers, security leaders, and field teams to help organizations operate securely in the cloud. Celeste holds a Bachelor’s in Economics from the University of Texas at Austin.

  •  

Optimize security operations through an AWS Security Hub POC

April 27, 2026: This post was first published in September 2025 when the enhanced AWS Security Hub was in public preview. It has since been updated to reflect the general availability of Security Hub. This revision also provides a more detailed, step-by-step framework for planning your POC.


AWS Security Hub prioritizes your critical security issues and helps you respond at scale to protect your environment. The service sharpens findings through aggregation, correlation, and enrichment of AWS native security signals into actionable insights, enabling faster and more efficient response times. You can use these capabilities to gain visibility across your cloud environment through centralized management in a unified cloud security solution. Security Hub creates a cloud-native application protection platform (CNAPP) and through the AWS free trial, you can create a comprehensive proof of concept (POC) evaluation without significant upfront investment in time or resources.

In this blog post, we guide you through planning and implementation POC for Security Hub to assess the implementation, functionality, cost estimate, and value of Security Hub in your environment. We walk you through the following steps:

  1. Understand the value of Security Hub
  2. Determine success criteria for the POC
  3. Define Security Hub configuration
  4. Prepare for deployment
  5. Enable Security Hub
  6. Validate deployment

Understand the value of Security Hub

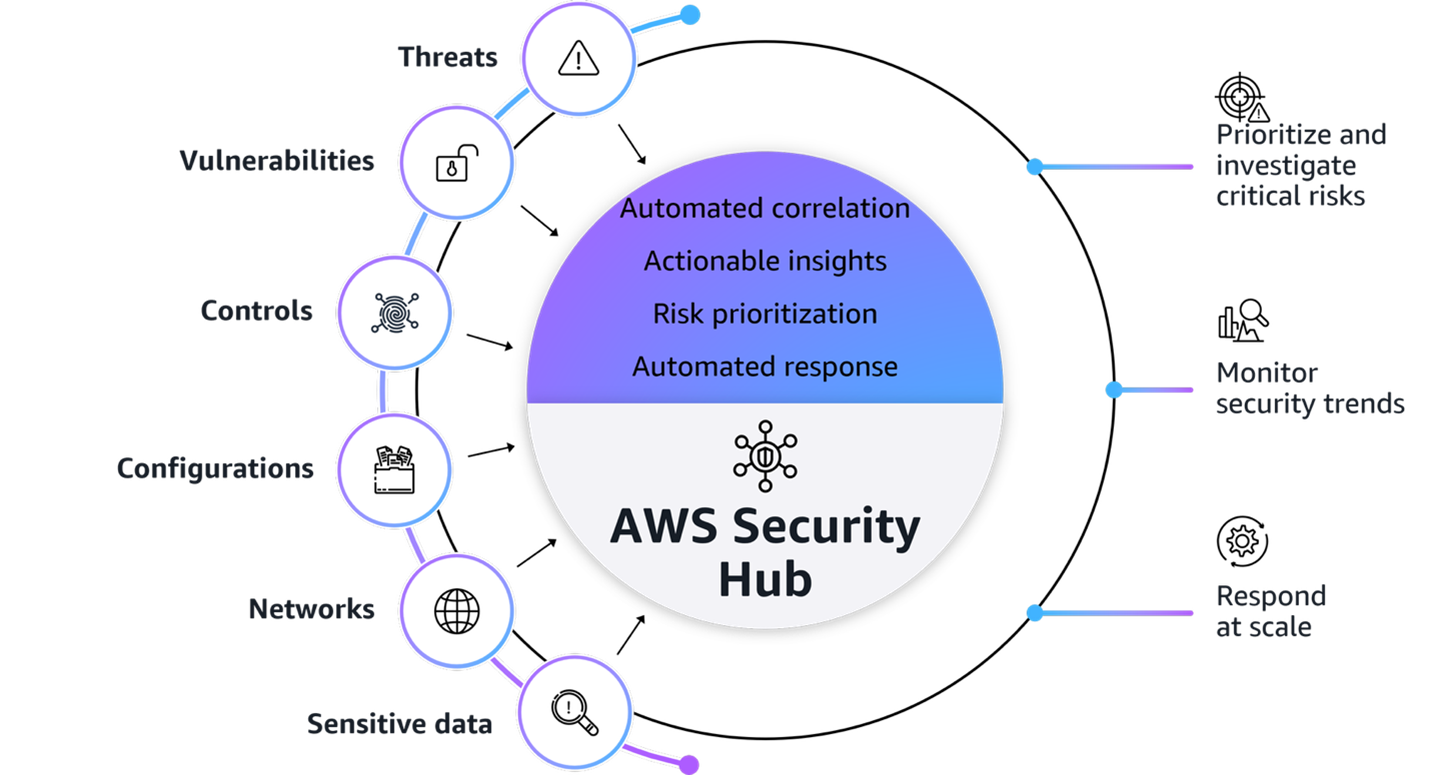
Figure1: AWS Security Hub overview

Figure 1: AWS Security Hub overview

Figure 1 provides a visualization of how Security Hub unifies signals from multiple AWS security services, partner solutions capabilities. The signals, which are ingested by Security Hub from multiple AWS security services and curated partner solutions include:

At its core, Security Hub provides four key capabilities in one unified solution:

  1. Unified security operations: Security Hub delivers a unified security operations experience, bringing your security signals into a single consolidated view and avoiding the need to switch between multiple security tools. This provides comprehensive visibility across your entire estate, including AWS, multi-cloud, and on-premises, so your security teams can efficiently detect, prioritize, and respond to potential security risks.
  2. Intelligent prioritization helps focus on what matters most: Security Hub helps you identify and prioritize critical security risks that might be missed when viewing findings in isolation. Security findings are correlated by analyzing resource relationships and signals from AWS security services and capabilities.
  3. Actionable insights guide security teams on next steps: Gain actionable insights through advanced analytics to transform correlated findings into clear, prioritized insights that highlight the most critical security risks in your environment. You can quickly understand potential impacts, visualize relationships, and identify which security issues pose the greatest risk to critical resources.
  4. Streamlined security response and automation capabilities: Security Hub enhances your security operations by enabling streamlined response capabilities. It seamlessly integrates with your existing ticketing systems to help facilitate efficient incident management.

With this integrated approach your security team can:

  • Investigate critical risks that need immediate attention from a single pane of glass
  • Monitor security trends and attack surface across your environments
  • Fix what really matters across the entire attack chain and path
  • Automate responses to streamline remediation

Understand the Open Cybersecurity Schema Framework

Security Hub uses the Open Cybersecurity Schema Framework (OCSF) to help standardize security data and analysis and enable better integration between security tools. This standardization helps simplify how security findings are structured and analyzed across your environment. This standardized data model enables seamless integration and data exchange across your security tooling, providing normalized and consistent data formats. When implementing your Security Hub POC, make sure that you’re familiar with the OCSF specifications Security Hub uses.

Additionally, confirm that any analytics or security information and event management (SIEM) tools you plan to integrate with support the OCSF data format to maximize the value of the consolidated security insights provided by Security Hub.

Determine success criteria

Establishing success criteria helps benchmark the outcomes of the POC with the goals of the business. Some example criteria and key performance indicators (KPI) include:

  • Alert consolidation metrics: Determine what resources you’re currently using to correlate security events and signals to understand their relationship. Review the process and note if it’s completed outside of AWS or through a SIEM. By setting a benchmark to reduce correlation overhead you can significantly improve efficiency and accelerate security investigations and posture improvement.
  • Response time improvements: Reducing your time to detect, investigate, and resolve security events and improve security posture is essential to streamlined security operations. Security Hub provides visualizations for potential attack paths that adversaries could use to exploit resources and helps assess the potential blast radius.
    • Reduced mean time to detect (MTTD) security incidents.
    • Reduced mean time to response (MTTR) for critical findings.
    • Reduced time to identify potentially affected resources in blast radius.
    • Increased accuracy of attack path analysis.
    • Number of controls implemented based on attack path insights (post investigation).
  • Automation capabilities: Having response playbooks as part of your incident management and response plan helps ensure comprehensive investigations lead to improved security posture. Review your automation capabilities to see if portions of or entire playbooks can be automated.
    • Potentially increased percentage of security findings automatically routed to the correct teams by using Jira Cloud, ServiceNow, or a third-party tool.
    • Reduced average time from detection to ticket creation.
  • Severity and risk classification: Review your organization’s inventory of assets to determine if it’s complete and if you can use telemetry to determine the severity level and associated risks.
    • Reduced time to identify critical resources and service coverage gaps affected by new vulnerabilities, threats, and misconfigurations.
    • Faster and more accurate severity label and risk calculation of findings.
    • Reduced time to identify service gap coverage.

After establishing your success criteria, it’s essential to evaluate organizational readiness and potential constraints that might impact your POC implementation. Begin by conducting a comprehensive assessment of your current environment: Determine if the foundational security services (GuardDuty, Amazon Inspector, Security Hub CSPM, and Macie) are enabled across your accounts, and identify your critical workloads and if there are any excessive attack surfaces.

Review your success criteria to make sure that your goals are realistic given your timeframe and potential constraints that are specific to your organization. For example:

  • Do you have full control over the configuration of AWS services that are deployed in an organization?
  • Do you have resources that can dedicate time to implement and test?
  • Is this time convenient for relevant stakeholders to evaluate the service?

Maximize your POC value through service activation

To get the most comprehensive evaluation of the capabilities of Security Hub, coordinate the activation of underlying security services to optimize the overlapping trial periods available at no additional cost. The following is a list of the underlying security services, and their free trial length:

  • Security Hub: 30-day trial (essential plan capabilities)
  • GuardDuty: 30-day trial (covers most protection plans except GuardDuty Malware Protection)
  • Security Hub CSPM: 30-day trial
  • Macie: 30-day trial
  • Amazon Inspector: 15-day trial

Consider enabling these services simultaneously so that you have at least two weeks of overlapping coverage to evaluate the full correlation and risk prioritization capabilities of Security Hub across each service. Optionally, if you want to conduct a POC with minimal configuration because of limitations, you can enable only Security Hub CSPM and Amazon Inspector during the initial POC phase to properly assess the results and data.

Note: Document your activation dates and trial expiration dates carefully. Create calendar reminders for trial end dates and schedule your key POC evaluation milestones to occur while services are active. This will help make sure that you can thoroughly assess the unified security operations capabilities of Security Hub when services are running at full capacity.

If you already have one or more of these underlying services enabled, you can proceed to enable the new Security Hub. To fully use the new Security Hub capabilities, particularly the exposure findings feature, specific service dependencies must be met, both Security Hub CSPM and Amazon Inspector are essential because they provide the telemetry needed for the Security Hub correlation engine and exposure findings. The combination enables Security Hub to deliver comprehensive risk analysis and prioritization by correlating configuration risks with runtime vulnerabilities. If you have other security services already enabled (such as GuardDuty or Macie), you can maintain these existing services while enabling Security Hub, and it will automatically begin incorporating their findings into its consolidated view, enhancing your overall security posture visualization.

Define your Security Hub configuration

After your success criteria have been established, you’re ready to plan your configuration. Some important decisions include:

  • Select a delegated administrator: From the AWS Organizations management account, you can set a delegated administrator for your organization. As a best practice, we recommend using the same delegated administrator across security services for consistent governance and according to our AWS Security Reference Architecture (AWS SRA).
  • Select accounts in scope: Define accounts you want to have Security Hub enabled for.
  • Define AWS Regions: Determine Regional restrictions or considerations.
  • Determine AWS service integrations: In addition to the core security capabilities of posture management and vulnerability management, Security Hub integrates signals from other AWS security services such as GuardDuty and Macie.
  • Define third-party integrations:
    • For ticketing, Security Hub integrates with popular service management systems such as Atlassian’s Jira Service Management Cloud and ServiceNow.
    • Partners who already support or intend to support the OCSF schema to receive findings from Security Hub include companies such as Arctic Wolf, CrowdStrike, DataBee, Datadog, DTEX Systems, Dynatrace, Fortinet, IBM, Netskope, Orca Security, Palo Alto Neworks, Rapid7, Securonix, SentinelOne, Sophos, Splunk, Sumo Logic, Tines, Trellix, Wiz, and Zscaler.
    • Service partners such as Accenture, Caylent, Deloitte, IBM, and Optiv can help you adopt Security Hub and the OCSF schema.
  • Use the Security Hub cost estimator: Use the Security Hub Cost Estimation Tool for a pre-enablement cost estimate based on your current spend on Amazon Inspector, Security Hub CSPM, and GuardDuty.

Prepare for deployment

After determining your success criteria and Security Hub configuration, identify stakeholders, desired state, and timeframe. Prepare for deployment by completing:

  • Project plan and timeline: Develop a project plan with defined success criteria, scope boundaries, key milestones, and realistic implementation timelines. Suggested timeline of events:
    • Before enablement:
      • Validate core security service configuration for GuardDuty, Amazon Inspector, Security Hub CSPM, and Macie
      • Request approvals for free trial from appropriate stakeholders
    • Day 0 – Enable the service, become comfortable with the Security Hub layout and begin training security personnel
    • Week 1 – Validate desired coverage of threat detection, vulnerability management, and posture management across accounts and Regions
    • Week 2 – Connect to IT service management (ITSM) tools and begin creating automations for critical workloads and resources
    • Week 3 – Execute a tabletop exercise in response to a selected exposure finding
    • Week 4 – Analyze trends of threats and exposures from day 1 through week 4
  • Identify stakeholders: Identify CISO, information security teams, SOC personnel, incident response teams, security engineers, finance, legal, compliance, external MSSPs, and business unit representatives.
  • Develop a RACI matric: Create a detailed RACI chart defining roles and responsibilities across the incident response lifecycle, facilitating accountability and proper communication channels.
  • Configure management account access: Secure authorization to delegate administrative access. For more information, see Permissions required to designate a delegated Security Hub administrator account.
  • Set up IAM roles and permissions: Use AWS Identity and Access Management (IAM) roles to implement role-based access controls aligned with the RACI chart, including case management, escalation, and read-only roles using AWS managed policies. For more information, see AWS Managed Policies

Enable Security Hub

AWS security services integrate with AWS Organizations to help you centrally manage Security Hub.

  1. If you haven’t already done so, enable Security Hub CSPM and Amazon Inspector at a minimum. Also enable any other AWS security services that you want to integrate with Security Hub.
  2. Enable Security Hub for your organization from the organization management account.
  3. If setting a delegated administrator for Security Hub, see Setting a delegated administrator account in Security Hub from the management account.

    Note: As a best practice, we recommend using the same delegated administrator across security services for consistent governance.

  4. Sign in to the delegated administrator with an IAM policy that gives you permission to enable and disable member accounts. With this policy, you will have granular control to decide what Regions you want enabled.
  5. Configure Security Hub plans for deployment. Security Hub comes with the Essentials, Threat Analytics, and Extended plans.
  6. Configure third-party integrations to create incidents or issues for Security Hub findings.

Note: After you enable Security Hub, exposure findings in your environment are created and analyzed immediately. However, it can take up to 6 hours to receive an exposure finding for a resource.

Validate deployment

The final step is to confirm that Security Hub is configured correctly and to evaluate the solution against your success criteria.

  • Validate policy: Verify that you have the correct permissions to manage member accounts and Regional restrictions are configured correctly.
  • Validate integrations: Verify that tickets with ServiceNow or Jira Cloud are working correctly by signing in to the AWS Management Console for Security hub and choosing Inventory in the navigation pane. Select Findings and verify there is a ticket ID in your finding.
  • Assess success criteria: Determine if you achieved the success criteria that you defined at the beginning of the project.

Conclusion

In this post, we showed you how to plan and implement an effective Security Hub POC. You learned how to do so through phases, including defining success criteria, configuring Security Hub, and validating that Security Hub meets your business needs. Take advantage of the trial periods to maximize your testing window without incurring significant costs. Throughout the POC, maintain focus on your predefined success criteria while remaining open to unexpected benefits or challenges that might arise. Maintain open communication with your AWS account team to address any questions or concerns to help you get the most out of your Security Hub POC experience.

Additional resources

If you have feedback about this post, submit comments in the Comments section below. If you have questions about this post, contact AWS Support.
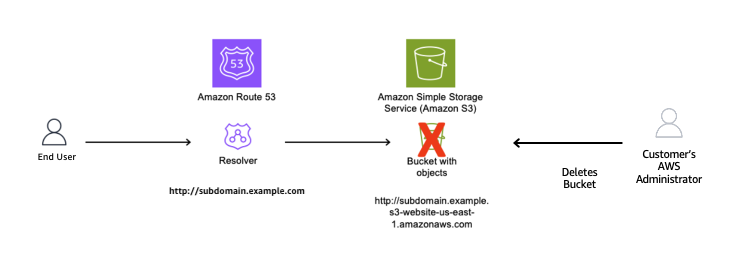
Kyle Shields

Kyle Shields

Kyle is a Security Specialist Solutions Architect focused on threat detection and incident response at AWS. Today, he’s focused on helping enterprise AWS customers adopt and operationalize AWS Security Incident Response and improve their security posture.

Ahmed Adekunle

Ahmed is a Security Specialist Solutions Architect focused on detection and response services at AWS. Before AWS, his background was in business process management and AWS technology consulting, helping customers use cloud technology to transform their business. Outside of work, Ahmed enjoys playing soccer, supporting less privileged activities, traveling, and eating spicy food, specifically African cuisine.

Author

Marshall Jones

Marshall is a Worldwide Security Specialist Solutions Architect at AWS. His background is in AWS consulting and security architecture and focused on a variety of security domains including edge, threat detection, and compliance. Today, he’s focused on helping enterprise AWS customers adopt and operationalize AWS security services to increase security effectiveness and reduce risk.

  •  

A technical walkthrough of multicloud full-stack security using AWS Security Hub Extended

Building on our recent announcement of AWS Security Hub Extended —our full-stack enterprise security offering — we want to show you how we’re simplifying security procurement and operations for your multicloud environments. Whether you’re a security architect evaluating solutions or a CISO looking to streamline vendor management, this post walks through the streamlined experience that transforms how you acquire, deploy, and manage end-to-end enterprise security solutions across endpoint, identity, email, network, data, browser, cloud, AI, and security operations. Security Hub Extended brings together AWS security services with carefully curated security partners. Delivering better outcomes together through unified procurement, billing, and operations that significantly reduce vendor management overhead so you can focus on what matters most: protecting your organization.

The challenge we’re addressing

Security teams today spend too much time on vendor management, evaluating services, negotiating contracts, and managing multiple billing cycles instead of focusing on what matters most: managing risk. But the procurement challenge runs even deeper. Until now, customers really only had one option: sign multi-year agreements based solely on proof-of-concept testing and estimated annual usage. This forces organizations to commit budget before they can validate whether a solution will work for them at scale.

AWS Security Hub Extended transforms this procurement model. Security Hub Extended offers customers the option to get started with pay-as-you-go pricing and no commitments, so they can move fast and validate solutions in their actual environment. After they’ve confirmed a solution works at scale, they can then align their vendor strategy and sign longer-term commitments for even more favorable pricing.

Security Hub Extended provides a curated set of carefully chosen partner solutions with competitive pricing, unified billing through your AWS account, and seamless integration. Our initial launch partners, selected by customers for their proven value, include 7AI, Britive, CrowdStrike, Cyera, Island, Noma, Okta, Oligo, Opti, Proofpoint, SailPoint, Splunk, Upwind, and Zscaler.

Getting started with Security Hub Extended

AWS Security Hub consolidates threat analytics from Amazon GuardDuty, vulnerability management from Amazon Inspector, and sensitive data discovery from Amazon Macie, correlating these signals with Security Hub Exposure findings to determine overall risk, reachability, and assumability. Security Hub Extended builds on this foundation by adding curated partner solutions, extending these unified security operations across your entire organization including multicloud, on-premises, and endpoint environments. If you’re already using Security Hub, you can navigate directly to the Extended plan section.

Getting started with Security Hub is straightforward. From the AWS Management Console, search for Security Hub to start the onboarding walkthrough. If you’re not already a Security Hub customer, you can quickly complete onboarding by designating an AWS organization delegated administrator (DA) account. You can then centrally enable and manage Security Hub across your entire organization’s accounts and AWS Regions from a single location (see Introduction to AWS Security Hub). After you’ve onboarded, navigate to the Extended plan section to add curated partner solutions.

Figure 1- Security Hub centralized configuration

Figure 1: Security Hub centralized configuration

From this single interface, you can enable detection and response capabilities across your entire organization, provide granular configurations at the organizational unit or member account level, select specific Regions, and turn individual features on or off as needed.

Understanding risk through attack paths

The Security Hub risk correlation engine identifies potential exposures by correlating threats, vulnerabilities, and misconfigurations to reveal how they connect and could lead to compromise of critical resources.

Figure 2 - Security Hub exposure attack path visualization

Figure 2: Security Hub exposure attack path visualization

The attack path visualization in the preceding figure reveals critical insights including upstream root causes and blast radius, showing the potential impact if a threat actor exploits a vulnerability. You can use this visualization to focus on fixing the root cause rather than addressing symptoms. For example, updating one security group configuration can eliminate the entire attack path, cutting off all downstream exposure.

Accessing Security Hub Extended

You can find Security Hub Extended, shown in the following figure, in the left navigation pane under Management in your Security Hub delegated administrator (DA) account; Security Hub Extended will only be visible from the delegated administrator account. The Extended plan brings curated third-party security solutions directly into the Security Hub experience. Because Extended is built into Security Hub, there’s no separate console to manage. You discover, subscribe to, and operate curated partner solutions from the same place you manage enterprise security, delivering unified operations across your entire security estate.

Figure 3- Security Hub Extended partners

Figure 3: Security Hub Extended partners


Transparent, competitive pricing consolidated with Security Hub

Unlike traditional third-party engagements that require lengthy negotiations, private pricing deals, and multi-year commitments, Security Hub Extended offers complete pricing transparency. Every partner solution displays clear, competitive monthly pay-as-you-go rates billed directly with Security Hub requiring no commitments. For example, Cloud Security from Upwind costs $3.75 per resource per month, and Identity Security from Okta costs $20 per user per month.

All Security Hub Extended offerings are also eligible for AWS Enterprise Discount Program (EDP) discounts that will be applied automatically. If you have an existing AWS enterprise discount agreement, those discounts automatically apply to Security Hub Extended offerings, further reducing your effective costs. All partner solutions you deploy through Security Hub Extended appear on your consolidated AWS bill, no separate invoices or payment processes.

Streamlined onboarding

Adopting curated partner solutions through Security Hub Extended is straightforward. Choose View Product to initiate an automated workflow. Depending on the solution, you’ll either be directed to the partner onboarding console or provide information for the partner to guide you through their onboarding process tailored to your environment.

Billing begins only after you’re fully activated on the partner solution and starts automatically, no additional action is required to benefit from the unified billing. If you’re already using one of the curated partner solutions, transitioning to Security Hub Extended for consolidated billing and flexible pricing won’t disrupt your current services. Now, instead of receiving separate invoices for each partner in addition to Amazon Inspector, GuardDuty, and Security Hub CSPM you get one unified bill through Security Hub. This consolidates visibility to support better understanding of spend and to manage cost.

Unified operations

Security Hub Extended unifies security operations by consolidating findings from AWS and curated partner solutions. All findings use the Open Cybersecurity Schema Framework (OCSF) for consistency, without the need for complex data normalization, transformation, and extract, transform, and load (ETL) processes.

When you deploy solutions such as CrowdStrike, Noma, and Upwind alongside Splunk and 7AI through Security Hub Extended, security findings automatically flow into Security Hub and then seamlessly route to Splunk and 7AI. All in OCSF format so your security team can focus on responding to threats, not managing pipelines, so you can quickly identify and respond to security risks that span boundaries—from endpoint compromises to cloud infrastructure—without spending valuable time on manual integration work.

The full-stack security vision

Security Hub Extended represents a shift in how you discover, procure, and build comprehensive security programs. Instead of managing dozens of vendor relationships, negotiating separate contracts, agreeing to multi-year annual commitments, and integrating disparate tools, you now have one procurement process through AWS, one bill with transparent competitive pay-as-you-go pricing, one console for unified security operations, one support channel for AWS Enterprise Support customers, and one schema (OCSF) for all security findings. The result: reduced security risk, improved team productivity, and a more unified approach to security operations across your enterprise.

Get started

Try Security Hub Extended today and experience how simplified procurement and unified operations can transform your security program. Security Hub Extended is generally available globally in all AWS commercial Regions where Security Hub is available. We’ve also published a walk through video to further explain how Security Hub Extended works.

It’s still Day 1, but we’re iterating fast, so share your feedback with us on AWS re:Post for Security Hub or through your AWS Support contacts and watch for future blog posts on our progress.


Matt Meck

Matt Meck

Matt is a Worldwide Security Specialist at Amazon Web Services, based in New York, with 10 years of experience in the tech industry. For the past 4 years at AWS, he’s focused on Detection and Response, helping solve complex security challenges in the rapidly evolving security space. He works closely with product teams, customers, partners, and field teams to deliver effective security solutions.


Michael Fuller

Michael Fuller

Michael has been with AWS for 16 years and led product for AWS Security Services for 11 years. Michael has 29 years in the industry and held several roles in product management, business development, and software development for IBM, Cisco, and Amazon. Michael has a Bachelor’s of Science in Computer Engineering from the University of Arizona and an MBA from the University of Washington.


  •  

AWS Security Hub is expanding to unify security operations across multicloud environments

After talking with many customers, one thing is clear: the security challenge has not gotten easier. Enterprises today operate across a complex mix of environments, including on-premises infrastructure, private data centers, and multiple clouds, often with tools that were never designed to work together. The result is enterprise security teams spend more time managing tools than managing risk, making it harder to stay ahead of threats across an increasingly complex environment.

At Amazon Web Service (AWS), we believe security should be simple, integrated, and built for the way enterprises actually operate. This belief is what drove us to reimagine AWS Security Hub, delivering full-stack security through a single experience, and this vision is driving our next chapter.

Building on a foundation of unified security

We transformed Security Hub into a unified security operations solution by bringing together AWS security services, including Amazon GuardDuty, Amazon Inspector, AWS Security Hub Cloud Security Posture Management (Security Hub CSPM), and Amazon Macie, into a single experience that automatically and continuously analyzes security signals across threats, vulnerabilities, misconfigurations, and sensitive data. Security Hub delivers a common foundation, bringing together findings from across your AWS environment so your security team spends less time translating signals and more time acting on them. Built on top of that foundation, a unified operations layer gives security teams near real-time risk analytics, automated analysis, and prioritized insights, helping them focus on what matters most, at scale.

We also introduced new capabilities (the Extended plan) that simplify how enterprises procure, deploy, and integrate a full-stack security solution across endpoint, identity, email, network, data, browser, cloud, AI, and security operations. Now, customers can use Security Hub to expand their security portfolio through a curated selection of AWS Partner solutions (at launch: 7AI, Britive, CrowdStrike, Cyera, Island, Noma, Okta, Oligo, Opti, Proofpoint, SailPoint, Splunk (a Cisco company), Upwind, and Zscaler), all through one unified experience. With AWS as the seller of record, you benefit from pay-as-you-go pricing, a single bill, and no long-term commitments. Our goal is simple: unified security, everywhere your enterprise operates.

Freedom to innovate, wherever your workloads are

At AWS, interoperability means giving customers the freedom to choose solutions that best suit their needs, and the ability to use them wherever their workloads run. But freedom to innovate across multicloud environments also means that it is critical to secure them consistently, and without adding operational complexity.

What’s coming for Security Hub

In the coming months, we are expanding Security Hub with new multicloud capabilities that extend unified security operations beyond AWS. The foundation of this expansion is a common data layer that unifies security signals from wherever your workloads run. On top of that, a unified policy and operations layer delivers consistent posture management, exposure analysis, and risk prioritization, so your security team operates from a single view of risk rather than a fragmented collection of consoles.

Security Hub will deliver unified risk analytics that surface critical risks across your multicloud estate. You’ll be able to manage cloud security posture with Security Hub CSPM checks that give you consistent posture visibility, and extend vulnerability management with expanded Amazon Inspector capabilities, including virtual machine scanning, container image scanning, and serverless scanning. Security Hub will also deliver external network scanning that enriches security findings with context about internet-facing exposure across your multicloud environment, including for resources not running in AWS.

The result is more comprehensive risk coverage across your enterprise. It’s about giving your security team a single, unified experience to detect and respond to risks, wherever you operate.

Security as a business enabler

The security leaders I speak with aren’t just asking for better tools. They’re asking for a way to get ahead of risk, not just manage it. They want security that keeps pace with the business, not security that slows it down.

That’s the vision behind AWS Security Hub: unified security through a single, integrated security operations experience, built on a common data foundation, powered by intelligent analytics, and delivered through a consistent operations layer, to help reduce security risk, improve team productivity, and strengthen security operations across AWS and beyond.

Our multicloud expansion is underway, and we are just getting started.

You can learn more at aws.amazon.com/security-hub, or visit us at the AWS booth (S-0466) at RSA Conference, March 23–26 in San Francisco.

Gee Rittenhouse Gee Rittenhouse
Gee is the Vice President of Security Services at AWS, overseeing key services including Security Hub, GuardDuty, and Inspector. He holds a PhD from MIT and brings extensive leadership experience across enterprise security and cloud. He previously served as CEO of Skyhigh Security and Senior Vice President and General Manager of Cisco’s Security Business Group, where he was responsible for Cisco’s worldwide cybersecurity business.
  •  

File integrity monitoring with AWS Systems Manager and Amazon Security Lake 

Customers need solutions to track inventory data such as files and software across Amazon Elastic Compute Cloud (Amazon EC2) instances, detect unauthorized changes, and integrate alerts into their existing security workflows.

In this blog post, I walk you through a highly scalable serverless file integrity monitoring solution. It uses AWS Systems Manager Inventory to collect file metadata from Amazon EC2 instances. The metadata is sent through the Systems Manager Resource Data Sync feature to a versioned Amazon Simple Storage Service (Amazon S3) bucket, storing one inventory object for each EC2 instance. Each time a new object is created in Amazon S3, an Amazon S3 Event Notification triggers a custom AWS Lambda function. This Lambda function compares the latest inventory version with the previous one to detect file changes. If a file that isn’t expected to change has been created, modified, or deleted, the function creates an actionable finding in AWS Security Hub. Findings are then ingested by Amazon Security Lake in a standard OCSF format, which centralizes and normalizes the data. Finally, the data can be analyzed using Amazon Athena for one-time queries, or by building visual dashboards with Amazon QuickSight and Amazon OpenSearch Service. Figure 1 summarizes this flow:

Figure 1: File integrity monitoring workflow

Figure 1: File integrity monitoring workflow

This integration offers an alternative to the default AWS Config and Security Hub integration, which relies on limited data (for example, no file modification timestamps). The solution presented in this post provides control and flexibility to implement custom logic tailored to your operational needs and support security-related efforts.

This flexible solution can also be used with other Systems Manager Inventory metadata, such as installed applications, network configurations, or Windows registry entries, enabling custom detection logic across a wide range of operational and security use cases.

Now let’s build the file integrity monitoring solution.

Prerequisites

Before you get started, you need an AWS account with permissions to create and manage AWS resources such as Amazon EC2, AWS Systems Manager, Amazon S3, and Lambda.

Step 1: Start an EC2 instance

Start by launching an EC2 instance and creating a file that you will later modify to simulate an unauthorized change.

Create an AWS Identity and Access Management (IAM) role to allow the EC2 instance to communicate with Systems Manager:

  1. Open the AWS Management Console and go to IAM, choose Roles from the navigation pane, and then choose Create role.
  2. Under Trusted entity type, select AWS service, select EC2 as the use case, and choose Next.
  3. On the Add permissions page, search for and select the AmazonSSMManagedInstanceCore IAM policy, then choose Next.
  4. Enter SSMAccessRole as the role name and choose Create role.
  5. The new SSMAccessRole should now appear in your list of IAM roles:
Figure 2: Create an IAM role for communication with Systems Manager

Figure 2: Create an IAM role for communication with Systems Manager

Start an EC2 instance:

  1. Open the Amazon EC2 console and choose Launch Instance.
  2. Enter a Name, keep the default Linux Amazon Machine Image (AMI), and select an Instance type (for example, t3.micro).
  3. Under Advanced details:
    1. IAM instance profile, select the previously created SSMAccessRole
    2. Create a fictitious payment application configuration file in the /etc/paymentapp/ folder on the EC2 instance. Later, you will modify it to demonstrate a file-change event for integrity monitoring. To create this file during EC2 startup, copy and paste the following script into User data.
#!/bin/bash
mkdir -p /etc/paymentapp
echo "db_password=initial123" > /etc/paymentapp/config.yaml
Figure 3: Adding the application configuration file

Figure 3: Adding the application configuration file

  1. Leave the remaining settings as default, choose Proceed without key pair, and then select Launch Instance. A key pair isn’t required for this demo because you use Session Manager for access.

Step 2: Enable Security Hub and Security Lake

If Security Hub and Security Lake are already enabled, you can skip to Step 3.
To start, enable Security Hub, which collects and aggregates security findings. AWS Security Hub CSPM adds continuous monitoring and automated checks against best practices.

  1. Open the Security Hub console.
  2. Choose Security Hub CSPM from the navigation pane and then select Enable AWS Security Hub CSPM and choose Enable Security Hub CSPM at the bottom of the page.

Note: For this demo, you don’t need the Security standards options and can clear them.

Figure 4: Enable Security Hub CSP

Figure 4: Enable Security Hub CSP

Next, activate Security Lake to start collecting actionable findings from Security Hub:

  1. Open the Amazon Security Lake console and choose Get Started.
  2. Under Data sources, select Ingest specific AWS sources.
  3. Under Log and event sources, select Security Hub (you will use this only for this demo):
Figure 5: Select log and event sources

Figure 5: Select log and event sources

  1. Under Select Regions, choose Specific Regions and make sure you select the AWS Region that you’re using.
  2. Use the default option to Create and use a new service role.
  3. Choose Next and Next again, then choose Create.

Step 3: Configure Systems Manager Inventory and sync to Amazon S3

With Security Hub and Security Lake enabled, the next step is to enable Systems Manager Inventory to collect file metadata and configure a Resource Data Sync to export this data to S3 for analysis.

  1. Create an S3 bucket by carefully following the instructions in the section To create and configure an Amazon S3 bucket for resource data sync.
  2. After you created the bucket, enable versioning in the Amazon S3 console by opening the bucket’s Properties tab, choosing Edit under Bucket Versioning, selecting Enable, and saving your changes. Versioning causes each new inventory snapshot to be saved as a separate version, so that you can track file changes over time.

Note: In production, enable S3 server access logging on the inventory bucket to keep an audit trail of access requests, enforce HTTPS-only access, and enable CloudTrail data events for S3 to record who accessed or modified inventory files.

The next step is to enable Systems Manager Inventory and set up the resource data sync:

  1. In the Systems Manager console, go to Fleet Manager, choose Account management, and select Set up inventory.
  2. Keep the default values but deselect every inventory type except File. Set a Path to limit collection to the files relevant for this demo and your security requirements. Under File, set the Path to: /etc/paymentapp/.
Figure 6: Set the parameters and path

Figure 6: Set the parameters and path

  1. Choose Setup Inventory.
  2. In Fleet Manager, choose Account management and select Resource Data Syncs.
  3. Choose Create resource data sync, enter a Sync name, and enter the name of the versioned S3 bucket you created earlier.
  4. Select This Region and then choose Create.

Step 4: Implement the Lambda function

Next, complete the setup to detect changes and create findings. Each time Systems Manager Inventory writes a new object to Amazon S3, an S3 Event Notification triggers a Lambda function that compares the latest and previous object versions. If it finds created, modified, or deleted files, it creates a security finding. To accomplish this, you will create the Lambda function, set its environment variables, add the helper layer, and attach the required permissions.

The following is an example finding generated in AWS Security Finding Format (ASFF) and sent to Security Hub. In this example, you see a notification about a file change on the EC2 instance listed under the Resources section.

{
	...
"Id": "fim-i-0b8f40f4de065deba-2025-07-12T13:48:31.741Z",
	"AwsAccountId": "XXXXXXXXXXXX",
	"Types": [
		"Software and Configuration Checks/File Integrity Monitoring"
	],
	"Severity": {
		"Label": "MEDIUM"
	},
	"Title": "File changes detected via SSM Inventory",
	"Description": "0 created, 1 modified, 0 deleted file(s) on instance i-0b8f40f4de065deba",
	"Resources": [
		{
			"Type": "AwsEc2Instance",
			"Id": "i-0b8f40f4de065deba"
		}
	],
	...
}

Create the Lambda function

This function detects file changes, reports findings, and removes unused Amazon S3 object versions to reduce costs.

  1. Open the Lambda console and choose Create function in the navigation pane.
  2. For Function Name enter fim-change-detector.
  3. Select Author from scratch, enter a function name, select the latest Python runtime, and choose Create function.
  4. On the Code tab, paste the following main function and choose Deploy.
import boto3, os, json, re
from datetime import datetime, UTC
from urllib.parse import unquote_plus
from helpers import is_critical, load_file_metadata, is_modified, extract_instance_id

s3 = boto3.client('s3')
securityhub = boto3.client('securityhub')

CRITICAL_FILE_PATTERNS = os.environ["CRITICAL_FILE_PATTERNS"].split(",")
SEVERITY_LABEL = os.environ["SEVERITY_LABEL"]
	
def lambda_handler(event, context):
	# Safe event handling
	if "Records" not in event or not event["Records"]:
		return

	# Extract S3 event
	record = event['Records'][0]
	bucket = record['s3']['bucket']['name']
	key = unquote_plus(record['s3']['object']['key'])
	current_version = record['s3']['object'].get('versionId')
	if not current_version:
		return

	# Fetching the region name
	account_id = context.invoked_function_arn.split(":")[4]
	region = boto3.session.Session().region_name

	# Get object versions (latest first)
	versions = s3.list_object_versions(Bucket=bucket, Prefix=key).get('Versions', [])
	versions = sorted(versions, key=lambda v: v['LastModified'], reverse=True)

	# Find previous version
	idx = next((i for i,v in enumerate(versions) if v["VersionId"] == current_version), None)
	if idx is None or idx + 1 >= len(versions):
		return
	prev_version = versions[idx+1]["VersionId"]

	# Load both versions
	current = load_file_metadata(bucket, key, current_version)
	previous = load_file_metadata(bucket, key, prev_version)

	# Compare
	created = {p for p in set(current) - set(previous) if is_critical(p)}
	deleted = {p for p in set(previous) - set(current) if is_critical(p)}
	modified = {p for p in set(current) & set(previous) if is_critical(p) and is_modified(p, current, previous)}

	# Report if changes were found
	if created or deleted or modified:
		instance_id = extract_instance_id(bucket, key, current_version)
		now = datetime.now(UTC).isoformat(timespec='milliseconds').replace('+00:00', 'Z')
		finding = {
			"SchemaVersion": "2018-10-08",
			"Id": f"fim-{instance_id}-{now}",
			"ProductArn": f"arn:aws:securityhub:{region}:{account_id}:product/{account_id}/default",
			"AwsAccountId": account_id,
			"GeneratorId": "ssm-inventory-fim",
			"CreatedAt": now,
			"UpdatedAt": now,
			"Types": ["Software and Configuration Checks/File Integrity Monitoring"],
			"Severity": {"Label": SEVERITY_LABEL},
			"Title": "File changes detected via SSM Inventory",
			"Description": (
				f"{len(created)} created, {len(modified)} modified, "
				f"{len(deleted)} deleted file(s) on instance {instance_id}"
			),
			"Resources": [{"Type": "AwsEc2Instance", "Id": instance_id}]
		}
		securityhub.batch_import_findings(Findings=[finding])

	# No change – delete older S3 version
	else:
		if prev_version != current_version:
			try:
				s3.delete_object(Bucket=bucket, Key=key, VersionId=prev_version)
			except Exception as e:
				print(f"Delete previous S3 object version failed: {e}")

Note: In production, set Lambda reserved concurrency to prevent unbounded scaling, configure a dead letter queue (DLQ) to capture failed invocations, and optionally attach the function to an Amazon VPC for network isolation.

Configure environment variables

Configure the two required environment variables in the Lambda console. These two variables (one for critical paths to monitor and one for security finding severity) must be set or the function will fail.

  1. Open the Lambda console and choose Configuration and then select Environment variables.
  2. Choose Edit and then choose Add environment variable.
  3. Under Key, choose CRITICAL_FILE_PATTERNS
    1. Enter ^/etc/paymentapp/config.*$ as the value.
    2. Set the SEVERITY_LABEL to MEDIUM.
Figure 7: CRITICAL_FILE_PATTERNS and SEVERITY_LABEL configuration

Figure 7: CRITICAL_FILE_PATTERNS and SEVERITY_LABEL configuration

Set up permissions

The next step is to attach permissions to the Lambda function

  1. In your Lambda function, choose Configuration and then select Permissions.
  2. Under Execution role, select the role name that will lead to the role in IAM.
  3. Choose Add permissions and select Create inline policy. Select JSON view.
  4. Paste the following policy, and make sure to replace <bucket-name> with the name of your S3 bucket, and you also update <region> and <account-id> with your AWS Region and Account ID:
{
"Version": "2012-10-17",
"Statement": [
	{
		"Effect": "Allow",
		"Action": "securityhub:BatchImportFindings",
		"Resource": "arn:aws:securityhub:<region>:<account-id>:product/<account-id>/default"
	},
	{
		"Effect": "Allow",
		"Action": [
			"s3:GetObject",
			"s3:GetObjectVersion",
			"s3:ListBucketVersions",
			"s3:DeleteObjectVersion"
		],
		"Resource": [
			"arn:aws:s3:::<bucket-name>",
			"arn:aws:s3:::<bucket-name>/*"
			]
		}
	]
}
  1. To finalize, enter a Policy name and choose Create policy.

Add functions to the Lambda layer

For better modularity, add some helper functions to a Lambda layer. These functions are already referenced in the import section of the preceding Lambda function’s Python code. The helper functions check critical paths, load file metadata, compare modification times, and extract the EC2 instance ID.

Open AWS CloudShell from the top-right corner of the AWS console header, then copy and paste the following script and press Enter. It creates the helper layer and attaches it to your Lambda function.

#!/bin/bash
set -e
FUNCTION_NAME="fim-change-detector"
LAYER_NAME="fim-change-detector-layer"

mkdir -p python
cat > python/helpers.py << 'EOF'
import json, re, os
from dateutil.parser import parse as parse_dt
import boto3
s3 = boto3.client('s3')
CRITICAL_FILE_PATTERNS = os.environ.get("CRITICAL_FILE_PATTERNS", "").split(",")

def is_critical(path):
	return any(re.match(p.strip(), path) for p in CRITICAL_FILE_PATTERNS if p.strip())

def load_file_metadata(bucket, key, version_id):
	obj = s3.get_object(Bucket=bucket, Key=key, VersionId=version_id)
	data = {}
	for line in obj['Body'].read().decode().splitlines():
		if line.strip():
			i = json.loads(line)
			n, d, m = i.get("Name","").strip(), i.get("InstalledDir","").strip(), i.get("ModificationTime","").strip()
			if n and d and m: data[f"{d.rstrip('/')}/{n}"] = m
	return data

def is_modified(path, current, previous):
	try: return parse_dt(current[path]) != parse_dt(previous[path])
	except: return current[path] != previous[path]

def extract_instance_id(bucket, key, version_id):
	obj = s3.get_object(Bucket=bucket, Key=key, VersionId=version_id)
	for line in obj['Body'].read().decode().splitlines():
		if line.strip():
			r = json.loads(line)
			if "resourceId" in r: return r["resourceId"]
	return None
EOF

zip -r helpers_layer.zip python >/dev/null
LAYER_VERSION_ARN=$(aws lambda publish-layer-version \
	--layer-name "$LAYER_NAME" \
	--description "Helper functions for File Integrity Monitoring" \
	--zip-file fileb://helpers_layer.zip \
	--compatible-runtimes python3.13 \
	--query 'LayerVersionArn' \
	--output text)

aws lambda update-function-configuration \
	--function-name "$FUNCTION_NAME" \
	--layers "$LAYER_VERSION_ARN" >/dev/null
echo "Layer created and attached to the Lambda function."

Step 5: Set up S3 Event Notifications

Finally, set up S3 Event Notifications to trigger the Lambda function when new inventory data arrives.

  1. Open the S3 console and select the Systems Manager Inventory bucket that you created.
  2. Choose Properties and select Event notifications.
  3. Choose Create event notification.
    1. Enter an Event name.
    2. In the Prefix field, enter AWS%3AFile/ to limit Lambda triggers to file inventory objects only.
      Note: The prefix contains a : character, which must be URL-encoded as %3A.
    3. Under Event types, select Put.
    4. At the bottom, select your newly created Lambda function, and choose Save changes.

In this example, inventory collection runs every 30 minutes (48 times each day) but can be adjusted based on security requirements to optimize costs. The Lambda function is triggered once for each instance whenever a new inventory object is created. You can further reduce event volume by filtering EC2 instances through S3 Event Notification prefixes, enabling focused monitoring of high-value instances.

Step 6: Test the file change detection flow

Now that the EC2 instance is running and the sample configuration file /etc/paymentapp/config.yaml has been initialized, you’re ready to simulate an unauthorized change to test the file integrity monitoring setup.

  1. Open the Systems Manager console.
  2. Go to Session Manager and choose Start session.
  3. Select your EC2 instance and choose Start Session.
  4. Run the following command to modify the file:

echo “db_password=hacked456" | sudo tee /etc/paymentapp/config.yaml

This simulates a configuration tampering event. During the next Systems Manager Inventory run, the updated metadata will be saved to Amazon S3.

To manually trigger this:

  1. Open the Systems Manager console and choose State Manager.
  2. Select your association and choose Apply association now to start the inventory update.
  3. After the association status changes to Success, check your SSM Inventory S3 bucket in the AWS:File folder and review the inventory object and its versions.
  4. Open the Security Hub console and choose Findings. After a short delay, you should see a new finding like the one shown in Figure 8:
Figure 8: View file change findings

Figure 8: View file change findings

Step 7: Query and visualize findings

While Security Hub provides a centralized view of findings, you can deepen your analysis using Amazon Athena to run SQL queries directly on the normalized Security Lake data in Amazon S3. This data follows the Open Cybersecurity Schema Framework (OCSF), which is a vendor-neutral standard that simplifies integration and analysis of security data across different tools and services.

The following is an example Athena query:

SELECT
	finding_info.desc AS description,
	class_uid AS class_id,
	severity AS severity_label,
	type_name AS finding_type,
	time_dt AS event_time,
	region,
	accountid
FROM amazon_security_lake_table_us_east_1_sh_findings_2_0

Note: Be sure to adjust the FROM clause for other Regions. Security Lake processes findings before they appear in Athena, so expect a short delay between ingestion and data availability.
You will see a similar result for the preceding query, shown in Figure 9:

Figure 9: Athena query result in the Amazon Athena query editor

Figure 9: Athena query result in the Amazon Athena query editor

Security Lake classifies this finding as an OCSF 2004 Class, Detection Finding. You can explore the full schema definitions at OCSF Categories. For more query examples, see the Security Lake query examples.
For visual exploration and real-time insights, you can integrate Security Lake with OpenSearch Service and QuickSight, both of which now offer extensive generative AI support. For a guided walkthrough using QuickSight, see How to visualize Amazon Security Lake findings with Amazon QuickSight.

Clean up

After testing the step-by-step guide, make sure to clean up the resources you created for this post to avoid ongoing costs.

  1. Terminate the EC2 instance
  2. Delete the Resource Data Sync and Inventory Association
  3. Remove the Lambda function.
  4. Disable Security Lake and Security Hub CSPM
  5. Delete IAM roles created for this post
  6. Delete the associated SSM Resource Data Sync and Security Lake S3 buckets.

Conclusion

In this post, you learned how to use Systems Manager Inventory to track file integrity, report findings to Security Hub, and analyze them using Security Lake.
You can access the full sample code to set up this solution in the AWS Samples repository.
While this post uses a single-account, single-Region setup for simplicity, Security Lake supports collecting data across multiple accounts and Regions using AWS Organizations. You can also use a Systems Manager resource data sync to send inventory data to a central S3 bucket.

Getting Started with Amazon Security Lake and Systems Manager Inventory provides guidance for enabling scalable, cloud-centric monitoring with full operational context.

Adam Nemeth Adam Nemeth
Adam is a Senior Solutions Architect and generative AI enthusiast at AWS, helping financial services customers by embracing the Day 1 culture and customer obsession of Amazon. With over 24 years of IT experience, Adam previously worked at UBS as an architect and has also served as a delivery lead, consultant, and entrepreneur. He lives in Switzerland with his wife and their three children.
  •  
❌