Unchecked AI in the workplace quickly becomes a massive loophole for data leaks and security breaches. All too often, employees drop sensitive company data into public chatbots, or install rogue AI assistants on their own — in the process handing over way too much access. In a previous post, we broke down the different types of risky AI systems, and later shared some tips on how to turn off the built-in AI features on major tech platforms. Today let’s take a look at practical ways to block or restrict the unauthorized “helpers” employees might be using — from ChatGPT and Grammarly, to meeting bots like Fireflies and Read AI.
How to detect and restrict ChatGPT
ChatGPT is the biggest culprit when it comes to unauthorized AI use worldwide. A quick word of warning, though: an outright ban only sends users hunting for sketchy third-party sites or messaging app chatbots that hook into the same service. That’s why it’s always a good idea to offer an approved alternative before pulling the plug.
Detecting it: keep an eye on the NGFW or web filter for traffic heading to chat.openai.com, chatgpt.com, oaistatic.com, oaiusercontent.com, or cdn.oaistatic.com. It’s also smart to use EDR/EPP tools to scan browser histories, installed apps, and browser extensions across corporate devices.
Locking it down: use the firewall or web filter to block the entire AI Services category, and set up DNS to reroute traffic away from those OpenAI domains. Browser policies can also be used to ban ChatGPT-powered extensions. Better yet, block all extensions not on a pre-approved allowlist. Finally, use application controls and EPP solutions to stop users from installing the official desktop app (ChatGPT.exe or com.openai.chat).
How to detect and restrict Claude and Claude Code
Detecting it: use the NGFW or web filter to track traffic going to claude.ai, anthropic.com, *.anthropic.com, and api.anthropic.com. EDR/EPP or application control tools can also be used to scan employee computers for the desktop app (claude.exe).
Locking it down: drop a blanket block on the AI Services category through the NGFW or web filter, and tweak DNS settings to reroute traffic away from the aforementioned Anthropic domains. Next, use browser policies to shut down Claude-powered extensions. Finally, use application controls and the EPP platform to prevent users from installing the desktop app.
How to detect and restrict Perplexity AI
Detecting it: keep tabs on the NGFW or web filter to flag any traffic heading to *.perplexity.ai or pplx.ai.
Locking it down: just like the others, add the AI Services category to the NGFW or web filter blocklist, and use DNS routing to redirect traffic away from those domains.
Configure the browser to block third-party extensions from being installed. If Firefox is used in the organization, be aware that recent versions come with Perplexity built in. Luckily, these AI features can be turned-off company-wide using enterprise policies — specifically, by setting SidebarChatbot = blocked. The full list of tweaks can be found in the Firefox documentation.
How to detect and restrict DeepSeek
Detecting it: keep an eye on the NGFW or web filter for traffic hitting deepseek.com, chat.deepseek.com, api.deepseek.com, or platform.deepseek.com. For better precision, analyze the SNI (server name identification) in TLS connection requests. For mobile devices, look out for the official app (com.deepseek.chat).
Locking it down: blocklist the AI Services category on the NGFW or web filter, and reroute traffic to DeepSeek’s domains via DNS settings. Use browser policies to block third-party extensions, and lean on MDM/EMM tools to restrict the mobile app.
How to detect and restrict Mistral, xAI Grok, and Character.ai
The playbook for these tools is exactly the same as DeepSeek, so here’s the quick list of domains to watch for and block: chat.mistral.ai, mistral.ai, console.mistral.ai, grok.com, x.ai, api.x.ai, character.ai, beta.character.ai, and c.ai.
A quick word of warning on Grok: because Grok is baked into X, blocking this specific AI access point means blocking the entire social media platform.
How to detect and restrict Slack AI
Detecting it: in the Slack workspace admin dashboard, look under Analytics → Slack AI usage. If an enterprise plan is used, the detailed Slack logs can be searched for any events starting with the ai_ prefix.
Blocking it with policies: in the organization’s Slack settings, click through the Workspace settings → Roles & permissions → Feature access, and change the permission to “no one”. Slack has a step-by-step guide in their help center.
Locking it down: shutting this down at the network level is tricky; it can be pulled off with a finely tuned CASB solution in place. Also, don’t forget the importance of blocking rogue integrations and keeping external AI services from tapping into Slack data in the first place. We covered how to lock this down using OAuth controls in a previous post.
How to detect and restrict Zoom AI Companion
Detecting it: if a corporate Zoom subscription is in use, just head to Admin Center → Reports → AI Companion usage. Detecting Zoom’s AI when employees join external meetings or use free accounts is a lot tougher, but email filters can be set up to flag incoming AI-generated meeting notes by scanning for subject lines or text containing “Meeting summary” or “Meeting assets”.
Blocking it with policies: for the company’s own Zoom subscription, go to the Admin Portal → Account Management → Account Settings → Meeting → AI Companion and toggle it OFF for everyone.
Locking it down: unfortunately, AI Companion is baked into Zoom’s DNA, so the only real option is blocking Zoom altogether.
How to detect and restrict Grammarly
What looks like an innocent spellchecker is actually one of the biggest culprits for workplace data leaks.
Detecting it: check the NGFW or web filter logs for traffic hitting grammarly.com, *.grammarly.com, and gnar.grammarly.com. EDR and MDM/EMM tools can also be used to hunt down the standalone desktop apps (Grammarly Desktop.exe and the macOS version), as well as the Grammarly browser extension.
Locking it down: use firewalls to block those domains at the network level, and EPP to stop employees from installing the desktop app, browser extensions, or the Grammarly add-ins for Microsoft Word and Excel.
How to detect and restrict meeting assistants: Fireflies, Read.ai, Tactiq, Fathom, and Granola
This massive category of third-party SaaS tools records and analyzes meetings — creating a massive risk for data leaks. The trickiest part? Outside clients or vendors can bring these bots into a meeting just as easily as employees can.
Detecting them: run an audit on calendar invites, and look for bot participants using email domains like @fireflies.ai, @read.ai, @tactiq.io, @fathom.video, or @granola.ai. Zoom, Teams, or Google Meet logs can also be used to review external participants who joined past calls.
Locking them down: since it’s impossible to control what outsiders do, blocking these bots comes down to tightening meeting rules. The best moves are: blocking users from granting OAuth permissions for bots to join calls, restricting employees from inviting unapproved external participants, or locking down meeting recording access for external users. That last option is usually the least painful way to keep bots out without disrupting business.
How to detect and restrict AI code editors: Cursor, Windsurf, and the like
Detecting them: use EDR/EPP tools to scan for executables like cursor.exe or windsurf.exe. It’s also worth monitoring network traffic heading to cursor.com and windsurf.com, as well as traffic hitting various AI model API providers. Keep in mind that there’s a pretty extensive list of API hosts to monitor here, since these editors aren’t tied to just one specific AI vendor.
Blocking them with policies: these apps can be prevented from being installed by setting up filters based on the developer’s digital signature certificate. Alternatively, a strict application allowlist can be employed where only pre-approved software is allowed to run.
Locking them down: rely on the EPP/EDR platform to actively detect and block these applications from running.
How to detect and restrict local AI tools: Ollama, LM Studio, and GPT4All
On one hand, this category carries fewer data leak risks because the AI models run completely locally on the user’s machine. On the other hand, it opens up a whole new can of worms: these apps themselves aren’t always highly secure, and can become targets for cyberattacks. Plus, it still means that employees can misuse models or process data in unauthorized ways.
Detecting them: EDR/EPP tools are the best line of defense here. They should be used to flag known local AI files and processes like ollama.exe, ollama serve, lmstudio.exe, LM Studio.app, jan.exe, or gpt4all.exe. From a network perspective, it’s worth scanning for open ports on local devices — typically port 1234 for Ollama and LM Studio, or port 8080 for WebUIs (using an additional fingerprint check of the server response). Another massive red flag is the presence of large files (often several gigabytes) containing language model weights. Look out for extensions like .gguf, .bin, or sometimes .safetensors.
Locking them down: use EPP/EDR platforms or windows AppLocker to block these applications by name, or switch to an application allowlist.
How to detect and restrict autonomous agents: OpenClaw, NemoClaw, and NanoClaw
This is easily one of the most dangerous categories of AI tools out there. These agents mix high-level independence with access to untrusted data, making them a massive security headache.
Detecting them: use EPP/EDR tools to sniff out active processes like openclaw, nanoclaw, nemoclaw, or clawdbot. Also keep an eye out for devices running Node.js that suddenly start launching Bash or Python scripts. Another dead giveaway is the appearance of system folders like ~/openclaw, ~/nanoclaw, ~/.claw*, or ~/clawhub. At the network level, monitor connections to the AI model APIs we mentioned earlier, as well as traffic hitting servers like openclaw.ai, nanoclaw.dev, or clawhub.*.
Locking them down: the safest bet is to use strict application allowlisting (only allowing approved software to run), or to specifically ban the known agent apps listed above. On top of that, consider blocking non-developers from installing Node.js and Docker, neither of which they need on their computers anyway.
Enabling security tooling is the starting point. Making it operational—where findings drive decisions, response times are measurable, and your security posture improves week over week—is where most organizations struggle.
This blog post provides a phased maturity roadmap for organizations that have already enabled AWS Security Hub and Amazon GuardDuty. These two services form the foundation of a cloud-centered security operations capability on AWS. Security Hub provides centralized security posture management and aggregates findings from multiple AWS security services, while GuardDuty provides intelligent threat detection by continuously monitoring for malicious activity and unauthorized behavior. For any production or enterprise AWS environment, having both services enabled across all accounts and AWS Regions is a baseline expectation; not because they’re optional add-ons, but because effective security operations require both the ability to detect threats and the ability to understand your overall security posture. If you haven’t yet enabled them, the Security Hub documentation and GuardDuty documentation provide setup guidance, including multi-account deployment with AWS Organizations.
Customers consistently tell us that while individual AWS security service documentation is thorough, what’s missing is a consolidated operational playbook—one resource that ties the services together into a working security operations practice with clear phases, progression criteria, and an operational cadence. That’s the gap this post fills. Rather than covering how each feature works (the documentation does that well), this post focuses on when and why to use each capability, and how to build the organizational habits that make them effective.
What follows is a six-phase roadmap for moving from these services are active to these services are driving our security operations. Each phase builds on the previous one, and each is designed to deliver tangible, measurable improvement.
Phase 0: Assess your current state
Goal: Understand what’s working before changing anything.
Estimated timeline: 1–2 weeks
Move to Phase 1 when: You have a documented current-state assessment covering all the following items.
Before introducing new processes or automation, establish a clear picture of the current environment. This assessment informs every decision that follows.
Actions:
Findings inventory: Review existing active GuardDuty findings to determine how many there are, the severity distribution, and how old the oldest findings are. A large backlog of untouched HIGH or CRITICAL findings that have been sitting for weeks is a strong signal about where to focus first.
Security Hub score baseline: Determine your current compliance score against AWS Foundational Security Best Practices (FSBP) and The CIS AWS Foundations Benchmark. Check to see which standards are enabled; if multiple standards are enabled, review for overlapping standards (creating noise) or unused standards.
Multi-account and multi-Region check: Look to see if GuardDuty is enabled in every account and every Region, or only in Regions with active workloads. Threat actors frequently operate in Regions that organizations don’t actively monitor. Also check to see if Security Hub aggregation is configured with a delegated administrator account or if each account is being managed independently.
Integration check: Determine if GuardDuty findings are flowing into Security Hub and if Amazon Inspector and Amazon Macie are enabled and feeding findings in. Without integration, Security Hub might be only surfacing its own compliance checks.
Notification check: See if there’s an Amazon EventBridge rule configured for notifications and if so, how findings are being routed and to whom. Know if notifications are being sent using an Amazon Simple Notification Service (Amazon SNS) topic or a chat channel integration. Without a clear notification and response workflow, findings can accumulate silently in the console with no one looking at them.
Deliverable: A one-page current state assessment that identifies what’s enabled, what’s flowing where, who’s looking at it, and what’s in the existing backlog.
Phase 1: Reduce the noise
Goal: Make the signal meaningful before asking anyone to act on it.
Estimated timeline: 2–3 weeks
Move to Phase 2 when: Remaining findings represent items requiring real decisions, compliance scores reflect actual posture, and you can articulate why every suppression rule and disabled control exists.
This is the single most important phase. If this step is skipped in favor of jumping straight to automation, the result is automated chaos. Alert fatigue is the primary reason security tooling is ignored, and addressing it first is what makes everything that follows sustainable.
GuardDuty tuning:
Create suppression rules for known-benign findings. The goal is to suppress activity you’ve already evaluated and accepted—such as expected traffic from corporate egress IPs (based on trusted IP lists), internal tools that trigger DNS-based findings, or internet-facing resources that naturally receive port scanning. The principle: if you’ve investigated a finding and it’s expected, suppress it so your team can focus on what matters.
Triage every active HIGH and CRITICAL finding into three categories: needs immediate investigation (real threat, not yet reviewed), true positive, already addressed (archive using workflow status), or false positive or expected behavior (create a suppression rule). Every finding must be categorized into one of these three states.
Review GuardDuty protection plans and enable any that are relevant but not yet active. Organizations that enabled GuardDuty years ago might not have activated protection plans released since then (such as Runtime Monitoring, Malware Protection, RDS Protection, and Lambda Protection). Evaluate each against your workload profile and enable what applies.
Security Hub tuning:
Disable controls that aren’t relevant to the environment. This is the highest-value quick win. If a service isn’t in use, disable its controls. If a control is addressed by an alternative solution, disable it. A 47% compliance score where half the failures are irrelevant trains teams to ignore the dashboard entirely. See the Security Hub controls reference for the full list.
Choose a primary standard. AWS Foundational Security Best Practices is a strong default. The CIS AWS Foundations Benchmark adds value when there’s a specific compliance mandate. Avoid enabling PCI DSS or NIST 800-53 standards unless there’s a reporting requirement—they add significant volume without proportional signal for most organizations.
Configure cross-Region aggregation to the delegated administrator account if not already in place. A single aggregated view eliminates the need to check findings across multiple Regional consoles.
Use the workflow status field operationally. Findings should progress from NEW to NOTIFIED to RESOLVED or SUPPRESSED. If everything remains in NEW indefinitely, the system carries no operational meaning.
Deliverable: A tuned environment where remaining findings represent items that require real decisions. Compliance scores should now reflect your organization’s actual security posture rather than noise.
Phase 2: Build the notification and routing layer
Goal: Get the right findings to the right people at the right time.
Estimated timeline: 2–3 weeks
Move to Phase 3 when: CRITICAL and HIGH findings reach the security team within minutes, MEDIUM findings create tracked tickets, and notifications include enriched context. No action is taken until a person or an automation is informed that something needs attention.
Architecture: Security Hub to EventBridge rule to routing logic to destination
Tiered notification strategy:
CRITICAL
Page on-call immediately
PagerDuty or Opsgenie
15 minutes
HIGH
Alert security team channel
Slack or Teams channel and ticket creation
4 hours
MEDIUM
Create ticket for review
Jira or ServiceNow
48 hours
LOW or INFORMATIONAL
Batch digest
Weekly email summary or dashboard review
Next review cycle
Key design decisions:
Route from Security Hub, not individual services. Because findings from GuardDuty, Inspector, Macie, and Security Hub compliance checks all aggregate in Security Hub, build your EventBridge rules there for centralized management.
Create a fast path for the most dangerous finding types. Certain GuardDuty findings, particularly those involving credential exfiltration, cryptocurrency activity, trojans, and active compromises, warrant a separate, faster routing path that bypasses normal triage. Identify these based on your threat model and the GuardDuty finding types reference.
Enrich notifications before delivery. A raw JSON finding in a chat channel provides little actionable context. Use an AWS Lambda function to format notifications with the information responders need: account alias, Region, Amazon Resource Name (ARN), finding type, severity, a console deep link, and a plain-language description. The Security Hub CloudWatch Events integration guide describes the event format.
Deliverable: A working notification pipeline where CRITICAL and HIGH findings reach the security team within minutes, MEDIUM findings create tracked work items, and LOW and INFORMATIONAL findings are batched for periodic review.
Phase 3: Build automated remediation for high-confidence findings
Goal: For findings where the correct response is deterministic, remove the human from the loop.
Estimated timeline: 3–4 weeks
Move to Phase 4 when: At least 3–5 high-confidence finding types have automated responses deployed with audit trails, and the team has established a process for evaluating new auto-remediation candidates.
The guiding principle: Only auto-remediate when all three conditions are met: the finding is high-confidence, the response is deterministic, and the blast radius of the automated action is limited. Automated remediation must not create the risk of a production outage.
Decision framework:
Confidence level
High – no false positive risk
Medium – context-dependent
Low – requires investigation
Response complexity
Single, well-defined action
Multiple steps or judgment calls
Requires forensic analysis
Blast radius
Limited to one resource
Could affect dependent services
Production-wide impact
Rollback difficulty
Straightforward to reverse
Moderate effort to reverse
Difficult or impossible to reverse
Common auto-remediation categories:
Instance isolation for confirmed compromise findings (cryptocurrency mining, malware, and trojans): Replace the security group, snapshot volumes for forensics, and notify.
Credential revocation for confirmed credential compromise: Attach deny-all policies, revoke sessions, and deactivate access keys as appropriate to the credential type.
Compliance drift correction for deterministic misconfigurations: Re-enable Amazon Simple Storage Service (Amazon S3) Block Public Access, revoke overly permissive security group rules, and re-enable AWS CloudTrail logging.
Notification-only escalation for findings that require human judgment before action: Amazon Elastic Block Store (Amazon EBS) encryption gaps (require migration) and access key rotation (requires coordination with the key owner).
For implementation, AWS provides Security Hub Automated Response and Remediation (SHARR), a solution that includes pre-built remediation playbooks deployed as AWS Step Functions workflows triggered by EventBridge. This is a strong starting point—evaluate the provided playbooks, enable the ones that fit, and extend with custom remediations as needed.
Note: For findings that recur because the environment lacks preventive guardrails, the best long-term response is often a service control policy (SCP) that prevents the misconfiguration from occurring in the first place. Phase 5 covers this preventive controls layer.
Deliverable: A library of automated and semi-automated remediation runbooks with full audit trails, and a documented decision framework the team uses to evaluate new auto-remediation candidates.
Phase 4: Build the operational rhythm
Goal: Turn security findings management into a sustained organizational practice, not a one-time cleanup.
Estimated timeline: 4–6 weeks to establish, then ongoing
Move to Phase 5 when: The weekly cadence has been running consistently for at least 8 weeks, monthly metrics show positive trends, and the first quarterly review has been completed.
This is where many organizations stall, and it’s the most important phase in the entire roadmap. The technology is working, the notifications are flowing, automated remediations are firing, but there’s no organizational habit built around it. Without this phase, everything you’ve built in Phases 0–3 will gradually decay. Suppression rules will go stale, new team members won’t know the system exists, and findings will start accumulating again. The operational rhythm is what converts a security tooling deployment into a security operations practice.
Weekly security review (30 minutes)
Attendees: Security team lead, cloud platform team representative, rotating engineering lead from an application team
Why the rotating engineering lead matters: Security findings don’t exist in a vacuum; they’re generated by workloads that engineering teams own. Rotating an engineering representative through this meeting accomplishes three things: it builds security awareness across the organization, ensures findings are routed to people with the context to resolve them, and creates organizational accountability beyond the security team.
Agenda template:
5 minutes
Compliance score trend – Review Security Hub scores by account and standard. Is the trend improving, declining, or flat? If declining, why?
Security lead
Identified regression areas
5 minutes
Critical and high findings review – Walk through new HIGH and CRITICAL GuardDuty findings from the past week. Are there any that need immediate escalation?
Security lead
Escalation actions assigned
10 minutes
Top five failing controls – Identify the five Security Hub controls with the most failures. Assign an owner and a target date for each.
Platform lead
Owners and dates documented
5 minutes
Automation review – Did any auto-remediations fire this week? Did they work correctly? Were there any false triggers?
Security lead
Automation adjustments queued
5 minutes
Tuning decisions – Are new suppression rules needed based on this week’s findings? Are any new finding types candidates for auto-remediation?
All
Tuning backlog updated
Running the meeting effectively:
Keep a running document (such as a wiki page or shared document) that captures decisions and action items week over week. This becomes your institutional memory.
If the compliance score hasn’t moved in over 3 weeks, that’s a signal. Either the assigned work isn’t happening, or the remaining findings are genuinely difficult to address. Both need to be discussed.
Track action items from previous weeks. A review that generates action items but never follows up on them will lose credibility and attendance quickly.
Escalation procedures
Define clear escalation paths before they’re needed:
CRITICAL finding not acknowledged within the SLA
Auto-escalate to security team manager
15 minutes after SLA breach
HIGH finding not resolved within the SLA
Escalate to finding owner’s manager
4 hours after SLA breach
Compliance score drops more than 5 points in a week
Escalate to cloud platform team lead for investigation
Next business day
Auto-remediation failure
Page security on-call
Immediate
New finding type not covered by existing runbooks
Add to weekly review agenda for triage and runbook development
Next weekly review
Monthly metrics report
Compile these metrics monthly and review them with security and engineering leadership. The goal is to tell a story about whether the organization’s security posture is improving, stable, or degrading, and why.
Mean time to acknowledge (MTTA) for CRITICAL findings
Are findings being seen promptly?
Decreasing month over month
Mean time to resolve (MTTR) for CRITICAL and HIGH findings
Are findings being acted on?
Decreasing month over month
Security Hub compliance score by standard, by account
What is the posture trend over time?
Increasing month over month
Number of active GuardDuty findings by severity
Is the backlog growing or shrinking?
Decreasing for HIGH and CRITICAL
Findings auto-remediated compared to manually resolved
Is automation delivering value?
Auto-remediation ratio increasing
Number of suppressed findings (with quarterly justification review)
Is noise being managed, or are problems being hidden?
Stable or decreasing
New findings introduced compared to resolved this month
Is the organization getting ahead or falling behind?
More finding resolved than introduced
SLA adherence rate by severity
Are response commitments being met?
More than 95% for CRITICAL, and more than 90% for HIGH
Building the dashboard: Use Amazon CloudWatch dashboards for real-time operational visibility or Amazon QuickSight connected to Security Hub findings through Amazon Security Lake for historical trend analysis and executive reporting. The dashboard should be visible to—and regularly viewed by—everyone in the weekly review, not locked in a security team tool.
Quarterly reviews
The quarterly review is a deeper inspection of the system itself; not just the findings, but the machinery processing them.
Quarterly review checklist:
Suppression rules audit: Review every active suppression rule to determine if the underlying condition is still present and the suppression is still justified. Document the review outcome for each rule.
Disabled controls audit: Review every disabled Security Hub control. Check that the justification is still valid and if the environment changed (for example, a service that wasn’t in use is now in use).
Automation audit: Review AWS Identity and Access Management (IAM) roles used by remediation functions and verify least privilege. Review execution logs for any anomalies or failures that weren’t caught.
New capabilities review: Evaluate newly released GuardDuty protection plans and Security Hub controls from that quarter. AWS releases new detection and compliance capabilities regularly. If you’re not reviewing them quarterly, you’re accumulating blind spots.
Process effectiveness review: Determine if the weekly meeting is well-attended and if action items are being completed. Make sure SLAs are being met. If attendance, action item completion, and SLA compliance aren’t where they should be, explore structural changes to address the gaps.
Operational maturity scoring
Use this rubric to assess the maturity of your operational rhythm itself. Score each dimension 1–3 and use the total to track progress over time.
Review cadence
One time reviews when someone remembers
Weekly review happens, but attendance is inconsistent
Weekly review is consistently attended with documented outcomes
Metrics tracking
No metrics captured
Metrics are collected monthly but not acted on
Metrics drive decisions and declining trends trigger specific actions
Finding ownership
Findings sit in queue with no owner
Findings are assigned to teams but SLAs aren’t tracked
Every finding has an owner, SLAs are tracked, and breaches are escalated
Automation management
Set-and-forget automations
Automation logs are reviewed periodically
Automation is reviewed weekly, and new candidates are evaluated continuously
Tuning lifecycle
Suppression rules created but never reviewed
Annual review of suppressions and disabled controls
Quarterly reviews with documented justification for every rule
Cross-team engagement
Security team works in isolation
Platform team participates
Engineering teams actively participate and own remediation
Scoring (revisit quarterly):
Beginning: 6–9
Established: 10–14
Optimized: 15–18
Deliverable: A documented operational cadence with clear ownership (consider a RACI matrix), metrics dashboards, escalation procedures, and a continuous improvement loop. The cadence should survive team member turnover—if it depends on one person remembering to run it, it’s not yet operational.
Phase 5: Mature the architecture
Goal: Fill remaining gaps and build toward a comprehensive security operations capability. Estimated timeline: Ongoing. Prioritize based on organizational risk profile and compliance requirements.
Amazon Inspector integration: Enable Amazon Inspector for Amazon Elastic Compute Cloud (Amazon EC2) instances, Lambda functions, and Amazon Elastic Container Registry (Amazon ECR) container images. Findings flow into Security Hub automatically, adding vulnerability management alongside threat detection and posture management. Prioritize this if you have Amazon EC2 or container workloads without an existing vulnerability scanning solution.
Amazon Macie: Enable Amazon Macie for S3 buckets containing potentially sensitive data. Particularly important for organizations with compliance requirements around personally identifiable information (PII), protected health information (PHI), or Payment Card Industry (PCI) data. Configure automated sensitive data discovery and route findings to Security Hub.
Amazon Security Lake: Amazon Security Lake centralizes security-relevant logs in OCSF format for long-term retention, forensic investigation, and threat hunting. This is valuable when you need historical analysis beyond the Security Hub retention window, or when feeding a third-party Security Information and Event Management (SIEM) tool.
Preventive controls layer: Convert recurring detective findings into preventive policies. Use SCPs to prevent disabling GuardDuty, Security Hub, and CloudTrail, IAM permission boundaries on developer roles, AWS WAF on public endpoints, and AWS Network Firewall for VPC traffic inspection. The pattern is to make recurring misconfigurations impossible to introduce.
Incident response readiness: Have incident response playbooks referencing specific GuardDuty finding types, pre-built forensics infrastructure (isolated VPC, forensic AMIs, and pre-configured IAM roles), regular tabletop exercises, and AWS CloudFormation templates to deploy isolation infrastructure on demand. See the AWS Security Incident Response Guide for a comprehensive framework.
Conclusion
In this post, I provided a six-phase roadmap for operationalizing Security Hub and GuardDuty and showed that it isn’t a single project, but a progression. Phase 0 and Phase 1 can typically be completed in 3–5 weeks and deliver immediate clarity. Phases 2 and 3 build the response infrastructure that turns findings into action over the following 5–7 weeks. Phase 4 is what makes everything sustainable and is where you should invest the most attention. And Phase 5 expands the aperture from Security Hub and GuardDuty into a comprehensive security operations capability.
If you walked away from this post and did one thing, run the Phase 0 assessment this week. That single deliverable tells you exactly where to focus next. Use the following self-assessment checklist to identify your current phase, then focus on the next one. A tuned environment with working notifications and a weekly review cadence is dramatically more effective than a fully featured but neglected deployment. Start where you are, reduce the noise, build the habits, and iterate. To learn more, explore the AWS Security Hub User Guide, the Amazon GuardDuty User Guide, and the AWS Security Incident Response Guide. If you’ve implemented a similar operational cadence, or have questions about any phase, share your experience in the comments.
Self-assessment checklist
Phase 0
We know how many active GuardDuty findings exist across all accounts
☐
We know our current Security Hub compliance score
☐
We know whether GuardDuty is enabled in every account and region
☐
We know who (if anyone) is reviewing findings today
☐
Phase 1
GuardDuty suppression rules exist for known-benign activity
☐
Irrelevant Security Hub controls have been disabled with documented justification
☐
All active HIGH and CRITICAL findings have been triaged
☐
Security Hub compliance scores reflect actual posture, not noise
☐
Phase 2
HIGH and CRITICAL findings generate real-time notifications to the security team
☐
MEDIUM findings automatically create tracked work items
☐
Notifications include enriched context (account alias, resource ARN, and console link)
☐
Phase 3
At least three high-confidence finding types trigger automated remediation
☐
Auto-remediation actions have full audit trails
☐
Remediation runbooks are documented and version-controlled
☐
Phase 4
A weekly security review meeting occurs with defined attendees and agenda
☐
MTTA and MTTR are tracked monthly for CRITICAL and HIGH findings
☐
Suppression rules and disabled controls are reviewed quarterly
☐
Security metrics trend positively over the past 3 months
☐
Phase 5
Amazon Inspector, Macie, or Security Lake are integrated
Check Point Research has identified active exploitation of CVE-2026-50751, a critical authentication bypass vulnerability affecting Check Point Remote Access VPN and Mobile Access deployments configured to use the deprecated IKEv1 key exchange protocol. By exploiting a logic flaw in certificate validation, an attacker can establish a VPN session without possession of a valid password, effectively bypassing authentication requirements. Additional post-authentication activity is required to access internal resources or escalate privileges. To date, the observed exploitation has been limited to a few dozen targeted organizations globally. One case involved confirmed post-compromise activity associated with Qilin ransomware affiliate. Customers using IKEv1 key […]
Modern web applications require robust security controls to protect user data and application resources. Authentication and authorization are two fundamental pillars of application security that answer critical questions: Who are you? and What are you allowed to do? Implementing these controls correctly can be challenging for developers, especially when building data-intensive applications with frameworks like Streamlit (an open-source Python framework for building interactive web applications) or when requiring fine-grained access control. Key challenges include protecting access to application resources, implementing application identity with multi-factor authentication (MFA), and implementing usage-based controls.
In this post, you will learn how to build fine-grained access controls for a sample Streamlit application using Amazon Cognito for authentication and Amazon Verified Permissions with Cedar policies for authorization. This architecture provides enterprise-grade security with minimal development effort, so you can focus on your application’s core functionality. You will learn how to reduce development time for secure applications, implement enterprise-grade authentication, through proper access management, and scale security with growing user bases.
Security architecture overview
The reference architecture follows a layered security design with four key components; separating identity verification, authorization evaluation, application logic, and enforcement boundaries. By assigning clear responsibilities to each layer, the architecture limits blast radius and ensures that a failure in any single control does not compromise the overall system.
Authentication layer: Amazon Cognito handles user authentication with secure credential validation and JSON web tokens (JWTs). It provides built-in password policies, account lockout protection, and session management.
Authorization layer: Verified Permissions uses the Cedar policy engine to evaluate fine-grained access requests based on centrally stored policies.
Application layer: The Streamlit frontend integrates with both services, managing user sessions and enforcing access controls in the user interface.
Security boundaries: Multiple layers of security controls protect against unauthorized access, privilege escalation, authentication verification, authorization checks, and input validation.
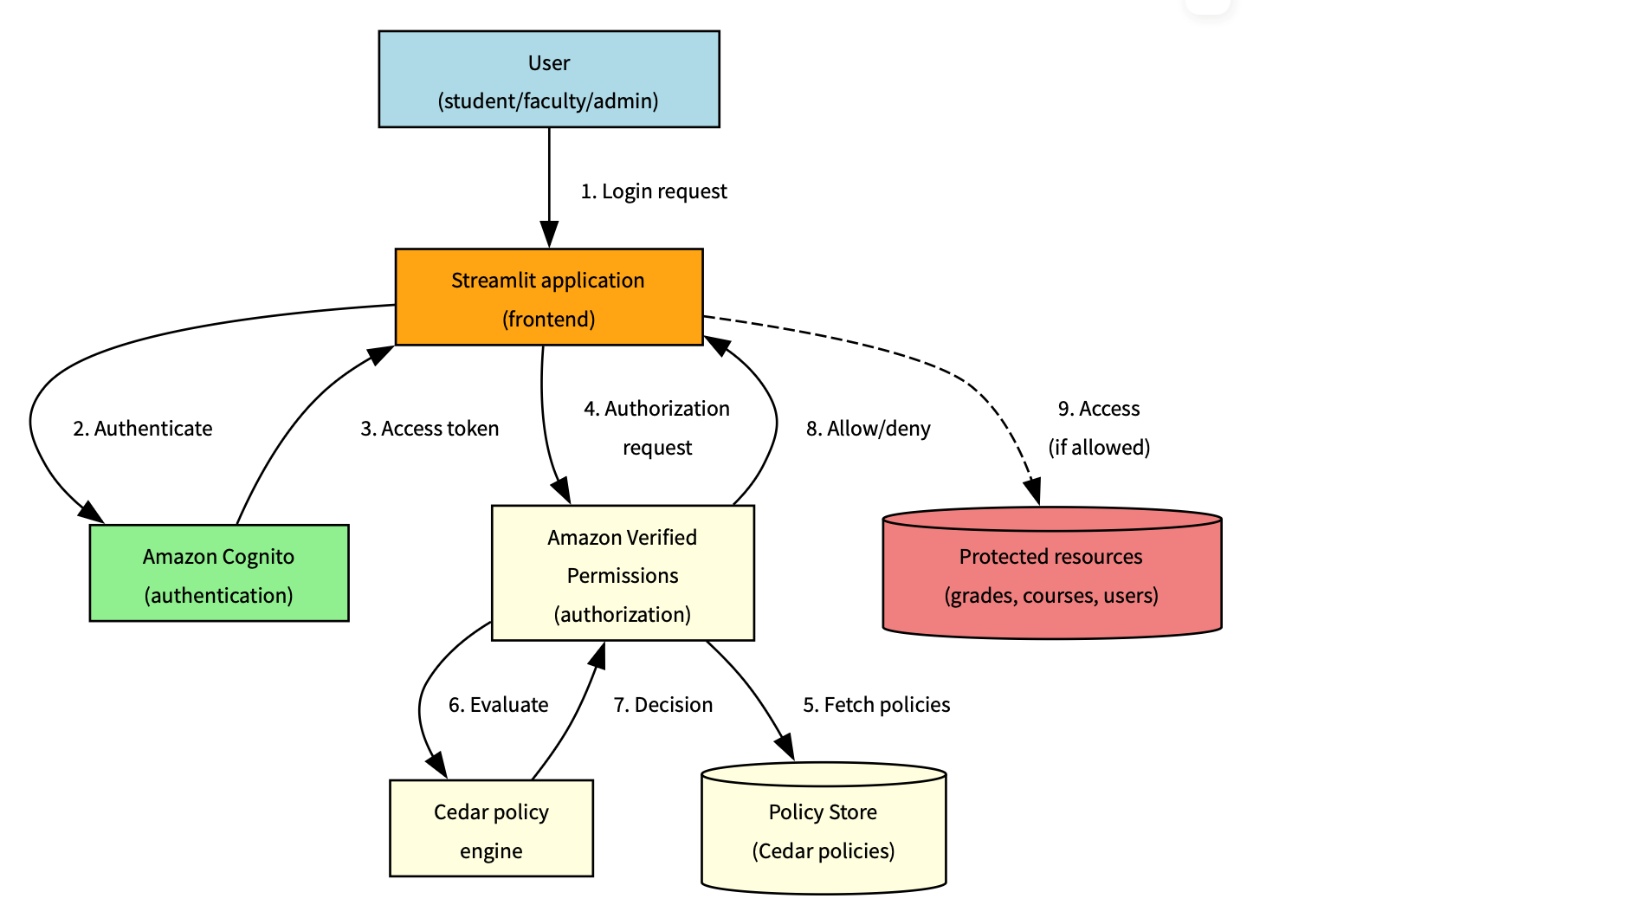
This separation of concerns enables authentication and authorization to function as complementary security controls, following defense-in-depth principles. Figure 1 illustrates the end-to-end authentication and authorization workflow, showing how a user’s sign-in request flows through Amazon Cognito for identity verification, then through Verified Permissions for Cedar policy-based access decisions, before the application enforces the result.
Figure 1: Solution architecture and workflow
The following workflow demonstrates how the three architecture layers work together: the authentication layer (steps 1–3) handles identity verification using Amazon Cognito, the authorization layer (steps 4–6) evaluates Cedar policies using Verified Permissions, and the application layer (steps 7–8) enforces the decision in Streamlit.
The user sends a sign-in request, which is submitted through Streamlit
The request is authenticated by Amazon Cognito
An access token is sent back to Streamlit
An authorization request is sent to Verified Permissions
The Cedar policy engine evaluates the request
A decision is sent back by the policy engine
The instruction to allow or deny is sent back to Streamlit
If the instruction is to allow, access is provided
Understanding authorization with Cedar
While authentication establishes user identity, authorization determines what actions users can perform. Verified Permissions provides a scalable authorization service based on Cedar, a policy language specifically designed for fine-grained access control.
Cedar policies follow a structured format that defines who can perform which actions on what resources. Let’s examine the anatomy of a Cedar policy:
permit(
    principal == ?principal,
    action == application::Action::"ViewGrade",
    resource == ?resource
) when {
    principal has role == "Student" &&
    resource.student == principal.entityId
};
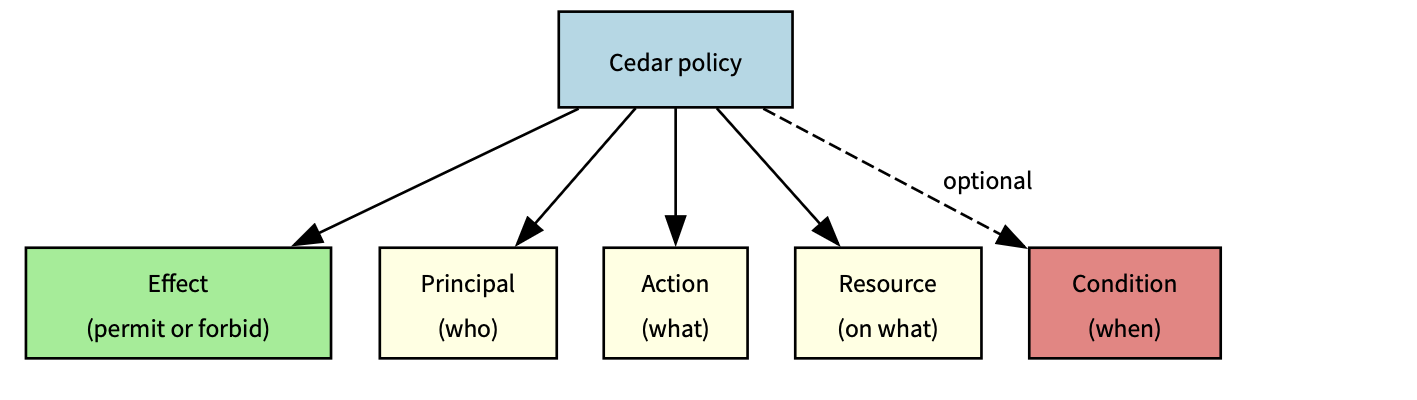
Policy components
Effect: permitor forbid determines whether the policy allows or denies access
Principal: The entity (user) making the request, represented by ?principal as a variable
Action: The operation being performed, scoped to your application namespace
Resource: The target of the action, also represented as a variable
Conditions: The when clause contains logical expressions that must evaluate to true
Advanced Cedar policy patterns
This section describes commonly used Cedar policy patterns for implementing fine-grained authorization with Amazon Verified Permissions. The examples illustrate how to model ownership, role-based access, hierarchical permissions, and administrative controls in real-world applications
Resource ownership control
This pattern helps ensure that users can only access resources they own:
permit(
    principal == ?principal,
    action == application::Action::"ViewGrade",
    resource == ?resource
) when {
    principal has role == "Student" &&
    resource.student == principal.entityId
};
What it does – This policy allows students to view only their own grades by:
Checking that the user has the Student role
Verifying that the grade resource’s student attribute matches the student’s entityId
Preventing students from accessing other students’ grades while allowing access to their own academic performance
Role-based access with resource type
This pattern grants access based on role and resource type:
permit(
    principal == ?principal,
    action == application::Action::"EditCourse",
    resource == ?resource
) when {
    principal has role == "Faculty" &&
    resource has resourceType == "Course" &&
    resource.instructor == principal.entityId
};
What it does – This policy allows faculty members to edit courses they teach by:
Verifying the user has the Faculty role
Confirming the resource is of type Course
Verifying that the course’s instructor attribute matches the faculty member’s entityId
Restricting faculty to modify only their own courses, not courses taught by other instructors
Hierarchical authorization
This pattern allows department heads to manage faculty in their department:
permit(
    principal == ?principal,
    action == application::Action::"ManageFaculty",
    resource == ?resource
) when {
    principal has role == "DepartmentHead" &&
    resource has role == "Faculty" &&
    resource.department == principal.department
};
What it does – This policy implements departmental hierarchy controls by:
Requiring the user to be a DepartmentHead
Verifying the resource is a faculty member
Matching the faculty member’s department with the department head’s department
Preventing department heads from managing faculty in other departments
Administrative override
This pattern provides emergency access with proper justification:
permit(
    principal == ?principal,
    action == ?action,
    resource == ?resource
) when {
    principal has role == "Administrator" &&
    context has emergencyAccess == true &&
    context has justification
};
What it does – This policy provides emergency access capabilities by:
Allowing administrators to perform any action on any resource
Requiring an emergency access flag to be set to true
Requiring a justification for emergency access
Supporting accountability through required documentation while enabling emergency operations
Cedar policy evaluation flow
Understanding how policies are evaluated helps design effective authorization systems. Figure 2 shows a common evaluation pattern for an academic scenario
Note: A policy match evaluates to the policy’s effect (permit or forbid). Forbid policies take precedence: if any forbid policy matches, access is denied regardless of permit policies.
Figure 2: Policy evaluation process
The policy evaluation process follows these steps:
User attempts to access a protected resource
Application sends an authorization request to Verified Permissions
Verified Permissions retrieves applicable Cedar policies from the policy store
The Cedar policy engine evaluates each policy against the request
If any forbid policy matches, access is denied immediately
If any permit policy matches and no forbid policies match, access is allowed
If no policies match, access is denied by default
The evaluation result (ALLOW or DENY) is returned to the application
Application enforces the authorization decision
Cedar policy language
Cedar is an Amazon open source policy language designed for fine-grained authorization. Every policy defines who (principal) can perform what action on which resource under what conditions, as shown in Figure 3.
Figure 3: Cedar policy definitions
Policy interaction
The following table shows how different policies interact in complex scenarios where multiple policies could apply:
Scenario
Student policy
Faculty policy
Department head policy
Admin policy
Student accessing own grade
Permit
N/A
N/A
Override
Faculty editing course
N/A
Permit
N/A
Override
Department head managing faculty
N/A
N/A
Permit
Override
Emergency admin access
N/A
N/A
N/A
Permit
Legend:
Permit – Policy allows access
N/A – Policy doesn’t apply
Override – Emergency admin access
The preceding table shows how each role’s policy applies to different scenarios, with admin access having override capabilities across most situations except for emergency admin access where it’s the primary permit authority. The Override column specifically indicates that the administrator’s emergency access policy can supersede other role-specific policies, but only when the emergencyAccess context flag is explicitly set and a justification is provided. This is not an automatic override.
Policy optimization tips:
Order conditions by likelihood of success – Place the most frequently true conditions first in your when clause to enable short-circuit evaluation. For example, check role before resource ownership, because role mismatches are caught earlier. See Cedar best practices.
Use indexed attributes for faster lookups – Use entity attributes that Verified Permissions indexes natively (entityId, role, resource type) as primary conditions. Best practices for designing an authorization model
Cache policy evaluations when appropriate
Monitor evaluation metrics and performance
Real-world application: Academic system
Consider an academic system with different user roles and their corresponding permissions:
Student: View own grades
Policy helps ensure students can only access grade resources where they are listed as the student
The policy verifies the student’s role and matches the resource owner to the principal’s entity ID
Faculty: Edit course content, manage grades
Policy allows faculty to edit courses they teach
Faculty can view and modify grades for students in their courses
Teaching assistant (TA): Grade management and course support
Policy permits TAs to manage grades for courses they assist with
Access is limited to specific courses assigned to the TA
Department head: Manage faculty assignments
Policy allows department heads to manage faculty in their department
Access is scoped to the department hierarchy
Administrator: System-wide access
Policy provides emergency access with proper justification
Administrative actions are logged and audited
Prerequisites
To implement the preceding Academic system application, you need an active AWS account, Python 3.8 or later, basic Streamlit knowledge, and AWS Identity and Access Management (IAM) permissions for Amazon Cognito and Verified Permissions.
./deploy-demo-environment.sh
Do you want to start the demo now? (Y/N): Y
This provisions an Amazon Cognito user pool, a Verified Permissions policy store, and any sample resources needed for the demo.
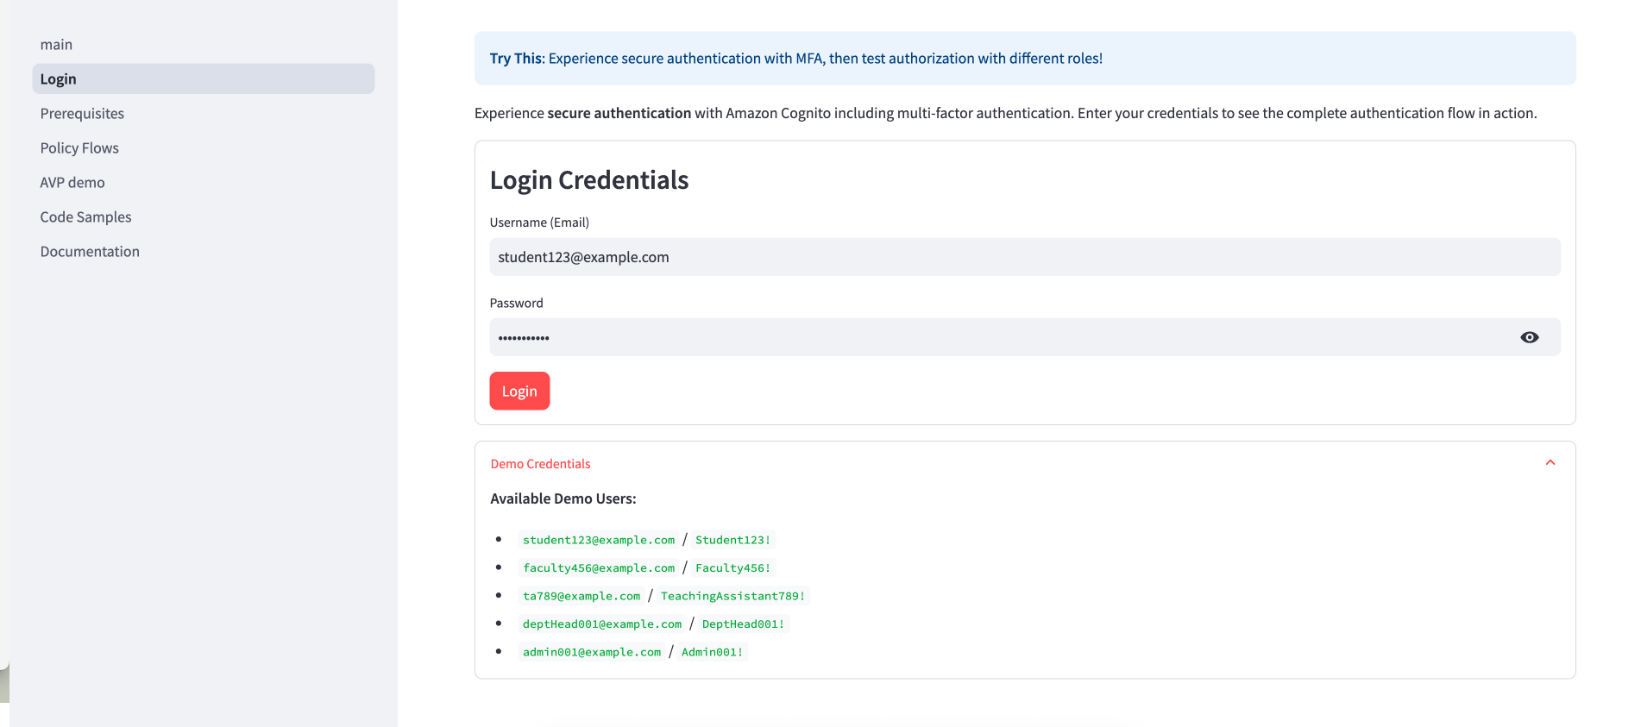
Verify the login screen:
Figure 4: Verify login credentials
Demo walkthrough and shut down: Interact with the demo and test the policies and features. When you’re ready to exit, press Ctrl+C to shut down and stop.
Define your Cedar policies: Start with basic policies and gradually add complexity as you understand the evaluation model.
Implement authentication: Integrate Amazon Cognito authentication into your application with proper error handling.
Add authorization checks: Implement authorization checks at critical access points in your application. For authentication, implement proper error handling for expired tokens, failed MFA challenges, and account lockouts. Use the Amazon Cognito built-in token refresh flow. For authorization, place Verified Permissions checks at every API endpoint and UI component that accesses protected resources.
Test thoroughly: Create test scenarios for each user role and permission combination.
When implementing this architecture, follow these best practices to support security:
Layer your security controls: Use both authentication and authorization as complementary controls rather than relying on a single mechanism.
Follow least privilege principles: Grant only the permissions needed for specific user roles. Start with minimal permissions and add more as needed.
Implement proper session management: Set appropriate token expiration and refresh policies. Amazon Cognito handles much of this automatically, but you should configure timeouts based on your security requirements.
Validate all inputs: Sanitize user inputs to prevent injection attacks. Don’t rely on client-side validation alone.
Monitor authentication events: Set up logging and alerts for suspicious activities such as repeated failed login attempts or unusual access patterns.
Conduct regular security reviews: Periodically audit your policies and security configurations to verify they still meet your requirements and follow current best practices.
Implement secure error handling: Avoid information disclosure through error messages. Provide helpful feedback to users without revealing system details that could aid attackers.
Conclusion
Implementing proper authentication and authorization is critical for application security. By using Amazon Cognito and Amazon Verified Permissions, you can build robust security controls without complex custom code. Through this approach, you can implement enterprise-grade authentication with minimal effort, define and enforce fine-grained authorization policies, scale your security controls as your application grows, and centrally manage and audit security policies.
To get started with your implementation, create your AWS resources including an Amazon Cognito user pool and Verified Permissions policy store. Define your Cedar policies based on your application’s access requirements. Integrate authentication and authorization checks into your application flow. Test thoroughly with different user roles and access scenarios. Finally, monitor and refine your security controls based on usage patterns.
Public attitudes toward Artificial Intelligence (AI) are changing, and we wanted to understand why.
A recent Pew Research survey found that about half of adults say the increased use of AI in daily life makes them more concerned than excited, and that concern has grown over the last few years. People tend to worry most about long‑term social effects (jobs, creativity, relationships, misinformation), even while many do use AI tools and see some practical benefits, particularly for data analysis and routine tasks.
Data from an older UK survey already showed something similar. Awareness of highly visible AI technologies, such as driverless cars and facial recognition is high, but awareness of AI in welfare assessments, loan decisions, or care services is much lower. Concern about many of these use cases has risen since 2022. In other words, people feel AI is everywhere, but don’t always understand where or how it’s being used, and that makes people cautious.
The concern is usually less about science‑fiction extinction scenarios and more about social and economic harm. People worry about their jobs disappearing, a loss of creativity, the spread of disinformation, and increased surveillance, more than about killer robot scenarios.
Research into public attitudes towards AI repeatedly finds that people hold conflicting views, shaped by narratives of admiration and hype on one side and threat and dystopia on the other.
They see genuine benefits in the technology, but are increasingly wary of how companies, governments, and criminals might use it. Basically, people aren’t scared of AI itself, but about who’s using it and for what purpose.
Cybersecurity
AI in cybersecurity is a special case. When asked in which field of AI research they would invest an unlimited amount of money, people chose the fields of medicine and cybersecurity.
People increasingly recognize that AI is now a tool used by both defenders and cybercriminals. Few would feel comfortable with defenders refusing to use AI while attackers continue to adopt it.
Security products use machine learning to process huge volumes of data, detect unusual behavior, prioritize alerts, and identify threats faster than human analysts could alone.
At the same time, cybercriminals are using AI to create more convincing phishing emails, clone voices, generate fake images and videos, automate research on victims, and develop malware that can evade traditional detection techniques.
While studies consistently show that cybersecurity is one of the AI applications people worry about most, they also see that AI is increasingly necessary to keep pace with modern threats. A 2025 study focusing on AI in cybersecurity found that the public widely recognizes the technical benefits of AI‑driven defenses (speed, scale, accuracy), while remaining concerned about privacy, bias, and job displacement in security operations.
That is why the AI debate in cybersecurity feels different from the debate in many other fields. People may be uneasy about AI, but they also understand that the threat landscape no longer moves at human speed. Attackers already use automation, scale, and increasingly AI‑assisted workflows, so defensive teams that refuse to adapt would simply be slower and less effective.
Our mission at Malwarebytes is twofold: reduce the risks created by AI, and use AI to prevent, detect, and respond to threats. We’ve been using machine learning in our security products for nearly two decades, developing proprietary detection systems that help identify malicious code and suspicious behavior at a scale and speed that would be impossible manually.
Coming soon: How AI is changing trust online
Malwarebytes recently surveyed 1,500 adults across the US, UK, Austria, Germany, and Switzerland about their experiences with AI. The findings reveal a growing uncertainty about what people can trust online, alongside increasing concern about scams, impersonation, and AI-generated deception.
Stay tuned for the full Malwarebytes report on how AI is reshaping trust, identity, and scams.
Use AI safely
If you use AI in a security context, keep your data hygiene strict. Don’t paste passwords, customer data, or sensitive incident details into public AI tools. Treat AI-generated outputs as untrusted until verified, especially when they touch code, logs, indicators, or policy decisions.
AI can be useful for summarizing information, indentifying patterns, and producing first drafts, but keep a human in the loop for anything that affects access, containment, legal decisions, or public communications. Where possible, prefer enterprise or local deployments with logging, access control, and clear data-retention rules.
Also remember that AI can hallucinate confidently. In security work, that means every output needs validation against logs, documentation, source code, or other primary evidence before you act on it.
Something feel off? Check it before you click.
Malwarebytes Scam Guard helps you analyze suspicious links, texts, and screenshots instantly.
Amazon Cognito recently introduced high-throughput performance for demanding workloads, customer-managed keys for full control over data encryption at rest, and multi- Region replication for business continuity improvement. These capabilities were made possible through a next-generation storage infrastructure designed for extensibility and scale. To deliver this, we migrated hundreds of millions of user profiles, and you probably didn’t even notice. In this post, we walk through what’s new, the architecture behind it, and how we got here with a zero-downtime migration that kept your applications running.
New capabilities now available on Cognito
The migration to the new infrastructure wasn’t just about maintaining existing functionality—it created the foundation for delivering capabilities that solve customer challenges while positioning Amazon Cognito for continuous improvements.
High-throughput performance: The new architecture supports the higher request volumes and scale requirements of modern applications while maintaining the low latency performance that your applications depend on—able to support tens of millions of users per user pool and thousands of transactions per second (TPS).
Customer-managed keys: Customers can now use their own encryption keys stored in AWS Key Management Service (AWS KMS) for encrypting data at rest. This provides enhanced security control and capabilities, giving customers full ownership over their encryption key lifecycle.
Multi-Region replication: Customers can now synchronize their entire user pool data, including user passwords, attributes, and configurations to another user pool in another Region of their choice. This means that customers can implement business continuity strategies and maintain authentication availability in case of a Regional failover, helping their applications remain accessible to users even during unexpected disruptions.
An architecture for innovation
The new architecture uses a purpose-built storage layer designed for extensibility and scale of identity operations. We anchored the new architecture around a set of design tenets:
Identity-first design: The storage layer understands user identities. There’s no client-specific business logic and no generalizations beyond identity management; keeping the system focused, portable, and optimized.
Avoid one-way doors: Deliver value incrementally while keeping architectural choices reversible, so we can evolve as new needs arise.
Backward compatible: Changes to the underlying infrastructure should never break customers’ applications.
These tenets shaped every architectural decision. The architecture separates into independently deployable domains. Previously, while using Amazon Cloud Directory, the service architecture relied on a single data store to persist all customer information. This provided straightforward data traversal mechanisms but required multi-service coordination to adjust database schema when new features were required. The new architecture uses different datasets, allowing them to evolve independently for faster feature iterations.
Migration with zero-downtime
Migrating users requires extreme precautions and a strategy designed to maintain zero downtime and ensure data integrity at every step. Our approach prioritizes both immediate stability and long-term flexibility through the following measures:
Shadow mode validation: We ran customer API requests through both old and new infrastructures simultaneously, comparing response structures, status codes, and behavioral characteristics. The validation was designed so that sensitive information was never exposed in plaintext during comparison. We accounted for known variances—for example, timestamps could differ slightly between systems—so that only meaningful discrepancies surfaced as actionable alerts.
Data backfill: Before switching a user pool to the new infrastructure, we performed a bulk backfill of all existing user records from the legacy system into the new storage. The backfill ran alongside live traffic with dual-write capturing any changes made during the backfill window, ensuring no data loss or stale data. Shadow mode served as the validation layer for the backfill; as we addressed more edge cases in data syncing, shadow mode match rates increased, confirming data completeness before we proceeded to the switchover.
Dual-write architecture: We implemented a system where all identity operations were simultaneously written to both legacy and new services, with comprehensive validation to ensure consistency. Even when a dual-write to the new infrastructure failed, the operation still succeeded in the legacy system, preserving all customer-initiated requests. This means any dual-write failure was contained as an internal consistency issue and not customer-impacting.
Anti–entropy validation: We implemented a data validation and correction system that continuously compared records across old and new infrastructures, detecting and resolving any data divergence. Anti-entropy scans compared user attributes, credential hashes, group memberships, and configurations, among other records. When true discrepancies were found, the system automatically reconciled them using the legacy system as the source of truth. This layer was able to catch edge cases that shadow mode and dual writes alone could not cover.
Incremental rollout with rollback capability: We established controlled deployment phases with immediate rollback capabilities. After switching a user pool to the new infrastructure, we continued replicating all writes back to the legacy system, ensuring we can revert any user pool to the legacy infrastructure at any point without data loss. If a rollback was needed during migration, an orchestrator replayed entries in timestamp order, syncing user profiles back to the legacy system.
Lessons learned for infrastructure modernization
This modernization taught us valuable principles that apply to any large-scale infrastructure project, therefore we choose to share these learnings to help you perform similar migrations.
Customer access patterns drive architecture decisions: Analyzing actual customer access patterns revealed that identity workloads follow predictable patterns, which meant we could adopt a synchronous dual-write approach that balanced completeness with operational simplicity. This principle applies to any domain-specific migration: understand your workload’s actual access patterns before reaching for general-purpose solutions.
Behavioral preservation requires techniques beyond traditional testing: Ensuring equivalent functionality across old and new systems was straightforward. Preserving identical API behavior was not. Functional tests validate intended behaviors, but we identified scenarios where customers had built applications around specific API behaviors such that a change could have silently broken their applications. For example, concurrent writes to the same user could resolve to different final states between old and new systems where writes all succeed but outcome diverges slightly. Similarly, customers who write an attribute and immediately read it are affected by the consistency window. Subtle timing differences in when updates become visible could cause stale reads. These aren’t functional failures, but behavior under real traffic patterns can vary. Shadow mode verification surfaced edge cases that automated tests alone would have missed. Invest in these techniques early.
Gradual validation builds confidence that testing alone cannot: Layer multiple independent validation techniques, such as shadow mode, dual writes, and anti-entropy scans—each covering a different access pattern. No single approach will catch everything, and the gaps between them are where production issues hide. Incremental rollout with immediate rollback capability lets you validate each step while maintaining the ability to revert quickly.
Key principles for your own modernization projects: Invest in purpose-built solutions, design for extensibility, and implement gradual validation. Or use managed services so your infrastructure improves without effort on your part while your applications keep running; helping you focus on your business needs.
Conclusion
In this post, we shared the high-level approach and learnings from the Amazon Cognito infrastructure modernization that create a foundation for modern identity management capabilities. The new Cognito infrastructure is live, delivering capabilities such as customer-managed keys and multi-Region replication. As the migration continues, all Cognito customers will gain access to these capabilities on the same service they rely on today, with no action required.
Ready to modernize your authentication infrastructure? Visit Amazon Cognito to learn more.
If you have feedback about this post, submit comments in the Comments section below.
Reconstructing distributed denial of service (DDoS) attack traffic used to mean combining data from multiple sources after the fact. AWS Shield Advanced attack flow logs change that—they capture traffic metadata during attacks so you can pinpoint sources, verify mitigations, and feed your existing analysis pipelines.
In this post, you will learn how Shield Advanced attack flow logs capture metadata during DDoS events, what each field in a flow log entry means, and how to enable and configure flow logging for your protected resources.
How DDoS attacks affect your applications
A DDoS attack floods an application with traffic, making it unavailable to users. Infrastructure-layer attacks saturate bandwidth and exhaust connection tables—you see packet loss and timeouts.
Shield Advanced is a managed DDoS protection service that detects and mitigates attacks for Amazon CloudFront distributions, Elastic Load Balancing load balancers, Amazon Route 53 hosted zones, AWS Global Accelerator standard accelerators, and Elastic IP (EIP) addresses. See the AWS Shield Advanced documentation for full coverage details. Initially, Shield Advanced will provide infrastructure-layer attack flow logs for EIP protections, with support for additional resource types to follow.
Key benefits
Flow logs help you understand attacks in several ways:
Reconstruct traffic patterns – Query logs after an attack to analyze volume, source distribution, and protocol mix without relying only on aggregate CloudWatch metrics.
Identify attack origins – The srccountry and location fields show where traffic originated and which AWS edge location it entered.
Verify mitigation behavior – The action field records what Shield did with each flow.
Logs go to Amazon S3, CloudWatch Logs, or Data Firehose. You can then query them with Amazon Athena (a serverless query service for analyzing data in Amazon S3), route them to third-party Security Information and Event Management (SIEM) platforms or build CloudWatch Logs Insights queries (an interactive log analysis feature) without deploying new infrastructure.
What attack flow logs capture
Log records capture source and destination IP addresses and ports, protocol, packet and byte counts, the action Shield Advanced took, and TCP flags. They also include the AWS ingress location where traffic entered and a two-letter country code for the traffic source when available. Logs are written at 5-minute intervals and are available during an active attack and after it concludes.
The maximum file size is 75 MB. If a file reaches that limit within the 5-minute window, the file will be closed, published, and a new file will start. Flow logs support JSON, plain text, W3C, and Parquet output formats and contain the following fields:
Field
Description
protection_arn
Amazon Resource Name (ARN) of the Shield protection
event_timestamp
Timestamp of log generation
version
Flow log version number
srcaddr
Source IP address
dstaddr
Destination IP address
srcport
Source port
dstport
Destination port
protocol
IP protocol number
packets
Packet count within the aggregation window
bytes
Byte count within the aggregation window
starttime
Aggregation window start time
endtime
Aggregation window end time
action
Action taken by Shield
location
AWS ingress location
sampling_rate
Sampling rate used during packet processing
tcp_flags
TCP flags from the packet
srccountry
Two-letter country code for the traffic source
How to configure flow logs for Shield Advanced protected resources
The following steps walk you through creating the CloudWatch Logs delivery resources that connect a Shield Advanced protection to your preferred log destination.
AWS Identity and Access Management (IAM) permissions to create CloudWatch Logs delivery resources (logs:PutDeliverySource, logs:PutDeliveryDestination, logs:CreateDelivery)
Flow logs incur standard CloudWatch Logs vended log charges, and the destination resources (S3 bucket storage, CloudWatch Logs log group storage, or Firehose data processing) incur separate charges. Review the Vended Logs entry on the CloudWatch pricing page and the pricing for your chosen destination service before enabling flow logs on high-traffic resources.
How it works
Log delivery requires three objects:
DeliverySource – Represents the Shield Advanced protection that produces the logs
DeliveryDestination – Represents where logs should be sent (Amazon S3, CloudWatch Logs, or Amazon Data Firehose)
Delivery – Connects the source to the destination
This three-object model lets you reuse destinations across multiple sources and manage delivery pipelines independently. For example, you can send logs from multiple Shield protections to the same S3 bucket by creating multiple DeliverySource objects that reference the same DeliveryDestination.
Because Shield Advanced attack flow logs use the CloudWatch Logs delivery infrastructure, you can aggregate them across accounts and Regions just like other vended logs. Deliver directly to a centralized S3 bucket with a cross-account policy, replicate CloudWatch Logs log groups using cross-account cross-Region centralization rules, or stream to a shared Firehose stream using cross-account subscriptions. Explore these options to build a unified view of DDoS attack traffic across your multi-account, multi-Region footprint.
Step 1: Create your destination resource
Choose a destination:
Option A – S3 bucket: Best for long-term storage and Athena queries. See Creating an S3 bucket.
Automatic policy creation: If your bucket has no existing resource policy and you have the s3:GetBucketPolicy and s3:PutBucketPolicy permissions, AWS automatically creates the required policy when you create the delivery in step 6. You can skip to step 3.
Manual policy update: If you need to customize the policy or your organization requires pre-approved policies, create the policy manually by following the instructions for Logs sent to Amazon S3.
Step 3: Get your protection ARN
Shield Advanced is a global service and uses the us-east-1 AWS Region for management. Run the following command to list your Shield Advanced protections.
aws shield list-protections \
  --region us-east-1
In the output, copy the ProtectionArn value for the protection you want to log.
Step 4: Create a delivery source
Run the following command to create the delivery source, replace <protection-arn> with the ProtectionArn value from step 3.
The --resource-arn is the ARN of your Shield Advanced protection—not the protected resource itself. Shield Advanced creates a separate protection object that wraps your resource, and flow logs are generated by that protection layer rather than the underlying resource.
Step 5: Create a delivery destination
Run the following command to create the delivery destination, replace <resource-arn> with the ARN of the destination resource you created in step 1.
The --delivery-destination-configuration parameter takes a JSON object with a destinationResourceArn key whose value is the ARN of your S3 bucket, log group, or Firehose stream.
In the output, copy the value of the top-level ARN field—this is the delivery destination ARN (different from the bucket ARN). You will use this in step 6.
Step 6: Create the delivery
Run the following command to connect the delivery source to the delivery destination, replace <delivery-destination-arn> with the delivery destination ARN from step 5.
Shield Advanced attack flow logs provide the visibility you need to understand and respond to DDoS attacks effectively. By integrating with your existing observability infrastructure, they deliver actionable insights without requiring new tooling or complex setup. Enable flow logs on your Shield Advanced protections today to gain immediate visibility into attack patterns and strengthen your DDoS defense posture.
Lately, software developers have been baking AI features straight into everyday work tools, operating systems, and browsers. In some cases, they’re genuinely handy. However, their presence introduces specific risks, which means plenty of companies are hesitant to give employees access to these tools. In a previous post, we categorized these unwanted AI systems, looked at how to spot them at the network and endpoint levels, and covered the ultimate universal kill switch: managing OAuth access across major corporate platforms. In this deep dive, we’re getting tactical: breaking down how to disable or restrict the AI built into popular platforms.
A quick heads-up: major software vendors occasionally change the names of their AI settings and tweak how they function. If any of the options mentioned below are missing or aren’t working as expected, a quick web search for the setting’s name will usually point you to its new location or branding.
How to turn off Microsoft 365 Copilot
Detection: you can check actual Copilot usage in the logs by going to Microsoft 365 admin → Copilot usage report.
Disabling via policies: in the Microsoft 365Admin Center, go to Settings → Integrated Apps, find Copilot in the Available Apps list, and select Block. More granular configuration policies are available under Customization → Policy Management. The Policies page here contains over two thousand entries, so you’ll want to filter them by the keyword “Copilot” (detailed guide). Given that Copilot is a paid add-on for Office, another way to block it — and save money by doing so — is to simply avoid assigning users SKUs that include Copilot.
We recommend separately blocking Copilot Chat, which is available in Teams, Edge, Outlook, and several other services. Yes, it’s not Copilot itself. And yes, it has to be blocked separately by following this guide.
Additional layer of protection: you can block the domains copilot.cloud.microsoft and m365.cloud.microsoft/chat at the web filter or NGFW level. However, Microsoft explicitly advises against this, warning that it could break other Microsoft 365 features.
How to turn off Windows Copilot
Beyond the Office version of Copilot, you also need to manage its consumer-facing cousin.
Detection: look through your NGFW or other network logs for traffic hitting copilot.microsoft.com, bing.com/chat, or edgeservices.bing.com.
Disabling via policies: in Windows Group Policy, navigate to Computer Config → Admin Templates → Windows Components → Windows Copilot. In Microsoft 365 Group Policy, go to Admin center → Block consumer Copilot for organizational accounts.
Additional layer of protection: block the Copilot.exe executable from running entirely.
How to turn off the Copilot sidebar in Edge
Detection: look through your NGFW or other network logs for traffic hitting copilot.microsoft.com, bing.com/chat, or edgeservices.bing.com.
Blocking: configure the following MS Edge Group Policies: HubsSidebarEnabled = false, EdgeShoppingAssistantEnabled = false, CopilotPageContext = Disabled (false), CopilotNewTabPageEnabled = false, Microsoft365CopilotChatIconEnabled = false, GenAILocalFoundationalModelSettings = 1 (note that disabling this unexpectedly requires a 1 instead of a 0).
Second layer of protection: block the domains copilot.cloud.microsoft and m365.cloud.microsoft/chat at the web filter or NGFW level. However, Microsoft explicitly advises against this, warning that it could break other features.
How to turn off the Gemini Assistant in Google Workspace
Blocking via policies: in the Admin Console, navigate to Apps → Additional Google services → > Gemini app, and set it to OFF. Then, go to Manage Workspace smart feature settings → Smart features in Google Workspace, and set it to OFF.
Second layer of protection: block network traffic to the domains gemini.google.com, bard.google.com, and aistudio.google.com.
How to turn off Gemini in Google Chrome
Detection: check your Chrome Enterprise reports (Chrome management → Reports), or look through network traffic logs for connections to the previously mentioned domains.
Blocking via policies: in your Chrome Enterprise policies, configure the following settings: GenAILocalFoundationalModelSettings = 0, HelpMeWriteSettings = 2 (disabled), TabOrganizerSettings = 2, CreateThemesSettings = 2, DevToolsGenAiSettings = 2.
Additional layer of protection: block network traffic to the domains gemini.google.com, bard.google.com, and aistudio.google.com. Additionally, block unauthorized Chrome/Chromium installations (those outside your policy management) with the help of host-based application control tools like EPP/EDR or AppLocker.
How to turn off Apple Intelligence
Detection: on your NGFW and web filters, traffic hitting apple-relay.apple.com and *.apple-cloudkit.com is a clear indicator that Apple Intelligence is active.
Blocking via policies: any managed Apple device allows you to disable individual AI features, though there isn’t a master switch you can flip to shut down “all AI”. In your MDM profile, you need to set the following keys to false (disabled): allowWritingTools, allowMailSummary, allowGenmoji, allowImagePlayground, allowImageWand, allowPersonalizedHandwritingResults, allowExternalIntelligenceIntegrations, allowExternalIntelligenceIntegrationsSignIn, allowNotesTranscription, and allowNotesTranscriptionSummary. Here is a brief configuration example:
Despite Apple’s shift toward declarative device management, these AI features still need to be managed through traditional MDM payload settings.
Second layer of protection: block network traffic to the hosts mentioned above — though the obvious downside for mobile devices is that this won’t work once they leave the corporate network.
The Future of Threat Defense Resides at the IP Layer
For years, network security operated on a relatively predictable premise: inspect traffic, identify malicious content, and block it. Because deep content inspection created a seemingly robust defense in depth, relatively static legacy approaches—like reliance on threat intelligence feeds—were allowed to simply persist in the background.
The weaponization of agentic AI and highly evasive techniques has fundamentally shattered that model. Attackers are no longer just iterating on old threats. They are launching attacks at staggering velocity, completely outpacing threat feeds, and employing evasion tactics that actively starve legacy prevention solutions of the content they rely on to inspect.
Our new research report from Unit 42, Attackers Are Evading Threat Prevention at the Internet Edge, reveals how adversaries are actively exploiting the contextual vacuum at the IP layer to bypass standard security controls. For security leaders, understanding this shift is no longer optional. As the nature of the threat fundamentally changes, our strategic approach to network security must definitively change with it.
The AI-Accelerated, Evasive Attack Lifecycle
To understand why legacy defenses are failing, we must look at how adversaries are accelerating and obfuscating every stage of the attack lifecycle. As these threats progress, the commonly used network indicators we have long relied upon are vanishing, collapsing traditional defenses and leaving defenders with little to act on.
Powered by frontier AI, adversaries now automate reconnaissance and exploitation at huge scale and speed, while using anonymizers to mask their intent. Once an intrusion is launched, orchestration shifts to highly evasive command and control (C2). Attackers hide communications using advanced encryption and AI-built malware-less techniques. They’re also bypassing traditional web and DNS inspection entirely by routing traffic directly to IP addresses—a tactic Unit 42 found in 23% of modern malware
Ultimately, the takeaway is clear: network threat prevention can no longer rely solely on detecting malicious payloads. As AI-driven attacks continue to minimize their footprint, security strategies must augment content inspection with real-time IP layer monitoring to left-shift threat detection and counter these rapid, machine-speed threats at the network foundation.
Existing Approaches Aren’t Working
Where content-based detection falls short, many security vendors and organizations still rely on IP threat intelligence feeds to pick up the slack in an attempt to filter out malicious connections on the network layer. However, after years of operating under this model, the results are in—the traditional feed is showing its age.
Attackers have long relied on proxies, anonymizers, residential routers and public cloud providers as a tactic to evade detection. However, agentic AI morphs this process, enabling rapid infrastructure rotation and stealth at an unprecedented scale. As this autonomous evasion accelerates, experienced network defenders continue to run into the well-known limitations of classic IP blocklists:
Too slow to keep pace: Unit 42 found an average 20-day lag time before new threats hit popular feeds. Because agentic AI enables adversaries to autonomously rotate proxy IPs in hours, these lists are obsolete at the moment of delivery.
Fundamentally incomplete: IP feeds are unable to see a massive portion of the modern attack surface. Unit 42 research indicates that 52% of malicious IPs used for direct-to-IP connections are completely absent from these lists.
Unactionable on shared infrastructure: Even known threats are often impossible to block. The Unit 42 team reports that 37% of direct-to-IP traffic uses reputable CDNs and cloud providers. IP feeds cannot distinguish malicious connections from legitimate ones, making blocking too risky for business continuity.
A management nightmare: Among the security teams that Unit 42 polled, 30% indicate resource-intensive vetting and false-positive triage as their top pain point. To avoid breaking legitimate traffic, feeds are frequently relegated to an alert-only mode, defeating the entire purpose of prevention.
If modern and agentic AI-enabled attacks can outrun traditional network payload-based detections, we need a new weapon in the network defender’s arsenal. We can no longer depend on yesterday’s IP feeds to secure such an extremely agile threat environment.
The Blueprint for Modernizing the Internet Edge
To outpace the impact of agentic AI and advanced evasion on network threat prevention, security leaders must redefine their defense strategy and shift-left to track the attacker infrastructure itself—monitoring the exact IP layer locations where adversaries build and control their campaigns. Deep content inspection remains essential, but securing the modern edge requires establishing the context and intent of a connection before a session is established.
To achieve this goal, organizations must move beyond the limitations of static defense and adopt a modern security blueprint:
Proactive protection against attacker infrastructure: While high-quality threat feeds remain essential for SOC investigations and incident response, relying on them for frontline, real-time prevention creates major blind spots. Instead, security teams must use real-world, global telemetry to proactively identify and block connections to attacker-controlled hosts before requesting a URL or file.
Zero trust principles applied to the network layer: An IP address without a negative reputation does not equal a safe connection. Continuous verification requires extending zero trust down to the network foundation. It validates the real-time behavior and intent of every single session to ensure attackers cannot hide in the contextual vacuum of the IP layer.
Reducing the attack surface with rich contextual attributes: Traditional IP blocking is like a blunt instrument that creates unacceptable false positives and alert fatigue. To modernize the edge, security teams need deep, attribute-based visibility across the entire Internet address space to reduce noise and replace legacy IP feeds entirely.
By moving away from point-in-time assumptions and embracing real-time, inline protection, security leaders can reclaim the advantage at the network foundation.
To see how these evasion tactics operate in the wild, read the latest Unit 42 report, Attackers Are Evading Threat Prevention at the Internet Edge. You’ll find this report valuable in understanding the systemic gaps in legacy risk models and learning why continuous verification must be our new mandate.
You can use Amazon Cognito user pools to add sign-up and sign-in functionality to your web and mobile applications. You can authenticate users directly with Amazon Cognito managed accounts using passwords, passwordless flows, or custom authentication flows, or let users federate in through external identity providers (IdP) using SAML, OpenID Connect, or social providers such as Google, Facebook, Sign in with Apple, or Login with Amazon. For consumers, identity federation means fewer passwords to remember and a smoother sign-in experience. For business-to-business (B2B) software as a service (SaaS) providers, it means your tenants’ organizations keep control of their own identities rather than managing credentials on their behalf. But federation can also introduce challenges for enterprises and application developers. What happens when your enterprise customer’s SAML provider sends hundreds of group memberships that exceed attribute size limits? Or when your ecommerce customer forgets they already have an account and tries to sign in with a different social provider, creating duplicate records?
In this blog post, I introduce the inbound federation Lambda trigger for Amazon Cognito, a new feature that gives you programmatic control over federated authentication flows. This AWS Lambda trigger intercepts the federated authentication response immediately after your external identity provider responds to Cognito, so you can transform, filter, and enrich user attributes before the user profile is created and user attributes are mapped in your user pool.
Understanding the inbound federation Lambda trigger
The inbound federation Lambda trigger is invoked after your Amazon Cognito user pool has received and verified the response from the external IdP. The request payload for the federated IdP response is then sent from Cognito to your Lambda function and you will receive the following information:
The common parameters of Amazon Cognito Lambda triggers (including userPoolId and clientId)
Which external IdP was used (for example, providerName)
The providerType (SAML, OIDC, Login with Amazon, and so on)
Attribute data from the external IdP specific to the user signing in
The specific format of this attribute data depends on the provider type, view the Inbound federation Lambda trigger parameters section in the docs to learn more. If the external IdP is a SAML provider, you will receive a JSON key-pair listing of the user’s attributes from the IdP assertion. If the external IdP is an OIDC provider (or social provider), you will receive the access token and attribute data from the /userinfo endpoint, along with an ID token if one was provided. See Figure 1 for a detailed flow of a federated sign-in with an Amazon Cognito user pool configured to use the inbound federation Lambda trigger.
Figure 1: Sequence flow of a federated login configured with the inbound federation Lambda trigger
The user begins using the application but is required to sign in first.
The managed login is rendered, and the user can select which IdP they want to sign in with. If identifiers are used with SAML or OIDC providers, the user enters their email address and Amazon Cognito looks up the domain of their provided email and routes them to the appropriate IdP.
Alternatively, the managed login can be bypassed by the client providing the identity_provider request parameter.
Amazon Cognito sends the authentication request to the appropriate IdP.
The external IdP challenges the user to sign in.
The user completes the sign-in process required by the external identity provider.
The challenge response is sent to the external IdP.
The IdP verifies that the sign-in is successful. If there are any subsequent challenges, such as multi-factor authentication (MFA), additional rounds of authentication challenges and responses take place. This is determined by the configuration and settings of the external IdP.
The external IdP sends a response to the Amazon Cognito user pool, and Cognito validates the cryptographic signature and that it hasn’t been tampered with.
Amazon Cognito sends attribute data from the IdP to the inbound federation Lambda function
Attribute data for the authenticated user and the common parameters for Amazon Cognito are available for the Lambda function to add, modify, or suppress according to your requirements.
Your added, modified, or suppressed attributes are returned to Amazon Cognito. These are attribute values that map to the user’s profile in Cognito—whether the user profile was just created or is being updated for a returning user.
Continuing the OAuth 2.0 authorization code grant, Amazon Cognito sends an authorization code to the client.
The client then calls the /token endpoint with the authorization code. Note: It’s a security best practice to use confidential clients and to use OAuth 2.0 Proof Key for Code Exchange (PKCE) extension whenever possible.
An access, ID, and refresh token is returned to the client.
The user has signed into the application. ID tokens can be used to identify who the user is (authentication), and access tokens can be used to determine what the user can do (authorization).
Common federation challenges and use cases
Federation introduces complexity that varies depending on your use case. For B2B and SaaS applications, you’re often not in control of your customers’ IdPs, including what attributes they send or how they format them. As an example, an enterprise customer will configure their SAML response to include every group a user belongs to. This could be hundreds of groups or long group identifiers, and if the group membership of the user is mapped to an Amazon Cognito attribute, this can lead to a scenario where the Cognito attribute size limit is exceeded, causing federated sign-ins to fail.
Challenges for business-to-customer (B2C) applications can differ from B2B use cases. For B2C applications, organizations shouldn’t be required to think about identity providers. The ability to sign-up and sign-in should be seamless for consumer-facing applications. Customers visiting a consumer-facing application might create an account with email and password, forget they created created it, and then later try signing in with Facebook (or other social provider). Without proper account linking in Amazon Cognito, you then have multiple user records for the same user, which could lead to fragmented purchase history and a frustrating customer experience.
Both B2B and B2C use cases might need to look up external data just prior to completing the sign-in process, such as additional roles and access for B2B users or looking up active orders for B2C users. Another example could be the need to normalize data just prior to storing it in the user profile within the Amazon Cognito user pool or even discarding personally identifiable information (PII) prior to storing it in your Cognito user pool.
With the inbound federation Lambda trigger, you can handle these B2B and B2C use cases programmatically, and do so without requiring modification of your applications or coordinating IdP-specific changes with external IdPs. In this section, I dive deeper into two common use cases: oversized group attributes, common with B2B customers, and automated account linking, common with B2C customers.
Use case 1: Filtering oversized group attributes
If you have B2B and SaaS use cases, it’s a common practice to use group membership from the IdP to determine the level of access you have within the SaaS service. This is a great way to still provide some access control back to the enterprise customers themselves. The groups can be used to represent the roles a user will have or for some form of coarse-grained authorization. However, your customers might inadvertently send a large number of groups a user is a member of, thus leading to an oversized attribute payload.
Another common scenario is where the syntax and format of group name a user belongs to can arrive in various formats across different IdPs; such as a canonical name (for example, example.com/groups/myApp-readOnly), a distinguished name (common with LDAP based systems and such as cn=myApp-readOnly,OU=groups,DC=example,DC=com), or a plain text string (such as myApp-readOnly). Instead of having downstream authorization logic to accommodate different variations of a group name, you can now normalize how groups are represented prior to storing the user’s attribute data using the inbound federation Lambda trigger.
To expand this, imagine your enterprise customer uses a SAML IdP, such as Active Directory Federation Services (AD FS), in front of Active Directory (AD). When their users authenticate, AD FS sends a groups attribute containing every AD group the user belongs to. For users in large organizations, this can be hundreds of groups, and the attribute is mapped to an Amazon Cognito attribute, this could result in a string that exceeds 2,048-character limit per attribute of Cognito. Authentication would fail in this scenario, ultimately leading to support tickets because enterprise customers would be unable to sign in. Even if certain users didn’t exceed this limit, because of a smaller number of group memberships, this would result in the collection and storing of unnecessary data in your Cognito user pool.
Previously, you would need to work with your customer’s IT department to modify their SAML configuration to filter groups at the source—a process that could take weeks and require multiple approval cycles because it involves a change to the federation configuration. Especially for SaaS customers, this isn’t a scalable approach because you could integrate with hundreds of external IdPs. With the inbound federation Lambda trigger, you can solve this by filtering the groups to only those relevant to your application and normalizing the nomenclature of these groups. The following Lambda function filters the groups attribute to include only groups relevant to your application and normalizes the names of groups.
// Configure the group prefix to filter on (e.g. "App1-", "myApp-", etc.)
// Change this to match the prefix your IdP uses for relevant group names.
const GROUP_PREFIX = process.env.GROUP_PREFIX || 'myApp-';

// The SAML attribute/claim name that contains group membership.
// Common values: "groups", "memberOf", "http://schemas.xmlsoap.org/claims/Group", etc.
const GROUP_ATTRIBUTE = process.env.GROUP_ATTRIBUTE || 'groups';

/**
 * Extracts the short group name from common IdP formats:
 *   - Plain text:       "myApp-readOnly"
 *   - Leading slash:    "/myApp-readOnly"
 *   - Canonical/URL:    "example.com/groups/myApp-readOnly"
 *   - Distinguished name (DN): "cn=myApp-readOnly,OU=groups,DC=example,DC=com"
 * Returns the last meaningful segment so all formats normalize to "myApp-readOnly".
 */

function extractGroupName(raw) {
  let name = raw.trim();

  // Some IdPs prefix group names with "/" to indicate a top level group — strip it before format detection
  if (name.startsWith('/')) {
    name = name.substring(1);
  }

  // DN format — extract the CN (common name) value
  if (/^cn=/i.test(name) || /,\s*(ou|dc)=/i.test(name)) {
    const cnMatch = name.match(/^cn=([^,]+)/i);
    return cnMatch ? cnMatch[1].trim() : name;
  }

  // URL / path format — take the last segment after the final "/"
  if (name.includes('/')) {
    const segments = name.split('/').filter(Boolean);
    return segments[segments.length - 1];
  }

  return name;
}
export const handler = async (event) => {
  try {
    console.log('Full event:', JSON.stringify(event, null, 2));
    console.log('Provider type:', event.request?.providerType);

    // Initialize the response structure
    event.response = event.response || {};

    if (event.request?.providerType?.toLowerCase() === "saml") {
      const samlResponse = event.request.attributes?.samlResponse;

      if (samlResponse) {
        console.log('Original SAML Attributes:', JSON.stringify(samlResponse, null, 2));

        // Build the attribute map — you MUST include every attribute you want Cognito to retain. Anything omitted from userAttributesToMap is dropped.
        const mappedAttributes = {};

        Object.keys(samlResponse).forEach(key => {
          if (key === GROUP_ATTRIBUTE) {
            // Parse the groups JSON string from the SAML assertion
            let groupsArray = [];
            try {
              groupsArray = JSON.parse(samlResponse[GROUP_ATTRIBUTE]);
            } catch (error) {
              console.error(`Error parsing ${GROUP_ATTRIBUTE}:`, error);
            }

            // Normalize each group name, then filter to the configured prefix
            const normalizedGroups = groupsArray.map(extractGroupName);
            const filteredGroups = normalizedGroups.filter(group =>
              group.startsWith(GROUP_PREFIX)
            );

            console.log(`Original ${GROUP_ATTRIBUTE}:`, groupsArray);
            console.log(`Normalized ${GROUP_ATTRIBUTE}:`, normalizedGroups);
            console.log(`Filtered ${GROUP_ATTRIBUTE}:`, filteredGroups);

            // Only include the groups attribute if there are matching groups
            if (filteredGroups.length > 0) {
              mappedAttributes[GROUP_ATTRIBUTE] = filteredGroups.map(group => `'${group}'`).join(', ');
            }
          } else {
            // Pass all other SAML attributes through unchanged
            mappedAttributes[key] = samlResponse[key];
          }
        });

        event.response.userAttributesToMap = mappedAttributes;
        console.log('Response to Cognito:', JSON.stringify(event.response, null, 2));
      }
    }

    // For any unhandled provider type (or missing samlResponse), this intentionally does NOT set userAttributesToMap and tells Cognito to keep all original IdP attributes unchanged (no-op).

    // To handle OIDC or social providers, add additional logic here using event.request.attributes.idToken, .userInfo, and/or .tokenResponse.

    return event;
  } catch (error) {
    console.error('Error in Lambda:', error);
    throw error;
  }
};
This approach reduces a large group list to only what is applicable to your application. Authentication succeeds, and you maintain control over your user pool’s data without depending on external configuration changes.
Use case 2: Automatic account linking
The second use case addresses a challenge that’s particularly common in B2C facing ecommerce or any consumer-facing applications; although it can also be applicable to B2B scenarios. Imagine you’re running an online retail store. A customer creates an account with their email and password to make a purchase. A few months later, they return to your site but forgot they already created an account and they see the Login with Amazon button and decide to sign in this way. Without account linking, Amazon Cognito creates a new federated user because these are technically distinct accounts, and now this customer has two separate accounts with different purchase histories and saved preferences.
This fragmentation creates a poor customer experience and complicates your business operations. You can’t see the customer’s complete purchase history, loyalty points are split across accounts, and your analytics show two distinct customers instead of one.
The inbound federation Lambda trigger can be used to solve this by automatically linking federated identities to existing local accounts based on email address. While account linking can also be implemented in a pre-sign-up Lambda trigger, the inbound federation trigger runs on every federated sign-in, not just the first, giving you access to the latest IdP attributes and the ability to apply linking logic continuously rather than only at initial account creation. If no local Amazon Cognito account exists, you can create one and then link the social provider account to it. The local account can serve as the primary identity, ensuring consistent JSON Web Tokens (JWTs) regardless of how the user signs in. The following is an example of an inbound federation Lambda trigger that can help address this use case.
import {
  CognitoIdentityProviderClient,
  ListUsersCommand,
  AdminCreateUserCommand,
  AdminLinkProviderForUserCommand
} from "@aws-sdk/client-cognito-identity-provider";

const client = new CognitoIdentityProviderClient();

export const handler = async (event) => {
  try {
    console.log('Full event:', JSON.stringify(event, null, 2));

    const { userPoolId, request, userName } = event;
    const { providerName, providerType, attributes } = request;

    // Extract email and profile attributes based on provider type
    const { email, givenName, surname } = extractAttributes(providerType, attributes);

    if (!email) {
      console.error('No email found in federated response');
      return event;
    }

    console.log(`Processing federated login for email: ${email}, provider: ${providerName} (${providerType})`);

    // Check if a local user exists with this email
    const existingUser = await findLocalUserByEmail(userPoolId, email);

    if (existingUser) {
      console.log(`Found existing local user: ${existingUser.Username}`);
      if (isAlreadyLinked(existingUser, providerName, userName)) {
        console.log(`Federated identity ${providerName}:${userName} is already linked to ${existingUser.Username}, skipping link`);
      } else {
        await linkFederatedUser(userPoolId, existingUser.Username, providerName, userName);
      }
    } else {
      console.log('No existing local user found, creating new one');
      const newUsername = await createLocalUser(userPoolId, email, givenName, surname);
      await linkFederatedUser(userPoolId, newUsername, providerName, userName);
    }

    return event;

  } catch (error) {
    console.error('Error in account linking Lambda:', error);
    throw error;
  }
};


/**
 * Check if the federated identity is already linked to the local user by inspecting the identities attribute from the ListUsers response.
 */
function isAlreadyLinked(user, providerName, federatedUsername) {
  const identities = user.Attributes?.find(a => a.Name === 'identities');
  if (!identities?.Value) return false;

  try {
    const parsed = JSON.parse(identities.Value);
    return parsed.some(id => id.providerName === providerName && id.userId === federatedUsername);
  } catch {
    return false;
  }
}

/**
 * Extract email and profile attributes based on provider type.
 * - SAML: attributes come from samlResponse
 * - OIDC/Social: attributes come from userInfo, falling back to idToken (if one exists)
 */
function extractAttributes(providerType, attributes) {
  if (providerType?.toLowerCase() === 'saml') {
    const saml = attributes?.samlResponse;
    return {
      email: saml?.email || null,
      givenName: saml?.givenName || '',
      surname: saml?.surname || ''
    };
  }

  // OIDC and social providers: prefer userInfo, fall back to idToken
  const userInfo = attributes?.userInfo;
  const idToken = attributes?.idToken;

  const source = userInfo?.email ? userInfo : idToken;

  return {
    email: source?.email || null,
    givenName: source?.given_name || '',
    surname: source?.family_name || ''
  };
}

/**
 * Find a local Cognito user (not EXTERNAL_PROVIDER) by email address.
 */
async function findLocalUserByEmail(userPoolId, email) {
  try {
    const command = new ListUsersCommand({
      UserPoolId: userPoolId,
      Filter: `email = "${email}"`
    });

    const response = await client.send(command);
    console.log('ListUsers response:', JSON.stringify(response, null, 2));

    if (!response.Users || response.Users.length === 0) {
      return null;
    }

    // Find the first user that is a true local account (not a federated-only profile)
    const localUser = response.Users.find(u => u.UserStatus !== 'EXTERNAL_PROVIDER');
    return localUser || null;
  } catch (error) {
    console.error('Error finding user by email:', error);
    throw error;
  }
}

/**
 * Create a new local Cognito user without a password.
 * With passwordless (email OTP) enabled on the user pool, the user is created with UserStatus=CONFIRMED and no FORCE_CHANGE_PASSWORD state.
 */
async function createLocalUser(userPoolId, email, givenName, surname) {
  try {
    const userAttributes = [
      { Name: 'email', Value: email }
    ];

    if (givenName) userAttributes.push({ Name: 'given_name', Value: givenName });
    if (surname) userAttributes.push({ Name: 'family_name', Value: surname });

    const command = new AdminCreateUserCommand({
      UserPoolId: userPoolId,
      Username: email,
      UserAttributes: userAttributes,
      MessageAction: 'SUPPRESS'
    });

    const response = await client.send(command);
    console.log(`Created local user: ${email}`, JSON.stringify(response, null, 2));

    return email;
  } catch (error) {
    console.error('Error creating local user:', error);
    throw error;
  }
}

/**
 * Link a federated user identity to a local Cognito user.
 * The local user becomes the primary profile — all future JWTs will represent this local user regardless of sign-in method.
 */
async function linkFederatedUser(userPoolId, localUsername, providerName, federatedUsername) {
  try {
    const command = new AdminLinkProviderForUserCommand({
      UserPoolId: userPoolId,
      DestinationUser: {
        ProviderName: 'Cognito',
        ProviderAttributeValue: localUsername
      },
      SourceUser: {
        ProviderName: providerName,
        ProviderAttributeName: 'Cognito_Subject',
        ProviderAttributeValue: federatedUsername
      }
    });

    const response = await client.send(command);
    console.log(`Linked federated user ${federatedUsername} to local user ${localUsername}`);
    console.log('Link response:', JSON.stringify(response, null, 2));

    return response;
  } catch (error) {
    if (error.name === 'AliasExistsException' || error.message?.includes('already linked')) {
      console.log(`User already linked: ${error.message}`);
      return;
    }
    console.error('Error linking federated user:', error);
    throw error;
  }
}
Every federated sign-in will invoke the inbound federation Lambda trigger, and the logic is straightforward. When a user authenticates with an external identity provider, the trigger extracts their email from the federated response and searches the user pool for a local Cognito account with that same email. If one exists—such as if the user originally signed up with email and password—the Lambda function links the federated identity to that existing local account. If no local account exists, the trigger creates one on the fly as a passwordless account (confirmed, suppressing any emails, and ready for passwordless email one-time passcode (OTP) sign-in), then links the federated identity to it. In both cases, the local account is set as the primary profile. This means the user’s JWTs always carry the same sub-claim regardless of how they sign in—directly, or through Google, Facebook, or SAML—your application sees one consistent identity. The preceding Lambda trigger is also smart enough to check whether a linked account already exists before making the call, so returning users who’ve already been linked don’t generate unnecessary API calls. And because the local account supports passwordless authentication, a user who first arrived through federation can later sign in directly with an emailed OTP—or even add a password later through your applications account settings. The local account is always the anchor.
Best practices
As you implement these patterns, keep a few best practices in mind. Your Lambda function must be completed within 5 seconds, so optimize for speed to help ensure the federated sign-in process is able to successfully complete. If you’re making external calls within the inbound federation Lambda function, like Amazon DynamoDB queries or API requests, implement caching where possible. Handle errors gracefully—if your Lambda function throws an exception or an error, authentication could fail for the user. Consider logging the error and returning the original event back to Amazon Cognito rather than failing authentication for a legitimate user attempting to sign in. Here are some additional best practices for working with Lambda functions.
For the account linking use case, automatic linking relies on matching the email from the federated identity to a local account. However, there are scenarios where this match won’t exist. For example, Apple’s Hide My Email feature generates a unique alias for each app, so the federated email won’t match any existing local account. This is an effective privacy feature but it also blocks the ability to automatically link accounts. In cases like these, your application will need to implement a user-initiated account linking flow, such as prompting the user to verify ownership of both email addresses before calling the AdminLinkProviderForUser API to complete the link.
Monitor your Lambda function performance using Amazon CloudWatch metrics. Set up alarms for errors, timeouts, and throttling so you can respond quickly if issues arise. I also recommend capturing sample event payloads from a CloudWatch log group during your initial development and deployment—these will be valuable for local testing and debugging which can lead to quicker resolution if issues arise in your production environment. This is especially important as different IdPs (namely SAML and OIDC providers) may respond with varying attribute and value syntaxes. Consider implementing CloudWatch alarms to alert your security and operational teams if authentication failures spike, which could indicate an attempted attack, misconfiguration, or provide insight into further optimization of your inbound federation Lambda trigger.
Conclusion
In this post, you learned about the new inbound federation Lambda trigger for Amazon Cognito and how it can solve various use cases. You walked through two common federation challenges and reviewed some sample code to help resolve those challenges. For B2B and SaaS applications, the inbound federation Lambda trigger gives you control when dealing with oversized attributes from external identity providers (such as group membership) without requiring coordination with enterprise IT teams. For B2C and consumer-facing applications, it enables seamless account linking across multiple authentication methods, creating a unified customer experience.
The new Lambda trigger works with SAML, OIDC, and supported social providers, and is available now in AWS Regions where Amazon Cognito is available. To learn more about the new Lambda trigger and others, see the Amazon Cognito Developer Guide.
What federation challenges are you facing in your applications? I’d love to hear about your use cases in the comments below and over at AWS re:Post.
Enterprise security has always had a comforting assumption baked into it: systems do what they were built to do. Sometimes badly. Sometimes insecurely. Sometimes in ways that make auditors develop a nervous twitch. But still, the basic shape was understandable. Applications processed requests. Databases stored data. APIs connected systems. Users clicked things they probably should not have clicked. Then AI arrived and made the whole thing a little weird. AI did not introduce one neat new risk category. Security teams are very good at turning new risk categories into taxonomies, dashboards, and meetings with names like “working group.” The real […]
When people hear about hackers “asking an AI chatbot” to help them take over Instagram accounts, the instinctive reaction is to file it under prompt injection, jailbreaks, or “the model got tricked.” That may be the wrong lesson. According to reporting from 404 Media, hackers claimed they used Meta’s AI support chatbot to gain access to high-profile Instagram accounts by asking it to change the email address associated with the target account. The reported incidents coincided with several high-profile account takeovers, including accounts linked to the Obama White House, Sephora, and the Chief Master Sergeant of the Space Force. […]
As you scale your use of Amazon Web Services (AWS), managing KMS keys becomes increasingly important. Whether you manage a handful of keys or thousands across multiple AWS accounts and AWS Regions, there’s often a need to audit key usage to help you meet compliance requirements, evaluate your risk posture, and optimize key management costs. However, determining which keys are actively in use and which have been sitting idle can be a time consuming and complex task.
To help with this, AWS Key Management Service (AWS KMS) has launched the GetKeyLastUsage API, a new feature that you can use to quickly determine when each key was last used for a cryptographic operation, significantly enhancing your audit capabilities and key lifecycle management. For more information, see Determine past usage of a KMS key.
Before this launch, the primary way to audit key usage was through AWS CloudTrail logs. CloudTrail captures every cryptographic operation by default, so the data is available. The difficulty is turning that data into actionable insight. You need to identify which keys to examine, query the right logs, and repeat that process frequently enough to maintain an accurate view. For the most recent 90 days, CloudTrail event history makes this manageable. Beyond that, you need to create a dedicated trail to deliver logs to Amazon Simple Storage Service (Amazon S3) for long-term retention, then query those logs using tools such as Amazon Athena to determine when a key was last used.
Determine when a key was last used
AWS KMS now provides a direct way to see when a key was last used for cryptographic operations. You can also see this information using the AWS Management Console for AWS KMS and the AWS Command Line Interface (AWS CLI).
The GetKeyLastUsage API returns the date and time of the most recent cryptographic operation performed with a KMS key, without requiring you to search through CloudTrail logs. The API returns the date and time of the last key operation, the type of operation performed, CloudTrail event ID, and KMS request ID. You can access this information for all customer-managed keys and AWS managed keys irrespective of key spec, key origin, key store, or key usage type.
In addition, you can restrict a key from being disabled or scheduled for deletion if it was recently used, by incorporating this usage information as a condition within the KMS key policy. See the Preventing accidental key deletion with policy controls section for implementation details.
About the tracking period
One of the important concepts you must understand before relying on the last usage information reported on a KMS key is the tracking period. The tracking period is the date from which AWS KMS began tracking cryptographic activity for the key. Tracking began on April 23, 2026, for most AWS Regions. Understanding the tracking period is critical because it determines whether the absence of usage information means a key has never been used or only hasn’t been used since tracking started.
For example, if you have a key created on January 1, 2026, and you check its usage, any cryptographic operations that occurred between January 1 and April 22 wouldn’t be captured in the usage information. Thus, you can’t conclude that it’s never been used, because it might have been used in the months before tracking began.
Getting started
There’s nothing to enable or additional configuration required to view usage information on last cryptographic operation performed on your KMS keys.
To view KMS key usage:
Go to the AWS KMS console and choose Customer-managed keys in the navigation pane and select a key. Look for Last used on the general configuration.
Figure 1: KMS key general configuration page
Choose the link under Last used to see additional details such as Timestamp, Operation, and the CloudTrail event ID.
Figure 2: View last used details including timestamp, operation, and event ID
The Last used column is also shown when you attempt to schedule key deletion, so that you can make informed decisions.
Figure 3: Scheduled key deletion warning
API reference
See the following examples for ideas on how to use the GetKeyLastUsage API to better understand KMS key usage.
Use case 1: Cost optimization through unused key cleanup
If you manage thousands of AWS KMS keys distributed across multiple AWS accounts, you might have keys that have remained unused since creation or keys that are no longer needed. By cleaning up these keys, you can reduce operational costs and minimize your security footprint. However, without visibility into which keys are actively performing cryptographic operations, it can be difficult to distinguish between keys protecting critical workloads and those that can be safely decommissioned.
Note that there are some precautions that you should take before scheduling key deletion. While the last usage information can help identify unused keys, it shouldn’t be the only factor in deciding whether to delete or disable a key. The last usage information tells you when a key was last used, not whether it will be needed in the future. A key might be unused for months but still required to decrypt files, for compliance scenarios or disaster recovery as shown in figure 4.
When you identify a potentially unused key, first disable it using DisableKey and monitor your applications and services for any encryption or decryption failures.
Figure 4: A use case where GetKeyLastUsage doesn’t accurately reflect whether a KMS key is still required
As an example, Amazon EBS volumes only interact with KMS keys during specific lifecycle events like volume creation, attachment, and detachment. After a volume is attached to an Amazon Elastic Compute Cloud (Amazon EC2) instance, the plaintext data encryption key is cached in the Nitro Card hardware, and all subsequent read/write operations use this cached key without any further AWS KMS API calls. This means a production volume running continuously for months or years will show no KMS activity during that entire period. However, the volume remains completely dependent on that KMS key for any future operations like instance restarts, volume reattachments, or disaster recovery scenarios. If someone deletes the KMS key, the encrypted data key stored with the volume can never be decrypted again, making the volume’s data permanently and irreversibly inaccessible. Before deleting any KMS key, you must verify it has no associated EBS volumes or snapshots, regardless of how long ago the last KMS API call occurred.
AWS provides a mechanism where you can create a CloudWatch alarm that notifies you if a key pending deletion is being accessed, giving you an opportunity to cancel the deletion before data becomes inaccessible.
Solution with GetKeyLastUsage API
Here’s a sample script that scans all customer-managed keys in an account and retrieves each key’s last usage date through the GetKeyLastUsage API. It accepts two optional inputs: a threshold in days and an AWS Region. The script filters and displays only keys that haven’t been used within the specified period, presenting results in a table with the key name, AWS account ID, AWS Region, and last usage date. This can help you identify unused encryption keys.
The following is an example to scan all keys that haven’t been used in the last 180 days in the us-east-1 Region:
./script.sh 180 us-east-1
#!/bin/bash
DAYS=${1:-90}
REGION=${2:-$(aws configure get region)}
CUTOFF=$(date -v-${DAYS}d +%s 2>/dev/null || date -d "-${DAYS} days" +%s)
ACCOUNT_ID=$(aws sts get-caller-identity --query Account --output text)
printf "Showing keys not used in the last %s days (Region: %s)\n\n" "$DAYS" "$REGION"
printf "%-50s %-15s %-20s %-15s\n" "Key Name" "Account ID" "Region" "Last Usage Date"
printf "%.0s-" {1..100}
printf "\n"
for key_id in $(aws kms list-keys --region $REGION --query 'Keys[*].KeyId' --output text); do
key_manager=$(aws kms describe-key --region $REGION --key-id $key_id --query 'KeyMetadata.KeyManager' --output text)
if [ "$key_manager" = "CUSTOMER" ]; then
last_usage=$(aws kms get-key-last-usage --region $REGION --key-id $key_id)
timestamp=$(echo $last_usage | jq -r '.KeyLastUsage.TimeStamp // empty')
if [ -z "$timestamp" ]; then
last_epoch=0
else
last_epoch=$(date -jf "%Y-%m-%dT%H:%M:%S" "$(echo $timestamp | cut -d. -f1)" +%s 2>/dev/null || date -d "$timestamp" +%s)
fi
if [ "$last_epoch" -lt "$CUTOFF" ]; then
key_alias=$(aws kms list-aliases --region $REGION --key-id $key_id --query 'Aliases[0].AliasName' --output text)
key_name=${key_alias:-$key_id}
[ "$key_name" = "None" ] && key_name=$key_id
if [ -z "$timestamp" ]; then
tracking_date=$(echo $last_usage | jq -r '.TrackingStartDate' | cut -d'T' -f1)
last_used="${tracking_date}*"
else
last_used=$(echo $timestamp | cut -d'T' -f1)
fi
printf "%-50s %-15s %-20s %-15s\n" "$key_name" "$ACCOUNT_ID" "$REGION" "$last_used"
fi
fi
done
printf "\n* = No operations performed since tracking started\n"
Use case 2: Preventing accidental key deletion with policy controls
Organizations frequently face the risk of accidental key deletions, which can have severe operational consequences. Despite precautions and safety measures, accidents can happen. A key might be deleted because someone believes it’s no longer in use, only to discover that critical applications or workloads depend on it. This results in data access failures, application downtime, and emergency recovery procedures. Without visibility into recent key usage, teams lack the information needed to make safe disable decisions or implement effective safeguards.
Solution with policy based controls
To prevent KMS keys from being accidentally Disabled or Deleted use the kms:TrailingDaysWithoutKeyUsage condition key in key policies to automatically block deletion or disabling of recently used keys:
Open the AWS KMS console and choose Customer managed keys in the navigation pane.
Select the key you want to protect.
In the Key policy tab, choose Edit.
In the policy editor, add the following statement:
The policy prevents deletion or disabling a key if it was used within the past 365 days. You can adjust the threshold to match your organization’s requirements. For more information about the condition key, see kms:TrailingDaysWithoutKeyUsage.
Important considerations
When reviewing key usage for possible deletion, consider the following:
Key deletion is irreversible and makes encrypted data unrecoverable. AWS enforces a 7–30 day waiting period. During this time, monitor usage attempts and cancel the deletion if necessary. Delete a key only if you’re certain that no data has been encrypted or will be encrypted with it. Consider disabling the key first to test the impact of unavailable keys.
CloudTrail remains authoritative because it provides the full audit trail. GetKeyLastUsage quickly tells you when and what operations occurred, but CloudTrail shows you who made the request and with what parameters. Learn more about logging KMS API calls with CloudTrail.
Conclusion
The GetKeyLastUsage API enhances your KMS key management capabilities by providing immediate access to usage data that was previously only present in CloudTrail logs. Start by opening the AWS KMS console and checking the Last used field for any customer-managed keys and AWS managed keys to see this information in action. For broader key auditing, integrate the API into your existing automation scripts using the AWS CLI examples provided.
If you have feedback about this post, submit comments in the Comments section below.
Software as a service (SaaS) providers building AI-powered applications on Amazon Bedrock AgentCore often need to serve multiple tenants with distinct security requirements from a shared infrastructure. Some tenants require cross-account access from their own Amazon Web Services (AWS) accounts, while others mandate that traffic stay within a private virtual private cloud (VPC) for regulatory compliance. Without centralized resource-level control, managing these diverse requirements can be complex.
AgentCore supports resource-based policies, giving you centralized, resource-level control over who can access your AgentCore Runtime and AgentCore Runtime endpoint resources and under what conditions.
In this post, you walk through a multi-tenant AI customer service platform where two tenants need different levels of access to the same agent. You learn how to use resource-based policies on AgentCore to grant cross-account access for one tenant while restricting another to VPC-only traffic—all while sharing the same underlying AgentCore Runtime and AgentCore Runtime endpoint.
The multi-tenant scenario
Imagine you’re an SaaS provider who builds and operates an AI-powered customer service platform. You use AgentCore to deploy intelligent agents that handle customer inquiries, answering product questions, processing returns, and escalating complex issues to human agents.
You serve multiple enterprise clients (tenants), each with their own AWS account and unique security requirements:
Tenant A: Example Corp is a large retailer operating in AWS account 111122223333. Their development teamis building a customer-facing chat agent that calls your AI agent to answer product questions in real time, and their admin team needs access to test agent behavior and monitor responses. Both roles must invoke the agent directly from Example Corp’s own AWS account without you having to share credentials or create AWS Identity and Access Management (IAM) users on their behalf. Example Corp has no network restriction requirements—their teams can invoke the agent from any network path as long as they have valid AWS credentials.
Tenant B: AnyCompany is a healthcare company operating in AWS account 444455556666. Because of regulatory (HIPAA) requirements, AI agent traffic must originate only from their private VPC (vpc-health1234). Their internal support staff uses the AI agent to assist with patient billing inquiries, which might involve protected health information (PHI). Their compliance team mandates that no API call to the agent can be made from developer laptops, public endpoints, or any network outside the controlled VPC boundary.
Your platform (SaaS provider) runs in account 555555555555 in the us-west-2 AWS Region. You operate an AgentCore Runtime (support-agent-runtime) that handles the core customer service logic, and an AgentCore Runtime endpoint (DEFAULT) that routes requests to the latest version of the support agent. Both tenants share this same agent infrastructure.
You can use resource-based policies to define who can access your AgentCore Runtime and AgentCore Runtime endpoint directly on the resources themselves—centralizing access control on the resource side. For cross-account scenarios like Example Corp, both a resource-based policy on your resources and an identity-based policy in the tenant’s account are required. For VPC-restricted scenarios like AnyCompany, you can use specific IAM conditions to enforce that requests originate only from an approved VPC, adding a network-level security boundary on top of identity-based controls.
Solution architecture
The following diagram shows the architecture for the multi-tenant AI customer service platform with both access patterns.
Figure 1: Architecture for the multi-tenant AI customer service platform with both access patterns
Your account (555555555555) with AgentCore Runtime and AgentCore Runtime endpoint
Example Corp’s account (111122223333) with DeveloperRole and AdminRole
AnyCompany’s account (444455556666) with VPC boundary and ApplicationRole
Policy enforcement points on both resources
VPC endpoint in AnyCompany’s VPC connecting to AgentCore
The SaaS provider account (555555555555) hosts the AgentCore Runtime and AgentCore Runtime endpoint that both tenants share. Example Corp (111122223333) accesses the agent cross-account using IAM roles—DeveloperRole and AdminRole—authenticated with Signature Version 4 (SigV4), the standard AWS request signing protocol. AWS evaluates both the resource-based policy on your resources and the identity-based policy in Example Corp’s account before granting access.
AnyCompany (444455556666) also accesses the agent cross-account, but with an additional constraint: all requests must originate from within their private VPC (vpc-health1234) through a VPC endpoint for AgentCore. The resource-based policy on your resources includes an explicit Deny statement that blocks any request from AnyCompany’s ApplicationRole when it doesn’t originate from the approved VPC.
In both cases, resource-based policies must be applied to both the AgentCore Runtime and AgentCore Runtime endpoint. AWS evaluates policies on both resources for InvokeAgentRuntime operations—if either resource denies access or lacks an explicit Allow, the request is denied.
Prerequisites
Before you begin, ensure you have the following:
An AWS account with AgentCore access and permissions to call PutResourcePolicy, GetResourcePolicy, and DeleteResourcePolicy on AgentCore resources
An AgentCore Runtime with SigV4 authentication and a DEFAULT AgentCore Runtime endpoint pointing to the latest runtime version
For the VPC-restricted scenario, the tenant must have a VPC endpoint for AgentCore configured in their VPC. An interface VPC endpoint creates a private connection between the tenant’s VPC and the AgentCore service without requiring traffic to traverse the public internet. For more information, see Interface VPC endpoints for Amazon Bedrock AgentCore.
Implementation
Both Example Corp and AnyCompanyoperate in separate AWS accounts from your platform. For cross-account access to AgentCore Runtime, AWS requires that both of the following allow the action:
A resource-based policyin your platform account applied to both the AgentCore Runtime and its AgentCore Runtime endpoint. InvokeAgentRuntime operations require an explicit Allow on both resources—if either lacks one, the request is denied.
An identity-based policy attached to the caller’s IAM role in the tenant’s account.
If either side is missing or denies the action, the request is denied.
Step 1: Configure cross-account access for Example Corp (Tenant A)
Example Corp’s DeveloperRole and AdminRole in account 111122223333 need to invoke your AI customer service agent. Without resource-based policies, enabling this cross-account access would typically require Example Corp’s roles to assume a role in your platform account through IAM role chaining—adding operational complexity, introducing temporary credential management, and creating additional IAM roles that must be maintained in your account for each tenant. With resource-based policies, you grant Example Corp’s roles direct access to your AgentCore Runtime and AgentCore Runtime endpoint without role chaining. Example Corp’s roles can invoke the agent directly from their own account using their own credentials, while you maintain centralized control over access on the resource side.
AgentCore Runtime resource-based policy
The following policy grants Example Corp’s DeveloperRole and AdminRole permission to invoke the agent runtime. This is the first of two resource-based policies required—it controls access to the runtime resource itself. Save this as runtime-policy.json:
The following policy grants the same roles permission to invoke the AgentCore Runtime endpoint. Without this second policy, requests are allowed at the runtime level but denied at the endpoint level, and the invocation fails. Save this as endpoint-policy.json:
Configure an identity-based policy (Example Corp’s account)
Resource-based policies alone aren’t sufficient for cross-account access. Example Corp must also attach an identity-based policy to DeveloperRole and AdminRole in their account (111122223333) that allows the same action on your resources. Without this policy on the tenant side, IAM denies the cross-account request even though your resource-based policies allow it.
Example Corp attaches the following policy to both DeveloperRole and AdminRole:
Attach this policy to both DeveloperRole and AdminRole in Example Corp’s account.
Step 2: Configure cross-account with VPC-restricted access for AnyCompany (Tenant B)
AnyCompany operates under HIPAA compliance requirements and mandates that all traffic to your agent stays within a private network path. Like Example Corp, AnyCompany needs cross-account access from account 444455556666—but with an additional constraint, requests must originate from their VPC vpc-health1234 through an interface VPC endpoint. Any request from outside this VPC is denied, even if it comes from AnyCompany’s ApplicationRole.
Resource-based policies (your platform account): To enforce this, you update the resource-based policies on both the AgentCore Runtime and AgentCore Runtime endpoint. Each policy includes an Allow statement that grants ApplicationRole permission to invoke the agent, paired with a Deny statement that blocks any request not originating from vpc-health1234. In the following policy, the Deny statement uses StringNotEquals on aws:SourceVpc . When a request arrives through an interface VPC endpoint, AWS populates this key with the VPC ID. If it doesn’t match vpc-health1234, or if the key is absent because no VPC endpoint was used, the Deny takes effect. Because an explicit Deny overrides any Allow from any policy, this pattern helps ensure that no other identity-based or resource-based policy can inadvertently grant AnyCompany access from outside the VPC. Add the following statements to runtime-policy-v2.json alongside the Example Corp statement from Step 1:
Because put-resource-policy replaces the entire policy on a resource, your updated policy files must include both the preceding AnyCompany statments and the Example Corp statements from Step 1.
AnyCompany must attach an identity-based policy to ApplicationRole in their account 444455556666 that allows the same InvokeAgentRuntime on your resources in account 555555555555. Without this policy on the tenant side, IAM denies the cross-account request even though your resource-based policies allow it.
AnyCompany attaches the following policy to ApplicationRole:
The VPC restriction is enforced entirely on resource account through the resource-based policy condition, AnyCompany’s identity-based policy doesn’t need VPC conditions. This keeps the tenant-side configuration straightforward while you maintain centralized network-level control.
OAuth authentication considerations
The policies in this post use SigV4 authentication with specific IAM role principals. If your AgentCore Runtime or AgentCore Gateway is configured with OAuth authentication instead, the principal structure changes. OAuth-authenticated resources require a wildcard principal (“Principal": "*") because the caller identity comes from a JSON Web Token (JWT) validated before policy evaluation. Anonymous or unauthenticated requests are rejected before the policy is evaluated, so the wildcard principal doesn’t grant open access. To restrict OAuth-authenticated requests to a specific VPC, combine the wildcard principal with a VPC condition in the resource-based policy. IAM principal-based condition keys such as aws:PrincipalAccount and aws:PrincipalOrgID aren’t populated in the OAuth authentication context—only supported network-level condition keys (such as aws:SourceVpc, aws:SourceVpce, aws:SourceIp) are available for use in resource-based policies with OAuth. For more details, see Resource-based policies for Amazon Bedrock AgentCore.
Understanding policy evaluation
To understand how AWS evaluates these policies when a request arrives, consider the following scenarios:
Caller or principal
Network
Identity-based policy (tenant side)
Runtime resource-based policy
Runtime endpoint resource-based policy
Final policy evaluation result
Example Corp
Any network
Allows
Allows
Allows
Allowed
Example Corp
Any network
Allows
Allows
Allows
Allowed
AnyCompany
From
Allows
Allows ( does not match)
Allows ( does not match)
Allowed
AnyCompany
Outside VPC
Allows
matches
matches
Denied
Any other cross-account role
Any network
Allows
No matching
No matching
Denied
Any other cross-account role
Any network
No policy
Allows
Allows
Denied
Conclusion and next steps
In this post, you learned how to use resource-based policies on AgentCore to secure a multi-tenant AI platform with distinct access patterns for each tenant:
Example Corp gets seamless cross-account integration, their development and admin teams can invoke your AI agent directly from their own AWS account without credential management.
AnyCompany gets the strict network-level isolation their compliance team requires, the AI agent is accessible only from within their private VPC, ensuring that interactions involving potential PHI — stay within the controlled network boundary
Both tenants share the same underlying AgentCore Runtime and AgentCore Runtime endpoint, yet each has tailored security controls enforced at the resource level. his approach avoids per-tenant infrastructure duplication while satisfying each tenant’s security posture, a challenge you likely face when onboarding tenants with different compliance postures. Resource-based policies complement identity-based IAM policies, giving you layered control over which principals can invoke which agents, and from which network paths.
Mexico is one of the host countries for the 2026 FIFA World Cup, with matches to be played in three major cities: Mexico City, Monterrey, and Guadalajara. These locations are expected to see a large influx of international visitors, increasing the potential security risks. Many of those risks arise from users connecting to public wireless networks.
To better understand the wireless environments that visitors may encounter, we at Kaspersky GReAT conducted a wardriving assessment in the three host cities. The aim of the study was to analyze characteristics, deployment patterns, security configurations and potential exposure risks of public Wi-Fi infrastructure in urban wireless environments.
The information collected during the assessment was used exclusively for passive observation and infrastructure analysis. No attempts were made to authenticate, intercept communications, exploit systems or interact with the detected wireless networks beyond the publicly broadcast management information.
During processing of the collected data, one step involved filtering out networks belonging to cars or cell phones categorized as mobile hotspots because they do not represent networks that can be considered part of the assessment.
Research scope
The cities included in the study have high population density and extensive wireless infrastructure deployments. We chose areas with the most prominent wireless network activity and highly concentrated public access points. We carried out wardriving research in Monterrey back in 2008, but the city’s hotspot landscape has changed since then.
We chose the following analysis areas for each of the cities:
Mexico City: México City Stadium, Mexico City International Airport, Zócalo, Paseo de la Reforma, Colonia Roma, La Condesa, Polanco, and Coyoacán.
Guadalajara: Guadalajara Stadium, Guadalajara International Airport, the city center, Zapopan, Providencia, Avenida Chapultepec, Colonia Americana, Tlaquepaque, and the area around Andares.
Monterrey: Monterrey Stadium, Monterrey International Airport, Fundidora Park, Cintermex Monterrey, the downtown area, Barrio Antiguo, MacroPlaza, and the San Pedro financial district.
The wireless information was collected using passive wireless reconnaissance techniques. The collected information included:
SSID analysis and information exposure, including BSSID-derived SSIDs
Default router configurations and ISP deployments
Frequency and signal characteristics
Channel congestion and spectrum usage
Wireless security configurations, including:
Open and insecure wireless networks
WPS-enabled networks
Secure networks (WPA2/WPA3) with WPS enabled
We performed a wireless infrastructure analysis in Mexico City, Guadalajara, and Monterrey. We drove through the areas surrounding the World Cup stadiums, tourist zones, and other places where fan concentrations are likely to be largest. Our goal was to evaluate the security status, deployment characteristics and operational exposure of detected wireless networks.
In total, we recorded 84,588 signals with 69,473 unique Service Set Identifiers (SSIDs) in busy locations and World Cup zones across the three cities. Mexico City accounted for 61.4% of the signals, Guadalajara for 23.6%, and Monterrey for 14.8%. Approximately 82% of the signals had a single SSID (81.9%, 81.34%, and 84% respectively). Notably, they all operate under the IEEE 802.11 standard protocol.
Particular attention was given to identifying standard deployment patterns, legacy configurations, default vendor settings and information disclosure through publicly broadcast wireless identifiers.
The following sections present the results that were obtained by analyzing wireless infrastructure across the three locations.
Our findings
SSID analysis and information exposure
SSID analysis was conducted to evaluate naming conventions, deployment standardization and potential information exposure.
Only a few networks (0.0047%) have an invisible SSID, meaning the names of these networks are not broadcast. Some users prefer to hide the SSID for various reasons, such as the network’s purpose, the profile of its users, internal policies, etc. In contrast, the rest of the networks maintained active SSID broadcasting.
SSID structures may unintentionally disclose operational details about internet service providers (ISPs), device manufacturers, deployment practices, organizational ownership or user identity. The repeated presence of default SSID naming patterns across the analyzed locations indicates a significant degree of infrastructure homogeneity and reuse of default wireless configurations. It may also facilitate passive infrastructure profiling by revealing standard characteristics in use.
Approximately 34% of the detected networks retained the default SSID naming conventions provided by the manufacturer or ISP, while 66% used customized identifiers.
Distribution of SSID naming conventions (download)
Several recurring SSID naming conventions associated with ISP-provided deployments were identified in the three cities. The most frequently observed patterns include identifiers such as “Club_Totalplay_WiFi”, “izzi WiFi”, and “Megacable WiFi”, which suggests extensive standardization of wireless infrastructure deployment. Additionally, we observed distinctive location-specific SSIDs in each area of analysis, such as “XXXX-Internet para Todos-CDMX” or “RED JALISCO”.
Sequential SSID naming structures were also identified during the analysis. Patterns such as “INFINITUMXX” and “IZZI-XX” suggest automated ISP deployment and large-scale deployment strategies.
We identified 33 unique sequential naming structures among the 137 sequential SSIDs in total, representing approximately 0.16% of the detected wireless networks.
The following graph shows the top five sequential SSID patterns found in the largest number of networks:
Five most frequently observed sequential patterns (download)
Several customized SSIDs contained personal or organizational identifiers, including family names, professions, addresses or internal department references. Although personalized SSIDs may simplify local network identification for users, they may also expose sensitive information that could be useful for social engineering, physical targeting, or organizational profiling.
BSSID-derived SSID
During the analysis, multiple networks were identified that used the physical MAC address of a Wi-Fi access point (BSSID) as the visible SSID. This practice exposes hardware-level information that could facilitate vendor fingerprinting and targeted reconnaissance activities.
The organizationally unique identifier (OUI) contained in the first bytes of the BSSID identifies the equipment manufacturer. Threat actors can correlate exposed manufacturers with device-specific vulnerabilities.
Notably, we found that more than 30% of networks in all three cities reuse the MAC address as the SSID.
Default router configurations and ISP deployments
We performed wireless infrastructure profiling to identify the most common wireless equipment manufacturers and ISP deployments across the three locations.
Large-scale ISP deployments frequently use standardized wireless configurations and vendor-specific hardware platforms. Identifying dominant manufacturers and ISP naming conventions can provide insight into infrastructure and deployment practices facilitating the mapping of standardized attack surfaces.
The following figure shows the distribution of the most commonly used manufacturers.
Most frequently observed wireless equipment manufacturers (download)
The manufacturer analysis revealed a strong concentration of wireless infrastructure among a limited number of vendors. Across the three locations, Huawei Technologies, MediaTek-based devices, and other manufacturers’ equipment that is distributed through ISP channels represented a significant portion of the detected deployments. Mexico City had the most diverse infrastructure, while Monterrey and Guadalajara had a greater concentration of wireless equipment known as SOHO (small office/home office) or residential-grade hardware. The widespread presence of standard vendor platforms may facilitate infrastructure fingerprinting and large-scale targeting of known device-specific vulnerabilities.
Most frequently observed wireless equipment manufacturers across the three cities (download)
ISP deployments frequently exhibited standardized configuration patterns and recurring manufacturer identifiers. Our ISP deployment analysis revealed a high concentration of access points associated with major residential internet providers. Deployments associated with Infinitum, Totalplay and Izzi represented a substantial portion of the detected wireless infrastructure across all locations. These findings suggest a high degree of deployment standardization across networks associated with major residential internet providers. This observation was supported by the repeated presence of ISP-associated SSIDs such as “Infinitum”, “Totalplay”, and “Izzi”, combined with manufacturer identifiers frequently associated with consumer equipment, including Huawei, ZTE and other residential wireless equipment vendors.
It is important to note that, for this analysis, ISPs were primarily inferred from SSID naming conventions and manufacturer fingerprint data. A significant portion of the detected wireless networks fell into the “UNKNOWN/CUSTOM” category. This classification includes custom hotspots and networks whose naming conventions did not expose identifiable ISP-associated patterns. The findings suggest that many users and organizations (as we saw previously, approximately 66%) use custom network names, limiting direct provider attribution.
The following figure illustrates the distribution of ISP-associated wireless deployments in general.
To better understand this distribution, we took the most frequently observed ISPs by city.
Most frequently observed ISPs across the three cities (download)
Frequency and signal characteristics
We also analyzed wireless signal characteristics to evaluate coverage quality, signal strength, and frequency band utilization in the three cities. In dense urban environments, signal quality and frequency spectrum distribution can affect wireless reliability, client connectivity, roaming performance, and overall network efficiency.
Signal quality analysis revealed that a substantial portion of the detected access points operated under weak or very weak signal conditions. Monterrey had the highest percentage of very weak signals, with approximately 50% of detected deployments. Similar patterns were observed in Guadalajara and Mexico City, suggesting high-density wireless environments with overlapping coverage areas. Only a limited percentage of networks were classified within the very good or excellent signal categories across the three locations.
Signal stability analysis revealed that most detected wireless deployments exhibited stable beacon transmission behavior. More than 96% of the detected access points across all locations were classified as stable, while only a small percentage exhibited unstable or indeterminate signal behavior.
These findings imply that the majority of the wireless infrastructure observed during the assessment corresponded to permanently deployed access points rather than transient or intermittent wireless devices.
Frequency band analysis revealed the strong prevalence of 2.4 GHz wireless deployments across the three locations. More than 95% of the detected wireless networks operated within the 2.4 GHz spectrum, while only a small percentage of deployments were classified under the unknown or non-standard frequency categories. This uneven distribution reflects the continued prevalence of legacy-compatible wireless infrastructure and SOHO deployments.
These findings are consistent with dense urban wireless environments with large numbers of access points in restricted spectrum allocations.
Channel congestion and spectrum usage
Next, we analyzed wireless channel utilization to evaluate frequency spectrum congestion and channel allocation patterns across the three cities. Our analysis focused on the 2.4 GHz spectrum, where channel overlap and high access point density commonly produce interference and degraded wireless performance. In densely populated wireless environments, an excessive concentration of access points on a limited number of channels can lead to co-channel interference, packet collisions, reduced throughput, and degraded network stability.
Spectrum congestion analysis revealed that the 2.4 GHz band consistently experienced elevated congestion levels across the three cities. The detailed results showed a strong concentration of deployments on channels 11, 6 and 1, which are traditionally recommended as non-overlapping channels within the 2.4 GHz spectrum. Channel 11 was the most utilized channel, accounting for 25.2% of the detected access points, followed by channel 6 with 22.5% and channel 1 with 19.5%. This distribution indicates that most wireless deployments adhere to standard channel allocation practices for 2.4 GHz Wi-Fi environments.
The following figure illustrates the overall distribution of the most frequently utilized wireless channels.
To further assess wireless spectrum saturation, the detected access points were grouped according to channel congestion levels: VERY_HIGH, HIGH, UNKNOWN, MEDIUM, LOW and NONE.
Mexico City had the highest proportion of heavily congested wireless channels, with approximately 7% of detected access points operating under HIGH congestion conditions. Guadalajara followed with nearly 5% of deployments categorized as HIGH congestion, while Monterrey had the lowest percentage at approximately 3.29%.
These findings suggest that wireless spectrum saturation increases proportionally with urban infrastructure density and access point concentration. Despite the presence of congested deployments, most detected access points were categorized as LOW or MEDIUM congestion, suggesting severe spectrum saturation was localized rather than uniformly distributed.
A thorough analysis of individual channel utilization revealed that channels 11, 6 and 1 consistently experienced the highest congestion levels across the three cities, which correlates with our previous findings. These channels accounted for the majority of VERY_HIGH congestion classifications, particularly within the 2.4 GHz band.
In Mexico City, channel 11 alone accounted for more than 25% of detected deployments and consistently exhibited VERY_HIGH congestion levels.
This behavior reflects the limited availability of non-overlapping channels within the 2.4 GHz spectrum and the widespread reliance on default wireless configurations.
Overall, the channel utilization analysis showed that wireless deployments are concentrated heavily within the traditional, non-overlapping 2.4 GHz channels. While this strategy reduces adjacent-channel interference, excessive access point density on the same channels can still produce significant co-channel contention and poor wireless performance in high-density urban environments.
Wireless security configurations
The next thing we evaluated was the security posture of the detected wireless networks. We analyzed the wireless security configurations advertised by access points in each of the locations.
Overall security configuration distribution
The analysis revealed that WPA2 was the dominant wireless authentication mechanism across the three cities. Mexico City had the highest WPA2 adoption rate at 81.19%, followed by Monterrey at 79.19% and Guadalajara at 77.59%.
The study found that every 6th open access point (17%) was unsafe, namely 16.5% in Mexico City, 18.5% in Guadalajara, and 17.2% in Monterrey. Open wireless deployments were consistently present across all locations, ranging between 10% and 12% of detected access points. These findings show that despite the widespread deployment of modern wireless security standards, encryption adoption remains incomplete.
Distribution of wireless authentication mechanisms across the three locations (download)
To simplify the interpretation of wireless security posture, we grouped detected networks into four categories:
Secure (WPA2/WPA3)
Insecure (Open/WEP)
Weak (WPA)
Unknown
Across the three locations, secure networks comprised most of detected deployments, accounting for approximately 82% of all access points. However, insecure open networks still account for between 10% and 12% of detected wireless infrastructure, consistent with our previous findings. It is important to mention that networks within the unknown category are not considered secure.
Mexico City had the highest percentage of secure deployments at 83.54%, while Guadalajara had the highest percentage of insecure open networks at 12.46%. Although Monterrey had the lowest percentage of insecure networks, open deployments still accounted for more than 10% of the detected access points.
Wireless security posture grouping across the three locations (download)
Although modern WPA2/WPA3 encryption standards dominate current wireless deployments, the continued presence of open and legacy WPA deployments indicates that insecure wireless configurations remain relevant from an operational standpoint. These networks may expose users to passive traffic interception, unauthorized monitoring, rogue access point attacks, and credential harvesting techniques.
WPS-enabled networks
We also analyzed Wi-Fi Protected Setup (WPS) in all the locations to evaluate additional attack surfaces. WPS is a standard feature on wireless routers that enables devices such as printers, repeaters or mobile phones to connect to a secure Wi-Fi network without manually entering a long password, typically through a PIN-based enrolled mechanism. Although WPA2 and WPA3 provide strong encryption mechanisms, the presence of WPS can introduce security weaknesses due to inherently vulnerable PIN-based enrollment methods.
By combining detections from the three locations, we found that 55% of all detected access points did not advertise WPS capabilities, leaving 45% of deployments vulnerable to WPS-based abuse. These results suggest that, despite the adoption of modern encryption standards, a significant portion of wireless infrastructure continues to expose legacy convenience features.
During the analysis, we found that Mexico City had the highest proportion of WPS-enabled networks, with 46.61% of the detected access points advertising WPS capabilities. Guadalajara was second with 43.45%, while Monterrey had the lowest proportion at 40.93%.
The percentage of detected access points advertising WPS capabilities across the three locations (download)
Almost half of the detected wireless networks in each city continued to advertise WPS, indicating that WPS prevalence is consistently high across the three cities.
Secure networks with WPS enabled
In many cases, networks classified as secure because of WPA2/WPA3 encryption still had WPS functionality enabled, which effectively increased the available attack surface.
To further assess the relationship between encryption strength and WPS exposure, we conducted a secondary analysis of secure networks (WPA2/WPA3) only. The results showed that around half of all secure deployments still exposed WPS, with the following breakdown for each city:
Mexico City: 53.7%
Guadalajara: 50.9%
Monterrey: 47.5%
The proportion of secure networks with WPS enabled across the three locations (download)
These findings indicate that encryption strength alone is not enough to evaluate wireless security posture because additional protocol features, such as WPS, may still expose exploitable attack vectors.
Additional security considerations
Overall, travelers operating within dense public environments are exposed not only to insecure wireless infrastructure but also to various risks associated with digital interactions. These risks include many threats, from public USB charging systems and phishing QR codes to proximity-based protocols and exposure to shared public devices, such as interactive totems or kiosks. One particular point that should be taken into account in light of our research is the issue of rogue wireless deployments.
Rogue access points are not necessarily malicious; they may be set up accidentally by misconfiguring router settings. An entry point for potential compromise might be caused by various misconfigurations, from a weak password to an insecure protocol. However, attackers deploy such unauthorized hotspots with malicious intent to infiltrate a network. Threat actors may deploy rogue access points posing as legitimate public wireless networks in airports, hotels, cafés and tourist areas. These deployments are called “evil twins” and can trick users into connecting to attacker-controlled infrastructure capable of intercepting traffic, harvesting credentials, or performing man-in-the-middle attacks. Further risk lies in the potential compromise of local network devices or even malware distribution. Such threats complement our findings, underscoring the importance of implementing traffic encryption, using a security solution and exercising extreme caution while browsing via public networks.
Conclusion
The wardriving assessment conducted in Mexico City, Guadalajara, and Monterrey revealed that modern wireless infrastructure continues to present multiple forms of operational exposure despite the widespread adoption of WPA2 and WPA3 security standards. The analysis demonstrated that wireless environments are highly standardized in all the locations, with recurring ISP deployments, default SSID naming conventions, homogeneous manufacturer distribution, and predictable channel allocation practices observed in all three cities.
Although most of the detected networks were classified as secure under WPA2/WPA3 authentication mechanisms, a significant proportion were exposing additional attack surfaces through enabled WPS functionality, default configurations, sequential SSID structures, and infrastructure metadata disclosure. This demonstrates that encryption strength alone is insufficient for evaluating the overall security posture of wireless infrastructure. Additionally, the prevalence of open networks and legacy wireless configurations indicates that insecure deployments are still operationally relevant in all the locations.
The results also showed that wireless infrastructure is heavily concentrated within the 2.4 GHz spectrum, particularly around channels 11, 6, and 1. This leads to elevated congestion and increased co-channel interference in densely populated urban environments.
SSID analysis further revealed that publicly broadcast wireless identifiers frequently expose valuable operational information about ISPs, equipment manufacturers, deployment templates, organizational ownership, and user-defined naming practices. The identification of default ISP naming conventions, sequential SSID structures, and BSSID-derived SSIDs demonstrated that many deployments prioritize operational convenience and simplicity over exposure minimization and privacy.
The scope of the threats stemming from vulnerable wireless configurations poses serious digital exposure risks for users. The widespread presence of standard deployments, predictable SSID naming and publicly exposed infrastructure identifiers can facilitate passive reconnaissance, infrastructure fingerprinting and opportunistic targeting.
Recommendations
To minimize the risks of wireless-based exposure and the attack surface related to hotspot infrastructure, we recommend taking the following measures:
Disable WPS functionality on wireless routers whenever possible, particularly within WPA2/WPA3 deployments.
Avoid using default SSID naming conventions that disclose ISP providers, router manufacturers, or deployment templates.
Refrain from using personal, organizational, or location-based identifiers in wireless network names.
Avoid configuring SSID using BSSID or naming conventions derived from MAC addresses, as these may expose hardware fingerprinting information.
Promote migration toward modern WPA3-capable infrastructure while removing legacy wireless protocols when operationally feasible.
Reduce wireless congestion by optimizing channel allocation strategies and minimizing excessive dependence on the 2.4 GHz spectrum.
Encourage adoption of 5 GHz and newer wireless technologies to reduce interference and improve spectrum efficiency.
The findings presented in this assessment emphasize the importance of combining strong wireless encryption standards, secure deployment practices, exposure minimization strategies, and user awareness to enhance the overall security posture of wireless environments.
One of the biggest football (soccer) events of this summer is the World Cup 2026. The tournament is co-hosted by three countries: the U.S., Canada, and Mexico. Unfortunately, events of this scale attract not just fans, but also scammers from all over the globe. We’ve already covered how cybercriminals are prepping for the World Cup online, and today we’re talking about digital security for fans on the ground in Mexico.
The country will host 13 matches and welcome millions of tourists. They’ll be staying in hotels, heading to games, checking out restaurants, navigating airports, and visiting popular tourist spots — and everywhere they go, the temptation to connect to public Wi-Fi will be high.
We’ve surveyed more than 84 500 (!) public Wi-Fi access points in Mexico City, Guadalajara, and Monterrey — and we have a lot to share about their security. Spoiler alert: many networks are still using outdated security standards, so you really shouldn’t go on vacation without reliable protection and an eSIM.
What and how we tested
Walking across Mexico looking for public Wi-Fi access points would have been a bit tough, though that’s exactly what we did for a similar Wi-Fi security survey in Paris. You can check out the results of that in our post, How safe is Wi-Fi in Paris?
This time the mission was far more demanding: mapping the wireless landscape of three major metropolises. That’s why we went wardriving — scanning for and logging wireless networks from a moving vehicle while equipped with a smartphone or laptop. It’s similar to searching for Wi-Fi on your phone, where the device constantly listens for nearby networks. Except instead of connecting to them, we just collect data about them.
All information was used strictly for passive observation and infrastructure analysis. Beyond receiving publicly broadcast service information, the experts of Kaspersky’s Global Research and Analysis Team (GReAT) didn’t attempt to authenticate, intercept traffic, exploit systems, or otherwise interact with the wireless networks they discovered. Mobile access points deployed in cars and on mobile devices were excluded from the sample.
Our main target was Mexico City — the capital and one of the most densely populated cities in Latin America. We took a drive through popular tourist spots: Mexico City Stadium, Mexico City International Airport, Zócalo, Paseo de la Reforma, Colonia Roma, La Condesa, Polanco, Coyoacán.
In Guadalajara and Monterrey, we drove similar routes: stadiums, main avenues, airports, and popular neighborhoods. Below you can see a heatmap of the areas we covered, ranging from red for areas with the highest density of public access points, through yellow and green, to blue for the lowest concentration.
Heatmap showing the locations of all Wi-Fi access points we covered in Mexico City
Heatmap showing the locations of all Wi-Fi access points we covered in Guadalajara
Heatmap showing the locations of all Wi-Fi access points we covered in Monterrey
We used passive radio reconnaissance to log 84 500 signals and 69 500 unique network identifiers across these three cities. The majority of the signals were caught in Mexico City (61.4%), followed by Guadalajara (23.6%) and Monterrey (14.8%).
What we analyzed:
Wireless network identifiers (SSIDs): the names that show up in your list of available Wi-Fi networks
Information that can be gleaned from these identifiers
Default router configurations and how ISPs deploy their networks
Frequencies used and signal characteristics
Channel load and radio frequency spectrum usage
Wireless network security configurations:
Open and insecure networks
Networks with WPS enabled
Secure networks (WPA2/WPA3) with WPS activated
You can find the full version of the study on the Securelist blog.
Telltale public Wi-Fi access point names
Network names (SSIDs) can tell you a lot by unintentionally revealing information about hardware manufacturers, ISPs, deployment methods, and whether an access point belongs to a business or a private user.
About 34% of the public Wi-Fi networks we logged didn’t bother changing their names at all, either sticking with the factory SSIDs from the router manufacturers or using standard naming conventions from their ISPs. For attackers, this can be a pretty solid hint, since this kind of network name lets them know which provider owns a given access point, what hardware is being used, and how it’s likely configured by default.
Another troubling nuance is the large number of Wi-Fi networks (over 30%) that use the access point’s MAC address (BSSID) as the visible network name. The first few bytes of a BSSID contain an Organizationally Unique Identifier (OUI), which gives away the router’s manufacturer. This is a useful lead for bad actors: they can find out who made the hardware and test for vulnerabilities specific to that brand’s models.
Is Mexican Wi-Fi well-protected?
An access point secured with WPA2/WPA3 can be considered more or less safe. All other authentication mechanisms yield much weaker results. We grouped the public Wi-Fi networks into four categories:
Secure (WPA2/WPA3)
Unsecured (open/WEP)
Weak (WPA)
Undetermined
The results are roughly the same across all three cities: about 82% of all analyzed access points are protected by secure standards. The outdated and insecure WPA protocol was practically nonexistent. However, more than 10% of the access points turned out to be completely unsecured. Connecting to these networks carries the risk of traffic interception and hidden surveillance.
But security isn’t evaluated by WPA protocols alone. We also checked for the presence of WPS, the infamous feature for quickly connecting to a network without entering a password, which is highly vulnerable to attacks. It turned out that WPS is enabled on nearly half (47%) of the access points in Mexico City, 43% in Guadalajara, and 41% in Monterrey. On average, 45% of the access points are potentially vulnerable to WPS-related attacks — sacrificing security for the sake of convenience.
What’s more, this feature frequently remained active even on seemingly secure WPA2/WPA3 networks — about half of them utilized WPS. This shows that having WPA2/WPA3 is still not enough to consider a Wi-Fi access point safe, as additional features like WPS can still leave the door open to attacks.
What else every tourist needs to know
Digital risks on a trip aren’t limited to public Wi-Fi alone, especially now that many are shifting away from public Wi-Fi to an eSIM. There are still plenty of threats in crowded places: public USB chargers, QR codes with swapped links, NFC and Bluetooth attacks, and, of course, social engineering tactics. Let’s break it all down.
Charging stations. Public USB chargers can also be dangerous: bad actors could potentially gain access to the data on your device or try to install malware. We covered these attacks in detail in our post, Data theft during smartphone charging.
Dangerous QR codes. Criminals can plant phishing QR codes in popular tourist spots. The pretexts can vary wildly; for instance, ads for team-specific fan “events”, or links supposedly offering discounts or restaurant menus. In reality, any QR code posted on the street can be considered insecure by default, and you shouldn’t scan them with your smartphone unless you have a QR code threat analyzer installed.
Fake broadcasts, tickets, and betting pools. Earlier, we described cases where bad actors were distributing malware via fake IPTV apps to capitalize on the WC26 hype. Remember, even if you plan to watch the tournament from home, you still need to stay alert and not trust the first sites that pop up advertising free broadcasts, offering betting pools, or promising unbelievably generous payouts.
Despite the prevalence of secure WPA2/WPA3 public Wi-Fi access points in Mexico City, Guadalajara, and Monterrey, our study shows that public Wi-Fi networks remain vulnerable. It’s also important to remember that attackers can create fake networks — so-called evil twins — disguised as legitimate public Wi-Fi in airports, hotels, cafés, and tourist spots.
For the average user, it’s practically impossible to tell how safe a specific access point is when trying to connect. That’s why the safest option is to use cellular data to access the internet — completely eliminating the need for Wi-Fi. Besides, there’s no need to research the nuances of local laws, rates, and other cellular details for every country you plan to visit; you can just buy a global eSIM online in two clicks. We explained how to make the entire process hassle-free in our post, Internet on the go with Kaspersky eSIM Store.
If you still plan on connecting to public Wi-Fi, always use a VPN to secure your device and data when connecting to unfamiliar — especially unsecured — Wi-Fi networks. This creates an encrypted tunnel between your device and the VPN server, making it impossible to intercept your data along the way. Haven’t picked a VPN yet? Try Kaspersky VPN Secure Connection, which is included with both Kaspersky Premium and Kaspersky Plus subscriptions.
Now, if you still plan to attend the World Cup without any cybersecurity solution, at least follow these basic rules of digital hygiene:
Don’t use public USB chargers
Don’t send sensitive information over connections that aren’t secure
Don’t log in to banking, email, or social media accounts over unsecured Wi-Fi
Turn off Bluetooth and NFC while walking around in crowded places
Don’t trust QR codes posted on the street
Connect to public Wi-Fi only when absolutely necessary
What else to read to make sure cheering for your favorite team isn’t only exciting, but also safe:
Amazon Web Services (AWS) is pleased to announce that the Spring 2026 System and Organization Controls (SOC) 1, 2, and 3 reports are now available. The reports cover 188 services over the 12-month period from April 1, 2025–March 31, 2026, giving customers a full year of assurance. These reports demonstrate our continuous commitment to adhering to the heightened expectations of cloud service providers.
AWS strives to continuously bring services into the scope of its compliance programs to help customers meet their architectural and regulatory needs. You can view the current list of services in scope on our Services in Scope page. As an AWS customer, you can reach out to your AWS account team if you have any questions or feedback about SOC compliance.
Modern infrastructures universally rely on containerization to deploy applications, scale services, and build cloud platforms. The use of Docker, Kubernetes, and similar technologies has become the corporate standard for efficient automation. However, as containers grow in popularity, so does the interest of malicious actors — a trend we actively track in our research into advanced cyberthreats. For instance, in one of its recent attacks, the APT group TeamPCP compromised Checkmarx KICS across multiple attack chains for different vectors. This included poisoning a Docker Hub repository to later steal Kubernetes secrets and other sensitive data. The tainted images distributed a stealer that was loaded during the KICS scanning process.
Today, attacks on container environments have evolved into full-fledged, multi-stage scenarios involving supply chain compromises, Kubernetes secrets theft, orchestration API abuse, and container escape attempts. This article examines the primary container attack vectors that retain top relevance today.
Principles of containerization
A container is an isolated code execution environment, designed to partition resources so applications can run correctly and independently. Unlike a virtual machine, a container uses the single underlying kernel of the host operating system.
To isolate the environment, a container uses a distinct process namespace and a virtual file system. Container resources are capped and shared with the host system. This container isolation is built on top of Linux kernel features such as namespaces, cgroups, capabilities, and seccomp.
Compromising a container can help attackers achieve their objectives on the host system itself. Below, we examine the current vectors relevant to container implementation architecture and infrastructure.
Current attack vectors
The primary and most critical attack vectors targeting container environments that are actively exploited by malicious actors include:
Exploiting vulnerabilities in the host system and container runtime components
Malicious activity inside a compromised container
Container escape followed by host compromise
Exploiting misconfigurations and the insecure use of containerization and orchestration APIs
Supply chain attacks, including container image poisoning and CI/CD pipeline compromise
Each of these vectors can be utilized either independently or as part of a complex, multi-stage attack chain. In practice, attackers rarely stop at compromising a single container; their primary objective is often to gain access to the Kubernetes cluster, secrets management systems, or other mission-critical environment components. This is why securing container infrastructure requires a comprehensive approach that spans configuration auditing, runtime protection, activity monitoring, and software supply chain security. Let’s take a closer look at each of these vectors.
Exploiting host system vulnerabilities
Because a container does not have its own isolated OS, vulnerabilities affecting the Linux kernel or runtime components remain just as critical when exploited from within a container.
Any vulnerability that allows for privilege escalation, arbitrary code execution, or isolation bypassing can potentially be leveraged by an attacker once the container is compromised. Successful exploitation of these flaws can lead to a container escape, compromise of the Kubernetes node or the entire cluster, lateral movement across the infrastructure, secrets theft, and malicious actions potentially culminating in a complete service disruption. It is worth noting that the mere presence of a vulnerability does not always guarantee a compromise, as exploitation sometimes requires specific configuration settings or privileges to work.
Below are examples of several vulnerabilities leveraged in attacks on container environments:
CVE-2019-5736 is one of the most prominent and illustrative vulnerabilities associated with containerization. It affected the runC runtime environment and allowed an attacker, who already had root access inside the container, to execute arbitrary code on the host system with root privileges. The root cause of the vulnerability was runC’s improper handling of the file descriptor for its own executable via the /proc/self/exe mechanism. When a container was started, the runC process temporarily executed within the container’s context while remaining a host system process. This allowed an attacker to gain access to the runC binary and overwrite its contents.
CVE-2022-0492 is a critical Linux kernel vulnerability that allows for container escape and arbitrary command execution on the host system. The flaw stemmed from improper privilege validation when interacting with the cgroups release_agent mechanism. This vulnerability posed a particular risk for container infrastructures because it allowed an attacker who already possessed code execution capabilities inside a container to break out of isolation and gain control of the host system.
CVE-2024-21626 is a critical vulnerability in runC that allowed an attacker to access the host file system from within a container, and in specific scenarios, even perform a complete container escape. The root cause of the issue was runC’s improper handling of file descriptors and the process’ current working directory when spinning up containers or executing commands via docker exec or similar mechanisms.
Malicious actions inside the container
Sometimes, an attacker does not need to exploit complex attack chains involving container escapes, Kubernetes cluster compromise, or lateral movement to achieve their goals. In many cases, the container itself already houses data and resources that are highly valuable to the attacker. For example, a container may contain:
User and service credentials
API keys
Access tokens
SSH keys
Environment variables containing secrets
Kubernetes ServiceAccount tokens
Configuration files
Application service data or databases
These types of data are especially prone to exposure due to configuration mistakes or specific operational processes. For instance, secrets might be passed via environment variables, baked into Docker images during the build phase, or mounted directly inside the container. In Kubernetes environments, automatically mounted ServiceAccount tokens are of particular interest to attackers, as they provide a direct pathway to interact with the Kubernetes API.
Even a single compromised container frequently provides an attacker with sufficient leverage for next steps: gaining access to external services, compromising cloud infrastructure, stealing user data, impersonating a trusted service, or establishing persistence within the environment. Beyond data theft, malicious actors can use a compromised container as a staging ground for further malicious activity. This is why securing container infrastructure is about much more than just preventing escapes. Even a fully isolated container, if it houses sensitive data or holds access to internal services, can become a major foothold for an infrastructure breach.
In the context of this vector, approaches and techniques applicable not only to container environments but also to traditional systems are frequently applied. Once an attacker gains access to a container, they usually find themselves in a full-featured Linux environment, allowing them to deploy standard post-exploitation, reconnaissance, and persistence methods.
We explored container configuration errors and other unsafe practices that attackers could exploit to carry out malicious activities in more detail in this article.
Container escape
Container escape is one of the most dangerous and prevalent attack vectors targeting container infrastructure. The term refers to the bypassing of container isolation, allowing an attacker to directly interact with the host system.
The opportunity to escape a container can arise from a multitude of sources: the exploitation of vulnerabilities, container misconfigurations, or the insecure use of containerization and orchestration APIs. Indeed, container escape is the logical conclusion of most attacks on container infrastructure, as the attacker’s ultimate goal is frequently to break out of the isolated environment and gain access to the host system or the broader Kubernetes cluster. As such, container escape ties together a significant portion of the attack vectors discussed in this article. In practice, misconfigurations remain one of the most common root causes of successful container escapes, as they occur far more frequently than the exploitation of complex vulnerabilities. With that in mind, we will take a closer look at container misconfigurations and their associated attack scenarios below.
To better understand the risks associated with container misconfigurations, let’s explore the concept of capabilities in Linux systems. This is a mechanism for granularly granting extended permissions to processes, allowing them to perform privileged actions without needing full root access.
Privileged containers
One of the most dangerous configurations is running a container with the --privileged flag. In this mode, the container is granted all Linux capabilities, direct access to host devices, and the ability to interact with kernel interfaces. A container configured this way virtually ceases to be an isolated environment and, in many cases, possesses capabilities comparable to root access on the host system.
Let’s look at a basic example of a container escape attack involving the --privileged flag. Using the capsh utility, you can see that such a container possesses virtually all Linux capabilities. Furthermore, if the PID namespace matches the host’s, the process with PID=1 corresponds to init, the first system process in Linux. In a different configuration, PID 1 would belong to the process that created the container. If we spawn a shell from the init process using the nsenter utility, the expected behavior is the creation of a process outside the container, which can easily be verified by using the hostname command.
Container privilege misconfigurations open up a broad attack surface. Let’s dive deeper into how specific capabilities can be used to execute a container escape.
CAP_SYS_ADMIN
CAP_SYS_ADMIN is considered one of the most dangerous Linux capabilities in the context of container security. Although Linux capabilities were originally intended to break down superuser privileges into discrete categories, over time, CAP_SYS_ADMIN became a catch-all for a massive number of sensitive kernel operations. As a result, a container granted this capability gains access to a wide array of system mechanisms that directly impact container isolation. It inherits the ability to mount file systems, interact with the cgroups mechanism responsible for resource allocation, modify kernel parameters within certain limits, work with loop devices, and utilize various namespace management features. In practice, this heavily blurs the line between the container and the host system.
This capability becomes especially dangerous when combined with other configuration errors. For instance, if the container is configured to use the hostPath parameter, an attacker can leverage a container compromise to mount the host system’s directories right into their own environment and access critical host files. Similarly, having access to /proc or /sys allows for direct interaction with internal Linux kernel mechanisms, which can drastically expand the blast radius of the breach.
Let’s look at a clear example of how having CAP_SYS_ADMIN can help an attacker escape a container. Illustrated below is the sequence of actions inside a container possessing CAP_SYS_ADMIN privileges and access to host directories. By mounting the host’s disk to a folder inside the container, the attacker can freely interact with all files on the host system. In this specific example, it shows the ability to overwrite the root user’s shell configuration by injecting an arbitrary malicious payload.
CAP_SYS_MODULE
CAP_SYS_MODULE provides direct access to the kernel module loading and unloading mechanism. This direct interaction with kernel space makes CAP_SYS_MODULE a high-risk capability, unlike many other capabilities that are restricted purely to user space.
From a Linux architectural standpoint, kernel modules consist of code executing with maximum privileges inside kernel space. These modules can extend system functionality, manage devices, handle the network stack, interface with file systems, and control other mission-critical components. This is why the ability to dynamically load these modules via CAP_SYS_MODULE equates to having the power to manipulate the behavior of the entire operating system.
In practice, modern containerized applications rarely require CAP_SYS_MODULE. The presence of this capability is typically tied to legacy architectures, monitoring systems, or specialized drivers that must interact directly with the kernel. This is why CAP_SYS_MODULE is almost universally banned in modern infrastructures. In most environments, it is considered an unacceptable risk because its compromise does not just lead to localized privilege escalation within the container, but to code execution directly in kernel space.
A container escape using this capability happens in several stages. The goal of the attack in this case is to load a malicious Linux kernel module. It is worth noting that the module must match the specific kernel version in use, requiring the attacker to perform additional reconnaissance to identify it. These attacks can be executed entirely within the container if it contains the necessary build tools to compile the module and has access to kernel dependency directories. However, because these utilities are typically stripped from container images, attackers usually compile the malicious payload with the required dependencies on an external host. They then either transfer it over the network or drop it into a binary file on the target by using a command like echo.
Let’s look at a container escape using a kernel module with the following payload example:
Upon loading, this module triggers the reverse shell. Once the payload is built and successfully delivered to the container, all the attacker needs to do is start a listener on the IP address and port specified in the payload, and then load the module into kernel space.
CAP_SYS_PTRACE
The CAP_SYS_PTRACE capability grants a process elevated permissions to interact with other system processes via the ptrace system call. While it is designed for debugging and code tracing, its misconfiguration in containerized environments can severely weaken isolation and, under certain conditions, enable a container escape leading to host system compromise.
The primary risk of CAP_SYS_PTRACE is that it allows a process to read and modify the memory of other processes, control their execution, inject code, and extract sensitive data directly from memory. Furthermore, CAP_SYS_PTRACE enables process injection techniques.
If a container is compromised, an attacker can use ptrace to attach to host processes. Crucially, this is only possible if the host’s PID namespace is shared with the container — this is configured via hostPID: true. This configuration allows the attacker to target a process running on the host, inject code, and trigger a reverse shell — though in most cases, this requires additional malicious code. The image below demonstrates this kind of an attack, implemented using a publicly available PoC.
CAP_NET_ADMIN
CAP_NET_ADMIN provides extensive privileges to manage the network stack of a Linux system. If a container is compromised, the presence of this capability significantly weakens network isolation and creates additional opportunities for further exploitation.
A container equipped with CAP_NET_ADMIN can modify network interface configurations, manipulate routing tables, interact with traffic filtering mechanisms, and alter the behavior of the network stack. Although most of these operations are formally restricted to the container’s own network namespace, in practice, this capability is frequently combined with other misconfigurations — such as the hostNetwork: true parameter — which grants direct access to the host’s network resources.
Once inside the container, an attacker can leverage this capability to modify its network behavior and launch further attacks across the infrastructure. One of the most common scenarios involves manipulating iptables rules to redirect traffic. This enables man-in-the-middle (MitM) attacks, allowing the attacker to intercept internal traffic or mask their own malicious activities.
It is important to emphasize that there are many other Linux capabilities that can lead to a container escape when combined with specific misconfigurations; we have highlighted only a few of the most severe and frequently encountered.
Exploitation of orchestration APIs
One of the most dangerous and common attack vectors in containerized infrastructure is the exploitation of misconfigured container management and orchestration APIs. Unlike attacks that require complex kernel vulnerability exploits or container escape, this scenario is often remarkably straightforward: the attacker simply needs to gain access to the control interfaces of the container environment.
The fundamental risk stems from the fact that container platform APIs possess inherent administrative privileges over the entire infrastructure. The Docker API, Kubernetes API, and kubelet API are designed to spin up containers, modify configurations, access host file systems, and execute commands inside running containers. When misconfigured, these interfaces immediately become a point of failure for the entire environment.
One of the most notorious examples of this vector is an exposed Docker API. If the Docker daemon is accessible over TCP without TLS or authentication, an attacker can remotely interact with the host system with permissions equivalent to a local administrator. They can deploy new containers custom-configured for attacks, mount the host’s entire root file system, and execute arbitrary commands within any container via the API. In practice, compromising an unauthenticated Docker API typically leads to a complete host takeover after just a few API requests.
Similar risks exist within Kubernetes environments. The Kubernetes API server acts as the central control point for the entire cluster. If an attacker manages to compromise a ServiceAccount token, exploit weak RBAC policies, or discover an inadvertently exposed API server, they can execute a broad spectrum of destructive operations.
For the sake of this attack example, let us assume that an attacker has compromised a Kubernetes API token for a privileged account. First, they enumerate the token’s permissions, typically by running a script to query each individual capability. This gives them a full list of Kubernetes privileges.
The script’s output reveals that the compromised API token grants exceptionally high privileges within the cluster. The logical next step in the attack chain is to deploy a malicious, privileged container to execute any of the host escape techniques described above. In our example, the attacker used a curl POST request to the API to create the container:
Once the privileged container is deployed, the attacker can execute an escape to compromise the underlying host system.
However, this is not the only high-risk scenario involving API requests. For instance, when a Docker socket is mounted inside a container, an attacker gains the ability to interact with the Docker daemon directly. Once that container is compromised, the attacker effectively inherits the privileges of the daemon, which means they gain control over all containers on the host.
To execute the attack, adversaries look for containers with mounted sockets. The further progression of the attack replicates what has been described above: an API request is made to create a privileged container, after which any escape method is similarly exploited using the API.
Supply chain attacks
Unlike classic attacks aimed at exploiting vulnerabilities in already deployed containers, this approach focuses on compromising components before they are even launched in the runtime environment. Modern container infrastructure is tightly integrated with a large number of external components. As a result, container security directly depends not only on the application itself, but on the entire image build and delivery chain. Compromising any of these stages potentially allows an attacker to inject malicious code into multiple containers and services simultaneously.
One of the most common scenarios involves attacks that contaminate container images. In many organizations, developers use public images from Docker Hub or other available sources without a full verification of their origin or contents. Threat actors frequently publish contaminated images that masquerade as popular services and utilities. Once a container like that is launched within the infrastructure, the attacker gains the ability to execute their own code right inside the organization’s trusted environment.
Furthermore, CI/CD container deployment systems are among the most frequent targets of these attacks. Application build and delivery platforms typically possess elevated privileges. For instance, after gaining access to a CI/CD system, an attacker can covertly modify the Docker image build stages. Instead of altering the application’s source code, the attacker can inject the malicious logic directly into the pipeline itself. An additional command during the build process can download a third-party binary, add a hidden script, modify the container configuration, or implant a remote management mechanism. Externally, the container will look completely legitimate because its core functionality remains unchanged.
Takeaways
Overall, modern attacks on container environments demonstrate that the primary threat arises not just from within the container itself, but from the implementation of the container infrastructure as a whole. Containers are frequently exploited as an initial foothold to establish persistence within a system; following an initial compromise, attackers aim to either escalate to the host OS level or gain control over infrastructure management via containerization and orchestration APIs. To achieve this, they exploit weak configurations, excessive capabilities, and isolation flaws.
Furthermore, there is a visible trend of attacks shifting toward CI/CD pipelines, where compromising a single component can lead to a full infrastructure takeover. Therefore, under current realities, securing containerized environments requires an approach that encompasses host protection, strict access control within the orchestrator, minimization of container capabilities, and comprehensive validation of the entire supply chain. Our solution Kaspersky Container Security has been designed with the specific characteristics of container environments in mind and provides protection at various levels from container images to the host system helping to implement the principles of secure software development.

 Login
Login