Reading view

Threat tactic spotlight: Subdomain takeover

In this blog post you’ll learn how to detect and prevent subdomain takeover – a tactic where threat actors exploit dangling DNS records to redirect traffic to attacker-controlled resources. We’ll explain the issue, how the situation arises, and how you can use various AWS features and services to help mitigate the impact of this tactic.

Under the shared responsibility model, securing configurations in the cloud is your responsibility. AWS supports you through strong defaults, guidance in the Security Pillar of the Well-Architected Framework, and security services to help you meet that responsibility. The AWS Customer Incident Response Team (AWS CIRT) also monitors for new and trending tactics that threat actors use to exploit specific customer configurations, so that you can make informed design decisions and improve your response plans.

AWS CIRT has observed threat actors actively scanning for public DNS CNAME records that point to resources that no longer exist, looking for subdomain takeover opportunities.

Note: The subdomain takeover tactic does not leverage vulnerabilities of AWS services. It exploits a dangling DNS record to redirect traffic to an attacker-controlled resource.

Quick DNS Primer

CNAME Records: A CNAME (Canonical Name) record is a DNS entry that points one domain name to another. For example, api.example.com can be configured to point to api.example.s3-website-us-east-1.amazonaws.com. This feature of DNS enables users to configure a memorable, human-friendly domain name while the actual resource lives at a longer, machine-generated AWS hostname. A security issue emerges when the target resource is deleted but the CNAME record pointing to it remains – creating a “dangling” record.

Dangling Records: When a resource (like an S3 bucket) is deleted but the DNS record pointing to it is left behind, that DNS record becomes “dangling”, pointing to a resource that no longer exists. For resources in globally shared namespaces, threat actors can potentially reclaim the name of your deleted resource and serve malicious content through your DNS record.

What is subdomain takeover?

A subdomain is a prefix added to a domain that allows you to organize access to your resources. A subdomain takeover occurs when you delete the underlying resource and a threat actor creates a new resource with the same name to take advantage of the DNS records still pointing to it.

A subdomain takeover is possible when a CNAME record points to an AWS resource that uses a globally shared DNS namespace where the resource name can be chosen by any AWS customer. The following AWS resources meet these criteria:

Amazon S3 (global namespace): Bucket names like mybucket.s3.amazonaws.com are globally unique and can be claimed by any account if the bucket is deleted. Note: S3 buckets created with account regional namespaces (launched March 2026) are scoped to your account and are not subject to this issue.

Amazon CloudFront: Distribution domain names like d111111abcdef8.cloudfront.net are assigned by AWS and cannot be chosen by an attacker. However, if you delete a distribution and another customer creates one that happens to receive the same domain name, a dangling CNAME could resolve to their content.

AWS Elastic Beanstalk: Environment names like myapp.elasticbeanstalk.com are globally unique and can be claimed by any account if the environment is terminated.

Resources like Amazon VPC, Amazon EC2 instances, or private hosted zones are not subject to this tactic because they do not expose globally claimable DNS namespaces.

MITRE ATT&CK classifies this technique under T1584.001: Compromise Infrastructure – Domains.

Analyzing an example scenario

Consider the following scenario:

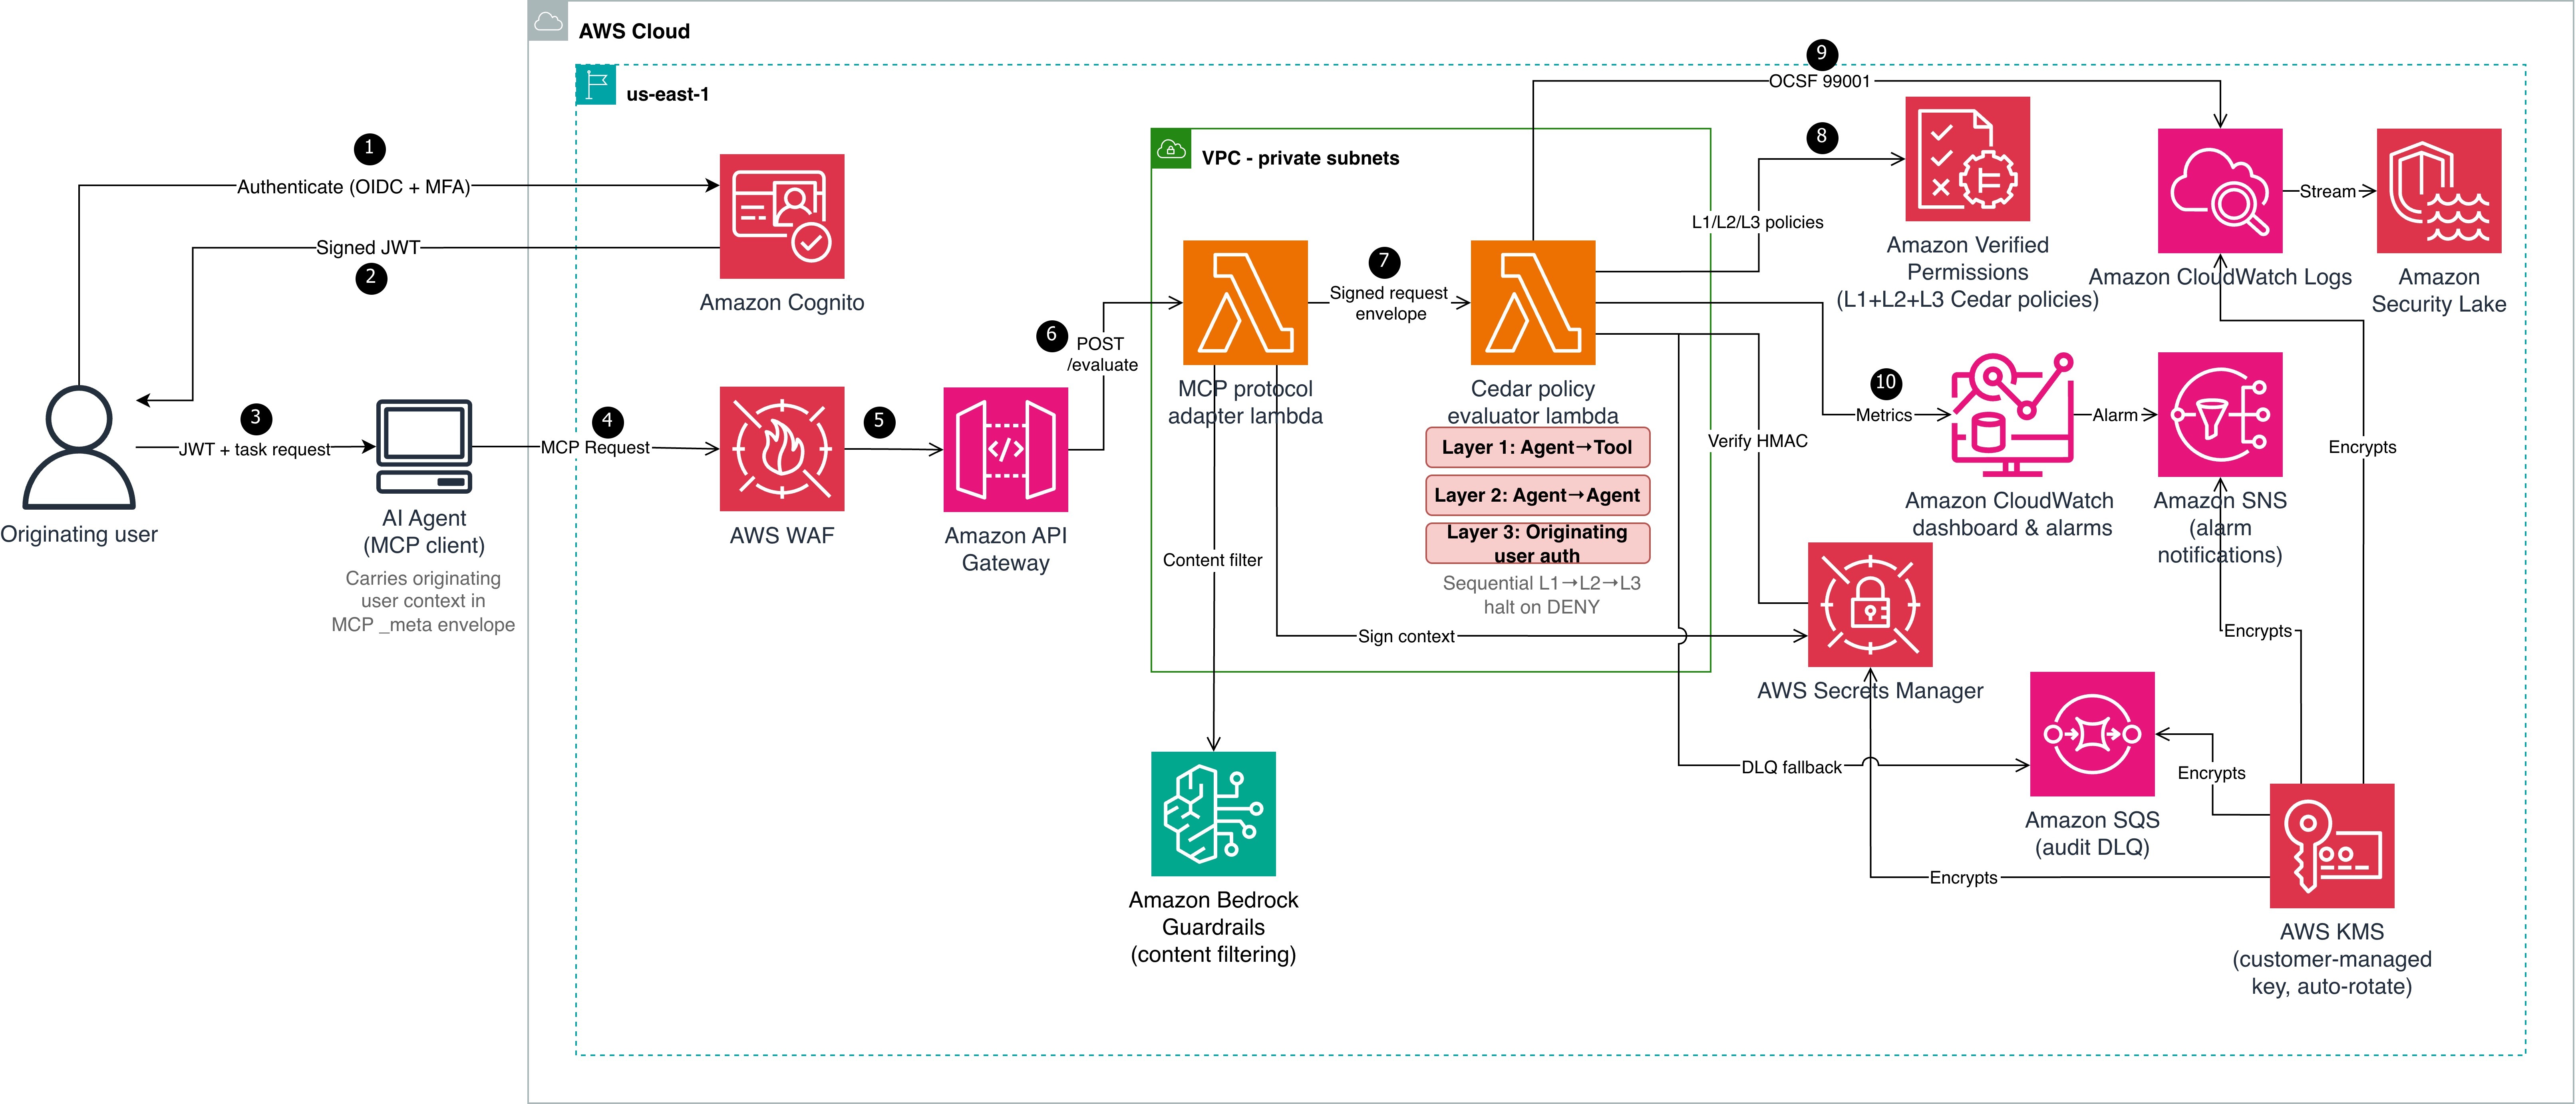
You create a DNS CNAME record pointing to your S3 website endpoint. The subdomain subdomain.example.com now resolves to subdomain.example.s3-website-us-east-1.amazonaws.com, which serves content from the S3 bucket named subdomain.example. If your team deletes the bucket and forgets to delete the DNS record, users that navigate to the site will see an error stating that the bucket doesn’t exist. However, at this point, if a threat actor sees this error and moves in to claim the bucket name, they will be able to set up their own site that users will see when they navigate to the subdomain.example.com site.

Figure 1 shows an S3 bucket named subdomain.example (a globally unique bucket name) configured to host a static website, with the S3 website endpoint subdomain.example.s3-website-us-east-1.amazonaws.com.

Figure 1: S3 bucket configured as a static website

Figure 1: S3 bucket configured as a static website

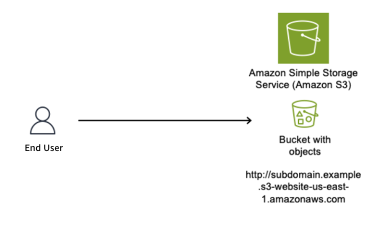
As shown in Figure 2, we use Amazon Route 53 to create a CNAME record to resolve to our Amazon domain name; to give users a friendly name and so they do not have to remember the long S3 website name in URLs.

Figure 2: DNS Resolver configured with CNAME record pointing to origin bucket

Figure 2: DNS Resolver configured with CNAME record pointing to origin bucket

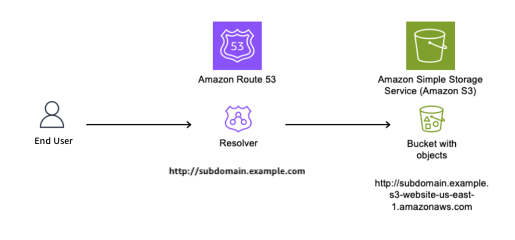
The customer’s AWS administrator decides to stop serving content from the S3 bucket and deletes it, as shown in Figure 3.

Figure 3: Resource deleted without removing the CNAME record

Figure 3: Resource deleted without removing the CNAME record

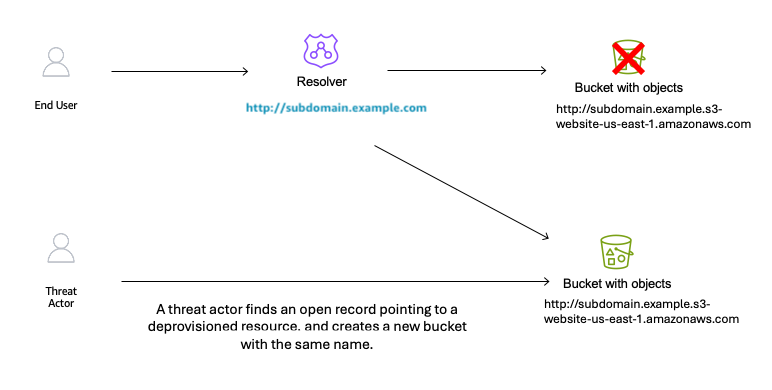
With the S3 bucket deleted and the CNAME record still in place, the DNS record is now dangling. A threat actor identifies this situation and creates a new S3 bucket with the same global name subdomain.example in an AWS account that the threat actor controls, as shown in Figure 4. The threat actor can now serve content from this new bucket, including potentially malicious content. End users remain unaware of this switch and continue to access subdomain.example.com, trusting the content because it appears to originate from a URL they recognize.

Figure 4: Subdomain takeover happens

Figure 4: Subdomain takeover happens

Potential impacts of a sub-domain takeover

Consider these potential impacts:

Reputation risk: There is a potential risk to your organization’s reputation, because you don’t control the content being served from the threat actor’s site that your DNS record points to.

Potential exposure to phishing campaigns: Users within your organization might have the subdomain bookmarked in their browser, not knowing the resource is no longer available, then unsuspectingly navigate to the site that now hosts malware or is used to phish user credentials.

Blocking: If the subdomain is flagged by security vendors for malicious activity, it could impact your business operations.

Financial loss: Subdomain takeover incidents can result in a financial impact due to the potential disruption to service delivery as you deal with the event.

Proactive detection

AWS Config for proactive detection

For proactive detection, you can use AWS Config to continuously monitor your Route 53 CNAME records and verify that the target resources exist in your account.

Prerequisite: This approach requires AWS Config recorder to be enabled for the resource types you want to monitor (S3 buckets, CloudFront distributions, Elastic Beanstalk environments). If Config isn’t recording a resource type, it won’t appear in the inventory check. For more information, see Setting up AWS Config with the console.

Why use AWS Config inventory instead of DNS resolution checks?

A common approach is to check whether a CNAME resolves to a valid endpoint. However, this method has a critical flaw: if an attacker has already claimed the resource, DNS resolution will succeed – to their resource, not yours. You would have no indication that you don’t own what’s responding.

By querying AWS Config’s recorded configuration items, you’re checking whether the resource exists in your account inventory, not just whether something responds at that DNS name. This approach correctly identifies dangling CNAMEs even after a takeover has occurred.

Implementation approach:

Account-level vs. organization-level scope

The reference implementation queries AWS Config inventory within a single account. This means that if a CNAME record in Account A points to a resource that legitimately exists in Account B within the same AWS organization, the rule will flag it as NON_COMPLIANT.

For organizations that share resources across accounts, you can modify the solution to use an AWS Config Aggregator, which queries resource inventory across all accounts in your organization. This is similar to how IAM Access Analyzer supports both account-level and organization-level scopes. To use this approach, you need an organization-level Config Aggregator already configured, and the Lambda function’s IAM role needs the config:SelectAggregateResourceConfig permission.

We recommend starting with account-level scope for simplicity, then expanding to organization-level if your environment includes cross-account resource sharing.

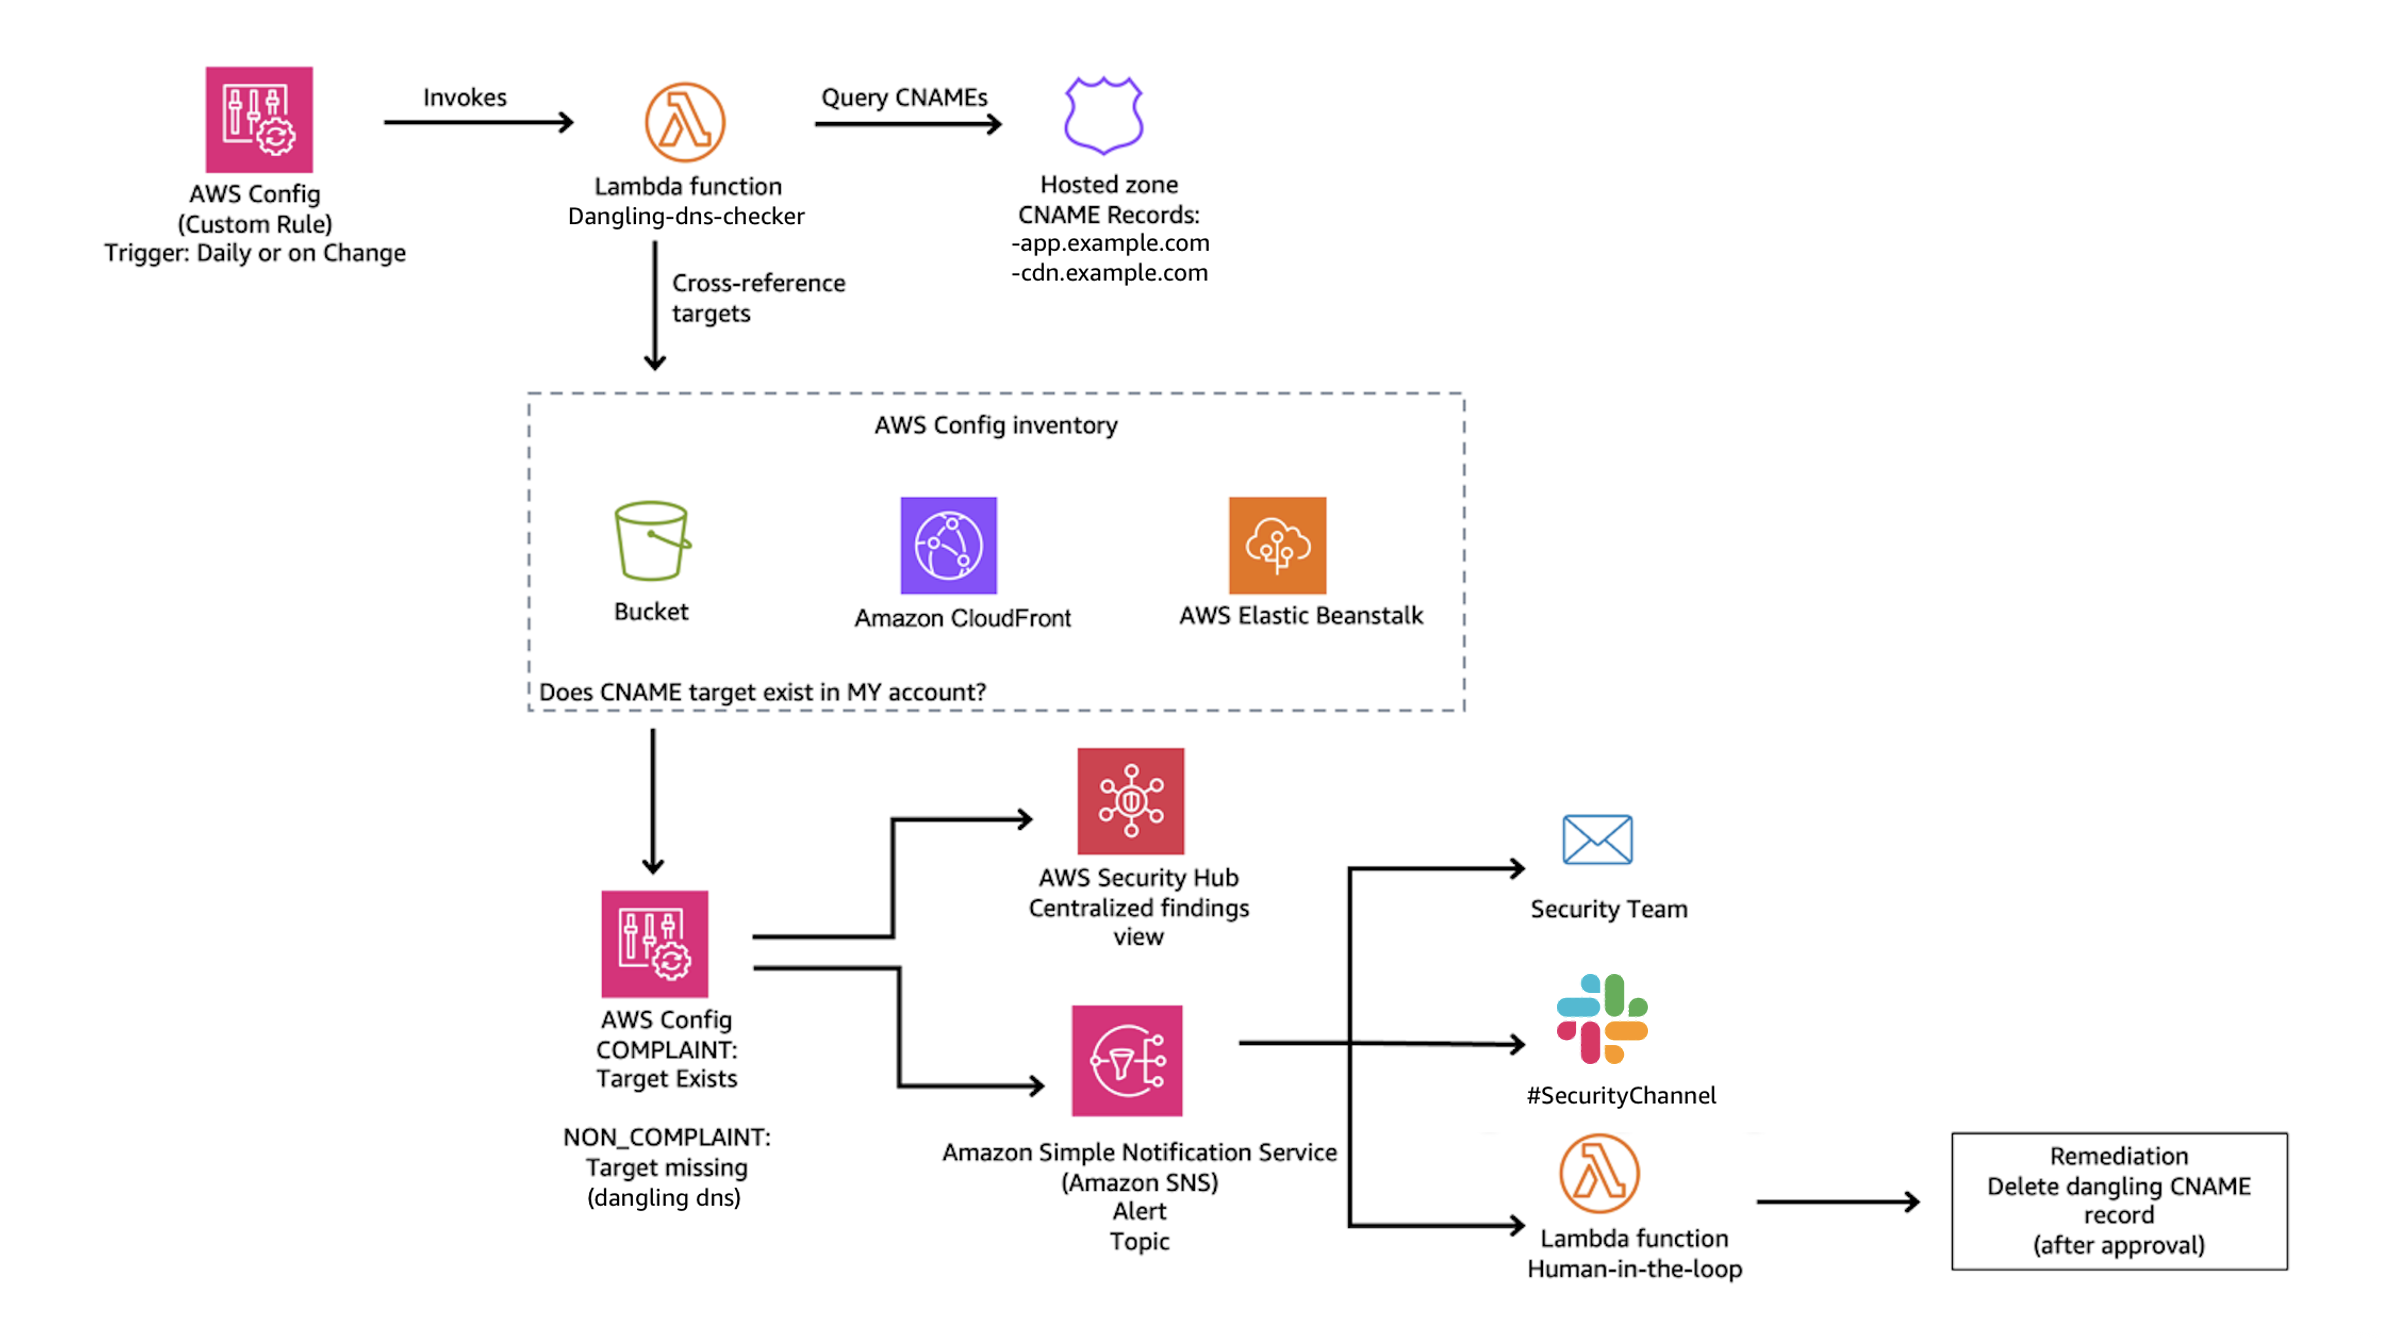
The main idea is to create a custom AWS Config rule that queries your Route 53 hosted zones for CNAME records, then parses each CNAME target to determine whether it points to a known AWS resource pattern such as S3, CloudFront, or Elastic Beanstalk. For each match, the rule cross-references the target against your AWS Config inventory to verify that the resource actually exists in your account. If the resource isn’t found, the rule marks the CNAME record as NON_COMPLIANT, surfacing it for review.

The Config rule should focus on known AWS resource patterns:

  • S3: *.s3.amazonaws.com, *.s3-website-<region>.amazonaws.com
  • CloudFront: *.cloudfront.net
  • Elastic Beanstalk: *.elasticbeanstalk.com

Note: CNAME records pointing to external third-party services are outside the scope of this detection mechanism, as those resources won’t appear in your AWS Config inventory.

NON_COMPLIANT findings from your Config rule can be routed to AWS Security Hub for centralized visibility, or trigger SNS notifications to alert your security team.

Figure 5: Dangling DNS Detection Solution

Figure 5: Dangling DNS Detection Solution

Reference implementation:

We’ve published a complete implementation of this detection approach as an open-source solution. The solution deploys a Lambda function that discovers CNAME records across all your Route 53 hosted zones and uses pattern matching to identify targets pointing to S3, CloudFront, and Elastic Beanstalk. It then queries your AWS Config inventory to verify whether each target resource still exists in your account. When a dangling record is detected, the solution generates a HIGH severity finding in Security Hub and can optionally send SNS notifications to alert your security team. A CloudWatch metrics dashboard is also included for ongoing compliance tracking.

Deployment:

# Clone the repository
git clone https://github.com/aws-samples/sample-dangling-dns-detection
cd sample-dangling-dns-detection

# Build the Lambda deployment package
./scripts/package.sh

# Upload to S3
aws s3 cp dist/dangling-dns-detection.zip s3://YOUR_BUCKET/

# Deploy the CloudFormation stack
aws cloudformation deploy \
  --template-file infrastructure/template.yaml \
  --stack-name dangling-dns-detection \
  --parameter-overrides \
      LambdaCodeS3Bucket=YOUR_BUCKET \
      EvaluationFrequency=TwentyFour_Hours \
  --capabilities CAPABILITY_NAMED_IAM

The stack creates an AWS Config custom rule that runs on your specified schedule (default: every 24 hours), evaluating all CNAME records and reporting compliance status.

Mitigating the effects

Mitigating subdomain takeover requires both preventive procedures and responsive capabilities.

Prevention: Standard operating procedure

The most effective mitigation is a standard operating procedure for resource deprovisioning that ensures DNS records are removed before the underlying resource:

  1. Within your DNS zone, delete the CNAME record that points to the fully qualified domain name (FQDN) of the resource that you plan to deprovision.
  2. Wait for the DNS TTL to expire before deleting the resource. DNS resolvers cache records for the duration of the TTL (for example, a TTL of 3600 means resolvers may serve the old record for up to one hour). If you delete the resource before the TTL expires, a threat actor could claim the resource name while cached CNAME entries are still directing traffic to it.
  3. Deprovision the resource that you no longer want to use.
  4. Run a DNS check of the CNAME record that you removed to verify that the resource is no longer resolving.

Key principle: Always delete DNS first, wait for the TTL to expire, then delete the resource. This order eliminates the window where a dangling record could be exploited.

Prevention: S3 account regional namespaces

As mentioned earlier, AWS introduced account regional namespaces for Amazon S3 general purpose buckets in March 2026. While this is a meaningful step toward mitigating the S3-specific takeover vector, there are important operational limitations to be aware of:

Existing buckets are unaffected. Buckets already created in the global namespace cannot be migrated to an account regional namespace. The bucket names remain globally unique and claimable by anyone if the bucket is deleted.

Global namespace is still the default. When creating a new bucket through the console, CLI, or SDK, the global namespace remains the default selection. Users who aren’t aware of the new option will continue creating globally-scoped buckets.

Existing IaC templates require updates. Existing infrastructure-as-code templates (CloudFormation, CDK, Terraform) that don’t explicitly opt in to the account regional namespace will continue provisioning buckets in the global namespace. For CloudFormation, this means setting the BucketNamespace property to account-regional. For other IaC tools, consult their documentation for the equivalent configuration. Organizations need to audit and update their templates to opt in.

For these reasons, the dangling DNS detection approach described in this post remains critical – particularly for organizations with existing S3 infrastructure, and for CloudFront, and Elastic Beanstalk resources where no equivalent namespace scoping exists.

Response: Notification and remediation

When a dangling DNS record is detected, the reference solution described in the Detection section automatically creates a HIGH severity finding in AWS Security Hub and reports the CNAME record as NON_COMPLIANT in AWS Config. If you provide an SNS topic ARN during deployment, the solution also sends notifications to alert your security or operations team via email, Slack, or other channels. For production environments, consider a human-in-the-loop workflow where these notifications are reviewed by a team member who approves the DNS record deletion before it’s executed. This prevents accidental deletion of legitimate records during transient issues.

The reference solution also includes a CloudWatch dashboard for tracking compliance status and evaluation metrics over time, giving your team ongoing visibility into DNS health across your hosted zones.

Note: Fully automated remediation (auto-deleting DNS records) carries risk – a false positive could disrupt legitimate services. We recommend starting with detection and notification, then evaluating automation based on your detection accuracy and operational maturity.

Conclusion

Subdomain takeover is a preventable misconfiguration that can have significant impact on your organization. A layered defense approach provides the best protection:

Prevention: Implement a standard operating procedure that deletes DNS records before deprovisioning the underlying resource.

Detection: Use AWS Config custom rules to proactively identify CNAME records pointing to resources that no longer exist in your account.

Response: Configure notifications through SNS or Security Hub so your team can respond quickly when dangling records are detected.

Monitoring: Maintain ongoing visibility through CloudWatch dashboards to track DNS health and compliance status.

The key insight is that good DNS hygiene – knowing when your CNAME records point to a nonexistent resource – is your first line of defense. Automated detection through AWS Config provides a safety net when operational procedures fail. And if you detect an issue, having a playbook ready to enact your response can lower the impact and your mean time to recovery.

If you have feedback about this post, submit comments in the Comments section below.


Matt Gurr

Matthew Gurr

Matthew is the Senior Incident Response lead in the Asia-Pacific region for the AWS Customer Incident Response Team (AWS CIRT). He has a passion for helping customers proactively prepare for a security event. In his spare time, he enjoys cycling, music, and reading.

Luis Pastor

Luis Pastor

Luis is a Senior Security Solutions Architect at AWS leading the Infrastructure Security and Compliance Technical Field Communities. He drives security architecture for enterprise customers across financial services, healthcare, and retail, specializing in cloud security transformation and regulatory compliance frameworks. Before AWS, Luis architected security solutions in hybrid cloud environments.

Geoff Sweet

Geoff Sweet

Geoff has been in industry since the late 1990s. He began his career in electrical engineering. Starting in IT during the dot-com boom, he has held a variety of diverse roles, such as systems architect, network architect, and, for the past several years, security architect. Geoff specializes in infrastructure security.

Ariam Michael

Ariam Michael

Ariam is a Solutions Architect at AWS. She has supported various customers in the Worldwide Public Sector, specifically SLG and Federal Civilian customers. She is passionate about security, specifically Data Protection helping customers implement encryption and best practices.

  •  

Customize federated sign-in with new Amazon Cognito Lambda trigger

You can use Amazon Cognito user pools to add sign-up and sign-in functionality to your web and mobile applications. You can authenticate users directly with Amazon Cognito managed accounts using passwords, passwordless flows, or custom authentication flows, or let users federate in through external identity providers (IdP) using SAML, OpenID Connect, or social providers such as Google, Facebook, Sign in with Apple, or Login with Amazon. For consumers, identity federation means fewer passwords to remember and a smoother sign-in experience. For business-to-business (B2B) software as a service (SaaS) providers, it means your tenants’ organizations keep control of their own identities rather than managing credentials on their behalf. But federation can also introduce challenges for enterprises and application developers. What happens when your enterprise customer’s SAML provider sends hundreds of group memberships that exceed attribute size limits? Or when your ecommerce customer forgets they already have an account and tries to sign in with a different social provider, creating duplicate records?

In this blog post, I introduce the inbound federation Lambda trigger for Amazon Cognito, a new feature that gives you programmatic control over federated authentication flows. This AWS Lambda trigger intercepts the federated authentication response immediately after your external identity provider responds to Cognito, so you can transform, filter, and enrich user attributes before the user profile is created and user attributes are mapped in your user pool.

Understanding the inbound federation Lambda trigger

The inbound federation Lambda trigger is invoked after your Amazon Cognito user pool has received and verified the response from the external IdP. The request payload for the federated IdP response is then sent from Cognito to your Lambda function and you will receive the following information:

  • The common parameters of Amazon Cognito Lambda triggers (including userPoolId and clientId)
  • Which external IdP was used (for example, providerName)
  • The providerType (SAML, OIDC, Login with Amazon, and so on)
  • Attribute data from the external IdP specific to the user signing in

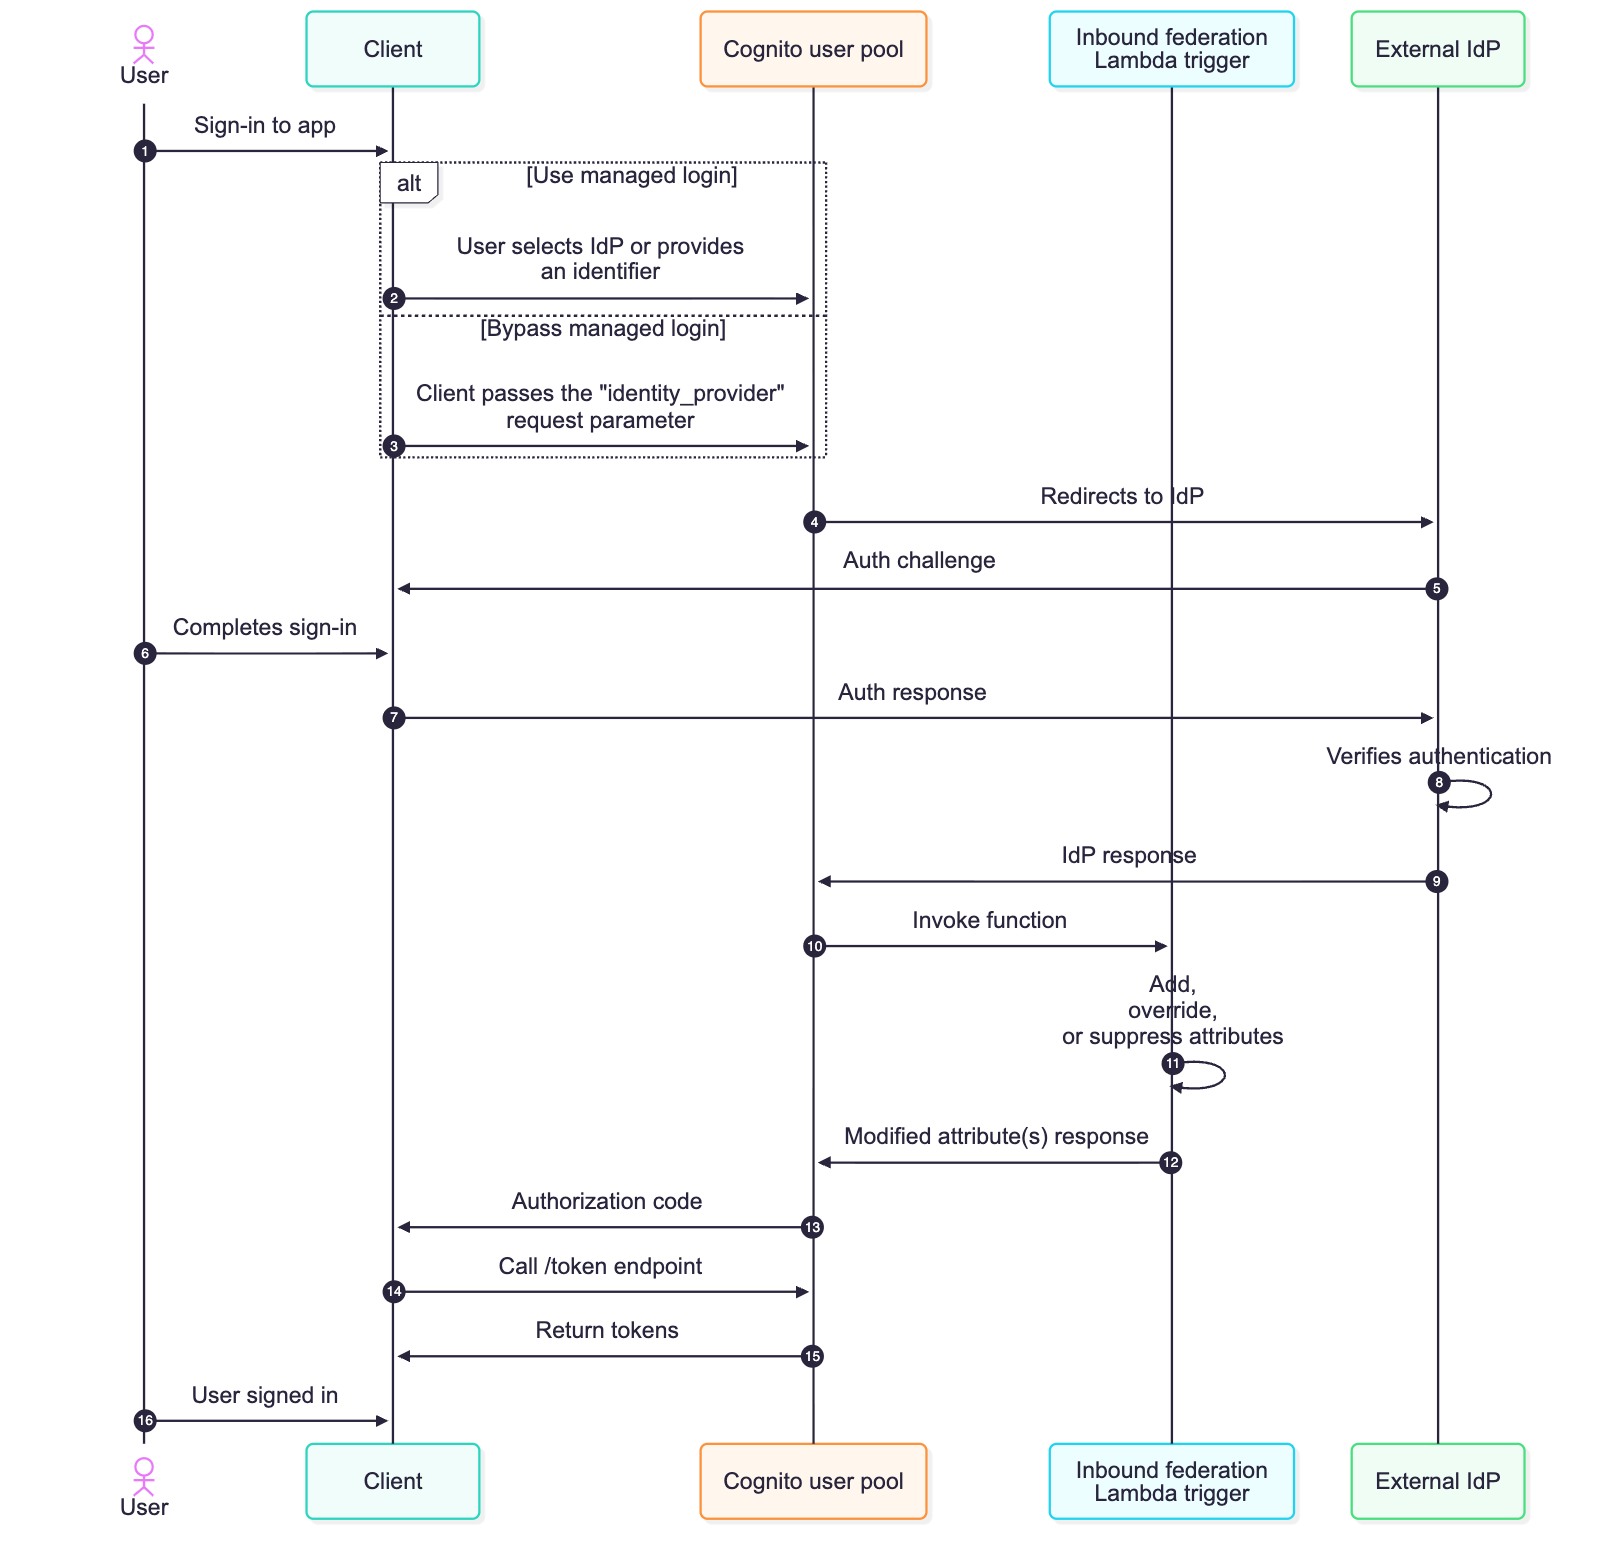
The specific format of this attribute data depends on the provider type, view the Inbound federation Lambda trigger parameters section in the docs to learn more. If the external IdP is a SAML provider, you will receive a JSON key-pair listing of the user’s attributes from the IdP assertion. If the external IdP is an OIDC provider (or social provider), you will receive the access token and attribute data from the /userinfo endpoint, along with an ID token if one was provided. See Figure 1 for a detailed flow of a federated sign-in with an Amazon Cognito user pool configured to use the inbound federation Lambda trigger.

Figure 1: Sequence flow of a federated login configured with the inbound federation Lambda trigger

Figure 1: Sequence flow of a federated login configured with the inbound federation Lambda trigger

  1. The user begins using the application but is required to sign in first.
  2. The managed login is rendered, and the user can select which IdP they want to sign in with. If identifiers are used with SAML or OIDC providers, the user enters their email address and Amazon Cognito looks up the domain of their provided email and routes them to the appropriate IdP.
  3. Alternatively, the managed login can be bypassed by the client providing the identity_provider request parameter.
  4. Amazon Cognito sends the authentication request to the appropriate IdP.
  5. The external IdP challenges the user to sign in.
  6. The user completes the sign-in process required by the external identity provider.
  7. The challenge response is sent to the external IdP.
  8. The IdP verifies that the sign-in is successful. If there are any subsequent challenges, such as multi-factor authentication (MFA), additional rounds of authentication challenges and responses take place. This is determined by the configuration and settings of the external IdP.
  9. The external IdP sends a response to the Amazon Cognito user pool, and Cognito validates the cryptographic signature and that it hasn’t been tampered with.
  10. Amazon Cognito sends attribute data from the IdP to the inbound federation Lambda function
  11. Attribute data for the authenticated user and the common parameters for Amazon Cognito are available for the Lambda function to add, modify, or suppress according to your requirements.
  12. Your added, modified, or suppressed attributes are returned to Amazon Cognito. These are attribute values that map to the user’s profile in Cognito—whether the user profile was just created or is being updated for a returning user.
  13. Continuing the OAuth 2.0 authorization code grant, Amazon Cognito sends an authorization code to the client.
  14. The client then calls the /token endpoint with the authorization code.
    Note: It’s a security best practice to use confidential clients and to use OAuth 2.0 Proof Key for Code Exchange (PKCE) extension whenever possible.
  15. An access, ID, and refresh token is returned to the client.
  16. The user has signed into the application. ID tokens can be used to identify who the user is (authentication), and access tokens can be used to determine what the user can do (authorization).

Common federation challenges and use cases

Federation introduces complexity that varies depending on your use case. For B2B and SaaS applications, you’re often not in control of your customers’ IdPs, including what attributes they send or how they format them. As an example, an enterprise customer will configure their SAML response to include every group a user belongs to. This could be hundreds of groups or long group identifiers, and if the group membership of the user is mapped to an Amazon Cognito attribute, this can lead to a scenario where the Cognito attribute size limit is exceeded, causing federated sign-ins to fail.

Challenges for business-to-customer (B2C) applications can differ from B2B use cases. For B2C applications, organizations shouldn’t be required to think about identity providers. The ability to sign-up and sign-in should be seamless for consumer-facing applications. Customers visiting a consumer-facing application might create an account with email and password, forget they created created it, and then later try signing in with Facebook (or other social provider). Without proper account linking in Amazon Cognito, you then have multiple user records for the same user, which could lead to fragmented purchase history and a frustrating customer experience.

Both B2B and B2C use cases might need to look up external data just prior to completing the sign-in process, such as additional roles and access for B2B users or looking up active orders for B2C users. Another example could be the need to normalize data just prior to storing it in the user profile within the Amazon Cognito user pool or even discarding personally identifiable information (PII) prior to storing it in your Cognito user pool.

With the inbound federation Lambda trigger, you can handle these B2B and B2C use cases programmatically, and do so without requiring modification of your applications or coordinating IdP-specific changes with external IdPs. In this section, I dive deeper into two common use cases: oversized group attributes, common with B2B customers, and automated account linking, common with B2C customers.

Use case 1: Filtering oversized group attributes

If you have B2B and SaaS use cases, it’s a common practice to use group membership from the IdP to determine the level of access you have within the SaaS service. This is a great way to still provide some access control back to the enterprise customers themselves. The groups can be used to represent the roles a user will have or for some form of coarse-grained authorization. However, your customers might inadvertently send a large number of groups a user is a member of, thus leading to an oversized attribute payload.

Another common scenario is where the syntax and format of group name a user belongs to can arrive in various formats across different IdPs; such as a canonical name (for example, example.com/groups/myApp-readOnly), a distinguished name (common with LDAP based systems and such as cn=myApp-readOnly,OU=groups,DC=example,DC=com), or a plain text string (such as myApp-readOnly). Instead of having downstream authorization logic to accommodate different variations of a group name, you can now normalize how groups are represented prior to storing the user’s attribute data using the inbound federation Lambda trigger.

To expand this, imagine your enterprise customer uses a SAML IdP, such as Active Directory Federation Services (AD FS), in front of Active Directory (AD). When their users authenticate, AD FS sends a groups attribute containing every AD group the user belongs to. For users in large organizations, this can be hundreds of groups, and the attribute is mapped to an Amazon Cognito attribute, this could result in a string that exceeds 2,048-character limit per attribute of Cognito. Authentication would fail in this scenario, ultimately leading to support tickets because enterprise customers would be unable to sign in. Even if certain users didn’t exceed this limit, because of a smaller number of group memberships, this would result in the collection and storing of unnecessary data in your Cognito user pool.

Previously, you would need to work with your customer’s IT department to modify their SAML configuration to filter groups at the source—a process that could take weeks and require multiple approval cycles because it involves a change to the federation configuration. Especially for SaaS customers, this isn’t a scalable approach because you could integrate with hundreds of external IdPs. With the inbound federation Lambda trigger, you can solve this by filtering the groups to only those relevant to your application and normalizing the nomenclature of these groups. The following Lambda function filters the groups attribute to include only groups relevant to your application and normalizes the names of groups.

// Configure the group prefix to filter on (e.g. "App1-", "myApp-", etc.)
// Change this to match the prefix your IdP uses for relevant group names.
const GROUP_PREFIX = process.env.GROUP_PREFIX || 'myApp-';

// The SAML attribute/claim name that contains group membership.
// Common values: "groups", "memberOf", "http://schemas.xmlsoap.org/claims/Group", etc.
const GROUP_ATTRIBUTE = process.env.GROUP_ATTRIBUTE || 'groups';

/**
 * Extracts the short group name from common IdP formats:
 *   - Plain text:       "myApp-readOnly"
 *   - Leading slash:    "/myApp-readOnly"
 *   - Canonical/URL:    "example.com/groups/myApp-readOnly"
 *   - Distinguished name (DN): "cn=myApp-readOnly,OU=groups,DC=example,DC=com"
 * Returns the last meaningful segment so all formats normalize to "myApp-readOnly".
 */

function extractGroupName(raw) {
  let name = raw.trim();

  // Some IdPs prefix group names with "/" to indicate a top level group — strip it before format detection
  if (name.startsWith('/')) {
    name = name.substring(1);
  }

  // DN format — extract the CN (common name) value
  if (/^cn=/i.test(name) || /,\s*(ou|dc)=/i.test(name)) {
    const cnMatch = name.match(/^cn=([^,]+)/i);
    return cnMatch ? cnMatch[1].trim() : name;
  }

  // URL / path format — take the last segment after the final "/"
  if (name.includes('/')) {
    const segments = name.split('/').filter(Boolean);
    return segments[segments.length - 1];
  }

  return name;
}
export const handler = async (event) => {
  try {
    console.log('Full event:', JSON.stringify(event, null, 2));
    console.log('Provider type:', event.request?.providerType);

    // Initialize the response structure
    event.response = event.response || {};

    if (event.request?.providerType?.toLowerCase() === "saml") {
      const samlResponse = event.request.attributes?.samlResponse;

      if (samlResponse) {
        console.log('Original SAML Attributes:', JSON.stringify(samlResponse, null, 2));

        // Build the attribute map — you MUST include every attribute you want Cognito to retain. Anything omitted from userAttributesToMap is dropped.
        const mappedAttributes = {};

        Object.keys(samlResponse).forEach(key => {
          if (key === GROUP_ATTRIBUTE) {
            // Parse the groups JSON string from the SAML assertion
            let groupsArray = [];
            try {
              groupsArray = JSON.parse(samlResponse[GROUP_ATTRIBUTE]);
            } catch (error) {
              console.error(`Error parsing ${GROUP_ATTRIBUTE}:`, error);
            }

            // Normalize each group name, then filter to the configured prefix
            const normalizedGroups = groupsArray.map(extractGroupName);
            const filteredGroups = normalizedGroups.filter(group =>
              group.startsWith(GROUP_PREFIX)
            );

            console.log(`Original ${GROUP_ATTRIBUTE}:`, groupsArray);
            console.log(`Normalized ${GROUP_ATTRIBUTE}:`, normalizedGroups);
            console.log(`Filtered ${GROUP_ATTRIBUTE}:`, filteredGroups);

            // Only include the groups attribute if there are matching groups
            if (filteredGroups.length > 0) {
              mappedAttributes[GROUP_ATTRIBUTE] = filteredGroups.map(group => `'${group}'`).join(', ');
            }
          } else {
            // Pass all other SAML attributes through unchanged
            mappedAttributes[key] = samlResponse[key];
          }
        });

        event.response.userAttributesToMap = mappedAttributes;
        console.log('Response to Cognito:', JSON.stringify(event.response, null, 2));
      }
    }

    // For any unhandled provider type (or missing samlResponse), this intentionally does NOT set userAttributesToMap and tells Cognito to keep all original IdP attributes unchanged (no-op).

    // To handle OIDC or social providers, add additional logic here using event.request.attributes.idToken, .userInfo, and/or .tokenResponse.

    return event;
  } catch (error) {
    console.error('Error in Lambda:', error);
    throw error;
  }
};

This approach reduces a large group list to only what is applicable to your application. Authentication succeeds, and you maintain control over your user pool’s data without depending on external configuration changes.

Use case 2: Automatic account linking

The second use case addresses a challenge that’s particularly common in B2C facing ecommerce or any consumer-facing applications; although it can also be applicable to B2B scenarios. Imagine you’re running an online retail store. A customer creates an account with their email and password to make a purchase. A few months later, they return to your site but forgot they already created an account and they see the Login with Amazon button and decide to sign in this way. Without account linking, Amazon Cognito creates a new federated user because these are technically distinct accounts, and now this customer has two separate accounts with different purchase histories and saved preferences.

This fragmentation creates a poor customer experience and complicates your business operations. You can’t see the customer’s complete purchase history, loyalty points are split across accounts, and your analytics show two distinct customers instead of one.

The inbound federation Lambda trigger can be used to solve this by automatically linking federated identities to existing local accounts based on email address. While account linking can also be implemented in a pre-sign-up Lambda trigger, the inbound federation trigger runs on every federated sign-in, not just the first, giving you access to the latest IdP attributes and the ability to apply linking logic continuously rather than only at initial account creation. If no local Amazon Cognito account exists, you can create one and then link the social provider account to it. The local account can serve as the primary identity, ensuring consistent JSON Web Tokens (JWTs) regardless of how the user signs in. The following is an example of an inbound federation Lambda trigger that can help address this use case.

import { 
  CognitoIdentityProviderClient, 
  ListUsersCommand,
  AdminCreateUserCommand,
  AdminLinkProviderForUserCommand
} from "@aws-sdk/client-cognito-identity-provider";

const client = new CognitoIdentityProviderClient();

export const handler = async (event) => {
  try {
    console.log('Full event:', JSON.stringify(event, null, 2));
    
    const { userPoolId, request, userName } = event;
    const { providerName, providerType, attributes } = request;
    
    // Extract email and profile attributes based on provider type
    const { email, givenName, surname } = extractAttributes(providerType, attributes);
    
    if (!email) {
      console.error('No email found in federated response');
      return event;
    }
    
    console.log(`Processing federated login for email: ${email}, provider: ${providerName} (${providerType})`);
    
    // Check if a local user exists with this email
    const existingUser = await findLocalUserByEmail(userPoolId, email);
    
    if (existingUser) {
      console.log(`Found existing local user: ${existingUser.Username}`);
      if (isAlreadyLinked(existingUser, providerName, userName)) {
        console.log(`Federated identity ${providerName}:${userName} is already linked to ${existingUser.Username}, skipping link`);
      } else {
        await linkFederatedUser(userPoolId, existingUser.Username, providerName, userName);
      }
    } else {
      console.log('No existing local user found, creating new one');
      const newUsername = await createLocalUser(userPoolId, email, givenName, surname);
      await linkFederatedUser(userPoolId, newUsername, providerName, userName);
    }
    
    return event;
    
  } catch (error) {
    console.error('Error in account linking Lambda:', error);
    throw error;
  }
};


/**
 * Check if the federated identity is already linked to the local user by inspecting the identities attribute from the ListUsers response.
 */
function isAlreadyLinked(user, providerName, federatedUsername) {
  const identities = user.Attributes?.find(a => a.Name === 'identities');
  if (!identities?.Value) return false;

  try {
    const parsed = JSON.parse(identities.Value);
    return parsed.some(id => id.providerName === providerName && id.userId === federatedUsername);
  } catch {
    return false;
  }
}

/**
 * Extract email and profile attributes based on provider type.
 * - SAML: attributes come from samlResponse
 * - OIDC/Social: attributes come from userInfo, falling back to idToken (if one exists)
 */
function extractAttributes(providerType, attributes) {
  if (providerType?.toLowerCase() === 'saml') {
    const saml = attributes?.samlResponse;
    return {
      email: saml?.email || null,
      givenName: saml?.givenName || '',
      surname: saml?.surname || ''
    };
  }

  // OIDC and social providers: prefer userInfo, fall back to idToken
  const userInfo = attributes?.userInfo;
  const idToken = attributes?.idToken;

  const source = userInfo?.email ? userInfo : idToken;

  return {
    email: source?.email || null,
    givenName: source?.given_name || '',
    surname: source?.family_name || ''
  };
}

/**
 * Find a local Cognito user (not EXTERNAL_PROVIDER) by email address.
 */
async function findLocalUserByEmail(userPoolId, email) {
  try {
    const command = new ListUsersCommand({
      UserPoolId: userPoolId,
      Filter: `email = "${email}"`
    });
    
    const response = await client.send(command);
    console.log('ListUsers response:', JSON.stringify(response, null, 2));
    
    if (!response.Users || response.Users.length === 0) {
      return null;
    }

    // Find the first user that is a true local account (not a federated-only profile)
    const localUser = response.Users.find(u => u.UserStatus !== 'EXTERNAL_PROVIDER');
    return localUser || null;
  } catch (error) {
    console.error('Error finding user by email:', error);
    throw error;
  }
}

/**
 * Create a new local Cognito user without a password.
 * With passwordless (email OTP) enabled on the user pool, the user is created with UserStatus=CONFIRMED and no FORCE_CHANGE_PASSWORD state.
 */
async function createLocalUser(userPoolId, email, givenName, surname) {
  try {
    const userAttributes = [
      { Name: 'email', Value: email }
    ];

    if (givenName) userAttributes.push({ Name: 'given_name', Value: givenName });
    if (surname) userAttributes.push({ Name: 'family_name', Value: surname });

    const command = new AdminCreateUserCommand({
      UserPoolId: userPoolId,
      Username: email,
      UserAttributes: userAttributes,
      MessageAction: 'SUPPRESS'
    });
    
    const response = await client.send(command);
    console.log(`Created local user: ${email}`, JSON.stringify(response, null, 2));
    
    return email;
  } catch (error) {
    console.error('Error creating local user:', error);
    throw error;
  }
}

/**
 * Link a federated user identity to a local Cognito user.
 * The local user becomes the primary profile — all future JWTs will represent this local user regardless of sign-in method.
 */
async function linkFederatedUser(userPoolId, localUsername, providerName, federatedUsername) {
  try {
    const command = new AdminLinkProviderForUserCommand({
      UserPoolId: userPoolId,
      DestinationUser: {
        ProviderName: 'Cognito',
        ProviderAttributeValue: localUsername
      },
      SourceUser: {
        ProviderName: providerName,
        ProviderAttributeName: 'Cognito_Subject',
        ProviderAttributeValue: federatedUsername
      }
    });
    
    const response = await client.send(command);
    console.log(`Linked federated user ${federatedUsername} to local user ${localUsername}`);
    console.log('Link response:', JSON.stringify(response, null, 2));
    
    return response;
  } catch (error) {
    if (error.name === 'AliasExistsException' || error.message?.includes('already linked')) {
      console.log(`User already linked: ${error.message}`);
      return;
    }
    console.error('Error linking federated user:', error);
    throw error;
  }
}

Every federated sign-in will invoke the inbound federation Lambda trigger, and the logic is straightforward. When a user authenticates with an external identity provider, the trigger extracts their email from the federated response and searches the user pool for a local Cognito account with that same email. If one exists—such as if the user originally signed up with email and password—the Lambda function links the federated identity to that existing local account. If no local account exists, the trigger creates one on the fly as a passwordless account (confirmed, suppressing any emails, and ready for passwordless email one-time passcode (OTP) sign-in), then links the federated identity to it. In both cases, the local account is set as the primary profile. This means the user’s JWTs always carry the same sub-claim regardless of how they sign in—directly, or through Google, Facebook, or SAML—your application sees one consistent identity. The preceding Lambda trigger is also smart enough to check whether a linked account already exists before making the call, so returning users who’ve already been linked don’t generate unnecessary API calls. And because the local account supports passwordless authentication, a user who first arrived through federation can later sign in directly with an emailed OTP—or even add a password later through your applications account settings. The local account is always the anchor.

Best practices

As you implement these patterns, keep a few best practices in mind. Your Lambda function must be completed within 5 seconds, so optimize for speed to help ensure the federated sign-in process is able to successfully complete. If you’re making external calls within the inbound federation Lambda function, like Amazon DynamoDB queries or API requests, implement caching where possible. Handle errors gracefully—if your Lambda function throws an exception or an error, authentication could fail for the user. Consider logging the error and returning the original event back to Amazon Cognito rather than failing authentication for a legitimate user attempting to sign in. Here are some additional best practices for working with Lambda functions.

For the account linking use case, automatic linking relies on matching the email from the federated identity to a local account. However, there are scenarios where this match won’t exist. For example, Apple’s Hide My Email feature generates a unique alias for each app, so the federated email won’t match any existing local account. This is an effective privacy feature but it also blocks the ability to automatically link accounts. In cases like these, your application will need to implement a user-initiated account linking flow, such as prompting the user to verify ownership of both email addresses before calling the AdminLinkProviderForUser API to complete the link.

Monitor your Lambda function performance using Amazon CloudWatch metrics. Set up alarms for errors, timeouts, and throttling so you can respond quickly if issues arise. I also recommend capturing sample event payloads from a CloudWatch log group during your initial development and deployment—these will be valuable for local testing and debugging which can lead to quicker resolution if issues arise in your production environment. This is especially important as different IdPs (namely SAML and OIDC providers) may respond with varying attribute and value syntaxes. Consider implementing CloudWatch alarms to alert your security and operational teams if authentication failures spike, which could indicate an attempted attack, misconfiguration, or provide insight into further optimization of your inbound federation Lambda trigger.

Conclusion

In this post, you learned about the new inbound federation Lambda trigger for Amazon Cognito and how it can solve various use cases. You walked through two common federation challenges and reviewed some sample code to help resolve those challenges. For B2B and SaaS applications, the inbound federation Lambda trigger gives you control when dealing with oversized attributes from external identity providers (such as group membership) without requiring coordination with enterprise IT teams. For B2C and consumer-facing applications, it enables seamless account linking across multiple authentication methods, creating a unified customer experience.

The new Lambda trigger works with SAML, OIDC, and supported social providers, and is available now in AWS Regions where Amazon Cognito is available. To learn more about the new Lambda trigger and others, see the Amazon Cognito Developer Guide.

What federation challenges are you facing in your applications? I’d love to hear about your use cases in the comments below and over at AWS re:Post.

Abrom-Douglas-author

Abrom Douglas

Abrom is a Senior Solutions Architect within AWS Identity with over 20 years of software engineering and security experience, specializing in the identity and access management space. He loves speaking with customers about how identity and access management can provide secure outcomes that enable both business and technology initiatives. In his free time, he enjoys cheering for Arsenal FC, photography, travel, volunteering, and competing in duathlons.

  •  
❌