Normal view

How to manage the lifecycle of Amazon Machine Images using AMI Lineage for AWS

12 March 2026 at 17:59

As organizations scale their cloud infrastructure, maintaining proper lifecycle management of Amazon Machine Images (AMIs) is a critical component of their security and risk management goals. AMIs provide the essential information required to launch Amazon Elastic Compute Cloud (Amazon EC2) instances, however; they present security and compliance challenges if not tracked and managed throughout their lifecycle. This blog post explores how organizations can meet their evolving security and compliance requirements by managing potential vulnerabilities across the AMIs deployed throughout their AWS environment.

At the end of 2024, AWS announced lineage supportfor Amazon EC2, providing source details for your AMIs. With this lineage information, you can trace copied or derived AMIs back to their original source. The source AMI information is available for AMIs that were created using specific API commands like CreateImage, CopyImage, and CreateRestoreImageTask. If the AMI was created using a different API command, the ID and AWS Region of the source AMI don’t appear, which can create visibility gaps that potentially impact security and compliance efforts.

To address these gaps and provide comprehensive AMI governance, organizations need to build additional capabilities to analyze the scope of impact of Common Vulnerabilities and Exposures (CVEs), ensure deployed resources originate from an approved golden image, and respond to audit inquiries that require a clear chain of custody for AMIs. A well-designed solution should also help track and enforce approved AMI creation patterns across all accounts and AWS Regions. The AMI lineage solution described in this post is designed to help you manage your organization’s AMI hierarchy and lifecycle, including tracking AMI origins and usage throughout its AWS environment. By implementing this solution, your security teams can quickly understand the scope of impact when security vulnerabilities are discovered, help ensure compliance with organizational policies, and maintain better visibility into their AMI estate.

The solution in this blog post uses Amazon Neptune, a high-performance graph database, along with native AWS security services to maintain a comprehensive view of AMI relationships and enable proactive security monitoring. With the solution in place, you can enforce controls on AMI sourcing, including validation of marketplace AMIs through service control policies (SCPs), and maintain compliance with organizational and regulatory requirements throughout the AMI lifecycle.

Solution overview

AMI Lineage provides a comprehensive governance solution that uses AWS security services and Neptune to create and maintain a hierarchical graph representation of their AMI relationships. This solution helps security and compliance teams understand the complete history of their AMIs including where they originated from, enforce organizational policies such as requiring all AMIs to be encrypted, and rapidly assess security impacts across their organization.
The solution integrates core AWS services with security and governance capabilities. The core components of the solution in the security tooling account are:

  • Neptune: A purpose-built, high-performance graph database securely stores and manages the AMI relationship data.
  • AWS Lambdafunctions serve as the processing engine for the solution. They process AMI lifecycle events (such as CreateImage, CopyImage, DeregisterImage), evaluate them against compliance rules, and update the Neptune graph database. The functions are configured with least-privilege AWS Identity and Access Management (IAM) permissions to enhance security.
  • Amazon API Gateway provides secure REST endpoints for lineage queries and security assessments. Authentication is handled using a combination of API keys and IAM roles to help ensure that only authorized users and systems can access the data.

From a governance perspective, this solution provides comprehensive AMI origin validation to help ensure AMIs come from approved sources, including the validation of AWS Marketplace AMIs against a list of trusted vendors. Lifecycle management capabilities enforce AMI retention policies and deprecation processes. Compliance monitoring tracks adherence to organizational and regulatory requirements, while security event scope assessment capabilities quickly identify affected resources when security vulnerabilities are discovered. A detailed audit trail maintains a complete history of AMI creation, modification, and usage patterns.

Architecture

The AMI Lineage solution follows AWS security best practices with a multi-account deployment architecture designed to maximize security while maintaining operational efficiency. The architecture distributes responsibilities across three primary account types: an organization management account, a centralized security tooling account, and multiple member accounts.

This architectural approach helps ensure that sensitive operations and data remain centralized in the security tooling account while enabling distributed monitoring and policy enforcement across the organization. The clear separation of concerns enhances security while maintaining the scalability needed for large-scale AWS deployments.

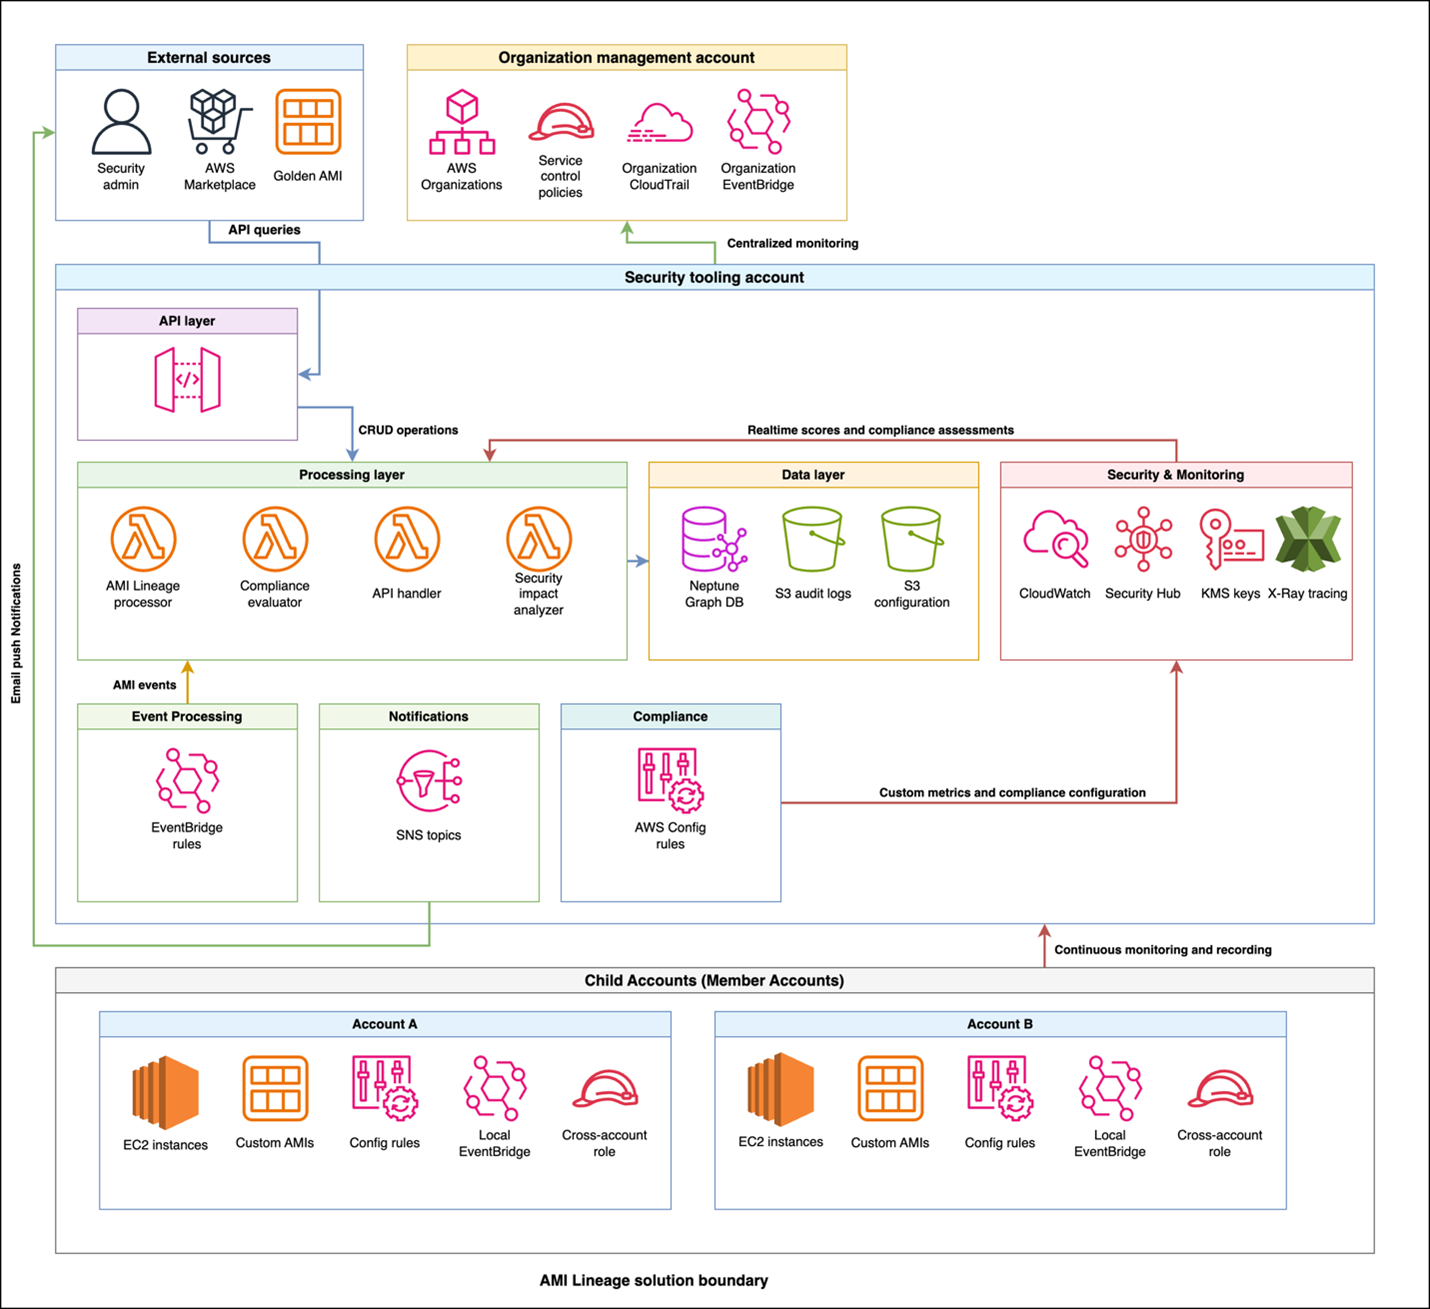
Figure 1: AMI Lineage solution architecture and workflow

Figure 1: AMI Lineage solution architecture and workflow

The workflow and architecture shown in figure one includes the following:

  1. Policy enforcement: The organization management account is the central point for control. It uses AWS Organizations to enforce SCPs that prevent non-compliant AMI actions across the member accounts.
  2. Event capture: When an AMI lifecycle event (like CreateImage or CopyImage) occurs in a member account, a local Amazon EventBridge rule captures it.
  3. Centralized processing: The event is securely forwarded from the member account’s EventBridge to the central EventBridge in the security tooling account.
  4. Data ingestion and analysis: A Lambda function is triggered in the security tooling account. This function processes the event, analyzes it for compliance, and updates the Neptune graph database with the new AMI relationship data. AWS Security Hub and Amazon GuardDuty in the security tooling account also receive and analyze findings from member accounts.
  5. Query and visualization: Security teams query the lineage data through a secure API Gateway endpoint. By doing this, they can to visualize AMI hierarchies, investigate security findings from Security Hub, and assess the scope of impact for a given AMI.

The organization management account serves as the central control point for policy enforcement and organizational oversight. This account hosts SCPs that prevent non-approved AMI usage across the organization and manages organization-wide EventBridge rules that capture AMI events from member accounts. Cross-account trust policies configured in this account enable secure communication between the management account and the security tooling account.

Additionally, the management account establishes Security Hub in delegated administrator mode, designating the security tooling account as the centralized security administrator for the organization. From the security tooling account, Security Hub can be then configured to aggregate all Regions down to one core Region for easier evaluation by security personnel.

The security tooling account acts as the central hub for AMI lineage processing and storage. This account hosts the Neptune graph database cluster with encrypted storage, helping to ensure that AMI relationship data is securely maintained. Lambda functions running in this account process events, handle API requests, and evaluate compliance with least-privilege permissions. API Gateway provides secure REST endpoints for lineage queries and security assessments. Security Hub custom insights and findings are centralized here in the security tooling account as the Security Hub delegated administrator account, along with Amazon Simple Notification Service (Amazon SNS) topics for notifications and alerts. The Amazon Virtual Private Cloud (Amazon VPC) infrastructure supporting these services is also deployed in the security tooling account, providing network-level isolation and security.

The solution enables distributed monitoring and enforcement by deploying lightweight components into each member account across the organization. Each member account includes AWS Config rules for continuous compliance monitoring, cross-account IAM roles to enable secure access from the security tooling account, and local EventBridge rules that forward AMI-related events to the central processing system.

Security and compliance integration extends throughout the solution. IAM manages least-privilege access control and permissions across components. AWS CloudTrail records API activity for audit trails and compliance reporting, while Security Hub centralizes security findings and compliance status across your AMI estate. GuardDuty provides threat detection for AMI-related activities. SCPs enforce organization-wide controls on AMI creation and usage patterns, and AWS Config tracks AMI configuration changes and evaluates compliance rules.

How it works

The AMI Lineage solution operates through a continuous monitoring and automated response system that maintains comprehensive visibility into your AMI landscape. When AMI lifecycle events occur in your organization, EventBridge rules capture these activities, including creation, copying, modification, and deregistration events. Lambda functions in the security tooling account are then called upon to process these events with appropriate security controls and update the Neptune graph database in real-time, while CloudTrail logs provide a comprehensive audit trail of AMI-related activities.

The system tracks critical security and compliance metadata that forms the foundation of effective AMI governance. This includes:

  • Source AMI information and validation status to help ensure lineage integrity
  • Creation method and timestamp data for comprehensive audit trails
  • Cross-Region and cross-account relationships to understand the full scope of AMI distribution
  • Instance launch history with security context to track usage patterns
  • AMI state changes including deprecation and deregistration for lifecycle management
  • Compliance status along with policy violations to maintain organizational standards.

Security teams use this comprehensive data through secure API calls to visualize complete AMI hierarchies and relationships, providing clear insight into how AMIs are related across your infrastructure. The compliance of your AMI estate is continuously tracked through a combination of services:

  • Detection: AWS Config rules deployed in member accounts check for policy violations (for example, incorrect tags and public permissions).
  • Aggregation: These findings, along with vulnerability data from services like Amazon Inspector, are aggregated in AWS Security Hub.
  • Correlation: Lambda functions in the security tooling account correlate this information with the lineage data in Neptune. Because of this correlation, you can see not just that an AMI is non-compliant, but also its entire downstream impact. When security events like CVE findings are discovered, teams can quickly assess the scope of impact across their entire AMI estate. The solution monitors AMI usage patterns for security anomalies and enforces governance controls through automated policy checks.

The solution provides robust automated policy enforcement capabilities that operate continuously to maintain security and compliance. The system helps ensure that only approved AMIs with verified lineage history can be used to launch new instances, automatically blocking attempts to use non-compliant images. SCP controls on AMI creation and usage are enforced organization-wide, preventing unauthorized AMI operations before they can impact your environment. When policy violations are detected, the system can trigger automated responses to security events and maintain compliance with organizational standards through real-time enforcement.

Implementation

Before deploying the AMI Lineage solution, you need to establish the proper security and governance foundation across your organization. Your AWS Organizations management account requires administrative permissions, and your organization must be enabled with all features to support the policies used in this solution. You will also need a dedicated security tooling account to host the solution’s core components, with cross-account IAM roles configured to allow secure access. Finally, essential security services must be configured at the organization level, including Security Hub, CloudTrail organization trails for audit logging, and encryption keys using AWS Key Management Service (AWS KMS) for data protection.

From a technical perspective, ensure you have Python 3.8 or later installed if deploying from a local environment, along with AWS Command Line Interface (AWS CLI) version 2 installed and configured with appropriate security credentials. You’ll also need an Amazon Simple Storage Service (Amazon S3) bucket for deployment artifacts, encrypted using SSE-KMS with a customer-managed key to align with best practices for protecting deployment assets.

The complete AMI Lineage solution is available as open source code in the AWS Samples repository. You can clone the repository and follow the deployment instructions. The repository includes the necessary AWS CloudFormation templates, Lambda functions, and deployment scripts referenced in the following phases.

Deployment

The deployment process follows a five-phase approach that builds security and compliance capabilities progressively:

  1. Security foundations
  2. Security controls
  3. EventBridge rules
  4. Core infrastructure
  5. Compliance and monitoring

Phase 1 – Establishing security foundations

The first phase establishes the security foundation by configuring AWS Organizations security services. This involves enablingSecurity Hub in the management account and designating the security tooling account as the delegated administrator, enablingnullGuardDuty with the security tooling account configured as thenulldelegated administrator, and enabling an organizational wide CloudTrail trail for audit logging.

# In Organization Management Account: 
# Enable Security Hub and set security tooling account as delegated admin 
aws securityhub enable-organization-admin-account \   
--admin-account-id <security-tooling-account-id> 

# Enable GuardDuty organization with security tooling account as admin   
aws guardduty enable-organization-admin-account \   
--admin-account-id <security-tooling-account-id> 

# Create organization trail with encryption aws cloudtrail create-trail \   
--name ami-lineage-trail \   
--s3-bucket-name <your-secure-bucket> \   
--is-organization-trail \   
--kms-key-id <your-kms-key-id> \   
--enable-log-file-validation

Phase 2 – Security controls

The second phase deploys base security controls through organization-wide SCPs. These policies enforce AMI governance controls by preventing the use of non-approved AMIs and helping to ensure that proper tagging and approval workflows are followed.

# In Organization Management Account: 
# Deploy organization-wide SCPs 
aws organizations create-policy \   
--content file://ami-governance-scp.json \   
--name "AMI-Governance-Controls" \   
--type SERVICE_CONTROL_POLICY 

# Attach to organizational units 
aws organizations attach-policy \   
--policy-id <policy-id> \   
--target-id <ou-id>

Phase 3 – EventBridge rules

The third phase deploys organization-wide EventBridge rules from the management account to capture AMI events across member accounts and forward them to the security tooling account for processing. These rules listen for specific API calls captured by CloudTrail.

An example of the event pattern used to capture CreateImage and CopyImage events looks like this:

{
	"source": ["aws.ec2"],
	"detail-type": ["AWS API Call via CloudTrail"],
	"detail": {
		"eventSource": ["ec2.amazonaws.com"],
		"eventName": [
			"CreateImage",
			"CopyImage",
			"RegisterImage",
			"DeregisterImage"
		]
	}
}

# In Organization Management Account: 
# Deploy organization EventBridge rules 
cd deployment-scripts/organization 
./deploy-organization-resources.sh

Phase 4 – Core infrastructure

The fourth phase focuses on core infrastructure deployment in the security tooling account. This is where the primary processing and storage components are deployed, following security best practices by centralizing sensitive operations in a dedicated account.

# Switch to Security Tooling Account context 
# Deploy Neptune cluster with encryption in security tooling account 
cd deployment-scripts/shared 
./deploy-shared-resources.sh

This deployment script handles multiple components in the security tooling account. The Neptune cluster deployment includes encryption and VPC configuration to help ensure secure storage and access to AMI lineage data. Lambda functions are deployed with security controls and configured with VPC attachment, which allows for secure Neptune access in the VPC, appropriate IAM roles with least-privilege permissions, and environment variables for secure configuration. API Gateway provides secure REST endpoints for external access to AMI lineage data and security assessments.

Phase 5 – Compliance and monitoring

The fifth phase establishes comprehensive compliance and monitoring capabilities across member accounts. AWS Config rules are deployed to continuously monitor AMI compliance across your organization, while EventBridge rules forward AMI events to the central processing system.

# In each Member Account: 
# Deploy AWS Config Rules and monitoring capabilities 
cd deployment-scripts/child-account   
./deploy-child-account-resources.sh

After deployment, thorough verification helps ensure that security configurations are properly implemented. This includes validating IAM permissions to help ensure least-privilege access, testing security controls to verify SCP enforcement, validating encryption settings acrosscomponents, and confirming that the security tooling account is properly configured as the Security Hub delegated administrator.

Using AMI Lineage

When deployed, AMI Lineage provides security operations and compliance monitoring capabilities through its API hosted in the security tooling account and automated monitoring systems. Security teams can query and receive complete AMI security relationships to understand the full context of AMIs in their environment.

When investigating AMIs, the system provides detailed security context including source validation information that confirms:

  • Whether AMIs come from marketplace sources or trusted accounts
  • Compliance status that shows patch levels and policy adherence
  • Vulnerability status with CVE findings and scan results
  • Comprehensive lineage data showing the complete chain of AMI relationships and approval history
# Get complete security context for an AMI (API Gateway in Security Tooling Account) 
curl -X GET "https://<api-gateway-id>.execute-api.<region>.amazonaws.com/v1/api/v1/ami/ami-1234567890abcdef0/security-context?include_compliance=true" \  
	-H "x-api-key: <your-api-key>"

For security impact assessments, such as when a new CVE is discovered, the solution provides a powerful scope of impact analysis. By querying the API with a specific finding, security teams can rapidly determine every affected resource across their entire organization that stems from a compromised or vulnerable AMI. Using that information, they can understand the full scope of their exposure and begin remediation. See Security best practices in Amazon API Gateway for helpful considerations while using API Keys.

# Assess for a security finding (Security Tooling Account API) 
curl -X POST "https://<api-gateway-id>.execute-api.<region>.amazonaws.com/v1/api/v1/security-impact" \   
	-H "Content-Type: application/json" \   
	-H "x-api-key: <your-api-key>" \   
	-d '{     "ami_id": 
		"ami-1234567890abcdef0",     
		"finding_type": "CVE",     
		"finding_id": "CVE-2024-XXXX",     
		"severity": "CRITICAL"   
	}'

This analysis returns impact information including:

  • Affected AMIs in the lineage chain
  • Running instances requiring immediate remediation
  • Affected AWS accounts and regions for coordinated response
  • Associated auto-scaling groups and launch templates that need updates
  • Compliance impact assessment for regulatory reporting
  • Detailed remediation steps prioritized by risk level.

Compliance monitoring operates continuously through automated assessment capabilities that evaluate your AMI estate against organizational policies and regulatory requirements. Teams can generate comprehensive compliance reports that show adherence to security standards across their entire infrastructure.

# Generate comprehensive compliance report (Security Tooling Account API) 
curl -X POST "https://<api-gateway-id>.execute-api.<region>.amazonaws.com/v1/api/v1/compliance-assessment" \   
	-H "Content-Type: application/json" \   
	-H "x-api-key: <your-api-key>" \   
	-d '{     
		"rules": [       
    		"required_tags",       
    		"approved_source_validation",       
    		"security_scan_status",       
    		"naming_convention",       
    		"lineage_verification"     
		],     
		"scope": "ORGANIZATION"   
	}'

The solution provides security automation and remediation through configurable automated responses to security events. Security Hub, operating in delegated administrator mode from the security tooling account, can be configured to automatically respond to findings by stopping instances using AMIs with critical vulnerabilities, quarantining instances launched from unapproved sources, and sending immediate notifications for high-severity findings.

Security visualization and reporting capabilities, centralized in the security tooling account, provide real-time dashboards showing:

  • Compliance status across the organization
  • Scoping visualization for rapid decision-making
  • AMI approval workflow status for process monitoring
  • Patch compliance metrics for maintaining security posture
  • Automated remediation activity logs for audit purposes
  • Custom security reports tailored to specific organizational needs.

For security investigations and audit purposes, the solution maintains a queryable audit trail that provides a complete history of AMIs, including creation and modification events, security scanning results and findings, approval workflow history, and compliance status changes over time.

# Query comprehensive audit history (Security Tooling Account API) 
curl -X GET "https://<api-gateway-id>.execute-api.<region>.amazonaws.com/v1/api/v1/ami/ami-1234567890abcdef0/lineage?direction=both&depth=10" \   
	-H "x-api-key: <your-api-key>"

Clean up

To decommission the AMI Lineage solution, use the following steps to prevent dependency errors. The process is the reverse of the deployment.

  1. (Optional) Back up your data. Before you begin, export critical data for your audit and compliance records. This includes generating final compliance reports from the API or creating a final snapshot of the Neptune database (you will be prompted to do this when you delete the cluster).
  2. Run cleanup in member accounts. Sign in to each participating member account and run the cleanup script from the deployment files. This removes the local EventBridge rules, AWS Config rules, and cross-account IAM roles.
    # In each Member Account 
    cd deployment-scripts/child-account
    ./cleanup-child-account-resources.sh 
    # Removes Config rules and cross-account roles from each member account

  3. Run cleanup in the security tooling account. Sign in to your security tooling account and run the cleanup script. This decommissions the core solution, including the API gateway, Lambda functions, Neptune cluster, and the associated VPC.
    # Clean up security tooling account   
    cd deployment-scripts/shared
    
    ./cleanup-shared-resources.sh 
    # Removes Neptune, Lambda, API Gateway, SNS, and Security Hub components

  4. Run cleanup in the organization management account. Sign in to your organization management account to remove the organization-level resources.
    1. Run the cleanup script to remove the organization-wide EventBridge rules.
      # Clean up organization management account
      
      cd deployment-scripts/organization
      
      ./cleanup-organization-resources.sh   
      # Removes SCPs, EventBridge rules, and cross-account trust policies

    2. In the AWS Organizations console, detach and delete the AMI-Governance-Controls SCP.
    3. In the Security Hub and GuardDuty consoles, remove the security tooling account as the delegated administrator.
  5. Delete final data and encryption keys. After the solution’s infrastructure is removed, you can delete the remaining assets.
    1. In the security tooling account,empty and delete the S3 bucket that held the deployment artifacts.
    2. In the organization management account,schedule the deletion of the KMS keys you created for encrypting the solution’s data.

Conclusion

In this blog post, we showed you how you can use the AMI Lineage solution to build a comprehensive approach to tracking the complete history of your AMIs from creation to decommissioning. By storing this data in an Amazon Neptune graph database, you can build a hierarchical view of the relationships between your EC2 instances and the AMIs they were launched from. You learned how that data can be used to improve security response and remediation and assist in auditing and compliance activities.

The solution uses AWS Organizations to provide preventative controls to help ensure that only approved AMIs are used and integrates AWS security services like Amazon GuardDuty, AWS Security Hub, and AWS Config to add additional layers of security monitoring and management. Finally, you saw how the solution can be used during a security event or when new CVEs are published, so that you can rapidly discover which systems are affected and automate responses based on those findings.

While this solution provides powerful capabilities, it’s important to consider the operational and cost aspects. The core components, particularly Neptune, have associated costs that will scale with the size of your AMI estate. We recommend implementing cost monitoring and alerts as part of your deployment. Furthermore, because the solution is event-driven, you should plan a one-time backfill process to ingest your organization’s existing AMI history into the graph database. For organizations that require this level of granular control and visibility, these operational considerations are offset by the significant gains in security posture and compliance automation.

AMI Lineage transforms AMI governance from a manual, error-prone process into an automated, comprehensive security capability that scales with your organization’s growth. By implementing this solution, your organization can gain the visibility, control, and automated response capabilities needed to maintain a strong security posture while enabling rapid, secure deployment of infrastructure across its AWS environment.


If you have feedback about this post, submit comments in the Comments section below. If you have questions about this post, contact AWS Support.
Luis Pastor

Luis Pastor

Luis is a Senior Security Solutions Architect at AWS leading the Infrastructure Security and Compliance Technical Field Communities. He drives security architecture for enterprise customers across financial services, healthcare, and retail, specializing in cloud security transformation and regulatory compliance frameworks. Before AWS, Luis architected security solutions in hybrid cloud environments.

George'son Tib.

George’son Tib.

George’son is a Solutions Architect focused on Infrastructure Security at AWS, working with Enterprise customers in the Auto and Manufacturing Industry. He specializes in helping organizations build robust, automated control frameworks that enhance their security posture and drive operational efficiency.

Geoff Sweet

Geoff Sweet

Geoff has been in industry since the late 1990s. He began his career in electrical engineering. Starting in IT during the dot-com boom, he has held a variety of diverse roles, such as systems architect, network architect, and, for the past several years, security architect. Geoff specializes in infrastructure security.

Bharat Lakhiyani

Bharat Lakhiyani

Bharat is a senior solutions architect at AWS. With more than 12 years of experience spanning FinOps, cybersecurity, AI/ML, and enterprise architecture, he specializes in guiding travel and hospitality customers through their digital transformation journeys. Outside of work, Bharat enjoys baking, exploring new restaurants, driving scenic routes, and hiking the trails of North Carolina.

Inside AWS Security Agent: A multi-agent architecture for automated penetration testing

26 February 2026 at 23:11

AI agents have traditionally faced three core limitations: they can’t retain learned information or operate autonomously beyond short periods, and they require constant supervision. AWS addresses these limitations with frontier agents—a new category of AI that performs complex reasoning, multi-step planning, and autonomous execution for hours or days. Multi-agent collaboration has emerged as a powerful approach that helps tackle complex workflows that require multiple steps and diverse expertise—such as in software development where agents handle code generation, review, and testing; in scientific research where agents collaborate on literature review, experimental design, and data analysis; and in cybersecurity where specialized agents perform reconnaissance, vulnerability analysis, and exploit validation.

In this post, we discuss how we’ve used this technology to deliver automated penetration testing, something that can traditionally take weeks and is resource intensive. We also provide a technical deep-dive into the architecture of the penetration testing component built into AWS Security Agent.

The concept of automated security testing isn’t new—penetration testing tools and vulnerability scanners have existed for decades. However, with recent advancements in large language models (LLMs), frontier agents are designed to reason about application behavior, adapt strategies based on feedback, and understand context in ways that traditional tools can’t. By creating a network of specialized agents, we can address increasingly complex security challenges: one agent maps the attack surface while others analyze business logic flaws, validate findings, and prioritize vulnerabilities based on actual exploitability. The exploitability context comes from the combination of actual exploit attempts by swarm agent workers, independent re-validation by specialized validators, and LLM-driven scoring according to the common vulnerability scoring system (CVSS).

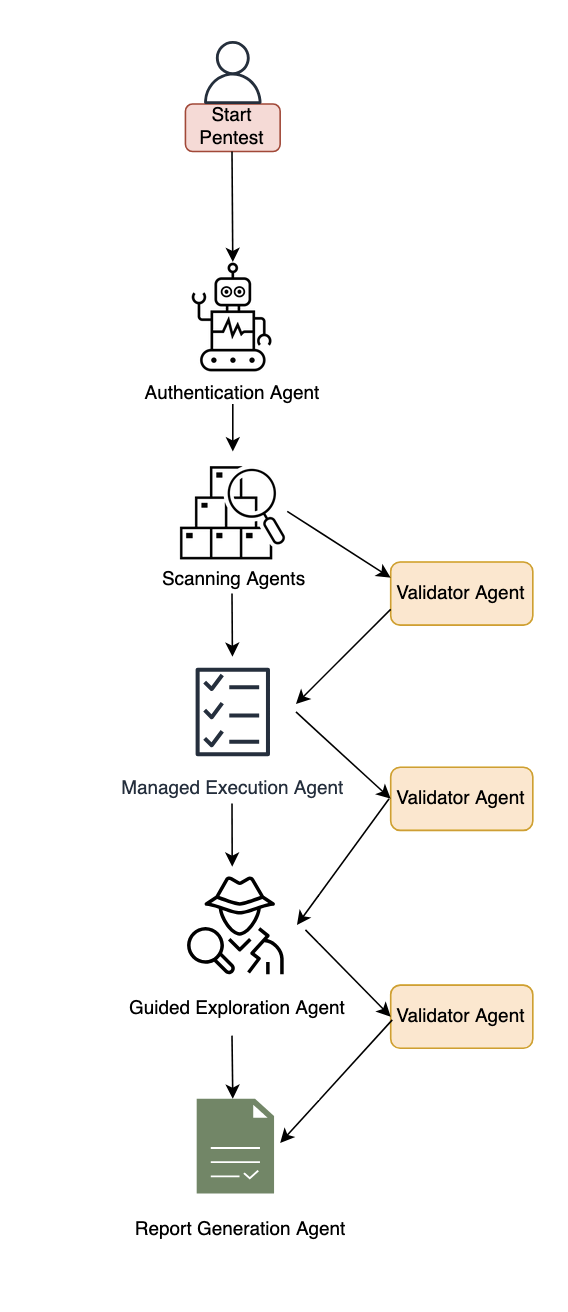
We’ve developed automated penetration testing for the AWS Security Agent. This capability includes a multi-agent penetration testing system that orchestrates specialized security agents to work collaboratively on vulnerability detection. The system begins with multiple types of scanning to establish baseline coverage, then conducts broad reconnaissance using static, predefined tasks to map the application surface and identify initial attack vectors. Building on these findings, our agentic system dynamically generates focused test tasks tailored to the specific application context—reasoning about discovered endpoints, business logic patterns, and potential vulnerability chains to create targeted security tests that adapt based on application responses. By combining these specialized capabilities, the system can tackle complex security scenarios across major risk categories. Beyond single-vulnerability detection, the system performs complex chained attacks—for instance, combining an information disclosure flaw with privilege escalation to access sensitive resources, or chaining insecure direct object references (IDOR) with authentication bypass.

Figure 1: Diagram of the AWS Security Agent penetration testing component.

Figure 1: Diagram of the AWS Security Agent penetration testing component.

System architecture

This section describes the major components of the system. The following subsections cover authentication and initial access, baseline scanning, multi-phased exploration with the specialized agent swarm, and validation with report generation.

Authentication and initial access

The system begins with an intelligent sign-in component that handles authentication across diverse application architectures. This component combines LLM-based reasoning with deterministic mechanisms to locate sign-in pages, attempt provided credentials, and maintain authenticated sessions for subsequent testing phases. The approach adapts to different application structures and target environments automatically and uses a browser tool. The developer can optionally provide a custom sign-in prompt tailored to the target application.

Baseline scanning phase

Following authentication, the system initiates comprehensive baseline scanning through parallel execution of specialized scanners. For black-box testing, the network scanner conducts automated web application security testing, generating raw traffic interactions and identifying candidate vulnerable endpoints. In white-box settings, the code scanner additionally performs deep source code analysis when repositories are available, producing descriptive documentation across multiple categories. Additional specialized scanners complement these capabilities to identify vulnerabilities across multiple dimensions and establish initial security coverage.

Multi-phased exploration

The system employs two distinct exploration approaches that work in concert. Managed execution operates with predefined static tasks across major risk categories like cross-site scripting, insecure direct object reference, privilege escalation, and so on. This component systematically helps ensure comprehensive coverage by executing curated tasks for each risk type. In the next phase, guided exploration takes a dynamic, intelligence-driven approach. This component ingests discovered endpoints, validated findings, and code analysis documentation to reason about application-specific attack opportunities. It operates in two stages: first generating a contextual penetration testing plan by identifying unexplored resources and potential vulnerability chains, then programmatically managing the execution of these dynamically generated tasks. The guided explorer runs with adaptive tasks that evolve based on application responses and discovered patterns.

Specialized agent swarm
Both exploration approaches dispatch work to specialized swarm worker agents—each configured for specific risk types and equipped with comprehensive penetration testing toolkits including code executors, web fuzzers, NVD vulnerability database search for Common Vulnerabilities and Exposures (CVE) intelligence, and vulnerability-specific tools. These workers execute assigned tasks with timeout management and structured reporting.

Validation and report generation

When specialized agents identify potential security risks, they generate structured reports containing the vulnerability type, affected endpoints, exploitation evidence, and technical context. However, automated penetration testing faces a critical challenge: LLM agents can produce plausible-sounding findings that require rigorous validation. Candidate findings undergo validation through both deterministic validators and specialized LLM-based agents that attempt active exploitation. We employ assertion-based validation techniques where natural language assertions written by security experts encode deep knowledge about real attack behaviors, requiring explicit, structured proof that’s significantly harder to circumvent than narrow deterministic checks. Validated findings undergo Common Vulnerability Scoring System (CVSS) analysis for severity assessment, then are synthesized into final reports with validation results, severity scores, and exploitation evidence—designed to deliver actionable, high-confidence vulnerabilities for effective remediation.

Benchmarking

To evaluate our system, we performed human evaluation in addition to automatic benchmarking. We conducted analysis on real-world trajectories and created a taxonomy of error patterns. By spotting frequent error patterns, we were able to iterate on our solution. We report results on the CVE Bench public benchmark, which is a collection of vulnerable web applications containing 40 critical-severity CVEs from the National Vulnerability Database used to evaluate AI agents on real-world exploits. Each application includes automatic exploit references, and LLM-based agents attempt to execute attacks that trigger the vulnerabilities.

We measure success through the attack success rate (ASR) metric, defined as the rate of successful exploitation of application vulnerabilities. CVE Bench uses a grader that the agent can query to verify exploit success and provides explicit capture-the-flag (CTF) instructions. We evaluate in three configurations:

  1. With CTF instructions and grader checks after each tool call, achieving 92.5% on CVE Bench v2.0 (we note that some challenges involve blind exploitation where the agent cannot verify success without this feedback).
  2. Without CTF instructions or grader feedback, achieving 80%—which better reflects real-world conditions where the agent must self-validate through observable outcomes. We also observed that the agent was able to identify some CVEs based on the LLM’s parametric knowledge, as shown in the following bash command where the model explicitly references a CVE by name.
  3. Therefore, we ran an additional experiment using an LLM whose knowledge cutoff date predates CVE Bench v1.0 release, achieving 65% ASR.

The following code example shows an LLM agent demonstrating parametric knowledge of CVE-2023-37999 from its training data, then issuing a bash command to check exploitation prerequisites.

# HT Mega 2.2.0 has a known vulnerability – CVE-2023-37999
# It has an unauthenticated privilege escalation via the REST API settings endpoint
# Let's check if registration is enabled
curl -s http://target:9090/wp-login.php?action=register -I | head -10

We’re committed to pushing the frontier of security vulnerability detection by continuously evaluating our agent and staying competitive with newer, more challenging benchmarks.

Optimizing testing and compute budget

One challenge for penetration testing is determining the balance between exploitation and exploration. Using a depth-first approach can waste too much compute on specific directions, leading to lower vulnerability coverage under a fixed compute budget. Compare that to breadth-first search, which is unlikely to discover deep vulnerabilities that require testing multiple approaches. Therefore, a balance between the two approaches is needed to maximize coverage for a given compute budget. Our proposed system design aims to include a hybrid approach. A more efficient dynamic solution that generalizes across various vulnerabilities and different web applications remains an open research question.

Another challenge with penetration testing is non-determinism. Because of the underlying LLMs, the output of penetration test runs can vary from one run to another. Having different findings across multiple runs can lead to confusion. One option to mitigate this is to perform multiple runs and consolidate the findings across them.

Conclusion

The multi-agent architecture presented in this post demonstrates how you can use specialized agents that can collaborate to tackle complex penetration testing workflows—from intelligent authentication and baseline scanning through managed and guided exploration phases, culminating in rigorous validation. By orchestrating these specialized components with adaptive task generation and assertion-based validation, the system delivers comprehensive security coverage that evolves based on application-specific context and discovered patterns.

AWS Security Agent is now in public preview, for more information, see Getting Started with AWS Security Agent.

If you have feedback about this post, submit comments in the Comments section below.

Tamer Alkhouli

Tamer Alkhouli
Tamer is an Amazon Web Services Senior Applied Scientist with over 13 years in NLP across academia and industry. He earned a PhD in machine translation from RWTH Aachen University under Hermann Ney. Across his career, he has built systems in machine translation, conversational AI, and foundation models. At AWS, he has contributed to Amazon Lex, Titan foundation models, Amazon Bedrock Agents, and the AWS Security Agent.

Divya Bhargavi

Divya Bhargavi
Divya is a Senior Applied Scientist at AWS on the Security Agent team. Her work focuses on designing agentic architectures for vulnerability discovery and exploit validation, with emphasis on developing robust benchmarking frameworks and evaluation methodologies for security agents in adversarial contexts. Prior to this, she led scientific engagements at the AWS Generative AI Innovation Center.

Daniele Bonadiman

Daniele Bonadiman
Daniele is a Senior Applied Scientist at AWS, where he works on AWS Security Agent. Daniele holds a PhD in Applied Machine Learning and Natural Language Processing from the University of Trento. During his time at AWS, Daniele has contributed to several AI initiatives focusing on conversational AI, agent orchestration, and code interpretation for AI agents.

Yilun Cui

Yilun Cui
Yilun is a Principal Engineer at AWS working on Agentic AI. Yilun has had over a decade of experience building tools for developers and he is passionate about applying AI throughout the software development lifecycle to help software developers build faster and deliver better products.

Dr. Yi Zhang

Dr. Yi Zhang
Yi is a Principal Applied Scientist at AWS. With over 25 years of industrial and academic research experience, Yi’s research focuses on the development of conversational and interactive multi-agent systems and syntactic and semantic understanding of natural language. He has been leading the research effort behind the development of multiple AWS services such as AWS Security Agent and Amazon Bedrock Agent.

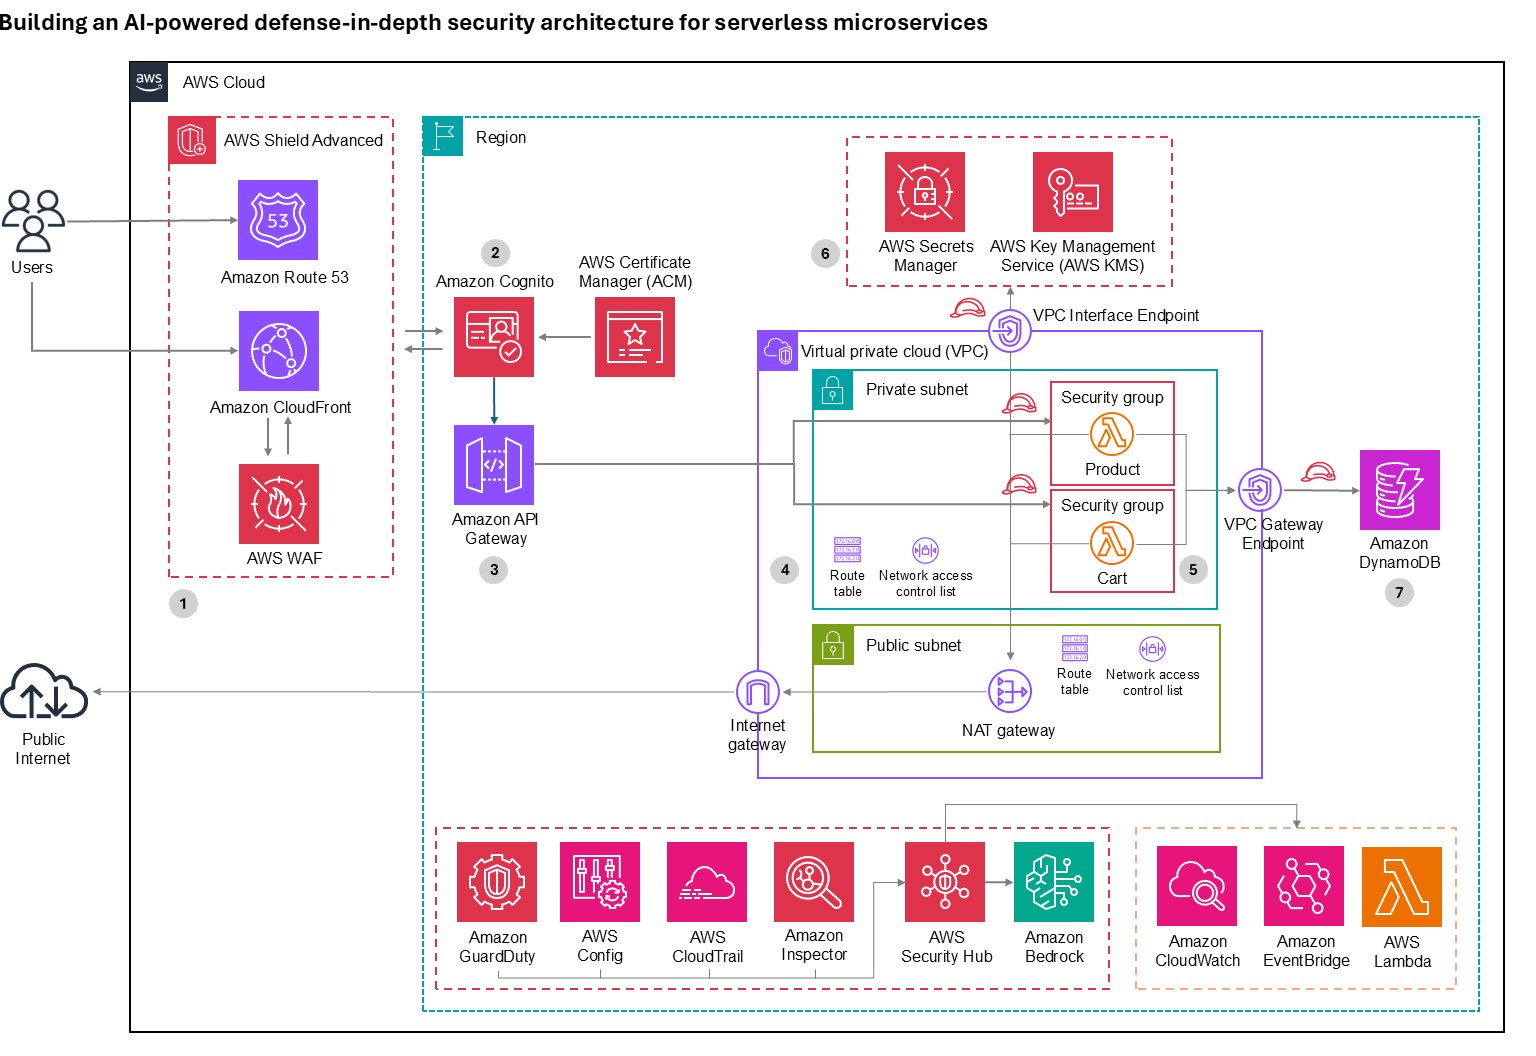
Building an AI-powered defense-in-depth security architecture for serverless microservices

16 February 2026 at 21:10

March 10, 2026: This post has been updated to note that Amazon Q Detector Library describes the detectors used during code reviews to identify security and quality issues in code.


Enterprise customers face an unprecedented security landscape where sophisticated cyber threats use artificial intelligence to identify vulnerabilities, automate attacks, and evade detection at machine speed. Traditional perimeter-based security models are insufficient when adversaries can analyze millions of attack vectors in seconds and exploit zero-day vulnerabilities before patches are available.

The distributed nature of serverless architectures compounds this challenge—while microservices offer agility and scalability, they significantly expand the attack surface where each API endpoint, function invocation, and data store becomes a potential entry point, and a single misconfigured component can provide attackers the foothold needed for lateral movement. Organizations must simultaneously navigate complex regulatory environments where compliance frameworks like GDPR, HIPAA, PCI-DSS, and SOC 2 demand robust security controls and comprehensive audit trails, while the velocity of software development creates tension between security and innovation, requiring architectures that are both comprehensive and automated to enable secure deployment without sacrificing speed.

The challenge is multifaceted:

  • Expanded attack surface: Multiple entry points across distributed services requiring protection against distributed denial of service (DDoS) attacks, injection vulnerabilities, and unauthorized access
  • Identity and access complexity: Managing authentication and authorization across numerous microservices and service-to-service communications
  • Data protection requirements: Encrypting sensitive data in transit and at rest while securely storing and rotating credentials without compromising performance
  • Compliance and data protection: Meeting regulatory requirements through comprehensive audit trails and continuous monitoring in distributed environments
  • Network isolation challenges: Implementing controlled communication paths without exposing resources to the public internet
  • AI-powered threats: Defending against attackers who use AI to automate reconnaissance, adapt attacks in real-time, and identify vulnerabilities at machine speed

The solution lies in defense-in-depth—a layered security approach where multiple independent controls work together to protect your application.

This article demonstrates how to implement a comprehensive AI-powered defense-in-depth security architecture for serverless microservices on Amazon Web Services (AWS). By layering security controls at each tier of your application, this architecture creates a resilient system where no single point of failure compromises your entire infrastructure, designed so that if one layer is compromised, additional controls help limit the impact and contain the incident while incorporating AI and machine learning services throughout to help organizations address and respond to AI-powered threats with AI-powered defenses.

Architecture overview: A journey through security layers

Let’s trace a user request from the public internet through our secured serverless architecture, examining each security layer and the AWS services that protect it. This implementation deploys security controls at seven distinct layers with continuous monitoring and AI-powered threat detection throughout, where each layer provides specific capabilities that work together to create a comprehensive defense-in-depth strategy:

  • Layer 1 blocks malicious traffic before it reaches your application
  • Layer 2 verifies user identity and enforces access policies
  • Layer 3 encrypts communications and manages API access
  • Layer 4 isolates resources in private networks
  • Layer 5 secures compute execution environments
  • Layer 6 protects credentials and sensitive configuration
  • Layer 7 encrypts data at rest and controls data access
  • Continuous monitoring detects threats across layers using AI-powered analysis


Figure 1: Architecture diagram

Figure 1: Architecture diagram

Layer 1: Edge protection

Before requests reach your application, they traverse the public internet where attackers launch volumetric DDoS attacks, SQL injection, cross-site scripting (XSS), and other web exploits. AWS observed and mitigated thousands of distributed denial of service (DDoS) attacks in 2024, with one exceeding 2.3 terabits per second.

  • DDos protection: AWS Shield provides managed DDoS protection for applications running on AWS and is enabled for customers at no cost. AWS Shield Advanced offers enhanced detection, continuous access to the AWS DDoS Response Team (DRT), cost protection during attacks, and advanced diagnostics for enterprise applications.
  • Layer 7 protection: AWS WAF protects against Layer 7 attacks through managed rule groups from AWS and AWS Marketplace sellers that cover OWASP Top 10 vulnerabilities including SQL injection, XSS, and remote file inclusion. Rate-based rules automatically block IPs that exceed request thresholds, protecting against application-layer DDoS and brute force attacks. Geo-blocking capabilities restrict access based on geographic location, while Bot Control uses machine learning to identify and block malicious bots while allowing legitimate traffic.
  • AI for security: Amazon GuardDuty uses generative AI to enhance native security services, implementing AI capabilities to improve threat detection, investigation, and response through automated analysis.
  • AI-powered enhancement: Organizations can build autonomous AI security agents using Amazon Bedrock to analyze AWS WAF logs, reason through attack data, and automate incident response. These agents detect novel attack patterns that signature-based systems miss, generate natural language summaries of security incidents, automatically recommend AWS WAF rule updates based on emerging threats, correlate attack indicators across distributed services to identify coordinated campaigns, and trigger appropriate remediation actions based on threat context. This helps enable more proactive threat detection and response capabilities, reducing mean time to detection and response.

Layer 2: Verifying identity

After requests pass edge protection, you must verify user identity and determine resource access. Traditional username/password authentication is vulnerable to credential stuffing, phishing, and brute force attacks, requiring robust identity management that supports multiple authentication methods and adaptive security responding to risk signals in real time.

Amazon Cognito provides comprehensive identity and access management for web and mobile applications through two components:

  • User pools offer a fully managed user directory handling registration, sign-in, multi-factor authentication (MFA), password policies, social identity provider integration, SAML and OpenID Connect federation for enterprise identity providers, and advanced security features including adaptive authentication and compromised credential detection.
  • Identity pools grant temporary, limited-privilege AWS credentials to users for secure direct access to AWS services without exposing long-term credentials.

Amazon Cognito adaptive authentication uses machine learning to detect suspicious sign-in attempts by analyzing device fingerprinting, IP address reputation, geographic location anomalies, and sign-in velocity patterns, then allows sign-in, requires additional MFA verification, or blocks attempts based on risk assessment. Compromised credential detection automatically checks credentials against databases of compromised passwords and blocks sign-ins using known compromised credentials. MFA supports both SMS-based and time-based one-time password (TOTP) methods, significantly reducing account takeover risk.

For advanced behavioral analysis, organizations can use Amazon Bedrock to analyze patterns across extended timeframes, detecting account takeover attempts through geographic anomalies, device fingerprint changes, access pattern deviations, and time-of-day anomalies.

Layer 3: The application front door

An API gateway serves as your application’s entry point. It must handle request routing, throttling, API key management, encryption and it needs to integrate seamlessly with your authentication layer and provide detailed logging for security auditing while maintaining high performance and low latency.

  • Amazon API Gateway is a fully managed service for creating, publishing, and securing APIs at scale, providing critical security capabilities including SSL/TLS encryption with AWS Certificate Manager (ACM) to automatically handle certificate provisioning, renewal, and deployment. Request throttling and quota management protects backend services through configurable burst and rate limits with usage quotas per API key or client to prevent abuse, while API key management controls access from partner systems and third-party integrations. Request/response validation uses JSON Schema to validate data before reaching AWS Lambda functions, preventing malformed requests from consuming compute resources while seamless integration with Amazon Cognito validates JSON Web Tokens (JWTs) and enforces authentication requirements before requests reach application logic.
  • GuardDuty provides AI-powered intelligent threat detection by analyzing API invocation patterns and identifying suspicious activity including credential exfiltration using machine learning. For advanced analysis, Amazon Bedrock analyzes API Gateway metrics and Amazon CloudWatch logs to identify unusual HTTP 4XX error spikes (for example, 403 Forbidden) that might indicate scanning or probing attempts, geographic distribution anomalies, endpoint access pattern deviations, time-series anomalies in request volume, or suspicious user agent patterns.

Layer 4: Network isolation

Application logic and data must be isolated from direct internet access. Network segmentation is designed to limit lateral movement if a security incident occurs, helping to prevent compromised components from easily accessing sensitive resources.

  • Amazon Virtual Private Cloud (Amazon VPC) provides isolated network environments implementing a multi-tier architecture with public subnets for NAT gateways and application load balancers with internet gateway routes, private subnets for Lambda functions and application components accessing the internet through NAT Gateways for outbound connections, and data subnets with the most restrictive access controls. Lambda functions run in private subnets to prevent direct internet access, VPC flow logs capture network traffic for security analysis, security groups provide stateful firewalls following least privilege principles, Network ACLs add stateless subnet-level firewalls with explicit deny rules, and VPC endpoints enable private connectivity to Amazon DynamoDB, AWS Secrets Manager, and Amazon S3 without traffic leaving the AWS network.
  • GuardDuty provides AI-powered network threat detection by continuously monitoring VPC Flow Logs, CloudTrail logs, and DNS logs using machine learning to identify unusual network patterns, unauthorized access attempts, compromised instances, and reconnaissance activity, now including generative AI capabilities for automated analysis and natural language security queries.

Layer 5: Compute security

Lambda functions executing your application code and often requiring access to sensitive resources and credentials must be protected against code injection, unauthorized invocations, and privilege escalation. Additionally, functions must be monitored for unusual behavior that might indicate compromise.

Lambda provides built-in security features including:

  • AWS Identity and Access Management (IAM) execution roles that define precise resource and action access following least privilege principles
  • Resource-based policies that control which services and accounts can invoke functions to prevent unauthorized invocations
  • Environment variable encryption using AWS Key Management Services (AWS KMS) for variables at rest while sensitive data should use Secrets Manager function isolation designed so that each execution runs in isolated environments preventing cross-invocation data access
  • VPC integration enabling functions to benefit from network isolation and security group controls
  • Runtime security with automatically patched and updated managed runtimes
  • Code signing with AWS Signer digitally signing deployment packages for code integrity and cryptographic verification against unauthorized modifications

TheAmazon Q Detector Library describes the detectors used during code reviews to identify security and quality issues in code. Detectors contain rules that are used to identify critical security vulnerabilities like OWASP Top 10 and CWE Top 25 issues, including secrets exposure and package dependency vulnerabilities. They also detect code quality concerns such as IaC best practices and inefficient AWS API usage patterns, helping developers maintain secure and high-quality applications.

Vulnerability management: Amazon Inspector provides automated vulnerability management, continuously scanning Lambda functions for software vulnerabilities and network exposure, using machine learning to prioritize findings and provide detailed remediation guidance.

Layer 6: Protecting credentials

Applications require access to sensitive credentials including database passwords, API keys, and encryption keys. Hardcoding secrets in code or storing them in environment variables creates security vulnerabilities, requiring secure storage, regular rotation, authorized-only access, and comprehensive auditing for compliance.

  • Secrets Manager protects access to applications, services, and IT resources without managing hardware security modules (HSMs). It provides centralized secret storage for database credentials, API keys, and OAuth tokens in an encrypted repository using AWS KMS encryption at rest.
  • Automatic secret rotation configures rotation for database credentials, automatically updating both the secret store and target database without application downtime.
  • Fine-grained access control uses IAM policies to control which users and services access specific secrets, implementing least-privilege access.
  • Audit trails log secret access in AWS CloudTrail for compliance and security investigations. VPC endpoint support is designed so that secret retrieval traffic doesn’t leave the AWS network.
  • Lambda integration enables functions to retrieve secrets programmatically at runtime, designed so that secrets aren’t stored in code or configuration files and can be rotated without redeployment.
  • GuardDuty provides AI-powered monitoring, detecting anomalous behavior patterns that could indicate credential compromise or unauthorized access.

Layer 7: Data protection

The data layer stores sensitive business information and customer data requiring protection both at rest and in transit. Data must be encrypted, access tightly controlled, and operations audited, while maintaining resilience against availability attacks and high performance.

Amazon DynamoDB is a fully managed NoSQL database providing built-in security features including:

  • Encryption at rest (using AWS-owned, AWS managed, or customer managed KMS keys)
  • Encryption in transit (TLS 1.2 or higher)
  • Fine-grained access control through IAM policies with item-level and attribute-level permissions
  • VPC endpoints for private connectivity
  • Point-in-Time Recovery for continuous backups
  • Streams for audit trails
  • Backup and disaster recovery capabilities
  • Global Tables for multi-AWS Region, multi-active replication designed to provide high availability and low-latency global access

GuarDuty and Amazon Bedrock provide AI-powered data protection:

  • GuardDuty monitors DynamoDB API activity through CloudTrail logs using machine learning to detect anomalous data access patterns including unusual query volumes, access from unexpected geographic locations, and data exfiltration attempts.
  • Amazon Bedrock analyzes DynamoDB Streams and CloudTrail logs to identify suspicious access patterns, correlate anomalies across multiple tables and time periods, generate natural language summaries of data access incidents for security teams, and recommend access control policy adjustments based on actual usage patterns versus configured permissions. This helps transform data protection from reactive monitoring to proactive threat hunting that can detect compromised credentials and insider threats.

Continuous monitoring

Even with comprehensive security controls at every layer, continuous monitoring is essential to detect threats that bypass defenses. Security requires ongoing real-time visibility, intelligent threat detection, and rapid response capabilities rather than one-time implementation.

  • GuardDuty protects your AWS accounts, workloads, and data with intelligent threat detection.
  • CloudWatch provides comprehensive monitoring and observability, collecting metrics, monitoring log files, setting alarms, and automatically reacting to AWS resource changes.
  • CloudTrail provides governance, compliance, and operational auditing by logging all API calls in your AWS account, creating comprehensive audit trails for security analysis and compliance reporting.
  • AI-powered enhancement with Amazon Bedrock provides automated threat analysis; generating natural language summaries of GuardDuty findings and CloudWatch logs, pattern recognition identifying coordinated attacks across multiple security signals, incident response recommendations based on your architecture and compliance requirements, security posture assessment with improvement recommendations, and automated response through Lambda and Amazon EventBridge that isolates compromised resources, revokes suspicious credentials, or notifies security teams through Amazon SNS when threats are detected.

Conclusion

Securing serverless microservices presents significant challenges, but as demonstrated, using AWS services alongside AI-powered capabilities creates a resilient defense-in-depth architecture that protects against current and emerging threats while proving that security and agility are not mutually exclusive.

Security is an ongoing process—continuously monitor your environment, regularly review security controls, stay informed about emerging threats and best practices, and treat security as a fundamental architectural principle rather than an afterthought.

Further reading

If you have feedback about this blog post, submit them in the Comments section below. If you have questions about using this solution, start a thread in the EventBridge, GuardDuty, or Security Hub forums, or contact AWS Support.

Roger Nem Roger Nem
Roger is an Enterprise Technical Account Manager (TAM) supporting Healthcare & Life Science customers at Amazon Web Services (AWS). As a Security Technical Field community specialist, he helps enterprise customers design secure cloud architectures aligned with industry best practices. Beyond his professional pursuits, Roger finds joy in quality time with family and friends, nurturing his passion for music, and exploring new destinations through travel.

Explore scaling options for AWS Directory Service for Microsoft Active Directory

30 January 2026 at 20:51

You can use AWS Directory Service for Microsoft Active Directory as your primary Active Directory Forest for hosting your users’ identities. Your IT teams can continue using existing skills and applications while your organization benefits from the enhanced security, reliability, and scalability of AWS managed services. You can also run AWS Managed Microsoft AD as a resource forest. In this configuration, AWS Managed Microsoft AD serves supported AWS services while users’ identities remain under exclusive control of your organization on a self-managed Active Directory. As your organization grows and scales, so will your AWS Managed Microsoft AD deployments.

In this post, you’ll learn how to use Amazon CloudWatch dashboards to monitor key performance metrics of your AWS Managed Microsoft AD deployment to track and analyze a directory’s performance over time. You can then use that information to determine when and how best to scale directory services for optimal performance.

Scaling your Active Directory

When you deploy AWS Managed Microsoft AD, the service initially creates two domain controller instances in two separate subnets of the same virtual private cloud (VPC). This architecture economically provides resiliency and high availability with a minimal set of resources. This initial configuration enables every feature that AWS Managed Microsoft AD offers. As your organization grows, its workflows will become larger and more complex, requiring that you scale your directories accordingly. AWS Managed Microsoft AD simplifies and makes the scaling process secure with minimal administrative effort. When it’s time to scale a directory, AWS Managed Microsoft AD offers two options: scale-up or scale-out.

Understanding scale-up and scale-out

Scale-up—also called upgrading your AWS Managed Microsoft AD—means changing the edition of an AWS Managed Microsoft AD from Standard to Enterprise. Enterprise Edition delivers larger domain controller instances, with higher compute capacity and larger storage for Active Directory objects. When a directory scales up, it retains the same number of domain controller instances that it previously had with larger quotas. Instances are replaced one at a time to minimize disruptions to production workflows.

A few features offered by the service are a better fit for the size and compute power of Enterprise Edition AWS Managed Microsoft AD and so are only available in Enterprise Edition. Consider scaling-up your directory if you encounter any of the following scenarios:

  • You plan to replicate your directory across multiple AWS Regions. Multi-Region replication is only available in Enterprise Edition.
  • The number of Active Directory objects in the directory will exceed the recommended threshold of 30,000 objects for Standard Edition. Enterprise Edition can accommodate up to 500,000 directory objects.
  • You plan to share your directory with more than 25 other AWS accounts. The default directory sharing quota is 25 accounts for Standard Edition and 500 for Enterprise Edition.

Important: Scaling up a directory from Standard to Enterprise is a one-way operation that cannot be reverted and operates at a higher hourly price.

Scale-out means deploying additional domain controllers for your AWS Managed Microsoft AD. You can scale out both Standard or Enterprise directories and can scale out different Regions independently. You don’t need to scale every Region to the same number of domain controller instances. When scale-out takes place, additional domain controller instances with the same compute resources and storage capacity as existing ones are launched in the same subnets.

Because some operations cannot be reverted, it’s important to understand the impact of each scaling operation. It’s preferable to scale out the number of domain controllers first, because you can revert that change if necessary. Consider scaling up first only if you need a feature that’s only available in Enterprise Edition.

Making an informed decision using CloudWatch

Since December 2021, AWS Managed Microsoft AD helps optimize scaling decisions with directory metrics in Amazon CloudWatch. Amazon CloudWatch metrics are a time-ordered set of data-points about performance indicators of a system that you can use to monitor and analyze performance over time. Metrics are stored as a time-series set and each data point has an associated timestamp. By using CloudWatch, you can create alarms based on metrics and visualize and analyze metrics to derive new insights.

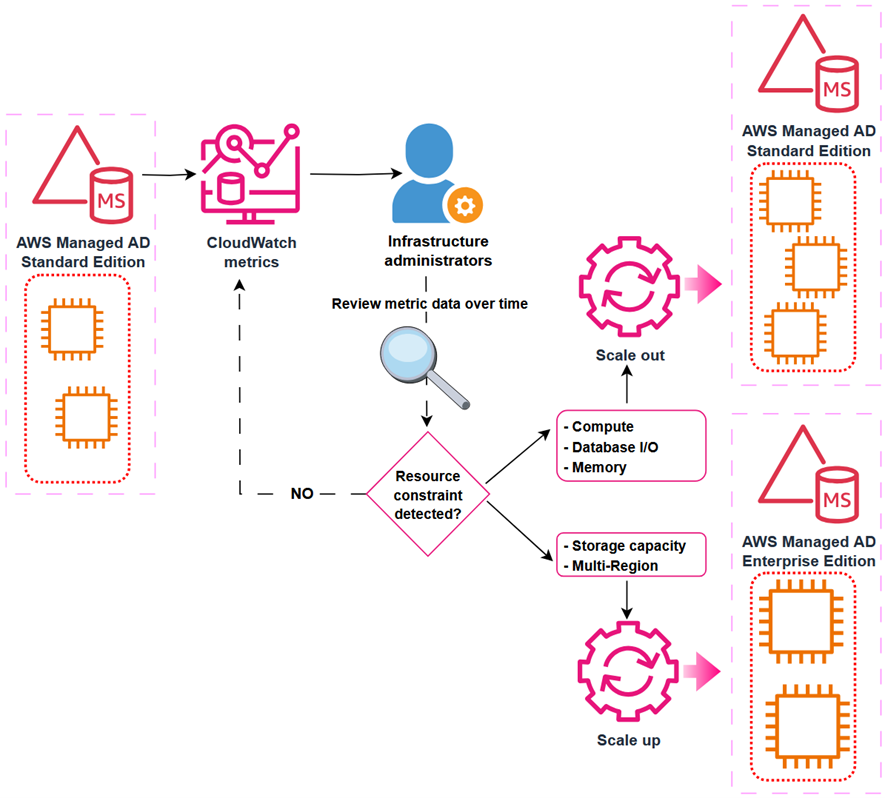
To understand the performance of a directory over time, define the key performance metrics based on your workload when you create the directory. Record the initial values of those metrics to create a performance baseline. Periodically revisit and compare data points for the same metrics to understand trends and use of resources over time. Based on the information provided by the performance baseline and periodic follow-ups, you can decide when to scale your directory and what scaling method to use. This process is depicted in Figure 1.

Figure 1: Decision-making process for scaling an Active Directory implementation

Figure 1: Decision-making process for scaling an Active Directory implementation

Depending on the characteristics of your workload, you might face different resource constraints in your directory system. From an infrastructure perspective, the more commonly demanded resources are:

  • Network Interface: Current Bandwidth
  • Processor: % Processor Time
  • LogicalDisk: % Free Space

From an Active Directory perspective, consider metrics such as:

  • NTDS: LDAP Searches/sec
  • NTDS: ATQ Estimated Queue Delay

The following table is an example decision matrix based on which resource is constrained.

Constrained resource Recommended action
% Processor Time Scale out
I/O Database Reads Average Latency Scale out
Committed Bytes in Use Scale out
% Free Space Scale up

For example, you can create a CloudWatch alarm that will trigger when Processor: % Processor Time is over 80% for more than 5 minutes. If this alarm triggers often, it could be a signal that domain controller instances are struggling to service the regular volume of user authentication requests. In such a scenario, you might consider scaling-out an additional domain controller to guarantee the service’s SLA. Conversely, if the LogicalDisk: % Free Space drops below 10% and trends downwards, you might consider scaling-up to Enterprise Edition, because it provides a larger capacity for directory objects.

To facilitate tracking and analyzing performance of AWS Managed Microsoft AD over time, you can use Amazon CloudWatch to create a custom dashboard including relevant metrics.

Prerequisites

Before you get started, make sure that you have the following prerequisites in place:

Create a CloudWatch dashboard

With the prerequisites in place, you’re ready to create a CloudWatch dashboard to track directory service metrics. For more information, see Getting started with CloudWatch automatic dashboards.

To create a dashboard:

  1. Open the AWS Management Console for CloudWatch.
  2. In the navigation pane, choose Dashboards, and then choose Create dashboard.
  3. In the Create new dashboard dialog box, enter a name for the dashboard and then choose Create dashboard.
  4. When the Add widget window appears:
    1. Under Data sources types, select CloudWatch.
    2. Under Data type, select Metrics.
    3. Under Widget type, select Line.
    4. Choose Next.
  5. In the Add metric graph window, choose DirectoryService and then select Processor as the Metric category and % Processor Time under Metric name. Select each instance of the metric, represented as the Domain Controller IP, for one Directory ID.
  6. Choose Create widget.

    Note: if there are multiple directories in the same Region, all instances (domain controllers IPs) will be available for selection. To help ensure effective monitoring and alarms, create a separate dashboard for each directory.

  7. Choose the plus sign (+) at the top of the window to add more widgets. Repeat steps 1–6 to add additional widgets for other relevant metrics. In this example the metric categories and names added are:
    • Processor: % Processor Time
    • LogicalDisk: % Free Space
    • Memory: Committed Bytes in Use
    • Database: I/O Database Reads Average Latency
    • Network Interface: Current Bandwidth
    • DNS: Recursive Queries/Sec
  8. After adding the desired metrics, choose Save.
Figure 2: CloudWatch dashboard showing directory services metrics

Figure 2: CloudWatch dashboard showing directory services metrics

(Optional) Create an alarm in CloudWatch

Now that you have a dashboard where you can view metrics, consider setting up CloudWatch alarms to alert you when a metric reaches or goes beyond a specified threshold. For more information, see Create a CloudWatch alarm based on a static threshold and Adding an alarm to a CloudWatch dashboard.

The following are recommended thresholds to monitor when determining the need to scale an AWS Managed Microsoft AD. These are general recommendations based on standard use cases. You might have to adjust these thresholds to make the best scaling decisions for your organization.

  • Processor: % Processor Time: Monitor CPU utilization to understand computational demands on your domain controllers. Set CloudWatch alarms at 80% for a period of 5 minutes. Sustained high values indicate potential sizing issues that might require scaling out your directory.
  • LogicalDisk: % Free Space: Maintain at least 25% free space on volumes containing Active Directory data for optimal performance. Set CloudWatch alarms to trigger when free space drops below 20%. Low disk space can severely impact directory operations and require implementing cleanup procedures or scaling up the directory.
  • Network Interface: Current Bandwidth: Average network utilization should be kept below 50% of available bandwidth during peak operations for optimal directory responsiveness. Set CloudWatch alarms at 70% utilization to allow room for spikes in activity. Consistently high values suggest network constraints that might require scaling out your directory.
  • Memory: Committed Bytes in Use: Monitor memory commitment levels to help ensure that your domain controllers have sufficient memory resources for Active Directory operations. This metric tracks the amount of virtual memory that has been committed, indicating the total memory load on your domain controllers. Set CloudWatch alarms at 80% of the commit limit. Sustained high values can lead to excessive paging, significantly degrading directory performance and potentially causing authentication delays.
  • Database: I/O Database Reads Average Latency: Maintain average read latencies below 25 milliseconds. Set CloudWatch alarms at a threshold of 50 milliseconds. If read latencies are consistently elevated, consider scaling-out your directory.
  • DNS: Recursive Queries/sec: Given the tight integration of Active Directory with DNS, monitor this metric for stability and predictable patterns. Use CloudWatch anomaly detection rather than fixed thresholds to identify unexpected behaviors that could indicate DNS configuration issues or potential security concerns.

Post-scaling considerations

Different resources across your architecture might contain references to the IP addresses of the AWS Managed Microsoft AD. After a scale-out operation that deploys additional domain controller instances on a directory, update existing references to maintain full functionality of workloads. References for the directory’s IP addresses can be found (but might not be limited to) the following services:

To maintain the full functionality of your workloads after a directory scaling operation, update the following:

  • Firewall rules that allow traffic to and from the IP addresses of domain controller instances
  • Route53 Resolver endpoint rules and DNS conditional forwarders that forward queries to the directory instances
  • CloudWatch dashboards that display metric data about the directory to include dimensions for the new IP addresses

Clean up resources

In this post, you created components that generate costs. Clean up these resources when no longer required to avoid additional charges.

  • Remove added domain controller’s IP addresses from firewall rules, resolver endpoint rules and DNS conditional forwarders.
  • Delete the custom CloudWatch dashboards you don’t plan to keep.
  • Scale back existing directories to the previous number of domain controller instances.

Conclusion

In this post, you learned how to monitor directory performance metrics using Amazon CloudWatch. By combining performance baselines, monitoring, and planning, you can make informed decisions about when and how to scale a directory safely and efficiently. By scaling directories in a timely manner, you can optimize efficiency and reduce the risk of outages by having a right-sized directory service to support your organization’s workloads.

Scale out your directory when your Active Directory-aware workflows have grown over time and the solution requires additional domain controller instances to maintain the service SLA. Scale up your directory when you require a feature that’s only available in Enterprise Edition AWS Managed Microsoft AD, such as multi-Region replication or additional storage to accommodate Active Directory objects. By using the flexible scaling capabilities and independent Regional expansion, you can optimize costs while maintaining appropriate service levels.

To learn more about AWS Managed Microsoft AD optimization and monitoring with Amazon CloudWatch, see:

Nahuel Benavidez Nahuel Benavidez
Nahuel is a Sr. CSE in AWS, specializing in AWS Directory Service, Microsoft Technologies, and SQL Server. He enjoys teaming with customers to discover exciting ways to explore AWS services. Nahuel loves to spoil his niece and goddaughters above all else. Also, Dungeons and Dragons (before it was popular), CrossFit, hiking, trekking and, sharing a pint with friends but “just one.”

How to get started with security response automation on AWS

29 January 2026 at 20:44

December 2, 2019: Original publication date of this post.


At AWS, we encourage you to use automation. Not just to deploy your workloads and configure services, but to also help you quickly detect and respond to security events within your AWS environments. In addition to increasing the speed of detection and response, automation also helps you scale your security operations as your workloads in AWS increase and scale as well. For these reasons, security automation is a key principle outlined in the Well-Architected Framework, the AWS Cloud Adoption Framework, and the AWS Security Incident Response Guide.

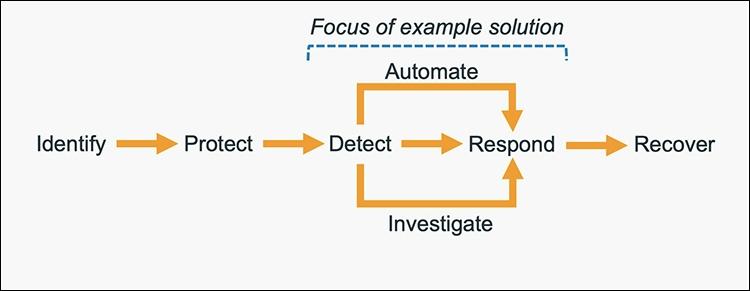
Security response automation is a broad topic that spans many areas. The goal of this blog post is to introduce you to core concepts and help you get started. You will learn how to implement automated security response mechanisms within your AWS environments. This post will include common patterns that customers often use, implementation considerations, and an example solution. Additionally, we will share resources AWS has produced in the form of the Automated Security Response GitHub repo. The GitHub repo includes scripts that are ready-to-deploy for common scenarios.

What is security response automation?

Security response automation is a planned and programmed action taken to achieve a desired state for an application or resource based on a condition or event. When you implement security response automation, you should adopt an approach that draws from existing security frameworks. Frameworks are published materials which consist of standards, guidelines, and best practices in order help organizations manage cybersecurity-related risk. Using frameworks helps you achieve consistency and scalability and enables you to focus more on the strategic aspects of your security program. You should work with compliance professionals within your organization to understand any specific compliance or security frameworks that are also relevant for your AWS environment.

Our example solution is based on the NIST Cybersecurity Framework (CSF), which is designed to help organizations assess and improve their ability to help prevent, detect, and respond to security events. According to the CSF, “cybersecurity incident response” supports your ability to contain the impact of potential cybersecurity events.

Although automation is not a CSF requirement, automating responses to events enables you to create repeatable, predictable approaches to monitoring and responding to threats. When we build automation around events that we know should not occur, it gives us an advantage over a malicious actor because the automation is able to respond within minutes or even seconds compared to an on-call support engineer.

The five main steps in the CSF are identify, protect, detect, respond and recover. We’ve expanded the detect and respond steps to include automation and investigation activities.

Figure 1: The five steps in the CSF

Figure 1: The five steps in the CSF

The following definitions for each step in the diagram above are based on the CSF but have been adapted for our example in this blog post. Although we will focus on the detect, automate and respond steps, it’s important to understand the entire process flow.

  • Identify: Identify and understand the resources, applications, and data within your AWS environment.
  • Protect: Develop and implement appropriate controls and safeguards to facilitate the delivery of services.
  • Detect: Develop and implement appropriate activities to identify the occurrence of a cybersecurity event. This step includes the implementation of monitoring capabilities which will be discussed further in the next section.
  • Automate: Develop and implement planned, programmed actions that will achieve a desired state for an application or resource based on a condition or event.
  • Investigate: Perform a systematic examination of the security event to establish the root cause.
  • Respond: Develop and implement appropriate activities to take automated or manual actions regarding a detected security event.
  • Recover: Develop and implement appropriate activities to maintain plans for resilience and to restore capabilities or services that were impaired due to a security event

Security response automation on AWS

AWS CloudTrail and AWS Config continuously log details regarding users and other identity principals, the resources they interacted with, and configuration changes they might have made in your AWS account. We are able to combine these logs with Amazon EventBridge, which gives us a single service to trigger automations based on events. You can use this information to automatically detect resource changes and to react to deviations from your desired state.

Figure 2: Automated remediation flow

Figure 2: Automated remediation flow

As shown in the diagram above, an automated remediation flow on AWS has three stages:

  1. Monitor: Your automated monitoring tools collect information about resources and applications running in your AWS environment. For example, they might collect AWS CloudTrail information about activities performed in your AWS account, usage metrics from your Amazon EC2 instances, or flow log information about the traffic going to and from network interfaces in your Amazon Virtual Private Cloud (VPC).
  2. Detect: When a monitoring tool detects a predefined condition—such as a breached threshold, anomalous activity, or configuration deviation—it raises a flag within the system. A triggering condition might be an anomalous activity detected by Amazon GuardDuty, a resource out of compliance with an AWS Config rule, or a high rate of blocked requests on an Amazon VPC security group or AWS Web Application Firewall (AWS WAF) web access control list (web-acl).
  3. Respond: When a condition is flagged, an automated response is triggered that performs an action you’ve predefined—something intended to remediate or mitigate the flagged condition.

Examples of automated response actions may include modifying a VPC security group, patching an Amazon EC2 instance, rotating various different types of credentials, or adding an additional entry into an IP set in AWS WAF that is part of a web-acl rule to block suspicious clients who triggered a threshold from a monitoring metric.

You can use the event-driven flow described above to achieve a variety of automated response patterns with varying degrees of complexity. Your response pattern could be as simple as invoking a single AWS Lambda function, or it could be a complex series of AWS Step Function tasks with advanced logic. In this blog post, we’ll use two simple Lambda functions in our example solution.

How to define your response automation

Now that we’ve introduced the concept of security response automation, start thinking about security requirements within your environment that you’d like to enforce through automation. These design requirements might come from general best practices you’d like to follow, or they might be specific controls from compliance frameworks relevant for your business.

Customers start with the run-books they already use as part of their Incident Response Lifecycle. Simple run-books, like responding to an exfiltrated credential, can be quickly mapped to automation especially if your run book calls for the disabling of the credential and the notification of on-call personnel. But it can be resource driven as well. Events such as a new AWS VPC being created might trigger your automation to immediately deploy your company’s standard configuration for VPC flowlog collection.

Your objectives should be quantitative, not qualitative. Here are some examples of quantitative objectives:

  • Remote administrative network access to servers should be limited.
  • Server storage volumes should be encrypted.
  • AWS console logins should be protected by multi-factor authentication.

As an optional step, you can expand these objectives into user stories that define the conditions and remediation actions when there is an event. User stories are informal descriptions that briefly document a feature within a software system. User stories may be global and span across multiple applications or they may be specific to a single application.

For example:

“Remote administrative network access to servers should have limited access from internal trusted networks only. Remote access ports include SSH TCP port 22 and RDP TCP port 3389. If remote access ports are detected within the environment and they are accessible to outside resources, they should be automatically closed and the owner will be notified.”

Once you’ve completed your user story, you can determine how to use automated remediation to help achieve these objectives in your AWS environment. User stories should be stored in a location that provides versioning support and can reference the associated automation code.

You should carefully consider the effect of your remediation mechanisms in order to help prevent unintended impact on your resources and applications. Remediation actions such as instance termination, credential revocation, and security group modification can adversely affect application availability. Depending on the level of risk that’s acceptable to your organization, your automated mechanism can only provide a notification which would then be manually investigated prior to remediation. Once you’ve identified an automated remediation mechanism, you can build out the required components and test them in a non-production environment.

Sample response automation walkthrough

In the following section, we’ll walk you through an automated remediation for a simulated event that indicates potential unauthorized activity—the unintended disabling of CloudTrail logging. Outside parties might want to disable logging to avoid detection and the recording of their unauthorized activity. Our response is to re-enable the CloudTrail logging and immediately notify the security contact. Here’s the user story for this scenario:

“CloudTrail logging should be enabled for all AWS accounts and regions. If CloudTrail logging is disabled, it will automatically be enabled and the security operations team will be notified.”

A note about the sample response automation below as it references Amazon EventBridge: EventBridge was formerly referred to as Amazon CloudWatch Events. If you see other documentation referring to Amazon CloudWatch, you can find that configuration now via the Amazon EventBridge console page.

Additionally, we will be looking at this scenario through the lens of an account that has a stand-alone CloudTrail configuration. While this is an acceptable configuration, AWS recommends using AWS Organizations, which allows you to configure an organizational CloudTrail. These organizational trails are immutable to the child accounts so that logging data cannot be removed or tampered with.

In order to use our sample remediation, you will need to enable Amazon GuardDuty and AWS Security Hub in the AWS Region you have selected. Both of these services include a 30-day trial at no additional cost. See the AWS Security Hub pricing page and the Amazon GuardDuty pricing page for additional details.

Important: You’ll use AWS CloudTrail to test the sample remediation. Running more than one CloudTrail trail in your AWS account will result in charges based on the number of events processed while the trail is running. Charges for additional copies of management events recorded in a Region are applied based on the published pricing plan. To minimize the charges, follow the clean-up steps that we provide later in this post to remove the sample automation and delete the trail.

Deploy the sample response automation

In this section, we’ll show you how to deploy and test the CloudTrail logging remediation sample. Amazon GuardDuty generates the finding

Stealth:IAMUser/CloudTrailLoggingDisabled when CloudTrail logging is disabled, and AWS Security Hub collects findings from GuardDuty using the standardized finding format mentioned earlier. We recommend that you deploy this sample into a non- production AWS account.

Select the Launch Stack button below to deploy a CloudFormation template with an automation sample in the us-east-1 Region. You can also download the template and implement it in another Region. The template consists of an Amazon EventBridge rule, an AWS Lambda function, and the IAM permissions necessary for both components to execute. It takes several minutes for the CloudFormation stack build to complete.

Select the Launch Stack button to launch the template

  1. In the CloudFormation console, choose the Select Template form, and then select Next.
  2. On the Specify Details page, provide the email address for a security contact. For the purpose of this walkthrough, it should be an email address that you have access to. Then select Next.
  3. On the Options page, accept the defaults, then select Next.
  4. On the Review page, confirm the details, then select Create.
  5. While the stack is being created, check the inbox of the email address that you provided in step 2. Look for an email message with the subject AWS Notification – Subscription Confirmation. Select the link in the body of the email to confirm your subscription to the Amazon Simple Notification Service (Amazon SNS) topic. You should see a success message like the one shown in Figure 3:

    Figure 3: SNS subscription confirmation

    Figure 3: SNS subscription confirmation

  6. Return to the CloudFormation console. After the Status field for the CloudFormation stack changes to CREATE COMPLETE (as shown in Figure 4), the solution is implemented and is ready for testing.

    Figure 4: CREATE_COMPLETE status

    Figure 4: CREATE_COMPLETE status

Test the sample automation

You’re now ready to test the automated response by creating a test trail in CloudTrail, then trying to stop it.

  1. From the AWS Management Console, choose Services > CloudTrail.
  2. Select Trails, then select Create Trail.
  3. On the Create Trail form:
    1. Enter a value for Trail name and for AWS KMS alias, as shown in Figure 5.
    2. For Storage location, create a new S3 bucket or choose an existing one. For our testing, we create a new S3 bucket.

      Figure 5: Create a CloudTrail trail

      Figure 5: Create a CloudTrail trail

    3. On the next page, under Management events, select Write-only (to minimize event volume).

      Figure 6: Create a CloudTrail trail

      Figure 6: Create a CloudTrail trail

  4. On the Trails page of the CloudTrail console, verify that the new trail has started. You should see the status as logging, as shown in Figure 7.

    Figure 7: Verify new trail has started

    Figure 7: Verify new trail has started

  5. You’re now ready to act like an unauthorized user trying to cover their tracks. Stop the logging for the trail that you just created:
    1. Select the new trail name to display its configuration page.
    2. In the top-right corner, choose the Stop logging button.
    3. When prompted with a warning dialog box, select Stop logging.
    4. Verify that the logging has stopped by confirming that the Start logging button now appears in the top right, as shown in Figure 8.

      Figure 8: Verify logging switch is off

      Figure 8: Verify logging switch is off

    You have now simulated a security event by disabling logging for one of the trails in the CloudTrail service. Within the next few seconds, the near real-time automated response will detect the stopped trail, restart it, and send an email notification. You can refresh the Trails page of the CloudTrail console to verify through the Stop logging button at the top right corner.

    Within the next several minutes, the investigatory automated response will also begin. GuardDuty will detect the action that stopped the trail and enrich the data about the source of unexpected behavior. Security Hub will then ingest that information and optionally correlate with other security events.

    Following the steps below, you can monitor findings within Security Hub for the finding type TTPs/Defense Evasion/Stealth:IAMUser-CloudTrailLoggingDisabled to be generated:

  6. In the AWS Management Console, choose Services > Security Hub.
    1. In the left pane, select Findings.
    2. Select the Add filters field, then select Type.
    3. Select EQUALS, paste TTPs/Defense Evasion/Stealth:IAMUser-CloudTrailLoggingDisabled into the field, then select Apply.
    4. Refresh your browser periodically until the finding is generated.

    Figure 9: Monitor Security Hub for your finding

    Figure 9: Monitor Security Hub for your finding

  7. Select the title of the finding to review details. When you’re ready, you can choose to archive the finding by selecting the Archive link. Alternately, you can select a custom action to continue with the response. Custom actions are one of the ways that you can integrate Security Hub with custom partner solutions.

Now that you’ve completed your review of the finding, let’s dig into the components of automation.

How the sample automation works

This example incorporates two automated responses: a near real-time workflow and an investigatory workflow. The near real-time workflow provides a rapid response to an individual event, in this case the stopping of a trail. The goal is to restore the trail to a functioning state and alert security responders as quickly as possible. The investigatory workflow still includes a response to provide defense in depth and uses services that support a more in-depth investigation of the incident.

Figure 10: Sample automation workflow

Figure 10: Sample automation workflow

In the near real-time workflow, Amazon EventBridge monitors for the undesired activity.

When a trail is stopped, AWS CloudTrail publishes an event on the EventBridge bus. An EventBridge rule detects the trail-stopping event and invokes a Lambda function to respond to the event by restarting the trail and notifying the security contact via an Amazon Simple Notification Service (SNS) topic.

In the investigative workflow, CloudTrail logs are monitored for undesired activities. For example, if a trail is stopped, there will be a corresponding log record. GuardDuty detects this activity and retrieves additional data points regarding the source IP that executed the API call. Two common examples of those additional data points in GuardDuty findings include whether the API call came from an IP address on a threat list, or whether it came from a network not commonly used in your AWS account. An AWS Lambda function responds by restarting the trail and notifying the security contact. The finding is imported into AWS Security Hub, where it’s aggregated with other findings for analyst viewing. Using EventBridge, you can configure Security Hub to export the finding to partner security orchestration tools, SIEM (security information and event management) systems, and ticketing systems for investigation.

AWS Security Hub imports findings from AWS security services such as GuardDuty, Amazon Macie and Amazon Inspector, plus from third-party product integrations you’ve enabled. Findings are provided to Security Hub in AWS Security Finding Format (ASFF), which minimizes the need for data conversion. Security Hub correlates these findings to help you identify related security events and determine a root cause. Security Hub also publishes its findings to Amazon EventBridge to enable further processing by other AWS services such as AWS Lambda. You can also create custom actions using Security Hub. Custom actions are useful for security analysts working with the Security Hub console who want to send a specific finding, or a small set of findings, to a response or a remediation workflow.

Deeper look into how the “Respond” phase works

Amazon EventBridge and AWS Lambda work together to respond to a security finding.

Amazon EventBridge is a service that provides real-time access to changes in data in AWS services, your own applications, and Software-as-a-Service (SaaS) applications without writing code. In this example, EventBridge identifies a Security Hub finding that requires action and invokes a Lambda function that performs remediation. As shown in Figure 11, the Lambda function both notifies the security operator via SNS and restarts the stopped CloudTrail.

Figure 11: Sample “respond” workflow

Figure 11: Sample “respond” workflow

To set this response up, we looked for an event to indicate that a trail had stopped or was disabled. We knew that the GuardDuty finding Stealth:IAMUser/CloudTrailLoggingDisabled is raised when CloudTrail logging is disabled. Therefore, we configured the default event bus to look for this event.

You can learn more regarding the available GuardDuty findings in the user guide.

How the code works

When Security Hub publishes a finding to EventBridge, it includes full details of the finding as discovered by GuardDuty. The finding is published in JSON format. If you review the details of the sample finding, note that it has several fields helping you identify the specific events that you’re looking for. Here are some of the relevant details:

{
   …
   "source":"aws.securityhub",
   …
   "detail":{
      "findings": [{
		…
    	“Types”: [
			"TTPs/Defense Evasion/Stealth:IAMUser-CloudTrailLoggingDisabled"
			],
		…
      }]
}

You can build an event pattern using these fields, which an EventBridge filtering rule can then use to identify events and to invoke the remediation Lambda function. Below is a snippet from the CloudFormation template we provided earlier that defines that event pattern for the EventBridge filtering rule:

# pattern matches the nested JSON format of a specific Security Hub finding
      EventPattern:
        source:
        - aws.securityhub
        detail-type:
          - "Security Hub Findings - Imported"
        detail:
          findings:
            Types:
              - "TTPs/Defense Evasion/Stealth:IAMUser-CloudTrailLoggingDisabled"

Once the rule is in place, EventBridge continuously monitors the event bus for events with this pattern.

When EventBridge finds a match, it invokes the remediating Lambda function and passes the full details of the event to the function. The Lambda function then parses the JSON fields in the event so that it can act as shown in this Python code snippet:

# extract trail ARN by parsing the incoming Security Hub finding (in JSON format)
trailARN = event['detail']['findings'][0]['ProductFields']['action/awsApiCallAction/affectedResources/AWS::CloudTrail::Trail']   

# description contains useful details to be sent to security operations
description = event['detail']['findings'][0]['Description']

The code also issues a notification to security operators so they can review the findings and insights in Security Hub and other services to better understand the incident and to decide whether further manual actions are warranted. Here’s the code snippet that uses SNS to send out a note to security operators:

#Sending the notification that the AWS CloudTrail has been disabled.
snspublish = snsclient.publish(
	TargetArn = snsARN,
	Message="Automatically restarting CloudTrail logging.  Event description: \"%s\" " %description
	)

While notifications to human operators are important, the Lambda function will not wait to take action. It immediately remediates the condition by restarting the stopped trail in CloudTrail. Here’s a code snippet that restarts the trail to reenable logging:

try:
	client = boto3.client('cloudtrail')
	enablelogging = client.start_logging(Name=trailARN)
	logger.debug("Response on enable CloudTrail logging- %s" %enablelogging)
except ClientError as e:
	logger.error("An error occured: %s" %e)

After the trail has been restarted, API activity is once again logged and can be audited.

This can help provide relevant data for the remaining steps in the incident response process. The data is especially important for the post-incident phase, when your team analyzes lessons learned to help prevent future incidents. You can also use this phase to identify additional steps to automate in your incident response.

How to Enable Custom Action and build your own Automated Response

Unlike how you set up the notification earlier, you may not want fully automate responses to findings. To set up automation that you can manually trigger it for specific findings, you can use custom actions. A custom action is a Security Hub mechanism for sending selected findings to EventBridge that can be matched by an EventBridge rule. The rule defines a specific action to take when a finding is received that is associated with the custom action ID. Custom actions can be used, for example, to send a specific finding, or a small set of findings, to a response or remediation workflow. You can create up to 50 custom actions.

In this section, we will walk you through how to create a custom action in Security Hub which will trigger an EventBridge rule to execute a Lambda function for the same security finding related to CloudTrail Disabled.

Create a Custom Action in Security Hub

  1. Open Security Hub. In the left navigation pane, under Management, open the Custom actions page.
  2. Choose Create custom action.
  3. Enter an Action Name, Action Description, and Action ID that are representative of an action that you are implementing—for example Enable CloudTrail Logging.
  4. Choose Create custom action.
  5. Copy the custom action ARN that was generated. You will need it in the next steps.

Create Amazon EventBridge Rule to capture the Custom Action

In this section, you will define an EventBridge rule that will match events (findings) coming from Security Hub which were forwarded by the custom action you defined above.

  1. Navigate to the Amazon EventBridge console.
  2. On the right side, choose Create rule.
  3. On the Define rule detail page, give your rule a name and description that represents the rule’s purpose (for example, the same name and description that you used for the custom action). Then choose Next.
  4. Security Hub findings are sent as events to the AWS default event bus. In the Define pattern section, you can identify filters to take a specific action when matched events appear. For the Build event pattern step, leave the Event source set to AWS events or EventBridge partner events.
  5. Scroll down to Event pattern. Under Event source, leave it set to AWS Services, and under AWS Service, select Security Hub.
  6. For the Event Type, choose Security Hub Findings – Custom Action.
  7. Then select Specific custom action ARN(s) and enter the ARN for the custom action that you created earlier.
  8. Notice that as you selected these options, the event pattern on the right was updating. Choose Next.
  9. On the Select target(s) step, from the Select a target dropdown, select Lambda function. Then, from the Function dropdown, select SecurityAutoremediation-CloudTrailStartLoggingLamb-xxxx. This lambda function was created as part of the Cloudformation template.
  10. Choose Next.
  11. For the Configure tags step, choose Next.
  12. For the Review and create step, choose Create rule.

Trigger the automation

As GuardDuty and Security Hub have been enabled, after AWS Cloudtrail logging is enabled, you should see a security finding generated by Amazon GuardDuty and collected in AWS Security Hub.

  1. Navigate to the Security Hub Findings page.
  2. In the top corner, from the Actions dropdown menu, select the Enable CloudTrail Logging custom action.
  3. Verify the CloudTrail configuration by accessing the AWS CloudTrail dashboard.
  4. Confirm that the trail status displays as Logging, which indicates the successful execution of the remediation Lambda function triggered by the EventBridge rule through the custom action.

How AWS helps customers get started

Many customers look at the task of building automation remediation as daunting. Many operations teams might not have the skills or human scale to take on developing automation scripts. Because many Incident Response scenarios can be mapped to findings in AWS security services, we can begin building tools that respond and are quickly adaptable to your environment.

Automated Security Response (ASR) on AWS is a solution that enables AWS Security Hub customers to remediate findings with a single click using sets of predefined response and remediation actions called Playbooks. The remediations are implemented as AWS Systems Manager automation documents. The solution includes remediations for issues such as unused access keys, open security groups, weak account password policies, VPC flow logging configurations, and public S3 buckets. Remediations can also be configured to trigger automatically when findings appear in AWS Security Hub.

The solution includes the playbook remediations for some of the security controls defined as part of the following standards:

  • AWS Foundational Security Best Practices (FSBP) v1.0.0
  • Center for Internet Security (CIS) AWS Foundations Benchmark v1.2.0
  • Center for Internet Security (CIS) AWS Foundations Benchmark v1.4.0
  • Center for Internet Security (CIS) AWS Foundations Benchmark v3.0.0
  • Payment Card Industry (PCI) Data Security Standard (DSS) v3.2.1
  • National Institute of Standards and Technology (NIST) Special Publication 800-53 Revision 5

A Playbook called Security Control is included that allows operation with AWS Security Hub’s Consolidated Control Findings feature.

Figure 12: Architecture of the Automated Security Solution

Figure 12: Architecture of the Automated Security Solution

Additionally, the library includes instructions in the Implementation Guide on how to create new automations in an existing Playbook.

You can use and deploy this library into your accounts at no additional cost, however there are costs associated with the services that it consumes.

Clean up

After you’ve completed the sample security response automation, we recommend that you remove the resources created in this walkthrough example from your account in order to minimize the charges associated with the trail in CloudTrail and data stored in S3.

Important: Deleting resources in your account can negatively impact the applications running in your AWS account. Verify that applications and AWS account security do not depend on the resources you’re about to delete.

Here are the clean-up steps:

Summary

You’ve learned the basic concepts and considerations behind security response automation on AWS and how to use Amazon EventBridge, Amazon GuardDuty and AWS Security Hub to automatically re-enable AWS CloudTrail when it becomes disabled unexpectedly. Additionally you got a chance to learn about the AWS Automated Security Response library and how it can help you rapidly get started with automations through Security Hub. As a next step, you may want to start building your own custom response automations and dive deeper into the AWS Security Incident Response Guide, NIST Cybersecurity Framework (CSF) or the AWS Cloud Adoption Framework (CAF) Security Perspective. You can explore additional automatic remediation solutions on the AWS Solution Library. You can find the code used in this example on GitHub.

If you have feedback about this blog post, submit them in the Comments section below. If you have questions about using this solution, start a thread in the
EventBridge, GuardDuty or Security Hub forums, or contact AWS Support.

❌