Normal view

File integrity monitoring with AWS Systems Manager and Amazon Security Lake 

27 January 2026 at 19:21

Customers need solutions to track inventory data such as files and software across Amazon Elastic Compute Cloud (Amazon EC2) instances, detect unauthorized changes, and integrate alerts into their existing security workflows.

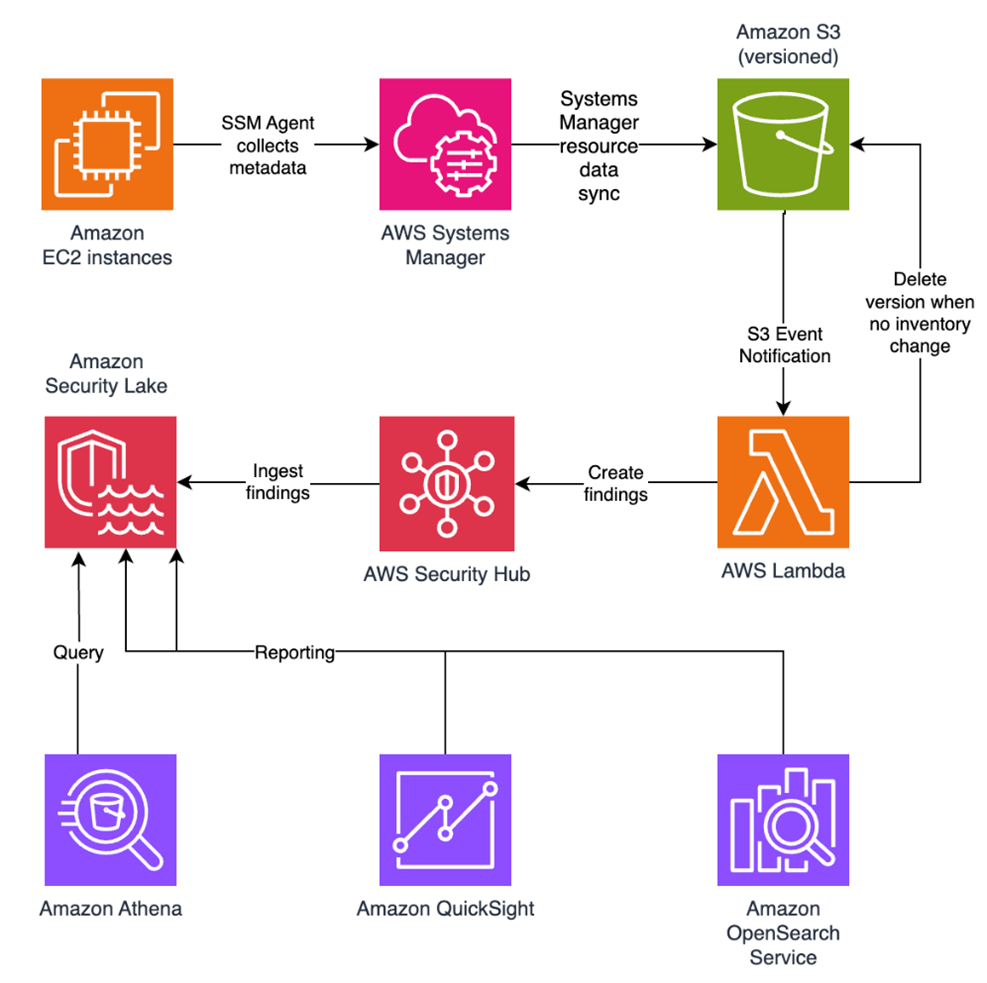
In this blog post, I walk you through a highly scalable serverless file integrity monitoring solution. It uses AWS Systems Manager Inventory to collect file metadata from Amazon EC2 instances. The metadata is sent through the Systems Manager Resource Data Sync feature to a versioned Amazon Simple Storage Service (Amazon S3) bucket, storing one inventory object for each EC2 instance. Each time a new object is created in Amazon S3, an Amazon S3 Event Notification triggers a custom AWS Lambda function. This Lambda function compares the latest inventory version with the previous one to detect file changes. If a file that isn’t expected to change has been created, modified, or deleted, the function creates an actionable finding in AWS Security Hub. Findings are then ingested by Amazon Security Lake in a standard OCSF format, which centralizes and normalizes the data. Finally, the data can be analyzed using Amazon Athena for one-time queries, or by building visual dashboards with Amazon QuickSight and Amazon OpenSearch Service. Figure 1 summarizes this flow:

Figure 1: File integrity monitoring workflow

Figure 1: File integrity monitoring workflow

This integration offers an alternative to the default AWS Config and Security Hub integration, which relies on limited data (for example, no file modification timestamps). The solution presented in this post provides control and flexibility to implement custom logic tailored to your operational needs and support security-related efforts.

This flexible solution can also be used with other Systems Manager Inventory metadata, such as installed applications, network configurations, or Windows registry entries, enabling custom detection logic across a wide range of operational and security use cases.

Now let’s build the file integrity monitoring solution.

Prerequisites

Before you get started, you need an AWS account with permissions to create and manage AWS resources such as Amazon EC2, AWS Systems Manager, Amazon S3, and Lambda.

Step 1: Start an EC2 instance

Start by launching an EC2 instance and creating a file that you will later modify to simulate an unauthorized change.

Create an AWS Identity and Access Management (IAM) role to allow the EC2 instance to communicate with Systems Manager:

  1. Open the AWS Management Console and go to IAM, choose Roles from the navigation pane, and then choose Create role.
  2. Under Trusted entity type, select AWS service, select EC2 as the use case, and choose Next.
  3. On the Add permissions page, search for and select the AmazonSSMManagedInstanceCore IAM policy, then choose Next.
  4. Enter SSMAccessRole as the role name and choose Create role.
  5. The new SSMAccessRole should now appear in your list of IAM roles:
Figure 2: Create an IAM role for communication with Systems Manager

Figure 2: Create an IAM role for communication with Systems Manager

Start an EC2 instance:

  1. Open the Amazon EC2 console and choose Launch Instance.
  2. Enter a Name, keep the default Linux Amazon Machine Image (AMI), and select an Instance type (for example, t3.micro).
  3. Under Advanced details:
    1. IAM instance profile, select the previously created SSMAccessRole
    2. Create a fictitious payment application configuration file in the /etc/paymentapp/ folder on the EC2 instance. Later, you will modify it to demonstrate a file-change event for integrity monitoring. To create this file during EC2 startup, copy and paste the following script into User data.
#!/bin/bash
mkdir -p /etc/paymentapp
echo "db_password=initial123" > /etc/paymentapp/config.yaml
Figure 3: Adding the application configuration file

Figure 3: Adding the application configuration file

  1. Leave the remaining settings as default, choose Proceed without key pair, and then select Launch Instance. A key pair isn’t required for this demo because you use Session Manager for access.

Step 2: Enable Security Hub and Security Lake

If Security Hub and Security Lake are already enabled, you can skip to Step 3.
To start, enable Security Hub, which collects and aggregates security findings. AWS Security Hub CSPM adds continuous monitoring and automated checks against best practices.

  1. Open the Security Hub console.
  2. Choose Security Hub CSPM from the navigation pane and then select Enable AWS Security Hub CSPM and choose Enable Security Hub CSPM at the bottom of the page.

Note: For this demo, you don’t need the Security standards options and can clear them.

Figure 4: Enable Security Hub CSP

Figure 4: Enable Security Hub CSP

Next, activate Security Lake to start collecting actionable findings from Security Hub:

  1. Open the Amazon Security Lake console and choose Get Started.
  2. Under Data sources, select Ingest specific AWS sources.
  3. Under Log and event sources, select Security Hub (you will use this only for this demo):
Figure 5: Select log and event sources

Figure 5: Select log and event sources

  1. Under Select Regions, choose Specific Regions and make sure you select the AWS Region that you’re using.
  2. Use the default option to Create and use a new service role.
  3. Choose Next and Next again, then choose Create.

Step 3: Configure Systems Manager Inventory and sync to Amazon S3

With Security Hub and Security Lake enabled, the next step is to enable Systems Manager Inventory to collect file metadata and configure a Resource Data Sync to export this data to S3 for analysis.

  1. Create an S3 bucket by carefully following the instructions in the section To create and configure an Amazon S3 bucket for resource data sync.
  2. After you created the bucket, enable versioning in the Amazon S3 console by opening the bucket’s Properties tab, choosing Edit under Bucket Versioning, selecting Enable, and saving your changes. Versioning causes each new inventory snapshot to be saved as a separate version, so that you can track file changes over time.

Note: In production, enable S3 server access logging on the inventory bucket to keep an audit trail of access requests, enforce HTTPS-only access, and enable CloudTrail data events for S3 to record who accessed or modified inventory files.

The next step is to enable Systems Manager Inventory and set up the resource data sync:

  1. In the Systems Manager console, go to Fleet Manager, choose Account management, and select Set up inventory.
  2. Keep the default values but deselect every inventory type except File. Set a Path to limit collection to the files relevant for this demo and your security requirements. Under File, set the Path to: /etc/paymentapp/.
Figure 6: Set the parameters and path

Figure 6: Set the parameters and path

  1. Choose Setup Inventory.
  2. In Fleet Manager, choose Account management and select Resource Data Syncs.
  3. Choose Create resource data sync, enter a Sync name, and enter the name of the versioned S3 bucket you created earlier.
  4. Select This Region and then choose Create.

Step 4: Implement the Lambda function

Next, complete the setup to detect changes and create findings. Each time Systems Manager Inventory writes a new object to Amazon S3, an S3 Event Notification triggers a Lambda function that compares the latest and previous object versions. If it finds created, modified, or deleted files, it creates a security finding. To accomplish this, you will create the Lambda function, set its environment variables, add the helper layer, and attach the required permissions.

The following is an example finding generated in AWS Security Finding Format (ASFF) and sent to Security Hub. In this example, you see a notification about a file change on the EC2 instance listed under the Resources section.

{
	...
"Id": "fim-i-0b8f40f4de065deba-2025-07-12T13:48:31.741Z",
	"AwsAccountId": "XXXXXXXXXXXX",
	"Types": [
		"Software and Configuration Checks/File Integrity Monitoring"
	],
	"Severity": {
		"Label": "MEDIUM"
	},
	"Title": "File changes detected via SSM Inventory",
	"Description": "0 created, 1 modified, 0 deleted file(s) on instance i-0b8f40f4de065deba",
	"Resources": [
		{
			"Type": "AwsEc2Instance",
			"Id": "i-0b8f40f4de065deba"
		}
	],
	...
}

Create the Lambda function

This function detects file changes, reports findings, and removes unused Amazon S3 object versions to reduce costs.

  1. Open the Lambda console and choose Create function in the navigation pane.
  2. For Function Name enter fim-change-detector.
  3. Select Author from scratch, enter a function name, select the latest Python runtime, and choose Create function.
  4. On the Code tab, paste the following main function and choose Deploy.
import boto3, os, json, re
from datetime import datetime, UTC
from urllib.parse import unquote_plus
from helpers import is_critical, load_file_metadata, is_modified, extract_instance_id

s3 = boto3.client('s3')
securityhub = boto3.client('securityhub')

CRITICAL_FILE_PATTERNS = os.environ["CRITICAL_FILE_PATTERNS"].split(",")
SEVERITY_LABEL = os.environ["SEVERITY_LABEL"]
	
def lambda_handler(event, context):
	# Safe event handling
	if "Records" not in event or not event["Records"]:
		return

	# Extract S3 event
	record = event['Records'][0]
	bucket = record['s3']['bucket']['name']
	key = unquote_plus(record['s3']['object']['key'])
	current_version = record['s3']['object'].get('versionId')
	if not current_version:
		return

	# Fetching the region name
	account_id = context.invoked_function_arn.split(":")[4]
	region = boto3.session.Session().region_name

	# Get object versions (latest first)
	versions = s3.list_object_versions(Bucket=bucket, Prefix=key).get('Versions', [])
	versions = sorted(versions, key=lambda v: v['LastModified'], reverse=True)

	# Find previous version
	idx = next((i for i,v in enumerate(versions) if v["VersionId"] == current_version), None)
	if idx is None or idx + 1 >= len(versions):
		return
	prev_version = versions[idx+1]["VersionId"]

	# Load both versions
	current = load_file_metadata(bucket, key, current_version)
	previous = load_file_metadata(bucket, key, prev_version)

	# Compare
	created = {p for p in set(current) - set(previous) if is_critical(p)}
	deleted = {p for p in set(previous) - set(current) if is_critical(p)}
	modified = {p for p in set(current) & set(previous) if is_critical(p) and is_modified(p, current, previous)}

	# Report if changes were found
	if created or deleted or modified:
		instance_id = extract_instance_id(bucket, key, current_version)
		now = datetime.now(UTC).isoformat(timespec='milliseconds').replace('+00:00', 'Z')
		finding = {
			"SchemaVersion": "2018-10-08",
			"Id": f"fim-{instance_id}-{now}",
			"ProductArn": f"arn:aws:securityhub:{region}:{account_id}:product/{account_id}/default",
			"AwsAccountId": account_id,
			"GeneratorId": "ssm-inventory-fim",
			"CreatedAt": now,
			"UpdatedAt": now,
			"Types": ["Software and Configuration Checks/File Integrity Monitoring"],
			"Severity": {"Label": SEVERITY_LABEL},
			"Title": "File changes detected via SSM Inventory",
			"Description": (
				f"{len(created)} created, {len(modified)} modified, "
				f"{len(deleted)} deleted file(s) on instance {instance_id}"
			),
			"Resources": [{"Type": "AwsEc2Instance", "Id": instance_id}]
		}
		securityhub.batch_import_findings(Findings=[finding])

	# No change – delete older S3 version
	else:
		if prev_version != current_version:
			try:
				s3.delete_object(Bucket=bucket, Key=key, VersionId=prev_version)
			except Exception as e:
				print(f"Delete previous S3 object version failed: {e}")

Note: In production, set Lambda reserved concurrency to prevent unbounded scaling, configure a dead letter queue (DLQ) to capture failed invocations, and optionally attach the function to an Amazon VPC for network isolation.

Configure environment variables

Configure the two required environment variables in the Lambda console. These two variables (one for critical paths to monitor and one for security finding severity) must be set or the function will fail.

  1. Open the Lambda console and choose Configuration and then select Environment variables.
  2. Choose Edit and then choose Add environment variable.
  3. Under Key, choose CRITICAL_FILE_PATTERNS
    1. Enter ^/etc/paymentapp/config.*$ as the value.
    2. Set the SEVERITY_LABEL to MEDIUM.
Figure 7: CRITICAL_FILE_PATTERNS and SEVERITY_LABEL configuration

Figure 7: CRITICAL_FILE_PATTERNS and SEVERITY_LABEL configuration

Set up permissions

The next step is to attach permissions to the Lambda function

  1. In your Lambda function, choose Configuration and then select Permissions.
  2. Under Execution role, select the role name that will lead to the role in IAM.
  3. Choose Add permissions and select Create inline policy. Select JSON view.
  4. Paste the following policy, and make sure to replace <bucket-name> with the name of your S3 bucket, and you also update <region> and <account-id> with your AWS Region and Account ID:
{
"Version": "2012-10-17",
"Statement": [
	{
		"Effect": "Allow",
		"Action": "securityhub:BatchImportFindings",
		"Resource": "arn:aws:securityhub:<region>:<account-id>:product/<account-id>/default"
	},
	{
		"Effect": "Allow",
		"Action": [
			"s3:GetObject",
			"s3:GetObjectVersion",
			"s3:ListBucketVersions",
			"s3:DeleteObjectVersion"
		],
		"Resource": [
			"arn:aws:s3:::<bucket-name>",
			"arn:aws:s3:::<bucket-name>/*"
			]
		}
	]
}
  1. To finalize, enter a Policy name and choose Create policy.

Add functions to the Lambda layer

For better modularity, add some helper functions to a Lambda layer. These functions are already referenced in the import section of the preceding Lambda function’s Python code. The helper functions check critical paths, load file metadata, compare modification times, and extract the EC2 instance ID.

Open AWS CloudShell from the top-right corner of the AWS console header, then copy and paste the following script and press Enter. It creates the helper layer and attaches it to your Lambda function.

#!/bin/bash
set -e
FUNCTION_NAME="fim-change-detector"
LAYER_NAME="fim-change-detector-layer"

mkdir -p python
cat > python/helpers.py << 'EOF'
import json, re, os
from dateutil.parser import parse as parse_dt
import boto3
s3 = boto3.client('s3')
CRITICAL_FILE_PATTERNS = os.environ.get("CRITICAL_FILE_PATTERNS", "").split(",")

def is_critical(path):
	return any(re.match(p.strip(), path) for p in CRITICAL_FILE_PATTERNS if p.strip())

def load_file_metadata(bucket, key, version_id):
	obj = s3.get_object(Bucket=bucket, Key=key, VersionId=version_id)
	data = {}
	for line in obj['Body'].read().decode().splitlines():
		if line.strip():
			i = json.loads(line)
			n, d, m = i.get("Name","").strip(), i.get("InstalledDir","").strip(), i.get("ModificationTime","").strip()
			if n and d and m: data[f"{d.rstrip('/')}/{n}"] = m
	return data

def is_modified(path, current, previous):
	try: return parse_dt(current[path]) != parse_dt(previous[path])
	except: return current[path] != previous[path]

def extract_instance_id(bucket, key, version_id):
	obj = s3.get_object(Bucket=bucket, Key=key, VersionId=version_id)
	for line in obj['Body'].read().decode().splitlines():
		if line.strip():
			r = json.loads(line)
			if "resourceId" in r: return r["resourceId"]
	return None
EOF

zip -r helpers_layer.zip python >/dev/null
LAYER_VERSION_ARN=$(aws lambda publish-layer-version \
	--layer-name "$LAYER_NAME" \
	--description "Helper functions for File Integrity Monitoring" \
	--zip-file fileb://helpers_layer.zip \
	--compatible-runtimes python3.13 \
	--query 'LayerVersionArn' \
	--output text)

aws lambda update-function-configuration \
	--function-name "$FUNCTION_NAME" \
	--layers "$LAYER_VERSION_ARN" >/dev/null
echo "Layer created and attached to the Lambda function."

Step 5: Set up S3 Event Notifications

Finally, set up S3 Event Notifications to trigger the Lambda function when new inventory data arrives.

  1. Open the S3 console and select the Systems Manager Inventory bucket that you created.
  2. Choose Properties and select Event notifications.
  3. Choose Create event notification.
    1. Enter an Event name.
    2. In the Prefix field, enter AWS%3AFile/ to limit Lambda triggers to file inventory objects only.
      Note: The prefix contains a : character, which must be URL-encoded as %3A.
    3. Under Event types, select Put.
    4. At the bottom, select your newly created Lambda function, and choose Save changes.

In this example, inventory collection runs every 30 minutes (48 times each day) but can be adjusted based on security requirements to optimize costs. The Lambda function is triggered once for each instance whenever a new inventory object is created. You can further reduce event volume by filtering EC2 instances through S3 Event Notification prefixes, enabling focused monitoring of high-value instances.

Step 6: Test the file change detection flow

Now that the EC2 instance is running and the sample configuration file /etc/paymentapp/config.yaml has been initialized, you’re ready to simulate an unauthorized change to test the file integrity monitoring setup.

  1. Open the Systems Manager console.
  2. Go to Session Manager and choose Start session.
  3. Select your EC2 instance and choose Start Session.
  4. Run the following command to modify the file:

echo “db_password=hacked456" | sudo tee /etc/paymentapp/config.yaml

This simulates a configuration tampering event. During the next Systems Manager Inventory run, the updated metadata will be saved to Amazon S3.

To manually trigger this:

  1. Open the Systems Manager console and choose State Manager.
  2. Select your association and choose Apply association now to start the inventory update.
  3. After the association status changes to Success, check your SSM Inventory S3 bucket in the AWS:File folder and review the inventory object and its versions.
  4. Open the Security Hub console and choose Findings. After a short delay, you should see a new finding like the one shown in Figure 8:
Figure 8: View file change findings

Figure 8: View file change findings

Step 7: Query and visualize findings

While Security Hub provides a centralized view of findings, you can deepen your analysis using Amazon Athena to run SQL queries directly on the normalized Security Lake data in Amazon S3. This data follows the Open Cybersecurity Schema Framework (OCSF), which is a vendor-neutral standard that simplifies integration and analysis of security data across different tools and services.

The following is an example Athena query:

SELECT
	finding_info.desc AS description,
	class_uid AS class_id,
	severity AS severity_label,
	type_name AS finding_type,
	time_dt AS event_time,
	region,
	accountid
FROM amazon_security_lake_table_us_east_1_sh_findings_2_0

Note: Be sure to adjust the FROM clause for other Regions. Security Lake processes findings before they appear in Athena, so expect a short delay between ingestion and data availability.
You will see a similar result for the preceding query, shown in Figure 9:

Figure 9: Athena query result in the Amazon Athena query editor

Figure 9: Athena query result in the Amazon Athena query editor

Security Lake classifies this finding as an OCSF 2004 Class, Detection Finding. You can explore the full schema definitions at OCSF Categories. For more query examples, see the Security Lake query examples.
For visual exploration and real-time insights, you can integrate Security Lake with OpenSearch Service and QuickSight, both of which now offer extensive generative AI support. For a guided walkthrough using QuickSight, see How to visualize Amazon Security Lake findings with Amazon QuickSight.

Clean up

After testing the step-by-step guide, make sure to clean up the resources you created for this post to avoid ongoing costs.

  1. Terminate the EC2 instance
  2. Delete the Resource Data Sync and Inventory Association
  3. Remove the Lambda function.
  4. Disable Security Lake and Security Hub CSPM
  5. Delete IAM roles created for this post
  6. Delete the associated SSM Resource Data Sync and Security Lake S3 buckets.

Conclusion

In this post, you learned how to use Systems Manager Inventory to track file integrity, report findings to Security Hub, and analyze them using Security Lake.
You can access the full sample code to set up this solution in the AWS Samples repository.
While this post uses a single-account, single-Region setup for simplicity, Security Lake supports collecting data across multiple accounts and Regions using AWS Organizations. You can also use a Systems Manager resource data sync to send inventory data to a central S3 bucket.

Getting Started with Amazon Security Lake and Systems Manager Inventory provides guidance for enabling scalable, cloud-centric monitoring with full operational context.

Adam Nemeth Adam Nemeth
Adam is a Senior Solutions Architect and generative AI enthusiast at AWS, helping financial services customers by embracing the Day 1 culture and customer obsession of Amazon. With over 24 years of IT experience, Adam previously worked at UBS as an architect and has also served as a delivery lead, consultant, and entrepreneur. He lives in Switzerland with his wife and their three children.

IAM Identity Center now supports IPv6

26 January 2026 at 21:17

Amazon Web Services (AWS) recommends using AWS IAM Identity Center to provide your workforce access to AWS managed applications—such as Amazon Q Developer—and AWS accounts. Today, we announced IAM Identity Center support for IPv6. To learn more about the advantages of IPv6, visit the IPv6 product page.

When you enable IAM Identity center, it provides an access portal for workforce users to access their AWS applications and accounts either by signing in to the access portal using a URL or by using a bookmark for the application URL. In either case, the access portal handles user authentication before granting access to applications and accounts. Supporting both IPv4 and IPv6 connectivity to the access portal helps facilitate seamless access for clients, such as browsers and applications, regardless of their network configuration.

The launch of IPv6 support in IAM Identity Center introduces new dual-stack endpoints that support both IPv4 and IPv6, so that users can connect using IPv4, IPv6, or dual-stack clients. Current IPv4 endpoints continue to function with no action required. The dual stack capability offered by Identity Center extends to managed applications. When users access the application dual-stack endpoint, the application automatically routes to the Identity Center dual-stack endpoint for authentication. To use Identity Center from IPv6 clients, you must direct your workforce to use the new dual-stack endpoints, and update configurations on your external identity provider (IdP), if you use one.

In this post, we show you how to update your configuration to allow IPv6 clients to connect directly to IAM Identity Center endpoints without requiring network address translation services. We also show you how to monitor which endpoint users are connecting to. Before diving into the implementation details, let’s review the key phases of the transition process.

Transition overview

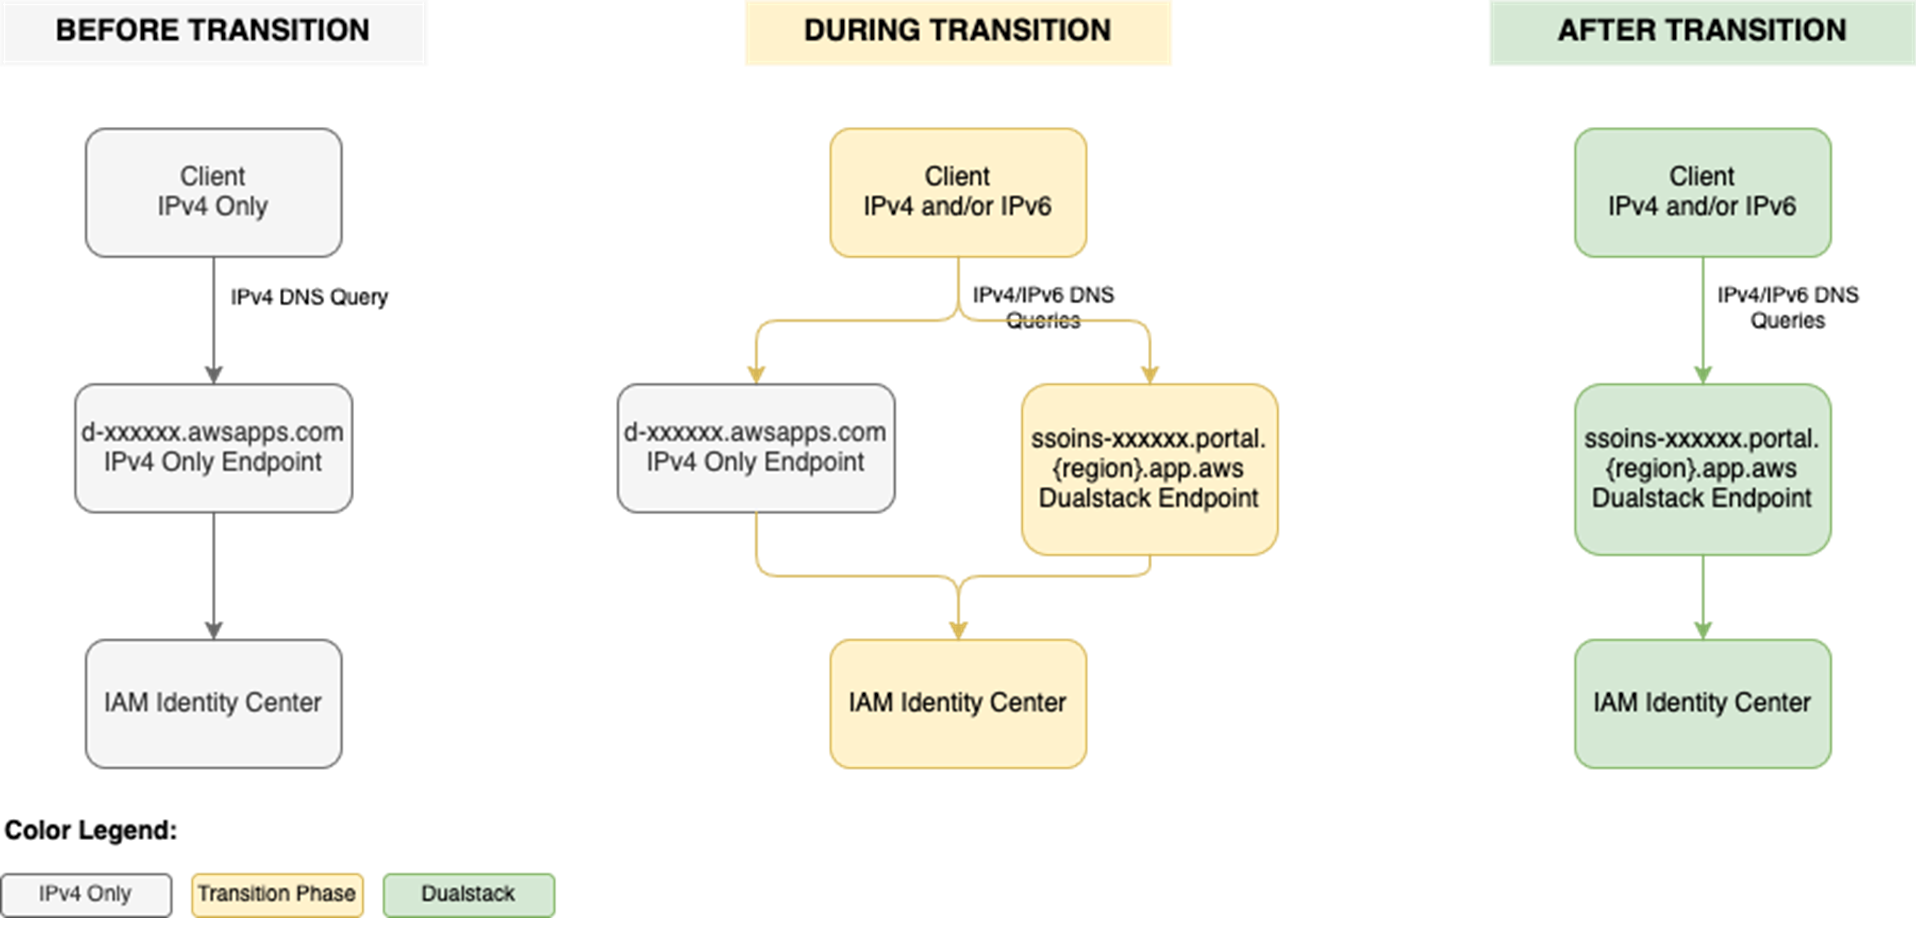
To use IAM Identity Center from an IPv6 network and client, you need to use the new dual-stack endpoints. Figure 1 shows what the transition from IPv4 to IPv6 over dual-stack endpoints looks like when using Identity Center. The figure shows:

  • A before state where clients use the IPv4 endpoints.
  • The transition phase, when your clients use a combination of IPv4 and dual-stack endpoints.
  • After the transition is complete, your clients will connect to dual-stack endpoints using their IPv4 or IPv6, depending on their preferences.

Figure 1: Transition from IPv4-only to dual-stack endpoints

Figure 1: Transition from IPv4-only to dual-stack endpoints

Prerequisites

You must have the following prerequisites in place to enable IPv6 access for your workforce users and administrators:

  • An existing IAM Identity Center instance
  • Updated firewalls or gateways to include the new dual-stack endpoints
  • IPv6 capable clients and networks

Work with your network administrators to update the configuration of your firewalls and gateways and to verify that your clients, such as laptops or desktops, are ready to accept IPv6 connectivity. If you have already enabled IPv6 connectivity for other AWS services, you might be familiar with these changes. Next, implement the two steps that follow.

Step 1: Update your IdP configuration

You can skip this step If you don’t use an external IdP as your identity source.

In this step, you update the Assertion Consumer Service (ACS) URL from your IAM Identity Center instance into your IdP’s configuration for single sign-on and the SCIM configuration for user provisioning. Your IdP’s capability determines how you update the ACS URLs. If your IdP supports multiple ACS URLs, configure both IPv4 and dual-stack URLs to enable a flexible transition. With that configuration, some users can continue using IPv4-only endpoints while others use dual-stack endpoints for IPv6. If your IdP supports only one ACS URL, to use IPv6 you must update the new dual-stack ACS URL in your IdP and transition all users to using dual-stack endpoints. If you don’t use an external IdP, you can skip this step and go to the next step.

Update both the SAML single sign-on and the SCIM provisioning configurations:

  1. Update the single sign-on settings in your IdP to use the new dual-stack URLs. First, locate the URLs in the AWS Management Console for IAM Identity Center.
    1. Choose Settings in the navigation pane and then select Identity source.
    2. Choose Actions and select Manage authentication.
    3. in Under Manage SAML 2.0 authentication, you will find the following URLs under Service provider metadata:
      • AWS access portal sign-in URL
      • IAM Identity Center Assertion Consumer Service (ACS) URL
      • IAM Identity Center issuer URL
  2. If your IdP supports multiple ACS URLs, then add the dual-stack URL to your IdP configuration alongside existing IPv4 one. With this setting, you and your users can decide when to start using the dual-stack endpoints, without all users in your organization having to switch together.

    Figure 2: Dual-stack single sign-on URLs

    Figure 2: Dual-stack single sign-on URLs

  3. If your IdP does not support multiple ACS URLs, replace the existing IPv4 URL with the new dual-stack URL, and switch your workforce to use only the dual-stack endpoints.
  4. Update the provisioning endpoint in your IdP. Choose Settings in the navigation pane and under Identity source, choose Actions and select Manage provisioning. Under Automatic provisioning, copy the new SCIM endpoint that ends in api.aws. Update this new URL in your external IdP.

    Figure 3: Dual-stack SCIM endpoint URL

    Figure 3: Dual-stack SCIM endpoint URL

Step 2: Locate and share the new dual-stack endpoints

Your organization needs two kinds of URLs for IPv6 connectivity. The first is the new dual-stack access portal URL that your workforce users use to access their assigned AWS applications and accounts. The dual-stack access portal URL is available in the IAM Identity Center console, listed as the Dual-stack in the Settings summary (you might need to expand the Access portal URLs section, shown in Figure 4).

Figure 4: Locate dual-stack access portal endpoints

Figure 4: Locate dual-stack access portal endpoints

This dual-stack URL ends with app.aws as its top-level domain (TLD). Share this URL with your workforce and ask them to use this dual-stack URL to connect over IPv6. As an example, if your workforce uses the access portal to access AWS accounts, they will need to sign in through the new dual-stack access portal URL when using IPv6 connectivity. Alternately, if your workforce accesses the application URL, you need to enable the dual-stack application URL following application-specific instructions. For more information, see AWS services that support IPv6.

The URLs that administrators use to manage IAM Identity Center are the second kind of URL your organization needs. The new dual-stack service endpoints end in api.aws as their TLD and are listed in the Identity Center service endpoints. Administrators can use these service endpoints to manage users and groups in Identity Center, update their access to applications and resources, and perform other management operations. As an example, if your administrator uses identitystore.{region}.amazonaws.com to manage users and groups in Identity Center, they should now use the dual-stack version of the same service endpoint which is identitystore.{region}.api.aws, so they can connect to service endpoints using IPv6 clients and networks.

If your users or administrators use an AWS SDK to access AWS applications and accounts or manage services, follow Dual-stack and FIPS endpoints to enable connectivity to the dual-stack endpoints.

After completing these two steps, your workforce and administrators can connect to IAM Identity Center using IPv6. Remember, these endpoints also support IPv4, so clients not yet IPv6-capable can continue to connect using IPv4.

Monitoring dual-stack endpoint usage

You can optionally monitor AWS CloudTrail logs to track usage of dual-stack endpoints. The key difference between IPv4-only and dual-stack endpoint usage is the TLD and appears in the clientProvidedHostHeader field. The following example shows the difference between these CloudTrail events for the CreateTokenWithIAM API call.

IPv4-only endpoints Dual-stack endpoints
"CloudTrailEvent": {
  "eventName": "CreateToken",
  "tlsDetails": {
     "tlsVersion": "TLSv1.3",
     "cipherSuite": "TLS_AES_128_GCM_SHA256",
     "clientProvidedHostHeader": "oidc.us-east-1.amazonaws.com"
  }
}
"CloudTrailEvent": {
  "eventName": "CreateToken",
  "tlsDetails": {
     "tlsVersion": "TLSv1.3",
     "cipherSuite": "TLS_AES_128_GCM_SHA256",
     "clientProvidedHostHeader": "oidc.us-east-1.api.aws"
  }
}

Conclusion

IAM Identity Center now allows clients to connect over IPv6 natively with no network address translation infrastructure. This post showed you how to transition your organization to use IPv6 with Identity Center and its integrated applications. Remember that existing IPv4 endpoints will continue to function, so you can transition at your own pace. Also, no immediate action is required by you. However, we recommend planning your transition to take advantage of IPv6 benefits and meet compliance requirements. If you have questions, comments, or concerns, contact AWS Support, or start a new thread in the IAM Identity Center re:Post channel.

 
If you have feedback about this post, submit comments in the Comments section below. If you have questions about this post, contact AWS Support.
 

Suchintya Dandapat Suchintya Dandapat
Suchintya Dandapat is a Principal Product Manager for AWS where he partners with enterprise customers to solve their toughest identity challenges, enabling secure operations at global scale.

Updated PCI PIN compliance package for AWS CloudHSM now available

26 January 2026 at 19:11

Amazon Web Services (AWS) is pleased to announce the successful completion of Payment Card Industry Personal Identification Number (PCI PIN) audit for the AWS CloudHSM service.

With CloudHSM, you can manage and access your keys on FIPS 140-3 Level 3 validated hardware, protected with customer-owned, single-tenant hardware security module (HSM) instances that run in your own virtual private cloud (VPC). This PCI PIN attestation gives you the flexibility to deploy your regulated workloads with reduced compliance overhead. CloudHSM might be suitable when operations supported by the service are integrated into a broader solution that requires PCI-PIN compliance. For payment operations, such as PIN translation, we encourage you to consider AWS Payment Cryptography as a fully managed alternative for PCI-PIN compliance.

The PCI PIN compliance report package for AWS CloudHSM includes two key components:

  • PCI PIN Attestation of Compliance (AOC) – demonstrating that AWS CloudHSM was successfully validated against the PCI PIN standard with zero findings
  • PCI PIN Responsibility Summary – provides guidance to help AWS customers understand their responsibilities in developing and operating a highly secure environment for handling PIN-based transactions

AWS was evaluated by Coalfire, a third-party Qualified Security Assessor (QSA). Customers can access the PCI PIN Attestation of Compliance (AOC) and PCI PIN Responsibility Summary reports through AWS Artifact.

To learn more about our PCI program and other compliance and security programs, see the AWS Compliance Programs page. As always, we value your feedback and questions; reach out to the AWS Compliance team through the Contact Us page.

If you have feedback about this post, submit comments in the Comments section below. If you have questions about this post, contact AWS Support.

Tushar Jain

Tushar Jain

Tushar is a Compliance Program Manager at AWS. He leads multiple security and privacy initiatives within AWS. Tushar holds a Master of Business Administration from Indian Institute of Management Shillong, India and a Bachelor of Technology in electronics and telecommunication engineering from Marathwada University, India. He has over 13 years of experience in information security and holds CCSK and CSXF certifications.

Will Black

Will Black

Will is a Compliance Program Manager at Amazon Web Services. He leads multiple security and compliance initiatives within AWS. He has ten years of experience in compliance and security assurance and holds a degree in Management Information Systems from Temple University. Additionally, he holds the CCSK and ISO 27001 Lead Implementer certifications.

Updated PCI PIN compliance package for AWS Payment Cryptography now available

24 January 2026 at 00:14

Amazon Web Services (AWS) is pleased to announce the successful completion of Payment Card Industry Personal Identification Number (PCI PIN) audit for the AWS Payment Cryptography service.

With AWS Payment Cryptography, your payment processing applications can use payment hardware security modules (HSMs) that are PCI PIN Transaction Security (PTS) HSM certified and fully managed by AWS, with PCI PIN-compliant key management. This attestation gives you the flexibility to deploy your regulated workloads with reduced compliance overhead.

The PCI PIN compliance report package for AWS Payment Cryptography includes two key components:

  • PCI PIN Attestation of Compliance (AOC) – demonstrating that AWS Payment Cryptography was successfully validated against the PCI PIN standard with zero findings
  • PCI PIN Responsibility Summary – provides guidance to help AWS customers understand their responsibilities in developing and operating a highly secure environment for handling PIN-based transactions

AWS was evaluated by Coalfire, a third-party Qualified Security Assessor (QSA). Customers can access the PCI PIN Attestation of Compliance (AOC) and PCI PIN Responsibility Summary reports through AWS Artifact.

To learn more about our PCI programs and other compliance and security programs, visit the AWS Compliance Programs page. As always, we value your feedback and questions; reach out to the AWS Compliance team through the Compliance Support page.

If you have feedback about this post, submit comments in the Comments section below. If you have questions about this post, contact AWS Support.

Tushar Jain

Tushar Jain

Tushar is a Compliance Program Manager at AWS. He leads multiple security and privacy initiatives within AWS. Tushar holds a Master of Business Administration from Indian Institute of Management Shillong, India and a Bachelor of Technology in electronics and telecommunication engineering from Marathwada University, India. He has over 13 years of experience in information security and holds CCSK and CSXF certifications.

Will Black

Will Black

Will is a Compliance Program Manager at Amazon Web Services. He leads multiple security and compliance initiatives within AWS. He has ten years of experience in compliance and security assurance and holds a degree in Management Information Systems from Temple University. Additionally, he holds the CCSK and ISO 27001 Lead Implementer certifications.

AWS achieves 2025 C5 Type 2 attestation report with 183 services in scope 

23 January 2026 at 22:39

Amazon Web Services (AWS) is pleased to announce a successful completion of the 2025 Cloud Computing Compliance Criteria Catalogue (C5) attestation cycle with 183 services in scope. This alignment with C5 requirements demonstrates our ongoing commitment to adhere to the heightened expectations for cloud service providers. AWS customers in Germany and across Europe can run their applications in the AWS Regions that are in scope of the C5 report with the assurance that AWS aligns with C5 criteria.

The C5 attestation scheme is backed by the German government and was introduced by the Federal Office for Information Security (BSI) in 2016. AWS has adhered to the C5 requirements since their inception. C5 helps organizations demonstrate operational security against common cybersecurity threats when using cloud services.

Independent third-party auditors evaluated AWS for the period of October 1, 2024, through September 30, 2025. The C5 report illustrates the compliance status of AWS for both the basic and additional criteria of C5. Customers can download the C5 report through AWS Artifact, a self-service portal for on-demand access to AWS compliance reports. Sign in to AWS Artifact in the AWS Management Console or learn more at Getting Started with AWS Artifact.

AWS has added the following five services to the current C5 scope:

The following AWS Regions are in scope of the 2025 C5 attestation: Europe (Frankfurt), Europe (Ireland), Europe (London), Europe (Milan), Europe (Paris), Europe (Stockholm), Europe (Spain), Europe (Zurich), and Asia Pacific (Singapore). For up-to-date information, see the C5 page of our AWS Services in Scope by Compliance Program.

Security and compliance is a shared responsibility between AWS and the customer. When customers move their computer systems and data to the cloud, security responsibilities are shared between the customer and the cloud service provider. For more information, see the AWS Shared Security Responsibility Model.

To learn more about our compliance and security programs, see AWS Compliance Programs. As always, we value your feedback and questions; reach out to the AWS Compliance team through the Contact Us page.

Reach out to your AWS account team if you have questions or feedback about the C5 report.
If you have feedback about this post, submit comments in the Comments section below.

Tea Jioshvili

Tea Jioshvili

Tea is a Manager in AWS Compliance & Security Assurance based in Berlin, Germany. She leads various third-party audit programs across Europe. She previously worked in security assurance and compliance, business continuity, and operational risk management in the financial industry for 20 years.

Why Identity Security Must Move Beyond MFA

21 January 2026 at 13:30

By integrating identity threat detection with MFA, organizations can protect sensitive data, maintain operational continuity, and reduce risk exposure.

The post Why Identity Security Must Move Beyond MFA appeared first on SecurityWeek.

Lawmakers Must Listen to Young People Before Regulating Their Internet Access: 2025 in Review

27 December 2025 at 23:25

State and federal lawmakers have introduced multiple proposals in 2025 to curtail or outright block children and teenagers from accessing legal content on the internet. These lawmakers argue that internet and social media platforms have an obligation to censor or suppress speech that they consider “harmful” to young people. Unfortunately, in many of these legislative debates, lawmakers are not listening to kids, whose experiences online are overwhelmingly more positive than what lawmakers claim. 

Fortunately, EFF has spent the past year trying to make sure that lawmakers hear young people’s voices. We have also been reminding lawmakers that minors, like everyone else, have First Amendment rights to express themselves online. 

These rights extend to a young person’s ability to use social media both to speak for themselves and access the speech of others online. Young people also have the right to control how they access this speech, including a personalized feed and other digestible and organized ways. Preventing teenagers from accessing the same internet and social media channels that adults use is a clear violation of their right to free expression. 

On top of violating minors’ First Amendment rights, these laws also actively harm minors who rely on the internet to find community, find resources to end abuse, or access information about their health. Cutting off internet access acutely harms LGBTQ+ youth and others who lack familial or community support where they live. These laws also empower the state to decide what information is acceptable for all young people, overriding parents’ choices. 

Additionally, all of the laws that would attempt to create a “kid friendly” internet and an “adults-only” internet are a threat to everyone, adults included. These mandates encourage an adoption of invasive and dangerous age-verification technology. Beyond creepy, these systems incentivize more data collection, and increase the risk of data breaches and other harms. Requiring everyone online to provide their ID or other proof of their age could block legal adults from accessing lawful speech if they don’t have the right form of ID. Furthermore, this trend infringes on people’s right to be anonymous online, and creates a chilling effect which may deter people from joining certain services or speaking on certain topics

EFF has lobbied against these bills at both the state and federal level, and we have also filed briefs in support of several lawsuits to protect the First Amendment Rights of minors. We will continue to advocate for the rights of everyone online – including minors – in the future.

This article is part of our Year in Review series. Read other articles about the fight for digital rights in 2025.

EFF and 12 Organizations Urge UK Politicians to Drop Digital ID Scheme Ahead of Parliamentary Petition Debate

13 December 2025 at 12:10

The UK Parliament convened earlier this week to debate a petition signed by 2.9 million people calling for an end to the government’s plans to roll out a national digital ID. Ahead of that debate, EFF and 12 other civil society organizations wrote to politicians in the country urging MPs to reject the Labour government’s newly announced digital ID proposal.

The UK’s Prime Minister Keir Starmer pitched the scheme as a way to “cut the faff” in proving people’s identities by creating a virtual ID on personal devices with information like names, date of birth, nationality, photo, and residency status to verify their right to live and work in the country. 

But the case for digital identification has not been made. 

As we detail in our joint briefing, the proposal follows a troubling global trend: governments introducing expansive digital identity systems that are structurally incompatible with a rights-respecting democracy. The UK’s plan raises six interconnected concerns:

  1. Mission creep
  2. Infringements on privacy rights
  3. Serious security risks
  4. Reliance on inaccurate and unproven technologies
  5. Discrimination and exclusion
  6. The deepening of entrenched power imbalances between the state and the public.

Digital ID schemes don’t simply verify who you are—they redefine who can access services and what those services look like. They become a gatekeeper to essential societal infrastructure, enabling governments and state agencies to close doors as easily as they open them. And they disproportionately harm those already at society’s margins, including people seeking asylum and undocumented communities, who already face heightened surveillance and risk.

Even the strongest recommended safeguards cannot resolve the core problem: a mandatory digital ID scheme that shifts power dramatically away from individuals and toward the state. No one should be coerced—technically or socially—into a digital system in order to participate fully in public life. And at a time when almost 3 million people in the UK have called on politicians to reject this proposal, the government must listen to people and say no to digital ID.

Read our civil society briefing in full here.

Review of the Data Brokers

By: BHIS
5 September 2017 at 17:26

Jordan Drysdale // The following content is loosely based on a presentation I gave at BSides Denver. After speaking at BSides Denver, one of the audience members spent some time […]

The post Review of the Data Brokers appeared first on Black Hills Information Security, Inc..

❌