In today's fast-moving cybersecurity landscape, threat analysts must move beyond basic, binary reputation scores to successfully defend against modern, highly adaptive web threats. Traditional URL analysis has been redefined by the launch of URL Scanning 2.0, an update that significantly expands VirusTotal's URL analysis capabilities by introducing automated visits with a full browser instance and deeper historical visibility.
Instead of relying on static reputation scores alone, URL Scanning 2.0 enriches reports with "under-the-hood" headless browser telemetry, including the DOM, full-page screenshots, web technologies, and network request logs. Crucially, it introduces historical analysis pivoting, giving analysts the ability to track how a page has changed over time.
URL Scanning 2.0
To successfully defend against modern, highly adaptive web threats, threat analysts must move beyond basic, binary reputation scores. With the debut of URL Scanning 2.0, VirusTotal introduces robust headless browser integration that captures how a page behaves dynamically in a clean sandbox environment.
Every scan now generates rich, granular telemetry that provides a blueprint of the target page's execution:
- Headless Browser Data: Full-page visual screenshots, full DOM (Document Object Model) trees, and web technologies (e.g., Cloudflare, PHP, HTTP/3).
- Page and Network Statistics: Highly detailed counters of individual network requests, encrypted HTTPS transactions, unique contacted domains/subdomains, and serving IP address mappings with geographic tracking.
- Anti-Phishing Fingerprints: Automatic identification of brands, cloned-website tags, password input fields, tracker IDs, and favicon dhashes.
- Historical Pivoting: A timeline containing historical analyses of a URL with its corresponding risk score, allowing analysts to track exactly how its metadata and content have shifted over time.
Access Levels in VirusTotal
Public Access (Free for VirusTotal Users) The core enhancements of the URL Scanning 2.0 engine are available to everyone. For the latest scan, analysts can access rich telemetry generated by headless browser execution, including visual screenshots, extracted JavaScript globals, console messages, and a list of all loaded network resources.
VirusTotal Premium Customers For paid VirusTotal customers, the platform unlocks deeper retrospective capabilities and exclusive data fields. Analysts have the ability to pivot to and review the full historical analyses of a URL as it was observed at specific points in time, and access advanced telemetry like the full DOM captures of the execution. Furthermore, premium access unlocks advanced infrastructure relationships, allowing users to pivot on contacted domains, IPs, and downloaded files.
Note: The aforementioned Google Threat Intelligence and Automatic Brand Identification features are exclusively available to Google Threat Intelligence customers.
Investigating a Phishing Case
Initially, when an analyst navigates to the mentioned URL to view the report generated by VirusTotal, they would see something similar to the following with the new URL Scanning features:
At the top of the interface, we can see that the URL has been scanned three times. This means there are three distinct reports for the same URL, each potentially containing different information that could be highly useful for an analyst. In the top right corner, we can view these past analyses by clicking on "History".
This is where the new historical analysis pivoting comes into play: it allows analysts to travel back through a URL's timeline with point-in-time snapshots.
By clicking on "History", we can view all the historical analyses for that URL, including response codes, detections, screenshots, and other metadata. You can also apply filters to narrow down the timeline and view only the historical records you are interested in, based on specific response codes, URL actions, and other criteria.
In this case, if we click on the initial historical analysis performed on July 6, 2026 (as shown in the screenshot above), we can examine its specific information across the "Summary", "Details", and "Detection" tabs. A key feature of URL Scanning 2.0 is that the information within these report tabs will dynamically re-render to match the exact historical state of the snapshot you select.
As observed in the history timeline, after clicking on this specific analysis included a live screenshot and other relevant metadata, indicating the scan occurred while the website was fully operational and actively distributed. The previous screenshot gives us a clear view of how the phishing page was visually structured.
Furthermore, diving into the "Details" tab reveals other interesting technical artifacts from the campaign. These details are incredibly useful for pivoting and identifying new malicious URLs that share similar characteristics.
Among the wealth of information generated by URL Scanning 2.0, analysts will find HTTP transactions, detected JavaScript variables, console messages, external outbound links, and other critical metadata. These key technical markers serve as pivotable and searchable attributes, allowing teams to conduct advanced footprint hunting and instantly find other malicious URLs exhibiting the exact same technical fingerprint.
Furthermore, every snapshot taken during each analysis provides the complete Document Object Model (DOM) tree captured by the full browser instances. It allows you to inspect the exact structure of the page as it was dynamically rendered to the victim, exposing elements that static scans might miss. As can be seen in the following image, having direct access to this point-in-time DOM data empowers analysts to dig deep into the page's architecture.
Advanced Threat Hunting: Scaling the Investigation
Let's scale our investigation using VirusTotal Intelligence queries based on the artifacts discovered via URL Scanning 2.0.
During the analysis of the financial phishing site, we discovered that the page relied on static assets hosted on a third-party domain: jiaoyisuo.thai2570[.]com. We can pivot on this finding using an advanced query:
VT Query
entity:url (outgoing_link:jiaoyisuo.thai2570.com OR content:jiaoyisuo.thai2570.com)
The results demonstrate a multi-brand operation, including fake cryptocurrency exchange portals and typosquatting domains for other financial services. By further pivoting on the hosting domain with entity:domain "thai2570.com", analysts can map out a highly segmented subdomain tree used for hosting assets, capturing payments, and backend control panels.
Conclusion
URL Scanning 2.0 represents a paradigm shift in how security analysts investigate web-based threats. Investigations are no longer limited to static verdicts. By surfacing powerful metadata directly inside the workflow—such as historical DOM captures, live screenshots, and pivotable technical identifiers—analysts can now turn a single indicator into a comprehensive infrastructure map.
Log in to VirusTotal to explore the new URL Scanning 2.0 features today, and consider upgrading to VirusTotal Premium to unlock the full power of historical pivoting and advanced threat hunting.
Once the attacker has breached the corporate network, subsequent stages of the attack often involve leveraging standard domain infrastructure protocols: using Kerberos, running DNS queries, accessing internal services, opening network shares, and other common networking actions. Because this activity is virtually indistinguishable from legitimate network traffic, it is extremely difficult to detect it with traditional network attack detection tools.
Kerberoasting and DNS tunneling have long ceased to be exotic techniques. They are becoming standard methods in modern attacks because they allow attackers to execute critical compromise stages while remaining undetected by traditional security tools. A clear example of this trend is seen in latest campaigns, employing both Kerberoasting and DNS tunneling.
Traditional network security tools perform well when the attack features a distinct and identifiable indicator: a characteristic query string, a known malicious traffic pattern, or the source code of an already discovered exploit. While this approach to threat detection remains effective, it cannot always be applied to discovering network attacks that blend seamlessly with legitimate traffic inside a corporate network.
Instead of searching for explicit indicators of attack, Network Anomaly Detection (NAD) analyzes all traffic for suspicious artifacts that deviate from the host’s typical network activity. Within Kaspersky’s solution portfolio, this technology is implemented specifically in the Kaspersky Anti Targeted Attack (KATA) platform.
The system analyzes network traffic data (DNS, DCE/RPC, Kerberos and other packets) and extracts key parameters used to identify anomalous behavior. This approach enables searching for attacks on domain controllers, signs of traffic tunneling and exfiltration, C2 communications, and other scenarios that may point to compromise of network infrastructure.
However, Network Anomaly Detection is not built on a single, universal set of indicators. Each attack scenario employs tailored detection models that account for the specifics of the corresponding network protocol, typical host behavior, and characteristic deviations from that baseline. This article examines two practical examples – detecting Kerberoasting and DNS tunneling – to demonstrate how these principles are implemented in KATA’s NAD rules and why this approach proves more effective than traditional signature-based analysis.
Kerberoasting attack detection by KATA
Why standard tools have a hard time detecting Kerberoasting
The Kerberoasting attack leverages the standard operational logic of the Kerberos protocol. The attacker identifies service accounts configured with a Service Principal Name (SPN), requests a Ticket-Granting Service (TGS) ticket for them, and attempts to crack the password offline using a dictionary attack against the retrieved ticket. If the password is weak or hasn’t been changed in a long time, the adversary can bruteforce it to get it in cleartext. Subsequently, these compromised credentials can be leveraged for both vertical and horizontal movement across the network.
The essence of a Kerberoasting attack is that an adversary possessing a compromised low-privileged account and a valid Ticket-Granting Ticket (TGT) for that account can request TGS tickets with weakened encryption for service accounts with SPNs. Crucially, it doesn’t matter whether the compromised account actually holds access permissions for those services. Having obtained these tickets, the attacker can then take them offline and bruteforce the service account’s password by trying to decrypt the corresponding ticket locally, without generating any network activity. As the encryption key is based on the password hash, the adversary can guess the password upon finding the correct key.
The attacker’s objective is to find a service account that has a simple password. Most likely, this will be an account created manually by the administrators of the infrastructure or a service. This is precisely why attackers are not interested in system service accounts with SPNs (such as CIFS/fileserver.company.local); these are generated automatically and feature highly complex passwords that are impossible to bruteforce.
We should note that the TGS ticket requests made by attackers are identical to standard, legitimate requests. Every domain naturally exhibits a high volume of Kerberos traffic. Therein lies the primary challenge of detecting Kerberoasting: legitimate service ticket requests (TGS-REQ) are indistinguishable from those issued by attackers. Consequently, the primary detection method relies on correlating indirect indicators rather than signature matching. Key indicators include an anomalous request source (atypical host or user account), a surge in requested SPNs within a short time window, attempts to obtain service tickets for sensitive or privileged service accounts, and off-hour timing or unusual request volume when benchmarked against the historical profile of both the user and the host.
Most of these indicators can be detected using NAD technology, which helps analysts cut through high volumes of Kerberos traffic to establish a concrete hypothesis: who initiated the Kerberoasting attack, which service accounts are at risk, and why this activity deviates from the baseline.
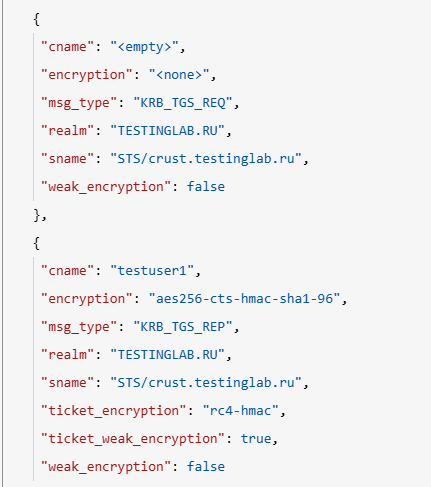
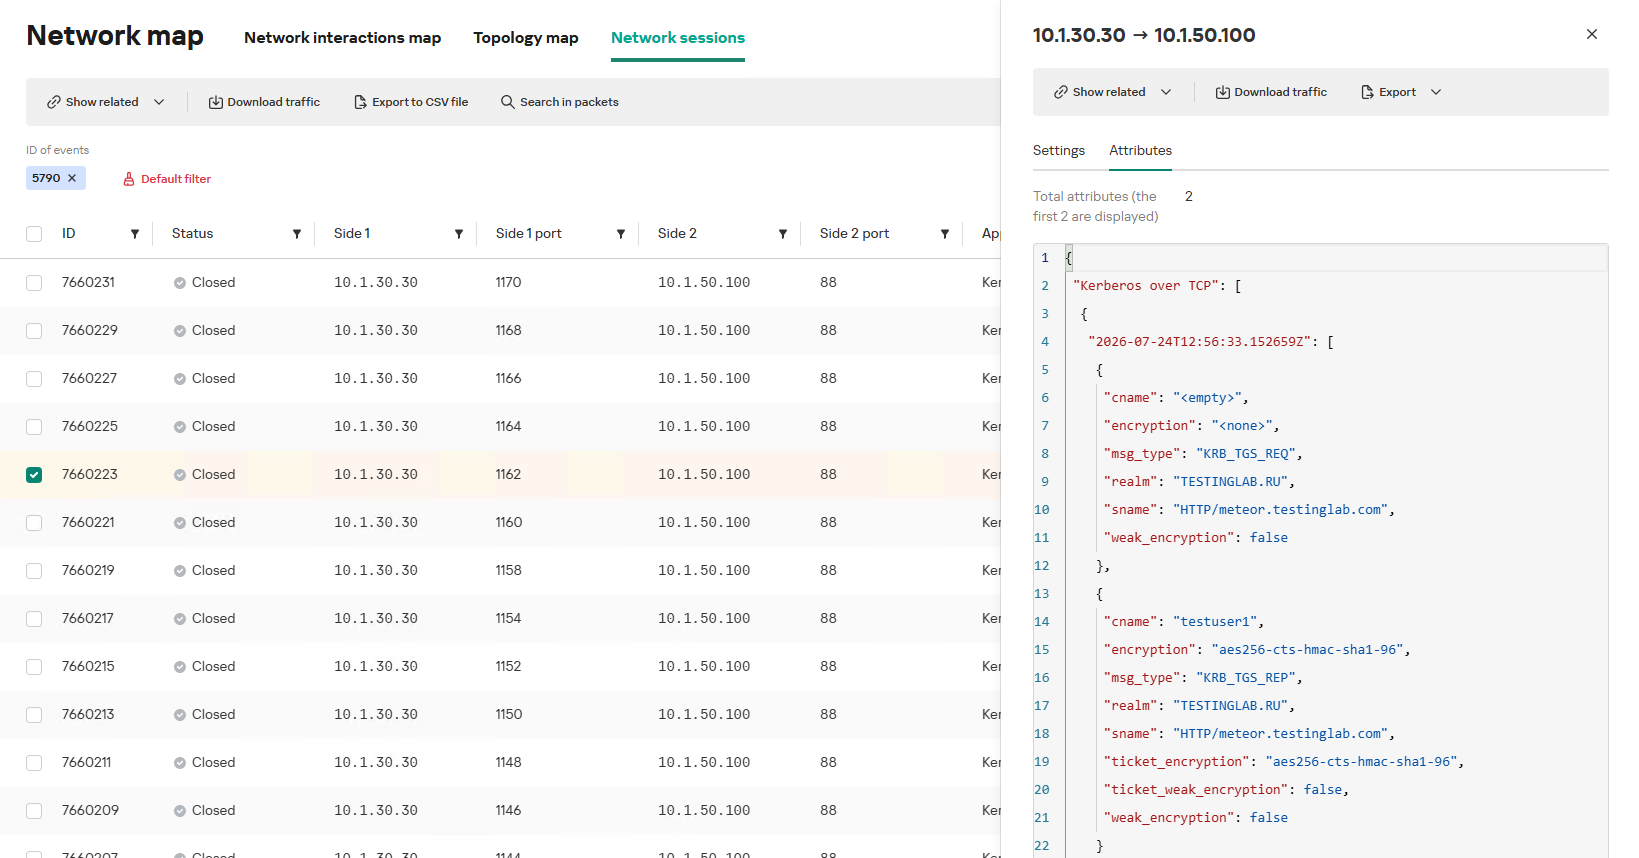
In the context of this attack, the network anomaly stems from a single host – likely using a single user account (cname) – receiving TGS tickets ("msg_type": "KRB_TGS_REP") for numerous unique services with SPNs (sname) within a short timeframe. These service accounts are non-system accounts.
Example of a TGS-REQ – TGS-REP event pair from network session attributes
To detect this anomaly, the NAD rule titled “Signs of a Kerberoasting attack” implements the following logic:
From Kerberos network sessions during the search depth period, select only those with a successful Kerberos TGS-REP response, subject to the following conditions:
The IP address that initiated the session must not be excluded in the excl_sip variable.
The requesting client name (cname) must not be included in the excluded users list (excl_users variable).
The SPN (sname) must not be excluded within the rule. System SPNs are omitted from detection logic because they exist across most corporate environments and hold no interest for adversaries in this attack vector; including them in the total count of unique SPNs could lead to predefined threshold being exceeded, triggering false positives.
Extract the cname (the name of the client requesting the TGS-REQ) and sname (SPN itself) from these qualifying sessions.
Group the sessions by the source IP address and client account name (cname), while aggregating sessions with unique SPNs.
Generate an alert if a single IP address using a single client account receives TGS-REP responses for N unique SPN names within the specified search depth window, where N equals or exceeds the threshold variable count_spns.
Within the event regeneration window, group under the initial alert all subsequent alerts associated with the same client IP address. This avoids creating duplicate event records by incrementing the aggregation counter (Total appearances).
We should note that this type of logic cannot be implemented using IDS signatures. Consider creating a Suricata rule designed to detect Kerberos TGS-REP packets. To minimize false positives, we’ll exclude system SPNs (which carry highly complex passwords) and apply a threshold for the number of responses a single client can receive. However, such a rule cannot evaluate the uniqueness of the requested SPNs; it can only track packet counts. As a result, this signature would produce a high volume of false positives because any domain naturally generates large amounts of identical legitimate TGS-REP messages.
Furthermore, adding exclusions and tuning thresholds to fit your specific infrastructure environments is significantly more practical when managed through user variables in the interface rather than directly modifying the underlying structure of the IDS rule itself.
Creating a Network Anomaly Detection rule
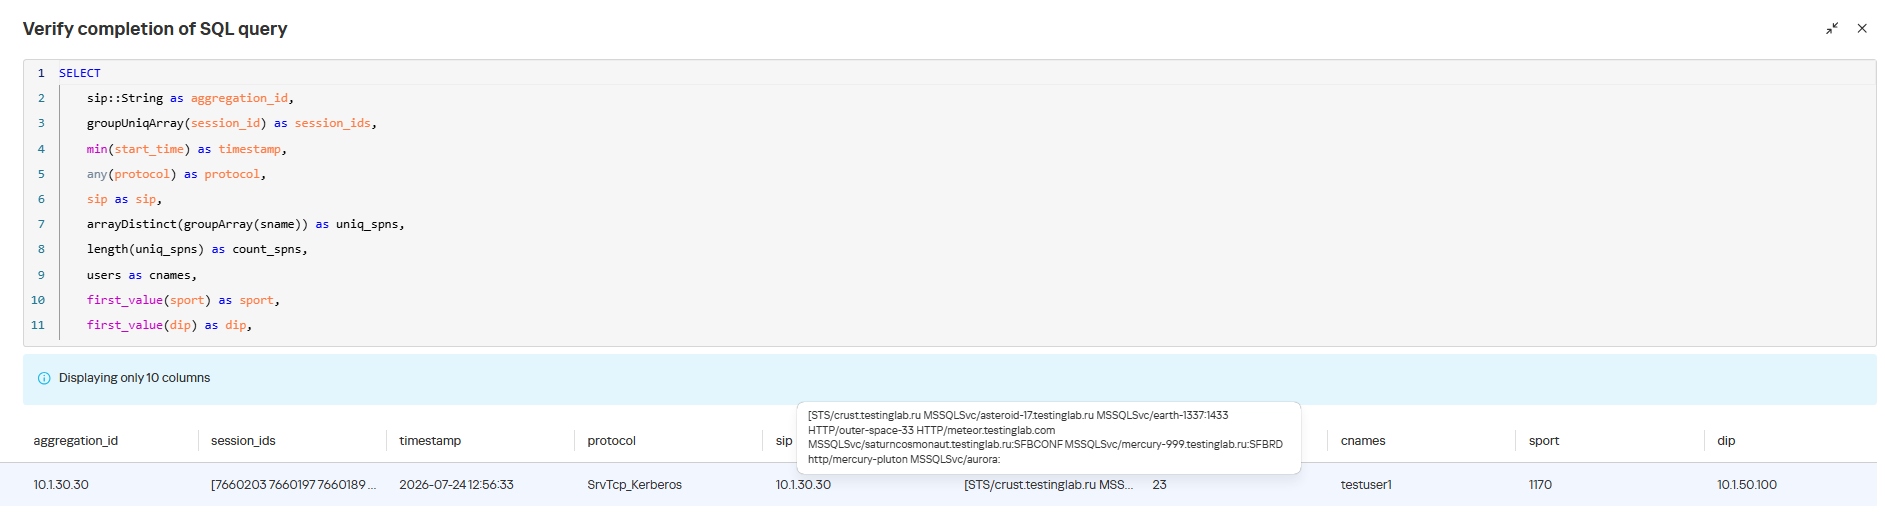
Network Anomaly Detection (NAD) rules are written as SQL queries executed against KATA’s ClickHouse database. Below, we demonstrate how to add and deploy a rule.
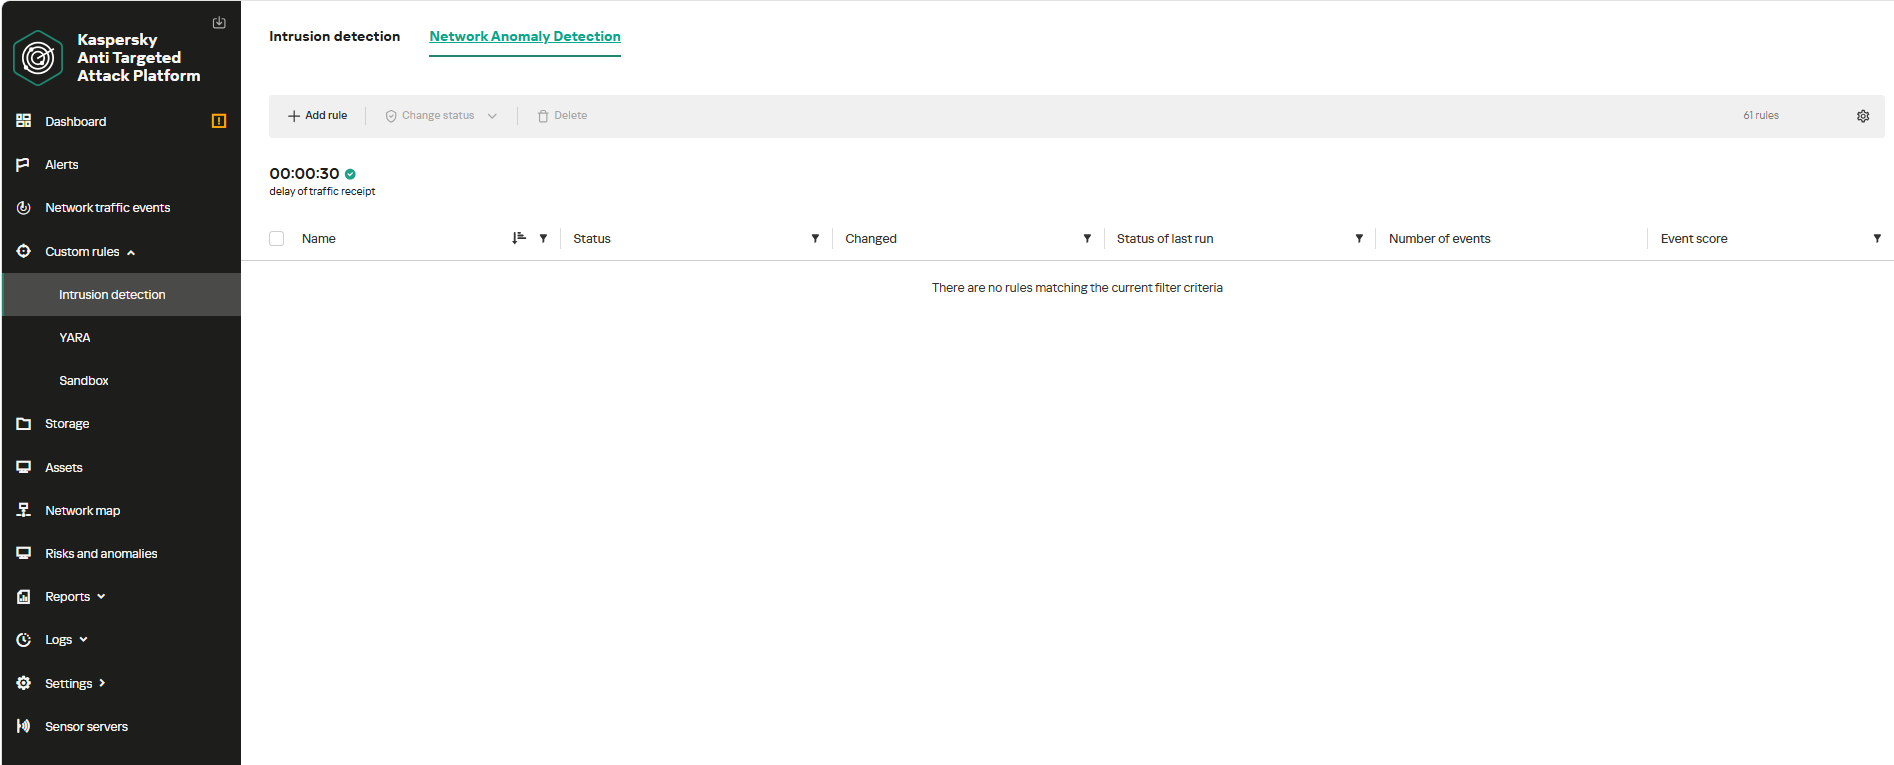
To begin working with NAD rules, navigate to the “Custom rules” section of the interface and select “Intrusion detection”. Under the “Network Anomaly Detection” tab, you can create a new rule.
The Network Anomaly Detection page UI
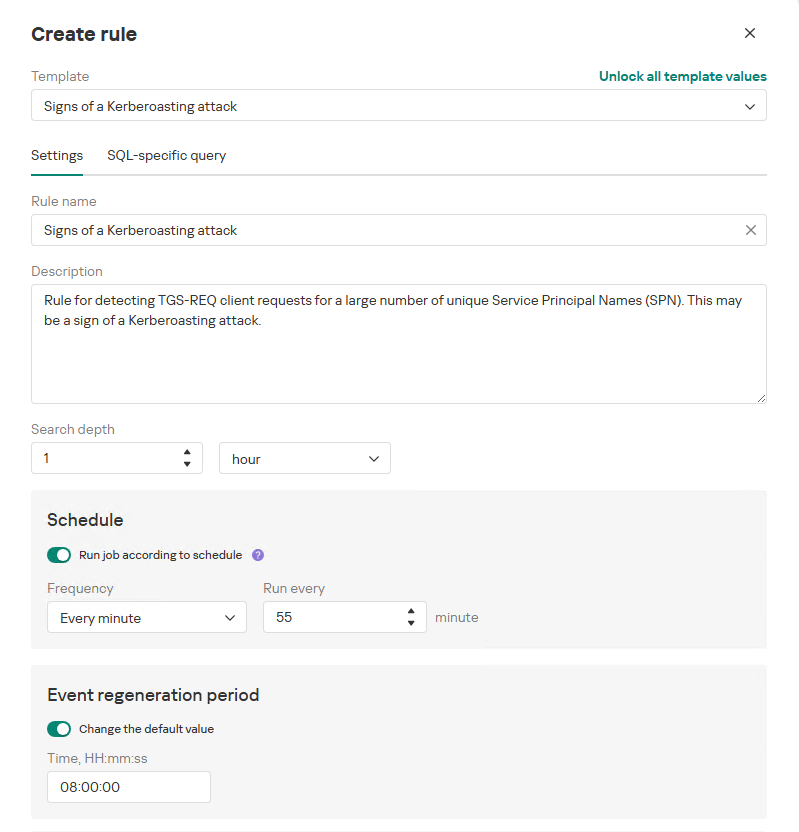
When adding a new rule, an analyst can select an appropriate rule template from the prebuilt set supplied with product updates. They can also manually modify the rule added from the template (converting it to a custom rule while keeping the original template intact) or author a rule from scratch using the provided guide.
Upon selecting a template, the analyst can review the rule description and either adjust or leave the default values for the following settings:
Search depth (the lookback window over which the SQL query will run)
Schedule (the execution frequency for running the query against the specified search depth)
Event regeneration period (the timeframe during which identical alerts will be aggregated into a single record rather than displayed as distinct events)
UI for creating a new NAD rule
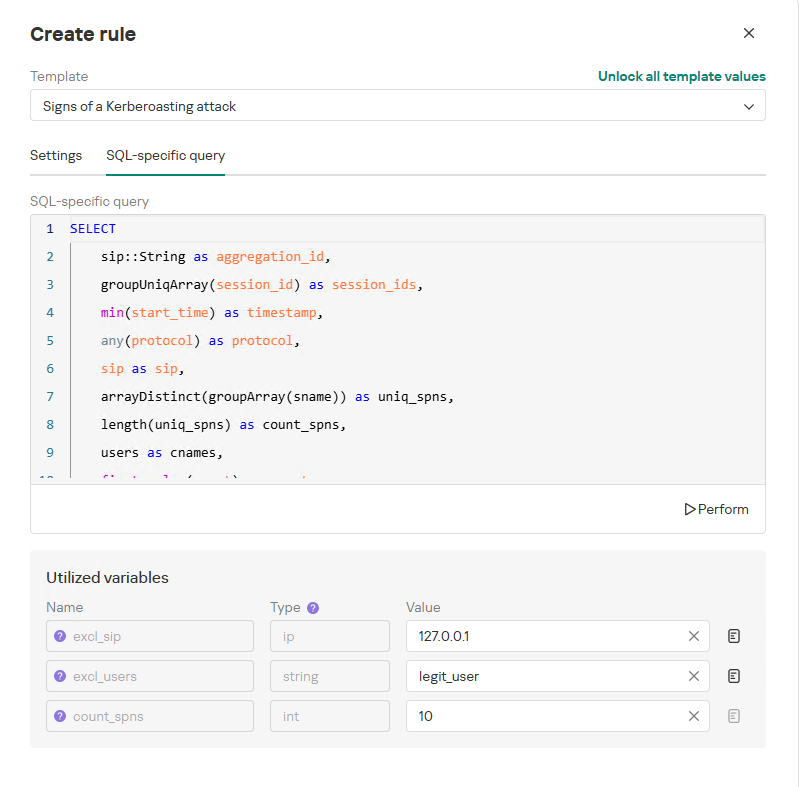
To ensure the rule functions correctly, we recommend navigating to the “SQL-specific query” tab before deployment to review the variables used within the rule – a description for each variable is available by hovering over the question mark icon.
The variables are lists of IP addresses, dates, strings or numeric values that define the network infrastructure – such as domain controllers, DNS servers, time ranges, critical segments, and other entities. This allows you to tailor each rule to different network environments and incorporate specific infrastructure characteristics without modifying the underlying logic.
In our example, using variables allows you to adjust the “Signs of a Kerberoasting attack” rule as follows without altering the underlying SQL query:
Exclude the source IP address of the TGS-REQ requests from the scope of detection logic (you can specify a single address, a subnet mask, or a dictionary containing addresses and subnets) as well as the requesting client account (accepts a single value or a dictionary with multiple values).
Adjust the threshold value required to trigger an alert based on the number of unique SPNs in the TGS-REQ messages.
Query contents and variables used in the new rule
On this same page, you can test if the rule is functional prior to saving it.
Rule execution test results
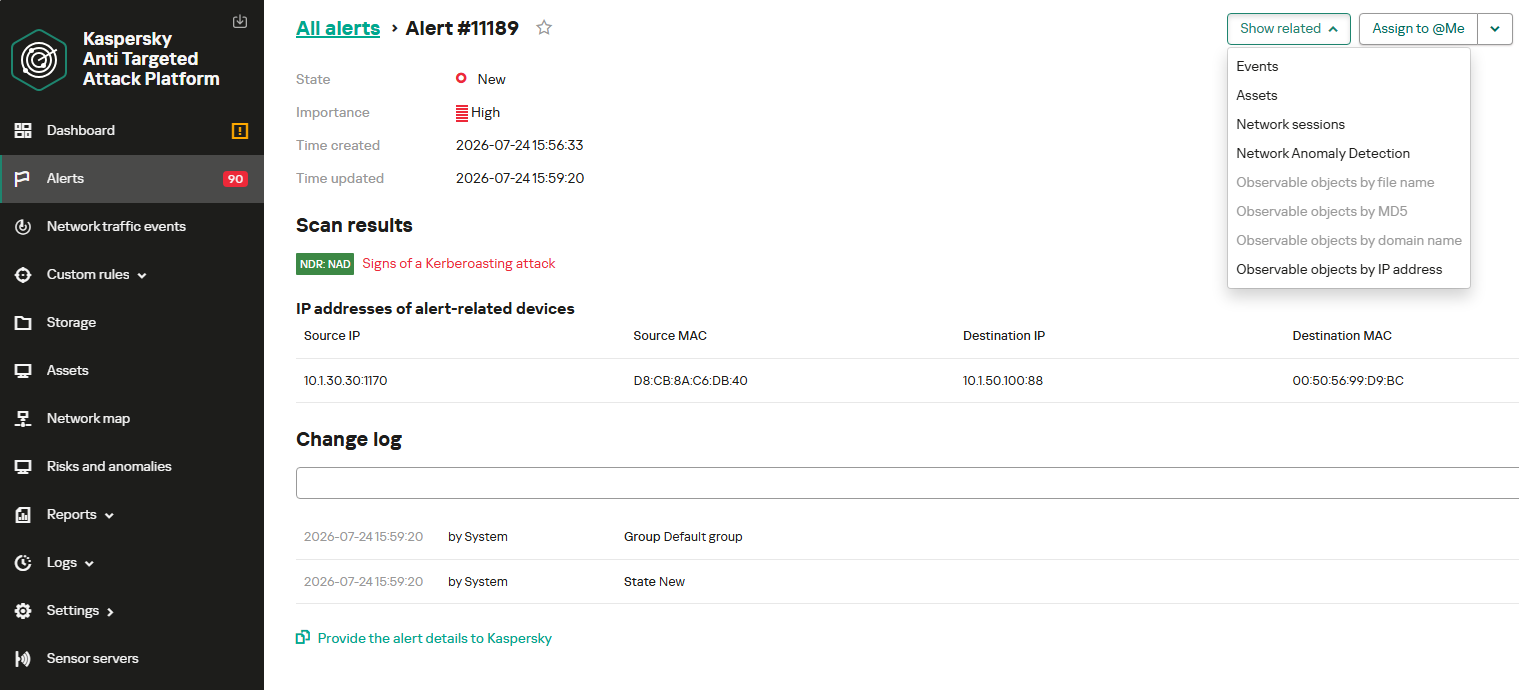
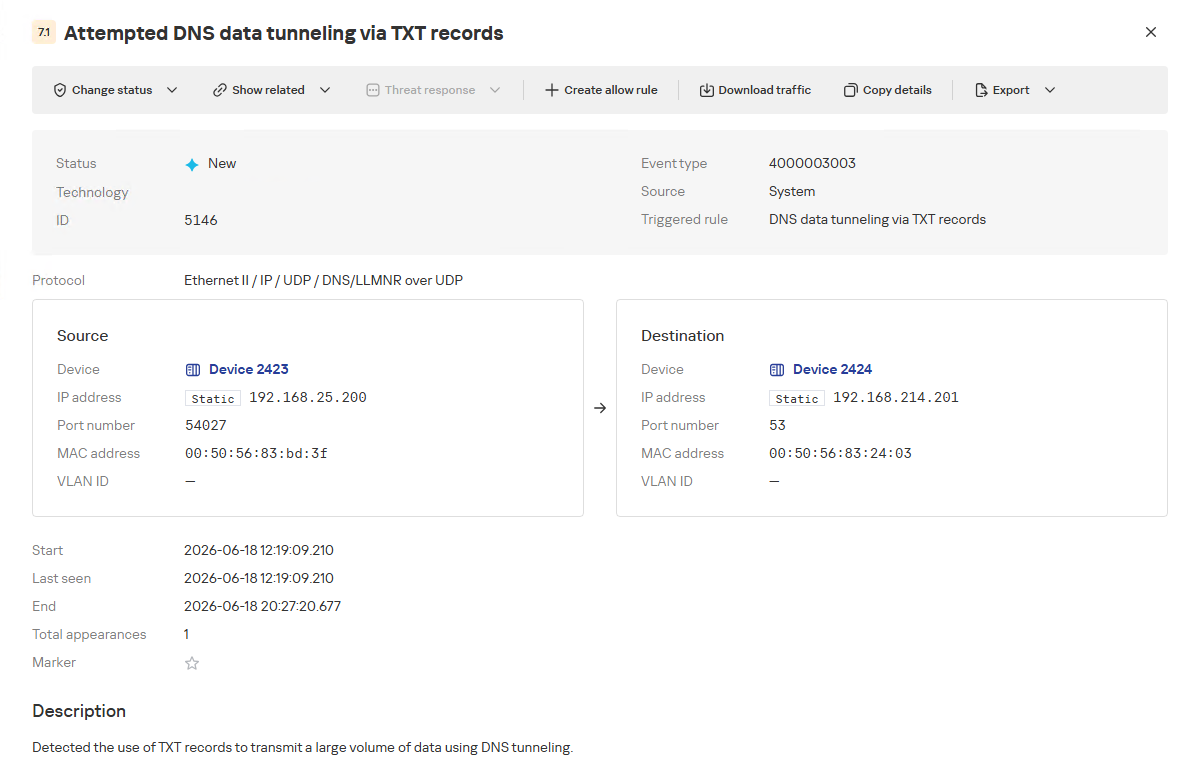
When this rule triggers, an NDR:NAD alert is generated. In the alert card, the analyst can review basic information: IP addresses, ports, and participating network endpoints.
Alert card for the NAD rule
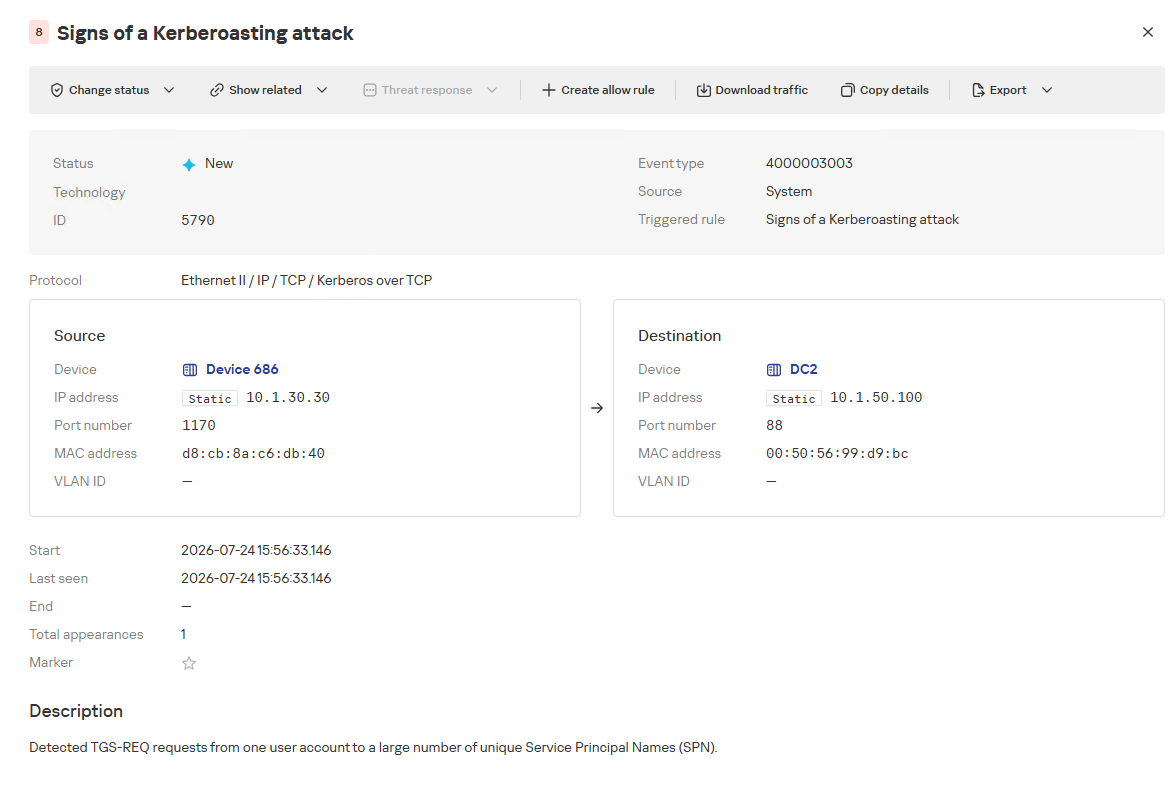
From there, the analyst can navigate to the associated event, which provides a detailed breakdown of the anomaly alongside links to the affected hosts.
NAD rule triggering event
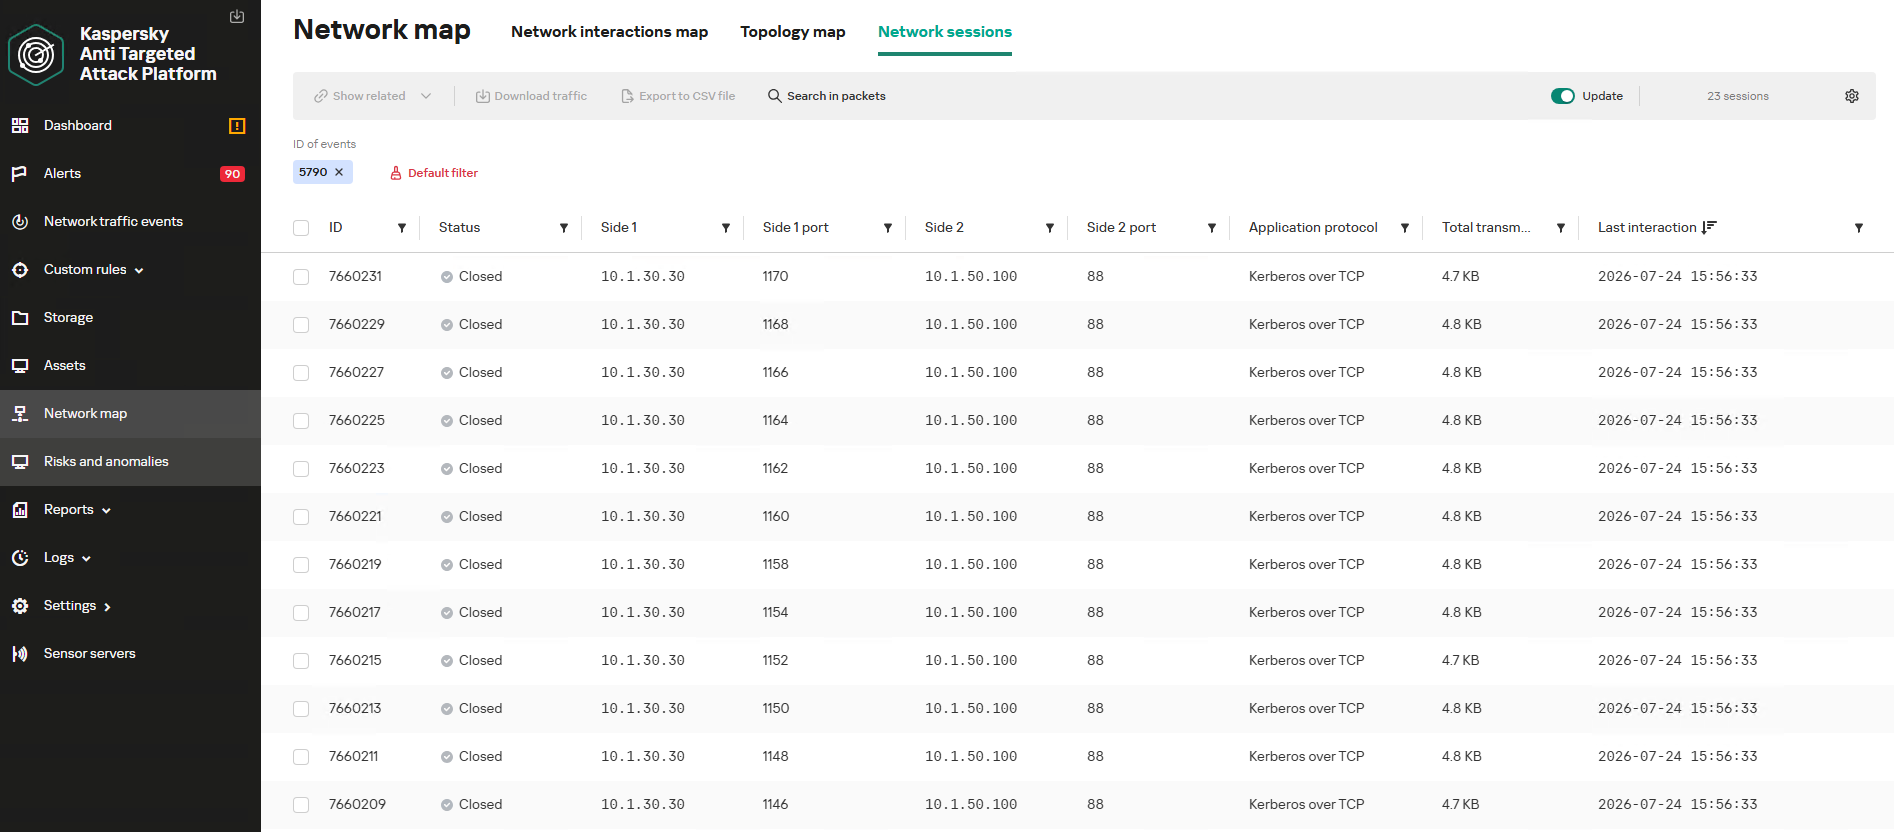
If needed, the analyst can view and export the network sessions associated with the alert. These sessions can be accessed directly from the alert or within the event card via the “Show related” drop-down list.
Network sessions that triggered the rule
Within an individual session, the analyst can inspect standard details including interacting parties, data volume sent and received, and other fields and metrics. On the “Attributes” tab, the analyst can review the specific events recorded within that session.
Network session attributes
Detecting DNS tunneling in KATA
How DNS tunnels work
DNS tunneling is a technique used to transmit data or control malware through firewalls by encoding information within DNS protocol requests and responses. Instead of performing standard name resolution, an infected host transmits data encoded within subdomain strings and receives response data via DNS records. This covert channel can be leveraged for C2 communication, bypassing network restrictions, or data exfiltration.
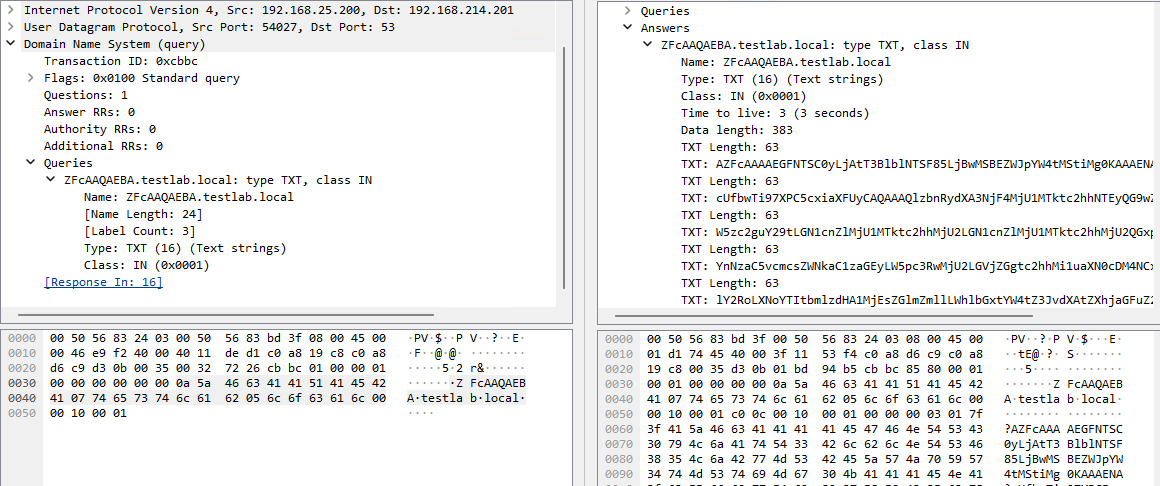
One method of implementing DNS tunneling involves utilizing TXT records. In this scenario, the client issues DNS TXT record queries for domain names where the right-hand portion of the domain name (the higher-level domains) remains static, while the left-hand portion (the lowest-level subdomain) carries encoded or encrypted data sent from the client to the server. Under this structure, a sample domain name might look like ZFcABQAIBA[.]testlab[.]local, where testlab[.]local serves as the static right-hand portion and ZFcABQAIBA represents the variable left-hand string containing the data transmitted by the client.
In response to these queries, the server delivers commands or messages inside the data field of the TXT response. Because the right-hand portion of the domain name remains static, all client queries are consistently routed to the same C2 server, even if the intermediate DNS resolvers targeted by the client change.
DNS query (left) and corresponding response (right) during DNS tunneling via TXT records
It is rather challenging to identify this malicious activity within DNS traffic without generating false positives. DNS traffic is permitted across almost all corporate networks, long domain names occur routinely in both internal and external environments, and TXT records are frequently leveraged for legitimate operational purposes.
Suspicion is established through a combination of indicators: a high volume of long, seemingly random subdomains associated with a single top-level domain, high request frequency, an unusually large number of unique names, non-standard record types, and significant data transfer volumes within a single DNS session.
By analyzing DNS traffic for threat detection, we identified three primary fields of interest:
Requested DNS name
DNS record type
TXT data field within the response
As shown in the image above, all of these fields are present in the DNS response. In a real-world scenario, a tunnel of this nature will transmit a volume of data that is abnormally large compared to standard DNS traffic.
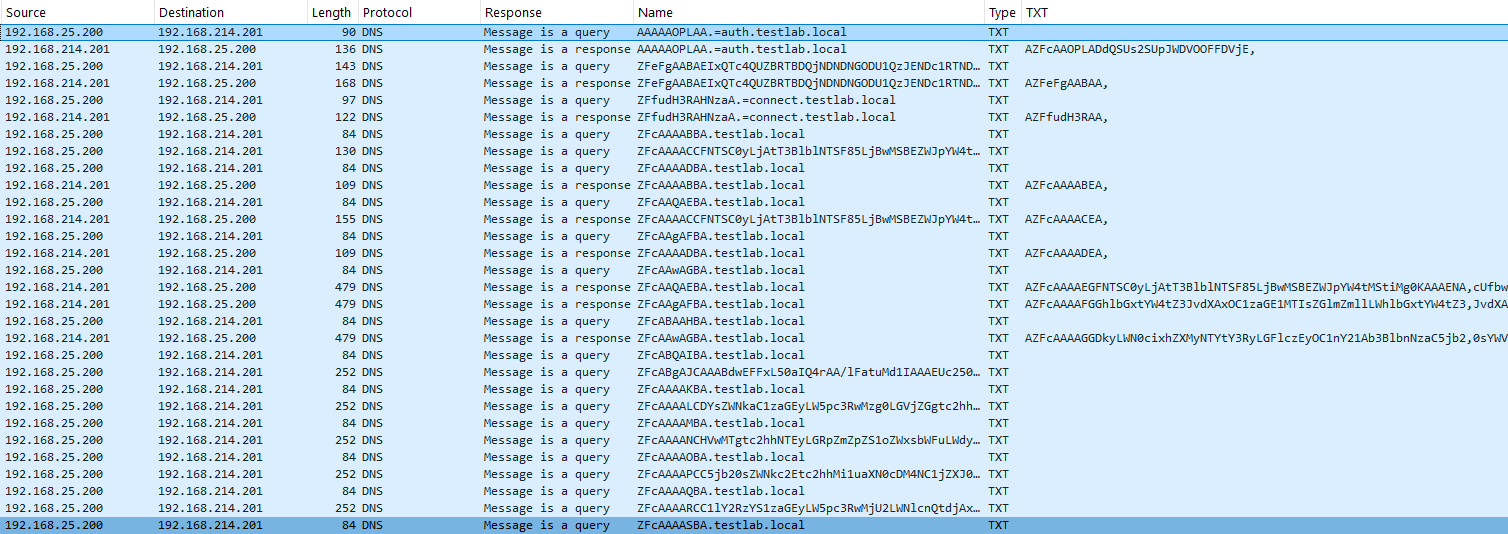
Data exchange within a DNS tunnel
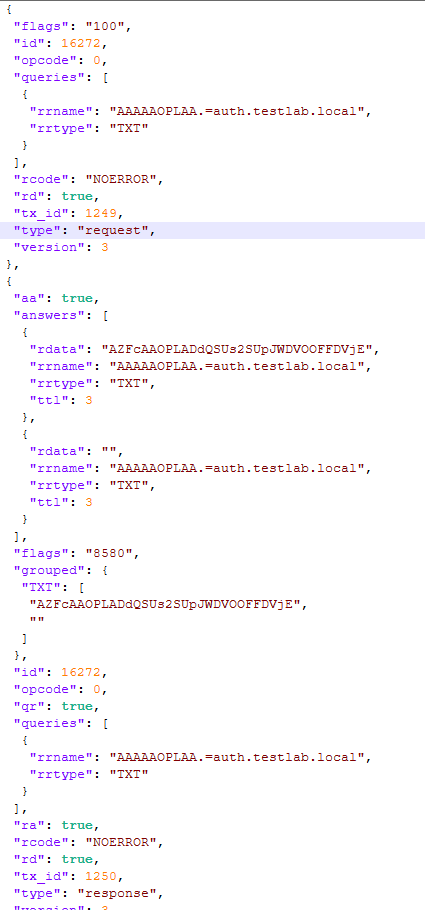
Thus, in the context of DNS tunneling, a network anomaly occurs when 1) a single query source host sends data embedded in the variable left-hand portion of domain names (rrname) while 2) maintaining a static right-hand portion (rrname) and 3) receives DNS server responses containing TXT records (rtype) with varying data (rdata), while 4) the total volume of data transmitted in the left-hand portion of the requested domain name together with the TXT data response (rdata + rrname) exceeds a predefined threshold.
Request and response events from DNS session attributes
When detecting DNS tunneling, the following nuances must be considered:
A single tunnel will not be constrained to a single DNS session; data may be transmitted across multiple sessions with the DNS server, or each individual request may occur within a separate session.
A client DNS query can contain more than one requested domain name.
A DNS response can contain multiple TXT records, as well as a large volume of various non-TXT record types.
Traffic between DNS servers must be excluded, as it duplicates client requests and can trigger false positives.
Although the factors outlined above (an abnormally large or frequently changing left-hand subdomain alongside a static right-hand domain, or an unusually long string in a TXT record) serve as key indicators of DNS tunneling, they can also occur within legitimate network traffic.
These challenges create a high likelihood of false positives when detecting DNS tunneling, particularly when using IDS-based tools. Writing an accurate IDS rule for this type of activity is practically impossible. With rare exceptions, DNS tunneling tools possess static markers that can be leveraged for signature-based detection. However, in the absence of such markers, signature methods fail to deliver high detection accuracy without generating an overwhelming number of false positives. In these cases, a comprehensive approach combining multiple correlated indicators is essential to improve overall detection quality.
DNS tunneling detection logic
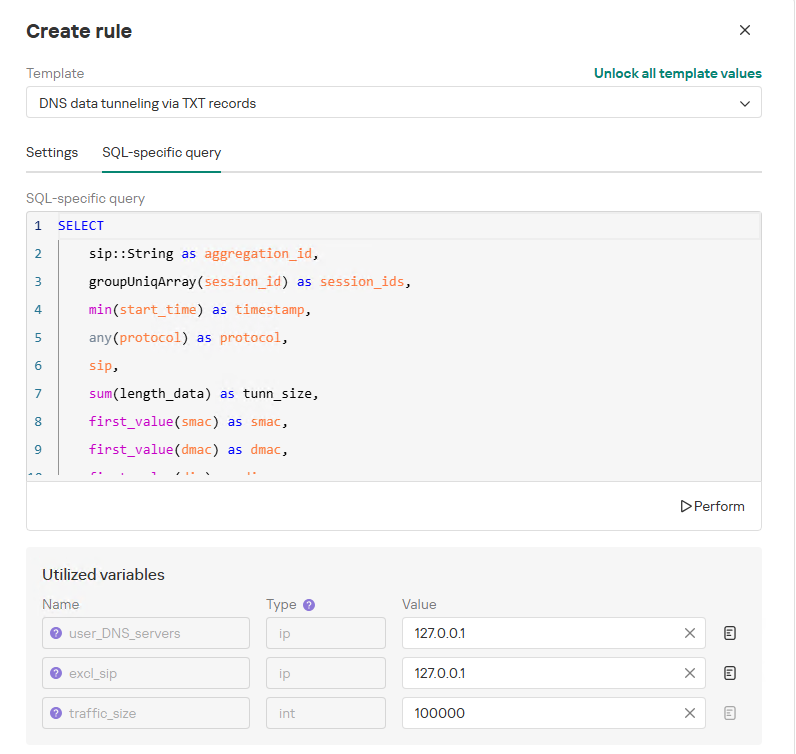
To add a rule for detecting this anomaly, you can use the prebuilt “DNS data tunneling via TXT records” template in the new rule creation interface. The “SQL-specific query” tab will display the list of variables used:
user_DNS_servers: a list of internal DNS server addresses within the infrastructure, required for the rule to function correctly and minimize potential false positives
excl_sip: IP addresses to be excluded from the scope of the rule (you can specify a single address, a subnet mask, or a list containing both addresses and subnets)
traffic_size: the threshold value for the total volume of data (in bytes) transmitted through the tunnel
Variables used in the “DNS data tunneling via TXT records” rule
The detection logic for this network anomaly is structured as follows:
From network sessions using the DNS protocol within the timeframe defined by the rule’s search depth, select only those sessions containing at least one TXT response.
Additionally:
The IP address that initiated the session must not be excluded in the excl_sip variable.
The source IP address that initiated the session must not belong to the internal DNS servers listed in the user_DNS_servers variable.
The DNS names requested by the client must not be excluded within the rule.
Split qualifying DNS sessions into individual log lines, each corresponding to an individual request or response. Retain only DNS responses containing TXT data.
Extract DNS names and their associated TXT data from these DNS responses. Retain only unique values.
Group all resulting records by the session’s source IP address, aggregating all unique DNS names and TXT data blocks.
Generate an alert if the combined size (in bytes) of the unique DNS names and TXT response data for a single IP address within the search depth window exceeds the specified threshold (the traffic_size parameter).
Within the event regeneration window, group under the initial alert all subsequent alerts associated with the same client IP address. This avoids creating duplicate event records by incrementing the aggregation counter (Total appearances).
“DNS data tunneling via TXT records” rule triggering event
The primary value of NAD technology in this scenario lies in noise reduction – by minimizing false positives – and faster investigation times. A DNS tunnel rarely presents itself as a single, blatantly malicious request. Instead, it leaves behind a behavioral footprint: repetition, length, domain structure, unusual record types, numerous subdomains branching off an unchanging root domain, and anomalous host behavior. KATA consolidates these indicators into a single alert, presenting the analyst with an actionable attack hypothesis rather than a set of fragmented DNS events.
Prebuilt rules for detecting network anomalies in KATA
KATA users should note that Network Anomaly Detection (NAD) rules are not enabled by default. Rules must be added manually using the procedure described in the preceding sections. This design ensures that analysts can fine-tune rules to fit specific network infrastructures using variables.
Analysts have three ways of creating new rules:
Adding a rule from a prebuilt template and adjusting custom variables. In this case, the rule is classified as a system rule.
Adding a rule from a prebuilt template and modifying its underlying SQL query (which requires enabling the “Unlock all template values” option) to create a custom rule based on the template. When modified this way, the rule transitions from a system rule to a custom rule.
Authoring a custom rule from scratch, which requires a basic understanding of ClickHouse SQL queries and familiarity with the product documentation.
As of this publication, the product ships with 59 prebuilt NAD rule templates (with additional templates delivered via product updates). KATA supports running up to 200 active rules simultaneously.
Prebuilt rules are divided into six categories:
Large Data Transfers: tracking abnormally large network sessions across various protocols during regular hours, at night, or over weekends.
Suspicious Connections: detecting suspicious connections that may indicate hazardous activity, shadow IT, evasion of attack detection mechanisms, and other threats.
Connections to Suspicious Resources: detects actions that violate security policies, potential data exfiltration beyond the perimeter, and unauthorized internet access originating from secured network segments.
C2 Communication: identifies network sessions characteristic of a potential C2 communication channel or tunnel.
The table below lists the rule templates for detecting network anomalies in KATA:
Rule category
Rule name
Protocols used
Large Data Transfers
Data tunneling in DNS traffic
DNS
ICMP, TCP, UDP, RDP, SSH or LDAP sessions with a large volume of traffic (6 rules)
ICMP, TCP, UDP, RDP, SSH, or LDAP (depends on selected rule)
ICMP, TCP, UDP, RDP, SSH or LDAP sessions with a large volume of traffic at nighttime (6 rules)
ICMP, TCP, UDP, RDP, SSH, or LDAP (depends on selected rule)
ICMP, TCP, UDP, RDP, SSH or LDAP sessions with a large volume of traffic on non-working days (6 rules)
ICMP, TCP, UDP, RDP, SSH, or LDAP (depends on selected rule)
Suspicious Connections
Queries to unknown DNS servers
DNS
Use of unauthorized routes
TCP, UDP
Use of suspicious ports for connections to external addresses
TCP, UDP
Use of non-typical protocols for connections
TCP, UDP, HTTP, HTTPS, DNS, SMTP
Inconsistencies with firewall configuration
TCP, UDP
Use of unauthorized ports for RDP or SSH sessions (2 rules)
RDP or SSH (depends on selected rule)
Interactions with external IP addresses over the RDP or SSH protocol (2 rules)
RDP or SSH (depends on selected rule)
Suspicious RDP sessions with domain controllers
RDP
Connection to an unknown server via Kaspersky Security Center ports
TCP, UDP
Domain Attacks
Signs of a DCSync attack
DCE/RPC
Signs of a DCShadow attack
DCE/RPC
Signs of DHCP spoofing
DHCP
DNS queries to Canarytoken domains
DNS
Signs of a Kerberoasting attack
Kerberos
Signs of an AS-REP Roasting attack
Kerberos
Signs of a brute-force password attack on SSH
SSH
Signs of SOAPHound usage
LDAP
Large-volume Active Directory object data collection via LDAP queries
LDAP
Reconnaissance Activity
Getting information about a task in the Task Scheduler
DCE/RPC
Getting a list of Kerberos users
Kerberos
LDAP queries to rights delegation attribute
LDAP
LDAP queries to attribute for getting administrator passwords
LDAP
Signs of an internal horizontal port scan
TCP, UDP
Signs of an internal vertical port scan
TCP, UDP
DNS zone data replication requests sent from sources other than DNS servers
DNS
Successfully completed requests for DNS zone data replication sent from sources other than DNS servers
DNS
LDAP query targeting a critical attribute of insecure credentials
LDAP
Enumeration of domain accounts via LDAP queries
LDAP
Exceeding the threshold for requested critical attributes in LDAP queries
LDAP
LDAP search queries containing a high number of critical attributes
LDAP
Connections to Suspicious Resources
Queries to unauthorized domain names
DNS
Transmission of large data volumes to cloud storages
TCP, UDP, DNS
Connections to cloud storages or file transfer services
TCP, DNS
Connections to public repositories
TCP, DNS
Connections to resources of programs for traffic tunneling
TCP, DNS
С2 Communication
Possible queries to DGA domains
DNS
DNS data tunneling via TXT records
DNS
Numerous blocked connections to external addresses
TCP, UDP
Conclusion
The examples of Kerberoasting and DNS tunneling clearly demonstrate why modern security defenses cannot rely solely on looking for known signatures and indicators of compromise. Both attack techniques abuse protocols that operate inside corporate networks every day. At the individual event level, they may look like legitimate activity, yet in behavioral context, they stand out as clear indicators of compromise.
NAD directly addresses this gap. Instead of relying purely on signature matches across Kerberos or DNS traffic, it highlights deviations from established baselines: who initiated the activity, how frequently it recurred, which services or domains were targeted, and why that matters for a specific infrastructure.
As a result, analysts gain a clear, actionable starting point for investigation. This capability is especially valuable for spotting the signs of APT group activity, which runs stealthily and is designed to blend in with legitimate operations. The importance of this capability will only grow: as attack techniques evolve, detecting suspicious activity at its earliest stages – before it escalates into critical service compromise or a data breach – becomes increasingly vital.
Once the attacker has breached the corporate network, subsequent stages of the attack often involve leveraging standard domain infrastructure protocols: using Kerberos, running DNS queries, accessing internal services, opening network shares, and other common networking actions. Because this activity is virtually indistinguishable from legitimate network traffic, it is extremely difficult to detect it with traditional network attack detection tools.
Kerberoasting and DNS tunneling have long ceased to be exotic techniques. They are becoming standard methods in modern attacks because they allow attackers to execute critical compromise stages while remaining undetected by traditional security tools. A clear example of this trend is seen in latest campaigns, employing both Kerberoasting and DNS tunneling.
Traditional network security tools perform well when the attack features a distinct and identifiable indicator: a characteristic query string, a known malicious traffic pattern, or the source code of an already discovered exploit. While this approach to threat detection remains effective, it cannot always be applied to discovering network attacks that blend seamlessly with legitimate traffic inside a corporate network.
Instead of searching for explicit indicators of attack, Network Anomaly Detection (NAD) analyzes all traffic for suspicious artifacts that deviate from the host’s typical network activity. Within Kaspersky’s solution portfolio, this technology is implemented specifically in the Kaspersky Anti Targeted Attack (KATA) platform.
The system analyzes network traffic data (DNS, DCE/RPC, Kerberos and other packets) and extracts key parameters used to identify anomalous behavior. This approach enables searching for attacks on domain controllers, signs of traffic tunneling and exfiltration, C2 communications, and other scenarios that may point to compromise of network infrastructure.
However, Network Anomaly Detection is not built on a single, universal set of indicators. Each attack scenario employs tailored detection models that account for the specifics of the corresponding network protocol, typical host behavior, and characteristic deviations from that baseline. This article examines two practical examples – detecting Kerberoasting and DNS tunneling – to demonstrate how these principles are implemented in KATA’s NAD rules and why this approach proves more effective than traditional signature-based analysis.
Kerberoasting attack detection by KATA
Why standard tools have a hard time detecting Kerberoasting
The Kerberoasting attack leverages the standard operational logic of the Kerberos protocol. The attacker identifies service accounts configured with a Service Principal Name (SPN), requests a Ticket-Granting Service (TGS) ticket for them, and attempts to crack the password offline using a dictionary attack against the retrieved ticket. If the password is weak or hasn’t been changed in a long time, the adversary can bruteforce it to get it in cleartext. Subsequently, these compromised credentials can be leveraged for both vertical and horizontal movement across the network.
The essence of a Kerberoasting attack is that an adversary possessing a compromised low-privileged account and a valid Ticket-Granting Ticket (TGT) for that account can request TGS tickets with weakened encryption for service accounts with SPNs. Crucially, it doesn’t matter whether the compromised account actually holds access permissions for those services. Having obtained these tickets, the attacker can then take them offline and bruteforce the service account’s password by trying to decrypt the corresponding ticket locally, without generating any network activity. As the encryption key is based on the password hash, the adversary can guess the password upon finding the correct key.
The attacker’s objective is to find a service account that has a simple password. Most likely, this will be an account created manually by the administrators of the infrastructure or a service. This is precisely why attackers are not interested in system service accounts with SPNs (such as CIFS/fileserver.company.local); these are generated automatically and feature highly complex passwords that are impossible to bruteforce.
We should note that the TGS ticket requests made by attackers are identical to standard, legitimate requests. Every domain naturally exhibits a high volume of Kerberos traffic. Therein lies the primary challenge of detecting Kerberoasting: legitimate service ticket requests (TGS-REQ) are indistinguishable from those issued by attackers. Consequently, the primary detection method relies on correlating indirect indicators rather than signature matching. Key indicators include an anomalous request source (atypical host or user account), a surge in requested SPNs within a short time window, attempts to obtain service tickets for sensitive or privileged service accounts, and off-hour timing or unusual request volume when benchmarked against the historical profile of both the user and the host.
Most of these indicators can be detected using NAD technology, which helps analysts cut through high volumes of Kerberos traffic to establish a concrete hypothesis: who initiated the Kerberoasting attack, which service accounts are at risk, and why this activity deviates from the baseline.
In the context of this attack, the network anomaly stems from a single host – likely using a single user account (cname) – receiving TGS tickets ("msg_type": "KRB_TGS_REP") for numerous unique services with SPNs (sname) within a short timeframe. These service accounts are non-system accounts.
Example of a TGS-REQ – TGS-REP event pair from network session attributes
To detect this anomaly, the NAD rule titled “Signs of a Kerberoasting attack” implements the following logic:
From Kerberos network sessions during the search depth period, select only those with a successful Kerberos TGS-REP response, subject to the following conditions:
The IP address that initiated the session must not be excluded in the excl_sip variable.
The requesting client name (cname) must not be included in the excluded users list (excl_users variable).
The SPN (sname) must not be excluded within the rule. System SPNs are omitted from detection logic because they exist across most corporate environments and hold no interest for adversaries in this attack vector; including them in the total count of unique SPNs could lead to predefined threshold being exceeded, triggering false positives.
Extract the cname (the name of the client requesting the TGS-REQ) and sname (SPN itself) from these qualifying sessions.
Group the sessions by the source IP address and client account name (cname), while aggregating sessions with unique SPNs.
Generate an alert if a single IP address using a single client account receives TGS-REP responses for N unique SPN names within the specified search depth window, where N equals or exceeds the threshold variable count_spns.
Within the event regeneration window, group under the initial alert all subsequent alerts associated with the same client IP address. This avoids creating duplicate event records by incrementing the aggregation counter (Total appearances).
We should note that this type of logic cannot be implemented using IDS signatures. Consider creating a Suricata rule designed to detect Kerberos TGS-REP packets. To minimize false positives, we’ll exclude system SPNs (which carry highly complex passwords) and apply a threshold for the number of responses a single client can receive. However, such a rule cannot evaluate the uniqueness of the requested SPNs; it can only track packet counts. As a result, this signature would produce a high volume of false positives because any domain naturally generates large amounts of identical legitimate TGS-REP messages.
Furthermore, adding exclusions and tuning thresholds to fit your specific infrastructure environments is significantly more practical when managed through user variables in the interface rather than directly modifying the underlying structure of the IDS rule itself.
Creating a Network Anomaly Detection rule
Network Anomaly Detection (NAD) rules are written as SQL queries executed against KATA’s ClickHouse database. Below, we demonstrate how to add and deploy a rule.
To begin working with NAD rules, navigate to the “Custom rules” section of the interface and select “Intrusion detection”. Under the “Network Anomaly Detection” tab, you can create a new rule.
The Network Anomaly Detection page UI
When adding a new rule, an analyst can select an appropriate rule template from the prebuilt set supplied with product updates. They can also manually modify the rule added from the template (converting it to a custom rule while keeping the original template intact) or author a rule from scratch using the provided guide.
Upon selecting a template, the analyst can review the rule description and either adjust or leave the default values for the following settings:
Search depth (the lookback window over which the SQL query will run)
Schedule (the execution frequency for running the query against the specified search depth)
Event regeneration period (the timeframe during which identical alerts will be aggregated into a single record rather than displayed as distinct events)
UI for creating a new NAD rule
To ensure the rule functions correctly, we recommend navigating to the “SQL-specific query” tab before deployment to review the variables used within the rule – a description for each variable is available by hovering over the question mark icon.
The variables are lists of IP addresses, dates, strings or numeric values that define the network infrastructure – such as domain controllers, DNS servers, time ranges, critical segments, and other entities. This allows you to tailor each rule to different network environments and incorporate specific infrastructure characteristics without modifying the underlying logic.
In our example, using variables allows you to adjust the “Signs of a Kerberoasting attack” rule as follows without altering the underlying SQL query:
Exclude the source IP address of the TGS-REQ requests from the scope of detection logic (you can specify a single address, a subnet mask, or a dictionary containing addresses and subnets) as well as the requesting client account (accepts a single value or a dictionary with multiple values).
Adjust the threshold value required to trigger an alert based on the number of unique SPNs in the TGS-REQ messages.
Query contents and variables used in the new rule
On this same page, you can test if the rule is functional prior to saving it.
Rule execution test results
When this rule triggers, an NDR:NAD alert is generated. In the alert card, the analyst can review basic information: IP addresses, ports, and participating network endpoints.
Alert card for the NAD rule
From there, the analyst can navigate to the associated event, which provides a detailed breakdown of the anomaly alongside links to the affected hosts.
NAD rule triggering event
If needed, the analyst can view and export the network sessions associated with the alert. These sessions can be accessed directly from the alert or within the event card via the “Show related” drop-down list.
Network sessions that triggered the rule
Within an individual session, the analyst can inspect standard details including interacting parties, data volume sent and received, and other fields and metrics. On the “Attributes” tab, the analyst can review the specific events recorded within that session.
Network session attributes
Detecting DNS tunneling in KATA
How DNS tunnels work
DNS tunneling is a technique used to transmit data or control malware through firewalls by encoding information within DNS protocol requests and responses. Instead of performing standard name resolution, an infected host transmits data encoded within subdomain strings and receives response data via DNS records. This covert channel can be leveraged for C2 communication, bypassing network restrictions, or data exfiltration.
One method of implementing DNS tunneling involves utilizing TXT records. In this scenario, the client issues DNS TXT record queries for domain names where the right-hand portion of the domain name (the higher-level domains) remains static, while the left-hand portion (the lowest-level subdomain) carries encoded or encrypted data sent from the client to the server. Under this structure, a sample domain name might look like ZFcABQAIBA[.]testlab[.]local, where testlab[.]local serves as the static right-hand portion and ZFcABQAIBA represents the variable left-hand string containing the data transmitted by the client.
In response to these queries, the server delivers commands or messages inside the data field of the TXT response. Because the right-hand portion of the domain name remains static, all client queries are consistently routed to the same C2 server, even if the intermediate DNS resolvers targeted by the client change.
DNS query (left) and corresponding response (right) during DNS tunneling via TXT records
It is rather challenging to identify this malicious activity within DNS traffic without generating false positives. DNS traffic is permitted across almost all corporate networks, long domain names occur routinely in both internal and external environments, and TXT records are frequently leveraged for legitimate operational purposes.
Suspicion is established through a combination of indicators: a high volume of long, seemingly random subdomains associated with a single top-level domain, high request frequency, an unusually large number of unique names, non-standard record types, and significant data transfer volumes within a single DNS session.
By analyzing DNS traffic for threat detection, we identified three primary fields of interest:
Requested DNS name
DNS record type
TXT data field within the response
As shown in the image above, all of these fields are present in the DNS response. In a real-world scenario, a tunnel of this nature will transmit a volume of data that is abnormally large compared to standard DNS traffic.
Data exchange within a DNS tunnel
Thus, in the context of DNS tunneling, a network anomaly occurs when 1) a single query source host sends data embedded in the variable left-hand portion of domain names (rrname) while 2) maintaining a static right-hand portion (rrname) and 3) receives DNS server responses containing TXT records (rtype) with varying data (rdata), while 4) the total volume of data transmitted in the left-hand portion of the requested domain name together with the TXT data response (rdata + rrname) exceeds a predefined threshold.
Request and response events from DNS session attributes
When detecting DNS tunneling, the following nuances must be considered:
A single tunnel will not be constrained to a single DNS session; data may be transmitted across multiple sessions with the DNS server, or each individual request may occur within a separate session.
A client DNS query can contain more than one requested domain name.
A DNS response can contain multiple TXT records, as well as a large volume of various non-TXT record types.
Traffic between DNS servers must be excluded, as it duplicates client requests and can trigger false positives.
Although the factors outlined above (an abnormally large or frequently changing left-hand subdomain alongside a static right-hand domain, or an unusually long string in a TXT record) serve as key indicators of DNS tunneling, they can also occur within legitimate network traffic.
These challenges create a high likelihood of false positives when detecting DNS tunneling, particularly when using IDS-based tools. Writing an accurate IDS rule for this type of activity is practically impossible. With rare exceptions, DNS tunneling tools possess static markers that can be leveraged for signature-based detection. However, in the absence of such markers, signature methods fail to deliver high detection accuracy without generating an overwhelming number of false positives. In these cases, a comprehensive approach combining multiple correlated indicators is essential to improve overall detection quality.
DNS tunneling detection logic
To add a rule for detecting this anomaly, you can use the prebuilt “DNS data tunneling via TXT records” template in the new rule creation interface. The “SQL-specific query” tab will display the list of variables used:
user_DNS_servers: a list of internal DNS server addresses within the infrastructure, required for the rule to function correctly and minimize potential false positives
excl_sip: IP addresses to be excluded from the scope of the rule (you can specify a single address, a subnet mask, or a list containing both addresses and subnets)
traffic_size: the threshold value for the total volume of data (in bytes) transmitted through the tunnel
Variables used in the “DNS data tunneling via TXT records” rule
The detection logic for this network anomaly is structured as follows:
From network sessions using the DNS protocol within the timeframe defined by the rule’s search depth, select only those sessions containing at least one TXT response.
Additionally:
The IP address that initiated the session must not be excluded in the excl_sip variable.
The source IP address that initiated the session must not belong to the internal DNS servers listed in the user_DNS_servers variable.
The DNS names requested by the client must not be excluded within the rule.
Split qualifying DNS sessions into individual log lines, each corresponding to an individual request or response. Retain only DNS responses containing TXT data.
Extract DNS names and their associated TXT data from these DNS responses. Retain only unique values.
Group all resulting records by the session’s source IP address, aggregating all unique DNS names and TXT data blocks.
Generate an alert if the combined size (in bytes) of the unique DNS names and TXT response data for a single IP address within the search depth window exceeds the specified threshold (the traffic_size parameter).
Within the event regeneration window, group under the initial alert all subsequent alerts associated with the same client IP address. This avoids creating duplicate event records by incrementing the aggregation counter (Total appearances).
“DNS data tunneling via TXT records” rule triggering event
The primary value of NAD technology in this scenario lies in noise reduction – by minimizing false positives – and faster investigation times. A DNS tunnel rarely presents itself as a single, blatantly malicious request. Instead, it leaves behind a behavioral footprint: repetition, length, domain structure, unusual record types, numerous subdomains branching off an unchanging root domain, and anomalous host behavior. KATA consolidates these indicators into a single alert, presenting the analyst with an actionable attack hypothesis rather than a set of fragmented DNS events.
Prebuilt rules for detecting network anomalies in KATA
KATA users should note that Network Anomaly Detection (NAD) rules are not enabled by default. Rules must be added manually using the procedure described in the preceding sections. This design ensures that analysts can fine-tune rules to fit specific network infrastructures using variables.
Analysts have three ways of creating new rules:
Adding a rule from a prebuilt template and adjusting custom variables. In this case, the rule is classified as a system rule.
Adding a rule from a prebuilt template and modifying its underlying SQL query (which requires enabling the “Unlock all template values” option) to create a custom rule based on the template. When modified this way, the rule transitions from a system rule to a custom rule.
Authoring a custom rule from scratch, which requires a basic understanding of ClickHouse SQL queries and familiarity with the product documentation.
As of this publication, the product ships with 59 prebuilt NAD rule templates (with additional templates delivered via product updates). KATA supports running up to 200 active rules simultaneously.
Prebuilt rules are divided into six categories:
Large Data Transfers: tracking abnormally large network sessions across various protocols during regular hours, at night, or over weekends.
Suspicious Connections: detecting suspicious connections that may indicate hazardous activity, shadow IT, evasion of attack detection mechanisms, and other threats.
Connections to Suspicious Resources: detects actions that violate security policies, potential data exfiltration beyond the perimeter, and unauthorized internet access originating from secured network segments.
C2 Communication: identifies network sessions characteristic of a potential C2 communication channel or tunnel.
The table below lists the rule templates for detecting network anomalies in KATA:
Rule category
Rule name
Protocols used
Large Data Transfers
Data tunneling in DNS traffic
DNS
ICMP, TCP, UDP, RDP, SSH or LDAP sessions with a large volume of traffic (6 rules)
ICMP, TCP, UDP, RDP, SSH, or LDAP (depends on selected rule)
ICMP, TCP, UDP, RDP, SSH or LDAP sessions with a large volume of traffic at nighttime (6 rules)
ICMP, TCP, UDP, RDP, SSH, or LDAP (depends on selected rule)
ICMP, TCP, UDP, RDP, SSH or LDAP sessions with a large volume of traffic on non-working days (6 rules)
ICMP, TCP, UDP, RDP, SSH, or LDAP (depends on selected rule)
Suspicious Connections
Queries to unknown DNS servers
DNS
Use of unauthorized routes
TCP, UDP
Use of suspicious ports for connections to external addresses
TCP, UDP
Use of non-typical protocols for connections
TCP, UDP, HTTP, HTTPS, DNS, SMTP
Inconsistencies with firewall configuration
TCP, UDP
Use of unauthorized ports for RDP or SSH sessions (2 rules)
RDP or SSH (depends on selected rule)
Interactions with external IP addresses over the RDP or SSH protocol (2 rules)
RDP or SSH (depends on selected rule)
Suspicious RDP sessions with domain controllers
RDP
Connection to an unknown server via Kaspersky Security Center ports
TCP, UDP
Domain Attacks
Signs of a DCSync attack
DCE/RPC
Signs of a DCShadow attack
DCE/RPC
Signs of DHCP spoofing
DHCP
DNS queries to Canarytoken domains
DNS
Signs of a Kerberoasting attack
Kerberos
Signs of an AS-REP Roasting attack
Kerberos
Signs of a brute-force password attack on SSH
SSH
Signs of SOAPHound usage
LDAP
Large-volume Active Directory object data collection via LDAP queries
LDAP
Reconnaissance Activity
Getting information about a task in the Task Scheduler
DCE/RPC
Getting a list of Kerberos users
Kerberos
LDAP queries to rights delegation attribute
LDAP
LDAP queries to attribute for getting administrator passwords
LDAP
Signs of an internal horizontal port scan
TCP, UDP
Signs of an internal vertical port scan
TCP, UDP
DNS zone data replication requests sent from sources other than DNS servers
DNS
Successfully completed requests for DNS zone data replication sent from sources other than DNS servers
DNS
LDAP query targeting a critical attribute of insecure credentials
LDAP
Enumeration of domain accounts via LDAP queries
LDAP
Exceeding the threshold for requested critical attributes in LDAP queries
LDAP
LDAP search queries containing a high number of critical attributes
LDAP
Connections to Suspicious Resources
Queries to unauthorized domain names
DNS
Transmission of large data volumes to cloud storages
TCP, UDP, DNS
Connections to cloud storages or file transfer services
TCP, DNS
Connections to public repositories
TCP, DNS
Connections to resources of programs for traffic tunneling
TCP, DNS
С2 Communication
Possible queries to DGA domains
DNS
DNS data tunneling via TXT records
DNS
Numerous blocked connections to external addresses
TCP, UDP
Conclusion
The examples of Kerberoasting and DNS tunneling clearly demonstrate why modern security defenses cannot rely solely on looking for known signatures and indicators of compromise. Both attack techniques abuse protocols that operate inside corporate networks every day. At the individual event level, they may look like legitimate activity, yet in behavioral context, they stand out as clear indicators of compromise.
NAD directly addresses this gap. Instead of relying purely on signature matches across Kerberos or DNS traffic, it highlights deviations from established baselines: who initiated the activity, how frequently it recurred, which services or domains were targeted, and why that matters for a specific infrastructure.
As a result, analysts gain a clear, actionable starting point for investigation. This capability is especially valuable for spotting the signs of APT group activity, which runs stealthily and is designed to blend in with legitimate operations. The importance of this capability will only grow: as attack techniques evolve, detecting suspicious activity at its earliest stages – before it escalates into critical service compromise or a data breach – becomes increasingly vital.
Intezer already investigates 100% of your alerts and escalates fewer than 2% of them for human review. That part is handled.
The work does not stop there, though. Every SOC has its own routines wrapped around the investigation itself. The incident reports written in a particular format, the closure notes, the shift handoffs, the rules that decide who picks up which case. When we looked at how teams actually use AI Chat, our in-product investigation agent, more than a third of those conversations turned out to be the same repetitive tasks asked again and again. The same summaries. The same reports. The same closure notes.
Intezer’s AI SOC already runs agents around the clock to triage, investigate, and respond to your alerts on their own. Custom Agents is the next step. Now you can shape how that AI SOC works for your team. Add your own agents and automations on top of the ones Intezer runs out of the box, take more of the manual work off your analysts, and tailor the whole thing to the way your team actually operates.
Meet Custom Agents
Intezer ships with a set of agents and automations that handle triage, investigation, and response from day one. Custom Agents lets you build your own on top of them.
An agent is made up of three components:
Your instructions
A trigger
The tools it is allowed to use
You describe what you want done in plain language, choose when it should run, and pick what it can touch. It then runs on its own inside your Intezer environment, on the same engine that powers our investigation Agent (Chat).
Build an agent in minutes
1. Tell it what to do, in plain language. Write the instructions the way you would brief a new analyst. “Every morning, review the open case queue, close the clear false positives per our playbook, and leave a handoff note on the rest.” That is an agent.
2. Choose when it runs. Three trigger types cover most workflows:
On a schedule: every day, week, or month. For example, a 9:00 report.
On an event: the moment a case is closed, a verdict is set, or an alert meets your conditions.
On demand: run it yourself, or call it from the API.
3. Give it the right tools. Agents work across your whole stack which includes Intezer’s built-in toolset plus the SIEM, EDR, and identity tools you have already connected, including CrowdStrike, SentinelOne, Splunk, Microsoft Sentinel, and Entra ID. They do more than summarize. They take action by updating, commenting on, closing cases, and emailing a finished report to your team.
See it in action
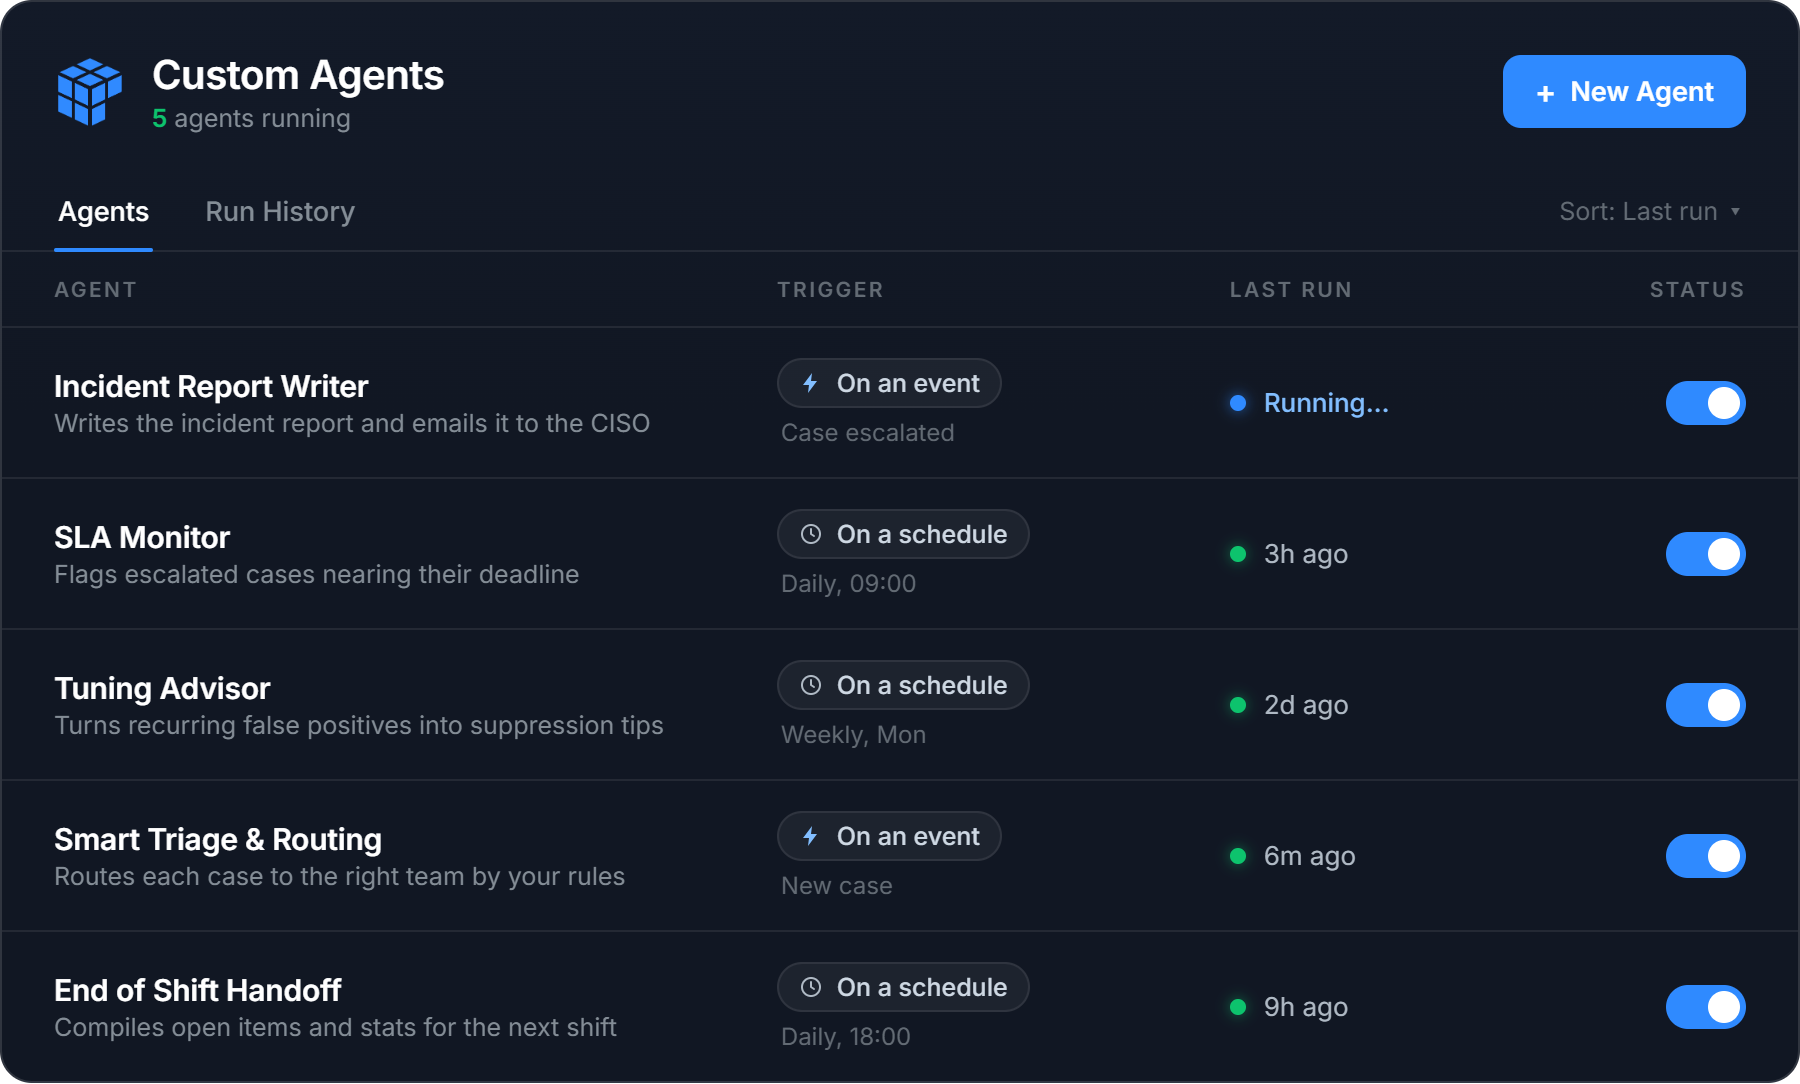
Take an Incident Report Writer agent illustrated above. We deliberately never shipped a single “Generate report” button, because no two teams want the same report. One team wants an executive summary up top, another wants the full timeline, another has a compliance format it has to match. So instead of a button, you put your format into the agent’s instructions, and it writes every report that way, every time.
The agent triggers on every escalated case an analyst has confirmed as a real threat. It reads the case, writes the report in your format, and emails it to your team’s inbox. The analyst makes the call. The paperwork writes itself.
That’s one agent. The point of Custom Agents is that you decide what they are.
Nothing runs blind
Security teams do not trust black boxes, and they are right not to. Custom Agents is built so you can see and control everything an agent does.
Every run is visible. You see the agent’s reasoning, every tool call and its result, and the final output. Each run is logged, and you can export it.
Test safely with Dry Run. Dry Run executes the agent for real but mocks every write action, so you can watch exactly what it would do before it does anything. Iterate on the instructions until it is right, then turn it on.
Guardrails are built in. Action tools are limited by design. An agent can only email active members of your organization, for example. It cannot reach outside your walls.
You stay in control. You choose which tools an agent gets, you review its output, and you can switch it off in one click.
This is how everything at Intezer works. AI executes, humans supervise. Custom Agents lets you decide what it executes.
What security teams are already building with it
We opened Custom Agents to a small group of alpha customers, and the best part has been watching what they build. Alongside the Incident Report Writer above, a few of the agents already running in production:
SLA Monitor (daily): a morning email listing every escalated case that has been sitting too long, so nothing critical slips past its deadline.
Tuning Advisor (weekly): takes the alerts your detection tools fired that Intezer judged to be false positives and turns them into suppression recommendations for the week ahead.
Threat Hunter (weekly): proactively sweeps your environment for the latest threats instead of waiting for an alert to fire. It pulls the new malware families, campaigns, and indicators Intezer is tracking, queries your connected SIEM and EDR for matches across historical data, and opens a case for anything it surfaces.
Smart Triage and Routing: for organizations with multiple entities, subsidiaries, and stakeholders, the agent reads each case and works out which team should own it, using your own escalation rules. It either leaves a comment with the routing, or assigns the case to the right analyst directly. Analysts stop digging through a separate list or knowledge base to figure out where a case goes.
End of Shift Handoff: built to match what a real SOC handover looks like. At the end of a shift the agent compiles the open items, the escalations still waiting for attention, the shift’s statistics, and any open system events or configuration issues, then writes the handoff so the next shift starts with the full picture.
The AI SOC, built for your team
We are on a mission to build the AI SOC the industry has been promised but never delivered. One that does the work and earns the trust to do it. It runs autonomously, around the clock. It works alongside the people who supervise it, not over their heads. And it is never a black box. You can always open it up, question what it did, and change how it behaves.
Custom Agents is central to that vision. Triage, investigation, and response come built in. Everything particular to how your team operates, you build yourself. Because the strongest security teams have always run on their own playbooks, their own logic, and their own standards, and an AI SOC should be no different. It should not ship the same to everyone. No two SOCs are the same, and no two should be.
That is the point of Custom Agents. You decide what they are.
Available now
Custom Agents is available now in beta to Intezer customers, and it is free during the beta period. This is the moment to build, test, and tell us what you want it to do next.
I am incredibly proud to share that Palo Alto Networks has been named a Leader in the 2026 Gartner® Magic Quadrant for Endpoint Protection Platforms for the fourth consecutive year. For us, this recognition is a testament to our team's relentless vision as we continue to define endpoint defense—from the pioneer days of XDR to the new frontier of agentic AI.
We believe our repeated recognition as a Leader is built on a single, uncompromising commitment to our customers and partners: empowering organizations with reduced overhead, rapid threat response, a strengthened security posture, and the resilient protection required to close the most critical security gaps. We are now leading the shift into the agentic era. While AI agents significantly boost enterprise productivity, they also introduce novel attack surfaces that legacy EDR tools are unable to protect. As the pioneer of XDR, we are committed to defining the next generation of cybersecurity by securing this new frontier.
Cortex® XDR is helping customers:
Secure Agentic AI with Koi: Gain unprecedented visibility, guardrails, and control over AI agents and agentic tools before they become a liability.
Stop the Unseen: Leverage battle-tested prevention powered by behavioral analytics, and industry-leading automation and response.
Unify Your Defense: Consolidate your endpoint and workspace security with a proven, four-time industry Leader.
We are incredibly proud to be recognized as a Leader once again, an acknowledgement that belongs just as much to our customers and partners as it does to us. Your trust, feedback, and real-world challenges keep us sharp and dictate our roadmap. At the end of the day, our continued leadership is built on one core promise: make each day more secure than the day before.
To get the full story and a comprehensive analysis of the endpoint security market, I invite you to read the 2026 Gartner Magic Quadrant report.
Gartner, Magic Quadrant for Endpoint Protection Platforms, By Deepak Mishra, Evgeny Mirolyubov, Nikul Patel, May 29, 2026
Gartner and Magic Quadrant are trademarks of Gartner, Inc. and/or its affiliates. Gartner does not endorse any company, vendor, product or service depicted in its publications, and does not advise technology users to select only those vendors with the highest ratings or other designation. Gartner publications consist of the opinions of Gartner’s business and technology insights organization and should not be construed as statements of fact. Gartner disclaims all warranties, expressed or implied, with respect to this publication, including any warranties of merchantability or fitness for a particular purpose.
The window for defense has collapsed, and most SOCs weren’t built for the speed of today’s attacks. According to the 2026 Unit 42® Global Incident Response Report, some end-to-end attacks now unfold in under an hour. Attacks that used to take days or weeks now happen in minutes.
Most traditional SOC models are trapped in a cycle of alert overload, fragmented tools and limited engineering capacity that slow investigations and delay response. Traditional SIEM and MDR models were designed to react to alerts. They were not designed to continuously improve detections, correlations and response with threats that move at machine speed. Over time, that gap between attacker speed and defender capability keeps widening, and it’s exactly why we built Unit 42 Managed XSIAM 2.0 (MSIAM).
Today marks the availability of the next evolution of our managed SOC offering – one that reflects how modern security operations must run in today’s threat landscape. MSIAM 2.0 is built on Cortex XSIAM®, Palo Alto Networks SOC transformation platform, and operated by Unit 42 analysts, threat hunters, responders and SOC engineers who handle the most complex incidents in the world. With this solution, Unit 42 provides organizations with a 24/7 managed SOC that delivers continuous detection, investigation and full-cycle remediation across the entire attack surface while improving operations over time.
We don’t just manage alerts. Unit 42 continuously engineers detections, correlations and response playbooks within XSIAM, refining them as attacker behavior evolves. This ongoing engineering ensures defenses improve over time, driven by real-world incidents and frontline threat intelligence, not static rules that quickly fall behind.
Why Managed XSIAM 2.0 Is Different
Elite SOC on Day One
We want SOC teams up and running as fast as possible. Experts lead onboarding, data mapping and configuration, and then your managed SOC team takes responsibility for operating and optimizing XSIAM on a day-to-day basis. The result is a SOC that improves over time without adding operational burden.
Every Threat Exposed
Unit 42 goes beyond reactive monitoring with continuous, proactive threat hunting across the entire attack surface. When a new threat is found in the wild, we produce threat impact reports that show how those techniques apply to each customer’s environment. We then translate those insights into custom detections and automated response actions, while also monitoring and investigating the correlation rules your team creates. Both the global threat intelligence and your unique use cases are backed by our 24/7 analysis, closing gaps quickly and strengthening defenses over time.
We also now support both native and third-party EDR telemetry, so organizations can benefit from Unit 42 expertise and Cortex® AI-driven analytics, regardless of the security technologies they use today. This enables customers to receive the strongest possible managed defense now, while creating a natural, low-friction path toward deeper platform consolidation as their environment evolves.
Machine-Speed Response
When incidents escalate, we don’t just hand you a ticket; we take ownership. Collaborating with your team, we establish pre-authorized workflows to execute immediate responses across your entire environment, from endpoints and firewalls to identity and cloud. We pair the platform’s native speed with expert oversight. By validating threat context and business impact, every response action is precise and safe, giving you the confidence to unleash full-cycle remediation. This allows MSIAM 2.0 to move seamlessly from detection to resolution with both velocity and precision.
And we stand behind our solution with a Breach Response Guarantee. If a complex incident strikes, you have the world’s best responders in your corner with up to 250 hours of Unit 42 Incident Response included. This built-in coverage removes the administrative hurdles of crisis response, enabling our experts to immediately transition from monitoring to deep forensic investigation and complete eradication, so you can focus on recovery.
Proven in the Real World with the Green Bay Packers
Working with Unit 42 and the Cortex XSIAM platform, the Green Bay Packers modernized their security across a complex hybrid environment, demonstrating what Unit 42's managed services deliver in real-world operations. By consolidating telemetry and accelerating investigation and response, they reduced response times from hours to minutes, investigated 54% more alerts and saved over 120 hours of analyst time without adding headcount.
These outcomes reflect the key benefits of MSIAM: Unit 42 experts working to apply frontline intelligence as new attacker behavior emerges, translating it into reporting and tailored detections that improve response where it matters most. When a machine-speed platform is operated by experts handling real incidents every day, defenses continuously strengthen as threats evolve.
The Future of the SOC
Unit 42 MSIAM 2.0 helps your SOC operate as it should by combining AI-driven analytics and automation with expert-led operations and engineering. This combination provides teams with the confidence that their defenses are always on, always improving and ready when it matters most. That’s the SOC that security leaders need today, and the one we’re building for tomorrow.
MSIAM is now delivered through two service tiers, Pro and Premium. Organizations can start where they are and grow at their own pace. Pro provides AI-driven managed SOC operations with continuous detection, investigation and response. Premium extends into full-lifecycle SOC engineering, with designated experts and customized detections, automation and tailored response playbooks as your security maturity grows.
To learn more about Managed XSIAM 2.0, join us at Symphony 2026, a Palo Alto Networks premier virtual SOC event, where Unit 42 and Cortex® experts will share frontline threat intelligence from the new 2026 Unit 42 Incident Response Report alongside real-world SOC transformation insights from organizations operating at machine speed.
Understanding how threat hunting differs from reactive security provides a deeper understanding of the role, while hinting at how it will evolve in the future.
As part of our commitment to sharing interesting hunts, we are launching these 'Flash Hunting Findings' to highlight active threats. Our latest investigation tracks an operation active between January 11 and January 15, 2026, which uses consistent ZIP file structures and a unique behash ("4acaac53c8340a8c236c91e68244e6cb") for identification. The campaign relies on a trusted executable to trick the operating system into loading a malicious payload, leading to the execution of secondary-stage infostealers.
Findings
The primary samples identified are ZIP files that mostly reference the MalwareBytes company and software using the filename malwarebytes-windows-github-io-X.X.X.zip. A notable feature for identification is that all of them share the same behash.
behash:"4acaac53c8340a8c236c91e68244e6cb"
The initial instance of these samples was identified on January 11, 2026, with the most recent occurrence recorded on January 14.
All of these ZIP archives share a nearly identical internal structure, containing the same set of files across the different versions identified. Of particular importance is the DLL file, which serves as the initial malicious payload, and a specific TXT file found in each archive. This text file has been observed on VirusTotal under two distinct filenames: gitconfig.com.txt and Agreement_About.txt.
The content of the TXT file holds no significant importance for the intrusion itself, as it merely contains a single string consisting of a GitHub URL.
However, this TXT is particularly valuable for pivoting and infrastructure mapping. By examining its "execution parents," analysts can identify additional ZIP archives that are likely linked to the same malicious campaign. These related files can be efficiently retrieved for further investigation using the following VirusTotal API v3 endpoint:
The primary payload of this campaign is contained within a malicious DLL named CoreMessaging.dll. Threat actors are utilizing a technique known as DLL Sideloading to execute this code. This involves placing the malicious DLL in the same directory as a legitimate, trusted executable (EXE) also found within the distributed ZIP file. When an analyst or user runs the legitimate EXE, the operating system is tricked into loading the malicious CoreMessaging.dll.
The identified DLLs exhibit distinctive metadata characteristics that are highly effective for pivoting and uncovering additional variants within the same campaign. Security analysts can utilize specific hunting queries to track down other malicious DLLs belonging to this activity. For instance, analysts can search for samples sharing the following unique signature strings found in the file metadata:
Furthermore, the exported functions within these DLLs contains unusual alphanumeric strings. These exports serve as reliable indicators for identifying related malicious components across different stages of the campaign:
Finally, another observation for behavioral analysis can be found in the relations tab of the ZIP files. These files document the full infection chain observed during sandbox execution, where the sandbox extracts the ZIP, runs the legitimate EXE, and subsequently triggers the loading of the malicious DLL. Within the Payload Files section, additional payloads are visible. These represent secondary stages dropped during the initial DLL execution, which act as the final malware samples. These final payloads are primarily identified as infostealers, designed to exfiltrate sensitive data.
Analysis of all the ZIP files behavioral relations reveals a recurring payload file consistently flagged as an infostealer. This malicious component is identified by various YARA rules, including those specifically designed to detect signatures associated with stealing cryptocurrency wallet browser extension IDs among others.
To identify and pivot through the various secondary-stage payloads dropped during this campaign, analysts can utilize a specific behash identifier. These files represent the final infection stage and are primarily designed to exfiltrate credentials and crypto-wallet information. The following behash provides a reliable pivot point for uncovering additional variants.
behash:5ddb604194329c1f182d7ba74f6f5946
IOCs
We have created a public VirusTotal Collection to share all the IOCs in an easy and free way. Below you can find the main IOCs related to the ZIP files and DLLs too.
import "pe"

rule win_dll_sideload_eosinophil_infostealer_jan26
{
  meta:
    author = "VirusTotal"
    description = "Detects malicious DLLs (CoreMessaging.dll) from an infostealer campaign impersonating Malwarebytes, Logitech, and others via DLL sideloading."
    reference = "https://blog.virustotal.com/2026/01/malicious-infostealer-january-26.html"
    date = "2026-01-16"
    behash = "4acaac53c8340a8c236c91e68244e6cb"
    target_entity = "file"
    hash = "606baa263e87d32a64a9b191fc7e96ca066708b2f003bde35391908d3311a463"
  condition:
    (uint16(0) == 0x5A4D and uint32(uint32(0x3C)) == 0x00004550 and pe.is_dll()) and
    pe.exports("15Mmm95ml1RbfjH1VUyelYFCf") and pe.exports("2dlSKEtPzvo1mHDN4FYgv")
}
By Troy Wojewoda During a recent Breach Assessment engagement, BHIS discovered a highly stealthy and persistent intrusion technique utilized by a threat actor to maintain Command-and-Control (C2) within the client’s […]
We are excited to announce the launch of Saved Searches in Google Threat Intelligence (GTI) and VirusTotal (VT), a powerful new feature designed to streamline your threat hunting workflows and foster seamless collaboration across your security team.
From Campaign to Feature: Better Search Efficiency
For the last month, we’ve highlighted the critical importance of mastering search in our ongoing #monthofgoogletisearch campaign. We saw how security teams rely on complex, highly-tuned queries to identify threats, track adversaries, and perform deep-dive investigations.
This campaign emphasized a key challenge: once you craft the perfect query - a cornerstone of your investigation - it should be easy to reuse and share. Saved Searches is the direct answer to this need, turning successful, repeatable threat-hunting logic into a shared institutional asset.
Collaboration, Simplified: Save and Share Your Queries
With this initial launch of Saved Searches, we’re delivering two foundational capabilities that will immediately improve your team’s efficiency:
Save Searches: Instantly save any complex or frequently used query directly within GTI. This ensures your best investigative logic is always accessible, eliminating the need to rebuild queries from scratch or store them externally.
Share with Users: Critical insights are often time-sensitive. You can now easily share your saved searches with any other user in your organization with access to GTI. Whether you’re escalating a finding or establishing a standard workflow, sharing the exact query ensures consistency and accelerates joint analysis.
This means that a newly onboarded analyst can instantly access the expertise of senior members, and teams can maintain a unified approach to monitoring high-priority threats. It’s collaboration built right into your investigation tool.
Get Started Today with Campaign Searches
The Saved Searches feature is live now in Google Threat Intelligence and VirusTotal.
To help you hit the ground running, we have made the most impactful searches used throughout the #monthofgoogletisearch campaign public and available to all intelligence users! You can find these expert-crafted queries in your Saved Searches section today - a perfect starting point for your investigations.
Start by exploring these campaign searches and then easily save and share your own complex search queries. Look for the option to Save and Share your searches to transform your investigative logic into a shared asset.
This is just the first phase of enhancing search capabilities within GTI. We are committed to building on this foundation to provide even more robust tools that make your threat intelligence actionable and collaborative.
You can get more info by exploring our documentation page:
Generative AI has emerged as one of the most powerful technologies of our era. Capable of producing realistic text, images, voice, and even code, these systems are revolutionizing industries. But while they fuel innovation and productivity, they also introduce an entirely new class of threats. As AI capabilities grow, so too does the potential for […]
Sensitive information relates to more than 100 individuals and their referees
Personal details submitted by applicants for a job at Tate art galleries have been leaked online, exposing their addresses, salaries and the phone numbers of their referees, the Guardian has learned.
The records, running to hundreds of pages, appeared on a website unrelated to the government-sponsored organisation, which operates the Tate Modern and Tate Britain galleries in London, Tate St Ives in Cornwall and Tate Liverpool.
We have recently started a new blog series called #VTPRACTITIONERS. This series aims to share with the community what other practitioners are able to research using VirusTotal from a technical point of view.
Our first blog saw our colleagues at SEQRITE tracking UNG0002, Silent Lynx, and DragonClone. In this new post, Acronis Threat Research Unit (TRU) shares practical insights from multiple investigations, including the ClickFix variant known as FileFix, the long-running South Asian threat actor SideWinder, and the SVG-based campaign targeting Colombia and named Shadow Vector.
How VT plays a role in hunting for analysts
For the threat analyst, web-based threats present a unique set of challenges. Unlike file-based malware, the initial stages of a web-based attack often exist only as ephemeral artifacts within a browser. The core of the investigation relies on dissecting the components of a website, from its HTML and JavaScript to the payloads it delivers. This is where VT capabilities for archiving and analyzing web content become critical.
VT allows analysts to move beyond simple URL reputation checks and delve into the content of web pages themselves. For attacks like the *Fix family, which trick users into executing malicious commands, the entire attack chain is often laid bare within the page's source code. The analyst's starting point becomes the malicious commands themselves, such as navigator.clipboard.writeText or document.execCommand("copy"), which are used to surreptitiously copy payloads to the victim's clipboard.
The Acronis team's investigation into the FileFix variant demonstrates a practical application of this methodology. Their research began not with a specific sample, but with a hypothesis that could be translated into a set of hunting rules. Using VT's Livehunt feature, they were able to create YARA rules that searched for new web pages containing the clipboard commands alongside common payload execution tools like powershell, mshta, or cmd. This proactive hunting approach allowed them to cast a wide net and identify potentially malicious sites in real-time.
One of the main challenges in this type of hunting is striking a balance between rule specificity and the need to uncover novel threats. Overly broad rules can lead to a deluge of false positives, while highly specific rules risk missing creatively crafted commands. The Acronis team addressed this by creating multiple rulesets with varying levels of specificity, allowing them to both find known threats and uncover new variants like FileFix.
In the case of the SideWinder campaign, which uses document-based attacks, VT value comes from its rich metadata and filtering capabilities. Analysts can hunt for malicious documents exploiting specific vulnerabilities, and then narrow the results by focusing on specific geographic regions through submitter country information. This allows them to effectively isolate threats that match a specific actor's profile, such as SideWinder's focus on South Asia.
Similarly, for the Shadow Vector campaign, which used malicious SVG files to target users in Colombia, VT content search and archiving proved essential. The platform's ability to store and index SVG content allowed researchers to identify a campaign using judicial-themed lures. By combining content searches for legal keywords with filters like submitter:CO, the Acronis team could map the entire infection chain and its infrastructure, transforming fragmented indicators into a comprehensive intelligence picture.
Acronis - Success Story
[In the words of Acronis…]
Acronis Threat Research Unit (TRU) used VirusTotal’s platform for threat hunting and intelligence across several investigations, including FileFix, SideWinder, and Shadow Vector. In the FileFix case, TRU used VT’s Livehunt framework, developing rules to identify malicious web pages using clipboard manipulation to deliver PowerShell payloads. The ability to inspect archived HTML and JavaScript whitin the VirusTotal platform allowed the team to uncover not only known Fix-family attacks but also previously unseen variants that shared code patterns.
VirusTotal’s data corpus also supported Acronis TRU’s broader threat tracking. In the SideWinder campaign, VT’s metadata and sample filtering capabilities helped analysts trace targeted document-based attacks exploiting tag:CVE-2017-0199 and tag:CVE-2017-11882 across South Asia, leading to the creation of hunting rules later published in “From banks to battalions: SideWinder’s attacks on South Asia’s public sector”.
Similarly, during the “Shadow Vector targets Colombian users via privilege escalation and court-themed SVG decoys” investigation, VT’s archive of SVG content exposed a campaign targeting Colombian entities that embedded judicial lures and external payload links within SVG images. By correlating samples with metadata filters such as submitter:CO and targeted content searches for terms like href="https://" and legal keywords, the team mapped an entire infection chain and its supporting infrastructure. Across all these efforts, VirusTotal provided a unified environment where Acronis could pivot, correlate, and validate findings in real time, transforming fragmented indicators into comprehensive, actionable intelligence.
Hunting Exploits Like It’s 2017-0199 (SideWinder Edition)
SideWinder is a well-known threat actor that keeps going back to what works. Their document-based delivery chain has been active for years, and the group continues to rely on the same proven exploits to target government and defense entities across South Asia. Our goal in this hunt was to get beyond just finding samples. We wanted to understand where new documents were surfacing, who they were likely aimed at, and what types of decoys were in circulation during the latest campaign wave. VirusTotal gave us the visibility we needed to do that efficiently and at scale.
We started by digging into Microsoft Office and RTF files recently uploaded to VirusTotal that were tagged with CVE-2017-0199 or CVE-2017-11882 and coming from Pakistan, Bangladesh, Sri Lanka, and neighboring countries. By filtering based on VT metadata such as submitter country and file type, and by excluding obvious noise from bulk submissions or unrelated activity, we could narrow our focus to the samples that actually fit SideWinder’s operational profile.
/*
    Checks if the file is tagged with CVE-2017-0199 or CVE-2017-11882
    and originates from one of the targeted countries
    and the file type is a Word document, RTF, or MS-Office file
*/
import "vt"
rule hunting_cve_maldocs {
    meta:
        author = "Acronis Threat Research Unit (TRU)"
        description = "Hunting for malicious Word/RTF files exploiting CVE-2017-0199 or CVE-2017-11882 from specific countries"
        distribution = "TLP:CLEAR"
        version = "1.2"

    condition:
        // Match if the file has CVE-2017-0199 or CVE-2017-11882 in the tags
        for any tag in vt.metadata.tags :
        (
            tag == "cve-2017-0199" or
            tag == "cve-2017-11882"
        )
        // Originates from a specific country?
        and
        (
            // Removed CN due to spam submissions of related maldocs
            vt.metadata.submitter.country == "PK" or
            vt.metadata.submitter.country == "LK" or
            vt.metadata.submitter.country == "BD" or
            vt.metadata.submitter.country == "NP" or
            vt.metadata.submitter.country == "MM" or
            vt.metadata.submitter.country == "MV" or
            vt.metadata.submitter.country == "AF"
        )
        // Is it a DOC, DOCX, or RTF?
        and
        (
            vt.metadata.file_type == vt.FileType.DOC or
            vt.metadata.file_type == vt.FileType.DOCX or
            vt.metadata.file_type == vt.FileType.RTF
        )
        // Different TA spotted using .ru TLD (excluding it for now)
        and not (
            for any url in vt.behaviour.memory_pattern_urls : (
                url contains ".ru"
            )
        )
        and vt.metadata.new_file
}
Next, we began translating those results into new livehunt rules. The initial version was intentionally broad: match any new document exploiting those CVEs, uploaded from a small list of countries of interest, and restricted to document file types like DOC, DOCX, or RTF. We also added logic to avoid hits that didn’t fit SideWinder’s patterns, such as samples calling out .ru infrastructure tied to other known threat clusters.
A good starting point when creating broad hunting rules is to define a daily notification limit and if everything works as expected and the level of false positives is tolerable, begin refining the rule as more and more hits come to our inbox.
It’s always a good idea to not spam your own inbox when creating broad hunting rules
In our case, the final hunting rule ended up matching a hexadecimal pattern for malicious documents used by SideWinder. By adding filters for submitter country and only triggering on new files, the rule produced a reliable feed of samples that we could confidently attribute to this actor for further analysis.
/*
    Sidewinder related malicious documents exploiting CVE 2017-0199 used during 2025 campaign
*/
import "vt"
rule apt_sidewinder_documents
{
    meta:

        author = "Acronis Threat Research Unit (TRU)"
        description = "Sidewinder related malicious documents exploiting CVE 2017-0199"
        distribution = "TLP:CLEAR"
        version = "1.0"

    strings:

        $a1 = {62544CB1F0B9E6E04433698E85BFB534278B9BDC5F06589C011E9CB80C71DF23}
        $a2 = {E20F76CDABDFAB004A6BA632F20CE00512BA5AD2FE8FB6ED9EE1865DFD07504B0304140000}

    condition:

        filesize
Once we refined the rule set, SideWinder activity became much easier to track consistently. We began to see new decoys appear in near real time, allowing us to monitor changes in themes and spot repeated use of lure content and infrastructure across different campaigns. Using the same logic in retrohunt confirmed our observations that SideWinder had been using the same tactics for months, only changing the decoy topics while keeping the underlying delivery technique intact.
Using Retrohunt to uncover additional samples and establish the threat actor’s timeline
We also observed geofencing behavior in the delivery chain. If the server hosting the external resource did not recognize the visitor or the IP range did not match the intended target, the server often returned a benign decoy file (or an HTTP 404 error code) instead of the real payload.
While relying on exploits from 2017, SideWinder carefully filters the victims that will receive the final malicious payload
One recurring decoy had the SHA256 hash 1955c6914097477d5141f720c9e8fa44b4fe189e854da298d85090cbc338b35a, which corresponds to an empty RTF document. That decoy is useful as a hunting pivot: by searching for that hash and combining it with submitter country and file type filters in VT, you can separate likely targeted, genuine hits from broad noise and map where geofencing is being applied.
RTF empty decoy file used by SideWinder still presents valuable information for pivoting into other parts of their infrastructure
In addition, VirusTotal allowed us to trace the attack back to the initial infection vector and recover some of the spear phishing emails that started the chain. We pivoted from known samples and shared strings, and used file relations to follow linked URLs and artifacts upstream, and found an .eml file that contained the original message and attachment. One concrete example is the spear phish titled 54th CISM World Military Naval Pentathlon 2025 - Invitation.eml, indexed in VirusTotal with behavior metadata and attachments tied to the same infrastructure.
Getting initial infection spear-phishing e-mails allowed us to put together the different pieces of the puzzle, from beginning to end
For other hunters, the key takeaway is that even older exploits like CVE-2017-0199 can reveal a lot when you combine multiple VirusTotal features. In this case, we used metadata, livehunt, and regional telemetry to connect seemingly unrelated samples. We also checked hashtags and community votes, including those from researchers like Joseliyo, to cross-check our assumptions and spot ongoing discussions about similar activity. The Telemetry tab helped us see where submissions were coming from geographically, and the Threat Graph view made it easier to visualize how documents, infrastructure, and payloads were linked.
Every single data point counts when hunting for new samples
Using these tools together turned a noisy set of samples into a clear picture of SideWinder’s targeting and operations.
Uncovering Shadow Vector’s SVG-Based Crimeware Campaign in Colombia
An example of a rendered SVG lure with a judicial correspondence theme
These files mimicked official judicial correspondence and contained embedded links to externally hosted payloads, such as script-based downloaders or password-protected archives. The investigation began after we noticed an unusual pattern of SVG submissions from Colombia. By using a small set of samples for an initial rule, we began our hunt.
<!--
    This YARA rule detects potentially malicious SVG files that are likely being used for crimeware campaigns targeting Colombia.
    The rule identifies SVG images that contain legal or judicial terms commonly used in phishing scams,
    along with embedded external links that could be used to deliver a payload.
-->
import "vt"
rule crimeware_svg_colombia {
   meta:
        author = "Acronis Threat Research Unit (TRU)"
        description = "Detects potentially malicious SVG files that are likely being used for crimeware campaigns targeting Colombia"
        distribution = "TLP:CLEAR"
        version = "1.1"

        // Reference hashes
        hash1 = "6d4a53da259c3c8c0903b1345efcf2fa0d50bc10c3c010a34f86263de466f5a1"
        hash2 = "2aae8e206dd068135b16ff87dfbb816053fc247a222aad0d34c9227e6ecf7b5b"
        hash3 = "4cfeab122e0a748c8600ccd14a186292f27a93b5ba74c58dfee838fe28765061"
        hash4 = "9bbbcb6eae33314b84f5e367f90e57f487d6abe72d6067adcb66eba896d7ce33"
        hash5 = "60e87c0fe7c3904935bb1604bdb0b0fc0f2919db64f72666b77405c2c1e46067"
        hash6 = "609edc93e075223c5dc8caaf076bf4e28f81c5c6e4db0eb6f502dda91500aab4"
        hash7 = "4795d3a3e776baf485d284a9edcf1beef29da42cad8e8261a83e86d35b25cafe"
        hash8 = "5673ad3287bcc0c8746ab6cab6b5e1b60160f07c7b16c018efa56bffd44b37aa"
        hash9 = "b3e8ab81d0a559a373c3fe2ae7c3c99718503411cc13b17cffd1eee2544a787b"
        hash10 = "b5311cadc0bbd2f47549f7fc0895848adb20cc016387cebcd1c29d784779240c"
        hash11 = "c3319a8863d5e2dc525dfe6669c5b720fc42c96a8dce3bd7f6a0072569933303"
        hash12 = "cb035f440f728395cc4237e1ac52114641dc25619705b605713ecefb6fd9e563"
        hash13 = "cf23f7b98abddf1b36552b55f874ae1e2199768d7cefb0188af9ee0d9a698107"
        hash14 = "f3208ae62655435186e560378db58e133a68aa6107948e2a8ec30682983aa503"

   strings:
        // SVG
        $svg = "<svg xmlns=" ascii fullword

        // Documents containing legal or judicial terms
        $s1 = "COPIA" nocase
        $s2 = "CITACION" nocase
        $s3 = "JUZGADO" nocase
        $s4 = "PENAL" nocase
        $s5 = "JUDICIAL" nocase
        $s6 = "BOGOTA" nocase
        $s7 = "DEMANDA" nocase

        // When image loads it retrieves payload from external website using HTTPS
        $href1= "href='https://" nocase
        $href2 = "href=\"https://" nocase

   condition:
      $svg
      and filesize < 3MB
      and 3 of ($s*)
      and any of ($href*)
      and vt.metadata.submitter.country == "CO"
}
By including reference hashes from manually verified samples, we used a broad hunting rule both as detection mechanism and a pivot point for uncovering related infrastructure or newly generated lures.
Once the initial hunting logic was in place, we refined it into a livehunt rule specifically tailored for SVG-based decoys. The rule matched files containing judicial terminology and outbound HTTPS links, while filtering by file size and origin to reduce false positives. Using this rule, we began collecting and analyzing related uploads.
We used the VT Diff functionality to compare variations between samples and quickly spot patterns, such as repeated words, hexadecimal values, URLs, or metadata tags that hinted at automated generation (i.e. the string “Generado Automaticamente”).
VT Diff feature helped us to identify patterns
Results of our VT Diff session
While we could not conclusively attribute the SVG decoy campaign to Blind Eagle at the time of research, the technical and thematic overlaps were difficult to ignore. The VT blog “Uncovering a Colombian Malware Campaign with AI Code Analysis” describes similar judicial-themed SVG files used as lures in operations targeting Colombian users. As with other open reports on this threat actor, attribution remains based on cumulative evidence, clustering campaigns based on commonalities such as infrastructure reuse, phishing template design, malware family selection, and linguistic or regional indicators observed across samples.
The evolution from the initial hunting rule to the refined detection rule illustrates our approach to threat hunting in VT, iterative and continuously refined through testing and analysis. The first rule was broad, meant to surface related samples and reveal the full scope of the campaign. It proved useful in livehunt and retrohunt, helping us find clusters of judicial-themed SVGs and their linked payloads. As the investigation progressed, we focused on precision, reducing false positives and removing elements that did not add value. Tuning a rule is always a balance: removing one pattern might miss some samples, but it can also make the rule more accurate and easier to maintain.
FileFix in the wild!
A few weeks ago, the TRU team at Acronis released research on a (at the time) rarely seen variant of the ClickFix attack, called FileFix. Much of the investigation of this attack vector was possible thanks to VirusTotal’s ability to archive, search, and write rules for finding web pages. We, at Acronis, together with VT, wanted to share a bit of information on how we did it- so that others can better research this type of emerging threat.
Anatomy of an attack- where do we start?
Like many phishing attacks, *Fix attacks rely on malicious websites where victims are tricked into running malicious commands. Lucky for us, these attacks have a few particular components that are in common to all, or many, *Fix attacks. Using VT, we were able to write rules and livehunt for any new web pages which included these components, and were able to quickly reiterate on rules that were too broad.
One thing all *Fix attacks have in common, is that they copy a malicious command to the victims clipboard- copying the malicious command, rather than letting the user copy the command themselves, allows attackers to try to hide the malicious part of the command from the victim, and only allow for a smaller, “benign” portion of the command to appear when they copy it into their Windows Run Dialogue or address bar. This commonality gives us two great strings to hunt for:
The commands used to copy text into the victims clipboard
The commands used to construct the malicious payload
We began our research by using the Livehunt feature, and wrote a rule to detect navigator.clipboard.writeText and document.execCommand("copy"), both used for copying into clipboard, as well as any string including the words powershell, mshta, cmd, and other commands we find commonly used in *Fix attacks. At its most basic form, a rule might look like this:
import "vt"

rule ClickFix
{
  strings:
    $clipboard = /(navigator\.clipboard\.writeText|document\.execCommand\(\"copy\"\))/
    $pay01 = /(powershell|cmd|mshta|msiexec|pwsh)/gvfi
  condition:
    vt.net.url.new_url and
    $clipboard and
    any of ($pay*)
}
However, this is far from enough. There are plenty of benign sites that use the copy to clipboard feature, and also have the words powershell or cmd present (the three letters “cmd” appear often as part of Base64 strings). This makes things a bit more tricky, as it requires us to iron out these false positives. We need to make our patterns look more similar to real powershell or cmd commands.
Unfortunately, there is such a huge variance in how these commands are written, that the more rigid our patterns became, the more likely it was for us to miss a true positive that included something we haven’t seen before or couldn’t think of. This requires a balancing act- if your rules are too rigid, you will miss true positives that employ a creatively crafted command; too loose and you will receive a large number of false positives, which will slow down investigation.
For example, we can try narrowing down our rule to include more true positives of powershell commands by searching for a string that’s better resembling some of the powershell commands we’ve seen as part of a ClickFix payload, by including the “iex” cmdlet, which tells the powershell command to execute a command:
$pay03 = /powershell.{,80}iex/
This will match whenever the word powershell appears, with the word iex appearing 0 to 80 characters after it. This should reduce the number of false positives we see related to powershell, as it more clearly resembles a powershell command, but at the same time limits our rule to only catch powershell commands that follow this structure- any true positive command with more than 80 characters between the word powershell and iex, or commands forgoing the use of iex, will not be caught.
We ended up setting a number of separate rulesets, some were more specific, others more generic. The more generic ones helped us tune our more specific rulesets. This tactic allowed us to find a large number of ClickFix attacks. Most were run of the mill fake captchas, leveraging ClickFix, others were more interesting. As we continued fine tuning our rules, and within a week of setting up our Livehunt, one of our more generic rules has made an interesting detection. At first glance, it appeared to be a false positive, but as we looked closer, we discovered that it’s exactly what we were hoping to find- a FileFix attack.
Analyzing payloads
One of the nicest things about researching a *Fix attack is that the payload is right there on the website, right in plain site. This offers a few advantages- the first is that we can examine the payload even when the phishing site itself is down, as long as it’s archived by VT. The second advantage is we can further search for similar patterns on VT via VT queries to try and catch other attacks from the same campaign.
Payloads are visible directly in VT, by using the content tab on any suspected website (and in this case- obfuscated)
Often, these payloads may contain additional malicious urls which are used to download and execute additional payloads. These can also very easily be examined on VT, and any files they lead to may also be downloaded directly from VT.
In our investigation of the FileFix site, we found that the payload (a powershell command) downloads an image, and then runs a script that is embedded in the image file. That second-stage script then decrypts and extracts an executable from the image and runs it.
FileFix site downloading and extracting code from an image (highlighted)
We were using both a VM and VT to investigate these payloads. One interesting way we were able to use VT is to track additional examples of the malicious images, as parts of the command were embedded as strings in the image file, allowing us to match these patterns via a VT query and find new examples of the attack, or by searching for the file name or the domain which hosts it.
Pivoting on the domain hosting malicious .jpg files, to investigate additional stages of the attack, archived by VT
VT has been extremely helpful in allowing us to very easily analyze malicious URLs used not only for phishing, but also for delivering malware and additional scripts. In some examples, we were able to get quite far along the chain of scripts and payloads without ever having to spin up a VM, just by looking at the content tab, to see what’s inside a particular file. That’s not going to be the case every time, but it’s certainly nice when it does happen.
The malicious images used during the attack contain parts of the malicious code used in the second stage of the attack
By pivoting on specific strings from within that code, we are able to locate other samples of the malicious images and scripts created by the same attacker, and further pivot to uncover their infrastructure
The ability to investigate and correlate various stages, or multiple samples from the same attacker, were a huge boon to us during the investigation. It allowed us to quickly connect the dots without leaving VT, and should be a great asset in your investigation.
Looking for a *Fix
So now that you know all this- what's next? How can this be useful? Well, we hope it can be helpful in a number of ways.
Firstly, working together as a community, it is important that we continue to catch and block URLs that are employing *Fix attacks. It’s not easy to detect a *Fix site dynamically, and prevention may still happen in many cases after the payload has already been run. Maintaining a robust blocklist remains a very good and accessible option for stopping these threats.
Secondly, those of us interested in continuing to track this threat and follow its evolution may use this to find these threats and potentially automate detection. As a side note, *Fix attacks are great investigation topics for those of us starting out in security, and as long as appropriate precautions are taken, it can be relatively safely investigated via VT, and can be very useful for learning about malicious commands, phishing sites, etc.
Thirdly, for those of us protecting organizations, this can be a useful guide for finding these attacks by yourself, in the wild, in order to gain a deeper understanding of how they operate, and what relevant ways you can find to defend your organization, although there are certainly many reports written on the subject which would also come in handy.
VT Tips (based on the success story)
[In the words of VirusTotal…]
The Acronis team’s investigation into FileFix, SideWinder, and ShadowVector is a goldmine of threat hunting techniques. Let’s move beyond the narrative and extract some advanced, practical methods you can apply to your own hunts for web-based threats and multi-stage payloads.
Supercharge Your Web-Content YARA Rules
A simple YARA rule looking for clipboard commands and "powershell" is a good start, but attackers know this. You can significantly improve your detection rate by building rules that look for the context in which these commands appear.
Instead of a generic search, try focusing on the obfuscation and page structure common in these attacks. For instance, attackers often hide their malicious script inside other functions or encoded strings. Your YARA rules can hunt for the combination of a clipboard command and indicators of de-obfuscation functions like atob() (for Base64) or String.fromCharCode.
Combine content searches with URL metadata. The content modifier is also available for URLs, when you set the entity to url you can use the content modifier to search for strings within the URL content. For example, the next query can be useful to identify potential ClickFix URLs combining some of the findings shared by Acronis and potential strings used to avoid detections.
entity:url (content:"navigator.clipboard.writeText" or content:"document.execCommand(\"copy\")") (content:"String.fromCharCode" or content:"atob")
Dissect Payloads with Advanced Content Queries
When you find a payload, as Acronis did within the FileFix site's source code, your job has just begun. The next step is to find related samples. Attackers often reuse code, and even when they obfuscate their scripts, unique strings or logic patterns can give them away. Isolate unique, non-generic parts of the script. Look for:
Custom function names
Specific variable names
Uncommon comments
Unique sequences of commands or API calls
Focus on the unobfuscated parts of the code. In the FileFix payload, the attackers might obfuscate the C2 domain, but the PowerShell command structure used to decode and run it could be consistent across samples. Use that structure as your pivot. For example, if a payload uses a specific combination of [System.Text.Encoding]::UTF8.GetString([System.Convert]::FromBase64String(...)), you can build a query to find other files using that exact deobfuscation chain.
Acronis has been tracking SideWinder in a very intelligent way. Their experience with VirusTotal is evident. Most of our users use VirusTotal primarily for file analysis, but sometimes we forget that there are powerful features for tracking infrastructure through livehunt.
In the SideWinder intrusions, there is a continuously monitored hash that corresponds to a
decoy file, and this file is downloaded from different URLs.
ITW URLs means that these URLs were downloading the file being studied, in this case the RTF decoy file
An interesting way to proactively identify new URLs quickly is by creating a YARA rule in livehunt for URLs, where the objective is to discover new URLs that are downloading that specific RTF decoy file.
import "vt"

rule URLs_Downloading_Decoy_RTF_SideWinder {

  meta:
    target_entity = "url"
    author = "Virustotal"
    description = "This YARA rule identify new URLs downloading the decoy file related to SideWinder"

  condition:
    vt.net.url.downloaded_file.sha256 == "1955c6914097477d5141f720c9e8fa44b4fe189e854da298d85090cbc338b35a"
    and vt.net.url.new_url
}
Another approach that could also be interesting is to directly query the itw_urls relationship of the decoy file using the API. One use case could be creating a script that regularly (perhaps daily) calls the relationship API, retrieves the URLs, stores them in a database, and then repeats the call each day to identify new URLs. It's a simple, yet effective way to integrate with technology that any company might already have.
The following code snippet can be executed in
Google Colab and once you establish the API Key, you will obtain all the itw_urls related to the decoy file in the all_itw_urls variable.
!pip install vt-py nest_asyncio
import getpass, vt, json, nest_asyncio
nest_asyncio.apply()

cli = vt.Client(getpass.getpass('Introduce your VirusTotal API key: '))

FILEHASH = "1955c6914097477d5141f720c9e8fa44b4fe189e854da298d85090cbc338b35a"
RELATIONS = "itw_urls"
all_itw_urls = []

async for itemobj in cli.iterator(f'/files/{FILEHASH}/{RELATIONS}', limit=0):
    all_itw_urls.append(itemobj.to_dict())
The great forgotten one: VT Diff
When we read researchs using VT Diff, we are pleased, as it is a tool that is truly good for creating YARA rules.
When analyzing a set of related samples, use the VT Diff feature to spot commonalities and variations. This can help you identify patterns, such as repeated strings, hardcoded values, or metadata artifacts that indicate automated generation.
As the Acronis team notes, "We used the VT Diff functionality to compare variations between samples and quickly spot patterns, such as repeated words, hexadecimal values, URLs, or metadata tags that hinted at automated generation (i.e. the string “Generado Automaticamente”)".
You can easily use VT Diff from multiple places: intelligence search results, collections, campaigns, reports, VT Graph…
The examples shared by the Acronis Threat Research Unit in tracking campaigns like FileFix, SideWinder, and Shadow Vector demonstrates the power of VT as a comprehensive threat intelligence and hunting platform. By leveraging a combination of proactive Livehunt rules, deep content analysis, and rich metadata pivoting, security researchers can effectively uncover and track elusive and evolving threats.
These examples highlight that successful threat hunting is not just about having the right tools, but about applying creative and persistent investigation techniques. The ability to pivot from a simple YARA rule to a full-fledged campaign analysis, as Acronis did, is crucial to connecting the dots and revealing the full scope of an attack. From hunting for clipboard manipulation in web-based threats to tracking decade-old exploits and analyzing malicious SVG decoys, the Acronis team has demonstrated a deep understanding of modern threat hunting, and we appreciate them sharing their valuable insights with the community.
We hope this blog have been insightful and will help you in your own threat-hunting endeavors. The fight against cybercrime is a collective effort, and the more we share our knowledge and experiences, the stronger we become as a community.
If you have a success story of using VirusTotal that you would like to share with the community, we would be delighted to hear from you. Please reach out to us, and we will be happy to feature your story in a future blog post at practitioners@virustotal.com.
Together, we can make the digital world a safer place.
This November, we’re celebrating the power of VirusTotal Enterprise search!
All VirusTotal customers will enjoy uncapped searches through the GUI — no quota consumption for the entire month so long as it is manual searches via the web interface.
Whether you’re investigating malware campaigns, analyzing infrastructure, or tracking threat actor activity, this is your chance to search freely and explore advanced use cases using VirusTotal Intelligence.
Experiment with powerful VT search modifiers to uncover patterns, hunt for related samples, and pivot across hashes, domains, IP addresses, or URLs — without worrying about your quota.
What’s happening
No quota consumption for all GUI searches during November (API interaction will continue to consume).
Every day, we’ll share interesting and creative search queries on our LinkedIn and X channels using the hashtag #MonthOfVTSearch.
We invite you to try these searches, interact with us, and share your own search tips and findings with the community.
Learn and level up
Make the most of this month to sharpen your threat-hunting skills:
This search helps identify document files that, when executed in a sandbox environment, show behavior consistent with potential malicious activity involving .ru infrastructure. It specifically looks for:
Documents (type:document) that were uploaded to VT.
During execution, they show process behavior containing:
HTTP traffic (behavior_processes:*http*)
The string DavSetCookie (often observed in HTTP request headers or custom cookie operations)
And references to .ru domains
And additionally, they show network or embedded indicators related to .ru domains via:
Behavior-based network connections (behavior_network:*.ru*), or
Embedded domains or URLs within the file (embedded_domain:*.ru*, embedded_url:*.ru*)
Join the community
Let’s make November a month of discovery and collaboration!
Tag your posts with #MonthOfVTSearch, share your favorite searches, and show the world how you use VirusTotal to explore and understand the threat landscape.
One of the best parts of being at VirusTotal (VT) is seeing all the amazing ways our community uses our tools to hunt down threats. We love hearing about your successes, and we think the rest of the community would too.
That's why we're so excited to start a new blog series where we'll be sharing success stories from some of our customers. They'll be giving us a behind-the-scenes look at how they pivot from an initial clue to uncover entire campaigns.
To
kick things off, we're thrilled to have our friends from SEQRITE
join us. Their APT-Team
is full of incredible threat hunters, and they've got a great story to share about how they've used VT to
track some sophisticated actors.
How VT plays a role in hunting for analysts
For a threat analyst, the hunt often begins with a single, seemingly isolated clue—a suspicious file, a strange domain, or an odd IP address. The challenge is to connect that one piece of the puzzle to the larger picture. This is where VT truly shines.
VT is more than just a tool for checking if a file is malicious. It's a massive, living database of digital artifacts (process activity, registry key activity, memory dumps, LLM verdicts, among others) and their relationships. It allows analysts to pivot from one indicator of compromise to another, uncovering hidden connections and mapping out entire attack campaigns. It's this ability to connect the dots—to see how a piece of malware communicates with a C2 server, what other files are associated with it, what processes were launched or files were used to set persistence or exfiltrate information, and who else has seen it—that transforms a simple file check into a full-blown investigation. The following story from SEQRITE is a perfect example of this process in action.
Seqrite - Success Story
[In the words of SEQRITE…]
We at SEQRITE APT-Team perform a lot of activities, including threat hunting and threat intelligence, using customer telemetry and multiple other data corpuses. Without an iota of doubt, apart from our customer telemetry, the VT corpus has aided us a decent amount in converting our research, which includes hunting unique campaigns and multiple pivots that have led us to an interesting set of campaigns, ranging across multiple spheres of Asian geography, including Central, South, and East Asia.
UNG0002
SEQRITE
APT-Team have been tracking a south-east asian threat entity, which was termed as UNG0002,
using certain behavioral artefacts, such using similar OPSEC mistakes across multiple campaigns and using
similar set of decoys and post-exploitation toolkit across multiple operational campaigns ranging from May
2024 to May 2025.
During
the initial
phase
of this campaign, the threat actor performed multiple targets across Hong Kong and Pakistan against
sectors involving defence, electrotechnical, medical science, academia and much more.
VT corpus has helped us to pivot through Cobalt Strike oriented beacons, which were used by this threat actor to target various sectors. In our hunt for malicious activity, we discovered a series of Cobalt Strike beacons. These were all delivered through similar ZIP files, which acted as lures. Each ZIP archive contained the same set of file types: a malicious executable, along with LNK, VBS, and PDF decoy files. The beacons themselves were also similar, sharing configurations, filenames and compilation timestamps.
Using
the timestamps from the malicious executables and the filenames previously mentioned, we discovered up to 14
different samples, all of them related to the campaign with this query
based on the configuration extracted by VT, we could use the public key extracted to identify more samples
using exactly the same with the following query
Besides
these executables, we mentioned that there were also LNK
files within the ZIP files. After analyzing them, a consistent LNK-ID metadata revealed the same identifiers
across many samples. Querying
VT for those LNK-IDs exposed we could identify new files related to the campaign.
VirusTotal query: metadata:"laptop-g5qalv96"
Decoy documents identified within the ZIP files mentioned above
We initially tracked several campaigns leveraging LNK-based device IDs and Cobalt Strike beacons. However, an intriguing shift began to emerge in the September-October activity. We observed a new set of campaigns that frequently used CV-themed decoys, often impersonating students from prominent Chinese research institutions.
While the spear-phishing tactics remained similar, the final execution changed. The threat actors dropped their Cobalt Strike beacons and pivoted toward DLL-Sideloading for their payloads, all while keeping the same decoy theme. This significant change in technique led us to identify a second major wave of this activity, which we're officially labeling Operation AmberMist.
Tracking this second wave of operations attributed to the UNG0002 cluster, we observed a recurring behavioral artifact: the use of academia-themed lures targeting victims in China and Hong Kong.
Across these campaigns, multiple queries were leveraged, but a consistent pattern emerged—heavy reliance on LOLBINS such as wscript.exe, cscript.exe, and VBScripts for persistence.
By
developing a simple yet effective hunting query,
we were able to uncover a previously unseen sample not publicly reported:
type:zip AND (metadata:"lnk" AND metadata:".vbs" AND metadata:".pdf") and submitter:HK
VirusTotal query: type:zip AND (metadata:"lnk" AND metadata:".vbs" AND metadata:".pdf") and submitter:HK
Silent Lynx
Another
campaign tracked by the SEQRITE APT-team, named Silent
Lynx,
targeted multiple sectors including banking. As in the previous described case, thanks to VT we were able to
pivot and identify new samples associated with this campaign.
Initial Discovery and Pivoting
During
the initial phase of this campaign, we discovered a decoy-based
SPECA-related archive file
targeting Kyrgyzstan around December 2024 - January 2025. The decoy was designed to distract from the real
payload: a malicious C++ implant.
Decoy document identified during our research
Email identified during our reserach
We performed multiple pivots focusing on the implant, starting by analyzing the sample’s metadata and network indicators and functionalities, we found that the threat actor had been using a similar C++ implant, which led us to another campaign targeting the banking sector of Kyrgyzstan related to Silent Lynx too.
Information obtained during the analysis of the C++ implants
Information obtained during the analysis of the C++ implants
We
leveraged VT corpus for deploying multiple Livehunt
rules on multiple junctures, some of the simpler examples are as follows:
Looking
at the usage of encoded Telegram Bot based payload inside the C++ implant. Using
either content or malware_config modifiers when extracted from the config could help us to identify
new samples.
Spawning
Powershell.exe LOLBIN.
VT
search enablers for checking for malicious email files, if uploaded from Central Asian
Geosphere.
ISO-oriented
first-stagers.
Multiple
behavioral overlaps between YoroTrooper & Silent Lynx and further hunting hypothesis developed
by us.
Leveraging VT corpus and using further pivots on the above metrics and many others included on the malicious spear-phishing email, we also tracked some further campaigns. Most importantly, we developed a new YARA rule and a new hypothesis every time to hunt for similar implants leveraging the Livehunt feature depending on the tailored specifications and the raw data we received during hunting keeping in mind the cases of false positives and false negatives.
Decoy document identified during our hunting activities
Submissions identified in the decoy document
The
threat actor repeatedly used the same implant across multiple campaigns in Uzbekistan
and
Turkmenistan.
Using hunting queries
through VT along with submitter:UZ or submitter:TM helped us to identify these samples.
The
most important pivot
in our investigation was the malware sample itself as shown in the previous screenshots was the usage of
encoded PowerShell blob
spawning powershell.exe,
which was used multiple times across different campaigns. This sample acted as a key indicator, allowing us
to uncover other campaigns targeting critical sectors in the region, and confirmed the repetitive nature of
the actor's operations.
Also,
thanks to VT feature of collections,
we further leveraged it to build an attribution of the threat entity.
Collections used during the attribution process
DragonClone
Finally,
the last campaign that we wanted to illustrate how pivoting within the VT ecosystem enabled our team to
uncover new samples was by a group we named DRAGONCLONE
The SEQRITE APT Team has been monitoring DRAGONCLONE as they actively target critical sectors across Asia and the globe. They utilize sophisticated methods for cyber-espionage, compromising strategic organizations in sectors like telecom and energy through the deployment of custom malware implants, the exploitation of unpatched vulnerabilities, and extensive spear-phishing.
Initial Discovery
Recently,
on 13th
May,
our team discovered a malicious
ZIP
file
that surfaced across various sources, including VT. The ZIP file was used as a preliminary infection vector
and contained multiple EXE and DLL files inside the archive, like this
one
which contains the malicious payload.
Chinese-based
threat actors have a well-known tendency to deliver DLL
sideloading implants
as part of their infection chains. Leveraging crowdsourced
Sigma rules in VT,
along with personal hunting techniques using static YARA
signatures,
we were able to track and hunt this malicious spear-phishing attachment effectively. In their public
Sigma
Rules list
you can find different Sigma Rules that are created to identify DLL SideLoading.
Pivoting Certificates via VT Corpus
While
exploring the network of related artifacts, we could not initially find any direct commonalities. However, a
particular clean-looking executable
named “2025 China Mobile Tietong Co., Ltd. Internal Training Program” raised our concern. Its naming and
metadata suggested potential masquerading behavior, making it a critical pivot point that required deeper
investigation.
Certificates
are one of the most key indicators, while looking into malicious artefacts, we saw that it is a fresh and
clean copy of WonderShare’s Repairit Software, a well known software for repairing corrupted files, whereas
a suspicious concern is that it has been signed by ShenZhen
Thunder NetWorking Technologies Ltd
Using this hunch, we discovered and hunted for executables, which have been signed by similar and found there have been multiple malicious binaries, although, this has not been the only indicator or pivot, but a key one, to research for further ones.
Pivoting on Malware Configs via VT Corpus
We analyzed the loader and determined it's slightly advanced, performing complex tasks like anti-debugging. More significantly, it drops V-Shell, a post-exploitation toolkit. V-Shell was originally open-source but later taken down by its authors and has been observed in campaigns by Earth Lamia.
After
extracting the V-Shell shellcode, we discovered an unusual malware configuration property: qwe123qwe.
By leveraging the VT corpus to pivot
on this finding, we were able to identify additional V-Shell implant samples potentially linked to this
campaign.
VirusTotal query: malware_config:"qwe123qwe"
VT Tips (based on the success story)
[In the words of VirusTotal…]
Threat hunting is an art, and a good artist needs the right tools and techniques. In this section, we'll share some practical tips for pivoting and hunting within the VirusTotal ecosystem, inspired by the techniques used in the campaigns discussed in this blog post.
Hunt by Malware Configuration
Many malware families use configuration files to store C2 information, encryption keys, and other operational data. For some malware families, VirusTotal automatically extracts these configurations. You can use unique values from these configurations to find other samples from the same campaign.
For instance, in the DRAGONCLONE investigation, the V-Shell implant had an unusual malware configuration property: qwe123qwe. A simple query like malware_config:"qwe123qwe" in VT can reveal other samples using the same configuration. Similarly, the Cobalt Strike beacons used by UNG0002 had a unique public key in their configuration that could be used for pivoting. That's thanks to Backscatter. We've written blogs showing how to do advanced hunting using only the malware_config modifier. Remember that you can search for samples by family name like malware_config:"redline" up to Telegram tokens and even URLs configured in the malware configuration like malware_config:"https://steamcommunity.com/profiles/76561198780612393".
Don't Overlook LNK File Metadata
Threat actors often make operational security (OPSEC) mistakes. One common mistake is failing to remove metadata from files, including LNK (shortcut) files. This metadata can reveal information about the attacker's machine, such as the hostname.
In the UNG0002 campaign, the actor consistently used LNK files with the same metadata, specifically the machine identifier laptop-g5qalv96. We know that this information can be also modified by them to deceive security researchers, but often we observe good information that can be used to track them. This allowed the SEQRITE team to uncover a wider set of samples by querying VirusTotal for this metadata string.
Track Actors via Leaked Bot Tokens
Some malware, especially those using public platforms for command and control, will have hardcoded API tokens. As seen in the "Silent Lynx" campaign, a PowerShell script used a hardcoded Telegram bot token for C2 communication and data exfiltration.
These
tokens can be extracted from memory dumps during sandbox execution or from the malware's code itself. Once
you have a token, you may be able to track the threat actor's commands and even identify other victims, as
was done in the Silent
Lynx investigation. A concrete example of using Telegram bot tokens is the query malware_config:"bot7213845603:AAFFyxsyId9av6CCDVB1BCAM5hKLby41Dr8", which is associated with four infostealer samples uploaded between 2024 and 2025.
Leverage Code-Signing Certificates
Threat actors sometimes sign their malicious executables to make them appear legitimate. They may use stolen certificates or freshly created ones. These certificates can be a powerful pivot point.
In the DRAGONCLONE case, a suspicious executable was signed by "ShenZhen Thunder Networking Technologies Ltd.". By searching for other files signed with the same certificate (signature:"ShenZhen Thunder Networking Technologies Ltd."), you can uncover other tools in the attacker's arsenal.
Utilize YARA and Sigma Rules
For proactive hunting, you can develop your own YARA rules to find malware families based on unique strings, code patterns, or other characteristics. This was a key technique in the "Silent Lynx" campaign for hunting similar implants.
Additionally,
you can leverage the power of the community by using crowdsourced
Sigma rules
in VirusTotal, even within
your YARA rules.
These rules can help you identify malicious behaviors, such as the DLL sideloading techniques used by
DRAGONCLONE, directly from sandbox execution data.
For example, If you want to search for the Sigma rule "Potential DLL Sideloading Of MsCorSvc.DLL" in VT files, you can use the query sigma_rule:99b4e5347f2c92e8a7aeac6dc7a4175104a8ba3354e022684bd3780ea9224137 to do so. All the Sigma rules are updated from the public repo and can be consumed here.
Conclusion
The success stories of the SEQRITE APT-Team in tracking campaigns like UNG0002, Silent Lynx, and DRAGONCLONE demonstrate the power of VirusTotal as a collaborative and comprehensive threat intelligence platform. By leveraging a combination of malware configuration analysis, metadata pivoting, and community-driven tools like YARA and Sigma rules, security researchers can effectively uncover and track sophisticated threat actors.
These examples highlight that successful threat hunting is not just about having the right tools, but also about applying creative and persistent investigation techniques. The ability to pivot from one piece of evidence to another is crucial in connecting the dots and revealing the full scope of a campaign. The SEQRITE team has demonstrated a deep understanding of these pivoting techniques, and we appreciate that they have decided to share their valuable insights with the rest of the community.
We hope these tips and stories have been insightful and will help you in your own threat-hunting endeavors. The fight against cybercrime is a collective effort, and the more we share our knowledge and experiences, the stronger we become as a community.
If you have a success story of using VirusTotal that you would like to share with the community, we would be delighted to hear from you. Please reach out to us, and we will be happy to feature your story in a future blog post at practitioners@virustotal.com.
Together, we can make the digital world a safer place.
Last week, we were fortunate enough to attend the fantastic LABScon conference, organized by the SentinelOne Labs team. While there, we presented a workshop titled 'Advanced Threat Hunting: Automating Large-Scale Operations with LLMs.' The main goal of this workshop was to show attendees how they could automate their research using the VirusTotal API and Gemini. Specifically, we demonstrated how to integrate the power of Google Colab to quickly and efficiently generate Jupyter notebooks using natural language.
It goes without saying that the use of LLMs is a must for every analyst today. For this reason, we also want to make life easier for everyone who uses the VirusTotal API for research.
The Power of the VirusTotal API and vt-py
The VirusTotal API is the programmatic gateway to our massive repository of threat intelligence data. While the VirusTotal GUI is great for agile querying, the API unlocks the ability to conduct large-scale, automated investigations and access raw data with more pivoting opportunities.
To make interacting with the API even easier, we recommend using the vt-py library. It simplifies much of the complexity of HTTP requests, JSON parsing, and rate limit management, making it the go-to choice for Python users.
From Natural Language to Actionable Intelligence with Gemini
To bridge the gap between human questions and API queries, we can leverage the integrated Gemini in Google Colab. We have created a "meta Colab" notebook that is pre-populated with working real code snippets for interacting with the VirusTotal API to retrieve different information such as campaigns, threat actors, malware, samples, URLs among others (which we will share soon). This provides Gemini with the necessary context to understand your natural language requests and generate accurate Python code to query the VirusTotal API. Gemini doesn't call the API directly; it creates the code snippet for you to execute.
For Gemini to generate accurate and relevant code, it needs context. Our meta Colab notebook is filled with examples that act as a guide. For complex questions, it will be nice to provide the exact field names that you want to work with. This context generally falls into two categories:
Reference Documentation: We include detailed documentation directly in the Colab. For example, we provide a comprehensive list of all available file search modifiers for the VirusTotal Intelligence search endpoint. This gives Gemini the "vocabulary" it needs to construct precise queries.
Working Code Examples: The notebook is pre-populated with dozens of working vt-py code snippets for common tasks like retrieving file information, performing an intelligence search, or getting relationships. This gives Gemini the "grammar" and correct patterns for interacting with our API.
Example of code snippet context that we have included in our meta colab:
Practical Example: Hunting for Malicious LNK Files
One of the exercises in our workshop focused on analyzing malicious LNK files submitted to VirusTotal in a specific period of time to limit results. The goal was to discover common execution techniques and interesting command-line patterns.
Here’s how you could approach this with natural language queries in our meta Colab:
1. Retrieve all LNK file objects matching the criteria.
You can start by asking Gemini:
Create a code snippet to retrieve all LNK files submitted from January 1st, 2025, until April 1st, 2025, with 5 or more positives.
Code generated:
query_results = []

# Query for LNK files submitted between January 1st, 2025, and April 1st, 2025, with 5 or more positives.
query = "fs:2025-01-01+ fs:2025-04-01- p:5+ type:lnk"

async for itemobj in cli.iterator('/intelligence/search',params={'query': "%s"%(query)},limit=0):
    query_results.append(itemobj.to_dict())

lnk_files = list(query_results)
print(f"Found {len(lnk_files)} LNK files matching the criteria.")
2. Flatten the data and visualize it.
Next, you can ask Gemini to process the retrieved data and create visualizations:
Flatten the data in a dataframe and create a bar chart depicting the most common TargetFileDOSName values.
Code generated:
import pandas as pd
import plotly.express as px

# Extract the 'attributes' dictionary from each object in our results
attributes_list = [result.get('attributes', {}) for result in lnk_files]

# Use json_normalize to create a flat DataFrame
df_flat = pd.json_normalize(attributes_list)

# Check if 'exiftool.TargetFileDOSName' column exists and is not empty
if 'exiftool.TargetFileDOSName' in df_flat.columns and not df_flat['exiftool.TargetFileDOSName'].empty:
    # Count the occurrences of each TargetFileDOSName
    target_file_counts = df_flat['exiftool.TargetFileDOSName'].value_counts().reset_index()
    target_file_counts.columns = ['TargetFileDOSName', 'Count']

    # Get the top 10 most common TargetFileDOSName values for visualization
    top_target_files = target_file_counts.head(10)

    # Create an interactive bar chart
    fig = px.bar(top_target_files,
                 x='Count',
                 y='TargetFileDOSName',
                 orientation='h',
                 title='Top 10 Most Common TargetFileDOSName in LNK files',
                 labels={'Count': 'Number of Occurrences', 'TargetFileDOSName': 'Target File DOS Name'})
    fig.show()
else:
    print("The 'exiftool.TargetFileDOSName' column was not found or is empty in the flattened data.")

print("DataFrame shape:", df_flat.shape)
df_flat.head()
This will generate a code snippet using pandas and Plotly to give you a clear view of the most frequent target files in the malicious LNKs.
3. Visualize relationships with a Sankey diagram.
To dig deeper and understand the relationships between the infected machines and the malware, you can ask for a more advanced visualization:
Create a Sankey diagram connecting MachineID (source) to TargetFileDOSName (target), with link widths representing the number of occurrences. Include only MachineID values with 10 or more occurrences, grouping the rest as "Other", and make the visualization interactive with hover details.
Code generated:
import plotly.graph_objects as go
import pandas as pd

# Ensure df_flat is available from previous steps
# If not, you might need to re-run the cell that creates df_flat.

# Check if necessary columns exist in df_flat
if 'lnk_info.machine_id' in df_flat.columns and 'exiftool.TargetFileDOSName' in df_flat.columns:

    # Calculate the frequency of each machine ID and target file name pair
    pair_frequencies = df_flat.groupby(['lnk_info.machine_id', 'exiftool.TargetFileDOSName']).size().reset_index(name='frequency')

    # Identify MachineIDs with less than 10 occurrences
    machine_id_counts = pair_frequencies.groupby('lnk_info.machine_id')['frequency'].sum().reset_index(name='count')
    other_machine_ids = machine_id_counts[machine_id_counts['count']  {row['exiftool.TargetFileDOSName']}: {row['frequency']}", axis=1)
        )
    )])

    fig.update_layout(title_text="MachineID to TargetFileDOSName Sankey Diagram (Infrequent MachineIDs grouped as 'Other')", font_size=10)
    fig.show()
else:
    print("Required columns 'lnk_info.machine_id' or 'exiftool.TargetFileDOSName' not found in the DataFrame.")
This will create a powerful visualization that shows how different machines are being targeted with specific files, allowing us identify patterns for each machineID metadata.
4. Analyze the behavior of the LNK files.
Finally, you can investigate the behavior of the LNK files themselves, for example, by looking at how they are executed:
Create a pie chart depicting the distribution of window behaviors for LNK target processes (hidden, minimized,...).
Code generated:
import plotly.express as px
import pandas as pd

# Check if the relevant column exists
if 'lnk_info.header.show_window_str' in df_flat.columns and not df_flat['lnk_info.header.show_window_str'].empty:
    # Count the occurrences of each window behavior string
    window_behavior_counts = df_flat['lnk_info.header.show_window_str'].value_counts().reset_index()
    window_behavior_counts.columns = ['Window Behavior', 'Count']

    # Create an interactive pie chart
    fig = px.pie(window_behavior_counts,
                 names='Window Behavior',
                 values='Count',
                 title='Distribution of LNK Target Process Window Behaviors',
                 hover_data={'Count': True})
    fig.show()
else:
    print("The 'lnk_info.header.show_window_str' column was not found or is empty in the flattened data. Cannot create the pie chart.")
This allows you to quickly identify if the LNK files are trying to hide their execution, a common use case for malware.
5. Geographic Threat Mapping of Submissions
Understanding the geographical distribution of malware submissions can provide crucial insights into whether a campaign is widespread or targeting a specific region. By analyzing the submission metadata for our set of LNK files, an analyst can quickly identify potential hotspots, which could indicate a geographically focused attack. This is achieved by fetching the submissions relationship for each file, extracting the country of origin for each submission, and plotting this data on a world map (please note that submissions doesn’t mean targeted countries, but in some cases could be related).
Using the LNK files identified previously, create a code snippet that retrieves the submissions relationship for each file. Then, count the number of submissions from each country and display the results on a choropleth world map to visualize the submission hotspots.
In this case, Gemini uses the step-by-step execution, which basically is a set of consecutive executions. The code generated was:
Step 1
query_results_with_submissions = []

# Define the search query string for LNK files
query = "fs:2025-01-01+ fs:2025-04-01- p:5+ type:lnk"

# Define the relationship to request
RELATIONS = "submissions"

# Define the relationship attributes to retrieve (all attributes)
ATTRIBUTES_RELATIONS = "*"

# Use cli.iterator to perform an intelligence search with the specified query, relationships, and relationship attributes.
async for itemobj in cli.iterator('/intelligence/search', params={'query': query, 'relationships': RELATIONS, 'relationship_attributes[%s]'%(RELATIONS): ATTRIBUTES_RELATIONS}, limit=0):
    query_results_with_submissions.append(itemobj.to_dict())

# Convert query_results_with_submissions to a list called lnk_files_with_submissions
lnk_files_with_submissions = list(query_results_with_submissions)

# Print the number of LNK files found with submission data.
print(f"Found {len(lnk_files_with_submissions)} LNK files with submission data matching the criteria.")
Step 2
import pandas as pd

# Initialize an empty list to store submission countries
submission_countries = []

# Iterate through each item (LNK file) in the lnk_files_with_submissions list
for item in lnk_files_with_submissions:
    # Check if 'relationships' and 'submissions' exist and are not empty
    if 'relationships' in item and 'submissions' in item['relationships'] and item['relationships']['submissions']['data']:
        # Iterate through each submission object
        for submission in item['relationships']['submissions']['data']:
            # Extract the 'country' from 'submission['attributes']' and append it to the list
            if 'country' in submission['attributes']:
                submission_countries.append(submission['attributes']['country'])

# Convert the submission_countries list into a pandas Series
submission_countries_series = pd.Series(submission_countries)

# Count the occurrences of each country and store in a DataFrame
country_counts = submission_countries_series.value_counts().reset_index()
country_counts.columns = ['country', 'count']

print(f"Total unique countries found: {len(country_counts)}")
print("Top 5 submission countries:")
print(country_counts.head())
Step 3
!pip install pycountry
import plotly.express as px
import pandas as pd
import pycountry

# Function to get ISO-3 code from country name
def get_iso3(country_name):
    try:
        return pycountry.countries.search_fuzzy(country_name)[0].alpha_3
    except:
        return None

# Apply the function to get ISO-3 codes
country_counts['iso_alpha'] = country_counts['country'].apply(get_iso3)

# Create a world heatmap using Plotly Express with ISO-3 codes
fig = px.choropleth(country_counts.dropna(subset=['iso_alpha']), # Drop rows where ISO code couldn't be found
                      locations="iso_alpha", # Use ISO-3 codes for locations
                      locationmode='ISO-3',   # Specify ISO-3 location mode
                      color="count",
                      hover_name="country",
                      color_continuous_scale="Viridis",
                      title="Submission Country Heatmap")

# Update layout to increase figure size
fig.update_layout(
    autosize=False,
    width=1000, # Adjust width as needed
    height=600 # Adjust height as needed
)

fig.show()
More Examples
Here are some other examples of how you can use natural language to query the VirusTotal API:
Find malicious Chrome extensions (based on this blog):
This specific question is actually a really good example of how Google Colab will run the step-by-step process. As you can see, we asked different questions in the same prompt, for that reason Gemini will do it in different steps.
Retrieve all the samples from the /intelligence/search endpoint with the following query: fs:2025-08-01+ fs:2025-08-14- p:5+ tag:crx have:codeinsight.

Get the bundled_files and create a new dataframe with them too, but store only those having 5 or more malicious value.

Then identify the top 5 magika of those bundled files obtained
Code generated:
Step 1
query_results_with_bundled_files = []

# Define the search query string
query = "fs:2025-08-01+ fs:2025-08-14- p:5+ tag:crx have:codeinsight"

# Define the relationship to request
RELATIONS = "bundled_files"

# Define the relationship attributes to retrieve (all attributes)
ATTRIBUTES_RELATIONS = "*"

# Use cli.iterator to perform an intelligence search with the specified query, relationships, and relationship attributes.
async for itemobj in cli.iterator('/intelligence/search', params={'query': query, 'relationships': RELATIONS, 'relationship_attributes[%s]'%(RELATIONS): ATTRIBUTES_RELATIONS}, limit=0):
    query_results_with_bundled_files.append(itemobj.to_dict())

# Convert query_results_with_bundled_files to a list called crx_files_with_bundled_files
crx_files_with_bundled_files = list(query_results_with_bundled_files)

# Print the number of found CRX files with bundled file data.
print(f"Found {len(crx_files_with_bundled_files)} CRX files with bundled file data matching the criteria.")
Step 2
import pandas as pd

# List to store all bundled file attributes
all_bundled_files_data = []

# Iterate through each CRX file with bundled file data
for crx_file in crx_files_with_bundled_files:
    if 'relationships' in crx_file and 'bundled_files' in crx_file['relationships']:
        for bundled_file in crx_file['relationships']['bundled_files']['data']:
            all_bundled_files_data.append(bundled_file.get('attributes', {}))

# Create a DataFrame from the extracted bundled file attributes
df_bundled_files = pd.json_normalize(all_bundled_files_data)

# Filter for bundled files with 5 or more malicious detections
df_malicious_bundled_files = df_bundled_files[df_bundled_files['last_analysis_stats.malicious'] >= 5]

print(f"Total bundled files extracted: {len(df_bundled_files)}")
print(f"Bundled files with 5 or more malicious detections: {len(df_malicious_bundled_files)}")

df_malicious_bundled_files.head()
Step 3
import pandas as pd
import plotly.express as px

# Check if the 'magika' column exists and is not empty in the filtered DataFrame
if 'magika' in df_malicious_bundled_files.columns and not df_malicious_bundled_files['magika'].empty:
    # Count the occurrences of each magika type
    magika_counts = df_malicious_bundled_files['magika'].value_counts().reset_index()
    magika_counts.columns = ['Magika Type', 'Count']

    # Get the top 5 most frequent magika types
    top_5_magika = magika_counts.head(5)

    print("Top 5 Magika Types in malicious bundled files:")
    print(top_5_magika)

    # Visualize the top 5 magika types
    fig = px.bar(top_5_magika,
                 x='Count',
                 y='Magika Type',
                 orientation='h',
                 title='Top 5 Magika Types in Malicious Bundled Files',
                 labels={'Count': 'Number of Occurrences', 'Magika Type': 'Magika Type'})
    fig.update_layout(yaxis={'categoryorder':'total ascending'}) # Order bars by count
    fig.show()
else:
    print("The 'magika' column was not found or is empty in the filtered malicious bundled files DataFrame. Cannot identify top magika types.")
Retrieve threat actors:
Retrieve threat actors targeting the United Kingdom with an espionage motivation. Sort the results in descending order of relevance. Display the total number of threat actors and their names.
Investigate campaigns:
Retrieve information about threat actors and malware involved in campaigns targeting Pakistan. For each threat actor, retrieve its country of origin, motivations, and targeted industries. For each malware, retrieve its name.
What’s next
This workshop, co-authored with Aleksandar from Sentinel LABS, will be presented at future conferences to show the community how to get the most out of the VirusTotal API. We'll be updating the content of our meta colab regularly and will share more information soon about how to get the Google Colab.
We are excited to announce that our colleague Joseliyo Sánchez, will be at Labscon to present our workshop: Advanced Threat Hunting: Automating Large-Scale Operations with LLMs. This workshop is a joint effort with SentinelOne and their researcher, Aleksandar Milenkoski.
In today's rapidly evolving threat landscape, security professionals face an overwhelming tide of data and increasingly sophisticated adversaries. This hands-on workshop is designed to empower you to move beyond the traditional web interface and harness the full potential of the VirusTotal Enterprise API for large-scale, automated threat intelligence and hunting.
We will dive deep into how you can use the VirusTotal Enterprise API with Python and Google Colab notebooks to automate the consumption of massive datasets. You'll learn how to track the behaviors of advanced persistent threat (APT) actors and cybercrime groups through practical, real-time exercises.
A key part of our workshop will focus on leveraging Large Language Models (LLMs) to supercharge your analysis. We'll show how you can use AI to help understand complex data, build better queries, and create insightful visualizations to enrich your information for a deeper understanding of threats.
This session is ideal for cyber threat intelligence analysts, threat hunters, incident responders, SOC analysts, and security researchers looking to automate and scale up their threat hunting workflows.
After the workshop, we will publish a follow-up blog post that will delve deeper into some of the exercises and examples presented, providing a valuable resource for further learning and implementation.
We look forward to seeing you at Labscon!
(All of the scenarios are compatible with Google Threat Intelligence)
Answered by Chris Brenton of Active Countermeasures | Questions compiled from the infosec community by Shelby Perry This article was originally published in the Threat Hunting issue of our infosec […]
Note: You can view the full content of the blog here.
Introduction
Detection engineering is becoming increasingly important in surfacing new malicious activity. Threat actors might take advantage of previously unknown malware families - but a successful detection of certain methodologies or artifacts can help expose the entire infection chain.
In previous blog posts, we announced the integration of Sigma rules for macOS and Linux into VirusTotal, as well as ways in which Sigma rules can be converted to YARA to take advantage of VirusTotal Livehunt capabilities. In this post, we will show different approaches to hunt for interesting samples and derive new Sigma detection opportunities based on their behavior.
Tell me what role you have and I'll tell you how you use VirusTotal
VirusTotal is a really useful tool that can be used in many different ways. We have seen how people from SOCs and Incident Response teams use it (in fact, we have our VirusTotal Academy videos for SOCs and IRs teams), and we have also shown how those who hunt for threats or analyze those threats can use it too.
But there's another really cool way to use VirusTotal - for people who build detections and those who are doing research. We want to show everyone how we use VirusTotal in our work. Hopefully, this will be helpful and also give people ideas for new ways to use it themselves.
To explain our process, we used examples of Lummac and VenomRAT samples that we found in recent campaigns. These caught our attention due to some behaviors that had not been identified by public detection rules in the community. For that reason we have created two Sigma rules to share with the community, but if you want to get all the details about how we identified it and started our research, go to our Google Threat Intelligence community blog.
Our approach
As detection engineers, it is important to look for techniques that can be in use by multiple threat actors - as this makes tracking malicious activity more efficient. Prior to creating those detections, it is best to check existing research and rule collections, such as the Sigma rules repository. This can save time and effort, as well as provide insight into previously observed samples that can be further researched.
A different approach would be to instead look for malicious files that are not detected by existing Sigma rules, since they can uncover novel methodologies and provide new opportunities for detection creation.
One approach is to hunt for files that are flagged by at least five different AV vendors, were recently uploaded within the last month, have sandbox execution (in order to view their behavior), and which have not triggered any Crowdsourced Sigma rules.
p:5+ have:behavior fs:30d+ not have:sigma
This initial query can be adapted to incorporate additional filters that the researcher may find relevant. These could include modifiers to identify for example, the presence of the PowerShell process in the list of executed processes (behavior_created_processes:powershell.exe), filtering results to only include documents (type:document), or identifying communication with services like Pastebin (behavior_network:pastebin.com).
Another way to go is to look at files that have been flagged by at least five AV’s and were tested in either Zenbox or CAPE. These sandboxes often have great logs produced by Sysmon, which are really useful for figuring out how to spot these threats. Again, we'd want to focus on files uploaded in the last month that haven't triggered any Sigma rules. This gives us a good starting point for building new detection rules.
p:5+ (sandbox_name:"CAPE Sandbox" or sandbox_name:"Zenbox") fs:30d+ not have:sigma
Lastly, another idea is to look for files that have not triggered many high severity detections from the Sigma Crowdsourced rules, as these can be more evasive. Specifically, we will look for samples with zero critical, high or medium alerts - and no more than two low severity ones.
With these queries, we can start investigating some samples that may be interesting to create detection rules.
Our detections for the community
Our approach helps us identify behaviors that seem interesting and worth focusing on. In our blog, where we explain this approach in detail, we highlighted two campaigns linked to Lummac and VenomRAT that exhibited interesting activity. Because of this, we decided to share the Sigma rules we developed for these campaigns. Both rules have been published in Sigma's official repository for the community.
Detect The Execution Of More.com And Vbc.exe Related to Lummac Stealer
title: Detect The Execution Of More.com And Vbc.exe Related to Lummac Stealer
  id: 19b3806e-46f2-4b4c-9337-e3d8653245ea
  status: experimental
  description: Detects the execution of more.com and vbc.exe in the process tree. This behaviors was observed by a set of samples related to Lummac Stealer. The Lummac payload is injected into the vbc.exe process.
  references:
      - https://www.virustotal.com/gui/file/14d886517fff2cc8955844b252c985ab59f2f95b2849002778f03a8f07eb8aef
      - https://strontic.github.io/xcyclopedia/library/more.com-EDB3046610020EE614B5B81B0439895E.html
      - https://strontic.github.io/xcyclopedia/library/vbc.exe-A731372E6F6978CE25617AE01B143351.html
  author: Joseliyo Sanchez, @Joseliyo_Jstnk
  date: 2024-11-14
  tags:
      - attack.defense-evasion
      - attack.t1055
  logsource:
      category: process_creation
      product: windows
  detection:
      # VT Query: behaviour_processes:"C:\\Windows\\SysWOW64\\more.com" behaviour_processes:"C:\\Windows\\Microsoft.NET\\Framework\\v4.0.30319\\vbc.exe"
      selection_parent:
          ParentImage|endswith: '\more.com'
      selection_child:
          - Image|endswith: '\vbc.exe'
          - OriginalFileName: 'vbc.exe'
      condition: all of selection_*
  falsepositives:
      - Unknown
  level: high
Sysmon event for: Detect The Execution Of More.com And Vbc.exe Related to Lummac Stealer
title: File Creation Related To RAT Clients
  id: 2f3039c8-e8fe-43a9-b5cf-dcd424a2522d
  status: experimental
  description: File .conf created related to VenomRAT, AsyncRAT and Lummac samples observed in the wild.
  references:
      - https://www.virustotal.com/gui/file/c9f9f193409217f73cc976ad078c6f8bf65d3aabcf5fad3e5a47536d47aa6761
      - https://www.virustotal.com/gui/file/e96a0c1bc5f720d7f0a53f72e5bb424163c943c24a437b1065957a79f5872675
  author: Joseliyo Sanchez, @Joseliyo_Jstnk
  date: 2024-11-15
  tags:
      - attack.execution
  logsource:
      category: file_event
      product: windows
  detection:
      # VT Query: behaviour_files:"\\AppData\\Roaming\\DataLogs\\DataLogs.conf"
      # VT Query: behaviour_files:"DataLogs.conf" or behaviour_files:"hvnc.conf" or behaviour_files:"dcrat.conf"
      selection_required:
          TargetFilename|contains: '\AppData\Roaming\'
      selection_variants:
          TargetFilename|endswith:
              - '\datalogs.conf'
              - '\hvnc.conf'
              - '\dcrat.conf'
          TargetFilename|contains:
              - '\mydata\'
              - '\datalogs\'
              - '\hvnc\'
              - '\dcrat\'
      condition: all of selection_*
  falsepositives:
      - Legitimate software creating a file with the same name
  level: high
Sysmon event for: File Creation Related To RAT Clients
Detection engineering teams can proactively create new detections by hunting for samples that are being distributed and uploaded to our platform. Applying our approach can benefit in the development of detection on the latest behaviors that do not currently have developed detection mechanisms. This could potentially help organizations be proactive in creating detections based on threat hunting missions.
The Sigma rules created to detect Lummac activity have been used during threat hunting missions to identify new samples of this family in VirusTotal. Another use is translating them into the language of the SIEM or EDR available in the infrastructure, as they could help identify potential behaviors related to Lummac samples observed in late 2024. After passing quality controls and being published on Sigma's public GitHub, they have been integrated for use in VirusTotal, delivering the expected results. You can use them in the following way:
Lummac Stealer Activity - Execution Of More.com And Vbc.exe
By Ray Van Hoose, Wade Wells, and Edna Jonsson || Guest Authors This post is comprised of 3 articles that were originally published in the second edition of the InfoSec […]

 Login
Login