Login
Login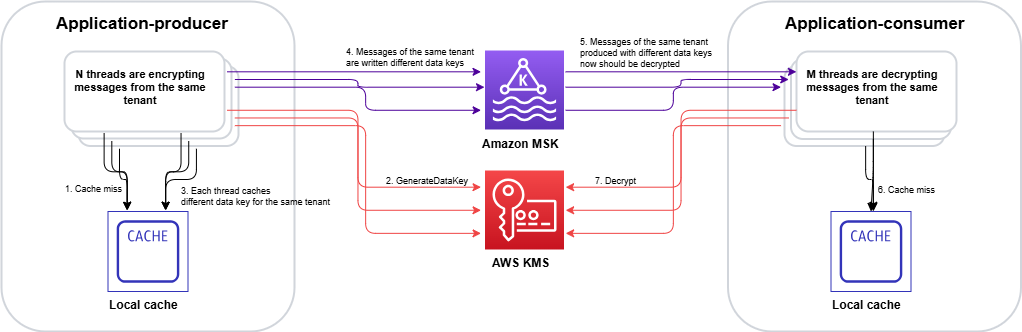


Caching KMS data keys in multi-thread environments: Per-tenant encryption for event-driven systems at scale
This post assumes familiarity with envelope encryption and the AWS Encryption SDK.
When your encryption system generates millions of duplicate API calls per hour, costs spiral and performance degrades. That’s exactly the challenge NICE Actimize faced while operating their global-scale, event-driven financial crime detection platform on Amazon Web Services (AWS).
NICE Actimize, a leading provider of financial crime, risk, and compliance solutions, processes millions of encrypted messages daily across hundreds of tenants. By rethinking how they cache encryption keys, they reduced their AWS Key Management Service (AWS KMS) costs by 77% while maintaining strict security guarantees and per-tenant encryption isolation.
In this post, we explore the cache stampede problem that emerges when envelope encryption meets high-concurrency, multi-tenant architectures. We walk through two solutions: the AWS-recommended hierarchical keyring pattern and a custom caching approach that NICE Actimize built for their regulated environment. These patterns apply to multi-tenant software as a service (SaaS) environments and high-throughput systems where per-tenant encryption generates significant KMS API volume.
Why per-tenant encryption matters
Financial services systems operate under strict regulatory requirements. You must encrypt data at rest and in transit. For multi-tenant SaaS providers, this requirement might go further: each tenant’s data must be encrypted with separate keys to provide complete cryptographic isolation. If one tenant’s key is compromised, no other tenant’s data is at risk.
Consider an enterprise SaaS environment built on an event-driven architecture using Amazon Managed Streaming for Apache Kafka (Amazon MSK), with many different databases for storing data and Amazon Simple Queue Service (Amazon SQS) for messaging. Messages flow continuously between producers and consumers, and each message must be encrypted with the correct tenant-specific key. At scale with millions of messages daily across hundreds of tenants, this creates a massive volume of encryption and decryption operations.
To handle this volume efficiently, the standard approach is envelope encryption: a two-tier model where an AWS KMS key encrypts short-lived data keys, and those data keys encrypt the actual data. Your application can encrypt large volumes of data locally without calling AWS KMS for every operation, reducing latency and costs.
The cache stampede problem
Envelope encryption reduces AWS KMS calls, but it doesn’t eliminate them. Each encrypt operation still requires a data key, either generated fresh using GenerateDataKey or retrieved from a cache, and each decrypt operation must unwrap an encrypted data key (EDK) by calling Decrypt. In high-throughput systems processing millions of messages, these calls add up quickly.
The AWS Encryption SDK provides a built-in solution for this: the CachingCryptoMaterialsManager. This component caches data encryption materials (data keys) locally, so your application can reuse them across multiple operations without calling AWS KMS each time. You configure a time-to-live (TTL), a maximum message-use limit, and a local cache, and the SDK handles the rest.
This approach works well under moderate load when you partition the cache by tenant AWS KMS key Amazon Resource Name (ARN) so that each tenant’s encryption materials remain cryptographically isolated. However, a critical problem emerges as concurrency scales to hundreds of threads processing millions of encrypted messages in parallel: the cache stampede, also known as the thundering herd problem.
How the stampede occurs
The CachingCryptoMaterialsManager caches the result of the SDK’s internal getMaterialsForEncrypt and decryptMaterials calls at the materials level. The cache stampede, however, happens at the KMS API call level. When a cached data key expires or a new, previously-unseen EDK arrives, the following sequence unfolds:
- On encrypt – data key explosion: Multiple threads simultaneously call
encrypt()for the same tenant. Each thread finds the cache entry expired and independently callsGenerateDataKeyagainst AWS KMS. Instead of one thread generating a data key while others wait, N threads create N distinct data keys. Each new data key produces a unique EDK, which inflates the EDK cardinality across the system. - On decrypt – redundant unwrap calls: Those extra unique EDKs propagate downstream. When consumers later read encrypted records, each distinct EDK is a separate cache key. Multiple threads encountering the same EDK simultaneously each trigger an independent
Decryptcall to AWS KMS because the cache has no coordination mechanism to make competing threads wait for a single in-flight request. - Compounding effect: The encrypt-side stampede creates excess EDK cardinality, which degrades the decrypt-side cache hit ratio, which triggers more KMS calls, which drives up costs further. In the NICE Actimize case, this produced a ratio of 30% unique data keys to data records in DynamoDB tables, meaning nearly one in three records was encrypted with a different data key.
At enterprise SaaS scale, this compounding effect can generate millions of redundant AWS KMS GenerateDataKey and Decrypt calls per hour, even with the SDK’s built-in caching enabled. The following figure shows the pattern leading to a stampede.

Figure 1: Cache stampede – multiple threads independently calling AWS KMS for the same encrypted data key, creating duplicate requests
The stampede follows this sequence on the encrypt side:
- Multiple threads call
encrypt()for the same tenant concurrently. - Each thread checks the CachingCryptoMaterialsManager and finds the cache entry expired.
- With no coordination mechanism, each thread independently calls
GenerateDataKey. - AWS KMS returns N distinct data keys (one per thread).
- Each data key produces a unique EDK, inflating cardinality across the system.
On the decrypt side, the inflated EDK cardinality compounds the problem:
- Consumer threads encounter unique EDKs that were never cached.
- Multiple threads hitting the same EDK simultaneously each trigger a separate
Decryptcall. AWS KMS returns the same plaintext data key N times, doing redundant work.
Two paths forward
We evaluated two approaches to solve the cache stampede problem. Each fits different architectural requirements and regulatory constraints.
Option A: Hierarchical keyring with DynamoDB (AWS-recommended)
AWS addresses the cache stampede challenge through the hierarchical keyring pattern, which introduces an additional level of key hierarchy that significantly reduces how often cache stampedes occur.
In this architecture, branch keys serve as intermediate wrapping keys stored in a DynamoDB table. This DynamoDB table acts as a shared cache layer that coordinates across all instances in your distributed fleet.
Figure 2: Hierarchical keyring architecture – branch keys in DynamoDB coordinating across distributed instances
The architecture (shown in Figure 2) works as follows:
- The application requests encryption through the hierarchical keyring.
- The keyring checks the local cache for the tenant’s branch key.
- On a cache miss, it queries the DynamoDB Key Store table for the active branch key.
- AWS KMS decrypts the branch key (this is the only KMS call in the flow).
- The decrypted branch key is returned to the keyring.
- The keyring stores the branch key in the local cache for subsequent requests.
- The keyring derives a unique wrapping key from the branch key and generates the data key locally.
The key insight is that the cache is thread-aware. When the cache expires, threads coordinate to make a single request to refresh the cache. Only a single thread is used to make a call to the branch key, rather than all the threads acting independently. Additionally, by adding an additional key into the key hierarchy, branch keys don’t live within AWS KMS. This means cache misses and the stampedes they trigger interact with the branch key, and don’t make as many calls to the AWS KMS service at the top of the hierarchy:
- Without hierarchical keyrings: Your local cache needs to store all the data encryption keys, and has constant misses as new, unique data keys arrive with each encrypted message. A miss can trigger a stampede.
- With hierarchical keyrings: The same branch key wraps thousands or millions of data keys. A cache miss only occurs when a branch key expires or is first requested, which happens orders of magnitude less frequently than without hierarchical keyrings.
The DynamoDB table acts as a coordination point. The first thread to request a missing branch key retrieves it from AWS KMS and stores it in DynamoDB (the Key Store table). Subsequent requests from instances in the fleet retrieve the cached branch key from DynamoDB instead of making duplicate AWS KMS calls.
Beyond reducing cache miss frequency, the hierarchical keyring provides built-in stampede protection within its local cache implementation. The SDK offers multiple cache types, and the Default cache, designed for heavily multi-threaded environments, prevents multiple threads from calling AWS KMS on cache expiry by notifying a single thread that the branch key materials entry is about to expire 10 seconds in advance. That one thread refreshes the cache while all other threads continue serving requests using the still-valid entry.
This solution integrates with the AWS Encryption SDK and requires minimal code changes to existing applications. For event-driven architectures processing encrypted Kafka streams, this approach reduces KMS call volume by orders of magnitude while preserving per-tenant cryptographic isolation.
Option B: Custom KMS client caching – Solving the stampede at the API layer
While the hierarchical keyring (Option A) addresses the stampede by reducing how often cache misses occur, there’s a complementary approach: eliminating the stampede at its source by caching KMS API responses directly, using atomic, single-flight cache loading that prevents concurrent threads from issuing duplicate calls. This is the path NICE Actimize took.
The IClientSupplier extension point in AWS Encryption SDK v3
In the AWS Encryption SDK v2, decorating the AWS KMS client on a per-request basis was possible through the RegionalClientSupplier interface, but it was an advanced and undocumented use case. Without explicit guidance or a supported pattern, caching strategies typically operated above the SDK layer, making it difficult to prevent duplicate KMS calls at their source. The AWS Encryption SDK v3 introduced the IClientSupplier interface, which the AwsKmsMrkMultiKeyring accepts at construction time. This interface is called by the SDK whenever it needs a KMS client for a given AWS Region, and you control what it returns, making it possible to insert a caching layer between the SDK and AWS KMS.
Architecture: A decorated KMS client with two Caffeine caches
The solution is a CachedKmsClient—a decorator that wraps the standard AWS SDK KmsClient and interposes two Caffeine LoadingCache instances between the application and AWS KMS:
| Cache | Key | Value | Purpose |
| GenerateDataKey cache | GenerateDataKeyRequest (tenant KMS key ARN and key spec) | GenerateDataKeyResponse (EDK and plaintext data key) | Ensures encrypt operations on the same node reuse the same data key for a given tenant KMS key during the cache window |
| Decrypt cache | DecryptRequest (EDK and key ARN) | DecryptResponse (plaintext data key) | Ensures decrypt operations for the same EDK share a single KMS call result |
Both caches are configured with refreshAfterWrite (default: 1 hour, configurable), which means:
- During the refresh window, concurrent threads receive the cached response instantly resulting in zero KMS calls.
- When a cache entry expires, Caffeine’s
LoadingCache.get()guarantees that exactly one thread executes the loader function (the actual KMS API call), while all other concurrent threads block and wait for that single result. This is the atomic, single-flight property that eliminates the stampede.
Security consideration: Caching plaintext data keys in memory means the keys exist in process memory for the duration of the cache TTL. The TTL acts as a security control: shorter TTLs reduce the window of exposure in the event of a memory dump, while longer TTLs reduce KMS call volume. Choose a TTL that balances your security requirements with your cost and performance goals. Key rotation at the KMS key level remains unaffected by the cache, because rotated keys produce new data keys on the next cache refresh.
Integration with the AWS Encryption SDK v3
The integration is minimal. The IClientSupplier AWS Lambda function returns a CachedKmsClient singleton for each AWS Region, this singleton is passed into the AwsKmsMrkMultiKeyring at keyring construction time. From that point forward, each GenerateDataKey and Decrypt call the SDK makes flows through the caching decorator transparently, with no changes to the encrypt or decrypt call sites.
The CachedKmsClient is a singleton per Region (managed using a ConcurrentHashMap), so all tenants on the same node share the same caching layer but their data keys remain fully isolated because the cache keys include the tenant-specific AWS KMS key ARN.
Why Caffeine?
Caffeine is a high-performance, near-optimal Java caching library well-suited for this pattern for several reasons:
- Atomic loading:
LoadingCache.get()guarantees that on a cache miss, only one thread executes the loader while others wait. This is the core property that eliminates the stampede. - refreshAfterWrite semantics: Unlike
expireAfterWrite(which blocks all threads during refresh), refreshAfterWrite allows one thread to asynchronously reload the entry while other threads continue to serve the stale-but-valid cached value. This eliminates latency spikes during key rotation. - Observability: Cache eviction listeners and Micrometer metric counters can be wired in to track actual KMS call volume per tenant KMS key, enabling real-time cost monitoring.
Choosing between the two options
The hierarchical keyring with DynamoDB (Option A) is a production-ready, AWS-recommended solution that reduces stampede frequency by introducing longer-lived branch keys. It’s the best choice for most organizations. Particularly when starting fresh or when the operational overhead of an additional data store is acceptable.
NICE Actimize chose the custom caching approach (Option B) for a pragmatic reason: it avoided introducing a new infrastructure dependency into the encryption critical path. Their platform already operated at scale across hundreds of tenants, and adding a DynamoDB table as a key coordination layer would have meant taking on additional operational responsibility: provisioning, monitoring, backup, access control, and ensuring high availability for a component that sits directly in the encrypt/decrypt hot path. In a regulated financial services environment, each new stateful component in the security chain requires its own resilience planning, failure-mode analysis, and compliance review. The Caffeine cache used in Option B, by contrast, is an in-process library (a JAR on the classpath). It is stateless, requires no network calls, no provisioning and no operational overhead. It makes a lighter dependency than a managed cloud resource in the critical path. There is no shared state to lose, no additional infrastructure to protect, and no new failure mode beyond what already exists with AWS KMS itself. If a node restarts, the cache rebuilds on the next KMS call.
Results
By implementing a rotation policy with the optimized caching approach, NICE Actimize achieved the following results:
- 77% reduction in AWS KMS costs – Eliminating millions of redundant API calls translated directly into significant cost savings.
- Maintained strict per-tenant isolation – Per-tenant encryption isolation remained fully intact, with no compromise to their security posture.
- Improved system performance – Removing the stampede of duplicate AWS KMS calls reduced latency and freed up system resources for core processing.
- Simplified operations – A coordinated caching layer replaced fragmented, per-thread caching, reducing operational complexity.
Conclusion and next steps
The cache stampede problem compounds in multi-tenant encryption systems: excess data key generation on the encrypt side degrades cache hit ratios on the decrypt side, creating a feedback loop of redundant KMS calls. The AWS-recommended hierarchical keyring pattern with DynamoDB provides a production-ready solution that integrates with the AWS Encryption SDK with minimal code changes. For regulated environments requiring additional control, a custom caching approach can deliver similar results.
If you operate a multi-tenant SaaS platform or a high-throughput system with per-tenant encryption requirements, consider these patterns to optimize your encryption costs and performance.
To get started, explore the following resources:
- AWS Encryption SDK Developer Guide
- AWS KMS Developer Guide
- Amazon DynamoDB Developer Guide
- Amazon MSK Developer Guide
If you have questions or feedback about this post, leave a comment in the Comments section.