
❌

Normal view

Automating identity lifecycle and security with AWS Directory Service APIs

21 May 2026 at 18:00

Managing identities and access across complex environments has become more critical than ever. AWS Directory Service for Managed Microsoft Active Directory, also known as AWS Managed Microsoft AD, has added new capabilities to manage users and groups. Now, you can perform create, read, update, and delete (CRUD) operations on users and groups directly through AWS Command Line Interface (AWS CLI), APIs, and the AWS Management Console. You can use this powerful capability to automate identity lifecycle management and enhance security in your AWS environment. By using these APIs, collectively known as the Directory Service Data APIs, you can perform operations such as:

  • Listing users and groups
  • Retrieving user and group details
  • Disabling and enabling user accounts
  • Resetting user passwords
  • Managing group memberships

These APIs provide new possibilities for automating identity management tasks and integrating Active Directory management into your existing workflows and applications.

The introduction of these APIs brings several key benefits:

  • Automation of the identity lifecycle: You can now programmatically manage user accounts throughout their lifecycleβ€”from creation to deletionβ€”enabling streamlined onboarding and offboarding processes.
  • Enhanced security: By integrating these APIs with security services like Amazon GuardDuty, you can create automated responses to potential security threats, such as disabling accounts with inappropriate access.
  • Improved compliance: You can use automated user management to help enforce consistent policies and help maintain compliance with various regulatory requirements.
  • Operational efficiency: You can automate routine tasks such as user provisioning, deprovisioning, and group management, reducing manual effort and the potential for human error.
  • Integration capabilities: By using these APIs, you can seamlessly integrate with existing identity management systems, custom applications, and third-party tools.
  • Cost optimization: By automating processes and reducing manual intervention, you can potentially help your organization optimize operational costs associated with identity management.

In this post, we explore these new APIs and demonstrate how you can use them to create an automated solution for detecting and responding to unexpected behavior by Active Directory users. We walk through a practical example that combines GuardDuty, AWS Step Functions, Amazon EventBridge, and the new AWS Directory Service APIs to create a robust security automation workflow.

Solution overview

To demonstrate the power of these new APIs, let’s explore a practical solution that automates the detection and response to unexpected behavior by Active Directory users. This solution combines several AWS services to create a robust security automation workflow:

    1. GuardDuty continuously monitors for unexplained behavior of Active Directory users from AWS Managed Microsoft AD. For the example in this post, we’re using Backdoor:Runtime/C&CActivity.B!DNS
    2. An EventBridge rule detects GuardDuty findings related to these users and triggers a Step Functions workflow.
      {
        "detail-type": ["GuardDuty Finding"],
        "source": ["aws.guardduty"],
        "detail": {
          "type": ["Backdoor:Runtime/C&CActivity.B!DNS"]
        }
      }
    3. The Step Functions workflow will:
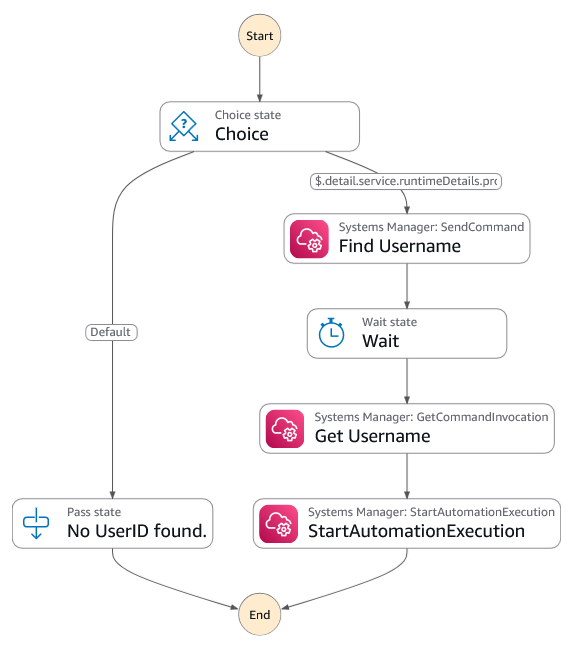
      1. Extract the Active Directory username from the instance using a run command.
      2. Start an automation that will disable the account using the DisableUser API.
Figure 1: Diagram of the Step Functions workflow showing the process of Systems Manager finding the username and starting the automation to disable the account

Figure 1: Diagram of the Step Functions workflow showing the process of Systems Manager finding the username and starting the automation to disable the account

  1. Finally, another EventBridge rule will monitor the DisableUser API call. It will send an email to the user using Amazon Simple Notification Service (Amazon SNS) notifications.
    {
      "detail-type": ["AWS API Call via CloudTrail"],
      "source": ["aws.ds"],
      "detail": {
        "eventSource": ["ds.amazonaws.com"],
        "eventName": ["DisableUser"]
      }
    }

This solution delivers automated, near real-time remediation of potential security threats β€” significantly reducing exposure windows and containing the impact of unauthorized account access.

The following figure shows a high-level architecture diagram of the solution.

Figure 2: Diagram showing the workflow of what happens when potentially damaging activity is detected

Figure 2: Diagram showing the workflow of what happens when potentially damaging activity is detected

Note: The solution must be deployed in the primary AWS Region of your directory.

Prerequisites

To complete the walkthrough in this post, you must have the following prerequisites in place.

GuardDuty

GuardDuty is an automated threat detection service that continuously monitors for unexpected activity and unauthorized behavior to protect your AWS accounts, workloads, and data stored in Amazon Simple Storage Service (Amazon S3).

To activate GuardDuty:

  1. Go to the GuardDuty console.
    1. If you’re activating GuardDuty for the first time, underβ€―Try threat detection with GuardDuty, select All Featuresβ€―and then chooseβ€―Get Started.
    2. If you’ve used GuardDuty before, select Runtime Monitoringβ€―and then chooseβ€―Enableβ€―underβ€―Runtime Monitoring.
Figure 3: Runtime Monitoring enabled

Figure 3: Runtime Monitoring enabled

AWS Managed Microsoft AD

AWS Managed Microsoft AD provides a fully managed service for Microsoft Active Directory (AD) in the AWS Cloud. When you create your directory, AWS deploys two domain controllers that are exclusively yours in separate Availability Zones for high availability. For use cases that require even higher resilience and performance in a specific AWS Region or during specific hours, you can scale AWS Managed Microsoft AD by deploying additional domain controllers to meet your needs. These domain controllers can help load balance, increase overall performance, or provide additional nodes to protect against temporary availability issues. Using AWS Managed Microsoft AD, you can define the correct number of domain controllers for your directory based on your use case.

To deploy a new AWS Managed Microsoft AD:

  1. Go to the Directory Service console.
  2. Chooseβ€―Set up directoryβ€―and selectβ€―AWS Managed Microsoft AD.
  3. Select Standard Editionβ€―and enter a directory DNS name and password.
  4. Select a virtual private cloud (VPC). For this example, use theβ€―Default VPC.
  5. Chooseβ€―Create directory.

Create a test Active Directory user

You will use this test user account to sign in to an EC2 instance and initiate a command that simulates unexplained activity that results in this account being disabled.

To create the test user, you can use AWS CloudShell or the AWS CLI from your local machine. Run the following commands, replacing the --directory-id value with your own:

# Create the test user
aws ds-data create-user \
 --directory-id "your-directory-id" \
 --sam-account-name "TestUser" \
 --given-name "Test" \
 --surname "User"

Then

# Set a password for the test user 
aws ds reset-user-password \
 --directory-id "your-directory-id" \
 --user-name "TestUser" \
 --new-password "YourSecurePassword123!"

In this example, the password is set to YourSecurePassword123!. If you need to replace it with a password that meets your organization’s requirements, see Resetting and enabling an AWS Managed Microsoft AD user’s password. For more information on creating users, see Creating an AWS Managed Microsoft AD user in the AWS Directory Service documentation.

Test EC2 instance

To generate alerts on GuardDuty, you need a domain joined Linux EC2 instance. If you don’t have a domain joined EC2 Linux instance, follow these instructions for joining a Linux instance to an Active Directory domain. This instance will be used to simulate suspicious activity that triggers a GuardDuty finding and initiates the automated remediation workflow.

Implement the solution

Let’s walk through the steps to implement this solution in your AWS environment.

Deploy the solution

  1. Download the CloudFormation template
  2. Navigate to the CloudFormation console in the AWS account.
  3. For Create Stack, choose with new resources (standard).
  4. For Template source, choose Upload a template file. Choose Choose file and select the template you downloaded in step 1.
  5. Choose Next.
  6. For Stack name, enter a stack name (such as CRUD-API-MAD).
  7. In the Parameters area, do the following:
    1. For DirectoryID, enter the AWS Active Directory ID.
    2. For NotificationEmail, enter the email address to send the notification to.
  8. On the Configure stack options page, choose Next.
  9. Select I acknowledge that AWS CloudFormation might create IAM resources with custom names, then choose Submit.

After the page is refreshed, the status of your stack should be CREATE_IN_PROGRESS. When the status changes to CREATE_COMPLETE, proceed to the next section.

Test

To simulate a threat, use a GuardDuty test domain that GuardDuty will recognize as a command and control server.

  1. Go to the Amazon EC2 console.
  2. Choose Instances from the navigation pane.
  3. Select the test EC2 instance that you created earlier.
  4. Choose Connect, select the Session Manager tab, and choose Connect.
  5. Authenticate with your test user by entering su followed by the test user with the domain name that you created earlier. For example su TestUser@example.com, then enter the password.
  6. Enter the command curl guarddutyc2activityb.com.
    You will receive an error because the page won’t resolve, but GuardDuty will have detected concerning events.
  7. Go to the GuardDuty console and select Findings from the navigation pane.
  8. Within 3–5 minutes, you should see a high severity finding for Backdoor:Runtime/C&CActivity.B!DNS.
  9. This will then trigger the automation to disable the account.
    Figure 4: Account successfully disabled

    Figure 4: Account successfully disabled

  10. After the account is disabled, an email notification will be sent notifying an administrator that the account was disabled (it might take up to 5 minutes to receive the notification).

    Figure 5: AWS notification message showing the username has been disabled

    Figure 5: AWS notification message showing the username has been disabled

Note: You must archive the GuardDuty finding before running this test again, because the EventBridge rule only runs once against a GuardDuty finding with the same details. To archive the finding, select the check box next to the Backdoor:Runtime/C&CActivity.B!DNS finding, choose Actions (top right), and select Archive.

Conclusion

The new AWS Directory Service APIs for AWS Managed Microsoft AD provide powerful capabilities for programmatically managing Active Directory users and groups. By using these APIs in conjunction with services such as Amazon GuardDuty and AWS Step Functions, you can create sophisticated automation workflows that enhance your security posture and streamline identity management processes.

The solution we’ve explored in this post demonstrates just one of many possible use cases for these new APIs. As you integrate these capabilities into your own environments, you will probably discover numerous opportunities to improve efficiency, security, and compliance in your identity management practices.

For a solution that uses PowerShell Active Directory cmdlets with AWS Systems Manager Run Command to disable users, see How to automatically disable users in AWS Managed Microsoft AD based on GuardDuty findings.

For more information about AWS Directory Service and its APIs, visit the AWS Directory Service documentation.

We’re excited to see how you’ll use these new APIs to innovate and improve your identity management workflows. If you have any questions or want to share your own use cases, leave a comment below or reach out to AWS Support.

Remember, the cloud journey is all about continuous improvement and innovation. Keep exploring, keep learning, and keep pushing the boundaries of what’s possible with AWS.
Ali Alzand

Ali Alzand

Ali is a Senior Infrastructure Migration & Modernization Specialist Solutions Architect at AWS who helps enterprise customers migrate, modernize, and operate their Microsoft workloads on AWS. He specializes in Infrastructure as Code, automating at scale with AWS Systems Manager, EC2 Image Builder, and CloudFormation. He also designs event-driven architectures building responsive, loosely coupled solutions with EventBridge and Lambda. Outside of work, Ali enjoys grilling with friends and discovering new cuisines around town.

Kevin Sookhan

Kevin Sookhan

Kevin is a Specialist Solutions Architect at Amazon Web Services with over 20 years of experience working with Microsoft technologies. He has expertise in running Microsoft workloads on AWS with specialization in helping customers with their migrations, cost optimization, and infrastructure architecture.

File integrity monitoring with AWS Systems Manager and Amazon Security LakeΒ 

27 January 2026 at 19:21

Customers need solutions to track inventory data such as files and software across Amazon Elastic Compute Cloud (Amazon EC2) instances, detect unauthorized changes, and integrate alerts into their existing security workflows.

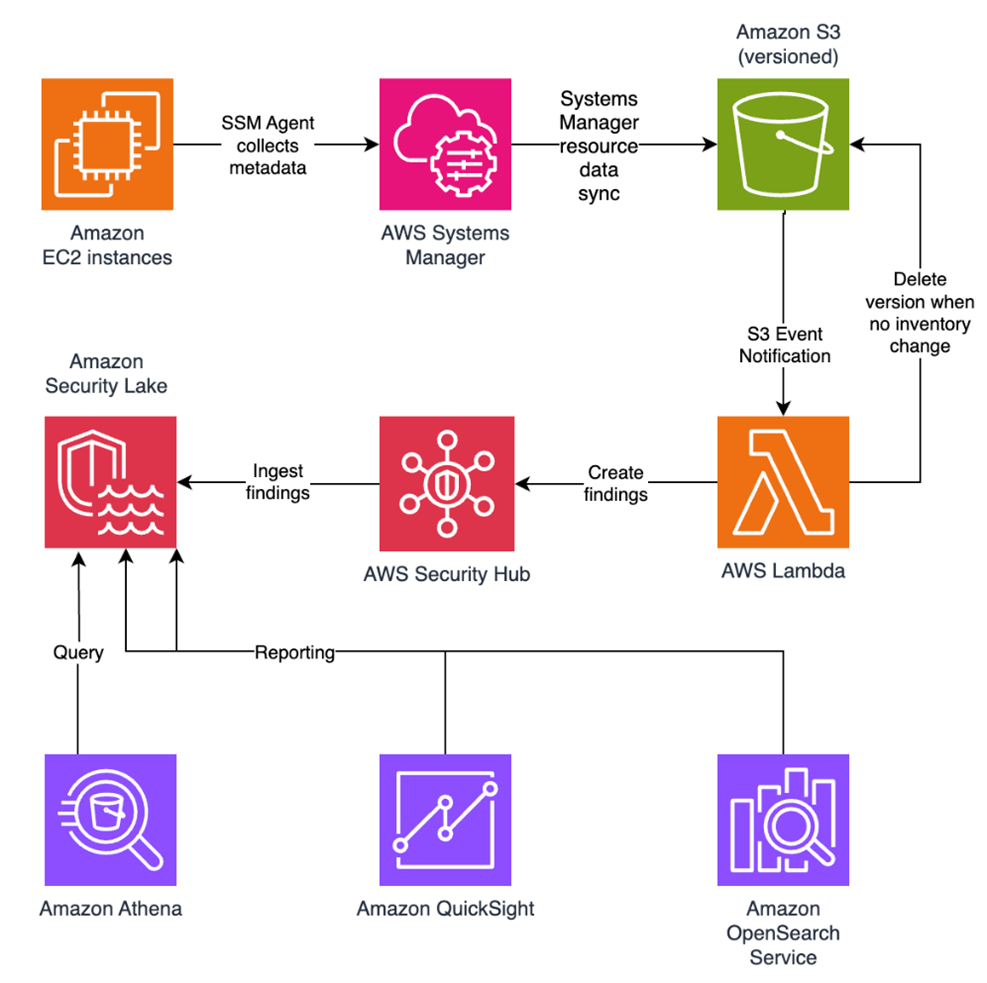
In this blog post, I walk you through a highly scalable serverless file integrity monitoring solution. It uses AWS Systems Manager Inventory to collect file metadata from Amazon EC2 instances. The metadata is sent through the Systems Manager Resource Data Sync feature to a versioned Amazon Simple Storage Service (Amazon S3) bucket, storing one inventory object for each EC2 instance. Each time a new object is created in Amazon S3, an Amazon S3 Event Notification triggers a custom AWS Lambda function. This Lambda function compares the latest inventory version with the previous one to detect file changes. If a file that isn’t expected to change has been created, modified, or deleted, the function creates an actionable finding in AWS Security Hub. Findings are then ingested by Amazon Security Lake in a standard OCSF format, which centralizes and normalizes the data. Finally, the data can be analyzed using Amazon Athena for one-time queries, or by building visual dashboards with Amazon QuickSight and Amazon OpenSearch Service. Figure 1 summarizes this flow:

Figure 1: File integrity monitoring workflow

Figure 1: File integrity monitoring workflow

This integration offers an alternative to the default AWS Config and Security Hub integration, which relies on limited data (for example, no file modification timestamps). The solution presented in this post provides control and flexibility to implement custom logic tailored to your operational needs and support security-related efforts.

This flexible solution can also be used with other Systems Manager Inventory metadata, such as installed applications, network configurations, or Windows registry entries, enabling custom detection logic across a wide range of operational and security use cases.

Now let’s build the file integrity monitoring solution.

Prerequisites

Before you get started, you need an AWS account with permissions to create and manage AWS resources such as Amazon EC2, AWS Systems Manager, Amazon S3, and Lambda.

Step 1: Start an EC2 instance

Start by launching an EC2 instance and creating a file that you will later modify to simulate an unauthorized change.

Create an AWS Identity and Access Management (IAM) role to allow the EC2 instance to communicate with Systems Manager:

  1. Open the AWS Management Console and go to IAM, choose Roles from the navigation pane, and then choose Create role.
  2. Under Trusted entity type, select AWS service, select EC2 as the use case, and choose Next.
  3. On the Add permissions page, search for and select the AmazonSSMManagedInstanceCore IAM policy, then choose Next.
  4. Enter SSMAccessRole as the role name and choose Create role.
  5. The new SSMAccessRole should now appear in your list of IAM roles:
Figure 2: Create an IAM role for communication with Systems Manager

Figure 2: Create an IAM role for communication with Systems Manager

Start an EC2 instance:

  1. Open the Amazon EC2 console and choose Launch Instance.
  2. Enter a Name, keep the default Linux Amazon Machine Image (AMI), and select an Instance type (for example, t3.micro).
  3. Under Advanced details:
    1. IAM instance profile, select the previously created SSMAccessRole
    2. Create a fictitious payment application configuration file in the /etc/paymentapp/ folder on the EC2 instance. Later, you will modify it to demonstrate a file-change event for integrity monitoring. To create this file during EC2 startup, copy and paste the following script into User data.
#!/bin/bash
mkdir -p /etc/paymentapp
echo "db_password=initial123" > /etc/paymentapp/config.yaml
Figure 3: Adding the application configuration file

Figure 3: Adding the application configuration file

  1. Leave the remaining settings as default, choose Proceed without key pair, and then select Launch Instance. A key pair isn’t required for this demo because you use Session Manager for access.

Step 2: Enable Security Hub and Security Lake

If Security Hub and Security Lake are already enabled, you can skip to Step 3.
To start, enable Security Hub, which collects and aggregates security findings. AWS Security Hub CSPM adds continuous monitoring and automated checks against best practices.

  1. Open the Security Hub console.
  2. Choose Security Hub CSPM from the navigation pane and then select Enable AWS Security Hub CSPM and choose Enable Security Hub CSPM at the bottom of the page.

Note: For this demo, you don’t need the Security standards options and can clear them.

Figure 4: Enable Security Hub CSP

Figure 4: Enable Security Hub CSP

Next, activate Security Lake to start collecting actionable findings from Security Hub:

  1. Open the Amazon Security Lake console and choose Get Started.
  2. Under Data sources, select Ingest specific AWS sources.
  3. Under Log and event sources, select Security Hub (you will use this only for this demo):
Figure 5: Select log and event sources

Figure 5: Select log and event sources

  1. Under Select Regions, choose Specific Regions and make sure you select the AWS Region that you’re using.
  2. Use the default option to Create and use a new service role.
  3. Choose Next and Next again, then choose Create.

Step 3: Configure Systems Manager Inventory and sync to Amazon S3

With Security Hub and Security Lake enabled, the next step is to enable Systems Manager Inventory to collect file metadata and configure a Resource Data Sync to export this data to S3 for analysis.

  1. Create an S3 bucket by carefully following the instructions in the section To create and configure an Amazon S3 bucket for resource data sync.
  2. After you created the bucket, enable versioning in the Amazon S3 console by opening the bucket’s Properties tab, choosing Edit under Bucket Versioning, selecting Enable, and saving your changes. Versioning causes each new inventory snapshot to be saved as a separate version, so that you can track file changes over time.

Note: In production, enable S3 server access logging on the inventory bucket to keep an audit trail of access requests, enforce HTTPS-only access, and enable CloudTrail data events for S3 to record who accessed or modified inventory files.

The next step is to enable Systems Manager Inventory and set up the resource data sync:

  1. In the Systems Manager console, go to Fleet Manager, choose Account management, and select Set up inventory.
  2. Keep the default values but deselect every inventory type except File. Set a Path to limit collection to the files relevant for this demo and your security requirements. Under File, set the Path to: /etc/paymentapp/.
Figure 6: Set the parameters and path

Figure 6: Set the parameters and path

  1. Choose Setup Inventory.
  2. In Fleet Manager, choose Account management and select Resource Data Syncs.
  3. Choose Create resource data sync, enter a Sync name, and enter the name of the versioned S3 bucket you created earlier.
  4. Select This Region and then choose Create.

Step 4: Implement the Lambda function

Next, complete the setup to detect changes and create findings. Each time Systems Manager Inventory writes a new object to Amazon S3, an S3 Event Notification triggers a Lambda function that compares the latest and previous object versions. If it finds created, modified, or deleted files, it creates a security finding. To accomplish this, you will create the Lambda function, set its environment variables, add the helper layer, and attach the required permissions.

The following is an example finding generated in AWS Security Finding Format (ASFF) and sent to Security Hub. In this example, you see a notification about a file change on the EC2 instance listed under the Resources section.

{
	...
"Id": "fim-i-0b8f40f4de065deba-2025-07-12T13:48:31.741Z",
	"AwsAccountId": "XXXXXXXXXXXX",
	"Types": [
		"Software and Configuration Checks/File Integrity Monitoring"
	],
	"Severity": {
		"Label": "MEDIUM"
	},
	"Title": "File changes detected via SSM Inventory",
	"Description": "0 created, 1 modified, 0 deleted file(s) on instance i-0b8f40f4de065deba",
	"Resources": [
		{
			"Type": "AwsEc2Instance",
			"Id": "i-0b8f40f4de065deba"
		}
	],
	...
}

Create the Lambda function

This function detects file changes, reports findings, and removes unused Amazon S3 object versions to reduce costs.

  1. Open the Lambda console and choose Create function in the navigation pane.
  2. For Function Name enter fim-change-detector.
  3. Select Author from scratch, enter a function name, select the latest Python runtime, and choose Create function.
  4. On the Code tab, paste the following main function and choose Deploy.
import boto3, os, json, re
from datetime import datetime, UTC
from urllib.parse import unquote_plus
from helpers import is_critical, load_file_metadata, is_modified, extract_instance_id

s3 = boto3.client('s3')
securityhub = boto3.client('securityhub')

CRITICAL_FILE_PATTERNS = os.environ["CRITICAL_FILE_PATTERNS"].split(",")
SEVERITY_LABEL = os.environ["SEVERITY_LABEL"]
	
def lambda_handler(event, context):
	# Safe event handling
	if "Records" not in event or not event["Records"]:
		return

	# Extract S3 event
	record = event['Records'][0]
	bucket = record['s3']['bucket']['name']
	key = unquote_plus(record['s3']['object']['key'])
	current_version = record['s3']['object'].get('versionId')
	if not current_version:
		return

	# Fetching the region name
	account_id = context.invoked_function_arn.split(":")[4]
	region = boto3.session.Session().region_name

	# Get object versions (latest first)
	versions = s3.list_object_versions(Bucket=bucket, Prefix=key).get('Versions', [])
	versions = sorted(versions, key=lambda v: v['LastModified'], reverse=True)

	# Find previous version
	idx = next((i for i,v in enumerate(versions) if v["VersionId"] == current_version), None)
	if idx is None or idx + 1 >= len(versions):
		return
	prev_version = versions[idx+1]["VersionId"]

	# Load both versions
	current = load_file_metadata(bucket, key, current_version)
	previous = load_file_metadata(bucket, key, prev_version)

	# Compare
	created = {p for p in set(current) - set(previous) if is_critical(p)}
	deleted = {p for p in set(previous) - set(current) if is_critical(p)}
	modified = {p for p in set(current) & set(previous) if is_critical(p) and is_modified(p, current, previous)}

	# Report if changes were found
	if created or deleted or modified:
		instance_id = extract_instance_id(bucket, key, current_version)
		now = datetime.now(UTC).isoformat(timespec='milliseconds').replace('+00:00', 'Z')
		finding = {
			"SchemaVersion": "2018-10-08",
			"Id": f"fim-{instance_id}-{now}",
			"ProductArn": f"arn:aws:securityhub:{region}:{account_id}:product/{account_id}/default",
			"AwsAccountId": account_id,
			"GeneratorId": "ssm-inventory-fim",
			"CreatedAt": now,
			"UpdatedAt": now,
			"Types": ["Software and Configuration Checks/File Integrity Monitoring"],
			"Severity": {"Label": SEVERITY_LABEL},
			"Title": "File changes detected via SSM Inventory",
			"Description": (
				f"{len(created)} created, {len(modified)} modified, "
				f"{len(deleted)} deleted file(s) on instance {instance_id}"
			),
			"Resources": [{"Type": "AwsEc2Instance", "Id": instance_id}]
		}
		securityhub.batch_import_findings(Findings=[finding])

	# No change – delete older S3 version
	else:
		if prev_version != current_version:
			try:
				s3.delete_object(Bucket=bucket, Key=key, VersionId=prev_version)
			except Exception as e:
				print(f"Delete previous S3 object version failed: {e}")

Note: In production, set Lambda reserved concurrency to prevent unbounded scaling, configure a dead letter queue (DLQ) to capture failed invocations, and optionally attach the function to an Amazon VPC for network isolation.

Configure environment variables

Configure the two required environment variables in the Lambda console. These two variables (one for critical paths to monitor and one for security finding severity) must be set or the function will fail.

  1. Open the Lambda console and choose Configuration and then select Environment variables.
  2. Choose Edit and then choose Add environment variable.
  3. Under Key, choose CRITICAL_FILE_PATTERNS
    1. Enter ^/etc/paymentapp/config.*$ as the value.
    2. Set the SEVERITY_LABEL to MEDIUM.
Figure 7: CRITICAL_FILE_PATTERNS and SEVERITY_LABEL configuration

Figure 7: CRITICAL_FILE_PATTERNS and SEVERITY_LABEL configuration

Set up permissions

The next step is to attach permissions to the Lambda function

  1. In your Lambda function, choose Configuration and then select Permissions.
  2. Under Execution role, select the role name that will lead to the role in IAM.
  3. Choose Add permissions and select Create inline policy. Select JSON view.
  4. Paste the following policy, and make sure to replace <bucket-name> with the name of your S3 bucket, and you also update <region> and <account-id> with your AWS Region and Account ID:
{
"Version": "2012-10-17",
"Statement": [
	{
		"Effect": "Allow",
		"Action": "securityhub:BatchImportFindings",
		"Resource": "arn:aws:securityhub:<region>:<account-id>:product/<account-id>/default"
	},
	{
		"Effect": "Allow",
		"Action": [
			"s3:GetObject",
			"s3:GetObjectVersion",
			"s3:ListBucketVersions",
			"s3:DeleteObjectVersion"
		],
		"Resource": [
			"arn:aws:s3:::<bucket-name>",
			"arn:aws:s3:::<bucket-name>/*"
			]
		}
	]
}
  1. To finalize, enter a Policy name and choose Create policy.

Add functions to the Lambda layer

For better modularity, add some helper functions to a Lambda layer. These functions are already referenced in the import section of the preceding Lambda function’s Python code. The helper functions check critical paths, load file metadata, compare modification times, and extract the EC2 instance ID.

Open AWS CloudShell from the top-right corner of the AWS console header, then copy and paste the following script and press Enter. It creates the helper layer and attaches it to your Lambda function.

#!/bin/bash
set -e
FUNCTION_NAME="fim-change-detector"
LAYER_NAME="fim-change-detector-layer"

mkdir -p python
cat > python/helpers.py << 'EOF'
import json, re, os
from dateutil.parser import parse as parse_dt
import boto3
s3 = boto3.client('s3')
CRITICAL_FILE_PATTERNS = os.environ.get("CRITICAL_FILE_PATTERNS", "").split(",")

def is_critical(path):
	return any(re.match(p.strip(), path) for p in CRITICAL_FILE_PATTERNS if p.strip())

def load_file_metadata(bucket, key, version_id):
	obj = s3.get_object(Bucket=bucket, Key=key, VersionId=version_id)
	data = {}
	for line in obj['Body'].read().decode().splitlines():
		if line.strip():
			i = json.loads(line)
			n, d, m = i.get("Name","").strip(), i.get("InstalledDir","").strip(), i.get("ModificationTime","").strip()
			if n and d and m: data[f"{d.rstrip('/')}/{n}"] = m
	return data

def is_modified(path, current, previous):
	try: return parse_dt(current[path]) != parse_dt(previous[path])
	except: return current[path] != previous[path]

def extract_instance_id(bucket, key, version_id):
	obj = s3.get_object(Bucket=bucket, Key=key, VersionId=version_id)
	for line in obj['Body'].read().decode().splitlines():
		if line.strip():
			r = json.loads(line)
			if "resourceId" in r: return r["resourceId"]
	return None
EOF

zip -r helpers_layer.zip python >/dev/null
LAYER_VERSION_ARN=$(aws lambda publish-layer-version \
	--layer-name "$LAYER_NAME" \
	--description "Helper functions for File Integrity Monitoring" \
	--zip-file fileb://helpers_layer.zip \
	--compatible-runtimes python3.13 \
	--query 'LayerVersionArn' \
	--output text)

aws lambda update-function-configuration \
	--function-name "$FUNCTION_NAME" \
	--layers "$LAYER_VERSION_ARN" >/dev/null
echo "Layer created and attached to the Lambda function."

Step 5: Set up S3 Event Notifications

Finally, set up S3 Event Notifications to trigger the Lambda function when new inventory data arrives.

  1. Open the S3 console and select the Systems Manager Inventory bucket that you created.
  2. Choose Properties and select Event notifications.
  3. Choose Create event notification.
    1. Enter an Event name.
    2. In the Prefix field, enter AWS%3AFile/ to limit Lambda triggers to file inventory objects only.
      Note: The prefix contains a : character, which must be URL-encoded as %3A.
    3. Under Event types, select Put.
    4. At the bottom, select your newly created Lambda function, and choose Save changes.

In this example, inventory collection runs every 30 minutes (48 times each day) but can be adjusted based on security requirements to optimize costs. The Lambda function is triggered once for each instance whenever a new inventory object is created. You can further reduce event volume by filtering EC2 instances through S3 Event Notification prefixes, enabling focused monitoring of high-value instances.

Step 6: Test the file change detection flow

Now that the EC2 instance is running and the sample configuration file /etc/paymentapp/config.yaml has been initialized, you’re ready to simulate an unauthorized change to test the file integrity monitoring setup.

  1. Open the Systems Manager console.
  2. Go to Session Manager and choose Start session.
  3. Select your EC2 instance and choose Start Session.
  4. Run the following command to modify the file:

echo β€œdb_password=hacked456" | sudo tee /etc/paymentapp/config.yaml

This simulates a configuration tampering event. During the next Systems Manager Inventory run, the updated metadata will be saved to Amazon S3.

To manually trigger this:

  1. Open the Systems Manager console and choose State Manager.
  2. Select your association and choose Apply association now to start the inventory update.
  3. After the association status changes to Success, check your SSM Inventory S3 bucket in the AWS:File folder and review the inventory object and its versions.
  4. Open the Security Hub console and choose Findings. After a short delay, you should see a new finding like the one shown in Figure 8:
Figure 8: View file change findings

Figure 8: View file change findings

Step 7: Query and visualize findings

While Security Hub provides a centralized view of findings, you can deepen your analysis using Amazon Athena to run SQL queries directly on the normalized Security Lake data in Amazon S3. This data follows the Open Cybersecurity Schema Framework (OCSF), which is a vendor-neutral standard that simplifies integration and analysis of security data across different tools and services.

The following is an example Athena query:

SELECT
	finding_info.desc AS description,
	class_uid AS class_id,
	severity AS severity_label,
	type_name AS finding_type,
	time_dt AS event_time,
	region,
	accountid
FROM amazon_security_lake_table_us_east_1_sh_findings_2_0

Note: Be sure to adjust the FROM clause for other Regions. Security Lake processes findings before they appear in Athena, so expect a short delay between ingestion and data availability.
You will see a similar result for the preceding query, shown in Figure 9:

Figure 9: Athena query result in the Amazon Athena query editor

Figure 9: Athena query result in the Amazon Athena query editor

Security Lake classifies this finding as an OCSF 2004 Class, Detection Finding. You can explore the full schema definitions at OCSF Categories. For more query examples, see the Security Lake query examples.
For visual exploration and real-time insights, you can integrate Security Lake with OpenSearch Service and QuickSight, both of which now offer extensive generative AI support. For a guided walkthrough using QuickSight, see How to visualize Amazon Security Lake findings with Amazon QuickSight.

Clean up

After testing the step-by-step guide, make sure to clean up the resources you created for this post to avoid ongoing costs.

  1. Terminate the EC2 instance
  2. Delete the Resource Data Sync and Inventory Association
  3. Remove the Lambda function.
  4. Disable Security Lake and Security Hub CSPM
  5. Delete IAM roles created for this post
  6. Delete the associated SSM Resource Data Sync and Security Lake S3 buckets.

Conclusion

In this post, you learned how to use Systems Manager Inventory to track file integrity, report findings to Security Hub, and analyze them using Security Lake.
You can access the full sample code to set up this solution in the AWS Samples repository.
While this post uses a single-account, single-Region setup for simplicity, Security Lake supports collecting data across multiple accounts and Regions using AWS Organizations. You can also use a Systems Manager resource data sync to send inventory data to a central S3 bucket.

Getting Started with Amazon Security Lake and Systems Manager Inventory provides guidance for enabling scalable, cloud-centric monitoring with full operational context.

Adam Nemeth Adam Nemeth
Adam is a Senior Solutions Architect and generative AI enthusiast at AWS, helping financial services customers by embracing the Day 1 culture and customer obsession of Amazon. With over 24 years of IT experience, Adam previously worked at UBS as an architect and has also served as a delivery lead, consultant, and entrepreneur. He lives in Switzerland with his wife and their three children.
❌