❌

Normal view

Meta confirms it’s working on premium subscription for its apps

29 January 2026 at 22:06

Meta plans to test exclusive features that will be incorporated in paid versions of Facebook, Instagram, and WhatsApp. It confirmed these plans to TechCrunch.

But these plans are not to be confused with the ad-free subscription options that Meta introduced for Facebook and Instagram in the EU, the European Economic Area, and Switzerland in late 2023 and framed as a way to comply with General Data Protection Regulation (GDPR) and Digital Markets Act requirements.

From November 2023, users in those regions could either keep using the services for free with personalized ads or pay a monthly fee for an ad‑free experience. European rules require Meta to get users’ consent in order to show them targeted ads, so this was an obvious attempt to recoup advertising revenue when users declined to give that consent.

This year, users in the UK were given the same choice: use Meta’s products for free or subscribe to use them without ads. But only grudgingly, judging by the tone in the offer… β€œAs part of laws in your region, you have a choice.”

As part of laws in your region, you have a choice
The ad-free option that has been rolling out coincides with the announcement of Meta’s premium subscriptions.

That ad-free option, however, is not what Meta is talking about now.

The newly announced plans are not about ads, and they are also separate from Meta Verified, which starts at around $15 a month and focuses on creators and businesses, offering a verification badge, better support, and anti‑impersonation protection.

Instead, these new subscriptions are likely to focus on additional featuresβ€”more control over how users share and connect, and possibly tools such as expanded AI capabilities, unlimited audience lists, seeing who you follow that doesn’t follow you back, or viewing stories without the poster knowing it was you.

These examples are unconfirmed. All we know for sure is that Meta plans to test new paid features to see which ones users are willing to pay for and how much they can charge.

Meta has said these features will focus on productivity, creativity, and expanded AI.

My opinion

Unfortunately, this feels like another refusal to listen.

Most of us aren’t asking for more AI in our feeds. We’re asking for a basic sense of control: control over who sees us, what’s tracked about us, and how our data is used to feed an algorithm designed to keep us scrolling.

Users shouldn’t have to choose between being mined for behavioral data or paying a monthly fee just to be left alone. The message baked into β€œpay or be profiled” is that privacy is now a luxury good, not a default right. But while regulators keep saying the model is unlawful, the experience on the ground still nudges people toward the path of least resistance: accept the tracking and move on.

Even then, this level of choice is only available to users in Europe.

Why not offer the same option to users in the US? Or will it take stronger US privacy regulation to make that happen?


We don’t just report on threats – we help protect your social media

Cybersecurity risks should never spread beyond a headline. Protect your social media accounts by usingΒ Malwarebytes Identity Theft Protection.

How to get started with security response automation on AWS

29 January 2026 at 20:44

December 2, 2019: Original publication date of this post.


At AWS, we encourage you to use automation. Not just to deploy your workloads and configure services, but to also help you quickly detect and respond to security events within your AWS environments. In addition to increasing the speed of detection and response, automation also helps you scale your security operations as your workloads in AWS increase and scale as well. For these reasons, security automation is a key principle outlined in the Well-Architected Framework, the AWS Cloud Adoption Framework, and the AWS Security Incident Response Guide.

Security response automation is a broad topic that spans many areas. The goal of this blog post is to introduce you to core concepts and help you get started. You will learn how to implement automated security response mechanisms within your AWS environments. This post will include common patterns that customers often use, implementation considerations, and an example solution. Additionally, we will share resources AWS has produced in the form of the Automated Security Response GitHub repo. The GitHub repo includes scripts that are ready-to-deploy for common scenarios.

What is security response automation?

Security response automation is a planned and programmed action taken to achieve a desired state for an application or resource based on a condition or event. When you implement security response automation, you should adopt an approach that draws from existing security frameworks. Frameworks are published materials which consist of standards, guidelines, and best practices in order help organizations manage cybersecurity-related risk. Using frameworks helps you achieve consistency and scalability and enables you to focus more on the strategic aspects of your security program. You should work with compliance professionals within your organization to understand any specific compliance or security frameworks that are also relevant for your AWS environment.

Our example solution is based on the NIST Cybersecurity Framework (CSF), which is designed to help organizations assess and improve their ability to help prevent, detect, and respond to security events. According to the CSF, β€œcybersecurity incident response” supports your ability to contain the impact of potential cybersecurity events.

Although automation is not a CSF requirement, automating responses to events enables you to create repeatable, predictable approaches to monitoring and responding to threats. When we build automation around events that we know should not occur, it gives us an advantage over a malicious actor because the automation is able to respond within minutes or even seconds compared to an on-call support engineer.

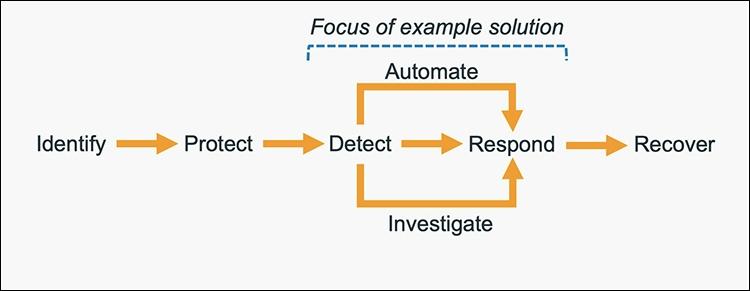
The five main steps in the CSF are identify, protect, detect, respond and recover. We’ve expanded the detect and respond steps to include automation and investigation activities.

Figure 1: The five steps in the CSF

Figure 1: The five steps in the CSF

The following definitions for each step in the diagram above are based on the CSF but have been adapted for our example in this blog post. Although we will focus on the detect, automate and respond steps, it’s important to understand the entire process flow.

  • Identify: Identify and understand the resources, applications, and data within your AWS environment.
  • Protect: Develop and implement appropriate controls and safeguards to facilitate the delivery of services.
  • Detect: Develop and implement appropriate activities to identify the occurrence of a cybersecurity event. This step includes the implementation of monitoring capabilities which will be discussed further in the next section.
  • Automate: Develop and implement planned, programmed actions that will achieve a desired state for an application or resource based on a condition or event.
  • Investigate: Perform a systematic examination of the security event to establish the root cause.
  • Respond: Develop and implement appropriate activities to take automated or manual actions regarding a detected security event.
  • Recover: Develop and implement appropriate activities to maintain plans for resilience and to restore capabilities or services that were impaired due to a security event

Security response automation on AWS

AWS CloudTrail and AWS Config continuously log details regarding users and other identity principals, the resources they interacted with, and configuration changes they might have made in your AWS account. We are able to combine these logs with Amazon EventBridge, which gives us a single service to trigger automations based on events. You can use this information to automatically detect resource changes and to react to deviations from your desired state.

Figure 2: Automated remediation flow

Figure 2: Automated remediation flow

As shown in the diagram above, an automated remediation flow on AWS has three stages:

  1. Monitor: Your automated monitoring tools collect information about resources and applications running in your AWS environment. For example, they might collect AWS CloudTrail information about activities performed in your AWS account, usage metrics from your Amazon EC2 instances, or flow log information about the traffic going to and from network interfaces in your Amazon Virtual Private Cloud (VPC).
  2. Detect: When a monitoring tool detects a predefined conditionβ€”such as a breached threshold, anomalous activity, or configuration deviationβ€”it raises a flag within the system. A triggering condition might be an anomalous activity detected by Amazon GuardDuty, a resource out of compliance with an AWS Config rule, or a high rate of blocked requests on an Amazon VPC security group or AWS Web Application Firewall (AWS WAF) web access control list (web-acl).
  3. Respond: When a condition is flagged, an automated response is triggered that performs an action you’ve predefinedβ€”something intended to remediate or mitigate the flagged condition.

Examples of automated response actions may include modifying a VPC security group, patching an Amazon EC2 instance, rotating various different types of credentials, or adding an additional entry into an IP set in AWS WAF that is part of a web-acl rule to block suspicious clients who triggered a threshold from a monitoring metric.

You can use the event-driven flow described above to achieve a variety of automated response patterns with varying degrees of complexity. Your response pattern could be as simple as invoking a single AWS Lambda function, or it could be a complex series of AWS Step Function tasks with advanced logic. In this blog post, we’ll use two simple Lambda functions in our example solution.

How to define your response automation

Now that we’ve introduced the concept of security response automation, start thinking about security requirements within your environment that you’d like to enforce through automation. These design requirements might come from general best practices you’d like to follow, or they might be specific controls from compliance frameworks relevant for your business.

Customers start with the run-books they already use as part of their Incident Response Lifecycle. Simple run-books, like responding to an exfiltrated credential, can be quickly mapped to automation especially if your run book calls for the disabling of the credential and the notification of on-call personnel. But it can be resource driven as well. Events such as a new AWS VPC being created might trigger your automation to immediately deploy your company’s standard configuration for VPC flowlog collection.

Your objectives should be quantitative, not qualitative. Here are some examples of quantitative objectives:

  • Remote administrative network access to servers should be limited.
  • Server storage volumes should be encrypted.
  • AWS console logins should be protected by multi-factor authentication.

As an optional step, you can expand these objectives into user stories that define the conditions and remediation actions when there is an event. User stories are informal descriptions that briefly document a feature within a software system. User stories may be global and span across multiple applications or they may be specific to a single application.

For example:

β€œRemote administrative network access to servers should have limited access from internal trusted networks only. Remote access ports include SSH TCP port 22 and RDP TCP port 3389. If remote access ports are detected within the environment and they are accessible to outside resources, they should be automatically closed and the owner will be notified.”

Once you’ve completed your user story, you can determine how to use automated remediation to help achieve these objectives in your AWS environment. User stories should be stored in a location that provides versioning support and can reference the associated automation code.

You should carefully consider the effect of your remediation mechanisms in order to help prevent unintended impact on your resources and applications. Remediation actions such as instance termination, credential revocation, and security group modification can adversely affect application availability. Depending on the level of risk that’s acceptable to your organization, your automated mechanism can only provide a notification which would then be manually investigated prior to remediation. Once you’ve identified an automated remediation mechanism, you can build out the required components and test them in a non-production environment.

Sample response automation walkthrough

In the following section, we’ll walk you through an automated remediation for a simulated event that indicates potential unauthorized activityβ€”the unintended disabling of CloudTrail logging. Outside parties might want to disable logging to avoid detection and the recording of their unauthorized activity. Our response is to re-enable the CloudTrail logging and immediately notify the security contact. Here’s the user story for this scenario:

β€œCloudTrail logging should be enabled for all AWS accounts and regions. If CloudTrail logging is disabled, it will automatically be enabled and the security operations team will be notified.”

A note about the sample response automation below as it references Amazon EventBridge: EventBridge was formerly referred to as Amazon CloudWatch Events. If you see other documentation referring to Amazon CloudWatch, you can find that configuration now via the Amazon EventBridge console page.

Additionally, we will be looking at this scenario through the lens of an account that has a stand-alone CloudTrail configuration. While this is an acceptable configuration, AWS recommends using AWS Organizations, which allows you to configure an organizational CloudTrail. These organizational trails are immutable to the child accounts so that logging data cannot be removed or tampered with.

In order to use our sample remediation, you will need to enable Amazon GuardDuty and AWS Security Hub in the AWS Region you have selected. Both of these services include a 30-day trial at no additional cost. See the AWS Security Hub pricing page and the Amazon GuardDuty pricing page for additional details.

Important: You’ll use AWS CloudTrail to test the sample remediation. Running more than one CloudTrail trail in your AWS account will result in charges based on the number of events processed while the trail is running. Charges for additional copies of management events recorded in a Region are applied based on the published pricing plan. To minimize the charges, follow the clean-up steps that we provide later in this post to remove the sample automation and delete the trail.

Deploy the sample response automation

In this section, we’ll show you how to deploy and test the CloudTrail logging remediation sample. Amazon GuardDuty generates the finding

Stealth:IAMUser/CloudTrailLoggingDisabled when CloudTrail logging is disabled, and AWS Security Hub collects findings from GuardDuty using the standardized finding format mentioned earlier. We recommend that you deploy this sample into a non- production AWS account.

Select the Launch Stack button below to deploy a CloudFormation template with an automation sample in the us-east-1 Region. You can also download the template and implement it in another Region. The template consists of an Amazon EventBridge rule, an AWS Lambda function, and the IAM permissions necessary for both components to execute. It takes several minutes for the CloudFormation stack build to complete.

Select the Launch Stack button to launch the template

  1. In the CloudFormation console, choose the Select Template form, and then select Next.
  2. On the Specify Details page, provide the email address for a security contact. For the purpose of this walkthrough, it should be an email address that you have access to. Then select Next.
  3. On the Options page, accept the defaults, then select Next.
  4. On the Review page, confirm the details, then select Create.
  5. While the stack is being created, check the inbox of the email address that you provided in step 2. Look for an email message with the subject AWS Notification – Subscription Confirmation. Select the link in the body of the email to confirm your subscription to the Amazon Simple Notification Service (Amazon SNS) topic. You should see a success message like the one shown in Figure 3:

    Figure 3: SNS subscription confirmation

    Figure 3: SNS subscription confirmation

  6. Return to the CloudFormation console. After the Status field for the CloudFormation stack changes to CREATE COMPLETE (as shown in Figure 4), the solution is implemented and is ready for testing.

    Figure 4: CREATE_COMPLETE status

    Figure 4: CREATE_COMPLETE status

Test the sample automation

You’re now ready to test the automated response by creating a test trail in CloudTrail, then trying to stop it.

  1. From the AWS Management Console, choose Services > CloudTrail.
  2. Select Trails, then select Create Trail.
  3. On the Create Trail form:
    1. Enter a value for Trail name and for AWS KMS alias, as shown in Figure 5.
    2. For Storage location, create a new S3 bucket or choose an existing one. For our testing, we create a new S3 bucket.

      Figure 5: Create a CloudTrail trail

      Figure 5: Create a CloudTrail trail

    3. On the next page, under Management events, select Write-only (to minimize event volume).

      Figure 6: Create a CloudTrail trail

      Figure 6: Create a CloudTrail trail

  4. On the Trails page of the CloudTrail console, verify that the new trail has started. You should see the status as logging, as shown in Figure 7.

    Figure 7: Verify new trail has started

    Figure 7: Verify new trail has started

  5. You’re now ready to act like an unauthorized user trying to cover their tracks. Stop the logging for the trail that you just created:
    1. Select the new trail name to display its configuration page.
    2. In the top-right corner, choose the Stop logging button.
    3. When prompted with a warning dialog box, select Stop logging.
    4. Verify that the logging has stopped by confirming that the Start logging button now appears in the top right, as shown in Figure 8.

      Figure 8: Verify logging switch is off

      Figure 8: Verify logging switch is off

    You have now simulated a security event by disabling logging for one of the trails in the CloudTrail service. Within the next few seconds, the near real-time automated response will detect the stopped trail, restart it, and send an email notification. You can refresh the Trails page of the CloudTrail console to verify through the Stop logging button at the top right corner.

    Within the next several minutes, the investigatory automated response will also begin. GuardDuty will detect the action that stopped the trail and enrich the data about the source of unexpected behavior. Security Hub will then ingest that information and optionally correlate with other security events.

    Following the steps below, you can monitor findings within Security Hub for the finding type TTPs/Defense Evasion/Stealth:IAMUser-CloudTrailLoggingDisabled to be generated:

  6. In the AWS Management Console, choose Services > Security Hub.
    1. In the left pane, select Findings.
    2. Select the Add filters field, then select Type.
    3. Select EQUALS, paste TTPs/Defense Evasion/Stealth:IAMUser-CloudTrailLoggingDisabled into the field, then select Apply.
    4. Refresh your browser periodically until the finding is generated.

    Figure 9: Monitor Security Hub for your finding

    Figure 9: Monitor Security Hub for your finding

  7. Select the title of the finding to review details. When you’re ready, you can choose to archive the finding by selecting the Archive link. Alternately, you can select a custom action to continue with the response. Custom actions are one of the ways that you can integrate Security Hub with custom partner solutions.

Now that you’ve completed your review of the finding, let’s dig into the components of automation.

How the sample automation works

This example incorporates two automated responses: a near real-time workflow and an investigatory workflow. The near real-time workflow provides a rapid response to an individual event, in this case the stopping of a trail. The goal is to restore the trail to a functioning state and alert security responders as quickly as possible. The investigatory workflow still includes a response to provide defense in depth and uses services that support a more in-depth investigation of the incident.

Figure 10: Sample automation workflow

Figure 10: Sample automation workflow

In the near real-time workflow, Amazon EventBridge monitors for the undesired activity.

When a trail is stopped, AWS CloudTrail publishes an event on the EventBridge bus. An EventBridge rule detects the trail-stopping event and invokes a Lambda function to respond to the event by restarting the trail and notifying the security contact via an Amazon Simple Notification Service (SNS) topic.

In the investigative workflow, CloudTrail logs are monitored for undesired activities. For example, if a trail is stopped, there will be a corresponding log record. GuardDuty detects this activity and retrieves additional data points regarding the source IP that executed the API call. Two common examples of those additional data points in GuardDuty findings include whether the API call came from an IP address on a threat list, or whether it came from a network not commonly used in your AWS account. An AWS Lambda function responds by restarting the trail and notifying the security contact. The finding is imported into AWS Security Hub, where it’s aggregated with other findings for analyst viewing. Using EventBridge, you can configure Security Hub to export the finding to partner security orchestration tools, SIEM (security information and event management) systems, and ticketing systems for investigation.

AWS Security Hub imports findings from AWS security services such as GuardDuty, Amazon Macie and Amazon Inspector, plus from third-party product integrations you’ve enabled. Findings are provided to Security Hub in AWS Security Finding Format (ASFF), which minimizes the need for data conversion. Security Hub correlates these findings to help you identify related security events and determine a root cause. Security Hub also publishes its findings to Amazon EventBridge to enable further processing by other AWS services such as AWS Lambda. You can also create custom actions using Security Hub. Custom actions are useful for security analysts working with the Security Hub console who want to send a specific finding, or a small set of findings, to a response or a remediation workflow.

Deeper look into how the β€œRespond” phase works

Amazon EventBridge and AWS Lambda work together to respond to a security finding.

Amazon EventBridge is a service that provides real-time access to changes in data in AWS services, your own applications, and Software-as-a-Service (SaaS) applications without writing code. In this example, EventBridge identifies a Security Hub finding that requires action and invokes a Lambda function that performs remediation. As shown in Figure 11, the Lambda function both notifies the security operator via SNS and restarts the stopped CloudTrail.

Figure 11: Sample β€œrespond” workflow

Figure 11: Sample β€œrespond” workflow

To set this response up, we looked for an event to indicate that a trail had stopped or was disabled. We knew that the GuardDuty finding Stealth:IAMUser/CloudTrailLoggingDisabled is raised when CloudTrail logging is disabled. Therefore, we configured the default event bus to look for this event.

You can learn more regarding the available GuardDuty findings in the user guide.

How the code works

When Security Hub publishes a finding to EventBridge, it includes full details of the finding as discovered by GuardDuty. The finding is published in JSON format. If you review the details of the sample finding, note that it has several fields helping you identify the specific events that you’re looking for. Here are some of the relevant details:

{
   …
   "source":"aws.securityhub",
   …
   "detail":{
      "findings": [{
		…
    	β€œTypes”: [
			"TTPs/Defense Evasion/Stealth:IAMUser-CloudTrailLoggingDisabled"
			],
		…
      }]
}

You can build an event pattern using these fields, which an EventBridge filtering rule can then use to identify events and to invoke the remediation Lambda function. Below is a snippet from the CloudFormation template we provided earlier that defines that event pattern for the EventBridge filtering rule:

# pattern matches the nested JSON format of a specific Security Hub finding
      EventPattern:
        source:
        - aws.securityhub
        detail-type:
          - "Security Hub Findings - Imported"
        detail:
          findings:
            Types:
              - "TTPs/Defense Evasion/Stealth:IAMUser-CloudTrailLoggingDisabled"

Once the rule is in place, EventBridge continuously monitors the event bus for events with this pattern.

When EventBridge finds a match, it invokes the remediating Lambda function and passes the full details of the event to the function. The Lambda function then parses the JSON fields in the event so that it can act as shown in this Python code snippet:

# extract trail ARN by parsing the incoming Security Hub finding (in JSON format)
trailARN = event['detail']['findings'][0]['ProductFields']['action/awsApiCallAction/affectedResources/AWS::CloudTrail::Trail']   

# description contains useful details to be sent to security operations
description = event['detail']['findings'][0]['Description']

The code also issues a notification to security operators so they can review the findings and insights in Security Hub and other services to better understand the incident and to decide whether further manual actions are warranted. Here’s the code snippet that uses SNS to send out a note to security operators:

#Sending the notification that the AWS CloudTrail has been disabled.
snspublish = snsclient.publish(
	TargetArn = snsARN,
	Message="Automatically restarting CloudTrail logging.  Event description: \"%s\" " %description
	)

While notifications to human operators are important, the Lambda function will not wait to take action. It immediately remediates the condition by restarting the stopped trail in CloudTrail. Here’s a code snippet that restarts the trail to reenable logging:

try:
	client = boto3.client('cloudtrail')
	enablelogging = client.start_logging(Name=trailARN)
	logger.debug("Response on enable CloudTrail logging- %s" %enablelogging)
except ClientError as e:
	logger.error("An error occured: %s" %e)

After the trail has been restarted, API activity is once again logged and can be audited.

This can help provide relevant data for the remaining steps in the incident response process. The data is especially important for the post-incident phase, when your team analyzes lessons learned to help prevent future incidents. You can also use this phase to identify additional steps to automate in your incident response.

How to Enable Custom Action and build your own Automated Response

Unlike how you set up the notification earlier, you may not want fully automate responses to findings. To set up automation that you can manually trigger it for specific findings, you can use custom actions. A custom action is a Security Hub mechanism for sending selected findings to EventBridge that can be matched by an EventBridge rule. The rule defines a specific action to take when a finding is received that is associated with the custom action ID. Custom actions can be used, for example, to send a specific finding, or a small set of findings, to a response or remediation workflow. You can create up to 50 custom actions.

In this section, we will walk you through how to create a custom action in Security Hub which will trigger an EventBridge rule to execute a Lambda function for the same security finding related to CloudTrail Disabled.

Create a Custom Action in Security Hub

  1. Open Security Hub. In the left navigation pane, under Management, open the Custom actions page.
  2. Choose Create custom action.
  3. Enter an Action Name, Action Description, and Action ID that are representative of an action that you are implementingβ€”for example Enable CloudTrail Logging.
  4. Choose Create custom action.
  5. Copy the custom action ARN that was generated. You will need it in the next steps.

Create Amazon EventBridge Rule to capture the Custom Action

In this section, you will define an EventBridge rule that will match events (findings) coming from Security Hub which were forwarded by the custom action you defined above.

  1. Navigate to the Amazon EventBridge console.
  2. On the right side, choose Create rule.
  3. On the Define rule detail page, give your rule a name and description that represents the rule’s purpose (for example, the same name and description that you used for the custom action). Then choose Next.
  4. Security Hub findings are sent as events to the AWS default event bus. In the Define pattern section, you can identify filters to take a specific action when matched events appear. For the Build event pattern step, leave the Event source set to AWS events or EventBridge partner events.
  5. Scroll down to Event pattern. Under Event source, leave it set to AWS Services, and under AWS Service, select Security Hub.
  6. For the Event Type, choose Security Hub Findings – Custom Action.
  7. Then select Specific custom action ARN(s) and enter the ARN for the custom action that you created earlier.
  8. Notice that as you selected these options, the event pattern on the right was updating. Choose Next.
  9. On the Select target(s) step, from the Select a target dropdown, select Lambda function. Then, from the Function dropdown, select SecurityAutoremediation-CloudTrailStartLoggingLamb-xxxx. This lambda function was created as part of the Cloudformation template.
  10. Choose Next.
  11. For the Configure tags step, choose Next.
  12. For the Review and create step, choose Create rule.

Trigger the automation

As GuardDuty and Security Hub have been enabled, after AWS Cloudtrail logging is enabled, you should see a security finding generated by Amazon GuardDuty and collected in AWS Security Hub.

  1. Navigate to the Security Hub Findings page.
  2. In the top corner, from the Actions dropdown menu, select the Enable CloudTrail Logging custom action.
  3. Verify the CloudTrail configuration by accessing the AWS CloudTrail dashboard.
  4. Confirm that the trail status displays as Logging, which indicates the successful execution of the remediation Lambda function triggered by the EventBridge rule through the custom action.

How AWS helps customers get started

Many customers look at the task of building automation remediation as daunting. Many operations teams might not have the skills or human scale to take on developing automation scripts. Because many Incident Response scenarios can be mapped to findings in AWS security services, we can begin building tools that respond and are quickly adaptable to your environment.

Automated Security Response (ASR) on AWS is a solution that enables AWS Security Hub customers to remediate findings with a single click using sets of predefined response and remediation actions called Playbooks. The remediations are implemented as AWS Systems Manager automation documents. The solution includes remediations for issues such as unused access keys, open security groups, weak account password policies, VPC flow logging configurations, and public S3 buckets. Remediations can also be configured to trigger automatically when findings appear in AWS Security Hub.

The solution includes the playbook remediations for some of the security controls defined as part of the following standards:

  • AWS Foundational Security Best Practices (FSBP) v1.0.0
  • Center for Internet Security (CIS) AWS Foundations Benchmark v1.2.0
  • Center for Internet Security (CIS) AWS Foundations Benchmark v1.4.0
  • Center for Internet Security (CIS) AWS Foundations Benchmark v3.0.0
  • Payment Card Industry (PCI) Data Security Standard (DSS) v3.2.1
  • National Institute of Standards and Technology (NIST) Special Publication 800-53 Revision 5

A Playbook called Security Control is included that allows operation with AWS Security Hub’s Consolidated Control Findings feature.

Figure 12: Architecture of the Automated Security Solution

Figure 12: Architecture of the Automated Security Solution

Additionally, the library includes instructions in the Implementation Guide on how to create new automations in an existing Playbook.

You can use and deploy this library into your accounts at no additional cost, however there are costs associated with the services that it consumes.

Clean up

After you’ve completed the sample security response automation, we recommend that you remove the resources created in this walkthrough example from your account in order to minimize the charges associated with the trail in CloudTrail and data stored in S3.

Important: Deleting resources in your account can negatively impact the applications running in your AWS account. Verify that applications and AWS account security do not depend on the resources you’re about to delete.

Here are the clean-up steps:

Summary

You’ve learned the basic concepts and considerations behind security response automation on AWS and how to use Amazon EventBridge, Amazon GuardDuty and AWS Security Hub to automatically re-enable AWS CloudTrail when it becomes disabled unexpectedly. Additionally you got a chance to learn about the AWS Automated Security Response library and how it can help you rapidly get started with automations through Security Hub. As a next step, you may want to start building your own custom response automations and dive deeper into the AWS Security Incident Response Guide, NIST Cybersecurity Framework (CSF) or the AWS Cloud Adoption Framework (CAF) Security Perspective. You can explore additional automatic remediation solutions on the AWS Solution Library. You can find the code used in this example on GitHub.

If you have feedback about this blog post, submit them in the Comments section below. If you have questions about using this solution, start a thread in the
EventBridge, GuardDuty or Security Hub forums, or contact AWS Support.

New Microsoft Data Security Index report explores secure AI adoption to protect sensitive data

29 January 2026 at 18:00

Generative AI and agentic AI are redefining how organizations innovate and operate, unlocking new levels of productivity, creativity and collaboration across industry teams. From accelerating content creation to streamlining workflows, AI offers transformative benefits that empower organizations to work smarter and faster. These capabilities, however, also introduce new dimensions of data riskβ€”as AI adoption grows, so does the urgency for effective data security that keeps pace with AI innovation. In the 2026 Microsoft Data Security Index report, we explored one of the most pressing questions facing today’s organizations: How can we harness the power of AI while safeguarding sensitive data?

47% of surveyed organizations are​ implementing controls focused on generative AI workloads

To fully realize the potential of AI, organizations must pair innovation with responsibility and robust data security. This year, the Data Security Index report builds upon the responses of more than 1,700 security leaders to highlight three critical priorities for protecting organizational data and securing AI adoption:

  1. Moving from fragmented tools to unified data security.
  2. Managing AI-powered productivity securely.
  3. Strengthening data security with generative AI itself.

By consolidating solutions for better visibility and governance controls, implementing robust controls processes to protect data in AI-powered workflows, and using generative AI agents and automation to enhance security programs, organizations can build a resilient foundation for their next wave of generative AI-powered productivity and innovation. The result is a future where AI both drives efficiency and acts as a powerful ally in defending against data risk, unlocking growth without compromising protection.

In this article we will delve into some of the Data Security Index report’s key findings that relate to generative AI and how they are being operationalized at Microsoft. The report itself has a much broader focus and depth of insight.

1. From fragmented tools to unified data security

Many organizations still rely on disjointed tools and siloed controls, creating blind spots that hinder the efficacy of security teams. According to the 2026 Data Security Index, decision-makers cite poor integration, lack of a unified view across environments, and disparate dashboards as their top challenges in maintaining proper visibility and governance. These gaps make it harder to connect insights and respond quickly to risksβ€”especially as data volumes and data environment complexity surge. Security leaders simply aren’t getting the oversight they need.

Why it matters
Consolidating tools into integrated platforms improves visibility, governance, and proactive risk management.

To address these challenges, organizations are consolidating tools, investing in unified platforms like Microsoft Purview that bring operations together while improving holistic visibility and control. These integrated solutions frequently outperform fragmented toolsets, enabling better detection and response, streamlined management, and stronger governance.

As organizations adopt new AI-powered technologies, many are also leaning into emerging disciplines like Microsoft Purview Data Security Posture Management (DSPM) to keep pace with evolving risks. Effective DSPM programs help teams identify and prioritize data‑exposure risks, detect access to sensitive information, and enforce consistent controls while reducing complexity through unified visibility. When DSPM provides proactive, continuous oversight, it becomes a critical safeguardβ€”especially as AI‑powered data flows grow more dynamic across core operations.

More than 80% of surveyed organizations are implementing or developing DSPM strategies

We’re trying to use fewer vendors. If we need 15 tools, we’d rather not manage 15 vendor solutions. We’d prefer to get that down to five, with each vendor handling three tools.”

β€”Global information security director in the hospitality and travel industry

2. Managing AI-powered productivity securely

Generative AI is already influencing data security incident patterns: 32% of surveyed organizations’ data security incidents involve the use of generative AI tools. Understandably, surveyed security leaders have responded to this trend rapidly. Nearly half (47%) the security leaders surveyed in the 2026 Data Security Index are implementing generative AI-specific controlsβ€”an increase of 8% since the 2025 report. This helps enable innovation through the confident adoption of generative AI apps and agents while maintaining security.

A banner chart that says "32% of surveyed organizations' data security incidents involve use of AI tools."

Why it matters
Generative AI boosts productivity and innovation, but both unsanctioned and sanctioned AI tools must be managed. It’s essential to control tool use and monitor how data is accessed and shared with AI.

In the full report, we explore more deeply how AI-powered productivity is changing the risk profile of enterprises. We also explore several mechanisms, both technical and cultural, already helping maintain trust and reduce risk without sacrificing productivity gains or compliance.

3. Strengthening data security with generative AI

The 2026 Data Security Index indicates that 82% of organizations have developed plans to embed generative AI into their data security operations, up from 64% the previous year. From discovering sensitive data and detecting critical risks to investigating and triaging incidents, as well as refining policies, generative AI is being deployed for both proactive and reactive use cases at scale. The report explores how AI is changing the day-to-day operations across security teams, including the emergence of AI-assisted automation and agents.

alt text

Why it matters
Generative AI automates risk detection, scales protection, and accelerates responseβ€”amplifying human expertise while maintaining oversight.

Our generative AI systems are constantly observing, learning, and making recommendations for modifications with far more data than would be possible with any kind of manual or quasi-manual process.”

β€”Director of IT in the energy industry

Turning recommendations into action

As organizations confront the challenges of data security in the age of AI, the 2026 Data Security Index report offers three clear imperatives: unifyingΒ data security, increasing generative AI oversight, and using AI solutions to improve data security effectiveness.

  1. Unified data security requires continuous oversight and coordinated enforcement across your data estate. Achieving this scenario demands mechanisms that can discover, classify, and protect sensitive information at scale while extending safeguards to endpoints and workloads. Microsoft Purview DSPM operationalizes this principle through continuous discovery, classification, and protection of sensitive data across cloud, software as a service (SaaS), and on-premises assets.
  2. Responsible AI adoption depends on strict (but dynamic) controls and proactive data risk management. Organizations must enforce automated mechanisms that prevent unauthorized data exposure, monitor for anomalous usage, and guide employees toward sanctioned tools and responsible practices. Microsoft enforces these principles through governance policies supported by Microsoft Purview Data Loss Prevention and Microsoft Defender for Cloud Apps. These solutions detect, prevent, and respond to risky generative AI behaviors that increase the likelihood of data exposure, policy violations, or unsafe outputs, ensuring innovation aligns with security and compliance requirements.
  3. Modern security operations benefit from automation that accelerate detection and response alongside strong oversight. AI-powered agents can streamline threat investigation, recommend policies, and reduce manual workload while maintaining human oversight for accountability. We deliver this capability through Microsoft Security Copilot, embedded across Microsoft Sentinel, Microsoft Entra, Microsoft Intune, Microsoft Purview, and Microsoft Defender. These agents automate threat detection, incident investigation, and policy recommendations, enabling faster response and continuous improvement of security posture.

Stay informed, stay productive, stay protected

The insights we’ve covered here only scratch the surface of what the Microsoft Data Security Index reveals.The full report dives deeper into global trends, detailed metrics, and real-world perspectives from security leaders across industries and the globe. It provides specificity and context to help you shape your generative AI strategy with confidence.

If you want to explore the data behind these findings, see how priorities vary by region, and uncover actionable recommendations for secure AI adoption, read the full 2026 Microsoft Data Security Index to access comprehensive research, expert commentary, and practical guidance for building a security-first foundation for innovation.

Learn more

Learn more about the Microsoft Purview unified data security solutions.

To learn more about Microsoft Security solutions, visit ourΒ website.Β Bookmark theΒ Security blogΒ to keep up with our expert coverage on security matters. Also, follow us on LinkedIn (Microsoft Security) and X (@MSFTSecurity)Β for the latest news and updates on cybersecurity.

The post New Microsoft Data Security Index report explores secure AI adoption to protect sensitive data appeared first on Microsoft Security Blog.

The Five Phases of the Threat Intelligence Lifecycle

Blogs

Blog

The Five Phases of the Threat Intelligence Lifecycle: A Strategic Guide

The threat intelligence lifecycle is a fundamental framework for all fraud, physical, and cybersecurity programs. It is useful whether a program is mature and sophisticated or just starting out.

Share:
Default Author Image
January 29, 2026

What is the Core Purpose of the Threat Intelligence Lifecycle?

The threat intelligence lifecycle is a foundational framework for all fraud, physical security, and cybersecurity programs at every stage of maturity. It provides a structured way to understand how intelligence is defined, built, and applied to support real-world decisions.

At a high level, the lifecycle outlines how organizations move from questions to insight to action. Rather than focusing on tools or outputs alone, it emphasizes the practices required to produce intelligence that is relevant, timely, and trusted. This iterative, adaptable methodology consists of five stages that guide how intelligence requirements are set, how information is collected and analyzed, how insight reaches decision-makers, and how priorities are continuously refined based on feedback and changing risk conditions.

The Five Phases of the Threat Intelligence Lifecycle

Key Objectives at Each Phase of the Threat Intelligence Lifecycle

  1. Requirements & Tasking: Define what intelligence needs to answer and why. This phase establishes clear priorities tied to business risk, assets, and stakeholder needs, providing direction for all downstream intelligence activity.
  2. Collection & Discovery: Gather relevant information from internal and external sources and expand visibility as threats evolve. This includes identifying new sources, closing visibility gaps, and ensuring coverage aligns with defined intelligence requirements.
  3. Analysis & Prioritization: Transform collections into insight by connecting signals, context, and impact. Analysts assess relevance, likelihood, and business significance to determine which threats, actors, or exposures matter most.
  4. Dissemination & Action: Deliver intelligence in formats that reach the right stakeholders at the right time. This phase ensures intelligence informs operations, response, and decision-making, not just reporting.
  5. Feedback & Retasking: Continuously review outcomes, stakeholder input, and changing threats to refine requirements and adjust collection and analysis. This feedback loop keeps the intelligence program aligned with real-world risk and operational needs.

PHASE 1: Requirements & Tasking

The first phase of the threat intelligence lifecycle is arguably the most important because it defines the purpose and direction of every activity that follows. This phase focuses on clearly articulating what intelligence needs to answer and why.

As an initial step, organizations should define their intelligence requirements, often referred to as Priority Intelligence Requirements (PIRs). In public sector contexts, these may also be called Essential Elements of Information (EEIs). Regardless of terminology, the goal is the same: establish clear, stakeholder-driven questions that intelligence is expected to support.

Effective requirements are tied directly to business risk and operational outcomes. They should reflect what the organization is trying to protect, the threats of greatest concern, and the decisions intelligence is meant to inform, such as reducing operational risk, improving efficiency, or accelerating detection and response.

This process often resembles building a business case, and that’s intentional. Clearly defined requirements make it easier to align intelligence efforts with organizational priorities, establish meaningful key performance indicators (KPIs), and demonstrate the value of intelligence over time.

In many organizations, senior leadership, such as the Chief Information Security Officer (CISO or CSO), plays a key role in shaping requirements by identifying critical assets, defining risk tolerance, and setting expectations for how intelligence should support decision-making.

Key Considerations in Phase 1

β€” Β Which assets, processes, or people present the highest risk to the organization?

β€” What decisions should intelligence help inform or accelerate?

β€” How should intelligence improve efficiency, prioritization, or response across teams?

β€” Which downstream teams or systems will rely on these intelligence outputs?

PHASE 2: Collection & Discovery

The Collection & Discovery phase focuses on building visibility into the threat environments most relevant to your organization. Both the breadth and depth of collection matter. Too little visibility creates blind spots; too much unfocused data overwhelms teams with noise and false positives.

At this stage, organizations determine where and how intelligence is collected, including the types of sources monitored and the mechanisms used to adapt coverage as threats evolve. This can include visibility into phishing activity, compromised credentials, vulnerabilities and exploits, malware tooling, fraud schemes, and other adversary behaviors across open, deep, and closed environments.

Effective programs increasingly rely on Primary Source Collection, or the ability to collect intelligence directly from original sources based on defined requirements, rather than consuming static, vendor-defined feeds. This approach enables teams to monitor the environments where threats originate, coordinate, and evolveβ€”and to adjust collection dynamically as priorities shift.

Discovery extends collection beyond static source lists. Rather than relying solely on predefined feeds, effective programs continuously identify new sources, communities, and channels as threat actors shift tactics, platforms, and coordination methods. This adaptability is critical for surfacing early indicators and upstream activity before threats materialize internally.

The processing component of this phase ensures collected data is usable. Raw inputs are normalized, structured, translated, deduplicated, and enriched so analysts can quickly assess relevance and move into analysis. Common processing activities include language translation, metadata extraction, entity normalization, and reduction of low-signal content.

Key Considerations in Phase 2

β€” Β Where do you lack visibility into emerging or upstream threat activity?

β€” Are your collection methods adaptable as threat actors and platforms change?

β€” Do you have the ability to collect directly from primary sources based on your own intelligence requirements, rather than relying on fixed vendor feeds?

β€” How effectively can you access and monitor closed or high-risk environments?

β€” Is collected data structured and enriched in a way that supports efficient analysis?

PHASE 3: Analysis & Prioritization

The Analysis & Prioritization phase focuses on transforming processed data into meaningful intelligence that supports real decisions. This is where analysts connect signals across sources, enrich raw findings with context, assess credibility and relevance, and determine why a threat matters to the organization.

Effective analysis evaluates activity, likelihood, impact, and business relevance. Analysts correlate threat actor behavior, infrastructure, vulnerabilities, and targeting patterns to understand exposure and prioritize response. This step is critical for moving from information awareness to actionable insight.

As artificial intelligence and machine learning continue to mature, they increasingly support this phase by accelerating enrichment, correlation, translation, and pattern recognition across large datasets. When applied thoughtfully, AI helps analysts scale their work and improve consistency, while human expertise remains essential for judgment, context, and prioritization especially for high-risk or ambiguous threats.

This phase delivers clarity and a defensible view of what requires attention first and why.

Key Considerations in Phase 3

β€” Β Which threats pose the greatest risk based on likelihood, impact, and business relevance?

β€” How effectively are analysts correlating signals across sources, assets, and domains?

β€” Where can automation or AI reduce manual effort without sacrificing analytic rigor?

β€” Are analysis outputs clearly prioritized to support downstream action?

PHASE 4: Dissemination & Action

Once analysis and prioritization are complete, intelligence must be delivered in a way that enables action. The Dissemination & Action phase focuses on translating finished intelligence into formats that are clear, relevant, and aligned to how different stakeholders make decisions.

This phase is dedicated to ensuring the right information reaches the right teams at the right time. Effective dissemination considers audience, urgency, and operational context, whether intelligence is supporting detection engineering, incident response, fraud prevention, vulnerability remediation, or executive decision-making.

Finished intelligence should include clear assessments, confidence levels, and recommended actions. These recommendations may inform incident response playbooks, ransomware mitigation steps, patch prioritization, fraud controls, or monitoring adjustments. The goal is to remove ambiguity and enable stakeholders to act decisively.

Ultimately, intelligence only delivers value when it drives outcomes. In this phase, stakeholders evaluate the intelligence provided and determine whether, and how, to act on it.

Key Considerations in Phase 4

β€” Β Who needs this intelligence, and how should it be delivered to support timely decisions?

β€” Are findings communicated with appropriate context, confidence, and clarity?

β€” Do outputs include clear recommendations or actions tailored to the audience?

β€” Is intelligence integrated into operational workflows, not just distributed as static reports?

PHASE 5: Feedback & Retasking

The Feedback & Retasking phase closes the intelligence lifecycle loop by ensuring intelligence remains aligned to real-world needs as threats, priorities, and business conditions change. Rather than treating intelligence delivery as an endpoint, this phase focuses on evaluating impact and continuously refining what the intelligence function is working on and why.

Once intelligence has been acted on, stakeholders assess whether it was timely, relevant, and actionable. Their feedback informs updates to requirements, collection priorities, analytic focus, and delivery methods. Mature programs use this input to adjust tasking in near real time, ensuring intelligence efforts remain focused on the threats that matter most.

Improvements at this stage often center on shortening retasking cycles, reducing low-value outputs, and strengthening alignment between intelligence producers and decision-makers. Over time, this creates a more adaptive and responsive intelligence function that evolves alongside the threat landscape.

Key Considerations in Phase 5Β 

β€”Β  How frequently are intelligence priorities reviewed and updated?

β€” Which intelligence outputs led to decisions or actionβ€”and which did not?

β€” Are stakeholders able to provide structured feedback on relevance and impact?

β€” How quickly can requirements, sources, or analytic focus be adjusted based on new threats or business needs?

β€” Does the feedback loop actively improve future intelligence collection, analysis, and delivery?

Assessing Your Threat Intelligence Lifecycle in Practice

Understanding the threat intelligence lifecycle is one thing. Knowing how effectively it operates inside your organization today is another.

Most teams don’t struggle because they lack intelligence activities; they struggle because those activities aren’t consistently aligned, operationalized, or adapted as needs change. Requirements may be defined in one area, while collection, analysis, and dissemination evolve unevenly across teams like CTI, vulnerability management, fraud, or physical security.

To help organizations move from conceptual understanding to practical evaluation, Flashpoint developed the Threat Intelligence Capability Assessment.

The assessment maps directly to the lifecycle outlined above, evaluating how intelligence functions across five core dimensions:

  • Requirements & Tasking – How clearly intelligence priorities are defined and tied to real business risk
  • Collection & Discovery – Whether visibility is broad, deep, and adaptable as threats evolve
  • Analysis & Prioritization – How effectively analysts connect signals, context, and impact
  • Dissemination & Action – How intelligence reaches operations and decision-makers
  • Feedback & Retasking – How frequently priorities are reviewed and adjusted

Based on responses, organizations are mapped to one of four stagesβ€”Developing, Maturing, Advanced, or Leaderβ€”reflecting how intelligence actually flows across the lifecycle today.

Teams can apply insights by function or workflow, using the results to identify where intelligence is working well, where friction exists, and where targeted changes will have the greatest impact. Each participant also receives a companion guide with practical guidance, including strategic priorities, immediate actions, and a 90-day planning framework to help translate lifecycle insight into execution.

Take the Threat Intelligence Capability Assessment to evaluate how your program aligns to the lifecycle and where to focus next.

See Flashpoint in Action

Flashpoint’s comprehensive threat intelligence platform supports intelligence teams across every phase of the threat intelligence lifecycle, from defining clear requirements and expanding visibility into relevant threat ecosystems, to analysis, prioritization, dissemination, and continuous retasking as conditions change.

Schedule a demo to see how Flashpoint delivers actionable intelligence, analyst expertise, and workflow-ready outputs that help teams identify, prioritize, and respond to threats with greater clarity and confidenceβ€”so intelligence doesn’t just inform awareness, but drives timely, measurable action across the organization.

Frequently Asked Questions (FAQs)

What are the five phases of the threat intelligence lifecycle?

The threat intelligence lifecycle consists of five repeatable phases that describe how intelligence moves from intent to action:

Requirements & Tasking, Collection & Discovery, Analysis & Prioritization, Dissemination & Action, and Feedback & Retasking.

Together, these phases ensure that intelligence is driven by real business needs, grounded in relevant visibility, enriched with context, delivered to decision-makers, and continuously refined as threats and priorities change.

PhasePrimary Objective
Requirements & TaskingDefining intelligence priorities and tying them to real business risk
Collection & DiscoveryGathering data from relevant sources and expanding visibility as threats evolve
Analysis & PrioritizationConnecting signals, context, and impact to determine what matters most
Dissemination & ActionDelivering intelligence to operations and decision-makers in usable formats
Feedback & RetaskingReviewing outcomes and adjusting priorities, sources, and focus over time

How do intelligence requirements guide security operations?

Intelligence requirementsβ€”often formalized as Priority Intelligence Requirements (PIRs)β€”define the specific questions intelligence teams must answer to support the business. They provide the north star for what to collect, analyze, and report on.

Clear requirements help teams:

  • Focus: Reduce noise by prioritizing intelligence aligned to real risk
  • Measure: Track whether intelligence outputs are driving decisions or action
  • Align: Ensure security, fraud, physical security, and risk teams are working toward shared outcomes

Without clear requirements, intelligence efforts often default to reactive collection and generic reporting that struggle to deliver impact.

Why is the feedback phase of the intelligence lifecycle necessary for a proactive defense?

Feedback & Retasking turns the intelligence lifecycle from a linear process into a continuous improvement loop. It ensures intelligence stays aligned with changing threats, business priorities, and operational needs.

Through regular review and stakeholder input, teams can:

  • Identify which intelligence outputs led to action and which did not
  • Retire low-value sources or reporting formats
  • Adjust requirements, collection, and analysis as new threats emerge

This phase is essential for moving from static reporting to intelligence-led operations, where priorities evolve in near real time and intelligence continuously improves its relevance and impact.

The post The Five Phases of the Threat Intelligence Lifecycle appeared first on Flashpoint.

Microsoft Office zero-day lets malicious documents slip past security checks

29 January 2026 at 15:53

Microsoft issued an emergency patch for a high-severity zero-day vulnerability in Office that allows attackers to bypass document security checks and is being exploited in the wild via malicious files.

Microsoft pushed the emergency patch for the zero‑day, tracked as CVE-2026-21509, and classified it as a β€œMicrosoft Office Security Feature Bypass Vulnerability” with a CVSS score of 7.8 out of 10.

The flaw allows attackers to bypass Object Linking and Embedding (OLE) mitigations that are designed to block unsafe COM/OLE controls inside Office documents. This means a malicious attachment could infect a PC despite built-in protections.

In a real-life scenario, an attacker creates a fake Word, Excel, or PowerPoint file containing hidden β€œmini‑programs” or special objects. They can run code and do other things on the affected computer. Normally, Office has safety checks that would block those mini-programs because they’re risky.

However, the vulnerability allows the attacker to tweak the file’s structure and hidden information in a way that tricks Office into thinking the dangerous mini‑program inside the document is harmless. As a result, Office skips the usual security checks and allows the hidden code to run.

As code to test the bypass is publicly available, increasing the risk of exploitation, users are under urgent advice to apply the patch.

Updating Microsoft 365 and Office

How to protect your system

What you need to do depends on which version of Office you’re using.

The affected products include Microsoft Office 2016, 2019, LTSC 2021, LTSC 2024, and Microsoft 365 Apps (both 32‑bit and 64‑bit).

Office 2021 and later are protected via a server‑side change once Office is restarted. To apply it, close all Office apps and restart them.

Office 2016 and 2019 require a manual update. Run Windows Update with the option to update other Microsoft products turned on.

If you’re running build 16.0.10417.20095 or higher, no action is required. You can check your build number by opening any Office app, going to your account page, and selecting About for whichever application you have open. Make sure the build number at the top reads 16.0.10417.20095 or higher.

What always helps:

  • Don’t open unsolicited attachments without verifying them with a trusted sender.
  • Treat all unexpected documents, especially those asking to β€œenable content” or β€œenable editing,” as suspicious.
  • Keep macros disabled by default and only allow signed macros from trusted publishers.
  • Use an up-to-date real-time anti-malware solution.
  • Keep your operating system and software fully up to date.

We don’t just report on threatsβ€”we remove them

Cybersecurity risks should never spread beyond a headline. Keep threats off your devices byΒ downloading Malwarebytes today.

Clawdbot’s rename to Moltbot sparks impersonation campaign

29 January 2026 at 15:26

After the viral AI assistant Clawdbot was forced to rename to Moltbot due to a trademark dispute, opportunists moved quickly. Within days, typosquat domains and a cloned GitHub repository appearedβ€”impersonating the project’s creator and positioning infrastructure for a potential supply-chain attack.

The code is clean. The infrastructure is not. With the GitHub downloads and star rating rapidly rising, we took a deep dive into how fake domains target viral open source projects.

Fake domains spring up to impersonate Moltbot's landing page

The background: Why was Clawdbot renamed?

In early 2026, Peter Steinberger’s Clawdbot became one of the fastest-growing open source projects on GitHub. The self-hosted assistantβ€”described as β€œClaude with hands”—allowed users to control their computer through WhatsApp, Telegram, Discord, and similar platforms.

Anthropic later objected to the name. Steinberger complied and rebranded the project to Moltbot (β€œmolt” being what lobsters do when they shed their shell).

During the rename, both the GitHub organization and X (formerly Twitter) handle were briefly released before being reclaimed. Attackers monitoring the transition grabbed them within seconds.

β€œHad to rename our accounts for trademark stuff and messed up the GitHub rename and the X rename got snatched by crypto shills.” β€” Peter Steinberger

β€œHad to rename our accounts for trademark stuff and messed up the GitHub rename and the X rename got snatched by crypto shills.” β€” Peter Steinberger

That brief gap was enough.

Impersonation infrastructure emerged

While investigating a suspicious repository, I uncovered a coordinated set of assets designed to impersonate Moltbot.

Domains

  • moltbot[.]you
  • clawbot[.]ai
  • clawdbot[.]you

Repository

  • github[.]com/gstarwd/clawbot β€” a cloned repository using a typosquatted variant of the former Clawdbot project name

Website

A polished marketing site featuring:

  • professional design closely matching the real project
  • SEO optimization and structured metadata
  • download buttons, tutorials, and FAQs
  • claims of 61,500+ GitHub stars lifted from the real repository

Evidence of impersonation

False attribution: The site’s schema.org metadata falsely claims authorship by Peter Steinberger, linking directly to his real GitHub and X profiles. This is explicit identity misrepresentation.

The site's metadata

Misdirection to an unauthorized repository: β€œView on GitHub” links send users to gstarwd/clawbot, not the official moltbot/moltbot repository.

Stolen credibility:The site prominently advertises tens of thousands of stars that belong to the real project. The clone has virtually none (although at the time of writing, that number is steadily rising).

The site advertises 61,500+ GitHub stars

Mixing legitimate and fraudulent links: Some links point to real assets, such as official documentation or legitimate binaries. Others redirect to impersonation infrastructure. This selective legitimacy defeats casual verification and appears deliberate.

Full SEO optimization: Canonical tags, Open Graph metadata, Twitter cards, and analytics are all presentβ€”clearly intended to rank the impersonation site ahead of legitimate project resources.

The ironic security warning: The impersonation site even warns users about scams involving fake cryptocurrency tokensβ€”while itself impersonating the project.

The site warms about crypto scams.

Code analysis: Clean by design

I performed a static audit of the gstarwd/clawbot repository:

  • no malicious npm scripts
  • no credential exfiltration
  • no obfuscation or payload staging
  • no cryptomining
  • no suspicious network activity

The code is functionally identical to the legitimate project, which is not reassuring.

The threat model

The absence of malware is the strategy. Nothing here suggests an opportunistic malware campaign. Instead, the setup points to early preparation for a supply-chain attack.

The likely chain of events:

A user searches for β€œclawbot GitHub” or β€œmoltbot download” and finds moltbot[.]you or gstarwd/clawbot.

The code looks legitimate and passes a security audit.

The user installs the project and configures it, adding API keys and messaging tokens. Trust is established.

At a later point, a routine update is pulled through npm update or git pull. A malicious payload is delivered into an installation the user already trusts.

An attacker can then harvest:

  • Anthropic API keys
  • OpenAI API keys
  • WhatsApp session credentials
  • Telegram bot tokens
  • Discord OAuth tokens
  • Slack credentials
  • Signal identity keys
  • full conversation histories
  • command execution access on the compromised machine

What’s malicious, and what isn’t

Clearly malicious

  • false attribution to a real individual
  • misrepresentation of popularity metrics
  • deliberate redirection to an unauthorized repository

Deceptive but not yet malware

  • typosquat domains
  • SEO manipulation
  • cloned repositories with clean code

Not present (yet)

  • active malware
  • data exfiltration
  • cryptomining

Clean code today lowers suspicion tomorrow.

A familiar pattern

This follows a well-known pattern in open source supply-chain attacks.

A user searches for a popular project and lands on a convincing-looking site or cloned repository. The code appears legitimate and passes a security audit.

They install the project and configure it, adding API keys or messaging tokens so it can work as intended. Trust is established.

Later, a routine update arrives through a standard npm update or git pull. That update introduces a malicious payload into an installation the user already trusts.

From there, an attacker can harvest credentials, conversation data, and potentially execute commands on the compromised system.

No exploit is required. The entire chain relies on trust rather than technical vulnerabilities.

How to stay safe

Impersonation infrastructure like this is designed to look legitimate long before anything malicious appears. By the time a harmful update arrivesβ€”if it arrives at allβ€”the software may already be widely installed and trusted.

That’s why basic source verification still matters, especially when popular projects rename or move quickly.

Advice for users

  • Verify GitHub organization ownership
  • Bookmark official repositories directly
  • Treat renamed projects as higher risk during transitions

Advice for maintainers

  • Pre-register likely typosquat domains before public renames
  • Coordinate renames and handle changes carefully
  • Monitor for cloned repositories and impersonation sites

Pro tip: Malwarebytes customers are protected. Malwarebytes is actively blocking all known indicators of compromise (IOCs) associated with this impersonation infrastructure, preventing users from accessing the fraudulent domains and related assets identified in this investigation.


We don’t just report on threatsβ€”we remove them

Cybersecurity risks should never spread beyond a headline. Keep threats off your devices byΒ downloading Malwarebytes today.

Celebrating Check Point’s 2025 Americas Partner Award Winners

29 January 2026 at 13:00

At Check Point, our partners are more than collaborators. They are the driving force behind our customers’ success, our innovation, and our ability to stay ahead of today’s rapidly evolving cyber threat landscape. This year, we are thrilled to recognize an extraordinary group of partners who demonstrated exceptional performance, growth, technical excellence, and commitment to helping organizations stay secure. These awards celebrate not just results, but leadership, trust, and the relentless pursuit of excellence. We are proud to announce the 2025 Americas Partner Award winners: Partner of the Year: World Wide Technology Latin America Partner of the Year: NTSec Group […]

The post Celebrating Check Point’s 2025 Americas Partner Award Winners appeared first on Check Point Blog.

❌