Normal view

Shifting from Data Hoarding to Active Defense: Navigating the New Era of OMB M-26-14

10 June 2026 at 00:39

The release of OMB Memo M-26-14 ("Ensuring Effective and Efficient Agency Logging and Network Visibility to Defend Against Evolving Cyber Threats") marks a historic turning point in federal cybersecurity. By officially rescinding the M-21-31 directive, the White House has delivered a clear message to federal IT leaders: the era of compliance-driven data hoarding is officially over.

While the previous framework was a well-intentioned response to the SolarWinds breach, its mandate to collect and retain vast oceans of unstructured logging data created unintended, unsustainable operational burdens. For the past several years, federal agencies have faced skyrocketing cloud storage bills and overwhelmed Security Operations Centers (SOCs). Crucially, they have been left with vast quantities of cold data that lacked clear operational utility.

As OMB noted, retaining endless data without operational focus is neither cost-effective nor operationally feasible. With M-26-14, the federal government is pivoting to a smarter, sleeker, and far more decisive strategy: a risk-based, prioritized logging framework driven by AI and machine-speed defense.

The Core Shifts: What Federal Leaders Must Understand

M-26-14 strips away administrative "red tape" to focus on how modern cybersecurity risks have evolved. Nation-state threat actors are actively leveraging advanced automation and Artificial Intelligence (AI) to orchestrate attacks at unprecedented speeds. They move laterally across agencies in minutes, hiding behind legitimate corporate credentials.

To beat machine-speed threats, your data layer must operate at machine-scale. The new memo reorganizes federal visibility around two foundational pillars:

1. Continuous Event Monitoring — Owning the Present

Continuous Event Monitoring demands that logging infrastructure shift from a passive archiving tool to a live-streaming asset. Agencies are now required to monitor network and asset activity in real time, rapidly flag anomalous behavior via behavioral analytics, and initiate immediate mitigation actions directly through their SOCs.

2. Threat Hunting, Investigation, Response, and Forensics — Dominating the Post-Compromise

When a compromise is suspected, agencies can no longer spend days running slow database queries or pulling disconnected csv files. M-26-14 mandates that agencies keep 6 months of logs "hot and searchable" and 1 year fully "retrievable." This allows defenders to immediately stitch together cross-domain attack patterns, perform rapid root-cause forensics, and share threat intelligence seamlessly with CISA and the FBI.

3. Expanding the Blast Radius: Entering IoT and OT

Perhaps the most significant structural change is the explicit inclusion of Internet of Things (IoT) and Operational Technology (OT) systems. Adversaries do not respect the boundary between your corporate IT network and your physical infrastructure. Under M-26-14, your logging and threat-hunting capabilities must aggressively cover the entire enterprise—from public cloud workloads to the physical facility controls and critical infrastructure grids running on an agency's behalf.

The Clock is Ticking: The Aggressive Maturity Deadlines

Agencies cannot afford a passive approach. The timeline established by OMB M-26-14 moves quickly:

  • T+90 Days: CISA will publish the new Logging Reference Architecture (LRA) codifying hybrid/centralized deployments, Zero Trust Maturity Model (ZTMM) integration, and AI-driven monitoring guidelines.
  • LRA +90 Days: Agencies must submit their comprehensive Agency Logging Plans.
  • LRA +120 Days: Achieve Basic Level 1 Maturity.
  • LRA +180 Days: Achieve Intermediate Level 2 Maturity.
  • LRA +320 Days: Achieve Advanced Level 3 Maturity (Advanced/Optimal Effectiveness).

Activating OMB M-26-14 with Palo Alto Networks Cortex

Trying to retrofit a legacy SIEM architecture to meet the advanced or optimal effectiveness tiers of M-26-14 is an engineering and budgetary dead end. Legacy SIEMs scale costs linearly with ingestion and rely on static, human-written correlation rules that fail against AI-fueled threats.

The FedRAMP Certified Palo Alto Networks Cortex platform—anchored by Cortex XSIAM (Extended Security Intelligence and Automation Management)—was engineered from the ground up to solve the exact problems this new memo addresses.

From Disconnected Columns to Cross-Domain "Stitching"

Legacy logging stores data in isolated silos. An analyst trying to track an adversary has to manually look at an identity log, cross-reference it with a network firewall alert, and match it to an endpoint execution.

Cortex XSIAM features a revolutionary Analytics Engine that automatically stitches multi-vendor logs across cloud, network, endpoint, and identity at the moment of ingestion. It transforms raw text into a single, cohesive, context-rich story, instantly aligning incidents with the MITRE ATT&CK framework.  Cortex XSIAM doesn’t just ingest data, it understands the data which enables stitching of multiple data elements into a single, multi-context construct which accelerates analysis via AI and machine learning.

Replacing Static Rules with Cloud-Scale AI

Adversaries use AI to evade signature detection. Cortex XSIAM fights fire with fire, applying out-of-the-box, unsupervised machine learning models to baseline normal behavioral patterns across your entire federal enterprise. When an anomalous lateral movement, data exfiltration attempt, or credential abuse event occurs, XSIAM flags the threat instantly—without requiring your team to spend weeks writing custom correlation code.

Accelerating Continuous Event Monitoring (CEM) and Threat Hunting, Investigation, Response and Forensics (THIRF)

There is more to CEM than just monitoring network activity.  Activity on endpoints, within your identity management solution(s) and in the cloud are just as important.  Understanding the data, knowing which log records are related to each other across multiple log sources, which events are relevant and the context they provide is required.  

Understanding these events and their contextual relationships is fundamental to providing THIRF in an efficient manner.  Cortex XSIAM provides over 2,900 machine learning models out of the box, models that are trained on the data in your environment so they detect anomalous activity based on what is “normal” in your environment, not trained on generic data from other customers or a lab.  These models can identify threats based on data stitched together from multiple sources to provide a more complete context yielding more accurate and consistent results while decreasing time to value.

Securing the Unmanageable: Agentless IoT/OT Defense

You cannot install an EDR logging agent on a smart building HVAC system or an industrial programmable logic controller (PLC). Palo Alto Networks utilizes non-disruptive, passive network analysis to continuously discover, profile, and generate high-fidelity security logs for IoT and OT infrastructure. These logs stream directly into XSIAM, eliminating critical federal blind spots and protecting your High Value Assets (HVAs) from cross-boundary pivot attacks.

Solving the Storage Conundrum Safely

Keeping six months of high-velocity event logs fully "hot and searchable" under a traditional database indexing model creates a crushing financial burden. Cortex XSIAM fundamentally resets the Total Cost of Ownership (TCO) equation by leveraging an index-free, cloud-native data lake architecture that decouples storage costs from analytical performance. By eliminating legacy ingestion taxes and infrastructure overhead, federal defenders can search petabytes of data in seconds—effortlessly meeting the 6-month searchable and 1-year retrievable thresholds. Furthermore, integrated data masking rules strip away sensitive PII or low-value data noise before it hits the SOC, ensuring agencies only pay for operationally vital intelligence.


The Bottom Line for Federal Leaders

OMB M-26-14 is a massive step forward for federal cybersecurity. It frees CISOs from the operational gridlock of untargeted data archiving and empowers them to build faster, modern, and highly responsive security operations.

Meeting the strict 120-to-320-day maturity milestones requires moving past the tools of the last decade. By partnering with Palo Alto Networks and deploying the Cortex suite, federal agencies can seamlessly transition into a risk-aligned, AI-driven SOC. They can confidently check the box on OMB compliance while achieving what the directive actually intends: protecting the resilience and integrity of the federal mission at machine speed.

Palo Alto Networks’ Cortex XSIAM is FedRAMP certified at both the moderate and high levels.

Want to learn more about how to structure your upcoming Agency Logging Plan to meet CISA's upcoming Logging Reference Architecture? 

Contact the Palo Alto Networks Federal Team today to schedule an architectural deep-dive.

The post Shifting from Data Hoarding to Active Defense: Navigating the New Era of OMB M-26-14 appeared first on Palo Alto Networks Blog.

Can I do that with policy? Understanding the AWS Service Authorization Reference

27 April 2026 at 18:01

Understanding what AWS Identity and Access Management (IAM) policies can control helps you build better security controls and avoid spending time on approaches that won’t work. You’ve likely encountered questions like:

  • Can I use AWS Organizations service control policies (SCPs) to prevent the creation of security groups that allow traffic from 0.0.0.0/0?
  • Can I block uploads unless objects are encrypted?
  • Can I prevent functions with more than 512 MB of memory allocated?

Some of these are possible with IAM policies. Others are not. The difference is determined by a fundamental principle of AWS authorization: Policies make decisions based on information available in the authorization context at the time of the API call.

In this blog post, you learn how to use the AWS Service Authorization Reference to determine what’s achievable with IAM policies, recognize scenarios that need alternative solutions, and build more effective security controls in your AWS environment.

Understanding AWS authorization context

When you make an AWS API request through the AWS Management Console, AWS Command Line Interface (AWS CLI), or AWS SDK, the specific AWS service (such as Amazon S3 or Amazon EC2) receiving the request assembles a request context containing information about that request. This context is used for policy evaluation decisions. Request context is structured using the Principal, Action, Resource, Condition (PARC) model, which has four key components.

  • Principal: Identifies the requester and their attributes (tags, session context)
  • Action: Specifies the AWS API operation being requested (for example, s3:PutObject, ec2:RunInstances)
  • Resource: Defines the target AWS resource using Amazon Resource Names (ARNs)
  • Condition: Provides additional context available at request time, such as IP address, time, encryption parameters, MFA status, and service-specific attributes

The following example shows the typical request context for an Amazon S3 object upload:

  • Principal: AIDA123456789EXAMPLE
  • Action: s3:PutObject
  • Resource: arn:aws:s3:::my-bucket/documents/samplereport.pdf
  • Condition:
    • aws:PrincipalTag/Department=Finance
    • aws:RequestedRegion=us-east-1
    • aws:SourceIp=x.x.x.x
    • aws:MultiFactorAuthPresent=true
    • s3:x-amz-server-side-encryption=AES256
    • s3:x-amz-storage-class=STANDARD_IA

IAM policies can evaluate request metadata like encryption method and storage class being specified. However, it cannot evaluate the actual file contents, object size, or specific data patterns. Policy evaluation occurs at the time of the request, using the information present in the authorization context.

An essential resource: The Service Authorization Reference

The Service Authorization Reference is the authoritative documentation for understanding what policies can control. For every AWS service, it documents:

  • Actions: Every controllable operation
  • Resources: Resource types that can be targeted
  • Condition keys: The exact context information available for policy decisions

Condition keys are broadly divided into two categories. Global condition keys, which can be used across AWS services, and service-specific condition keys, which are defined for use with an individual AWS service. Use the Service Authorization Reference to find the global-condition keys or service-specific condition keys for each AWS service.

How to use the Service Authorization Reference

Follow these steps to determine if your requirement can be controlled with IAM policies:

  1. Navigate to your service: Go to the page for the specific AWS service you’re working with, such as Actions, resources, and condition keys for Amazon S3.
  2. Find the action you want: Find the API operation you want to control. Be precise, different actions have different available condition keys.
  3. Examine available condition keys: The Condition keys column shows what context information AWS makes available for that action.
  4. Make your feasibility determination: If the information you need isn’t listed as a condition key, you will not be able to control it with IAM policies alone.

Let’s take an example from the Amazon Elastic Compute Cloud (Amazon EC2) ec2:RunInstances action to see what you can and can’t control. In the Service Authorization Reference under the Amazon EC2 section, examine the RunInstances action and check the Resource types column. The RunInstances action affects multiple resource types, each with its own set of condition keys.

For the instance* resource type:

  • ec2:InstanceType: Can restrict instance types
  • ec2:EbsOptimized: Can require EBS optimization
  • aws:RequestTag/: Can enforce tagging requirements

For the network-interface* resource type:

  • ec2:Subnet: Can control subnet placement
  • ec2:Vpc: Can limit to specific virtual private clouds (VPCs)
  • ec2:AssociatePublicIpAddress: Can control public IP assignment

Note: These are a few examples from the many condition keys available for each resource type under the RunInstances action. The Service Authorization Reference lists dozens of condition keys across resource types (instance, network interface, security group, subnet, volume, and so on) that RunInstances affects. Consult the complete reference to see the available options for your specific use case.

Access the Service Authorization Reference programmatically

Beyond the human-readable documentation, AWS provides the Service Authorization Reference in machine-readable JSON format to streamline automation of policy management workflows. Use this programmatic access to incorporate authorization metadata into your development and security workflows.
For detailed information about the JSON structure and field definitions, see the Simplified AWS service information for programmatic access.
Developers can use tools like the IAM MCP Server for AWS IAM operations. This server provides AI assistants with the ability to manage IAM users, roles, policies, and permissions while following security best practices.

Using IAM policies to control specific scenarios

The following examples show how you can use IAM policies to control specific scenarios.

Example 1: Enforce AES256 server-side encryption on S3 objects

In the Amazon S3 Service Authorization Reference, under s3:PutObject action, the s3:x-amz-server-side-encryption condition key is available in the authorization context, which can be used to control the server-side encryption of S3 objects with AES-256. Here is the required policy.

Policy 1: Deny Amazon S3 object upload if the encryption doesn’t use AES-256

{
	"Version": "2012-10-17",
	"Statement": [
		{
			"Sid": "DenyUnencryptedObjectUploads",
			"Effect": "Deny",
			"Action": "s3:PutObject",
			"Resource": "arn:aws:s3:::my-bucket/*",
			"Condition": {
				"StringNotEquals": {
					"s3:x-amz-server-side-encryption": "AES256"
				}
			}
		}
	]
}

Policy 1 is a resource-based policy that can be applied on an S3 bucket to restrict object uploads. It denies a PutObject request when the server-side encryption isn’t using the AES-256 encryption algorithm.

Example 2: Allow different instance types based on the user’s cost center tag.

When checking the Amazon EC2 Service Authorization Reference for ec2:RunInstances, the ec2:InstanceType condition key, which is resource specific, is available. To restrict instance types based on who is launching them (rather than just what is being launched), you can either combine this with a global condition key or attach different policies to different principals. By using aws:PrincipalTag/tag-key alongside ec2:InstanceType, you can identify the user’s cost center from their IAM identity tags and then apply different instance type restrictions accordingly. This allows a single policy to dynamically enforce different permissions based on the requester’s identity.

Policy 2: Restricting EC2 instance types by cost center

{
	"Version": "2012-10-17",
	"Statement": [
		{
			"Sid": "AllowDevInstanceTypes",
			"Effect": "Allow",
			"Action": "ec2:RunInstances",
			"Resource": "arn:aws:ec2:*:*:instance/*",
			"Condition": {
				"StringEquals": {
					"aws:PrincipalTag/CostCenter": "Development"
				},
				"StringLike": {
					"ec2:InstanceType": "t3.*"
				}
			}
		},
		{
			"Sid": "AllowProdInstanceTypes",
			"Effect": "Allow",
			"Action": "ec2:RunInstances",
			"Resource": "arn:aws:ec2:*:*:instance/*",
			"Condition": {
				"StringEquals": {
					"aws:PrincipalTag/CostCenter": "Production"
				},
				"StringLike": {
					"ec2:InstanceType": [
						"m5.*",
						"c5.*",
						"r5.*"
					]
				}
			}
		}
	]
}

This is an identity-based policy that you can attach to IAM users, groups, or roles to control EC2 instance launches based on cost allocation. In the first statement, aws:PrincipalTag, which is a global condition key (tags attached to the IAM user or role), is used to determine which instance types are allowed. Users tagged with CostCenter=Development can only launch cost-effective T3 instance types (t3.micro, t3.small, t3.medium, and so on)with the service specific key ec2:InstanceType.

In the second statement, users tagged with CostCenter=Production can launch more powerful instance types from the M5 (general purpose), C5 (compute optimized), and R5 (memory optimized) families. This approach lets organizations enforce cost controls and allocate resources based on workload requirements. Each cost center maintains flexibility for its specific needs.

Note: Additional resources are required in the IAM policy to successfully launch EC2 instances. For the complete list, see Launch Instances.

Example 3: Users can only access and update DynamoDB items where the partition key matches their username.

You have identified that GetItem, PutItem,and UpdateItem actions are required. Corresponding to these actions, you can use the condition key to expose partition key values in the authorization context as described in the Amazon DynamoDB Service Authorization Reference

Policy 3: DynamoDB fine-grained access control

{
	"Version": "2012-10-17",
	"Statement": [
		{
			"Effect": "Allow",
			"Action": [
				"dynamodb:GetItem",
				"dynamodb:PutItem",
				"dynamodb:UpdateItem"
			],
			"Resource": "arn:aws:dynamodb:us-east-1:111122223333:table/UserProfiles",
			"Condition": {
				"ForAllValues:StringEquals": {
					"dynamodb:LeadingKeys": ["${aws:username}"]
				}
			}
		}
	]
}

The policy allows users to perform read and write actions (GetItem, PutItem, and UpdateItem) on the UserProfiles table, but only for items where the partition key value equals their own username (using the ${aws:username} policy variable). For example, if user alice attempts to access an item with partition key bob, the request will be denied.

Scenarios that need more than policies alone

Some requirements can’t be met using IAM policies. Here are three common scenarios that aren’t achievable with IAM policies alone.

Scenario 1: Block users from creating security group rules that allow traffic from 0.0.0.0/0 on TCP port 22

Upon checking the Amazon EC2 Service Authorization Reference, you will find that the ec2:AuthorizeSecurityGroupIngress action is required in an IAM policy to add an inbound access rules to a security group.

To verify this in the Service Authorization Reference, navigate to the Amazon EC2 Service Authorization Reference and search for the AuthorizeSecurityGroupIngress action, which is the action that creates security group rules. After you locate this action, review the Condition keys column and look for condition keys related to CIDR blocks, IP ranges, ports, or protocols. Available condition keys for ec2:AuthorizeSecurityGroupIngress include:

Notice there are no condition keys for CIDR blocks (such as 0.0.0.0/0), port numbers (such as 22), or protocols (such as TCP). The authorization context doesn’t include information about the specific CIDR blocks, ports, or protocols being added to the security group rule, so IAM policies can’t control these attributes.

Solution
Take a reactive approach using the AWS Config managed rule INCOMING_SSH_DISABLED to detect overly permissive rules. You can also use a combination of Amazon EventBridge and Lambda to either send a notification to your security team for the non-compliant configuration or to restrict the security group through an automation. For more information, see How to Automatically Revert and Receive Notifications About Changes to Your Amazon VPC Security Groups.

Scenario 2: Prevent creation of Lambda functions with more than 512 MB of memory allocated

Following the same verification methodology described in Scenario 1, navigate to the AWS Lambda Service Authorization Reference and examine the CreateFunction action’s condition keys for the function* resource type.

Available condition keys for lambda:CreateFunction with the function* resource type include:

  • lambda:CodeSigningConfigArn: Filters access by the ARN of the code signing
  • configuration-lambda:Layer: Filters access by the ARN of a version of an AWS Lambda layer
  • lambda:VpcIds: Filters access by the ID of the VPC configured for the Lambda function

There is no condition key for memory allocation (MemorySize parameter), timeout settings, storage configuration (EphemeralStorage), or runtime selection. Because memory allocation isn’t exposed in the authorization context, IAM policies can’t restrict this parameter.

Solution

Key takeaways

Keep these principles in mind when working with IAM policies:

  • Policies control what’s in the authorization context, not all elements you see in API documentation
  • The Service Authorization Reference is authoritative; if something isn’t listed as a condition key, you can’t control it with policies
  • Different actions have different available contexts even within the same service
  • Alternative approaches exist. AWS Config, EventBridge, and service-specific controls can be used to achieve your goals when policies alone can’t
  • Layered security is essential; combine preventive, detective, and responsive controls to help ensure that your data is secure

Conclusion

In this post, you learned how to use the AWS Service Authorization Reference to determine what’s achievable with IAM policies and recognize scenarios that require alternative solutions. By understanding that policies can only make decisions based on information available in the authorization context, you can build more effective security controls and avoid spending time on approaches that won’t work.

The Service Authorization Reference is your authoritative source for understanding policy capabilities. When you need to implement a control, start there to see if the required condition keys exist. If they don’t, you will need to layer in detective or responsive controls using services like AWS Config, Amazon EventBridge, or AWS Lambda.

Remember that effective AWS security isn’t about finding one perfect control, it’s about combining preventive, detective, and responsive measures to create defense in depth. IAM policies are powerful tools for prevention and work as part of a comprehensive security strategy.

Next steps:

If you have feedback about this post, submit comments in the Comments section below.


Author

Anshu Bathla

Anshu is a Senior Lead Consultant – SRC at AWS, based in Gurugram, India. He works with customers across diverse verticals to help strengthen their security infrastructure and achieve their security goals. Outside of work, Anshu enjoys reading books and gardening at his home garden.

Author

Prafful Gupta

Prafful is an Associate Delivery Consultant at AWS, based in Gurugram, India. Having started his professional journey with Amazon, he specializes in DevOps and Generative AI solutions, helping customers navigate their cloud transformation journeys. Beyond work, he enjoys networking with fellow professionals and spending quality time with family.

Secure AI agent access patterns to AWS resources using Model Context Protocol

15 April 2026 at 00:52

AI agents and coding assistants interact with AWS resources through the Model Context Protocol (MCP). Unlike traditional applications with deterministic code paths, agents reason dynamically, choosing different tools or accessing different data depending on context. You must assume an agent can do anything within its granted entitlements, whether OAuth scopes, API keys, or AWS Identity and Access Management (IAM) permissions, and design your controls accordingly. Agents operate at machine speed, so the impact of misconfigured permissions scales quickly.

This blog post focuses on IAM as the authorization layer for AWS resource access and presents three security principles for building deterministic IAM controls for these non-deterministic AI systems. The principles apply whether you’re using AI coding assistants like Kiro and Claude Code, or deploying agents on hosting environments like Amazon Bedrock AgentCore. We cover deployment patterns, then explore each principle with concrete IAM policy examples and implementation guidance.

This post specifically addresses securing the MCP access path, where agents interact with AWS resources through MCP servers. AI coding assistants and agents can also access AWS service APIs directly through general-purpose tools like bash or shell execution, bypassing MCP servers entirely. For this reason, we recommend architecting agents to use MCP servers rather than direct service access where possible. MCP servers provide a layer of abstraction that enables the differentiation controls in principle 3 and creates additional monitoring capabilities through AWS CloudTrail. When agents bypass MCP, the differentiation mechanisms in principle 3 don’t apply, and principles 1 and 2 become your primary controls. We discuss this scope boundary in principle 3.

MCP deployment patterns

Your deployment pattern determines which security principles and implementation approaches apply. Three dimensions define this pattern, including where the agent runs, what type of MCP server offers the tools, and your level of control over the agent code. No matter how you connect to it, the MCP server needs AWS credentials to interact with AWS resources.

Where agents run

Agents access AWS resources from three locations: developer machines (where you control the infrastructure), hosting environments (where you control the infrastructure or significant aspects of it), and third-party agent platforms (where you do not control the infrastructure). This post focuses on the first two patterns. Each has a different credential model and different organizational control options.

AI coding assistants and local agents

AI coding assistants (Kiro, Claude Code) or local agent applications represent the first deployment pattern. These assistants run locally on developer machines and connect to MCP servers or use AWS Command Line Interface (AWS CLI) commands to access AWS resources. In this pattern, credentials come from the developer’s local environment. When a developer configures an MCP server in their mcp.json file, they specify which AWS credentials to use. Options include a named profile, which can use credential helpers and the credential provider chain for short-lived credentials, environment variables, or explicit credential configuration. This means the developer controls which IAM principal the agent uses to access AWS. This creates a governance challenge. Without additional controls, developers often use their developer admin credentials, shared development roles, or even production roles for agent access. Developer credentials often carry broad permissions designed for interactive use, where human judgment serves as a safeguard. When an agent inherits these permissions, it operates without that judgment at machine speed. Principle 1 explores this risk in detail.

Agents on hosting environments

Agents deployed on hosting environments represent the second deployment pattern. These agents run on infrastructure you manage, not on developer machines. This changes the credential management model. Using Amazon Bedrock AgentCore as an example, when an agent runs on AgentCore Runtime, it uses an execution IAM role that you configure when creating the runtime. The execution role’s permissions apply to all operations the agent performs and cannot be scoped down per-invocation at the runtime configuration level. For more granular control, agents can call AWS Security Token Service (AWS STS) AssumeRole or AssumeRoleWithWebIdentity (collectively referred to as AssumeRole in this post). This obtains temporary credentials with session policies that further restrict permissions beyond the role’s base permissions. Agents built with frameworks like Strands can also initialize individual MCP clients with different credential sets by calling AssumeRole and passing the resulting credentials to each client connection. This enables per-tool credential isolation within a single agent process. The same pattern applies to agents deployed on Amazon Elastic Compute Cloud (Amazon EC2) or Amazon Elastic Kubernetes Service (Amazon EKS).

With this centralized execution model, you can implement organizational controls. You define the available IAM roles through infrastructure configuration instead of relying on developer choice. However, you must design these roles carefully to prevent overly permissive access and implement session policies for tool-specific restrictions.

What type of MCP server

MCP servers come in two types, provider-managed and self-managed. AWS-managed servers are operated by AWS on your behalf. Self-managed servers are servers that you install and run yourself. The server type affects your operational overhead, available features, and how you implement security controls.

AWS offers fully managed MCP servers, including the AWS MCP Server, Amazon EKS MCP Server, and Amazon ECS MCP Server. These AWS-managed servers run on AWS infrastructure and require no installation or maintenance on your part. AWS-managed MCP servers automatically add IAM context keys (aws:ViaAWSMCPService and aws:CalledViaAWSMCP) to every downstream AWS service call. You can write IAM policies that check these keys to distinguish between AI-driven actions and human-initiated actions without any additional configuration.

Self-managed MCP servers include AWS-provided servers from the AWS MCP GitHub repository that you install and run yourself. They also include custom MCP servers that you build from scratch. With self-managed servers, you control the deployment location (local machine, Amazon EC2, Amazon EKS), the configuration, and the maintenance. These servers can be used with either AI coding assistants running locally or agents deployed on hosting environments. The key difference for security controls is that self-managed servers don’t automatically add IAM context keys for differentiation. You must configure the MCP server to add session tags when assuming IAM roles if you require differentiation between AI-driven and human-initiated actions. This requires modifying your MCP server code to call AWS STS AssumeRole with tags attached. You then write IAM policies that check for these tags using the aws:PrincipalTag condition key. Self-managed servers can also be extended to implement dynamic authorization flows, such as mapping inbound OAuth tokens to outbound IAM role assumptions, giving you control over the full authorization chain. Additionally, with AWS-managed MCP servers, AWS injects context keys at the service layer, so callers cannot spoof them. With self-managed servers, the entity calling AssumeRole sets the session tags, so you must trust that your MCP server code hasn’t been modified.

The responsibility model differs between server types. With AWS-managed MCP servers, AWS is responsible for server infrastructure, patching, and context key injection. You’re responsible for IAM policy design and credential configuration. With self-managed MCP servers, you’re additionally responsible for server patching, dependency and library supply chain security, session tag implementation, and verifying server integrity. This connects to the supply chain risk described in principle 1. While self-managed servers require more operational overhead to implement and maintain, they give you flexibility and control.

Level of client control

A third dimension shapes your security implementation, whether you control the agent and MCP client code (code-controlled) or are limited to configuring pre-built tools without modifying their runtime behavior (configuration-bound). This determines which security mechanisms are available to you at runtime.

In configuration-bound scenarios, you use an AI coding assistant such as Kiro or Claude Code and configure credentials in your mcp.json file. You select which IAM role or profile the agent uses, but you cannot modify the agent’s runtime behavior. The agent calls AWS APIs using whatever credentials you configured ahead of time, and you cannot inject session policies or tags into those calls programmatically. Your security controls must be in place before the agent runs. You select narrowly scoped roles at configuration time, and your organization enforces guardrails through permission boundaries and service control policies (SCPs). These mechanisms restrict what the agent can do regardless of which role the developer selects.

In code-controlled scenarios, you build or deploy a custom agent on Amazon Bedrock AgentCore, Amazon EC2, Amazon EKS, or your local machine, or you build and run a custom MCP server. Because you control the runtime code, you can implement credential management programmatically. For custom agents, this means calling AssumeRole with session policies scoped to each tool invocation, attaching session tags for differentiation, and obtaining temporary credentials with the minimum permissions each operation requires. For custom MCP servers, you can inject session policies into every AWS API call the server makes, applying a consistent set of restrictions across all operations. Both approaches give you runtime IAM controls that are not available in config-bound scenarios.

Deployment pattern summary

The following table summarizes how these dimensions combine.

Source type MCP server type Client control Credential source Differentiation mechanism Example use case
AI coding assistant AWS-managed MCP Config-bound Local (AWS CLI, env vars, ) Automatic context keys Kiro calling AWS-managed MCP server
AI coding assistant Self-managed MCP (local or remote) Config-bound Local (AWS CLI, env vars, ) Manual session tags or session policies Kiro calling local AWS MCP server
Agent on hosting environment AWS-managed MCP Code-controlled Execution role or AssumeRole Automatic context keys Amazon Bedrock AgentCore agent calling AWS-managed MCP server
Agent on hosting environment Self-managed MCP (remote) Code-controlled Execution role or AssumeRole Manual session tags or session policies Agent calling AWS MCP server deployed on Amazon Bedrock AgentCore

Your deployment pattern and level of client control determine which of the following security principles apply and how you implement them.

Three security principles for agent access

With this understanding of deployment patterns, let’s explore the three security principles that apply across all patterns.

  • Principle 1 – Assume all granted permissions could be used: Design permissions based on the acceptable scope of impact, not intended functionality alone.
  • Principle 2 – Provide organizational guidance on role usage: Enforce permission design through role governance, session policies, permission boundaries, and organizational policies.
  • Principle 3 – Differentiate AI-driven from human-initiated actions: Apply different IAM rules based on whether the action comes from an agent or a human.

Security principle 1: Assume all granted permissions could be used

The first security principle is fundamental. Any permission you grant to an agent can be exercised, regardless of your intended use case. If you give an agent s3:DeleteObject permission with a tool that can call the API, you must assume it can delete any Amazon Simple Storage Service (Amazon S3) object it has access to. This can happen in ways you cannot predict or fully prevent through code review alone. This non-deterministic behavior requires a shift in your approach to IAM permissions.

Traditional applications follow deterministic code paths. You can review the source code, identify every API call, and grant the permissions needed. AI agents operate differently. They make decisions at runtime based on reasoning, context, and learned patterns. You cannot predict which AWS APIs or tools an agent will call or which resources it will access. Static analysis of agent code tells you what tools are available, but not which tools will be invoked or how they’ll be used.

This creates a challenge when developers configure agents to use AWS credentials. Developers commonly use existing IAM roles, such as the role their traditional application uses or their local admin role for the AWS CLI. These roles were designed assuming predictable behavior and human judgment. Your local admin role has s3:* permissions because you exercise judgment on what to delete and when. You understand the context, recognize production resources, and can assess the impact of your actions.

An agent with that same role operates at machine speed without human judgment. It can delete production data through hallucination or be directed through prompt injection to perform unintended actions. It can also make a logical error in its reasoning that leads to unintended operations. The speed and scale at which agents operate increases the potential scope of these issues. An agent can make thousands of API calls in seconds, so the impact of misconfigured permissions scales quickly.

Consider the following scenarios with overly permissive access.

  • Hallucination: The agent misinterprets a user request and performs the wrong action. An agent designed to clean up temporary files might hallucinate that production data is temporary and delete it.
  • Prompt injection: An outside party crafts unexpected input that influences the agent’s reasoning. An agent designed to query Amazon DynamoDB tables could be directed to call dynamodb:PutItem or dynamodb:DeleteItem on resources outside its intended scope.
  • Logic errors: The agent’s reasoning leads to an incorrect conclusion. An agent analyzing S3 storage costs might conclude that frequently accessed production data is unused and delete it to save costs.
  • Tool poisoning: A compromised MCP server or dependency performs unintended operations using the agent’s credentials. An agent with broad S3 and DynamoDB permissions connects to an MCP server whose dependency has been modified to exfiltrate data. The compromised tool reads sensitive objects and writes them to an attacker-controlled location, all within the agent’s granted permissions.

This security principle reframes how you approach IAM permissions for agents. Instead of asking what does the agent need to do?, ask what is the scope of impact if the agent acts outside its intended use case? Design permissions based on the acceptable scope of access, not only on intended functionality. If an agent needs to read S3 objects, grant s3:GetObject, not s3:*. If it needs to write to specific paths, use resource-level conditions to restrict access to those paths. Consider what tools the agent has access to and what API calls those tools can make. Design permissions that limit what the agent is allowed to perform based on organizational policy. This doesn’t mean agents can’t have write or delete permissions. It means you and your organization must consider what resources those permissions apply to and what safeguards are in place.

Beyond IAM policies, consider implementing data perimeters as an additional layer of defense. Data perimeters use VPC endpoint policies, resource control policies (RCPs), resource policies, and service control policies (SCPs) to restrict access based on identity, resource, and network boundaries. For agents, data perimeters help verify that even if IAM permissions are broader than intended, access is limited to trusted resources from expected networks. For more information, see Building a data perimeter on AWS.

Practical implementation guidance:

  • Apply least privilege rigorously: If an agent needs read access, grant read permissions. If it needs write access, grant write to specific resources, not all resources of that type.
  • Use resource-level restrictions: Employ IAM policy conditions to limit permissions to specific buckets, paths, tables, or other resources. Don’t grant blanket permissions across all resources.
  • Consider read-only alternatives: Evaluate whether the agent’s task can be accomplished with read-only access. Many analysis and reporting tasks don’t require write or delete permissions.
  • Implement comprehensive monitoring: Set up Amazon CloudWatch alarms for unexpected agent actions, unusual access patterns, or operations on sensitive resources. Monitor for sensitive operations like deletions or modifications to production resources.
  • Conduct regular permission audits: As agents gain new tools and capabilities, developers often add permissions incrementally without removing unused ones. An agent that started with read-only access can gradually accumulate write and delete permissions across multiple services. Review agent IAM roles and policies regularly to identify and remove permissions that are no longer needed.
  • Verify MCP server integrity: Verify the provenance and integrity of MCP servers before granting them access to AWS credentials. Maintain an organizational registry of approved MCP servers and their expected behavior, and monitor for unauthorized server deployments that might have assumed execution roles. For more on agentic application risks, see the OWASP Top 10 for Agentic Applications.

Security principle 1 establishes the foundation. Understand the scope of every permission you grant. The next two security principles build on this foundation.

Security principle 2: Provide organizational guidance on role usage

The second security principle addresses organizational governance. Principle 1 requires that you design permissions based on acceptable scope of impact. Principle 2 addresses how your organization enforces that design through role governance, session policies, permission boundaries, and organizational policies.

When developers adopt AI coding assistants and configure MCP servers, they choose which credentials to use. Without organizational controls, developers often use existing roles (such as personal admin roles, shared development roles, or production roles) that were designed for human use with far more permissions than agents need. For agents deployed on hosting environments, you configure execution roles, but the same question applies. What permissions should those roles have, and how do you enforce consistency across deployments? The answer depends on your level of client control.

When you control the agent code

When you build or deploy custom agents on Amazon Bedrock AgentCore, Amazon EC2, Amazon EKS, or locally, you control the runtime code and can implement dynamic credential management. This is the strongest enforcement model because you can scope permissions per tool invocation at runtime. The same applies if you build or modify a custom MCP server. Because you control the server code, you can inject session policies into every AWS API call the server makes.

The IAM role defines the permission ceiling for the agent across all its tools. Instead of creating a separate role for every tool or MCP server, you use session policies to scope down the role’s permissions per operation. When the agent invokes a specific tool, it calls AssumeRole with a session policy that restricts permissions to just what that tool requires. The effective permissions are the intersection of the role’s policies and the session policy. Session policies restrict permissions but never expand them. If a role grants broad permissions but you attach the ReadOnlyAccess managed policy as a session policy, the agent can only perform read operations. You can also use inline session policies for resource-specific restrictions, such as limiting access to specific S3 buckets or DynamoDB tables.

The following example shows how to implement session policies in agent code.

import boto3

# Uses the execution IAM role as part of AgentCore Runtime
sts = boto3.client('sts')

# Assume role with ReadOnlyAccess managed policy as session policy
response = sts.assume_role(
    RoleArn='arn:aws:iam::111122223333:role/AgentDataRole',
    RoleSessionName='agent-data-reader',
    PolicyArns=[
        {'arn': 'arn:aws:iam::aws:policy/ReadOnlyAccess'}
    ],
    DurationSeconds=3600
)

# Use the temporary credentials
credentials = response['Credentials']
s3 = boto3.client(
    's3',
    aws_access_key_id=credentials['AccessKeyId'],
    aws_secret_access_key=credentials['SecretAccessKey'],
    aws_session_token=credentials['SessionToken']
)

For agents on hosting environments like Amazon Bedrock AgentCore, the execution role serves two purposes. It’s the trust anchor that lets the agent call AssumeRole for tool-specific credentials, and it can supply baseline permissions that all operations need, such as writing logs to CloudWatch. For tool-specific operations that access customer resources, use AssumeRole with session policies to obtain scoped temporary credentials rather than using the execution role’s permissions directly. This centralized execution model simplifies enforcing consistent session policies across all agent deployments. Agents can also attach tags when assuming roles for differentiation purposes (covered in Security principle 3).

When you’re configuration bound

When you use an AI coding assistant like Kiro or Claude Code with off-the-shelf MCP servers, you configure credentials in your mcp.json file but cannot modify the agent’s runtime behavior. Your security controls must be established before the agent runs.

Your first control is role selection. As described in the preceding deployment patterns section, AI coding assistants use credentials from the developer’s local environment. Create agent-specific IAM roles with narrower permissions than equivalent human roles, and direct developers to use them. For self-managed MCP servers running locally, the developer specifies the role through environment variables in the mcp.json configuration.

{
  "mcpServers": {
    "awslabs.aws-pricing-mcp-server": {
      "command": "uvx",
      "args": ["awslabs.aws-pricing-mcp-server@latest"],
      "env": {
        "AWS_PROFILE": "agent-dev-role",
        "AWS_REGION": "us-east-1"
      }
    }
  }
}

For AWS-managed MCP servers, the developer connects through the mcp-proxy-for-aws proxy and specifies the role through the profile parameter.

{
  "mcpServers": {
    "aws-mcp": {
      "command": "uvx",
      "args": [
        "mcp-proxy-for-aws@latest",
        "https://aws-mcp.us-east-1.api.aws/mcp",
        "--profile", "agent-dev-role",
        "--metadata", "AWS_REGION=us-east-1"
      ]
    }
  }
}

Only role selection depends on developer compliance. IAM permission boundaries provide organizational enforcement without requiring code changes or developer cooperation. A permission boundary is a managed policy that your security team attaches to an IAM role to set the maximum permissions that role can grant. The effective permissions are the intersection of the role’s identity-based policies and the permission boundary. Permission boundaries are most effective on agent-specific roles that your organization creates for agent use. They ensure those roles cannot exceed their intended permissions even if misconfigured. If a developer configures their existing role in mcp.json instead, a permission boundary on that role restricts all use of the role, not just agent use. For AWS-managed MCP servers, principle 3’s context keys address this gap. They let you write IAM policies that restrict actions only when they come through an MCP server, leaving the developer’s direct use of the same role unaffected. For self-managed MCP servers, modifying the server code to AssumeRole into an organization-defined role provides a similar override, and session tags can be attached during that AssumeRole for differentiation (see principle 3). For multi-account environments, SCPs in AWS Organizations provide guardrails at the account or organizational unit level. SCPs set the maximum permissions for all principals in an account, giving your central governance team control over agent permissions across your organization.

Organizational governance at scale

Whether your agents are config-bound or code-controlled, you need organizational mechanisms to enforce consistent governance across teams and accounts.

Tag IAM roles intended for agent use with a consistent identifier, such as a tag key of Usage with a value of Agent. This lets your governance team inventory all agent roles across accounts, identify roles that don’t have permission boundaries, and distinguish agent roles from human roles in audit reports. You can also use tag-based conditions in SCPs to enforce that only properly tagged roles are used for agent operations. For AWS-managed MCP servers, the automatic context keys (principle 3) provide this identification without requiring role tags, but tagging remains useful for role inventory and audit purposes.

Use CloudTrail to monitor all API calls made by agent sessions and set up CloudWatch alarms for sensitive operations like resource deletion or permission changes. Principle 3 covers how to filter and analyze agent activity using context keys (AWS-managed MCP) and session tags (self-managed MCP).

For multi-account environments, combine SCPs with permission boundaries and resource control policies (RCPs) for layered enforcement. SCPs set the maximum permissions for principals within your organization at the account or organizational unit level, while permission boundaries constrain individual roles. RCPs enforce controls at the resource level regardless of the caller’s organizational membership, protecting resources even from cross-account access. Verify that the AWS services you use support MCP context keys in RCP evaluation. This layered approach gives your central governance team control over agent permissions across your organization, even when individual teams manage their own accounts and roles. Conduct quarterly reviews of agent roles and session policies to identify permissions that are no longer needed as agent capabilities evolve.

Practical implementation guidance:

  • For code controlled agents: Implement session policies for every tool invocation. Use AssumeRole with the minimum permissions each operation requires rather than relying on the execution role’s base permissions.
  • For config-bound agents: Create agent-specific IAM roles with narrower permissions than human roles or configure self-managed MCP servers to AssumeRole into an organization-defined role. Have your security team attach permission boundaries to agent-specific roles to enforce maximum permissions regardless of developer role selection.
  • At the organization level: Tag agent roles consistently, enforce guardrails through SCPs, and monitor agent activity through CloudTrail. Conduct quarterly reviews to remove unused permissions.

Security principle 2 gives you organizational control over agent permissions through mechanisms matched to your level of client control. Session policies and dynamic credential scoping enforce permissions at runtime for code-controlled agents. Permission boundaries and SCPs enforce permissions at the organizational level for config-bound agents. The next principle adds a complementary layer of governance at the resource level based on whether a human or agent is performing the action.

Security principle 3: Differentiate AI-driven from human-initiated actions

The third security principle adds an additional level of control on top of principle 2. Where principle 2 governs what permissions an agent has, this principle governs what the agent can do with those permissions based on whether the action is AI-driven or human-initiated.

This principle is essential for two reasons. For AWS-managed MCP servers, you cannot modify the server code to inject session policies or call AssumeRole with scoped credentials. The developer’s credentials flow through as-is. Context keys are your primary mechanism to restrict agent actions differently from human-initiated actions on the same role. For self-managed MCP servers where principle 2’s session policies are already in place, differentiation adds a second layer of defense at the resource level. Even if the session policy is broader than intended, differentiation policies can deny specific dangerous operations when performed through an agent.

For example, you can allow both humans and agents to read Amazon S3 objects, but deny delete operations when accessed through agents. Without a differentiation mechanism, IAM policies can’t distinguish between AI-driven actions and human-initiated actions. If a developer has s3:DeleteObject permission and uses an agent with their credentials, the agent also has s3:DeleteObject permission with no way to restrict it.

Differentiation gives you granular governance. Allow human-initiated actions with broad permissions while restricting agent actions to narrower permissions. Apply different rules based on context and implement progressive restrictions. Allow read operations for everyone, require approval for AI-driven write operations, and deny delete operations for agent actions entirely. Maintain audit trails showing which actions were AI-driven versus human-initiated, essential for compliance and security investigations.

When agents bypass MCP servers

Differentiation through condition keys and session tags applies when the agent accesses AWS through an MCP server. AI coding assistants like Kiro and Claude Code have access to general-purpose tools, including bash, shell, and code execution. When an agent uses a bash tool to run an AWS CLI command like aws s3 rm s3://my-bucket/my-object or executes a Python script that calls boto3 directly, the request goes straight to AWS using the developer’s existing credentials. The request bypasses MCP servers entirely. The aws:ViaAWSMCPService condition key isn’t set, session tags from MCP server AssumeRole calls aren’t applied, and IAM policies conditioned on these values don’t evaluate.

This means a deny policy like “Condition": {"Bool": {"aws:ViaAWSMCPService": “true"}} blocks the agent when it calls Amazon S3 through a managed MCP server, but doesn’t block the same agent when it runs the equivalent AWS CLI command through a bash tool. The agent has two paths to the same AWS API, and differentiation controls govern one path.

The condition keys work as designed, differentiating MCP-mediated access from direct access. This is a scope boundary. Differentiation controls secure the MCP access path. For the direct access path, principles 1 and 2 are your controls. Least privilege on the underlying IAM role (principle 1) and organizational guardrails like permission boundaries and SCPs (principle 2) apply regardless of how the agent reaches AWS. If the role doesn’t have s3:DeleteObject permission, the agent can’t delete objects through a bash tool or through an MCP server.

Restricting which tools an agent can access is a complementary control outside the scope of IAM. You can use agent frameworks and hosting environments such as Amazon Bedrock AgentCore to limit the set of available tools, removing general-purpose execution capabilities for agents that interact with AWS exclusively through MCP servers. When you combine tool restriction with the IAM controls in this post, you close the gap between the MCP access path and the direct access path.

AWS-managed MCP servers: Automatic context keys

AWS-managed MCP servers, including the AWS MCP Server, Amazon EKS MCP Server, and Amazon ECS MCP Server, offer differentiation by default. They automatically add IAM context keys to every downstream AWS service call. These context keys are aws:ViaAWSMCPService, a boolean set to true when the request comes through any AWS-managed MCP server. The second key is aws:CalledViaAWSMCP, a string containing the MCP server name like aws-mcp.amazonaws.com, eks-mcp.amazonaws.com, or ecs-mcp.amazonaws.com. No configuration is required on your part. You only need to write IAM policies that check for these keys to apply different rules for agent actions.

The following IAM policy denies delete operations when accessed through any AWS-managed MCP server.

{
  "Version": "2012-10-17",
  "Statement": [{
    "Sid": "AllowS3ReadOperations",
    "Effect": "Allow",
    "Action": [
      "s3:GetObject",
      "s3:ListBucket"
    ],
    "Resource": "*"
  }, {
    "Sid": "DenyDeleteWhenAccessedViaMCP",
    "Effect": "Deny",
    "Action": [
      "s3:DeleteObject",
      "s3:DeleteBucket"
    ],
    "Resource": "*",
    "Condition": {
      "Bool": {
        "aws:ViaAWSMCPService": "true"
      }
    }
  }]
}

When a request doesn’t come through an AWS-managed MCP server, the aws:ViaAWSMCPService condition key isn’t present in the request context. The Deny statement only applies when the key is explicitly set to true, so human-initiated actions are unaffected by this policy.

You can also restrict operations to specific MCP servers. With this policy, you can run EKS operations only when accessed through the EKS MCP server, not through the AWS API MCP server.

{
  "Version": "2012-10-17",
  "Statement": [{
    "Sid": "AllowEKSOperationsViaEKSMCP",
    "Effect": "Allow",
    "Action": "eks:*",
    "Resource": "*",
    "Condition": {
      "StringEquals": {
        "aws:CalledViaAWSMCP": "eks-mcp.amazonaws.com"
      }
    }
  }, {
    "Sid": "DenyEKSOperationsViaOtherMCP",
    "Effect": "Deny",
    "Action": "eks:*",
    "Resource": "*",
    "Condition": {
      "Bool": {
        "aws:ViaAWSMCPService": "true"
      },
      "StringNotEquals": {
        "aws:CalledViaAWSMCP": "eks-mcp.amazonaws.com"
      }
    }
  }]
}

Self-managed MCP servers: Manual session tags

Self-managed MCP servers, whether AWS-provided servers from the AWS MCP GitHub repository or custom servers you build yourself, don’t automatically add IAM context keys. To implement differentiation with self-managed servers, you must configure the MCP server to add session tags when assuming IAM roles. This requires modifying your MCP server to call AWS STS AssumeRole with tags attached. The tags remain active for the duration of the assumed role session and can be referenced in IAM policies using the aws:PrincipalTag condition key. This approach gives you flexibility and control over the session tag configuration. To maintain consistency, verify that all MCP server instances add the appropriate tags.

The following example shows how to configure your MCP server to add session tags.

import boto3

sts = boto3.client('sts')

response = sts.assume_role(
    RoleArn='arn:aws:iam::111122223333:role/MCPServerRole',
    RoleSessionName='mcp-server-session',
    Tags=[
        {'Key': 'AccessType', 'Value': 'AI'},
        {'Key': 'Source', 'Value': 'AgentRuntime'},
        {'Key': 'MCPServer', 'Value': 'org-data-server'}
    ]
)

# Use the temporary credentials from response['Credentials']
credentials = response['Credentials']

After your MCP server has added session tags, you can write IAM policies that check for these tags to differentiate agent actions.

{
  "Version": "2012-10-17",
  "Statement": [{
    "Sid": "AllowS3ReadOperations",
    "Effect": "Allow",
    "Action": [
      "s3:GetObject",
      "s3:ListBucket"
    ],
    "Resource": "*"
  }, {
    "Sid": "DenyDeleteWhenAccessedViaAI",
    "Effect": "Deny",
    "Action": [
      "s3:DeleteObject",
      "s3:DeleteBucket"
    ],
    "Resource": "*",
    "Condition": {
      "StringEquals": {
        "aws:PrincipalTag/AccessType": "AI"
      }
    }
  }]
}

Session tags and session policies are both passed to AssumeRole, but serve different purposes. Session policies (covered in security principle 2) constrain what permissions the agent has. Session tags (covered here in security principle 3) mark the session as AI-driven, enabling IAM policies to differentiate between agent and human actions. You can use both in the same AssumeRole call for defense-in-depth. The session policy constrains what the agent can do. The session tags let IAM policies apply different rules based on the actor type.

The following example uses both session policies and session tags together.

import boto3

sts = boto3.client('sts')

# Assume role with both managed session policy and tags
response = sts.assume_role(
    RoleArn='arn:aws:iam::111122223333:role/AgentDataRole',
    RoleSessionName='agent-data-reader',
    PolicyArns=[                              # Principle 2: Constrains permissions
        {'arn': 'arn:aws:iam::aws:policy/ReadOnlyAccess'}
    ],
    Tags=[                                    # Principle 3: Enables differentiation
        {'Key': 'AccessType', 'Value': 'AI'},
        {'Key': 'Source', 'Value': 'AgentRuntime'},
        {'Key': 'MCPServer', 'Value': 'org-data-server'}
    ],
    DurationSeconds=3600
)

CloudTrail logging and audit trails

Both differentiation mechanisms generate CloudTrail logs for audit trails. For AWS-managed MCP servers, downstream AWS API calls include the MCP service identifier in the invokedBy, sourceIPAddress, and userAgent fields. You can filter on these fields to isolate agent activity. MCP-originated downstream calls are classified as data events, so you must enable data event logging on your CloudTrail trail to capture them.

{
  "eventVersion": "1.11",
  "userIdentity": {
    "type": "AssumedRole",
    "principalId": "AROAEXAMPLE:developer-session",
    "arn": "arn:aws:sts::111122223333:assumed-role/DeveloperRole/developer-session",
    "accountId": "111122223333",
    "sessionContext": {
      "sessionIssuer": {
        "type": "Role",
        "principalId": "AROAEXAMPLE",
        "arn": "arn:aws:iam::111122223333:role/DeveloperRole",
        "accountId": "111122223333",
        "userName": "DeveloperRole"
      }
    },
    "invokedBy": "aws-mcp.amazonaws.com"
  },
  "eventSource": "s3.amazonaws.com",
  "eventName": "GetObject",
  "sourceIPAddress": "aws-mcp.amazonaws.com",
  "userAgent": "aws-mcp.amazonaws.com",
  "eventType": "AwsApiCall",
  "managementEvent": false,
  "eventCategory": "Data"
}

For self-managed MCP servers with session tags, the tags appear in the requestParameters.principalTags field of the AssumeRole CloudTrail event. You can correlate the session name from the AssumeRole event to downstream API calls to trace agent activity.

{
  "eventSource": "sts.amazonaws.com",
  "eventName": "AssumeRole",
  "requestParameters": {
    "roleArn": "arn:aws:iam::111122223333:role/MCPServerRole",
    "roleSessionName": "mcp-server-session",
    "principalTags": {
      "AccessType": "AI",
      "Source": "AgentRuntime",
      "MCPServer": "org-data-server"
    }
  }
}

With these logs, you can query CloudTrail to find all AI-driven actions and analyze patterns of agent behavior. You can also identify unexpected or unauthorized operations and maintain compliance audit trails. Set up CloudWatch alarms to detect agent actions on sensitive resources or unusual patterns that indicate unintended access or misconfiguration.

Things to consider

When deciding between AWS-managed and self-managed MCP servers, consider the trade-offs. AWS-managed MCP servers offer the most straightforward path. Context keys are added automatically with no configuration on your part. Self-managed MCP servers require modifying code to add session tags. However, they give you complete control over the tags and let you implement custom functionality not available in AWS-managed servers. Organizations can use both approaches, AWS-managed servers for standard AWS operations and self-managed servers for specialized use cases.

Practical implementation guidance:

  • Assess direct access paths: Evaluate whether your agents have access to general-purpose tools (bash, shell, code execution) that can bypass MCP servers. If they do, rely on principles 1 and 2 for those paths and consider restricting tool availability where possible.
  • Choose a differentiation mechanism: Select based on your MCP server type (for managed, use context keys, for self-managed, use session tags).
  • For AWS-managed MCP: Write IAM policies that check aws:ViaAWSMCPService and aws:CalledViaAWSMCP condition keys. No MCP server configuration needed.
  • For self managed MCP: Modify MCP server code to add session tags when assuming roles. Verify consistent tag application across all instances.
  • Update IAM policies: Add differentiation conditions to existing policies. Test in non-production first to verify behavior.
  • Monitor CloudTrail logs: Verify differentiation is working by checking for context keys or session tags in CloudTrail events.
  • Set up alerts: Configure CloudWatch alarms for AI-driven sensitive operations or policy violations.
  • Perform regular audits: Review IAM policies quarterly to verify differentiation conditions remain correct as agent capabilities evolve.

Conclusion

Securing AI agent access to AWS resources requires building deterministic IAM controls for non-deterministic AI systems. The three security principles give you a defense-in-depth framework that adapts to your deployment pattern and level of client control.

Your implementation path depends on your situation. Start with principle 1. Audit current agent permissions and default to read-only access where possible. Next, implement principle 2. For config-bound scenarios, establish permission boundaries and select agent-specific roles. For code-controlled scenarios, implement dynamic session policies scoped to each tool invocation. Finally, add principle 3 differentiation based on your MCP server type. Use automatic context keys with AWS-managed MCP servers, or configure session tags with self-managed servers.

By applying these three security principles, you can use AI agents while maintaining the governance and compliance controls your organization requires.

Riggs Goodman III

Riggs Goodman III

Riggs is a Principal Solution Architect at AWS. His current focus is on AI security, providing technical guidance, architecture patterns, and leadership for customers and partners to build AI workloads on AWS. Internally, Riggs focuses on driving overall technical strategy and innovation across AWS service teams to address customer and partner challenges.

IAM policy types: How and when to use them

23 March 2026 at 21:13

June 3, 2022: Original publication date of this post. This post has been updated to add the additional IAM policy types: Resource control policies.


You manage access in AWS by creating policies and attaching them to AWS Identity and Access Management (IAM) principals (roles, users, or groups of users) or AWS resources. AWS evaluates these policies when an IAM principal makes a request, such as uploading an object to an Amazon Simple Storage Service (Amazon S3) bucket. Permissions in the policies determine whether the request is allowed or denied. While IAM operates primarily at the individual AWS account level, organizations with multiple AWS accounts can extend these access controls through AWS Organizations, which provides additional policy types that work alongside IAM to enforce governance and security standards across their entire organizational structure. By using AWS Organizations, you can group accounts in the multi-account environment into organizational units (OUs), apply policy-based controls across these groups.

In this blog post, you will learn how to select the appropriate policy types for your security requirements and determine which team should own and manage each policy. You will explore seven policy types—including identity-based policies, resource-based policies, permissions boundaries, service control policies (SCPs), and resource control policies (RCPs)—through a practical scenario involving multiple AWS accounts and teams.

Different policy types and when to use them

AWS has different policy types that provide you with powerful flexibility, and it’s important to know how and when to use each policy type. It’s also important for you to understand how to structure your IAM policy ownership to avoid a centralized team from becoming a bottleneck. Explicit policy ownership can allow your teams to move more quickly, while staying within the secure guardrails that are defined centrally.

Service control policies overview

Service control policies (SCPs) are a feature of AWS Organizations. AWS Organizations is a service for grouping and centrally managing the AWS accounts that your business owns. SCPs are policies that specify the maximum permissions for an organization, organizational unit (OU), or an individual account. An SCP can limit permissions for principals in member accounts, including the AWS account root user.

SCPs are meant to be used as coarse-grained guardrails, and they don’t directly grant access. The primary function of SCPs is to enforce security invariants across AWS accounts and OUs in an organization. Security invariants are control objectives or configurations that you apply to multiple accounts, OUs, or the whole organization managed by AWS Organizations. For example, you can use an SCP to prevent member accounts from leaving your organization or to enforce that AWS resources can only be deployed to certain AWS Regions.

Resource control policies overview

Resource control policies (RCPs) are an AWS Organizations feature to manage permissions centrally. RCPs set the maximum available permissions for resources across your organization. RCPs help ensure that resources in your accounts stay within your organization’s access control guidelines.

RCPs are typically used to enforce data perimeter controls to prevent accidental data sharing outside your organization and to control resource sharing and cross-account access patterns centrally. You can also use RCPs to implement security controls for sensitive resources across your organization’s accounts and to add an additional layer of protection for resources such as S3 buckets that store confidential data.

Note: SCPs are principal-centric controls that specify which services your IAM users and IAM roles can access, which resources they can access, or the conditions under which they can make requests (for example, from specific Regions or networks). On the other hand, RCPs are resource-centric controls that can restrict access to your resources so that they can be accessed only by identities that belong to your organization or specify the conditions under which identities external to your organization can access your resources. To understand SCPs and RCPs differences and use cases, see General use cases for SCPs and RCPs.

Permissions boundaries overview

Permissions boundaries are an advanced IAM feature in which you set the maximum permissions that an identity-based policy can grant to an IAM principal. When you set a permissions boundary for a principal, the principal can perform only the actions that are allowed by both its identity-based policies and its permissions boundaries.

A permissions boundary is a type of identity-based policy that doesn’t directly grant access. Instead, like an SCP, a permissions boundary acts as a guardrail for your IAM principals that allows you to set coarse-grained access controls. A permissions boundary is typically used to delegate the creation of IAM principals. Delegation enables other individuals in your accounts to create new IAM principals, but limits the permissions that can be granted to the new IAM principals.

Identity-based policies overview

Identity-based policies are policy documents that you attach to a principal (roles, users, and groups of users) to control what actions a principal can perform, on which resources, and under what conditions. Identity-based policies can be further categorized into AWS managed policies, customer managed policies, and inline policies. AWS managed policies are reusable identity-based policies that are created and managed by AWS. You can use AWS managed policies as a starting point for building your own identity-based policies that are specific to your organization. Customer managed policies are reusable identity-based policies that can be attached to multiple identities. Customer managed policies are useful when you have multiple principals with identical access requirements. Inline policies are identity-based policies that are attached to a single principal. Use inline-policies when you want to create least-privilege permissions that are specific to a particular principal.

You will have many identity-based policies in your AWS account that are used to enable access in scenarios such as human access, application access, machine learning workloads, and deployment pipelines. These policies should be fine-grained. You use these policies to directly apply least privilege permissions to your IAM principals. You should write the policies with permissions for the specific task that the principal needs to accomplish.

Resource-based policies overview

Resource-based policies are policy documents that you attach to a resource such as an S3 bucket. These policies grant the specified principal permission to perform specific actions on that resource and define under what conditions this permission applies. Resource-based policies are inline policies. For a list of AWS services that support resource-based policies, see AWS services that work with IAM.

Resource-based policies are optional for many workloads that don’t span multiple AWS accounts. Fine-grained access within a single AWS account is typically granted with identity-based policies. AWS Key Management Service (AWS KMS) keys and IAM role trust policies are two exceptions, and both of these resources must have a resource-based policy even when the principal and the KMS key or IAM role are in the same account. IAM roles and KMS keys behave this way as an extra layer of protection that requires the owner of the resource (key or role) to explicitly allow or deny principals from using the resource. For other resources that support resource-based policies, here are some examples where they are most commonly used:

  1. Granting cross-account access to your AWS resource.
  2. Granting an AWS service access to your resource when the AWS service uses an AWS service principal. For example, when using AWS CloudTrail, you must explicitly grant the CloudTrail service principal access to write files to an Amazon S3 bucket.
  3. Applying broad access guardrails to your AWS resources. You can see some examples in the blog post IAM makes it easier for you to manage permissions for AWS services accessing your resources.
  4. Applying an additional layer of protection for resources that store sensitive data, such as AWS Secrets Manager secrets or an S3 bucket with sensitive data. You can use a resource-based policy to deny access to IAM principals that shouldn’t have access to sensitive data, even if granted access by an identity-based policy. An explicit deny in an IAM policy always overrides an allow.

How to implement different policy types

In this section, we will walk you through an example of a design that includes all four of the policy types explained in this post.

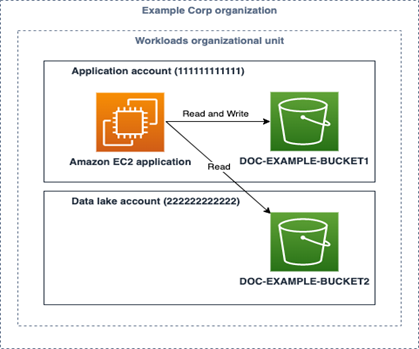
The example that follows shows an application that runs on an Amazon Elastic Compute Cloud (Amazon EC2) instance and needs to read from and write files to an S3 bucket in the same account. The application also reads (but doesn’t write) files from an S3 bucket in a different account. The company in this example, Example Corp, uses a multi-account strategy, and each application has its own AWS account. The architecture of the application is shown in Figure 1.

Figure 1: Sample application architecture that needs to access S3 buckets in two different AWS accounts

Figure 1: Sample application architecture that needs to access S3 buckets in two different AWS accounts

There are three teams that participate in this example: the Central Cloud Team, the Application Team, and the Data Lake Team. The Central Cloud Team is responsible for the overall security and governance of the AWS environment across all AWS accounts at Example Corp. The Application Team is responsible for building, deploying, and running their application within the application account (111111111111) that they own and manage. Likewise, the Data Lake Team owns and manages the data lake account (222222222222) that hosts a data lake at Example Corp.

With that background in mind, we will walk you through an implementation for each of the four policy types and include an explanation of which team we recommend own each policy. The policy owner is the team that is responsible for creating and maintaining the policy.

Service control policies

The Central Cloud Team owns the implementation of the security controls that should apply broadly to all of Example Corp’s AWS accounts. At Example Corp, the Central Cloud Team has two security requirements that they want to apply to all accounts in their organization:

  1. AWS API calls should be encrypted in transit to maintain security best practices
  2. Accounts can’t leave the organization on their own.

The Central Cloud Team chooses to implement these security invariants using SCPs and applies the SCPs to the root of the organization. The first statement in Policy 1 denies all requests that are not sent using SSL (TLS). The second statement in Policy 1 prevents an account from leaving the organization.

This is only a subset of the SCP statements that Example Corp uses. Example Corp uses a deny list strategy, and there must also be an accompanying statement with an Effect of Allow at every level of the organization that isn’t shown in the SCP in Policy 1.

Policy 1: SCP attached to AWS Organizations organization root

{
		"Id": "ServiceControlPolicy",
		"Version": "2012-10-17",
		"Statement": [{
			"Sid": "DenyIfRequestIsNotUsingSSL",
			"Effect": "Deny",
			"Action": "*",
			"Resource": "*",
			"Condition": {
				"BoolIfExists": {
					"aws:SecureTransport": "false"
				}
			}
	},
	{
		"Sid": "PreventLeavingTheOrganization",
		"Effect": "Deny",
		"Action": "organizations:LeaveOrganization",
		"Resource": "*"
	}]
}

Resource control policies

The Central Cloud Team also has three additional security requirements for Amazon S3 resource deployment to accounts.

  1. Require a minimum TLS version of 1.2 for S3 bucket access
  2. Mandate encryption of S3 objects using AWS Key Management Service (AWS KMS)
  3. Deny S3 access from AWS account outside the organization managed by AWS Organizations

The Central Cloud Team attaches the RCPs to the root of the organization, following the same approach used for SCPs, so that the policy applies across all accounts.
Policy 2 enforces three controls across S3 buckets in the organization. The first statement requires TLS 1.2 for data-in-transit. The second statement requires AWS KMS encryption for data-at-rest. The third statement restricts S3 bucket access to principals from accounts within the organization (identified by example-corp-organization-id), blocking access from external accounts.

Policy 2: RCP attached to the organization root to enforce data perimeter

{
  "Id": "ResourceControlPolicy",
  "Version": "2012-10-17",
  "Statement": [
    {
      "Sid": "EnforceS3TLSVersion",
      "Effect": "Deny",
      "Principal": "*",
      "Action": "s3:*",
      "Resource": "*",
      "Condition": {
        "NumericLessThan": {
          "s3:TlsVersion": [
            "1.2"
          ]
        }
      }
    },
    {
      "Sid": "EnforceKMSEncryption",
      "Effect": "Deny",
      "Principal": "*",
      "Action": "s3:PutObject",
      "Resource": "*",
      "Condition": {
        "Null": {
          "s3:x-amz-server-side-encryption-aws-kms-key-id": "true"
        }
      }
    },
    {
      "Sid": "DenyAllExternalS3Access",
      "Effect": "Deny",
      "Principal": "*",
      "Action": "s3:*",
      "Resource": "*",
      "Condition": {
        "StringNotEquals": {
          "aws:PrincipalOrgID": "example-corp-organization-id"
        }
      }
    }
  ]
}

Permissions boundary policies

The Central Cloud Team wants to make sure that they don’t become a bottleneck for the Application Team. They want to allow the Application Team to deploy their own IAM principals and policies for their applications. The Central Cloud Team also wants to make sure that any principals created by the Application Team can only use AWS APIs that the Central Cloud Team has approved.

At Example Corp, the Application Team deploys to their production AWS environment through a continuous integration/continuous deployment (CI/CD) pipeline. The pipeline itself has broad access to create AWS resources needed to run applications, including permissions to create additional IAM roles. The Central Cloud Team implements a control that requires that all IAM roles created by the pipeline must have a permissions boundary attached. This allows the pipeline to create additional IAM roles, but limits the permissions that the newly created roles can have to what is allowed by the permissions boundary. This delegation strikes a balance for the Central Cloud Team. They can avoid becoming a bottleneck to the Application Team by allowing the Application Team to create their own IAM roles and policies, while ensuring that those IAM roles and policies are not overly privileged.

An example of the permissions boundary policy that the Central Cloud Team attaches to IAM roles created by the CI/CD pipeline is shown below. This same permissions boundary policy can be centrally managed and attached to IAM roles created by other pipelines at Example Corp. The policy describes the maximum possible permissions that additional roles created by the Application Team are allowed to have, and it limits those permissions to some Amazon S3 and Amazon Simple Queue Service (Amazon SQS) data access actions. It’s common for a permissions boundary policy to include data access actions when used to delegate role creation. This is because most applications only need permissions to read and write data (for example, writing an object to an S3 bucket or reading a message from an SQS queue) and only sometimes need permission to modify infrastructure (for example, creating an S3 bucket or deleting an SQS queue). As Example Corp adopts additional AWS services, the Central Cloud Team updates this permissions boundary with actions from those services.

Policy 3: Permissions boundary policy attached to IAM roles created by the CI/CD pipeline

{
  "Id": "PermissionsBoundaryPolicy",
  "Version": "2012-10-17",
  "Statement": [
    {
      "Effect": "Allow",
      "Action": [
        "s3:PutObject",
        "s3:GetObject",
        "sqs:ChangeMessageVisibility",
        "sqs:DeleteMessage",
        "sqs:ReceiveMessage",
        "sqs:SendMessage",
        "sqs:PurgeQueue",
        "sqs:GetQueueUrl",
        "logs:PutLogEvents"
      ],
      "Resource": "*"
    }
  ]
}

In the next section, you will learn how to enforce that this permissions boundary is attached to IAM roles created by your CI/CD pipeline.

Identity-based policies

In this example, teams at Example Corp are only allowed to modify the production AWS environment through their CI/CD pipeline. Write access to the production environment is not allowed otherwise. To support the different personas that need to have access to an application account in Example Corp, three baseline IAM roles with identity-based policies are created in the application accounts:

  • A role for the CI/CD pipeline to use to deploy application resources.
  • A read-only role for the Central Cloud Team, with a process for temporary elevated access.
  • A read-only role for members of the Application Team.

All three of these baseline roles are owned, managed, and deployed by the Central Cloud Team.

The Central Cloud Team is given a default read-only role (CentralCloudTeamReadonlyRole) that allows read access to all resources within the account. This is accomplished by attaching the AWS managed ReadOnlyAccess policy to the Central Cloud Team role. You can use the IAM console to attach the ReadOnlyAccess policy, which grants read-only access to all services. When a member of the team needs to perform an action that is not covered by this policy, they follow a temporary elevated access process to make sure that this access is valid and recorded.

A read-only role is also given to developers in the Application Team (DeveloperReadOnlyRole) for analysis and troubleshooting. At Example Corp, developers are allowed to have read-only access to Amazon EC2, Amazon S3, Amazon SQS, AWS CloudFormation, and Amazon CloudWatch. Your requirements for read-only access might differ. Several AWS services offer their own read-only managed policies, and there is also the previously mentioned AWS managed ReadOnlyAccess policy that grants read only access to all services. To customize read-only access in an identity-based policy, you can use the AWS managed policies as a starting point and limit the actions to the services that your organization uses. The customized identity-based policy for Example Corp’s DeveloperReadOnlyRole role is shown below.

Policy 4: Identity-based policy attached to a developer read-only role to support human access and troubleshooting

{
  "Id": "DeveloperRoleBaselinePolicy",
  "Version": "2012-10-17",
  "Statement": [
    {
      "Effect": "Allow",
      "Action": [
        "cloudformation:Describe*",
        "cloudformation:Get*",
        "cloudformation:List*",
        "cloudwatch:Describe*",
        "cloudwatch:Get*",
        "cloudwatch:List*",
        "ec2:Describe*",
        "ec2:Get*",
        "ec2:List*",
        "ec2:Search*",
        "s3:Describe*",
        "s3:Get*",
        "s3:List*",
        "sqs:Get*",
        "sqs:List*",
        "logs:Describe*",
        "logs:FilterLogEvents",
        "logs:Get*",
        "logs:List*",
        "logs:StartQuery",
        "logs:StopQuery"
      ],
      "Resource": "*"
    }
  ]
}

The CI/CD pipeline role has broad access to the account to create resources. Access to deploy through the CI/CD pipeline should be tightly controlled and monitored. The CI/CD pipeline is allowed to create new IAM roles for use with the application, but those roles are limited to only the actions allowed by the previously discussed permissions boundary. The roles, policies, and EC2 instance profiles that the pipeline creates should also be restricted to specific role paths. This enables you to enforce that the pipeline can only modify roles and policies or pass roles that it has created. This helps prevent the pipeline, and roles created by the pipeline, from elevating privileges by modifying or passing a more privileged role. Pay careful attention to the role and policy paths in the Resource element of the following CI/CD pipeline role policy (Policy 5). The CI/CD pipeline role policy also provides some example statements that allow the passing and creation of a limited set of service-linked roles (which are created in the path /aws-service-role/). You can add other service-linked roles to these statements as your organization adopts additional AWS services.

Policy 5: Identity-based policy attached to CI/CD pipeline role

{
  "Id": "CICDPipelineBaselinePolicy",
  "Version": "2012-10-17",
  "Statement": [
    {
      "Effect": "Allow",
      "Action": [
        "ec2:*",
        "sqs:*",
        "s3:*",
        "cloudwatch:*",
        "cloudformation:*",
        "logs:*",
        "autoscaling:*"
      ],
      "Resource": "*"
    },
    {
      "Effect": "Allow",
      "Action": "ssm:GetParameter*",
      "Resource": "arn:aws:ssm:*::parameter/aws/service/*"
    },
    {
      "Effect": "Allow",
      "Action": [
        "iam:CreateRole",
        "iam:PutRolePolicy",
        "iam:DeleteRolePolicy"
      ],
      "Resource": "arn:aws:iam::111111111111:role/application-roles/*",
      "Condition": {
        "ArnEquals": {
          "iam:PermissionsBoundary": "arn:aws:iam::111111111111:policy/PermissionsBoundary"
        }
      }
    },
    {
      "Effect": "Allow",
      "Action": [
        "iam:AttachRolePolicy",
        "iam:DetachRolePolicy"
      ],
      "Resource": "arn:aws:iam::111111111111:role/application-roles/*",
      "Condition": {
        "ArnEquals": {
          "iam:PermissionsBoundary": "arn:aws:iam::111111111111:policy/PermissionsBoundary"
        },
        "ArnLike": {
          "iam:PolicyARN": "arn:aws:iam::111111111111:policy/application-role-policies/*"
        }
      }
    },
    {
      "Effect": "Allow",
      "Action": [
        "iam:DeleteRole",
        "iam:TagRole",
        "iam:UntagRole",
        "iam:GetRole",
        "iam:GetRolePolicy"
      ],
      "Resource": "arn:aws:iam::111111111111:role/application-roles/*"
    },
    {
      "Effect": "Allow",
      "Action": [
        "iam:CreatePolicy",
        "iam:DeletePolicy",
        "iam:CreatePolicyVersion",
        "iam:DeletePolicyVersion",
        "iam:GetPolicy",
        "iam:TagPolicy",
        "iam:UntagPolicy",
        "iam:SetDefaultPolicyVersion",
        "iam:ListPolicyVersions"
      ],
      "Resource": "arn:aws:iam::111111111111:policy/application-role-policies/*"
    },
    {
      "Effect": "Allow",
      "Action": [
        "iam:CreateInstanceProfile",
        "iam:AddRoleToInstanceProfile",
        "iam:RemoveRoleFromInstanceProfile",
        "iam:DeleteInstanceProfile"
      ],
      "Resource": "arn:aws:iam::111111111111:instance-profile/application-instance-profiles/*"
    },
    {
      "Effect": "Allow",
      "Action": "iam:PassRole",
      "Resource": [
        "arn:aws:iam::111111111111:role/application-roles/*",
        "arn:aws:iam::111111111111:role/aws-service-role/autoscaling.amazonaws.com/AWSServiceRoleForAutoScaling*"
      ]
    },
    {
      "Effect": "Allow",
      "Action": "iam:CreateServiceLinkedRole",
      "Resource": "arn:aws:iam::111111111111:role/aws-service-role/*",
      "Condition": {
        "StringEquals": {
          "iam:AWSServiceName": "autoscaling.amazonaws.com"
        }
      }
    },
    {
      "Effect": "Allow",
      "Action": [
        "iam:DeleteServiceLinkedRole",
        "iam:GetServiceLinkedRoleDeletionStatus"
      ],
      "Resource": "arn:aws:iam::111111111111:role/aws-service-role/autoscaling.amazonaws.com/AWSServiceRoleForAutoScaling*"
    },
    {
      "Effect": "Allow",
      "Action": "iam:ListRoles",
      "Resource": "*"
    },
    {
      "Effect": "Allow",
      "Action": "iam:GetRole",
      "Resource": [
        "arn:aws:iam::111111111111:role/application-roles/*",
        "arn:aws:iam::111111111111:role/aws-service-role/*"
      ]
    }
  ]
}

In addition to the three baseline roles with identity-based policies in place that you’ve seen so far, there’s one additional IAM role that the Application Team creates using the CI/CD pipeline. This is the role that the application running on the EC2 instance will use to get and put objects from the S3 buckets in Figure 1. Explicit ownership allows the Application Team to create this identity-based policy that fits their needs without having to wait and depend on the Central Cloud Team. Because the CI/CD pipeline can only create roles that have the permissions boundary policy attached, Policy 6 cannot grant more access than the permissions boundary policy allows (Policy 3).

If you compare the identity-based policy attached to the EC2 instance’s role (Policy 6 on left) with the permissions boundary policy described previously (Policy 3 on the right), you can see that the actions allowed by the EC2 instance’s role are also allowed by the permissions boundary policy. Actions must be allowed by both policies for the EC2 instance to perform the s3:GetObject and s3:PutObject actions. Access to create a bucket would be denied even if the role attached to the EC2 instance was given permission to perform the s3:CreateBucket action because the s3:CreateBucket action exceeds the permissions allowed by the permissions boundary.

Policy 6: Identity-based policy bound by permissions boundary and attached to the application’s EC2 instance

{
  "Id": "ApplicationRolePolicy",
  "Version": "2012-10-17",
  "Statement": [
	{   
      "Effect": "Allow",    
      "Action": [
         "s3:PutObject",
         "s3:GetObject"
    ],    
    "Resource": "arn:aws:s3:::DOC-EXAMPLE-BUCKET1/*"
  },
{   
      "Effect": "Allow",    
      "Action": [
         "s3:GetObject"
      ],    
      "Resource": "arn:aws:s3:::DOC-EXAMPLE-BUCKET2/*"
    }
  ]
}

Policy 3: Permissions boundary policy attached to IAM roles created by the CI/CD pipeline.

{
  "Id": "PermissionsBoundaryPolicy",
  "Version": "2012-10-17",
  "Statement": [
    {
      "Effect": "Allow",
      "Action": [
        "s3:PutObject",
        "s3:GetObject",
        "sqs:ChangeMessageVisibility",
        "sqs:DeleteMessage",
        "sqs:ReceiveMessage",
        "sqs:SendMessage",
        "sqs:PurgeQueue",
        "sqs:GetQueueUrl",
        "logs:PutLogEvents"
      ],
      "Resource": "*"
    }
  ]
}

Resource-based policies
The only resource-based policy needed in this example is attached to the bucket in the account external to the application account (DOC-EXAMPLE-BUCKET2 in the data lake account in Figure 1). Both the identity-based policy and resource-based policy must grant access to an action on the S3 bucket for access to be allowed in a cross-account scenario. The bucket policy below only allows the GetObject action to be performed on the bucket, regardless of what permissions the application’s role (ApplicationRole) is granted from its identity-based policy (Policy 6).

This resource-based policy is owned by the Data Lake Team that owns and manages the data lake account (222222222222) and the policy (Policy 7). This allows the Data Lake Team to have complete control over what teams external to their AWS account can access their S3 bucket.

Policy 7: Resource-based policy attached to S3 bucket in external data lake account (222222222222)

{
  "Version": "2012-10-17",
  "Statement": [
    {
      "Principal": {
        "AWS": "arn:aws:iam::111111111111:role/application-roles/ApplicationRole"
      },
      "Effect": "Allow",
      "Action": [
        "s3:GetObject"
      ],
      "Resource": "arn:aws:s3:::DOC-EXAMPLE-BUCKET2/*"
    }
  ]
}

No resource-based policy is needed on the S3 bucket in the application account (DOC-EXAMPLE-BUCKET1 in Figure 1). Access for the application is granted to the S3 bucket in the application account by the identity-based policy. Access can be granted by either an identity-based policy or a resource-based policy when access is within the same AWS account.

Putting it all together

Figure 2 shows the architecture and includes the different policies and the resources they are attached to. The table that follows summarizes the various IAM policies that are deployed to the Example Corp AWS environment, and specifies what team is responsible for each of the policies.

Figure 2: Sample application architecture with CI/CD pipeline used to deploy infrastructure

Figure 2: Sample application architecture with CI/CD pipeline used to deploy infrastructure

The numbered policies in Figure 2 correspond to the policy numbers in the following table.

Policy number

Policy description

Policy type

Policy owner

Attached to

1

Enforce SSL and prevent member accounts from leaving the organization for all principals in the organization

Service control policy (SCP)

Central Cloud Team

Organization root

2

Enforce TLS 1.2 and KMS encryption for S3 buckets across the organization

Resource control policy (RCP)

Central Cloud Team

Organization root

3

Restrict maximum permissions for roles created by CI/CD pipeline

Permissions boundary

Central Cloud Team

All roles created by the pipeline (ApplicationRole)

4

Scoped read-only policy

Identity-based policy

Central Cloud Team

IAM role

5

CI/CD pipeline policy

Identity-based policy

Central Cloud Team

IAM role

6

Policy used by running application to read and write to S3 buckets

Identity-based policy

Application Team

on EC2 instance

7

Bucket policy in data lake account that grants access to a role in application account

Resource-based policy

Data Lake Team

S3 Bucket in data lake account

8

Broad read-only policy

Identity-based policy

Central Cloud Team

IAM role

Conclusion
In this blog post, you learned about four different policy types: identity-based policies, resource-based policies, service control policies (SCPs), resource control polices (RCPs), permissions boundary policies, and resource control policies. You saw examples of situations where each policy type is commonly applied. Then, you walked through a real-life example that describes an implementation that uses these policy types.

By implementing multiple IAM policy types in a layered approach, you can achieve robust access control that follows the principle of least privilege while enabling team autonomy. This defense-in-depth strategy helps prevent unauthorized access through multiple policy evaluation checkpoints.

You can use this blog post as a starting point for developing your organization’s IAM strategy. You might decide that you don’t need all of the policy types explained in this post, and that’s OK. Not every organization needs to use every policy type. You might need to implement policies differently in a production environment than a sandbox environment. The important concepts to take away from this post are the situations where each policy type is applicable, and the importance of explicit policy ownership. We also recommend taking advantage of policy validation in AWS IAM Access Analyzer when writing IAM policies to validate your policies against IAM policy grammar and best practices.

For more information, including the policies described in this solution and the sample application, see the how-and-when-to-use-aws-iam-policy-blog-samples GitHub repository. The repository walks through an example implementation using a CI/CD pipeline with AWS CodePipeline.If you have any questions, please post them in the AWS Identity and Access Management re:Post topic or reach out to AWS Support.

Author

Matt Luttrell

Matt is a Sr. Solutions Architect on the AWS Identity Solutions team. When he’s not spending time chasing his kids around, he enjoys skiing, cycling, and the occasional video game.

Author

Jay Goradia

Jay is a Technical Account Manager (TAM) at AWS who works closely with enterprise customers to accelerate their cloud journey through strategic guidance and technical expertise. Using his security background, he helps organizations understand security best practices in AWS.

Author

Anshu Bathla

Anshu is a Lead Consultant – SRC at AWS, based in Gurugram, India. He works with customers across diverse verticals to help strengthen their security infrastructure and achieve their security goals. Outside of work, Anshu enjoys reading books and gardening at his home garden.

Josh Joy

Josh is a Senior Identity Security Engineer with AWS Identity helping to ensure the safety and security of AWS Auth integration points. Josh enjoys diving deep and working backwards in order to help customers achieve positive outcomes. 

Introducing Unit 42 Managed XSIAM 2.0

17 February 2026 at 12:01

24/7 Managed SOC Built for Tomorrow's Threats

The window for defense has collapsed, and most SOCs weren’t built for the speed of today’s attacks. According to the 2026 Unit 42® Global Incident Response Report, some end-to-end attacks now unfold in under an hour. Attacks that used to take days or weeks now happen in minutes.

Most traditional SOC models are trapped in a cycle of alert overload, fragmented tools and limited engineering capacity that slow investigations and delay response. Traditional SIEM and MDR models were designed to react to alerts. They were not designed to continuously improve detections, correlations and response with threats that move at machine speed. Over time, that gap between attacker speed and defender capability keeps widening, and it’s exactly why we built Unit 42 Managed XSIAM 2.0 (MSIAM).

Today marks the availability of the next evolution of our managed SOC offering – one that reflects how modern security operations must run in today’s threat landscape. MSIAM 2.0 is built on Cortex XSIAM®, Palo Alto Networks SOC transformation platform, and operated by Unit 42 analysts, threat hunters, responders and SOC engineers who handle the most complex incidents in the world. With this solution, Unit 42 provides organizations with a 24/7 managed SOC that delivers continuous detection, investigation and full-cycle remediation across the entire attack surface while improving operations over time.

We don’t just manage alerts. Unit 42 continuously engineers detections, correlations and response playbooks within XSIAM, refining them as attacker behavior evolves. This ongoing engineering ensures defenses improve over time, driven by real-world incidents and frontline threat intelligence, not static rules that quickly fall behind.

Why Managed XSIAM 2.0 Is Different

Elite SOC on Day One

We want SOC teams up and running as fast as possible. Experts lead onboarding, data mapping and configuration, and then your managed SOC team takes responsibility for operating and optimizing XSIAM on a day-to-day basis. The result is a SOC that improves over time without adding operational burden.

Every Threat Exposed

Unit 42 goes beyond reactive monitoring with continuous, proactive threat hunting across the entire attack surface. When a new threat is found in the wild, we produce threat impact reports that show how those techniques apply to each customer’s environment. We then translate those insights into custom detections and automated response actions, while also monitoring and investigating the correlation rules your team creates. Both the global threat intelligence and your unique use cases are backed by our 24/7 analysis, closing gaps quickly and strengthening defenses over time.

We also now support both native and third-party EDR telemetry, so organizations can benefit from Unit 42 expertise and Cortex® AI-driven analytics, regardless of the security technologies they use today. This enables customers to receive the strongest possible managed defense now, while creating a natural, low-friction path toward deeper platform consolidation as their environment evolves.

Machine-Speed Response

When incidents escalate, we don’t just hand you a ticket; we take ownership. Collaborating with your team, we establish pre-authorized workflows to execute immediate responses across your entire environment, from endpoints and firewalls to identity and cloud. We pair the platform’s native speed with expert oversight. By validating threat context and business impact, every response action is precise and safe, giving you the confidence to unleash full-cycle remediation. This allows MSIAM 2.0 to move seamlessly from detection to resolution with both velocity and precision.

And we stand behind our solution with a Breach Response Guarantee. If a complex incident strikes, you have the world’s best responders in your corner with up to 250 hours of Unit 42 Incident Response included. This built-in coverage removes the administrative hurdles of crisis response, enabling our experts to immediately transition from monitoring to deep forensic investigation and complete eradication, so you can focus on recovery. 

Proven in the Real World with the Green Bay Packers

Working with Unit 42 and the Cortex XSIAM platform, the Green Bay Packers modernized their security across a complex hybrid environment, demonstrating what Unit 42's managed services deliver in real-world operations. By consolidating telemetry and accelerating investigation and response, they reduced response times from hours to minutes, investigated 54% more alerts and saved over 120 hours of analyst time without adding headcount.

These outcomes reflect the key benefits of MSIAM: Unit 42 experts working to apply frontline intelligence as new attacker behavior emerges, translating it into reporting and tailored detections that improve response where it matters most. When a machine-speed platform is operated by experts handling real incidents every day, defenses continuously strengthen as threats evolve.

The Future of the SOC

Unit 42 MSIAM 2.0 helps your SOC operate as it should by combining AI-driven analytics and automation with expert-led operations and engineering. This combination provides teams with the confidence that their defenses are always on, always improving and ready when it matters most. That’s the SOC that security leaders need today, and the one we’re building for tomorrow.

MSIAM is now delivered through two service tiers, Pro and Premium. Organizations can start where they are and grow at their own pace. Pro provides AI-driven managed SOC operations with continuous detection, investigation and response. Premium extends into full-lifecycle SOC engineering, with designated experts and customized detections, automation and tailored response playbooks as your security maturity grows.

To learn more about Managed XSIAM 2.0, join us at Symphony 2026, a Palo Alto Networks premier virtual SOC event, where Unit 42 and Cortex® experts will share frontline threat intelligence from the new 2026 Unit 42 Incident Response Report alongside real-world SOC transformation insights from organizations operating at machine speed.

The post Introducing Unit 42 Managed XSIAM 2.0 appeared first on Palo Alto Networks Blog.

Novel Technique to Detect Cloud Threat Actor Operations

7 February 2026 at 00:00

We introduce a novel method that maps cloud alert trends to MITRE ATT&CK techniques. The patterns created could identify threat actors by behavior.

The post Novel Technique to Detect Cloud Threat Actor Operations appeared first on Unit 42.

Palo Alto Networks Announces Support for NVIDIA Enterprise AI Factory

6 January 2026 at 00:01

Artificial intelligence has shifted to being the primary engine for market leadership. To compete, enterprises are shifting from general-purpose computing to AI factories, specialized infrastructures designed to manage the entire lifecycle of AI. However, this transition requires robust security without sacrificing performance and efficiency.

We are proud to announce that Palo Alto Networks Prisma® AIRS™, accelerated on the NVIDIA BlueField data processing unit (DPU), is now part of the NVIDIA Enterprise AI Factory validated design.

The integrated solution embeds zero trust security directly into the AI infrastructure, providing comprehensive protection without impacting AI performance. By deploying Palo Alto Networks Prisma® AIRS™ Network Intercept directly onto the NVIDIA BlueField and extending to the cloud, Prisma AIRS establishes an essential zero trust governance fabric for the AI factory, enabling enterprises to accelerate innovation while maintaining control.

This critical architectural shift enables optimal AI performance and infrastructure efficiency by offloading security processing to an isolated domain, while leveraging the DPU's hardware acceleration via NVIDIA DOCA to enforce security policies at line speed. The implementation also leverages real-time workload information captured using DOCA Argus, which is then passed to Cortex XSIAM® where it is used for AI-driven responses using the Cortex XSOAR® orchestration platform.

Rich Campagna, SVP Product Management, Palo Alto Networks said:

The AI Factory is the new engine for value creation, and securing it is a board-level imperative. The validation of Palo Alto Networks Prisma AIRS accelerated with NVIDIA BlueField within the NVIDIA Enterprise AI Factory enables a new security architecture for the AI era. We are embedding trust directly into the infrastructure, giving leaders the confidence to safeguard their proprietary intelligence and deploy AI bravely.

Kevin Deierling, senior vice president of Networking at NVIDIA said:

AI is transforming every industry and security must evolve to protect AI factories. To be scalable, security must be distributed and embedded within the AI infrastructure. This is achieved with NVIDIA BlueField running Palo Alto Networks Prisma AIRS to deliver robust, runtime security for the AI factory, with optimal AI performance and efficiency.

Deploy AI Bravely with a Future-Proof Foundation

The Future of Secure AI Factories

NVIDIA AI Factory with Prisma AIRS and Strata.

In addition to deploying Palo Alto Networks Prisma AIRS on NVIDIA BlueField in a distributed model, it’s essential to maintain a centralized Hyperscale Security Firewall (HSF) cluster at the ingress and egress points of the AI factory to enforce a defense-in-depth strategy. Beyond network segmentation, individual workloads can selectively route traffic through hyperscale clusters to detect advanced application-layer threats and prevent lateral movement. These hyperscale firewall clusters scale elastically with demand, delivering session resiliency and the high availability required for critical AI operations.

This architecture fundamentally improves the Total Cost of Ownership (TCO) for AI infrastructure. By isolating security functions on BlueField, enterprises enable 100% of host computing resources to be dedicated to AI applications. This elimination of resource contention allows the AI Factory to maximize token throughput and capital efficiency.

This validated design is the blueprint for immediate efficiency. It provides a seamless path for enterprises to shift from general-purpose clusters to secure AI factory infrastructure without costly overhauls. More importantly, this collaboration establishes an unparalleled roadmap for future-proofing your investment. By securing operations with the high-performance NVIDIA BlueField-3 today, the architecture is inherently ready for the next generation, NVIDIA BlueField-4. This forward compatibility helps AI factories immediately handle gigascale demands, scaling up to 6X the compute power and doubling the bandwidth when BlueField-4 becomes available.

The inclusion of the Palo Alto Networks Prisma AIRS platform in the NVIDIA Enterprise AI Factory Validated Design bolsters enterprise AI security. By establishing the zero trust governance fabric of Prisma AIRS runtime security on NVIDIA BlueField, organizations gain a comprehensive defense. Proprietary and sensitive data is secured throughout the entire stack, and models are protected from adversarial threats, such as prompt injection attacks. With Prisma AIRS, the world's most comprehensive AI security platform, leaders gain the confidence to innovate and deploy AI bravely. This validated design is the essential blueprint for securely accelerating your market leadership without compromising security.

Join our "How to Secure the AI Factory" breakout session at NVIDIA GTC 2026, March 16-19, in San Jose, CA to hear more about this transformative solution and accelerate your AI innovation securely.

The post Palo Alto Networks Announces Support for NVIDIA Enterprise AI Factory appeared first on Palo Alto Networks Blog.

Partners Are Fueling Innovation with Cortex XSIAM and Prisma SASE

At Palo Alto Networks, we believe that the true measure of our technology isn’t just in how it performs in the lab, but how it empowers our partners to solve critical security challenges for their customers. That is why we are incredibly proud to announce that Palo Alto Networks has been recognized by CRN with the 2025 Products of the Year Award for Cortex XSIAM® and 2025 Tech Innovator Award for Prisma® SASE.

This recognition is particularly meaningful because it is not decided by a small panel of judges. The CRN Awards are determined solely by ratings from solution providers – the people who are out in the field every day, deploying these tools to secure the modern enterprise.

Here is a look at why partners are betting on our platform.

Cortex XSIAM Outperforms Legacy SIEM by Sweeping Award SubcategoriesThe CRN Products of the Year 2025

Solution providers validated the shift to AI-driven operations by voting Cortex XSIAM the definitive choice for the modern SOC. We secured the Overall Category Winner title in the CRN 2025 Products of the Year Awards for Security Operations Platform/SIEM. Ranking #1 in technology, revenue and customer need, this verdict comes directly from the experts who deploy security architectures every day.

The Clean Sweep

Cortex XSIAM swept the board. We secured the top ranking across all three evaluation criteria:

  • Technology: Best-in-class innovation
  • Revenue and Profit: Proven business value
  • Customer Need: Solves critical operational challenges

This trifecta proves the platform excels in practice, not just theory. The legacy SIEM era is giving way to something fundamentally different.

For our partners, XSIAM represents a shift from "managing tools" to "delivering outcomes." By unifying SOC capabilities into a single, AI-driven platform, we are enabling solution providers to offer faster detection and remediation services without the operational overhead of legacy SIEMs.

As Dave Kennedy, Co-Founder & Chief Hacking Officer at Binary Defense, notes:

Effective security operations depend on actionable intelligence. Cortex XSIAM delivers the depth and precision our analysts need to connect the dots and act decisively. This award-winning platform, now recognized as CRN’s 2025 Product of the Year, strengthens our shared mission to protect organizations from evolving threats.

​​To dive deeper into how Cortex XSIAM continues to lead with AI-driven innovation, watch the on-demand webinar introducing the revolutionary Cortex AgentiX.

​​While XSIAM is transforming security operations, another Palo Alto Networks solution is reimagining network security entirely.

Prisma SASE Is Redefining Network Security

The CRN Tech Innovators Winner 2025

We believe being recognized as a Tech Innovator is a powerful validation of our commitment to delivering a best-in-class security that empowers our customers.

As per the CRN 2025 Tech Innovator Awards:

Prisma SASE from Palo Alto Networks is a comprehensive SASE solution converging networking and security for the entire hybrid workforce. Prisma SASE secures users, apps, data and devices everywhere. It delivers best-in-class security, exceptional user experiences and simplified operations through a unique multicloud architecture, single console, unified policies and AI copilot.

We secured this award primarily due to our deep understanding of customer needs. At Palo Alto Networks, understanding customer needs isn't just about listening to feedback on existing features; it's about anticipating where the future of work is heading. We don't just build security; we build solutions that adapt to our customer’s reality. Listening to over 70 thousand of our customers, we continue to push the boundaries of security, culminating in our latest Prisma SASE 4.0 launch.

The Power of the Platform

Winning 2025 Product of the Year and 2025 Tech Innovator in both SecOps and Network Security underscores the reality that today’s partners and customers are looking for unified, best-in-class solutions.

Whether it is revolutionizing the SOC with Cortex XSIAM or securing the hybrid workforce with SASE, these awards reflect the trust our solution providers place in us. We are committed to continuing this momentum, equipping our partner community with the innovation they need to stay ahead of tomorrow’s threats.

Thank you to all our partners who voted and continue to trust Palo Alto Networks as your cybersecurity platform of choice.

The post Partners Are Fueling Innovation with Cortex XSIAM and Prisma SASE appeared first on Palo Alto Networks Blog.

❌