❌

Reading view

Incident response guide for AWS CloudTrail investigations – Part 2

In Part 1 of this guide, we examined two common incident scenarios: cross-account Amazon Simple Storage Service (Amazon S3) data deletion with ransomware implications, and cryptocurrency mining deployed through AWS CloudFormation using exposed AWS Management Console credentials. We also introduced key incident response terminology and investigative frameworks for analyzing AWS CloudTrail events.

In this second part, we explore a more complex, multi-stage attack: how a web application vulnerability can cascade into credential harvesting and unauthorized access to Amazon Bedrock services across multiple AWS Regions. We also cover additional investigation techniques and hardening steps to strengthen your security posture.

Scenario 3: SSRF to IMDSv1 credential harvesting with multi-Region Amazon Bedrock service misuse

This scenario examines how a web application vulnerability can cascade into a multi-Region event targeting Amazon Bedrock services. The investigation demonstrates how threat actors chain together multiple techniques, using Amazon Elastic Compute Cloud (Amazon EC2) Instance Metadata Service version 1 (IMDSv1) through server-side request forgery (SSRF) and cross-Region pivoting to access Amazon Bedrock.

Your security team receives multiple alerts: failed AWS Identity and Access Management (IAM) operations in the us-east-1 Region, successful console sign-ins without multi-factor authentication (MFA), and unusual Amazon Bedrock API calls from us-east-2. Initially, these might seem like unrelated events across different services and Regions. However, as our Security Incident Response Team (SIRT) discovered, they represent a carefully orchestrated event chain that began with a web application vulnerability and culminated in unauthorized access to your organization’s AI infrastructure.

Architecture and progression

The architecture in figure 1 maps a multi-stage attack that exploits the trust relationship between Amazon Elastic Compute Cloud (Amazon EC2) instances and AWS services. A threat actor identified a server-side request forgery (SSRF) vulnerability in a web application running on an EC2 instance that had an attached webdev IAM role. Rather than attempting to escalate privileges directly, the threat actor used this foothold to reach the Instance Metadata Service version 1 (IMDSv1) endpoint and retrieve the temporary credentials issued to the webdev role. Because IMDSv1 returns credentials in response to a basic request with no session token, an SSRF flaw is enough to harvest them, which is why these credentials became the pivot point for everything that followed. The attack unfolded in five stages. Each stage is numbered in figure 1 so you can follow the progression from the initial web request through to the cross-Region Amazon Bedrock activity:

  1. Initial access: The threat actor exploited the SSRF vulnerability in the web application to make server-side requests on the instance’s behalf.
  2. Credential harvesting: Those requests reached the IMDSv1 endpoint and returned the temporary credentials for the webdev role.
  3. Permission testing: Using the harvested credentials, the threat actor attempted IAM operations to probe the boundaries of what the role could do.
  4. Service pivoting: When IAM actions were denied, the threat actor shifted focus to Amazon Bedrock, a service the role could reach.
  5. Region hopping: The threat actor moved operations from us-east-1 to us-east-2, likely to evade Region-specific monitoring and access controls.
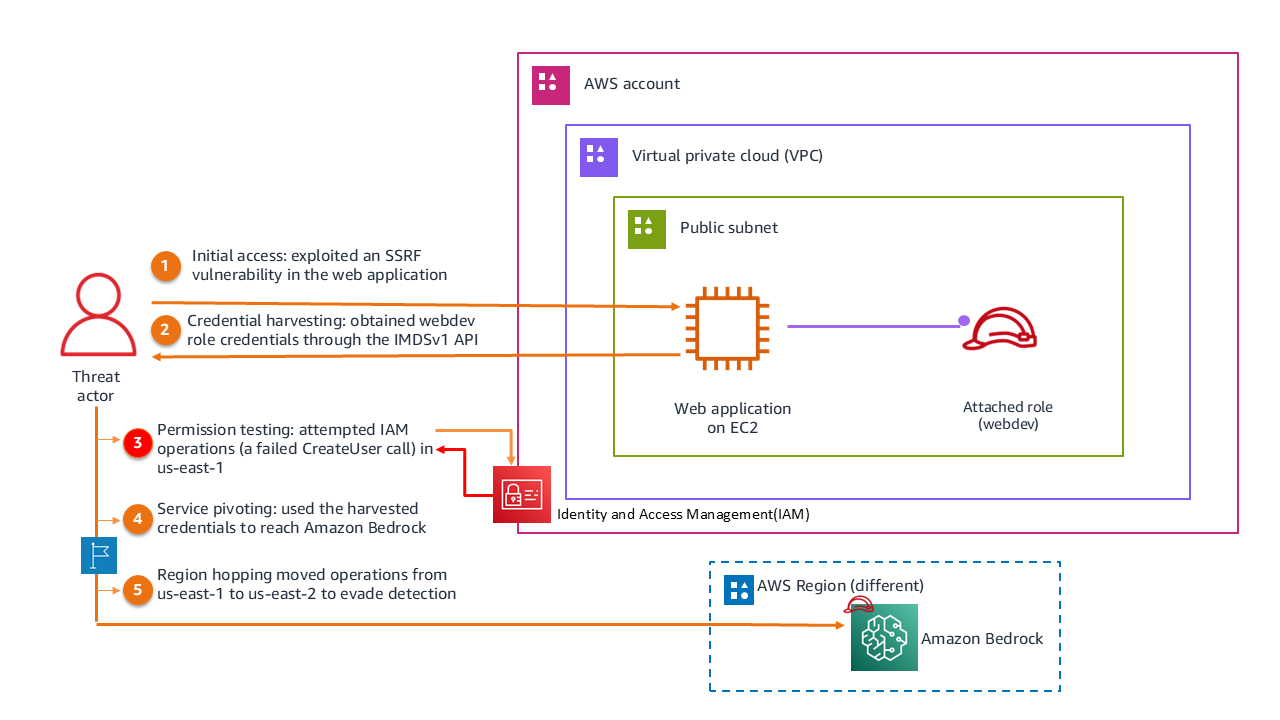
Figure 1: Scenario 3 architecture

Figure 1: Scenario 3 architecture

CloudTrail evidence and structured extractions

In this section, we walk through the CloudTrail evidence that documents the attack from start to finish. Each of the four events that follow maps to one or more stages in the progression described previously, and together they trace how the threat actor moved from harvested credentials to active misuse of Amazon Bedrock. For each event, we present the relevant portion of the CloudTrail log record, highlight the fields that matter most for the investigation, and include a forensic legend that explains what each highlighted field reveals.

We cover the following events:

  1. Permission boundary testing (15:53:49 UTC): A failed CreateUser call in us-east-1 that reveals the compromised role and the IMDSv1 credential source.
  2. Console access establishment (15:59:29 UTC): A successful console sign-in without MFA, showing the pivot from programmatic to interactive access.
  3. Bedrock service reconnaissance (17:20:00 UTC): A ListFoundationModels call in us-east-2 that marks the Region hop and the shift to AI services.
  4. Active model exploitation (17:25:48 UTC): A Converse call that invokes the Amazon Nova Pro model, confirming unauthorized usage.

As you read each event, focus on how the fields connect one stage to the next. The same webdev role, the same source IP address, and the recurring ec2RoleDelivery value are the threads that tie these otherwise separate events into a single attack chain.

Event 1: Permission boundary testing (15:53:49 UTC): The first suspicious activity appeared as a failed CreateUser API call in us-east-1. The CloudTrail log records an AssumedRole session attempting to create an IAM user named adm1n but receiving an AccessDenied error. The webdev role is visible in the userIdentity field, readOnly is false (indicating a write operation attempt), and the user-agent shows AWS Command Line Interface (AWS CLI) on Windows, suggesting programmatic access from the harvested credentials.

{
  "eventVersion": "1.11",
  "userIdentity": {
    "type": "AssumedRole",
    "principalId": "AROAFINDANEXAMPLE:i-0123456789abcdef0",
    "arn": "arn:aws:sts::XXXXXXXXXXXX:assumed-role/webdev/i-0123456789abcdef0",
    "sessionContext": {
      "sessionIssuer": { "type": "Role", "userName": "webdev" },  ◄── ❶ Compromised EC2 role
                                                     ‾‾‾‾‾‾‾‾
      "attributes": { "mfaAuthenticated": "false" }
    },
    "ec2RoleDelivery": "1.0"  ◄── ❷ IMDSv1 confirmed (SSRF exploitation path)
                       ‾‾‾‾‾
  },
  "eventTime": "2025-09-22T15:53:49Z",
  "eventSource": "iam.amazonaws.com",
  "readOnly": false,
  "eventName": "CreateUser",  ◄── ❸ Intent: establish persistent backdoor
               ‾‾‾‾‾‾‾‾‾‾‾‾
  "userAgent": "aws-cli/2.17.48 ua/2.0 os/windows#10 ...",
  "errorCode": "AccessDenied",  ◄── ❺ Hard policy stop (least-privilege held)
               ‾‾‾‾‾‾‾‾‾‾‾‾‾‾
  "errorMessage": "User: arn:aws:sts::XXXXXXXXXXXX:assumed-role/webdev/...
    is not authorized to perform: iam:CreateUser
    on resource: arn:aws:iam::XXXXXXXXXXXX:user/adm1n..."  ◄── ❹ Lookalike name (1 not i)
                                                ‾‾‾‾‾
}

───────────────────────────────────────────────────────────────────
  FORENSIC LEGEND
───────────────────────────────────────────────────────────────────
  ❶ userName: "webdev"         → Confirms the compromised EC2 role context
  ❷ ec2RoleDelivery: "1.0"    → Credentials obtained via IMDSv1 (SSRF vector)
  ❸ eventName: "CreateUser"   → Attacker attempting IAM persistence
  ❹ target user: "adm1n"      → Typosquatting admin (number 1 instead of letter i)
  ❺ errorCode: "AccessDenied" → Attacker probing permission boundaries; blocked
───────────────────────────────────────────────────────────────────

Event 2: Console access establishment (15:59:29 UTC): Six minutes later, the threat actor successfully signed in to the AWS Management Console using the same credentials. The ConsoleLogin event records that MFA wasn’t used (MFAUsed: No), and the source IP (75.3.231.105) provides attribution data. The user agent indicates Chrome browser on Windows 10.

{
  "eventVersion": "1.11",
  "userIdentity": {
    "type": "AssumedRole",
    "principalId": "AROAFINDANEXAMPLE:i-0123456789abcdef0",
    "arn": "arn:aws:sts::XXXXXXXXXXXX:assumed-role/webdev/i-0123456789abcdef0",
    "sessionContext": { "attributes": { "mfaAuthenticated": "false" } }
  },
  "eventTime": "2025-09-22T15:59:29Z",
  "eventSource": "signin.amazonaws.com",
  "userAgent": "Mozilla/5.0 (Windows NT 10.0; Win64; x64) AppleWebKit/537.36 	 (KHTML, like Gecko) Chrome/140.0.0.0 Safari/537.36 Edg/140.0.0.0",

  "eventName": "ConsoleLogin",  ◄── ❶ Pivoted to interactive console access
               ‾‾‾‾‾‾‾‾‾‾‾‾‾‾
  "awsRegion": "us-east-1",
  "sourceIPAddress": "75.3.231.105",
  "responseElements": { "ConsoleLogin": "Success" },◄── ❷ Hijacked login succeeded
                                        ‾‾‾‾‾‾‾‾‾
  "additionalEventData": { "MobileVersion": "No", "MFAUsed": "No" },◄── ❸ No MFA challenge
                                                             ‾‾‾‾
  "eventType": "AwsConsoleSignIn"  ◄── ❹ Console sign-in (not API call)
               ‾‾‾‾‾‾‾‾‾‾‾‾‾‾‾‾‾
}
───────────────────────────────────────────────────────────────────
FORENSIC LEGEND
───────────────────────────────────────────────────────────────────
❶ eventName: "ConsoleLogin"→ Attacker pivoted from programmatic to visual console access
❷ ConsoleLogin: "Success"→ Hijacked login successfully authenticated
❸ MFAUsed: "No" → Critical gap: no MFA enforced, enabling the pivot
❹ eventType: "AwsConsoleSignIn"   → Distinguishes this from basic API calls
───────────────────────────────────────────────────────────────────

Event 3: Amazon Bedrock service reconnaissance (17:20:00 UTC): Nearly two hours later, the threat actor pivoted to Amazon Bedrock, making a ListFoundationModels API call in us-east-2. This event exhibits several patterns: a Region change from us-east-1 to us-east-2 (potential defense evasion), a shift from IAM to AI services, readOnly: true (reconnaissance rather than modification), and sessionCredentialFromConsole: “true”, which ties the call to the console session established in Event 2 rather than a fresh IMDSv1 credential retrieval.

 {
  "eventVersion": "1.11",
  "userIdentity": {
    "type": "AssumedRole",
    "arn": "arn:aws:sts::XXXXXXXXXXXX:assumed-role/webdev/i-0123456789abcdef0"
  },
  "eventTime": "2025-09-22T17:20:00Z",
  "eventSource": "bedrock.amazonaws.com",  ◄── ❶ Pivoted to cloud AI services
               ‾‾‾‾‾‾‾‾‾‾‾‾‾‾‾‾‾‾‾‾‾‾‾‾
  "eventName": "ListFoundationModels",  ◄── ❷ AI model reconnaissance
               ‾‾‾‾‾‾‾‾‾‾‾‾‾‾‾‾‾‾‾‾‾‾
  "awsRegion": "us-east-2",  ◄── ❸ Region hop (evasion technique)
               ‾‾‾‾‾‾‾‾‾‾‾
  "sourceIPAddress": "75.3.231.105",
  "readOnly": true,
  "tlsDetails": {
    "clientProvidedHostHeader": "bedrock.us-east-2.amazonaws.com"  ◄── ❹ Intentional alternate region targeting
                               ‾‾‾‾‾‾‾‾‾‾‾‾‾‾‾‾‾‾‾‾‾‾‾‾‾‾‾‾‾‾‾‾‾
  },
  "sessionCredentialFromConsole": "true"
}

───────────────────────────────────────────────────────────────────
  FORENSIC LEGEND
───────────────────────────────────────────────────────────────────
❶ eventSource: "bedrock.amazonaws.com"→ Attacker pivoted from IAM to managed AI services
❷ eventName: "ListFoundationModels"→ Reconnaissance: enumerating available AI models
❸ awsRegion: "us-east-2"→ Region hop from us-east-1 (defense evasion)
❹ clientProvidedHostHeader: "bedrock.us-east-2..."  → Confirms intentional targeting of alternate region endpoint
───────────────────────────────────────────────────────────────────

Event 4: Active model exploitation (17:25:48 UTC): Five minutes after the reconnaissance call, the threat actor moved from enumeration to active exploitation, invoking the Amazon Nova Pro model through the Converse API in us-east-2. The additionalEventData field quantifies the unauthorized usage at 944 input tokens and 126 output tokens, confirming that the threat actor successfully prompted the model and received a response.

 {
  "eventVersion": "1.11",
  "userIdentity": {
    "type": "AssumedRole",
    "arn": "arn:aws:sts::XXXXXXXXXXXX:assumed-role/webdev/i-0123456789abcdef0"
  },
  "eventTime": "2025-09-22T17:25:48Z",
  "eventSource": "bedrock.amazonaws.com",
  "eventName": "Converse",  ◄── ❶ Active model invocation (recon → exploitation)
               ‾‾‾‾‾‾‾‾‾‾
  "awsRegion": "us-east-2",
  "requestParameters": {
    "modelId": "amazon.nova-pro-v1:0",  ◄── ❷ Specific model being misused
               ‾‾‾‾‾‾‾‾‾‾‾‾‾‾‾‾‾‾‾‾‾‾
    "inferenceConfig": { "maxTokens": 1024 }
  },
  "responseElements": null,
  "additionalEventData": { "inputTokens": 944, "outputTokens": 126 }  ◄── ❸ Unauthorized usage quantified
                           ‾‾‾‾‾‾‾‾‾‾‾‾‾‾‾‾‾‾‾‾‾‾‾‾‾‾‾‾‾‾‾‾‾‾‾‾‾‾
}

───────────────────────────────────────────────────────────────────
  FORENSIC LEGEND
───────────────────────────────────────────────────────────────────
❶ eventName: "Converse"                → Attacker transitioned from reconnaissance to active exploitation
❷ modelId: "amazon.nova-pro-v1:0"      → Identifies the specific foundation model being misused
❸ inputTokens: 944, outputTokens: 126  → Quantifies unauthorized usage (financial cost + data exfiltration exposure)
───────────────────────────────────────────────────────────────────

Notable event fields to track

As you review the event logs, a handful of fields do most of the investigative work in this scenario. Understanding what each one reveals, and why it matters, is what turns a collection of individual log records into a coherent attack narrative.

The userIdentity field is the starting point for attribution. In this scenario it carries the EC2 instance ID as the session name, which is what let us trace the harvested credentials back to a specific compromised instance rather than a human user. Whenever you see an assumed-role session, this field answers the first question of any investigation: whose credentials are these, and where did they come from?

The readOnly field reveals the intent behind an action. A value of true marks reconnaissance, such as the ListFoundationModels call the threat actor used to enumerate available models, while false marks an attempt to change or use something, such as the CreateUser call or the Converse invocation. Sorting events by this field quickly separates the threat actor’s information gathering from the actions that caused actual impact.

The awsRegion field is easy to overlook, but in this scenario it exposed the threat actor’s evasion strategy. The shift from us-east-1 to us-east-2 wasn’t incidental; threat actors move between Regions because monitoring, alerting, and access controls are often configured inconsistently across them. Watching this field helps you spot activity that has deliberately moved away from where your detection is strongest.

Finally, the userIdentity.invokedBy field identifies when an AWS service, rather than a user or a set of harvested credentials, made the request on your behalf. CloudTrail populates it only when the caller is an AWS service, such as through a service-linked role, a service role, or a forward access session. It doesn’t appear in the events for this scenario because the threat actor called Amazon Bedrock directly with the harvested webdev credentials. That absence is itself informative: it confirms the requests came from a principal acting on its own rather than from a legitimate service-driven workflow. As agent-based and service-integrated Amazon Bedrock workloads become more common, checking this field separates expected service activity from credentials driven directly by a threat actor.

Investigation priorities

With the full attack chain mapped, from SSRF through credential harvesting to Amazon Bedrock service misuse, the investigation turned to a harder question: what did each stage actually cost us, and what would stop it from happening again? A few priorities shaped that work.

The first was figuring out where the credentials came from and how far the exposure reached. It was clear the threat actor had valid credentials for the webdev role, but the more useful question was why a web application role could reach Amazon Bedrock at all. The customer confirmed there was no business reason for it, so we needed to understand whether that permission was a deliberate misconfiguration or an oversight, and then look for other EC2 instances carrying the same role attachment. One compromised instance is an incident; a fleet of instances with the same over-scoped role is a much bigger problem waiting to happen.

Next, we wanted to know what the threat actor did after they got into Amazon Bedrock. Reconnaissance and active use carry very different consequences, so we traced which foundation models were touched and whether any were actually invoked or only enumerated. That distinction matters for scoping the damage, and it signals whether data exfiltration is a concern. Unusual model usage, unexpected prompt volume, or output patterns that don’t match any legitimate workload are the signals that reconnaissance has turned into something worse.

The Region hop was its own line of inquiry. The move from us-east-1 to us-east-2 was almost certainly deliberate, and the investigation focused on understanding what the threat actor gained by it. In practice, that meant comparing the two Regions: were the monitoring and access controls in us-east-2 weaker than in us-east-1, and what else did the threat actor reach in the secondary Region once they were there? Inconsistent controls across Regions are one of the most common ways activity slips past detection.

Tying it all together was the timeline, which shows how quickly the threat actor moved through the chain:

  1. 15:53:49: Failed IAM operation (us-east-1)
  2. 15:59:29: Successful console login (us-east-1)
  3. 17:20:00: Amazon Bedrock reconnaissance (us-east-2)
  4. 17:25:48: Active model invocation (Converse call) (us-east-2)

Following the credentials across those events fills in the rest of the story. IMDSv1 handed the threat actor temporary credentials for the webdev role, and the same role appears in every event that followed, which confirms the credentials were reused rather than replaced. Nowhere in that sequence was MFA required, and that single gap is what let one harvested credential stay useful across two hours, two Regions, and two very different services.

Incident response checklist

The following checklist captures the actions needed to contain the incident, remediate the vulnerability, and assess the scope of unauthorized AI service usage. Each item names where to look and what a finding looks like, so the checklist stays usable under the time pressure of a live incident.

  1. Contain and remediate the entry point:
    1. Identify the specific web application feature that made the outbound request (URL fetchers, webhook callbacks, PDF or image renderers, and link-preview generators are the usual culprits), then confirm it can reach http://169.254.169.254.
    2. Audit the rest of the application for the same pattern, because one unvalidated URL parameter usually means others exist.
    3. Enforce IMDSv2 on the affected instance and across the fleet with aws ec2 modify-instance-metadata-options --http-tokens required --http-put-response-hop-limit 1. Setting --http-tokens required means credentials are only returned when the caller presents a session token it obtained through a PUT request, which a basic SSRF cannot do. Setting the hop limit to 1 keeps the metadata response on the instance itself, so a request coming from a container or proxy an extra hop away never receives it.
  2. Scope the Bedrock usage:
    1. List the foundation models the webdev role could reach by reviewing its IAM policy and any resource-based policies, so you know the full set of models that were exposed, not only the one that was invoked.
    2. Determine what was sent to and returned by the model. CloudTrail records the Converse call and the token counts, but only Amazon Bedrock model invocation logging captures the input prompts and model responses. If it was enabled, pull the log entries for the session; if it wasn’t, note that the prompt and response content can’t be recovered and enable it now.
    3. Flag any compliance exposure based on what those prompts and responses contained. Unauthorized processing of regulated data (such as personally identifiable information (PII), protected health information (PHI), or cardholder data) through the model might trigger notification obligations.
  3. Check for wider compromise and persistence:
    1. Query CloudTrail across all Regions and services—not only Amazon Bedrock—for every event tied to the webdev role’s session, to confirm what else the same credentials touched.
    2. Correlate the CloudTrail timestamps with VPC Flow Logs and application logs for source IP 75.3.231.105 to build the network-level picture around each API call.
    3. Search for IAM write events from the session (CreateUser, CreateRole, CreateAccessKey, and AttachRolePolicy) that indicate an attempt to establish persistence beyond the temporary credentials. The failed adm1n CreateUser call is the known starting point; confirm nothing similar succeeded.
  4. Watch for ongoing or hidden impact:
    1. Review Amazon Bedrock usage in CloudWatch and your billing data for invocation spikes or unexpected token consumption that fall outside normal workload patterns.
    2. Inspect the invocation logs for signs of sensitive data being processed or extracted through the model.
    3. Check the same logs for prompt injection attempts, where the input tries to override the model’s instructions or extract system prompts.

Key takeaways

This scenario reveals how a single application vulnerability can cascade into broad unauthorized access when multiple security controls are missing. The following takeaways highlight the key defensive gaps and hardening priorities.

  • Least-privilege IAM for workload roles: The webdev role’s access to Amazon Bedrock across multiple Regions had no business justification for a web application workload, which the customer confirmed during the investigation. Apply least-privilege principles to EC2 instance roles by scoping permissions to only the services and actions the application requires. Use AWS IAM Access Analyzer to identify unused permissions and tighten policies proactively. Overly permissive roles transform a single application vulnerability into broad lateral movement across unrelated services.
  • IMDSv1 compared to IMDSv2: Organizations must immediately switch to IMDSv2 and disable IMDSv1 across their entire cloud infrastructure. The ec2RoleDelivery: “1.0" field in the logs explicitly confirms the use of IMDSv1, which permits credential retrieval without an authentication token. This architectural weakness makes SSRF-based credential theft trivial, because a web application flaw that can make an outbound request is enough to read the role’s temporary credentials with no further authentication. Transitioning to IMDSv2 mitigates this attack surface by enforcing local, session-based tokens, effectively breaking the threat actor’s exploitation chain. In this scenario, IMDSv2 alone would have stopped the attack at its first step.
  • Region-based defense evasion signals a deliberate operator: The shift from us-east-1 to us-east-2 for Amazon Bedrock access wasn’t incidental. Threat actors move between Regions because monitoring, alerting, and access controls are often configured inconsistently across them, and activity in a secondary Region is more likely to go unnoticed. This kind of cross-Region movement is a marker of operational security awareness rather than opportunistic access, and it should raise the priority of an investigation. Treat consistent detection coverage across all Regions, including the ones you do not actively use, as a baseline requirement.
  • Interface switching and permission probing reveal the threat actor’s method: This event chain reveals a threat actor comfortable moving between AWS interfaces and testing boundaries before committing. The failed CreateUser attempt was systematic probing to understand the scope of the harvested credentials, and when IAM actions were denied, the threat actor pivoted to a service the role could actually reach. The combination of programmatic access through the AWS CLI and interactive console access demonstrates the same adaptability. Recognizing this pattern of probe, adapt, and pivot helps responders anticipate the next move instead of reacting to each event in isolation.
  • AI services need visibility beyond CloudTrail: Amazon Bedrock and other AI services are high-value targets, and CloudTrail alone doesn’t capture the whole story. CloudTrail records who called Amazon Bedrock and whether the call succeeded, but not what was asked or answered. Enable Amazon Bedrock model invocation logging to capture full prompts and responses for compliance auditing. For agent-based workloads, Amazon Bedrock AgentCore Observability, built on AWS Distro for OpenTelemetry (ADOT), provides session-level traces showing tool execution order and latency. Consider also enabling Amazon GuardDuty AI Protection, which analyzes Amazon Bedrock-related CloudTrail activity to detect anomalous invocations, cost harvesting, and prompt injection attempts. Correlating these signals—CloudTrail, Model Invocation Logging, and agent telemetry—gives investigators the complete picture. For implementation guidance, see Monitoring and Auditing AI Workloads on AWS.

Advanced forensic indicators and evasion techniques

Beyond the specific attack patterns in this scenario, investigators should be aware of several evasion techniques that threat actors use to confuse defenders and blend into legitimate activity. The top three that we observe across incident response with customers are:

  • Root user compared to IAM user named root: When you first create an AWS account, you begin with a single sign-in identity that has complete access to all AWS services and resources in the account. This identity is called the AWS account root user. In some previous investigations, threat actors have also created IAM users in an AWS account named root. The difference is visible in the type field of the userIdentity element of the CloudTrail log record, which indicates the type of user that logged the record.
  • Role and user name imitation: Threat actors attempt defense evasion by creating names for IAM users and roles that imitate those reserved for use by AWS. For example, the service-linked role AWSServiceRoleForSupport is a unique IAM role linked directly to AWS Support. Threat actors have created roles with the name AWSServiceRoIeforSupport (note the use of an upper-case letter I instead of a lower-case letter l in Role) in an attempt to trick users into thinking actions taken by this role have been performed by AWS Support.
  • Users named HIDDEN_DUE_TO_SECURITY_REASONS: The userName field contains the string HIDDEN_DUE_TO_SECURITY_REASONS when the recorded event is a console sign-in failure caused by incorrect user name input. CloudTrail doesn’t record the contents in this case because the text could contain sensitive information. However, threat actors have used this string as an actual username to trick investigators into thinking the name has been obfuscated. This technique is usually associated with a corresponding CreateUser or CreateRole CloudTrail event.

Conclusion and next steps

CloudTrail event fields help security teams identify identities with unintended access, track threat actor actions, and remediate affected resources. Understanding fields like userIdentity, eventName, and sourceIPAddress improves incident investigation and threat detection. Implementing best practices such as enabling comprehensive logging, using Amazon Athena for analysis, securing logs, and automating responses helps ensure that CloudTrail serves as a robust forensic and incident response tool.

If you suspect unauthorized activity in your AWS environment, AWS Security Incident Response is available to help. The service continuously monitors and triages findings from Amazon GuardDuty and third-party security tools integrated through AWS Security Hub, automatically filtering alerts to surface the most relevant events. In addition to proactive triage, customers can initiate security cases through the service. You can choose to handle these cases internally or receive support from the Security Incident Response Team (SIRT), a dedicated group of security experts available at all times to assist with investigation, containment, and recovery throughout the incident lifecycle.

Additional resources

The following resources provide further guidance on securing your AWS environment and strengthening your investigative capabilities.

If you have feedback about this post, submit comments in the Comments section below.

Oscar Diaz

Oscar E Diaz Cordovez

Oscar is a Senior Technical Account Manager specializing in cloud operations and security. His passion for technology and innovation drives his expertise in cloud-focused architectures, DevOps practices, and automation.

Steve de Vera

Steve de Vera

Steve is a manager for the AWS Security Incident Response service with a focus on threat research and threat intelligence. He is passionate about American-style BBQ and is a certified competition BBQ judge. He has a dog named Brisket.

Jennifer Paz

Jennifer is a Security Engineer Manager with over a decade of experience, for the AWS Security Incident Response service. Jennifer enjoys helping customers tackle security challenges and implementing complex solutions to enhance their security posture. When not at work, Jennifer is an avid runner, pickleball enthusiast, traveler, and foodie, always on the hunt for new culinary adventures.

  •  

Incident response guide for AWS CloudTrail investigations – Part 1

AWS CloudTrail logs contain the evidence you need when investigating suspicious activity in your AWS environment, but knowing which fields matter and how to interpret them can mean the difference between surface-level analysis and uncovering the full scope of an incident. This guide walks you through real-world scenarios, showing you how to analyze CloudTrail events to uncover cross-account unauthorized access, cryptocurrency mining operations, and AI service abuse. You’ll learn the investigative techniques our Security Incident Response Team (SIRT) team uses to handle threats, with practical methodologies you can apply to your own investigations.

Each scenario includes:

  • Architecture diagrams showing the event progression
  • Annotated CloudTrail logs highlighting significant fields
  • Investigation frameworks with specific questions to ask
  • Lessons learned and preventive measures

Whether you’re in security operations, cloud engineering, compliance, or leadership, this guide provides the investigative mindset needed to move beyond basic CloudTrail queries to comprehensive security analysis.

Incident response definitions

Throughout this guide, we reference terminology commonly used in incident response and threat intelligence. We’ve provided definitions for key terms to help ensure this guide is accessible to readers from diverse backgrounds, whether you’re in security operations, cloud engineering, compliance, or leadership.

  • Reconnaissance: The initial phase where a threat actor gathers information about the target environment (for example, listing Amazon Simple Storage Service (Amazon S3) buckets or browsing available resources) to understand what’s available before taking action.
  • Enumeration: Systematically cataloging specific resources, users, or configurations within an environment to identify potential targets or access paths.
  • Lateral movement: When a threat actor moves from one resource to another within the same environment (for example, pivoting from an Amazon Elastic Compute Cloud (Amazon EC2) instance to an AI service) to expand their access.
  • Privilege escalation: Attempting to gain higher-level permissions than initially obtained, such as trying to create admin users or modify AWS Identity and Access Management (IAM) policies.
  • Defense evasion: Techniques used to avoid detection, such as operating in a different AWS Region where monitoring might be less robust, or naming unauthorized resources to look legitimate.
  • Persistence: Establishing ongoing access to an environment (for example, creating new IAM users or access keys) so the threat actor can return even if the original entry point is closed.
  • Credential harvesting: Stealing authentication credentials (passwords, access keys, temporary tokens) to impersonate legitimate users or roles.
  • Server-side request forgery (SSRF): A web application technique where an unauthorized user tricks a server into making requests on their behalf, often used to access internal services such as the Amazon EC2 Instance Metadata Service (IMDS) endpoint. For more information, see Understanding SSRF.
  • IMDSv1 (Instance Metadata Service v1): Amazon EC2 Instance Metadata Service version 1 (IMDSv1) provides temporary credentials to applications running on an instance. IMDSv1 itself isn’t inherently insecure; however, when an application with issues (for example, one susceptible to SSRF) is running on the instance, an unauthorized user can use that application to reach the metadata endpoint and retrieve credentials. IMDSv2 mitigates this risk by requiring session-based authentication tokens.
  • Indicators of compromise (IOCs): Observable artifacts (IP addresses, user agents, session names, resource names) that suggest unauthorized activity has occurred.
  • Exfiltration: The unauthorized transfer of data out of an environment, such as copying files before deleting them.
  • Event chain: The sequence of steps a threat actor follows from initial access to achieving their objective, where each step enables the next.
  • Pivot: Shifting from one technique, service, or Region to another during a security event, often after an initial approach is blocked or to avoid detection.

Scenario 1: Cross-account S3 data deletion with ransomware implications

Cross-account access is sometimes necessary in AWS, but misconfiguration creates security risks. In this scenario, your security operations center has received an automated alert that multiple objects have been deleted from the customer-important-data S3 bucket. The initial response seems straightforward: check the CloudTrail logs, identify who deleted the objects, and determine if it was authorized. But as our SIRT team investigated further, what appeared to be a straightforward unauthorized deletion revealed itself as a cross-account incident with ransomware implications. CloudTrail analysis requires recognizing patterns, understanding context, and thinking like a threat actor.

Scenario architecture

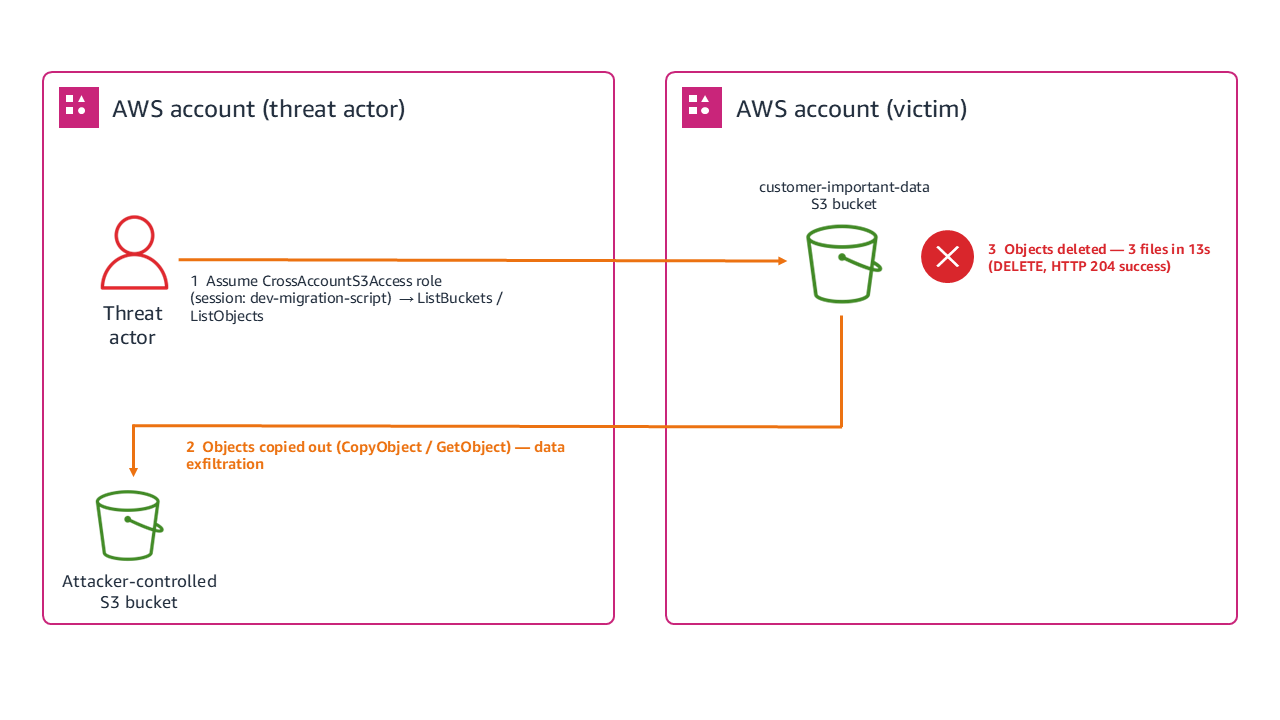
Figure 1 shows the architecture layout for accessing a trusted account and deleting objects from an S3 bucket, which is achieved through the following steps:

  1. Threat actor assumes the CrossAccountS3Access role from a trusted account.
  2. Lists S3 buckets to identify targets (ListBuckets API call).
  3. Lists objects within the target bucket to catalog contents.
  4. Executes scripted deletions of three files within 13 seconds.
  5. Each deletion returns an HTTP 204 (successful) status code.
Figure 1: Scenario 1 architecture

Figure 1: Scenario 1 architecture

Reconnaissance phase

Our investigation began with examining the CloudTrail logs, where we discovered that the unauthorized activity started with what many analysts might dismiss as routine activity: a ListBuckets API call made through an assumed role at 14:31:22 UTC. The CloudTrail entry contains a session named dev-migration-script using the CrossAccountS3Access role.

While cross-account access is common in enterprise environments, session names typically reflect legitimate business units. Attackers frequently use masquerading techniques, naming their sessions after common developer tasks or automation scripts, to blend seamlessly into daily operational noise. However, cross-referencing this session name against the external source IP and historical deployment logs confirmed that no such migration project was authorized, signaling a clear evasion attempt by a threat actor and the first indication of unauthorized access. Three seconds later, our logs showed a GET request to list objects in the bucket, which is classic reconnaissance behavior. The threat actor was cataloging available targets, using the same assumed role and IP address. This pattern, which you can see in the arn and eventname in the following log, showed us that the threat actor gathered intelligence, assessed targets, and planned their approach.

{
  "eventVersion": "1.08",
  "userIdentity": {
    "type": "AssumedRole",
    "principalId": "AROAEXAMPLE123456789:threat-actor-session",
    "arn": "arn:aws:sts::111122223333:assumed-role/CrossAccountS3Access/threat-actor-session"
  },
  "eventTime": "2025-01-20T14:31:22Z",
  "eventSource": "s3.amazonaws.com",
  "eventName": "ListBuckets",
  "sourceIPAddress": "203.0.113.47",
  "recipientAccountId": "444455556666"
}

──────────────────────────────────────────────────────────────────────────────────
  FORENSIC LEGEND
──────────────────────────────────────────────────────────────────────────────────
❶ arn: ".../CrossAccountS3Access/..."             → Cross-account role assumed; access came from another account
❷ Session name: "threat-actor-session"            → Custom session name attached at role assumption
❸ eventName: "ListBuckets"                        → Enumeration of all S3 buckets in the account (recon)
❹ principalId: "AROAEXAMPLE123456789:threat-actor-session" → Role's unique ID + attacker-chosen session label
❺ sourceIPAddress: "203.0.113.47"                 → Origin of the API call (RFC 5737 documentation IP range)
❻ recipientAccountId: "444455556666"              → AWS account that received/owned the request (fictional placeholder)
──────────────────────────────────────────────────────────────────────────────────

Systematic deletion

After completing their reconnaissance at 14:31:25 UTC, the threat actor went silent for 14 minutes before the first deletion at 14:45:12 UTC. During this window, the threat actor likely reviewed the inventory of objects they’d just enumerated, selected their highest-value targets (financial data, PII, and database backups), and prepared an automated deletion script to execute quickly once ready. We can infer this preparation period based on several factors: no other CloudTrail events from this session appeared during the 14-minute window, the subsequent deletions were precisely timed at 6-7 second intervals suggesting scripted execution, and the targets chosen were the three most business-critical files rather than a bulk delete of everything in the bucket. This selective, scripted approach indicates the threat actor used the reconnaissance data they gathered in the listing phase to build a targeted attack plan before executing it. Within 13 seconds (14:45:12–14:45:25 UTC), the threat actor deleted three files from the customer-important-data bucket: a financial report (q4-2024.xlsx at 14:45:12), a customer personally identifiable information (PII) database (pii-database.csv at 14:45:18), and a production database backup (prod-database-backup.sql at 14:45:25). Each deletion returned an HTTP 204 status code. The Amazon S3 access logs confirm these successful DELETE operations, all originating from the same session.

[20/Jan/2025:14:31:25] S3Access/dev-migration-script REST.GET.BUCKET    -  "GET /?list-type=2 HTTP/1.1" 200 - "-" "aws-cli/Linux"
                                ‾‾‾‾‾‾‾‾‾‾‾‾‾‾‾‾‾‾‾‾ ‾‾‾‾‾‾‾‾‾‾‾‾‾‾‾                                                ‾‾‾‾‾‾‾‾‾‾‾‾‾
                                ❶ Masquerading session   ❷ Recon: listing buckets                                        ❻ Scripted tool

[20/Jan/2025:14:34:15] S3Access/dev-migration-script REST.COPY.OBJECT   financial-reports/q4-2024.xlsx "PUT /..." 200 - "-" "aws-cli/Linux"
                                                     ‾‾‾‾‾‾‾‾‾‾‾‾‾‾‾‾   ‾‾‾‾‾‾‾‾‾‾‾‾‾‾‾‾‾‾‾‾‾‾‾‾‾‾‾‾‾
                                                     ❸ Data exfiltration  Financial data copied

[20/Jan/2025:14:34:20] S3Access/dev-migration-script REST.COPY.OBJECT   customer-data/pii-database.csv "PUT /..." 200 - "-" "aws-cli/Linux"
                                                     ‾‾‾‾‾‾‾‾‾‾‾‾‾‾‾‾   ‾‾‾‾‾‾‾‾‾‾‾‾‾‾‾‾‾‾‾‾‾‾‾‾‾‾‾‾‾‾
                                                     ❸ Data exfiltration  PII database copied

[20/Jan/2025:14:45:12] S3Access/dev-migration-script REST.DELETE.OBJECT financial-reports/q4-2024.xlsx "DELETE /..." 204 - "-" "aws-cli/Linux"
            ‾‾‾‾‾‾‾‾‾                               ‾‾‾‾‾‾‾‾‾‾‾‾‾‾‾‾‾ ‾‾‾‾‾‾‾‾‾‾‾‾‾‾‾‾‾‾‾‾‾‾‾‾‾‾‾‾‾               ‾‾‾
            ❺ 13-sec window starts                   ❹ Destruction        Target file                                   Success

[20/Jan/2025:14:45:18] S3Access/dev-migration-script REST.DELETE.OBJECT customer-data/pii-database.csv "DELETE /..." 204 - "-" "aws-cli/Linux"
                                                     ‾‾‾‾‾‾‾‾‾‾‾‾‾‾‾‾‾ ‾‾‾‾‾‾‾‾‾‾‾‾‾‾‾‾‾‾‾‾‾‾‾‾‾‾‾‾‾‾               ‾‾‾
                                                     ❹ Destruction        PII database destroyed                        Success

[20/Jan/2025:14:45:25] S3Access/dev-migration-script REST.DELETE.OBJECT backup-configs/prod-database-backup.sql "DELETE /..." 204 - "-" "aws-cli/Linux"
            ‾‾‾‾‾‾‾‾‾                               ‾‾‾‾‾‾‾‾‾‾‾‾‾‾‾‾‾ ‾‾‾‾‾‾‾‾‾‾‾‾‾‾‾‾‾‾‾‾‾‾‾‾‾‾‾‾‾‾‾‾‾‾‾‾‾         ‾‾‾
            ❺ 13-sec window ends                     ❹ Destruction        Prod backup destroyed (anti-recovery)         Success

───────────────────────────────────────────────────────────────────────────────────────────
  FORENSIC LEGEND
───────────────────────────────────────────────────────────────────────────────────────────
  ❶ "dev-migration-script"    → Masquerading session name; no authorized migration existed
  ❷ REST.GET.BUCKET           → Reconnaissance: cataloging available targets
  ❸ REST.COPY.OBJECT          → Data exfiltration before destruction (steal-then-destroy)
  ❹ REST.DELETE.OBJECT        → Systematic destruction of high-value assets
  ❺ 14:45:12 → 14:45:25      → 13-second automated deletion window (scripted execution)
  ❻ "aws-cli/Linux"           → CLI-based automation, not manual console activity
───────────────────────────────────────────────────────────────────────────────────────────

Analysis of timing and access patterns

The 13-second deletion window wasn’t arbitrary. The user-agent string showed AWS Command Line Interface (AWS CLI) usage on Linux, and the precise timing suggested scripted execution rather than manual operations. This indicated preplanned targeting and automated execution to minimize the detection window.

The consistent source IP across events let us search for other suspicious activities from the same source, correlate with threat intelligence feeds, and identify potential lateral movement attempts.

The broad Amazon S3 permissions of the CrossAccountS3Access role raised questions about least privilege implementation, regular access reviews, and the business justification for such extensive cross-account permissions.

Investigation priorities

With confirmation that misconfigured cross-account access had been taken advantage of to delete data, the next step was to prioritize the investigation. In incident response, priority is driven by three factors: whether the threat actor still has active access (containment urgency), whether sensitive data was exposed or exfiltrated (regulatory and business impact), and whether the attack can spread to other resources or accounts (blast radius). We applied these factors to guide the following questions:

  • How did the threat actor gain access to the CrossAccountS3Access role? We examined the role’s trust policy and recent modifications, authentication events in both the trusting and trusted accounts, and other sessions using the same role around the same timeframe.
  • Were the files copied before deletion? We searched for GetObject operations on the same objects before the deletions, unusual network traffic patterns during the reconnaissance phase, and CopyObject activities that might indicate data theft.
  • Did the objects have specific significance? Understanding why these specific objects mattered helped us prioritize recovery efforts based on business impact, assess regulatory notification requirements for the PII exposure, and determine the full scope of business disruption from backup loss.

Response checklist

After identifying the scope of the cross-account deletion, the following steps help ensure a thorough response and prevent recurrence.

  • Determine if the business purpose served by this cross-account access is legitimate
  • Identify the corresponding authentication events that show how the role was assumed
  • Identify other AWS resources that this role might access beyond Amazon S3
  • Check for failed attempts or reconnaissance activities that preceded the successful event
  • Determine when this cross-account trust relationship was created
  • Determine when the last access review of this role was conducted
  • Locate any backup copies of the deleted data
  • Determine detection rules that can be used to catch similar activity in the future

Key takeaways

This scenario illustrates several principles that apply broadly to cross-account incident investigations. Unusual identifiers in session names often reveal threat actor intent or poor operational security. The progression from ListBuckets to targeted deletions shows how threat actors operate with a plan. Cross-account access needs extra scrutiny because trusted relationships become vectors for unauthorized access when credentials are exposed. Understanding why specific files matter helps prioritize response efforts and assess true impact. Precise timing and consistent technical signatures often indicate scripted events that need different response strategies than manual intrusions.

Scenario 2: Cryptocurrency mining using CloudFormation with console credentials

In this scenario, your finance team notices an unexpected spike in AWS costs, particularly around Amazon EC2 compute charges in the us-east-1 AWS Region. During the investigation, we examine how threat actors use legitimate console access to deploy cryptocurrency mining operations through AWS CloudFormation and how investigators can uncover the scope of resource hijacking events. We discover a CloudFormation stack named CRYPTO which you have no record or knowledge of being created. The stack contains EC2 instances running in your production Amazon Virtual Private Cloud (Amazon VPC) consuming significant compute resources, which signals an immediate security investigation.

Architecture and sequence

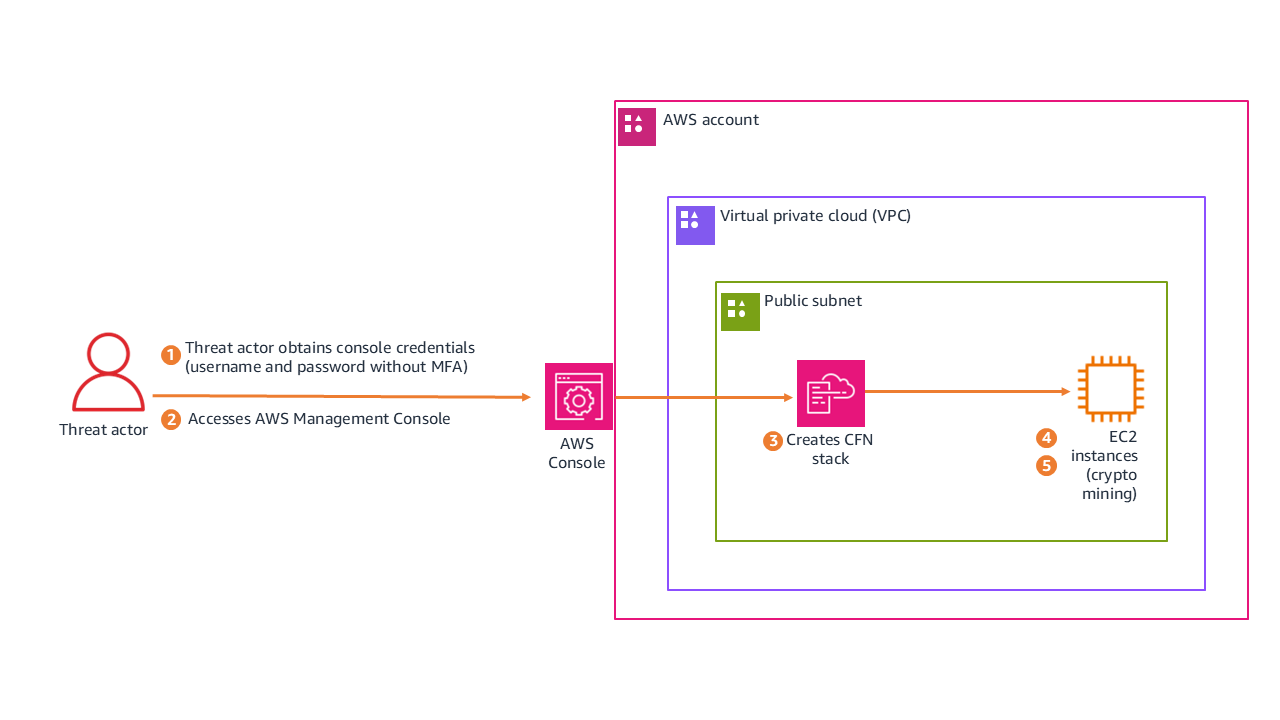
Figure 2 shows how the threat actor moved from credential acquisition to active mining, following these steps:

  1. Threat actor obtains console credentials (username and password without multi-factor authentication (MFA)).
  2. Accesses AWS Management Console.
  3. Creates CloudFormation stack CRYPTO in us-east-1.
  4. Stack deploys EC2 instances configured for cryptocurrency mining in a public subnet.
  5. Mining instances begin consuming compute resources.
Figure 2: Scenario 3 architecture

Figure 2: Scenario 3 architecture

The following is the redacted CloudTrail event record for the unauthorized CreateStack action. See if you can use it to find the following information:

  • The name of the CloudFormation stack that was created
  • The CloudFormation stack Amazon Resource Name (ARN)
  • If the credentials were secured by MFA
  • If the threat actor used the AWS Management Console to perform the actions, or if they were performed programmatically using the AWS CLI or a script
{
  "eventVersion": "1.11",
  "userIdentity": {
    "type": "AssumedRole",
    "principalId": "AROAFINDANEXAMPLE:Participant",
    "arn": "arn:aws:sts::XXXXXXXXXXXX:assumed-role/WSParticipantRole/Participant",
    "sessionContext": {
      "sessionIssuer": { "type": "Role", "userName": "WSParticipantRole" },
      "attributes": { "mfaAuthenticated": "false" }  ◄── ❹ No MFA on session
                                            ‾‾‾‾‾‾‾
    }
  },
  "eventTime": "2025-09-23T18:07:12Z",
  "eventSource": "cloudformation.amazonaws.com",
  "eventName": "CreateStack",
               ‾‾‾‾‾‾‾‾‾‾‾‾‾
  "awsRegion": "us-east-1",
  "userAgent": "aws-cli/2.30.0 ... exec-env/CloudShell",  ◄── ❻ Browser-based CloudShell execution
                                    ‾‾‾‾‾‾‾‾‾‾‾‾‾‾‾‾‾‾‾
  "requestParameters": {
    "stackName": "CRYPTO",  ◄── ❶ Cryptocurrency-related activity
                 ‾‾‾‾‾‾‾‾
    "parameters": [
      { "parameterKey": "VpcId" },      ◄── ❷ Prior recon: attacker knew target network
      { "parameterKey": "SubnetIds" }   ◄── ❷
                       ‾‾‾‾‾‾‾‾‾‾‾‾‾‾‾‾‾‾‾
    ]
  },
  "responseElements": {
    "stackId": "arn:aws:cloudformation:us-east-1:...:stack/CRYPTO/2102e190..."  ◄── ❸ Stack created successfully
               ‾‾‾‾‾‾‾‾‾‾‾‾‾‾‾‾‾‾‾‾‾‾‾‾‾‾‾‾‾‾‾‾‾‾‾‾‾‾‾‾‾‾‾‾‾‾‾‾‾‾‾‾‾‾‾‾‾‾‾
  },
  "sessionCredentialFromConsole": "true"  ◄── ❺ Console-based access
                                 ‾‾‾‾‾‾
}

───────────────────────────────────────────────────────────────────────────────────────────
  FORENSIC LEGEND
───────────────────────────────────────────────────────────────────────────────────────────
❶ stackName: "CRYPTO"                → Indicator of cryptocurrency mining deployment
❷ VpcId + SubnetIds parameters       → Attacker targeted specific network; prior recon confirmed
❸ stackId: "...stack/CRYPTO/..."     → Unique resource ID; stack was successfully created
❹ mfaAuthenticated: "false"          → Session lacked multi-factor authentication
❺ sessionCredentialFromConsole: true  → Access via AWS Console web portal (not external API)
❻ exec-env/CloudShell                → CLI commands executed via browser-based CloudShell
───────────────────────────────────────────────────────────────────────────────────────────

Analysis of authentication and access

The CloudTrail event record includes fields that answer the questions for this scenario.

Stack details summary:

The CloudTrail event confirms the following details about the deployed stack:

  • Stack name: CRYPTO is an indicator of cryptocurrency-related activity
  • Stack ARN: arn:aws:cloudformation:us-east-1:stack/CRYPTO/2102e190-98a8-11f0-bcea-1209335b107
  • Region: us-east-1 (a common choice for threat actors because of immediate service availability)

Authentication and session context analysis:

Examining the session metadata reveals how the threat actor authenticated and accessed the environment:

  • MFA status: “mfaAuthenticated": “false” indicates that the session was entirely unauthenticated by MFA.
  • Access method: “sessionCredentialFromConsole": “true” means that access was funneled through the console.
  • User context: AssumedRole using WSParticipantRole. Session creation occurred at 2025-09-23T18:06:22Z (approximately 50 seconds before stack creation).

Advanced forensic insight (the CloudShell pivot)

The sessionCredentialFromConsole: true field is important to note because this access originated from the AWS console rather than external programmatic API keys. Interestingly, while the session originated from the console, the userAgent field reveals the execution environment was exec-env/CloudShell. This shows that the threat actor didn’t manually click through the CloudFormation user interface, instead launching AWS CloudShell on sign-in to execute a prepackaged deployment script. This allowed the threat actor to achieve automated speed while evading traditional static API key monitoring. The mfaAuthenticated: false field represents a security control gap. Particularly in environments handling sensitive data or production workloads, MFA must be enforced for console access.

Investigation priorities

With the unauthorized stack confirmed, the investigation focused on understanding the full timeline and blast radius. We approached this in three phases, each building on the findings of the previous one.

Reconstruct the console session timeline

The session began at 18:06:22Z and the stack was created at 18:07:12Z, only 50 seconds later. That speed tells us the threat actor came prepared with a script rather than exploring the environment manually. But we needed to know what happened before and after. By filtering CloudTrail for the same session token across the full session duration, we could identify whether the threat actor performed any reconnaissance before deploying the stack, whether they accessed other services or regions during the same session, and whether they attempted to establish persistence (such as creating IAM users or access keys) before or after the mining deployment. Any actions taken outside the CloudFormation deployment could indicate secondary objectives beyond cryptomining.

Examine what the stack actually deployed

The stack name alone doesn’t tell us the full impact. We needed to inspect the CloudFormation template to understand what resources were created and how they were configured. This meant identifying the EC2 instance types (larger instances mean higher costs and potentially more mining output), reviewing the security group rules to determine what network access these instances had to internal resources, checking whether the template included custom AMIs or user data scripts that pulled mining software on boot, and determining if the stack created its own IAM roles with permissions that could be used for further lateral movement. The template itself is evidence. If it was hosted in Amazon S3, the upload event tells us when the threat actor first staged their tools.

Calculate business impact and determine blast radius

Finally, we needed to quantify the damage and determine whether this was isolated or part of a broader compromise. We calculated the total compute cost by multiplying instance hours by instance type pricing, checked whether the mining instances had network paths to production databases or internal services, examined outbound traffic logs for connections to known mining pool IP addresses, and searched for similar stacks or naming patterns across other regions and accounts. The presence of outbound connections to anything other than mining pools would suggest the instances served a dual purpose, potentially exfiltrating data while generating cryptocurrency.

Response checklist

The following checklist captures the key actions needed to contain the incident, assess its impact, and close security gaps.

  • Determine why MFA wasn’t required for this sensitive operation
  • Investigate how the threat actor obtained valid console credentials
  • Check for failed sign-in attempts preceding this successful access
  • Check for other activities that occurred during this console session
  • Look for resources that were created by the CloudFormation stack
  • Determine how long those resources have been running and consuming costs
  • Look for other similarly named or suspicious stacks in the environment
  • Check what network access these instances have to internal resources
  • Determine what outbound connections these instances are making
  • Look for cryptocurrency mining pool connections
  • Check if IAM users or roles were created
  • Check if additional access keys were generated
  • Determine if the threat actor modified existing permissions or policies

Key takeaways

This scenario highlights how credential hygiene and monitoring controls intersect with resource hijacking threats.

  • MFA enforcement prevents console-based credential abuse for IAM users. The absence of MFA enabled the full sequence. Console access to production environments should require multi-factor authentication as a security best practice.
  • Resource naming can be an indicator. The obvious CRYPTO naming suggests either threat actor confidence or poor operational security, both concerning for different reasons.
  • Cost monitoring is security monitoring. Unusual billing spikes can be early indicators of resource hijacking events.
  • Console-based activity has different patterns than programmatic activity and requires specialized investigation approaches. The sessionCredentialFromConsole field is your starting point for distinguishing between the two.

Conclusion

In this first part, we walked through two real-world scenarios that demonstrate how CloudTrail analysis can reveal the full scope of a security incident. In Scenario 1, we showed how a seemingly routine cross-account role assumption led to targeted data deletion with ransomware implications, and how session names, timing patterns, and source IP correlation help investigators piece together the event chain. In Scenario 2, we examined how stolen console credentials enabled a cryptocurrency mining deployment through CloudShell, highlighting the critical role of MFA enforcement and cost monitoring as security controls. Both scenarios reinforce a core principle: effective CloudTrail investigation goes beyond identifying what happened. It requires understanding how and why, so you can contain the immediate threat and close the gaps that enabled it.

In Part 2 of this guide, we examine how a web application vulnerability can cascade into a multi-Region event targeting AI services, chaining together SSRF, IMDSv1 credential harvesting, and cross-Region pivoting to access Amazon Bedrock. We also cover critical investigation techniques including root user compared to IAM user named root, role name imitation tactics, and the HIDDEN_DUE_TO_SECURITY_REASONS username trick, along with critical hardening steps and additional resources you can use to strengthen your cloud forensic capabilities.

If you have feedback about this post, submit comments in the Comments section below.

Oscar Diaz

Oscar E Diaz Cordovez

Oscar is a Senior Technical Account Manager specializing in cloud operations and security. His passion for technology and innovation drives his expertise in cloud-focused architectures, DevOps practices, and automation.

Steve de Vera

Steve de Vera

Steve is a manager for the AWS Security Incident Response service with a focus on threat research and threat intelligence. He is passionate about American-style BBQ and is a certified competition BBQ judge. He has a dog named Brisket.

Jennifer Paz

Jennifer is a Security Engineer Manager with over a decade of experience, for the AWS Security Incident Response service. Jennifer enjoys helping customers tackle security challenges and implementing complex solutions to enhance their security posture. When not at work, Jennifer is an avid runner, pickleball enthusiast, traveler, and foodie, always on the hunt for new culinary adventures.

  •  

Detecting multi-stage attacks on AWS: A guide to cross-service signal correlation

A single alert from one security service tells you something happened. Read that signal alongside activity from other services and your own business context, and you will know whether what happened is part of a multi-stage attack.

Consider a short sequence. An identity calls GetCallerIdentity from a source address it hasn’t previously used. Within minutes, that same identity runs a burst of List and Describe calls across several services, and some of them fail with AccessDenied. Soon after, a large volume of data leaves your environment toward a domain that was registered last week. Amazon GuardDuty might already flag pieces of this, such as the reconnaissance from an unfamiliar source, through finding types like Recon:IAMUser/* or Discovery:S3/*. What you gain from correlating the pieces yourself is a single view of the sequence, tied to your own business context, so you can act on the whole rather than triaging findings one at a time.

This post is for security engineers and security operations teams who run Amazon Web Services (AWS) detection services and want to catch patterns specific to their environment. You will see how AWS detection and your business context fit together, and how to build correlations that use that context. The examples run in Amazon CloudWatch Logs Insights so you can try them today, and the closing section describes how to grow them into an automated pipeline. The walkthrough later in this post lists the prerequisites for these queries.

Start with AWS detection services

Begin with the AWS detection services. They cover the threats common across customers, and everything in this post is built on them.

Turn these on and tune them before you build anything custom. Tuning means adjusting sensitivity to reduce false positives for your environment, choosing which data sources each service monitors, and suppressing findings for known-good patterns.

GuardDuty correlates multi-stage attacks for you

Before you build anything by hand, see what GuardDuty already does for you. Amazon GuardDuty Extended Threat Detection correlates signals across multiple data sources including AWS CloudTrail, Amazon S3 data events, runtime monitoring, Amazon Elastic Kubernetes Service (Amazon EKS) audit logs, and more, then raises a single critical severity attack sequence finding when it spots a multi-stage pattern. It recognizes sequences such as credential compromise followed by data exfiltration, maps them to MITRE ATT&CK tactics, and attaches a timeline and remediation guidance. If you have GuardDuty enabled today, then GuardDuty Extended Threat Detection is already enabled by default and needs no queries from you. For details on how GuardDuty charges apply, see Amazon GuardDuty pricing.

The credential compromise sequence in the opening example is the kind of universal pattern GuardDuty Extended Threat Detection is built to catch, so rely on it for those. Attack sequence findings show up in the GuardDuty console next to your other findings, and they route to Security Hub and your response workflows the same way.

GuardDuty handles the threats that look the same in every account. What it doesn’t have is the context that makes a given action suspicious in your account. That’s what you provide.

Add your business context

Business context is what only you know about your environment: which buckets hold sensitive data, which principals have a reason to touch which resources, which role chains your policy permits, and when your production change windows open. GuardDuty Extended Threat Detection learns from patterns common across customers, but it can’t answer these environment-specific questions. Express them as correlations and you add a detection layer tuned to your environment. Each of the following four patterns turns one of these facts into a query.

Run these queries in the AWS Management Console for CloudWatch by choosing Logs, then Logs Insights, using the CloudWatch Logs Insights query language. Most read CloudTrail events from a CloudWatch Logs log group that your trail delivers to. If your trail writes only to Amazon S3, add CloudWatch Logs delivery on the trail, or run equivalent queries in Amazon Athena (a serverless query service for analyzing data in Amazon S3 using SQL).

Note: The queries and code in this post use placeholder values. Replace them with your own before running: your-sensitive-bucket (your S3 bucket name), your-key-id (your AWS KMS key ID), region (your AWS Region, such as us-east-1), account-id (your 12-digit AWS account ID), and aws-cloudtrail-logs-my-trail (your CloudTrail log group name).

A note on multi-account environments. In AWS Organizations, an organization trail delivers every account’s events to one log group, so these queries work as-is but return cross-account results. Filter by recipientAccountId for account-scoped views. Without an organization trail, run queries per account or use Amazon Security Lake as a central query surface.

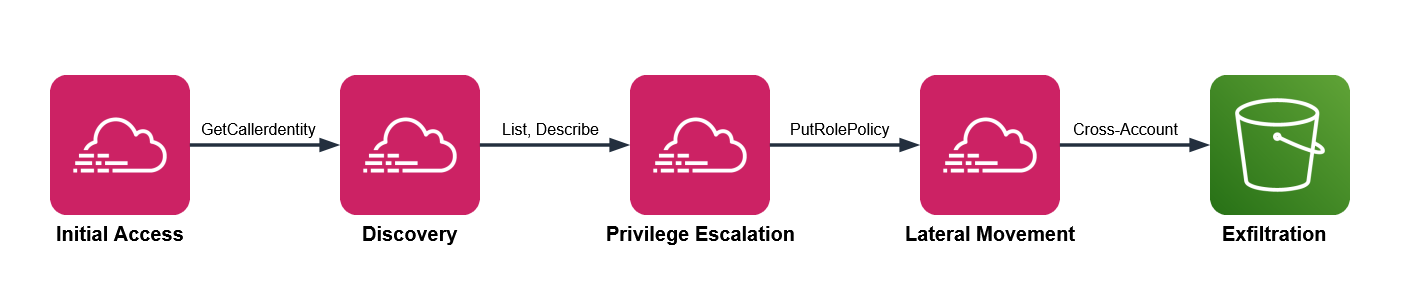
The attack chain mapped to AWS services

Multi-stage attacks move through five phases, and each phase leaves a signal in a different service. These signals surface across three log sources: CloudTrail, which records API activity in your account; Amazon VPC Flow Logs, which capture network connection metadata; and Amazon Route 53 Resolver query logs, which record DNS queries from your VPCs.

  • Initial access – Stolen credentials reach your environment. CloudTrail records GetCallerIdentity, GetSessionToken, or AssumeRole from an unfamiliar source.
  • Discovery – The threat actor enumerates with List, Describe, and Get calls, often triggering AccessDenied responses.
  • Privilege escalation – The threat actor chains roles or edits policies. CloudTrail records AssumeRole sequences, PutRolePolicy, or CreateAccessKey.
  • Lateral movement – The threat actor moves across accounts or AWS Regions, assuming roles and creating resources in unfamiliar places.
  • Exfiltration – Data leaves through GetObject calls at scale, large outbound transfers in VPC Flow Logs, and DNS queries in Route 53 Resolver query logs to recently registered domains.

Figure 1 shows the five attack phases mapped to the AWS log source that records each one.

Figure 1: Attack chain mapped to AWS services

Figure 1: Attack chain mapped to AWS services

GuardDuty Extended Threat Detection watches this chain for universal patterns. The four patterns that follow add the dimension you supply: your business context.

Pattern one: Sensitive data access by an unexpected principal

Your data classification and access norms drive this detection. One bucket holds customer records, another holds public web assets, and you know which principals have a reason to read the customer records, which are sensitive. Encode that knowledge and an ordinary looking read turns into something worth chasing.

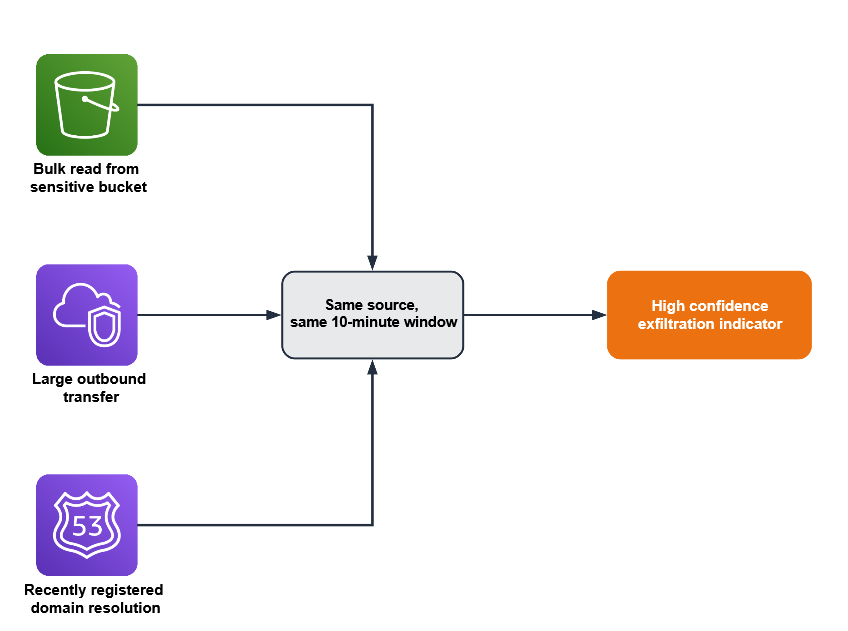
Three signals converge here. CloudTrail shows GetObject at volume on a bucket you’ve classified as sensitive. The principal isn’t on your list of expected readers for that bucket. And VPC Flow Logs show a large outbound transfer from the same source in the same window, while DNS query logs show a recently registered destination domain, which together increase your confidence that there’s a potential threat.

CloudTrail management events don’t record GetObject. You must turn on CloudTrail data events for the buckets you care about to capture GetObject. Many teams miss GetObject because data events weren’t enabled on the relevant buckets.

This query shows bulk reads on a sensitive bucket, grouped by principal. Run it in CloudWatch Logs Insights with your CloudTrail log group selected.

fields @timestamp, userIdentity.arn, requestParameters.bucketName
| filter eventSource = "s3.amazonaws.com" and eventName = "GetObject"
| filter requestParameters.bucketName = "your-sensitive-bucket"
| stats count(*) as objectReads,
        count_distinct(requestParameters.key) as distinctObjects
        by userIdentity.arn, bin(10m)
| filter objectReads > 100
| sort objectReads desc

The threshold of 100 is a placeholder. Run the query over a week of normal activity, find the ninety-fifth percentile read count for that bucket, and set the threshold above it. Then check each principal the query returns against your expected reader list. A principal that isn’t on the list, reading at volume, is the result to investigate.

To corroborate, look for a matching outbound transfer. Switch the log group selector to your VPC Flow Logs log group and run this.

fields @timestamp, srcAddr, dstAddr, bytes
| filter action = "ACCEPT"
# exclude RFC 1918 private ranges so only external destinations remain
| filter dstAddr not like /^10\./
        and dstAddr not like /^192\.168\./
        and dstAddr not like /^172\.(1[6-9]|2[0-9]|3[0-1])\./
| stats sum(bytes) as totalBytes by srcAddr, dstAddr, bin(10m)
| filter totalBytes > 1000000000
| sort totalBytes desc

The Amazon S3 query returns a principal, and the Flow Logs query works on IP addresses, so you translate one into the other. The worked example later in this post covers that translation in full.

Picture an analytics role that reads a reporting bucket all day. One afternoon, it reads a thousand objects from your customer records bucket instead. GuardDuty stays quiet, because an authenticated role making valid GetObject calls isn’t suspicious anywhere else. Your query flags it, because that role isn’t on the expected reader list for that bucket. The classification you applied is what turns silence into a signal.

Figure 2 shows a bulk read from a sensitive bucket in CloudTrail, a large outbound transfer in VPC Flow Logs, and a young domain resolution in Route 53 Resolver logs.

Figure 2: Three signals converging within a single time window to indicate exfiltration

Figure 2: Three signals converging within a single time window to indicate exfiltration

Pattern two: A role chain that crosses your access policy

Picture a deployment that assumes one role to build, then a second to release. For one principal, that two-hop AssumeRole chain is routine; for a different principal it’s a policy violation. This pattern relies on your trust topology—the chains your organization permits—so put that knowledge in the query.

This pattern needs three conditions:

  • CloudTrail shows several AssumeRole calls from the same source inside a short window
  • The chain ends in a sensitive action such as CreateAccessKey, PutRolePolicy, or AttachUserPolicy
  • The starting identity isn’t one your policy expects to run that chain

In CloudWatch Logs Insights, select your CloudTrail log group and run this query, which surfaces chains of two or more hops.

fields @timestamp, userIdentity.arn, requestParameters.roleArn, sourceIPAddress
| filter eventName = "AssumeRole"
| stats count(*) as assumeCount,
        count_distinct(requestParameters.roleArn) as rolesAssumed
        by sourceIPAddress, bin(5m)
| filter assumeCount >= 2 and rolesAssumed >= 2
| sort assumeCount desc

Two hops is the minimum for a chain; raise the count if your environment chains roles often. Your deployment pipeline probably assumes several roles an hour, as do AWS service principals such as AWS Security Hub. Exclude the identities you expect to see assuming multiple roles, including your pipeline role and known AWS service principals. What’s left is the set to investigate, such as a person assuming several roles at an odd hour and ending in a new access key. Treat that distinction as data: list the identities and actions you consider normal, and review the chains that fall outside the list.

Pattern three: An encryption key used outside its owning workload

Resource ownership is the signal here. A given AWS Key Management Service (AWS KMS) key creates and controls the encryption keys for a workload, and a single key should serve a single workload, such as a payments service. A Decrypt call against it is a valid, authorized API action, so nothing about the call itself looks wrong. The ownership rule you set is what makes another principal’s use of the key worth a second look.

This pattern applies only to customer-managed keys scoped to one workload. It doesn’t apply to AWS-managed keys (alias/aws/*) or to customer-managed keys intentionally shared across services. Confirm single-workload intent from the key policy’s Principal block before deploying this rule.

Two conditions indicate misuse:

  • CloudTrail shows Decrypt or GenerateDataKey calls on a key that’s tied to one workload
  • The calling principal isn’t the role that owns that workload

Against your CloudTrail log group, run this query to list the principals that called a specific key.

fields @timestamp, userIdentity.arn, eventName
| filter eventSource = "kms.amazonaws.com"
| filter eventName in ["Decrypt", "GenerateDataKey", "Encrypt"]
| filter resources.0.ARN = "arn:aws:kms:region:account-id:key/your-key-id"
| stats count(*) as keyUses by userIdentity.arn, eventName
| sort keyUses desc

Compare what comes back against the one workload role you expect. A principal you don’t recognize on that key is the signal. Because key misuse is an early move in data theft, this correlation catches activity that only your ownership knowledge can flag.

Consider a key that wraps your payments database. The payments service role calls it in normal operation, and nothing else should. If a developer role or a freshly created role runs Decrypt against it, the call succeeds and reads as ordinary in isolation. The reason it matters is the ownership rule you hold in your head and now state in this query.

Pattern four: A privileged action outside your change window

Start with the query, then read what it means.

fields @timestamp, userIdentity.arn, eventName, sourceIPAddress
| filter eventName in ["PutRolePolicy", "AttachRolePolicy",
        "CreateAccessKey", "AuthorizeSecurityGroupIngress", "PutBucketPolicy"]
| stats count(*) as sensitiveChanges by userIdentity.arn, eventName, sourceIPAddress
| sort sensitiveChanges desc

Run it against your CloudTrail log group, scoped to your off-hours window when you schedule it, so it returns only activity outside the change window. Your change process defines what normal looks like here: production security and identity changes flow through a pipeline during defined hours, run by a known actor. A console-driven policy change at 2:00 AM, made by a person rather than the pipeline, doesn’t fit those expectations. The signal is a sensitive change such as PutRolePolicy or AuthorizeSecurityGroupIngress, made outside the window, by a person rather than your pipeline role.

Exclude the actors you expect, such as your deployment pipeline role, your patch automation role, and AWS service principals like AWS CloudFormation and AWS Systems Manager. What remains is privileged change made outside your process, which is both what an attacker does to establish persistence and what your own change discipline says shouldn’t happen.

Your pipeline might open security group rules during a deployment every weekday afternoon. A person opening a security group rule at midnight on a weekend is the same API call carrying a very different meaning. The schedule and the actor, both facts you define, are what separate the two.

Build your first correlation rule

The following walkthrough uses pattern one as a complete example. The other three patterns follow the same design with their own queries.

Prerequisites

These prerequisites feed the queries in this walkthrough. Confirm each one before you start:

  • A CloudTrail trail logging management events to a CloudWatch Logs log group
  • CloudTrail data events enabled for your sensitive S3 buckets
  • GuardDuty enabled, with its protection plans and Extended Threat Detection
  • VPC Flow Logs on for your production VPCs
  • Amazon Route 53 Resolver query logging on

CloudTrail, GuardDuty, VPC Flow Logs, and Route 53 Resolver query logging provide the raw signals that your correlations connect. Without them, the queries in this post return empty results.

Step 1: Record the bucket and its expected readers

Choose one sensitive bucket to monitor, and write down the principals allowed to read it. Store the list where your automation can reach it, such as a configuration file in version control or an Amazon DynamoDB table (a managed NoSQL database).

{
  "customer-records-prod": [
    "arn:aws:iam::123456789012:role/AnalyticsPipeline",
    "arn:aws:iam::123456789012:role/ComplianceAudit"
  ],
  "financial-data-archive": [
    "arn:aws:iam::123456789012:role/FinanceReporting"
  ]
}

This example hardcodes the list for simplicity. In production, load it from a DynamoDB table or Parameter Store so you can update it without redeploying.

Step 2: Baseline before you set a threshold

Run the pattern one query over one week of normal activity. Find the 95th percentile read count for the bucket and use a value greater than that as your alert threshold. This step keeps legitimate high-volume access from generating false positives later.

Set the THRESHOLD_READS environment variable to this value when you configure the function in Step 5.

Step 3: Run the access query

In the CloudWatch console:

  1. Choose Logs, then choose Logs Insights.
  2. In the Select log group(s) dropdown, select your CloudTrail log group.
  3. Set the time range to 3h (the last three hours).
  4. In the query editor, paste the pattern one query.
  5. Replace your-sensitive-bucket with your bucket name.
  6. Choose Run query.
  7. Review the principals in the results table.
  8. Compare each principal against your expected reader list from step 1, and flag any that are not on it.

Each result includes a principal that step 4 translates into an IP address.

Step 4: Correlate with network activity

CloudTrail logs actions by AWS Identity and Access Management (IAM) principal, while VPC Flow Logs record traffic by IP address. To connect the two signals, translate the principal into its address.

For a role attached to an Amazon Elastic Compute Cloud (Amazon EC2) instance, the userIdentity.principalId field includes the instance ID after the colon, in the form AROAEXAMPLE:i-1234567890abcdef0. Copy the instance ID and look up its private IP address.

aws ec2 describe-instances \
  --instance-ids i-1234567890abcdef0 \
  --query "Reservations[0].Instances[0].PrivateIpAddress" \
  --output text

Other compute types differ. A VPC-connected AWS Lambda function sends traffic through elastic network interfaces in your subnets, so correlate on those interface addresses. An Amazon Elastic Container Service (Amazon ECS) task records its network interface in task metadata. For a plain assumed-role session with no instance behind it, the sourceIPAddress field in CloudTrail already holds the caller’s address, so you correlate on it directly.

Run the Flow Logs query from pattern one, filtering srcAddr to that address within 10 minutes of the Amazon S3 read timestamp. A match places the same source behind both the sensitive read and a large external transfer in one window. CloudTrail events reach CloudWatch Logs 5–15 minutes after the API call, so correlate on eventTime rather than query time. Query a wider lookback than your correlation window: for example, look back 30 to 60 minutes but correlate on a 10-minute eventTime window. Steps 3 and 4 are manual validation; step 5 automates them.

Figure 2 shows DNS resolution as a third corroborating signal. This walkthrough implements the CloudTrail and VPC Flow Logs correlation. To add DNS, apply the same run_query() pattern against your Route 53 Resolver query log group.

Step 5: Automate the check

Move the query into a Lambda function (serverless compute that runs your code without a server to manage), send results to a notification channel, and schedule regular runs. Work through the following sub-procedures.

To create the notification channel

  1. Open the Amazon Simple Notification Service (Amazon SNS) console. Amazon SNS is a managed messaging service that delivers notifications to subscribers.
  2. In the navigation pane, choose Topics.
  3. Choose Create topic.
  4. For Type, select Standard.
  5. For Name, enter security-correlation-alerts.
  6. Choose Create topic.
  7. Note the topic Amazon Resource Name (ARN) at the top of the topic details page. You will use it in the function.
  8. Choose Create subscription.
  9. For Protocol, select Email.
  10. For Endpoint, enter your email address or incident management endpoint.
  11. Choose Create subscription, then confirm the subscription from the email AWS sends.

To create the EventBridge Scheduler execution role

The schedule needs a role that lets it invoke your function, and its trust policy needs conditions that pin the role to the schedule you own. Without those conditions, another account with access to the scheduler service could theoretically call this role; a class of misuse known as the confused deputy problem.

1. Create a trust policy file named scheduler-trust-policy.json.

{
  "Version": "2012-10-17",
  "Statement": [
    {
      "Effect": "Allow",
      "Principal": { "Service": "scheduler.amazonaws.com" },
      "Action": "sts:AssumeRole",
      "Condition": {
        "StringEquals": {
          "aws:SourceAccount": "ACCOUNT-ID"
        },
        "ArnLike": {
          "aws:SourceArn": "arn:aws:scheduler:REGION:ACCOUNT-ID:schedule/*/s3-access-correlation-hourly"
        }
      }
    }
  ]
}

2. Create the role, then attach permission to invoke the function. Scope Resource to the specific function ARN so this role can’t invoke anything else.

aws iam create-role \
  --role-name EventBridgeSchedulerRole \
  --assume-role-policy-document file://scheduler-trust-policy.json

aws iam put-role-policy \
  --role-name EventBridgeSchedulerRole \
  --policy-name LambdaInvokePolicy \
  --policy-document '{
    "Version": "2012-10-17",
    "Statement": [
      {
        "Effect": "Allow",
        "Action": "lambda:InvokeFunction",
        "Resource": "arn:aws:lambda:REGION:ACCOUNT-ID:function:CorrelationFunction"
      }
    ]
  }'

When you create the function, Lambda automatically creates an execution role. You will attach the permissions this function needs to that role in a later step.

To deploy the correlation function

  1. Open the Lambda console.
  2. Choose Create function.
  3. For Function name, enter CorrelationFunction.
  4. For Runtime, select the latest Python runtime.
  5. Choose Create function.
  6. On the Code tab, replace the default code with the following function, then choose Deploy.
import os
import time
import logging
import boto3
from botocore.exceptions import ClientError

logger = logging.getLogger()
logger.setLevel(logging.INFO)

logs = boto3.client("logs")
sns = boto3.client("sns")
ec2 = boto3.client("ec2")

CLOUDTRAIL_LOG_GROUP = os.environ["CLOUDTRAIL_LOG_GROUP"]
FLOWLOGS_LOG_GROUP = os.environ["FLOWLOGS_LOG_GROUP"]
SNS_TOPIC = os.environ["SNS_TOPIC_ARN"]
BUCKET = os.environ["SENSITIVE_BUCKET"]
THRESHOLD = int(os.environ.get("THRESHOLD_READS", "100"))

# Expected readers per bucket
EXPECTED_READERS = {
    "customer-records-prod": [
        "arn:aws:iam::123456789012:role/AnalyticsPipeline",
        "arn:aws:iam::123456789012:role/ComplianceAudit",
    ],
}


def run_query(log_group, query, start, end):
    """Start a Logs Insights query and wait for it to finish."""
    started = logs.start_query(
        logGroupName=log_group,
        startTime=start,
        endTime=end,
        queryString=query,
    )
    query_id = started["queryId"]
    while True:
        outcome = logs.get_query_results(queryId=query_id)
        if outcome["status"] in ("Complete", "Failed", "Cancelled"):
            break
        time.sleep(1)
    if outcome["status"] != "Complete":
        raise RuntimeError(f"Query did not complete: {outcome['status']}")
    return [{f["field"]: f["value"] for f in row} for row in outcome["results"]]


def private_ip_for_principal(principal_id):
    """Resolve an EC2 instance role principalId to its private IP."""
    if ":" not in principal_id:
        return None
    instance_id = principal_id.split(":", 1)[1]
    if not instance_id.startswith("i-"):
        return None
    reservations = ec2.describe_instances(InstanceIds=[instance_id])
    for reservation in reservations["Reservations"]:
        for instance in reservation["Instances"]:
            return instance.get("PrivateIpAddress")
    return None


def egress_bytes(src_addr, start, end):
    """Sum external egress bytes for one source address."""
    query = f"""
    fields srcAddr, dstAddr, bytes
    | filter action = "ACCEPT" and srcAddr = "{src_addr}"
    | filter dstAddr not like /^10\\./
            and dstAddr not like /^192\\.168\\./
            and dstAddr not like /^172\\.(1[6-9]|2[0-9]|3[0-1])\\./
    | stats sum(bytes) as totalBytes
    """
    rows = run_query(FLOWLOGS_LOG_GROUP, query, start, end)
    if rows and rows[0].get("totalBytes"):
        return int(rows[0]["totalBytes"])
    return 0


def lambda_handler(event, context):
    try:
        # 1-hour lookback absorbs CloudTrail's 5-15 min delivery latency;
        # correlation happens on eventTime via 10-min bins in the query below.
        end = int(time.time())
        start = end - 3600  # 1 hour lookback
        allowed = EXPECTED_READERS.get(BUCKET, [])

        access_query = f"""
        fields userIdentity.arn, userIdentity.principalId
        | filter eventSource = "s3.amazonaws.com" and eventName = "GetObject"
        | filter requestParameters.bucketName = "{BUCKET}"
        | stats count(*) as objectReads
                by userIdentity.arn, userIdentity.principalId, bin(10m)
        | filter objectReads > {THRESHOLD}
        """

        for row in run_query(CLOUDTRAIL_LOG_GROUP, access_query, start, end):
            principal = row.get("userIdentity.arn")
            if not principal or principal in allowed:
                continue

            message = (
                f"Principal {principal} read {row.get('objectReads')} "
                f"objects from {BUCKET}."
            )

            ip = private_ip_for_principal(row.get("userIdentity.principalId", ""))
            if ip and egress_bytes(ip, start, end) > 1_000_000_000:
                message += (
                    f" The same source ({ip}) also sent a large volume of "
                    f"data to external destinations in the same window."
                )

            sns.publish(
                TopicArn=SNS_TOPIC,
                Subject="Unexpected S3 access detected",
                Message=message,
            )
    except ClientError as error:
        logger.error(f"AWS API error: {error}")
        raise
    except Exception as error:
        logger.error(f"Unexpected error: {error}")
        raise
    finally:
        logger.info("Correlation check completed")
  1. On the Configuration tab, choose General configuration, then choose Edit. Set Timeout to 5 minutes (300 seconds). CloudWatch Logs Insights queries run asynchronously and can take 30 to 60 seconds against large log groups. Choose Save.
  2. On the Configuration tab, choose Environment variables, then choose Edit, and add CLOUDTRAIL_LOG_GROUP, FLOWLOGS_LOG_GROUP, SNS_TOPIC_ARN, SENSITIVE_BUCKET, and THRESHOLD_READS.
  3. On the Configuration tab, choose Permissions, open the execution role, and attach the following least-privilege policy.
{
  "Version": "2012-10-17",
  "Statement": [
    {
      "Effect": "Allow",
      "Action": ["logs:StartQuery", "logs:GetQueryResults"],
      "Resource": [
        "arn:aws:logs:REGION:ACCOUNT-ID:log-group:aws-cloudtrail-logs-my-trail:*",
        "arn:aws:logs:REGION:ACCOUNT-ID:log-group:vpc-flow-logs:*"
      ]
    },
    {
      "Effect": "Allow",
      "Action": "ec2:DescribeInstances",
      "Resource": "*"
    },
    {
      "Effect": "Allow",
      "Action": "sns:Publish",
      "Resource": "arn:aws:sns:REGION:ACCOUNT-ID:security-correlation-alerts"
    }
  ]
}

Replace REGION, ACCOUNT-ID, and the log-group names with your values. The ec2:DescribeInstances action doesn’t support resource-level permissions, so Resource: "*" is required for that statement; the other statements are scoped to specific ARNs.

To schedule automated runs

Amazon EventBridge (a serverless event bus that connects applications using events) runs targets on a schedule. Create one from the command line, using the role you made earlier.

aws scheduler create-schedule \
  --name s3-access-correlation-hourly \
  --schedule-expression "rate(1 hour)" \
  --target "Arn=arn:aws:lambda:REGION:ACCOUNT-ID:function:CorrelationFunction,RoleArn=arn:aws:iam::ACCOUNT-ID:role/EventBridgeSchedulerRole" \
  --flexible-time-window "Mode=OFF"

Step 6: Add enrichment context (optional)

Enrichment cuts triage time by adding an independent signal, but it isn’t required for the correlation to work. This step adds costs. You pay your geolocation provider for API calls, and the additional Lambda execution time increases your Lambda charges. To add IP geolocation, sign up for a geolocation API, add this function to the code, and call it where the handler resolves an IP.

import urllib.request
import json

def geo_context(ip_address):
    """Enrich an IP address with geolocation data from your provider."""
    try:
        url = f"https://your-geolocation-api.example/json/{ip_address}"
        with urllib.request.urlopen(url, timeout=5) as response:
            data = json.load(response)
        return {
            "country": data.get("country_name"),
            "city": data.get("city"),
            "org": data.get("org"),
        }
    except Exception as error:
        logger.warning(f"Geolocation lookup failed for {ip_address}: {error}")
        return None

Inside the handler’s loop, after you resolve ip, append the location to the alert.

            if ip:
                geo = geo_context(ip)
                if geo:
                    message += (
                        f" Source location: {geo['city']}, "
                        f"{geo['country']} ({geo['org']})."
                    )

Step 7: Scale to additional patterns and accounts

As your library grows, move the logic into automated pipelines with EventBridge, Lambda, and AWS Step Functions (a serverless orchestration service that coordinates multiple services into workflows), and surface correlations next to findings in Security Hub. For cross-service correlation at scale, CloudWatch unified data and telemetry capabilities can convert security and compliance data into the OCSF format and let you query sources such as CloudTrail, VPC Flow Logs, and DNS logs from one interface. Security Lake with Athena is a strong option for long-term analysis. Choose the endpoint that fits your retention and query needs.

Figure 3 shows a correlation pipeline built on AWS services including EventBridge, Lambda, Step Functions, and AWS Security Hub. The pipeline runs from data sources through scheduled queries and enrichment to automated response and centralized visibility.

Figure 3: A correlation pipeline built on AWS services

Figure 3: A correlation pipeline built on AWS services

Conclusion

You now have four correlation patterns that layer your business context on top of GuardDuty Extended Threat Detection to catch attacks specific to your environment. A few principles carry across every correlation you build.

  • Identity is your primary correlation key: Track the same principal across services.
  • Time windows matter, but they depend on the attack: Events minutes apart are usually related for fast, automated sequences; the ten-minute bins here work for that pattern. Slow or manual reconnaissance can stretch across hours or days, so widen the window when the pattern is deliberate rather than automated.
  • Context is what you add: Your data classification, access norms, resource ownership, and change windows are signals you bring to detection.
  • Start with one rule: A single well-tuned correlation catches more significant activity than a wall of uncorrelated alerts.

GuardDuty Extended Threat Detection handles the multi-stage patterns common across customers. The correlations in this post add the layer that only your business context can supply. Start with one pattern this week, validate it against your own traffic, and add the next pattern after the first proves reliable.

Have you built correlation rules for patterns not covered here? Share your experience in the Comments section below.

Further reading


Nisha Kashyap

Nisha Kashyap

Nisha Kashyap is a Senior Support Security Engineer at AWS. She works on threat detection and security operations, helping customers investigate security events and build detection that connects signals across AWS services and reflects their own environment.

  •  
❌