
❌

Reading view

Introducing OAuth Support for AWS MCP Server

You can now connect your agents to the AWS MCP Server using the same credentials and sign-in methods that you already use for connecting to the AWS Management Console or AWS Command Line Interface (AWS CLI) through a familiar browser-based experience powered by industry-standard OAuth. This new sign-in path supports AWS Identity and Access Management (IAM) federation, AWS IAM Identity Center, and root or IAM users.

In addition, AWS is introducing several new security and governance tools, including: new global condition keys for OAuth, token introspection and revocation, dynamic client registration, new AWS CloudTrail elements, and a new API for headless OAuth connectivity. All of this is compatible with your existing IAM configuration including permissions, roles, and federated access.

In this post, you’ll learn how to connect your agents to the AWS MCP Server, understand how AWS Sign-In authorizes agent access, and manage access using new security and governance capabilities.

How to connect an agent to the AWS MCP Server

This walkthrough uses Claude Code, but the same steps apply to any agent that supports Model Context Protocol (MCP) such as Kiro, Codex, and Gemini. See Setting up the AWS MCP Server for how to connect the AWS MCP Server to an agent.

Prerequisite permissions

To connect an agent to the AWS MCP Server, you’ll need the IAM permissions required for OAuth-based sign-in. The following AWS CLI command adds a managed policy with required permissions to your IAM role (remember to replace <MyRole> with your IAM role):

aws iam attach-role-policy \
  --role-name <MyRole> \
  --policy-arn arn:aws:iam::aws:policy/AWSMCPSignInOAuthAccessPolicy

Step 1: Configure the AWS MCP Server on your agent

Run the following command to add the AWS MCP Server endpoint to your agent’s configuration as shown in Figure 1:

claude mcp add --transport http aws-mcp https://aws-mcp.us-east-1.api.aws/mcp

Figure 1: Adding the AWS MCP Server endpoint to Claude Code

Figure 1: Adding the AWS MCP Server endpoint to Claude Code

Step 2: Review the authorization request

The first time your agent needs to access the AWS MCP Server, it opens a browser and redirects you to an AWS Sign-In page, shown in Figure 2. Authenticate as you would on AWS console or AWS CLI, review the authorization request, and approve access. You should receive an Authorization successful message.
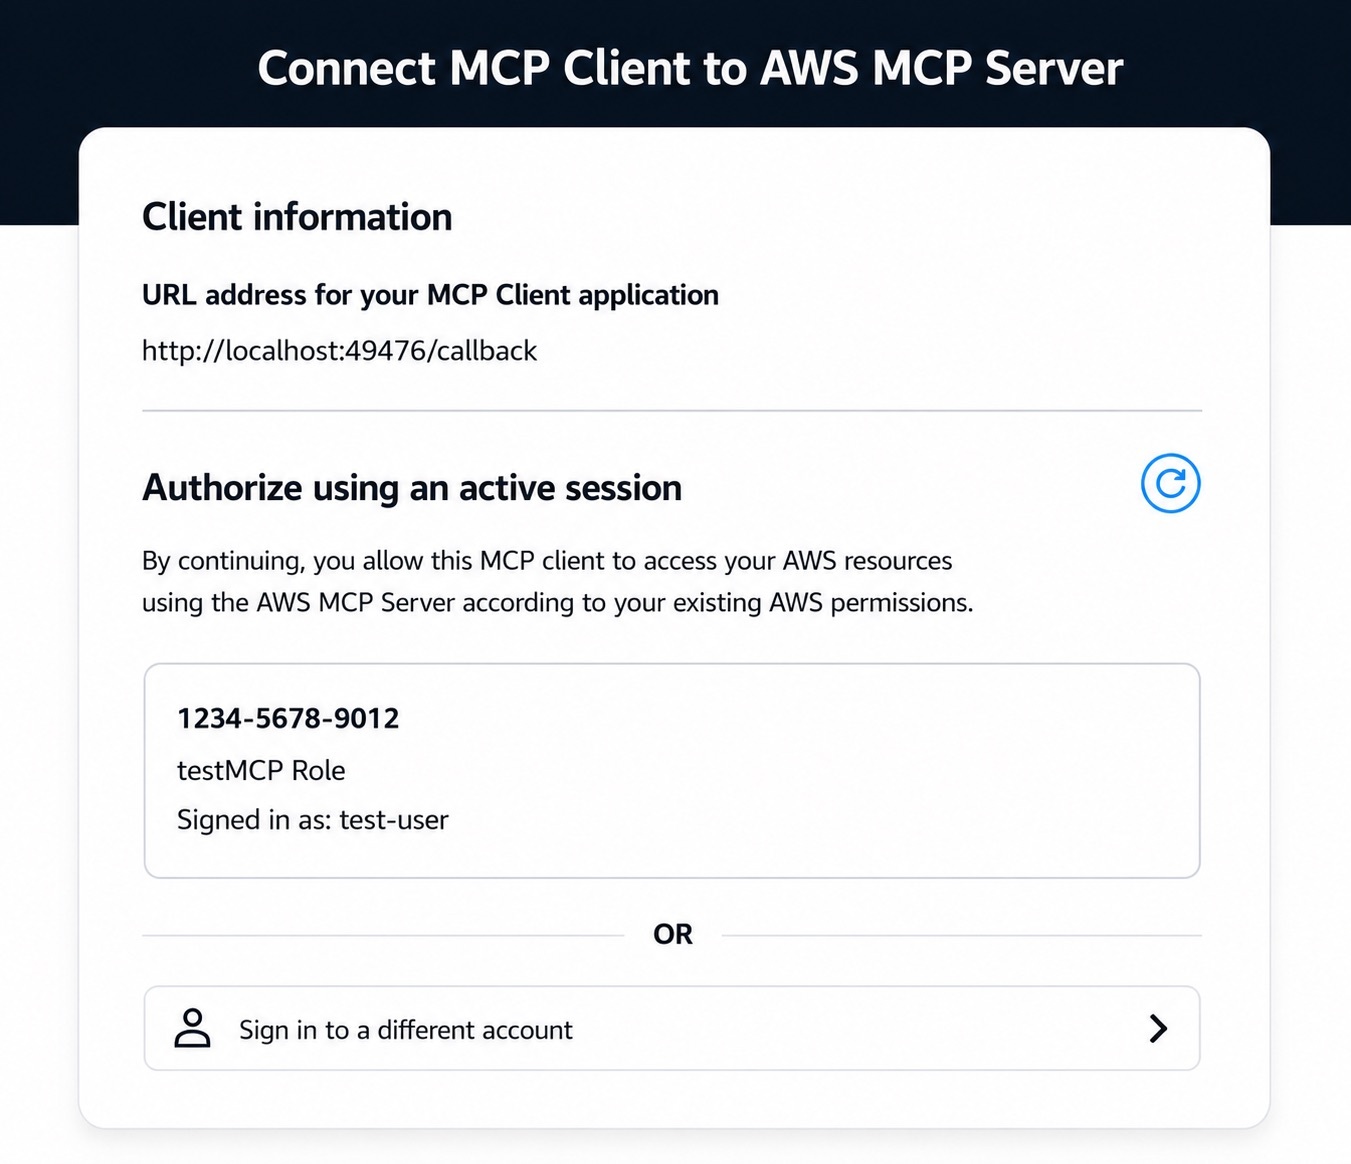
Figure 2: Review authorization request

Figure 2: Review authorization request

Note that if you already have an active AWS Sign-In session (e.g., because you previously signed in to the console earlier in the day), you can reuse that session without needing to sign in again.

Step 3: Start using AWS tools

After connecting your agent to the AWS MCP Server, you can begin invoking tools provided by the server. To verify that Claude Code is connected to the AWS MCP Server, start Claude Code and run the following command:

/mcp

The command displays the configured MCP servers and confirms that the AWS MCP Server is connected and ready to use with your AWS credentials.

Figure 3 shows an example of a successful connection to the AWS MCP Server.
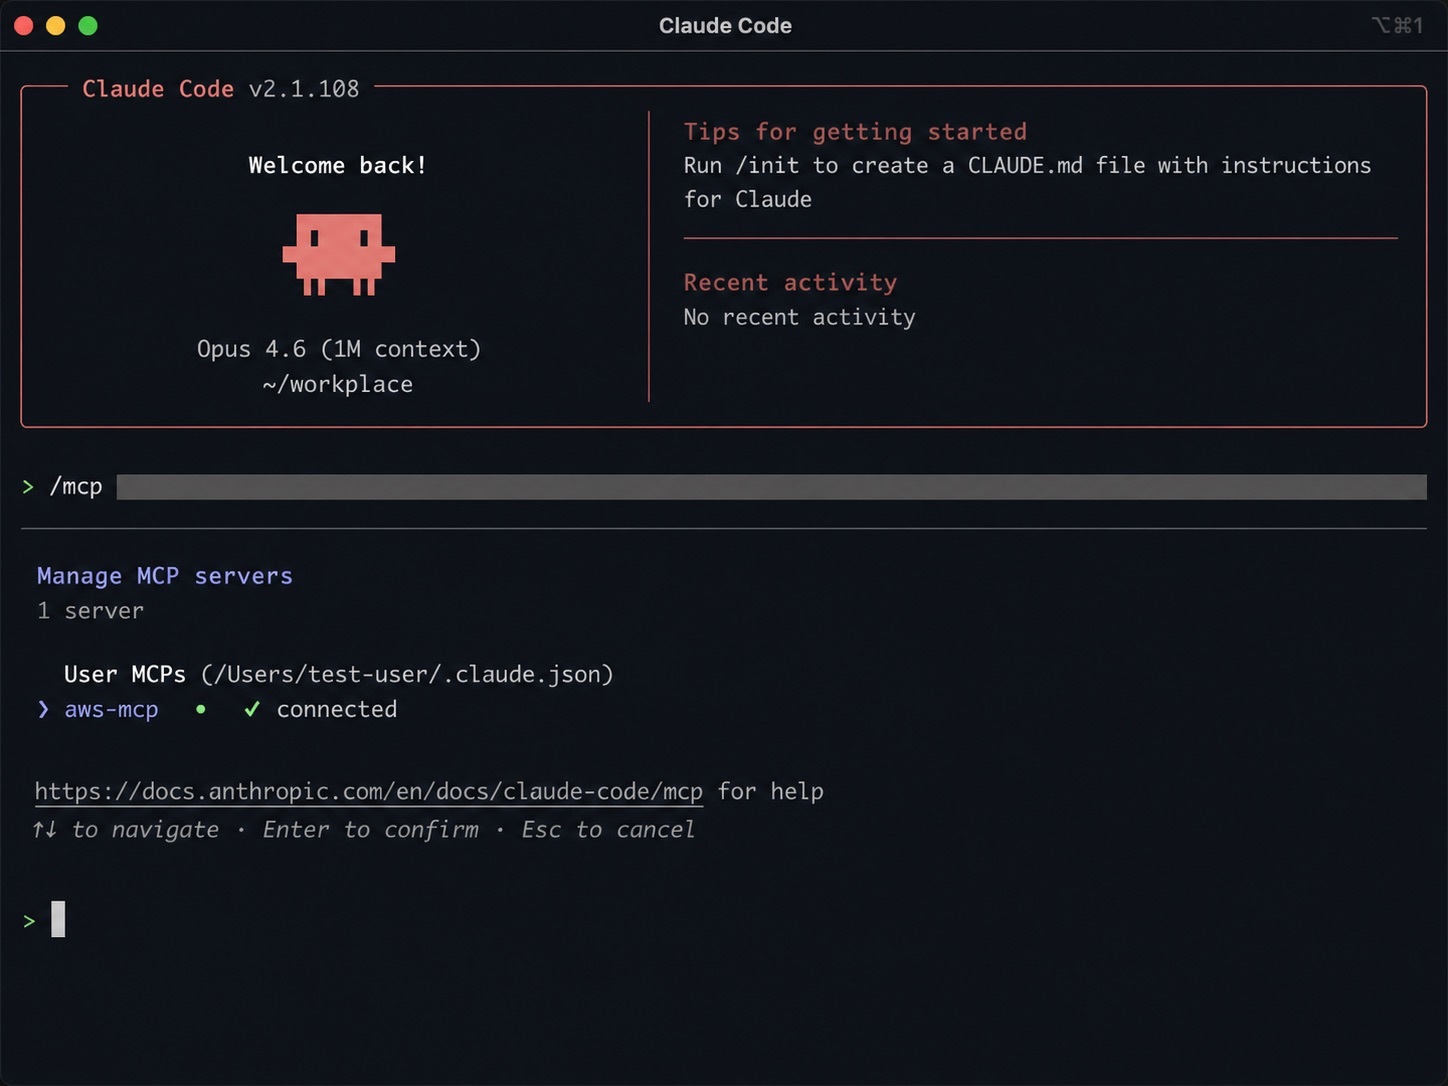
Figure 3: Verifying the AWS MCP Server connection in Claude Code

Figure 3: Verifying the AWS MCP Server connection in Claude Code

After the connection is established, you can ask Claude Code to invoke tools provided by the AWS MCP Server. For example, enter the following prompt:

Deploy a sample serverless web application into my development AWS account

Claude Code uses the AWS MCP Server to identify the active AWS account, confirm the target account, and describe the deployment it plans to perform before invoking AWS services on your behalf.

Figure 4 shows Claude Code confirming the active AWS account and outlining the resources that will be deployed.
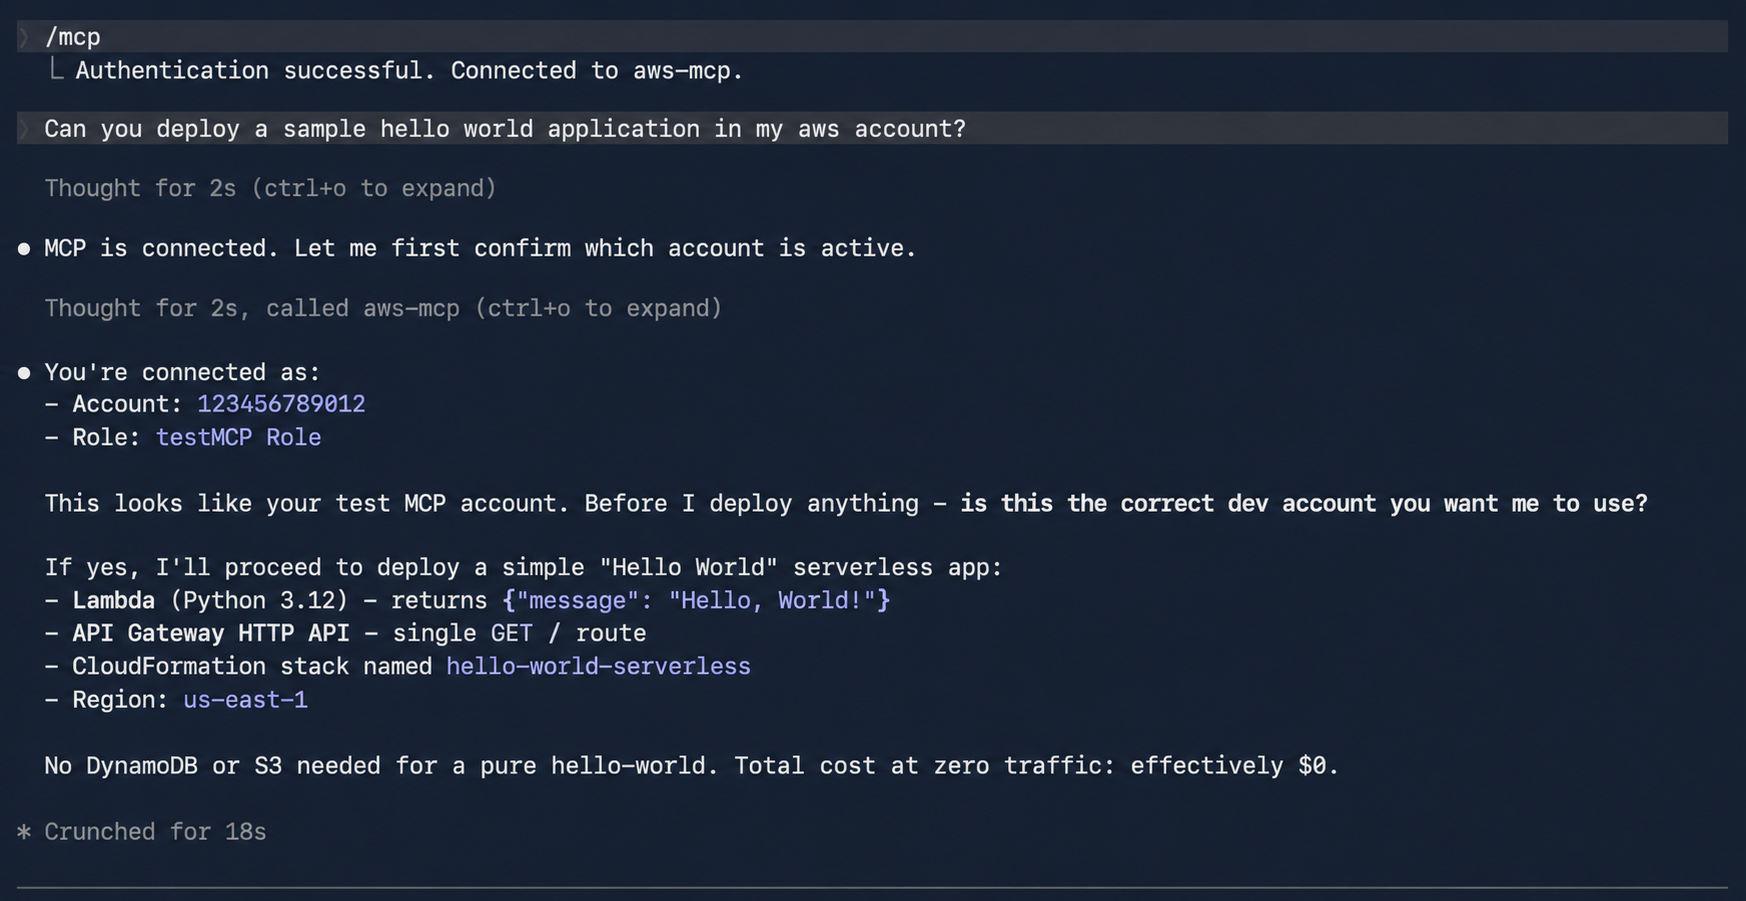
Figure 4: Using Claude Code to deploy a sample serverless application through the AWS MCP Server

Figure 4: Using Claude Code to deploy a sample serverless application through the AWS MCP Server

Authorization models and how they work

AWS Sign-In supports two authorization models for connecting agents to the AWS MCP Server:

  • Interactive authorization for developers’ AI agents using browser based authentication
  • Non-interactive (headless) authorization for applications and AI agents that already have AWS credentials and don’t have access to a browser

Note that authorizing an agent allows it to access the AWS MCP Server on your behalf. It doesn’t grant the agent additional AWS permissions. Every request is still evaluated using your existing IAM policies, SCPs, RCPs, permission boundaries, and other organizational controls.

Interactive access

In the interactive case, the agent first discovers the AWS Sign-In OAuth server and then registers itself as an OAuth client using Dynamic Client Registration (DCR). It then redirects you to an AWS Sign-In page where you authenticate and authorize access (step 2 in the preceding section). After successful authorization, AWS Sign-In then issues short-lived access tokens and refresh tokens that authorize the agent to access the AWS MCP Server on your behalf. AWS Sign-In automatically manages token issuance and token refresh, enabling authorized agents to continue accessing the AWS MCP Server without requiring you to repeatedly sign in.

The interactive authorization model supports three distinct sign-in methods: native AWS IAM credentials for individual developers, managed access through AWS IAM Identity Center for enterprises, and seamless federated access via third-party providers like Okta and Ping Identity for larger organizations.

OAuth server metadata and DCR

Before an agent can request authorization, it must discover the AWS Sign-In OAuth endpoints and register itself as an OAuth client. AWS Sign-In supports OAuth metadata discovery and DCR, allowing supported agents to configure themselves automatically without requiring developers to manually provision OAuth client IDs and client secrets. When an agent connects to the AWS MCP Server for the first time, it retrieves the AWS MCP Server’s protected resource metadata (RFC 9728) and the AWS Sign-In OAuth metadata (RFC 8414). The agent then uses (RFC 7591) to register with AWS Sign-In, obtain a client ID, and initiate the standard OAuth authorization code flow.

AWS Sign-In supports OAuth discovery and DCR for agents running on local workstations and supported hosted environments. For the current list of supported agents and environments, see Supported redirect URIs for the AWS MCP Server.

Non-interactive access to the AWS MCP Server

Non-interactive (headless) authorization is for agents and applications that run without a browser or human in the loop, and thus don’t require interactive sign-in. This allows agents that already have AWS credentials to obtain OAuth access tokens and connect to the AWS MCP Server. The following is an example of how to obtain an access token.

aws signin create-oauth2-token-with-iam \ 
--grant-type client_credentials \ 
--resource aws-mcp.amazonaws.com \  
--region us-east-1 
{ 
"accessToken": "ASOA****************************************...", 
"tokenType": "Bearer", 
"expiresIn": 3600 
}

In the non-interactive case, AWS Sign-In implements the OAuth client credentials grant using AWS security credentials instead of a static client secret. Applications authenticate to the AWS Sign-In token endpoint using SigV4 creds, and AWS Sign-In returns a short-lived OAuth access token that can be used to access the AWS MCP Server.

Please note you may have to update the SDK and AWS CLI, please refer to CLI guide.

Managing OAuth access

AWS Sign-In extends the existing IAM authorization model with capabilities for governing OAuth access to the AWS MCP Server. Administrators can use familiar IAM policies together with new OAuth-specific controls.

Granting OAuth permissions

OAuth access is governed using IAM policies and requires the following IAM actions:

  • signin:AuthorizeOAuth2Access – Allows users to sign in interactively using the OAuth authorization code flow
  • signin:CreateOAuth2Token – Allows applications to obtain OAuth access tokens by exchanging authorization codes, refresh tokens, or using client credentials

When an application requests access, AWS Sign-In creates an OAuth authorization grant between the agent and the AWS MCP Server. This grant is represented as an IAM resource, which the preceding AWS Sign-In actions are authorized against.

arn:aws:signin:us-east-1:012345678910:service-principal/aws-mcp.amazonaws.com

OAuth authorization grants are represented as an IAM resource enabling administrators to use standard IAM policy constructs, including global condition keys, together with OAuth-specific condition keys to control how authorization grants are created and used.

Governing OAuth access

AWS Sign-In introduces OAuth-specific condition keys that allow administrators to govern how agents obtain OAuth authorization. The following examples demonstrate common governance patterns.

To restrict OAuth authorization to localhost:

In addition to accessing the AWS MCP Server with agents on your local workstation, AWS supports signing into the AWS MCP Server on select hosted providers through dynamic client registration. Click here to view the list of supported remote providers. Many organizations want to allow developers to authorize agents running on their local workstations while preventing OAuth tokens from being delivered to untrusted redirect URIs or using unsupported authorization flows. The following policy allows only the OAuth authorization code and refresh token flows for the AWS MCP server and restricts token delivery tolocalhost.

{
  "Version": "2012-10-17",
  "Statement": [
    {
      "Effect": "Allow",
      "Action": [
        "signin:AuthorizeOAuth2Access",
        "signin:CreateOAuth2Token"
      ],
      "Resource": "arn:aws:signin:*:*:service-principal/aws-mcp.amazonaws.com",
      "Condition": {
        "StringLike": {
          "signin:OAuthRedirectUri": "http://localhost:*"
        },
        "StringEquals": {
          "signin:OAuthGrantType": [
            "authorization_code",
            "refresh_token"
          ]
        }
      }
    }
  ]
}

To deny access for a specific OAuth session

Use the aws:SignInSessionArn global condition key to deny authorization associated with a specific sign-in session. This allows administrators to contain a suspicious or compromised authorization session without affecting other active sessions.

{
  "Version": "2012-10-17",
  "Statement": [
    {
      "Effect": "Deny",
      "Action": [
        "*"
      ],
      "Resource": "*",
      "Condition": {
        "ArnEquals": {
          "aws:SignInSessionArn": "arn:aws:signin:us-east-1:111122223333:session/abc123-example-session-id"
        }
      }
    }
  ]
}

These examples demonstrate common governance patterns. Additional IAM and SCP examples are available in the AWS Sign-In condition keys reference.

Revoking OAuth tokens

AWS Sign-In provides OAuth token introspection and token revocation APIs that allow administrators to build custom tools for token validation and revocation. Access to these APIs is controlled through the signin:IntrospectOAuth2Token and signin:RevokeOAuth2Token permissions. IAM principals with permissions are allowed to introspect and revoke tokens for the same account.

The introspection API can be used to determine whether a token is active and obtain information about the associated authorization. The revocation API allows administrators and security tools to revoke individual refresh tokens without affecting other active sessions. For example, if an organization needs to invalidate access for a specific OAuth authorization, account admins can revoke the associated refresh token without affecting other active sessions.

Monitoring OAuth activity

OAuth-related activities are recorded in AWS CloudTrail, including authorization requests, token issuance, token revocation, and token introspection events. CloudTrail logs also capture details such as the OAuth client, target the AWS MCP Server, redirect URI, authorization flow, and associated sign-in session. In addition, AWS API calls made using OAuth access tokens include the associated aws:SignInSessionArn context, allowing organizations to correlate API activity with the originating OAuth sign-in session.

This allows security teams to monitor OAuth usage, investigate authorization activity, detect anomalous behavior, and integrate OAuth events into existing auditing, compliance, and incident response workflows alongside other AWS activity.

Here’s a CloudTrail sample for an AuthorizeOAuth2Access event:

{
    "eventVersion": "1.11",
    "userIdentity": {
        "type": "AssumedRole",
        "principalId": "AROATJHQDX737YZP****:testuser",
        "arn": "arn:aws:sts::111111111111:assumed-role/Admin/testuser",
        "accountId": "111111111111",
        "sessionContext": {
            "sessionIssuer": {
                "type": "Role",
                "principalId": "AROA2IRT4N5U4RDHM2LG4",
                "arn": "arn:aws:iam::111111111111:role/Admin",
                "accountId": "111111111111",
                "userName": "Admin"
            },
            "attributes": {
                "creationDate": "2026-06-09T05:06:39Z",
                "mfaAuthenticated": "false"
            }
        }
    },
    "eventTime": "2026-06-09T05:09:00Z",
    "eventSource": "signin.amazonaws.com",
    "eventName": "AuthorizeOAuth2Access",
    "awsRegion": "us-west-2",
    "sourceIPAddress": "192.0.0.2",
    "userAgent": "Mozilla/5.0 (Macintosh; Intel Mac OS X 10_15_7) AppleWebKit/537.36 (KHTML, like Gecko) Chrome/149.0.0.0 Safari/537.36",
    "requestParameters": {
        "resource": "https://aws-mcp.us-west-2.api.aws/mcp",
        "redirect_uri": "http://127.0.0.1:60432/oauth/callback",
        "code_challenge_method": "S256",
        "client_id": "arn:aws:signin:us-west-2::external-client/dcr/609544da-aasa-49a4-ab11-c2r457fa999"
    },
    "responseElements": null,
    "additionalEventData": {
        "success": "true"
    },
    "requestID": "4fb4ff7b-6yu7-9090-78i9-9c0088a65134",
    "eventID": "bb05b222-31ec-4237-b8e7-8eb26d4fd48b",
    "readOnly": true,
    "eventType": "AwsApiCall",
    "managementEvent": true,
    "recipientAccountId": "111111111111",
    "eventCategory": "Management",
    "tlsDetails": {
        "tlsVersion": "TLSv1.3",
        "cipherSuite": "TLS_AES_128_GCM_SHA256",
        "clientProvidedHostHeader": "us-west-2.oauth.signin.aws"
    }
}

Here’s a CloudTrail sample for a CreateOAuth2Token event:

{
    "eventVersion": "1.11",
    "userIdentity": {
        "type": "AssumedRole",
        "principalId": "AROATJHQDX737YZP7****:testuser",
        "arn": "arn:aws:sts::111111111111:assumed-role/Admin/testuser",
        "accountId": "111111111111",
        "sessionContext": {
            "sessionIssuer": {
                "type": "Role",
                "principalId": "AROA2IRT4N5U4RDHM****",
                "arn": "arn:aws:iam::111111111111:role/Admin",
                "accountId": "111111111111",
                "userName": "Admin"
            },
            "attributes": {
                "creationDate": "2026-06-09T05:06:39Z",
                "mfaAuthenticated": "false"
            },
            "signInSessionArn":"arn:aws:signin:us-west-2:111111111111:session/daff060f-7871-5tg6-67yu-a07bbdabe61a"
            
        }
    },
    "eventTime": "2026-06-09T05:10:04Z",
    "eventSource": "signin.amazonaws.com",
    "eventName": "CreateOAuth2Token",
    "awsRegion": "us-west-2",
    "sourceIPAddress": "192.0.0.2",
    "userAgent": "curl/8.7.1",
    "requestParameters": {
        "resource": "https://aws-mcp.us-west-2.api.aws/mcp",
        "client_id": "arn:aws:signin:us-west-2::external-client/dcr/609544da-b3dd-49a4-ab11-c2e98d7fa999"
    },
    "responseElements": null,
    "additionalEventData": {
        "signInSessionArn": "arn:aws:signin:us-west-2:111111111111:session/daff060f-7871-5tg6-67yu-a07bbdabe61a",
        "grant_type": "refresh_token",
        "success": "true"
    },
    "requestID": "44d6d7ce-e4r5-4cbf-0909-bfb8a8295a76",
    "eventID": "f79cc63f-b383-4e3c-a1e5-97c7db1ab833",
    "readOnly": true,
    "eventType": "AwsApiCall",
    "managementEvent": true,
    "recipientAccountId": "111111111111",
    "eventCategory": "Management",
    "tlsDetails": {
        "tlsVersion": "TLSv1.3",
        "cipherSuite": "TLS_AES_128_GCM_SHA256",
        "clientProvidedHostHeader": "us-west-2.oauth.signin.aws"
    }
}

Additional audit events and logging details for calls made using OAuth access tokens to the AWS MCP Server can be found in Logging AWS MCP Server API calls using AWS CloudTrail.

Conclusion

AWS Sign-In support for OAuth enables you to securely connect to the AWS MCP Server using industry-standard authorization. This release simplifies application and agent integration with AWS while supporting your existing IAM setup, governance, and auditing capabilities.

To learn more, see Sign-In with OAuth 2.0 in the AWS Sign-In User Guide and Setting up the AWS MCP Server in the Agent Toolkit for AWS User Guide.

If you have feedback about this post, submit comments in the Comments section below.

Vaibhav Chowla

Vaibhav Chowla

Vaibhav is a Senior Technical Product Manager at AWS, specializing in AWS Identity products. He focuses on enhancing user authentication and security, helping customers of all sizes solve complex identity and access management (IAM) challenges. Outside of technology, Vaibhav enjoys traveling and exploring new cultures and cuisines.

Jaimin Bhatt

Jaimin Bhatt

Jaimin is a Principal Software Engineer at AWS. He works on AWS Identity and Access Management (IAM) across sign-in, threat detection, and the authentication and authorization that secures access to AWS. Jaimin is an active participant in multiple industry standards bodies. Previously, he led work on data perimeter controls for AWS Management Console sign-in, multi-session support for the console, a simplified AWS CLI sign-in experience, and the internal Amazon identity provider.

Ankur Joshi

Ankur Joshi

Ankur is a Software Development Manager on the AWS Identity Sign-In team. His team focuses on delivering secure and resilient authentication mechanisms and access controls for AWS customers.

  •  

Enforce least-privilege authorization in multi-agent AI chains using Cedar

If you’re building multi-agent AI systems, you need to prevent authorization scope from silently expanding as agents delegate tasks through multi-hop chains. Without proper controls, an agent can potentially act beyond what the originating user authorized, even when role-based access control (RBAC) policies are in place. The OWASP Top 10 for Agentic Applications classifies this risk as ASI03: Identity & Privilege Abuse.

This post shows you how to address the potential risk using a three-layer policy model built with Cedar, an open source authorization policy language, deployed on Amazon Web Services (AWS). The reference implementation uses OAuth 2.0 for authentication and Cedar for authorization. A trusted identity provider authenticates the originating user, then Cedar policies enforce authorization across three layers using verified token claims.

Reference implementation overview

To enforce authorization at each hop in a multi-agent delegation chain, the reference implementation uses two AWS Lambda functions in sequence. A Model Context Protocol (MCP) adapter Lambda function normalizes inbound requests and cryptographically signs the originating user context. This prevents downstream tampering. A Cedar evaluator Lambda function evaluates three independent policy layers sequentially, halting on the first deny.

Table 1: Three-layer Cedar policy evaluation model

Layer What it checks Principal to resource
L1 – Agent-to-tool Whether the invoking agent has a sufficient trust score (1–5), belongs to the correct namespace (for example, payments), and is in the production lifecycle stage Agent to tool
L2 – Agent-to-agent delegation Whether the delegation hop count is within the hard limit of five, and whether requested tasks are a subset of the target agent’s registered capabilities Agent to agent
L3 – Originating user authorization Whether the human who initiated the chain has the required role (for example, admin), has completed MFA, and is within the allowed delegation depth Agent to tool (user in context)

Architecture

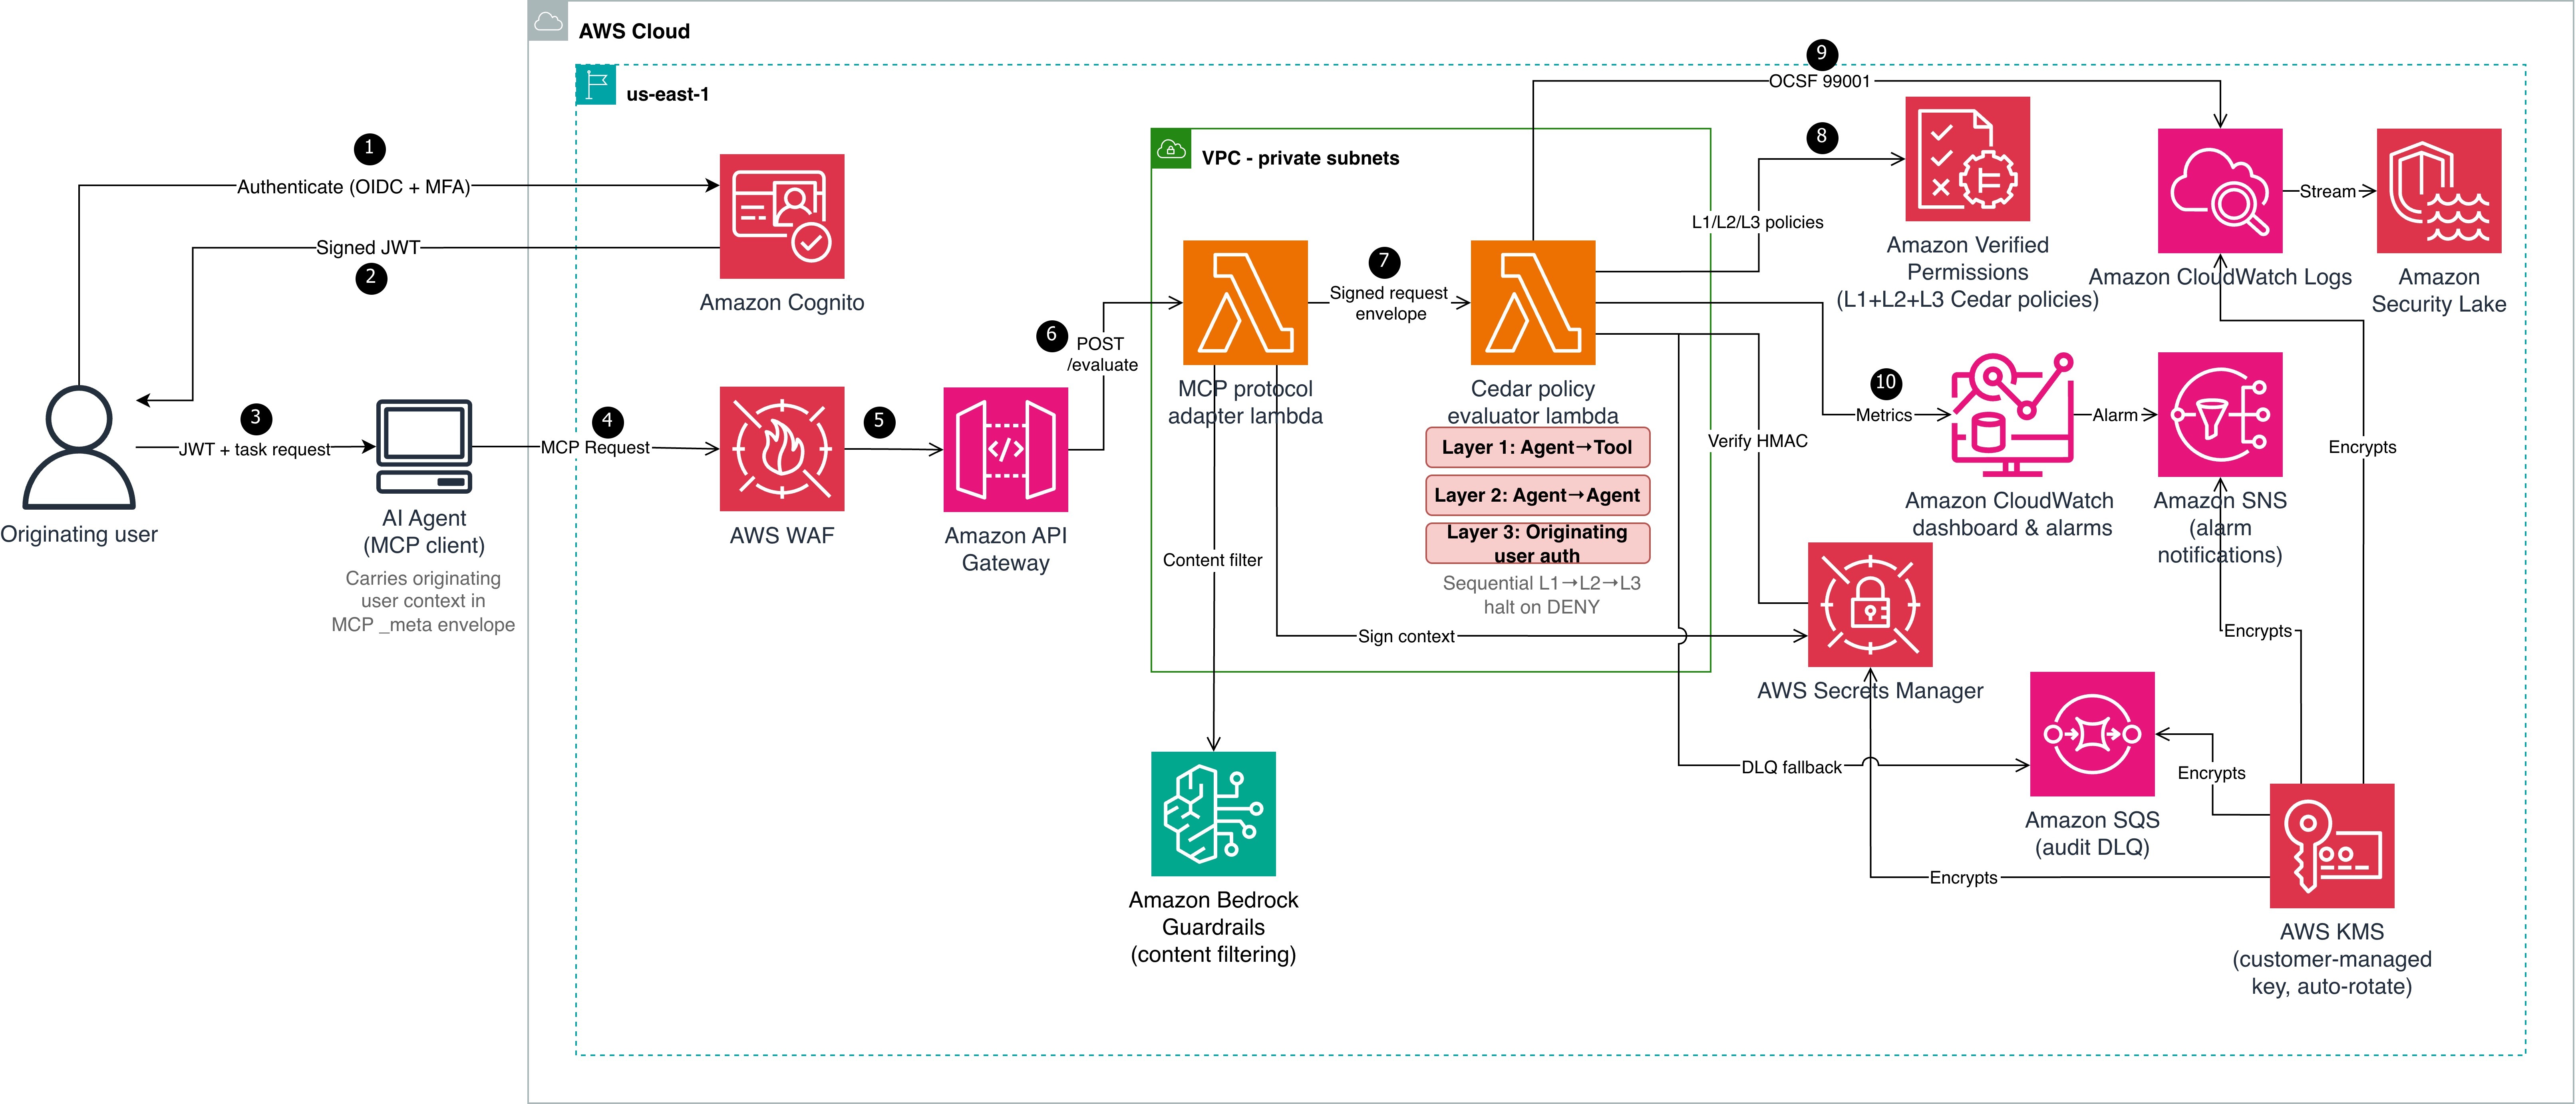
Cedar evaluates authorization but doesn’t establish identity. Before Cedar can evaluate context.originating_user.role or context.originating_user.mfa_verified, a trusted authentication layer must establish the user’s identity and produce verifiable claims. Steps 1–3 handle authentication; steps 4–10 handle authorization. The architecture shown in Figure 1 is described in the following lists:

Authentication (steps 1–3)

  1. The originating user authenticates with an OIDC-compliant identity provider (in this reference implementation, Amazon Cognito with TOTP multi-factor authentication (MFA)). The identity provider (IdP) issues a signed JSON Web Token (JWT) containing claims such as sub, role, amr (authentication methods), and session_id.
  2. Amazon Cognito returns the signed JWT to the user.
  3. The user passes the JWT and task request to the AI agent (MCP client). The agent carries the originating user context in the MCP _meta envelope.

Authorization pipeline (steps 4–10)

  1. The AI agent sends a Model Context Protocol (MCP) request to AWS WAF, which filters using CommonRuleSet, SQLiRuleSet, rate limiting, and body size constraints.
  2. Amazon API Gateway (with Amazon Cognito authorizer) verifies the JWT signature against the user pool’s public keys and rejects invalid or expired tokens. Valid requests are forwarded to the MCP protocol adapter Lambda function, which applies Amazon Bedrock Guardrails content filtering.
  3. The adapter extracts verified claims from the token and maps them to Cedar context attributes:
    1. JWT role claim : context.originating_user.role
    2. JWT amr includes MFA method: context.originating_user.mfa_verified = true
    3. JWT sub: context.originating_user.user_id
    4. JWT sid: context.originating_user.session_id
    5. JWT amr claim: context.originating_user.authentication_method

    The adapter then computes an HMAC-SHA256 signature over the user context (user_id, role, mfa_verified, authentication_method, and session_id in canonical order) using a key from AWS Secrets Manager.

  4. The adapter constructs a signed request envelope and invokes the Cedar evaluator Lambda function.
  5. The evaluator verifies the HMAC-SHA256 signature, retrieves L2 and L3 Cedar policies from Amazon Verified Permissions, and evaluates all three layers (L1, L2, and L3), halting on the first deny.
  6. The evaluator emits an Open Cybersecurity Schema Framework (OCSF) 99001 audit event to Amazon CloudWatch Logs. Failed emissions fall back to an Amazon Simple Queue Service (Amazon SQS) dead-letter queue (DLQ).
  7. Amazon CloudWatch dashboards and alarms monitor evaluation latency, deny rates, and DLQ depth. Alarm notifications route through Amazon Simple Notification Service (Amazon SNS).

Context integrity through delegation hops

Two mechanisms work together to protect identity across hops:

  • Hash-based Message Authentication Code (HMAC-SHA256) ensures integrity and authenticity. Every downstream evaluator verifies this signature before trusting the context.
  • OAuth 2.0 Token Exchange (RFC 8693) sets delegation scope using the on-behalf-of (OBO) pattern. When the orchestrator delegates to a downstream agent (data-bot), it exchanges the original token for a scoped OBO token that records who’s acting on behalf of whom and with what authority. The Cedar policies (detailed in Step 2: Three-layer policies) then check whether that scoped delegation is permitted and verify the originating user claims carried in the OBO token. Token exchange limits each downstream agent to only the delegated task’s scope instead of passing through the full original token. For enterprise deployments, use token exchange alongside HMAC. OAuth tracks who is acting on behalf of whom and with what scope. HMAC verifies that the context hasn’t been tampered with and came from a trusted source.

Prerequisites

The following prerequisites are needed to deploy the reference implementation. Before you begin, clone the repository:

git clone https://github.com/aws-samples/sample-cedar-agentic-ai-authorization.git
cd sample-cedar-agentic-ai-authorization

Verify that you have the following:

Walkthrough

In this walkthrough, you define the Cedar entity schema and policies, deploy the infrastructure with AWS CDK, and integrate your identity provider.

To define the Cedar entity schema

In this step, you define a schema with two entity types (Agent and Tool) and two actions (invoke_tool and delegate_task) in the AgentAuthz namespace. Notice that there is no User entity. Instead, you carry the originating user’s identity in the evaluation context record, which is a structured data object passed alongside each authorization request.

{
  "AgentAuthz": {
    "entityTypes": {
      "Agent": {
        "shape": {
          "type": "Record",
          "attributes": {
            "trust_level": { "type": "Long", "required": true },
            "namespace": { "type": "String", "required": true },
            "registered_capabilities": {
              "type": "Set", "element": { "type": "String" }, "required": true
            },
            "lifecycle_stage": { "type": "String", "required": true }
          }
        }
      },
      "Tool": {
        "shape": {
          "type": "Record",
          "attributes": {
            "namespace": { "type": "String", "required": true },
            "risk_level": { "type": "String", "required": true }
          }
        }
      }
    },
    "actions": {
      "invoke_tool": {
        "appliesTo": { "principalTypes": ["Agent"], "resourceTypes": ["Tool"] }
      },
      "delegate_task": {
        "appliesTo": { "principalTypes": ["Agent"], "resourceTypes": ["Agent"] }
      }
    }
  }
}

This schema is deployed to an Amazon Verified Permissions policy store by the VerifiedPermissionsStack CDK stack. In the reference implementation, the schema file is located at cedar-entity-schema.json.

Agent topology and attributes

The following tables show the agents and tools registered in this reference implementation, along with the attributes the Cedar evaluator function retrieves from the entity store. The test scenarios that follow trace requests through this topology.

Table 2: Agent attributes

Entity Type trust_level namespace lifecycle_stage registered_capabilities
orchestrator Agent 5 orchestration production

delegate_task

route_request

finance-agent Agent 3 payments production

process_payment

refund

data-bot Agent 4 data production

query_records

delete_records

Table 3: Tool attributes

Tool namespace risk_level
process_payment payments medium
delete_records data high
query_records data low

The orchestrator can delegate to both data-bot and finance-agent. Each agent can only invoke tools within its registered capabilities. The test scenarios below trace requests through these delegation paths.

To create three-layer Cedar policies

The following policies are deployed to the same Verified Permissions policy store. In the reference implementation, policy files are located under cedar/policies/ organized by layer: layer1-agent-to-tool/, layer2-agent-to-agent/, and layer3-originating-user-auth/.

Layer 1 (agent-to-tool): This policy permits the finance-agent to invoke the process_payment tool only when three conditions are met: the agent’s trust score is at least 3, it belongs to the payments namespace, and it’s deployed in the production lifecycle stage. If any condition fails, the request is denied. The agent’s trust_level, namespace, and lifecycle_stage aren’t self-reported in a production deployment. Instead, the evaluator retrieves these attributes from the Verified Permissions entity store using the agent_id as a lookup key.

Important: The reference implementation accepts these values from the request payload for simplicity. Production deployments must validate agent attributes against an authoritative source to prevent a compromised agent from escalating its own trust.

The trust_level attribute uses a 1–5 integer scale that represents an agent’s verified maturity: 1 for newly registered and untested agents, 3 for agents that have passed integration testing and security review, and 5 for agents with a proven production track record. Organizations assign trust levels through their agent promotion pipeline, not through self-declaration. The lifecycle_stage attribute (development, staging, production) prevents pre-production agents from invoking production tools, even if they have the correct namespace and trust score.

// L1-001: Finance agent can invoke payment tools
permit(
  principal == AgentAuthz::Agent::"finance-agent",
  action == AgentAuthz::Action::"invoke_tool",
  resource == AgentAuthz::Tool::"process_payment"
) when {
  principal.trust_level >= 3 &&
  principal.namespace == "payments" &&
  principal.lifecycle_stage == "production"
};

Layer 2 (agent-to-agent delegation) enforces depth limits and capability constraints. The orchestrator agent delegates tasks to data-bot only when the delegation chain is three hops or fewer and the requested capabilities are a subset of data-bot’s registered capabilities. A separate forbid policy (L2-004) enforces a hard system-wide limit of five hops regardless of which agents are involved.

// L2-002: Orchestrator can delegate to data agent
permit(
  principal == AgentAuthz::Agent::"orchestrator",
  action == AgentAuthz::Action::"delegate_task",
  resource == AgentAuthz::Agent::"data-bot"
) when {
  context.delegation_depth <= 3 &&
  context.target_capabilities.containsAll(context.requested_capabilities)
};

Layer 3 (originating user authorization) keeps the agent as the principal, but the policy evaluates context.originating_user to validate the human who initiated the request. data-bot invokes the delete_records tool only when the originating user has the admin role, has verified MFA, and the delegation chain is at most two hops deep. Without this layer, an agent with the right capabilities could invoke destructive tools regardless of who initiated the request.

// L3-001: High-risk tool (delete_records) requires admin + MFA
permit(
  principal == AgentAuthz::Agent::"data-bot",
  action == AgentAuthz::Action::"invoke_tool",
  resource == AgentAuthz::Tool::"delete_records"
) when {
  context.originating_user.role == "admin" &&
  context.originating_user.mfa_verified == true &&
  context.delegation_depth <= 2
};

Key design point: The principal remains the agent, not a user entity. The user’s role and MFA status are checked through context attributes, keeping the schema to two entity types and two actions.

Integrate your IdP

The reference implementation uses Amazon Cognito with TOTP MFA, but most OIDC-compliant providers (Okta, Microsoft Entra ID, Auth0, or AWS IAM Identity Center) work with this pattern. The authentication-to-signing flow is described in the preceding Authentication before authorization section. To use a different IdP, replace the Cognito authorizer on API Gateway with a Lambda or JWT authorizer for your IdP’s issuer URL. Cedar policies remain unchanged.

Deploy the infrastructure with AWS CDK

The reference implementation deploys five CloudFormation stacks: KmsStack, VerifiedPermissionsStack, LambdaStack, SecurityLakeStack, and MonitoringStack. The following commands deploy the stacks in dependency order:

cdk deploy KmsStack -c account_id=YOUR_ACCOUNT_ID -c guardrail_id=YOUR_GUARDRAIL_ID
cdk deploy VerifiedPermissionsStack -c account_id=YOUR_ACCOUNT_ID -c guardrail_id=YOUR_GUARDRAIL_ID
cdk deploy LambdaStack -c account_id=YOUR_ACCOUNT_ID -c guardrail_id=YOUR_GUARDRAIL_ID
cdk deploy SecurityLakeStack -c account_id=YOUR_ACCOUNT_ID -c guardrail_id=YOUR_GUARDRAIL_ID
cdk deploy MonitoringStack -c account_id=YOUR_ACCOUNT_ID -c guardrail_id=YOUR_GUARDRAIL_ID

Test the solution

Three end-to-end scenarios validate the evaluation model across different user roles, MFA states, and delegation depths. To run the tests:

  1. Set the API endpoint from the deployment output:
export API_ENDPOINT=$(aws cloudformation describe-stacks --stack-name LambdaStack \
  --query "Stacks[0].Outputs[?OutputKey=='ApiEndpoint'].OutputValue" --output text)
  1. Run the end-to-end tests:
.venv/bin/python -m pytest tests/e2e/ -v -s

The end-to-end tests cover the three scenarios described in the following sections. Each test sends a request through the deployed API and validates the per-layer authorization decisions.

Scenario A: Layer 3 enforcement

A support-role user (no MFA) requests record deletion through orchestrator and data-bot.

Layer Decision Reason
L1: Agent-to-tool PERMIT data-bot has trust level 4, namespace data, and lifecycle production
L2: Agent-to-agent PERMIT orchestrator is authorized to delegate to data-bot, depth within limits
L3: Originating user DENY User role is support, not admin; MFA not verified
Overall DENY Denying layer: L3

Without Layer 3, this request would have been permitted based on agent capabilities alone, demonstrating why originating user authorization is essential.

Scenario B: Authorized admin request

An admin user with MFA requests the same operation through the same chain.

Layer Decision Reason
L1 PERMIT Agent attributes match
L2 PERMIT Delegation path authorized
L3 PERMIT Role is admin, MFA verified, depth is less than or equal to 2
Overall PERMIT All three layers permit

Scenario C: Delegation depth limit

An admin with MFA requests the same operation, but the delegation chain has six hops. This scenario tests the Layer 2 depth constraint independently of user authorization.

Layer Decision Reason
L1 PERMIT Agent attributes match
L2 DENY Depth of six exceeds the hard limit of five
Overall DENY Denying layer: L2 (L3 not evaluated – halt)

Even an authorized admin can’t bypass the delegation depth constraint.

Alignment with the security principles for agentic AI

The AWS Office of the CISO published Four security principles for agentic AI systems. The following table shows how this solution maps to each principle.

Principle How the solution implements it
Secure development lifecycle across components Property-based testing (Hypothesis) for adversarial input fuzzing, Cedar policy formal verification with strict schema validation, end-to-end scenarios testing policy bypass and privilege escalation paths, and infrastructure-as-code (IaC) with AWS CDK.
Traditional security controls remain applicable AWS WAF, Amazon VPC isolation, AWS Key Management Service (AWS KMS) encryption, Amazon Cognito MFA, and Secrets Manager;
NIST SP 800-53 control mapping.
Deterministic external controls (security box) Three-layer Cedar evaluation runs outside the agent’s reasoning loop in a separate Lambda function.
HMAC-signed context prevents tampering.
Verified Permissions (the managed Cedar evaluation service) enforces L2 and L3 at the infrastructure level.
Greater autonomy earned through evaluation trust_level and lifecycle_stage policy attributes calibrate agent capabilities; OCSF 99001 audit events and Amazon CloudWatch dashboards provide the evidence base for expanding autonomy.

Monitoring and audit compliance

Each evaluation produces an OCSF 99001 audit event with request ID, user identity, delegation chain, per-layer decisions, and latency.

The following table maps this implementation to NIST SP 800-53 Rev. 5 controls. Customers are responsible for evaluating whether it meets their compliance requirements.

NIST control Control name How the reference implementation addresses it
AC-4 Information Flow Enforcement User context flows immutably through HMAC-signed envelopes
AC-6 Least Privilege Three-layer evaluation requires both agent capability and user role
AC-6(1) Authorize Access to Security Functions MFA required for high-risk tools in Layer 3
AC-6(5) Privileged Accounts Destructive operations restricted to admin with MFA verified
AU-2 Event Logging Each evaluation is logged as OCSF 99001
AU-3 Content of Audit Records Events include identity, chain, action, resource, decisions, and latency
SI-10 Information Input Validation HMAC verified before evaluation; Amazon Bedrock Guardrails on inbound
IA-2(1) Multi-factor Authentication Layer 3 enforces MFA for high-risk operations
SC-12 Cryptographic Key Management Signing key in Secrets Manager with rotation
SC-28 Protection of Information at Rest Policies in Verified Permissions with STRICT validation

Scaling to multi-account environments

Deploy the Cedar policy store in a central security account and use cross-account IAM roles for workload accounts to call verifiedpermissions:IsAuthorized. Use AWS Organizations service control policies (SCPs) to prevent workload accounts from creating their own policy stores. For standardizing user identity attributes across the organization, consider IAM Identity Center or a centralized OIDC provider that issues consistent claims to your workload accounts. This helps ensure that the context.originating_user attributes are uniform across accounts and agents.

For production deployments, consider extending this pattern with human-in-the-loop escalation for borderline denials, multi-tenant Cedar policy isolation, and Amazon Simple Storage Service (Amazon S3)-backed dynamic policy hot-reload for emergency tool shutdowns.

Clean up

To avoid ongoing charges, delete the deployed resources:

cdk destroy MonitoringStack SecurityLakeStack
cdk destroy LambdaStack
cdk destroy VerifiedPermissionsStack
cdk destroy KmsStack
aws logs delete-log-group --log-group-name /cedar-evaluator/audit  # if RETAIN policy

Conclusion

Multi-agent AI systems need authorization boundaries at every delegation hop. The three-layer Cedar policy model with OAuth 2.0 authentication provides that protection while maintaining least-privilege access. Combining a trusted IdP (AuthN) with Cedar policy evaluation (AuthZ) creates an authorization boundary around each tool invocation, verifying agent capability (L1), delegation path (L2), and originating user authority (L3). The pattern works with an OIDC-compliant IdP and a compute platform that can call Amazon Verified Permissions. Clone the reference implementation and adapt the Cedar policies to your organization’s requirements. For more information, see the Cedar policy language documentation and the Amazon Verified Permissions User Guide.

References

If you have feedback about this post, submit comments in the Comments section below.


Dhananjay Karanjkar

Dhananjay Karanjkar

Dhananjay is a Senior Lead Consultant at AWS Professional Services, specializing in agentic AI systems, multi-agent orchestration, and generative AI security. He holds two US patents and serves as a Responsible AI Champion, with a background spanning financial services, enterprise consulting, and enterprise-scale AI delivery. When not architecting AI solutions, he trains for triathlons, paints oil portraits, and is an avid reader.

  •  
❌