Reading view

How to see your Google Search history (and delete it)

Your Google Search history provides one of the most detailed windows into your private life, and I know this because when I looked at my own search history last year, I was overwhelmed by the information buried within.

Across just 18 months, Google tracked the 8,079 searches I made and the 3,050 websites I visited because of those searches. That included my late-night perusal of WebMD because of medical symptoms I’d looked up just seconds before, my tour of Goodwill donation sites as I searched for where to drop off clothes ahead of an upcoming move, and my ironically tracked visit to a Reddit thread titled “How do I delete most, if not all, of my info off of the Internet?” (One answer I learned: Don’t use Google Search.)

Google tracked my every question, concern, and flight of fancy—almost literally. On just one day in August 2025, Google recorded the seven flight searches I made on Google Flights and the six hotel searches I made on Google Travel.

Google also recorded the many questions and requests I made when researching topics for the Lock and Code podcast, which I host. And while all of that Google data made for an interesting investigation into what Google knows about me (which you can listen to below), it also made it clear that more people should know how to access this same information.

For most Google users, if Web & App Activity is turned on, Google is saving what they look up, what time they looked it up, and what websites they clicked on as a result. There are ways to turn that data tracking off, but the first step is to know where to look.

Here’s how to do that.

How to find your Google Search history

You can start by opening your web browser and signing into Google’s centralized hub for your data online at myactivity.google.com.
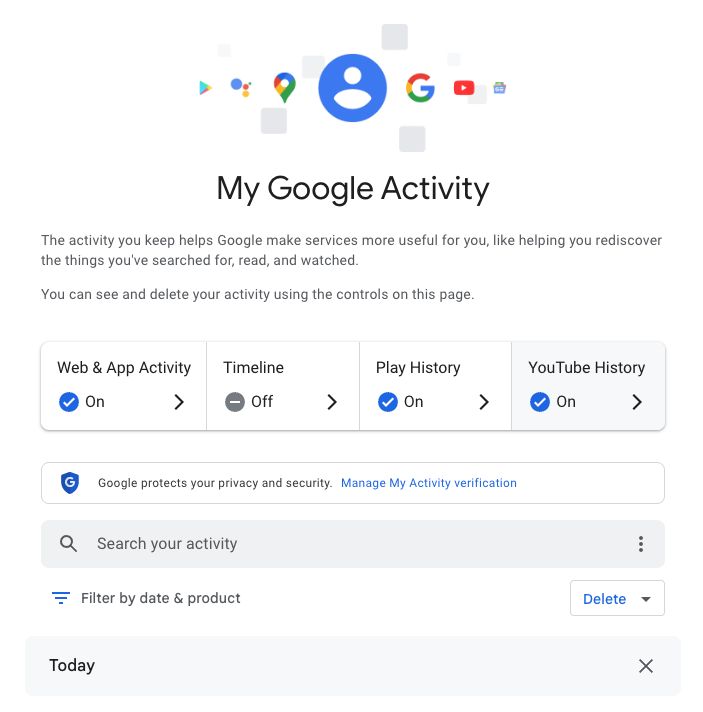
My Google Activity
The My Google Activity home page

Once logged in, you’ll see the above welcome screen with quick settings that you can change, if you want to. Those settings are different for some users, but may include:

  • Web & App Activity
  • Timeline
  • Play History
  • YouTube History

Further down on the page, you can browse through your Google Search history. (Our screenshot gallery below can help walk you through the steps.)

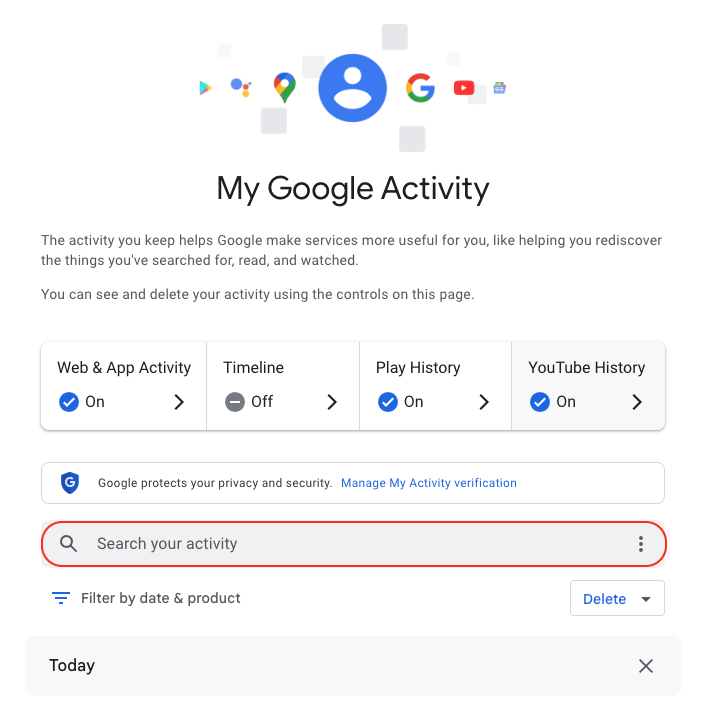
  • First, look for the search bar in the welcome screen that says Search your activity.
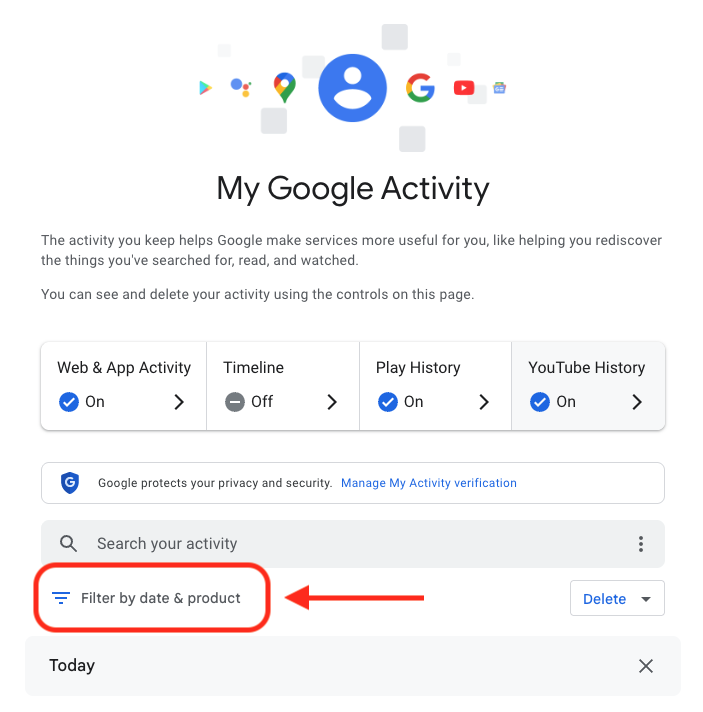
  • Right below, you will find the words Filter by date & product. These words are clickable. Click them.
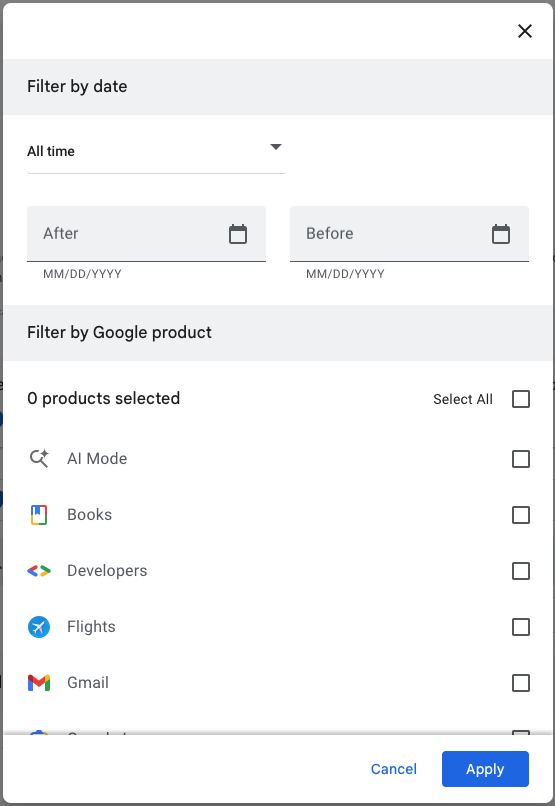
  • Once you’ve clicked Filter by date & product, you’ll see a pop-up menu where you can look through your Google activity by date or product. Instead of focusing on the date, scroll down through the list of Google products and check the box for Google Search.
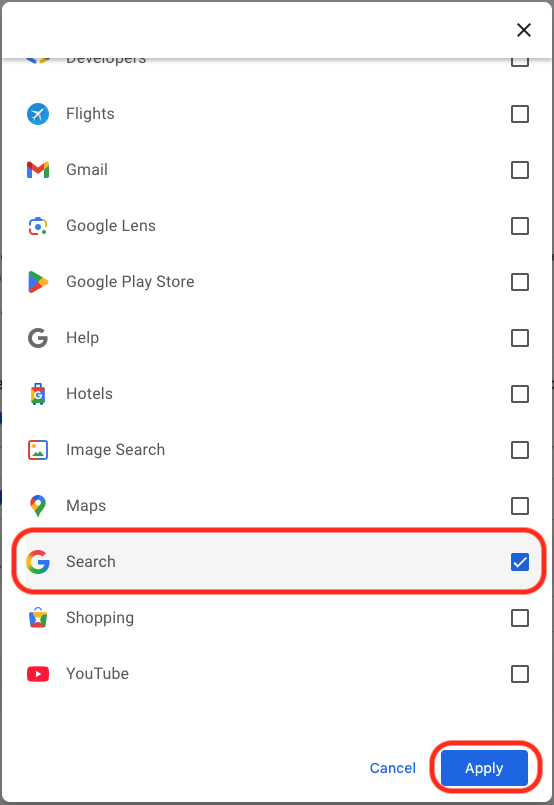
  • Press Apply.
  • Find the search bar in the My Google Activity homepage
  • Click on the words “Filter by date & product”
  • Scroll down through the list of items until you find Google Search
  • Click on the Google Search checkbox and click “Apply”

After you press Apply, you’ll be taken to a webpage that lists your Google Search history in reverse chronological order, showing you your most recent activity first. As you scroll down, you can find older activity. You can also use the search bar at the top of the page to look for individual pieces of activity, like a search or series of searches that you previously made.

From here, you can also delete individual Google Search entries so that Google no longer stores that data. This will only apply to the individual search you made.
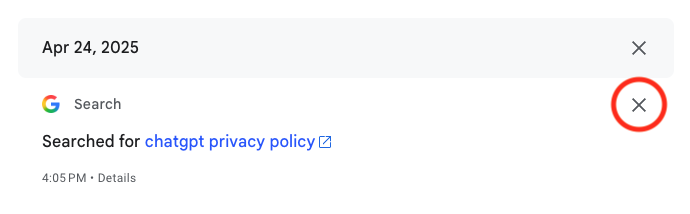
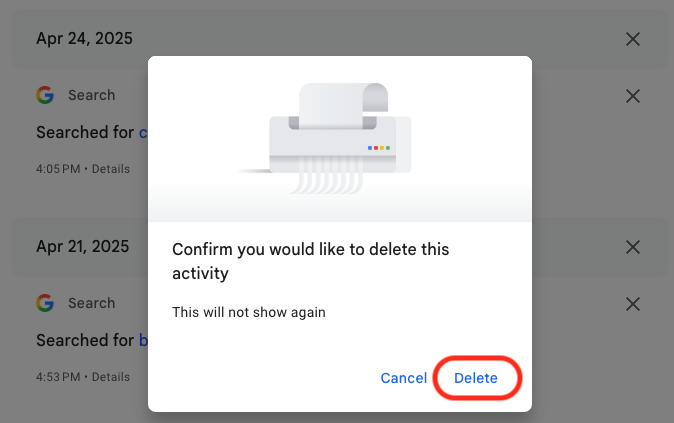
  • You can delete individual searches by clicking the “X” button in the top right corner of each search record
  • Confirm your deletion by pressing “Delete”
  • Your search is now no longer tied to your overall Google activity

If you want to better protect your privacy, making targeted deletions from your Google Search history is a difficult, lengthy, and imperfect method. Instead, you can simply tell Google to stop recording any of your searches from now on.

How to turn off Google Search history

There’s a simple way to instruct Google to stop saving your online searches to your Google Account, and it takes just a few clicks. Follow the instructions below, along with the image gallery, for guidance.

  • Go to your My Google Activity homepage (this is the same page you saw when first signing into myactivity.google.com)
  • Click on that quick control button we saw earlier: Web & App Activity
  • From here, you will see a new screen with the title Activity Controls
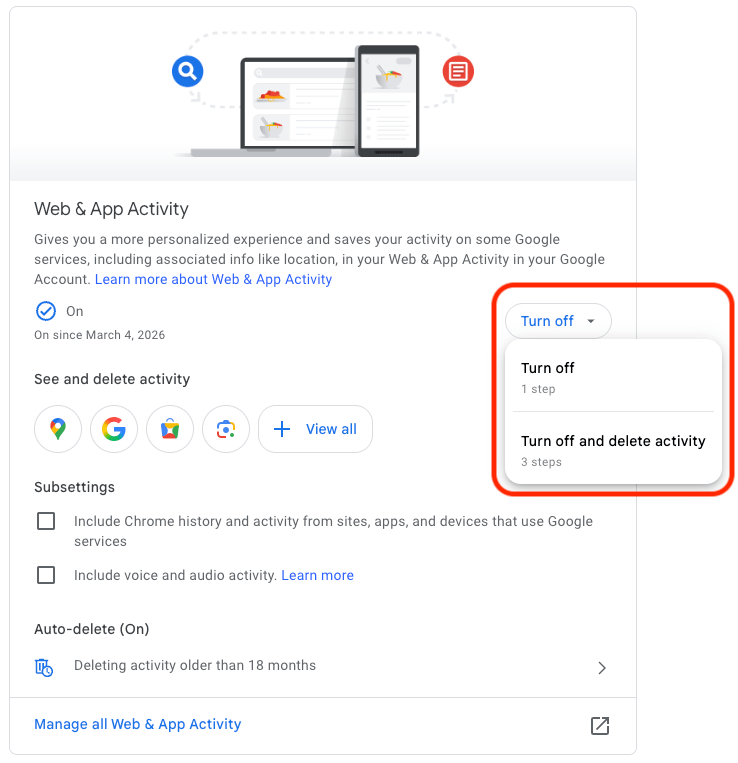
  • Find the button that says Turn off and click it
  • Choose between Turn off and Turn off and delete activity
  • Find the “Turn off” button from the Activity Controls webpage
  • You can choose one of two options for turning off your data
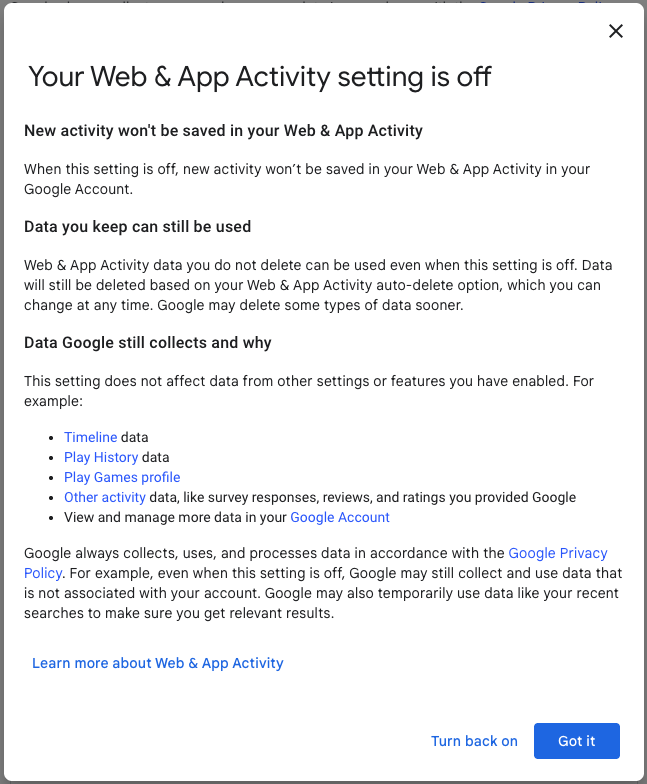
  • With one click, you can stop Google from recording your activity

If you selected Turn off, you’re done. Google will no longer save your Google Searches as part of your overall Google profile activity. This option means that Google still has your prior searches recorded, though. So, if you want, you can choose the second option, Turn off and delete activity.

When you select that option, Google will walk you through additional steps to choose what types of data you want erased, such as past activity tied to Google Search, Maps, Ads, Image Search, Google Play Store, Help and other services. All of these options reveal just how many products and pipelines Google has built to vacuum up your data.

Don’t be overwhelmed, though. Go through the list at your own pace and start making decisions about your data that are right for you.


We don’t just report on data privacy—we help you remove your personal information

Cybersecurity risks should never spread beyond a headline. With Malwarebytes Personal Data Remover, you can scan to find out which sites are exposing your personal information, and then delete that sensitive data from the internet.

  •  

How to see your Google Search history (and delete it)

Your Google Search history provides one of the most detailed windows into your private life, and I know this because when I looked at my own search history last year, I was overwhelmed by the information buried within.

Across just 18 months, Google tracked the 8,079 searches I made and the 3,050 websites I visited because of those searches. That included my late-night perusal of WebMD because of medical symptoms I’d looked up just seconds before, my tour of Goodwill donation sites as I searched for where to drop off clothes ahead of an upcoming move, and my ironically tracked visit to a Reddit thread titled “How do I delete most, if not all, of my info off of the Internet?” (One answer I learned: Don’t use Google Search.)

Google tracked my every question, concern, and flight of fancy—almost literally. On just one day in August 2025, Google recorded the seven flight searches I made on Google Flights and the six hotel searches I made on Google Travel.

Google also recorded the many questions and requests I made when researching topics for the Lock and Code podcast, which I host. And while all of that Google data made for an interesting investigation into what Google knows about me (which you can listen to below), it also made it clear that more people should know how to access this same information.

For most Google users, if Web & App Activity is turned on, Google is saving what they look up, what time they looked it up, and what websites they clicked on as a result. There are ways to turn that data tracking off, but the first step is to know where to look.

Here’s how to do that.

How to find your Google Search history

You can start by opening your web browser and signing into Google’s centralized hub for your data online at myactivity.google.com.

My Google Activity
The My Google Activity home page

Once logged in, you’ll see the above welcome screen with quick settings that you can change, if you want to. Those settings are different for some users, but may include:

  • Web & App Activity
  • Timeline
  • Play History
  • YouTube History

Further down on the page, you can browse through your Google Search history. (Our screenshot gallery below can help walk you through the steps.)

  • First, look for the search bar in the welcome screen that says Search your activity.
  • Right below, you will find the words Filter by date & product. These words are clickable. Click them.
  • Once you’ve clicked Filter by date & product, you’ll see a pop-up menu where you can look through your Google activity by date or product. Instead of focusing on the date, scroll down through the list of Google products and check the box for Google Search.
  • Press Apply.
  • Find the search bar in the My Google Activity homepage
  • Click on the words “Filter by date & product”
  • Scroll down through the list of items until you find Google Search
  • Click on the Google Search checkbox and click “Apply”

After you press Apply, you’ll be taken to a webpage that lists your Google Search history in reverse chronological order, showing you your most recent activity first. As you scroll down, you can find older activity. You can also use the search bar at the top of the page to look for individual pieces of activity, like a search or series of searches that you previously made.

From here, you can also delete individual Google Search entries so that Google no longer stores that data. This will only apply to the individual search you made.
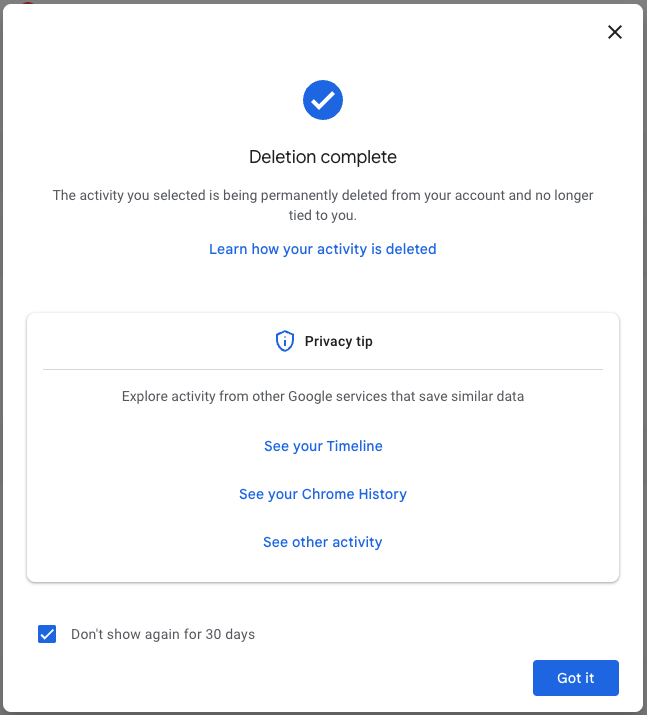
  • You can delete individual searches by clicking the “X” button in the top right corner of each search record
  • Confirm your deletion by pressing “Delete”
  • Your search is now no longer tied to your overall Google activity

If you want to better protect your privacy, making targeted deletions from your Google Search history is a difficult, lengthy, and imperfect method. Instead, you can simply tell Google to stop recording any of your searches from now on.

How to turn off Google Search history

There’s a simple way to instruct Google to stop saving your online searches to your Google Account, and it takes just a few clicks. Follow the instructions below, along with the image gallery, for guidance.

  • Go to your My Google Activity homepage (this is the same page you saw when first signing into myactivity.google.com)
  • Click on that quick control button we saw earlier: Web & App Activity
  • From here, you will see a new screen with the title Activity Controls
  • Find the button that says Turn off and click it
  • Choose between Turn off and Turn off and delete activity
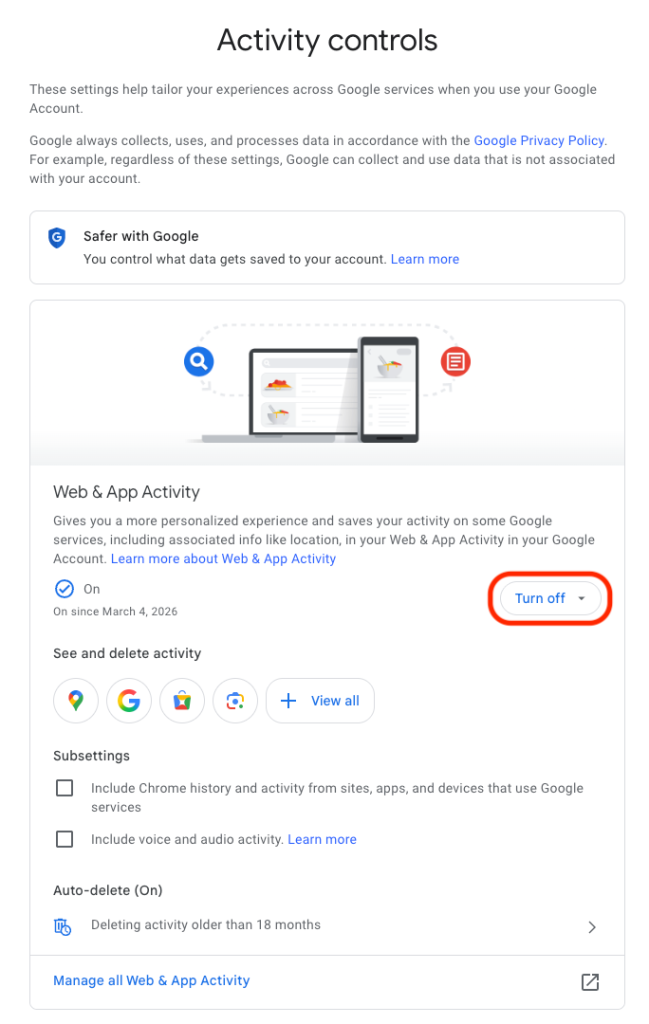
  • Find the “Turn off” button from the Activity Controls webpage
  • You can choose one of two options for turning off your data
  • With one click, you can stop Google from recording your activity

If you selected Turn off, you’re done. Google will no longer save your Google Searches as part of your overall Google profile activity. This option means that Google still has your prior searches recorded, though. So, if you want, you can choose the second option, Turn off and delete activity.

When you select that option, Google will walk you through additional steps to choose what types of data you want erased, such as past activity tied to Google Search, Maps, Ads, Image Search, Google Play Store, Help and other services. All of these options reveal just how many products and pipelines Google has built to vacuum up your data.

Don’t be overwhelmed, though. Go through the list at your own pace and start making decisions about your data that are right for you.


We don’t just report on data privacy—we help you remove your personal information

Cybersecurity risks should never spread beyond a headline. With Malwarebytes Personal Data Remover, you can scan to find out which sites are exposing your personal information, and then delete that sensitive data from the internet.
  •  

Signal and WhatsApp accounts targeted in phishing campaign

Dutch intelligence services AIVD and MIVD warn that Russian state‑backed hackers are running a large‑scale campaign to break into Signal and WhatsApp accounts of high‑value targets.

The targets are said to be senior officials, military personnel, civil servants, and journalists. The attackers are not breaking end‑to‑end encryption or exploiting a vulnerability in the apps themselves. Instead, they rely on proven phishing and social engineering methods to trick users into handing over verification codes and PINs, or to add a malicious “linked device” to their account.

Last year we reported on GhostPairing, a method that tricks the target into completing WhatsApp’s own device-pairing flow, silently adding the attacker’s browser as an invisible linked device to the account.

In the cases reported by the Dutch intelligence services, the attackers contacted victims on Signal or WhatsApp while posing as “Signal Security Support Chatbot”, “Signal Support” or a similar official‑sounding account.

The message typically warns about suspicious activity or a possible detected data leak and instructs the user to complete a verification step to avoid losing data or having their account blocked.

Victims are then asked to send back the SMS verification code they just received and/or their Signal PIN.

If the victim complies, the attacker can register the account on a device they control and effectively take it over, receiving new messages and sending messages as the victim.

In a second variant, attackers abuse the “linked devices” feature (Signal’s and WhatsApp’s desktop or other secondary device function). Targets are pushed to click a link or scan a QR code that silently links the attacker’s device to the victim’s account. The victim keeps access as normal, but the attacker can now read along in real time without obvious signs of compromise.

These attacks are not new, but deserve a renewed warning because they rely entirely on human behavior, and understanding how they work makes them easier to stop. The methods used are not technically sophisticated and they can easily be copied by non‑state actors or ordinary cybercriminals.

Because of the current Russian campaigns, AIVD and MIVD say that chat apps such as Signal and WhatsApp are unsuitable for sharing classified, confidential, or otherwise sensitive government information, even though they technically support end‑to‑end encryption.

How to keep your conversations confidential

One specific warning for the targeted users is to use designated apps for sensitive information. Despite dedicated secure systems being available to many of them, some resorted to apps they already knew—Signal and WhatsApp. And to be fair, these apps are safe if you follow a few basic rules:

How to prevent and detect compromised accounts

  • Never share verification codes or PIN numbers. Your SMS verification code and PIN are only needed when you install or re‑register the app on a device. They are never legitimately requested in a chat. Any in‑app message, direct message (DM), email, or SMS asking you to send these codes back is a phishing attempt.
  • Do not trust “support” accounts in chat. Signal explicitly states that Support will never contact you via in‑app messages, SMS, or social media to ask for your verification code or PIN. Treat any “Signal Support Bot”, “Security Chatbot” or similar as malicious, block and report it and then delete the conversation.
  • Be cautious with links and QR codes in chat. Only scan QR codes or click device‑linking links when you yourself are in the app’s device‑linking menu and you initiated the process. If a message pushes you to “verify your device” or “secure your data” via a link or QR, assume it is part of this campaign.
  • Regularly review linked devices and group memberships. In Signal and WhatsApp, check the list of linked devices and remove anything you do not recognize. Also keep an eye out for strange group participants or duplicate contacts (for example “deleted account” or a contact that appears twice), which Dutch intelligence services mention as possible signs of account compromise.
  • Use built‑in hardening features. Enable options like registration lock, registration PIN and device‑change alerts so that your account cannot be silently re‑registered without an extra secret. Store your PIN in a password manager instead of choosing something easy to guess or reusing a common code, to reduce the chance of social engineering or shoulder‑surfing.

Use disappearing messages

Both Signal and WhatsApp support disappearing messages, and using them can meaningfully limit the impact of account compromise or device access (though they don’t prevent it completely).

Short‑timer and disappearing messages reduce how much content is available if an attacker gets into a chat later, or if someone obtains long‑term access to a device or backup. They are not a complete solution, but they can limit the damage.

Signal lets you set a per‑chat timer so that all new messages in that conversation auto‑delete from all devices after the chosen period.​ You can enable it for 1:1 or group chats and choose from various durations (seconds to weeks), and either party can see it is enabled and change the timer.​

WhatsApp also supports disappearing messages with timers per chat (and a default option for new chats). Messages can auto-delete after periods such as 24 hours, 7 days, or 90 days, and newer builds include shorter options like 1 or 12 hours.

You turn it on in the chat info under “Disappearing messages,” then pick the desired timer; only messages sent after enabling it are affected.

For particularly sensitive media or voice messages, WhatsApp also offers “view once”  photos, voice messages, and videos that can only be opened a single time before disappearing from the chat.

Enable multi-factor authentication

We’ve written a complete guide on setting up two-step verification on WhatsApp.

To set up two-factor authentication (2FA) on Signal, enable the Registration Lock feature, which requires your set PIN to log in on a new device. Open Signal, go to Settings > Privacy > Registration Lock and turn it on. This ensures that even if someone steals your SIM, they cannot access your account without your personal PIN.


We don’t just report on privacy—we offer you the option to use it.

Privacy risks should never spread beyond a headline. Keep your online privacy yours by using Malwarebytes Privacy VPN.

  •  

Signal and WhatsApp accounts targeted in phishing campaign

Dutch intelligence services AIVD and MIVD warn that Russian state‑backed hackers are running a large‑scale campaign to break into Signal and WhatsApp accounts of high‑value targets.

The targets are said to be senior officials, military personnel, civil servants, and journalists. The attackers are not breaking end‑to‑end encryption or exploiting a vulnerability in the apps themselves. Instead, they rely on proven phishing and social engineering methods to trick users into handing over verification codes and PINs, or to add a malicious “linked device” to their account.

Last year we reported on GhostPairing, a method that tricks the target into completing WhatsApp’s own device-pairing flow, silently adding the attacker’s browser as an invisible linked device to the account.

In the cases reported by the Dutch intelligence services, the attackers contacted victims on Signal or WhatsApp while posing as “Signal Security Support Chatbot”, “Signal Support” or a similar official‑sounding account.

The message typically warns about suspicious activity or a possible detected data leak and instructs the user to complete a verification step to avoid losing data or having their account blocked.

Victims are then asked to send back the SMS verification code they just received and/or their Signal PIN.

If the victim complies, the attacker can register the account on a device they control and effectively take it over, receiving new messages and sending messages as the victim.

In a second variant, attackers abuse the “linked devices” feature (Signal’s and WhatsApp’s desktop or other secondary device function). Targets are pushed to click a link or scan a QR code that silently links the attacker’s device to the victim’s account. The victim keeps access as normal, but the attacker can now read along in real time without obvious signs of compromise.

These attacks are not new, but deserve a renewed warning because they rely entirely on human behavior, and understanding how they work makes them easier to stop. The methods used are not technically sophisticated and they can easily be copied by non‑state actors or ordinary cybercriminals.

Because of the current Russian campaigns, AIVD and MIVD say that chat apps such as Signal and WhatsApp are unsuitable for sharing classified, confidential, or otherwise sensitive government information, even though they technically support end‑to‑end encryption.

How to keep your conversations confidential

One specific warning for the targeted users is to use designated apps for sensitive information. Despite dedicated secure systems being available to many of them, some resorted to apps they already knew—Signal and WhatsApp. And to be fair, these apps are safe if you follow a few basic rules:

How to prevent and detect compromised accounts

  • Never share verification codes or PIN numbers. Your SMS verification code and PIN are only needed when you install or re‑register the app on a device. They are never legitimately requested in a chat. Any in‑app message, direct message (DM), email, or SMS asking you to send these codes back is a phishing attempt.
  • Do not trust “support” accounts in chat. Signal explicitly states that Support will never contact you via in‑app messages, SMS, or social media to ask for your verification code or PIN. Treat any “Signal Support Bot”, “Security Chatbot” or similar as malicious, block and report it and then delete the conversation.
  • Be cautious with links and QR codes in chat. Only scan QR codes or click device‑linking links when you yourself are in the app’s device‑linking menu and you initiated the process. If a message pushes you to “verify your device” or “secure your data” via a link or QR, assume it is part of this campaign.
  • Regularly review linked devices and group memberships. In Signal and WhatsApp, check the list of linked devices and remove anything you do not recognize. Also keep an eye out for strange group participants or duplicate contacts (for example “deleted account” or a contact that appears twice), which Dutch intelligence services mention as possible signs of account compromise.
  • Use built‑in hardening features. Enable options like registration lock, registration PIN and device‑change alerts so that your account cannot be silently re‑registered without an extra secret. Store your PIN in a password manager instead of choosing something easy to guess or reusing a common code, to reduce the chance of social engineering or shoulder‑surfing.

Use disappearing messages

Both Signal and WhatsApp support disappearing messages, and using them can meaningfully limit the impact of account compromise or device access (though they don’t prevent it completely).

Short‑timer and disappearing messages reduce how much content is available if an attacker gets into a chat later, or if someone obtains long‑term access to a device or backup. They are not a complete solution, but they can limit the damage.

Signal lets you set a per‑chat timer so that all new messages in that conversation auto‑delete from all devices after the chosen period.​ You can enable it for 1:1 or group chats and choose from various durations (seconds to weeks), and either party can see it is enabled and change the timer.​

WhatsApp also supports disappearing messages with timers per chat (and a default option for new chats). Messages can auto-delete after periods such as 24 hours, 7 days, or 90 days, and newer builds include shorter options like 1 or 12 hours.

You turn it on in the chat info under “Disappearing messages,” then pick the desired timer; only messages sent after enabling it are affected.

For particularly sensitive media or voice messages, WhatsApp also offers “view once”  photos, voice messages, and videos that can only be opened a single time before disappearing from the chat.

Enable multi-factor authentication

We’ve written a complete guide on setting up two-step verification on WhatsApp.

To set up two-factor authentication (2FA) on Signal, enable the Registration Lock feature, which requires your set PIN to log in on a new device. Open Signal, go to Settings > Privacy > Registration Lock and turn it on. This ensures that even if someone steals your SIM, they cannot access your account without your personal PIN.


We don’t just report on privacy—we offer you the option to use it.

Privacy risks should never spread beyond a headline. Keep your online privacy yours by using Malwarebytes Privacy VPN.

  •  

Quiz sites trick users into enabling unwanted browser notifications

Our support team flagged a number of customers who suspected their device might be infected with malware, but Malwarebytes scans came up empty.

When the customers provided screenshots, our Malware Removal Support team quickly recognized the format as web push notifications.

The reason the scans came up clean is that these notifications aren’t malware on the device. They’re browser notifications from websites that trick users into clicking “Allow.”

We helped the customers disable the push notifications (see below for instructions). But since most of them didn’t know how they got them in the first place, we went down the rabbit hole to find out where they were coming from.

Examples of web push notifications

We started with one of the most prevalent domains called unsphiperidion[.]co.in, but all we found was a misleading advertisement that promised the Adguard browser extension and instead led to Poperblocker.

Screenshot showing fake "update the Adguard browser extension" prompt
Fake Adguard browser extension update prompt

But another clue, also mentioned by the Malware Removal Support team—a domain called triviabox[.]co[.]in—practically brought us straight to the source.

We found a site that challenged our intelligence by prompting us to take a quiz.

Screenshot showing "Only people who lived through the 80s can score 15/20 on this quiz"
Quiz website example

Later we found these quizzes come in different flavors. Some about geography, vocabulary, and history, while others are specifically targeted at Canada, Germany, France, Japan, and the US.

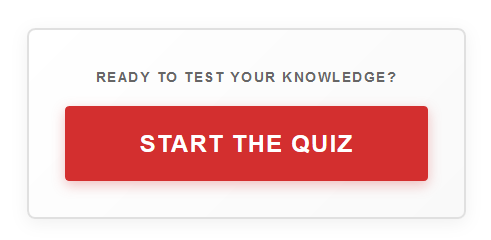
But the main goal of these sites is to get you to click the “Start the quiz” button, so the site can send notifications later and make money from ads, affiliate schemes, scams, or unwanted downloads.

Screenshot showing "Ready to test your knowledge? Start the quiz"
Ready to test your knowledge? Start the quiz

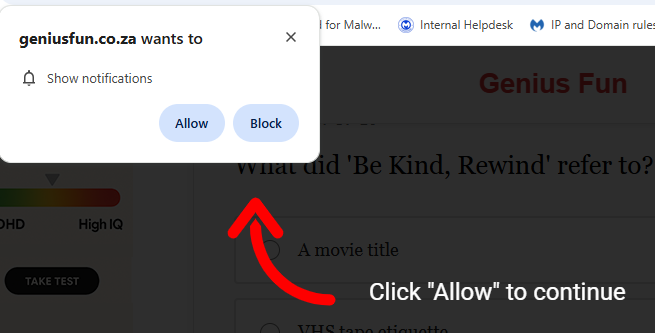
What that button does before it starts the quiz is show the visitor a prompt with a misleading background.

Screenshot showing "Click Allow to continue" and a show notifications prompt.
Click Allow to continue triggers the browser’s “show notifications” prompt

The show notifications text in the actual prompt tells the real story. You’ll be giving the website permission to show you notifications even when you’re not on the website, which makes it hard for users to determine the origin.

The Click “Allow” to continue text with the red arrow on the website itself is nothing more than a well-placed lure to get you to click that Allow button and open the flood gates. To avoid raising suspicion, the visitor is then presented with the quiz, so later on they will have no reason to suspect what started the ordeal.

Web push notifications (also called browser push notifications) are not always simple advertisements. Some can be misleading messages about the safety of your computer. The gear icon in the notifications themselves can be very helpful. On Chromium-based browsers, clicking it will lead you to the Notifications settings menu where you can block them.

Unfortunately, we often find them used by “affiliates” to promote security software. If you’re looking for an anti-malware solution that doesn’t make use of such affiliates, you know where to find us.

How to remove and block web push notifications

For every browser, the notifications look slightly different and the methods to disable them are slightly different as well. To make them easier to find, I have split them up by browser.

Chrome

To completely turn off notifications, even from an extension:

  • Click the three dots button in the upper right-hand corner of the Chrome menu to enter the Settings menu.
  • In the Settings menu and click on Privacy and Security.
  • Click on Site settings.
  • In that menu, select Notifications.
  • By default, the slider is set to Sites can ask to send notifications, but feel free to move it to Don’t allow sites to send notifications if you wish to block notifications completely.

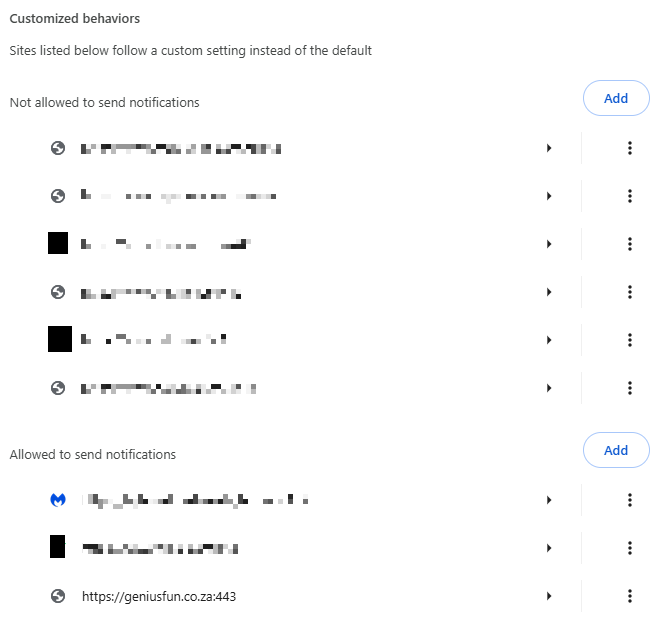
For more granular control, you can use the Customized behaviors menu to manipulate the individual items.

Customized behaviors section of the Chromium notifications menu

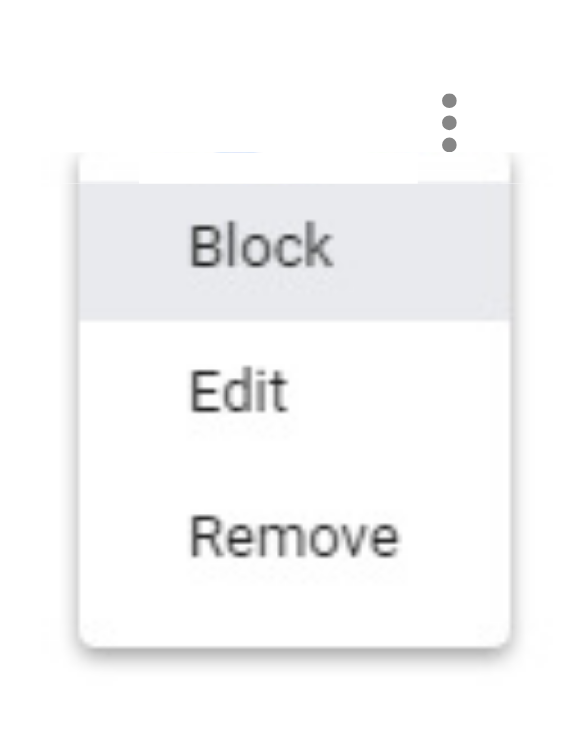
Note that sometimes you may see items with a jigsaw puzzle piece icon in the place of the three stacked dots. These are enforced by an extension, so you would have to figure out which extension is responsible first and then remove it. But for the ones with the three dots behind them, you can click on the dots to open this context menu:

Selecting Block will move the item to the block list. Selecting Remove will delete the item from the list. It will ask permission to show notifications again if you visit their site (unless you have set the slider to Block).

Shortcut: another way to get into the Notifications menu shown earlier is to click on the gear icon in the notifications themselves. This will take you directly to the itemized list.

Firefox

To completely turn off notifications in Firefox:

  • Click the three horizontal bars in the upper right-hand corner of the menu bar and select Options in the settings menu.
  • On the left-hand side, select Privacy & Security.
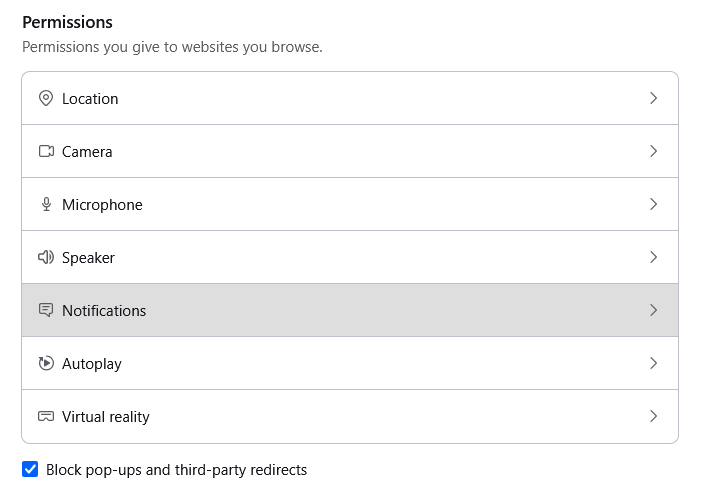
  • Scroll down to the Permissions section and click on Notifications.

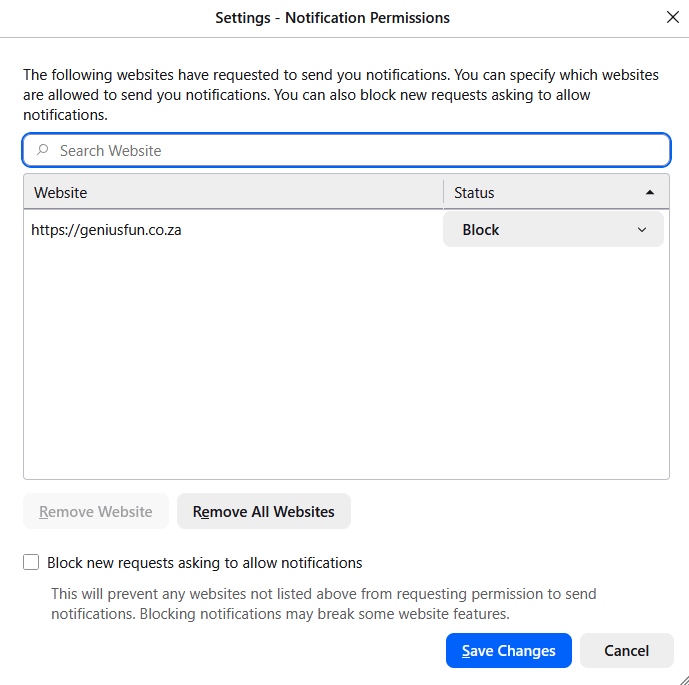
  • In the resulting menu, put a checkmark in the Block new requests asking to allow notifications box at the bottom.

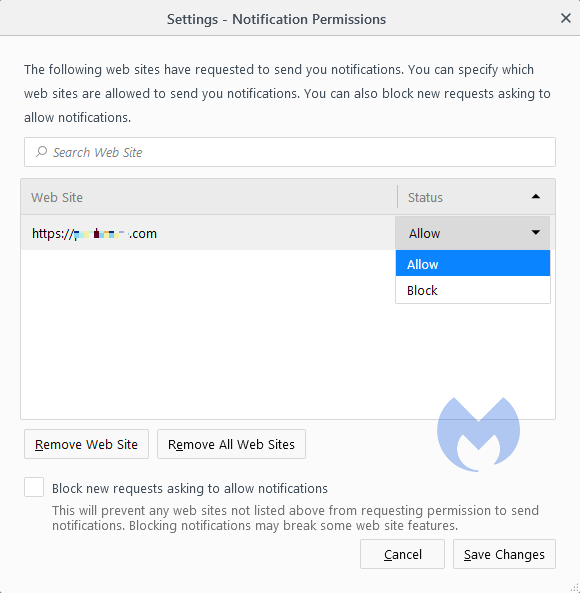
In the same menu, you can apply a more granular control by setting listed items to Block or Allow by using the drop-down menu behind each item.

Click on Save Changes when you’re done.

Opera

Where push notifications are concerned, you can see how closely related Opera and Chrome are.

  • Open the menu by clicking the O in the upper left-hand corner.
  • Click on Settings (on Windows)/Preferences (on Mac).
  • Click on Advanced and select Privacy & security.
  • Under Content settings (desktop)/Site settings (Android,) select Notifications.
Opera notifications menu

On Android, you can remove all the items at once or one by one. On desktops, it works exactly the same as it does in Chrome. The same is true for accessing the menu from the notifications themselves. Click the gear icon in the notification, and you will be taken to the Notifications menu.

Edge

In Edge, go to Settings and more in the upper right corner of your browser window, then

  • Select Settings  > Privacy, search, and services > Site permissions > All sites.
  • Select the website for which you want to block notifications, find the Notifications setting, and choose Block from the dropdown menu.​​​​​​​

To manage notifications from your browser address bar: 

To check or manage notifications while visiting a website you’ve already subscribed to, follow the steps below:   

  • Select View site information to the left of your address bar.
  • Under Permissions for this site Notifications, choose Block from the drop-down menu.

Safari on Mac

On your Mac, open the Apple menu, then

  • Choose System Settings, then click Notifications in the sidebar. (You may need to scroll down.)
  • Go to Application Notifications, click the website, then turn off Allow Notifications.

The website remains in the list in Notifications settings. To remove it from the list, deny the website permission to send notifications in Safari settings. See Change websites settings.

To stop seeing requests for permission to send you notifications in Safari:

  • Go to the Safari app on your Mac.
  • Choose Safari > Settings.
  • Click Websites, then click Notifications.
  • Deselect Allow websites to ask for permission to send notifications.

From now on, when you visit a website that wants to send you notifications, you aren’t asked.

Are these notifications useful at all?

While we could conceive of some cases where push notifications might be found useful, we would certainly not hold it against you if you decided to disable them altogether.

Web push notifications are not just there to disturb Windows users. Android, Chromebook, MacOS, even Linux users may see them if they use one of the participating browsers: Chrome, Firefox, Opera, Edge, and Safari. In some cases, the browser does not even have to be opened, and it can still display push notifications.

Be careful out there and think twice before you click “Allow.”

Indicators of Compromise (IOCs)

During the course of the investigation we found—and blocked—these domains related to the campaign:

  1. dailyrumour[.]co.nz
  2. edifaqe[.]org
  3. geniusfun[.]co.in
  4. geniusfun[.]co.za
  5. genisfun[.]co.nz 
  6. holicithed[.]com
  7. ivenih[.]org
  8. loopdeviceconnection[.]co.in
  9. mindorbittest[.]com
  10. navixzuno[.]co.in
  11. quizcentral[.]co.in
  12. quizcentral[.]co.za
  13. rixifabed[.]org
  14. triviabox[.]co.in
  15. uhuhedeb[.]org
  16. unsphiperidion[.]co.in
  17. yeqeso[.]org
  18. ylloer[.]org

We don’t just report on threats—we remove them

Cybersecurity risks should never spread beyond a headline. Keep threats off your devices by downloading Malwarebytes today.

  •  

Quiz sites trick users into enabling unwanted browser notifications

Our support team flagged a number of customers who suspected their device might be infected with malware, but Malwarebytes scans came up empty.

When the customers provided screenshots, our Malware Removal Support team quickly recognized the format as web push notifications.

The reason the scans came up clean is that these notifications aren’t malware on the device. They’re browser notifications from websites that trick users into clicking “Allow.”

We helped the customers disable the push notifications (see below for instructions). But since most of them didn’t know how they got them in the first place, we went down the rabbit hole to find out where they were coming from.

Examples of web push notifications

We started with one of the most prevalent domains called unsphiperidion[.]co.in, but all we found was a misleading advertisement that promised the Adguard browser extension and instead led to Poperblocker.

Screenshot showing fake "update the Adguard browser extension" prompt
Fake Adguard browser extension update prompt

But another clue, also mentioned by the Malware Removal Support team—a domain called triviabox[.]co[.]in—practically brought us straight to the source.

We found a site that challenged our intelligence by prompting us to take a quiz.

Screenshot showing "Only people who lived through the 80s can score 15/20 on this quiz"
Quiz website example

Later we found these quizzes come in different flavors. Some about geography, vocabulary, and history, while others are specifically targeted at Canada, Germany, France, Japan, and the US.

But the main goal of these sites is to get you to click the “Start the quiz” button, so the site can send notifications later and make money from ads, affiliate schemes, scams, or unwanted downloads.

Screenshot showing "Ready to test your knowledge? Start the quiz"
Ready to test your knowledge? Start the quiz

What that button does before it starts the quiz is show the visitor a prompt with a misleading background.

Screenshot showing "Click Allow to continue" and a show notifications prompt.
Click Allow to continue triggers the browser’s “show notifications” prompt

The show notifications text in the actual prompt tells the real story. You’ll be giving the website permission to show you notifications even when you’re not on the website, which makes it hard for users to determine the origin.

The Click “Allow” to continue text with the red arrow on the website itself is nothing more than a well-placed lure to get you to click that Allow button and open the flood gates. To avoid raising suspicion, the visitor is then presented with the quiz, so later on they will have no reason to suspect what started the ordeal.

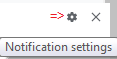
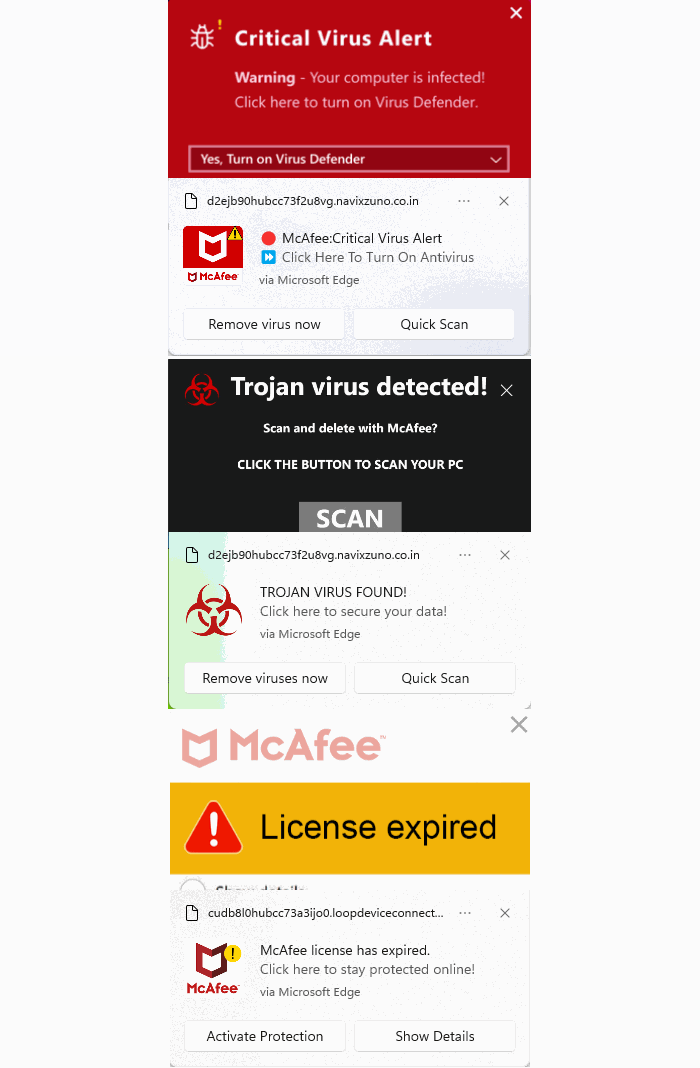
Web push notifications (also called browser push notifications) are not always simple advertisements. Some can be misleading messages about the safety of your computer. The gear icon in the notifications themselves can be very helpful. On Chromium-based browsers, clicking it will lead you to the Notifications settings menu where you can block them.

Unfortunately, we often find them used by “affiliates” to promote security software. If you’re looking for an anti-malware solution that doesn’t make use of such affiliates, you know where to find us.

How to remove and block web push notifications

For every browser, the notifications look slightly different and the methods to disable them are slightly different as well. To make them easier to find, I have split them up by browser.

Chrome

To completely turn off notifications, even from an extension:

  • Click the three dots button in the upper right-hand corner of the Chrome menu to enter the Settings menu.
  • In the Settings menu and click on Privacy and Security.
  • Click on Site settings.
  • In that menu, select Notifications.
  • By default, the slider is set to Sites can ask to send notifications, but feel free to move it to Don’t allow sites to send notifications if you wish to block notifications completely.

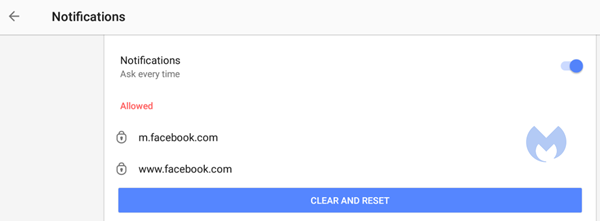
For more granular control, you can use the Customized behaviors menu to manipulate the individual items.

Customized behaviors section of the Chromium notifications menu

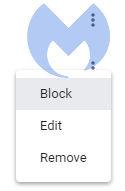
Note that sometimes you may see items with a jigsaw puzzle piece icon in the place of the three stacked dots. These are enforced by an extension, so you would have to figure out which extension is responsible first and then remove it. But for the ones with the three dots behind them, you can click on the dots to open this context menu:

Selecting Block will move the item to the block list. Selecting Remove will delete the item from the list. It will ask permission to show notifications again if you visit their site (unless you have set the slider to Block).

Shortcut: another way to get into the Notifications menu shown earlier is to click on the gear icon in the notifications themselves. This will take you directly to the itemized list.

Firefox

To completely turn off notifications in Firefox:

  • Click the three horizontal bars in the upper right-hand corner of the menu bar and select Options in the settings menu.
  • On the left-hand side, select Privacy & Security.
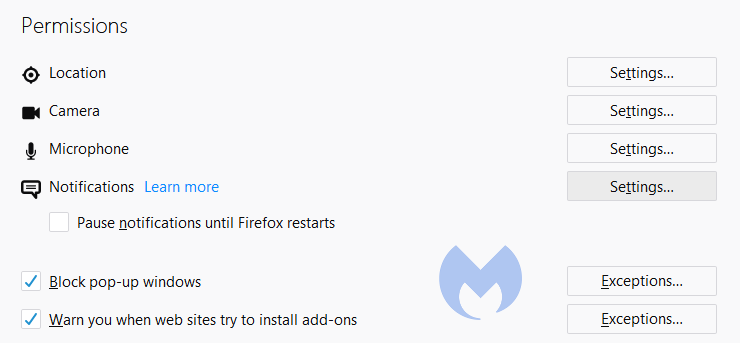
  • Scroll down to the Permissions section and click on Notifications.

  • In the resulting menu, put a checkmark in the Block new requests asking to allow notifications box at the bottom.

In the same menu, you can apply a more granular control by setting listed items to Block or Allow by using the drop-down menu behind each item.

Click on Save Changes when you’re done.

Opera

Where push notifications are concerned, you can see how closely related Opera and Chrome are.

  • Open the menu by clicking the O in the upper left-hand corner.
  • Click on Settings (on Windows)/Preferences (on Mac).
  • Click on Advanced and select Privacy & security.
  • Under Content settings (desktop)/Site settings (Android,) select Notifications.
Opera notifications menu

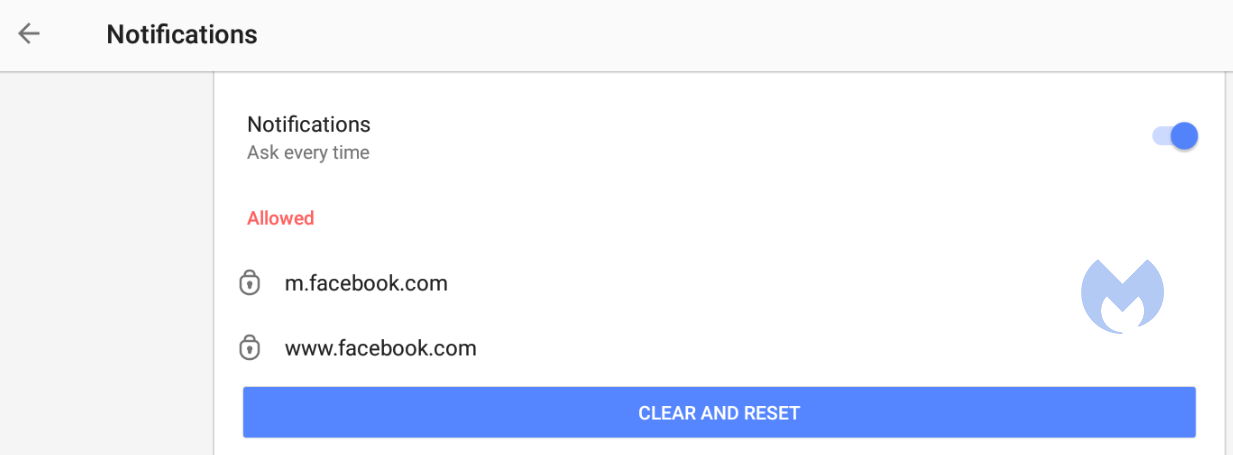
On Android, you can remove all the items at once or one by one. On desktops, it works exactly the same as it does in Chrome. The same is true for accessing the menu from the notifications themselves. Click the gear icon in the notification, and you will be taken to the Notifications menu.

Edge

In Edge, go to Settings and more in the upper right corner of your browser window, then

  • Select Settings  > Privacy, search, and services > Site permissions > All sites.
  • Select the website for which you want to block notifications, find the Notifications setting, and choose Block from the dropdown menu.​​​​​​​

To manage notifications from your browser address bar: 

To check or manage notifications while visiting a website you’ve already subscribed to, follow the steps below:   

  • Select View site information to the left of your address bar.
  • Under Permissions for this site Notifications, choose Block from the drop-down menu.

Safari on Mac

On your Mac, open the Apple menu, then

  • Choose System Settings, then click Notifications in the sidebar. (You may need to scroll down.)
  • Go to Application Notifications, click the website, then turn off Allow Notifications.

The website remains in the list in Notifications settings. To remove it from the list, deny the website permission to send notifications in Safari settings. See Change websites settings.

To stop seeing requests for permission to send you notifications in Safari:

  • Go to the Safari app on your Mac.
  • Choose Safari > Settings.
  • Click Websites, then click Notifications.
  • Deselect Allow websites to ask for permission to send notifications.

From now on, when you visit a website that wants to send you notifications, you aren’t asked.

Are these notifications useful at all?

While we could conceive of some cases where push notifications might be found useful, we would certainly not hold it against you if you decided to disable them altogether.

Web push notifications are not just there to disturb Windows users. Android, Chromebook, MacOS, even Linux users may see them if they use one of the participating browsers: Chrome, Firefox, Opera, Edge, and Safari. In some cases, the browser does not even have to be opened, and it can still display push notifications.

Be careful out there and think twice before you click “Allow.”

Indicators of Compromise (IOCs)

During the course of the investigation we found—and blocked—these domains related to the campaign:

  1. dailyrumour[.]co.nz
  2. edifaqe[.]org
  3. geniusfun[.]co.in
  4. geniusfun[.]co.za
  5. genisfun[.]co.nz 
  6. holicithed[.]com
  7. ivenih[.]org
  8. loopdeviceconnection[.]co.in
  9. mindorbittest[.]com
  10. navixzuno[.]co.in
  11. quizcentral[.]co.in
  12. quizcentral[.]co.za
  13. rixifabed[.]org
  14. triviabox[.]co.in
  15. uhuhedeb[.]org
  16. unsphiperidion[.]co.in
  17. yeqeso[.]org
  18. ylloer[.]org

We don’t just report on threats—we remove them

Cybersecurity risks should never spread beyond a headline. Keep threats off your devices by downloading Malwarebytes today.

  •  
❌