Reading view

Protecting your secrets from tomorrow’s quantum risks

As outlined in the AWS post-quantum cryptography (PQC) migration plan, addressing the risk of harvest now, decrypt later (HNDL) attack is an important part of your post-quantum plan. Upgrading the client-side of your workloads to support quantum-resistant confidentiality is an important aspect of your side of the PQC shared responsibility model. Timelines to plan and execute your PQC upgrades vary by region and by industry and will depend on your own business risk profile. To learn more, see the AWS PQC frequently asked questions.

AWS Secrets Manager uses SSL/TLS to communicate with AWS resources, currently supporting TLS 1.2 and 1.3 in all AWS Regions. The service supports using TLS 1.3 with hybrid post-quantum key exchange for clients that support this capability. The hybrid post-quantum approach establishes TLS connections by combining traditional cryptography (such as X25519) with post-quantum algorithms (ML-KEM), and helps to protect your secrets against both current classical attacks and future quantum computer threats. Regardless of how your workload accesses Secrets Manager, this client-side software upgrade is the only action you need to take to address risk to secrets from HNDL. Your secrets at rest are already encrypted using keys managed by AWS Key Management Service (AWS KMS). Properly implemented symmetric encryption is considered quantum-resistant; asymmetric cryptography faces quantum threats. To learn more, watch AWS re:Inforce 2025 – Post-Quantum Cryptography Demystified.

To reduce builder effort for client-side upgrades, we’re pleased to announce the following Secrets Manager clients now enable and prefer post-quantum TLS when initiating connections to Secrets Manager: Secrets Manager Agent (v2.0.0 or later), the AWS Lambda extension (v19 or later) and the Secrets Manager CSI Driver (v2.0.0 or later). For SDK-based clients, hybrid post-quantum key exchange is available in supported AWS SDKs. Enablement requirements vary by language, version, and operating system. See the following table for your SDK client.

This launch is part of the ongoing commitment AWS has made to migrate systems to post-quantum cryptography and making it straightforward for our customers to do the same. See Post-Quantum Cryptography to learn more.

Client hybrid post-quantum key exchange requirements

The following table summarizes the behavior for each client. When the client is upgraded to support hybrid post-quantum key exchange, the Secrets Manager service endpoint automatically selects it during the TLS handshake. Upgrading to the versions listed in the table is the only action you need to take for your workload to begin using hybrid post-quantum key exchange when calling Secrets Manager APIs.

Client Requirements
Secrets Manager Agent Hybrid PQ key exchange in TLS preferred by default (v2.0.0 and later)
AWS Lambda extension Hybrid PQ key exchange in TLS preferred by default (Version 19 and later)
Secrets Manager CSI Driver Hybrid PQ key exchange in TLS preferred by default (v2.0.0 and later)
AWS SDK for Rust Hybrid PQ key exchange in TLS preferred by default (releases after August 29, 2025)
AWS SDK for Go Hybrid PQ key exchange in TLS preferred by default (Go v1.24 and later)
AWS SDK for Node.js Hybrid PQ key exchange in TLS preferred by default (Node.js v22.20 and v24.9.0 and later)
AWS SDK for Kotlin Hybrid PQ key exchange in TLS preferred by default on Linux (v1.5.78 and later)
AWS SDK for Python The AWS SDK for Python (boto3) uses the OS-provided OpenSSL for TLS.
Hybrid PQ key exchange in TLS requires running on a system with OpenSSL 3.5 or later installed.
AWS SDK for Java v2 AWS SDK for Java v2 requires an AWS CRT HTTP client that supports PQ TLS when configured using postQuantumTlsEnabled.
Secrets Manager caching clients The Secrets Manager caching libraries are built on the AWS SDKs and inherit their TLS behavior. Note for Java: The JDBC driver flag and Java Caching flag must be set to enable Hybrid PQ key exchange in TLS.

If you’re using the Secrets Manager Agent, the Lambda extension, or the CSI Driver, upgrade to the listed version to use hybrid post-quantum key exchange in TLS as the default. Customers using the AWS SDK for Rust, Go, or Node.js at the versions listed in the table are already upgraded and no additional action is required. The SDK will select the hybrid post-quantum key exchange for API calls. For customers using the AWS SDK for Python, hybrid post-quantum key exchange in TLS requires OpenSSL 3.5 or later to be present on the host system. Guidance on verifying and enabling this is available in the AWS Secrets Manager documentation. For customers using the AWS SDK for Java v2, hybrid post-quantum key exchange in TLS requires using the AWS CRT HTTP client. The postQuantumTlsEnabled(true) must be set on the CRT client to enable hybrid post-quantum key exchange in TLS.

After your client versions meet the requirements listed in the table, you can verify that your connections are actively using hybrid post-quantum key exchange.

How to verify your connection uses hybrid post-quantum key exchange

With hybrid post-quantum key exchange using ML-KEM now enabled by default for Secrets Manager clients (see the preceding table), most customers will not need ongoing monitoring to verify correct behavior or detect regressions. However, security teams and compliance officers might want to confirm that their Secrets Manager API calls are negotiating the hybrid key exchange. On the server side, you can confirm hybrid post-quantum key exchange in TLS by using AWS CloudTrail. On the client side, you can inspect TLS handshake details using a utility like Wireshark or by using developer tools built into major web browsers.

Verification is a two-step process: first, fetch a secret using your Secrets Manager client to generate a GetSecretValue API call, then confirm in AWS CloudTrail that the call negotiated hybrid post-quantum key exchange.

Fetch your secret using your Secrets Manager client

The following examples show how to retrieve your secret using the Secrets Manager Agent, Lambda extension, and CSI Driver—each of which will automatically negotiate hybrid post-quantum key exchange when calling the GetSecretValue API.

To verify hybrid post-quantum TLS with Secrets Manager Agent on EC2 instance:
Install the agent on your Amazon Elastic Compute Cloud (Amazon EC2) instance and use it as a client to fetch your secret.

  1. Follow the instructions for AWS Secrets Manager Agent.
  2. Ensure that your EC2 instance profile has the permission for secretsmanager:GetSecretValue to fetch the secret.
  3. Connect to your private EC2 instance.
  4. Install the agent on your EC2 instance.
  5. Use the agent to fetch your secret.
    curl -H “X-Aws-Parameters-Secrets-Token: $(</tmp/awssmatoken)” localhost:2773/secretsmanager/get?secretId=<YOUR-SECRET-ARN>
  6. Wait for about 5 minutes for CloudTrail to deliver the logs.
  7. Go to the CloudTrail event history and search for the event GetSecretValue.

To verify hybrid post-quantum TLS with Lambda extension:
Use the AWS parameters and Secrets Manager Lambda extension to create a Lambda function that will consume your secrets from Secrets Manager using direct API calls.

  1. Follow Using the AWS parameters and secrets Lambda extension to create the Lambda layer and the Lambda function.
  2. Select the latest extension version.
  3. Wait for about 5 minutes for CloudTrail to deliver the logs.
  4. Go to the CloudTrail event history and search for the event GetSecretValue.

To verify hybrid post-quantum TLS with CSI driver on Amazon EKS:
On your Amazon Elastic Kubernetes Service (Amazon EKS) cluster, use the AWS Secrets Store CSI Driver provider to fetch secrets from Secrets Manager in Kubernetes pods:

  1. Confirm the installed add-on version is 2.0.0 or later.
    eksctl get addon --cluster <CLUSTER-NAME> --name aws-secrets-store-csi-driver-provider
  2. Trigger a secret retrieval by restarting a pod that mounts a secret, or deploying a new one.
  3. Wait for about 5 minutes for CloudTrail to deliver the logs.
  4. Go to the CloudTrail event history and search for the event GetSecretValue.

Confirm hybrid post-quantum key exchange using CloudTrail

CloudTrail logs include a tlsDetails field for Secrets Manager API calls. When hybrid post-quantum key exchange in TLS is active, the keyExchange field in tlsDetails will show X25519MLKEM768. Each CloudTrail record includes a tlsDetails field that contains the cipher suite and, where available, the key exchange group negotiated during the TLS handshake.

You can work with CloudTrail event history using the AWS Management Console for CloudTrail or the AWS Command Line Interface (AWS CLI).

To look up CloudTrail events using the console:

  1. Verify you are in the correct AWS Region.
  2. Open the CloudTrail console and select Event History.
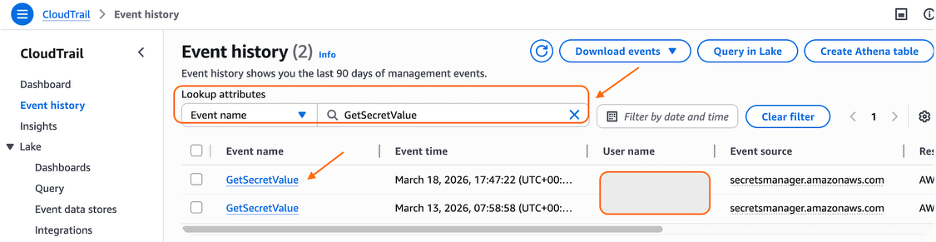
  3. Under Lookup attributes filter, select Event name and GetSecretValue.
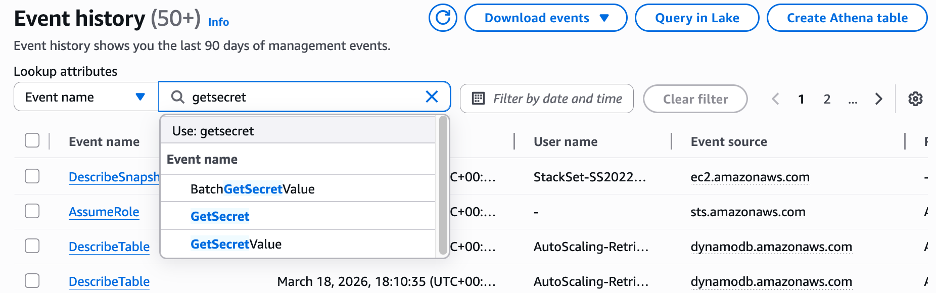
    Figure 1: Search CloudTrail event history by event name

    Figure 1: Search CloudTrail event history by event name

  4. Select your event.
    Figure 2: Select the event

    Figure 2: Select the event

  5. View the output in the Event Record section of the page.
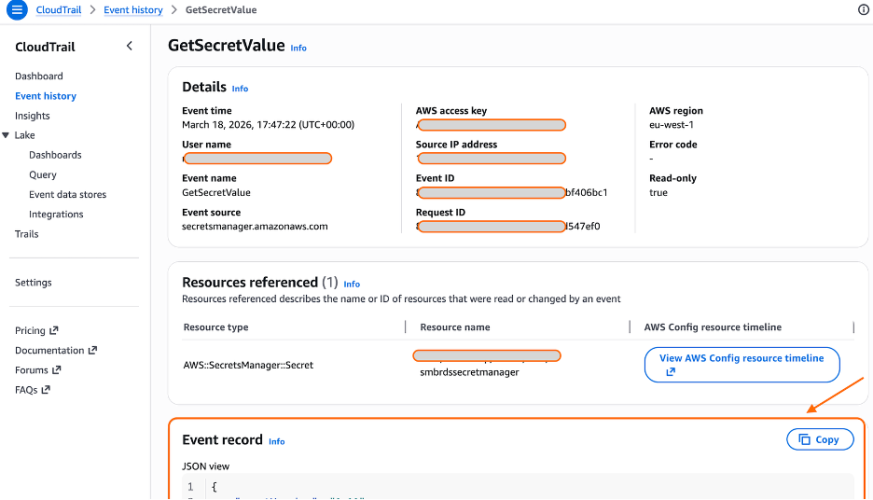
    Figure 3: CloudTrail - GetSecretValue event

    Figure 3: CloudTrail – GetSecretValue event

To look up CloudTrail events using AWS CLI :
Using AWS CLI, select the last events and look at the output.

aws cloudtrail lookup-events \
--lookup-attributes AttributeKey=EventName,AttributeValue=GetSecretValue \
--max-results 5 \
--region <YOUR-REGION> \
--query 'Events[0].CloudTrailEvent' \
--output text

Example of CloudTrail Event for GetSecretValue API call:

In the following example, the userAgent field reflects what it used as a client to connect to Secrets Manager.

Note: The userAgent value depends on the client you use.

{
    "eventVersion": "1.11",
    "userIdentity": {
        "type": "AssumedRole",
        "principalId": "AROA123456789EXAMPLE:i-0c1a23fc456b7ab89",
        "arn": "arn:aws:sts::111122223333:assumed-role/YOUR-EC2-INSTANCE-PROFILE/i-0c1a23fc456b7ab89",
        "accountId": "111122223333",
        "accessKeyId": "ASIAIOSFODNN7EXAMPLE",
        "sessionContext": {
            "sessionIssuer": {
                "type": "Role",
                "principalId": "AROA123456789EXAMPLE",
                "arn": "arn:aws:iam::111122223333:role/YOUR-EC2-INSTANCE-PROFILE",
                "accountId": "111122223333",
                "userName": "YOUR-EC2-INSTANCE-PROFILE"
            },
            "attributes": {
                "creationDate": "2026-03-27T17:08:37Z",
                "mfaAuthenticated": "false"
            },
            "ec2RoleDelivery": "2.0"
        },
        "inScopeOf": {
            "issuerType": "AWS::EC2::Instance",
            "credentialsIssuedTo": "arn:aws:ec2:eu-west-2:111122223333:instance/i-0c1a23fc456b7ab89"
        }
    },
    "eventTime": "2026-03-27T17:12:54Z",
    "eventSource": "secretsmanager.amazonaws.com",
    "eventName": "GetSecretValue",
    "awsRegion": "eu-west-2",
    "sourceIPAddress": "1.2.3.4",
    "userAgent": "aws-sdk-rust/1.3.14 os/linux lang/rust/1.94.1 aws-secrets-manager-agent/2.0.0",
    "requestParameters": {
        "secretId": "arn:aws:secretsmanager:eu-west-2:111122223333:secret:your-secret"
    },
    "responseElements": null,
    "requestID": "027507ea-f377-43d9-bf2f-646d4dc19223",
    "eventID": "f9c3ed0f-81f5-450b-a561-2b9e54fa9e73",
    "readOnly": true,
    "resources": [
        {
            "accountId": "111122223333",
            "type": "AWS::SecretsManager::Secret",
            "ARN": "arn:aws:secretsmanager:eu-west-2:111122223333:secret:your-secret"
        }
    ],
    "eventType": "AwsApiCall",
    "managementEvent": true,
    "recipientAccountId": "111122223333",
    "eventCategory": "Management",
    "tlsDetails": {
        "tlsVersion": "TLSv1.3",
        "cipherSuite": "TLS_AES_128_GCM_SHA256",
        "clientProvidedHostHeader": "secretsmanager.eu-west-2.amazonaws.com",
        "keyExchange": "X25519MLKEM768"
    }
}

If the keyExchange field shows X25519MLKEM768, then hybrid post-quantum key exchange in TLS is active. If it shows a traditional algorithm such as X25519, the client is not advertising ML-KEM support, and you should check the client version and configuration.

Troubleshooting

If your Secrets Manager API calls aren’t negotiating X25519MLKEM768 after updating your clients, check your SDK version, OpenSSL version (Python), and firewall or proxy configuration as shown in the Client Hybrid Post-Quantum Key Exchange Requirements section near the beginning of this post.

What’s next

This launch is one step in a broader migration. AWS is continuing to roll out ML-KEM support across AWS service HTTPS endpoints as part of Workstream 2 of the AWS PQC Migration Plan, with a target of full coverage across public AWS endpoints.

Support for CRYSTALS-Kyber, the pre-standardization predecessor to ML-KEM, is phasing out across AWS endpoints in 2026. Customers on older SDK versions that advertise only CRYSTALS-Kyber support will fall back gracefully to traditional TLS rather than negotiate the deprecated algorithm. To avoid this fallback, upgrade to the SDK versions listed in this post.

The journey of PQC migration extends beyond confidentiality of data in transit. To stay informed about the latest developments in the AWS PQC journey and your side of shared responsibility, follow the AWS Post-Quantum Cryptography page.

Conclusion

AWS Secrets Manager now enables hybrid post-quantum key exchange using ML-KEM by default to help protect your secrets and support your compliance efforts. This update requires no code changes or configuration updates for customers using the latest client versions.

This post covered how AWS Secrets Manager uses hybrid post-quantum cryptography to secure TLS connections, which clients support this capability, and how to verify that your connections are protected against harvest now, decrypt later attacks.

To benefit from this announcement today:

  • Upgrade your Secrets Manager client (Agent, Lambda extension, or CSI Driver) to the latest available versions to enable hybrid post-quantum key exchange using ML-KEM
  • If your workload uses the AWS SDK instead of a caching client, upgrade your AWS SDK and underlying dependencies to the minimum versions listed in this post
  • Verify hybrid post-quantum key exchange in TLS is active by checking the keyExchange field in CloudTrail tlsDetails for your Secrets Manager API calls
  • Test end-to-end hybrid post-quantum key exchange TLS connectivity in your environment, including network paths that traverse corporate firewalls or proxies

AWS will continue rolling out post-quantum cryptography support. For information about the broader migration effort, see the AWS PQC Migration Plan. Keep an updated cryptographic inventory of your broader environment to identify other uses of traditional public-key cryptography that will require migration. The CISA Quantum-Readiness guidance and the AWS PQC Migration Plan are good starting points.

Additional resources

If you have feedback about this post, submit comments in the Comments section below.
P. Stéphanie Mbappe

P. Stéphanie Mbappe

Stéphanie is a Security Consultant with Amazon Web Services. She delights in assisting her customers at any step of their security journey. Stéphanie enjoys learning, designing new solutions, and sharing her knowledge with others.

Tobias Nickl

Tobias Nickl

Tobias is a Security Consultant at Amazon Web Services, specializing in security architecture and cloud transformation. He partners with AWS customers to design and implement security architectures that address both current and emerging threats. Through his work, he helps organizations build security strategies that evolve with their cloud maturity.

  •  

A technical walkthrough of multicloud full-stack security using AWS Security Hub Extended

Building on our recent announcement of AWS Security Hub Extended —our full-stack enterprise security offering — we want to show you how we’re simplifying security procurement and operations for your multicloud environments. Whether you’re a security architect evaluating solutions or a CISO looking to streamline vendor management, this post walks through the streamlined experience that transforms how you acquire, deploy, and manage end-to-end enterprise security solutions across endpoint, identity, email, network, data, browser, cloud, AI, and security operations. Security Hub Extended brings together AWS security services with carefully curated security partners. Delivering better outcomes together through unified procurement, billing, and operations that significantly reduce vendor management overhead so you can focus on what matters most: protecting your organization.

The challenge we’re addressing

Security teams today spend too much time on vendor management, evaluating services, negotiating contracts, and managing multiple billing cycles instead of focusing on what matters most: managing risk. But the procurement challenge runs even deeper. Until now, customers really only had one option: sign multi-year agreements based solely on proof-of-concept testing and estimated annual usage. This forces organizations to commit budget before they can validate whether a solution will work for them at scale.

AWS Security Hub Extended transforms this procurement model. Security Hub Extended offers customers the option to get started with pay-as-you-go pricing and no commitments, so they can move fast and validate solutions in their actual environment. After they’ve confirmed a solution works at scale, they can then align their vendor strategy and sign longer-term commitments for even more favorable pricing.

Security Hub Extended provides a curated set of carefully chosen partner solutions with competitive pricing, unified billing through your AWS account, and seamless integration. Our initial launch partners, selected by customers for their proven value, include 7AI, Britive, CrowdStrike, Cyera, Island, Noma, Okta, Oligo, Opti, Proofpoint, SailPoint, Splunk, Upwind, and Zscaler.

Getting started with Security Hub Extended

AWS Security Hub consolidates threat analytics from Amazon GuardDuty, vulnerability management from Amazon Inspector, and sensitive data discovery from Amazon Macie, correlating these signals with Security Hub Exposure findings to determine overall risk, reachability, and assumability. Security Hub Extended builds on this foundation by adding curated partner solutions, extending these unified security operations across your entire organization including multicloud, on-premises, and endpoint environments. If you’re already using Security Hub, you can navigate directly to the Extended plan section.

Getting started with Security Hub is straightforward. From the AWS Management Console, search for Security Hub to start the onboarding walkthrough. If you’re not already a Security Hub customer, you can quickly complete onboarding by designating an AWS organization delegated administrator (DA) account. You can then centrally enable and manage Security Hub across your entire organization’s accounts and AWS Regions from a single location (see Introduction to AWS Security Hub). After you’ve onboarded, navigate to the Extended plan section to add curated partner solutions.

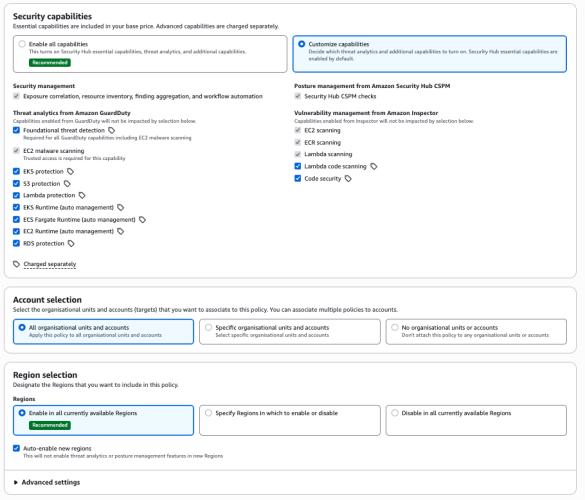
Figure 1- Security Hub centralized configuration

Figure 1: Security Hub centralized configuration

From this single interface, you can enable detection and response capabilities across your entire organization, provide granular configurations at the organizational unit or member account level, select specific Regions, and turn individual features on or off as needed.

Understanding risk through attack paths

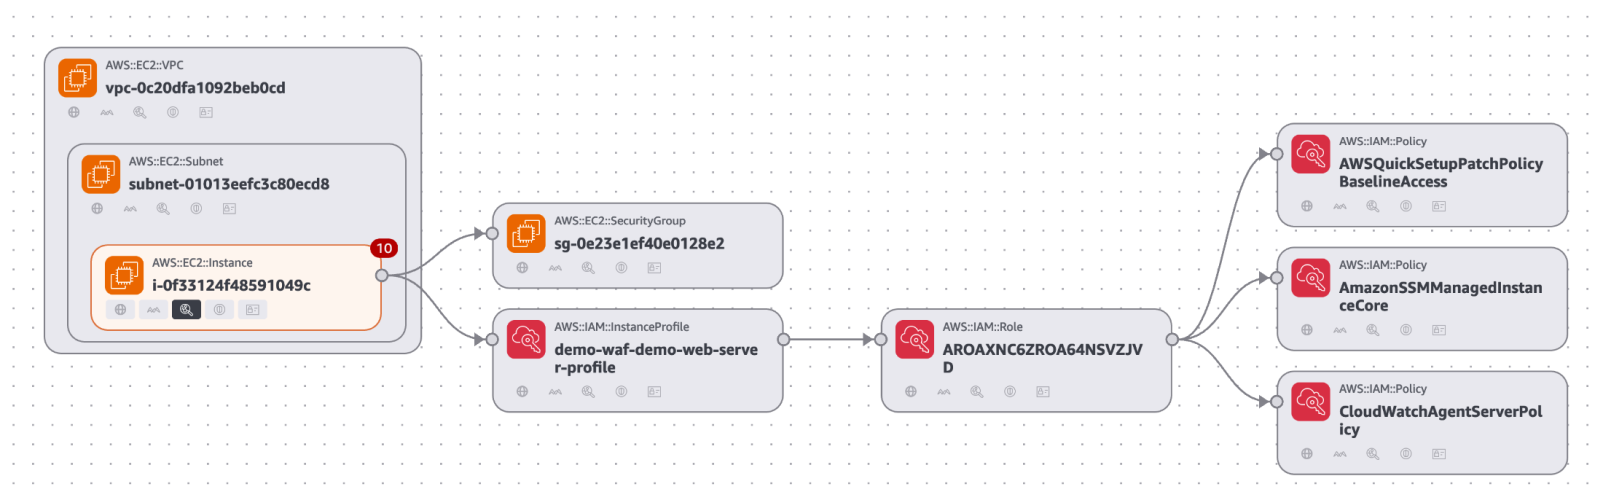
The Security Hub risk correlation engine identifies potential exposures by correlating threats, vulnerabilities, and misconfigurations to reveal how they connect and could lead to compromise of critical resources.

Figure 2 - Security Hub exposure attack path visualization

Figure 2: Security Hub exposure attack path visualization

The attack path visualization in the preceding figure reveals critical insights including upstream root causes and blast radius, showing the potential impact if a threat actor exploits a vulnerability. You can use this visualization to focus on fixing the root cause rather than addressing symptoms. For example, updating one security group configuration can eliminate the entire attack path, cutting off all downstream exposure.

Accessing Security Hub Extended

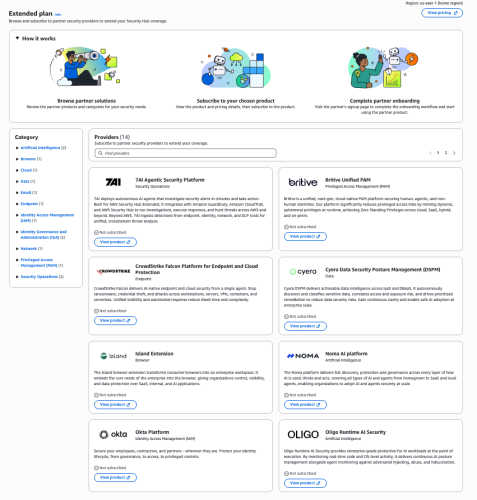
You can find Security Hub Extended, shown in the following figure, in the left navigation pane under Management in your Security Hub delegated administrator (DA) account; Security Hub Extended will only be visible from the delegated administrator account. The Extended plan brings curated third-party security solutions directly into the Security Hub experience. Because Extended is built into Security Hub, there’s no separate console to manage. You discover, subscribe to, and operate curated partner solutions from the same place you manage enterprise security, delivering unified operations across your entire security estate.

Figure 3- Security Hub Extended partners

Figure 3: Security Hub Extended partners


Transparent, competitive pricing consolidated with Security Hub

Unlike traditional third-party engagements that require lengthy negotiations, private pricing deals, and multi-year commitments, Security Hub Extended offers complete pricing transparency. Every partner solution displays clear, competitive monthly pay-as-you-go rates billed directly with Security Hub requiring no commitments. For example, Cloud Security from Upwind costs $3.75 per resource per month, and Identity Security from Okta costs $20 per user per month.

All Security Hub Extended offerings are also eligible for AWS Enterprise Discount Program (EDP) discounts that will be applied automatically. If you have an existing AWS enterprise discount agreement, those discounts automatically apply to Security Hub Extended offerings, further reducing your effective costs. All partner solutions you deploy through Security Hub Extended appear on your consolidated AWS bill, no separate invoices or payment processes.

Streamlined onboarding

Adopting curated partner solutions through Security Hub Extended is straightforward. Choose View Product to initiate an automated workflow. Depending on the solution, you’ll either be directed to the partner onboarding console or provide information for the partner to guide you through their onboarding process tailored to your environment.

Billing begins only after you’re fully activated on the partner solution and starts automatically, no additional action is required to benefit from the unified billing. If you’re already using one of the curated partner solutions, transitioning to Security Hub Extended for consolidated billing and flexible pricing won’t disrupt your current services. Now, instead of receiving separate invoices for each partner in addition to Amazon Inspector, GuardDuty, and Security Hub CSPM you get one unified bill through Security Hub. This consolidates visibility to support better understanding of spend and to manage cost.

Unified operations

Security Hub Extended unifies security operations by consolidating findings from AWS and curated partner solutions. All findings use the Open Cybersecurity Schema Framework (OCSF) for consistency, without the need for complex data normalization, transformation, and extract, transform, and load (ETL) processes.

When you deploy solutions such as CrowdStrike, Noma, and Upwind alongside Splunk and 7AI through Security Hub Extended, security findings automatically flow into Security Hub and then seamlessly route to Splunk and 7AI. All in OCSF format so your security team can focus on responding to threats, not managing pipelines, so you can quickly identify and respond to security risks that span boundaries—from endpoint compromises to cloud infrastructure—without spending valuable time on manual integration work.

The full-stack security vision

Security Hub Extended represents a shift in how you discover, procure, and build comprehensive security programs. Instead of managing dozens of vendor relationships, negotiating separate contracts, agreeing to multi-year annual commitments, and integrating disparate tools, you now have one procurement process through AWS, one bill with transparent competitive pay-as-you-go pricing, one console for unified security operations, one support channel for AWS Enterprise Support customers, and one schema (OCSF) for all security findings. The result: reduced security risk, improved team productivity, and a more unified approach to security operations across your enterprise.

Get started

Try Security Hub Extended today and experience how simplified procurement and unified operations can transform your security program. Security Hub Extended is generally available globally in all AWS commercial Regions where Security Hub is available. We’ve also published a walk through video to further explain how Security Hub Extended works.

It’s still Day 1, but we’re iterating fast, so share your feedback with us on AWS re:Post for Security Hub or through your AWS Support contacts and watch for future blog posts on our progress.


Matt Meck

Matt Meck

Matt is a Worldwide Security Specialist at Amazon Web Services, based in New York, with 10 years of experience in the tech industry. For the past 4 years at AWS, he’s focused on Detection and Response, helping solve complex security challenges in the rapidly evolving security space. He works closely with product teams, customers, partners, and field teams to deliver effective security solutions.


Michael Fuller

Michael Fuller

Michael has been with AWS for 16 years and led product for AWS Security Services for 11 years. Michael has 29 years in the industry and held several roles in product management, business development, and software development for IBM, Cisco, and Amazon. Michael has a Bachelor’s of Science in Computer Engineering from the University of Arizona and an MBA from the University of Washington.


  •  

Transform security logs into OCSF format using a configuration-driven ETL solution

Security logs capture essential security-related activities, such as user sign-ins, file access, network traffic, and application usage. These logs are important for monitoring, detecting, and responding to potential security events. The Open Cybersecurity Schema Framework (OCSF) addresses this challenge by providing a standardized format to represent security events, ensuring consistent and efficient data handling across various systems. OCSF enhances interoperability, streamlines analysis, simplifies compliance reporting, and reduces vendor lock-in, fostering greater flexibility and efficiency in security operations.

However, manually transforming diverse security logs into OCSF format at scale can be complex and time-consuming. Amazon Security Lake simplifies this process by automatically centralizing security data from AWS services such as AWS CloudTrail management and data events (Amazon Simple Storage Service (Amazon S3) and AWS Lambda), Amazon Elastic Kubernetes Service (Amazon EKS) audit logs, Amazon Route 53 resolver query logs, AWS Security Hub findings, Amazon Virtual Private Cloud (Amazon VPC) Flow Logs, and AWS WAF logs. It also centralizes security logs from software as a service (SaaS) providers, on-premises, and cloud sources into a purpose-built data lake stored in your account. It uses the OCSF format to standardize and normalize this data, ensuring consistency and simplifying analysis. By integrating with analytics tools such as Amazon Athena and Amazon Quick Sight, Security Lake simplifies threat detection, improves security posture monitoring, and streamlines compliance reporting, making it an essential tool for modern security operations.

In this post, we show you how to transform custom security logs into OCSF format after you have the OCSF mappings ready, using a configuration-driven extract, transform, load (ETL) solution.

Accelerating OCSF adoption with AWS ProServe ETL solution

Amazon Security Lake stores security data in OCSF format and so customers looking to use custom log sources in Security Lake must transform their logs into OCSF format. To facilitate this process, the AWS Professional Services (ProServe) team built an ETL solution accelerator that converts custom security logs into OCSF format. This solution bridges existing log formats with the OCSF version 1.1 standard, streamlining data onboarding into Security Lake or other data lakes of security logs coming from multiple security tools.

Prerequisites

To implement this solution, you must have the following resources:

Solution overview

The solution uses two input files: a mapping file and a configuration file. These files guide the transformation of source logs into OCSF-compliant Parquet format, which is then partitioned by location/region=region/accountId=accountID/eventDay=yyyyMMdd/ and stored in an Amazon S3 location provided by Security Lake.

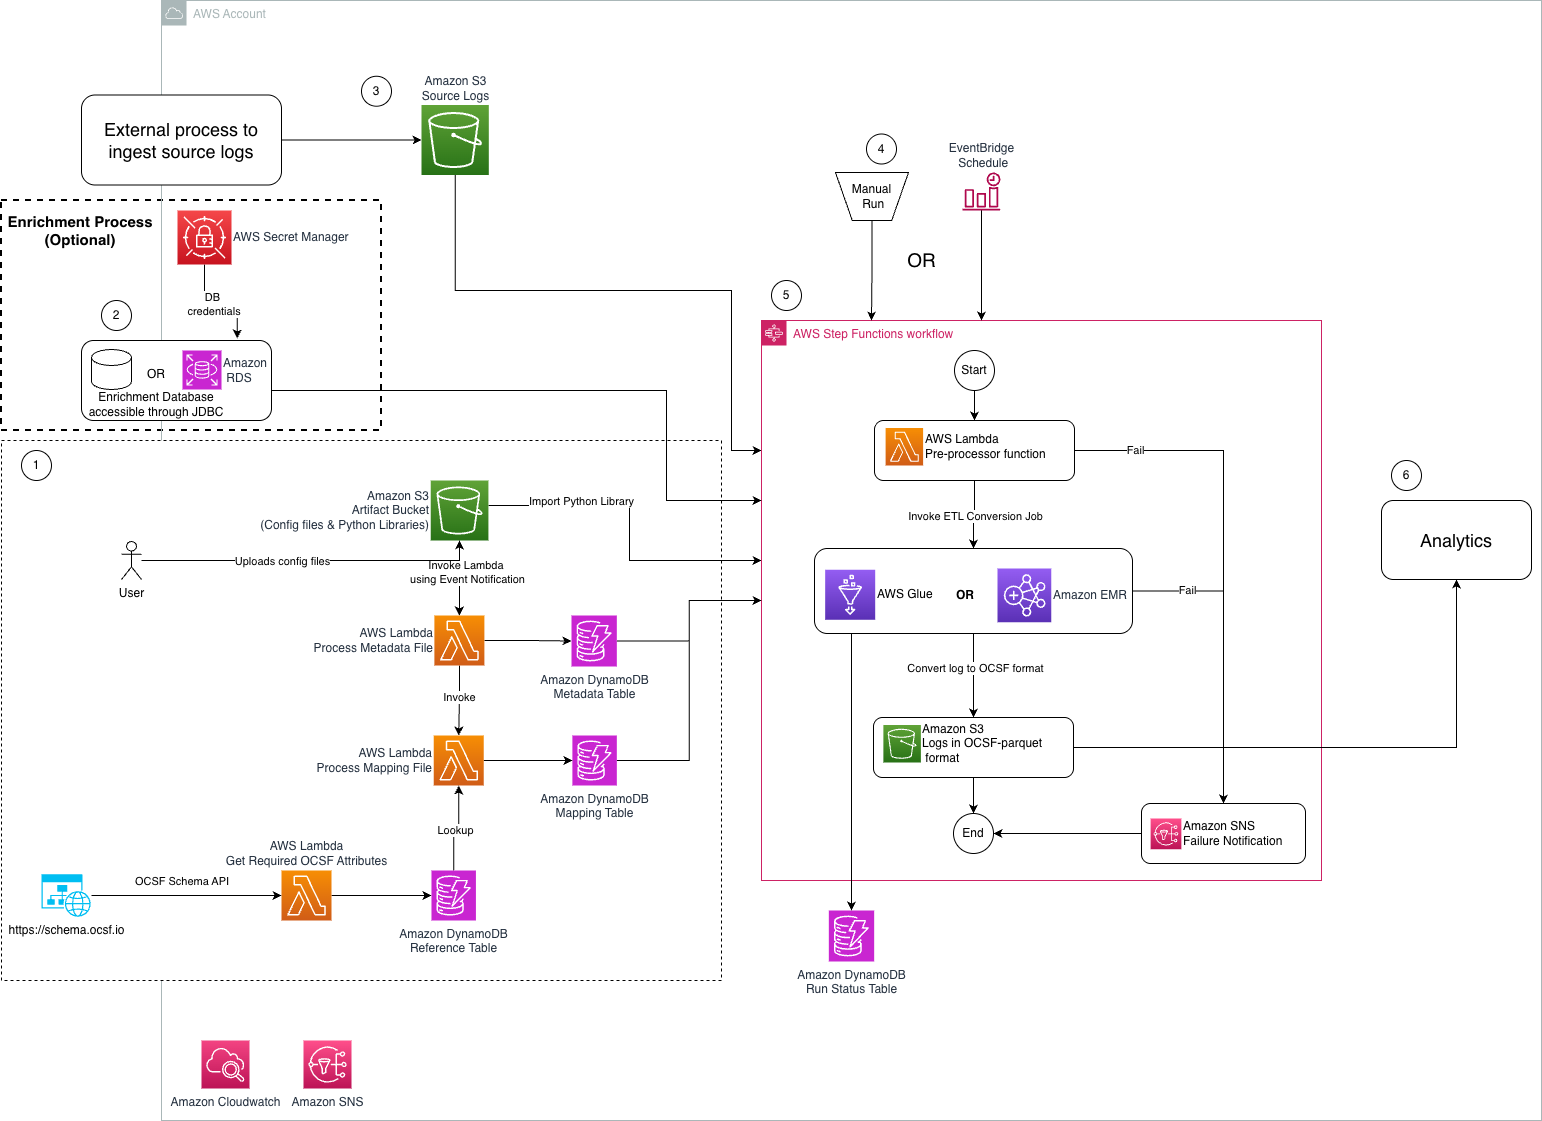
The following diagram shows the key architecture components of this solution and data flow between them.

Figure 1: Architecture diagram of ETL solution to transform security logs into OCSF format

The steps mentioned below walks you through the architecture diagram:

  1. Preprocessing steps:
    1. User uploads a mapping file in CSV format that maps custom security logs into OCSF class.
    2. User uploads a metadata file in CSV format that is passed to the solution to transform custom security logs into OCSF format.
    3. An Amazon S3 artifact bucket stores the metadata, source-to-target mapping, and Python libraries required for OCSF conversion.
    4. An Amazon S3 event notification invokes the Lambda function that writes the metadata to the asl-etl-framework-ocsf-attribute-metadata DynamoDB table when the metadata files are created or updated.
    5. Metadata and mapping Lambda functions process the respective configuration files and store the required information in DynamoDB tables.
    6. The Reference Lambda function extracts the required OCSF attributes using an API call and stores the results in a DynamoDB table.
  2. Optional enrichment process: The solution reads data from an enrichment database stored on Amazon RDS or an external on-premises database that’s accessible through a JDBC connection from either Amazon EMR or AWS Glue. The credentials of this enrichment database are stored in Secrets Manager.
  3. Source log files are delivered to an S3 bucket by an external process.
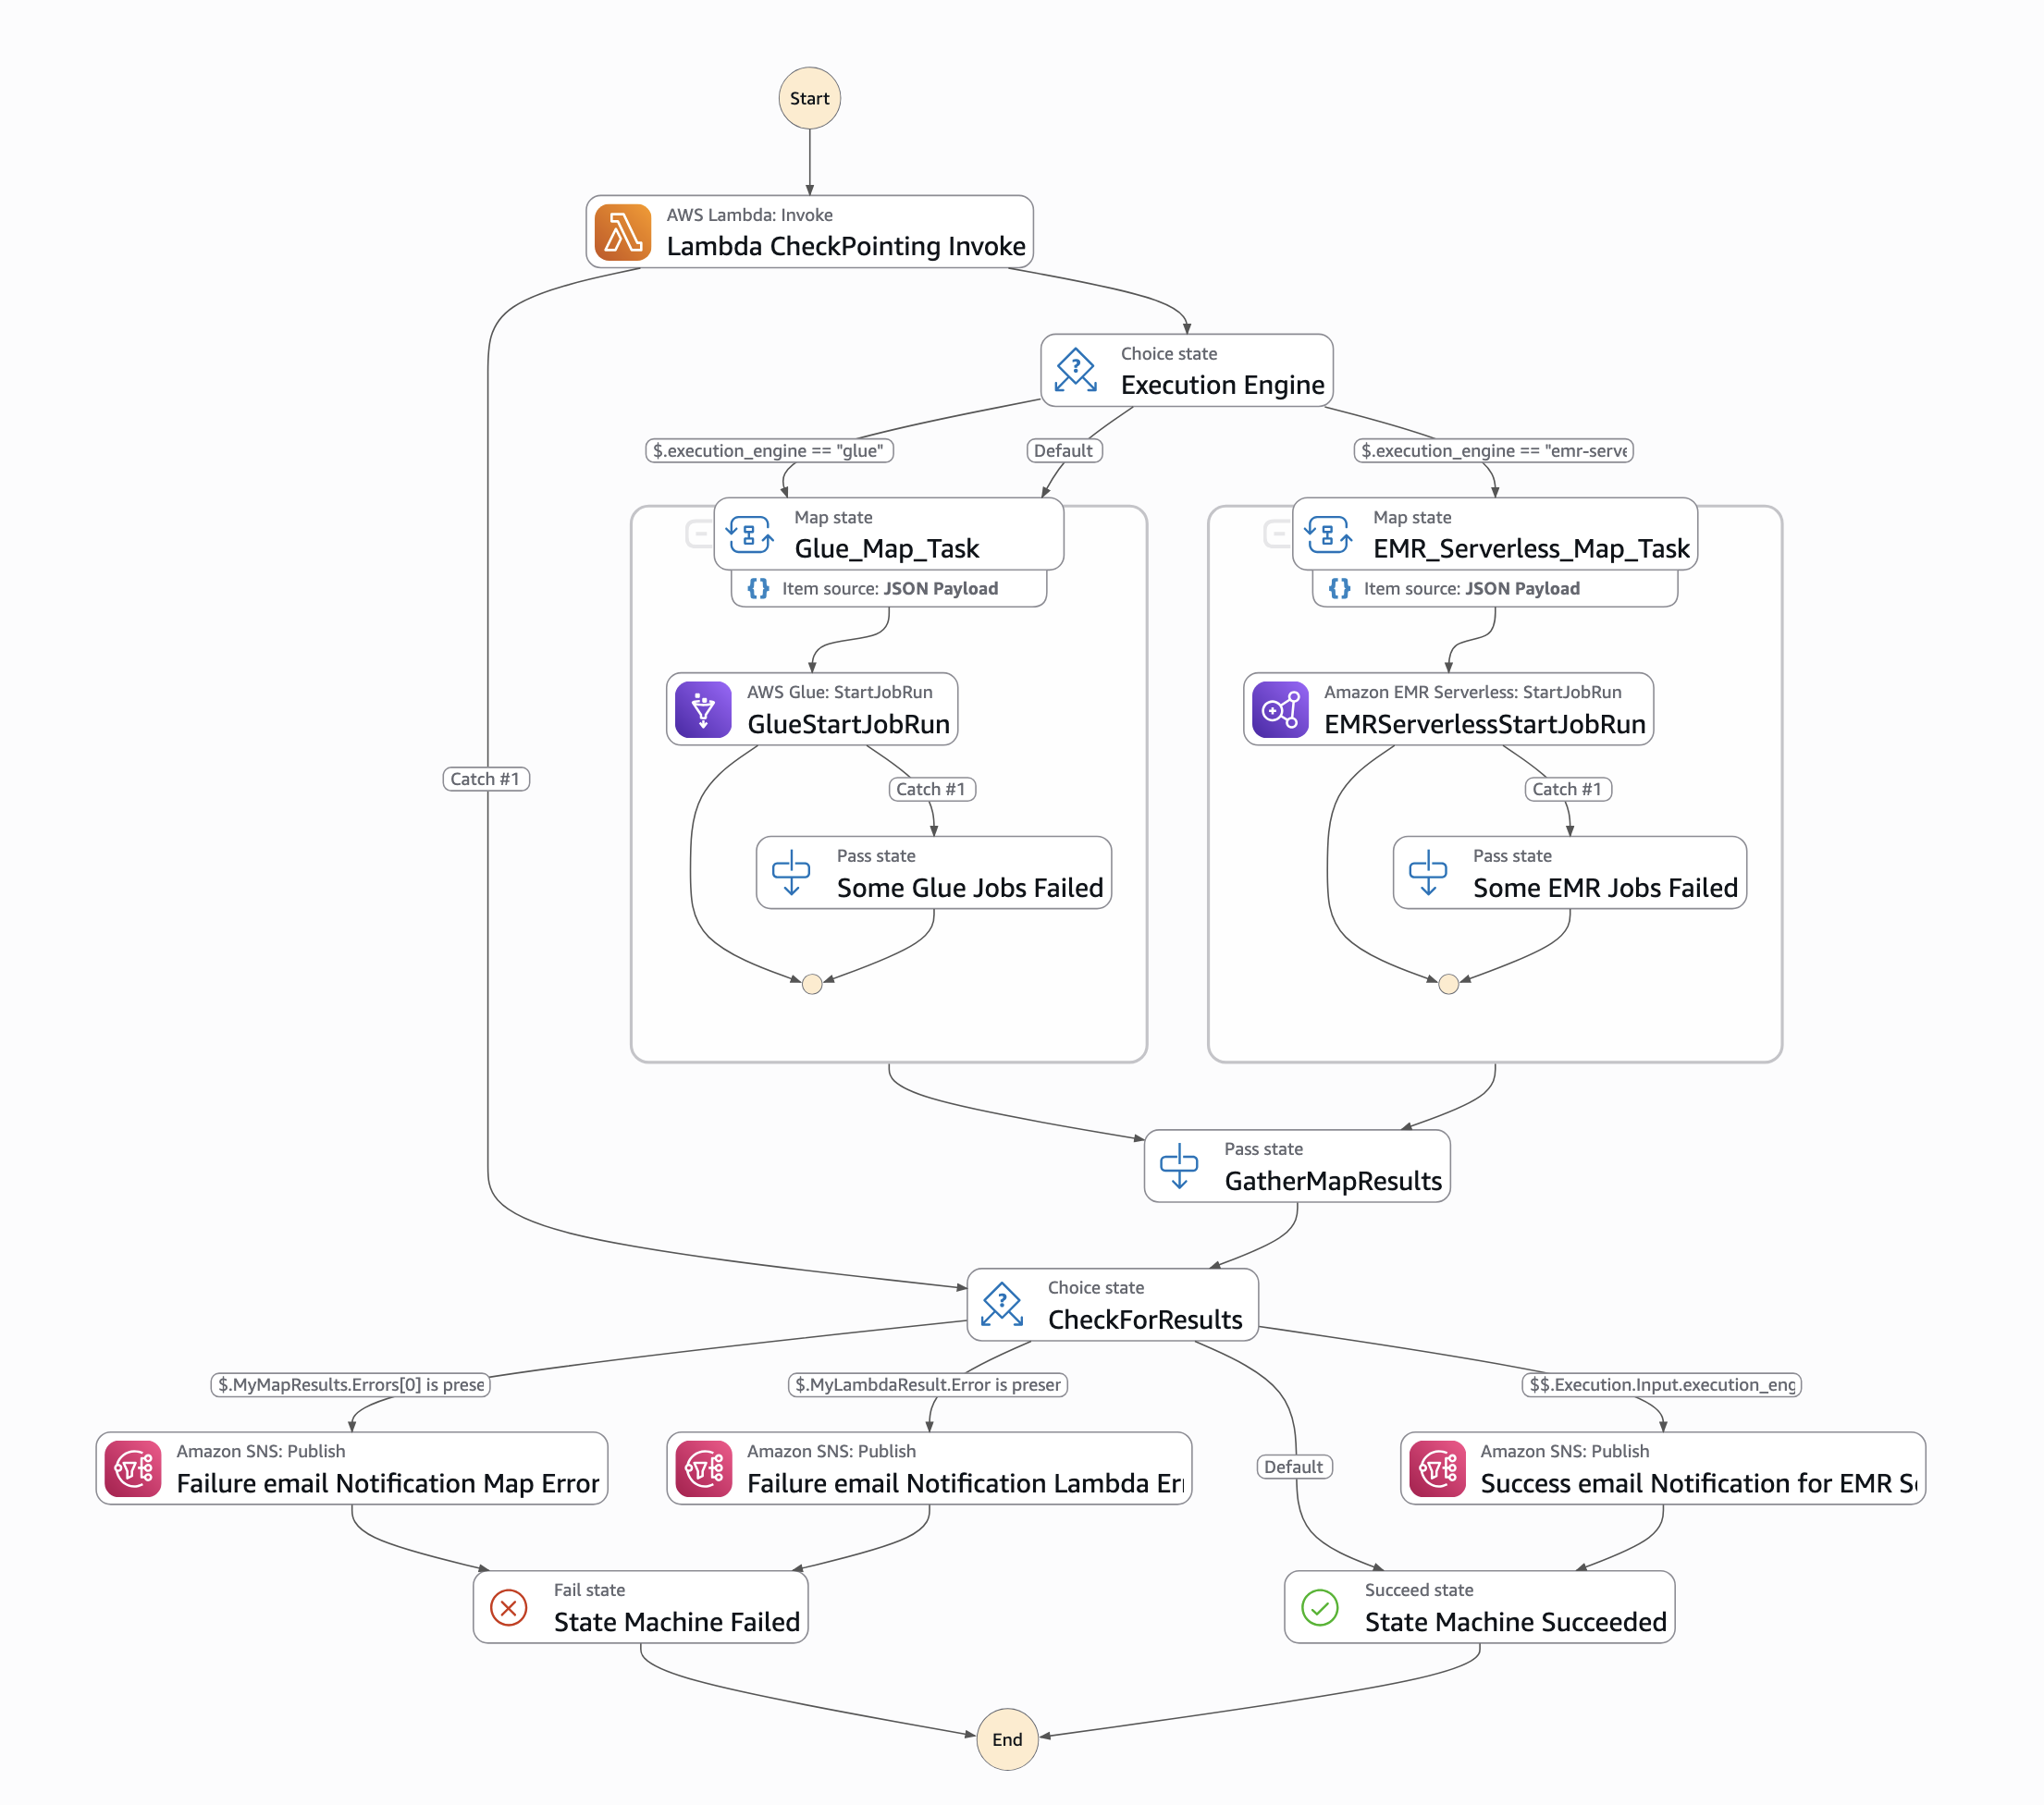
  4. An EventBridge schedule or manual invoke initiates the Step Functions workflow, responsible for log conversion.
  5. A Step Functions workflow performs the following tasks:
    1. The preprocessor Lambda function performs checkpointing and invokes the required number of ETL jobs in parallel.
    2. The ETL job converts the source log files to the OCSF-Parquet format using the custom Python libraries stored in the artifact bucket and the mapping information defined in the DynamoDB table.
    3. A separate target S3 bucket stores the converted log data.
    4. An Amazon SNS topic is used to notify users if the Step Functions workflow fails during checkpointing or the ETL process.
  6. Analytics are performed on the converted data.

Deployment

You can find the required resources to deploy this solution in this GitHub repository. It provides detailed instructions in the README on how to deploy the solution. After you have the prerequisites mentioned earlier, see the Environment Setup portion of the repository.

Solution walkthrough

In this section, we walk you through steps to deploy this solution.

Map source log files into OCSF format

Before you start mapping the security logs into OCSF format, check if there are existing mappings available on OCSF mappings Github.

Mapping security logs into the OCSF format typically involves several steps. Here are the high-level steps:

  1. Understand OCSF schema: Familiarize yourself with the OCSF schema, which defines the structure and format for organizing security log data into event classes and attributes. In OCSF, events are organized into event classes, each of which comprises a set of attributes designed to offer comprehensive semantics for the event.
  2. Identify log sources: Determine your security log sources, such as firewalls, intrusion detection systems, or antivirus software. Each log source might have its own format (CSV, JSON, and so on) and structure.
  3. Identify OCSF categories and classes: Analyze the log content and match security events to the appropriate OCSF categories and classes for standardized data organization.
  4. Map fields to OCSF schema: Map the source log data fields in the OCSF schema. Ensure that each field from your logs is mapped to the appropriate field in the OCSF format. If a field in the source log schema isn’t mapped to any OCSF field, you might need to consider mapping it to unmapped object.
  5. Enrichment: Enrich data with additional contextual information, such as standardizing timestamps, converting IP addresses to a common format, or adding supplementary data for better analysis. The enrichment column is added to the final dataset. Each category in OCSF has an optional enrichment column that provides more information about a column. For example, the Authentication OCSF category contains an optional enrichment column that provides more details about the IP addresses. .
  6. Test and validate: Validate mapped log data against the OCSF schema to ensure compliance and accuracy. Test the mapping process with sample log data from different sources to identify any inconsistencies or errors. You can use this open source utility to validate your generated OCSF version 1.1 output file based on mapping.
  7. Contribute OCSF Mapping to the OCSF community: Submit the OCSF mapping to the Github repository and raise a pull request to contribute it to the OCSF community. Iterate on the mapping procedure to improve accuracy, efficiency, and compatibility with the OCSF schema based on the pull request feedback.

By following these steps, you can effectively map security logs into the OCSF format, enabling better interoperability, analysis, and collaboration across security tools and platforms. AWS ProServe has helped many customers map their security logs to OCSF format. If you need guidance to map and transform security logs into OCSF format and want to use AWS ProServe, reach out to your account executive.

Create and transform mapping files

The ETL solution requires a CSV mapping file that maps the custom security log attributes into standardized OCSF attributes based on the specified OCSF class. For detailed instructions on generating this mapping file, see the Solution Usage section, bullet 2, in the README of the code repository. To follow the instructions in this post, you can enable Amazon S3 server access logging to publish source logs to Amazon S3. The following is a sample S3 server access log record:

90de84bb542adb54766fec66ee554475b7e1a56a9d8b30e3598230f9ef6d6ac7 azv-asl-src-logs [29/May/2025:04:35:45 +0000] - arn:aws:sts::768196192565:assumed-role/AwsSecurityAudit/Palisade QS8DSY4SGF8M8SD7 REST.GET.BUCKETPOLICY - “GET /?policy HTTP/1.1" 200 - 255 - 39 - "-" "-" - N9XclJkv6hw/y4yApPyDII2sRoMNbqJqBEXdnmzFndcvhQOpdcc3PNQNQX7NhQaPJ5FKSVPh6hLB0GqsSN4apcbBUHi3rNcPRqa6rFLAYU4= SigV4 TLS_AES_128_GCM_SHA256 AuthHeader azv-asl-src-logs.s3.amazonaws.com TLSv1.3 - -

Because the sample record uses spaces as delimiters and contains an extra space before +0000, you need to wrap each attribute in quotes. Here’s a sample Python code implementation that handles this requirement:

import re
def format_s3_access_log(log_line):
    def quote_field(field):
        """Add quotes around a field and handle special cases"""
        if field is None or field.strip() == '':
            return '"-"'
        # If field is already quoted, return as is
        if field.startswith('"') and field.endswith('"'):
            return field
        return f'"{field}"'
    try:
        # First, protect quoted strings and bracketed content by temporarily replacing them
        protected_line = log_line
        protected_parts = re.findall(r'(\[.*?\]|".*?")', log_line)
        for i, part in enumerate(protected_parts):
            protected_line = protected_line.replace(part, f"PROTECTED_{i}_PART")
        # Split the protected line
        parts = protected_line.split()
        # Restore protected parts
        restored_parts = []
        for part in parts:
            if part.startswith('PROTECTED_') and part.endswith('_PART'):
                index = int(part.split('_')[1])
                restored_parts.append(protected_parts[index])
            else:
                restored_parts.append(part)
        # Quote each field
        quoted_fields = [quote_field(field) for field in restored_parts]    
        # Join with spaces
        return ' '.join(quoted_fields)
    except Exception as e:
        print(f"Error processing line: {e}")
        return None

# Example usage
if __name__ == "__main__":
    # Example input log line
    log_line = '''90de84bb542adb54766fec66ee554475b7e1a56a9d8b30e3598230f9ef6d6ac7 azv-asl-src-logs [29/May/2025:04:35:45 +0000] - arn:aws:sts::768196192565:assumed-role/AwsSecurityAudit/Palisade QS8DSY4SGF8M8SD7 REST.GET.BUCKETPOLICY - "GET /?policy HTTP/1.1" 200 - 255 - 39 - "-" "-" - N9XclJkv6hw/y4yApPyDII2sRoMNbqJqBEXdnmzFndcvhQOpdcc3PNQNQX7NhQaPJ5FKSVPh6hLB0GqsSN4apcbBUHi3rNcPRqa6rFLAYU4= SigV4 TLS_AES_128_GCM_SHA256 AuthHeader azv-asl-src-logs.s3.amazonaws.com TLSv1.3 - -'''
    # Process the log line
    formatted_output = format_s3_access_log(log_line)
    print(formatted_output)

This sample code demonstrates how to wrap quotes around each attribute. You can extend this code to read source Amazon S3 server access log files from an S3 location and write the modified logs to another location. After these logs are available in an S3 bucket in your AWS account, you need to map the S3 server access logs to OCSF format. The following is an example of an S3 server access log CSV mapping file:

src_log_type src_column_name tgt_column default_values
s3-access-log bucket_owner resources:Object.owner:Object.uid:string
s3-access-log bucket resources:array.value:string
s3-access-log time time:timestamp
s3-access-log remote_ip src_endpoint:object.ip:string
s3-access-log requester actor:Object.user:object.uid:string
s3-access-log request_id http_request:object.uid:string
s3-access-log operation api:Object.operation:string
s3-access-log key unmapped:Object.key:string
s3-access-log request_uri http_request:object.url:object.url_string:string
s3-access-log http_status http_response:object.code:integer
s3-access-log error_code http_response:object.message:string
s3-access-log bytes_sent http_response:object.length:integer
s3-access-log object_size unmapped:Object.object_size:string
s3-access-log total_time duration:integer
s3-access-log turn_around_time http_response:object.Latency:integer
s3-access-log referer http_request:object.referrer:string
s3-access-log user_agent http_request:object.user_agent:string
s3-access-log version_id unmapped:Object.version_id:string
s3-access-log host_id unmapped:Object.host_id:string
s3-access-log signature_version unmapped:Object.signature_version:string
s3-access-log cipher_suite unmapped:Object.cipher_suite:string
s3-access-log authentication_type unmapped:object.authentication_type:string
s3-access-log host_header http_request:object.http_headers:array.value:string
s3-access-log tls_version unmapped:Object.tls_version:string
s3-access-log access_point_arn unmapped:Object.access_point_arn:string
s3-access-log acl_required unmapped:Object.acl_required:string
metadata:object.version:string 1.1.0
cloud:object.provider:string AWS
metadata:object.product:string.name:string S3
metadata:object.product:string.vendor_name:string AWS
http_request:object.http_headers:array.name:string http_header
resources:array.name:string bucket
activity_id:integer 99
severity_id:integer 99
type_uid:integer 600399
category_name:string Application Activity

Upload the mapping CSV file to the S3 artifact location s3://secure-datalake-artifacts-<account_number>-<aws_region>/config/mapping/. The Lambda function asl-etl-framework_update-mapping-ddb ingests this mapping CSV file, processes its entries, and converts them into the required DynamoDB format. This Lambda function writes the results to the asl-etl-framework-ocsf-attribute-mapping DynamoDB table, which stores the schema and mapping information for all source log files processed by this solution. You can find an example of an S3 server access log CSV metadata file in the GitHub repository.

Create and transform configuration files

To create a configuration metadata file, create a CSV file following the guidelines in Solution Usage, bullet 4, in the README of the code repository.

Upload the completed mapping CSV file into an S3 artifact location s3://secure-datalake-artifacts-<account_number>-<aws_region>/config/metadata/. An upload of a metadata CSV file to S3 invokes a Lambda function asl-etl-framework_insert_metadata_ddb, which stores the configuration in the asl-etl-framework-source-ocsf-metadata DynamoDB table. The following image shows the configuration in DynamoDB table.

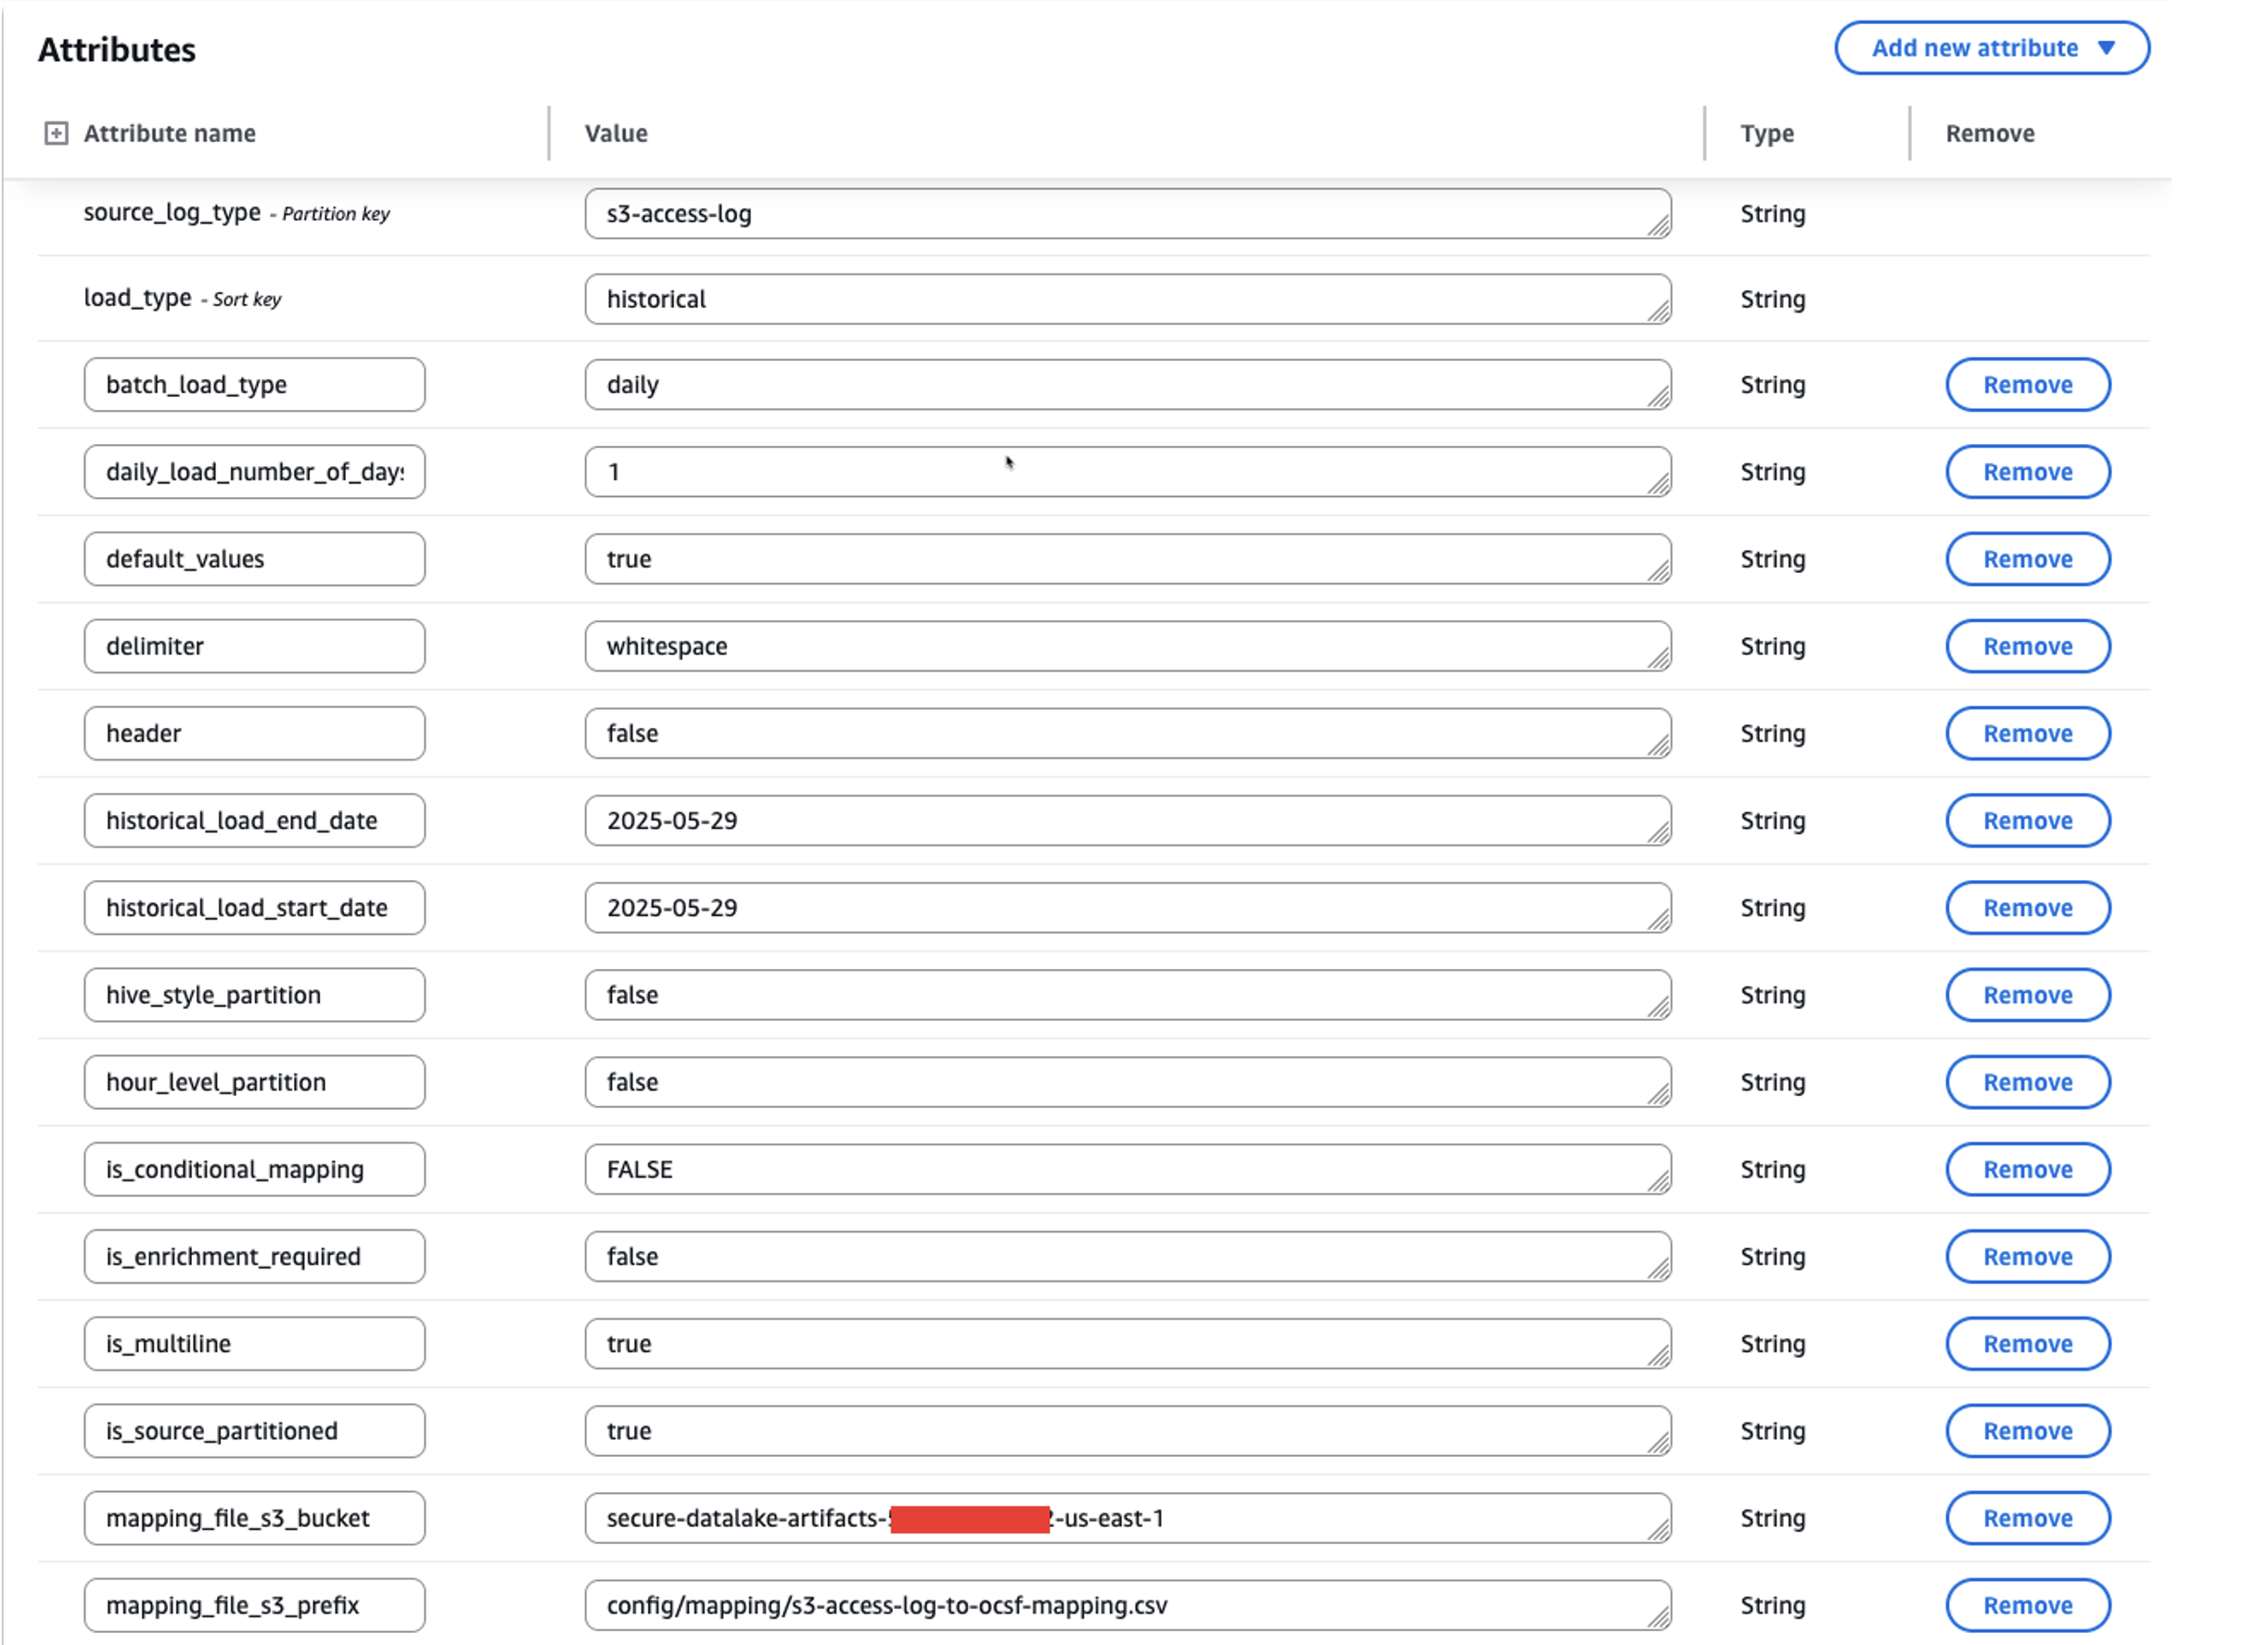
Figure 2: Screenshot of metadata configuration in the asl-etl-framework-source-ocsf-metadata DynamoDB table for S3 Access Logs

After inserting the metadata into the asl-etl-framework-source-ocsf-metadata DynamoDB table, the Lambda function asl-etl-framework_update-mapping-ddb is invoked to read the mapping CSV file and inserts mappings into the asl-etl-framework-ocsf-attribute-mapping DynamoDB table. The following image shows the mapping in DynamoDB table.

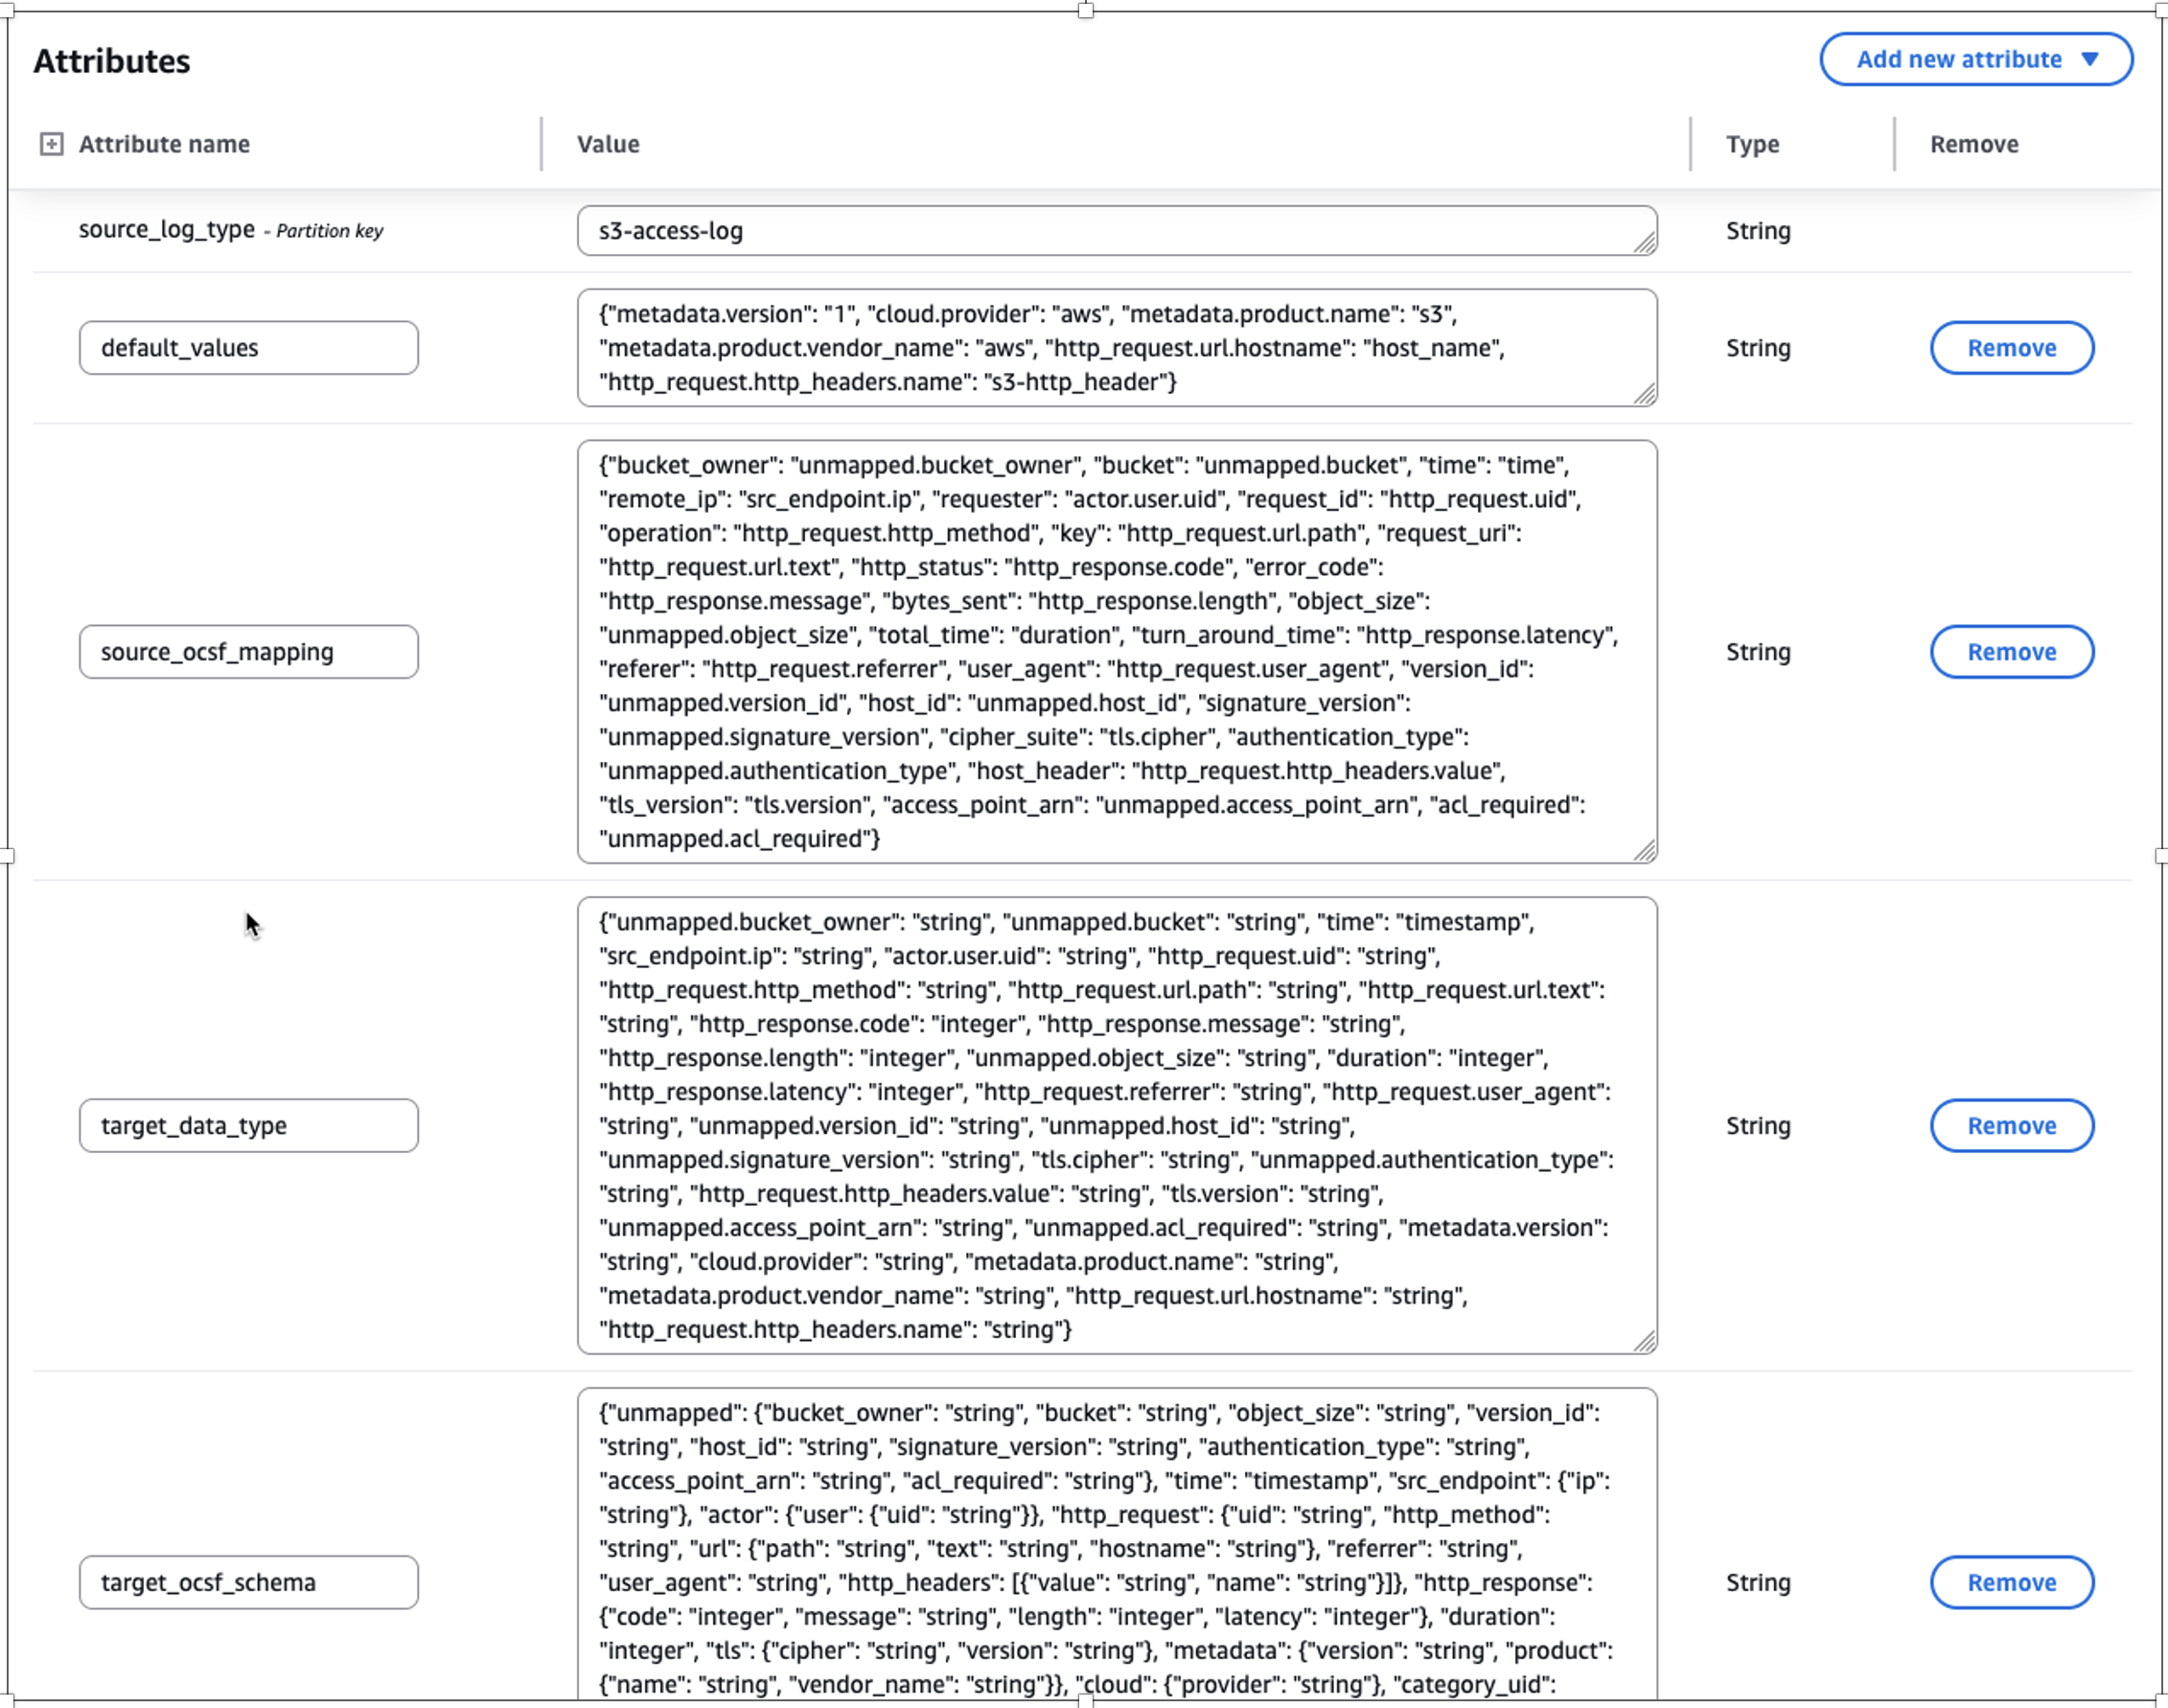
Figure 3: Screenshot of transformed mapping in the asl-etl-framework-ocsf-attribute-mapping DynamoDB table for S3 Access Logs

Historical load

The ETL solution offers a historical load capability that processes logs from specified date or year ranges based on metadata file inputs. After being converted to OCSF format in Parquet file format, these logs can be integrated into Amazon Security Lake or be used to create a custom data lake. The solution includes checkpointing functionality to handle potential failures during historical data processing.

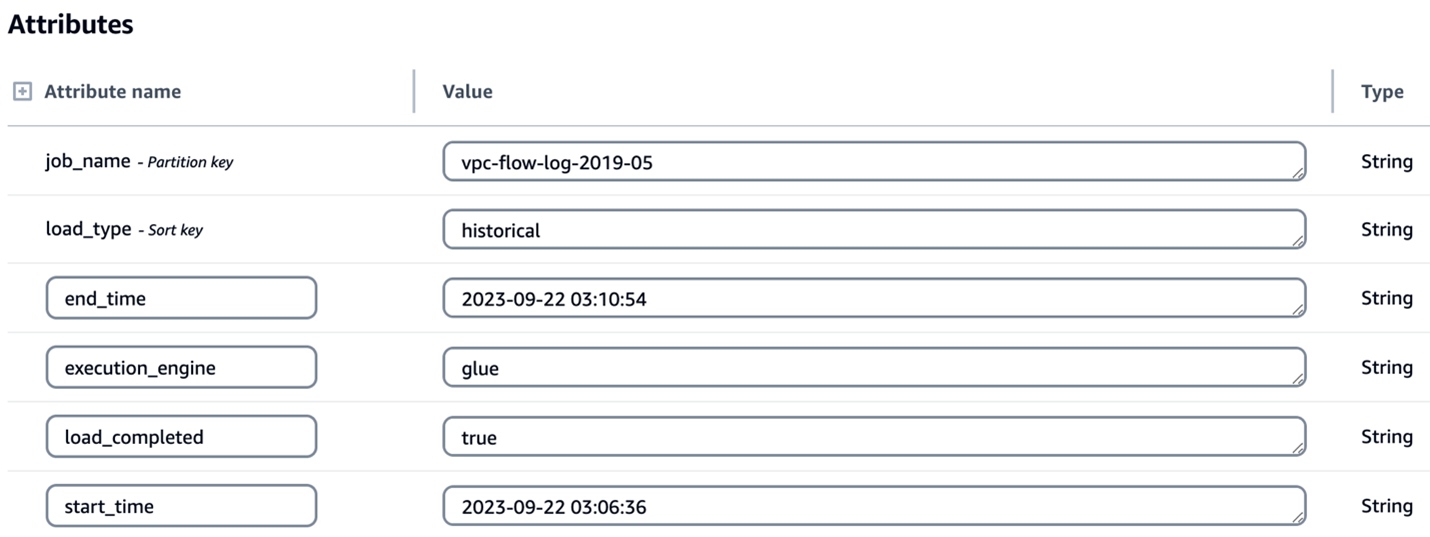
The checkpointing feature provides process resilience by tracking conversion progress in the asl-etl-framework-ocsf-run-status DynamoDB table. If a conversion process fails during multi-year historical processing, the solution resumes from the point of failure rather than reprocessing previously converted data. For example, if conversion fails while processing the second year’s data, the solution will resume from that point, preserving the first year’s successful conversion. While this feature is enabled by default, you can disable it, in which case any process restart will begin from the initial specified date. The following image shows the load_type as historical along with start_time and end_time for the period you want to transform the logs.

Figure 4: Screenshot of configuration for historical load attributes in the asl-etl-framework-source-ocsf-metadata DynamoDB table

Enrichment

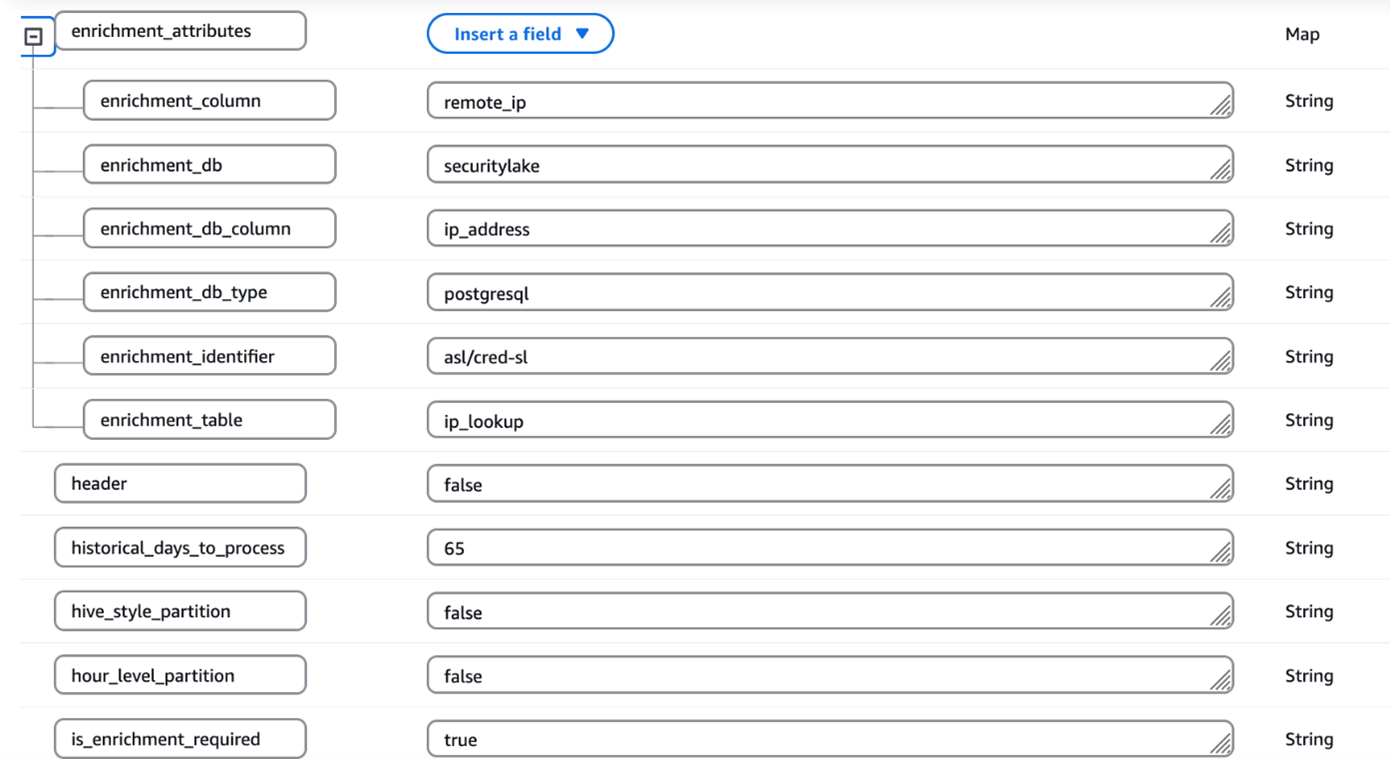
Enterprises often possess valuable contextual data that can enhance their security logs through enrichment. By correlating existing data with security logs and appending relevant information, you can create more comprehensive datasets for advanced analytics and deeper security insights. After the logs are converted to OCSF, you might want to know more about specific columns or attributes so that you can extract meaningful information. To support this, the solution has an option for enrichment. For example, if you want to get additional information, such as the geolocation of each IP address in the logs, you can provide the source database information in the metadata CSV file of the solution. It connects to the source database through a JDBC connection, extracts the requested information associated with the IP address to enrich the dataset, and adds the extracted information as new columns to the converted OCSF log output. In this way, you can have detailed information about each IP address in the converted OCSF log. The following screenshot shows parameters for enabling enrichment by setting the is_enrichment_required flag as true and adding necessary enrichment_attributes to the metadata table.

Figure 5: Screenshot of configuration for enrichment attributes in the asl-etl-framework-source-ocsf-metadata DynamoDB table

ETL transformation using AWS Glue or EMR Serverless

You can use the engine of your choice for the transformation by providing the engine name during the deployment steps as mentioned in the Pre-Deployment Configuration section of the ReadMe. Based on this, the solution uses either AWS Glue or EMR Serverless as mentioned in the Orchestration using Step Functions section.

The process includes the following steps:

  1. The user enters the metadata and mapping information in the respective CSV files and uploads the files to Amazon S3.
  2. A process (Lambda job) converts the metadata and mapping files to a DynamoDB schema and stores them in corresponding DynamoDB tables (metadata and mapping tables).
  3. A preprocessor job is invoked that takes the metadata from the DynamoDB table asl-etl-framework-source-ocsf-metadata and, based on the input parameters passed for the Step Functions workflow shown in the Orchestration using Step Functions section, the Step Functions workflow generates the input arguments for the transformation job (AWS Glue or EMR Serverless based on the user’s choice).
  4. The transformation job (AWS Glue or Amazon EMR based on the user’s choice) is invoked and reads the metadata and mapping tables and converts the data into OCSF format.
  5. The converted OCSF log files are stored to an Amazon S3 location in Parquet format, which is defined in the DynamoDB table asl-etl-framework-source-ocsf-metadata. These custom OCSF logs on S3 can be integrated with Security Lake.

Orchestration using Step Functions

This solution is orchestrated using Step Functions and offers two execution engine options: AWS Glue or EMR Serverless, depending on the services allow-listed in your enterprise. For processing historical loads, we recommend using EMR Serverless; however, AWS Glue is suitable for historical loads less than 100 GB. When invoking the Step Functions workflow, specify the execution engine as either emr-serverless or glue in the input parameters passed using EventBridge.

Figure 6: Screenshot of Step Functions workflow orchestration

To run the workflow, an input must be passed through an EventBridge schedule. The input parameters are as follows:

{
“source_log_type": “s3-access-log”,
“load_type": “historical”,
“full_load": “false”,
“ddb_lookup_table": “asl-etl-framework-ddb-table-details”,
“ddb_mapping_table": “asl-etl-framework-ocsf-attribute-mapping”,
“ddb_metadata_table": “asl-etl-framework-source-ocsf-metadata”,
“ddb_reference_table": “asl-etl-framework-ocsf-reference”,
“asl_status_table": “asl-etl-framework-run-status”,
“execution_engine": “glue”,
“asl_job_name": “asl-etl-framework-init-ocsf-conversion”
}

A description of the steps is also available in the ReadMe section of the code repository.

Verify the final output in OCSF format

It’s a best practice to ensure that the generated Parquet files properly map to the various schema definitions specified within the Open Cybersecurity Schema Framework (OCSF). Validating the mapping helps to maintain data integrity and allows the security data to be effectively analyzed and processed by downstream applications and tools, such as Security Lake. You can use OCSF Schema Validator, which was built to provide supplementary validation for Security Lake. Performing this validation step helps detect any schema misalignments or data quality issues early in the process, leading to more reliable and trustworthy security analytics.

If validation of the transformed OCSF Schema fails using the OCSF Schema Validator, you need to validate if your mappings are aligned with the respective OCSF category. Adjust your mappings, rerun the solution, and validate the transformed OCSF logs using OCSF Schema Validator until you get a valid OCSF schema.

When discovering incorrect OCSF mappings or format inconsistencies in converted logs, begin by conducting a thorough validation against OCSF schema specifications to identify specific discrepancies. Update the mappings with correct field mappings, ensuring proper data type conversions and mandatory field requirements are met. Test these corrections using sample data to verify OCSF compliance using the above mentioned tool and data integrity before implementing in production.

Conclusion

In this post, we showed you how the ETL solution accelerator transforms custom security logs into the standardized OCSF format, enabling enhanced security analytics capabilities. This solution, developed by AWS Professional Services (AWS ProServe), addresses common challenges in security log standardization and streamlines the adoption of Amazon Security Lake. While the solution is available as an open source project, engaging with AWS ProServe provides significant advantages, including proven implementation expertise, best practices guidance, and accelerated deployment timelines. Our ProServe team brings extensive experience in security log standardization and can help customize the solution to your specific requirements while ensuring optimal integration with Security Lake. To begin your journey toward standardized security analytics using OCSF, contact your AWS account team to discuss how AWS ProServe can help implement this solution in your environment.

Vivek Gautam

Vivek Gautam

Vivek is a Senior Data Architect with specialization in data analytics at AWS Professional Services. He works with enterprise customers building data products, analytics platforms, streaming, and search solutions on AWS. When not building and designing data products, Vivek is a food enthusiast who also likes to explore new travel destinations and go on hikes.

Arpit Gupta

Arpit Gupta

Arpit is a Data Architect at AWS Professional Services with a focus on data analytics. He specializes in developing data lakes, analytics solutions, and Generative AI applications in the cloud, helping organizations transform their data into actionable business insights. His passions extend from the digital to the physical realm—from tennis courts to the kitchen, and exploring new destinations with family.

Ryan Gomes

Ryan Gomes

Ryan was a Senior Data and ML Engineer with AWS Professional Services at the time of writing. He is passionate about helping customers achieve better outcomes through analytics, machine learning, and generative AI solutions in the cloud. Outside of work, he enjoys fitness, cooking, and spending quality time with friends and family.

  •  

Introducing the Landing Zone Accelerator on AWS Universal Configuration and LZA Compliance Workbook

November 20, 2025: Original publication date of this post. This post has been updated to reference the most recent version of the LZA Compliance Workbook published to AWS Artifact in March 2026.


We’re pleased to announce the availability of the latest sample security baseline from Landing Zone Accelerator on AWS (LZA)—the Universal Configuration. Developed from years of field experience with highly regulated customers including governments across the world, and in consultation with AWS Partners and industry experts, the Universal Configuration was built to help you implement security and compliance at scale for on your regulated workloads. By setting a high bar with the latest AWS security best practices, the Universal Configuration can help address technical control requirements from compliance frameworks across different geographic regions and industry verticals. The Universal Configuration’s multi-account security architecture provides a foundation to host your diverse workload requirements today along with providing the ability to explore the generative AI and agentic AI solutions that will shape your organization in the future. It can also replace months of complex planning and design by deploying a comprehensive security and compliance-driven environment based on AWS Well-Architected principles in a matter of hours.

As organizations grow, they typically pursue or must adhere to new security compliance certifications. LZA and the Universal Configuration help organizations of all sizes and phases in their security and compliance journey. The speed of deployment, step-by-step documentation, and compliance resources can reduce traditional assessment and authorization timelines by months and result in more predictable and successful audit outcomes. This enables more freedom to invest resources to grow the business instead of choosing between security and compliance tradeoffs.

The Universal Configuration helps organizations:

  • Automate the deployment of a secure multi-account AWS environment
    • Foundational security controls based on AWS Well-Architected best practices
    • Apply consistent and predictable security controls post-deployment
    • Enable and integrate with native AWS security, identity, and compliance services
  • Implement controls across system layers
    • Organization-wide security architecture
    • Perimeter and resource-specific preventative, proactive, and detective controls
    • Support for multi-AWS Region resilience, disaster recovery, and active failover
  • Establish a foundation for security and compliance readiness
    • Built-in AWS security best practices and technical implementation statements
    • Map LZA capabilities across global and industry-specific compliance frameworks
    • Deploy hundreds of controls hours instead of months

The LZA Compliance Workbook

The LZA engine has been a trusted tool for quickly deploying secure multi-account AWS environments for over 4 years. It is also cost effective because you pay only for the AWS services used to operate your environment. The Universal Configuration is the first sample configuration accompanied by the LZA Compliance Workbook available on AWS Artifact. It is a first-of-its-kind resource with detailed control mappings showing how the Universal Configuration can support different industries and regions, helping you address requirements from frameworks listed below.

  • NIST 800-53 Rev5
  • C5: 2020 (Germany)
  • HIPAA
  • SOC 2
  • CMMC Level 2
  • ISO/IEC 27001 Annex A
  • US Dept of War CCI
  • NERC-CIP
  • NIST 800-171
  • NATO D-32 Appendix B
  • NIST CSF 2.0
  • CIS Critical Controls v8

The LZA Compliance Workbook is regularly maintained to reflect the latest Universal Configuration baseline and will include additional compliance mappings in future releases. The workbook contains detailed security configuration descriptions based on the Universal Configuration deployment files, along with control requirement mappings and implementation statements that translate its security capabilities into a compliance-friendly format. By combining AWS security best practices with global compliance expertise, the Universal Configuration delivers predicable security outcomes while also helping you meet regional and industry requirements.

Getting started

To get started with the Landing Zone Accelerator on AWS Universal Configuration, the LZA Implementation Guide walks you through the steps, use cases, and considerations when deploying with LZA. You can download the LZA Compliance Workbook from AWS Artifact today and configure notifications to receive emails when future versions are released. You can view the deployment files and additional technical implementation guidance on the GitHub Universal Configuration sample and documentation page. Additionally, visit the AWS Partner Network (APN) for help with audit and advisory initiatives, cloud migrations, deploying the LZA Universal Configuration, and other services. You can visit the AWS Partner Finder tool and search by solution for Landing Zone Accelerator for the latest LZA Partner offerings.

If you have feedback about this post, submit comments in the Comments section below.
Kevin Donohue

Kevin Donohue

Kevin is a Senior Security Compliance Engineer at AWS, where he builds solutions and resources to help AWS customers achieve their security and compliance goals. Prior to joining the Landing Zone Accelerator team in AWS Professional Services in 2024, Kevin began his tenure with AWS Security in 2019 specializing in FedRAMP compliance and the shared responsibility model.

Christine Screnci

Christine Screnci

Christine is a Principal Technical Product Manager at AWS, where she specializes in developing and scaling enterprise-level solutions. Christine began her tenure with AWS in 2016 working with Worldwide Public Sector customers to improve the migration and modernization journey through globally scaled solutions. She is passionate about hypothesis-driven development and experimentation to improve customer experiences with AWS technologies.

Bhavish Khatri

Bhavish is a Senior Delivery Engineer at AWS, where he builds enterprise-scale solutions to help large organizations achieve their compliance goals. Bhavish started at AWS in 2018, specializing in multi-account AWS deployments and focusing on LZA and the Universal Configuration solution. He helps organizations build secure, scalable cloud environments that align with global compliance frameworks and regulatory requirements across diverse sectors.

  •  

IAM policy types: How and when to use them

June 3, 2022: Original publication date of this post. This post has been updated to add the additional IAM policy types: Resource control policies.


You manage access in AWS by creating policies and attaching them to AWS Identity and Access Management (IAM) principals (roles, users, or groups of users) or AWS resources. AWS evaluates these policies when an IAM principal makes a request, such as uploading an object to an Amazon Simple Storage Service (Amazon S3) bucket. Permissions in the policies determine whether the request is allowed or denied. While IAM operates primarily at the individual AWS account level, organizations with multiple AWS accounts can extend these access controls through AWS Organizations, which provides additional policy types that work alongside IAM to enforce governance and security standards across their entire organizational structure. By using AWS Organizations, you can group accounts in the multi-account environment into organizational units (OUs), apply policy-based controls across these groups.

In this blog post, you will learn how to select the appropriate policy types for your security requirements and determine which team should own and manage each policy. You will explore seven policy types—including identity-based policies, resource-based policies, permissions boundaries, service control policies (SCPs), and resource control policies (RCPs)—through a practical scenario involving multiple AWS accounts and teams.

Different policy types and when to use them

AWS has different policy types that provide you with powerful flexibility, and it’s important to know how and when to use each policy type. It’s also important for you to understand how to structure your IAM policy ownership to avoid a centralized team from becoming a bottleneck. Explicit policy ownership can allow your teams to move more quickly, while staying within the secure guardrails that are defined centrally.

Service control policies overview

Service control policies (SCPs) are a feature of AWS Organizations. AWS Organizations is a service for grouping and centrally managing the AWS accounts that your business owns. SCPs are policies that specify the maximum permissions for an organization, organizational unit (OU), or an individual account. An SCP can limit permissions for principals in member accounts, including the AWS account root user.

SCPs are meant to be used as coarse-grained guardrails, and they don’t directly grant access. The primary function of SCPs is to enforce security invariants across AWS accounts and OUs in an organization. Security invariants are control objectives or configurations that you apply to multiple accounts, OUs, or the whole organization managed by AWS Organizations. For example, you can use an SCP to prevent member accounts from leaving your organization or to enforce that AWS resources can only be deployed to certain AWS Regions.

Resource control policies overview

Resource control policies (RCPs) are an AWS Organizations feature to manage permissions centrally. RCPs set the maximum available permissions for resources across your organization. RCPs help ensure that resources in your accounts stay within your organization’s access control guidelines.

RCPs are typically used to enforce data perimeter controls to prevent accidental data sharing outside your organization and to control resource sharing and cross-account access patterns centrally. You can also use RCPs to implement security controls for sensitive resources across your organization’s accounts and to add an additional layer of protection for resources such as S3 buckets that store confidential data.

Note: SCPs are principal-centric controls that specify which services your IAM users and IAM roles can access, which resources they can access, or the conditions under which they can make requests (for example, from specific Regions or networks). On the other hand, RCPs are resource-centric controls that can restrict access to your resources so that they can be accessed only by identities that belong to your organization or specify the conditions under which identities external to your organization can access your resources. To understand SCPs and RCPs differences and use cases, see General use cases for SCPs and RCPs.

Permissions boundaries overview

Permissions boundaries are an advanced IAM feature in which you set the maximum permissions that an identity-based policy can grant to an IAM principal. When you set a permissions boundary for a principal, the principal can perform only the actions that are allowed by both its identity-based policies and its permissions boundaries.

A permissions boundary is a type of identity-based policy that doesn’t directly grant access. Instead, like an SCP, a permissions boundary acts as a guardrail for your IAM principals that allows you to set coarse-grained access controls. A permissions boundary is typically used to delegate the creation of IAM principals. Delegation enables other individuals in your accounts to create new IAM principals, but limits the permissions that can be granted to the new IAM principals.

Identity-based policies overview

Identity-based policies are policy documents that you attach to a principal (roles, users, and groups of users) to control what actions a principal can perform, on which resources, and under what conditions. Identity-based policies can be further categorized into AWS managed policies, customer managed policies, and inline policies. AWS managed policies are reusable identity-based policies that are created and managed by AWS. You can use AWS managed policies as a starting point for building your own identity-based policies that are specific to your organization. Customer managed policies are reusable identity-based policies that can be attached to multiple identities. Customer managed policies are useful when you have multiple principals with identical access requirements. Inline policies are identity-based policies that are attached to a single principal. Use inline-policies when you want to create least-privilege permissions that are specific to a particular principal.

You will have many identity-based policies in your AWS account that are used to enable access in scenarios such as human access, application access, machine learning workloads, and deployment pipelines. These policies should be fine-grained. You use these policies to directly apply least privilege permissions to your IAM principals. You should write the policies with permissions for the specific task that the principal needs to accomplish.

Resource-based policies overview

Resource-based policies are policy documents that you attach to a resource such as an S3 bucket. These policies grant the specified principal permission to perform specific actions on that resource and define under what conditions this permission applies. Resource-based policies are inline policies. For a list of AWS services that support resource-based policies, see AWS services that work with IAM.

Resource-based policies are optional for many workloads that don’t span multiple AWS accounts. Fine-grained access within a single AWS account is typically granted with identity-based policies. AWS Key Management Service (AWS KMS) keys and IAM role trust policies are two exceptions, and both of these resources must have a resource-based policy even when the principal and the KMS key or IAM role are in the same account. IAM roles and KMS keys behave this way as an extra layer of protection that requires the owner of the resource (key or role) to explicitly allow or deny principals from using the resource. For other resources that support resource-based policies, here are some examples where they are most commonly used:

  1. Granting cross-account access to your AWS resource.
  2. Granting an AWS service access to your resource when the AWS service uses an AWS service principal. For example, when using AWS CloudTrail, you must explicitly grant the CloudTrail service principal access to write files to an Amazon S3 bucket.
  3. Applying broad access guardrails to your AWS resources. You can see some examples in the blog post IAM makes it easier for you to manage permissions for AWS services accessing your resources.
  4. Applying an additional layer of protection for resources that store sensitive data, such as AWS Secrets Manager secrets or an S3 bucket with sensitive data. You can use a resource-based policy to deny access to IAM principals that shouldn’t have access to sensitive data, even if granted access by an identity-based policy. An explicit deny in an IAM policy always overrides an allow.

How to implement different policy types

In this section, we will walk you through an example of a design that includes all four of the policy types explained in this post.

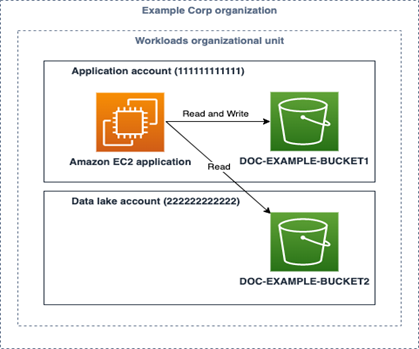
The example that follows shows an application that runs on an Amazon Elastic Compute Cloud (Amazon EC2) instance and needs to read from and write files to an S3 bucket in the same account. The application also reads (but doesn’t write) files from an S3 bucket in a different account. The company in this example, Example Corp, uses a multi-account strategy, and each application has its own AWS account. The architecture of the application is shown in Figure 1.

Figure 1: Sample application architecture that needs to access S3 buckets in two different AWS accounts

Figure 1: Sample application architecture that needs to access S3 buckets in two different AWS accounts

There are three teams that participate in this example: the Central Cloud Team, the Application Team, and the Data Lake Team. The Central Cloud Team is responsible for the overall security and governance of the AWS environment across all AWS accounts at Example Corp. The Application Team is responsible for building, deploying, and running their application within the application account (111111111111) that they own and manage. Likewise, the Data Lake Team owns and manages the data lake account (222222222222) that hosts a data lake at Example Corp.

With that background in mind, we will walk you through an implementation for each of the four policy types and include an explanation of which team we recommend own each policy. The policy owner is the team that is responsible for creating and maintaining the policy.

Service control policies

The Central Cloud Team owns the implementation of the security controls that should apply broadly to all of Example Corp’s AWS accounts. At Example Corp, the Central Cloud Team has two security requirements that they want to apply to all accounts in their organization:

  1. AWS API calls should be encrypted in transit to maintain security best practices
  2. Accounts can’t leave the organization on their own.

The Central Cloud Team chooses to implement these security invariants using SCPs and applies the SCPs to the root of the organization. The first statement in Policy 1 denies all requests that are not sent using SSL (TLS). The second statement in Policy 1 prevents an account from leaving the organization.

This is only a subset of the SCP statements that Example Corp uses. Example Corp uses a deny list strategy, and there must also be an accompanying statement with an Effect of Allow at every level of the organization that isn’t shown in the SCP in Policy 1.

Policy 1: SCP attached to AWS Organizations organization root

{
		"Id": "ServiceControlPolicy",
		"Version": "2012-10-17",
		"Statement": [{
			"Sid": "DenyIfRequestIsNotUsingSSL",
			"Effect": "Deny",
			"Action": "*",
			"Resource": "*",
			"Condition": {
				"BoolIfExists": {
					"aws:SecureTransport": "false"
				}
			}
	},
	{
		"Sid": "PreventLeavingTheOrganization",
		"Effect": "Deny",
		"Action": "organizations:LeaveOrganization",
		"Resource": "*"
	}]
}

Resource control policies

The Central Cloud Team also has three additional security requirements for Amazon S3 resource deployment to accounts.

  1. Require a minimum TLS version of 1.2 for S3 bucket access
  2. Mandate encryption of S3 objects using AWS Key Management Service (AWS KMS)
  3. Deny S3 access from AWS account outside the organization managed by AWS Organizations

The Central Cloud Team attaches the RCPs to the root of the organization, following the same approach used for SCPs, so that the policy applies across all accounts.
Policy 2 enforces three controls across S3 buckets in the organization. The first statement requires TLS 1.2 for data-in-transit. The second statement requires AWS KMS encryption for data-at-rest. The third statement restricts S3 bucket access to principals from accounts within the organization (identified by example-corp-organization-id), blocking access from external accounts.

Policy 2: RCP attached to the organization root to enforce data perimeter

{
  "Id": "ResourceControlPolicy",
  "Version": "2012-10-17",
  "Statement": [
    {
      "Sid": "EnforceS3TLSVersion",
      "Effect": "Deny",
      "Principal": "*",
      "Action": "s3:*",
      "Resource": "*",
      "Condition": {
        "NumericLessThan": {
          "s3:TlsVersion": [
            "1.2"
          ]
        }
      }
    },
    {
      "Sid": "EnforceKMSEncryption",
      "Effect": "Deny",
      "Principal": "*",
      "Action": "s3:PutObject",
      "Resource": "*",
      "Condition": {
        "Null": {
          "s3:x-amz-server-side-encryption-aws-kms-key-id": "true"
        }
      }
    },
    {
      "Sid": "DenyAllExternalS3Access",
      "Effect": "Deny",
      "Principal": "*",
      "Action": "s3:*",
      "Resource": "*",
      "Condition": {
        "StringNotEquals": {
          "aws:PrincipalOrgID": "example-corp-organization-id"
        }
      }
    }
  ]
}

Permissions boundary policies

The Central Cloud Team wants to make sure that they don’t become a bottleneck for the Application Team. They want to allow the Application Team to deploy their own IAM principals and policies for their applications. The Central Cloud Team also wants to make sure that any principals created by the Application Team can only use AWS APIs that the Central Cloud Team has approved.

At Example Corp, the Application Team deploys to their production AWS environment through a continuous integration/continuous deployment (CI/CD) pipeline. The pipeline itself has broad access to create AWS resources needed to run applications, including permissions to create additional IAM roles. The Central Cloud Team implements a control that requires that all IAM roles created by the pipeline must have a permissions boundary attached. This allows the pipeline to create additional IAM roles, but limits the permissions that the newly created roles can have to what is allowed by the permissions boundary. This delegation strikes a balance for the Central Cloud Team. They can avoid becoming a bottleneck to the Application Team by allowing the Application Team to create their own IAM roles and policies, while ensuring that those IAM roles and policies are not overly privileged.

An example of the permissions boundary policy that the Central Cloud Team attaches to IAM roles created by the CI/CD pipeline is shown below. This same permissions boundary policy can be centrally managed and attached to IAM roles created by other pipelines at Example Corp. The policy describes the maximum possible permissions that additional roles created by the Application Team are allowed to have, and it limits those permissions to some Amazon S3 and Amazon Simple Queue Service (Amazon SQS) data access actions. It’s common for a permissions boundary policy to include data access actions when used to delegate role creation. This is because most applications only need permissions to read and write data (for example, writing an object to an S3 bucket or reading a message from an SQS queue) and only sometimes need permission to modify infrastructure (for example, creating an S3 bucket or deleting an SQS queue). As Example Corp adopts additional AWS services, the Central Cloud Team updates this permissions boundary with actions from those services.

Policy 3: Permissions boundary policy attached to IAM roles created by the CI/CD pipeline

{
  "Id": "PermissionsBoundaryPolicy",
  "Version": "2012-10-17",
  "Statement": [
    {
      "Effect": "Allow",
      "Action": [
        "s3:PutObject",
        "s3:GetObject",
        "sqs:ChangeMessageVisibility",
        "sqs:DeleteMessage",
        "sqs:ReceiveMessage",
        "sqs:SendMessage",
        "sqs:PurgeQueue",
        "sqs:GetQueueUrl",
        "logs:PutLogEvents"
      ],
      "Resource": "*"
    }
  ]
}

In the next section, you will learn how to enforce that this permissions boundary is attached to IAM roles created by your CI/CD pipeline.

Identity-based policies

In this example, teams at Example Corp are only allowed to modify the production AWS environment through their CI/CD pipeline. Write access to the production environment is not allowed otherwise. To support the different personas that need to have access to an application account in Example Corp, three baseline IAM roles with identity-based policies are created in the application accounts:

  • A role for the CI/CD pipeline to use to deploy application resources.
  • A read-only role for the Central Cloud Team, with a process for temporary elevated access.
  • A read-only role for members of the Application Team.

All three of these baseline roles are owned, managed, and deployed by the Central Cloud Team.

The Central Cloud Team is given a default read-only role (CentralCloudTeamReadonlyRole) that allows read access to all resources within the account. This is accomplished by attaching the AWS managed ReadOnlyAccess policy to the Central Cloud Team role. You can use the IAM console to attach the ReadOnlyAccess policy, which grants read-only access to all services. When a member of the team needs to perform an action that is not covered by this policy, they follow a temporary elevated access process to make sure that this access is valid and recorded.

A read-only role is also given to developers in the Application Team (DeveloperReadOnlyRole) for analysis and troubleshooting. At Example Corp, developers are allowed to have read-only access to Amazon EC2, Amazon S3, Amazon SQS, AWS CloudFormation, and Amazon CloudWatch. Your requirements for read-only access might differ. Several AWS services offer their own read-only managed policies, and there is also the previously mentioned AWS managed ReadOnlyAccess policy that grants read only access to all services. To customize read-only access in an identity-based policy, you can use the AWS managed policies as a starting point and limit the actions to the services that your organization uses. The customized identity-based policy for Example Corp’s DeveloperReadOnlyRole role is shown below.

Policy 4: Identity-based policy attached to a developer read-only role to support human access and troubleshooting

{
  "Id": "DeveloperRoleBaselinePolicy",
  "Version": "2012-10-17",
  "Statement": [
    {
      "Effect": "Allow",
      "Action": [
        "cloudformation:Describe*",
        "cloudformation:Get*",
        "cloudformation:List*",
        "cloudwatch:Describe*",
        "cloudwatch:Get*",
        "cloudwatch:List*",
        "ec2:Describe*",
        "ec2:Get*",
        "ec2:List*",
        "ec2:Search*",
        "s3:Describe*",
        "s3:Get*",
        "s3:List*",
        "sqs:Get*",
        "sqs:List*",
        "logs:Describe*",
        "logs:FilterLogEvents",
        "logs:Get*",
        "logs:List*",
        "logs:StartQuery",
        "logs:StopQuery"
      ],
      "Resource": "*"
    }
  ]
}

The CI/CD pipeline role has broad access to the account to create resources. Access to deploy through the CI/CD pipeline should be tightly controlled and monitored. The CI/CD pipeline is allowed to create new IAM roles for use with the application, but those roles are limited to only the actions allowed by the previously discussed permissions boundary. The roles, policies, and EC2 instance profiles that the pipeline creates should also be restricted to specific role paths. This enables you to enforce that the pipeline can only modify roles and policies or pass roles that it has created. This helps prevent the pipeline, and roles created by the pipeline, from elevating privileges by modifying or passing a more privileged role. Pay careful attention to the role and policy paths in the Resource element of the following CI/CD pipeline role policy (Policy 5). The CI/CD pipeline role policy also provides some example statements that allow the passing and creation of a limited set of service-linked roles (which are created in the path /aws-service-role/). You can add other service-linked roles to these statements as your organization adopts additional AWS services.

Policy 5: Identity-based policy attached to CI/CD pipeline role

{
  "Id": "CICDPipelineBaselinePolicy",
  "Version": "2012-10-17",
  "Statement": [
    {
      "Effect": "Allow",
      "Action": [
        "ec2:*",
        "sqs:*",
        "s3:*",
        "cloudwatch:*",
        "cloudformation:*",
        "logs:*",
        "autoscaling:*"
      ],
      "Resource": "*"
    },
    {
      "Effect": "Allow",
      "Action": "ssm:GetParameter*",
      "Resource": "arn:aws:ssm:*::parameter/aws/service/*"
    },
    {
      "Effect": "Allow",
      "Action": [
        "iam:CreateRole",
        "iam:PutRolePolicy",
        "iam:DeleteRolePolicy"
      ],
      "Resource": "arn:aws:iam::111111111111:role/application-roles/*",
      "Condition": {
        "ArnEquals": {
          "iam:PermissionsBoundary": "arn:aws:iam::111111111111:policy/PermissionsBoundary"
        }
      }
    },
    {
      "Effect": "Allow",
      "Action": [
        "iam:AttachRolePolicy",
        "iam:DetachRolePolicy"
      ],
      "Resource": "arn:aws:iam::111111111111:role/application-roles/*",
      "Condition": {
        "ArnEquals": {
          "iam:PermissionsBoundary": "arn:aws:iam::111111111111:policy/PermissionsBoundary"
        },
        "ArnLike": {
          "iam:PolicyARN": "arn:aws:iam::111111111111:policy/application-role-policies/*"
        }
      }
    },
    {
      "Effect": "Allow",
      "Action": [
        "iam:DeleteRole",
        "iam:TagRole",
        "iam:UntagRole",
        "iam:GetRole",
        "iam:GetRolePolicy"
      ],
      "Resource": "arn:aws:iam::111111111111:role/application-roles/*"
    },
    {
      "Effect": "Allow",
      "Action": [
        "iam:CreatePolicy",
        "iam:DeletePolicy",
        "iam:CreatePolicyVersion",
        "iam:DeletePolicyVersion",
        "iam:GetPolicy",
        "iam:TagPolicy",
        "iam:UntagPolicy",
        "iam:SetDefaultPolicyVersion",
        "iam:ListPolicyVersions"
      ],
      "Resource": "arn:aws:iam::111111111111:policy/application-role-policies/*"
    },
    {
      "Effect": "Allow",
      "Action": [
        "iam:CreateInstanceProfile",
        "iam:AddRoleToInstanceProfile",
        "iam:RemoveRoleFromInstanceProfile",
        "iam:DeleteInstanceProfile"
      ],
      "Resource": "arn:aws:iam::111111111111:instance-profile/application-instance-profiles/*"
    },
    {
      "Effect": "Allow",
      "Action": "iam:PassRole",
      "Resource": [
        "arn:aws:iam::111111111111:role/application-roles/*",
        "arn:aws:iam::111111111111:role/aws-service-role/autoscaling.amazonaws.com/AWSServiceRoleForAutoScaling*"
      ]
    },
    {
      "Effect": "Allow",
      "Action": "iam:CreateServiceLinkedRole",
      "Resource": "arn:aws:iam::111111111111:role/aws-service-role/*",
      "Condition": {
        "StringEquals": {
          "iam:AWSServiceName": "autoscaling.amazonaws.com"
        }
      }
    },
    {
      "Effect": "Allow",
      "Action": [
        "iam:DeleteServiceLinkedRole",
        "iam:GetServiceLinkedRoleDeletionStatus"
      ],
      "Resource": "arn:aws:iam::111111111111:role/aws-service-role/autoscaling.amazonaws.com/AWSServiceRoleForAutoScaling*"
    },
    {
      "Effect": "Allow",
      "Action": "iam:ListRoles",
      "Resource": "*"
    },
    {
      "Effect": "Allow",
      "Action": "iam:GetRole",
      "Resource": [
        "arn:aws:iam::111111111111:role/application-roles/*",
        "arn:aws:iam::111111111111:role/aws-service-role/*"
      ]
    }
  ]
}

In addition to the three baseline roles with identity-based policies in place that you’ve seen so far, there’s one additional IAM role that the Application Team creates using the CI/CD pipeline. This is the role that the application running on the EC2 instance will use to get and put objects from the S3 buckets in Figure 1. Explicit ownership allows the Application Team to create this identity-based policy that fits their needs without having to wait and depend on the Central Cloud Team. Because the CI/CD pipeline can only create roles that have the permissions boundary policy attached, Policy 6 cannot grant more access than the permissions boundary policy allows (Policy 3).

If you compare the identity-based policy attached to the EC2 instance’s role (Policy 6 on left) with the permissions boundary policy described previously (Policy 3 on the right), you can see that the actions allowed by the EC2 instance’s role are also allowed by the permissions boundary policy. Actions must be allowed by both policies for the EC2 instance to perform the s3:GetObject and s3:PutObject actions. Access to create a bucket would be denied even if the role attached to the EC2 instance was given permission to perform the s3:CreateBucket action because the s3:CreateBucket action exceeds the permissions allowed by the permissions boundary.

Policy 6: Identity-based policy bound by permissions boundary and attached to the application’s EC2 instance

{
  "Id": "ApplicationRolePolicy",
  "Version": "2012-10-17",
  "Statement": [
	{   
      "Effect": "Allow",    
      "Action": [
         "s3:PutObject",
         "s3:GetObject"
    ],    
    "Resource": "arn:aws:s3:::DOC-EXAMPLE-BUCKET1/*"
  },
{   
      "Effect": "Allow",    
      "Action": [
         "s3:GetObject"
      ],    
      "Resource": "arn:aws:s3:::DOC-EXAMPLE-BUCKET2/*"
    }
  ]
}

Policy 3: Permissions boundary policy attached to IAM roles created by the CI/CD pipeline.

{
  "Id": "PermissionsBoundaryPolicy",
  "Version": "2012-10-17",
  "Statement": [
    {
      "Effect": "Allow",
      "Action": [
        "s3:PutObject",
        "s3:GetObject",
        "sqs:ChangeMessageVisibility",
        "sqs:DeleteMessage",
        "sqs:ReceiveMessage",
        "sqs:SendMessage",
        "sqs:PurgeQueue",
        "sqs:GetQueueUrl",
        "logs:PutLogEvents"
      ],
      "Resource": "*"
    }
  ]
}

Resource-based policies
The only resource-based policy needed in this example is attached to the bucket in the account external to the application account (DOC-EXAMPLE-BUCKET2 in the data lake account in Figure 1). Both the identity-based policy and resource-based policy must grant access to an action on the S3 bucket for access to be allowed in a cross-account scenario. The bucket policy below only allows the GetObject action to be performed on the bucket, regardless of what permissions the application’s role (ApplicationRole) is granted from its identity-based policy (Policy 6).

This resource-based policy is owned by the Data Lake Team that owns and manages the data lake account (222222222222) and the policy (Policy 7). This allows the Data Lake Team to have complete control over what teams external to their AWS account can access their S3 bucket.

Policy 7: Resource-based policy attached to S3 bucket in external data lake account (222222222222)

{
  "Version": "2012-10-17",
  "Statement": [
    {
      "Principal": {
        "AWS": "arn:aws:iam::111111111111:role/application-roles/ApplicationRole"
      },
      "Effect": "Allow",
      "Action": [
        "s3:GetObject"
      ],
      "Resource": "arn:aws:s3:::DOC-EXAMPLE-BUCKET2/*"
    }
  ]
}

No resource-based policy is needed on the S3 bucket in the application account (DOC-EXAMPLE-BUCKET1 in Figure 1). Access for the application is granted to the S3 bucket in the application account by the identity-based policy. Access can be granted by either an identity-based policy or a resource-based policy when access is within the same AWS account.

Putting it all together

Figure 2 shows the architecture and includes the different policies and the resources they are attached to. The table that follows summarizes the various IAM policies that are deployed to the Example Corp AWS environment, and specifies what team is responsible for each of the policies.

Figure 2: Sample application architecture with CI/CD pipeline used to deploy infrastructure

Figure 2: Sample application architecture with CI/CD pipeline used to deploy infrastructure

The numbered policies in Figure 2 correspond to the policy numbers in the following table.

Policy number

Policy description

Policy type

Policy owner

Attached to

1

Enforce SSL and prevent member accounts from leaving the organization for all principals in the organization

Service control policy (SCP)

Central Cloud Team

Organization root

2

Enforce TLS 1.2 and KMS encryption for S3 buckets across the organization

Resource control policy (RCP)

Central Cloud Team

Organization root

3

Restrict maximum permissions for roles created by CI/CD pipeline

Permissions boundary

Central Cloud Team

All roles created by the pipeline (ApplicationRole)

4

Scoped read-only policy

Identity-based policy

Central Cloud Team

IAM role

5

CI/CD pipeline policy

Identity-based policy

Central Cloud Team

IAM role

6

Policy used by running application to read and write to S3 buckets

Identity-based policy

Application Team

on EC2 instance

7

Bucket policy in data lake account that grants access to a role in application account

Resource-based policy

Data Lake Team

S3 Bucket in data lake account

8

Broad read-only policy

Identity-based policy

Central Cloud Team

IAM role

Conclusion
In this blog post, you learned about four different policy types: identity-based policies, resource-based policies, service control policies (SCPs), resource control polices (RCPs), permissions boundary policies, and resource control policies. You saw examples of situations where each policy type is commonly applied. Then, you walked through a real-life example that describes an implementation that uses these policy types.

By implementing multiple IAM policy types in a layered approach, you can achieve robust access control that follows the principle of least privilege while enabling team autonomy. This defense-in-depth strategy helps prevent unauthorized access through multiple policy evaluation checkpoints.

You can use this blog post as a starting point for developing your organization’s IAM strategy. You might decide that you don’t need all of the policy types explained in this post, and that’s OK. Not every organization needs to use every policy type. You might need to implement policies differently in a production environment than a sandbox environment. The important concepts to take away from this post are the situations where each policy type is applicable, and the importance of explicit policy ownership. We also recommend taking advantage of policy validation in AWS IAM Access Analyzer when writing IAM policies to validate your policies against IAM policy grammar and best practices.

For more information, including the policies described in this solution and the sample application, see the how-and-when-to-use-aws-iam-policy-blog-samples GitHub repository. The repository walks through an example implementation using a CI/CD pipeline with AWS CodePipeline.If you have any questions, please post them in the AWS Identity and Access Management re:Post topic or reach out to AWS Support.

Author

Matt Luttrell

Matt is a Sr. Solutions Architect on the AWS Identity Solutions team. When he’s not spending time chasing his kids around, he enjoys skiing, cycling, and the occasional video game.

Author

Jay Goradia

Jay is a Technical Account Manager (TAM) at AWS who works closely with enterprise customers to accelerate their cloud journey through strategic guidance and technical expertise. Using his security background, he helps organizations understand security best practices in AWS.

Author

Anshu Bathla

Anshu is a Lead Consultant – SRC at AWS, based in Gurugram, India. He works with customers across diverse verticals to help strengthen their security infrastructure and achieve their security goals. Outside of work, Anshu enjoys reading books and gardening at his home garden.

Josh Joy

Josh is a Senior Identity Security Engineer with AWS Identity helping to ensure the safety and security of AWS Auth integration points. Josh enjoys diving deep and working backwards in order to help customers achieve positive outcomes. 

  •  

File integrity monitoring with AWS Systems Manager and Amazon Security Lake 

Customers need solutions to track inventory data such as files and software across Amazon Elastic Compute Cloud (Amazon EC2) instances, detect unauthorized changes, and integrate alerts into their existing security workflows.

In this blog post, I walk you through a highly scalable serverless file integrity monitoring solution. It uses AWS Systems Manager Inventory to collect file metadata from Amazon EC2 instances. The metadata is sent through the Systems Manager Resource Data Sync feature to a versioned Amazon Simple Storage Service (Amazon S3) bucket, storing one inventory object for each EC2 instance. Each time a new object is created in Amazon S3, an Amazon S3 Event Notification triggers a custom AWS Lambda function. This Lambda function compares the latest inventory version with the previous one to detect file changes. If a file that isn’t expected to change has been created, modified, or deleted, the function creates an actionable finding in AWS Security Hub. Findings are then ingested by Amazon Security Lake in a standard OCSF format, which centralizes and normalizes the data. Finally, the data can be analyzed using Amazon Athena for one-time queries, or by building visual dashboards with Amazon QuickSight and Amazon OpenSearch Service. Figure 1 summarizes this flow:

Figure 1: File integrity monitoring workflow

Figure 1: File integrity monitoring workflow

This integration offers an alternative to the default AWS Config and Security Hub integration, which relies on limited data (for example, no file modification timestamps). The solution presented in this post provides control and flexibility to implement custom logic tailored to your operational needs and support security-related efforts.

This flexible solution can also be used with other Systems Manager Inventory metadata, such as installed applications, network configurations, or Windows registry entries, enabling custom detection logic across a wide range of operational and security use cases.

Now let’s build the file integrity monitoring solution.

Prerequisites

Before you get started, you need an AWS account with permissions to create and manage AWS resources such as Amazon EC2, AWS Systems Manager, Amazon S3, and Lambda.

Step 1: Start an EC2 instance

Start by launching an EC2 instance and creating a file that you will later modify to simulate an unauthorized change.

Create an AWS Identity and Access Management (IAM) role to allow the EC2 instance to communicate with Systems Manager:

  1. Open the AWS Management Console and go to IAM, choose Roles from the navigation pane, and then choose Create role.
  2. Under Trusted entity type, select AWS service, select EC2 as the use case, and choose Next.
  3. On the Add permissions page, search for and select the AmazonSSMManagedInstanceCore IAM policy, then choose Next.
  4. Enter SSMAccessRole as the role name and choose Create role.
  5. The new SSMAccessRole should now appear in your list of IAM roles:
Figure 2: Create an IAM role for communication with Systems Manager

Figure 2: Create an IAM role for communication with Systems Manager

Start an EC2 instance:

  1. Open the Amazon EC2 console and choose Launch Instance.
  2. Enter a Name, keep the default Linux Amazon Machine Image (AMI), and select an Instance type (for example, t3.micro).
  3. Under Advanced details:
    1. IAM instance profile, select the previously created SSMAccessRole
    2. Create a fictitious payment application configuration file in the /etc/paymentapp/ folder on the EC2 instance. Later, you will modify it to demonstrate a file-change event for integrity monitoring. To create this file during EC2 startup, copy and paste the following script into User data.
#!/bin/bash
mkdir -p /etc/paymentapp
echo "db_password=initial123" > /etc/paymentapp/config.yaml
Figure 3: Adding the application configuration file

Figure 3: Adding the application configuration file

  1. Leave the remaining settings as default, choose Proceed without key pair, and then select Launch Instance. A key pair isn’t required for this demo because you use Session Manager for access.

Step 2: Enable Security Hub and Security Lake

If Security Hub and Security Lake are already enabled, you can skip to Step 3.
To start, enable Security Hub, which collects and aggregates security findings. AWS Security Hub CSPM adds continuous monitoring and automated checks against best practices.

  1. Open the Security Hub console.
  2. Choose Security Hub CSPM from the navigation pane and then select Enable AWS Security Hub CSPM and choose Enable Security Hub CSPM at the bottom of the page.

Note: For this demo, you don’t need the Security standards options and can clear them.

Figure 4: Enable Security Hub CSP

Figure 4: Enable Security Hub CSP

Next, activate Security Lake to start collecting actionable findings from Security Hub:

  1. Open the Amazon Security Lake console and choose Get Started.
  2. Under Data sources, select Ingest specific AWS sources.
  3. Under Log and event sources, select Security Hub (you will use this only for this demo):
Figure 5: Select log and event sources

Figure 5: Select log and event sources

  1. Under Select Regions, choose Specific Regions and make sure you select the AWS Region that you’re using.
  2. Use the default option to Create and use a new service role.
  3. Choose Next and Next again, then choose Create.

Step 3: Configure Systems Manager Inventory and sync to Amazon S3

With Security Hub and Security Lake enabled, the next step is to enable Systems Manager Inventory to collect file metadata and configure a Resource Data Sync to export this data to S3 for analysis.

  1. Create an S3 bucket by carefully following the instructions in the section To create and configure an Amazon S3 bucket for resource data sync.
  2. After you created the bucket, enable versioning in the Amazon S3 console by opening the bucket’s Properties tab, choosing Edit under Bucket Versioning, selecting Enable, and saving your changes. Versioning causes each new inventory snapshot to be saved as a separate version, so that you can track file changes over time.

Note: In production, enable S3 server access logging on the inventory bucket to keep an audit trail of access requests, enforce HTTPS-only access, and enable CloudTrail data events for S3 to record who accessed or modified inventory files.

The next step is to enable Systems Manager Inventory and set up the resource data sync:

  1. In the Systems Manager console, go to Fleet Manager, choose Account management, and select Set up inventory.
  2. Keep the default values but deselect every inventory type except File. Set a Path to limit collection to the files relevant for this demo and your security requirements. Under File, set the Path to: /etc/paymentapp/.
Figure 6: Set the parameters and path

Figure 6: Set the parameters and path

  1. Choose Setup Inventory.
  2. In Fleet Manager, choose Account management and select Resource Data Syncs.
  3. Choose Create resource data sync, enter a Sync name, and enter the name of the versioned S3 bucket you created earlier.
  4. Select This Region and then choose Create.

Step 4: Implement the Lambda function

Next, complete the setup to detect changes and create findings. Each time Systems Manager Inventory writes a new object to Amazon S3, an S3 Event Notification triggers a Lambda function that compares the latest and previous object versions. If it finds created, modified, or deleted files, it creates a security finding. To accomplish this, you will create the Lambda function, set its environment variables, add the helper layer, and attach the required permissions.

The following is an example finding generated in AWS Security Finding Format (ASFF) and sent to Security Hub. In this example, you see a notification about a file change on the EC2 instance listed under the Resources section.

{
	...
"Id": "fim-i-0b8f40f4de065deba-2025-07-12T13:48:31.741Z",
	"AwsAccountId": "XXXXXXXXXXXX",
	"Types": [
		"Software and Configuration Checks/File Integrity Monitoring"
	],
	"Severity": {
		"Label": "MEDIUM"
	},
	"Title": "File changes detected via SSM Inventory",
	"Description": "0 created, 1 modified, 0 deleted file(s) on instance i-0b8f40f4de065deba",
	"Resources": [
		{
			"Type": "AwsEc2Instance",
			"Id": "i-0b8f40f4de065deba"
		}
	],
	...
}

Create the Lambda function

This function detects file changes, reports findings, and removes unused Amazon S3 object versions to reduce costs.

  1. Open the Lambda console and choose Create function in the navigation pane.
  2. For Function Name enter fim-change-detector.
  3. Select Author from scratch, enter a function name, select the latest Python runtime, and choose Create function.
  4. On the Code tab, paste the following main function and choose Deploy.
import boto3, os, json, re
from datetime import datetime, UTC
from urllib.parse import unquote_plus
from helpers import is_critical, load_file_metadata, is_modified, extract_instance_id

s3 = boto3.client('s3')
securityhub = boto3.client('securityhub')

CRITICAL_FILE_PATTERNS = os.environ["CRITICAL_FILE_PATTERNS"].split(",")
SEVERITY_LABEL = os.environ["SEVERITY_LABEL"]
	
def lambda_handler(event, context):
	# Safe event handling
	if "Records" not in event or not event["Records"]:
		return

	# Extract S3 event
	record = event['Records'][0]
	bucket = record['s3']['bucket']['name']
	key = unquote_plus(record['s3']['object']['key'])
	current_version = record['s3']['object'].get('versionId')
	if not current_version:
		return

	# Fetching the region name
	account_id = context.invoked_function_arn.split(":")[4]
	region = boto3.session.Session().region_name

	# Get object versions (latest first)
	versions = s3.list_object_versions(Bucket=bucket, Prefix=key).get('Versions', [])
	versions = sorted(versions, key=lambda v: v['LastModified'], reverse=True)

	# Find previous version
	idx = next((i for i,v in enumerate(versions) if v["VersionId"] == current_version), None)
	if idx is None or idx + 1 >= len(versions):
		return
	prev_version = versions[idx+1]["VersionId"]

	# Load both versions
	current = load_file_metadata(bucket, key, current_version)
	previous = load_file_metadata(bucket, key, prev_version)

	# Compare
	created = {p for p in set(current) - set(previous) if is_critical(p)}
	deleted = {p for p in set(previous) - set(current) if is_critical(p)}
	modified = {p for p in set(current) & set(previous) if is_critical(p) and is_modified(p, current, previous)}

	# Report if changes were found
	if created or deleted or modified:
		instance_id = extract_instance_id(bucket, key, current_version)
		now = datetime.now(UTC).isoformat(timespec='milliseconds').replace('+00:00', 'Z')
		finding = {
			"SchemaVersion": "2018-10-08",
			"Id": f"fim-{instance_id}-{now}",
			"ProductArn": f"arn:aws:securityhub:{region}:{account_id}:product/{account_id}/default",
			"AwsAccountId": account_id,
			"GeneratorId": "ssm-inventory-fim",
			"CreatedAt": now,
			"UpdatedAt": now,
			"Types": ["Software and Configuration Checks/File Integrity Monitoring"],
			"Severity": {"Label": SEVERITY_LABEL},
			"Title": "File changes detected via SSM Inventory",
			"Description": (
				f"{len(created)} created, {len(modified)} modified, "
				f"{len(deleted)} deleted file(s) on instance {instance_id}"
			),
			"Resources": [{"Type": "AwsEc2Instance", "Id": instance_id}]
		}
		securityhub.batch_import_findings(Findings=[finding])

	# No change – delete older S3 version
	else:
		if prev_version != current_version:
			try:
				s3.delete_object(Bucket=bucket, Key=key, VersionId=prev_version)
			except Exception as e:
				print(f"Delete previous S3 object version failed: {e}")

Note: In production, set Lambda reserved concurrency to prevent unbounded scaling, configure a dead letter queue (DLQ) to capture failed invocations, and optionally attach the function to an Amazon VPC for network isolation.

Configure environment variables

Configure the two required environment variables in the Lambda console. These two variables (one for critical paths to monitor and one for security finding severity) must be set or the function will fail.

  1. Open the Lambda console and choose Configuration and then select Environment variables.
  2. Choose Edit and then choose Add environment variable.
  3. Under Key, choose CRITICAL_FILE_PATTERNS
    1. Enter ^/etc/paymentapp/config.*$ as the value.
    2. Set the SEVERITY_LABEL to MEDIUM.
Figure 7: CRITICAL_FILE_PATTERNS and SEVERITY_LABEL configuration

Figure 7: CRITICAL_FILE_PATTERNS and SEVERITY_LABEL configuration

Set up permissions

The next step is to attach permissions to the Lambda function

  1. In your Lambda function, choose Configuration and then select Permissions.
  2. Under Execution role, select the role name that will lead to the role in IAM.
  3. Choose Add permissions and select Create inline policy. Select JSON view.
  4. Paste the following policy, and make sure to replace <bucket-name> with the name of your S3 bucket, and you also update <region> and <account-id> with your AWS Region and Account ID:
{
"Version": "2012-10-17",
"Statement": [
	{
		"Effect": "Allow",
		"Action": "securityhub:BatchImportFindings",
		"Resource": "arn:aws:securityhub:<region>:<account-id>:product/<account-id>/default"
	},
	{
		"Effect": "Allow",
		"Action": [
			"s3:GetObject",
			"s3:GetObjectVersion",
			"s3:ListBucketVersions",
			"s3:DeleteObjectVersion"
		],
		"Resource": [
			"arn:aws:s3:::<bucket-name>",
			"arn:aws:s3:::<bucket-name>/*"
			]
		}
	]
}
  1. To finalize, enter a Policy name and choose Create policy.

Add functions to the Lambda layer

For better modularity, add some helper functions to a Lambda layer. These functions are already referenced in the import section of the preceding Lambda function’s Python code. The helper functions check critical paths, load file metadata, compare modification times, and extract the EC2 instance ID.

Open AWS CloudShell from the top-right corner of the AWS console header, then copy and paste the following script and press Enter. It creates the helper layer and attaches it to your Lambda function.

#!/bin/bash
set -e
FUNCTION_NAME="fim-change-detector"
LAYER_NAME="fim-change-detector-layer"

mkdir -p python
cat > python/helpers.py << 'EOF'
import json, re, os
from dateutil.parser import parse as parse_dt
import boto3
s3 = boto3.client('s3')
CRITICAL_FILE_PATTERNS = os.environ.get("CRITICAL_FILE_PATTERNS", "").split(",")

def is_critical(path):
	return any(re.match(p.strip(), path) for p in CRITICAL_FILE_PATTERNS if p.strip())

def load_file_metadata(bucket, key, version_id):
	obj = s3.get_object(Bucket=bucket, Key=key, VersionId=version_id)
	data = {}
	for line in obj['Body'].read().decode().splitlines():
		if line.strip():
			i = json.loads(line)
			n, d, m = i.get("Name","").strip(), i.get("InstalledDir","").strip(), i.get("ModificationTime","").strip()
			if n and d and m: data[f"{d.rstrip('/')}/{n}"] = m
	return data

def is_modified(path, current, previous):
	try: return parse_dt(current[path]) != parse_dt(previous[path])
	except: return current[path] != previous[path]

def extract_instance_id(bucket, key, version_id):
	obj = s3.get_object(Bucket=bucket, Key=key, VersionId=version_id)
	for line in obj['Body'].read().decode().splitlines():
		if line.strip():
			r = json.loads(line)
			if "resourceId" in r: return r["resourceId"]
	return None
EOF

zip -r helpers_layer.zip python >/dev/null
LAYER_VERSION_ARN=$(aws lambda publish-layer-version \
	--layer-name "$LAYER_NAME" \
	--description "Helper functions for File Integrity Monitoring" \
	--zip-file fileb://helpers_layer.zip \
	--compatible-runtimes python3.13 \
	--query 'LayerVersionArn' \
	--output text)

aws lambda update-function-configuration \
	--function-name "$FUNCTION_NAME" \
	--layers "$LAYER_VERSION_ARN" >/dev/null
echo "Layer created and attached to the Lambda function."

Step 5: Set up S3 Event Notifications

Finally, set up S3 Event Notifications to trigger the Lambda function when new inventory data arrives.

  1. Open the S3 console and select the Systems Manager Inventory bucket that you created.
  2. Choose Properties and select Event notifications.
  3. Choose Create event notification.
    1. Enter an Event name.
    2. In the Prefix field, enter AWS%3AFile/ to limit Lambda triggers to file inventory objects only.
      Note: The prefix contains a : character, which must be URL-encoded as %3A.
    3. Under Event types, select Put.
    4. At the bottom, select your newly created Lambda function, and choose Save changes.

In this example, inventory collection runs every 30 minutes (48 times each day) but can be adjusted based on security requirements to optimize costs. The Lambda function is triggered once for each instance whenever a new inventory object is created. You can further reduce event volume by filtering EC2 instances through S3 Event Notification prefixes, enabling focused monitoring of high-value instances.

Step 6: Test the file change detection flow

Now that the EC2 instance is running and the sample configuration file /etc/paymentapp/config.yaml has been initialized, you’re ready to simulate an unauthorized change to test the file integrity monitoring setup.

  1. Open the Systems Manager console.
  2. Go to Session Manager and choose Start session.
  3. Select your EC2 instance and choose Start Session.
  4. Run the following command to modify the file:

echo “db_password=hacked456" | sudo tee /etc/paymentapp/config.yaml

This simulates a configuration tampering event. During the next Systems Manager Inventory run, the updated metadata will be saved to Amazon S3.

To manually trigger this:

  1. Open the Systems Manager console and choose State Manager.
  2. Select your association and choose Apply association now to start the inventory update.
  3. After the association status changes to Success, check your SSM Inventory S3 bucket in the AWS:File folder and review the inventory object and its versions.
  4. Open the Security Hub console and choose Findings. After a short delay, you should see a new finding like the one shown in Figure 8:
Figure 8: View file change findings

Figure 8: View file change findings

Step 7: Query and visualize findings

While Security Hub provides a centralized view of findings, you can deepen your analysis using Amazon Athena to run SQL queries directly on the normalized Security Lake data in Amazon S3. This data follows the Open Cybersecurity Schema Framework (OCSF), which is a vendor-neutral standard that simplifies integration and analysis of security data across different tools and services.

The following is an example Athena query:

SELECT
	finding_info.desc AS description,
	class_uid AS class_id,
	severity AS severity_label,
	type_name AS finding_type,
	time_dt AS event_time,
	region,
	accountid
FROM amazon_security_lake_table_us_east_1_sh_findings_2_0

Note: Be sure to adjust the FROM clause for other Regions. Security Lake processes findings before they appear in Athena, so expect a short delay between ingestion and data availability.
You will see a similar result for the preceding query, shown in Figure 9:

Figure 9: Athena query result in the Amazon Athena query editor

Figure 9: Athena query result in the Amazon Athena query editor

Security Lake classifies this finding as an OCSF 2004 Class, Detection Finding. You can explore the full schema definitions at OCSF Categories. For more query examples, see the Security Lake query examples.
For visual exploration and real-time insights, you can integrate Security Lake with OpenSearch Service and QuickSight, both of which now offer extensive generative AI support. For a guided walkthrough using QuickSight, see How to visualize Amazon Security Lake findings with Amazon QuickSight.

Clean up

After testing the step-by-step guide, make sure to clean up the resources you created for this post to avoid ongoing costs.

  1. Terminate the EC2 instance
  2. Delete the Resource Data Sync and Inventory Association
  3. Remove the Lambda function.
  4. Disable Security Lake and Security Hub CSPM
  5. Delete IAM roles created for this post
  6. Delete the associated SSM Resource Data Sync and Security Lake S3 buckets.

Conclusion

In this post, you learned how to use Systems Manager Inventory to track file integrity, report findings to Security Hub, and analyze them using Security Lake.
You can access the full sample code to set up this solution in the AWS Samples repository.
While this post uses a single-account, single-Region setup for simplicity, Security Lake supports collecting data across multiple accounts and Regions using AWS Organizations. You can also use a Systems Manager resource data sync to send inventory data to a central S3 bucket.

Getting Started with Amazon Security Lake and Systems Manager Inventory provides guidance for enabling scalable, cloud-centric monitoring with full operational context.

Adam Nemeth Adam Nemeth
Adam is a Senior Solutions Architect and generative AI enthusiast at AWS, helping financial services customers by embracing the Day 1 culture and customer obsession of Amazon. With over 24 years of IT experience, Adam previously worked at UBS as an architect and has also served as a delivery lead, consultant, and entrepreneur. He lives in Switzerland with his wife and their three children.
  •  
❌