Login
Login
Transform security logs into OCSF format using a configuration-driven ETL solution
Security logs capture essential security-related activities, such as user sign-ins, file access, network traffic, and application usage. These logs are important for monitoring, detecting, and responding to potential security events. The Open Cybersecurity Schema Framework (OCSF) addresses this challenge by providing a standardized format to represent security events, ensuring consistent and efficient data handling across various systems. OCSF enhances interoperability, streamlines analysis, simplifies compliance reporting, and reduces vendor lock-in, fostering greater flexibility and efficiency in security operations.
However, manually transforming diverse security logs into OCSF format at scale can be complex and time-consuming. Amazon Security Lake simplifies this process by automatically centralizing security data from AWS services such as AWS CloudTrail management and data events (Amazon Simple Storage Service (Amazon S3) and AWS Lambda), Amazon Elastic Kubernetes Service (Amazon EKS) audit logs, Amazon Route 53 resolver query logs, AWS Security Hub findings, Amazon Virtual Private Cloud (Amazon VPC) Flow Logs, and AWS WAF logs. It also centralizes security logs from software as a service (SaaS) providers, on-premises, and cloud sources into a purpose-built data lake stored in your account. It uses the OCSF format to standardize and normalize this data, ensuring consistency and simplifying analysis. By integrating with analytics tools such as Amazon Athena and Amazon Quick Sight, Security Lake simplifies threat detection, improves security posture monitoring, and streamlines compliance reporting, making it an essential tool for modern security operations.
In this post, we show you how to transform custom security logs into OCSF format after you have the OCSF mappings ready, using a configuration-driven extract, transform, load (ETL) solution.
Accelerating OCSF adoption with AWS ProServe ETL solution
Amazon Security Lake stores security data in OCSF format and so customers looking to use custom log sources in Security Lake must transform their logs into OCSF format. To facilitate this process, the AWS Professional Services (ProServe) team built an ETL solution accelerator that converts custom security logs into OCSF format. This solution bridges existing log formats with the OCSF version 1.1 standard, streamlining data onboarding into Security Lake or other data lakes of security logs coming from multiple security tools.
Prerequisites
To implement this solution, you must have the following resources:
- AWS Command Line Interface (AWS CLI) installed.
- AWS CDK CLI installed.
- Python installed. This solution has been tested to deploy with Python 3.9.6 or later.
- Source security logs in their native format should be delivered to an S3 bucket using an external process.
- Access to the AWS CLI through a user who can launch AWS CloudFormation stacks and the services mentioned in this post, including Lambda, Amazon EMR, AWS Glue jobs, AWS Secrets Manager, Amazon Relational Database Service (Amazon RDS), Amazon DynamoDB, Amazon S3, Amazon CloudWatch, Amazon Simple Notification Service (Amazon SNS), Amazon EventBridge, and AWS Step Functions.
- This solution uses serverless AWS services including Amazon S3, Lambda, DynamoDB, Step Functions, and either AWS Glue or Amazon EMR Serverless for ETL. Costs depend on data volume and processing frequency. Key expenses are storage (Amazon S3 and DynamoDB), compute (Lambda, AWS Glue, and Amazon EMR), and orchestration services. The architecture is cost-optimized through serverless components and pay-per-use pricing. Use AWS Pricing Calculator to estimate costs for your specific log volume and retention needs.
Solution overview
The solution uses two input files: a mapping file and a configuration file. These files guide the transformation of source logs into OCSF-compliant Parquet format, which is then partitioned by location/region=region/accountId=accountID/eventDay=yyyyMMdd/ and stored in an Amazon S3 location provided by Security Lake.
The following diagram shows the key architecture components of this solution and data flow between them.
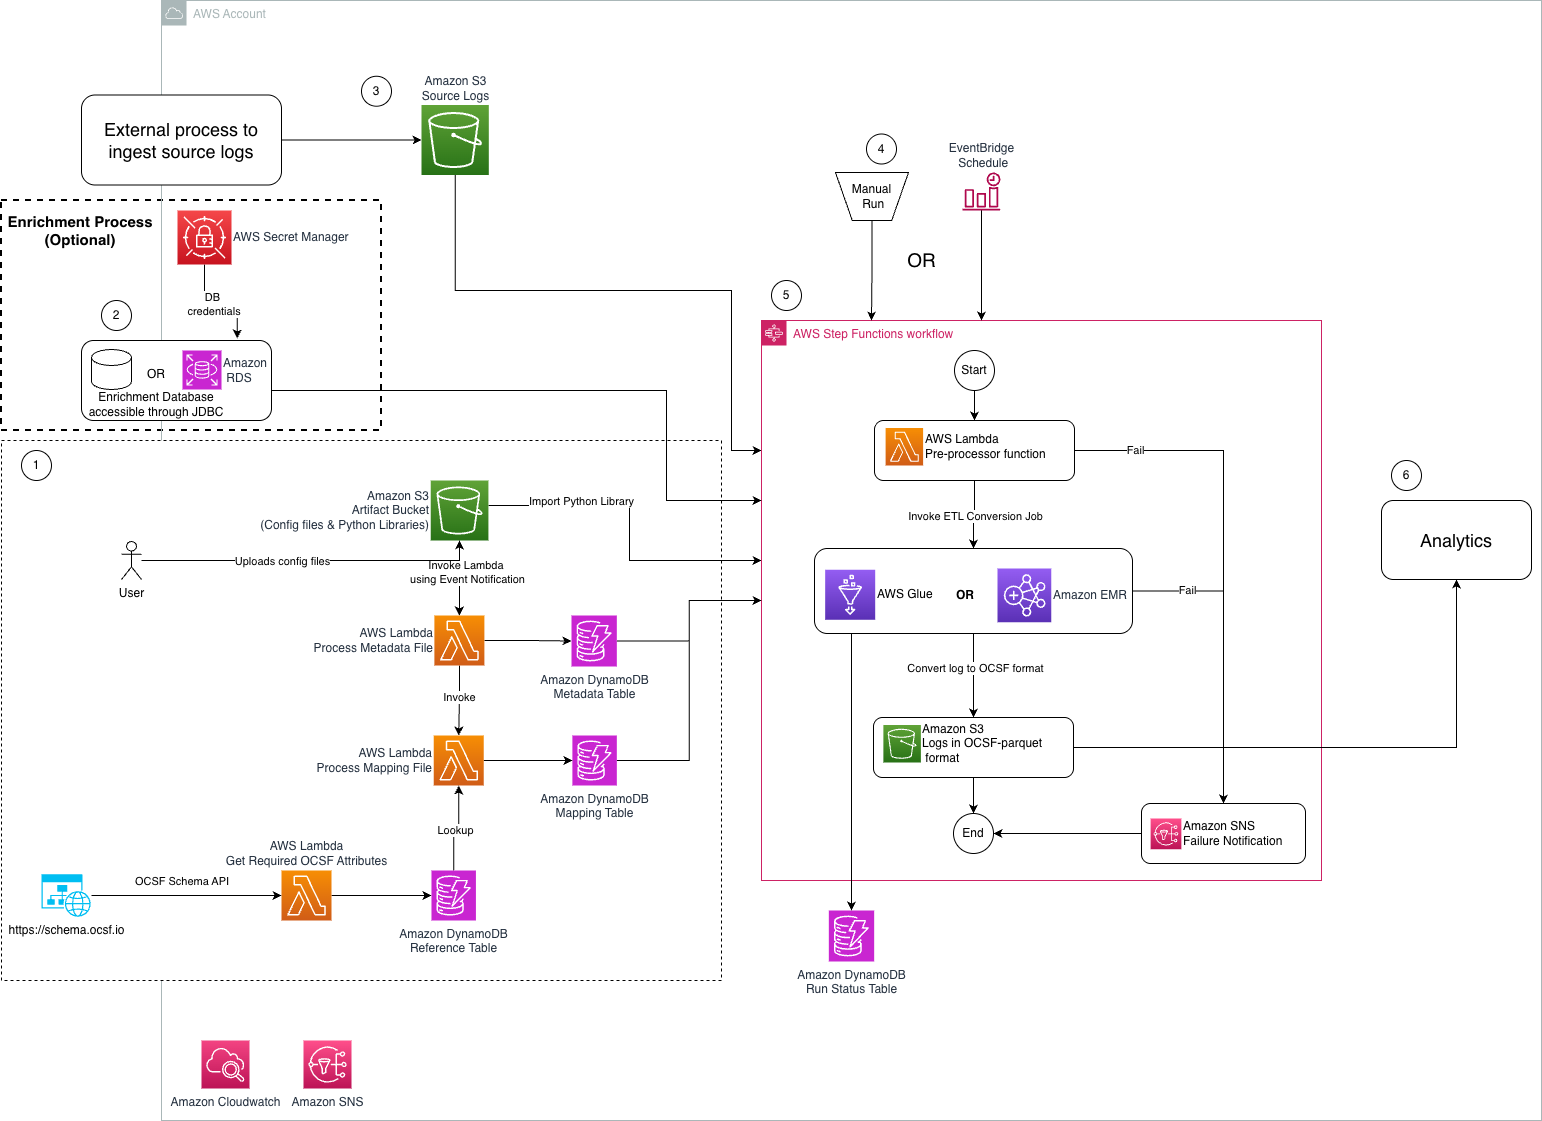
Figure 1: Architecture diagram of ETL solution to transform security logs into OCSF format
The steps mentioned below walks you through the architecture diagram:
- Preprocessing steps:
- User uploads a mapping file in CSV format that maps custom security logs into OCSF class.
- User uploads a metadata file in CSV format that is passed to the solution to transform custom security logs into OCSF format.
- An Amazon S3 artifact bucket stores the metadata, source-to-target mapping, and Python libraries required for OCSF conversion.
- An Amazon S3 event notification invokes the Lambda function that writes the metadata to the
asl-etl-framework-ocsf-attribute-metadataDynamoDB table when the metadata files are created or updated. - Metadata and mapping Lambda functions process the respective configuration files and store the required information in DynamoDB tables.
- The
ReferenceLambda function extracts the required OCSF attributes using an API call and stores the results in a DynamoDB table.
- Optional enrichment process: The solution reads data from an enrichment database stored on Amazon RDS or an external on-premises database that’s accessible through a JDBC connection from either Amazon EMR or AWS Glue. The credentials of this enrichment database are stored in Secrets Manager.
- Source log files are delivered to an S3 bucket by an external process.
- An EventBridge schedule or manual invoke initiates the Step Functions workflow, responsible for log conversion.
- A Step Functions workflow performs the following tasks:
- The preprocessor Lambda function performs checkpointing and invokes the required number of ETL jobs in parallel.
- The ETL job converts the source log files to the OCSF-Parquet format using the custom Python libraries stored in the artifact bucket and the mapping information defined in the DynamoDB table.
- A separate target S3 bucket stores the converted log data.
- An Amazon SNS topic is used to notify users if the Step Functions workflow fails during checkpointing or the ETL process.
- Analytics are performed on the converted data.
Deployment
You can find the required resources to deploy this solution in this GitHub repository. It provides detailed instructions in the README on how to deploy the solution. After you have the prerequisites mentioned earlier, see the Environment Setup portion of the repository.
Solution walkthrough
In this section, we walk you through steps to deploy this solution.
Map source log files into OCSF format
Before you start mapping the security logs into OCSF format, check if there are existing mappings available on OCSF mappings Github.
Mapping security logs into the OCSF format typically involves several steps. Here are the high-level steps:
- Understand OCSF schema: Familiarize yourself with the OCSF schema, which defines the structure and format for organizing security log data into event classes and attributes. In OCSF, events are organized into event classes, each of which comprises a set of attributes designed to offer comprehensive semantics for the event.
- Identify log sources: Determine your security log sources, such as firewalls, intrusion detection systems, or antivirus software. Each log source might have its own format (CSV, JSON, and so on) and structure.
- Identify OCSF categories and classes: Analyze the log content and match security events to the appropriate OCSF categories and classes for standardized data organization.
- Map fields to OCSF schema: Map the source log data fields in the OCSF schema. Ensure that each field from your logs is mapped to the appropriate field in the OCSF format. If a field in the source log schema isn’t mapped to any OCSF field, you might need to consider mapping it to unmapped object.
- Enrichment: Enrich data with additional contextual information, such as standardizing timestamps, converting IP addresses to a common format, or adding supplementary data for better analysis. The enrichment column is added to the final dataset. Each category in OCSF has an optional enrichment column that provides more information about a column. For example, the Authentication OCSF category contains an optional enrichment column that provides more details about the IP addresses. .
- Test and validate: Validate mapped log data against the OCSF schema to ensure compliance and accuracy. Test the mapping process with sample log data from different sources to identify any inconsistencies or errors. You can use this open source utility to validate your generated OCSF version 1.1 output file based on mapping.
- Contribute OCSF Mapping to the OCSF community: Submit the OCSF mapping to the Github repository and raise a pull request to contribute it to the OCSF community. Iterate on the mapping procedure to improve accuracy, efficiency, and compatibility with the OCSF schema based on the pull request feedback.
By following these steps, you can effectively map security logs into the OCSF format, enabling better interoperability, analysis, and collaboration across security tools and platforms. AWS ProServe has helped many customers map their security logs to OCSF format. If you need guidance to map and transform security logs into OCSF format and want to use AWS ProServe, reach out to your account executive.
Create and transform mapping files
The ETL solution requires a CSV mapping file that maps the custom security log attributes into standardized OCSF attributes based on the specified OCSF class. For detailed instructions on generating this mapping file, see the Solution Usage section, bullet 2, in the README of the code repository. To follow the instructions in this post, you can enable Amazon S3 server access logging to publish source logs to Amazon S3. The following is a sample S3 server access log record:
90de84bb542adb54766fec66ee554475b7e1a56a9d8b30e3598230f9ef6d6ac7 azv-asl-src-logs [29/May/2025:04:35:45 +0000] - arn:aws:sts::768196192565:assumed-role/AwsSecurityAudit/Palisade QS8DSY4SGF8M8SD7 REST.GET.BUCKETPOLICY - “GET /?policy HTTP/1.1" 200 - 255 - 39 - "-" "-" - N9XclJkv6hw/y4yApPyDII2sRoMNbqJqBEXdnmzFndcvhQOpdcc3PNQNQX7NhQaPJ5FKSVPh6hLB0GqsSN4apcbBUHi3rNcPRqa6rFLAYU4= SigV4 TLS_AES_128_GCM_SHA256 AuthHeader azv-asl-src-logs.s3.amazonaws.com TLSv1.3 - -
Because the sample record uses spaces as delimiters and contains an extra space before +0000, you need to wrap each attribute in quotes. Here’s a sample Python code implementation that handles this requirement:
import re
def format_s3_access_log(log_line):
    def quote_field(field):
        """Add quotes around a field and handle special cases"""
        if field is None or field.strip() == '':
            return '"-"'
        # If field is already quoted, return as is
        if field.startswith('"') and field.endswith('"'):
            return field
        return f'"{field}"'
    try:
        # First, protect quoted strings and bracketed content by temporarily replacing them
        protected_line = log_line
        protected_parts = re.findall(r'(\[.*?\]|".*?")', log_line)
        for i, part in enumerate(protected_parts):
            protected_line = protected_line.replace(part, f"PROTECTED_{i}_PART")
        # Split the protected line
        parts = protected_line.split()
        # Restore protected parts
        restored_parts = []
        for part in parts:
            if part.startswith('PROTECTED_') and part.endswith('_PART'):
                index = int(part.split('_')[1])
                restored_parts.append(protected_parts[index])
            else:
                restored_parts.append(part)
        # Quote each field
        quoted_fields = [quote_field(field) for field in restored_parts]
        # Join with spaces
        return ' '.join(quoted_fields)
    except Exception as e:
        print(f"Error processing line: {e}")
        return None

# Example usage
if __name__ == "__main__":
    # Example input log line
    log_line = '''90de84bb542adb54766fec66ee554475b7e1a56a9d8b30e3598230f9ef6d6ac7 azv-asl-src-logs [29/May/2025:04:35:45 +0000] - arn:aws:sts::768196192565:assumed-role/AwsSecurityAudit/Palisade QS8DSY4SGF8M8SD7 REST.GET.BUCKETPOLICY - "GET /?policy HTTP/1.1" 200 - 255 - 39 - "-" "-" - N9XclJkv6hw/y4yApPyDII2sRoMNbqJqBEXdnmzFndcvhQOpdcc3PNQNQX7NhQaPJ5FKSVPh6hLB0GqsSN4apcbBUHi3rNcPRqa6rFLAYU4= SigV4 TLS_AES_128_GCM_SHA256 AuthHeader azv-asl-src-logs.s3.amazonaws.com TLSv1.3 - -'''
    # Process the log line
    formatted_output = format_s3_access_log(log_line)
    print(formatted_output)
This sample code demonstrates how to wrap quotes around each attribute. You can extend this code to read source Amazon S3 server access log files from an S3 location and write the modified logs to another location. After these logs are available in an S3 bucket in your AWS account, you need to map the S3 server access logs to OCSF format. The following is an example of an S3 server access log CSV mapping file:
| src_log_type | src_column_name | tgt_column | default_values |
| s3-access-log | bucket_owner | resources:Object.owner:Object.uid:string | |
| s3-access-log | bucket | resources:array.value:string | |
| s3-access-log | time | time:timestamp | |
| s3-access-log | remote_ip | src_endpoint:object.ip:string | |
| s3-access-log | requester | actor:Object.user:object.uid:string | |
| s3-access-log | request_id | http_request:object.uid:string | |
| s3-access-log | operation | api:Object.operation:string | |
| s3-access-log | key | unmapped:Object.key:string | |
| s3-access-log | request_uri | http_request:object.url:object.url_string:string | |
| s3-access-log | http_status | http_response:object.code:integer | |
| s3-access-log | error_code | http_response:object.message:string | |
| s3-access-log | bytes_sent | http_response:object.length:integer | |
| s3-access-log | object_size | unmapped:Object.object_size:string | |
| s3-access-log | total_time | duration:integer | |
| s3-access-log | turn_around_time | http_response:object.Latency:integer | |
| s3-access-log | referer | http_request:object.referrer:string | |
| s3-access-log | user_agent | http_request:object.user_agent:string | |
| s3-access-log | version_id | unmapped:Object.version_id:string | |
| s3-access-log | host_id | unmapped:Object.host_id:string | |
| s3-access-log | signature_version | unmapped:Object.signature_version:string | |
| s3-access-log | cipher_suite | unmapped:Object.cipher_suite:string | |
| s3-access-log | authentication_type | unmapped:object.authentication_type:string | |
| s3-access-log | host_header | http_request:object.http_headers:array.value:string | |
| s3-access-log | tls_version | unmapped:Object.tls_version:string | |
| s3-access-log | access_point_arn | unmapped:Object.access_point_arn:string | |
| s3-access-log | acl_required | unmapped:Object.acl_required:string | |
| metadata:object.version:string | 1.1.0 | ||
| cloud:object.provider:string | AWS | ||
| metadata:object.product:string.name:string | S3 | ||
| metadata:object.product:string.vendor_name:string | AWS | ||
| http_request:object.http_headers:array.name:string | http_header | ||
| resources:array.name:string | bucket | ||
| activity_id:integer | 99 | ||
| severity_id:integer | 99 | ||
| type_uid:integer | 600399 | ||
| category_name:string | Application Activity |
Upload the mapping CSV file to the S3 artifact location s3://secure-datalake-artifacts-<account_number>-<aws_region>/config/mapping/. The Lambda function asl-etl-framework_update-mapping-ddb ingests this mapping CSV file, processes its entries, and converts them into the required DynamoDB format. This Lambda function writes the results to the asl-etl-framework-ocsf-attribute-mapping DynamoDB table, which stores the schema and mapping information for all source log files processed by this solution. You can find an example of an S3 server access log CSV metadata file in the GitHub repository.
Create and transform configuration files
To create a configuration metadata file, create a CSV file following the guidelines in Solution Usage, bullet 4, in the README of the code repository.
Upload the completed mapping CSV file into an S3 artifact location s3://secure-datalake-artifacts-<account_number>-<aws_region>/config/metadata/. An upload of a metadata CSV file to S3 invokes a Lambda function asl-etl-framework_insert_metadata_ddb, which stores the configuration in the asl-etl-framework-source-ocsf-metadata DynamoDB table. The following image shows the configuration in DynamoDB table.
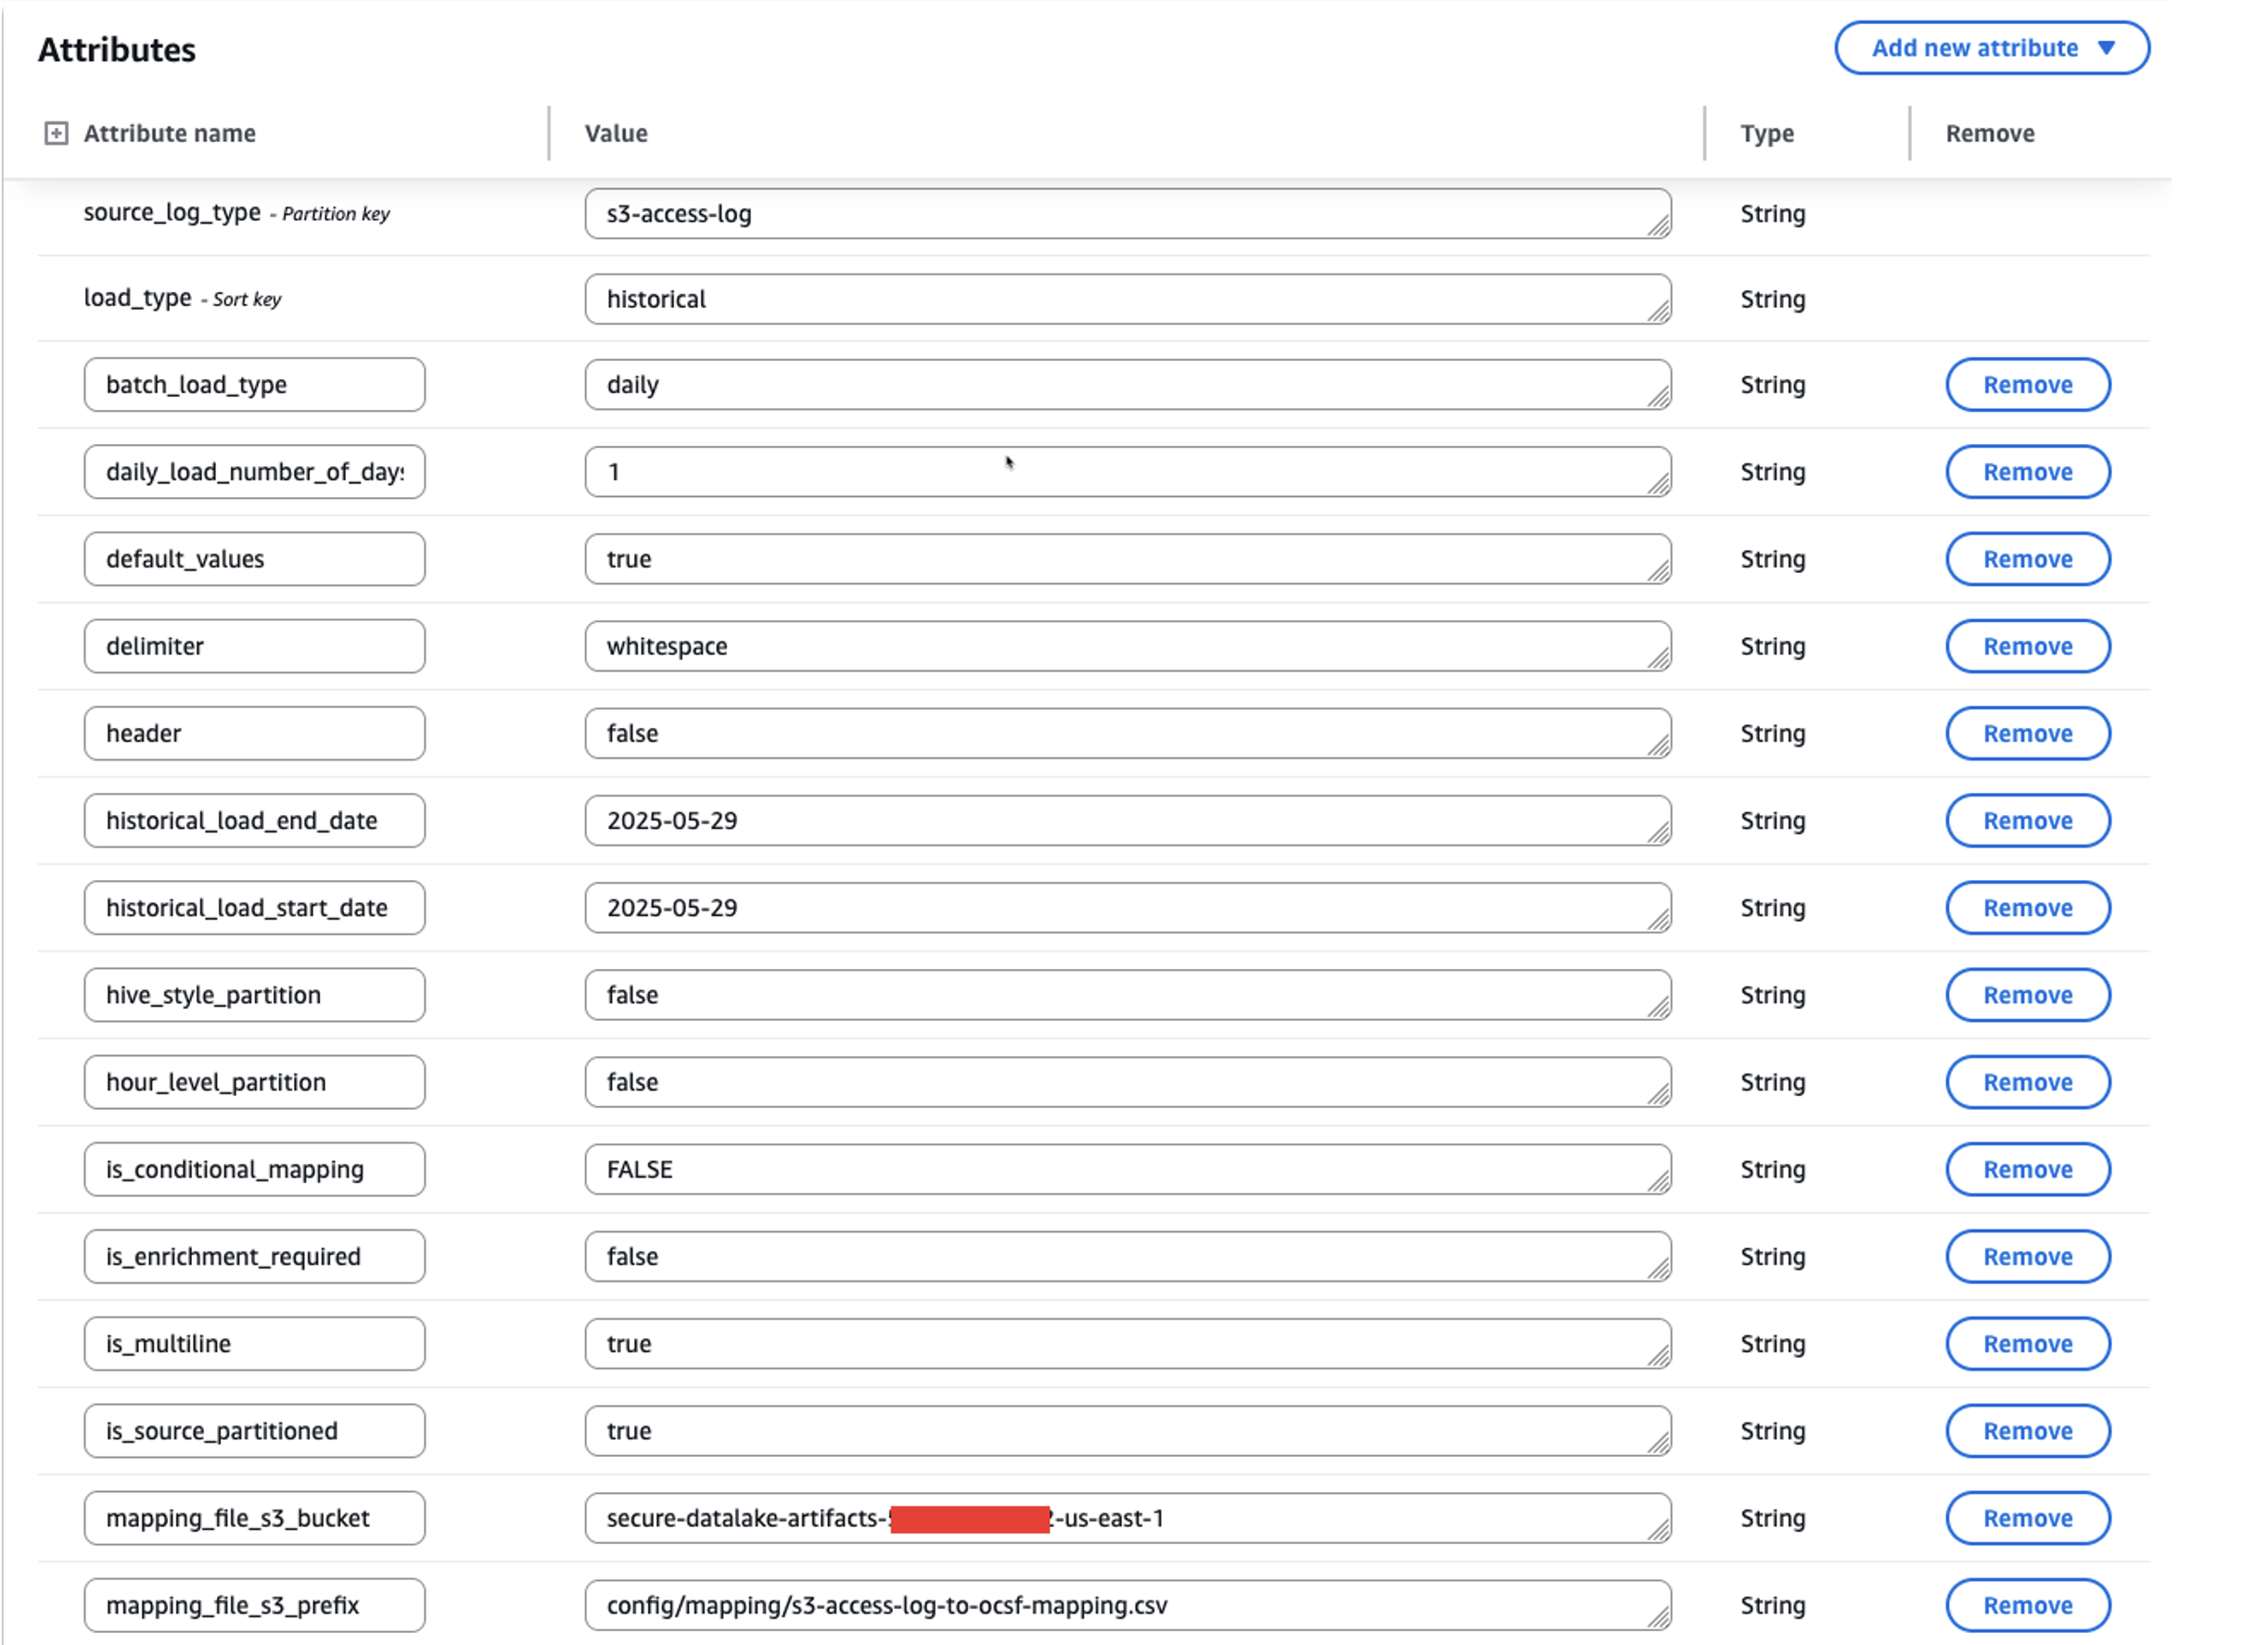
Figure 2: Screenshot of metadata configuration in the asl-etl-framework-source-ocsf-metadata DynamoDB table for S3 Access Logs
After inserting the metadata into the asl-etl-framework-source-ocsf-metadata DynamoDB table, the Lambda function asl-etl-framework_update-mapping-ddb is invoked to read the mapping CSV file and inserts mappings into the asl-etl-framework-ocsf-attribute-mapping DynamoDB table. The following image shows the mapping in DynamoDB table.
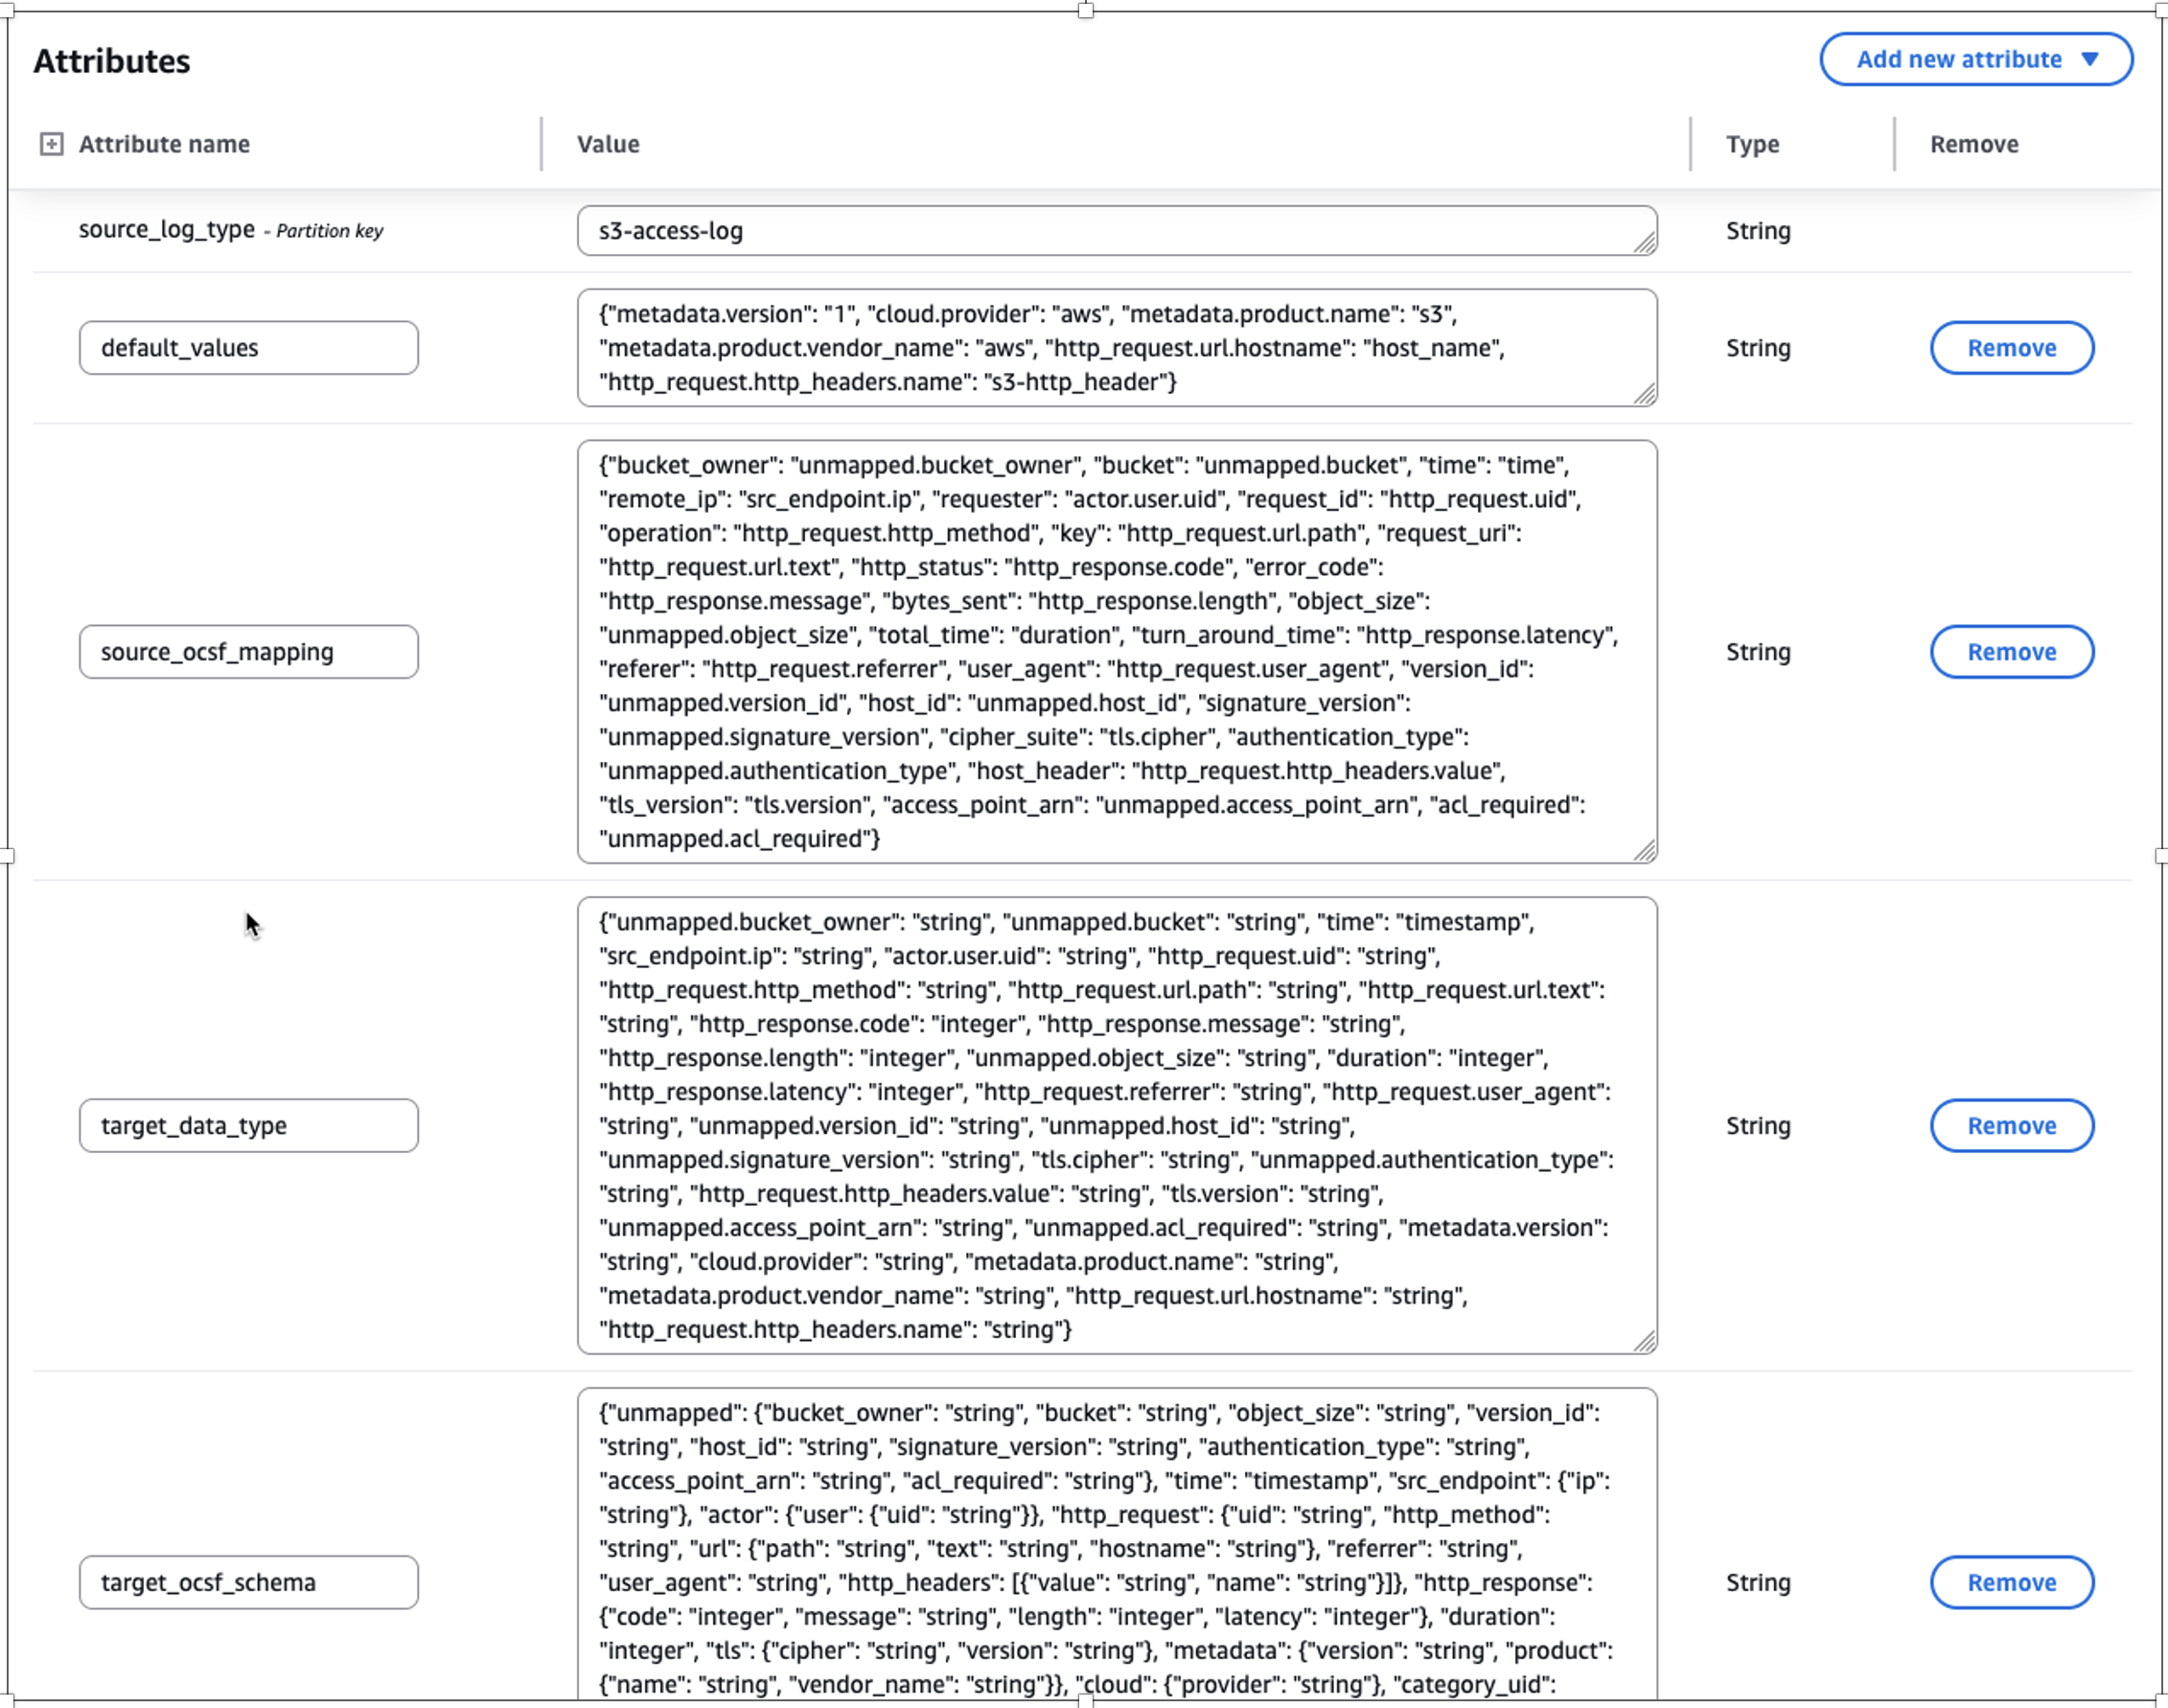
Figure 3: Screenshot of transformed mapping in the asl-etl-framework-ocsf-attribute-mapping DynamoDB table for S3 Access Logs
Historical load
The ETL solution offers a historical load capability that processes logs from specified date or year ranges based on metadata file inputs. After being converted to OCSF format in Parquet file format, these logs can be integrated into Amazon Security Lake or be used to create a custom data lake. The solution includes checkpointing functionality to handle potential failures during historical data processing.
The checkpointing feature provides process resilience by tracking conversion progress in the asl-etl-framework-ocsf-run-status DynamoDB table. If a conversion process fails during multi-year historical processing, the solution resumes from the point of failure rather than reprocessing previously converted data. For example, if conversion fails while processing the second year’s data, the solution will resume from that point, preserving the first year’s successful conversion. While this feature is enabled by default, you can disable it, in which case any process restart will begin from the initial specified date. The following image shows the load_type as historical along with start_time and end_time for the period you want to transform the logs.
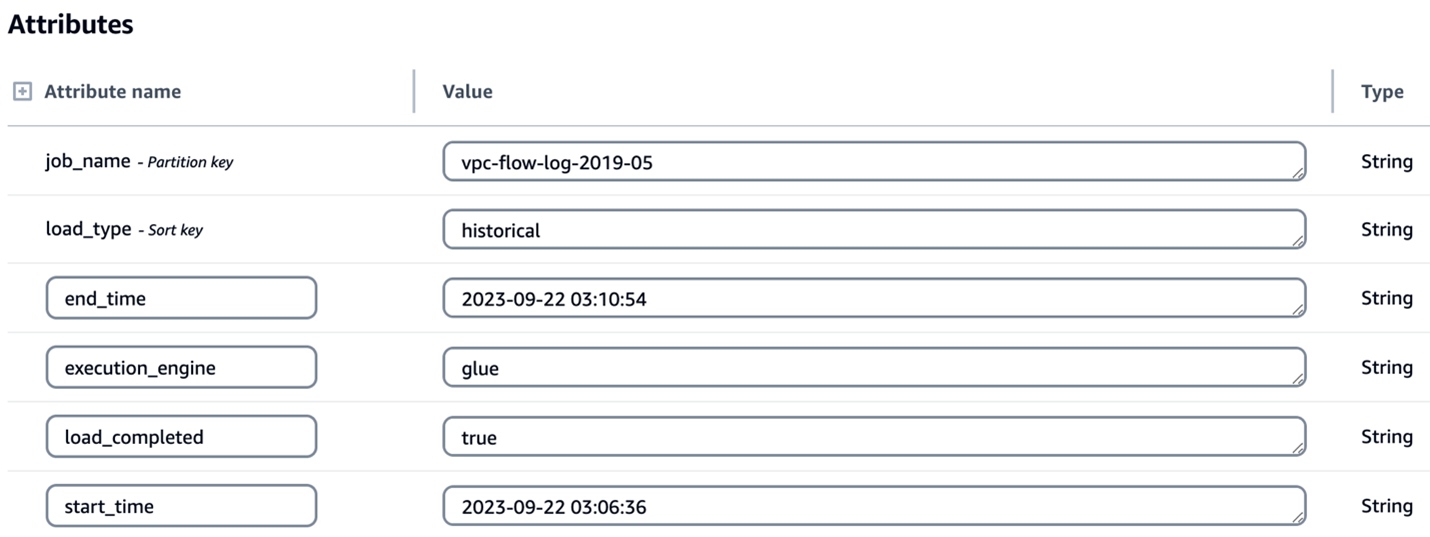
Figure 4: Screenshot of configuration for historical load attributes in the asl-etl-framework-source-ocsf-metadata DynamoDB table
Enrichment
Enterprises often possess valuable contextual data that can enhance their security logs through enrichment. By correlating existing data with security logs and appending relevant information, you can create more comprehensive datasets for advanced analytics and deeper security insights. After the logs are converted to OCSF, you might want to know more about specific columns or attributes so that you can extract meaningful information. To support this, the solution has an option for enrichment. For example, if you want to get additional information, such as the geolocation of each IP address in the logs, you can provide the source database information in the metadata CSV file of the solution. It connects to the source database through a JDBC connection, extracts the requested information associated with the IP address to enrich the dataset, and adds the extracted information as new columns to the converted OCSF log output. In this way, you can have detailed information about each IP address in the converted OCSF log. The following screenshot shows parameters for enabling enrichment by setting the is_enrichment_required flag as true and adding necessary enrichment_attributes to the metadata table.
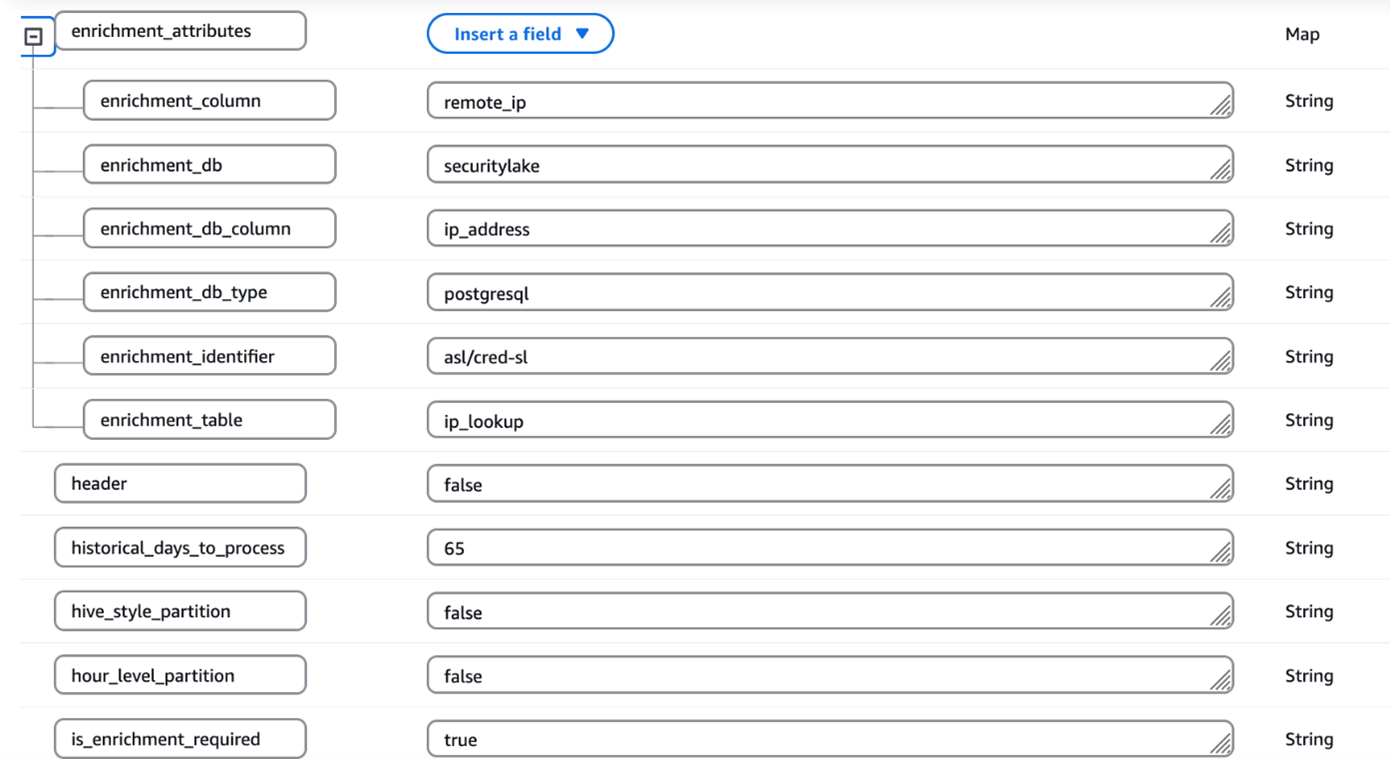
Figure 5: Screenshot of configuration for enrichment attributes in the asl-etl-framework-source-ocsf-metadata DynamoDB table
ETL transformation using AWS Glue or EMR Serverless
You can use the engine of your choice for the transformation by providing the engine name during the deployment steps as mentioned in the Pre-Deployment Configuration section of the ReadMe. Based on this, the solution uses either AWS Glue or EMR Serverless as mentioned in the Orchestration using Step Functions section.
The process includes the following steps:
- The user enters the metadata and mapping information in the respective CSV files and uploads the files to Amazon S3.
- A process (Lambda job) converts the metadata and mapping files to a DynamoDB schema and stores them in corresponding DynamoDB tables (metadata and mapping tables).
- A preprocessor job is invoked that takes the metadata from the DynamoDB table
asl-etl-framework-source-ocsf-metadataand, based on the input parameters passed for the Step Functions workflow shown in the Orchestration using Step Functions section, the Step Functions workflow generates the input arguments for the transformation job (AWS Glue or EMR Serverless based on the user’s choice). - The transformation job (AWS Glue or Amazon EMR based on the user’s choice) is invoked and reads the metadata and mapping tables and converts the data into OCSF format.
- The converted OCSF log files are stored to an Amazon S3 location in Parquet format, which is defined in the DynamoDB table
asl-etl-framework-source-ocsf-metadata. These custom OCSF logs on S3 can be integrated with Security Lake.
Orchestration using Step Functions
This solution is orchestrated using Step Functions and offers two execution engine options: AWS Glue or EMR Serverless, depending on the services allow-listed in your enterprise. For processing historical loads, we recommend using EMR Serverless; however, AWS Glue is suitable for historical loads less than 100 GB. When invoking the Step Functions workflow, specify the execution engine as either emr-serverless or glue in the input parameters passed using EventBridge.
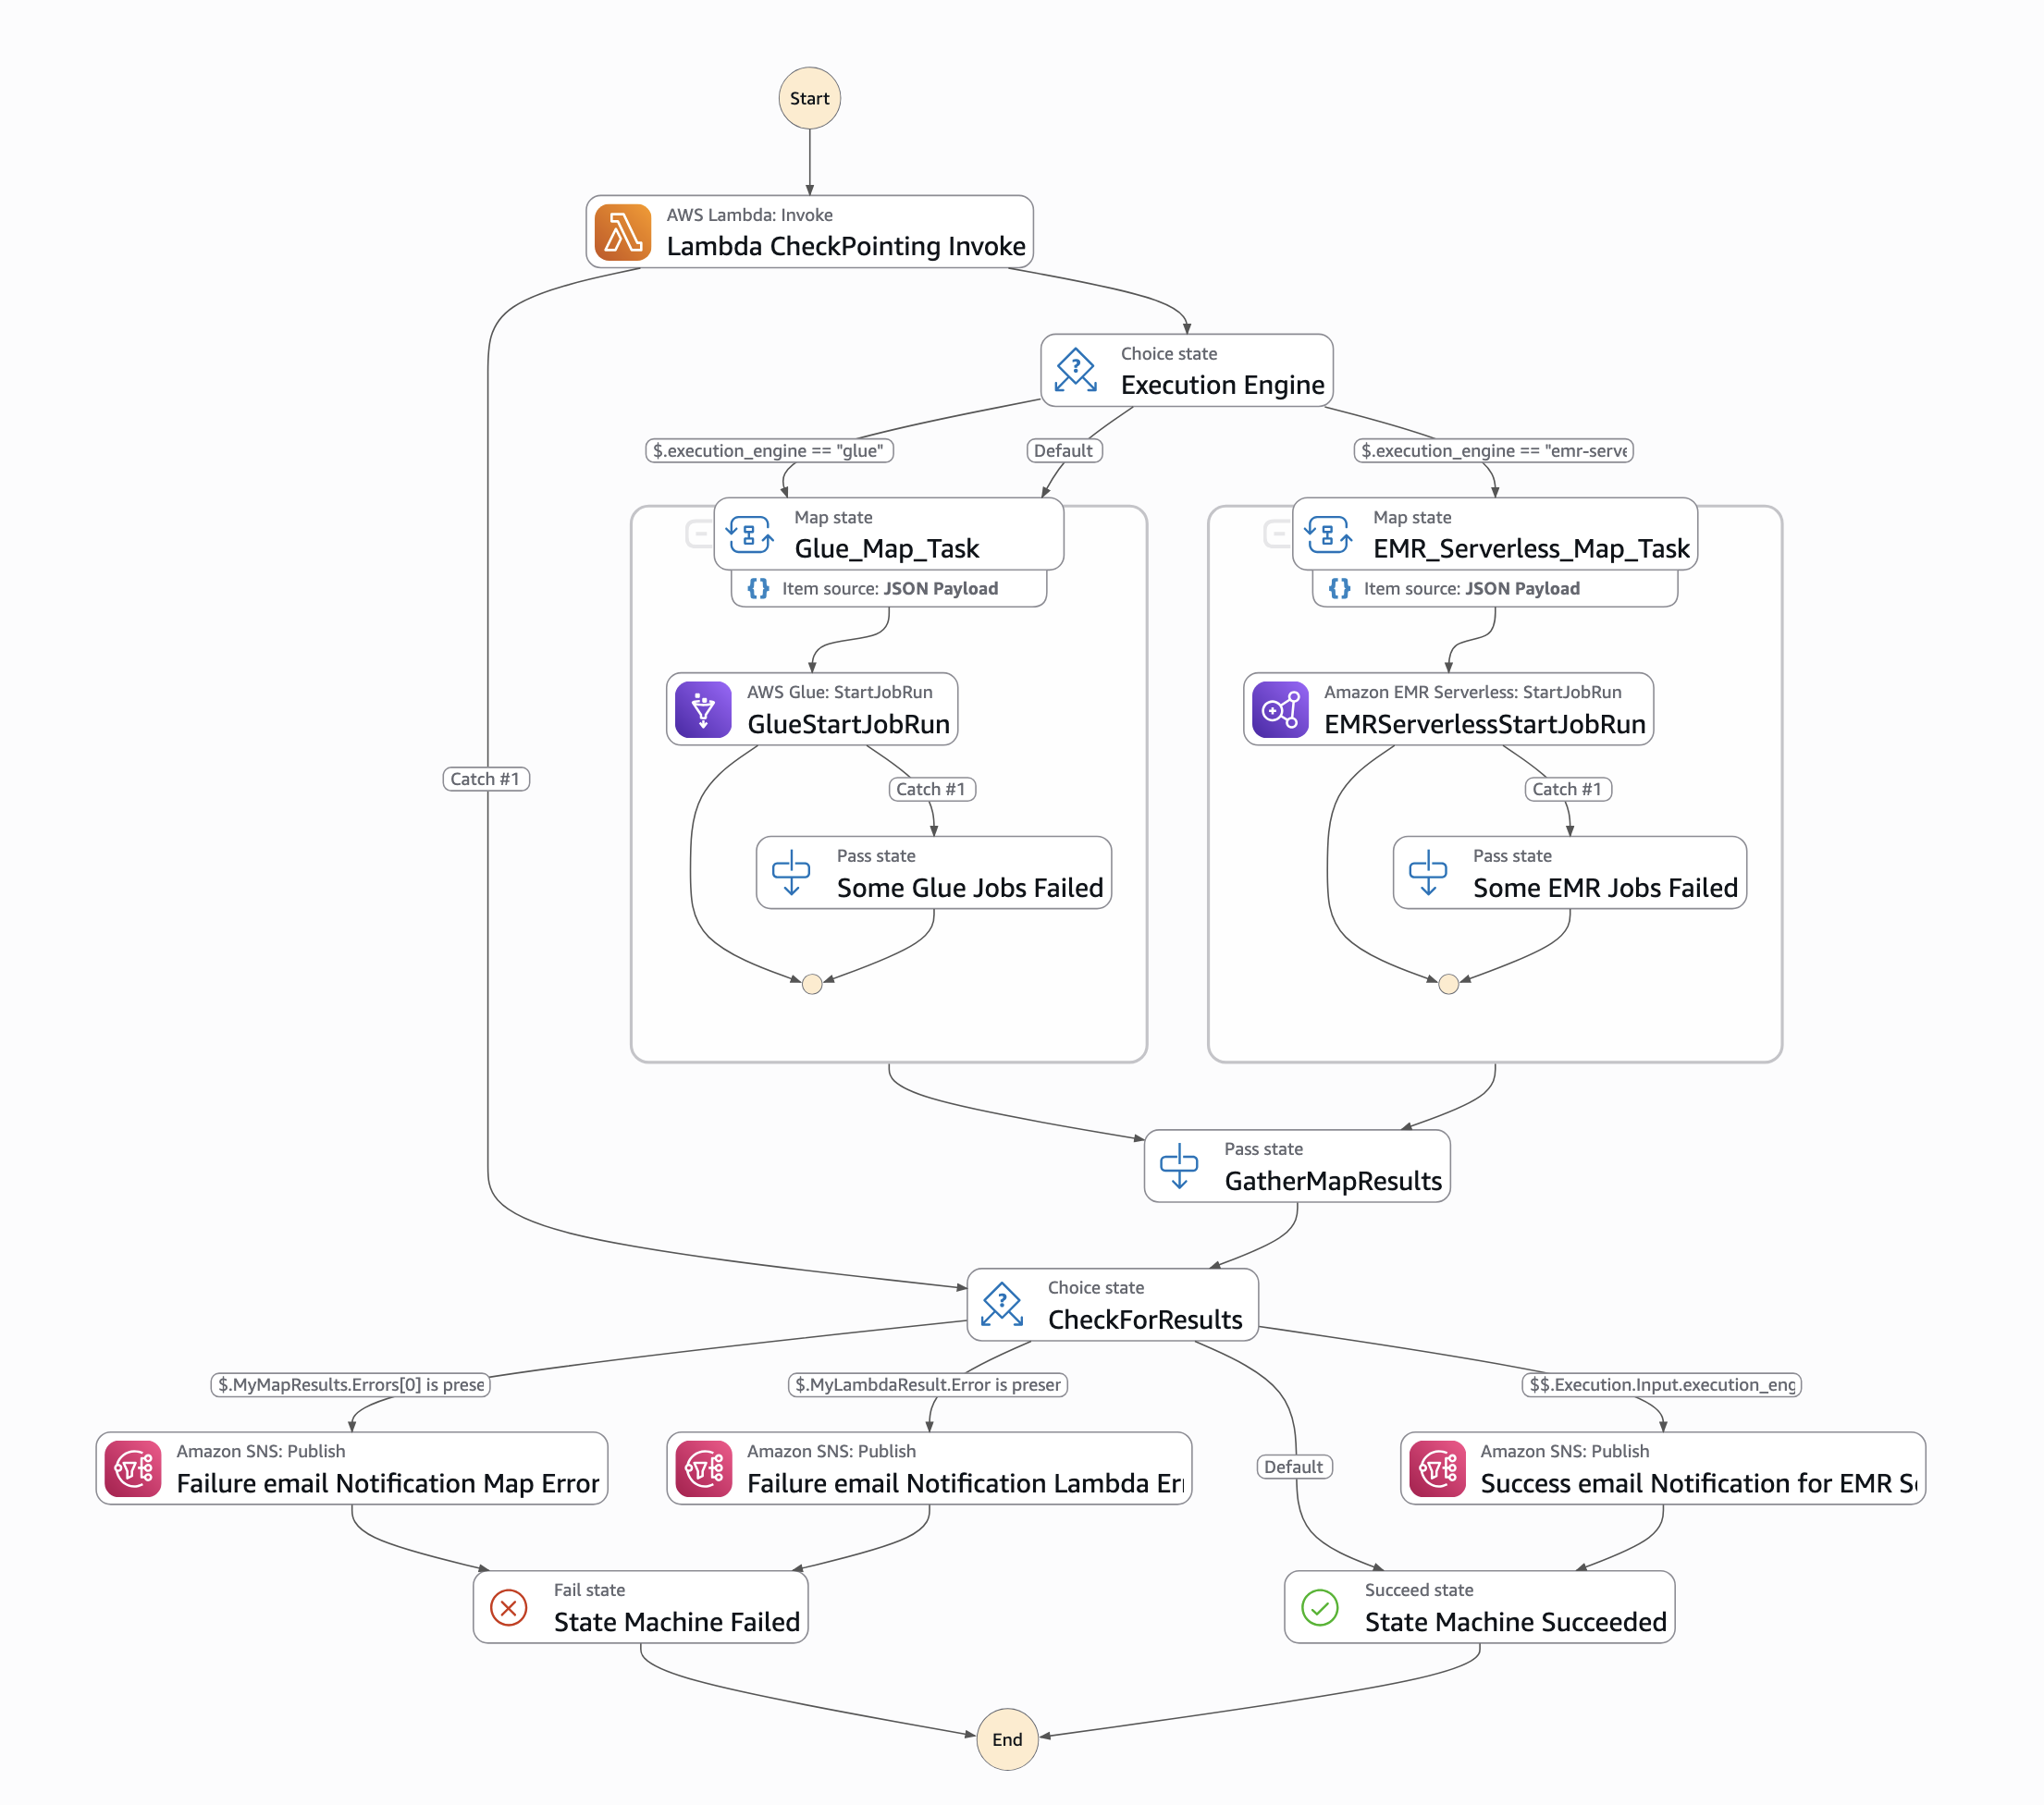
Figure 6: Screenshot of Step Functions workflow orchestration
To run the workflow, an input must be passed through an EventBridge schedule. The input parameters are as follows:
{
“source_log_type": “s3-access-log”,
“load_type": “historical”,
“full_load": “false”,
“ddb_lookup_table": “asl-etl-framework-ddb-table-details”,
“ddb_mapping_table": “asl-etl-framework-ocsf-attribute-mapping”,
“ddb_metadata_table": “asl-etl-framework-source-ocsf-metadata”,
“ddb_reference_table": “asl-etl-framework-ocsf-reference”,
“asl_status_table": “asl-etl-framework-run-status”,
“execution_engine": “glue”,
“asl_job_name": “asl-etl-framework-init-ocsf-conversion”
}
A description of the steps is also available in the ReadMe section of the code repository.
Verify the final output in OCSF format
It’s a best practice to ensure that the generated Parquet files properly map to the various schema definitions specified within the Open Cybersecurity Schema Framework (OCSF). Validating the mapping helps to maintain data integrity and allows the security data to be effectively analyzed and processed by downstream applications and tools, such as Security Lake. You can use OCSF Schema Validator, which was built to provide supplementary validation for Security Lake. Performing this validation step helps detect any schema misalignments or data quality issues early in the process, leading to more reliable and trustworthy security analytics.
If validation of the transformed OCSF Schema fails using the OCSF Schema Validator, you need to validate if your mappings are aligned with the respective OCSF category. Adjust your mappings, rerun the solution, and validate the transformed OCSF logs using OCSF Schema Validator until you get a valid OCSF schema.
When discovering incorrect OCSF mappings or format inconsistencies in converted logs, begin by conducting a thorough validation against OCSF schema specifications to identify specific discrepancies. Update the mappings with correct field mappings, ensuring proper data type conversions and mandatory field requirements are met. Test these corrections using sample data to verify OCSF compliance using the above mentioned tool and data integrity before implementing in production.
Conclusion
In this post, we showed you how the ETL solution accelerator transforms custom security logs into the standardized OCSF format, enabling enhanced security analytics capabilities. This solution, developed by AWS Professional Services (AWS ProServe), addresses common challenges in security log standardization and streamlines the adoption of Amazon Security Lake. While the solution is available as an open source project, engaging with AWS ProServe provides significant advantages, including proven implementation expertise, best practices guidance, and accelerated deployment timelines. Our ProServe team brings extensive experience in security log standardization and can help customize the solution to your specific requirements while ensuring optimal integration with Security Lake. To begin your journey toward standardized security analytics using OCSF, contact your AWS account team to discuss how AWS ProServe can help implement this solution in your environment.