Customers have access to models that are continuously getting better with each new generation bringing larger context windows, stronger reasoning, and lower token costs. Getting the strongest AI-powered security will come from tools that combine the most relevant models with deep knowledge of a customer’s specific environment.
AWS Continuum for code vulnerabilities (Preview) is built to be that tool to help secure your code at machine speed. Today, we’re announcing our work with Anthropic and OpenAI that extends AWS Continuum directly into the developer workflows where code is being written: Anthropic Claude Code, OpenAI Codex, and Kiro. Developers can use these integrations to discover vulnerabilities, contextually prioritize, validate, and remediate, within their existing workflows.
Models are getting smarter
AI models are advancing rapidly. Each generation brings new capabilities, and different models excel at different tasks. The latest frontier models can now identify vulnerabilities and reason through multi-step attack paths that would take a human security team weeks to trace manually.
This is a genuine breakthrough in detection, but it creates a new challenge for your security teams: more findings, more complexity, and the need to determine which ones matter most in your environment and how to address them. The next challenge customers face is building the correct harness and orchestration to turn these models into a single interface that goes from detection through remediation. This is what we set out to do when creating Continuum, which brings together many different models and uses the model that’s most effective for each part of the process.
We also partner with the Frontier Model Forum, an industry consortium developing shared safety standards, evaluation methods, and benchmarking to ensure we can evaluate these models effectively together. We’re also working with model providers on shared security performance benchmarking to make sure we’re using the best model for each task within Continuum and our other AWS security products.
The harness
An AI harness is the orchestration layer that wraps around a model to connect it to tools, guardrails, memory, and workflows, so it delivers outcomes. Think of the model as the engine and the harness as everything around it. You need both to have a high-performance car.
Harnesses are becoming increasingly complex. Teams are stitching together multiple models, agents that call agents, and dynamic workflows, and are dealing with constant change driven by innovations in models, agent frameworks, and tool integrations.
As a result of that complexity, customers are implementing shadow infrastructure to manage integration layers across models and tools. Every time the landscape shifts, security and governance controls potentially break, forcing teams to go back to revisit them and make updates.
These challenges extend beyond the model. They arise in the orchestration required to connect different models and developer environments with tools, context, controls, and workflows across a customer’s environment. At AWS, we see managing that complexity as heavy lifting that AWS should solve. We treat the harness as infrastructure and with the same rigor we apply to identity, discovery, policy enforcement, observability, and compliance of the core infrastructure at AWS.
Enter Continuum
AWS Continuum for code vulnerabilities discovers vulnerabilities, prioritizes them within the context of a customer’s business, validates them in a sandbox, and provides remediation at machine speed. Under the hood, Continuum is an agent-team loop architecture. A sophisticated harness that orchestrates all of it: selecting the right model, connecting to a customer environment, and delivering secure code that’s been validated in context. You never need to think about how the orchestration works, or what changed in the latest release.
Anthropic and OpenAI collaborations
We are working with Anthropic and OpenAI to bring Continuum into the developer workflows where code is being written.
How it will work:
Within Claude Code, Codex, and Kiro coding environments, on-demand vulnerability scans identify potential issues and send findings to Continuum. Continuum prioritizes them within the context of the customer’s AWS environment (configurations, AWS Identity and Access Management (IAM) policies, network topology, and exposure surfaces) and validates them in a sandbox. It then returns prioritized, contextual intelligence back to the coding assistant, which adjusts its recommendations accordingly.
This collapses what was traditionally a multi-step, multi-team process (write, scan, triage, prioritize, fix, rescan) into a single outcome: the code suggestion itself. Two modes, one outcome:
For existing code: Use Continuum for code vulnerabilities from AWS to discover, prioritize, validate, and remediate across your environment.
For greenfield code: Use the Continuum plugin within Codex, Claude Code, or Kiro to get security-validated suggestions in your development environment.
Early design partners are already seeing results.
“AWS Continuum connects source code with enterprise knowledge, allowing teams to accurately pinpoint security vulnerabilities and verify that flagged issues are truly meaningful. This shortens what really matters: timeline to fix serious vulnerabilities.” – Mike Johnson, CISO, Rivian
Next
AWS Continuum for code vulnerabilities is available in preview through AWS. Sign up to request access at AWS Continuum.
Continuum integrated into Claude Code, Codex, and Kiro workflows are coming soon.
If you have feedback about this post, submit comments in the Comments section below.
When an administrator introduces a rule change in AWS Network Firewall and network connectivity is disrupted, pinpointing the cause requires inspecting multiple points in the traffic path. The firewall gives you stateless and stateful rule engines, domain rules, and routing to the firewall endpoint inside your Amazon Virtual Private Cloud (Amazon VPC). A network drop looks the same from the workload no matter where it started. Isolating the cause means correlating the alert and flow logs with the firewall configuration, route tables, and recent API calls in AWS CloudTrail that might have changed them. That manual correlation is exactly where AWS DevOps Agent helps, accelerating root cause analysis so you can restore connectivity in minutes instead of hours.
AWS DevOps Agent does that correlation for you. As your always-available operations teammate, it resolves and proactively prevents operational issues across AWS, multicloud, and on-premises environments. When an Amazon CloudWatch alarm triggers, it reaches the agent through a webhook. The agent then reads the firewall configuration and logs through AWS APIs, ties the drop to recent API activity, and returns a root cause with a mitigation plan you review before you apply it.
This post connects CloudWatch monitoring to DevOps Agent. It walks through three Network Firewall failures from end to end. The first is a domain deny list blocking a legitimate endpoint. The second is a stateless rule priority misconfiguration. The third is an asymmetric cross Availability Zone (AZ) routing drop. Each maps to a different layer, so each leads down a different investigation path. An AWS Cloud Development Kit (AWS CDK) app deploys the whole environment in your own account so you can reproduce each failure and follow along.
The sample workload
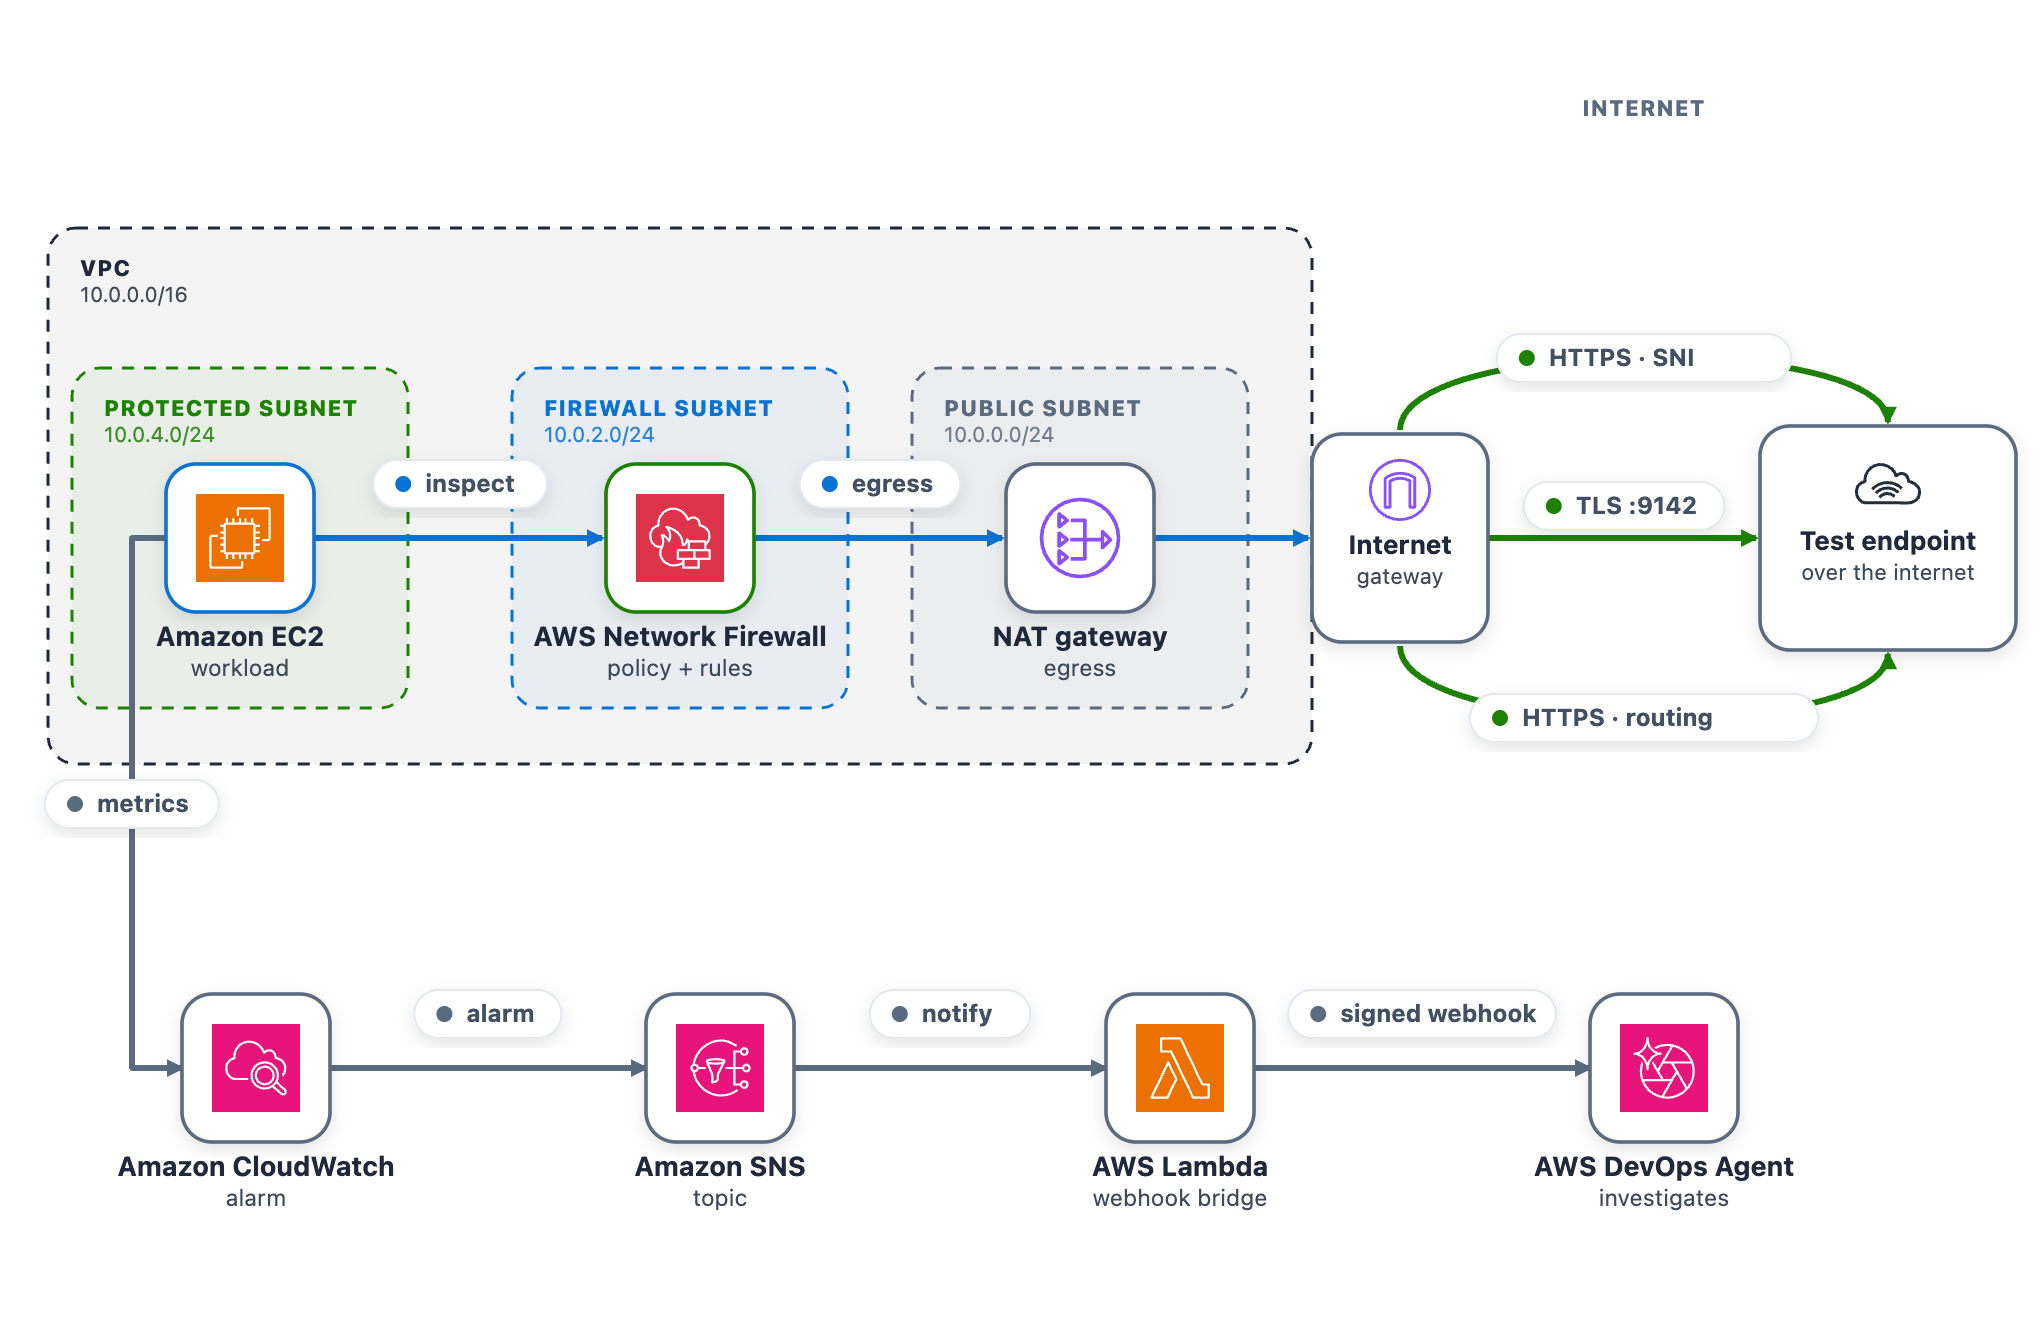
As part of this blog post, we provide a CDK stack that deploys both the AWS DevOps Agent Space and a sample workload used to walk through three separate troubleshooting scenarios. A single t3.micro instance in a protected subnet checks its connectivity to a test endpoint on a continuous loop and publishes results to CloudWatch. Traffic takes the internet egress path through Network Firewall, the NAT gateway, and the internet gateway, so the firewall can intercept or drop it. After completing the walkthrough, you can apply the same troubleshooting techniques with DevOps Agent against your own Network Firewall deployments.
The test endpoint runs in a separate VPC deployed by the same CDK app. It serves HTTPS on port 443 and TCP on port 9142, giving each scenario a different protocol layer to exercise: Scenario 1 targets a TLS connection on 443 (matched by Server Name Indication), Scenario 2 targets a TCP connection on 9142, and Scenario 3 exercises the whole egress path.
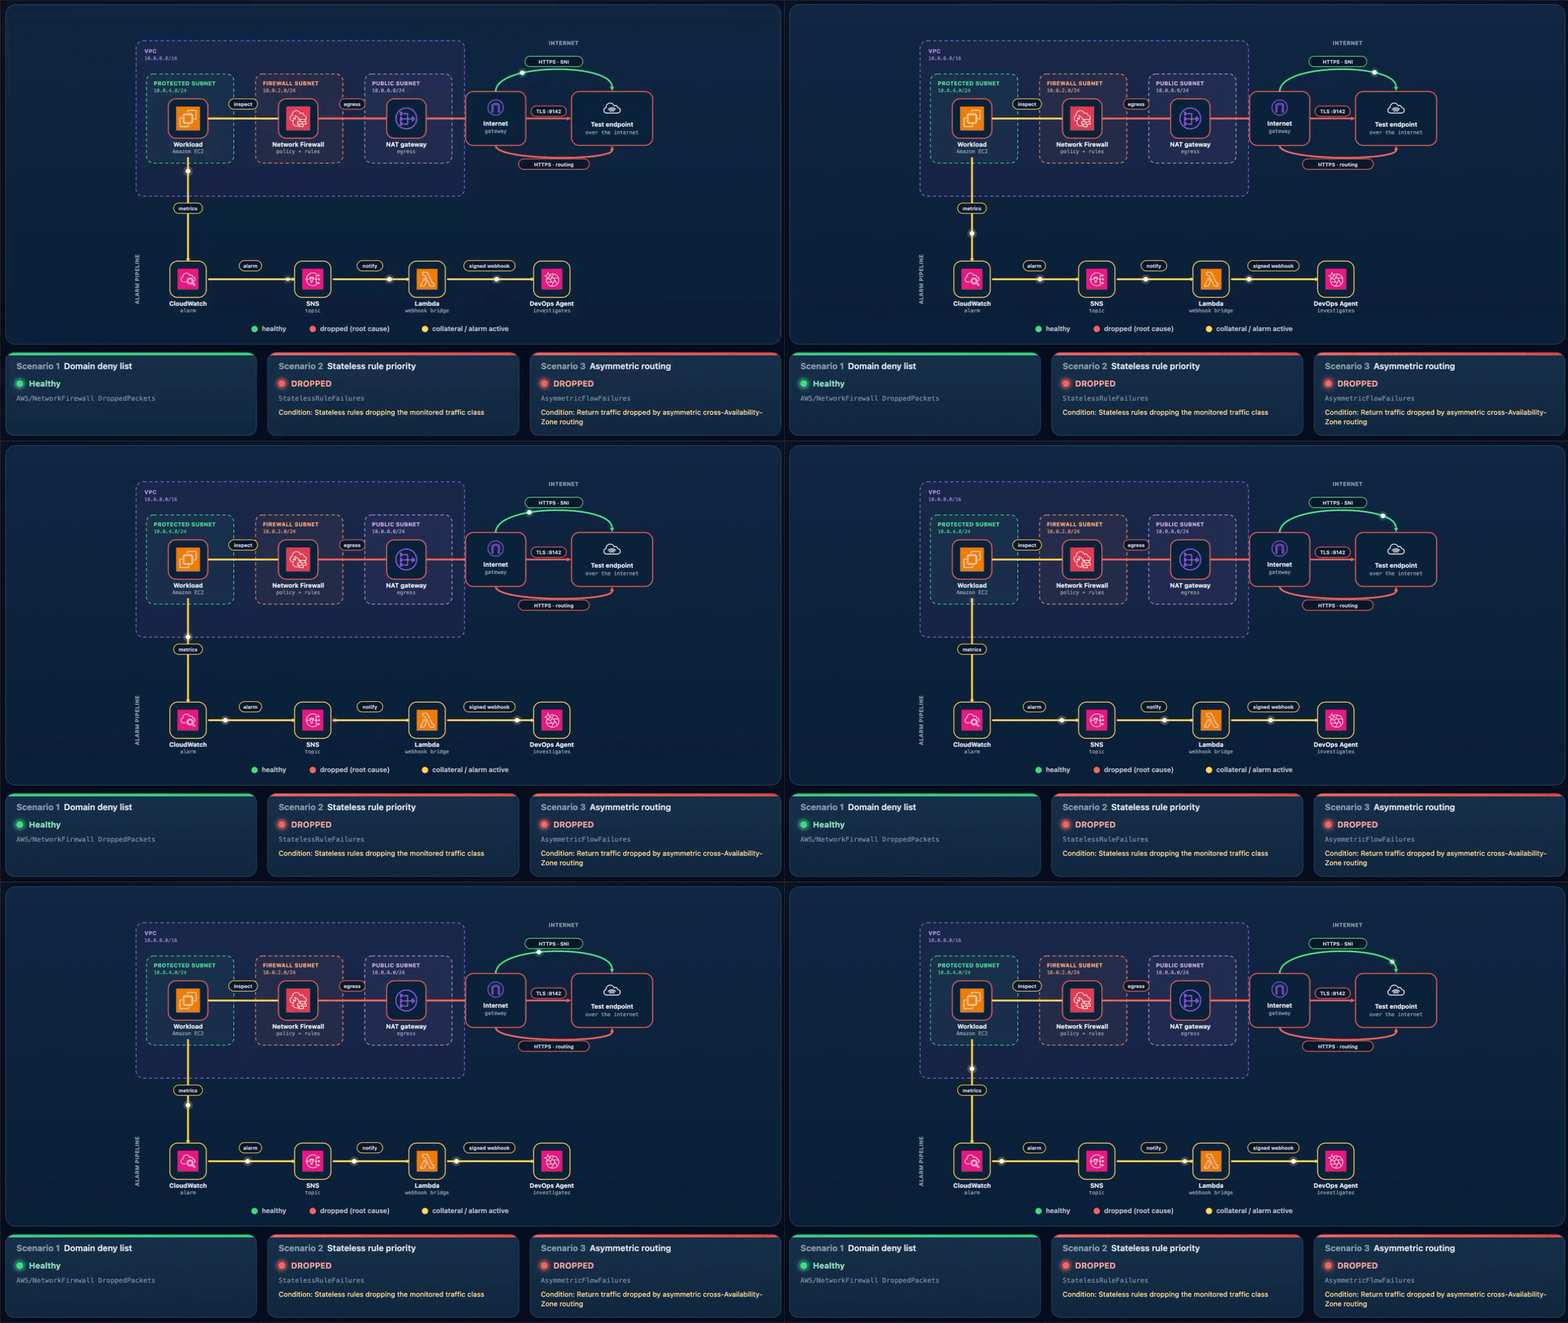
A live status page shows one card per scenario plus the network topology. The whole stack deploys from a single CDK app across two Availability Zones, each with a firewall endpoint and NAT gateway, which is what makes Scenario 3 possible.
As shown in the following figure, the egress data path runs from the workload through Network Firewall and the NAT and internet gateways to the test endpoint. The alarm pipeline runs from CloudWatch through Amazon Simple Notification Service (Amazon SNS) and the webhook AWS Lambda function to DevOps Agent.
Figure 1: The sample workload
To use this with your own workload, you need a CloudWatch alarm that detects the connectivity problem and the webhook pipeline (SNS topic and Lambda function) that delivers it to DevOps Agent. The agent reads your firewall configuration, logs, and CloudTrail through AWS APIs, so no additional instrumentation is needed on the firewall side.
AWS CDK 2.x is required. You can use it through the project’s npx dependency, or install it globally:
npm install -g aws-cdk
Deploy the sample workload
Clone the project and deploy it into us-east-1 with one command (set awsRegion to use another AWS Region).
git clone https://github.com/aws-samples/sample-accelerating-aws-network-firewall-troubleshooting-with-aws-devops-agent.git
cd sample-accelerating-aws-network-firewall-troubleshooting-with-aws-devops-agent
bash scripts/deploy.sh
The script checks prerequisites, installs dependencies, compiles and tests, and bootstraps the CDK if needed. It then deploys all the stacks from a clean baseline and prints the outputs, including the status-page URL and sign-in details.
Open the status-page link (an https://<random-id>.cloudfront.net address).
Sign in using the username and password provided from the CDK output and confirm all three cards show the green Healthy status.
Keep the page open while you run the scenarios.
Connect AWS DevOps Agent
To connect AWS DevOps Agent to the alarm pipeline
In the AWS DevOps Agent console, open the nf-devops-agent-space Agent Space created by the CDK deployment.
On the status page, choose Configure webhook, paste the URL and signing secret, and save. The page writes them to the nf-devops-agent-webhook-credentialsAWS Secrets Manager secret, so there is no AWS CLI or console step. Until you set it, the bridge Lambda function sees a placeholder and skips delivery.
Verify the path before you run a scenario. In the Lambda console, open nf-devops-agent-webhook and use the Test tab with this event.
{
  "Records": [
    {
      "Sns": {
        "Message": "{\"AlarmName\":\"TEST-webhook-verification\",\"AlarmDescription\":\"[TEST] Webhook integration test - not a real alarm.\",\"NewStateValue\":\"ALARM\",\"NewStateReason\":\"[TEST] Manual webhook connectivity test. Safe to ignore.\",\"Region\":\"us-east-1\"}"
      }
    }
  ]
}
A 200 response confirms the path, and a test investigation appears in the DevOps Agent Operator Web App view.
How the alarm pipeline works
Every scenario reaches DevOps Agent the same way. A CloudWatch alarm moves to ALARM and notifies the SNS topic. Amazon SNS invokes a Lambda function. The function reads the webhook URL and signing secret from Secrets Manager, signs an alarm payload, and POSTs it to the DevOps Agent webhook (as shown in Figure 1). Amazon SNS also provides delivery retries, fan-out to other subscribers, and cross-account publishing.
Prebuilt Network Firewall metric (Scenario 1) – Alarm-1 watches the DroppedPackets metric, summed across the stateful streams, and triggers when drops rise above a baseline threshold. This requires no workload or custom metric and works on an already-deployed firewall. However, it only tells you that the firewall is dropping packets, not which rule is responsible.
Application health metric (Scenarios 2 and 3) – Alarm-2 and Alarm-3 watch a custom metric from a connectivity check. Use this for an alarm tied to user-facing impact or to tell one traffic path from another, which requires running a component that emits the metric.
Alarm
Source
Triggers when
Alarm-1
Native AWS/NetworkFirewall DroppedPackets
The firewall’s dropped-packet count rises above the baseline
Alarm-2
Custom application health metric
The port 9142 (TCP) connectivity check to the test endpoint is being dropped
Alarm-3
Custom application health metric
The cross Availability Zone connectivity check is being dropped
Run the scenarios
Work through each of the scenarios one at a time, following the same cycle. Interrupt network connectivity, watch the alarm trigger, let DevOps Agent investigate, apply the recommended fix, and confirm recovery before moving on.
The status-page cards follow the live CloudWatch alarm state. A card shows a green dot and the word Healthy when its alarm is clear, and a red dot and the word DROPPED when its alarm triggers. In the DROPPED state the card also adds a Condition: line describing what’s being dropped, which isn’t shown when the card is healthy. Network Firewall applies changes to new flows, so a change shows within a minute or two. Recovery comes from the mitigation DevOps Agent recommends, which you review and apply.
Scenario 1. Domain deny list blocking a legitimate endpoint
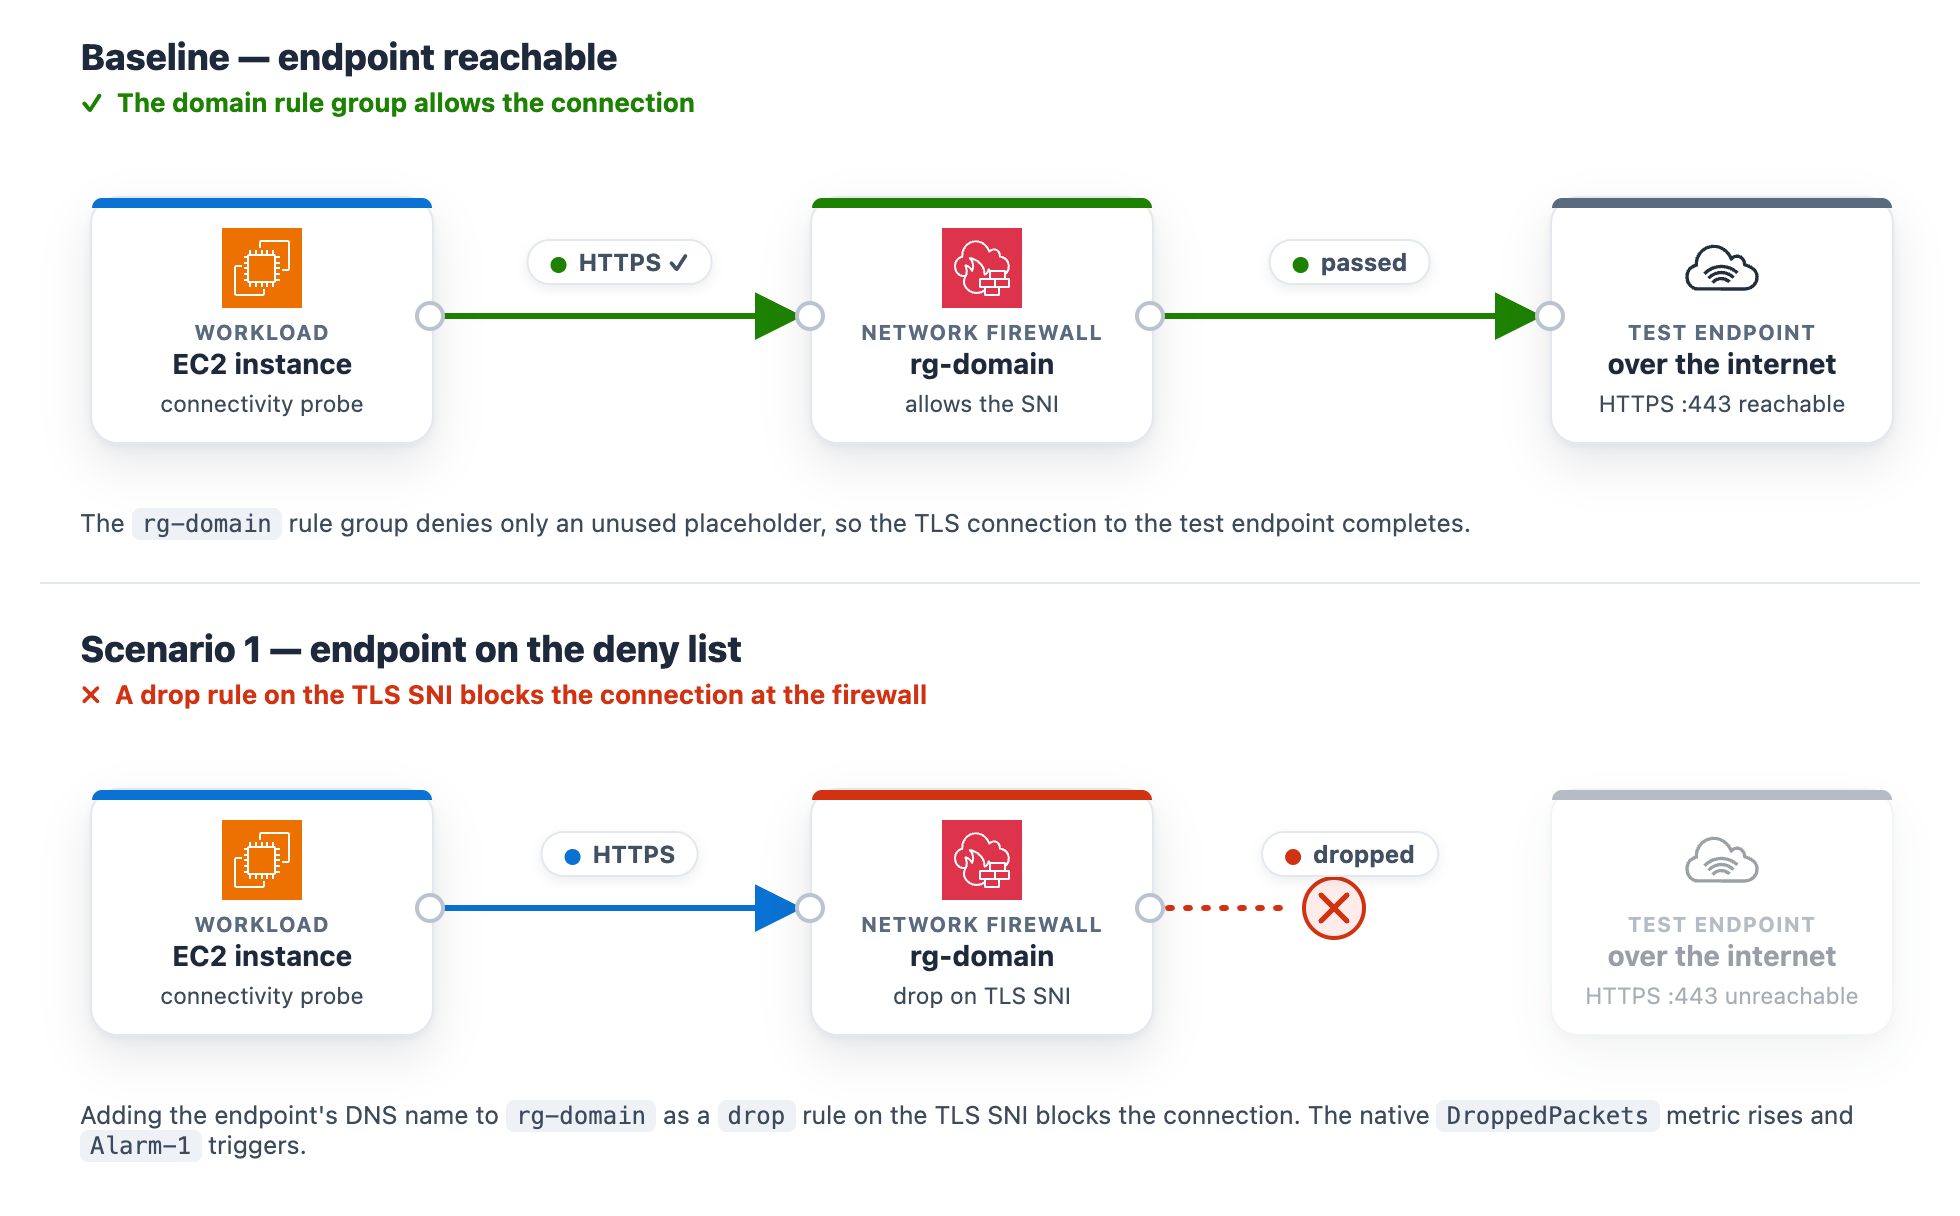
At baseline, the rg-domain Suricata domain rule group denies only an unused placeholder, so the test endpoint stays reachable. The rule group inspects the TLS Server Name Indication (SNI) on each outbound connection and drops any that matches a denied domain. The exact rule syntax and console steps follow.
In the navigation pane, under Network Firewall, choose Network Firewall rule groups.
Choose the rg-domain rule group to open its details page.
In the Rules section, choose Edit.
The rules box already contains two baseline placeholder rules (they match blocked.placeholder.invalid, so nothing real is denied). Leave those in place. Find the <app-endpoint-dns> value for Scenario 1 in the deployment script output (a Nework Load Balancer (NLB) DNS name such as NfTest-AppNl-a1b2C3dEf4G5-1234abcd5678efgh.elb.us-east-1.amazonaws.com). On a new line below the existing rules, add a drop rule that matches that DNS name on the TLS SNI, then choose Save.
drop tls $HOME_NET any -> $EXTERNAL_NET any (ssl_state:client_hello; tls.sni; content:"<app-endpoint-dns>"; startswith; nocase; endswith; msg:"S1 domain denylist"; flow:to_server, established; sid:2000002; rev:1;)
After saving, the rules box holds all three lines. The two placeholders remain, plus the new drop rule for the endpoint DNS name (note the distinct sid 2000002).
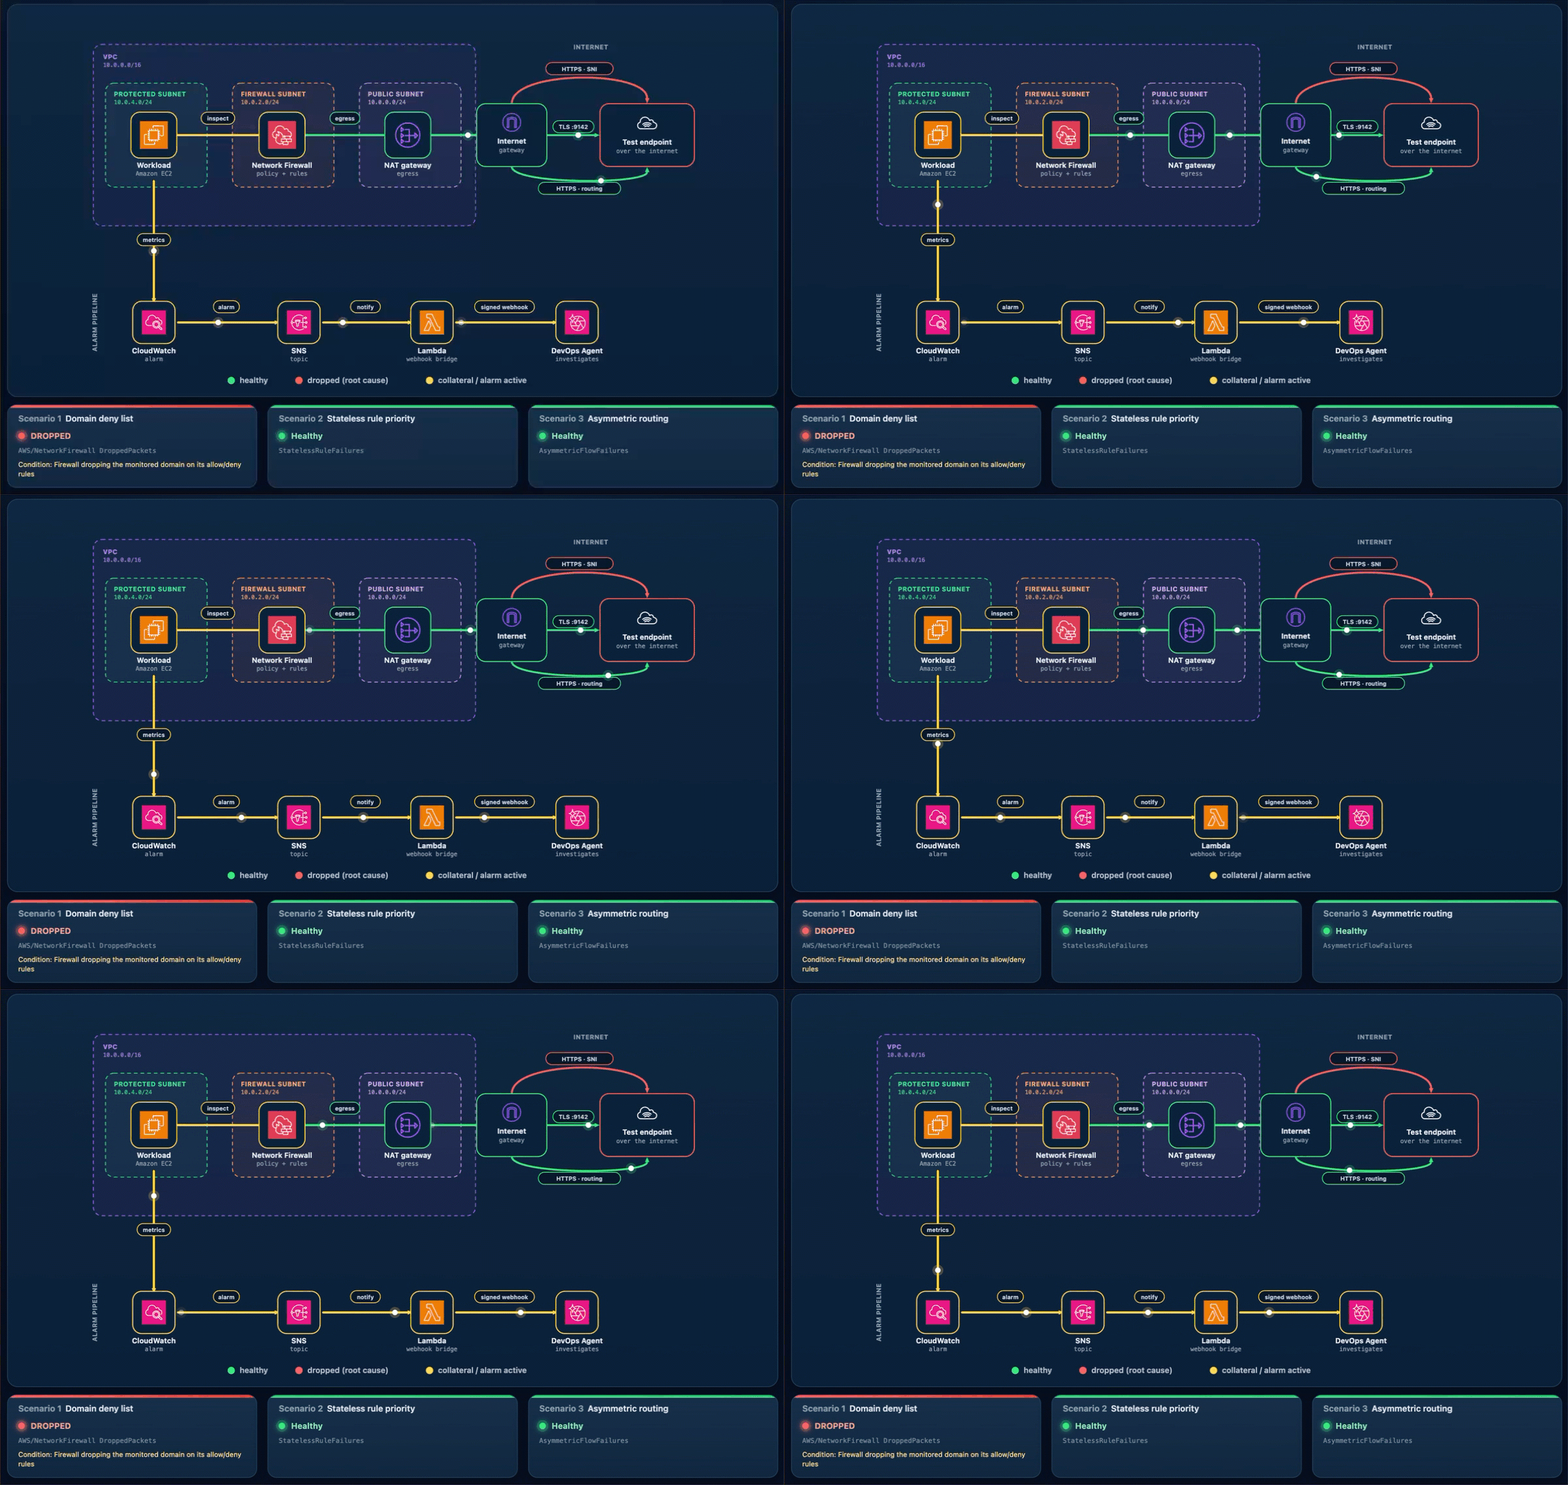
What happens. The workload’s HTTPS check to the test endpoint times out, the “AWS/NetworkFirewall DroppedPackets metric climbs above baseline, and Alarm-1 moves to ALARM. The Scenario 1 card reads DROPPED (with the condition Firewall dropping the monitored domain on its allow/deny rules), while the Scenario 2 and Scenario 3 cards stay Healthy (Figure 3). On the topology, the alarm pipeline from CloudWatch through Amazon SNS and Lambda to DevOps Agent and the workload-to-firewall inspect lines both turn amber, which the legend defines as collateral / alarm active, because the packets are now dropped at the firewall. To demonstrate the resulting failure, the HTTPS · SNI line from the internet gateway to the test endpoint is shown in red, which the legend defines as dropped (root cause).
Figure 3: Scenario 1 active – Traffic blocked at the firewall
Let DevOps Agent investigate. The agent runs several lines of investigation in parallel and correlates them:
Reads the DroppedPackets metric and correlates the spike with a simultaneous drop in passed packets, confirming the firewall is actively blocking traffic.
Reads the ALERT log and finds the workload’s TLS connections to the test endpoint blocked by the S1 domain denylist rule.
Compares the current state against a baseline window, where the same endpoint was reachable with no alerts, which shows the block is new.
Searches CloudTrail and surfaces the UpdateRuleGroup call that added the deny rule, identifying the user, role, and timestamp approximately one minute before the drops began.
Reports the root cause as that manual rule-group change. Recommends removing the deny entry or adding an allow exception and enabling FirewallPolicyChangeProtection to prevent unauthorized changes.
Presents this as a plan you review and apply, not an automatic change.
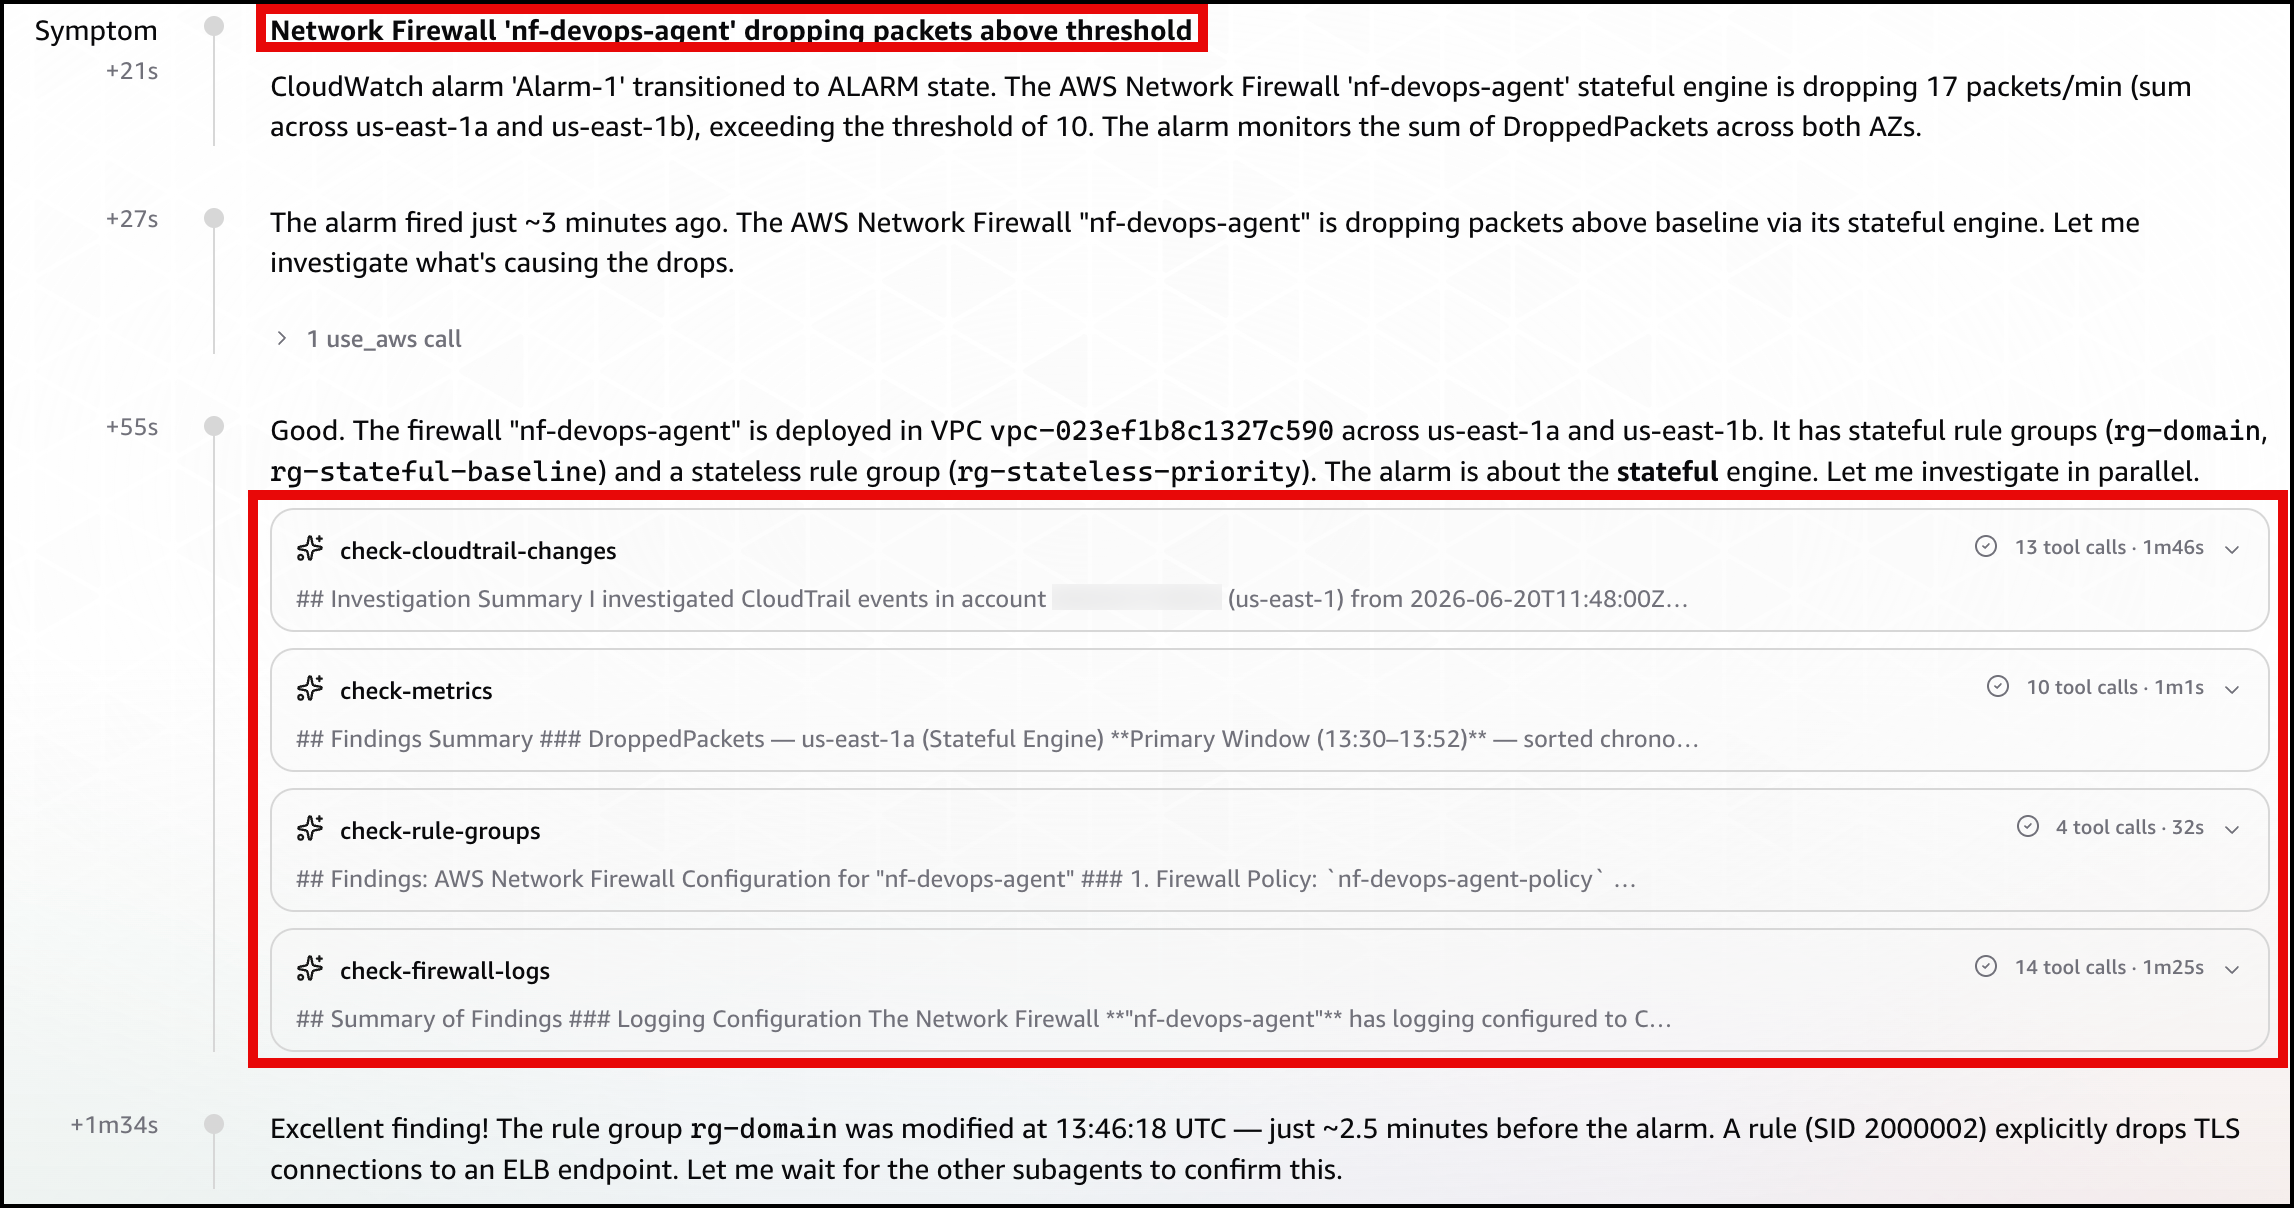
In the DevOps Agent Operator Web App view, the agent first restates the Alarm-1 trigger and confirms the firewall is dropping packets above the threshold (Figure 4).
Figure 4: Scenario 1 – The symptom
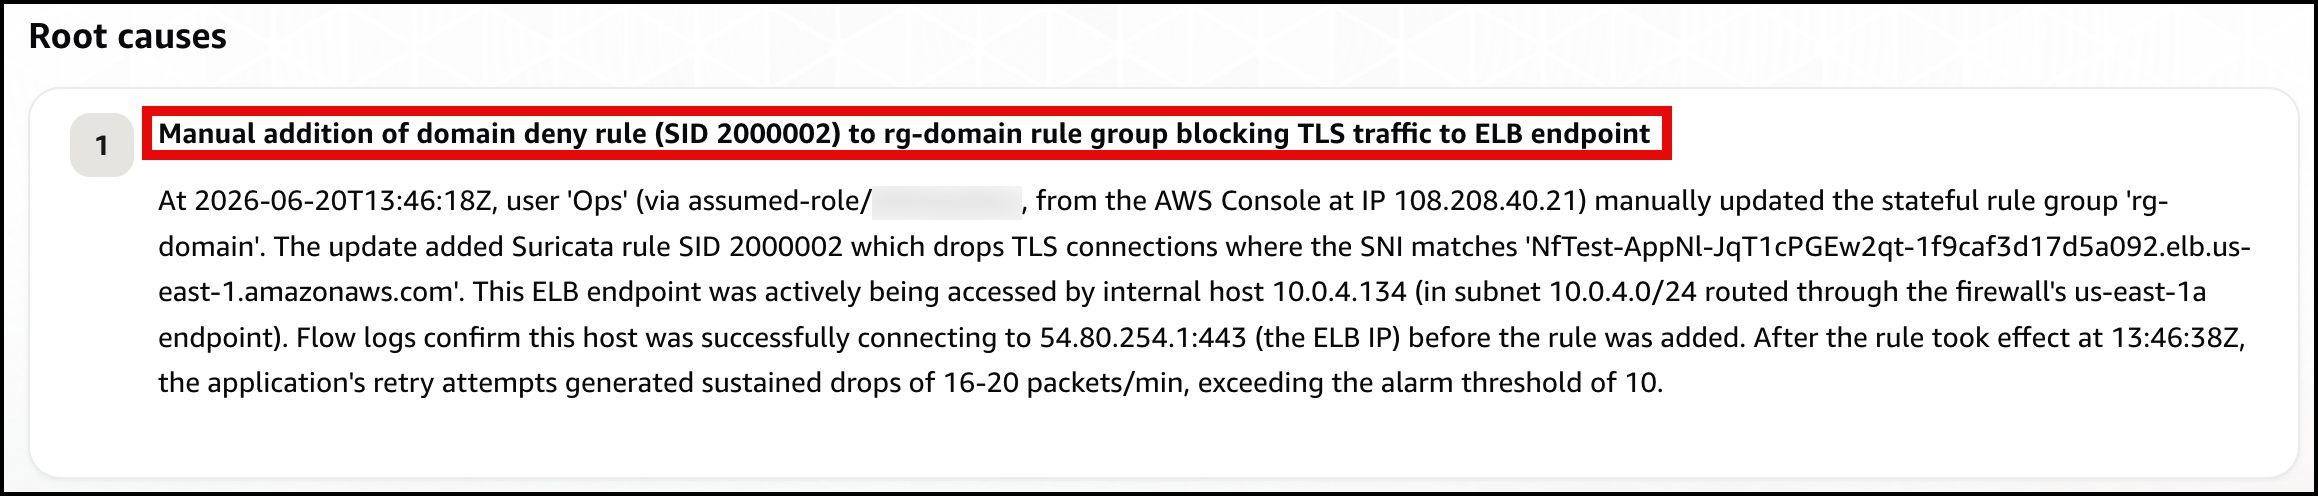
Next, the agent identifies the root cause: a manual update to the rg-domain rule group that added a domain deny rule (SID 2000002) shortly before the alarm fired, blocking TLS connections to the ELB endpoint (Figure 5).
Figure 5: Scenario 1 – The root cause
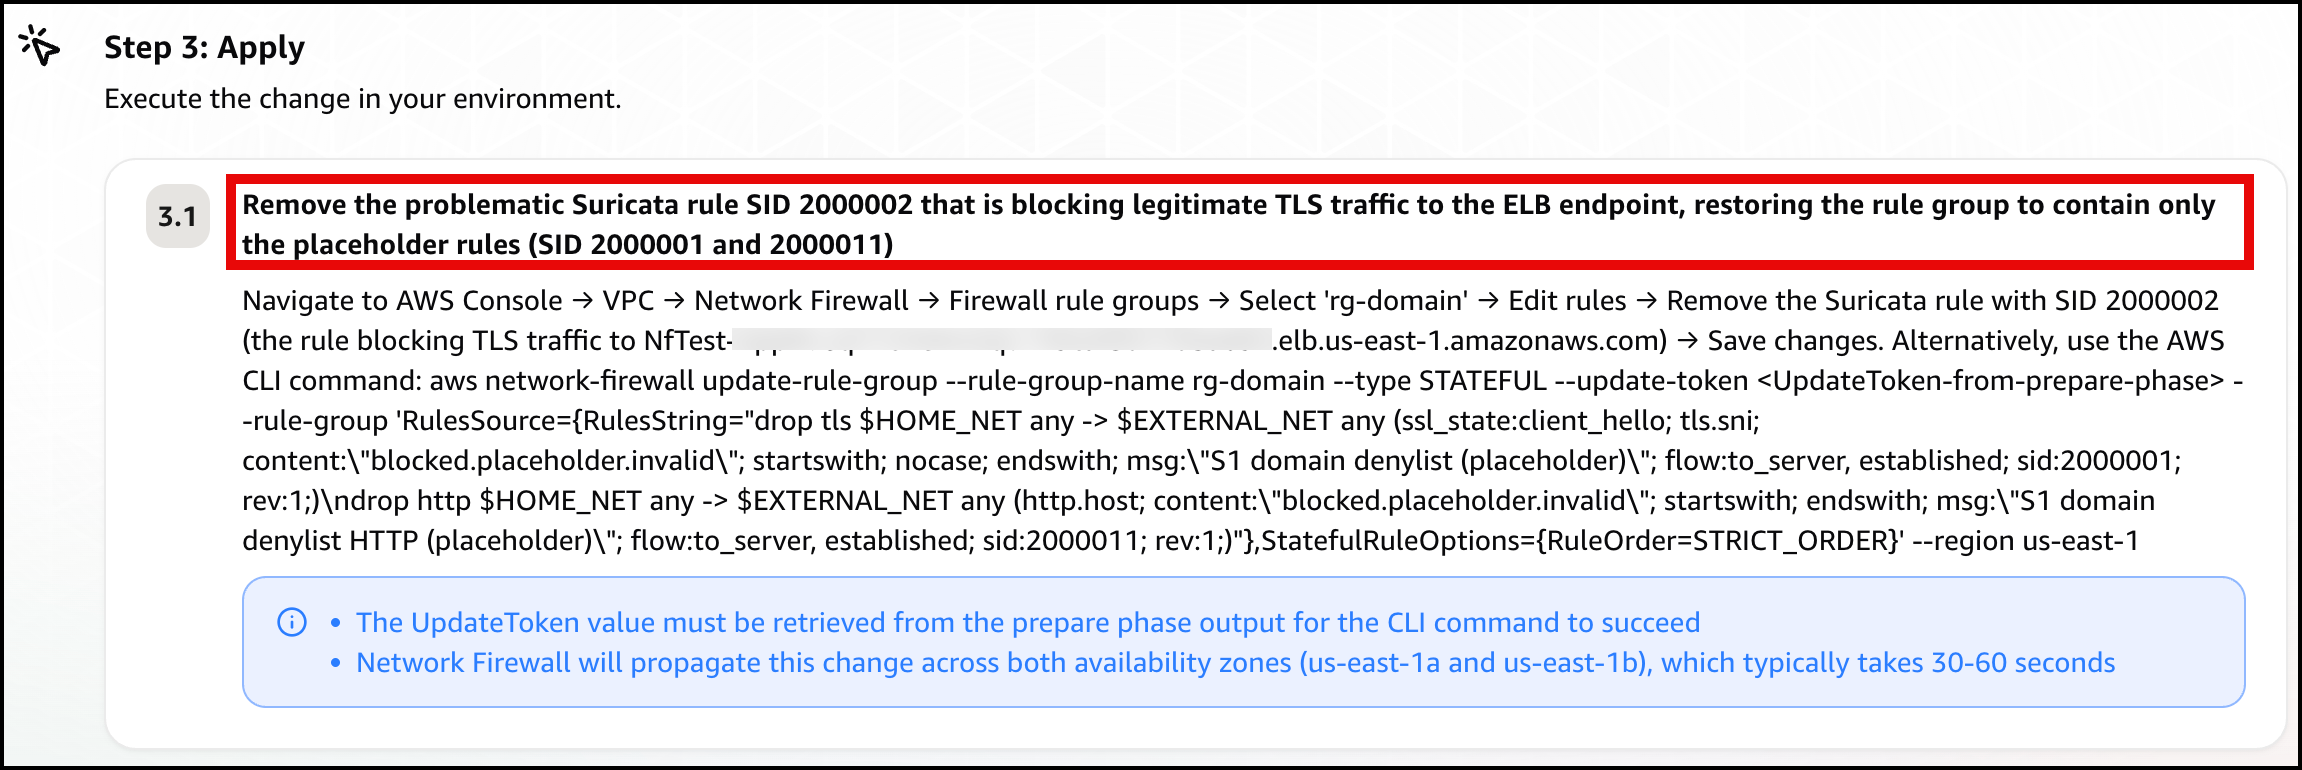
Finally, the agent presents a mitigation plan, recommending you remove the problematic deny rule (SID 2000002) to restore connectivity (Figure 6).
Figure 6: Scenario 1 – The mitigation plan
Note: In a real-world environment, this type of rule typically exists for a reason. Before removing it, verify whether it was intentional but scoped too broadly. If so, refine the rule to block only unauthorized endpoints rather than removing it entirely.
Confirm recovery. Apply the change the agent recommends. After the deny entry is gone, DroppedPackets falls back to baseline, Alarm-1 clears, and the card returns to green. Move on to Scenario 2.
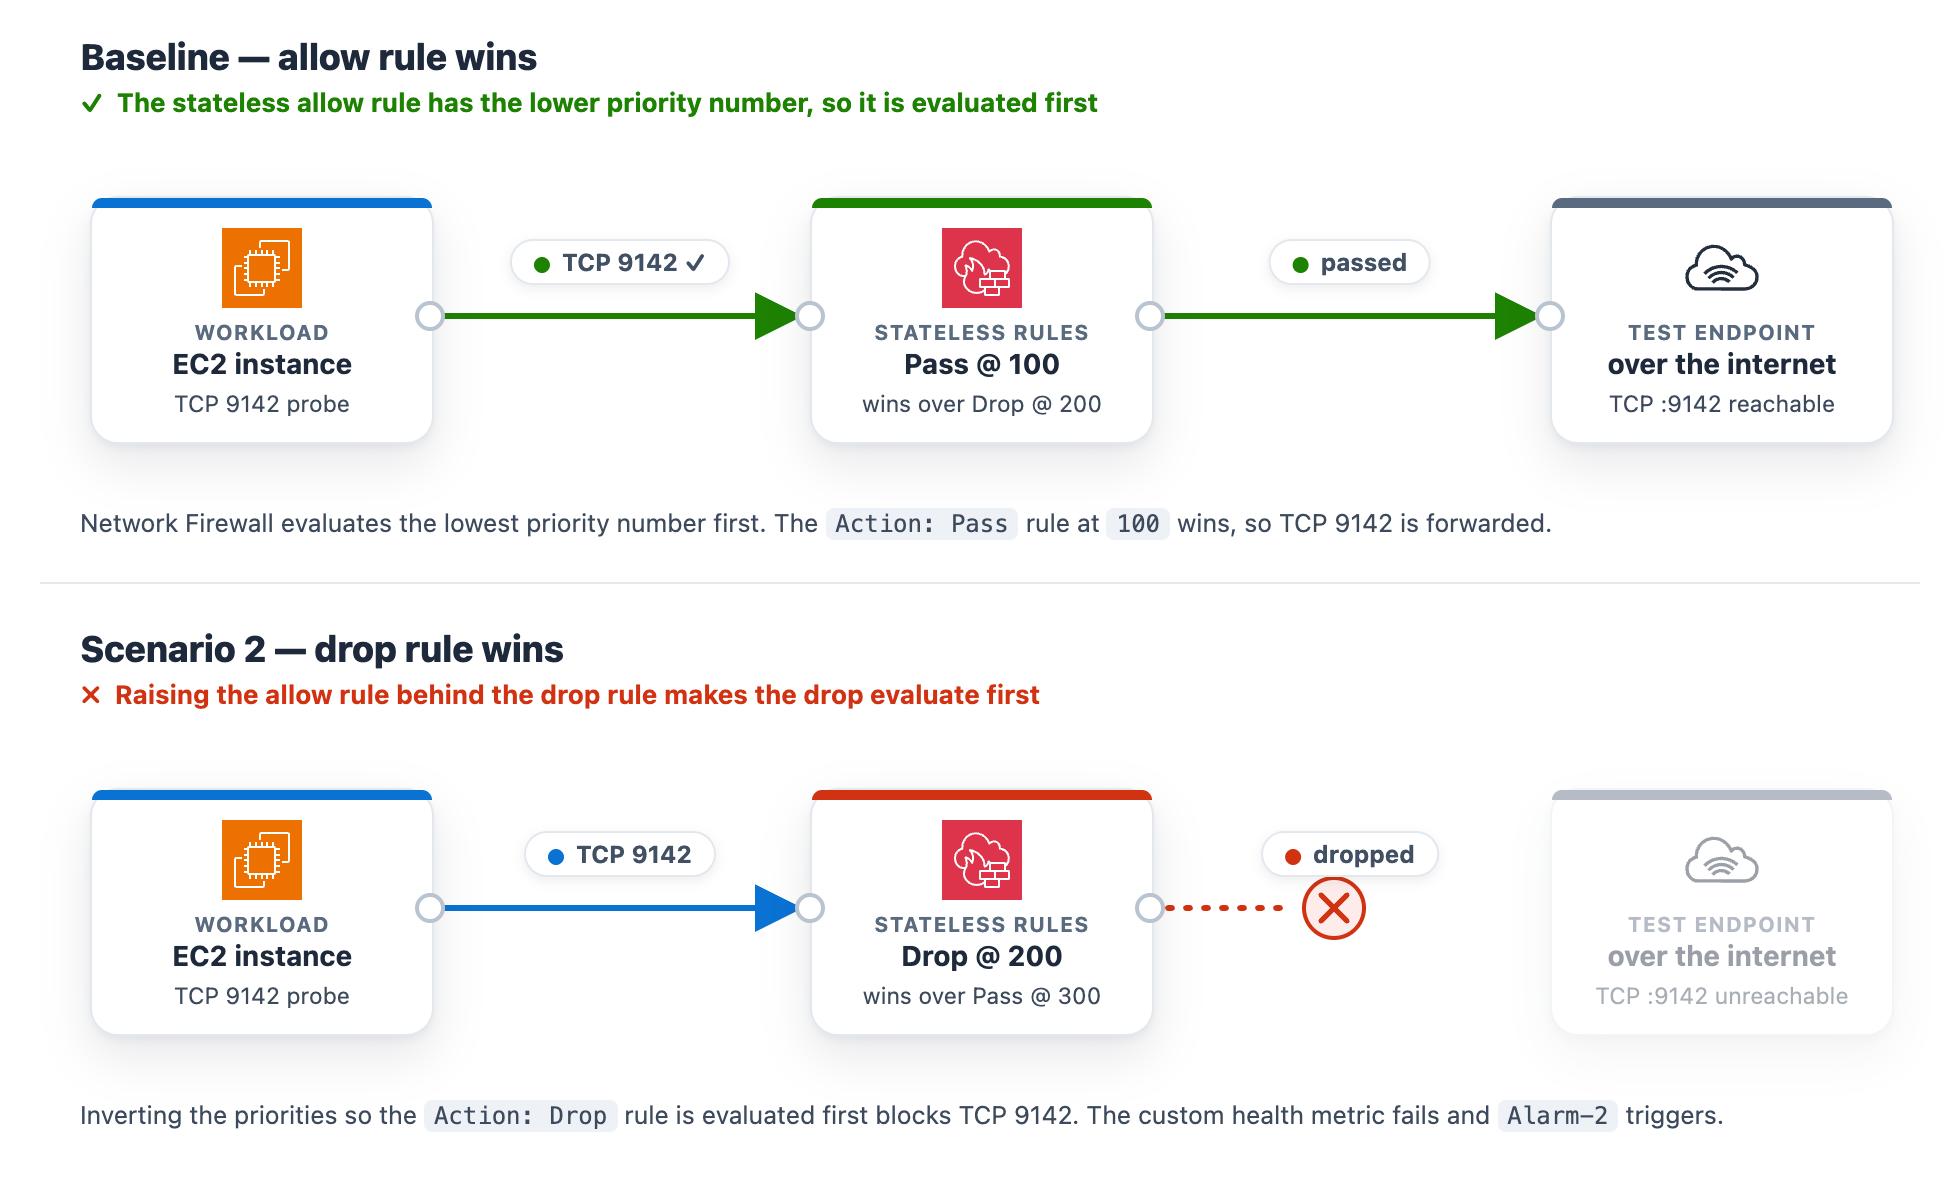
At baseline, the rg-stateless-priority stateless rule group keeps the allow rule at priority 100 and the drop rule at 200 for the test class, TCP destination port 9142. The workload opens a TCP connection to the test endpoint on this port. Lower priority numbers evaluate first, so the allow rule wins. This scenario uses port 9142 instead of 443 to demonstrate a stateless rule, which matches on the packet’s 5-tuple (protocol, ports, addresses) rather than application content.
Introduce the change. Invert the two rule priorities so the drop rule evaluates before the allow rule. This is the kind of change a rushed rule edit can introduce.
In the navigation pane, under Network Firewall, choose Network Firewall rule groups.
Choose the rg-stateless-priority rule group to open its details page.
In the Rules section, choose Edit.
Raise the (Action: Pass) rule’s priority number so it sits after the (Action: Drop) rule, then choose Save. For example, change the (Action: Pass) rule from 100 to 300 (any number higher than the drop rule’s 200 works). You only need to move one rule, and using 300 avoids a clash with the drop rule that already sits at 200. Network Firewall evaluates the lowest priority number first, so the (Action: Drop) rule at 200 now wins for this traffic class, ahead of the (Action: Pass) rule at 300.
Figure 7: Scenario 2 – Rule priority change blocking the traffic class
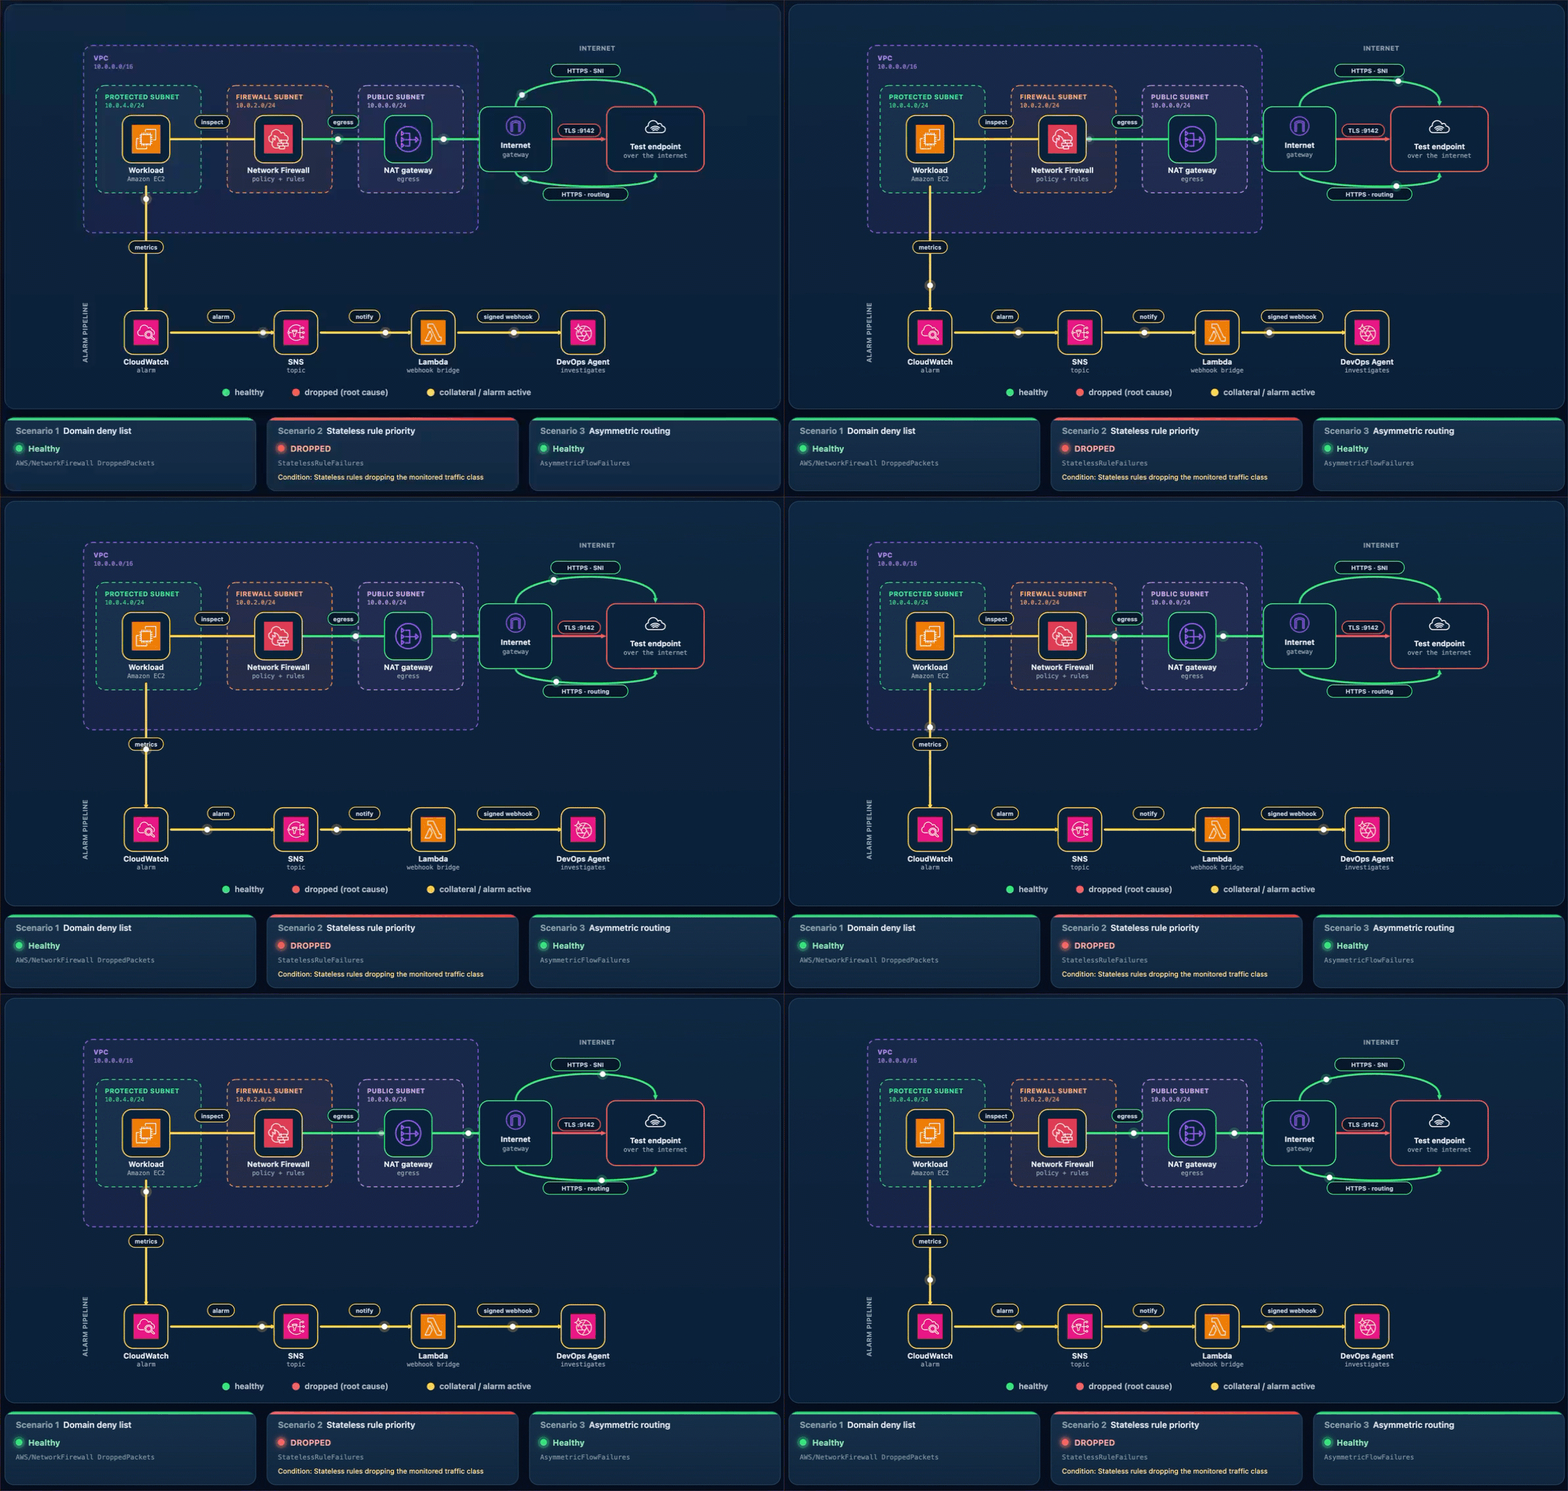
What happens. The drop rule now wins, the TCP connection to the test endpoint on port 9142 times out, the StatelessRuleFailures metric climbs above baseline, and Alarm-2 moves to ALARM. The Scenario 2 card reads DROPPED (with the condition Stateless rules dropping the monitored traffic class), while the Scenario 1 and Scenario 3 cards stay Healthy (Figure 8). On the topology, the alarm pipeline from CloudWatch through Amazon SNS and Lambda to DevOps Agent and the workload-to-firewall inspect lines both turn amber, which the legend defines as collateral / alarm active, because the packets are now dropped at the firewall. To demonstrate the resulting failure, the TLS :9142 line from the internet gateway to the test endpoint is shown in red, which the legend defines as dropped (root cause).
Figure 8: Scenario 2 active
Let DevOps Agent investigate. A stateless drop happens before traffic reaches the stateful inspection engine, so it produces no ALERT log entries. The agent turns to configuration and flow logs instead:
Reads the stateless rule group state and finds the drop rule at the lower priority number, ahead of the pass rule, so the drop evaluates first.
Reads the flow logs and sees passed packets drop to zero within a minute of the change.
Searches CloudTrail and surfaces the UpdateRuleGroup call that inverted the priorities, identifying the user, role, and timestamp about a minute before the alarm.
Reports the root cause as that priority inversion. Recommends removing the redundant drop rule and managing the rule group through infrastructure-as-code (IaC) to prevent manual misconfigurations.
Presents this as a plan you review and apply, not an automatic change.
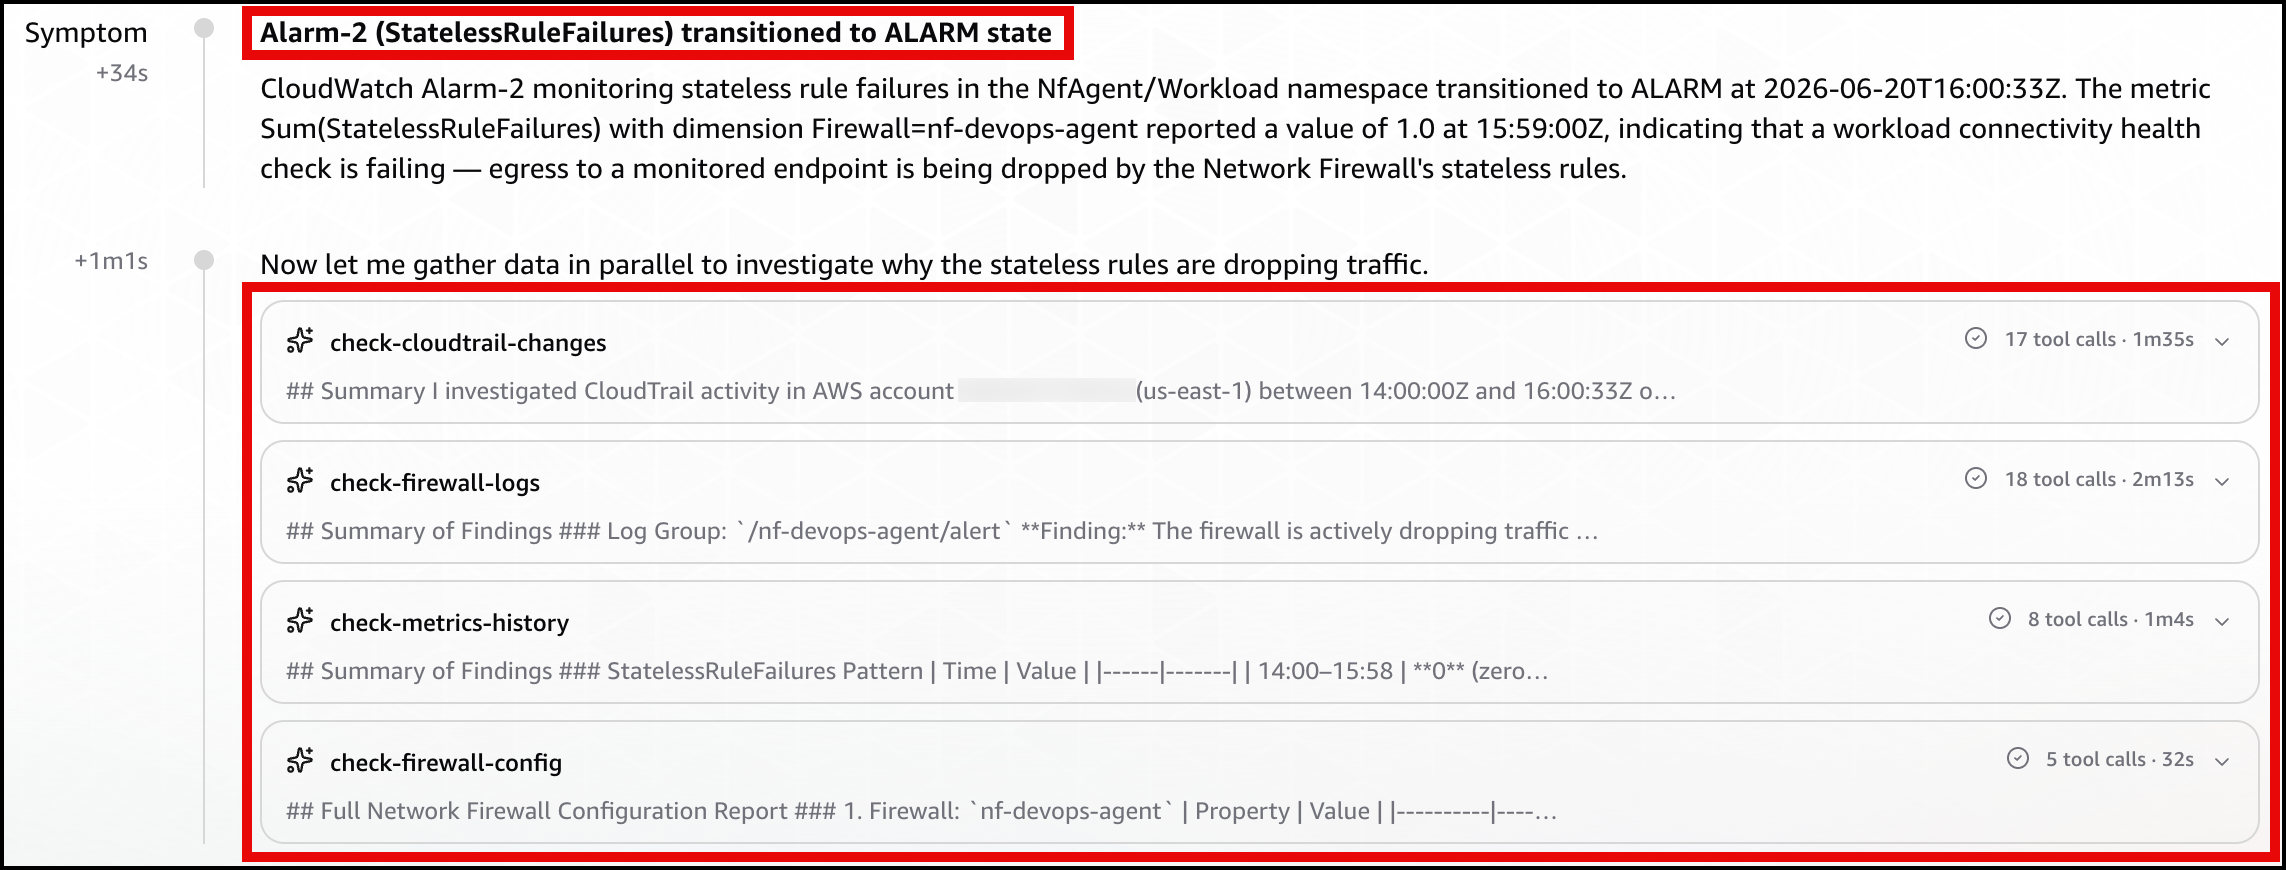
In the DevOps Agent Operator Web App view, the agent first restates the Alarm-2 trigger and confirms that a workload connectivity health check is failing because the firewall’s stateless rules are dropping egress (Figure 9).
Figure 9: Scenario 2 – The symptom
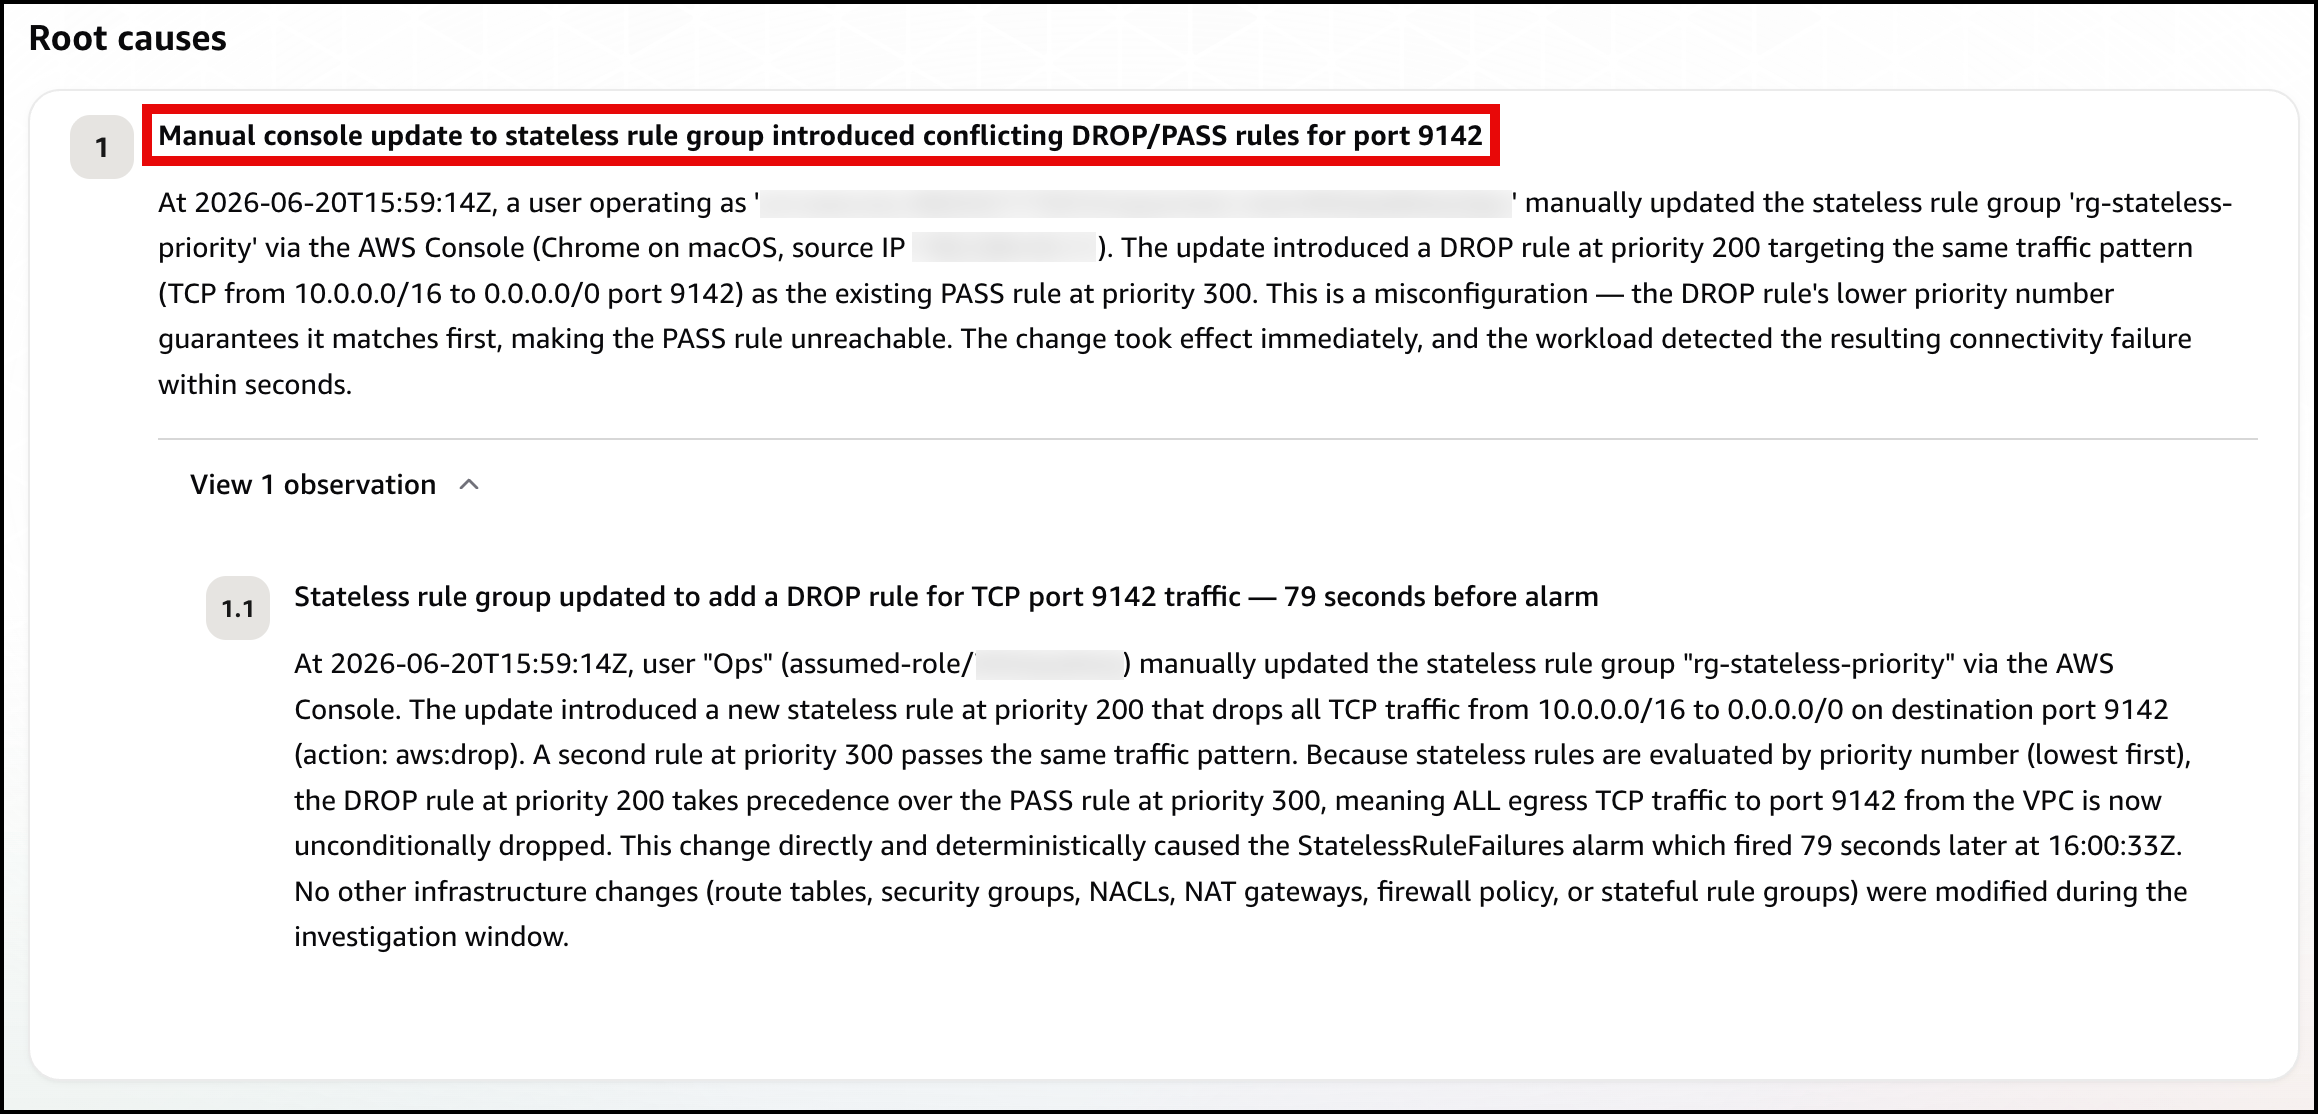
Next, the agent identifies the root cause, using the rule-group state and CloudTrail to pinpoint the conflicting DROP/PASS rules, where the new DROP rule’s lower priority number makes it match first (Figure 10).
Figure 10: Scenario 2 – The root cause
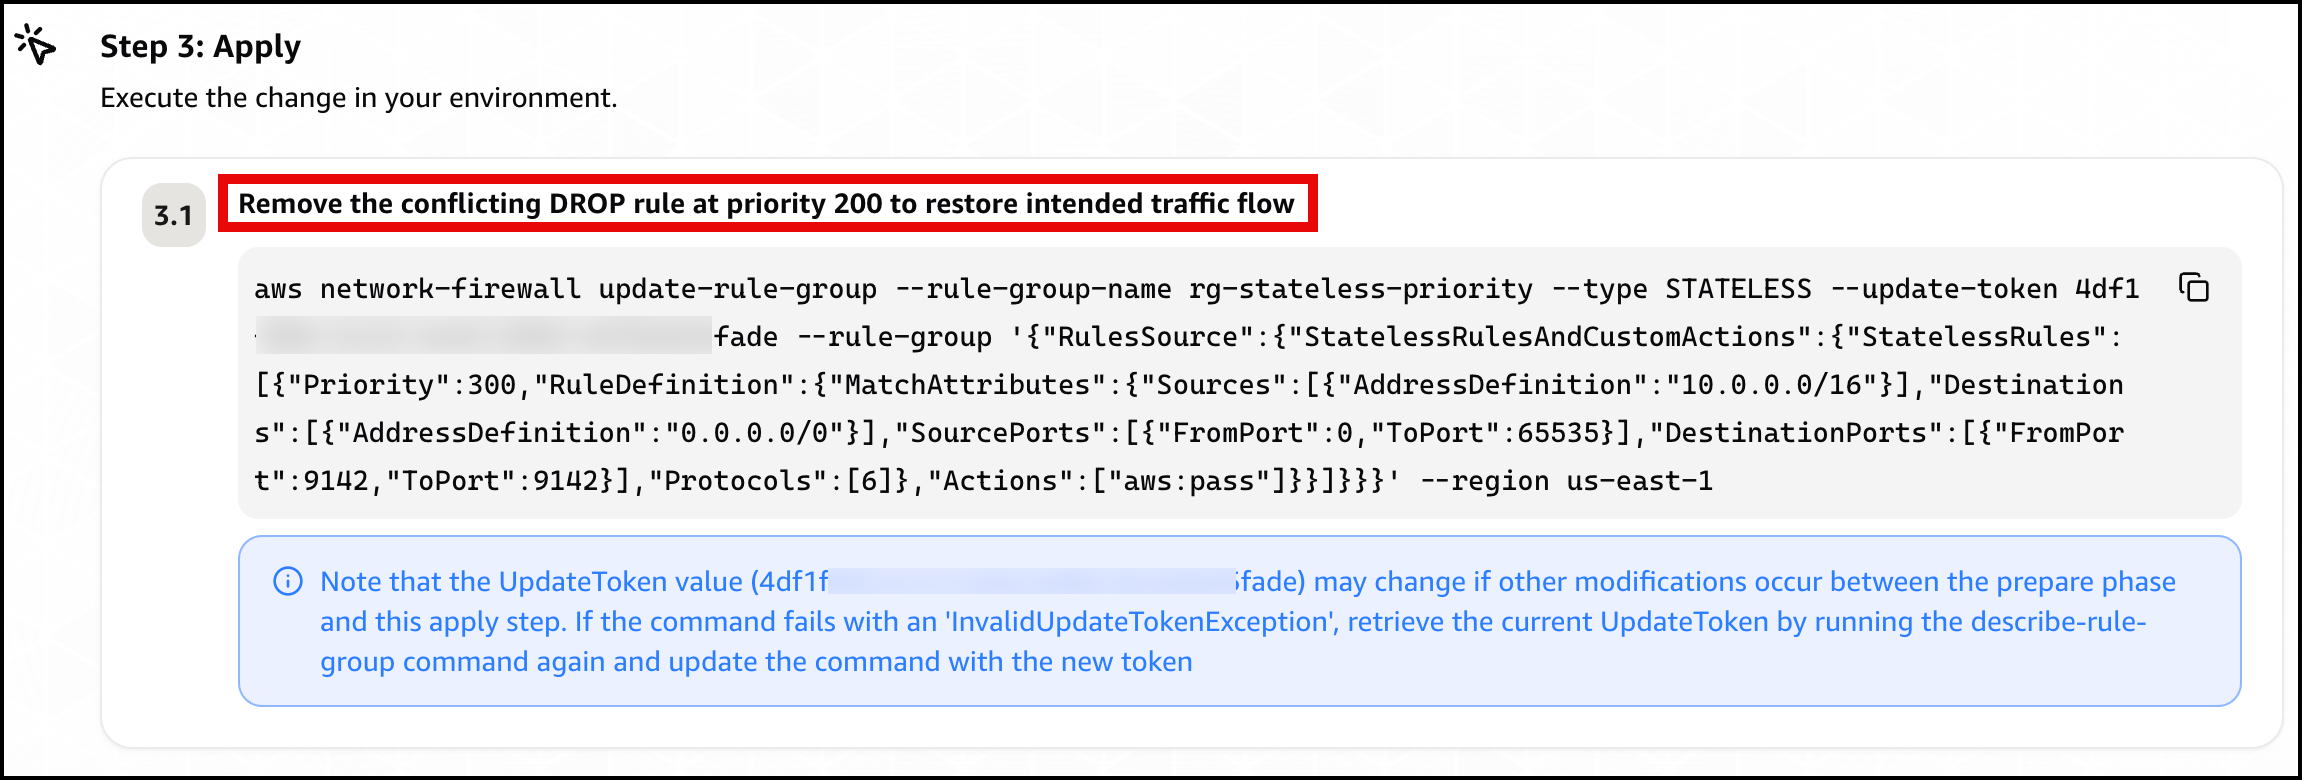
Finally, the agent presents a mitigation plan, recommending you remove the conflicting DROP rule at priority 200 to restore traffic flow (Figure 11).
Figure 11: Scenario 2 – The mitigation plan
Confirm recovery. Apply the change the agent recommends. After the allow rule is ahead of the drop rule again, Alarm-2 clears and the card returns to green. Move on to Scenario 3.
Scenario 3. Asymmetric cross Availability Zone routing drop
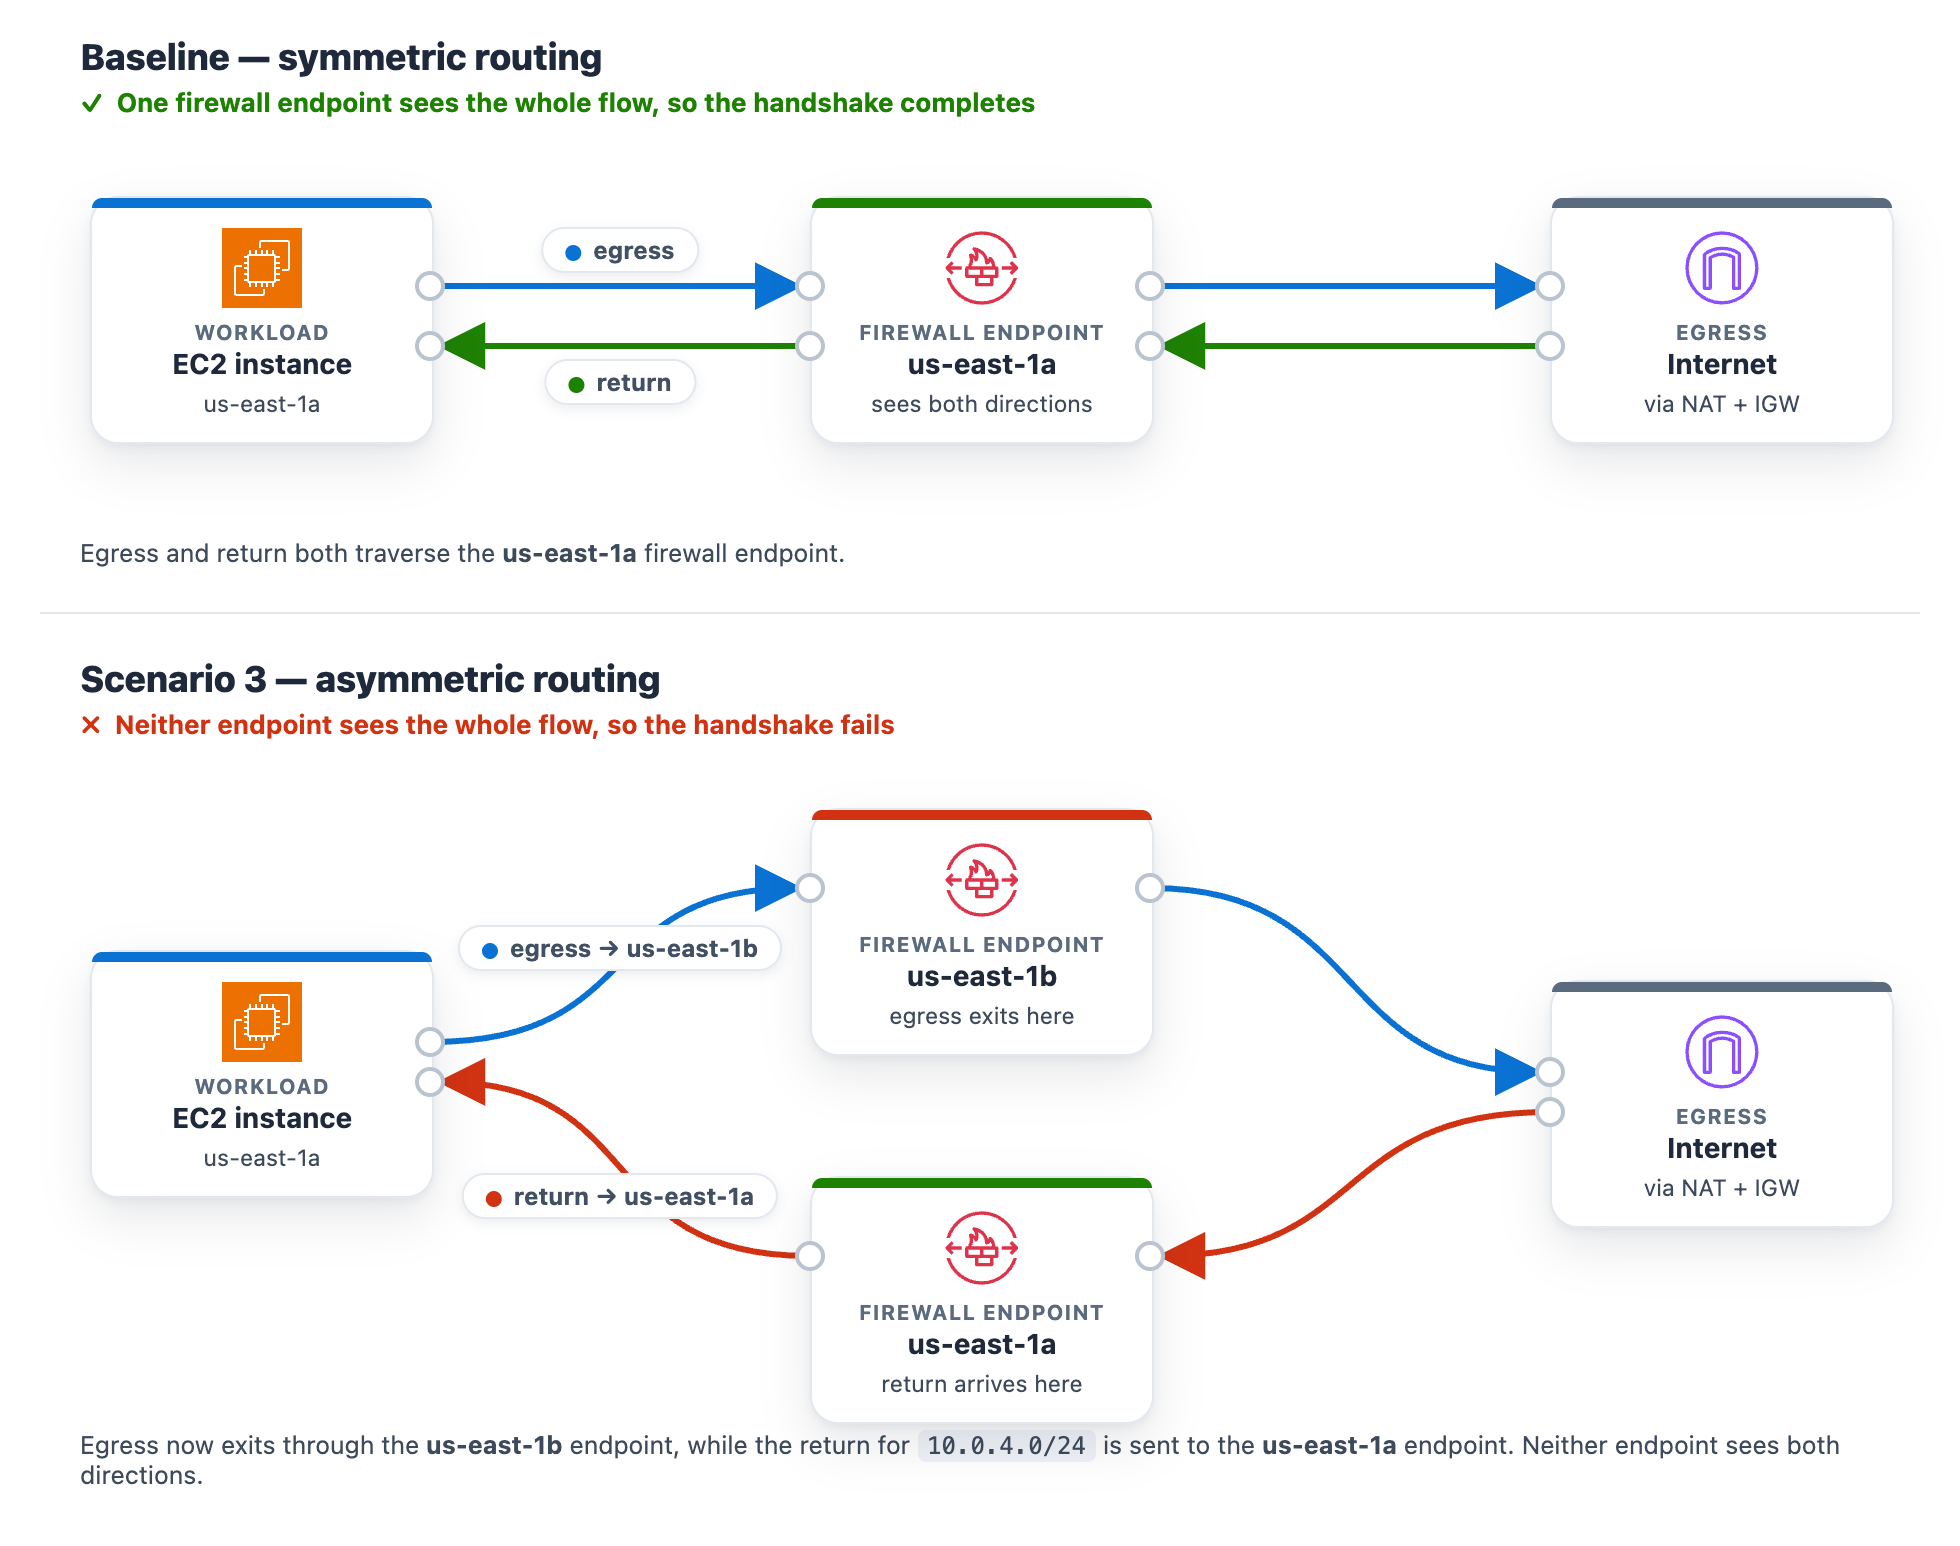
At baseline, the protected subnet in each Availability Zone routes its egress through the firewall endpoint in that same Availability Zone , and the matching return route uses that same endpoint. One endpoint sees both directions of the flow, so the stateful engine completes the handshake. The workload runs in the protected subnet in us-east-1a (CIDR 10.0.4.0/24), so at baseline its egress and its return both use the us-east-1a firewall endpoint.
Introduce the change. Make the flow asymmetric by sending egress out one Availability Zone endpoint while the return comes back through the other. This takes two route edits, and both are required. With only the first edit the flow can still complete, so the alarm will not trigger until both are saved. It makes no firewall-policy change, mirroring a real multi-Availability-Zone routing mistake.
To create asymmetric cross Availability Zone routing
Go to the Amazon VPC console and choose Route tables in the navigation pane.
Flip the egress. Select the NfNetworkStack/SampleVpc/protectedSubnet1 route table (the us-east-1a protected subnet, where the workload runs). On the Routes tab, choose Edit routes. Its 0.0.0.0/0 route currently targets the us-east-1a firewall endpoint. For the target, choose Gateway Load Balancer Endpoint and select the us-east-1b firewall endpoint, then choose Save changes.
Move the return. Select the NfNetworkStack/SampleVpc/publicSubnet2 route table (the us-east-1b public subnet, where egress now exits). Choose Edit routes, then Add route. For the destination enter the workload CIDR 10.0.4.0/24. For the target, choose Gateway Load Balancer Endpoint and select the us-east-1a firewall endpoint. Choose Save changes.
After both edits, a flow’s egress leaves through the us-east-1b endpoint while its return is directed to the us-east-1a endpoint. Neither endpoint sees the whole flow.
Figure 12: Scenario 3 routing change breaking the flow’s symmetry
What happens. A new connection leaves through one endpoint. Its return arrives at the other endpoint, which never saw the connection open, so the handshake fails. Unlike Scenarios 1 and 2, this affects the whole subnet, so all egress stops and Alarm-2 and Alarm-3 both move to ALARM. The AWS/NetworkFirewall DroppedPackets alarm (Alarm-1) stays quiet because no endpoint is making a drop decision. The flow is lost to asymmetric routing rather than counted as a firewall drop. This is why monitoring application connectivity matters. A routing fault is invisible to the firewall’s own drop counter. On the status page, the Scenario 2 card reads DROPPED (with the condition “Stateless rules dropping the monitored traffic class”) and the Scenario 3 card reads DROPPED (with the condition Return traffic dropped by asymmetric cross-Availability-Zone routing), while the Scenario 1 card stays Healthy (Figure 13). On the topology, the alarm pipeline from CloudWatch through Amazon SNS and Lambda to DevOps Agent and the workload-to-firewall inspect lines both turn amber, which the legend defines as collateral / alarm active, while the egress path from the firewall through the NAT gateway and the TLS :9142 and HTTPS · routing lines to the test endpoint turn red, which the legend defines as dropped (root cause).
Figure 13: Scenario 3 – The status page during a path-wide outage
Let DevOps Agent investigate. Both Alarm-2 and Alarm-3 fire in the same datapoint. DevOps Agent recognizes them as linked and merges them into a single investigation:
Reads the flow logs and sees bidirectional TLS connections stop abruptly, with only one-way traffic remaining and no flows reaching the established state.
Reads the firewall metrics and sees received and passed packets shift from one Availability Zone to the other at the moment of the change.
Calls DescribeRouteTables and finds the egress route pointing at one Availability Zone firewall endpoint while the return route points at the other.
Searches CloudTrail and surfaces the ReplaceRoute and CreateRoute calls by the same user, about a minute before both alarms fired.
Reports the root cause as that asymmetric routing change. Recommends restoring symmetric same-Availability-Zone routing so egress and return traverse the same endpoint.
Presents this as a plan you review and apply, not an automatic change.
A mitigation plan is a recommendation you review, not an automatic change, and the right fix depends on the intended design. Restoring symmetric routing can mean sending the workload subnet’s egress back through its own-Availability-Zone firewall endpoint (this sample’s architecture) or, in a design that doesn’t inspect this path, back through a NAT gateway. The agent infers a plausible target from what it can observe, so review the specific route it proposes against your intended topology before you apply it. (Connecting your pipeline or infrastructure-as-code, covered in the next section, lets the agent recommend the target that matches your design.)
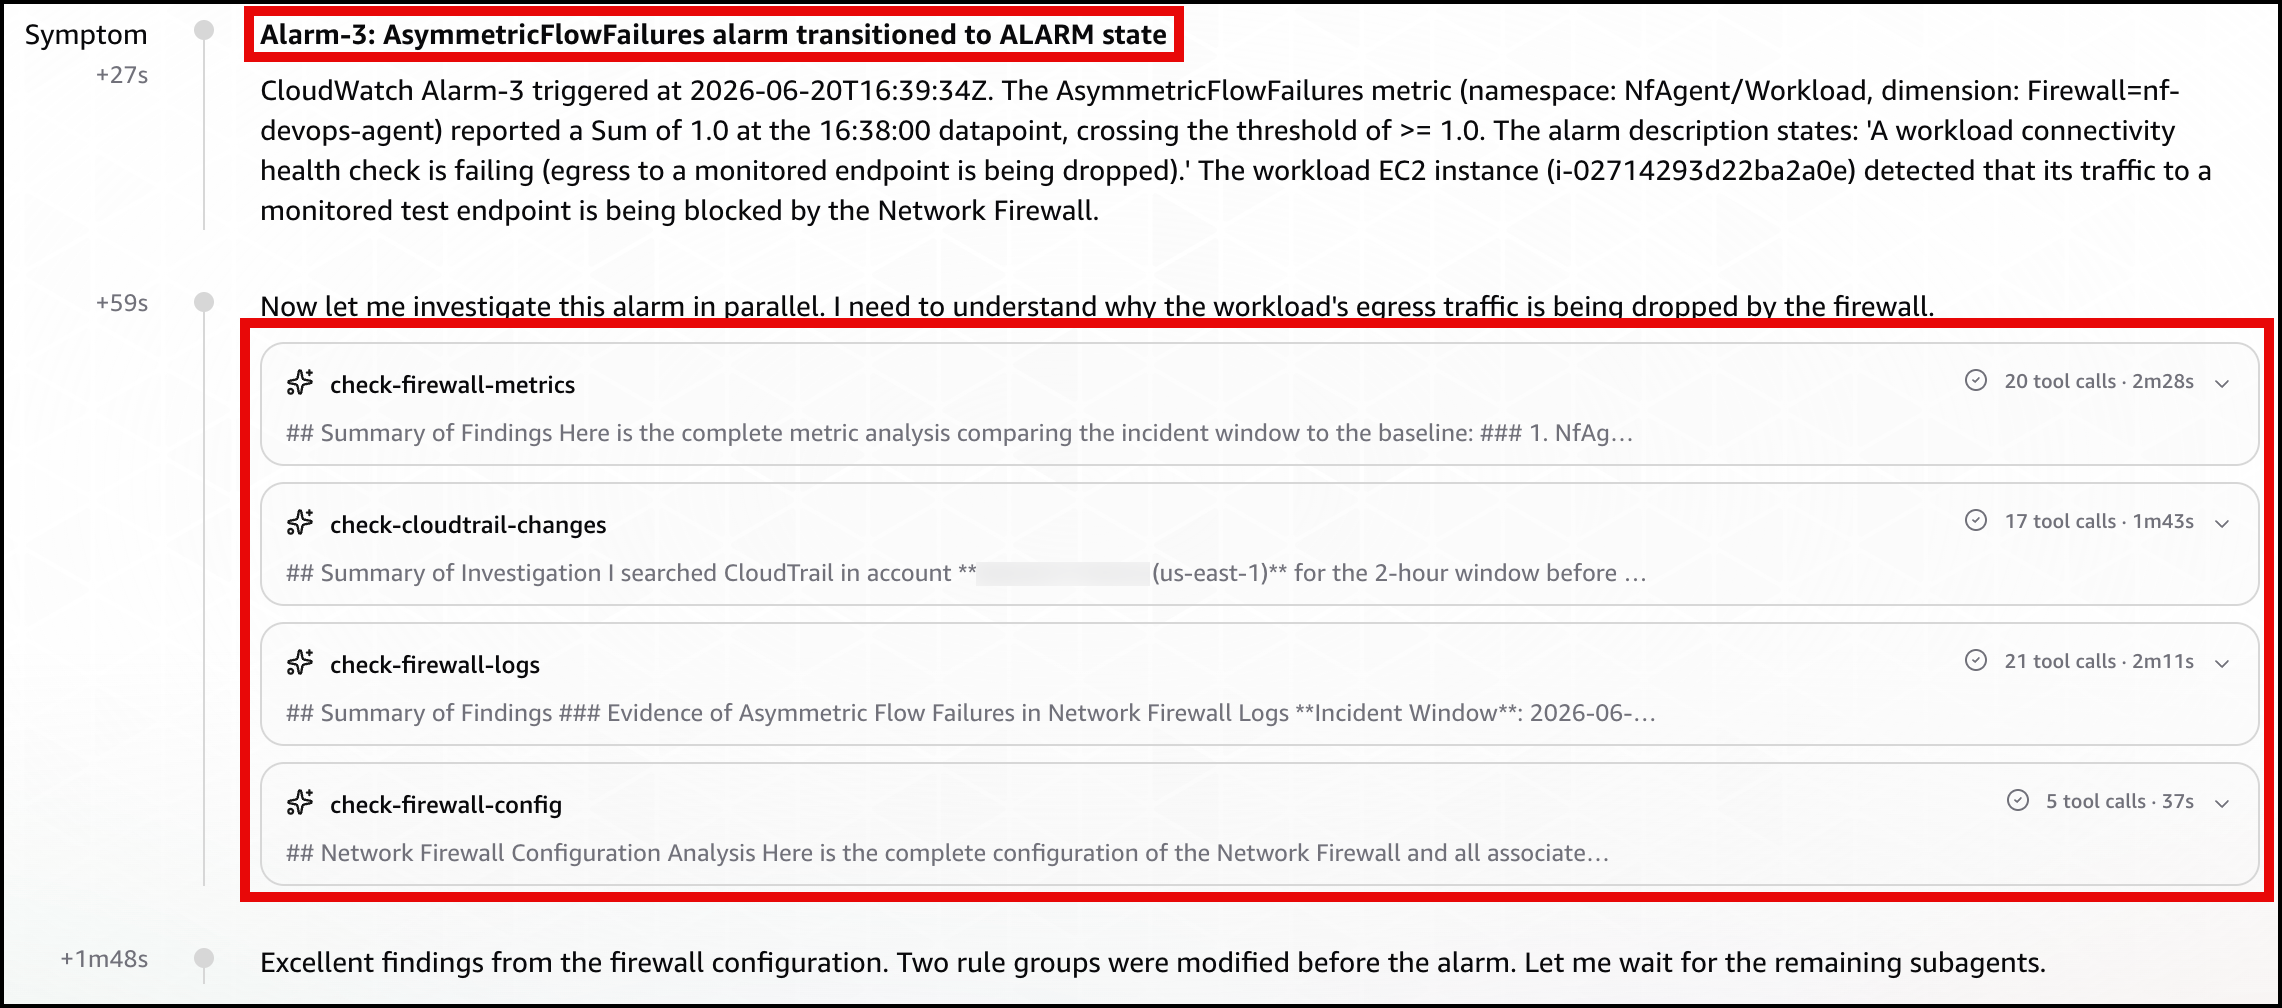
In the DevOps Agent Operator Web App view, the agent restates the Alarm-3 (AsymmetricFlowFailures) trigger and confirms the workload’s egress to a monitored endpoint is being blocked by the Network Firewall (Figure 14).
Figure 14: Scenario 3 – The symptom
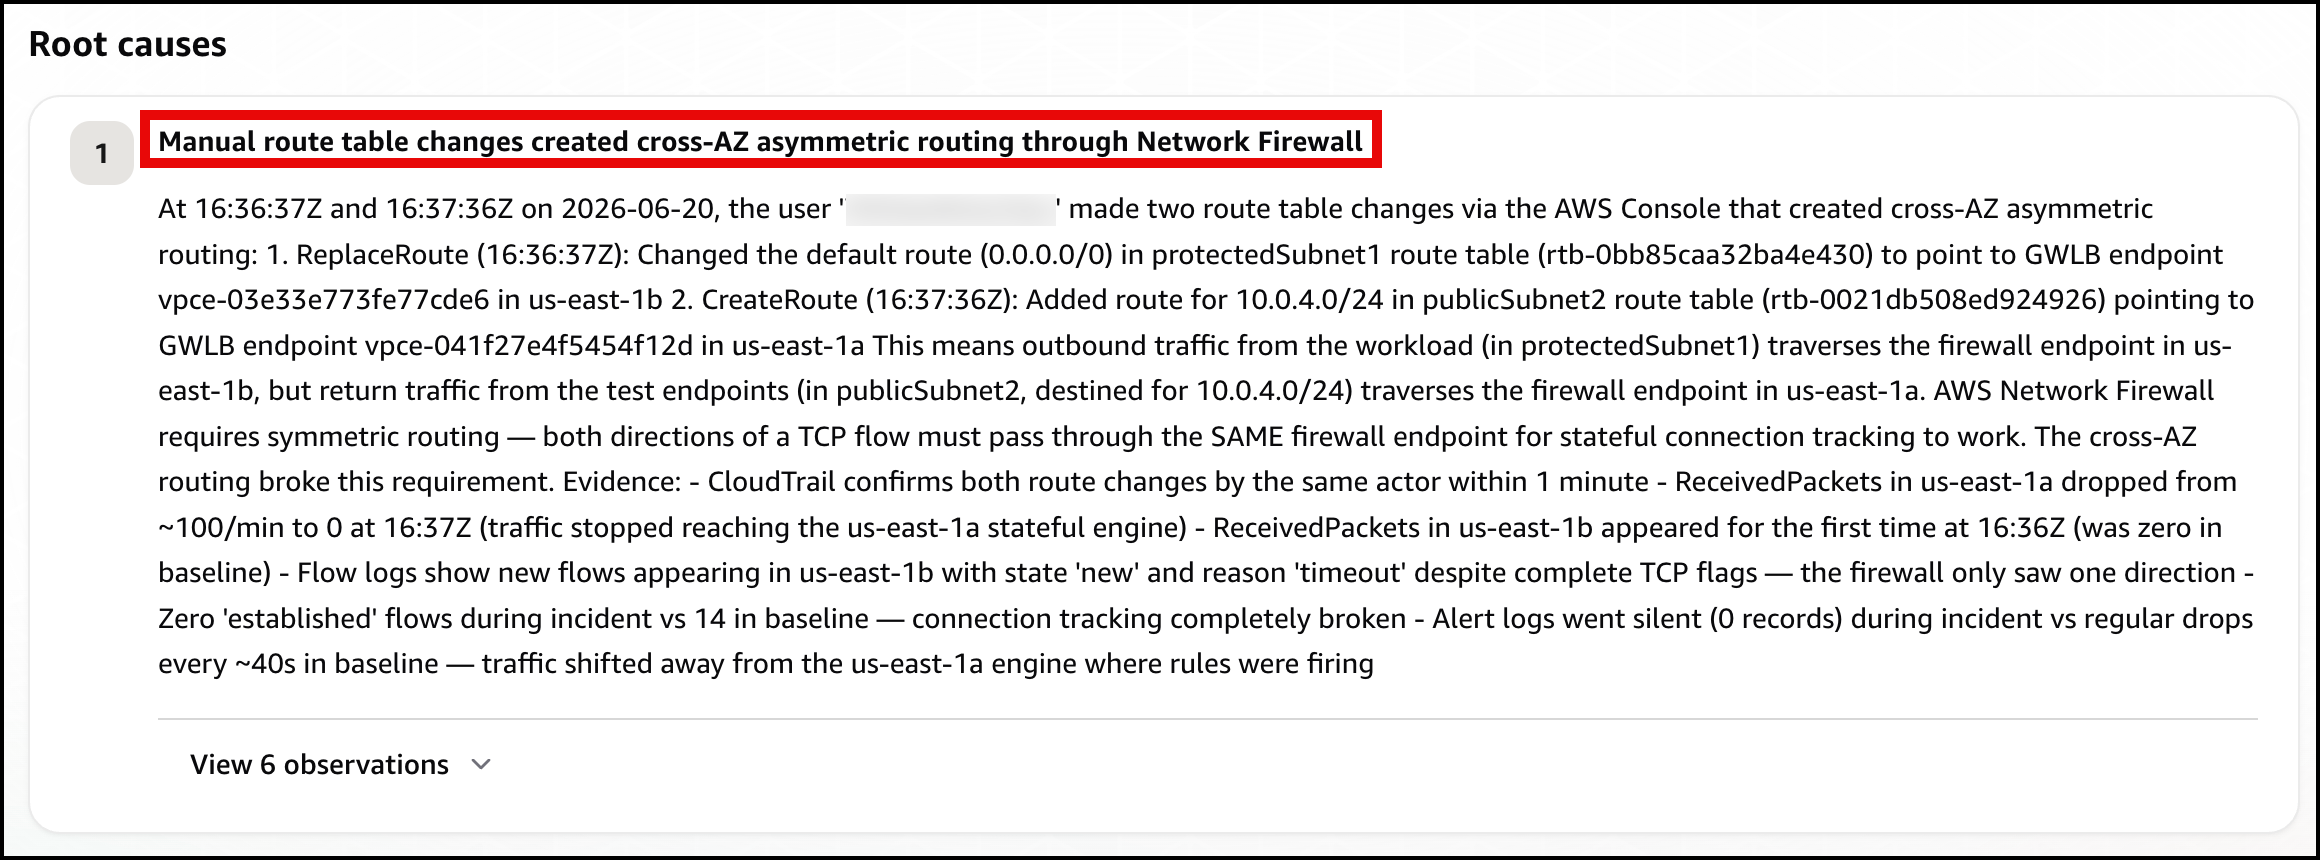
Next, the agent identifies the root cause: manual route table changes that created cross-AZ asymmetric routing through the network firewall, breaking its symmetric routing requirement (Figure 15)
Figure 15: Scenario 3 – The root cause
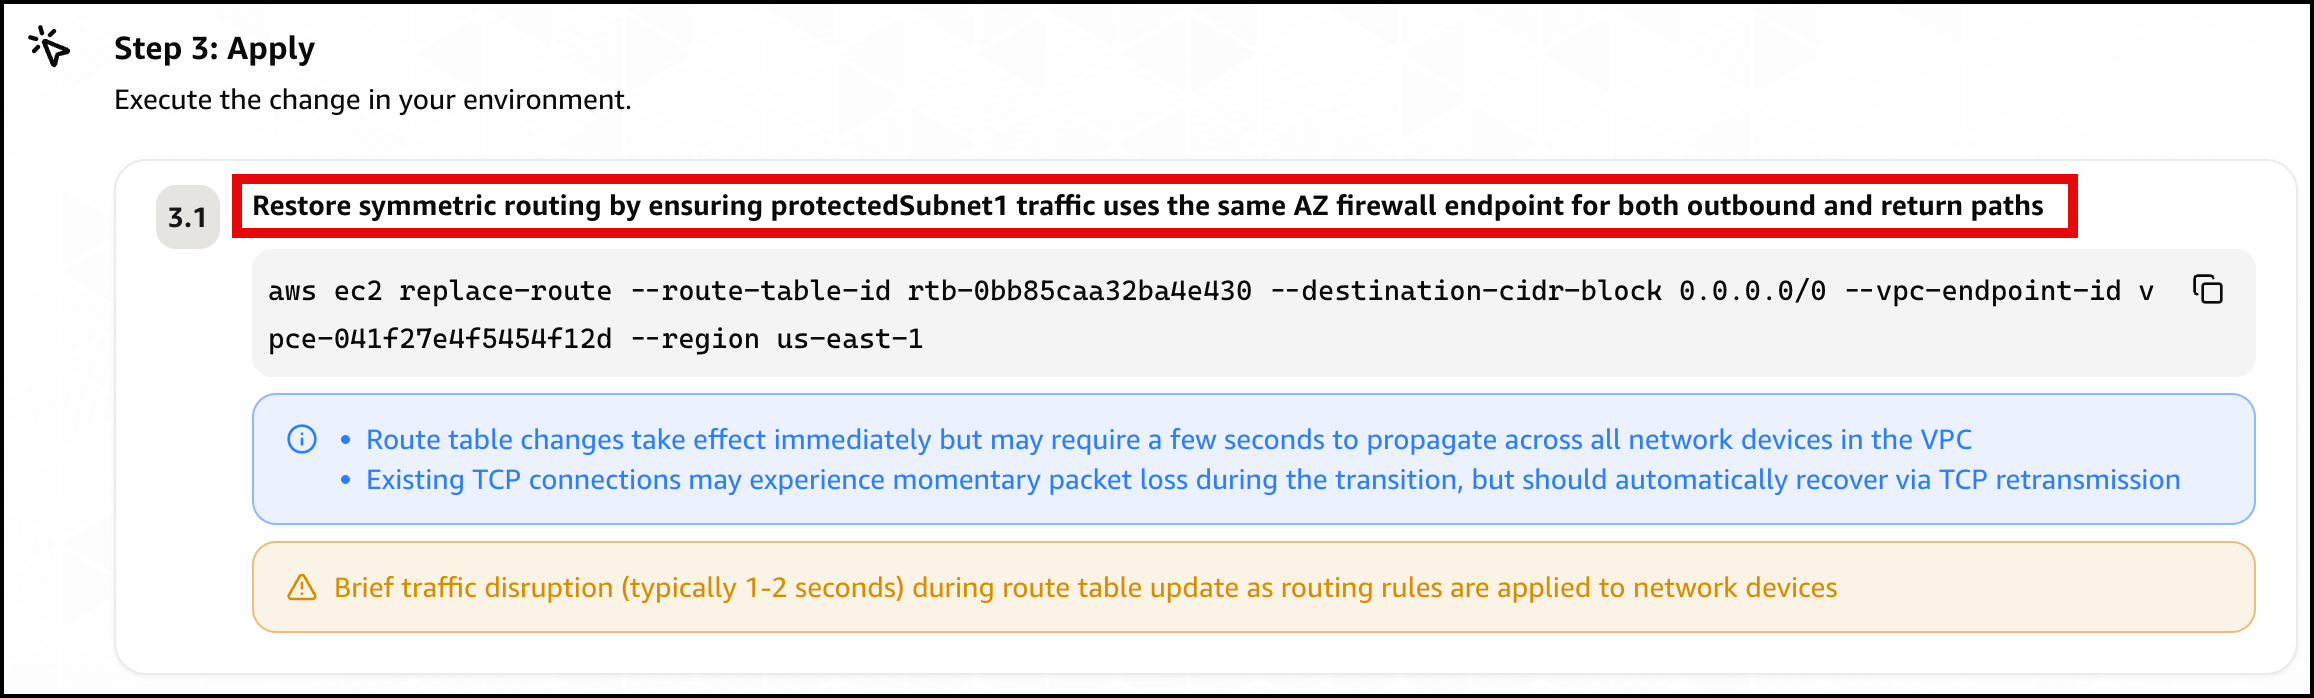
Finally, the agent presents a mitigation plan, recommending you restore symmetric routing by pointing protectedSubnet1‘s default route back to the same Availability Zone firewall endpoint, so one endpoint sees both directions of the flow again (Figure 16).
Figure 16: Scenario 3 – The mitigation plan
Confirm recovery. Apply the change the agent recommends, after checking the route target matches your intended design. After the workload subnet’s egress and return use the same Availability Zone firewall endpoint again, the control probe recovers, the alarms clear, and every card returns to green.
Further considerations
In production a single change can trigger several alarms at the same time, as Scenario 3 shows. DevOps Agent links related investigations and works them as one, so you review a single root cause. You can validate the linked findings or unlink an alarm to investigate it independently. If you would rather collapse alarms before they reach the agent, you can add correlation logic in the bridge Lambda function, buffering and grouping by firewall. You can also add email, Amazon Simple Queue Service (Amazon SQS), or HTTP subscribers to the SNS topic, or add the webhook Lambda function to a topic you already run. DevOps Agent produces a mitigation plan but does not change your environment on its own.
You can also give the agent more to work with. DevOps Agent connects to source repositories and CI/CD pipelines, integrating with GitHub (including GitHub Enterprise Server and GitLab Self-Managed through a private connection). It can associate AWS resources with deployments of AWS CloudFormation, AWS CDK, Amazon Elastic Container Registry (Amazon ECR) images, and Terraform. With deployed configuration and recent deployment events in view, the agent correlates the disruption against the change that introduced it and recommends a fix matching your intended design. For this sample, that means recommending the workload subnet’s own Availability Zone firewall endpoint rather than a generic symmetric path.
DevOps Agent also supports proactive incident prevention. It analyzes patterns across past investigations and delivers recommendations to prevent similar issues from recurring, including governance recommendations that strengthen deployment processes and pipeline controls. For Network Firewall rule changes, this means the agent can recommend guardrails for your CI/CD pipeline based on the classes of misconfigurations it has already resolved. You can access these recommendations through the Improvements page in the DevOps Agent Operator Web App.
Clean up
Clean up the environment with one command.
bash scripts/destroy.sh
It reverts any active scenario, runs cdk destroy for all stacks, and sweeps for stragglers by the Project = nf-devops-agent tag. The main cost drivers are the two Network Firewall endpoints, the NAT gateways (one in the main VPC for each Availability Zone, one in the test-endpoint VPC), and the test endpoint’s load balancers. Each of these bills at an hourly rate for as long as it’s provisioned, whether or not traffic is flowing, so a stack left running continues to accrue charges around the clock even while idle. Running the scenarios and tearing the stack down the same day limits the cost to a few active hours rather than days of idle hourly charges.
Conclusion
In this post, we showed you how AWS DevOps Agent accelerates troubleshooting for three common network firewall connectivity issues. The first was a domain deny list. The second was a stateless priority inversion. The third was an asymmetric cross-AZ routing drop. For each one, DevOps Agent investigated the drop and returned a root cause with a mitigation plan you approve before applying. The first scenario triggered on a prebuilt Network Firewall metric, and the other two on application health metrics. That shows both ways to alarm on a firewall problem through one pipeline.
The AWS Customer Incident Response Team (AWS CIRT) encounters patterns that repeat across engagements when helping customers respond to security incidents. We’re passionate about making sure that information is accessible so that everyone can improve their security posture and their organization’s resilience to disruption. The primary method we use to share this information is the Threat Technique Catalog for AWS (TTC). The latest update to the catalog for June 2026 focuses on container security, organization-level trust, and compute hijacking. Each new entry reflects something we’ve encountered in practice, and each provides straightforward mitigation. This post breaks down what changed, why it matters, and what you can do about it today.
What we’re seeing
We’ve added five new entries to the TTC.
EKS workload modification
Amazon Elastic Kubernetes Service (Amazon EKS) gives teams powerful orchestration capabilities. We’re seeing threat actors who have obtained Kubernetes credentials or an AWS Identity and Access Management (IAM) role with EKS permissions modify running workloads—altering container images, injecting sidecar containers, or changing pod specifications to introduce malicious code into a deployment.
Nothing new is created. The workload already exists, it might be running in production, and by modifying it in place the threat actor inherits the network access, service account permissions, and data access the legitimate workload already had. Without admission controllers or image verification, these changes can go unnoticed until the impact shows up downstream. Enforcing image signing through admission controllers, restricting workload changes with Kubernetes role-based access control (RBAC), and enabling Amazon GuardDuty EKS Protection to surface anomalous cluster activity all reduce this risk. For more information, see EKS Modification – Workload Integrity Degradation.
Exploit public-facing application – EKS
Publicly exposed Kubernetes API servers and misconfigured ingress controllers continue to be an entry point we see exploited. This technique captures threat actors targeting the customer-deployed workloads running on Amazon EKS—not EKS itself—and their exposure to the internet.
The pattern starts with an exposed service and an application-level weakness, then pivots from the compromised pod toward broader cluster access. When inside a pod, a threat actor can query the instance metadata service, read mounted service account tokens, or move laterally across the cluster network. Limiting public exposure of the Kubernetes API server, applying network policies to restrict pod-to-pod communication, and running workloads with least-privilege service accounts reduce the risk of this technique succeeding. For more information about this technique, see Exploit Public-Facing Application.
Assume root into organization member account
AWS Organizations centralizes trust across member accounts, and that trust runs in one direction—from the management account downward. We’ve observed threat actors who compromise a management account—or gain sufficient privilege within one—use that position to assume root access into member accounts using sts:AssumeRoot. Because the trust is inherent to the organization structure, this can avoid the access controls a member account administrator has configured.
With root access to a member account, a threat actor can disable security controls, delete resources, change billing configurations, and establish persistence that survives remediation focused on IAM principals. We strongly encourage implementing service control policies (SCPs) that restrict which principals can call sts:AssumeRoot and under what conditions, and monitoring for sts:AssumeRoot calls in AWS CloudTrail. For more information, see Assume Root into Organization Member Account.
Compute hijacking – EKS
Compute hijacking remains one of the most common motivations we see behind unauthorized access, and Amazon EKS clusters are increasingly the target. Threat actors deploy cryptocurrency mining or other compute-intensive workloads inside compromised clusters, consuming customer resources and generating unexpected cost.
What sets EKS-based hijacking apart is scale. In clusters without resource quotas, a single compromised service account can consume all available capacity across nodes. The workloads use legitimate-looking images pulled from public registries, which makes image scanning alone insufficient. Setting resource quotas and limit ranges, restricting which registries workloads can pull from, and enabling Amazon GuardDuty EKS Protection to flag mining behavior provides effective detection. For more information, see Resource Hijacking: Compute Hijacking – EKS.
Invite accounts to unknown organization
A threat actor with access to a standalone account—or one they’ve removed from its legitimate organization—invites it into an organization they control. After the account joins, it falls under the threat actor’s governance. The threat actor’s organization can apply SCPs that restrict the legitimate owner’s actions, gain visibility into the account’s resources through organizational services, and access consolidated billing information. The legitimate owner finds themselves locked out of their own governance controls. Monitoring organizations:InviteAccountToOrganization and organizations:AcceptHandshake, and implementing SCPs that prevent accounts from leaving their legitimate organization are important preventive measures. For more information, see Modify Cloud Resource Hierarchy: Invite Accounts to Unknown Organization.
What’s updated
We’ve refreshed three existing entries. S3 Object Collectionnow captures additional API calls used for bulk data staging from Amazon Simple Storage Service (Amazon S3), with refined detection guidance and mitigations that use recent Amazon S3 security features. Compute Hijacking – ECSadds methods threat actors use to deploy unauthorized tasks in Amazon Elastic Container Service (Amazon ECS), including abuse of overly permissive task execution roles. Role Assumption and Federated Access has been expanded to cover new cross-account role assumption variations and identity provider manipulation, with sharper guidance for distinguishing legitimate federated access from unauthorized use.
The current trend
This June update reflects a clear trend: threat actors are increasingly targeting container orchestration platforms and using organizational trust relationships to their advantage. The container techniques show that as organizations adopt Kubernetes at scale, the attack surface grows with it. The organization-level techniques show that threat actors understand organizational trust relationships.
The common thread is that every one of these techniques operates within the boundaries of legitimate functionality. Modifying a workload, assuming cross-account trust, and joining an organization are all expected actions in healthy environments.. Detection, then, depends entirely on context: the principal, the timing, and the sequence of events that follows.
The Threat Technique Catalog for AWS is designed to help with this. We encourage teams to review the relevant entries and assess whether their current monitoring would catch these patterns:
Unexpected modifications to EKS workload specifications
Pod deployments that use unsigned container images
sts:AssumeRoot calls into member accounts
Unbounded compute consumption in your EKS clusters that could be prevented by resource quotas
Unexpected organization invitations to your accounts
Each of the threats leaves traces in AWS CloudTrail and Kubernetes audit logs, and the TTC provides specific guidance on what to watch for and how to respond.
Looking ahead
The Threat Technique Catalog for AWS exists because we believe the patterns we observe during security engagements shouldn’t stay behind closed doors. When we see techniques repeating across customers, the most effective thing we can do is document them and make that knowledge available so you can act on it before you’re in the middle of an incident.
This June update adds five new entries and updates three existing ones, and the catalog will continue to evolve. Our team updates it based on what we’re seeing in the real world when helping customers respond to security events. We encourage security teams to review the catalog, incorporate its techniques into threat modeling exercises, and use it as a shared vocabulary for discussing cloud-specific threats.
May 26, 2026: This post was originally published in July 2022. It has been updated to reflect current engagement options, new threat intelligence resources such as the Threat Technique Catalog for AWS (TTC), additional open-source tools, and the distinction between AWS CIRT support and the AWS Security Incident Response managed service.
Welcome back, or welcome for the first time. Either way, we’re glad you’re here. We’re the AWS Customer Incident Response Team (CIRT), and we want to share who we are and how we can help when it matters most.
The AWS CIRT is a specialized 24/7 global team within Amazon Web Services (AWS) that provides support to customers during active security events on the customer side of the AWS Shared Responsibility Model. Our team is made up of security engineers who respond to cloud security events and build the tools and resources we use to do it.
Important: If you’re experiencing an active security event in your AWS environment—such as unauthorized access, data exfiltration, or ransomware—open an AWS support case and request assistance.
Mention that you have an urgent security incident in the case description.
Opening a support case from the affected account allows AWS to confirm account ownership and gives you a case number to track the engagement. If you have an account team (TAM, Account Manager, or Solutions Architect), you can also alert them to initiate an escalation.
When the AWS CIRT supports you, we focus on investigating security events as they appear in AWS service logs and the AWS control plane. For our analysis, we draw on sources such as AWS CloudTrail, Amazon VPC Flow Logs, and Amazon GuardDuty findings. We assist with triage, analysis, and containment, alongside providing recommendations and best practices to help you avoid security events in the future.
The AWS CIRT works alongside AWS threat intelligence and security operations teams. During an engagement, we use current threat intelligence and AWS infrastructure knowledge to inform our analysis and recommendations.
For investigations that extend into host-level or application-level analysis—such as operating system forensics, memory analysis, or application code review—we recommend complementing our support with a specialized AWS Partner for digital forensics and incident response (DFIR) capabilities.
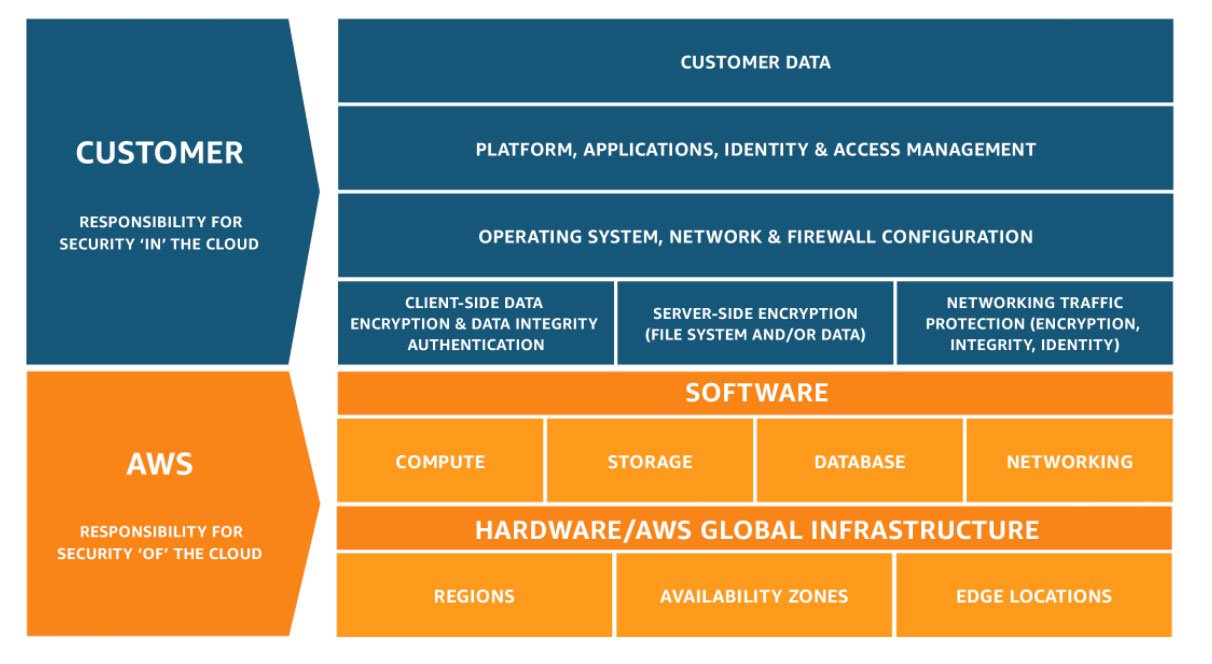
Figure 1 shows the two different sides of the shared responsibility model, in which AWS is responsible for security OF the cloud, while customers are responsible for security IN the cloud.
Figure 1: The customer and AWS Shared Responsibility Model
Threat intelligence: The Threat Technique Catalog for AWS
The AWS CIRT regularly encounters patterns that repeat across our engagements. The TTC started as an internal reference—a way for our team to track and share what we were seeing across engagements, so we weren’t solving the same problems in isolation. Over time, it became clear that the knowledge we were building for ourselves was exactly what customers needed to get ahead of the same threats. So, we made it public. When we see techniques repeating across customers, an effective way to help them is to document those techniques and make that knowledge available so they can act on it before they’re in the middle of an incident.
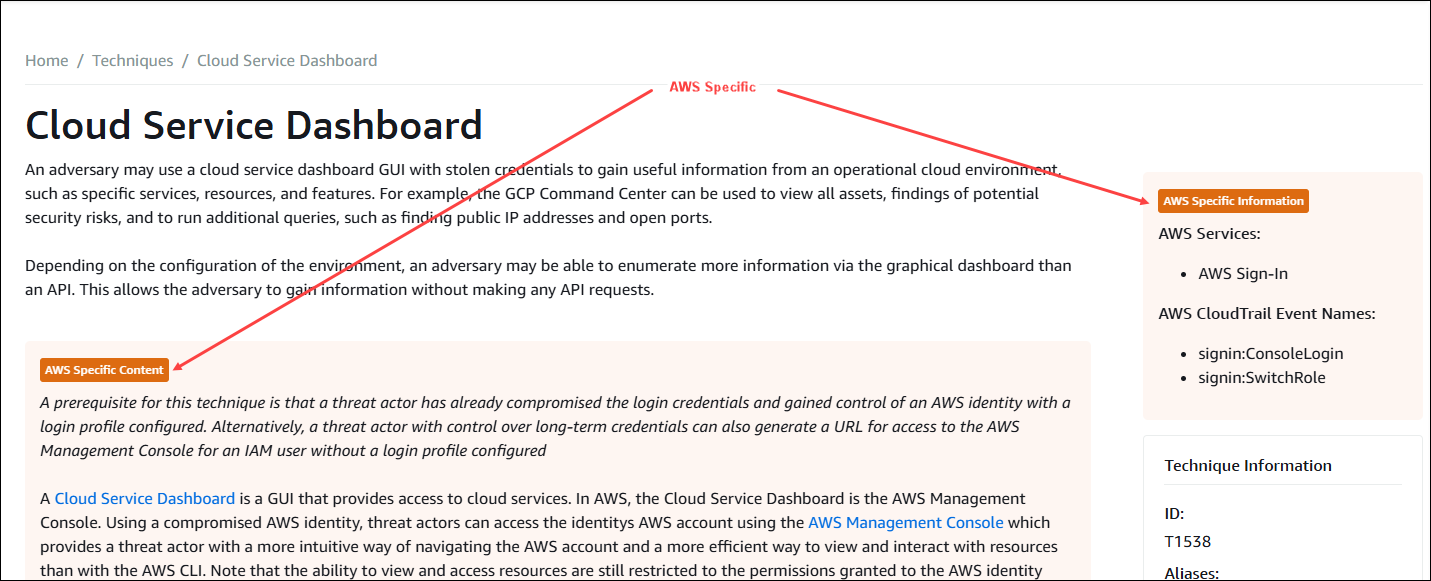
To that end, we developed the Threat Technique Catalog for AWS (TTC)—a publicly available catalog, based on MITRE ATT&CK Cloud Matrix, that documents threat actor tactics, techniques, and procedures (TTPs) specific to AWS as observed by the AWS CIRT. Each entry includes detection guidance and mitigations specific to AWS environments. You can filter for the AWS services in your account to focus on what’s most relevant to you.
Findings from the TTC also inform detection logic in AWS services like Amazon GuardDuty, helping customers strengthen automated protections in their environments.
Figure 2: The Threat Technique Catalog for AWS, based on MITRE ATT&CK Cloud Matrix
Open source tools
We’ve open-sourced several tools based on patterns we see in engagements. These complement rather than replace your existing security tooling. For a comprehensive framework for building your incident response program, see the AWS Security Incident Response Guide.
The tools below started as internal solutions we built to solve problems we kept running into.
AWS CloudSaga – A tool for testing security controls and alerts within an AWS environment by using generated simulated events based on common security events seen by the AWS CIRT
We maintain five publicly available workshops, regularly updated to simulate current security events to help you learn tools and procedures that we use daily. The workshops cover unauthorized IAM credential use, ransomware on Amazon S3, cryptomining, SSRF on IMDSv1, and incident response preparedness tooling. All you need is an AWS account, an internet connection, and the desire to learn more about incident response in the AWS Cloud. These workshops are built using the same scenarios our team trains on internally—we wanted to make that accessible to everyone.
How to contact us
Any AWS customer can engage the AWS CIRT through an AWS support case, regardless of support plan level. For those customers who have an account team, you can start an escalation to the AWS CIRT with the account team. Customers with Enterprise Support or Unified Operations can also onboard to AWS Security Incident Response, a managed service for security event triage and response.
Thank you for reading. This post is where we share what we’re learning—security trends, new resources, and threat intelligence—so you can stay prepared. If you’ve worked with us and have thoughts on how we can do better, reach out through your AWS account team, the comments below, or aws-cirt@amazon.com.
Until next time: logs on, credentials rotated, and alerts reviewed.
We also recommend subscribing to AWS Security Bulletins for notifications about security events for AWS services. You can subscribe through RSS feed to stay informed.
When customers experience a security incident, they need to acquire forensic artifacts to identify root cause, extract indicators of compromise (IoCs), and validate remediation efforts. NIST 800-86, Guide to Integrating Forensic Techniques into Incident Response, defines digital forensics as a process comprised of four basic phases: collection, examination, analysis, and reporting. This blog post focuses on the first phase—collection—and provides best practices for implementing least privilege during the forensic evidence collection processes that collect evidence and store the artifacts in Amazon Simple Storage Service (Amazon S3) buckets. The architecture presented in this post can be used to collect forensic evidence from both Amazon Web Services (AWS) and non-AWS compute resources.
It’s important to consider the security of the forensic artifact collection process because it involves communicating with potentially compromised resources. The collection methodology itself should be designed to avoid adding additional risks to infrastructure or other forensic investigation processes. At the same time, the collection of forensic artifacts requires the use of specialized tools that are difficult to change or adapt to new security requirements.
This post outlines factors that you should consider when creating an evidence collection capability and introduces an architecture that implements the best practices for least privilege and integrating with (instead of changing or adapting) existing forensic tools that support uploading artifacts to S3 buckets by using AWS security credentials.
Solution architecture
The architecture presented in this post demonstrates the following AWS best practices:
Least privilege – Use AWS Identity and Access Management (IAM) policies to provide least privilege access to upload forensic artifacts to an S3 location dedicated to a specific forensic collection task. The locked down credentials cannot be used to view or modify any other forensic collections.
Time-limited credentials – Use AWS Security Token Service (AWS STS) to provide time limited credentials, reducing the potential for an unauthorized user to abuse credentials while they’re visible on the target machine during the artifact collection process.
Compatibility with third-party tools – Forensic tools are specialized and changing a forensic collection process to adapt to different collection methods might not be possible. To avoid the risk of needing to change tools, maximize compatibility with any third-party tools that support uploading to S3 buckets. The method introduced in this post to generate time-limited, scoped down credentials can be used with most third-party forensic tools that support uploading to S3 buckets.
Credential vending – Use time-limited tokens, which can be vended on demand through an automated process, eliminating the need for forensic investigators to use the AWS Management Console, understand least privilege, or have any access to the AWS control plane. Forensic investigators can focus on the process of collecting and analyzing evidence.
Process automation – Deploy the process as infrastructure as code (IaC) and automate it through AWS services, reducing the burden on security teams to manually perform runbook steps during an active security incident.
This post starts with an overview of the digital forensic process, provides best practices for using Amazon S3 to store forensic artifacts, details how you can create time-limited, least privilege tokens to provide secure access to upload forensic artifacts to S3 buckets, and introduces a sample architecture that automates the end-to-end process.
The digital forensic process
Organizations need to have practices and resources in place to support a digital forensic investigation environment before an incident occurs. AWS has published several resources, including Forensic investigation environment strategies in the AWS Cloud and AWS prescriptive guidance: Security Reference Architecture, Cyber forensics, to provide best practices for organizing your AWS accounts using AWS Organizations to support forensic clean-room environments. Creating segregated AWS accounts and resources for your security teams is critical to provide your incident responders a location to store and analyze any digital forensic evidence collected during an investigation.
After you’ve established a landing zone for performing digital forensics, you’re ready to collect and process digital forensic evidence. AWS supports the collection of digital forensics through extensive logging of control plane events in AWS CloudTrail, and metrics and application logs that can be stored in Amazon CloudWatch. In addition, AWS core compute services, such as Amazon Elastic Compute Cloud (Amazon EC2), support forensics operations through snapshots of the underlying Amazon Elastic Block Storage (Amazon EBS) volume. An example architecture to demonstrate how to automate the collection of EBS volume snapshots for forensic investigations can be found in How to automate forensic disk collection in AWS.
You might want to use the same AWS infrastructure to collect, examine, analyze, and report on forensic incidents that occur on other resources, such as corporate laptops. You can use existing forensic tooling to perform live response, collecting specific artifacts such as Windows NT File System (NTFS) Master File Table (MFT), logs from Linux machines, volatile memory images, or other artifacts that are specified as part of your organization’s incident response plan. These tools can be provided by third parties or built in-house, and many support uploading to S3 buckets using AWS security credentials.
Using Amazon S3 for forensic artifact collection
Amazon S3 provides the foundational requirements for collecting and storing forensic artifacts. Digital forensics requires highly available, durable, and secure storage of artifacts collected from potentially compromised systems. Amazon S3 is designed for 11 nines of durability and can be configured to provide protection against modification, deletion, and unauthorized access to sensitive forensic artifacts. You can also use S3 to store forensic artifacts of almost any size—from one byte to 5 TB—in an S3 object.
S3 buckets used to store forensic artifacts require custom configuration to provide additional security. You should configure the S3 bucket that you use to store forensic artifacts to enable the following security and governance features:
Encryption in transit. You can require the use of encryption in transit and specify acceptable TLS versions using the aws:SecureTransport and s3:TlsVersion condition keys on the S3 bucket policy.
Encryption at rest using a customer managed key. You can automatically encrypt all objects uploaded to the bucket using a specified customer managed key by specifying a default server-side encryption key in the bucket’s configuration. For this post, we encourage you to use a customer managed key rather than relying upon an AWS managed key, so you can control the associated key policy.
Encryption at rest provides an additional layer of protection, because only entities that have both the permission to read from the bucket and permission to use the AWS Key Management Service (AWS KMS) key for decryption can download the forensic artifact from the S3 bucket.
You need to adjust the example KMS policies in this post if the evidence collection S3 bucket uses the S3 Bucket Key feature.
Audit logs of all S3 data event activity. You can turn on CloudTrail data events for any S3 buckets that contain forensic artifacts to provide a comprehensive audit trail of S3 object-level API activity. This helps provide a chain of custody of any artifacts stored in your forensic buckets.
Fine-grained access control using IAM permissions. You can define the set of entities (both human and machine) that have access to the artifacts in the S3 bucket. This post includes how to create time-limited, least privilege access using IAM permissions for uploading files into an S3 bucket. The permissions are fine-grained enough to scope down access to specific object names or object prefixes in an S3 bucket. Additionally, access to read the artifacts can be controlled through IAM permissions and access to the encryption-at-rest KMS key.
Protections against data modification and deletion. S3 provides features, such as S3 object versioning, to provide assurances that data hasn’t been modified or removed after it’s been collected. This is an additional layer of protection beyond the fine-grained access permissions, so even if an authorized entity attempts to overwrite or delete an object in the S3 bucket, the previous version of the object is still available.
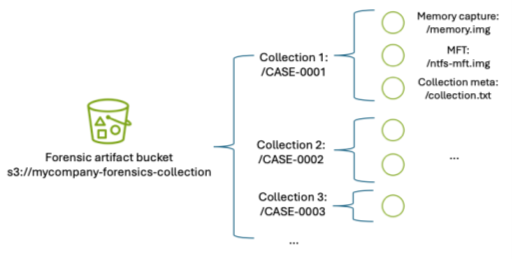
In addition to the preceding configuration, consider how to organize forensic artifacts in the S3 bucket. This post introduces a folder structure using S3 object prefixes to segregate each forensic artifact collection task into its own S3 object namespace. An example S3 namespace structure for an S3 bucket is shown in Figure 1.
Figure 1: S3 namespace structure for an S3 forensics artifact bucket using object prefixes
By separating each forensic collection task by its own prefix, you can use fine-grained IAM permissions to permit object uploads only into the active collection task. For example, scoped down credentials can be generated to only allow uploads into buckets with the CASE-0001 prefix using an IAM permission as shown in the following code example. Temporary security credentials can be generated using these limited permissions and the key is then used by the forensic acquisition tool to upload the artifacts into the S3 bucket.
Manually creating temporary IAM credentials for each forensic collection activity can be error-prone and time-consuming. Therefore, this post demonstrates how to use AWS tooling to automate the process of generating time-limited, scoped-down credentials.
Adapt existing forensic tools for AWS best security practices
Existing forensic tools typically use IAM access keys to perform S3 operations. Using a static IAM user secret access key isn’t a best practice. Even if the static key is associated with an IAM user that has been scoped down to only have access to the forensic collection S3 bucket as described previously, that means anyone with access to that key can potentially upload objects into that bucket. Therefore, the best practice is to create a time-limited temporary security credential unique to each collection activity, scoped down to only allow uploading files to a specific prefix in the target S3 bucket.
The examples in this post use the following resource names. Because these names will change based on your deployment, substitute your resource names in place of the names in the example code.
The evidence S3 bucket is named mycompany-forensics-collection
The forensics AWS account number is 112233445566. For the purposes of this example, all resources will live within this account.
The customer managed key used to encrypt the forensic artifacts at rest is ForensicsEvidenceKey
The IAM role that incident responders will assume when signing in to their AWS account is ForensicsUserRole
The IAM role that incident responders will use for generating S3 file upload temporary credentials is ForensicsUploadRole
The example uses the us-east-1 AWS Region
The following steps show you how to configure the IAM policies associated with the customer managed key ForensicsEvidenceKey and the IAM role ForensicsUploadRole. Before you begin, create the evidence S3 bucket configured as described in Using S3 for artifact collection and a customer managed key to encrypt the forensic artifacts at rest. Configure the evidence S3 bucket to use the KMS key by opening the S3 bucket’s properties tab in the Amazon S3 console and setting the new KMS key as the default encryption key for the bucket.
Next, create an IAM role that incident responders will assume through the AWS STS AssumeRole API to generate the temporary credentials. This role will define the maximum set of permissions allowed to upload artifacts to your evidence S3 bucket. This role, ForensicsUploadRole, created using the following example code, defines the maximum allowable permissions: the ability to upload objects into the evidence S3 bucket and to use the KMS key to encrypt those uploads. The effective permissions available to the forensic tool will be scoped down even further to the specific object prefix when the AWS STS temporary security credential is generated.
Next, you need to provide an ability to assume this role and generate AWS STS tokens using the role’s permissions. This is accomplished by creating a trust relationship associated with the IAM role you just created. The trust relationship shown in the following code sample describes which AWS principals are allowed to assume the role—in this case, you will allow any user who has federated into the ForensicsUserRole IAM role to be able to generate AWS STS tokens for forensic artifact collection.
After the role is established and access to the encryption key is granted, you can use the AWS STS AssumeRole API to create temporary credentials using this role. You can call this API using the AWS Command Line Interface (AWS CLI) or programmatically from a script. To scope down the token’s access to only provide permission to upload to the specific evidence object prefix, you must include a session policy as part of your AssumeRole API request to AWS STS. The following is an example session policy to restrict access to only upload objects into the CASE-0001 prefix.
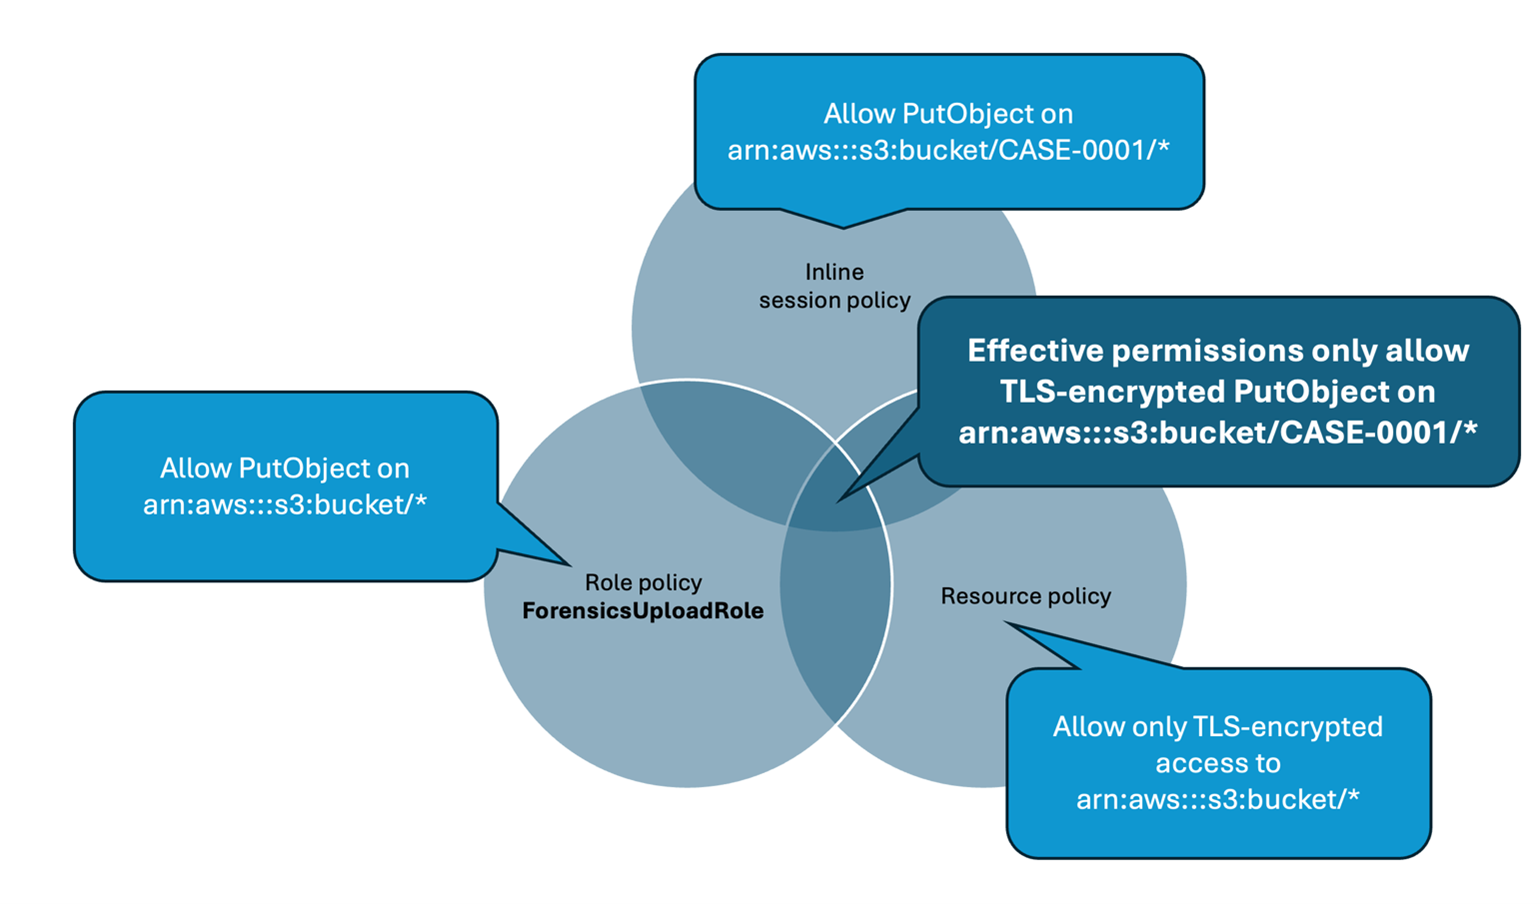
The effective permissions available to the session role will be the intersection of permissions available in the role policy (ForensicsUploadRole), the resource policy (in this case, mandating TLS-encrypted connections to the bucket), and the session policy that’s created on demand for every forensic collection (only allowing access to upload objects into the CASE-0001 prefix, as shown in the preceding example). Pictorially, this looks like the Venn diagram shown in Figure 2.
Figure 2: Intersection of IAM policies determine the effective permissions for the restricted forensic session role.
Test the temporary credentials
Now that the bucket has been created and the AWS KMS key and roles configured, you can use AWS STS to create a temporary security credential for a collection on CASE-0001. You can use the AWS CLI to do this manually or you can write a script to automate this process using the AWS API. The IAM access key, secret access key, and session token returned by this call can then be used by any tool that can use AWS access keys to upload files into the specified S3 bucket.
The following example shows an AWS CLI call to AssumeRole using the example ForensicsUploadRole and a case named CASE-0001. The --duration-seconds parameter defines the period, in seconds, that the temporary credentials are valid; the default of 3600 seconds will provide temporary credentials that are valid for one hour.
You can also verify that you can’t use those credentials to upload a file into any other object prefixes or S3 buckets. For example, if you change CASE-0001 to CASE-0004 in the Amazon S3 upload command, you will receive an AccessDenied error because you’re trying to upload an object outside of the allowed key prefix.
$ AWS_ACCESS_KEY_ID=ASIAXXXX \
	AWS_SECRET_ACCESS_KEY=XXXX \
	AWS_SESSION_TOKEN=XXXX \
	aws s3 cp evidence.zip s3://mycompany-forensics-collection/CASE-0004/evidence.zip

upload failed: evidence.zip to s3://mycompany-forensics-collection/cases/CASE-0004/evidence.zip
An error occurred (AccessDenied) when calling the PutObject operation: User: arn:aws:sts::112233445566:assumed-role/ForensicsUploadRole/CASE-0001 is not authorized to perform: s3:PutObject on resource: "arn:aws:s3:::mycompany-forensics-collection/CASE-0004/evidence.zip" because no session policy allows the s3:PutObject action
Additionally, if you wait more than the lifetime of the token (1 hour in this case), attempting to upload a file into the bucket will fail, because the token will no longer be valid:
$ AWS_ACCESS_KEY_ID=ASIAXXXX \
	AWS_SECRET_ACCESS_KEY=XXXX \
	AWS_SESSION_TOKEN=XXXX \
	aws s3 cp evidence.zip s3://mycompany-forensics-collection/CASE-0001/evidence.zip

upload failed: evidence.zip to s3://mycompany-forensics-collection/CASE-0001/evidence.zip

An error occurred (ExpiredToken) when calling the PutObject operation: The provided token has expired.
Create an automated process to vend temporary credentials on demand
After you’ve verified the security benefits of creating temporary credentials for S3 uploads and validated that the credentials work with your forensic software of choice, you can now use them as part of an automated process.
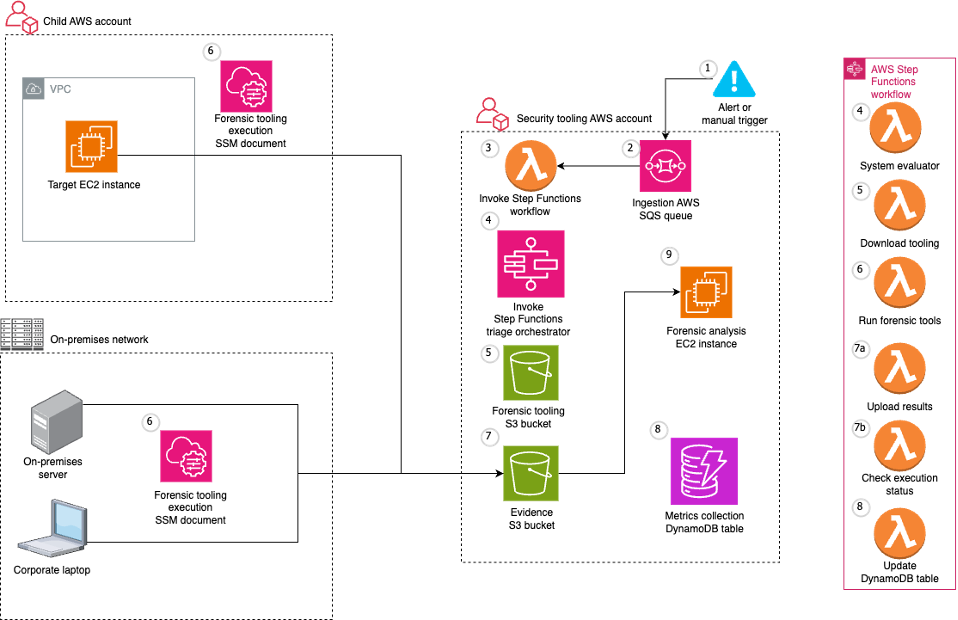
A sample automated architecture is shown in Figure 3.
Figure 3: Architecture to automate S3 credential vending and forensic artifact collection.
The workflow depicted in Figure 3 includes the following steps:
The workflow is triggered by an alert from a detection source or a manual trigger from an incident responder.
The Amazon SQS queue invokes an AWS Lambda function which in turn executes a Step Functions state machine to orchestrate the workflow.
First, the Step Functions workflow determines whether the target system is managed by AWS Systems Manager.
If the target system isn’t managed by Systems Manager, an error is noted, and the execution is abandoned.
If the target system is managed by Systems Manager, the Step Functions workflow determines the operating system (OS) of the target system and proceeds with the flow of execution.
The workflow then continues by executing the Systems Manager documents that implement the forensic collection process:
Downloads tooling:
Generates dynamically scoped IAM temporary credentials that provide access to download the OS-specific tooling to be executed on the target system from the tooling S3 bucket. These credentials are tightly scoped to only allow downloads from the S3 prefix that corresponds to the tooling for the target system’s OS.
Executes a Systems Manager command on the target system that uses the credentials generated from the previous step to download the OS tooling on the target system.
Runs forensic tools:
Executes a Systems Manager command on the target system to execute the OS tooling on the target system.
The Systems Manager commands run on the target system, which in this case is an EC2 instance.
Results are uploaded to the evidence S3 bucket:
Generates dynamically scoped IAM temporary credentials (as described previously) that provide access to upload the output of the previously executed tooling to the evidence S3 bucket. These credentials are tightly scoped to only allow uploads to a particular S3 prefix corresponding to the alert prefix.
Executes a Systems Manager command on the target system to upload the output of the previously executed tooling to the evidence S3 bucket. After the upload is complete, it cleans up both the output and the evidence tooling from the target system.
The evidence S3 bucket is tightly locked down to a subset of identities within the AWS security account. Access attempts from identities that aren’t allow listed trigger an Amazon EventBridge rule to alert the security team through an Amazon Simple Notification Service (Amazon SNS) topic.
When the workflow is complete, related details and metrics are recorded in an Amazon DynamoDB table.
The forensic analysis can be performed on a separate EC2 instance that has access to read from the evidence S3 bucket.
SecurityStack: This stack contains the basic forensic artifact workflow orchestration infrastructure described in this post, including the Step Functions workflow, Lambda functions, AWS SQS queues, IAM roles, and S3 buckets.
AlertStack: This stack contains the EventBridge workflow to notify administrators of anomalous activity in the evidence S3 bucket.
CustomerStack: This stack contains the SSM documents that are executed for the forensic artifact workflow and an IAM role assumed by the SecurityStack when the workflow is invoked. It’s deployed into each child AWS account containing EC2 instances from which the security account is authorized to collect forensic artifacts.
Configuration
Before deploying the solution, there are several variables in the config.ts file that must be modified for the environment:
CUSTOMER_ACCOUNTS: Target AWS account IDs (the Child AWS account in the architecture diagram).
ALERT_EMAIL_RECIPIENTS: List of email addresses that receive alerts when there is unexpected access to the evidence S3 bucket.
ALLOW_LISTED_ROLE_NAMES: Roles allowed to access the evidence S3 bucket. Any other identities accessing the evidence S3 bucket will result in an alarm.
Deployment
After you’ve updated the config.ts file to reflect the account numbers, email recipients, and role names, the stacks can be deployed into your AWS infrastructure.
Set Up AWS credentials using the AWS CLI: aws configure
Install dependencies and configure constants:
Clone the repository.
Navigate to the project directory.
Install project dependencies: npm install
Configure constants in constants/config.ts with the required information:
Then bootstrap if necessary in any target AWS accounts.
Deploy the AWS CDK Stacks:
Synthesize the CloudFormation template: cdk synth
Deploy the security and alert stacks in your security account: cdk deploy SecurityStack AlertStack
Deploy the customer stacks in your workload accounts: cdk deploy CustomerStack-ACCOUNT_ID
Set up your email alerts:
After the AlertStack is deployed, it will email all addresses listed in ALERT_EMAIL_RECIPIENTS. Choose the embedded link to accept the AWS SNS topic in each of those accounts.
Testing
With deployment complete, it’s time to test the solution.
Trigger an analysis
Make sure you have a Linux EC2 instance running in one of your customer accounts and in the AWS Region where you deployed the preceding customer stack.
Because this example uses Systems Manager to orchestrate the collection script, make sure that the EC2 instance is visible in Systems Manager either by checking the Systems Manager console, or by using the AWS CLI:
Console: In the AWS Systems Manager console, choose Managed instances in the left navigation pane and verify your instance appears in the list. For more information, see Managed Instances in the AWS Systems Manager User Guide.
AWS CLI: Run the following command to verify the instance is managed: aws ssm describe-instance-information --filters “Key=InstanceIds,Values=<instance-id> If the command returns instance information with PingStatus: Online, the instance is properly connected to Systems Manager.
Post a message in your security account to the Amazon SQS queue to start the Step Functions workflow. Note that the values in angle brackets (for example <accountID>) are placeholders that you must update with relevant AWS account ID, tracking ticket ID, AWS Region, and EC2 instance ID values: aws sqs send-message --queue-url --message-body ‘{ “account”: “”, “ticket_id”: “”, “region”: “>”, “instance_id”: “” }’
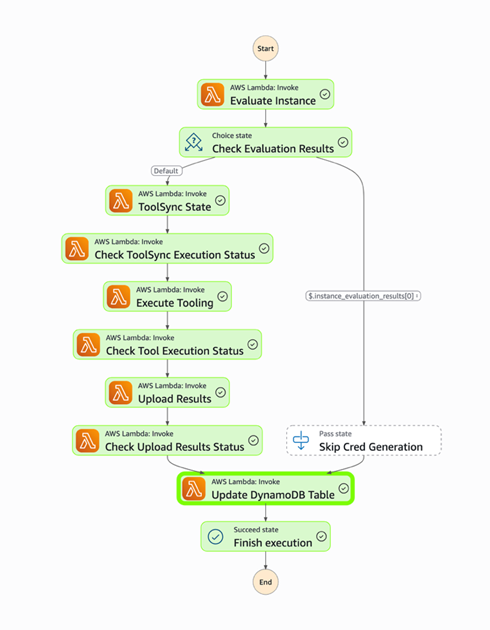
Go to the Step Functions console to view the successful execution of the workflow:
Figure 4: Workflow as shown in the Step Functions console
View the DynamoDB table to see the metadata for the results.
Check the evidence S3 bucket to see the uploaded files from the forensic collection.
Conclusion
Collecting forensic artifacts securely is a critical component of any digital forensics investigation. This post demonstrated how to implement least privilege access controls and time-limited credentials for forensic evidence collection workflows that use Amazon S3 for artifact storage. By combining IAM session policies with AWS STS temporary credentials, you can provide forensic tools with secure, scoped-down access to upload artifacts without exposing long-lived credentials or granting overly permissive access.
The architecture presented in this post automates the process of generating temporary credentials, collecting forensic artifacts from both AWS and non-AWS resources, and securely storing them in S3 buckets with appropriate encryption, access controls, and audit logging. With this approach, your security teams can focus on analyzing evidence instead of managing credentials and permissions during active security incidents.To get started with this solution, deploy the example AWS CDK stacks provided in the collect forensic artifacts repository and customize them for your organization’s forensic investigation requirements. For more information about related AWS forensic investigation architectures, review the Automated Forensics Orchestrator for EC2 and How to build forensic kernel modules for Linux EC2 instances resources.
If you have feedback about this post, submit comments in the Comments section below. If you have questions about this post, contact AWS Support.

 Login
Login