
Reading view

How to clone an AWS CloudHSM cluster across Regions

Important: As of January 1, 2025, Client SDK 3 tools (CMU and KMU) are no longer supported. This guide has been updated to use Client SDK 5 commands exclusively. Ensure you’re using the latest Client SDK 5 version (5.17 or later) for the most recent features and security improvements.

You can use AWS CloudHSM to generate, store, import, export, and manage your cryptographic keys. It also permits hash functions to compute message digests and hash-based message authentication codes (HMACs) and supports cryptographically signing data and verifying signatures. To help ensure redundancy of data and simplification of the disaster recovery process, AWS recommends you to clone your CloudHSM cluster into a different AWS Region. By doing this, you can synchronize keys, including non-exportable keys, across Regions. Non-exportable keys can only be synchronized to cloned clusters. Non-exportable keys are keys that can never leave the CloudHSM device in plaintext. They reside on the CloudHSM device and are encrypted for security purposes.

In this post, I show you how to set up one cluster in Region 1 and how to use the CopyBackupToRegion feature to clone the cluster and hardware security modules (HSMs) to a virtual private cloud (VPC) in Region 2.

Note: This post doesn’t include instructions on how to set up a cross-Region VPC to synchronize HSMs across the two cloned clusters. If you need to set up a cross-Region VPC, see Building a Scalable and Secure Multi-VPC AWS Network Infrastructure.

Solution overview

You clone a cluster to another Region in a two-step process:

  1. Copy a backup to the destination Region
  2. Create a new cluster from this backup

To complete this solution, you can use either the AWS Command Line Interface (AWS CLI) or the CloudHSM API. For this post, I show you how to use the AWS CLI to copy the cluster backup from Region 1 to Region 2 and then launch a new cluster from that copied backup.
Figure 1 illustrates the process described in this post.
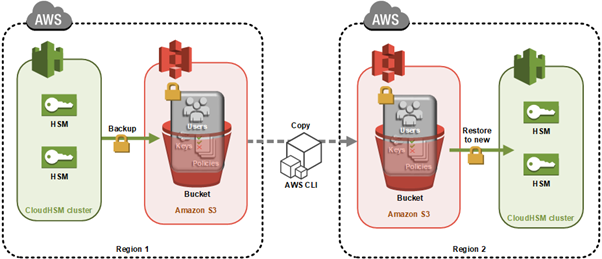
Figure 1: Architecture diagram

Figure 1: Architecture diagram

Here’s how the process works:

  1. CloudHSM creates a backup of the cluster and stores it in an Amazon Simple Storage Service (Amazon S3) bucket owned by the CloudHSM service.
  2. You use the AWS CLI API command to copy the backup to another Region.
  3. When the backup is completed, you use that backup to then create a new cluster and HSMs.
Note: Backups can’t be copied across partitions like the AWS GovCloud Regions, China Region and AWS European Sovereign Cloud.

As with all cluster backups, when you copy the backup to a new Region, it’s stored in an S3 bucket owned by a CloudHSM account. CloudHSM manages the security and storage of cluster backups for you. This means the backup in both Regions will also have the durability of Amazon S3, which has 99.999999999% durability. The backup in Region 2 will be encrypted and secured in the same way as your backup in Region 1. You can read more about the encryption process of your CloudHSM backups in AWS CloudHSM cluster backups.
Any HSMs created in this cloned cluster will have the same users and keys as the original cluster at the time the backup was taken. From this point on, you must manually keep the cloned clusters in sync. Specifically:

  • If you create users after creating your new cluster from the backup, you must create them on both clusters manually.
  • If you change the password for a user in one cluster, you must change the password on the cloned clusters to match.
  • If you create more keys in one cluster, you must sync them to at least one HSM in the cloned cluster. After you sync the key from cluster 1 to cluster 2, the CloudHSM automated cluster synchronization will take care of syncing the keys in the second cluster.

Prerequisites

Before starting, ensure you have the following in place:

Note: Syncing keys across clusters in more than one Region will only work if all clusters are created from the same backup. This is because synchronization requires the same secret key—called a masking key—to be present on the source and destination HSM. The masking key is specific to each cluster. It can’t be exported, and can’t be used for any purpose other than synchronizing keys across HSMs in a cluster.

Step 1: Create your first cluster in Region 1

The first step in cloning your CloudHSM cluster is to create the initial cluster—which will serve as the foundation for your cross-Region deployment—in your source Region.

Create the cluster

Replace <SUBNET_ID_1> with one of your private subnets. Make a note of the cluster ID to use later:
aws cloudhsmv2 create-cluster --hsm-type hsm2m.medium --subnet-ids <SUBNET_ID_1>

Launch the EC2 client

Launch an Amazon Elastic Compute Cloud (Amazon EC2) instance in your public subnet. See Step 1 of Get started with Amazon EC2 for detailed steps.

Create the first HSM

Replace <CLUSTER_ID> with the ID you recorded earlier and <AVAILABILITY_ZONE> with the Availability Zone matching your private subnet (for example, us-east-1a):
aws cloudhsmv2 create-hsm --cluster-id <CLUSTER_ID> --availability-zone <AVAILABILITY_ZONE>

Initialize the cluster

Before you initialize the cluster, create a self-signed certificate and use it to sign the cluster’s certificate signing request (CSR). Once you have the signed certificate, initialize the cluster:

aws cloudhsmv2 initialize-cluster \
    --cluster-id <CLUSTER_ID> \
    --signed-cert file://<CLUSTER_ID>_CustomerHsmCertificate.crt \
    --trust-anchor file://customerCA.crt

Important: Copy the certificate used to sign your cluster’s CSR to to maintain a secure connection.

After the command completes, the cluster transitions to the Initialized state. Copy the certificate used to sign your cluster’s CSR to /opt/cloudhsm/etc so that the CloudHSM client can verify the cluster’s identity when you configure it in the next step:

sudo cp _CustomerHsmCertificate.crt /opt/cloudhsm/etc/
sudo cp customerCA.crt /opt/cloudhsm/etc/

Install the CloudHSM Client SDK 5

Download and install the latest CloudHSM Client SDK 5 (version 5.17 or later):
For example, for Amazon Linux 2023:

wget https://s3.amazonaws.com/cloudhsmv2-software/CloudHsmClient/Amzn2023/cloudhsm-cli-latest.amzn2023.x86_64.rpm
sudo yum install -y ./cloudhsm-cli-latest.amzn2023.x86_64.rpm

Configure the client

Configure the CloudHSM client with your HSM’s elastic network interface (ENI IP) address:
configure-cli -a <HSM_IP>

Activate the cluster

To activate the cluster, run the CloudHSM CLI in interactive mode.

cloudhsm-cli interactive

You can run user list to see the admin user, which is not yet activated.

aws-cloudhsm > user list
{
  "error_code": 0,
  "data": {
    "users": [
      {
        "username": "admin",
        "role": "unactivated-admin",
        "locked": "false",
        "mfa": [],
        "cluster-coverage": "full"
      },
      {
        "username": "app_user",
        "role": "internal(APPLIANCE_USER)",
        "locked": "false",
        "mfa": [],
        "cluster-coverage": "full"
      }
    ]
  }
}

Use the cluster activate command to set the initial admin password.

aws-cloudhsm > cluster activate
Enter password:<NewPassword>
Confirm password:<NewPassword>
{
  "error_code": 0,
  "data": "Cluster activation successful"
}

When completed, sign out using the command quit, then sign back in with the new password, using the command login --username admin --role admin.

After doing this, you can create the first crypto user (CU). You create the user by running the command: user create --username <USERNAME> --role crypto-user. For more information, see HSM user types for CloudHSM CLI. Crypto users are permitted to create and share keys on the CloudHSM.

When completed, sign out using the command quit.

Step 2: Create keys in Region 1

Create a non-exportable AES-256 key:

aws-cloudhsm > key generate-symmetric aes \
    --label aes-example \
    --key-length-bytes 32 \
    --attributes extractable=false

Make note of the key reference returned in the output, because you’ll need it for synchronization later.

Step 3: Trigger a backup of your cluster

To trigger a backup for Region 2:

  1. Add another HSM to your cluster in Region 1 (can be done using the AWS Management Console or AWS CLI)
  2. The backup will contain:
    • All users (crypto officers (COs), crypto users (CUs), and appliance users)
    • All key material on the HSMs
    • All configurations and policies
Note: The user portion is critical because keys can only be synced across clusters to the same user.

Record the backup ID to use later. You can find this in the CloudHSM console under Backups, or using the following command:

aws cloudhsmv2 describe-backups --cluster-id

To avoid unnecessary charges, you can delete the additional HSM after the backup is created.

Step 4: Copy your backup Between Regions

Before you can transfer the backup to your destination Region, you need to configure the appropriate IAM permissions to allow the copy operation.

IAM permissions

Ensure proper permissions are configured for your IAM role or user. You need CloudHSM administrator privileges. Here’s an example permissions policy:

{
   "Version": "2012-10-17",
   "Statement": {
      "Effect": "Allow",
      "Action": [
         "cloudhsm:*",
         "ec2:CreateNetworkInterface",
         "ec2:DescribeNetworkInterfaces",
         "ec2:DescribeNetworkInterfaceAttribute",
         "ec2:DetachNetworkInterface",
         "ec2:DeleteNetworkInterface",
         "ec2:CreateSecurityGroup",
         "ec2:AuthorizeSecurityGroupIngress",
         "ec2:AuthorizeSecurityGroupEgress",
         "ec2:RevokeSecurityGroupEgress",
         "ec2:DescribeSecurityGroups",
         "ec2:DeleteSecurityGroup",
         "ec2:CreateTags",
         "ec2:DescribeVpcs",
         "ec2:DescribeSubnets",
         "iam:CreateServiceLinkedRole"
      ],
      "Resource": "*"
   }
}

Copy the backup

To copy your backup from Region 1 to Region 2, you need:

  • The destination Region
  • The source cluster ID and backup ID (you can use either or both) found in the CloudHSM console

If you specify only the cluster ID, the most recent backup will be chosen. For a specific backup, use the backup ID.

aws cloudhsmv2 copy-backup-to-region \
    --destination-region <DESTINATION_REGION> \
    --backup-id <BACKUP_ID>

Example response:

{
    "DestinationBackup": {
        "SourceBackup": "backup-4kuraxsqetz",
        "SourceCluster": "cluster-kzlczlspnho",
        "CreateTimestamp": 1531742400,
        "SourceRegion": "us-east-1"
    }
}

After copying, you will see a new backup ID in your console. Use this to create your new cluster in Region 2:

aws cloudhsmv2 create-cluster \
    --hsm-type hsm2m.medium \
    --subnet-ids <SUBNET_ID_REGION_2> \
    --source-backup-id <BACKUP_ID_REGION_2> \

Certificate transfer

Copy the cluster certificate from the original cluster to the new Region:

  1. Open two terminal sessions (one for each HSM)
  2. Copy the certificate content from cluster 1
  3. Create and paste into a new file in cluster 2

The certificate is required for encrypted connections between your client and HSM instances.

Security group configuration

Add the cloned cluster’s Security Group to your EC2 client instance:

  1. Select the Security Group for your EC2 client in the EC2 console
  2. Choose “Add rules”
  3. Add a rule allowing traffic from the cluster’s Security Group ID on port 2225

Then retrieve the ENI IP address of the HSM in Region 2 using the following command, and make a note of the output—you will use it in the next step to configure cross-Region connectivity:

aws cloudhsmv2 describe-clusters \
    --filters clusterIds=<cluster_ID_region_2> \
    --region <region_2> \
    --query 'Clusters.Hsms.EniIp' \
    --output text

Step 5: Configure cross-Region connectivity

To enable the CloudHSM CLI to communicate with both clusters simultaneously, add the Region 2 cluster to your existing client configuration using the ENI IP address you retrieved in the previous step:

Step 6: Synchronize keys between clusters

To synchronize keys between your source and destination clusters, you first need to verify which users and keys exist before replicating them.

configure-cli add-cluster \
    --cluster-id <cluster_ID_region_2> \
    --endpoint <hsm_eni_ip_region_2> \
    --region <region_2>

The CloudHSM CLI will now communicate with both clusters simultaneously using the certificates already configured during the initial setup, enabling key synchronization using the masking key shared between cloned clusters.

List users and keys

First, verify users and list available keys:
# List all users
cloudhsm-cli user list

# List keys for specific user
cloudhsm-cli key list --username

Replicate keys

To replicate a key from Region 1 to Region 2:

cloudhsm-cli key replicate \
    --filter key-reference=<key_ref> \
    --source-cluster-id <source_cluster_ID> \
    --destination-cluster-id <destination_cluster_ID>

Verify the key replication by listing keys again:

cloudhsm-cli key list --username <username>

The output should show identical key references on both clusters. Repeat this process for any additional keys that you want to synchronize.

Points to remember

After cloning a cluster to a backup cluster, remember these important points:

  • Always manually update users across clusters after the initial backup
  • Use key replication for any keys created after the initial backup
  • Keep your Client SDK 5 tools updated for the latest features and security improvements
  • The January 1, 2025, end-of-support date for Client SDK 3 tools (CMU and KMU) means you should migrate to Client SDK 5 as soon as possible

Client SDK 5 supports ARM64 architecture on the following Linux distributions:

  • Amazon Linux 2023
  • Amazon Linux 2
  • Red Hat Enterprise Linux (RHEL) 8 (8.3+)
  • Red Hat Enterprise Linux (RHEL) 9 (9.2+)
  • Red Hat Enterprise Linux (RHEL) 10 (10.0+)
  • Ubuntu 22.04 LTS
  • Ubuntu 24.04 LTS
  • Debian 12
  • USE Linux Enterprise Server 15

Conclusion

You now have a fault-tolerant AWS CloudHSM environment with synchronized keys across Regions using the latest tools and best practices. By implementing this cross-Region cluster configuration, you gain improved disaster recovery capabilities, reduced risk of data loss, and enhanced business continuity for your cryptographic operations. This approach helps ensure that your critical cryptographic keys remain available even in the event of a Regional outage, providing the resilience that enterprise workloads demand.

If you have feedback about this post, submit comments in the Comments section below. For questions about this post, start a new thread on the AWS re:Post.
Desiree Brunner

Desiree Brunner

Desiree is a Security Specialist Solutions Architect working with regulated customers as part of the AWS EMEA Security & Compliance team. She builds on her background in DevOps and platform engineering to support her customers in designing secure, compliant cloud environments. Passionate about mental health and knowledge sharing, she regularly speaks at AWS events and supports teams on their cloud security journey.

Rickard Löfström

Rickard Löfström

Rickard guides enterprises in building secure cloud environments as a Specialist Solutions Architect in the AWS EMEA Security & Compliance team. He advises customers on implementing AWS security services, focusing on identity management, data protection, and infrastructure security controls. He enjoys translating complex security requirements into technical solutions that enable organizations to meet their security objectives while maintaining operational efficiency.

  •  

Explore scaling options for AWS Directory Service for Microsoft Active Directory

You can use AWS Directory Service for Microsoft Active Directory as your primary Active Directory Forest for hosting your users’ identities. Your IT teams can continue using existing skills and applications while your organization benefits from the enhanced security, reliability, and scalability of AWS managed services. You can also run AWS Managed Microsoft AD as a resource forest. In this configuration, AWS Managed Microsoft AD serves supported AWS services while users’ identities remain under exclusive control of your organization on a self-managed Active Directory. As your organization grows and scales, so will your AWS Managed Microsoft AD deployments.

In this post, you’ll learn how to use Amazon CloudWatch dashboards to monitor key performance metrics of your AWS Managed Microsoft AD deployment to track and analyze a directory’s performance over time. You can then use that information to determine when and how best to scale directory services for optimal performance.

Scaling your Active Directory

When you deploy AWS Managed Microsoft AD, the service initially creates two domain controller instances in two separate subnets of the same virtual private cloud (VPC). This architecture economically provides resiliency and high availability with a minimal set of resources. This initial configuration enables every feature that AWS Managed Microsoft AD offers. As your organization grows, its workflows will become larger and more complex, requiring that you scale your directories accordingly. AWS Managed Microsoft AD simplifies and makes the scaling process secure with minimal administrative effort. When it’s time to scale a directory, AWS Managed Microsoft AD offers two options: scale-up or scale-out.

Understanding scale-up and scale-out

Scale-up—also called upgrading your AWS Managed Microsoft AD—means changing the edition of an AWS Managed Microsoft AD from Standard to Enterprise. Enterprise Edition delivers larger domain controller instances, with higher compute capacity and larger storage for Active Directory objects. When a directory scales up, it retains the same number of domain controller instances that it previously had with larger quotas. Instances are replaced one at a time to minimize disruptions to production workflows.

A few features offered by the service are a better fit for the size and compute power of Enterprise Edition AWS Managed Microsoft AD and so are only available in Enterprise Edition. Consider scaling-up your directory if you encounter any of the following scenarios:

  • You plan to replicate your directory across multiple AWS Regions. Multi-Region replication is only available in Enterprise Edition.
  • The number of Active Directory objects in the directory will exceed the recommended threshold of 30,000 objects for Standard Edition. Enterprise Edition can accommodate up to 500,000 directory objects.
  • You plan to share your directory with more than 25 other AWS accounts. The default directory sharing quota is 25 accounts for Standard Edition and 500 for Enterprise Edition.

Important: Scaling up a directory from Standard to Enterprise is a one-way operation that cannot be reverted and operates at a higher hourly price.

Scale-out means deploying additional domain controllers for your AWS Managed Microsoft AD. You can scale out both Standard or Enterprise directories and can scale out different Regions independently. You don’t need to scale every Region to the same number of domain controller instances. When scale-out takes place, additional domain controller instances with the same compute resources and storage capacity as existing ones are launched in the same subnets.

Because some operations cannot be reverted, it’s important to understand the impact of each scaling operation. It’s preferable to scale out the number of domain controllers first, because you can revert that change if necessary. Consider scaling up first only if you need a feature that’s only available in Enterprise Edition.

Making an informed decision using CloudWatch

Since December 2021, AWS Managed Microsoft AD helps optimize scaling decisions with directory metrics in Amazon CloudWatch. Amazon CloudWatch metrics are a time-ordered set of data-points about performance indicators of a system that you can use to monitor and analyze performance over time. Metrics are stored as a time-series set and each data point has an associated timestamp. By using CloudWatch, you can create alarms based on metrics and visualize and analyze metrics to derive new insights.

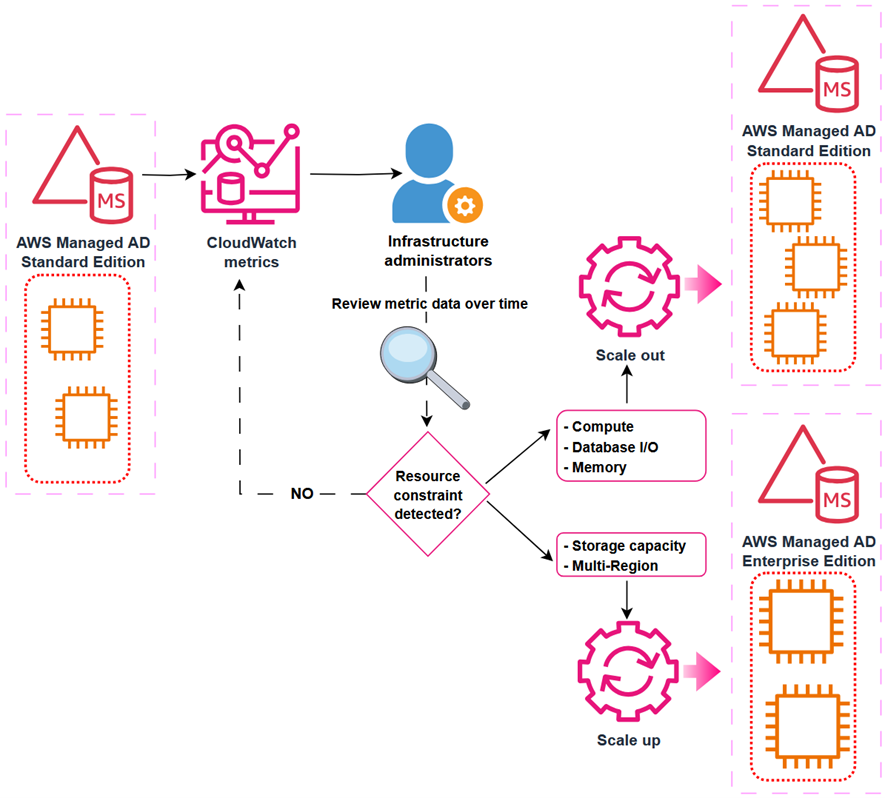
To understand the performance of a directory over time, define the key performance metrics based on your workload when you create the directory. Record the initial values of those metrics to create a performance baseline. Periodically revisit and compare data points for the same metrics to understand trends and use of resources over time. Based on the information provided by the performance baseline and periodic follow-ups, you can decide when to scale your directory and what scaling method to use. This process is depicted in Figure 1.

Figure 1: Decision-making process for scaling an Active Directory implementation

Figure 1: Decision-making process for scaling an Active Directory implementation

Depending on the characteristics of your workload, you might face different resource constraints in your directory system. From an infrastructure perspective, the more commonly demanded resources are:

  • Network Interface: Current Bandwidth
  • Processor: % Processor Time
  • LogicalDisk: % Free Space

From an Active Directory perspective, consider metrics such as:

  • NTDS: LDAP Searches/sec
  • NTDS: ATQ Estimated Queue Delay

The following table is an example decision matrix based on which resource is constrained.

Constrained resource Recommended action
% Processor Time Scale out
I/O Database Reads Average Latency Scale out
Committed Bytes in Use Scale out
% Free Space Scale up

For example, you can create a CloudWatch alarm that will trigger when Processor: % Processor Time is over 80% for more than 5 minutes. If this alarm triggers often, it could be a signal that domain controller instances are struggling to service the regular volume of user authentication requests. In such a scenario, you might consider scaling-out an additional domain controller to guarantee the service’s SLA. Conversely, if the LogicalDisk: % Free Space drops below 10% and trends downwards, you might consider scaling-up to Enterprise Edition, because it provides a larger capacity for directory objects.

To facilitate tracking and analyzing performance of AWS Managed Microsoft AD over time, you can use Amazon CloudWatch to create a custom dashboard including relevant metrics.

Prerequisites

Before you get started, make sure that you have the following prerequisites in place:

Create a CloudWatch dashboard

With the prerequisites in place, you’re ready to create a CloudWatch dashboard to track directory service metrics. For more information, see Getting started with CloudWatch automatic dashboards.

To create a dashboard:

  1. Open the AWS Management Console for CloudWatch.
  2. In the navigation pane, choose Dashboards, and then choose Create dashboard.
  3. In the Create new dashboard dialog box, enter a name for the dashboard and then choose Create dashboard.
  4. When the Add widget window appears:
    1. Under Data sources types, select CloudWatch.
    2. Under Data type, select Metrics.
    3. Under Widget type, select Line.
    4. Choose Next.
  5. In the Add metric graph window, choose DirectoryService and then select Processor as the Metric category and % Processor Time under Metric name. Select each instance of the metric, represented as the Domain Controller IP, for one Directory ID.
  6. Choose Create widget.

    Note: if there are multiple directories in the same Region, all instances (domain controllers IPs) will be available for selection. To help ensure effective monitoring and alarms, create a separate dashboard for each directory.

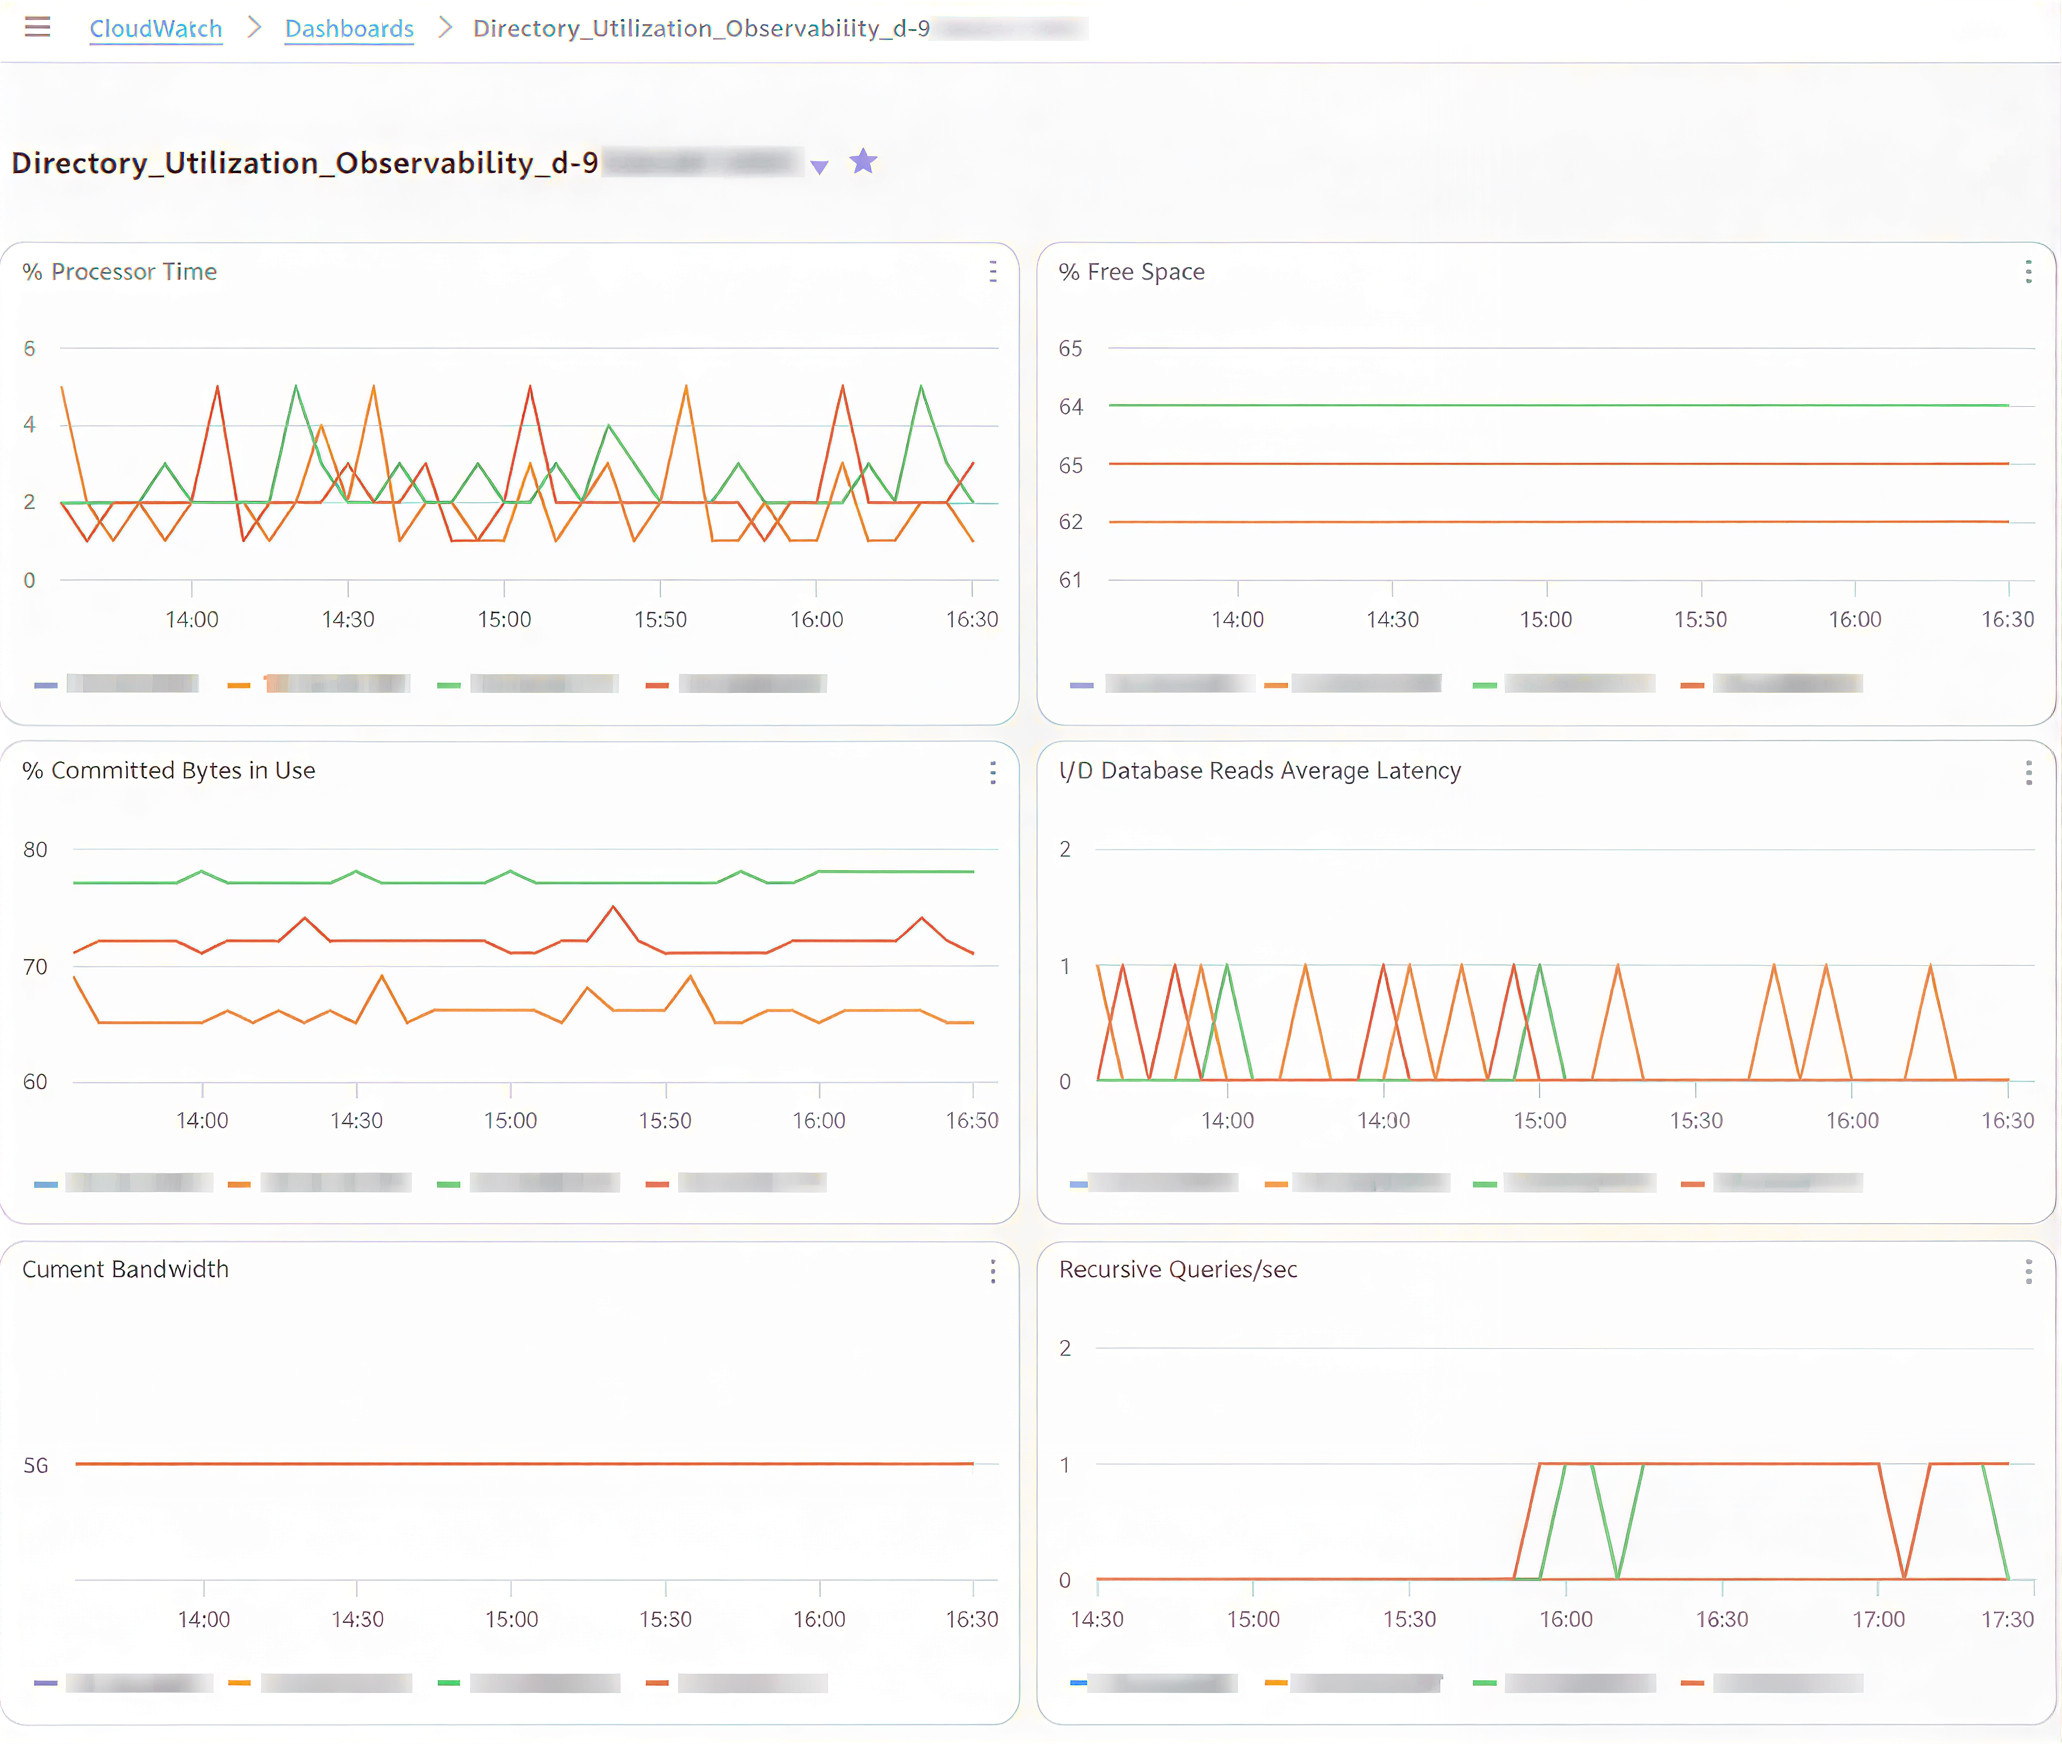
  7. Choose the plus sign (+) at the top of the window to add more widgets. Repeat steps 1–6 to add additional widgets for other relevant metrics. In this example the metric categories and names added are:
    • Processor: % Processor Time
    • LogicalDisk: % Free Space
    • Memory: Committed Bytes in Use
    • Database: I/O Database Reads Average Latency
    • Network Interface: Current Bandwidth
    • DNS: Recursive Queries/Sec
  8. After adding the desired metrics, choose Save.
Figure 2: CloudWatch dashboard showing directory services metrics

Figure 2: CloudWatch dashboard showing directory services metrics

(Optional) Create an alarm in CloudWatch

Now that you have a dashboard where you can view metrics, consider setting up CloudWatch alarms to alert you when a metric reaches or goes beyond a specified threshold. For more information, see Create a CloudWatch alarm based on a static threshold and Adding an alarm to a CloudWatch dashboard.

The following are recommended thresholds to monitor when determining the need to scale an AWS Managed Microsoft AD. These are general recommendations based on standard use cases. You might have to adjust these thresholds to make the best scaling decisions for your organization.

  • Processor: % Processor Time: Monitor CPU utilization to understand computational demands on your domain controllers. Set CloudWatch alarms at 80% for a period of 5 minutes. Sustained high values indicate potential sizing issues that might require scaling out your directory.
  • LogicalDisk: % Free Space: Maintain at least 25% free space on volumes containing Active Directory data for optimal performance. Set CloudWatch alarms to trigger when free space drops below 20%. Low disk space can severely impact directory operations and require implementing cleanup procedures or scaling up the directory.
  • Network Interface: Current Bandwidth: Average network utilization should be kept below 50% of available bandwidth during peak operations for optimal directory responsiveness. Set CloudWatch alarms at 70% utilization to allow room for spikes in activity. Consistently high values suggest network constraints that might require scaling out your directory.
  • Memory: Committed Bytes in Use: Monitor memory commitment levels to help ensure that your domain controllers have sufficient memory resources for Active Directory operations. This metric tracks the amount of virtual memory that has been committed, indicating the total memory load on your domain controllers. Set CloudWatch alarms at 80% of the commit limit. Sustained high values can lead to excessive paging, significantly degrading directory performance and potentially causing authentication delays.
  • Database: I/O Database Reads Average Latency: Maintain average read latencies below 25 milliseconds. Set CloudWatch alarms at a threshold of 50 milliseconds. If read latencies are consistently elevated, consider scaling-out your directory.
  • DNS: Recursive Queries/sec: Given the tight integration of Active Directory with DNS, monitor this metric for stability and predictable patterns. Use CloudWatch anomaly detection rather than fixed thresholds to identify unexpected behaviors that could indicate DNS configuration issues or potential security concerns.

Post-scaling considerations

Different resources across your architecture might contain references to the IP addresses of the AWS Managed Microsoft AD. After a scale-out operation that deploys additional domain controller instances on a directory, update existing references to maintain full functionality of workloads. References for the directory’s IP addresses can be found (but might not be limited to) the following services:

To maintain the full functionality of your workloads after a directory scaling operation, update the following:

  • Firewall rules that allow traffic to and from the IP addresses of domain controller instances
  • Route53 Resolver endpoint rules and DNS conditional forwarders that forward queries to the directory instances
  • CloudWatch dashboards that display metric data about the directory to include dimensions for the new IP addresses

Clean up resources

In this post, you created components that generate costs. Clean up these resources when no longer required to avoid additional charges.

  • Remove added domain controller’s IP addresses from firewall rules, resolver endpoint rules and DNS conditional forwarders.
  • Delete the custom CloudWatch dashboards you don’t plan to keep.
  • Scale back existing directories to the previous number of domain controller instances.

Conclusion

In this post, you learned how to monitor directory performance metrics using Amazon CloudWatch. By combining performance baselines, monitoring, and planning, you can make informed decisions about when and how to scale a directory safely and efficiently. By scaling directories in a timely manner, you can optimize efficiency and reduce the risk of outages by having a right-sized directory service to support your organization’s workloads.

Scale out your directory when your Active Directory-aware workflows have grown over time and the solution requires additional domain controller instances to maintain the service SLA. Scale up your directory when you require a feature that’s only available in Enterprise Edition AWS Managed Microsoft AD, such as multi-Region replication or additional storage to accommodate Active Directory objects. By using the flexible scaling capabilities and independent Regional expansion, you can optimize costs while maintaining appropriate service levels.

To learn more about AWS Managed Microsoft AD optimization and monitoring with Amazon CloudWatch, see:

Nahuel Benavidez Nahuel Benavidez
Nahuel is a Sr. CSE in AWS, specializing in AWS Directory Service, Microsoft Technologies, and SQL Server. He enjoys teaming with customers to discover exciting ways to explore AWS services. Nahuel loves to spoil his niece and goddaughters above all else. Also, Dungeons and Dragons (before it was popular), CrossFit, hiking, trekking and, sharing a pint with friends but “just one.”
  •  
❌