Login


Operationalizing least privilege: Automate IAM remediation through your CI/CD pipeline
The principle of least privilege is straightforward to articulate but challenging to maintain at scale. When teams first deploy applications to AWS, they often grant broader permissions than strictly necessary; it’s faster to get things working, and the plan is always to tighten permissions later. But later rarely comes. Permissions accumulate, AWS Identity and Access Management (IAM) principals that once needed broad access for initial deployment retain those permissions long after they’re necessary, and some principals stop being used entirely. Even small teams face this challenge—permission reviews aren’t a one-time task but an ongoing operational burden that demands automation.
AWS IAM Access Analyzer addresses detection and recommendation. It identifies unused permissions across IAM roles and users: actions that haven’t been exercised, services that haven’t been accessed, and principals that aren’t being assumed at all. For each finding, it generates a recommended policy with the excess permissions removed. Security teams can see exactly what to fix, but manual remediation doesn’t persist. A security engineer can right-size a role today, but if that role is defined in an AWS CloudFormation template or AWS Cloud Development Kit (AWS CDK) stack, the next deployment restores the original permissions. The fix must live where the role is defined, and not every role starts in the same place. Some are managed through infrastructure-as-code (IaC), where remediation means updating source code and deploying through a pipeline. Others were created manually through the AWS Management Console and have no code representation. And some principals aren’t being used at all and need a controlled decommission path. Each scenario requires a different remediation strategy.
This post walks through an automated remediation workflow that bridges the gap between detection and action. Instead of findings accumulating in a dashboard waiting for someone to investigate, the automation classifies each role by how it was created and produces a ready-to-review remediation artifact: a pull request with production-ready CDK code and a plain-English explanation for IaC-managed roles, an issue with the recommended policy and step-by-step IaC migration guidance for manually created roles, or a soft-disable issue with a monitored decommission plan for unused principals. Each output flows through your existing code review and issue tracking processes—the same workflows your teams already follow. By the end of this post, you’ll have a pattern that converts IAM Access Analyzer findings into tested, deployable code changes rather than a growing backlog of security tickets.
Understanding the problem
Unused IAM permissions increase the attack surface. Removing unused permissions limits the actions available to any compromised credentials, reducing potential impact. Roles that aren’t being assumed represent unused resources; removing them simplifies your IAM inventory and reduces potential access paths that aren’t actively monitored.
The challenge isn’t knowing what to fix. As we said earlier, Access Analyzer provides both the findings and the recommended policies. The challenge is acting on that knowledge consistently across your environment. Each finding requires context:
- What the role does
- Who created the role
- Determining if the permission is unused or used infrequently
- If the role is managed in a CloudFormation stack, or was created through the console
Multiply this by hundreds of roles and security teams face a backlog that grows faster than they can address it.
Manual remediation compounds the problem. A security engineer can right-size a role directly in the console, but that fix is fragile. If the role is defined in an IaC template, the next deployment restores the original permissions. If it was created manually, there’s no record of what changed or why, and no easy way to revert if the change causes issues.
This is where IaC changes the equation. When roles are defined in code, remediation means updating that code. Changes flow through pull requests, are reviewed by the team that owns the role, and deploy consistently across environments. The fix becomes permanent, not a point-in-time correction that drifts back on the next deployment. And because every change is tracked in version control, teams can confidently remove permissions knowing they can revert if something breaks. That safety net matters; it’s often the difference between a team acting on a finding and leaving it in the backlog.
Solution overview
The solution automates remediation by connecting four capabilities: IAM Access Analyzer for detection and policy recommendations, CloudTrail for role attribution, Amazon Bedrock for CDK code generation and plain-English explanations, and your existing continuous integration and delivery (CI/CD) pipeline for remediation execution. The workflow operates on a core principle: every IAM role has an origin, and that origin determines the remediation path.
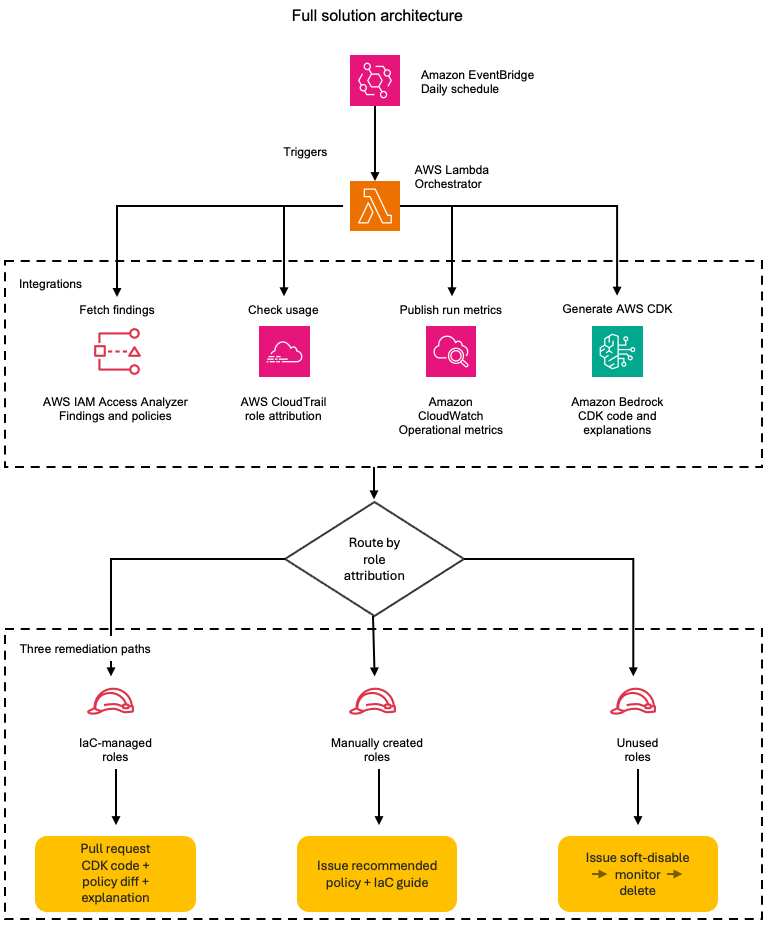
Figure 1 shows the solution architecture: Amazon EventBridge triggers an AWS Lambda orchestrator on a daily schedule. The Lambda orchestrator integrates with IAM Access Analyzer, CloudTrail, Amazon Bedrock, and Amazon CloudWatch. Each finding is routed to one of three remediation paths: a pull request for IaC-managed roles, an issue for manually created roles, and a soft-disable issue for unused roles.

Figure 1: The daily remediation workflow; from scheduled trigger to the three role-based remediation paths
On each scheduled run, the automation retrieves active findings from IAM Access Analyzer and queries CloudTrail to determine how each role was created. Roles created through CloudFormation or AWS CDK have a traceable origin: the service principal, stack name, and originating repository. Roles created manually through the console have a different origin: the IAM user who created them and the timestamp. This distinction drives the remediation strategy.
For IaC-managed roles, the automation retrieves the IAM Access Analyzer-recommended policy and uses Amazon Bedrock to wrap it in production-ready CDK code that includes the role definition and policy statements and imports what your CI/CD pipeline needs to deploy the update. It then creates a pull request in the originating repository. The pull request (PR) includes the updated CDK code, a policy diff showing exactly which permissions are being removed, and a plain-English explanation of the changes, for example, “This change removes write access to S3, keeping only read and list permissions.” Your existing code review process evaluates the change, and after being merged, the fix deploys consistently across environments.
For manually created roles, the automation creates an issue that includes the IAM Access Analyzer-recommended policy with unused permissions removed, a diff highlighting the changes, and an Amazon Bedrock-generated explanation of what the permission changes accomplish. The issue also provides guidance on importing the role into your IaC codebase. This gives teams an immediate remediation path while encouraging long-term governance through IaC adoption.
For roles that aren’t being assumed at all, the automation takes a more cautious approach. Instead of taking direct action, it creates an issue recommending a soft-disable workflow: attach a deny-all policy to the role, monitor for 30 days to confirm no workload depends on it, then delete. The issue provides the steps and context, the team executes the decommission through their preferred process, whether that’s a console change, an AWS Command Line Interface (AWS CLI) script, or a PR removing the role from the IaC. This controlled decommission path reduces the risk of removing a role that’s used infrequently or seasonally.
The solution supports both single-account and organization-wide deployment. In single-account mode, it uses an ACCOUNT_UNUSED_ACCESS analyzer to process findings for one account. In organization mode, it uses an ORGANIZATION_UNUSED_ACCESS analyzer deployed in a delegated administrator account, which generates findings across all member accounts from a single vantage point. The Lambda function automatically detects which analyzer type is available and extracts the account ID from each finding’s resource Amazon Resource Name (ARN), so role attribution and remediation routing work the same way regardless of scope.
This three-path strategy acknowledges operational reality. Not all roles start in IaC, not all unused roles are safe to delete immediately, and forcing immediate migration isn’t always practical. The solution provides a clear path forward for each scenario: remediate IaC roles through code, give teams actionable recommendations for manually created roles, and safely decommission what’s no longer needed. Over time, your infrastructure becomes increasingly code-driven, and remediation becomes a routine part of your CI/CD process rather than a manual security task.
Technical details
Consider a company—call them AnyCompany—running 200 IAM roles across three AWS accounts. Some roles were created through AWS CDK stacks during initial deployment. Others were created manually through the console by engineers who needed quick access during incident response or prototyping. A handful haven’t been assumed in over 6 months. AnyCompany’s security team wants to act on their IAM Access Analyzer findings, but each role requires different handling. The solution’s architecture addresses this by routing each finding through a classification and remediation pipeline.
Figure 2 shows how each IAM Access Analyzer finding is processed:
- The finding is first checked against exclusions and excluded findings are skipped.
- Remaining findings are split by type:
UnusedPermissionfindings retrieve a recommended policy from IAM Access Analyzer and then query CloudTrail for role origin, whileUnusedIAMRolefindings follow the unused role path. - By origin, IaC-managed roles generate AWS CDK code using Amazon Bedrock and create a pull request.
- Manually created or unknown-origin roles create an issue with the recommended policy and IaC migration guidance.
- Unused roles create a soft-disable issue to deny-all, monitor for 30 days, then delete.
- All paths publish CloudWatch metrics.
Figure 2: Detailed component interactions—the orchestrator’s five steps, its four service integrations, and the three remediation paths
The rest of this section walks through each component using AnyCompany’s roles as examples.
Exclusion filtering
Before processing any finding, the Lambda function loads an exclusion configuration and checks whether the role should be skipped. This prevents the automation from creating remediation items for roles that legitimately need broad permissions.
{
  "excluded_roles": [
    "arn:aws:iam::123456789012:role/BreakGlassRole",
    "arn:aws:iam::123456789012:role/ServiceLinkedRole"
  ],
  "excluded_permissions": [
    "iam:*",
    "sts:AssumeRole"
  ],
  "excluded_by_tag": {
    "NoRemediation": ["true"],
    "CriticalService": ["true"]
  },
  "min_unused_days": 30
}
AnyCompany excludes their break-glass role (used only during incidents), any service-linked roles, and roles tagged CriticalService. The min_unused_days threshold prevents false positives from seasonal workloads; a role that ran a quarterly batch job 25 days ago won’t generate a finding.
Detection and analysis
IAM Access Analyzer generates two types of findings relevant to this solution. UnusedPermission findings identify roles with permissions that haven’t been exercised within the analysis period. UnusedIAMRole findings identify roles that haven’t been assumed at all. The Lambda function queries both finding types separately because they follow different remediation paths.
The Lambda function auto-detects the analyzer type at startup. When ANALYZER_SCOPE is set to organization, it checks for an ORGANIZATION_UNUSED_ACCESS analyzer first and falls back to ACCOUNT_UNUSED_ACCESS if none exists. If multiple analyzers of the same type exist in the account, the Lambda function selects the first active analyzer returned by the API. To target a specific analyzer, set the ANALYZER_ARN environment variable explicitly. With an organization-level analyzer, findings include roles from all member accounts. The Lambda function extracts the account ID from each finding’s resource ARN (for example, account 111122223333 from arn:aws:iam::111122223333:role/MyRole) and carries that context through the entire pipeline: attribution, remediation, and issue or PR creation all include the originating account.
For UnusedPermission findings, the Lambda function calls GenerateFindingRecommendation to initiate policy generation, then retrieves the IAM Access Analyzer-recommended policy through the GetFindingRecommendation API. This is a key integration point: IAM Access Analyzer provides the right-sized policy with unused permissions removed, so the automation doesn’t need to generate policies itself.
Here’s what a typical finding looks like for one of AnyCompany’s application roles:
{
  "id": "a1b2c3d4-5678-90ab-cdef-example11111",
  "resource": "arn:aws:iam::123456789012:role/AnyCompanyOrderProcessorRole",
  "findingType": "UnusedPermission",
  "analyzedAt": "2026-03-01T00:00:00Z",
  "unusedPermissions": [
    { "action": "s3:PutObject", "lastAccessed": null },
    { "action": "s3:DeleteObject", "lastAccessed": null },
    { "action": "s3:PutBucketPolicy", "lastAccessed": null },
    { "action": "dynamodb:DeleteItem", "lastAccessed": null }
  ],
  "activePermissions": [
    { "action": "s3:GetObject", "lastAccessed": "2026-02-28T14:30:00Z" },
    { "action": "s3:ListBucket", "lastAccessed": "2026-02-28T14:30:00Z" },
    { "action": "dynamodb:Query", "lastAccessed": "2026-02-28T12:00:00Z" }
  ]
}
The OrderProcessorRole has write and delete permissions for Amazon Simple Storage Service (Amazon S3) and Amazon DynamoDB, but only uses read operations. The IAM Access Analyzer recommendation removes the four unused actions while preserving the three active ones.
For UnusedIAMRole findings, no recommendation is needed: the role isn’t being assumed at all, so the remediation is to disable or delete it. The Lambda function caps the number of unused role issues per run (configurable using MAX_UNUSED_ROLE_ISSUES, default 10) to avoid overwhelming teams with a flood of issues on the first execution.
Role attribution using CloudTrail
For each finding, the Lambda function queries CloudTrail to determine how the role was created. The CreateRole event contains the information needed to classify the role’s origin.
An IaC-created role looks like this in CloudTrail:
{
  "eventName": "CreateRole",
  "userIdentity": {
    "type": "AWSService",
    "invokedBy": "cloudformation.amazonaws.com"
  },
  "requestParameters": {
    "roleName": "AnyCompanyOrderProcessorRole"
  },
  "userAgent": "cloudformation.amazonaws.com"
}
The cloudformation.amazonaws.com service principal and user agent tell the automation this role was created through a CloudFormation or AWS CDK deployment. The Lambda function then looks up the role’s tags to find the originating repository (stored in a Repository tag set during deployment).
A manually-created role looks different:
{
  "eventName": "CreateRole",
  "userIdentity": {
    "type": "IAMUser",
    "userName": "jstiles"
  },
  "requestParameters": {
    "roleName": "AnyCompanyIncidentResponseRole"
  },
  "userAgent": "console.amazonaws.com"
}
Here, the IAMUser type and console.amazonaws.com user agent indicate someone created this role through the console. Roles created through the AWS CLI show a similar pattern: the IAMUser type with a user agent like aws-cli/2.x.x. The automation classifies both console and AWS CLI-created roles as manually created, because neither has an IaC origin that can be updated programmatically. The automation captures the username and timestamp for the remediation issue.
Cross-account role attribution
When the Lambda function processes findings from an organization-level analyzer, the role might live in a different account than the one running the function. The automation handles this by assuming a cross-account role (configurable using CROSS_ACCOUNT_ROLE_NAME, defaulting to OrganizationAccountAccessRole) in the member account, then querying that account’s CloudTrail and IAM APIs for the CreateRole event. If the cross-account assume fails—because the role doesn’t exist in that account or permissions aren’t configured—the automation falls back gracefully, classifying the role as unknown origin and creating an issue with the account ID and available context. This approach helps the automation produce an actionable output for findings even when attribution is incomplete.
Policy recommendations and AWS CDK code generation
For IaC-managed roles with UnusedPermission findings, the Lambda function retrieves the IAM Access Analyzer-recommended policy and sends it to Amazon Bedrock to generate production-ready AWS CDK code. This is an important distinction: IAM Access Analyzer decides what the policy should be, and Amazon Bedrock wraps that policy in the AWS CDK constructs, imports, and resource definitions that the CI/CD pipeline needs to deploy the update.
The prompt instructs Amazon Bedrock to convert the recommended policy to AWS CDK code exactly as provided, with no modifications:
Generate Python CDK code that creates/updates the role with the
RECOMMENDED policy exactly as provided. Include proper imports
(aws_cdk, aws_iam), use CDK best practices (PolicyStatement,
proper resource ARNs), and add tags: ManagedBy=CDK,
RemediatedBy=AccessAnalyzer.
IAM Access Analyzer generates recommendations for both inline policies and customer managed policies. When a managed policy has partially unused permissions, the recommendation contains the full right-sized policy. The automation wraps this in AWS CDK code as an iam.ManagedPolicy construct. Note that if a managed policy is shared across multiple roles, the recommendation applies to the specific role’s usage pattern. In this case, the automation generates an issue for manual review rather than a PR, because modifying a shared policy could affect other roles.
The generated code goes through a validation step before inclusion in any PR. The Lambda function compiles the Python code to check for syntax errors and verifies that required AWS CDK patterns (iam, PolicyStatement) are present. If validation fails, the finding is logged as an error rather than creating a broken PR.
The solution doesn’t currently invoke the IAM Access Analyzer ValidatePolicy API to check the generated policy for errors or overly permissive statements. However, this is a natural extension point. Teams can add a validation step that calls ValidatePolicy on the Amazon Bedrock-generated policy before including it in a PR, detecting issues like missing resource constraints or invalid action names.
Amazon Bedrock also generates a plain-English explanation of the policy changes. For AnyCompany’s OrderProcessorRole, the explanation might read:
“The role currently has full S3 write access and DynamoDB delete permissions, but only uses read operations. Removing s3:PutObject, s3:DeleteObject, s3:PutBucketPolicy, and dynamodb:DeleteItem reduces the scope of impact if credentials are compromised, while preserving the s3:GetObject, s3:ListBucket, and dynamodb:Query permissions the application needs.”
The solution uses the Anthropic Claude Sonnet model on Amazon Bedrock for CDK code generation (where accuracy matters) and Claude Haiku on Amazon Bedrock for explanations (where speed and cost efficiency matter more).
Three-path remediation
The Lambda function evaluates each finding’s origin and routes it to one of three remediation paths.
Path 1: IaC-managed roles (pull request) – For AnyCompany’s OrderProcessorRole, the automation creates a PR in the originating repository. The PR includes:
- The Amazon Bedrock-generated AWS CDK code implementing the IAM Access Analyzer-recommended policy
- A policy diff showing exactly which permissions are being removed
- The plain-English explanation of what the changes accomplish
- Labels (
security,iam-remediation,automated) for filtering and tracking
The team that owns the role reviews the PR through their normal code review process. Once merged, the fix deploys consistently across environments through the existing CI/CD pipeline.
Path 2: Manually-created roles (issue) – For AnyCompany’s IncidentResponseRole, the automation creates an issue that includes the Access Analyzer-recommended policy with unused permissions removed, a diff highlighting the changes, an Amazon Bedrock-generated explanation, and step-by-step guidance on importing the role into IaC. This gives the team an immediate remediation path (apply the recommended policy) while encouraging long-term governance through IaC adoption.
Path 3: Unused roles (soft-disable issue) – For roles that haven’t been assumed at all, the automation creates an issue recommending a three-stage decommission workflow: attach a deny-all policy to the role, monitor for 30 days to confirm no workload depends on it, then delete. This controlled approach reduces the risk of removing a role that’s used infrequently or seasonally – if something breaks during the monitoring period, removing the deny-all policy restores access immediately.
Dry-run mode
Before creating real PRs and issues, you can run the automation in dry-run mode by setting “dry_run": true in the CI/CD configuration or setting the CI_CD_PLATFORM environment variable to dryrun. In this mode, the Lambda function processes findings, classifies roles, and generates remediation data, but logs what it would create instead of making actual API calls to your repository platform. You can use the log to validate the automation’s behavior, review the classification accuracy, and tune exclusions before going live.
Operational metrics
The Lambda function publishes CloudWatch metrics after each run:
| findings_processed | Total UnusedPermission findings evaluated |
| iac_roles_found | Roles classified as IaC-managed |
| manual_roles_found | Roles classified as manually created |
| unused_roles_found | Roles with no assume activity (UnusedIAMRole findings) |
| prs_created | Pull requests created for IaC roles |
| issues_created | Issues created (manual roles and unused roles) |
| errors | Processing errors (failed classifications, API failures) |
These metrics feed into dashboards and alarms. AnyCompany sets an alarm on errors > 5 to catch API throttling or configuration issues, and tracks prs_created + issues_created over time to measure remediation velocity.
Implementation
The solution ships as two AWS CDK stacks and deploys in minutes. The accompanying GitHub repository contains the complete source code, AWS CDK stacks, configuration templates, and step-by-step deployment instructions.
At a high level, deployment involves:
- Prerequisites: An AWS account with an
ACCOUNT_UNUSED_ACCESSorORGANIZATION_UNUSED_ACCESSanalyzer enabled, Python 3.11 or later, AWS CDK v2, a CI/CD platform API token stored in AWS Secrets Manager, and Amazon Bedrock model access for the Anthropic Claude models you plan to use. The model IDs are configurable environment variables (BEDROCK_CODEGEN_MODELandBEDROCK_EXPLANATION_MODEL); Amazon Bedrock retires older foundation models over time, so if the shipped defaults stop working, set these variables to current models you have enabled and redeploy. The repository README documents this. - Configuration: Two files in the
config/directory control behavior.exclusions.jsondefines which roles and permissions to skip (break-glass roles, service-linked roles, tagged exceptions), andci_cd_config.jsonconfigures your repository platform integration (GitLab or GitHub), labels, and throttling limits. - Deploy: Run
cdk deploy --allto create the Lambda function, EventBridge schedule, IAM roles, and CloudWatch alarms. - Validate in dry-run mode: Start with
“dry_run": trueto see how the automation classifies your roles without creating real PRs or issues. Review the CloudWatch logs to confirm attribution accuracy and tune exclusions. - Go live: Set
“dry_run": falseand redeploy. The Lambda function runs on schedule (daily by default) and begins creating PRs and issues.
The repository README covers each step in detail, including organization-wide deployment, cross-account configuration, and platform-specific setup for GitLab and GitHub.
Operational considerations
Deploying the automation is only the starting point. Running it in production means making decisions about how roles are retired, how the volume of findings is managed at scale, which roles warrant human review before any change is proposed, and how you measure the automation’s impact over time. The following practices keep remediation sustainable as your IAM footprint grows, so the automation reduces operational burden rather than adding to it.
Unused role lifecycle
Unused roles follow a three-stage decommission workflow. When the automation identifies a role that hasn’t been assumed within the analysis period, it creates an issue with the recommended decommission steps; the automation doesn’t modify the role directly. The team then follows the soft-disable approach:
- Attach a deny-all inline policy to the role. This blocks all actions without deleting the role or its existing policies.
- Monitor for 30 days. If a workload depends on the role (seasonal jobs, infrequent batch processes), the deny-all policy surfaces the dependency quickly. Removing the deny-all policy restores full access immediately; no need to recreate the role or reattach policies.
- Delete the role after the monitoring period confirms no impact.
This approach is deliberately conservative. Deleting a role is irreversible; you lose the trust policy, attached policies, and any resource-based policies that reference it. The soft-disable step gives teams a safety net while still making progress on reducing their unused role inventory.
Scaling and throttling
On AnyCompany’s first run, the automation found 47 unused permission findings and 4 unused roles. That’s manageable. But organizations with hundreds of accounts and thousands of roles might see significantly more findings on initial deployment.
This is especially true with an organization-level analyzer. A single-account deployment might surface dozens of findings; an organization-level analyzer across multiple accounts could surface hundreds or thousands on the first run. The throttling controls become critical at this scale.
Two throttling controls prevent the automation from overwhelming teams:
max_findings_per_run(default 50): Caps the totalUnusedPermissionfindings processed per Lambda function execution. Remaining findings are picked up on the next scheduled run.MAX_UNUSED_ROLE_ISSUES(default 10): Caps unused role issues per run. This is especially important during initial deployment when you might have a large backlog of roles that haven’t been assumed in months.
Start with conservative limits and increase them as your team builds confidence in the review process. A team that can review 10 PRs per week shouldn’t receive 50 on Monday morning.
Approval workflows for sensitive roles
Not every role should receive automated PRs. Roles with administrative permissions or access to sensitive data might warrant manual review before any remediation is created. The exclusion configuration supports this through the approval_required_for_tags field:
{
  "approval_required_for_tags": {
    "Sensitive": ["true"],
    "Admin": ["true"]
  }
}
Roles matching these tags generate issues for manual review instead of automated PRs, regardless of whether they’re IaC-managed. This gives security teams a checkpoint for high-risk roles while still automating remediation for standard application roles.
Monitoring and alerting
The metrics published after each Lambda function run (covered in the Technical details section) feed into CloudWatch dashboards and alarms. A few patterns worth setting up:
- Alert on
errors > 5per run to catch API throttling, expired CI/CD tokens, or Amazon Bedrock availability issues. - Track
prs_created + issues_createdover time. A healthy trend shows this number decreasing as your environment converges toward least privilege. - Monitor
unused_roles_foundas a leading indicator. A sudden increase might signal a team spinning up roles for a project and not cleaning up afterward. - Compare
iac_roles_foundtomanual_roles_foundover time. As teams adopt IaC, the ratio should shift toward IaC-managed roles, which means more automated remediation and less manual work.
Cost
The solution uses Lambda (minimal cost at daily execution), CloudTrail (typically already enabled), IAM Access Analyzer (charges per IAM role or user analyzed per month for the unused access analyzer), and Amazon Bedrock (pay-per-token for AWS CDK code generation and explanations). For most organizations the ongoing cost is low, and Amazon Bedrock token usage is the largest variable, scaling with the number of findings processed per day and the complexity of each policy. Review the pricing pages for each service for current rates.
For organization-level deployments, the IAM Access Analyzer cost scales with the number of IAM roles analyzed across all member accounts. The ORGANIZATION_UNUSED_ACCESS analyzer charges per role per month across the organization, so an organization with 500 roles across 20 accounts will see higher analyzer costs than a single account with 50 roles. Review the IAM Access Analyzer pricing page for current rates.
Cleanup
To remove the solution, run cdk destroy --all from the infrastructure/ directory. This removes the Lambda function, EventBridge rule, CloudWatch alarms, and IAM roles created by the stacks.
If you stored a CI/CD platform API token in Secrets Manager as part of deployment, delete it with aws secretsmanager delete-secret --secret-id <your-secret-name> --recovery-window-in-days 7. The 7-day recovery window lets you restore the secret if the deletion was accidental. After 7 days, the secret is permanently deleted and can’t be recovered. To delete immediately without a recovery window, add --force-delete-without-recovery.
Lambda automatically creates a CloudWatch Logs log group at /aws/lambda/<function-name> that persists after cdk destroy --all and continues to incur log storage charges. To remove it, run aws logs delete-log-group --log-group-name /aws/lambda/<function-name>. WARNING: This permanently deletes all execution logs.
The IAM Access Analyzer isn’t created by the AWS CDK stacks. WARNING: Deleting the analyzer permanently removes all findings, analysis history, and unused permission data. Export any findings you need to retain before deletion. After exporting, run aws accessanalyzer delete-analyzer --analyzer-name <your-analyzer-name> to delete it. The ACCOUNT_UNUSED_ACCESS and ORGANIZATION_UNUSED_ACCESS analyzer types incur charges based on the number of IAM roles and users analyzed per month.
If you deployed in organization mode and created cross-account roles (default name: OrganizationAccountAccessRole) in member accounts solely for this solution, remove them from those accounts.
Any PRs or issues already created in your CI/CD platform remain after stack deletion; they’re artifacts in your repository, not AWS resources. See the repository README for detailed cleanup instructions.,
Conclusion
Automating IAM permission remediation turns least privilege from a periodic compliance exercise into an operational practice. By connecting IAM Access Analyzer findings and recommendations to your CI/CD pipeline, remediation shifts from manual security tasks to code review processes that your teams already follow.
The three-path strategy acknowledges how infrastructure evolves. IaC-managed roles receive pull requests with production-ready AWS CDK code and plain-English explanations. Manually created roles receive actionable issues with recommended policies and IaC migration guidance. Unused roles are put on a controlled decommission path that protects against accidental disruption. Over time, the manual role count decreases as teams adopt IaC, and remediation becomes a routine part of your deployment pipeline.
Start with a pilot. Choose 10–20 non-production roles, deploy in dry-run mode, and review the classification results. Tune your exclusions, confirm the CloudTrail attribution is accurate for your environment, and then enable live remediation. Expand to production roles after your team is comfortable with the review cadence.
When you’re ready to scale beyond a single account, switch to an organization-level analyzer and the same Lambda function will process findings across all member accounts with no architectural changes required, only a configuration toggle.
The complete source code, AWS CDK stacks, and configuration templates are available in the accompanying GitHub repository.
If you have feedback about this post, submit comments in the Comments section below.