Normal view

How AWS IAM role manager rethinks the starting point for IAM roles

13 August 2026 at 00:16

When you build a new application or capability on Amazon Web Services (AWS), you want to focus on what you’re building. Getting a service running almost always begins with AWS Identity and Access Management (IAM). Many AWS services that act on your behalf need an IAM role, an identity the service assumes to access your resources with a defined set of permissions. You then author a trust policy so the service can assume the role, choose the permissions the workload needs, and attach it. Configuring roles and policies for common patterns is repeatable work that doesn’t need to be manual.

IAM role manager does that work for you. When role manager is enabled, AWS creates and configures the IAM roles as you build in supported service consoles, so you can start using a service and let AWS handle the role behind it. You create the resource you want, and role manager provisions and attaches the role you need as part of the same flow, so you can build now and refine permissions as your workload matures.

With that step automated, getting started takes minutes. You can create an AWS Lambda function and start running your code, with its execution role already created and attached, without switching context to set one up. Role creation becomes an automated part of building your application rather than a separate step.

Role manager is especially useful when you’re getting started: the moments when you want to stand up a service or get a proof of concept running and want to defer role configuration until later in your development process. You don’t need prior IAM experience to get started. You keep full control of what it creates, because the roles are ordinary IAM roles that you can view, edit, or delete like any role you author yourself. When you want to tighten a role, AWS IAM Access Analyzer reviews how it has been used and recommends a policy scoped to only the permissions it needs.

How to enable role manager

Role manager has two states, enabled and disabled. Enabling it for an account authorizes AWS to create roles in that account. In an organization, administrators can use a service control policy (SCP) to control whether member accounts can enable or use role manager. To enable it:

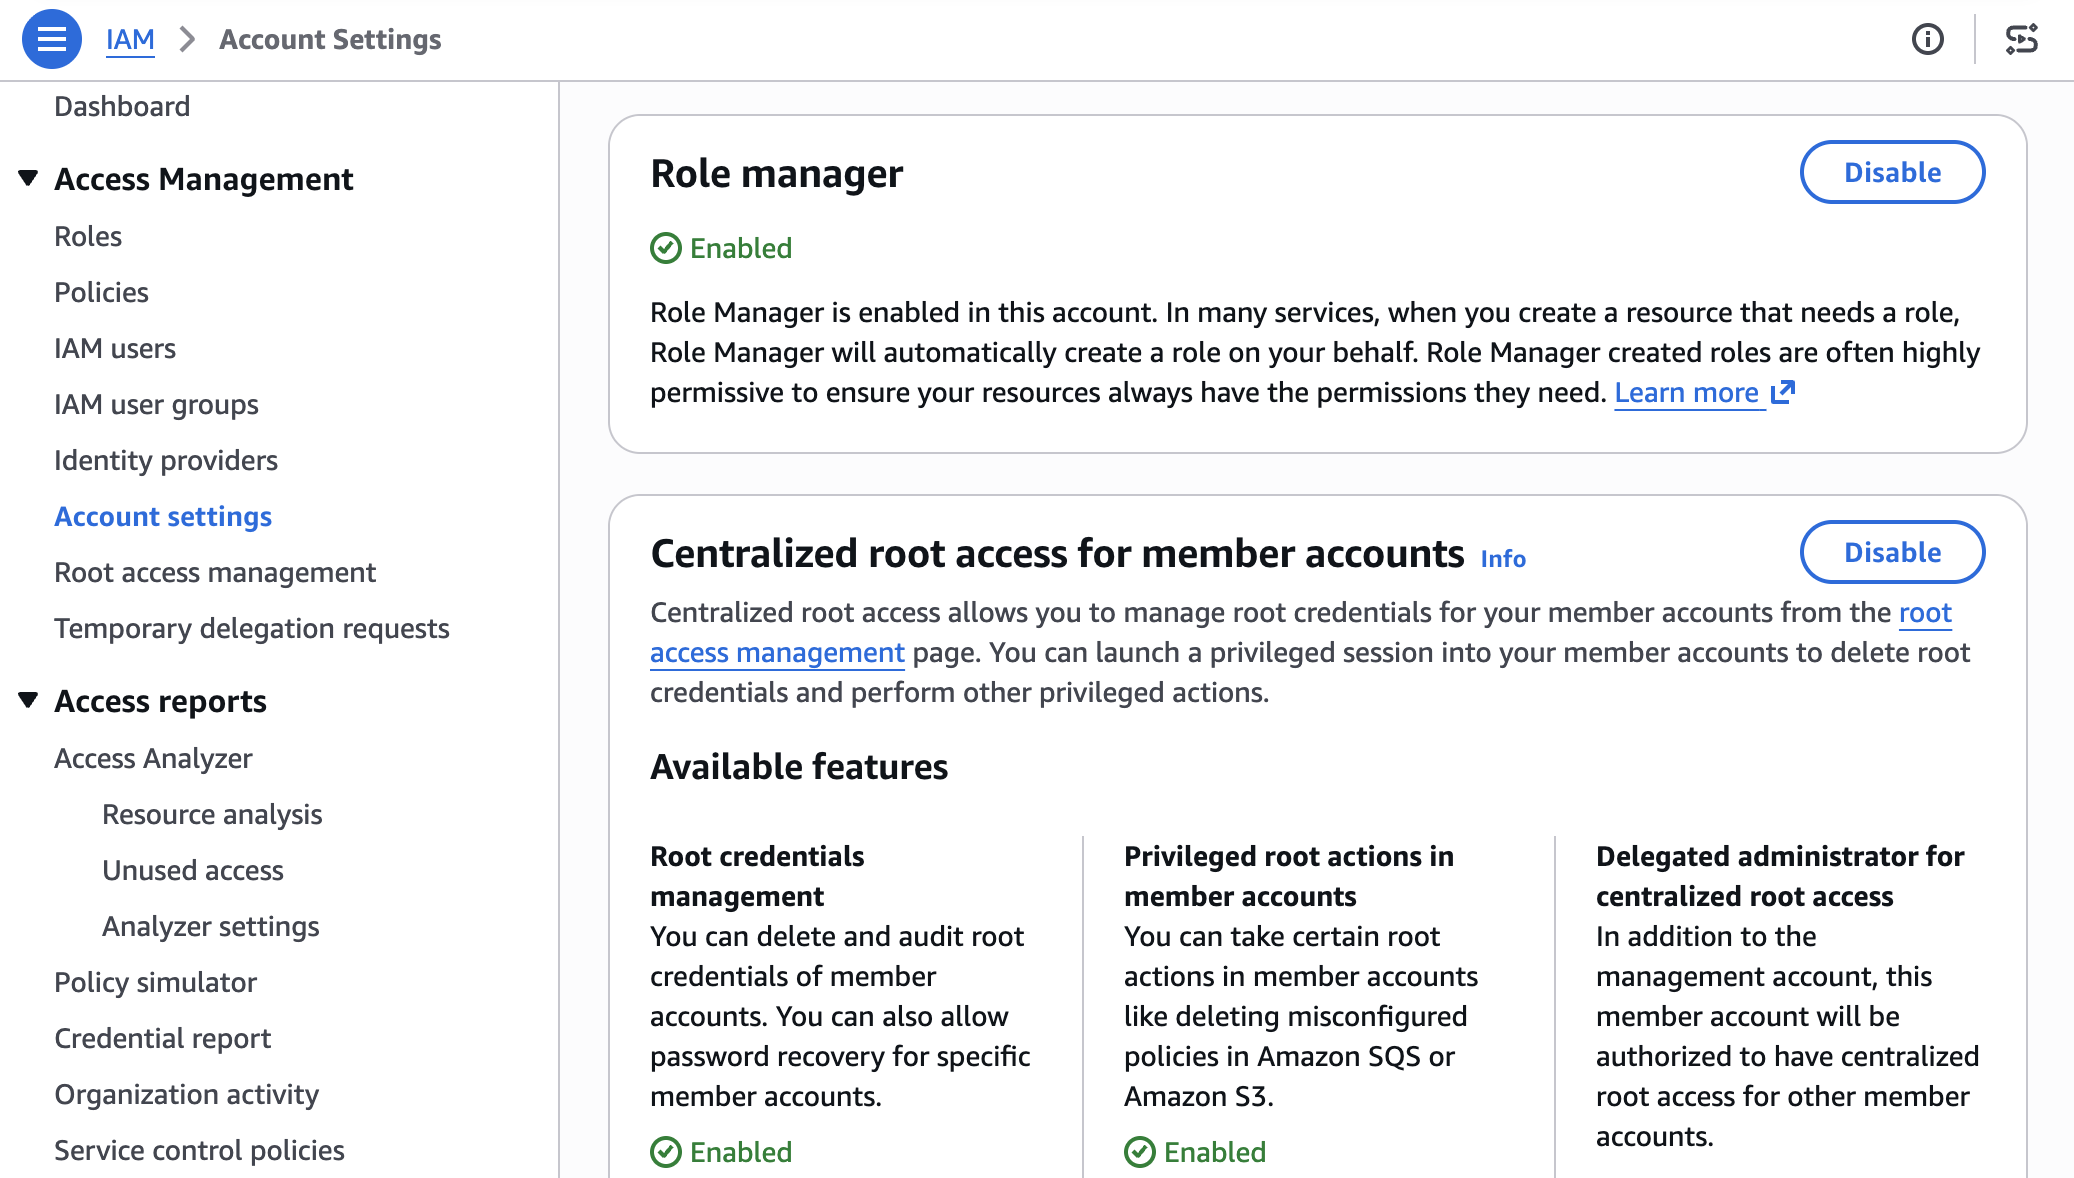
  1. Open the IAM console and choose Account settings.
  2. In the role manager section, choose Enable.

Figure 1: Enable Role Manager

Figure 1: Enable Role Manager

Some AWS services already create a role for you when you create a resource that needs one. Role manager doesn’t change that: those services keep creating roles automatically, and roles you already created keep working. What role manager adds is a single account-level control, and coverage for a case that built-in flows can’t handle: tasks whose permissions AWS can’t determine in advance, such as running your own code. For those tasks, role manager provisions a role that you can narrow later.

Example: Create an Amazon EventBridge rule

Start with a common task: an Amazon EventBridge rule that invokes a target, such as an Amazon Simple Queue Service (Amazon SQS) queue or an Amazon Simple Notification Service (Amazon SNS) topic. Without role manager, you would pause here to create a role that lets EventBridge invoke the target, write the role’s trust policy, attach the required permissions, and then return to finish the rule. With role manager enabled, you define the rule and its target, choose Create, and role manager provisions the role and attaches it for you. The EventBridge console shows the rule created and ready, and you never open the role-creation flow.

Figure 2: Creating an EventBridge rule with no manual role setup

Figure 2: Creating an EventBridge rule with no manual role setup

The role comes from an AWS managed role template: a definition AWS builds and maintains for a specific task, with the trust policy and permissions already worked out. The console calls a new IAM API, AcquireRole, which finds the matching template, provisions the role from it, and returns it to EventBridge. Depending on the service, AcquireRole either creates a new role or reuses one that already fits, so an account does not fill up with duplicate roles for the same task.

Role manager creates the role using your own IAM permissions, not a separate role-manager permission. To provision a new role, you need permission for the actions the template performs: at minimum, you need permissions to create and attach roles. When AcquireRole reuses an existing role instead of creating one, it needs only iam:GetRole and iam:GetRoleTemplateVersion. If you’re missing either of these permissions, the console tells you which one is needed rather than creating the role.

Run code that calls other AWS services

Not every task has a set of permissions AWS can define in advance. When a role runs your own code, such as a Lambda function, AWS has no way of knowing which services that code will call. Role manager covers this case too: create a Lambda function with role manager enabled, and it attaches an execution role that your code can use right away and that you can narrow once you know what the function calls.

Because the permissions your code needs aren’t known up front, role manager attaches the AWS managed policy PowerUserAccess to the role. PowerUserAccess grants access to AWS services so your function can call what it needs. By design, it doesn’t grant permission to manage IAM, AWS Organizations, or account settings. The template also configures the role to trust only the Lambda service.

Figure 3: Create an AWS Lambda function with no manual role setup

Figure 3: Create an AWS Lambda function with no manual role setup

Role manager attaches an execution role, and your function is ready to run. Figure 4 shows the Execution role panel on the function’s Configuration tab, with the role that role manager attached.

Figure 4: Role manager provides a role automatically to an AWS Lambda function

Figure 4: Role manager provides a role automatically to an AWS Lambda function

You can open the role in the IAM console to review its permissions. Figure 5 shows the role’s Permissions tab with the PowerUserAccess policy attached.

Figure 5: Permissions of the role provided by role manager for an AWS Lambda function

Figure 5: Permissions of the role provided by role manager for an AWS Lambda function

You keep full visibility into what role manager creates. Every role it creates records the role template it came from, and both GetRole and ListRoles return that template reference. You can inspect any role in your account and tell which were created by role manager. You read a role’s trust policy and permissions the same way you would for a role you authored, and AWS CloudTrail records each role’s creation.

Refining roles as workloads mature

As your workloads mature, refine the roles that role manager created to follow least privilege. When you’re ready, you can disable role manager and get IAM Access Analyzer unused access analysis at no additional cost for 90 days. Access Analyzer looks at how each role has been used and recommends a policy you can apply that keeps only the permissions the role needs. Start with the roles attached to your most critical workloads and work outward.

Disabling role manager doesn’t disrupt anything already running: your resources keep the roles they have, those roles stay in your account until you change them, and from that point you author new roles yourself, the same as before. If you would rather narrow a single role than the whole account, editing that role removes it from role manager’s control and it becomes a standard customer-managed role, with your changes preserved. In sandbox or development accounts, keeping role manager enabled saves time. For production workloads, disable role manager and refine the roles it created to least privilege before going live.

Conclusion

Role manager automates IAM role setup so you can focus on building from the start. When you enable it, AWS creates and attaches the IAM roles your resources need as you build, so you can start in minutes without prior IAM experience. Because these are IAM roles that you fully control, you keep the same visibility and the same tools you already use. Keep role manager enabled while you build, and refine the roles it created as your workloads mature.

To get started, enable role manager in the IAM console and create a resource in a supported service. To learn more, see IAM role creation and the list of supported services in the IAM User Guide.

If you have feedback about this post, submit comments in the Comments section below.


Zach Jiang

Zach Jiang

Zach is a Senior Technical Product Manager at AWS, specializing in AWS Identity products. He focuses on making identity the easy part of building on AWS for customers. Outside of technology, Zach enjoys traveling and exploring new cultures and cuisines.

David Sing

David Sing

David is a Principal Product Manager at AWS, specializing in AWS IAM. He focuses on simplifying IAM for builders and AI agents, safe credential issuance for AI agents, and authorization policy governing agent access. Outside of technology, David enjoys economics and markets, fishing, and time outdoors with his family.

Punit Deotale

Punit Deotale

Punit is a Software Development Manager on the AWS IAM team. He leads work on making it easier for customers to create and manage IAM roles directly within AWS service workflows, so they can set up the right permissions without leaving what they are doing. His focus is reducing permission-setup friction across AWS while helping customers stay aligned with least privilege. Outside of work, Punit enjoys reading, building side projects, and being outdoors.

Securing your Amazon S3 buckets: Identifying and remediating over-permissioned access

7 August 2026 at 18:46

Misconfigured Amazon Simple Storage Service (Amazon S3) buckets can expose your data to unauthorized access. Without proactive review, S3 bucket policies or Access Control Lists (ACLs) configured with broad access may go unnoticed in your environment. In this post, you learn how to identify and fix over-permissioned S3 buckets across your AWS environment, along with best practice recommendations and automation opportunities to help you prevent security gaps. This post provides a workflow framework and methodology recommendations for your security team to adapt. The focus of this post is on the what and why rather than a prescriptive implementation. You will need to customize the approach based on your organization’s requirements and existing security tooling.

This solution is intended for security engineers, cloud architects, and DevOps teams managing single- or multiple-account AWS environments with Amazon S3 workloads that require access management.

Prerequisites

Before you begin, make sure you have the following in place:

Solution overview

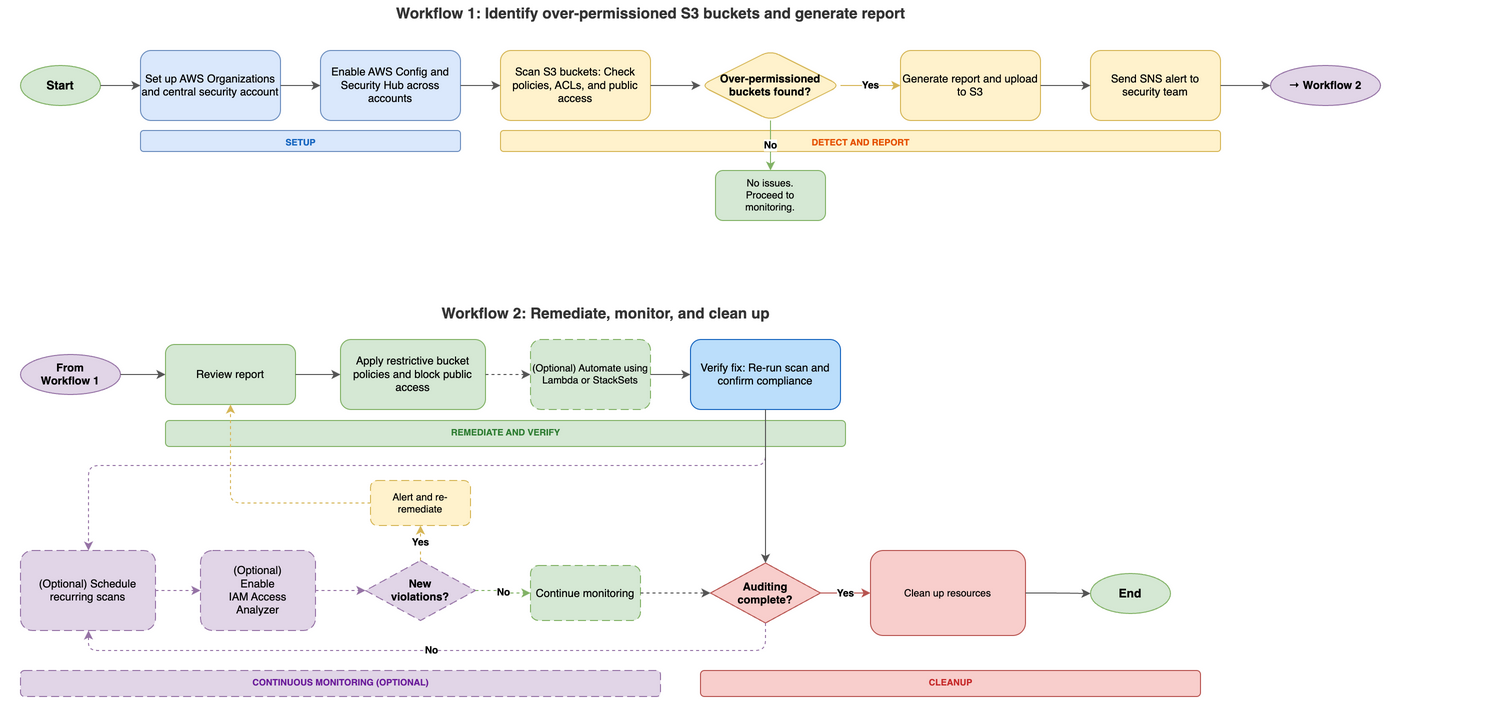
This solution uses a five-phase workflow diagram to detect, remediate, and continuously monitor over-permissioned S3 buckets across your AWS accounts. The following workflow diagram illustrates the high-level end-to-end process for identifying and remediating over-permissioned S3 buckets across your Amazon Web Services (AWS) environment.

Figure 1: Amazon S3 over-permissive access – Detection, remediation, monitoring and cleanup workflow

Figure 1: Amazon S3 over-permissive access – Detection, remediation, monitoring and cleanup workflow

The diagram in Figure 1 consists of five phases:

  1. Setup and prerequisites – Configure AWS Organizations or multi-account access, designate a central security account, deploy AWS Config across all accounts, and enable AWS Security Hub with a central administrator.
  2. Detection and identification – Deploy AWS Config rules (such as s3-bucket-public-read-prohibited and s3-bucket-public-write-prohibited) and run an audit Lambda function that scans each S3 bucket. The function checks three areas: Public Access Block configuration, bucket policy status, and bucket ACL grants. Buckets with issues are added to a risky buckets list. The function then generates a report in CSV and JSON format, uploads it to an output S3 bucket, and sends an SNS alert.
  3. Remediation – Address findings using one or more approaches – Apply restrictive bucket policies to deny public read/write access and restrict access to specific IAM principals; deploy a remediation Lambda function to automatically update bucket policies and disable public access settings; or use CloudFormation StackSets to deploy standardized policies across multiple accounts.
  4. Continuous monitoring – Schedule the audit Lambda function for recurring scans (daily or weekly) using Amazon EventBridge. Use EventBridge to detect policy changes, configure automated notifications for new violations, enable IAM Access Analyzer for S3 to identify external access, and run regular compliance scans.
  5. Resource cleanup – Review and delete resources created during the audit that are no longer needed, including Lambda functions and IAM roles, EventBridge rules, SNS topics and subscriptions, audit output S3 buckets, AWS Config rules, and Security Hub (if enabled only for this audit).

Cost considerations

This section covers the AWS services used in this solution and their associated costs so you can estimate spend before deployment. The primary cost drivers are AWS Config and Security Hub, which scale with the number of accounts and resources you monitor. Lambda, Amazon EventBridge, Amazon SNS, and Amazon S3 typically add minimal costs for most environments. Start with a pilot in one or two accounts to validate costs before scaling.

  • AWS Config – Charges per configuration item recorded and per rule evaluation. Costs scale with the number of accounts and resources tracked.
  • Security Hub – Charges per account per AWS Region for security checks and finding ingestion.
  • Lambda – Charges per request and per GB-second of compute time.
  • EventBridge – Scheduled rules are free. Custom event bus usage might incur charges.
  • Amazon SNS – Charges per notification delivered.
  • Amazon S3 – Storage costs for audit report output files. Minimal for most environments.
  • AWS IAM Access Analyzer – Check the AWS IAM Access Analyzer pricing page to understand which features have costs associated with them.

Check the service pricing pages for current rates. Use the AWS Pricing Calculator to estimate costs for your specific environment before enabling services across all accounts. Consider starting with a pilot in one or two accounts to validate costs before scaling.

Detect and report over-permissioned buckets

This section walks you through setting up the audit environment, deploying the Lambda-based scanner, and generating reports of over-permissioned S3 buckets across your accounts. Follow these steps to identify over-permissioned S3 buckets in your multi-account environment, starting with preparing your environment for an Amazon S3 audit.

To set up the multi-account audit environment:

  1. Set up AWS Organizations or multi-account access. Set up centralized management of your AWS accounts using AWS Organizations or configure cross-account IAM roles.
  2. Choose a central security account. Choose one account as your security/audit account. This account will run the audit Lambda function and collect results from member accounts.
  3. Create an Amazon SNS topic for alerts. Subscribe your security team to receive notifications when over-permissioned buckets are detected. Note the topic Amazon Resource Name (ARN) from the output—you will need it when creating the Lambda execution role (step 6) and the Lambda function (step 9). Confirm the email subscription before testing; Amazon SNS doesn’t deliver alerts until the subscription is confirmed. Learn more in the Amazon SNS Developer Guide.
  4. (Optional): Create an S3 bucket for audit reports. If you plan to use Script v2 for historical reporting and trend analysis, create a dedicated bucket now. Skip this step if you only need real-time alerts using Script v1.
  5. Plan cross-account IAM roles. The central security account needs permission to scan member accounts. Design cross-account roles that:
    1. Grant minimum Amazon S3 read permissions (list buckets, read policies, ACLs, public access configurations).
    2. Include an external ID condition to mitigate the confused deputy problem.
    3. Can be deployed consistently using AWS CloudFormation StackSets.
    4. See the IAM documentation on creating cross-account roles, The confused deputy problem, and IAM security best practices for additional guidance on role configuration and trust policies.

      Note: The specific trust policy and permissions policy for your cross-account roles will depend on organizational requirements. Work with your IAM administrators to grant minimum necessary access for the audit function.

  6. Create the Lambda execution role. Create an IAM role for your Lambda function with the permissions it needs to scan buckets, publish alerts, and write logs. Apply the principle of least privilege—grant only the minimum Amazon S3 read permissions required for the audit (such as, listing buckets, reading bucket policies, ACLs, and public access block configurations), Amazon SNS publish permission for the alert topic created in step 3, Amazon S3 write permission for the output bucket created in step 4 (Script v2), and Amazon CloudWatch Logs permissions. For multi-account scanning, also include sts:AssumeRolepermission for the cross-account role ARNs created in step 5. The AWS Lambda execution role documentation has instructions on creating and configuring execution roles.
  7. To deploy the S3 audit solution Deploy the audit components
    1. Enable AWS Config in member accounts. AWS Config provides compliance monitoring and can detect when S3 buckets are created or modified with public access settings. This will enable the Lambda-based audit to receive real-time detection between scheduled scans. The AWS Config Developer Guide has setup instructions. Deploy pre-defined AWS Config rules to identify overly permissive settings. These managed rules provide automated compliance checking. When AWS Config detects violations, it sends findings to Security Hub (configured in step 8) for centralized visibility alongside the Lambda audit results.
      • s3-bucket-public-read-prohibited
      • s3-bucket-public-write-prohibited
      • Create AWS Config rules for specific permission patterns. For the full list of available rules, see the AWS Config managed rules reference
  8. Enable Security Hub for centralized visibility. Enable AWS Security Hub in member accounts and configure the central security account as the administrator. Security Hub aggregates findings from AWS Config rules (step 7), IAM Access Analyzer (enabled later), and can receive custom findings from your Lambda audit function, providing a single dashboard for Amazon S3 security issues across your organization. See the Security Hub User Guide for setup details.
  9. Deploy the audit Lambda function. Deploy a Python Lambda function using the Boto3 library to list S3 buckets, check their policies, ACLs, and IAM permissions, and identify over-permissioned buckets. See the example scripts that follow.

Important: These code examples aren’t production ready. Adapt them to meet your organization’s requirements and test them in a non-production environment before deployment.

Choose your approach:

  • Script v1 – Best for immediate SNS alerts when issues are detected.
  • Script v2 – Best for historical reports, trend analysis using BI tools.
  • Both scripts – Best for different schedules and ongoing needs.

Audit Lambda function – Example script v1 (Scan and alert)

The following is an example of a Lambda function script for reference purposes. Review, adapt, and test before use in your environment, it scans all S3 buckets in the current account and checks for:

  • Public Access block configuration gaps
  • Bucket policies that allow public access
  • ACL grants to AllUsers

Note: Replace placeholder values with actual values before deployment:

  • <REGION>– Your AWS Region (for example, us-east-1)
  • <ACCOUNT_ID>– Your 12-digit AWS account ID
  • <TOPIC_NAME>– The name of your SNS topic created in step 3
import boto3
import json

def lambda_handler(event, context):
    s3 = boto3.client('s3')
    sns = boto3.client('sns')
    risky_buckets = []
    errors = []

    try:
        buckets = s3.list_buckets()['Buckets']
    except Exception as e:
        return {'statusCode': 500, 'body': f'Failed to list buckets: {str(e)}'}

    for bucket in buckets:
        bucket_name = bucket['Name']
        issues = []

        try:
            # Check Public Access Block — all four settings should be enabled
            try:
                pab = s3.get_public_access_block(Bucket=bucket_name)
                config = pab['PublicAccessBlockConfiguration']
                if not all([
                    config.get('BlockPublicAcls'),      # Block new public ACLs
                    config.get('BlockPublicPolicy'),     # Block new public bucket policies
                    config.get('IgnorePublicAcls'),      # Ignore existing public ACLs
                    config.get('RestrictPublicBuckets')   # Restrict access to public buckets
                ]):
                    issues.append('Public Access Block not fully enabled')
            except s3.exceptions.NoSuchPublicAccessBlockConfiguration:
                issues.append('No Public Access Block configured')

            # Check bucket policy — flag if policy status is public
            try:
                policy_status = s3.get_bucket_policy_status(Bucket=bucket_name)
                if policy_status['PolicyStatus']['IsPublic']:
                    issues.append('Bucket policy allows public access')
            except s3.exceptions.NoSuchBucketPolicy:
                pass  # No bucket policy is acceptable

            # Check bucket ACL
            acl = s3.get_bucket_acl(Bucket=bucket_name)
            for grant in acl.get('Grants', []):
                grantee = grant.get('Grantee', {})
                uri = grantee.get('URI', '')
                # 'AllUsers' = anonymous public access
                # 'AuthenticatedUsers' = any AWS account (still overly permissive)
                if grantee.get('Type') == 'Group' and ('AllUsers' in uri or 'AuthenticatedUsers' in uri):
                    issues.append('Bucket ACL grants public access')
                    break

            if issues:
                risky_buckets.append({'bucket': bucket_name, 'issues': issues})

        except Exception as e:
            errors.append(f'{bucket_name}: {str(e)}')

    # Send alert if risky buckets found
    if risky_buckets:
        message = f'Found {len(risky_buckets)} buckets with public access:\n\n'
        for item in risky_buckets:
            message += f"  {item['bucket']}: {', '.join(item['issues'])}\n"

        sns.publish(
            TopicArn='arn:aws:sns:<REGION>:<ACCOUNT_ID>:<TOPIC_NAME>',
            Subject='S3 Public Access Alert',
            Message=message
        )

    return {
        'statusCode': 200,
        'body': json.dumps({
            'risky_buckets': risky_buckets,
            'errors': errors,
            'total_checked': len(buckets)
        })
    }

Multi-account scanning: This script scans the current account only. To scan across member accounts, see the Multi-account extension section later in this post.

Audit Lambda function – Example script v2 (CSV and JSON report)

The following is an example Lambda function script for reference purposes. Before deploying any script, review error handling, logging, output structure, and permissions. This script generates CSV and JSON output files and uploads them to an S3 bucket for reporting and business intelligence (BI) dashboard integration.

You can deploy both functions with different EventBridge schedules, for example, Script v1 daily for alerts and Script v2 weekly for reports.

Note: Before you deploy this script, replace <OUTPUT_BUCKET_NAME> with the S3 bucket you created for audit reports in step 4.

import boto3
import csv
import json
import os

def lambda_handler(event, context):
    s3 = boto3.client('s3')
    buckets = s3.list_buckets()['Buckets']

    full_access_buckets = []
    for bucket in buckets:
        bucket_name = bucket['Name']
        try:
            bucket_policy = s3.get_bucket_policy(Bucket=bucket_name)['Policy']
            policy = json.loads(bucket_policy)
            for statement in policy['Statement']:
                if (statement['Effect'] == 'Allow'
                    and statement['Principal'] == '*'
                    and 'Action' in statement
                    and 's3:*' in statement['Action']):
                    full_access_buckets.append({'BucketName': bucket_name})
                    break
        except s3.exceptions.ClientError as e:
            if e.response['Error']['Code'] != 'NoSuchBucketPolicy':
                print(f'Error checking bucket policy for {bucket_name}: {e}')

    # Output CSV
    csv_output = os.path.join('/tmp', 'full_access_buckets.csv')
    with open(csv_output, 'w', newline='') as csvfile:
        writer = csv.DictWriter(csvfile, fieldnames=['BucketName'])
        writer.writeheader()
        writer.writerows(full_access_buckets)

    # Output JSON
    json_output = os.path.join('/tmp', 'full_access_buckets.json')
    with open(json_output, 'w') as jsonfile:
        json.dump(full_access_buckets, jsonfile, indent=2)

    # Upload to Amazon S3
    output_bucket = '<OUTPUT_BUCKET_NAME>'
    s3.upload_file(csv_output, output_bucket, 'full_access_buckets.csv')
    s3.upload_file(json_output, output_bucket, 'full_access_buckets.json')

    return {
        'statusCode': 200,
        'body': json.dumps(f'CSV and JSON files uploaded to {output_bucket}')
    }

Important: If this function runs on a schedule, consider implementing a file naming strategy with timestamps to prevent overwriting previous reports or establish a lifecycle policy to manage retention. Include the output bucket in your cleanup procedures when the auditing process is no longer needed.

What if no over-permissioned buckets are found?

If the audit scan returns zero risky buckets, document the clean baseline for future comparison and move to the verification and monitoring phase to so new buckets or policy changes don’t introduce risk over time.

Multi-account extension

The preceding example scripts scan buckets in the current account only. To scan across member accounts in your organization, add the following AssumeRole logic. This function assumes the cross-account IAM role you created during setup, then returns an Amazon S3 client with temporary credentials for each member account.

Note: Before you deploy, configure the following Lambda environment variables:

  • <MEMBER_ACCOUNTS> – Comma-separated list of 12-digit account IDs to scan (for example, 111111111111,222222222222)
  • <CROSS_ACCOUNT_ROLE_NAME> – The IAM role name created in each member account (for example, S3AuditRole)
  • <EXTERNAL_ID> – The external ID configured in the trust policy (for example, s3-audit-external-id)
import boto3
import os

def get_member_s3_clients():
    """
    Assumes the cross-account audit role in each member account
    and returns a list of (account_id, s3_client) tuples.
    """
    sts = boto3.client('sts')
    member_accounts = os.environ.get('<MEMBER_ACCOUNTS>', '').split(',')
    cross_account_role_name = os.environ.get('<CROSS_ACCOUNT_ROLE_NAME>')
    external_id = os.environ.get('<EXTERNAL_ID>')

    clients = []
    for account_id in member_accounts:
        account_id = account_id.strip()
        if not account_id:
            continue

        try:
            assumed_role = sts.assume_role(
                RoleArn=f'arn:aws:iam::{account_id}:role/{cross_account_role_name}',
                RoleSessionName='S3AuditSession',
                ExternalId=external_id
            )

            # Create S3 client with assumed credentials
            s3_client = boto3.client(
                's3',
                aws_access_key_id=assumed_role['Credentials']['AccessKeyId'],
                aws_secret_access_key=assumed_role['Credentials']['SecretAccessKey'],
                aws_session_token=assumed_role['Credentials']['SessionToken']
            )
            clients.append((account_id, s3_client))

        except Exception as e:
            print(f'Failed to assume role in account {account_id}: {e}')

    return clients

To scan each member account, replace the single-account s3.list_buckets() call with a loop over member accounts:

def lambda_handler(event, context):
    all_risky_buckets = []
    all_errors = []

    # Scan each member account
    for account_id, s3_client in get_member_s3_clients():
        try:
            buckets = s3_client.list_buckets()['Buckets']
            for bucket in buckets:
                # ... same scanning logic as the single-account scripts ...
                # Use s3_client instead of s3 for each API call
                pass
        except Exception as e:
            all_errors.append(f'Account {account_id}: {e}')

    # ... same alerting/reporting logic ...

The Lambda execution role in the central security account needs sts:AssumeRole permission for the cross-account role ARNs. Add this to the execution role policy you created in step 5.

Remediate elevated access

This section describes how to fix over-permissioned buckets using account-level controls, bucket policies, and optional automation. Any elevated access that you find needs to be remediated.

Enable Amazon S3 Block Public Access (account level)

Before applying individual bucket policies, enable Amazon S3 Block Public Access at the account level. This prevents buckets in the account from being made public, regardless of individual bucket policies or ACLs. See theS3 Block Public Access documentation for configuration details. See the following example AWS CLI command; replace <ACCOUNT_ID> with the ID of the account you’re using to manage resource access:

aws s3control put-public-access-block \
  --account-id <ACCOUNT_ID> \
  --public-access-block-configuration \
BlockPublicAcls=true,IgnorePublicAcls=true,BlockPublicPolicy=true,RestrictPublicBuckets=true

For multi-account environments, deploy this setting across member accounts using AWS CloudFormation StackSets or AWS Organizations service control policies (SCPs).

Important: Before enabling account-level S3 Block Public Access, check whether any workloads need public bucket access (for example, static website hosting, public dataset sharing). Coordinate with your application teams to identify any exceptions.

Remediate using bucket policies

Implement bucket policies that restrict access to specific IAM users, roles, or accounts. When crafting policies, apply the principle of least privilege and include only the actions and principals required for your use case.

Example S3 bucket policy: deny public read/write access. Modify the resource ARN, actions, and conditions to match your requirements:

{
  "Version": "2012-10-17",
  "Statement": [
    {
      "Effect": "Deny",
      "Principal": "*",
      "Action": [
        "s3:PutObject", "s3:PutObjectAcl",
        "s3:GetObject", "s3:GetObjectAcl",
        "s3:DeleteObject"
      ],
      "Resource": "arn:aws:s3:::<BUCKET_NAME>/*",
      "Condition": {
        "StringEquals": {
          "s3:x-amz-acl": ["public-read", "public-read-write"]
        }
      }
    }
  ]
}

Example S3 bucket policy: restrict access to specific IAM principals. Replace <ACCOUNT_ID>, <USERNAME>, and <ROLE_NAME>:

{
  "Version": "2012-10-17",
  "Statement": [
    {
      "Sid": "AllowObjectAccess",
      "Effect": "Allow",
      "Principal": {
        "AWS": [
          "arn:aws:iam::<ACCOUNT_ID>:user/<USERNAME>",
          "arn:aws:iam::<ACCOUNT_ID>:role/<ROLE_NAME>"
        ]
      },
      "Action": ["s3:GetObject", "s3:PutObject", "s3:DeleteObject"],
      "Resource": "arn:aws:s3:::<BUCKET_NAME>/*"
    },
    {
      "Sid": "AllowBucketAccess",
      "Effect": "Allow",
      "Principal": {
        "AWS": [
          "arn:aws:iam::<ACCOUNT_ID>:user/<USERNAME>",
          "arn:aws:iam::<ACCOUNT_ID>:role/<ROLE_NAME>"
        ]
      },
      "Action": ["s3:ListBucket", "s3:GetBucketLocation"],
      "Resource": "arn:aws:s3:::<BUCKET_NAME>"
    }
  ]
}

See the Amazon S3 bucket policy documentation for additional examples and guidance.

Automate remediation with Lambda or CloudFormation StackSets (optional):

You can also remediate using Lambda or CloudFormation Stacksets:

  • Create Lambda functions to automatically update bucket policies or disable public access settings for flagged buckets
  • Use CloudFormation StackSets to deploy standardized bucket policies and S3 Block Public Access settings across multiple accounts

Verify your remediation

This section explains how to confirm that your fixes are effective before moving to ongoing monitoring. After applying remediation, verify the fix is effective before setting up ongoing monitoring:

  1. Re-run the audit Lambda function – Confirm the previously flagged buckets no longer appear in the risky buckets list.
  2. Check Security Hub compliance – Verify the compliance status has changed from FAILED to PASSED for Amazon S3-related controls.
  3. Validate with IAM Access Analyzer – Review findings for the remediated S3 buckets. Active findings should resolve automatically after public access is removed.
  4. Test application functionality – Confirm that legitimate workloads continue to function correctly.

Document the verification results for your auditing needs. If any S3 buckets still show issues, investigate whether the policy was applied correctly or if there are conflicting permissions.

Automation opportunities

This section covers optional strategies to automate ongoing detection and maintain your security posture without manual intervention.

  1. (Optional) Schedule recurring scans with Amazon EventBridge
    • Regular security scans help identify new issues arising from configuration changes or newly created S3 buckets. When new security risks are detected, Amazon SNS sends an alert and automatically initiates the remediation phase (Workflow 2 in Figure 1). To avoid repeated alerts, you can configure the audit Lambda function to run on a schedule and compare current results with the previous baseline to generate notifications when new findings are discovered.
    • For ongoing monitoring, you can schedule the audit Lambda function to run on a recurring basis using EventBridge. Create a scheduled rule with a cron expression (for example, daily at 6:00 AM UTC or weekly on Mondays), add the Lambda function as the target, and grant EventBridge permission to invoke it. See Amazon EventBridge scheduling documentation for instructions on creating scheduled rules and configuring targets.
  2. Enable IAM Access Analyzer for Amazon S3
    • IAM Access Analyzer monitors bucket policies, ACLs, and access points to identify buckets accessible from outside your account or organization. Create an analyzer scoped to your organization or individual account, then review findings to identify unintended external access. Findings automatically flow into Security Hub when both services are enabled, giving you a dashboard view for Amazon S3 security findings. See the IAM Access Analyzer documentation for setup and usage instructions.
  3. Automate notifications for policy drift
    • Recurring scans might surface new findings from policy drift or newly created buckets. When new risks are detected, Amazon SNS alert triggers and the remediation cycle repeat (as shown in Workflow 2 in Figure 1) sends email notifications. Configure the audit Lambda function to compare current scan results against the previous baseline and alert on new findings for ongoing reviews.

Clean up

This section lists the resources created during this walkthrough that you should review and remove when they are no longer needed. If the following services were not previously active in your account, leaving them enabled might result in additional ongoing charges. See the Cost considerations section for details. Review and remove unused resources to optimize costs.

Delete or disable the following script-generated resources if they’re not required after outputs are generated. Focus first on Lambda functions and EventBridge rules if you’re not running recurring scans. If you enabled AWS Config or Security Hub specifically for this audit, evaluate whether you need them for other compliance requirements before disabling.

  • Lambda – Functions, IAM roles, and policies created for auditing
  • Amazon EventBridge – Scheduled rules created for recurring audit triggers
  • Amazon SNS – Topics and subscriptions created for notifications
  • Amazon S3 – Buckets containing script-generated audit output files
  • AWS Config – Rules and recorders if no longer needed for compliance
  • Security Hub – Disable if enabled solely for this audit
  • IAM Access Analyzer – Delete the analyzer if no longer needed for ongoing monitoring

Note: Be careful when deleting data and consider temporarily disabling services first to check for dependencies. Only delete resources generated as part of your audit outputs. Verify you have retained any necessary results before proceeding. Verify resources are not used by other workloads before deletion.

Best practices

This section provides recommendations to maintain secure Amazon S3 configurations long-term. To learn more about maintaining secure Amazon S3 configurations, review the AWS documentation links provided in the conclusion. The following recommendations aren’t exhaustive. Adapt and extend them based on your organization’s evolving security requirements and AWS best practices guidance. After you’ve fixed existing issues, these practices help you maintain secure Amazon S3 configurations.

  • Start with account-level controls – Enable S3 Block Public Access at the account level. This prevents buckets from becoming public even if someone misconfigures an individual bucket policy. For multi-account environments, enforce this through AWS Organizations SCPs.
  • Automate detection – Use IAM Access Analyzer to detect external access. Schedule your audit Lambda function with EventBridge to catch new issues weekly or daily, depending on your change frequency. Compare scan results against previous baselines to identify drift.
  • Standardize across accounts – Use CloudFormation StackSets to deploy the same secure configuration to all accounts in your organization, reducing the chance of configuration drift. Use StackSets for IAM roles, AWS Config rules, and S3 Block Public Access settings.

Additional security measures

  • Regularly review and rotate cross-account IAM role credentials and external IDs
  • Implement Amazon S3 server-side encryption (SSE-S3 or SSE-KMS) for data at rest
  • Enable S3 access logging and AWS CloudTrail data events for audit trails

Conclusion

This section summarizes what you accomplished and suggests next steps to maintain your S3 security posture. By implementing the detection, remediation, and monitoring workflow outlined in this post, you can proactively identify and secure over-permissioned S3 buckets across your AWS environment. To maintain your ongoing security posture, enable IAM Access Analyzer for continuous monitoring and schedule recurring audits with EventBridge. To learn more about Amazon S3 security best practices, see Security best practices for Amazon S3

For more information:

If you have feedback about this post, submit comments in the Comments section below.


Hetal Kolekar

Hetal Kolekar

Hetal is a Sr. Technical Account Manager at AWS with more than 21 years of experience in Infrastructure Architecture, Security, Systems Engineering, and Consulting. He excels in leading teams to strengthen their cloud security posture and helps customers scale up their security using AWS services. Hetal is a guitarist and loves playing at church.

Manomayi Vedam

Manonmayi Vedam

Manonmayi is a Senior TAM and Product Owner at AWS, specializing in AI-driven cloud enablement, security, and generative AI risk across Healthcare, Financial Services, Energy, and Public Sector. She co-leads global security programs for Fortune 500 clients, contributes to the NIST Cyber AI Profile RMF and NCCoE, and is a Fellow at SCRS with recognition from GlobeeAwards and IEEE.

Fernando Freitas

Fernando Freitas

Fernando is a Sr. Technical Account Manager at AWS in Salt Lake City, focused on helping customers achieve their desired outcomes with the AWS Cloud. Fernando is passionate about Identity and Security, Training and Education.

Automate certificates with ACME support in AWS Certificate Manager

7 August 2026 at 00:03

Customers tell us that managing TLS certificates at scale is one of their biggest operational concerns. The Certification Authority Browser Forum (CA/Browser Forum) has mandated a phased reduction in maximum certificate validity for public certificates. By March 2027, the maximum validity drops to 100 days. By March 2029, it lasts for 47 days. For an organization managing 1,000 certificates, the final transition means roughly 30 renewal events every day. Renewal and rotations of renewed certificates at that cadence isn’t something manual processes or ticket-driven workflows can sustain at scale.

We recently announced Automated Certificate Management Environment (ACME) protocol support in AWS Certificate Manager (ACM). With this launch, you can use the ACME clients your teams already know, including popular open source tools like certbot, cert-manager, acme.sh, and win-acme, to automate public certificate issuance and renewal for your infrastructure. Customers that are using third-party certificate authorities (CAs) can point their existing ACME-compatible clients at ACM instead of their current CA, with minimal reconfiguration. This applies whether it’s running on Amazon Web Services (AWS), on premises, or in a hybrid environment. Certificates created through ACME are registered in ACM, giving you a unified view of your entire certificate inventory.

This post covers how the feature works, how to get started, and the controls and best practices to help you manage certificate issuance at scale.

Background

ACME is an open source protocol that automates the process of verifying domain ownership and issuing certificates and has become a standard mechanism for certificate automation. While ACM has long provided managed certificate issuance and renewal for AWS-integrated services such as Elastic Load Balancing (ELB), Amazon CloudFront, and Amazon API Gateway, many customers also need to automate certificates for their own infrastructure, including servers they manage in their data centers, Kubernetes clusters, Internet of Things (IoT) fleets, and hybrid environments. Until now, those customers had to turn to external providers. This launch brings the ACM automation model to that same infrastructure, using the standard ACME protocol with AWS managed certificate endpoints.

How it works

The feature introduces a new centrally provisioned and managed resource type: the ACME endpoint. Each endpoint is an AWS resource with a unique ACME directory URL and AWS Identity and Access Management (IAM)-based access controls. You create and manage endpoints through the ACM API or AWS Management Console, and point your existing ACME clients at the endpoint URL. Certificates issued through your endpoint are automatically registered with ACM, appearing in your certificate inventory alongside certificates created by the RequestCertificate and ImportCertificate API calls.

The architecture separates into two planes. In the control plane, PKI administrators use ACM APIs to create ACME endpoints, pre-approve the domains an endpoint is allowed to issue for, and generate external account binding (EAB) credentials. In the data plane, ACME clients register with an endpoint using EAB credentials and request certificates for domains the administrator has already validated. This architecture is how we provide customers the ability to scale. Instead of each client proving domain ownership on every request, a principal with appropriate ACM permissions (typically your PKI administrator) validates domains once at the endpoint level, and then application owners don’t need DNS credentials to get a certificate.

Adding to the data plane, EABs control client access to the endpoints. Each EAB is bound to an IAM role that controls what certificate operations the ACME client can perform, and credentials you generate in ACM are distributed to authorized ACME clients. An ACME client authorized for one endpoint can’t use a different endpoint. This creates security boundaries between environments. For example, a client authorized for your development endpoint can’t obtain certificates from your production endpoint.

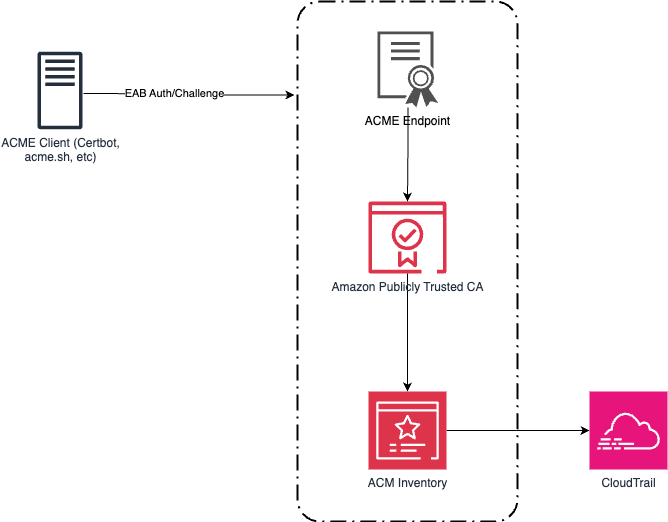
Figure 1 shows the ACME request flow through ACM. An ACME client authenticates to an ACME endpoint using EAB credentials. The endpoint routes certificate orders to Amazon Trust Services for issuance. Issued certificates are registered in ACM inventory, where Amazon EventBridge and AWS CloudTrail provide expiration alerting and audit logging.

Figure 1: An ACME architecture and workflow

Figure 1: An ACME architecture and workflow

Getting started

Getting started with the new ACME feature in ACM is straightforward. Use the following steps to create your first ACME-generated certificate.

Prerequisites

  • An AWS account with permissions to create and manage ACM resources
  • An ACME client installed on your infrastructure (for example, Certbot, cert-manager, acme.sh, or others)
  • AWS Command Line Interface (AWS CLI) installed on your device (see this blog post for the console equivalent)
  • Amazon Route 53 hosted zone for your domain, or the ability to create a CNAME record with your DNS provider

Step 1: Create an ACME endpoint

Before you can use ACME clients with ACM, you need to create an ACME endpoint. This endpoint provides the URL that your ACME clients will use to request certificates.

  1. Run the following command from the AWS CLI to create an ACME endpoint:
    aws acm create-acme-endpoint \
      --authorization-behavior PRE_APPROVED \
      --certificate-authority '{"PublicCertificateAuthority":{"AllowedKeyAlgorithms":["EC_prime256v1"]}}
  2. Note the endpoint Amazon Resource Name (ARN) from the response.
    {"AcmeEndpointArn": "arn:aws:acm:us-east-1:123456789012:acme-endpoint/11111111-2222-3333-4444-555555555555"}
  3. Run the following command to retrieve the endpoint URL, replacing the ARN with your endpoint ARN:
    aws acm describe-acme-endpoint \
    --acme-endpoint-arn arn:aws:acm:us-east-1:123456789012:acme-endpoint/11111111-2222-3333-4444-555555555555
  4. Save the output of the ACME EndpointUrl:
    {
        "AcmeEndpoint": {
            "AcmeEndpointArn": "arn:aws:acm:us-east-1:123456789012:acme-endpoint/11111111-2222-3333-4444-555555555555",
            "EndpointUrl": "https://acm-acme-enroll.<region>.api.aws/6666666-7777-8888-9999-000000000000/directory",
            "Status": "ACTIVE",
            "AuthorizationBehavior": "PRE_APPROVED",
            "Contact": "REQUIRED",
            "CertificateAuthority": {
                "PublicCertificateAuthority": {
                    "AllowedKeyAlgorithms": [
                        "EC_prime256v1"
                    ]
                }
            },
            "CreatedAt": "2026-07-14T18:23:58.876000-04:00",
            "UpdatedAt": "2026-07-14T18:23:58.876000-04:00"
        }
    }
    

Step 2: Pre-approve a domain

Before ACME clients can request a certificate, the administrator validates the domain using DNS once at the endpoint level. Use DomainScope to control exactly which certificate patterns are allowed:

  • Enabling only ExactDomain restricts clients to that specific name,
  • Subdomains enabled allows names like api.example.com,
  • Wildcards enabled allows *.example.com.

Leave a scope disabled to block that pattern outright, even if an otherwise-valid ACME request asks for it. For a production endpoint, consider enabling only ExactDomain and Subdomains and leaving Wildcards disabled for a stricter posture.

aws acm create-acme-domain-validation \
--acme-endpoint-arn arn:aws:acm:us-east-1:123456789012:acme-endpoint/11111111-2222-3333-4444-555555555555 \
--domain-name example.com \
--prevalidation-options '{"DnsPrevalidation":{"DomainScope":{"ExactDomain":"ENABLED","Subdomains":"ENABLED","Wildcards":"DISABLED"},"HostedZoneId":"Z1234567890ABC"}}'

If your domain is hosted in Route 53, specifying HostedZoneId lets ACM create the required CNAME record automatically. If your domain is hosted elsewhere, omit it and create the provided CNAME record manually with your DNS provider. Validation typically completes within a few seconds after the record is in place.

You will receive the following response back:

{
    "AcmeDomainValidationArn": "arn:aws:acm:us-east-1:123456789012:acme-endpoint/1111111-2222-3333-4444-555555555555/acme-domain-validation/6666666-8888-9999-0000-11111111111"
}

Step 3: Generate EAB credentials

EAB credentials authenticate your ACME clients to your endpoint. Generate a unique set of credentials for each client or environment to maintain security boundaries.

  1. Run the following command to generate your EAB credentials, adjusting your expiration to fit your organization’s risk profile:
    aws acm create-acme-external-account-binding \
        --acme-endpoint-arn arn:aws:acm:region:111122223333:acme-endpoint/00000000-0000-0000-0000-000000000000 \
        --role-arn arn:aws:iam::111122223333:role/AcmeIssuanceRole \
        --expiration '{"Value": 7, "Type": "DAYS"}'
  2. Note the response from a successful invocation of the command
    {
        "ExternalAccountBinding": {
            "AcmeExternalAccountBindingArn": "arn:aws:acm:region:111122223333:acme-endpoint/00000000-0000-0000-0000-000000000000/acme-external-account-binding/1234567-1234-1234-1234-123456789012",
            "AcmeEndpointArn": "arn:aws:acm:region:111122223333:acme-endpoint/00000000-0000-0000-0000-000000000000",
            "RoleArn": "arn:aws:iam::123456789012:role/service-role/AcmAcmeIssuanceRole-XXXXXXXX",
            "ExpiresAt": "2026-07-21T18:47:50.641000-04:00"
        }
    }
    
  3. Run the following command to retrieve the credentials. You’ll need these values for your ACME client configuration the next step.
    aws acm get-acme-external-account-binding-credentials \
        --acme-external-account-binding-arn arn:aws:acm:region:111122223333:acme-endpoint/00000000-0000-0000-0000-000000000000/acme-external-account-binding/22222222-2222-2222-2222-222222222222
  4. Save the KeyId and MacKey for the next step.
    {
        "KeyId": "xxxxxxxx-xxxx-xxxx-xxxx-xxxxxxxxxxxx",
        "MacKey": "xxxxxxxx-xxxxxxxxxx-xxxxxxxxxxxxxxx"
    }

Step 4: Configure your ACME client

With your endpoint URL and EAB credentials ready, you can now configure your preferred ACME client. The following examples show configuration for two popular clients. As a reminder, the server information was retrieved in step 1, part 4 as the EndpointUrl.

acme.sh:

acme.sh --issue --server https://acm-acme-enroll.us-east-1.api.aws/123457-1234-1234-123456789012/directory \
    --eab-kid <KeyId> --eab-hmac-key <MacKey> \
    --email <EMAIL> \
    -d <DOMAIN> \
    --dns --yes-I-know-dns-manual-mode-enough-go-ahead-please

Certbot:

certbot certonly --standalone --non-interactive --agree-tos \
  --email <EMAIL> \
  --server https://acm-acme-enroll.us-east-1.api.aws/1234567-1234-1234-123456789012/directory \
  --eab-kid <KeyId> \
  --eab-hmac-key <MacKey> \
  -d <DOMAIN>

After the initial registration, your ACME client handles renewals.

Enterprise controls

Other ACME alternatives can provide certificates but don’t give the same amount of control and governance for customers that need to scale their certificate environment. The following controls are available to help reduce risk across your organization.

Domain validation

Customers managing large numbers of domains told us they need a way to prevent unauthorized certificate issuance across their domain space. Domain validation gives you this control. For each domain you validate, you enable the certificate patterns it should be allowed to issue, whether it’s ExactDomain, Subdomains, or Wildcards. For example, if you validate internal.example.com and enable only Wildcards, an ACME client can request *.internal.example.com but a request for internal.example.com itself or api.internal.example.com is rejected. This enforcement happens at the endpoint level, before requests reach the ACM certificate authority, and you can validate multiple domains under a single endpoint, each with its own scope.

Centralized certificate visibility

Certificates issued through your ACME endpoints are registered with ACM. You can use the aws acm list-certificates command to see all your issued certificates.

IAM authorization, CloudTrail audit logging and observability

Endpoint management operations are authorized through IAM and logged to CloudTrail. You can use IAM policies to control which principals can create endpoints, generate EAB credentials, and manage domain constraints.

Best practices

For customers implementing ACME certificates for the first time, consider the following best practices for your organizations.

Segment endpoints along organizational or environment boundaries

The endpoint serves as a useful method of isolation for larger organizations. A large enterprise can create one endpoint per organizational boundary (business unit, subsidiary, or environment) instead of a single shared endpoint company-wide. Each endpoint has its own pre-approved domains and its own set of EABs, so a compromised credential in one business unit has no path to certificates in another.

However, weigh this against your operational overhead as well. A reasonable starting point is one endpoint per environment (dev, staging, andprod) within a business unit, expanding to per-business-unit endpoints only where compliance or organizational requirements call for it.

Manage EAB credentials securely

Anyone holding a validKeyIdandMacKeyfor an endpoint can obtain certificates for any domain pre-approved on that endpoint, so these credentials deserve the same handling you’d give an access key.

  • Avoid hard coding theMacKeywhere possible by using a secret store such as AWS Secrets Manager. Distribute it only to the ACME clients that you authorize to use the endpoint.
  • Set the expiration of the EAB to an acceptable level. While EAB supports long-lived credentials, not all scenarios require an indefinitely long EAB.
  • When creating the role for each EAB, adhere to concept of least privilege. Creating a role per EAB, rather than sharing a role across all bindings, can help reduce risk in your AWS environment.
  • Audit CreateAcmeExternalAccountBinding and GetAcmeExternalAccountBindingCredentials calls in CloudTrail separately. Because retrieving the actual key material is a distinct API call from creating the binding, alerting on retrieval events is a stronger signal of real credential distribution than binding creation alone.

Automate how EABs are associated with clients at runtime

Generate a unique set of EAB credentials for each client or environment rather than sharing one binding across multiple ACME clients. As you begin to scale with multiple endpoints, usesome of the following patterns to reduce operational toil.

  • Name each EAB and its bound IAM role after the client it belongs to (team, application, environment), so the binding’s purpose is obvious from DescribeAcmeExternalAccountBinding output alone, without cross-referencing a spreadsheet.
  • Store each client’s KeyId and MacKey under a secrets path scoped to that client (for example, a Secrets Manager path per team and environment), and let the client’s provisioning pipeline retrieve its own credentials.
  • In Kubernetes, use one ClusterIssuer or namespace-scoped Issuer per EAB rather than one shared issuer across teams. This keeps the client-to-EAB association explicit in cluster config, and lets you revoke one team’s access without touching anyone else’s.
  • For ephemeral infrastructure (build agents, autoscaled fleets), provision EAB credentials as part of your infrastructure-as-code or continuous integration and deployment (CI/CD) pipeline instead of a one-time manual handoff, so credential lifecycle tracks infrastructure lifecycle.

Monitor your deployment of ACME

ACME’s power is through automation, and organizations should monitor their ACME usage for anomalies.

  • Alarm on issuance failures, not just successes. At 45-day certificate validity, a silent renewal failure gives you far less runway to react than the months of time you might be used to with longer-lived certificates.
  • Test renewal automation before you depend on it. Force a manual renewal against a non-production endpoint and confirm your client, monitoring, and on-call runbooks behave as expected, before the CA/Browser Forum’s shortened validity windows turn a failed renewal into a disruptive event for your organization.

Availability and pricing

ACME support in AWS Certificate Manager is available today in all commercial AWS Regions and will be available in AWS GovCloud (US), the China Regions, and the AWS European Sovereign Cloud partitions at a later date. See the ACM pricing page for more information on ACME pricing.

Conclusion

The phased reduction in certificate validity can’t easily be solved without automation. ACME support in ACM gives you that automation through a standard protocol and standard tooling, while keeping the visibility and governance controls your security teams rely on from ACM.

To get started, see the AWS Certificate Manager documentation or follow the getting started guide.

If you have feedback about this post, submit comments in the Comments section below.


Anthony Harvey

Anthony Harvey

Anthony is a Senior Security Specialist Solutions Architect for AWS in the worldwide public sector group. Prior to joining AWS, he was a chief information security officer in local government for half a decade. With his public sector experience, he has a passion for figuring out how to do more with less and leveraging that mindset to enable customers in their security journey.

Chandan Kundapur

Chandan Kundapur

Chandan is a Principal Product Manager on the AWS Certificate Manager (ACM) team. With over 15 years of cybersecurity experience, he has a passion for driving PKI product strategy.

From 2 weeks to 2 minutes: Amazon Cognito launches Provisioned limits for self-service rate limit management

5 August 2026 at 19:17

Imagine preparing for your biggest sales event of the year, and you want to ensure your customer identity management service can handle the elevated traffic for carrying out application activities. For security teams, business leaders, and technologists managing identity infrastructure at scale, this scenario has been all too familiar. Whether you’re a CISO evaluating security controls, a CFO managing cloud costs, traditional support ticket processes for adjusting Amazon Cognito rate limits meant waiting 10–14 days for capacity increases, requiring teams to plan weeks in advance or rush to escalate.

Today, we’re announcing provisioned limits for Amazon Cognito, a capability that transforms how you manage authentication rate limits. This introduces a feature in the AWS Management Console for Amazon Cognito for on-demand capacity adjustments, working alongside the existing account-level maximum limits in AWS Service Quotas. Together, they give you self-service control over your authentication infrastructure so you can scale up for Black Friday (or similar sales events), scale down after tax season, and optimize costs with unprecedented precision. What once took up to 2 weeks now happens in minutes.

In this post, you’ll learn how provisioned limits work, the relationship between account-level maximums and provisioned capacity, the cost implications and optimization strategies, and step-by-step implementation guidance. This capability fundamentally changes how you approach authentication capacity planning.

Manual processes that can’t keep pace

Identity management services open the front door to your application. When users can’t sign in, everything else stops. Amazon Cognito offers extremely flexible limit management: customers can request adjustments as granular as 1 request per second (RPS) for as short as 1 day. As customer demand for faster, self-service adjustments grew, we identified opportunities to address the following challenges:

  • Support tickets required for each rate limit change
  • 10–14 day approval timelines for standard review and processing
  • Advance planning needed weeks ahead of anticipated traffic spikes

For businesses with seasonal traffic, like tax preparation services that see 90% of annual authentication volume in March and April, or ecommerce platforms preparing for Black Friday, these factors meant teams had to plan capacity decisions well in advance with limited ability to adjust in the moment.

Provisioned limits and account-level max limits

Starting July 6, 2026, Amazon Cognito introduced provisioned limits in the Amazon Cognito console. At the account level (per AWS Region, per account), you’ll find a Provisioned limits tab next to the User Pools tab. This gives you direct control over your authentication rate limits through two complementary mechanisms:

  • Provisioned limits (Amazon Cognito console) – Adjust your provisioned capacity up or down on-demand. Changes take effect immediately. You’re billed for the capacity you provision above the default limit, regardless of how much you use.
  • Account-level max limit (Service Quotas console) – Set your account’s ceiling, the maximum RPS your account is allowed to provision. Raising this ceiling doesn’t incur additional charges. Approximately 90% of requests are automatically approved within minutes. For larger limit increases (depending on the API category and Region), manual approval through AWS Support might still be required.

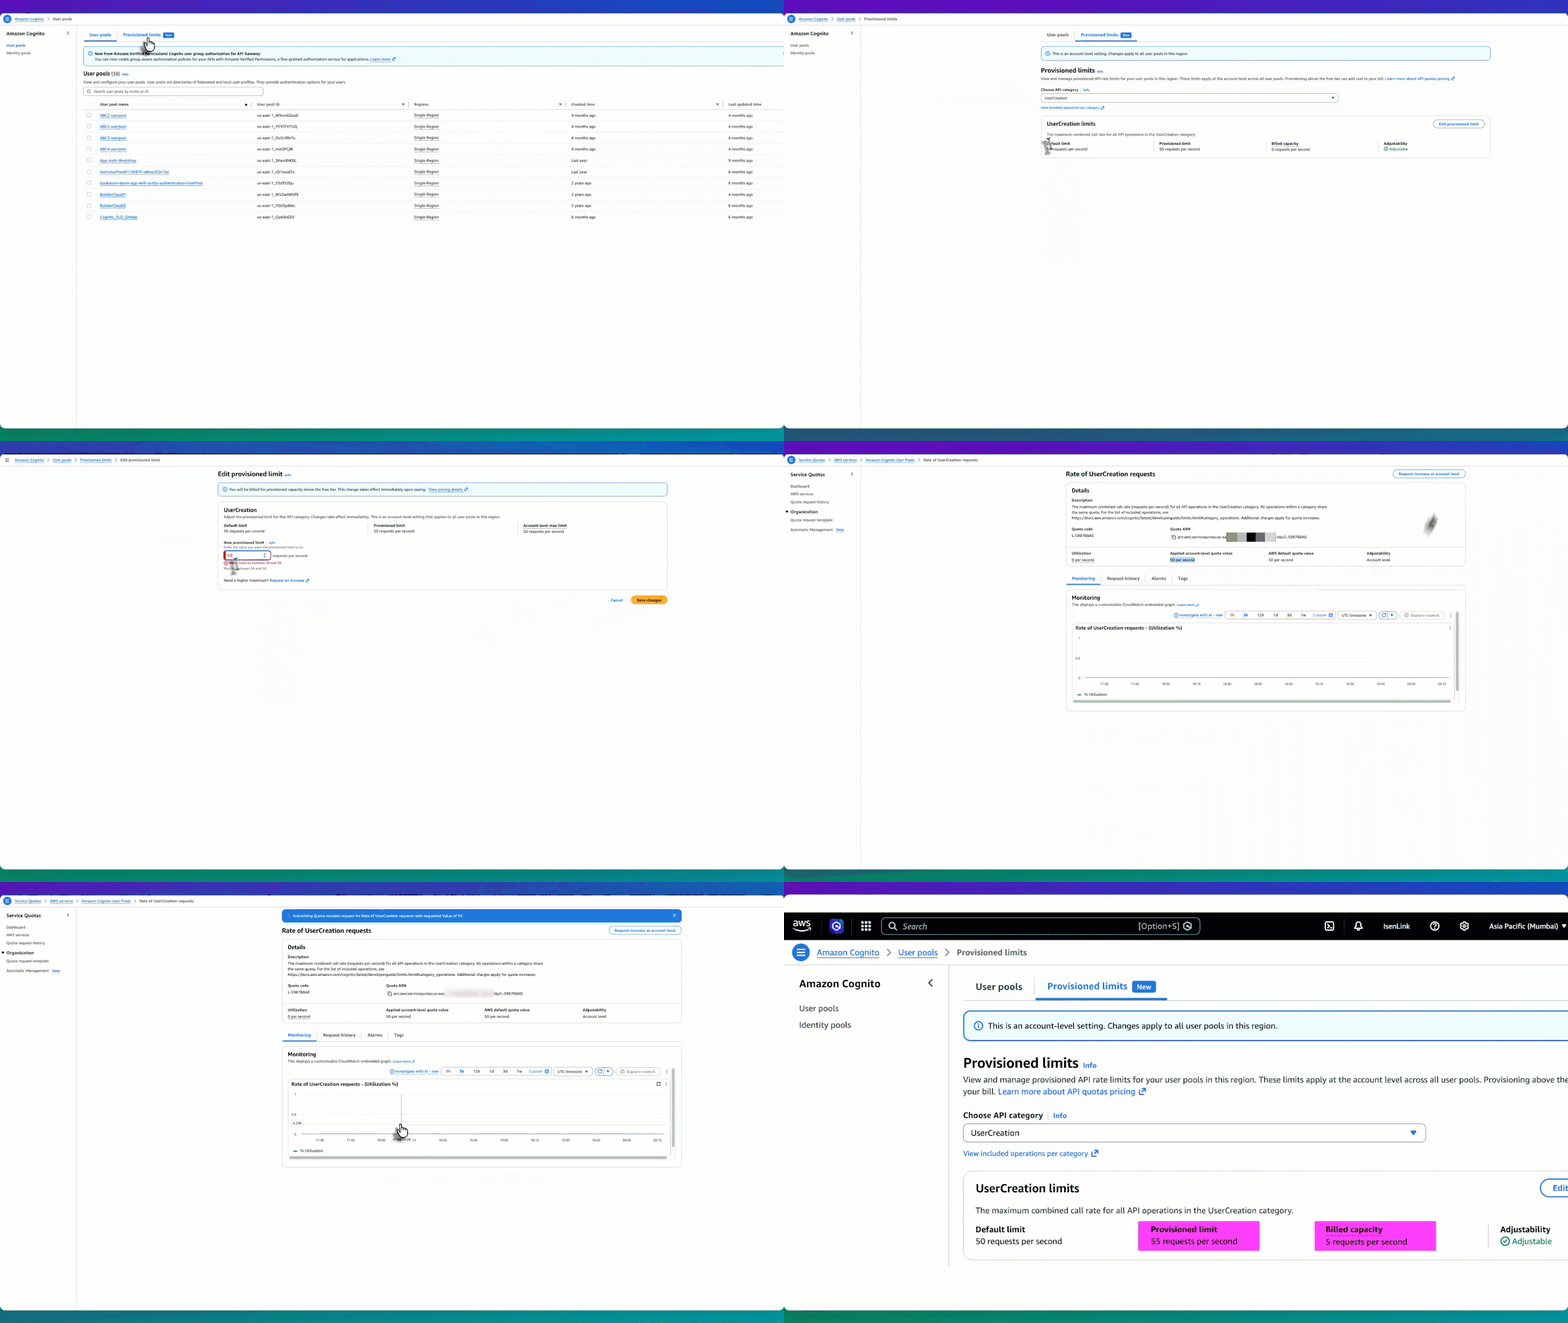
The following experience shows the end-to-end workflow of adjusting your provisioned limits and requesting a higher account-level max.

Figure 1: Provisioned limit experience workflow

Figure 1: Provisioned limit experience workflow

How they work together

Let’s use the UserCreation API as an example. The default limit is 50 RPS, and initially the provisioned limit is also 50 RPS—meaning billed capacity is 0 (no additional charge). The applied account-level max limit is also 50 RPS. So you have three values: default (50), provisioned limit (50), and account-level max (50).

  1. Start by going to the Amazon Cognito console and choosing User pools from the navigation pane.

    Figure 2: UserCreation with default values

    Figure 2: UserCreation with default values

  2. Choose Edit provisioned limit, to go to the Edit provisioned limit page with an input field for New provisioned limit. However, because the account-level max limit is 50 RPS, you can’t set the provisioned limit above 50. For example, if you want to provision 55 RPS, the console won’t allow it because 55 exceeds the current account max of 50.

    Figure 3: Editing the provisioned limit constraint constraint to more than the account-level max

    Figure 3: Editing the provisioned limit constraint constraint to more than the account-level max

  3. To set a higher limit, choose Request an increase. This takes you to the Service Quotas console, where you can choose Request increase at account level to request a higher account-level max, for example, 55 RPS. Most requests are automatically approved within minutes. At any time, you can check the status of the request using the Request history tab.

    Figure 4: Service Quotas page where the account-level max increase is requested and auto-approved

    Figure 4: Service Quotas page where the account-level max increase is requested and auto-approved

  4. After receiving approval, return to the Amazon Cognito console to edit your provisioned limit up to 55 RPS. Your billed capacity becomes 5 RPS (55 minus the 50 default).

    Figure 5: Provisioned after increasing the provisioned limit to 55 RPS, with billed capacity of 5 RPS.

    Figure 5: Provisioned after increasing the provisioned limit to 55 RPS, with billed capacity of 5 RPS.

This two-part model gives you precise control over both cost and capacity. Raising the account-level max in Service Quotas doesn’t incur additional charges—it only sets your ceiling. You are billed for what you provision in the Amazon Cognito console above the default, so you benefit from right-sizing your provisioned capacity to match expected demand. Raise your account max ahead of time to prepare for future scaling needs without incurring any cost. When the time comes, increase your provisioned limit to what you need, and scale back down after the event. You stop being charged for the extra capacity as soon as you reduce the provisioned limit. This applies equally to seasonal spikes, planned load tests, or unexpected viral growth—all self-service, all within minutes.

How the provisioned limits experience works

The provisioned limits experience introduces three key concepts that work together:

  • Default limit – The baseline rate included at no additional cost (for example, 50 RPS for UserCreation).
  • Provisioned limit – The capacity you actively request and reserve in the Amazon Cognito console. Because this capacity is reserved specifically for your account, it’s the chargeable dimension. You’re billed for any provisioned capacity above the default, regardless of how much you consume. For example, if the default is 50 RPS and you provision 80 RPS, you’re billed for 30 RPS even if your actual usage is only 60 RPS. If your provisioned capacity is 50 RPS (the default), your billed capacity is 0.
  • Applied account-level max limit – The ceiling managed through Service Quotas. This determines how high you can set your provisioned limit. Raising this ceiling doesn’t incur charges, it only unlocks the ability to provision higher capacity. Importantly, the Provisioned limits page displays each API category with its adjustability status. For example, UserCreation is marked Adjustable (shown earlier in Figure 5) and can be modified. However, UserList is marked Not adjustable, meaning the account-level max limit can’t be adjusted for that category. You can still see its default and provisioned limit on the page, but you can’t modify them. For adjustable categories, you will see the default limit, current provisioned limit, and billed capacity at a glance.
Figure 6: Provisioned limits overview with non-adjustable API categories.

Figure 6: Provisioned limits overview with non-adjustable API categories.

Multi-tenant SaaS considerations

For software as a service (SaaS) providers managing multiple tenants with varying throughput requirements, the UpdateProvisionedLimit API enables programmatic management of provisioned capacity. Teams using dedicated user pools per tenant, for example, can integrate this into their infrastructure-as-code pipelines to adjust provisioned limits per tenant tier. With provisioned limits, SaaS vendors can tier their capacity management per tenant, for example, provisioning higher capacity for enterprise-tier tenants and lower capacity for free-tier tenants, and adjust each tenant’s provisioned capacity independently through the API based on their service tier and demand patterns.

Conclusion

With provisioned limits, whether you’re preparing for peak shopping season, tax filing deadlines, or any other scaling event, you can now adjust provisioned limits to respond to your organization’s needs on demand. The separation between the account-level max (in Service Quotas) and the provisioned limit (in the Amazon Cognito console) gives you full control to plan ahead, respond to demand changes in minutes, and optimize costs on your own terms.

Get started

The provisioned limits experience for Amazon Cognito user pools launched on July 6, 2026, and is available across all AWS Regions where Amazon Cognito is supported. To get started:

  1. Review your current authentication traffic patterns using Amazon CloudWatch metrics to understand your baseline
  2. Set up CloudWatch alarms at 70% and 85% of your current rate limits
  3. Ensure your team has appropriate AWS Identity and Access Management ( IAM) permissions for both Service Quotas and the Provisioned limits tab in the Amazon Cognito console
  4. Raise your account-level max in Service Quotas based on your demand expectations
  5. Use the Amazon Cognito console Provisioned limits tab to adjust capacity up or down as needed

Resources:

Need help? Contact your AWS account team or visit AWS Support for assistance with planning your rate limit strategy.

If you have feedback about this post, submit comments in the Comments section below.


Kiran Dongara

Kiran is an Enterprise Solutions Architect at AWS, primarily supporting Retail, Restaurant, and CPG customers. His primary focus is application identity within the IAM domain. His expertise includes deep technical understanding across technical and industry domains, which he integrates to design scalable and efficient architectures using best practices. When not working, Kiran prioritizes family time, nature walks, and cycling.

Howie Li

Howie Li

Howie Li is a Product Manager at Amazon Web Services, where he strives to make authentication straightforward by default. Outside of work, Howie enjoys exploring cultures and food through travels and making new ice cream flavors inspired by them.

❌