
Normal view

How AWS IAM role manager rethinks the starting point for IAM roles

13 August 2026 at 00:16

When you build a new application or capability on Amazon Web Services (AWS), you want to focus on what you’re building. Getting a service running almost always begins with AWS Identity and Access Management (IAM). Many AWS services that act on your behalf need an IAM role, an identity the service assumes to access your resources with a defined set of permissions. You then author a trust policy so the service can assume the role, choose the permissions the workload needs, and attach it. Configuring roles and policies for common patterns is repeatable work that doesn’t need to be manual.

IAM role manager does that work for you. When role manager is enabled, AWS creates and configures the IAM roles as you build in supported service consoles, so you can start using a service and let AWS handle the role behind it. You create the resource you want, and role manager provisions and attaches the role you need as part of the same flow, so you can build now and refine permissions as your workload matures.

With that step automated, getting started takes minutes. You can create an AWS Lambda function and start running your code, with its execution role already created and attached, without switching context to set one up. Role creation becomes an automated part of building your application rather than a separate step.

Role manager is especially useful when you’re getting started: the moments when you want to stand up a service or get a proof of concept running and want to defer role configuration until later in your development process. You don’t need prior IAM experience to get started. You keep full control of what it creates, because the roles are ordinary IAM roles that you can view, edit, or delete like any role you author yourself. When you want to tighten a role, AWS IAM Access Analyzer reviews how it has been used and recommends a policy scoped to only the permissions it needs.

How to enable role manager

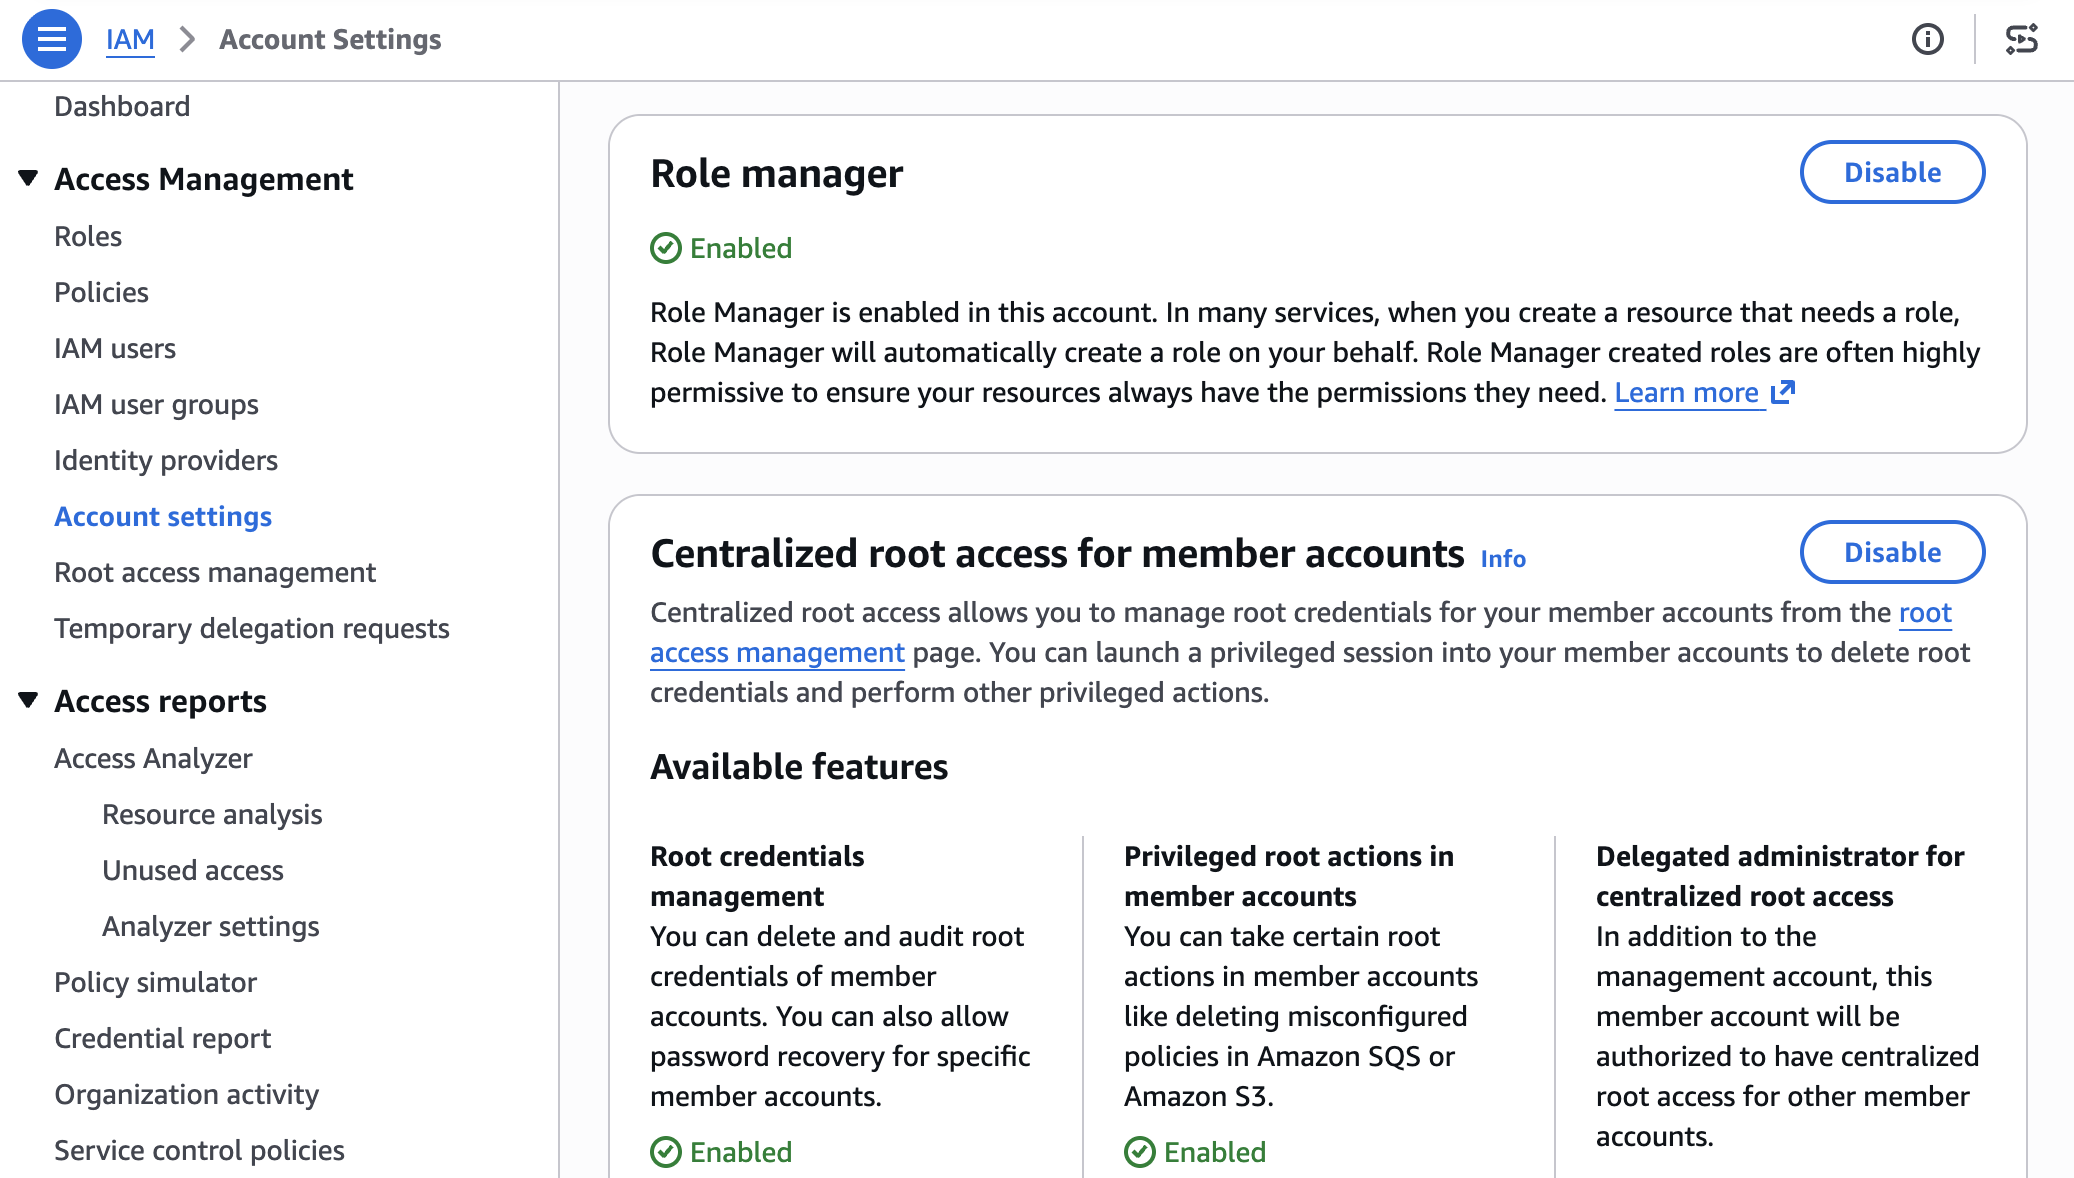
Role manager has two states, enabled and disabled. Enabling it for an account authorizes AWS to create roles in that account. In an organization, administrators can use a service control policy (SCP) to control whether member accounts can enable or use role manager. To enable it:

  1. Open the IAM console and choose Account settings.
  2. In the role manager section, choose Enable.

Figure 1: Enable Role Manager

Figure 1: Enable Role Manager

Some AWS services already create a role for you when you create a resource that needs one. Role manager doesn’t change that: those services keep creating roles automatically, and roles you already created keep working. What role manager adds is a single account-level control, and coverage for a case that built-in flows can’t handle: tasks whose permissions AWS can’t determine in advance, such as running your own code. For those tasks, role manager provisions a role that you can narrow later.

Example: Create an Amazon EventBridge rule

Start with a common task: an Amazon EventBridge rule that invokes a target, such as an Amazon Simple Queue Service (Amazon SQS) queue or an Amazon Simple Notification Service (Amazon SNS) topic. Without role manager, you would pause here to create a role that lets EventBridge invoke the target, write the role’s trust policy, attach the required permissions, and then return to finish the rule. With role manager enabled, you define the rule and its target, choose Create, and role manager provisions the role and attaches it for you. The EventBridge console shows the rule created and ready, and you never open the role-creation flow.

Figure 2: Creating an EventBridge rule with no manual role setup

Figure 2: Creating an EventBridge rule with no manual role setup

The role comes from an AWS managed role template: a definition AWS builds and maintains for a specific task, with the trust policy and permissions already worked out. The console calls a new IAM API, AcquireRole, which finds the matching template, provisions the role from it, and returns it to EventBridge. Depending on the service, AcquireRole either creates a new role or reuses one that already fits, so an account does not fill up with duplicate roles for the same task.

Role manager creates the role using your own IAM permissions, not a separate role-manager permission. To provision a new role, you need permission for the actions the template performs: at minimum, you need permissions to create and attach roles. When AcquireRole reuses an existing role instead of creating one, it needs only iam:GetRole and iam:GetRoleTemplateVersion. If you’re missing either of these permissions, the console tells you which one is needed rather than creating the role.

Run code that calls other AWS services

Not every task has a set of permissions AWS can define in advance. When a role runs your own code, such as a Lambda function, AWS has no way of knowing which services that code will call. Role manager covers this case too: create a Lambda function with role manager enabled, and it attaches an execution role that your code can use right away and that you can narrow once you know what the function calls.

Because the permissions your code needs aren’t known up front, role manager attaches the AWS managed policy PowerUserAccess to the role. PowerUserAccess grants access to AWS services so your function can call what it needs. By design, it doesn’t grant permission to manage IAM, AWS Organizations, or account settings. The template also configures the role to trust only the Lambda service.

Figure 3: Create an AWS Lambda function with no manual role setup

Figure 3: Create an AWS Lambda function with no manual role setup

Role manager attaches an execution role, and your function is ready to run. Figure 4 shows the Execution role panel on the function’s Configuration tab, with the role that role manager attached.

Figure 4: Role manager provides a role automatically to an AWS Lambda function

Figure 4: Role manager provides a role automatically to an AWS Lambda function

You can open the role in the IAM console to review its permissions. Figure 5 shows the role’s Permissions tab with the PowerUserAccess policy attached.

Figure 5: Permissions of the role provided by role manager for an AWS Lambda function

Figure 5: Permissions of the role provided by role manager for an AWS Lambda function

You keep full visibility into what role manager creates. Every role it creates records the role template it came from, and both GetRole and ListRoles return that template reference. You can inspect any role in your account and tell which were created by role manager. You read a role’s trust policy and permissions the same way you would for a role you authored, and AWS CloudTrail records each role’s creation.

Refining roles as workloads mature

As your workloads mature, refine the roles that role manager created to follow least privilege. When you’re ready, you can disable role manager and get IAM Access Analyzer unused access analysis at no additional cost for 90 days. Access Analyzer looks at how each role has been used and recommends a policy you can apply that keeps only the permissions the role needs. Start with the roles attached to your most critical workloads and work outward.

Disabling role manager doesn’t disrupt anything already running: your resources keep the roles they have, those roles stay in your account until you change them, and from that point you author new roles yourself, the same as before. If you would rather narrow a single role than the whole account, editing that role removes it from role manager’s control and it becomes a standard customer-managed role, with your changes preserved. In sandbox or development accounts, keeping role manager enabled saves time. For production workloads, disable role manager and refine the roles it created to least privilege before going live.

Conclusion

Role manager automates IAM role setup so you can focus on building from the start. When you enable it, AWS creates and attaches the IAM roles your resources need as you build, so you can start in minutes without prior IAM experience. Because these are IAM roles that you fully control, you keep the same visibility and the same tools you already use. Keep role manager enabled while you build, and refine the roles it created as your workloads mature.

To get started, enable role manager in the IAM console and create a resource in a supported service. To learn more, see IAM role creation and the list of supported services in the IAM User Guide.

If you have feedback about this post, submit comments in the Comments section below.

Zach Jiang

Zach Jiang

Zach is a Senior Technical Product Manager at AWS, specializing in AWS Identity products. He focuses on making identity the easy part of building on AWS for customers. Outside of technology, Zach enjoys traveling and exploring new cultures and cuisines.

David Sing

David Sing

David is a Principal Product Manager at AWS, specializing in AWS IAM. He focuses on simplifying IAM for builders and AI agents, safe credential issuance for AI agents, and authorization policy governing agent access. Outside of technology, David enjoys economics and markets, fishing, and time outdoors with his family.

Punit Deotale

Punit Deotale

Punit is a Software Development Manager on the AWS IAM team. He leads work on making it easier for customers to create and manage IAM roles directly within AWS service workflows, so they can set up the right permissions without leaving what they are doing. His focus is reducing permission-setup friction across AWS while helping customers stay aligned with least privilege. Outside of work, Punit enjoys reading, building side projects, and being outdoors.

From 2 weeks to 2 minutes: Amazon Cognito launches Provisioned limits for self-service rate limit management

5 August 2026 at 19:17

Imagine preparing for your biggest sales event of the year, and you want to ensure your customer identity management service can handle the elevated traffic for carrying out application activities. For security teams, business leaders, and technologists managing identity infrastructure at scale, this scenario has been all too familiar. Whether you’re a CISO evaluating security controls, a CFO managing cloud costs, traditional support ticket processes for adjusting Amazon Cognito rate limits meant waiting 10–14 days for capacity increases, requiring teams to plan weeks in advance or rush to escalate.

Today, we’re announcing provisioned limits for Amazon Cognito, a capability that transforms how you manage authentication rate limits. This introduces a feature in the AWS Management Console for Amazon Cognito for on-demand capacity adjustments, working alongside the existing account-level maximum limits in AWS Service Quotas. Together, they give you self-service control over your authentication infrastructure so you can scale up for Black Friday (or similar sales events), scale down after tax season, and optimize costs with unprecedented precision. What once took up to 2 weeks now happens in minutes.

In this post, you’ll learn how provisioned limits work, the relationship between account-level maximums and provisioned capacity, the cost implications and optimization strategies, and step-by-step implementation guidance. This capability fundamentally changes how you approach authentication capacity planning.

Manual processes that can’t keep pace

Identity management services open the front door to your application. When users can’t sign in, everything else stops. Amazon Cognito offers extremely flexible limit management: customers can request adjustments as granular as 1 request per second (RPS) for as short as 1 day. As customer demand for faster, self-service adjustments grew, we identified opportunities to address the following challenges:

  • Support tickets required for each rate limit change
  • 10–14 day approval timelines for standard review and processing
  • Advance planning needed weeks ahead of anticipated traffic spikes

For businesses with seasonal traffic, like tax preparation services that see 90% of annual authentication volume in March and April, or ecommerce platforms preparing for Black Friday, these factors meant teams had to plan capacity decisions well in advance with limited ability to adjust in the moment.

Provisioned limits and account-level max limits

Starting July 6, 2026, Amazon Cognito introduced provisioned limits in the Amazon Cognito console. At the account level (per AWS Region, per account), you’ll find a Provisioned limits tab next to the User Pools tab. This gives you direct control over your authentication rate limits through two complementary mechanisms:

  • Provisioned limits (Amazon Cognito console) – Adjust your provisioned capacity up or down on-demand. Changes take effect immediately. You’re billed for the capacity you provision above the default limit, regardless of how much you use.
  • Account-level max limit (Service Quotas console) – Set your account’s ceiling, the maximum RPS your account is allowed to provision. Raising this ceiling doesn’t incur additional charges. Approximately 90% of requests are automatically approved within minutes. For larger limit increases (depending on the API category and Region), manual approval through AWS Support might still be required.

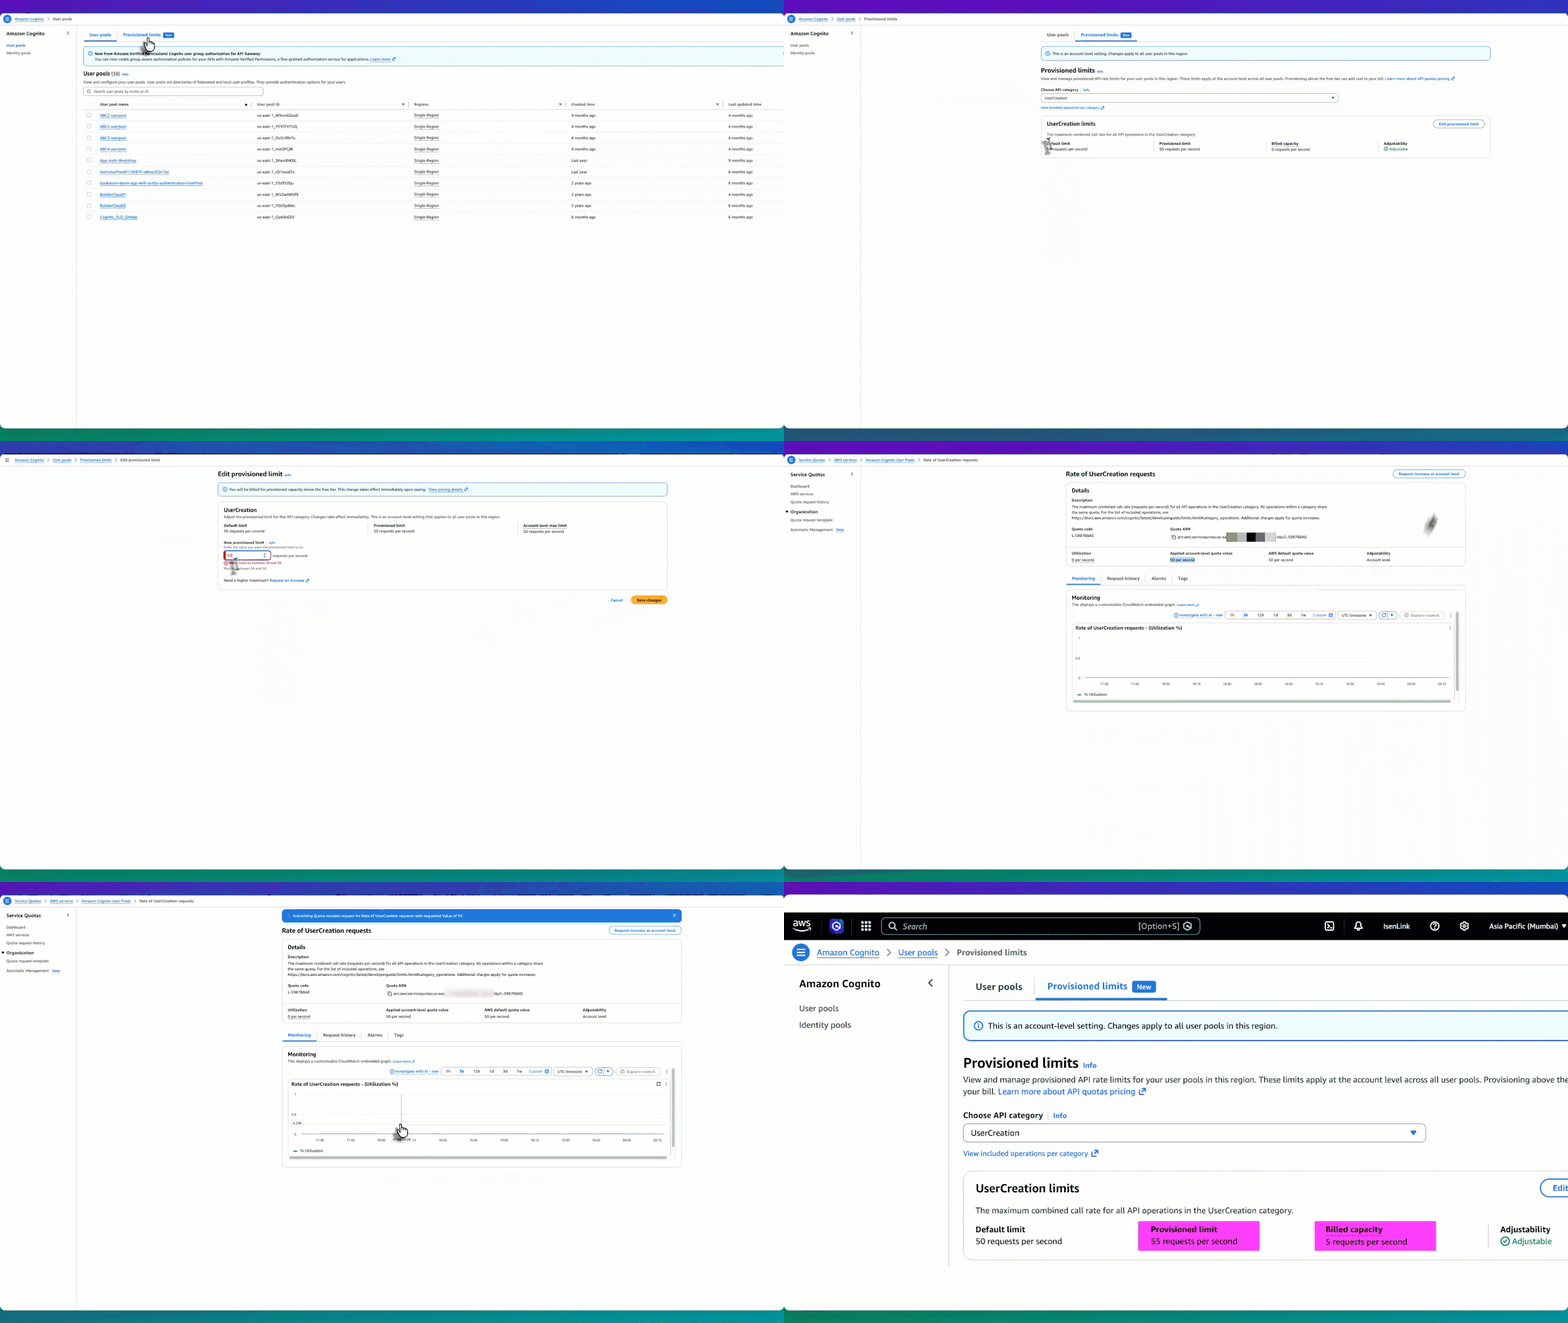
The following experience shows the end-to-end workflow of adjusting your provisioned limits and requesting a higher account-level max.

Figure 1: Provisioned limit experience workflow

Figure 1: Provisioned limit experience workflow

How they work together

Let’s use the UserCreation API as an example. The default limit is 50 RPS, and initially the provisioned limit is also 50 RPS—meaning billed capacity is 0 (no additional charge). The applied account-level max limit is also 50 RPS. So you have three values: default (50), provisioned limit (50), and account-level max (50).

  1. Start by going to the Amazon Cognito console and choosing User pools from the navigation pane.

    Figure 2: UserCreation with default values

    Figure 2: UserCreation with default values

  2. Choose Edit provisioned limit, to go to the Edit provisioned limit page with an input field for New provisioned limit. However, because the account-level max limit is 50 RPS, you can’t set the provisioned limit above 50. For example, if you want to provision 55 RPS, the console won’t allow it because 55 exceeds the current account max of 50.

    Figure 3: Editing the provisioned limit constraint constraint to more than the account-level max

    Figure 3: Editing the provisioned limit constraint constraint to more than the account-level max

  3. To set a higher limit, choose Request an increase. This takes you to the Service Quotas console, where you can choose Request increase at account level to request a higher account-level max, for example, 55 RPS. Most requests are automatically approved within minutes. At any time, you can check the status of the request using the Request history tab.

    Figure 4: Service Quotas page where the account-level max increase is requested and auto-approved

    Figure 4: Service Quotas page where the account-level max increase is requested and auto-approved

  4. After receiving approval, return to the Amazon Cognito console to edit your provisioned limit up to 55 RPS. Your billed capacity becomes 5 RPS (55 minus the 50 default).

    Figure 5: Provisioned after increasing the provisioned limit to 55 RPS, with billed capacity of 5 RPS.

    Figure 5: Provisioned after increasing the provisioned limit to 55 RPS, with billed capacity of 5 RPS.

This two-part model gives you precise control over both cost and capacity. Raising the account-level max in Service Quotas doesn’t incur additional charges—it only sets your ceiling. You are billed for what you provision in the Amazon Cognito console above the default, so you benefit from right-sizing your provisioned capacity to match expected demand. Raise your account max ahead of time to prepare for future scaling needs without incurring any cost. When the time comes, increase your provisioned limit to what you need, and scale back down after the event. You stop being charged for the extra capacity as soon as you reduce the provisioned limit. This applies equally to seasonal spikes, planned load tests, or unexpected viral growth—all self-service, all within minutes.

How the provisioned limits experience works

The provisioned limits experience introduces three key concepts that work together:

  • Default limit – The baseline rate included at no additional cost (for example, 50 RPS for UserCreation).
  • Provisioned limit – The capacity you actively request and reserve in the Amazon Cognito console. Because this capacity is reserved specifically for your account, it’s the chargeable dimension. You’re billed for any provisioned capacity above the default, regardless of how much you consume. For example, if the default is 50 RPS and you provision 80 RPS, you’re billed for 30 RPS even if your actual usage is only 60 RPS. If your provisioned capacity is 50 RPS (the default), your billed capacity is 0.
  • Applied account-level max limit – The ceiling managed through Service Quotas. This determines how high you can set your provisioned limit. Raising this ceiling doesn’t incur charges, it only unlocks the ability to provision higher capacity. Importantly, the Provisioned limits page displays each API category with its adjustability status. For example, UserCreation is marked Adjustable (shown earlier in Figure 5) and can be modified. However, UserList is marked Not adjustable, meaning the account-level max limit can’t be adjusted for that category. You can still see its default and provisioned limit on the page, but you can’t modify them. For adjustable categories, you will see the default limit, current provisioned limit, and billed capacity at a glance.
Figure 6: Provisioned limits overview with non-adjustable API categories.

Figure 6: Provisioned limits overview with non-adjustable API categories.

Multi-tenant SaaS considerations

For software as a service (SaaS) providers managing multiple tenants with varying throughput requirements, the UpdateProvisionedLimit API enables programmatic management of provisioned capacity. Teams using dedicated user pools per tenant, for example, can integrate this into their infrastructure-as-code pipelines to adjust provisioned limits per tenant tier. With provisioned limits, SaaS vendors can tier their capacity management per tenant, for example, provisioning higher capacity for enterprise-tier tenants and lower capacity for free-tier tenants, and adjust each tenant’s provisioned capacity independently through the API based on their service tier and demand patterns.

Conclusion

With provisioned limits, whether you’re preparing for peak shopping season, tax filing deadlines, or any other scaling event, you can now adjust provisioned limits to respond to your organization’s needs on demand. The separation between the account-level max (in Service Quotas) and the provisioned limit (in the Amazon Cognito console) gives you full control to plan ahead, respond to demand changes in minutes, and optimize costs on your own terms.

Get started

The provisioned limits experience for Amazon Cognito user pools launched on July 6, 2026, and is available across all AWS Regions where Amazon Cognito is supported. To get started:

  1. Review your current authentication traffic patterns using Amazon CloudWatch metrics to understand your baseline
  2. Set up CloudWatch alarms at 70% and 85% of your current rate limits
  3. Ensure your team has appropriate AWS Identity and Access Management ( IAM) permissions for both Service Quotas and the Provisioned limits tab in the Amazon Cognito console
  4. Raise your account-level max in Service Quotas based on your demand expectations
  5. Use the Amazon Cognito console Provisioned limits tab to adjust capacity up or down as needed

Resources:

Need help? Contact your AWS account team or visit AWS Support for assistance with planning your rate limit strategy.

If you have feedback about this post, submit comments in the Comments section below.


Kiran Dongara

Kiran is an Enterprise Solutions Architect at AWS, primarily supporting Retail, Restaurant, and CPG customers. His primary focus is application identity within the IAM domain. His expertise includes deep technical understanding across technical and industry domains, which he integrates to design scalable and efficient architectures using best practices. When not working, Kiran prioritizes family time, nature walks, and cycling.

Howie Li

Howie Li

Howie Li is a Product Manager at Amazon Web Services, where he strives to make authentication straightforward by default. Outside of work, Howie enjoys exploring cultures and food through travels and making new ice cream flavors inspired by them.

❌