
Normal view

Deploy AWS applications and access AWS accounts across multiple Regions with IAM Identity Center

14 March 2026 at 22:21

If your organization relies on AWS IAM Identity Center for workforce access, you can now extend that access across multiple AWS Regions with multi-Region replication. Previously, AWS access portal was only available in one Region, when you add an additional Region, users get an active access portal endpoint there. If the primary Region experiences a disruption, they can continue working through the additional Region. This enhancement also enables you to deploy AWS managed applications in additional Regions closer to your users, which reduces latency and helps meet regional compliance requirements. Meanwhile, you maintain centralized control by managing Identity Center configurations from the primary Region.

In this post, you’ll learn how to configure multi-Regions support, including multi-Region replication, encryption setup, adding Regions, updating your identity provider (IdP), and testing the setup end to end.

Prerequisites and considerations

Before enabling multi-Region support, confirm your environment meets these requirements and understand how this change will affect your existing setup.

Considerations

Keep the following limitations in mind before you begin:

  • IAM Identity Center account instances don’t support multiRegion replication.
  • Microsoft Active Directory and IAM Identity Center directory as identity source aren’t supported for multi-Region replication.
  • AWS opt-in Regions aren’t supported.
  • The AWS access portal in additional Regions doesn’t support the custom alias (in other words, customer-chosen subdomains).
  • AWS account access through additional Region relies on already provisioned permissions; new permission set assignments and group memberships can be managed only in the primary Region and are then automatically replicated to additional Regions.

Walkthrough

To set up multi-Region support, you’ll follow three steps: creating and configuring a customer-managed KMS key with Identity Center, enabling the additional Region in the Identity Center console, and updating your identity provider with the new regional URLs and bookmark applications.

Important: Your Identity Center instance operates on a primary-replica model where instance-level configuration changes must be made in the primary Region, while additional Regions receive read-only replications of your settings and provide Region-local access for your workforce. In this example, you will use Okta as your external IdP, with N. Virginia (us-east-1) as the primary Region and Frankfurt (eu-central-1) as the additional Region.

Before you start, ensure that you’re signed in to the console as an administrator in the same account and Region where your Identity Center instance resides.

Create and configure multi-Region customer-managed KMS keys with Identity Center

First, you must set up a multi-Region customer-managed KMS key with Identity Center in your primary Region and replicate it to additional Regions where you plan to replicate Identity Center. Identity Center uses customer-managed KMS keys for encryption of your identity data such as user attributes. Because the same key material must be available in each Region, you’ll create a multi-Region key — complete this step in the AWS Organizations management account. Before proceeding, confirm that your currently deployed AWS managed applications support customer-managed KMS keys with Identity Center. Each AWS KMS key has usage and storage cost, see AWS KMS pricing page for details.

1. Create the multi-Region customer-managed KMS keys in your primary Region and add it to your Identity Center instance
Follow the blog AWS IAM Identity Center now supports customer-managed KMS keys for encryption at rest, ensuring that you choose Multi-Region Key in Part 1: Create the key and define permissions.

For guidance on configuring your key policy, see the KMS key policy examples for common use cases in the Identity Center User Guide, which provides example policies you can adapt for your specific requirements.

2. Create replica keys in additional Regions
After completing the primary Region setup, create new replica keys in each AWS Region where you plan to replicate Identity Center. To complete this step, follow the documentation in Create multi-Region replica keys.

Note: The replica key automatically inherits the same key policy as the primary customer-managed KMS key. However, future modifications to the key policy must be manually applied to the replica key in each Region. AWS KMS replica keys are independent resources; policy changes on the primary key do not propagate automatically.

Add an additional Region to Identity Center

Now that key replication is complete, you can add an additional Region to your Identity Center instance. For this post, use Frankfurt (eu-central-1). If you have a delegated admin account configured, we recommend completing remaining configurations in that account. We will perform this configuration using the console, but you can also use the IAM Identity Center API. For detailed instructions, see Add the Region in IAM Identity Center.

  1. Open the AWS Management Console.
  2. In the search bar, enter IAM Identity Center and choose the service.
  3. In the navigation pane, choose Settings.
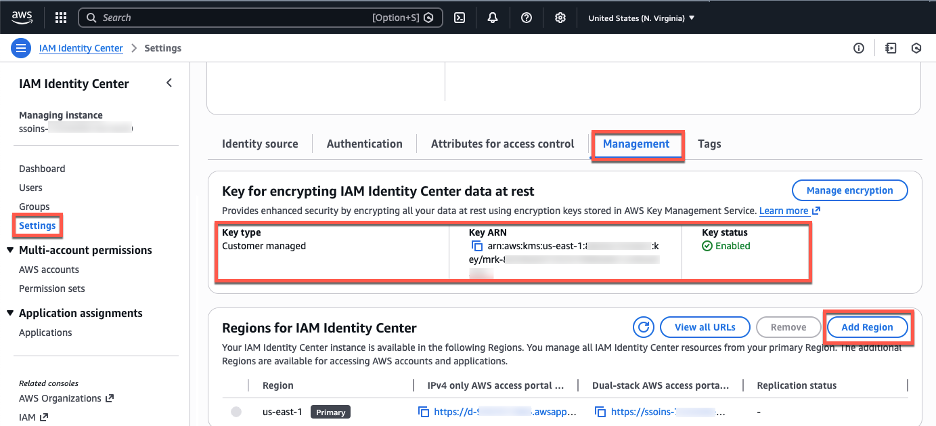
  4. Choose Add Region.
  5. Figure 1: Management tab with encryption and Region information

    Figure 1: Management tab with encryption and Region information

  6. From the Region list on the following page, select Frankfurt (eu-central-1). Then, choose Add Region.
  7. The Region list shows Regions enabled by default where the customer-managed KMS key was replicated, making them available for you to choose.

    Figure 2: Choose an AWS Region to add

    Figure 2: Choose an AWS Region to add

  8. You’ll return to the Settings for Identity Center page, where you’ll see the new Region with a Replicating status. A blue banner indicates that Identity Center is replicating your workforce identities, configuration, and metadata to the new Region. After the initial setup (15–30 minutes, depending on the size of your Identity Center instance), future changes replicate within seconds.
  9. Figure 3: Initial replication to the newly added Region in progress

    Figure 3: Initial replication to the newly added Region in progress

  10. After replication completes, the Replication Status column changes to Replicated. Your Identity Center endpoints in the additional Region are now active.
  11. Figure 4: A console view after the initial replication is done

    Figure 4: A console view after the initial replication is done

  12. Users can now access AWS accounts through both AWS access portal URLs. You can view and copy the enabled portal URLs either from the Region list or by choosing View AWS access portal URLs.

You can view Security Assertions Markup Language (SAML) information, such as ACS URLs, about the primary and additional Regions by choosing View ACS URLs. In the next section you will use both, your AWS access portal URLs and ACS URLs to update your external IdP configuration.

Update your IdP configuration for the additional Region

You’ve successfully replicated your Identity Center instance to the Frankfurt (eu-central-1) Region. This means your workforce identities are now available in that additional Region and can use the new AWS access portal endpoint. Identity Center supports two authentication flows: one where users start from the AWS access portal or AWS managed application (service provider-initiated), and one where users start from their IdP portal (IdP-initiated). With service provider-initiated authentication, when users attempt to authenticate, Identity Center redirects them to your IdP authentication page, and after successful authentication, their authentication response is sent to the Regional SAML assertion consumer service (ACS) endpoint in Identity Center. The ACS endpoint in the additional Region uses a different URL than the primary Region, as shown in the following image.

Figure 5: Identity Center URLs

Figure 5: Identity Center URLs

Currently, your IdP only has information about your Identity Center in the primary Region. To successfully redirect users’ authentication responses to the additional Region, you must add the new Regional endpoint to the IdP configuration.

Update the Identity Center application in your IdP:

This update enables service provider-initiated authentication to succeed. In the Identity Center app within your external IdP, add the ACS URL for the additional Region so that the app contains both Regional ACS URLs. Keep the existing URL as the first one in the list, the IdP uses the first URL as the default redirect target for IdP-initated authentication. The additional ACS URL will be used by the IdP to send the authentication response when users sign in using service provider-initiated authentication flows.

As an example, follow the instructions to configure your Identity Center application in Okta:

  1. Log in to the Okta portal as an Admin.
  2. Expand the Applications drop-down in the left pane, then choose Applications
  3. Choose your Identity Center Application
  4. Select the Sign-on tab and choose Edit in the Settings windows.
  5. In the AWS SSO ACS URL1 box add the additional ACS URL
Figure 6 – Identity Center enterprise application configuration in Okta

Figure 6: Identity Center enterprise application configuration in Okta

Users can now access accounts starting from the Region-specific AWS access portal, in this case they need to remember two Region specific URLs, one for Frankfurt (eu-central-1) and one for N. Virginia (us-east-1). To accommodate these Region-specific portal URLs, we recommend creating a bookmark application in your IdP. While users can also bookmark the URLs directly in their browsers, providing a bookmark app makes the additional Region discoverable in the IdP portal without requiring each user to manually save a URL.

This bookmark app functions like a browser bookmark and contains only the URL to the AWS access portal in the additional Region. Users can access this bookmark app from their IdP portal to reach the Region-specific AWS access portal. You also must grant your users access to the bookmark app in the external IdP. In Okta, follow the instructions below:

  1. Log in to the Okta portal as an Admin.
  2. Expand the Applications drop-down in the left pane, then choose Applications.
  3. Choose Browse App Catalog
  4. Search for “Bookmark App”, select it from the list of results, and choose Add in the left pane.
  5. Choose an app name. For this blog post, the name can be “Identity Center – Frankfurt (eu-central-1)”
  6. In the URL box, paste the Frankfurt (eu-central-1) specific URL
  7. Choose Done. You will be redirected to the Bookmark application in the Assignments tab.
  8. Choose Assign and select the Groups/People that will have access to this application.

After completing this configuration, users will see two Identity Center applications in their IdP portal—one for the primary Region and another for the additional Region.
Figure 7 shows how this configuration appears in the Okta end user dashboard.

Figure 7: Okta end-user portal with two Region-specific tiles for Identity Center

Figure 7: Okta end-user portal with two Region-specific tiles for Identity Center

If you choose the newly created bookmark app, it will direct you to the AWS access portal in the additional Region.

Note: Identity Center supports IPv4-only endpoints, and dual-stack endpoints that support both IPv6 and IPv4. Depending on where your organization is in the process of IPv6 adoption, you will need to configure corresponding Assertion Consumer Service (ACS) URLs in your external IdP and used the corresponding AWS access portal URLs in your IdP bookmark application. For more information, see IPv6 support in Identity Center blog.

Test your multi-Region configuration

In the previous sections, you finished configuring the requirements for Identity Center multi-Region replication between the primary N. Virginia (us-east-1) and additional Frankfurt (eu-central-1) Regions. With this configuration complete, users with sufficient permissions can now enable supported AWS managed applications in either Region. Additionally, users can access their AWS accounts through the AWS access portal from either Region. To validate both capabilities, you will first test AWS account access from the additional Region and then configure a supported AWS managed application in that Region.

Accessing AWS accounts from the additional Region

Permission set assignment that exists in the primary Region of your Identity Center instance will be replicated to your additional Region. This means that, if there is a service disruption in Identity Center in the primary Region, you can switch to the additional Region to access your AWS accounts through the access portal or AWS CLI. To complete this section, your user in Identity Center needs existing access to an AWS account with permission sets. For more information see Manage AWS accounts with permission sets.

Access AWS accounts from the additional Region using the AWS access portal

  1. Open the IAM Identity Center console.
  2. In the navigation pane, choose Settings.
  3. Choose the Management tab.
  4. Choose View AWS access portal URLs.
  5. Choose additional Region URL, a new browser tab will open with the AWS access portal in Frankfurt (eu-central-1).
  6. Confirm you can see permission sets assigned to you.
  7. Choose a permission set, confirm that you can access your AWS account.

Access AWS accounts from the additional Region using the AWS CLI

AWS Command Line Interface (AWS CLI) connects to a specific Identity Center Region to authenticate users and obtain credentials. For customers using multi-Region replication, we recommend creating multiple Regional CLI profiles—one for your primary Region and another for each additional Region. Separate profiles allow you to quickly switch between Regions during a disruption without reconfiguring your CLI. Before completing this section, confirm that AWS CLI version 2.x or later is installed and that you have an existing AWS CLI configuration file.
To facilitate Region-specific access through the AWS CLI, create two CLI profiles using the following configuration:

  1. Open your AWS CLI configuration file at ~/.aws/config.
  2. Add the following two profiles configurations, one per additional Region. The example below shows a user in Virginia using N. Virginia (us-east-1) as their primary Identity Center Region with Frankfurt (eu-central-1) as a backup. Replace with your actual Identity Center instance ID and with your account number. To find your Identity Center instance ID, navigate to IAM Identity Center console, Settings, Instance ARN (the instance ID is the value that starts with ‘ssoins-‘)
  3. Save the file.
    [profile ReadOnly]
    sso_role_name=ReadOnly
    sso_account=<account-Id>
    sso_session=us-east-1
    
    [sso-session us-east-1]
    sso_region=us-east-1
    sso_start_url=https://identitycenter.amazonaws.com/ssoins-<instance-Id>
    
    [profile ReadOnly-additional]
    sso_role_name=ReadOnly
    sso_account=<account-Id>
    sso_session=eu-central-1
    
    [sso-session eu-central-1]
    sso_region=eu-central-1
    sso_start_url=https://identitycenter.amazonaws.com/ssoins-<instance-Id>
    

Once the profiles have been configured, you can authenticate to each regional Identity Center endpoint independently using the following commands.
1. Run aws sso login –profile ReadOnly to log in through your primary Region N. Virginia (us-east-1),
2. Run aws sso login –profile ReadOnly-additional to log in through your additional Region Frankfurt (eu-central-1)

Each command opens a browser window to the corresponding regional AWS access portal, where you complete the authentication flow. After a successful login, the AWS CLI uses the credentials obtained from that Region for subsequent API calls made with that profile.

Deploy AWS managed applications in the additional Region

To test application deployment in the additional Region, for this blog post you will configure AWS Deadline Cloud, a managed service for rendering and visual effects workloads. You can choose other AWS managed applications that support deployment in additional Identity Center Regions — see the AWS managed applications that you can use with IAM Identity Center table in the documentation. This table is regularly updated as additional applications become available.
To configure AWS Deadline Cloud, follow the steps:

  1. Navigate to the AWS Deadline Cloud console and switch to your additional Region—for this example, Frankfurt (eu-central-1).
  2. Choose Set up Deadline Cloud on the Get Started section and follow the configuration wizard until Step 2: Set up monitor.
  3. In the Set up monitor screen, enter a name (for example, Frankfurtmonitorapp), then expand the Additional monitor settings menu. Notice how the Identity Center instance in Frankfurt (eu-central-1) is automatically selected by the AWS DeadLine Cloud wizard. Choose Next.
  4. On Define farm details, under Groups and users, select the group that will have access to the application, verify you are a member of that group. Notice how you can automatically choose groups that were synced from your IdP into your Identity Center instance.
  5. For this demonstration, leave remaining configurations with their default values and complete the application setup by following the wizard. After the application deployment is complete, choose Go to dashboard.

The application is now configured to use Region-local Identity Center service APIs for user sign-in and access to workforce identities. The dashboard displays the option to manage users, and user assignment management for this application is performed through the Frankfurt (eu-central-1) Region.

Testing user access to your AWS managed application

You can test user access to AWS Deadline Cloud by choosing Monitor in the upper right-hand corner of the dashboard. This initiates the service provider authentication workflow, which redirects you to your IdP for authentication. Because your IdP now recognizes the Frankfurt (eu-central-1) ACS URL, it knows where to send the successful authentication response, and you are authorized to access the newly created application.

You can also access the application using the application provided endpoint or through your AWS access portal. The AWS access portal in each Region displays the applications assigned to the user independent of the Region they are configured.

What happens when you try to enable your application in a Region where Identity Center isn’t configured?

If Frankfurt (eu-central-1) hasn’t been added to your Identity Center instance, the application console will detect your organization instance in N. Virginia (us-east-1), and prompt you to enable Frankfurt (eu-central-1) first.

Figure 8: AWS Deadline cloud console wizard when Identity Center isn’t configured in the current Region

Figure 8: AWS Deadline cloud console wizard when Identity Center isn’t configured in the current Region

Note: Existing deployments of AWS managed applications that use cross-Region calls with Identity Center (for example, Amazon Q Business) continue to function normally. When deploying an AWS managed application that supports cross-Region calls, we recommend configuring it to use Identity Center in the same Region, provided the prerequisites are met. Otherwise, you can configure the application to use Identity Center from one of its enabled Regions. See the respective AWS application’s User Guide to learn if it supports cross-Region calls to Identity Center.

Optional: Automatic failover of domains for AWS access portal

Identity Center provides Regional endpoints for the AWS access portal when you enable multi-Region replication. You can access these Regional instances directly, or you can build a redirection system that intelligently routes users to the nearest available AWS access portal endpoint with failover capabilities.

For a serverless implementation of automatic failover, you can combine several AWS services:

  • Amazon Route 53: Manages DNS routing with health checks and geoproximity-based routing policies to redirect users to their nearest Regional endpoint.
  • Amazon Application Recovery Controller (ARC): Orchestrates failover logic and provides readiness checks to ensure smooth transitions between Regions during service disruptions.
  • Application Load Balancer (ALB): Performs simple HTTP redirects to the appropriate Regional AWS access portal endpoints based on routing decisions.

This setup redirects users to a healthy endpoint in another Region if the primary Region goes down. Geoproximity routing sends users to their nearest endpoint under normal conditions.

Administration and auditing tasks by Region

The primary Region is the central management hub for instance-level configurations, while additional Regions provide Region-local application management and access capabilities. Application management is always performed in the Region where the application was configured.

This table shows the availability of use cases between Regions. The primary Region maintains centralized control over identity and access management, while additional Regions focus onRegion-specific application management and providing resilient access to AWS accounts.

Task category

Primary Region

Additional Region

Workforce identity management

Full management of workforce identities and user provisioning

Read-only

User session revocation

Revoke user sessions

Revoke user sessions

Instance-level configuration

Configuration changes and settings

Read-only

User assignments to applications (Region-specific)

For applications in the primary Region

For applications in an additional Region

Trusted identity propagation (TIP)

Use TIP with applications in the same Region

Use TIP with applications in the same Region

Enable/disable application access

For applications in the primary Region

For applications in an additional Region

External IdP configuration

Manage connection and configuration with external IdPs

Read-only

Customer-managed applications

Deploy and configure SAML and OAuth2 applications

Deploy and configure SAML and OAuth2 applications

AWS account access

Access AWS accounts through a Region-specific AWS access portal

Access AWS accounts through Region-specific AWS access portal

Application management (Region-specific)

Manage applications configured in the primary Region

Manage applications configured in additional Regions

Account access permissions

Configure and manage permission sets and account assignments

Not available

Conclusion

In this post, you learned how to extend your access to AWS through IAM Identity Center across multiple AWS Regions using multi-Region replication. To replicate your Identity Center instance to additional Regions, you need a multi-Region KMS key, updated IdP configuration, and network access to the new regional endpoints.

With multi-Region replication in place, your users gain resilient, low-latency access to AWS accounts and AWS managed applications through Region-specific AWS access portals. If a disruption occurs in the primary Region, users can continue working using already provisioned permissions through any additional Region. For organizations looking to deploy AWS managed applications beyond Deadline Cloud in additional Regions, consult the AWS managed applications that integrate with IAM Identity Center table in the Identity Center User Guide to verify that the application supports both customer-managed KMS keys and deployment in additional Regions before proceeding.

To explore the full range of IAM Identity Center multi-Region capabilities, including quota management, visit the Using IAM Identity Center across multiple AWS Regions user guide.


If you have feedback about this post, submit comments in the Comments section below. If you have questions about this post, contact AWS Support.
Alex Milanovic

Alex Milanovic

Alex is a Senior Product Manager at AWS Identity, with over a decade of expertise in identity and access management and more than 25 years in the tech sector. His work centers on empowering organizations of all sizes, from large enterprises to small and medium-sized businesses, to effectively adopt and implement identity and access management cloud services.

Laura Reith

Laura Reith

Laura is an Identity Solutions Architect at AWS, where she thrives on helping customers overcome security and identity challenges. In her free time, she enjoys wreck diving and traveling around the world.

How to manage the lifecycle of Amazon Machine Images using AMI Lineage for AWS

12 March 2026 at 17:59

As organizations scale their cloud infrastructure, maintaining proper lifecycle management of Amazon Machine Images (AMIs) is a critical component of their security and risk management goals. AMIs provide the essential information required to launch Amazon Elastic Compute Cloud (Amazon EC2) instances, however; they present security and compliance challenges if not tracked and managed throughout their lifecycle. This blog post explores how organizations can meet their evolving security and compliance requirements by managing potential vulnerabilities across the AMIs deployed throughout their AWS environment.

At the end of 2024, AWS announced lineage supportfor Amazon EC2, providing source details for your AMIs. With this lineage information, you can trace copied or derived AMIs back to their original source. The source AMI information is available for AMIs that were created using specific API commands like CreateImage, CopyImage, and CreateRestoreImageTask. If the AMI was created using a different API command, the ID and AWS Region of the source AMI don’t appear, which can create visibility gaps that potentially impact security and compliance efforts.

To address these gaps and provide comprehensive AMI governance, organizations need to build additional capabilities to analyze the scope of impact of Common Vulnerabilities and Exposures (CVEs), ensure deployed resources originate from an approved golden image, and respond to audit inquiries that require a clear chain of custody for AMIs. A well-designed solution should also help track and enforce approved AMI creation patterns across all accounts and AWS Regions. The AMI lineage solution described in this post is designed to help you manage your organization’s AMI hierarchy and lifecycle, including tracking AMI origins and usage throughout its AWS environment. By implementing this solution, your security teams can quickly understand the scope of impact when security vulnerabilities are discovered, help ensure compliance with organizational policies, and maintain better visibility into their AMI estate.

The solution in this blog post uses Amazon Neptune, a high-performance graph database, along with native AWS security services to maintain a comprehensive view of AMI relationships and enable proactive security monitoring. With the solution in place, you can enforce controls on AMI sourcing, including validation of marketplace AMIs through service control policies (SCPs), and maintain compliance with organizational and regulatory requirements throughout the AMI lifecycle.

Solution overview

AMI Lineage provides a comprehensive governance solution that uses AWS security services and Neptune to create and maintain a hierarchical graph representation of their AMI relationships. This solution helps security and compliance teams understand the complete history of their AMIs including where they originated from, enforce organizational policies such as requiring all AMIs to be encrypted, and rapidly assess security impacts across their organization.
The solution integrates core AWS services with security and governance capabilities. The core components of the solution in the security tooling account are:

  • Neptune: A purpose-built, high-performance graph database securely stores and manages the AMI relationship data.
  • AWS Lambdafunctions serve as the processing engine for the solution. They process AMI lifecycle events (such as CreateImage, CopyImage, DeregisterImage), evaluate them against compliance rules, and update the Neptune graph database. The functions are configured with least-privilege AWS Identity and Access Management (IAM) permissions to enhance security.
  • Amazon API Gateway provides secure REST endpoints for lineage queries and security assessments. Authentication is handled using a combination of API keys and IAM roles to help ensure that only authorized users and systems can access the data.

From a governance perspective, this solution provides comprehensive AMI origin validation to help ensure AMIs come from approved sources, including the validation of AWS Marketplace AMIs against a list of trusted vendors. Lifecycle management capabilities enforce AMI retention policies and deprecation processes. Compliance monitoring tracks adherence to organizational and regulatory requirements, while security event scope assessment capabilities quickly identify affected resources when security vulnerabilities are discovered. A detailed audit trail maintains a complete history of AMI creation, modification, and usage patterns.

Architecture

The AMI Lineage solution follows AWS security best practices with a multi-account deployment architecture designed to maximize security while maintaining operational efficiency. The architecture distributes responsibilities across three primary account types: an organization management account, a centralized security tooling account, and multiple member accounts.

This architectural approach helps ensure that sensitive operations and data remain centralized in the security tooling account while enabling distributed monitoring and policy enforcement across the organization. The clear separation of concerns enhances security while maintaining the scalability needed for large-scale AWS deployments.

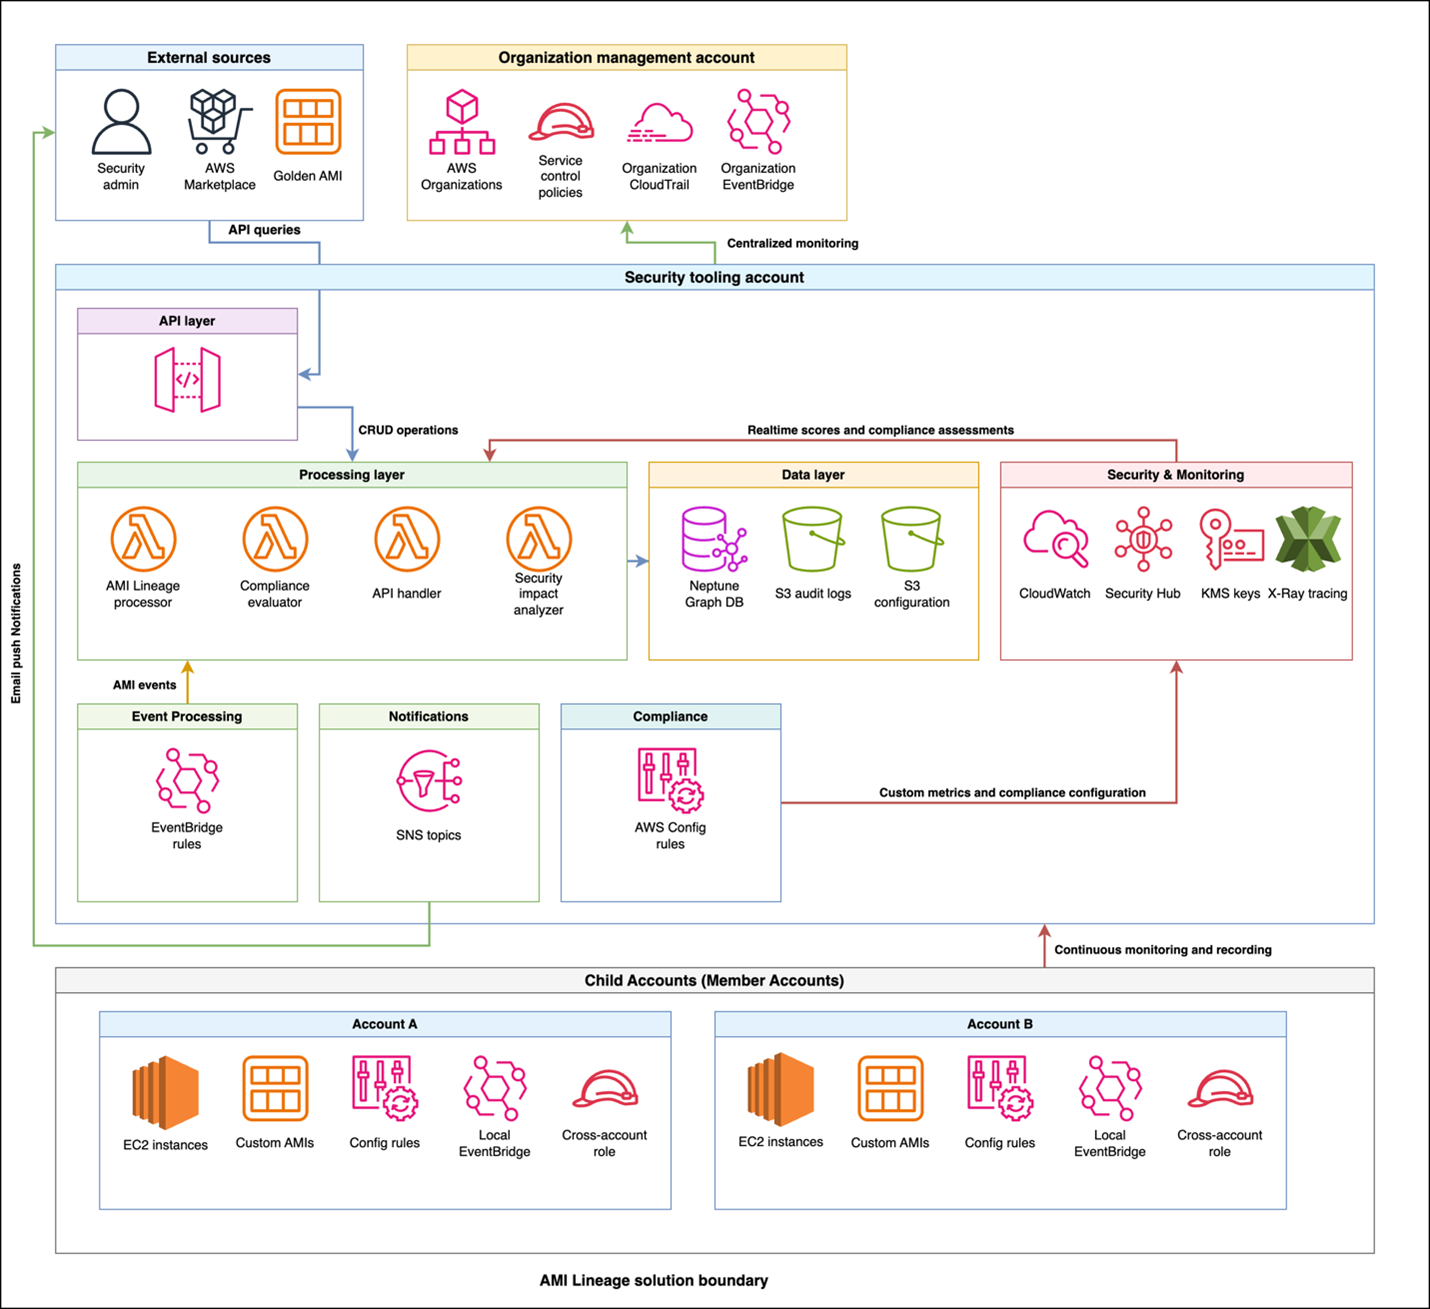
Figure 1: AMI Lineage solution architecture and workflow

Figure 1: AMI Lineage solution architecture and workflow

The workflow and architecture shown in figure one includes the following:

  1. Policy enforcement: The organization management account is the central point for control. It uses AWS Organizations to enforce SCPs that prevent non-compliant AMI actions across the member accounts.
  2. Event capture: When an AMI lifecycle event (like CreateImage or CopyImage) occurs in a member account, a local Amazon EventBridge rule captures it.
  3. Centralized processing: The event is securely forwarded from the member account’s EventBridge to the central EventBridge in the security tooling account.
  4. Data ingestion and analysis: A Lambda function is triggered in the security tooling account. This function processes the event, analyzes it for compliance, and updates the Neptune graph database with the new AMI relationship data. AWS Security Hub and Amazon GuardDuty in the security tooling account also receive and analyze findings from member accounts.
  5. Query and visualization: Security teams query the lineage data through a secure API Gateway endpoint. By doing this, they can to visualize AMI hierarchies, investigate security findings from Security Hub, and assess the scope of impact for a given AMI.

The organization management account serves as the central control point for policy enforcement and organizational oversight. This account hosts SCPs that prevent non-approved AMI usage across the organization and manages organization-wide EventBridge rules that capture AMI events from member accounts. Cross-account trust policies configured in this account enable secure communication between the management account and the security tooling account.

Additionally, the management account establishes Security Hub in delegated administrator mode, designating the security tooling account as the centralized security administrator for the organization. From the security tooling account, Security Hub can be then configured to aggregate all Regions down to one core Region for easier evaluation by security personnel.

The security tooling account acts as the central hub for AMI lineage processing and storage. This account hosts the Neptune graph database cluster with encrypted storage, helping to ensure that AMI relationship data is securely maintained. Lambda functions running in this account process events, handle API requests, and evaluate compliance with least-privilege permissions. API Gateway provides secure REST endpoints for lineage queries and security assessments. Security Hub custom insights and findings are centralized here in the security tooling account as the Security Hub delegated administrator account, along with Amazon Simple Notification Service (Amazon SNS) topics for notifications and alerts. The Amazon Virtual Private Cloud (Amazon VPC) infrastructure supporting these services is also deployed in the security tooling account, providing network-level isolation and security.

The solution enables distributed monitoring and enforcement by deploying lightweight components into each member account across the organization. Each member account includes AWS Config rules for continuous compliance monitoring, cross-account IAM roles to enable secure access from the security tooling account, and local EventBridge rules that forward AMI-related events to the central processing system.

Security and compliance integration extends throughout the solution. IAM manages least-privilege access control and permissions across components. AWS CloudTrail records API activity for audit trails and compliance reporting, while Security Hub centralizes security findings and compliance status across your AMI estate. GuardDuty provides threat detection for AMI-related activities. SCPs enforce organization-wide controls on AMI creation and usage patterns, and AWS Config tracks AMI configuration changes and evaluates compliance rules.

How it works

The AMI Lineage solution operates through a continuous monitoring and automated response system that maintains comprehensive visibility into your AMI landscape. When AMI lifecycle events occur in your organization, EventBridge rules capture these activities, including creation, copying, modification, and deregistration events. Lambda functions in the security tooling account are then called upon to process these events with appropriate security controls and update the Neptune graph database in real-time, while CloudTrail logs provide a comprehensive audit trail of AMI-related activities.

The system tracks critical security and compliance metadata that forms the foundation of effective AMI governance. This includes:

  • Source AMI information and validation status to help ensure lineage integrity
  • Creation method and timestamp data for comprehensive audit trails
  • Cross-Region and cross-account relationships to understand the full scope of AMI distribution
  • Instance launch history with security context to track usage patterns
  • AMI state changes including deprecation and deregistration for lifecycle management
  • Compliance status along with policy violations to maintain organizational standards.

Security teams use this comprehensive data through secure API calls to visualize complete AMI hierarchies and relationships, providing clear insight into how AMIs are related across your infrastructure. The compliance of your AMI estate is continuously tracked through a combination of services:

  • Detection: AWS Config rules deployed in member accounts check for policy violations (for example, incorrect tags and public permissions).
  • Aggregation: These findings, along with vulnerability data from services like Amazon Inspector, are aggregated in AWS Security Hub.
  • Correlation: Lambda functions in the security tooling account correlate this information with the lineage data in Neptune. Because of this correlation, you can see not just that an AMI is non-compliant, but also its entire downstream impact. When security events like CVE findings are discovered, teams can quickly assess the scope of impact across their entire AMI estate. The solution monitors AMI usage patterns for security anomalies and enforces governance controls through automated policy checks.

The solution provides robust automated policy enforcement capabilities that operate continuously to maintain security and compliance. The system helps ensure that only approved AMIs with verified lineage history can be used to launch new instances, automatically blocking attempts to use non-compliant images. SCP controls on AMI creation and usage are enforced organization-wide, preventing unauthorized AMI operations before they can impact your environment. When policy violations are detected, the system can trigger automated responses to security events and maintain compliance with organizational standards through real-time enforcement.

Implementation

Before deploying the AMI Lineage solution, you need to establish the proper security and governance foundation across your organization. Your AWS Organizations management account requires administrative permissions, and your organization must be enabled with all features to support the policies used in this solution. You will also need a dedicated security tooling account to host the solution’s core components, with cross-account IAM roles configured to allow secure access. Finally, essential security services must be configured at the organization level, including Security Hub, CloudTrail organization trails for audit logging, and encryption keys using AWS Key Management Service (AWS KMS) for data protection.

From a technical perspective, ensure you have Python 3.8 or later installed if deploying from a local environment, along with AWS Command Line Interface (AWS CLI) version 2 installed and configured with appropriate security credentials. You’ll also need an Amazon Simple Storage Service (Amazon S3) bucket for deployment artifacts, encrypted using SSE-KMS with a customer-managed key to align with best practices for protecting deployment assets.

The complete AMI Lineage solution is available as open source code in the AWS Samples repository. You can clone the repository and follow the deployment instructions. The repository includes the necessary AWS CloudFormation templates, Lambda functions, and deployment scripts referenced in the following phases.

Deployment

The deployment process follows a five-phase approach that builds security and compliance capabilities progressively:

  1. Security foundations
  2. Security controls
  3. EventBridge rules
  4. Core infrastructure
  5. Compliance and monitoring

Phase 1 – Establishing security foundations

The first phase establishes the security foundation by configuring AWS Organizations security services. This involves enablingSecurity Hub in the management account and designating the security tooling account as the delegated administrator, enablingnullGuardDuty with the security tooling account configured as thenulldelegated administrator, and enabling an organizational wide CloudTrail trail for audit logging.

# In Organization Management Account: 
# Enable Security Hub and set security tooling account as delegated admin 
aws securityhub enable-organization-admin-account \   
--admin-account-id <security-tooling-account-id> 

# Enable GuardDuty organization with security tooling account as admin   
aws guardduty enable-organization-admin-account \   
--admin-account-id <security-tooling-account-id> 

# Create organization trail with encryption aws cloudtrail create-trail \   
--name ami-lineage-trail \   
--s3-bucket-name <your-secure-bucket> \   
--is-organization-trail \   
--kms-key-id <your-kms-key-id> \   
--enable-log-file-validation

Phase 2 – Security controls

The second phase deploys base security controls through organization-wide SCPs. These policies enforce AMI governance controls by preventing the use of non-approved AMIs and helping to ensure that proper tagging and approval workflows are followed.

# In Organization Management Account: 
# Deploy organization-wide SCPs 
aws organizations create-policy \   
--content file://ami-governance-scp.json \   
--name "AMI-Governance-Controls" \   
--type SERVICE_CONTROL_POLICY 

# Attach to organizational units 
aws organizations attach-policy \   
--policy-id <policy-id> \   
--target-id <ou-id>

Phase 3 – EventBridge rules

The third phase deploys organization-wide EventBridge rules from the management account to capture AMI events across member accounts and forward them to the security tooling account for processing. These rules listen for specific API calls captured by CloudTrail.

An example of the event pattern used to capture CreateImage and CopyImage events looks like this:

{
	"source": ["aws.ec2"],
	"detail-type": ["AWS API Call via CloudTrail"],
	"detail": {
		"eventSource": ["ec2.amazonaws.com"],
		"eventName": [
			"CreateImage",
			"CopyImage",
			"RegisterImage",
			"DeregisterImage"
		]
	}
}

# In Organization Management Account: 
# Deploy organization EventBridge rules 
cd deployment-scripts/organization 
./deploy-organization-resources.sh

Phase 4 – Core infrastructure

The fourth phase focuses on core infrastructure deployment in the security tooling account. This is where the primary processing and storage components are deployed, following security best practices by centralizing sensitive operations in a dedicated account.

# Switch to Security Tooling Account context 
# Deploy Neptune cluster with encryption in security tooling account 
cd deployment-scripts/shared 
./deploy-shared-resources.sh

This deployment script handles multiple components in the security tooling account. The Neptune cluster deployment includes encryption and VPC configuration to help ensure secure storage and access to AMI lineage data. Lambda functions are deployed with security controls and configured with VPC attachment, which allows for secure Neptune access in the VPC, appropriate IAM roles with least-privilege permissions, and environment variables for secure configuration. API Gateway provides secure REST endpoints for external access to AMI lineage data and security assessments.

Phase 5 – Compliance and monitoring

The fifth phase establishes comprehensive compliance and monitoring capabilities across member accounts. AWS Config rules are deployed to continuously monitor AMI compliance across your organization, while EventBridge rules forward AMI events to the central processing system.

# In each Member Account: 
# Deploy AWS Config Rules and monitoring capabilities 
cd deployment-scripts/child-account   
./deploy-child-account-resources.sh

After deployment, thorough verification helps ensure that security configurations are properly implemented. This includes validating IAM permissions to help ensure least-privilege access, testing security controls to verify SCP enforcement, validating encryption settings acrosscomponents, and confirming that the security tooling account is properly configured as the Security Hub delegated administrator.

Using AMI Lineage

When deployed, AMI Lineage provides security operations and compliance monitoring capabilities through its API hosted in the security tooling account and automated monitoring systems. Security teams can query and receive complete AMI security relationships to understand the full context of AMIs in their environment.

When investigating AMIs, the system provides detailed security context including source validation information that confirms:

  • Whether AMIs come from marketplace sources or trusted accounts
  • Compliance status that shows patch levels and policy adherence
  • Vulnerability status with CVE findings and scan results
  • Comprehensive lineage data showing the complete chain of AMI relationships and approval history
# Get complete security context for an AMI (API Gateway in Security Tooling Account) 
curl -X GET "https://<api-gateway-id>.execute-api.<region>.amazonaws.com/v1/api/v1/ami/ami-1234567890abcdef0/security-context?include_compliance=true" \  
	-H "x-api-key: <your-api-key>"

For security impact assessments, such as when a new CVE is discovered, the solution provides a powerful scope of impact analysis. By querying the API with a specific finding, security teams can rapidly determine every affected resource across their entire organization that stems from a compromised or vulnerable AMI. Using that information, they can understand the full scope of their exposure and begin remediation. See Security best practices in Amazon API Gateway for helpful considerations while using API Keys.

# Assess for a security finding (Security Tooling Account API) 
curl -X POST "https://<api-gateway-id>.execute-api.<region>.amazonaws.com/v1/api/v1/security-impact" \   
	-H "Content-Type: application/json" \   
	-H "x-api-key: <your-api-key>" \   
	-d '{     "ami_id": 
		"ami-1234567890abcdef0",     
		"finding_type": "CVE",     
		"finding_id": "CVE-2024-XXXX",     
		"severity": "CRITICAL"   
	}'

This analysis returns impact information including:

  • Affected AMIs in the lineage chain
  • Running instances requiring immediate remediation
  • Affected AWS accounts and regions for coordinated response
  • Associated auto-scaling groups and launch templates that need updates
  • Compliance impact assessment for regulatory reporting
  • Detailed remediation steps prioritized by risk level.

Compliance monitoring operates continuously through automated assessment capabilities that evaluate your AMI estate against organizational policies and regulatory requirements. Teams can generate comprehensive compliance reports that show adherence to security standards across their entire infrastructure.

# Generate comprehensive compliance report (Security Tooling Account API) 
curl -X POST "https://<api-gateway-id>.execute-api.<region>.amazonaws.com/v1/api/v1/compliance-assessment" \   
	-H "Content-Type: application/json" \   
	-H "x-api-key: <your-api-key>" \   
	-d '{     
		"rules": [       
    		"required_tags",       
    		"approved_source_validation",       
    		"security_scan_status",       
    		"naming_convention",       
    		"lineage_verification"     
		],     
		"scope": "ORGANIZATION"   
	}'

The solution provides security automation and remediation through configurable automated responses to security events. Security Hub, operating in delegated administrator mode from the security tooling account, can be configured to automatically respond to findings by stopping instances using AMIs with critical vulnerabilities, quarantining instances launched from unapproved sources, and sending immediate notifications for high-severity findings.

Security visualization and reporting capabilities, centralized in the security tooling account, provide real-time dashboards showing:

  • Compliance status across the organization
  • Scoping visualization for rapid decision-making
  • AMI approval workflow status for process monitoring
  • Patch compliance metrics for maintaining security posture
  • Automated remediation activity logs for audit purposes
  • Custom security reports tailored to specific organizational needs.

For security investigations and audit purposes, the solution maintains a queryable audit trail that provides a complete history of AMIs, including creation and modification events, security scanning results and findings, approval workflow history, and compliance status changes over time.

# Query comprehensive audit history (Security Tooling Account API) 
curl -X GET "https://<api-gateway-id>.execute-api.<region>.amazonaws.com/v1/api/v1/ami/ami-1234567890abcdef0/lineage?direction=both&depth=10" \   
	-H "x-api-key: <your-api-key>"

Clean up

To decommission the AMI Lineage solution, use the following steps to prevent dependency errors. The process is the reverse of the deployment.

  1. (Optional) Back up your data. Before you begin, export critical data for your audit and compliance records. This includes generating final compliance reports from the API or creating a final snapshot of the Neptune database (you will be prompted to do this when you delete the cluster).
  2. Run cleanup in member accounts. Sign in to each participating member account and run the cleanup script from the deployment files. This removes the local EventBridge rules, AWS Config rules, and cross-account IAM roles.
    # In each Member Account 
    cd deployment-scripts/child-account
    ./cleanup-child-account-resources.sh 
    # Removes Config rules and cross-account roles from each member account

  3. Run cleanup in the security tooling account. Sign in to your security tooling account and run the cleanup script. This decommissions the core solution, including the API gateway, Lambda functions, Neptune cluster, and the associated VPC.
    # Clean up security tooling account   
    cd deployment-scripts/shared
    
    ./cleanup-shared-resources.sh 
    # Removes Neptune, Lambda, API Gateway, SNS, and Security Hub components

  4. Run cleanup in the organization management account. Sign in to your organization management account to remove the organization-level resources.
    1. Run the cleanup script to remove the organization-wide EventBridge rules.
      # Clean up organization management account
      
      cd deployment-scripts/organization
      
      ./cleanup-organization-resources.sh   
      # Removes SCPs, EventBridge rules, and cross-account trust policies

    2. In the AWS Organizations console, detach and delete the AMI-Governance-Controls SCP.
    3. In the Security Hub and GuardDuty consoles, remove the security tooling account as the delegated administrator.
  5. Delete final data and encryption keys. After the solution’s infrastructure is removed, you can delete the remaining assets.
    1. In the security tooling account,empty and delete the S3 bucket that held the deployment artifacts.
    2. In the organization management account,schedule the deletion of the KMS keys you created for encrypting the solution’s data.

Conclusion

In this blog post, we showed you how you can use the AMI Lineage solution to build a comprehensive approach to tracking the complete history of your AMIs from creation to decommissioning. By storing this data in an Amazon Neptune graph database, you can build a hierarchical view of the relationships between your EC2 instances and the AMIs they were launched from. You learned how that data can be used to improve security response and remediation and assist in auditing and compliance activities.

The solution uses AWS Organizations to provide preventative controls to help ensure that only approved AMIs are used and integrates AWS security services like Amazon GuardDuty, AWS Security Hub, and AWS Config to add additional layers of security monitoring and management. Finally, you saw how the solution can be used during a security event or when new CVEs are published, so that you can rapidly discover which systems are affected and automate responses based on those findings.

While this solution provides powerful capabilities, it’s important to consider the operational and cost aspects. The core components, particularly Neptune, have associated costs that will scale with the size of your AMI estate. We recommend implementing cost monitoring and alerts as part of your deployment. Furthermore, because the solution is event-driven, you should plan a one-time backfill process to ingest your organization’s existing AMI history into the graph database. For organizations that require this level of granular control and visibility, these operational considerations are offset by the significant gains in security posture and compliance automation.

AMI Lineage transforms AMI governance from a manual, error-prone process into an automated, comprehensive security capability that scales with your organization’s growth. By implementing this solution, your organization can gain the visibility, control, and automated response capabilities needed to maintain a strong security posture while enabling rapid, secure deployment of infrastructure across its AWS environment.


If you have feedback about this post, submit comments in the Comments section below. If you have questions about this post, contact AWS Support.

Luis Pastor

Luis Pastor

Luis is a Senior Security Solutions Architect at AWS leading the Infrastructure Security and Compliance Technical Field Communities. He drives security architecture for enterprise customers across financial services, healthcare, and retail, specializing in cloud security transformation and regulatory compliance frameworks. Before AWS, Luis architected security solutions in hybrid cloud environments.

George'son Tib.

George’son Tib.

George’son is a Solutions Architect focused on Infrastructure Security at AWS, working with Enterprise customers in the Auto and Manufacturing Industry. He specializes in helping organizations build robust, automated control frameworks that enhance their security posture and drive operational efficiency.

Geoff Sweet

Geoff Sweet

Geoff has been in industry since the late 1990s. He began his career in electrical engineering. Starting in IT during the dot-com boom, he has held a variety of diverse roles, such as systems architect, network architect, and, for the past several years, security architect. Geoff specializes in infrastructure security.

Bharat Lakhiyani

Bharat Lakhiyani

Bharat is a senior solutions architect at AWS. With more than 12 years of experience spanning FinOps, cybersecurity, AI/ML, and enterprise architecture, he specializes in guiding travel and hospitality customers through their digital transformation journeys. Outside of work, Bharat enjoys baking, exploring new restaurants, driving scenic routes, and hiking the trails of North Carolina.

❌