
Normal view

How AWS IAM role manager rethinks the starting point for IAM roles

13 August 2026 at 00:16

When you build a new application or capability on Amazon Web Services (AWS), you want to focus on what you’re building. Getting a service running almost always begins with AWS Identity and Access Management (IAM). Many AWS services that act on your behalf need an IAM role, an identity the service assumes to access your resources with a defined set of permissions. You then author a trust policy so the service can assume the role, choose the permissions the workload needs, and attach it. Configuring roles and policies for common patterns is repeatable work that doesn’t need to be manual.

IAM role manager does that work for you. When role manager is enabled, AWS creates and configures the IAM roles as you build in supported service consoles, so you can start using a service and let AWS handle the role behind it. You create the resource you want, and role manager provisions and attaches the role you need as part of the same flow, so you can build now and refine permissions as your workload matures.

With that step automated, getting started takes minutes. You can create an AWS Lambda function and start running your code, with its execution role already created and attached, without switching context to set one up. Role creation becomes an automated part of building your application rather than a separate step.

Role manager is especially useful when you’re getting started: the moments when you want to stand up a service or get a proof of concept running and want to defer role configuration until later in your development process. You don’t need prior IAM experience to get started. You keep full control of what it creates, because the roles are ordinary IAM roles that you can view, edit, or delete like any role you author yourself. When you want to tighten a role, AWS IAM Access Analyzer reviews how it has been used and recommends a policy scoped to only the permissions it needs.

How to enable role manager

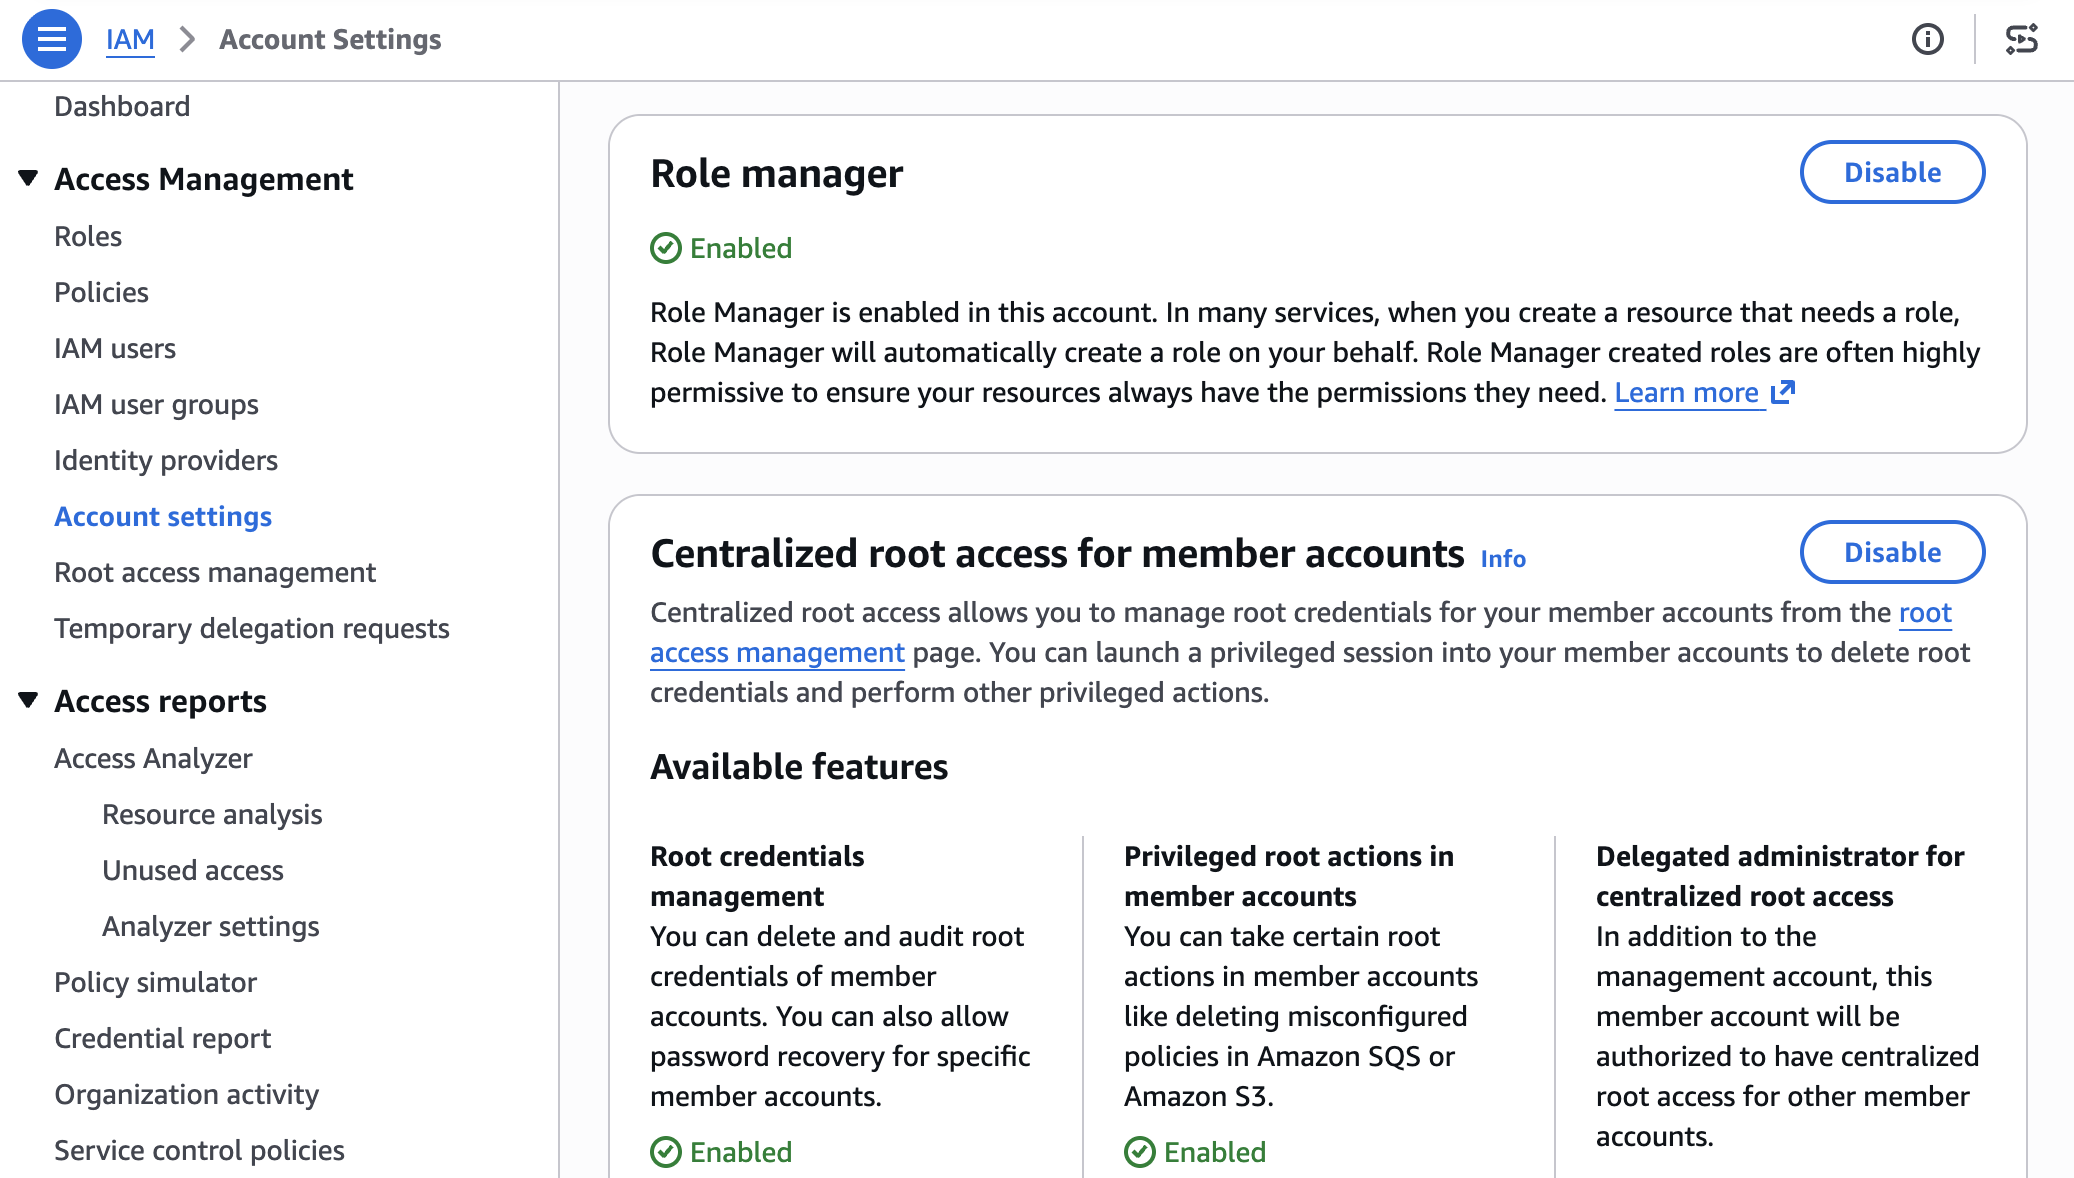
Role manager has two states, enabled and disabled. Enabling it for an account authorizes AWS to create roles in that account. In an organization, administrators can use a service control policy (SCP) to control whether member accounts can enable or use role manager. To enable it:

  1. Open the IAM console and choose Account settings.
  2. In the role manager section, choose Enable.

Figure 1: Enable Role Manager

Figure 1: Enable Role Manager

Some AWS services already create a role for you when you create a resource that needs one. Role manager doesn’t change that: those services keep creating roles automatically, and roles you already created keep working. What role manager adds is a single account-level control, and coverage for a case that built-in flows can’t handle: tasks whose permissions AWS can’t determine in advance, such as running your own code. For those tasks, role manager provisions a role that you can narrow later.

Example: Create an Amazon EventBridge rule

Start with a common task: an Amazon EventBridge rule that invokes a target, such as an Amazon Simple Queue Service (Amazon SQS) queue or an Amazon Simple Notification Service (Amazon SNS) topic. Without role manager, you would pause here to create a role that lets EventBridge invoke the target, write the role’s trust policy, attach the required permissions, and then return to finish the rule. With role manager enabled, you define the rule and its target, choose Create, and role manager provisions the role and attaches it for you. The EventBridge console shows the rule created and ready, and you never open the role-creation flow.

Figure 2: Creating an EventBridge rule with no manual role setup

Figure 2: Creating an EventBridge rule with no manual role setup

The role comes from an AWS managed role template: a definition AWS builds and maintains for a specific task, with the trust policy and permissions already worked out. The console calls a new IAM API, AcquireRole, which finds the matching template, provisions the role from it, and returns it to EventBridge. Depending on the service, AcquireRole either creates a new role or reuses one that already fits, so an account does not fill up with duplicate roles for the same task.

Role manager creates the role using your own IAM permissions, not a separate role-manager permission. To provision a new role, you need permission for the actions the template performs: at minimum, you need permissions to create and attach roles. When AcquireRole reuses an existing role instead of creating one, it needs only iam:GetRole and iam:GetRoleTemplateVersion. If you’re missing either of these permissions, the console tells you which one is needed rather than creating the role.

Run code that calls other AWS services

Not every task has a set of permissions AWS can define in advance. When a role runs your own code, such as a Lambda function, AWS has no way of knowing which services that code will call. Role manager covers this case too: create a Lambda function with role manager enabled, and it attaches an execution role that your code can use right away and that you can narrow once you know what the function calls.

Because the permissions your code needs aren’t known up front, role manager attaches the AWS managed policy PowerUserAccess to the role. PowerUserAccess grants access to AWS services so your function can call what it needs. By design, it doesn’t grant permission to manage IAM, AWS Organizations, or account settings. The template also configures the role to trust only the Lambda service.

Figure 3: Create an AWS Lambda function with no manual role setup

Figure 3: Create an AWS Lambda function with no manual role setup

Role manager attaches an execution role, and your function is ready to run. Figure 4 shows the Execution role panel on the function’s Configuration tab, with the role that role manager attached.

Figure 4: Role manager provides a role automatically to an AWS Lambda function

Figure 4: Role manager provides a role automatically to an AWS Lambda function

You can open the role in the IAM console to review its permissions. Figure 5 shows the role’s Permissions tab with the PowerUserAccess policy attached.

Figure 5: Permissions of the role provided by role manager for an AWS Lambda function

Figure 5: Permissions of the role provided by role manager for an AWS Lambda function

You keep full visibility into what role manager creates. Every role it creates records the role template it came from, and both GetRole and ListRoles return that template reference. You can inspect any role in your account and tell which were created by role manager. You read a role’s trust policy and permissions the same way you would for a role you authored, and AWS CloudTrail records each role’s creation.

Refining roles as workloads mature

As your workloads mature, refine the roles that role manager created to follow least privilege. When you’re ready, you can disable role manager and get IAM Access Analyzer unused access analysis at no additional cost for 90 days. Access Analyzer looks at how each role has been used and recommends a policy you can apply that keeps only the permissions the role needs. Start with the roles attached to your most critical workloads and work outward.

Disabling role manager doesn’t disrupt anything already running: your resources keep the roles they have, those roles stay in your account until you change them, and from that point you author new roles yourself, the same as before. If you would rather narrow a single role than the whole account, editing that role removes it from role manager’s control and it becomes a standard customer-managed role, with your changes preserved. In sandbox or development accounts, keeping role manager enabled saves time. For production workloads, disable role manager and refine the roles it created to least privilege before going live.

Conclusion

Role manager automates IAM role setup so you can focus on building from the start. When you enable it, AWS creates and attaches the IAM roles your resources need as you build, so you can start in minutes without prior IAM experience. Because these are IAM roles that you fully control, you keep the same visibility and the same tools you already use. Keep role manager enabled while you build, and refine the roles it created as your workloads mature.

To get started, enable role manager in the IAM console and create a resource in a supported service. To learn more, see IAM role creation and the list of supported services in the IAM User Guide.

If you have feedback about this post, submit comments in the Comments section below.


Zach Jiang

Zach Jiang

Zach is a Senior Technical Product Manager at AWS, specializing in AWS Identity products. He focuses on making identity the easy part of building on AWS for customers. Outside of technology, Zach enjoys traveling and exploring new cultures and cuisines.

David Sing

David Sing

David is a Principal Product Manager at AWS, specializing in AWS IAM. He focuses on simplifying IAM for builders and AI agents, safe credential issuance for AI agents, and authorization policy governing agent access. Outside of technology, David enjoys economics and markets, fishing, and time outdoors with his family.

Punit Deotale

Punit Deotale

Punit is a Software Development Manager on the AWS IAM team. He leads work on making it easier for customers to create and manage IAM roles directly within AWS service workflows, so they can set up the right permissions without leaving what they are doing. His focus is reducing permission-setup friction across AWS while helping customers stay aligned with least privilege. Outside of work, Punit enjoys reading, building side projects, and being outdoors.

Can I do that with policy? Understanding the AWS Service Authorization Reference

27 April 2026 at 18:01

Understanding what AWS Identity and Access Management (IAM) policies can control helps you build better security controls and avoid spending time on approaches that won’t work. You’ve likely encountered questions like:

  • Can I use AWS Organizations service control policies (SCPs) to prevent the creation of security groups that allow traffic from 0.0.0.0/0?
  • Can I block uploads unless objects are encrypted?
  • Can I prevent functions with more than 512 MB of memory allocated?

Some of these are possible with IAM policies. Others are not. The difference is determined by a fundamental principle of AWS authorization: Policies make decisions based on information available in the authorization context at the time of the API call.

In this blog post, you learn how to use the AWS Service Authorization Reference to determine what’s achievable with IAM policies, recognize scenarios that need alternative solutions, and build more effective security controls in your AWS environment.

Understanding AWS authorization context

When you make an AWS API request through the AWS Management Console, AWS Command Line Interface (AWS CLI), or AWS SDK, the specific AWS service (such as Amazon S3 or Amazon EC2) receiving the request assembles a request context containing information about that request. This context is used for policy evaluation decisions. Request context is structured using the Principal, Action, Resource, Condition (PARC) model, which has four key components.

  • Principal: Identifies the requester and their attributes (tags, session context)
  • Action: Specifies the AWS API operation being requested (for example, s3:PutObject, ec2:RunInstances)
  • Resource: Defines the target AWS resource using Amazon Resource Names (ARNs)
  • Condition: Provides additional context available at request time, such as IP address, time, encryption parameters, MFA status, and service-specific attributes

The following example shows the typical request context for an Amazon S3 object upload:

  • Principal: AIDA123456789EXAMPLE
  • Action: s3:PutObject
  • Resource: arn:aws:s3:::my-bucket/documents/samplereport.pdf
  • Condition:
    • aws:PrincipalTag/Department=Finance
    • aws:RequestedRegion=us-east-1
    • aws:SourceIp=x.x.x.x
    • aws:MultiFactorAuthPresent=true
    • s3:x-amz-server-side-encryption=AES256
    • s3:x-amz-storage-class=STANDARD_IA

IAM policies can evaluate request metadata like encryption method and storage class being specified. However, it cannot evaluate the actual file contents, object size, or specific data patterns. Policy evaluation occurs at the time of the request, using the information present in the authorization context.

An essential resource: The Service Authorization Reference

The Service Authorization Reference is the authoritative documentation for understanding what policies can control. For every AWS service, it documents:

  • Actions: Every controllable operation
  • Resources: Resource types that can be targeted
  • Condition keys: The exact context information available for policy decisions

Condition keys are broadly divided into two categories. Global condition keys, which can be used across AWS services, and service-specific condition keys, which are defined for use with an individual AWS service. Use the Service Authorization Reference to find the global-condition keys or service-specific condition keys for each AWS service.

How to use the Service Authorization Reference

Follow these steps to determine if your requirement can be controlled with IAM policies:

  1. Navigate to your service: Go to the page for the specific AWS service you’re working with, such as Actions, resources, and condition keys for Amazon S3.
  2. Find the action you want: Find the API operation you want to control. Be precise, different actions have different available condition keys.
  3. Examine available condition keys: The Condition keys column shows what context information AWS makes available for that action.
  4. Make your feasibility determination: If the information you need isn’t listed as a condition key, you will not be able to control it with IAM policies alone.

Let’s take an example from the Amazon Elastic Compute Cloud (Amazon EC2) ec2:RunInstances action to see what you can and can’t control. In the Service Authorization Reference under the Amazon EC2 section, examine the RunInstances action and check the Resource types column. The RunInstances action affects multiple resource types, each with its own set of condition keys.

For the instance* resource type:

  • ec2:InstanceType: Can restrict instance types
  • ec2:EbsOptimized: Can require EBS optimization
  • aws:RequestTag/: Can enforce tagging requirements

For the network-interface* resource type:

  • ec2:Subnet: Can control subnet placement
  • ec2:Vpc: Can limit to specific virtual private clouds (VPCs)
  • ec2:AssociatePublicIpAddress: Can control public IP assignment

Note: These are a few examples from the many condition keys available for each resource type under the RunInstances action. The Service Authorization Reference lists dozens of condition keys across resource types (instance, network interface, security group, subnet, volume, and so on) that RunInstances affects. Consult the complete reference to see the available options for your specific use case.

Access the Service Authorization Reference programmatically

Beyond the human-readable documentation, AWS provides the Service Authorization Reference in machine-readable JSON format to streamline automation of policy management workflows. Use this programmatic access to incorporate authorization metadata into your development and security workflows.
For detailed information about the JSON structure and field definitions, see the Simplified AWS service information for programmatic access.
Developers can use tools like the IAM MCP Server for AWS IAM operations. This server provides AI assistants with the ability to manage IAM users, roles, policies, and permissions while following security best practices.

Using IAM policies to control specific scenarios

The following examples show how you can use IAM policies to control specific scenarios.

Example 1: Enforce AES256 server-side encryption on S3 objects

In the Amazon S3 Service Authorization Reference, under s3:PutObject action, the s3:x-amz-server-side-encryption condition key is available in the authorization context, which can be used to control the server-side encryption of S3 objects with AES-256. Here is the required policy.

Policy 1: Deny Amazon S3 object upload if the encryption doesn’t use AES-256

{
	"Version": "2012-10-17",
	"Statement": [
		{
			"Sid": "DenyUnencryptedObjectUploads",
			"Effect": "Deny",
			"Action": "s3:PutObject",
			"Resource": "arn:aws:s3:::my-bucket/*",
			"Condition": {
				"StringNotEquals": {
					"s3:x-amz-server-side-encryption": "AES256"
				}
			}
		}
	]
}

Policy 1 is a resource-based policy that can be applied on an S3 bucket to restrict object uploads. It denies a PutObject request when the server-side encryption isn’t using the AES-256 encryption algorithm.

Example 2: Allow different instance types based on the user’s cost center tag.

When checking the Amazon EC2 Service Authorization Reference for ec2:RunInstances, the ec2:InstanceType condition key, which is resource specific, is available. To restrict instance types based on who is launching them (rather than just what is being launched), you can either combine this with a global condition key or attach different policies to different principals. By using aws:PrincipalTag/tag-key alongside ec2:InstanceType, you can identify the user’s cost center from their IAM identity tags and then apply different instance type restrictions accordingly. This allows a single policy to dynamically enforce different permissions based on the requester’s identity.

Policy 2: Restricting EC2 instance types by cost center

{
	"Version": "2012-10-17",
	"Statement": [
		{
			"Sid": "AllowDevInstanceTypes",
			"Effect": "Allow",
			"Action": "ec2:RunInstances",
			"Resource": "arn:aws:ec2:*:*:instance/*",
			"Condition": {
				"StringEquals": {
					"aws:PrincipalTag/CostCenter": "Development"
				},
				"StringLike": {
					"ec2:InstanceType": "t3.*"
				}
			}
		},
		{
			"Sid": "AllowProdInstanceTypes",
			"Effect": "Allow",
			"Action": "ec2:RunInstances",
			"Resource": "arn:aws:ec2:*:*:instance/*",
			"Condition": {
				"StringEquals": {
					"aws:PrincipalTag/CostCenter": "Production"
				},
				"StringLike": {
					"ec2:InstanceType": [
						"m5.*",
						"c5.*",
						"r5.*"
					]
				}
			}
		}
	]
}

This is an identity-based policy that you can attach to IAM users, groups, or roles to control EC2 instance launches based on cost allocation. In the first statement, aws:PrincipalTag, which is a global condition key (tags attached to the IAM user or role), is used to determine which instance types are allowed. Users tagged with CostCenter=Development can only launch cost-effective T3 instance types (t3.micro, t3.small, t3.medium, and so on)with the service specific key ec2:InstanceType.

In the second statement, users tagged with CostCenter=Production can launch more powerful instance types from the M5 (general purpose), C5 (compute optimized), and R5 (memory optimized) families. This approach lets organizations enforce cost controls and allocate resources based on workload requirements. Each cost center maintains flexibility for its specific needs.

Note: Additional resources are required in the IAM policy to successfully launch EC2 instances. For the complete list, see Launch Instances.

Example 3: Users can only access and update DynamoDB items where the partition key matches their username.

You have identified that GetItem, PutItem,and UpdateItem actions are required. Corresponding to these actions, you can use the condition key to expose partition key values in the authorization context as described in the Amazon DynamoDB Service Authorization Reference

Policy 3: DynamoDB fine-grained access control

{
	"Version": "2012-10-17",
	"Statement": [
		{
			"Effect": "Allow",
			"Action": [
				"dynamodb:GetItem",
				"dynamodb:PutItem",
				"dynamodb:UpdateItem"
			],
			"Resource": "arn:aws:dynamodb:us-east-1:111122223333:table/UserProfiles",
			"Condition": {
				"ForAllValues:StringEquals": {
					"dynamodb:LeadingKeys": ["${aws:username}"]
				}
			}
		}
	]
}

The policy allows users to perform read and write actions (GetItem, PutItem, and UpdateItem) on the UserProfiles table, but only for items where the partition key value equals their own username (using the ${aws:username} policy variable). For example, if user alice attempts to access an item with partition key bob, the request will be denied.

Scenarios that need more than policies alone

Some requirements can’t be met using IAM policies. Here are three common scenarios that aren’t achievable with IAM policies alone.

Scenario 1: Block users from creating security group rules that allow traffic from 0.0.0.0/0 on TCP port 22

Upon checking the Amazon EC2 Service Authorization Reference, you will find that the ec2:AuthorizeSecurityGroupIngress action is required in an IAM policy to add an inbound access rules to a security group.

To verify this in the Service Authorization Reference, navigate to the Amazon EC2 Service Authorization Reference and search for the AuthorizeSecurityGroupIngress action, which is the action that creates security group rules. After you locate this action, review the Condition keys column and look for condition keys related to CIDR blocks, IP ranges, ports, or protocols. Available condition keys for ec2:AuthorizeSecurityGroupIngress include:

Notice there are no condition keys for CIDR blocks (such as 0.0.0.0/0), port numbers (such as 22), or protocols (such as TCP). The authorization context doesn’t include information about the specific CIDR blocks, ports, or protocols being added to the security group rule, so IAM policies can’t control these attributes.

Solution
Take a reactive approach using the AWS Config managed rule INCOMING_SSH_DISABLED to detect overly permissive rules. You can also use a combination of Amazon EventBridge and Lambda to either send a notification to your security team for the non-compliant configuration or to restrict the security group through an automation. For more information, see How to Automatically Revert and Receive Notifications About Changes to Your Amazon VPC Security Groups.

Scenario 2: Prevent creation of Lambda functions with more than 512 MB of memory allocated

Following the same verification methodology described in Scenario 1, navigate to the AWS Lambda Service Authorization Reference and examine the CreateFunction action’s condition keys for the function* resource type.

Available condition keys for lambda:CreateFunction with the function* resource type include:

  • lambda:CodeSigningConfigArn: Filters access by the ARN of the code signing
  • configuration-lambda:Layer: Filters access by the ARN of a version of an AWS Lambda layer
  • lambda:VpcIds: Filters access by the ID of the VPC configured for the Lambda function

There is no condition key for memory allocation (MemorySize parameter), timeout settings, storage configuration (EphemeralStorage), or runtime selection. Because memory allocation isn’t exposed in the authorization context, IAM policies can’t restrict this parameter.

Solution

Key takeaways

Keep these principles in mind when working with IAM policies:

  • Policies control what’s in the authorization context, not all elements you see in API documentation
  • The Service Authorization Reference is authoritative; if something isn’t listed as a condition key, you can’t control it with policies
  • Different actions have different available contexts even within the same service
  • Alternative approaches exist. AWS Config, EventBridge, and service-specific controls can be used to achieve your goals when policies alone can’t
  • Layered security is essential; combine preventive, detective, and responsive controls to help ensure that your data is secure

Conclusion

In this post, you learned how to use the AWS Service Authorization Reference to determine what’s achievable with IAM policies and recognize scenarios that require alternative solutions. By understanding that policies can only make decisions based on information available in the authorization context, you can build more effective security controls and avoid spending time on approaches that won’t work.

The Service Authorization Reference is your authoritative source for understanding policy capabilities. When you need to implement a control, start there to see if the required condition keys exist. If they don’t, you will need to layer in detective or responsive controls using services like AWS Config, Amazon EventBridge, or AWS Lambda.

Remember that effective AWS security isn’t about finding one perfect control, it’s about combining preventive, detective, and responsive measures to create defense in depth. IAM policies are powerful tools for prevention and work as part of a comprehensive security strategy.

Next steps:

If you have feedback about this post, submit comments in the Comments section below.


Author

Anshu Bathla

Anshu is a Senior Lead Consultant – SRC at AWS, based in Gurugram, India. He works with customers across diverse verticals to help strengthen their security infrastructure and achieve their security goals. Outside of work, Anshu enjoys reading books and gardening at his home garden.

Author

Prafful Gupta

Prafful is an Associate Delivery Consultant at AWS, based in Gurugram, India. Having started his professional journey with Amazon, he specializes in DevOps and Generative AI solutions, helping customers navigate their cloud transformation journeys. Beyond work, he enjoys networking with fellow professionals and spending quality time with family.

❌