❌

Normal view

Extend Amazon Bedrock Guardrails to Tool Interactions Using the Strands Agents SDK

27 August 2026 at 18:20

If you’re running AI agents in production, Amazon Bedrock Guardrails protects the model boundary. But your agents also invoke tools, fetch external data, and communicate with other systems. That data flows outside the model boundary, where model-level guardrails can’t reach.

You can extend guardrail coverage to those interactions using three validation checkpoints built with the Strands Agents SDK lifecycle hooks and Amazon Bedrock guardrails. You implement each checkpoint using a Strands life-cycle hook, which validates data at a critical trust boundary without changing your existing tools or agent logic.

Agents can communicate with other systems through the Model Context Protocol (MCP), a standard for connecting AI systems to data sources and tools. You will learn how to implement three validation checkpoints, scope different guardrails to specific tools, and scale them to other agents.

Extending guardrails beyond the model boundary

Amazon Bedrock Guardrails provides protection at the model boundary. Every model invocation is checked: the input prompt is validated before inference, and the model response is validated after inference. You can enforce guardrail use at the account level using AWS Identity and Access Management (IAM) policies, making guardrails mandatory for model calls across your account. You can further refine this by using Amazon Bedrock Guardrails input tagging to mark specific portions of the prompt for evaluation, so trusted content like system prompts can be skipped.

Guardrails cover what the model sees, but agents do more than call models. They invoke tools, pull data from external sources, communicate with MCP servers, and return results to users. These interactions happen outside the model boundary by design, because model-level guardrails focus on the prompts and responses the model itself handles. Adding validation at the tool boundary complements, rather than replaces, that model-level protection.

Model-level guardrails alone leave you exposed in four ways:

  • Tool parameters pass through unchecked. The model decides which tool to use and what parameters to pass. The agent then calls the tool with those parameters. No validation sits between the model’s decision and the tool’s execution. If the parameters inadvertently contain personally identifiable information (PII) or policy-violating content, the tool runs with that content.
  • External data enters without validation. Agents consume data from tool responses, MCP server outputs, and API calls. Without validation at the tool boundary, content from external sources can influence the agent’s behavior before model-level guardrails have a chance to evaluate it.
  • Misleading content can affect reasoning. An agent that retrieves inaccurate or misleading content from an external source might treat it as authoritative, producing skewed recommendations in lending, healthcare, or legal advice.
  • Multi-agent systems can spread bad data downstream. In multi-agent systems, a misconfigured or poorly designed upstream component can pass policy-violating content to downstream agents. Model-level guardrails at each agent’s boundary don’t inspect data flowing between agents at the tool layer.

Three validation checkpoints

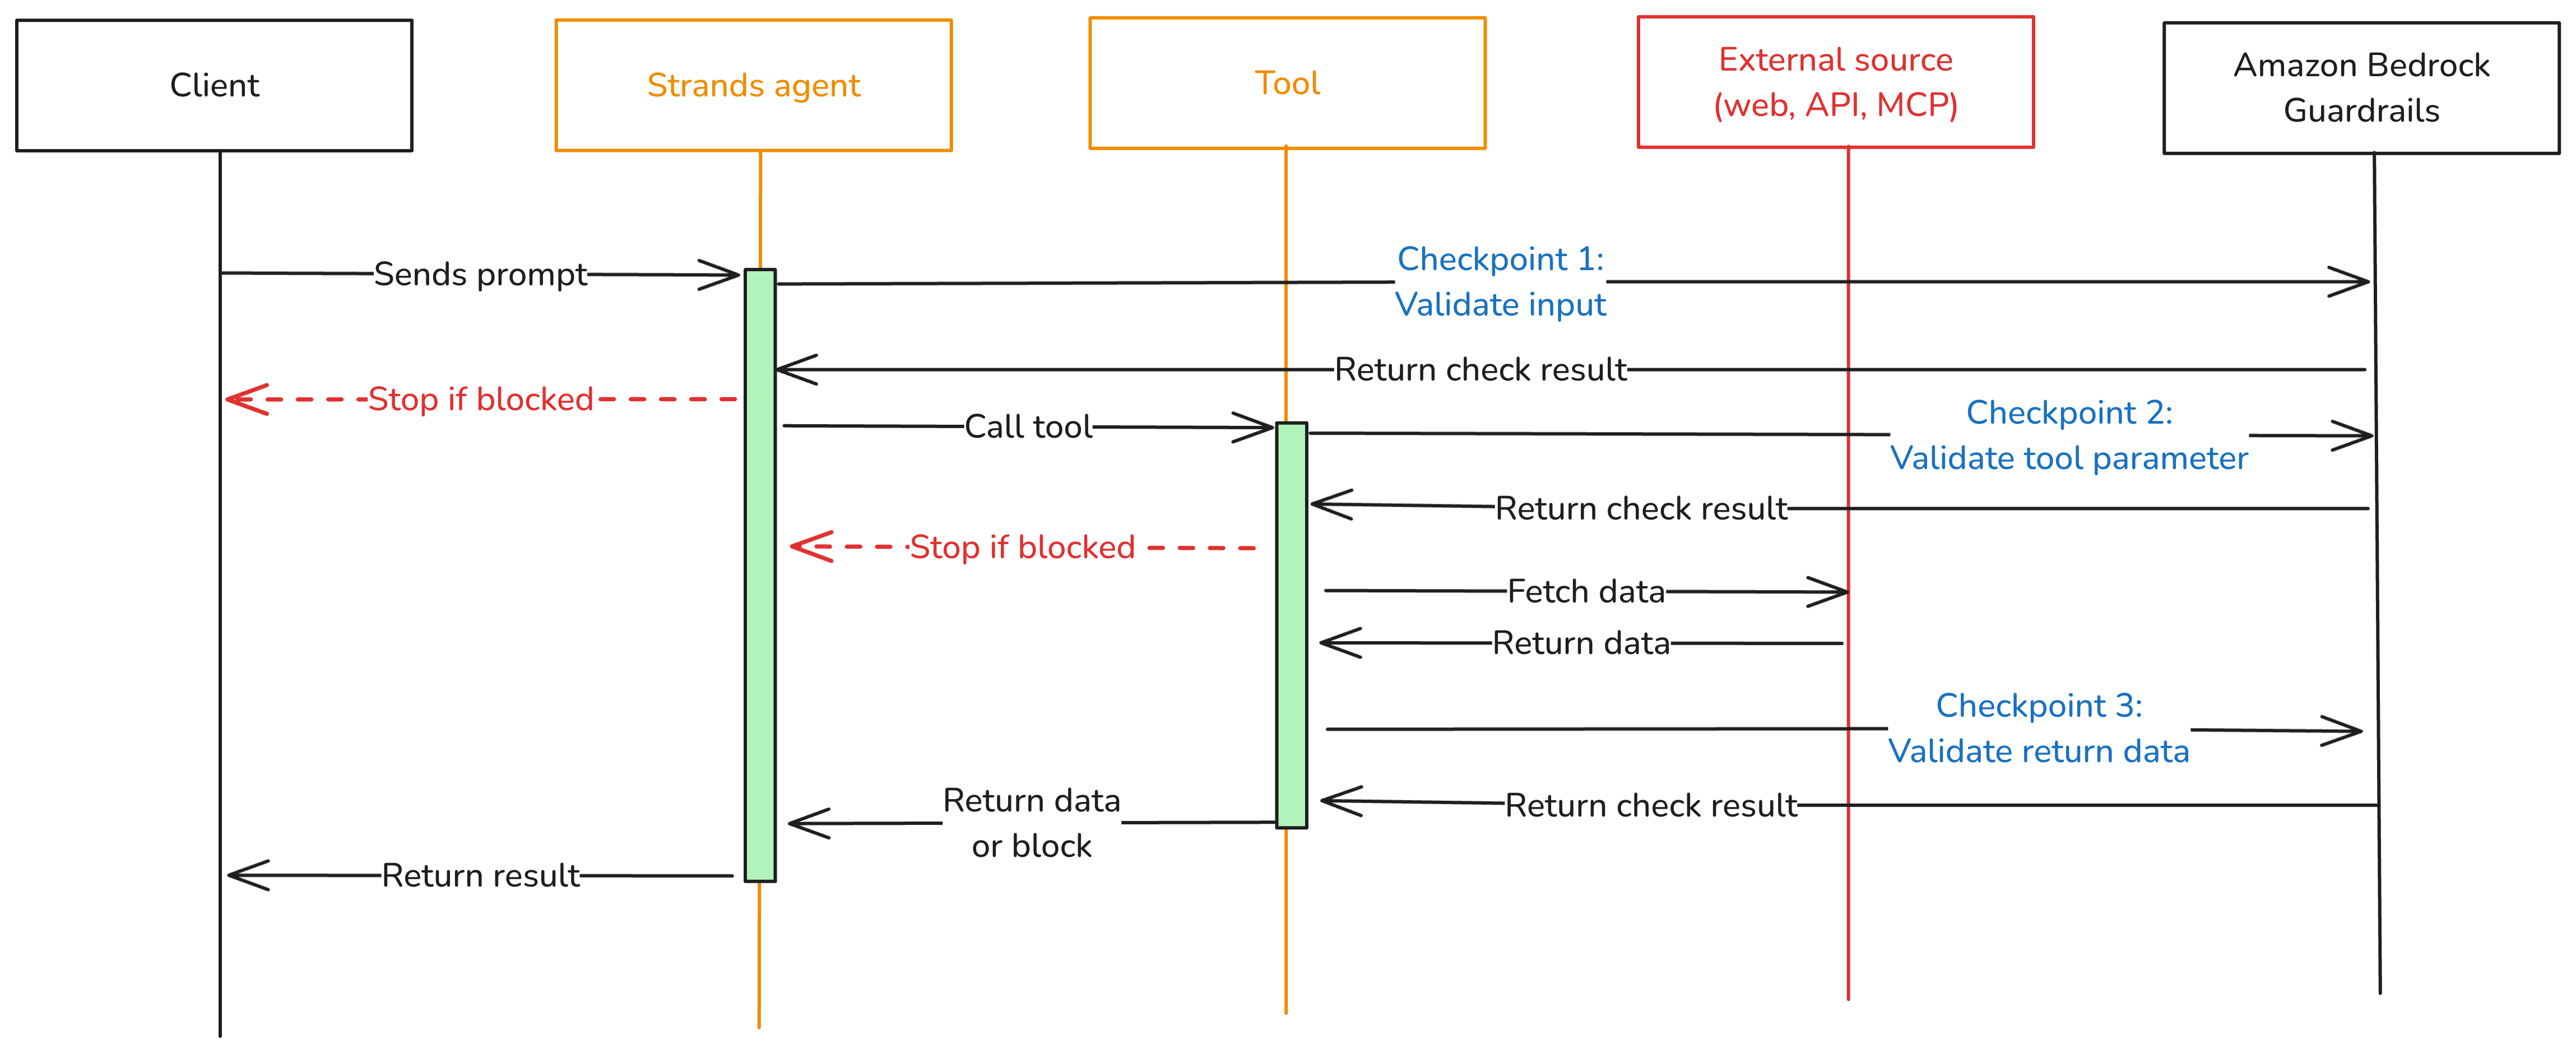
To close these gaps, add three validation checkpoints at each trust boundary where data crosses into or out of your agent as shown in Figure 1.

  • Checkpoint 1: Inbound data validation – Check data before it reaches the modelβ€”user input, data from other agents, MCP tool servers, and RAG pipelines. You catch policy-violating or biased content before it enters the model’s context window. In the Strands Agents SDK, you implement this using a BeforeInvocationEvent hook that fires before model inference or tool execution occurs. The hook inspects incoming messages and blocks the request if the content violates policies. The model doesn’t see blocked content.
  • Checkpoint 2: Tool interaction supervision – Before the agent calls a tool, a BeforeToolCallEvent hook checks the parameters it’s about to pass. This is the gap model-level guardrails don’t cover. The model has already decided what to send, but nothing has verified whether that content is safe to act on. If the hook flags the input, the call is canceled before the real-world action occurs.
  • Checkpoint 3: Outbound data validation – Validate results before returning them to the user or passing them to downstream systems. You need this most for tools that ingest external content, like a web search tool fetching web pages from sites outside your control. In Strands, an AfterToolCallEvent hook validates the tool’s return value and replaces it with a block message if the content violates policies.
Figure 1: Three validation checkpoints extend Amazon Bedrock Guardrails from the model boundary to the tool boundary.

Figure 1: Three validation checkpoints extend Amazon Bedrock Guardrails from the model boundary to the tool boundary.

You can adjust the validation intensity of each checkpoint:

  • At Checkpoint 1, use a full Amazon Bedrock guardrail with PII detection, content filtering, and topic enforcement.
  • Checkpoint 2 can be lighter. Configure a separate Amazon Bedrock guardrail with rules tailored to the specific tool being called, or run local checks like regex validation or schema enforcement.
  • For Checkpoint 3, focus on unwanted content detection for tool outputs that return external data.

Mix fast deterministic checks (regex, schema validation, allowlists) with AI-based guardrail evaluations. This keeps latency low.

Implementation

The implementation uses boto3, the AWS SDK for Python, to call the ApplyGuardrail API. The Strands Agents SDK exposes one life-cycle event per checkpoint. Here’s how to implement each one.

Prerequisites

This post assumes you already have a working Strands agent. Your agent should use least-privilege tool access, scoped system prompts, and validated business logic. If you’re starting from scratch, see Strands Agents SDK: A technical deep dive into agent architectures and observability for a step-by-step walk through of building and deploying a Strands agent with Amazon Bedrock Agent Core.

Before implementing the multi-checkpoint approach, you’ will need:

  1. An AWS account with access to Amazon Bedrock
  2. Amazon Bedrock Guardrails configured (see Creating a guardrail)
  3. Python 3.11 or later installed
  4. The Strands Agents SDK installed: pip install strands-agents
  5. AWS credentials configured with permissions for bedrock:ApplyGuardrail and bedrock:InvokeModel
  6. Your guardrail ID and version from the AWS Management Console for Amazon Bedrock (navigate to Guardrails, select your guardrail, and copy the ID)

Create the guardrail validation hook

The GuardrailHook class is a Strands HookProvider. It registers three callbacks, one for each lifecycle event. When Strands triggers an event, the matching callback runs validate_inbound checks user messages, validate_input checks tool parameters before execution, and validate_output checks tool results. All three use the shared _check method, which calls the Amazon Bedrock ApplyGuardrail API.

Create a guardrail_hook.py file and add this implementation. Use the optional tool_names parameter to scope a hook to specific tools, or pass None to apply it everywhere:

import boto3
from strands.hooks import HookProvider, HookRegistry
from strands.hooks.events import (
    BeforeInvocationEvent,
    BeforeToolCallEvent,
    AfterToolCallEvent,
)

class GuardrailHook(HookProvider):

    def __init__(self, guardrail_id, guardrail_version, region_name, tool_names=None):
        self.client = boto3.client("bedrock-runtime", region_name=region_name)
        self.guardrail_id = guardrail_id
        self.guardrail_version = guardrail_version
        self.tool_names = tool_names  # None = apply to all tools

    def register_hooks(self, registry: HookRegistry, **kwargs):
        registry.add_callback(BeforeInvocationEvent, self.validate_inbound)
        registry.add_callback(BeforeToolCallEvent, self.validate_input)
        registry.add_callback(AfterToolCallEvent, self.validate_output)

    def _check(self, content, source="INPUT"):
        """Call Bedrock ApplyGuardrail. Returns True if content is safe."""
        response = self.client.apply_guardrail(
            guardrailIdentifier=self.guardrail_id,
            guardrailVersion=self.guardrail_version,
            source=source,       # "INPUT" applies input policies; "OUTPUT" applies output policies
            content=[{"text": {"text": content}}],
        )
        return response["action"] != "GUARDRAIL_INTERVENED"

    # Checkpoint 1 β€” BeforeInvocationEvent
    # Validates user input before model inference or tool execution occurs.
    # The model does not see blocked content.
    async def validate_inbound(self, event: BeforeInvocationEvent):
        for msg in reversed(event.messages):
            if msg.get("role") == "user":
                for block in msg.get("content", []):
                    text = block.get("text", "")
                    if text and not self._check(text):
                        event.messages.clear()
                        event.messages.append({
                            "role": "user",
                            "content": [{"text": "Request blocked by safety guardrail."}],
                        })
                        return
                break

    # Checkpoint 2 β€” BeforeToolCallEvent
    # Validates tool input parameters before the tool executes.
    # Skips tools not in tool_names (if a filter is set).
    async def validate_input(self, event: BeforeToolCallEvent):
        if self.tool_names and event.tool_use.get("name") not in self.tool_names:
            return
        tool_input = event.tool_use.get("input", {})
        for param_value in tool_input.values():
            if isinstance(param_value, str) and not self._check(param_value):
                event.cancel_tool = "This request was blocked by a safety guardrail."
                return

    # Checkpoint 3 β€” AfterToolCallEvent
    # Validates tool output before it reaches the agent.
    # Skips tools not in tool_names (if a filter is set).
    async def validate_output(self, event: AfterToolCallEvent):
        if self.tool_names and event.tool_use.get("name") not in self.tool_names:
            return
        content_parts = [
            block["text"]
            for block in event.result.get("content", [])
            if "text" in block
        ]
        content = "\n".join(content_parts)
        if content and not self._check(content, source="OUTPUT"):
            event.result = {
                "toolUseId": event.result["toolUseId"],
                "status": "error",
                "content": [{"text": "Content blocked by safety guardrail."}],
            }

Define tools

Strands discovers tools through the @tool decorator. The decorator turns a plain Python function into a tool the model can call, using the function’s docstring and type hints as the tool’s contract. Here are two simple examples used in the registration sections below. A web search tool and a customer data tool:

from strands import tool

@tool
def web_search(query: str) -> str:
    """Search the web and return a result snippet."""
    # Replace with your actual search implementation
    return f"Search results for: {query}"

@tool
def get_customer_data(customer_id: str) -> str:
    """Retrieve customer record by ID."""
    # Replace with your actual data lookup implementation
    return f"Customer record for: {customer_id}"

If you don’t have existing tools, create a tools.py file and copy in the example code above.

Register the hook

Strands activates hooks through the hooks parameter on the Agent constructor. After being registered, the hook’s callbacks run automatically on every matching lifecycle event. No changes are needed in your tools or agent logic. For a single guardrail applied to all tools, create one hook instance and pass it to your agent:

from strands import Agent
from strands.models import BedrockModel
from guardrail_hook import GuardrailHook
from tools import web_search, get_customer_data # Example tools - replace with your tools

# Example model and region selection
model = BedrockModel(
    model_id="us.anthropic.claude-sonnet-4-5",
    region_name="us-east-1",
)

guardrail_hook = GuardrailHook(
    guardrail_id="your-guardrail-id",    # Copy it from the Amazon Bedrock console > Guardrails
    guardrail_version="1",               # Use "DRAFT" for testing
    region_name="us-east-1",             # Region where the guardrails are defined
)

agent = Agent(
    model=model,
    tools=[web_search, get_customer_data], # Example tools
    system_prompt="You are a helpful assistant.", # Example system prompt
    hooks=[guardrail_hook],  # Applied to all tool calls
)

Use different guardrails per tool

Different tools carry different risks. A web search tool fetches external content from untrusted sites and needs strict output filtering. A customer data tool returns internal records and might need PII detection configured differently. The tool_names parameter scopes a hook to specific tools. Strands still runs every registered hook on each event, but hooks skip the call when the tool name doesn’t match. Register one hook per guardrail:

from strands import Agent
from strands.models import BedrockModel
from guardrail_hook import GuardrailHook
from tools import web_search, get_customer_data # Example tools - replace with your tools

# Example model and region selection
model = BedrockModel(
    model_id="us.anthropic.claude-sonnet-4-5",
    region_name="us-east-1",
)
# Strict content filtering and PII detection for web search results
web_search_hook = GuardrailHook(
    guardrail_id="gr-websearch-id",      # Guardrail ID with content filtering + PII detection
    guardrail_version="1",               # Or set to DRAFT
    region_name="us-east-1",             # Change to your region
    tool_names={"web_search"},           # Only applies to the web_search tool
)

# PII detection for customer data β€” prevents sensitive records from leaking into tool parameters
customer_data_hook = GuardrailHook(
    guardrail_id="gr-customerdata-id",   # Guardrail ID with PII detection
    guardrail_version="1",               # Or set to DRAFT
    region_name="us-east-1",             # Change to your region
    tool_names={"get_customer_data"},    # Only applies to the get_customer_data tool
)

agent = Agent(
    model=model,
    tools=[web_search, get_customer_data],        # Example tools
    system_prompt="You are a helpful assistant.", # Example system prompt
    hooks=[web_search_hook, customer_data_hook],  # Each hook runs only for its assigned tools
)

Each guardrail is configured independently in the Amazon Bedrock console. You can match validation strictness to each tool’s risk level instead of applying one policy across your entire agent.

Test your implementation

Run a quick test with the preceding examples:

  1. Create a project folder and add the following files:
    1. guardrail_hook.py the GuardrailHook class
    2. tools.py the web_search and get_customer_data tool definitions as examples
    3. agent.py the agent setup from the Register the hook section
  2. In agent.py, add a test prompt at the end:
# Send a test prompt
response = agent("Search the web for the latest news on AI security.")
print(response)
  1. Update the guardrail IDs, AWS Region, and model ID in agent.py to match your configuration.
  2. Run the agent from your project folder: python agent.py

The guardrail hook runs at each checkpoint. If the prompt or any tool output is flagged, you’ll see the block message in the response instead of the tool result.

Use the hook across your organization

The GuardrailHook is a standalone HookProvider. Build it once, then attach it to Strands agents by passing it to the hooks parameter. The same hook package can be published as an internal library and consumed by

You can swap guardrail configurations or add checks like regex or schema validation without touching agent or tool code.

Conclusion

Amazon Bedrock Guardrails protects the model boundary, but agents also call tools, consume external data, and return results that never pass through model-level checks. The three validation checkpoints in this post close that gap using Strands Agents SDK lifecycle hooks: BeforeInvocationEvent validates user input, BeforeToolCallEvent validates tool parameters, and AfterToolCallEvent validates tool output. The same GuardrailHook class supports one shared guardrail or different guardrails scoped per tool, and deploys unchanged from local testing to Amazon Bedrock Agent Core Runtime.

To learn more, see:

If you have feedback about this post, submit comments in the Comments section below.


Stephan Traub

Stephan Traub

Stephan is a senior security consultant with AWS Professional Services, where he works closely with customers across different industries. A true technology enthusiast, Stephan is passionate about empowering customers to achieve a robust security posture within their cloud environments and AI workloads. When Stephan isn’t immersed in his AWS work, you can find him on the volleyball court or exploring the world with his family.

Introducing OAuth Support for AWS MCP Server

10 July 2026 at 01:43

You can now connect your agents to the AWS MCP Server using the same credentials and sign-in methods that you already use for connecting to the AWS Management Console or AWS Command Line Interface (AWS CLI) through a familiar browser-based experience powered by industry-standard OAuth. This new sign-in path supports AWS Identity and Access Management (IAM) federation, AWS IAM Identity Center, and root or IAM users.

In addition, AWS is introducing several new security and governance tools, including: new global condition keys for OAuth, token introspection and revocation, dynamic client registration, new AWS CloudTrail elements, and a new API for headless OAuth connectivity. All of this is compatible with your existing IAM configuration including permissions, roles, and federated access.

In this post, you’ll learn how to connect your agents to the AWS MCP Server, understand how AWS Sign-In authorizes agent access, and manage access using new security and governance capabilities.

How to connect an agent to the AWS MCP Server

This walkthrough uses Claude Code, but the same steps apply to any agent that supports Model Context Protocol (MCP) such as Kiro, Codex, and Gemini. See Setting up the AWS MCP Server for how to connect the AWS MCP Server to an agent.

Prerequisite permissions

To connect an agent to the AWS MCP Server, you’ll need the IAM permissions required for OAuth-based sign-in. The following AWS CLI command adds a managed policy with required permissions to your IAM role (remember to replace <MyRole> with your IAM role):

aws iam attach-role-policy \
  --role-name <MyRole> \
  --policy-arn arn:aws:iam::aws:policy/AWSMCPSignInOAuthAccessPolicy

Step 1: Configure the AWS MCP Server on your agent

Run the following command to add the AWS MCP Server endpoint to your agent’s configuration as shown in Figure 1:

claude mcp add --transport http aws-mcp https://aws-mcp.us-east-1.api.aws/mcp

Figure 1: Adding the AWS MCP Server endpoint to Claude Code

Figure 1: Adding the AWS MCP Server endpoint to Claude Code

Step 2: Review the authorization request

The first time your agent needs to access the AWS MCP Server, it opens a browser and redirects you to an AWS Sign-In page, shown in Figure 2. Authenticate as you would on AWS console or AWS CLI, review the authorization request, and approve access. You should receive an Authorization successful message.

Figure 2: Review authorization request

Figure 2: Review authorization request

Note that if you already have an active AWS Sign-In session (e.g., because you previously signed in to the console earlier in the day), you can reuse that session without needing to sign in again.

Step 3: Start using AWS tools

After connecting your agent to the AWS MCP Server, you can begin invoking tools provided by the server. To verify that Claude Code is connected to the AWS MCP Server, start Claude Code and run the following command:

/mcp

The command displays the configured MCP servers and confirms that the AWS MCP Server is connected and ready to use with your AWS credentials.

Figure 3 shows an example of a successful connection to the AWS MCP Server.

Figure 3: Verifying the AWS MCP Server connection in Claude Code

Figure 3: Verifying the AWS MCP Server connection in Claude Code

After the connection is established, you can ask Claude Code to invoke tools provided by the AWS MCP Server. For example, enter the following prompt:

Deploy a sample serverless web application into my development AWS account

Claude Code uses the AWS MCP Server to identify the active AWS account, confirm the target account, and describe the deployment it plans to perform before invoking AWS services on your behalf.

Figure 4 shows Claude Code confirming the active AWS account and outlining the resources that will be deployed.

Figure 4: Using Claude Code to deploy a sample serverless application through the AWS MCP Server

Figure 4: Using Claude Code to deploy a sample serverless application through the AWS MCP Server

Authorization models and how they work

AWS Sign-In supports two authorization models for connecting agents to the AWS MCP Server:

  • Interactive authorization for developers’ AI agents using browser based authentication
  • Non-interactive (headless) authorization for applications and AI agents that already have AWS credentials and don’t have access to a browser

Note that authorizing an agent allows it to access the AWS MCP Server on your behalf. It doesn’t grant the agent additional AWS permissions. Every request is still evaluated using your existing IAM policies, SCPs, RCPs, permission boundaries, and other organizational controls.

Interactive access

In the interactive case, the agent first discovers the AWS Sign-In OAuth server and then registers itself as an OAuth client using Dynamic Client Registration (DCR). It then redirects you to an AWS Sign-In page where you authenticate and authorize access (step 2 in the preceding section). After successful authorization, AWS Sign-In then issues short-lived access tokens and refresh tokens that authorize the agent to access the AWS MCP Server on your behalf. AWS Sign-In automatically manages token issuance and token refresh, enabling authorized agents to continue accessing the AWS MCP Server without requiring you to repeatedly sign in.

The interactive authorization model supports three distinct sign-in methods: native AWS IAM credentials for individual developers, managed access through AWS IAM Identity Center for enterprises, and seamless federated access via third-party providers like Okta and Ping Identity for larger organizations.

OAuth server metadata and DCR

Before an agent can request authorization, it must discover the AWS Sign-In OAuth endpoints and register itself as an OAuth client. AWS Sign-In supports OAuth metadata discovery and DCR, allowing supported agents to configure themselves automatically without requiring developers to manually provision OAuth client IDs and client secrets. When an agent connects to the AWS MCP Server for the first time, it retrieves the AWS MCP Server’s protected resource metadata (RFC 9728) and the AWS Sign-In OAuth metadata (RFC 8414). The agent then uses (RFC 7591) to register with AWS Sign-In, obtain a client ID, and initiate the standard OAuth authorization code flow.

AWS Sign-In supports OAuth discovery and DCR for agents running on local workstations and supported hosted environments. For the current list of supported agents and environments, see Supported redirect URIs for the AWS MCP Server.

Non-interactive access to the AWS MCP Server

Non-interactive (headless) authorization is for agents and applications that run without a browser or human in the loop, and thus don’t require interactive sign-in. This allows agents that already have AWS credentials to obtain OAuth access tokens and connect to the AWS MCP Server. The following is an example of how to obtain an access token.

aws signin create-oauth2-token-with-iam \ 
--grant-type client_credentials \ 
--resource aws-mcp.amazonaws.com \  
--region us-east-1 
{ 
"accessToken": "ASOA****************************************...", 
"tokenType": "Bearer", 
"expiresIn": 3600 
}

In the non-interactive case, AWS Sign-In implements the OAuth client credentials grant using AWS security credentials instead of a static client secret. Applications authenticate to the AWS Sign-In token endpoint using SigV4 creds, and AWS Sign-In returns a short-lived OAuth access token that can be used to access the AWS MCP Server.

Please note you may have to update the SDK and AWS CLI, please refer to CLI guide.

Managing OAuth access

AWS Sign-In extends the existing IAM authorization model with capabilities for governing OAuth access to the AWS MCP Server. Administrators can use familiar IAM policies together with new OAuth-specific controls.

Granting OAuth permissions

OAuth access is governed using IAM policies and requires the following IAM actions:

  • signin:AuthorizeOAuth2Access – Allows users to sign in interactively using the OAuth authorization code flow
  • signin:CreateOAuth2Token – Allows applications to obtain OAuth access tokens by exchanging authorization codes, refresh tokens, or using client credentials

When an application requests access, AWS Sign-In creates an OAuth authorization grant between the agent and the AWS MCP Server. This grant is represented as an IAM resource, which the preceding AWS Sign-In actions are authorized against.

arn:aws:signin:us-east-1:012345678910:service-principal/aws-mcp.amazonaws.com

OAuth authorization grants are represented as an IAM resource enabling administrators to use standard IAM policy constructs, including global condition keys, together with OAuth-specific condition keys to control how authorization grants are created and used.

Governing OAuth access

AWS Sign-In introduces OAuth-specific condition keys that allow administrators to govern how agents obtain OAuth authorization. The following examples demonstrate common governance patterns.

To restrict OAuth authorization to localhost:

In addition to accessing the AWS MCP Server with agents on your local workstation, AWS supports signing into the AWS MCP Server on select hosted providers through dynamic client registration. Click here to view the list of supported remote providers. Many organizations want to allow developers to authorize agents running on their local workstations while preventing OAuth tokens from being delivered to untrusted redirect URIs or using unsupported authorization flows. The following policy allows only the OAuth authorization code and refresh token flows for the AWS MCP server and restricts token delivery tolocalhost.

{
  "Version": "2012-10-17",
  "Statement": [
    {
      "Effect": "Allow",
      "Action": [
        "signin:AuthorizeOAuth2Access",
        "signin:CreateOAuth2Token"
      ],
      "Resource": "arn:aws:signin:*:*:service-principal/aws-mcp.amazonaws.com",
      "Condition": {
        "StringLike": {
          "signin:OAuthRedirectUri": "http://localhost:*"
        },
        "StringEquals": {
          "signin:OAuthGrantType": [
            "authorization_code",
            "refresh_token"
          ]
        }
      }
    }
  ]
}

To deny access for a specific OAuth session

Use the aws:SignInSessionArn global condition key to deny authorization associated with a specific sign-in session. This allows administrators to contain a suspicious or compromised authorization session without affecting other active sessions.

{
  "Version": "2012-10-17",
  "Statement": [
    {
      "Effect": "Deny",
      "Action": [
        "*"
      ],
      "Resource": "*",
      "Condition": {
        "ArnEquals": {
          "aws:SignInSessionArn": "arn:aws:signin:us-east-1:111122223333:session/abc123-example-session-id"
        }
      }
    }
  ]
}

These examples demonstrate common governance patterns. Additional IAM and SCP examples are available in the AWS Sign-In condition keys reference.

Revoking OAuth tokens

AWS Sign-In provides OAuth token introspection and token revocation APIs that allow administrators to build custom tools for token validation and revocation. Access to these APIs is controlled through the signin:IntrospectOAuth2Token and signin:RevokeOAuth2Token permissions. IAM principals with permissions are allowed to introspect and revoke tokens for the same account.

The introspection API can be used to determine whether a token is active and obtain information about the associated authorization. The revocation API allows administrators and security tools to revoke individual refresh tokens without affecting other active sessions. For example, if an organization needs to invalidate access for a specific OAuth authorization, account admins can revoke the associated refresh token without affecting other active sessions.

Monitoring OAuth activity

OAuth-related activities are recorded in AWS CloudTrail, including authorization requests, token issuance, token revocation, and token introspection events. CloudTrail logs also capture details such as the OAuth client, target the AWS MCP Server, redirect URI, authorization flow, and associated sign-in session. In addition, AWS API calls made using OAuth access tokens include the associated aws:SignInSessionArn context, allowing organizations to correlate API activity with the originating OAuth sign-in session.

This allows security teams to monitor OAuth usage, investigate authorization activity, detect anomalous behavior, and integrate OAuth events into existing auditing, compliance, and incident response workflows alongside other AWS activity.

Here’s a CloudTrail sample for an AuthorizeOAuth2Access event:

{
    "eventVersion": "1.11",
    "userIdentity": {
        "type": "AssumedRole",
        "principalId": "AROATJHQDX737YZP****:testuser",
        "arn": "arn:aws:sts::111111111111:assumed-role/Admin/testuser",
        "accountId": "111111111111",
        "sessionContext": {
            "sessionIssuer": {
                "type": "Role",
                "principalId": "AROA2IRT4N5U4RDHM2LG4",
                "arn": "arn:aws:iam::111111111111:role/Admin",
                "accountId": "111111111111",
                "userName": "Admin"
            },
            "attributes": {
                "creationDate": "2026-06-09T05:06:39Z",
                "mfaAuthenticated": "false"
            }
        }
    },
    "eventTime": "2026-06-09T05:09:00Z",
    "eventSource": "signin.amazonaws.com",
    "eventName": "AuthorizeOAuth2Access",
    "awsRegion": "us-west-2",
    "sourceIPAddress": "192.0.0.2",
    "userAgent": "Mozilla/5.0 (Macintosh; Intel Mac OS X 10_15_7) AppleWebKit/537.36 (KHTML, like Gecko) Chrome/149.0.0.0 Safari/537.36",
    "requestParameters": {
        "resource": "https://aws-mcp.us-west-2.api.aws/mcp",
        "redirect_uri": "http://127.0.0.1:60432/oauth/callback",
        "code_challenge_method": "S256",
        "client_id": "arn:aws:signin:us-west-2::external-client/dcr/609544da-aasa-49a4-ab11-c2r457fa999"
    },
    "responseElements": null,
    "additionalEventData": {
        "success": "true"
    },
    "requestID": "4fb4ff7b-6yu7-9090-78i9-9c0088a65134",
    "eventID": "bb05b222-31ec-4237-b8e7-8eb26d4fd48b",
    "readOnly": true,
    "eventType": "AwsApiCall",
    "managementEvent": true,
    "recipientAccountId": "111111111111",
    "eventCategory": "Management",
    "tlsDetails": {
        "tlsVersion": "TLSv1.3",
        "cipherSuite": "TLS_AES_128_GCM_SHA256",
        "clientProvidedHostHeader": "us-west-2.oauth.signin.aws"
    }
}

Here’s a CloudTrail sample for a CreateOAuth2Token event:

{
    "eventVersion": "1.11",
    "userIdentity": {
        "type": "AssumedRole",
        "principalId": "AROATJHQDX737YZP7****:testuser",
        "arn": "arn:aws:sts::111111111111:assumed-role/Admin/testuser",
        "accountId": "111111111111",
        "sessionContext": {
            "sessionIssuer": {
                "type": "Role",
                "principalId": "AROA2IRT4N5U4RDHM****",
                "arn": "arn:aws:iam::111111111111:role/Admin",
                "accountId": "111111111111",
                "userName": "Admin"
            },
            "attributes": {
                "creationDate": "2026-06-09T05:06:39Z",
                "mfaAuthenticated": "false"
            },
            "signInSessionArn":"arn:aws:signin:us-west-2:111111111111:session/daff060f-7871-5tg6-67yu-a07bbdabe61a"
            
        }
    },
    "eventTime": "2026-06-09T05:10:04Z",
    "eventSource": "signin.amazonaws.com",
    "eventName": "CreateOAuth2Token",
    "awsRegion": "us-west-2",
    "sourceIPAddress": "192.0.0.2",
    "userAgent": "curl/8.7.1",
    "requestParameters": {
        "resource": "https://aws-mcp.us-west-2.api.aws/mcp",
        "client_id": "arn:aws:signin:us-west-2::external-client/dcr/609544da-b3dd-49a4-ab11-c2e98d7fa999"
    },
    "responseElements": null,
    "additionalEventData": {
        "signInSessionArn": "arn:aws:signin:us-west-2:111111111111:session/daff060f-7871-5tg6-67yu-a07bbdabe61a",
        "grant_type": "refresh_token",
        "success": "true"
    },
    "requestID": "44d6d7ce-e4r5-4cbf-0909-bfb8a8295a76",
    "eventID": "f79cc63f-b383-4e3c-a1e5-97c7db1ab833",
    "readOnly": true,
    "eventType": "AwsApiCall",
    "managementEvent": true,
    "recipientAccountId": "111111111111",
    "eventCategory": "Management",
    "tlsDetails": {
        "tlsVersion": "TLSv1.3",
        "cipherSuite": "TLS_AES_128_GCM_SHA256",
        "clientProvidedHostHeader": "us-west-2.oauth.signin.aws"
    }
}

Additional audit events and logging details for calls made using OAuth access tokens to the AWS MCP Server can be found in Logging AWS MCP Server API calls using AWS CloudTrail.

Conclusion

AWS Sign-In support for OAuth enables you to securely connect to the AWS MCP Server using industry-standard authorization. This release simplifies application and agent integration with AWS while supporting your existing IAM setup, governance, and auditing capabilities.

To learn more, see Sign-In with OAuth 2.0 in the AWS Sign-In User Guide and Setting up the AWS MCP Server in the Agent Toolkit for AWS User Guide.

If you have feedback about this post, submit comments in the Comments section below.


Vaibhav Chowla

Vaibhav Chowla

Vaibhav is a Senior Technical Product Manager at AWS, specializing in AWS Identity products. He focuses on enhancing user authentication and security, helping customers of all sizes solve complex identity and access management (IAM) challenges. Outside of technology, Vaibhav enjoys traveling and exploring new cultures and cuisines.

Jaimin Bhatt

Jaimin Bhatt

Jaimin is a Principal Software Engineer at AWS. He works on AWS Identity and Access Management (IAM) across sign-in, threat detection, and the authentication and authorization that secures access to AWS. Jaimin is an active participant in multiple industry standards bodies. Previously, he led work on data perimeter controls for AWS Management Console sign-in, multi-session support for the console, a simplified AWS CLI sign-in experience, and the internal Amazon identity provider.

Ankur Joshi

Ankur Joshi

Ankur is a Software Development Manager on the AWS Identity Sign-In team. His team focuses on delivering secure and resilient authentication mechanisms and access controls for AWS customers.

❌