
Normal view

Received — 8 June 2026 AWS Security Blog

Building secure B2C applications with fine-grained access control using Amazon Cognito and Amazon Verified Permissions

5 June 2026 at 19:07

Modern web applications require robust security controls to protect user data and application resources. Authentication and authorization are two fundamental pillars of application security that answer critical questions: Who are you? and What are you allowed to do? Implementing these controls correctly can be challenging for developers, especially when building data-intensive applications with frameworks like Streamlit (an open-source Python framework for building interactive web applications) or when requiring fine-grained access control. Key challenges include protecting access to application resources, implementing application identity with multi-factor authentication (MFA), and implementing usage-based controls.

In this post, you will learn how to build fine-grained access controls for a sample Streamlit application using Amazon Cognito for authentication and Amazon Verified Permissions with Cedar policies for authorization. This architecture provides enterprise-grade security with minimal development effort, so you can focus on your application’s core functionality. You will learn how to reduce development time for secure applications, implement enterprise-grade authentication, through proper access management, and scale security with growing user bases.

Security architecture overview

The reference architecture follows a layered security design with four key components; separating identity verification, authorization evaluation, application logic, and enforcement boundaries. By assigning clear responsibilities to each layer, the architecture limits blast radius and ensures that a failure in any single control does not compromise the overall system.

  • Authentication layer: Amazon Cognito handles user authentication with secure credential validation and JSON web tokens (JWTs). It provides built-in password policies, account lockout protection, and session management.
  • Authorization layer: Verified Permissions uses the Cedar policy engine to evaluate fine-grained access requests based on centrally stored policies.
  • Application layer: The Streamlit frontend integrates with both services, managing user sessions and enforcing access controls in the user interface.
  • Security boundaries: Multiple layers of security controls protect against unauthorized access, privilege escalation, authentication verification, authorization checks, and input validation.

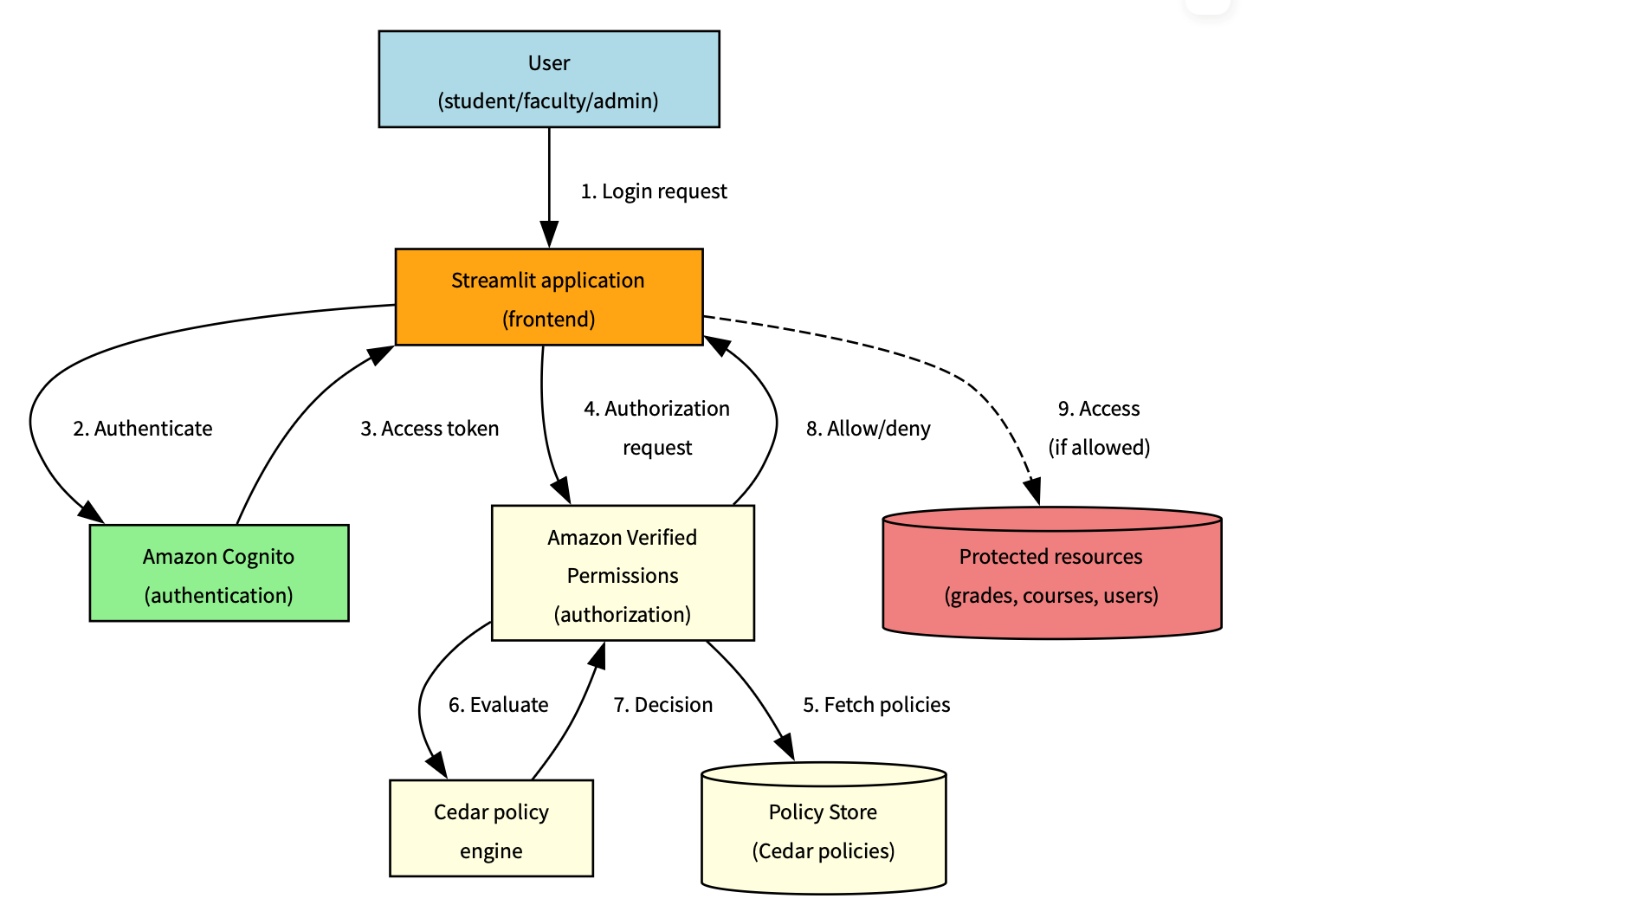
This separation of concerns enables authentication and authorization to function as complementary security controls, following defense-in-depth principles. Figure 1 illustrates the end-to-end authentication and authorization workflow, showing how a user’s sign-in request flows through Amazon Cognito for identity verification, then through Verified Permissions for Cedar policy-based access decisions, before the application enforces the result.

Figure 1: Solution architecture and workflow

Figure 1: Solution architecture and workflow

The following workflow demonstrates how the three architecture layers work together: the authentication layer (steps 1–3) handles identity verification using Amazon Cognito, the authorization layer (steps 4–6) evaluates Cedar policies using Verified Permissions, and the application layer (steps 7–8) enforces the decision in Streamlit.

  1. The user sends a sign-in request, which is submitted through Streamlit
  2. The request is authenticated by Amazon Cognito
  3. An access token is sent back to Streamlit
  4. An authorization request is sent to Verified Permissions
  5. The Cedar policy engine evaluates the request
  6. A decision is sent back by the policy engine
  7. The instruction to allow or deny is sent back to Streamlit
  8. If the instruction is to allow, access is provided

Understanding authorization with Cedar

While authentication establishes user identity, authorization determines what actions users can perform. Verified Permissions provides a scalable authorization service based on Cedar, a policy language specifically designed for fine-grained access control.

Cedar policies follow a structured format that defines who can perform which actions on what resources. Let’s examine the anatomy of a Cedar policy:

permit(
    principal == ?principal,
    action == application::Action::"ViewGrade",
    resource == ?resource
) when {
    principal has role == "Student" &&
    resource.student == principal.entityId
};

Policy components

  • Effectpermitor forbid determines whether the policy allows or denies access
  • Principal: The entity (user) making the request, represented by ?principal as a variable
  • Action: The operation being performed, scoped to your application namespace
  • Resource: The target of the action, also represented as a variable
  • Conditions: The when clause contains logical expressions that must evaluate to true

Advanced Cedar policy patterns

This section describes commonly used Cedar policy patterns for implementing fine-grained authorization with Amazon Verified Permissions. The examples illustrate how to model ownership, role-based access, hierarchical permissions, and administrative controls in real-world applications

Resource ownership control

This pattern helps ensure that users can only access resources they own:

permit(
    principal == ?principal,
    action == application::Action::"ViewGrade",
    resource == ?resource
) when {
    principal has role == "Student" &&
    resource.student == principal.entityId
};

What it does – This policy allows students to view only their own grades by:

  • Checking that the user has the Student role
  • Verifying that the grade resource’s student attribute matches the student’s entityId
  • Preventing students from accessing other students’ grades while allowing access to their own academic performance

Role-based access with resource type

This pattern grants access based on role and resource type:

permit(
    principal == ?principal,
    action == application::Action::"EditCourse",
    resource == ?resource
) when {
    principal has role == "Faculty" &&
    resource has resourceType == "Course" &&
    resource.instructor == principal.entityId
};

What it does – This policy allows faculty members to edit courses they teach by:

  • Verifying the user has the Faculty role
  • Confirming the resource is of type Course
  • Verifying that the course’s instructor attribute matches the faculty member’s entityId
  • Restricting faculty to modify only their own courses, not courses taught by other instructors

Hierarchical authorization

This pattern allows department heads to manage faculty in their department:

permit(
    principal == ?principal,
    action == application::Action::"ManageFaculty",
    resource == ?resource
) when {
    principal has role == "DepartmentHead" &&
    resource has role == "Faculty" &&
    resource.department == principal.department
};

What it does – This policy implements departmental hierarchy controls by:

  • Requiring the user to be a DepartmentHead
  • Verifying the resource is a faculty member
  • Matching the faculty member’s department with the department head’s department
  • Preventing department heads from managing faculty in other departments

Administrative override

This pattern provides emergency access with proper justification:

permit(
    principal == ?principal,
    action == ?action,
    resource == ?resource
) when {
    principal has role == "Administrator" &&
    context has emergencyAccess == true &&
    context has justification
};

What it does – This policy provides emergency access capabilities by:

  • Allowing administrators to perform any action on any resource
  • Requiring an emergency access flag to be set to true
  • Requiring a justification for emergency access
  • Supporting accountability through required documentation while enabling emergency operations

Cedar policy evaluation flow

Understanding how policies are evaluated helps design effective authorization systems. Figure 2 shows a common evaluation pattern for an academic scenario

Note: A policy match evaluates to the policy’s effect (permit or forbid). Forbid policies take precedence: if any forbid policy matches, access is denied regardless of permit policies.

Figure 2: Policy evaluation process

Figure 2: Policy evaluation process

The policy evaluation process follows these steps:

  1. User attempts to access a protected resource
  2. Application sends an authorization request to Verified Permissions
  3. Verified Permissions retrieves applicable Cedar policies from the policy store
  4. The Cedar policy engine evaluates each policy against the request
  5. If any forbid policy matches, access is denied immediately
  6. If any permit policy matches and no forbid policies match, access is allowed
  7. If no policies match, access is denied by default
  8. The evaluation result (ALLOW or DENY) is returned to the application
  9. Application enforces the authorization decision

Cedar policy language

Cedar is an Amazon open source policy language designed for fine-grained authorization. Every policy defines who (principal) can perform what action on which resource under what conditions, as shown in Figure 3.

Figure 3: Cedar policy definitions

Figure 3: Cedar policy definitions

Policy interaction

The following table shows how different policies interact in complex scenarios where multiple policies could apply:

Scenario Student policy Faculty policy Department head policy Admin policy
Student accessing own grade Permit N/A N/A Override
Faculty editing course N/A Permit N/A Override
Department head managing faculty N/A N/A Permit Override
Emergency admin access N/A N/A N/A Permit

Legend:

  • Permit – Policy allows access
  • N/A – Policy doesn’t apply
  • Override – Emergency admin access

The preceding table shows how each role’s policy applies to different scenarios, with admin access having override capabilities across most situations except for emergency admin access where it’s the primary permit authority. The Override column specifically indicates that the administrator’s emergency access policy can supersede other role-specific policies, but only when the emergencyAccess context flag is explicitly set and a justification is provided. This is not an automatic override.

Policy optimization tips:

  • Order conditions by likelihood of success – Place the most frequently true conditions first in your when clause to enable short-circuit evaluation. For example, check role before resource ownership, because role mismatches are caught earlier. See Cedar best practices.
  • Use indexed attributes for faster lookups – Use entity attributes that Verified Permissions indexes natively (entityId, role, resource type) as primary conditions. Best practices for designing an authorization model
  • Cache policy evaluations when appropriate
  • Monitor evaluation metrics and performance

Real-world application: Academic system

Consider an academic system with different user roles and their corresponding permissions:

Student: View own grades

  • Policy helps ensure students can only access grade resources where they are listed as the student
  • The policy verifies the student’s role and matches the resource owner to the principal’s entity ID

Faculty: Edit course content, manage grades

  • Policy allows faculty to edit courses they teach
  • Faculty can view and modify grades for students in their courses

Teaching assistant (TA): Grade management and course support

  • Policy permits TAs to manage grades for courses they assist with
  • Access is limited to specific courses assigned to the TA

Department head: Manage faculty assignments

  • Policy allows department heads to manage faculty in their department
  • Access is scoped to the department hierarchy

Administrator: System-wide access

  • Policy provides emergency access with proper justification
  • Administrative actions are logged and audited

Prerequisites

To implement the preceding Academic system application, you need an active AWS account, Python 3.8 or later, basic Streamlit knowledge, and AWS Identity and Access Management (IAM) permissions for Amazon Cognito and Verified Permissions.

Run the sample and extend the solution

  1. Download the code base: Start by downloading the code base from the avp streamlit samples repository
  2. Set up your development environment: Install the AWS SDK for Python (boto3) and configure your AWS credentials.
    • Install the AWS SDK for Python:
      pip install boto3
      
    • Log in to your AWS account:
      aws login --region $REGION
    • Verify that your AWS Command Line Interface (AWS CLI), Python, and dependencies are correctly configured.
      ./verify-setup.sh
  3. Create your AWS resources: Use the AWS Management Console or infrastructure as code (IaC) tools to provision your Amazon Cognito user pool and Verified Permissions policy store.
    ./deploy-demo-environment.sh
    Do you want to start the demo now? (Y/N): Y

    This provisions an Amazon Cognito user pool, a Verified Permissions policy store, and any sample resources needed for the demo.

  4. Verify the login screen:
    Figure 4: Verify login credentials

    Figure 4: Verify login credentials

  5. Demo walkthrough and shut down: Interact with the demo and test the policies and features. When you’re ready to exit, press Ctrl+C to shut down and stop.
  6. Define your Cedar policies: Start with basic policies and gradually add complexity as you understand the evaluation model.
  7. Implement authentication: Integrate Amazon Cognito authentication into your application with proper error handling.
  8. Add authorization checks: Implement authorization checks at critical access points in your application. For authentication, implement proper error handling for expired tokens, failed MFA challenges, and account lockouts. Use the Amazon Cognito built-in token refresh flow. For authorization, place Verified Permissions checks at every API endpoint and UI component that accesses protected resources.
  9. Test thoroughly: Create test scenarios for each user role and permission combination.
  10. Monitor and iterate: Set up AWS CloudTrail logging and Amazon CloudWatch alarms to monitor your security controls and refine them based on real-world usage.

Security best practices

When implementing this architecture, follow these best practices to support security:

  • Layer your security controls: Use both authentication and authorization as complementary controls rather than relying on a single mechanism.
  • Follow least privilege principles: Grant only the permissions needed for specific user roles. Start with minimal permissions and add more as needed.
  • Implement proper session management: Set appropriate token expiration and refresh policies. Amazon Cognito handles much of this automatically, but you should configure timeouts based on your security requirements.
  • Validate all inputs: Sanitize user inputs to prevent injection attacks. Don’t rely on client-side validation alone.
  • Monitor authentication events: Set up logging and alerts for suspicious activities such as repeated failed login attempts or unusual access patterns.
  • Conduct regular security reviews: Periodically audit your policies and security configurations to verify they still meet your requirements and follow current best practices.
  • Implement secure error handling: Avoid information disclosure through error messages. Provide helpful feedback to users without revealing system details that could aid attackers.

Conclusion

Implementing proper authentication and authorization is critical for application security. By using Amazon Cognito and Amazon Verified Permissions, you can build robust security controls without complex custom code. Through this approach, you can implement enterprise-grade authentication with minimal effort, define and enforce fine-grained authorization policies, scale your security controls as your application grows, and centrally manage and audit security policies.

To get started with your implementation, create your AWS resources including an Amazon Cognito user pool and Verified Permissions policy store. Define your Cedar policies based on your application’s access requirements. Integrate authentication and authorization checks into your application flow. Test thoroughly with different user roles and access scenarios. Finally, monitor and refine your security controls based on usage patterns.

For additional resources, check out the Amazon Cognito documentation and Amazon Verified Permissions documentation.

If you have feedback about this post, submit comments in the Comments section below.

Sowmya Vemuri

Sowmya Vemuri

Sowmya is a Senior Technical Customer Solutions Manager at AWS, where she partners with AWS’s largest customers to drive agentic AI transformation, cloud security strategy, and compute modernization at scale. She has 14+ years of engineering, product, and technical leadership experience building and scaling distributed systems across the stack: bare-metal servers, data platforms, enterprise and consumer applications, and autonomous cloud architectures with zero human operator access.

Received — 21 May 2026 AWS Security Blog

Why Policy in Amazon Bedrock AgentCore chose Cedar for securing agentic workflows

20 May 2026 at 22:56

Agents have agency: they adapt and find multiple ways to solve problems. This autonomy creates a fundamental security challenge: the large language model (LLM) at the heart of the agent is non-deterministic, and its decisions can’t be predicted or guaranteed in advance. It can hallucinate harmful actions with complete confidence. It’s vulnerable to prompt injection attacks, where adversaries inject malicious commands through tool responses or user inputs. LLMs don’t robustly differentiate between commands and data, everything is only tokens. For these reasons, if you want defense in depth, you must treat the LLM as an untrusted actor from a security point of view.

The insight is that the LLM can’t affect the external world directly: it has to go through an orchestrator that invokes tools based on the LLM’s output. This is precisely where the controls must be applied. What you need at this boundary is authorization: a decision about whether each tool invocation should be allowed and under what conditions. Consider a customer service agent for an online retailer. Without proper controls, it could process refunds that exceed authorized limits, apply discounts to product categories that should be excluded, or look up one customer’s data while handling another customer’s session.

If you control agents’ access to tools, you can establish a safety envelope within which the agent can operate freely. This differs from two common but unsatisfactory approaches:

  • Creating hard-coded workflows eliminates uncertainty, but by itself defeats the purpose of using an LLM as the brain of the agent, because you’ve built a traditional application with an LLM interface. And even with this restriction, using LLM outputs at any step can open up the same risks. While it’s a useful technique for well-understood workflows, it’s not sufficient for agents that need to adapt.
  • Human-in-the-loop provides a safety net for critical operations, and it will always have a role. But relying on it as the main control mechanism sacrifices autonomy and can lead to approval fatigue.

You need agents that are safe and autonomous. This requires an auditable, deterministic enforcement layer that sits outside the agent and tools. Why outside? Because the LLM’s plan is the thing you can’t trust—it can’t be responsible for enforcing its own constraints. Controls at the LLM layer—such as system prompts and training-time alignment—can be bypassed by prompt injection or hallucination. Hard-coded checks in agent or tool code are more robust, but become difficult to audit and manage at scale, especially when security logic is scattered across many tools and services. Centralizing authorization outside both gives you a single checkpoint the LLM can’t circumvent; one that’s auditable and can be verified independently of the application code.

This is where AgentCore Policies come in. Amazon Bedrock AgentCore Gateway sits between the agent and the remote tools it calls. When you associate a Policy with a Gateway, it blocks everything by default. Policies selectively open this boundary by specifying which tool invocations are allowed and under what conditions. This enforcement applies to all tool traffic routed through the Gateway. For this approach to scale, it must be more straightforward to reason about the policies than about the agent’s behavior.

AgentCore policies are expressed in Cedar. Cedar is an open source authorization policy language developed by AWS that has recently joined the Cloud Native Computing Foundation (CNCF). Cedar was designed with exactly these properties: it’s purpose-built for authorization, readable by humans, and analyzable by machines using automated reasoning. This gives enterprises the ability to scale policy definition and enforcement to their AI agents.

How Cedar is used by Amazon Bedrock AgentCore

Amazon Bedrock AgentCore provides the infrastructure to deploy and manage agents at scale. It includes AgentCore Runtime for hosting agents, AgentCore Gateway for managing how agents connect to tools using Model Context Protocol (MCP), and Policy in AgentCore. Policy intercepts all agent traffic through AgentCore gateways and evaluates each request against defined policies in the policy engine before allowing tool access. Cedar powers the policy layer.

AgentCore Policy uses Cedar and its mathematical analysis capabilities at several points in the AgentCore Gateway workflow: the Cedar authorization engine is used at policy evaluation and Cedar Analysis is used during policy authoring, and in the control plane.

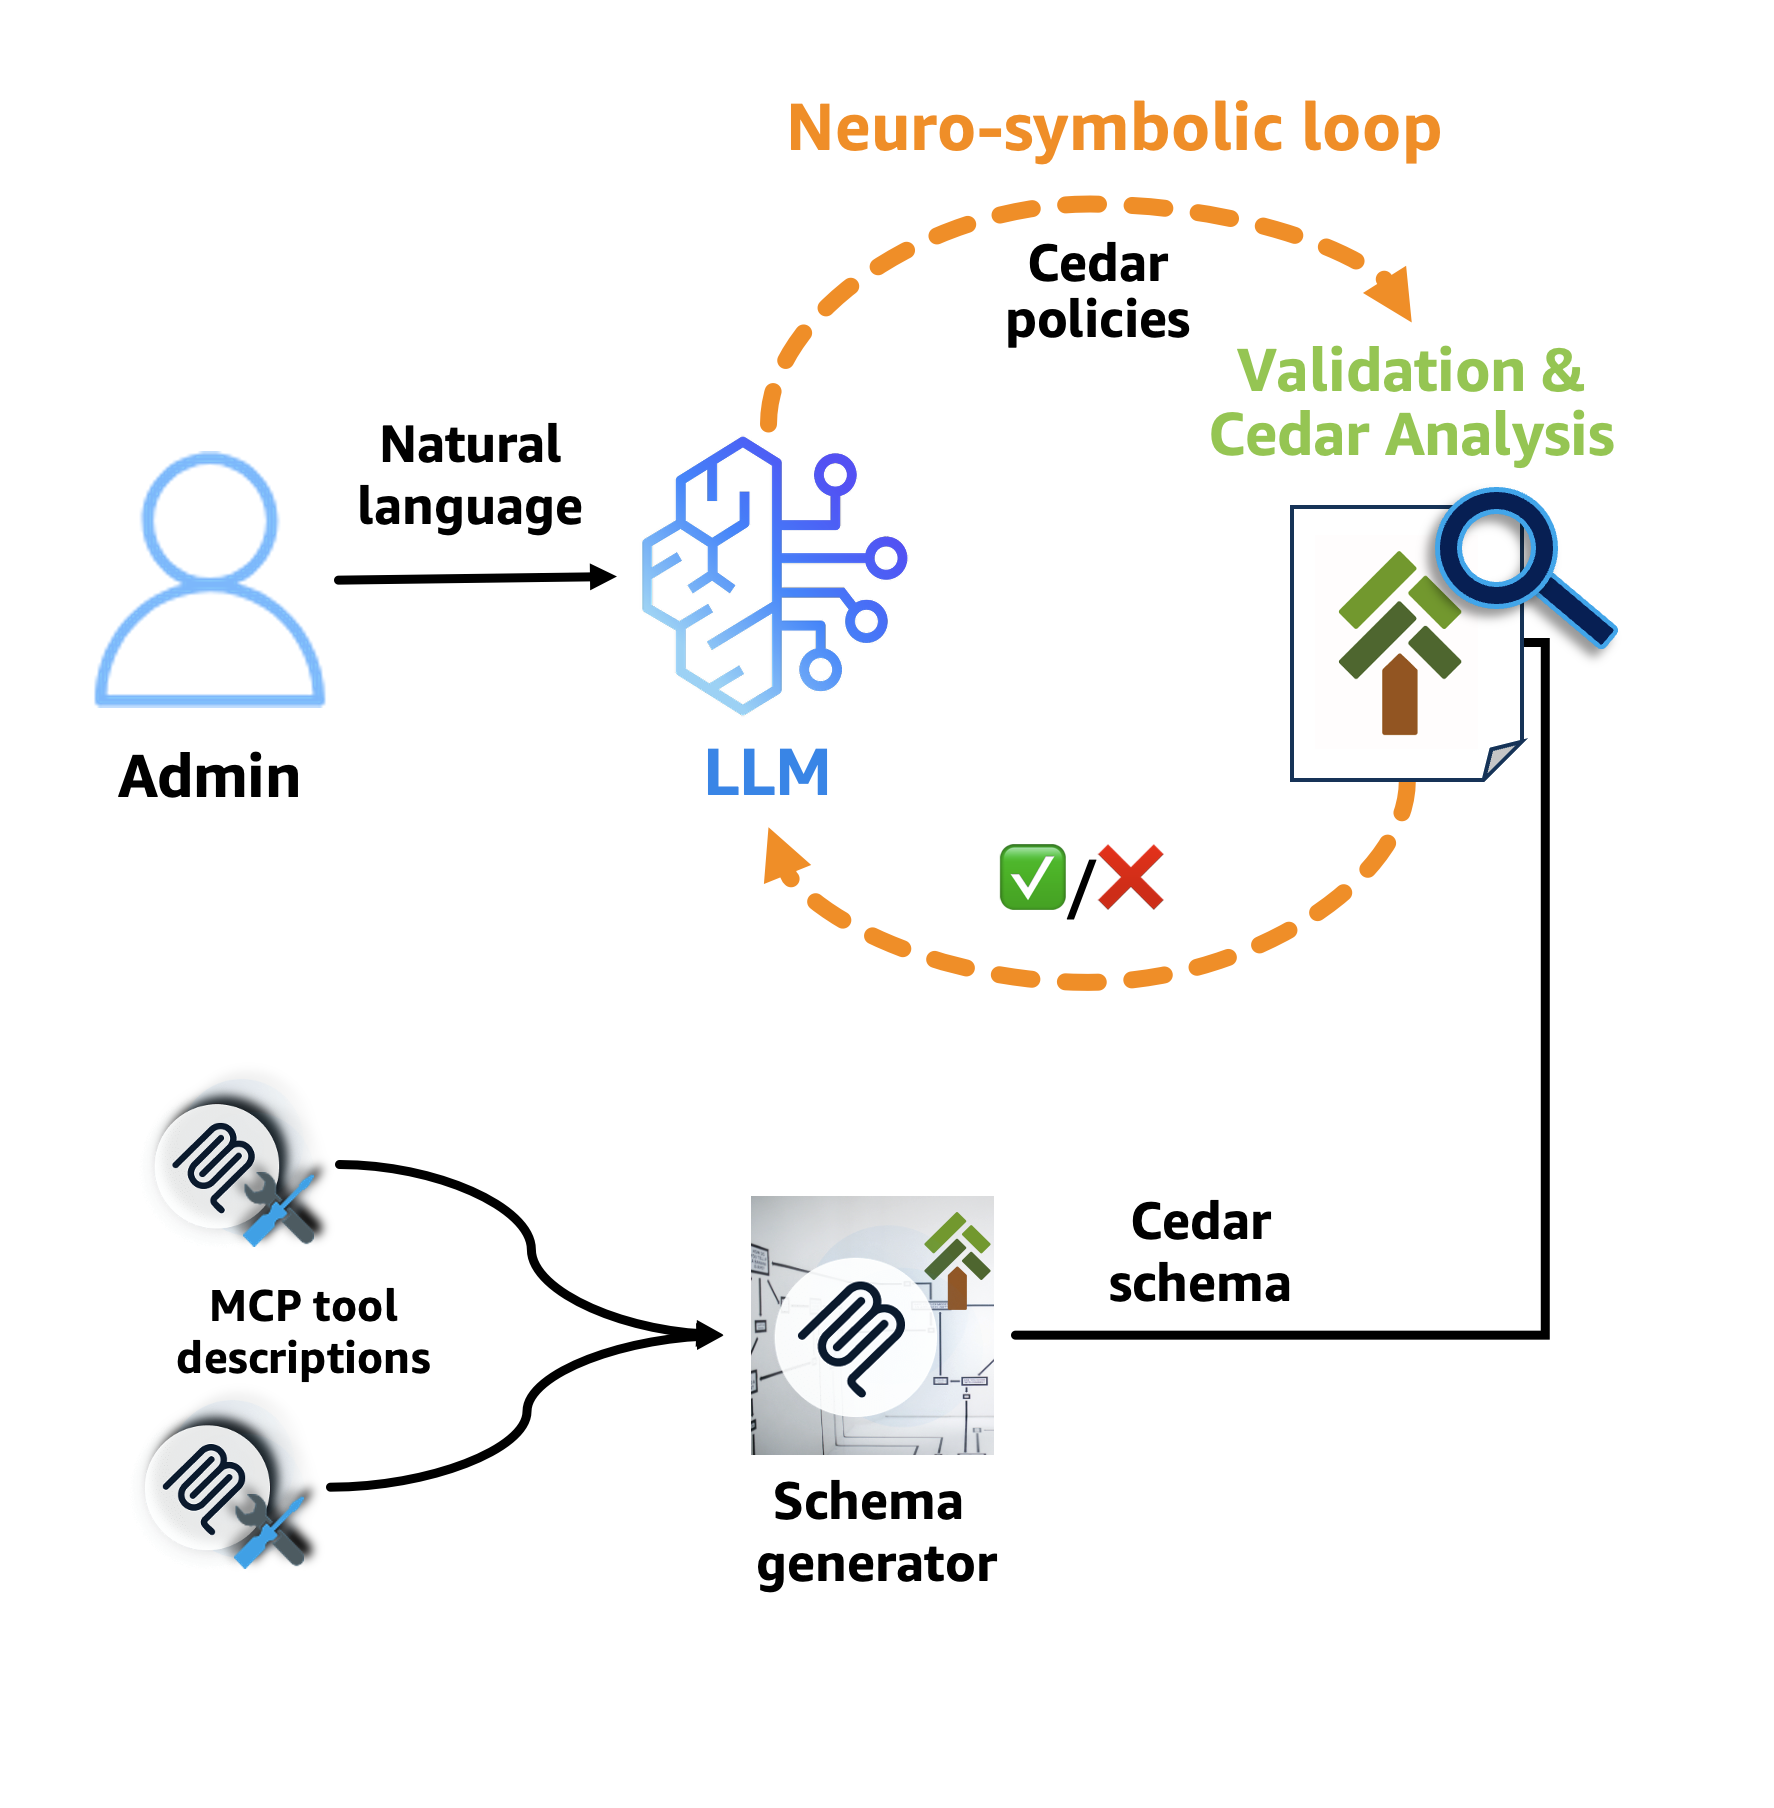
Policy authoring: Developers can write Cedar policies directly or use natural language that gets translated to Cedar through a neuro-symbolic AI feedback loop. Neuro-symbolic AI combines machine learning’s flexibility with automated reasoning’s provable correctness. An LLM generates policies from natural language, while Cedar Analysis validates them using symbolic, mathematical reasoning. The following diagram illustrates this workflow:

Figure 1: Cedar policy generation workflow

Figure 1: Cedar policy generation workflow

An administrator specifies—in natural language—which MCP tools the agent can call and under what conditions. The neuro-symbolic feedback loop then formalizes this description into Cedar policies. Here’s how it works: first, the LLM translates the natural language into Cedar policies. These policies are then run through two stages of verification. In the first stage, AgentCore Policy uses a Cedar schema generator that takes the MCP tool descriptions and produces a Cedar schema. Cedar validates the policies against this schema, helping to ensure that they reference valid tools and parameters and ruling out whole classes of runtime errors. If validation passes, the second stage runs Cedar Analysis, which encodes each policy as a mathematical formula and detects issues like policies that grant or deny everything, or that contain impossible conditions. These mathematical proofs identify errors in the process of translating from the natural language description to Cedar policies, and guide corrections.

The neuro-symbolic feedback loop significantly improves the accuracy of the generated policies. This demonstrates the power of combining neural and symbolic approaches—the LLM provides creative translation from natural language, while automated reasoning provides rigorous validation.

Control plane: When attaching policies to an AgentCore Gateway, Cedar Analysis performs holistic analysis of the entire policy set. Instead of analyzing policies in isolation, it examines how they interact and their combined effect. This analysis identifies potential logical errors—such as conflicting or redundant policies—and detects whether the policy set produces unintended authorization outcomes. When Cedar Analysis detects these errors, the operation fails and returns a description of the issue, so the policy author can fix and retry. See the Formal analysis for policy verification section for examples of the checks.

MCP tool invocation enforcement: Each agent tool request made to the AgentCore gateway is evaluated against Cedar policies which determine whether the MCP tool invocation with the given arguments should be allowed. This creates the safety envelope while allowing the necessary bridges to enable the agent to perform its job.

MCP tool filtering: Cedar enables an additional layer of protection that operates before any tool invocation occurs. When an agent issues a list tools command, AgentCore Gateway uses Cedar’s partial evaluation capability to determine which actions would always be denied under the current policy set. Those actions are omitted from the list tool response. The agent and the underlying LLM never see those tool actions, eliminating an entire class of risk: the agent and LLM can’t attempt to invoke a tool it doesn’t know exists. This is a direct benefit of Cedar’s partial evaluation: the system can determine that certain tool actions are unreachable without needing to wait for an actual tool invocation attempt.

Why Cedar: Analyzability enables safety at scale

Natural language is too ambiguous for security-critical infrastructure, and general-purpose programming languages, like Python, are very expressive but too difficult to analyze. They can have unintended side effects, termination issues, and can be difficult to understand.

Cedar avoids these issues by excluding loops and stateful operations, so policy evaluation terminates in O(n) time in common cases. This bounded execution time means agents can make authorization decisions without disrupting user experience or workflow efficiency.

Cedar is straightforward to read. Regulatory compliance and security audits require policies that humans can understand and verify. Cedar policies read like structured natural language, making them accessible to security teams, compliance officers, and business stakeholders:

// Only allow bulk discounts for premium customers with sufficient quantity
permit (
  principal is AgentCore::OAuthUser,
  action == AgentCore::Action::"ApplyBulkDiscount",
  resource
)
when
{
  principal.hasTag("customer_tier") &&
  principal.getTag("customer_tier") == "Platinum" &&
  context.input.orderQuantity >= 50
}
unless
{
  context.input
    .productTypes
    .containsAny
    (
      ["limited_edition", "seasonal_specials"]
    )
};

Auditors without a technical background can understand this policy: “Allow bulk discounts for platinum customers who order at least 50 items, except for limited edition or seasonal special products.” The unless clause makes the exception clear, which is how business rules are typically expressed in natural language. Notice that this single policy constrains two different sources of data. The customer tier comes from a JSON Web Token (JWT) claim—it can’t be hallucinated or manipulated by the LLM. The tool inputs like order quantity and product types, however, originate from the LLM’s tool call. Cedar policies constrain these inputs to only allowed values, ensuring that even if the LLM produces unexpected arguments, the policy enforcement layer rejects them deterministically.

Cedar is the right choice because it’s fast, straightforward to read, and analyzable through automated reasoning. This analyzability is why you can reason about the safety envelope around agents that’s expressed as Cedar policies. As agentic systems grow the number of tools grows. Without proper tooling, policy management becomes intractable; policies can conflict, create security gaps, or produce unintended authorization outcomes.

In the rest of this section, we examine how Cedar’s analyzability directly addresses this challenge through its deterministic, mathematically sound analysis. Because Cedar analysis can reliably detect conflicts and logical errors across large policy sets it enables scalable policy management through neuro-symbolic AI.

Formal analysis for policy verification

Cedar policies can be encoded as mathematical formulas and analyzed using automated reasoning techniques through a symbolic encoder. This enables AgentCore Policy to provide sophisticated policy verification capabilities during policy authoring and beyond. AgentCore Policy uses this analysis when authoring or attaching policies to detect possible logical errors, such as conflicting or redundant policies. Policy analysis, including policy comparison is available as an open source CLI tool. Next, we will take a look at some concrete examples of these checks.

Detecting logical errors in policies: Cedar Analysis can detect when policies contain logical errors. For example, the following policy has contradictory constraints that mean it can’t allow any request: the customer tier can’t be both gold and platinum at the same time. The intention was to use an || instead of &&, a mistake that can be made by both humans and AI systems that author policies.

// This policy cannot allow any requests due to logical errors
permit (
  principal is AgentCore::OAuthUser,
  action == AgentCore::Action::"ProcessRefund",
  resource
)
when
{
  principal.hasTag("customer_tier") &&
  principal.getTag("customer_tier") == "Gold" &&
  principal.getTag("customer_tier") == "Platinum"
}
unless { context.input.refundAmount > 1000 };

Similarly, Cedar Analysis can detect policies that always allow a given action, usually an indication of an overly permissive policy. For example, the following policy will allow all ApplyBulkDiscount requests because any order quantity will either be greater than or equal to 100 or less than 100.

// This policy allows all ApplyBulkDiscount requests
permit (
  principal is AgentCore::OAuthUser,
  action == AgentCore::Action::"ApplyBulkDiscount",
  resource
)
when
{
  context.input.orderQuantity >= 100 ||
  context.input.orderQuantity < 100 ||
  (principal.hasTag("customer_tier") &&
   principal.getTag("customer_tier") == "Platinum")
};

Detecting such logical errors isn’t easy for humans, and can’t be done by pattern matching: you need the formal rigor of mathematical analysis, which is exactly what Cedar Analysis does.

Detecting policy conflicts: Cedar Analysis can also analyze the entire policy set to detect inconsistencies between different individual policies:

// These policies conflict - Analysis will detect the subtle issue
permit (
  principal is AgentCore::OAuthUser,
  action == AgentCore::Action::"ProcessRefund",
  resource
)
when
{
  principal.hasTag("customer_tier") &&
  principal.getTag("customer_tier") == "Gold" &&
  context.input.refundAmount < 100
};

forbid (
  principal is AgentCore::OAuthUser,
  action == AgentCore::Action::"ProcessRefund",
  resource
)
when
{
  principal.hasTag("customer_tier") &&
  ["Gold", "Platinum"].contains(principal.getTag("customer_tier")) &&
  context.input.refundAmount < 500
};

The permit policy allows gold customers to process refunds less than $100, while the forbid policy blocks gold customers (and platinum customers) from processing refunds less than $500. Because forbid overrides permit in Cedar, the forbid policy would block all gold customer refunds despite the permit policy.

Comparing policy changes: When updating policies, Cedar Analysis can also determine the exact impact of a change. Consider the following update to the unless clause (the policy lines with + have been added and those with - have been removed): we now block ApplyBulkDiscount only when the product type is limited_edition and the quantity exceeds 200.

 permit (
   principal is AgentCore::OAuthUser,
   action == AgentCore::Action::"ProcessRefund",
   resource
 )
 when
 {
   context.input.refundAmount < 500
 };
 
 permit (
   principal is AgentCore::OAuthUser,
   action == AgentCore::Action::"ApplyBulkDiscount",
   resource
 )
 when
 {
   context.input.orderQuantity >= 50
 }
 unless
 {
-  context.input.productTypes.containsAny(["limited_edition"])
+  context.input.productTypes.containsAny(["limited_edition"]) &&
+  context.input.orderQuantity > 200
 };

At first glance, adding a condition to the unless clause might seem more restrictive. In fact, it’s the opposite: narrowing when the unless applies means the permit now covers more requests. For example, an order of 73 units of a limited_edition product would have been blocked before but is now allowed. Cedar Analysis can automatically detect this and generates the following table showing the difference in permissiveness between the original policy set and the updated one:

Principal type

Action

Resource type

Status

OAuthUser

ProcessRefund

Gateway

Equivalent

OAuthUser

ApplyBulkDiscount

Gateway

More permissive

In the preceding example, the analysis tells us that the updated policy allows allows exactly the same ProcessRefund requests, but allows more ApplyBulkDiscount requests.

This formal verification capability is essential when agents operate autonomously and can affect the real world. Organizations need mathematical certainty that their policies will behave as intended.

Deterministic behavior for reliable governance

Unlike probabilistic AI models, enterprise security requires deterministic guarantees. Cedar policies always produce the same authorization decision for identical requests, regardless of evaluation order or system state. Cedar’s default deny, forbid wins, no ordering semantics help ensure predictable behavior.

// Policy evaluation order does not affect the authorization decision
permit(
    principal,
    action == AgentCore::Action::"ProcessRefund",
    resource
) when {
    context.input.refundAmount < 500
};

forbid(
    principal,
    action == AgentCore::Action::"ProcessRefund", 
    resource
) when {
    context.input.orderDate.offset(duration("90d")) < context.system.now
};

Whether the permit or forbid policy is evaluated first, a refund request over $500 will always be denied, and any refund issued more than 90 days after the order date will also be denied. This predictability gives enterprises confidence in their agent governance.

From policies to production

By choosing AgentCore Policy and Cedar, organizations can deploy autonomous agents with policies they can reason about mathematically, not only hope the agents work correctly. Cedar’s combination of expressiveness, readability, and formal verification means that you can design agents with the flexibility needed to function and the certainty security teams demand.

Automated reasoning has already proven its value across AWS, from AWS IAM Access Analyzer verifying access policies to provable security for network configurations. Applying these same techniques to agentic AI is a natural extension: as agents take on more responsibility, the need for mathematically grounded guarantees only grows. The neuro-symbolic approach we’ve described in this post—combining LLM flexibility with the rigor of automated reasoning—points toward a future where agents can be both more autonomous and more trustworthy, because the verification keeps pace with the autonomy.

Learn more

Policy is now available as part of Amazon Bedrock AgentCore Gateway. To learn more about Cedar and its capabilities, visit the Cedar website, try the Cedar playground, or join the Cedar community on Slack.

For more information about Policy in Amazon Bedrock AgentCore Gateway, visit the AWS documentation or explore the AgentCore Gateway console.

If you have feedback about this post, submit comments in the Comments section below.
Liana Hadarean

Liana Hadarean

Liana is a Principal Applied Scientist at AWS. She has worked on the code analysis tools that power Amazon Q Java security detectors, and is now a contributor to the Cedar policy language.

John Tristan

Jean-Baptiste Tristan

Jean-Baptiste is a Senior Principal Applied Scientist at AWS Agentic AI where he works on neurosymbolic AI and agentic safety.

Received — 11 May 2026 AWS Security Blog

Can I do that with policy? Understanding the AWS Service Authorization Reference

27 April 2026 at 18:01

Understanding what AWS Identity and Access Management (IAM) policies can control helps you build better security controls and avoid spending time on approaches that won’t work. You’ve likely encountered questions like:

  • Can I use AWS Organizations service control policies (SCPs) to prevent the creation of security groups that allow traffic from 0.0.0.0/0?
  • Can I block uploads unless objects are encrypted?
  • Can I prevent functions with more than 512 MB of memory allocated?

Some of these are possible with IAM policies. Others are not. The difference is determined by a fundamental principle of AWS authorization: Policies make decisions based on information available in the authorization context at the time of the API call.

In this blog post, you learn how to use the AWS Service Authorization Reference to determine what’s achievable with IAM policies, recognize scenarios that need alternative solutions, and build more effective security controls in your AWS environment.

Understanding AWS authorization context

When you make an AWS API request through the AWS Management Console, AWS Command Line Interface (AWS CLI), or AWS SDK, the specific AWS service (such as Amazon S3 or Amazon EC2) receiving the request assembles a request context containing information about that request. This context is used for policy evaluation decisions. Request context is structured using the Principal, Action, Resource, Condition (PARC) model, which has four key components.

  • Principal: Identifies the requester and their attributes (tags, session context)
  • Action: Specifies the AWS API operation being requested (for example, s3:PutObject, ec2:RunInstances)
  • Resource: Defines the target AWS resource using Amazon Resource Names (ARNs)
  • Condition: Provides additional context available at request time, such as IP address, time, encryption parameters, MFA status, and service-specific attributes

The following example shows the typical request context for an Amazon S3 object upload:

  • Principal: AIDA123456789EXAMPLE
  • Action: s3:PutObject
  • Resource: arn:aws:s3:::my-bucket/documents/samplereport.pdf
  • Condition:
    • aws:PrincipalTag/Department=Finance
    • aws:RequestedRegion=us-east-1
    • aws:SourceIp=x.x.x.x
    • aws:MultiFactorAuthPresent=true
    • s3:x-amz-server-side-encryption=AES256
    • s3:x-amz-storage-class=STANDARD_IA

IAM policies can evaluate request metadata like encryption method and storage class being specified. However, it cannot evaluate the actual file contents, object size, or specific data patterns. Policy evaluation occurs at the time of the request, using the information present in the authorization context.

An essential resource: The Service Authorization Reference

The Service Authorization Reference is the authoritative documentation for understanding what policies can control. For every AWS service, it documents:

  • Actions: Every controllable operation
  • Resources: Resource types that can be targeted
  • Condition keys: The exact context information available for policy decisions

Condition keys are broadly divided into two categories. Global condition keys, which can be used across AWS services, and service-specific condition keys, which are defined for use with an individual AWS service. Use the Service Authorization Reference to find the global-condition keys or service-specific condition keys for each AWS service.

How to use the Service Authorization Reference

Follow these steps to determine if your requirement can be controlled with IAM policies:

  1. Navigate to your service: Go to the page for the specific AWS service you’re working with, such as Actions, resources, and condition keys for Amazon S3.
  2. Find the action you want: Find the API operation you want to control. Be precise, different actions have different available condition keys.
  3. Examine available condition keys: The Condition keys column shows what context information AWS makes available for that action.
  4. Make your feasibility determination: If the information you need isn’t listed as a condition key, you will not be able to control it with IAM policies alone.

Let’s take an example from the Amazon Elastic Compute Cloud (Amazon EC2) ec2:RunInstances action to see what you can and can’t control. In the Service Authorization Reference under the Amazon EC2 section, examine the RunInstances action and check the Resource types column. The RunInstances action affects multiple resource types, each with its own set of condition keys.

For the instance* resource type:

  • ec2:InstanceType: Can restrict instance types
  • ec2:EbsOptimized: Can require EBS optimization
  • aws:RequestTag/: Can enforce tagging requirements

For the network-interface* resource type:

  • ec2:Subnet: Can control subnet placement
  • ec2:Vpc: Can limit to specific virtual private clouds (VPCs)
  • ec2:AssociatePublicIpAddress: Can control public IP assignment

Note: These are a few examples from the many condition keys available for each resource type under the RunInstances action. The Service Authorization Reference lists dozens of condition keys across resource types (instance, network interface, security group, subnet, volume, and so on) that RunInstances affects. Consult the complete reference to see the available options for your specific use case.

Access the Service Authorization Reference programmatically

Beyond the human-readable documentation, AWS provides the Service Authorization Reference in machine-readable JSON format to streamline automation of policy management workflows. Use this programmatic access to incorporate authorization metadata into your development and security workflows.
For detailed information about the JSON structure and field definitions, see the Simplified AWS service information for programmatic access.
Developers can use tools like the IAM MCP Server for AWS IAM operations. This server provides AI assistants with the ability to manage IAM users, roles, policies, and permissions while following security best practices.

Using IAM policies to control specific scenarios

The following examples show how you can use IAM policies to control specific scenarios.

Example 1: Enforce AES256 server-side encryption on S3 objects

In the Amazon S3 Service Authorization Reference, under s3:PutObject action, the s3:x-amz-server-side-encryption condition key is available in the authorization context, which can be used to control the server-side encryption of S3 objects with AES-256. Here is the required policy.

Policy 1: Deny Amazon S3 object upload if the encryption doesn’t use AES-256

{
	"Version": "2012-10-17",
	"Statement": [
		{
			"Sid": "DenyUnencryptedObjectUploads",
			"Effect": "Deny",
			"Action": "s3:PutObject",
			"Resource": "arn:aws:s3:::my-bucket/*",
			"Condition": {
				"StringNotEquals": {
					"s3:x-amz-server-side-encryption": "AES256"
				}
			}
		}
	]
}

Policy 1 is a resource-based policy that can be applied on an S3 bucket to restrict object uploads. It denies a PutObject request when the server-side encryption isn’t using the AES-256 encryption algorithm.

Example 2: Allow different instance types based on the user’s cost center tag.

When checking the Amazon EC2 Service Authorization Reference for ec2:RunInstances, the ec2:InstanceType condition key, which is resource specific, is available. To restrict instance types based on who is launching them (rather than just what is being launched), you can either combine this with a global condition key or attach different policies to different principals. By using aws:PrincipalTag/tag-key alongside ec2:InstanceType, you can identify the user’s cost center from their IAM identity tags and then apply different instance type restrictions accordingly. This allows a single policy to dynamically enforce different permissions based on the requester’s identity.

Policy 2: Restricting EC2 instance types by cost center

{
	"Version": "2012-10-17",
	"Statement": [
		{
			"Sid": "AllowDevInstanceTypes",
			"Effect": "Allow",
			"Action": "ec2:RunInstances",
			"Resource": "arn:aws:ec2:*:*:instance/*",
			"Condition": {
				"StringEquals": {
					"aws:PrincipalTag/CostCenter": "Development"
				},
				"StringLike": {
					"ec2:InstanceType": "t3.*"
				}
			}
		},
		{
			"Sid": "AllowProdInstanceTypes",
			"Effect": "Allow",
			"Action": "ec2:RunInstances",
			"Resource": "arn:aws:ec2:*:*:instance/*",
			"Condition": {
				"StringEquals": {
					"aws:PrincipalTag/CostCenter": "Production"
				},
				"StringLike": {
					"ec2:InstanceType": [
						"m5.*",
						"c5.*",
						"r5.*"
					]
				}
			}
		}
	]
}

This is an identity-based policy that you can attach to IAM users, groups, or roles to control EC2 instance launches based on cost allocation. In the first statement, aws:PrincipalTag, which is a global condition key (tags attached to the IAM user or role), is used to determine which instance types are allowed. Users tagged with CostCenter=Development can only launch cost-effective T3 instance types (t3.micro, t3.small, t3.medium, and so on)with the service specific key ec2:InstanceType.

In the second statement, users tagged with CostCenter=Production can launch more powerful instance types from the M5 (general purpose), C5 (compute optimized), and R5 (memory optimized) families. This approach lets organizations enforce cost controls and allocate resources based on workload requirements. Each cost center maintains flexibility for its specific needs.

Note: Additional resources are required in the IAM policy to successfully launch EC2 instances. For the complete list, see Launch Instances.

Example 3: Users can only access and update DynamoDB items where the partition key matches their username.

You have identified that GetItem, PutItem,and UpdateItem actions are required. Corresponding to these actions, you can use the condition key to expose partition key values in the authorization context as described in the Amazon DynamoDB Service Authorization Reference

Policy 3: DynamoDB fine-grained access control

{
	"Version": "2012-10-17",
	"Statement": [
		{
			"Effect": "Allow",
			"Action": [
				"dynamodb:GetItem",
				"dynamodb:PutItem",
				"dynamodb:UpdateItem"
			],
			"Resource": "arn:aws:dynamodb:us-east-1:111122223333:table/UserProfiles",
			"Condition": {
				"ForAllValues:StringEquals": {
					"dynamodb:LeadingKeys": ["${aws:username}"]
				}
			}
		}
	]
}

The policy allows users to perform read and write actions (GetItem, PutItem, and UpdateItem) on the UserProfiles table, but only for items where the partition key value equals their own username (using the ${aws:username} policy variable). For example, if user alice attempts to access an item with partition key bob, the request will be denied.

Scenarios that need more than policies alone

Some requirements can’t be met using IAM policies. Here are three common scenarios that aren’t achievable with IAM policies alone.

Scenario 1: Block users from creating security group rules that allow traffic from 0.0.0.0/0 on TCP port 22

Upon checking the Amazon EC2 Service Authorization Reference, you will find that the ec2:AuthorizeSecurityGroupIngress action is required in an IAM policy to add an inbound access rules to a security group.

To verify this in the Service Authorization Reference, navigate to the Amazon EC2 Service Authorization Reference and search for the AuthorizeSecurityGroupIngress action, which is the action that creates security group rules. After you locate this action, review the Condition keys column and look for condition keys related to CIDR blocks, IP ranges, ports, or protocols. Available condition keys for ec2:AuthorizeSecurityGroupIngress include:

Notice there are no condition keys for CIDR blocks (such as 0.0.0.0/0), port numbers (such as 22), or protocols (such as TCP). The authorization context doesn’t include information about the specific CIDR blocks, ports, or protocols being added to the security group rule, so IAM policies can’t control these attributes.

Solution
Take a reactive approach using the AWS Config managed rule INCOMING_SSH_DISABLED to detect overly permissive rules. You can also use a combination of Amazon EventBridge and Lambda to either send a notification to your security team for the non-compliant configuration or to restrict the security group through an automation. For more information, see How to Automatically Revert and Receive Notifications About Changes to Your Amazon VPC Security Groups.

Scenario 2: Prevent creation of Lambda functions with more than 512 MB of memory allocated

Following the same verification methodology described in Scenario 1, navigate to the AWS Lambda Service Authorization Reference and examine the CreateFunction action’s condition keys for the function* resource type.

Available condition keys for lambda:CreateFunction with the function* resource type include:

  • lambda:CodeSigningConfigArn: Filters access by the ARN of the code signing
  • configuration-lambda:Layer: Filters access by the ARN of a version of an AWS Lambda layer
  • lambda:VpcIds: Filters access by the ID of the VPC configured for the Lambda function

There is no condition key for memory allocation (MemorySize parameter), timeout settings, storage configuration (EphemeralStorage), or runtime selection. Because memory allocation isn’t exposed in the authorization context, IAM policies can’t restrict this parameter.

Solution

Key takeaways

Keep these principles in mind when working with IAM policies:

  • Policies control what’s in the authorization context, not all elements you see in API documentation
  • The Service Authorization Reference is authoritative; if something isn’t listed as a condition key, you can’t control it with policies
  • Different actions have different available contexts even within the same service
  • Alternative approaches exist. AWS Config, EventBridge, and service-specific controls can be used to achieve your goals when policies alone can’t
  • Layered security is essential; combine preventive, detective, and responsive controls to help ensure that your data is secure

Conclusion

In this post, you learned how to use the AWS Service Authorization Reference to determine what’s achievable with IAM policies and recognize scenarios that require alternative solutions. By understanding that policies can only make decisions based on information available in the authorization context, you can build more effective security controls and avoid spending time on approaches that won’t work.

The Service Authorization Reference is your authoritative source for understanding policy capabilities. When you need to implement a control, start there to see if the required condition keys exist. If they don’t, you will need to layer in detective or responsive controls using services like AWS Config, Amazon EventBridge, or AWS Lambda.

Remember that effective AWS security isn’t about finding one perfect control, it’s about combining preventive, detective, and responsive measures to create defense in depth. IAM policies are powerful tools for prevention and work as part of a comprehensive security strategy.

Next steps:

If you have feedback about this post, submit comments in the Comments section below.


Author

Anshu Bathla

Anshu is a Senior Lead Consultant – SRC at AWS, based in Gurugram, India. He works with customers across diverse verticals to help strengthen their security infrastructure and achieve their security goals. Outside of work, Anshu enjoys reading books and gardening at his home garden.

Author

Prafful Gupta

Prafful is an Associate Delivery Consultant at AWS, based in Gurugram, India. Having started his professional journey with Amazon, he specializes in DevOps and Generative AI solutions, helping customers navigate their cloud transformation journeys. Beyond work, he enjoys networking with fellow professionals and spending quality time with family.

❌