Imagine preparing for your biggest sales event of the year, and you want to ensure your customer identity management service can handle the elevated traffic for carrying out application activities. For security teams, business leaders, and technologists managing identity infrastructure at scale, this scenario has been all too familiar. Whether you’re a CISO evaluating security controls, a CFO managing cloud costs, traditional support ticket processes for adjusting Amazon Cognito rate limits meant waiting 10–14 days for capacity increases, requiring teams to plan weeks in advance or rush to escalate.
Today, we’re announcing provisioned limits for Amazon Cognito, a capability that transforms how you manage authentication rate limits. This introduces a feature in the AWS Management Console for Amazon Cognito for on-demand capacity adjustments, working alongside the existing account-level maximum limits in AWS Service Quotas. Together, they give you self-service control over your authentication infrastructure so you can scale up for Black Friday (or similar sales events), scale down after tax season, and optimize costs with unprecedented precision. What once took up to 2 weeks now happens in minutes.
In this post, you’ll learn how provisioned limits work, the relationship between account-level maximums and provisioned capacity, the cost implications and optimization strategies, and step-by-step implementation guidance. This capability fundamentally changes how you approach authentication capacity planning.
Manual processes that can’t keep pace
Identity management services open the front door to your application. When users can’t sign in, everything else stops. Amazon Cognito offers extremely flexible limit management: customers can request adjustments as granular as 1 request per second (RPS) for as short as 1 day. As customer demand for faster, self-service adjustments grew, we identified opportunities to address the following challenges:
Support tickets required for each rate limit change
10–14 day approval timelines for standard review and processing
Advance planning needed weeks ahead of anticipated traffic spikes
For businesses with seasonal traffic, like tax preparation services that see 90% of annual authentication volume in March and April, or ecommerce platforms preparing for Black Friday, these factors meant teams had to plan capacity decisions well in advance with limited ability to adjust in the moment.
Provisioned limits and account-level max limits
Starting July 6, 2026, Amazon Cognito introduced provisioned limits in the Amazon Cognito console. At the account level (per AWS Region, per account), you’ll find a Provisioned limits tab next to the User Pools tab. This gives you direct control over your authentication rate limits through two complementary mechanisms:
Provisioned limits (Amazon Cognito console) – Adjust your provisioned capacity up or down on-demand. Changes take effect immediately. You’re billed for the capacity you provision above the default limit, regardless of how much you use.
Account-level max limit (Service Quotas console) – Set your account’s ceiling, the maximum RPS your account is allowed to provision. Raising this ceiling doesn’t incur additional charges. Approximately 90% of requests are automatically approved within minutes. For larger limit increases (depending on the API category and Region), manual approval through AWS Support might still be required.
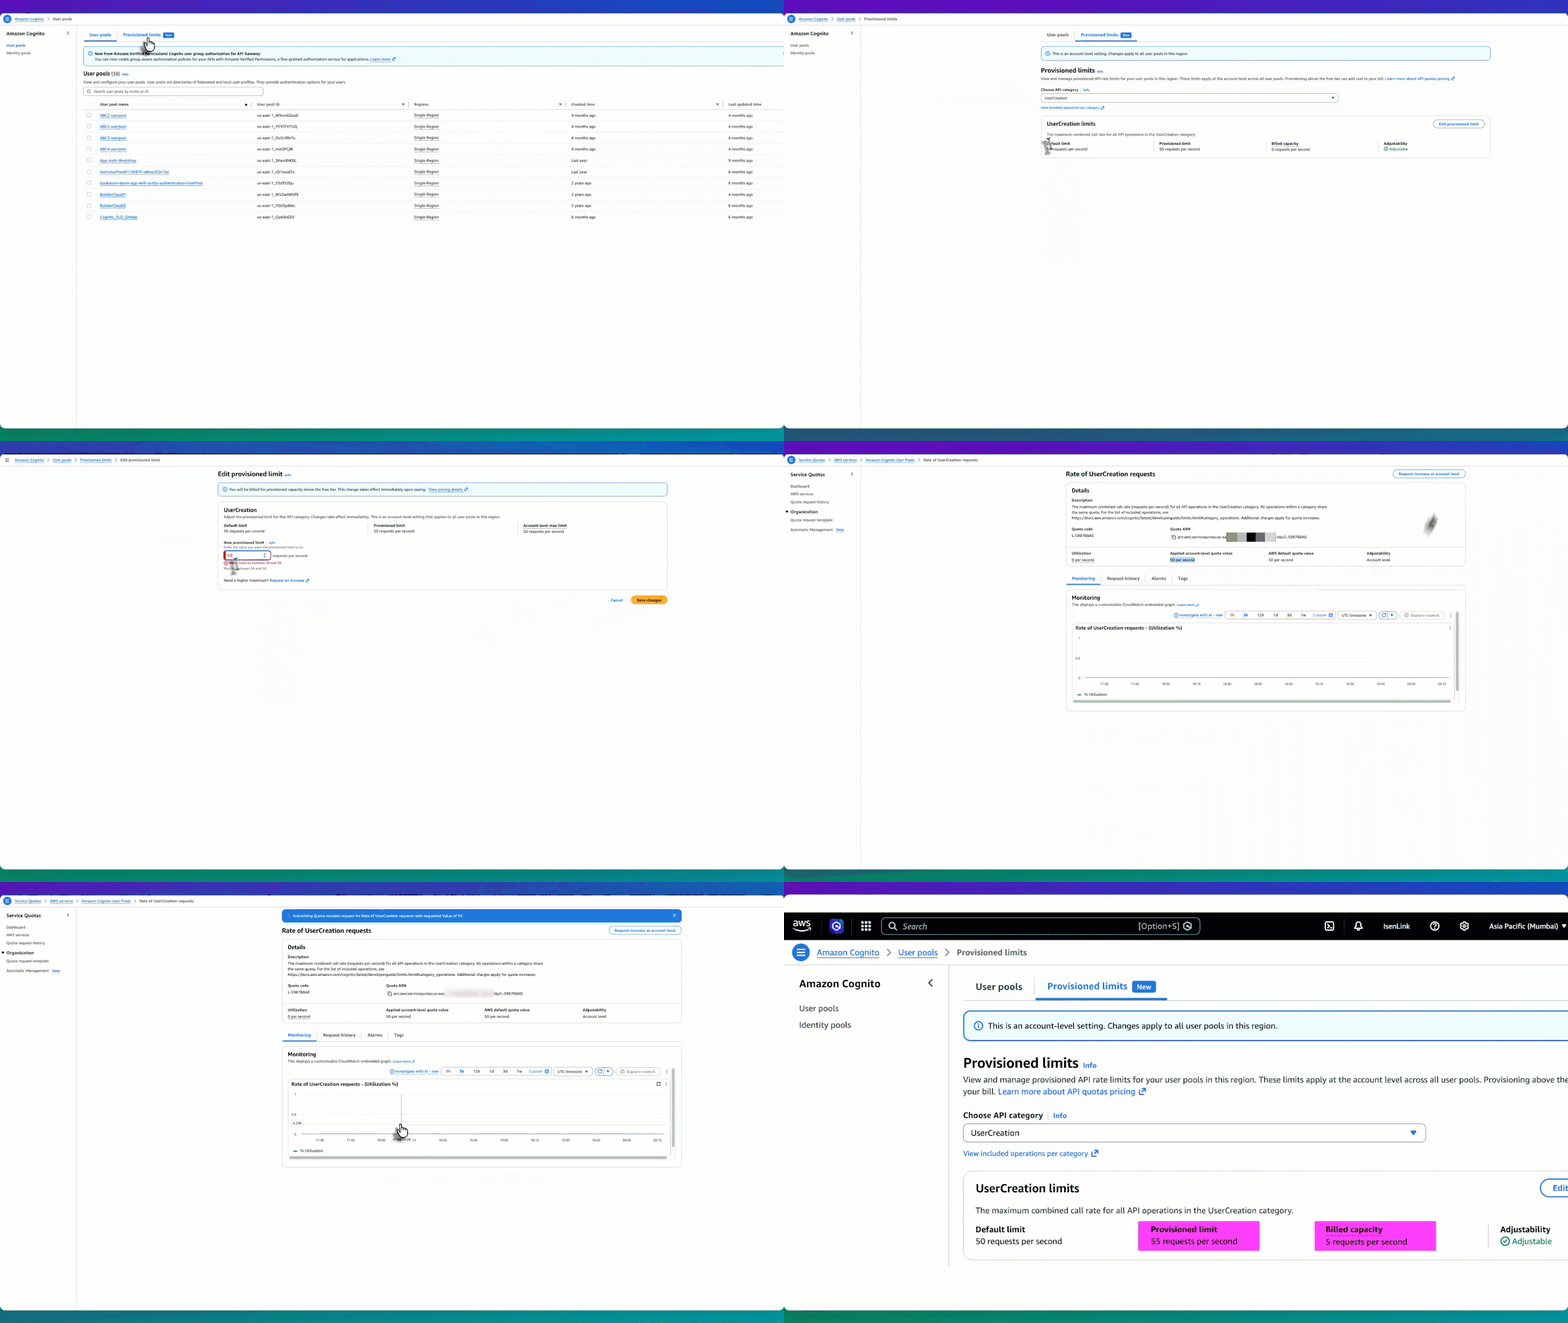
The following experience shows the end-to-end workflow of adjusting your provisioned limits and requesting a higher account-level max.
Figure 1: Provisioned limit experience workflow
How they work together
Let’s use the UserCreation API as an example. The default limit is 50 RPS, and initially the provisioned limit is also 50 RPS—meaning billed capacity is 0 (no additional charge). The applied account-level max limit is also 50 RPS. So you have three values: default (50), provisioned limit (50), and account-level max (50).
Start by going to the Amazon Cognito console and choosing User pools from the navigation pane.
Figure 2: UserCreation with default values
Choose Edit provisioned limit, to go to the Edit provisioned limit page with an input field for New provisioned limit. However, because the account-level max limit is 50 RPS, you can’t set the provisioned limit above 50. For example, if you want to provision 55 RPS, the console won’t allow it because 55 exceeds the current account max of 50.
Figure 3: Editing the provisioned limit constraint constraint to more than the account-level max
To set a higher limit, choose Request an increase. This takes you to the Service Quotas console, where you can choose Request increase at account level to request a higher account-level max, for example, 55 RPS. Most requests are automatically approved within minutes. At any time, you can check the status of the request using the Request history tab.
Figure 4: Service Quotas page where the account-level max increase is requested and auto-approved
After receiving approval, return to the Amazon Cognito console to edit your provisioned limit up to 55 RPS. Your billed capacity becomes 5 RPS (55 minus the 50 default).
Figure 5: Provisioned after increasing the provisioned limit to 55 RPS, with billed capacity of 5 RPS.
This two-part model gives you precise control over both cost and capacity. Raising the account-level max in Service Quotas doesn’t incur additional charges—it only sets your ceiling. You are billed for what you provision in the Amazon Cognito console above the default, so you benefit from right-sizing your provisioned capacity to match expected demand. Raise your account max ahead of time to prepare for future scaling needs without incurring any cost. When the time comes, increase your provisioned limit to what you need, and scale back down after the event. You stop being charged for the extra capacity as soon as you reduce the provisioned limit. This applies equally to seasonal spikes, planned load tests, or unexpected viral growth—all self-service, all within minutes.
How the provisioned limits experience works
The provisioned limits experience introduces three key concepts that work together:
Default limit – The baseline rate included at no additional cost (for example, 50 RPS for UserCreation).
Provisioned limit – The capacity you actively request and reserve in the Amazon Cognito console. Because this capacity is reserved specifically for your account, it’s the chargeable dimension. You’re billed for any provisioned capacity above the default, regardless of how much you consume. For example, if the default is 50 RPS and you provision 80 RPS, you’re billed for 30 RPS even if your actual usage is only 60 RPS. If your provisioned capacity is 50 RPS (the default), your billed capacity is 0.
Applied account-level max limit – The ceiling managed through Service Quotas. This determines how high you can set your provisioned limit. Raising this ceiling doesn’t incur charges, it only unlocks the ability to provision higher capacity. Importantly, the Provisioned limits page displays each API category with its adjustability status. For example, UserCreation is marked Adjustable (shown earlier in Figure 5) and can be modified. However, UserList is marked Not adjustable, meaning the account-level max limit can’t be adjusted for that category. You can still see its default and provisioned limit on the page, but you can’t modify them. For adjustable categories, you will see the default limit, current provisioned limit, and billed capacity at a glance.
Figure 6: Provisioned limits overview with non-adjustable API categories.
Multi-tenant SaaS considerations
For software as a service (SaaS) providers managing multiple tenants with varying throughput requirements, the UpdateProvisionedLimit API enables programmatic management of provisioned capacity. Teams using dedicated user pools per tenant, for example, can integrate this into their infrastructure-as-code pipelines to adjust provisioned limits per tenant tier. With provisioned limits, SaaS vendors can tier their capacity management per tenant, for example, provisioning higher capacity for enterprise-tier tenants and lower capacity for free-tier tenants, and adjust each tenant’s provisioned capacity independently through the API based on their service tier and demand patterns.
Conclusion
With provisioned limits, whether you’re preparing for peak shopping season, tax filing deadlines, or any other scaling event, you can now adjust provisioned limits to respond to your organization’s needs on demand. The separation between the account-level max (in Service Quotas) and the provisioned limit (in the Amazon Cognito console) gives you full control to plan ahead, respond to demand changes in minutes, and optimize costs on your own terms.
Get started
The provisioned limits experience for Amazon Cognito user pools launched on July 6, 2026, and is available across all AWS Regions where Amazon Cognito is supported. To get started:
Review your current authentication traffic patterns using Amazon CloudWatch metrics to understand your baseline
Set up CloudWatch alarms at 70% and 85% of your current rate limits
Ensure your team has appropriate AWS Identity and Access Management ( IAM) permissions for both Service Quotas and the Provisioned limits tab in the Amazon Cognito console
Raise your account-level max in Service Quotas based on your demand expectations
Use the Amazon Cognito console Provisioned limits tab to adjust capacity up or down as needed
Modern web applications require robust security controls to protect user data and application resources. Authentication and authorization are two fundamental pillars of application security that answer critical questions: Who are you? and What are you allowed to do? Implementing these controls correctly can be challenging for developers, especially when building data-intensive applications with frameworks like Streamlit (an open-source Python framework for building interactive web applications) or when requiring fine-grained access control. Key challenges include protecting access to application resources, implementing application identity with multi-factor authentication (MFA), and implementing usage-based controls.
In this post, you will learn how to build fine-grained access controls for a sample Streamlit application using Amazon Cognito for authentication and Amazon Verified Permissions with Cedar policies for authorization. This architecture provides enterprise-grade security with minimal development effort, so you can focus on your application’s core functionality. You will learn how to reduce development time for secure applications, implement enterprise-grade authentication, through proper access management, and scale security with growing user bases.
Security architecture overview
The reference architecture follows a layered security design with four key components; separating identity verification, authorization evaluation, application logic, and enforcement boundaries. By assigning clear responsibilities to each layer, the architecture limits blast radius and ensures that a failure in any single control does not compromise the overall system.
Authentication layer: Amazon Cognito handles user authentication with secure credential validation and JSON web tokens (JWTs). It provides built-in password policies, account lockout protection, and session management.
Authorization layer: Verified Permissions uses the Cedar policy engine to evaluate fine-grained access requests based on centrally stored policies.
Application layer: The Streamlit frontend integrates with both services, managing user sessions and enforcing access controls in the user interface.
Security boundaries: Multiple layers of security controls protect against unauthorized access, privilege escalation, authentication verification, authorization checks, and input validation.
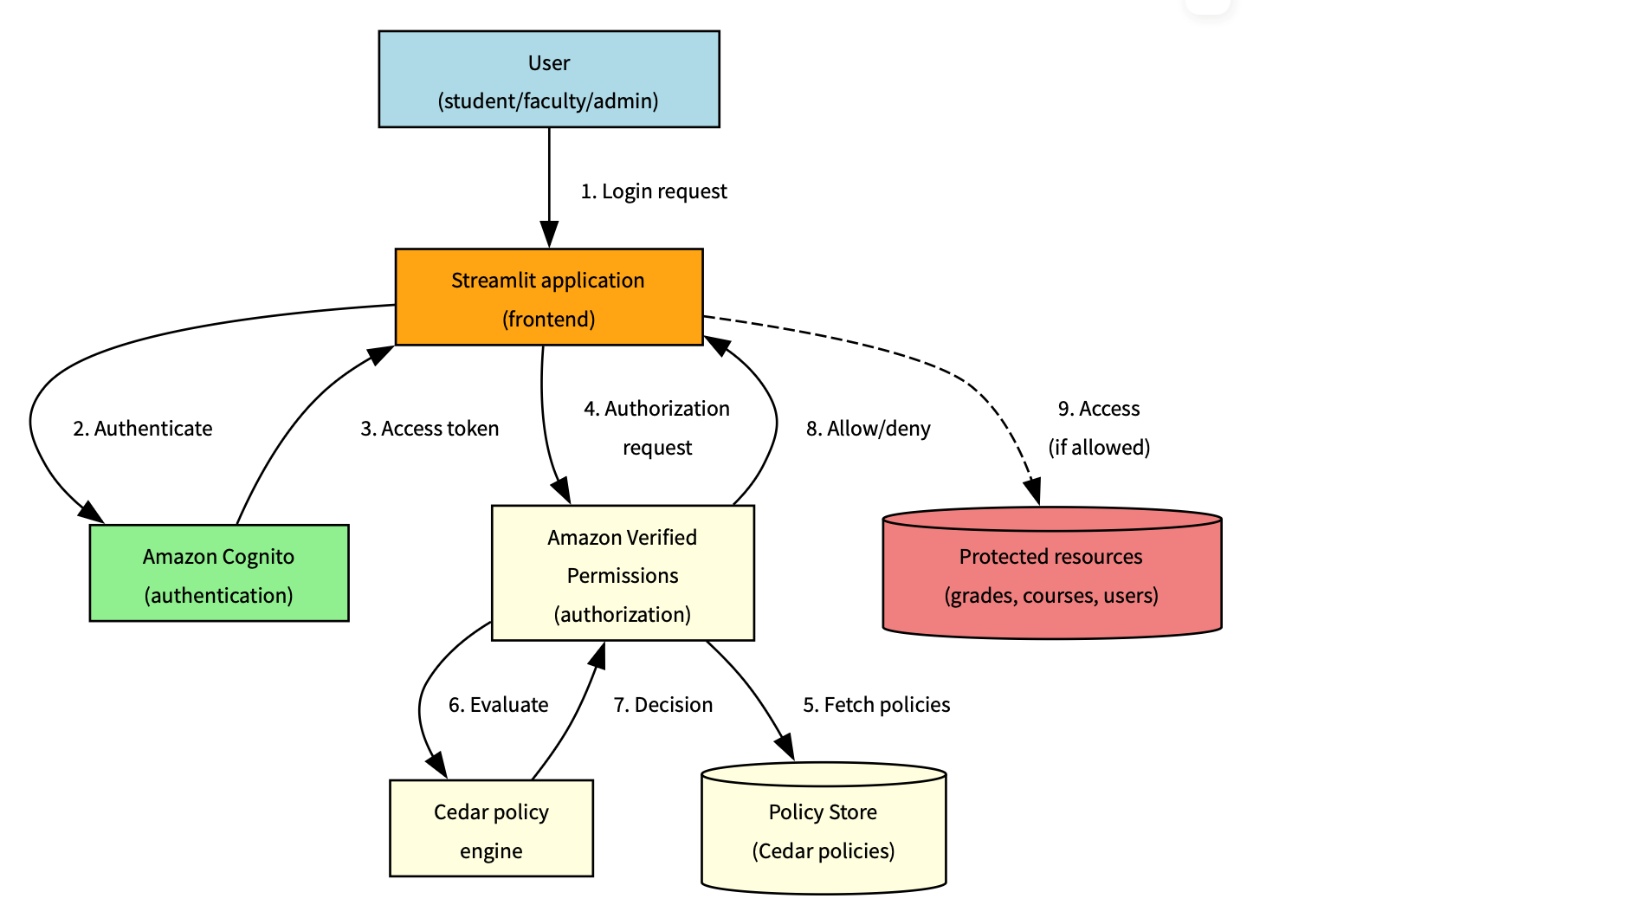
This separation of concerns enables authentication and authorization to function as complementary security controls, following defense-in-depth principles. Figure 1 illustrates the end-to-end authentication and authorization workflow, showing how a user’s sign-in request flows through Amazon Cognito for identity verification, then through Verified Permissions for Cedar policy-based access decisions, before the application enforces the result.
Figure 1: Solution architecture and workflow
The following workflow demonstrates how the three architecture layers work together: the authentication layer (steps 1–3) handles identity verification using Amazon Cognito, the authorization layer (steps 4–6) evaluates Cedar policies using Verified Permissions, and the application layer (steps 7–8) enforces the decision in Streamlit.
The user sends a sign-in request, which is submitted through Streamlit
The request is authenticated by Amazon Cognito
An access token is sent back to Streamlit
An authorization request is sent to Verified Permissions
The Cedar policy engine evaluates the request
A decision is sent back by the policy engine
The instruction to allow or deny is sent back to Streamlit
If the instruction is to allow, access is provided
Understanding authorization with Cedar
While authentication establishes user identity, authorization determines what actions users can perform. Verified Permissions provides a scalable authorization service based on Cedar, a policy language specifically designed for fine-grained access control.
Cedar policies follow a structured format that defines who can perform which actions on what resources. Let’s examine the anatomy of a Cedar policy:
permit(
    principal == ?principal,
    action == application::Action::"ViewGrade",
    resource == ?resource
) when {
    principal has role == "Student" &&
    resource.student == principal.entityId
};
Policy components
Effect: permitor forbid determines whether the policy allows or denies access
Principal: The entity (user) making the request, represented by ?principal as a variable
Action: The operation being performed, scoped to your application namespace
Resource: The target of the action, also represented as a variable
Conditions: The when clause contains logical expressions that must evaluate to true
Advanced Cedar policy patterns
This section describes commonly used Cedar policy patterns for implementing fine-grained authorization with Amazon Verified Permissions. The examples illustrate how to model ownership, role-based access, hierarchical permissions, and administrative controls in real-world applications
Resource ownership control
This pattern helps ensure that users can only access resources they own:
permit(
    principal == ?principal,
    action == application::Action::"ViewGrade",
    resource == ?resource
) when {
    principal has role == "Student" &&
    resource.student == principal.entityId
};
What it does – This policy allows students to view only their own grades by:
Checking that the user has the Student role
Verifying that the grade resource’s student attribute matches the student’s entityId
Preventing students from accessing other students’ grades while allowing access to their own academic performance
Role-based access with resource type
This pattern grants access based on role and resource type:
permit(
    principal == ?principal,
    action == application::Action::"EditCourse",
    resource == ?resource
) when {
    principal has role == "Faculty" &&
    resource has resourceType == "Course" &&
    resource.instructor == principal.entityId
};
What it does – This policy allows faculty members to edit courses they teach by:
Verifying the user has the Faculty role
Confirming the resource is of type Course
Verifying that the course’s instructor attribute matches the faculty member’s entityId
Restricting faculty to modify only their own courses, not courses taught by other instructors
Hierarchical authorization
This pattern allows department heads to manage faculty in their department:
permit(
    principal == ?principal,
    action == application::Action::"ManageFaculty",
    resource == ?resource
) when {
    principal has role == "DepartmentHead" &&
    resource has role == "Faculty" &&
    resource.department == principal.department
};
What it does – This policy implements departmental hierarchy controls by:
Requiring the user to be a DepartmentHead
Verifying the resource is a faculty member
Matching the faculty member’s department with the department head’s department
Preventing department heads from managing faculty in other departments
Administrative override
This pattern provides emergency access with proper justification:
permit(
    principal == ?principal,
    action == ?action,
    resource == ?resource
) when {
    principal has role == "Administrator" &&
    context has emergencyAccess == true &&
    context has justification
};
What it does – This policy provides emergency access capabilities by:
Allowing administrators to perform any action on any resource
Requiring an emergency access flag to be set to true
Requiring a justification for emergency access
Supporting accountability through required documentation while enabling emergency operations
Cedar policy evaluation flow
Understanding how policies are evaluated helps design effective authorization systems. Figure 2 shows a common evaluation pattern for an academic scenario
Note: A policy match evaluates to the policy’s effect (permit or forbid). Forbid policies take precedence: if any forbid policy matches, access is denied regardless of permit policies.
Figure 2: Policy evaluation process
The policy evaluation process follows these steps:
User attempts to access a protected resource
Application sends an authorization request to Verified Permissions
Verified Permissions retrieves applicable Cedar policies from the policy store
The Cedar policy engine evaluates each policy against the request
If any forbid policy matches, access is denied immediately
If any permit policy matches and no forbid policies match, access is allowed
If no policies match, access is denied by default
The evaluation result (ALLOW or DENY) is returned to the application
Application enforces the authorization decision
Cedar policy language
Cedar is an Amazon open source policy language designed for fine-grained authorization. Every policy defines who (principal) can perform what action on which resource under what conditions, as shown in Figure 3.
Figure 3: Cedar policy definitions
Policy interaction
The following table shows how different policies interact in complex scenarios where multiple policies could apply:
Scenario
Student policy
Faculty policy
Department head policy
Admin policy
Student accessing own grade
Permit
N/A
N/A
Override
Faculty editing course
N/A
Permit
N/A
Override
Department head managing faculty
N/A
N/A
Permit
Override
Emergency admin access
N/A
N/A
N/A
Permit
Legend:
Permit – Policy allows access
N/A – Policy doesn’t apply
Override – Emergency admin access
The preceding table shows how each role’s policy applies to different scenarios, with admin access having override capabilities across most situations except for emergency admin access where it’s the primary permit authority. The Override column specifically indicates that the administrator’s emergency access policy can supersede other role-specific policies, but only when the emergencyAccess context flag is explicitly set and a justification is provided. This is not an automatic override.
Policy optimization tips:
Order conditions by likelihood of success – Place the most frequently true conditions first in your when clause to enable short-circuit evaluation. For example, check role before resource ownership, because role mismatches are caught earlier. See Cedar best practices.
Use indexed attributes for faster lookups – Use entity attributes that Verified Permissions indexes natively (entityId, role, resource type) as primary conditions. Best practices for designing an authorization model
Cache policy evaluations when appropriate
Monitor evaluation metrics and performance
Real-world application: Academic system
Consider an academic system with different user roles and their corresponding permissions:
Student: View own grades
Policy helps ensure students can only access grade resources where they are listed as the student
The policy verifies the student’s role and matches the resource owner to the principal’s entity ID
Faculty: Edit course content, manage grades
Policy allows faculty to edit courses they teach
Faculty can view and modify grades for students in their courses
Teaching assistant (TA): Grade management and course support
Policy permits TAs to manage grades for courses they assist with
Access is limited to specific courses assigned to the TA
Department head: Manage faculty assignments
Policy allows department heads to manage faculty in their department
Access is scoped to the department hierarchy
Administrator: System-wide access
Policy provides emergency access with proper justification
Administrative actions are logged and audited
Prerequisites
To implement the preceding Academic system application, you need an active AWS account, Python 3.8 or later, basic Streamlit knowledge, and AWS Identity and Access Management (IAM) permissions for Amazon Cognito and Verified Permissions.
./deploy-demo-environment.sh
Do you want to start the demo now? (Y/N): Y
This provisions an Amazon Cognito user pool, a Verified Permissions policy store, and any sample resources needed for the demo.
Verify the login screen:
Figure 4: Verify login credentials
Demo walkthrough and shut down: Interact with the demo and test the policies and features. When you’re ready to exit, press Ctrl+C to shut down and stop.
Define your Cedar policies: Start with basic policies and gradually add complexity as you understand the evaluation model.
Implement authentication: Integrate Amazon Cognito authentication into your application with proper error handling.
Add authorization checks: Implement authorization checks at critical access points in your application. For authentication, implement proper error handling for expired tokens, failed MFA challenges, and account lockouts. Use the Amazon Cognito built-in token refresh flow. For authorization, place Verified Permissions checks at every API endpoint and UI component that accesses protected resources.
Test thoroughly: Create test scenarios for each user role and permission combination.
When implementing this architecture, follow these best practices to support security:
Layer your security controls: Use both authentication and authorization as complementary controls rather than relying on a single mechanism.
Follow least privilege principles: Grant only the permissions needed for specific user roles. Start with minimal permissions and add more as needed.
Implement proper session management: Set appropriate token expiration and refresh policies. Amazon Cognito handles much of this automatically, but you should configure timeouts based on your security requirements.
Validate all inputs: Sanitize user inputs to prevent injection attacks. Don’t rely on client-side validation alone.
Monitor authentication events: Set up logging and alerts for suspicious activities such as repeated failed login attempts or unusual access patterns.
Conduct regular security reviews: Periodically audit your policies and security configurations to verify they still meet your requirements and follow current best practices.
Implement secure error handling: Avoid information disclosure through error messages. Provide helpful feedback to users without revealing system details that could aid attackers.
Conclusion
Implementing proper authentication and authorization is critical for application security. By using Amazon Cognito and Amazon Verified Permissions, you can build robust security controls without complex custom code. Through this approach, you can implement enterprise-grade authentication with minimal effort, define and enforce fine-grained authorization policies, scale your security controls as your application grows, and centrally manage and audit security policies.
To get started with your implementation, create your AWS resources including an Amazon Cognito user pool and Verified Permissions policy store. Define your Cedar policies based on your application’s access requirements. Integrate authentication and authorization checks into your application flow. Test thoroughly with different user roles and access scenarios. Finally, monitor and refine your security controls based on usage patterns.
Amazon Cognito recently introduced high-throughput performance for demanding workloads, customer-managed keys for full control over data encryption at rest, and multi- Region replication for business continuity improvement. These capabilities were made possible through a next-generation storage infrastructure designed for extensibility and scale. To deliver this, we migrated hundreds of millions of user profiles, and you probably didn’t even notice. In this post, we walk through what’s new, the architecture behind it, and how we got here with a zero-downtime migration that kept your applications running.
New capabilities now available on Cognito
The migration to the new infrastructure wasn’t just about maintaining existing functionality—it created the foundation for delivering capabilities that solve customer challenges while positioning Amazon Cognito for continuous improvements.
High-throughput performance: The new architecture supports the higher request volumes and scale requirements of modern applications while maintaining the low latency performance that your applications depend on—able to support tens of millions of users per user pool and thousands of transactions per second (TPS).
Customer-managed keys: Customers can now use their own encryption keys stored in AWS Key Management Service (AWS KMS) for encrypting data at rest. This provides enhanced security control and capabilities, giving customers full ownership over their encryption key lifecycle.
Multi-Region replication: Customers can now synchronize their entire user pool data, including user passwords, attributes, and configurations to another user pool in another Region of their choice. This means that customers can implement business continuity strategies and maintain authentication availability in case of a Regional failover, helping their applications remain accessible to users even during unexpected disruptions.
An architecture for innovation
The new architecture uses a purpose-built storage layer designed for extensibility and scale of identity operations. We anchored the new architecture around a set of design tenets:
Identity-first design: The storage layer understands user identities. There’s no client-specific business logic and no generalizations beyond identity management; keeping the system focused, portable, and optimized.
Avoid one-way doors: Deliver value incrementally while keeping architectural choices reversible, so we can evolve as new needs arise.
Backward compatible: Changes to the underlying infrastructure should never break customers’ applications.
These tenets shaped every architectural decision. The architecture separates into independently deployable domains. Previously, while using Amazon Cloud Directory, the service architecture relied on a single data store to persist all customer information. This provided straightforward data traversal mechanisms but required multi-service coordination to adjust database schema when new features were required. The new architecture uses different datasets, allowing them to evolve independently for faster feature iterations.
Migration with zero-downtime
Migrating users requires extreme precautions and a strategy designed to maintain zero downtime and ensure data integrity at every step. Our approach prioritizes both immediate stability and long-term flexibility through the following measures:
Shadow mode validation: We ran customer API requests through both old and new infrastructures simultaneously, comparing response structures, status codes, and behavioral characteristics. The validation was designed so that sensitive information was never exposed in plaintext during comparison. We accounted for known variances—for example, timestamps could differ slightly between systems—so that only meaningful discrepancies surfaced as actionable alerts.
Data backfill: Before switching a user pool to the new infrastructure, we performed a bulk backfill of all existing user records from the legacy system into the new storage. The backfill ran alongside live traffic with dual-write capturing any changes made during the backfill window, ensuring no data loss or stale data. Shadow mode served as the validation layer for the backfill; as we addressed more edge cases in data syncing, shadow mode match rates increased, confirming data completeness before we proceeded to the switchover.
Dual-write architecture: We implemented a system where all identity operations were simultaneously written to both legacy and new services, with comprehensive validation to ensure consistency. Even when a dual-write to the new infrastructure failed, the operation still succeeded in the legacy system, preserving all customer-initiated requests. This means any dual-write failure was contained as an internal consistency issue and not customer-impacting.
Anti–entropy validation: We implemented a data validation and correction system that continuously compared records across old and new infrastructures, detecting and resolving any data divergence. Anti-entropy scans compared user attributes, credential hashes, group memberships, and configurations, among other records. When true discrepancies were found, the system automatically reconciled them using the legacy system as the source of truth. This layer was able to catch edge cases that shadow mode and dual writes alone could not cover.
Incremental rollout with rollback capability: We established controlled deployment phases with immediate rollback capabilities. After switching a user pool to the new infrastructure, we continued replicating all writes back to the legacy system, ensuring we can revert any user pool to the legacy infrastructure at any point without data loss. If a rollback was needed during migration, an orchestrator replayed entries in timestamp order, syncing user profiles back to the legacy system.
Lessons learned for infrastructure modernization
This modernization taught us valuable principles that apply to any large-scale infrastructure project, therefore we choose to share these learnings to help you perform similar migrations.
Customer access patterns drive architecture decisions: Analyzing actual customer access patterns revealed that identity workloads follow predictable patterns, which meant we could adopt a synchronous dual-write approach that balanced completeness with operational simplicity. This principle applies to any domain-specific migration: understand your workload’s actual access patterns before reaching for general-purpose solutions.
Behavioral preservation requires techniques beyond traditional testing: Ensuring equivalent functionality across old and new systems was straightforward. Preserving identical API behavior was not. Functional tests validate intended behaviors, but we identified scenarios where customers had built applications around specific API behaviors such that a change could have silently broken their applications. For example, concurrent writes to the same user could resolve to different final states between old and new systems where writes all succeed but outcome diverges slightly. Similarly, customers who write an attribute and immediately read it are affected by the consistency window. Subtle timing differences in when updates become visible could cause stale reads. These aren’t functional failures, but behavior under real traffic patterns can vary. Shadow mode verification surfaced edge cases that automated tests alone would have missed. Invest in these techniques early.
Gradual validation builds confidence that testing alone cannot: Layer multiple independent validation techniques, such as shadow mode, dual writes, and anti-entropy scans—each covering a different access pattern. No single approach will catch everything, and the gaps between them are where production issues hide. Incremental rollout with immediate rollback capability lets you validate each step while maintaining the ability to revert quickly.
Key principles for your own modernization projects: Invest in purpose-built solutions, design for extensibility, and implement gradual validation. Or use managed services so your infrastructure improves without effort on your part while your applications keep running; helping you focus on your business needs.
Conclusion
In this post, we shared the high-level approach and learnings from the Amazon Cognito infrastructure modernization that create a foundation for modern identity management capabilities. The new Cognito infrastructure is live, delivering capabilities such as customer-managed keys and multi-Region replication. As the migration continues, all Cognito customers will gain access to these capabilities on the same service they rely on today, with no action required.
Ready to modernize your authentication infrastructure? Visit Amazon Cognito to learn more.
If you have feedback about this post, submit comments in the Comments section below.
You can use Amazon Cognito user pools to add sign-up and sign-in functionality to your web and mobile applications. You can authenticate users directly with Amazon Cognito managed accounts using passwords, passwordless flows, or custom authentication flows, or let users federate in through external identity providers (IdP) using SAML, OpenID Connect, or social providers such as Google, Facebook, Sign in with Apple, or Login with Amazon. For consumers, identity federation means fewer passwords to remember and a smoother sign-in experience. For business-to-business (B2B) software as a service (SaaS) providers, it means your tenants’ organizations keep control of their own identities rather than managing credentials on their behalf. But federation can also introduce challenges for enterprises and application developers. What happens when your enterprise customer’s SAML provider sends hundreds of group memberships that exceed attribute size limits? Or when your ecommerce customer forgets they already have an account and tries to sign in with a different social provider, creating duplicate records?
In this blog post, I introduce the inbound federation Lambda trigger for Amazon Cognito, a new feature that gives you programmatic control over federated authentication flows. This AWS Lambda trigger intercepts the federated authentication response immediately after your external identity provider responds to Cognito, so you can transform, filter, and enrich user attributes before the user profile is created and user attributes are mapped in your user pool.
Understanding the inbound federation Lambda trigger
The inbound federation Lambda trigger is invoked after your Amazon Cognito user pool has received and verified the response from the external IdP. The request payload for the federated IdP response is then sent from Cognito to your Lambda function and you will receive the following information:
The common parameters of Amazon Cognito Lambda triggers (including userPoolId and clientId)
Which external IdP was used (for example, providerName)
The providerType (SAML, OIDC, Login with Amazon, and so on)
Attribute data from the external IdP specific to the user signing in
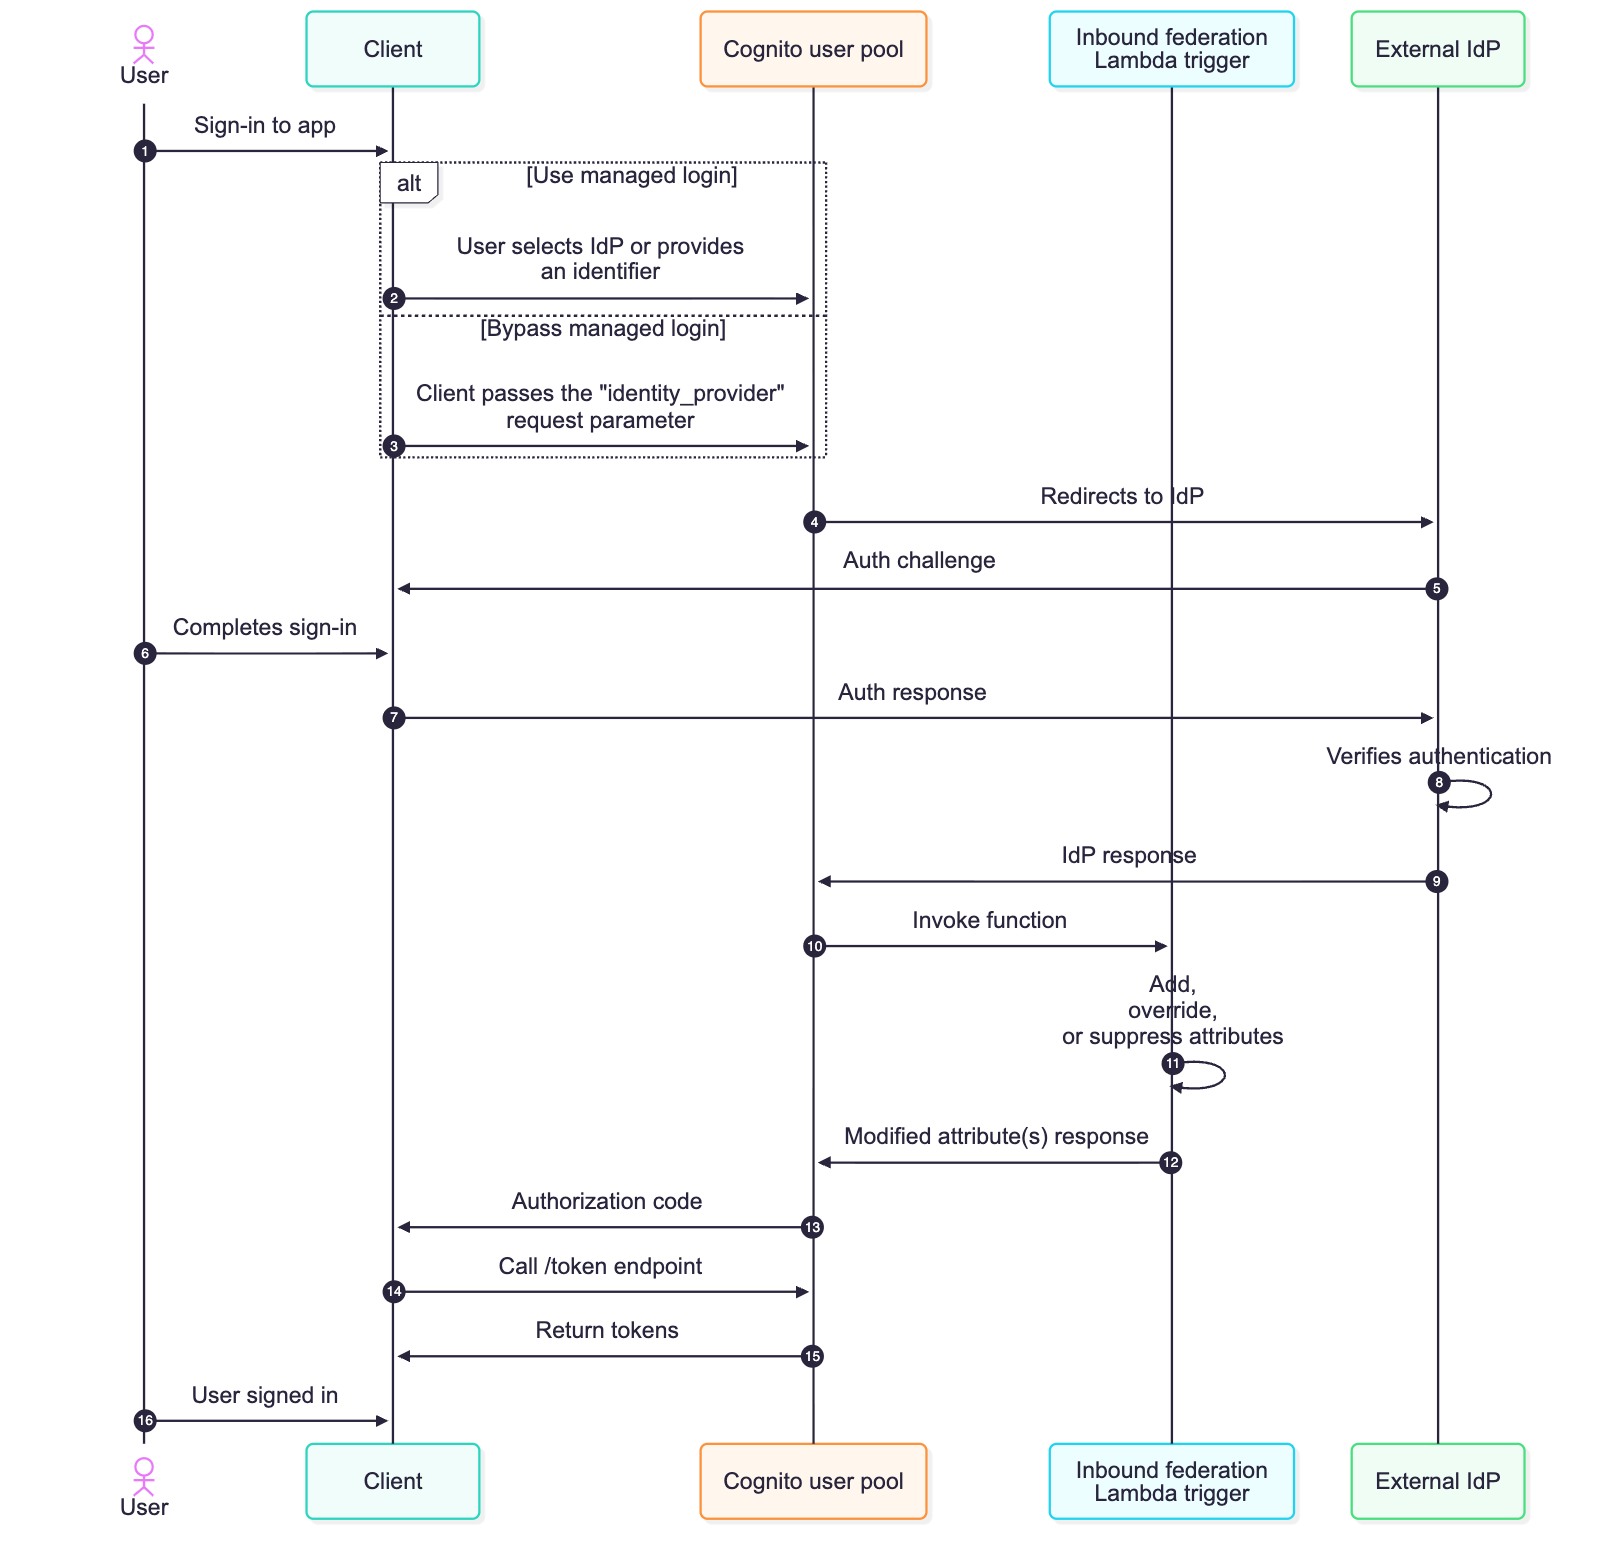
The specific format of this attribute data depends on the provider type, view the Inbound federation Lambda trigger parameters section in the docs to learn more. If the external IdP is a SAML provider, you will receive a JSON key-pair listing of the user’s attributes from the IdP assertion. If the external IdP is an OIDC provider (or social provider), you will receive the access token and attribute data from the /userinfo endpoint, along with an ID token if one was provided. See Figure 1 for a detailed flow of a federated sign-in with an Amazon Cognito user pool configured to use the inbound federation Lambda trigger.
Figure 1: Sequence flow of a federated login configured with the inbound federation Lambda trigger
The user begins using the application but is required to sign in first.
The managed login is rendered, and the user can select which IdP they want to sign in with. If identifiers are used with SAML or OIDC providers, the user enters their email address and Amazon Cognito looks up the domain of their provided email and routes them to the appropriate IdP.
Alternatively, the managed login can be bypassed by the client providing the identity_provider request parameter.
Amazon Cognito sends the authentication request to the appropriate IdP.
The external IdP challenges the user to sign in.
The user completes the sign-in process required by the external identity provider.
The challenge response is sent to the external IdP.
The IdP verifies that the sign-in is successful. If there are any subsequent challenges, such as multi-factor authentication (MFA), additional rounds of authentication challenges and responses take place. This is determined by the configuration and settings of the external IdP.
The external IdP sends a response to the Amazon Cognito user pool, and Cognito validates the cryptographic signature and that it hasn’t been tampered with.
Amazon Cognito sends attribute data from the IdP to the inbound federation Lambda function
Attribute data for the authenticated user and the common parameters for Amazon Cognito are available for the Lambda function to add, modify, or suppress according to your requirements.
Your added, modified, or suppressed attributes are returned to Amazon Cognito. These are attribute values that map to the user’s profile in Cognito—whether the user profile was just created or is being updated for a returning user.
Continuing the OAuth 2.0 authorization code grant, Amazon Cognito sends an authorization code to the client.
The client then calls the /token endpoint with the authorization code. Note: It’s a security best practice to use confidential clients and to use OAuth 2.0 Proof Key for Code Exchange (PKCE) extension whenever possible.
An access, ID, and refresh token is returned to the client.
The user has signed into the application. ID tokens can be used to identify who the user is (authentication), and access tokens can be used to determine what the user can do (authorization).
Common federation challenges and use cases
Federation introduces complexity that varies depending on your use case. For B2B and SaaS applications, you’re often not in control of your customers’ IdPs, including what attributes they send or how they format them. As an example, an enterprise customer will configure their SAML response to include every group a user belongs to. This could be hundreds of groups or long group identifiers, and if the group membership of the user is mapped to an Amazon Cognito attribute, this can lead to a scenario where the Cognito attribute size limit is exceeded, causing federated sign-ins to fail.
Challenges for business-to-customer (B2C) applications can differ from B2B use cases. For B2C applications, organizations shouldn’t be required to think about identity providers. The ability to sign-up and sign-in should be seamless for consumer-facing applications. Customers visiting a consumer-facing application might create an account with email and password, forget they created created it, and then later try signing in with Facebook (or other social provider). Without proper account linking in Amazon Cognito, you then have multiple user records for the same user, which could lead to fragmented purchase history and a frustrating customer experience.
Both B2B and B2C use cases might need to look up external data just prior to completing the sign-in process, such as additional roles and access for B2B users or looking up active orders for B2C users. Another example could be the need to normalize data just prior to storing it in the user profile within the Amazon Cognito user pool or even discarding personally identifiable information (PII) prior to storing it in your Cognito user pool.
With the inbound federation Lambda trigger, you can handle these B2B and B2C use cases programmatically, and do so without requiring modification of your applications or coordinating IdP-specific changes with external IdPs. In this section, I dive deeper into two common use cases: oversized group attributes, common with B2B customers, and automated account linking, common with B2C customers.
Use case 1: Filtering oversized group attributes
If you have B2B and SaaS use cases, it’s a common practice to use group membership from the IdP to determine the level of access you have within the SaaS service. This is a great way to still provide some access control back to the enterprise customers themselves. The groups can be used to represent the roles a user will have or for some form of coarse-grained authorization. However, your customers might inadvertently send a large number of groups a user is a member of, thus leading to an oversized attribute payload.
Another common scenario is where the syntax and format of group name a user belongs to can arrive in various formats across different IdPs; such as a canonical name (for example, example.com/groups/myApp-readOnly), a distinguished name (common with LDAP based systems and such as cn=myApp-readOnly,OU=groups,DC=example,DC=com), or a plain text string (such as myApp-readOnly). Instead of having downstream authorization logic to accommodate different variations of a group name, you can now normalize how groups are represented prior to storing the user’s attribute data using the inbound federation Lambda trigger.
To expand this, imagine your enterprise customer uses a SAML IdP, such as Active Directory Federation Services (AD FS), in front of Active Directory (AD). When their users authenticate, AD FS sends a groups attribute containing every AD group the user belongs to. For users in large organizations, this can be hundreds of groups, and the attribute is mapped to an Amazon Cognito attribute, this could result in a string that exceeds 2,048-character limit per attribute of Cognito. Authentication would fail in this scenario, ultimately leading to support tickets because enterprise customers would be unable to sign in. Even if certain users didn’t exceed this limit, because of a smaller number of group memberships, this would result in the collection and storing of unnecessary data in your Cognito user pool.
Previously, you would need to work with your customer’s IT department to modify their SAML configuration to filter groups at the source—a process that could take weeks and require multiple approval cycles because it involves a change to the federation configuration. Especially for SaaS customers, this isn’t a scalable approach because you could integrate with hundreds of external IdPs. With the inbound federation Lambda trigger, you can solve this by filtering the groups to only those relevant to your application and normalizing the nomenclature of these groups. The following Lambda function filters the groups attribute to include only groups relevant to your application and normalizes the names of groups.
// Configure the group prefix to filter on (e.g. "App1-", "myApp-", etc.)
// Change this to match the prefix your IdP uses for relevant group names.
const GROUP_PREFIX = process.env.GROUP_PREFIX || 'myApp-';

// The SAML attribute/claim name that contains group membership.
// Common values: "groups", "memberOf", "http://schemas.xmlsoap.org/claims/Group", etc.
const GROUP_ATTRIBUTE = process.env.GROUP_ATTRIBUTE || 'groups';

/**
 * Extracts the short group name from common IdP formats:
 *   - Plain text:       "myApp-readOnly"
 *   - Leading slash:    "/myApp-readOnly"
 *   - Canonical/URL:    "example.com/groups/myApp-readOnly"
 *   - Distinguished name (DN): "cn=myApp-readOnly,OU=groups,DC=example,DC=com"
 * Returns the last meaningful segment so all formats normalize to "myApp-readOnly".
 */

function extractGroupName(raw) {
  let name = raw.trim();

  // Some IdPs prefix group names with "/" to indicate a top level group — strip it before format detection
  if (name.startsWith('/')) {
    name = name.substring(1);
  }

  // DN format — extract the CN (common name) value
  if (/^cn=/i.test(name) || /,\s*(ou|dc)=/i.test(name)) {
    const cnMatch = name.match(/^cn=([^,]+)/i);
    return cnMatch ? cnMatch[1].trim() : name;
  }

  // URL / path format — take the last segment after the final "/"
  if (name.includes('/')) {
    const segments = name.split('/').filter(Boolean);
    return segments[segments.length - 1];
  }

  return name;
}
export const handler = async (event) => {
  try {
    console.log('Full event:', JSON.stringify(event, null, 2));
    console.log('Provider type:', event.request?.providerType);

    // Initialize the response structure
    event.response = event.response || {};

    if (event.request?.providerType?.toLowerCase() === "saml") {
      const samlResponse = event.request.attributes?.samlResponse;

      if (samlResponse) {
        console.log('Original SAML Attributes:', JSON.stringify(samlResponse, null, 2));

        // Build the attribute map — you MUST include every attribute you want Cognito to retain. Anything omitted from userAttributesToMap is dropped.
        const mappedAttributes = {};

        Object.keys(samlResponse).forEach(key => {
          if (key === GROUP_ATTRIBUTE) {
            // Parse the groups JSON string from the SAML assertion
            let groupsArray = [];
            try {
              groupsArray = JSON.parse(samlResponse[GROUP_ATTRIBUTE]);
            } catch (error) {
              console.error(`Error parsing ${GROUP_ATTRIBUTE}:`, error);
            }

            // Normalize each group name, then filter to the configured prefix
            const normalizedGroups = groupsArray.map(extractGroupName);
            const filteredGroups = normalizedGroups.filter(group =>
              group.startsWith(GROUP_PREFIX)
            );

            console.log(`Original ${GROUP_ATTRIBUTE}:`, groupsArray);
            console.log(`Normalized ${GROUP_ATTRIBUTE}:`, normalizedGroups);
            console.log(`Filtered ${GROUP_ATTRIBUTE}:`, filteredGroups);

            // Only include the groups attribute if there are matching groups
            if (filteredGroups.length > 0) {
              mappedAttributes[GROUP_ATTRIBUTE] = filteredGroups.map(group => `'${group}'`).join(', ');
            }
          } else {
            // Pass all other SAML attributes through unchanged
            mappedAttributes[key] = samlResponse[key];
          }
        });

        event.response.userAttributesToMap = mappedAttributes;
        console.log('Response to Cognito:', JSON.stringify(event.response, null, 2));
      }
    }

    // For any unhandled provider type (or missing samlResponse), this intentionally does NOT set userAttributesToMap and tells Cognito to keep all original IdP attributes unchanged (no-op).

    // To handle OIDC or social providers, add additional logic here using event.request.attributes.idToken, .userInfo, and/or .tokenResponse.

    return event;
  } catch (error) {
    console.error('Error in Lambda:', error);
    throw error;
  }
};
This approach reduces a large group list to only what is applicable to your application. Authentication succeeds, and you maintain control over your user pool’s data without depending on external configuration changes.
Use case 2: Automatic account linking
The second use case addresses a challenge that’s particularly common in B2C facing ecommerce or any consumer-facing applications; although it can also be applicable to B2B scenarios. Imagine you’re running an online retail store. A customer creates an account with their email and password to make a purchase. A few months later, they return to your site but forgot they already created an account and they see the Login with Amazon button and decide to sign in this way. Without account linking, Amazon Cognito creates a new federated user because these are technically distinct accounts, and now this customer has two separate accounts with different purchase histories and saved preferences.
This fragmentation creates a poor customer experience and complicates your business operations. You can’t see the customer’s complete purchase history, loyalty points are split across accounts, and your analytics show two distinct customers instead of one.
The inbound federation Lambda trigger can be used to solve this by automatically linking federated identities to existing local accounts based on email address. While account linking can also be implemented in a pre-sign-up Lambda trigger, the inbound federation trigger runs on every federated sign-in, not just the first, giving you access to the latest IdP attributes and the ability to apply linking logic continuously rather than only at initial account creation. If no local Amazon Cognito account exists, you can create one and then link the social provider account to it. The local account can serve as the primary identity, ensuring consistent JSON Web Tokens (JWTs) regardless of how the user signs in. The following is an example of an inbound federation Lambda trigger that can help address this use case.
import {
  CognitoIdentityProviderClient,
  ListUsersCommand,
  AdminCreateUserCommand,
  AdminLinkProviderForUserCommand
} from "@aws-sdk/client-cognito-identity-provider";

const client = new CognitoIdentityProviderClient();

export const handler = async (event) => {
  try {
    console.log('Full event:', JSON.stringify(event, null, 2));

    const { userPoolId, request, userName } = event;
    const { providerName, providerType, attributes } = request;

    // Extract email and profile attributes based on provider type
    const { email, givenName, surname } = extractAttributes(providerType, attributes);

    if (!email) {
      console.error('No email found in federated response');
      return event;
    }

    console.log(`Processing federated login for email: ${email}, provider: ${providerName} (${providerType})`);

    // Check if a local user exists with this email
    const existingUser = await findLocalUserByEmail(userPoolId, email);

    if (existingUser) {
      console.log(`Found existing local user: ${existingUser.Username}`);
      if (isAlreadyLinked(existingUser, providerName, userName)) {
        console.log(`Federated identity ${providerName}:${userName} is already linked to ${existingUser.Username}, skipping link`);
      } else {
        await linkFederatedUser(userPoolId, existingUser.Username, providerName, userName);
      }
    } else {
      console.log('No existing local user found, creating new one');
      const newUsername = await createLocalUser(userPoolId, email, givenName, surname);
      await linkFederatedUser(userPoolId, newUsername, providerName, userName);
    }

    return event;

  } catch (error) {
    console.error('Error in account linking Lambda:', error);
    throw error;
  }
};


/**
 * Check if the federated identity is already linked to the local user by inspecting the identities attribute from the ListUsers response.
 */
function isAlreadyLinked(user, providerName, federatedUsername) {
  const identities = user.Attributes?.find(a => a.Name === 'identities');
  if (!identities?.Value) return false;

  try {
    const parsed = JSON.parse(identities.Value);
    return parsed.some(id => id.providerName === providerName && id.userId === federatedUsername);
  } catch {
    return false;
  }
}

/**
 * Extract email and profile attributes based on provider type.
 * - SAML: attributes come from samlResponse
 * - OIDC/Social: attributes come from userInfo, falling back to idToken (if one exists)
 */
function extractAttributes(providerType, attributes) {
  if (providerType?.toLowerCase() === 'saml') {
    const saml = attributes?.samlResponse;
    return {
      email: saml?.email || null,
      givenName: saml?.givenName || '',
      surname: saml?.surname || ''
    };
  }

  // OIDC and social providers: prefer userInfo, fall back to idToken
  const userInfo = attributes?.userInfo;
  const idToken = attributes?.idToken;

  const source = userInfo?.email ? userInfo : idToken;

  return {
    email: source?.email || null,
    givenName: source?.given_name || '',
    surname: source?.family_name || ''
  };
}

/**
 * Find a local Cognito user (not EXTERNAL_PROVIDER) by email address.
 */
async function findLocalUserByEmail(userPoolId, email) {
  try {
    const command = new ListUsersCommand({
      UserPoolId: userPoolId,
      Filter: `email = "${email}"`
    });

    const response = await client.send(command);
    console.log('ListUsers response:', JSON.stringify(response, null, 2));

    if (!response.Users || response.Users.length === 0) {
      return null;
    }

    // Find the first user that is a true local account (not a federated-only profile)
    const localUser = response.Users.find(u => u.UserStatus !== 'EXTERNAL_PROVIDER');
    return localUser || null;
  } catch (error) {
    console.error('Error finding user by email:', error);
    throw error;
  }
}

/**
 * Create a new local Cognito user without a password.
 * With passwordless (email OTP) enabled on the user pool, the user is created with UserStatus=CONFIRMED and no FORCE_CHANGE_PASSWORD state.
 */
async function createLocalUser(userPoolId, email, givenName, surname) {
  try {
    const userAttributes = [
      { Name: 'email', Value: email }
    ];

    if (givenName) userAttributes.push({ Name: 'given_name', Value: givenName });
    if (surname) userAttributes.push({ Name: 'family_name', Value: surname });

    const command = new AdminCreateUserCommand({
      UserPoolId: userPoolId,
      Username: email,
      UserAttributes: userAttributes,
      MessageAction: 'SUPPRESS'
    });

    const response = await client.send(command);
    console.log(`Created local user: ${email}`, JSON.stringify(response, null, 2));

    return email;
  } catch (error) {
    console.error('Error creating local user:', error);
    throw error;
  }
}

/**
 * Link a federated user identity to a local Cognito user.
 * The local user becomes the primary profile — all future JWTs will represent this local user regardless of sign-in method.
 */
async function linkFederatedUser(userPoolId, localUsername, providerName, federatedUsername) {
  try {
    const command = new AdminLinkProviderForUserCommand({
      UserPoolId: userPoolId,
      DestinationUser: {
        ProviderName: 'Cognito',
        ProviderAttributeValue: localUsername
      },
      SourceUser: {
        ProviderName: providerName,
        ProviderAttributeName: 'Cognito_Subject',
        ProviderAttributeValue: federatedUsername
      }
    });

    const response = await client.send(command);
    console.log(`Linked federated user ${federatedUsername} to local user ${localUsername}`);
    console.log('Link response:', JSON.stringify(response, null, 2));

    return response;
  } catch (error) {
    if (error.name === 'AliasExistsException' || error.message?.includes('already linked')) {
      console.log(`User already linked: ${error.message}`);
      return;
    }
    console.error('Error linking federated user:', error);
    throw error;
  }
}
Every federated sign-in will invoke the inbound federation Lambda trigger, and the logic is straightforward. When a user authenticates with an external identity provider, the trigger extracts their email from the federated response and searches the user pool for a local Cognito account with that same email. If one exists—such as if the user originally signed up with email and password—the Lambda function links the federated identity to that existing local account. If no local account exists, the trigger creates one on the fly as a passwordless account (confirmed, suppressing any emails, and ready for passwordless email one-time passcode (OTP) sign-in), then links the federated identity to it. In both cases, the local account is set as the primary profile. This means the user’s JWTs always carry the same sub-claim regardless of how they sign in—directly, or through Google, Facebook, or SAML—your application sees one consistent identity. The preceding Lambda trigger is also smart enough to check whether a linked account already exists before making the call, so returning users who’ve already been linked don’t generate unnecessary API calls. And because the local account supports passwordless authentication, a user who first arrived through federation can later sign in directly with an emailed OTP—or even add a password later through your applications account settings. The local account is always the anchor.
Best practices
As you implement these patterns, keep a few best practices in mind. Your Lambda function must be completed within 5 seconds, so optimize for speed to help ensure the federated sign-in process is able to successfully complete. If you’re making external calls within the inbound federation Lambda function, like Amazon DynamoDB queries or API requests, implement caching where possible. Handle errors gracefully—if your Lambda function throws an exception or an error, authentication could fail for the user. Consider logging the error and returning the original event back to Amazon Cognito rather than failing authentication for a legitimate user attempting to sign in. Here are some additional best practices for working with Lambda functions.
For the account linking use case, automatic linking relies on matching the email from the federated identity to a local account. However, there are scenarios where this match won’t exist. For example, Apple’s Hide My Email feature generates a unique alias for each app, so the federated email won’t match any existing local account. This is an effective privacy feature but it also blocks the ability to automatically link accounts. In cases like these, your application will need to implement a user-initiated account linking flow, such as prompting the user to verify ownership of both email addresses before calling the AdminLinkProviderForUser API to complete the link.
Monitor your Lambda function performance using Amazon CloudWatch metrics. Set up alarms for errors, timeouts, and throttling so you can respond quickly if issues arise. I also recommend capturing sample event payloads from a CloudWatch log group during your initial development and deployment—these will be valuable for local testing and debugging which can lead to quicker resolution if issues arise in your production environment. This is especially important as different IdPs (namely SAML and OIDC providers) may respond with varying attribute and value syntaxes. Consider implementing CloudWatch alarms to alert your security and operational teams if authentication failures spike, which could indicate an attempted attack, misconfiguration, or provide insight into further optimization of your inbound federation Lambda trigger.
Conclusion
In this post, you learned about the new inbound federation Lambda trigger for Amazon Cognito and how it can solve various use cases. You walked through two common federation challenges and reviewed some sample code to help resolve those challenges. For B2B and SaaS applications, the inbound federation Lambda trigger gives you control when dealing with oversized attributes from external identity providers (such as group membership) without requiring coordination with enterprise IT teams. For B2C and consumer-facing applications, it enables seamless account linking across multiple authentication methods, creating a unified customer experience.
The new Lambda trigger works with SAML, OIDC, and supported social providers, and is available now in AWS Regions where Amazon Cognito is available. To learn more about the new Lambda trigger and others, see the Amazon Cognito Developer Guide.
What federation challenges are you facing in your applications? I’d love to hear about your use cases in the comments below and over at AWS re:Post.
The AWS Customer Incident Response Team (AWS CIRT) regularly encounters patterns that repeat across their engagements when helping customers respond to security incidents. We’re passionate about making sure that information is widely accessible so that everyone can improve their security posture and their organization’s resilience to disruption. The primary method we use to share this information is the Threat Technique Catalog for AWS (TTC). The latest update to the catalog for March 2026 addresses identity, persistence, infrastructure destruction, and privilege escalation. Each new entry reflects something we’ve encountered in practice, and each provides straightforward mitigations. This post breaks down what changed, why it matters, and what you can do about it today.
What we’re seeing
Based on recent observations, we’ve added three new entries to the TTC.
Cognito refresh token abuse: The quiet persistence mechanism
Amazon Cognito refresh tokens are designed for convenience. They let applications obtain new access and ID tokens without requiring users to re-authenticate. The default lifetime is 30 days and is configurable up to 10 years. Cognito provides the flexibility to address a wide range of use cases, however the AWS CIRT has seen this lifetime window used by threat actors in an unauthorized way to maintain persistence by refreshing credentials.
When a threat actor obtains a valid refresh token—through credential theft, compromised client-side storage, or elevated permissions—they can call cognito-idp:GetTokensFromRefreshToken to silently generate fresh tokens. The legitimate user’s session continues normally because their application independently refreshes tokens as needed—the threat actor’s refresh calls don’t invalidate the user’s token. This creates a parallel, persistent foothold that’s invisible to the user. In environments where refresh token rotation isn’t enabled, the same token can be reused indefinitely within its validity window.
This method of gaining persistent access is often overlooked by response teams who were confident that the initial compromise was contained, only to discover ongoing unauthorized access weeks later through a refresh token they didn’t know existed.
Enabling refresh token rotation and reducing the lifetime of tokens can help mitigate this risk. Dive deeper in the TTC (T1098.A006).
AMI image deletion: Targeting recovery capabilities
Amazon Machine Images (AMI) are a core part of many solutions and foundational to disaster recovery. They often contain the operating system, application configurations, and everything needed to rebuild your infrastructure. Threat actors know this, and we’re seeing ec2:DeregisterImage used to make it more difficult to recover from an incident.
By default, when an AMI is deregistered, it’s gone. Recycle Bin retention rules can allow the recovery of the AMI, but if you haven’t explicitly enabled that functionality, there’s no way to undo the deregister action. Working with customers, we’ve seen cases where the impact of this action goes beyond the immediate loss because the threat actors have also removed the golden images the teams planned to restore from.
The TTC has more information about how to detect and mitigate this technique, including how to enable Recycle Bin retention rules for key AMIs (T1485.A002).
Additional cloud roles: The trust policy blind spot
We’ve updated T1098.003: Additional Cloud Roles to now include UpdateAssumeRolePolicy as a tracked API call. We’ve seen an increase in the use of this call to avoid detections set to flag new role creation (iam:CreateRole). By modifying the trust policy of an existing role, a threat actor with sufficient permissions can use UpdateAssumeRolePolicy to subtly add an external account or an identity they control. No new roles appear. No new policies are created. The existing role simply trusts a new principal which the threat actor can assume.
This persistence and privilege escalation technique blends into the volume of normal AWS Identity and Access Management (IAM) operations. It’s especially effective in environments with a large number of roles where trust policy changes aren’t actively monitored.
The current trend
A common thread runs through all three of these updates: threat actors are using subtle, default, or unexpected behaviors to sidestep detection. Refresh tokens working as designed. AMI deregistration completing without guardrails. Trust policies being modified through legitimate API calls. These actions might not trigger alarms in most environments because they look like normal operations.
This is a shift worth paying attention to. Rather than relying on novel exploits or zero-days, the techniques we’re cataloging reflect threat actors who understand how cloud services work and use that knowledge to hide in plain sight. The implication for security teams is clear: prevention and detection strategies need to mature beyond monitoring for obviously malicious actions. Customers need to be watching for legitimate actions happening in illegitimate context—such as the right API call, made by the wrong principal, at the wrong time.
The Threat Technique Catalogue for AWS is designed to help with exactly this. Each technique entry includes detection guidance and mitigations specific to AWS environments. We encourage teams to review the relevant entries and assess whether their current monitoring would catch these patterns:
T1098.A006: Cognito Refresh Token Abuse: Are you monitoring for cognito-idp:GetTokensFromRefreshToken from unexpected sources? Is refresh token rotation enabled?
T1485.A002: AMI Image Deletion: Do you have Recycle Bin retention rules protecting your critical AMIs? Would you know if a production AMI was deregistered outside a maintenance window?
T1098.003: Additional Cloud Roles: Are trust policy modifications tracked and alerted on? Could an external account be added to an existing role without anyone noticing?
Each of these techniques leaves traces in AWS CloudTrail, and the TTC provides specific guidance on what to watch for and how to respond.
Looking ahead
The Threat Technique Catalog for AWS exists because we believe the patterns we observe during security engagements shouldn’t stay behind closed doors. When we see techniques repeating across customers, the most effective thing we can do is document them and make that knowledge available so you can act on it before you’re in the middle of an incident.
This March update adds three new entries, and the catalog will continue to evolve. Our team regularly updates it based on what we’re seeing in the real world when helping customers respond to security events. We encourage security teams to review the catalog regularly, incorporate its techniques into threat modeling exercises, and use it as a shared vocabulary for discussing cloud-specific threats.

 Login
Login