Normal view

A technical walkthrough of multicloud full-stack security using AWS Security Hub Extended

22 April 2026 at 18:31

Building on our recent announcement of AWS Security Hub Extended —our full-stack enterprise security offering — we want to show you how we’re simplifying security procurement and operations for your multicloud environments. Whether you’re a security architect evaluating solutions or a CISO looking to streamline vendor management, this post walks through the streamlined experience that transforms how you acquire, deploy, and manage end-to-end enterprise security solutions across endpoint, identity, email, network, data, browser, cloud, AI, and security operations. Security Hub Extended brings together AWS security services with carefully curated security partners. Delivering better outcomes together through unified procurement, billing, and operations that significantly reduce vendor management overhead so you can focus on what matters most: protecting your organization.

The challenge we’re addressing

Security teams today spend too much time on vendor management, evaluating services, negotiating contracts, and managing multiple billing cycles instead of focusing on what matters most: managing risk. But the procurement challenge runs even deeper. Until now, customers really only had one option: sign multi-year agreements based solely on proof-of-concept testing and estimated annual usage. This forces organizations to commit budget before they can validate whether a solution will work for them at scale.

AWS Security Hub Extended transforms this procurement model. Security Hub Extended offers customers the option to get started with pay-as-you-go pricing and no commitments, so they can move fast and validate solutions in their actual environment. After they’ve confirmed a solution works at scale, they can then align their vendor strategy and sign longer-term commitments for even more favorable pricing.

Security Hub Extended provides a curated set of carefully chosen partner solutions with competitive pricing, unified billing through your AWS account, and seamless integration. Our initial launch partners, selected by customers for their proven value, include 7AI, Britive, CrowdStrike, Cyera, Island, Noma, Okta, Oligo, Opti, Proofpoint, SailPoint, Splunk, Upwind, and Zscaler.

Getting started with Security Hub Extended

AWS Security Hub consolidates threat analytics from Amazon GuardDuty, vulnerability management from Amazon Inspector, and sensitive data discovery from Amazon Macie, correlating these signals with Security Hub Exposure findings to determine overall risk, reachability, and assumability. Security Hub Extended builds on this foundation by adding curated partner solutions, extending these unified security operations across your entire organization including multicloud, on-premises, and endpoint environments. If you’re already using Security Hub, you can navigate directly to the Extended plan section.

Getting started with Security Hub is straightforward. From the AWS Management Console, search for Security Hub to start the onboarding walkthrough. If you’re not already a Security Hub customer, you can quickly complete onboarding by designating an AWS organization delegated administrator (DA) account. You can then centrally enable and manage Security Hub across your entire organization’s accounts and AWS Regions from a single location (see Introduction to AWS Security Hub). After you’ve onboarded, navigate to the Extended plan section to add curated partner solutions.

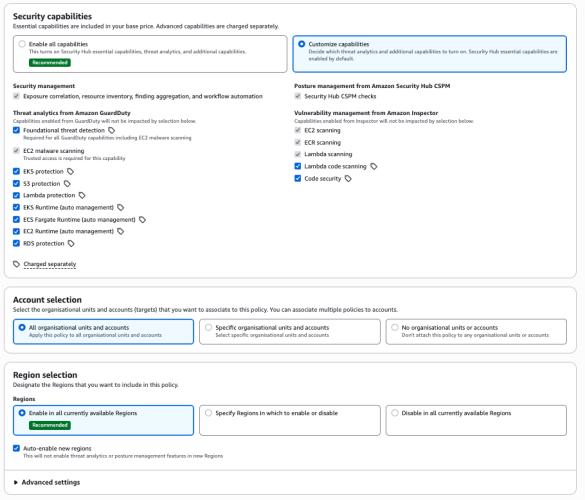
Figure 1- Security Hub centralized configuration

Figure 1: Security Hub centralized configuration

From this single interface, you can enable detection and response capabilities across your entire organization, provide granular configurations at the organizational unit or member account level, select specific Regions, and turn individual features on or off as needed.

Understanding risk through attack paths

The Security Hub risk correlation engine identifies potential exposures by correlating threats, vulnerabilities, and misconfigurations to reveal how they connect and could lead to compromise of critical resources.

Figure 2 - Security Hub exposure attack path visualization

Figure 2: Security Hub exposure attack path visualization

The attack path visualization in the preceding figure reveals critical insights including upstream root causes and blast radius, showing the potential impact if a threat actor exploits a vulnerability. You can use this visualization to focus on fixing the root cause rather than addressing symptoms. For example, updating one security group configuration can eliminate the entire attack path, cutting off all downstream exposure.

Accessing Security Hub Extended

You can find Security Hub Extended, shown in the following figure, in the left navigation pane under Management in your Security Hub delegated administrator (DA) account; Security Hub Extended will only be visible from the delegated administrator account. The Extended plan brings curated third-party security solutions directly into the Security Hub experience. Because Extended is built into Security Hub, there’s no separate console to manage. You discover, subscribe to, and operate curated partner solutions from the same place you manage enterprise security, delivering unified operations across your entire security estate.

Figure 3- Security Hub Extended partners

Figure 3: Security Hub Extended partners


Transparent, competitive pricing consolidated with Security Hub

Unlike traditional third-party engagements that require lengthy negotiations, private pricing deals, and multi-year commitments, Security Hub Extended offers complete pricing transparency. Every partner solution displays clear, competitive monthly pay-as-you-go rates billed directly with Security Hub requiring no commitments. For example, Cloud Security from Upwind costs $3.75 per resource per month, and Identity Security from Okta costs $20 per user per month.

All Security Hub Extended offerings are also eligible for AWS Enterprise Discount Program (EDP) discounts that will be applied automatically. If you have an existing AWS enterprise discount agreement, those discounts automatically apply to Security Hub Extended offerings, further reducing your effective costs. All partner solutions you deploy through Security Hub Extended appear on your consolidated AWS bill, no separate invoices or payment processes.

Streamlined onboarding

Adopting curated partner solutions through Security Hub Extended is straightforward. Choose View Product to initiate an automated workflow. Depending on the solution, you’ll either be directed to the partner onboarding console or provide information for the partner to guide you through their onboarding process tailored to your environment.

Billing begins only after you’re fully activated on the partner solution and starts automatically, no additional action is required to benefit from the unified billing. If you’re already using one of the curated partner solutions, transitioning to Security Hub Extended for consolidated billing and flexible pricing won’t disrupt your current services. Now, instead of receiving separate invoices for each partner in addition to Amazon Inspector, GuardDuty, and Security Hub CSPM you get one unified bill through Security Hub. This consolidates visibility to support better understanding of spend and to manage cost.

Unified operations

Security Hub Extended unifies security operations by consolidating findings from AWS and curated partner solutions. All findings use the Open Cybersecurity Schema Framework (OCSF) for consistency, without the need for complex data normalization, transformation, and extract, transform, and load (ETL) processes.

When you deploy solutions such as CrowdStrike, Noma, and Upwind alongside Splunk and 7AI through Security Hub Extended, security findings automatically flow into Security Hub and then seamlessly route to Splunk and 7AI. All in OCSF format so your security team can focus on responding to threats, not managing pipelines, so you can quickly identify and respond to security risks that span boundaries—from endpoint compromises to cloud infrastructure—without spending valuable time on manual integration work.

The full-stack security vision

Security Hub Extended represents a shift in how you discover, procure, and build comprehensive security programs. Instead of managing dozens of vendor relationships, negotiating separate contracts, agreeing to multi-year annual commitments, and integrating disparate tools, you now have one procurement process through AWS, one bill with transparent competitive pay-as-you-go pricing, one console for unified security operations, one support channel for AWS Enterprise Support customers, and one schema (OCSF) for all security findings. The result: reduced security risk, improved team productivity, and a more unified approach to security operations across your enterprise.

Get started

Try Security Hub Extended today and experience how simplified procurement and unified operations can transform your security program. Security Hub Extended is generally available globally in all AWS commercial Regions where Security Hub is available. We’ve also published a walk through video to further explain how Security Hub Extended works.

It’s still Day 1, but we’re iterating fast, so share your feedback with us on AWS re:Post for Security Hub or through your AWS Support contacts and watch for future blog posts on our progress.
Matt Meck

Matt Meck

Matt is a Worldwide Security Specialist at Amazon Web Services, based in New York, with 10 years of experience in the tech industry. For the past 4 years at AWS, he’s focused on Detection and Response, helping solve complex security challenges in the rapidly evolving security space. He works closely with product teams, customers, partners, and field teams to deliver effective security solutions.


Michael Fuller

Michael Fuller

Michael has been with AWS for 16 years and led product for AWS Security Services for 11 years. Michael has 29 years in the industry and held several roles in product management, business development, and software development for IBM, Cisco, and Amazon. Michael has a Bachelor’s of Science in Computer Engineering from the University of Arizona and an MBA from the University of Washington.


A framework for securely collecting forensic artifacts into S3 buckets

8 April 2026 at 20:19

When customers experience a security incident, they need to acquire forensic artifacts to identify root cause, extract indicators of compromise (IoCs), and validate remediation efforts. NIST 800-86, Guide to Integrating Forensic Techniques into Incident Response, defines digital forensics as a process comprised of four basic phases: collection, examination, analysis, and reporting. This blog post focuses on the first phase—collection—and provides best practices for implementing least privilege during the forensic evidence collection processes that collect evidence and store the artifacts in Amazon Simple Storage Service (Amazon S3) buckets. The architecture presented in this post can be used to collect forensic evidence from both Amazon Web Services (AWS) and non-AWS compute resources.

It’s important to consider the security of the forensic artifact collection process because it involves communicating with potentially compromised resources. The collection methodology itself should be designed to avoid adding additional risks to infrastructure or other forensic investigation processes. At the same time, the collection of forensic artifacts requires the use of specialized tools that are difficult to change or adapt to new security requirements.

This post outlines factors that you should consider when creating an evidence collection capability and introduces an architecture that implements the best practices for least privilege and integrating with (instead of changing or adapting) existing forensic tools that support uploading artifacts to S3 buckets by using AWS security credentials.

Solution architecture

The architecture presented in this post demonstrates the following AWS best practices:

  1. Least privilege – Use AWS Identity and Access Management (IAM) policies to provide least privilege access to upload forensic artifacts to an S3 location dedicated to a specific forensic collection task. The locked down credentials cannot be used to view or modify any other forensic collections.
  2. Time-limited credentials – Use AWS Security Token Service (AWS STS) to provide time limited credentials, reducing the potential for an unauthorized user to abuse credentials while they’re visible on the target machine during the artifact collection process.
  3. Compatibility with third-party tools – Forensic tools are specialized and changing a forensic collection process to adapt to different collection methods might not be possible. To avoid the risk of needing to change tools, maximize compatibility with any third-party tools that support uploading to S3 buckets. The method introduced in this post to generate time-limited, scoped down credentials can be used with most third-party forensic tools that support uploading to S3 buckets.
  4. Credential vending – Use time-limited tokens, which can be vended on demand through an automated process, eliminating the need for forensic investigators to use the AWS Management Console, understand least privilege, or have any access to the AWS control plane. Forensic investigators can focus on the process of collecting and analyzing evidence.
  5. Process automation – Deploy the process as infrastructure as code (IaC) and automate it through AWS services, reducing the burden on security teams to manually perform runbook steps during an active security incident.

This post starts with an overview of the digital forensic process, provides best practices for using Amazon S3 to store forensic artifacts, details how you can create time-limited, least privilege tokens to provide secure access to upload forensic artifacts to S3 buckets, and introduces a sample architecture that automates the end-to-end process.

The digital forensic process

Organizations need to have practices and resources in place to support a digital forensic investigation environment before an incident occurs. AWS has published several resources, including Forensic investigation environment strategies in the AWS Cloud and AWS prescriptive guidance: Security Reference Architecture, Cyber forensics, to provide best practices for organizing your AWS accounts using AWS Organizations to support forensic clean-room environments. Creating segregated AWS accounts and resources for your security teams is critical to provide your incident responders a location to store and analyze any digital forensic evidence collected during an investigation.

After you’ve established a landing zone for performing digital forensics, you’re ready to collect and process digital forensic evidence. AWS supports the collection of digital forensics through extensive logging of control plane events in AWS CloudTrail, and metrics and application logs that can be stored in Amazon CloudWatch. In addition, AWS core compute services, such as Amazon Elastic Compute Cloud (Amazon EC2), support forensics operations through snapshots of the underlying Amazon Elastic Block Storage (Amazon EBS) volume. An example architecture to demonstrate how to automate the collection of EBS volume snapshots for forensic investigations can be found in How to automate forensic disk collection in AWS.

You might want to use the same AWS infrastructure to collect, examine, analyze, and report on forensic incidents that occur on other resources, such as corporate laptops. You can use existing forensic tooling to perform live response, collecting specific artifacts such as Windows NT File System (NTFS) Master File Table (MFT), logs from Linux machines, volatile memory images, or other artifacts that are specified as part of your organization’s incident response plan. These tools can be provided by third parties or built in-house, and many support uploading to S3 buckets using AWS security credentials.

Using Amazon S3 for forensic artifact collection

Amazon S3 provides the foundational requirements for collecting and storing forensic artifacts. Digital forensics requires highly available, durable, and secure storage of artifacts collected from potentially compromised systems. Amazon S3 is designed for 11 nines of durability and can be configured to provide protection against modification, deletion, and unauthorized access to sensitive forensic artifacts. You can also use S3 to store forensic artifacts of almost any size—from one byte to 5 TB—in an S3 object.

S3 buckets used to store forensic artifacts require custom configuration to provide additional security. You should configure the S3 bucket that you use to store forensic artifacts to enable the following security and governance features:

  1. Encryption in transit. You can require the use of encryption in transit and specify acceptable TLS versions using the aws:SecureTransport and s3:TlsVersion condition keys on the S3 bucket policy.
  2. Encryption at rest using a customer managed key. You can automatically encrypt all objects uploaded to the bucket using a specified customer managed key by specifying a default server-side encryption key in the bucket’s configuration. For this post, we encourage you to use a customer managed key rather than relying upon an AWS managed key, so you can control the associated key policy.
    1. Encryption at rest provides an additional layer of protection, because only entities that have both the permission to read from the bucket and permission to use the AWS Key Management Service (AWS KMS) key for decryption can download the forensic artifact from the S3 bucket.
    2. You need to adjust the example KMS policies in this post if the evidence collection S3 bucket uses the S3 Bucket Key feature.
  3. Audit logs of all S3 data event activity. You can turn on CloudTrail data events for any S3 buckets that contain forensic artifacts to provide a comprehensive audit trail of S3 object-level API activity. This helps provide a chain of custody of any artifacts stored in your forensic buckets.
  4. Fine-grained access control using IAM permissions. You can define the set of entities (both human and machine) that have access to the artifacts in the S3 bucket. This post includes how to create time-limited, least privilege access using IAM permissions for uploading files into an S3 bucket. The permissions are fine-grained enough to scope down access to specific object names or object prefixes in an S3 bucket. Additionally, access to read the artifacts can be controlled through IAM permissions and access to the encryption-at-rest KMS key.
  5. Protections against data modification and deletion. S3 provides features, such as S3 object versioning, to provide assurances that data hasn’t been modified or removed after it’s been collected. This is an additional layer of protection beyond the fine-grained access permissions, so even if an authorized entity attempts to overwrite or delete an object in the S3 bucket, the previous version of the object is still available.
  6. There are additional options that you can configure on the S3 bucket to protect your data against modification and deletion, including S3 Object Lock and multi-factor authentication (MFA) delete.

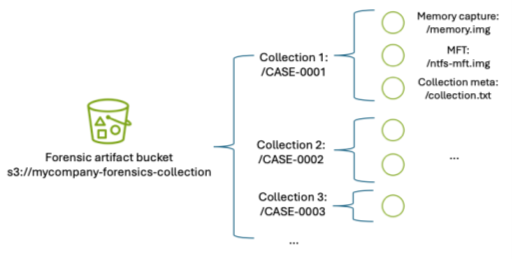
In addition to the preceding configuration, consider how to organize forensic artifacts in the S3 bucket. This post introduces a folder structure using S3 object prefixes to segregate each forensic artifact collection task into its own S3 object namespace. An example S3 namespace structure for an S3 bucket is shown in Figure 1.

Figure 1 – S3 namespace structure for an S3 forensics artifact bucket using object prefixes

Figure 1: S3 namespace structure for an S3 forensics artifact bucket using object prefixes

By separating each forensic collection task by its own prefix, you can use fine-grained IAM permissions to permit object uploads only into the active collection task. For example, scoped down credentials can be generated to only allow uploads into buckets with the CASE-0001 prefix using an IAM permission as shown in the following code example. Temporary security credentials can be generated using these limited permissions and the key is then used by the forensic acquisition tool to upload the artifacts into the S3 bucket.

{
	"Sid": "UploadToCase0001",
	"Effect": "Allow",
	"Action": [
		"s3:PutObject",
		"s3:AbortMultipartUpload"
	],
"	Resource": "arn:aws:s3:::mycompany-forensics-collection/CASE-0001/*"
}

Manually creating temporary IAM credentials for each forensic collection activity can be error-prone and time-consuming. Therefore, this post demonstrates how to use AWS tooling to automate the process of generating time-limited, scoped-down credentials.

Adapt existing forensic tools for AWS best security practices

Existing forensic tools typically use IAM access keys to perform S3 operations. Using a static IAM user secret access key isn’t a best practice. Even if the static key is associated with an IAM user that has been scoped down to only have access to the forensic collection S3 bucket as described previously, that means anyone with access to that key can potentially upload objects into that bucket. Therefore, the best practice is to create a time-limited temporary security credential unique to each collection activity, scoped down to only allow uploading files to a specific prefix in the target S3 bucket.

The examples in this post use the following resource names. Because these names will change based on your deployment, substitute your resource names in place of the names in the example code.

  1. The evidence S3 bucket is named mycompany-forensics-collection
  2. The forensics AWS account number is 112233445566. For the purposes of this example, all resources will live within this account.
  3. The customer managed key used to encrypt the forensic artifacts at rest is ForensicsEvidenceKey
  4. The IAM role that incident responders will assume when signing in to their AWS account is ForensicsUserRole
  5. The IAM role that incident responders will use for generating S3 file upload temporary credentials is ForensicsUploadRole
  6. The example uses the us-east-1 AWS Region

The following steps show you how to configure the IAM policies associated with the customer managed key ForensicsEvidenceKey and the IAM role ForensicsUploadRole.
Before you begin, create the evidence S3 bucket configured as described in Using S3 for artifact collection and a customer managed key to encrypt the forensic artifacts at rest. Configure the evidence S3 bucket to use the KMS key by opening the S3 bucket’s properties tab in the Amazon S3 console and setting the new KMS key as the default encryption key for the bucket.

Next, create an IAM role that incident responders will assume through the AWS STS AssumeRole API to generate the temporary credentials. This role will define the maximum set of permissions allowed to upload artifacts to your evidence S3 bucket. This role, ForensicsUploadRole, created using the following example code, defines the maximum allowable permissions: the ability to upload objects into the evidence S3 bucket and to use the KMS key to encrypt those uploads. The effective permissions available to the forensic tool will be scoped down even further to the specific object prefix when the AWS STS temporary security credential is generated.

Note that the policy allows the forensics upload role Decrypt permission in addition to Encrypt; this is required when uploading files larger than 5 GB using the multi-part S3 file upload feature.

{
	"Version": "2012-10-17",
	"Statement": [
			{
				"Sid": "BasePermissionsForS3Upload",
				"Effect": "Allow",
				"Action": [
					"s3:PutObject",
					"s3:AbortMultipartUpload"
				],
				"Resource": "arn:aws:s3:::mycompany-forensics-collection/*"
		},
		{
			"Sid": "KeyAccessToS3Upload",
			"Effect": "Allow",
			"Action": [
				"kms:GenerateDataKey",
				"kms:Encrypt",
				"kms:Decrypt"
			],
			"Resource": "arn:aws:kms:us-east-1:112233445566:alias/ForensicsEvidenceKey",
			"Condition": {
				"StringLike": {
					"kms:EncryptionContext:aws:s3:arn": "arn:aws:s3:::mycompany-forensics-collection/*"
				}
			}
		}
	]
}

Next, you need to provide an ability to assume this role and generate AWS STS tokens using the role’s permissions. This is accomplished by creating a trust relationship associated with the IAM role you just created. The trust relationship shown in the following code sample describes which AWS principals are allowed to assume the role—in this case, you will allow any user who has federated into the ForensicsUserRole IAM role to be able to generate AWS STS tokens for forensic artifact collection.

{
	"Version": "2012-10-17",
	"Statement": [
		{
			"Sid": "Statement1",
			"Effect": "Allow",
			"Principal": {
				"AWS": "arn:aws:iam::112233445566:role/ForensicsUserRole"
			},
			"Action": "sts:AssumeRole"
		}
	]
}

After the role is established and access to the encryption key is granted, you can use the AWS STS AssumeRole API to create temporary credentials using this role. You can call this API using the AWS Command Line Interface (AWS CLI) or programmatically from a script. To scope down the token’s access to only provide permission to upload to the specific evidence object prefix, you must include a session policy as part of your AssumeRole API request to AWS STS. The following is an example session policy to restrict access to only upload objects into the CASE-0001 prefix.

[
	{
		"Effect": "Allow",
		"Action": [
			"s3:PutObject", 
			"s3:AbortMultipartUpload"
		],
		"Resource": "arn:aws:s3:::mycompany-forensics-collection/CASE-0001/*"
	},
	{
		"Effect": "Allow",
		"Action": [
			"kms:GenerateDataKey", 
			"kms:Encrypt", 
			"kms:Decrypt"
		],
		"Resource": "*",
		"Condition": {
			"StringLike": {
				"kms:EncryptionContext:aws:s3:arn": "arn:aws:s3:::mycompany-forensics-collection/CASE-0001/*"
			}
		}
	}
]

The effective permissions available to the session role will be the intersection of permissions available in the role policy (ForensicsUploadRole), the resource policy (in this case, mandating TLS-encrypted connections to the bucket), and the session policy that’s created on demand for every forensic collection (only allowing access to upload objects into the CASE-0001 prefix, as shown in the preceding example). Pictorially, this looks like the Venn diagram shown in Figure 2.

Figure 2 – Intersection of IAM policies determine the effective permissions for the restricted forensic session role.

Figure 2: Intersection of IAM policies determine the effective permissions for the restricted forensic session role.

Test the temporary credentials

Now that the bucket has been created and the AWS KMS key and roles configured, you can use AWS STS to create a temporary security credential for a collection on CASE-0001. You can use the AWS CLI to do this manually or you can write a script to automate this process using the AWS API. The IAM access key, secret access key, and session token returned by this call can then be used by any tool that can use AWS access keys to upload files into the specified S3 bucket.

The following example shows an AWS CLI call to AssumeRole using the example ForensicsUploadRole and a case named CASE-0001. The --duration-seconds parameter defines the period, in seconds, that the temporary credentials are valid; the default of 3600 seconds will provide temporary credentials that are valid for one hour.

$ aws sts assume-role \
	--role-arn arn:aws:iam::112233445566:role/ForensicsUploadRole \
	--role-session-name CASE-0001 \
	--duration-seconds 3600 \
	--policy '{"Version": "2012-10-17", "Statement": [{"Effect": "Allow", "Action": ["s3:PutObject", "s3:AbortMultipartUpload"], "Resource": "arn:aws:s3:::mycompany-forensics-collection/CASE-0001/*"}, {"Sid": "BasePermissionsForS3Upload", "Effect": "Allow", "Action": ["kms:GenerateDataKey", "kms:Encrypt", "kms:Decrypt"], "Resource": "*"}]}'

{
	"Credentials": {
		"AccessKeyId": "ASIAXXXX",
		"SecretAccessKey": "XXXX",
		"SessionToken": "XXXX",
		"Expiration": "2025-04-10T17:16:13+00:00"
	},
	"AssumedRoleUser": {
		"AssumedRoleId": "AROXXXX:CASE-0001",
		"Arn": "arn:aws:sts::112233445566:assumed-role/ForensicsUploadRole/CASE-0001"
	},
	"PackedPolicySize": 39
}

Now that you have obtained temporary credentials from AWS STS, you can use those credentials to upload a file into Amazon S3:

$ AWS_ACCESS_KEY_ID=ASIAXXXX \
	AWS_SECRET_ACCESS_KEY=XXXX \
	AWS_SESSION_TOKEN=XXXX \
	aws s3 cp evidence.zip s3://mycompany-forensics-collection/CASE-0001/evidence.zip

upload: evidence.zip to s3://mycompany-forensics-collection/CASE-0001/evidence.zip

You can also verify that you can’t use those credentials to upload a file into any other object prefixes or S3 buckets. For example, if you change CASE-0001 to CASE-0004 in the Amazon S3 upload command, you will receive an AccessDenied error because you’re trying to upload an object outside of the allowed key prefix.

$ AWS_ACCESS_KEY_ID=ASIAXXXX \
	AWS_SECRET_ACCESS_KEY=XXXX \
	AWS_SESSION_TOKEN=XXXX \
	aws s3 cp evidence.zip s3://mycompany-forensics-collection/CASE-0004/evidence.zip

upload failed: evidence.zip to s3://mycompany-forensics-collection/cases/CASE-0004/evidence.zip
An error occurred (AccessDenied) when calling the PutObject operation: User: arn:aws:sts::112233445566:assumed-role/ForensicsUploadRole/CASE-0001 is not authorized to perform: s3:PutObject on resource: "arn:aws:s3:::mycompany-forensics-collection/CASE-0004/evidence.zip" because no session policy allows the s3:PutObject action

Additionally, if you wait more than the lifetime of the token (1 hour in this case), attempting to upload a file into the bucket will fail, because the token will no longer be valid:

$ AWS_ACCESS_KEY_ID=ASIAXXXX \
	AWS_SECRET_ACCESS_KEY=XXXX \
	AWS_SESSION_TOKEN=XXXX \
	aws s3 cp evidence.zip s3://mycompany-forensics-collection/CASE-0001/evidence.zip

upload failed: evidence.zip to s3://mycompany-forensics-collection/CASE-0001/evidence.zip

An error occurred (ExpiredToken) when calling the PutObject operation: The provided token has expired.

Create an automated process to vend temporary credentials on demand

After you’ve verified the security benefits of creating temporary credentials for S3 uploads and validated that the credentials work with your forensic software of choice, you can now use them as part of an automated process.

A sample automated architecture is shown in Figure 3.

Figure 3: Architecture to automate S3 credential vending and forensic artifact collection.

Figure 3: Architecture to automate S3 credential vending and forensic artifact collection.

The workflow depicted in Figure 3 includes the following steps:

  1. The workflow is triggered by an alert from a detection source or a manual trigger from an incident responder.
  2. The workflow input is added to an Amazon Simple Queue Service (Amazon SQS) queue.
  3. The Amazon SQS queue invokes an AWS Lambda function which in turn executes a Step Functions state machine to orchestrate the workflow.
  4. First, the Step Functions workflow determines whether the target system is managed by AWS Systems Manager.
    1. If the target system isn’t managed by Systems Manager, an error is noted, and the execution is abandoned.
    2. If the target system is managed by Systems Manager, the Step Functions workflow determines the operating system (OS) of the target system and proceeds with the flow of execution.
  5. The workflow then continues by executing the Systems Manager documents that implement the forensic collection process:
    1. Downloads tooling:
      1. Generates dynamically scoped IAM temporary credentials that provide access to download the OS-specific tooling to be executed on the target system from the tooling S3 bucket. These credentials are tightly scoped to only allow downloads from the S3 prefix that corresponds to the tooling for the target system’s OS.
      2. Executes a Systems Manager command on the target system that uses the credentials generated from the previous step to download the OS tooling on the target system.
    2. Runs forensic tools:
  • Executes a Systems Manager command on the target system to execute the OS tooling on the target system.
  • The Systems Manager commands run on the target system, which in this case is an EC2 instance.
  • Results are uploaded to the evidence S3 bucket:
    1. Generates dynamically scoped IAM temporary credentials (as described previously) that provide access to upload the output of the previously executed tooling to the evidence S3 bucket. These credentials are tightly scoped to only allow uploads to a particular S3 prefix corresponding to the alert prefix.
    2. Executes a Systems Manager command on the target system to upload the output of the previously executed tooling to the evidence S3 bucket. After the upload is complete, it cleans up both the output and the evidence tooling from the target system.
    3. The evidence S3 bucket is tightly locked down to a subset of identities within the AWS security account. Access attempts from identities that aren’t allow listed trigger an Amazon EventBridge rule to alert the security team through an Amazon Simple Notification Service (Amazon SNS) topic.
  • When the workflow is complete, related details and metrics are recorded in an Amazon DynamoDB table.
  • The forensic analysis can be performed on a separate EC2 instance that has access to read from the evidence S3 bucket.
  • Deploying the example solution

    You can use the AWS Cloud Development Kit (AWS CDK) repository to implement the architecture shown in Figure 3.

    The AWS CDK solution is split into three stacks:

    1. SecurityStack: This stack contains the basic forensic artifact workflow orchestration infrastructure described in this post, including the Step Functions workflow, Lambda functions, AWS SQS queues, IAM roles, and S3 buckets.
    2. AlertStack: This stack contains the EventBridge workflow to notify administrators of anomalous activity in the evidence S3 bucket.
    3. CustomerStack: This stack contains the SSM documents that are executed for the forensic artifact workflow and an IAM role assumed by the SecurityStack when the workflow is invoked. It’s deployed into each child AWS account containing EC2 instances from which the security account is authorized to collect forensic artifacts.

    Configuration

    Before deploying the solution, there are several variables in the config.ts file that must be modified for the environment:

    1. SECURITY_ACCOUNT: Security Tooling AWS account ID.
    2. CUSTOMER_ACCOUNTS: Target AWS account IDs (the Child AWS account in the architecture diagram).
    3. ALERT_EMAIL_RECIPIENTS: List of email addresses that receive alerts when there is unexpected access to the evidence S3 bucket.
    4. ALLOW_LISTED_ROLE_NAMES: Roles allowed to access the evidence S3 bucket. Any other identities accessing the evidence S3 bucket will result in an alarm.

    Deployment

    After you’ve updated the config.ts file to reflect the account numbers, email recipients, and role names, the stacks can be deployed into your AWS infrastructure.

    1. Set Up AWS credentials using the AWS CLI:
      aws configure
    2. Install dependencies and configure constants:
      1. Clone the repository.
      2. Navigate to the project directory.
      3. Install project dependencies:
        npm install
      4. Configure constants in constants/config.ts with the required information:
        export const SECURITY_ACCOUNT = "123456789012"; // Your security tooling account ID 
        export const CUSTOMER_ACCOUNTS = ["234567890123", "345678901234"]; // Target account IDs 
        export const ALLOW_LISTED_ROLE_NAMES = ["SecurityAnalystRole"];// Roles allowed to access evidence S3 bucket 
        export const ALERT_EMAIL_RECIPIENTS = ["soc_team@company.com"];// Email addresses for alerts

    3. Bootstrap AWS CDK in your accounts (if it hasn’t been done already):
      1. Example: cdk bootstrap aws://456789012345/us-east-1 (example security AWS account).
      2. Then bootstrap if necessary in any target AWS accounts.
    4. Deploy the AWS CDK Stacks:
      1. Synthesize the CloudFormation template:
        cdk synth
      2. Deploy the security and alert stacks in your security account:
        cdk deploy SecurityStack AlertStack
      3. Deploy the customer stacks in your workload accounts:
        cdk deploy CustomerStack-ACCOUNT_ID
    5. Set up your email alerts:
      1. After the AlertStack is deployed, it will email all addresses listed in ALERT_EMAIL_RECIPIENTS. Choose the embedded link to accept the AWS SNS topic in each of those accounts.

    Testing

    With deployment complete, it’s time to test the solution.

    1. Trigger an analysis
      1. Make sure you have a Linux EC2 instance running in one of your customer accounts and in the AWS Region where you deployed the preceding customer stack.
      2. Because this example uses Systems Manager to orchestrate the collection script, make sure that the EC2 instance is visible in Systems Manager either by checking the Systems Manager console, or by using the AWS CLI:
        1. Console: In the AWS Systems Manager console, choose Managed instances in the left navigation pane and verify your instance appears in the list. For more information, see Managed Instances in the AWS Systems Manager User Guide.
        2. AWS CLI: Run the following command to verify the instance is managed:
          aws ssm describe-instance-information --filters “Key=InstanceIds,Values=<instance-id>
          If the command returns instance information with PingStatus: Online, the instance is properly connected to Systems Manager.
      3. Post a message in your security account to the Amazon SQS queue to start the Step Functions workflow. Note that the values in angle brackets (for example <accountID>) are placeholders that you must update with relevant AWS account ID, tracking ticket ID, AWS Region, and EC2 instance ID values:
        aws sqs send-message --queue-url --message-body ‘{ “account”: “”, “ticket_id”: “”, “region”: “>”, “instance_id”: “” }’
    2. Go to the Step Functions console to view the successful execution of the workflow:
      Figure 4 – Workflow as shown in the Step Functions console

      Figure 4: Workflow as shown in the Step Functions console

    3. View the DynamoDB table to see the metadata for the results.
    4. Check the evidence S3 bucket to see the uploaded files from the forensic collection.

    Conclusion

    Collecting forensic artifacts securely is a critical component of any digital forensics investigation. This post demonstrated how to implement least privilege access controls and time-limited credentials for forensic evidence collection workflows that use Amazon S3 for artifact storage. By combining IAM session policies with AWS STS temporary credentials, you can provide forensic tools with secure, scoped-down access to upload artifacts without exposing long-lived credentials or granting overly permissive access.

    The architecture presented in this post automates the process of generating temporary credentials, collecting forensic artifacts from both AWS and non-AWS resources, and securely storing them in S3 buckets with appropriate encryption, access controls, and audit logging. With this approach, your security teams can focus on analyzing evidence instead of managing credentials and permissions during active security incidents.To get started with this solution, deploy the example AWS CDK stacks provided in the collect forensic artifacts repository and customize them for your organization’s forensic investigation requirements. For more information about related AWS forensic investigation architectures, review the Automated Forensics Orchestrator for EC2 and How to build forensic kernel modules for Linux EC2 instances resources.

    If you have feedback about this post, submit comments in the Comments section below. If you have questions about this post, contact AWS Support.

    Jason Garman

    Jason Garman

    Jason is a principal security specialist solutions architect at AWS. He has 30 years of cybersecurity experience including incident response, reverse engineering, identity, and data protection. At AWS, he helps large organizations adopt the latest cloud and AI technologies while maintaining a high bar for data governance, security, and safety.

    Vaishnav Murthy

    Vaishnav Murthy

    Vaishnav is a Senior Security Engineer with AWS CloudResponse. He has an extensive background in incident response and security automation and enjoys building automated solutions that help AWS customers investigate and respond to security incidents at scale.

    How AWS KMS and AWS Encryption SDK overcome symmetric encryption bounds

    3 April 2026 at 17:44

    If you run high-scale applications that encrypt large volumes of data, you might be concerned about tracking encryption limits and rotating keys. This post explains how AWS Key Management Service (AWS KMS) and the AWS Encryption SDK handle Advanced Encryption Standard in Galois Counter Mode’s (AES-GCM) encryption limits or bounds automatically by using derived key methods so you don’t have to. These methods generate a new derived key Kd from the main key K by using a random nonce. That way, encryption is done with a unique key each time, and K can be used for much longer. Similar derived key modes have been proposed in various schemes recently like (KC-)XAES, DNDK v2, and ia.cr/2020/1153.

    Symmetric encryption bounds

    Symmetric encryption algorithms encrypt large amounts of data in transit and at rest. Modern ciphers also authenticate data using an authentication tag — these are called Authenticated Encryption with Additional Data (AEAD) ciphers. Examples of AEAD ciphers include AES-GCM and ChaCha20/Poly1305.

    AES-GCM is the most widely used encryption algorithm and was standardized by NIST in SP 800-38D. AES-GCM uses a 128- or 256-bit key K and a (usually 96-bit) initialization vector (IV) to encrypt and authenticate a plaintext P. It also authenticates additional authenticated data (AAD). The output is a ciphertext C and an authentication tag T:
    (C, T) = AES-GCM(K, IV, AAD, P)

    At decryption, the recipient decrypts C and verifies the tag T by using K, IV and AAD and produces the original plaintext P (assuming the tag was authenticated successfully).

    Encryption invocation limits

    When encrypting data, it’s critical that the K, IV tuple does not repeat for the life of the key K. Otherwise, the security properties of AES-GCM are lost. SP 800-38D requires an implementation to have a probability of key and IV reuse less than one in 4.29 billion (<2-32). This can be achieved by using a deterministic IV that doesn’t repeat or a random IV. If a random IV is used, then it is necessary to rekey after 232 encryptions. For example, common protocols like TLS or IKEv2/IPsec prevent (K, IV) collisions by using deterministic (that is, starting from a random value and incrementing) IVs per connection.

    Data bounds

    Assuming the probability of an (K, IV) collision is statistically insignificant (<2-32), there are still data bounds when encrypting large amounts of plaintexts with the same key K. The block counter in AES-GCM is 32-bits, which leads to a limit of 232-2 blocks (68.72 GB) per encryption operation (per (K, IV) pair). Additionally, a failure to restrict the total amount of data reduces the security guarantees an adversary can distinguish between two different plaintexts, that is knowing which of two messages are encrypted in the ciphertext. The higher protection of indistinguishability, the lower the total number of bytes you can encrypt. NIST’s specification, SP 800-38D, suggests a limit of 268 bytes protected under a single key K which provides an indistinguishability probability of 50%. More conservative security margins are sometimes used, based on different analyses (ia.cr/2024/051, 10.1145/3243734.3243816). AWS sets a more conservative margin too, enforcing a negligible indistinguishability probability (<2-32) by default.

    Once you reach the AES-GCM data bounds for a given security margin, you need to rotate the symmetric key. Such limits (for example, 232 encryptions per key with random IVs, or encrypting the maximum total data per key) could be reached in modern, high-scale encryption use cases. Tracking these limits across distributed systems with many concurrent sessions adds operational complexity. We have shared these challenges with using AES-GCM at the scale of AWS in a writeup and a presentation in NIST’s third NIST Workshop on Block Cipher Modes of Operation in 2023.

    How AWS KMS uses derived keys

    AWS KMS is a managed service that you can use to create and control the keys used to encrypt and sign data. The AWS KMS Encrypt API supports symmetric and asymmetric encryption. For symmetric key encryption, AWS KMS uses AES-GCM with 256-bit keys to encrypt a plaintext up to 4 KB in size. The AWS KMS request includes the plaintext, and the symmetric key identifier (KeyId) of the symmetric customer managed key (CMK) stored in KMS.

    A symmetric key Encrypt API call to AWS KMS uses the CMK to derive a symmetric encryption key before encrypting the plaintext. AWS KMS generates a random 128-bit nonce N and produces a 256-bit symmetric key from the main key K specified in the KeyId by using a key derivation function (KDF). A KDF takes in a key, a label and context, an invocation-specific nonce N, and an output length LKm in bytes, and produces key material of that length as Kmat = KDF(K, <label>, <context>, N, LKm). <label> is usually an application- or invocation-specific value. <context> includes invocation-specific input. For AWS KMS, the KDF function is a NIST SP 800-108r1 Counter Mode KDF producing 256 bits of keying material with HMAC-SHA256 as the pseudorandom function. Kd is essentially produced with one call to HMAC-SHA256 with key K as:
    Kd = HMAC-SHA256(K, <ctx>),
    where <ctx> consists of a counter value concatenated with constants and N.

    Subsequently, AWS KMS generates a 96-bit random IV and encrypts the input plaintext input P with AES-GCM as (C, T) = AES-GCM(Kd, IV, AAD, P).

    AWS KMS returns a CiphertextBlob that includes the IV, nonce N, ciphertext and tag (C,T) so that the CiphertextBlob can be decrypted on subsequent calls to the Decrypt API.

    Intuitively, the 128-bit random nonce used to derive a per encryption key under a CMK ensures that a caller can go way over the 232 limit on the number of encryptions they can make under the CMK. Furthermore, the limit of 4 KB on the payload size for an AWS Encrypt call ensures the total amount of data encrypted under an encryption key stays well below NIST or other more conservative total encryption bounds. For more details and the mathematics of the security underpinnings of this scheme, see Key Management Systems at the Cloud Scale.

    How AWS Encryption SDK applies derived key modes per invocation

    The AWS Encryption SDK is a client-side encryption library used for encrypting and decrypting data. It can be configured to use data key caching to reduce API calls when encrypting multiple payloads. Using a nonce-based derived key for each AES-GCM encryption invocation eliminates the need for customers to keep track of the total amount of data they encrypt under a single data key.

    Although the AWS Encryption SDK provides a lot of flexibility to accommodate many encryption scenarios, the default configuration handles key derivation and frame sizing automatically, so you don’t need to tune these settings for most use cases. To derive a different key per invocation, like AWS KMS, it uses a randomly generated value, N, the main key K, and some invocation-specific context in the KDF. N is 256 bits in the default configuration. The underlying KDF is the HMAC-based Extract-and-Expand Key Derivation Function (HKDF) with SHA512 as the default hash. Kd is essentially produced with one HKDF call with key K as:
    Kd = HKDF(K, salt=<lbl>, info=<ctx>, 32),
    where <lbl> is a constant and <ctx> consists of constants concatenated with a random 256-bit value in the default configuration.

    Subsequently, the AWS Encryption SDK uses the derived key Kd to encrypt user content, broken into 4-KB frames by default. Each frame plaintext Pf is encrypted with AES-GCM with a deterministic IV as (C, T) = AES-GCM(Kd, IV, AAD, Pf).

    The 96-bit deterministic IV consists of the frame counter frameID, where frameID<232. The additional authenticated data AAD is specific to the Encryption SDK data frame. At decryption, the recipient derives Kd from K in the same way and decrypts the ciphertext C to produce the frame plaintext Pf and validates the authentication tag T.

    The 4 KB frame size ensures that by default no more than 244 bytes (232 frames of 4 K bytes each) of data can be encrypted under a single encryption key. This is well below the NIST suggested bound (268), even with data key caching. It is also well below our conservative requirement of <2-32 indistinguishability probability. The limit of invocations per key, even with data key caching, exceeds the encryption counts in most high-scale applications.

    Note: While the AWS Encryption SDK makes conservative choices in its default configuration, if you’re using legacy version 1.0 or making configuration changes, you might have lower security guarantees. For example, a custom maximized frame size of 232-1 bytes would lead to larger total plaintext size which is still below the 268 NIST suggested limit, but not below other conservative bounds.

    Note that the default AWS Encryption SDK configuration also provides lesser-known security properties, like key commitment. The commitment string is produced similarly to the derived key, by using K and HKDF.

    Conclusion

    By deriving a unique key per encryption call, AWS KMS and the AWS Encryption SDK eliminate the need to manually track AES-GCM limits.

    For the academic basis for AES-GCM’s bounds, see SP 800-38D and draft-irtf-cfrg-aead-limits. To read more on the cryptographic analysis of the key derivation scheme used in KMS, see Key Management Systems at the Cloud Scale. For more details on the Encryption SDK AES-GCM key derivation, see the AWS Encryption SDK algorithms reference.

    If you have feedback about this post, submit comments in the Comments section below. If you have questions about this post, start a new thread on the AWS Security, Identity, & Compliance re:Post or contact AWS Support.
     

    Panos Kampanakis Panos Kampanakis
    Panos is a Principal Security Engineer at AWS. He has experience with cybersecurity, applied cryptography, security automation, and vulnerability management. He has coauthored publications on cybersecurity and participated in various security standards bodies to provide common interoperable protocols and languages for security information sharing, cryptography, and public-key infrastructure. Currently, he works with engineers and industry partners to provide cryptographically secure tools, protocols, and standards.
    Matt Campagna Matt Campagna
    Matthew is a Cryptographer and Sr. Principal Engineer at Amazon Web Services. He manages the design and review of cryptographic solutions across the company and leads the migration to post-quantum cryptography. In his spare time, he searches Seattle for the perfect Korean Fried Chicken.
    Patrick Palmer Patrick Palmer
    Patrick is a Principal Security Specialist Solutions Architect at AWS. He helps customers around the world use AWS services in a secure manner and specializes in cryptography. When not working, he enjoys spending time with his growing family and playing video games.

    Amazon threat intelligence teams identify Interlock ransomware campaign targeting enterprise firewalls

    18 March 2026 at 16:57

    Amazon threat intelligence has identified an active Interlock ransomware campaign exploiting CVE-2026-20131, a critical vulnerability in Cisco Secure Firewall Management Center (FMC) Software that could allow an unauthenticated, remote attacker to execute arbitrary Java code as root on an affected device, which was disclosed by Cisco on March 4, 2026.

    After Cisco’s disclosure, Amazon threat intelligence began research into this vulnerability using Amazon MadPot’s global sensor network—a system of honeypot servers that attract and monitor cybercriminal activity. While looking for any current or past exploits of this vulnerability, our research found that Interlock was exploiting this vulnerability 36 days before its public disclosure, beginning January 26, 2026. This wasn’t just another vulnerability exploit, Interlock had a zero-day in their hands, giving them a week’s head start to compromise organizations before defenders even knew to look. Upon making this discovery, we shared our findings with Cisco to help support their investigation and protect customers.

    A misconfigured infrastructure server—essentially, a poorly secured staging area used by the attackers—exposed Interlock’s complete operational toolkit. This rare mistake provided Amazon’s security teams with visibility into the ransomware group’s multi-stage attack chain, custom remote access trojans (backdoor programs that give attackers control of compromised systems), reconnaissance scripts (automated tools for mapping victim networks), and evasion techniques.

    AWS infrastructure and customer workloads on AWS were not observed to be involved in this campaign. This advisory shares comprehensive technical analysis and indicators of compromise to help organizations identify potential compromise and defend against Interlock’s operations. Organizations running Cisco Secure Firewall Management Center should immediately apply Cisco’s security patches and review the indicators provided below.

    Discovery and investigation timeline

    Amazon threat intelligence identified threat activity potentially related to CVE-2026-20131 beginning January 26, 2026, predating the public disclosure. Observed activity involved HTTP requests to a specific path in the affected software. Request bodies contained Java code execution attempts and two embedded URLs: one used to deliver configuration data supporting the exploit, and another designed to confirm successful exploitation by causing a vulnerable target to perform an HTTP PUT request and upload a generated file. Multiple variations of these URLs were observed across different exploit attempts.

    To advance the investigation and obtain additional threat intelligence, we performed the expected HTTP PUT request with the anticipated file content—essentially, we pretended to be a successfully compromised system. This successfully prompted Interlock to proceed to the next stage, issuing commands to fetch and execute a malicious ELF binary (a Linux executable file) from a remote server.

    When analysts retrieved the binary, they discovered the same host (attacker-controlled server) is used for distributing Interlock’s entire operational toolkit. The exposed infrastructure organized artifacts into separate paths corresponding to individual targets, with the same paths used for both downloading tools to compromised hosts and uploading operational artifacts back to the staging server.

    Attribution to Interlock ransomware

    The ELF binary and associated artifacts are attributable to the Interlock ransomware family based on convergent technical and operational indicators. The embedded ransom note and TOR negotiation portal are consistent with Interlock’s established branding and infrastructure. The ransom note’s invocation of multiple data protection regulations reflects Interlock’s documented practice of citing regulatory exposure to pressure victims, essentially threatening organizations not just with data encryption, but with regulatory fines and compliance violations. The campaign-specific organization identifier embedded in the note aligns with Interlock’s per-victim tracking model.

    Interlock has historically targeted specific sectors where operational disruption creates maximum pressure for payment. Education represents the largest share of their activity, followed by engineering, architecture, and construction firms, manufacturing and industrial organizations, healthcare providers, and government and public sector entities.

    Temporal analysis performed on timestamps from observed threat activities, artifacts stored on the misconfigured infrastructure server, and metadata embedded within recovered threat artifacts indicates the actor most likely operates in UTC+3 with 75–80% confidence. Systematic analysis across all UTC offsets showed UTC+3 produced the best fit: first activity around 08:30, peak activity between 12:00 and 18:00, and a probable sleep window of 00:30–08:30.

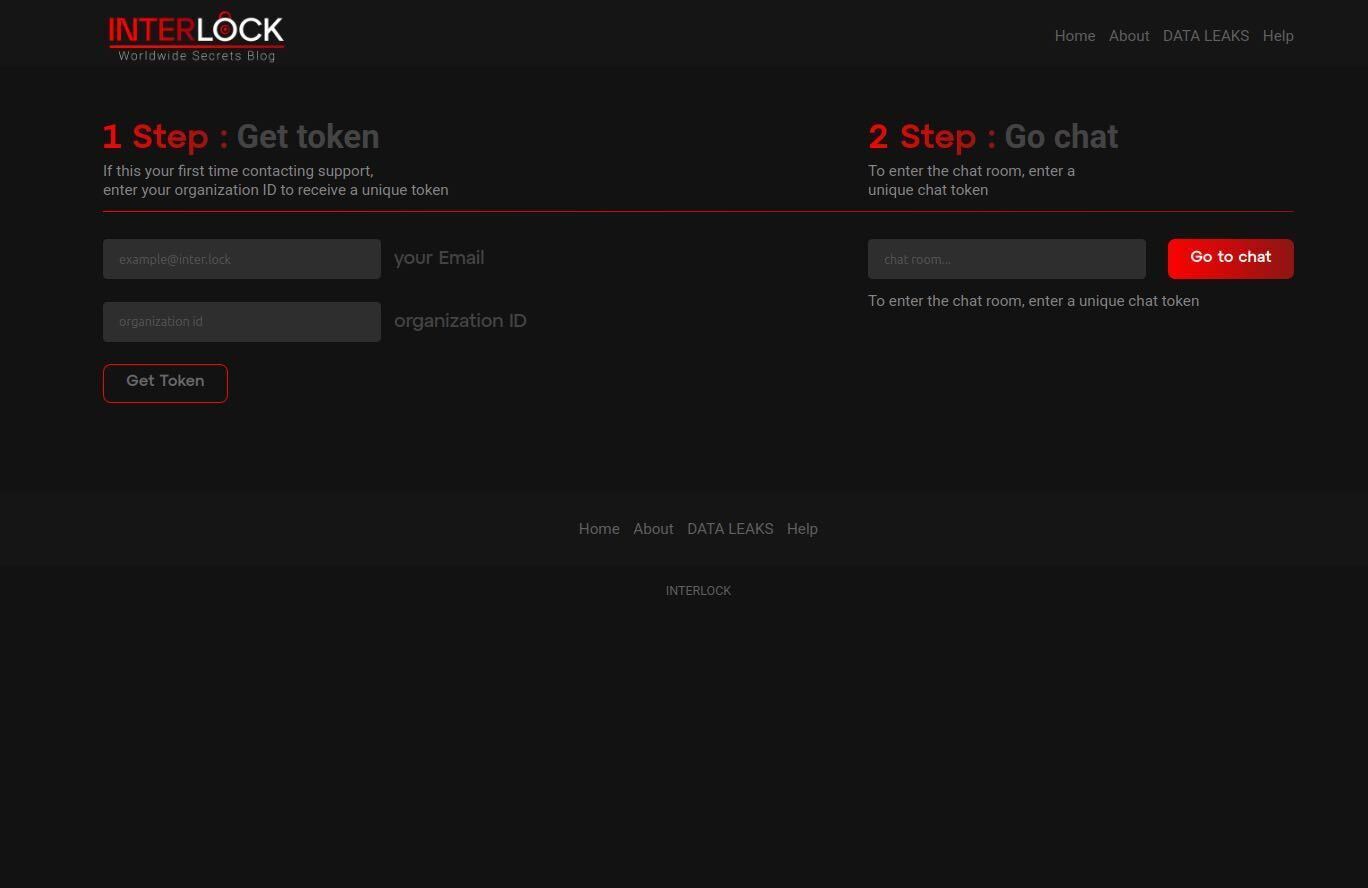
    Interlock ransomware negotiation portal where victims enter their organization ID and email address to receive an auth token to begin a negotiation chat session.

    Figure 1: Interlock ransomware negotiation portal where victims enter their organization ID and email address to receive an auth token to begin a negotiation chat session.

    Technical analysis: Interlock’s operational toolkit

    Post-compromise reconnaissance script

    Once Interlock gains initial access, they use a variety of priority tools to complete their attack. Amazon threat intelligence teams recovered a PowerShell script designed for systematic Windows environment enumeration (automated information gathering about the victim’s network). The script collects operating system and hardware details, running services, installed software, storage configuration, Hyper-V virtual machine inventory, user file listings across Desktop, Documents, and Downloads directories, browser artifacts from Chrome, Edge, Firefox, Internet Explorer, and 360 browser (including history, bookmarks, stored credentials, and extensions), active network connections correlated with responsible processes, ARP tables, iSCSI session data, and RDP authentication events from Windows event logs.

    The script stages results to a centralized network share (\JK-DC2\Temp) using each system’s fully qualified hostname to create dedicated directories—essentially creating a folder for each compromised computer. Following collection, it compresses data into ZIP archives named after each hostname and removes original raw data. This structured per-host output format indicates the script operates across multiple machines within a network—a hallmark of ransomware intrusion chains that prepare for organization-wide encryption.

    Custom remote access trojans

    Remote access trojans (RATs) are malicious programs that give attackers persistent control over compromised systems, functioning like unauthorized remote desktop software.

    JavaScript implant: Amazon threat intelligence recovered an obfuscated JavaScript remote access trojan that suppresses debugging output by overriding browser console methods (hiding its activity from basic detection tools). On execution, it profiles the infected host using PowerShell and Windows Management Instrumentation (WMI), collecting system identity, domain membership, username, OS version, and privilege context before transmitting this data during an encrypted initialization handshake.

    Command-and-control communication occurs over persistent WebSocket connections with RC4-encrypted messages using per-message 16-byte random keys embedded in packet headers—essentially, each message uses a different encryption key, making interception more difficult. The implant cycles through multiple operator-controlled hostnames and IP addresses in randomized order with exponential backoff between reconnection attempts.

    The implant provides interactive shell access, arbitrary command execution, bidirectional file transfer, and SOCKS5 proxy capability for tunneling TCP traffic (routing malicious traffic through other systems to hide its origin). Self-update and self-delete capabilities allow operators to replace or remove the implant without reinfection, supporting operational cleanup to hinder forensic investigation.

    Java implant: A functionally equivalent client implemented in Java provides identical command-and-control capabilities. Built on GlassFish ecosystem libraries, it uses Grizzly for non-blocking I/O transport and Tyrus for WebSocket protocol communication. In simpler terms, Interlock built the same backdoor in two different programming languages, ensuring they maintain access even if defenders detect one version.

    Infrastructure laundering script

    Sophisticated threat actors don’t attack from their own infrastructure, they build disposable relay networks to hide their tracks. Amazon threat intelligence teams identified a Bash script that configures Linux servers as HTTP reverse proxies (intermediary servers that forward traffic to hide the attacker’s true location). The script performs system updates, installs fail2ban with SSH brute-force protection, and compiles HAProxy 3.1.2 from source. The HAProxy instance listens on port 80 and forwards all inbound HTTP traffic to a hardcoded target IP, with systemd ensuring persistence across reboots.

    A notable component is a log erasure routine running as a cron job every five minutes. The routine truncates all *.log files under /var/log and suppresses shell history by unsetting the HISTFILE variable. This aggressive evidence destruction, wiping logs every five minutes, combined with the purpose-built HTTP forwarding proxy, indicates the script establishes disposable traffic-laundering relay nodes. These nodes obscure exploit traffic origin, relay command-and-control communications, or proxy data exfiltration, making it nearly impossible to trace attacks back to their source.

    Memory-resident webshell

    Amazon threat intelligence teams observed a Java class file delivered as an alternative to the ELF binary drop. When loaded by the Java Virtual Machine (JVM), its static initializer registers a ServletRequestListener with the server’s StandardContext, essentially installing a persistent memory-resident backdoor that intercepts HTTP requests without writing files to disk. This “fileless” approach evades traditional antivirus scanning that looks for malicious files.

    The listener inspects incoming requests for specially crafted parameters containing encrypted command payloads. Payloads are decrypted using AES-128 with a key derived from the MD5 hash of the hardcoded seed “geckoformboundary99fec155ea301140cbe26faf55ed2f40″ (using the first 16 characters: 09b1a8422e8faed0). Decrypted payloads are treated as compiled Java bytecode, dynamically loaded into the JVM, and executed—a technique designed to evade file-based detection by running malicious code entirely in memory.

    Connectivity verification tool

    Amazon threat intelligence teams recovered Java class files implementing a basic TCP server listening on port 45588 (encoded as Unicode character 넔 to obscure the port number from static analysis). The server accepts connections, logs connecting IP addresses, sends a greeting message, and immediately closes connections. This operational profile is consistent with a lightweight network beacon—essentially a “phone home” tool used to verify successful code execution or confirm network port reachability following initial exploitation.

    Legitimate tool abuse

    Interlock deployed ConnectWise ScreenConnect, a legitimate commercial remote desktop tool, alongside custom implants. When ransomware operators deploy legitimate remote access tools alongside their custom malware, they’re buying insurance—if defenders find and remove one backdoor, they still have another way in. This indicates multiple redundant remote access mechanisms—a pattern consistent with ransomware operators seeking to maintain access even if individual footholds are removed. The tool’s legitimate network footprint helps blend with authorized remote administration traffic, making detection more challenging.

    Amazon threat intelligence teams also recovered Volatility, an open-source memory forensics framework typically used by incident responders (the same tool defenders use to investigate attacks). While no artifacts indicated automated use, its presence alongside custom implants and reconnaissance scripts is consistent with advanced threat operations. Both ransomware groups and nation-state actors have been observed deploying Volatility during intrusions. The tool’s focus on parsing memory dumps provides access to sensitive data such as credentials stored in RAM, which can enable lateral movement (spreading through the network) and deeper environment compromise in support of ransom operations or espionage objectives.

    Interlock also used Certify, an open source offensive security tool designed to exploit misconfigurations in Active Directory Certificate Services (AD CS). For ransomware operators, Certify provides a pathway to identify vulnerable certificate templates and enrollment permissions that allow requesting authentication-capable certificates. These certificates can be used to impersonate users, escalate privileges, or maintain persistent access. These capabilities directly support both initial compromise and long-term persistence objectives in ransomware operations.

    Indicators of compromise (IoCs)

    The following indicators support defensive measures by organizations that may be affected. Due to Interlock’s use of content variation techniques, most file hashes are not included as reliable indicators. The threat actor modified most artifacts like scripts and binaries downloaded to different targets. This resulted in different file hashes for functionally identical tools. The customization allowed each attack to evade signature-based detection that looks for exact file matches.

    206.251.239[.]164

    Exploit source IP

    Active Jan 2026

    199.217.98[.]153

    Exploit source IP

    Active Mar 2026

    89.46.237[.]33

    Exploit source IP

    Active Mar 2026

    Mozilla/5.0 (Windows NT 10.0; Win64; x64; rv:136.0) Gecko/20100101 Firefox/136.0

    Exploit HTTP User-Agent

    Observed Jan 2026 and Mar 2026

    b885946e72ad51dca6c70abc2f773506

    Exploit TLS JA3

    Observed Jan 2026 and Mar 2026

    f80d3d09f61892c5846c854dd84ac403

    Exploit TLS JA3

    Observed Mar 2026

    t13i1811h1_85036bcba153_b26ce05bbdd6

    Exploit TLS JA4

    Observed Jan 2026 and Mar 2026

    t13i4311h1_c7886603b240_b26ce05bbdd6

    Exploit TLS JA4

    Observed Mar 2026

    144.172.94[.]59

    C2 Fallback IP

    Active Mar 2026

    199.217.99[.]121

    C2 Fallback IP

    Active Mar 2026

    188.245.41[.]78

    C2 Fallback IP

    Active Mar 2026

    144.172.110[.]106

    Backend C2 IP

    Active Mar 2026

    95.217.22[.]175

    Backend C2 IP

    Active Mar 2026

    37.27.244[.]222

    Staging host IP

    Active Mar 2026

    hxxp://ebhmkoohccl45qesdbvrjqtyro2hmhkmh6vkyfyjjzfllm3ix72aqaid[.]onion/chat.php

    Ransom negotiation portal

    Active Mar 2026

    cherryberry[.]click

    Exploit Support Domain

    Active Jan 2026

    ms-server-default[.]com

    Exploit Support Domain

    Active Mar 2026

    initialize-configs[.]com

    Exploit Support Domain

    Active Mar 2026

    ms-global.first-update-server[.]com

    Exploit Support Domain

    Active Mar 2026

    ms-sql-auth[.]com

    Exploit Support Domain

    Active Mar 2026

    kolonialeru[.]com

    Exploit Support Domain

    Active Mar 2026

    sclair.it[.]com

    Exploit Support Domain

    Active Mar 2026

    browser-updater[.]com

    C2 domain

    Active Mar 2026

    browser-updater[.]live

    C2 domain

    Active Mar 2026

    os-update-server[.]com

    C2 domain

    Active Mar 2026

    os-update-server[.]org

    C2 domain

    Active Mar 2026

    os-update-server[.]live

    C2 domain

    Active Mar 2026

    os-update-server[.]top

    C2 domain

    Active Mar 2026

    d1caa376cb45b6a1eb3a45c5633c5ef75f7466b8601ed72c8022a8b3f6c1f3be

    Offensive security tool (Certify)

    Observed Mar 2026

    6c8efbcef3af80a574cb2aa2224c145bb2e37c2f3d3f091571708288ceb22d5f

    Screen locker

    Observed Mar 2026

    Defensive recommendations

    Organizations should take the following actions to protect against Interlock ransomware operations.

    Immediate actions:

    • Apply Cisco’s security patches for Cisco Secure Firewall Management Center
    • Review logs for the indicators of compromise listed above
    • Conduct security assessments to identify potential compromise
    • Review ScreenConnect deployments for unauthorized installations

    Detection opportunities:

    • Monitor for PowerShell scripts staging data to network shares with hostname-based directory structures
    • Detect Java ServletRequestListener registrations in web application contexts (unusual modifications to Java web applications)
    • Identify HAProxy installations with aggressive log deletion cron jobs (proxy servers that erase their own logs every five minutes)
    • Watch for TCP connections to unusual high-numbered ports (e.g., 45588)

    Long-term measures:

    • Implement defense-in-depth strategies with multiple layers of security controls
    • Maintain continuous threat monitoring and hunting capabilities
    • Ensure comprehensive logging with secure, centralized log storage (stored separately from systems that could be compromised)
    • Regularly test incident response procedures for ransomware scenarios
    • Educate security teams on Interlock’s tactics, techniques, and procedures

    The real story here isn’t just about one vulnerability or one ransomware group—it’s about the fundamental challenge zero-day exploits pose to every security model. When attackers exploit vulnerabilities before patches exist, even the most diligent patching programs can’t protect you in that critical window. This is precisely why defense in depth is essential—layered security controls provide protection when any single control fails or hasn’t yet been deployed. Rapid patching remains foundational in vulnerability management, but defense in depth helps organizations not to be defenseless during the window between exploit and patch.

    Amazon Threat Intelligence teams continue to monitor Interlock ransomware operations and will provide updates as additional information becomes available. The intelligence gathered from this campaign is being integrated into AWS security services to protect customers proactively.


    If you have feedback about this post, submit comments in the Comments section below. If you have questions about this post, contact AWS Support.

    CJ Moses

    CJ Moses

    CJ Moses is the CISO of Amazon Integrated Security. In his role, CJ leads security engineering and operations across Amazon. His mission is to enable Amazon businesses by making the benefits of security the path of least resistance. CJ joined Amazon in December 2007, holding various roles including Consumer CISO, and most recently AWS CISO, before becoming CISO of Amazon Integrated Security September of 2023.

    Prior to joining Amazon, CJ led the technical analysis of computer and network intrusion efforts at the Federal Bureau of Investigation’s Cyber Division. CJ also served as a Special Agent with the Air Force Office of Special Investigations (AFOSI). CJ led several computer intrusion investigations seen as foundational to the security industry today.

    CJ holds degrees in Computer Science and Criminal Justice, and is an active SRO GT America GT2 race car driver.

    ❌